
Projector
PH1000U
User’s Manual
Model No.
NP-PH1000U

Ver. 3/06/12
•DLPisatrademarkofTexasInstruments.
•Macintosh,MacOSXandPowerBookaretrademarksofAppleInc.registeredintheU.S.andothercountries.
•Microsoft,Windows,WindowsVista,InternetExplorer,.NETFrameworkandPowerPointareeitheraregistered
trademarkortrademarkofMicrosoftCorporationintheUnitedStatesand/orothercountries.
•Adobe,AdobePDF,AdobeReader,andAcrobatareeitherregisteredtrademarksortrademarksofAdobeSystems
IncorporatedintheUnitedStatesand/orothercountries.
•VirtualRemoteToolusesWinI2C/DDClibrary,©NicomsoftLtd.
•HDMI,theHDMILogoandHigh-DenitionMultimediaInterfacearetrademarksorregisteredtrademarksofHDMI
LicensingLLC.
•DisplayPortandDisplayPortComplianceLogoaretrademarksownedbytheVideoElectronicsStandardsAssocia-
tion.
•TrademarkPJLinkisatrademarkappliedfortrademarkrightsinJapan,theUnitedStatesofAmericaandother
countriesandareas.
•Wi-Fi
®
,Wi-FiAlliance
®
,andWi-FiProtectedAccess(WPA,WPA2)
®
areregisteredtrademarksoftheWi-FiAlli-
ance.
•Blu-rayisatrademarkofBlu-rayDiscAssociation
•CRESTRONandROOMVIEWareregisteredtrademarksofCrestronElectronics,Inc.intheUnitedStatesandother
countries.
•Otherproductandcompanynamesmentionedinthisuser’smanualmaybethetrademarksorregisteredtrademarks
oftheirrespectiveholders.
NOTES
(1)Thecontentsofthisuser’smanualmaynotbereprintedinpartorwholewithoutpermission.
(2)Thecontentsofthisuser’smanualaresubjecttochangewithoutnotice.
(3)Greatcarehasbeentakeninthepreparationofthisuser’smanual;however,shouldyounoticeanyquestionable
points,errorsoromissions,pleasecontactus.
(4)Notwithstandingarticle(3),NECwillnotberesponsibleforanyclaimsonlossofprotorothermattersdeemed
toresultfromusingtheProjector.
i
Important Information
Safety Cautions
Precautions
PleasereadthismanualcarefullybeforeusingyourNECprojectorandkeepthemanualhandyforfuturereference.
CAUTION
Toturnoffmainpower,besuretoremovetheplugfrompoweroutlet.
Thepoweroutletsocketshouldbeinstalledasneartotheequipmentaspossible,andshouldbeeasily
accessible.
CAUTION
TOPREVENTSHOCK,DONOTOPENTHECABINET.
THEREAREHIGH-VOLTAGECOMPONENTSINSIDE.
REFERSERVICINGTOQUALIFIEDSERVICEPERSONNEL.
Thissymbolwarnstheuserthatuninsulatedvoltagewithintheunitmaybesufcienttocauseelectrical
shock.Therefore,itisdangeroustomakeanykindofcontactwithanypartinsideoftheunit.
Thissymbolalertstheuserthatimportantinformationconcerningtheoperationandmaintenanceofthis
unithasbeenprovided.
Theinformationshouldbereadcarefullytoavoidproblems.
WARNING:TOPREVENTFIREORSHOCK,DONOTEXPOSETHISUNITTORAINORMOISTURE.
DONOTUSETHISUNIT’SPLUGWITHANEXTENSIONCORDORINANOUTLETUNLESSALLTHEPRONGS
CANBEFULLYINSERTED.
DOC Compliance Notice (for Canada only)
ThisClassAdigitalapparatusmeetsallrequirementsoftheCanadianInterference-CausingEquipmentRegula-
tions.
Machine Noise Information Regulation - 3. GPSGV,
Thehighestsoundpressurelevelislessthan70dB(A)inaccordancewithENISO7779.
Disposing of your used product
EU-widelegislationasimplementedineachMemberStaterequiresthatusedelectricalandelectronicprod-
uctscarryingthemark(left)mustbedisposedofseparatelyfromnormalhouseholdwaste.Thisincludes
projectorsandtheirelectricalaccessoriesorlamps.Whenyoudisposeofsuchproducts,pleasefollowthe
guidanceofyourlocalauthorityand/orasktheshopwhereyoupurchasedtheproduct.
Aftercollectingtheusedproducts,theyarereusedandrecycledinaproperway.Thiseffortwillhelpus
reducethewastesaswellasthenegativeimpactsuchasmercurycontainedinalamptothehumanhealth
andtheenvironmentattheminimumlevel.
ThemarkontheelectricalandelectronicproductsonlyappliestothecurrentEuropeanUnionMember
States.
WARNING
ThisisaClassAproduct.Inadomesticenvironmentthisproductmaycauseradiointerferenceinwhichcasethe
usermayberequiredtotakeadequatemeasures.
CAUTION
•Inordertoreduceanyinterferencewithradioandtelevisionreceptionuseasignalcablewithferritecoreattached.
Useofsignalcableswithoutaferritecoreattachedmaycauseinterferencewithradioandtelevisionreception.
•ThisequipmenthasbeentestedandfoundtocomplywiththelimitsforaClassAdigitaldevice,pursuanttoPart
15oftheFCCRules.Theselimitsaredesignedtoprovidereasonableprotectionagainstharmfulinterference
whentheequipmentisoperatedinacommercialenvironment.Thisequipmentgenerates,uses,andcanradi-
ateradiofrequencyenergyand,ifnotinstalledandusedinaccordancewiththeinstallationmanual,maycause
harmfulinterferencetoradiocommunications.Operationofthisequipmentinaresidentialareaislikelytocause
harmfulinterferenceinwhichcasetheuserwillberequiredtocorrecttheinterferenceathisownexpense
ii
Important Information
WARNING TO CALIFORNIA RESIDENTS:
Handlingthecablessuppliedwiththisproductwillexposeyoutolead,achemicalknowntotheStateofCalifornia
tocausebirthdefectsorotherreproductiveharm.WASHHANDSAFTERHANDLING.
Important Safeguards
Thesesafetyinstructionsaretoensurethelonglifeofyourprojectorandtopreventreandshock.Pleasereadthem
carefullyandheedallwarnings.
Installation
•Donotplacetheprojectorinthefollowingconditions:
-onanunstablecart,stand,ortable.
-nearwater,baths,ordamprooms.
-indirectsunlight,nearheaters,orheatradiatingappliances.
-inadusty,smokyorsteamyenvironment.
-onasheetofpaperorcloth,rugsorcarpets.
•Ifyouwishtohavetheprojectorinstalledontheceiling:
-Donotattempttoinstalltheprojectoryourself.
-Theprojectormustbeinstalledbyqualiedtechniciansinordertoensureproperoperationandreducetherisk
ofbodilyinjury.
-Inaddition,theceilingmustbestrongenoughtosupporttheprojectorandtheinstallationmustbeinaccordance
withanylocalbuildingcodes.
-Pleaseconsultyourdealerformoreinformation.
WARNING
•Donotcoverthelenswiththelenscaporequivalentwhiletheprojectorison.Doingsocanleadtomeltingof
thecapduetotheheatemittedfromthelightoutput.
•Donotplaceanyobjects,whichareeasilyaffectedbyheat,infrontoftheprojectorlens.Doingsocouldlead
totheobjectmeltingfromtheheatthatisemittedfromthelightoutput.
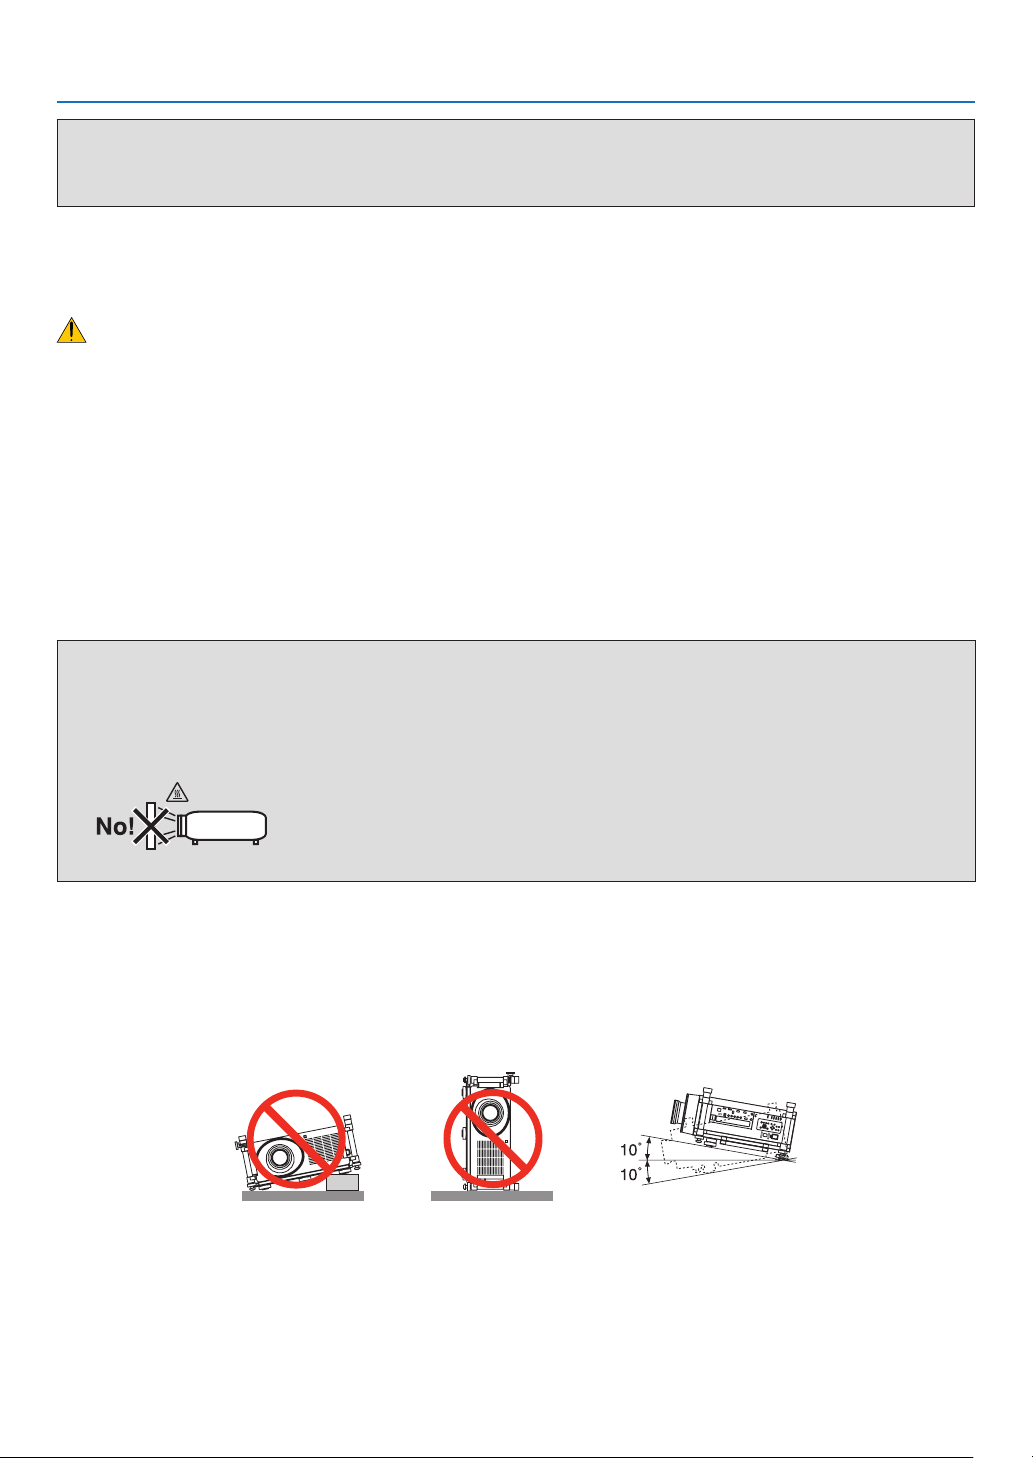
Orientation and Fan Mode
•Donottilttheprojectortotheleftorright.Doingsomayresultinmalfunction.Thereisnolimitonthetiltangle
upwardordownward.Selecttheappropriateoptionfor[FANMODE]accordingtotheinstallationangle.
Tiltingthefrontoftheprojectorupordownbymorethan10°fromlevelcouldreducelamplifebyupto20%.
•Whenchangingtheprojectororientationorinstallationangle,alsochangethe[SETTING]optionof[FANMODE]
accordingly.Failuretodosomaycauseproductmalfunction.(→page
123,124,129)

iii
Important Information
Fire and Shock Precautions
•Ensurethatthereissufcientventilationandthatventsareunobstructedtopreventthebuild-upofheatinsideyour
projector.Allowminimumspacesbetweenyourprojectorandawall.(→pagevandvi)
•Donottrytotouchtheventilationoutletontherearsideofthecabinetasitcanbecomeheatedwhiletheprojectoris
turnedonandimmediatelyaftertheprojectoristurnedoff.Partsoftheprojectormaybecometemporarilyheatedif
theprojectoristurnedoffwiththePOWERbuttonoriftheACpowersupplyisdisconnectedduringnormalprojector
operation.
Usecautionwhenpickinguptheprojector.
•Preventforeignobjectssuchaspaperclipsandbitsofpaperfromfallingintoyourprojector.Donotattempttoretrieve
anyobjectsthatmightfallintoyourprojector.Donotinsertanymetalobjectssuchasawireorscrewdriverintoyour
projector.Ifsomethingshouldfallintoyourprojector,disconnectitimmediatelyandhavetheobjectremovedbya
qualiedservicepersonnel.
•Donotplaceanyobjectsontopoftheprojector.
•Donottouchthepowerplugduringathunderstorm.Doingsocancauseelectricalshockorre.
•Theprojectorisdesignedtooperateonapowersupplyof100-240VAC50/60Hz.Ensurethatyourpowersupply
tsthisrequirementbeforeattemptingtouseyourprojector.
•Donotlookintothelenswhiletheprojectorison.Seriousdamagetoyoureyescouldresult.
•Keepanyitems(magnifyingglassetc.)outofthelightpathoftheprojector.Thelightpathbeingprojectedfromthe
lensisextensive,thereforeanykindofabnormalobjectsthatcanredirectlightcomingoutofthelens,cancause
anunpredictableoutcomesuchasareorinjurytotheeyes.
•Donotplaceanyobjects,whichareeasilyaffectedbyheat,infrontofaprojectorexhaustvent.
Doingsocouldleadtotheobjectmeltingorgettingyourhandsburnedfromtheheatthatisemittedfromtheex-
haust.
•Handlethepowercordcarefully.Adamagedorfrayedpowercordcancauseelectricshockorre.
-Donotuseanypowercordotherthantheonespeciedbythemanufacturer.
-Donotbendortugthepowercordexcessively.
-Donotplacethepowercordundertheprojector,oranyheavyobject.
-Donotcoverthepowercordwithothersoftmaterialssuchasrugs.
-Donotheatthepowercord.
-Donothandlethepowerplugwithwethands.
•Turnofftheprojector,unplugthepowercordandhavetheprojectorservicedbyaqualiedservicepersonnelunder
thefollowingconditions:
-Whenthepowercordorplugisdamagedorfrayed.
-Ifliquidhasbeenspilledintotheprojector,orifithasbeenexposedtorainorwater.
-Iftheprojectordoesnotoperatenormallywhenyoufollowtheinstructionsdescribedinthisuser’smanual.
-Iftheprojectorhasbeendroppedorthecabinethasbeendamaged.
-Iftheprojectorexhibitsadistinctchangeinperformance,indicatinganeedforservice.
•Disconnectthepowercordandanyothercablesbeforecarryingtheprojector.
•Turnofftheprojectorandunplugthepowercordbeforecleaningthecabinetorreplacingthelamp.
•Turnofftheprojectorandunplugthepowercordiftheprojectorisnottobeusedforanextendedperiodoftime.
•WhenusingaLANcable:
Forsafety,donotconnecttotheconnectorforperipheraldevicewiringthatmighthaveexcessivevoltage.

iv
Important Information
CAUTION
•Aminimumoftwopersonsarerequiredtocarrytheprojector.Otherwisetheprojectormaytumbleordrop,caus-
ingpersonalinjury.
•Keephandsawayfromthelensmountingportionwhilethelensshiftisinoperation.
Failuretodosocouldresultinhandsbeingpinchedbythemovinglens.
•Donotusethetilt-footforpurposesotherthanoriginallyintended.Misusessuchasgrippingthetilt-footorhang-
ingonthewallcancausedamagetotheprojector.
•Donotsendtheprojectorinthesoftcasebyparceldeliveryserviceorcargoshipment.Theprojectorinsidethe
softcasecouldbedamaged.
•Set[LAMPSELECT]and[LAMPINTERVALMODE]ifyoucontinuetousetheprojectorforconsecutivedays.
(Fromthemenu,select[LAMPMODE]→[LAMPSELECT]and[LAMPINTERVALMODE].)
•BeforeusingDirectPowerOff,besuretoallowatleast20minutesimmediatelyafterturningontheprojectorand
startingtodisplayanimage.
•Donotunplugthepowercordfromthewalloutletorprojectorwhentheprojectorispoweredon.Doingsocan
causedamagetotheACINconnectoroftheprojectorand(or)theprongplugofthepowercord.
ToturnofftheACpowersupplywhentheprojectorispoweredon,usetheprojector'smainpowerswitchora
powerstripequippedwithaswitchandabreaker.
•DonotturnofftheACpowerfor60secondsafterthelampisturnedonandwhilethePOWERindicatorisblink-
ingblue.Doingsocouldcauseprematurelampfailure.
•Useofawalloutletwitha20Aormorecircuitbreakerisrecommended.
Performing Lens Calibration After Installation of the Optional Lens
Besuretoperform[CALIBRATION]afterinstallationorreplacementofthelens.(→page
17,126)Calibrationcorrects
theadjustablezoomandfocusrange.
Thefollowinglensesneedcalibration:
•NP26ZL,NP27ZL,NP28ZL,NP29ZL
Caution on Carrying the Projector/Handling the Optional Lens
Whenshippingtheprojectorwiththelens,removethelensbeforeshippingtheprojector.Alwaysattachthedustcap
tothelenswheneveritisnotmountedontheprojector.Thelensandthelensshiftmechanismmayencounterdamage
causedbyimproperhandlingduringtransportation.
Remote Control Precautions
•Handletheremotecontrolcarefully.
•Iftheremotecontrolgetswet,wipeitdryimmediately.
•Avoidexcessiveheatandhumidity.
•Donotshort,heat,ortakeapartbatteries.
•Donotthrowbatteriesintore.
•Ifyouwillnotbeusingtheremotecontrolforalongtime,removethebatteries.
•Ensurethatyouhavethebatteries’polarity(+/−)alignedcorrectly.
•Donotusenewandoldbatteriestogether,orusedifferenttypesofbatteriestogether.
•Disposeofusedbatteriesaccordingtoyourlocalregulations.
Note for US Residents
Thelampsinthisproductcontainmercury.PleasedisposeaccordingtoLocal,StateorFederalLaws.
v
Important Information
Lamp Replacement
•Usethespeciedlampforsafetyandperformance.
•Toreplacethelamp,followallinstructionsprovidedonpage
185.
•Besuretoreplacethelampwhenthemessage[THE LAMP HAS REACHED THE END OF ITS USABLE LIFE.
PLEASE REPLACE THE LAMP 1 (or 2). USE THE SPECIFIED LAMP FOR SAFETY AND PERFORMANCE.]
appears.Ifyoucontinuetousethelampafterthelamphasreachedtheendofitsusablelife,thelampbulbmay
shatter,andpiecesofglassmaybescatteredinthelampcase.Donottouchthemasthepiecesofglassmaycause
injury.
Ifthishappens,contactyourdealerforlampreplacement.
A Lamp Characteristic
Theprojectorhasahigh-pressuremercurylampasalightsource.
Alamphasacharacteristicthatitsbrightnessgraduallydecreaseswithage.Alsorepeatedlyturningthelampon
andoffwillincreasethepossibilityofitslowerbrightness.
CAUTION:
•DONOTTOUCHTHELAMPimmediatelyafterithasbeenused.Itwillbeextremelyhot.Turntheprojectoroff
andthendisconnectthepowercord.Allowatleastonehourforthelamptocoolbeforehandling.
•Whenremovingthelampfromaceiling-mountedprojector,makesurethatnooneisundertheprojector.Glass
fragmentscouldfallifthelamphasbeenburnedout.
Clearance for Installing the Projector
Allowampleclearancebetweentheprojectoranditssurroundingsasshownbelow.
AvoidinstallingtheprojectorinaplacewhereairmovementfromtheHVACisdirectedattheprojector.
HeatedairfromtheHVACcanbetakeninbytheprojector'sintakevent.Ifthishappens,thetemperatureinsidethe
projectorwillrisetoohighcausingtheover-temperatureprotectortoautomaticallyturnofftheprojectorspower.
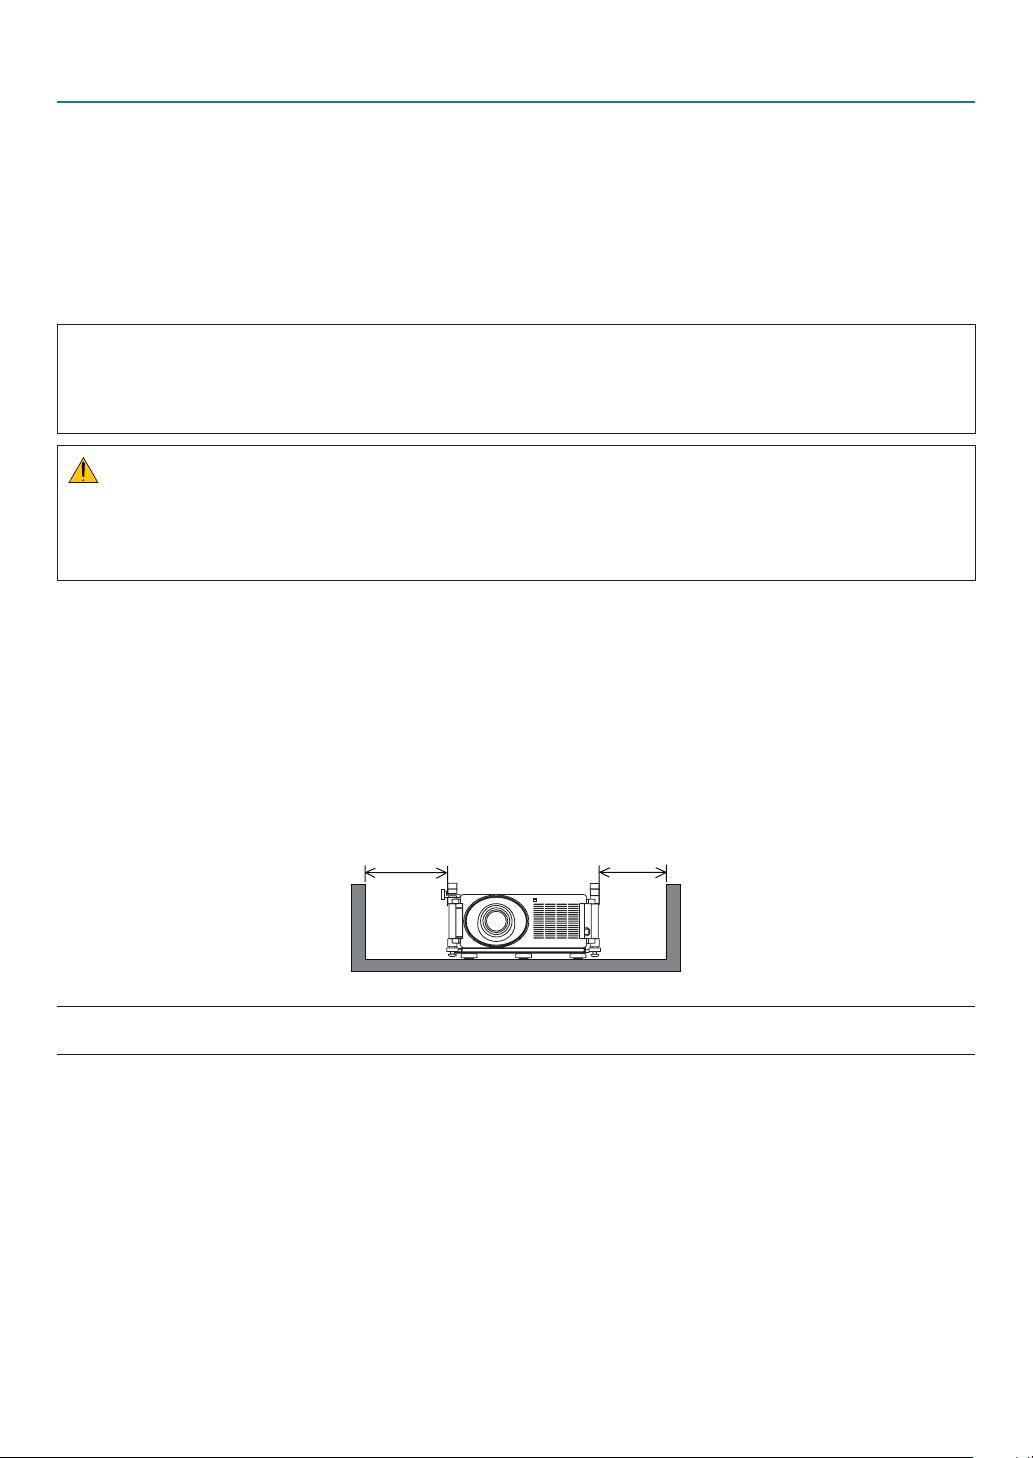
Example 1 – If there are walls on both sides of the projector.
50 cm/19.7" or greater 30 cm/12" or greater
NOTE:
The drawing shows the proper clearance required for the front, back and top of the projector.
vi
Important Information
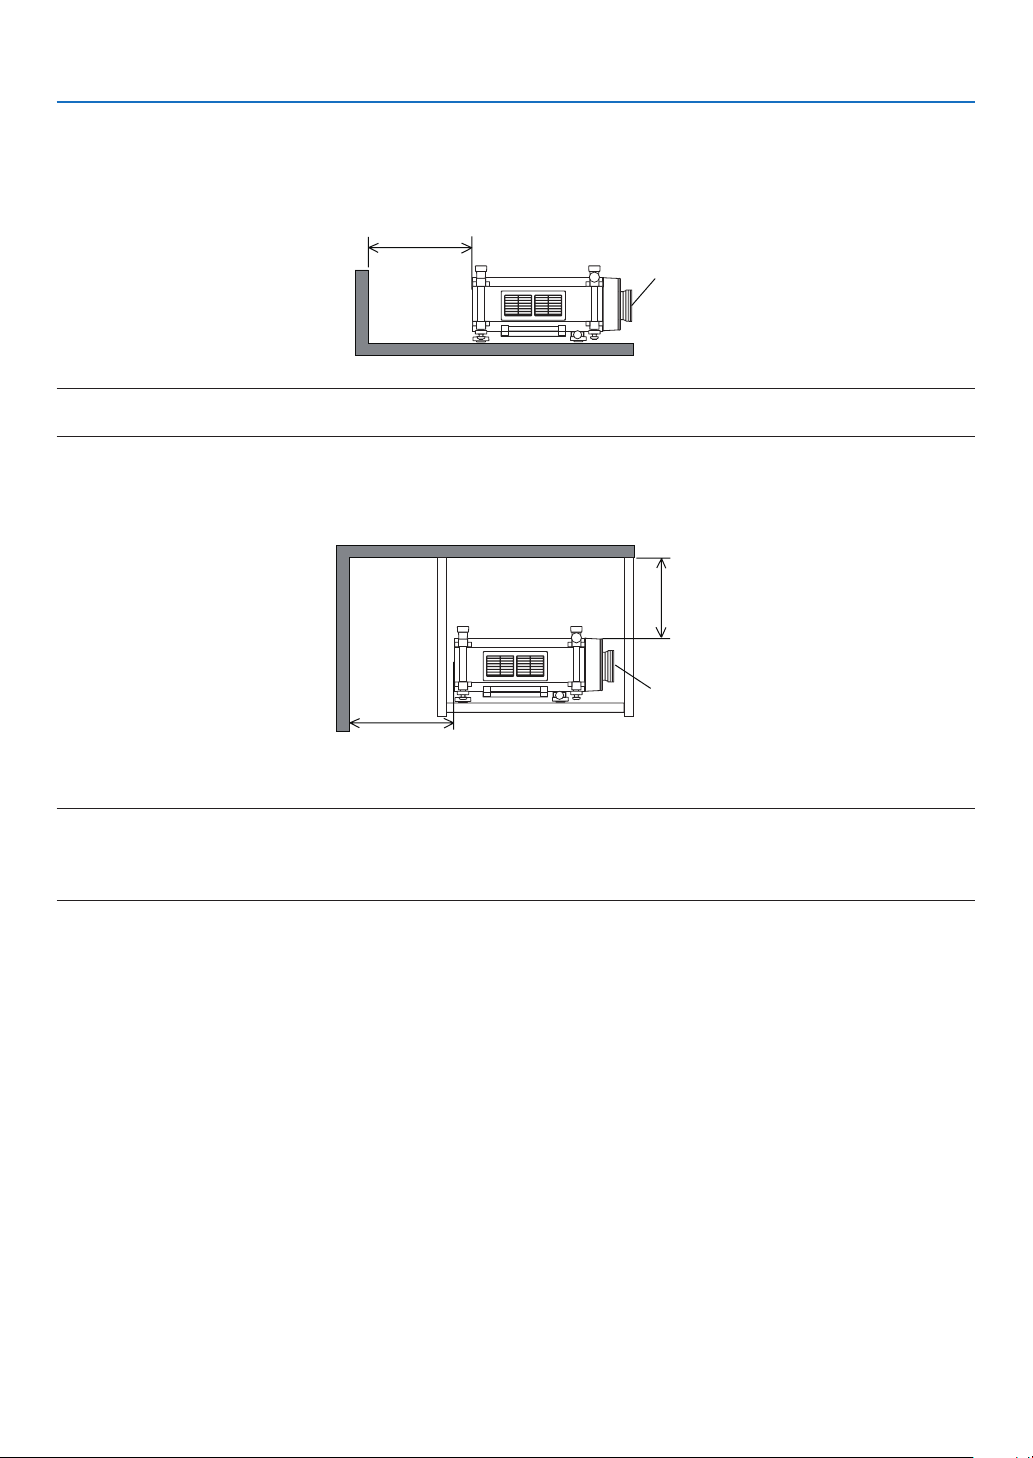
Example 2 – If there is a wall behind the projector.
(1) For floor installation:
70 cm/27.6" or greater
Lens
NOTE:
The drawing shows the proper clearance required for the back, sides and top of the projector.
(2) For ceiling mounting:
30 cm/12" or
greater
70 cm/27.6" or greater
Lens
NOTE:
1. The drawing shows the proper clearance required for the front, sides, back and bottom of the projector.
2. If suspending the projector 30 cm/12 inches away from the ceiling, allow ample clearance for all four sides and the under the
projector.
About High Altitude mode
•
Set[FAN
MODE]to[HIGHALTITUDE]whenusingtheprojectorataltitudesapproximately5500feet/1600meters
orhigher.
Usingtheprojectorataltitudesapproximately5500feet/1600metersorhigherwithoutsettingto[HIGHALTITUDE]
cancausetheprojectortooverheatandtheprojectorcouldshutdown.Ifthishappens,waitacoupleminutesand
turnontheprojector.
•Usingtheprojectorataltitudeslessthanapproximately5500feet/1600metersandsettingto[HIGHALTITUDE]
cancausethelamptoovercool,causingtheimagetoicker.Switch[FANMODE]to[AUTO].
•Usingtheprojectorataltitudesapproximately5500feet/1600metersorhighercanshortenthelifeofinternalparts
suchasthelamp.

vii
Important Information
About Copyright of original projected pictures:
Pleasenotethatusingthisprojectorforthepurposeofcommercialgainortheattractionofpublicattentioninavenue
suchasacoffeeshoporhotelandemployingcompressionorexpansionofthescreenimagewiththefollowingfunc-
tionsmayraiseconcernabouttheinfringementofcopyrightswhichareprotectedbycopyrightlaw.
[ASPECTRATIO],[3DREFORM],[D-ZOOM]featureandothersimilarfeatures.
Turkish RoHS information relevant for Turkish market
EEE Yönetmeliğine Uygundur.

viii
Table of Contents
Important Information ............................................................................................i
1. Introduction .......................................................................................................... 1
1What’sintheBox? ......................................................................................................... 1
IntroductiontotheProjector .......................................................................................... 2
CongratulationsonYourPurchaseoftheProjector ................................................. 2
Featuresyou’llenjoy: ............................................................................................... 2
Aboutthisuser’smanual .......................................................................................... 3
PartNamesoftheProjector .......................................................................................... 4
Front/Top .................................................................................................................. 4
Rear ......................................................................................................................... 5
ControlPanel/IndicatorSection ............................................................................... 6
TerminalPanelFeatures .......................................................................................... 7
PartNamesoftheRemoteControl ............................................................................... 8
BatteryInstallation ................................................................................................... 9
RemoteControlPrecautions .................................................................................... 9
OperatingRangeforWirelessRemoteControl ........................................................ 9
OperatingEnvironmentforDownloadableSoftware .................................................... 10
OperatingEnvironment .......................................................................................... 11
2. Projecting an Image (Basic Operation) .............................................. 12
1FlowofProjectinganImage ........................................................................................ 12
ConnectingYourComputer/ConnectingtheSuppliedPowerCord .............................. 13
UsingtheSuppliedPowerCords ........................................................................... 13
UsingthePowerCordStopper .............................................................................. 14
TurningontheProjector .............................................................................................. 16
PerformingLensCalibration .................................................................................. 17
NoteonStartupscreen(MenuLanguageSelectscreen) ...................................... 18
Iftheprojectedimageisinvertedorupsidedown .................................................. 19
SelectingaSource ...................................................................................................... 20
Selectingthecomputerorvideosource................................................................. 20
AdjustingthePictureSizeandPosition ....................................................................... 21
Tiltingtheprojector ................................................................................................ 22
Adjustingtheverticalpositionofaprojectedimage(Lensshift) ............................ 24
Focus ..................................................................................................................... 26
Zoom ...................................................................................................................... 27
CorrectingKeystoneDistortion .................................................................................... 28
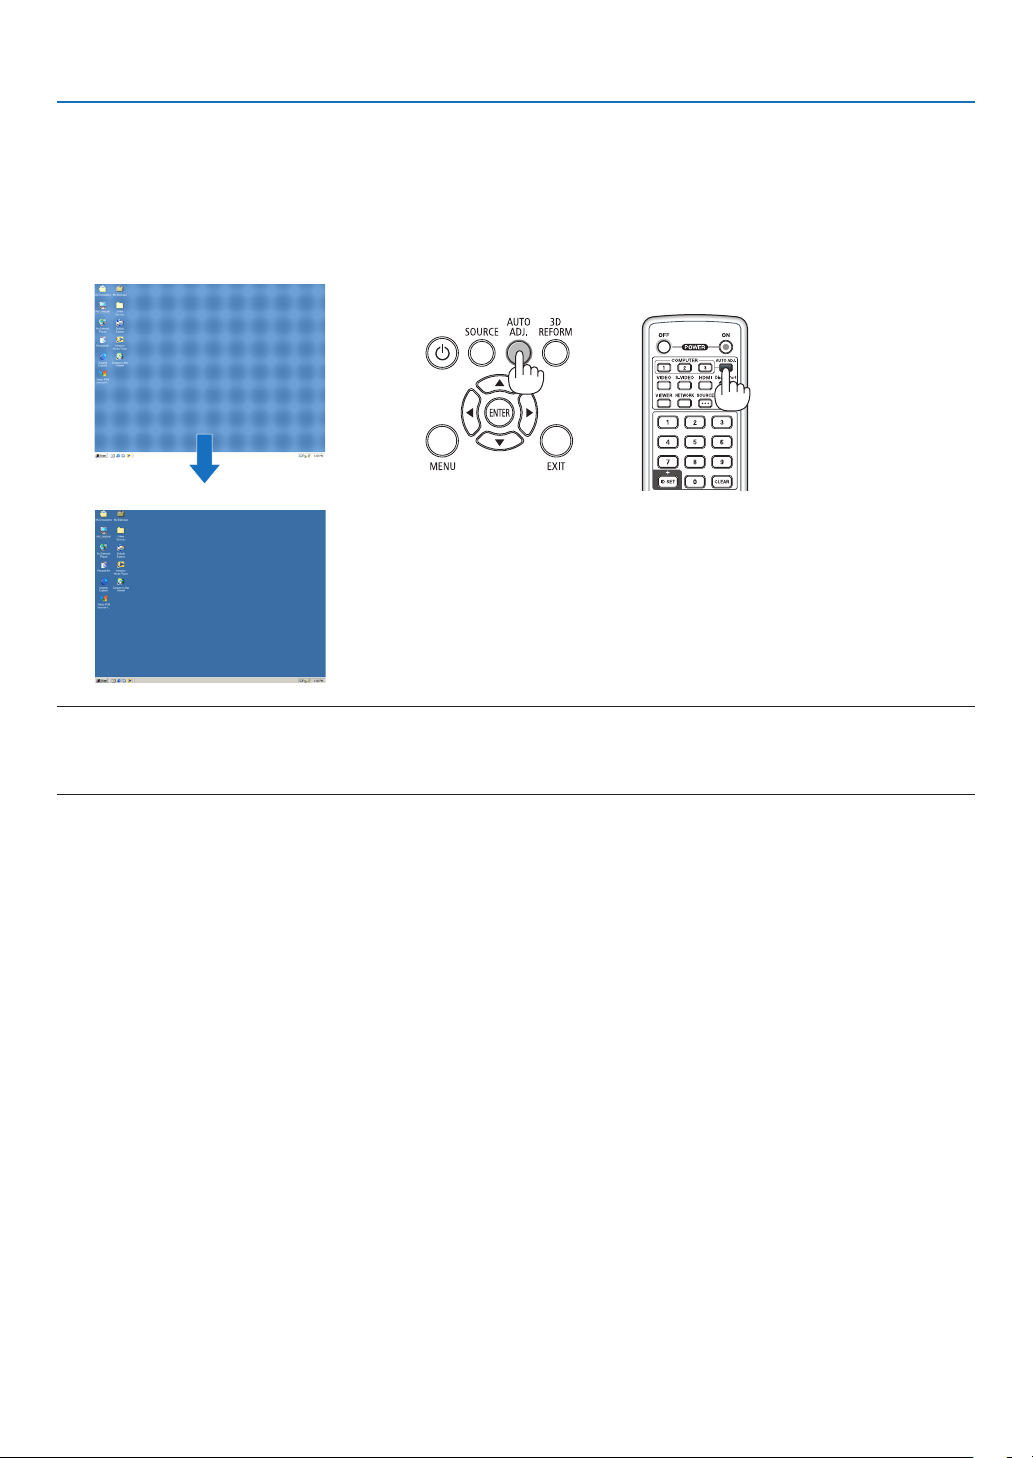
OptimizingComputerSignalAutomatically ................................................................. 30
AdjustingtheImageUsingAutoAdjust .................................................................. 30
TurningofftheProjector .............................................................................................. 31
CarryingtheProjector ................................................................................................. 33
3. Convenient Features ..................................................................................... 34
1Blockingthelamplight(LENSSHUTTER) .................................................................. 34
TurningofftheImage ................................................................................................... 34
FreezingaPicture ....................................................................................................... 34
EnlargingaPicture ...................................................................................................... 35

ix
Table of Contents
ChangingEcoMode/CheckingEnergy-SavingEffectUsingEcoMode[ECO
MODE] ................................................................................................................... 36
CheckingEnergy-SavingEffect[CARBONMETER] ............................................. 37
UsingtheOptionalRemoteMouseReceiver(NP01MR) ............................................ 38
CorrectingHorizontalandVerticalKeystoneDistortion[CORNERSTONE] ................ 40
Cornerstone ........................................................................................................... 40
DisplayingTwoPicturesattheSameTime .................................................................. 43
SelectingthePIPorPICTUREBYPICTUREMode[MODE] ................................ 43
[POSITION] ............................................................................................................ 44
PreventingtheUnauthorizedUseoftheProjector[SECURITY] ................................. 45
StoringChangesforLensShift,Zoom,andFocus[LENSMEMORY] ........................ 48
UsageExample...................................................................................................... 48
Tostoreyouradjustedvaluesin[REF.LENSMEMORY]: ...................................... 48
Tocallupyouradjustedvaluesfrom[REF.LENSMEMORY]: ............................... 49
DisplayingaPictureUsing[EDGEBLENDING] .......................................................... 52
BeforeexplaininguseoftheEdgeBlendingfunction ............................................. 52
BlackLevelAdjustment .......................................................................................... 55
9-segmentedportionsforBlackLeveladjustment ................................................. 56
ControllingtheProjectorbyUsinganHTTPBrowser ................................................. 57
ProjectingYourComputer’sScreenImagefromtheProjectorviaaNetwork
[NETWORKPROJECTOR] .................................................................................... 64
UsingtheProjectortoOperateYourComputerviaaNetwork[REMOTE
DESKTOP] ............................................................................................................. 68
4. Using the Viewer ............................................................................................. 74
❶WhatyoucandowiththeViewer ................................................................................. 74
❷Preparingpresentationmaterials ................................................................................ 77
❸ProjectingimagesstoredinaUSBmemorydevice .................................................... 78
StartingtheViewer ................................................................................................. 78
ExitingtheViewer .................................................................................................. 81
NamesandfunctionsofViewerscreen .................................................................. 82
Vieweroptionsettings ............................................................................................ 87
❹Projectingdatafromsharedfolder .............................................................................. 90
Connectingtheprojectortothesharedfolder ....................................................... 90
Disconnectingthesharedfolderfromtheprojector ............................................... 93
❺Projectingdatafrommediaserver............................................................................... 94
Settingup“MediaSharing”inWindowsMediaPlayer11 ...................................... 94
Settingup“MediaSharing”inWindowsMediaPlayer12 ...................................... 96
Connectingtheprojectortothemediaserver ........................................................ 97
Disconnectingtheprojectorfromthemediaserver ............................................... 98
❻Restrictionsondisplayingles .................................................................................... 99
SomerestrictionsonPowerPointles .................................................................... 99
SomerestrictionsonPDFles .............................................................................. 99
5. Using On-Screen Menu .............................................................................. 100
1UsingtheMenus ........................................................................................................ 100
MenuElements .......................................................................................................... 101
ListofMenuItems ..................................................................................................... 102

x
Table of Contents
MenuDescriptions&Functions[SOURCE] .............................................................. 105
COMPUTER1,2,and3 ...................................................................................... 105
HDMI .................................................................................................................... 105
DisplayPort ........................................................................................................... 105
VIDEO .................................................................................................................. 105
S-VIDEO .............................................................................................................. 105
VIEWER ............................................................................................................... 105
NETWORK ........................................................................................................... 105
SLOT(foroptionalboard) .................................................................................... 105
ENTRYLIST ........................................................................................................ 105
TESTPATTERN ................................................................................................... 105
MenuDescriptions&Functions[ADJUST] ................................................................ 109
[PICTURE] ........................................................................................................... 109
[IMAGEOPTIONS] .............................................................................................. 112
[VIDEO] ................................................................................................................ 116
UsingtheLensMemoryFunction[LENSMEMORY] ........................................... 117
MenuDescriptions&Functions[SETUP] .................................................................. 118
[BASIC] ................................................................................................................ 118
[MENU] ................................................................................................................ 122
[INSTALLATION(1)] .............................................................................................. 123
[INSTALLATION(2)] .............................................................................................. 127
[OPTIONS(1)] ...................................................................................................... 129
[OPTIONS(2)] ...................................................................................................... 131
[EDGEBLENDING] ............................................................................................. 133
MenuDescriptions&Functions[INFO.] .................................................................... 134
[USAGETIME] ..................................................................................................... 134
[SOURCE(1)] ....................................................................................................... 135
[SOURCE(2)] ....................................................................................................... 135
[WIREDLAN] ....................................................................................................... 135
[WIRELESSLAN(1)] ............................................................................................ 136
[WIRELESSLAN(2)] ............................................................................................ 136
[VERSION(1)] ...................................................................................................... 136
[VERSION(2)] ...................................................................................................... 137
[OTHERS] ............................................................................................................ 137
8MenuDescriptions&Functions[RESET] .................................................................. 138
ReturningtoFactoryDefault[RESET] ................................................................. 138
❾ApplicationMenu ....................................................................................................... 140
IMAGEEXPRESSUTILITY ................................................................................. 140
NETWORKPROJECTOR .................................................................................... 140
REMOTEDESKTOPCONNECTION .................................................................. 141
NETWORKSETTINGS ........................................................................................ 142
TOOLS ................................................................................................................. 158
6. Connecting to Other Equipment .......................................................... 163
MountingtheOptionalLens....................................................................................... 163
Beforemountingthelens: .................................................................................... 163
Mountingthelens................................................................................................. 163
Removingthelens ............................................................................................... 165
MakingConnections .................................................................................................. 166
AnalogRGBsignalconnection ............................................................................ 166
DigitalRGBsignalconnection ............................................................................. 167

xi
Table of Contents
ConnectinganExternalMonitor .......................................................................... 169
ConnectingYourDVDPlayerorOtherAVEquipment .......................................... 170
ConnectingComponentInput .............................................................................. 171
ConnectingHDMIInput........................................................................................ 172
ConnectingtoaWiredLAN ................................................................................. 173
ConnectingtoaWirelessLAN(soldseparately).................................................. 174
MountingawirelessLANunit .............................................................................. 174
ToremovethewirelessLANunit.......................................................................... 176
Stackingprojectors .............................................................................................. 178
7. Maintenance .................................................................................................... 180
1CleaningtheFilters.................................................................................................... 180
Cleaningthelterontheleftside......................................................................... 180
Cleaningthelteronthefrontside ...................................................................... 182
CleaningtheLens...................................................................................................... 184
CleaningtheCabinet ................................................................................................. 184
ReplacingtheLampandtheFilters ........................................................................... 185
ReplacingtheFilters .................................................................................................. 188
Replacingthelterontheleftside ....................................................................... 188
Replacingthelteronthefrontside .................................................................... 190
8. User Supportware ......................................................................................... 192
InstallingSoftwareProgram ...................................................................................... 192
InstallationforWindowssoftware ......................................................................... 192
InstallationforMacintoshsoftware ....................................................................... 193
ProjectingImagesorVideosfromtheProjectoroveraLAN(ImageExpressUtility
2.0) ....................................................................................................................... 194
WhatyoucandowithImageExpressUtility2.0 .................................................. 194
ConnectingtheprojectortoaLAN ....................................................................... 195
BasicOperationofImageExpressUtility2.0 ....................................................... 196
ControllingtheProjectoroveraLAN(PCControlUtilityPro4) ................................. 205
ProjectingYourMac’sScreenImagefromtheProjectoroveraLAN(Image
ExpressUtility2forMac) ..................................................................................... 206
WhatyoucandowithImageExpressUtility2 ..................................................... 206
Operatingenvironment ........................................................................................ 206
ConnectingtheprojectortoaLAN ....................................................................... 206
UsingImageExpressUtility2 .............................................................................. 207
OperatingtheProjectorViatheLAN(VirtualRemoteTool) ....................................... 210
ConvertingPowerPointlestoSlides(ViewerPPTConverter3.0) ........................... 213
9. Appendix ............................................................................................................. 215
Throwdistanceandscreensize ................................................................................ 215
Lenstypesandthrowdistance ............................................................................ 215
Tablesofscreensizesanddimensions ............................................................... 217
Lensshiftingrange ............................................................................................... 218
❷MountingtheOptionalBoard(soldseparately) ......................................................... 219
CompatibleInputSignalList ...................................................................................... 221
Specications ............................................................................................................ 223
Optical .................................................................................................................. 223

xii
Table of Contents
Electrical .............................................................................................................. 223
Mechanical ........................................................................................................... 224
Optionlens ........................................................................................................... 225
PowerCord .......................................................................................................... 225
CabinetDimensions .................................................................................................. 226
PinAssignmentsofD-SubCOMPUTERInputConnector ........................................ 227
Troubleshooting ......................................................................................................... 228
IndicatorMessages .............................................................................................. 228
CommonProblems&Solutions ........................................................................... 230
Ifthereisnopicture,orthepictureisnotdisplayedcorrectly. .............................. 232
PCControlCodesandCableConnection ................................................................. 233
TroubleshootingCheckList ........................................................................................ 234
REGISTERYOURPROJECTOR!(forresidentsintheUnitedStates,Canada,and
Mexico) ................................................................................................................ 236
1
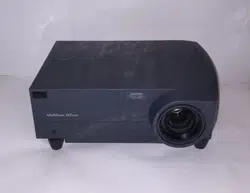
Projector
Dust cap for lens
* The projector is shipped without a lens. For the types of
lens and throw distances, see page 215.
1. Introduction
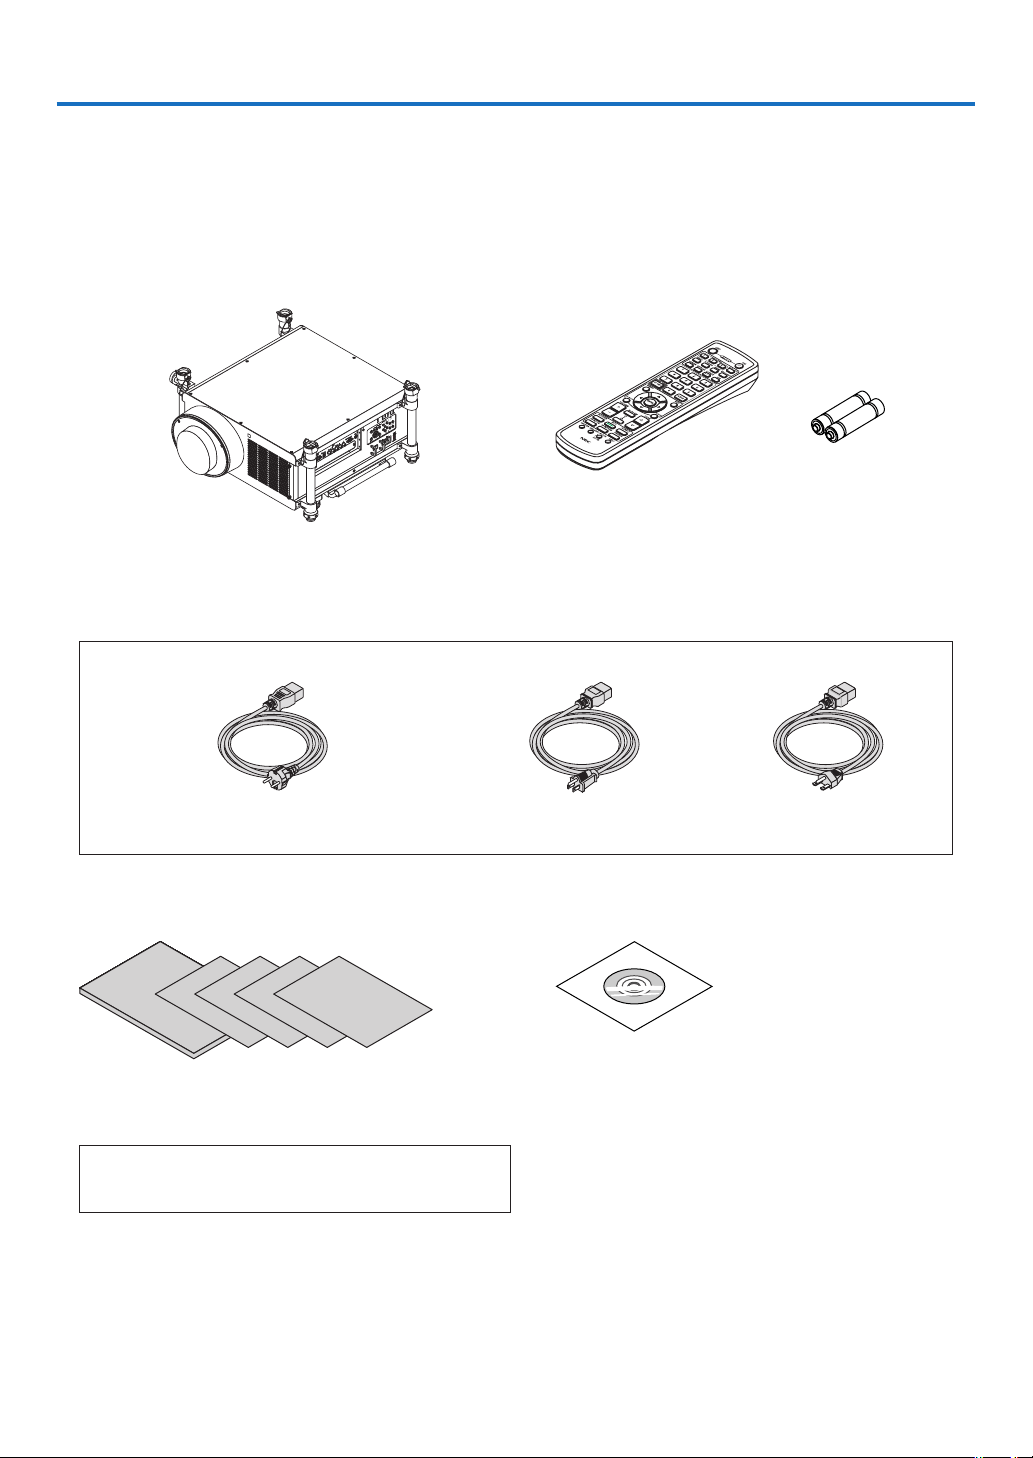
1 What’s in the Box?
Makesureyourboxcontainseverythinglisted.Ifanypiecesaremissing,contactyourdealer.
Pleasesavetheoriginalboxandpackingmaterialsifyoueverneedtoshipyourprojector.
NEC Projector CD-ROM
User’s manual (PDF)
(7N951663)
•ImportantInformation(7N8N2114)
•QuickSetupGuide(7N8N2122/7N8N2132)
•Limitedwarranty(forNorthAmerica)
For customers in Europe:
YouwillndourcurrentvalidGuaranteePolicyonourWebSite:
www.nec-display-solutions.com
Remote control
(7N900961)
AAalkalinebatteries
(x2)
Power cord × 3
(79TM1021) (79TM1001forAC120V)(79TM1011forAC200V)
ForEurope/Asia/SouthAmericaForNorthAmerica
Power cord stopper (79TM1111)
Anti-theftcapforLANunit(foroptionalwirelessLANunit)(79TM1091)

2
1. Introduction
Introduction to the Projector
Thissectionintroducesyoutoyournewprojectoranddescribesthefeaturesandcontrols.
Congratulations on Your Purchase of the Projector
Thisprojectorisoneoftheverybestprojectorsavailabletoday.Theprojectorenablesyoutoprojectpreciseimagesup
to500inches(200inchesonNP25FL)across(measureddiagonally)fromyourPCorMacintoshcomputer(desktop
ornotebook),VCR,DVDplayer,ordocumentcamera.
Youcanusetheprojectoronatabletoporcart,youcanusetheprojectortoprojectimagesfrombehindthescreen,
andtheprojectorcanbepermanentlymountedonaceiling*1.Theremotecontrolcanbeusedwirelessly.
*1Donotattempttomounttheprojectoronaceilingyourself.
Theprojectormustbeinstalledbyqualiedtechniciansinordertoensureproperoperationandreducetherisk
ofbodilyinjury.
Inaddition,theceilingmustbestrongenoughtosupporttheprojectorandtheinstallationmustbeinaccordance
withanylocalbuildingcodes.Pleaseconsultyourdealerformoreinformation.
Features you’ll enjoy:
•DLP
®
projector with high resolution and high brightness
Highresolutiondisplay–WUXGA(1920×1200)nativeresolution(16:10)
•Widerangeofoptionallensesselectableaccordingtotheplaceofinstallation
Thisprojectorsupports5typesofoptionallenses,providingaselectionoflensesadaptedforavarietyofinstal-
lationrequirements.
Inaddition,thelensescanbemountedandremovedeasily.
Notethatnolensismounteduponshipmentfromthefactory.Pleasepurchaseoptionallensesseparately.
•DualLampsystem
Twolampsystemoffersincreasedlamplifeandenergysavingsalongwithredundancy.
•Doublestackableforbuiltinredundancyandhighlightoutputrequirements
Doublestackingprojectorsincreasethebrightnessandvisibility.
•EDGEBLENDINGfunction
TheEDGEBLENDINGfunctionallowsamulti-screenimagewithhighresolutiontobedisplayedonalarge
screen.
•PoweredLensShift,Zoom,andFocusofferinstallationexibility
PoweredHorizontalandVerticallensshiftprovidestheabilitytoprojectfromoffcenterscreeninstallations.Powered
zoomandfocusprovidequickandeasyadjustment.
NotethatfocuscanbeadjustedmanuallyontheNP25FLlens.
•360°installationangle(tilt-free)
Theprojectorcanbeinstalledatanyangle(360°).
Note,however,thatthelamplifecouldbereduceddependingonwhatangletheprojectoristilted.
Also,the“FANMODE”settingmustbechangedaccordingtotheangleofinstallation.Theprojectorcannotbe
installedtiltedtotheleftorright.
•Widerangeofinput/outputconnectors(HDMI,DisplayPort,BNC,etc.)
Theprojectorisequippedwithavarietyofinput/outputconnectors:computer(analog),5BNC,HDMI,DisplayPort,
Video,S-Video,etc.(Thecomputer(analog)andBNCconnectorsalsosupportcomponentinputs.)
Theprojector’sHDMIandDisplayPortinputconnectorssupportHDCP.
•Slotforoptionalboard
Theprojectorhasaslotfortheoptionalboard(SB-01HCorotherNEC’sinterfaceboards).

3
1. Introduction
•Highpicturequalityprocessingcircuit
TheReon-VXvideoprocessorisusedtoprojecthighqualityimages.
•Energy-savingdesignwithastandbypowerconsumptionof0.5Wattsorless
Whentheon-screenmenu’sstandbymodeissetto“PowerSaving”,thepowerconsumptioninthestandbymode
is0.5W.
•“Ecomode”forlowpowerconsumptionand“CarbonMeter”display
Theprojectorisequippedwithan“ecomode”forreducingpowerconsumptionduringuse.Furthermore,the
power-savingeffectwhentheecomodeissetisconvertedintotheamountofreductionsofCO2emissionsand
thisisindicatedontheconrmationmessagedisplayedwhenthepoweristurnedoffandat“Information”onthe
on-screenmenu(CARBONMETER).
•Seamlessswitchfunctionforsmootherscreenchangeswhenswitchingthesignal
Whentheinputconnectorisswitched,theimagedisplayedbeforeswitchingisheldsothatthatprojectorcanwrite
thenewimagewithoutgoingtoblack.
•Simultaneousdisplayof2images(PIP/PICTUREBYPICTURE)
Twoimagescanbeprojectedsimultaneouslywithasingleprojector.
Therearetwotypesoflayoutsforthetwoimages:“picture-in-picture”inwhichasub-pictureisdisplayedonthe
mainpicture,and“picture-by-picture”inwhichthemainandsubpicturesaredisplayednexttoeachother.
•Securityfunctionforpreventingunauthorizeduse
Thisprojectorisequippedwiththefollowingsecurityfunctions:
-Passwordsecurity:Whenapasswordissetintheon-screenmenu,ascreentoinputthepasswordappears
whentheprojector’spoweristurnedon.
•Wired/wirelessLANcompatibility(wirelessLANunitsoldseparately)
TheprojectorisequippedwithaLANport(RJ-45)forconnectiontoawiredLANfortransferringimagesfroma
computertotheprojector,controllingtheprojectorfromacomputer,etc.
Furthermore,theprojectorcanbeusedinawirelessLANbymountingtheseparatelysoldwirelessLANunit
(NP02LM).
•Convenientutilitysoftwaredownloadablefromtheweb
Fiveutilitysoftwareprograms(ImageExpressUtility2.0,PCControlUtilityPro4,ImageExpressUtility2forMac,
VirtualRemoteTool,andViewerPPTConverter3.0.)canbedownloadedfromourwebsite.
•LAN-compatibleviewerfunction
StillandmovingimagesinsharedfoldersonacomputerconnectedbywiredorwirelessLANcanbeprojected
withtheprojector’sviewer.
-TheviewersupportstheWindowsMediaPlayer11’s“mediasharing”function.
•CRESTRONROOMVIEWcompatibility
TheprojectorsupportsCRESTRONROOMVIEW,allowingmultipledevicesconnectedinthenetworktobemanaged
andcontrolledfromacomputerorcontroller.
About this user’s manual
Thefastestwaytogetstartedistotakeyourtimeanddoeverythingrightthersttime.Takeafewminutesnowto
reviewtheuser’smanual.Thismaysaveyoutimelateron.Atthebeginningofeachsectionofthemanualyou’llnd
anoverview.Ifthesectiondoesn’tapply,youcanskipit.
4
1. Introduction
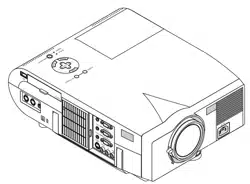
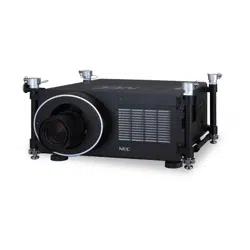
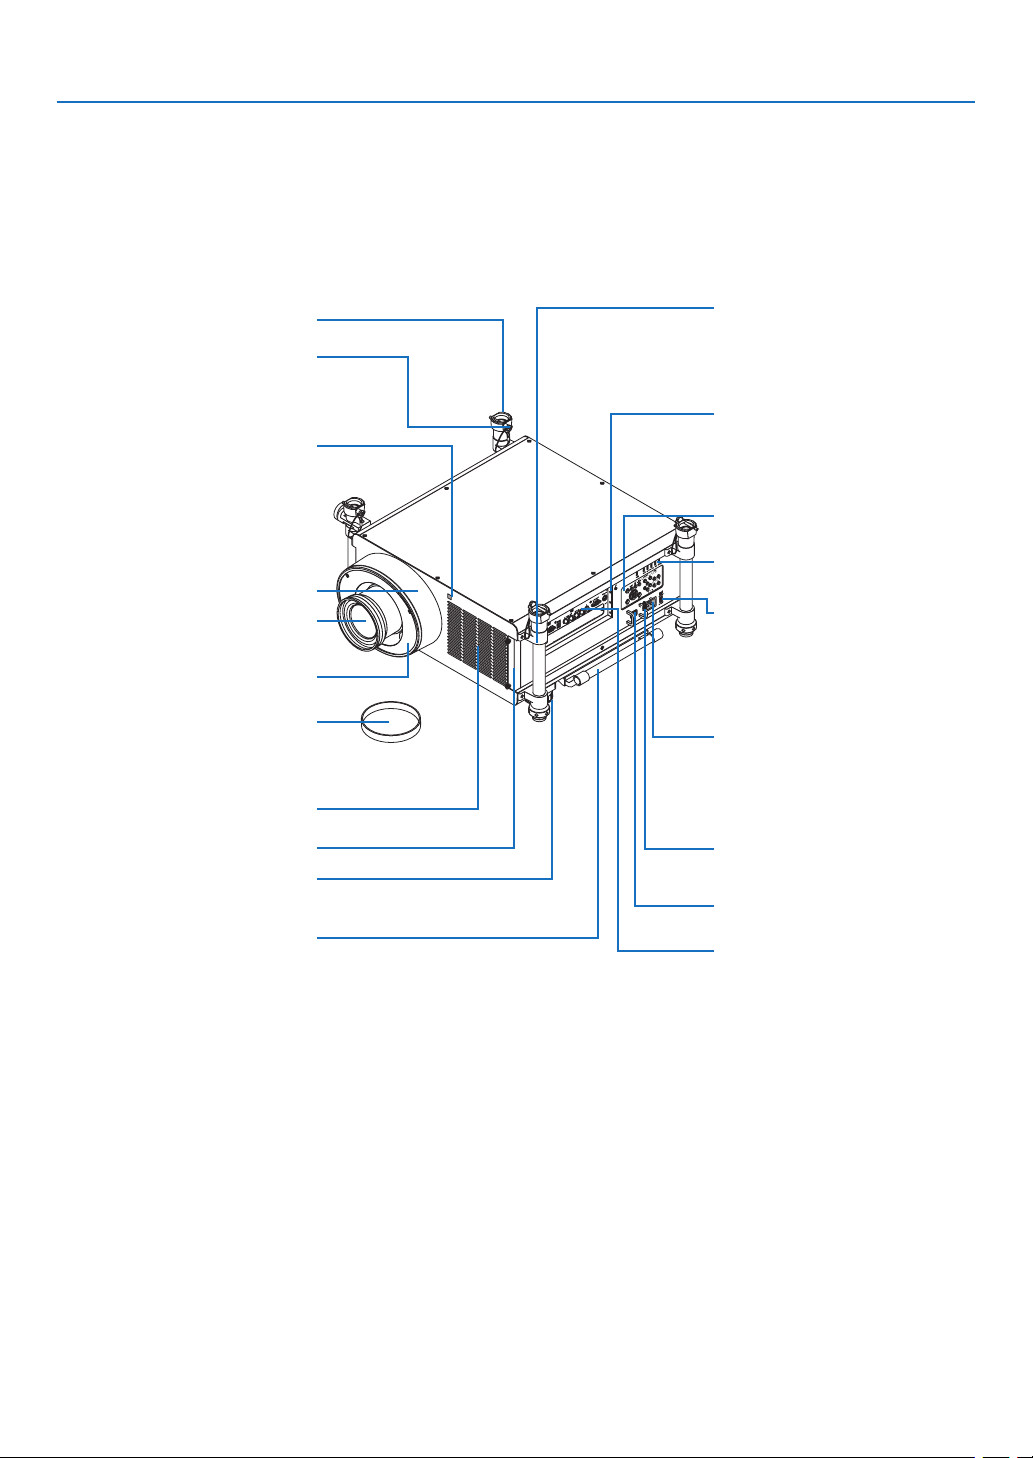
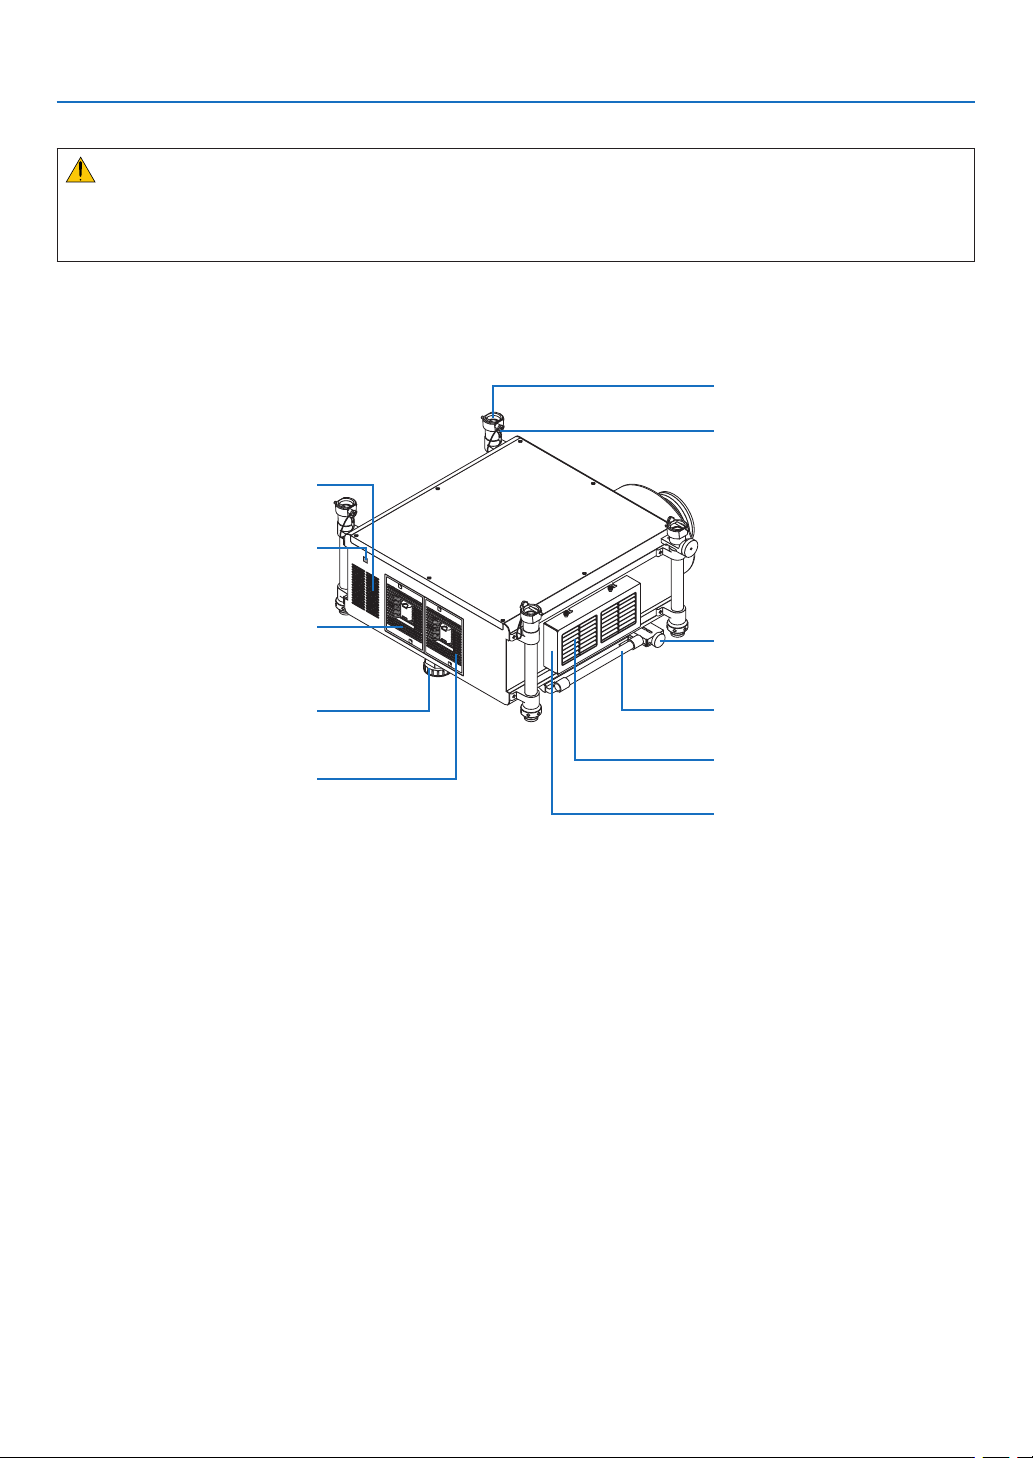
Part Names of the Projector
Front/Top
Thelensissoldseparately.ThedescriptionbelowisforwhentheNP27ZLlensismounted.
Control Panel
(
→ page 6)
Lens
Ventilation(inlet)
Filter Cover
Handle
Lens Hood
SecurityLockingPin
StackingColumn
LensShroud
RemoteSensor(locatedonthe
front and the rear)
(
→ page 9)
Terminal Panel
(
→ page 7)
LED Lights (six locations)
IndicatorSection
(→ page 6)
LensReleaseLever/SafetyLever
(bothleversarelocatedinsidethe
lens shroud.)
(
→ page 163)
ACInput
Connect the supplied power cord's
three-pin plug here, and plug the
other end into an active wall outlet.
(
→ page 13)
MainPowerSwitch
USB(LAN)Port(foroptionalWire-
lessLANUnit)(→ page 174)
Lens Cap
(The lens cap is attached to the
lens.)
VOLTAGESELECTSwitch
Use this switch according to the
voltagebeingused.
(→ page 13)
AdjustableTiltFoot
(→ page 22)
SlotforPowerCordStopper(→
page
14)
5
1. Introduction
Rear
CAUTION:
PartsoftheprojectormaybecometemporarilyheatediftheprojectoristurnedoffwiththePOWERbuttonorifthe
ACpowersupplyisdisconnectedduringnormalprojectoroperation.
Usecautionwhenpickinguptheprojector.
RemoteSensor(locatedonthe
front and the rear)
(
→ page 9)
Ventilation(inlet)
HorizontalAdjustmentKnob
Filter Cover (→ page 180, 188)
Ventilation(outlet)
Heated air is exhausted from here.
Lamp Cover (1)
(
→ page 186, 187)
Lamp Cover (2)
(
→ page 186, 187)
StackingColumn
SecurityLockingPin
AdjustableTiltFoot
(→ page 22)
Handle
6
1. Introduction
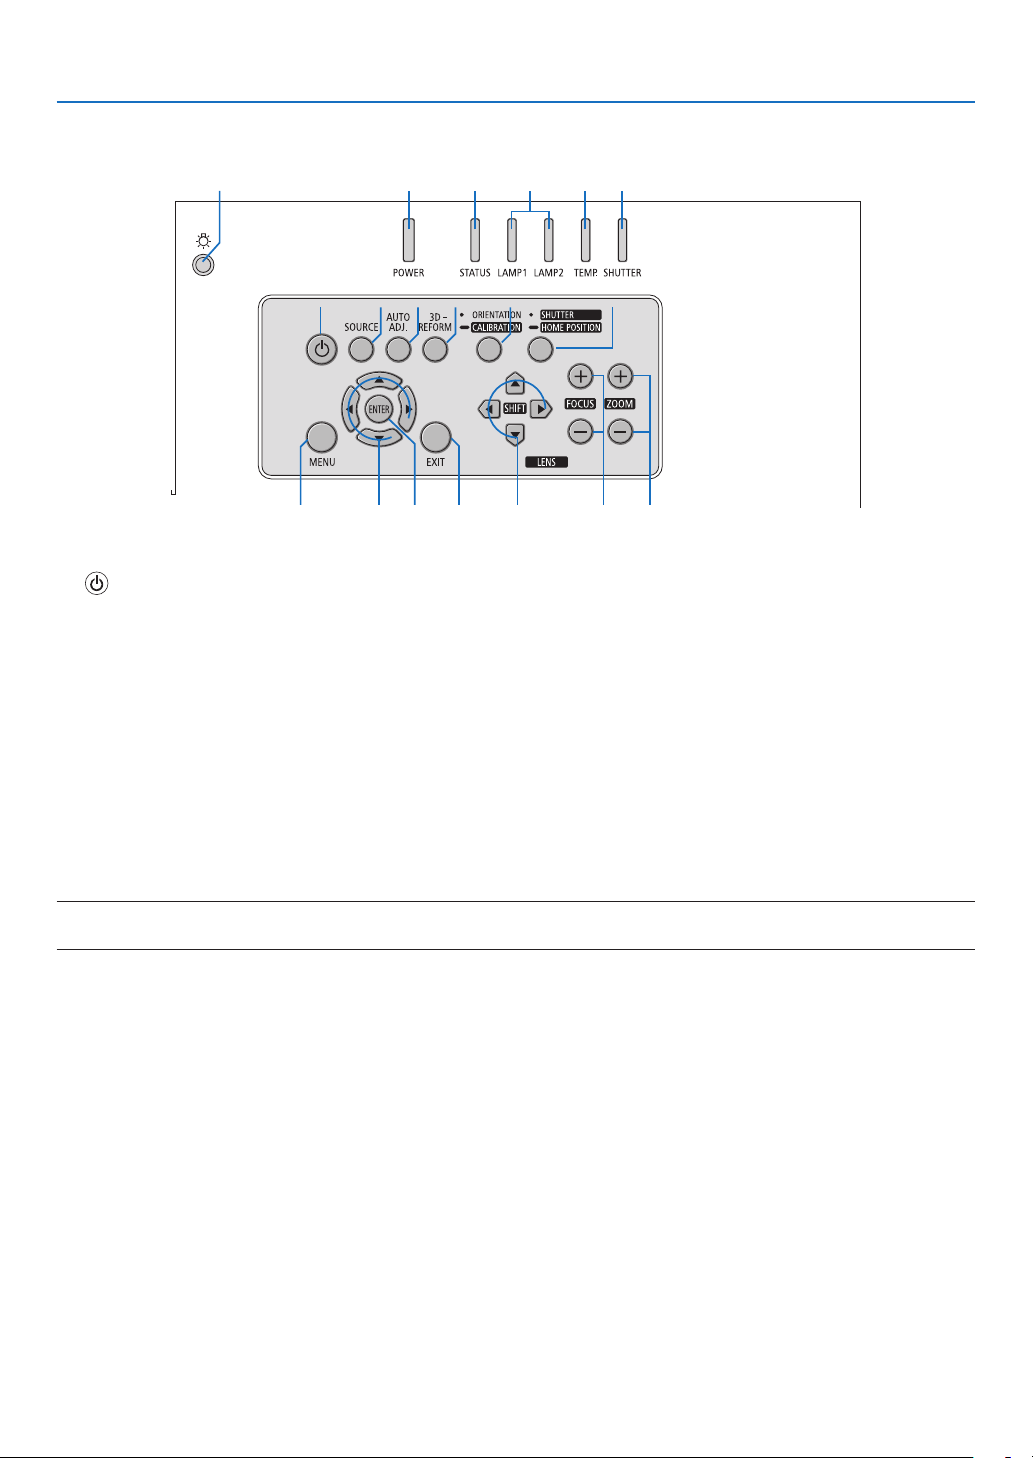
Control Panel/Indicator Section
1. (POWER) Button (→page17,31)
2. POWER Indicator (→page
17,31,228)
3.STATUSIndicator(→page
228)
4. LAMP 1 and LAMP 2 Indicators (→page
185,228)
5.TEMP.Indicator(→page
229)
6.SHUTTERIndicator(→page
229)
7. SOURCE Button (→page
20)
8. AUTO ADJ. Button (→page
30)
9.3DREFORMButton(→page
40)
10.ORIENTATION/CALIBRATIONButton(→page
17,19)
11.SHUTTER/HOMEPOSITIONButton(→page
24,34)
NOTE: The “home position” for lens shift position is not the center position of the adjustable lens shift range. The home position
should be used for lens installation.
12. MENU Button (→page100)
13. Buttons (→
page
100)
14. ENTER Button (→page
100)
15.EXITButton(→page
100)
16.LENSSHIFT Buttons (→page
24)
17.FOCUS+/−Buttons(→page
26)
18.ZOOM+/−Buttons(→page
27)
19. Light button
Illuminatesthecontrolpanelandtheterminalpanel.
219 34 56
1
12 131514 16
7 8 9 1011
17 18

7
1. Introduction
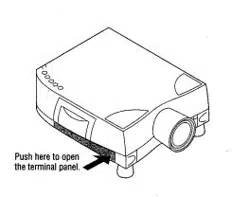
Terminal Panel Features
1.COMPUTER1IN/ComponentInputConnector(MiniD-Sub15Pin)(→ page 13,166,171)
2.COMPUTER2IN/ComponentInputConnector(MiniD-Sub15Pin)(→ page
166,171)
3.COMPUTER3IN/Component(R/Cr,G/Y,B/Cb,H,V)Connectors(BNC×5)(→ page
166,171)
4.HDMIINConnector(TypeA)(→ page
167,168,172)
5.DisplayPortINConnector(DisplayPort20P)(→ page
167)
6.MONITOROUT(COMP1)Connector(MiniD-Sub15Pin)(→ page
169)
7.VIDEOINConnector(BNC)(→ page
170)
8.S-VIDEOINConnector(MiniDIN4Pin)(→ page
170)
9.LANPort(RJ-45)(→ page
173)
10.USBPort(TypeA)(→ page
78)
11.PCCONTROLPort(D-Sub9Pin)(→ page
233)
UsethisporttoconnectaPCorcontrolsystem.Thisenablesyoutocontroltheprojectorusingserialcommunica-
tionprotocol.Ifyouarewritingyourownprogram,typicalPCcontrolcodesareonpage
233.
12. REMOTE Connector (Stereo Mini)
UsethisconnectorforwiredremotecontroloftheprojectorusingtheNECoptionalremotecontrol.
Connecttheprojectorandoptionalremotecontrolusingacommerciallyavailablewiredremotecontrolcable.
NOTE:
•ConnectingtheremotecabletotheREMOTEminijackontheterminalpanelwillmakethewirelessoperationunavailable.
13.USB(LAN)Port (for optional Wireless LAN Unit) (→ page 174)
14. Optional Slot (SLOT) (→ page
219)
9 4 538102 1 7
1311 12 14 6
8
1. Introduction
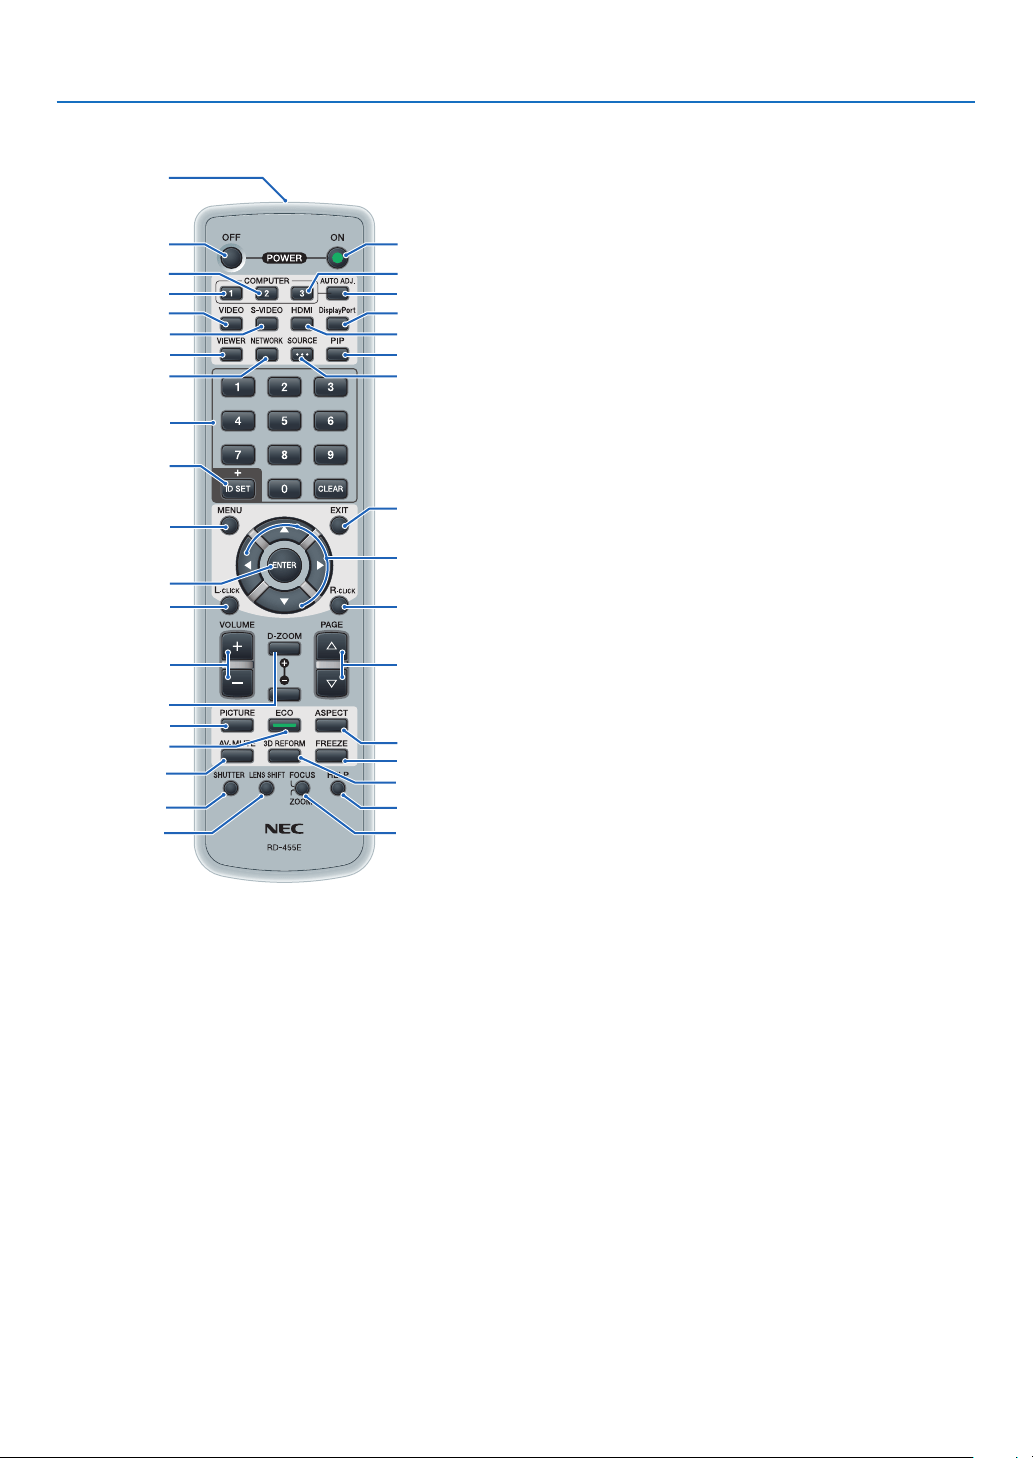
Part Names of the Remote Control
1. Infrared Transmitter
(→page9)
2. POWER ON Button
(→page
17)
3.POWEROFFButton
(→page
31)
4,5,6.COMPUTER1/2/3Button
(→page
20)
7. AUTO ADJ. Button
(→page30)
8.VIDEOButton
(→page
20)
9.S-VIDEOButton
(→page
20)
10.HDMIButton(→page20)
11.DisplayPortButton(→page
20)
12.VIEWERButton(→page
20,74)
13.NETWORKButton(→page
20)
14. SOURCE Button (→page
20)
15.PIPButton(→page
20,43)
16.IDSETButton(→page
128)
17.NumericKeypadButton/CLEARButton
(→page128)
18. MENU Button (→page
100)
19.EXITButton(→page100)
20. Button (→
page
100)
21. ENTER Button (→page
100)
22.L-CLICKButton*(→page
39)
23.R-CLICKButton*(→page39)
24.VOLUME(+)(−)Button(Notavailable)
25.D-ZOOM(+)(−)Button(→page35)
26.PAGE/Button*(→page39)
27. PICTURE Button (→page109,111)
28. ECO Button (→page36)
29. ASPECT Button (→page
114)
30.AV-MUTEButton(→page34)
31.3DREFORMButton(→page40)
32.FREEZEButton(→page34)
33.SHUTTERButton(→page34)
34.LENSSHIFTButton(→page
24)
35.FOCUS/ZOOMButton(→page26,27)
36.HELPButton(→page134)
*ThePAGE/,,L-CLICKandR-CLICKbuttonsworkonlywhenaUSBcableisconnectedwithyourcom-
puter.
1
3
5
4
8
9
12
13
2
6
7
11
10
15
14
17
16
18
22
24
25
27
28
21
19
20
23
26
29
30
33
34
32
31
36
35
9
1. Introduction
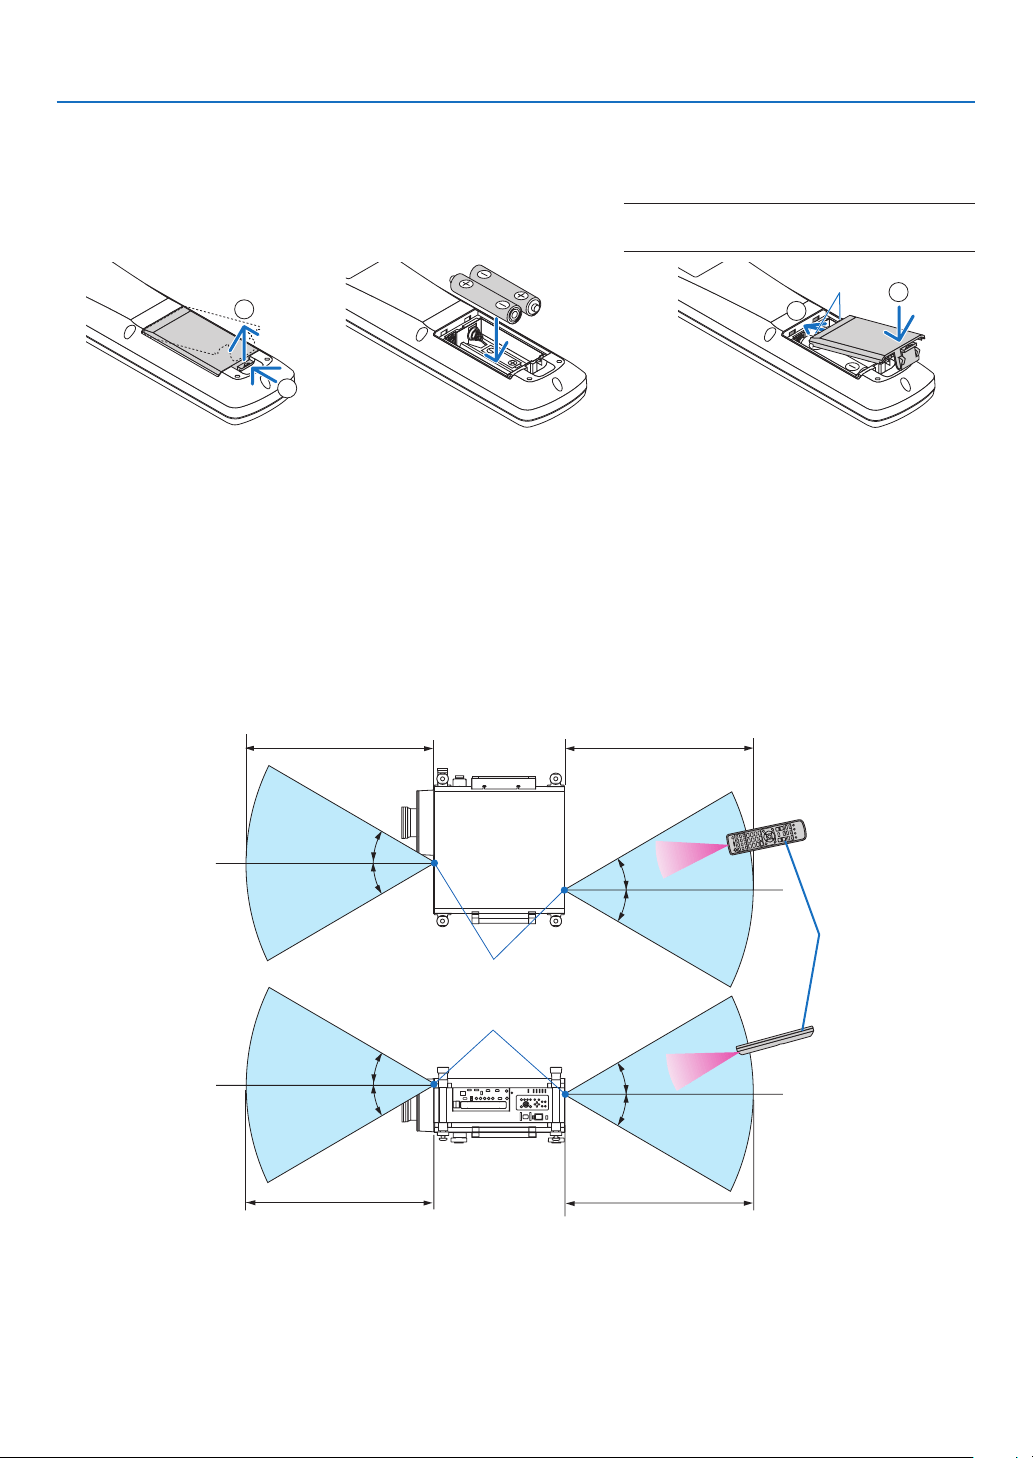
Battery Installation
Remote Control Precautions
•Handletheremotecontrolcarefully.
•Iftheremotecontrolgetswet,wipeitdryimmediately.
•Avoidexcessiveheatandhumidity.
•Donotshort,heat,ortakeapartbatteries.
•Donotthrowbatteriesintore.
•Ifyouwillnotbeusingtheremotecontrolforalongtime,removethebatteries.
•Ensurethatyouhavethebatteries’polarity(+/−)alignedcorrectly.
•Donotusenewandoldbatteriestogether,orusedifferenttypesofbatteriestogether.
•Disposeofusedbatteriesaccordingtoyourlocalregulations.
7 m/22 feet 7 m/22 feet
30°
30°
30°
30°
30°
30°
30°
30°
7 m/22 feet7 m/22 feet
Remote control
Remotesensoronprojectorcabinet
Operating Range for Wireless Remote Control
•Theinfraredsignaloperatesbyline-of-sightuptoadistanceofabout22feet/7mandwithina60-degreeangleof
theremotesensorontheprojectorcabinet.
•Theprojectorwillnotrespondifthereareobjectsbetweentheremotecontrolandthesensor,orifstronglightfalls
onthesensor.Weakbatterieswillalsopreventtheremotecontrolfromproperlyoperatingtheprojector.
1
Pressthecatchandremove
thebatterycover.
2
Installnewones(AA).Ensure
thatyouhavethebatteries’polar-
ity(+/−)alignedcorrectly.
3
Slipthecoverbackoverthebatteriesuntilit
snapsintoplace.
NOTE: Do not mix different types of batteries or
new and old batteries.
1
2
1
2

10
1. Introduction
Operating Environment for Downloadable Software
Thefollowingsoftwareprogramscanbedownloadedfromourwebsite.
NameofsoftwareprogramFeatures
ImageExpressUtility2.0•Thisisasoftwareprogramusedtosendthescreensofyourpersonalcomput-
erstotheprojectorviawired/wirelessLAN(Meetingmode).
Projectedimagescanbetransferredandsavedtopersonalcomputers.
When“MeetingMode”isused,projectedimagescanbesentandsavedto
thepersonalcomputers.Imagescanbesentfromapersonalcomputerto
notonlyoneprojectorbutalsototwoormoreprojectorsatthesametime.
(→page
194)
PCControlUtilityPro4Thisisasoftwareprogramusedtooperatetheprojectorfromthecomputerwhen
thecomputerandtheprojectorareconnectedwithLAN(wiredorwireless)or
aserialcable.(→page
205)
ImageExpressUtilityforMac•ThisisasoftwareprogramusedtosendtheMac’sscreenimagetotheprojec-
toroveranetwork(wiredorwirelessLAN).ForMac’soperatingenvironment,
seepage
206.
VirtualRemoteToolWhenthecomputerandprojectorareconnectedusinganetwork(wired/wireless
LAN),suchoperationsasturningtheprojector’spoweronandoffandswitching
thesignalcanbeperformed.Itisalsopossibletosendanimagetotheprojector
andregisteritasthebackgroundlogo.Oncetheimageisregistered,itcanbe
lockedtopreventthelogofrombeingoverwritten.(→page
210)
ViewerPPTConverter3.0ThisisasoftwareprogramusedtoconvertlescreatedwithPowerPointinto
JPEGlesthatcanbedisplayedwiththeviewerfunctionoftheprojectorwhen
aUSBmemorydeviceisinsertedintotheprojector.(→page
213)
*AseparatelysoldwirelessLANunitisrequiredtouseawirelessLAN.
NOTE:
•ImageExpressUtilityforMacdoesnotsupport“MeetingMode”whichisprovidedinImageExpressUtility2.0.
Download service
Fordownloadingorupdatingthesesoftwareprograms,visitourwebsite:
URL:
http://www.nec-display.com/dl/en/index.html

11
1. Introduction
Operating Environment
ThefollowingistheoperatingenvironmentforImageExpressUtility2.0.Fortheoperatingenvironmentofothersoft-
wareprogram,refertothehelpfunctionofeachsoftwareprogram.
SupportedOSWindows7HomeBasic
Windows7HomePremium
Windows7Professional
Windows7Ultimate
Windows7Enterprise
WindowsVistaHomeBasic
WindowsVistaHomePremium
WindowsVistaBusiness
WindowsVistaUltimate
WindowsVistaEnterprise
WindowsXPHomeEditionServicePack2orlater
WindowsXPProfessionalServicePack2orlater
WindowsXPTabletPCEdition2005orlater(WindowsXPTabletPCEditionService
Pack2orlater)
•Only32-bitversion
*“EasyConnection”supportstheAdministrativeprivilegesofWindowsXPandWindows7/
WindowsVistaonly
•Windowspower-savingfunctionisnotsupported.
Processor•Windows7/WindowsVista
Pentium4/PentiumM800MHzequivalentorhigherrequired
Dualcore1GHzorhigherrecommended
•WindowsXP
PentiumIII800MHzorhigherrequired
Pentium41.6GHzorhigherrecommended
Memory•Windows7/WindowsVista
512MBormorerequired
1GBormorerecommended
•WindowsXP
128MBormorerequired
192MBormorerecommended
*Morememorymayberequiredtorunadditionalapplicationssimultaneously.
Graphicprocessor•Windows7/WindowsVista
The“Graphics”score3.0ormoreof“WindowsExperienceIndex”recommended.
NetworkenvironmentTCP/IP-compatiblewiredLANorwirelessLAN
(*UseawirelessLANunitcomplyingwiththeWi-Fistandard.)
Resolution•Windows7/WindowsVista
SVGA(800×600)orhigherrequired
XGA(1024×768)recommended
•WindowsXP
VGA(640×480)orhigherrequired
XGA(1024×768)recommended
ScreenColorsHighColor(15bits,16bits)
TrueColor(24bits,32bits)(recommended)
•256orfewercolorsarenotsupported.

12
Thissectiondescribeshowtoturnontheprojectorandtoprojectapictureontothescreen.
1 Flow of Projecting an Image
Step 1
•Connectingyourcomputer/Connectingthesuppliedpowercord(→page13)
Step 2
•Turningontheprojector(→page16)
Step 3
•Selectingasource(→page20)
Step 4
•Adjustingthepicturesizeandposition(→page21)
•Correctingkeystonedistortion[KEYSTONE](→page28)
Step 5
•Adjustingapicture
- Optimizing a computer signal automatically (→ page 30)
Step 6
•Makingapresentation
Step 7
•Turningofftheprojector(→page31)
Step 8
•Carryingtheprojector(→page33)
2. Projecting an Image (Basic Operation)
13
2. Projecting an Image (Basic Operation)
Connecting Your Computer/Connecting the Supplied Power
Cord
NOTE:
•Installalensbeforeperformingthefollowingsteps.(→ page 163)
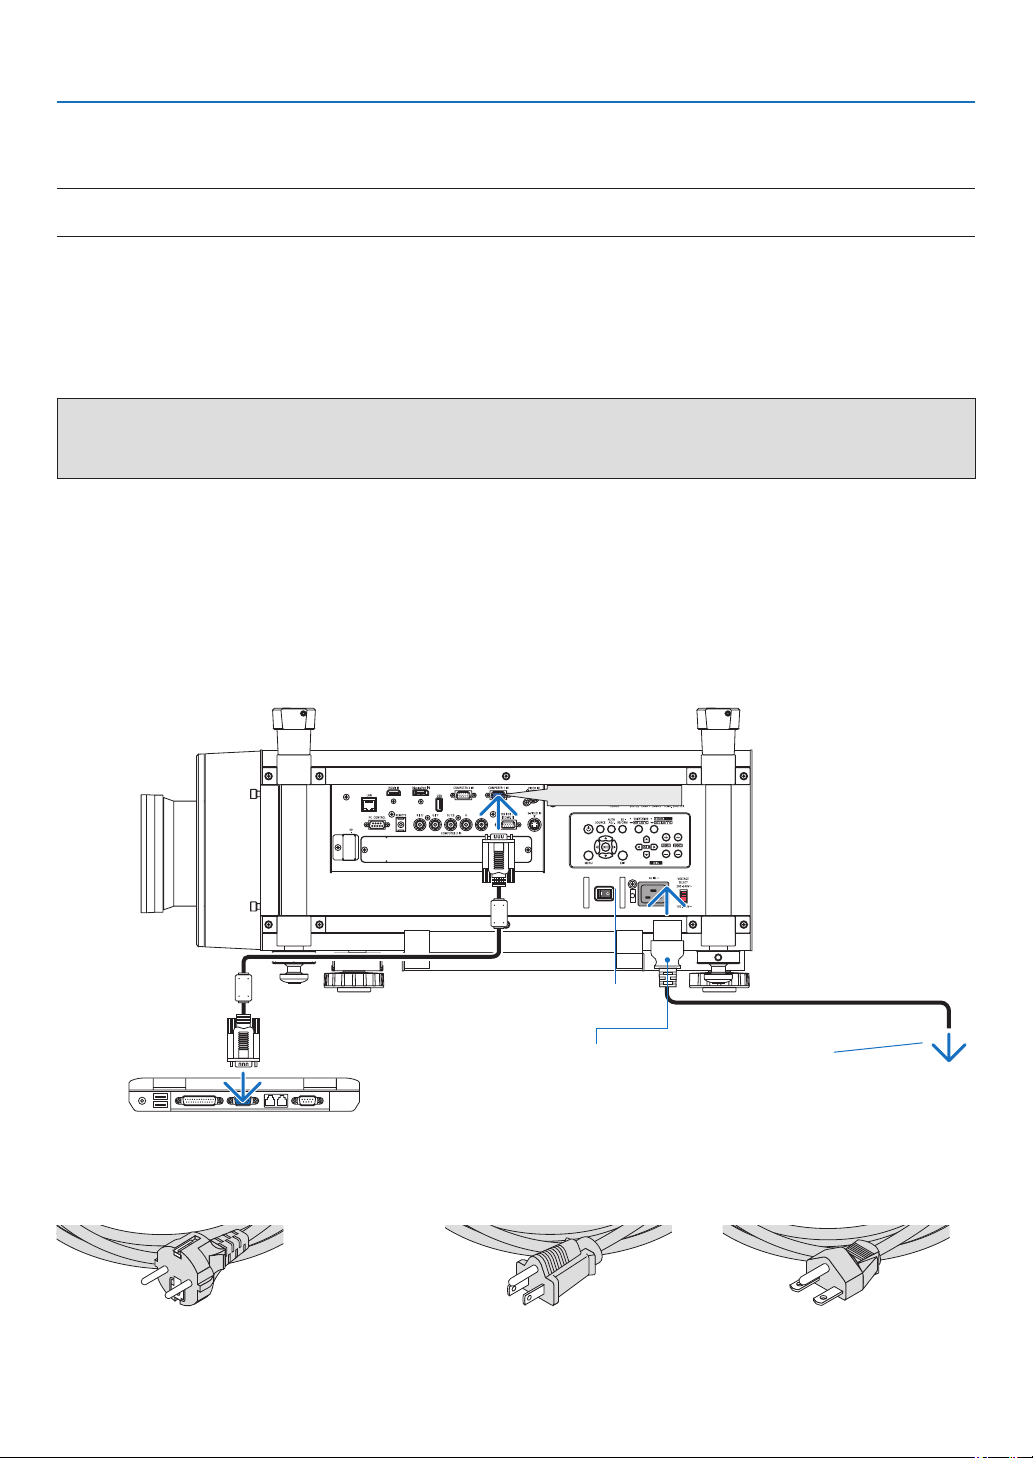
1.Connectyourcomputertotheprojector.
Thissectionwillshowyouabasicconnectiontoacomputer.Forinformationaboutotherconnections,see“(2)
MakingConnections”onpage
166.
Connectthecomputercable(VGA)betweentheprojector’sCOMPUTER1INconnectorandthecomputer’sport
(miniD-Sub15Pin).Turntwothumbscrewsofbothconnectorstoxthecomputercable(VGA).
2.Connectthesuppliedpowercordtotheprojector.
WARNING:TOPREVENTFIREORSHOCK,DONOTEXPOSETHISUNITTORAINORMOISTURE.
DONOTUSETHISUNIT’SPLUGWITHANEXTENSIONCORDORINANOUTLETUNLESSALLTHEPRONGS
CANBEFULLYINSERTED.
•UsetheVOLTAGESELECTswitchaccordingtothevoltagebeingused.Select“100V”for100to130Vand“200V”
for200to240V.
ImportantInformation:
•Whenplugginginorunpluggingthesuppliedpowercord,makesurethatthemainpowerswitchispushedto
the off [O] position. Failure to do so may cause damage to the projector.
•Donotuseathree-phasepowersupply.Doingsomaycausemalfunction.
Firstconnectthesuppliedpowercord’sthree-pinplugtotheACINoftheprojector,andthenconnecttheother
plug of the supplied power cord in the wall outlet.
COMPUTER 1 IN
Makesurethattheprongsarefullyinsertedinto
boththeACINandthewalloutlet.
Main power switch
To wall outlet
Using the Supplied Power Cords
Selectthepowercordsuitableforyourcountryorregion.
ForEurope/Asia/SouthAmericaForNorthAmerica
(120V)(200V)
(→page
225)
14
2. Projecting an Image (Basic Operation)
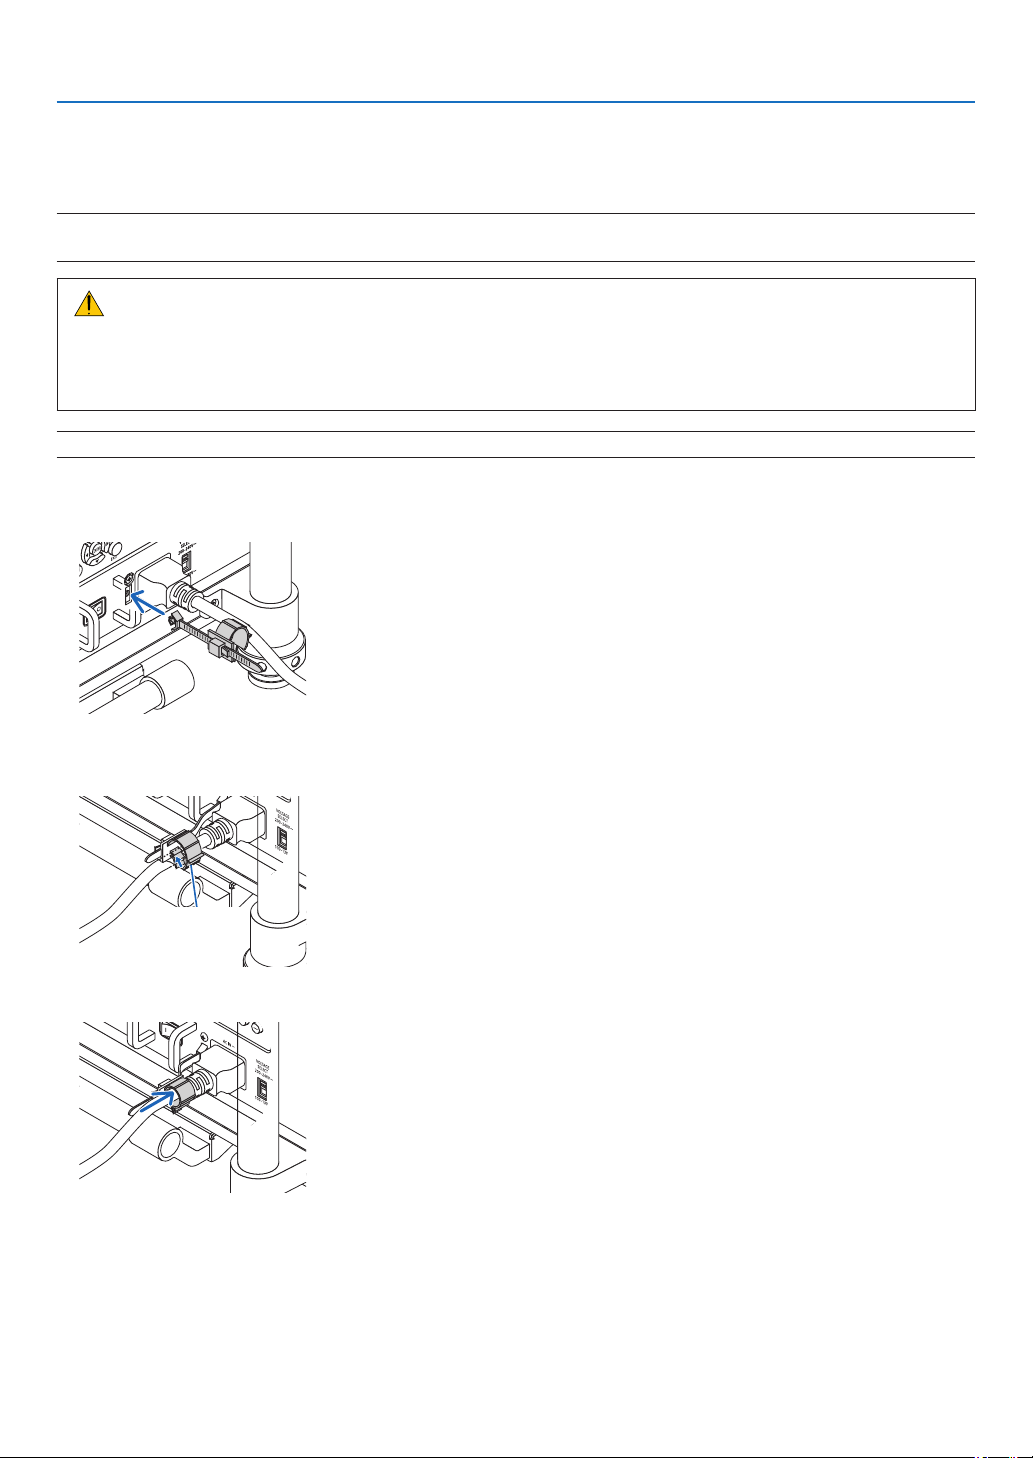
Using the Power Cord Stopper
TopreventthepowercordfromaccidentlyremovingfromtheACINoftheprojector,attachthepowercordstopper
toclampthepowercord.
NOTE:
•Donotclampthepowercordwithothercables.Doingsocangeneratenoise,whichcanaffectadverselythesignalcable.
CAUTION
•Donotbundlethepowercord.Doingthiscouldcauseheatorare.
•Donotclamptwopowercordsthatwouldbeusedwhenstackingtwoprojectors.Doingthiscouldcausea
re.
NOTE:Becarefulnottoinsertthebandinversely.Oncethebandisattached,itcannotberemovedfromtheslot.
Attaching the power cord stopper
1.InserttheendofbandofthepowercordstopperintotheslotnexttotheACINontheterminalpanel.
2.Usethepowercordstoppertoclampthepowercord.
Pushtheclampertolockit.
Clamper
3.Slidetheclampertothehiltofthepowercord.
15
2. Projecting an Image (Basic Operation)
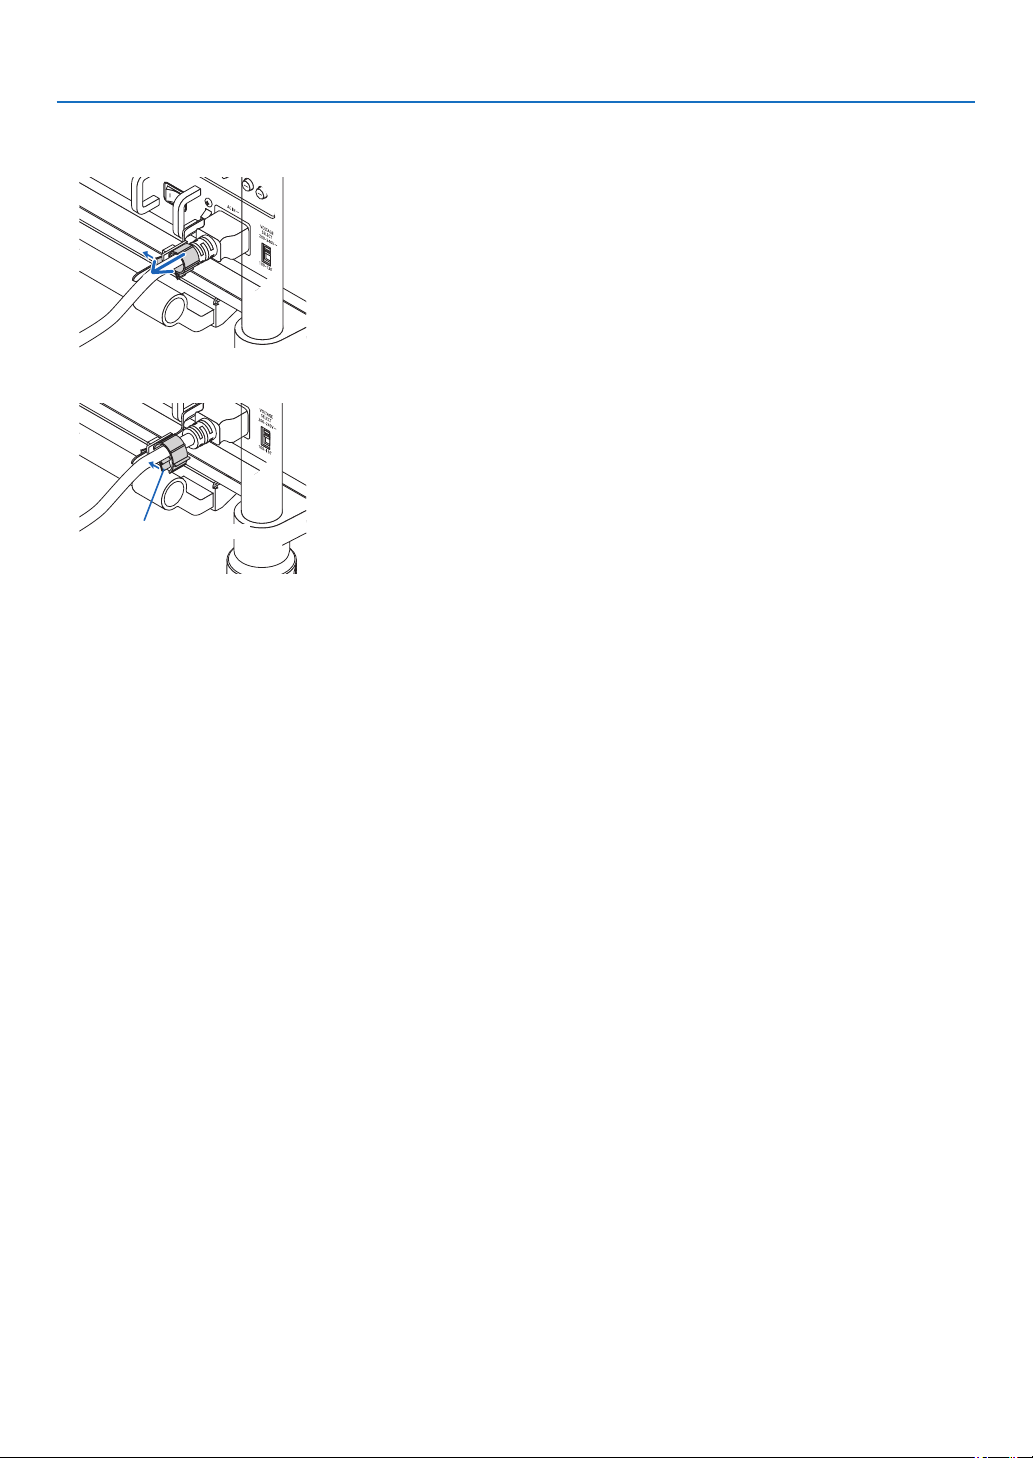
Removingthepowercordfromthepowercordstopper
1.Pushtheclamperofthepowercordstoppertounclaspit.
2.Pushthepowercordclampertoopenitwideenoughtopulloutthepowercord.
Clamper
16
2. Projecting an Image (Basic Operation)
Turning on the Projector
NOTE:
•Theprojectorhastwopowerswitches:AmainpowerswitchandaPOWERbutton(POWERONandOFFontheremotecontrol)
•Turningontheprojector:
1.PressthemainpowerswitchtotheONposition(I).
Theprojectorwillgointostandbymode.
2.PressthePOWERbutton.
Theprojectorwillbecomereadytouse.
•Turningofftheprojector:
1.PressthePOWERbutton.
Theconrmationmessagewillbedisplayed.
2.PressthePOWERbuttonagain.
Theprojectorwillgointostandbymode.
3.PressthemainpowerswitchtotheOFFposition(O).
Theprojectorwillbeturnedoff.
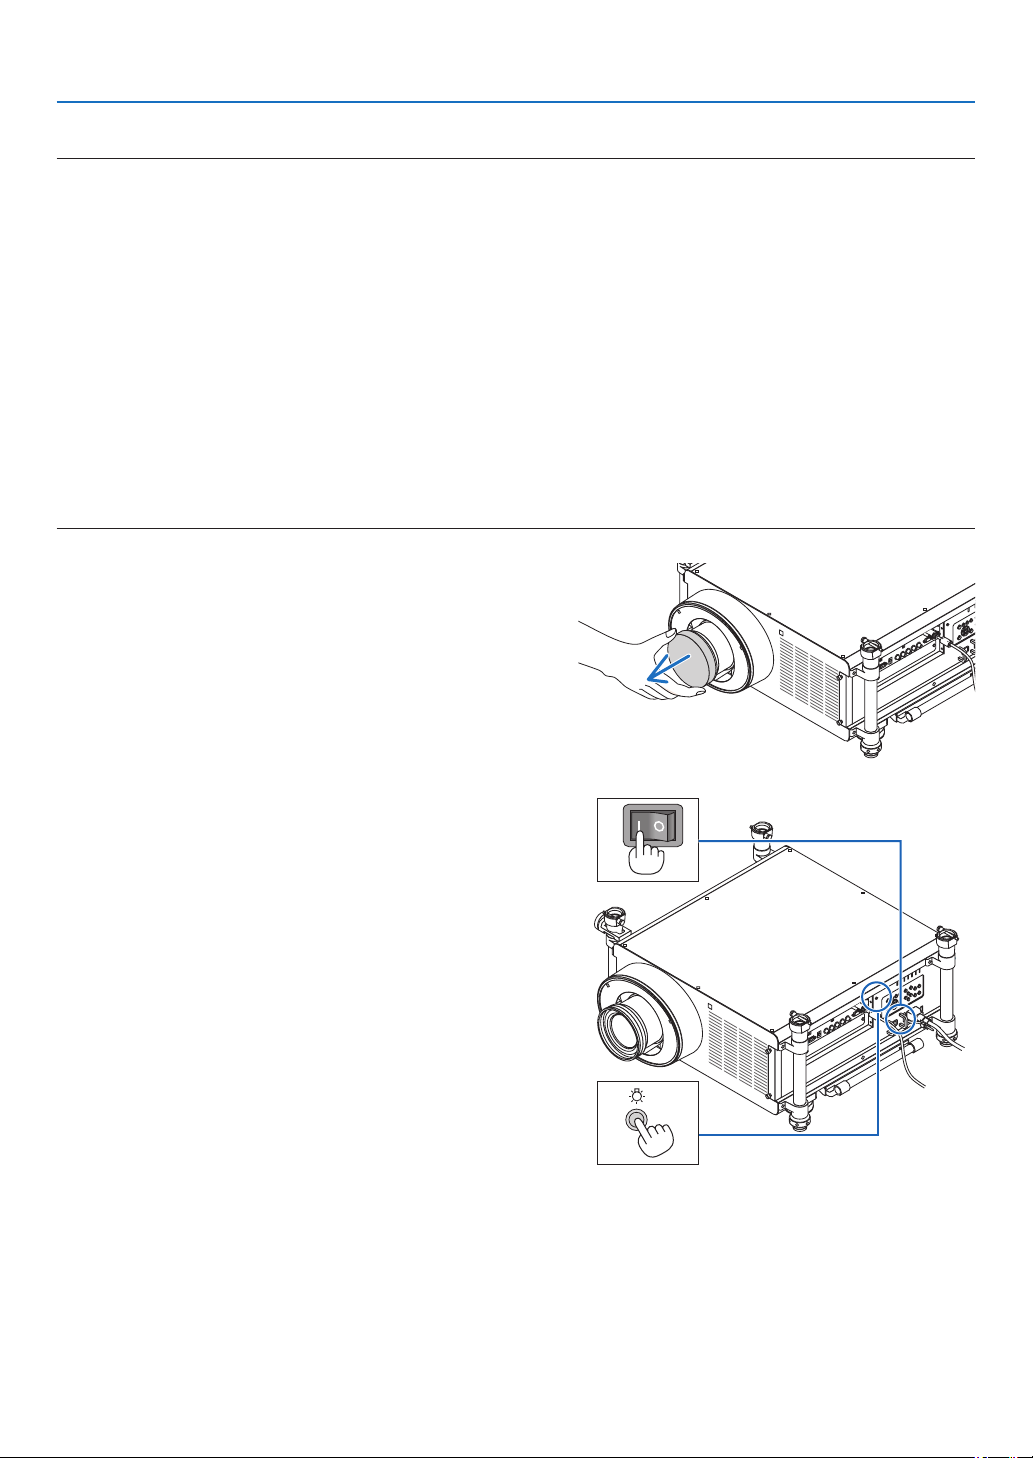
Removethelenscap.
1.PressthemainpowerswitchtotheONposition(I).
Theprojectorwillgointostandbymode.Wheninstandby
mode,thePOWERindicatorwilllightorangeandtheSTA
-
TUSindicatorwilllightgreenwhen[NORMAL]isselected
for[STANDBYMODE].SeethePowerIndicatorsection.
(→ page 228)
Whenyouareworkinginadarkroom,itisconvenientto
use the LED lights on the projector.
PresstheLIGHTbuttontoturnontheLEDlightstoillu-
minate the control panel and the terminal panel; press it
again to turn off the LED light.
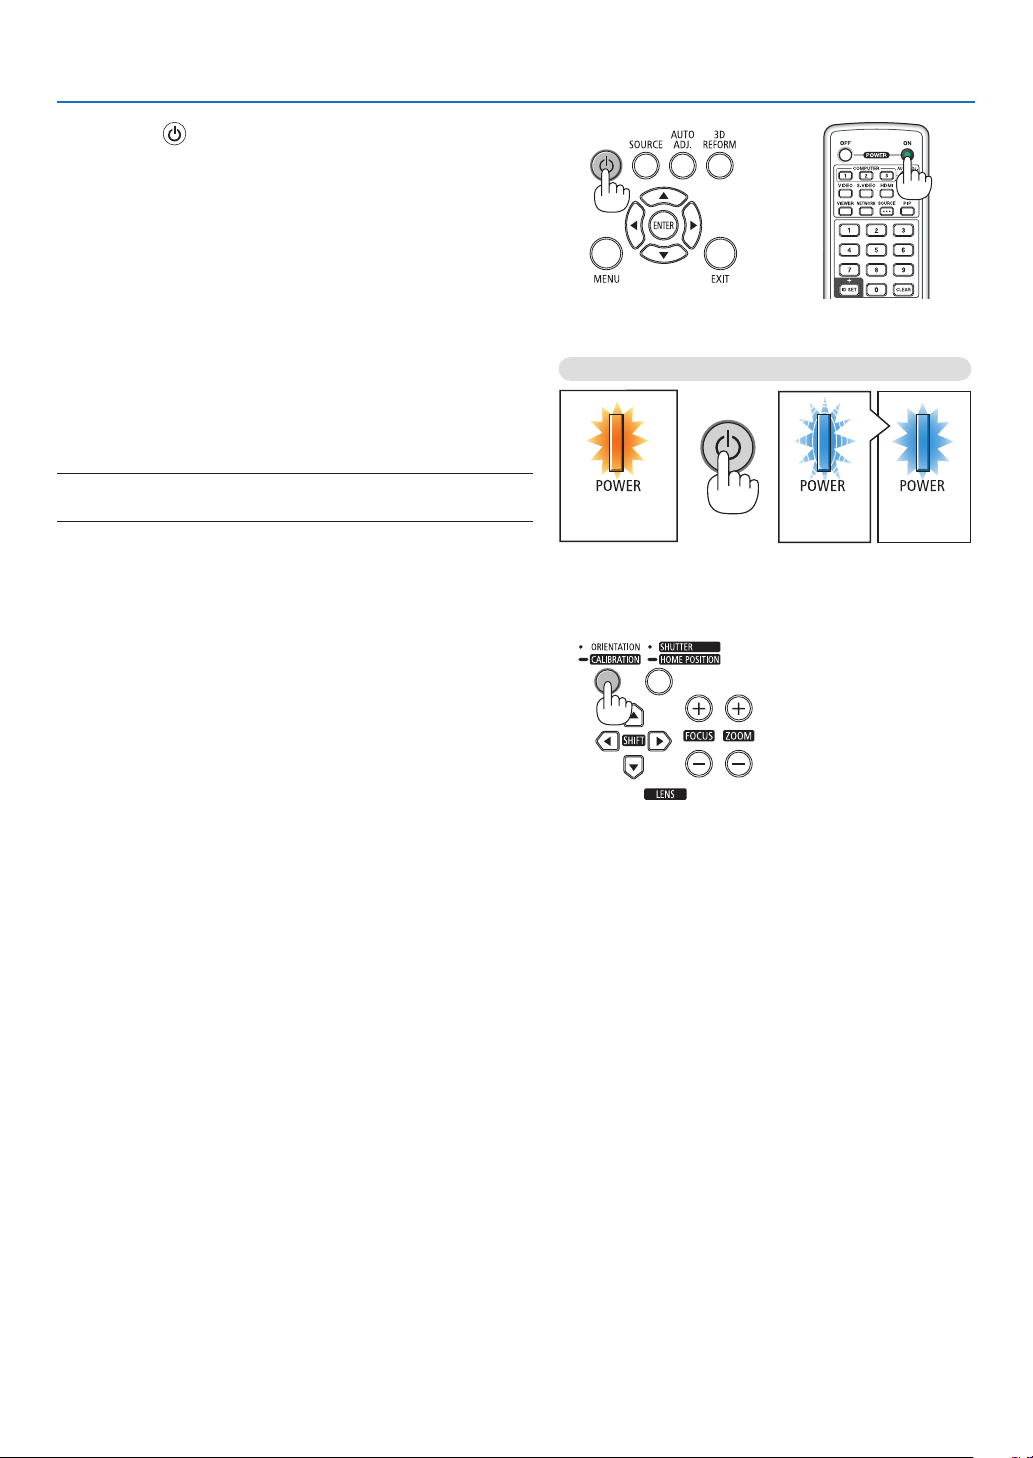
17
2. Projecting an Image (Basic Operation)
2.Pressthe(POWER)buttonontheprojectorcabinet
orthePOWERONbuttonontheremotecontrol.
ThePOWERindicatorwillturntoblueandtheprojector
willbecomereadytouse.
TIP:
•Whenthemessage“PROJECTORISLOCKED!ENTERYOUR
PASSWORD.”isdisplayed,itmeansthatthe[SECURITY]
featureisturnedon.(→
page 45)
•WhentheECOmessageisdisplayed,itmeansthat[ON]is
selectedfor[ECOMESSAGE].(→ page 122)
Afteryouturnonyourprojector,ensurethatthecomputer
or video source is turned on.
NOTE:Whennosignalisavailable,theNEClogo(default),blue,or
black screen will be displayed.
Performing Lens Calibration
Afterinstallationorreplacementofthelens,besuretoperform
[CALIBRATION]bypressingandholdingtheORIENTATION
buttonforatleasttwoseconds.Calibrationcorrectsthead-
justablezoomandfocusrange.Ifcalibrationisnotperformed,
youmaynotbeabletogetthebestfocusandzoomevenif
youadjustthefocusandzoomforthelens.
•Thefollowinglensesneedcalibration:
NP26ZL,NP27ZL,NP28ZL,NP29ZL
StandbyBlinkingPowerOn
Steady orange
light
Blinking blue
light
Steady blue
light
(→page228)
18
2. Projecting an Image (Basic Operation)
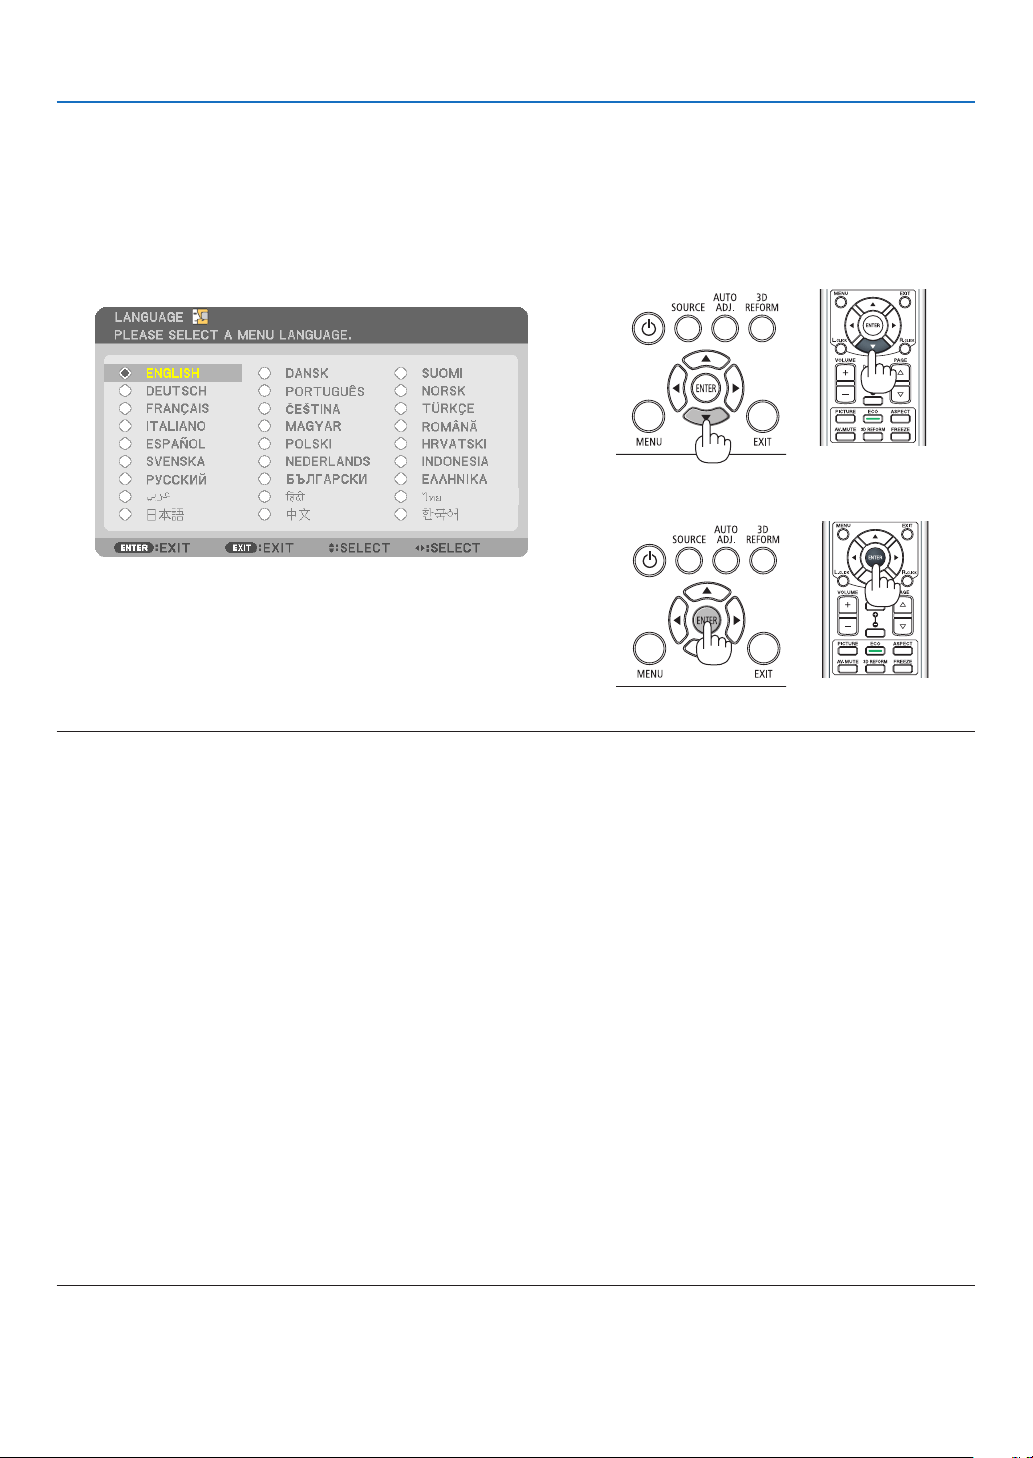
Note on Startup screen (Menu Language Select screen)
Whenyourstturnontheprojector,youwillgettheStartupmenu.Thismenugivesyoutheopportunitytoselectone
ofthe27menulanguages.
Toselectamenulanguage,followthesesteps:
1.Usethe
, , or buttontoselectoneofthe27lan-
guagesfromthemenu.
2.PresstheENTERbuttontoexecutetheselection.
Afterthishasbeendone,youcanproceedtothemenuopera-
tion.
Ifyouwant,youcanselectthemenulanguagelater.
(→[LANGUAGE]onpage
103and121)
NOTE:
•Turningthepowerbackondirectlyafteritisturnedoff(bydirectpoweroff)whileanimageisbeingprojectedcanresultin
malfunction. Be sure to wait at least 1 second before turning the power back on.
•Keepthelenscapoffthelenswhiletheprojector’spowerison.
If the lens cap is on, it could be warped due to high temperature.
•Ifoneofthefollowingthingshappens,theprojectorwillnotturnon.
- If the internal temperature of the projector is too high, the projector detects abnormal high temperature. In this condition the
projectorwillnotturnontoprotecttheinternalsystem.Ifthishappens,waitfortheprojector’sinternalcomponentstocool
down.
-Startingunderlowtemperatureconditions
Iftheusageenvironmenttemperatureislowerthantheprojector’soperatingtemperature,theTEMP.indicatorwillash.Increase
theusageenvironmenttemperatureto0°Corhigherandturnontheprojectoragain.
Ifyouturnontheprojectorataround0°C,itmaytake5minutestowarmuptheprojector.
Duringwarm-up,theTEMP.indicatorwillash.Whenthewarm-upiscompleted,theTEMP.indicatorwilllightout.
-Whenthelampreachesitsendofusablelife,theprojectorwillnotturnon.Ifthishappens,replacethelamp.
-IftheSTATUSindicatorlightsorangewiththepowerbuttonpressed,itmeansthatthe[CONTROLPANELLOCK]isturnedon.
Cancelthelockbyturningitoff.(→ page 127)
-Ifthelampfailstolight,andiftheLAMP1orLAMP2indicatorashesonandoffinacycleofsixtimes,waitafullminuteand
then turn on the power.
•WhilethePOWERindicatorisblinkingblueinshortcycles,thepowercannotbeturnedoffbyusingthepowerbutton.
•Immediatelyafterturningontheprojector,screenickermayoccur.Thisisnormal.Wait3to5minutesuntilthelamplightingis
stabilized.
•Whentheprojectoristurnedon,itmaytakesometimebeforethelamplightbecomesbright.
•Ifyouturnontheprojectorimmediatelyafterthelampisturnedofforwhenthetemperatureishigh,thefansrunwithoutdisplay-
ing an image for some time and then the projector will display the image.
19
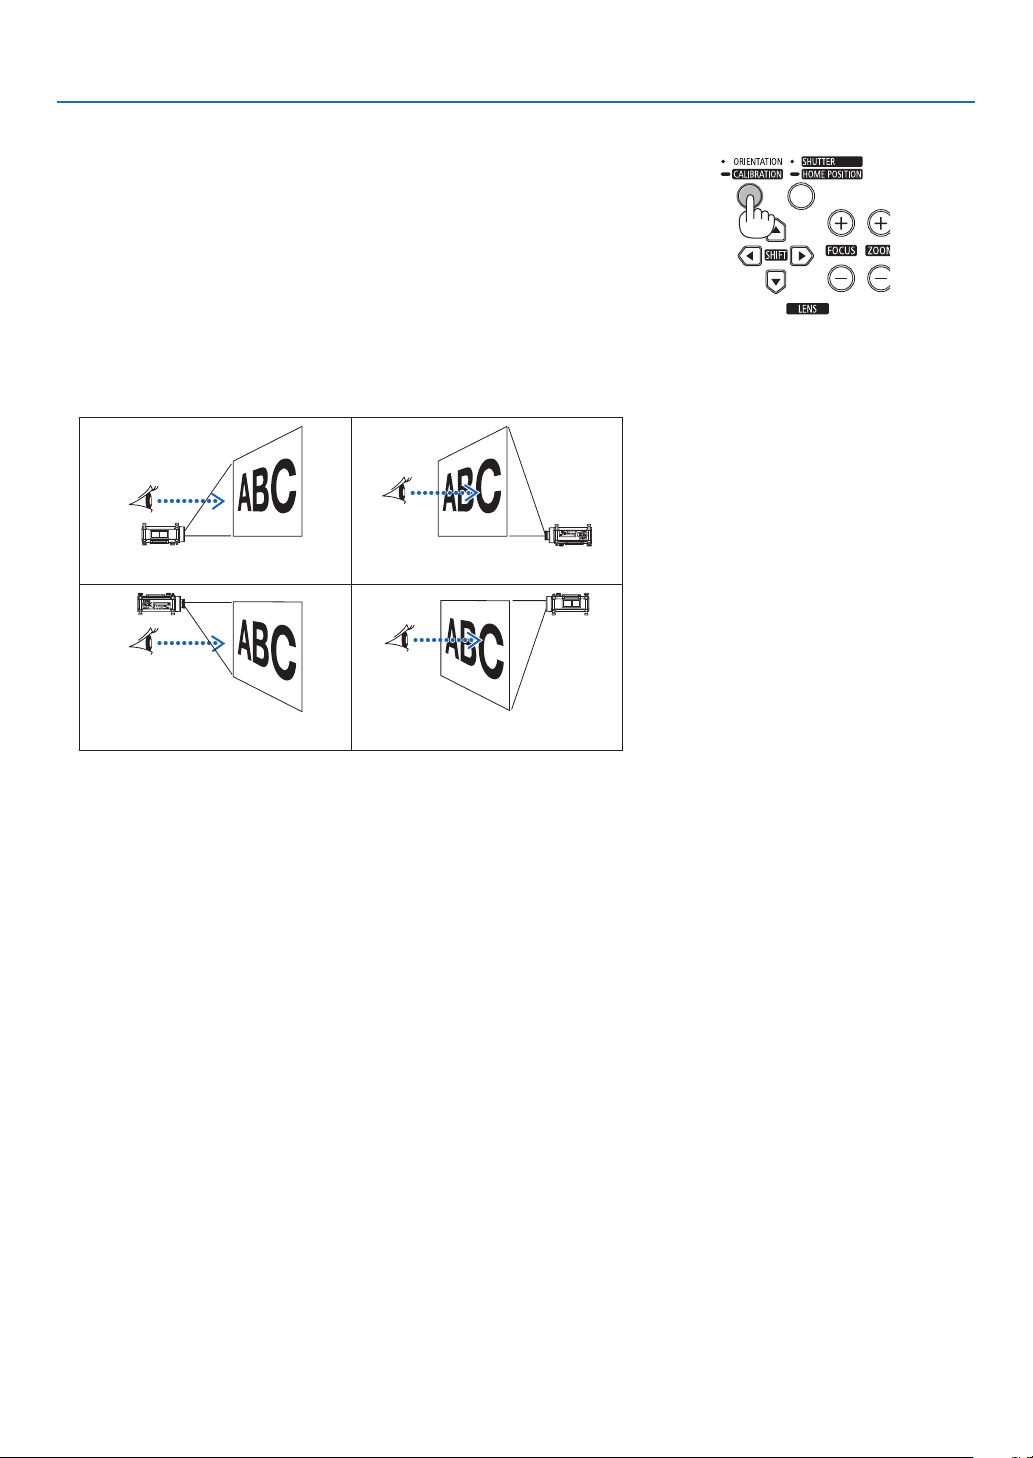
2. Projecting an Image (Basic Operation)
If the projected image is inverted or upside down
1PresstheORIENTATIONbutton.
The[ORIENTATION]screenwillbedisplayed.
2Pressagaintoselectacorrectorientation.
EachtimetheORIENTATIONbuttonispressed,thechoiceyouhighlight
willbechanged.
DESKTOPFRONTDESKTOPREAR
CEILINGFRONTCEILINGREAR
3StoppressingtheORIENTATIONbutton.
Themenuwillbeclosedinabouttwosecondsandtheprojectedimage
willbedisplayedintheorientationyouselect.
Aconrmationmessagewillbealsodisplayed.
4PresstheENTERbutton.
Theconrmationmessagewillbeclosed.
20
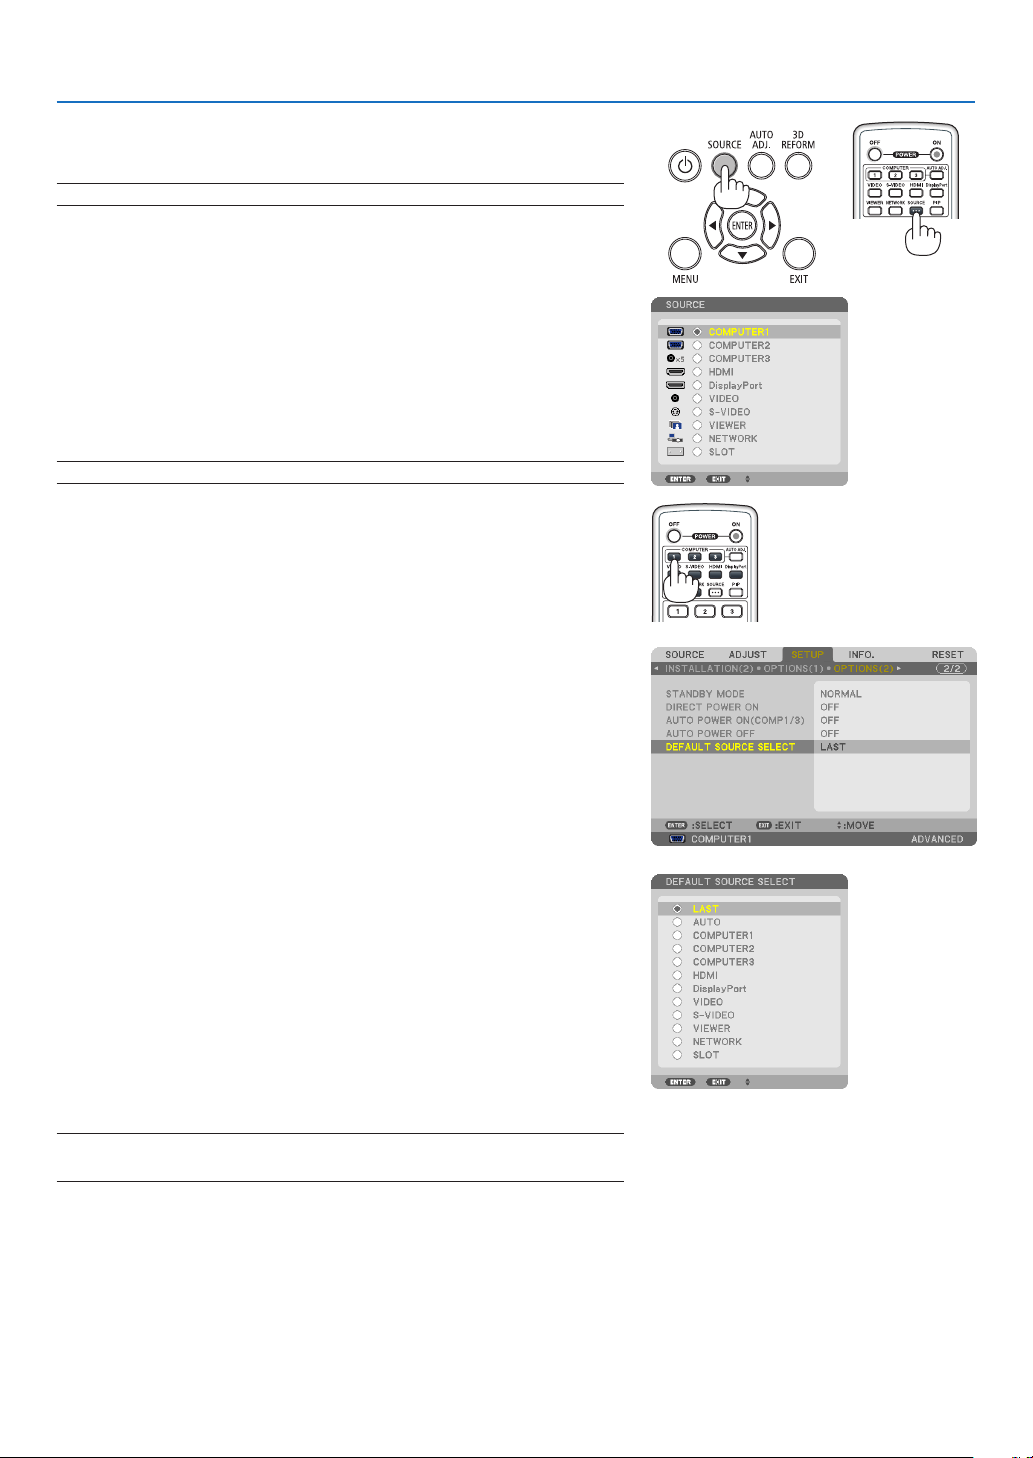
2. Projecting an Image (Basic Operation)
Selecting a Source
Selecting the computer or video source
NOTE:Turnonthecomputerorvideosourceequipmentconnectedtotheprojector.
DetectingtheSignalAutomatically
PresstheSOURCEbuttononce.Theprojectorwillsearchfortheavailable
inputsourceanddisplayit.Theinputsourcewillchangeasfollows:
COMPUTER1→COMPUTER2→COMPUTER3→HDMI→DisplayPort
→VIDEO→S-VIDEO→VIEWER→SLOT→COMPUTER1→ ...
•WiththeSOURCEscreendisplayed,youcanpresstheSOURCE
buttonafewtimestoselecttheinputsource.
TIP:Ifnoinputsignalispresent,theinputwillbeskipped.
Using the Remote Control
PressanyoneoftheCOMPUTER1,COMPUTER2,COMPUTER3,HDMI,
DisplayPort,VIDEO,S-VIDEO,VIEWER,orNETWORKbuttons.
Selecting Default Source
Youcansetasourceasthedefaultsourcesothatitwillbedisplayed
eachtimetheprojectoristurnedon.
1.PresstheMENUbutton.
Themenuwillbedisplayed.
2.Pressthebuttontwicetoselect[SETUP]andpressthebut
-
tonortheENTERbuttontoselect[BASIC].
3.
Pressthe
buttonvetimestoselect[OPTIONS(2)].
4.Pressthebuttonvetimestoselect[DEFAULTSOURCE
SELECT]andpresstheENTERbutton.
The[DEFAULTSOURCESELECT]screenwillbedisplayed.
(→ page 132)
5.Selectasourceasthedefaultsource,andpresstheENTERbut-
ton.
6.PresstheEXITbuttonafewtimestoclosethemenu.
7.Restarttheprojector.
Thesourceyouselectedinstep5willbeprojected.
NOTE:Evenwhen[AUTO]isturnedon,the[NETWORK]willnotbeautomatically
selected.Tosetyournetworkasthedefaultsource,select[NETWORK].
TIP:
•WhentheprojectorisinStandbymode,applyingacomputersignalfroma
computerconnectedtotheCOMPUTER1/3INinputwillpowerontheprojector
andsimultaneouslyprojectthecomputer’simage.
([AUTOPOWERON(COMP1/3)]→
page 132)
•OntheWindows7keyboard,acombinationoftheWindowsandPkeysallows
you to set up external display easily and quickly.
21
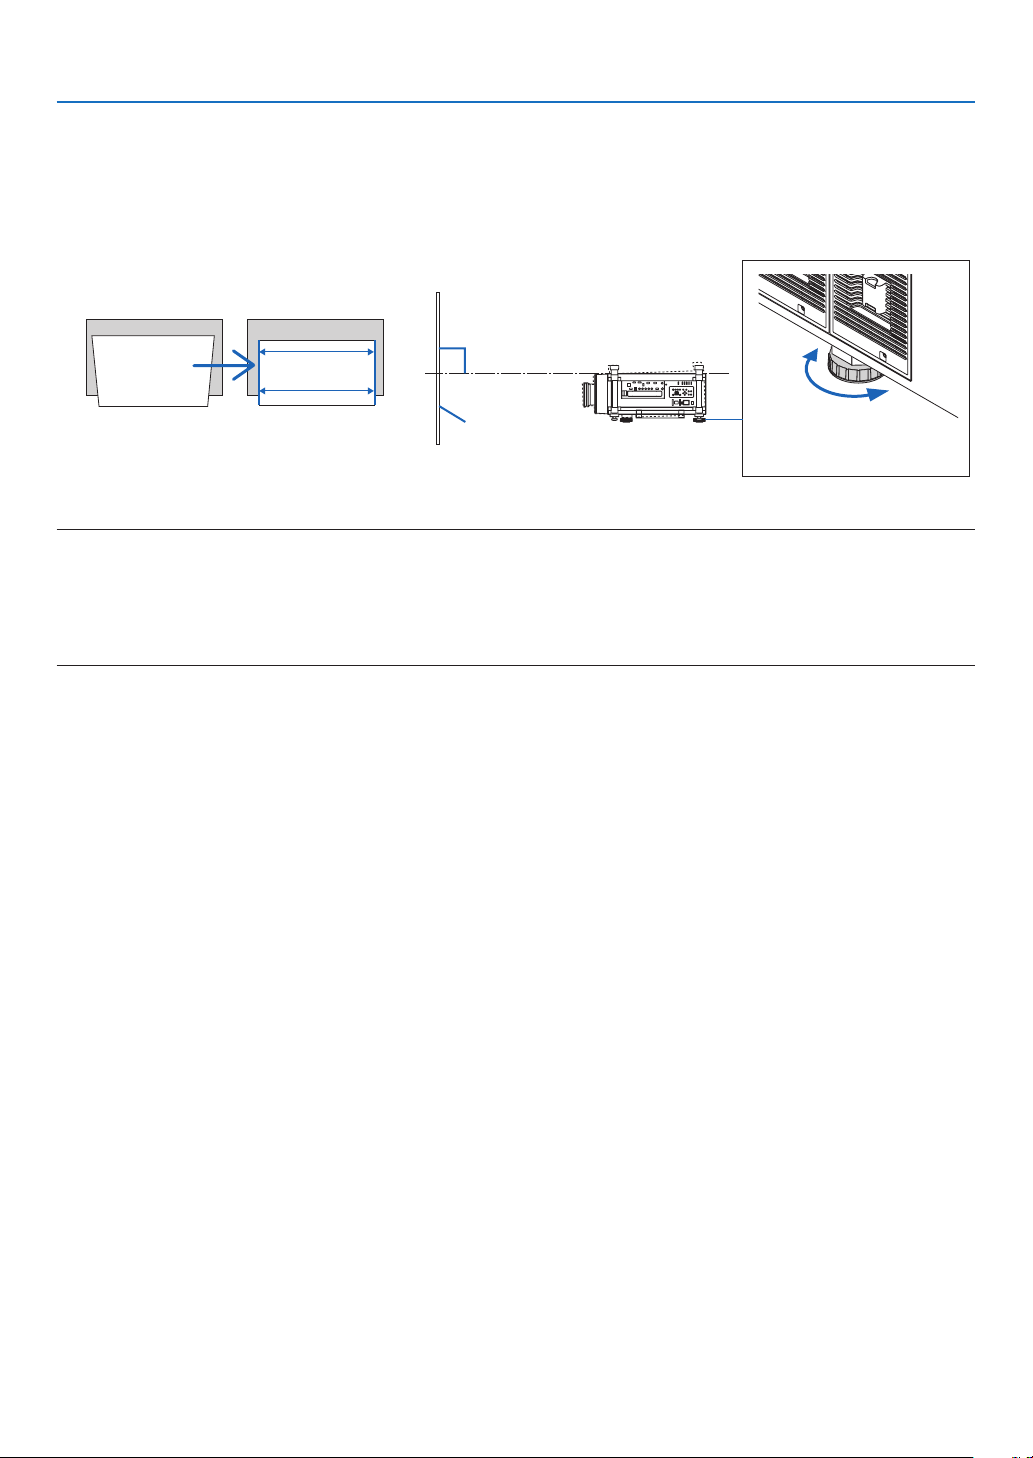
2. Projecting an Image (Basic Operation)
Adjusting the Picture Size and Position
Usethehorizontaladjustmentknobandadjustabletiltfeettonelytilttheprojector;usetheLENSSHIFT,ZOOM,
andFOCUSbuttonstoadjustthepicturesizeandposition.
Inthischapterdrawingsandcablesareomittedforclarity.
Tiltingtheprojector
[Horizontaladjustmentknob/Tiltfeet]
Adjustingtheprojectedimage’sverticalandhorizontal
position
[Lensshift]
(→ page 22) (→ page 24)
Adjustingthefocus
[Focus]
Finelyadjustingthesizeofanimage
[Zoom]
(→ page 26) (→ page 27)
Adjustingthekeystonecorrection
[Keystone]
(→ page 28)
TIP:
•Built-intestpatternscanbeconvenientlyusedforadjustingthepicturesizeandposition.(→ page 105)
22
2. Projecting an Image (Basic Operation)
CAUTION
•Performtheadjustmentfrombehindorfromthesideoftheprojector.Adjustingfrom
thefrontcouldexposeyoureyestostronglightwhichcouldinjurethem.Therear
ventsoftheprojectormaybecomeheatedduringnormalprojectoroperation.Use
cautionwhenadjustingthetiltfootontherearside.
•Keephandsawayfromthelensmountingportionwhilethelensshiftisinoperation.
Failuretodosocouldresultinhandsbeingpinchedbythemovinglens.
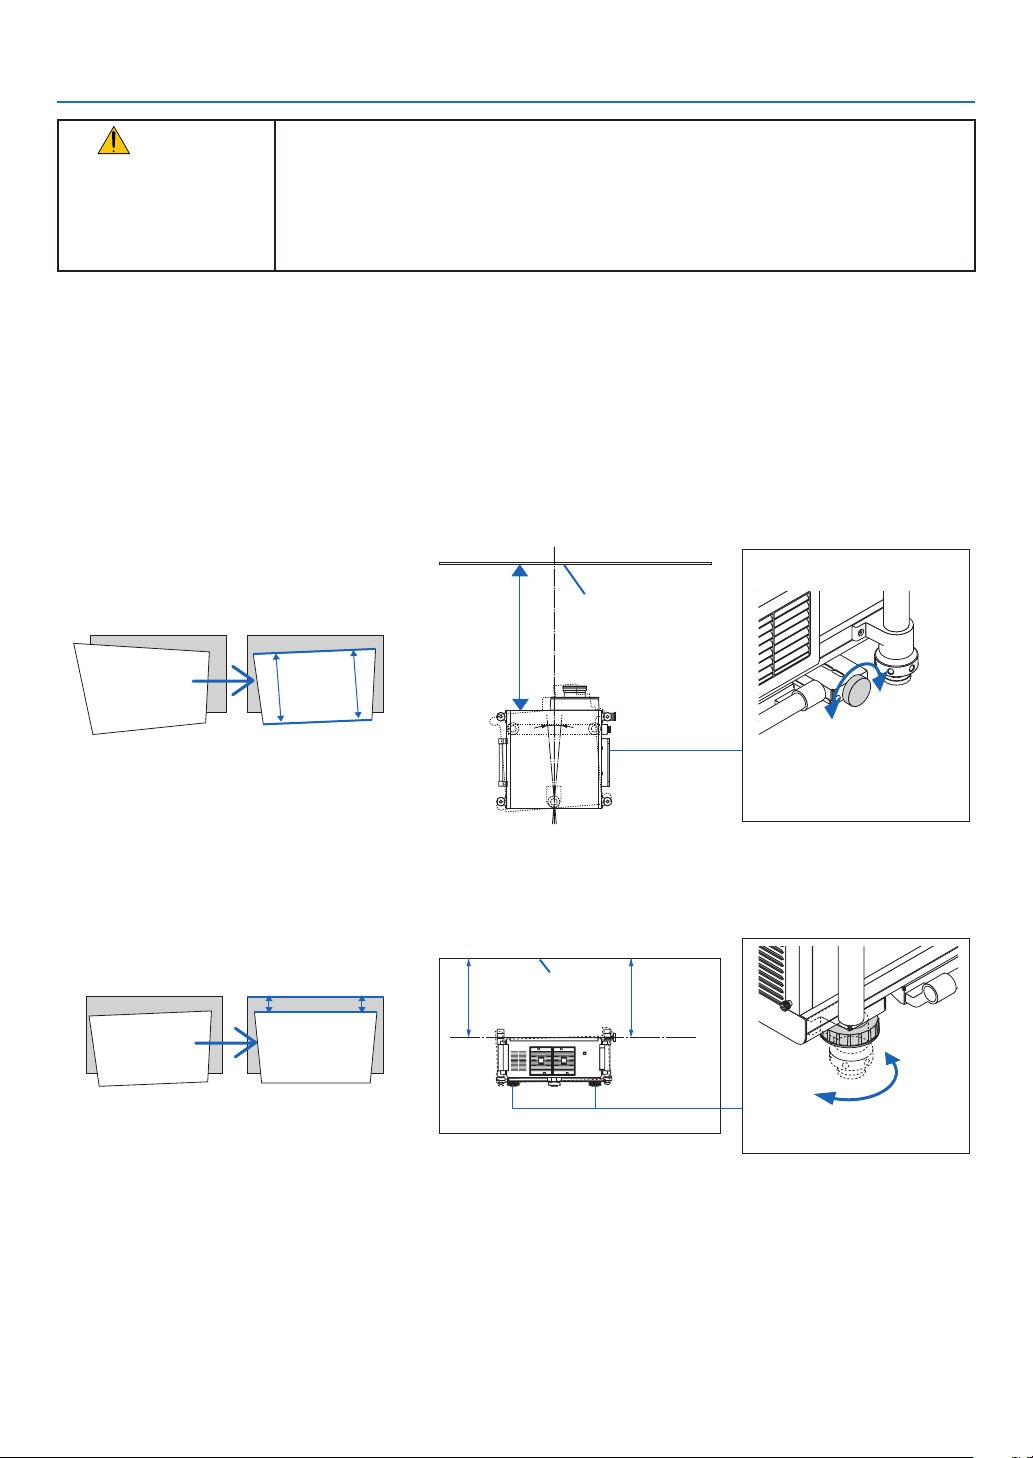
Tilting the projector
Theprojectormustbeplacedsquaretothescreenotherwisekeystonedistortionmayappearonthescreen.Thissec-
tionprovidesexplanationonhowtoplacetheprojectorperpendiculartothescreenwhenviewedfromtheside.
1.Lowerthefrontandbacktiltfeet.
2.Usethehorizontaladjustmentknobtonelytilttheprojectorsothattheprojectorissettobeparallelwith
thescreen.
Makesurethatthetopedgeoftheimageisparallelwiththebottomedgeoftheimage.
Adjustablerange:4°
Screen
Parallel
Clockwise
Counter-
clockwise
Horizontaladjustmentknob
3.Rotatethetwofronttiltfeettoadjusttheheighttokeeptheprojectorlevelsothatthetopedgeofthescreen
isparallelwiththetopedgeoftheprojectedimage.
Adjustablerange:1.8°
Screen
Parallel
Lower
Raise
Front tilt foot
23
2. Projecting an Image (Basic Operation)
4.Rotateeachofthetiltfeettoadjusttheheightwhilekeepingtheprojectorlevelwiththeoor/ceilingand
perpendiculartothescreenwhenviewedfromtheside.
To raise the front side of the projector, extend the left and right tilt feet.
To lower the front side of the projector, extend the rear foot.
Adjustablerange:2°
Screen
90°
Lower
Raise
Front tilt foot
NOTE:
•Donotlengtheneachofthetiltfeetanymorethan13mm/0.51".Theforceofdoingsomaycausethetiltfoottocomeoff,result-
ing in damage to the projector.
•Donotusethetiltfeetforanypurposeotherthanadjustingtheprojector’sprojectionangle.
Do not attempt to carry or mount the projector using the tilt feet. Doing so may result in damage to the projector or personal
injury.
24
2. Projecting an Image (Basic Operation)
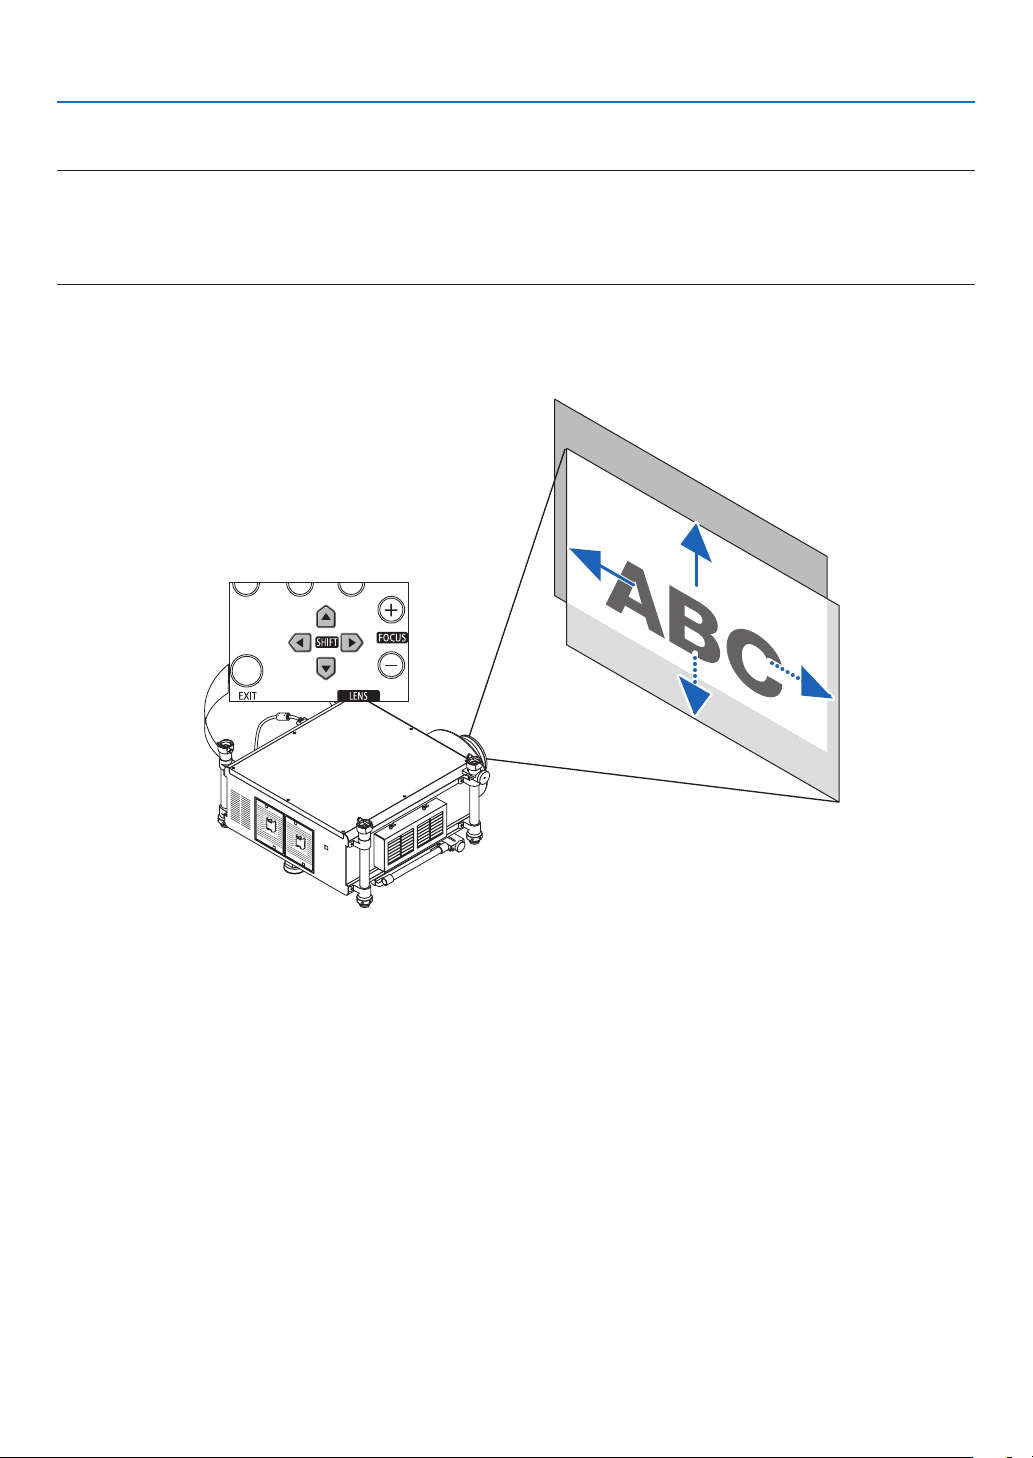
Adjusting the vertical position of a projected image (Lens shift)
NOTE:
•ThelensshiftfunctionisnotavailableontheprojectorwithNP25FL(xedfocus)lensinstalled.
Returnthelensshiftpositiontothehomepositionbeforeinstallingthelenstotheprojector.
•Shiftingthelenstothemaximumintwodirectionscombinedwillcausetheedgesoftheimagetobecomedarkorwillcause
some shadows.
Adjusting with buttons on the cabinet
1.PressoneoftheLENSSHIFT▼▲◀▶buttons.
2.UsetheLENSSHIFT▼▲◀▶buttonstomovetheprojectedimage.
Returningthelensshiftpositiontothehomeposition
PressandholdtheSHUTTER/HOMEPOSITIONbuttonfor2secondstoreturnthelensshiftpositiontothehome
position(nearlycenterposition)
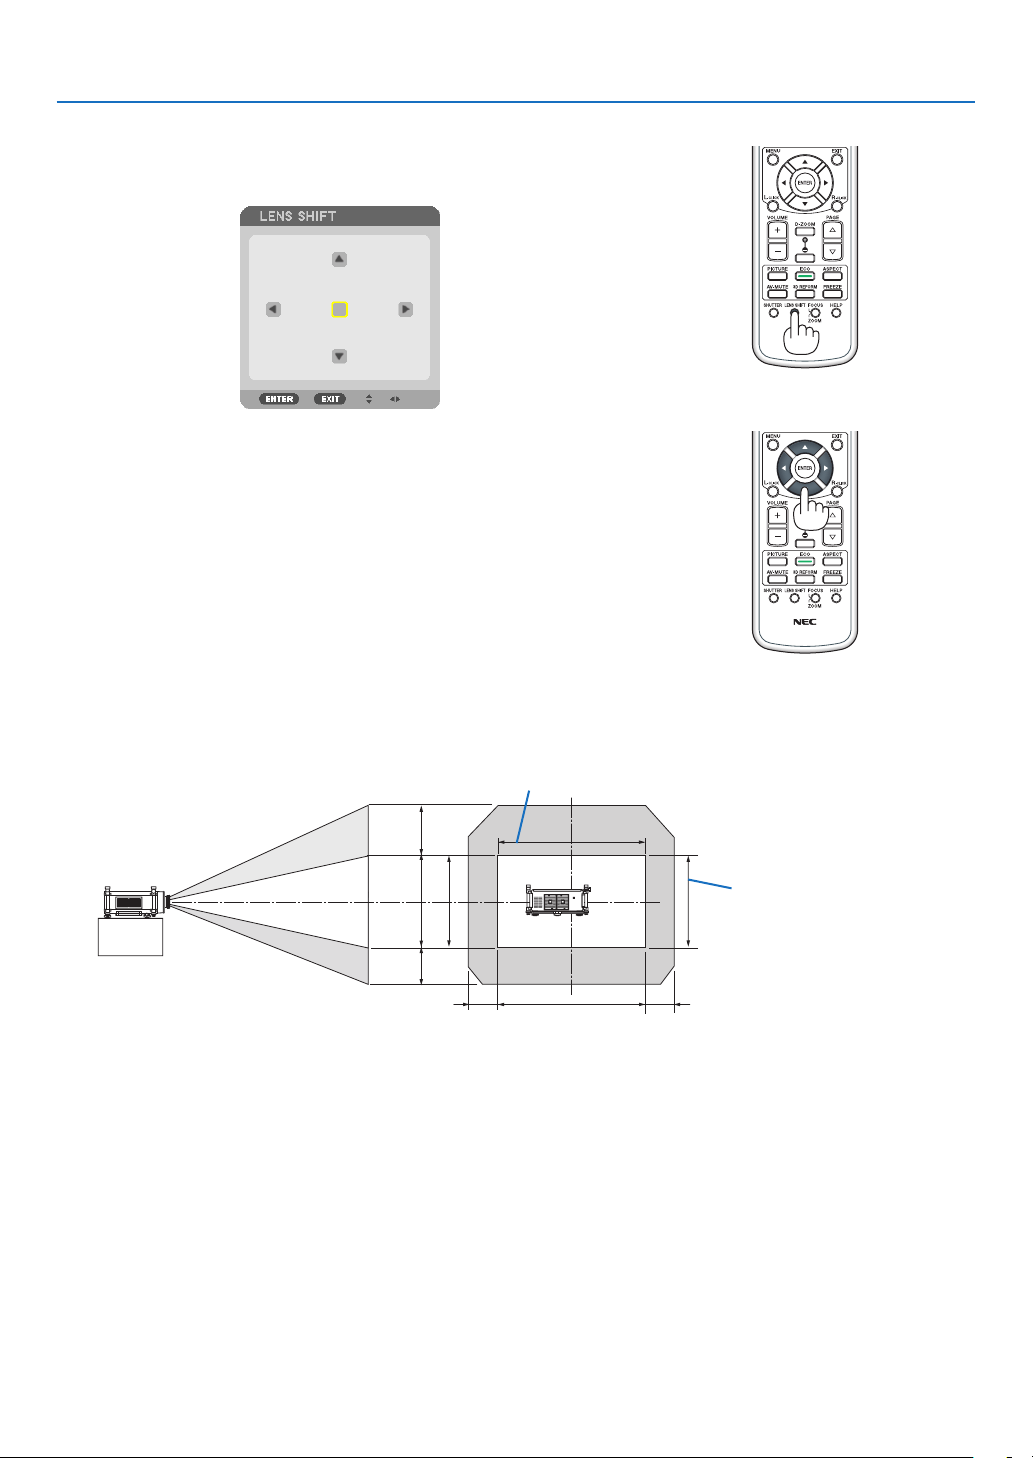
25
2. Projecting an Image (Basic Operation)
Adjusting with the remote control
1.PresstheLENSSHIFTbutton.
TheLensShiftscreenwillbedisplayed.
2.Pressthe▼▲◀ or ▶button.
Use the ▼▲◀▶buttonstomovetheprojectedimage.
TIP:
•Thediagrambelowshowsthelensshiftadjustmentrangeforthedesktopfront.Toraisetheprojectionpositionhigherthanthis,
usethetiltfeet.(→ page 22)
1V
1H
0.2H 0.2H
0.55V
0.4V
Height of projected image
Widthofprojectedimage
26
2. Projecting an Image (Basic Operation)
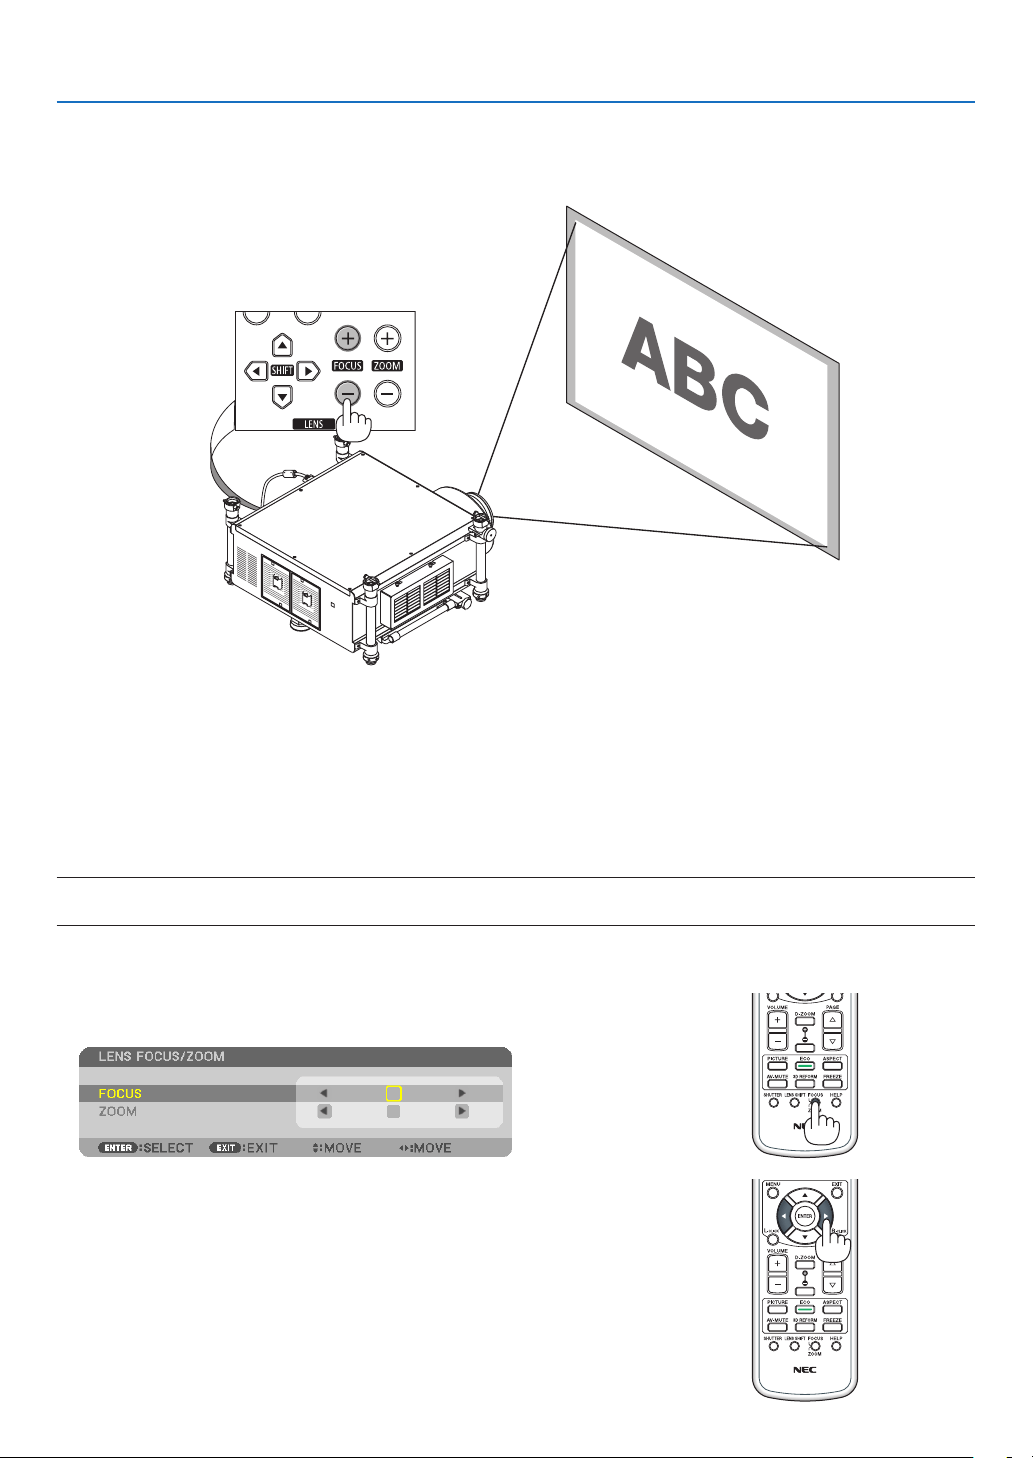
Focus
Applicablelens:NP26ZL/NP27ZL/NP28ZL/NP29ZL
UsetheFOCUS(+)or(−)buttonontheprojectorcabinettoobtainthebestfocus.
TIP:Toobtainthebestfocus,performthefollowing(forxedinstallation)
Preparation:Warmuptheprojectorforonehour.
1.UsetheFOCUS+/−buttonstomakesureyouobtainthebestfocus.Ifyoudonot,movetheprojectorbackandforth.
2.Selectthe[TESTPATTERN]fromthemenuanddisplaythetestpattern.(→ page 105)
3.KeeppressingtheFOCUS−buttonuntilthegridofthetextpatternismadeinvisible.
4.KeeppressingtheFOCUS+buttonuntilyouobtainthebestfocus.
If you adjust beyond the best focal point, go back to step 3 and repeat the procedures.
NOTE:
•UsethefocusringtoobtainthebestfocusontheNP25FLlens.
Adjusting with buttons on the remote control
1.PresstheFOCUS/ZOOMbuttontodisplaytheadjustmentwin
-
dow.
2.Usethe◀ or ▶buttontoadjustthefocus.
3.PresstheFOCUS/ZOOMbuttonagaintoclosetheadjustment
window.
27
2. Projecting an Image (Basic Operation)
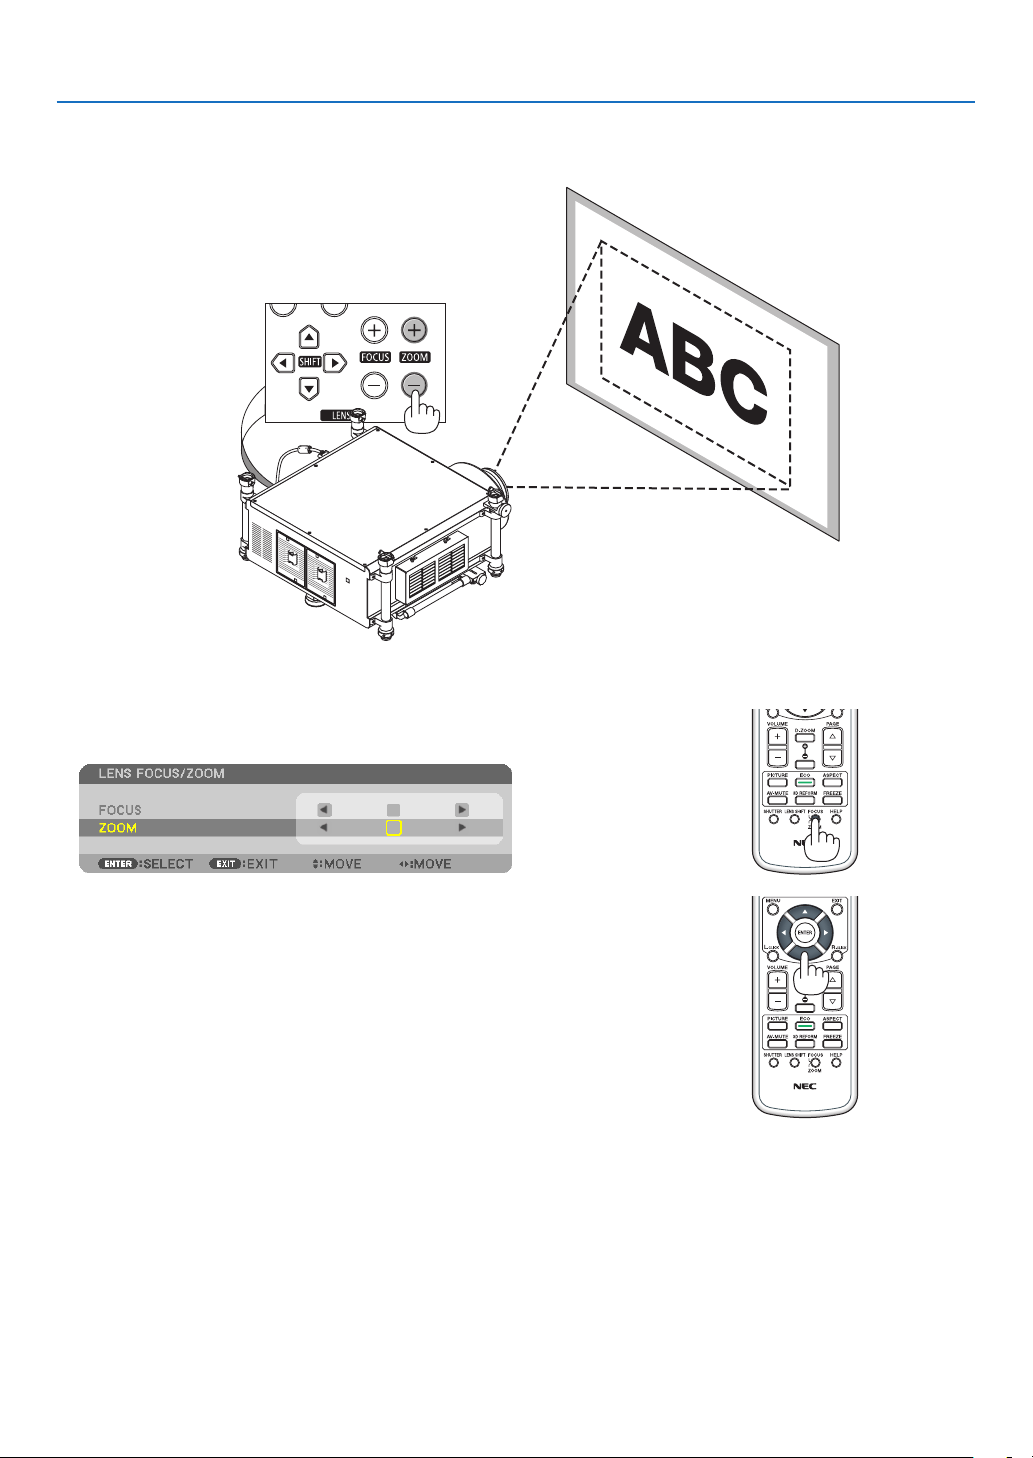
Zoom
UsetheZOOM(+)or(−)buttonontheprojectorcabinettozoominorout.
Adjusting with buttons on the remote control
1.PresstheFOCUS/ZOOMbuttontodisplaytheadjustmentwin
-
dow.
2.Pressthe▼buttontoselect[ZOOM].
3.Usethe◀
or ▶buttontozoominorout.
4.PresstheFOCUS/ZOOMbuttonagaintoclosetheadjustment
window.
28
2. Projecting an Image (Basic Operation)
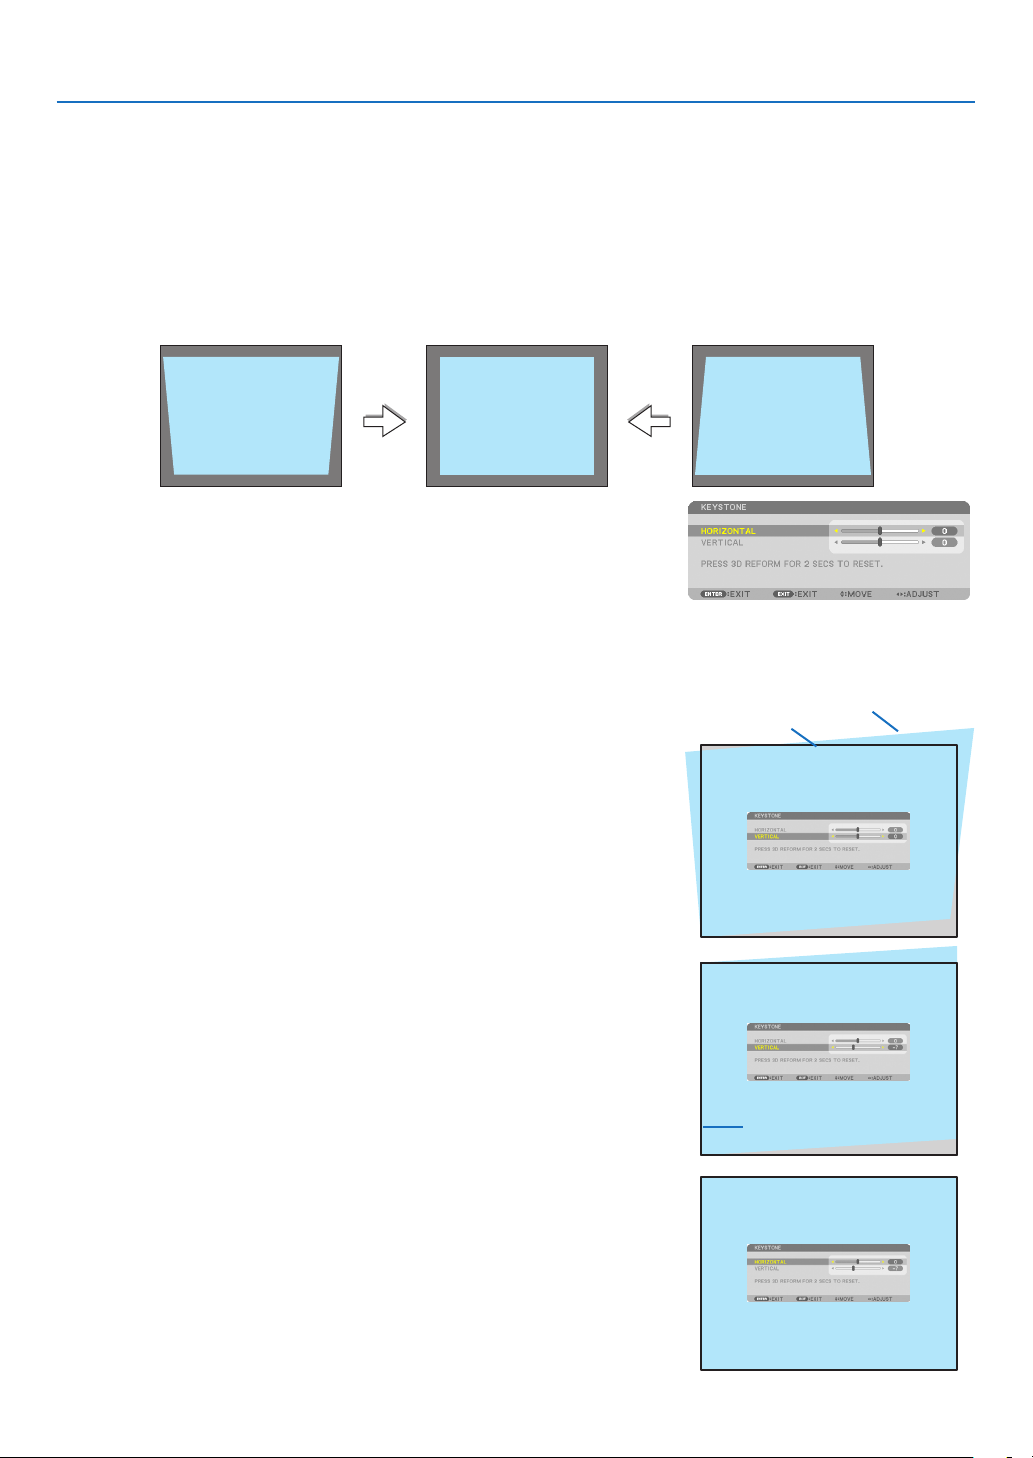
Correcting Keystone Distortion
Whentheprojectorisnotexactlyperpendiculartothescreen,keystonedistortionoccurs.Toovercomeit,youcanuse
the“Keystone”function,adigitaltechnologythatcanadjustforkeystone-typedistortion,resultinginacrisp,square
image.
Thefollowingprocedureexplainshowtousethe[KEYSTONE]screenfromthemenutocorrecttrapezoidaldistor-
tions.
Whentheprojectorisplaceddiagonallytothescreen,
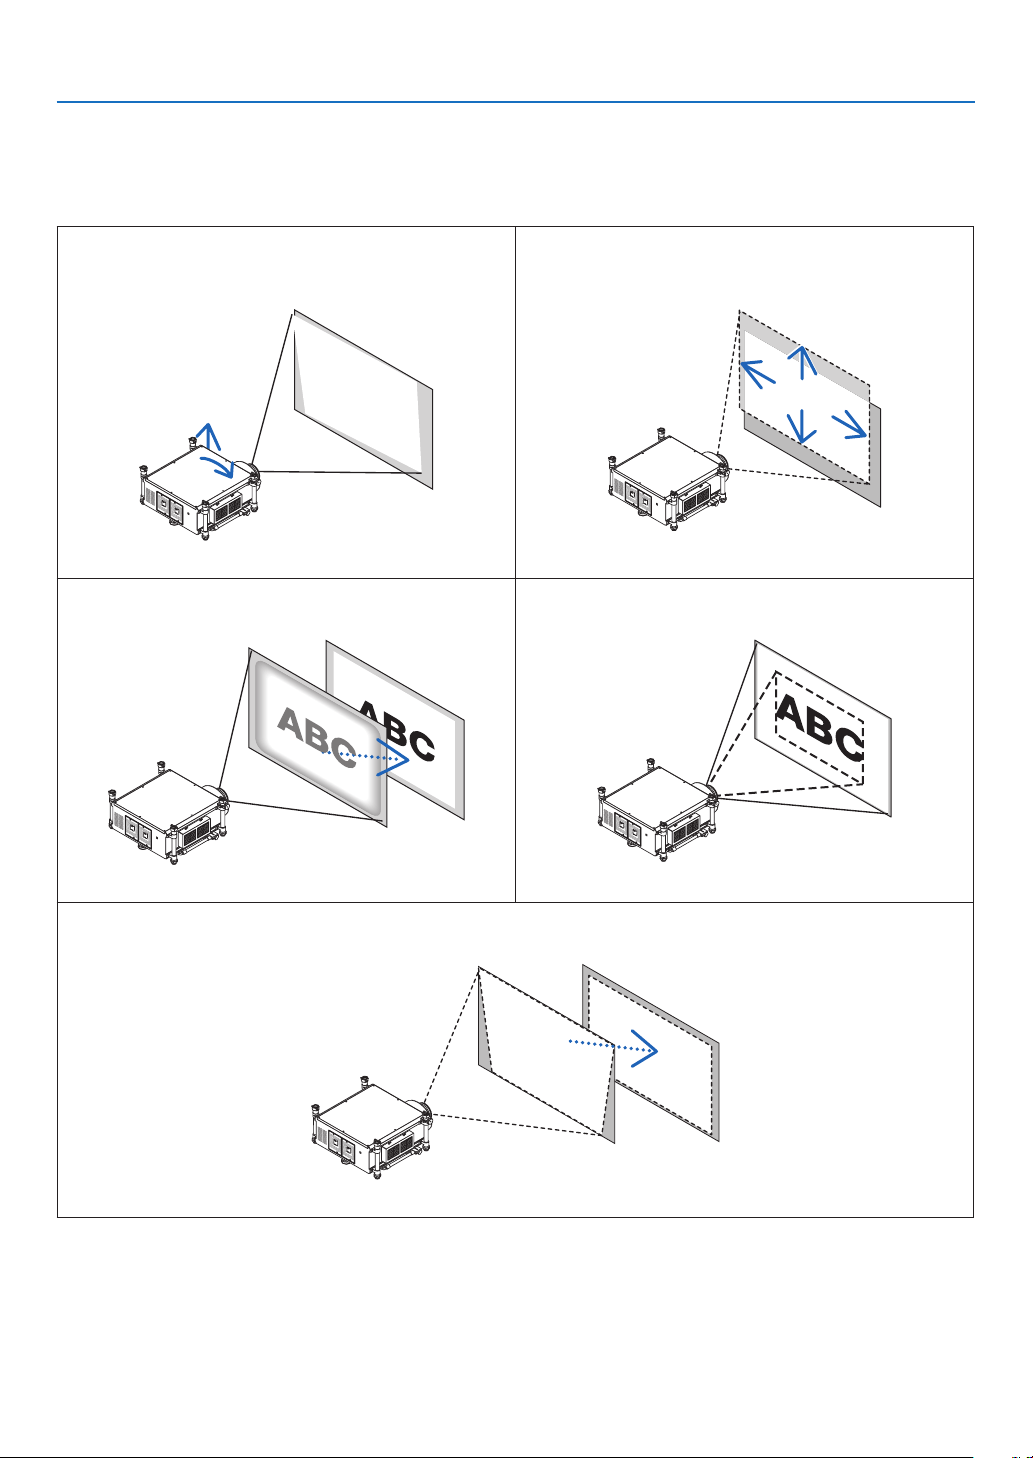
Whentheprojectorissetupatanangleinrelationtothescreen,adjusttheHorizontaloptionoftheKeystonemenu
sothatthetopandbottomofsidesoftheprojectedimageareparallel.
1.Pressthe3DREFORMbuttonontheremotecontrolortheprojec
-
torcabinet.
TheKeystonescreenwillbedisplayedonthescreen.
2.Pressthe
buttontoselect[VERTICAL]andthenusethe
or
sothattheleftandrightsidesoftheprojectedimageareparallel.
*Adjusttheverticalkeystonedistortion.
3.Aligntheleft(orright)sideofthescreenwiththeleft(orright)side
oftheprojectedimage.
•Usetheshortersideoftheprojectedimageasthebase.
•Intherightexample,usetheleftsideasthebase.
4.Pressthe
buttontoselect[HORIZONTAL]andthenusethe
or
sothatthetopandbottomsidesoftheprojectedimagearepar
-
allel.
•Adjustthehorizontalkeystonedistortion.
Screenframe
Projected area
Alignleftside

29
2. Projecting an Image (Basic Operation)
NOTE:
•Iftheprojectionangleisthesameasinthelastuse,thepreviouscorrectionsettingvaluesareretainedinthememory.
•WhendoingStep2,adjustthepositionofimagesothatthescreenissmallerthantheareaoftheprojectedarea.
•Toresetthe3DReformcorrectionsettingvalues,pressandholdthe3DREFORMbuttonforaminimumof2seconds.
•Eachtimethe3DREFORMbuttonispressed,theitemwillchangeasfollows:KEYSTONE→CORNERSTONE→ None →KEY-
STONE→ ...
Forinformationon[CORNERSTONE],see“CorrectingHorizontalandVerticalKeystoneDistortion(Cornerstone)”onpage40.
•TheCornerstoneadjustmentwillnotbeavailableduringtheKeystoneadjustment.ToperformtheCornerstoneadjustment,press
andholdthe3DREFORMbuttonforaminimumof2secondstoresettheKeystonecorrectionsettingvalues.TheKeystone
adjustmentwillnotbeavailableduringtheCornerstoneadjustment.ToperformtheKeystoneadjustment,pressandholdthe3D
REFORMbuttonforaminimumof2secondstoresettheCornerstonecorrectionsettingvalues.
•The3DReformfeaturecancauseanimagetobeslightlyblurredbecausethecorrectionismadeelectronically.
5.Repeatsteps2and4tocorrectkeystonedistortion.
6.AftercompletingKeystonecorrection,presstheEXITbutton.
TheKeystonescreenwilldisappear.
•ToperformKeystonecorrectionagain,pressthe3DREFORMbutton
todisplaytheKeystonescreenandrepeatabovesteps1to6.
30
2. Projecting an Image (Basic Operation)
Optimizing Computer Signal Automatically
Adjusting the Image Using Auto Adjust
Optimizingacomputerimageautomatically.(COMPUTER1/COMPUTER2/COMPUTER3)
PresstheAUTOADJ.buttontooptimizeacomputerimageautomatically.
Thisadjustmentmaybenecessarywhenyouconnectyourcomputerforthersttime.
[Poor picture]
[Normal picture]
NOTE:
Somesignalsmaytaketimetodisplayormaynotbedisplayedcorrectly.
•IftheAutoAdjustoperationcannotoptimizethecomputersignal,trytoadjust[HORIZONTAL],[VERTICAL],[CLOCK],and[PHASE]
manually.(→ page 112, 113)
31
2. Projecting an Image (Basic Operation)
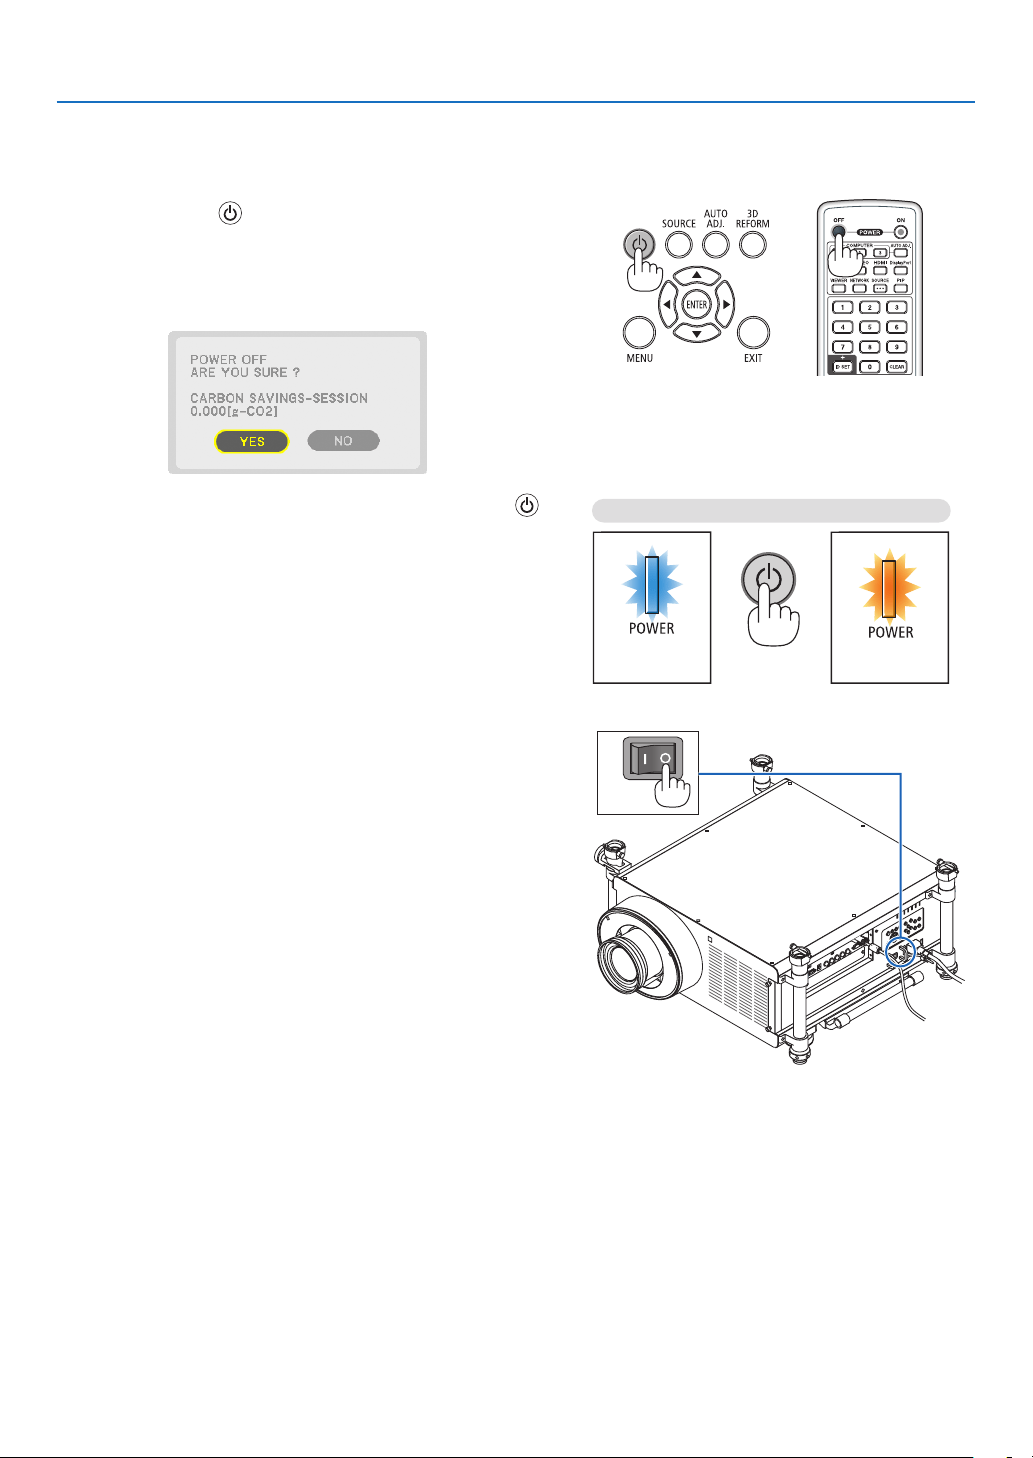
Turning off the Projector
To turn off the projector:
1.First,pressthe(POWER)buttonontheprojector
cabinetorthePOWEROFFbuttonontheremotecon-
trol.
The[POWEROFF/AREYOUSURE?/CARBONSAV-
INGS-SESSION0.000[g-CO2]]messagewillappear.
2.Secondly,presstheENTERbuttonorpressthe
(POWER)orthePOWEROFFbuttonagain.
Thelampwillturnoffandtheprojectorwillgointostandby
mode.Wheninstandbymode,thePOWERindicatorwill
lightorangeandtheSTATUSindicatorwilllightgreenwhen
[NORMAL]isselectedfor[STANDBYMODE].
3.PressthemainpowerswitchtotheOFFposition(O).
ThePOWERindicatorwillgooffandthemainpowerwill
turn off.
PowerOn
Steady blue light
Standby
Steady orange light
Press twice

32
2. Projecting an Image (Basic Operation)
CAUTION:
PartsoftheprojectormaybecometemporarilyheatediftheprojectoristurnedoffwiththePOWERbuttonorifthe
ACpowersupplyisdisconnectedduringnormalprojectoroperation.
Usecautionwhenpickinguptheprojector.
NOTE:
•WhilethePOWERindicatorisblinkingblueinshortcycles,thepowercannotbeturnedoff.
•Youcannotturnoffthepowerfor60secondsimmediatelyafterturningitonanddisplayinganimage.
•Waitatleast20minutesafterthepoweristurnedon(afterstartingtoproject)beforeturningtheACpoweroffwhileanimageis
being projected or while the cooling fan is running.
•Donotunplugthepowercordfromtheprojectororfromthepoweroutletwhileanimageisbeingprojected.Doingsocould
deterioratetheprojector’sACinputconnectororthepowerplug’scontact.ToturnofftheACpowerwhileanimageisbeing
projected,usetheprojector'smainpowerswitch,thepowerstrip’sswitch,thebreaker,etc.
•DonotdisconnecttheACpowersupplytotheprojectorwithin10secondsofmakingadjustmentorsettingchangesandclosing
the menu. Doing so can cause loss of adjustments and settings.
•DonotturnoffthemainpowerusingtheMainPowerSwitchorbydisconnectingthepowertotheprojectorwhilelensadjust-
mentsarebeingperformed.Ifpowerisremovedwhilethelensismoving,youmaynotbeabletoachievethebestpossiblelens
adjustments after restarting the projector.

33
2. Projecting an Image (Basic Operation)
Carrying the Projector
Preparation:Makesurethattheprojectoristurnedoff.
1.Unplugthepowercord.
2.Disconnectanyothercables.
•RemovetheUSBmemoryifitisinsertedintotheprojector.
•Removethelensbeforeshippingtheprojector.
3. Mountthelenscaponthelens.
4. Beforemovingtheprojector,screwinthetiltfeetiftheyhavebeenlengthened.
NOTE:
•Donotapplystrongshockorforcetotheprojectorwhilecarryingtheprojector.
•Removethelensbeforemovingtheprojector.Attachthelenscaptothelensandthedustcaptothelenshoodoftheprojector.
•Usetheoriginalcartonwhenshippingtheprojectorwithoutthelens.Improperpackagingmaycausedamagetotheprojector
during shipping.
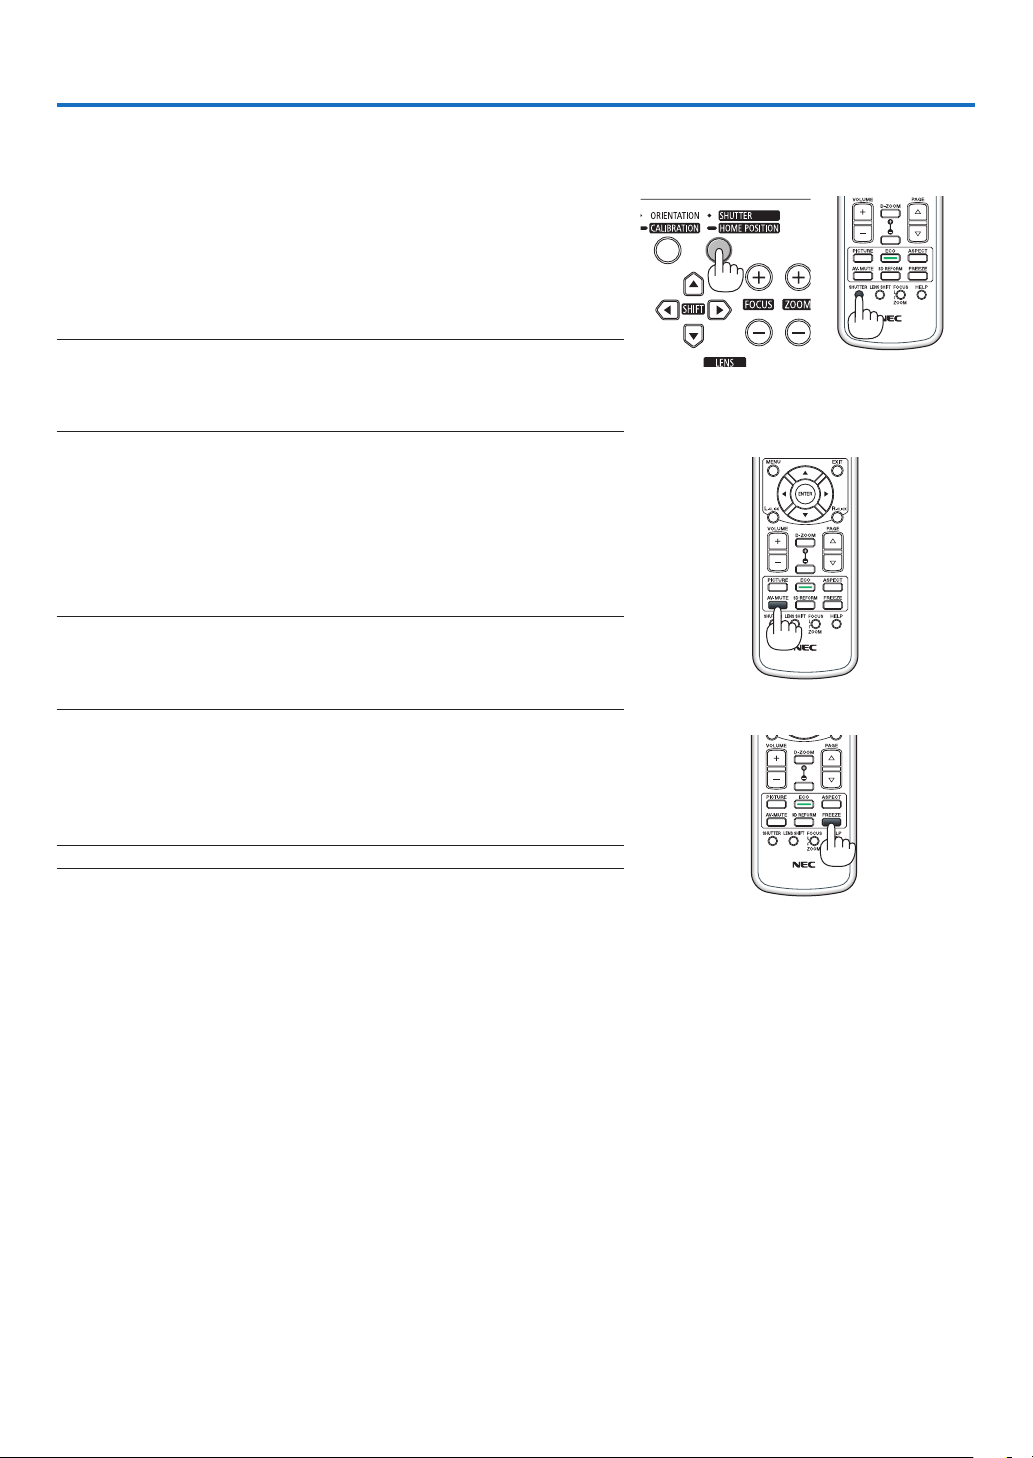
34
3. Convenient Features
1 Blocking the lamp light (LENS
SHUTTER)
PresstheSHUTTER/HOMEPOSITIONbuttontoblockthelampslight
fromhittingthescreen.Pressagaintoallowthescreentobecomeil-
luminatedagain.
•AnotherwaytoshutthelamplightoffistopresstheSHUTTERbutton
ontheremotecontrol.
NOTE:
•DonotpressandholdtheSHUTTER/HOMEPOSITIONbuttonfor2secondsor
longer.
Doing so will cause the lens shift position to return to the home position.
Turning off the Image
PresstheAV-MUTEbuttontoturnofftheimageforashortperiodoftime.
Pressagaintorestoretheimage.
Theprojector’spower-savingfunctionwillworkinsomesecondsafterthe
imageisturnedoff.Asaresult,thelamppowerwillbereduced.
NOTE:
•Torestoretheimage,evenifyoupresstheAV-MUTEbuttonimmediatelyafter
thestartofthepower-savingfunction,thelampbrightnessmaynotberestored
toitsoriginallevel.
Freezing a Picture
PresstheFREEZEbuttontofreezeapicture.Pressagaintoresume
motion.
NOTE:Theimageisfrozenbuttheoriginalvideoisstillplayingback.
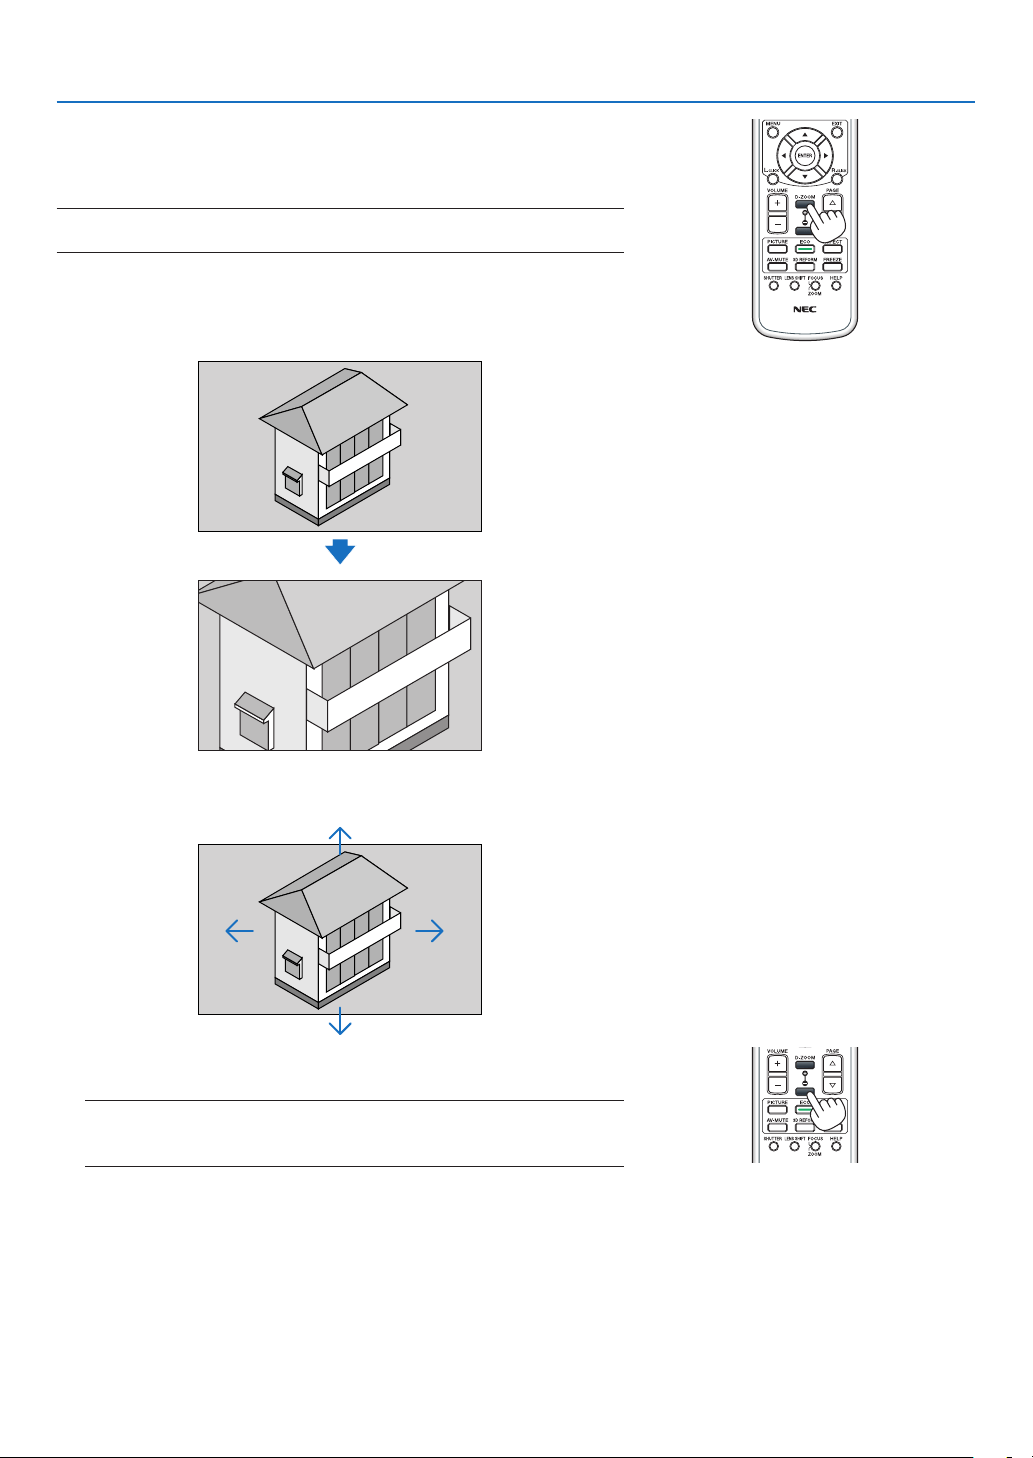
35
3. Convenient Features
Enlarging a Picture
Youcanenlargethepictureuptofourtimes.
NOTE:Themaximummagnicationmaybelessthanfourtimesdependingon
the signal.
Todoso:
1.PresstheD-ZOOM(+)buttontomagnifythepicture.
2. Pressthebutton.
Theareaofthemagniedimagewillbemoved
3.PresstheD-ZOOM(−)button.
EachtimetheD-ZOOM(−)buttonispressed,theimageisreduced.
NOTE:
•Theimagewillbeenlargedorreducedatthecenterofthescreen.
•Displayingthemenuwillcancelthecurrentmagnication.

36
3. Convenient Features
Changing Eco Mode/Checking Energy-Saving Effect Using
Eco Mode [ECO MODE]
Thisfeatureenablesyoutoselecttwobrightnessmodesofthelamp:
OFFandONmodes.Thelamplifecanbeextendedbyturningonthe[ECOMODE].
[ECOMODE]Description
[OFF]
Thisisthedefaultsetting(100%Brightness).
[ON]
Lowlamppowerconsumption(approx.75%Brightness).
Toturnonthe[ECOMODE],dothefollowing:
1.PresstheECObuttonontheremotecontroltodisplay[ECOMODE]screen.
2.Usethe
or buttontoselect[ON].
3.PresstheENTERbutton.
Tochangefrom[ON]to[OFF],GobacktoStep2andselect[OFF].RepeatStep3.
NOTE:
•The[ECOMODE]canbechangedbyusingthemenu.
Select[SETUP]→[BASIC]→[LAMPMODE]→[ECOMODE].
•Thelampliferemainingandlamphoursusedcanbecheckedin[USAGETIME].Select[INFO.]→[USAGETIME].
•[ECOMODE]isalwayssetto[OFF]immediatelyafterthelampisturnedon.Thelampconditionwillnotbeaffectedevenwhen
[ECOMODE]ischanged.
•Afteralapseof1minutefromwhentheprojectordisplaysablue,blackorlogoscreen,[ECOMODE]willautomaticallyswitchto
[ON].
•Iftheprojectorisoverheatedin[OFF]mode,theremaybeacasewherethe[ECOMODE]automaticallychangesto[ON]mode
toprotecttheprojector.Thisiscalled“ForcedECOMode”.WhentheprojectorisintheForcedEcoMode,thepicturebrightness
decreasesslightlyandtheTEMP.indicatorlightsorange.AtthesametimetheThermometersymbol[]isdisplayedatthebot-
tom right of the screen.
Whentheprojectorcomesbacktonormaltemperature,theForcedEcoModeiscancelledandthe[ECOMODE]returnsto[OFF]
mode.
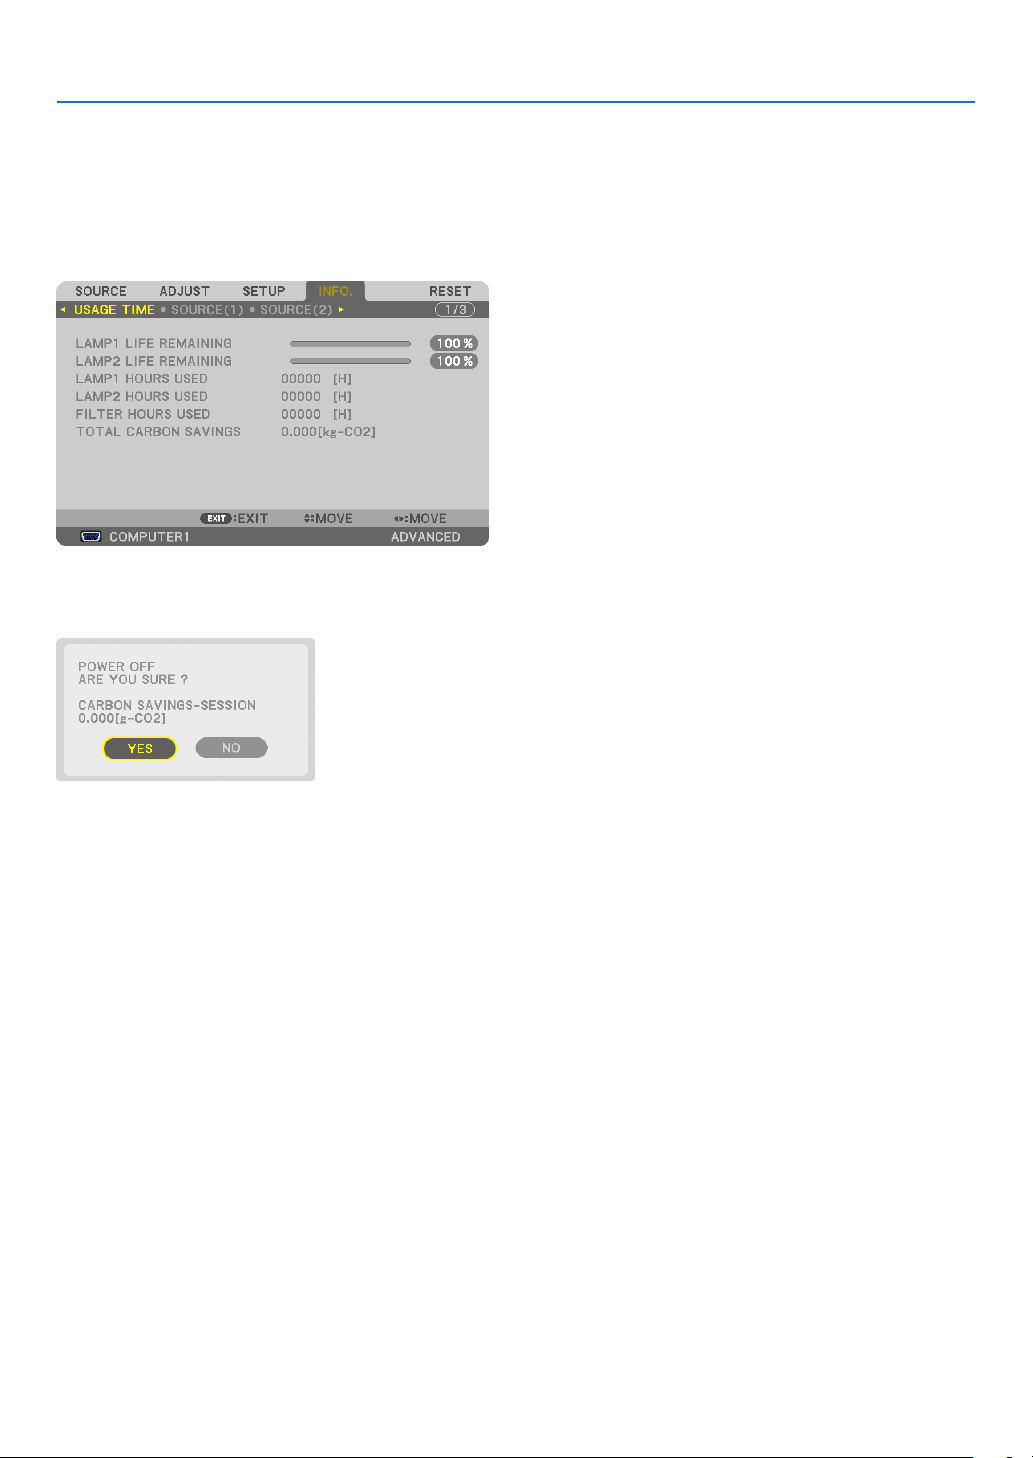
37
3. Convenient Features
Checking Energy-Saving Effect [CARBON METER]
Thisfeaturewillshowenergy-savingeffectintermsofCO
2
emissionreduction(kg)whentheprojector’s[ECOMODE]
issetto[ON].Thisfeatureiscalledas[CARBONMETER].
Therearetwomessages:[TOTALCARBONSAVINGS]and[CARBONSAVINGS-SESSION].The[TOTALCARBON
SAVINGS]messageshowsthetotalamountofCO
2
emissionreductionfromthetimeofshipmentuptonow.Youcan
checktheinformationon[USAGETIME]from[INFO.]ofthemenu.(→page
134)
The[CARBONSAVINGS-SESSION]messageshowstheamountofCO
2
emissionreductionbetweenthetimeof
changingtoECOMODEimmediatelyafterthetimeofpower-onandthetimeofpower-off.The[CARBONSAVINGS-
SESSION]messagewillbedisplayedinthe[POWEROFF/AREYOUSURE?]messageatthetimeofpower-off.
TIP:
•TheformulaasshownbelowisusedtocalculatetheamountofCO
2
emission reduction.
AmountofCO
2
emissionreduction=(Powerconsumptionin[OFF]forECOMODE−Powerconsumptionin[ON]forECOMODE)
×CO
2
conversionfactor.*Whentheimageisturnedoff,theamountofCO
2
emission reduction will also increase.
*CalculationforamountofCO
2
emissionreductionisbasedonanOECDpublication“CO
2
EmissionsfromFuelCombustion,2008
Edition”.
•The[TOTALCARBONSAVINGS]iscalculatedbasedonsavingsrecordedin15minutesintervals.
•Thisformulawillnotapplytothepowerconsumptionwhichisnotaffectedbywhether[ECOMODE]isturnedonoroff.

38
3. Convenient Features
Using the Optional Remote Mouse Receiver (NP01MR)
Theoptionalremotemousereceiverenablesyoutooperateyourcomputer’smousefunctionsfromtheremotecontrol.
Itisagreatconvenienceforclickingthroughyourcomputer-generatedpresentations.
Connectingtheremotemousereceivertoyourcomputer
Ifyouwishtousetheremotemousefunction,connectthemousereceiverandcomputer.
Themousereceivercanbeconnecteddirectlytothecomputer’sUSBport(typeA).
NOTE:DependingonthetypeofconnectionorOSinstalledonyourcomputer,youmayhavetorestartyourcomputerorchange
your computer settings.
Remote mouse receiver
Computer
ToUSBportofPCorMacintosh
When operating a computer via the remote mouse receiver
Remote sensor on the remote mouse receiver
7 m/22 feet
When connecting using the USB terminal
ForPC,themousereceivercanonlybeusedwithaWindowsXP*,WindowsVista,Windows7,orMacOSX10.0.0
orlateroperatingsystem.
*NOTE:InSP1orolderversionofWindowsXP,ifthemousecursorwillnotmovecorrectly,dothefollowing:
CleartheEnhancepointerprecisioncheckboxunderneaththemousespeedsliderintheMousePropertiesdialogbox[Pointer
Optionstab].
NOTE:ThePAGE
and buttonsdonotworkwithPowerPointforMacintosh.
NOTE:Waitatleast5secondsafterdisconnectingthemousereceiverbeforereconnectingitandviceversa.Thecomputermaynot
identifythemousereceiverifitisrepeatedlyconnectedanddisconnectedinrapidintervals.

39
3. Convenient Features
Operatingyourcomputer’smousefromtheremotecontrol
Youcanoperateyourcomputer’smousefromtheremotecontrol.
PAGE / Button . scrolls the viewing area of the window or to move to the previous or next slide in PowerPoint on your
computer.
Buttons .... moves the mouse cursor on your computer.
L-CLICK Button ...... works as the mouse left button.
R-CLICK Button ..... works as the mouse right button.
NOTE:
•Whenyouoperatethecomputerusingthe or button with the menu displayed, both the menu and the mouse pointer
willbeaffected.Closethemenuandperformthemouseoperation.
•ThePAGE and buttonsdonotworkwithPowerPointforMacintosh.
About Drag Mode:
BypressingtheL-CLICKorR-CLICKbuttonfor2or3secondsthenreleasing,thedragmodeissetandthedrag
operationcanbeperformedsimplybypressingthebutton.Todroptheitem,presstheL-CLICK(orR-CLICK)
button.Tocancelit,presstheR-CLICK(orL-CLICK)button.
TIP:YoucanchangethePointerspeedontheMousePropertiesdialogboxontheWindows.Formoreinformation,seetheuser
documentation or online help supplied with your computer.
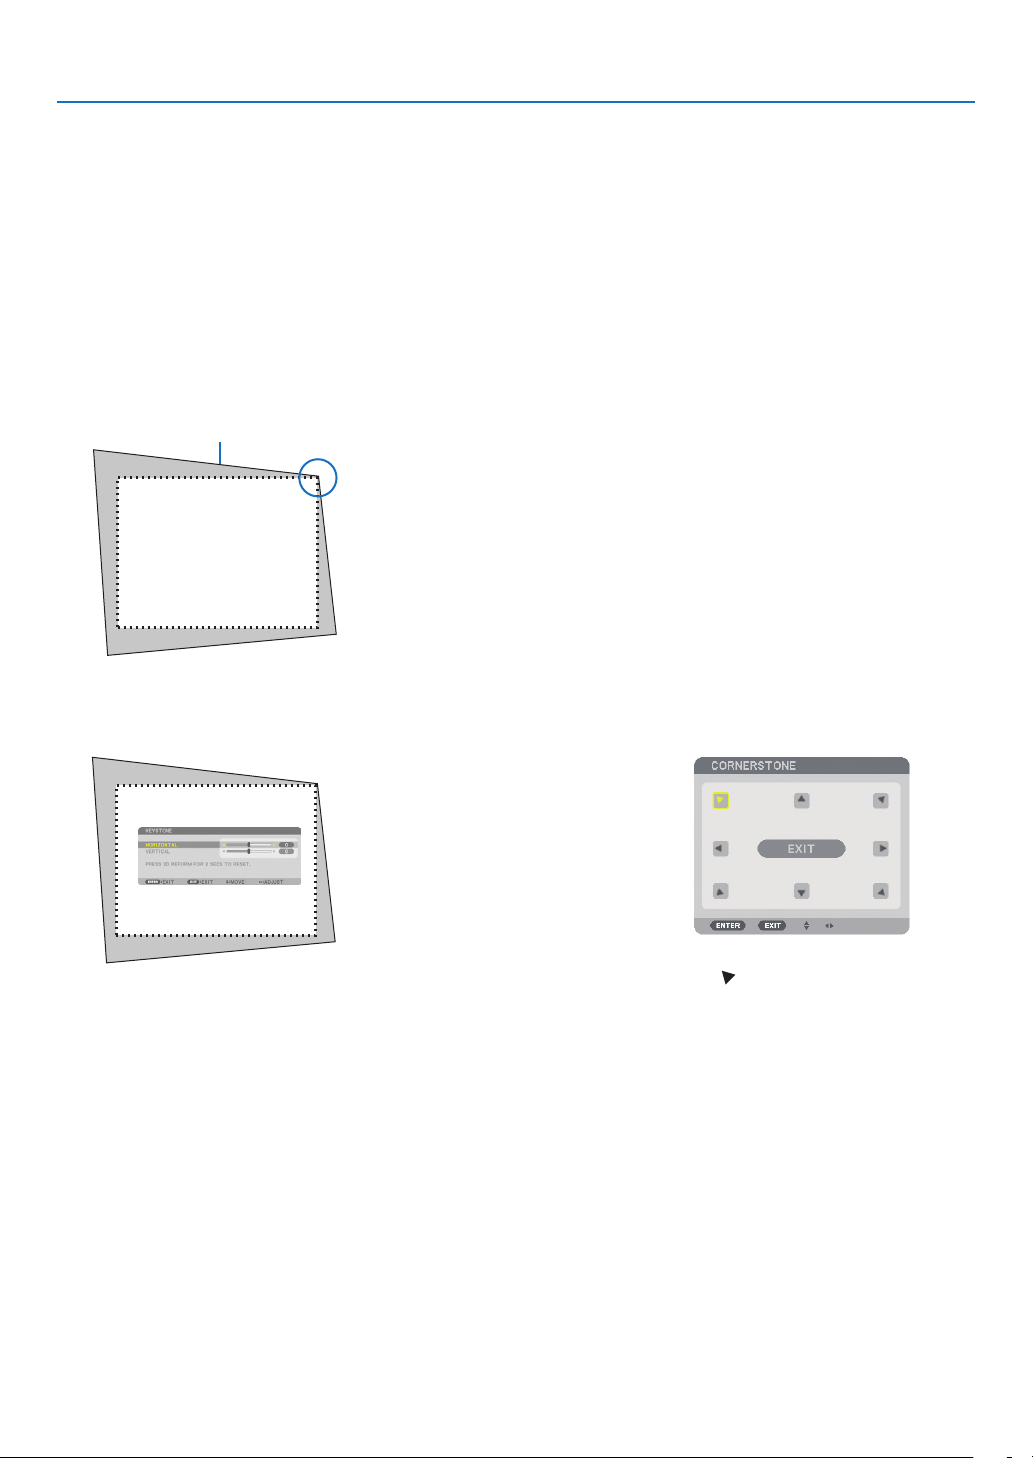
40
3. Convenient Features
Correcting Horizontal and Vertical Keystone Distortion
[CORNERSTONE]
Usethe3DReformfeaturetocorrectkeystone(trapezoidal)distortiontomakethetoporbottomandtheleftorright
sideofthescreenlongerorshortersothattheprojectedimageisrectangular.
Cornerstone
1.Pressandholdthe3DREFORMbuttonforaminimumof2secondstoresetcurrentadjustments.
Currentadjustmentsfor[KEYSTONE]or[CORNERSTONE]willbecleared.
2.Projectanimagesothatthescreenissmallerthantheareaoftheraster.
3.Pickupanyoneofthecornersandalignthecorneroftheimagewithacornerofthescreen.
Projected image
The drawing shows the up-
per right corner.
4.Pressthe3DREFORMbuttontwice.
The Cornerstone adjustment screen is displayed.
5.Usethebuttontoselectoneicon()whichpointsinthedirectionyouwishtomovetheprojected
imageframe.
6.PresstheENTERbutton.
TIP:Ifyouareadjusting[KEYSTONE],[CORNERSTONE]willnotbe
available.Ifthishappens,pressandholdthe3DREFORMbuttonfora
minimumof2secondstoresetthe[KEYSTONE]adjustments.
The drawing shows the upper left
icon ( ) is selected.
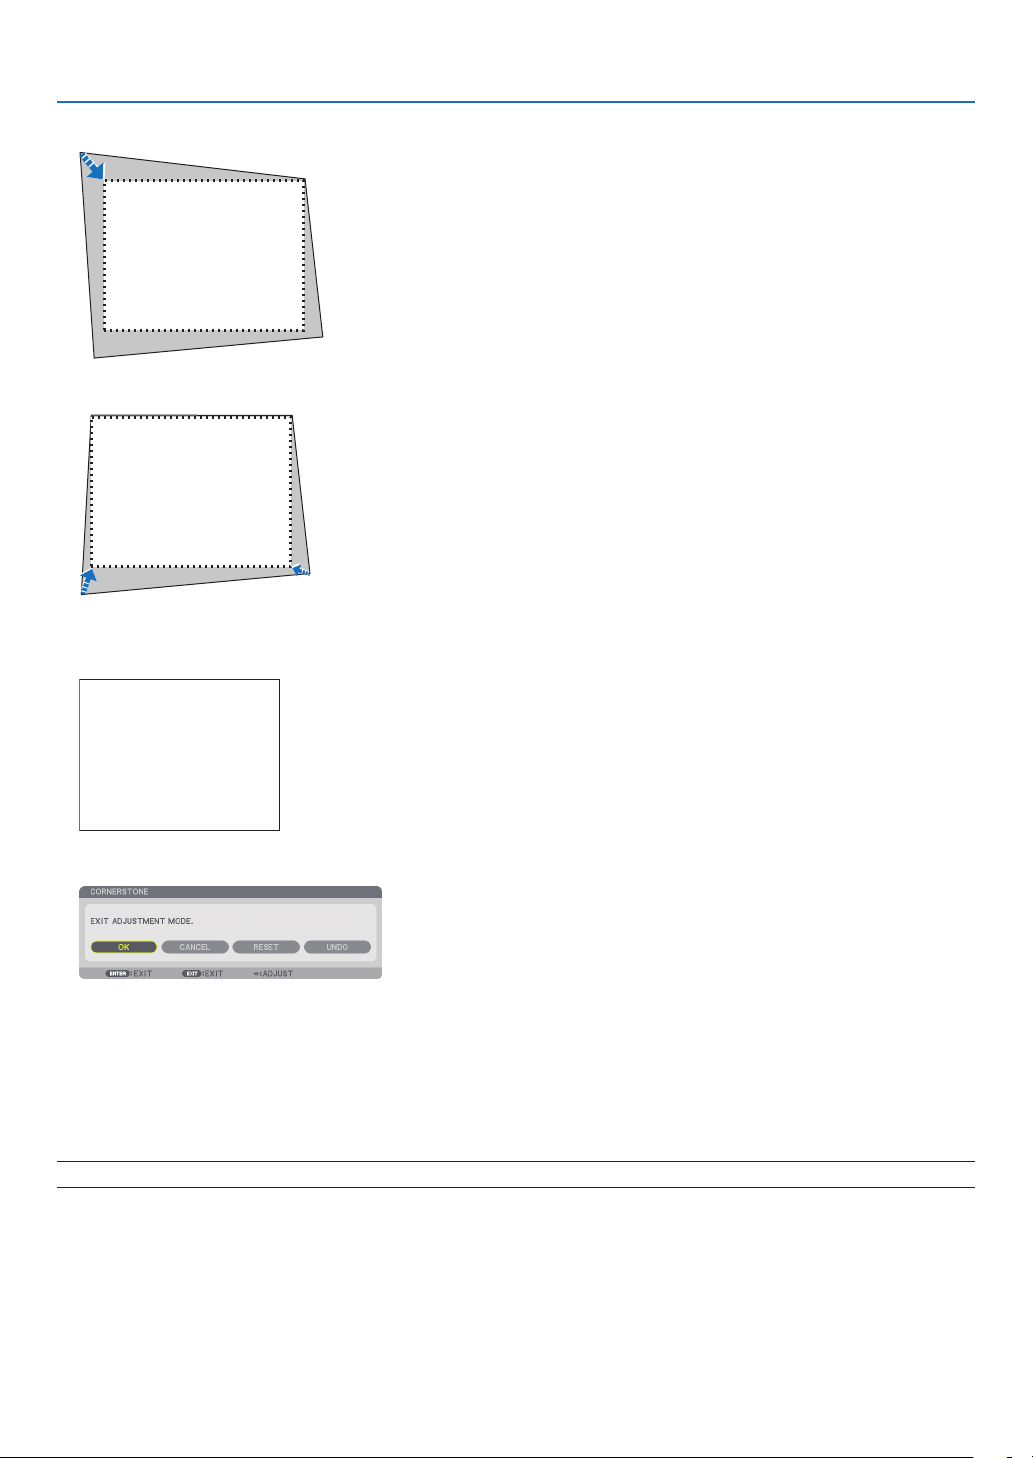
41
3. Convenient Features
7.Usethebuttontomovetheprojectedimageframeasshownontheexample.
8.PresstheENTERbutton.
9.Usethebuttontoselectanothericonwhichpointsinthedirection.
OntheCornerstoneadjustmentscreen,select[EXIT]orpresstheEXITbuttonontheremotecontrol.
Theconrmationscreenisdisplayed.
10
.Pressthe or buttontohighlightthe[OK]andpresstheENTERbutton.
ThiscompletestheCornerstonecorrection.
Selecting[CANCEL]willreturntotheadjustmentscreenwithoutsavingchanges(Step3).
Selecting[RESET]willreturntothefactorydefault.
Selecting[UNDO]willexitwithoutsavingchanges.
NOTE:Toresetthe3DReformcorrectionsettingvalues,pressandholdthe3DREFORMbuttonforaminimumof2seconds.

42
3. Convenient Features
Theadjustablerangesfor3DReformareasfollows:
HORIZONTALVERTICAL
CORNERSTONE
Max.+/−35°approx.Max.+/−30°approx.
KEYSTONE
*Thefollowingareconditionsunderwhichthemaximumangleisachieved:
•WhentheNP27ZLlensisused
•Whenthelensshiftissettothecenter
Whenthelensshiftisusedandyettheimageisnotdisplayedinthecenterofthescreen,theadjustablerange
willbeincreasedordecreased.
•Imageisprojectedinmaximumwidewiththezoom
NOTE:
•Evenwhentheprojectoristurnedon,thelastusedcorrectionvaluesareapplied.
•IftheCornerstonescreenisunavailable(grayed),pressandholdthe3DREFORMbuttonforaminimumof2secondstoreset
thecurrentcorrectiondata.TheCornerstonefunctionbecomesavailable.
•Therangeofkeystonecorrectionisnotthemaximumtiltangleofprojector.
NOTE:Using3DReformcorrectioncancausetheimagetobeslightlyblurredbecausethecorrectionismadeelectronically.
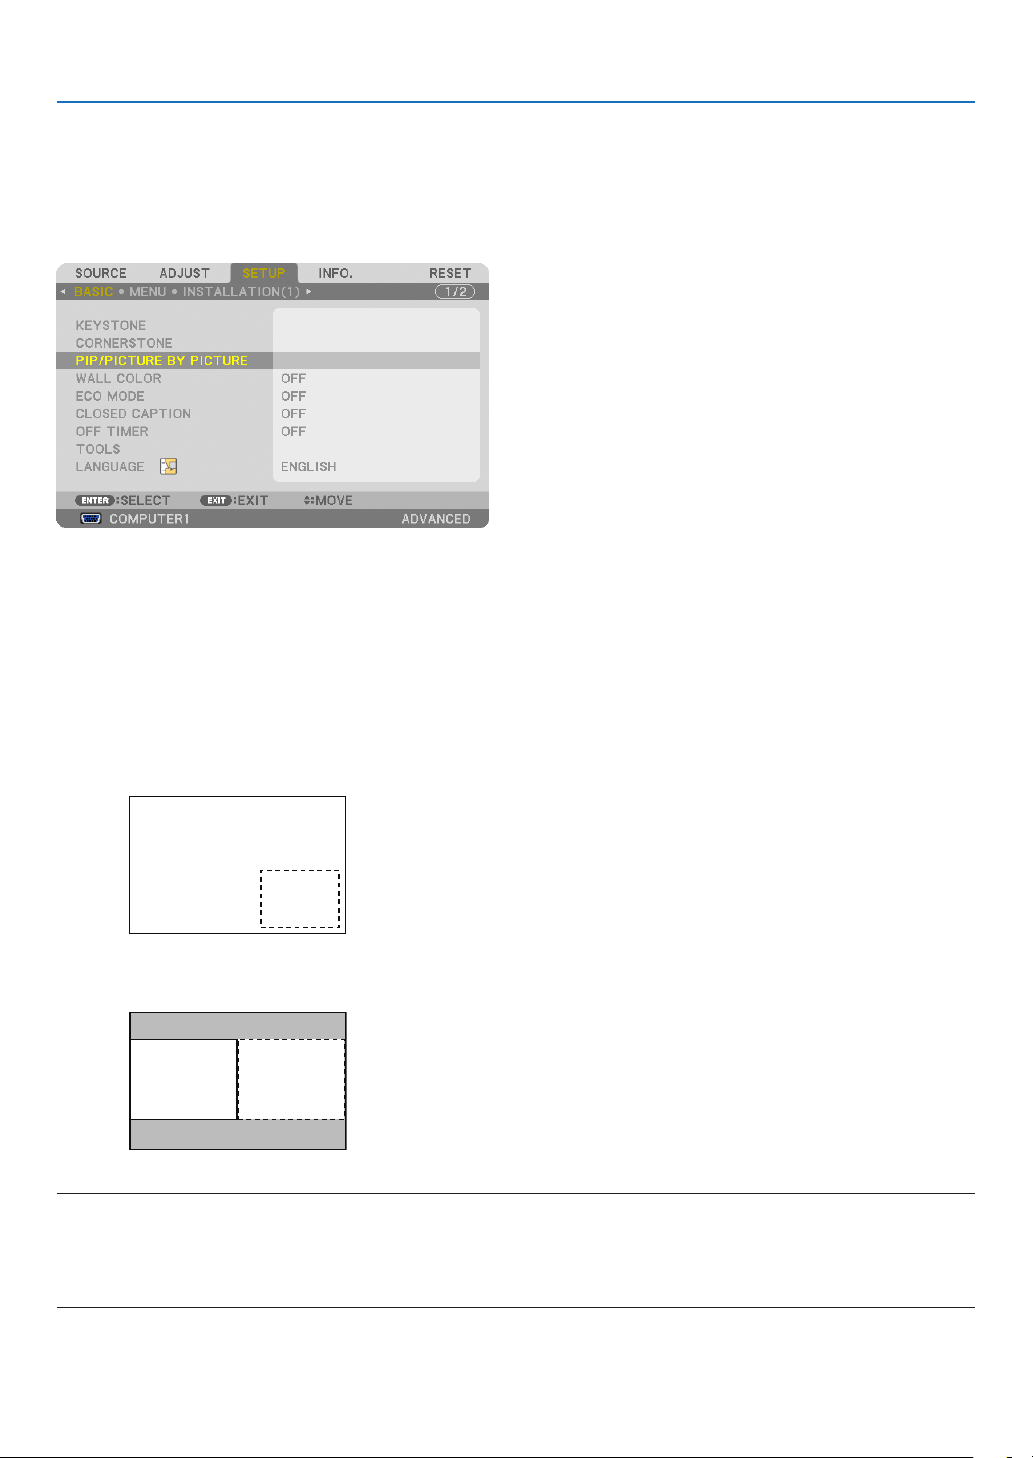
43
3. Convenient Features
Displaying Two Pictures at the Same Time
Theprojectorhasafeaturethatallowsyoutoviewtwodifferentsignalssimultaneously.Youhavetwomodes:PIP
modeandPICTUREBYPICTUREmode.
Fromthemenuyoucanselect[SETUP]→[BASIC]→[PIP/PICTUREBYPICTURE].
The[PIP/PICTUREBYPICTURE]menuitemhasthefollowingthreeoptions:MODE,POSITION,andSOURCE.
Usethe or buttontoselect[MODE],[POSITION]or[SOURCE]andpresstheENTERbutton.
Selecting the PIP or PICTURE BY PICTURE Mode [MODE]
Thisoptionallowsyoutoselecttwomodes:PIPandSIDEBYSIDE.
Usethe or buttontoselect[PIP]or[PICTUREBYPICTURE]andpresstheENTERbutton.
PIP:Thisoptionallowsyoutoviewasubpictureinthemainpicture.
Main picture
Sub picture
PICTUREBYPICTURE:Thisallowsyoutoviewtwopicturessidebyside.
Main picture Sub picture
NOTE:
•Themainpicturewillbedisplayedontheleftsideandthesubpictureontherightside.
•ThemainpicturesignalsupportstheCOMPUTER1,COMPUTER2,andCOMPUTER3connectors.
ThesubpicturesignalsupportstheVIDEOINandS-VIDEOINconnectors.
•ThemainpicturesupportsanRGBsignalwitharesolutionof1280×1024pixelsorless.
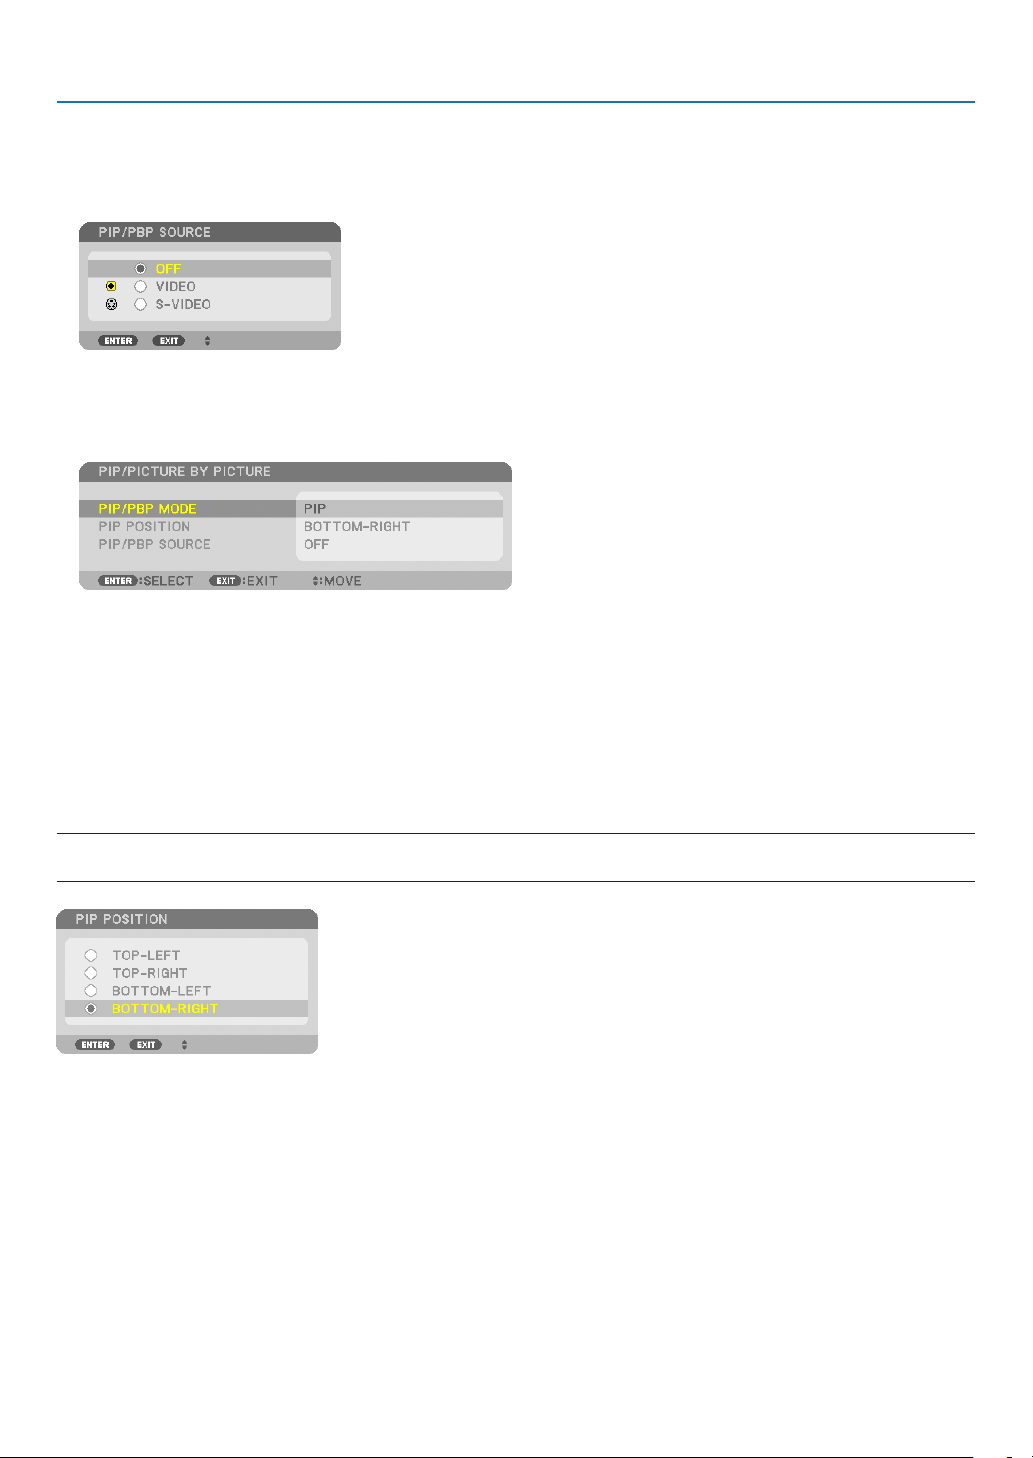
44
3. Convenient Features
ViewingTwoPictures
1.PressthePIPbuttonontheremotecontrol.
ThePIP/PICTUREBYPICTURESOURCEscreenwillbedisplayed.
2.Usethe or buttontoselectthesourceandpresstheENTERbutton.
ThePIPscreenorPICTUREBYPICTUREscreenwillbedisplayed,dependingonwhichwasselectedinthe
[MODE] setting screen.
3.PressthePIPbuttonagaintoreturntothenormalscreen(singlepicture).
TIP:
•Selectinganothersourcewillreturntothenormalscreen.
•Selectingasourcenotsupportedforthemainpictureorthesubpicturewillreturntothenormalscreen.
[POSITION]
Thisoptionallowsyoutoselectthepositionofasubpictureinthemainpicture.
NOTE:
•Thedefaultsettingis[BOTTOM-RIGHT].
Usethe or buttontoselectthesubpicture’spositionandpresstheENTERbutton.
Theoptionsare:TOP-LEFT,TOP-RIGHT,BOTTOM-LEFT,andBOTTOM-RIGHT.
Thefollowingadjustmentsandsettingsareavailableforthemainpictureonly.
-Adjustingpicture
-Magnifyingapicture
Thefollowingoperationsareavailableforboththemainandsubpictures.
-Picturemute
-Freezingamovingpicture
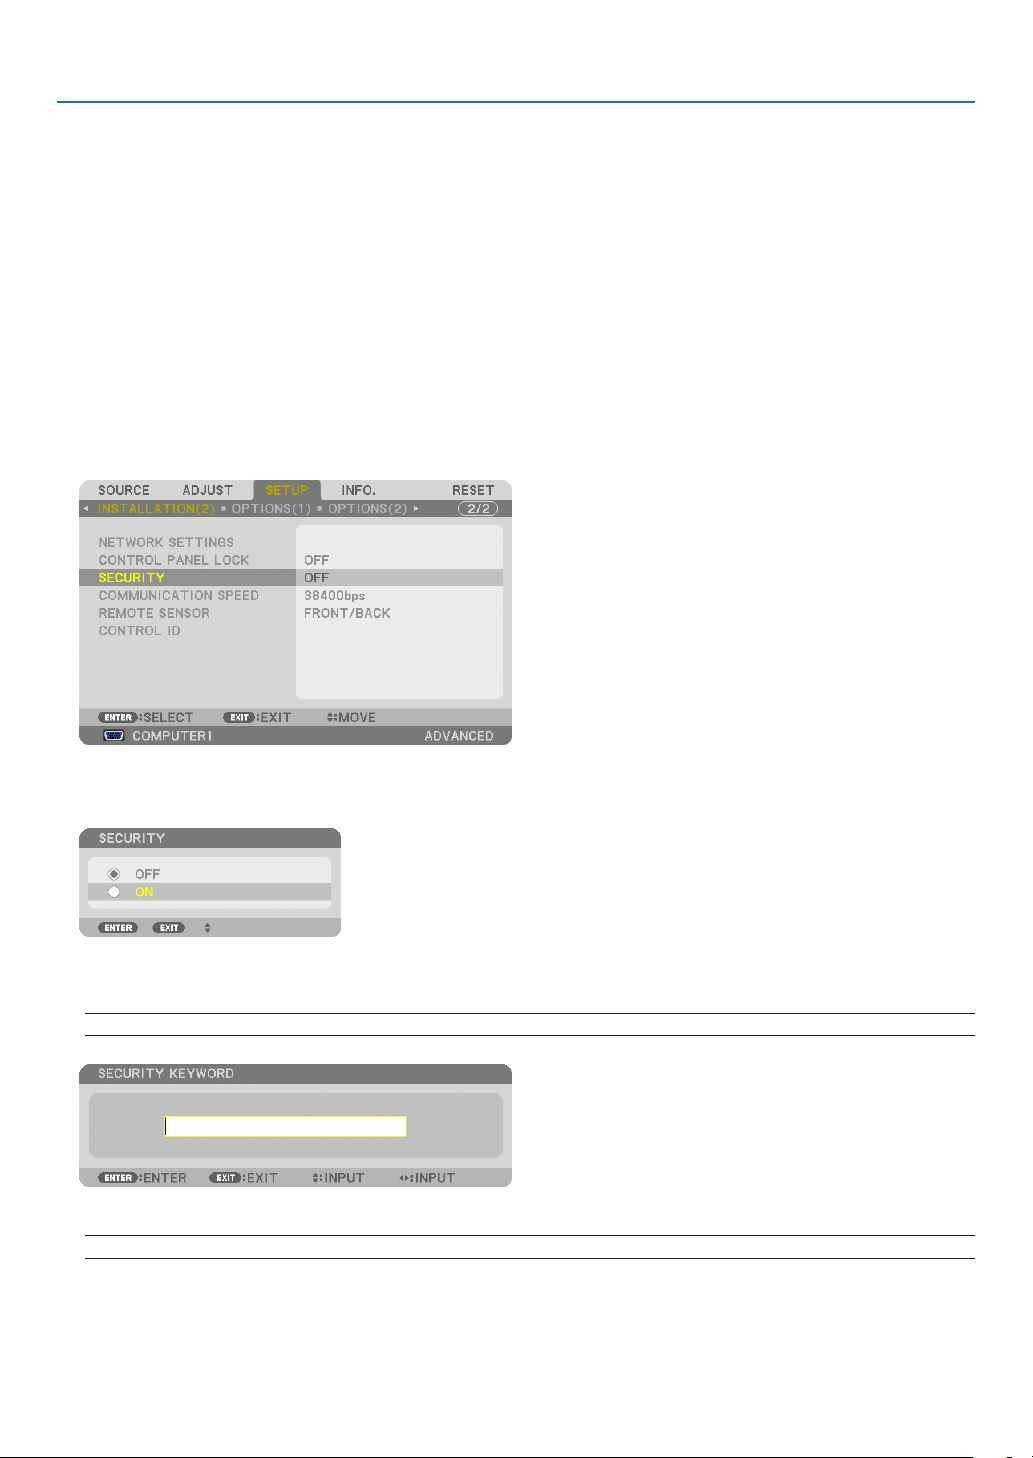
45
3. Convenient Features
Preventing the Unauthorized Use of the Projector [SECURITY]
AkeywordcanbesetforyourprojectorusingtheMenutoavoidoperationbyanunauthorizeduser.Whenakeyword
isset,turningontheprojectorwilldisplaytheKeywordinputscreen.Unlessthecorrectkeywordisentered,thepro-
jectorcannotprojectanimage.
•The[SECURITY]settingcannotbecancelledbyusingthe[RESET]ofthemenu.
ToenabletheSecurityfunction:
1.PresstheMENUbutton.
Themenuwillbedisplayed.
2.Pressthebuttontwicetoselect[SETUP]andpressthebuttonortheENTERbuttontoselect[BA
-
SIC].
3.Pressthebuttontoselect[INSTALLATION(2)].
4.Pressthebuttonthreetimestoselect[SECURITY]andpresstheENTERbutton.
TheOFF/ONmenuwillbedisplayed.
5.Pressthebuttontoselect[ON]andpresstheENTERbutton.
The[SECURITYKEYWORD]screenwillbedisplayed.
6.TypeinacombinationofthefourbuttonsandpresstheENTERbutton.
NOTE:Akeywordmustbe4to10digitsinlength.
The[CONFIRMKEYWORD]screenwillbedisplayed.
NOTE:Makeanoteofyourpasswordandstoreitinasafeplace.
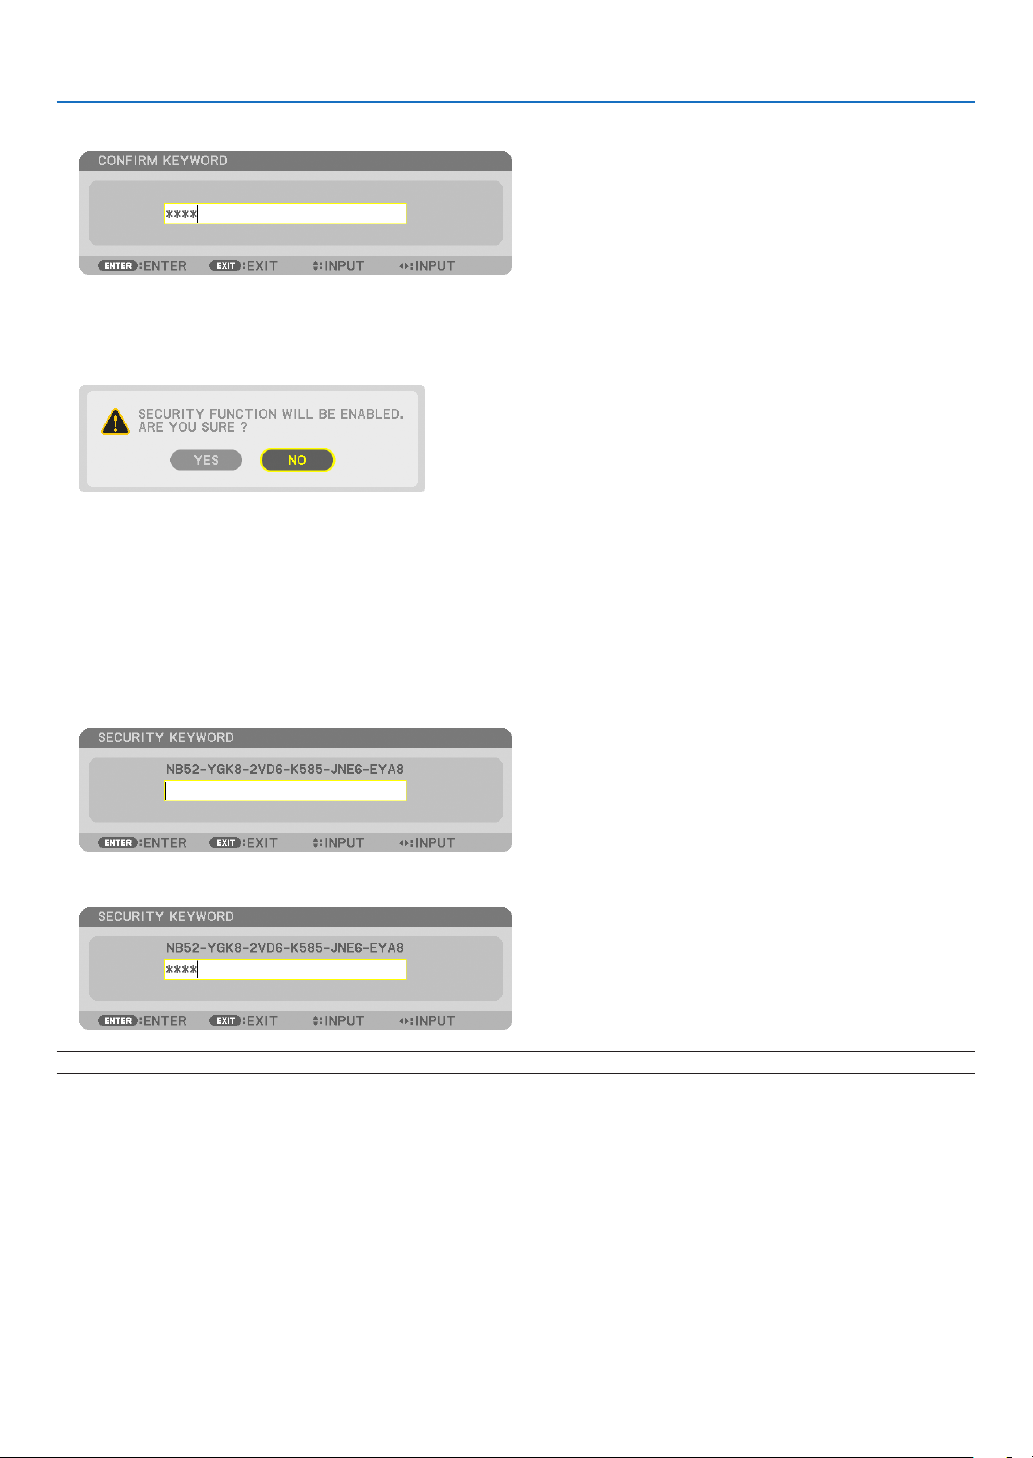
46
3. Convenient Features
7.TypeinthesamecombinationofbuttonsandpresstheENTERbutton.
Theconrmationscreenwillbedisplayed.
8.Select[YES]andpresstheENTERbutton.
TheSECURITYfunctionhasbeenenabled.
To turn on the projector when [SECURITY] is enabled:
1.PressthePOWERbutton.
Theprojectorwillbeturnedonanddisplayamessagetotheeffectthattheprojectorislocked.
2.PresstheMENUbutton.
3.TypeinthecorrectkeywordandpresstheENTERbutton.Theprojectorwilldisplayanimage.
NOTE: The security disable mode is maintained until the main power is turned off or unplugging the power cord.
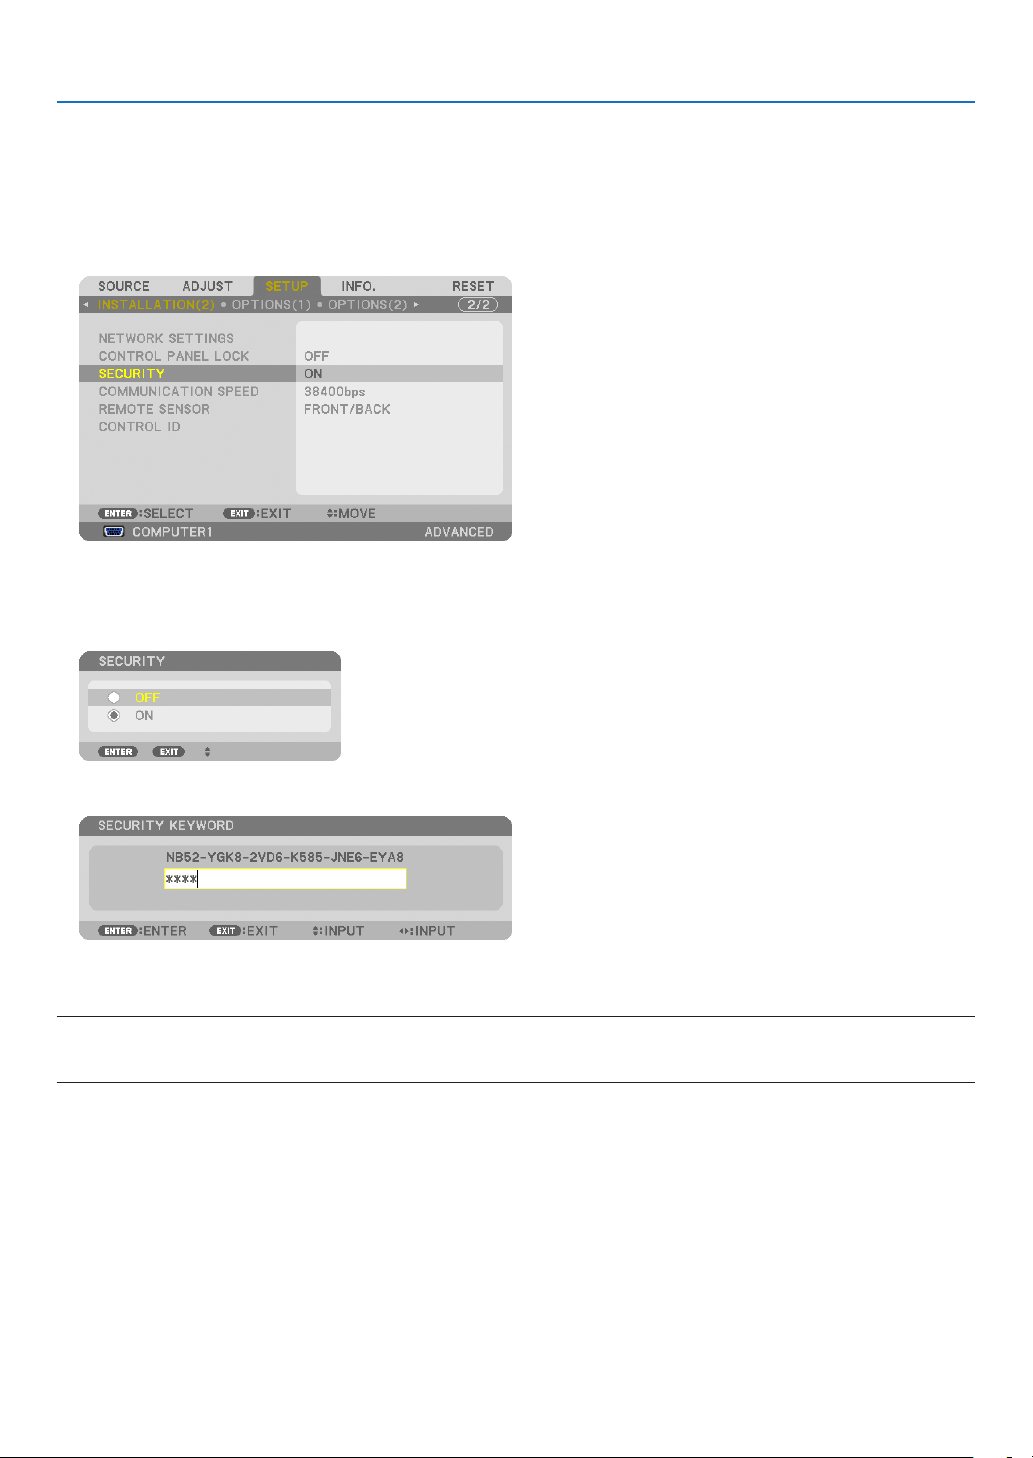
47
3. Convenient Features
To disable the SECURITY function:
1.PresstheMENUbutton.
Themenuwillbedisplayed.
2.Select[SETUP]→[INSTALLATION(2)]→[SECURITY]andpresstheENTERbutton.
TheOFF/ONmenuwillbedisplayed.
3.Select[OFF]andpresstheENTERbutton.
TheSECURITYKEYWORDscreenwillbedisplayed.
4.TypeinyourkeywordandpresstheENTERbutton.
Whenthecorrectkeywordisentered,theSECURITYfunctionwillbedisabled.
NOTE:Ifyouforgetyourkeyword,contactyourdealer.Yourdealerwillprovideyouwithyourkeywordinexchangeforyourrequest
code.YourrequestcodeisdisplayedintheKeywordConrmationscreen.Inthisexample[NB52-YGK8-2VD6-K585-JNE6-EYA8]
is a request code.
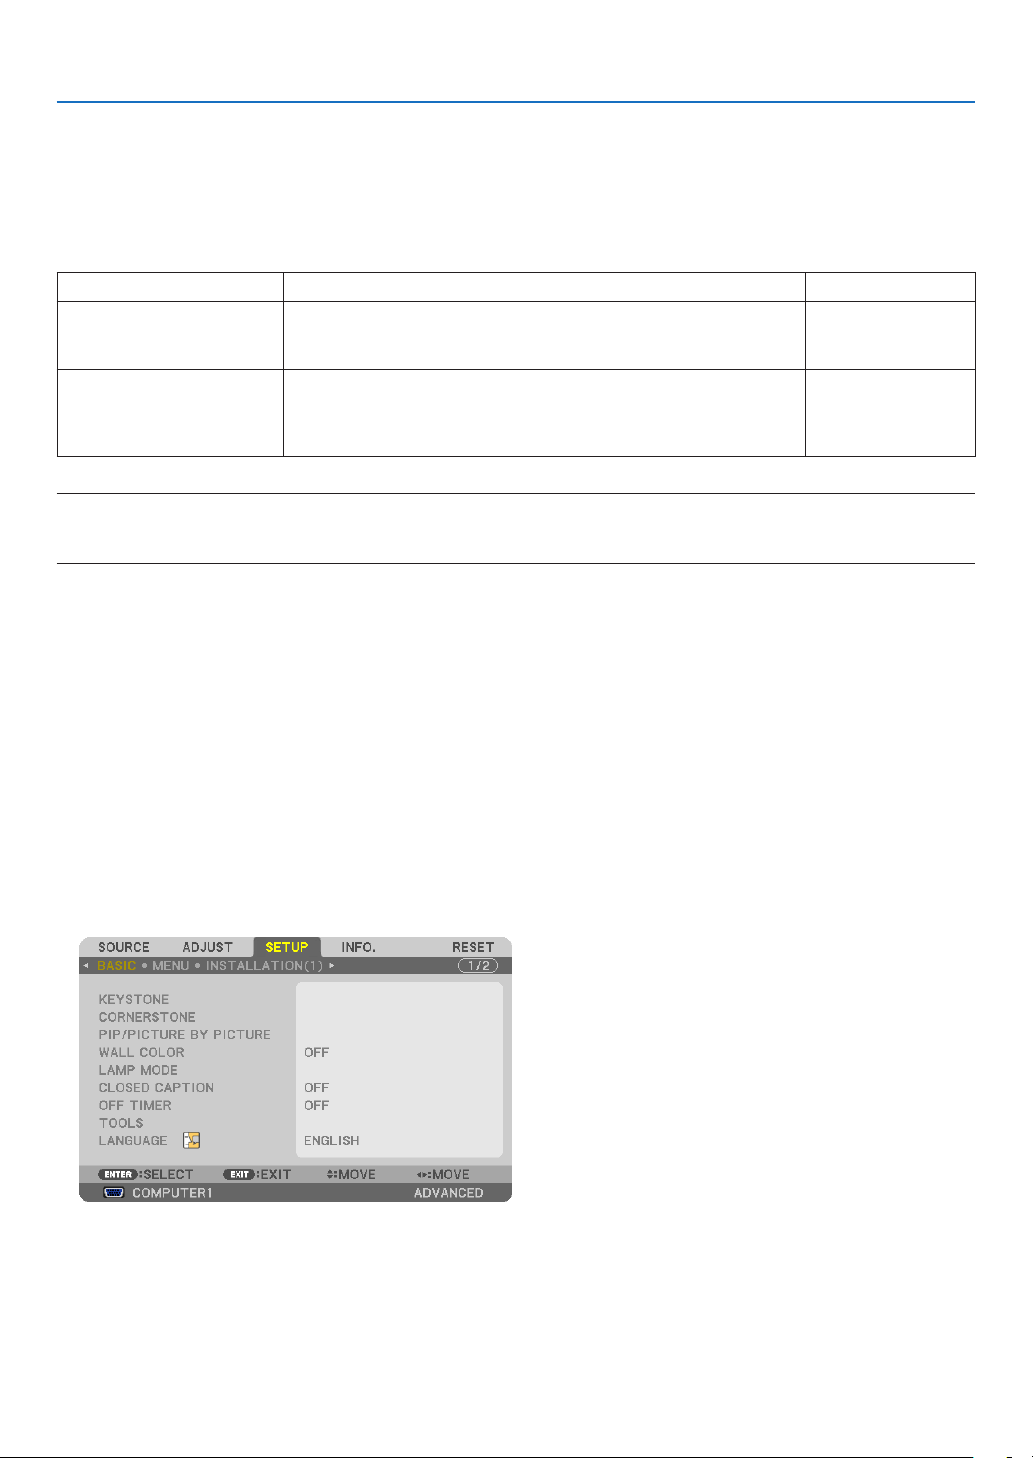
48
3. Convenient Features
Storing Changes for Lens Shift, Zoom, and Focus [LENS
MEMORY]
TheadjustedvaluescanbestoredinprojectormemorywhenusingtheLENSSHIFT,ZOOMandFOCUSbuttonsof
theprojectorortheremotecontrol.Adjustedvaluescanbeappliedtothesignalyouselected.Thiswilleliminatethe
needtoadjustlensshift,focus,andzoomatthetimeofsourceselection.Therearetwowaystosaveadjustedvalues
forlensshift,zoom,andfocus.
FunctionnameDescriptionpage
REF.LENSMEMORYAdjustedvaluescommontoalltheinputsignals.
Ifnoadjustedvaluesarestoredin[LENSMEMORY],thevaluesstored
in[REF.LENSMEMORY]willbeappliedforlensadjustment.
→page
126
LENSMEMORYAdjustedvaluesforeachinputsignal.
Usetheadjustedvaluesforthesignalwithadifferentaspectratioor
resolution.Theadjustedvaluescanbeappliedatthetimeofsource
selection.
→
page
117
NOTE:
•TheNP25FLlensdoesnotsupporttheLensMemoryfunction.
•Besuretoperform[CALIBRATION]afterreplacementofthelens.
Usage Example
Whenyouwishtodisplayonascreenhavinga4:3aspectratioanNTSCorother4:3aspectratiosignalandan
SXGAorother5:4aspectratiosignal:
Performshift,focus,andzoomadjustmentstosettheverticalscreensizeoftheverticallytall5:4aspectratiosignal
tostandard.
Both4:3aspectratiosignalsand5:4aspectratiosignalscannowbedisplayed.
Notethatwiththeseshift,focus,andzoomadjustments,the4:3aspectratiosignalwillbecomesmalleronthe
screen.
Toeliminatethissizereduction,adjusttheshift,focusandzoomtotheoptimumconditionforeachofthe4:3aspect
ratiosignalandthe5:4aspectratiosignal.
Memory(storage)ofeachofthesevalueswillpermitprojectionatanoptimumconditionuponsignalswitching.
To store your adjusted values in [REF. LENS MEMORY]:
1.PresstheMENUbutton.
Themenuwillbedisplayed.
2.Pressthe▶buttontoselect[SETUP]andpresstheENTERbutton.
3.Pressthe▶buttontoselect[INSTALLATION(1)].
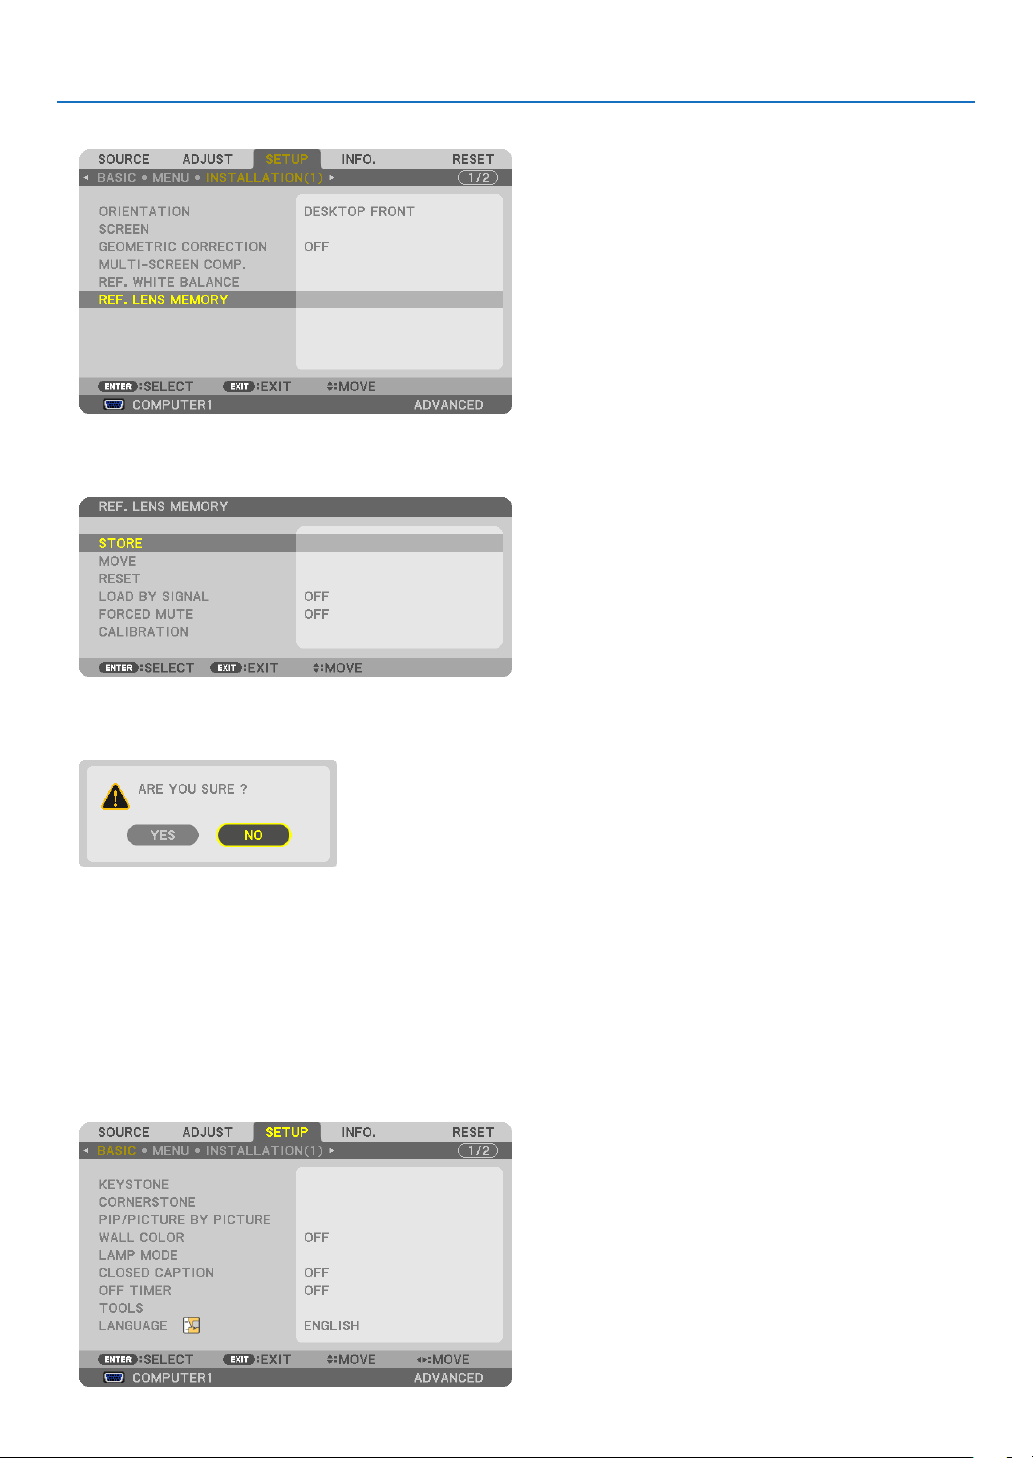
49
3. Convenient Features
4.Pressthe▼buttontoselect[REF.LENSMEMORY]andpresstheENTERbutton.
The[REF.LENSMEMORY]screenwillbedisplayed.
5.Select[STORE]andpresstheENTERbutton.
Theconrmationscreenwillbedisplayed.
6.Pressthe◀buttontoselectand[YES]andpresstheENTERbutton.
Theadjustedvaluesforlensshift,zoom,andfocushavebeenstoredin[REF.LENSMEMORY].
7.PresstheMENUbutton.
Themenuwillbeclosed.
TIP:
•Tostoreadjustedvaluesforeachinputsource,usetheLensMemoryfunction.
To call up your adjusted values from [REF. LENS MEMORY]:
1.PresstheMENUbutton.
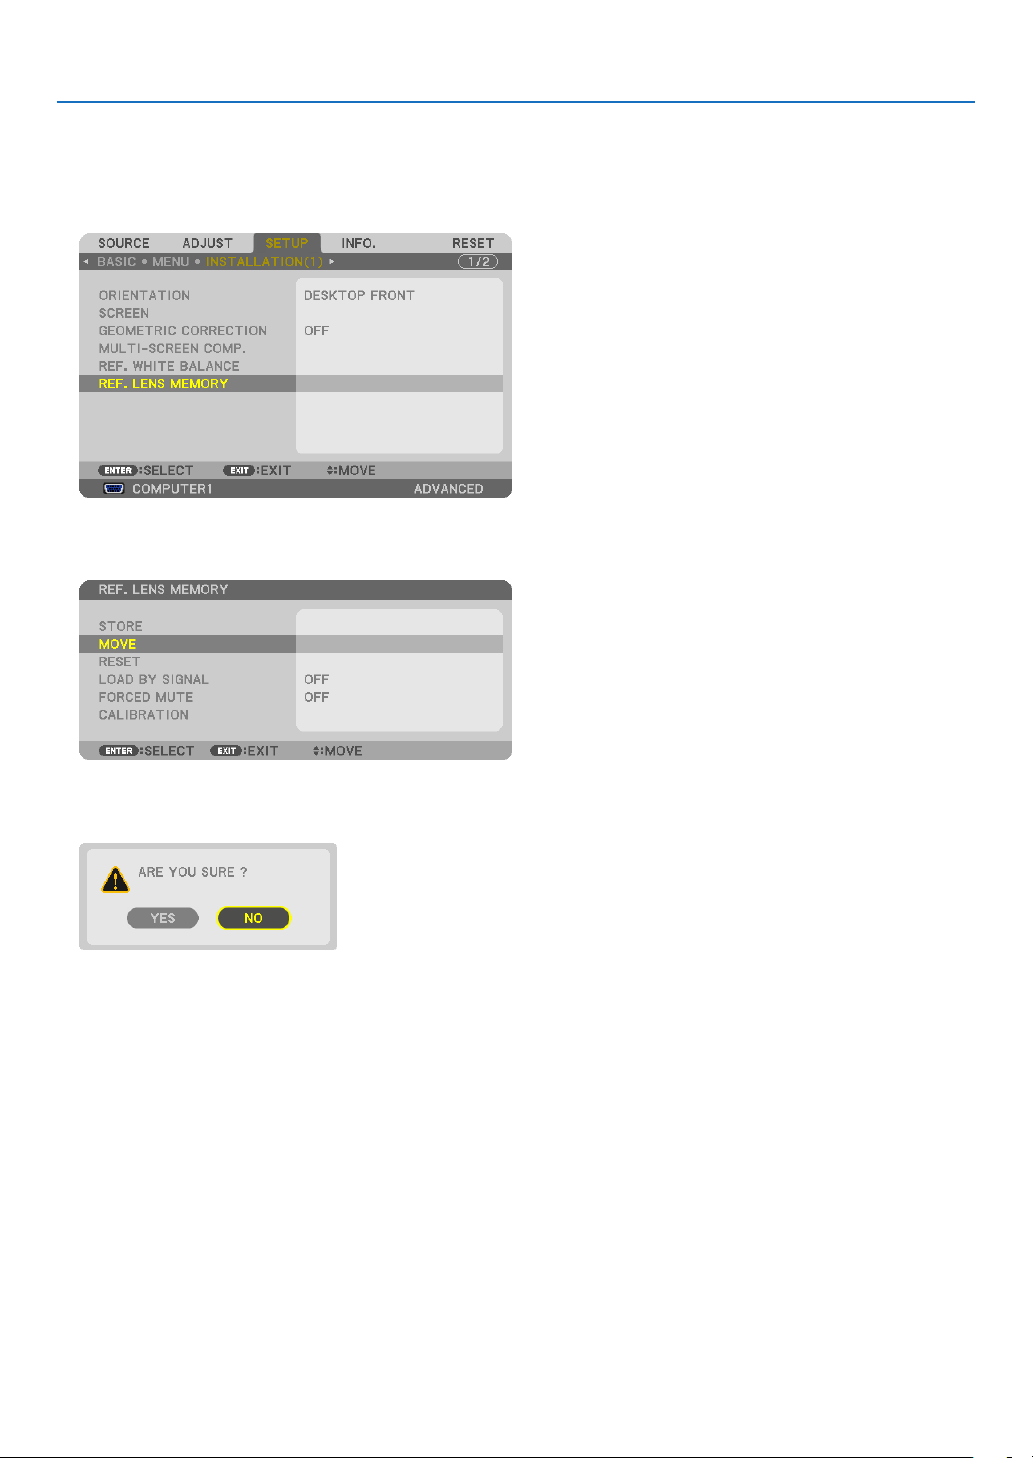
50
3. Convenient Features
Themenuwillbedisplayed.
2.Pressthe▶buttontoselect[SETUP]andpresstheENTERbutton.
3.Pressthe▶buttontoselect[INSTALLATION(1)].
4.Pressthe▼buttontoselect[REF.LENSMEMORY]andpresstheENTERbutton.
The[REF.LENSMEMORY]screenwillbedisplayed.
5.Select[MOVE]andpresstheENTERbutton.
Theconrmationscreenwillbedisplayed.
6.Pressthe◀buttontoselectand[YES]andpresstheENTERbutton.
Theadjustedvalueswillbeappliedtothecurrentsignal..
7.PresstheMENUbutton.
Themenuwillbeclosed.
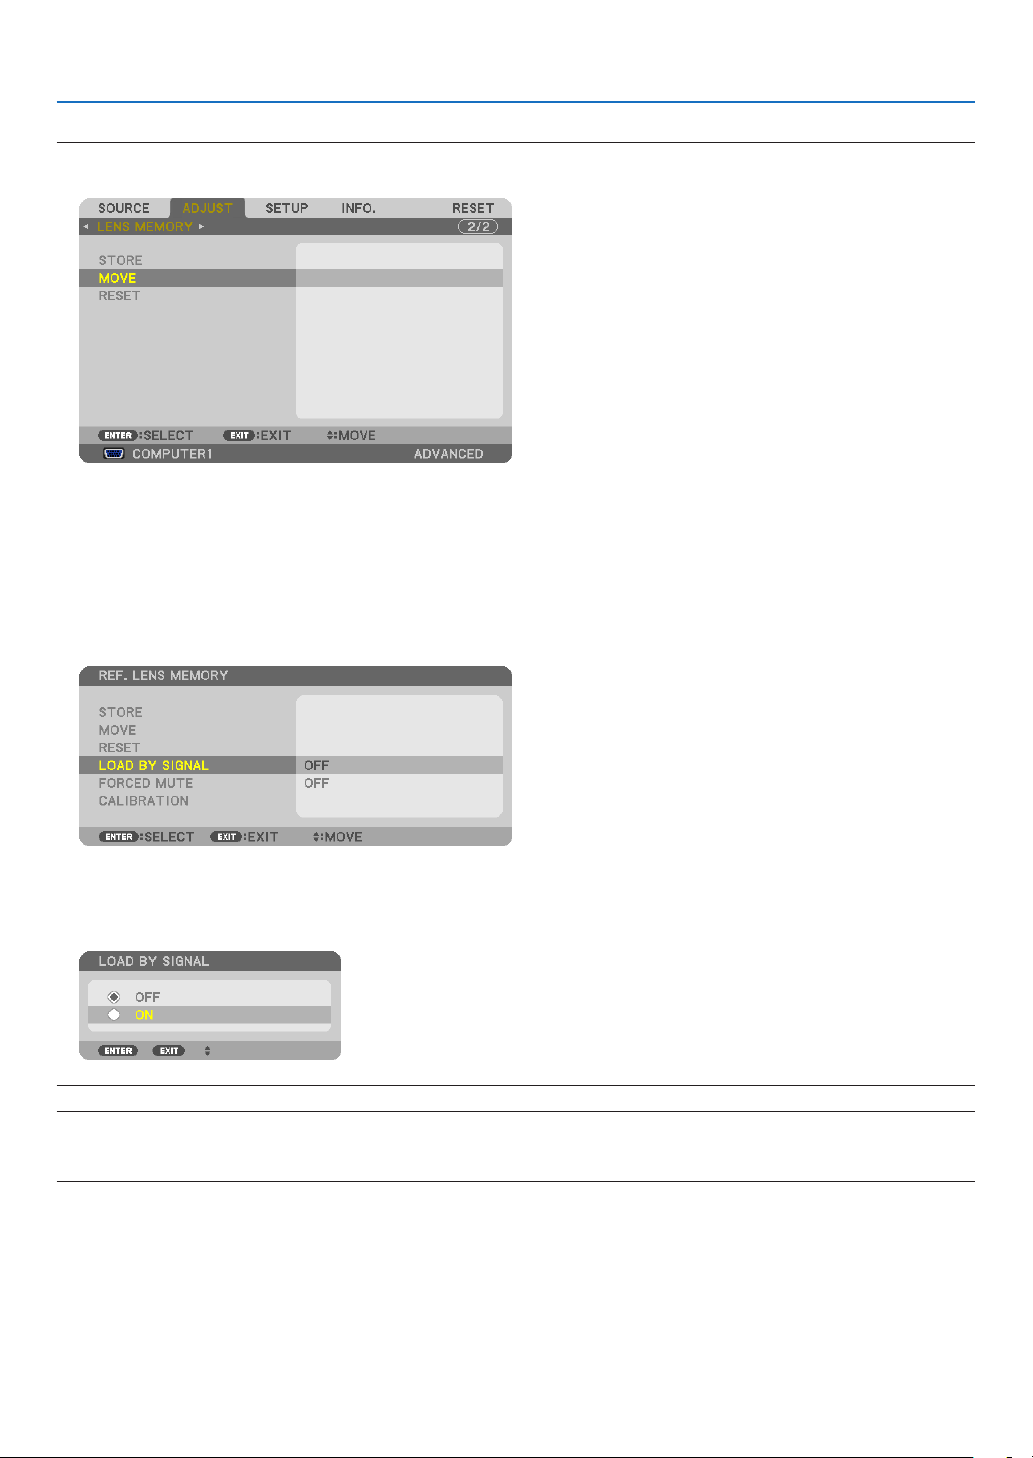
51
3. Convenient Features
TIP:
Tocalluptheadjustedvaluesfrom[LENSMEMORY]:
1.Fromthemenu,select[ADJUST]→[LENSMEMORY]→[MOVE]andpresstheENTERbutton.
Theconrmationscreenwillbedisplayed.
2.Pressthe◀buttontoselectand[YES]andpresstheENTERbutton.
Theadjustedvaluesstoredin[LENSMEMORY]willbeappliedtothecurrentsignal.
Toautomaticallyapplytheadjustedvaluesatthetimeofsourceselection:
1.Fromthemenu,select[SETUP]→[REF.LENSMEMORY]→[LOADBYSIGNAL]andpresstheENTERbut-
ton.
2.Pressthevbuttontoselectand[ON]andpresstheENTERbutton.
This will move the lens automatically to the position at the time of source selection according to the adjusted val-
ues.
NOTE:TheLensMemoryfunctionmaynotproduceacompletelyalignedimage(duetotolerancesinthelenses)usingtheadjusted
valuesstoredintheprojector.AftercallingupandapplyingtheadjustedvaluesfromtheLensMemoryfunction,nelyadjustthe
lens shift, zoom and focus to produce the best possible image.
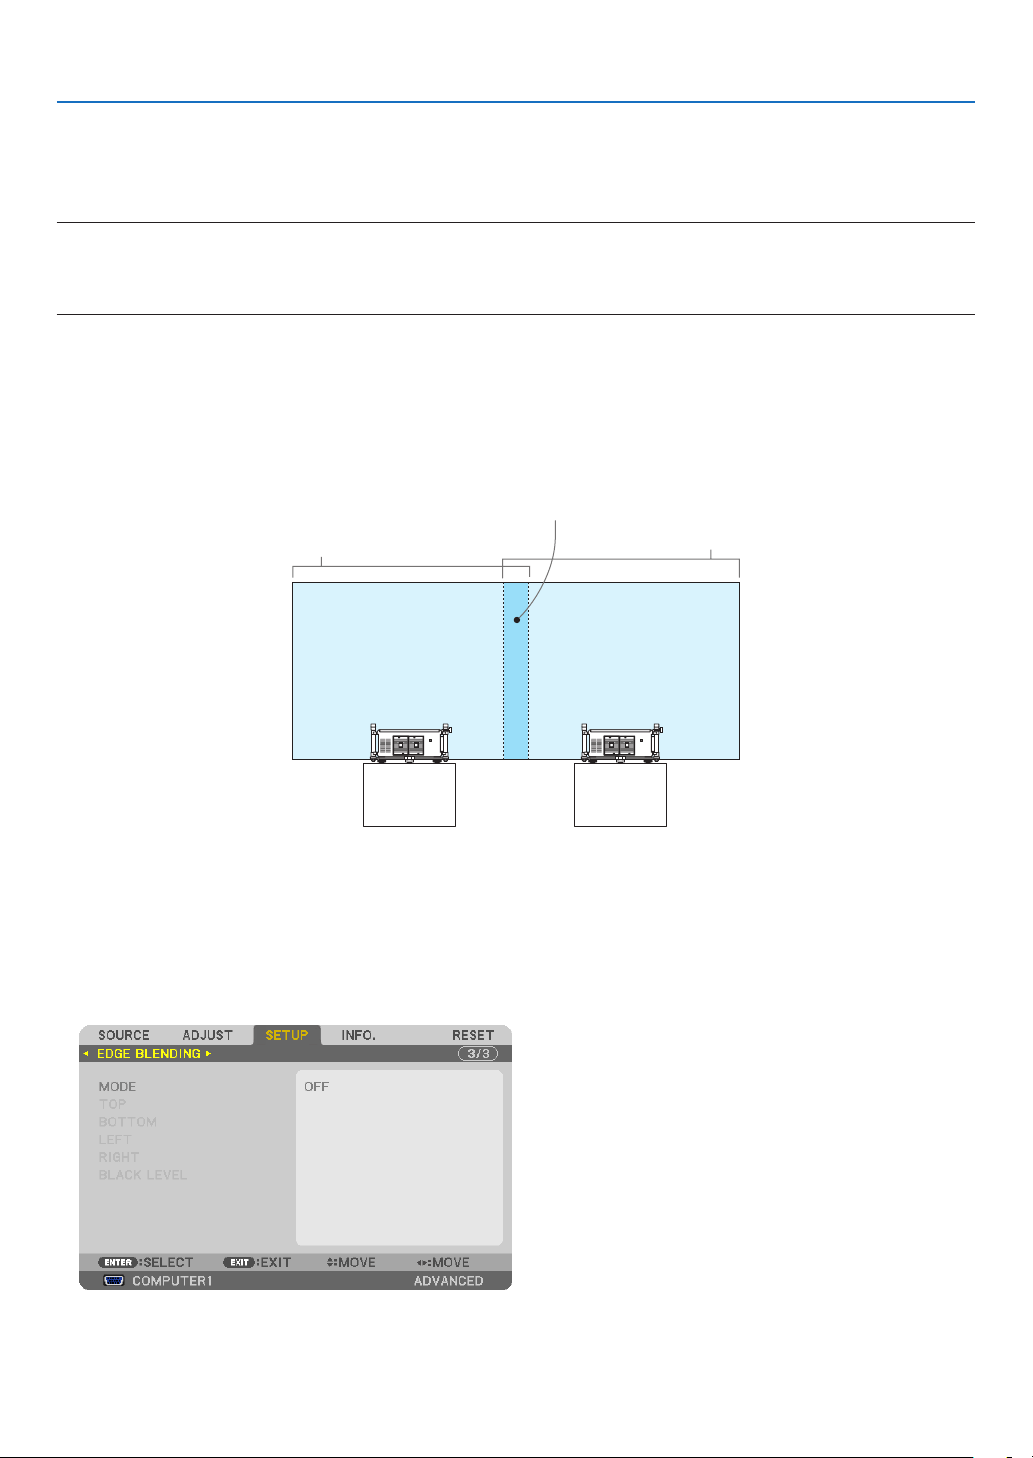
52
3. Convenient Features
Displaying a Picture Using [EDGE BLENDING]
TheEDGEBLENDINGfunctionallowsamulti-screenimagewithhighresolutiontobedisplayedonalargescreen.
Thisfunctionadjustsoverlappingedgesofimagesprojectedfromeachprojectortouniformmulti-screenimages.
NOTE:
•Forprojectorthrowdistances,referto“Throwdistanceandscreensize”onpage215, 216, 217.
•BeforeperformingtheEdgeBlendingfunction,placetheprojectorinthecorrectpositionsothattheimagebecomessquarein
theappropriatesize,andthenmakeopticaladjustments(lensshift,focus,andzoom).
Before explaining use of the Edge Blending function
Thissectionexplainsthecasefor“Example:Placingtwoprojectorssidebyside”.Asshown,theprojectedimageon
theleftisreferredtoas“ProjectorA”andtheprojectedimageontherightisreferredto“ProjectorB”.Unlessotherwise
speciedhereinafter,the“projector”isusedtomeanbothAandB.
Example:Placingtwoprojectorssidebyside
EdgeBlendingarea
Projected area
Projected area
ProjectorAProjectorB
Preparation:
•Turnontheprojectoranddisplayasignal.
•Tousetwoormoreprojectors,youhavetoturnon[CONTROLID]fromthemenu.Formoreinformation,referto
“SettingIDtotheProjector[CONTROLID]”onpage
127.
① Enable [EDGE BLENDING].
1Select[SETUP]→[EDGEBLENDING]andpresstheENTERbutton.
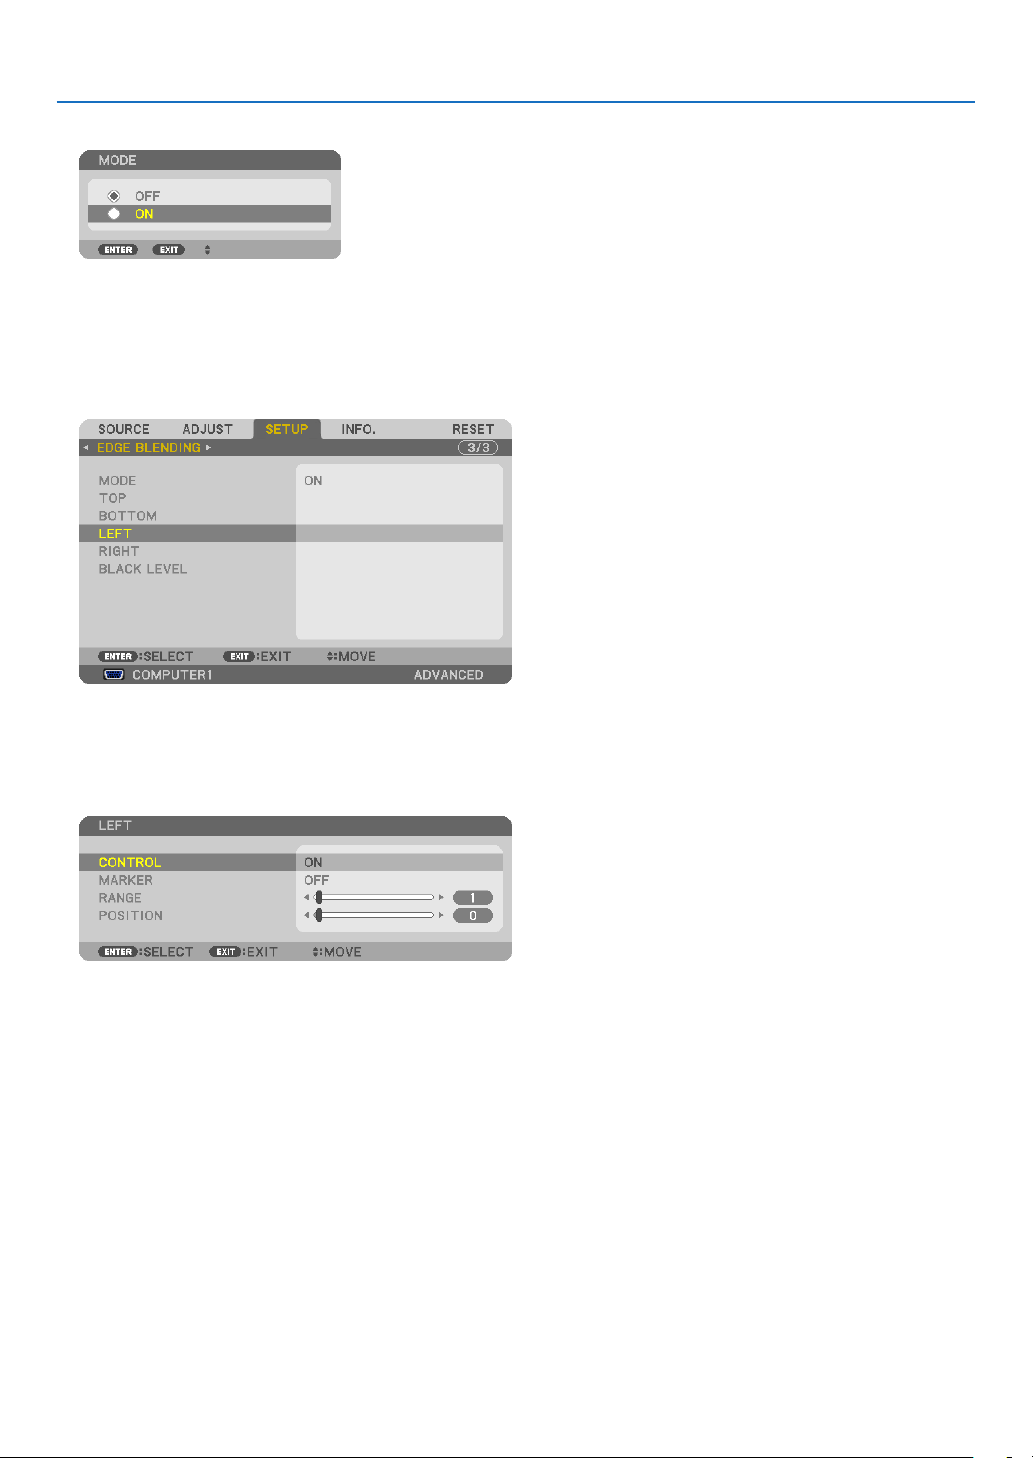
53
3. Convenient Features
2Select[MODE]→[ON]andpresstheENTERbutton.
ThisenablestheEdgeBlendingfunction.Thefollowingmenuitemsareavailable:
[TOP],[BOTTOM],[LEFT],[RIGHT],and[BLACKLEVEL]
3Select[RIGHT]forProjectorAand[LEFT]forProjectorB.
PresstheENTERbutton.
Thefollowingitemsareavailable:
[CONTROL],[MARKER],[RANGE],and[POSITION]
4Select[CONTROL]→[ON]andpresstheENTERbutton.
Each[TOP],[BOTTOM],[LEFT],[RIGHT],and[BLACKLEVEL]hasitsown[CONTROL],[MARKER],[RANGE],
and[POSITION].Turningon[CONTROL]willmake[MARKER],[RANGE],and[POSITION]available.
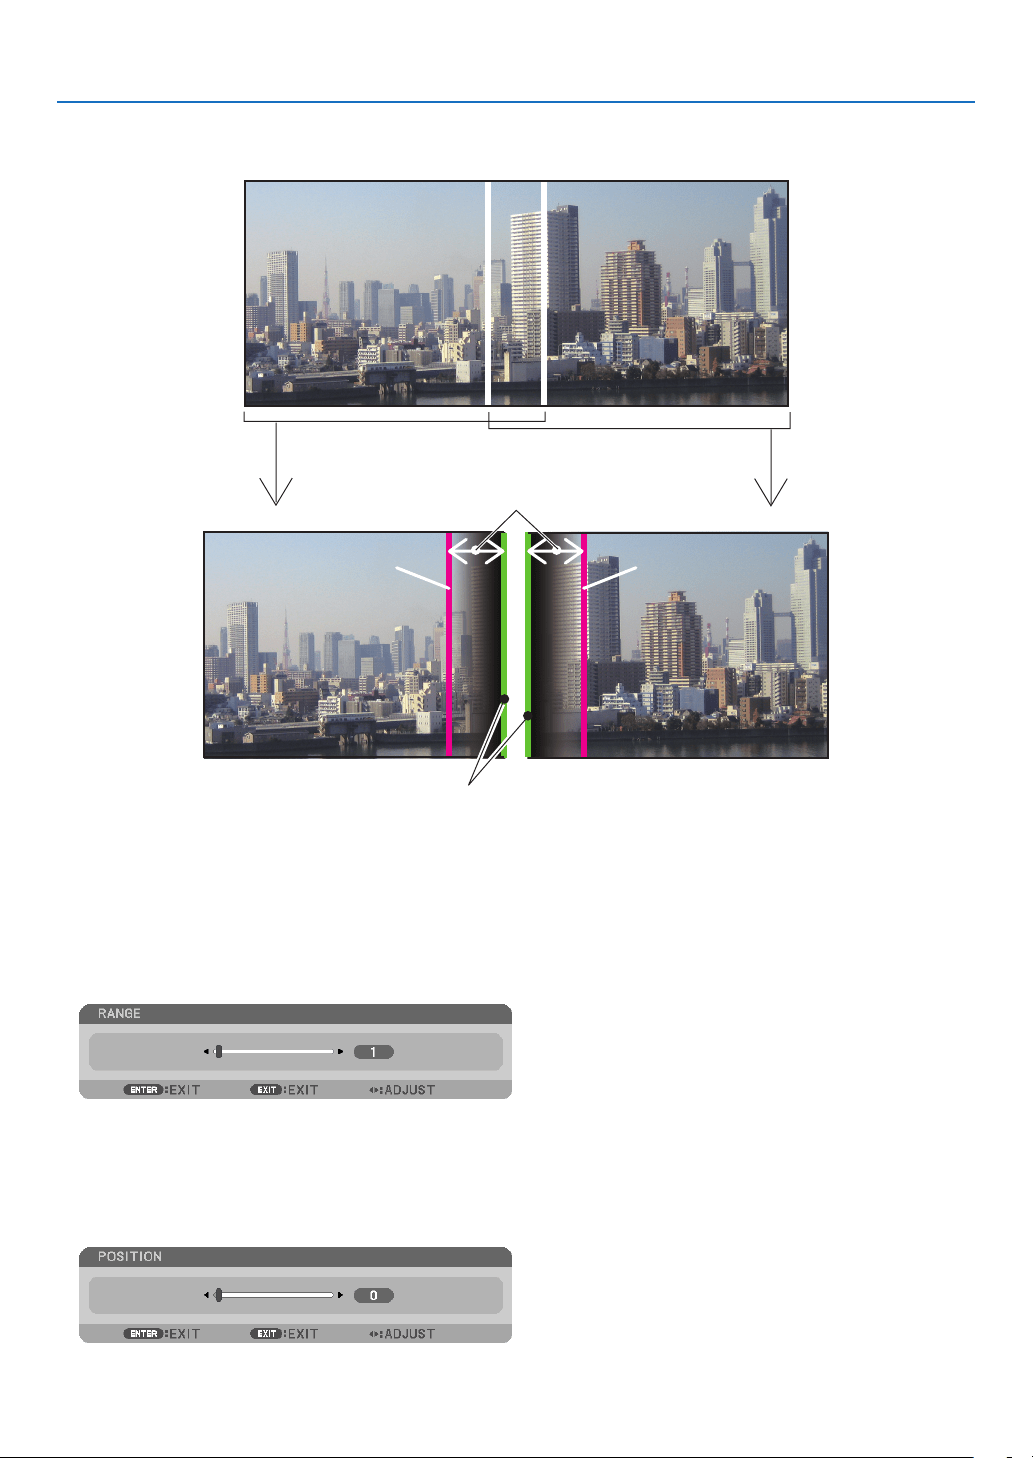
54
3. Convenient Features
② Adjust [RANGE] and [POSITION] to determine an area of overlapped edges of images
projected from each projector.
[RANGE]
(Determine an area of overlapped edges of
images.)
[POSITION]
(Determine the position of overlapped edges of images.)
Greenmarker
Turnon[RIGHT]
Magentamarker
Turn on [LEFT]
Magentamarker
Turningon[MARKER]willdisplaymarkersinmagentaandgreen.
Themagentamarkerisusedfor[RANGE]andgreenonefor[POSITION].
1Adjust[RANGE].
Use the or buttontoadjusttheoverlappedarea.
TIP:
•Adjusttooverlaponeprojector’markerwiththeotherprojector’smarker.
2Adjust[POSITION].
Use the or buttontoalignoneedgewiththeotheredgeofoverlappedimages.
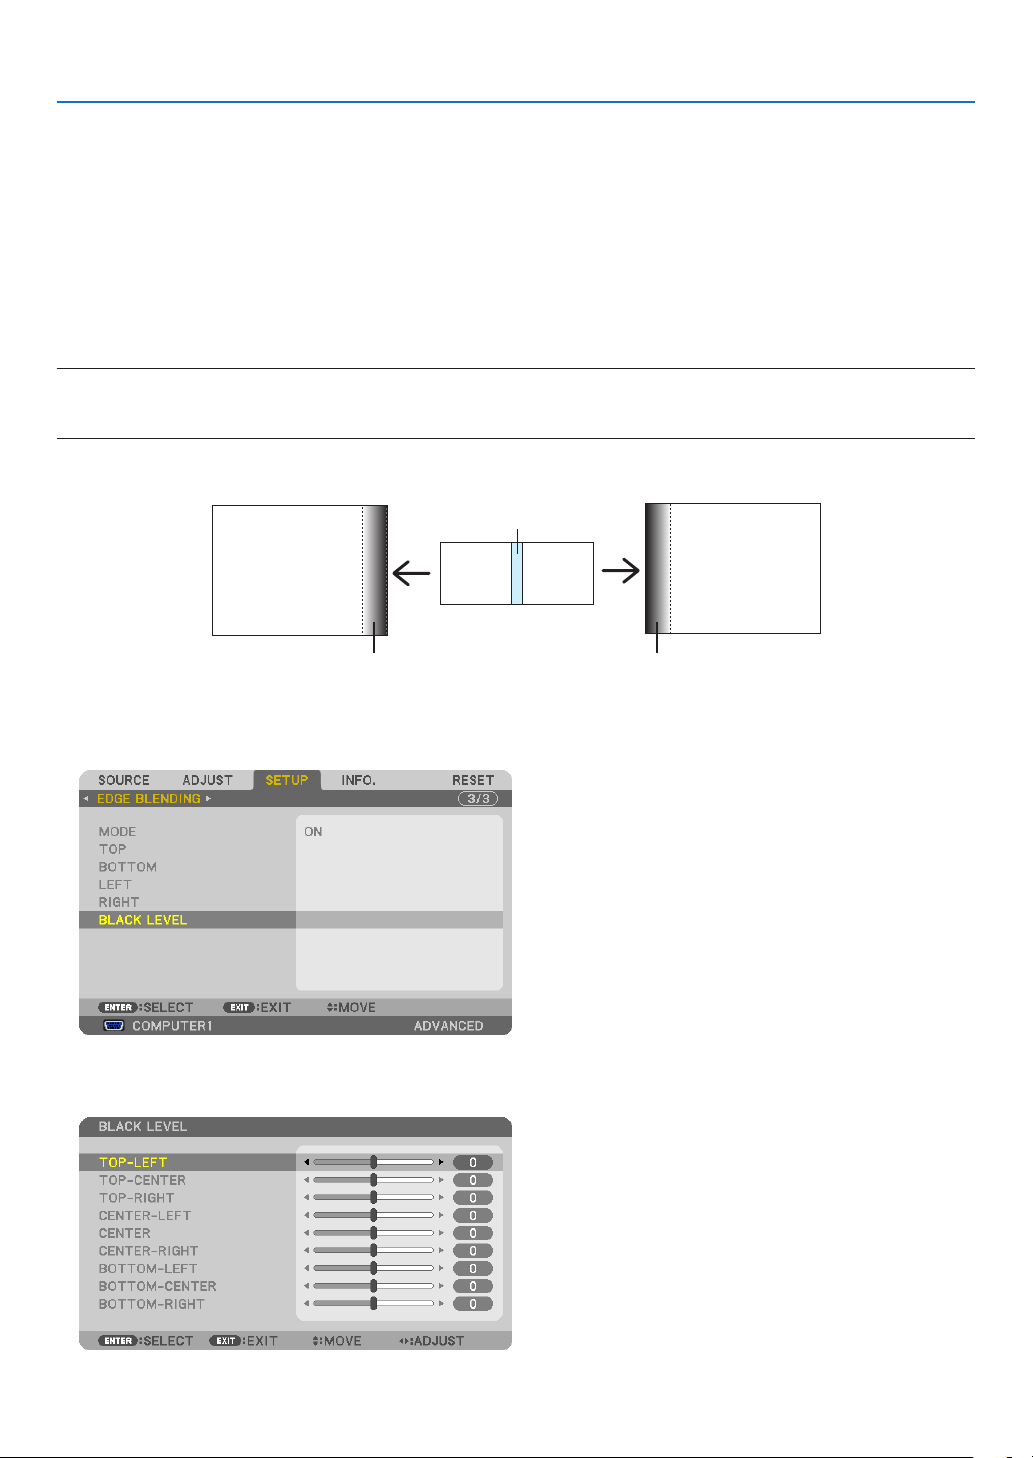
55
3. Convenient Features
TIP:
•Whendisplayingasignalwithadifferentresolution,performtheEdgeBlendingfunctionfromthestart.
•Settingof[MARKER]willnotbesavedandreturnto[OFF]whentheprojectoristurnedoff.
•Todisplayorhidethemarkerwhiletheprojectorisrunning,turnonoroff[MARKER]fromthemenu.
•Ifyouwanttomakedifferencesinwhitebalanceandbrightnessbetweenprojectorslessvisible,adjust[REF.WHITEBALANCE]
and[MULTI-SCREENCOMP.]toobtainthepossiblebestresults.(→ page 125)
Black Level Adjustment
Ifyounoticeanydifferencesinthebrightnessofanimage,use[BLACKLEVEL]toadjustthedarkestpartorthelevel
ofbrightness.
NOTE:
Thisfunctionisenabledonlywhen[MODE]isturnedon.
Adjustableareavariesdependingonwhatcombinationof[TOP],[BOTTOM],[LEFT]and[RIGHT]areturnedon.
Example:AdjustingtheBlackLevelwhenplacingtwoprojectorssidebyside
Widthofoverlap
Adjust[CENTER]Adjust[CENTER]
ProjectorA’s
image
ProjectorB’s
image
Adjust[CENTER-RIGHT]Adjust[CENTER-LEFT]
1.Turnon[MODE]
2.Select[BLACKLEVEL]andpresstheENTERbutton.
3.Usethe or buttontoselectanitemandusethe or toadjusttheblacklevel.
Do this for the other projector if necessary.
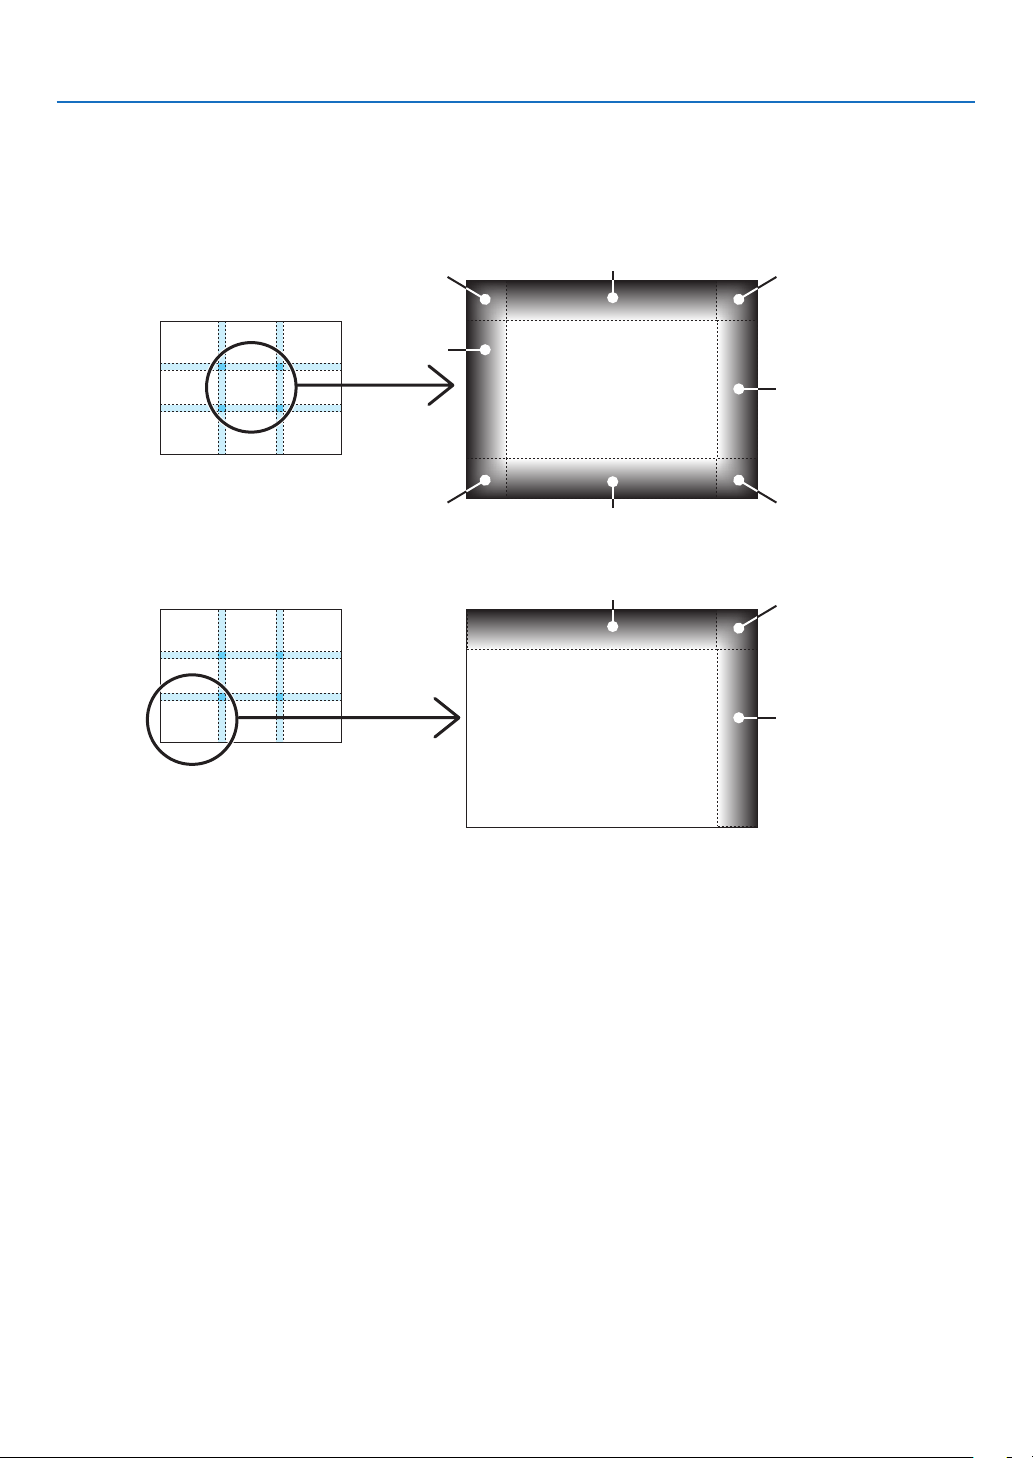
56
3. Convenient Features
9-segmented portions for Black Level adjustment
Thecenterprojector
Thisfunctionadjuststhebrightnesslevelof9-segmentedportionsforthecenterprojectorand4-segmentedportions
fortheleftbottomprojectorasshownbelow.
TOP-LEFT
BOTTOM-LEFT
CENTER-
LEFT
TOP-RIGHT
CENTER-RIGHT
BOTTOM-RIGHT
TOP-CENTER
CENTER
CENTER
BOTTOM-CENTER
TOP-RIGHT
CENTER-RIGHT
TOP-CENTER

57
3. Convenient Features
Controlling the Projector by Using an HTTP Browser
Overview
TheHTTPServerfunctionprovidessettingsandoperationsfor:
1.Settingforwired/wirelessnetwork(NETWORKSETTINGS)
TousewirelessLANconnection,theoptionalUSBWirelessLANUnitisrequired.(→ page 174)
Tousewired/wirelessLANconnection,connecttheprojectortothecomputerwithacommerciallyavailableLAN
cable.(→ page 173)
2.SettingAlertMail(ALERTMAIL)
Whentheprojectorisconnectedtoawired/wirelessnetwork,lampreplacetimeorerrormessageswillbesentvia
e-mail.
3.Operatingtheprojector
Poweron/off,selectinginput,andpictureadjustmentsarepossible.
4.SettingPJLinkPASSWORDandAMXBEACON
AccesstotheHTTPserverfunction:
•StarttheWebbrowseronthecomputerviathenetworkconnectedtotheprojectorandenterthefollowing
URL:
http://<theprojector’sIPaddress>/index.html
TIP:ThefactorysettingIPaddressis[DHCPON].
NOTE:
•Tousetheprojectorinanetwork,consultwithyournetworkadministratoraboutnetworksettings.
•Thedisplay’sorbutton’sresponsecanbesloweddownoroperationmaynotbeaccepteddependingthesettingsofyournet-
work.
Shouldthishappen,consultyournetworkadministrator.Theprojectormaynotrespondifitsbuttonsarerepeatedlypressedin
rapidintervals.Shouldthishappen,waitamomentandrepeat.Ifyoustillcan’tgetanyresponse,turnoffandbackontheprojec-
tor.
•IfthePROJECTORNETWORKSETTINGSscreendoesnotappearinthewebbrowser,presstheCtrl+F5keystorefreshyourweb
browser(orclearthecache).
•Thisdeviceuses“JavaScript”and“Cookies”andthebrowsershouldbesettoacceptthesefunctions.Thesettingmethodwill
varydependingontheversionofbrowser.Pleaserefertothehelplesandtheotherinformationprovidedinyoursoftware.
Preparation before Use
ConnecttheprojectortoacommerciallyavailableLANcablebeforeengaginginbrowseroperations.(→page
173)
Operationwithabrowserthatusesaproxyservermaynotbepossibledependingonthetypeofproxyserverandthe
settingmethod.Althoughthetypeofproxyserverwillbeafactor,itispossiblethatitemsthathaveactuallybeenset
willnotbedisplayeddependingontheeffectivenessofthecache,andthecontentssetfromthebrowsermaynotbe
reectedinoperation.Itisrecommendedthataproxyservernotbeusedunlessitisunavoidable.

58
3. Convenient Features
Handling of the Address for Operation via a Browser
RegardingtheactualaddressthatisenteredfortheaddressorenteredtotheURLcolumnwhenoperationofthepro-
jectorisviaabrowser,thehostnamecanbeusedasitiswhenthehostnamecorrespondingtotheIPaddressofthe
projectorhasbeenregisteredtothedomainnameserverbyanetworkadministrator,orthehostnamecorresponding
totheIPaddressoftheprojectorhasbeensetinthe“HOSTS”leofthecomputerbeingused.
Example1:Whenthehostnameoftheprojectorhasbeensetto“pj.nec.co.jp”,accessisgainedtothenetwork
settingbyspecifying
http://pj.nec.co.jp/index.html
fortheaddressortheentrycolumnoftheURL.
Example2:WhentheIPaddressoftheprojectoris“192.168.73.1”,accessisgainedtothenetworksettingby
specifying
http://192.168.73.1/index.html
fortheaddressortheentrycolumnoftheURL.
PROJECTOR ADJUSTMENT
POWER:Thiscontrolsthepoweroftheprojector.
ON ......................... Power is switched on.
OFF ........................ Power is switched off.
VOLUME:Thiscontrolisnotavailableonthismodel.
AV-MUTE:Thiscontrolsthemutefunctionoftheprojector.
PICTURE ................ Mutes the video.
PICTURE ........... Cancels the video muting.
SOUND* ................ Mutes the audio.
SOUND*
............ Cancels the audio muting.
ALL ON .................. Mutes each of the video, and audio* functions.
ALL OFF ................. Cancels the muting of each of the video, and audio* functions.
NOTE:
*Thesoundmutefunctionisnotavailablebecausetheprojectordoesnothaveanaudiofunction.

59
3. Convenient Features
PICTURE:Controlsthevideoadjustmentoftheprojector.
BRIGHTNESS .... Increases the brightness adjustment value.
BRIGHTNESS .... Decreases the brightness adjustment value.
CONTRAST ........ Increases the contrast adjustment value.
CONTRAST ........ Decreases the contrast adjustment value.
COLOR .............. Increases the color adjustment value.
COLOR .............. Decreases the color adjustment value.
HUE ................... Increases the hue adjustment value.
HUE ................... Decreases the hue adjustment value.
SHARPNESS ..... Increases the sharpness adjustment value.
SHARPNESS ..... Decreases the sharpness adjustment value.
•Thefunctionsthatcanbecontrolledwillvarydependingonthesignalbeinginputtotheprojector.(→page
111)
SOURCESELECT:Thisswitchestheinputconnectoroftheprojector.
COMPUTER 1 ........ Switches to the COMPUTER 1 IN connector.
COMPUTER 2 ........ Switches to the COMPUTER 2 IN connector.
COMPUTER 3 ........ Switches to the COMPUTER 3 IN connector.
HDMI ..................... Switches to the HDMI IN connector.
DisplayPort ............ Switches to the DisplayPort.
VIDEO .................... Switches to the VIDEO IN connector.
S-VIDEO ................ Switches to the S-VIDEO IN connector.
VIEWER ................. Switches to the data on the USB memory device.
NETWORK ............. Switches to a LAN signal.
SLOT ...................... Switches to the optional board.
PROJECTORSTATUS:Thisdisplaystheconditionoftheprojector.
LAMP 1 LIFE REMAINING ..Displays the remaining life of the lamp 1 as a percentage.
LAMP 2 LIFE REMAINING ..Displays the remaining life of the lamp 2 as a percentage.
LAMP 1 HOURS USED ........Displays how many hours the lamp 1 has been used.
LAMP 2 HOURS USED ........Displays how many hours the lamp 2 has been used.
FILTER HOURS USED .........Displays how many hours the filter has been used.
ERROR STATUS ..................Displays the status of errors occurring within the projector.
LOGOFF:Loggingoffyourprojectorandreturningtotheauthenticationscreen(LOGONscreen).

60
3. Convenient Features
NETWORK SETTINGS
•SETTINGS
WIRED or WIRELESS
SETTINGSetforwiredLANorforwirelessLAN.
APPLYApplyyoursettingstowiredLANorwirelessLAN.
DHCPONAutomaticallyassignIPaddress,subnetmask,andgatewaytotheprojectorfromyour
DHCPserver.
DHCPOFFSetIPaddress,subnetmask,andgatewaytotheprojectorassignedbyyournetwork
administrator.
IPADDRESSSetyourIPaddressofthenetworkconnectedtotheprojector.
SUBNETMASKSetyoursubnetmasknumberofthenetworkconnectedtotheprojector.
GATEWAYSetthedefaultgatewayofthenetworkconnectedtotheprojector.
WINSSettheIPaddressofyourWINSserverofthenetworkconnectedtotheprojectorwhen
[DHCP]isturnedon,thisoptionisnotavailable.
AUTODNSONDHCPserverwillautomaticallyassignIPaddressofDNSserverconnectedtothe
projector.
AUTODNSOFFSetyourIPaddressofDNSserverconnectedtotheprojector.
Setting for WIRED LAN
PROFILE1/PROFILE2TwosettingscanbesetforwiredLANconnection.SelectPROFILE1orPROFILE2.
DISABLETurnoffwiredLANconnection
SettingforWIRELESSLAN(theoptionalWirelessLANUnitrequiredforEurope,Australia,andAsiancoun-
tries)
EASYCONNECTIONExecuteawirelessLANusingEASYCONNECTION.
SIMPLEACCESPOINTSettheprojectorforsimpleaccesspoint.
WPSUseWPS(Wi-FiProtectedSetup™)tosetupthewirelessLANfortheprojector.
NOTE:Usetheprojector’smenustomakeWPSconnectionsandchangetheWPS
prolesettings.
CHANNELSelectachannel.Availablechannelsvarydependingonthecountryandregion.When
youselect[INFRASTRUCTURE],makesurethattheprojectorandyouraccesspoint
areonthesamechannel;whenyouselect[ADHOC],makesurethattheprojectorand
yourcomputerareonthesamechannel.
PROFILE1/PROFILE2TwosettingscanbesetforwirelessLANconnection.SelectPROFILE1orPROFILE
2.
61
3. Convenient Features
SSIDEnteranidentier(SSID)forwirelessLAN.Communicationcanbedoneonlywith
equipmentwhoseSSIDmatchesSSIDforyourwirelessLAN.
SITESURVEYDisplaysalistofavailableSSIDsforwirelessLANonsite.SelectanSSIDwhichyou
canaccess.
NETWORKTYPESelectcommunicationmethodwhenusingwirelessLAN.
INFRASTRUCTURE:Selectthisoptionwhencommunicatingwithoneormoreequip-
mentconnectedtothewirelessLANnetworkviaawirelessaccesspoint.
ADHOC:SelectthisoptionwhenusingthewirelessLANtodirectlycommunicatewith
acomputerinpeer-to-peermode.
SECURITYTYPE
Turnonorofftheencryptionmodeforsecuretransmission.Whenturnontheencryp-
tionmode,setWEPkeyorencryptedkey.
DISABLEWillnotturnontheencryptionfeature.Yourcommunicationsmay
bemonitoredbysomeone.
WEP64bitUses64-bitdatalengthforsecuretransmission.
WEP128bitUses128-bitdatalengthforsecuretransmission.Thisoptionwill
increaseprivacyandsecuritywhencomparedtouseof64-bit
datalengthencryption.
WPA-PSKTKIP/WPA-PSKAES/
WPA2-PSKTKIP/WPA2-PSKAES/
WPA-EAPTKIPEAP-TLS/
WPA-EAPAESEAP-TLS/
WPA-EAPTKIPPEAP-MSCHAPv2/
WPA-EAPAESPEAP-MSCHAPv2/
WPA2-EAPTKIPEAP-TLS/
WPA2-EAPAESEAP-TLS/
WPA2-EAPTKIPPEAP-MSCHAPv2/
WPA2-EAPAESPEAP-MSCHAPv2
Theseoptionsparovidestrongersecurity
thanWEP.
NOTE:
•TheWEPsettingsmustbethesameascommunicationdevicessuchasPCoraccesspointin
your wireless network.
•WhenyouuseWEP,yourimagetransmissionspeedwillslowdown.
•OtherencryptionkeysthanWEP64bitandWEP128bitarenotavailablewhen[ADHOC]is
selectedfrom[NETWORKTYPE].
•Toinstalladigitalcerticate,usetheprojector’smenu.(→ page 147)
INDEX
Selectencryptionkeywhenselecting[WEP64bit]or[WEP128bit]in[SECURITY
TYPE].
KEY
Whenselecting[WEP64bit]or[WEP128bit]in[SECURITYTYPE]:
EnterWEPkey.
SelectCharacters(ASCII)Hexadecimaldigit(HEX)
WEP64bitUpto5charactersUpto10characters
WEP128bitUpto13charactersUpto26characters
Whenselecting[WPAPSK-TKIP],[WPAPSK-AES],[WPA2PSK-TKIP]or[WPA2
PSK-AES]:
Enterencryptionkey.Keylengthmustbe8orgreaterand63orless.
USERNAMESetausernameforWPA-EAP/WPA2-EAP.
PASSWORDSetapasswordforWPA-EAPTKIPPEAP-MSCHAPv2/WPA-EAPAESPEAP-MSCHAP
v2/WPA2-EAPTKIPPEAP-MSCHAPv2/WPA2-EAPAESPEAP-MSCHAPv2.
USEDIGITALCERTIFI-
CATE
SelectthisifyouuseadigitalcerticateforWPA-EAPTKIPPEAP-MSCHAPv2/WPA-
EAPAESPEAP-MSCHAPv2/WPA2-EAPTKIPPEAP-MSCHAPv2/WPA2-EAPAES
PEAP-MSCHAPv2.

62
3. Convenient Features
•NAME
PROJECTORNAMEEnteranameforyourprojectorsothatyourcomputercanidentifytheprojector.A
projectornamemustbe16charactersorless.
TIP:Projectornamewillnotbeaffectedevenwhen[RESET]isdonefromthemenu.
HOSTNAMEEnterthehostnameofthenetworkconnectedtotheprojector.Ahostnamemustbe
15orless.
DOMAINNAMEEnterthedomainnameofthenetworkconnectedtotheprojector.Adomainname
mustbe60charactersorless.
•ALERTMAIL
ALERTMAILThisoptionwillnotifyyourcomputeroflampreplacetimeorerrormessagesviae-mail
whenusingwirelessorwiredLAN.
PlacingacheckmarkwillturnontheAlertMailfeature.
ClearingacheckmarkwillturnofftheAlertMailfeature.
Sampleofamessagetobesentfromtheprojector:
Thelampandltersareattheendofitsusablelife.Pleasereplacethelamp.
ProjectorName:XXXXX
Lamp1HoursUsed:XXX[H]
Lamp2HoursUsed:XXX[H]
SENDER’SADDRESSEntersender’saddress.
SMTPSERVERNAMEEntertheSMTPservernametobeconnectedtotheprojector.
RECIPIENT’SADDRESS
1,2,3
Enteryourrecipient’saddress.Uptothreeaddressescanbeentered.
TESTMAIL
Sendatestmailtocheckwhetheryoursettingsarecorrectornot
NOTE:
•Ifyouexecuteatest,youmaynotreceiveanAlertmail.Shouldthishappen,checkifnetwork
settings are correct.
•Ifyouenteredanincorrectaddressinatest,youmaynotreceiveanAlertmail.Shouldthis
happen,checkiftheRecipient’sAddressiscorrect.
SAVEClickthisbuttontosaveyoursettingstotheprojector’smemory.

63
3. Convenient Features
•NETWORKSERVICE
PJLinkPASSWORDSetapasswordforPJLink*.Apasswordmustbe32charactersorless.Donotforget
yourpassword.However,ifyouforgetyourpassword,consultwithyourdealer.
HTTPPASSWORDSetapasswordforHTTPserver.Apasswordmustbe10charactersorless.
AMXBEACONTurnonorofffordetectionfromAMXDeviceDiscoverywhenconnectingtothenetwork
supportedbyAMX’sNetLinxcontrolsystem.
TIP:
WhenusingadevicethatsupportsAMXDeviceDiscovery,allAMXNetLinxcontrolsystemwillrec
-
ognizethedeviceanddownloadtheappropriateDeviceDiscoveryModulefromanAMXserver.
PlacingacheckmarkwillenabledetectingtheprojectorfromAMXDeviceDiscovery.
ClearingacheckmarkwilldisabledetectingtheprojectorfromAMXDeviceDiscovery.
NOTE: If you forget your password, contact your dealer.
*WhatisPJLink?
PJLinkisastandardizationofprotocolusedforcontrollingprojectorsofdifferentmanufacturers.Thisstandardproto-
colisestablishedbyJapanBusinessMachineandInformationSystemIndustriesAssociation(JBMIA)in2005.
TheprojectorsupportsallthecommandsofPJLinkClass1.
SettingofPJLinkwillnotbeaffectedevenwhen[RESET]isdonefromthemenu.
CRESTRONROOMVIEWcompatibility
TheprojectorsupportsCRESTRONROOMVIEW,allowingmultipledevicesconnectedinthenetworktobemanaged
andcontrolledfromacomputeroracontroller.
Formoreinformation,visithttp://www.crestron.com
<Setting Procedure>
AccesstotheHTTPserverfunction,andmakenecessarysettingsfor[CRESTRON]in[NETWORKSETTINGS].
•ROOMVIEWformanagingfromthecomputer.
DISABLEDisablesROOMVIEW.
ENABLEEnablesROOMVIEW.
•CRESTRONCONTROLformanagingfromthecontroller.
DISABLEDisablesCRESTRONCONTROL.
ENABLEEnablesCRESTRONCONTROL.
IPADDRESSSetyourIPaddressofCRESTRONSERVER.
IPIDSetyourIPIDofCRESTRONSERVER.
TIP:TheCRESTRONsettingsarerequiredonlyforusewithCRESTRONROOMVIEW.
Formoreinformation,visit
http://www.crestron.com
•INFORMATION
WIREDLANDisplayalistofsettingsofwiredLANconnection.
WIRELESSLANDisplayalistofsettingsofwirelessLANconnection.
UPDATEReectsettingswhentheyarechanged.
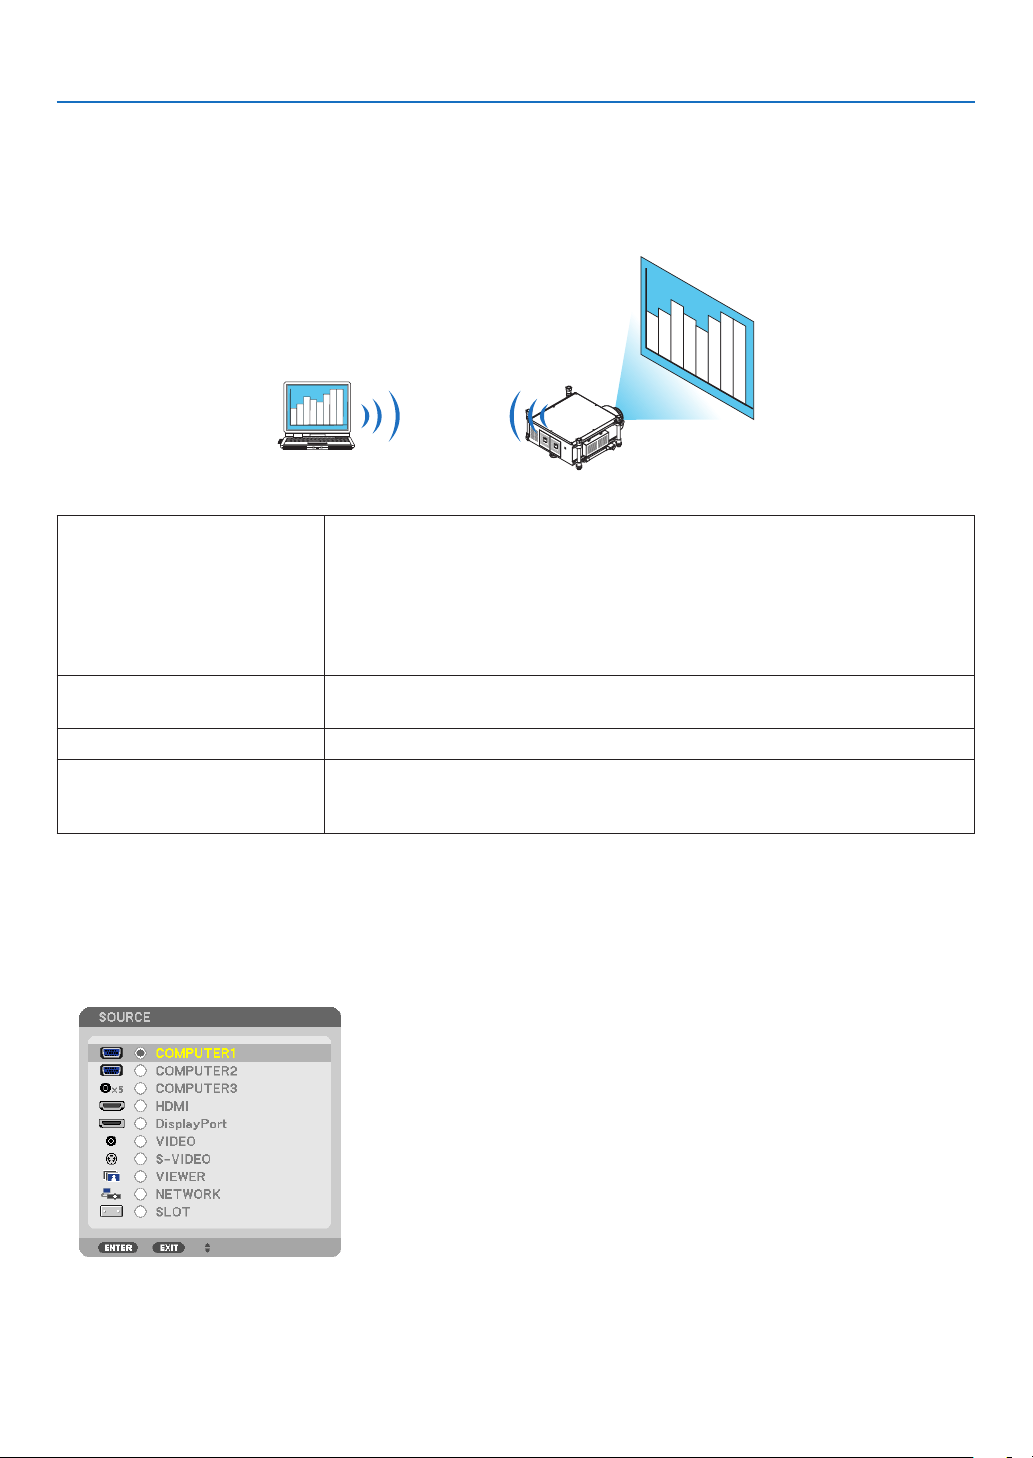
64
3. Convenient Features
Projecting Your Computer’s Screen Image from the
Projector via a Network [NETWORK PROJECTOR]
ByselectingtheprojectorconnectedtothesamenetworkasthatofyourPC,thePCscreenimagecanbeprojected
tothescreenvianetwork.Thereisnoneedofconnectionusingthecomputercable(VGA).
Operation Environment
ApplicableOSWindows7Professional
Windows7Ultimate
Windows7Enterprise
WindowsVistaHomePremium
WindowsVistaBusiness
WindowsVistaUltimate
WindowsVistaEnterprise
HardwarespecicationsThespecicationsrecommendedbyMicrosoftastheoperationenvironmentfor
Windows7/WindowsVistashouldbesatised.
NetworkEnvironmentWiredLANorwirelessLANenvironmentthatsupportsTCP/IPisrequired.
ScreencolorHighColor(16bits)
TrueColor(24bitsand32bits)
*Settingwith256colorsorlessisnotavailable.
SettingtheProjectortoNetworkProjectorInputMode
1.Withtheprojectorturnedon,presstheSOURCEbutton.
The input selection window appears.
AnotherwaytodisplaytheinputselectionwindowistopresstheNETWORKbuttonontheremotecontrol.The
APPLICATIONMENUscreenwillbedisplayed.Gotostep3.
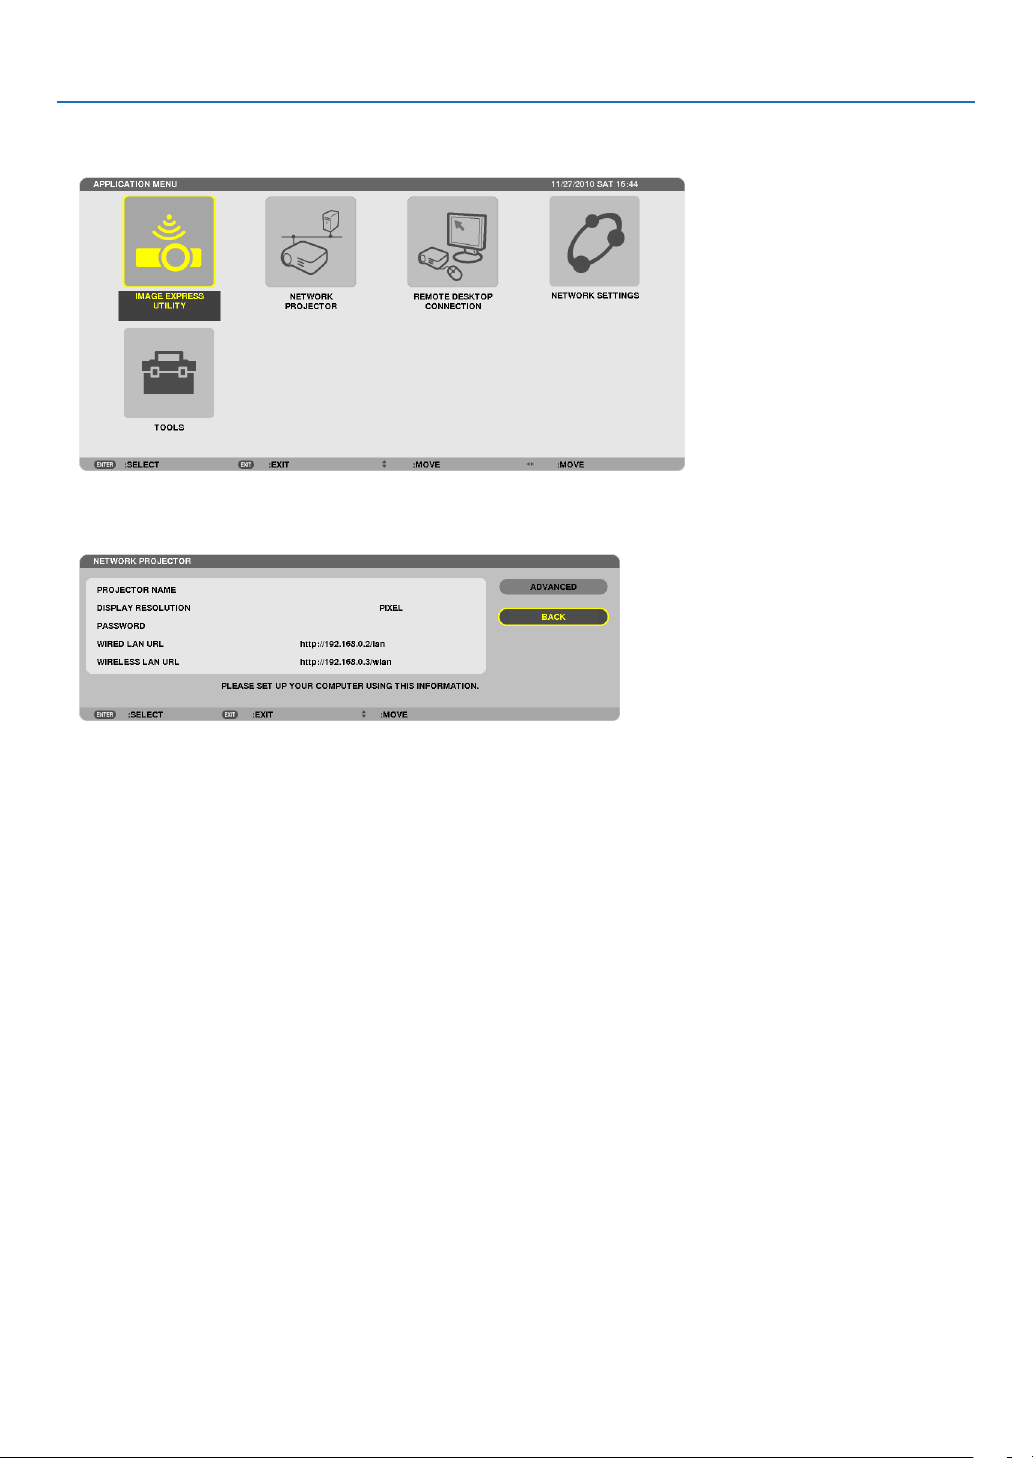
65
3. Convenient Features
2.Pressthe
or buttontoselect[NETWORK]andpresstheENTERbutton.
Inthescreen,the[APPLICATIONMENU]menuisdisplayed.
3.Fromthe[APPLICATIONMENU]menu,select[NETWORKPROJECTOR].
The[PROJECTORNAME/DISPLAYRESOLUTION/PASSWORD/URL]willbedisplayed.

66
3. Convenient Features
ProjectingtheImagewithNetworkProjector
1.Click[Start]fromthedesktopofWindows7.
2.Click[AllPrograms].
3.Click[Accessories].
4.Click[ConnecttoaNetworkProjector].
Whenthe[PermissionConnecttoaNetworkProjector]windowappears,click[Yes.].
The“ConnecttoaNetworkProjector”windowappears.
5.Click[→Searchforaprojector(recommended)].
Inthe“Availableprojectors”box,“PH1000Series”isdisplayed.
6.Click[PH1000Series].
Themessage“Enterthepasswordfortheprojectorthatyouselected.”isdisplayedatthebottomofthewindow.
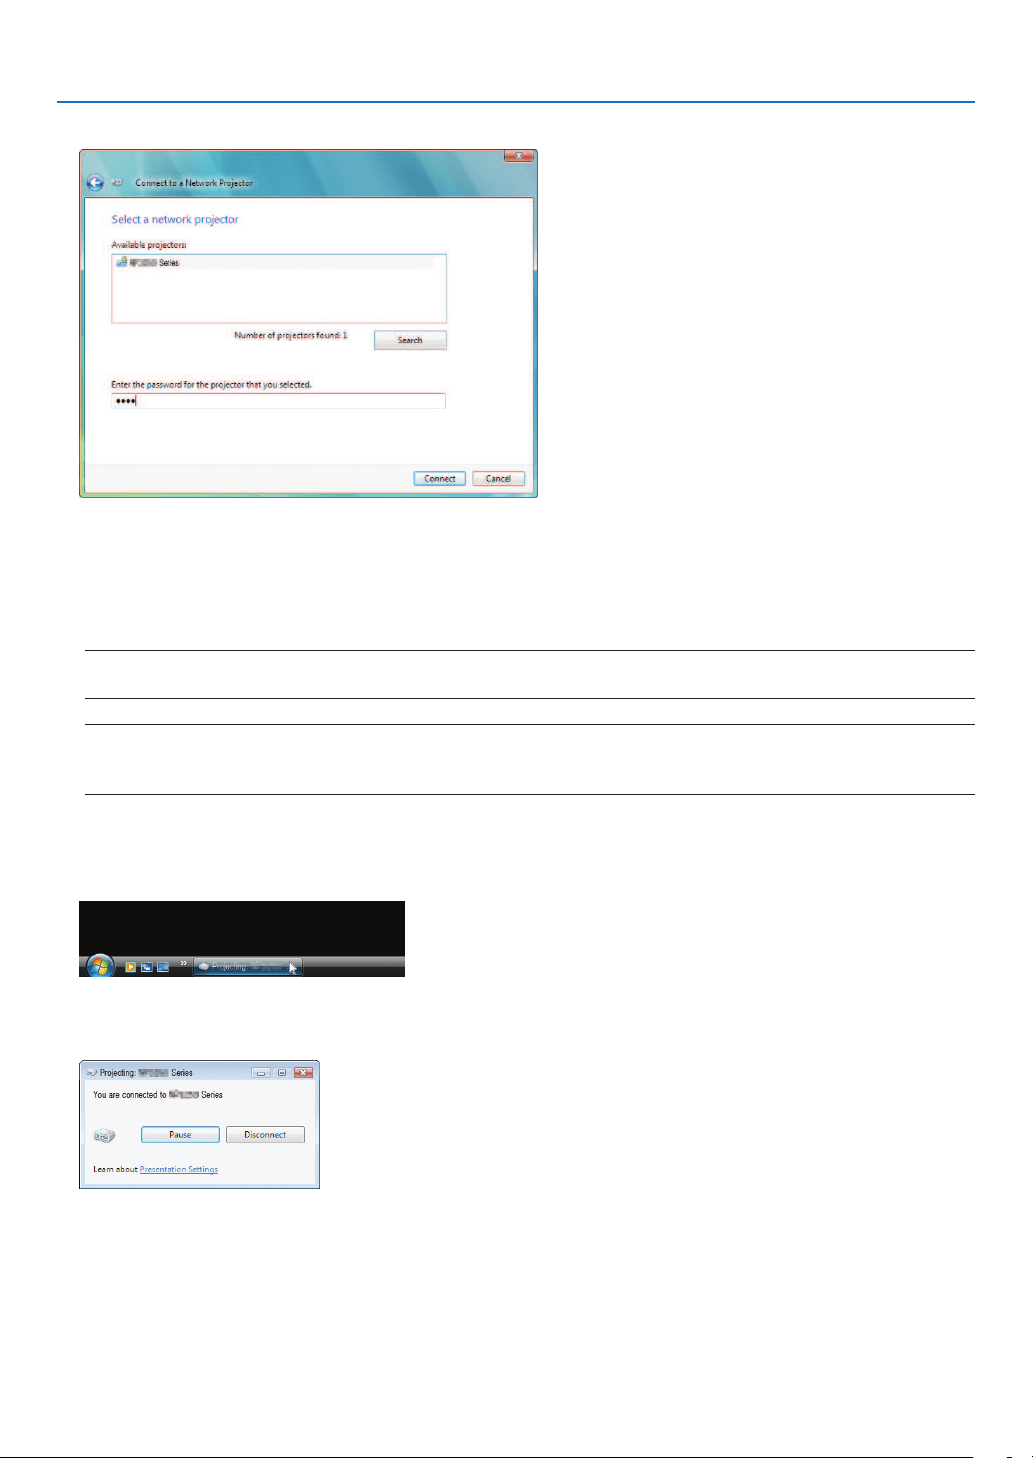
67
3. Convenient Features
7.Inputthepasswordtothepasswordinputboxdisplayedbytheoperationatstep3onpage65.
8.Click[Connect].
ThenetworkprojectorfunctionworksandthescreenofWindows7isprojectedfromtheprojector.
•Iftheresolutionofyourcomputer’sscreenisdifferentfromtheprojector’sscreenresolution,theNETWORK
PROJECTORfunctionmaynotwork.Ifthishappens,changetheresolutionofthecomputer’sscreentolower
resolutionthantheonedisplayedatStep3onpage
65.
NOTE:Whenthenetworkprojectorfunctionworks,thebackgroundcolorofthedesktopchangestoblack.Whenthenetwork
projector function is stopped, the original background color is restored.
Reference:IftheprojectorcannotbefoundatStep5,click[→Entertheprojectoraddress].Then,inputthe“Networkaddress”
(Inputexample:http://10.32.97.61/lan)and“Projectorpassword”(Inputexample:82291627)displayedinthescreenprojected
from the projector.
ExitingtheNetworkProjectorOperation
1.Click[Projecting:PH1000Series]intheWindowsVistataskbar.
2.Click[Disconnect].
TheNetworkProjectorfunctionisstopped.
3.PresstheSOURCEbuttonoftheprojectortoselectaninputterminalotherthan[NETWORK].
Whenusingtheremotecontrol,pressabuttonotherthantheNETWORKbutton.
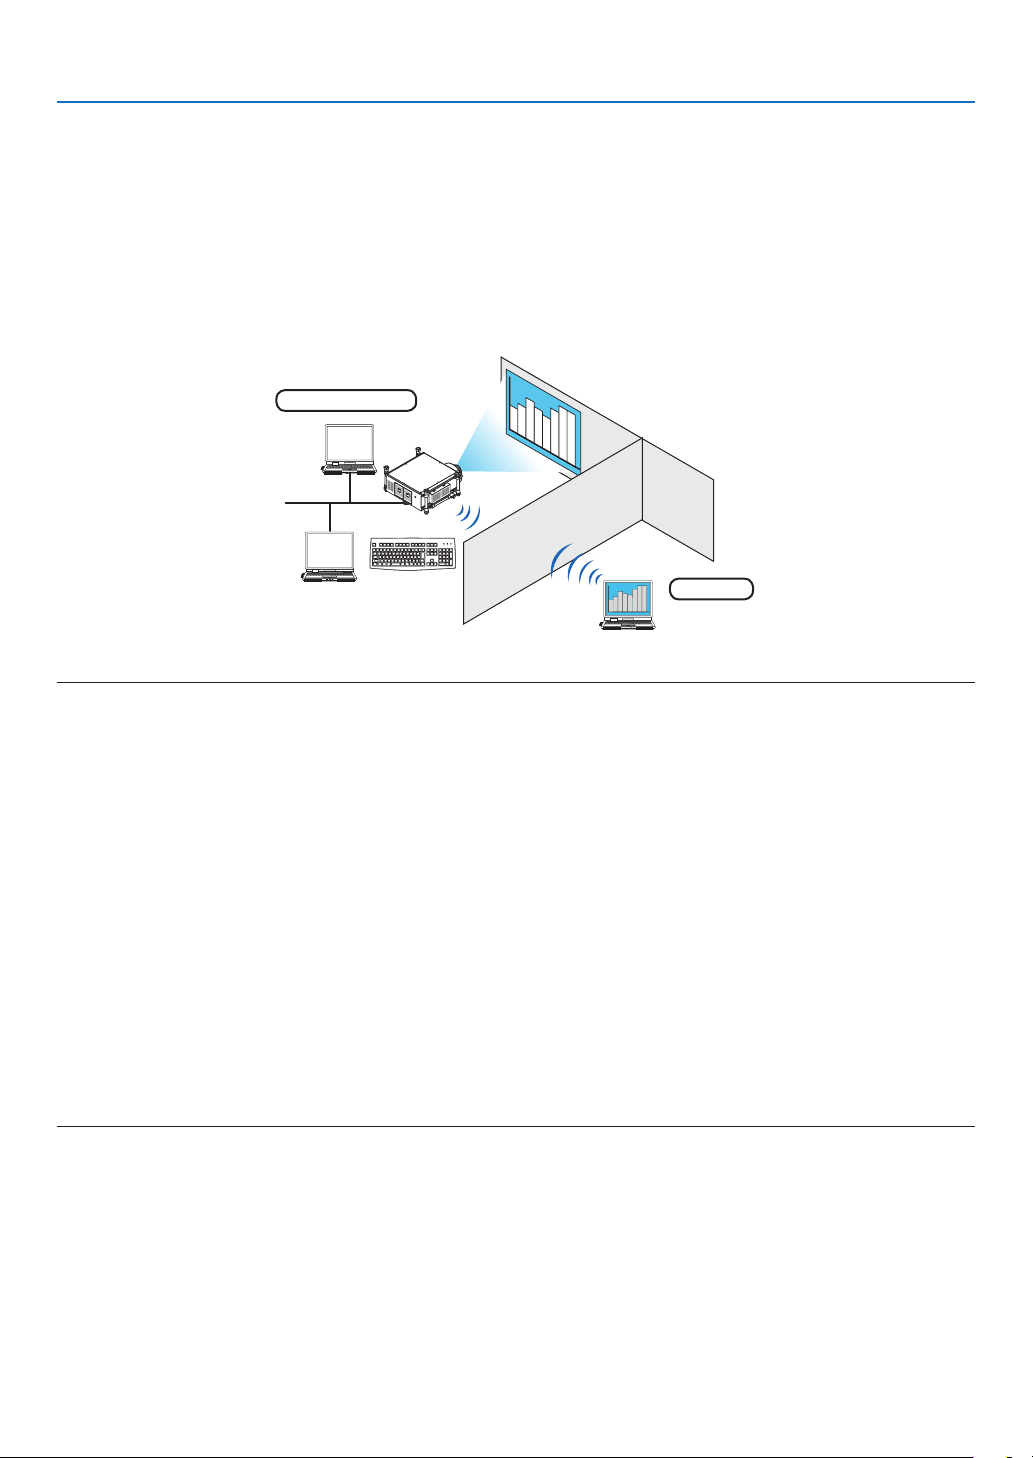
68
3. Convenient Features
Using the Projector to Operate Your Computer via a Network
[REMOTE DESKTOP]
•ByselectingthePCconnectedtothesamenetworkasthatoftheprojector,thePCscreenimagecanbeprojected
tothescreenvianetwork.
Then,byoperatingthekeyboard,youcanoperateWindows7,WindowsVistaorWindowsXPonthePCconnected
withthenetwork.
•WiththeRemoteDesktopfunction,youcanremotelyoperatethePCplacedatadistancefromtheprojector.
Meetingroom
Ofce
NOTE:
•The[REMOTEDESKTOP]functionwillworkonthefollowingWindowseditions.
Windows7Professional
Windows7Ultimate
Windows7Enterprise
WindowsVistaBusiness
WindowsVistaUltimate
WindowsVistaEnterprise
WindowsXPProfessionalwithServicePack3
(Note)
•Inthisuser’smanualthisfeatureisdescribedusingWindows7asanexample,butWindowsVistaandWindowsXPProfessional
ServicePack2orlaterwillalsoworkwiththisfeature.
•AkeyboardisrequiredtousetheRemoteDesktopfunction.
•TheRemoteDesktopfunctioncanbeoperatedwithakeyboard.Usingawirelessmousewithawirelesskeyboardismoreuseful
for operating.
Useacommerciallyavailablewirelesskeyboard,awirelessmouse,andaUSBwirelessreceiver.
UseacommerciallyavailableUSBkeyboardandUSBmouse.
•AUSBkeyboardwithabuilt-inUSBhubcannotbeusedwiththeprojector.
•AwirelesskeyboardormousethatsupportsBluetoothcannotbeusedwiththeprojector.
•WedonotwarrantthattheUSBportoftheprojectorwillsupportallUSBdevicesinthemarket.
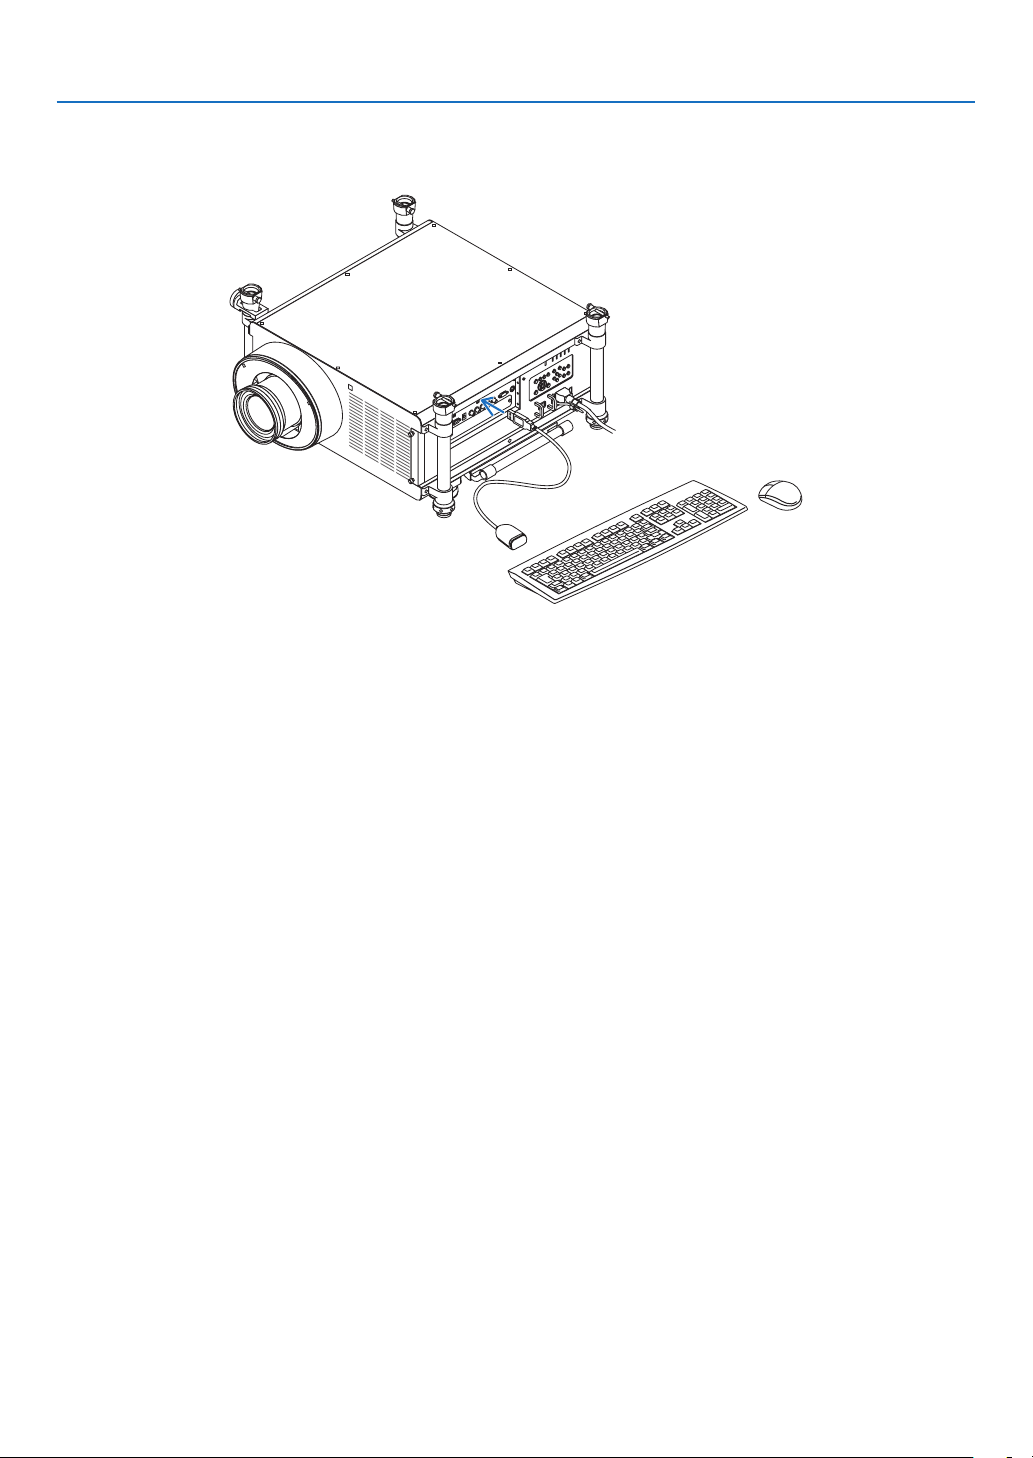
69
3. Convenient Features
Prepareacommerciallyavailablewirelesskeyboard(USlayoutversion).
ConnecttheUSBwirelessreceivertotheUSBport(TypeA)oftheprojector.Makeallnecessarysettingsforyour
wirelesskeyboardandmouse.
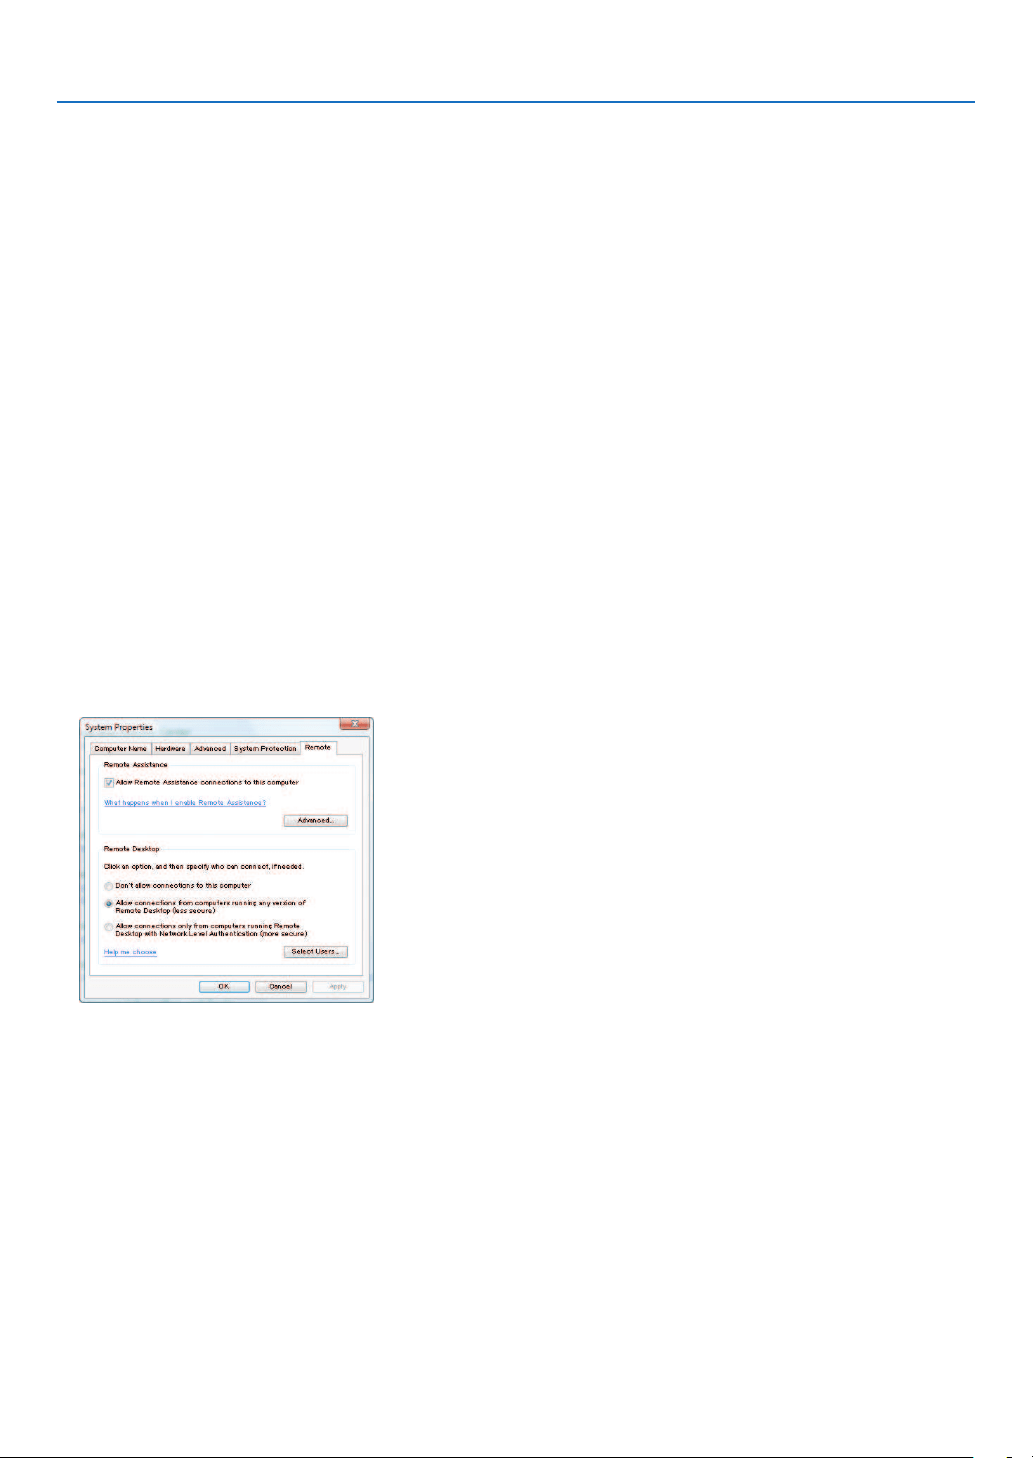
70
3. Convenient Features
Setting the password to the user account of Windows 7
TIP:Ifapasswordhasbeensetforanaccount,thesteps1to9canbeskipped.
1.Click[Start]fromthedesktopofWindows7.
2.Click[ControlPanel].
3.Click[Addorremoveuseraccounts]displayedunder[UserAccounts].
4.Whenthe[UserAccountControl]conrmationwindowappears,click[Continue].
5.Click[Administrator].
6.Click[Createapassword].
7.Inputthepasswordtothe[Newpassword]box.
8.InputthesamepasswordasthatatStep7tothe[Conrmnewpassword]box.
9.Click[Createapassword].
TheAdministratorischangedto[PasswordProtection].
Setting the Remote Access
1.Click[Start]fromthedesktopofWindows7.
2.Click[ControlPanel].
3.Click[SystemandSecurity].
4.Click[Allowremoteaccess]displayedunder[System].
5.Whenthe[UserAccountControl]conrmationwindowappears,click[Continue].
The[SystemProperties]windowappears.
6.Click[AllowconnectionsfromcomputersrunninganyversionofRemoteDesktop(lesssecure)]inthe
RemoteDesktopboxandclick[OK].
CheckingtheIPaddressonWindows7
1.Click[Start]fromthedesktopofWindows7.
2.Click[ControlPanel].
3.Click[Viewnetworkstatusandtasks]displayedunder[NetworkandInternet].
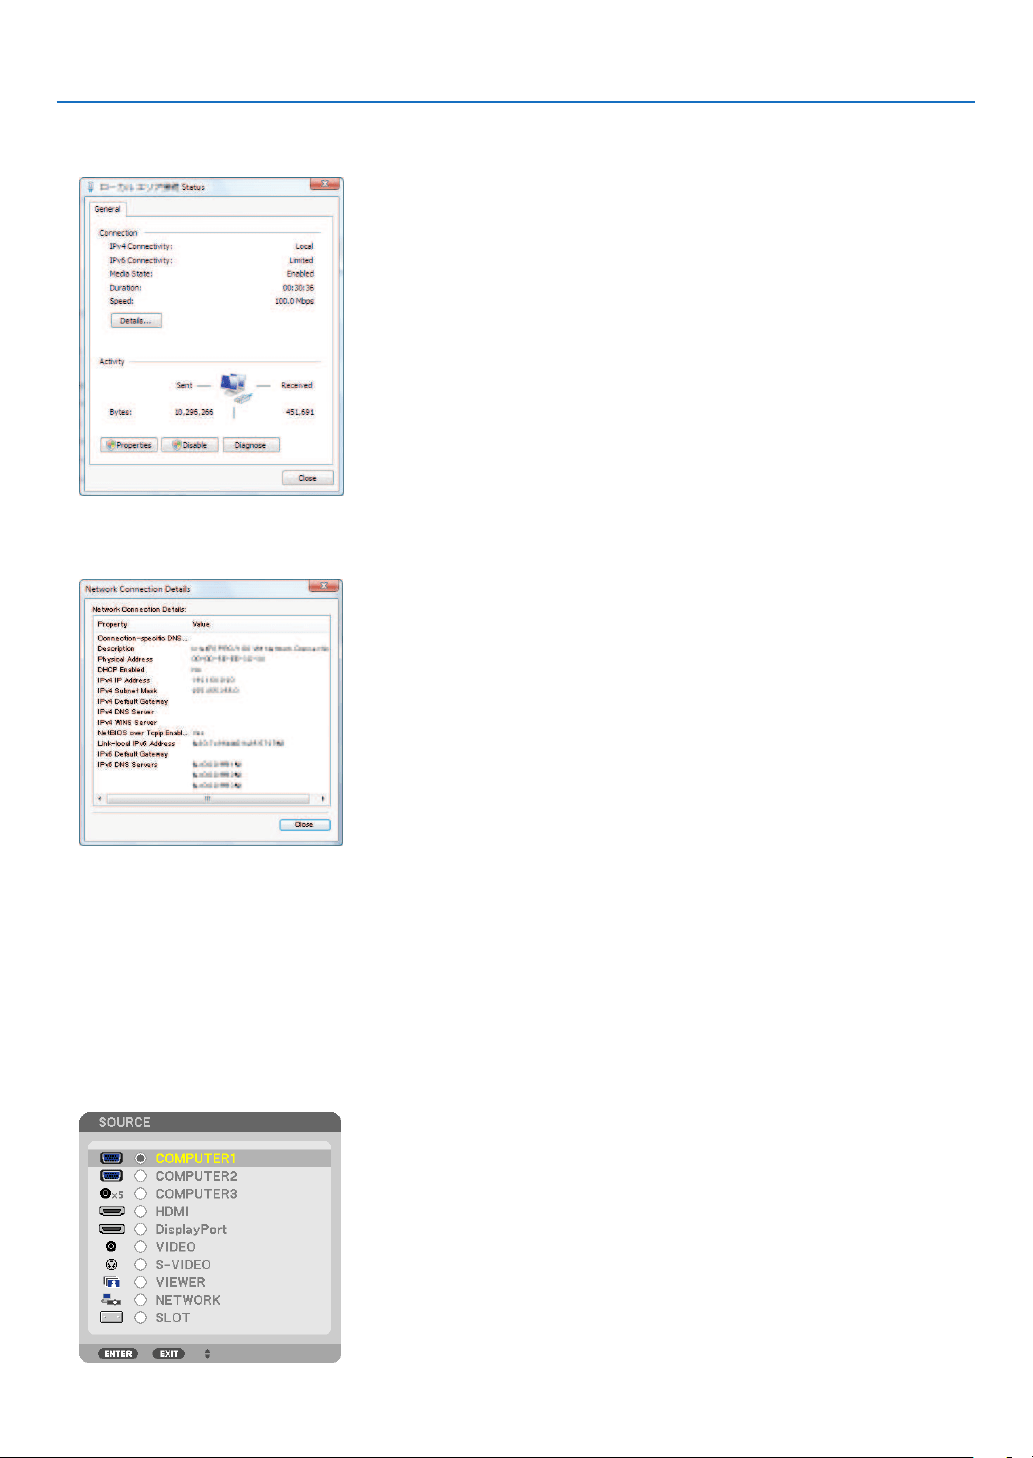
71
3. Convenient Features
4.Click[Viewstatus]displayedinblueontherightof[LocalAreaConnection]inthewindow.
The[LocalAreaConnectionStatus]windowappears.
5.Click[Details...].
Writedownthevaluefor“IPv4IPAddress”(xxx.xxx.xxx.xxx)displayed.
6.Click[Close].
7.Click[X]attheupperrightofthewindow.
Thesystemgoesbacktothedesktop.
StartingtheRemoteDesktop
1.Withtheprojectorturnedon,presstheSOURCEbutton.
The input selection window appears.
AnotherwaytodisplaytheinputselectionwindowistopresstheNETWORKbuttonontheremotecontrol.The
APPLICATIONMENUscreenwillbedisplayed.Gotostep3.
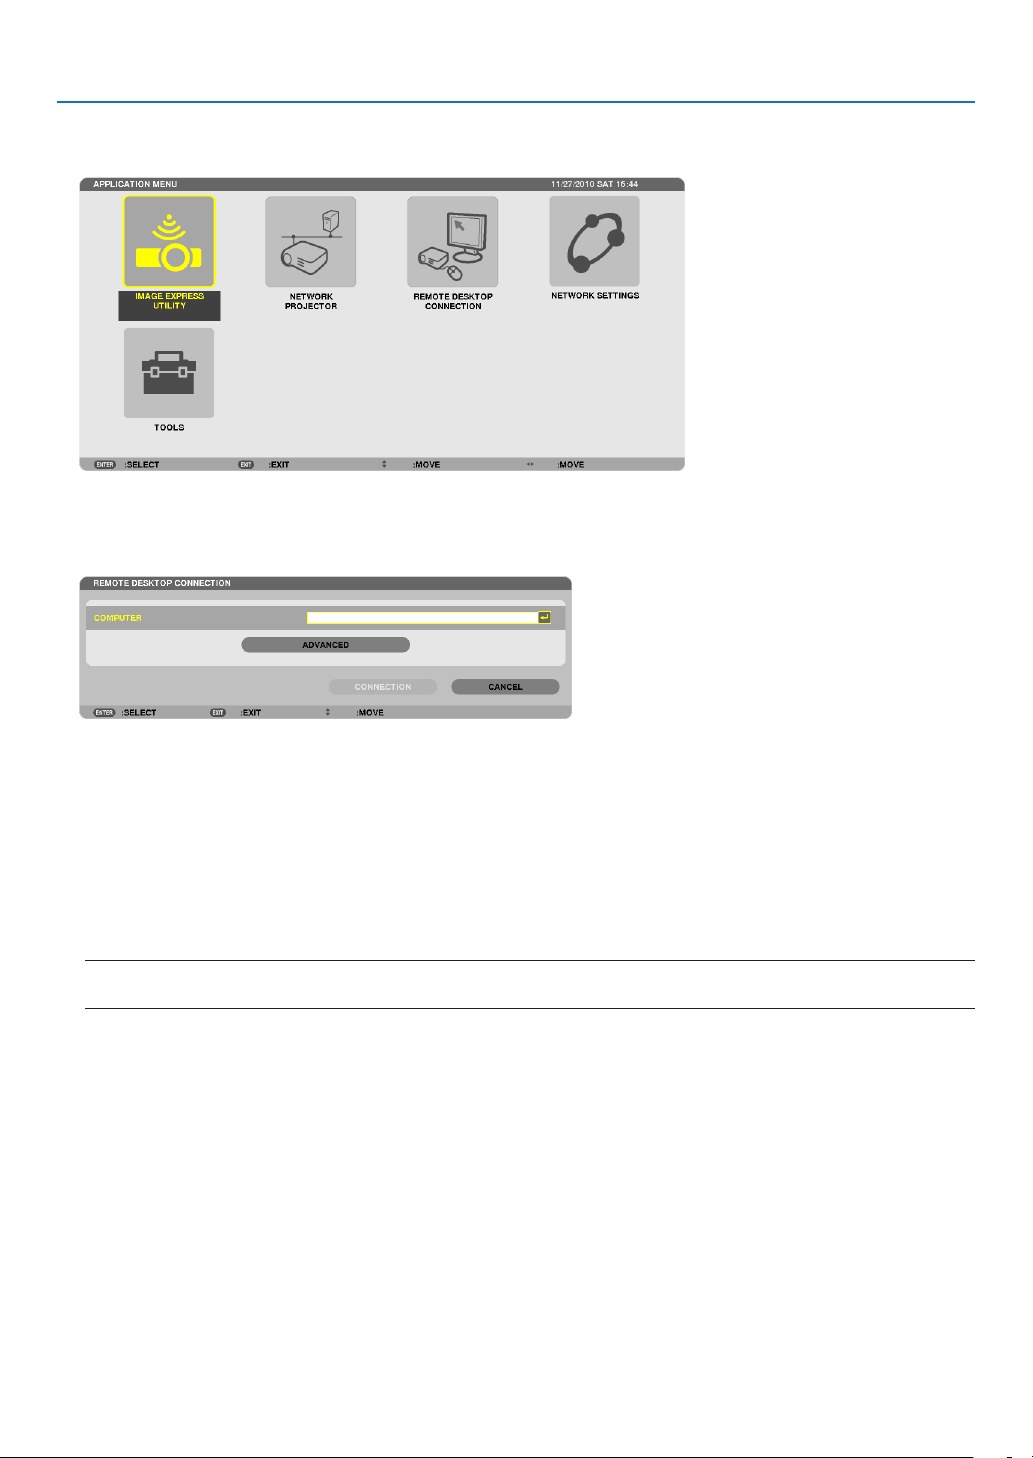
72
3. Convenient Features
2.Pressthe or buttontoselect[NETWORK]andpresstheENTERbutton.
The[APPLICATIONMENU]menuwillbedisplayed.
3.Fromthe[APPLICATIONMENU]menu,usethewirelesskeyboardtoselect[REMOTEDESKTOPCONNEC-
TION].
The[REMOTEDESKTOPCONNECTION]windowappears.
4.OperatethewirelesskeyboardtoinputtheIPaddressofWindows7andclick“Connect”.
Thelog-onscreenofWindows7isdisplayedinthescreenprojectedbytheprojector.
5.Operatethewirelesskeyboardtoinputtheuser’spasswordandpress“Enter”.
Theremotedesktopfunctionisstarted.
Windows7desktopisdisplayedinthescreenprojectedbytheprojector.
Log out the computer.
UsethewirelesskeyboardconnectedtotheprojectortooperateWindows7.
NOTE:Whentheprojectionismadewiththeremotedesktopfunction,thebackgroundcolorofthedesktopischangedto
black.

73
3. Convenient Features
ExitingtheRemoteDesktop
1.Operatethewirelesskeyboardtoclick[Start]fromthedesktopscreenprojectedbytheprojector.
2.Click[X]ontherightofthestartmenu.
Theremotedesktopfunctionisstopped.
3.PresstheSOURCEbuttonoftheprojectortoselectaninputterminalotherthan[NETWORK].
Whenusingtheremotecontrol,pressabuttonotherthantheNETWORKbutton.
TIP:
Setting[OPTIONS]inREMOTEDESKTOP
Clicking[OPTIONS]displaysthe[PERFORMANCE]screen.
Makingsettingsto[OPTIONS]willallowyoutodisplaythedesktopbackground,ortoenablethewindowanimationfunctionduring
theRemoteDesktopoperation.However,doingthiswillcausethedisplay’sormouse’sresponsetoslowdown.
Ifthedisplay’sormouse’sresponseissloweddown,tryoneormoreofthefollowing:
DESKTOPBACKGROUND:Clearthecheckmarktodisplaythedesktopbackgroundinmonochrome.
MENUANDWINDOWANIMATION:Clearthecheckmarktodisablemenuandwindowanimation.
THEMES:ClearthecheckmarknottouseThemes.
SHOWCONTENTSOFWINDOWWHILEDRAGGING:Clearthecheckmarktoshowonlythewindowpanewhile
dragging.

74
4. Using the Viewer
❶ What you can do with the Viewer
TheViewerfeatureallowsyoutoviewslidesormovielesstoredonaUSBmemoryontheprojector,orashared
folderinacomputerconnectedtothenetwork.
TheViewerhasthefollowingfeatures.
•WhenacommerciallyavailableUSBmemorythatstoresimagelesisinsertedintotheUSBport(TypeA)ofthe
projector,theViewerallowsyoutoviewtheimagelesontheUSBmemory.
Evenifnocomputerisavailable,presentationscanbeconductedsimplywiththeprojector.
•Movielecanbeplayedback.
•AMicrosoftPowerPointleorAdobePDFlecanbesimplyprojectedonthescreenwithoutconnectingacom-
puter.
•Imageandmovielesstoredinasharedfolderinacomputerconnectedtoanetworkcanbeprojected.
Thecomputerwith“MediaSharing”ofWindowsMediaPlayer11turnedoncanbeusedasamediaserver.
Supported graphic formats
FormatFilenameextension
JPEG.jpg,.jpe,.jpeg(CMYKisnotsupported.)
BMP.bmp(biteldnotsupported)
PNG
.png(InterlacedPNGandαchannelPNGarenotsupported.)
GIF.gif(InterlacedGIF,transparationGIF,andanimationGIFarenotsupported.)
*Ifanunsupportedimageisselected,theicon
willbedisplayed.
NOTE:
Maximumnumberofpixelsofimagewhichcanbedisplayedare:
•ProgressiveJPEG:1280×1280
•GIF:1280×1280
•Others:4000×4000
•Somelessupportedbytheaboverequirementsmaynotbedisplayed.
Supported movie files
FilenameextensionVideocompression/expansionmethodAudiocompression/expansionmethod
.mpg,.mpegMPEG2MPEGAudioLayer2
MPEGAudioLayer3
.wmvVC-1/WMV9WMA9Standard
.mp4H.264/AVCAAC-LC
Playbackrequirements:
Resolution:320×240to1280×720
Videoframerate:upto30fps
Bitrate:upto15Mbps
Max.lesize:upto2GB
NOTE:
•Somelessupportedbytheaboverequirementsmaynotbeplayedback.
Whenasupportedmovieleisplayedback,itsaudiowillnotbeoutputfromtheprojector.

75
4. Using the Viewer
NOTE:
•Movielesconvertedbyusingthevideo/audioformatwhichisnotsupportedbythisprojectorcannotbeplayedback.
In this case, there will be no icon to show that playback is not possible.
•FileswithDigitalRightsManagement(DRM)protectioncannotbeplayedback.
•Someofthemovielesthatmeettheaboverequirementsmaynotbeplayedback.
•WMVformatvideolewillbedisplayedinanaspectratioof1to1independentlyofitsoriginalaspectratio.
•Filesthatcanbeplayedbackonthemediaserveraregraphicsandmovieles.InWindowsMediaPlayer11(WindowsXP/
WindowsVista)mp4lescannotbeplayedback.
Supported PDF files
FilenameextensionSupportedleformat
.pdfAdobeAcrobatPDF
NOTE:
•FontsnotembeddedinPDFlemaynotbedisplayed
•FunctionsaddedtoPDFleaftercreatedwillnotworkordisplay.Functionsaddedarebookmarks,boxesinformtool,andnotes
will not be displayed.
AutoiporAutotransitionwillnotwork.
•SomePDFlesmaynotbedisplayed.
Supported PowerPoint files
FilenameextensionSupportedleformat
.pptMicrosoftPowerPoint97–2003
NOTE:
•Playablefonts,colors,fontornament,placement,objectinsertionoranimationarerestricted.
•SomeMicrosoftPowerPoint97–2003lesmaynotbedisplayed.
SupportedUSBmemorydevices
-BesuretouseaUSBmemorydeviceformattedwiththeFAT,exFAT,FAT32orFAT16lesystem.
TheprojectordoesnotsupportNTFSformattedUSBmemory.
IftheprojectordoesnotrecognizeyourUSBmemory,checkiftheformatissupported.
ToformatyourUSBmemoryinyourcomputer,refertothedocumentorhelplethatcomeswithyourWin-
dows.
-WedonotwarrantthattheUSBportoftheprojectorwillsupportallUSBmemoriesinthemarket.
-Waitatleast5secondsafterdisconnectingaUSBmemorydevicebeforereconnectingitandviceversa.
TheprojectormaynotidentifytheUSBmemorydeviceifitisrepeatedlyconnectedanddisconnectedinrapid
intervals.

76
4. Using the Viewer
Notices on shared folder and media server
•Filesfromasharedfolderormediaservermaynotbeprojectedifsecurityorantivirussoftwareisinstalledonyour
computer.
•Openthefollowingrewallports:
-Mediaserver
PortnumberProtocol
1900UDP
2869TCP
10243TCP
10280-10284UDP
-Sharedfolder
PortnumberProtocol
137UDP/TCP
138UDP/TCP
139UDP/TCP
445UDP/TCP
•Setyourcomputerforsharingandsecuritytograntaccesstolesinthesharedfolderandsetyoursecurityor
antivirussoftwaretograntaccesstolesinthesharedfolder.Consultyournetworkadministratorformoreinforma-
tion.
•Movielesinthesharedfolderorthemediaservermaynotbeplayedbackcorrectlydependingonyournetwork
environmentorthebitrateofyourle.
NOTE:
DonotdisconnectbetweentheprojectorandyourcomputerbyremovingtheLANcableorturningofftheprojectorwhenaPow-
erPointleorPDFleisdisplayedfromasharedfolder.
DoingsowillmakeViewerinoperable.
NOTE:
•ThefollowingoperationsbyusingthebuttonsontheprojectorarenotpossiblewhentheVIEWERscreensuchastheslidescreen
and the thumbnail screen is displayed.
-AutoAdjustmentbyusingtheAUTOADJ.button
•FreezingpicturebyusingtheFREEZE,ASPECT,orAUTOADJ.buttonontheremotecontrolisnotpossiblewhentheVIEWER
screen such as the slide screen and the thumbnail screen is displayed.
•Executing[RESET]→[ALLDATA]fromthemenuwillreturnthesettingsfortheViewertoolbartothefactorydefault.
77
4. Using the Viewer
❷ Preparing presentation materials
1.Createyourpresentationmaterialsandsavetheminasupportedleformattoyourcomputer.
•Seepage
99forsupportedleformats.
•MakesurethatPowerPointleisdisplayedontheViewerbeforegivingyourrealpresentation.
WithViewerPPTConverter3.0,youcanconvertyourPowerPointlestoindexlesthatcanbedisplayedon
theViewer.ViewerPPTConverter3.0canbedownloadedfromourwebsite.
•WhencreatingaPDFle,embedyourfontsinyourPDFle.EmbeddingfontsrequiresAdobeAcrobat.This
cannotbedoneinAdobeReader.
TIP:
•UsingPrintCommand
ExampleforfontembeddingusingPrintCommand.SeethehelpofAdobeAcrobatformoreinformation.
1.Select“Print”fromthe“File”menu.
2.Select“AdobePDF”from“Printername”andclickthe“Properties”but
-
ton.
3.Clickthe“Edit”buttoninthe“AdobePDFSettings”tab.
4.ClickthefonttabintheEditwindowtoselectthefontembedwindow.
5.Placeacheckmarkfor“Embedallfonts”.
Click“OK”toreturntothePrintwindow,andclick“OK”tostartcreatinga
PDFle.
2.Savealetoyourdrive.
TosavealetoyourUSBmemory:
UsetheWindowsExploretocopytheletoyourUSBmemory.
Toplacealeinasharedfolderyoucreateinyourcomputer,seepage
90.
Touse“MediaSharing”inWindowsMediaPlayer11,seepage94.
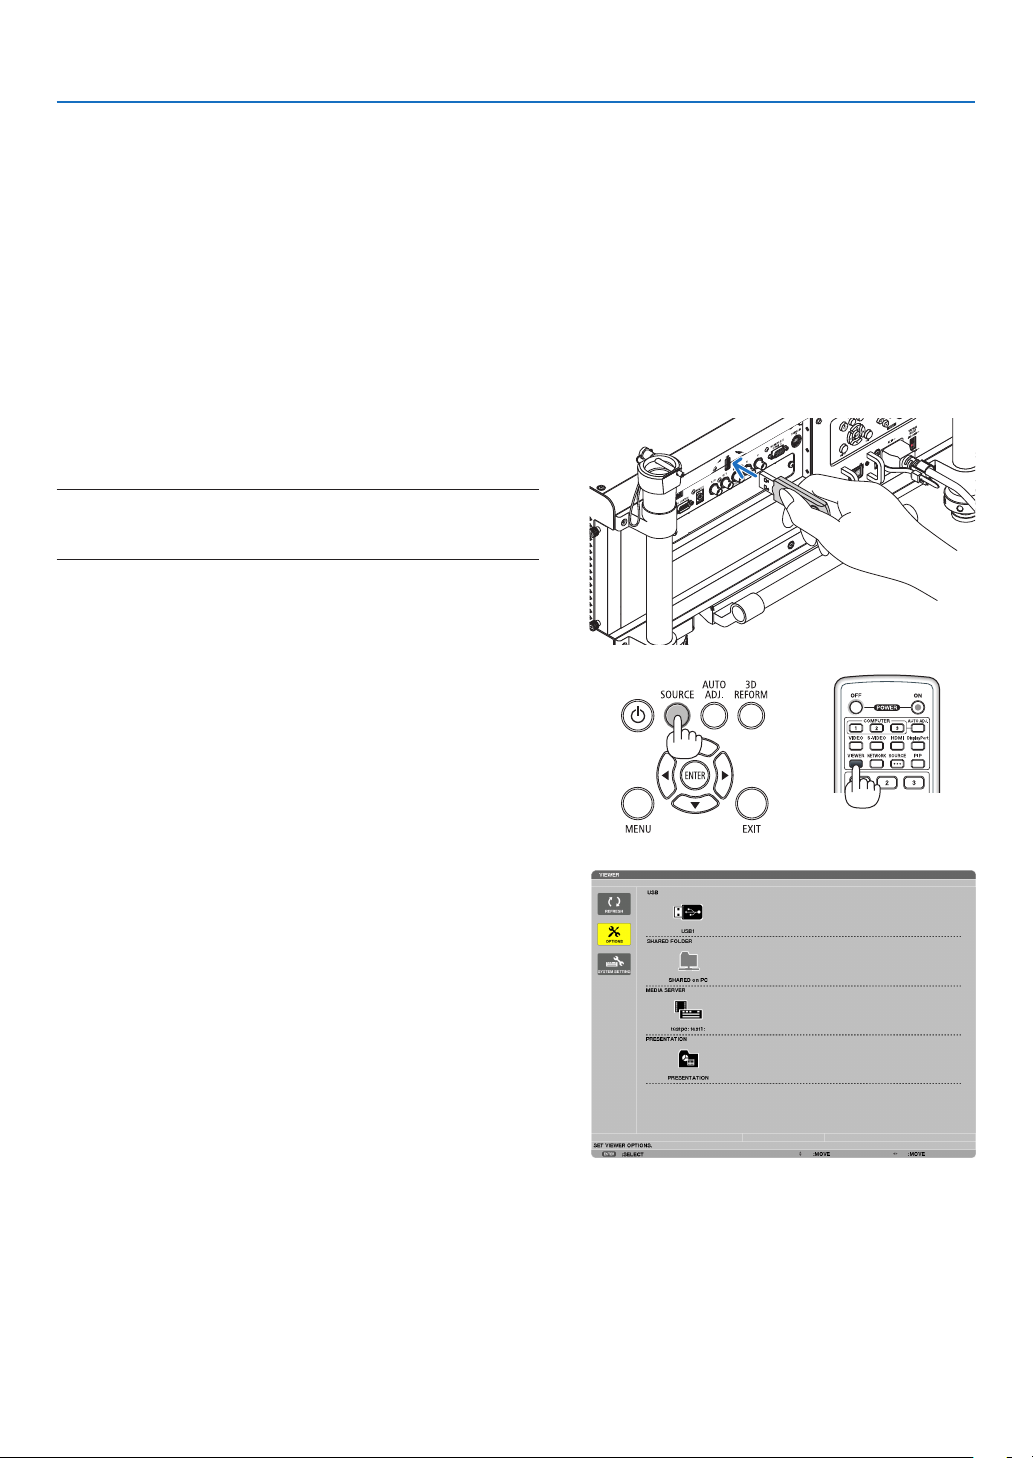
78
4. Using the Viewer
❸ Projecting images stored in a USB memory device
ThissectionexplainsthebasicoperationoftheViewer.
TheexplanationprovidestheoperationalprocedurewhentheViewertoolbarissettothefactorydefault.
Preparation:BeforestartingtheViewer,storeimagestotheUSBmemoryusingyourcomputer.
Starting the Viewer
1.Turnontheprojector.(→page
16)
2.InserttheUSBmemoryintotheUSBportoftheprojec-
tor.
NOTE:
•DonotremovetheUSBmemoryfromtheprojectorwhileit’sLED
ashes.Doingsomaycorruptthedata.
TIP:
YoucanaUSBmemoryinserttheprojectorwhenthedrivelistscreen
is displayed.
3.PresstheSOURCEbuttontoselect[VIEWER].
ApressoftheSOURCEbuttonwilldisplaythesourceselect
screen.
AfewmorepressesoftheSOURCEbuttonwilldisplaythe
drive list screen.
Anotherwaytoselect[VIEWER]istopresstheVIEWER
buttonontheremotecontrol.
TIP:
•Formoreinformationaboutthedrivelistscreen,seepage
82.
•Todisplaygraphicsinasharedfolder,seepage90; to display still
imagesormovielesinamediaserver,seepage94.
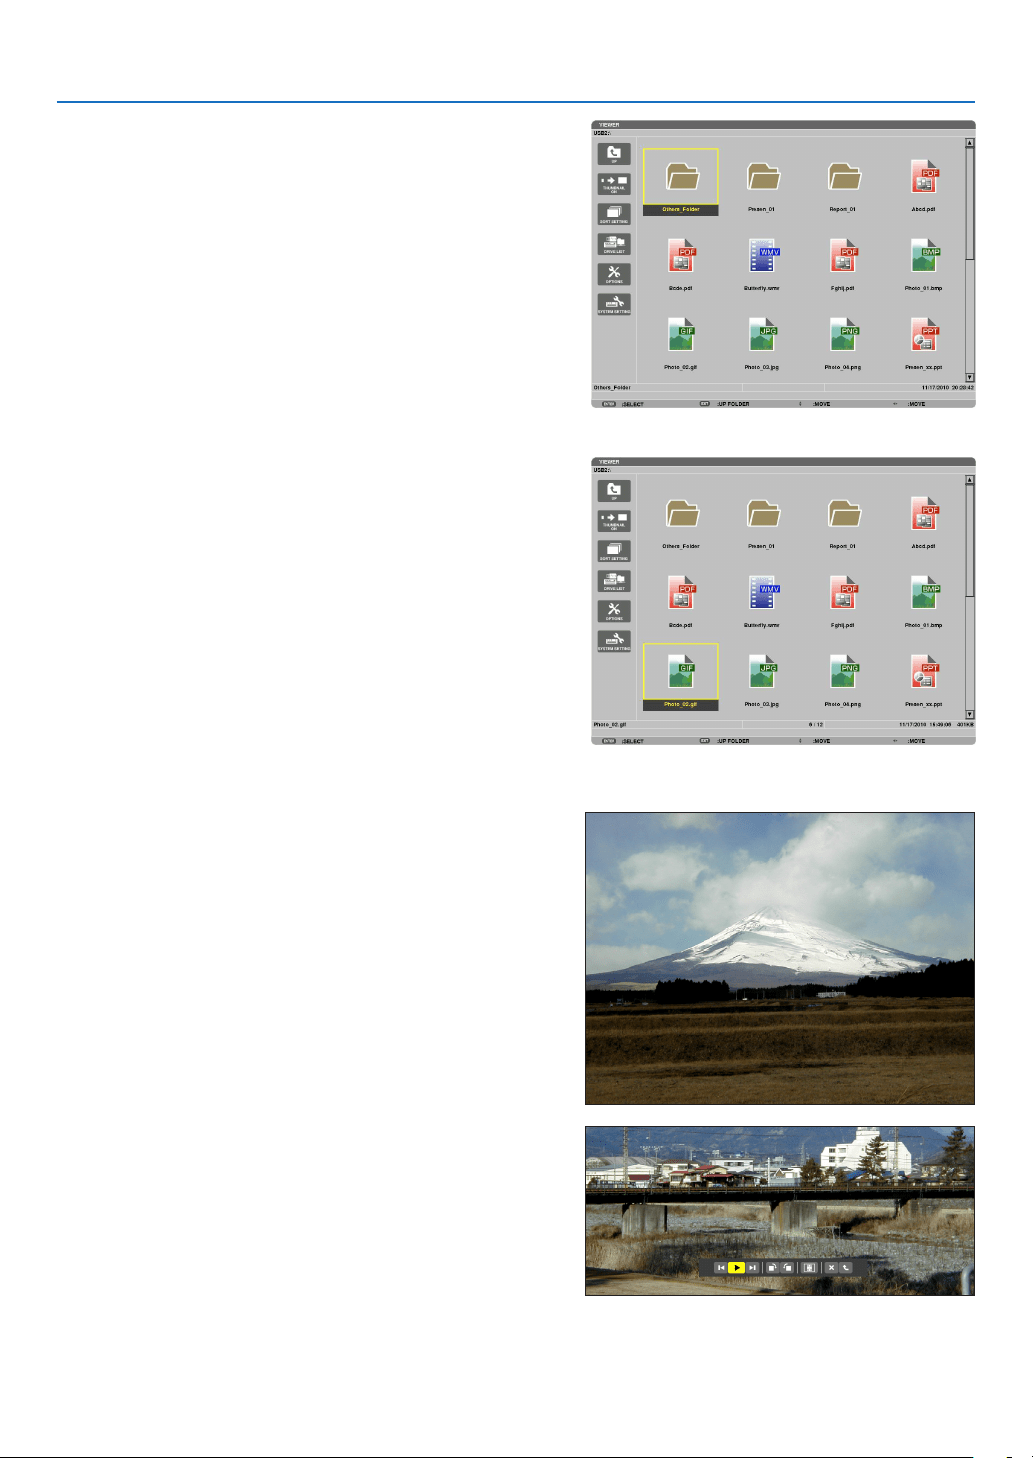
79
4. Using the Viewer
4.Pressthe▶buttontoselect“USB1”andpressthe
ENTERbutton.
The“USB1”thumbnailscreenwillbedisplayed.
TIP:
•Formoreinformationaboutthumbnailscreen,seepage
84.
5.Usethe▲▼◀ or ▶buttontoselectanicon.
•The→(arrow)symbolontherightindicatesthereare
morepages.pressingthePAGE▽(pagedown)button
willshowthenextpage:pressingthePAGE△
(page up)
will show the previous page.
6.PresstheENTERbutton.
Operationvariesdependingontheselectedle.
•Stillimage
Theselectedslidewillbedisplayed.
The ◀ or ▶buttoncanbeusedtoselectthenext(right)
slideortheprevious(left)slideinthethumbnailscreen.
•PressingtheENTERbuttonwilldisplaythecontrolbar
with which is used to select or rotate an slide.(→ page
85)
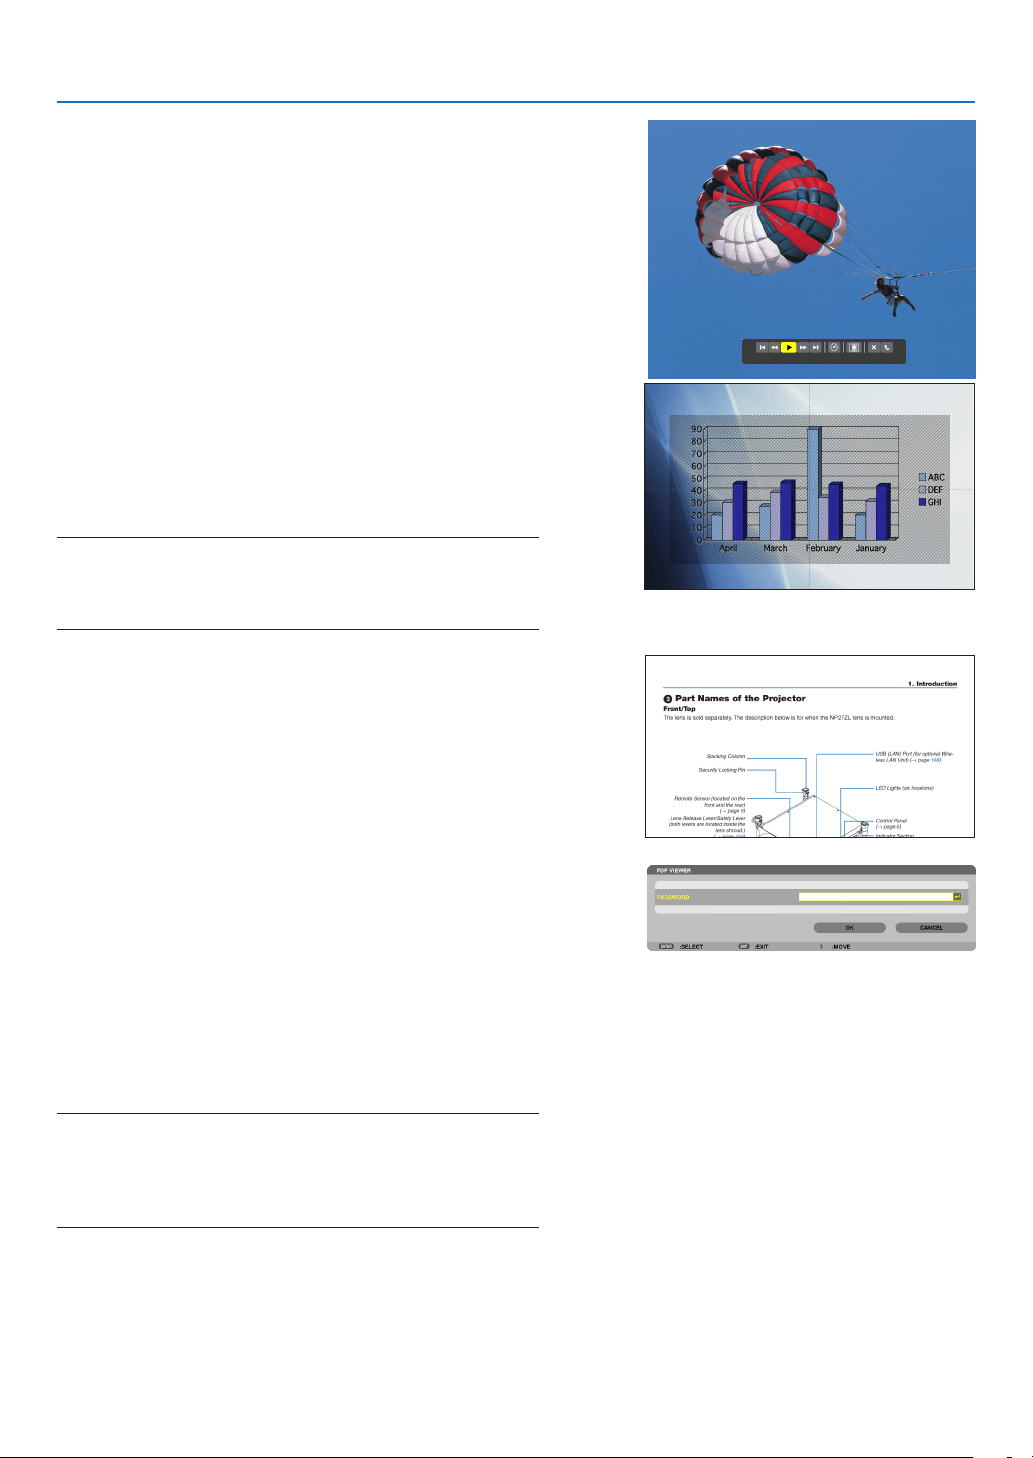
80
4. Using the Viewer
•Moviele
Themovielewillstartplaying.
Afternishingtheplayback,thescreenwillturntoblack.
PresstheEXITbuttontoreturntothethumbnailscreen.
•PressingtheENTERbuttonwilldisplaythemovie’s
controlbarwithwhichyoucanpauseorfastforwardand
some other operations.
•MicrosoftPowerPointle
Theslideontherstpagewillbedisplayed.
Press ▶ to select the next slide; press ◀ to select the previ-
ous slide.
•Youcanalsousethe▼ or ▲buttontoselectapage.To
returntothethumbnailscreen,presstheEXITbutton.
NOTE:
•Fileswithslideshoworanimationeffectsmaynotbecorrectly
displayedontheViewer.
See“SupportedPowerPointles”onpage75, 99.
•AdobePDFle
Therstpagewillbedisplayed.
•ThePDFlewillllthewidthofthescreen.
Pressing the ▼ or ▲buttonwillscrollthescreendownor
up.
ThePAGE▽orPAGE△buttonwillmovethescreenone
page down or up.
Toreturntothethumbnailscreen,presstheEXITbutton.
•Whenapassowordinputwindowisdisplayed,itmeans
thatthePDFleispassword-protected.
PressingtheENTERbuttonwillshowthesoftware
keyboard.Usethesoftwarekeyboardtoenteryour
password.
Select[OK]andpresstheENTERbutton.ThePDFle
willbedisplayed.
•Formoreinformationonthesoftwarekeyboard,seepage
153.
NOTE:
BookmarksandnotesthatwereaddedafterPDFconversionwillnot
be displayed.
IffontswerenotembeddedatthetimeofPDFconversion,thosefonts
will not be displayed.
TIP:
Ittakessometime(about30secondstotwominutes)todisplaya
largesizeleortoturnpagesofaPDFlethathasmanypages.
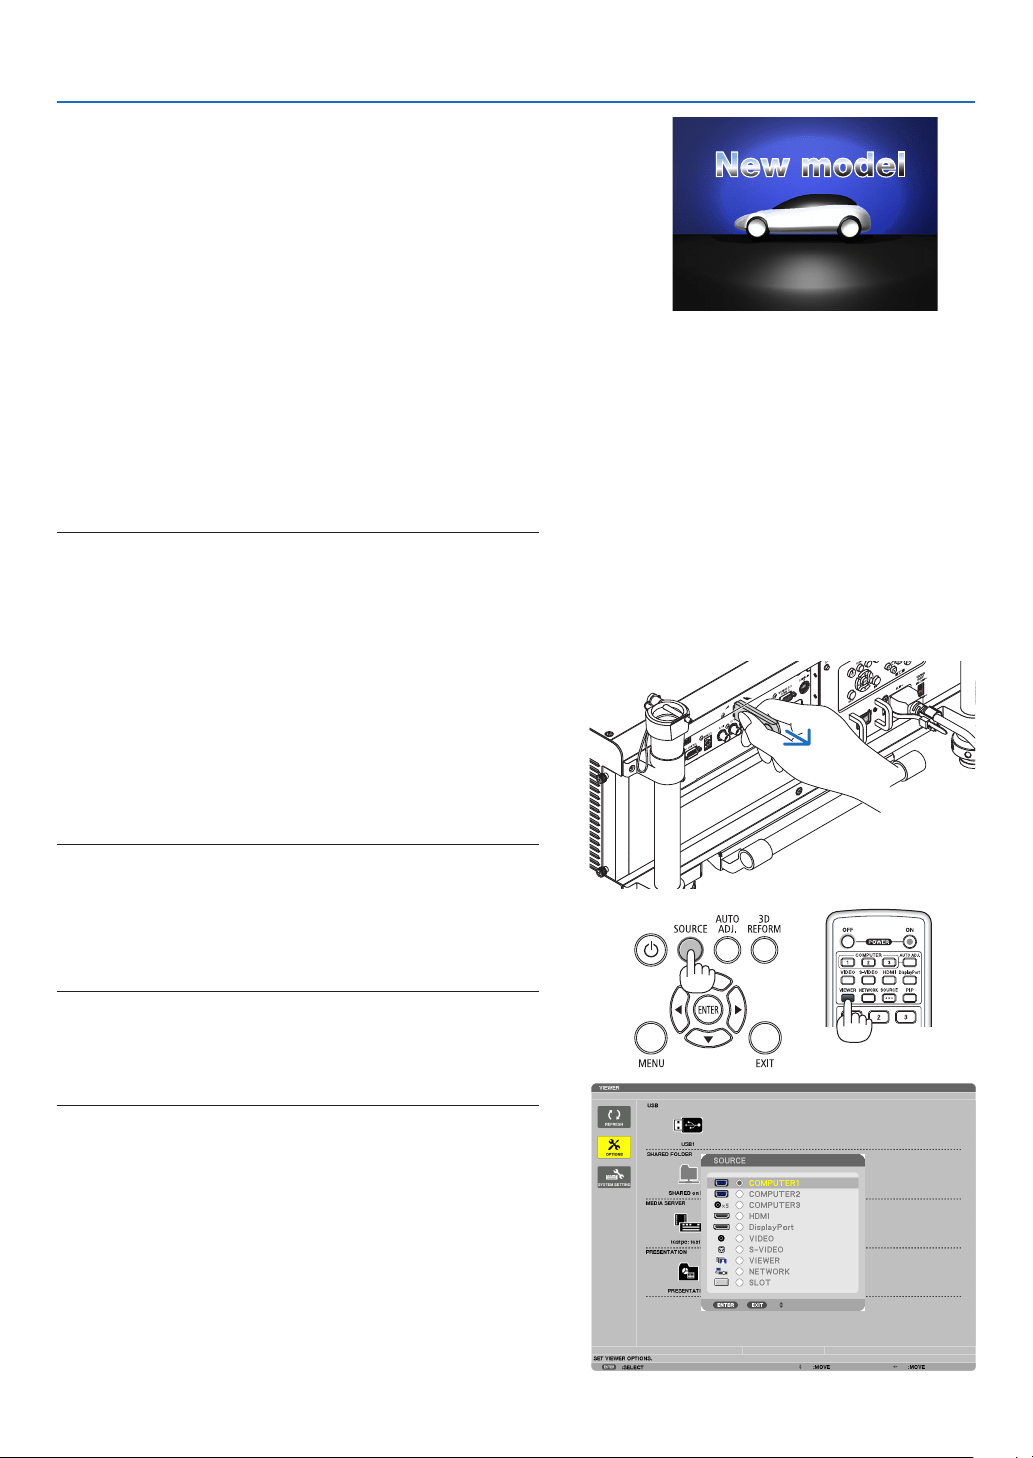
81
4. Using the Viewer
•Indexle(extension:.idx)
•Indexles,whichisconvertedbyusingViewerPPT
Converter3.0,willappearintheThumbnailscreen.
OnlyfoldersandJPEGfilesconvertedbyusing
ViewerPPTConverter3.0willappearintheThumbnail
screen.
•Toselectslideshowofindexles,openthe[PRESENTA-
TION]folderintheDRIVELISTscreen.
However,indexleswillnotappear.Onlyfoldersand
JPEGleswillappear.
•UptofourindexfoldersinyourUSBandsharedfolder
aredisplayed.Thefourfolderswillbedisplayedinreverse
chronological order
•WhenyouinserttheUSBmemorydevicestoringindex
withtheViewerinoperation,thecontentoftheindexles
willbedisplayed.
NOTE:
•Theplaymode(MANUAL/AUTO)forslidesofindexleworksin
the following way:
Incaseof[MANUAL]for[PLAYMODE]
Whenyouselect[OPTIONS]→[SLIDESETTING]→[PLAYMODE]
→[MANUAL],indexleswillbesetformanualplaybackinregard-
lessofwhether[INTERVAL]isset.
Incaseof[AUTO]selectedfor[PLAYMODE]
Whenyouselect[OPTIONS]→[SLIDESETTING]→[PLAYMODE]
→[AUTO],indexleswillbesetforautoplaybackatintervals
speciedbyusing[INTERVAL].
When,however,[-1]isselectedfor[INTERVAL],theplaymodewill
besetforautoplaybackaccordingtothesettingfor[OPTIONS]→
[SLIDESETTING]→[INTERVAL].
7.RemovetheUSBmemoryfromtheprojector.
Returntothedrivelistscreen.MakesurethattheLEDon
theUSBmemoryisnotashingbeforeremovingtheUSB
memory.
NOTE:IfyouremovetheUSBmemoryfromtheprojectorwithaslide
displayed, the projector may not operate correctly. If this happens,
turn off the projector, turn off the main power switch, and unplug the
powercord.Wait3minutes,thenconnectthepowercord,turnon
the main power switch, and turn on the projector.
Exiting the Viewer
1.PresstheSOURCEbuttontoselectasourceotherthan
[VIEWER].
ApressoftheSOURCEbuttonwilldisplaythesourceselect
screen.
AfewmorepressesoftheSOURCEbuttonwilldisplay
another source.
•ToexittheViewerusingtheremotecontrol,selecta
sourceotherthan[VIEWER].
XXXX Motors
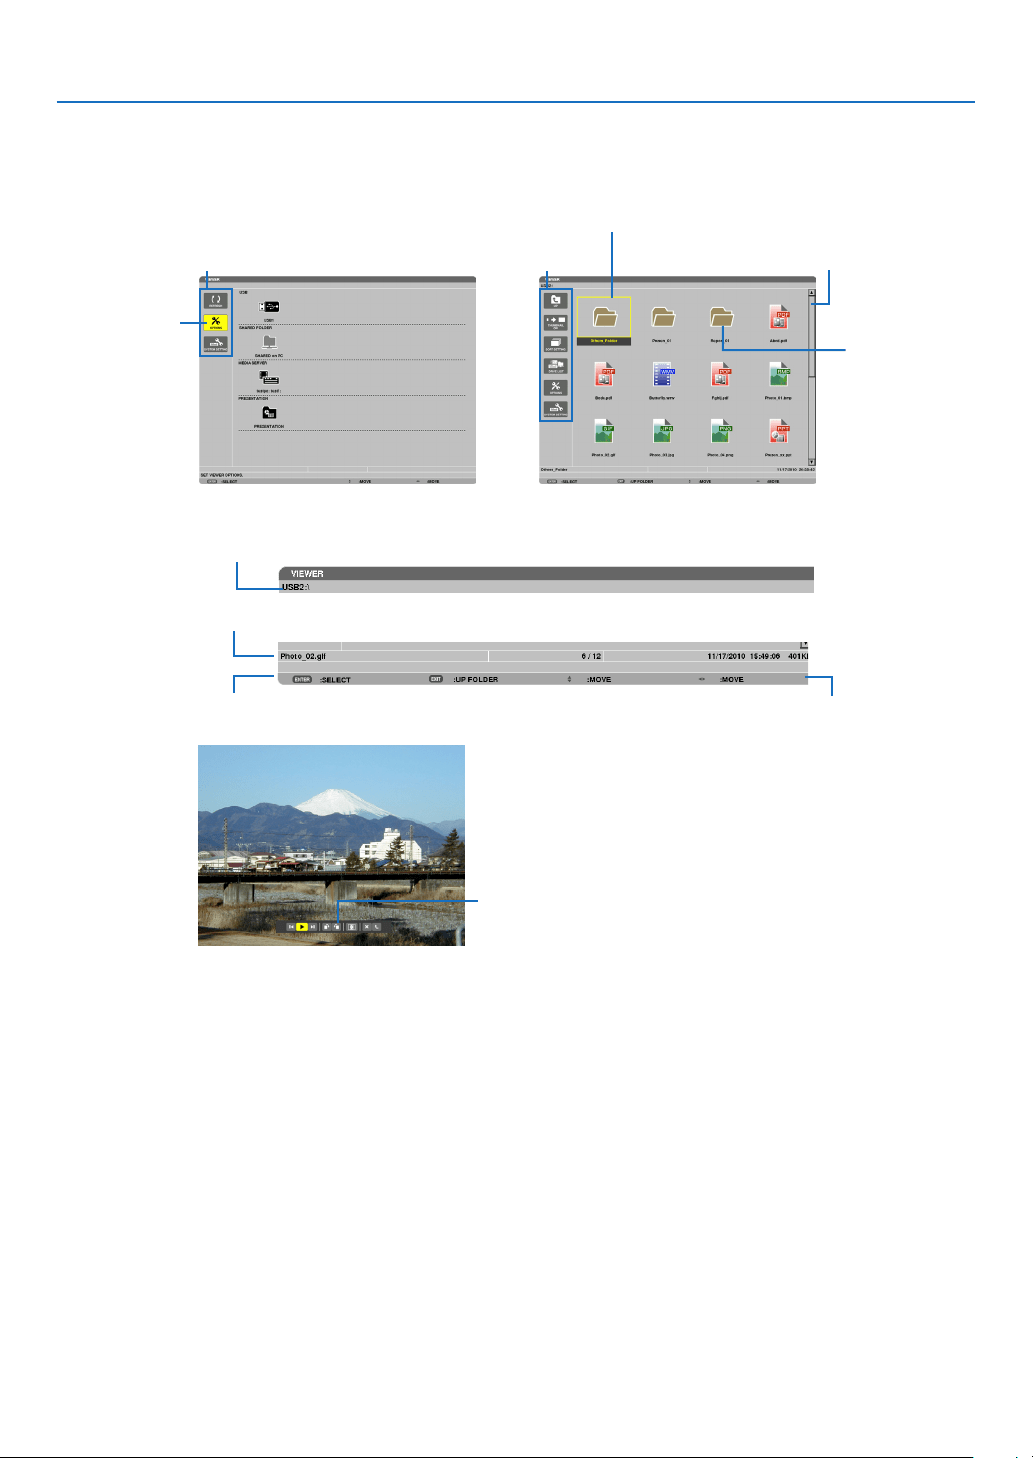
82
4. Using the Viewer
Names and functions of Viewer screen
TheViewerhasthreescreens:Drivelistscreen,Thumbnailscreen,andSlidescreen.
•Drivelistscreen
Displaysalistofdrivesconnectedtotheprojector.
Menu operation
•Usethe▼
or ▲buttontomovethecursorupordown.SelectthemenuitemandpresstheENTERbutton
todisplaythesubmenu.
Operation for Drive list screen
1.Pressthe▶buttontomovethecursortothedrivelist.
(Use the ◀ or ▶buttontoswitchbetweenthemenuandthedrivelist.)
Press the ▼ or ▲buttontoselectatypeofdrive;pressthe◀ or ▶buttontoselectthedriveconnectedtothe
projector.
2.SelectthedriveandpresstheENTERbuttontoswitchtothethumbnailscreenoftheselecteddrive.
Cursor (yellow)
Cursor (yellow)
Menu Menu
Scrollbar
[Drive list screen] [Thumbnailscreen]
Folder icon
Path information
Drive information/File information
Menu guide
Operationbuttonguide
Controlbar
* The operation for still image differs from that for movie.
[Slidescreen]
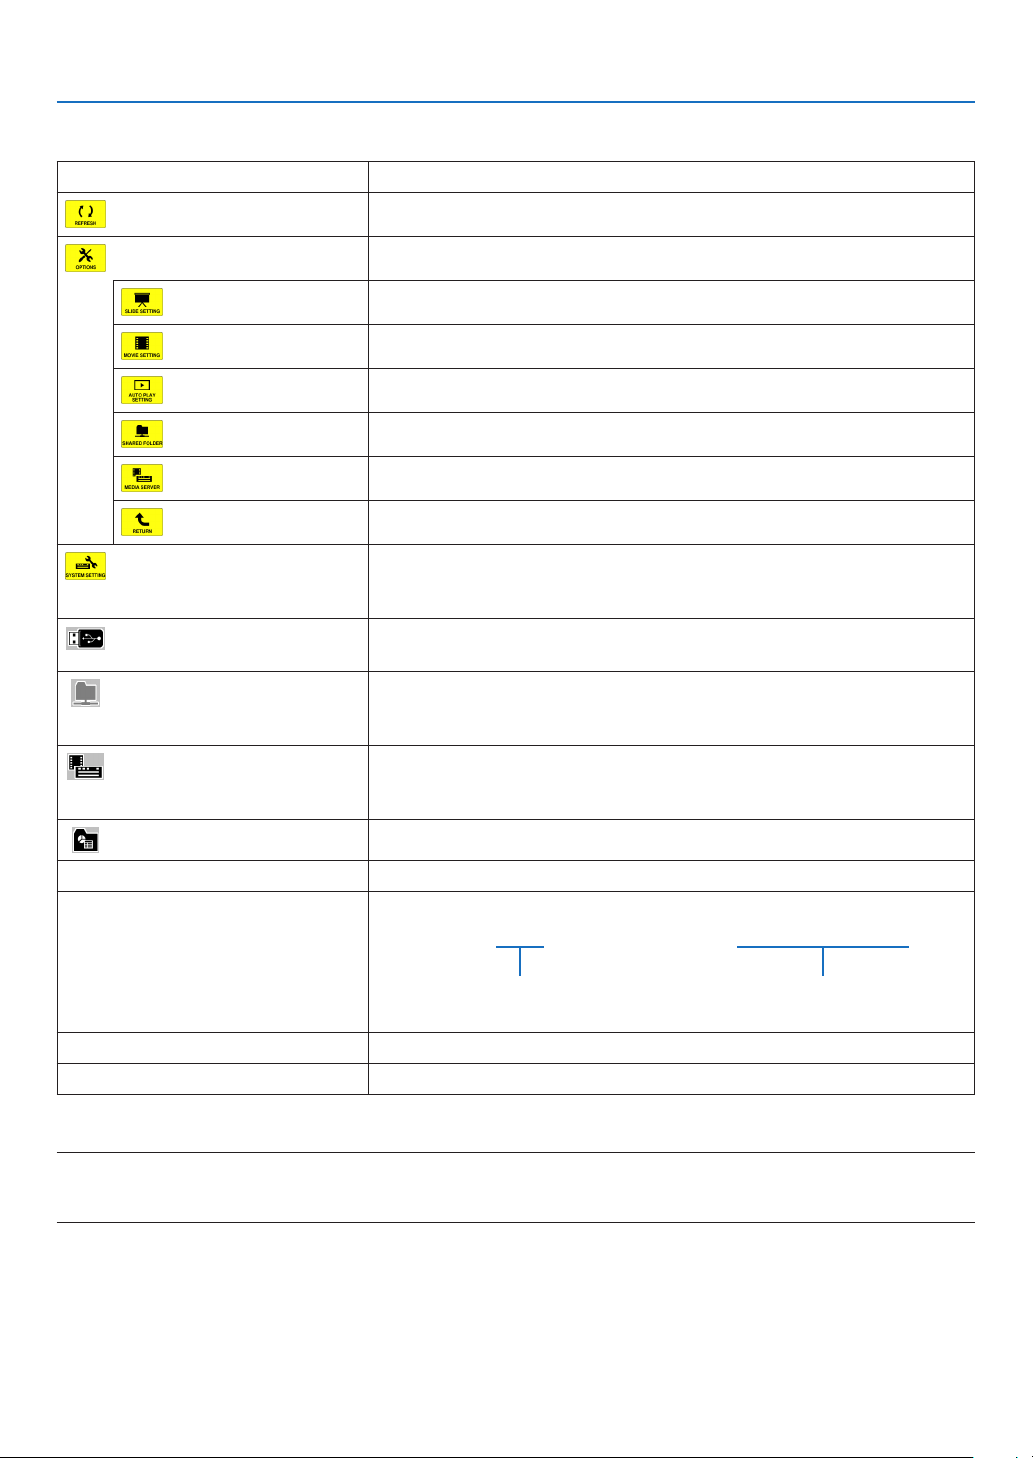
83
4. Using the Viewer
Functions
NameDescription
REFRESHDisplaysadditionalmediaserversinthedrivelistscreen.
OPTIONSOpenstheOPTIONSmenu.
SLIDESETTING
Setsupslides.(→page
87)
MOVIESETTING
Setsupmovieles.(→page
88)
AUTOPLAYSETTING
Setsupautoplay.(→page
88)
SHAREDFOLDER
Setsupasharedfolder.(→page
90)
MEDIASERVER
Setsupamediaserver.(→page
94)
RETURNClosestheOPTIONSmenu.
SYSTEMSETTINGSwitchestothesystemsettingmenu.SeewiredLAN,wirelessLAN,WPS,
networkinformation,mouse,andkeyboardin“9.ApplicationMenu”.(→
page
140)
USBDisplaystheiconforaUSBmemoryinsertedintotheUSBportofthe
projector.
SHAREDFOLDERDisplaysuptofourdrivesofacomputerconnectedtoaLAN(setforcon-
nectingasharedfolder).
*Seepage
90forsettingupforconnectingasharedfoleroftheprojector.
MEDIASERVERDisplaysuptofourdrivesofacomputerconnectedtoaLAN(setforcon-
nectingamediaserver).
*Seepage94forsettingupforconnectingamediaserveroftheprojector
PRESENTATIONDisplaystheiconwhenaUSBmemoryorsharedfolerstoresindexles.
PathinformationDisplaysthelocationofafolderorle.
Driveinformation[Example]
USB1314MBFREE/492MB
Displaysthedrive.Displaysfreespaceandcapcityof
adrive.(USBonly)
MenuguideDisplaysthedescriptionofaselectedmenu.
OperationbuttonguideDisplaysinformationaboutoperationbuttons.
*Itisdisplayedinthree-digitnumber(roundingup)
NOTE:
WhentheOPTIONSmenuisdisplayed,thedrivelistscreenorthumbnailscreenisnotdisplayed.Todisplayit,selectthe[RETURN]
iconandpresstheENTERbutton.
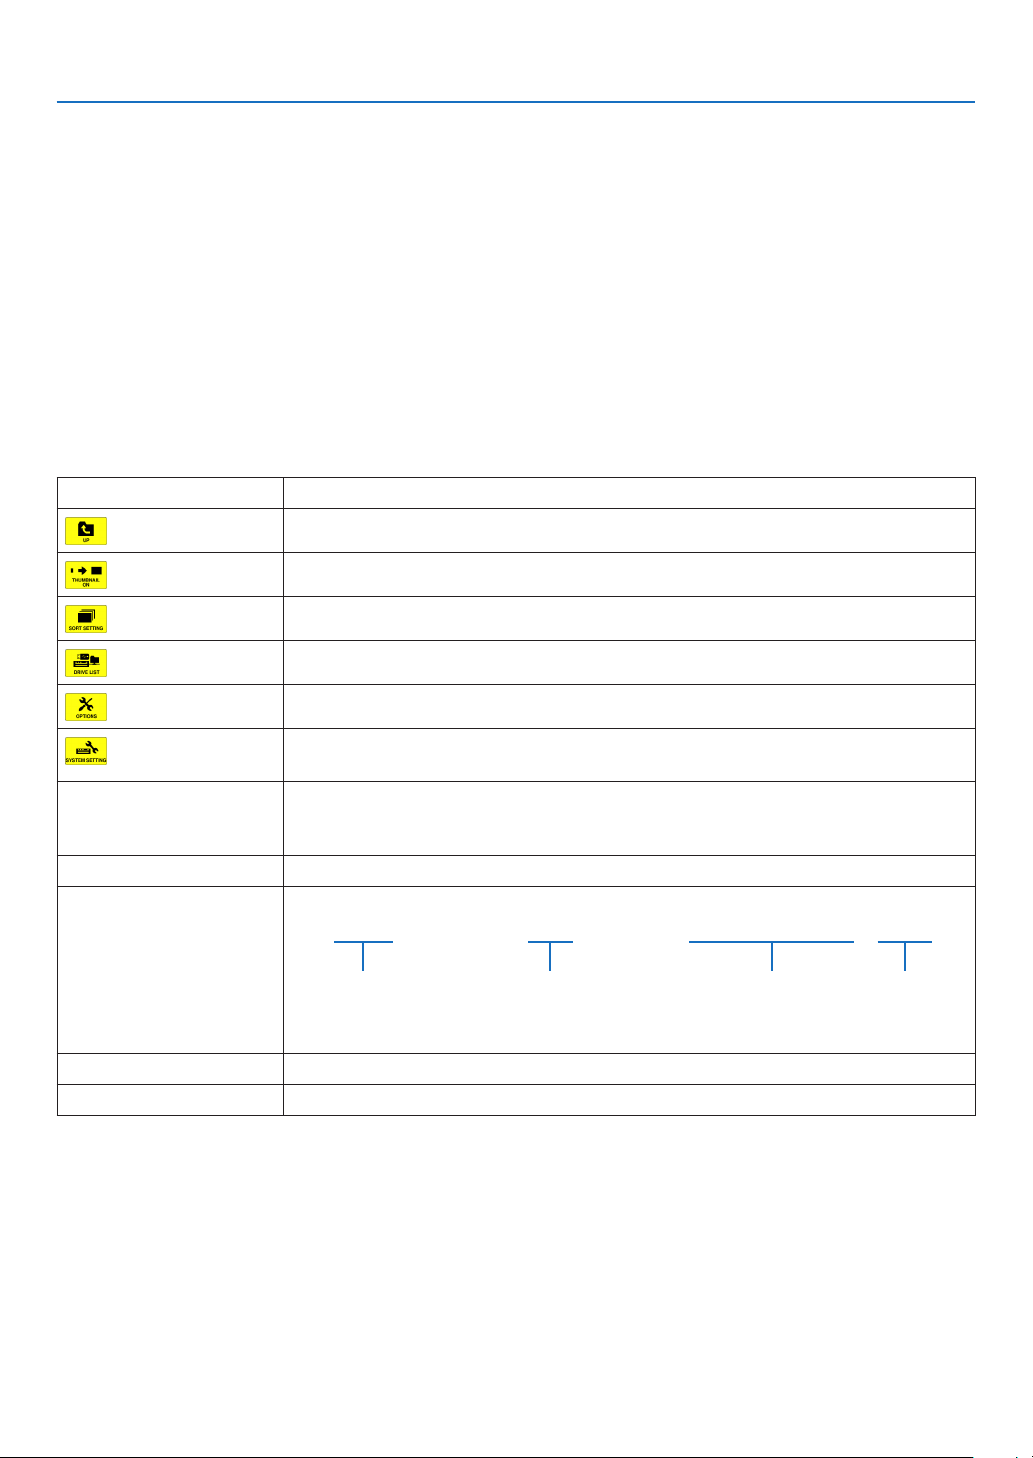
84
4. Using the Viewer
•Thumbnailscreen
Displaysalistoffolders,thumbnails,andiconsinthedriveselectedonthedrivelistscreen.
Menu operation
•Usethe▼
or ▲buttontomovethecursorupordown.SelectthemenuitemandpresstheENTERbutton
todisplaythemenuorsettingscreen.
Operation for Thumbnail screen
1.Pressthe▶buttontomovethecursortothethumbnailscreenwhentheOPTIONSmenuisnotdis
-
played.
2.Pressthe▼
, ▲, ◀, or ▶buttontoselectaleorfolder.
3.PresstheENTERbuttontostartslideshoworplaybackoftheselectedle.Selectingafolderwilldisplay
itsthumbnailscreen.
Functions
NameDescription
UP Goestooneupperlevelmenu.
THUMBNAILSwitchestwodisplaysbetweenthumbnailandicon.
SORTSETTINGRearrangesfoldersorles.
DRIVELISTReturnstothedrivelistscreen.
OPTIONSChangestotheOPTIONSmenu.
SYSTEMSET-
TING
Opensthesystemsettingmenu.
ScrollbarThumbnailscreenwilldisplay12leswith4by3.Ifthethumbnailscreenhastwelveor
morelesorfolders,thescrollbarwillbedisplayedattherightside.UsingthePAGE
▽orPAGE△buttonwillscrollthewholescreendownorup.
PathinformationDisplaysthelocationofafolderorle.
Thumbnailinformation[Example]
005.jpg5/200 11/03/201013:25:12502KB
Selectedfolder
nameorle
name
Numbersandorderof
lesinafolder(only
whenfolderselected)
Create/Changedate:
M/D/Y/H/M/B
Displaysle
capacity
MenuguideDisplaysthedescriptionofaselectedmenu.
OperationbuttonguideDisplaysinformationaboutoperationbuttons.
TIP:
•Ifanunsupportedimageisselected,theicon[?]willbedisplayed,
•Themaximumdisplayablenumberofimagesis300inthethumbnailscreenincludingthenumberoffolders.
•Ifalenameorpathofafolderislongerthanspecied,itwillbedisplayedwithcentercharactersorpathskipped.
Example:“123456789.jpg”willbedisplayedin“123..789.jpg”.
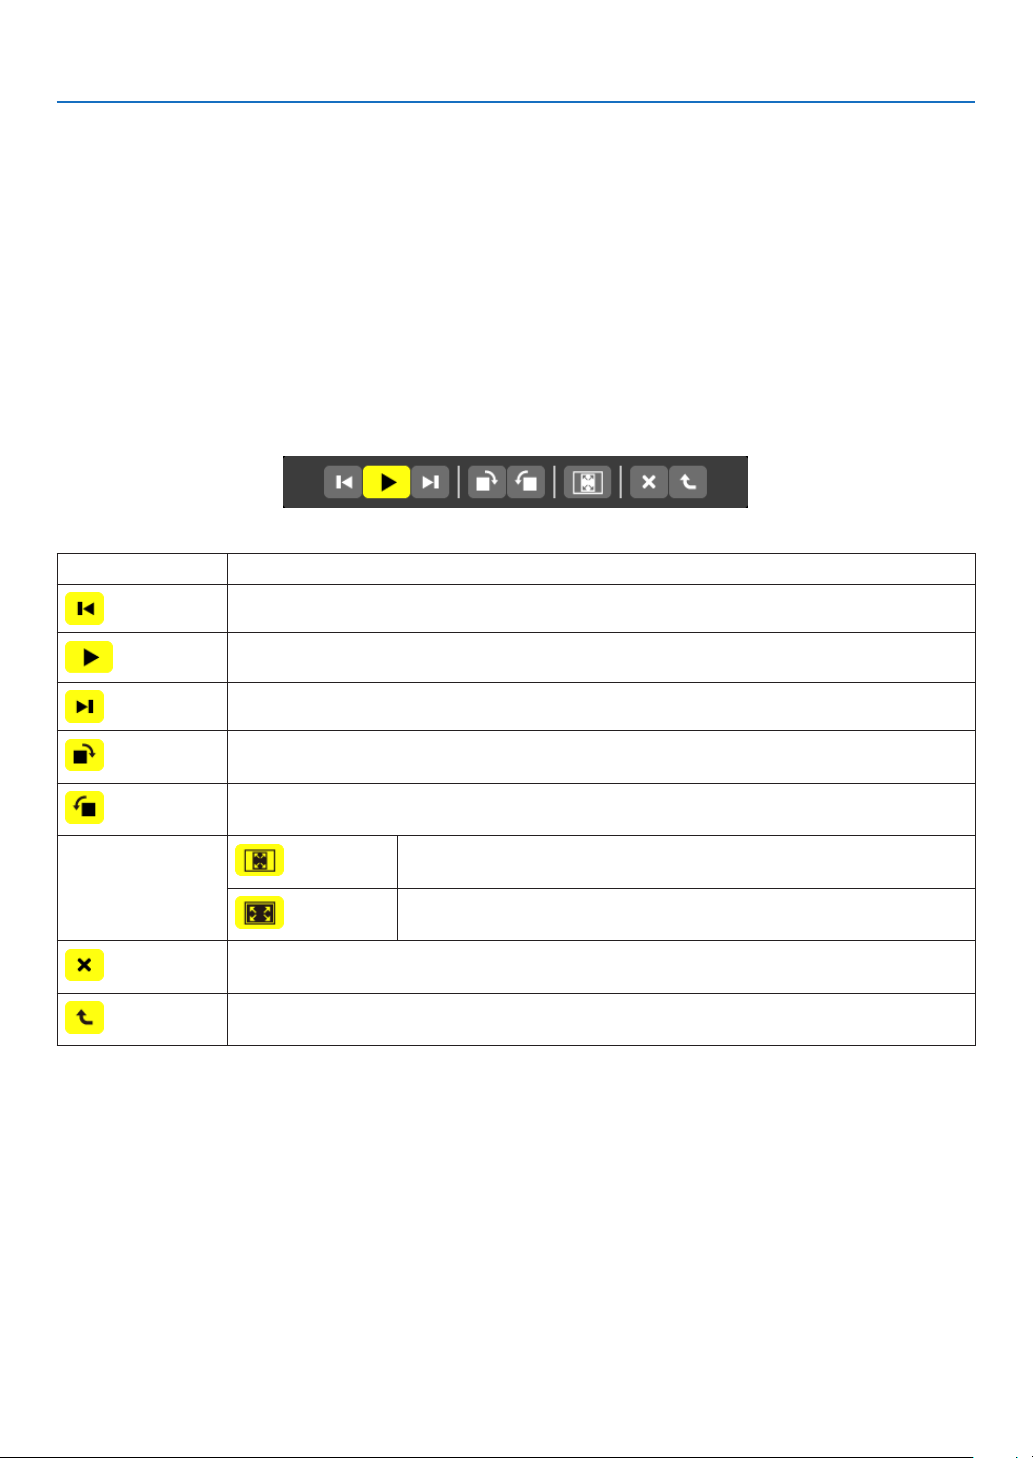
85
4. Using the Viewer
•Slidescreen(stillimage/movie)
Playsaleselectedfromalistofthumbnailsoricons.
•ForoperatingaMicrosoftPowerPointleandAdobePDFle,seepage
80.
Control bar operation
•Thecontrolbarwillbedisplayedonlywhenastillimage(orindexle)andamovieleisselected.
•Thecontrolbarforstillimagesdiffersfromthatformovieles.
1.PressingtheENTERbuttoninSlidescreenwilldisplaythecontrolbaratthebottomofthescreen.
2.Usethe◀
or ▶buttontoselectaleandpresstheENTERbutton.
•Theselectedfunctionwillbeexecuted.
Functions of still image control bar
NameDescription
PREVGoesbacktothepreviousimage
PLAYPlaystheimage.Thisbuttonalsoisusedtostoporstartplayinganimage.
NEXTGoestothenextimage.
RIGHTRotatestheimage90°clockwise.
•Tocancel,selectanotherfolder.
LEFTRotatestheimage90°counterclockwise.
•Tocancel,selectanotherfolder.
SIZE
BESTFITDisplaystheimagewithitsaspectratiointheprojector’sdisplayable
maximumresolution.
ACTUAL
SIZE
Displaystheimageinitsactualsize.
CLOSEClosesthecontrolbar.
•YoucanalsopresstheEXITbuttontoclosethecontrolbar.
ENDStopsplayingslidesorslideshow,andclosesthecontrolbartoreturntothethumbnail
screen.
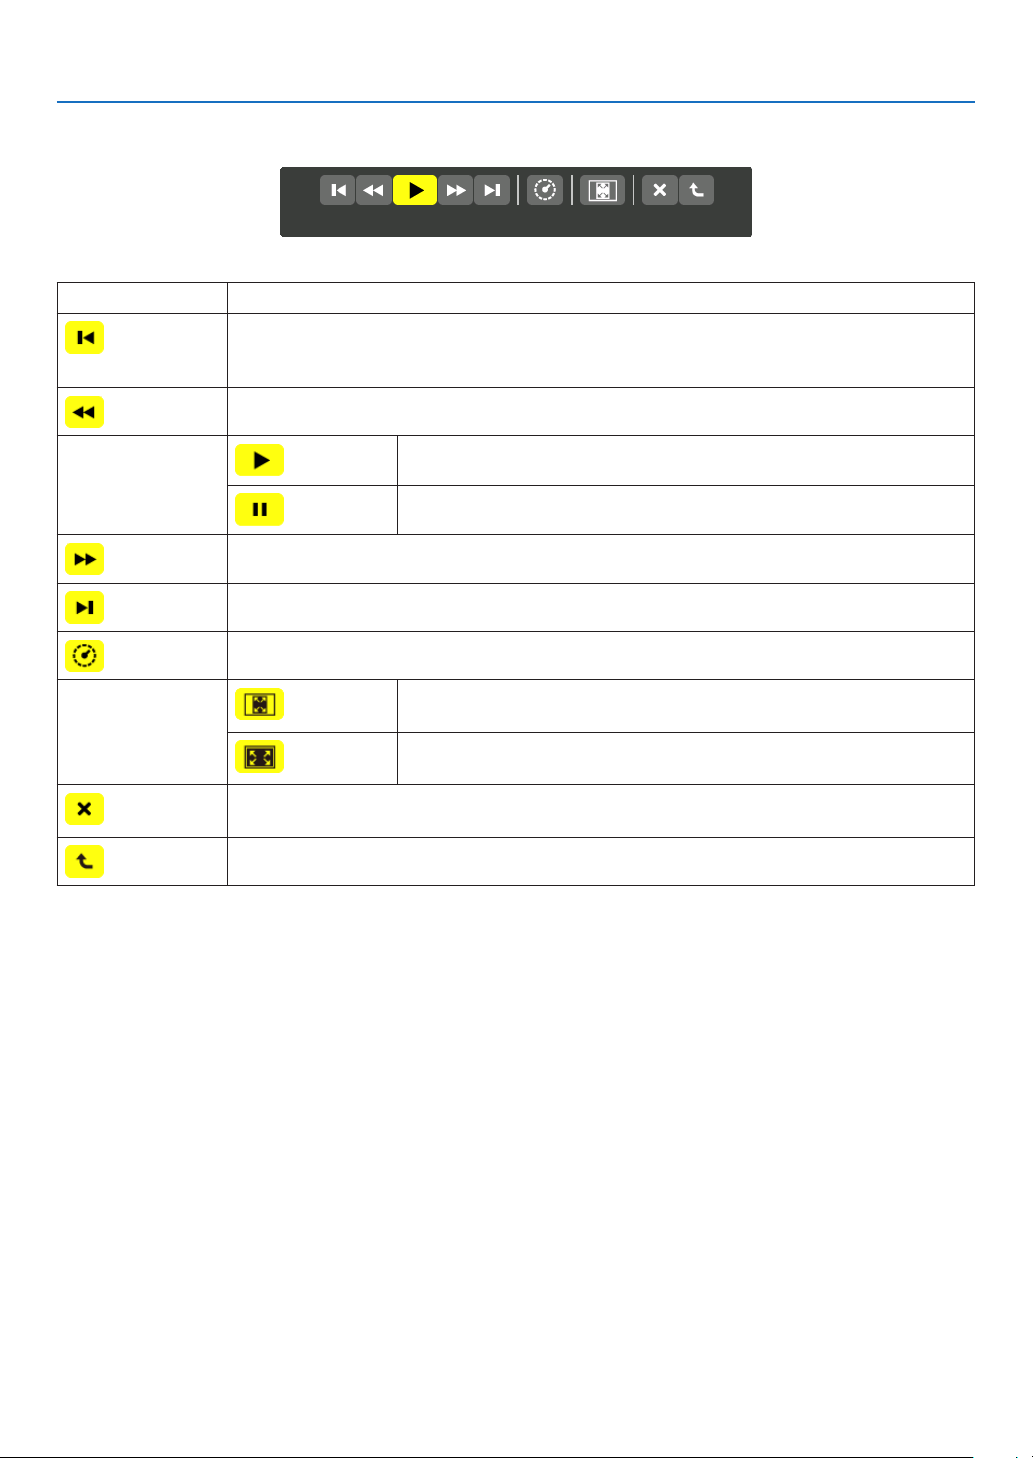
86
4. Using the Viewer
Functions of movie control bar
NameDescription
PREVGoesbacktothebeginningofamoviele.
•Goesbacktothebeginningofthepreviousmovieleifexecutedimmediatelyafterbeing
startedplaying.
FRFast-rewindsamovieleforabout7seconds.
PLAY/PAUSE
PLAYPlaysamoviele.
PAUSEStopsplayingamoviele.
FFFast-forwardsamovieleforabout7seconds.
NEXTGoestothebeginningofanextmoviele.
TIMEDisplaysanelapsedtimeforplaybackorpause.
SIZE
BESTFITDisplaystheimagewithitsaspectratiointheprojector’sdisplayable
maximumresolution.
ACTUAL
SIZE
Displaystheimageinitsactualsize.
CLOSEClosesthecontrolbar.
•YoucanalsopresstheEXITbuttontoclosethecontrolbar.
ENDStopsplayingamovie,andclosesthecontrolbartoreturntothethumbnailscreen.

87
4. Using the Viewer
Viewer option settings
•SLIDESETTING
Setsstillimagesorslides.
NameOptionsDescription
SCREENSIZEBESTFITDisplaystheimagewithitsaspectratiointheprojector’sdisplay-
ablemaximumresolution.
ACTUALSIZEDisplaystheimageinitsactualsize.
PLAYMODEMANUALSelectsmanualplay.
AUTOSelectsautoplay.
INTERVAL5-300secondsSpecifiesintervaltimewhen[AUTO]isselectedforPLAY
MODE.
REPEAT
CheckmarkTurnsonorofftherepeatfunction.
TIP
•Toplayoneormoreslides,placethoselesintoafolder.
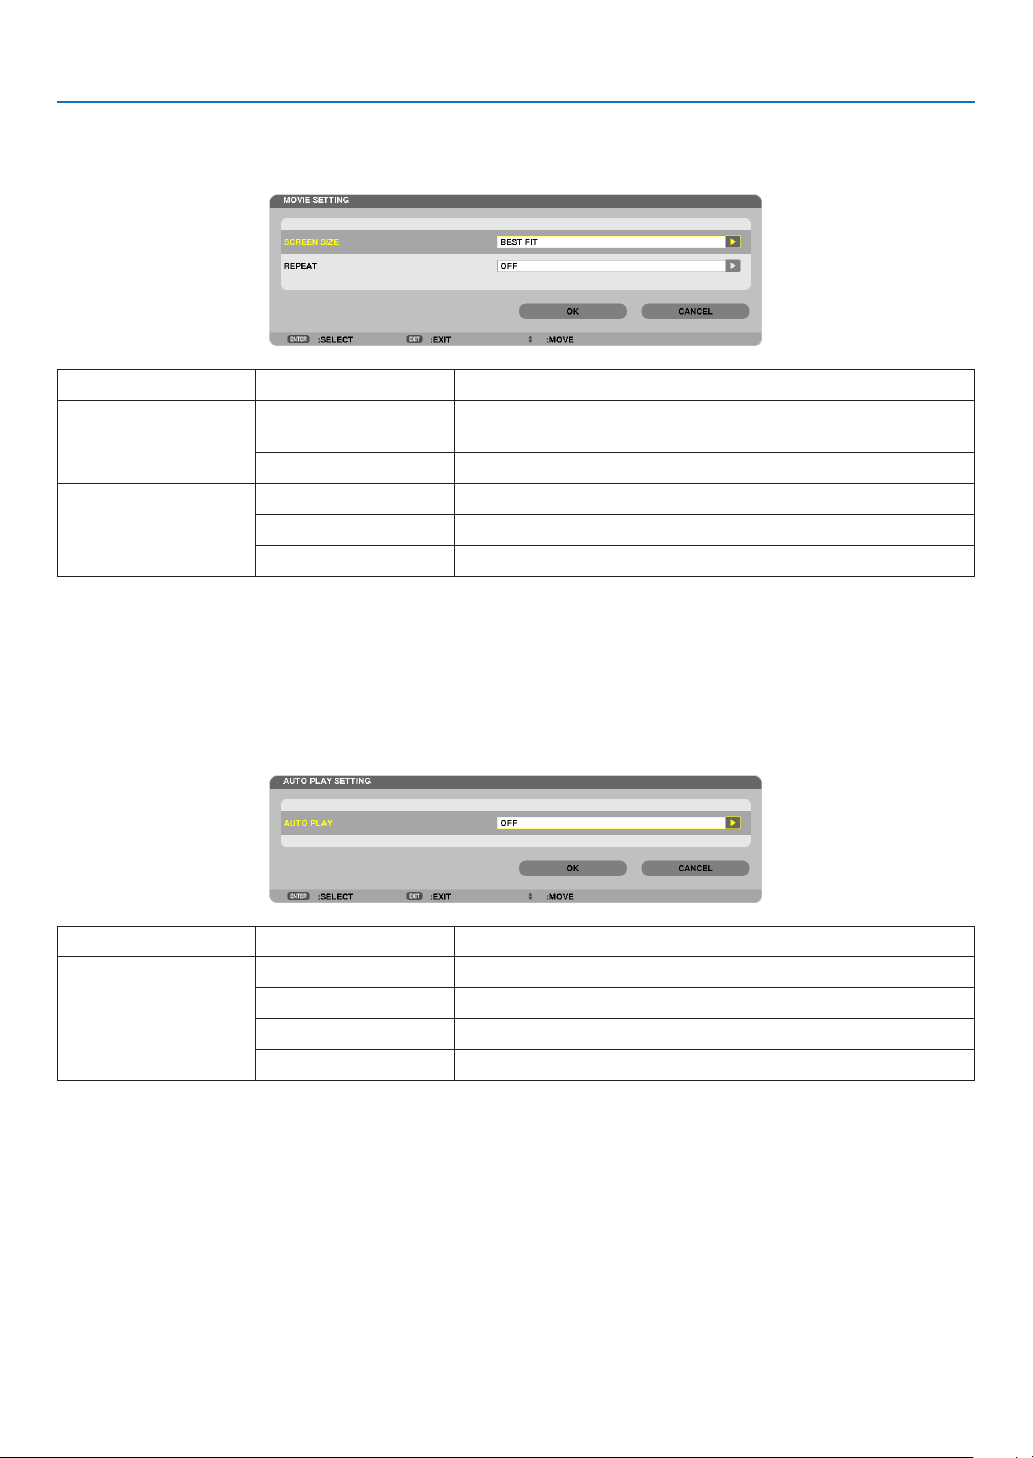
88
4. Using the Viewer
•MOVIESETTING
Setsthefunctionsforamoviele.
NameOptionsDescription
SCREENSIZEBESTFITDisplaystheimagewithitsaspectratiointheprojector’sdisplay-
ablemaximumresolution.
ACTUALSIZEDisplaystheimageinitsactualsize.
REPEATOFFTurnsonorofftherepeatfunction.
ONEREPEATRepeatsoneleonly.
ALLREPEATRepeatsalllesinthecurrentfolder.
TIP
•Turningon[REPEAT]willdisplayblackscreenduringintermissionbetweenmovies.
•AUTOPLAYSETTING
SetsautoplayforslideshowwhenaUSBmemorydeviceisinsertedintotheUSBportoftheprojector,orwhen
[VIEWER]isselectedfor[SOURCE].
NameOptionsDescription
AUTOPLAYOFF—
PICTURE
Playstherststillimagefoundinadrive.
MOVIEPlaystherstmoviefoundinadrive.
PowerPointPlaystherstPowerPointlefoundinadrive.
TIP
•AutoplaybehaviorisdifferentbetweenwhenaUSBmemorydeviceisinsertedintotheUSBportoftheprojectorandwhen
[VIEWER]isselectedfor[SOURCE].
•AutoplaystartsfortherstfoundlesupportingtheletypesetupforAutoPlay.Thelewillbesearchedinthedriverootor
lowerlevel.
•When[VIEWER]isselectedfor[SOURCE],thelastselectedlewillbeautomaticallyplayedifitisfound,orthelastselectedfolder
willbesearchedandtherstfoundlewillbeautomaticallyplayed.
ToautomaticallyplayamovieleinaUSBmemory,storeonemovieleorchangeitslenamesothatitcanbesearchedrst.

89
4. Using the Viewer
•SORTSETTING
Setstheorderofdisplayingthumbnailsorslides.
NameOptionsDescription
SORT
NAME(ABC..)Displaysthelesalphabeticallybynameinascendingorder.
NAME(ZYX..)Displaysthelesalphabeticallybynameindescendingorder.
EXT.(ABC..)Displaysthelesalphabeticallybyextensioninascendingor-
der.
EXT.(ZYX..)Displaysthelesalphabeticallybyextensionindescending
order.
DATE(NEW)Displaysthelesinreversechronologicalorder.
DATE(OLD)Displaysthelesinchronologicalorder.
SIZE(BIG)Displaysthelesindescendingorderofitslesize.
SIZE(SMALL)Displaysthelesinascendingorderofitslesize.
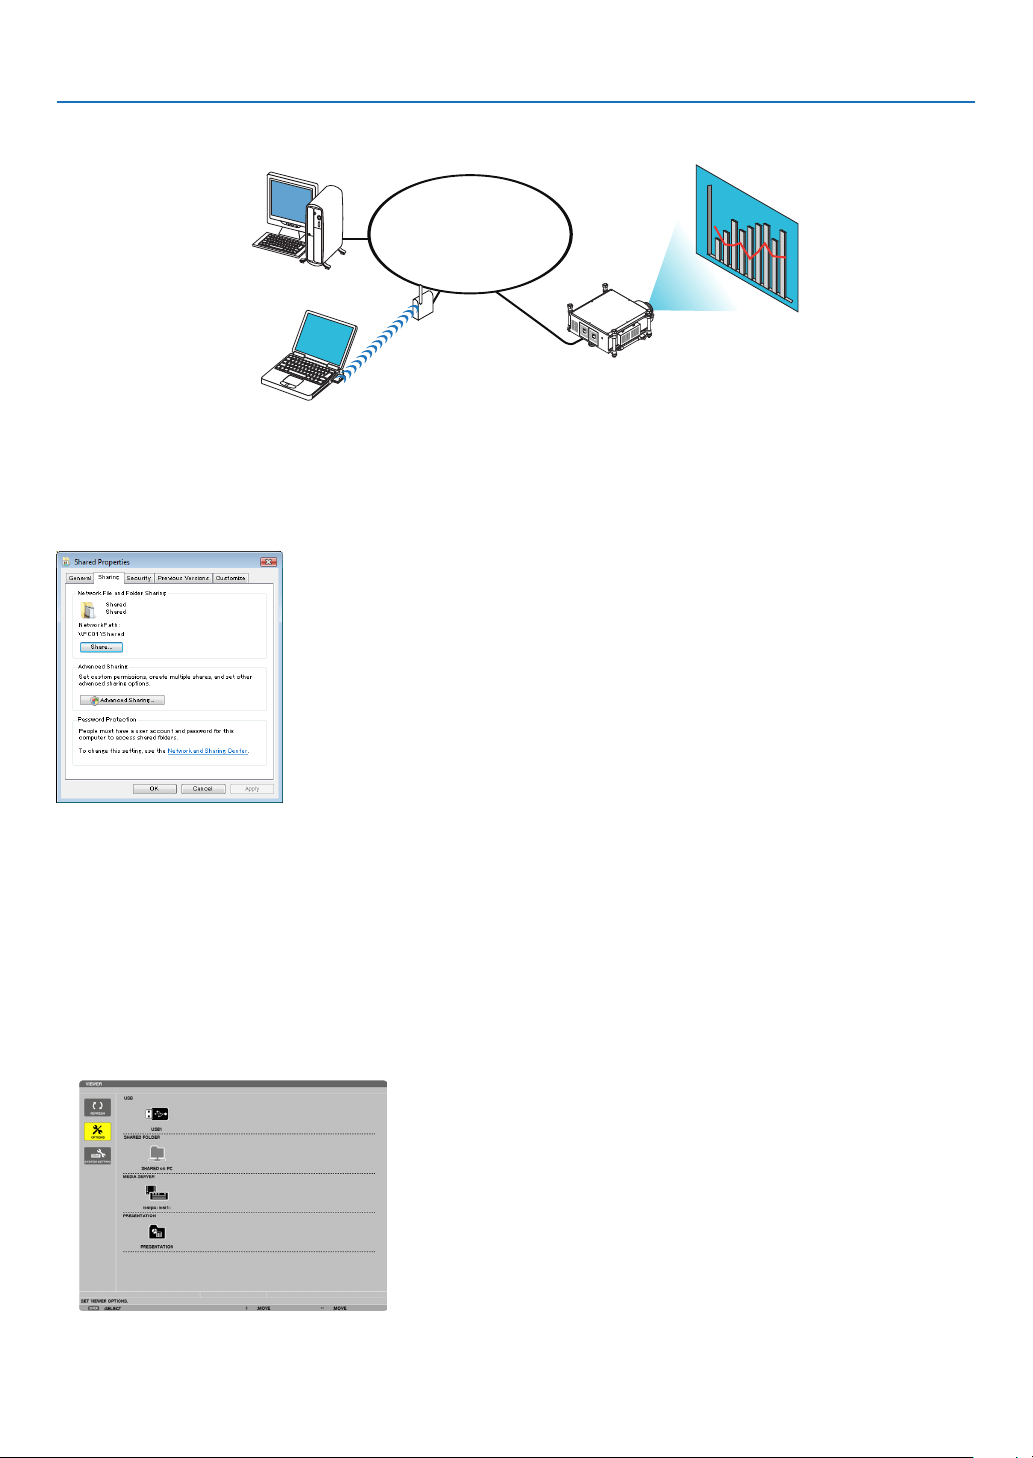
90
4. Using the Viewer
❹ Projecting data from shared folder
LAN
Sharedfolder
WirelessLAN
Projector
Sharedfolder
Preparation
Forprojector:Connecttheprojectortothenetwork.
Forcomputer:Placelestobeprojectedinasharedfolderandnotethefolder’spath.Memorizeorwritedownthe
pathforlateruse.
•Forsharingafolder,refertoyouruserguideorhelpleaccompaniedwithyourWindowscomputer.
•Useakeyboardtogiveanametothesharedfolderinalphanumericcharacters.
•Toconnectthesharedfolderbeyondthesubnet,set[WINSCONFIGURATION]in[NETWORKSETTINGS]from
themenu.
•Digitalsignature(SMBsignature)isnotsupported.
Connecting the projector to the shared folder
1.PresstheVIEWERbuttonontheremotecontrol.
Thedrivelistwindowwillbedisplayed.
•AnotherwaytostarttheVIEWERistopresstheSOURCEbuttonafewtimesontheprojectorcabinet.(→ page
20)
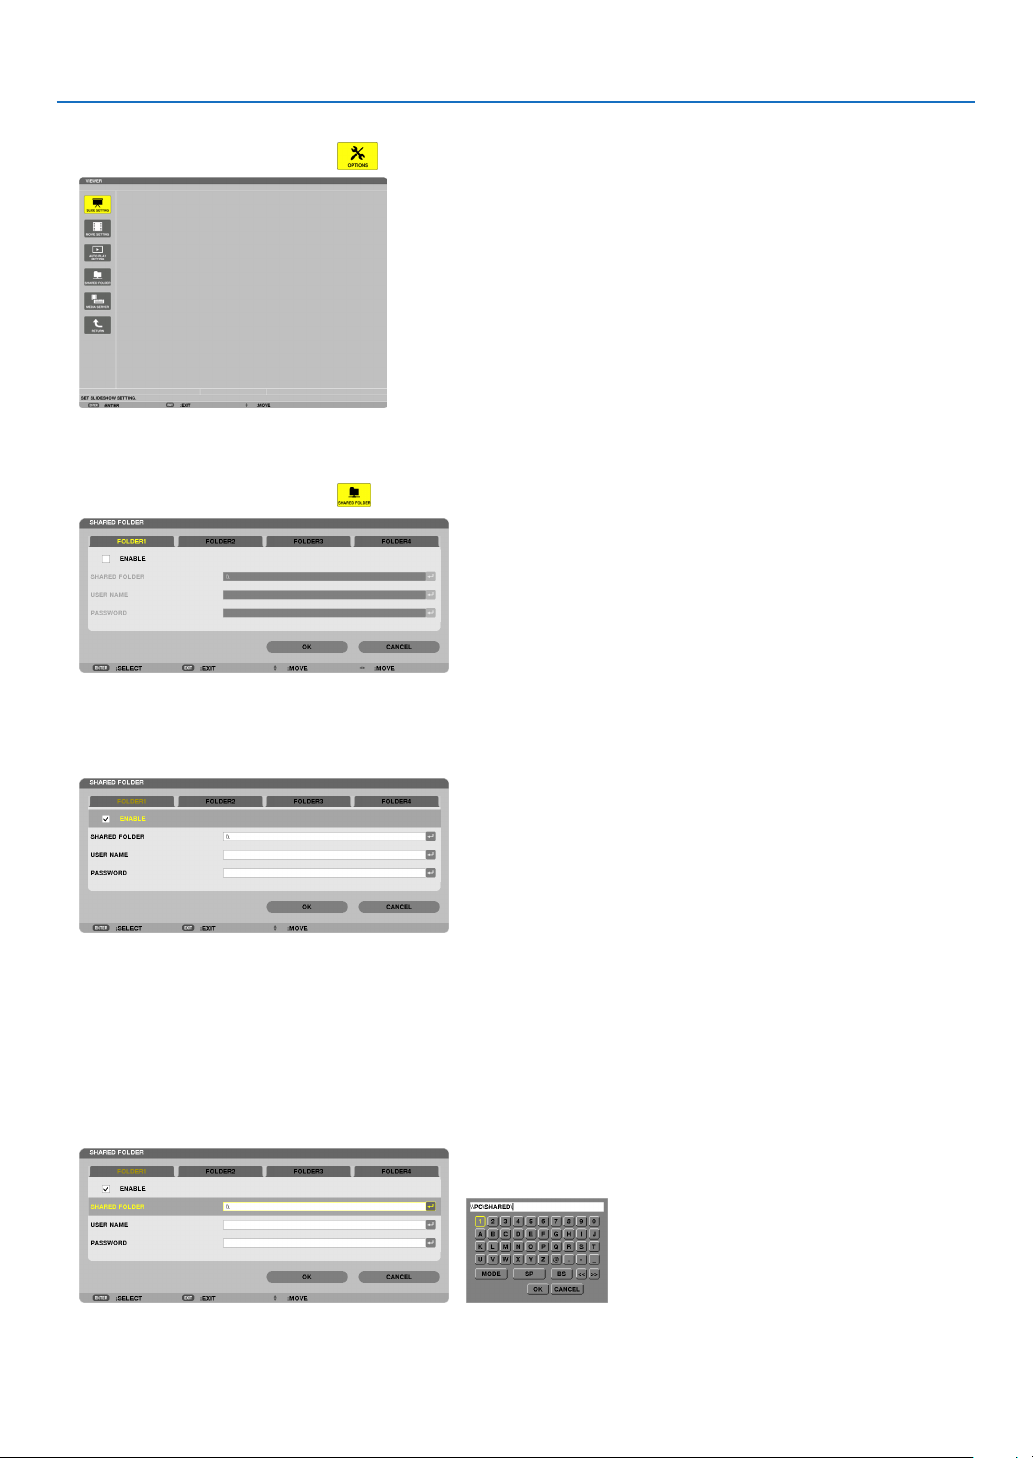
91
4. Using the Viewer
2.Displaysthe[OPTIONS]menu.
Press the ▼buttontoselectthe(OPTIONS)iconandpresstheENTERbutton.
•WhentheOPTIONSmenuisdisplayed,thedrivelistwillnotbedisplayed.
3.Displaythe[SHAREDFOLDERSETTING]screen.
Press the ▼buttontoselectthe(SHAREDFOLDERSETTING)iconandpresstheENTERbutton.
4.Selectafoldernumberandplacetoenableit.
Press the ◀ or ▶buttontoasharedfoldernumberandpressthe▼buttontoselect[ENABLE],andthenpress
theENTERbutton.
5.Enterthepath,username,andpasswordforthesharedfolder.
Press the ▼buttontoselectthe[SHAREDFOLDER]eld.Thesoftwarekeyboardwillbedisplayed.
Forusingthesoftwarekeyboard,seepage
153.
•Ifyourcomputerisnotpasswordprotected,enteringapasswordisnotrequired.
•Uptofoursharedfolderscanbeadded.
•Themaximumlengthofapathofthesharedfoldermustbe15alphanumericcharactersforcomputernameand
23 alphanumeric characters for folder name.

92
4. Using the Viewer
6.Exitthesetting.
Press the ▼buttontoselect[OK]andpresstheENTERbutton.
Thiswillclosethe[SHAREDFOLDER]screen.
•Ifanerrormessageappear,yoursettingsarenotcorrect.Tryagain.

93
4. Using the Viewer
Disconnecting the shared folder from the projector
•Disablethenumberofasharedfolderyouwishtodisconnect
Press the ▼buttontoselect[ENABLE]andpresstheENTERbuttontoclearit.
NOTE:
•WhenaPowerPointleorPDFleisdisplayed,donotdisconnectyourLANcable.Ifdoingso,theViewerwillnotwork.
TIP:
•ConnectingsettingsforSharedfolder
Settingsofuptofourfolderscanbesaved.
Restartingtheprojectorwilldisplaysetting-savedsharedfoldersingreyfoldericononthedrivelistscreen.
Selectingthegreyiconfolderwillskipentryforafolderpath.
•Failingtoconnectwithasharedfolderwilldisplaythefoldericonwith“x”mark.Ifthishappen,checkyourfoldersetting.
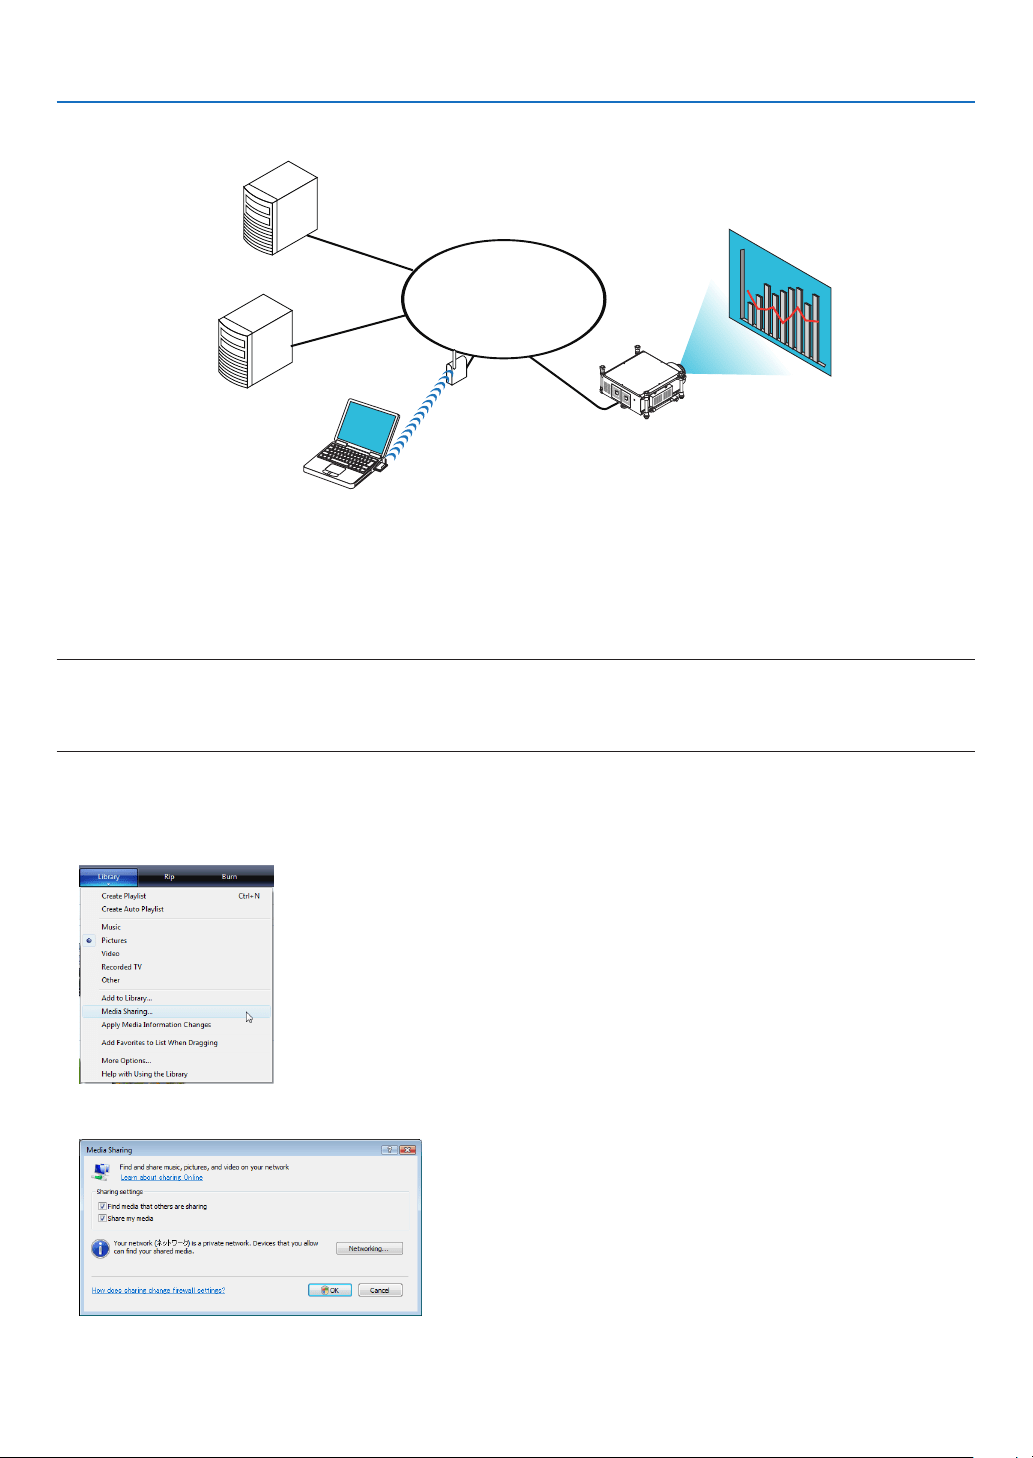
94
4. Using the Viewer
❺ Projecting data from media server
LAN
Media server
Media server
WirelessLAN
Media server
Projector
Preparation
Forprojector:Connecttheprojectortothenetwork.
Forcomputer:Prepareimagelesormovielestobeprojected,andsetup“MediaSharing”inWindowsMediaPlayer
11orWindowsMediaPlayer12.
NOTE:
•Boththeprojectorandthemediaservermustbeonthesamesubnet.Connectingtothemediaserverbeyondthesubnetisnot
possible.
•TypesofimagesandmovieswhichcanbesharedmayvarydependingonWindowsversion.
Setting up “Media Sharing” in Windows Media Player 11
1.StartWindowsMediaPlayer11.
2.Select“MediaSharing”from“Library”.
The“MediaSharing”dialogboxwillbedisplayed.

95
4. Using the Viewer
3.Select“Sharemymedia”checkbox,andthenselectOK.
Alistofaccessibledeviceswillbedisplayed.
4.Select“PH1000Series”andthen“Allow”.
Acheckmarkwillbeaddedtothe“PH1000Series”icon.
•The“PH1000Series”isaprojectornamespeciedin[NETWORKSETTINGS].
5.Select“OK”.
Thiswillmakepicturesandvideoin“Library”availablefromtheprojector.
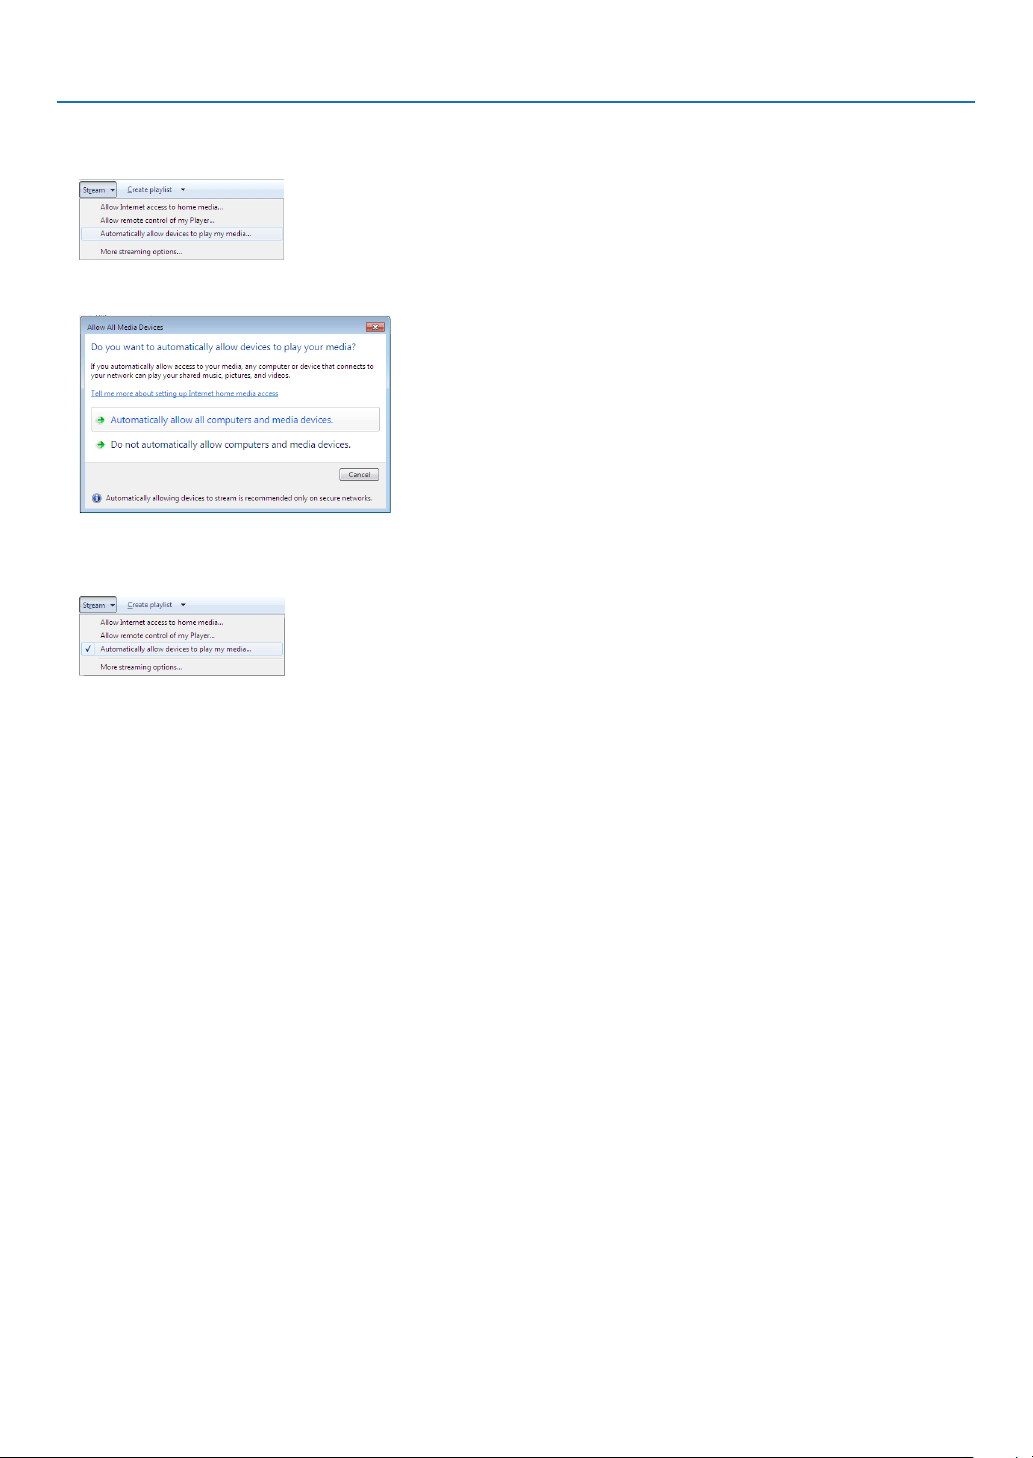
96
4. Using the Viewer
Setting up “Media Sharing” in Windows Media Player 12
1.StartWindowsMediaPlayer12.
2.Select“Stream”,andthenselect“Automaticallyallowdevicestoplaymymedia”.
The“AllowAllMediaDevices”windowswillbedisplayed.
3.Select“Automaticallyallowallcomputersandmediadevices”.
Graphicsandmovielesin“Library”canbeusedfromtheprojector.
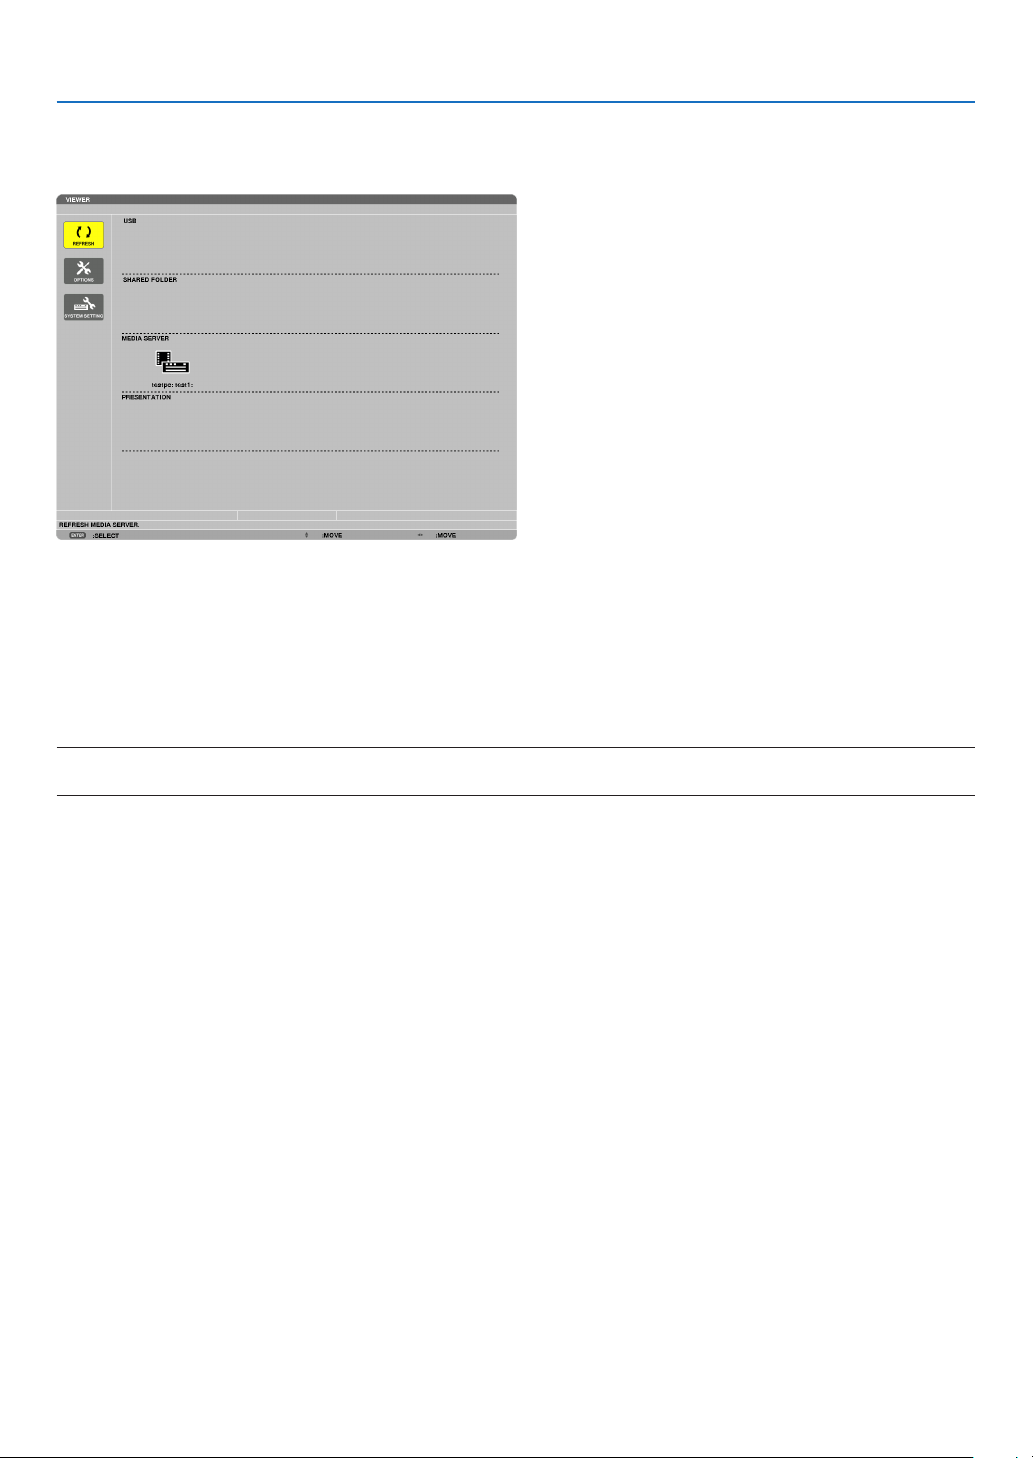
97
4. Using the Viewer
Connecting the projector to the media server
PresstheVIEWERbuttonontheremotecontrol.
TheVIEWERwillstart.
•AnotherwaytostarttheVIEWERistopresstheSOURCEbuttonafewtimesontheprojectorcabinet.(→page
20)
•Thiswillstartsearchingforacomputerwith“mediasharing”enabledinthenetworkandaddittothe“Mediaserver”
ofthethumbnailscreen.
Anotherwaytodothisistopointthecursorto“Mediaserver”andselect[REFRESH]fromthethumbnailmenu
andpresstheENTERbutton.
NOTE:
•Uptofouraccessiblemediaserverscanbeautomaticallysearchedanddisplayed.Thefthdeviceorlatercannotbedisplayed.
(→page78)
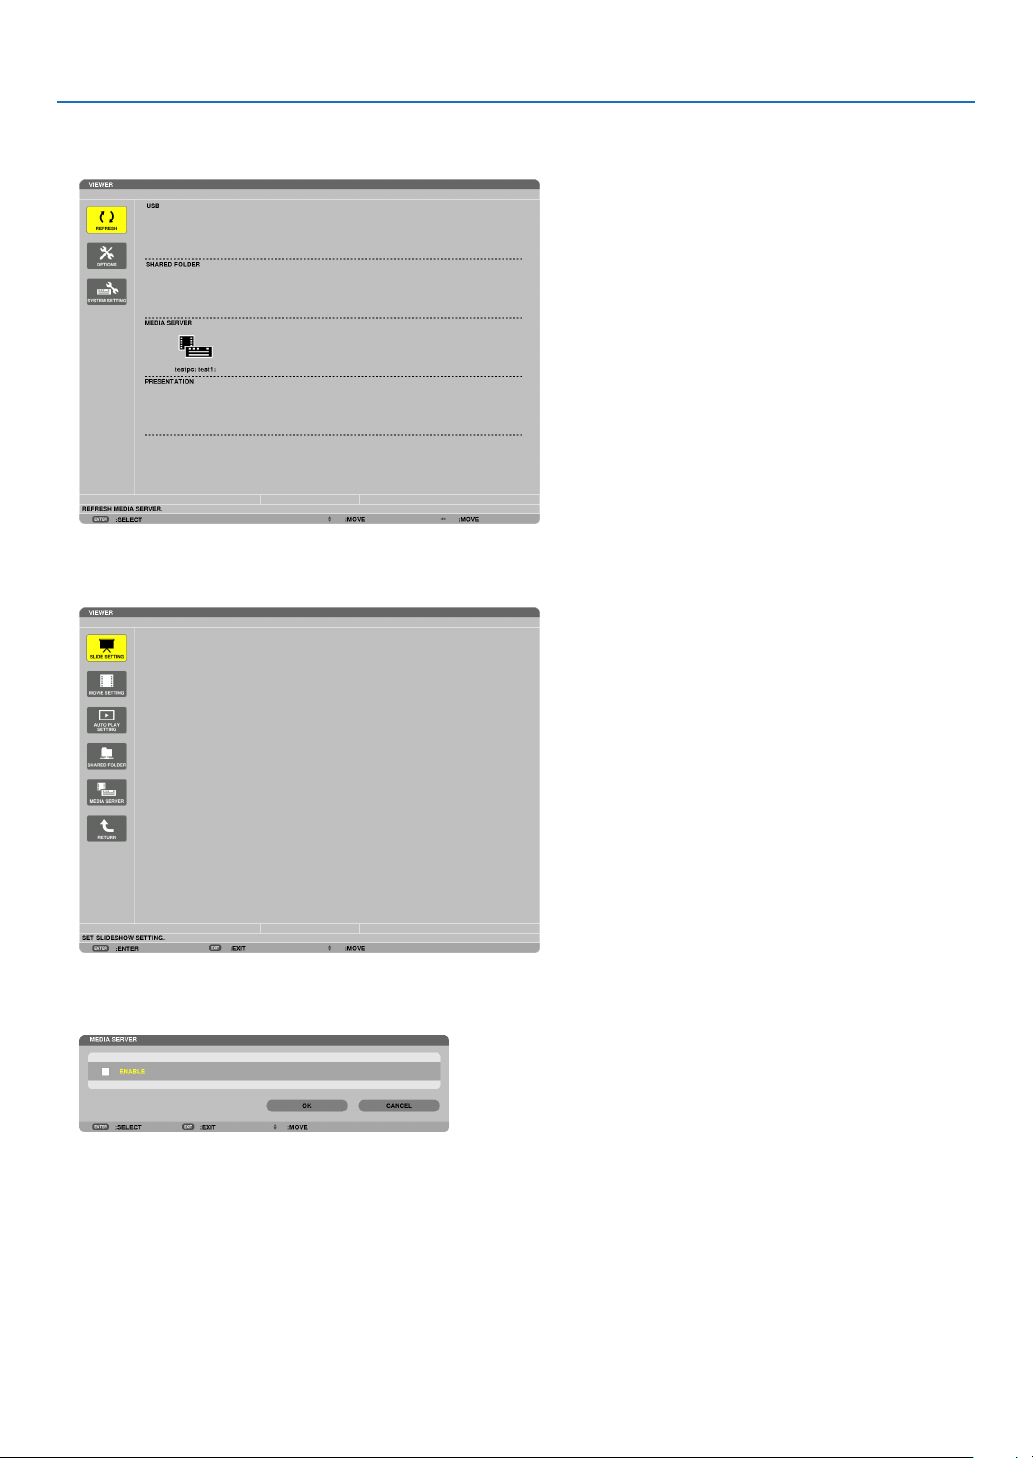
98
4. Using the Viewer
Disconnecting the projector from the media server
1.DisplaytheOPTIONSmenu.
Press the ▼buttontoselectthe[OPTIONS]iconandselecttheENTERbutton.
2.DisplaytheMEDIASERVERsettingscreen.
Press the ▼buttontoselecttheMEDIASERVERiconandpresstheENTERbutton.
3.Disabletheconnection.
PresstheENTERbuttontoclearthecheckmarktodisabletheconnection.
Press the ▼buttontoselect[OK]andpresstheENTERbuttontoclosetheMEDIASERVERsettingscreen.

99
4. Using the Viewer
❻ Restrictions on displaying files
TheViewerallowsyoutogiveasimplieddisplayofaPowerPointleorPDFle.
Duetosimplieddisplay,however,actualdisplaymaybedifferentfromtheoneonyourcomputerapplicationpro-
gram.
Some restrictions on PowerPoint files
•Fontswillbeautomaticallyconvertedtothefontsinstalledintheprojector.Fontscanvaryinsizeorwidth,causing
layoutcorruption
Somecharactersorfontsmaynotbedisplayed.
•Somefunctionsincludedinfontarenotsupported.
Example:Therearesomerestrictionsonanimation,selection,orhyperlink.
•Itmaytakelongertimetofeedpagescomparedwithacomputer
•InsomecasesMicrosoftPowerPoint97-2003formatlesmaynotbedisplayed.
Some restrictions on PDF files
•FontsnotembeddedatthetimeofPDFcreationmaynotbedisplayed.
•Somefunctionsincludedinfontarenotsupported.
Example:Therearesomerestrictionsonannotations,selection,form,orcolorspace.
•Itmaytakelongertimetofeedpagescomparedwithacomputer
•InsomecasesAdobeAcrobatformatlesmaynotbedisplayed.
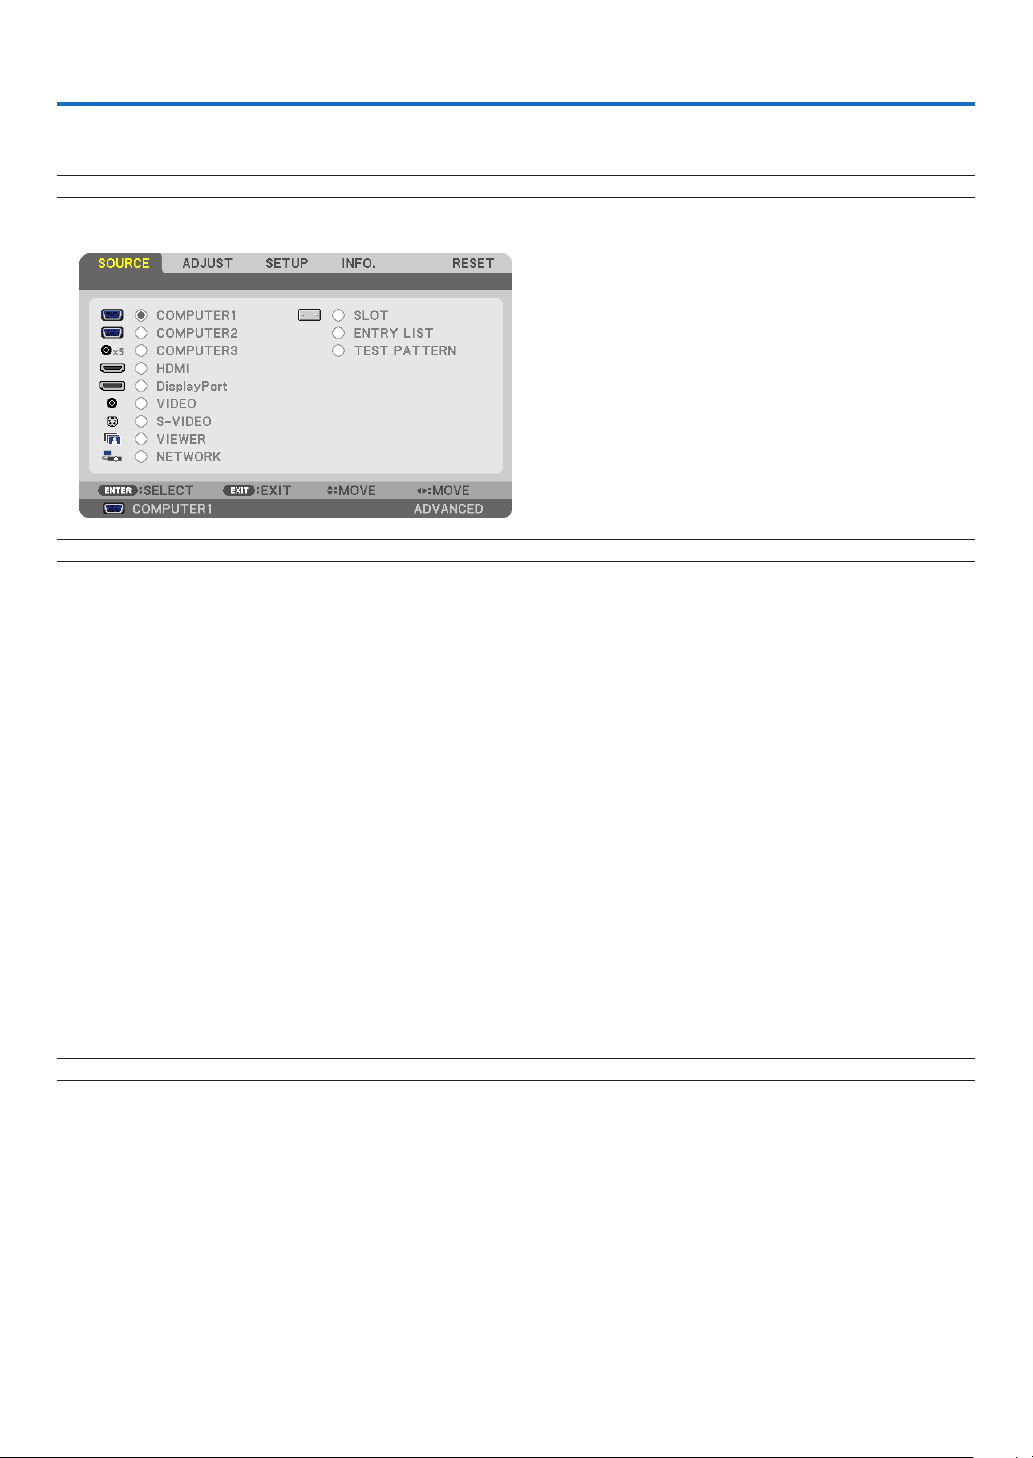
100
5. Using On-Screen Menu
1 Using the Menus
NOTE:Theon-screenmenumaynotbedisplayedcorrectlywhileinterlacedmotionvideoimageisprojected.
1.PresstheMENUbuttonontheremotecontrolortheprojectorcabinettodisplaythemenu.
NOTE: The commands such as ENTER,EXIT,, inthebottomshowavailablebuttonsforyouroperation.
2.Pressthebuttonsontheremotecontrolortheprojectorcabinettodisplaythesubmenu.
3.PresstheENTERbuttonontheremotecontrolortheprojectorcabinettohighlightthetopitemortherst
tab.
4.Usethebuttonsontheremotecontrolortheprojectorcabinettoselecttheitemyouwanttoadjustor
set.
Youcanusethebuttonsontheremotecontrolortheprojectorcabinettoselectthetabyouwant.
5.PresstheENTERbuttonontheremotecontrolortheprojectorcabinettodisplaythesubmenuwindow.
6.Adjustthelevelorturntheselecteditemonoroffbyusingthebuttonsontheremotecontrolor
theprojectorcabinet.
Changesarestoreduntiladjustedagain.
7.Repeatsteps2-6toadjustanadditionalitem,orpresstheEXITbuttonontheremotecontrolortheprojec
-
torcabinettoquitthemenudisplay.
NOTE:Whenamenuormessageisdisplayed,severallinesofinformationmaybelost,dependingonthesignalorsettings.
8.PresstheMENUbuttontoclosethemenu.
Toreturntothepreviousmenu,presstheEXITbutton.
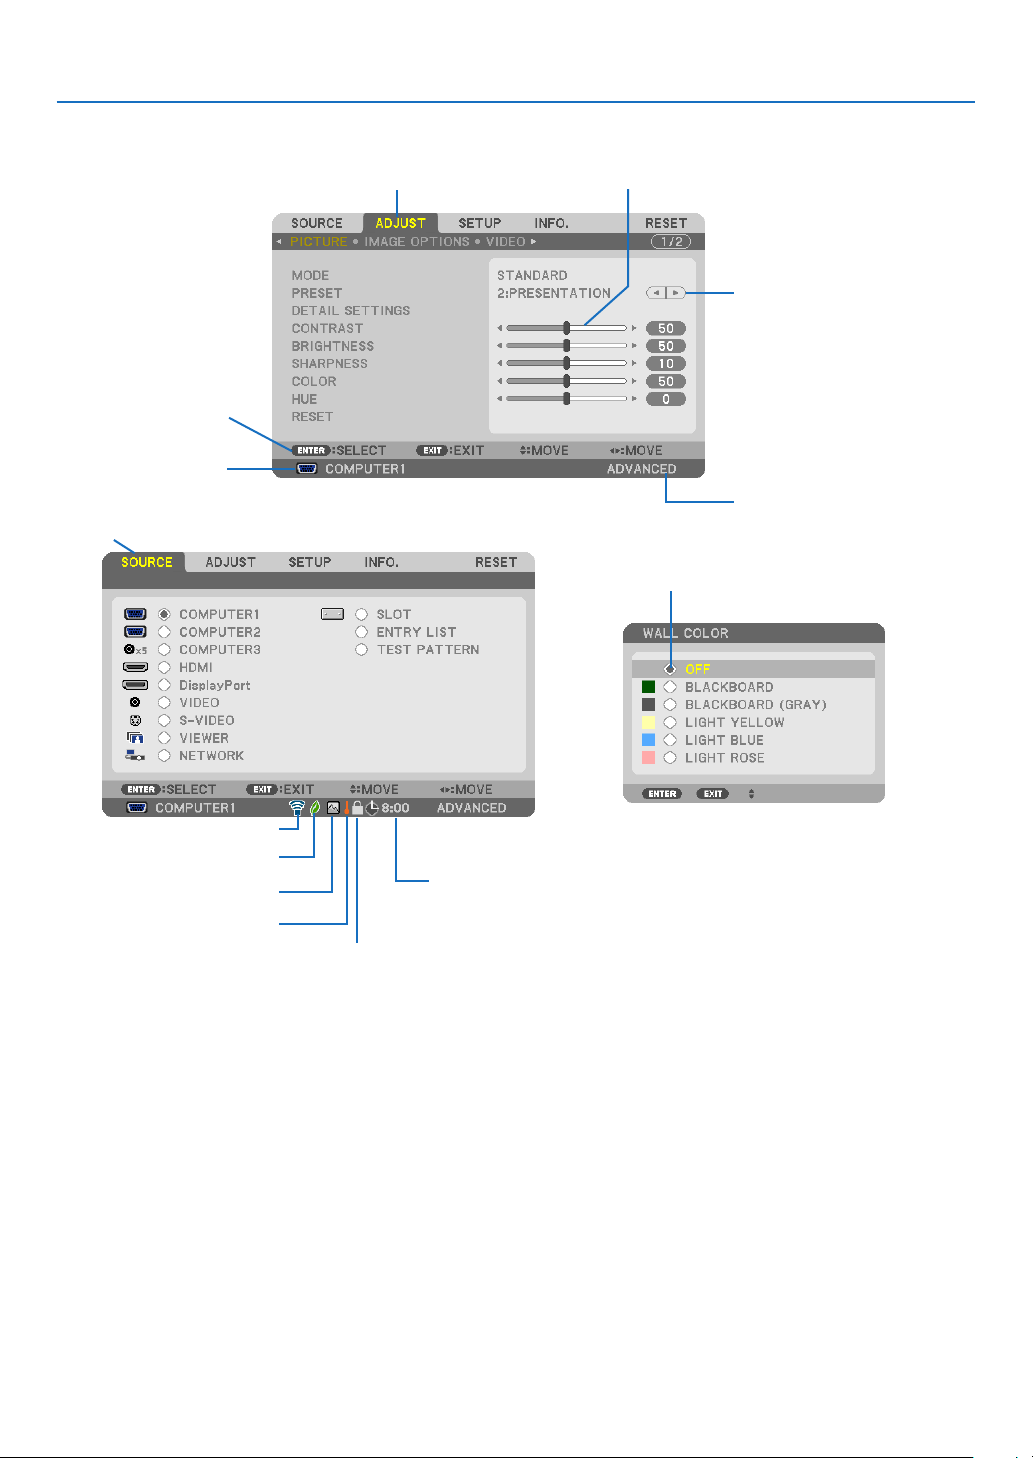
101
5. Using On-Screen Menu
Menu Elements
Slidebar
Solidtriangle
Menu mode
Tab
Radiobutton
ECOmodesymbol
Wirelesssymbol
Menuwindowsordialogboxestypicallyhavethefollowingelements:
Highlight .............................Indicates the selected menu or item.
Solid triangle ......................Indicates further choices are available. A highlighted triangle indicates the item is active.
Tab ......................................Indicates a group of features in a dialog box. Selecting on any tab brings its page to the front.
Radio button .......................Use this round button to select an option in a dialog box.
Source ................................Indicates the currently selected source.
Menu mode ........................Indicates the current menu mode: BASIC or ADVANCED.
Off Timer remaining time ....Indicates the remaining countdown time when the [OFF TIMER] is preset.
Slide bar .............................Indicates settings or the direction of adjustment.
ECO mode symbol ..............Indicates [ECO MODE] is set.
Key Lock symbol ................Indicates the [CONTROL PANEL LOCK] is enabled.
Thermometer symbol .........Indicates the [ECO MODE] is forcibly set to [ON] mode because the internal temperature is too
high.
High Altitude symbol ..........Indicates the [FAN MODE] is set to [HIGH ALTITUDE] mode.
Wireless symbol .................Indicate the wireless LAN connection is enabled.
Source
Availablebuttons
HighAltitudesymbol
Off Timer remaining
time
Highlight
Thermometersymbol
KeyLocksymbol
102
5. Using On-Screen Menu
List of Menu Items
Somemenuitemsarenotavailabledependingontheinputsource.
MenuItemDefaultOptions
SOURCE
COMPUTER1*
COMPUTER2*
COMPUTER3*
HDMI*
DisplayPort*
VIDEO*
S-VIDEO*
VIEWER*
NETWORK*
SLOT
ENTRYLIST
TESTPATTERN
ADJUST
PICTURE
MODESTANDARD
STANDARD,PROFESSIONAL
PRESET*
HIGH-BRIGHT,PRESENTATION,VIDEO,MOVIE,GRAPHIC,
sRGB,DICOMSIM.
DETAILSETTINGS
GENERAL
REFERENCE*
HIGH-BRIGHT,PRESENTATION,VIDEO,MOVIE,GRAPHIC,
sRGB,DICOMSIM.
GAMMA
CORRECTION
DYNAMIC,NATURAL,BLACKDETAIL
SCREENSIZE*
1
*LARGE,MEDIUM,SMALL
COLOR
TEMPERATURE*
2
*5000,6500,7800,8500,9300,10500
DYNAMIC
CONTRAST
*OFF,ON
WHITEBALANCE
CONTRASTR0
CONTRASTG0
CONTRASTB0
BRIGHTNESSR0
BRIGHTNESSG0
BRIGHTNESSB0
SATURATION
RED0
GREEN0
BLUE0
YELLOW0
MAGENTA0
CYAN0
CONTRAST50
BRIGHTNESS50
SHARPNESS10
COLOR50
HUE0
RESET
IMAGEOPTIONS
CLOCK*
PHASE*
HORIZONTAL*
VERTICAL*
BLANKING*
TOP,BOTTOM,LEFT,RIGHT
OVERSCAN*AUTO,0[%],5[%],10[%]
ASPECTRATIO
*
(COMPUTER1/2/3)AUTO,4:3,5:4,16:9,15:9,16:10,
NATIVE
*
(COMPONENT/VIDEO/S-VIDEO)AUTO,4:3,LETTERBOX,
WIDESCREEN,ZOOM
*
(COMPONENT/VIDEO/S-VIDEO)AUTO,4:3WINDOW,
LETTERBOX,WIDESCREEN,4:3FILL
RESOLUTION*–
VIDEO
NOISE
REDUCTION
RANDOMNR*OFF,LOW,MEDIUM,HIGH
MOSQUITONROFFOFF,LOW,MEDIUM,HIGH
BLOCKNROFFOFF,ON
DEINTERLACEAUTOAUTO,VIDEO,FILM
3DY/CSEPARATIONONOFF,ON
DETAILENHANCEMENT*
SIGNALTYPERGBRGB,COMPONENT
VIDEOLEVELAUTOAUTO,NORMAL,ENHANCED
LENSMEMORY
STORE
MOVE
RESET
*Theasterisk(*)indicatesthatthedefaultsettingvariesdependingonthesignal.
*1The[SCREENSIZE]itemisavailablewhen[DICOMSIM.]isselectedfor[REFERENCE].
*2When[PRESENTATION]or[HIGH-BRIGHT]isselectedin[REFERENCE],the[COLORTEMPERATURE]isnotavailable.
•Basicmenuitemsareindicatedbyshadedarea.
103
5. Using On-Screen Menu
MenuItemDefaultOptions
SETUP
BASIC
KEYSTONE
HORIZONTAL0
VERTICAL0
CORNERSTONE
PIP/PICTUREBY
PICTURE
PIP/PBPMODEPIPPIP,PICTUREBYPICTURE
PIPPOSITIONBOTTOM-RIGHTTOP-LEFT,TOP-RIGHT,BOTTOM-LEFT,BOTTOM-RIGHT
PIP/PBPSOURCEOFFOFF,VIDEO,S-VIDEO
WALLCOLOROFF
OFF,BLACKBOARD,BLACKBOARD(GRAY),LIGHT
YELLOW,LIGHTBLUE,LIGHTROSE
LAMPMODE
ECOMODEOFFOFF,ON
LAMPSELECTDUALDUAL,SINGLE,LAMP1ONLY,LAMP2ONLY
LAMPINTERVAL
MODE
OFFOFF,12HOURS,24HOURS,1WEEK
LAMPSWITCHING
TIME
00:0000:00-24:00
LAMPSWITCHING
DAY
SUNSUN,MON,TUE,WED,THU,FRI,SAT
CLOSEDCAPTIONOFF
OFF,CAPTION1,CAPTION2,CAPTION3,CAPTION4,
TEXT1,TEXT2,TEXT3,TEXT4
OFFTIMEROFFOFF,0:30,1:00,2:00,4:00,8:00,12:00,16:00
TOOLS
ADMINISTRATORMODE,PROGRAMTIMER,TIME,
MOUSE
LANGUAGEENGLISH
ENGLISH,DEUTSCH,FRANÇAIS,ITALIANO,ESPAÑOL,
SVENSKA,日本語
DANSK,PORTUGUÊS,ČEŠTINA,MAGYAR,POLSKI,
NEDERLANDS,SUOMI
NORSK,TÜRKÇE,РУССКИЙ,
, Ελληνικά, 中文, 한국어
ROMÂNĂ, HRVATSKA, БЪЛГАРСКИ, INDONESIA, ,
ไทย
MENU
COLORSELECTCOLORCOLOR,MONOCHROME
SOURCEDISPLAYONOFF,ON
MESSAGEDISPLAYONOFF,ON
IDDISPLAYONOFF,ON
ECOMESSAGEOFFOFF,ON
DISPLAYTIMEAUTO45SECMANUAL,AUTO5SEC,AUTO15SEC,AUTO45SEC
BACKGROUNDLOGOBLUE,BLACK,LOGO
FILTERMESSAGEOFFOFF,100[H],500[H],1000[H],2000[H],5000[H]
INSTALLATION
(1)
ORIENTATION
DESKTOP
FRONT
DESKTOPFRONT,CEILINGREAR,DESKTOPREAR,
CEILINGFRONT
SCREENSCREENTYPE4:3SCREEN4:3SCREEN,16:9SCREEN,16:10SCREEN
GEOMETRICCORRECTIONOFFOFF,1,2,3
MULTI-SCREEN
COMP.
MODEOFFOFF,ON
CONTRAST0
BRIGHTNESS0
REF.WHITE
BALANCE
CONTRASTR0
CONTRASTG0
CONTRASTB0
BRIGHTNESSR0
BRIGHTNESSG0
BRIGHTNESSB0
UNIFORMITYR0
UNIFORMITYB0
REF.LENS
MEMORY
STORE
MOVE
RESET
LOADBYSIGNALOFFOFF,ON
FORCEDMUTEOFFOFF,ON
CALIBRATION
INSTALLATION
(2)
NETWORKSETTINGS
WIREDLAN,WIRELESSLAN,WPS,NETWORK
INFORMATION,PROJECTORNAME,DOMAIN,ALERT
MAIL,NETWORKSERVICE
CONTROLPANELLOCKOFFOFF,ON
SECURITYOFFOFF,ON
COMMUNICATIONSPEED38400bps4800bps,9600bps,19200bps,38400bps,115200bps
REMOTESENSORFRONT/BACKFRONT/BACK,FRONT,BACK
CONTROLID
CONTROLID
NUMBER
1 1–254
CONTROLIDOFFOFF,ON
*Theasterisk(*)indicatesthatthedefaultsettingvariesdependingonthesignal.
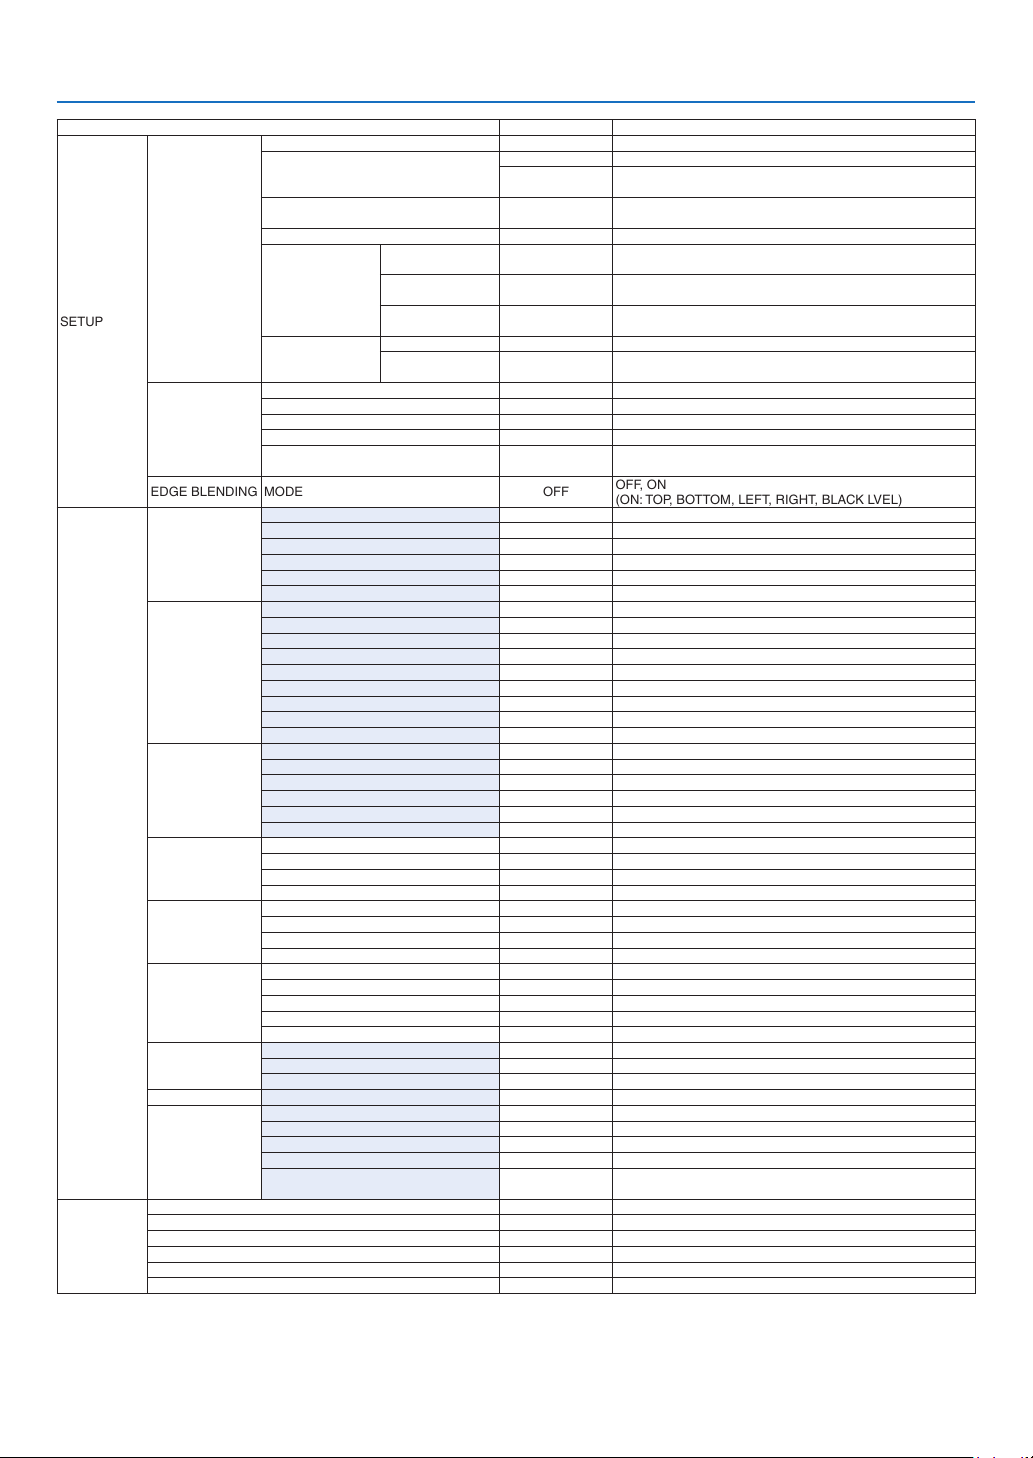
104
5. Using On-Screen Menu
MenuItemDefaultOptions
SETUP
OPTIONS(1)
AUTOADJUSTNORMALOFF,NORMAL,FINE
FANMODE
AUTOMODE:AUTO,HIGH,HIGHALTITUDE
FLOOR
SETTING:FLOOR,CEILING,VERTICALTILTUP,VERTICAL
TILTDOWN
SIGNALSELECT(COMP3)
RGB/
COMPONENT
RGB/COMPONENT,VIDEO
SEAMLESSSWITCHINGOFFOFF,ON
COLORSYSTEM
VIDEOAUTO
AUTO,NTSC3.58,NTSC4.43,PAL,PAL-M,PAL-N,PAL60,
SECAM
S-VIDEOAUTO
AUTO,NTSC3.58,NTSC4.43,PAL,PAL-M,PAL-N,PAL60,
SECAM
COMPUTER3
(VIDEO)
AUTO
AUTO,NTSC3.58,NTSC4.43,PAL,PAL-M,PAL-N,PAL60,
SECAM
SLOTPOWER
PROJECTORONOFF,ON
PROJECTOR
STANDBY
ENABLE
DISABLE,ENABLE
OPTIONS(2)
STANDBYMODENORMALNORMAL,POWER-SAVING,NETWORKSTANDBY
DIRECTPOWERONOFFOFF,ON
AUTOPOWERON(COMP1/3)OFFOFF,COMPUTER1,COMPUTER3
AUTOPOWEROFFOFFOFF,0:05,0:10,0:20,0:30
DEFAULTSOURCESELECTLAST
LAST,AUTO,COMPUTER1,COMPUTER2,COMPUTER3,
HDMI,DisplayPort,VIDEO,S-VIDEO,VIEWER,NETWORK
EDGEBLENDINGMODEOFF
OFF,ON
(ON:TOP,BOTTOM,LEFT,RIGHT,BLACKLVEL)
INFO.
USAGETIME
LAMP1LIFEREMAINING
LAMP2LIFEREMAINING
LAMP1HOURSUSED
LAMP2HOURSUSED
FILTERHOURSUSED
TOTALCARBONSAVINGS
SOURCE(1)
INPUTTERMINAL
RESOLUTION
HORIZONTALFREQUENCY
VERTICALFREQUENCY
SYNCTYPE
SYNCPOLARITY
SCANTYPE
SOURCENAME
ENTRYNO.
SOURCE(2)
SIGNALTYPE
VIDEOTYPE
BITDEPTH
VIDEOLEVEL
LINKRATE
LINKLANE
WIREDLAN
IPADDRESS
SUBNETMASK
GATEWAY
MACADDRESS
WIRELESS
LAN(1)
IPADDRESS
SUBNETMASK
GATEWAY
MACADDRESS
WIRELESS
LAN(2)
SSID
NETWORKTYPE
WEP/WPA
CHANNEL
SIGNALLEVEL
VERSION(1)
FIRMWARE
DATA
FIRMWARE2
VERSION(2)FIRMWARE3
OTHERS
PROJECTORNAME
MODELNO.
SERIALNUMBER
LANUNITTYPE
CONTROLID(when[CONTROLID]
isset)
RESET
CURRENTSIGNAL
ALLDATA
ALLDATA(INCLUDINGENTRYLIST)
CLEARLAMP1HOURS
CLEARLAMP2HOURS
CLEARFILTERHOURS

105
5. Using On-Screen Menu
Menu Descriptions & Functions [SOURCE]
COMPUTER 1, 2, and 3
SelectsthecomputerconnectedtoyourCOMPUTER1,2,orCOMPUTER3inputconnectorsignal.
NOTE:WhenthecomponentinputsignalisconnectedtotheCOMPUTER1IN,COMPUTER2IN,orCOMPUTER3INconnector,select
[COMPUTER1],[COMPUTER2]or[COMPUTER3]respectively.TheprojectorautomaticallydetermineswhethertheCOMPUTER1,
2,or3inputsignalisanRGBorcomponentsignal.
HDMI
SelectstheHDMIcompatibleequipmentconnectedtoyourHDMIINconnector.
DisplayPort
ProjectstheimageofthedeviceconnectedtotheDisplayPortinputconnector.
VIDEO
SelectswhatisconnectedtoyourVIDEOinput-VCR,DVDplayerordocumentcamera.
S-VIDEO
SelectswhatisconnectedtoyourS-VIDEOinput-VCRorDVDplayer.
NOTE:Aframemayfreezeforabriefperiodoftimewhenavideoisplayedbackinfast-forwardorfast-rewindwithaVideoorS-
Videosource.
VIEWER
ThisfeatureenablesyoutomakepresentationsusingaUSBmemorythatcontainsslides.
(→page74“4.UsingtheViewer”)
NETWORK
SelectsasignalfromtheLANport(RJ-45)ortheinstalledUSBwirelessLANunit(optionalformodelsforEurope,
Australia,AsiaandothercountriesthanNorthAmerica).
SLOT (for optional board)
Selectsasignalfromtheoptionalboard(SB-01HCorotherNEC’sinterfaceboards)whenitisinstalled.
ENTRY LIST
Displaysalistofsignals.Seethefollowingpages.
TEST PATTERN
Displaysthetestpattern.
NOTE:
•Thetestpatterncanbedisplayedevenwhenthemenuisdisplayed.Unavailablemenuitemsaredisplayedingrey.
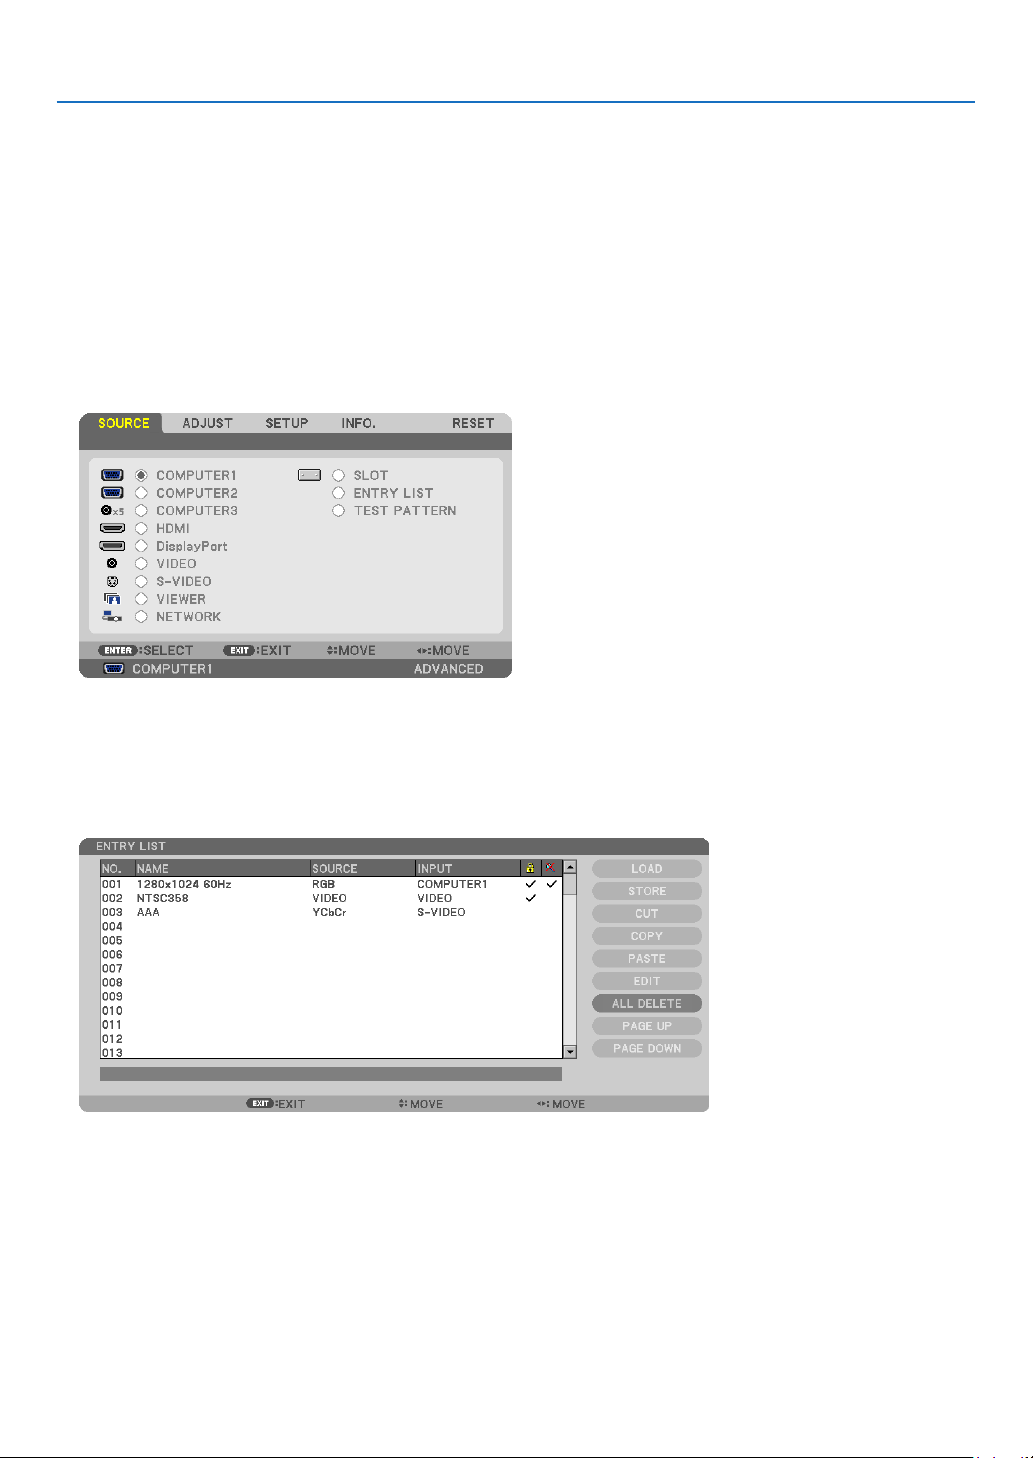
106
5. Using On-Screen Menu
UsingtheEntryList
Whenanysourceorlensmemoryadjustmentsaremade,theadjustmentsareautomaticallyregisteredintheEntry
List.The(adjustmentvaluesof)registeredsignalscanbeloadedfromtheEntryListwhenevernecessary.
However,onlyupto100patternscanberegisteredintheEntryList.When100patternshavebeenregisteredinthe
EntryList,anerrormessageisthendisplayedandnoadditionalpatternscanberegistered.Youshouldthusdelete
(adjustmentvaluesof)signalsthatarenolongerneeded.
DisplayingtheEntrylist
1.PresstheMENUbutton.
Themenuwillbedisplayed.
2.Pressthe
or buttontoselect[SOURCE].
TheSOURCElistwillbedisplayed.
3.Usethe, , , or toselect[ENTRYLIST]andpresstheENTERbutton.
TheENTRYLISTwindowswillbedisplayed.
IftheENTRYLISTwindowisnotdisplayed,switchthemenuto[ADVANCED].
Toswitchthemenubetween[ADVANCED]and[BASIC],select[APPLICATIONMENU]→[TOOLS]→
[ADMINISTRATORMODE].(→ page 158)
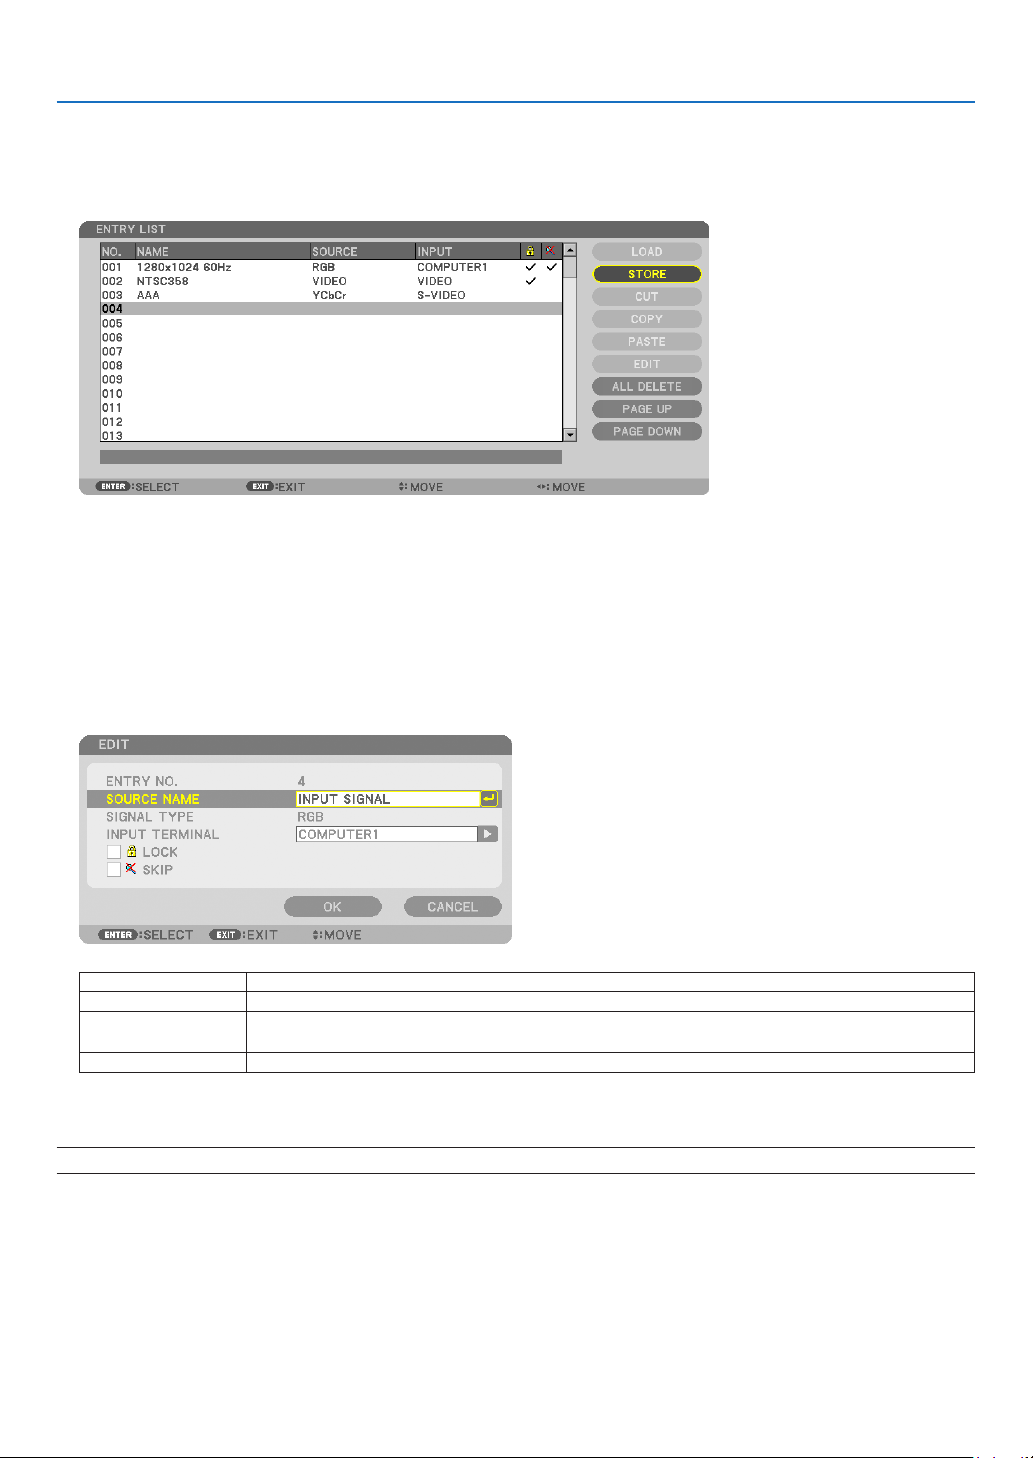
107
5. Using On-Screen Menu
EnteringthecurrentlyprojectedsignalintotheEntryList[STORE]
1.Pressthe
or buttontoselectanynumber.
2.Pressthe
or buttontoselect[STORE]andpresstheENTERbutton.
CallingupasignalfromtheEntryList[LOAD]
Pressthe or buttontoselectasignalandpresstheENTERbutton.
EditingasignalfromtheEntryList[EDIT]
1.Pressthe or buttontoselectasignalyouwishtoedit.
2.Pressthe
, , , or buttontoselect[EDIT]andpresstheENTERbutton.
TheEditwindowwillbedisplayed.
SOURCENAMEEnterasignalname.Upto18alphanumericcharacterscanbeused.
INPUTTERMINALSelecttheinputsource.
LOCKSetsothattheselectedsignalcannotbedeletedwhen[ALLDELETE]isexecuted.The
changesmadeafterLOCKexecutioncannotbesaved.
SKIPSetsothattheselectedsignalwillbeskippedduringautosearch.
3.Settheaboveitemsandselect[OK]andpresstheENTERbutton.
NOTE: The input terminal cannot be changed to the currently projected signal.

108
5. Using On-Screen Menu
CuttingasignalfromtheEntryList[CUT]
1.Pressthe or buttontoselectasignalyouwishtodelete.
2.Pressthe
, , , or buttontoselect[CUT]andpresstheENTERbutton.
ThesignalwillbedeletedfromtheEntryListandthedeletedsignalwillbedisplayedontheclipboardatthebottom
of the Entry List.
NOTE:
•Thecurrentlyprojectedsignalcannotbedeleted.
•Whenthelockedsignalisselected,itwillbedisplayedingraywhichindicatesitisnotavailable.
TIP:
•DataontheclipboardcanbepassedontotheEntryList.
•DataontheclipboardwillnotbelostaftertheEntryListisclosed.
CopyingandpastingasignalfromtheEntryList[COPY]/[PASTE]
1.Pressthe
or buttontoselectasignalyouwishtocopy.
2.Pressthe
, , , or buttontoselect[COPY]andpresstheENTERbutton.
ThecopiedsignalwillbedisplayedontheclipboardatthebottomoftheEntryList.
3.Pressthe
or buttontomovetothelist.
4.Pressthe
or buttontoselectasignal.
5.Pressthe
, , , or buttontoselect[PASTE]andpresstheENTERbutton.
Dataontheclipboardwillbepastedtothesignal.
DeletingallthesignalsfromtheEntryList[ALLDELETE]
1.Pressthe
, , , or buttontoselect[ALLDELETE]andpresstheENTERbutton.
Theconrmationmessagewillbedisplayed.
2.Pressthe
or buttontoselect[YES]andpresstheENTERbutton.
NOTE: The locked signal cannot be deleted.
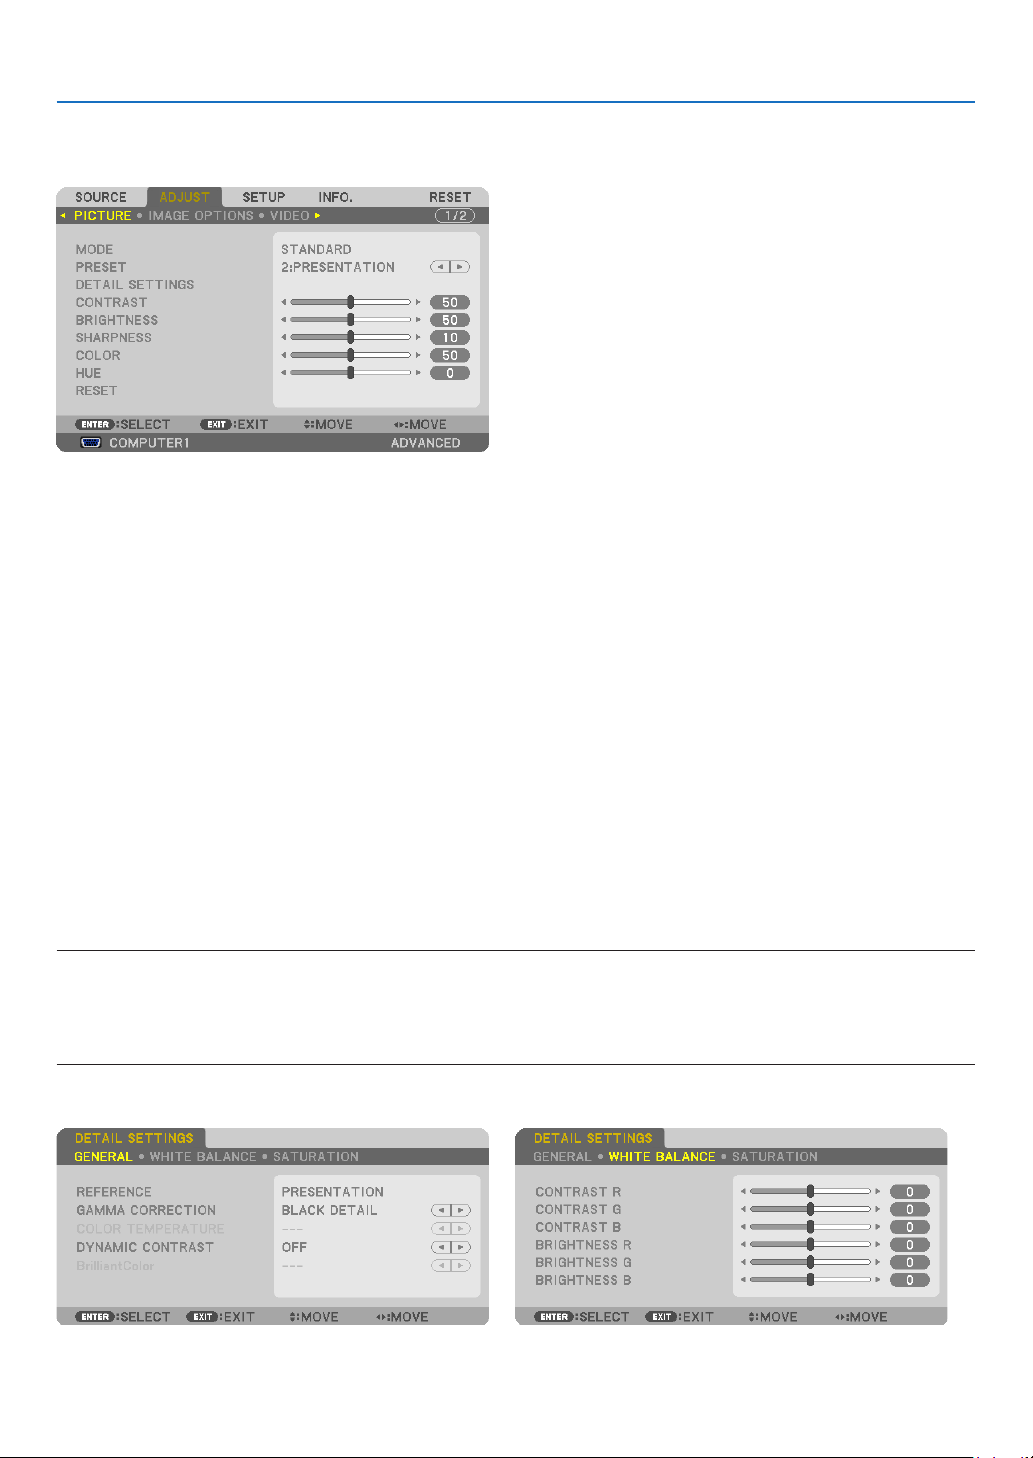
109
5. Using On-Screen Menu
Menu Descriptions & Functions [ADJUST]
[PICTURE]
[MODE]
Thisfunctionallowsyoutodeterminehowtosavesettingsfor[DETAILSETTINGS]of[PRESET]foreachinput.
STANDARD ............ Saves settings for each item of [PRESET] (Preset 1 through 7)
PROFESSIONAL ..... Saves all the settings of [PICTURE] for each input.
[PRESET]
Thisfunctionallowsyoutoselectoptimizedsettingsforyourprojectedimage.
Youcanadjustneutraltintforyellow,cyanormagenta.
Therearesixfactorypresetsoptimizedforvarioustypesofimages.Youcanalsouse[DETAILSETTINGS]tosetuser
adjustablesettingstocustomizeeachgammaorcolor.
Yoursettingscanbestoredin[PRESET1]to[PRESET7].
HIGH-BRIGHT ........ Recommended for use in a brightly lit room.
PRESENTATION ..... Recommended for making a presentation using a PowerPoint file.
VIDEO .................... Recommended for typical TV program viewing.
MOVIE ................... Recommended for movies.
GRAPHIC ............... Recommended for graphics.
sRGB ..................... Standard color values
DICOM SIM. .......... Recommended for DICOM simulation format.
NOTE:
•The[DICOMSIM.]optionisfortraining/referenceonlyandshouldnotbeusedforactualdiagnosis.
•DICOMstandsforDigitalImagingandCommunicationsinMedicine.ItisastandarddevelopedbytheAmericanCollegeofRadiol-
ogy(ACR)andtheNationalElectricalManufacturersAssociation(NEMA).
Thestandardspecieshowdigitalimagedatacanbemovedfromsystemtosystem.
[DETAIL SETTINGS]

110
5. Using On-Screen Menu
[GENERAL]
StoringYourCustomizedSettings[REFERENCE]
Thisfunctionallowsyoutostoreyourcustomizedsettingsin[PRESET1]to[PRESET7].
First,selectabasepresetmodefrom[REFERENCE],thenset[GAMMACORRECTION]and[COLORTEMPERA-
TURE].
HIGH-BRIGHT ........ Recommended for use in a brightly lit room.
PRESENTATION ..... Recommended for making a presentation using a PowerPoint file.
VIDEO .................... Recommended for typical TV program viewing.
MOVIE ................... Recommended for movies.
GRAPHIC ............... Recommended for graphics.
sRGB ..................... Standard color values.
DICOM SIM. .......... Recommended for DICOM simulation format.
Selecting Gamma Correction Mode [GAMMA CORRECTION]
Eachmodeisrecommendedfor:
DYNAMIC .............. Creates a high-contrast picture.
NATURAL ............... Natural reproduction of the picture.
BLACK DETAIL ....... Emphasizes detail in dark areas of the picture.
SelectingScreenSizeforDICOMSIM[SCREENSIZE]
Thisfunctionwillperformgammacorrectionappropriateforthescreensize.
LARGE ................... For screen size of 200"
MEDIUM ................ For screen size of 150"
SMALL ................... For screen size of 100"
NOTE:Thisfunctionisavailableonlywhen[DICOMSIM.]isselectedfor[DETAILSETTINGS].
Adjusting Color Temperature [COLOR TEMPERATURE]
Thisoptionallowsyoutoselectthecolortemperatureofyourchoice.
NOTE:
•When[PRESENTATION]or[HIGH-BRIGHT]isselectedin[REFERENCE],thisfunctionisnotavailable.
•Whenacoloroptionotherthan[OFF]isselectedfor[WALLCOLOR],thisfunctionisnotavailable.
Adjusting Brightness and Contrast [DYNAMIC CONTRAST]
Thisfunctionallowsyoutoadjustthecontrastratioopticallyusingthebuilt-iniris.
Toincreasethecontrastratio,select[ON].

111
5. Using On-Screen Menu
Adjusting White Balance [WHITE BALANCE]
Thisallowsyoutoadjustthewhitebalance.Contrastforeachcolor(RGB)toadjustthewhitelevelofthescreen;
Brightnessforeachcolor(RGB)isusedtoadjusttheblacklevelofthescreen.
[SATURATION]
Correctsthesaturationforallsignals.
Adjuststhesaturationforthecolorsred,green,blue,yellow,magentaandcyan.
RED ....................... Adjusts the color in red areas, centered around the red.
GREEN ................... Adjusts the color in green areas, centered around the green.
BLUE ...................... Adjusts the color in blue areas, centered around the blue.
YELLOW ................ Adjusts the color in yellow areas, centered around the yellow.
MAGENTA .............. Adjusts the color in magenta areas, centered around the magenta.
CYAN ..................... Adjusts the color in cyan areas, centered around the cyan.
[CONTRAST]
Adjuststheintensityoftheimageaccordingtotheincomingsignal.
[BRIGHTNESS]
Adjuststhebrightnesslevelorthebackrasterintensity.
[SHARPNESS]
Controlsthedetailoftheimage.
[COLOR]
Increasesordecreasesthecolorsaturationlevel.
[HUE]
Variesthecolorlevelfrom+/−greento+/−blue.Theredlevelisusedasreference.
InputsignalCONTRASTBRIGHTNESSSHARPNESSCOLORHUE
COMPUTER/DisplayPort/HDMI(RGB)YesYesYes
No(Yes:SDTV/
HDTV)
No(Yes:SDTV/
HDTV)
COMPUTER/DisplayPort/HDMI
(COMPONENT)
YesYesYesYesYes
VIDEO/S-VIDEO/COMPONENTYesYesYesYesYes
VIEWER/NETWORKYesYesYesNo No
Yes=Adjustable,No=Notadjustable
[RESET]
Thesettingsandadjustmentsfor[PICTURE]willbereturnedtothefactorysettingswiththeexceptionofthefollowing;
Presetnumbersand[REFERENCE]withinthe[PRESET]screen.
Thesettingsandadjustmentsunder[DETAILSETTINGS]withinthe[PRESET]screenthatarenotcurrentlyselected
willnotbereset.
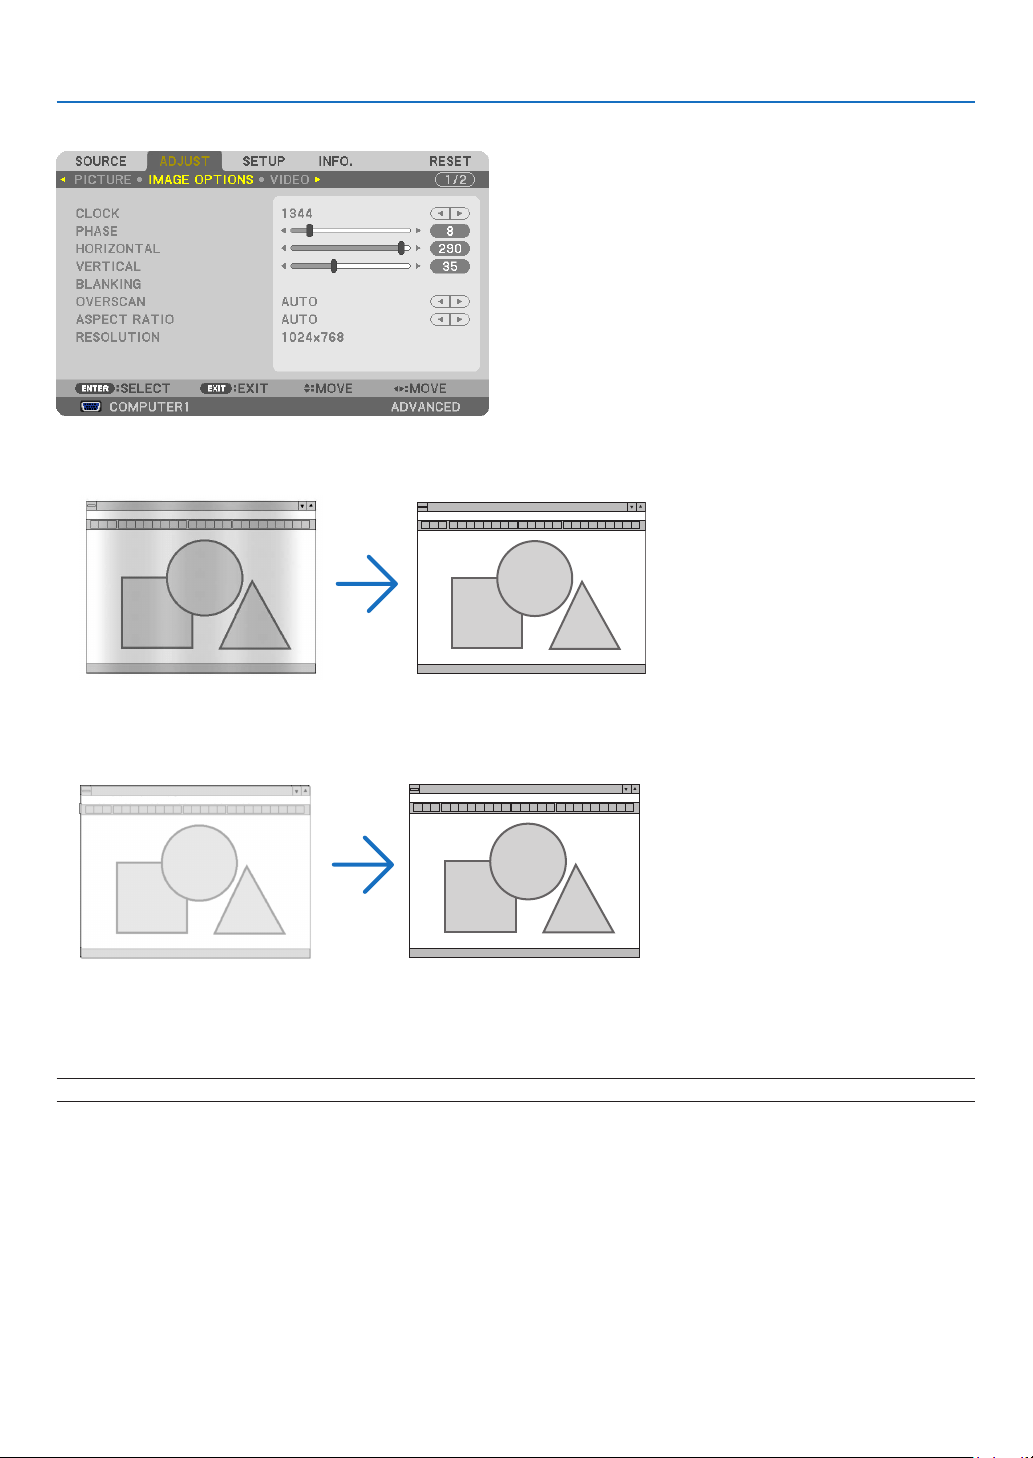
112
5. Using On-Screen Menu
[IMAGE OPTIONS]
AdjustingClockandPhase[CLOCK/PHASE]
ThisallowsyoutomanuallyadjustCLOCKandPHASE.
CLOCK ................... Use this item to fine tune the computer image or to remove any vertical banding that might appear. This
function adjusts the clock frequencies that eliminate the horizontal banding in the image.
This adjustment may be necessary when you connect your computer for the first time.
PHASE ................... Use this item to adjust the clock phase or to reduce video noise, dot interference or cross talk. (This is
evident when part of your image appears to be shimmering.)
Use [PHASE] only after the [CLOCK] is complete.
NOTE:The[CLOCK]and[PHASE]itemsareavailableforRGBsignalsonly.
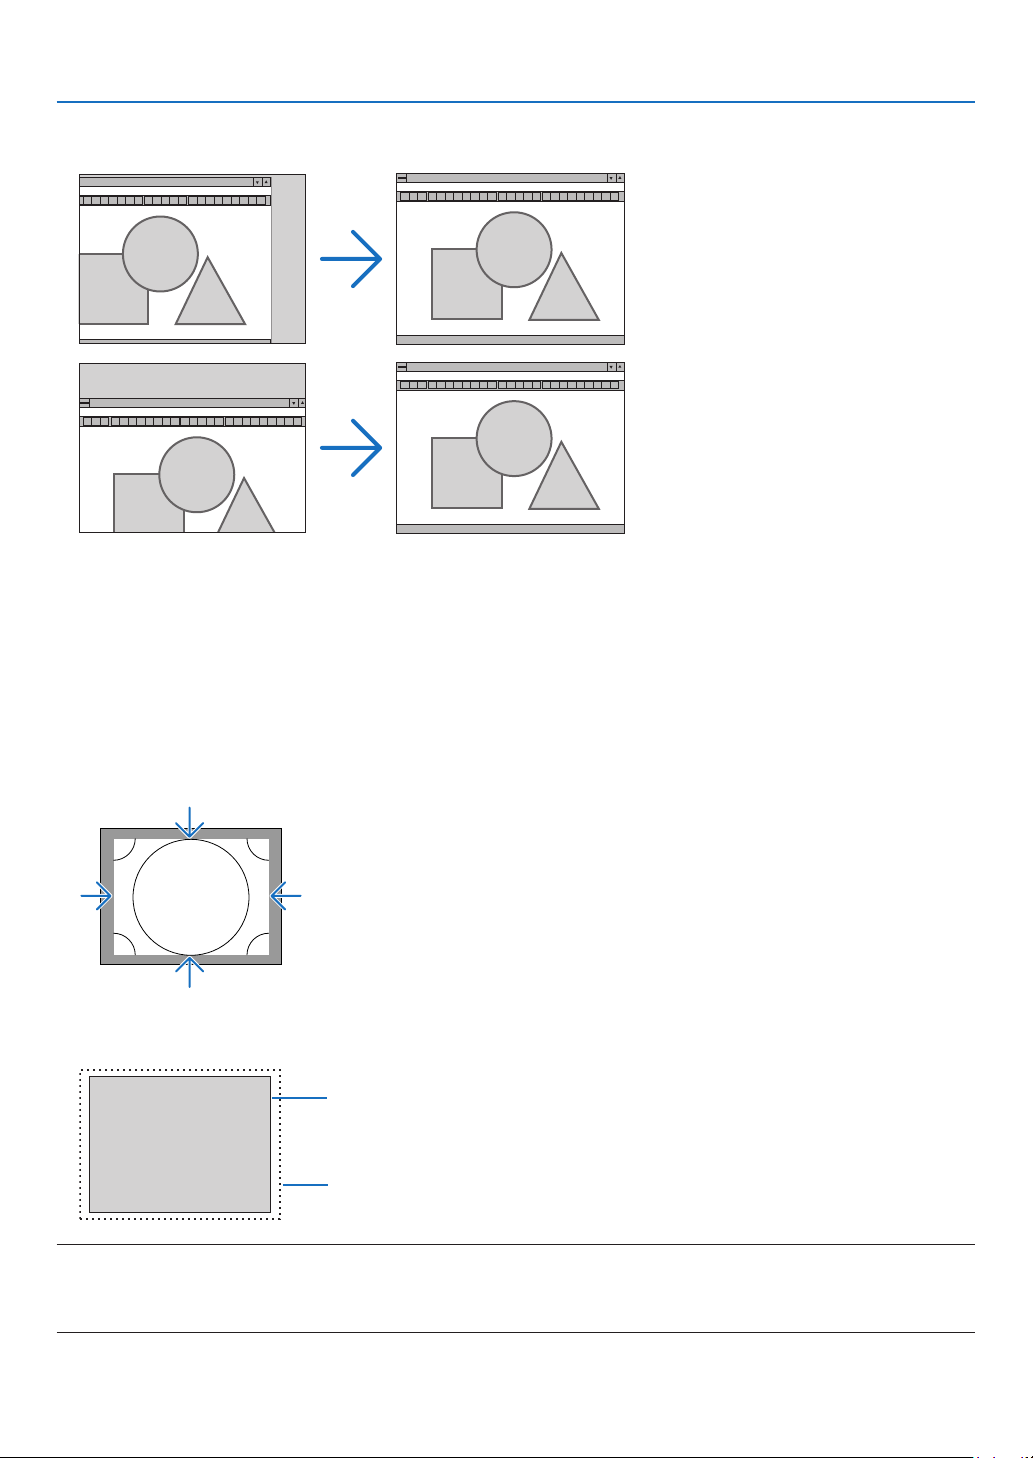
113
5. Using On-Screen Menu
AdjustingHorizontal/VerticalPosition[HORIZONTAL/VERTICAL]
Adjuststheimagelocationhorizontallyandvertically.
-Animagecanbedistortedduringtheadjustmentof[CLOCK]and[PHASE].Thisisnotmalfunction.
-Theadjustmentsfor[CLOCK],[PHASE],[HORIZONTAL],and[VERTICAL]willbestoredinmemoryforthe
currentsignal.Thenexttimeyouprojectthesignalwiththesameresolution,horizontalandverticalfrequency,
itsadjustmentswillbecalledupandapplied.
Todeleteadjustmentsstoredinmemory,fromthemenu,youselect[RESET]→[CURRENTSIGNAL]andreset
theadjustments.
[BLANKING]
Adjuststhedisplayrange(blanking)atthetop,bottom,leftandrightedgesoftheinputsignal.
SelectingOverscanPercentage[OVERSCAN]
Selectoverscanpercentage(Auto,0%,5%and10%)forsignal.
Projected image
Overscanedby10%
NOTE:
•The[OVERSCAN]itemisnotavailable:
-when[NATIVE]isselectedfor[ASPECTRATIO].
-when[VIEWER]or[NETWORK]isselectedfor[SOURCE]
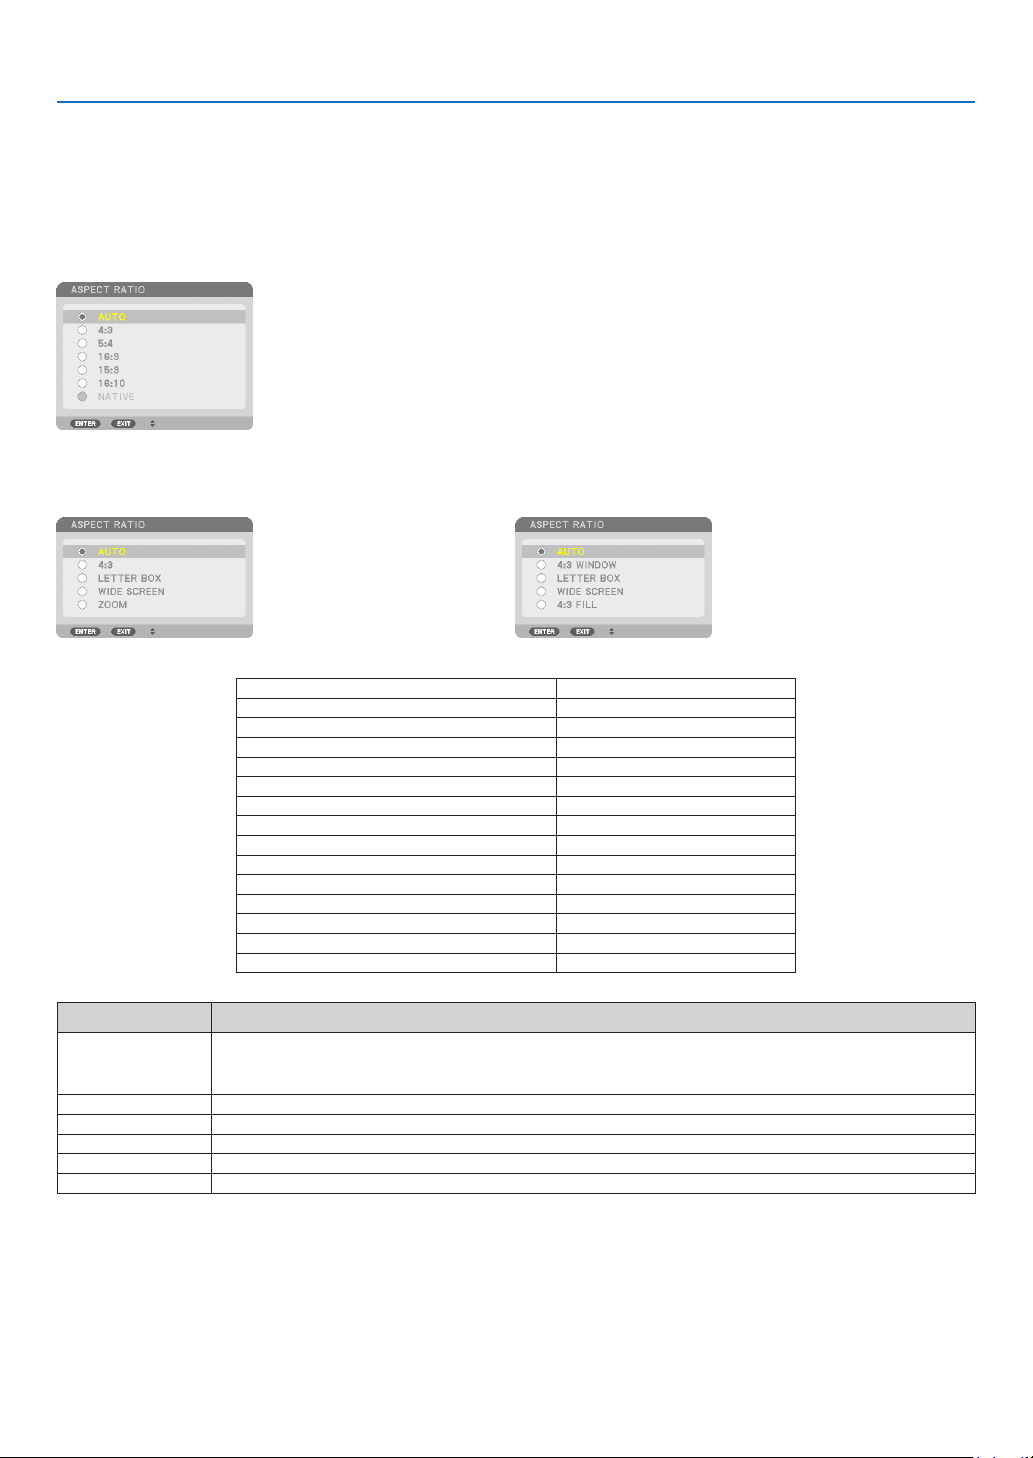
114
5. Using On-Screen Menu
Selecting the Aspect Ratio [ASPECT RATIO]
Usethisfunctiontoselectthescreen’svertical:horizontalaspectratio.
Selectthescreentype(4:3screen,16:9screenor16:10screen)atthescreensettingbeforesettingtheaspectratio.
(→page
124)
Theprojectorautomaticallyidentiesthesignalbeinginputandsetstheoptimumaspectratio.
For Computer signal
ForComponent/Video/S-Videosignals
Whenthescreentypeissetto4:3Whenthescreentypeissetto16:9or16:10
ResolutionAspectRatio
VGA640×4804:3
SVGA800×6004:3
XGA1024×7684:3
WXGA1280×76815:9
WXGA1280×80016:10
HD(FWXGA)1366×768approx.16:9
WXGA+1440×90016:10
SXGA1280×10245:4
SXGA+1400×10504:3
WXGA++1600×90016:9
UXGA
1600×12004:3
WSXGA+ 1680×105016:9
FHD(1080P) 1920×108016:9
WUXGA1920×120016:10
OptionsFunction
AUTO
Theprojectorwillautomaticallydeterminetheincomingsignalanddisplayitinitsaspectratio.
Theprojectormayerroneouslydeterminetheaspectratiodependingonitssignal.Ifthisoccurs,
selecttheappropriateaspectratiofromthefollowing.
4:3Theimageisdisplayedin4:3aspectratio.
5:4Theimageisdisplayedin5:4aspectratio
16:9Theimageisdisplayedin16:9aspectratio
15:9Theimageisdisplayedin15:9aspectratio
16:10Theimageisdisplayedin16:10aspectratio
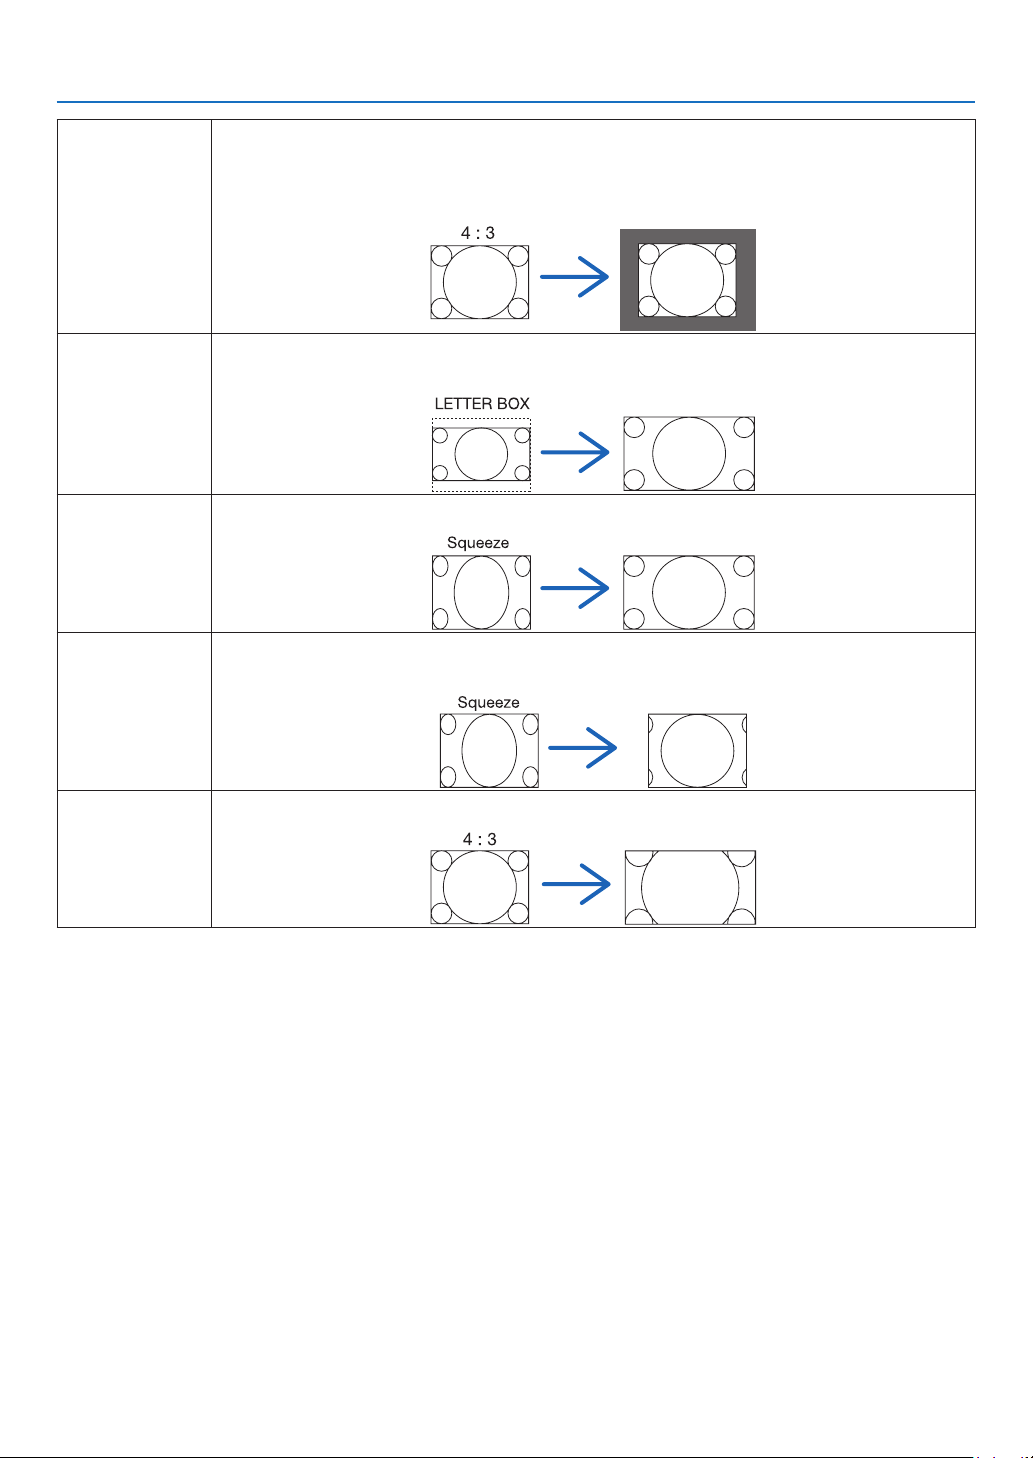
115
5. Using On-Screen Menu
NATIVETheprojectordisplaysthecurrentimageinitstrueresolutionwhentheincomingcomputersignal
hasalowerorhigherresolutionthantheprojector’snativeresolution.(→page
2,223)
Whentheincomingcomputersignalhasahigherresolutionthantheprojector'snativeresolution,
thecenterofanimagewillbedisplayed.
LETTERBOXTheimageofaletterboxsignal(16:9)isstretchedequallyinthehorizontalandverticaldirections
totthescreen.
WIDESCREENTheimageofasqueezesignal(16:9)isstretchedleftandrightin16:9.
ZOOMTheimageofasqueezesignal(16:9)isstretchedleftandrightin4:3.
Partsofthedisplayedimagearecroppedattheleftandrightedgesandthereforenotvisible.
4:3FILLTheimageofasignal(4:3)isstretchedleftandrightin16:9.
TIP:
•Imagepositioncanbeadjustedverticallyusing[POSITION]whenthe[16:9],[15:9],or[16:10]aspectratiosareselected.
•Theterm“letterbox”referstoamorelandscape-orientedimagewhencomparedtoa4:3image,whichisthestandardaspect
ratioforavidesource.
Theletterboxsignalhasaspectratioswiththevistasize“1.85:1”orcinemascopesize“2.35:1”formovielm.
•Theterm“squeeze”referstothecompressedimageofwhichaspectratioisconvertedfrom16:9to4:3.
[RESOLUTION]
Thisfunctionsetstheresolutionofaprojectedimageifauto-detectfailstoworkwell.

116
5. Using On-Screen Menu
[VIDEO]
Using Noise Reduction [NOISE REDUCTION]
Thisfunctionisusedtoreducevideonoise.
RANDOM NR ......... Reduces flickering random noise in an image.
MOSQUITO NR ...... Reduces mosquito noise that appears around the edges of an image during DVD playback.
BLOCK NR ............. Reduces block noise or mosaic-like patterns by selecting ON.
Selecting Interlaced Progressive Conversion Process Mode [DEINTERLACE]
Thisfunctionallowsyoutoselectaninterlaced-to-progressiveconversionprocessforvideosignals.
AUTO ..................... Determines an appropriate interlaced-to-progressive conversion process automatically.
VIDEO .................... Applies a normal interlaced-to-progressive conversion process.
FILM ...................... Applies the automatic detection mode for telecine signals. This option is recommended for a movie pic-
ture.
NOTE:ThisfunctionisnotavailablewithRGBsignals.
TurningOnorOffthe3DDimensionalSeparation[3DY/CSEPARATION]
WhenprojectinganimagefromaVIDEOinput,settoONtoprojectthehighestqualityimage.
OFF ........................ Turns off the 3 dimensional separation feature.
ON ......................... Turns on the 3 dimensional separation feature.
NOTE:OnlyavailableforNTSC3.58videosignals.
[DETAIL ENHANCEMENT]
Thisfunctionenhancesthecontoursoftheimagewhenprojectingcomponentsignals.
NOTE:
Thisfunctionmaynotbeavailabledependingonthesignalorscreensetting.
[SIGNAL TYPE]
TheprojectorautomaticallyidentieswhethertheCOMPUTER1,COMPUTER2orCOMPUTER3*inputsignalsare
RGBorcomponentsignalstoprojecttheimage.Ifthecolorsareunnatural,however,tryswitchingthesetting.
*ForCOMPUTER3,thecomputersignalandvideosignalcanbeselectedatSIGNALSELECT(COMP3).
RGB ....................... Switches to the RGB input.
COMPONENT ......... Switches to the component signal input.
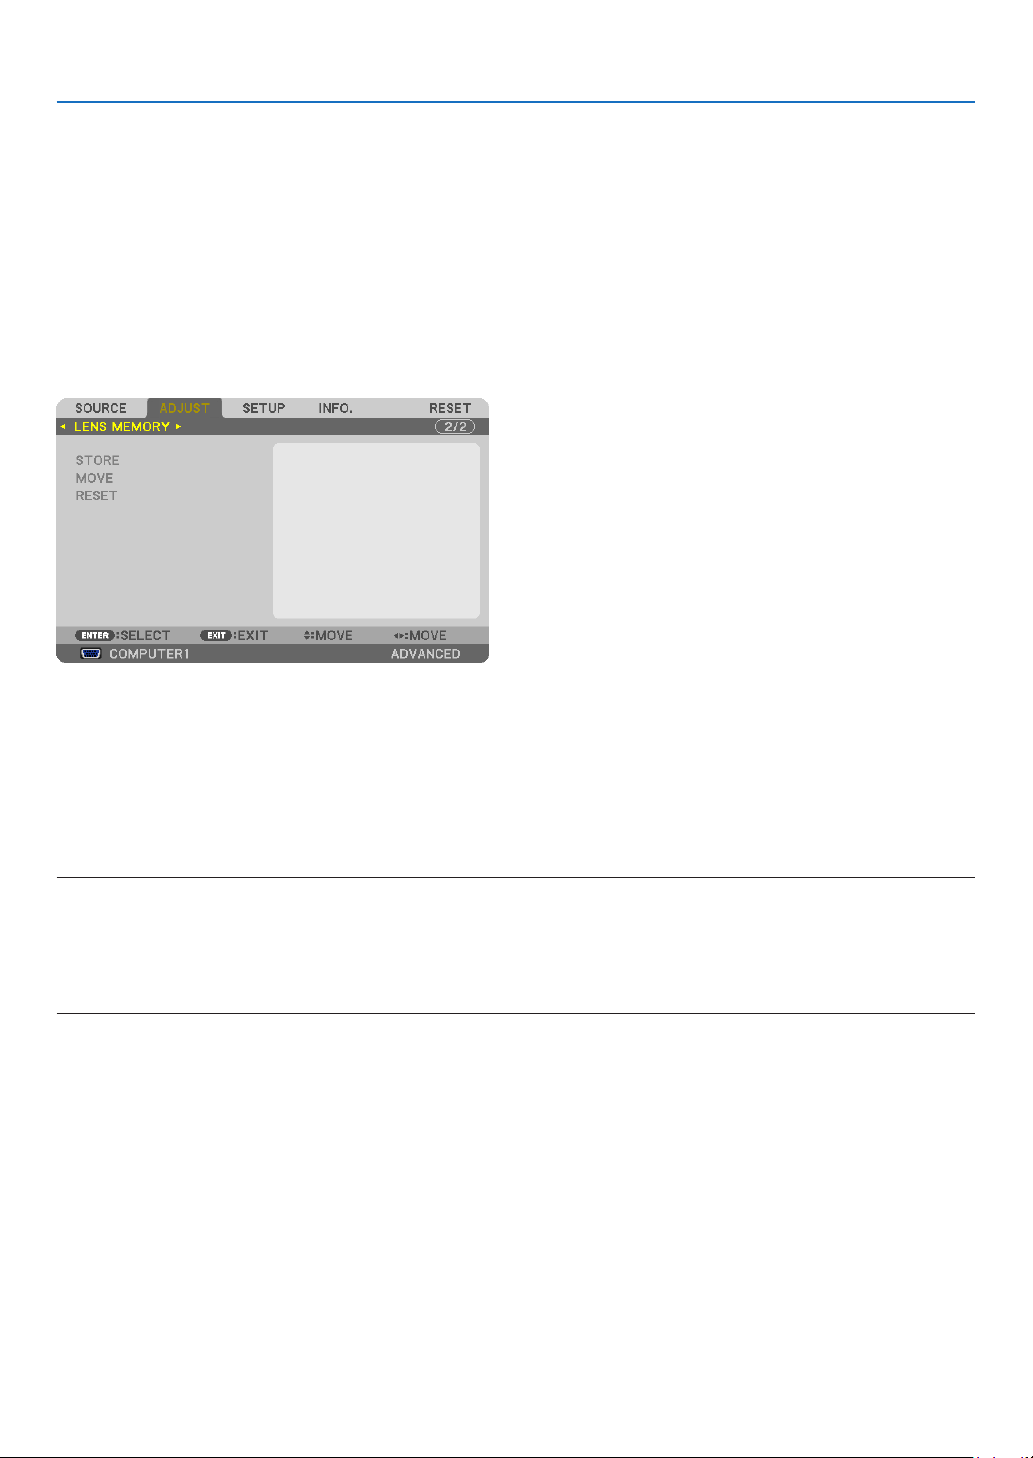
117
5. Using On-Screen Menu
[VIDEOLEVEL]
Thisfunctionselectsvideosignallevelwhentheprojector’sHDMIandDisplayPortinputconnectorsandanexternal
deviceareconnected.
AUTO ..................... The video level is switched automatically based on the information from the device outputting the signal.
Depending on the connected device, this setting may not be made properly. In this case, switch to “NORMAL”
or “ENHANCED” from the menu and view with the optimum setting.
NORMAL ................ This disables the enhanced mode.
ENHANCED ............ This improves the image’s contrast, expressing the dark and light sections more dynamically.
Using the Lens Memory Function [LENS MEMORY]
ThisfunctionservestostoretheadjustedvaluesforeachinputsignalwhenusingtheLENSSHIFT,ZOOMandFO-
CUSbuttonsoftheprojectorortheremotecontrol.Adjustedvaluescanbeappliedtothesignalyouselected.This
willeliminatetheneedtoadjustlensshift,focus,andzoomatthetimeofsourceselection.
STORE ................... Stores the current adjusted values in memory for each input signal.
MOVE .................... Applies the adjusted values to the current signal.
RESET .................... Returns the adjusted values to the last condition.
NOTE:
•Tostoreadjustedvaluescommontoalltheinputsources,usetheREF.LENSMEMORYfunction.Seepage48, 126.
•LensmemoryadjustmentswillbeautomaticallyregisteredtheENTRYLIST.Theselensmemoryadjustmentscanbeloadedfrom
theENTRYLIST.(→ page 107)
Notethatperforming[CUT]or[ALLDELETE]intheENTRYLISTwilldeletelensmemoryadjustmentsaswellassourceadjust-
ments. This deletion will not take effect until other adjustments is loaded.
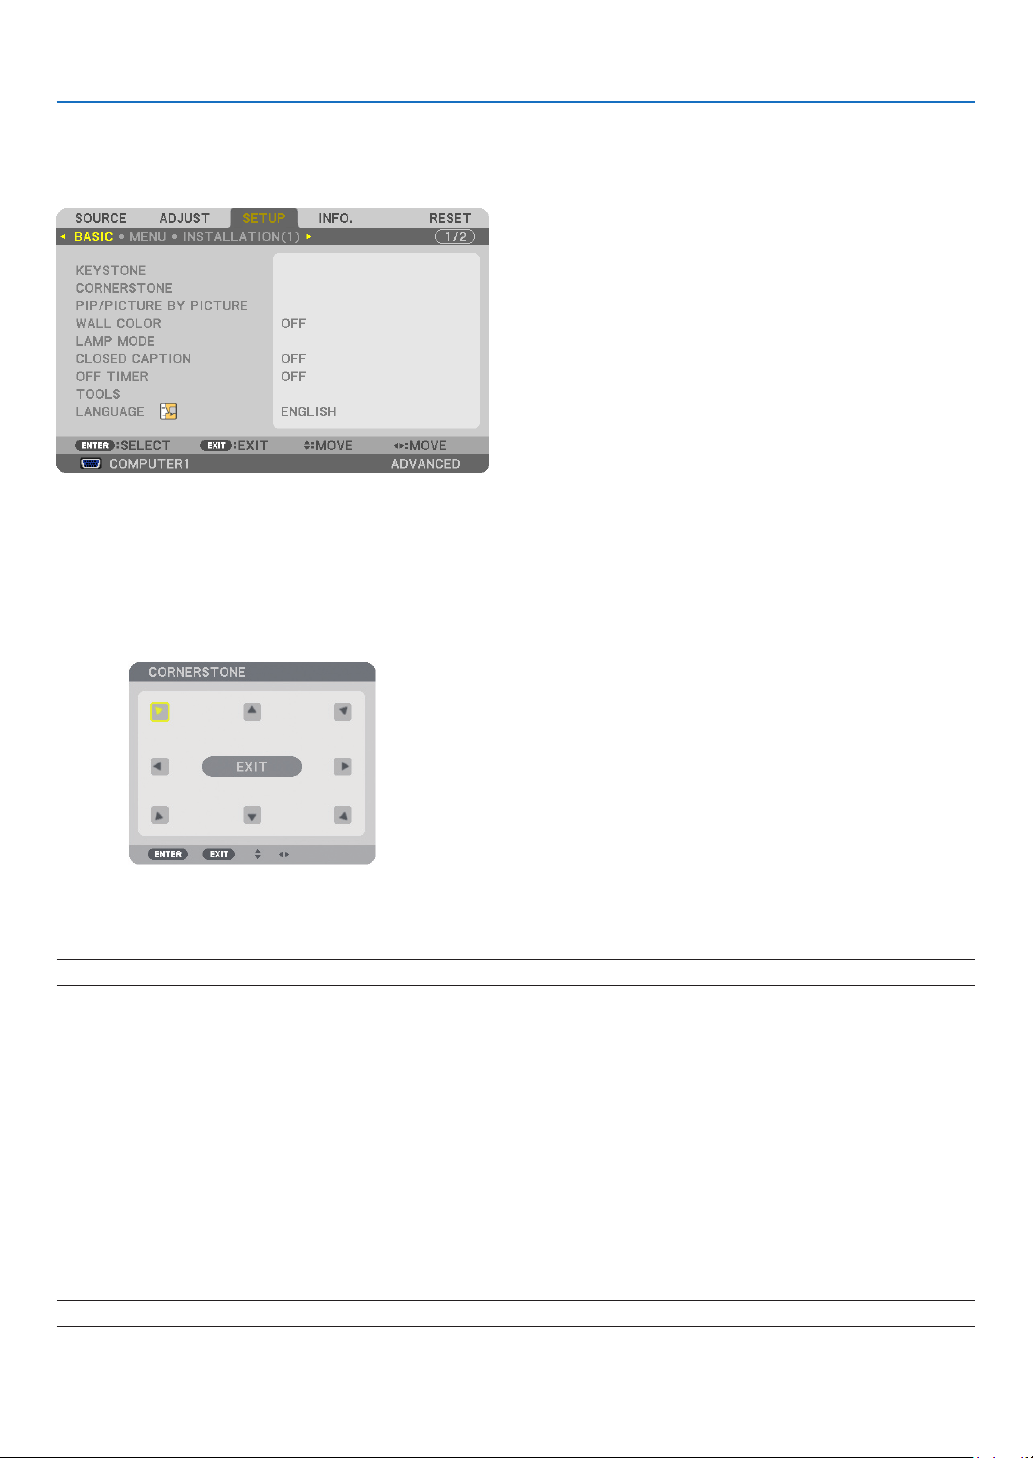
118
5. Using On-Screen Menu
Menu Descriptions & Functions [SETUP]
[BASIC]
CorrectingVerticalKeystoneDistortionManually[KEYSTONE]
Youcancorrectverticaldistortionmanually.(→page
28)
TIP:Whenthisoptionishighlighted,pressingtheENTERbuttonwilldisplayitsslidebarforadjustment.
Selecting Cornerstone Mode [CORNERSTONE]
Thisoptionallowsyoutocorrecttrapezoidaldistortion.
SelectingthisitemwilldisplaytheCornerstoneadjustmentscreen.(→page40)
NOTE:The[CORNERSTONE]itemisnotavailablewhen[KEYSTONE]or[GEOMETRICCORRECTION]isselected.
UsingthePIP/PICTUREBYPICTUREFunction[PIP/PICTUREBYPICTURE]
Thisfunctionallowsyoutoviewtwodifferentsignalssimultaneously.(→page
43)
MODE:
Thisoptionallowsyoutoselecttwomodes:PIPandPICTUREBYPICTURE.
PIP:Thisoptionallowsyoutoviewasubpictureinthemainpicture.
PICTUREBYPICTURE:Thisallowsyoutoviewtwopicturessidebyside.
POSITION:
When[PIP]isselectedfor[MODE],thisoptionallowsyoutoselectthepositionofasubpictureinthemainpic-
ture.
Theoptionsare:TOP-LEFT,TOP-RIGHT,BOTTOMLEFT,andBOTTOMRIGHT.
NOTE:The[POSITION]cannotbeselectedwhen[PICTUREBYPICTURE]isselected.
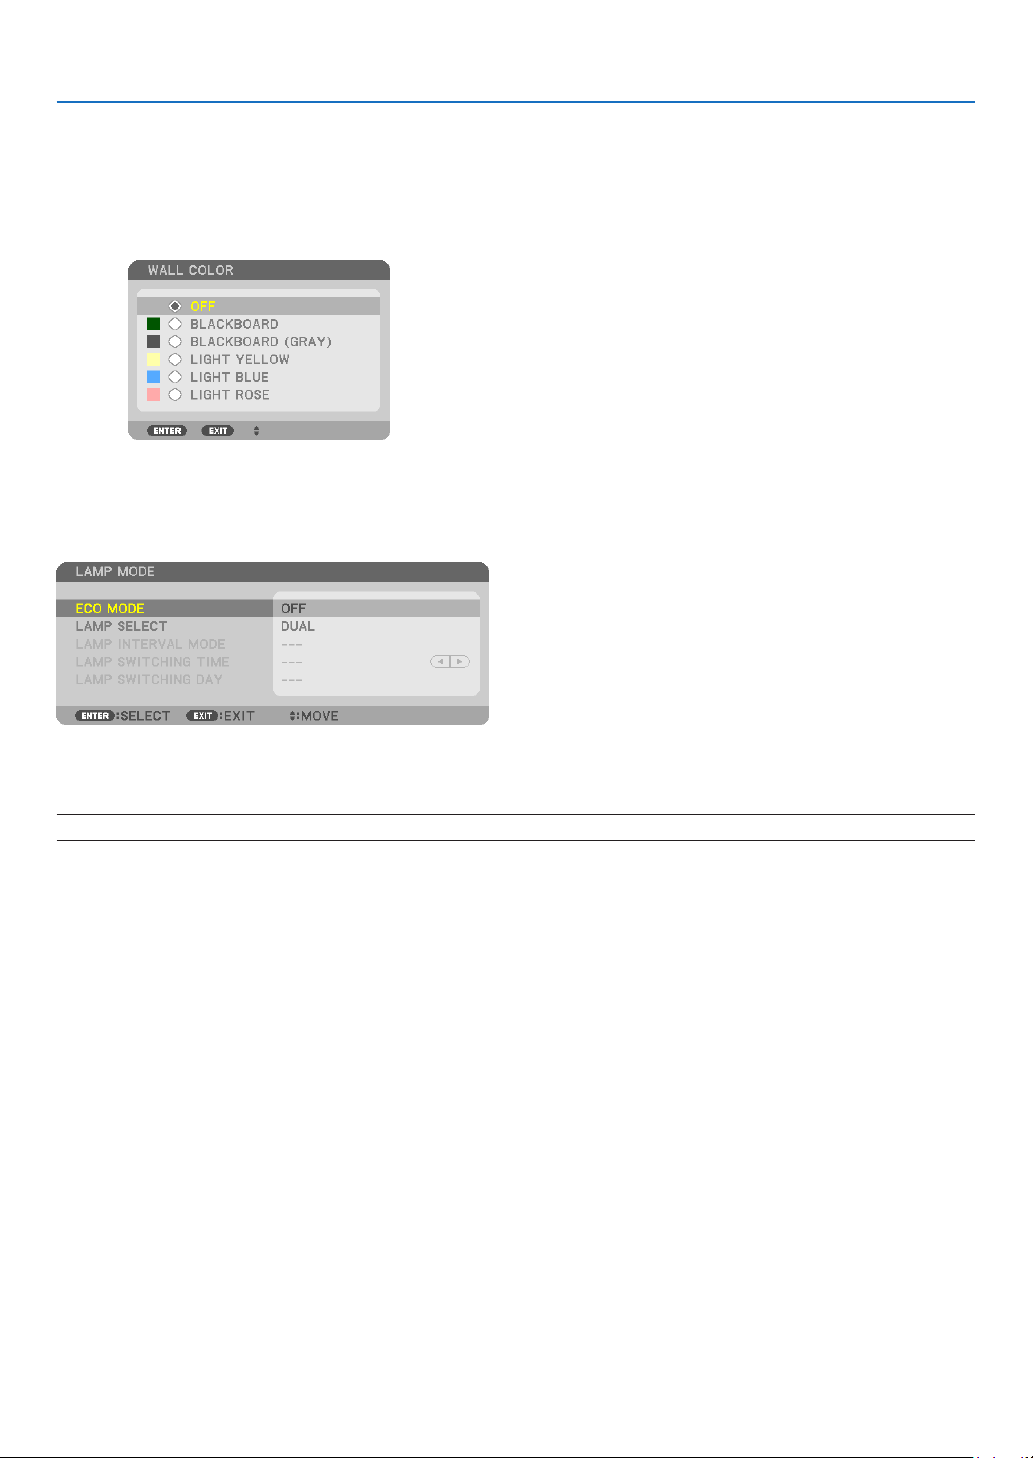
119
5. Using On-Screen Menu
SOURCE:
Thisoptionallowsyoutoselectasubpicturesignal.
Theoptionsare:OFF,VIDEOandS-VIDEO.
Selecting[OFF]willcancelthePIP/PICTUREBYPICTUREmodeandreturntothenormalscreen.
Using the Wall Color Correction [WALL COLOR]
Thisfunctionallowsforquickadaptivecolorcorrectioninapplicationswherethescreenmaterialisnotwhite.
[LAMP MODE]
Theprojectorisdesignedtoaccepttwolamps(duallampsystem).
Thisduallampsystemprovidesprolongedlamplifeorhighbrightnessorextralamp(Extendedlifelamp).
The[LAMPMODE]itemhas3options:[ECOMODE],[LAMPSELECT],and[LAMPINTERVALMODE].
NOTE: Be sure to use the same lamp type for both lamp 1 and 2.
Setting Eco Mode [ECO MODE]
TheECOMODEincreaseslamplife,whileloweringpowerconsumptionandcuttingdownonCO
2
emissions.
Twobrightnessmodesofthelampcanbeselected:[OFF]and[ON]modes.
(→page
36)

120
5. Using On-Screen Menu
Selecting the lamp to be used [LAMP SELECT]
Thisfeatureallowsyoutoselectwhichlamptobeused.
NOTE: This option is not displayed in the Basic menu.
DUAL
..................... Select to use the two lamps at the same time to increase brightness.
SINGLE .................. Lights either lamp 1 or 2 whichever was used last. This option also selects Lamp 1 or Lamp 2 according to
the time preset with Lamp Interval.
LAMP 1 ONLY ........ Select to use the Lamp 1 of the two lamps. (Lamp 1 on the right of the rear side)
LAMP 2 ONLY ........ Select to use the Lamp 2 of the two lamps. (Lamp 2 on the left of the rear side)
TIP:
OnSelecting[SINGLE]for[LAMPSELECT]
•Alamphasapropertythatitsbrightnessgraduallydecreaseswithage.Tokeepthebrightnessoftwolampsonthesamelevelas
muchaspossible,select[SINGLE]for[LAMPSELECT].
•Lamplifewilldecreasewhenshorterlampintervaltimesaresetwithintheon-screenmenu.Youarerecommendedtoextendthe
lampintervaltime.
Settingthelampinterval[LAMPINTERVALMODE]
Thisallowsyoutospecifythetimeforswitchingbetweenthetwolampsalternately.Thisoptionisavailableonlywhen
[SINGLE]isselectedfor[LAMPSELECT].
OFF ........................ Turns off the lamp interval mode setting.
12 HOURS/24 HOURS/1 WEEK
.............................. Select one of these three options for interval time.
NOTE:
•Thisfunctionisavailableonlywhen[SINGLE]isselectedfor[LAMPSELECT].
•Beforesetting[LAMPINTERVALMODE],[LAMPSWITCHINGTIME]or[LAMPSWITCHINGDAY],makesurethatthecurrentdate
andtimeissetfortheprojector.Tosetthedateandtimefortheprojector,select[APPLICATIONMENU]→[TOOLS]→[DATE
ANDTIME]fromthemenu.(→ page 162)
Setting the time for changing the lamp [LAMP SWITCHING TIME]
Thisallowsyoutosetthetimeforchangingthelamp.
Example–When[SINGLE]isselectedfor[LAMPSELECT]and[24HOURS]for[LAMPINTERVALMODE]:
Lamp 1
Lamp 2
24hours24hours
24hours24hours
This indicates the lamp is turned on.
This indicates the lamp is turned off.
Current Time SwitchingTime*SwitchingTime
(*)AftersettingtheCurrentTime,ifthevaluebetweenCurrentTimeandSwitchingTimeislessthanve(5)minutes,therst
lampswitchinginstancedoesnottakeplace.

121
5. Using On-Screen Menu
Settingthedayforchangingthelamp[LAMPSWITCHINGDAY]
Thisallowsyoutosetthedayforchangingthelamp.
Theoptionsare:SUN(Sunday),MON(Monday),TUE(Tuesday),WED(Wednesday),THU(Thursday),FRI(Friday),
andSAT(Saturday).
NOTE:
•Thisfunctionisavailableonlywhen[1WEEK]isselectedfor[LAMPINTERVALMODE].
Setting Closed Caption [CLOSED CAPTION]
ThisoptionsetsseveralclosedcaptionmodesthatallowtexttobesuperimposedontheprojectedimageofVideo
orS-Video.
OFF ........................ This exits the closed caption mode.
CAPTION 1-4 ......... Text is superimposed.
TEXT 1-4 ................ Text is displayed.
Using Off Timer [OFF TIMER]
1.Selectyourdesiredtimebetween30minutesand16hours:OFF,0:30,1:00,2:00,4:00,8:00,12:00,16:00.
2.PresstheENTERbuttonontheremotecontrol.
3.Theremainingtimestartscountingdown.
4.Theprojectorwillturnoffafterthecountdowniscomplete.
NOTE:
•Tocancelthepresettime,set[OFF]forthepresettimeorturnoffthepower.
•Whentheremainingtimereaches3minutesbeforetheprojectoristurnedoff,the[THEPROJECTORWILLTURNOFFWITHIN3
MINUTES]messagewillbedisplayedonthebottomofthescreen.
[TOOLS]
See“APPLICATIONMENU”onpage
140.
Selecting Menu Language [LANGUAGE]
Youcanchooseoneof27languagesforon-screeninstructions.
NOTE:Yoursettingwillnotbeaffectedevenwhen[RESET]isdonefromthemenu.
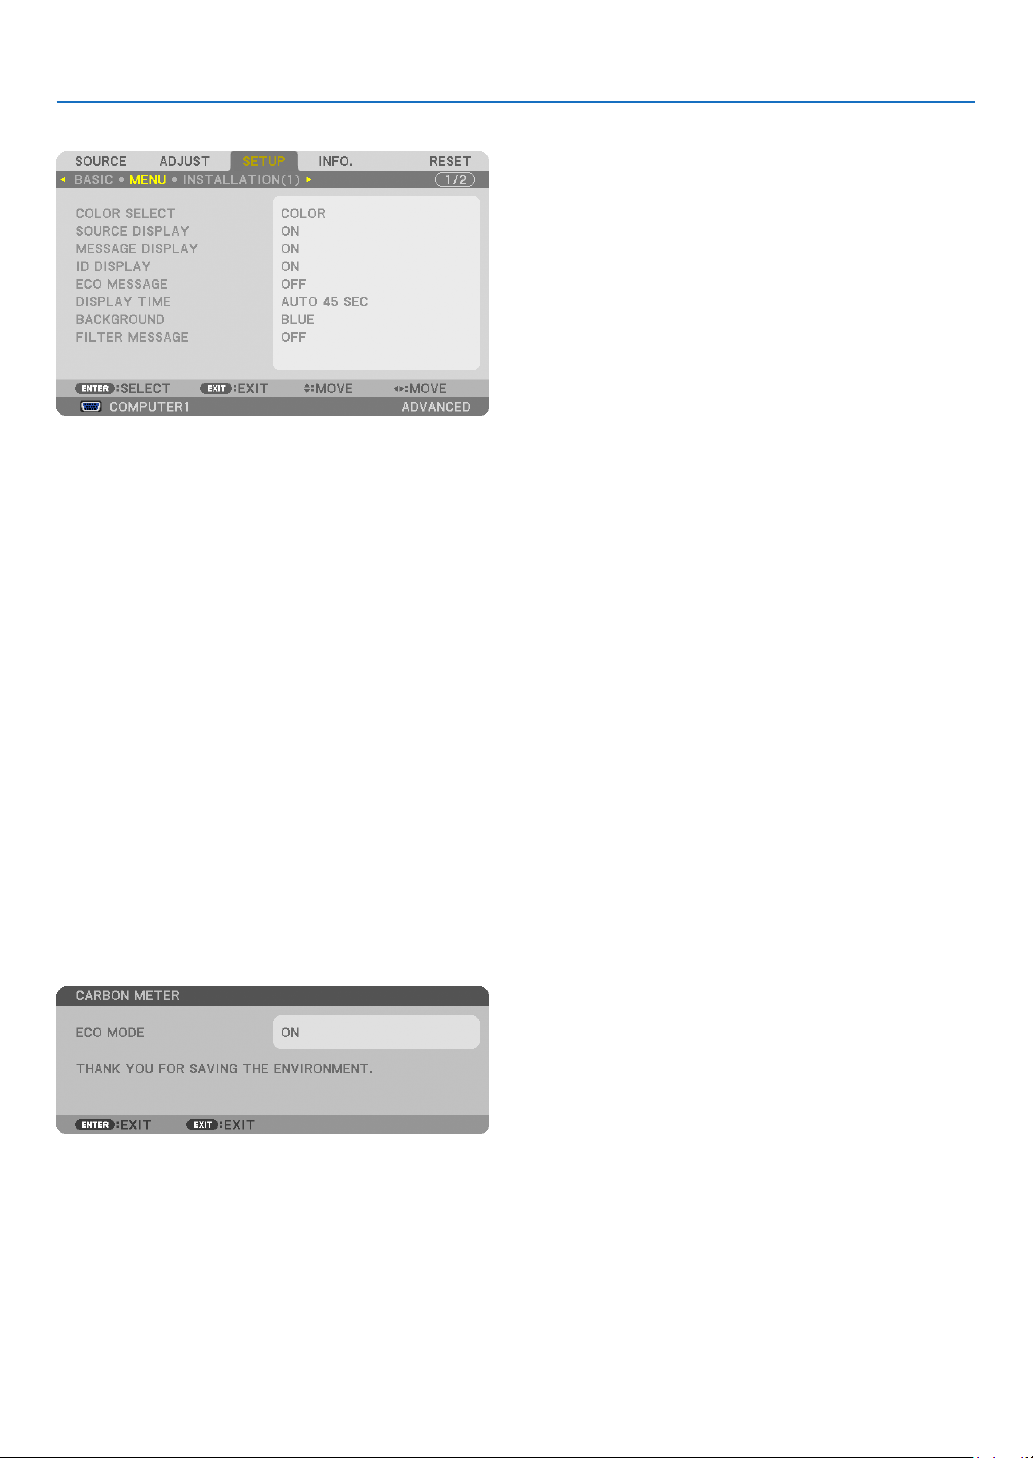
122
5. Using On-Screen Menu
[MENU]
Selecting Menu Color [COLOR SELECT]
Youcanchoosebetweentwooptionsformenucolor:COLORandMONOCHROME.
TurningOn/OffSourceDisplay[SOURCEDISPLAY]
ThisoptionturnsonoroffinputnamedisplaysuchasCOMPUTER1,COMPUTER2,COMPUTER3,HDMI,Display-
Port,VIDEO,S-VIDEO,VIEWER,NETWORKtobedisplayedonthetoprightofthescreen.
Turning messages on and off [MESSAGE DISPLAY]
Thisoptionselectswhetherornottodisplayprojectormessagesatthebottomoftheprojectedimage.
Evenwhen“OFF”isselected,thesecuritylockwarningisdisplayed.Thesecuritylockwarningturnsoffwhenthe
securitylockiscanceled.
TurningON/OFFControlID[IDDISPLAY]
ID DISPLAY ........... This option turns on or off the ID number which is displayed when the ID SET button on the remote control
is pressed. (→ page
127)
TurningOn/OffEcoMessage[ECOMESSAGE]
Thisoptionturnsonoroffthefollowingmessageswhentheprojectoristurnedon.
TheEcoMessagepromptstheusertosaveenergy.When[OFF]isselectedfor[ECOMODE],youwillgetamessage
topromptyoutoselect[ON]for[ECOMODE].
When[ON]isselectedfor[ECOMODE]
Toclosethemessage,pressanyoneofthebuttons.Themessagewilldisappearifnobuttonoperationisdonefor
30seconds.
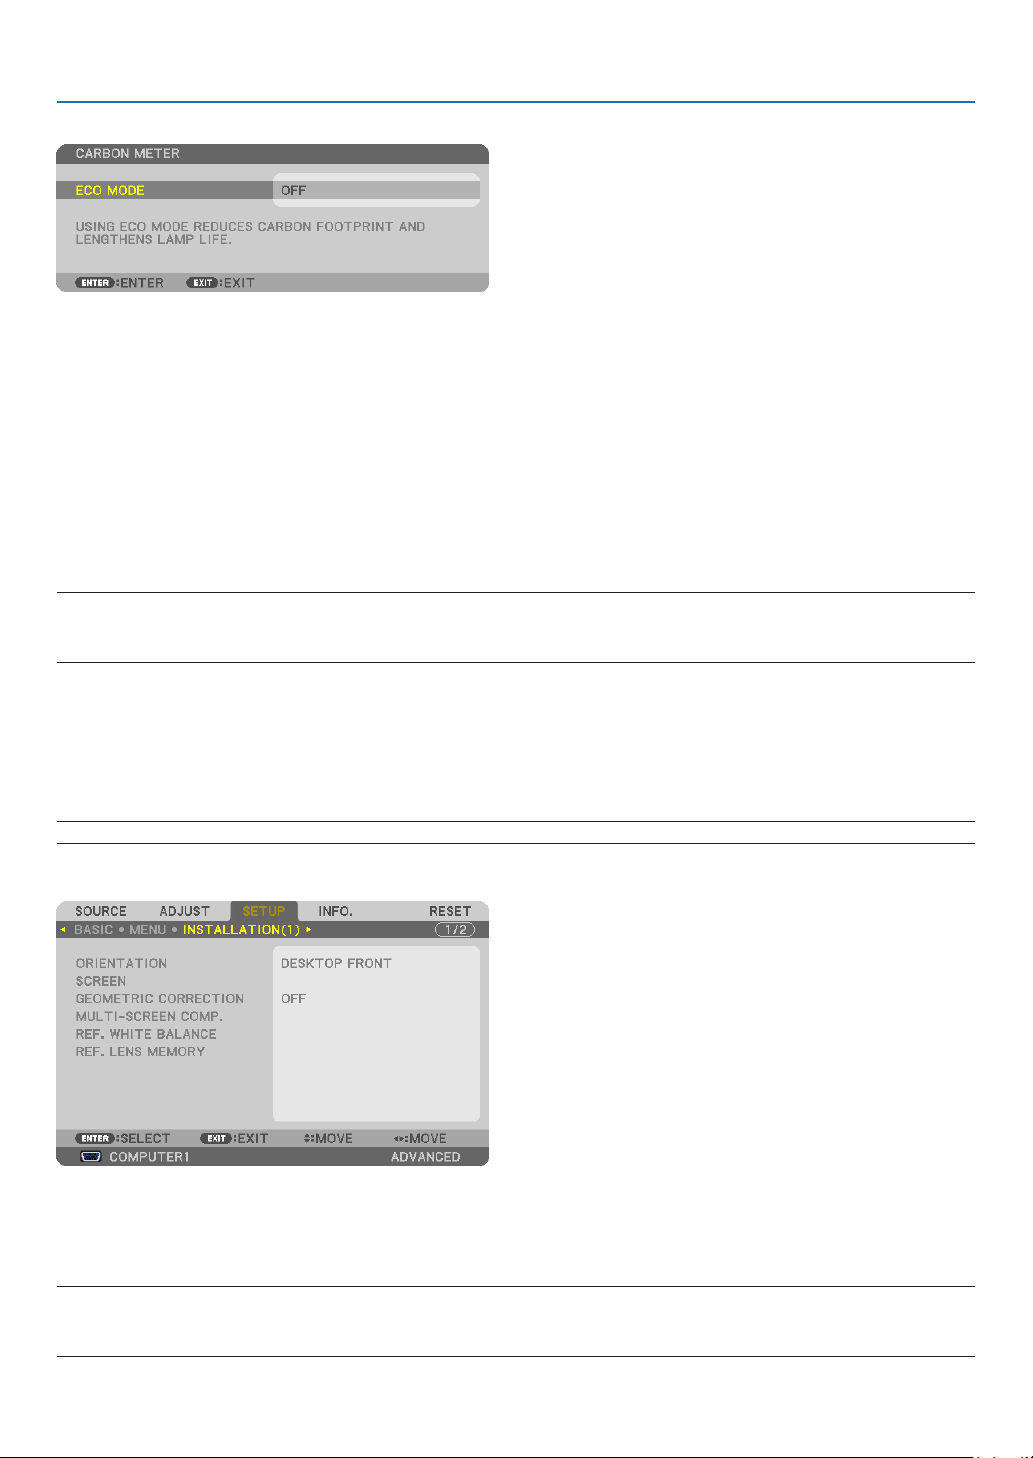
123
5. Using On-Screen Menu
When[OFF]isselectedfor[ECOMODE]
PressingtheENTERbuttonwilldisplaythe[ECOMODE]screen.(→page36)
Toclosethemessage,presstheEXITbutton.
SelectingMenuDisplayTime[DISPLAYTIME]
Thisoptionallowsyoutoselecthowlongtheprojectorwaitsafterthelasttouchofabuttontoturnoffthemenu.The
presetchoicesare[MANUAL],[AUTO5SEC],[AUTO15SEC],and[AUTO45SEC].The[AUTO45SEC]isthefac-
torypreset.
SelectingaColororLogoforBackground[BACKGROUND]
Usethisfeaturetodisplayablue/blackscreenorlogowhennosignalisavailable.Thedefaultbackgroundis
[LOGO].
NOTE:
•
Evenwhenthebackgroundlogoisselected,iftwopicturesaredisplayedin[PIP/PICTUREBYPICTURE]mode,thebluebackground
is displayed without the logo when there is no signal.
Selecting Interval Time for Filter Message [FILTER MESSAGE]
Thisoptionallowsyoutoselectthetimepreferencebetweendisplayingthemessageforcleaningthelters.Clean
thelterwhenyougetthemessage“PLEASECLEANFILTER.”(→page
180)
Sixoptionsareavailable:OFF,100[H],500[H],1000[H],2000[H],5000[H]
Thedefaultsettingis[OFF].
NOTE:Yoursettingwillnotbeaffectedevenwhen[RESET]isdonefromthemenu.
[INSTALLATION(1)]
Selecting Projector Orientation [ORIENTATION]
Thisreorientsyourimageforyourtypeofprojection.Theoptionsare:desktopfrontprojection,ceilingrearprojection,
desktoprearprojection,andceilingfrontprojection.
NOTE:
Thisprojectorisatilt-freeprojectorwithwhichitispossibletoprojectimagesontheceiling(upward)oroor(downward).When
changingtheprojectororientation,alsochangethe[SETTING]optionof[FANMODE]accordingly.(→ page 129)
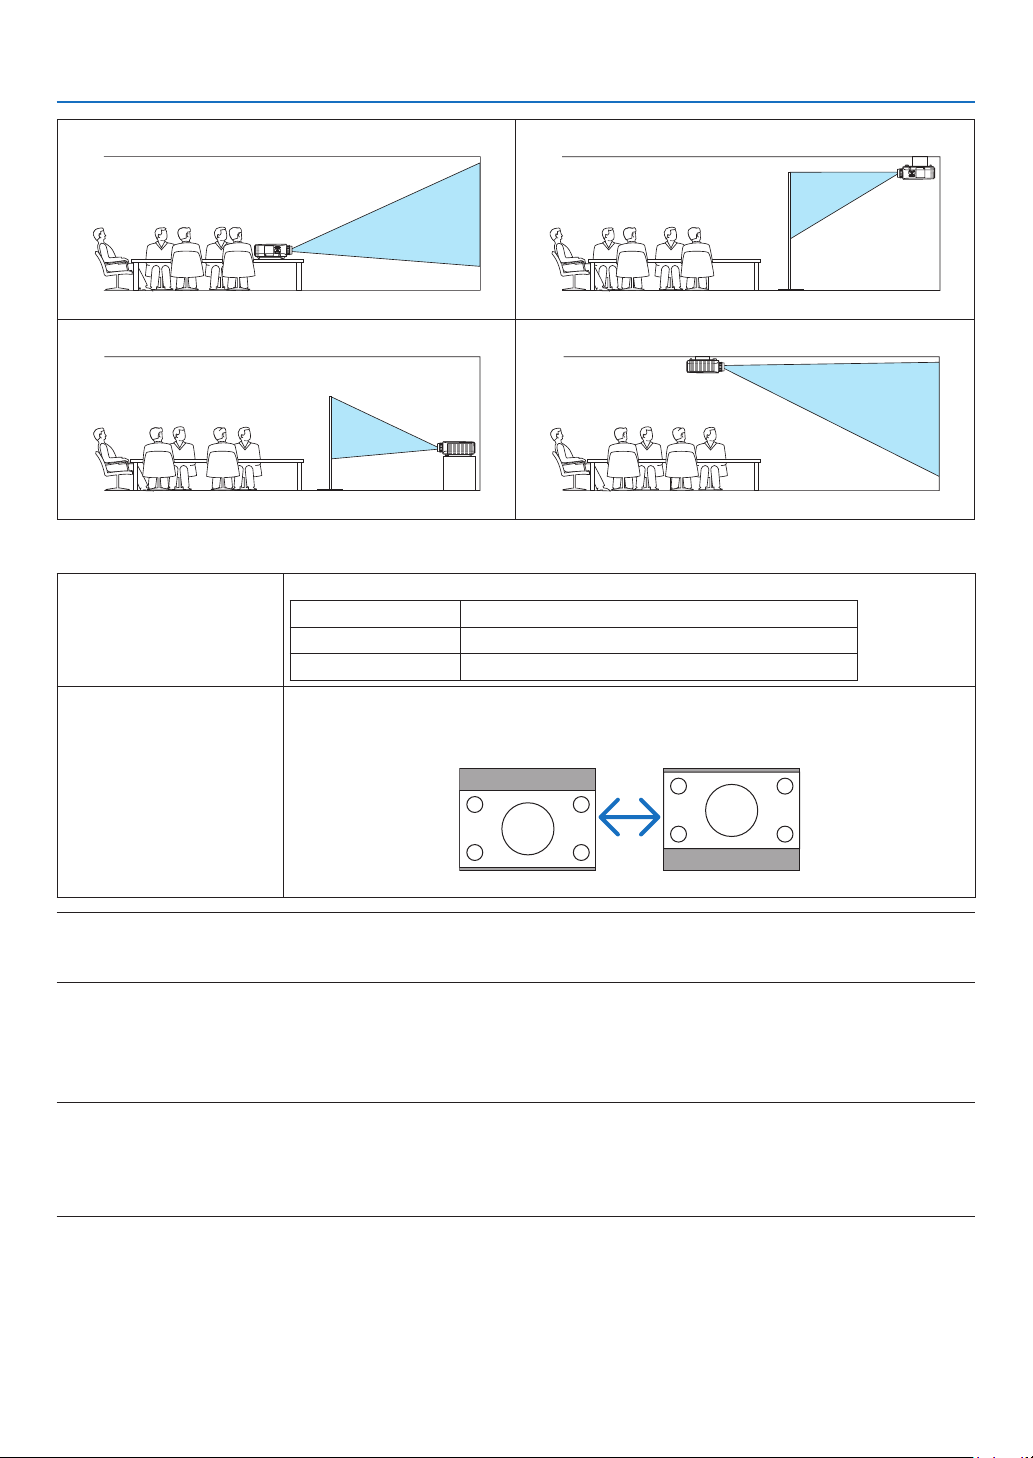
124
5. Using On-Screen Menu
DESKTOPFRONT
CEILINGREAR
DESKTOPREAR
CEILINGFRONT
Selecting Aspect Ratio and Position for Screen [SCREEN]
ScreentypeSetstheaspectratiooftheprojectionscreen.
4:3screenForascreenwitha4:3aspectratio
16:9screenForascreenwitha16:9aspectratio
16:10screenForascreenwitha16:10aspectratio
DisplaypositionWhenthescreentypeissetto16:9or16:10,adjuststheverticalpositionofthedisplay
range.
Downward
Upward
NOTE:
•
Afterchangingthescreentype,checkthesettingof[ASPECTRATIO]inthemenu.
(→ page 114)
Using Geometric Correction [GEOMETRIC CORRECTION]
Thisfeatureretrievesgeometricdataregisteredintheprojectormemory.
Threepresetsofgeometricdatahavebeenregistered.Toturnoffthisfeature,select[OFF].
NOTE:
•The[KEYSTONE]and[CORNERSTONE]adjustmentsarenotavailablewhengeometricdataisapplied.
•Toclearyourgeometricdata,pressthe3DREFORMbuttonforaminimumof2seconds.
•The[GEOMETRICCORRECTION]featurecancauseanimagetobeslightlyblurredbecausethecorrectionismadeelectroni-
cally.

125
5. Using On-Screen Menu
UsingMulti-ScreenCompensation[MULTI-SCREENCOMP.]
Thisfeatureallowsyoutomatchbrightnessofimagesprojectedfrommultipleprojectors.
Beforeusing[MULTI-SCREENCOMP.],youneedtomatchcolorofimagesprojectedfrommultipleprojectors.
MODE .................... OFF: Turns off this function.
ON: Turns on this function. The [BRIGHTNESS] and the [CONTRAST] can be adjusted.
CONTRAST ............ Adjusts the bright part of the picture.
BRIGHTNESS ......... Adjusts the dark part of the picture.
Adjusting
1.Prepareblackandwhiteimagessothattheimagescanbedisplayedonthecomputerscreen.
2.Displaytheblackimageonthecomputerscreen,andprojecttheimagefromtheprojector.
3.Select[MULTI-SCREENCOMP.]→
[MODE] → [ON].
4.Adjustthedarkpartoftheimages.
Press the buttontoselect[BRIGHTNESS]andusethe or tomatchtheblackpartofanotherprojector.
5. Display the white screen on the computer screen.
Project the image from two or more projectors.
6.Adjustthebrightpartoftheimages.
Press the buttontoselect[CONTRAST]andusethe or to match the white part of another projector.
Movingtheslidebartoward[+](plus)canchangethewhitepartoftheimage.Shouldthishappen,movethe
slidebartoward[−](minus)toadjustthebrightness.
TIP:
•Whenyouusemultipleprojectors,youcanusethe[CONTROLID]functiontooperateasingleprojectororalltheprojectorsfrom
theremotecontrol.(→
page 127)
•Yoursettingwillnotbeaffectedevenwhen[RESET]isdonefromthemenu.
[REF. WHITE BALANCE]
Thisfeatureallowsyoutoadjustthewhitebalanceforallsignals.
Thewhiteandblacklevelsofthesignalareadjustedforoptimumcolorreproduction.
Uniformityisalsoadjustedwhentheredness(R)andblueness(B)ofthewhitecolorinthescreen’shorizontal(left/
right)directionareuneven.
BRIGHTNESS R/BRIGHTNESS G/BRIGHTNESS B
.............................. These adjust the picture’s black color.
CONTRAST R/CONTRAST G/CONTRAST B
.............................. These adjust the picture’s white color.
UNIFORMITY R ...... The further this is set to the + side, the stronger the redness on the left side of the picture (increasing
towards the left edge) and the weaker the redness on the right side of the picture (decreasing towards the
right edge).
This is reversed when set to the − side.
UNIFORMITY B ...... The further this is set to the + side, the stronger the blueness on the left side of the picture (increasing
towards the left edge) and the weaker the blueness on the right side of the picture (decreasing towards the
right edge).
This is reversed when set to the − side.

126
5. Using On-Screen Menu
UsingtheReferenceLensMemoryFunction[REF.LENSMEMORY]
ThisfunctionservestostoretheadjustedvaluescommontoallinputsourceswhenusingtheLENSSHIFT,ZOOM
andFOCUSbuttonsoftheprojectorortheremotecontrol.Theadjustedvaluesstoredinmemorycanbeusedasa
referencetothecurrent.
STORE ................... Stores the current adjusted values in memory as a reference.
MOVE .................... Applies the adjusted reference values stored in [STORE] to the current signal.
RESET .................... Returns the adjusted reference values to the factory default setting.
LOAD BY SIGNAL .. For change to take effect at the time of source selection, select [YES].
FORCED MUTE ...... To turn off the image during lens shift, select [YES].
CALIBRATION ........ Corrects the adjustable zoom and focus range.
The adjustable zoom and focus range can vary depending on the lens in use. Be sure to perform [CALIBRA-
TION] after replacement of the lens.
NOTE:
The following lenses need calibration:
•NP26ZL,NP27ZL,NP28ZL,NP29ZL
NOTE:
•Adjustedvaluesin[REF.LENSMEMORY]willnotbereturnedtodefaultwhenperforming[CURRENTSIGNAL]or[ALLDATA]for
[RESET]fromthemenu.
•Tostoreadjustedvaluesforeachinputsource,usetheLensMemoryfunction.(→ page 48, 117)

127
5. Using On-Screen Menu
[INSTALLATION(2)]
DisablingtheCabinetButtons[CONTROLPANELLOCK]
ThisoptionturnsonorofftheCONTROLPANELLOCKfunction.
NOTE:
•ThisCONTROLPANELLOCKdoesnotaffecttheremotecontrolfunctions.
•Whenthecontrolpanelislocked,pressingandholdingtheEXITbuttonontheprojectorcabinetforabout10secondswillchange
thesettingto[OFF].
TIP:Whenthe[CONTROLPANELLOCK]isturnedon,akeylockicon[]willbedisplayedatthebottomrightofthemenu.
EnablingSecurity[SECURITY]
ThisfeatureturnsonorofftheSECURITYfunction.
Unlessthecorrectkeywordisentered,theprojectorcannotprojectanimage.(→page
45)
NOTE:Yoursettingwillnotbeaffectedevenwhen[RESET]isdonefromthemenu.
Selecting Communication Speed [COMMUNICATION SPEED]
ThisfeaturesetsthebaudrateofthePCControlport(D-Sub9P).Itsupportsdataratesfrom4800to115200bps.
Thedefaultis38400bps.Selecttheappropriatebaudrateforyourequipmenttobeconnected(dependingonthe
equipment,alowerbaudratemayberecommendedforlongcableruns).
NOTE:
•Select[38400bps]orlesswhenusingtheUserSupportware.
•Yourselectedcommunicationspeedwillnotbeaffectedevenwhen[RESET]isdonefromthemenu.
Turning On or Off Remote Sensor [REMOTE SENSOR]
Thisoptiondetermineswhichremotesensorontheprojectorisenabledinwirelessmode.
Theoptionsare:FRONT/BACK,FRONT,andBACK.
Iftheremotecontrolsystemdoesnotfunctionwhendirectsunlightorstrongilluminationstrikestheremotecontrol
sensoroftheprojector,changeanotheroption.
Setting ID to the Projector [CONTROL ID]
YoucanoperatemultipleprojectorsseparatelyandindependentlywiththesingleremotecontrolthathastheCONTROL
IDfunction.IfyouassignthesameIDtoalltheprojectors,youcanconvenientlyoperatealltheprojectorstogether
usingthesingleremotecontrol.Todoso,youhavetoassignanIDnumbertoeachprojector.
CONTROL ID NUMBER .......Select a number from 1 to 254 you wish to assign to your projector.
CONTROL ID .......................Select [OFF] to turn off the CONTROL ID setting and select [ON] to turn on the CONTROL ID set-
ting.
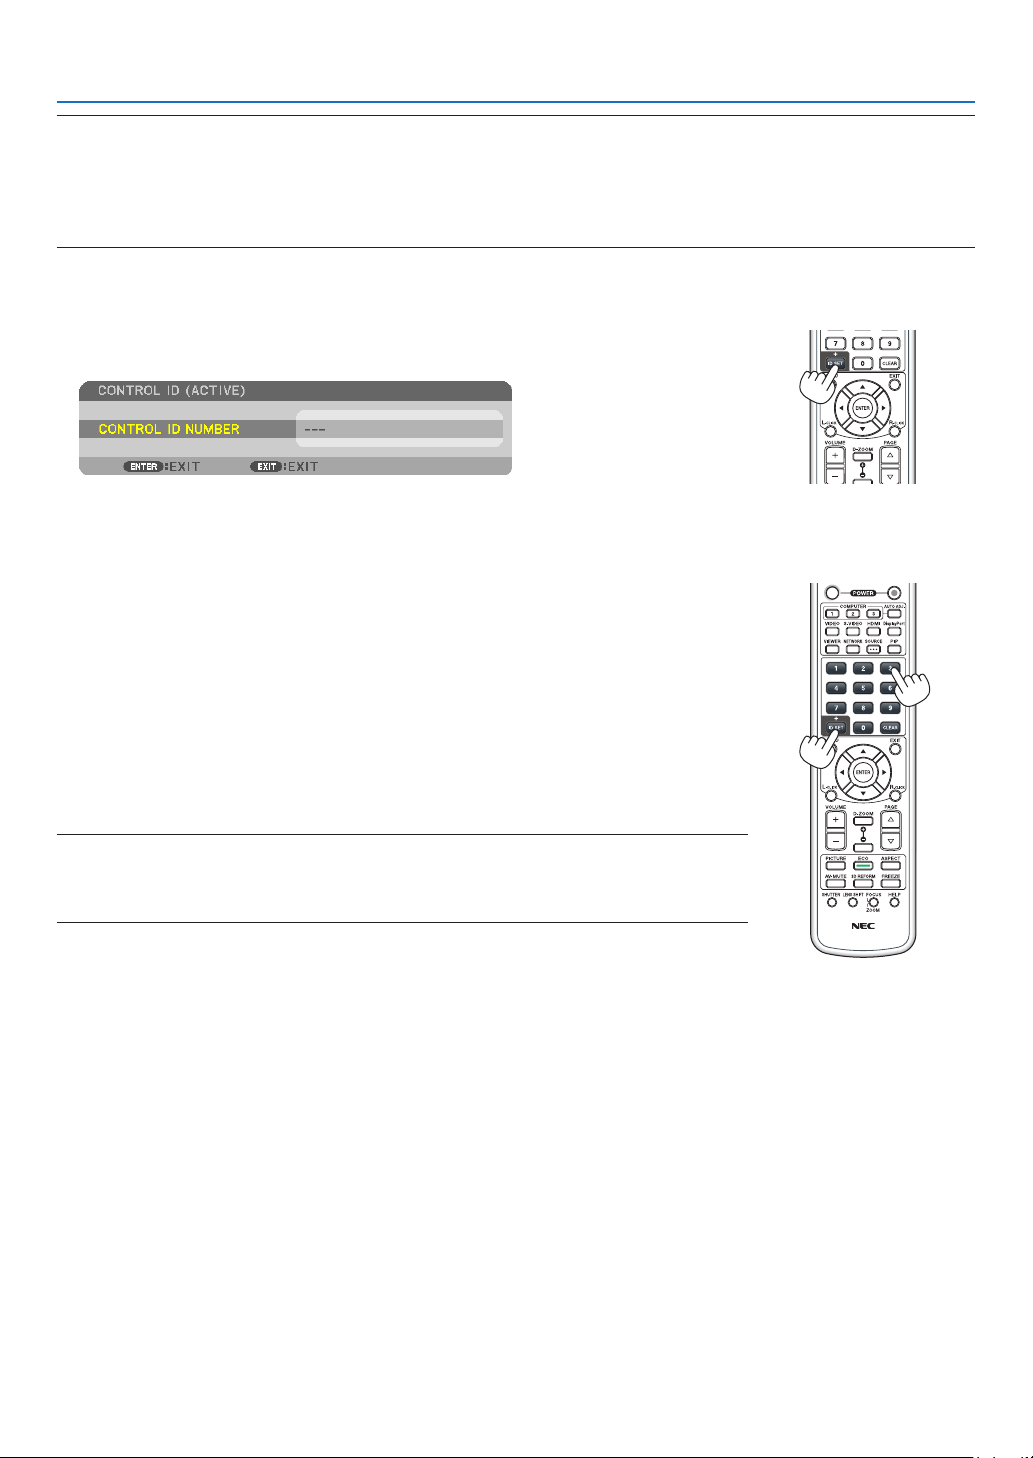
128
5. Using On-Screen Menu
NOTE:
•When[ON]isselectedfor[CONTROLID],theprojectorcannotbeoperatedbyusingtheremotecontrolthatdoesnotsupport
theCONTROLIDfunction.(Inthiscasethebuttonsontheprojectorcabinetcanbeused.)
•Yoursettingwillnotbeaffectedevenwhen[RESET]isdonefromthemenu.
•PressingandholdingtheENTERbuttonontheprojectorcabinetfor10secondswilldisplaythemenuforcancelingtheControl
ID.
Assigning or Changing the Control ID
1.Turnontheprojector.
2.PresstheIDSETbuttonontheremotecontrol.
TheCONTROLIDscreenwillbedisplayed.
IftheprojectorcanbeoperatedwiththecurrentremotecontrolID,the[ACTIVE]
willbedisplayed.Iftheprojectorcannotbeoperatedwiththecurrentremotecontrol
ID,the[INACTIVE]willbedisplayed.Tooperatetheinactiveprojector,assignthe
controlIDusedfortheprojectorbyusingthefollowingprocedure(Step3).
3.PressoneofnumerickeypadbuttonswhilepressingandholdingtheIDSET
buttonontheremotecontrol.
Example:
Toassign“3”,pressthe“3”buttonontheremotecontrol.
NoIDmeansthatalltheprojectorscanbeoperatedtogetherwithasingleremote
control.Toset“NoID”,enter“000”orpresstheCLEARbutton.
TIP:TherangeofIDsisfrom1to254.
4.ReleasetheIDSETbutton.
TheupdatedCONTROLIDscreenwillbedisplayed.
NOTE:
•TheIDscanbeclearedinafewdaysafterthebatteriesarerundownorremoved.
•Accidentallypressinganyoneofthebuttonsoftheremotecontrolwillclearcurrentlyspecied
IDwithbatteriesremoved.
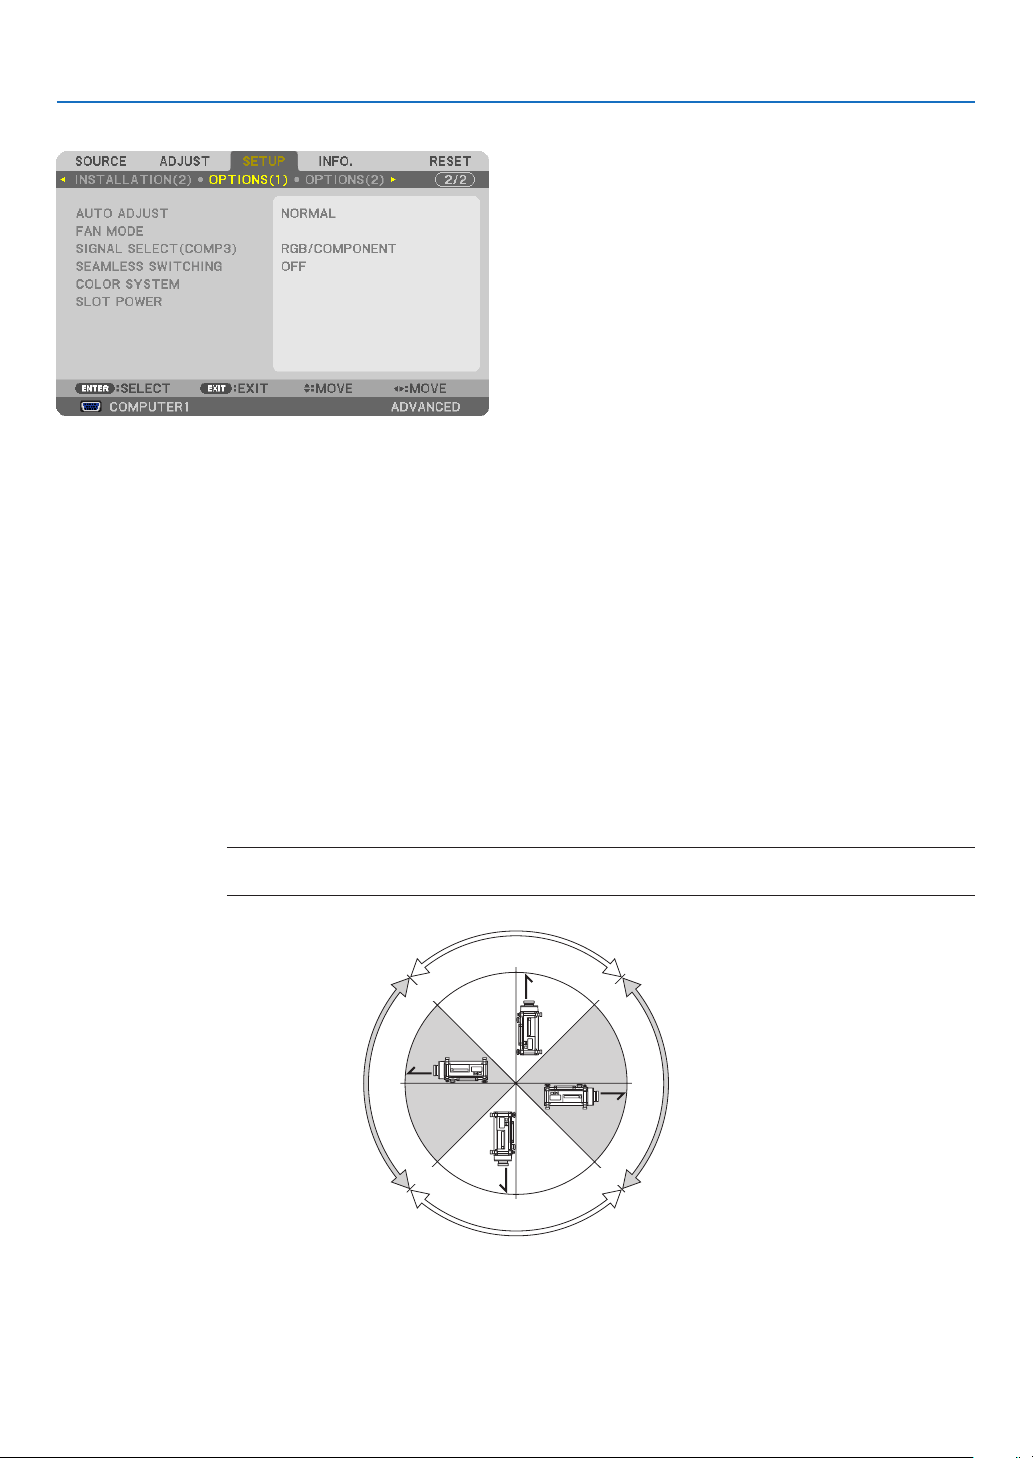
129
5. Using On-Screen Menu
[OPTIONS(1)]
Setting Auto Adjust [AUTO ADJUST]
ThisfeaturesetstheAutoAdjustmodesothatthecomputersignalcanbeautomaticallyormanuallyadjustedfor
noiseandstability.Youcanautomaticallymakeadjustmentintwoways:[NORMAL]and[FINE].
OFF ........................ The computer signal will not be automatically adjusted. You can manually optimize the computer signal.
NORMAL ................ Default setting. The computer signal will be automatically adjusted. Normally select this option.
FINE ....................... Select this option if fine adjustment is needed. It takes more time to switch to the source than when [NOR-
MAL]is selected.
Selecting Fan Mode [FAN MODE]
FanModeisusedtosetthespeedoftheinternalcoolingfan.
MODE .................... Select three modes for fan speed: AUTO, HIGH, and HIGH ALTITUDE.
AUTO: The built-in fans automatically run at a variable speed according to the internal temperature.
HIGH: The built-in fans run at high speed
HIGH ALTITUDE: The built-in fans run at a high speed. Select this option when using the projector at altitudes
approximately 5500 feet/1600 meters or higher.
SETTING ................ Select one of the four options ([FLOOR], [CEILING], [VERTICAL TILT DOWN], or [VERTICAL TILT UP])
according to the installation angle of the projector. See the drawing below.
NOTE:Besuretoselectthe[SETTING]optionaccordingtotheprojector’sorientation.Failuretodosomay
cause product malfunction.
0°
45°
90°
225°
180°
135°
270°
315°
Select [VERTICAL TILT UP] for this angle
Select [VERTICAL TILT DOWN] for this angle
Select [FLOOR] for this angle
Select [CEILING] for this angle
Whenyouwishtocooldownthetemperatureinsidetheprojectorquickly,select[HIGH].

130
5. Using On-Screen Menu
NOTE:
•When[HIGHALTITUDE]isselectedfor[FANMODE],asymbolicon will be displayed at the bottom of the menu.
•ItisrecommendedthatyouselectHighspeedmodeifyouusetheprojectornon-stopforconsecutivedays.
•Set[FANMODE]to[HIGHALTITUDE]whenusingtheprojectorataltitudesapproximately5500feet/1600metersorhigher.
•Usingtheprojectorataltitudesapproximately5500feet/1600metersorhigherwithoutsettingto[HIGHALTITUDE]cancause
theprojectortooverheatandtheprotectorcouldshutdown.Ifthishappens,waitacoupleminutesandturnontheprojector.
•Usingtheprojectorataltitudeslessthanapproximately5500feet/1600metersandsettingto[HIGHALTITUDE]cancausethe
lamptoovercool,causingtheimagetoicker.Switch[FANMODE]to[AUTO].
•Usingtheprojectorataltitudesapproximately5500feet/1600metersorhighercanshortenthelifeofinternalpartssuchasthe
lamp.
•Yoursettingwillnotbeaffectedevenwhen[RESET]isdonefromthemenu.
SelectingtheSignalFormat[SIGNALSELECT(COMP3)]
WhenanoutputdeviceisconnectedtotheCOMPUTER3videoinputconnectors,thissetstheinputsignal.
RGB/COMPONENT ........RGB and component signals are identified automatically.
VIDEO ...........................This switches to the video signal.
NOTE:Whenavideocable(commerciallyavailable)isconnectedtotheCOMPUTER3videoinputconnectors’G/Yconnector,video
signalscanbeprojected.Inthiscase,setto“VIDEO”.
[SEAMLESS SWITCHING]
Whentheinputconnectorisswitched,theimagedisplayedbeforeswitchingisheldtoswitchtothenewimagewithout
abreakduetoabsenceofasignal.
[COLOR SYSTEM]
ThisfeatureallowsyoutoselecttheTVvideosignal,whichdiffersfromcountrytocountry(NTSC,PAL,etc.).
Thisissetto[AUTO]byfactorydefault.Setthisiftheprojectorcannotidentifythesignalautomatically.
Setting for the Optional Board [SLOT POWER]
WhenusingtheoptionalboardsuchasSB-01HCinstalledintheslot,setthefollowingoptions.
PROJECTOR ON .................Thisfeaturewillturnonoroffthepowertotheoptionalboard.
OFF: Forcibly turn off the power to the optional board installed in the slot.
ON (Default): Turn on the power to the optional board installed in the slot.
PROJECTOR STANDBY ....... Thisfeaturewillautomaticallyenableordisabletheoptionalboardinstalledintheslot
whentheprojectorisinstandby.
DISABLE: Select this option to disable the optional board in the projector standby.
ENABLE (Default): Select this option to enable the optional board in the projector standby.
NOTE:
•Select[OFF]whentheoptionalboardisnotinstalledintotheslot.

131
5. Using On-Screen Menu
[OPTIONS(2)]
SelectingPower-savingin[STANDBYMODE]
Theprojectorhasthreestandbymodes:[NORMAL],[POWER-SAVING]and[NETWORKSTANDBY].
ThePOWER-SAVINGmodeisthemodethatallowsyoutoputtheprojectorinthepower-savingconditionwhich
consumeslesspowerthantheNORMALmode.TheprojectorispresetforNORMALmodeatthefactory.
NORMAL .............................Power indicator: Orange light/STATUS indicator: Green light
POWER-SAVING .................Power indicator: Red light/STATUS indicator: Off
The following connectors, buttons or functions will not work during this mode.
- MONITOR OUT (COMP. 1) connector
- LAN and Mail Alert functions
- Buttons other than POWER button on the cabinet
- Buttons other than POWER ON button on the remote control
- Virtual Remote Tool fucntion
- [AUTO POWER ON (COMP1/3)]
- PC control commands for other than power-on
NETWORK STANDBY
..........When in the standby mode, the POWER indicator will light orange and the STATUS indicator will
not light. This shows that the projector’s power can be turned on by wired LAN.
When in the standby mode, the following connectors, buttons or functions will not work:
- MONITOR OUT (COMP. 1) connector
- Wireless LAN Unit
- [AUTO POWER ON (COMP1/3)]
- Buttons other than POWER button on the cabinet
- Buttons other than POWER ON button on the remote control
- PC control commands for other than power-on
Important:
•When[CONTROLPANELLOCK]or[CONTROLID]isturnedon,orwhen[COMPUTER1]or[COMPUTER3]isselectedfor[AUTO
POWERON(COMP1/3)],the[STANDBYMODE]settingbecomesinvalid.
Thismeansthattheprojectorisinthesameconditionwhenthe[NORMAL]isselectedfor[STANDBYMODE].
NOTE:
•Evenwhen[POWER-SAVING]isselectedfor[STANDBYMODE],poweronoroffcanbedonebyusingthePCCONTROLport.
•ThepowerconsumptioninthestandbymodewillnotbeincludedincalculatingCO
2
emission reduction.
•Yoursettingwillnotbeaffectedevenwhen[RESET]isdonefromthemenu.
Enabling Direct Power On [DIRECT POWER ON]
Turnstheprojectoronautomaticallywhenthepowercordisinsertedintoanactivepoweroutlet.Thiseliminatesthe
needtoalwaysusethePOWERbuttonontheremotecontrolorprojectorcabinet.

132
5. Using On-Screen Menu
TurningOntheProjectorByApplyingComputerSignal[AUTOPOWERON(COMP1/3)]
WhentheprojectorisinStandbymode,applyingacomputersignalfromacomputerconnectedtotheCOMPUTER1
INorCOMPUTER3INinputwillpowerontheprojectorandsimultaneouslyprojectthecomputer’simage.
ThisfunctionalityeliminatestheneedtoalwaysusethePOWERbuttonontheremotecontrolortheprojectorcabinet
topowerontheprojector.
Tousethisfunction,rstconnectacomputertotheprojectorandtheprojectortoanactiveACinput.
NOTE:
•Disconnectingacomputersignalfromthecomputerwillnotpowerofftheprojector.Werecommendusingthisfunctionincom-
binationoftheAUTOPOWEROFFfunction.
•Thisfunctionwillnotbeavailableunderthefollowingconditions:
-whenacomponentsignalisappliedtotheCOMPUTER1INorCOMPUTER3INconnector
-whenaSynconGreenRGBsignalorcompositesyncsignalisapplied
•When[AUTOPOWERON(COMP1/3]isset,the[STANDBYMODE]settingbecomesinvalid.Thismeansthattheprojectorisin
thesameconditionwhenthe[NORMAL]isselectedfor[STANDBYMODE].
•ToenabletheAUTOPOWERON(COMP1/3)afterturningofftheprojector,wait3secondsandinputacomputersignal.
Ifacomputersignalisstillpresentwhentheprojectoristurnedoff,theAUTOPOWERON(COMP1/3)willnotworkandthe
projector remains in standby mode.
Enabling Power Management [AUTO POWER OFF]
Whenthisoptionisselectedyoucanenabletheprojectortoautomaticallyturnoff(attheselectedtime:5min.,10min.,
20min.,30min.)ifthereisnosignalreceivedbyanyinputorifnooperationisperformed.
NOTE:
•The[AUTOPOWEROFF]functionwillnotworkwhen[VIEWER]or[NETWORK]isselectedfor[SOURCE].
Selecting Default Source [DEFAULT SOURCE SELECT]
Youcansettheprojectortodefaulttoanyoneofitsinputseachtimetheprojectoristurnedon.
LAST ...................... Sets the projector to default to the previous or last active input each time the projector is turned on.
AUTO ..................... Searches for an active source in order of COMPUTER1 → COMPUTER2 → COMPUTER3 → HDMI →
DisplayPort → VIDEO → S-VIDEO → VIEWER → COMPUTER1 and displays the first found source.
COMPUTER1 ......... Displays the computer signal from the COMPUTER 1 IN connector every time the projector is turned on.
COMPUTER2 ......... Displays the computer signal from the COMPUTER 2 IN connector every time the projector is turned on.
COMPUTER3 ......... Displays the computer signal from the COMPUTER 3 IN connector every time the projector is turned on.
HDMI ..................... Displays the digital source from the HDMI IN connector every time the projector is turned on.
DisplayPort ............ Displays the digital source from the DisplayPort every time the projector is turned on.
VIDEO .................... Displays the Video source from the VIDEO IN connector every time the projector is turned on.
S-VIDEO ................ Displays the Video source from the S-VIDEO IN connector every time the projector is turned on.
VIEWER ................. Displays slides or plays back movie files from the USB memory device every time the projector is turned
on.
NETWORK ............. Displays the data sent from the computer via the LAN port (RJ-45) or the wireless LAN unit (sold separately)
mounted on the projector is projected.
SLOT ...................... Displays a signal from the optional (SB-01HC or other NEC’s optional boards) when it is installed.

133
5. Using On-Screen Menu
[EDGE BLENDING]
Thisfunctionadjustsoverlappingedgesofimagesprojectedfromeachprojectortouniformmulti-screenimages.
Turns on or off the Edge Blending function. [MODE]
Turningon[MODE]willmake[TOP],[BOTTOM],[LEFT],[RIGHT],and[BLACKLEVEL]available.(Default:OFF).
Selectsedgeoftop,bottom,left,andrightofthescreentoperformtheEdgeBlendingfunction.
[TOP/BOTTOM/LEFT/RIGHT]
Turningon[CONTROL]willmake[MARKER],[RANGE],and[POSITION]available.(→page
52)
CONTROL .............. Turns on or off [TOP], [BOTTOM], [LEFT], and [RIGHT].
MARKER ................ Turns on or off a marker for the range and position adjustment. Turning on [MARKER] will display a magenta
marker for [RANGE] and green marker for [POSITION].
RANGE ................... Adjusts the Edge Blending range (width).
POSITION .............. Adjusts the Edge Blending start position.
Adjuststhebrightnesslevelof9-segmentedportions.[BLACKLEVEL]
9-segmentedportionsare[TOP-LEFT],[TOP-CENTER],[TOP-RIGHT],[CENTER-LEFT],[CENTER],[CENTER-
RIGHT],[BOTTOM-LEFT],[BOTTOM-CENTER],and[BOTTOM-RIGHT].(→page
55)
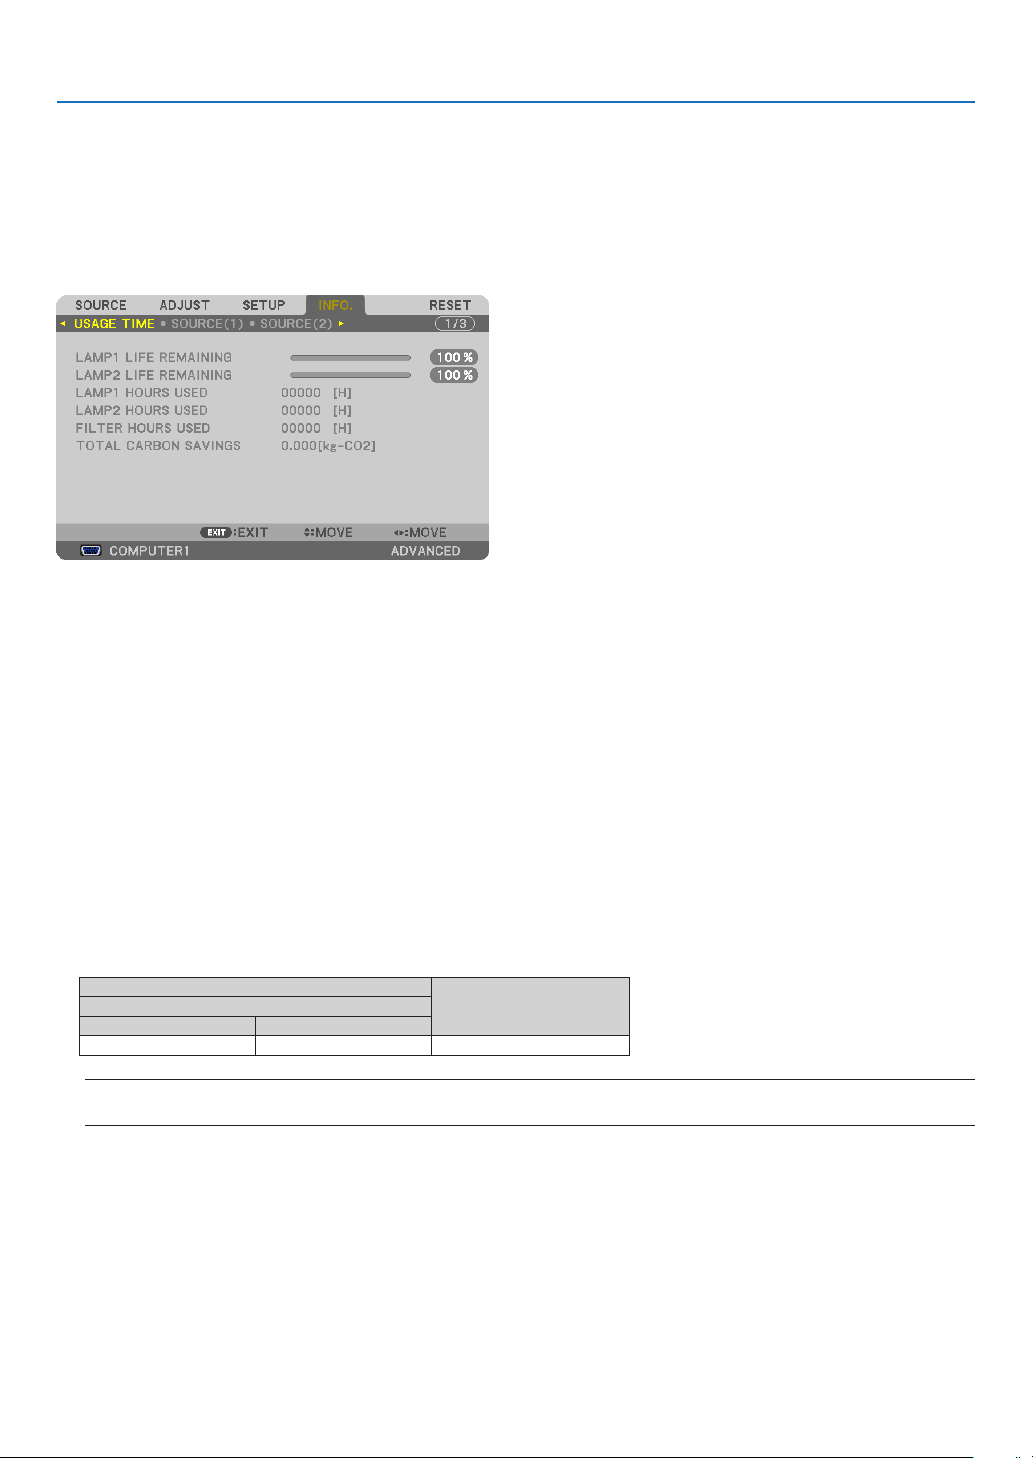
134
5. Using On-Screen Menu
Menu Descriptions & Functions [INFO.]
Displaysthestatusofthecurrentsignalandlampusage.Thisitemhasninepages.Theinformationincludedisas
follows:
TIP:PressingtheHELPbuttonontheremotecontrolwillshowthe[INFO.]menuitems.
[USAGE TIME]
[LAMP1LIFEREMAINING](%)*
[LAMP2LIFEREMAINING](%)*
[LAMP1HOURSUSED](H)
[LAMP2HOURSUSED](H)
[FILTERHOURSUSED](H)
[TOTALCARBONSAVINGS](kg-CO2)
*Theprogressindicatorshowsthepercentageofremainingbulblife.
Thevalueinformsyouoftheamountoflampusage.Whentheremaininglamptimereaches0,theLAMPLIFE
REMAININGbarindicatorchangesfrom0%to100Hoursandstartscountingdown.
Iftheremaininglamptimereaches0hours,theprojectorwillnotturnon.
•Themessagetotheeffectthatthelamportheltersshouldbereplacedwillbedisplayedforoneminutewhen
theprojectoristurnedonandwhenthePOWERbuttonontheprojectorortheremotecontrolispressed.
Todismissthismessage,pressanybuttonontheprojectorortheremotecontrol.
Lamp life(H)
Replacement lampECO MODE
OFF ON
2000 2500 NP22LP
NOTE:
Tiltingthefrontoftheprojectorupordownbymorethan10°fromlevelcouldreducelamplifebyupto20%.
•[TOTALCARBONSAVINGS]
Thisdisplaystheestimatedcarbonsavinginformationinkg.Thecarbonfootprintfactorinthecarbonsavingcal-
culationisbasedontheOECD(2008Edition).(→page
37)
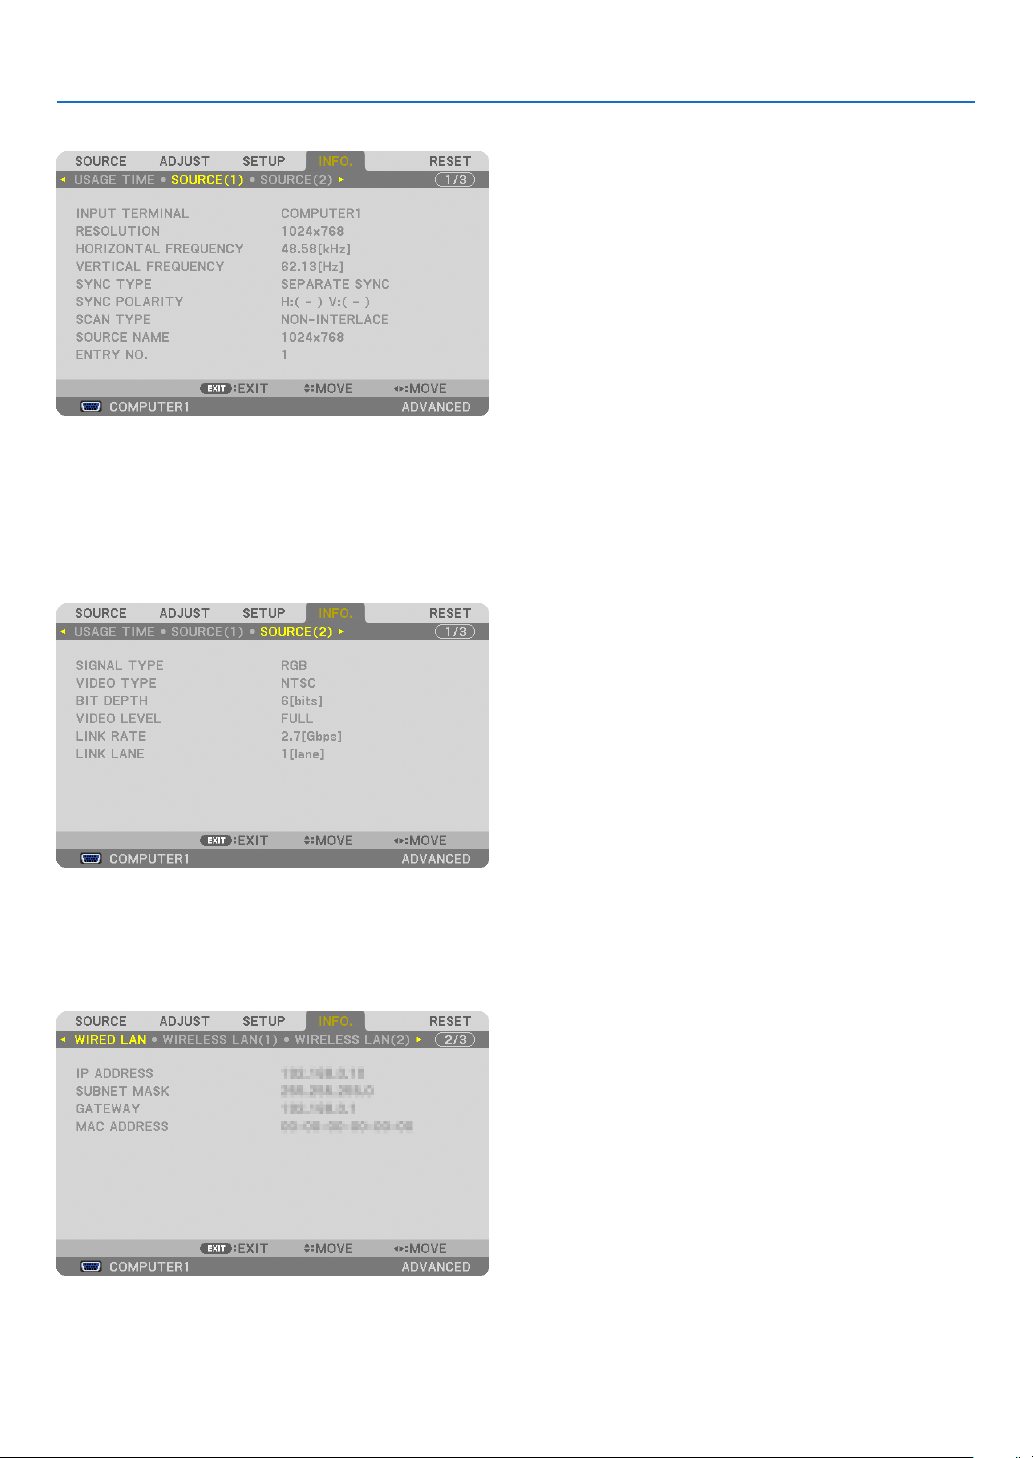
135
5. Using On-Screen Menu
[SOURCE(1)]
INPUTTERMINALRESOLUTION
HORIZONTALFREQUENCYVERTICALFREQUENCY
SYNCTYPESYNCPOLARITY
SCANTYPESOURCENAME
ENTRYNO.
[SOURCE(2)]
SIGNALTYPEVIDEOTYPE
BITDEPTHVIDEOLEVEL
LINKRATELINKLANE
[WIRED LAN]
IPADDRESSSUBNETMASK
GATEWAYMACADDRESS
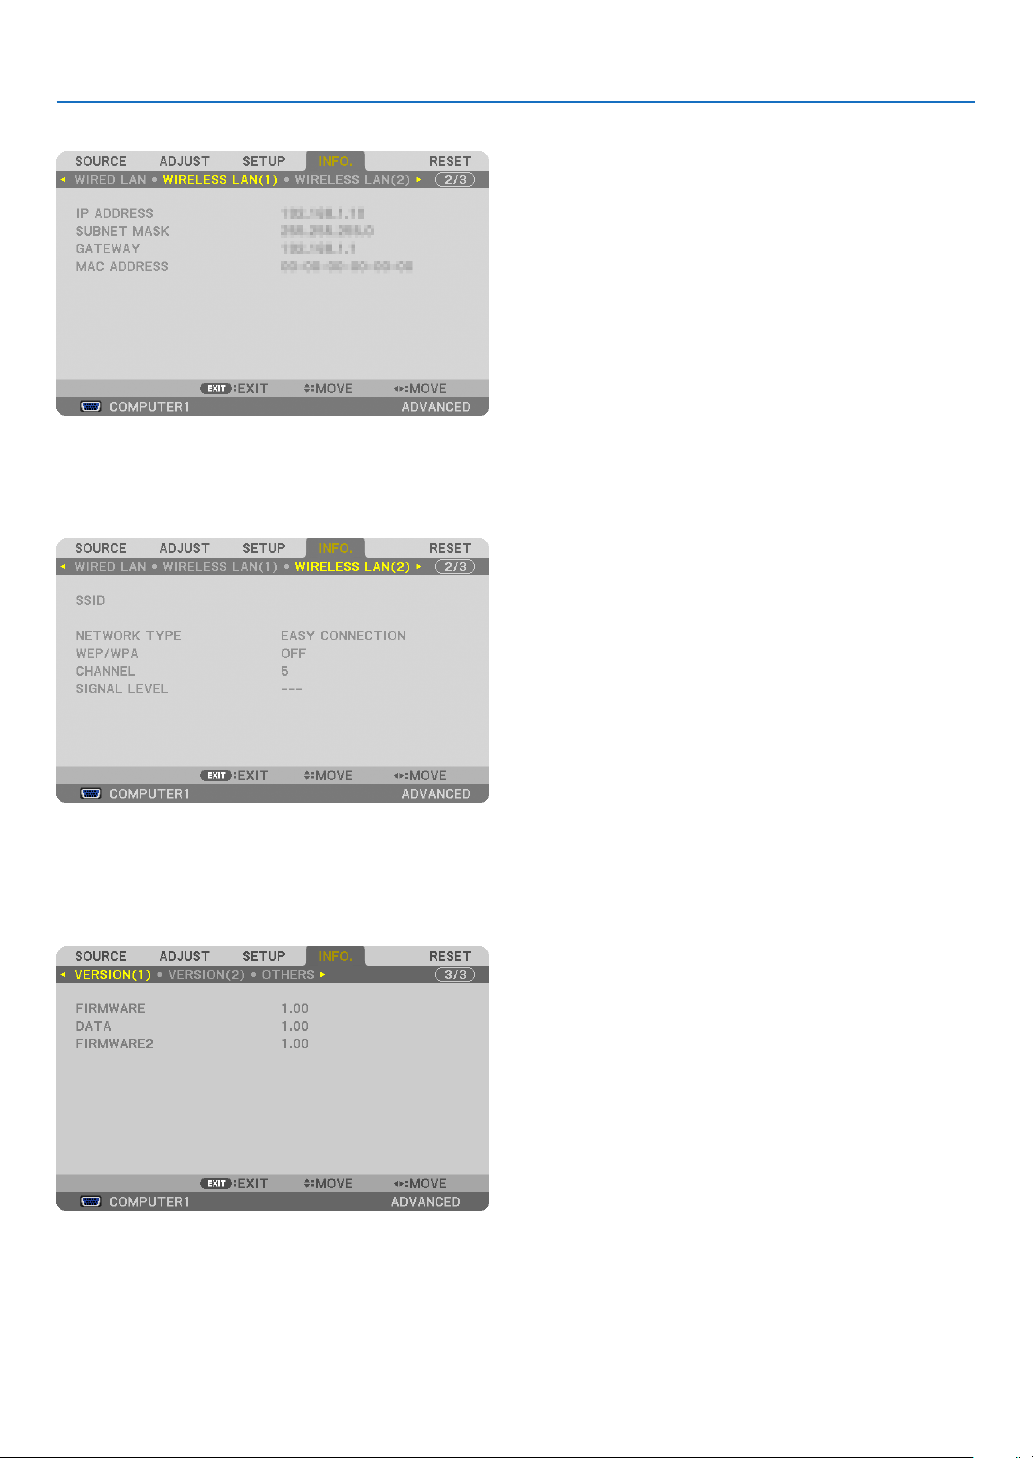
136
5. Using On-Screen Menu
[WIRELESS LAN(1)]
IPADDRESSSUBNETMASK
GATEWAYMACADDRESS
[WIRELESS LAN(2)]
SSIDNETWORKTYPE
WEP/WPACHANNEL
SIGNALLEVEL
[VERSION(1)]
FIRMWAREDATA
FIRMWARE2
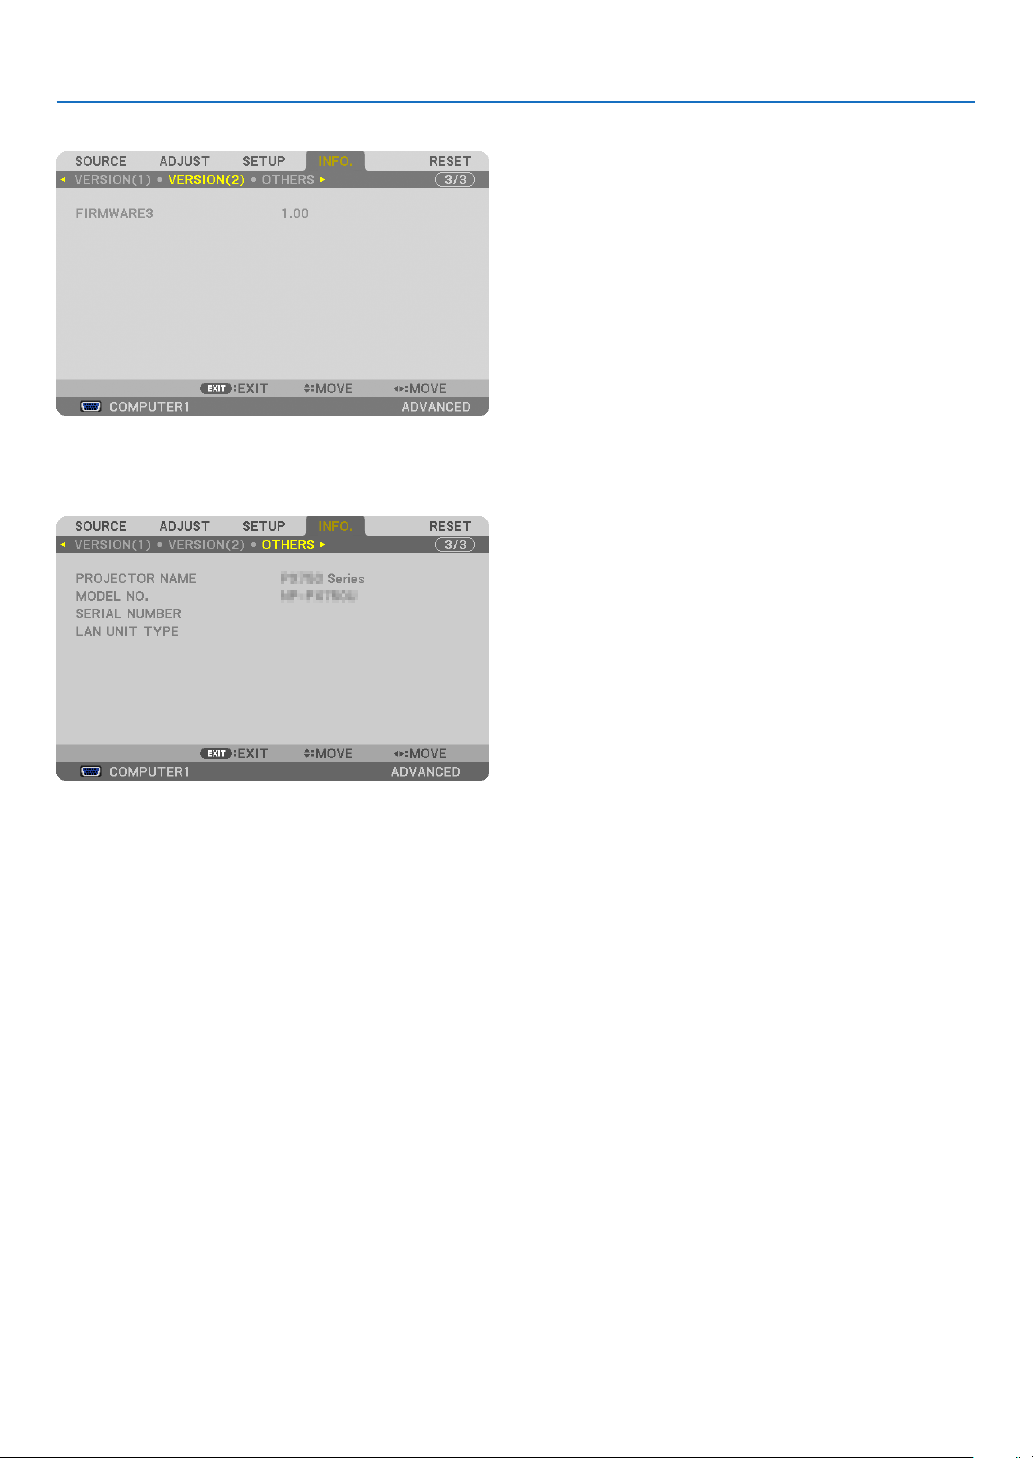
137
5. Using On-Screen Menu
[VERSION(2)]
FIRMWARE3
[OTHERS]
PROJECTORNAMEMODELNO.
SERIALNUMBERLANUNITTYPE
CONTROLID(when[CONTROLID]isset)

138
5. Using On-Screen Menu
8 Menu Descriptions & Functions [RESET]
Returning to Factory Default [RESET]
TheRESETfeatureallowsyoutochangeadjustmentsandsettingstothefactorypresetfora(all)source(s)except
thefollowing:
[CURRENTSIGNAL]
Resetstheadjustmentsforthecurrentsignaltothefactorypresetlevels.
Theitemsthatcanberesetare:[PRESET],[CONTRAST],[BRIGHTNESS],[COLOR],[HUE],[SHARPNESS],
[ASPECTRATIO],[HORIZONTAL],[VERTICAL],[CLOCK],[PHASE],and[OVERSCAN].
[ALLDATA]
Resetalltheadjustmentsandsettingsforallthesignalstothefactorypreset.
AllitemscanberesetEXCEPT[ENTRYLIST],[LANGUAGE],[BACKGROUND],[FILTERMESSAGE],[SCREEN],
[GEOMETRICCORRECTION],[MULTI-SCREENCOMP.],[REF.WHITEBALANCE],[CONTROLPANELLOCK],
[SECURITY],[COMMUNICATIONSPEED],[CONTROLID],[SEAMLESSSWITCHING],[STANDBYMODE],
[FANMODE],[EDGEBLENDING],[REF.LENSMEMORY],[DATEANDTIME],[LAMPLIFEREMAINING],[LAMP
HOURSUSED],[FILTERHOURSUSED],[TOTALCARBONSAVINGS],[WIREDLAN],and[WIRELESSLAN].
Toresetthelampusagetime,see“ClearingLampHourMeter[CLEARLAMPHOURS]”below.
[ALL DATA (INCLUDING ENTRY LIST)]
Resetalltheadjustmentsandsettingsforallthesignalstothefactorypresetexcept[LANGUAGE],[BACKGROUND],
[FILTERMESSAGE],[SCREEN],[MULTI-SCREENCOMP.],[REF.WHITEBALANCE],[CONTROLPANELLOCK],
[SEAMLESSSWITCHING],[SECURITY],[COMMUNICATIONSPEED],[CONTROLID],[FANMODE],[EDGEBLEND-
ING],[GEOMETIRCCORRECTION],[REF.LENSMEMORY],[DATEANDTIME],[STANDBYMODE],[LAMPLIFE
REMAINING],[LAMPHOURSUSED],[FILTERHOURSUSED],[TOTALCARBONSAVINGS],[WIREDLAN],and
[WIRELESSLAN].
Alsodeletesallthesignalsinthe[ENTRYLIST]andreturnstothefactorypreset.
NOTE:LockedsignalsinEntryListcannotbereset.
ClearingLampHourMeter[CLEARLAMP1HOURS/CLEARLAMP2HOURS]
Resetsthelampclockbacktozero.Selectingthisoptiondisplayssubmenuforaconrmation.Select[YES]andpress
theENTERbutton.
NOTE:Elapsedtimeofthelampusewillnotbeaffectedevenwhen[RESET]isdonefromthemenu.
NOTE: The projector will turn off and go into standby mode when you continue to use the projector for another 100 hours after the
lamp has reached the end of its life. In this condition you cannot clear the lamp hour meter on the menu. If this happens, press the
HELPbuttonontheremotecontrolfor10secondstoresetthelampclockbacktozero.Dothisonlyafterreplacingthelamp.

139
5. Using On-Screen Menu
Clearing the Filter Usage Hours [CLEAR FILTER HOURS]
Resetsthelterusagebacktozero.Selectingthisoptiondisplayssubmenuforaconrmation.Select[YES]andpress
theENTERbutton.
The[OFF]itemisselectedfor[FILTERMESSAGE]atthetimeofshipment.When[OFF]isselected,youdonotneed
toclearthelterusagehour.
NOTE:Elapsedtimeofthelterusewillnotbeaffectedevenwhen[RESET]isdonefromthemenu.
140
5. Using On-Screen Menu
❾ Application Menu
When[NETWORK]isselectedfromthe[SOURCE]menu,theapplicationmenu[APPLICATIONMENU]willbedis-
played.
TheapplicationmenuallowsyoutosetuptheUserSupportware,NetworkSettings(NETWORKSETTINGS)and
Tools(TOOLS).
TheUserSupportwarecanbedownloadedfromourwebsite.
In[ADMINISTRATORMODE],either[ADVANCED]menuor[BASIC]menucanbeselected.(→page
158)
The[BASIC]menucontainsminimumessentialsofmenusandcommands.
IMAGE EXPRESS UTILITY
Thisshowsinformationforprojectorname,resolution,andnetwork(wired/wireless)whicharerequiredtouseImage
ExpressUtility.
Usethisinformationtosetupforyourcomputer.
NETWORK PROJECTOR
Thisshowsinformationforprojectorname,resolution,andnetwork(wired/wireless)whicharerequiredtouseNetwork
Projector.
Usethisinformationtosetupforyourcomputer.

141
5. Using On-Screen Menu
REMOTE DESKTOP CONNECTION
ThisallowsyoutosetupforcomputernameentryandeffectsforRemoteDesktop.
NOTE:
•AUSBkeyboardisrequiredtosetuptheRemoteDesktopConnection.
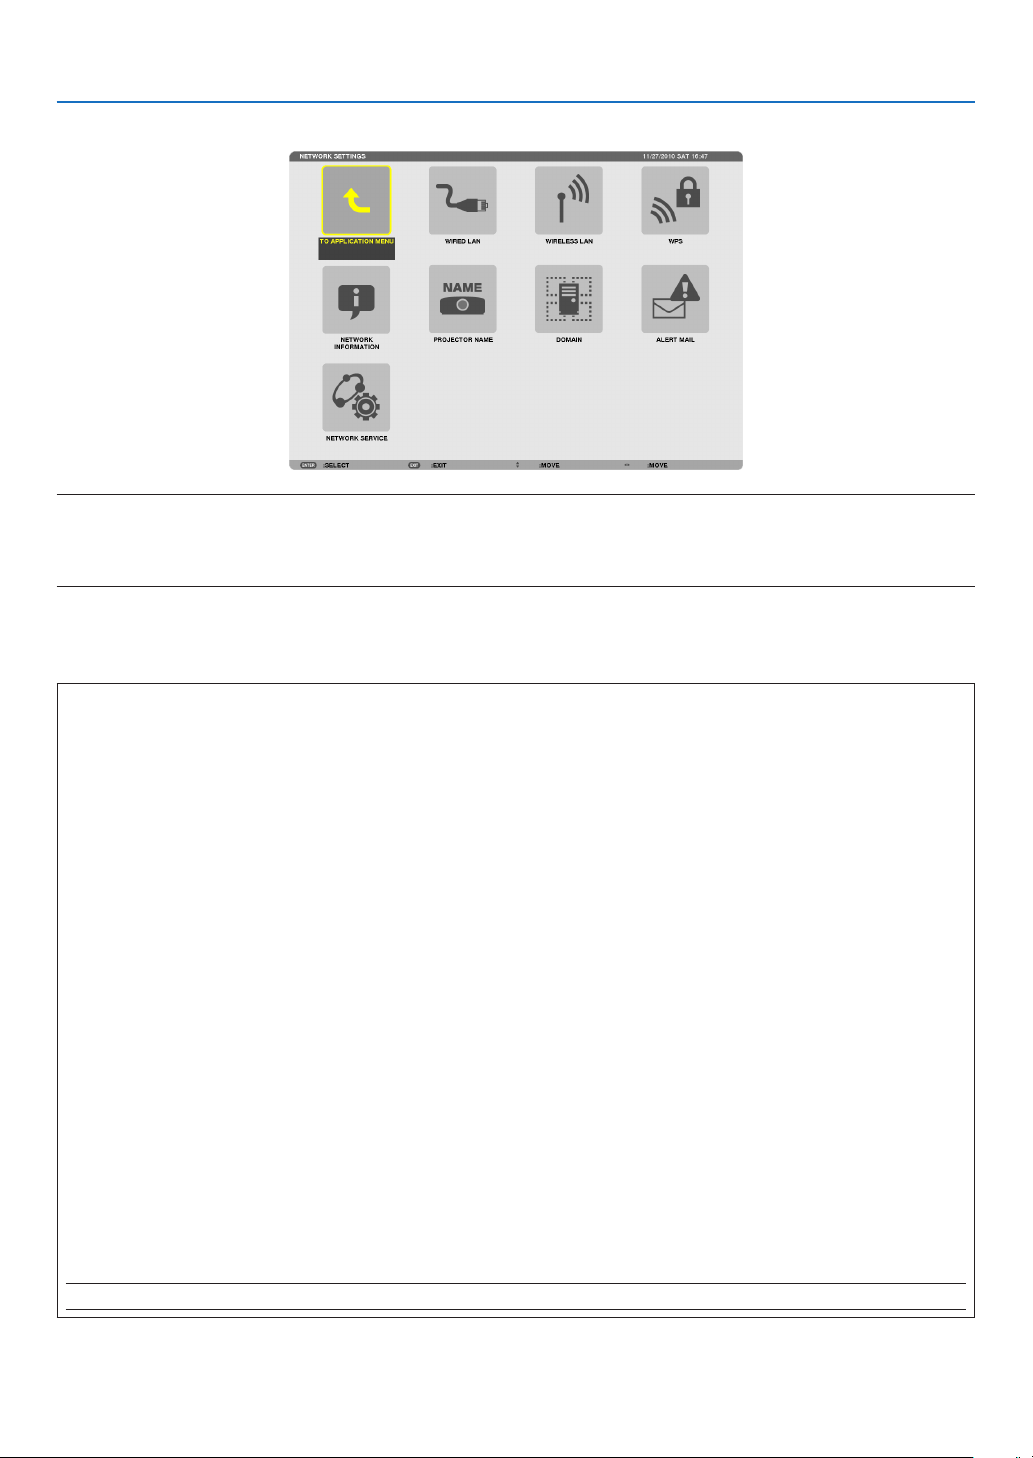
142
5. Using On-Screen Menu
NETWORK SETTINGS
Important:
•Consultwithyournetworkadministratoraboutthesesettings.
•WhenusingawiredLANconnection,connectaLANcable(Ethernetcable)totheLANport(RJ-45)oftheprojector.(→ page
173)
TIP:Thenetworksettingsyoumakewillnotbeaffectedevenwhen[RESET]isdonefromthemenu.
Hints on How to Set Up LAN Connection
To set up the projector for a LAN connection:
Select[WIREDLAN]or[WIRELESSLAN]→[PROFILES]→[PROFILE1]or[PROFILE2].
TwosettingscanbesetforwiredorwirelessLAN.
Nextturnonorofffor[DHCP],[IPADDRESS],[SUBNETMASK],and[GATEWAY]andselect[OK]andpressthe
ENTERbutton.(→page143)
To recall LAN settings stored in the profile number:
Select[PROFILE1]or[PROFILE2]forwiredorwirelessLAN,andthenselect[OK]andpresstheENTERbutton.
(→page143)
To connect a DHCP server:
Turnon[DHCP]forwiredorwirelessLAN.Select[ON]andpresstheENTERbutton.TospecifyIPaddresswithout
usingtheDHCPserver,turnoff[DHCP].(→page144)
TosetonlyforwirelessLAN(NETWORKTYPEandWEP/WPA):
Select[PROFILE1]or[PROFILE2]forwirelessLAN,andthenselect[ADVANCED]and[OK]andpresstheENTER
button.TheAdvancedmenuwillbedisplayed.(→page145)
To select an SSID:
Select[ADVANCED]→[SITESURVEY]andpresstheENTERbutton.
SelectanSSIDandpressthe>buttontoselect[OK]andpresstheENTERbutton.
Ifyoudonotuse[SITESURVEY],typetheSSIDandselect[INFRASTRUCTURE]or[ADHOC].(→page145)
Toreceivelampreplacementtimeorerrormessagesviae-mail:
Select[ALERTMAIL],andset[SENDER'SADDRESS],[SMTPSERVERNAME],and[RECIPIENT'SADDRESS].
Last,select[OK]andpresstheENTERbutton.(→page156)
Toexecute[EASYCONNECTION]usingImageExpressUtility2.0orImageExpressUtility2forMac:
The[EASYCONNECTION]isamodethatcanabbreviatethetroublesomeLANsettingswhenusingtheImage
ExpressUtilityandconnectingthePCandprojectorviaawirelessLAN.
ImageExpressUtility2.0andImageExpressUtility2forMacarecontainedonthesuppliedNECProjectorCD-
ROM.
Touse[EASYCONNECTION],select[WIRELESSLAN]→[PROFILES]→[EASYCONNECTION].
NOTE:The[EASYCONNECTION]functionisavailableonWindows7,WindowsVistaorWindowsXPSP3.
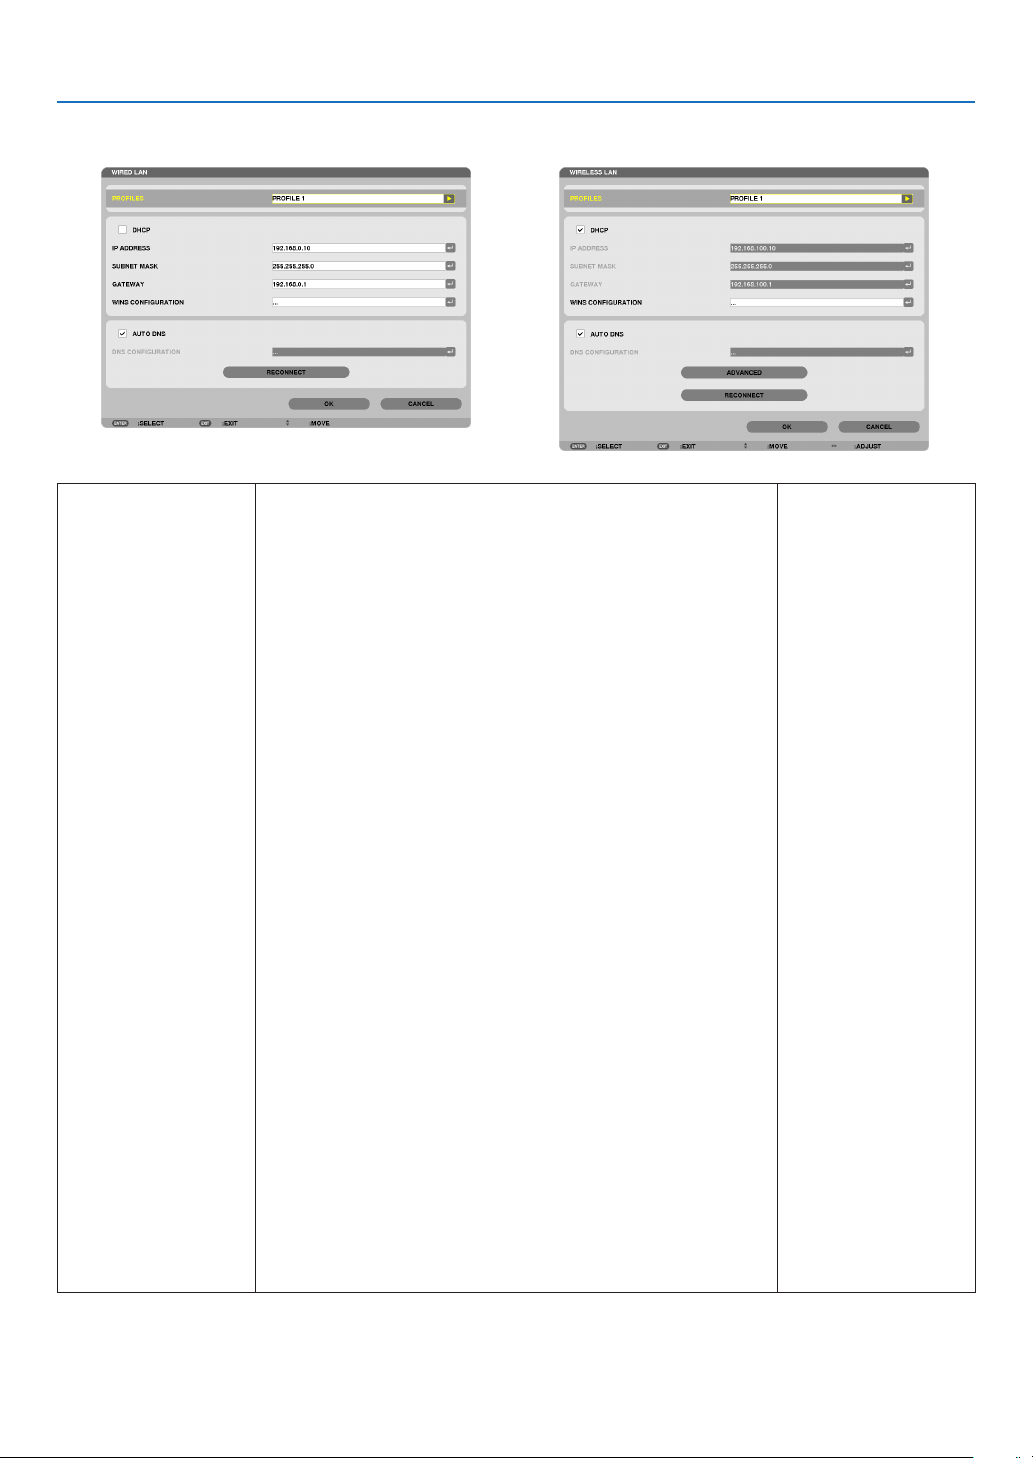
143
5. Using On-Screen Menu
WIREDLANorWIRELESSLAN(ADVANCEDmenuonly)
*TousethewirelessLANfunctions,connectaseparatelysoldwirelessLANunittotheprojector.(→page174)
PROFILES•UptotwosettingsfortheLANportorUSBwirelessLANunit
canbestoredinmemoryoftheprojector.Totaloffoursettings
canbestored.
Fivesettingscanbestored:twoforthebuilt-inLANport,two
forwirelessLANandoneforWPS.
•Select[PROFILE1]or[PROFILE2]andthendosettingsfor
[DHCP]andtheotheroptions.
Afterdoingthis,select[OK]andpresstheENTERbutton.This
willstoreyoursettingsinmemory.
•Torecallthesettingsfrommemory:
Afterselecting[PROFILE1]or[PROFILE2]fromthe[PRO-
FILES]list.
Select[OK]andpresstheENTERbutton.
•TostopemittingradiowavesfromtheUSBWirelessLANUnit,
select[DISABLE]fromthe[PROFILES]list.
•Selecting[SIMPLEACCESSPOINT]willallowtheprojectorto
createaninfrastructurenetwork.
AnSSIDwillbeautomaticallycreated.
WhentheIPaddressoftheprojectorischanged,itwillauto-
maticallytakeeffectinoneortwominutes.
Select“ObtainanIPAddressAutomatically”tosettheIPad-
dressofaconnectedcomputer.
Ittakesafewsecondsforachangeofyourcomputer’sIPad-
dresstocomeintoeffectinWindows7/WindowsVistawhileit
takesoneortwominutesinWindowXP.
Whenyouconnectwithyourcomputertosaveyourprole
andselect“Automaticallyconnectwhenwithinrange”fromthe
PropertiestabofWirelessNetworkinWindowsforyourselected
prole,yourwirelessLANwillbeaccessedunderthefollowing
conditions:
•atthetimeofturningonthecomputerortheprojector
•whenthenotebooktypeiswithintherangeoftheprojector’s
wirelessLANcanbeachieved.
DatatransmissionbetweenwirelessLANandwiredLANisnot
possible.
Whenthe[SIMPLEACCESSPOINT]modeisusedtosend
images,itisrecommendedtoconnecttoonlyonecomputer.
—

144
5. Using On-Screen Menu
•Whenselecting[WPS],thenetworkwillbeconnectedbyusing
settingsstoredautomaticallywiththeWPSfunction.
Selecting[WPS]willallowtheprojectortoaccessthenetwork
byusingthesettingstheWPSfunctionautomaticallystored.
DHCPPlaceacheckmarktoautomaticallyassignanIPaddresstothe
projectorfromyourDHCPserver.
ClearthischeckboxtoregistertheIPaddressorsubnetmask
numberobtainedfromyournetworkadministrator.
—
IPADDRESSSetyourIPaddressofthenetworkconnectedtotheprojector
when[DHCP]isturnedoff.
Upto12numeric
characters
SUBNETMASKSetyoursubnetmasknumberofthenetworkconnectedtothe
projectorwhen[DHCP]isturnedoff.
Upto12numeric
characters
GATEWAY
Setthedefaultgatewayofthenetworkconnectedtotheprojector
when[DHCP]isturnedoff.
Upto12numeric
characters
WNSCONFIGURA-
TION
SettheIPaddressofyourWINSserverofthenetworkconnected
totheprojectorwhen[DHCP]isturnedoff.
Upto12numeric
characters
AUTODNSPlaceacheckmarktoautomaticallyassigntheIPaddressofyour
DNSserverconnectedtotheprojectorfromyourDHCPserver.
ClearthischeckboxtosettheIPaddressofyourDNSserver
connectedtotheprojector.
Upto12numeric
characters
DNSCONFIGURA-
TION
SettheIPaddressofyourDNSserveronthenetworkconnected
totheprojectorwhen[AUTODNS]iscleared.
Upto12numeric
characters
ADVANCED*
ThismenuallowsyoutosetvariousitemsforyourwirelessLAN
connection(networktype,security).
—
RECONNECT
Retrytoconnecttheprojectortoanetwork.Trythisifyouhave
changed[PROFILES].
—
*The[ADVANCED]settingscreenisavailablefor[WIRELESSLAN]only.
NOTE:
•Ifyouselect[EASYCONNECTION]from[PROFILES],youcannotmakesettingstoDHCPanditsfollowingitemsexcept[CHAN-
NEL]in[ADVANCED].
AdvancedSettings(settingsonlyrequiredwhenusingaseparatelysoldwirelessLANunit)
(ADVANCEDmenuonly)

145
5. Using On-Screen Menu
SITESURVEYDisplaysalistofavailableSSIDsforwirelessLANonsite.Select
anSSIDwhichyoucanaccess.
ToselectanSSID,highlight[SSID]andusethetoselect[OK]
andpresstheENTERbutton.
....................... Wireless access point
....................... Ad Hoc PC
....................... WEP or WPA enabled
—
SECURITY
Thiswillturnonorofftheencryptionmodeforsecuretransmis-
sion.
Touseencryption,specifyaWEPkeyorencryptionkey.Select
yoursecuritytypeappropriateforyourcomputerandthewire-
lessLANunit.
DISABLE ................ Will not turn on the encryption feature. Your com-
munications may be monitored by someone.
WEP(64bit) ............ Uses 64-bit datalength for secure transmis-
sion.
WEP(128bit) .......... Uses 128-bit datalength for secure transmission.
This option will increase privacy and security
when compared to use of 64-bit datalength en-
cryption.
WPA-PSK/WPA2-PSK/WPA-EAP/WPA2-EAP
.............................. These options provide stronger security than
WEP.
NOTE:
•Thesecuritytype,WEPkey,andencryptionkeysettingsmustbethe
sameascommunicationdevicessuchasPCoraccesspointinyour
wireless network.
•Whenyouuse[SECURITY],yourimagetransmissionspeedwillslow
down.
•[WPA-PSK],[WPA-EAP],[WPA2-PSK]and[WPA2-EAP]arenotavail-
ablewhen[ADHOC]isselectedfrom[NETWORKTYPE].
—
SSID
Enteranidentier(SSID)forwirelessLAN.Communicationcan
bedoneonlywithequipmentwhoseSSIDmatchesSSIDforyour
wirelessLAN.
Upto32alphanumeric
characters(case
sensitive).
NETWORKTYPESelectcommunicationmethodwhenusingwirelessLAN.
INFRASTRUCTURE ...Select this option when communicating with
one or more equipment connected to the wire-
less or wired LAN network via a wireless access
point.
AD HOC ....................Select this option when using the wireless LAN
to directly communicate with a computer in
peer-to-peer mode.
—
CHANNEL
Selectachannel.Availablechannelsvarydependingonthe
countryandregion.Whenyouselect[INFRASTRUCTURE],make
surethattheprojectorandyouraccesspointareonthesame
channel;whenyouselect[ADHOC],makesurethattheprojector
andyourcomputerareonthesamechannel.
—

146
5. Using On-Screen Menu
When[WEP(64bit)]or[WEP(128bit)]isselectedfor[SECURITYTYPE]
KEYSELECTSelectsoneWEPkeyfromthefourkeysbelow.
KEY1,KEY2,KEY3,
KEY4
EnteraWEPkey.
•Maximumnumberofcharacters
OptionAlphanumeric(ASCII)Hexadecimal(HEX)
WEP64bit5 10
WEP128bit13 26
When[WPA-PSK],[WPA-EAP],[WPA2-PSK],or[WPA2-EAP]isselectedfor[SECURITYTYPE]
ENCRYPTIONTYPESelect[TKIP]or[AES].
KEYEnterencryptionkey.Keylengthmustbe8orgreaterand63orless.
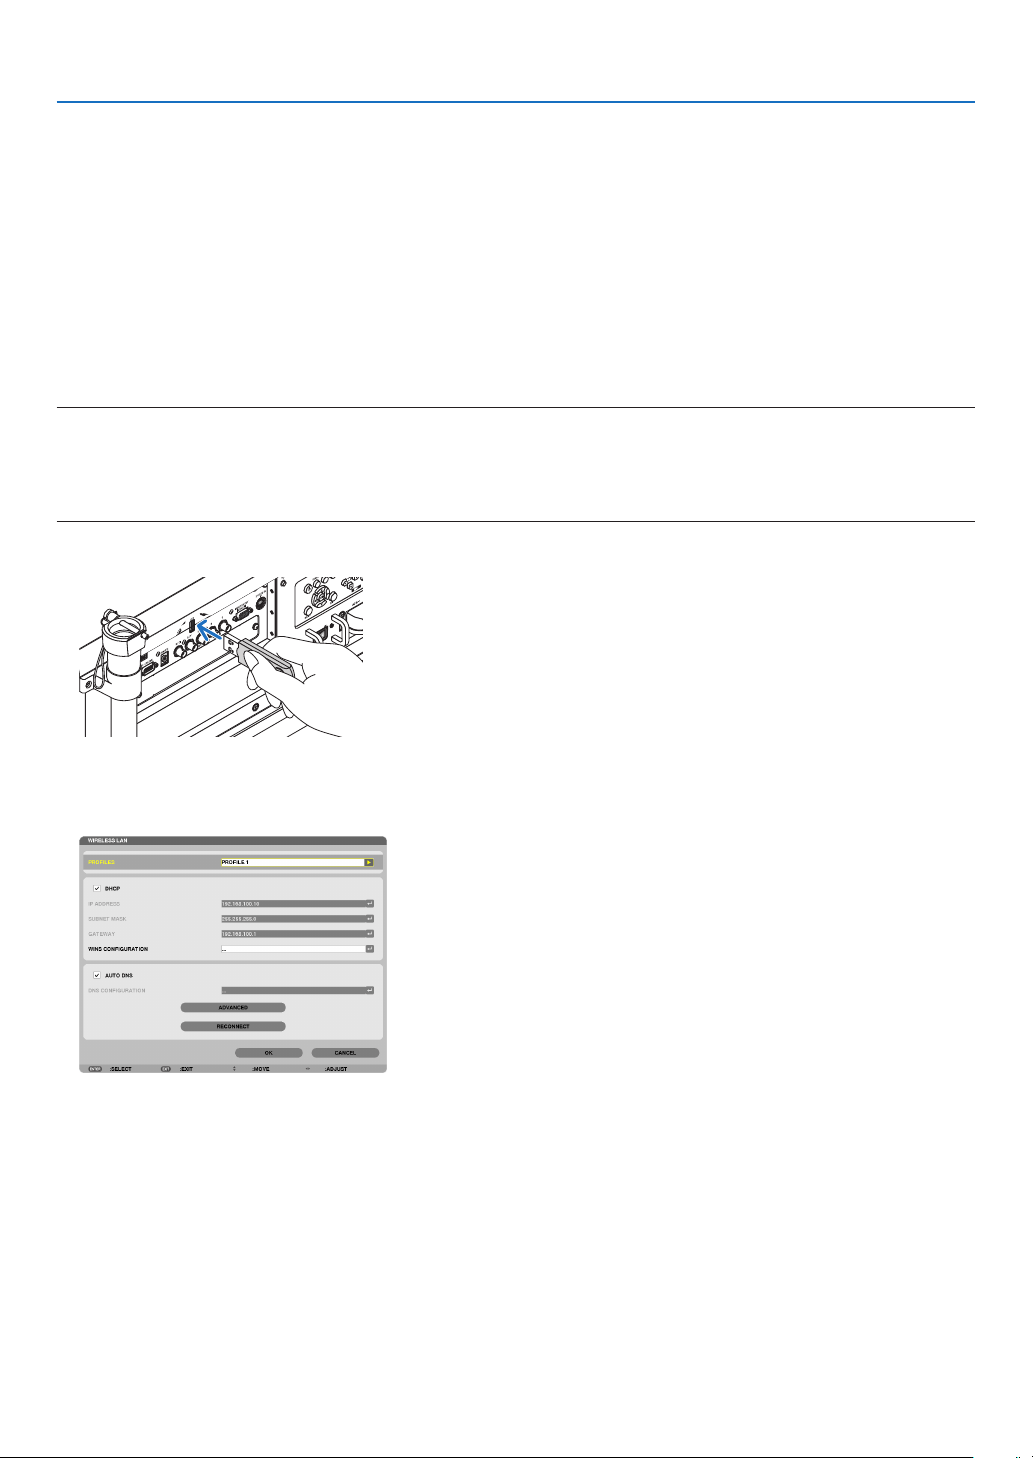
147
5. Using On-Screen Menu
[AUTHENTICATION](requiredforwirelessonly)
SettingisrequiredforusingWPA-EAPorWPA2-EAP.
Preparation before setting
SelectawirelessLANcompliantWPA-EAPorWPA2-EAPauthenticationandinstalladigitalcerticateontheprojec-
tor.
1.Set[DATEANDTIME]ontheprojector.(→page
162)
2.Useacomputertosavedigitalcerticates(les)forWPA-EAPorWPA2-EAPsettingtoyourUSBmemory
device.
Aftercompletingsavingthele,removetheUSBmemorydevicefromthecomputer.
Important:
•TheleformatsofdigitalcerticatethataresupportedbytheprojectorareDERandPKCS#12only.
•Theprojectorcannothandleanydigitalcerticatewhoselesizeexceeds8KB.
•CRL(CerticateRelocationList)isnotsupported.
•Clientcerticatechainisnotsupported.
3.PlugtheUSBmemorydeviceintotheUSBportoftheprojector.
Setting Procedures
1.Select[NETWORKSETTINGS]→[WIRELESSLAN].
2.SetitemssuchasPROFILES,DHCP,IPADDRESS,SUBNETMASKandothersasrequired.
•Select[PROFILE1]or[PROFILE2]for[PROFILES].If[EASYCONNECTION]isselected,WPA-PSK,WPA2-
PSK,WPA-EAP,orWPA2-EAPisnotavailable.
3.Select[ADVANCED]andpresstheENTERbutton.
The[ADVANCED]settingscreenwillbedisplayed.
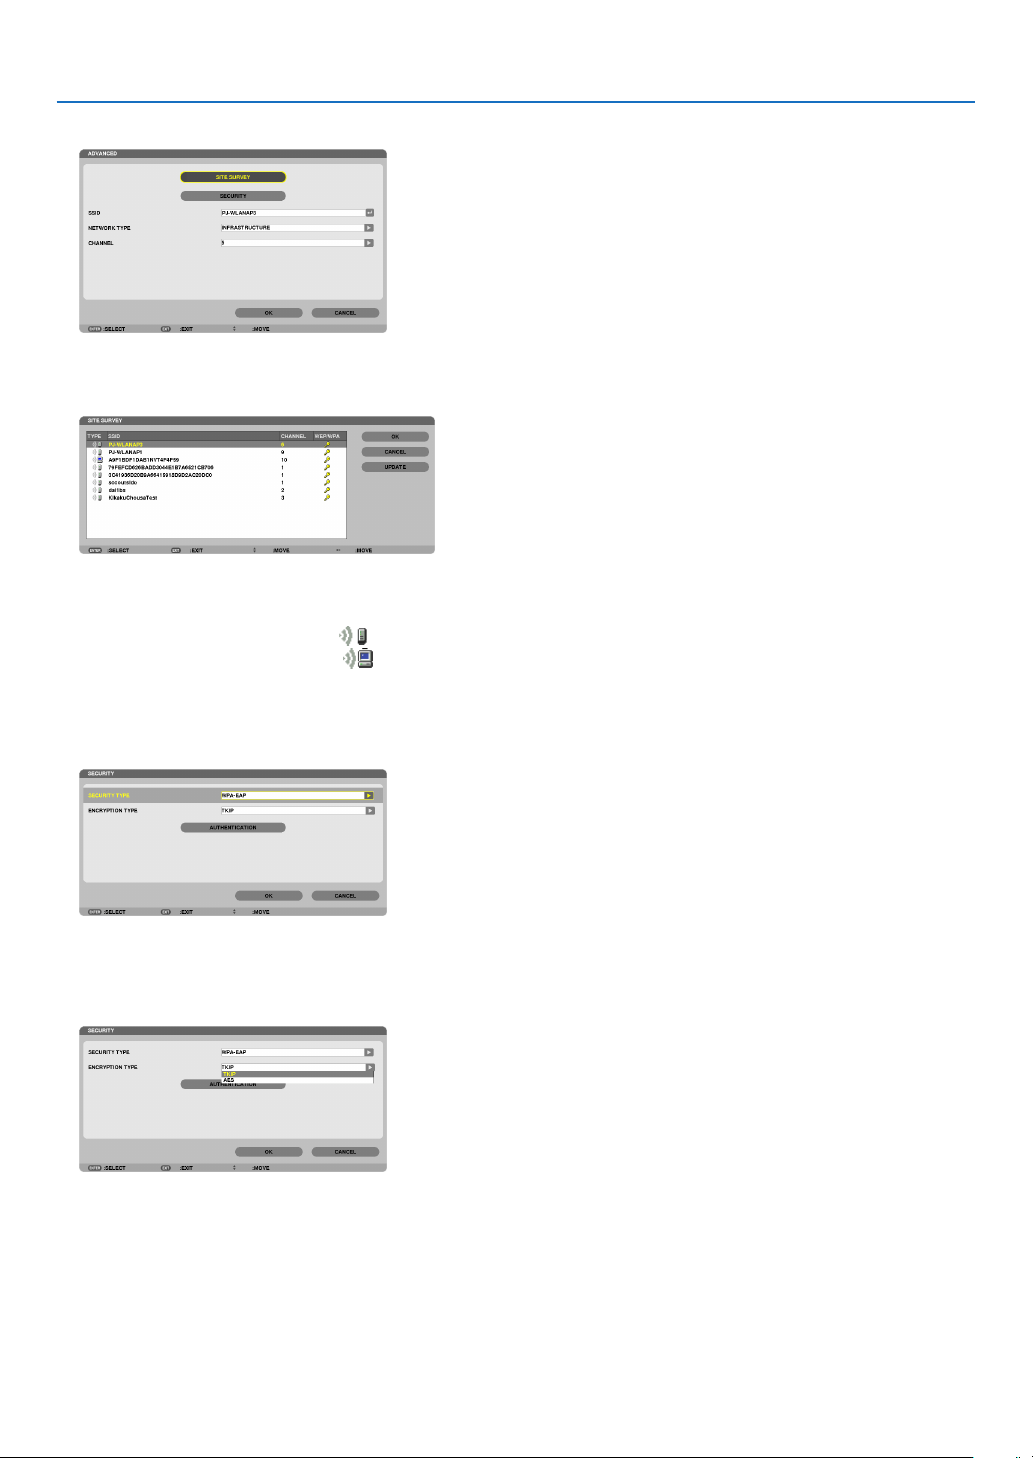
148
5. Using On-Screen Menu
4.Select[SITESURVEY]andpresstheENTERbutton.
The“SSID”listwillbedisplayed.
5.SelectaconnectingSSID,andthenselect[OK].
FinallypresstheENTERbutton.
•SelecttheSSIDforwhichWPA-PSKorWPA2-PSKisset.
•Select[INFRASTRUCTURE(
)]for[NETWORKTYPE].WPA-PSK,WPA2-PSK,WPA-EAP,orWPA2-EAPis
notavailablewhen[ADHOC()] is selected.
6.Selectthe[SECURITY]tab.
The[SECURITY]pagewillbedisplayed.
7.Selectthe[SECURITYTYPE]eldandpresstheENTERbutton.
Thepull-downlistwillbedisplayed.
8.Select[WPA-EAP]or[WPA2-EAP]andpresstheENTERbutton.
9.Selectthe[TKIP/AES]eldandpresstheENTERbutton.
Thepull-downlistwillbedisplayed.
10
.Select[TKIP]or[AES]andpresstheENTERbutton.
Select[TKIP]or[AES]accordingtothesettingforyouraccesspoint.
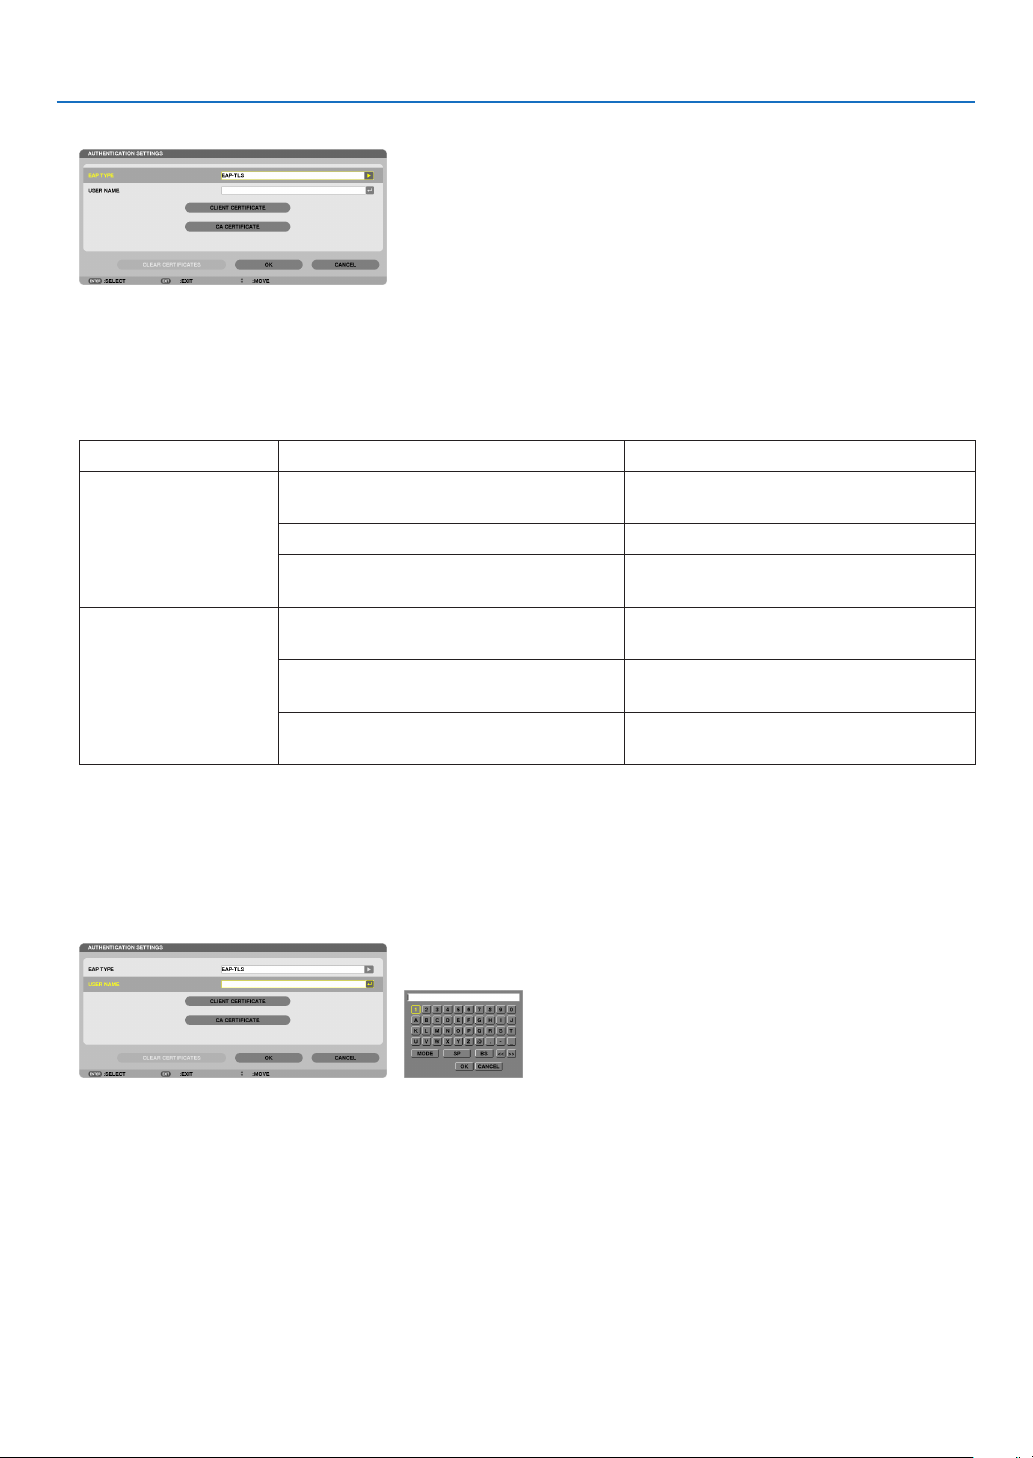
149
5. Using On-Screen Menu
11
.Selectthe[AUTHENTICATION]tab.
The[AUTHENTICATION]pagewillbedisplayed.
Selecteither[EAP-TLS]or[PEAP-MSCHAPv2]for[EAPTYPE].ThesettingitemsvarydependingontheEAP
type.
Seethetablebelow.
EAPTypeSettingItemNote
EAP-TLS
UserName1characterormoreand32charactersor
less
ClientCerticatePKCS#12formatle
CACerticate
(Certicateauthority’scerticate)
DERformatle
PEAP-MSCHAPv2UserName1characterormoreand32charactersor
less
Password
1characterormoreand32charactersor
less
CACerticate
(Certicateauthority’scerticate)
DERformatle
①Selecting[EAP-TLS]for[EAPTYPE]:
Thefollowingsectionexplainstheoperationforselecting[EAP-TLS].
Forselecting[PEAP-MSCHAPv2],goontoStep12onpage
151.
12.
Selectthe[USERNAME]eldandpresstheENTERbutton.
Thecharacterentryscreen(softwarekeyboard)willbedisplayed.Setausername.
•Ausernamemustbe1characterormoreand32charactersorless.
(→ page 153)
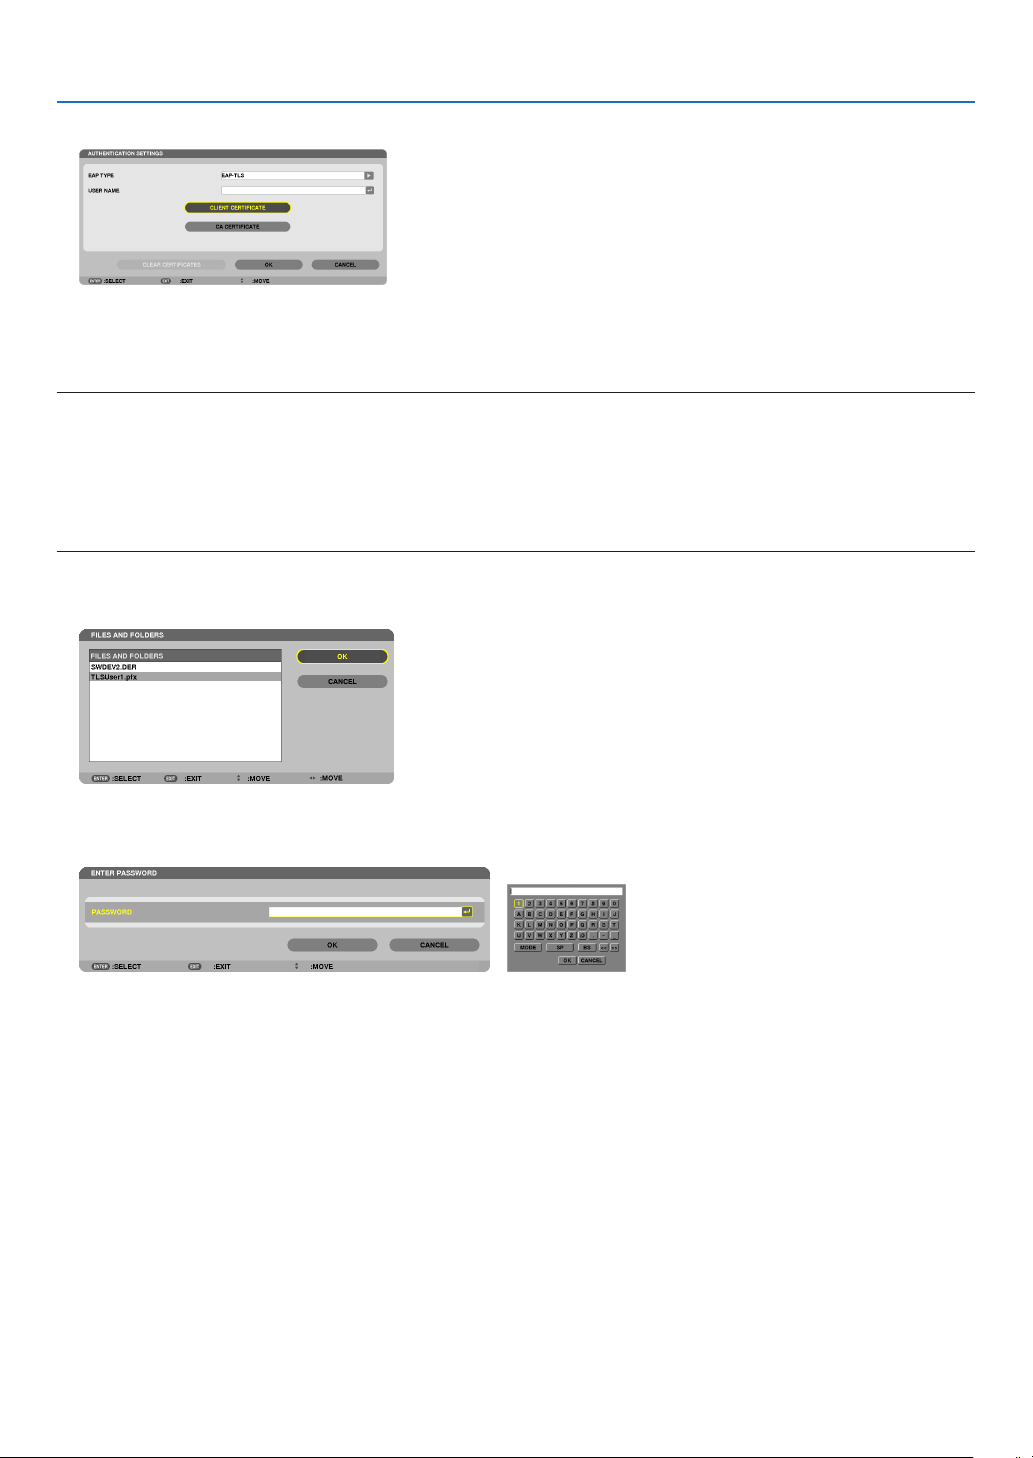
150
5. Using On-Screen Menu
13.
Select[CLIENTCERTIFICATE]andpresstheENTERbutton.
Alistofles(thumbnailscreen)willbedisplayed.
•Foroperatingthethumbnailscreen,see“4.UsingtheViewer”inthe“User’sManual”(PDF).
•Toreturntothe[AUTHENTICATION]page,presstheEXITbutton.
NOTE:
Installing a digital certificate
Youcaninstalleachdigitalcerticate(clientcerticateandCAcerticate)for[PROFILE1(or2)]onale-by-lebasis.
•InstallarootCAcerticateforaCAcerticate.
•Ifyouinstalladigitalcerticateoveryourexistingdigitalcerticate,theexistingdigitalcerticatewillbeoverwrittenwiththenew
digitalcerticate.
•Onceadigitalcerticatehasbeeninstalled,itsinformationcannotbedeletedevenifyoustopsettingWPA-EAPorWPA2-EAP.
14.
Onthethumbnailscreen,selectadigitalcerticate(PKCS#12formatle)savedinyourUSBmemorydevice
andpresstheENTERbutton.
Thepasswordscreenwillbedisplayed.
15.
Select[PASSWORD]eldandpresstheENTERbutton.
Thecharacterentryscreen(softwarekeyboard)willbedisplayed.Setthepasswordoftheprivatekey.Apassword
mustbe1characterormoreand32charactersorless.
Theselecteddigitalcerticatelewillbeinstalledontheprojector.
•WhentherootCAcerticateisnotincludedinthelethatwasselectedinStep14,proceedtoStep16.When
therootcerticationauthoritycerticateisincluded,proceedtoStep18.
16.
Select[CACERTIFICATE]andpresstheENTERbutton.
Thedrivelistscreenwillbedisplayed.

151
5. Using On-Screen Menu
17.
Onthethumbnailscreen,selectadigitalcerticate(DERformatle)savedinyourUSBmemorydevice
andpresstheENTERbutton.
•SelectyourrootCAcerticatehere.
Theselecteddigitalcerticatewillbeinstalledontheprojector.
18.
Aftercompletingrequiredsettings,select[OK]andpresstheENTERbutton.
The[WIRELESS]pagewillbereturned.
19.
Select[RECONNECT]andpresstheENTERbutton.
20.
Select[OK]andpresstheENTERbutton.
Thiswillcompletesetting[EAP-TLS]for[EAPTYPE]in[WPA-EAP]or[WPA2-EAP].
TIP:
Clearing the digital certificate that is installed on the projector
Toclearthedigitalcerticateinstalledontheprojector,followthestepsbelow.
Bydoingthefollowingprocedure,allthedigitalcerticatesforthecurrentlydisplayedprolewillbecleared.
1.Select[CLEARCERTIFICATES]inthebottomleftofthe[AD
-
VANCED]settingscreenandpresstheENTERbutton.
Amessageforconrmationwillbedisplayed.
2.Select[YES]andpresstheENTERbutton.
Thedigitalcerticateswillbecleared.
TIP:
•ThePKCS#12formatdigitalcerticateincludingaCAcerticatewillbeinstalledasarootCAcerticate.
②Selecting[PEAP-MSCHAPv2]for[EAPTYPE]:
12.
Fromthe[AUTHENTICATION]page,select[EAPTYPE]eldandpresstheENTERbutton.
Thepull-downlistwillbedisplayed.
13.
Select[PEAP-MSCHAPv2]andpresstheENTERbutton.
14.
Select[USERNAME]eldandpresstheENTERbutton.
Thecharacterentryscreen(softwarekeyboard)willbedisplayed.Setausername.
•Ausernamemustbe32charactersorless.
(→ page 153)
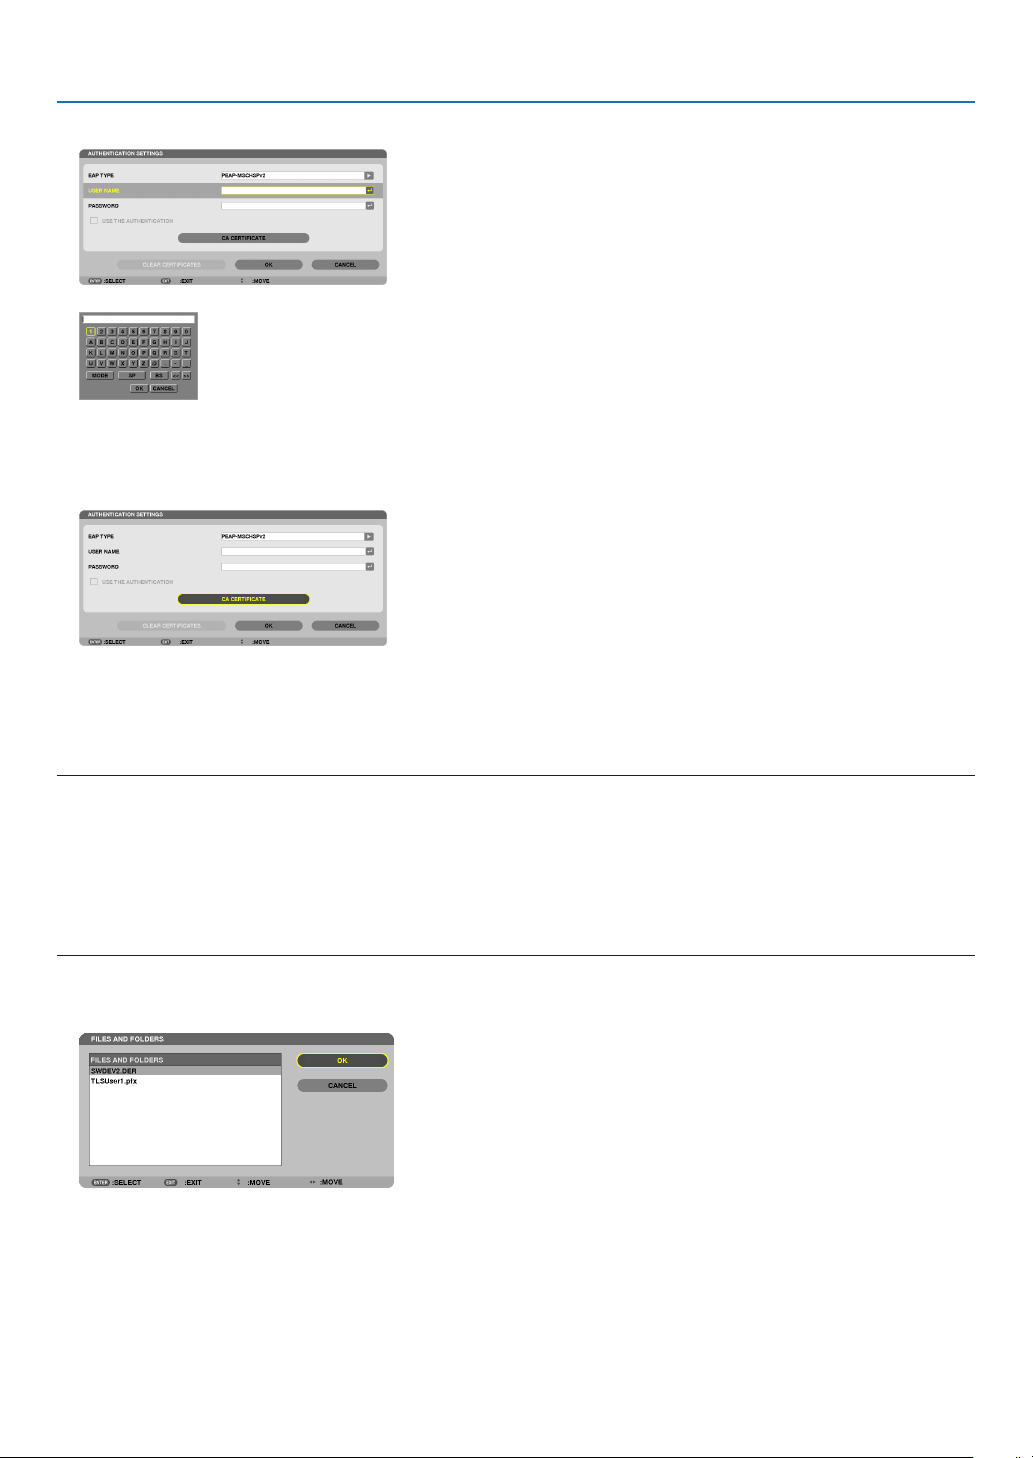
152
5. Using On-Screen Menu
15.
Aftercompletingsettingausername,selectthe[PASSWORD]eldandpresstheENTERbutton.
Thecharacterentryscreen(softwarekeyboard)willbedisplayed.Setapassword.
•Apasswordmustbe32charactersorless.
16.
Aftercompletingsettingthepassword,select[CACERTIFICATE]eldandpresstheENTERbutton.
Thedrivelistscreenwillbedisplayed.
•Foroperatingthethumbnailscreen,see“4.UsingtheViewer”inthe“User’sManual”(PDF).
•Toreturntothe[AUTHENTICATION]page,presstheEXITbutton.
NOTE:
Installing a digital certificate
Youcaninstalleachdigitalcerticate(clientcerticateandCAcerticate)for[PROFILE1(or2)]onale-by-le
basis.
•InstallarootCAcerticateforaCAcerticate.
•Ifyouinstalladigitalcerticateoveryourexistingdigitalcerticate,theexistingdigitalcerticatewillbeoverwrittenwiththenew
digitalcerticate.
•Onceadigitalcerticatehasbeeninstalled,itsinformationcannotbedeletedevenifyoustopsettingWPA-EAPorWPA2-EAP.
17.
Onthethumbnailscreen,selectadigitalcerticate(DERformatle)savedinyourUSBmemorydevice
andpresstheENTERbutton.
•SelectyourrootCAcerticatehere.
Theselecteddigitalcerticatewillbeinstalledontheprojector.
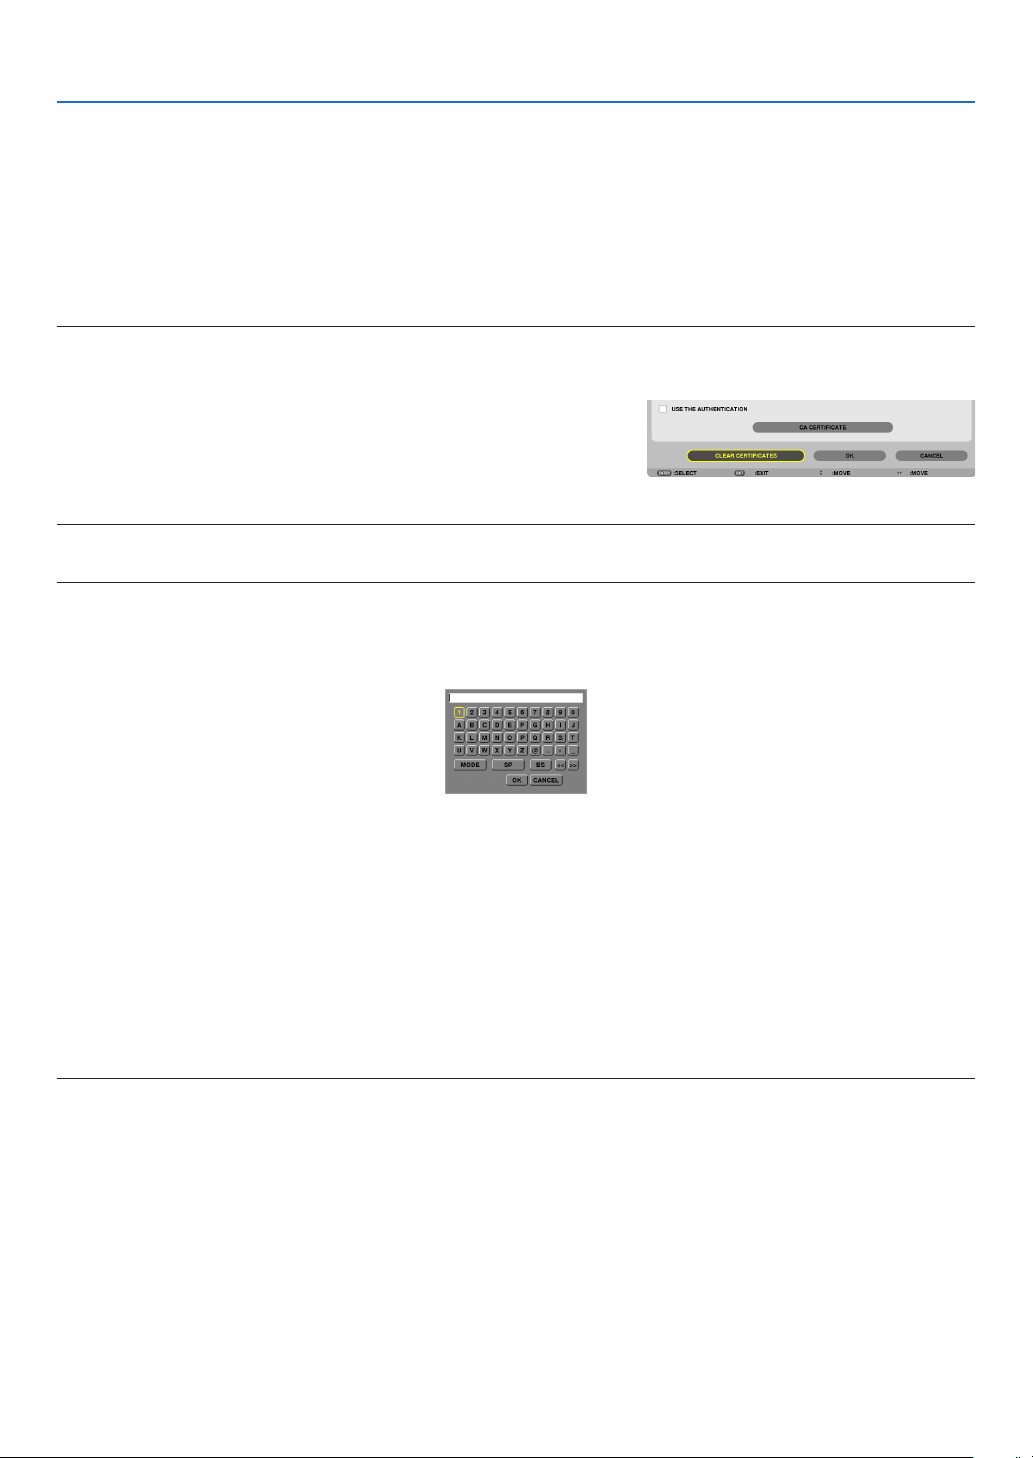
153
5. Using On-Screen Menu
18.
Aftercompletingrequiredsettings,select[OK]andpresstheENTERbutton.
The[WIRELESS]pagewillbereturned.
19.
Select[RECONNECT]andpresstheENTERbutton.
20.
Select[OK]andpresstheENTERbutton.
Thiswillcompletesetting[PEAP-MSCHAPv2]for[EAPTYPE]in[WPA-EAP]or[WPA2-EAP].
TIP:
Clearing the digital certificate that is installed on the projector
Toclearthedigitalcerticateinstalledontheprojector,followthestepsbelow.
Bydoingthefollowingprocedure,allthedigitalcerticatesforthecurrentlydisplayedprolewillbecleared.
1.Select[CLEARCERTIFICATES]inthebottomleftofthe[AD
-
VANCED]settingscreenandpresstheENTERbutton.
Amessageforconrmationwillbedisplayed.
2.Select[YES]andpresstheENTERbutton.
Thedigitalcerticateswillbecleared.
TIP:
EnteringWEPkeys(SwitchingbetweenAlphanumericcharactersandhexadecimal)
Toenterfrom[KEY1]to[KEY4],dothefollowing:
1.Selectoneof[KEY1],[KEY2],[KEY3]and[KEY4]andpresstheENTERbutton.
Thecharacterentryscreen(softwarekeyboard)willbedisplayed.
2.Usethe▼, ▲, ◀, or ▶buttontoselectacharacterandpresstheENTERbutton.
•ToenteraWEPkeyorpassphrase,usealphanumericcharacters(ASCII)orhexadecimal(HEX).ToenteraPSK
key,usealphanumericcharacters(ASCII).
•Pressthe[HEX]buttontochangeto[ASCII]tosetthekeyinASCIIdigit.Youcantogglethisbuttonbetween
[ASCII]and[HEX].
•Enter0x(numeralandalphabetrespectively)rightinfrontofyourkeycode.
•Hexadecimaluses0to9andAtoF.
3.AfterenteringyourWEPkeyorpassphrase,usethe▼
, ▲, ◀, or ▶buttontoselect[OK]andpresstheENTER
button.
Thecharacterentryscreen(softwarekeyboard)willbeclosed.

154
5. Using On-Screen Menu
WPS
WhenthewirelessLANaccesspointconnectedtotheprojectorsupportsWPS(Wi-FiProtectedSetupTM),youcan
usePINmethodorpushbuttonmethodtosetupthewirelessLANfortheprojector.
PINTYPESeta4-digitor8digit-PINcodeofWPSforyouraccesspointtocompletesettingforthe
SSIDsecurity.
PUSHBUTTONTYPEPressthededicatedbuttonoftheaccesspointandtheprojector’swirelessLANunitto
completesettingfortheSSIDsecurity.
NETWORKINFORMATION
Thefollowinginformationwillbedisplayedwhentheprojectorisconnectedtoanetwork(wiredLANorwireless
LAN).
PROJECTORNAME
HOSTNAME
DOMAIN
NETWORKINFOR-
MATION(WIRED
LAN/WIRELESSLAN)
CONNECTIONSTATUS,IPADDRESS,SUBNETMASK,GATEWAY,WINS,DNS,MAC
ADDRESS,SSID,NETWORKTYPE,WEP/WPA,CHANNEL,SIGNALLEVEL,AU-
THENTICATION,AUTHENTICATIONPERIOD
DISPLAYTHEINFOR-
MATIONINAPPLICA-
TIONMENU
Turnonoroffthedisplayofthenetworkinformation.
Themeaningsofthesestatusstatementsaredescribedbelow.
StatementAuthenticationstatus
AuthenticatedAuthenticationisdonecorrectly.
FailureAuthenticationfailed.
Authenticating…Authenticationisinprocess.
ExpiredThedigitalcerticateisexpired.Or[DATE,TIMEPRESET]isnotsetcorrectly.
TimeErrorThe[DATE,TIMEPRESET]hasbeencleared.Setthecorrectdateandtime.
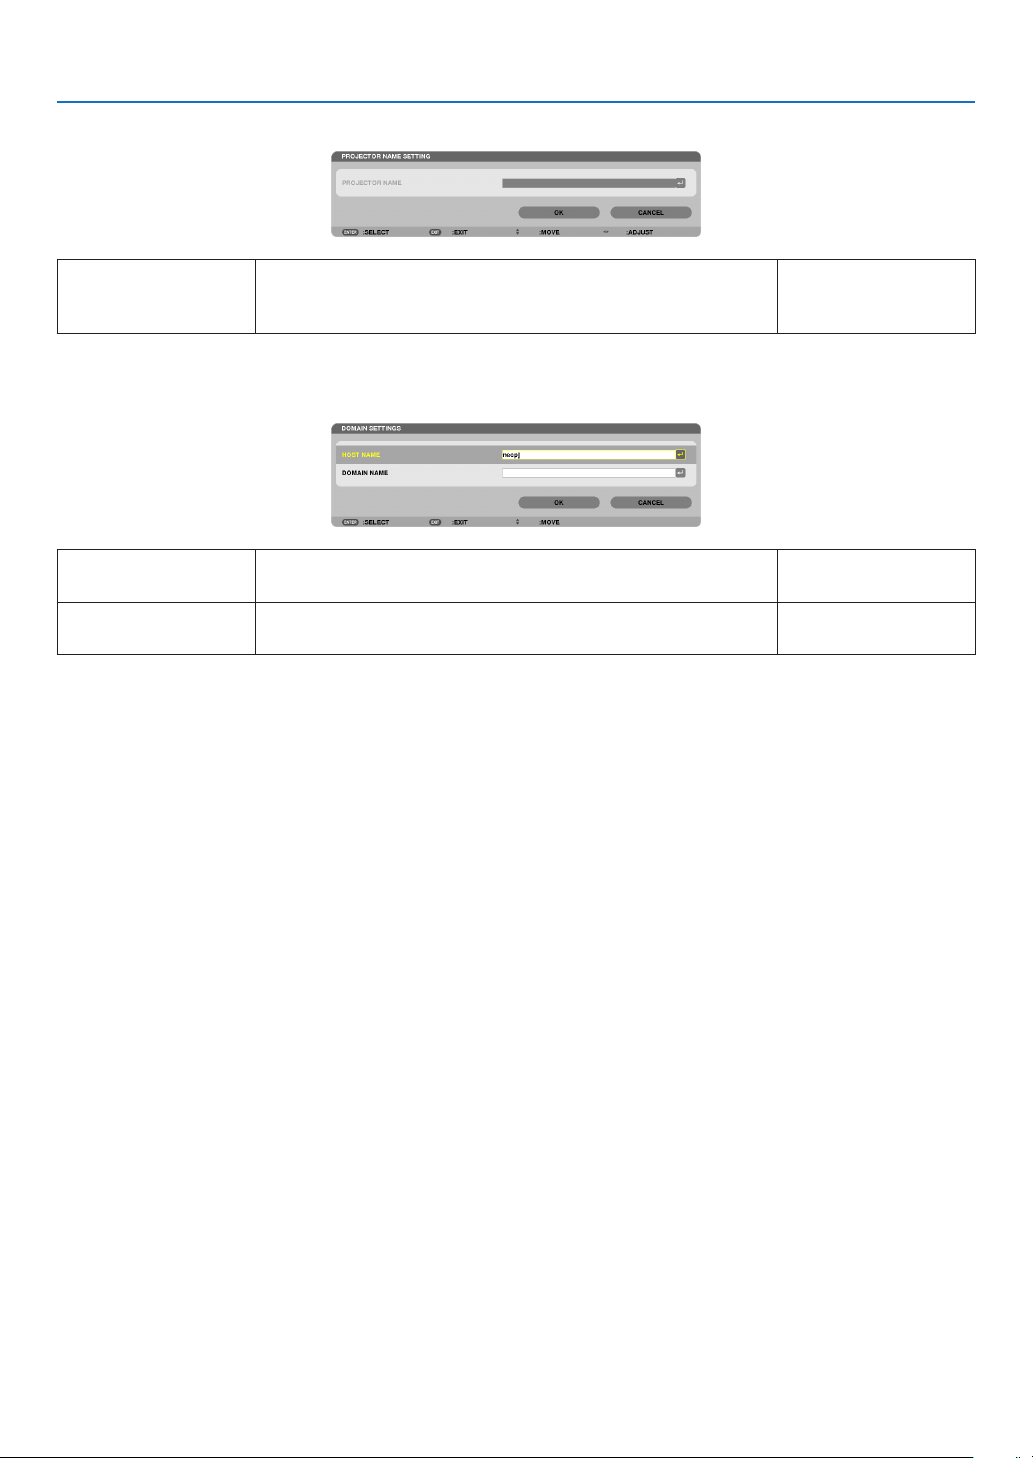
155
5. Using On-Screen Menu
PROJECTORNAME(ADVANCEDmenuonly)
PROJECTORNAMESetauniqueprojectorname.Upto16alphanu-
mericcharactersand
symbols
DOMAIN(ADVANCEDmenuonly)
Setahostnameanddomainnameoftheprojector.
HOSTNAMESetahostnameoftheprojector.Upto15alphanumeric
characters
DOMAINNAMESetadomainnameoftheprojector.Upto60alphanumeric
characters

156
5. Using On-Screen Menu
ALERTMAIL(ADVANCEDmenuonly)
ALERTMAILThisoptionwillnotifyyourcomputeroflampreplacetimeorerror
messagesviae-mailwhenusingwirelessorwiredLAN.
Placing a checkmark will turn on the Alert Mail feature.
Clearing a checkmark will turn off the Alert Mail feature.
Sample of a message to be sent from the projector:
Thelampandltersareattheendofitsusablelife.Please
replacethelamp.
ProjectorName:NECProjector
Lamp1HoursUsed:xxxx[H]
Lamp2HoursUsed:xxxx[H]
—
HOSTNAMETypeinahostname.Upto15alphanumeric
characters
DOMAINNAMETypeinadomainnameofthenetworkconnectedtotheprojec-
tor.
Upto60alphanumeric
characters
SENDER'SAD-
DRESS
Specifythesender’saddress.Upto60alphanu-
mericcharactersand
symbols
SMTPSERVER
NAME
TypeintheSMTPservernametobeconnectedtotheprojec-
tor.
Upto60alphanumeric
characters
RECIPIENT'SAD-
DRESS1,2,3
Typeinyourrecipient’saddress.Upto60alphanu-
mericcharactersand
symbols
TESTMAIL
Sendatestmailtocheckifyoursettingsarecorrect.
NOTE:
•Ifyouenteredanincorrectaddressinatest,youmaynotreceivean
Alertmail.Shouldthishappen,checkiftheRecipient’sAddressis
correctly set.
•Unlessanyoneofthe[SENDER'SADDRESS],[SMTPSERVER'S
NAME]or[RECIPIENT'SADDRESS1-3]isselected,[TESTMAIL]is
notavailable.
•Besuretohighlight[OK]andpresstheENTERbuttonbeforeexecuting
[TESTMAIL].
—

157
5. Using On-Screen Menu
NETWORKSERVICE(ADVANCEDmenuonly)
HTTPSERVERSetapasswordforyourHTTPserver.Upto10alphanumeric
characters
PJLink
Thisoptionallowsyoutosetapasswordwhenyouusethe
PJLinkfeature.
NOTE:
•Donotforgetyourpassword.However,ifyouforgetyourpassword,
consult with your dealer.
•WhatisPJLink?
PJLinkisastandardizationofprotocolusedforcontrollingprojectors
of different manufacturers. This standard protocol is established by
JapanBusinessMachineandInformationSystemIndustriesAssocia-
tion(JBMIA)in2005.
TheprojectorsupportsallthecommandsofPJLinkClass1.
•SettingofPJLinkwillnotbeaffectedevenwhen[RESET]isdonefrom
the menu.
Upto32alphanumeric
characters
AMX
TurnonorofffordetectionfromAMXDeviceDiscoverywhen
connectingtothenetworksupportedbyAMX’sNetLinxcontrol
system.
TIP:
WhenusingadevicethatsupportsAMXDeviceDiscovery,allAMXNetLinx
controlsystemwillrecognizethedeviceanddownloadtheappropriate
DeviceDiscoveryModulefromanAMXserver.
Placing a checkmark will enable detecting the projector from AMX Device
Discovery.
Clearing a checkmark will disable detecting the projector from AMX
Device Discovery.
—
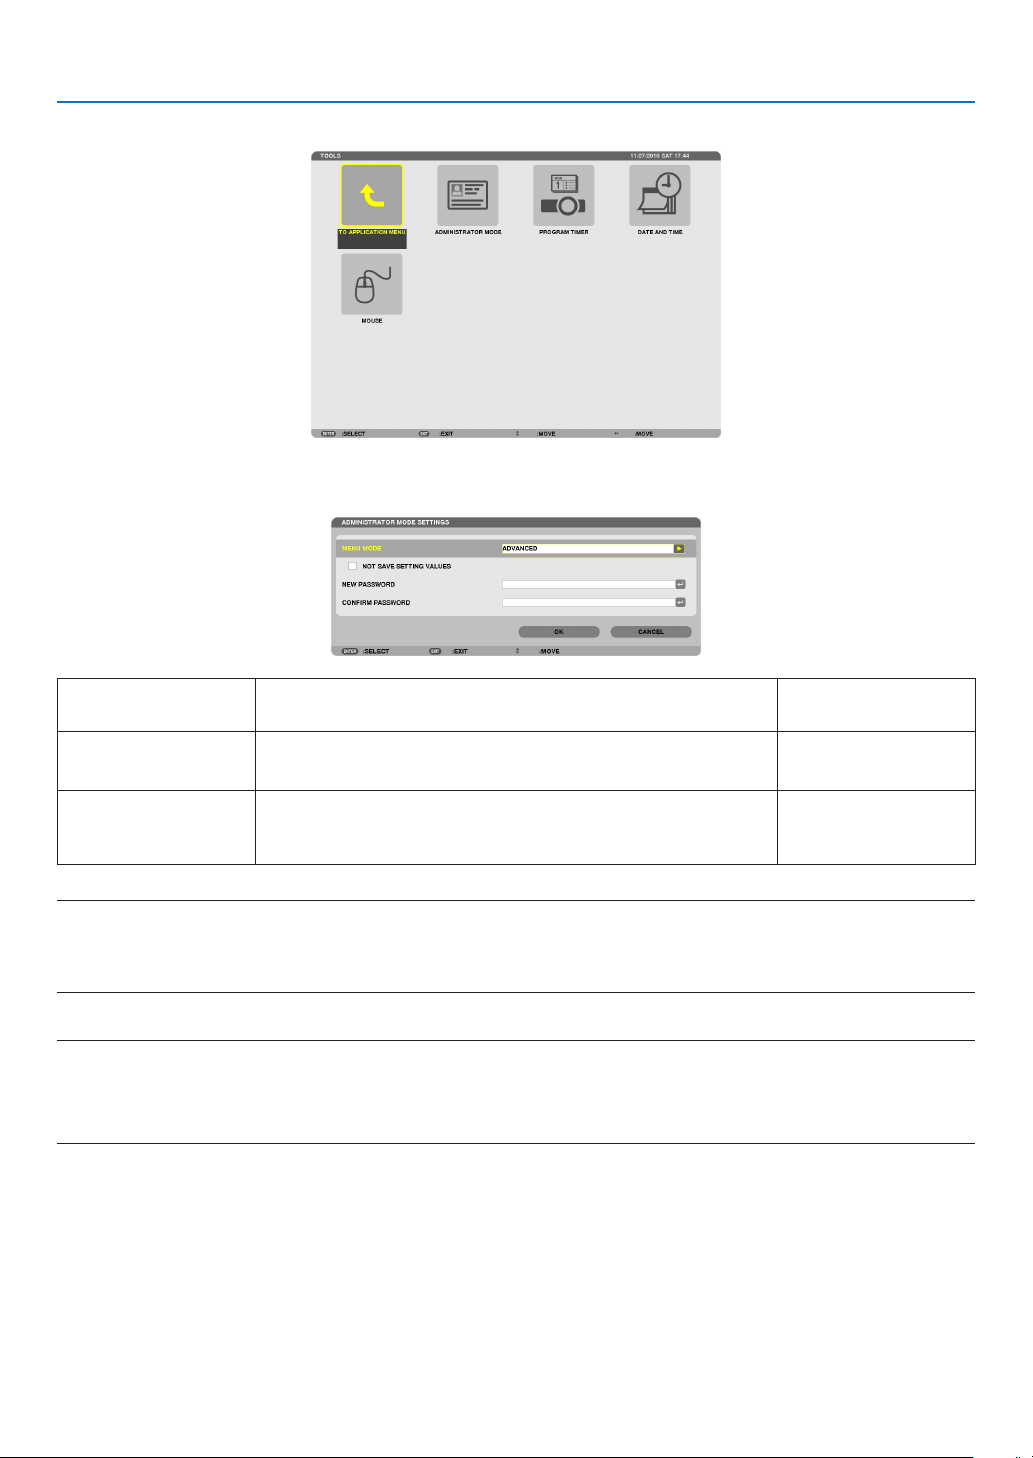
158
5. Using On-Screen Menu
TOOLS
ADMINISTRATOR MODE
ThisallowsyoutoselectMENUMODE,savesettings,andsetapasswordfortheadministratormode.
MENUMODESelecteither[BASIC]or[ADVANCED]menu.
(→page102)
—
NOTSAVESETTING
VALUES
Placing a check mark will not save your projector settings.
Clear this check box to save your projector settings.
—
NEWPASSWORD/
CONFIRMPASS-
WORD
Assignapasswordfortheadministratormode.Upto10alphanumeric
characters
NOTE:
When[LAST]isselectedfor[DEFAULTSOURCESELECT],placingacheckmarkfor[NOTSAVESETTINGVALUES]willforcibly
selectNETWORKforsourceateverypower-ontime.
Toavoidthis,select[AUTO]for[DEFAULTSOURCESELECT]beforeplacingacheckmarkfor[NOTSAVESETTINGVALUES].
TIP:
ToreturntotheADVANCEDmenufromtheBASICmenu,dothefollowing:
1.UsetheSOURCEbuttononthecabinetorpresstheNETWORKbuttonontheremotecontroltoselect
[NETWORK]todisplaytheAPPLICATIONMENU.
2.Select[TOOLS]→[ADMINISTRATORMODE]→[MENUMODE]→[ADVANCEDMODE].
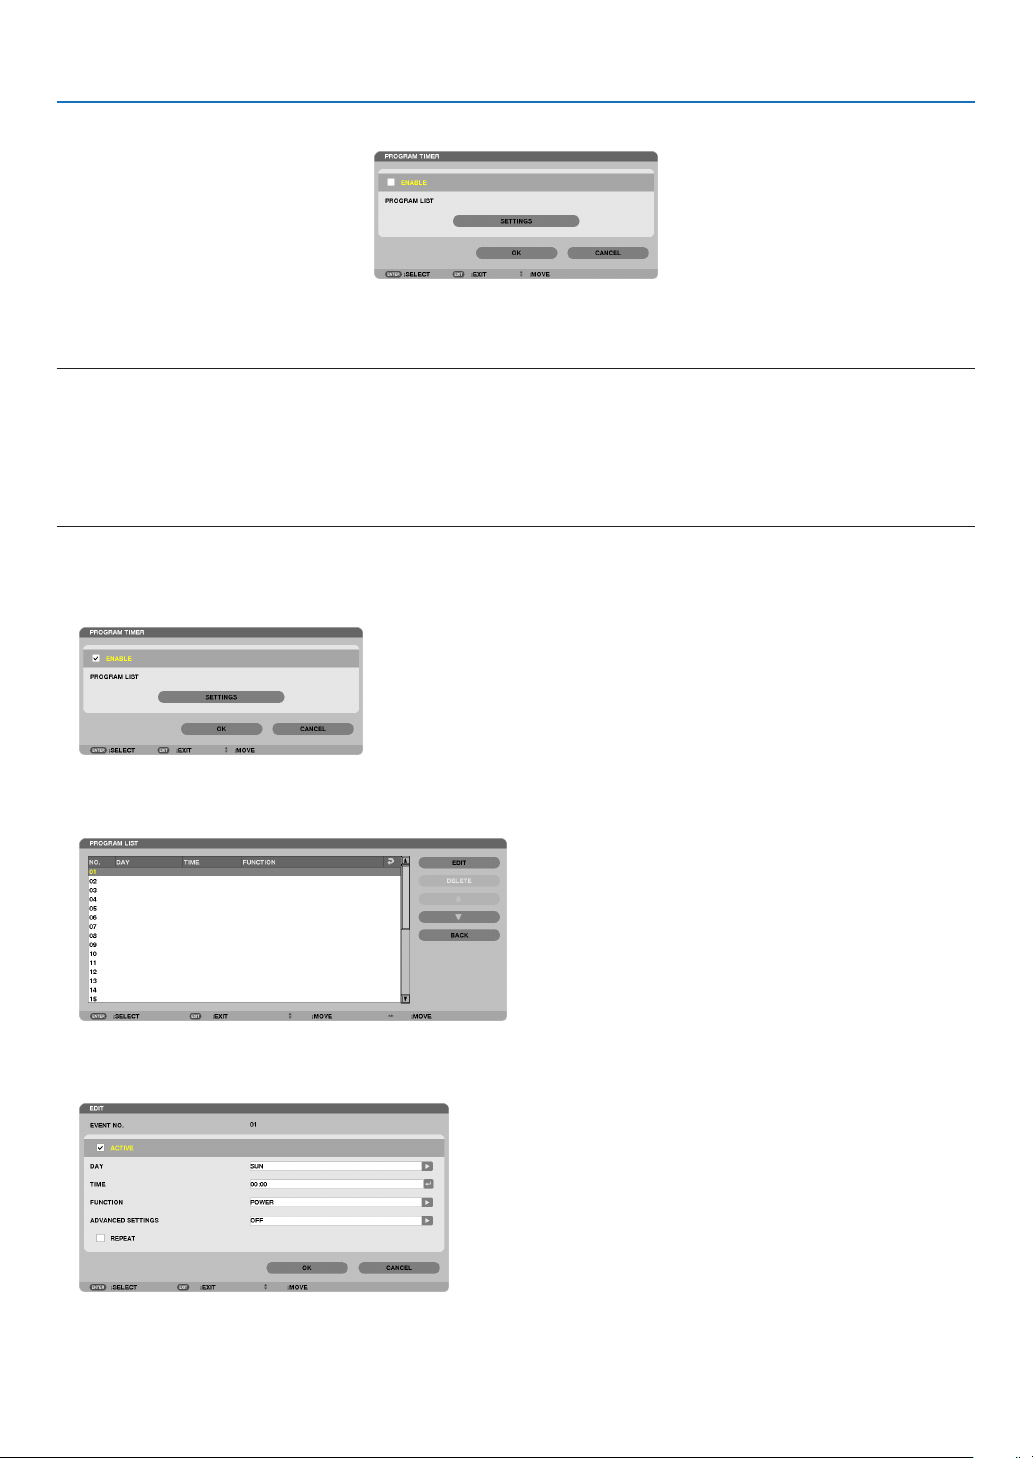
159
5. Using On-Screen Menu
PROGRAM TIMER
Thisoptionturnson/offtheprojectorandchangesvideosignals,andselectsECOmodeautomaticallyataspecied
time.
NOTE:
•Beforeusing[PROGRAMTIMER],makesurethatthe[DATEANDTIME]featureisset.(→ page 162)
•MakesurethattheprojectorisinthestandbyconditionwiththePOWERcordconnected.
•Theprojectorhasabuilt-inclock.Theclockwillkeepworkingforabouttwoweeksafterthemainpoweristurnedoff.Ifthemain
power is not supplied to the projector for two weeks or more, the built-in clock stops working.
•When[PROGRAMTIMER]isenabled,the[STANDBYMODE]settingbecomesinvalid.
Thismeansthattheprojectorisinthesameconditionwhenthe[NORMAL]isselectedfor[STANDBYMODE].
Setting a new program timer
1.OnthePROGRAMTIMERscreen,usethe▲ or ▼buttontoselect[SETTINGS]andpresstheENTERbut-
ton.
The[PROGRAMLIST]screenwillbedisplayed.
2.SelectablankprogramnumberandpresstheENTERbutton.
The[EDIT]screenwillbedisplayed.
3.Makesettingsforeachitemasrequired.
ACTIVE .................. Place a check mark to enable the program.

160
5. Using On-Screen Menu
DAY ........................ Select days of the week for the program timer. To execute the program from Monday to Friday, select [MON-
FRI].To execute the program in everyday basis, select [EVERYDAY].
TIME ...................... Set the time to execute the program. Enter time in 24-hour format.
FUNCTION ............. Select a function to be executed. Selecting [POWER] will allow you to turn on or off the projector by setting
[ADVANCED SETTINGS]. Selecting [SOURCE] will allow you to select a video source by setting [ADVANCED
SETTINGS]. Selecting [ECO MODE] will allow you to select [ECO MODE] by setting [ADVANCED SET-
TINGS].
ADVANCED SETTINGS
.............................. Select power on/off, a type of video source, or ECO MODE for the selected item in [FUNCTION].
REPEAT .................. Place a check mark to repeat the program continuing basis. To use the program this week only, clear the
check mark.
4.Select[OK]andpresstheENTERbutton.
This will complete the settings.
Youwillbereturnedtothe[PROGRAMLIST]screen.
5.Select[BACK]andpresstheENTERbutton.
Youwillbereturnedtothe[PROGRAMTIMER]screen.
6.Select[OK]andpresstheENTERbutton.
Youwillbereturnedtothe[TOOLS]screen.
NOTE:
•Upto30differenttimersettingscanbeprogrammed.
•When[PROGRAMTIMER]isturnedon,the[STANDBYMODE]settingisignored.
•TheProgramTimerisexecutedonasettimebasis,notinaprogrambasis.
•Oncetheprogramnotmarkedwithacheckin[REPEAT]hasbeenexecuted,thecheckmarkinthe[ACTIVE]checkboxwillbe
cleared automatically and the program will be disabled.
•Whentheon-timeandtheoff-timesetforthesametime,theoff-timesettingwilltakepreference.
•Twodifferentsourcesaresetforthesametime,thelargerprogramnumberwilltakepreference.
•Theon-timesettingwillnotbeexecutedwhilethecoolingfansarerunningoranerrorisoccurring.
•Iftheoff-timesettingisexpiredundertheconditioninwhichthepoweroffisnotpossible,theoff-timersettingwillnotbeexecuted
until the power off becomes possible.
•Programsnotmarkedwithacheckmarkin[ACTIVE]ofthe[EDIT]screenwillnotbeexecutedeveniftheProgramTimeris
enabled.
•Whentheprojectoristurnedonbyusingtheprogramtimerandifyouwanttoturnofftheprojector,settheoff-timeordoit
manuallysoasnottoleavetheprojectoronforalongperiodoftime.

161
5. Using On-Screen Menu
Activating the program timer
1.Select[ENABLE]onthe[PROGRAMTIMER]screenandpresstheENTERbutton.
The[ENABLE]willbeactivated.
2.Select[OK]andpresstheENTERbutton.
The[PROGRAMTIMER]screenwillbechangedtothe[TOOL]screen.
NOTE:
•Clearing[ENABLE]willdisabletheProgramTimerevenwhenaprogramismarkedwithacheckmarkon[PROGRAMLIST]
screen.
•When[ENABLE]isselected,the[PROGRAMLIST]cannotbeedited.Toedittheprograms,select[ENABLE]toturnofftheProgram
Timer.
Changing the programmed settings
1.Onthe[PROGRAMLIST]screen,selectaprogramyouwanttoeditandpresstheENTERbutton.
2.Changethesettingsonthe[EDIT]screen.
3.Select[OK]andpresstheENTERbutton.
Theprogrammedsettingswillbechanged.
Youwillbereturnedtothe[PROGRAMLIST]screen.
Changing the order of programs
1.Onthe[PROGRAMLIST]screen,selectaprogramwhoseorderyouwanttochangeandpressthe▶but
-
ton.
2.Pressthe▼buttontoselect▲ or ▼.
3.PresstheENTERbuttonafewtimestoselectarowtowhichyouwishtomovetheprogram.
Theorderoftheprogramswillbechanged.
Deleting the programs
1.Onthe[PROGRAMLIST]screen,selectaprogramnumberyouwanttodeleteandpressthe▶button.
2.Pressthe▼buttontoselect[DELETE].
3.PresstheENTERbutton.
Theconrmationscreenwillbedisplayed.
4.Select[YES]andpresstheENTERbutton.
Theprogramwillbedeleted.
This will complete deleting the program.

162
5. Using On-Screen Menu
DATE AND TIME
Youcansetthecurrenttime,month,date,andyear.
NOTE: The projector has a built-in clock. The clock will keep working for about 2 weeks after the main power is turned off. If the
main power is off for 2 weeks or more, the built-in clock will cease. If the built-in clock ceases, set the date and time again. The
built-in clock will not cease while in the standby mode.
TIME ZONE SETTINGS
.............. Select your time zone.
DATE AND TIME SETTINGS ...... Set your current date (MM/DD/YYYY) and time (HH:MM).
INTERNET TIME SERVER ......... If you place a check mark, the projector’s built-in clock will be synchronized with an Internet
time server in every 24 hours and at the time of projector’s startup.
UPDATE .................................... Synchronizes the projector’s built-in clock immediately. The UPDATE button is not available
unless the INTERNET TIME SERVER check box is turned on.
SUMMER TIME SETTINGS ....... If you place a check mark, the clock for daylight saving will be enabled.
MOUSE
ThisoptionletsyoutochangeyourUSBmousesettings.ThemousesettingsfeatureisavailableforUSBmouseonly.
Choosethesettingsyouwant:
MOUSE BUTTON ...................... [RIGHT HAND] or [LEFT HAND]
MOUSE SENSITIVITY ............... [FAST], [MEDIUM] or [SLOW]
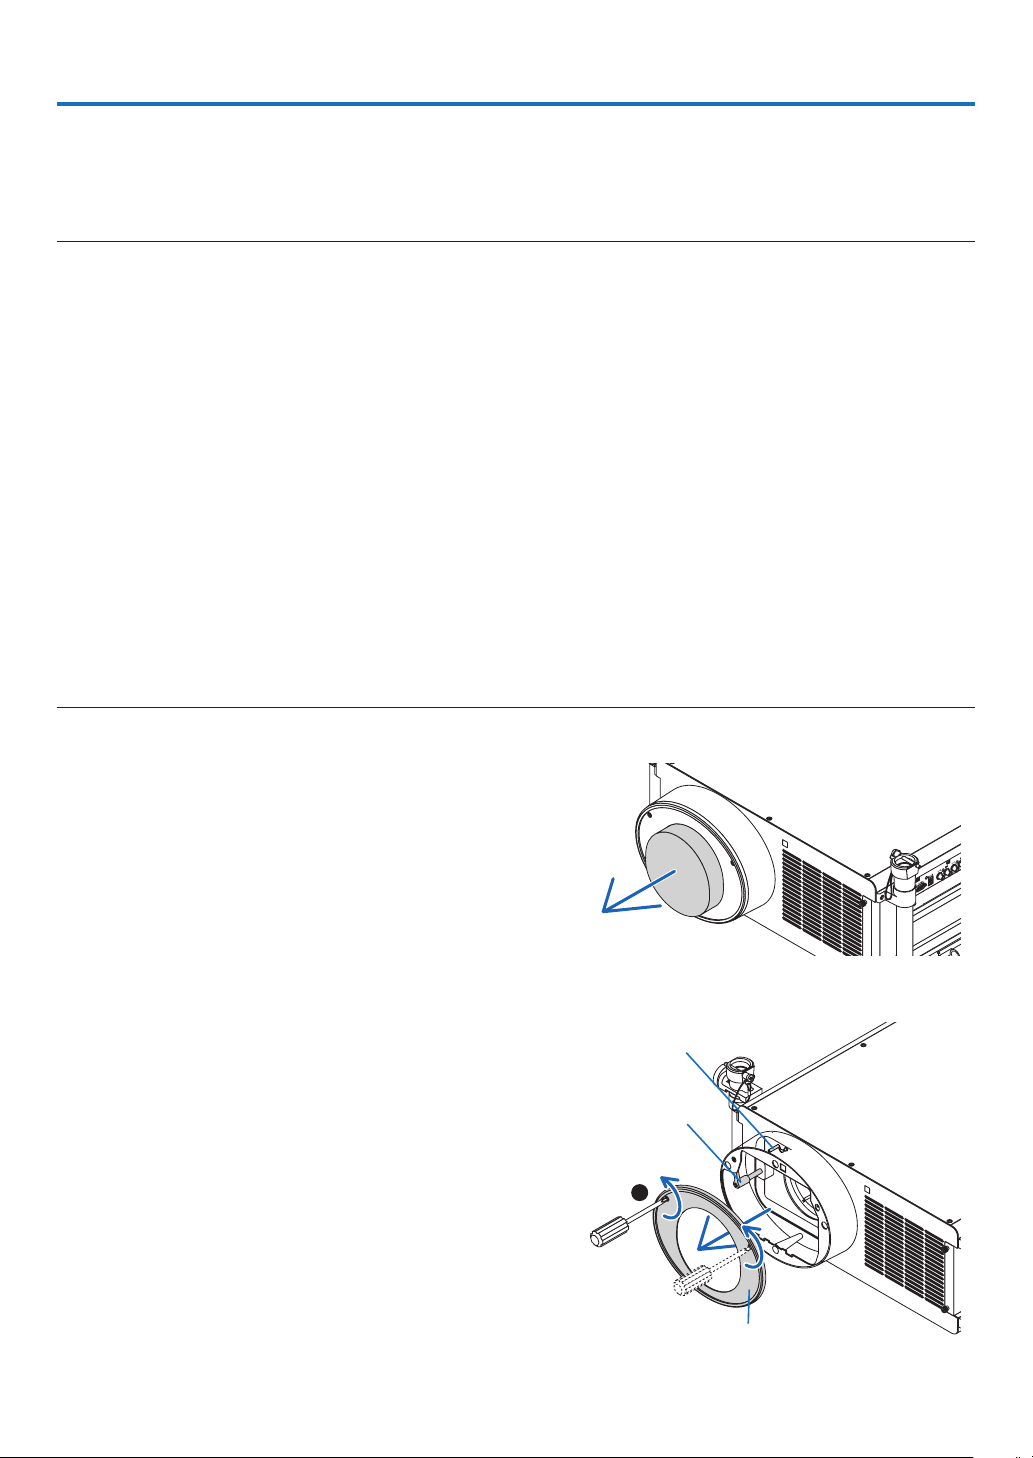
163
6. Connecting to Other Equipment
Mounting the Optional Lens
Fiveseparatebayonetstylelensescanbeusedwiththisprojector.ThedescriptionsherearefortheNP27ZLlens.
Mountotherlensesinthesamemanner.
NOTE:
•Theprojectorandlensesaremadeofprecisionparts.Donotsubjectthemtoshockorexcessiveforces.
•Removetheseparatelysoldlenswhenmovingtheprojector.Ifnot,thelenscouldbesubjecttoshockwhiletheprojectorisbeing
moved,damagingthelensandthelensshiftmechanism.
•Turnoffthepowerandwaitforthecoolingfantostopandturnoffthemainpowerswitchbeforemountingorremovingthe
lens.
•Whendismountingthelensfromtheprojector,returnthelenspositiontothehomepositionbeforeturningoffthepower.Failureto
dosomaypreventthelensfrombeingmountedordismountedbecauseofnarrowspacebetweentheprojectorandthelens.
•Besuretoperform[CALIBRATION]afterinstallationorreplacementofthelens.(→ page 17, 126)Calibrationcorrectstheadjust-
able zoom and focus range.
The following lenses need calibration:
-NP26ZL,NP27ZL,NP28ZL,NP29ZL
•Nevertouchthelenssurfacewhiletheprojectorisoperating.
•Beverycarefulnottoletdirt,grease,etc.,onthelenssurfaceandnottoscratchthelenssurface.
•Performtheseoperationsonaatsurfaceoverapieceofcloth,etc.,topreventthelensfromgettingscratched.
•Whenleavingthelensofftheprojectorforlongperiodsoftime,mountthedustcapontheprojectortopreventdustordirtfrom
getting inside.
•Ifyouhavemultipleprojectors,becarefulofthefollowing:
-TheNP25FL,NP26ZL,NP27ZL,NP28ZL,andNP29ZLlensesaredesignedexclusivelyforthismodeloftheprojector.These
lensesarenotavailableonotherprojectormodels.
-TheotherNECoptionallensescannotbeusedwiththismodeloftheprojector.
Before mounting the lens:
•PrepareaPhillipsscrewdriver(plus-head)
•Removethedustcapfromtheprojector.
TIP:
•Theprojectorcomeswiththedustcapatthetimeofshipment
Mounting the lens
1.Removethelensshroud.
(1) Loosen two screws.
1
Lens release
lever
Safetylever
Lens shroud
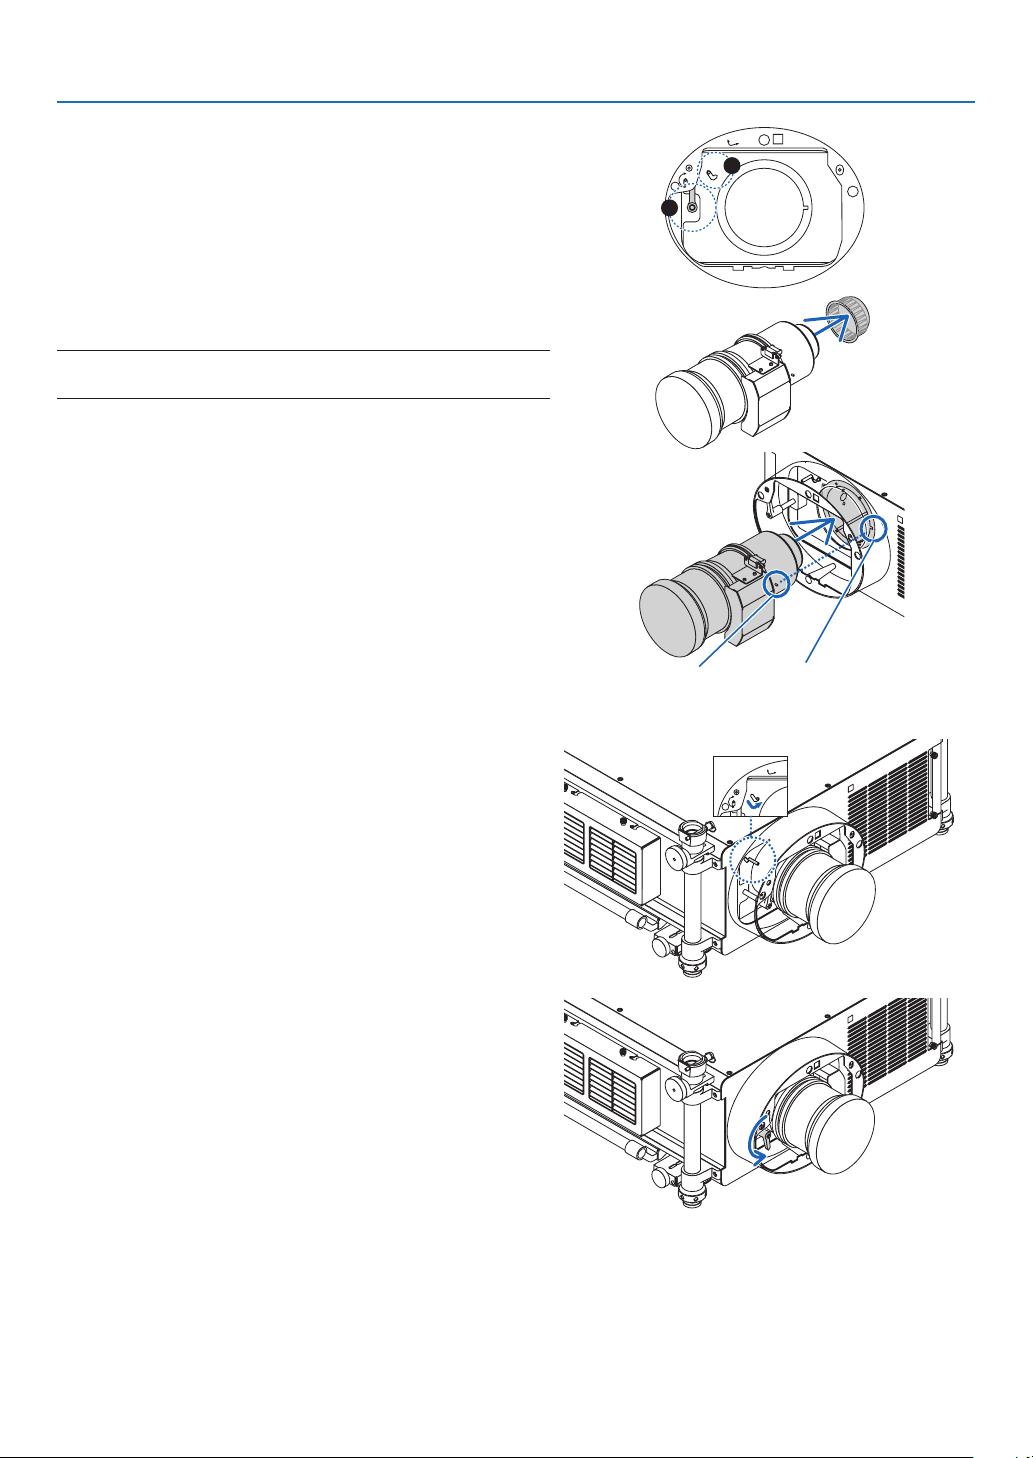
164
6. Installation and Connections
(2)Makesurethatthelensreleaseleverpointsupward(RE
-
LEASE).
(3)Makesurethatthesafetyleverissettotheunlockedposi
-
tion(UNLOCK)topreventthelensfromfallingout.
UNLOCK
LOCK
RELEASE
LOCK
LENS
2
3
2.Removethelenscaponthebackofthelens.
•TheNP27ZLlensisusedasanexample.
NOTE:Mountingthelenswithlenscaponitsbacktotheprojectorcan
cause malfunction.
3.Placetheguidepininthecorrectorientationbyaligning
itwiththenotchonthelenshood,theninsertthelens
intotheprojector.
Push the lens slowly until it comes to a complete stop.
Guidepin
Notch
4.Setthesafetylevertotherightposition(LOCK)tolock
thelens.
LOCK
LOCK
LENS
5.Slowlyturnthelensreleaselevercounterclockwiseuntil
thelensreleaseleverisfacingdownward.
•Ifthelensreleaselevercannotbeturned,itmeansthat
the lens is not fully inserted.
Turnbackthelensreleaselevertotheunlockedposition
and push the lens into the projector until it comes to a
complete stop.
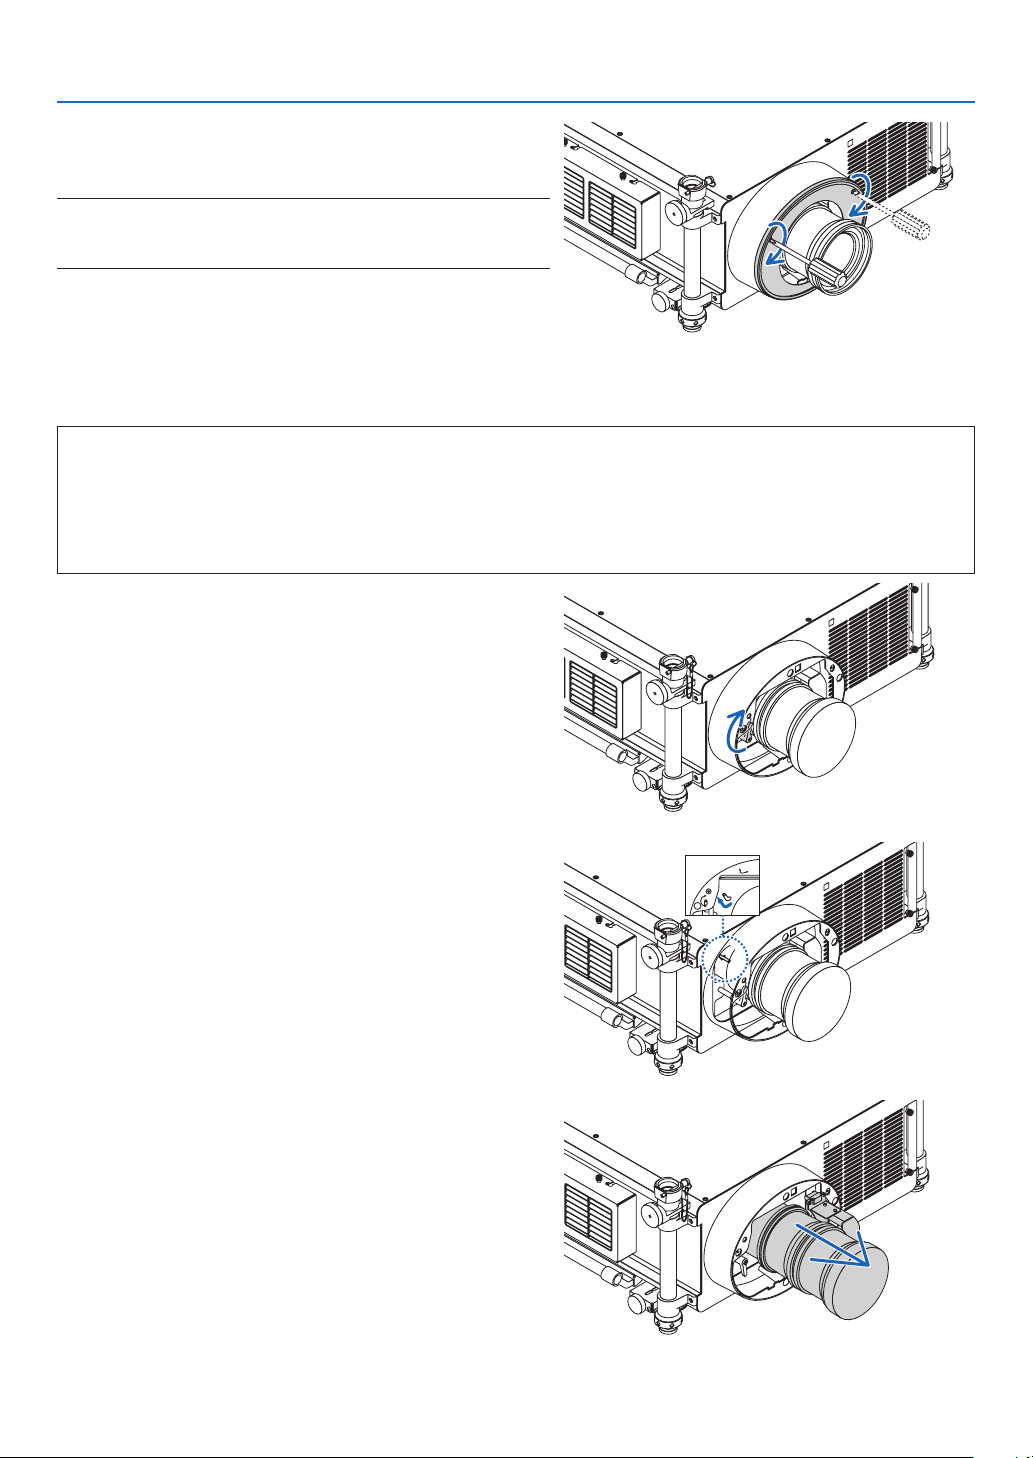
165
6. Installation and Connections
6.Placethelensshroudbackontothelenshood.
•Tightenthetwoscrewstoxthelensshroud
NOTE :
Besuretoperform[CALIBRATION]afterinstallationorreplacementof
thelens.(→ page 17, 126)
Removing the lens
Before removing the lens:
1.Turnontheprojector.(→page16)
2.PressandholdtheSHUTTER/HOMEPOSITIONbuttonforaminimumof2seconds.
The lens position will return to the home position. (→ page 24)
3.Turnoffthemainpowerandunplugthepowercord.
4.Waitfortheprojectortocoolsufcientlybeforeremovingthelens.
1.Removethelensshroud.
(→ page 163)
2.Slowlyturnthelensreleaseleverclockwiseuntilitpoints
upward.
3.Setthesafetylevertotheleftposition(UNLOCK).
LOCK
LOCK
LENS
4.Slowlyremovethelensfromtheprojectorbypullingit
straightout.
•Afterremovingthelens,attachthelenscaptoboththe
frontandbackofthelensforproperstorage.
5.Placethelensshroudbackintothelenshood.
•Tightenthetwoscrewstoxthelensshroud.
•Iftheprojectorisstoredwithoutthelens,attachthedust
cover to the lens hood.
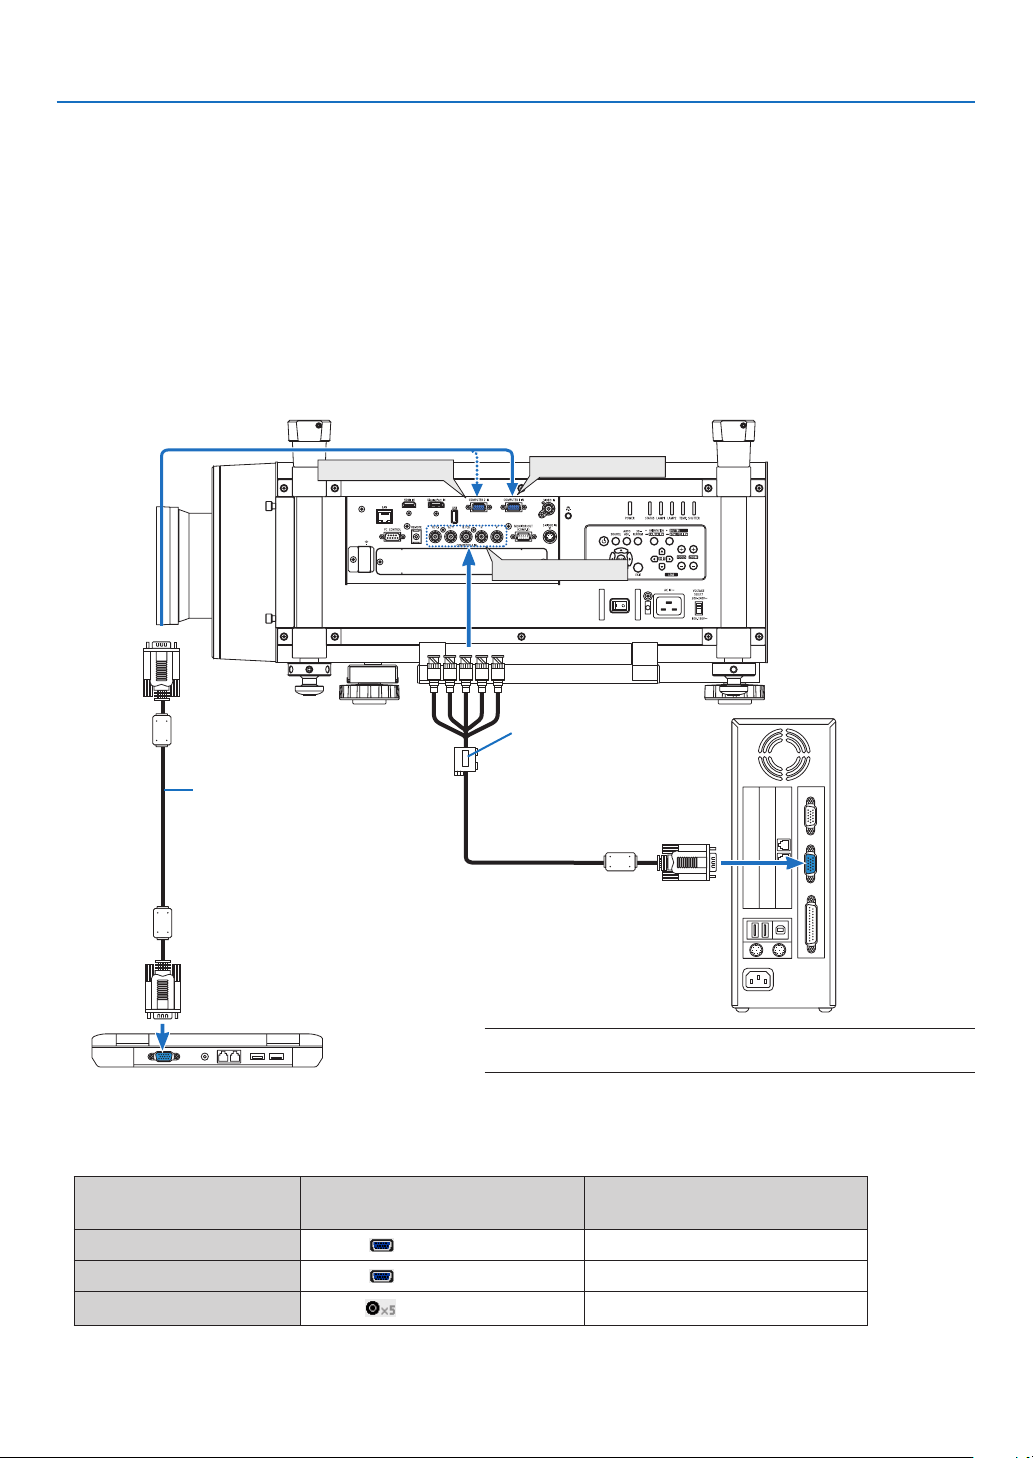
166
6. Installation and Connections
COMPUTER 2 IN
COMPUTER 3 IN
COMPUTER 1 IN
Computercable(VGA)(supplied)
TominiD-Sub15-pinconnector
ontheprojector.Itisrecommend-
ed that you use a commercially
availabledistributionamplierif
connectingasignalcablelonger
thanthecablesupplied.
NOTE:ForMacintosh,useacommerciallyavailablepinadapter(not
supplied)toconnecttoyourMac’svideoport.
RGB-to-BNCcable(not
supplied)
Making Connections
Theprojectorcanbeconnectedtoacomputerusingthecomputercable,a5xBNCcable,HDMIcableorDisplayPort
cable.
Preparecommerciallyavailablecablesforconnection.
Analog RGB signal connection
•Connectthecomputercablebetweenthecomputer’sdisplayoutputconnector(miniD-Sub15-pin)andtheprojector’s
Computer1orComputer2videoinputconnector.
•Whenconnectingthecomputer’sdisplayoutputconnector(miniD-Sub15-pin)andtheprojector’sComputer3
videoinputconnector,useaBNCcable(5-core)→miniD-Sub15-pinconvertercable.
•Tooutputaudiofromthecomputer,usecommerciallyavailableaudiosystem.
•Selectthesourcenameforitsappropriateinputconnectorafterturningontheprojector.
Inputconnector
SOURCEbuttonontheprojector
cabinet
Buttonontheremotecontrol
COMPUTER1IN
COMPUTER1COMPUTER1
COMPUTER2IN
COMPUTER2COMPUTER2
COMPUTER3IN
COMPUTER3
COMPUTER3
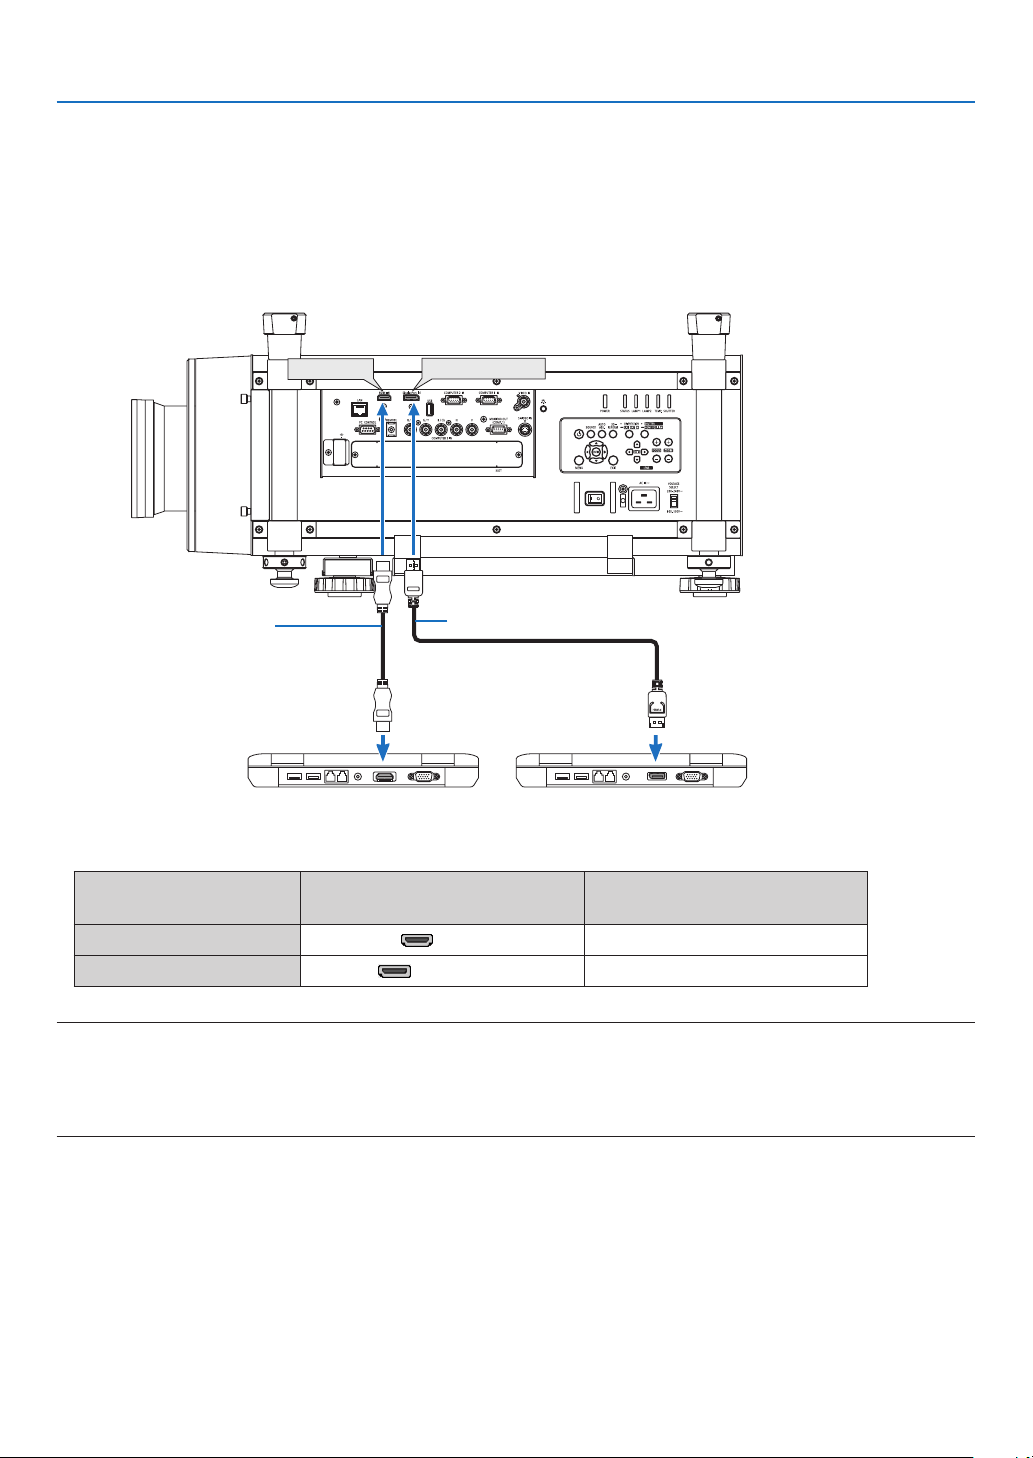
167
6. Installation and Connections
DisplayPort IN
HDMI IN
Digital RGB signal connection
•ConnectacommerciallyavailableHDMIcablebetweenthecomputer’sHDMIoutputconnectorandtheprojector’s
HDMIinputconnector.
•ConnectacommerciallyavailableDisplayPortcablebetweenthecomputer’sDisplayPortoutputconnectorand
theprojector’sDisplayPortinputconnector.
•Selectthesourcenameforitsappropriateinputconnectorafterturningontheprojector.
Inputconnector
SOURCEbuttonontheprojector
cabinet
Buttonontheremotecontrol
HDMIIN
HDMIHDMI
DisplayPortIN
DisplayPortDisplayPort
NOTE:
•Turnoffthepowerofthecomputerandprojectorbeforeconnecting.
•ThisprojectordoesnotsupportNECvideounit(modelISS-6020)videodecoded outputs.
•Whenavideodeckisconnectedviaascanconverter,etc.,thedisplaymaynotbecorrectduringfast-forwardingand
rewinding.
TIP
•TheComputer1andComputer2videoinputconnectorssupportWindowsPlugandPlay.TheComputer3videoinputconnector
doesnotsupportWindowsPlugandPlay.
•AMacintoshsignaladapter(commerciallyavailable)mayberequiredtoconnectaMacintoshcomputer.
ToconnectaMacintoshcomputerequippedwithaMiniDisplayPorttotheprojector,useacommerciallyavailableMiniDisplayPort
→DisplayPortconvertercable.
HDMIcable(notsupplied)
DisplayPortcable(notsupplied)
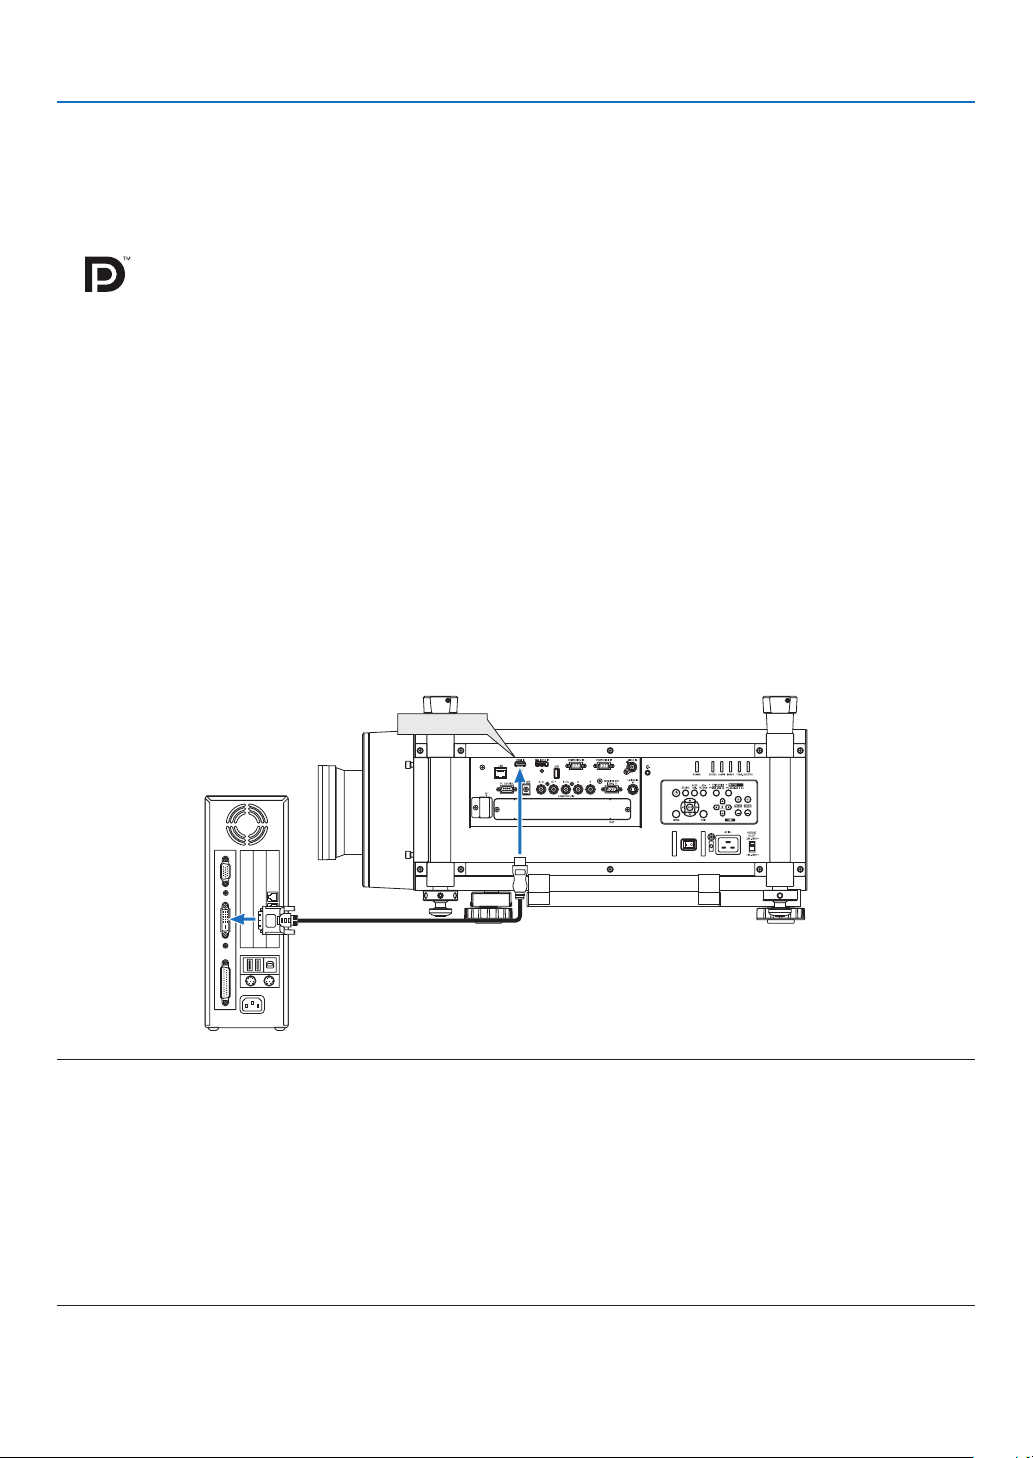
168
6. Installation and Connections
Cautions when connecting an HDMI cable
•UseacertiedHighSpeedHDMI
®
Cable or HighSpeedHDMI
®
CablewithEthernet.
CautionswhenconnectingaDisplayPortcable
•UseacertiedDisplayPortcable.
•Dependingonthecomputer,sometimemayberequireduntiltheimageisdisplayed.
•SomeDisplayPortcables(commerciallyavailable)havelocks.
•Todisconnectthecable,pressthebuttononthetopofthecable’sconnector,thenpullthecableout.
•NopowerissuppliedfromtheDisplayPortinputconnectortotheconnecteddevice.
•WhensignalsfromadevicethatusesasignalconverteradapterareconnectedtotheDisplayPortinputconnector,
insomecasestheimagemaynotbedisplayed.
•WhentheHDMIoutputofacomputerisconnectedtotheDisplayPortinputconnector,useaconverter(commercially
available).
CautionswhenusingaDVIsignal
•WhenthecomputerhasaDVIoutputconnector,useacommerciallyavailableconvertercabletoconnectthe
computertotheprojector’sHDMIinputconnector(onlydigitalvideosignalscanbeinput).
Toconnectthecomputer’sDVIoutputconnectortotheprojector’sDisplayPortinputconnector,useacommercially
availableconverter.
HDMI IN
NOTE:WhenViewingaDVIDigitalSignal
•UseaDVI-to-HDMIcablecompliantwithDDWG(DigitalDisplayWorkingGroup)DVI(DigitalVisualInterface)revision1.0stan-
dard.Thecableshouldbewithin197"/5mlong.
•TurnofftheprojectorandthePCbeforeconnectingtheDVI-to-HDMIcable.
•ToprojectaDVIdigitalsignal:Connectthecables,turntheprojectoron,thenselecttheHDMIinput.Finally,turnonyourPC.
Failuretodosomaynotactivatethedigitaloutputofthegraphicscardresultinginnopicturebeingdisplayed.Shouldthishappen,
restartyourPC.
•SomegraphicscardshavebothanalogRGB(15-pinD-Sub)andDVI(orDFP)outputs.Useofthe15-pinD-Subconnectormay
result in no picture being displayed from the digital output of the graphics card.
•DonotdisconnecttheDVI-to-HDMIcablewhiletheprojectorisrunning.Ifthesignalcablehasbeendisconnectedandthen
reconnected,animagemaynotbecorrectlydisplayed.Shouldthishappen,restartyourPC.
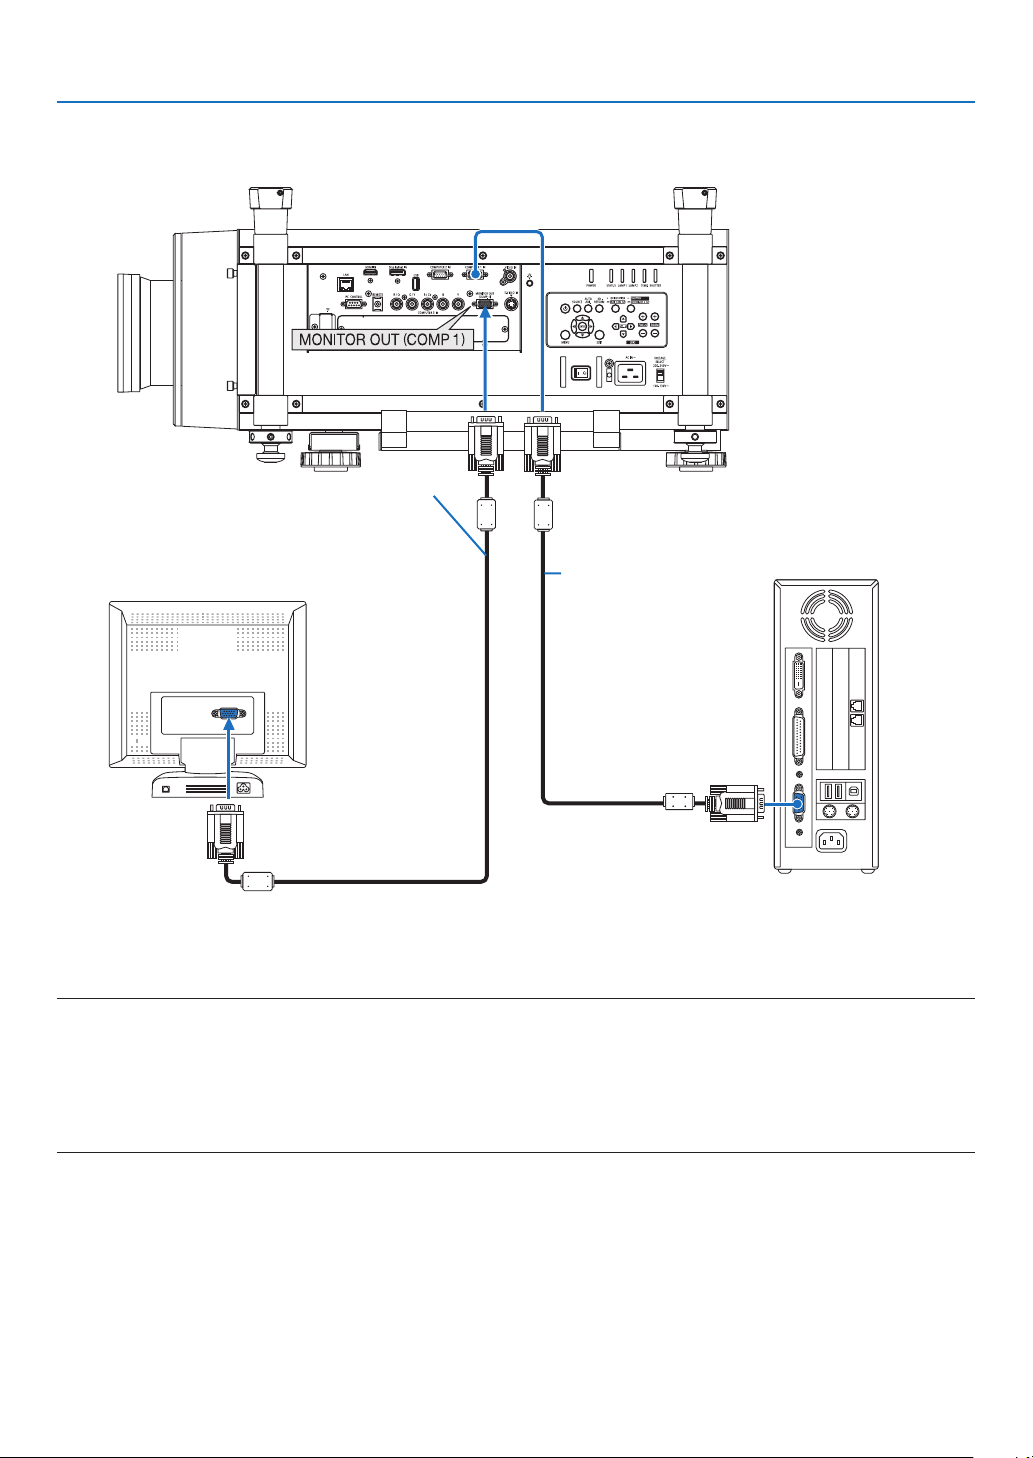
169
6. Installation and Connections
Connecting an External Monitor
Youcanconnectaseparate,externalmonitortoyourprojectortosimultaneouslyviewonamonitorthecomputer
analogimageyou’reprojecting.
NOTE:
•Daisychainconnectionisnotpossible.
•ThesignalonlyfromtheCOMPUTER1INconnectorwillbeoutputtotheMONITOROUT(COMP1)connector.
•When[POWER-SAVING]or[NETWORKSTANDBY]isselectedfor[STANDBYMODE]withintheon-screenmenu,thesignalwill
notbeoutputtotheMONITOROUT(COMP1)connectorinstandby.
•WhenthesignalfromtheCOMPUTER3INconnectorsisprojected,novideosignalwillbeoutputtotheMONITOROUT(COMP1)
connector.
Computercable(VGA)
(supplied)
Computercable(VGA)
(not supplied)
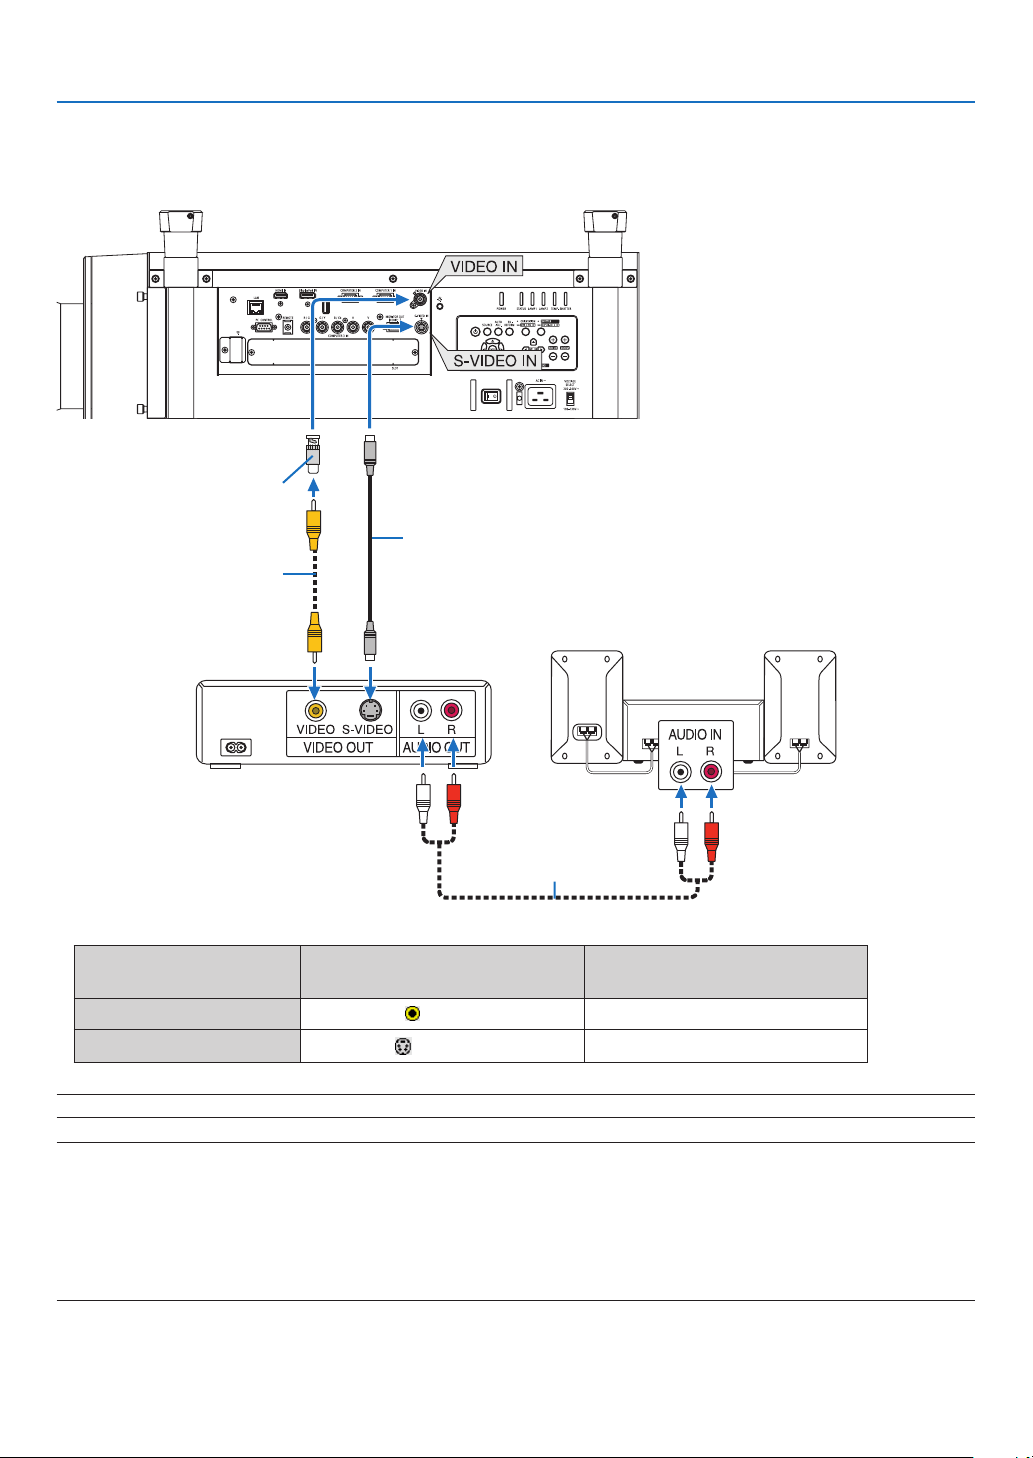
170
6. Installation and Connections
Connecting Your DVD Player or Other AV Equipment
ConnectingVideo/S-VideoInput
•Selectthesourcenameforitsappropriateinputconnectorafterturningontheprojector.
Inputconnector
SOURCEbuttonontheprojector
cabinet
Buttonontheremotecontrol
VIDEOIN
VIDEO
VIDEO
S-VIDEOIN
S-VIDEO
S-VIDEO
NOTE:RefertoyourVCRowner’smanualformoreinformationaboutyourequipment’svideooutputrequirements.
NOTE:
•AnimagemaynotbedisplayedcorrectlywhenaVideoorS-Videosourceisplayedbackinfast-forwardorfast-rewindviaascan
converter.
•Videosignalscanbeprojectedwhenavideocable(commerciallyavailable)isconnectedtotheComputer3videoinputconnector’s
G/Yconnector.
Inthiscase,settheon-screenmenu’sSETUP→OPTION(1)→
SIGNALSELECT(COMP3) to [VIDEO]andselectComputer3for
the input selection.
Videocable(notsupplied)
BNC(male)toRCA(female)
adapter (not supplied)
S-Videocable(notsupplied)
Audioequipment
Audiocable(notsupplied)
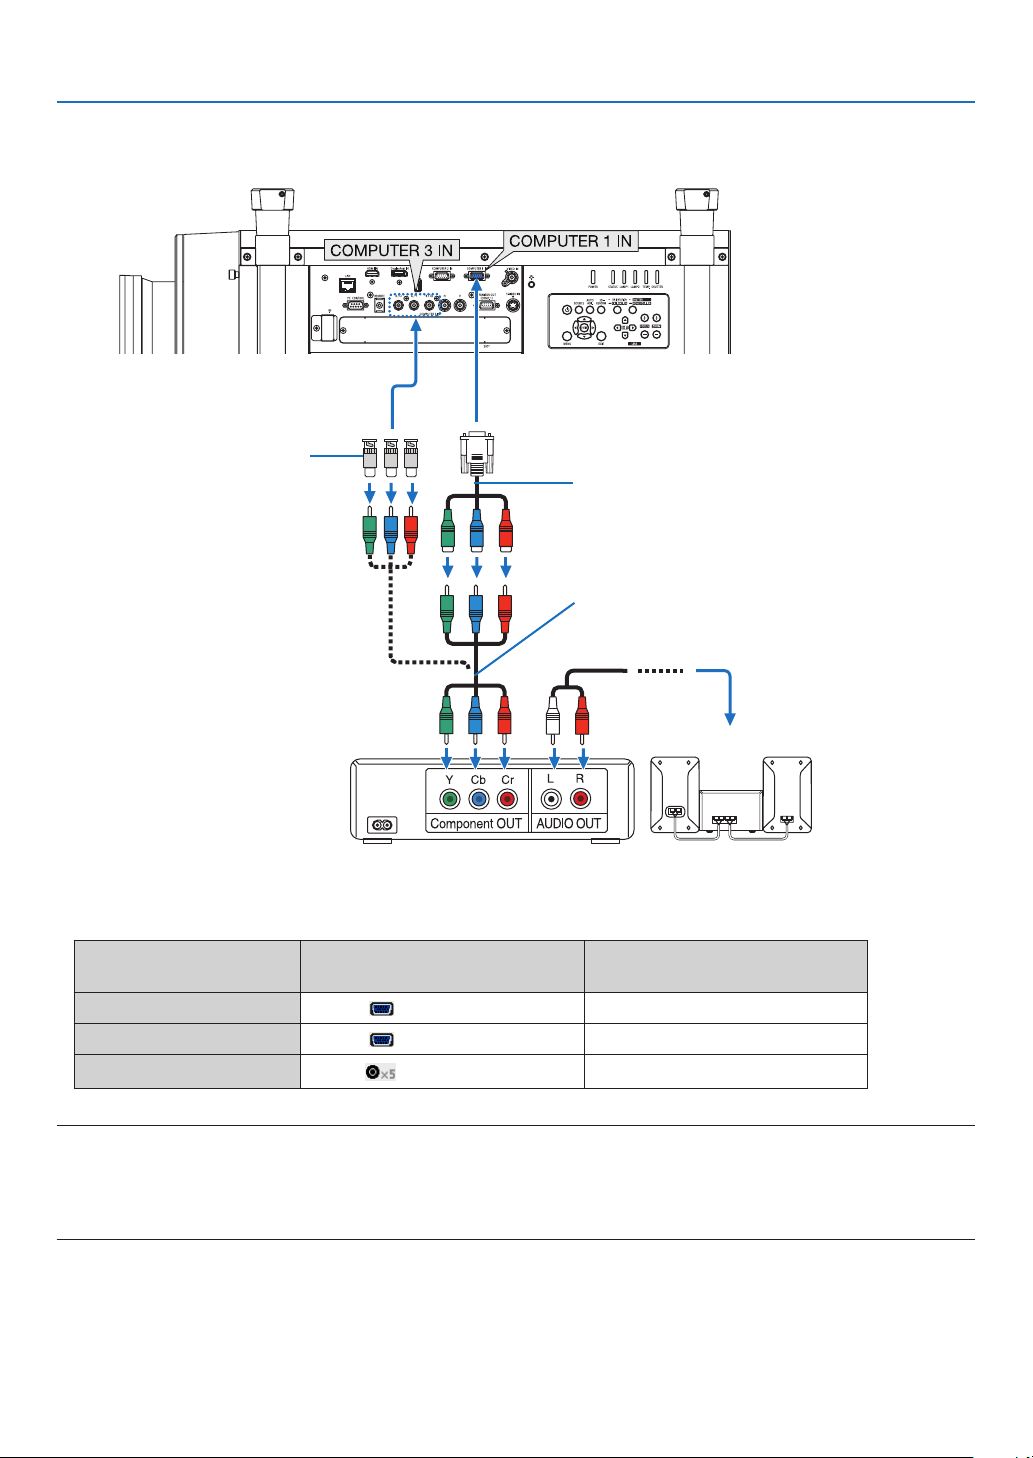
171
6. Installation and Connections
Connecting Component Input
•Selectthesourcenameforitsappropriateinputconnectorafterturningontheprojector.
Inputconnector
SOURCEbuttonontheprojector
cabinet
Buttonontheremotecontrol
COMPUTER1IN
COMPUTER1COMPUTER1
COMPUTER2IN
COMPUTER2COMPUTER2
COMPUTER3IN
COMPUTER3
COMPUTER3
NOTE:
•Normallythecomputersignalandcomponentsignalareidentiedandswitchedautomatically.Ifthesignalcannotbeidentied,
however,selectthesignalat[ADJUST]→[VIDEO]→[SIGNALTYPE]ontheprojector’son-screenmenu.Select“COMPUTER”or
“VIDEO”fortheComputer3videoinputconnectorat[SETUP]→[OPTION(1)]→[SIGNALSELECT(COMP3)](→ page 130).
•ToconnecttoavideodevicewithaDconnector,usethesoldseparatelyDconnectorconverteradapter(modelADP-DT1E).
15-pin-to-RCA(female)×3cableadapter
(ADP-CV1E)
BNC(male)toRCA(female)
adapter (not supplied)
ComponentvideoRCA×3cable(notsupplied)
DVDplayer
AudioEquipment
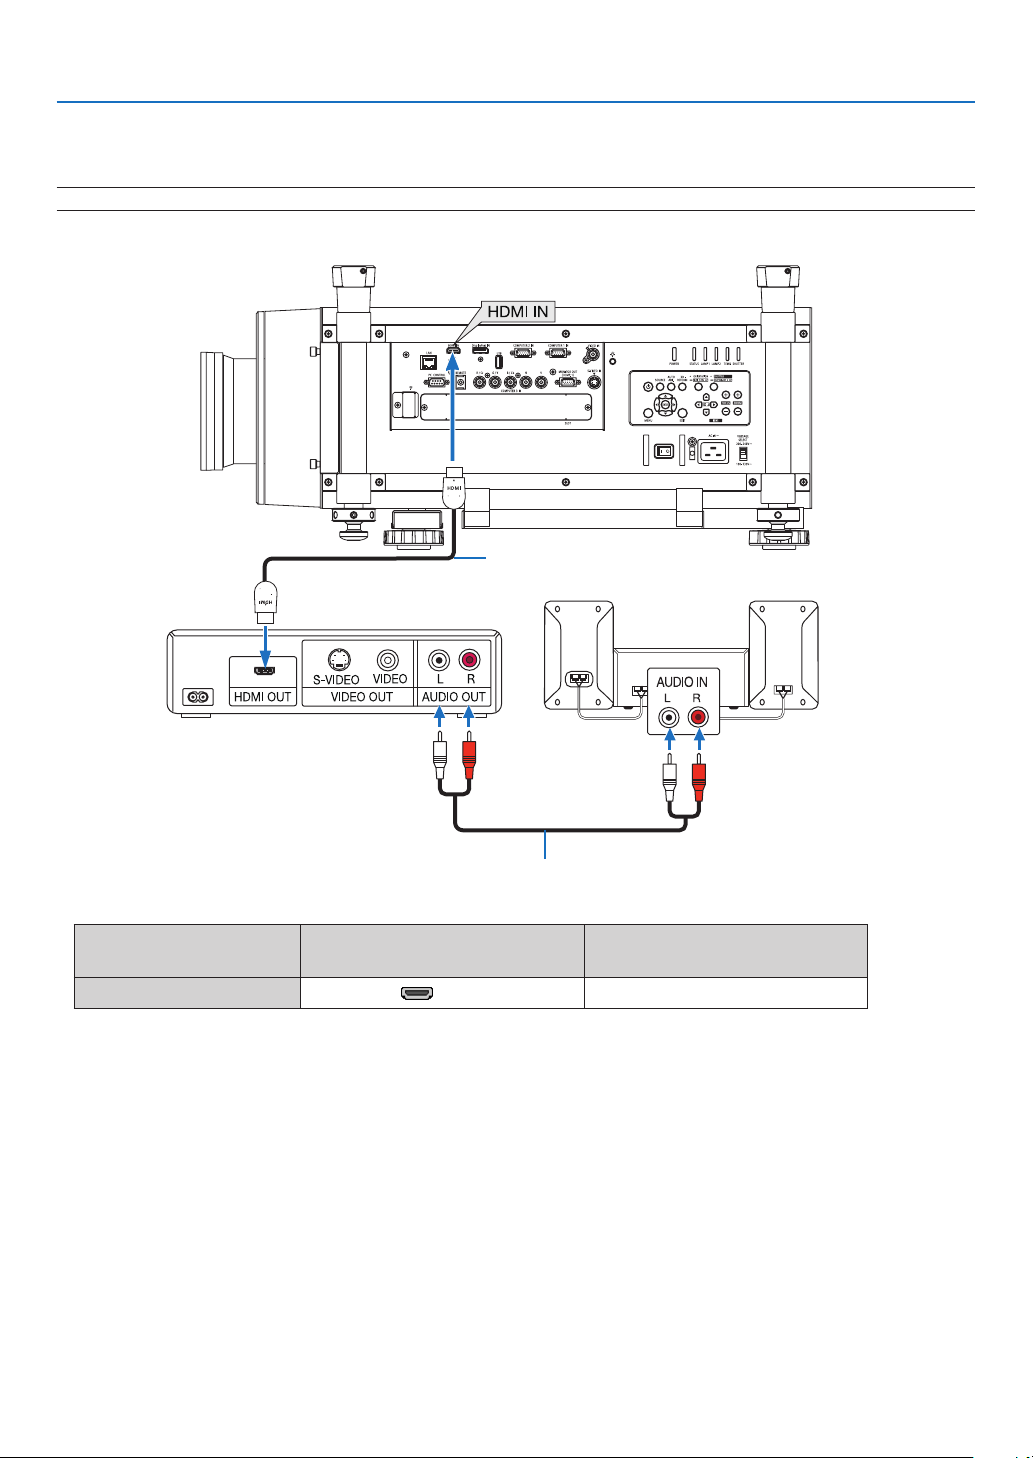
172
6. Installation and Connections
Connecting HDMI Input
YoucanconnecttheHDMIoutputofyourDVDplayer,harddiskplayer,Blu-rayplayer,ornotebooktypePCtothe
HDMIINconnectorofyourprojector.
NOTE:TheHDMIINconnectorsupportsPlug&Play(DDC2B).
Audiocable(notsupplied)
HDMIcable(notsupplied)
UseHighSpeedHDMI
®
Cable.
Inputconnector
SOURCEbuttonontheprojector
cabinet
Buttonontheremotecontrol
HDMIIN
HDMIHDMI
TIP:ForusersofaudiovideoequipmentwithanHDMIconnector:
Select“Enhanced”ratherthan“Normal”ifHDMIoutputisswitchablebetween“Enhanced”and“Normal”.
Thiswillprovideimprovedimagecontrastandmoredetaileddarkareas.
Formoreinformationonsettings,refertotheinstructionmanualoftheaudiovideoequipmenttobeconnected.
•WhenconnectingtheHDMIINconnectoroftheprojectortotheDVDplayer,theprojector’svideolevelcanbe
madesettingsinaccordancewiththeDVDplayer’svideolevel.Inthemenuselect[ADJUST]→[VIDEO]→[VIDEO
LEVEL]andmakenecessarysettings.
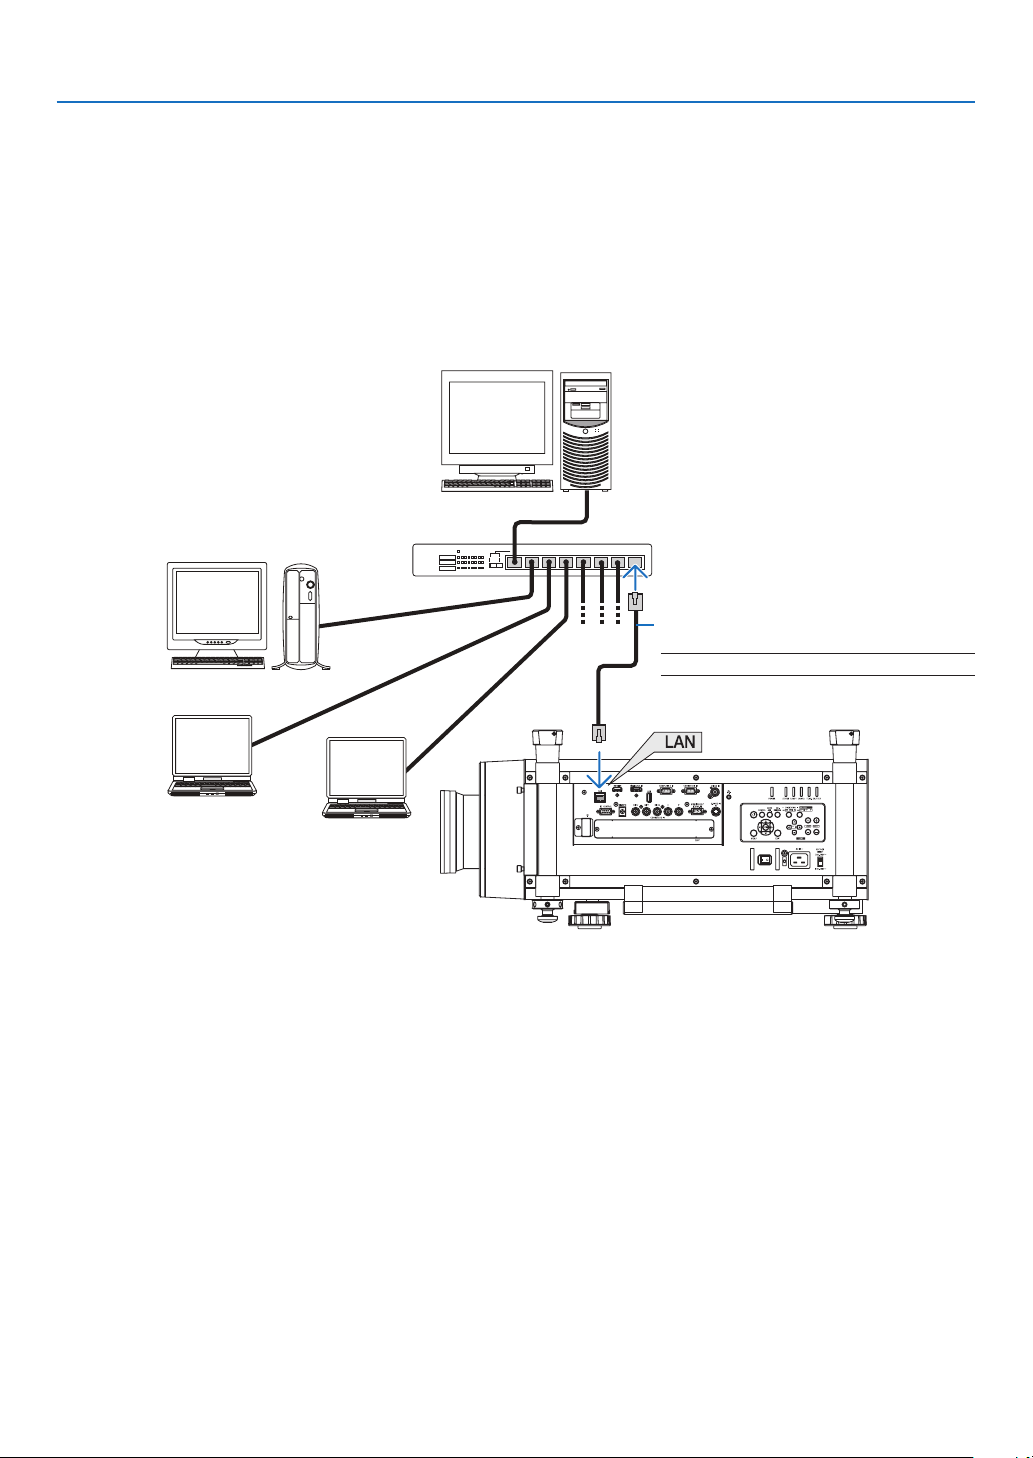
173
6. Installation and Connections
Connecting to a Wired LAN
TheprojectorcomesstandardwithaLANport(RJ-45)whichprovidesaLANconnectionusingaLANcable.
TouseaLANconnection,youarerequiredtosettheLANontheprojectormenu.Select[APPLICATIONMENU]→
[NETWORKSETTINGS]→[WIREDLAN].(→page
143).
Example of LAN connection
ExampleofwiredLANconnection
Server
Hub
LANcable(notsupplied)
NOTE:UseaCategory5orhigherLANcable.

174
6. Installation and Connections
Connecting to a Wireless LAN (sold separately)
TheseparatelysoldwirelessLANunitallowsyoutouseawirelessLANenvironment.Whenusingtheprojectorina
wirelessLANenvironment,theIPaddressandothersettingsmustbemadeontheprojector.
Important:
•IfyouusetheprojectorwiththeUSBWirelessLANUnitintheareawheretheuseofwirelessLANequipmentis
prohibited,removetheUSBWirelessLANUnitfromtheprojector.
•BuytheappropriateUSBWirelessLANUnitforyourcountryorarea.
NOTE:
•ThegreenLEDontheUSBWirelessLANUnitashestoshowthattheUSBWirelessLANUnitisworking.
•Yourcomputer’swirelessLANadapter(orunit)mustbecompliedwithWi-Fi(IEEE802.11b/g/n)standard.
Flow of Setting Wireless LAN
Step1:AttachtheUSBWirelessLANUnittotheprojector.(→page
175)
Step2:Display[NETWORKSETTINGS]from[APPLICATIONMENU].(→page142)
Step3:Select[NETWORKSETTINGS]→[WIRELESSLAN]→[PROFILES]andset[EASYCONNECTION],
[PROFILE1],or[PROFILE2].(→page143)
TIP:
AccesstheHTTPserverfunctiontoset[NETWORKSETTINGS]→[SETTINGS]→[WIRELESS]→[EASYCONNECTION],[PRO
-
FILE1],[PROFILE2].
Mounting a wireless LAN unit
NOTE:
•
ThewirelessLANunithasafrontandabackandmustbemountedinthewirelessLANportinaspecicdirection.Theportis
designed so that the unit cannot be mounted in the opposite direction, but trying to push it in by force could damage the wireless
LANunitport.
•Topreventdamageduetostaticelectricity,touchanearbymetalobject(adoorknob,aluminumsash,etc.)beforetouchingthe
wirelessLANunittoeliminatethestaticelectricityfromyourbody.
•TurnoffthemainpowerbeforemountingandremovingthewirelessLANunit.
MountingandremovingthewirelessLANunitwhiletheprojector’spowerisoncoulddamagethewirelessLANunitorresultin
malfunctionontheprojector.Iftheprojectorshouldmalfunction,turnofftheprojector’spower,turnoffthemainpowerswitch,
and unplug the power cord, then plug the power cord back in.
•DonotconnectanyUSBdeviceotherthanthewirelessLANunittotheUSB(LAN)port.Also,donotconnectthewirelessLAN
unittotheUSBportintheconnectorsection.
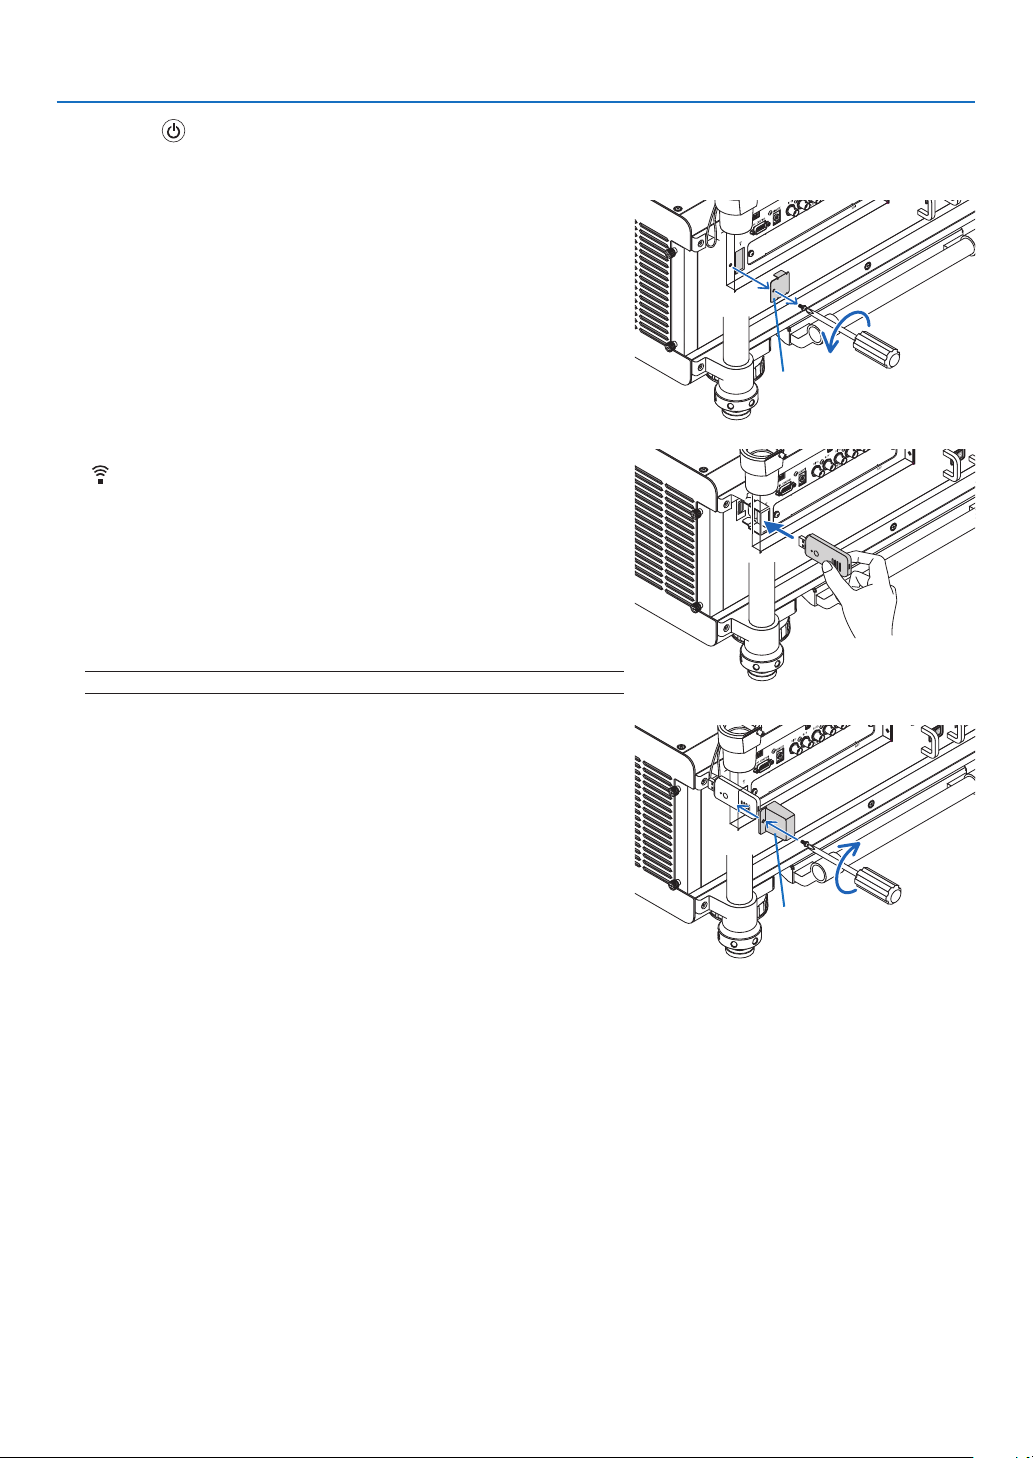
175
6. Installation and Connections
1.Pressthebuttontosettheprojectortothestandbymode,then
turnoffthemainpowerswitch.
2.Removetheplate(portcover).
Loosen the screw security port cover.
•Thescrewisnotremovable.
3.SlowlyinsertthewirelessLANunitintotheUSB(LAN)port
(
).
-RemovethewirelessLANunit’scap,settheunitwiththefront(the
sidewiththeindicator)facingupwards,holdthebackedgeand
insert the unit gently.
Next,pressthewirelessLANunitinwithanger.
-ThecapyouhaveremovedwillbeusedwhenthewirelessLANunit
is removed, so store it in a safe place.
NOTE:IfthewirelessLANunitishardtoinsert,donotpushitinbyforce.
4.Attachtheanti-theftcapforwirelessLANunit.
UsethescrewyouremovedatStep2tosecuretheanti-theftcap.
Plate
Anti-theftcap
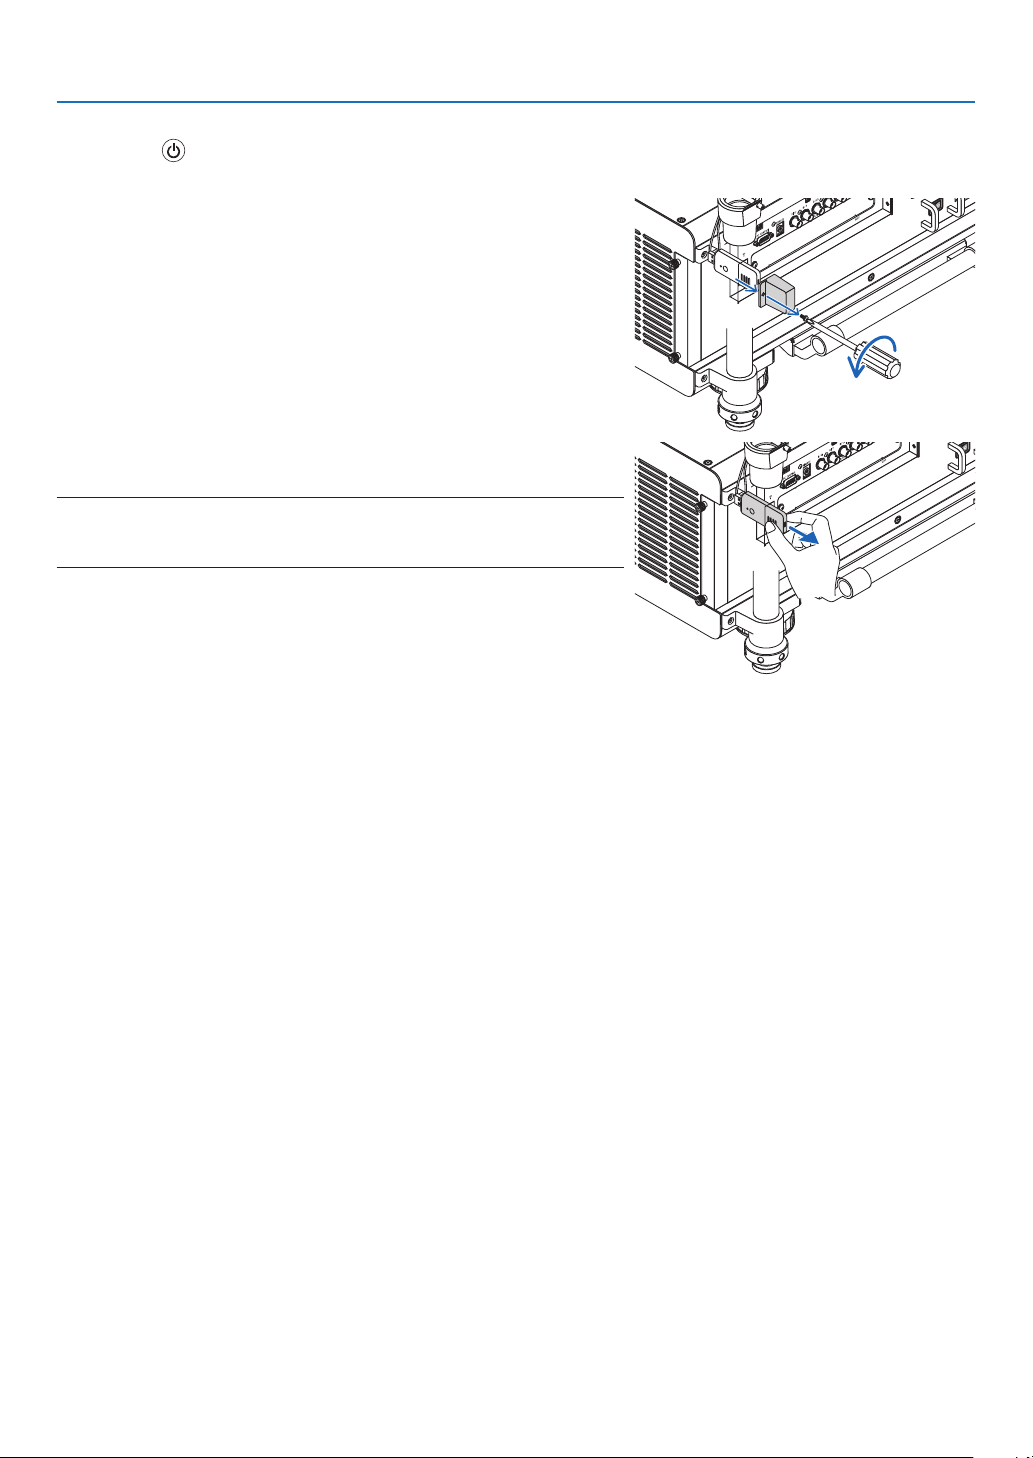
176
6. Installation and Connections
To remove the wireless LAN unit
1.Pressthe
buttontosettheprojectortothestandbymode,then
turnoffthemainpowerswitch.
2.Removetheanti-theftcap.
Loosenthescrewandremovetheanti-theftcapfortheWirelessLAN
Unit.
3.PullouttheWirelessLANUnitfromtheUSB(LAN)port.
NOTE:
IfthewirelessLANunitisnottobeusedforanextendedperiodoftime,putthe
plate back and secure it with the two screws.
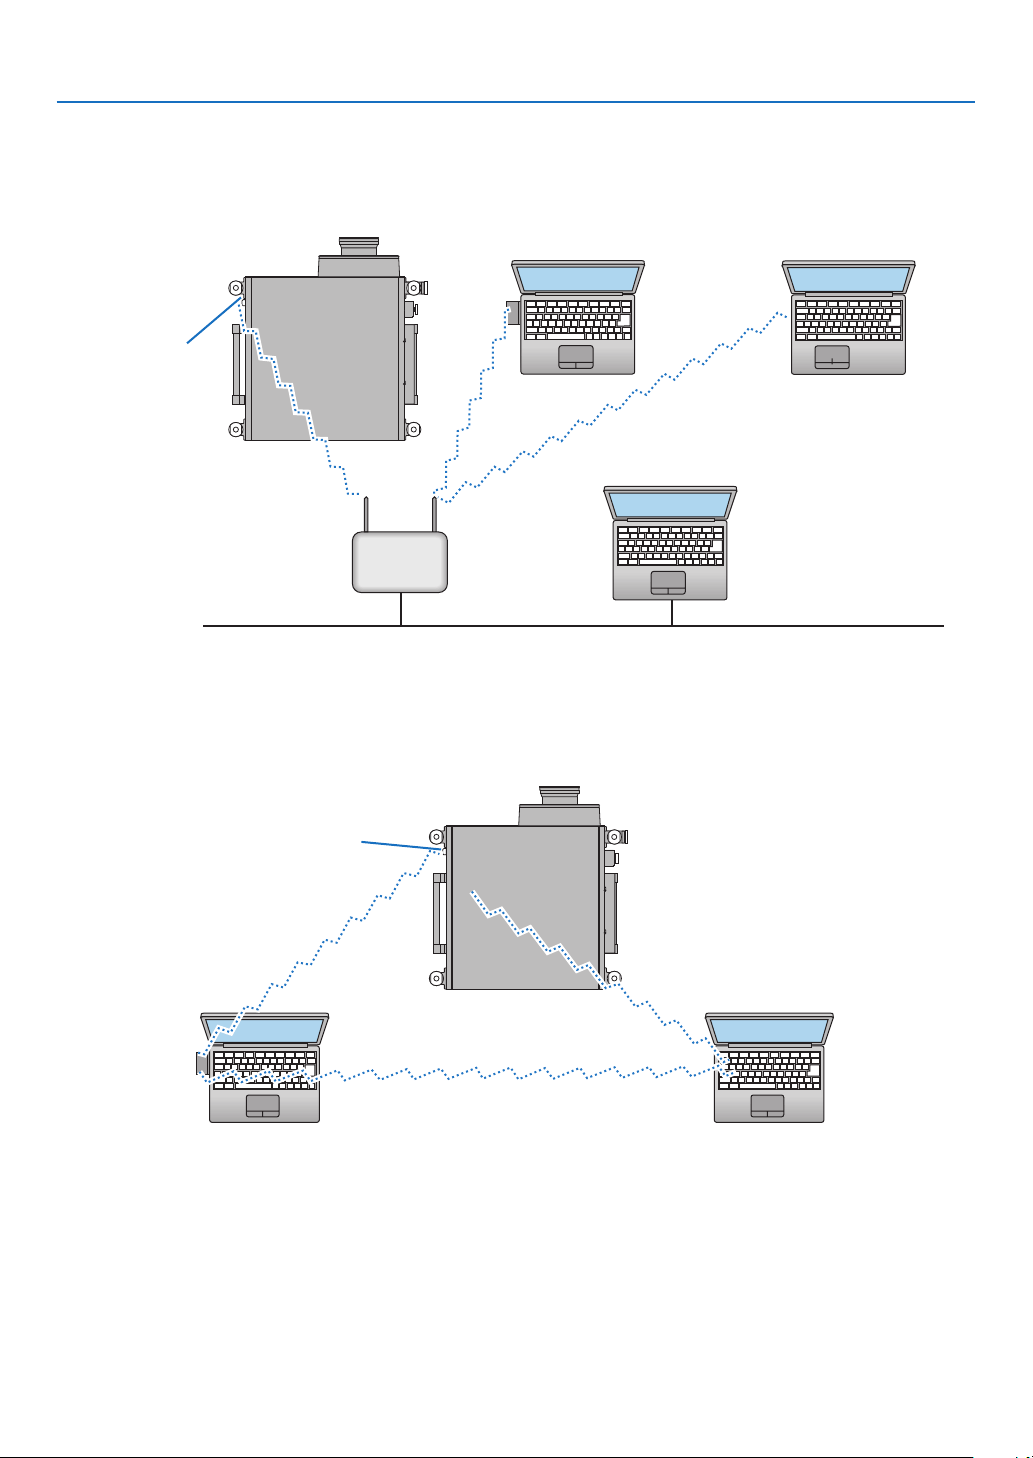
177
6. Installation and Connections
ExampleofwirelessLANconnection
(NetworkType→Infrastructure)
(→page145)
PCwithwirelessLANcard
inserted
PCwithbuilt-inwirelessLAN
function
WiredLAN
Wirelessaccesspoint
USBWirelessLANUnit
Toenabledirectcommunication(i.e.,peer-to-peer)betweencomputersandprojectors,youneedtoselecttheAd
Hocmode.(→page
145)
PCwithwirelessLANcard
inserted
PCwithbuilt-inwirelessLAN
function
ExampleofwirelessLANconnection(NetworkType→AdHoc)
USBWirelessLANUnit
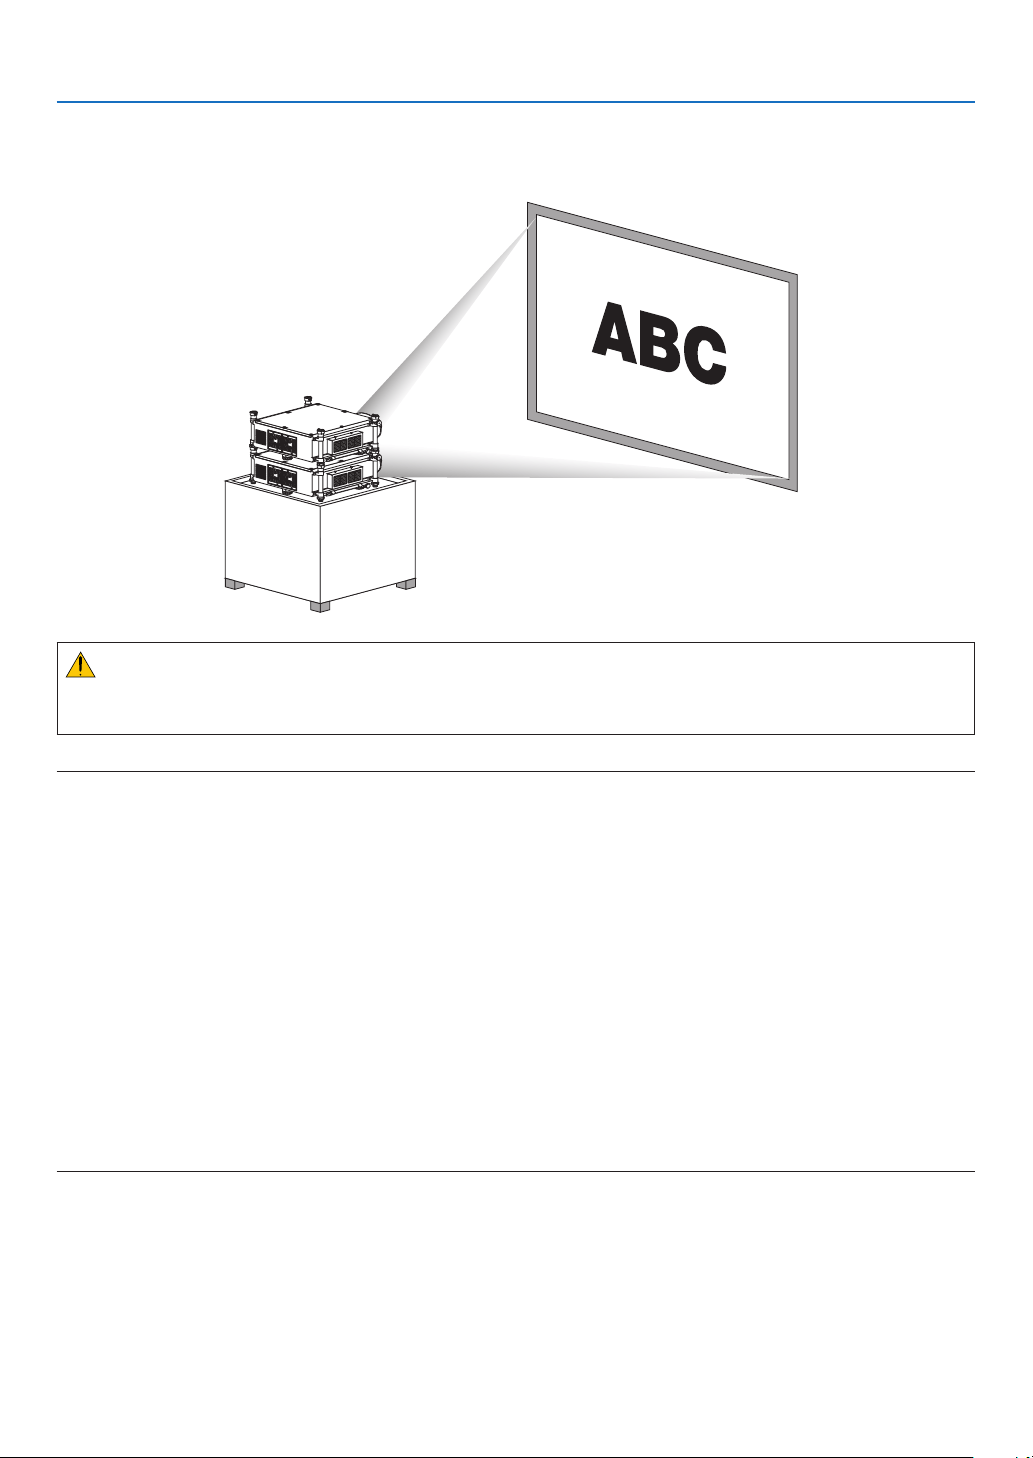
178
6. Installation and Connections
Stacking projectors
Theprojectedimagebrightnesscanbedoubledbygravitystackinguptotwoprojectorswithoutexternalsupport.This
iscalled“StackingProjection”.
CAUTION:
Aminimumoftwopersonsarerequiredtocarrytheprojector.Otherwisetheprojectormaytumbleordrop,causing
personalinjury.
NOTE:
•Projectorswithdifferentmodelnumberscannotbegravitystacked.
Optional lenses with the same model numbers must be used for stacking projection.
•Thestackingprojectiondoesnotsupportaccuracyforoverlayingtwoimagesperfectlysothatsmalltextanddetailedgraphics
can be clearly read or seen.
•Useacommerciallyavailabledistributionampliertoboththeprimary(upper)andthesecondary(lower)projectorstodistribute
signal to two outputs of the two projectors.
•Notesforstacking
-Askyourservicepersonforsettingupandadjustingprojectors.
-Setuptheprojectorsinaplaceorstructureinawaywithsufcientstrengthtosupportthecombinedweightofthetwoprojec-
tors. The single projector with a lens weighs up to approximately 46 kg/ 101 lbs.
-Topreventtheprojectorsfromfalling,fastentheminawaytowithstandearthquakes.
-Doublestackingwillcauseroomtemperaturetoincrease.Ventilatetheroomwell.
-Donotattempttostackprojectorsontheceiling.Gravitystackingcannotbedoneontheceiling.
-Warmuptheprojectorsforonehourbeforethedesiredprojectionisobtained.
-Setuptheprojectorssothattheprojectedimageshowsaslittlegeometricdistortionsaspossible.Thelensisdifferentin
geometricdistortionbetweenwide(+)andtele(−)forzoom.
-Adjustthehorizontallensshifttothelenscenter.
s
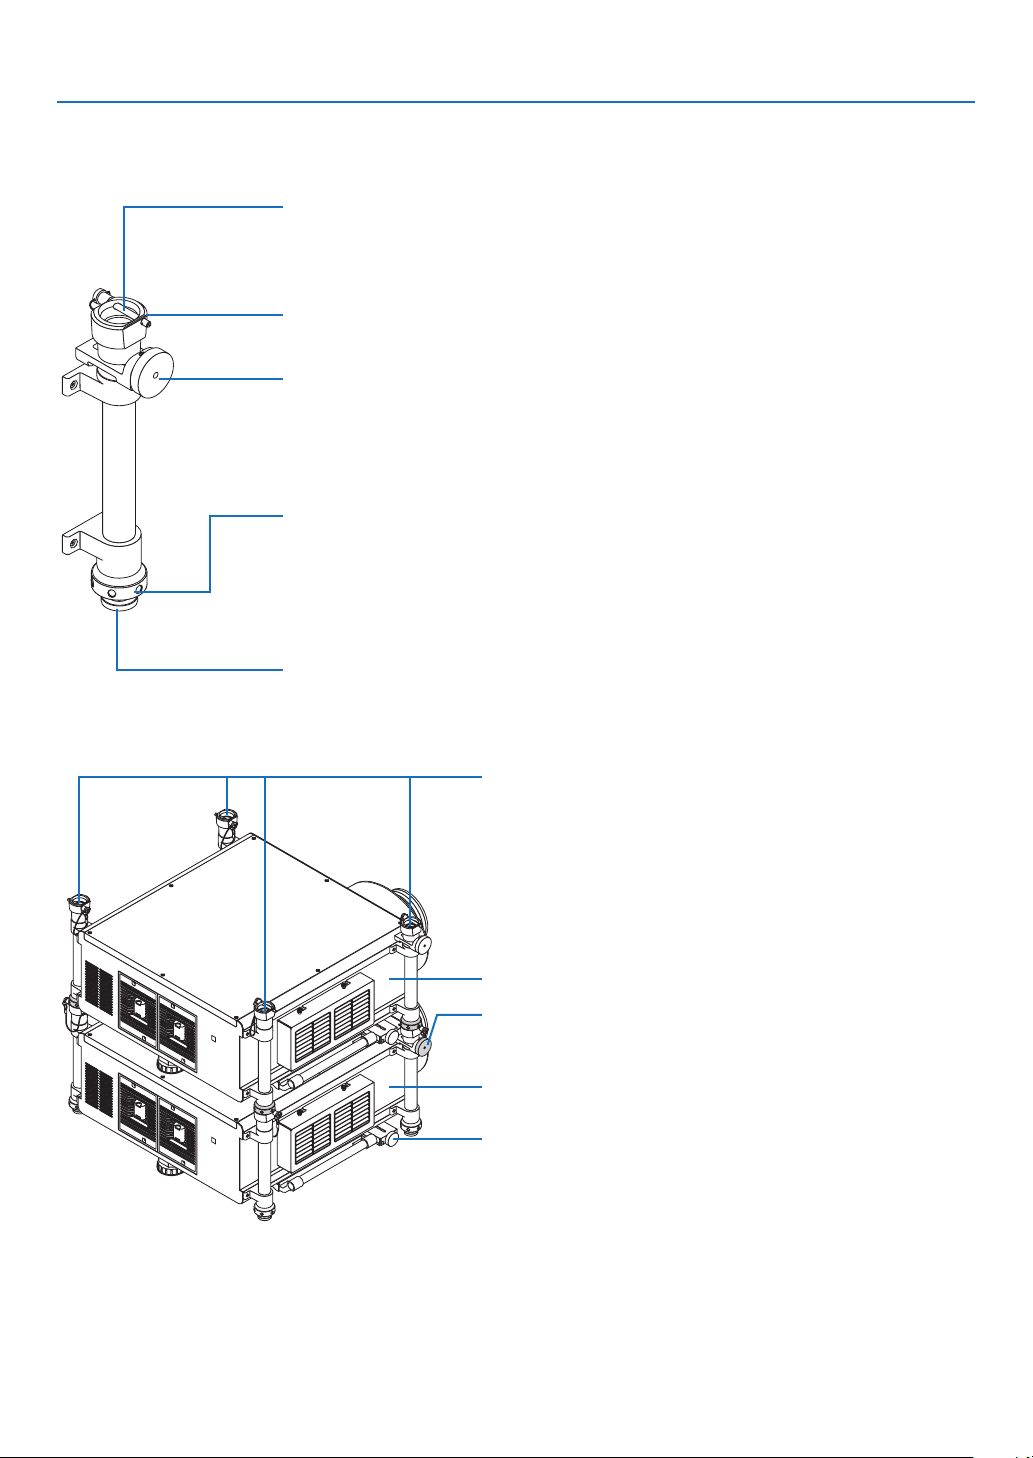
179
6. Installation and Connections
PartNamesandFunctionsofStackingColumn
Stackingcolumn
Upper projector
To tilt the upper projector horizontally, use the lower projector’s
horizontaladjustmentknob.
Lower projector
Usethelowerprojector’shorizontaladjustmentknobtonelytiltthe
two projectors horizontally.
Securitylockingpin(withawire)
Afterpullingoutfoursecuritylockingpins,puteachfootoftheupperprojectorhere,andthen
insertthefoursecuritylockingpinsfullysothatthefeetcannotmove.
Eachsecuritylockingpincanbeinsertedfromeitherdirection.
Foot holder
Place the four feet in their respective foot holder.
Horizontaladjustmentknob
Finelytilttheupperprojectorhorizontally.Turnitclockwisetoorienttheprojectortotheright;
turnitcounterclockwisetoorienttheprojectortotheleft.
Maximumrotatingangle:+/−0.4°
Verticaladjustmentring
Tilttheprojectorvertically.Turntheverticaladjustmentringclockwisetobeshortened;turnit
counterclockwisetobeextended.Ifyoucannotturnitmanually,useahexagonalwrench.Donot
turn the screws inside.
Upto38mm(1.5")canbeextended.
Foot(4locations)
Supporttheprojectoratthefourlocations.
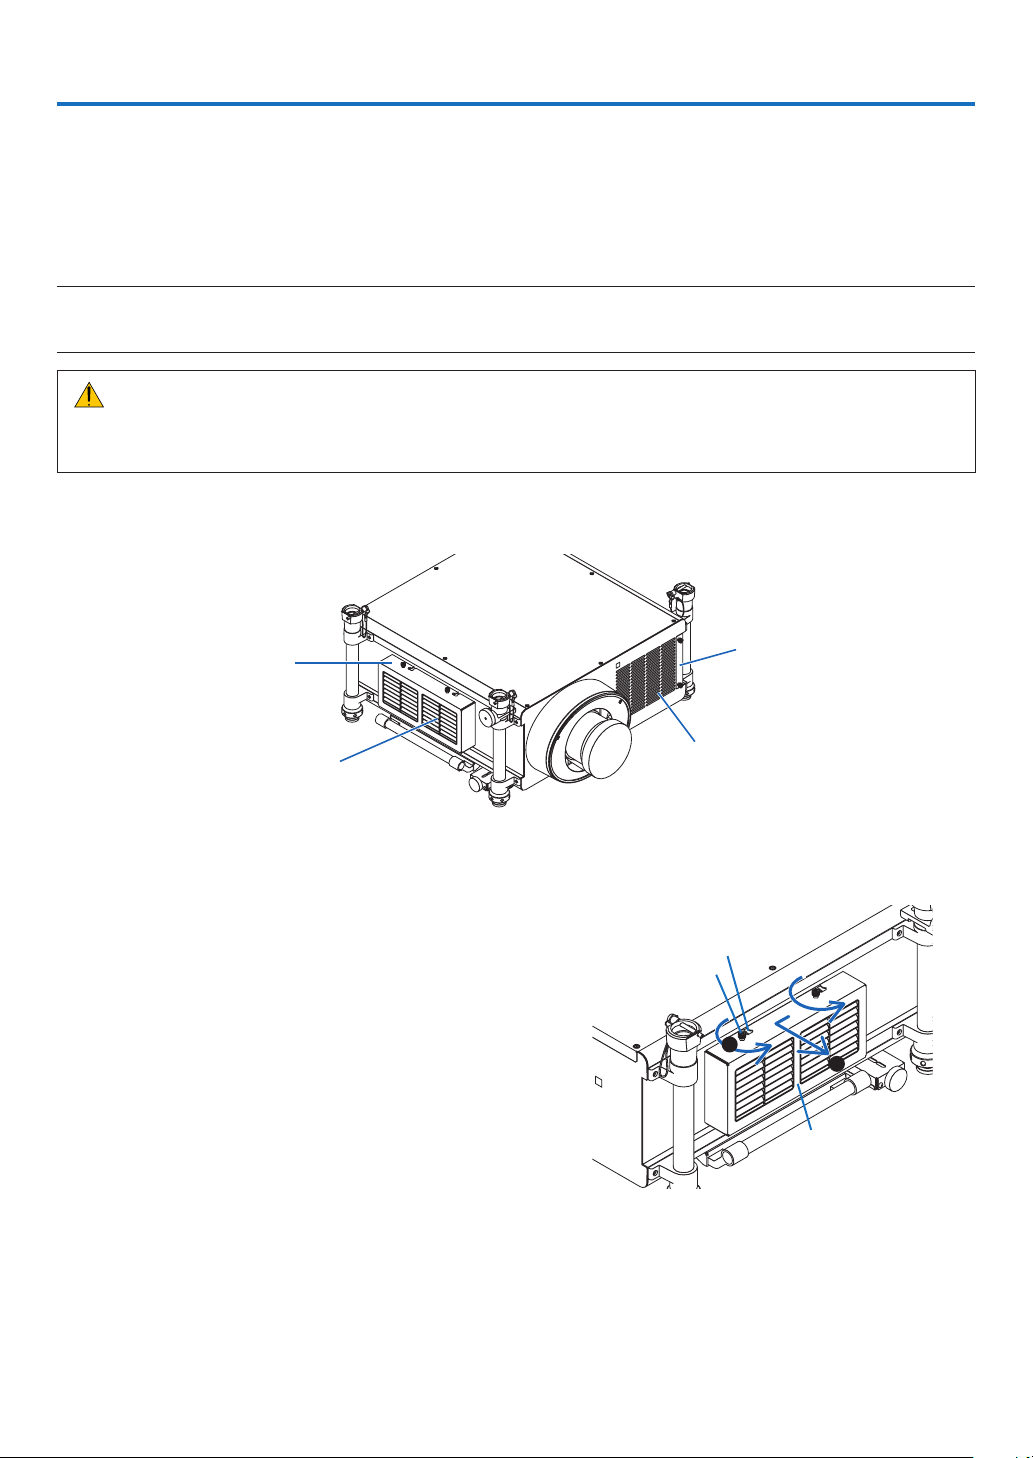
180
Thissectiondescribesthesimplemaintenanceproceduresyoushouldfollowtocleanthelters,thelens,thecabinet,
andtoreplacethelampandthelters.
1 Cleaning the Filters
Theair-lterspongekeepsdustanddirtfromgettinginsidetheprojectorandshouldbefrequentlycleaned.Ifthelter
isdirtyorclogged,yourprojectormayoverheat.
NOTE:Themessageforltercleaningwillbedisplayedforoneminuteaftertheprojectoristurnedonoroff.Whenthemessageis
displayed,cleanthelters.Thetimetocleantheltersissetto[OFF]attimeofshipment.(→
page 123)
To cancel the message, press any button on the projector cabinet or the remote control.
CAUTION
•Beforecleaningthelters,turnofftheprojector,disconnectthepowercordandthenallowthecabinettocool.
Failuretodosocanresultinelectricshockorburninjuries.
Preparation:Beforecleaningthelters,useavacuumcleanertocleantheventilations(inlet).
Twoltersareattachedontheleftsideandthefrontside.Cleanbothlters.Bothltershavethesameshape.
Whenreplacingthelters,buytheoptionallterNP03FTinadvance.
Filter cover
Inlet
(Thelterisinside)
Filter cover
Inlet
(Thelterisinside.)
Cleaning the filter on the left side
1.Removetheltercover.
(1)Looseneachofthetwoknobsbyturningthemcounter
-
clockwise.
•Theknobsarenotremovable.
•Iftheknobistootighttoturn,useaPhillipsscrew
-
driver.
(2)Removetheltercoverbyslidingittotheleftandpulling
it out.
1
2
Filter cover
Notch
Knob
7. Maintenance
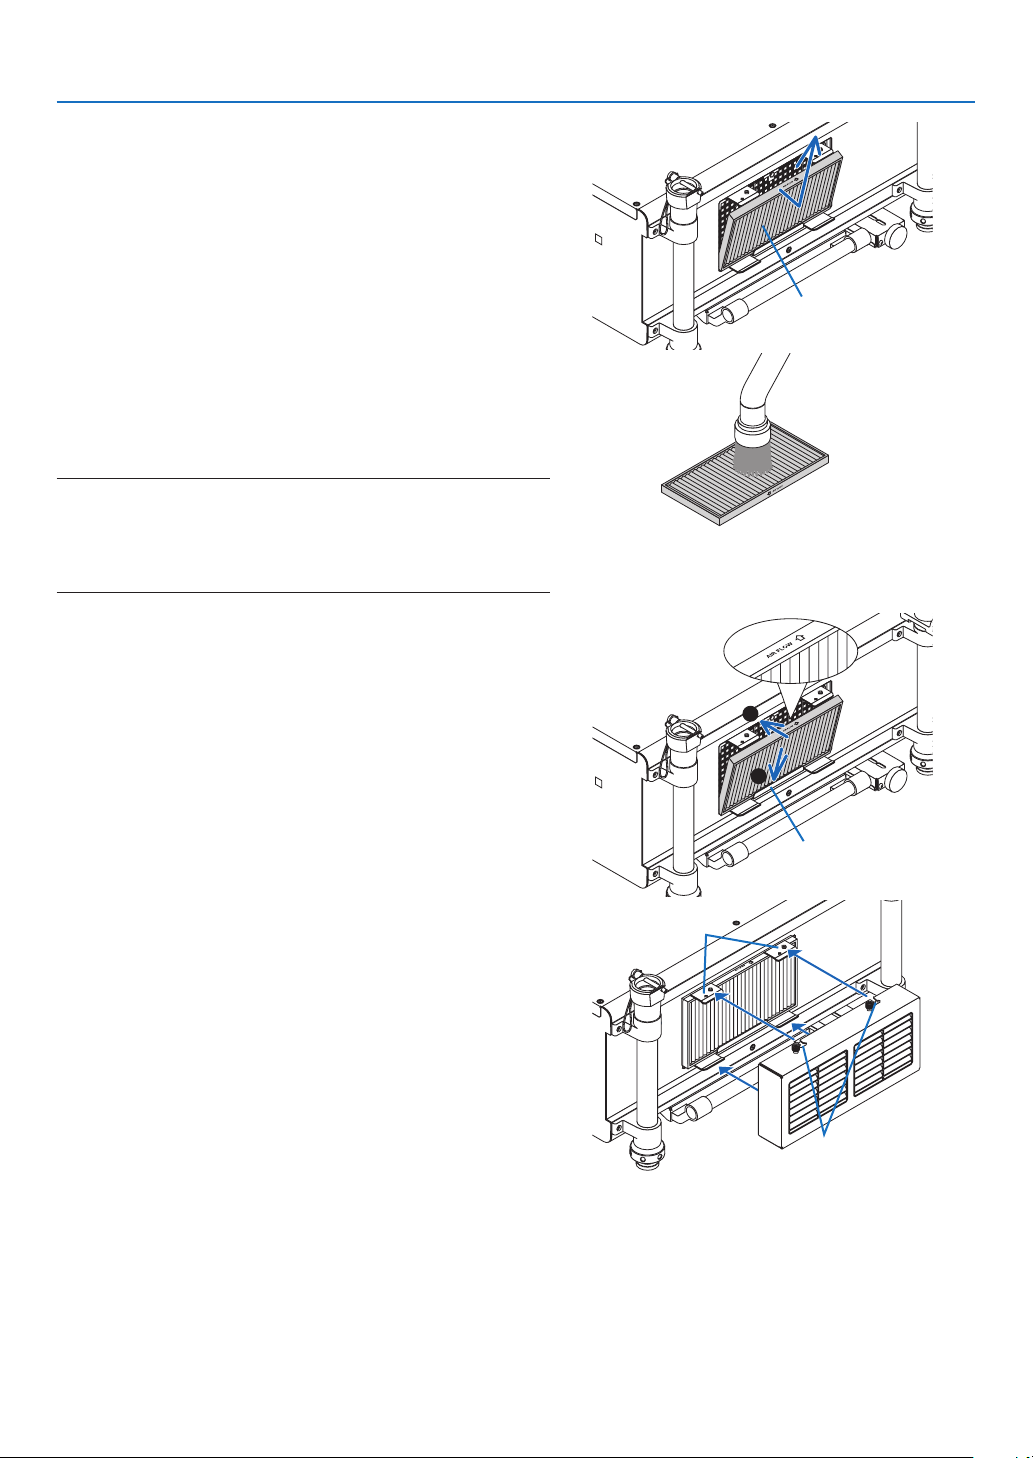
181
7. Maintenance
2.Removethelter.
Pullthetopofthelteroutwardandremovethelterbylifting
it up.
Filter
3.Useavacuumcleanertovacuumallthedustfromthe
insideofthelter.
Getridofdustintheaccordionlter.
•Removethedustinsidetheltercoverandtheinletofthe
projector as well.
NOTE:
•Wheneveryouvacuumthelter,usethesoftbrushattachmentto
vacuum.Thisistoavoiddamagetothelter.
•Donotwashthelterwithwater.Doingsocanresultindamageto
theltermembraneandalsocauseclogging.
4.Putthelterbackintoplace.
Insertthelterwith“↓AIRFLOW↓”facingtheprojector.
(1)Insertthelterintheange.
(2) Fitthetopedgeofthelterintheinlet.
1
2
Flange
5.Placetheltercoverbackontotheprojectorcabinet.
(1)Inserttheguidepin(4locations)oftheprojectorintothe
notch(4locations)oftheltercover.
Notch
Guidepin
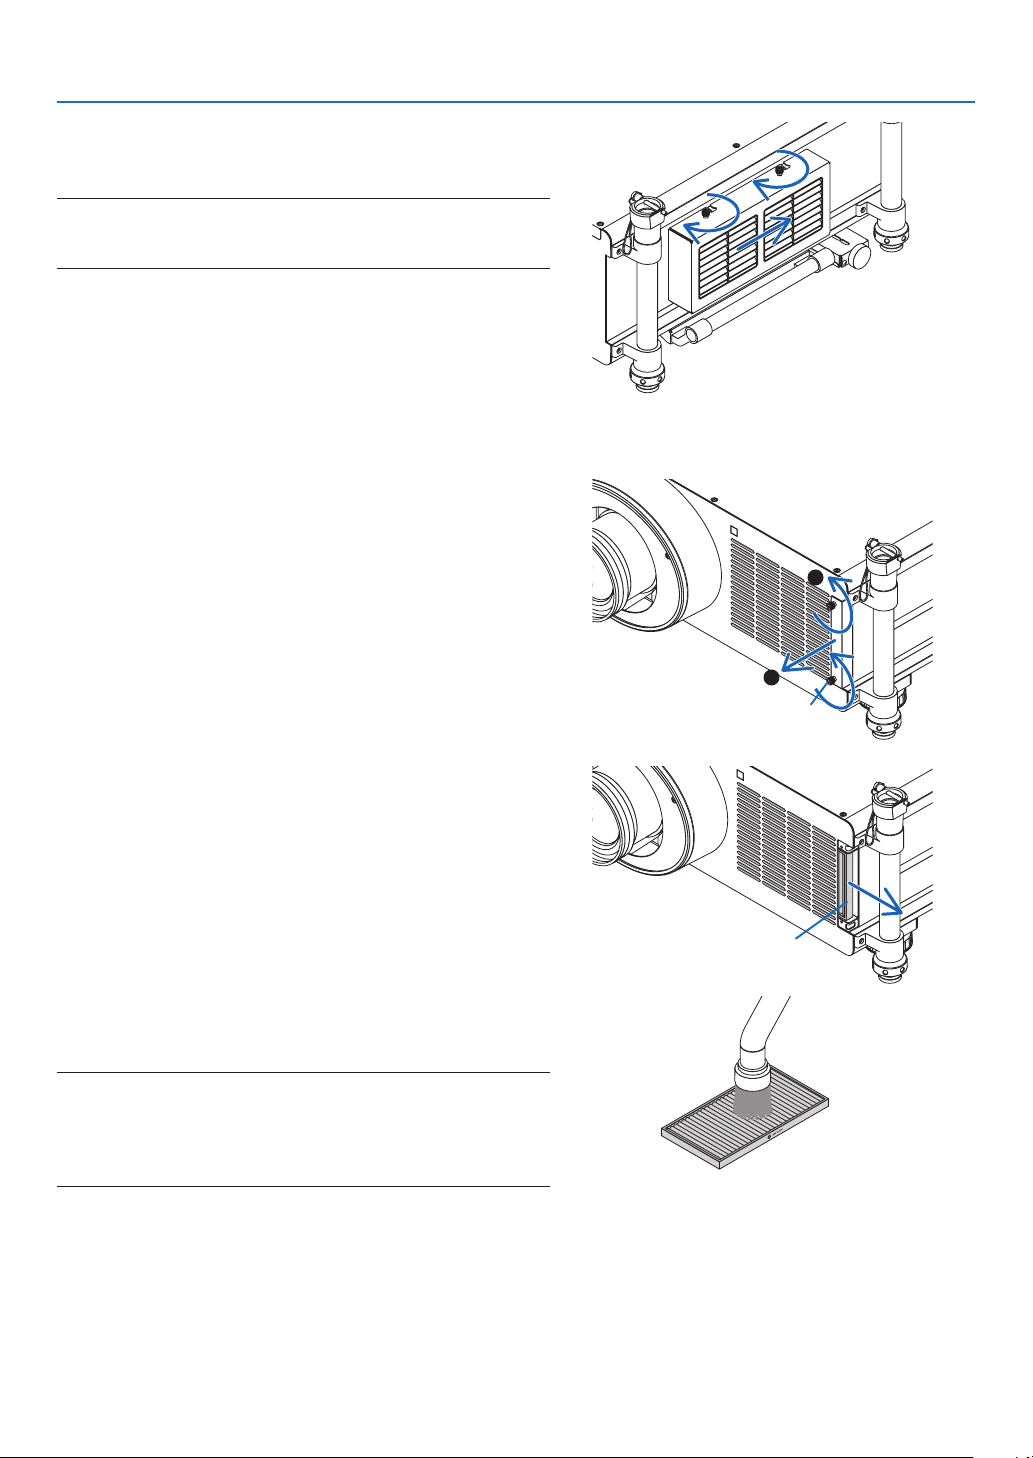
182
7. Maintenance
(2)Slidetheltercovertotherightandtighteneachofthe
twoknobsbyturningthemclockwise.
NOTE:
Besuretocleanbothlters(leftandfrontsides)todisplaythelter
usage hours as accurate as possible.
Cleaning the filter on the front side
1.Removetheltercover.
(1)Looseneachofthetwoknobsbyturningthemcounter
-
clockwise.
•Theknobsarenotremovable.
•Iftheknobistootighttoturn,useaPhillipsscrew
-
driver.
(2)Removetheltercoverbypullingitout.
1
2
Knob
2.Removethelter.
Removethelterbypullingittotheright.
Filter
3.Useavacuumcleanertovacuumallthedustfromthe
insideofthelter.
Getridofdustintheaccordionlter.
NOTE:
•Wheneveryouvacuumthelter,usethesoftbrushattachmentto
vacuum.Thisistoavoiddamagetothelter.
•Donotwashthelterwithwater.Doingsocanresultindamageto
theltermembraneandalsocauseclogging.
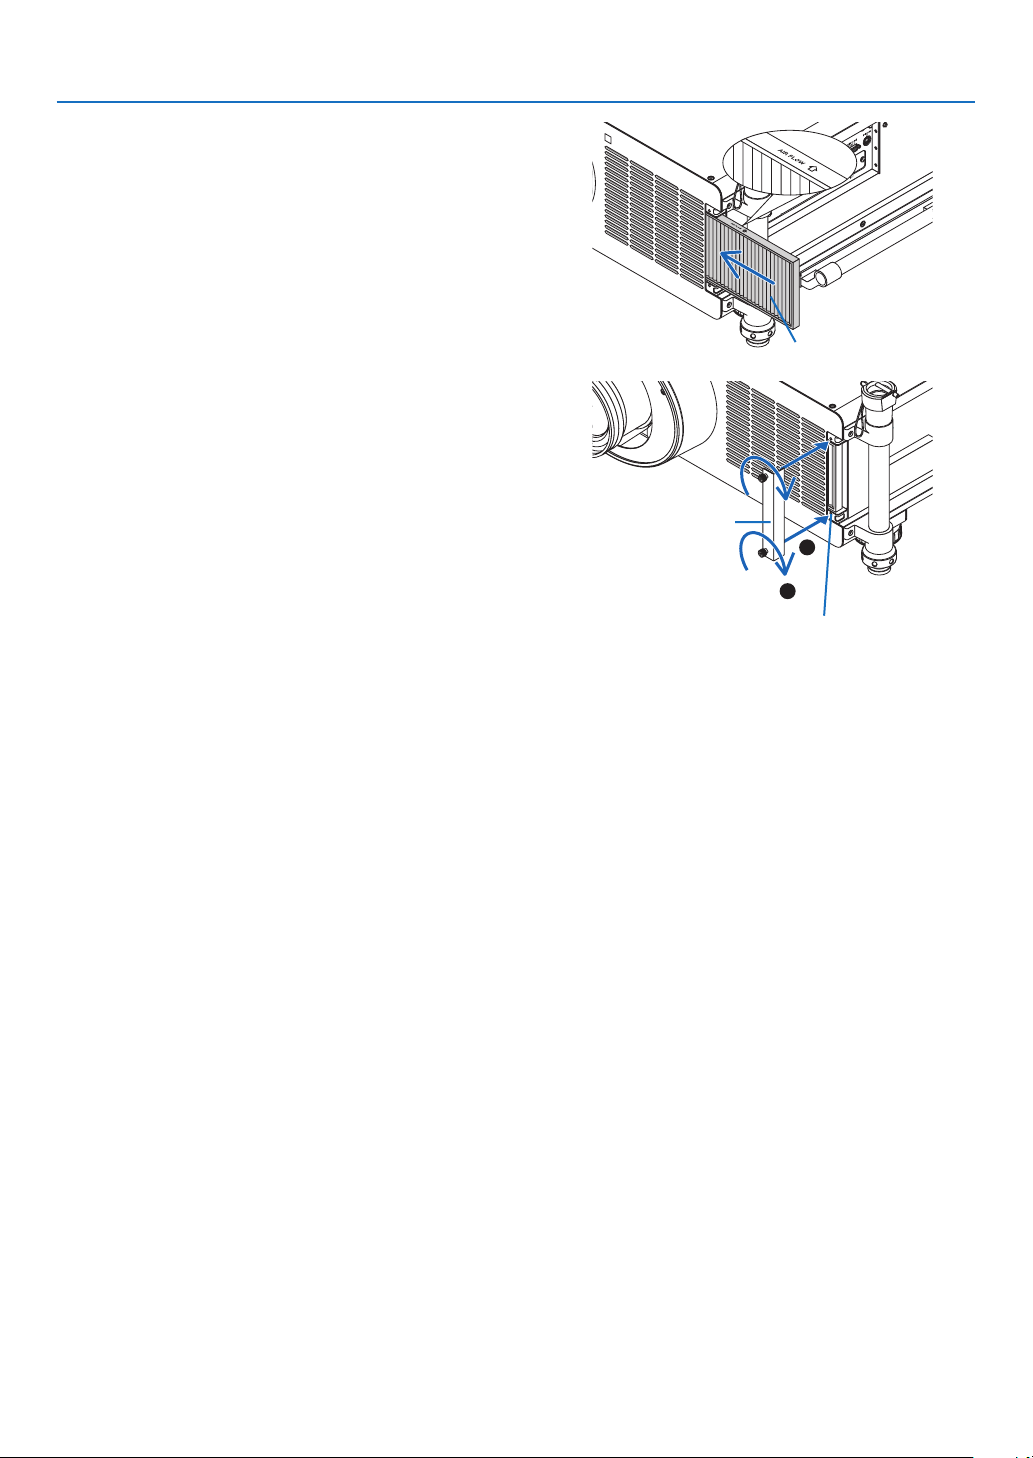
183
7. Maintenance
4.Putthelterbackintoplace.
Insertthelterwith“↓AIRFLOW↓”facingtheprojector.
(1)Insertthelterintheinlet.
(2) Fitthetopedgeofthelterintheinlet.
Filter
5.Placetheltercoverbackintotheprojectorcabinet.
(1)Aligntheknob(screw)withthescrewhole.
(2)Tighteneachofthetwoknobsbyturningitclockwise.
1
2
Screwhole
Filter cover
6.Clearthelterusagehours.
Plug the power cord into the wall outlet, turn on the main
power switch, and then turn on the projector.
Fromthemenu,select[RESET]→[CLEARFILTERHOURS]
andresetthelterusagehours.(→ page 139)
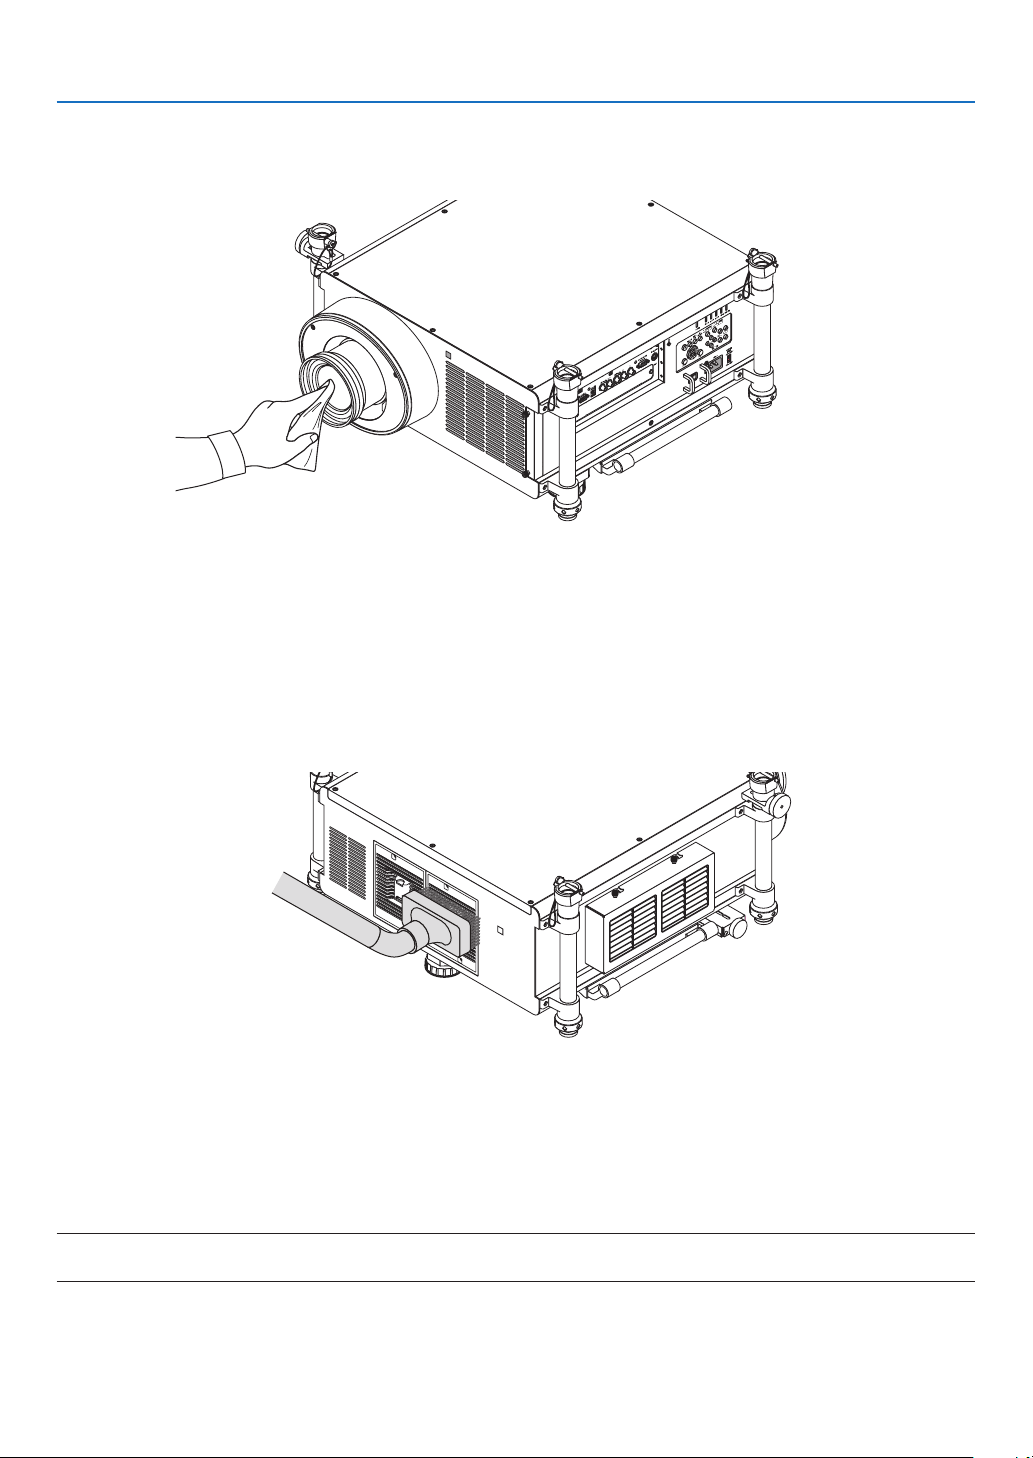
184
7. Maintenance
Cleaning the Lens
•Turnofftheprojectorbeforecleaning.
•Useablowerorlenspapertocleanthelens,andbecarefulnottoscratchormarthelens.
Cleaning the Cabinet
Turnofftheprojector,andunplugtheprojectorbeforecleaning.
•Useadrysoftclothtowipedustoffthecabinet.
Ifheavilysoiled,useamilddetergent.
•Neverusestrongdetergentsorsolventssuchasalcoholorthinner.
•Whencleaningtheventilationslitsorthespeakerusingavacuumcleaner,donotforcethebrushofthevacuum
cleanerintotheslitsofthecabinet.
Vacuumthedustofftheventilationslits.
•Cloggedventilationslitsmaycauseariseintheinternaltemperatureoftheprojector,resultinginmalfunction.
•Donotscratchorhitthecabinetwithyourngersoranyhardobjects
•Contactyourdealerforcleaningtheinsideoftheprojector.
NOTE:Donotapplyvolatileagentsuchasinsecticideonthecabinet,thelens,orthescreen.Donotleavearubberorvinylproduct
inprolongedcontactwithit.Otherwisethesurfacenishwillbedeterioratedorthecoatingmaybestrippedoff.

185
7. Maintenance
Replacing the Lamp and the Filters
Whenthelampreachestheendofitslife,theLAMPindicatorinthecabinetwillblinkredandthemessage“THELAMP
HASREACHEDTHEENDOFITSUSABLELIFE.PLEASEREPLACETHELAMP1(or2).USETHESPECIFIED
LAMPFORSAFETYANDPERFORMANCE.”willappear(*).Eventhoughthelampmaystillbeworking,replacethe
lamptomaintaintheoptimalprojectorperformance.Afterreplacingthelamp,besuretoclearthelamphourmeter.
(→page
138)
CAUTION
•DONOTTOUCHTHELAMPimmediatelyafterithasbeenused.Itwillbeextremelyhot.Turntheprojector
offandthendisconnectthepowercord.Allowatleastonehourforthelamptocoolbeforehandling.
•Usethespeciedlampforsafetyandperformance.
•DONOTREMOVEANYSCREWSexcepttwo(2)lampcoverscrewandthree(3)lamphousingscrews.Youcould
receiveanelectricshock.
•Donotbreaktheglassonthelamphousing.
Keepngerprintsofftheglasssurfaceonthelamphousing.Leavingngerprintsontheglasssurfacemightcause
anunwantedshadowandpoorpicturequality.
•Theprojectorwillturnoffandgointostandbymodewhenyoucontinuetousetheprojectorforanother100hours
afterthelamphasreachedtheendofitslife.Ifthishappens,besuretoreplacethelamp.Ifyoucontinuetouse
thelampafterthelampreachestheendofitslife,thelampbulbmayshatter,andpiecesofglassmaybescattered
inthelampcase.Donottouchthemasthepiecesofglassmaycauseinjury.Ifthishappens,contactyourNEC
dealerforlampreplacement.
*NOTE:Thismessagewillbedisplayedunderthefollowingconditions:
•foroneminuteaftertheprojectorhasbeenpoweredon
•whenthe
(POWER)buttonontheprojectorcabinetorthePOWEROFFbuttonontheremotecontrolispressed
To turn off the message, press any button on the projector cabinet or the remote control.
Optionallampandtoolsneededforreplacement:
•Phillipsscrewdriver(plus-head)
•Replacementlamp:
NP22LP
Flow of Replacing the Lamp and the Filters
Thefollowingprocedureisanexampleforreplacingbothlamps.
Step 1.Replacethelamp
Step 2.Replacethelters(→page188)
Step 3.
Clearthelampusagehoursandthelterusagehours(→page138, 139)
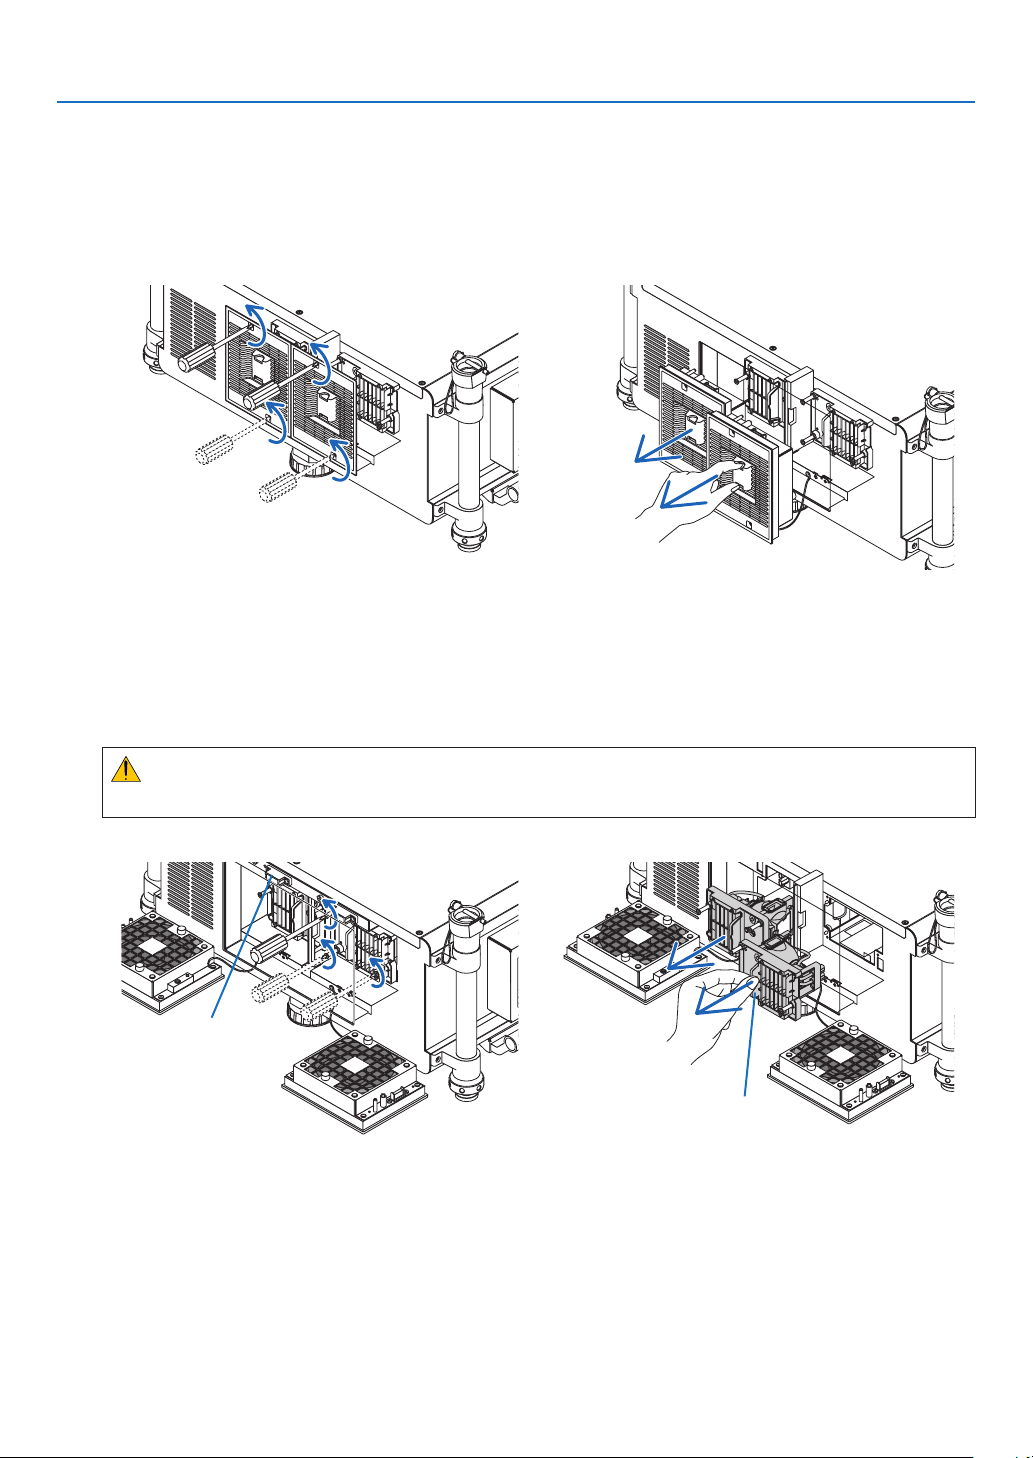
186
7. Maintenance
To replace the lamp:
1.Removethelampcover.
(1)Loosenthetwolampcoverscrews.
•Thelampcoverscrewisnotremovable.
(2)Pullthelampcovertowardsyouandremoveit.
2.Removethelamphousing.
(1)Loosenthethreescrewssecuringthelamphousinguntilthephillipsscrewdrivergoesintoafreewheelingcondi-
tion.
•Thethreescrewsarenotremovable.
•Donottouchtheexhaustfanpowerconnectors.
(2)Removethelamphousingbyholdingit.
CAUTION:
Makesurethatthelamphousingiscoolenoughtohandlebeforeremovingit.
Exhaust fan power
connector
Handle
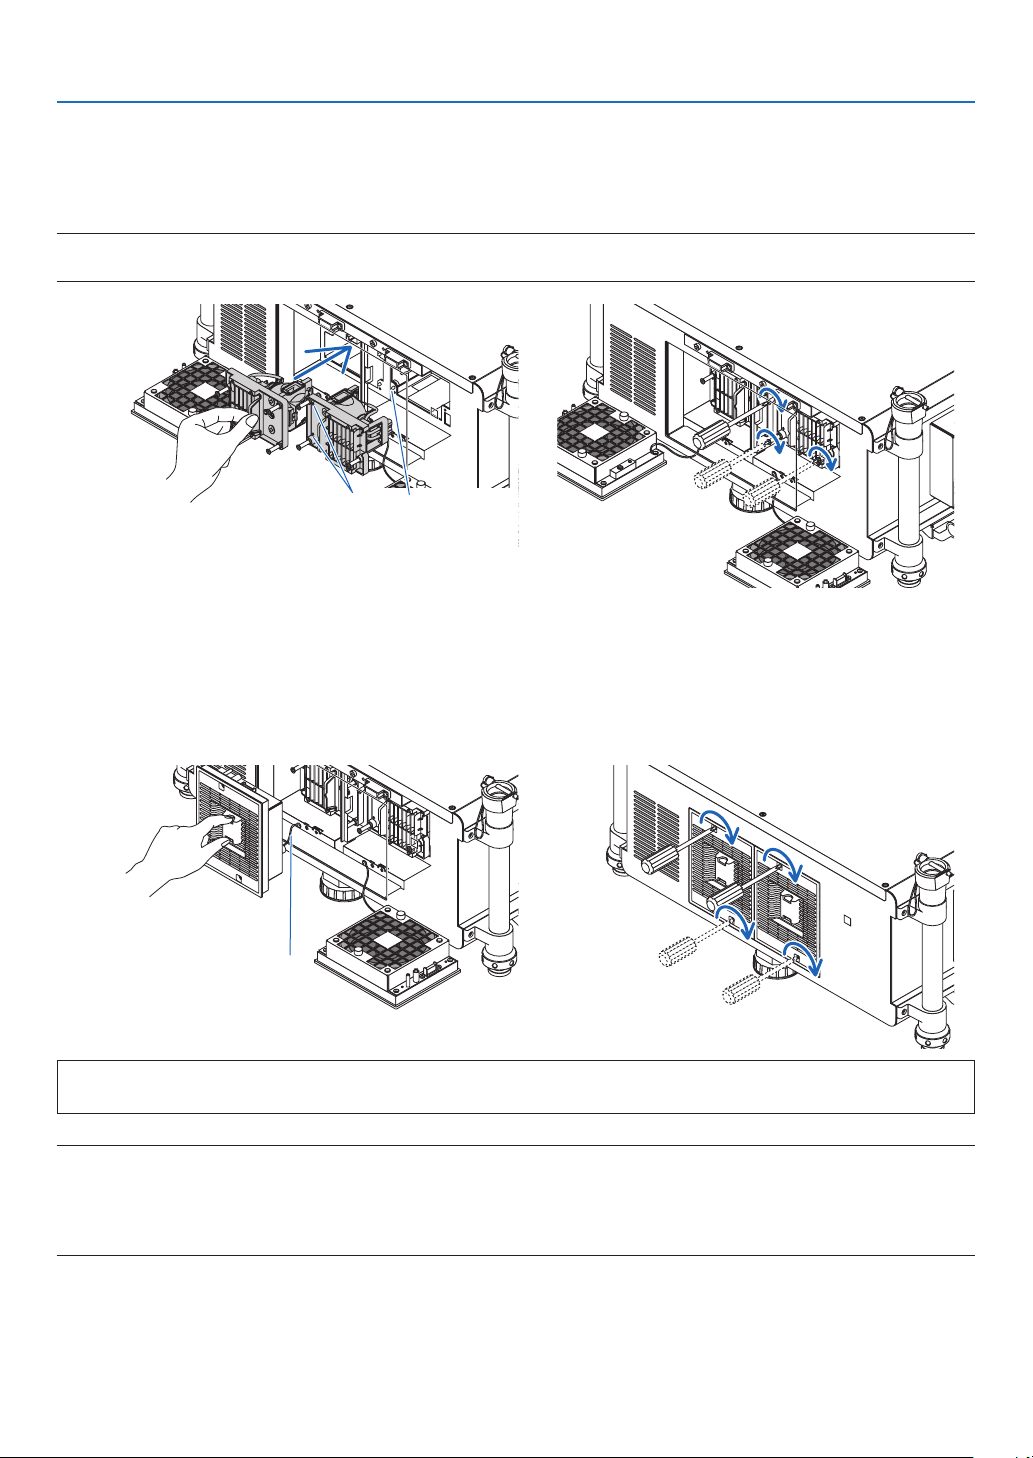
187
7. Maintenance
3.Installanewlamphousing.
(1)Insertanewlamphousinguntilthelamphousingispluggedintothesocket.
(2)Secureitinplacewiththethreescrews.
•Besuretotightenthescrews.
NOTE:
•BesuretoinstallbothLamp1andLamp2.Theprojectorwillnotturnonunlessboththelampsareinstalled.
Alignmenthole
Guidepin
4.Reattachthelampcover.
(1)Aligntheleftsideofthelampcoverwiththeleftsideofthelamphousingandreattachthelampcover.While
doingso,placethewireinsidethelampcompartmentsoasnottogetitcaughtunderthelampcover.
(2)Tightenthetwoscrewstosecurethelampcover.
•Besuretotightenthescrews.
Wire
This completes the lamp replacement.
Go on to the filter replacement.
NOTE:Whenyoucontinuetousetheprojectorforanother100hoursafterthelamphasreachedtheendofitslife,bothLAMP1
andLAMP2indicatorswilllightredandtheprojectorcannotturnonandthemenuisnotdisplayed.
Ifthishappens,presstheHELPbuttonontheremotecontrolfor10secondstoresetthelampclockbacktozero.
Whenthelamptimeclockisresettozero,theLAMPindicatorgoesout.Whenonlyonelampisreplaced,select[RESET]fromthe
menutoresetthelamphourused.DonotpresstheHELPbutton.
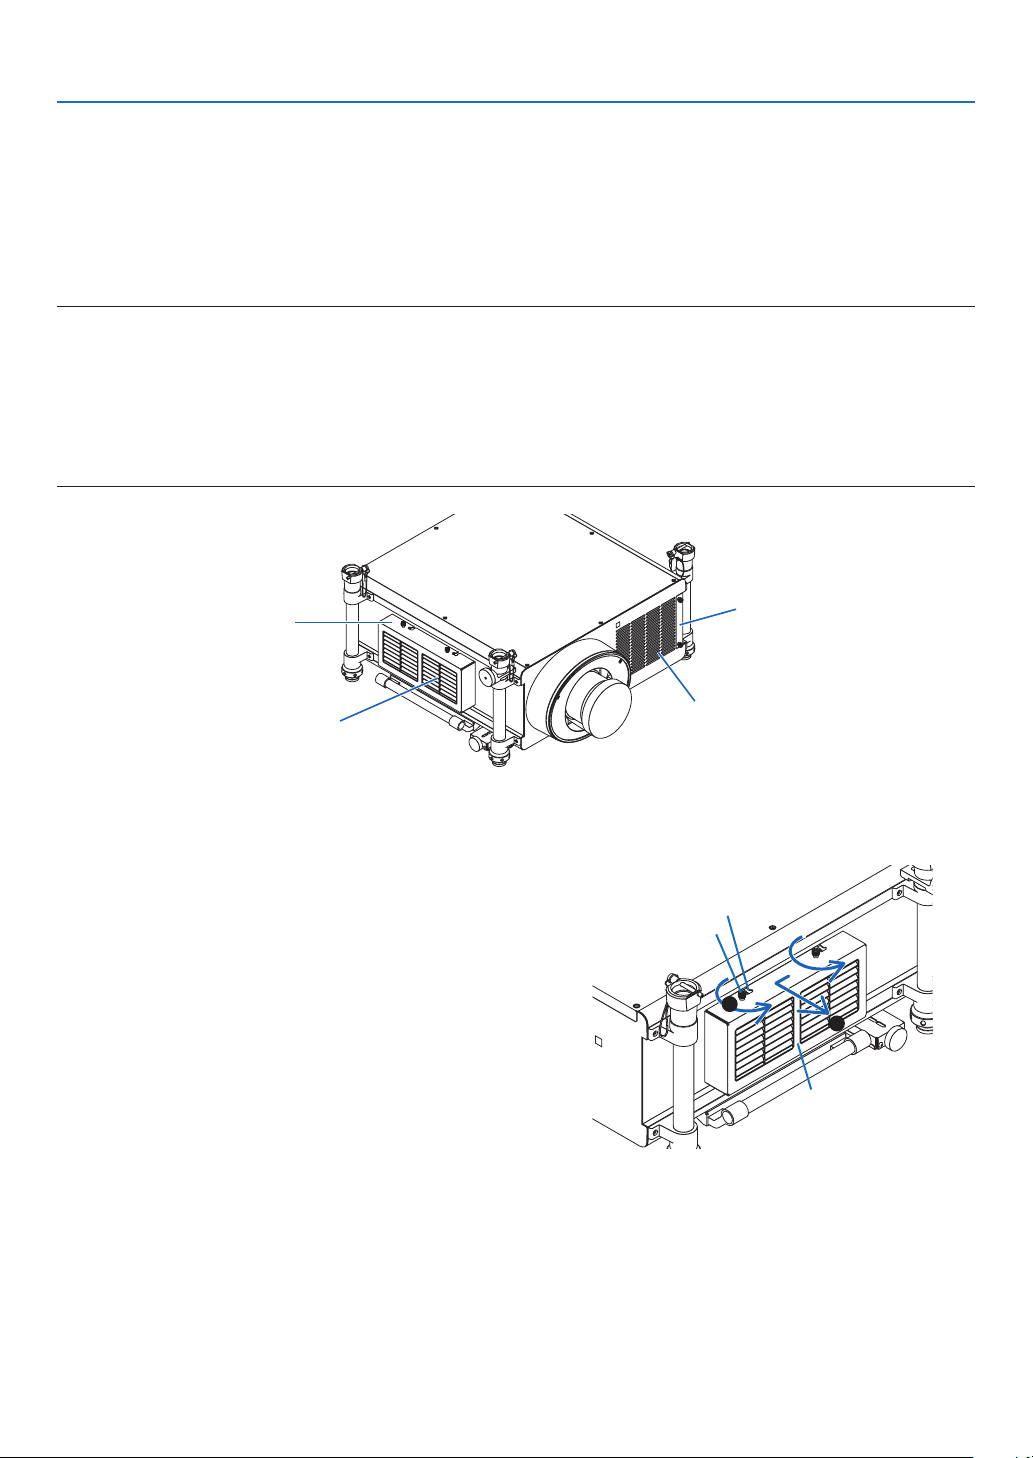
188
7. Maintenance
Replacing the Filters
Itisrecommendedthattheltersarecleanedafterevery5000hoursofuseandreplacedafterevery10000hoursof
use.Thesehourscanvarydependingonyourusageenvironment.
Therearetwolters,onelocatedatthefrontoftheprojectorandoneontheside.
Optionallters(twolter)areavailable.
Smalloneforthefront
Largeonefortheleftside
NOTE:
•Replacebothlterswiththenewonesatthesametime.
•Beforereplacingthelters,useavacuumcleanertovacuumdustanddirtfromthevents(inlet)oftheprojectoranduseadry
soft cloth to wipe dust off the cabinet.
•Theprojectorcontainshigh-precisionparts.Keepoutdustanddirtduringlterreplacement.
•Donotwashthelterwithwater.Waterwilldamagetheltermembrane.
•Attachthelterinthecorrectorientation.Failuretodosomaycausedustanddirttoenterinsidetheprojector,resultinginprojec-
tor malfunction.
Filter cover
Inlet
(Thelterisinside)
Filter cover
Inlet
(Thelterisinside.)
Replacing the filter on the left side
1.Removetheltercover.
(1)Looseneachofthetwoknobsbyturningthemcounter
-
clockwise.
•Theknobsarenotremovable.
•Iftheknobistootighttoturn,useaPhillipsscrew
-
driver.
(2)Removetheltercoverbyslidingittotheleftandpulling
it out.
1
2
Filter cover
Notch
Knob
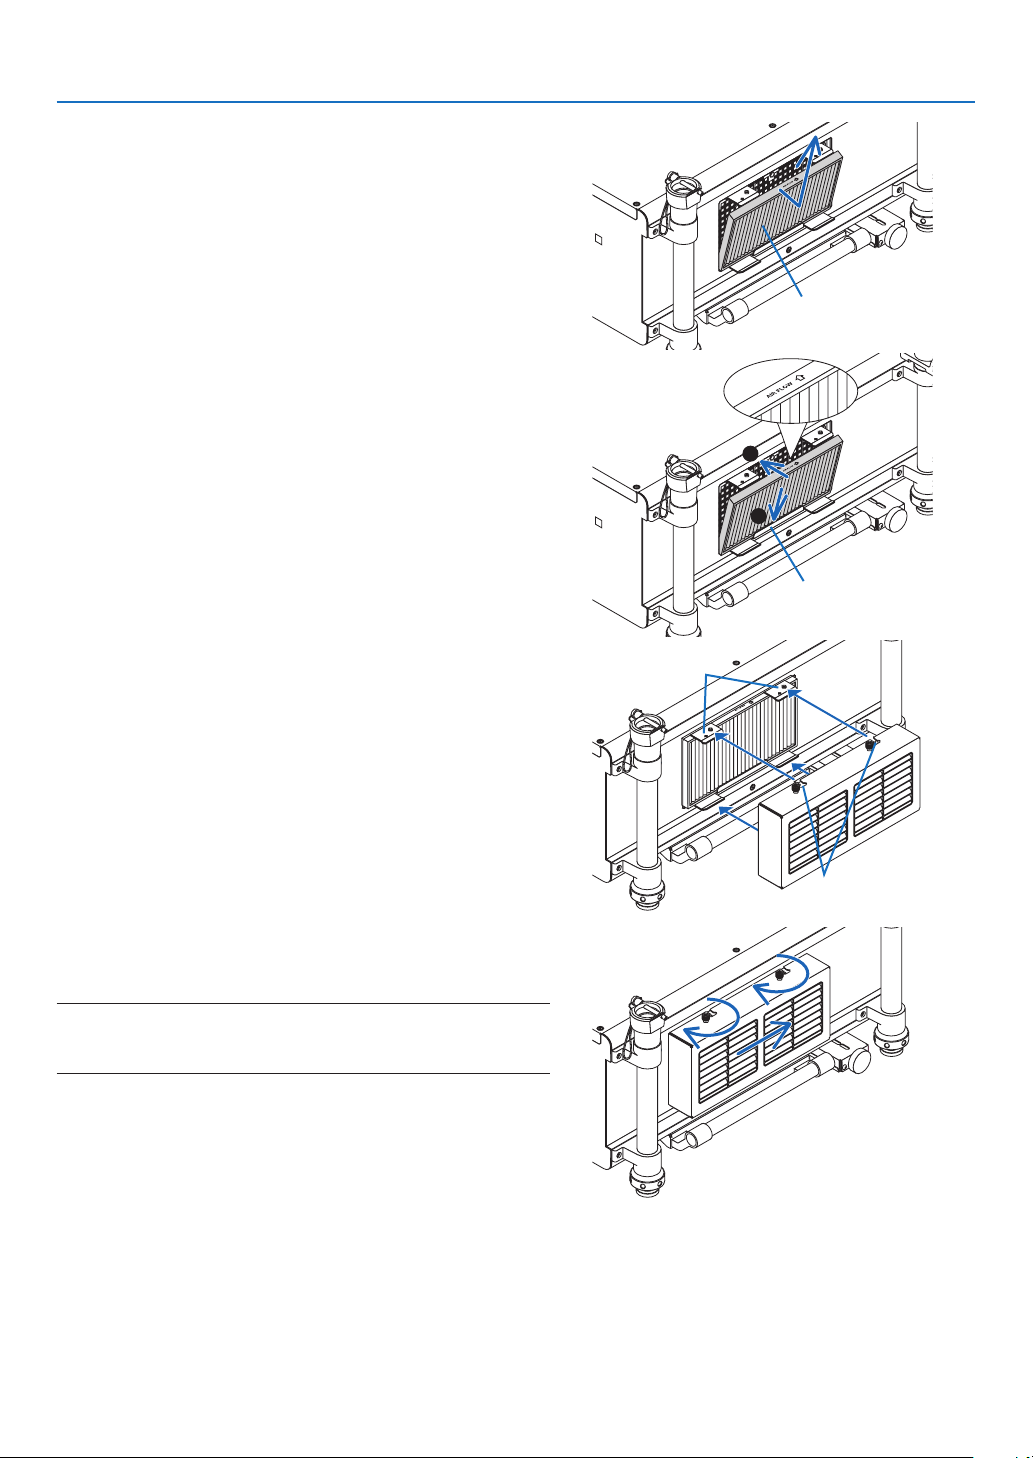
189
7. Maintenance
2.Removethelter.
Pullthetopofthelteroutwardandremovethelterbylifting
it up.
Filter
3.Installthenewlter.
Insertthelterwith“↓AIRFLOW↓”facingtheprojector.
(1)Insertthelterintheange.
(2) Fitthetopedgeofthelterintheinlet.
1
2
Flange
4.Placetheltercoverbackontotheprojectorcabinet.
(1)Inserttheguidepin(4locations)oftheprojectorintothe
notch(4locations)oftheltercover.
Notch
Guidepin
(2)Slidetheltercovertotherightandtighteneachofthe
twoknobsbyturningthemclockwise.
NOTE:
Besuretocleanbothlters(leftandfrontsides)todisplaythelter
usage hours as accurate as possible.
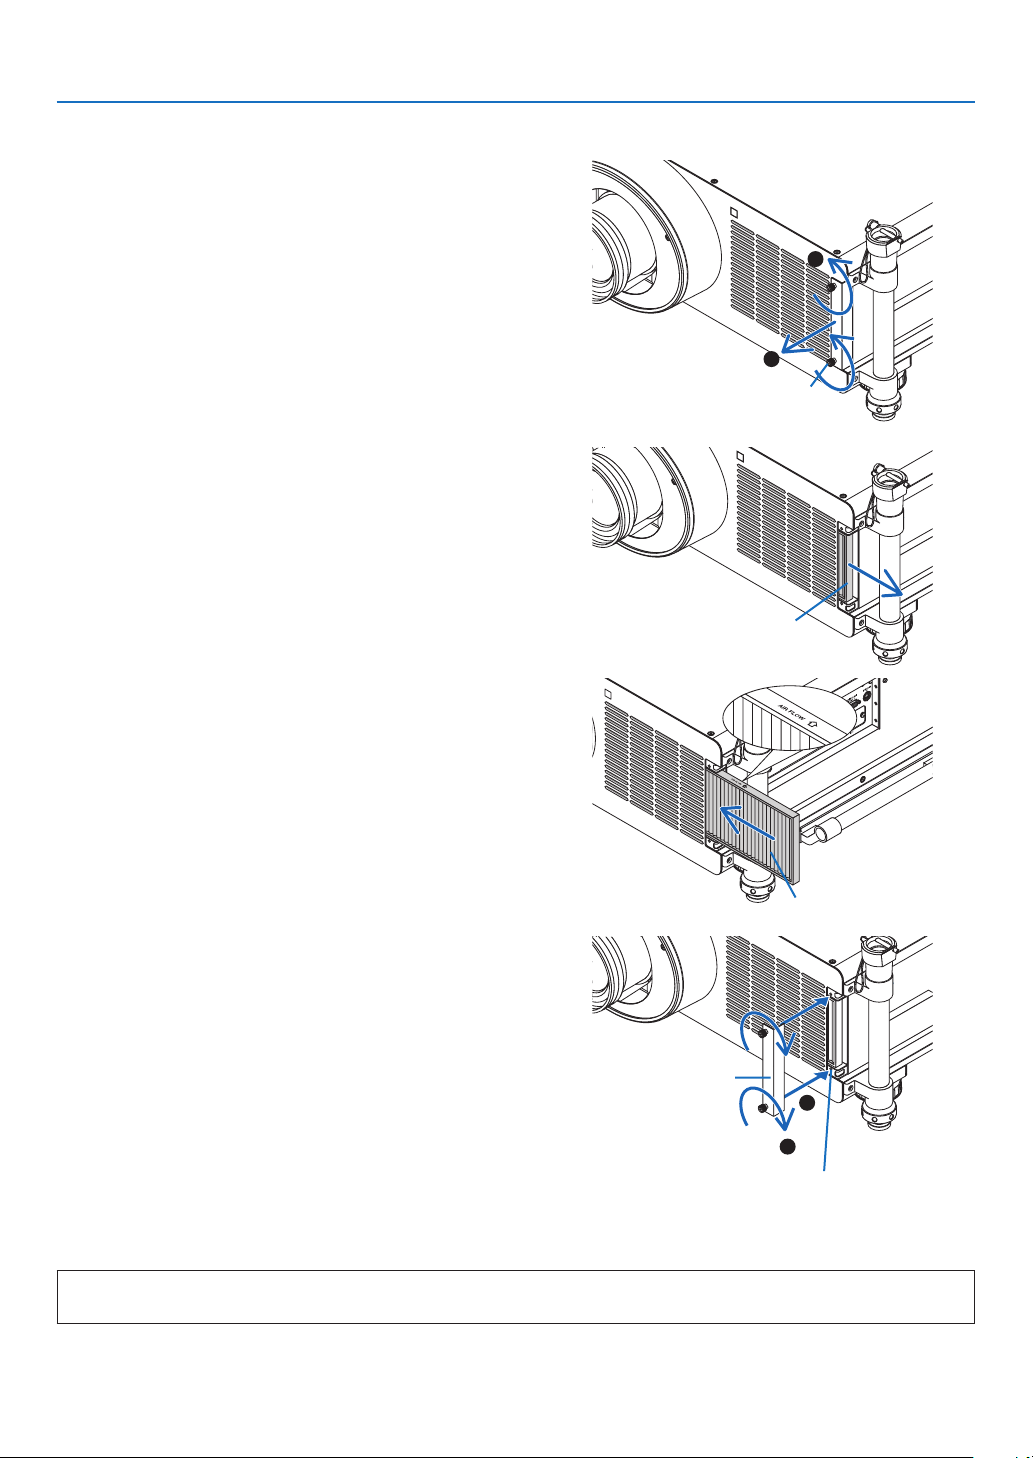
190
7. Maintenance
Replacing the filter on the front side
1.Removetheltercover.
(1)Looseneachofthetwoknobsbyturningthemcounter
-
clockwise.
•Theknobsarenotremovable.
•Iftheknobistootighttoturn,useaPhillipsscrew
-
driver.
(2)Removetheltercoverbypullingitout.
1
2
Knob
2.Removethelter.
Removethelterbypullingittotheright.
Filter
3.Installthenewlter.
Insertthelterwith“↓AIRFLOW↓”facingtheprojector.
(1)Insertthelterintheinlet.
(2) Fitthetopedgeofthelterintheinlet.
Filter
4.Placetheltercoverbackintotheprojectorcabinet.
(1)Aligntheknob(screw)withthescrewhole.
(2)Tighteneachofthetwoknobsbyturningitclockwise.
1
2
Screwhole
Filter cover
This completes the filter replacement.
Go on to the clearing lamp and filter hour meters.

191
7. Maintenance
To clear the lamp usage hours and the filter usage hours:
1.Placetheprojectorwhereyouuseit.
2.Plugthepowercordintothewalloutlet,andthenturnontheprojector.
3.Clearthelampusagehoursandthelterusagehours.
1.Fromthemenu,select[RESET]→[CLEARLAMPHOURS]andresetthelampusagehours.(→
page 138)
2.Select[CLEARFILTERHOURS]andresetthelterusagehours.(→ page 139)

192
8. User Supportware
Installing Software Program
Installation for Windows software
ThesoftwareprogramsexceptImageExpressUtility2forMacsupportWindows7,WindowsVista,andWindows
XP.
1.Downloadtheupdatedsoftwareprogramfromourwebsite(http://www.nec-display.com/dl/en/index.
html)
NOTE:
•Toinstalloruninstalleachsoftwareprogram,theWindowsuseraccountmusthave“Administrator”privilege(Windows7,Win-
dowsVista)or“ComputerAdministrator”privilege(WindowsXP).
•Exitallrunningprogramsbeforeinstallation.Ifanotherprogramisrunning,theinstallationmaynotbecompleted.
•TorunVirtualRemoteToolorPCControlUtilityPro4onWindowsXPHomeEditionandWindowsXPProfessional,“Microsoft
.NETFrameworkVersion2.0orlater”isrequired.TheMicrosoft.NETFrameworkVersion2.0orlaterisavailablefromMicrosoft’s
web page. Download and install it on your computer
1.Connectyourcomputertotheinternetandvisitourwebsite(http://www.nec-display.com/dl/en/index.
html).
2.Downloadthesupportedsoftwareprogramsfrom“Download”andsavean“.exe”letoyourcomputer.
File name is different depending on the version of the software program.
3.Clickthe“.exe”le.
The installation will start.
Follow the instructions on the installer screens to complete the installation.
TIP:
Uninstalling a Software Program
Preparation:
Exitthesoftwareprogrambeforeuninstalling.Touninstallthesoftwareprogram,theWindowsuseraccountmusthave
“Administrator”privilege(Windows7andWindowsVista)or“ComputerAdministrator”privilege(WindowsXP).
•ForWindows7/WindowsVista
1Click“Start”andthen“ControlPanel”.
TheControlPanelwindowwillbedisplayed.
2Click“Uninstallaprogram”under“Programs”
The“ProgramsandFeatures”windowwillbedisplayed.
3Selectthesoftwareprogramandclickit.
4Click“Uninstall/Change”or“Uninstall”.
•Whenthe“UserAccountControl”windowsisdisplayed,click“Continue”.
Follow the instructions on the screens to complete the uninstallation.
•ForWindowsXP
1Click“Start”andthen“ControlPanel”.
TheControlPanelwindowwillbedisplayed.
2Double-click“Add/RemovePrograms”.
TheAdd/RemoveProgramswindowwillbedisplayed.
3Clickthesoftwareprogramfromthelistandthenclick“Remove”.
Follow the instructions on the screens to complete the uninstallation.

193
8. User Supportware
Installation for Macintosh software
ImageExpressUtility2forMacsupportsMacOSX.
1.ConnectyourMacintoshcomputertotheinternetandvisitourwebsite(http://www.nec-display.com/dl/en/
index.html).
2.Download“ImageExpressUtility2forMacOS(Intel)”or“ImageExpressUtility2forMacOS(PowerPC)”
from“Download”andsavean“.exe”letoyourcomputer.
File name is different depending on the version of the software program.
3.Movethe“ImageExpressUtility2”folderto“Applications”folderusingadrag-and-dropoperation.
TIP:
•Uninstallingasoftwareprogram
1.Putthe“ImageExpressUtility2”foldertotheTrashicon.
2.PutthecongurationleofImageExpressUtility2totheTrashicon.
•ThecongurationleofImageExpressUtility2islocatedin“/user/yourusername/library/Preferences/jp.co.
nec.nevt.ImageExpressUtility.plist”.
194
8. User Supportware
Projecting Images or Videos from the Projector over a LAN
(Image Express Utility 2.0)
What you can do with Image Express Utility 2.0
•UsingImageExpressUtility2.0allowsyoutosendthescreensofyourcomputerstotheprojectorviawired/wire-
lessLAN.
Theprojectedimagescanbesentfromacomputertonotonlyoneprojectorbutalsototwoormoreprojectorsat
thesametime.
When“MeetingMode”isused,projectedimagescanbesentandreceivedbetweentwoormorecomputers.
•High-speed,high-qualityimagetransmissionsbasedonNEC’soriginalcompressionalgorithm
NEC’soriginalcompressionalgorithmallowshigh-qualityimagestobesentoverthenetworkathighspeed,from
yourcomputertotheprojector.
•Simultaneousprojectionbymultipleprojectors
Imagescanbesentfromacomputertonotonlyoneprojectorbutalsototwoormoreprojectorsatthesame
time.
•“EasyConnection”functionforconnectingwirelessLAN
Byusing“EasyConnection”function*
1
,thecomplicatedsettingofwirelessLANcanbesimplied.
*
1
ThisfunctioncanbeusedwhenWindowsXPisusedastheOSandwhenyouhavea“ComputerAdminis-
trator”privilege.IftheOSisWindows7/WindowsVista,inputoflogonpasswordas“Administrator”maybe
prompted.
195
8. User Supportware
•Projectedimagescanbetransferredandsavedtocomputers.
When“MeetingMode”isused,projectedimagescanbesenttothecomputersofalltheparticipants(attendants)
ofa“Meeting”.Thereceivedimagescanbesavedtoyourcomputerwithamemo(textdata)attached.
Presenter
Attendant
Attendant
Attendant
•1-clickswitchingofpresenter
Whenswitchingtoanotherpresenterduringtheconference,theparticipants(attendants)cansimplyclickabutton
toswitchovertothenewpresenter.
•Centralmanagementoftheprojectingcomputer
UsingtheTrainingModeallowsyoutouseasinglecomputer(Manager)tomanagewhichcomputer(Attendant)
projects.Possibleoperationincludesswitchingprojectingcomputerstoprojectfrom,aswellastemporarilytermi-
natingcommunicationwiththeprojector.
Mr. D, please start your
presentation.
Manager
Attendant CAttendant B
Attendant D
(presenter)
Attendant A
NOTE:
TheTrainingModeisnotinstalledviathe“Typical”installationoptionwhenImageExpressUtility2.0isinstalled.
TouseTrainingMode,select“Extension”installationoptionontheinstallselectionscreenthatisdisplayedwhileImageExpress
Utility2.0installationisinprogress,andselect“TrainingMode(Attendant)”or“TrainingMode(Manager)”.
Connecting the projector to a LAN
ConnecttheprojectortotheLANbyfollowingtheinstructionsin“ConnectingtoaWiredLAN”(→page
173),“Con-
nectingtoaWirelessLAN”(→page174)and“9ApplicationMenus-NETWORKSETTINGS”(→page142)
196
8. User Supportware
Basic Operation of Image Express Utility 2.0
ThissectionexplainsthefollowingthreecasesasexamplesofoperatingImageExpressUtility2.0.
(1)Transferringimagestotheprojector
(2)Holdingaconference
(3)Participatinginaconference
Sending Images to Projector
•Connectingprojector
1TurnonthepowertotheprojectorforwhichLANhasbeenset.
2ClickWindows[Start]→[AllPrograms]→[NECProjectorUserSupportware]→[ImageExpressUtility2.0]
→[ImageExpressUtility2.0],inthatorder.
The“SelectionOfNetworkConnections”windowwillbedisplayed.
Alistofthenetworkequipmentconnectedtoyourcomputerwillbedisplayed.
IMPORTANT:
AscreenliketheonebelowisdisplayedwhenthesoftwareisstartedonaPCinstalledwithWindowsXPServicePack2(SP2)(or
later).
Click“Unblock”ifthisisdisplayed.
3Selectthenetworkequipmentthatistobeusedandclick[OK].
Selectthenetworkdevicedisplaying“EasyConnection”iftheproductLANsettingisfor“EasyConnection.”This
willcallupthe“ProjectorList”window.
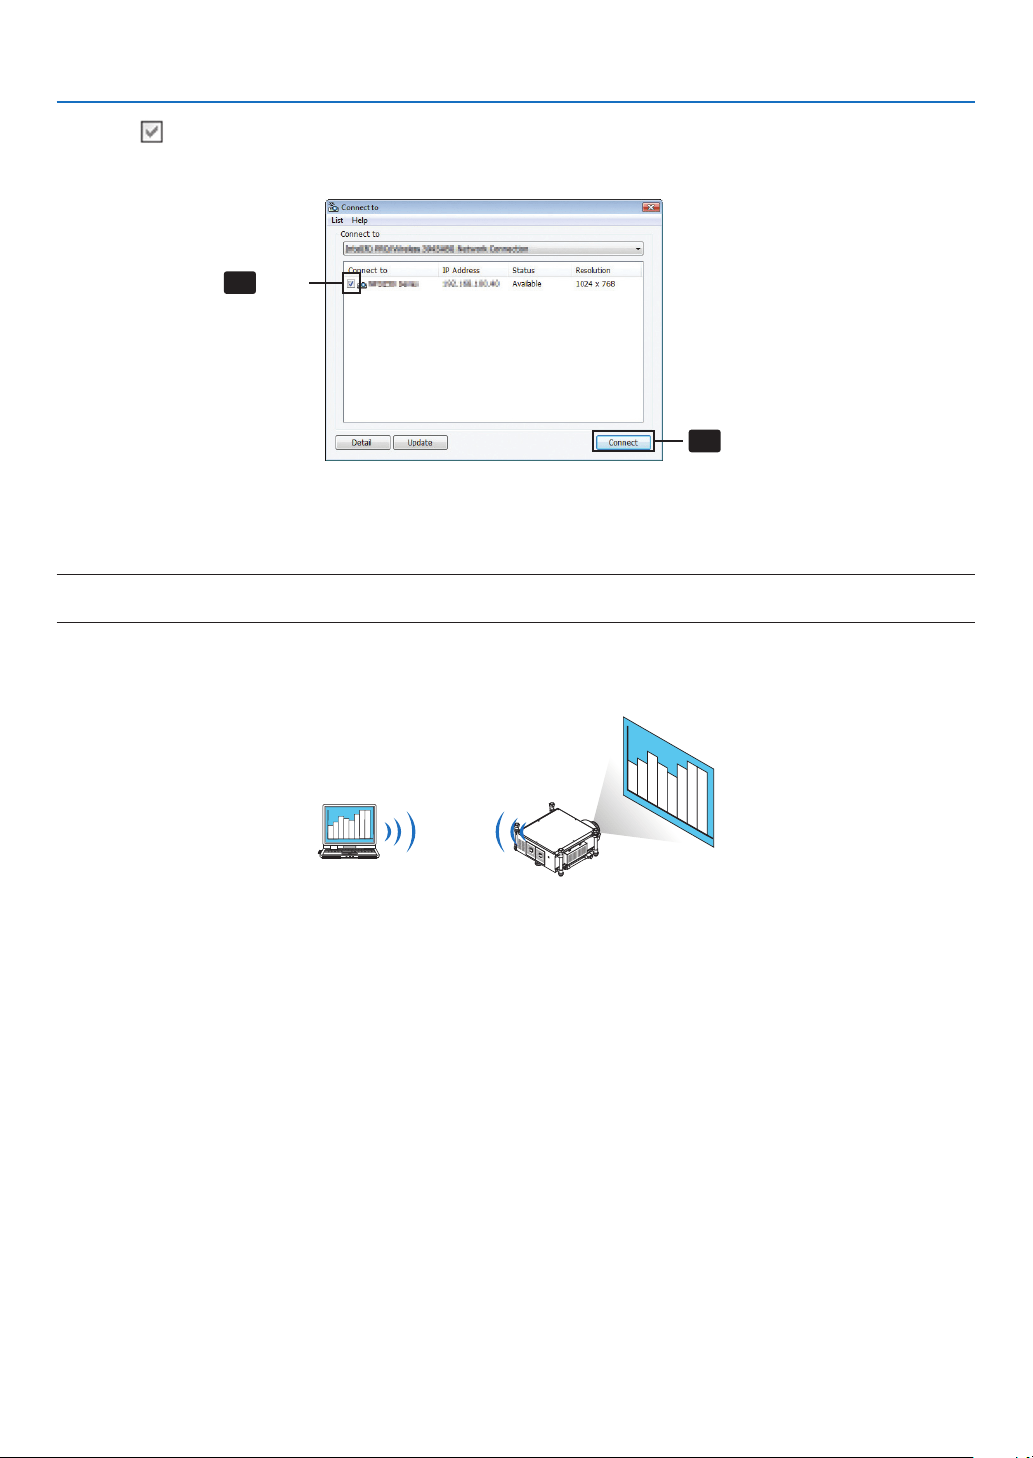
197
8. User Supportware
4Check()theprojectortoconnectandclick[Connect].
Ifthenameoftheprojectortoconnectisnotonthelistorifitishidden,click[Update].
4-1
4-2
Click
Click
Thescreenofyourcomputerwillbeprojectedfromtheprojector.
Atthistime,theinputsignaloftheprojectorwillautomaticallychangeto“NETWORK”.
NOTE:
•Whentheprojectorisfound,“1280×800”willbedisplayedintheresolutioneld.
•Transferringimages
Whenyourcomputerisconnectedtotheprojector,thescreenofthecomputerisprojectedfromtheprojectorasis.To
makeyourpresentationbyusingaPowerPointle,openthePowerPointleandstartyourpresentation.
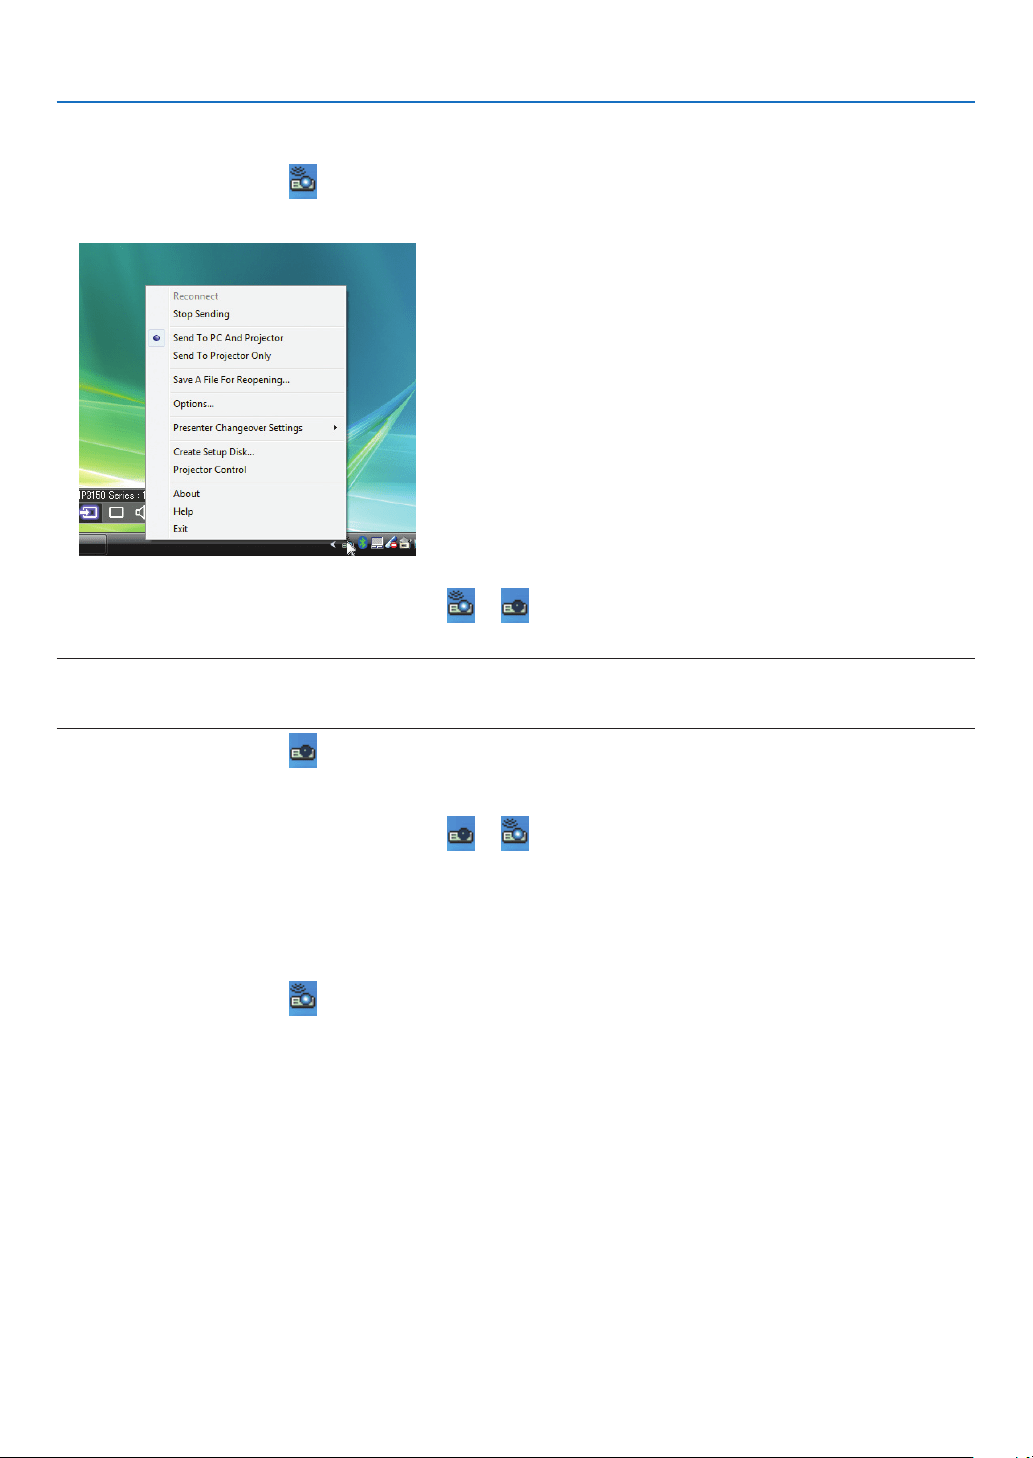
198
8. User Supportware
•Stoppingorresumingthetransmissionofimages
Thetransmissionofthescreenofthecomputertotheprojectorcanbetemporarilystoppedandthenresumed.
1Clicktheprojectoricon(
)ontheWindowstaskbar.
Apop-upmenuwillbedisplayed.
2Click[StopSending].
Theprojectoricononthetaskbarwillchange(
→ ).
NOTE:
Evenifthescreenofthecomputerischangedinthisstatus,theimageprojectedfromtheprojectordoesnotchange.
Tomanipulatethescreenthatshouldnotbedisclosed(projectedfromtheprojector),stoptransmission.
3Clicktheprojectoricon()ontheWindowstaskbar.
Apop-upmenuwillbedisplayed.
4Click[StartSending].
Theprojectoricononthetaskbarwillchange( → ).
Thetransmissionofthescreenforthecomputerwillberesumed,andthecurrentscreenofthecomputerwillbe
projected from the projector.
•Endthetransmissionofimages
ExitImageExpressUtility2.0.
1Clicktheprojectoricon()ontheWindowstaskbar.
Apop-upmenuwillbedisplayed.
2Click[Exit].
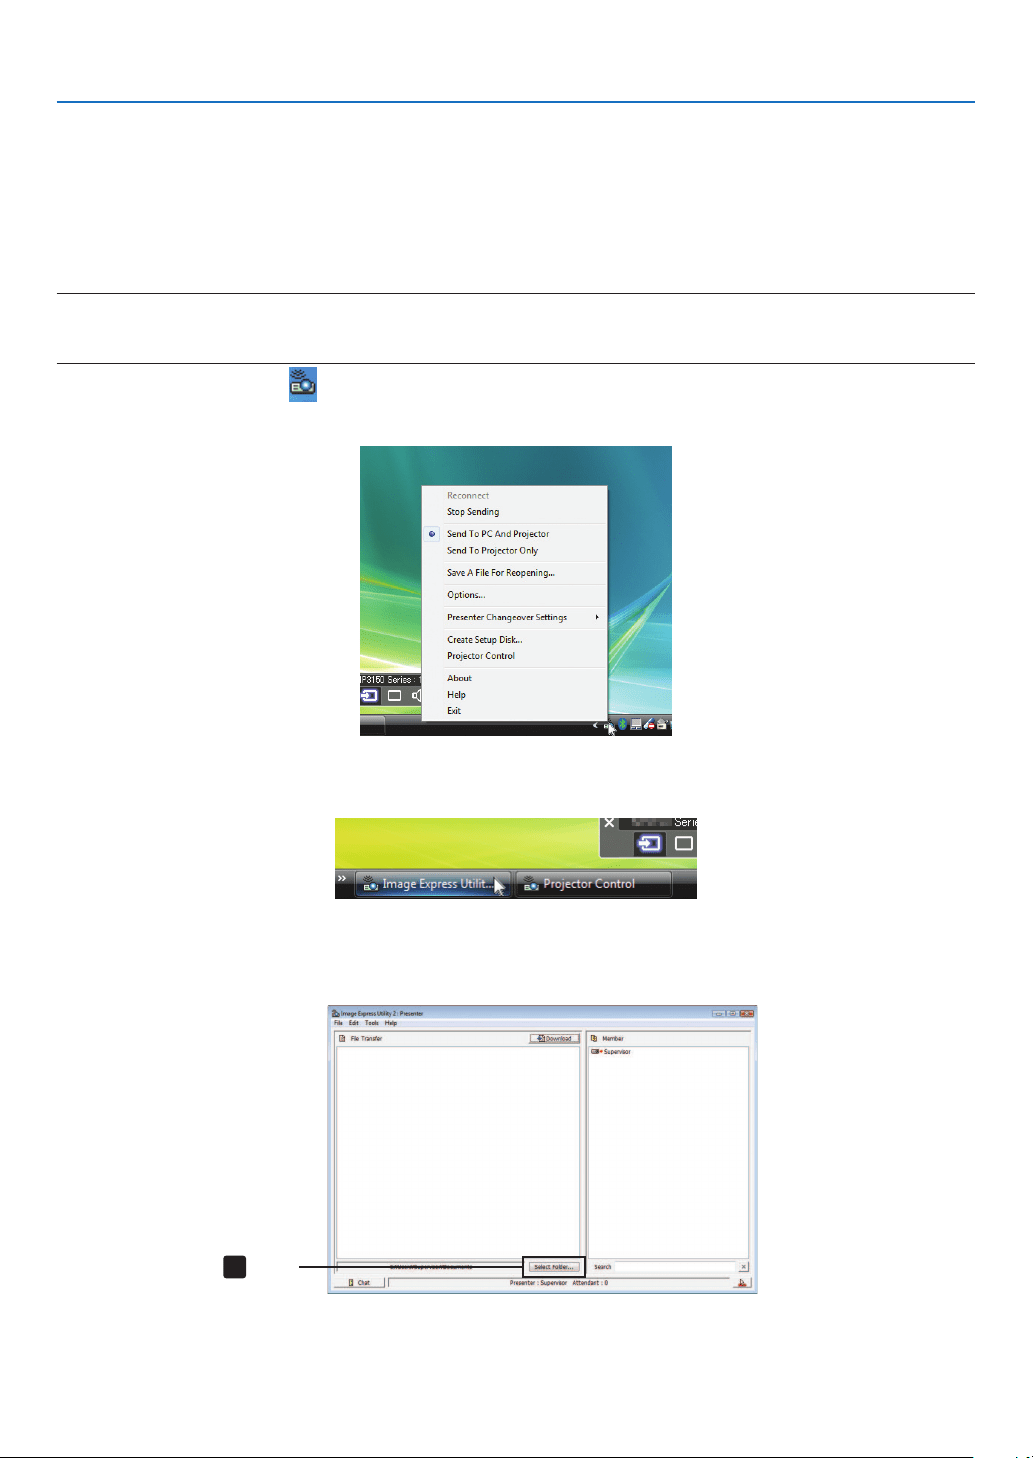
199
8. User Supportware
Holding Conferences
•Holdingconferences
1Followsteps1through4in“Connectingprojector”of“SendingImagestoProjector”(→page
196).
Thescreenofyourcomputerwillbeprojectedfromtheprojector.
•Disclosealetotheparticipantsoftheconference.
NOTE:
Todisclosealetotheparticipants,selectioncanbemadeonlyinfolderunits.
Therefore,afolderonlyhavinglesthatcanbedisclosedtotheparticipantsmustbecreatedinadvance.
1Clicktheprojectoricon()ontheWindowstaskbar.
Apop-upmenuwillbedisplayed.
2Beforeclicking[SendtoPCandProjector],checkthatthereisa“•”markapplied.
3Clickthe[ImageExpressUtility2.0]buttononthetaskbar.
Thepresenterwindowwillbeopened.
4Click[SelectFolder].
4
Click
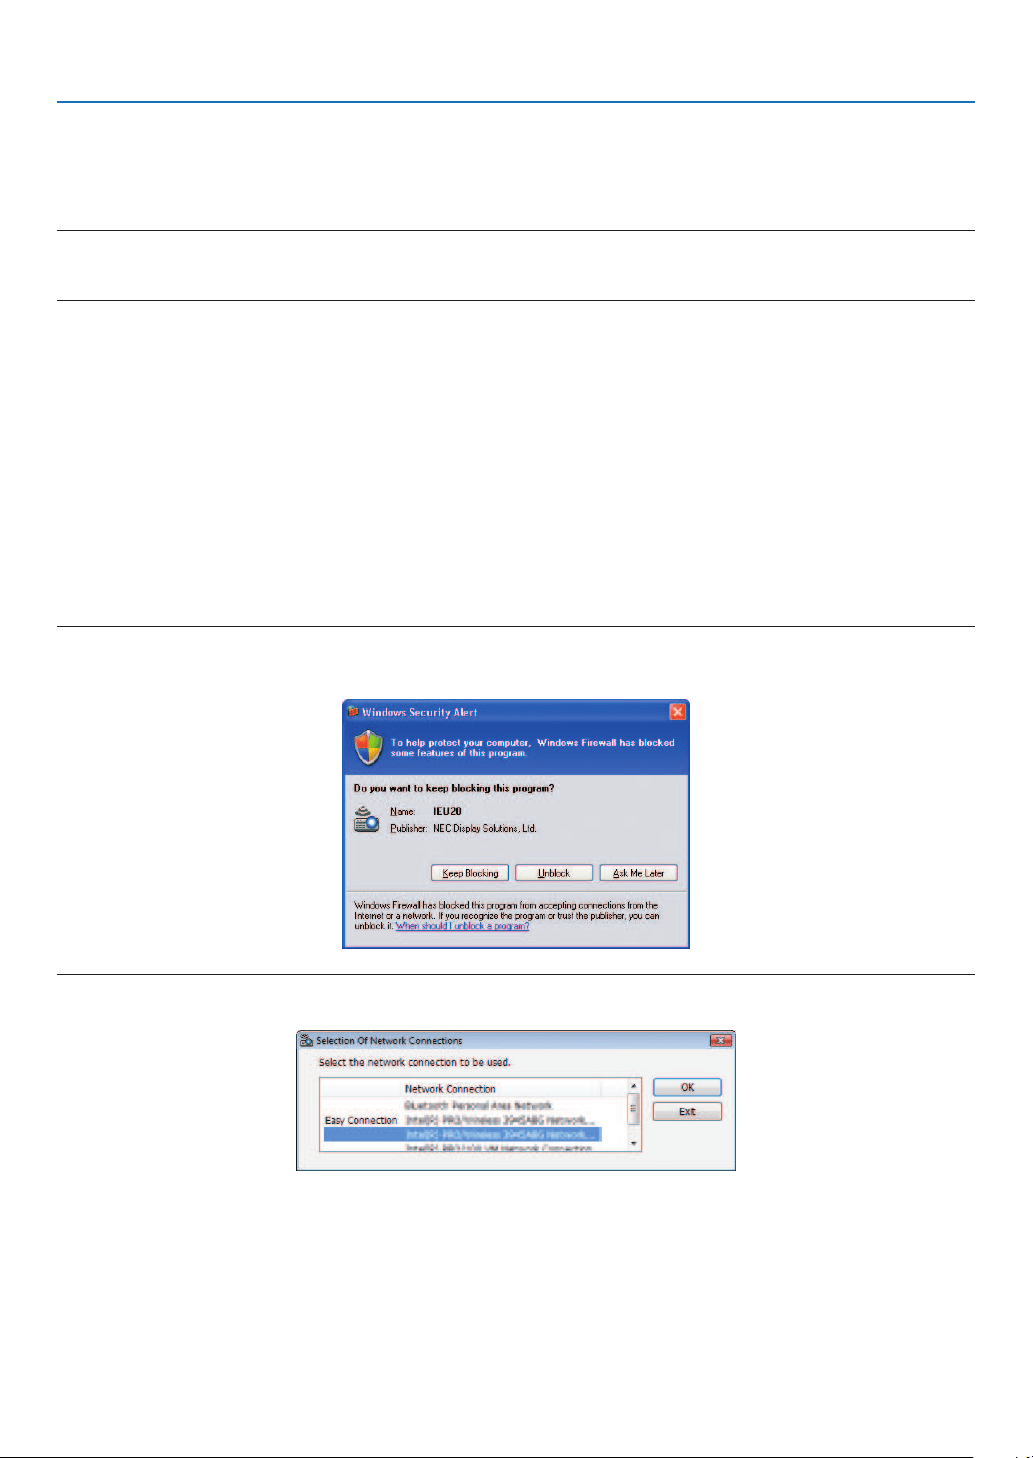
200
8. User Supportware
5Selectafoldersavingtheletobedisclosedtotheparticipants,andclick[OK].
Theleintheselectedfolderwillbedisplayedinthelistoflestotransfer.
6Click[Download].
Thelewillbeshowntotheparticipants.
NOTE:
Whenthecomputerisconnectedtotheprojector,thecomputerscreenthatisinofbeingprogressisalsoprojectedfromtheprojec-
tor.Tomanipulateascreenthatshouldnotbeshown(notprojected),temporarilystopthetransmission(→ page 198).
•Endingconference
1Click[File]inthepresenterwindow,andclick[Exit].
Youcanalsoendtheconferencebyclicking[×]attheupperrightofthepresenterwindow.
Participating in Conference
•Participatinginconferences
1ClickWindows[Start]→[AllPrograms]→[NECProjectorUserSupportware]→[ImageExpressUtility2.0]
→[ImageExpressUtility2.0],inthatorder.
The“SelectionOfNetworkConnections”windowwillbedisplayed.
Alistofthenetworkequipmentconnectedtoyourcomputerwillbedisplayed.
IMPORTANT:
AscreenliketheonebelowisdisplayedwhenthesoftwareisstartedonaPCinstalledwithWindowsXPServicePack2(SP2)(or
later).
Click“Unblock”ifthisisdisplayed.
2Selectthenetworkequipmentthatistobeusedandclick[OK].
Selectthenetworkdevicedisplaying“EasyConnection”iftheproductLANsettingisfor“EasyConnection.”This
willcallupthe“MeetingList”window.
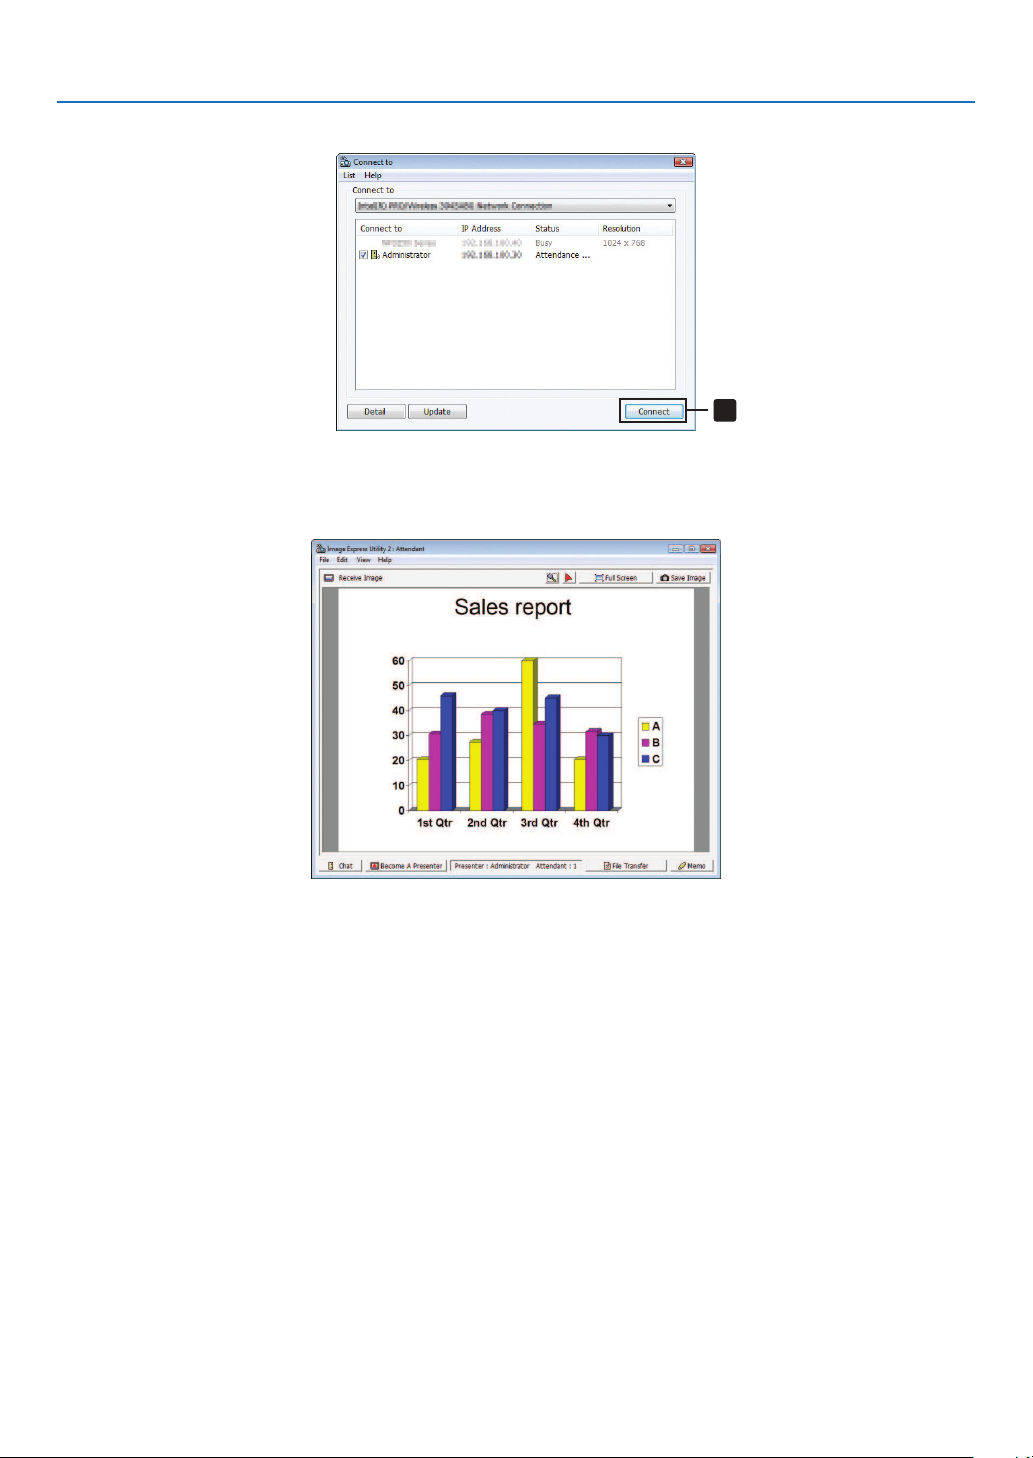
201
8. User Supportware
3ClicktheMeetingNametoparticipate,andclick[Connect].
3
Click
Thecomputerwillbeconnectedtotheselectedconferenceandtheattendantwindowwillbedisplayed.
Ifthepresenterselects“SendtoPCAndProjector”,theimageprojectedfromtheprojectorisdisplayedintheat
-
tendant window.
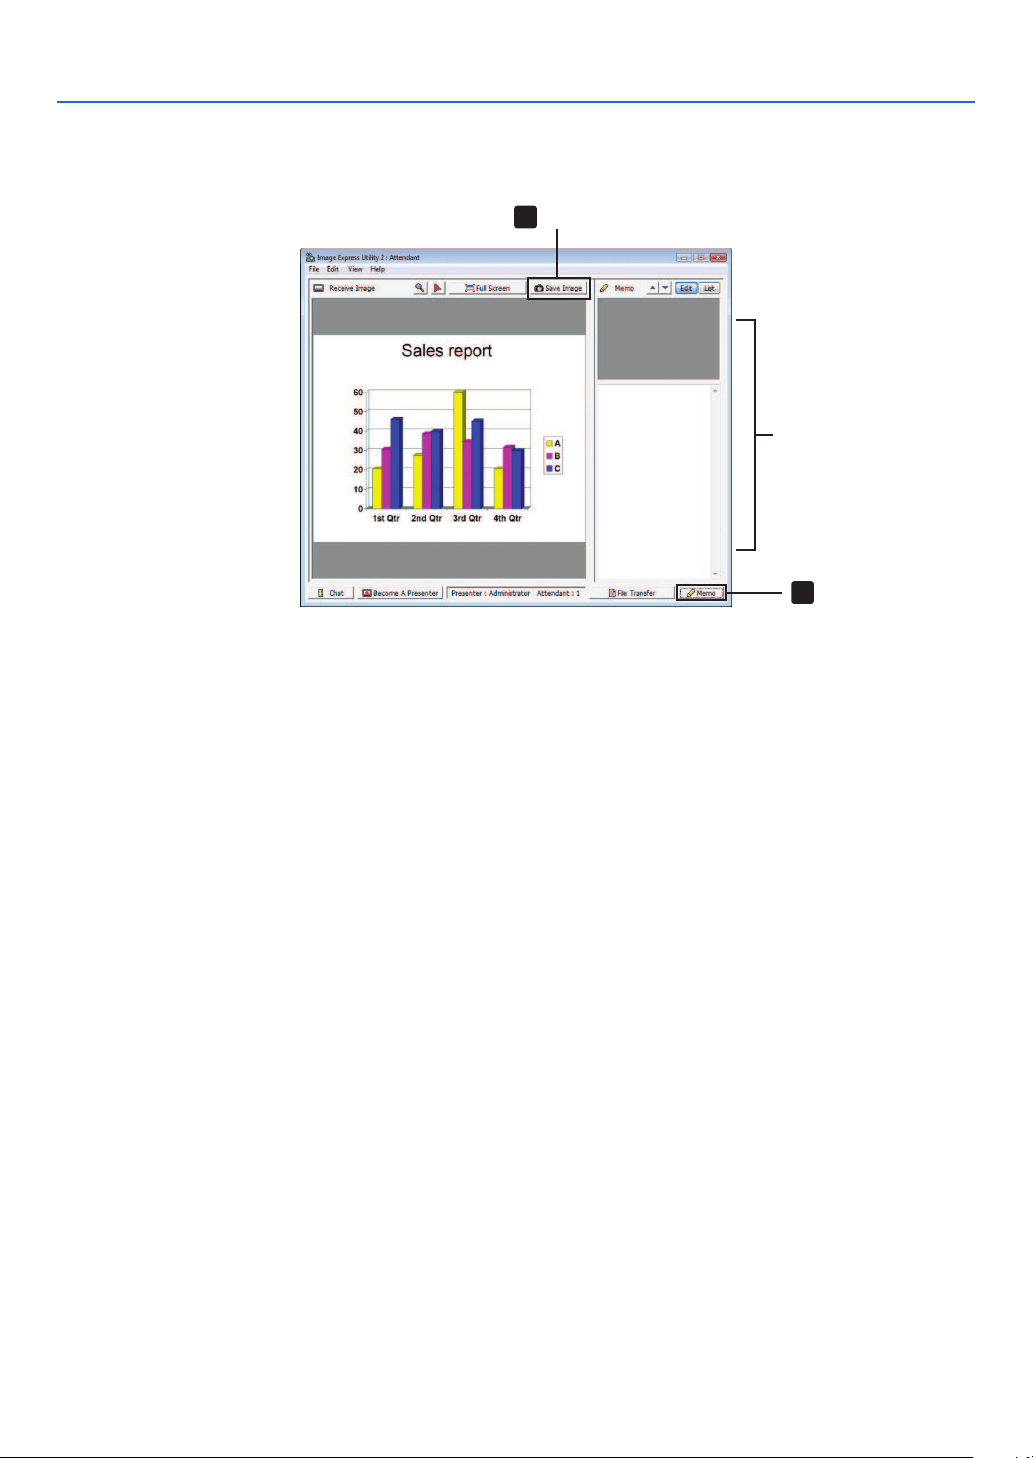
202
8. User Supportware
•Savingreceivedimages
1Click[Memo]intheattendantwindow.
Amemopanewillbedisplayed.
2
1
Click
Memo pane
Click
2Click[SaveImage]intheattendantwindow.
Theimagedisplayedintheattendantwindowwillbesaved.
•Thesavedimageisaddedtothememolistandathumbnailisdisplayed.
•Amemocanbeattachedtothesavedimage.
REFERENCE:
•IncaseofWindowsXP,acreatedleissavedto“MyDocuments\ImageExpress\”underthedefaultsettings.IncaseofWindows
7/WindowsVista,“Document\ImageExpress\”isthedefaultfoldertosaveacreatedle.
•Afolderiscreatedbelowthedefaultfolderbasedonthetimeanddateoftheconference,andtheimageissavedtoaleinthe
created folder.
Forexample,ifaconferenceisheldat11:20onMay14,2009,thedefaultfoldernameonWindowsXPwillbe“MyDocuments\
ImageExpress\2009-05-14_11-20_MeetingRecords”.
Inthisfolder,anHTMLlenamed“MeetingRecords”iscreated.
Thesavedimageissavedin“Images”folder.
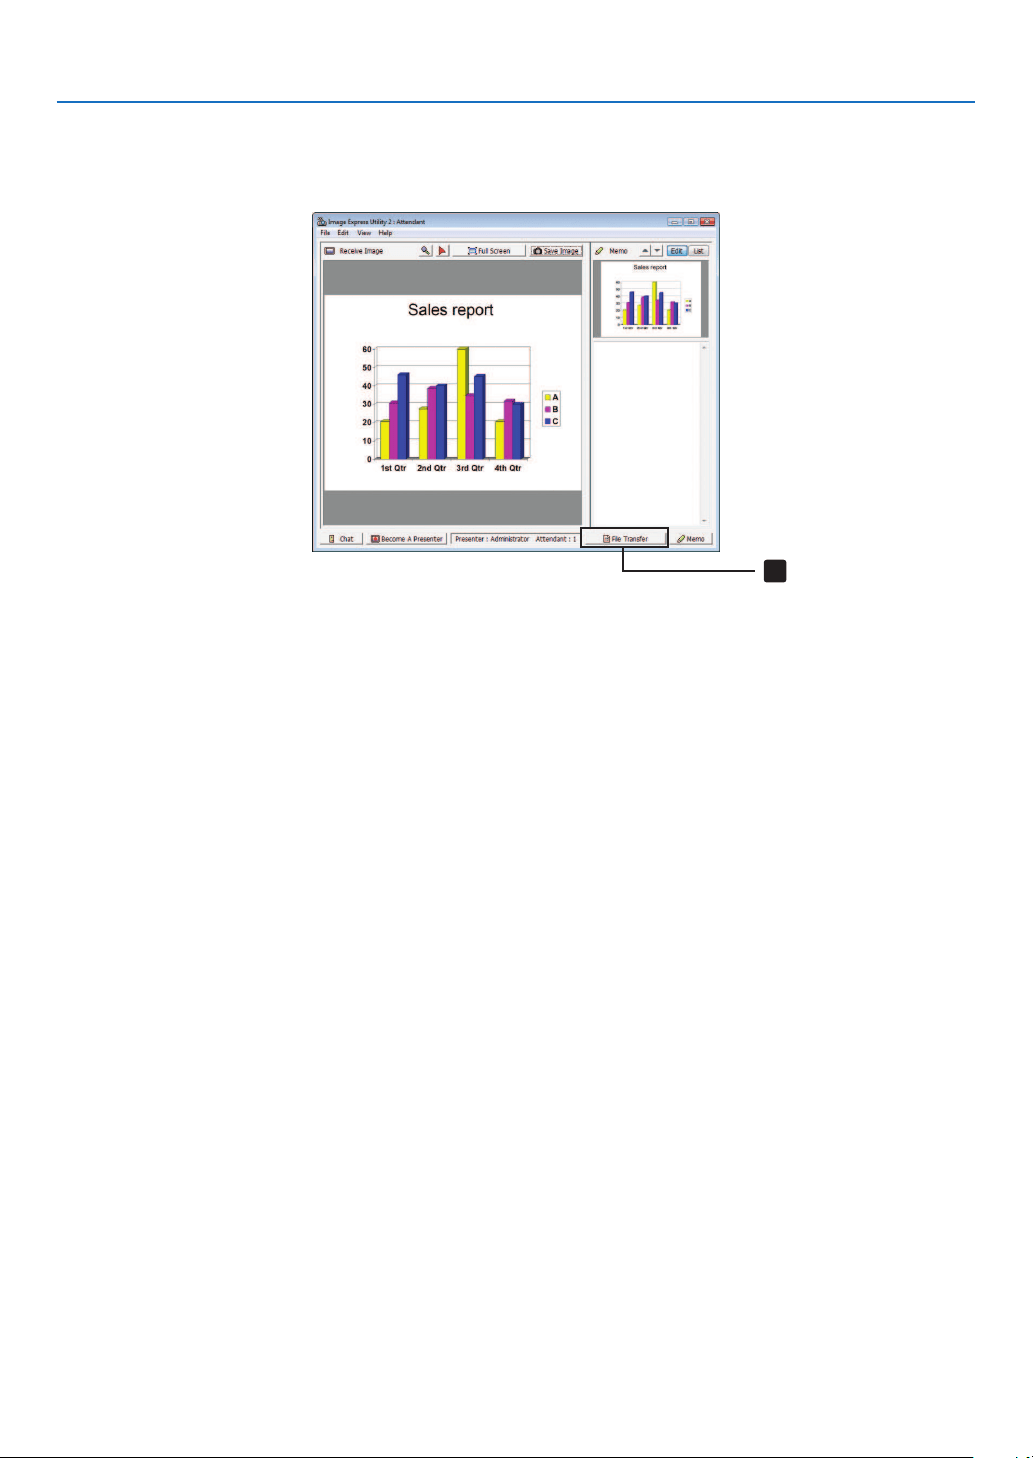
203
8. User Supportware
•Downloadingdisclosedle
1Click[FileTransfer]intheattendantwindow.
The“FileTransfer”windowwillbeopened.
1
Click
2Selectaletodownload,andclick[Download].
Downloadingwillbegin.
The progress of the downloading is displayed at the lower left of the window.
3Whendownloadingiscomplete,click[File]inthe“FileTransfer”window,andclick[Exit].
The“FileTransfer”windowwillbeclosed.
REFERENCE:
•If“OpenAfterDownloading”ischecked,theleisopenedbyspeciedWindowsapplicationsoftwareafterdownloadingiscom
-
plete.
•IncaseofWindowsXP,acreatedleissavedto“MyDocuments\ImageExpress\”underthedefaultsettings.IncaseofWindows
7/WindowsVista,“Document\ImageExpress\”isthedefaultfoldertosaveacreatedle.
•Afolderiscreatedbelowthedefaultfolderbasedonthetimeanddateoftheconference,andtheimageissavedtoaleinthe
created folder.
Forexample,ifaconferenceisheldat11:20onMay14,2009,thedefaultfoldernameonWindowsXPwillbe“MyDocuments\
ImageExpress\2009-05-14_11-20_MeetingRecords”.
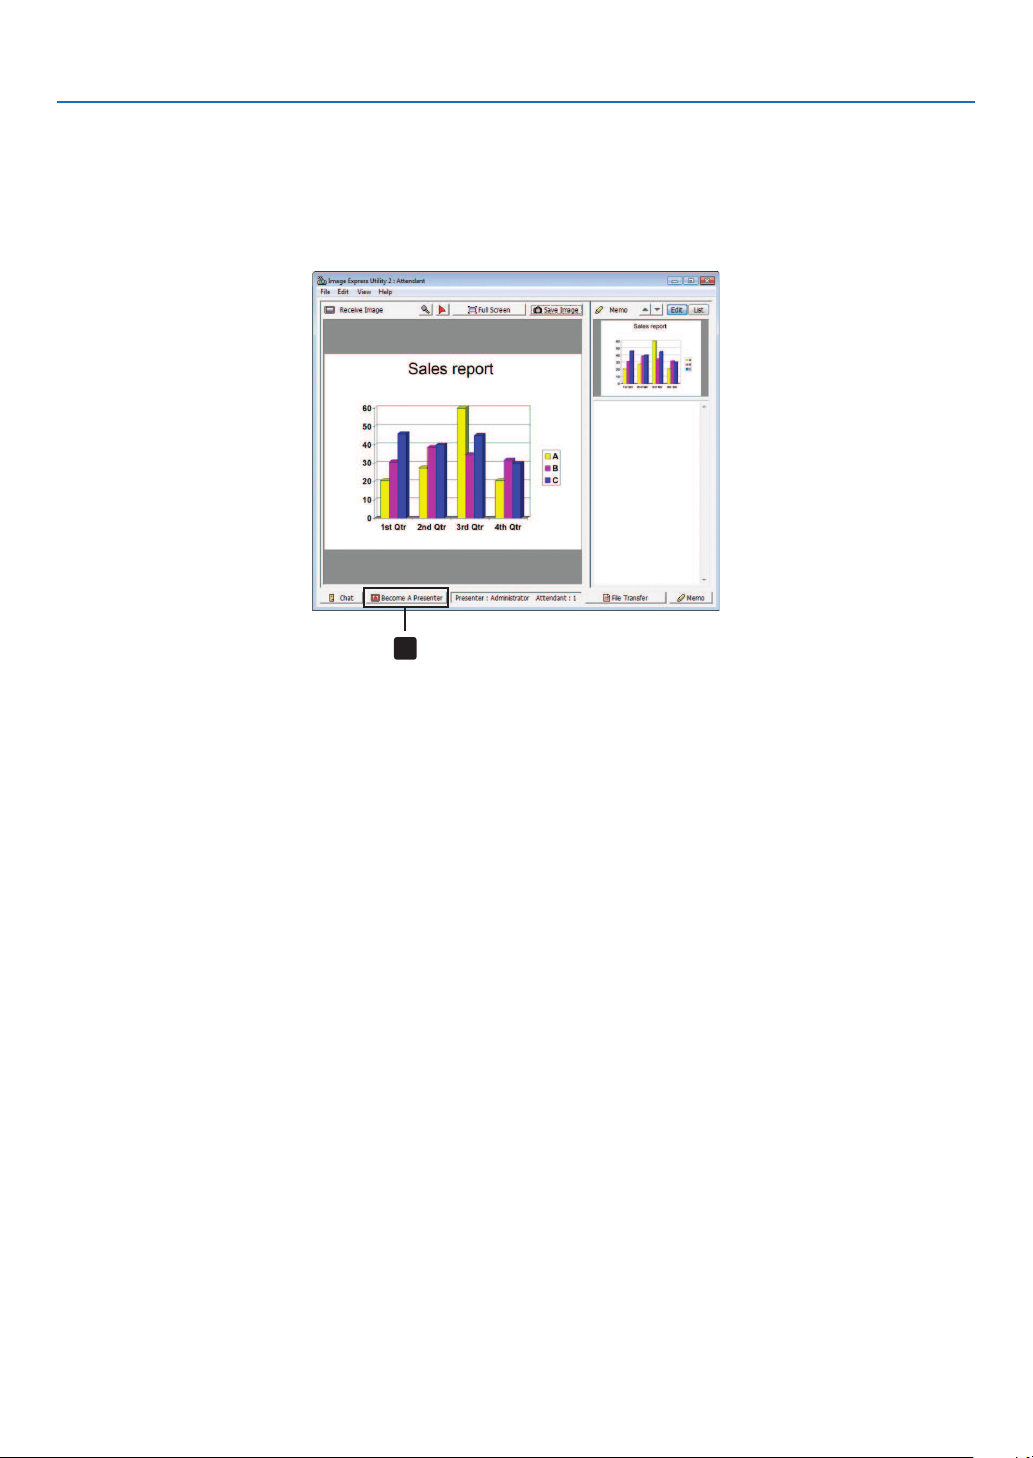
204
8. User Supportware
•Changingpresenter
Threetypesofsettingsmaybemadetochangethepresenter:“NotApproved”,“Approved”,and“ChangingProhibited”
(thesecanbeselectedonlybythepresenter).
Inthefollowingexample,“NotApproved”isselected.
•Click[BecomeAPresenter]intheattendantwindow.
Youwillchangefromaparticipanttoapresenter.
1
Click
•Leavingconference
LeavetheconferenceandexitImageExpressUtility2.0.
•Click[File]intheattendantwindow,andclick[Exit].
Youcanalsoleavetheconferencebyclicking[×]attheupperrightoftheattendantwindow.

205
8. User Supportware
Controlling the Projector over a LAN (PC Control Utility Pro 4)
Usingtheutilitysoftware“PCControlUtilityPro4”,theprojectorcanbecontrolledfromacomputeroveraLAN.
Control Functions
PowerOn/Off,signalselection,picturefreeze,picturemute,adjusting,errormessagenotication,eventschedule.
ScreenofPCControlUtilityPro4
ThissectionprovidesanoutlineofpreparationforuseofPCControlUtilityPro4.ForinformationonhowtousePC
ControlUtilityPro4,seeHelpofPCControlUtilityPro4.
TIP:
•PCControlUtilityPro4canbeusedwithaserialconnection.
Connect the projector to a LAN.
ConnecttheprojectortotheLANbyfollowingtheinstructionsin“ConnectingtoaWiredLAN”(→page
173),“Con-
nectingtoaWirelessLAN(soldseparately)”(→page174)and“9ApplicationMenus-NETWORKSETTINGS”(→
page142)
Start PC Control Utility Pro 4
Click“Start”→“Allprograms”or“Programs”→“NECProjectorUserSupportware”→“PCControlUtilityPro4”→
“PCControlUtilityPro4”.
NOTE:
•FortheSchedulefunctionofthePCControlutilityPro4towork,youmusthaveyourcomputerrunningandnotinstandby/
sleepmode.Select“PowerOptions”fromthe“ControlPanel”inWindowsanddisableitsstandby/sleepmodebeforerunningthe
scheduler.
[Example]ForWindows7:
Select“ControlPanel”→“SystemandSecurity”→“PowerOptions”→“Changewhenthecomputersleeps”→“Putthecomputer
to sleep” →“Never”.
NOTE:
•When[POWER-SAVING]isselectedfor[STANDBYMODE]fromthemenu,theprojectorcannotbeturnedonviathenetwork
(wiredLAN/wirelessLAN)connection.
When[NETWORKSTANDBY]isselectedfor[STANDBYMODE],theprojectorcannotbeturnedonviawirelessLANconnection.
TIP:
ViewingtheHelpofPCControlUtilityPro4
•DisplayingtheHelpleofPCControlUtilityPro4whileitisrunning.
Click“Help(H)”→“Help(H)…”ofwindowofPCControlUtilityPro4inthisorder.
Thepop-upmenuwillbedisplayed.
•DisplayingthehelpleusingtheStartMenu.
Click“Start”→“Allprograms”or“Programs”→“NECProjectorUserSupportware”→“PCControlUtilityPro4”→
“PCControlUtilityPro4Help”.
TheHelpscreenwillbedisplayed.

206
8. User Supportware
Projecting Your Mac’s Screen Image from the Projector over
a LAN (Image Express Utility 2 for Mac)
UsingImageExpressUtility2forMaccontainedallowsyoutosendtheMac’sscreenimagetotheprojectorovera
network(wiredorwirelessLAN).
ImageExpressUtility2forMacrunsonMacOSX10.2.8orlater.
ItrunsonbothMacOSX(PowerPC)andMacOSX(Intel).
Hereafter,“ImageExpressUtility2forMac”isabbreviatedas“ImageExpressUtility2”.
What you can do with Image Express Utility 2
•ViathenetworkimagesonthescreenofyourMaccanbesenttotheprojectorandprojectedonthescreen.
•Onecomputercansendimagestomorethanoneprojector.
Operating environment
Supported OS
MacOSX10.2.8orlaterrequired
MacOSX10.3.0orlaterrecommended
Processor (CPU)
PowerPCG3600MHzprocessorrequired
PowerPCG4800MHzorhigherrecommended
or
IntelCoreSolo1.5GHzorhigherrequired
Memory
256MBorhigherrequired
Networkenvironment
WiredorwirelessLANrequiredthatsupportsTCP/IP
OnlytheAirPortandAirPortExtremewirelessLANcardsareguaranteedtoworkwithImageExpressUtility2.
“EasyConnection”supportsonlyAirPortandAirPortExtreme.
Supported resolution
VGA(640×480)orhigherrequired
XGA(1024×768)recommended
(1024×768-1280×800recommended)
Supported screen colors
32thousandsofcolors,16.7millioncolorsrequired
*256orfewercolorsarenotsupported.
Connecting the projector to a LAN
ConnecttheprojectortotheLANbyfollowingtheinstructionsin“ConnectingtoaWiredLAN”(→page
173),“Con-
nectingtoaWirelessLAN”(→page174)and“9ApplicationMenus-NETWORKSETTINGS”(→page142)
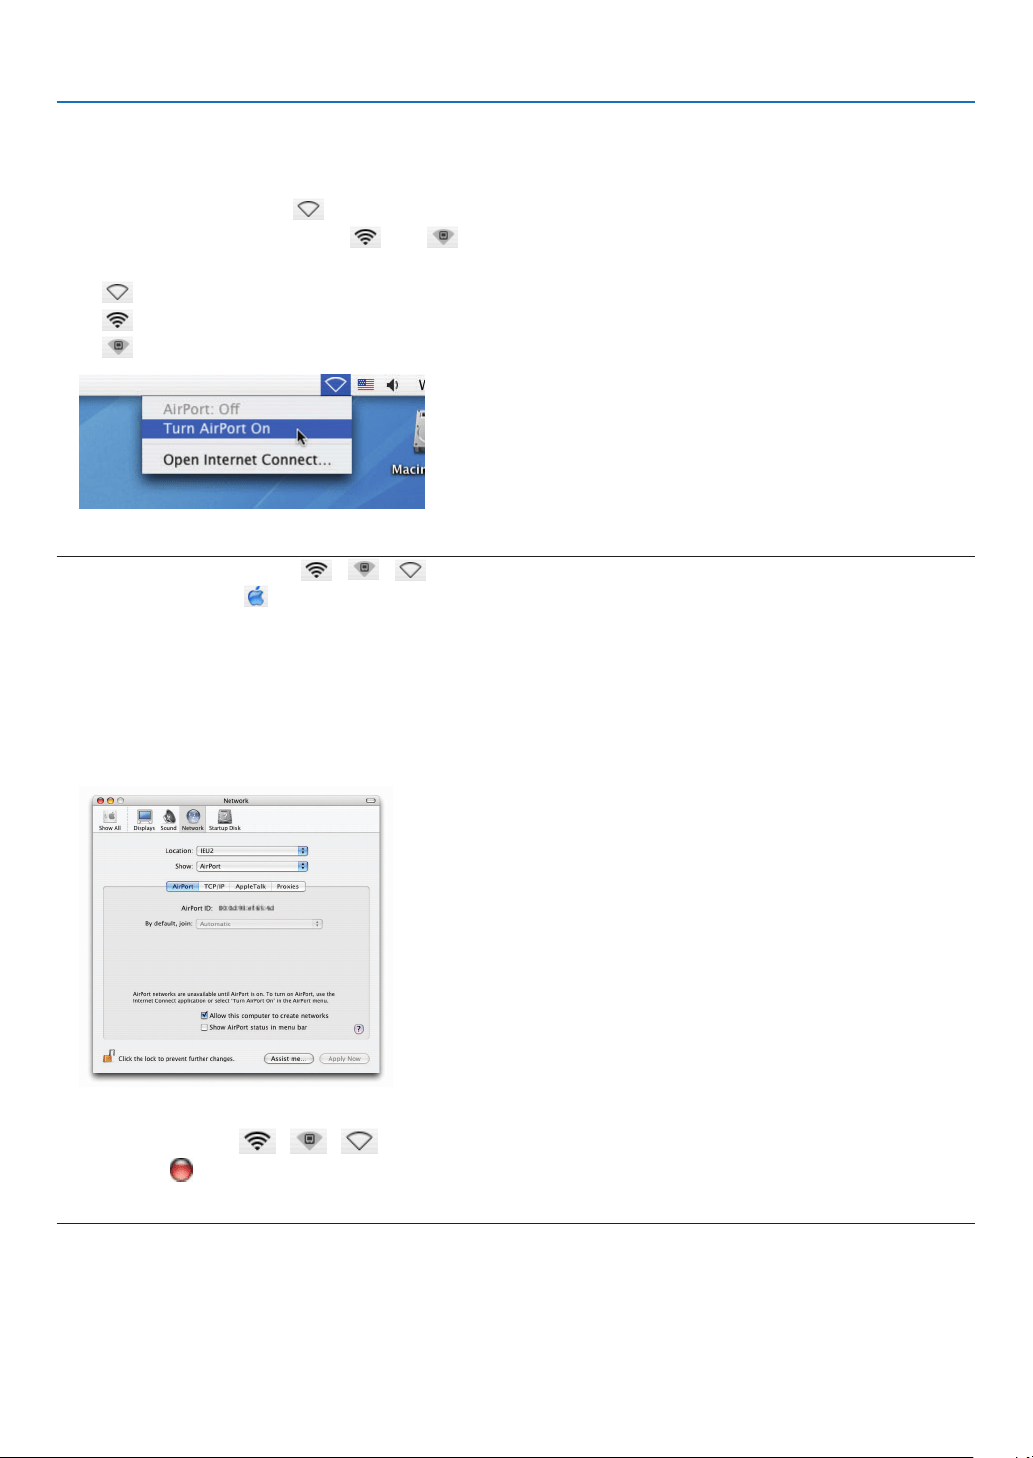
207
8. User Supportware
Using Image Express Utility 2
Connecting to a projector
1Conrmthattheprojectorhasbeenturnedon.
2ClicktheAirPortstatus(
)ontheMacintoshmenubar,andclick“TurnAirPortOn”.
TheAirPortstatusischangedto“
”or“”.
•AirPortstatustypesandmeanings
...AirPort:Off
...AirPort:On(ininfrastructureconnection)
...AirPort:On(inadhocconnection)
REFERENCE:
When the AirPort status ( //)isnotdisplayedonthemenubar:
1ClickAppleMenu(
)and[SystemPreferences...].
The“SystemPreferences”windowwillbedisplayed.
2Click[Network].
TheNetworkcongurationwindowwillbedisplayed.
3Select[AirPort]in[Show].
4Click[AirPort]tab.
TheAirPortcongurationitemwillbedisplayed.
5Checkthe“ShowAirPortstatusinmenubar”checkboxatthebottomcongurationitem.
TheAirPortstatus(
/ / )willbedisplayedonthemenubar.
6Clickthe[
]buttonattheupperleftontheNetworkcongurationwindow.
TheNetworkcongurationwindowwillbeclosed.
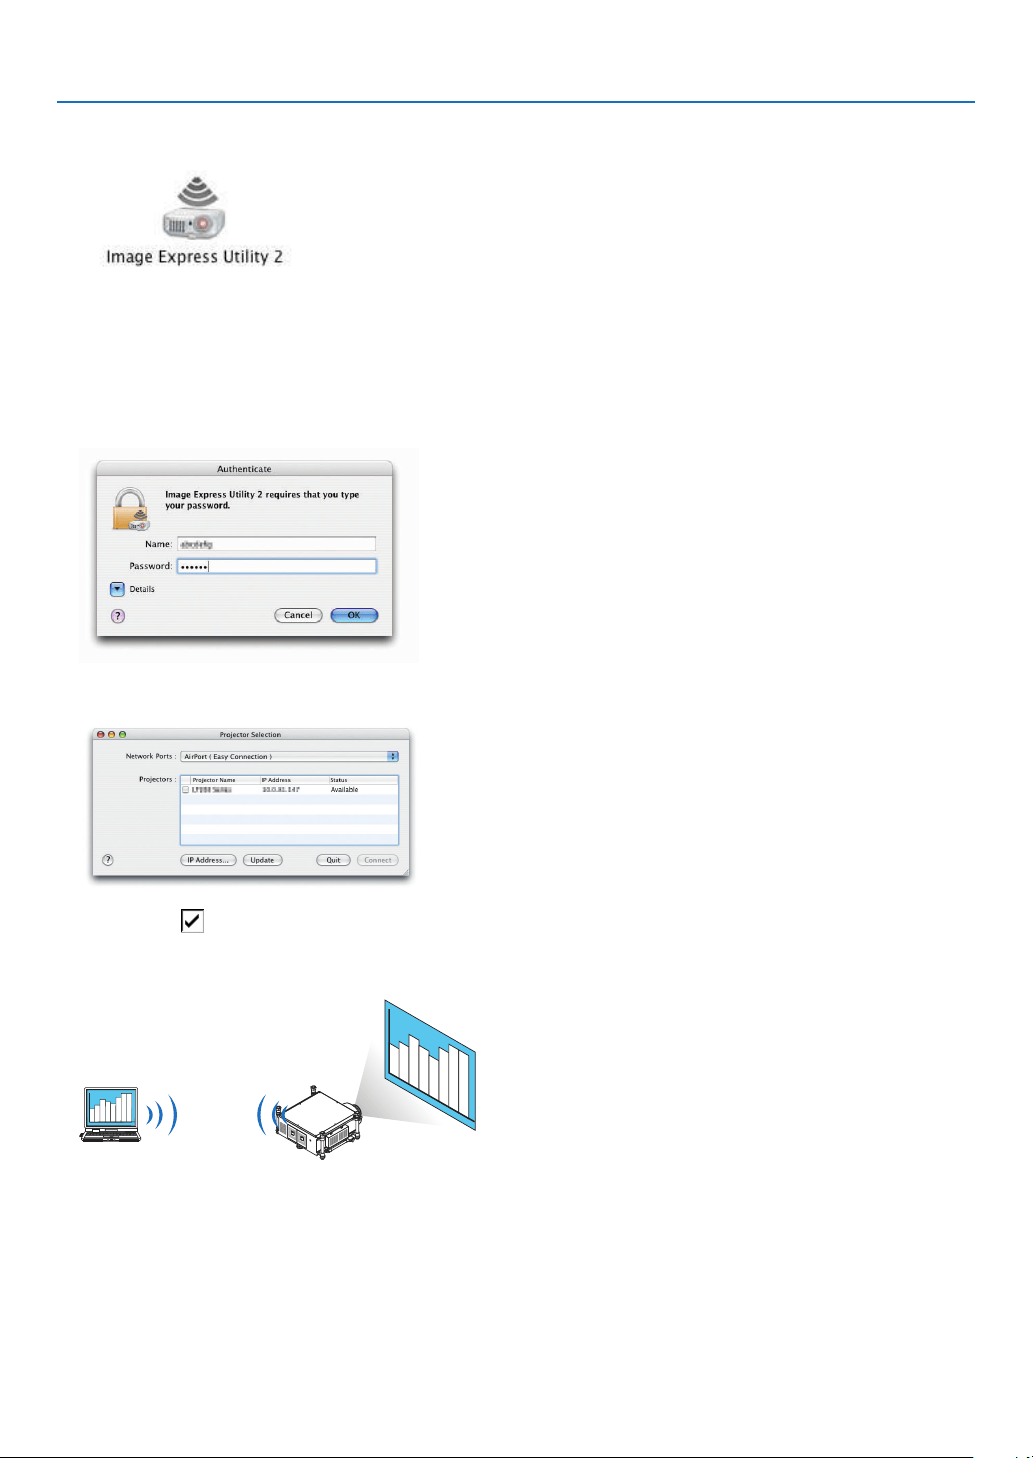
208
8. User Supportware
3Double-clickthe“ImageExpressUtility2”iconinthe“ImageExpressUtility2”folder.
•Attheinitialstart,the“LicenseAgreement”windowisdisplayed.
Thoroughlyreadtheagreementshownonthescreen,andclick“Iacceptthetermsinthelicenseagreement”
andthe[OK]button.
Next,the“Authenticate”windowwillbedisplayed.
4EntertheadministratornameandpasswordofyourMacintoshcomputer,andclickthe[OK]button.
The[ProjectorSelection]windowwillbedisplayed.
5Checkthe()checkboxtotheleftoftheprojectornametoconnectandclick[Connect].
TheMacintoshcomputerandtheprojectorareconnectedviawirelessLAN,andimagesontheMacintoshscreen
are projected from the projector.
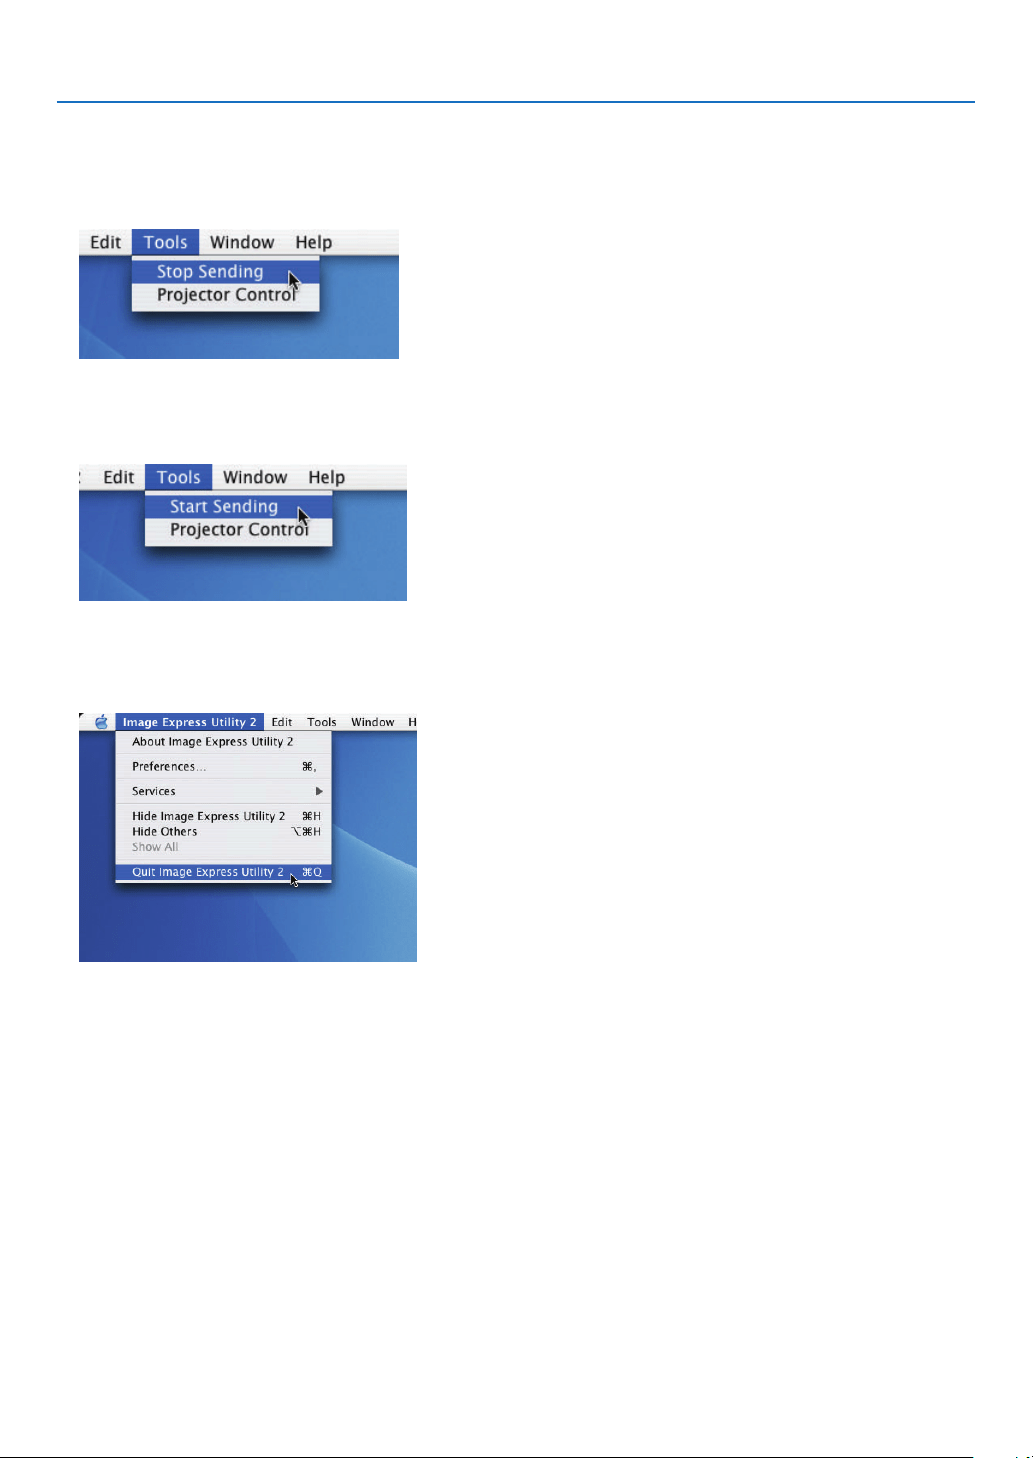
209
8. User Supportware
Stopping/RestartingImageTransmission
•Stoppingimagetransmission
1Click[Tools]onthemenubar,andclick[StopSending].
Imagetransmissionistemporarilystopped.
•Restartingimagetransmission
1Click[Tools]onthemenubar,andclick[StartSending].
Imagetransmissionisstartedagain.
ExitingImageExpressUtility2
1Click[ImageExpressUtility2]onthemenubar,andclick[QuitImageExpressUtility2].
ImageExpressUtility2isexited.
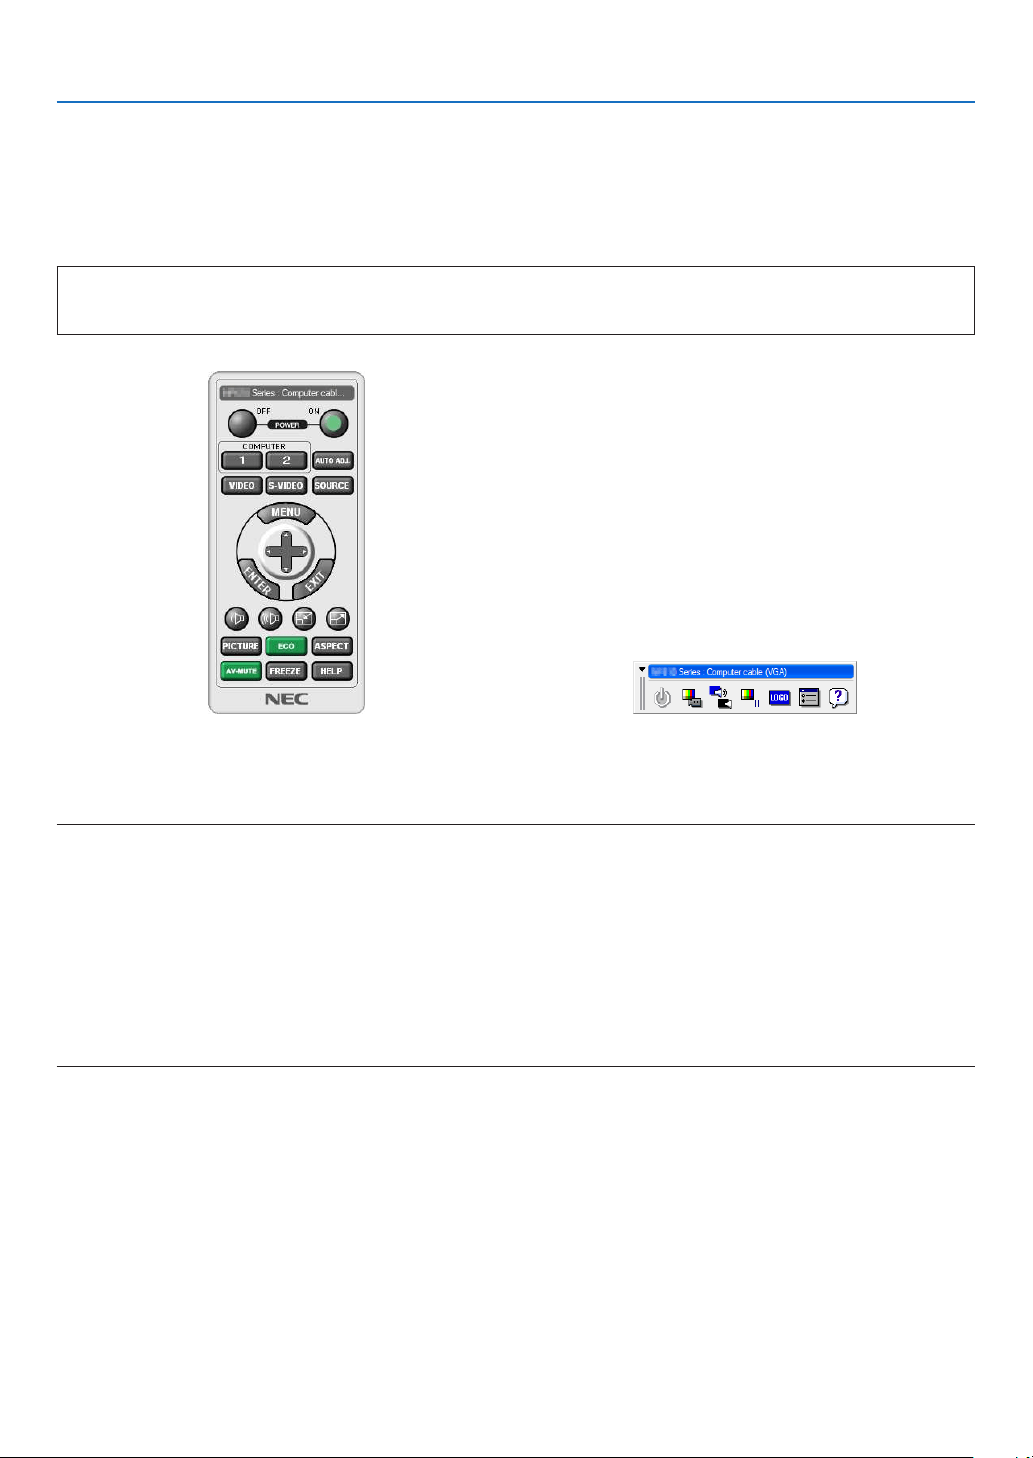
210
8. User Supportware
Operating the Projector Via the LAN (Virtual Remote Tool)
Usingthesoftwareprogram“VirtualRemoteTool”thatyoucandownloadfromourwebsite,VirtualRemotescreen
(ortoolbar)canbedisplayedonyourcomputerscreen.
Thiswillhelpyouperformoperationssuchasprojector’spoweronoroffandsignalselectionviaaLANconnection.It
isalsousedtosendanimagetotheprojectorandregisteritasthelogodataoftheprojector.Afterregisteringit,you
canlockthelogotopreventitfromchanging.
Control Functions
PowerOn/Off,signalselection,picturefreeze,picturemute,Logotransfertotheprojector,andremotecontrolop-
erationonyourPC.
VirtualRemotescreen
RemoteControlWindowToolbar
ThissectionprovidesanoutlineofpreparationforuseofVirtualRemoteTool.
ForinformationonhowtouseVirtualRemoteTool,seeHelpofVirtualRemoteTool.(→page
212)
NOTE:
•Logodata(graphics)thatcanbesenttotheprojectorwithVirtualRemoteToolhasthefollowingrestrictions:
-Filesize:256KBorless
-Imagesize(resolution):thenativeresolutionofthe projector
-Fileformat:JPEG
•ThelogodatathatissentwithVirtualRemoteToolwillbedisplayedatthecenterofthescreen.Itssurroundingwillbepainted
out in black.
•Onceyouhavechangedthebackgroundselectionfromthedefault“NEClogo”toanotherselection,youcannotreturnthelogoto
thedefault“NEClogo”evenafterusing[RESET].Toputthedefault“NEClogo”backinthebackgroundlogo,youneedtoregister
itasthebackgroundlogobyusingtheimagele(\Logo\NEC_logo_black_WUXGA.jpg)includedonthesuppliedNECProjector
CD-ROM.
TIP:
•VirtualRemoteToolcanbeusedalsowithaserialconnection.
•TodownloadorupdateVirtualRemoteTool,visitourwebsite:http://www.nec-display.com/dl/en/index.html
Connect the projector to a LAN.
ConnecttheprojectortotheLANbyfollowingtheinstructionsin“ConnectingtoaWiredLAN”(→page
173),“Con-
nectingtoaWirelessLAN(soldseparately)”(→page174)and“9ApplicationMenus-NETWORKSETTINGS”(→
page142)
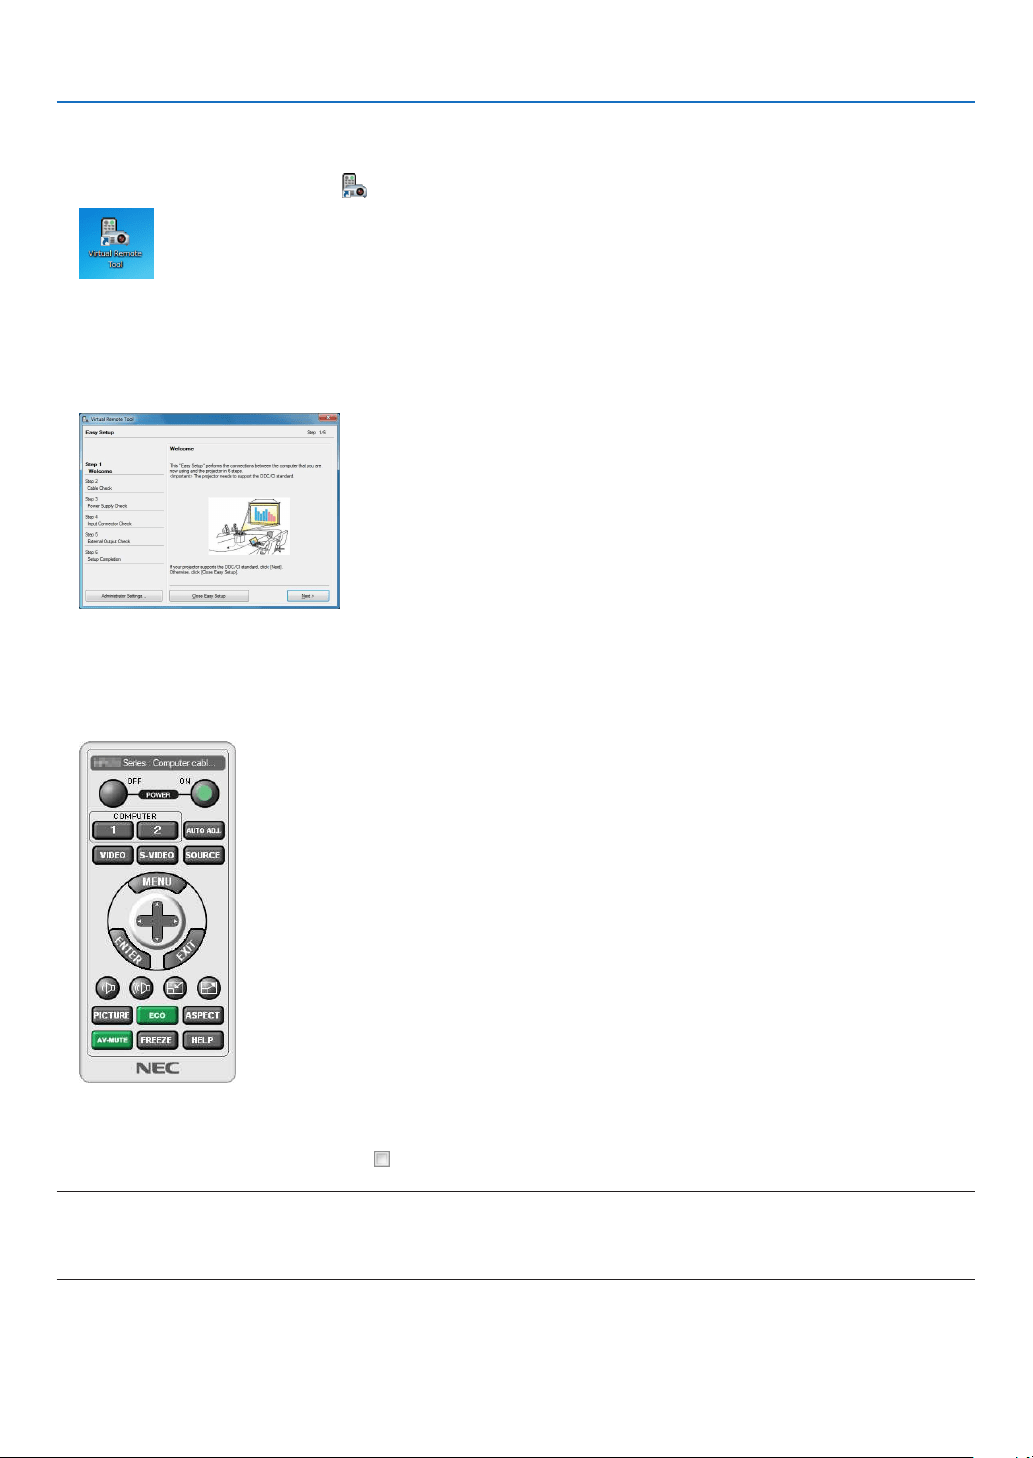
211
8. User Supportware
Start Virtual Remote Tool
Start using the shortcut icon
•Double-clicktheshortcuticon
ontheWindowsDesktop.
Start from the Start menu
•Click[Start]→[AllPrograms]or[Programs]→[NECProjectorUserSupportware]→[VirtualRemoteTool]
→[VirtualRemoteTool].
WhenVirtualRemoteToolstartsforthersttime,“EasySetup”windowwillbedisplayed.
The“EasySetup”featureisnotavailableonthismodel.Click“CloseEasySetup”.
Closingthe“EasySetup”windowwilldisplaythe“ProjectorList”
window.
Selectyourprojectoryouwishtoconnect.ThiswilldisplaytheVirtualRemotescreen.
TIP:
•TheVirtualRemoteToolscreen(orToolbar)canbedisplayedwithoutdisplaying“EasySetup”window.
To do so, click to place a check mark for “ DonotuseEasySetupnexttime”onthescreen.
NOTE:
•When[POWER-SAVING]isselectedfor[STANDBYMODE]fromthemenu,theprojectorcannotbeturnedonviathenetwork
(wiredLAN/wirelessLAN)connection.When[NETWORKSTANDBY]isselectedfor[STANDBYMODE],theprojectorcannotbe
turnedonviawirelessLANconnection.
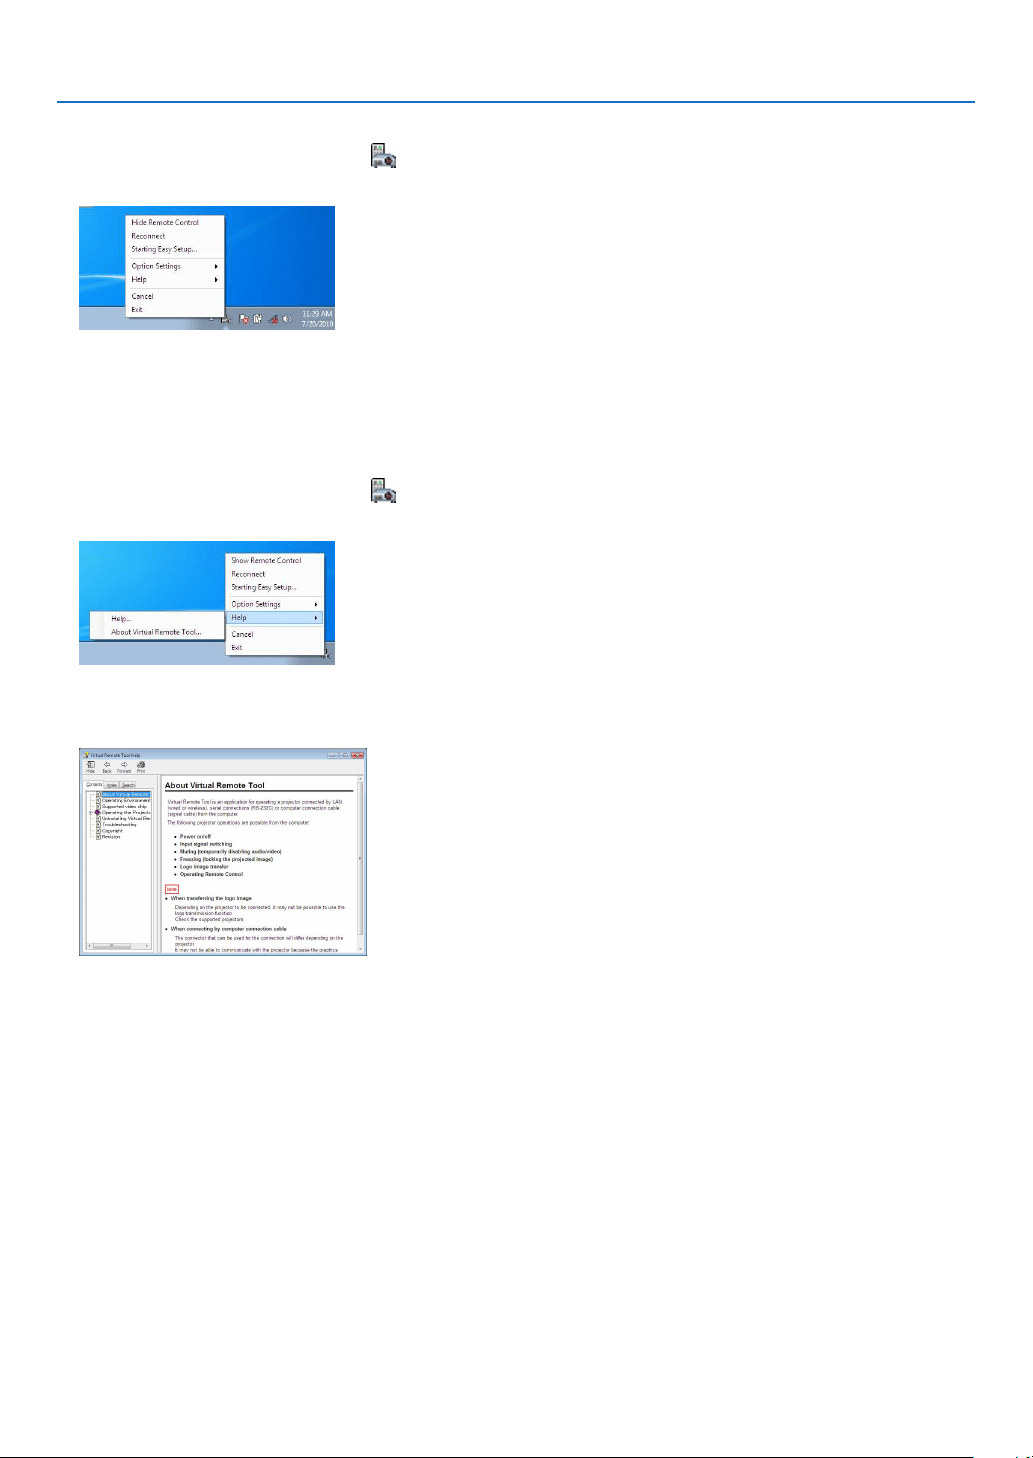
212
8. User Supportware
ExitingVirtualRemoteTool
1ClicktheVirtualRemoteToolicon
ontheTaskbar.
Thepop-upmenuwillbedisplayed.
2Click“Exit”.
TheVirtualRemoteToolwillbeclosed.
ViewingthehelpleofVirtualRemoteTool
•Displayingthehelpleusingthetaskbar
1ClicktheVirtualRemoteToolicononthetaskbarwhenVirtualRemoteToolisrunning.
Thepop-upmenuwillbedisplayed.
2.Click“Help”.
TheHelpscreenwillbedisplayed.
•DisplayingthehelpleusingtheStartMenu.
1.Click“Start”.“Allprograms”or“Programs”.“NECProjectorUserSupportware”.“VirtualRemoteTool”.and
then“VirtualRemoteToolHelp”inthisorder.
TheHelpscreenwillbedisplayed.
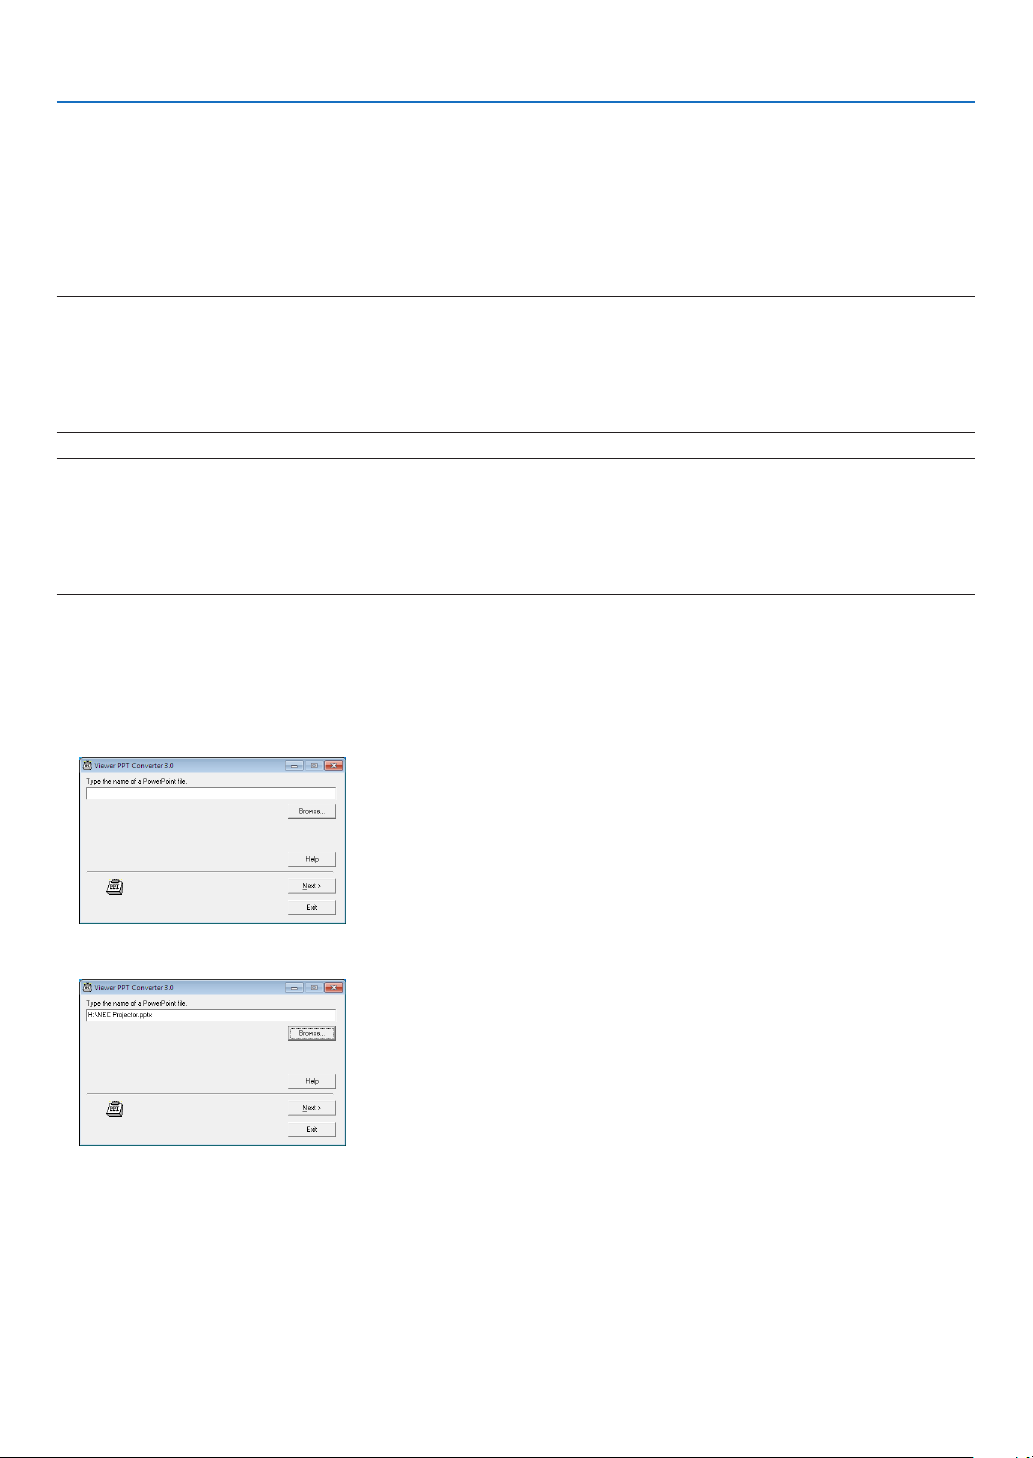
213
8. User Supportware
Converting PowerPoint files to Slides (Viewer PPT Converter
3.0)
UsingViewerPPTConverter3.0allowsyoutoconvertPowerPointlesintoJPEGles.ConvertedJPEGlesand
Indexles(.idx)canbesavedtoaUSBmemory.WhentheUSBmemoryinsertedintotheprojector,theseJPEGles
andIndexles(.idx)canbedisplayedwiththeviewerfunctionoftheprojectorwithoutconnectingacomputer.
NOTE:
WhenViewerPPTConverter3.0hasbeeninstalled,oncestartViewerPPTConverter3.0oncewiththeprivilegeusedforinstallation.
ThenexitfromViewerPPTConverter3.0withoutdoinganything.
•Starting
ClickWindow’s[Start]→[AllPrograms]→[NECProjectorUserSupportware]→[ViewerPPTConverter3.0]→[ViewerPPT
Converter3.0],inthatorder.
NOTE:
•WheninstallingViewerPPTConverter3.0ontoacomputerthathasPowerPointinstalled,ViewerPPTConverter3.0isautomati-
callyregisteredasaPower-Pointadd-in.
ItisnecessarytocancelViewerPPTConverter3.0add-inbeforeuninstallingViewerPPTConverter3.0.
RefertoViewerPPTConverter3.0Helptounregistertheadd-in.
•Theprojectordoesnotsupporttheadd-in's“RunSlideShow”.
Converting PowerPoint files and saving them to a USB memory
1.InserttheUSBmemoryintotheUSBportofthecomputer.
2.OnWindows,click“Start”→“Allprograms”→“NECProjectorUserSupportware”→“ViewerPPTConverter
3.0”→“ViewerPPTConverter3.0”.
ViewerPPTConverter3.0willstart.
3.Click“Brows...”andselectaPowerPointleyouwishtoconvert,andthenclick“Open”.
4.Click“Next”.

214
8. User Supportware
5.SelecttheUSBmemorydrivefor“CardDrive”andtypein“Indexname”.
Indexnamemustbeeightalphanumericcharactersorless.2-bytecharacterandlewithalonglenamecannot
beused.
6.Click“Export”.
Aconrmationmessagewillbedisplayed.
7.Click“OK”.
Exportingalewillstart.
8.Click“OK”.
9.Click“Exit”.
ViewerPPTConverter3.0willexit.
10.RemovetheUSBmemoryfromthecomputer.
NOTE:
•BeforeremovingtheUSBmemoryfromtheUSBportofthecomputer,clickthe“SafetoRemoveHardware”icononthetask-
bar.

215
9. Appendix
Throw distance and screen size
Fiveseparatebayonetstylelensescanbeusedonthisprojector.Refertotheinformationonthispageandusea
lenssuitedfortheinstallationenvironment(screensizeandthrowdistance).Forinstructionsonmountingthelens,
seepage
163.
Eachnumberprovidedinthetablebelowmeansthethrowdistancebetweenthelenssurfaceandthescreen.
Lens types and throw distance
unit=m
ScreensizeLensmodelname
NP25FLNP26ZLNP27ZLNP28ZLNP29ZL
80"1.1 — — — —
100"1.4
2.9–4.04.0–5.59.012.0–15.0
120"1.73.5–4.84.8–6.69.0–10.812.0–18.0
150"2.2 4.4–6.06.0–8.29.0–13.513.5–22.4
200"3.0 5.9–8.08.0–11.011.1–17.917.9–29.8
240"— 7.1–9.69.6–13.213.3–21.421.4–35.7
300"— 8.9–12.012.1–16.616.5–26.826.7–44.5
400"— 11.9–16.116.1–22.122.0–35.635.5–59.3
500"— 14.9–20.120.2–24.027.4–44.544.3–74.0
TIP
•Calculationofthethrowdistancefromthescreensize
NP25FLlensthrowdistance(m)=H×0.67:1.1m(min.)to3.2m(max.)
NP26ZLlensthrowdistance(m)=H×1.35toH×1.84:2.8m(min.)to24.0m(max.)
NP27ZLlensthrowdistance(m)=H×1.84toH×2.54:4.0m(min.)to24.0m(max.)
NP28ZLlensthrowdistance(m)=H×2.62toH×4.20:9.0m(min.)to45.0m(max.)
NP29ZLlensthrowdistance(m)=H×4.21toH×6.96:12.0m(min.)to80.0m(max.)
“H”(Horizontal)referstothescreenwidth.
*Figuresdifferbyseveral%withthetableabovebecausethecalculationisapproximate.
Ex.:Throwdistancewhenprojectingona150"screenusingtheNP27ZLlens:
Accordingtothe“ScreenSize(forreference)”table(→
page 217),H(screenwidth)=323.1cm.
Thethrowdistanceis323.1cm×1.7to323.1cm×2.3=549.3cmto743.13cm(becauseofthezoomlens).
•UsingtheNP28ZLlenswillslightlychangetheimagesize.WhenusingtheNP28ZLlenstoadjusttheimagesize,adjustthefocus
and then the zoom.
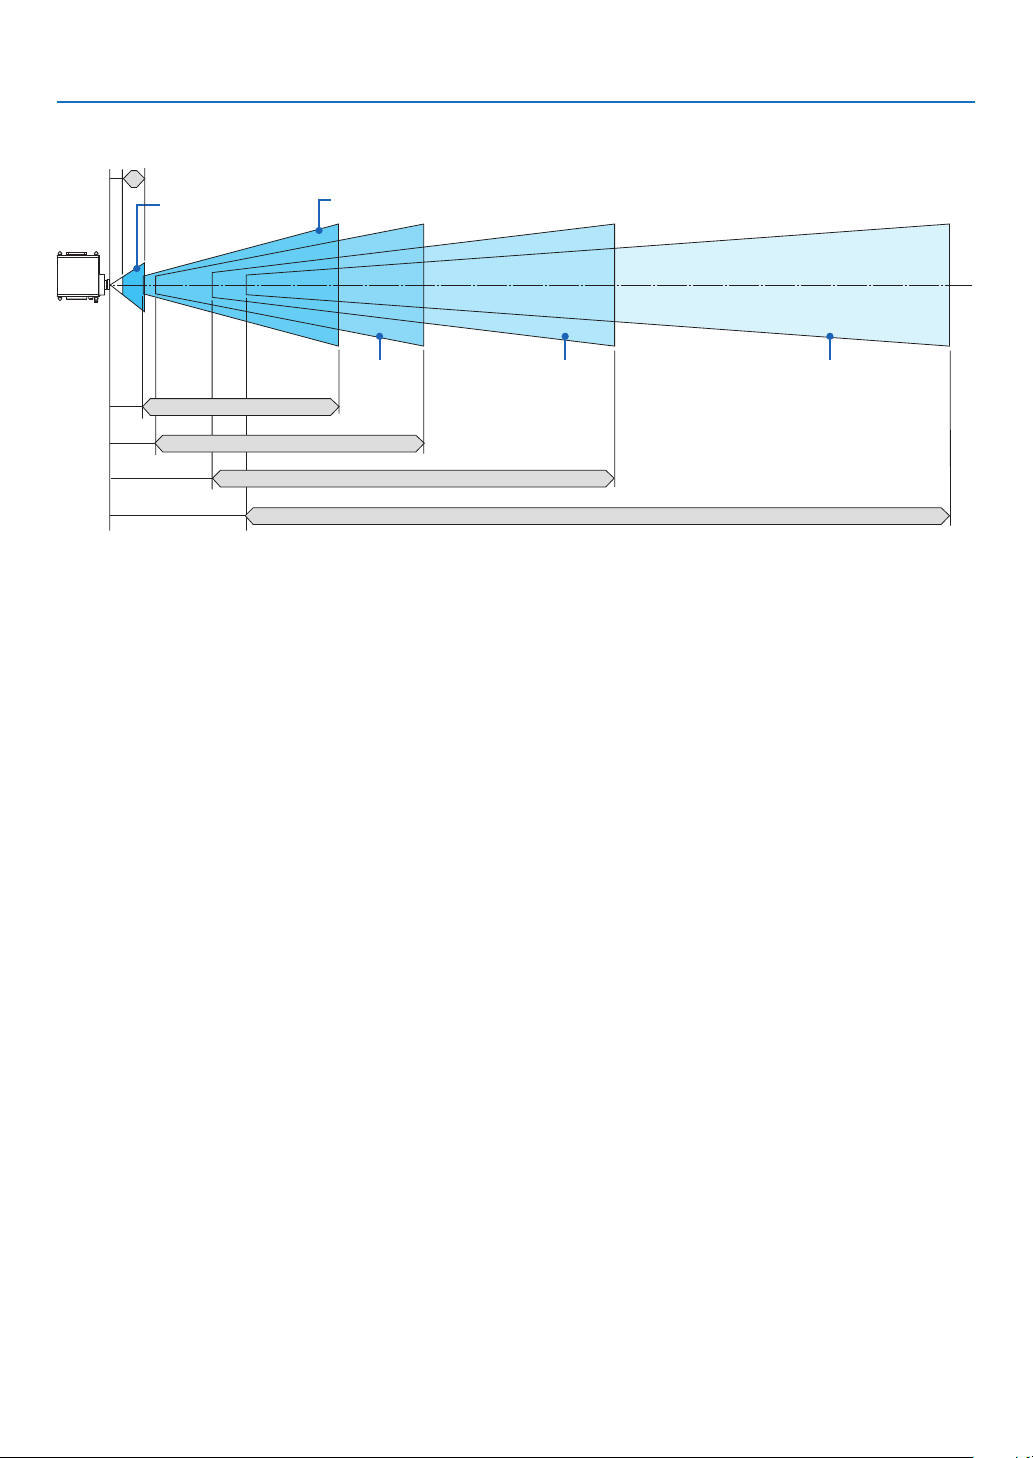
216
9. Appendix
Projection range for the different lenses
80-200"
100-500"
100-500" 100-500"
100-500"
NP25FL : 1.1–3.2 m
NP26ZL : 2.8–24.0 m
NP27ZL : 4.0–24.0 m
NP28ZL : 9.0–45.0 m
NP29ZL : 12.0–80.0 m

217
9. Appendix
Tables of screen sizes and dimensions
Screen
height
Screenwidth
16:10screensize
(diagonal)
Size(inches)ScreenwidthScreenheight
(inches)(cm)(inches)(cm)
50 42.4107.726.5 67.3
60 50.9129.231.880.8
8067.8172.342.4107.7
100 84.8215.453.0 134.6
120 101.8258.563.6 161.5
150 127.2323.1 79.5201.9
200 169.6430.8106.0 269.2
240203.5 516.9127.2323.1
300 254.4646.2159.0403.9
350 296.8753.9185.5471.2
400339.2861.6212.0 538.5
450381.6969.3238.5605.8
500 424.01077.0265.0 673.1
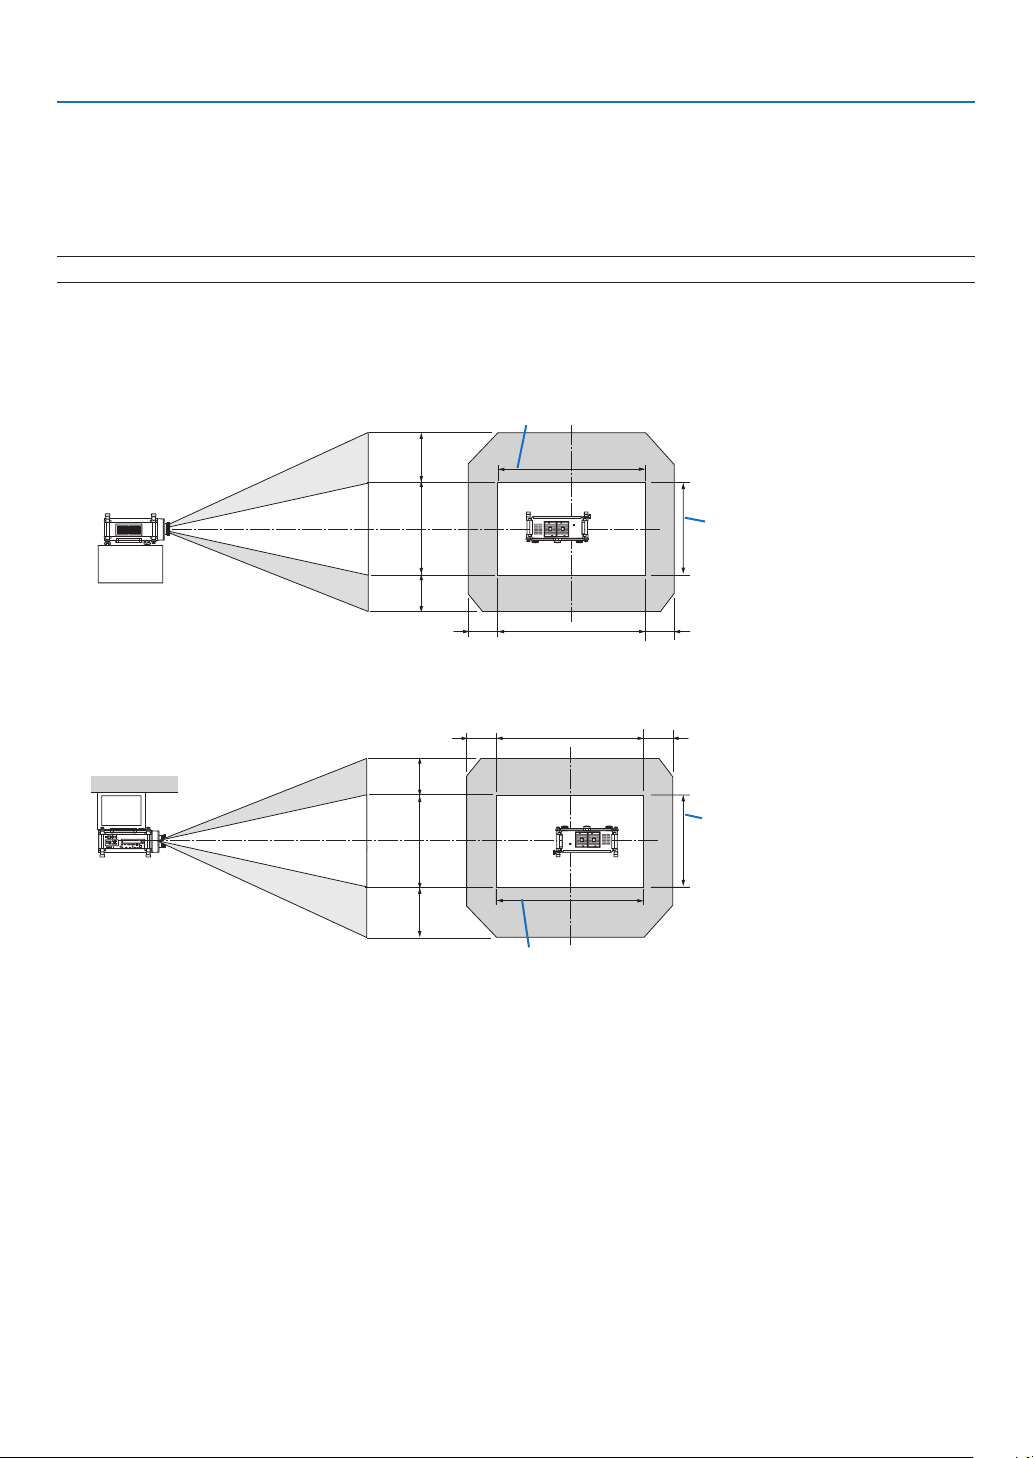
218
9. Appendix
Lens shifting range
ThisprojectorisequippedwithalensshiftfunctionforadjustingthepositionoftheprojectedimagebyusingtheLENS
SHIFT▼▲◀▶buttons.Thelenscanbeshiftedwithintherangeshownbelow.
Descriptionofsymbols:Vindicatesvertical(heightoftheprojectedimage),Hindicateshorizontal(widthofthe
projectedimage).
NOTE:ThelensshiftfunctioncannotbeusedwhentheNP25FLlensisused.
Desk/frontprojection
1V
1H
0.2H 0.2H
0.55V
0.4V
Height of projected image
Widthofprojectedimage
Ceiling/frontprojector
1V
1H
0.2H 0.2H
0.55V
0.4V
Height of projected image
Widthofprojectedimage
Ex.:Whenprojectingona150"screen
Accordingtothetablesofscreensizesanddimensionsfor16:10(→page
217),H=323.1cm,V=201.9cm.
Adjustmentrangeintheverticaldirection:Theprojectedimagecanbemovedupwards0.55×201.9cm≈111cm,
(whenthelensisatthecenterposition).Foraceiling/frontinstallation,theaboveguresareinverted.
Adjustmentrangeinthehorizontaldirection:Theprojectedimagecanbemovedtotheleft0.2×323.1cm≈64.6cm,
totheright0.2×323.1cm≈64.6cm.
*Figuresdifferbyseveral%becausethecalculationisapproximate.
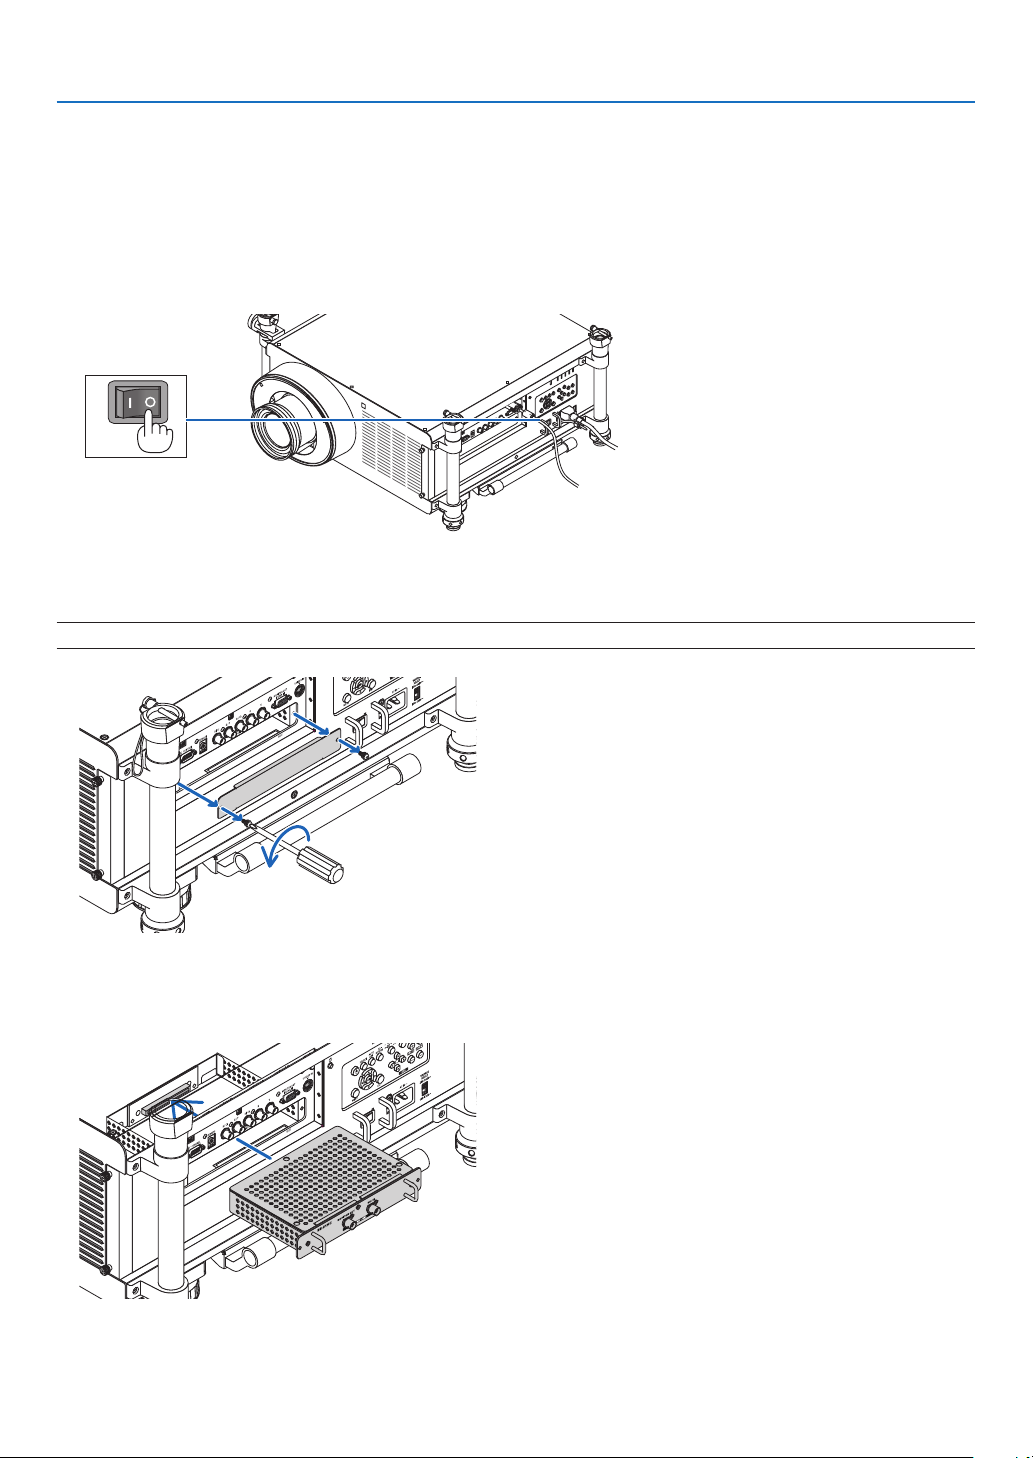
219
9. Appendix
❷ Mounting the Optional Board (sold separately)
CAUTION
Beforemountingorremovingtheoptionalboard,besuretoturnofftheprojector,waitforthefanstostopandturn
offthemainpowerswitch.
Toolneeded:Phillipsscrewdriver(plus-head)
TheSB-01HCboardisusedasanexample.
1.Turnoffthemainpowerswitchoftheprojector.
2.Loosenthetwoscrewsontheslotcoveroftheterminalpanel.
Remove the two screws and the slot cover.
NOTE:Keepthetwoscrewsandtheslotcover.
3.Inserttheoptionalboardintotheslot.
Makesurethattheboardisinsertedintotheslotinthecorrectorientation.
Incorrectorientationmaycausemiscommunicationbetweentheoptionalboardandprojector.
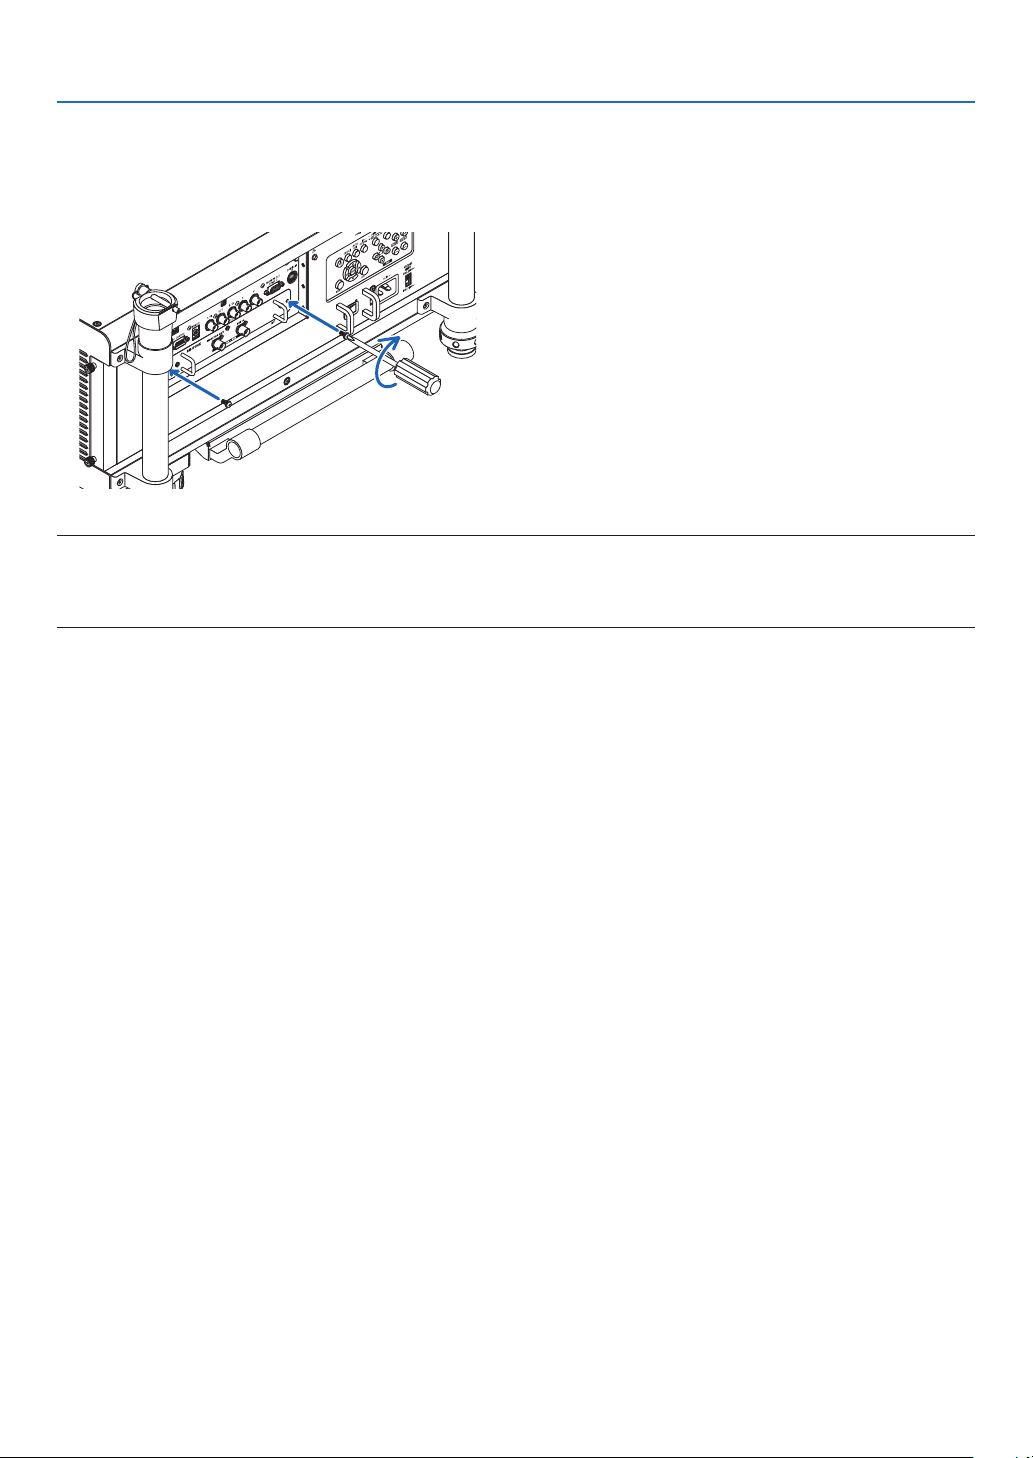
220
9. Appendix
4.Tightenthetwoscrewsonbothsidesoftheslot.
•Besuretotightenthescrews.
Thiswillcompleteinstallationoftheoptionalboard.
Refertotheuser’smanualincludedwiththeboardforsourceselection.
NOTE:
•Mountingtheoptionalboardmaycausethefanstoruninthestandbymodeforthepurposeofcoolingdependingontheoptional
board. The fan speed may also increase in order to cool the projector properly. Both of these instances are considered normal
and not a malfunction of the projector.

221
9. Appendix
Compatible Input Signal List
Analog RGB
SignalResolution(dots)AspectRatioRefreshRate(Hz)
VGA640×4804:3 60/72/75/85/iMac
SVGA800×600 4:3 56/60/72/75/85/iMac
XGA1024×7684:3 60/70/75/85/iMac
XGA+1152 ×8644:3 60/70/75/85
WXGA1280×76815 :960
1280×80016 :10 60
1360 ×768*
1
16 :960
1366 ×768*
1
16 :960
Quad-VGA1280×9604:3 60/75/85
SXGA1280×10245 :460/75/85
SXGA+1400×1050 4:3 60/75
WXGA+1440×90016 :10 60
WXGA++1600 ×90016 :960
UXGA1600 ×1200 4:3 60/65/70/75
WSXGA+1680×1050 16 :10 60
WUXGA1920×1200 16 :10
60(ReducedBlanking)
HD1280×72016 :960
FullHD1920×108016 :960
MAC13"640×4804:3 67
MAC16"832×6244:3 75
MAC19"1024×7684:3 75
MAC21"1152 ×870*
2
4:3 75
MAC23"1280×10245 :465
HDMI
SignalResolution(dots)AspectRatioRefreshRate(Hz)
VGA640×4804:3 60
SVGA800×600 4:3 60
XGA1024×7684:3 60
HD1280×72016 :960
WXGA1280×76815 :960
1280×80016 :10 60
1366 ×768*
1
16 :960
Quad-VGA1280×9604:3 60
SXGA1280×10245 :460
SXGA+1400×1050 4:3 60
WXGA+1440×90016 :10 60
WXGA++1600 ×90016 :960
WSXGA+1680×1050 16 :10 60
UXGA1600 ×1200 4:3 60
FullHD1920×108016 :960
WUXGA1920×1200 16 :10
60(ReducedBlanking)
HDTV(1080p)1920×108016 :950/60
HDTV(1080i)1920×108016 :950/60
HDTV(720p)1280×72016 :950/60
SDTV(480p)720×4804:3/16:960
SDTV(576p)720×5764:3/16:950
SDTV(480i)1440×480
4:3/16:960
SDTV(576i)1440×576
4:3/16:950

222
9. Appendix
DisplayPort
SignalResolution(dots)AspectRatioRefreshRate(Hz)
VGA640×4804:3 60
SVGA800×600 4:3 60
XGA1024×7684:3 60
HD1280×72016 :960
WXGA1280×76815 :960
1280×80016 :10 60
1366 ×768*
1
16 :960
Quad-VGA1280×9604:3 60
SXGA1280×10245 :460
SXGA+1400×1050 4:3 60
WXGA+1440×90016 :10 60
WXGA++1600 ×90016 :960
WSXGA+1680×1050 16 :10 60
UXGA1600 ×1200 4:3 60
FullHD1920×108016 :960
WUXGA1920×1200 16 :10
60(ReducedBlanking)
HDTV(1080p)1920×108016 :950/60
HDTV(720p)1280×72016 :950/60
SDTV(480p)720×4804:3/16:960
SDTV(576p)720×5764:3/16:950
Component
SignalResolution(dots)AspectRatioRefreshRate(Hz)
HDTV(1080p)1920×108016 :950/60
HDTV(1080i)1920×108016 :950/60
HDTV(720p)1280×72016 :950/60
SDTV(480p)720×4804:3/16:960
SDTV(576p)720×5764:3/16:950
SDTV(480i)720×480
4:3/16:960
SDTV(576i)720×576
4:3/16:950
CompositeVideo/S-Video
SignalAspectRatioRefreshRate(Hz)
NTSC4:3 60
PAL4:3 50
PAL604:3 60
SECAM4:3 50
*1Theprojectormayfailtodisplaythesesignalscorrectlywhen[AUTO]isselectedfor[ASPECTRATIO]intheon-screenmenu.
Thefactorydefaultis[AUTO]for[ASPECTRATIO].Todisplaythesesignals,select[16:9]for[ASPECTRATIO].
*2Theprojectormayfailtodisplaythesesignalscorrectlywhen[AUTO]isselectedfor[ASPECTRATIO]intheon-screenmenu.
Thefactorydefaultis[AUTO]for[ASPECTRATIO].Todisplaythesesignals,select[4:3]for[ASPECTRATIO].
•Signalsexceedingtheprojector’sresolutionarehandledwithscalingtechnology.
•Withscalingtechnology,thesizeofcharactersandruledlinesmaybeunevenandcolorsmaybeblurred.
•Uponshipment,theprojectorissetforsignalswithstandarddisplayresolutionsandfrequencies,butadjustments
mayberequireddependingonthetypeofcomputer.

223
9. Appendix
Specifications
Thissectionprovidestechnicalinformationaboutprojector’sperformance.
Optical
ModelNamePH1000U
ProjectionSystemDMD™0.96"×3(aspect16:10)
Resolution*
1
1920×1200pixels(WUXGA)
LensOption(seepage
225)
NP25FL
NP26ZL
NP27ZL
NP28ZL
NP29ZL
PowerLensShift
(NP26ZL,NP27ZL,NP28ZL,NP29ZL)
−0.4Vto+0.55V,+/−0.2H
Lamp400WAC(320WinECO)
LightOutput*
2
*
3
11000lumens
ECO:75%
ContrastRatio*
3
(fullwhite:fullblack)
2000:1withDYNAMICCONTRASTON
ImageSize(Diagonal)
100-500"(dependingonthelens→page
216)
80-200"onNP25FL
ProjectionDistance(Min.-Max.)
(dependingonthelens→page
215)
*1Effectivepixelsaremorethan99.99%.
*2Thisisthelightoutputvalue(lumens)whenthe[PRESET]modeissetto[HIGH-BRIGHT].Ifanyothermodeisselectedasthe
[PRESET]mode,thelightoutputvaluemaydropslightly.
*3CompliancewithISO21118-2005
Electrical
ModelNamePH1000U
Inputs
2×RGB/Component(miniD-Sub15P),5×BNC,
1×HDMITypeA(HDMI
®
Connector)HDCPsupported*
4
,
1×DisplayPort(20pinconnecter)HDCPsupported*
4
,
1×S-Video(DIN4P),1×Video(BNC)
1×OptionSlot
Outputs1×RGB(D-Sub15P)
PCControl1×PCControlPort(D-Sub9P)
WiredRemote1×StereominiJack
WiredLANPort1×RJ-45(10BASE-T/100BASE-TX)
WirelessLANPort(Optional)IEEE802.11b/g/n(optionalWirelessLANUnit[NP02LMSeries]required)
USBPort1×TypeA
ColorReproduction10-bitsignalprocessing(1.07billioncolors)(VIEWER,NETWORK:Colors,16.7million
colors)
CompatibleSignals*
5
Analog:VGA/SVGA/XGA/XGA+/WXGA/WXGA+/SXGA/SXGA+/UXGA/WUXGA/480i/480
p/576i/576p/720p/1080i/1080p
HDMI:VGA/SVGA/XGA/WXGA/SXGA/SXGA+/UXGA/WUXGA/480p/576p/720p/1080i/10
80p(Refreshrate:60Hzonly)
VideoBandwidthRGB:165MHz(Max.)
HorizontalResolution540TVlines:NTSC/NTSC4.43/PAL/PAL-M/PAL-N/PAL60
300TVlines:SECAM
ScanRateHorizontal:15kHzto108kHz(RGB:24kHzorover)
Vertical:48Hzto120Hz(HDMI:50Hzto85Hz)
SyncCompatibilitySeparateSync/CompositeSync/SynconGreen
PowerRequirement100-240VAC,50/60Hz
InputCurrent11.2A(100-130V),5.4A(200-240V)
PowerCon-
sumption
ECOMODEOFFDuallamp:1100W(100V)/1050W(240V)
Singlelamp:600W(100V)/580W(240V)
ECOMODEONDuallamp:880W(100V)/840W(240V)
Singlelamp:500W(100V)/490W(240V)
STANDBY(NORMAL)90W
NETWORKSTANDBY60W
STANDBY(POWER-
SAVING)
0.5W

224
9. Appendix
*4HDMI
®
(DeepColor)/DisplayPortwithHDCP
WhatisHDCP/HDCPtechnology?
HDCPisanacronymforHigh-bandwidthDigitalContentProtection.HighbandwidthDigitalContentProtection(HDCP)isasystem
forpreventingillegalcopyingofvideodatasentoveraHigh-DenitionMultimediaInterface(HDMI).
IfyouareunabletoviewmaterialviatheHDMIandDisplayPortinput,thisdoesnotnecessarilymeantheprojectorisnotfunction-
ingproperly.WiththeimplementationofHDCP,theremaybecasesinwhichcertaincontentisprotectedwithHDCPandmight
notbedisplayedduetothedecision/intentionoftheHDCPcommunity(DigitalContentProtection,LLC).
*5Animagewithhigherorlowerresolutionthantheprojector’snativeresolution(1920×1200)willbedisplayedwithscalingtech-
nology.
Mechanical
ModelNamePH1000U
Installation
Orientation
Desktop/Front,Desktop/Rear,Ceiling/Front,Ceiling/Rear
Dimensions22.0"(W)×22.8"(H)×9.3"(D)/558mm(W)×578mm(H)×235mm(D)
(notincludingprotrusions)
Weight87.1lbs/39.5kg(withoutlens)
Environmental
Considerations
OperationalTemperatures:32°to104°F(0°to40°C)*
6
,
20%to80%humidity(non-condensing)atsealevel
StorageTemperatures:14°to122°F(−10°to60°C),
20%to80%humidity(non-condensing)
RegulationsUL/C-ULApproved(UL60950-1,CSA60950-1)
MeetsDOCCanadaClassArequirements
MeetsFCCClassArequirements
MeetsAS/NZSCISPR.22ClassA
MeetsEMCDirective(EN55022,EN55024,EN61000-3-2,EN61000-3-3)
MeetsLowVoltageDirective(EN60950-1,TUVGSApproved)
*695to104°F(35to40ºC)-“Forcedecomode”
Foradditionalinformationvisit:
US:http://www.necdisplay.com/
Europe:http://www.nec-display-solutions.com/
Global:http://www.nec-display.com/global/index.html
Forinformationonouroptionalaccessories,visitourwebsiteorseeourbrochure.
Thespecicationsaresubjecttochangewithoutnotice.
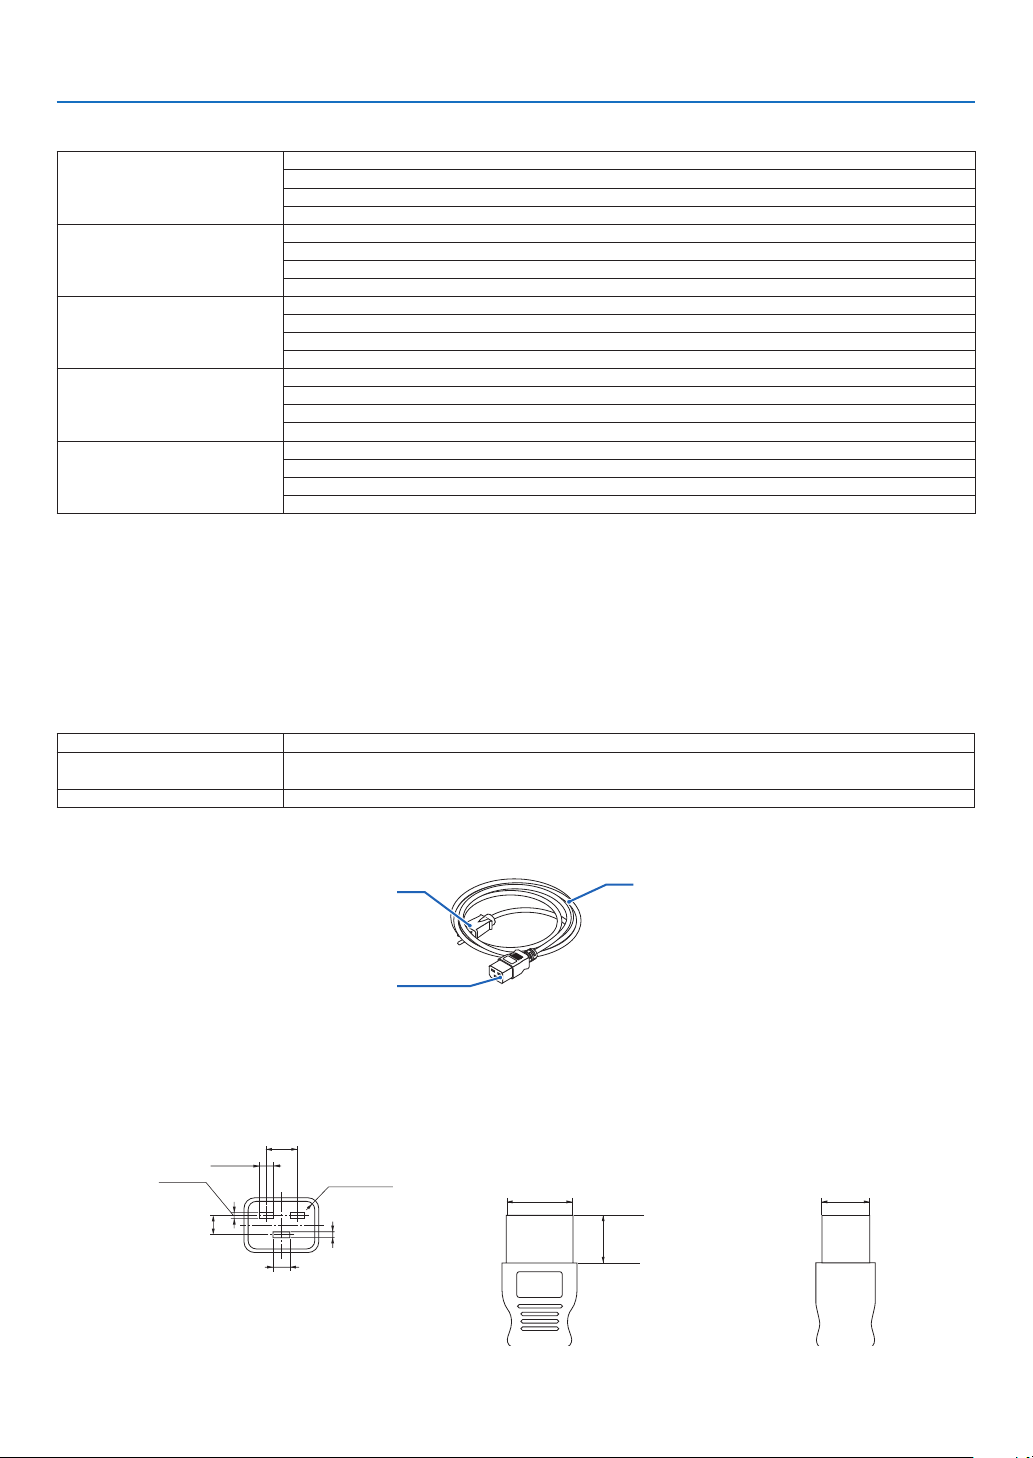
225
9. Appendix
Option lens
NP25FLManualfocus
throwratio0.67:1,F1.85,f=11.2mm
ImageSize(Diagonal):80–200inches/1.27–5.08m
ProjectionDistance(Min.-Max.):1.1–3.0m
NP26ZLPowerzoomandfocus
throwratio1.39-1.87:1,F1.85-2.5,f=18.7-26.5mm
ImageSize(Diagonal):100–500inches/1.27–7.62m
ProjectionDistance(Min.-Max.):2.9–20.1m
NP27ZLPowerzoomandfocus
throwratio1.87-2.56:1,F1.64-1.86,f=25.7-33.7mm
ImageSize(Diagonal):100–500inches/1.27–7.62m
ProjectionDistance(Min.-Max.):4.0–24.0m
NP28ZLPowerzoomandfocus
throwratio2.56-4.16:1,F1.86-2.48,f=32.91-54.23mm
ImageSize(Diagonal):100–500inches/1.27–7.62m
ProjectionDistance(Min.-Max.):9.0–44.5m
NP29ZLPowerzoomandfocus
throwratio4.16-6.96:1,F1.85-2.41,f=52.8-79.1mm
ImageSize(Diagonal):100–500inches/1.27–7.62m
ProjectionDistance(Min.-Max.):12.0–74.0m
•Thesespecicationsandtheproduct’sdesignaresubjecttochangewithoutnotice.
Power Cord
Ifthesuppliedpowercordcannotbeusedorinyourareathevoltageconditionisdifferentfromthesuppliedpower
cord,usepowercordsthataresuitablefortheelectricalspecications,typesofpowercordsandregulationsofthe
countryofinstallation,asshowninthefollowingtableasshownbelow.Formoreinformation,contactyourdealer.
Power Cord Electrical Specifications
PowersupplyPowercordelectricalspecs
AC100-130V125V15Aorhigher
250V16Aorhigher
AC200-240V250V16Aorhigher
Typeofpowercord
plug
connector
cord
Plug and cord
Yourplugmustcomplywithyourcountry’ssafetyrequirementsandyouroutlettype.
Connector
Dimensionsoftheconnectorofthepowercordareshownbelow
7
+0.5
−0
13±0.2
20min
2.5
+0.5
−0
8±0.2
2.5
+0.5
−0
R3.5min
6.0
+0.5
−0
28
+0
−0.9
20
+0
−0.7
Unit:mm
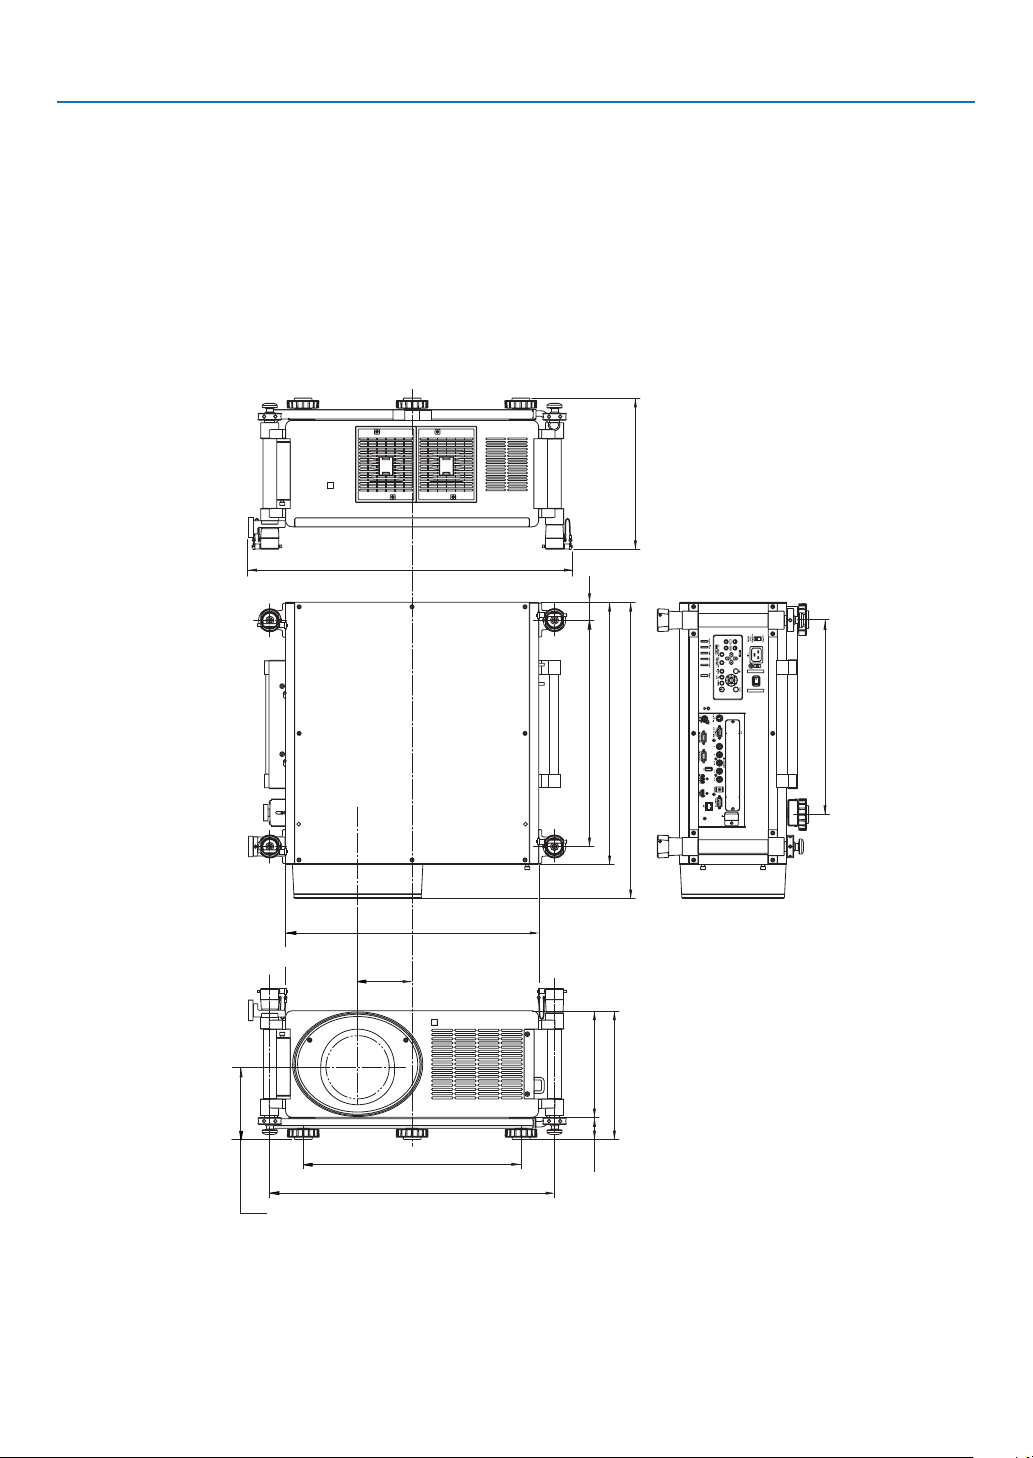
226
9. Appendix
578 (22.8)
653 (25.7)
39.5
(1.6)
499 (19.6)
430 (16.9)
235 (9.3)
283.7 (11.2)
628 (24.7)
480 (18.9)
558 (22)
700 (27.6)
119.9
(4.7)
155.3 (6.1)
333 (13.1)
48.7 (1.9)
Cabinet Dimensions
Lens center
Lens center
Unit:mm(inch)

227
9. Appendix
Pin Assignments of D-Sub COMPUTER Input Connector
Mini D-Sub 15 Pin Connector
SignalLevel
Videosignal:0.7Vp-p(Analog)
Syncsignal:TTLlevel
51423
10
11 12 13 14 15
6978
Pin No. RGB Signal (Analog) YCbCr Signal
1 RedCr
2
GreenorSynconGreenY
3 BlueCb
4Ground
5 Ground
6
RedGroundCrGround
7GreenGroundYGround
8BlueGroundCbGround
9NoConnection
10 SyncSignalGround
11 NoConnection
12 Bi-directionalDATA(SDA)
13 HorizontalSyncorComposite
Sync
14VerticalSync
15 DataClock

228
9. Appendix
Troubleshooting
Thissectionhelpsyouresolveproblemsyoumayencounterwhilesettinguporusingtheprojector.
Indicator Messages
POWER Indicator
IndicatordisplayProjectorstatusProcedure
OffPowerisoff.–
Flashing
Blue(shortashes)PreparingtoturnpoweronWaitawhile.
Blue(longashes)Offtimer(enabled)
Programtimer(offtimeenabled)
–
Orange(shortashes)ProjectorcoolingWaitawhile.
Orange(longashes)Programtimer(ontimeenabled)
LitBluePoweron–
Orange
Standbymode(NORMALorNETWORK
STANDBY)
–
RedStandbymode(POWER-SAVING)–
STATUS Indicator
IndicatordisplayProjectorstatusProcedure
Off
Noproblem,orstandby
mode(POWER-SAVING
orNETWORKSTANDBY)
–
Flashing
Red(cyclesof1)Coverproblem
Thelampcoverisnotproperlymounted.Mountitproperly.(→Page
187)
Red(cyclesof4)FanproblemThecoolingfanhasstoppedturning.ContactanNECprojectorcus-
tomersupportcenterforrepairs.
FlashingOrangeNetworkconictItisnotpossibletoconnecttheprojector’sbuilt-inLANandwireless
LANsimultaneouslytothesamenetwork.Toconnecttheprojector’s
built-inLANandwirelessLANsimultaneously,connectthemtodiffer-
entnetworks.
LitGreenStandbymode(NOR-
MAL)
–
Orange
Buttonhasbeenpressed
whileprojectorisinkey
lockmode
Theprojector’skeysarelocked.Thesettingmustbecanceledtooper-
atetheprojector.(→Page
127)
Projector’sIDnumber
andremotecontrol’sID
numberdonotmatch
CheckthecontrolIDs.(→Pages127and128)
LAMP1/LAMP2Indicator
IndicatordisplayProjectorstatusProcedure
Off
Thelampisturnedoff.–
FlashingGreen
Preparingtorelightlampafter
lightinghasfailed
Waitawhile.
RedLampreplacementgraceperiodThelamphasreachedtheendofitsservicelifeandisnowin
thereplacementgraceperiod(100hours).Replacethelamp
assoonaspossible.(→page
185)
Red(cyclesof6)LampdoesnotlightThelamphasnotturnedon.Waitatleast1minute,thenturn
thepowerbackon.Ifthelampstilldoesnotlight,contactan
NECprojectorcustomersupportcenter.
LitRedLampusagetimeexceededThelamphasexceededitsusagetime.Theprojector’spower
cannotbeturnedonuntilthelampisreplaced.(→page
185)
Green
Lamplit–

229
9. Appendix
Temp. Indicator
IndicatordisplayProjectorstatusProcedure
Off
Noproblem
FlashingRedTemperatureproblemThetemperatureprotectorhasbeenactivated.Iftheroom
temperatureishigh,movetheprojectortoacoolplace.Ifthe
TEMP.indicatorstillbeashingwhentheprojectorisusedat
operatingtemperatures,contactanNECprojectorcustomer
supportcenter.
OrangeWarmingupTheusageenvironmenttemperatureislowerthanthe
projector’soperatingtemperature(0°C).Inthatcase,raise
theusageenvironmenttemperaturetoa0°Corhigherand
turnontheprojector.Iftheprojectoristurnedonataround
0°C,itmaytake5minutestowarmuptheprojector.During
thiswarm-upperiodtheTEMP.indicatorwillash.Whenthe
warm-upiscompleted,theTEMP.indicatorwillgooff.
SHUTTER Indicator
IndicatordisplayProjectorstatusProcedure
OffLight–
FlashingGreen
Lenscalibrationisinprocess.–
OnGreen
Lightshuttered–
If the temperature protector is activated
Iftheprojector’sinternaltemperaturerisesabnormally,thelampturnsoffandthetemperatureindicatorashes
(repeatedlyincyclesof2).
Itmayhappenthattheprojector’stemperatureprotectorissimultaneouslyactivatedandtheprojector’spowerturns
off.
Ifthishappens,dothefollowing:
-Unplugthepowercordfromthepoweroutlet.
-Ifusinginaplacewherethesurroundingtemperatureishigh,movetheprojectortoadifferent,coolplace.
-Ifthereisdustintheventilationholes,clean.(→ pages
180and184)
-Waitassuchabout1hourfortheprojector’sinternaltemperaturetolower.

230
9. Appendix
Common Problems & Solutions
(→“Power/Status/LampIndicator”onpage228.)
Problem CheckTheseItems
Does not turn on or
shut down
• Checkthatthepowercordispluggedinandthatthepowerbuttonontheprojectorcabinetortheremotecontrol
is on. (→ pages 13, 14, 17)
• Ensurethatthelampcoverisinstalledcorrectly.(→ page 187)
• Checktoseeiftheprojectorhasoverheated.Ifthereisinsufcientventilationaroundtheprojectororiftheroom
where you are presenting is particularly warm, move the projector to a cooler location.
• Checktoseeifyoucontinuetousetheprojectorforanother100hoursafterthelamphasreachedtheendofits
life. If so, replace the lamp. After replacing the lamp, reset the lamp hours used. (→ page 138)
• Thelampmayfailtolight.Waitafullminuteandthenturnonthepoweragain.
• Set[FANMODE]to[HIGHALTITUDE]whenusingtheprojectorataltitudesapproximately5500feet/1600meters
or higher. Using the projector at altitudes approximately 5500 feet/1600 meters or higher without setting to [HIGH
ALTITUDE] can cause the projector to overheat and the projector could shut down. If this happens, wait a couple
minutes and turn on the projector. (→ page 129)
If you turn on the projector immediately after the lamp is turned off, the fans run without displaying an image for
some time and then the projector will display the image. Wait for a moment.
Will turn off • Ensurethatthe[OFFTIMER],[AUTOPOWEROFF]or[PROGRAMTIMER]isoff.(→ page 121, 132, 159)
No picture
• Checkiftheappropriateinputisselected.(→ page
20) If there is still no picture, press the SOURCE button or one
of the input buttons again.
• Ensureyourcablesareconnectedproperly.
• Usemenustoadjustthebrightnessandcontrast.(→ page 111)
• Ensurethatthelenscoverisopen.(→ page 16)
• Resetthesettingsoradjustmentstofactorypresetlevelsusingthe[RESET]intheMenu.(→ page 138)
• EnteryourregisteredkeywordiftheSecurityfunctionisenabled.(→ page 45)
• IftheHDMIinputortheDisplayPortsignalcannotbedisplayed,trythefollowing.
- Reinstall your driver for the graphics card built in your computer, or use the updated driver.
For reinstalling or updating your driver, refer to the user guide accompanied with your computer or graphics
card, or contact the support center for your computer manufacturer.
Install the updated driver or OS on your own responsibility.
We are not liable for any trouble and failure caused by this installation.
• BesuretoconnecttheprojectorandnotebookPCwhiletheprojectorisinstandbymodeandbeforeturningon
the power to the notebook PC.
In most cases the output signal from the notebook PC is not turned on unless connected to the projector before
being powered up.
* If the screen goes blank while using your remote control, it may be the result of the computer’s screen-saver
or power management software.
• Seealsothepage232.
Picture suddenly
becomes dark
• CheckiftheprojectorisintheForcedECOmodebecauseoftoohighambienttemperature.Ifthisisthecase,
lower the internal temperature of the projector by selecting [HIGH] for [FAN MODE]. (→ page 129)
Color tone or hue is
unusual
• Checkifanappropriatecolorisselectedin[WALLCOLOR].Ifso,selectanappropriateoption.(→ page
119)
• Adjust[HUE]in[PICTURE].(→ page 111)
Image isn’t square to
the screen
• Repositiontheprojectortoimproveitsangletothescreen.(→ page
21)
• UsetheKeystonecorrectionfunctiontocorrectthetrapezoiddistortion.(→ page 28)
Picture is blurred
• Adjustthefocus.(→ page
26)
• Repositiontheprojectortoimproveitsangletothescreen.(→ page 21)
• Ensurethatthedistancebetweentheprojectorandscreeniswithintheadjustmentrangeofthelens.
(→ page 215)
• Hasthelensbeenshiftedbyanamountexceedingtheguaranteedrange?(→ page 218)
• Isthelensinserteduntilitcomestoacompletestop?(→ page 163)
• Condensationmayformonthelensiftheprojectoriscold,broughtintoawarmplaceandisthenturnedon.
Should this happen, let the projector stand until there is no condensation on the lens.
Flicker appears on
screen
• Set[FANMODE]tootherthan[HIGHALTITUDE]modewhenusingtheprojectorataltitudesapproximately5500
feet/1600 meters or lower. Using the projector at altitudes less than approximately 5500 feet/1600 meters and
setting to [HIGH ALTITUDE] can cause the lamp to overcool, causing the image to flicker. Switch [FAN MODE] to
[AUTO]. (→ page
129)

231
9. Appendix
Image is scrolling
vertically, horizontally
or both
• Checkthecomputer’sresolutionandfrequency.Makesurethattheresolutionyouaretryingtodisplayissupported
by the projector. (→ page
221)
• AdjustthecomputerimagemanuallywiththeHorizontal/Verticalinthe[IMAGEOPTIONS].(→ page
113)
Remote control does
not work
• Installnewbatteries.(→ page
9)
• Makesuretherearenoobstaclesbetweenyouandtheprojector.
• Standwithin22feet(7m)oftheprojector.(→ page 9)
• Toperformcomputermouseoperationsusingtheprojector’sremotecontrol,connecttheoptionalmousereceiver
to the computer. (→ page 38)
Indicator is lit or
blinking
• SeethePOWER/STATUS/LAMPIndicator.(→ page
228)
Cross color in RGB
mode
• PresstheAUTOADJ.buttonontheprojectorcabinetortheremotecontrol.(→ page
30)
• Adjustthecomputerimagemanuallywith[CLOCK]/[PHASE]in[IMAGEOPTIONS]inthemenu.(→ page 112)
Formoreinformationcontactyourdealer.

232
9. Appendix
If there is no picture, or the picture is not displayed correctly.
•PoweronprocessfortheprojectorandthePC.
BesuretoconnecttheprojectorandnotebookPCwhiletheprojectorisinstandbymodeandbeforeturningon
thepowertothenotebookPC.
InmostcasestheoutputsignalfromthenotebookPCisnotturnedonunlessconnectedtotheprojectorbefore
beingpoweredup.
NOTE:Youcancheckthehorizontalfrequencyofthecurrentsignalintheprojector’smenuunderInformation.Ifitreads“0kHz”,
thismeansthereisnosignalbeingoutputfromthecomputer.(→
page 135 or go to next step)
•Enablingthecomputer’sexternaldisplay.
DisplayinganimageonthenotebookPC’sscreendoesnotnecessarilymeanitoutputsasignaltotheprojector.
WhenusingaPCcompatiblelaptop,acombinationoffunctionkeyswillenable/disabletheexternaldisplay.Usu-
ally,thecombinationofthe“Fn”keyalongwithoneofthe12functionkeysgetstheexternaldisplaytocomeon
oroff.Forexample,NEClaptopsuseFn+F3,whileDelllaptopsuseFn+F8keycombinationstotogglethrough
externaldisplayselections.
•Non-standardsignaloutputfromthecomputer
IftheoutputsignalfromanotebookPCisnotanindustrystandard,theprojectedimagemaynotbedisplayed
correctly.Shouldthishappen,deactivatethenotebookPC’sLCDscreenwhentheprojectordisplayisinuse.Each
notebookPChasadifferentwayofdeactivate/reactivatethelocalLCDscreensasdescribedinthepreviousstep.
Refertoyourcomputer’sdocumentationfordetailedinformation.
•ImagedisplayedisincorrectwhenusingaMacintosh
WhenusingaMacintoshwiththeprojector,settheDIPswitchoftheMacadapter(notsuppliedwiththeprojector)
accordingtoyourresolution.Aftersetting,restartyourMacintoshforthechangestotakeaffect.
ForsettingdisplaymodesotherthanthosesupportedbyyourMacintoshandtheprojector,changingtheDIPswitch
onaMacadaptermaybounceanimageslightlyormaydisplaynothing.Shouldthishappen,settheDIPswitch
tothe13"xedmodeandthenrestartyourMacintosh.Afterthat,restoretheDIPswitchestoadisplayablemode
andthenrestarttheMacintoshagain.
NOTE:AVideoAdaptercablemanufacturedbyAppleComputerisneededforaPowerBookwhichdoesnothaveaminiD-Sub
15-pin connector.
•MirroringonaPowerBook
*WhenusingtheprojectorwithaMacintoshPowerBook,outputmaynotbesetto1024×768unless“mirroring”
isoffonyourPowerBook.Refertoowner’smanualsuppliedwithyourMacintoshcomputerformirroring.
•FoldersoriconsarehiddenontheMacintoshscreen
Foldersoriconsmaynotbeseenonthescreen.Shouldthishappen,select[View]→[Arrange]fromtheApple
menuandarrangeicons.
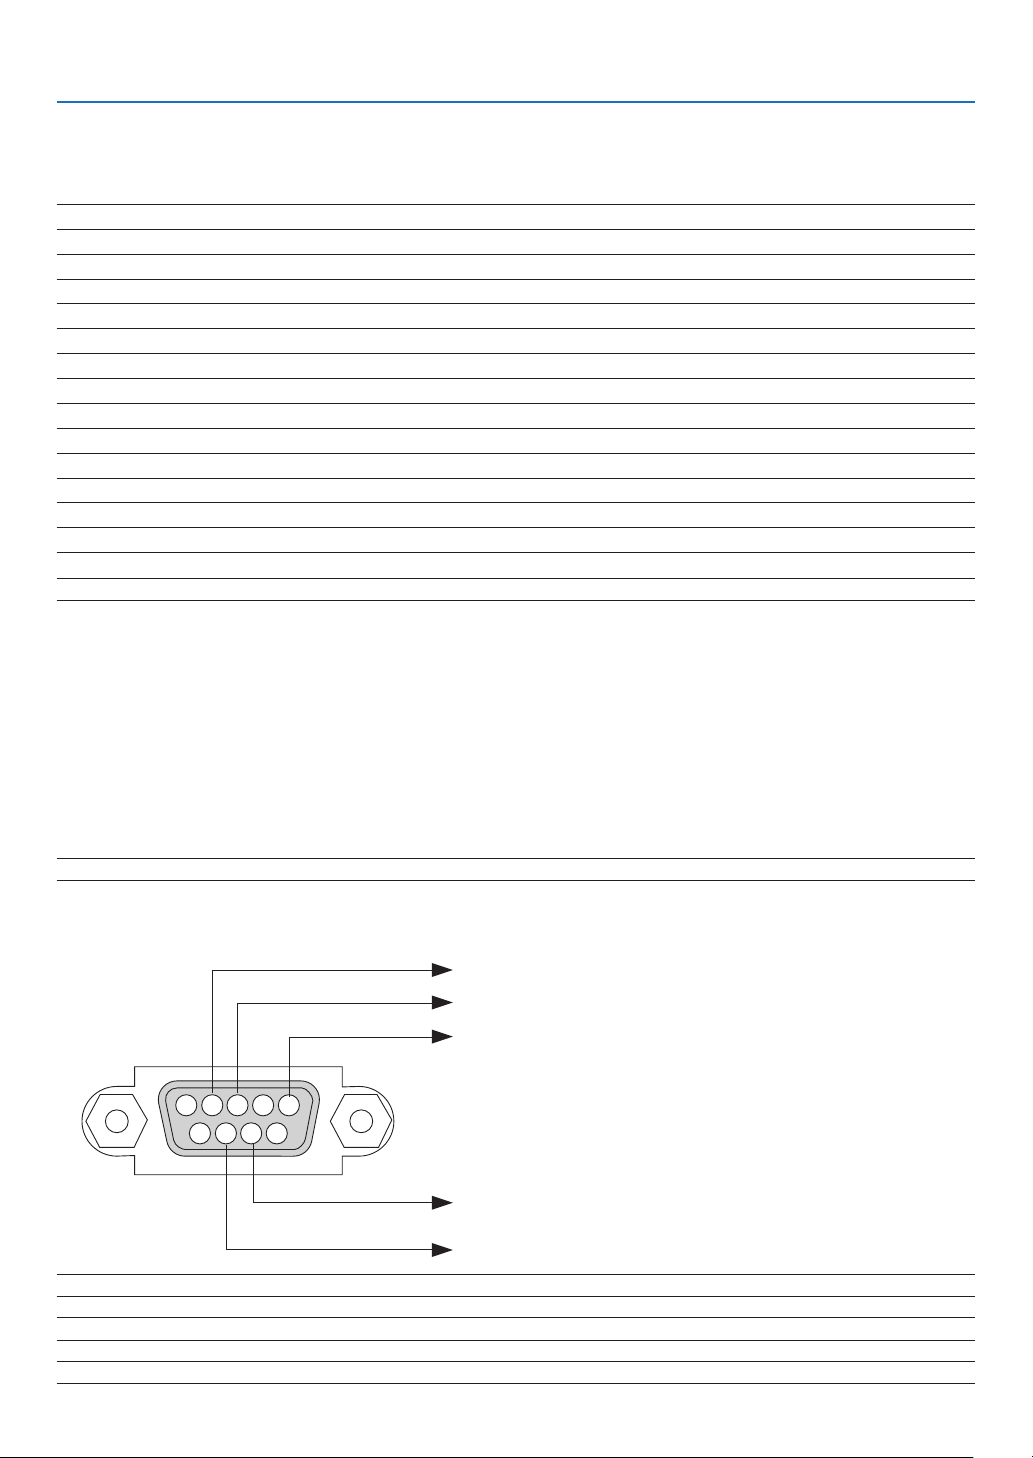
233
9. Appendix
PC Control Codes and Cable Connection
PC Control Codes
Function Code Data
POWER ON 02H 00H 00H 00H 00H 02H
POWER OFF 02H 01H 00H 00H 00H 03H
INPUT SELECT COMPUTER 1 02H 03H 00H 00H 02H 01H 01H 09H
INPUT SELECT COMPUTER 2 02H 03H 00H 00H 02H 01H 02H 0AH
INPUT SELECT COMPUTER 3 02H 03H 00H 00H 02H 01H 03H 0BH
INPUT SELECT HDMI 02H 03H 00H 00H 02H 01H 1AH 22H
INPUT SELECT DisplayPort 02H 03H 00H 00H 02H 01H 1BH 23H
INPUT SELECT VIDEO 02H 03H 00H 00H 02H 01H 06H 0EH
INPUT SELECT S-VIDEO 02H 03H 00H 00H 02H 01H 0BH 13H
INPUT SELECT VIEWER 02H 03H 00H 00H 02H 01H 1FH 27H
INPUT SELECT NETWORK 02H 03H 00H 00H 02H 01H 20H 28H
PICTURE MUTE ON 02H 10H 00H 00H 00H 12H
PICTURE MUTE OFF 02H 11H 00H 00H 00H 13H
NOTE:ContactyourlocaldealerforafulllistofthePCControlCodesifneeded.
Cable Connection
CommunicationProtocol
Baud rate .........................................38400 bps
Data length ......................................8 bits
Parity ...............................................No parity
Stop bit ............................................One bit
X on/off ............................................None
Communications procedure .............Full duplex
NOTE: Depending on the equipment, a lower baud rate may be recommended for long cable runs.
PC Control Connector (D-SUB 9P)
NOTE1:Pins1,4,6and9arenoused.
NOTE2:Jumper“RequesttoSend”and“CleartoSend”togetheronbothendsofthecabletosimplifycableconnection.
NOTE3:Forlongcablerunsitisrecommendedtosetcommunicationspeedwithinprojectormenusto9600bps.
15243
67 98
ToGNDofPC
To RxD of PC
To TxD of PC
ToRTSofPC
ToCTSofPC

234
9. Appendix
No image is displayed from your PC or video equipment to the
projector.
Still no image even though you connect the projector to the PC
first, then start the PC.
Enabling your notebook PC’s signal output to the projector.
• Acombinationoffunctionkeyswillenable/disabletheexter-
naldisplay.Usually,thecombinationofthe“Fn”keyalong
with one of the 12 function keys turns the external display
on or off.
No image (blue or black background, no display).
Still no image even though you press the AUTO ADJUST
button.
Still no image even though you carry out [RESET] in the
projector’s menu.
Signal cable’s plug is fully inserted into the input connector
A message appears on the screen.
( _____________________________________________ )
The source connected to the projector is active and available.
Still no image even though you adjust the brightness and/or
the contrast.
Input source’s resolution and frequency are supported by the
projector.
Troubleshooting Check List
Beforecontactingyourdealerorservicepersonnel,checkthefollowinglisttobesurerepairsareneededalsoby
referringtothe“Troubleshooting”sectioninyouruser’smanual.Thischecklistbelowwillhelpussolveyourproblem
moreefciently.
*Printthispageandthenextpageforyourcheck.
Frequency of occurrence always sometimes(Howoften?_____________________) other (__________________)
Power
No power (POWER indicator does not light blue) See also “Status
Indicator (STATUS)”.
Power cord’s plug is fully inserted into the wall outlet.
Main power switch is pressed to the ON position.
Lamp cover is installed correctly.
Lamp Hours Used (lamp operation hours) was cleared after
lamp replacement.
No power even though you press and hold the POWER button
for 1 second.
Shut down during operation.
Power cord’s plug is fully inserted into the wall outlet.
Lamp cover is installed correctly.
[AUTO POWER OFF] is turned off (only models with the [AUTO
POWER OFF] function).
[OFF TIMER] is turned off (only models with the [OFF TIMER]
function).
Video and Audio
Image is too dark.
Remains unchanged even though you adjust the brightness
and/or the contrast.
Image is distorted.
Image appears to be trapezoidal (unchanged even though you
carry out the [KEYSTONE] adjustment).
Parts of the image are lost.
Still unchanged even though you press the AUTO ADJUST
button.
Still unchanged even though you carry out [RESET] in the
projector’s menu.
Image is shifted in the vertical or horizontal direction.
Horizontal and vertical positions are correctly adjusted on a
computer signal.
Input source’s resolution and frequency are supported by the
projector.
Some pixels are lost.
Image is flickering.
Still unchanged even though you press the AUTO ADJUST
button.
Still unchanged even though you carry out [RESET] in the
projector’s menu.
Image shows flickering or color drift on a computer signal.
Still unchanged even though you change [FAN MODE] from
[HIGH ALTITUDE] to [AUTO].
Image appears blurry or out of focus.
Still unchanged even though you checked the signal’s resolution
on PC and changed it to projector’s native resolution.
Still unchanged even though you adjusted the focus.
Other
Remote control does not work.
No obstacles between the sensor of the projector and the
remote control.
Projector is placed near a fluorescent light that can disturb the
infrared remote controls.
Batteries are new and are not reversed in installation.
Buttons on the projector cabinet do not work (only models with the
[CONTROL PANEL LOCK] function)
[CONTROL PANEL LOCK] is not turned on or is disabled in
the menu.
Still unchanged even though you press and hold the EXIT button
for a minimum of 10 seconds.
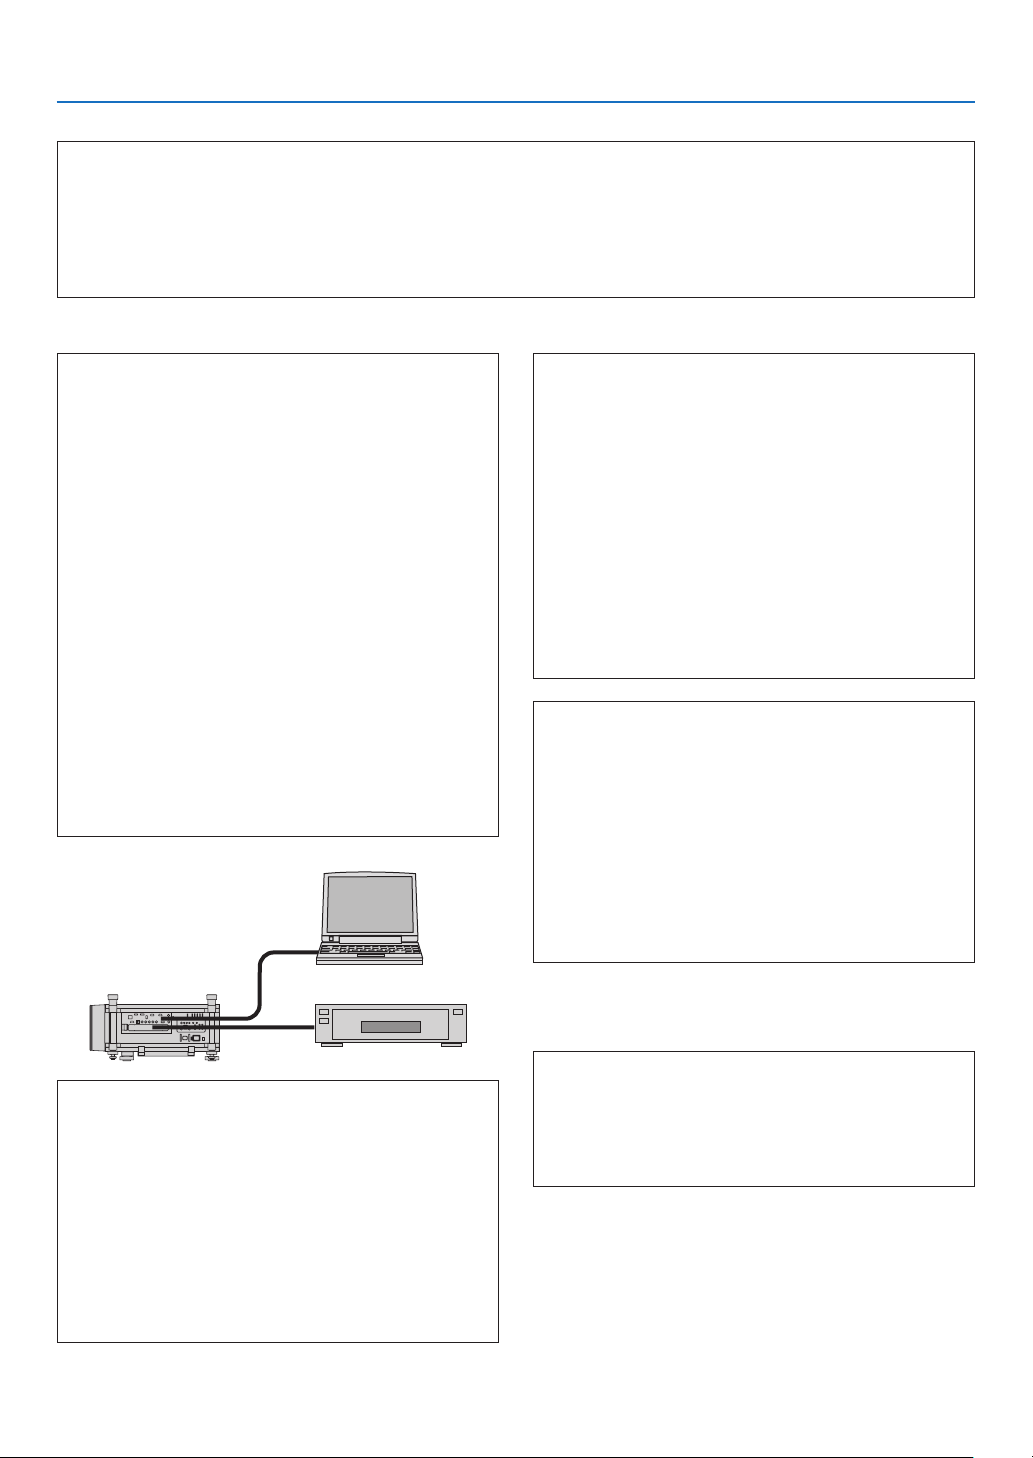
235
9. Appendix
In the space below please describe your problem in detail.
Information on application and environment where your projector is used
Projector
Model number:
Serial No.:
Date of purchase:
Lamp operating time (hours):
Eco Mode: OFF ON
Information on input signal:
Horizontal synch frequency [ ] kHz
Vertical synch frequency [ ] Hz
Synch polarity H (+) (−)
V (+) (−)
Synch type Separate Composite
Sync on Green
STATUS Indicator:
Steady light Orange Green
Flashing light [ ] cycles
Remote control model number:
Signal cable
NECstandardorothermanufacturer’scable?
Model number: Length: inch/m
Distribution amplifier
Model number:
Switcher
Model number:
Adapter
Model number:
Projector
PC
DVDplayer
Installation environment
Screen size: inch
Screen type: White matte Beads Polarization
Wide angle High contrast
Throw distance: feet/inch/m
Orientation: Ceiling mount Desktop
Power outlet connection:
Connected directly to wall outlet
Connected to power cord extender or other (the
number of connected equipment______________)
Connected to a power cord reel or other (the number
of connected equipment______________)
Computer
Manufacturer:
Model number:
Notebook PC / Desktop
Native resolution:
Refresh rate:
Video adapter:
Other:
Videoequipment
VCR, DVD player, Video camera, Video game or other
Manufacturer:
Model number:

236
9. Appendix
REGISTER YOUR PROJECTOR! (for residents in the United
States, Canada, and Mexico)
Pleasetaketimetoregisteryournewprojector.ThiswillactivateyourlimitedpartsandlaborwarrantyandInstaCare
serviceprogram.
Visitourwebsiteatwww.necdisplay.com,clickonsupportcenter/registerproductandsubmityourcompletedform
online.
Uponreceipt,wewillsendaconrmationletterwithallthedetailsyouwillneedtotakeadvantageoffast,reliable
warrantyandserviceprogramsfromtheindustryleader,NECDisplaySolutionsofAmerica,Inc.

©NECDisplaySolutions,Ltd.2011–20127N951663