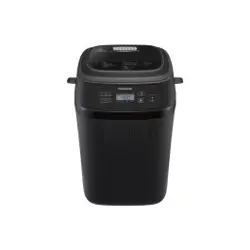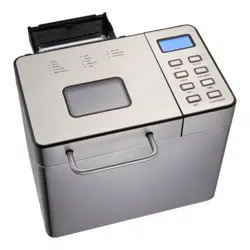

BREAD MAKER
Model Number: FW61100043213
UPC: 4897074552841
Customer Assistance
1-855-451-2897 (US)
Please consider the option to recycle the packaging material.
IM_Bread Maker_IM_US_V5_210507.indd 1 5/7/21 11:38 AM

IMPORTANT SAFEGUARDS
SAVE THESE INSTRUCTIONS!
2
When using electrical appliances, basic safety precautions should always
be followed, including the following:
• Read all instructions before use.
• Do not touch hot surfaces. Use handles or knobs.
• WARNING - to protect against electric shock, re and personal injury:
- do not immerse cord, plug or appliance in water or other liquids;
- do not immerse the cord, plug, appliance or any electrical components
in water or any other liquids;
- always switch o and unplug the appliance before cleaning.
• Close supervision is necessary when any appliance is used by or near
children.
• Unplug from wall outlet when not in use, before putting on or taking o
parts and before cleaning. Allow to cool before handling, putting on or
taking o parts, and before cleaning the appliance.
• Do not operate any appliance with a damaged cord or plug, or after the
appliance malfunctions or has been damaged in any manner. Call our
toll-free customer assistance number for information on examination,
repair, or adjustment.
• The use of accessory attachments not recommended by the appliance
manufacturer may result in re, electric shock or injuries to persons.
• Do not use outdoors or in a damp area.
• Do not place the appliance close to the edge of the countertop.
• Do not let power cord hang over edge of table or counter, or touch hot
surfaces.
• Do not place on or near a hot gas or electric burner or in a heated oven.
• Do not use appliance for other than intended use.
• Do not clean with metal scouring pads. Pieces can break o the pad and
touch electrical parts involving a risk of electric shock.
• Do not attempt to dislodge food while the appliance is plugged in.
• To turn o and disconnect, press the START/PAUSE Button until the
appliance switches o, and remove plug from wall outlet.
• Do not store any materials, other than manufacturers recommended
accessories, in this appliance when not in use.
• Do not place any object made of the following materials in the appliance:
paper, cardboard, plastic, wood, rubber, foam and cloth.
• Metal foil packages, or metal utensils must not be inserted in the
appliance as they may create a re or risk of electric shock.
IM_Bread Maker_IM_US_V5_210507.indd 2 5/7/21 11:38 AM

IMPORTANT SAFEGUARDS
SAVE THESE INSTRUCTIONS!
3
• A re may occur if the appliance is covered or touches ammable
material, including curtains, draperies, walls, and the like, when in
operation. Do not store any item on top of the appliance when in
operation.
• Avoid contact with moving or spinning parts.
• Do not operate the appliance without the provided bread pan or with an
empty bread pan.
• Never beat the bread pan top or edge to remove the bread, as this may
damage the bread pan.
• The appliance is not intended to be operated by means of an external
timer or separate remote-control system.
IM_Bread Maker_IM_US_V5_210507.indd 3 5/7/21 11:38 AM

4
This appliance is for HOUSEHOLD USE ONLY.
WARNING:
- DO NOT OPERATE THIS APPLIANCE, IF THE POWER CORD SHOWS
DAMAGE OR IF APPLIANCE WORKS INTERMITTENTLY OR STOPS
WORKING ENTIRELY.
• A short power-supply cord is to be provided to reduce the risk resulting
from becoming entangled in or tripping over a longer cord.
• Longer extension cords are available and may be used if care is exercised
in their use.
• If an extension cord is used:
- The marked electrical rating of the cord or extension cord should be at
least as great as the electrical rating of the appliance.
- If the appliance is of the grounded type, the extension cord should be a
grounding 3-wire cord;
- The longer cord should be arranged so that it does not drape over
the countertop or table top where it can be pulled on by children or
tripped over.
Grounding instructions
• This appliance must be grounded while in use. Do not remove or ignore
the grounding pin during use.
WARNING:
- To ensure continued protection against risk of electric shock, connect
to properly grounded outlets only.
• Do not let children handle or put the electrical cord into their mouths.
ADDITIONAL SAFEGUARDS
SAVE THESE INSTRUCTIONS!
IM_Bread Maker_IM_US_V5_210507.indd 4 5/7/21 11:38 AM
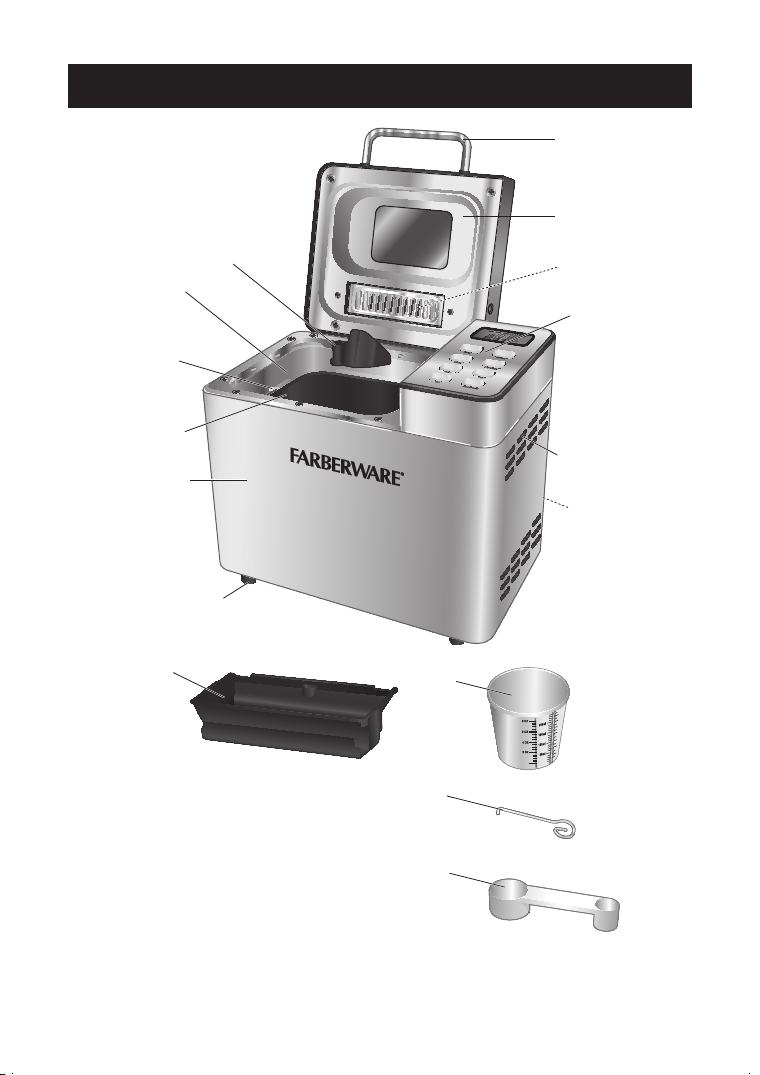
ILLUSTRATIONS
5
PARTS
Lid Handle
Lid with
Viewing
Window
Drawer
Control
Panel
Air Vents
Power
Cord
With Plug
Anti-slip Foot (x4)
Body
Bread
Pan
Kneading
Paddle
Housing
Bread Pan
Handle
Dispenser Measuring
Cup
Paddle
Removal
Tool
Measuring
Spoon
IM_Bread Maker_IM_US_V5_210507.indd 5 5/7/21 11:38 AM
6
Display
LOAF
SIZE
Button
CUSTOMIZE
Button
TIME -
Button
START/
PAUSE
Button
NUT
Button
TIME +
Button
COLOR
Button
MENU
Button
Program
Display
Loaf Size
Display
Dispenser
Display
Crust
Browning
Level Display
Program Step
Display
Time/Delay
Display
PARTS
IM_Bread Maker_IM_US_V5_210507.indd 6 5/7/21 11:38 AM

OPERATION
7
WARNING:
- Always use oven mitts to protect your hand when handling the appliance.
Escaping steam can burn and the appliance housing is hot.
Before rst use
• Remove all packaging materials and/or other transportation means.
• Remove all accessories from the appliance.
• Check package content to verify it is complete and undamaged. Do not operate
the appliance if the content is incomplete or appears damaged. Return it
immediately to Walmart.
Danger of suocation!
- Packaging materials are not toys. Always keep plastic bags, foils and foam parts
away from babies and children. Packaging material could block airways and
prevent breathing.
NOTE:
- Always use the appliance with the Bread Pan assembled.
- The appliance may produce an odor and emit smoke when switched on for
the first time, as residues from the production process are eliminated. This is
normal and does not indicate a defect or hazard.
• When using the appliance for the first time, it is recommended to operate it for at
least 15minutes on its BAKE setting ( Using the appliance) with the Lid open,
until no odor or smoke is present. During use, ensure ample ventilation.
• Let the appliance cool completely.
• Clean the appliance ( Cleaning and Maintenance).
Accessories
Bread Pan For containing the recipe ingredients. Always use the
appliance with the Bread Pan assembled.
Kneading Paddle For mixing ingredients.
Measuring Cup For measuring liquids and dry ingredients ( Ingredients
measurement) Clean the measuring cup in-between
ingredients measurement. For dry ingredients, level the
ingredients to ensure the right amount is used.
Dispenser For automatically pouring ingredients (nuts, chopped
fruits, herbs, etc.) into the Bread Pan during the second
kneading cycle.
The Dispenser holds about ¾ cups.
Paddle Removal Tool For removing the Kneading Paddle after demolding the
bread.
IM_Bread Maker_IM_US_V5_210507.indd 7 5/7/21 11:38 AM

OPERATION
8
Measuring Spoon For measuring smaller ingredient quantity ( Ingredients
measurement). The large spoon side is equivalent to a
tablespoon, and the small spoon side is equivalent to a
teaspoon.
Programs
This appliance is designed with several programs. There are usually 4 cycles for each
program: kneading, rising, baking and keep warm.
Program 1 - Basic 2 - Quick 3 - French 4 - Ultra
Fast
Description For white and
mixed breads
consisting
mainly of basic
bread our. This
setting yields a
normal bread.
For quick-
bread
recipes
that use
baking
powder
or soda.
The bread
baked
on this
setting is
usually
smaller
with a
dense
texture.
For light breads
made from ne
our. Normally,
the bread is
uy and has
a crispy crust.
This is not a
suitable setting
for recipes
requiring
butter,
margarine, or
milk.
For the
fastest
bread
making.
The baked
bread is
smaller
and
rougher
than the
one made
with the
2 Quick
program.
Loaf size (lb) 1.5 2.0 N/A 1.5 2.0 N/A
KNEAD1
First kneading
9 min 10 min 10 min 16
min
18 min 8 min
RISE1
First rise
20 min 20 min 5 min 40
min
40 min N/A
KNEAD2
Second
kneading
(with Dispenser)
14 min 15 min 15 min 19
min
22 min N/A
RISE2
Second rise
25 min 25 min 10 min 30
min
30 min 12 min
RISE3
Third rise
45 min 45 min 40 min 50
min
50 min 20 min
IM_Bread Maker_IM_US_V5_210507.indd 8 5/7/21 11:38 AM

USING THE APPLIANCE
9
OPERATION
Program 1 - Basic 2 - Quick 3 - French 4 - Ultra
Fast
BAKE 80 min 85 min 80 min 85
min
90 min 90 min
Total time 3h
13min
3h
20min
2h 40min 4h 4h
10min
2h 10min
Program 5 - Whole
Wheat
6 - Cake 7 - Dough 8 - Bake
Description For breads
with heavy
varieties of our
that require a
longer phase of
kneading and
rising. Bread will
be more dense
and heavier.
For baking
cakes.
Kneading,
rising, and
baking
occurs, but
with aid
of soda
or baking
powder.
For preparing
dough for
buns, pizza
crust, etc., to
be baked in a
conventional
oven. No
baking in this
program.
For baking
only. No
kneading or
rising in this
program.
Can be used
to increase
the baking
time of other
programs.
Loaf size (lb) 1.5 2.0 N/A N/A N/A
KNEAD1
First
kneading
9 min 10
min
10 min 20 min N/A
RISE1
First rise
25 min 25
min
5 min N/A N/A
KNEAD2
Second
kneading
(with
Dispenser)
18 min 20
min
20 min N/A N/A
RISE2
Second rise
45 min 45
min
30 min 30 min N/A
RISE3
Third rise
70 min 70
min
35 min 40 min N/A
BAKE 68 min 70
min
70 min N/A 1h
Total time 3h
55min
4h 2h 50min 1h 30min 1h
IM_Bread Maker_IM_US_V5_210507.indd 9 5/7/21 11:38 AM

10
OPERATION
Program 9 - Sand-
wich
10 -
Jam
11 -
Mix
Stir
12 - Gluten
Free
13 -
Home
Made
Description For bak-
ing light
texture
sandwich
bread with
a thinner
crust.
For
boiling
jams
and
marma-
lades.
For
mixing
our.
For gluten-free
breads and
mixes.
The
length of
each step
can be
custom-
ized.
Loaf size (lb) N/A N/A N/A 1.5 2.0 N/A
KNEAD1
First knead-
ing
15 min N/A 20 min 12 min 12 min 6 - 14 min
RISE1
First rise
40 min 15 min N/A 5 min 6 min 20 - 60
min
KNEAD2
Second
kneading
(with Dis-
penser)
5 min N/A N/A 13 min 14 min 5 - 20 min
RISE2
Second rise
25 min N/A N/A 30 min 30 min 5 - 40 min
RISE3
Third rise
40 min 45 min N/A 40 min 43 min 0 - 60 min
BAKE 75 min 20 min N/A 70 min 70 min 0 - 90 min
Total time 3h 20min 1h
20min
20 min 2h
50min
2h
55min
36 min -
4h 44min
NOTE:
- The room temperature has an impact on the loaf size. It is recommended for
the temperature to be between 59°F (15°C) and 93°F (34°C).
- For the 2 (Quick) program, use a rubber spatula to scrape the sides of Bread Pan
during mixing to ensure all ingredients are blended.
- If a quick bread is a little moist on top when baking is complete, leave it in
the appliance for an extra 10 to 15 minutes with no heat, and it will continue
baking.
IM_Bread Maker_IM_US_V5_210507.indd 10 5/7/21 11:38 AM

11
OPERATION
- For the 4 (Ultra Fast) program, water temperature is critical for fermentation
performance. If the water temperature is too low, the loaf will not rise to the
expected size, and if the water temperature is too high, yeast is likely to lose
activity and aect the fermentation performance. It is recommended to use
water at a temperature between 75°F (24°C) and 90°F (32°C).
- Whole wheat bread is made with at least 50% of whole wheat our. Whole
wheat our is milled from the entire wheat berry, including the bran and the
germ. Using whole wheat our produces a bread that is brown to dark brown
in color.
- It is recommended to avoid using the delay function with the 5 (Whole Wheat)
program as this can lead to poor results.
- If a cake tester inserted in the cake center does not come out clean, select the
8 (Bake) program and set time to achieve doneness.
- When preparing jams and marmalades, fruits must be chopped before putting
them into the Bread Pan.
- The doughs of gluten-free breads are generally wetter and more like a batter.
It is important not to over-mix or over-knead gluten-free doughs. Due to the
high moisture content, baking time is increased.
- The 13 (Home Made) program default time setting is 3h:10min.
Using the appliance
This appliance can be used for kneading and baking breads, cakes, dough, and
boiling jams.
NOTE:
- The appliance has a rated power of 550W. Before plugging it into the wall
outlet, ensure that the electrical circuit is not overloaded with other appliances.
This appliance should always be operated on a separate 120V ~ 60Hz wall
outlet.
- Make sure the Housing is empty and free of food residues.
• Place the appliance on a clean, at and heat resistant surface. When using the
appliance on wooden furniture, use a heat resistant mat to protect the wood
from damages.
IM_Bread Maker_IM_US_V5_210507.indd 11 5/7/21 11:38 AM
12
OPERATION
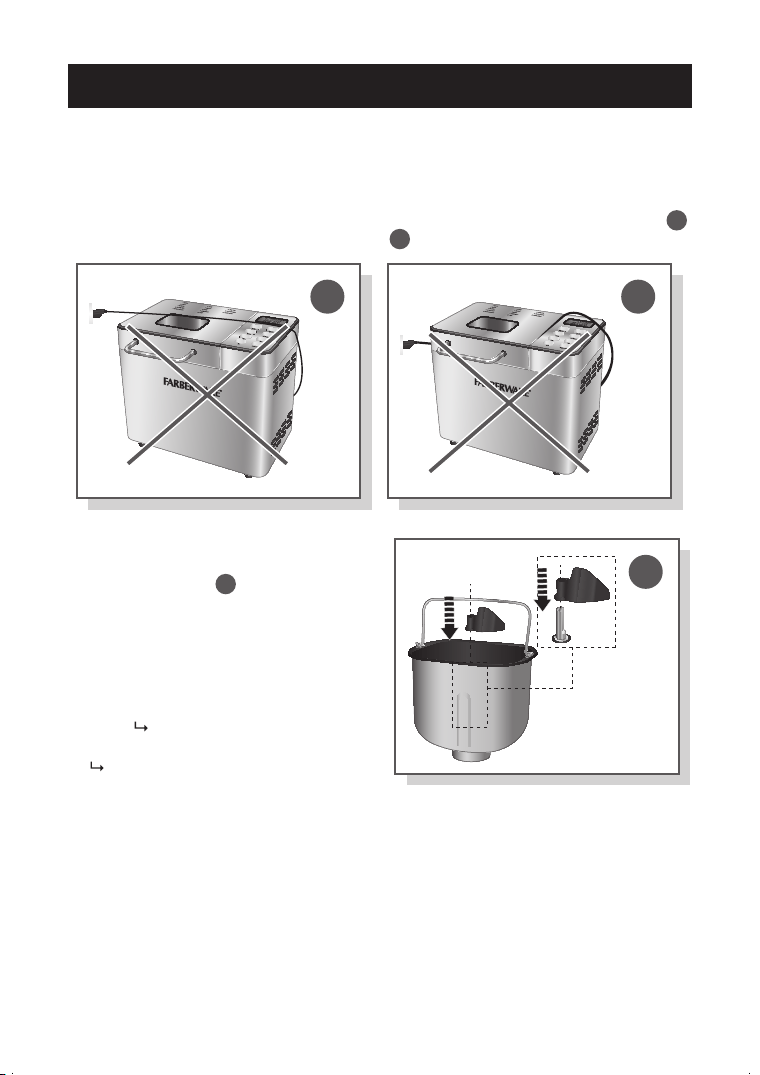
WARNING:
- Only use accessories recommended by the manufacturer. Do not place any
other materials in the appliance.
- Do not cover or insert any objects into the Air Vents.
- Never let the Power Cord come in contact with the Housing during use (ill.
a
)
or allow it to be trapped by the Lid (ill.
b
).
a b
• Insert the Kneading Paddle onto the
Bread Pan shaft, at the bottom of the
Bread Pan (ill.
c
). Applying some
nonstick cooking spray or vegetable
oil onto the Kneading Paddle makes it
easier to remove it from the loaf after
baking.
• Use the Measuring Cup and Measuring
Spoon to add ingredients to the Bread
Pan ( Ingredients measurement),
in the order listed in the recipe
( Recipes).
c
IM_Bread Maker_IM_US_V5_210507.indd 12 5/7/21 11:38 AM
13
OPERATION
IMPORTANT:
- Always place liquids and salt 1 rst, then dry ingredients 2 and nally yeast
3 on top (ill.
d
). Make a small indentation on top of the dry ingredients and
place the yeast into the indentation. Yeast must never come into contact with
liquids and salt until the program starts.
• Insert the Bread Pan into the Housing (ill.
e
). Ensure the Bread Pan is secured
onto the drive shaft. Rotate the Bread Pan slightly to engage, if required.
• Gently close the Lid (ill.
f
).
• When required, pull out the Drawer located under the lid, at the back of the
appliance, and remove the Dispenser (ill.
g
). Add ingredients (i.e. nuts, chopped
fruits, herbs, etc.) into the Dispenser and refit inside the Drawer. During the
second kneading cycle, the ingredients will be automatically poured into the
Bread Pan.
d
1
2
3
e
f g
NOTE:
- When adjusting the settings, press the NUT Button to activate the Dispenser
function .
IM_Bread Maker_IM_US_V5_210507.indd 13 5/7/21 11:38 AM
14
OPERATION
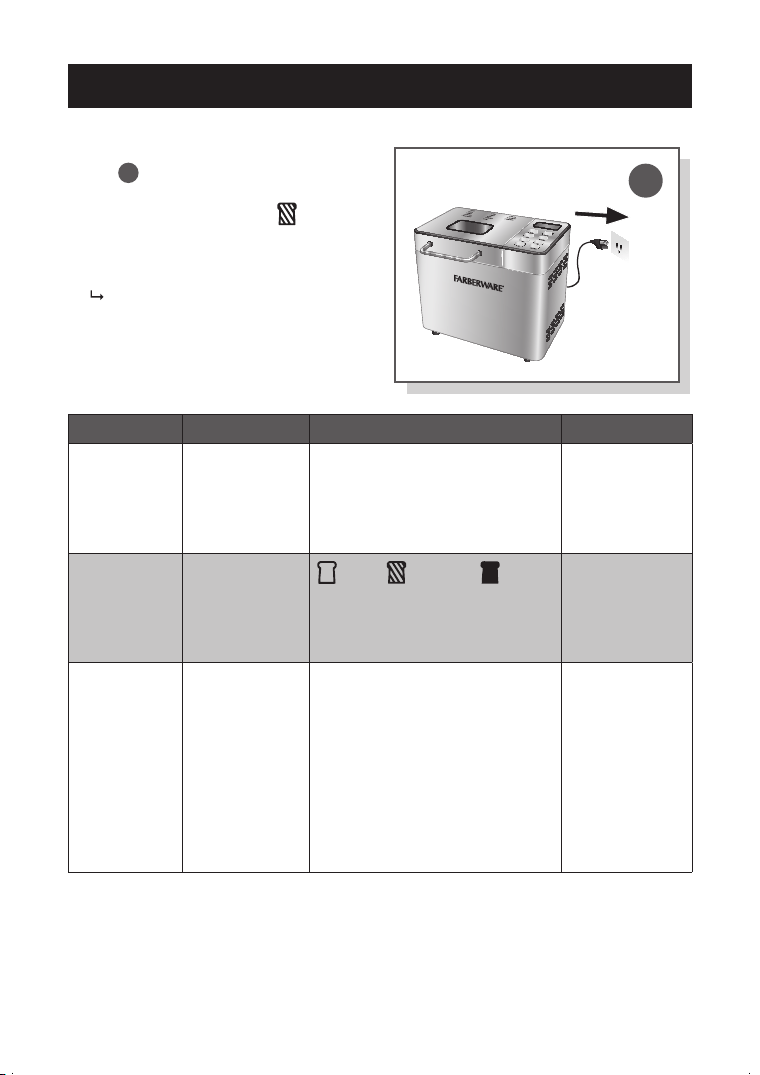
• Insert the Plug into a wall outlet
(ill.
h
). The appliance beeps once.
By default, the Display shows 2.0lb,
medium browning level , program
1 - Basic, and time 3:20.
• Press the MENU Button to select
the required program from 1 to 13
( Programs).
• Adjust the program settings according
to the recipe.
h
Button Function Possible settings Programs
LOAF SIZE
Button
Selecting the
bread size.
Total
operation time
will vary.
1.5lb - 2.0lb Applicable to 1
Basic, 3 French,
5 Whole
Wheat, 12
Gluten Free
COLOR
Button
Selecting
the crust
browning
level.
Light, Medium, Dark
Applicable to
all, except 7
Dough, 8 Bake,
10 Jam, 11 Mix
Stir
TIME +
Button
/ TIME -
Button
Setting the
delay function.
The display
time is
equivalent to
the program
cycle duration
plus the
selected delay
time.
Increase / Decrease starting
time:
10 minutes to 13 hours
With 10 minutes increments
Applicable to
all, except
10 Jam
IM_Bread Maker_IM_US_V5_210507.indd 14 5/7/21 11:38 AM

15
OPERATION
Button Function Possible settings Programs
CUSTOMIZE
Button
Adjusting
the duration
of each step
of the 13
Home Made
program.
KNEAD1
RISE1
KNEAD2
RISE2
RISE3
BAKE
KEEP WARM
: 6 - 14 minutes
: 20 - 60 minutes
: 5 - 20 minutes
: 5 - 40 minutes
: 0 - 60 minutes
: 0 - 90 minutes
: 0 - 60 minutes
Only
applicable
to 13 Home
Made
NUT Button Dispensing
ingredients
during the
second
kneading of
the program
cycle.
Dispenser function on
Dispenser function o
Applicable to
all, except
7 Dough, 8
Bake, 10 Jam,
11 Mix Stir
START/
PAUSE
Button
Starting/
Pausing the
selected
program.
- All
• Press the START/PAUSE Button to start the program. The appliance beeps once,
the two dots between hours and minutes starts flashing, and the preparation
time winds down.
NOTE:
- Do not set the delay function (TIME + Button / TIME - Button) if you want the
appliance to start working immediately.
- Select the delay function only after selecting the program, loaf size, and crust
color.
- Do not use the delay function if the recipe includes ingredients which can spoil
(eggs, milk, meat, sh, etc.)
- Press the START/PAUSE Button to pause the program. Without any action
within 10 minutes, the appliance will resume the selected program. The
settings cannot be modied when the program is paused.
- This appliance is equipped with a memory function in case of a power failure.
Memory can be maintained for up to 10 minutes, within which the appliance
will resume the bread making cycle once power is restored. If the power failure
exceeds 10 minutes, the appliance must be restarted. If the program did not
reach past the kneading phase when the power failure occurred, press the
START/PAUSE Button to restart the program from the beginning. If the dough
has started rising, discard ingredients in the Bread Pan and start over.
IM_Bread Maker_IM_US_V5_210507.indd 15 5/7/21 11:38 AM
16
OPERATION
• When the program ends, the appliance beeps 10 times and switches to the keep
warm function, which lasts 1 hour.
• Press the START/PAUSE Button until the appliance is switched off, and then
remove the Plug from the wall outlet.
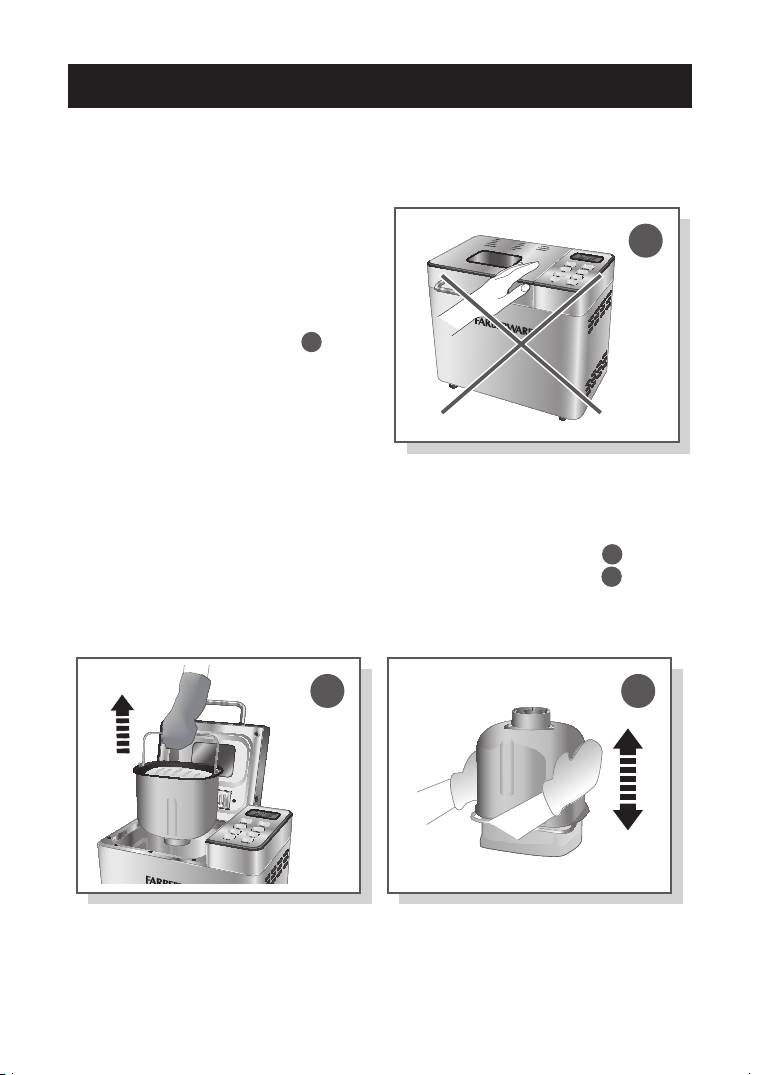
Danger of burns!
- Always pay special attention when
placing or removing accessories and
food from the appliance. Never place
your bare hand inside the appliance,
use it to remove accessories or touch
the Housing or Lid (ill.
i
) when
the appliance is plugged in and
switched on. Always use oven mitts
when inserting or removing items
from the appliance.
- Escaping steam can burn.
i
- Never place the Bread Pan on a table or counter top to avoid damage to
surfaces. It is recommended to use a heat resistant trivet or cutting board.
• Lift the Lid open.
• Use the Bread Pan Handle to lift the Bread Pan out of the Housing (ill.
j
).
• Carefully shake the Bread Pan upside down to demold the bread (ill.
k
). Use the
Paddle Removal Tool to remove the Kneading Paddle from the loaf of bread.
• Let cool down for 20 minutes before slicing with a bread knife.
j k
IM_Bread Maker_IM_US_V5_210507.indd 16 5/7/21 11:38 AM
17
OPERATION
NOTE:
- Fresh baked bread can be stored up to 3 days at room temperature.
- Alternatively, place the cooled bread in a sealed bag or container in the
refrigerator for up to 10 days.
- Cooled bread placed in a sealed bag or container can also be frozen for up to
6 months.
Ingredients
IMPORTANT:
- Always place liquids and salt 1 first,
then dry ingredients 2 and finally
yeast 3 on top (ill.
d
). Make a
small indentation on top of the dry
ingredients and place the yeast into
the indentation. Yeast must never
come into contact with liquids and
salt until the program starts.
- Always follow the recipe order and
use the exact ingredient quantities
( Recipes).
d
1
2
3
- The maximum quantity of flour and yeast to be used for a loaf of bread are
respectively 4 cups (560g) and 3 teaspoons (12g).
The following table lists some ingredients for common as well as gluten-free bread
making. This is not an exhaustive list, as there are many types of ours and add-ins
readily available.
Ingredient Description Remarks
All-purpose
our (bleached
or unbleached)
Used for the Quick
breads.
Can also be used to make yeast breads,
but bread our will yield better results.
Amaranth our Gluten-free our.
High in both
protein and ber,
it is also a good
source of calcium.
It has a nutty avor and combines well
with other gluten-free ours.
Ascorbic acid
(vitamin C)
Acts as a
preservative,
deterring mold and
bacteria growth.
Use about 1/8 teaspoon per 3 cups our.
IM_Bread Maker_IM_US_V5_210507.indd 17 5/7/21 11:38 AM

18
OPERATION
Ingredient Description Remarks
Baking
powder/soda
Used for the Ultra
Fast breads.
Store any open packet in a sealed bag or
container.
Bread our Unbleached our
high in protein and
gluten.
Recommended our for bread making.
Cake our Soft our with low
protein.
Do not use for bread making.
Cider vinegar Acts as a dough
enhancer.
It improves the bread texture as well as
its shelf life.
Cornstarch Gluten-free
combining
ingredient.
Dry Milk Increases
nutritional value.
Mix with our. Allows the use of the
delay function.
Egg Improves bread
texture. Keeps
breads fresh and
moist.
The egg must be whisked in with other
liquid ingredients. Do not use the delay
function when the recipe calls for eggs.
Fats (butter or
vegetable oil)
Adds taste, texture
and moisture to
breads.
It is recommended to use melted or
chopped unsalted butter.
Gelatin Adds protein and
gives elasticity to
the bread.
Not suitable for vegetarians, as it is
derived from meat.
Nuts/Seeds Adds avor,
nutrition and
texture to breads.
Can be added to any bread recipe,
according to taste.
Potato our Heavier then
potato starch, it can
be used in a similar
way.
Stronger potato taste than potato starch.
Potato starch Supplementary
our used in
gluten-free baking.
Rice our
(white or
brown)
Gluten-free our. Milled from rice, it is a versatile our in
gluten-free baking. Combines well with
other gluten-free ours.
IM_Bread Maker_IM_US_V5_210507.indd 18 5/7/21 11:38 AM

19
OPERATION
Ingredient Description Remarks
Salt Improves bread
avor.
Salt must not come into contact with
yeast in the Bread Pan until the program
starts.
Self-rising our All-purpose
our mixed with
baking powder.
Traditionally used
for cookies or
pancakes.
Do not use self-rising our with the
appliance.
Soy our Gluten-free our. Milled from roasted soybeans and
high in quality protein, soy our
has a characteristic nutty avor. It is
recommended to combine soy our with
other ours.
Sugar Increases taste and
bread color. Sugar
also stimulates
yeast growth.
Use white sugar, except if stated
otherwise in your recipe.
Water Water is an
essential ingredient
for making bread.
For the best results,
its temperature
should be between
75°F (24°C) and
90°F (32°C).
Water may be replaced with fresh milk or
water mixed with 2% milk powder, which
may enhance bread avor and improve
crust color. Some recipes may call for
juice for the purpose of enhancing bread
avor, e.g. apple juice, orange juice,
lemon juice and so on.
Whole-wheat
our
Whole wheat our
is milled from the
entire wheat berry,
including the bran
and the germ.
Using whole wheat our produces
a bread that is brown to dark brown
in color and often smaller in size. It is
recommended to combine with bread
our for a better yield.
IM_Bread Maker_IM_US_V5_210507.indd 19 5/7/21 11:38 AM
20
OPERATION
Ingredient Description Remarks
Yeast Yeast will produce
carbon dioxide.
The carbon dioxide
will expand
bread and make
the inner ber
soften. It needs
carbohydrates
found in sugar
and our as
nourishment.
It is recommended
to use bread
machine yeast,
active-dry yeast, or
instant yeast.
Before using, check the expiration date
of the yeast. Return to refrigerator
immediately after each use.
To check whether yeast is fresh and
active:
Pour ½ cup (120 ml) warm water
(120°F/48°C) into a measuring cup.
Add 1 teaspoon (5 ml) white sugar and
2 teaspoons (10 ml) yeast.
Place the measuring cup in a warm place
for 5 to 10 minutes. Do not stir.
Fresh, active yeast will begin to bubble,
up to the 1 cup marking. If it does not,
the yeast is dead or inactive.
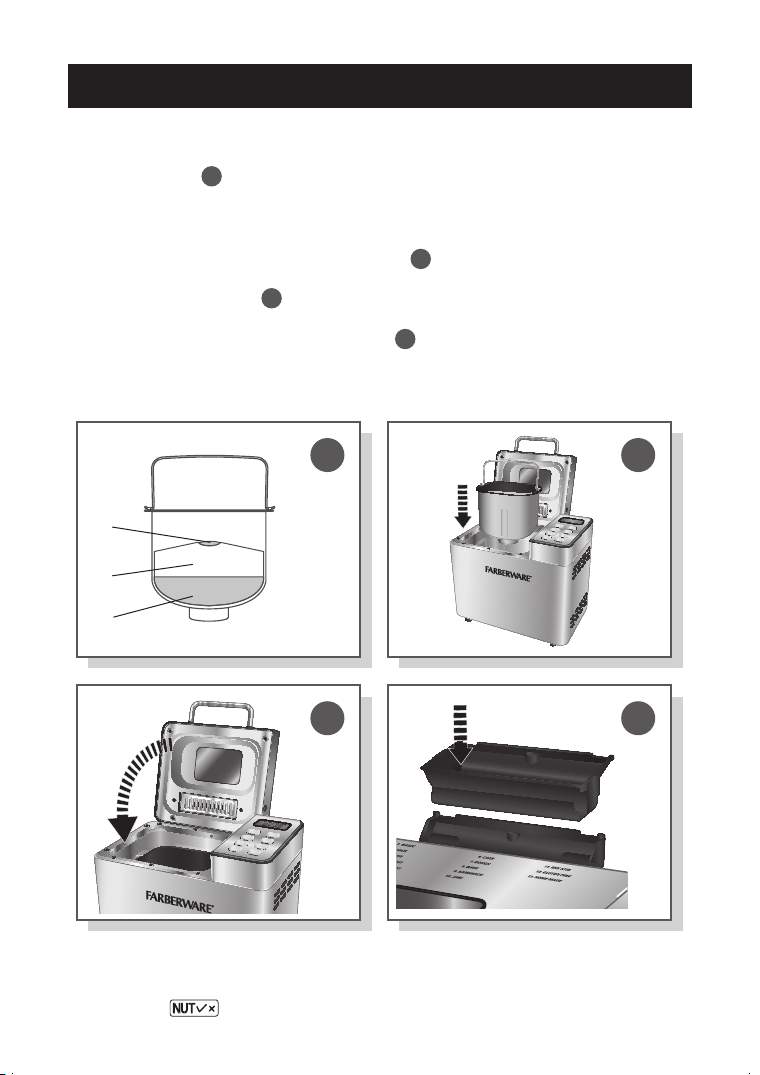
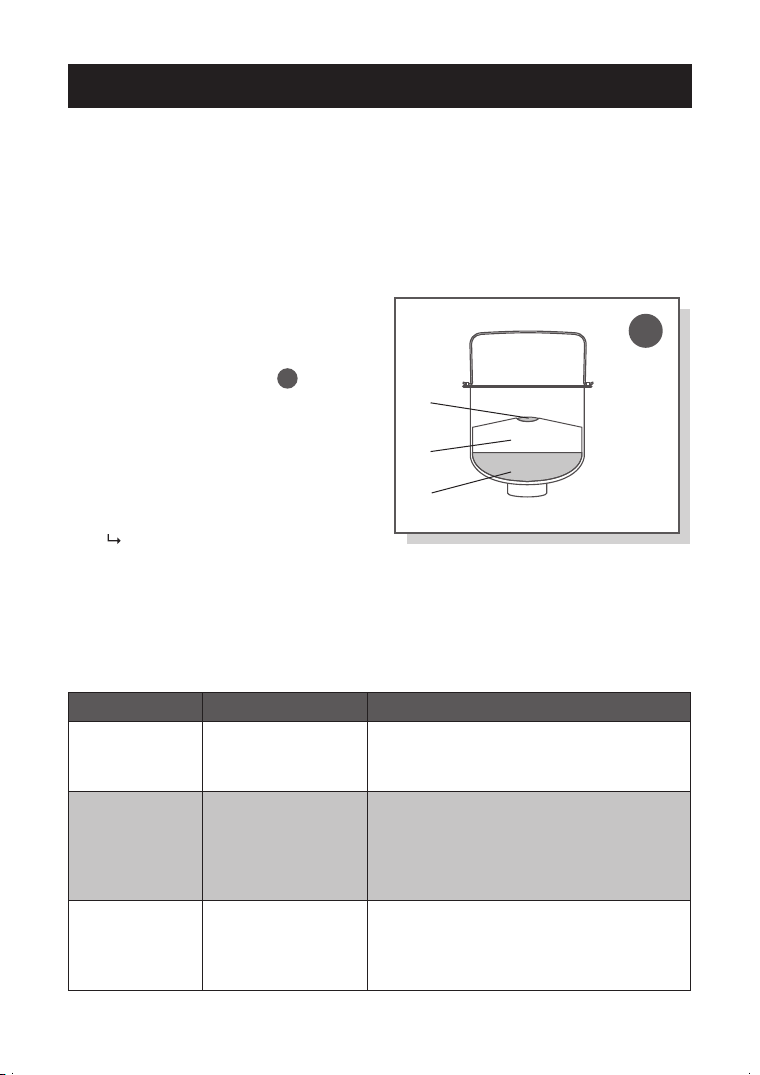
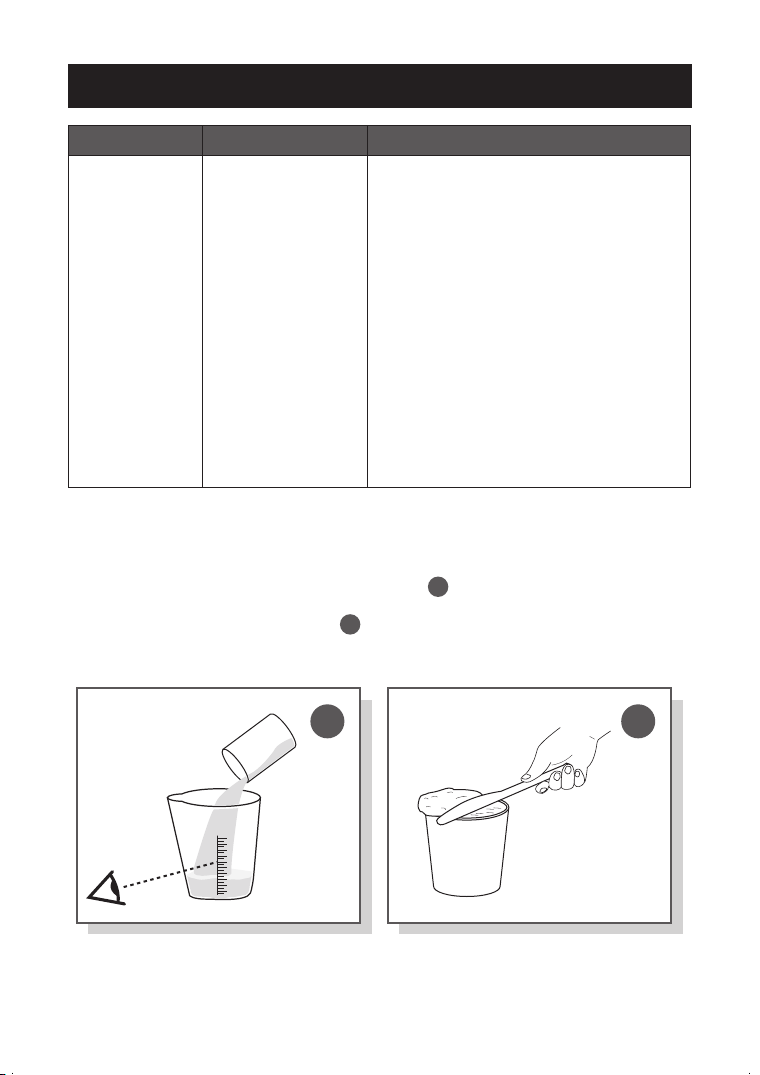
Ingredients Measurement
Accurate ingredient measurement is crucial to bread making.
• Liquids must be measured with a levelled Measuring Cup. Observe the liquid
level against the Measuring Cup markings (ill.
l
).
• Dry ingredients must be added into a Measuring Cup. When the cup is filled, the
excess should be levelled off (ill.
m
). For smaller quantities, use the Measuring
Spoon. It must be levelled off before being added to the Pan.
l m
IM_Bread Maker_IM_US_V5_210507.indd 20 5/7/21 11:38 AM

21
OPERATION
NOTE:
- Clean the measuring cup in-between ingredients, such as oil.
- It is recommended to use a flour sifter to aerate the flour before measuring it.
- Add ingredients into the Bread Pan in the order listed in the recipe. Ensure the
yeast does not come into contact with liquids and salt.
Conversion charts
Fluid Ounces
( oz - for liquids)
Cup Tablespoons
(tbsp)
Teaspoons
(tsp)
8 1 16 48
7 7/8 14 42
6 3/4 12 36
5 5/8 10 30
4 1/2 8 24
3 3/8 6 18
2 1/4 4 12
1 1/8 2 6
1 3
1/2 1 ½
Below table shows the equivalence between yeasts.
Active dry yeast Instant yeast
1 tsp ¾ tsp
1.5 tsp 1 tsp
2 tsp 1½ tsp
IM_Bread Maker_IM_US_V5_210507.indd 21 5/7/21 11:38 AM

22
OPERATION
IMPORTANT:
- Always place liquids and salt 1 first,
then dry ingredients 2 and finally
yeast 3 on top (ill.
d
). Make a
small indentation on top of the dry
ingredients and place the yeast into
the indentation. Yeast must never
come into contact with liquids and
salt until the program starts.
- Always follow the recipe order and
use the exact ingredient quantities.
- There are no recipes below for
programs 8 (Bake), 11 (Mix Stir), and
13 (Home Made).
d
1
2
3
RECIPES
Breads
1 - Basic 2 -
Quick
3 - French 4 - Ultra
Fast
Loaf size (lb) 1.5 2.0 N/A 1.5 2.0 N/A
Water 5½ oz
(165 ml)
7 oz
(190 ml)
6 oz
(175 ml)
7 oz
(195 ml)
9 oz
(260 ml)
6 oz
(175 ml)
Milk powder 2 tsp
(9 g)
2½ tsp
10 g)
2½ tsp
(10 g)
- -
2½ tsp
(10 g)
Egg 1 1 - - - -
Butter or
vegetable
oil
2½ tbsp
oil
or 30 g
butter
3 tbsp oil
or 40 g
butter
1¾ tbsp
oil
or 20 g
butter
- -
1¾ tbsp
oil
or 20 g
butter
Sugar 5 tbsp
(60 g)
6½ tbsp
(80 g)
4 tbsp
(50 g)
3 tbsp
(40 g)
4 tbsp
(50 g)
4 tbsp
(50 g)
Salt ½ tsp
(3 g)
½ tsp
(4 g)
¼ tsp
(2 g)
½ tsp
(4 g)
¾ tsp
(5 g)
¼ tsp
(2 g)
High gluten
our
2¼ cups
(300 g)
2½ cups
(350 g)
2¼ cups
(300 g)
2½ cups
(350 g)
3 cups
(420 g)
2¼ cups
(300 g)
Yeast 1 tsp
(4 g)
1 tsp
(4 g)
1.5 tsp
(6 g)
1.5 tsp
(6 g)
1.5 tsp
(6 g)
1.5 tsp
(6 g)
IM_Bread Maker_IM_US_V5_210507.indd 22 5/7/21 11:38 AM

23
RECIPES
5 - Whole Wheat 9 - Sandwich 12 - Gluten Free
Loaf size (lb) 1.5 2.0 1.5 2.0 1.5 2.0
Water 6 oz
(170 ml)
7 oz
(200 ml)
9 oz
(250 ml)
12 oz
(340 ml)
4½ oz
(120 ml)
5½ oz
(160 ml)
Milk powder 2 tsp
(8 g)
2 tsp
(9 g)
1½ tbsp
(10 g)
2 tbsp
(14 g)
2½ tsp
(10 g)
3¾ tsp
(15 g)
Egg 1 1 - - 1 1
Butter or
vegetable
oil
3 tbsp
oil
or 35 g
butter
3 tbsp
oil
or 40 g
butter
20 g
butter
30 g
butter
2 tbsp
oil
or 25 g
butter
2½ tbsp
oil
or 30 g
butter
Sugar 5 tbsp
(60 g)
6½ tbsp
(80 g)
1¾ tbsp
(20 g)
2 tbsp
(25 g)
3 tbsp
(40 g)
4 tbsp
(50 g)
Salt ½ tsp
(4 g)
¾ tsp
(5 g)
1½ tsp
(10 g)
2 tsp
(14 g)
½ tsp
(3 g)
½ tsp
(4 g)
High gluten
our
1½ cups
(200 g)
2 cups
(260 g)
- - - -
Warm wheat ¾ cup
(100 g)
1 cup
(120 g)
- - - -
Bread our - - 3 cups
(420 g)
4 cups
(560 g)
- -
Low gluten
our
- - - - 2¼ cups
(300 g)
2½ cups
(350 g)
Yeast 1 tsp
(4 g)
1 tsp
(4 g)
¾ tsp
(3 g)
1½ tsp
(6 g)
1 tsp
(4 g)
1 tsp
(4 g)
IM_Bread Maker_IM_US_V5_210507.indd 23 5/7/21 11:38 AM

24
RECIPES
Others
6 - Cake 7 - Dough
Milk 11 tbsp
(130 g)
Water 7½ oz
(210 ml)
Egg white 3½ oz
(100 g)
Sugar 2 tbsp
(24 g)
Butter 100 g Salt 1½ tsp
(10 g)
Sugar 10 tbsp
(120 g)
Vegetable oil 1¾ tbsp oil
or 20 g butter
Salt ½ tsp
(3 g)
Flour 2½ cups
(350 g)
Baking powder 1 tsp
(8 g)
Low gluten our 2¼ cups
(300 g)
Yeast 1¼ tsp
(5 g)
10 - Jam
Water 1 oz
(50 ml)
Fruit pulp 1 cup
(200 g)
Starch 3½ tbsp
(25 g)
Sugar 16½ tbsp
(200 g)
Lemon Juice 1 tbsp
(10 g)
IM_Bread Maker_IM_US_V5_210507.indd 24 5/7/21 11:38 AM

25
HINTS AND TIPS
• The appliance may walk during the kneading cycle. Always position the appliance
in the center of the counter, away from the edge.
• It is recommended to use a scale to ensure a better measurement accuracy.
• It is recommended to remove bread immediately after the baking cycle is
complete to prevent its crust from becoming darker. Moreover, if the loaf is left in
the machine for too long, it may absorb moisture and become soggy.
• It is recommended to avoid opening the appliance too often, especially after the
early stages of kneading. Opening the lid during rising and baking could hinder
the loaf expansion.
• Bread making is affected by the temperature, humidity and altitude. If the
dough clings onto the fingers when touched it is too wet. If the dough appears
dry during the first kneading cycle, you may add some liquid. Add flour or liquid
1 teaspoon at a time until the desired consistency is reached.
• Doughs prepared and baked at higher altitude tend to rise higher and faster. Try
reducing the amount of yeast by ¼ - ½ teaspoon. If the bread still rises too high,
reduce yeast by another ¼ teaspoon the next time.
• Allow cold ingredients to come to room temperature before adding them to the
Bread Pan.
• Liquids and butter may be combined and placed in a microwave on the defrost
setting to warm them without heating too hot.
• A pinch of powdered ginger or vitamin C can give a boost to the yeast and help it
grow better.
• Whole wheat and whole grain breads are usually denser and shorter than white
flour breads.
CLEANING AND MAINTENANCE
Proper maintenance will ensure many years of service from your appliance. Clean
the appliance after every use. The appliance contains no user serviceable parts and
requires little maintenance. Leave any servicing or repairs to qualied personnel.
WARNING:
- Always ensure the appliance is switched off. Disconnect the Plug from the
wall outlet before cleaning. Allow all parts of the appliance to cool down
completely.
IM_Bread Maker_IM_US_V5_210507.indd 25 5/7/21 11:38 AM

26
CLEANING AND MAINTENANCE
NOTE:
- Do not immerse the Power Cord with
Plug, or appliance into water or any
other liquids. Do not use abrasive
cleaners, steel wool or scouring pads
(ill.
n
). Dry all parts thoroughly after
cleaning, before using or storing
the appliance. Ensure that no water
enters the appliance Body, Housing,
Lid, and Control Panel.
• Remove the Bread Pan from the
Housing.
• Open the Drawer and remove the
Dispenser.
n
• Wash the Bread Pan, Dispenser, Measuring Cup, Paddle Removal Tool and
Measuring Spoon with hot soapy water. Rinse and dry carefully. Alternatively,
these accessories are dishwasher-safe.
• Wipe the appliance Body, Housing, Control Panel and Lid with a damp cloth. Take
extra care when cleaning near the heating element in order not to damage it.
NOTE:
- Dry all parts and surfaces thoroughly before use. Make sure that all parts and
surfaces are completely dry before connecting the appliance to a wall outlet.
- The Lid is not dishwasher safe.
Storage
• Before storage, always make sure the appliance is completely cool, clean and dry.
• It is recommended to store the appliance in a dry place.
• Store the appliance on a stable shelf or in a cupboard. To avoid accidents, ensure
that both the appliance and its power cord are beyond reach of children or pets.
IM_Bread Maker_IM_US_V5_210507.indd 26 5/7/21 11:38 AM

TROUBLESHOOTING
27
Problem Cause Solution
The appliance is
not working
Appliance not plugged in Insert the plug into the wall
outlet.
Wall outlet not energized Check fuses and circuit
breaker.
Appliance malfunction Disconnect the appliance
from the wall outlet and
contact qualied personnel
to check and repair the
appliance.
The appliance is on,
the program starts
but ingredients are
not blending
Kneading Paddle missing or
not properly installed
Press the START/PAUSE
Button, remove the
Bread Pan, and install the
Kneading Paddle properly.
Reassemble and press the
START/PAUSE Button to
resume operation.
Kneading Paddle blocked Press the START/PAUSE
Button, remove the Bread
Pan, and remove the
blockage. Reassemble and
press the START/PAUSE
Button to resume operation.
Motor drive shaft not
rotating
Disconnect the appliance
from the wall outlet and
contact qualied personnel
to check and repair the
appliance.
Wrong program selected
(8 Bake or 10 Jam)
Restart the program
selection to choose the
required settings.
IM_Bread Maker_IM_US_V5_210507.indd 27 5/7/21 11:38 AM

TROUBLESHOOTING
28
Problem Cause Solution
The bread does not
rise
Expired yeast/our Check the yeast/our
expiration date. Ensure it is
fresh and stored in a sealed
contained in a dark place.
Liquids too hot, killed the
yeast
Use liquids with a
temperature between 75°F
(24°C) and 90°F (32°C).
Liquids too cool, did not
activate the yeast
Program start time delayed
and ingredients order not
respected
Follow the ingredients order
for the next batch.
Lid lifted too often Avoid opening the Lid often
for next batches.
The bread is too
short
Not enough sugar/yeast
added
Follow the recipe quantities
for the next batch.
Expired yeast/our Check the yeast/our
expiration date. Ensure it is
fresh and stored in a sealed
contained in a dark place.
Salt came in contact with
yeast
Add ingredients into the
Bread Pan in the order listed
in the recipe. Ensure the
yeast does not come into
contact with liquids and
salt.
Whole wheat our used Whole wheat breads are
usually shorter than white
our breads.
The bread loaf is
uneven
Too much yeast/water Measure ingredients
accurately. Use a scale if
necessary.
Dough pushed to the side
by the Kneading Paddle
Check the dough from time
to time.
IM_Bread Maker_IM_US_V5_210507.indd 28 5/7/21 11:38 AM

TROUBLESHOOTING
29
Problem Cause Solution
The bread
collapsed
Too much yeast/water Measure ingredients
accurately. Use a scale if
necessary.
Liquids too hot, killed the
yeast
Use liquids at a temperature
between 75°F (24°C) and
90°F (32°C).
Wrong program selected Choose the correct program
for the next batch.
The bread structure
is heavy and lumpy
Too much our Follow the recipe quantities
for the next batch. Add
water one teaspoon at a
time, if necessary.
Not enough yeast, sugar or
water
Measure ingredients
accurately. Use a scale if
necessary.
The crust color is
too light
Lid lifted too often Avoid opening the Lid often
for next batches.
Crust browning level too
low
Select a higher setting level.
The crust color is
too dark
Too much sugar added Decrease the sugar amount
for the next batch.
Crust browning level too
high
Select a lower setting level.
The bread rises too
fast/too high
Ingredients improperly
measured (too much yeast/
our)
Measure ingredients
accurately and ensure sugar
and salt have been added.
Use a scale if necessary.
The bread is
underbaked
Dough too wet Follow the recipe quantities
for the next batch. Add our
one teaspoon at a time, if
necessary.
Bread Pan too small for the
total volume of ingredients
Follow the recipe quantities
for the next batch. Measure
ingredients accurately. Use
a scale if necessary.
IM_Bread Maker_IM_US_V5_210507.indd 29 5/7/21 11:38 AM

TROUBLESHOOTING
30
Problem Cause Solution
The bread bottom
is soggy
Bread remained in the Bread
Pan for too long
Remove the bread from
the Bread Pan once the
program ends.
The Lid Window is
foggy
Condensation during
kneading and rising cycles.
Avoid opening the Lid
often. Condensation will
disappear during the baking
cycle. Clean the Window
after use.
The Kneading
Paddle is stuck to
the Bread Pan
Cooked ingredients stuck
between the Kneading
Paddle and Bread Pan shaft
Fill the Bread Pan with
warm water and let soak
for 30 minutes. Remove the
Kneading Paddle and clean
both Kneading Paddle and
Bread Pan. For the next
batch, apply some nonstick
cooking spray or vegetable
oil onto the Kneading
Paddle before assembly.
The appliance does
not heat up
Wrong program selected
(7 Dough or 11 Mix Stir)
If the dough rose properly,
select the 8 Bake program
and bake until done,
according to the recipe
baking time.
Otherwise, restart the recipe
from the beginning.
Wrong baking setting
for the 13 Home Made
program
If the dough rose properly,
select the 8 Bake program
and bake until done,
according to the recipe
baking time.
Damaged / malfunctioning
appliance
Disconnect the appliance
from the wall outlet and
contact qualied personnel
to check and repair the
appliance.
IM_Bread Maker_IM_US_V5_210507.indd 30 5/7/21 11:38 AM

TROUBLESHOOTING
31
Problem Cause Solution
The Dispenser does
not release add-ins
Food stuck in the release
mechanism
Clean the Dispenser and let
dry before next use.
Damaged / malfunctioning
appliance
Contact qualied personnel
to check and repair the
appliance.
Malfunctioning appliance Disconnect the appliance
from the wall outlet and
contact qualied personnel
to check and repair the
appliance
The Bread Pan
base darkens or is
spotted
Damaged / malfunctioning
appliance
Disconnect the appliance
from the wall outlet and
contact qualied personnel
to check and repair the
appliance.
The appliance
produces an odor
and emits smoke
Residues from the
production process are
eliminated during rst use
Operate the appliance for
at least 15 minutes on its
BAKE setting with the Lid
open, with no food, until no
odor or smoke is present.
Ingredients spilled into the
Housing
Press the START/PAUSE
Button to stop the
operation and disconnect
the appliance from the wall
outlet. Let the appliance
cool down, and then
remove the Bread Pan.
Carefully wipe the spill
before resuming operation.
Crust browning level too
high
Press the START/PAUSE
Button to stop the
operation and remove the
food from the appliance.
Reduce the crust browning
level for the next batch.
Malfunctioning appliance Disconnect the appliance
from the wall outlet and
contact qualied personnel
to check and repair the
appliance
IM_Bread Maker_IM_US_V5_210507.indd 31 5/7/21 11:38 AM

TROUBLESHOOTING
32
Error codes
Error Cause Solution
EE1 + 5 beeps Internal temperature
too high
Press the START/PAUSE Button, open
the Lid, and let the appliance cool
down for 20 minutes
EE2 + 5 beeps Internal temperature
too low
Press the START/PAUSE Button, open
the Lid, and let the appliance warm up
for 20 minutes
EEr Disconnected
temperature sensor
Disconnect the appliance from the
wall outlet and contact qualied
personnel to check and repair the
appliance
If additional assistance is needed, please contact our Customer Assistance at
1-855-451-2897 (US).
TECHNICAL DATA
Rated voltage: 120V ~ 60Hz Rated power input: 550W
IM_Bread Maker_IM_US_V5_210507.indd 32 5/7/21 11:38 AM

© 2021 Farberware Licensing Company, LLC. All Rights Reserved.
Copyrights and Trademarks of Farberware Licensing Company,
LLC, including FARBERWARE®, are used under license from
Farberware Licensing Company, LLC.
CUSTOMER ASSISTANCE
If you have a claim under this warranty, please call our Customer Assistance
Number. For faster service, please have the model number and product name ready
for the operator to assist you. This number can be found on the bottom of your
appliance and on the front page of this manual.
Model Number: __________________ Product Name: __________________
Customer Assistance Number 1-855-451-2897
Keep these numbers for future reference!
Two-year limited warranty
What does your warranty cover?
• Any defect in material or workmanship.
For how long after the original purchase?
• Two years.
What will we do?
• Provide you with a new one.
• For those items still under warranty but no
longer available, WAL-MART reserves the
right to replace with a similar FARBERWARE
branded product of equal or greater value.
How do you make a warranty claim?
• Save your receipt.
• Properly pack your unit. We recommend
using the original carton and packing
materials.
• Return the product to your nearest
Walmart store or call Customer Assistance
at 1-855-451-2897.
What does your warranty not cover?
• Parts subject to wear, including, without
limitation, glass parts, glass containers,
cutter/strainer, blades, seals, gaskets,
clutches, motor brushes, and/or agitators,
etc.
• Commercial use or any other use not found
in printed directions.
• Damage from misuse, abuse, or neglect,
including failure to clean product regularly
in accordance with manufacturer's
instructions.
How does state law relate to this
warranty?
• This warranty gives you specic legal
rights, and you may also have other rights
which vary from state to state or province
to province.
• This warranty is in lieu of any other
warranty or condition, whether express or
implied, written or oral, including, without
limitation, any statutory warranty or
condition of merchantability or tness for a
particular purpose.
• WAL-MART, FARBERWARE and the product
manufacturer expressly disclaim all
responsibility for special, incidental, and
consequential damages or losses caused
by use of this appliance. Any liability is
expressly limited to an amount equal to
the purchase price paid whether a claim,
however instituted, is based on contract,
indemnity, warranty, tort (including
negligence), strict liability, or otherwise.
Some states or provinces do not allow
this exclusion or limitation of incidental
or consequential losses, so the foregoing
disclaimer may not apply to you.
What if you encounter a problem with this
product while using it outside the country
of purchase?
• The warranty is valid only in the country
of purchase and if you follow the warranty
claim procedure as noted.
IM_Bread Maker_IM_US_V5_210507.indd 33 5/7/21 11:38 AM