Loading ...
Loading ...
Loading ...
E-32
• When you go from the Timekeeping Mode to the sensor modes, the sensor mode that you last used
before returning to the Timekeeping Mode will be entered fi rst.
• Whenever you enter a sensor mode, the watch will beep the number of times indicated by the numbers
in the fi gure above. This will let you know what sensor mode you are entering.
• To enter a sensor mode from the Tide/Moon Data, Stopwatch, Countdown Timer, Alarm, World Time, or
Receive Mode, fi rst enter the Timekeeping Mode and then press the applicable button.
General Functions (All Modes)
The functions and operations described in this section can be used in all of the modes.
Auto Return Features
• The watch automatically returns to the Timekeeping Mode from other modes if the crown is not pulled
out and if no button operation is performed for a preset amount of time.
Mode Name Approximate Elapsed Time
Tide/Moon Data, Alarm, Receive 3 minutes
Barometer, Thermometer 1 hour
Digital Compass 1 minute
Altimeter 1 hour minimum
12 hours maximum
Initial Screens
When you enter the Alarm or World Time Mode, the data you were viewing when you last exited the mode
appears fi rst.
E-33
Timekeeping
Use the Timekeeping Mode (
TIME
) to set and view the current time and date.
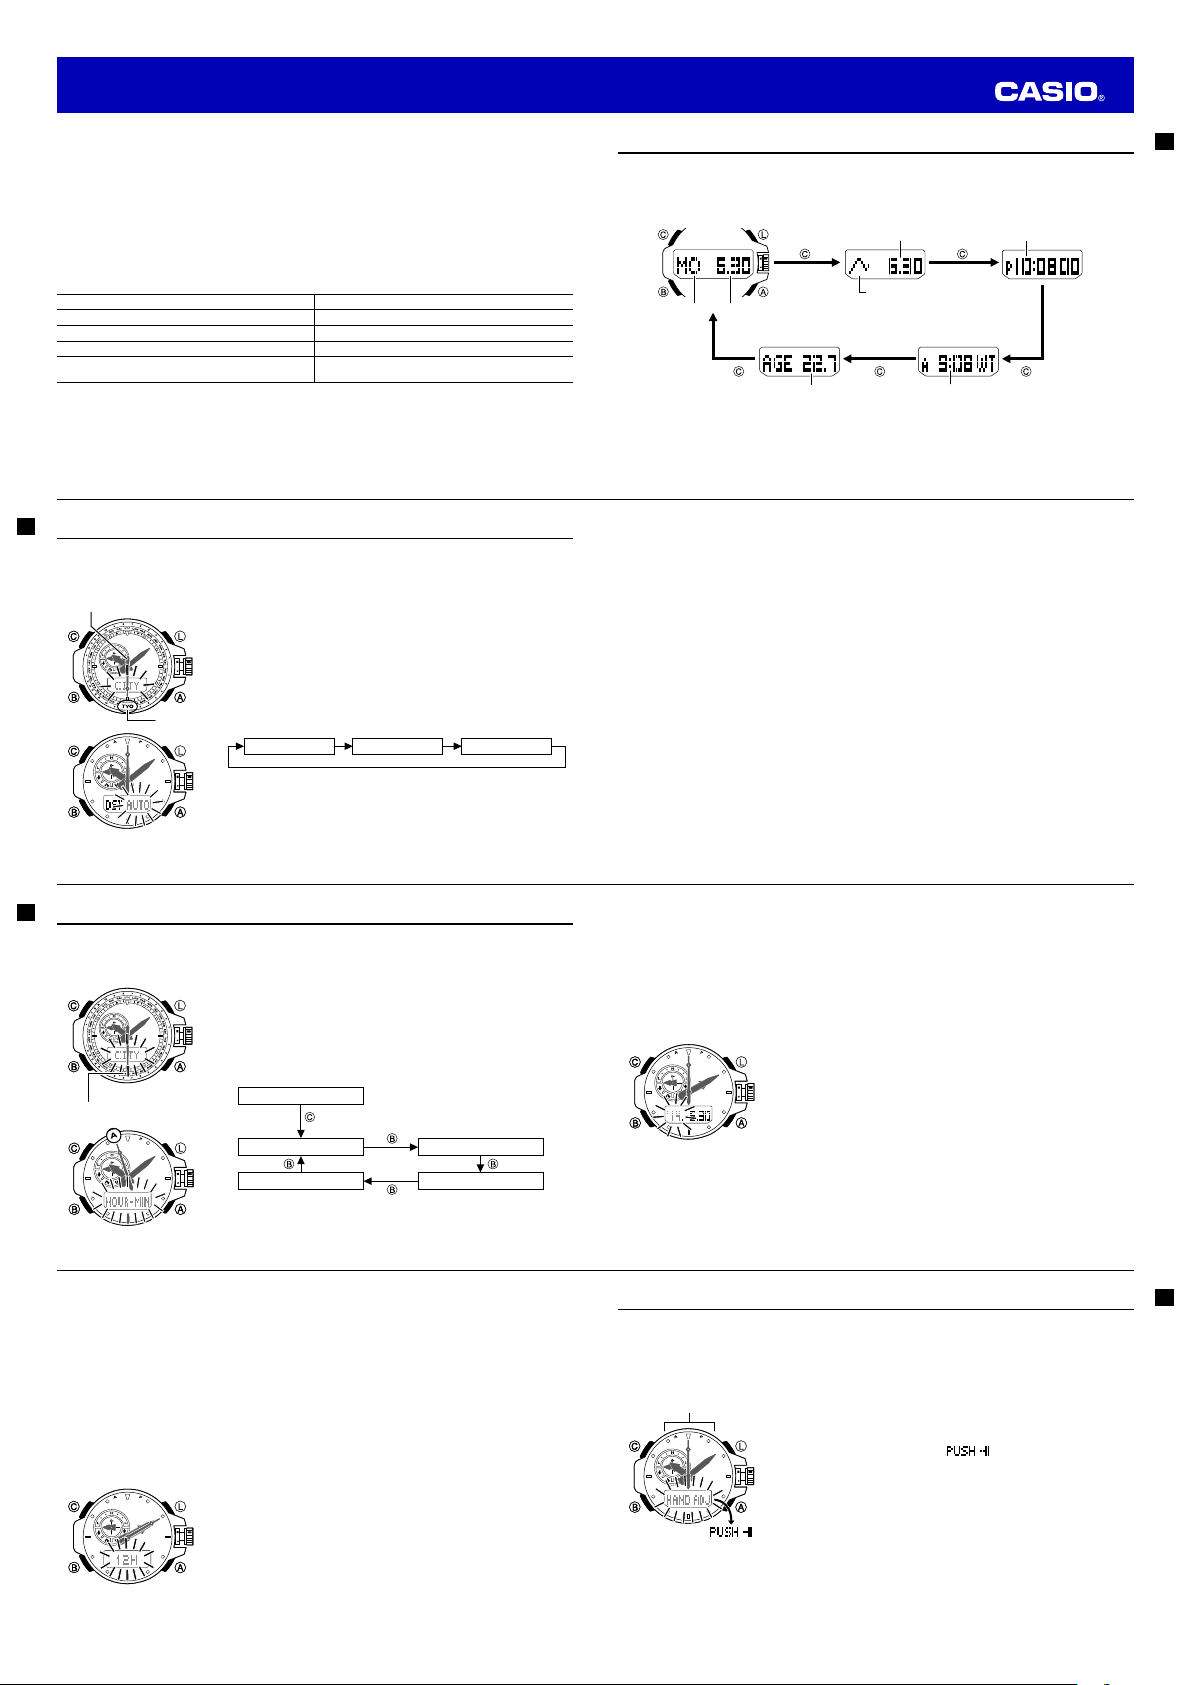
• Each press of
C
in the Timekeeping Mode will change screen contents as shown below.
Day of the week,
month/day screen
Barometric pressure graph,
date (month/day) screen
Time (hour, minute,
second) screen
World Time screenMoon age screen
Barometric
pressure graph
Day of week
Hour : MinutesMoon age
Month Day
Hour : Minutes Second
Month Day
• Holding down
C
for at least two seconds while any screen is displayed will toggle the barometric
pressure change indicator between ON and OFF.
When ON, the barometric pressure graph is displayed along with the
BARO
indicator.
• For information about how to check for signifi cant barometric pressure changes, refer to “Barometric
Pressure Change Indications” (page E-49).
E-34
Confi guring Home City Settings
There are two Home City settings: actually selecting the Home City and selecting either standard time or
daylight saving time (DST).
To confi gure Home City and summer time settings
1. In the Timekeeping Mode, pull out the crown.
• CITY will fl ash on the digital display indicating that the Home City
setting can be changed.
2. Rotate the crown to move the second hand to the city code of the city
you want you use as your Home City.
• For details about city codes, see the “City Code Table” at the back
of this manual.
3. Press
B
to display the DST setting screen.
4. Rotate the crown away from you to cycle through the DST settings as
shown below.
Auto DST (AUTO) DST off (OFF)
DST on (
ON
)
• The displayed DST setting will not change if you rotate the crown
towards you.
• After you change the Home City and/or DST setting, the hour
and minute hands will automatically move to the appropriate time
setting. The time shown on the digital display will also change
accordingly.
City code
Second Hand
City code
Second Hand
E-35
• The Auto DST (AUTO) setting will be available only when a city code that supports time calibration
signal reception (page E-20) is selected as the Home City. While Auto DST is selected the DST
setting will be changed automatically in accordance with time calibration signal data.
• Note that you cannot switch between standard time and daylight saving time (DST) while UTC is
selected as your Home City.
5. After the settings are the way you want, push the crown back in.
• Daylight Saving Time is turned on when the DST indicator is on the display.
Note
• After you specify a city code, the watch will use UTC* offsets in the World Time Mode to calculate
the current time for other time zones based on the current time in your Home City.
* Coordinated Universal Time, the world-wide scientifi c standard of timekeeping.
The reference point for UTC is Greenwich, England.
• Selecting some city codes automatically makes it possible for the watch to receive the time
calibration signal for the corresponding area. See page E-20 for details.
E-36
Confi guring Current Time and Date Settings Manually
You can confi gure current time and date settings manually when the watch is unable to receive a time
calibration signal.
To change the current time and date settings manually
1. In the Timekeeping Mode, pull out the crown. This will cause
CITY
to
fl ash on the digital display.
2. Press
C
.
• This will cause HOUR-MIN to fl ash on the digital display.
• The second hand will point to either A (a.m.) or P (p.m.)
• This is the time setting mode.
• In the following steps, each press of
B
cycles between settings
as shown below.
Home City/DST
Hour, minute
Month, day
Hour
Year
City codeCity code
E-37
3. Rotate the crown to change the minute setting.
• You can also use HS1 and HS2 high-speed movement (page E-6) to move the hands forward or
back at high speed.
• The hour hand will move in accordance with minute hand movement.
To set the hour hand separately, go to step 4 of this procedure.
4. Press
B
.
• This will cause HOUR to fl ash on the digital display.
5. Rotate the crown to change the hour setting.
• You can also use HS1 and HS2 high-speed movement (page E-6) to move the hands forward or
back at high speed.
6. Press
B
.
• This causes the currently set year, month, and day to appear on
the digital display, with the year setting fl ashing.
7. Rotate the crown to adjust the year setting.
• You can also use HS1 high-speed movement (page E-6) to change
this setting.
8. Press
B
.
• This causes the currently set date (month, day) setting to fl ash on
the display.
9. Rotate the crown to adjust the month and day setting.
• You can also use HS1 high-speed movement (page E-6) to change this setting.
• Pressing
B
will return to the hour and minute setting screen.
10. After the settings are the way you want, push the crown back in.
• This will cause timekeeping to start from 0 seconds.
E-38
Note
• For information about selecting a Home City and confi guring the DST setting, see “Confi guring
Home City Settings” (page E-34).
• While 12-hour timekeeping is in use, P (p.m.) is displayed from noon to midnight (11:59 p.m.) A (a.m.)
is displayed from midnight to noon (11:59 a.m.) These indicators are not displayed while 24-hour
timekeeping (displays times from 00:00 to 23:59) is being used.
• The watch’s built-in full automatic calendar makes allowances for different month lengths and leap
years. Once you set the date, there should be no reason to change it except after you have the
watch’s rechargeable battery replaced or after power drops to Level 5 (page E-15).
• The day of the week changes automatically when the date changes.
• Refer to the pages shown below for more information on Timekeeping Mode settings.
- Button operation tone on/off: “To turn the button operation tone on or off” (page E-99)
- Illumination duration setting: “To change the illumination duration” (page E-96)
- Enabling and disabling power saving: “To turn Power Saving on or off” (page E-99)
To switch between 12-hour and 24-hour timekeeping
1. Pull out the crown.
2. Press
B
fi ve times.
• This causes the current timekeeping setting (12H or 24H) to fl ash
on the digital display.
3. Rotate the crown to select either 12-hour (
12H
) or 24-hour (
24H
)
timekeeping.
4. After the setting is the way you want, push the crown back in.
E-39
Hand Home Position Adjustment
If the watch is exposed to strong magnetism or impact, its hands can go out of alignment with the time on
the digital display. This can result in incorrect time indication even though a time calibration signal is being
received. Your watch has an auto hand position correction feature that normally adjusts the hands. Should
you notice that the hand positions are not correct, perform the operation below to correct them manually.
To adjust home positions
1. In the Timekeeping Mode, pull out the crown.
2. Hold down
A
for at least fi ve seconds until
HAND SET
fl ashes and
then
HAND ADJ
appears on the digital display.
• This will start home position adjustment, which causes all of the
watch hands to move to 12 o’clock.
• After the hands stop moving, will appear on the digital
display.
Important!
• Before performing step 3, below, make sure that all hands have
returned to the 12 o’clock position. Pushing the crown back in
while any hand is not at the 12 o’clock position will not perform
home position adjustment.
3. Push the crown back in.
• This will cause all of the hands (small hand, hour hand, minute
hand, second hand) to return to their normal positions.
Note
After performing home position adjustment, enter the Timekeeping Mode and check to make sure that the
analog hands and the display indicate the same time. If they do not, perform home position adjustment
again.
Wait until all of the hands
move to 12 o'clock.
Wait until all of the hands
move to 12 o'clock.
Operation Guide 5371
Loading ...
Loading ...
Loading ...