Loading ...
Loading ...
Loading ...
Morton
®
Water Softener Installation & Operation Manual 21
Routine Maintenance
Protect the Water Softener from
Freezing
If the softener is installed where it could freeze (sum-
mer cabin, lake home, etc.), you must drain all water
from it to stop possible freeze damage. To drain the
softener:
1. Close the shut-off valve on the house main water
pipe, near the water meter or pressure tank.
2. Open a faucet in the soft water pipes to vent pres-
sure in the softener.
3. Move the stem in the single bypass valve to bypass.
Close the inlet and outlet valve in a 3 valve bypass
system, and open the bypass valve. If you want
water in the house pipes again, reopen the shut-off
valve on the main water pipe.
4. Unplug the power supply at the wall outlet. Remove
the softener’s top cover, together with the salt lid.
Take off both drain hoses if they will interfere with
moving the softener into position over the drain.
5. Push the bypass valve body toward the softener (as
shown in Figure 15) and carefully remove the large
holding clips at the softener inlet and outlet.
Separate the softener from the plastic installation
adaptors, or from the bypass valve.
6. Lay a piece of 2 inch thick board near the floor drain
(See Figure 45).
7. Move the softener close to the drain. Slowly and
gently, tip it over until the rim rests on the wood
block with the inlet and outlet over the drain. Do not
allow the softener’s weight to rest on the inlet and
outlet fittings or they may break.
8. Tip the bottom of the softener up a few inches and
hold until all water has drained. Leave the softener
laying like this until you are ready to use it. Plug the
inlet and outlet with clean rags to keep dirt, bugs,
etc. out.
Floor Drain
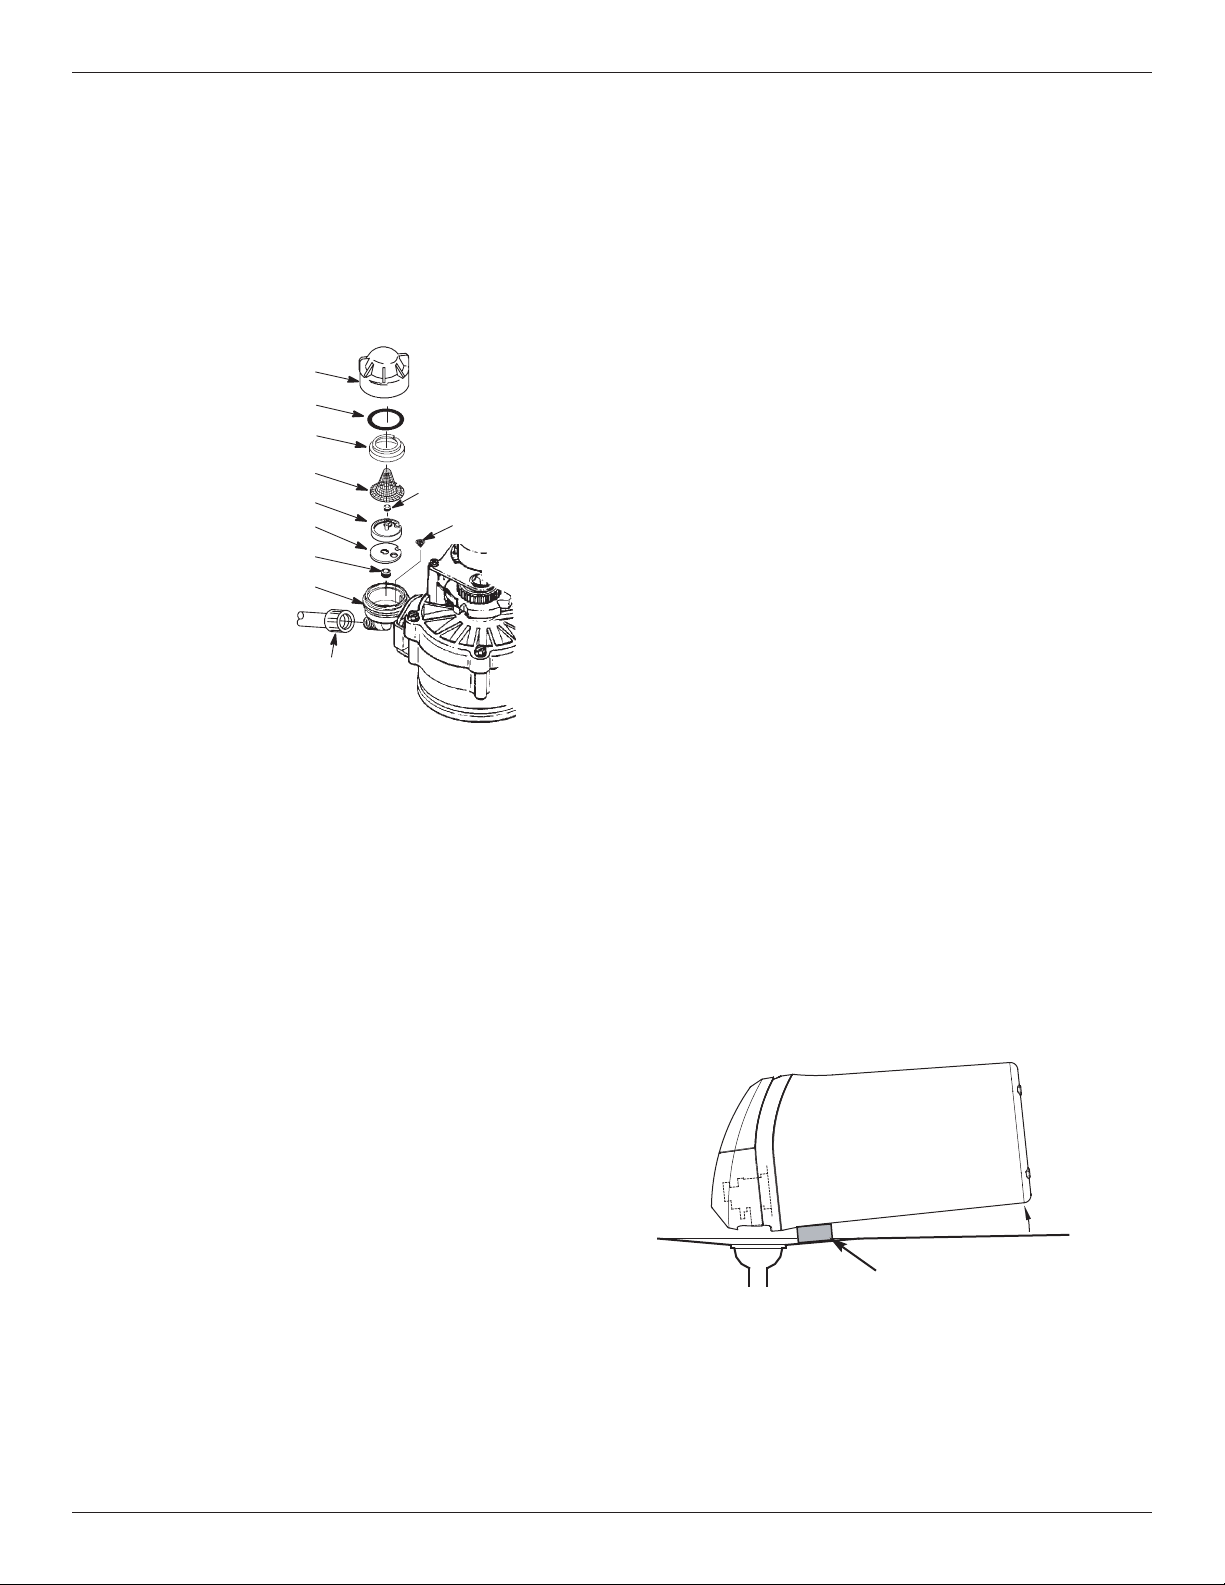
FIG. 45
Wood Block
FIG. 44
Cap
O-ring Seal
Screen Support
Screen
Gasket
*Flow Plug (HVDC)
Housing
Ferrule
Nut
Cone Screen
*Flow Plug
*Install with lettered
side up, concave
side down.
Cleaning the Nozzle & Venturi
A clean nozzle & venturi (See Figure 44) is a necessity
for the water softener to work properly. This small
component creates the suction to move brine from the
brine tank, into the resin tank. If it should become
plugged with sand, silt, dirt, etc., the water softener will
not work, and hard water will result.
Nozzle & Venturi Disc
IMPORTANT: Be sure small hole in the gasket is cen-
tered directly over the small hole in the nozzle & ven-
turi housing. Be sure the numbers are facing up.
To get access to the nozzle & venturi, remove the
water softener’s top cover. Put the bypass valve(s)
into the bypass position. Be sure the water softener is
in soft water (service) cycle (no water pressure at noz-
zle & venturi). Then, holding the nozzle & venturi
housing with one hand, un screw the cap. Do not lose
the o-ring seal. Lift out the screen support and screen.
Then, remove the nozzle & venturi disc, gasket and
flow plug(s). Wash the parts in warm, soapy water
and rinse in fresh water. Be sure to clean both the top
and bottom of the nozzle & venturi disc. If needed,
use a small brush to remove iron or dirt. Do not
scratch, misshape, etc., surfaces of the nozzle & ven-
turi.
Carefully replace all parts in the correct order.
Lubricate the o-ring seal with silicone grease and
locate in place. Install and tighten the cap by hand,
while supporting the housing. Overtightening may
break the cap or housing. Put the bypass valve(s) into
service (soft water) position.
Recharge the softener to reduce water level in the
tank. This will also assure that the softener is com-
pletely recharged and ready to provide softened water
again. Check the water level in the tank by looking
down the brinewell. If the water level does not drop
after a recharge, the problem has not been resolved.
Call 1-888-64 WATER or visit www.mortonwatersoften-
ers.com.
Loading ...
Loading ...
Loading ...