Operation Guide ITM-461
1
MA1309-EA
© 2013 CASIO COMPUTER CO., LTD.
Features
••• Temperature•s ens or•for•temperature•reading•display.
••• Humidity•sensor•for•humidity•reading•di spl ay.
Specifications
Quartz Oscillation Frequency:•32,768Hz
Display Contents:••Analog:•Hour, •mi nut e,•second•(3 han ds)
Digital:•Humidit y,•temperature
Accuracy:•±30 •se con ds•per•month
Temperature:• •Measurement•Range:•–1 9.9 °C•to•49.9°C
Display•Unit: •0. 1°C•
Measuring•Accura cy:•±2°C•(0°C•to•40°C)
Humidity:••Measurement•Range:•
• 20%•to•90%•(Result•reading•at•5°C•to•45°C)•
Display•Unit: •1%•
Measuring•Accura cy:•±10%•(5°C•to•40°C)•
(Example:•Readin g•of•40%•to•6 0%•will•be•displaye d•when•
humidity•is•5 0%. )
••• A•temperature •re adi ng•and•humidity•reading•ar e•taken•
each•minute.
Main Element:••Tuning•fork•type• hig h-p erf orm anc e•quartz•oscillator,•
CMOS-LSI
Operating Temperature:••–10•to•50°C
••• The•LCD•may•become•difficult•to•read•at•tem per atu res•outside•of•
the•range•(0•to•40°C).
Battery:••Two•AA-size•alkaline•batt eri es•(Type:• LR6 )
Battery Life:••Approximat ely•1•year
Dimensions:•3 43( H)× 343 (W) ×49 (D)• mm
Weight:••Approximately•1200g•(includin g•batteries)
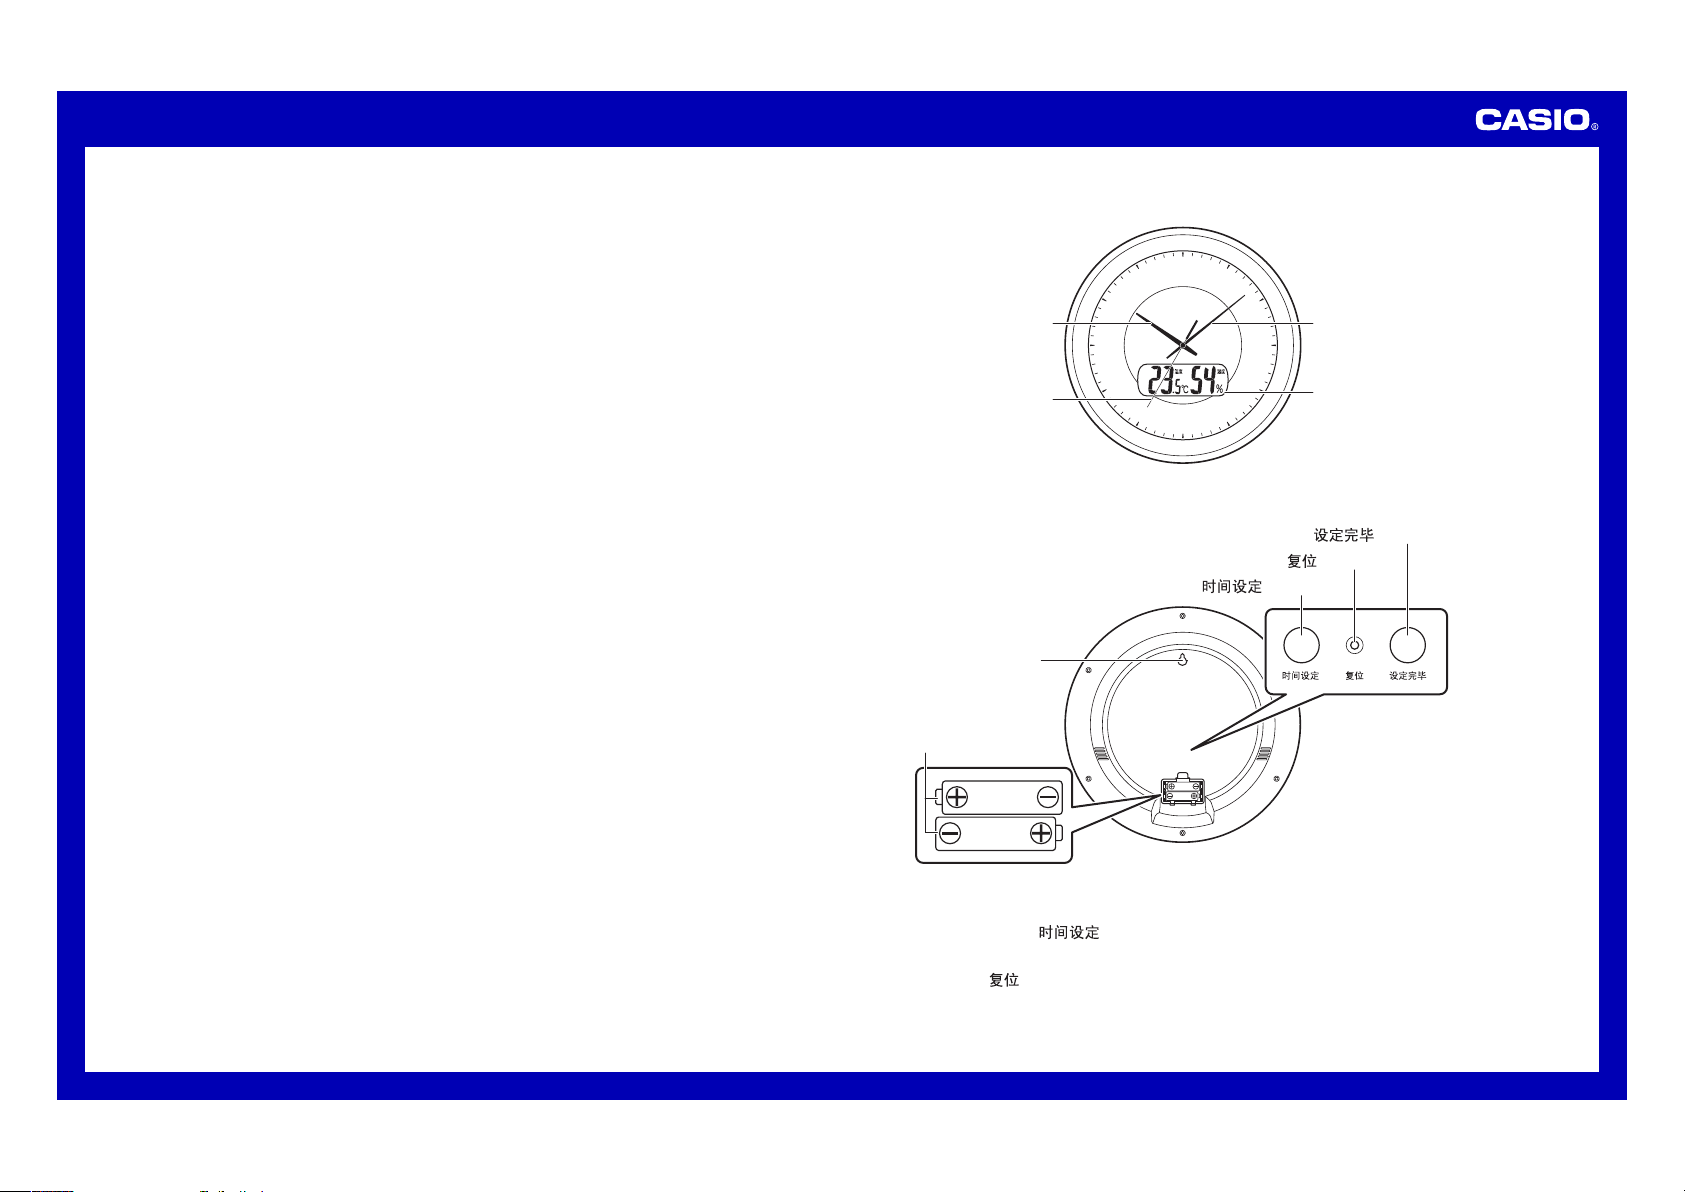
General Guide
12
6
3
48
210
57
111
9
Hour•Hand
(Front)
Minute• Hand
Second• Hand
Digital •display
1
Adjust time ( ) button
2
Reset ( ) button
3
Time adjustment end ( ) button
Two•AA-size•
alkaline•batteries•
(LR6)
Wall•hang•hole
(Back - Battery cover open)
••• The•actual•appea ran ce•of•the• clo ck•depends•on •th e•model.
1
• Adjust time (
) button
Use•this•button•to•adjust• the•current•time•setting.
2
• Reset (
) button
Be•sure•to•press•this•button•after•replacing•the•batteries .
••• If•you•have•trou ble•pressing•this•button,•use•a•thin,•poin ted•
object•to•press•it.•Take•care•to•avoid•dam agi ng•the•clock.
Operation Guide ITM-461
2
3
••Time adjustment end (
) button
Press•this•butto n•to•exit•the•time•adjustment•operation.
QQ
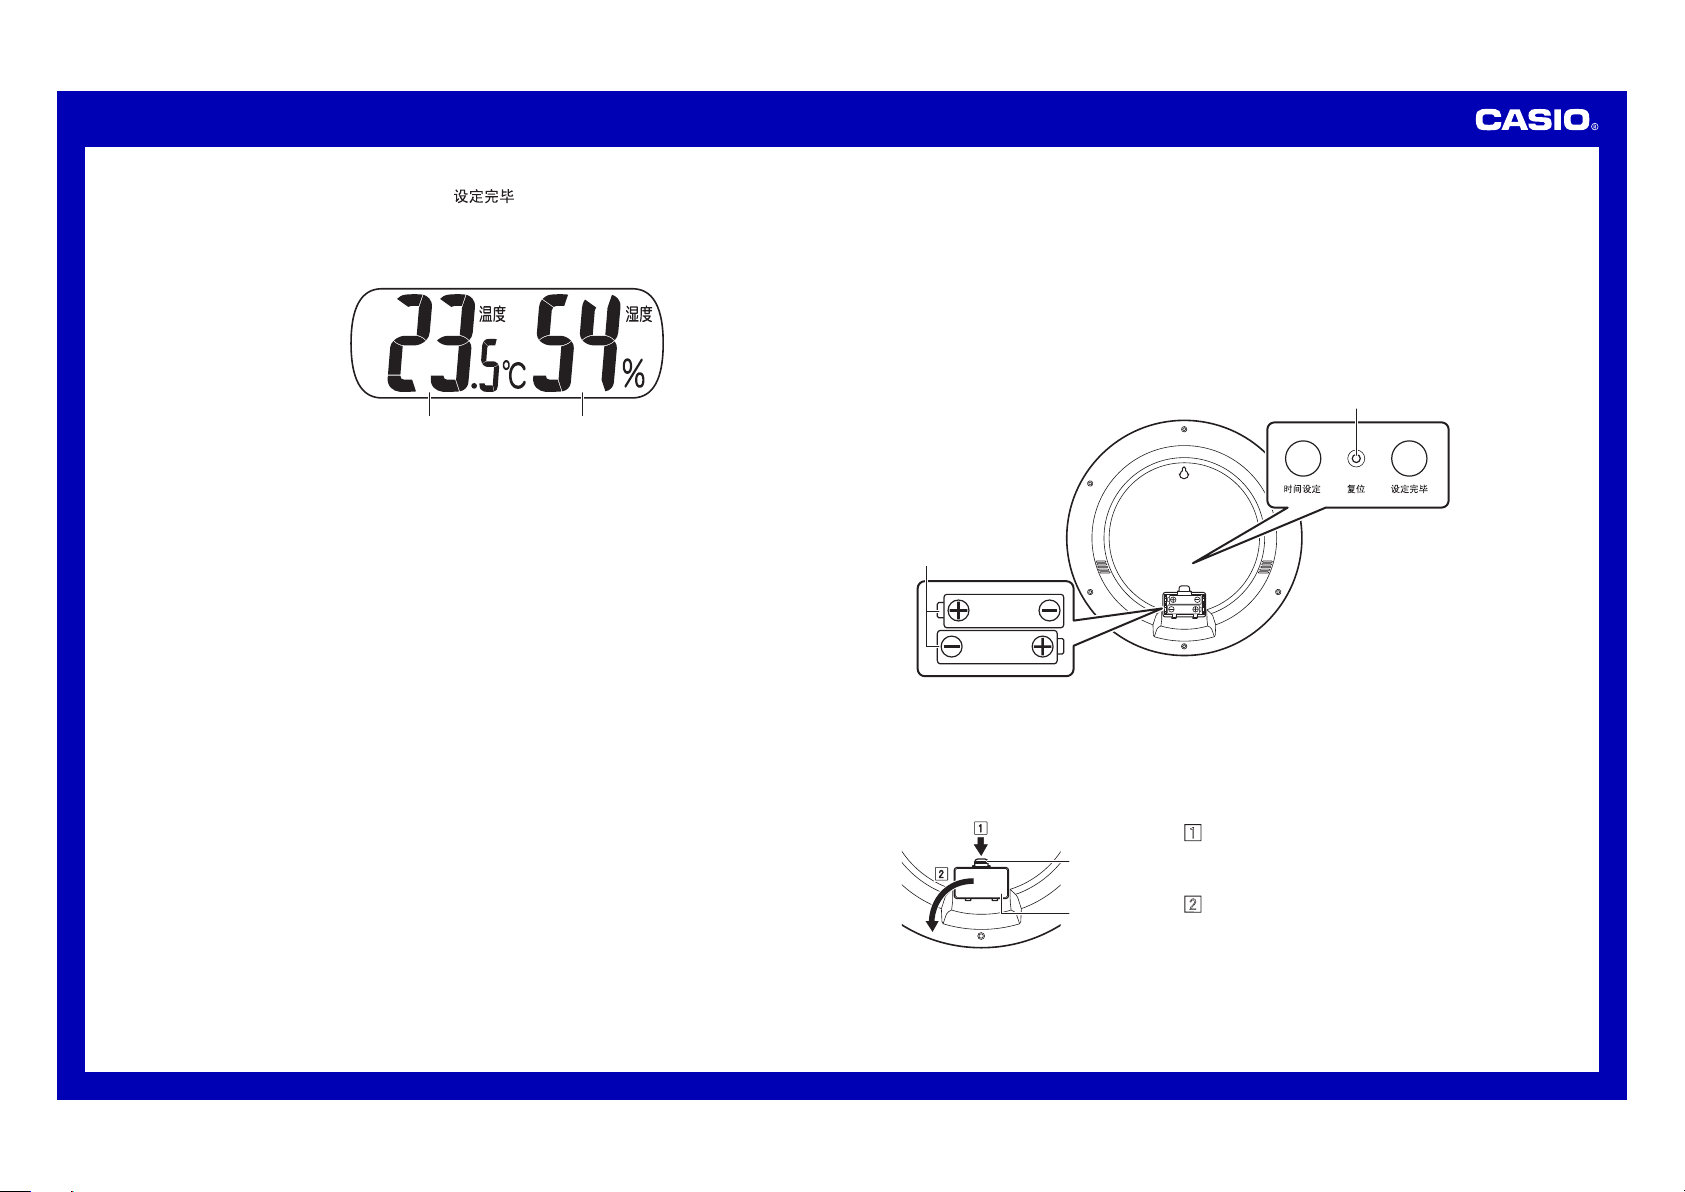
Digital Display Contents
Temperatur e Humidity
QQ
Temperature and Humidity Readings
The•temperature•and•humidity•reading•displ aye d•by•the•cloc k•are•
based•on•measuremen ts•taken•b y•the•clock’s•bu ilt -in•temperature•
and•humidity• sen sor s.•Even•if •th ere•is•a•sudden•change•in•
temperature•a nd/ or•humidity,•it•can•take•u p•to•about•30•mi nut es•until•
the•reading•is•reflected•on •th e•clock•display.•This•is•beca use•it•takes•
time•for•conditions•inside•the•clock•match•conditions•outside.•Al so,•
do•not•leave•the•clock•near•a n•air•conditioner•air•outlet•when•using•
sensors.
••• The•clock•takes•temperature•and•humidity•readings•once•every•
minute•(except•while•a•time•setting•operation•is•in•pro gre ss) .
••• Temperature•r ead ing s•continue•to•be•taken• at•temperatures•lower•
than•0°C•and•fro m•40.1°C•and• hig her ,•but•such•re adi ngs•are•
outside•the•guar ant eed•range.
••• The•displayed •te mpe rat ure•reading•will•show•“ LO”•when•the•
temperature•i s•lower•than•–19 .9° C•and•“HI”•wh en•it•is•higher•than•
49.9°C.
••• The•displayed •hu mid ity•reading•will•show•“LO”•when•the•hum idi ty•
is•lower•than •20 %•and•“HI”•when•it•is•higher•than•90%.
••• The•displayed •hu mid ity•reading•will•show•“-•-”•when•the•
temperature•i s•outside•the•ra nge•of•5°C•to•45 °C.
Power Supply
••• Your•clock•runs•on•two•AA-size•alkaline •ba tte rie s.
••• Whenever•possibl e•use•CASIO•specified•batte rie s•or•equivalents .
••• Be•sure•to•remov e•the•batteries•from•the•c loc k•when•you•do •no t•
plan•to•use•it•for•a•long•time.
QQ
Replacing Batteries (Replace both batteries!)
1.••Open•the•battery•cover•then•remove•the•old•batteries.•(Refer•to•
“To•open•the•bat ter y•cover”•belo w.)
2.••Taking•care•t o•ensure•that •th eir•plus•(+)•and•minus•(–)•ends•are•
facing•correctly,•load•two•new•batteries.•Press•them•into•place•a s•
far•as•they•will•go.
3.••After•replacing•the•batteries,•press•the•reset•button.
4.••Close•the•battery•cover.
Two•AA-size•
alkaline•batteries•
(LR6)
Reset button
(Back - Battery cover open)
••• If•you•have•trou ble•pressing•this•button,•use•a•thin,•poin ted•object•
to•press•it.•Tak e•care•to•avoid•damaging•t he•clock.
••• The•actual•appea ran ce•of•the• clo ck•depends•on •th e•model.
QQ
To open the battery cover
1•Press•downwards•on•the•hook•
of•the•battery•cover•with•you r•
fingertip.
2•While•pressing•down•on•the•
hook,•swing•the•battery•cover•
outwards•to•o pen•it.
Hook
Battery•
Cover
Operation Guide ITM-461
3
Important!
QQO
Ensure that the plus (+) and minus (–) ends of the batteries
are facing correctly when you load them.
QQO
The symptoms listed below indicate that battery power
is getting low. Replace batteries as soon as possible
after any one of these symptoms occurs. Regular battery
replacement is recommended.
••• Incorrect•operat ion•(resetting•of•time, •in cor rec t•timekeeping,•
etc.)
••• Dim•display•figur es•or•blank•d isp lay
••• Slow•or•stopped•timekeeping•(analog•model)
••• Even•if•the•cloc k•is•operating•normally,•b e•sure•to•replace•
the•batteries •at•least•once•a •ye ar.
QQO
The batteries are not chargeable. Never try to charge them.
••• Store•batteries•out•of•the•re ach•of•small•chi ldr en.•Should•
anyone•ever•a cci den tal ly•swallow•a•battery,•c ont act•a•
physician•immedi ate ly.
••• Should•a•battery•ever•leak,•immediately •wi pe•up•the•fluid,•
without•allowing•it•to•come•into•contact•with•your•s kin .
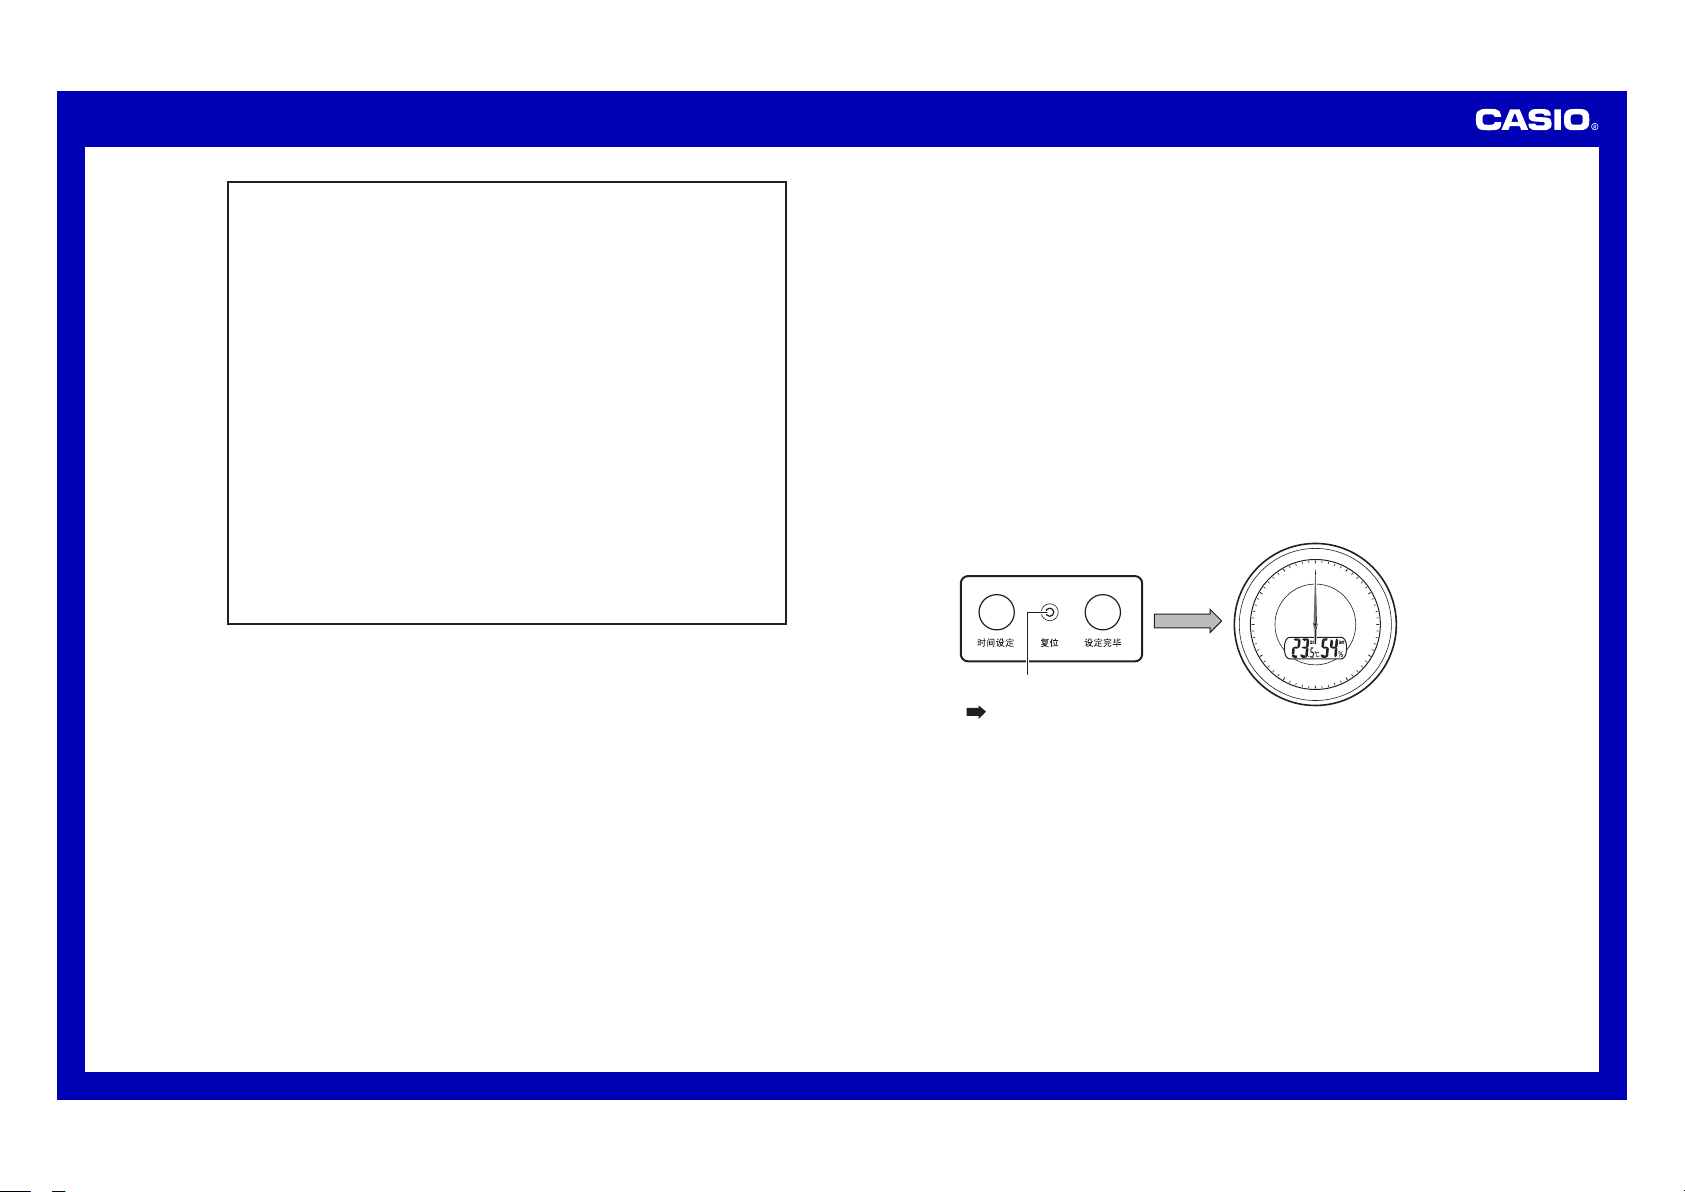
Using the Clock for the First Time
1.••Load•batteries.•(Refer•to•“Replacing •Ba tte rie s”. )
Open•the•battery•cover•on•the•back•of•the• clo ck•and•correctly•
load•batteries•ensuring•th at•their•plus •(+ )•and•minus•(–)• end s•of•the•
batteries•are •fa cin g•correctly.
••• Loading•batteries•will•cause•the•hands•of•the•clock•to•
start•changing•automatically•until•they•reach•12:0000•
(hour:minute:second).
••• The•hands•always•move•clockwise.•They•d o•not•move•
counterclockwise.•
2.••Press•the•reset•button•on•the•back•of•the• clo ck.•(Reset•Op era tio n)
••• After•the•reset•operation•is•complete,•clo se•the•battery•cover.
••• When•the•hands•stop•at•12:0000•press•the•time•adjustment•
end•button.•This•will•cause•the•hands•to•s tar t•normal•
timekeeping•m ove men t.
12
6
3
48
210
57
111
9
Reset button
Press
Operation Guide ITM-461
4
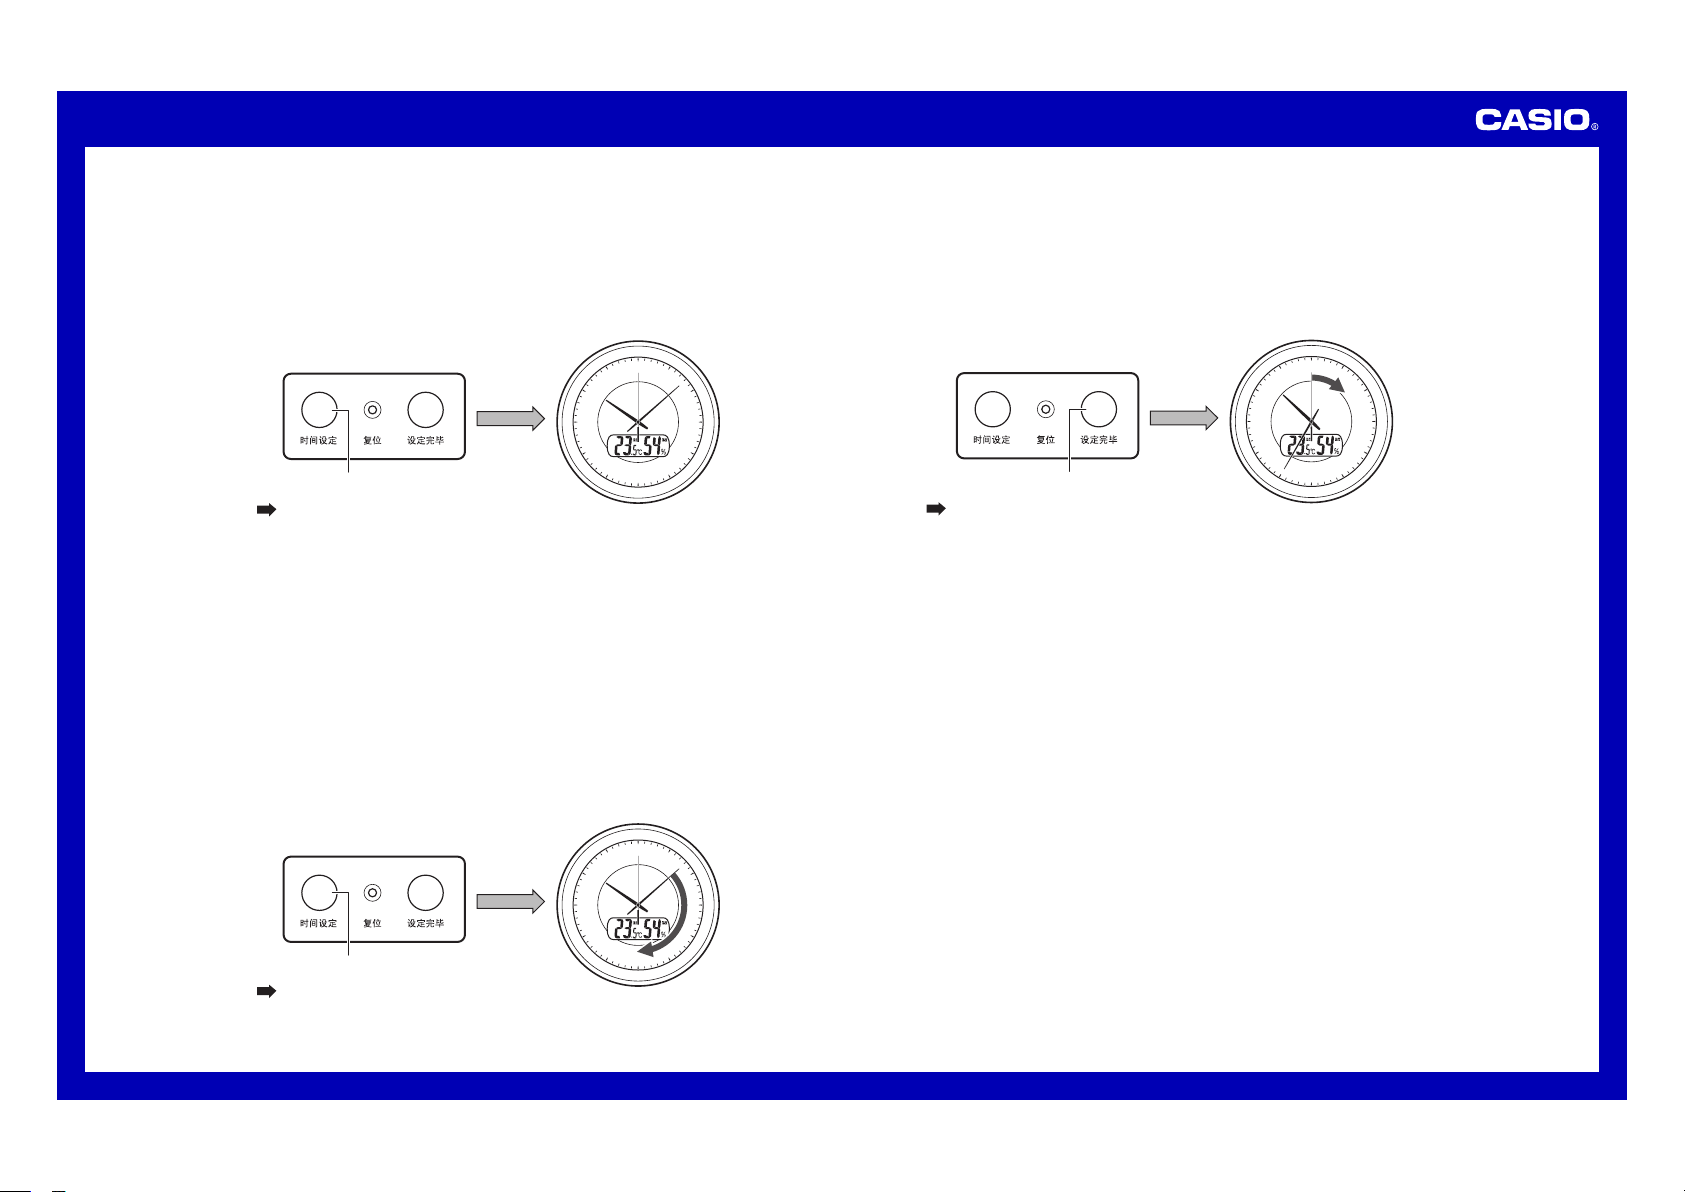
Configuring Time Settings
1.••Press•the•adjust•time•button•to•enter•the•time•adjustment•mode.
Time•the•pressing•of•the•adju st•time•button•so•the•second•hand•of•
the•clock•stops•at•around•12 o’c loc k.
This•will•cause•the•hour•hand ,•minute•hand,•and•second• han d•to•
stop•and•enter•the•time•adjustme nt•mode.
12
6
3
48
210
57
111
9
Adjust time button
Press
Hour hand, minute hand,
and second hand stopped.
2.••Press•the•adjust•time•button•again.
This•will•cause•the•minute •ha nd•to•start•movi ng.•The•hour• han d•will•
also•move•in• acc ord anc e•with•min ute•hand•movemen t.
Press•once:•Time•setting•adva nce s•one•minute.
Hold•down•for •tw o•seconds:••Hour•hand•and•minute•ha nd•move•at•
high•speed.
••• To•keep•from• goi ng•past•your• des ire d•setting•wit h•high-speed•
hand•movement,•move•the•hands•until•the•se tti ng•is•about•
10minutes•be for e•your•desired•setting. •Th en•move•the•minu te•
hand•in•one-minute•increments•until•you r•setting•is• rea che d.
••• The•clock•does•not•distinguish•between•a.m .•and•p.m.
12
6
3
48
210
57
111
9
Adjust time button
Press
Hour hand and minute hand
move at high speed.
3.••Press•the•time•adjustment• end•button.
Time•the•pressing•of•the•time•adjustment•end•button• wit h•the•
sounding•of•a •ti me•signal•on• the•TV,•on•a•telephone•time•serv ice ,•
etc.•This•will•exit•time•a dju stm ent•and•start•normal•secon d•hand•
movement.
••• Note•that•the •cl ock•will•exit •ti me•adjustment•automatically•if•you•
do•not•perform•any•operation•for•about•three•minutes.
12
6
3
48
210
57
111
9
Time adjustment end button
Press
Second hand movement
restarts.
Operation Guide ITM-461
5
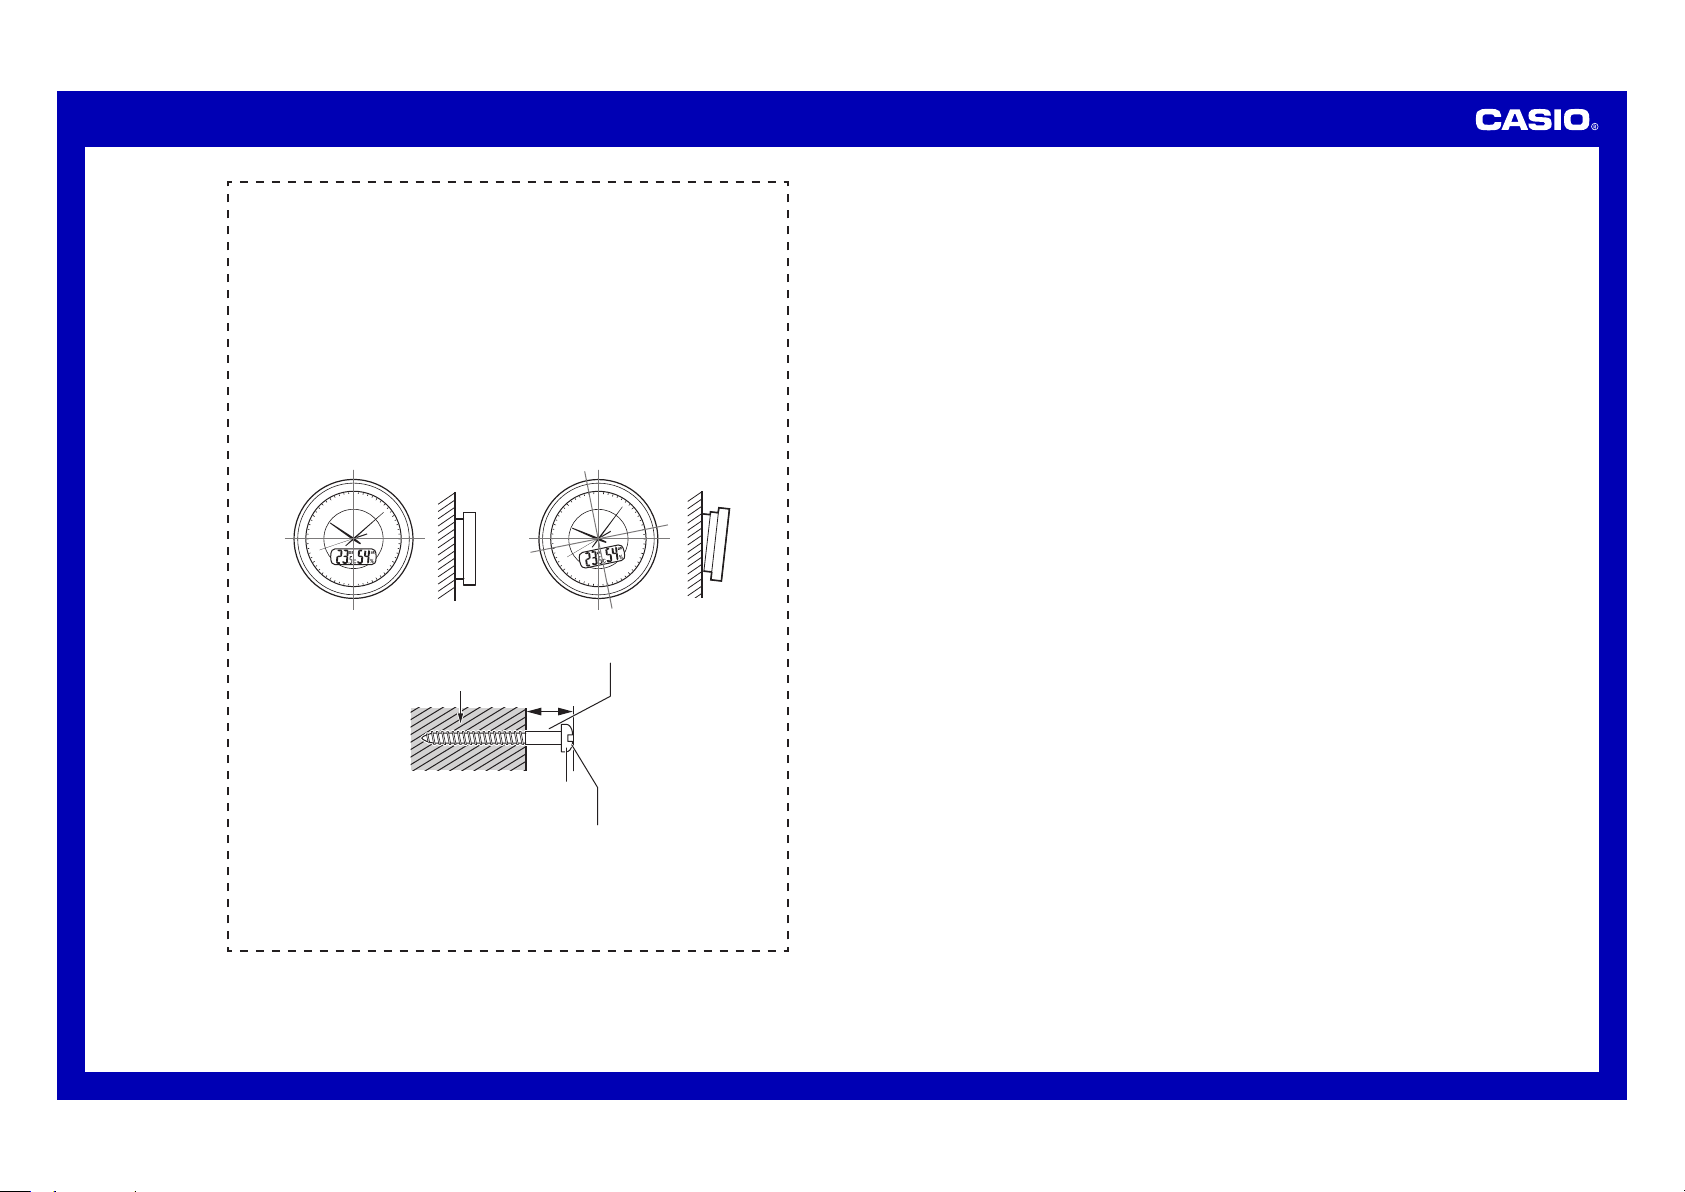
Wall mounting example
Put•the•clock•in•the•location•where•you•want•to•use•it.
Important!
QQO
After hanging the clock onto a hook, screw, etc., move the
clock upwards, downwards, left, and right, and pull lightly
towards you to make sure it is secure. A clock that is hung
in a way that is not secure can fall and cause accidents.
QQO
Make sure that the clock is straight while hanging, and is
not at an angle.
12
6
3
48
210
57
111
9
12
6
3
48
210
57
111
9
OK NG
••
10mm
Wall
Screw
Screw•diameter:•4•to• 5•mm
Screw•head•diameter:•6•to•8• mm
Important!
QQO
Be sure to use a screw that is strong enough to support
the weight of the clock.

