Hold the buttons to advance settings more quickly.
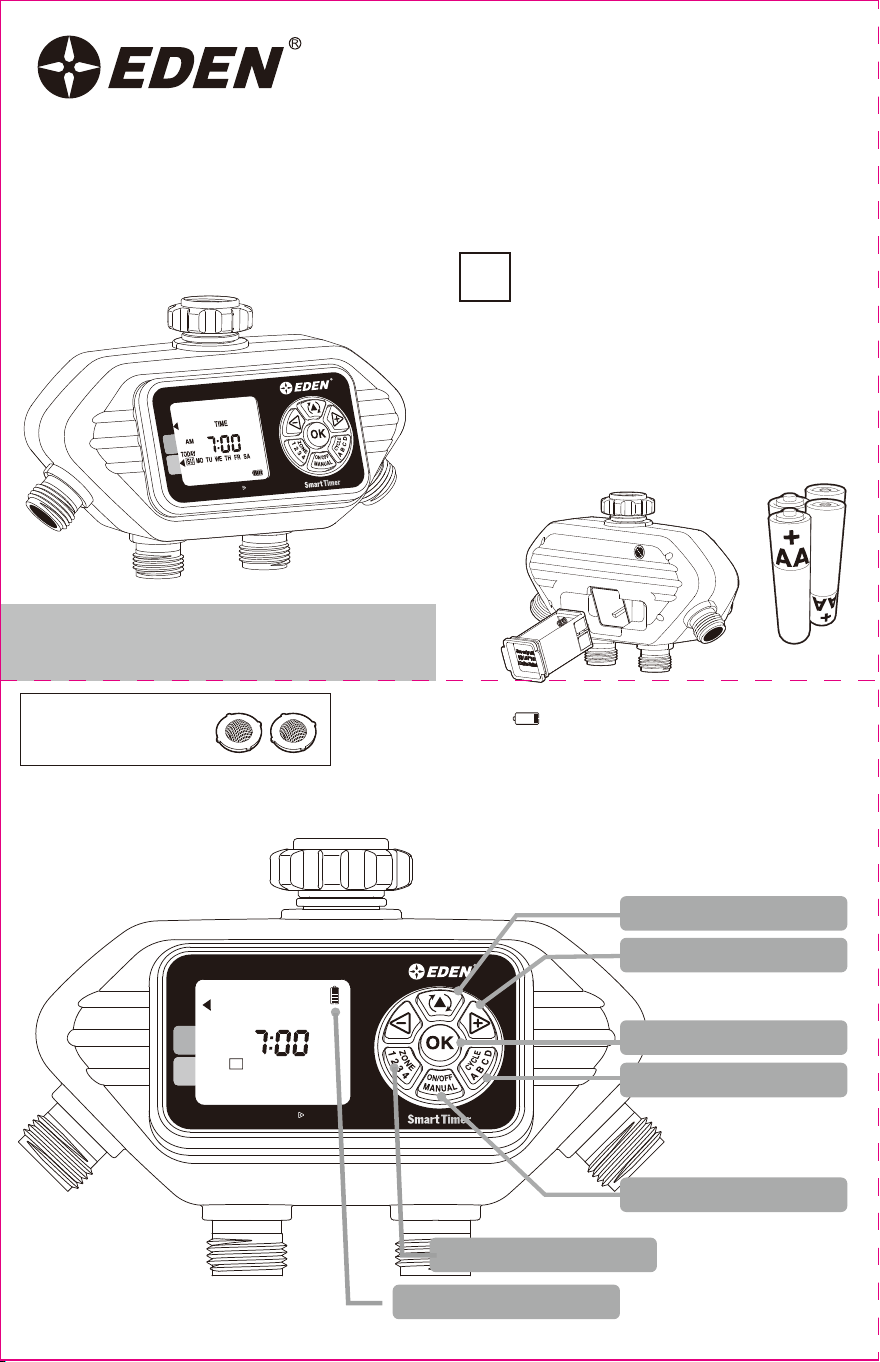
Remove the battery holder from the back of the Timer. Insert 4 ×
AA alkaline batteries as indicated on the battery holder. Do
not use rechargeable batteries. Replace the battery holder,
making sure that it is firmly and securely placed in the Timer.
We recommend replacing batteries when the indicator
reaches
NOTE: Do not use your timer when the air temperature is below
40°F (4.5° C). When storing your timer, be sure it is in a dry
place and protected from frost.
Installation of the Timer
Attach the timer to an outside faucet and turn on the water. The
water must be left on while the timer is attached to the
faucet for your timer to operate.
NOTE: You may choose to program your timer before or after
attaching it to the faucet.
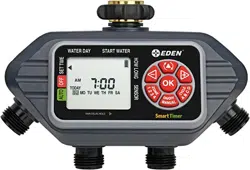
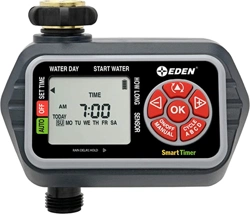
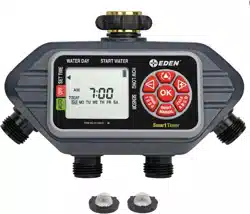
4-Zone Digital
Programmable Water Timer
Understanding Zones
Initial Digital Water Timer Set Up
93413EDAMZ
Battery Installation & Assembly
SET TIME:
"Set Current Time and Day"
Hold the buttons to advance settings more quickly.
WATER DAY:
"What days do you want to water?"
This is a four-zone timer allowing you to water four different areas
from the same faucet.
Each zone can be programmed with up to four different start times.
You can use the PLANNING TABLE provided at the end of this
sheet to help organize your watering schedule for each zone.
Before setting your watering schedule, you must first set the current
day of the week and time. When the batteries are first installed, the
arrow on the screen will point to SET TIME. If it is not in that
position, press the button until the arrow is pointing to
SET TIME.
The Water Timer default setting is a 12-hour mode (AM/PM). To
ensure correct timing, look for either AM or PM to the left of the
time. To switch between 12-hour (AM/PM) and 24-hour (military
time), hold the button for 10 seconds. 12-hour mode shows
AM or PM while 24-hour mode does not.
Note: Changing time mode will erase all programs.
On your screen, a flashing box will appear around the SU. Simply set
the timer to the current day by pressing the and buttons on the
touchpad until the square is on the correct day. Once the correct day
has been indicated, press the button.
To set the time, press the and buttons until the correct time
appears on the screen, and then press .
Press the button (at the top of the touch pad) to move to
WATER DAY
1
2
3
3.1
With the arrow on the screen pointing to WATER DAY, you can
select specific days to water or an interval period of days when
watering will occur.
To set the watering day, use the and buttons to select the
day-of-the-week you wish to water. Press the button when the
desired day-of-the-week is highlighted on the screen. You can
select as many days as you like. The days selected will have a
square around them.
To water at preset intervals, press the button on the touchpad
to navigate past the days of the week. Press the and
buttons to set the time period
(EVERY 1 DAY through EVERY 7 DAY(s) ).
Press the button to move to START WATER.
Note: You will see Zone 1 highlighted at the bottom of
the screen; program Zone 1 before moving on to Zone 2.
RAIN DELAY, HOLD
WATER DAY START WATER
HOW LONG
OFF
SENSOR
SET TIME
AUTO
RAIN DELAY, HOLD
WATER DAY START WATER
HOW LONG
OFF
SENSOR
SET TIME
AUTO
CYCLE
MIN
MANUAL
PM
TODAY
DELAY
TIME
WATER EVERY
SU
FR
SATH
WE
TUMO
A
B
C D
DAY
NEXT START
ZONE
AM
HRS
DAY
1 2
3
4
SENSOR
RESET
Toggle Button
+/- Buttons
OK Button
Manual Watering Button
Cycle ABCD Button
Zone 1 2 3 4 Button
Battery Indicator
WATER DAY
START WATER
HOW LONG
OFF
SENSOR
SET TIME
AUTO
RAIN DELAY, HOLD
CYCLE
MIN
MANUAL
PM
TODAY
DELAY
TIME
WATER EVERY
SU
FR
SATH
WE
TUMO
A
B
C D
DAY
NEXT START
ZONE
AM
HRS
DAY
1
2
3
4
SENSOR
RESET
WATER DAY
START WATER
HOW LONG
OFF
SENSOR
SET TIME
AUTO
RAIN DELAY, HOLD
CYCLE
MIN
MANUAL
PM
TODAY
DELAY
TIME
WATER EVERY
SU
FR
SATH
WE
TUMO
A
B
C D
DAY
NEXT START
ZONE
AM
HRS
DAY
1
2
3
4
SENSOR
RESET
WATER DAY
START WATER
HOW LONG
OFF
SENSOR
SET TIME
AUTO
RAIN DELAY, HOLD
CYCLE
MIN
MANUAL
PM
TODAY
DELAY
TIME
WATER EVERY
SU
FR
SATH
WE
TUMO
A
B
C D
DAY
NEXT START
ZONE
AM
HRS
DAY
1
2
3
4
SENSOR
RESET
Select Days Example
SUN MON TUE WED THU FRI SAT
SUN MON TUE WED THU FRI SAT
SUN MON TUE WED THU FRI SAT
SUN MON TUE WED THU FRI SAT
Regular Intervals Examples
EVERY 2 DAYS
EVERY 1 DAY
EVERY
WEEK
WEEK
ONE
WEEK
TWO
WEEK
ONE
WEEK
TWO
EVERY 3 DAYS
3.2
Includes 2 extra stainless
steel lter washers for a
leak-free seal
Compatible with Eden Wireless Soil Moisture
Sensors 25417EDAMZ (sold separately)

Hold the buttons to advance settings more quickly.
Remove the battery holder from the back of the Timer. Insert 4 ×
AA alkaline batteries as indicated on the battery holder. Do
not use rechargeable batteries. Replace the battery holder,
making sure that it is firmly and securely placed in the Timer.
We recommend replacing batteries when the indicator
reaches
NOTE: Do not use your timer when the air temperature is below
40°F (4.5° C). When storing your timer, be sure it is in a dry
place and protected from frost.
Installation of the Timer
Attach the timer to an outside faucet and turn on the water. The
water must be left on while the timer is attached to the
faucet for your timer to operate.
NOTE: You may choose to program your timer before or after
attaching it to the faucet.
4-Zone Digital
Programmable Water Timer
Understanding Zones
Initial Digital Water Timer Set Up
93413EDAMZ
Battery Installation & Assembly
SET TIME:
"Set Current Time and Day"
Hold the buttons to advance settings more quickly.
WATER DAY:
"What days do you want to water?"
This is a four-zone timer allowing you to water four different areas
from the same faucet.
Each zone can be programmed with up to four different start times.
You can use the PLANNING TABLE provided at the end of this
sheet to help organize your watering schedule for each zone.
Before setting your watering schedule, you must first set the current
day of the week and time. When the batteries are first installed, the
arrow on the screen will point to SET TIME. If it is not in that
position, press the button until the arrow is pointing to
SET TIME.
The Water Timer default setting is a 12-hour mode (AM/PM). To
ensure correct timing, look for either AM or PM to the left of the
time. To switch between 12-hour (AM/PM) and 24-hour (military
time), hold the button for 10 seconds. 12-hour mode shows
AM or PM while 24-hour mode does not.
Note: Changing time mode will erase all programs.
On your screen, a flashing box will appear around the SU. Simply set
the timer to the current day by pressing the and buttons on the
touchpad until the square is on the correct day. Once the correct day
has been indicated, press the button.
To set the time, press the and buttons until the correct time
appears on the screen, and then press .
Press the button (at the top of the touch pad) to move to
WATER DAY
1
2
3
3.1
With the arrow on the screen pointing to WATER DAY, you can
select specific days to water or an interval period of days when
watering will occur.
To set the watering day, use the and buttons to select the
day-of-the-week you wish to water. Press the button when the
desired day-of-the-week is highlighted on the screen. You can
select as many days as you like. The days selected will have a
square around them.
To water at preset intervals, press the button on the touchpad
to navigate past the days of the week. Press the and
buttons to set the time period
(EVERY 1 DAY through EVERY 7 DAY(s) ).
Press the button to move to START WATER.
Note: You will see Zone 1 highlighted at the bottom of
the screen; program Zone 1 before moving on to Zone 2.
RAIN DELAY, HOLD
WATER DAY START WATER
HOW LONG
OFF
SENSOR
SET TIME
AUTO
RAIN DELAY, HOLD
WATER DAY START WATER
HOW LONG
OFF
SENSOR
SET TIME
AUTO
CYCLE
MIN
MANUAL
PM
TODAY
DELAY
TIME
WATER EVERY
SU
FR
SATH
WE
TUMO
A
B
C D
DAY
NEXT START
ZONE
AM
HRS
DAY
1 2
3
4
SENSOR
RESET
Toggle Button
+/- Buttons
OK Button
Manual Watering Button
Cycle ABCD Button
Zone 1 2 3 4 Button
Battery Indicator
WATER DAY
START WATER
HOW LONG
OFF
SENSOR
SET TIME
AUTO
RAIN DELAY, HOLD
CYCLE
MIN
MANUAL
PM
TODAY
DELAY
TIME
WATER EVERY
SU
FR
SATH
WE
TUMO
A
B
C D
DAY
NEXT START
ZONE
AM
HRS
DAY
1
2
3
4
SENSOR
RESET
WATER DAY
START WATER
HOW LONG
OFF
SENSOR
SET TIME
AUTO
RAIN DELAY, HOLD
CYCLE
MIN
MANUAL
PM
TODAY
DELAY
TIME
WATER EVERY
SU
FR
SATH
WE
TUMO
A
B
C D
DAY
NEXT START
ZONE
AM
HRS
DAY
1
2
3
4
SENSOR
RESET
WATER DAY
START WATER
HOW LONG
OFF
SENSOR
SET TIME
AUTO
RAIN DELAY, HOLD
CYCLE
MIN
MANUAL
PM
TODAY
DELAY
TIME
WATER EVERY
SU
FR
SATH
WE
TUMO
A
B
C D
DAY
NEXT START
ZONE
AM
HRS
DAY
1
2
3
4
SENSOR
RESET
Select Days Example
SUN MON TUE WED THU FRI SAT
SUN MON TUE WED THU FRI SAT
SUN MON TUE WED THU FRI SAT
SUN MON TUE WED THU FRI SAT
Regular Intervals Examples
EVERY 2 DAYS
EVERY 1 DAY
EVERY
WEEK
WEEK
ONE
WEEK
TWO
WEEK
ONE
WEEK
TWO
EVERY 3 DAYS
3.2
Includes 2 extra stainless
steel lter washers for a
leak-free seal
Compatible with Eden Wireless Soil Moisture
Sensors 25417EDAMZ (sold separately)

Hold the buttons to advance settings more quickly.
With the arrow pointing to HOW LONG, use the and buttons
to select the length of each watering cycle. After setting HOW LONG
you want to water during a selected cycle, press to move
to the next cycle. Repeat until HOW LONG has been set for each
cycle.
HOW LONG can be set for up to 360 minutes (6 hours) for each
watering cycle. The cycle length cannot overlap
the next START WATER time.
Note: You can only select Watering Cycles if you have set a
start time in Step 4 above.
CYCLE
ABCD
With the arrow pointing to START WATER on your screen,
CYCLE A should be highlighted, use the and buttons to
select the first watering time. You can select up to four
independent start times (CYCLE A, B, C, D).
If you want to set another START WATER time, press to
move to CYCLE B. Repeat the process above to set the next
START WATER time. You may select up to four START WATER
times.
When you have set all desired START WATER times,
press the button to move to HOW LONG.
CYCLE
ABCD
START WATER:
“What time-of-day do you want to water?”
HOW LONG:
“How long do you want to water?”
AUTO MODE:
“Your timer is ready to go.”
MANUAL WATERING:
“Fill a bucket, clean the car or wash the dog.”
RAIN DELAY:
“Prevent watering when rain is in the forecast.”
In AUTO Mode, your timer will run the watering program you
have entered.
The screen display will alternate between showing the current
time and the next watering cycle of each zone.
To use a hose or other watering tool, simply press the
button. Then use the button to select which zone
you want to use.
Using the button, select the length of time you wish to water. After
a few seconds, the valve will open, and then automatically close when
the selected time is reached.
SENSOR:
“Monitor how wet the soil is to delay watering when needed.”
You can pair your timer with the Eden Soil Moisture Sensors (model
#25417 , sold separately) to monitor how wet the soil is and prevent
overwatering. Set your desired moisture level and if the soil is too wet
the watering schedule will be delayed.
To completely erase all settings in the timer and return to the original
factory settings, press the button until the arrow is pointing to SET
TIME. Then press and hold the button for 10 seconds. The
screen will display RESET.
You will need to press and hold the button a second time to
change the clock format.
Note: All programming will be lost when the timer is RESET. After
RESET You may need to change the time setting between 12-hour
(AM/PM) and 24- hour (military time). See Step 2 for further
instructions.
If there is rain in the forecast, you can temporarily suspend your
watering program on both zones for up to 7 days using the RAIN
DELAY feature. After the selected delay has ended, your watering
program will resume automatically.
To set the RAIN DELAY, check to make sure the arrow on the screen is
pointing to AUTO.
Hold the button until the word DELAY appears. Now press the
button to set the duration of the delay. You can reduce or deactivate the
delay period with the button.
Once the delay time is selected, press the button and wait for the
number to stop flashing.
All other functions, including MANUAL WATERING and OFF are on
hold during RAIN DELAY.
To cancel RAIN DELAY, press the button until DELAY is set to “0”.
Note: In the RAIN DELAY mode, the screen will alternate between the
current time and the remaining delay time.
To stop watering indefinitely, press the button until the arrow on
the screen points to OFF. The timer will not water while in this mode.
The screen will display the word OFF.
To start watering automatically again, press the button until the
arrow on the screen points to AUTO. The program will begin watering
at the next previously scheduled START WATER Time.
Note: Watering will be stopped for all zones when this feature is
activated.
TIMER RESET:
OFF MODE:
“Stop watering for an extended period.”
WATER DAY START WATER
HOW LONG
OFF
SENSOR
SET TIME
AUTO
RAIN DELAY, HOLD
CYCLE
MIN
RESET
MANUAL
PM
TODAY
DELAY
TIME
WATER EVERY
SU
FR
SATH
WE
TUMO
A
B
C D
DAY
NEXT START
ZONE
AM
HRS
DAY
SENSOR
1 2
WATER DAY START WATER
HOW LONG
OFF
SENSOR
SET TIME
AUTO
RAIN DELAY, HOLD
CYCLE
MIN
RESET
MANUAL
PM
TODAY
DELAY
TIME
WATER EVERY
SU
FR
SATH
WE
TUMO
A
B
C D
DAY
NEXT START
ZONE
AM
HRS
DAY
SENSOR
1 2
4
SETTING ANOTHER ZONE:
“Keep your plants watered on separate cycles.”
6
5
7
Model: 25413 Item No.: 93413EDAMZ
Pressure Operating: 10 - 120 PSI
Temperature Operating: 32 - 110° F (0 - 45° C) T45
Receiver Operation Frequency: 915 MHz (N. Amer.)
Timer Spec:
ADDITIONAL SETTINGS
MANUAL
ON/OFF
WATER DAY START WATER
HOW LONG
OFF
SENSOR
SET TIME
AUTO
RAIN DELAY, HOLD
CYCLE
MIN
MANUAL
PM
TODAY
DELAY
TIME
WATER EVERY
SU
FR
SATH
WE
TUMO
A
B
C D
DAY
NEXT START
ZONE
AM
HRS
DAY
1
2
3
4
SENSOR
RESET
When you have set WATER DAY, START WATER,
and HOW LONG for Zone 1, press the button back to
WATER DAY.
Press to select another zone, and repeat steps 3-5
above on up to four individual zones.
When all desired zones are set, press the button to move to
AUTO mode.
ZONE
1234
ZONE
1234
WATER DAY START WATER
HOW LONG
OFF
SENSOR
SET TIME
AUTO
RAIN DELAY, HOLD
CYCLE
MIN
MANUAL
PM
TODAY
DELAY
TIME
WATER EVERY
SU
FR
SATH
WE
TUMO
A
B
C D
DAY
NEXT START
ZONE
AM
HRS
DAY
1
2
3
4
SENSOR
RESET
WATER DAY START WATER
HOW LONG
OFF
SENSOR
SET TIME
AUTO
RAIN DELAY, HOLD
CYCLE
MIN
MANUAL
PM
TODAY
DELAY
TIME
WATER EVERY
SU
FR
SATH
WE
TUMO
A
B
C D
DAY
NEXT START
ZONE
AM
HRS
DAY
1 2
3
4
SENSOR
RESET
WATER DAY START WATER
HOW LONG
OFF
SENSOR
SET TIME
AUTO
RAIN DELAY, HOLD
CYCLE
MIN
MANUAL
PM
TODAY
DELAY
TIME
WATER EVERY
SU
FR
SATH
WE
TUMO
A
B
C D
DAY
NEXT START
ZONE
AM
HRS
DAY
1
2
3
4
SENSOR
RESET
WATER DAY START WATER
HOW LONG
OFF
SENSOR
SET TIME
AUTO
RAIN DELAY, HOLD
CYCLE
MIN
MANUAL
PM
TODAY
DELAY
TIME
WATER EVERY
SU
FR
SATH
WE
TUMO
A
B
C D
DAY
NEXT START
ZONE
AM
HRS
DAY
1
2
3
4
SENSOR
RESET
WATER DAY START WATER
HOW LONG
OFF
SENSOR
SET TIME
AUTO
RAIN DELAY, HOLD
CYCLE
MIN
MANUAL
PM
TODAY
DELAY
TIME
WATER EVERY
SU
FR
SATH
WE
TUMO
A
B
C D
DAY
NEXT START
ZONE
AM
HRS
DAY
1
2
3
4
SENSOR
RESET
WATER DAY START WATER
HOW LONG
OFF
SENSOR
SET TIME
AUTO
RAIN DELAY, HOLD
CYCLE
MIN
MANUAL
PM
TODAY
DELAY
TIME
WATER EVERY
SU
FR
SATH
WE
TUMO
A
B
C D
DAY
NEXT START
ZONE
AM
HRS
DAY
1 2
3
4
SENSOR
RESET

Shaking during transportation can cause valve to be open. if
this occurs, water may run continuously through the valve
during installation.
Turn the water off. Remove the batteries. Wait for the screen to
go blank. Reinsert the batteries. Turn the water back on.
Note: Removing the batteries will not erase any existing
watering schedules.
If the problem persists, turn off the water. Use the Manual
feature to open and close the valve 3 times.
This device complies with Industry Canada’s licence-exempt RSSs.
Operation is subject to the following two conditions:
( 1 ) This device may not cause interference; and ( 2 ) This device
must accept any interference, including interference that may cause
undesired operation of the device.
Le présent appareil est conforme aux CNR d'Industrie Canada
applicables aux appareils radio exempts de licence. L'exploitation est
autorisée aux deux conditions suivantes : ( 1 ) l'appareil ne doit pas
produire de brouillage, et ( 2 ) l'utilisateur de l'appareil doit accepter
tout brouillage radioélectrique subi, même si le brouillage est
susceptible d'en compromettre le fonctionnement
Useful Tips:
FCC Statement:
CAN ICES-3 (B)/NMB-3(B) Canada Statement :
Open Valve During Installation:
Freezing temperatures can cause water in the timer to freeze
and expand, damaging the timer. At the end of the season or
when there is frost in the forecast, turn off the water and
remove your timer from the faucet.
Remove the batteries.
Be sure to store the timer indoors, away from freezing
temperatures.
Seasonal Storage:
- Make sure to use fresh alkaline batteries.
- Do not use rechargeable batteries.
- Remove the batteries at the end of the season before storing.
- Batteries should last about one season. A schedule with
more frequent watering times can cause the batteries to drain faster.
Tips for Battery Life:
You should clean your timer periodically. Debris or sediments
commonly found in water can build up in your timer.
Turn off the water. Remove the timer from the faucet and
check that the filter washer is clear. If you notice any debris,
remove the filter washer and clean it out with water.
Activate the MANUAL mode by pressing the MANUAL
button. Open the valve and spray water through the valve and
the faucet connection to flush out any built-up sediments or
debris.
This device complies with part 15 of the FCC Rules. Operation is
subject to the following two conditions:
( 1 ) This device may not cause harmful interference, and ( 2 ) this
device must accept any interference received, including interference
that may cause undesired operation.
Caution: Any changes or modifications not expressly approved by the
grantee of this device could void the user’s authority to operate the
device.
Note: This equipment has been tested and found to comply with the
limits for a Class B digital device, pursuant to part 15 of the FCC Rules.
These limits are designed to provide reasonable protection against
harmful interference in a residential installation. This equipment
generates, uses and can radiate radio frequency energy and, if not
installed and used in accordance with the instructions, may cause
harmful interference to radio communications. However, there is no
guarantee that interference will not occur in a particular installation. If
this equipment does cause harmful interference to radio or television
reception, which can be determined by turning the equipment off and
on, the user is encouraged to try to correct the interference by one or
more of the following measures:
- Reorient or relocate the receiving antenna.
- Increase the separation between the equipment and receiver.
- Connect the equipment into an outlet on a circuit different from that to
which the receiver is connected.
- Consult the dealer or an experienced radio/TV technician for help.
Cleaning Your Timer:
Should your unit need replacement after extended use, do not dispose of it with the household waste, but in an environmentally safe way.
Waste produced by electrical machine items should not be handled like normal household garbage. Please recycle where recycle
facilities exist. Check with your local authority or retailer for recycling advice.
Disposal:
Intended for outdoor use only. Severe electrical shock could result if water is sprayed into outlets or sources of electrical current. Do not use water
more than 115°F (46°C). Do not use when the ambient air temperature is less 40°F (4.5°C). When not in use, remove batteries, drain and store
indoors away from freezing temperatures.
CAUTION
!!
PLANNING TABLE
ZONE 1
Start Water (Time)
How Long (Minutes)
Start Water (Time)
How Long (Minutes)
CYCLE A CYCLE B CYCLE C CYCLE D
ZONE 2 CYCLE A CYCLE B CYCLE C CYCLE D
ZONE 3
Start Water (Time)
How Long (Minutes)
Start Water (Time)
How Long (Minutes)
CYCLE A CYCLE B CYCLE C CYCLE D
ZONE 4 CYCLE A CYCLE B CYCLE C CYCLE D
Prevent overwatering while conserving water
by connecting your timer to the Wireless Soil
Moisture Sensor. The easy to set sensor
monitors moisture in the soil, and will
suspend a watering cycle when it is raining or
when the ground is already wet.
Works with
Wireless Soil Moisture Sensor (not included)
Learn more at www.edengarden.com
1.
2.
Filter
RAIN DELAY, HOLD
WATER DAY START WATER
HOW LONG
OFF
SENSOR
SET TIME
AUTO
RAIN DELAY, HOLD
WATER DAY START WATER
HOW LONG
OFF
SENSOR
SET TIME
AUTO
CYCLE
MIN
MANUAL
PM
TODAY
DELAY
TIME
WATER EVERY
SU
FR
SA
TH
WE
TU
MO
A
B
C
D
DAY
NEXT START
ZONE
AM
HRS
DAY
1
2
3
4
SENSOR
RESET
RAIN DELAY, HOLD
WATER DAY START WATER
HOW LONG
OFF
SENSOR
SET TIME
AUTO
CYCLE
MIN
MANUAL
PM
TODAY
DELAY
TIME
WATER EVERY
SU
FR
SA
TH
WE
TU
MO
A
B
C
D
DAY
NEXT START
ZONE
AM
HRS
DAY
1
2
3
4
SENSOR
RESET
Valve
Faucet
connection
WARNING: This product can expose you to chemicals including lead, which is known to the State of California to
cause cancer and birth defects or other reproductive harm, and styrene, which is known to the State of California to cause
cancer. For more information go to www.P65Warnings.ca.gov.
!