wafe maker
DuraCeramic
™
coated plates

2
product safety
READ CAREFULLY AND KEEP FOR FUTURE REFERENCE
This appliance can be used by children aged from 8 years and above
and persons with reduced physical, sensory or mental capabilities or
lack of experience and knowledge if they have been given supervision or
instruction concerning use of the appliance in a safe way and understand
the hazards involved. Children shall not play with the appliance. Cleaning
and user maintenance shall not be made by children unless they are older
than 8 and supervised.
Keep the appliance and its cord out of reach of children less than 8 years
old.
Always allow adequate air space above and on all sides for air circulation.
Never use the appliance under cupboards or curtains or other ammable
materials.
Never operate the appliance by means of an external timer or separate
remote-control system.
Do not touch the metal parts of the appliance during use as they may
become very hot.
Never use this appliance for anything other than its intended use. This
appliance is for household use only. Do not use this appliance outdoors.
If the supply cord is damaged, it must be replaced by the manufacturer, its
service agent or similarly qualied persons in order to avoid a hazard.
! Always ensure that hands are dry before handling the plug or switching on the
appliance.
! Always use the appliance on a stable, secure, dry and level surface.
! Care is required when using the appliance on surfaces that may be damaged by heat.
The use of an insulated pad is recommended.
! This appliance must not be placed on or near any potentially hot surfaces (such as a
gas or electric hob).
! Never let the power cord hang over the edge of a worktop, touch hot surfaces or
become knotted, trapped or pinched.
! Do not use the appliance if it has been dropped or if there are any visible signs of
damage.
! Ensure the appliance is switched off and unplugged from the supply socket after use,
before removing or replacing the wafe plates and before cleaning.
! Always allow the appliance to cool before cleaning or storing.
! Do not immerse the main body, cord set or plug in water or liquid of any kind.
! Never leave the appliance unattended when in use.
3
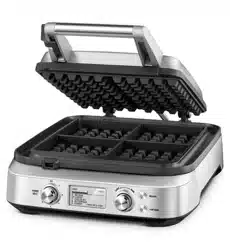
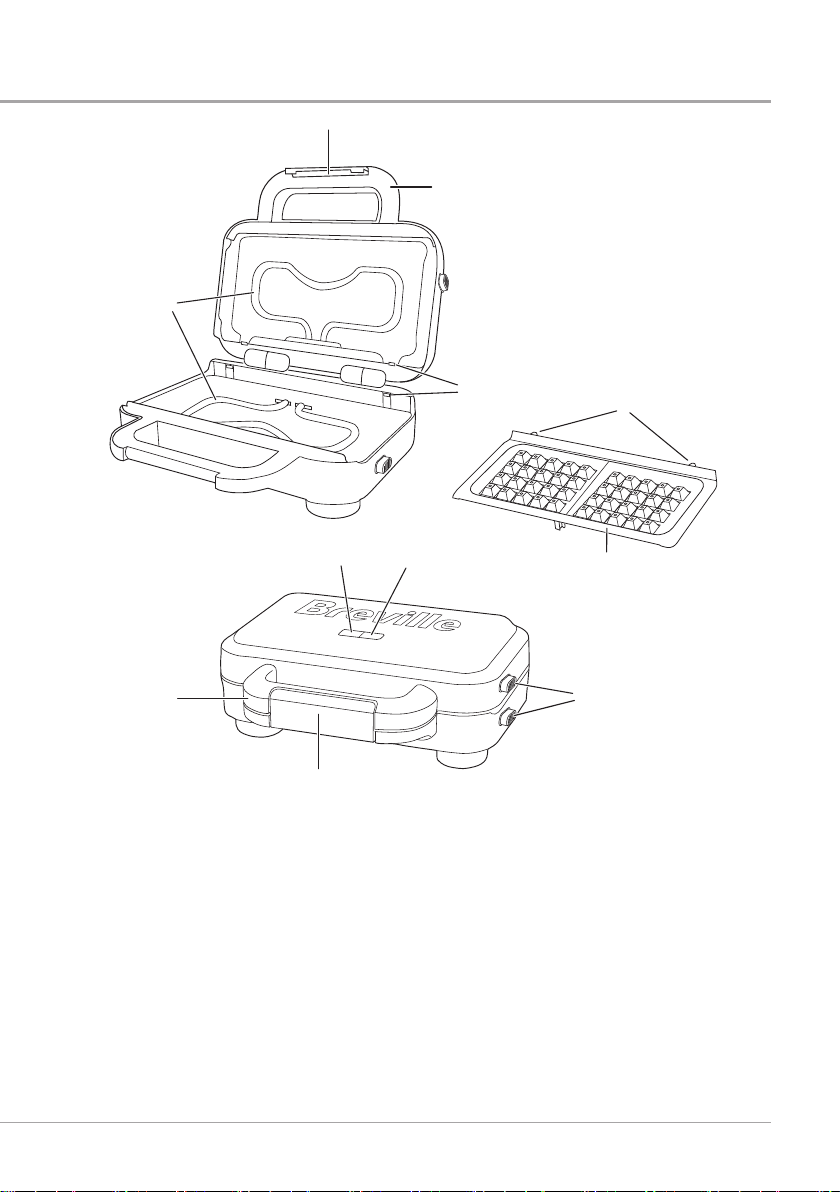
features
1 Latch
2 Handle
3 Positioning slots
4 Heating elements
5 Power light (green)
6 Ready-to-cook light (amber)
7 Release buttons
8 WafeplateswithDuraCeramic
™
coating (x2)
9 Positioning tabs
Due to our policy of continuous improvement, the actual product may differ slightly from the one illustrated in these instructions.
e
r
u
yt
o
i
q
q
w
w

4
using your waffle maker
Beforerstuse
• Unpack your wafe maker. You may wish to keep the packaging for future use.
• Remove and wash the wafe plates thoroughly to remove any impurities or residues
that may be left over from the manufacturing process (follow the directions under
Care and Cleaning).
• Clean the outside of your wafe maker with a soft damp cloth. The cover can be
polished with a soft dry cloth.
Note that the rst time you use your wafe maker, you may notice a slight burning smell
and a little smoke. This is completely normal and will soon disappear.
DuraCeramic
™
coatedwafeplates
The wafe plates feature the exclusive DuraCeramic
™
coating. This specialised natural
ceramic coating is designed to transfer heat quicker and more efciently than standard
non-stick coatings – meaning faster cooking times for your delicious home-cooked
snacks. In addition, the DuraCeramic
™
coating is scratch resistant – this is a product built
to last. Peace of mind comes from the fact that the DuraCeramic
™
coating is PTFE and
PFOA free, so this exclusive coating is durable and easy to clean.
DuraCeramic
™
coating – designed to handle whatever you throw at it with ease.
Usingyourwafemaker
Takecarearoundhotsurfaces.Thewafeplatesgetveryhot.DONOTtouch
anyparts,orattempttoremoveorreplacethewafeplatesuntilcompletely
cooled.
Steammayescapefromaroundthewafemakerduringcooking.Neverleaveyour
wafemakerunattendedwhileinuse.
1. Plug your wafe maker into the mains supply socket and switch the socket on if
required. The green power light will come on and your wafe maker will start heating
up.
2. When your wafe maker is fully heated the amber ready-to-cook light will come on.
This light will come on and go out during cooking.
3. Unclip the latch on the handle and open the lid.
4. Carefully pour your batter mix into the bottom wafe plate. For the perfect wafe, we
recommend you pour a ladleful (about 75ml) into the centre of each grid of the wafe
plate. Make sure you don’t overll the wafe plate as the mixture may spill over the
edges of the plate.
5. Close the lid. DO NOT clip the latch shut during cooking. This allows the wafe to rise
and the steam to release (you may notice the lid lift slightly as the wafe rises). Cook
the wafe according to the recipe time.
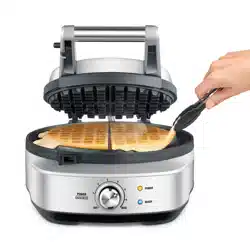
6. When cooked, open the lid. Watch out for escaping steam – we recommend that you
use a tea towel or wear oven gloves. Remove the wafe with a non-metallic spatula.
Don’t use a metal blade as this can damage the DuraCeramic
™
surface of the plates.
7. Unplug your wafe maker from the mains supply socket. Do not leave the wafe
maker plugged in when not in use.

5
recipes
Classicwafes– makes 12
• 280g plain our
• 2 tsp baking powder
• 50g caster sugar
• 1 tsp salt
• 425ml milk
• 1 tsp vanilla extract
• 3 large eggs
• 125g butter, melted
1. Mix the our, baking powder, sugar and salt in a bowl.
2. Whisk the milk, vanilla extract and eggs in a separate bowl.
3. Make a well in the dry ingredients and add the milk mixture along with the butter.
Whisk together until barely combined, the batter will still be slightly lumpy. Don’t
over-mix. For best results, leave the batter to rest for a few minutes.
4. Pre-heat your wafe maker until the ready-to-cook light comes on.
5. Grease both the wafe plates with a little oil-based cooking spray, then pour about
75ml of the batter mix evenly into the centre of each grid of the wafe plate.
6. Lower the lid but don’t clip the latch shut. Cook for about 7 minutes until golden brown.
Delicious topped with Greek yoghurt, fresh berries and a drizzle of honey.
Luxurywafes– makes 12
• 250g plain our
• 2 tsp baking powder
• 1 tbsp sugar
• ½ tsp salt
• 3 egg yolks, beaten
• 3 egg whites, beaten stify
• 400ml milk
• 115ml vegetable oil
1. Mix the our, baking powder, sugar and salt in a bowl.
2. Whisk the milk, egg yolks and vegetable oil in a separate bowl.
3. Make a well in the dry ingredients and add the milk mixture. Whisk together until
smooth.
4. Gently fold in the beaten egg whites until barely combined, don’t over-mix.
5. Pre-heat your wafe maker until the ready-to-cook light comes on.
6. Grease both the wafe plates with a little oil-based cooking spray, then pour about
75ml of the batter mix evenly into the centre of each grid of the wafe plate.
7. Lower the lid but don’t clip the latch shut. Cook for about 7 minutes until golden brown.
Why not try making a lemon meringue pie wafe? Just top with lemon curd, crushed
meringue and whipped cream.

6
Chocolatewafes– makes 12
• 200g plain our
• 100g caster sugar
• 45g cocoa powder
• 1 tsp salt
• ½ tsp bicarbonate of soda
• 450ml milk
• 1 tsp vanilla extract
• 3 large eggs
• 60g melted butter, cooled
• 110g plain chocolate chips
1. Mix the our, sugar, cocoa powder, salt and bicarbonate of soda in a bowl.
2. Whisk the milk, vanilla extract and eggs in a separate bowl.
3. Make a well in the dry ingredients and add the milk mixture along with the butter.
Whisk together until you have a smooth batter.
4. Stir in the chocolate chips.
5. Pre-heat your wafe maker until the ready-to-cook light comes on.
6. Grease both the wafe plates with a little oil-based cooking spray, then pour about
75ml of the batter mix evenly into the centre of each grid of the wafe plate.
7. Lower the lid but don’t clip the latch shut. Cook for about 7 minutes.
Why not try topping with vanilla ice cream, crushed pistachios and fresh raspberries?
Chiamultigrainwafes – makes 6
• 250ml buttermilk
• 190ml milk
• 50g onion chutney
• 1 egg, beaten
• 2 tbsp chia seeds
• 1 tsp vanilla extract
• 160g granary our
• 40g rolled oats
• 25g ground almonds
• 2 tsp baking powder
• 2 tsp sugar
• ¼ tsp salt
1. Mix the buttermilk, milk, onion chutney, egg, chia seeds and vanilla extract in a
medium bowl. Leave for 2 minutes to allow the chia seeds to soak and thicken.
2. Mix the our, oats, ground almonds, baking powder, sugar and salt in a separate bowl.
3. Make a well in the dry ingredients and add the milk mixture and whisk until you have
a thick smooth batter.
recipes

7
4. Pre-heat your wafe maker until the ready-to-cook light comes on.
5. Grease both the wafe plates with a little oil-based cooking spray, then pour about
75ml of the batter mix evenly into the centre of each grid of the wafe plate.
6. Lower the lid but don’t clip the latch shut. Cook for about 7 minutes until golden brown.
For a healthy anytime snack, why not serve these wafes with some wilted spinach and a
soft poached egg?
Potatowafes– makes 6
• 2 tbsp butter
• 1 onion, nely chopped
• 1 tsp nely chopped garlic
• 360g mashed potato
• 30g plain our
• 2 eggs
• ¼ tsp salt
• ¼ tsp ground black pepper
1. Gently fry the onion and garlic in the butter until soft (about 5–7 minutes).
2. Place the mashed potato in a bowl and add the onion mix, our, eggs and seasoning.
Mix well to form a smooth, thick batter.
3. Pre-heat your wafe maker until the ready-to-cook light comes on.
4. Grease both the wafe plates with a little oil-based cooking spray, then pour about
75ml of the batter mix evenly into the centre of each grid of the wafe plate.
5. Lower the lid but don’t clip the latch shut. Cook for 7 minutes until golden brown.
Why not serve your potato wafes topped with thinly sliced steak, rocket and a balsamic
dressing?
Hintsandtips
• When preparing your Classic and Luxury wafe batters, make sure that you don’t
over-mix. Ideally these batters should be slightly lumpy. Producing smooth batters will
result in chewy wafes that won’t rise well.
• If you are preparing more than 1 batch of wafes, keep these warm in your oven until
the others are ready. Arrange in a single layer in an oven tray and place into your
oven at a low heat. This way everyone can enjoy their wafes at the same time.
• Freezing and reheating wafes is easy. Allow to cool completely and then stack 2
wafes with a layer of baking parchment between each one. Wrap in plastic wrap or
a freezer bag and freeze. To reheat simply pop the frozen wafes into your toaster or
under the grill.
recipes

8
care and cleaning
Unplugandswitchoffyourwafemakerandallowittofullycooldownbefore
cleaningit.Neverimmersethemainbody,cordsetorpluginwaterorliquidofany
kind.
Neverusesteelwool,scouringpads,abrasivecleanersormetallicutensilstoclean
yourwafemaker.
1. Wipe the wafe plates with absorbent paper or a soft damp cloth.
2. Clean the outside of your wafe maker with a soft damp cloth. The cover can be
polished with a soft dry cloth.
3. Remove one plate at a time. Press the corresponding release button and lift the plate
away from the heating element.
4. Immerse the plates in warm, soapy water. Rinse with clean water. Wipe dry with a
soft cloth.
Note: We recommend that you wash the plates by hand only, in order to preserve the
DuraCeramic
™
coating.
5. Replace one plate at a time. Guide the positioning tabs into the slots located on
the hinge side of the wafe maker. Press the plate gently to lock in place onto the
heating element.
Note: The bottom plate is slightly shallower than the top plate. Each plate will only t
into the appropriate position on the wafe maker (bottom or top).
Storage
1. Allow the wafe maker to cool fully before storing and ensure that the appliance is
clean.
2. Lock the wafe plates together by clipping the latch shut. Wrap the cord in the cord
storage area.
3. Store the appliance upright. Alternatively, on a at, level surface, away from the edge
and where it cannot be easily knocked over.

9
Thisappliancemustbeearthed.
This appliance is tted with either a moulded or rewirable BS1363, 13 amp plug. The fuse
should be rated at 13 amps and be ASTA approved to BS1362.
If the fuse in a moulded plug needs to be changed, the fuse cover must be retted. The
appliance must not be used without the fuse cover tted.
If the plug is unsuitable, it should be dismantled and removed from the supply cord
and an appropriate plug tted as detailed below. If you remove the plug it must not be
connected to a 13 amp socket and the plug must be disposed of immediately.
The wires of the mains lead are coloured in accordance with the following code:
GREEN/YELLOW = EARTH BLUE = NEUTRAL BROWN = LIVE
The wire which is coloured GREEN/YELLOW must be connected to the terminal in
your plug which is marked with an E or by the earth symbol (
) or coloured GREEN or
GREEN /YELLOW.
The wire which is coloured BLUE must be connected to the terminal in your plug which is
marked with the letter N or coloured BLACK.
The wire which is coloured BROWN must be connected to the terminal in your plug which
is marked with the letter L or coloured RED.
If any other plug is used, a 13 amp fuse must be tted either in the plug or adaptor or at
the distributor board.
connection to the mains supply
Blue
(Neutral)
Brown
(Live)
13A Fuse
Green/Yellow
(Earth)
Plug should be ASTA approved to BS1363
Fuse should be ASTA approved to BS1362
Ensure that the outer sheath of
the cable is firmly held by the cord grip

10
after sales service
These appliances are built to the very highest of standards. There are no user serviceable
parts. Follow these steps if the unit fails to operate:
1. Check the instructions have been followed correctly.
2. Check that the fuse has not blown.
3. Check that the mains supply is functional.
If the appliance will still not operate, return it to the place it was purchased for a
replacement. To return the appliance to the Customer Service Department, follow the
steps below:
1. Pack it carefully (preferably in the original carton). Ensure the appliance is clean.
2. Enclose your name and address and quote the model number (located on the rating
label) on all correspondence.
3. Give the reason why you are returning it.
4. If within the guarantee period, state when and where it was purchased and include
proof of purchase (e.g. till receipt).
5. Send it to our Customer Service Department at the address below:
CustomerServiceDepartment
JardenConsumerSolutions(Europe)Limited
MiddletonRoad,Royton,Oldham
OL25LN,UK.
Telephone:01616216900Fax:01616260391
e-mail:[email protected]
Replacementparts
For additional or replacement parts, please visit www.breville.co.uk or call us
on 01616216900.
Troubleshooting
For troubleshooting and FAQs visit www.breville.co.uk/faqs.
TurnonyourCreativity
™
Let the Breville
®
team help you turn on your creativity with a gateway to a world of food
and drinks without limits. You don’t have to travel far – just to your computer, tablet or
mobile - where you will discover our FREE website with top tips and recipes to inspire
your imagination. Join us now atwww.turnonyourcreativity.com
®

11
guarantee
Please keep your receipt as this will be required for any claims under this guarantee.
This appliance is guaranteed for 1 year after your purchase as described in this
document.
During this guaranteed period, if in the unlikely event the appliance no longer functions
due to a design or manufacturing fault, please take it back to the place of purchase, with
your till receipt and a copy of this guarantee.
The rights and benets under this guarantee are additional to your statutory rights, which
are not affected by this guarantee. Only Jarden Consumer Solutions (Europe) Limited
(“JCS (Europe)”) has the right to change these terms.
JCS (Europe) undertakes within the guarantee period to repair or replace the appliance,
or any part of appliance found to be not working properly free of charge provided that:
• you promptly notify the place of purchase or JCS (Europe) of the problem; and
• the appliance has not been altered in any way or subjected to damage, misuse,
abuse, repair or alteration by a person other than a person authorised by JCS
(Europe).
Faults that occur through, improper use, damage, abuse, use with incorrect voltage, acts
of nature, events beyond the control of JCS (Europe), repair or alteration by a person
other than a person authorised by JCS (Europe) or failure to follow instructions for use
are not covered by this guarantee. Additionally, normal wear and tear, including, but not
limited to, minor discoloration and scratches are not covered by this guarantee.
The rights under this guarantee shall only apply to the original purchaser and shall not
extend to commercial or communal use.
If your appliance includes a country-specic guarantee or warranty insert please refer
to the terms and conditions of such guarantee or warranty in place of this guarantee or
contact your local authorized dealer for more information.
Waste electrical products should not be disposed of with Household waste. Please
recycle where facilities exist. E-mail us at [email protected] for further
recycling and WEEE information.
Jarden Consumer Solutions (Europe) Limited
5400 Lakeside
Cheadle Royal Business Park
Cheadle
SK8 3GQ
UK

VST072_Rev1 11/16 P.N. 191017_RevA
Jarden Consumer Solutions (Europe) Limited
Cheadle Royal Business Park, Cheadle, SK8 3GQ, United Kingdom
e-mail: [email protected]
Telephone: 0161 621 6900
For Customer Service details, please see the website.
www.breville.co.uk
©2016JardenConsumerSolutions(Europe)Limited
All rights reserved. Imported and distributed by Jarden Consumer Solutions (Europe) Limited
5400 Lakeside, Cheadle Royal Business Park, Cheadle SK8 3GQ, United Kingdom.
Jarden Consumer Solutions (Europe) Limited is a subsidiary of Newell Brands Inc. (NYSE: NWL).
The product supplied may differ slightly from the one illustrated due to continuing product development.
Printed in China