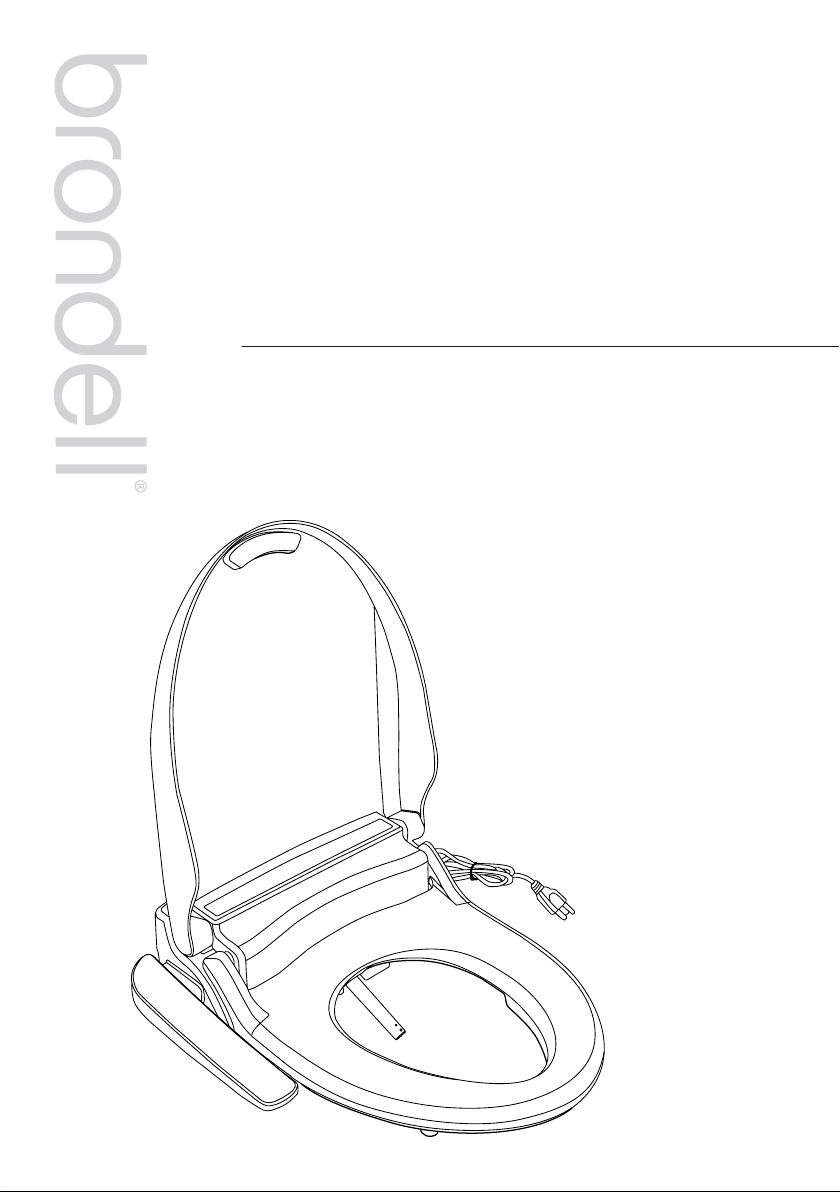
Owner’s Manual
ADVANCED BIDET SEAT
SWASH LT89 / LE89

2
This manual contains important safety information.
Before operating the bidet, please read this manual
thoroughly, and retain it for future reference.
PRODUCT INSTALLATION
GENERAL INFO
PRODUCT OPERATION
01
SAFETY INFORMATION
06
06
07
08
PRODUCT INFORMATION
Product Features
Product Dimensions
Product Parts
09
09
10
11
13
PRODUCT INSTALLATION
Installation Parts
Before Installation
Swash Installation
External Bidet Filter Installation
14
14
16
17
OPERATING THE SWASH
LT89 / LE89 Control Panel
Using the LT89 / LE89
Special Mode Operations
TECHNICAL INFO
TRANSLATIONS
19
PRODUCT SPECIFICATIONS
20
20
20
21
21
MAINTENANCE
Seat Cleaning & Removal
Nozzle Cleaning
Cleaning the Mesh Filter
Product Storage
22
TROUBLESHOOTING
25
WARRANTY
26
CONTACT
1
ENGLISH
27
SPANISH
54
FRENCH
LT89 / LE89 OWNER'S MANUAL
Table of Contents
1
SAFETY INFORMATION
(IMPORTANT SAFEGUARDS)
READ ALL INSTRUCTIONS BEFORE USING
BE CAREFUL TO KEEP THIS SAFETY INFORMATION. PLEASE READ THIS INFORMATION TO PREVENT
PROPERTY LOSS AND ENSURE SAFETY.
DANGER: If not observed, serious injury or even death may occur as a result.
WARNING: If not observed, serious physical injury or property damage may occur as a result.
CAUTION: If not observed, minor physical injury or property damage may occur as a result.
DANGER
Failure to observe the following warnings may result in electric shock, fire,
personal injury, property damage or product damage.
• Do not use a damaged power plug or plug into a loose electric outlet.
• Do not move the product by pulling the power cord.
• Do not handle the product or power plug with wet hands.
• Do not forcefully bend the power cord or place heavy objects on it to prevent it from being
damaged or deformed.
• Do not connect and pull out the power plug or cord repeatedly.
• Unplug the product before cleaning, repairing, inspecting, or replacing parts.
• Remove any dust or water from the power plug prior to plugging in.
• Do not plug the product into an electrical outlet or power strip that is being used by too many
other products. Use an electrical outlet adequate for the wattage of the product rated for a
minimum of 15 amps.
• If the power cord is damaged, do not attempt to repair, modify, or replace the cord yourself.
Contact the Brondell Service Center toll free at 888-542-3355 or email us through our website.
• If the product produces a strange noise, a burning smell, or emits smoke, unplug it immediately
from the electrical outlet and contact Brondell. Failure to do so may result in electric shock or fire.
• Do not insert any wires or sharp objects into any product gaps. This may result in electric shock,
fire, or product damage.
• Do not place an electronic or gas heater near the product or dispose of any burning materials
such as a lit cigarette in the toilet. This may result in fire or product deformation. Do not place any
containers filled with water or other liquids, food, metallic objects, or any flammable material on
top of the product. If foreign material enters the product, this may result in electric shock or fire.
SAVE THESE INSTRUCTIONS

2
• Do not plug in, operate, or store the unit in locations where flammable or combustible materials are
used or kept.
• Do not use industrial water, or gray water for the supply, as this may cause skin damage or disease.
• Turn o the main water supply valve when cleaning.
• For children and seniors who may have diculties with adjusting temperatures or those with
sensitive skin or impaired heat sensitivity, set the temperature of the wash spray and seat to “low”
or “o” to prevent burning.
• Close supervision is necessary when this product is used by children, seniors, or persons requiring
general assistance.
• Do not press the buttons using excessive force.
• Do not stand on top of or place any heavy objects onto the seat cover.
• Use this product for its intended use only, as described in this manual. Do not use any attachments
that are not recommended by Brondell.
SAVE THESE INSTRUCTIONS
SAFETY INFORMATION
(IMPORTANT SAFEGUARDS)
DANGER
Failure to observe the following warnings may result in electric shock, fire,
personal injury, property damage or product damage.
• Do not use the product in locations exposed to excessive moisture and do not splash water
onto the product.
• While cleaning the bathroom, pull the power plug out of the electrical outlet and exercise
caution to ensure that water or cleaning supplies do not splash onto the bidet. Failure to do so
may result in electric shock or fire.
• If foreign material enters the product, pull the power plug out of the electrical outlet, turn o
the main water valve, and call the Brondell Service Center.
• Do not disassemble, repair, or modify the product yourself.
• Do not use the product while wet from bathing or showering.
• Do not place or store the product where it can fall or be pulled into a tub or sink.
• Do not place in or drop the product into water or any other liquid.
• Do not reach for the product if it has fallen into water. Unplug the product immediately and call
the Brondell Service Center.
• Do not use the product if it is not working properly. Please unplug the product immediately,
close the main water supply valve, and call the Brondell Service Center at 888-542-3355.
Failure to do so may result in electric shock, fire, or flooding.
WARNING
Failure to observe the following warnings may result in electric shock, fire,
personal injury, property damage or product damage.

3
SAVE THESE INSTRUCTIONS
• Do not connect the main water supply to the hot water pipe or supply (only connect to the
cold water supply).
• After the installation, make sure to check all water supply connections for leaks. Rubber
washers should be in place for the water connection hoses & T-valve.
• Do not open/close the seat or seat cover with excessive force.
• Exercise caution that urine does not come into contact with the product - failure to do so may
result in bad odors or malfunction.
• If the product will not be used for a long period of time, unplug the power cord, close the
main water supply valve, and drain any water in the water tank.
• Do not pull out the bidet hose using excessive force.
• Do not use thinner, benzene, acidic chemicals, chloride, or hydrochloric acid detergent on or
near the product. This may result in corrosion to the metal parts or discoloration or scratches
to the bidet body.
• This appliance is not intended for use by persons (including children and seniors) with
reduced physical, sensory, or mental capabilities, or lack of experience and knowledge,
unless they have been given supervision or instruction concerning the use of the appliance by
a person responsible for their safety.
• Children should be supervised to ensure that they do not play with the appliance.
• Never operate this product if it has a damaged cord or plug, if it is not working properly, if it
has been dropped or damaged, or dropped into water. Contact the Brondell Service Center for
examination and repair.
• Keep the cord away from heated surfaces and heating vents.
• Never block the air openings of the product or place it on a soft surface, such as a bed or couch,
where the air openings may be blocked. Keep the air openings free of lint, hair, etc.
• Never drop or insert any object into any opening or hose.
• Do not use the product outdoors or operate where aerosol (spray) products are being used or a
room where it could be exposed to oxygen.
• Connect this product to a properly grounded outlet only. Refer to the Grounding Instructions in
the next pages of the manual.
SAFETY INFORMATION
(IMPORTANT SAFEGUARDS)
WARNING
Failure to observe the following warnings may result in electric shock, fire,
personal injury, property damage or product damage.
CAUTION
Failure to observe the following warnings may result in electric shock, fire,
personal injury, property damage or product damage.
4
SAFETY INFORMATION
(IMPORTANT SAFEGUARDS)
Ground GFCI Outlet
ATTENTION
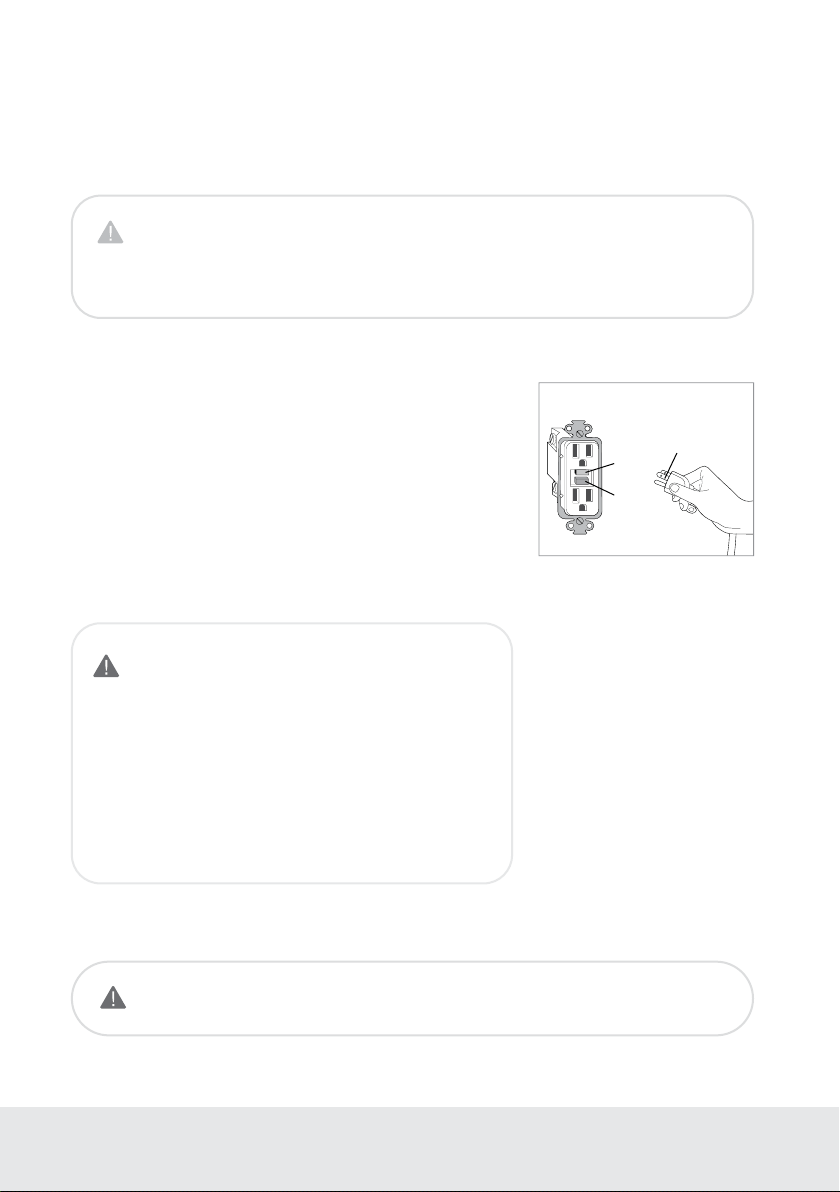
This product should only be used with a grounded GFCI (Ground Fault
Circuit Interrupter) outlet and a grounded three-prong electrical cord
as shown to the right. In the event of an electrical short circuit, using a
grounded GFCI outlet reduces the risk of electric shock.
This product is equipped with a grounded cord and is for use on a
nominal 120V circuit only (minimum 15 amps) and must be plugged
into an outlet that is properly grounded with a GFCI breaker as shown.
Replace or repair a damaged cord immediately.
Test
Reset
Grounding Pin
IMPROPER USE OF THE GROUNDING PLUG CAN RESULT
IN A RISK OF ELECTRIC SHOCK.
• If repair or replacement of the cord or plug is necessary,
do not connect the grounding wire to either flat blade
terminal. The wire with green insulation (either with or
without a yellow stripe) is the grounding wire.
• Check with a qualified electrician if the grounding
instructions are not completely understood, or if there is
doubt if the product is properly grounded.
For those with certain medical or mobility issues in the bathroom,
we recommend our Swash 1400 or Swash 1000 bidet seats, as their
mounting systems are engineered for the most secure transitions from
wheelchairs or walkers.
GROUNDING AND GFCI OUTLET INSTRUCTIONS
SAVE THESE INSTRUCTIONS
DANGER
Improper use of the grounding plug can result in a risk of electric shock.
5
DANGER
Do not connect the grounding wire to a
non-grounded outlet.
SAVE THESE INSTRUCTIONS
OPTIONAL GROUNDING INSTRUCTIONS
SAFETY INFORMATION
(IMPORTANT SAFEGUARDS)
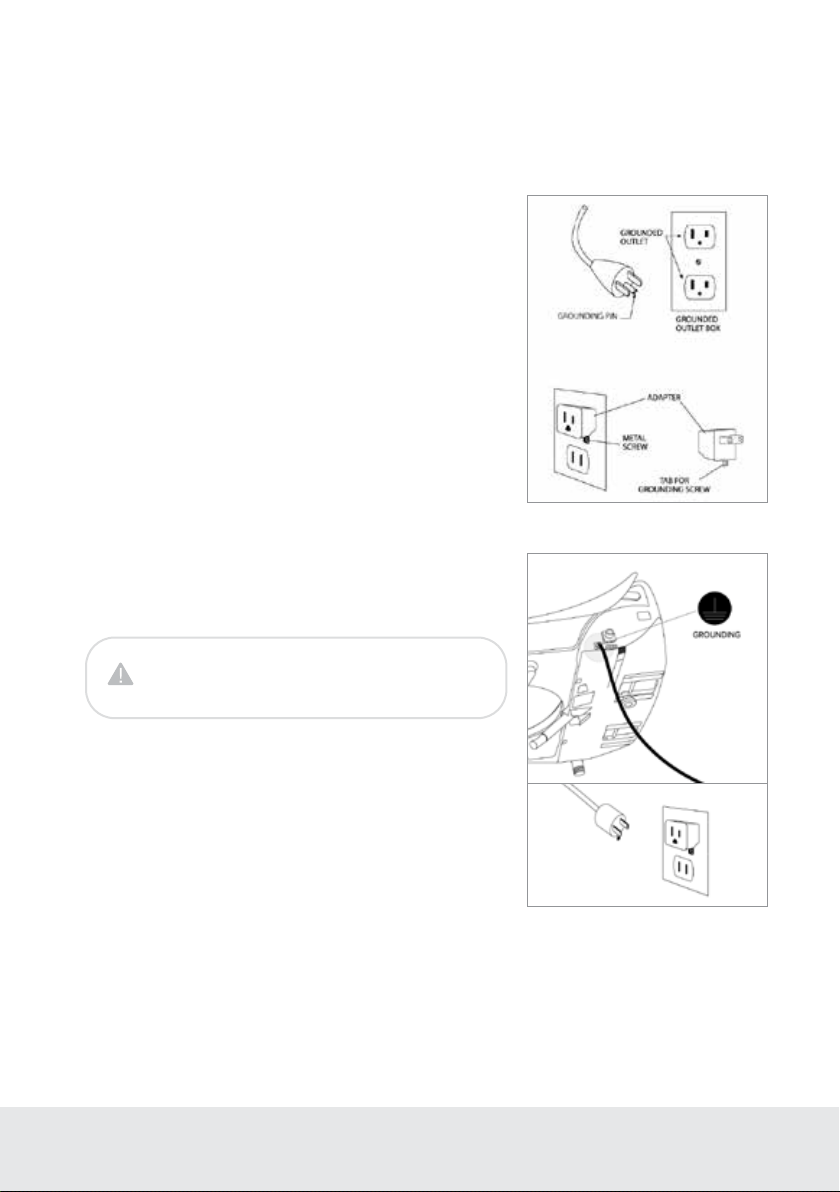
This product is for use on a nominal 120V circuit, and has a grounding
plug that looks like the plug illustrated in sketch A in Figure 1.
A temporary adapter, which looks like the adapter illustrated in
sketches B and C, may be used to connect this plug to a 2-pole
receptacle as shown in sketch B if a properly grounded outlet is
not available.
The temporary adapter should be used only until a properly grounded
outlet (sketch A) can be installed by a qualified electrician.
A
B
D
C
Figure 1
Figure 2
Attach the grounding wire to the grounding screw on the product as
shown in sketch D of Figure 2. Attach the other end of the grounding
wire to the grounding screw located on the temporary outlet.

6
Stainless Steel Nozzle
Stainless steel resists soiling and bacterial
contamination for enhanced hygiene.
Posterior and Feminine Warm Water Wash
Experience the ultimate in clean with
adjustable temperature, position, pressure,
massage, and oscillation settings.
Strong Wash
Concentrated stream with adjustable
pressure, position, temperature, massage, and
oscillation settings.
Positionable Nozzle
The nozzle has five dierent positions
to ensure the most comfortable and
complete wash.
Adjustable Water Temperature and Pressure
Front, Rear and Strong wash modes have four
available water temperature settings, and five
water pressure settings.
Pulse
When activated, the water pressure
automatically increases and decreases to
provide a pulsating, cleaning spray.
Warm Air Dryer
Includes adjustable temperature with five
levels for a hands-free experience and
toilet paper reduction – even elimination
(LE89 model only).
PRODUCT INFORMATION
Product Features
Nozzle Oscillation
The Move function provides a massaging,
oscillating cleanse during the wash cycle
ensuring a thorough and comfortable wash.
Gentle Wash Function
Activates a preset wash cycle at the softest
setting for a gentle clean. A drying cycle will
follow on LE89 model only.
Ergonomic Heated Seat
With four temperature settings
(High/Medium/Low/O).
Illuminating Nightlight
The cool blue hue of the nightlight means
no more blinding lights during midnight trips
to the bathroom.
Gentle-Closing Seat and Lid
“Slam free” gentle-closing seat and lid are
user friendly.
Eco Mode
When activated, this function automatically
lowers the water and seat temperature to one
of two dierent settings.
Quick-Release Seat
Quick-release button for easy removal and
cleaning of seat and toilet.
7
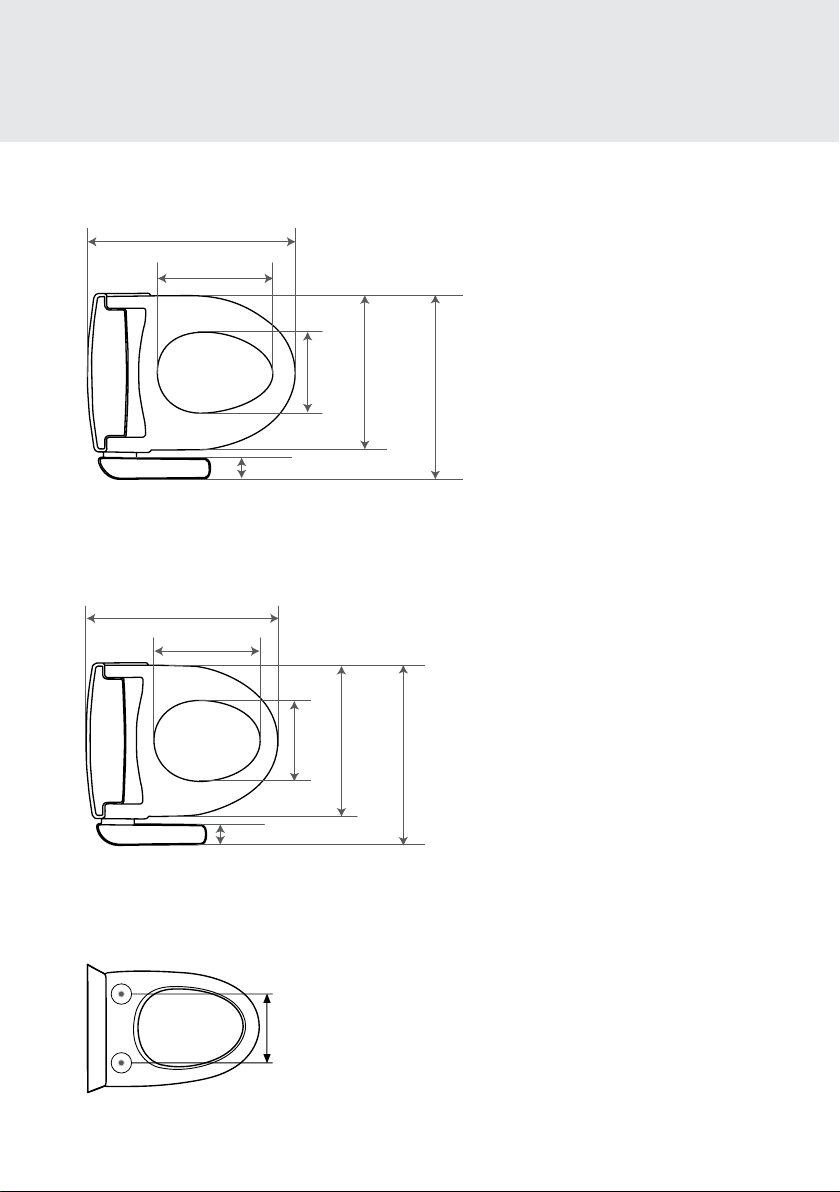
5.25 – 7.45 in
Required Distance Between Mounting Holes
18.5 in
18.5 in
15.9 in
15.9 in
8.1 in
11.4 in
8.1 in
2.1 in
20.7 in
19.5 in
10.6 in
2.1 in
Elongated Top View
Round Top View
PRODUCT INFORMATION
Product Dimensions
8
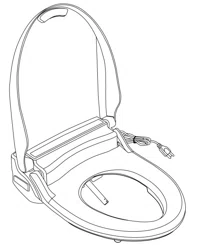
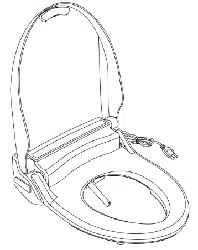
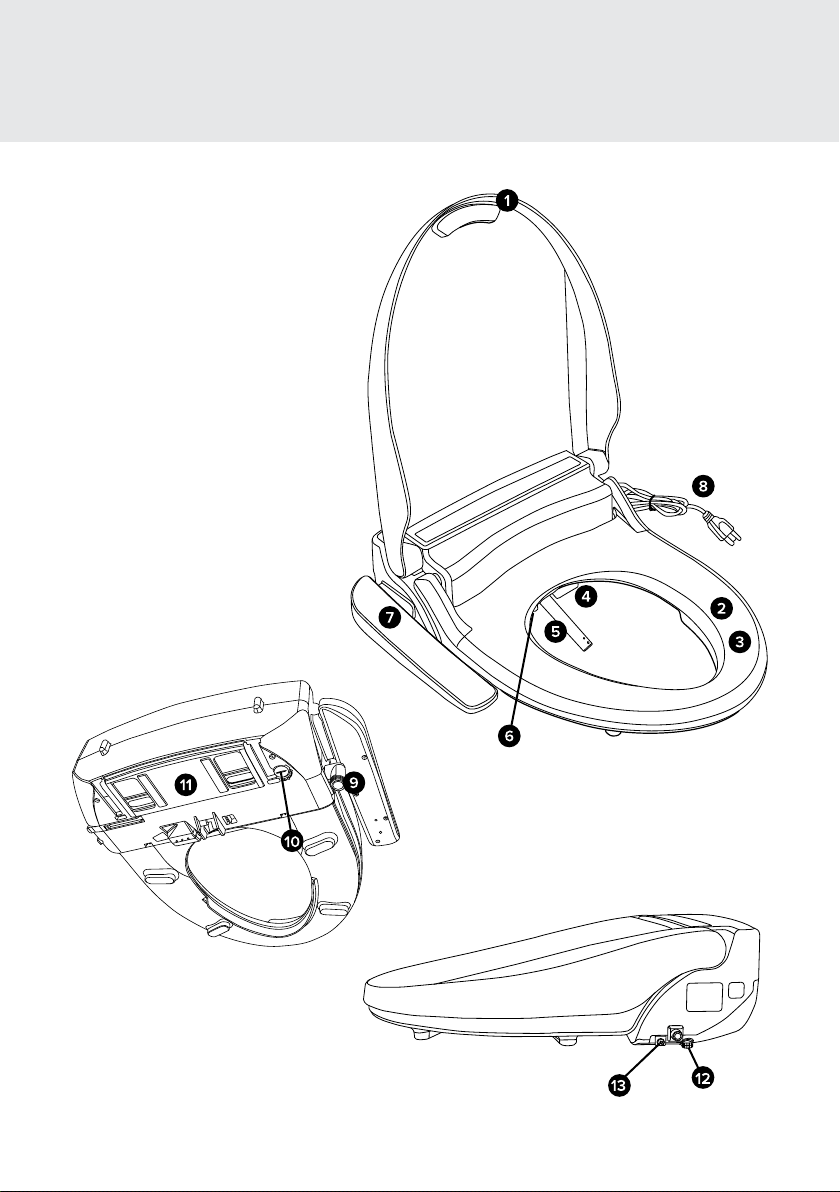
1. Lid
2. Seat Sensor
3. Warm Seat
4. Warm Air Dryer (LE89 model only)
5. Nozzle Assembly
6. LED Nightlight
7. Control Panel
8. Power Plug
9. Water Inlet with Mesh Filter
10. Drain Plug
11. Mounting Plate
12. Quick-Release
13. Grounding Wire
PRODUCT INFORMATION
Product Parts
9
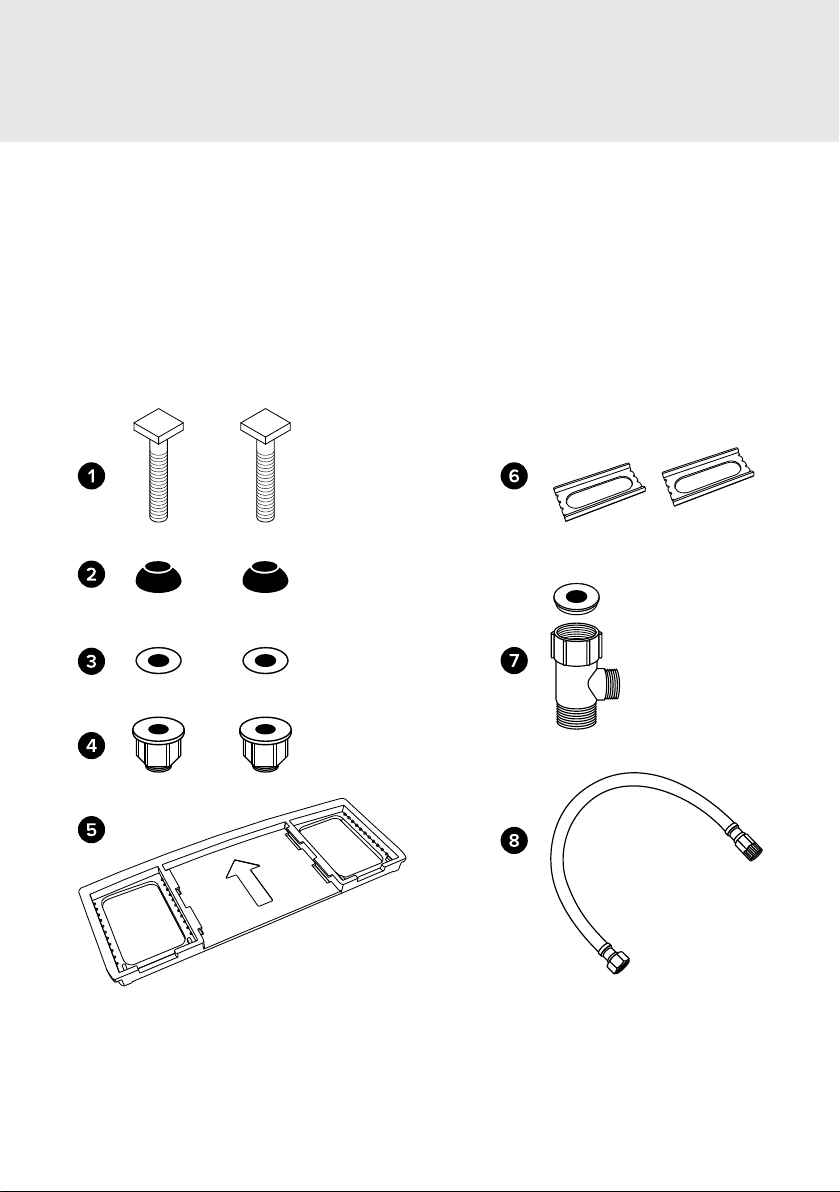
1. Mounting Bolt (2)
2. Rubber Cone Washer (2)
3. Flat Washer (2)
4. Nuts (2)
5. Mounting Plate
6. Adjustable Brackets (2)
7. T-Valve Connector with
Rubber Washer
8. Bidet Hose
PRODUCT INSTALLATION
Installation Parts

10
PRODUCT INSTALLATION
Before Installation
DO NOT PLUG THE PRODUCT IN WHILE THE UNIT IS UPSIDE DOWN
This may cause damage to the internal components.
WATCH OUR INSTALLATION VIDEO
Installation for all Swash products can be found online at brondell.com
CHECK BOLT SPREAD
This bidet seat can only be installed on toilets with a bolt hole spread of 5.25 – 7.45 in.
(see Product Dimensions on page 7 for more information).
CHECK FOR TOP MOUNT INSTALLATION
If your fixture only has top-side access to the mounting bolts that hold the seat to the toilet, you
will likely need to purchase the Swash Bidet Seat Top Mount Hardware Kit, found on brondell.com.
CHECK FOR A CONCEALED TOILET FILL VALVE
Many modern toilets have sleek designs intended to cover and camouflage plumbing
connections, which make a standard Swash installation dicult or impossible. For this, we
recommend using our Alternate Swash Bidet Seat T-valve, found on brondell.com.
CHECK WATER SUPPLY LINE
Check the line that connects the toilet tank to the water shut o valve. If it is a rigid pipe, you may
need to purchase a flexible hose to replace it before installing the Swash. The length of the hose
and the size of the connectors will vary.
RESIDUAL MOISTURE IS NORMAL
Every product is tested with pure water during production to ensure the highest quality and
performance. It is normal to find a small amount of residual moisture on the product and in the
reservoir and filter.
TOOLS
A Phillips head or standard screwdriver may be needed to remove the existing toilet seat and a
standard wrench may be needed for tight water supply connections. Teflon tape can be helpful in
creating a water-tight seal between plumbing connections.
11
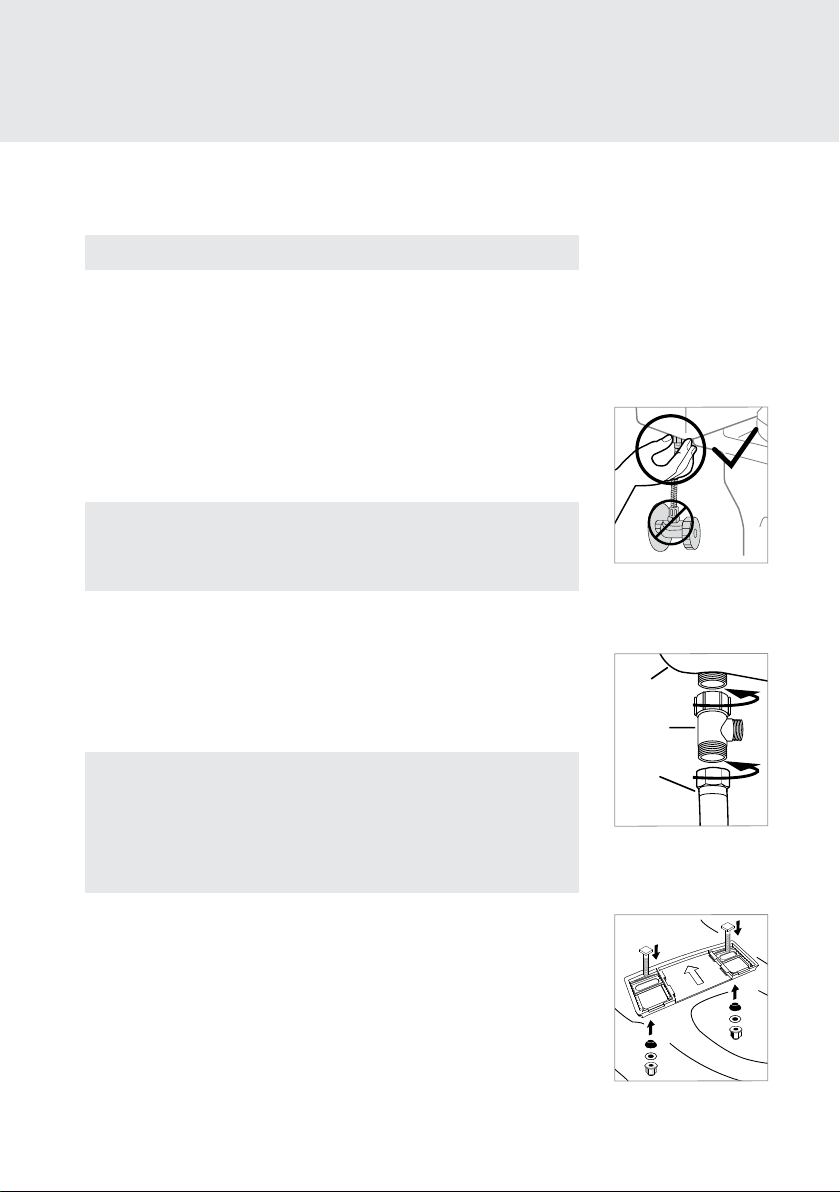
4. Connect the water supply line coming from the wall to the bottom of
the T-valve.
5. Install Mounting Plate for Standard Installation
a. Place mounting plate over mounting holes on toilet, rubber side
facing down, arrow pointing to the toilet tank.
b. Place adjustable brackets flat side down in the center of the square
opening in the mounting plate and insert mounting bolts through
adjustable brackets and mounting holes. Be sure that the square
mounting bolt head is even with sides of adjustable bracket.
1. Existing Toilet Seat Removal
a. Lift hinge covers and use a screwdriver to remove the mounting bolts.
b. Remove the toilet seat. Keep for future use.
2. Turn O Water Supply Valve and Flush Toilet
a. Turn water valve o to stop the flow of water.
b. Flush toilet and hold down handle to completely
empty tank.
c. Disconnect water supply hose from toilet tank. Do not disconnect
from the water supply valve.
PRODUCT INSTALLATION
Swash Installation
Please read these instructions carefully before installing the Swash.
Failure to do so could result in flooding, leaking or damage to the product.
NOTE: Steps may vary by type of seat and toilet
NOTES
• You may wish to place a container under the tank to catch excess water.
• Do not continue without completing the above steps.
• Failure to do so could result in flooding, leaking or damage to the Swash.
NOTES
• The T-valve connects to the fill valve directly under your toilet tank - it
does not connect at the wall.
• Only connect to the cold toilet water supply line.
• If your water supply line is rigid you may need to replace the water
supply line before continuing.
Steps 3-4
Toilet tank
T-valve
Cold
water
supply
line
Step 2c
Steps 5b-5c
3. Connect the top of the T-valve to the incoming water connection on
the bottom of your toilet tank.
a. Ensure the rubber washer is placed inside the T-valve against
the metal with the raised lip facing the toilet tank connection.
b. Install the T-valve with the rubber washer to the incoming water
connection on the bottom of the toilet tank.
12
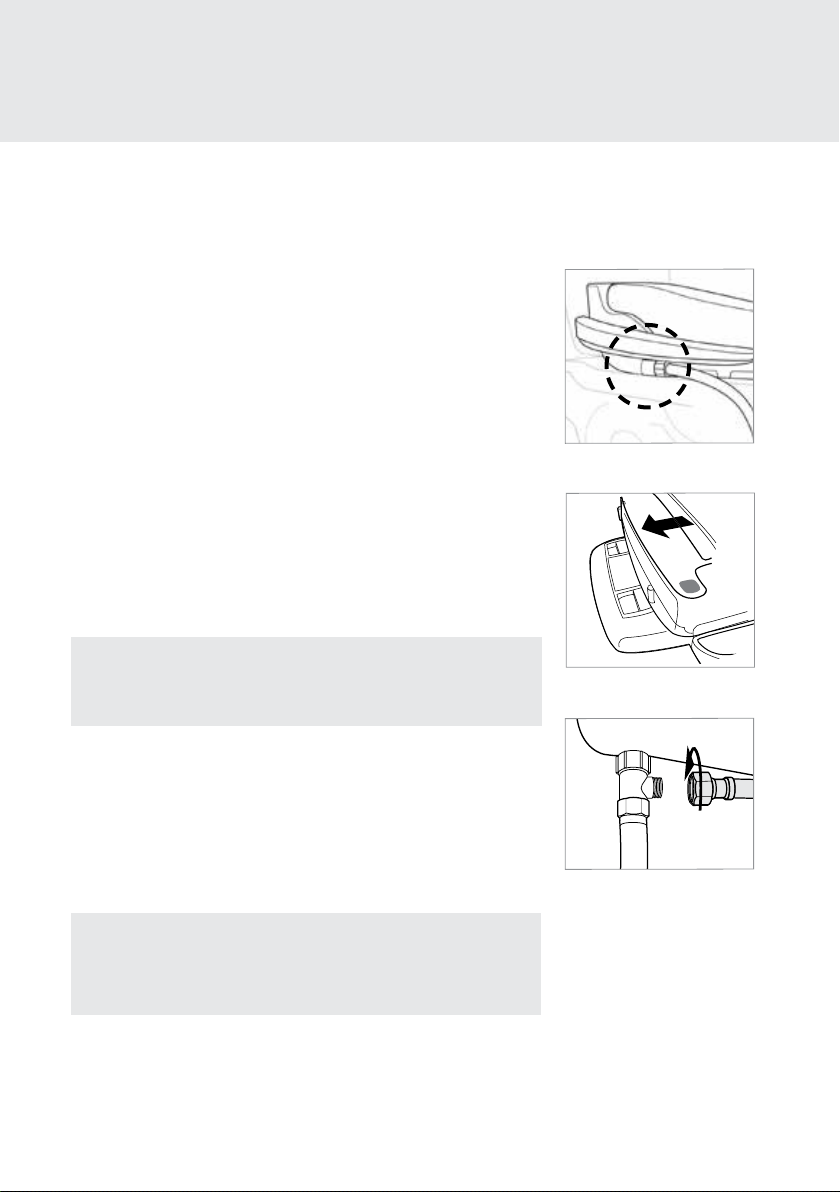
6. Connect the Bidet Hose to the Seat
Connect the plastic side of the bidet hose to the water inlet.
Hand-tighten to secure. Take care not to twist the bidet hose,
excessively bend it, or strip the plastic screw threads when
screwing the hose onto the bidet seat.
7. Attach the Swash to the Mounting Plate
a. Set the Swash flat on the toilet bowl in front of the mounting
plate, and slide seat onto plate until it is secure.
b. If the seat appears too short or too long for the toilet, adjust
the mounting plate accordingly. To adjust the mounting plate,
loosen the nuts underneath the toilet and slide seat forward
or backwards as needed. Once the seat is lined up properly,
tighten the nuts to hold in place.
8. Connect the open end of the Bidet Hose to the T-valve.
NOTE: For those with mobility issues, we recommend our Swash 1400
or Swash 1000 bidet seats, as their mounting systems are engineered
for the most secure transitions from wheelchairs or walkers.
9. Turn On Water Supply
a. Open the main water supply valve slowly and check for leaks.
b. Wait 5 minutes, check again and, if there are no leaks, continue.
10. Plug the Power Cord into an electrical outlet. Nozzle will extend
and retract.
PRODUCT INSTALLATION
Swash Installation
c. Slide rubber cone washer, flat washer, and then nut onto
mounting bolts under the toilet bowl and tighten to keep
mounting plate in place.
Step 7
Step 6
Step 8
NOTE: Make sure to only use a grounded GFCI (Ground Fault Circuit
Interrupter) electrical outlet. In the case of a short circuit, a grounded
GFCI outlet may help prevent electric shock or injury.
11. Follow instructions on page 16 for using the Swash.
13
NOTE: Customers with hard water, well water, and softened water can extend the
life of their bidet seat by purchasing and installing an external inline water filter
to be used with the Swash. The bidet filter should be changed every six months,
and can be purchased online at brondell.com.
PRODUCT INSTALLATION
External Bidet Filter Installation
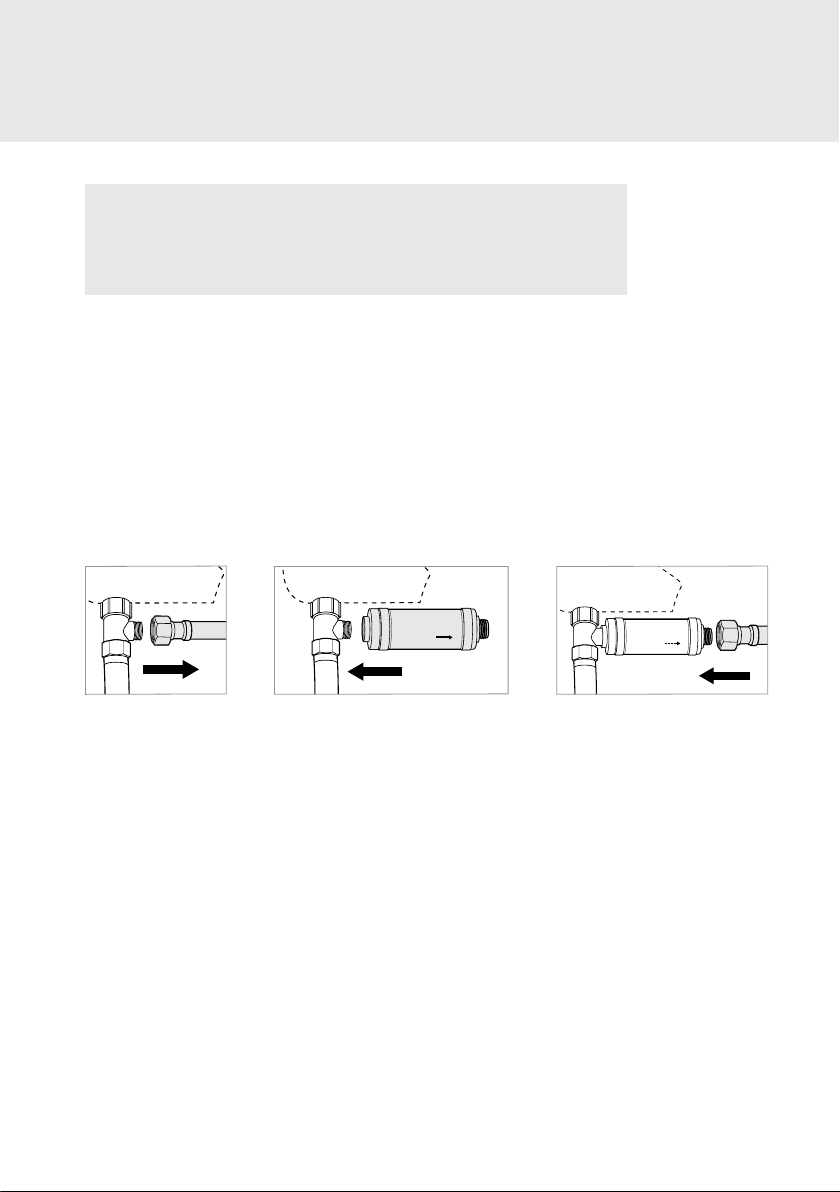
1. Turn O Water Supply Valve and Flush Toilet.
a. Turn water valve o to stop the flow of water.
b. Flush toilet and hold down handle to completely empty tank.
2. Disconnect the Bidet Hose from the T-valve.
3. Connect the female end of the Swash Filter to the open T-valve connection.
4. Connect the Bidet Hose to the male end of the Swash Filter.
5. Turn the toilet water supply valve back on.
Step 2
FLOW
Step 3
FLOW
Step 4
14
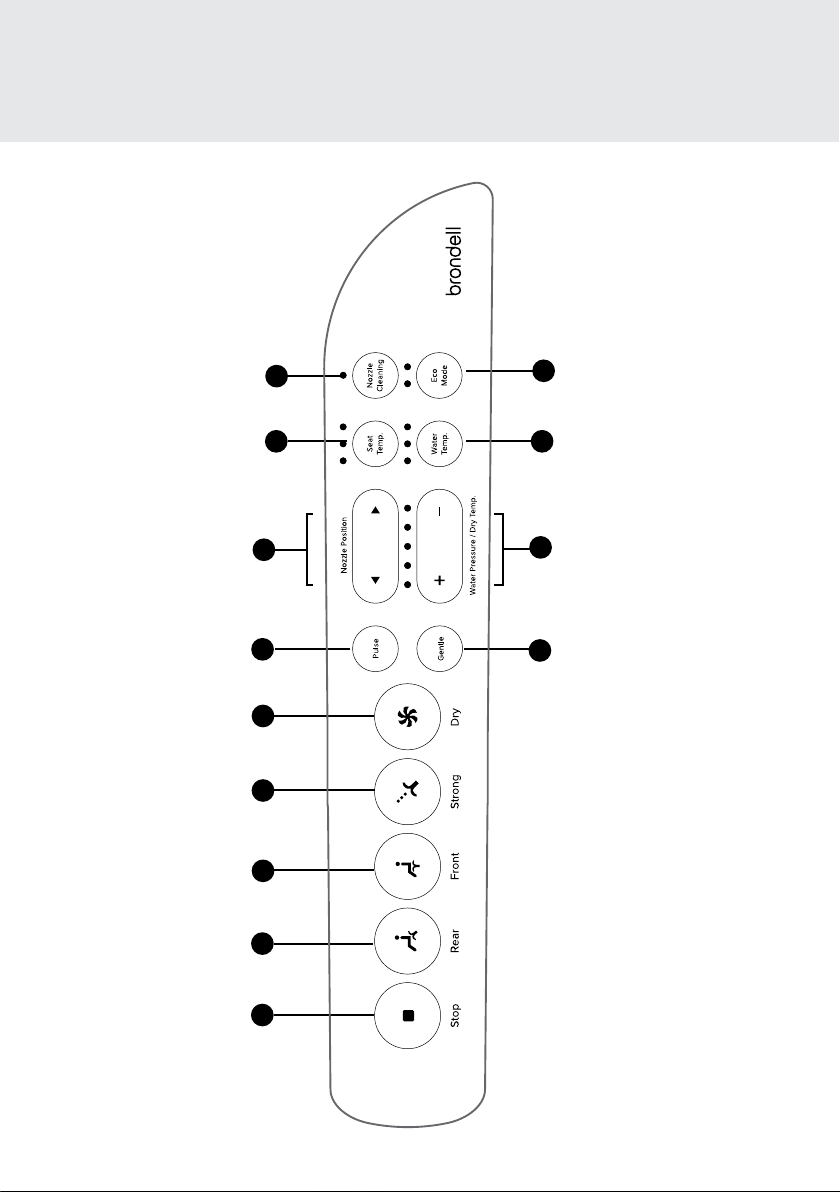
Nozzle Cleaning Button
9
Pulse Button
6
Seat Temperature Button
8
Nozzle Position Controls
7
Water Pressure and
Dryer Temperature Controls
(Dryer on LE89 model only)
12
Gentle Mode Button
13
Water Temperature Button
11
Eco Mode Button
10
1
Stop Button
3
Front Wash /
Move Button
2
Rear Wash /
Move Button
4
Strong Wash /
Move Button
Dry Button
(LE89 model only)
5
OPERATING THE SWASH
LT89 / LE89 Control Panel

15
1. Stop Button
Stops all wash and dry functions
currently operating.
2. Rear Wash / Move Button
Press once to initiate a rear wash. Press
again to initiate nozzle oscillation (repetitive
forward and backward nozzle movement).
3. Front Wash / Move Button
Press once to initiate a front wash. Press
again to initiate nozzle oscillation (repetitive
forward and backward nozzle movement).
4. Strong Wash / Move Button
Press once to initiate a strong wash. Press
again to initiate nozzle oscillation (repetitive
forward and backward nozzle movement).
5. Dry Button (LE89 model only)
Press once to initiate a two-minute Warm
Air Dryer cycle.
6. Pulse Button
Pressing this button while a wash is
running enables the water to repeatedly
increase and decrease in pressure in a
pulsating pattern.
7. Nozzle Position Buttons
Press the up and down arrow buttons to
adjust the nozzle position forward and
backward during a wash cycle.
8. Seat Temperature Button and Indicators
Press and release the Seat Temp button
to adjust the seat temperature to one of
four settings (Low: 93.2°F, Medium: 100.4°F,
High: 107.6°F, and O). Settings will be
saved for the next use.
OPERATING THE SWASH
LT89 / LE89 Control Panel
9. Nozzle Cleaning Button
Press this button to initiate Nozzle Cleaning
when not sitting on the seat, or while seat
sensor is deactivated. For more nozzle
maintenance see page 20.
10. Eco Mode Button and Indicator
Press and release the Eco Mode button to
select between two energy-saving options
(Standard, High-Eciency). See page 17 for
more information.
11. Water Temperature Button and Indicators
Press and release the Water Temp button
to adjust the outgoing water temperature to
one of four settings (Low: 91.4°F,
Medium: 96.8°F, High: 102.2°F, and O).
Settings will be saved for the next use.
12. Water Pressure and Dry Temperature
Controls (Dryer on LE89 model only)
Press the “+” and “–” buttons to increase
and decrease the outgoing water pressure
to one of five settings. Pressing these
buttons while the Warm Air Dryer is
operating will adjust the drying temperature
(LE89 model only). For Front Wash, Rear
Wash and Dry, settings will be saved for
next use. For Strong Wash, the highest
pressure settings will default for all uses.
13. Gentle Mode Button
Press this button to initiate a two-minute
gentle wash cycle followed by a two-minute
dry cycle (LE89 model only). See page 16
for more information.

16
Prepare for Wash
Sit on the seat to ensure skin-to-seat contact
on the Seat Sensor. Once contact is made the
water pressure indicator lights will turn on.
Warm Water Wash
When ready to wash, press the Rear Wash,
Front Wash, or Strong Wash button on
the control panel one time to initiate a wash.
The nozzle will self-clean, extend into
the toilet bowl, spray for two minutes, turn o
automatically, retract, and self-clean once again.
1. Pressing the Rear Wash, Front Wash, or
Strong Wash button a second time while
the wash is running will cause the nozzle to
oscillate forward and backward, providing
a wider range of wash spray. Press again to
cancel the Move function.
2. While washing, users can adjust the water
temperature, pressure, and nozzle position
settings, as well as initiate the Pulse feature
by following the notes on page 15.
3. If you would like to stop the wash before the
two-minute cycle ends, press the Stop button
to discontinue water flow.
4. After extended use the water may decrease
in temperature if a Low, Medium, or High
water temperature setting is selected. To
regain warmer water, stop all wash functions
for three minutes to allow the bidet to reheat
the water.
NOTE: The wash functions will not work
unless the sensor in the seat detects someone
sitting down (with the built-in skin conductivity
sensor). To override the Seat Sensor, please
see the instructions on page 17.
OPERATING THE SWASH
Using the LT89 / LE89
Warm Air Dryer Function (LE89 model only)
Press the Dry button to activate the Warm Air
Dryer. The dryer will run for two minutes and
turn o automatically.
1. While the air dryer is operating, users
can adjust the dryer temperature to a
comfortable level using the Dry Temp “+”
and “–” buttons. The dry temperature will be
reflected on the five indicator LEDs.
2. If you would like to stop the dryer before the
two minutes has elapsed, press Stop.
Gentle Mode
All settings within Gentle Mode are 40%
softer than standard wash modes.
Once activated, gentle mode will begin a
two-minute wash including:
• Full nozzle extension
• Water Pressure set to low
• Front Wash for one minute, Nozzle
Oscillation for 30 seconds, then Pulse
for 30 seconds
After the wash cycle is over, Gentle Mode will
initiate a two minute Warm Air Dry cycle on
Level Two (LE89 model only).
NOTE: While the Gentle Mode cycle is running,
the Water Pressure setting is adjustable. Dryer
settings are also adjustable during the Gentle
Mode (LE89 model only).

17
OPERATING THE SWASH
Special Mode Operations
Eco Mode
In this mode, the water in the tank and the seat temperature can be reduced to one of
two dierent energy-saving settings.
Standard Eco Mode: Press the Eco Mode button until the yellow indicator light is on for
Low energy-saving, and the seat and water temperature will be heated to 89.6 °F. Once
a person sits on the bidet, the Swash will revert to the last seat and water temperature
settings used. Press the Eco Mode button until there are no indicator lights on to
deactivate Eco Mode.
High-Eciency Eco Mode: Press the Eco Mode button until the green indicator light is
on for High energy-saving, and the seat and water temperature will turn o when the
bidet is not in use. Once a person sits on the bidet, the Swash will revert to the last seat
and water temperature settings used. Press the Eco Mode button until there are no
indicator lights on to deactivate Eco Mode.
Sitz Bath Mode
In Sitz Bath Mode, water pressure is switched to the lowest level regardless of the
preset water pressure settings. To initiate Sitz Bath Mode, while in a front or rear wash
cycle, press the Nozzle Cleaning button. Sitz Bath Mode will automatically run for five
minutes. The Nozzle Cleaning LED on the side arm will light up indicating Sitz Bath
Mode is on. To stop the Sitz Bath Mode before the end of the five-minute cycle, press
the Nozzle Cleaning button.
Seat Sensor Override
1. To activate the Seat Sensor Override, press and hold the Pulse button for four seconds.
A beep will sound to indicate that the seat sensor has been turned o. If the Swash is in
Silent Mode, there will not be a beep. The Nozzle Position and Water Pressure/Dry Temp
lights will stay on as long as Seat Sensor Override is activated.
2. To deactivate the Seat Sensor Override, press and hold the Pulse button for four seconds.
Two beeps will sound and the Nozzle Position and Water Pressure/Dry Temp lights will
turn o.
NOTES
• Activation or deactivation of Seat Sensor Override is not possible when seated.
• The Swash cannot be put into Silent Mode while Seat Sensor Override is activated.
• Nozzle Cleaning function will not work when Seat Sensor Override is activated. To initiate Nozzle
Cleaning you must first deactivate Seat Sensor Override.

18
OPERATING THE SWASH
Special Mode Operations
Activating / Deactivating Silent Mode
1. To activate Silent Mode, press and hold the
“ – “ Water Pressure/Dry Temp button for
four seconds. A beep will sound to indicate
that Silent Mode has been activated.
2. To deactivate Silent Mode, press and
hold the “ – “ Water Pressure/Dry Temp
button for four seconds. Two beeps will
sound to indicate that Silent Mode has
been deactivated.
Activating / Deactivating Nightlight
The Nightlight is activated at the factory
by default.
1. To deactivate the Nightlight, press and hold
“+” for four seconds. This function cannot be
performed while sitting on the seat.
2. To activate the Nightlight, press and hold
“+” for four seconds. This function cannot
be performed while sitting on the seat.
Sleep Mode
In Sleep Mode, the Swash essentially
powers down. The Nightlight and the side arm
lights, the seat heater and the water heater will
turn o.
1. To activate Sleep Mode, press and hold the
Stop button for four seconds. The unit will
power down.
2. To awaken the Swash from Sleep Mode,
press the Stop, Front, or Strong button.
Factory Default Reset
It is possible to reset the Swash to Factory
Default settings.
To reset the Factory Default settings, press
and hold the Stop button for ten seconds. A
beep will sound at two seconds indicating the
beginning of the reset process and another
beep will sound at four seconds indicating the
reset is activated.
Automatic Tank Draining
1. To prevent stagnation, water in the warm
water storage tank can be set to drain and refill
itself if the seat hasn’t been used in 48 hours.
2. To program this feature, press “Stop” and
“Water Temp.” at the same time and hold
buttons for four seconds.

19
BRONDELL SWASH ADVANCED BIDET SEAT
Model
LT89-EW, LT89-RW / LE89-EW, LE89-RW
Power Voltage
120V / 60Hz
Max Power Consumption
870W
Supply Water Pressure
9.95 psi – 106.7 psi
Dimensions
Elongated: 18.5 in x 20.7 in x 5.7 in / Round: 18.5 in x 19.5 in x 5.7 in
LT89 Weight Elongated: 11.24 lbs / Round: 10.8 lbs
LE89 Weight
Elongated: 11.68 lbs / Round: 11.24 lbs
Incoming Water Temperature
37.4°F – 104°F
Mesh Filter
0.51 in x 0.44 in diameter
Seat Weight Limit
330 lbs
HEATED SEAT
Seat Temperature Control
4 Levels: O - room temperature Low – 93.2°F,
Medium – 100.4°F, High – 107.6°F
Max Heater Power Consumption
55W
Safety Devices
Thermostat, Thermal Fuse, Thermal Sensor,
Seat Occupied Sensor
NOTE: The specifications listed above are subject to change without prior notice for reasons of improving
the product performance.
WARM WATER WASHING DEVICE
Rear Wash
Maximum 0.8 L/min., automatic nozzle self-cleaning
Front Wash
Maximum 0.8 L/min., automatic nozzle self-cleaning
Strong Wash
Maximum 0.6 L/min., automatic nozzle self-cleaning
Standard Time
Rear Wash: 2 minutes, Front Wash: 2 minutes,
Strong Wash: 2 minutes
Water Pressure Control
5 Levels
Water Temperature Control
4 Levels: O - incoming water temperature,
Low – 91.4°F, Medium – 96.8°F, High – 102.2°F
Max Heater Power Consumption
800W
Safety Devices
Thermal Fuse, Thermostat, Water Level Sensor,
Thermal Sensor, Bi-metal
TECHNICAL INFORMATION
Product Specifications
Lid Weight Limit 160 lbs
20
Seat Cleaning & Removal
Use a soft, damp cloth and mild cleanser (such as dish soap, Simple Green or Windex) to wipe
down the seat. DO NOT scrub or use harsh, abrasive products to clean the Swash. DO NOT use
thinner, benzene, acidic chemicals, chloride, or hydrochloric acid detergent. This may result in
corrosion to the metal parts or discoloration or scratches to the bidet body.
For a more thorough cleaning, you may remove the Swash. To remove the bidet, press the Quick
Release button and slide the seat forward o of the mounting plate and toilet.
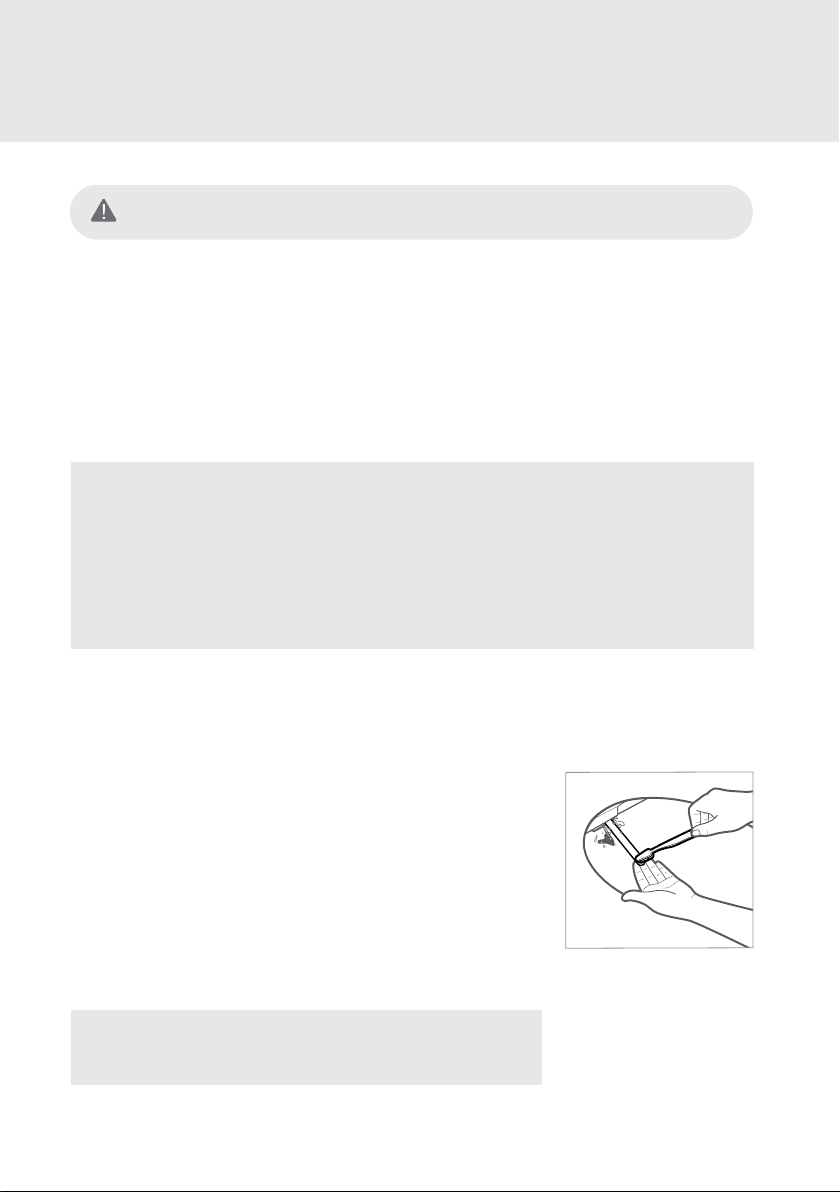
Nozzle Cleaning
1. Press the Nozzle Cleaning button on the control panel. The
nozzle will extend into the toilet bowl and self-clean three times.
The nozzle will stop cleaning and stay extended to allow for
manual cleaning.
2. Gently clean the nozzle manually with a soft cloth or toothbrush.
3. Press the Nozzle Cleaning button again. The nozzle will
self-clean three times and retract.
Step 2
NOTE: Be cautious of leaving home and beauty products in contact with the bidet seat, the result of
which can be irreversible discoloration. Most stains can be removed using a 1:1 mix of rubbing alcohol
and water and a soft cloth or towel. However, some permanent stains are the result of substances left on
the seat while the seat heater was activated. Be cautious of home and beauty products (including but not
limited to various hair and air freshener sprays, lotions, body wash, skin tanners, body butters, and oils)
that come in contact with the seat. Wash o any substances that come in contact with the seat as soon as
possible. If necessary, replacement seat parts can be purchased through Brondell customer support.
NOTE: The Nozzle Cleaning function will not work if the seat is
occupied, or if the Seat Sensor has been overridden.
MAINTENANCE
Seat Cleaning & Removal, Nozzle Cleaning
Unplug the Swash from the power source before cleaning or removing the seat.
21
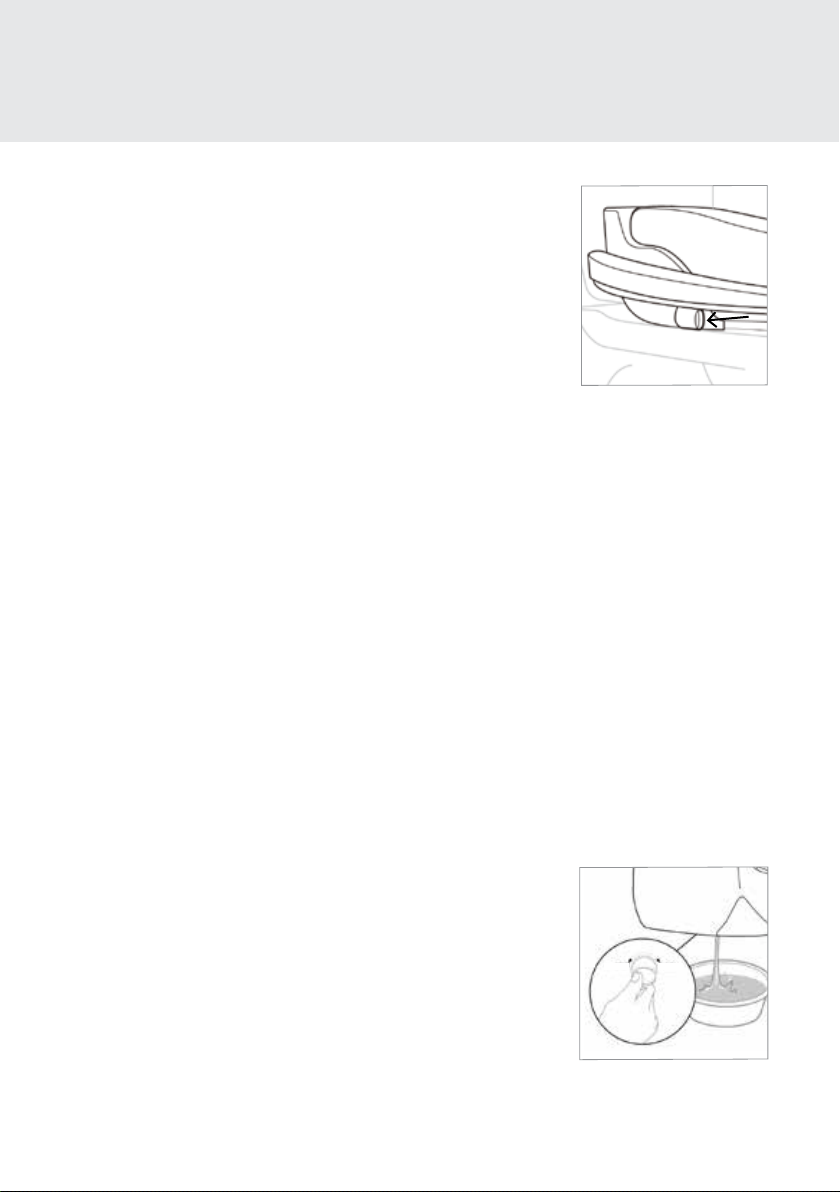
Cleaning the Mesh Filter
Cleaning intervals will dier depending on use and water quality. It
is recommended to check the filter at least once a year.
1. Turn o the water supply and hold the toilet’s flush lever down
until all of the water has drained from the tank.
2. Unplug the Swash, remove the bidet from the toilet, and
disconnect the bidet hose. You may want to use a bucket to
catch any dripping water from the bidet hose.
Step 3
Short Term Non-Use
If the product will not be used for more than a few weeks, you can simply unplug it.
You may also consider shutting the water supply o at the wall for extra precaution.
Long Term Non-Use
If the product will not be used for an extended time (longer than
four months), you should unplug the unit, shut the water supply o
at the wall, and remove the Swash from the toilet. To remove the
bidet, press the Quick Release button and slide the seat forward o
of the mounting plate and toilet. Remove the bidet hose. To drain
the Hot Water Heater, use a coin to unscrew the drain plug on the
bottom of the bidet seat, turning the plug clockwise by 90 degrees
towards “OPEN.” Using your finger, gently release the plug from the
body of the seat. When the water is completely drained, push the
plug back in place and lock the drain plug into position.
MAINTENANCE
Cleaning the Mesh Filter & Product Storage
3. Remove the Mesh Filter from the water inlet with a pair of tweezers or
needle-nosed pliers.
4. Clean the filter with a toothbrush while running it under tap water to
eectively remove any foreign substances or build-up.
5. Replace the Mesh Filter and carefully check that it is installed correctly.
If improperly installed, it could result in the product leaking water.
6. Reconnect the bidet hose and place the seat back on the toilet. Plug the
cord back in, and turn the water supply back on.
Product Storage
CLOSE OPEN

22
If the bidet appears to be operating abnormally, please review the troubleshooting tips before
calling the Brondell Service Center as most issues are easily resolved with a few simple steps. If you
are unable to resolve the issue after checking the following items, please call the Service Center at
888-542-3355, Mon–Fri, 9am–5pm PST, or email us at [email protected].
Check before continuing:
• Make sure the Swash is connected to power and that the outlet is working properly.
• Make sure you check & test the reset button on the GFCI outlet (Standard 120V GFCI outlet).
• Make sure the main water supply valve is open.
• Make sure the seat is not in Standard or High-Eciency Eco Mode.
• Confirm there are no leaks from hoses or water supply.
• Make sure Mesh Filter is clean and free of build up or debris (see maintenance section on page 21).
After checking items above, refer to the following troubleshooting chart for additional solutions.
Problem Possible Cause(s) Solution(s)
The bidet seat
is not working
1. Bidet not plugged in
2.
Water supply valve not
opened fully
3. No power to Swash
4. The incoming water is
too hot
5. Not activating Seat Sensor
1. Make sure the bidet is plugged in.
2. Check that the water supply valve at the wall is
fully open.
3. Check and reset GFCI outlet.
4. Ensure that the bidet seat is connected to the cold
water supply.
5a. Adjust sitting position to fully cover the Seat Sensor.
5b. Override the Seat Sensor (see page 17).
Product shuts o
during use
1. Washing time exceeded
the cycle time
2. Power failure
3. Not activating Seat Sensor
1. The wash cycles run for two minutes. Press the wash
button after the wash has finished to continue the
wash cycle.
2. Check and reset GFCI outlet.
3
a. Adjust sitting position to fully cover the Seat Sensor.
3b. Override the Seat Sensor (see page 17).
Nozzle does not
function properly
1. Nozzle is dirty
2. Clogged filter
3. Water pressure is too low
4. External bidet filter
1. Clean the nozzle (see page 20).
2. Remove, clean, and reinstall mesh filter (see page 21).
3. Check water supply valve at wall is
fully open.
4. If you have an external bidet filter, check and replace
if necessary.
TECHNICAL INFORMATION
Troubleshooting

23
Problem Possible Cause(s) Solution(s)
Low water flow or
spray pressure
1. Clogged filter
2. Water supply valve not
opened fully
3. Nozzle is dirty
4. External bidet filter
5. Pressure settings
1. Remove, clean, and reinstall mesh filter
(see maintenance section on page 21).
2. Check that the water supply valve at wall is
fully open.
3. Clean the nozzle (see page 20).
4. If you have an external bidet filter, check and
replace if necessary.
5a. Increase the water pressure settings.
5b. Check if connection hose is bent.
Water Temperature
is low
1. Water comes out cold
2. Water comes out lukewarm
3. Water starts out hot but
decreases in temperature
1a. The Water temperature level is turned o or set to
Low. Adjust temperature on control panel.
1b. Turn o High-Eciency Eco Mode.
2. Turn o Standard Eco Mode.
3. Warm water can be used for about 90 seconds at
the Medium setting. Stop all wash functions to allow
the heater to warm the water.
Wash features do not
work or fail to spray
1. Not activating Seat Sensor 1a. Adjust sitting position to fully cover the Seat Sensor.
1b. Override the Seat Sensor (see page 17).
Water (wash spray)
not heated
1. Water temperature set to o
2. Resettable fuse blown
3. Eco Mode set to
High-Eciency
1. Make sure that the Water temperature setting is on.
2. The bimetal resettable fuse may blow if the
temperature exceeds over the normal level. The
bidet will not work and show an error message until
the bidet cools down.
3. Turn Eco Mode o or change setting to Standard
Eco Mode.
Water flows before
or after use
1. Water coming from nozzle
1a. The water that comes out between the nozzle
before or after a wash cycle is the self-clean cycle
and is not a malfunction.
1b. Residual water may drip into the bowl for several
seconds after a wash cycle or self-clean cycle, and
is not a malfunction.
TECHNICAL INFORMATION
Troubleshooting

24
Problem Possible Cause(s) Solution(s)
Water leaks from
areas other than
the nozzle
1. Water leaking from the T-valve
2. Water leaking from the bidet
hose connection
3. Water leaking from under the seat
4. Water leaking from behind the seat
1. Make sure that the rubber gasket is
inserted correctly into the T-valve (flat
side down with lip pointing up towards the
toilet tank connection) and firmly tighten
the connector.
2. Make sure that the bidet hose is correctly
connected and tight. Check any rubber
washers and do not over tighten.
3. Check if there is anything between the
mesh filter and bidet. Remove, clean, and
reinstall mesh filter. Check if the filter is
damaged (see maintenance section on
page 21).
4. Check the water tank plug in the back of
the seat (see maintenance section under
product storage and use on page 21).
Water Temp
lights blinking
1. Water supply not connected properly 1. Make sure that the bidet hose is correctly
connected and tight.
Seat is not heated 1. Seat temperature set to o
2. Eco Mode set to High-Eciency
1. Make sure that the Seat temperature setting
is on.
2. Turn Eco Mode o or change to Standard
Eco Mode.
TECHNICAL INFORMATION
Troubleshooting

25
Brondell products are backed by some of the most comprehensive warranties in the industry. Brondell
warrants that all products (excluding consumable items) shall be free from defects in material and
workmanship under normal use and service.
LT89, LE89 Residential One-Year Limited Warranty
100% Coverage of all parts and labor for the entire product (excluding consumable filters) for the first year
from original date of purchase.
LT89, LE89 Commercial Warranty
Warranty period one year from original purchase date for all Brondell products. Warranties may not apply
to products that are used for heavy commercial, hospital, or other high use non-residential applications.
Exclusions and Limitations
1. BRONDELL warrants its products to be free from manufacturing defects under normal use and service.
This warranty is extended only to the ORIGINAL PURCHASER.
2. BRONDELL’s obligations under this warranty are limited to repairs or replacement, at BRONDELL’s
option, of products or parts found to be defective, provided that such products were properly installed
and used in accordance with instructions. BRONDELL reserves the right to make such inspections as may
be necessary in order to determine the cause of the defect. BRONDELL will not charge for labor or parts
in connection with warranty repairs for the first year from date of purchase on all products except those
that may be subject to commercial use limitations.
3. BRONDELL is not responsible for the cost of removal, return (shipping) and/or re-installation of
products. This warranty does NOT apply to:
• Damage or loss which occurs during shipment.
• Damage or loss sustained through any natural or man-made causes beyond the control of
BRONDELL, including but not limited to fire, earthquake, floods, etc.
• Damage or loss resulting from sediments or foreign matter contained in a water system.
• Damage or loss resulting from negligent or improper installation including installation of a unit in a
harsh or hazardous environment.
• Damage or loss resulting from removal, improper repair, modification of the product, or improper
maintenance including damage caused by chlorine or chlorine related products
• Damage or loss resulting from electrical surges, electrical outages, lightning strikes, or other acts
which are not the fault of Brondell or which the Product is not specified to tolerate.
4. This warranty gives you specific legal rights. You may have other rights which vary from state to state.
THIS WRITTEN WARRANTY IS THE ONLY WARRANTY MADE BY BRONDELL. REPAIR OR REPLACEMENT
AS PROVIDED UNDER THIS WARRANTY SHALL BE THE EXCLUSIVE REMEDY AVAILABLE TO THE
PURCHASER. BRONDELL SHALL NOT BE RESPONSIBLE FOR LOSS OF USE OF THE PRODUCT OR FOR
OTHER INCIDENTAL, SPECIAL, FOR CONSEQUENTIAL DAMAGES OR EXPENSES INCURRED BY THE
PURCHASER OR FOR LABOR OR OTHER COSTS DUE TO INSTALLATION OR REMOVAL OR COSTS OF
REPAIRS BY OTHERS, OR FOR ANY OTHER EXPENSE NOT SPECIFICALLY STATED ABOVE. EXCEPT
TO THE EXTENT PROHIBITED BY APPLICABLE LAW, ANY IMPLIED WARRANTIES, INCLUDING THAT OF
MERCHANTABILITY, ARE EXPRESSLY LIMITED TO THE DURATION OF THIS WARRANTY. SOME STATES
DO NOT ALLOW LIMITATIONS, SO THE ABOVE LIMITATION AND EXCLUSION MAY NOT APPLY TO YOU.
How to Obtain Service
To obtain repair service under this warranty, you must contact an authorized BRONDELL Service Center
to obtain an RMA (Return Merchandise Authorization) number. Proof of purchase in the form of a copy of
the original receipt must accompany the returned unit for the warranty to be valid. Take or ship the unit
pre-paid to the closest Brondell authorized service center along with the RMA number and proof
of purchase.
To obtain the RMA number and locate the BRONDELL Service Center location nearest you, please call
1-888-542-3355, Mon–Fri, 9am–5pm PST.
TECHNICAL INFORMATION
Warranty

26
CONTACT:
Brondell, Inc.
PO Box 470085
San Francisco, CA 94147-0085
Email: [email protected]
Web: www.brondell.com
For questions, contact
Brondell Customer Service:
1-888-542-3355
Monday – Friday
9am – 5pm PST
MANUFACTURED BY:
Brondell, Inc.
PO Box 470085
San Francisco, CA 94147-0085
Made in Korea
Please retain receipt records for any
warranty claims.