Safety • Assembly • Operation • Tips & Techniques • Maintenance • Troubleshooting • Parts Lists • Warranty
OF A O A AL
\
\
\
\
\
\
\
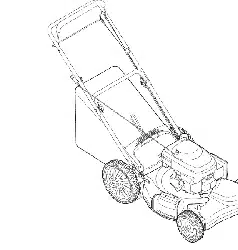
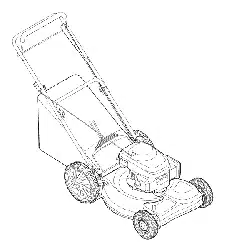
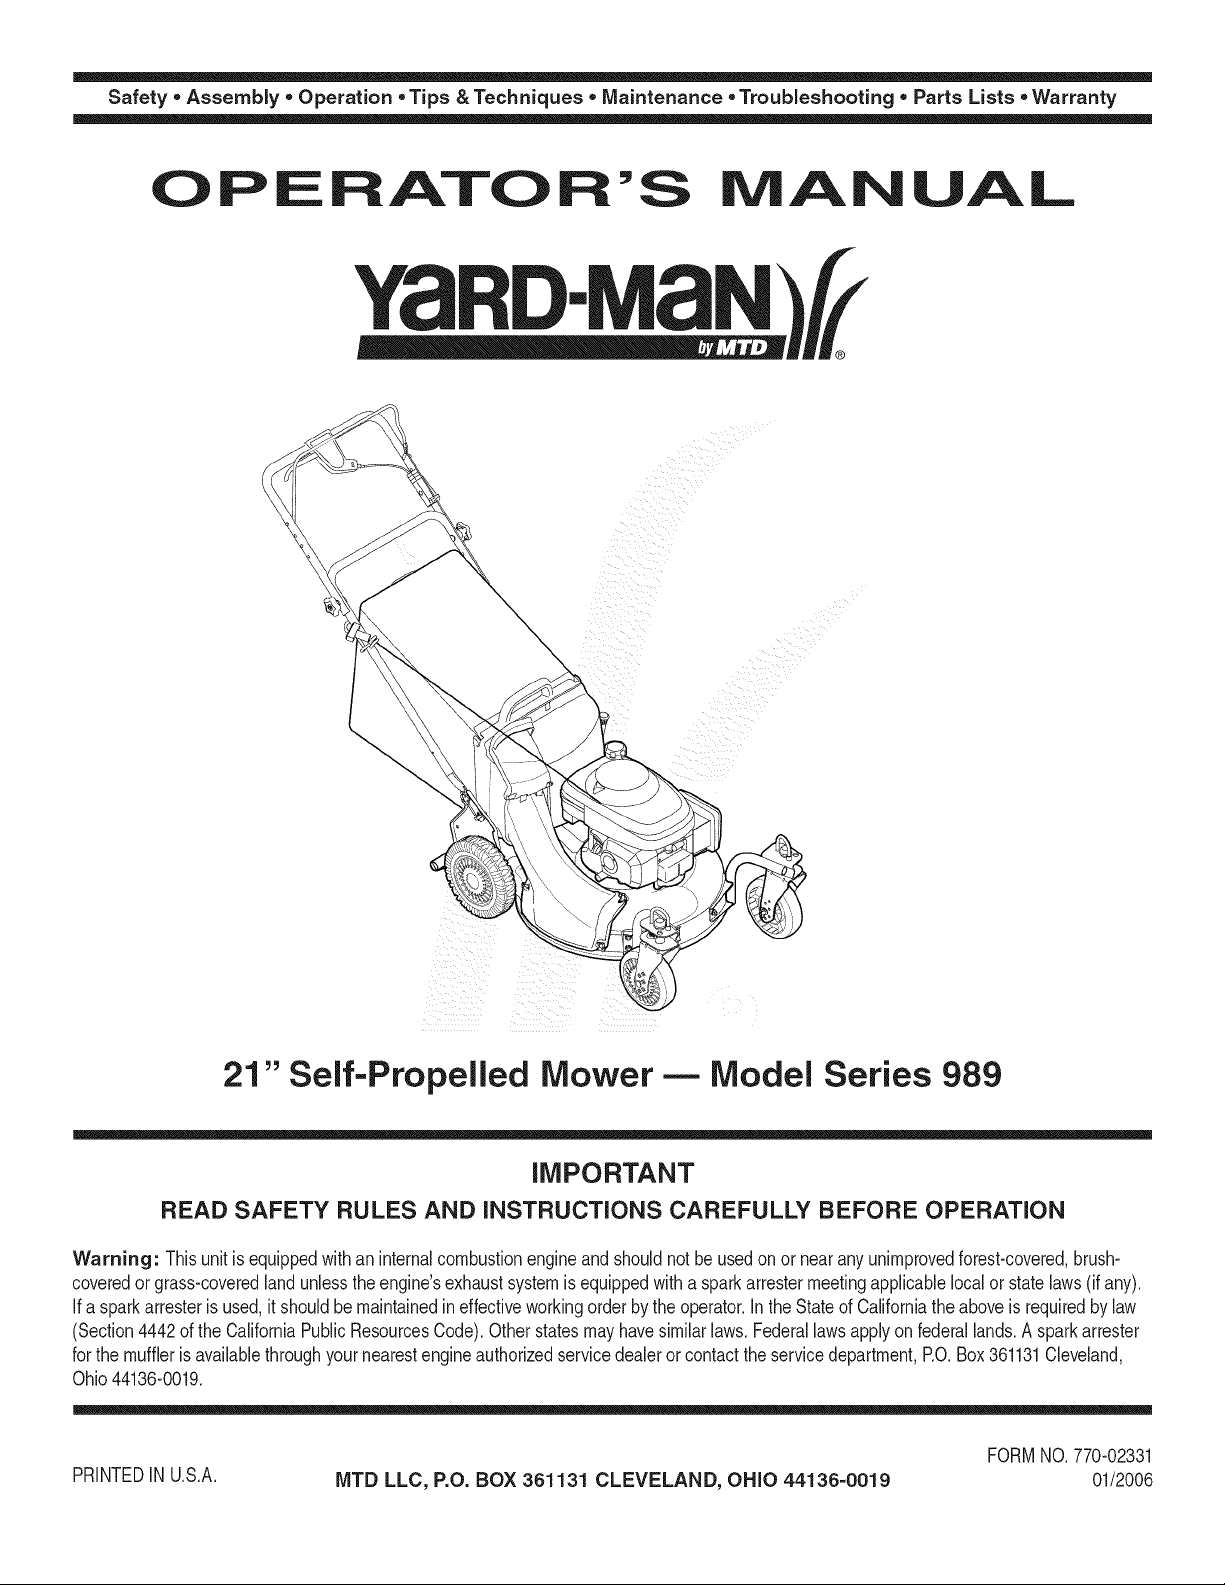
21" Self-Propelled Mower
Model Series 989
iMPORTANT
READ SAFETY RULES AND iNSTRUCTiONS CAREFULLY BEFORE OPERATION
Warning: Thisunit is equippedwithan internalcombustionengineandshouldnot beusedon or nearany unimprovedforest-covered,brush-
coveredor grass-coveredlandunlesstheengine'sexhaustsystemis equippedwitha sparkarrestermeetingapplicablelocalor statelaws(if any).
If a sparkarresteris used,it shouldbe maintainedineffectiveworkingorder by the operator.In theState of Californiathe aboveis requiredbylaw
(Section4442of the CaliforniaPublicResourcesCode).Otherstatesmayhavesimilarlaws.Federallawsapplyonfederallands.A sparkarrester
for the muffleris availablethroughyour nearestengineauthorizedservicedealeror contactthe servicedepartment,RO. Box361131Cleveland,
Ohio44136-0019.
PRINTEDIN U.S.A.
MTD LLC, P.O. BOX 361131 CLEVELAND, OHIO 44136-0019
FORMNO.770-02331
01/2006
This Operator's Manual is an important part of your new lawn mower, it will help you assemble,
prepare and maintain the unit for best performance. Please read and understand what it says.
Table of Contents
Slope Gauge ....................................................... 3
Safe Operation Practices ................................... 4
Setup and Adjustment ....................................... 6
Operating Your Lawn Mower .............................. 8
Maintaining Your Lawn Mower ......................... 10
Trouble Shooting .............................................. 14
Off-Season Storage and Safety Labels .......... 15
Parts List ........................................................... 16
Warranty ............................................ Back Cover
Finding and Recording Model Number
BEFOREYOU START ASSEMBLING
YOUR NEW EQUIPMENT,
please locatethe model plate on the equipment and copy the
information to the sample model plate provided to the right.
You can locate the model plate by standing at the operating
position and looking down at the rear of the deck. This
information will be necessary to use the manufacturer's web
site and/or obtain assistancefrom the Customer Support
Department or an authorized service dealer.
Model Number
Serial Number
P. O. BOX 361131
CLEVELAND,OH44136
www.yardman.com 330-220-4683
800-800-7310
Customer Support
Please do/VOTreturn the unit to the retailer from which it was
purchased, without first contacting Customer Support.
1. Visit yardman.com. Click on the Customer Support
menu option.
2. Phone a Customer Support Representativeat 1 (800)
800-7310.
If you have difficulty assembling this product or have any questions regarding the controls, operation or maintenanceof this unit,
you can seek help from the experts. Choose from the options below:
3. The engine manufactureris responsible for all engine-
related issues with regards to performance, power-rating,
specifications, warranty and service. Please refer to the
engine manufacturer'sOwner's/Operator's Manual, packed
separatelywith your unit, for more information.
Y_doM_ YardMac_,_es M_ua,s O_,ine P_s O_iine Sewic_ Loca_o_ ]i P_o_Juc,:Re!_str_o_ ]
2
O
o
o
>:.
(13
O3
(13
(13
O-
O
O
(--
O5
E
O
(13
(13
o3
(13
O-
O
o3
(13
E
(]3
(13
o
(13
C5
('5
O3
O5
(13
t"b
(13
O9
o5
(13
O-
O
O3
-5
O3
O
O
E
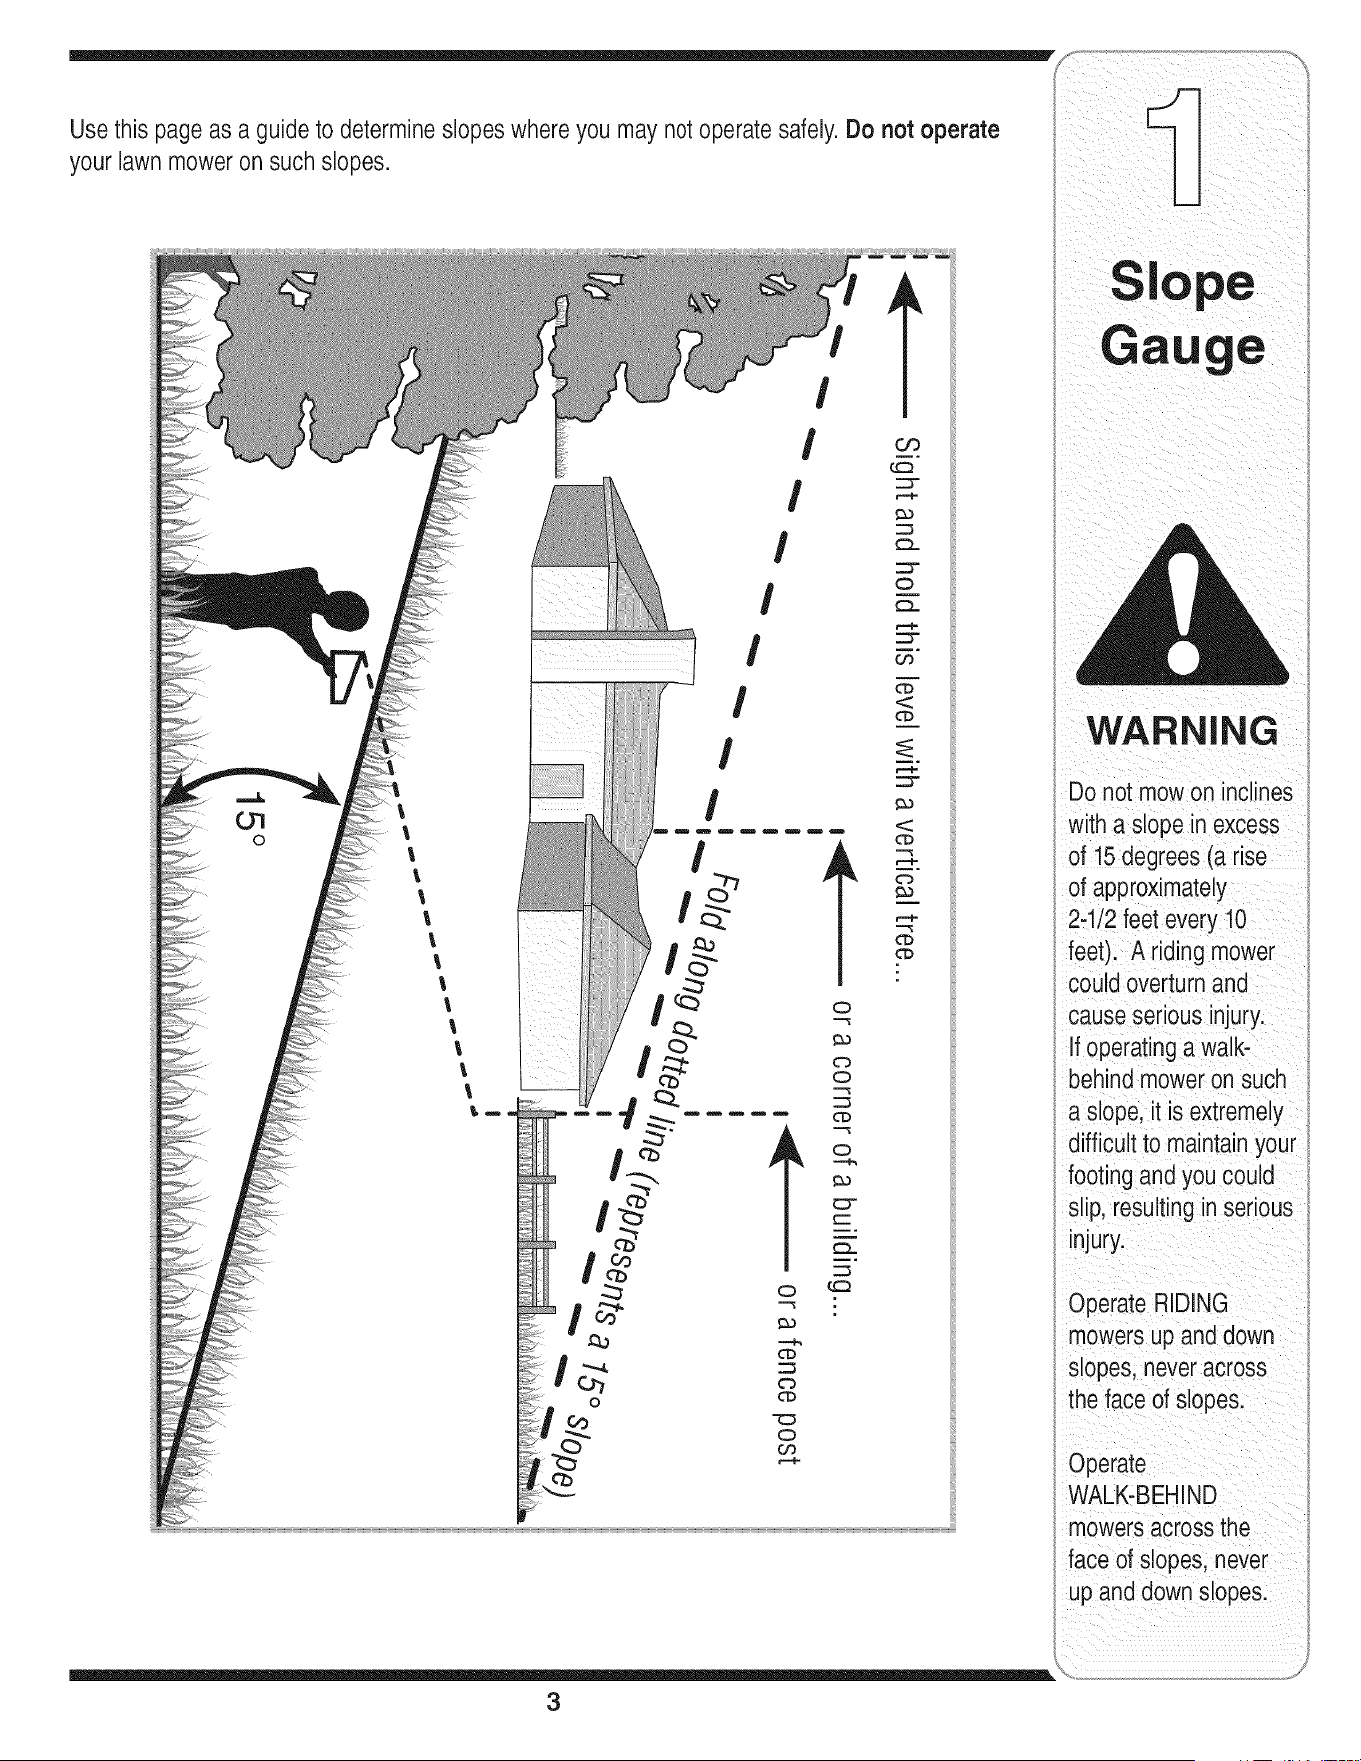
Sight and hold this levelwith a vertical tree...
also
I
15°

RNING
This symbol points
out important safety
instructionswhich, if
notfollowed, could
endangerthe personal
i safety and/or property
of yourself and others.
Readand follow all
instructions inthis man-
ual before attempting to
operatethis machine.
Failureto comply with
these instructions may
result in personal injury.
i When you see this
symbol.
HEED iTS WARNING
Your
i Flesponsibility
I Restrictthe use
i of this power machine
to persons who read.
understand
and follow the warnings
and instructions
in this manual
and on the machine.
WARNING: Engine Exhaust,some of its constituents, and certain vehicle compo-
nents contain or emit chemicals knownto State of Californiato cause cancer and
birth defects or other reproductiveharm.
DANGER: This machine was built to be operated according to the rules for safe operation in this
manual. As with any type of power equipment, carelessness or error on the part of the operator can
result in serious injury.This machine is capable of amputating hands and feet and throwing objects.
Failureto observe the following safety instructionscould result in serious injury or death.
Children
Tragicaccidentscan occur if operatoris notalert to presence
of children.Childrenare oftenattractedto mowerand mowing
activity.Theydo not understandthe dangers.Neverassume
thatchildrenwill remainwhereyou lastsawthem.
1. Keepchildrenout of the mowingareaand underwatchful
careof a responsibleadultotherthanthe operator.
2. Be alert andturn moweroff if a childentersthe area.
3. Beforeand while movingbackwards,look behindanddown
forsmallchildren.
4. Useextremecare whenapproachingblind corners,
doorways,shrubs,trees,or otherobjectsthat may obscure
yourvisionof a child whomayrun intothe mower.
5. Keepchildrenawayfrom hot or runningengines.Theycan
sufferburnsfrom a hotmuffler.
6. Neverallowchildrenunder14 yearsoldto operatea power
mower.Children14 yearsoldand overshouldreadand
understandoperationinstructionsandsafetyrulesin this
manualandshouldbe trainedandsupervisedbya parent.
General Operation
1. Readthis operator'smanualcarefullyin its entiretybefore
attemptingto assemblethis machine.Read,understand,
andfollowall instructionson the machineandin the
manual(s)beforeoperation.Be completelyfamiliar with
thecontrols andthe properuseof this machinebefore
operatingit. Keepthis manualin a safe place forfuture
and regularreferenceand for orderingreplacementparts.
2. Thismachineis a precisionpieceof powerequipment,
nota plaything.Therefore,exerciseextremecautionat all
times.Yourunithas beendesignedto performonejob: to
mowgrass. Do not use it for any otherpurpose.
3. Neverallow childrenunder 14yearsold to operatethis
machine.Children 14yearsold and overshould readand
understandthe instructionsinthis manualandshould
be trainedand supervisedby a parent.Onlyresponsible
individualswho arefamiliar withthese rulesof safe
operationshould be allowedto usethis machine.
4. Thoroughlyinspectthe areawherethe equipmentis to
be used. Removeall stones,sticks,wire, bones,toys and
otherforeignobjectswhichcould be tripped overor picked
up andthrown by the blade.Thrownobjectscan cause
seriouspersonalinjury.Plan yourmowingpatternto avoid
dischargeof materialtoward roads, sidewalks,bystanders
andthe like.Also, avoiddischargingmaterialagainsta
wall or obstructionwhich maycausedischargedmaterial
to ricochetbacktoward the operator.
5. Tohelpavoid bladecontact or a thrown objectinjury,
stay inoperatorzone behindhandlesand keepchildren,
bystanders,helpers,and petsat least75 feet frommower
whileit is inoperation.Stop machineif anyoneenters
area.
6. Alwayswearsafetyglasses or safetygogglesduringopera-
tion andwhile performingan adjustmentor repairto protect
youreyes.Thrownobjectswhich ricochetcan causeserious
injuryto the eyes.
7. Wearsturdy, rough-soledworkshoesand close-fitting
slacksandshirts. Shirtsand pantsthatcoverthe arms and
legs andsteel-toedshoesare recommended.Neveroperate
this machinein bare feet,sandals, slipperyor lightweight
(e.g. canvas)shoes.
8. Do not put hands orfeet near rotatingparts or undercutting
deck.Contactwithblade can amputatehands andfeet.
9. A missingor damageddischargecovercan cause blade
contactor thrownobject injuries.
10.Manyinjuriesoccuras a resultof the mowerbeing pulled
overthefoot duringa fall causedby slippingor tripping.
Do nothold on to the mower if you are falling;releasethe
handle immediately.
11.Neverpullthe mowerbacktowardyou whileyou are
walking.If you must backthe mowerawayfroma wall or
obstructionfirst look downand behindto avoid trippingand
thenfollowthese steps:
a. Stepback from mowerto fully extend yourarms.
b. Be sure youare well balancedwithsurefooting.
c. Pullthe mowerbackslowly,no morethan half way
toward you.
d. Repeatthesestepsas needed.
12.Do notoperatethe mowerwhileunderthe influenceof
alcoholor drugs.
13.Do notengage the self-propelledmechanismon units so
equippedwhilestartingengine.
14.The bladecontrolhandle is a safetydevice.Neverattempt
to bypassits operation.Doingso makesthe safetydevice
inoperativeandmay result in personalinjurythrough
contactwith the rotatingblade. The bladecontrol handle
mustoperateeasily in bothdirectionsandautomatically
returnto the disengagedpositionwhenreleased.
15.Neveroperatethe mowerinwet grass. Alwaysbe sure of
yourfooting. A slip and fall cancauseseriouspersonal
injury.If youfeel youare losing yourfooting,releasethe
bladecontrol handle immediatelyand the bladewillstop
rotatingwithinthreeseconds.
16.Mowonly in daylightor good artificiallight. Walk,neverrun.
17.Stopthe bladewhencrossinggraveldrives, walksor roads.
18.If the equipmentshouldstartto vibrateabnormally,stop the
engineand check immediatelyfor the cause.Vibrationis
generallya warningof trouble.
19.Shutthe engineoff andwait untilthe bladecomesto a
completestop beforeremovingthe grasscatcheror unclog-
gingthe chute.
The cuttingblade continuesto rotatefor a fewseconds
4
after theengine is shutoff. Neverplace any part of the body
inthe bladearea untilyouare surethe bladehas stopped
rotating.
20. Neveroperatemowerwithoutpropertrailshield, discharge
cover,grass catcher,bladecontrol handle,or othersafety
protectivedevices in placeand working.Neveroperate
mowerwithdamagedsafetydevices.Failureto do so can
resultin personalinjury.
21. Mufflerandengine becomehotandcan causea burn.Do
nottouch.
22.Only use parts and accessoriesmadefor this machineby
manufacturer.Failureto do so can result inpersonalinjury.
23. If situationsoccurwhich are not coveredin this manual,
use careand goodjudgment.Contactyourdealerfor
assistance.Telephone1-800-800-7310for the nameof your
nearestdealer.
Slope Operation
Slopesare a majorfactor relatedto slip andfallaccidentswhich
can resultinsevereinjury.Operationon slopesrequiresextra
caution.If you feel uneasyon a slope,do notmow it. For your
safety,usethe slope gaugeincludedas part of this manualto
measureslopesbeforeoperatingthis unit on a slopedor hilly
area.If theslope is greaterthan 15degrees,do not mowit.
Do:
1. Mowacrossthe faceof slopes; neverup anddown.
Exerciseextremecaution whenchangingdirectionon
slopes.
2. Watchfor holes,ruts,rocks, hiddenobjects,or bumpswhich
can causeyouto slip or trip. Tallgrass can hideobstacles.
3. Alwaysbe sure of yourfooting.A slip andfall can cause
serious personalinjury.If you feel youare losingyour
balance,releasethe bladecontrolhandle immediately,and
the bladewill stoprotatingwithin 3 seconds.
Do Not:
1. Donot mowneardrop-offs, ditchesor embankments,where
you couldloseyour footingor balance.
2. Donot mowslopesgreaterthan 15degreesasshown on
the slopegauge.
3. Donot mowon wetgrass. Unstablefooting couldcause
slipping.
Service
Safe Handling Of Gasoline:
1. To avoidpersonalinjury orpropertydamage useextreme
care in handlinggasoline.Gasolineis extremelyflammable
and the vapors are explosive.Serious personalinjurycan
occur when gasolineis spilled on yourself or your clothes
which can ignite.
2. Wash yourskin andchangeclothesimmediately.
3. Useonly an approvedgasolinecontainer.
4. Neverfill containers insidea vehicle oron a truckor trailer
bedwith a plasticliner.Alwaysplace containerson the
ground awayfrom yourvehicle beforefilling.
5. Removegas-poweredequipmentfromthe truck ortrailer
and refuel it on the ground.If this is not possible,then refuel
such equipmenton a trailer witha portablecontainer,rather
than from a gasoline dispensernozzle.
6. Keepthe nozzlein contactwith the rimof the fuel tank or
container openingat all times until fuelingis complete.Do
notuse a nozzlelock-opendevice.
7. Extinguishallcigarettes,cigars,pipesand othersources
of ignition.
8. Neverfuel machineindoorsbecauseflammablevaporswill
accumulatein thearea.
9. Neverremovegas cap or add fuel whileengine is hot or
running. Allowengineto cool at least two minutesbefore
refueling.
10.Neveroverfill fuel tank. Filltank to no more than Y2inch
below bottomof filler neckto providefor fuel expansion.
11.Replacegasoline cap andtighten securely.
12.If gasolineis spilled,wipe it off theengine and equipment.
Moveunit to another area.Wait 5 minutesbeforestarting
engine.
13.Neverstorethe machineorfuel containernear an open
flame,sparkor pilot light as on a water heater,space
heater,furnace, clothesdryer,or othergas appliances.
14.Toreducefire hazard,keepmowerfree of grass, leaves,
orother debrisbuild-up.Clean up oil orfuel spillageand
removeany fuel soakeddebris.
15.Allow a mowerto cool at least5 minutesbeforestoring.
General Service:
1. Neverrun an engine indoorsorin a poorlyventilatedarea.
Engineexhaustcontainscarbonmonoxide,an odorlessand
deadlygas.
2. Beforecleaning,repairing,or inspecting,makecertainthe
bladeandall movingparts havestopped.Disconnectthe
sparkplugwire andgroundagainstthe engineto prevent
unintendedstarting.
3. Checkthe bladeandengine mountingbolts atfrequent
intervalsfor propertightness.Also,visuallyinspectbladefor
damage(e.g.,bent,cracked,worn) Replacebladewith the
originalequipmentmanufacture's(O.E.M.)bladeonly,listed
inthis manual."Use of partswhichdo notmeetthe original
equipmentspecificationsmay leadto improperperformance
andcompromisesafety!"
4. Mowerbladesare sharp andcan cut.Wrapthebladeor wear
gloves,anduse extracautionwhen servicingthem.
5. Keepall nuts,bolts,andscrewstightto be surethe equip-
mentis in safeworkingcondition.
6. Nevertamperwithsafetydevices.Checktheir proper opera-
tion regularly.
7. Afterstrikinga foreignobject,stop the engine,discon-
nectthe sparkplugwire andgroundagainsttheengine.
Thoroughlyinspectthe mowerfor any damage.Repairthe
damagebeforestartingandoperatingthe mower.
8. Neverattemptto makea wheelor cuttingheightadjustment
whiletheengine is running.
9. Grasscatchercomponents,dischargecover,andtrail
shield aresubjectto wear anddamagewhichcould expose
movingparts or allowobjectsto be thrown. For safety
protection,frequentlycheck componentsandreplaceim-
mediatelywithoriginal equipmentmanufacturer's(O.E.M.)
parts only,listed in this manual."Use of parts which do
notmeetthe original equipmentspecificationsmayleadto
improperperformanceandcompromisesafety!"
10.Do notchangetheenginegovernorsettingor overspeedthe
engine.The governorcontrolsthe maximumsafe operating
speedof theengine.
11.Maintainor replacesafetylabels,as necessary.
12.Observeproperdisposallawsand regulations.Improper
disposalof fluidsand materialscanharmthe environment.
5
WARNING
This symbol points
out important safety
instructions which, if
not followed, could
endangerthe personal
safety and/or property
of yourself and others.
Readand follow all
instructions in this man-
ual before attempting to
operate this machine.
Failureto comply with
these instructionsmay
result in personal injury.
When you see this
symbol.
HEED iTS WARNING
Your
Responsibility
Restrictthe use
of this power machine
to persons who read.
understand
and follow the warnings
and instructions
in this manual
and on the machine.
Standbehindthe mower
i as if you weregoingto
operateit. Yourright hand
correspondsto the right
sideofthe mower;your
left handcorrespondsto
the leftsideof the mower.
Makecertainthe drive
cableis routedaround
the outsideand above
the lowerhandleso it
I doesnot interferewith
attachingthe grassbag.
i The chutedoor has been
designedto movethe
i starterrope outof the way
i of the bagwhen the chute
dooris opened.
i IMPORTANT
Thisunit is shippedwith=
outgasoline or oil inthe
engine.Fillup gasoline
i and oil asinstructedin
I the accompanyingengine
i manual BEFOREoperat-
I ingyour mower.
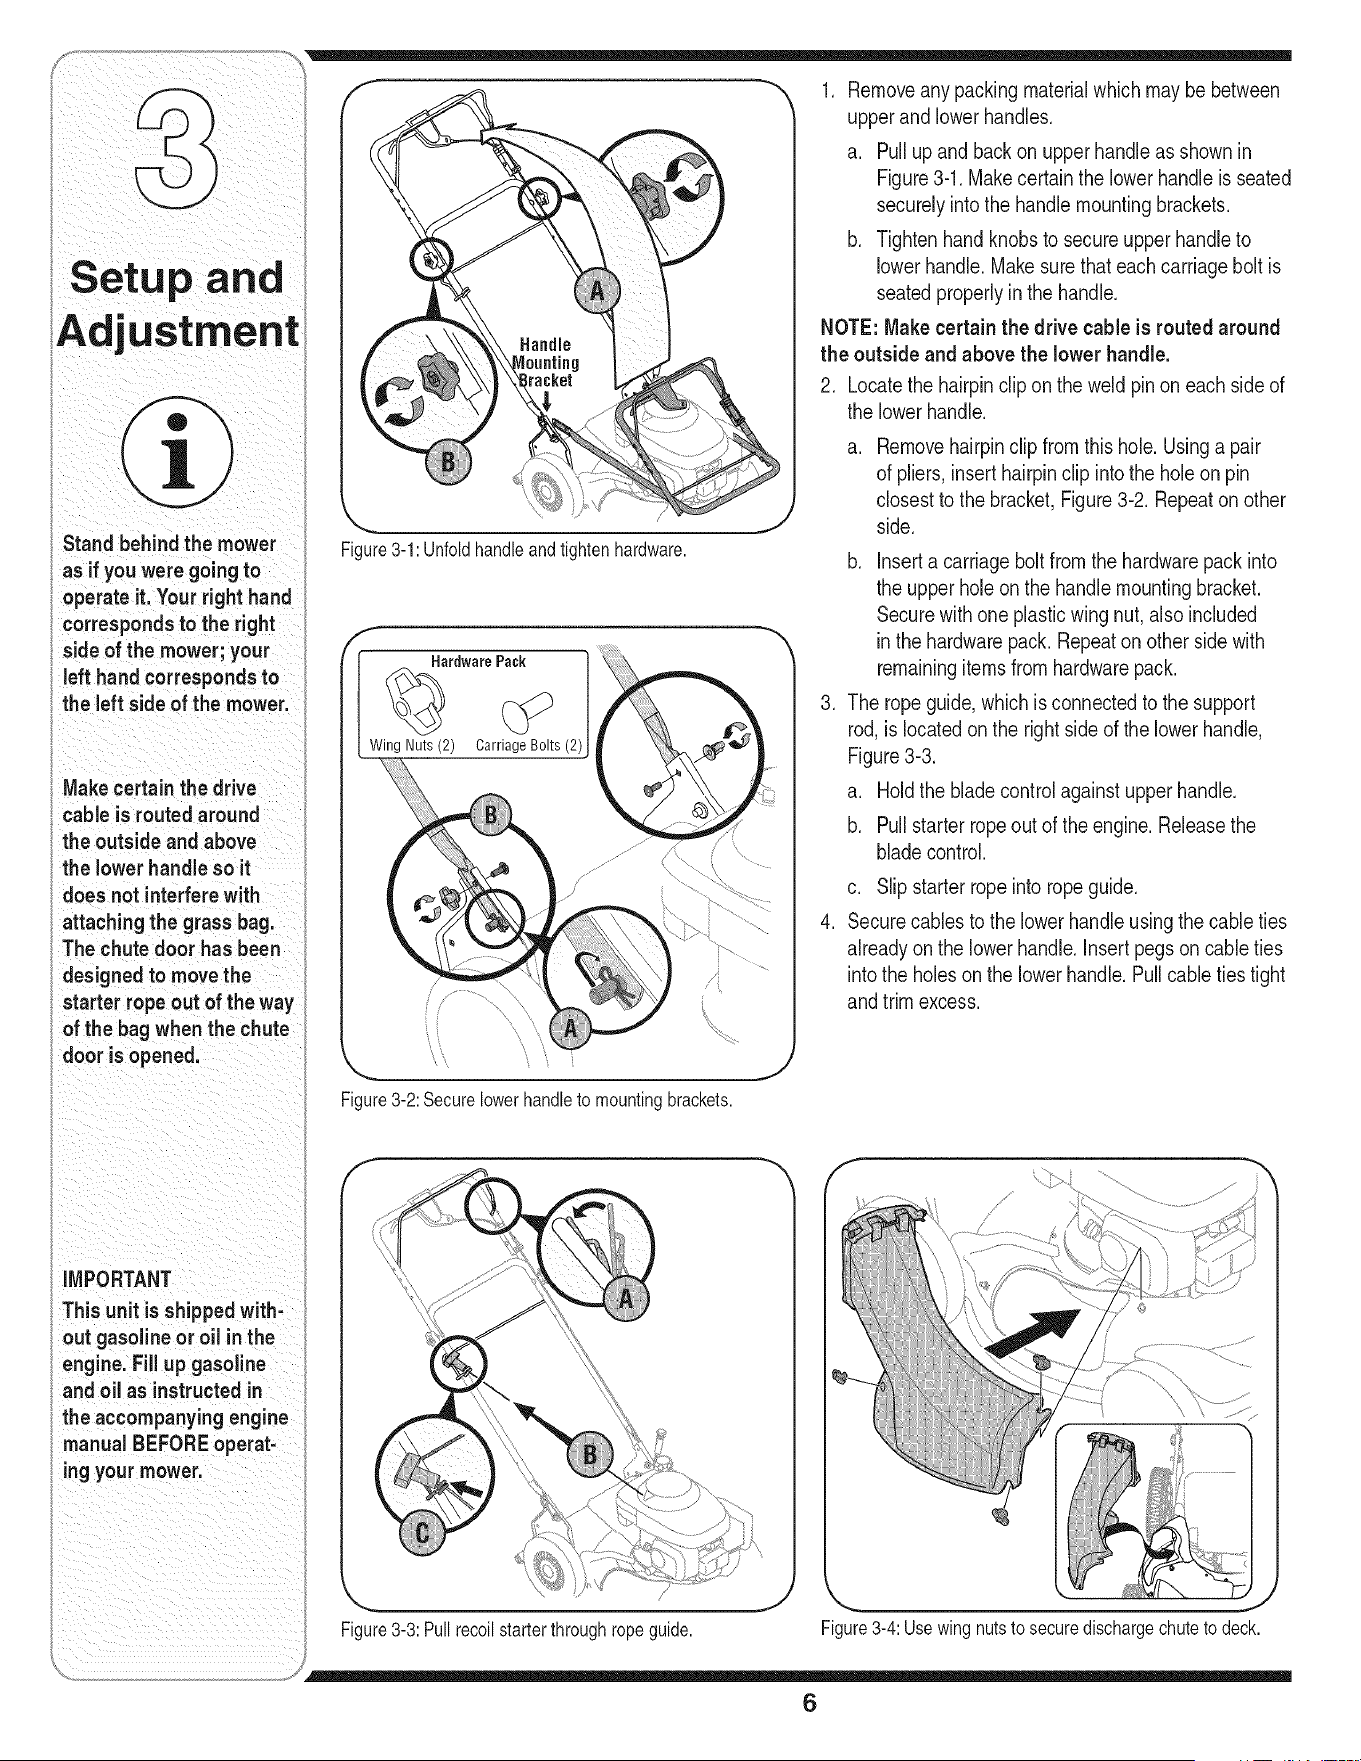
Figure3-1:Unfoldhandleand tightenhardware.
f
[ Hardware Pack l
Wing Nuts (2) Carriage Bolts (2)
Figure3-2:Securelowerhandleto mountingbrackets.
1. Removeanypackingmaterialwhichmaybebetween
upperandlowerhandles.
a. Pullupand backon upperhandleas shownin
Figure3-1.Makecertainthe lowerhandleis seated
securelyintothe handle mountingbrackets.
b. Tightenhandknobsto secureupperhandleto
lowerhandle.Makesurethateachcarriagebolt is
seatedproperlyin the handle.
NOTE:Makecertainthe drive cable is routedaround
the outside and above the lowerhandle.
2. Locatethe hairpinclipon the weldpinon eachsideof
the lowerhandle.
a.
Removehairpinclipfromthis hole.Usinga pair
of pliers,insert hairpinclip intothe holeon pin
closestto the bracket,Figure3-2. Repeaton other
side.
.
b. Inserta carriagebolt fromthe hardwarepack into
the upperhole on the handle mountingbracket.
Securewithone plasticwing nut,also included
inthe hardwarepack.Repeaton other sidewith
remainingitemsfromhardwarepack.
The ropeguide,whichis connectedto the support
rod,is locatedonthe right sideof the lowerhandle,
Figure3-3.
a. Holdthe bladecontrolagainstupperhandle.
b. Pullstarterropeout of the engine.Releasethe
bladecontrol.
.
c. Slipstarterropeinto ropeguide.
Securecablesto the lowerhandle usingthe cableties
alreadyonthe lowerhandle.Insertpegsoncable ties
intothe holeson the lowerhandle.Pullcableties tight
andtrim excess.
Figure3-3: Pullrecoilstarterthrough ropeguide.
J
Figure3-4:Usewing nutsto secure dischargechuteto deck.
6
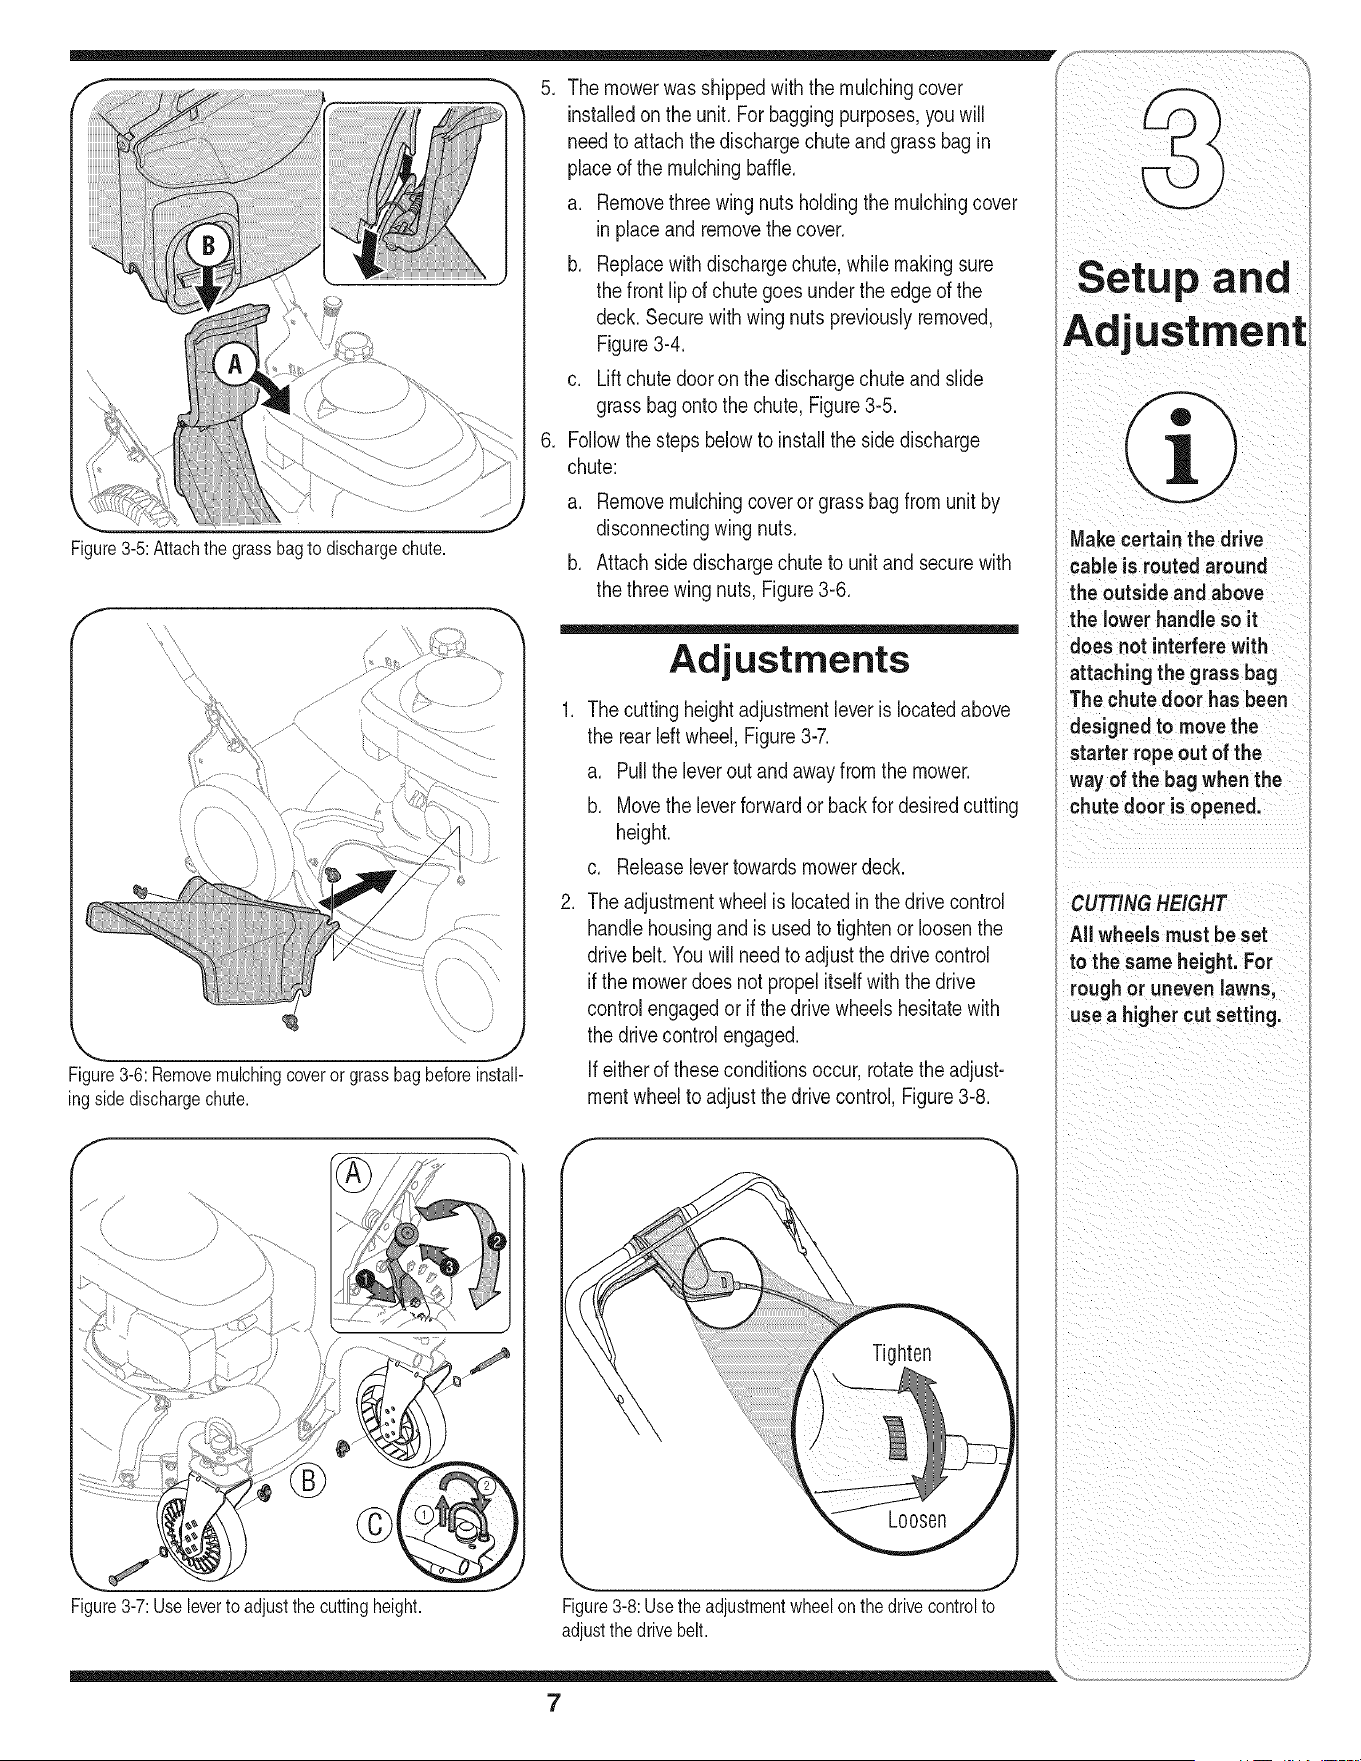
Figure3-5: Attachthe grassbagto dischargechute.
f
/
Figure3-6: Removemulchingcoveror grassbagbeforeinstall-
ing side dischargechute.
5. Themowerwasshippedwiththe mulchingcover
installedonthe unit. For baggingpurposes,youwill
needto attachthedischargechuteandgrass bag in
placeof the mulchingbaffle.
a. Removethree wingnutsholdingthe mulchingcover
in placeandremovethe cover.
b. Replacewith dischargechute,while makingsure
the frontlip of chutegoes underthe edge of the
deck.Securewith wingnutspreviouslyremoved,
Figure3-4.
c. Liftchutedooronthe dischargechute and slide
grassbagontothe chute, Figure3-5.
6. Followthe stepsbelowto installthe sidedischarge
chute:
a. Removemulchingcoveror grassbagfrom unit by
disconnectingwing nuts.
b. Attachsidedischargechuteto unit andsecurewith
the threewingnuts,Figure3-6.
Adjustments
.
.
Thecuttingheightadjustmentleveris locatedabove
the rear left wheel, Figure3-7.
a. Pullthe leverout and awayfrom the mower.
b. Movethe leverforwardor backfor desiredcutting
height.
c. Releaselevertowardsmowerdeck.
Theadjustmentwheelis locatedin the drivecontrol
handlehousingand is usedto tightenor loosenthe
drivebelt.Youwill needto adjustthe drivecontrol
if the mowerdoesnot propelitself with thedrive
controlengagedor if thedrivewheels hesitatewith
the drivecontrolengaged.
If eitherof theseconditionsoccur,rotatetheadjust-
mentwheelto adjustthedrive control,Figure3-8.
Figure3-7: Useleverto adjustthe cuttingheight. Figure3-8: Usethe adjustmentwheelon the drivecontrolto
adjustthe drivebelt.
Makecertainthe drive
cableis routedaround
the outside and above
the lower handleso it
does not interferewith
attaching the grassbag
The chutedoorhas been
designedto movethe
starter ropeout of the
way of the bag when the
chutedooris opened.
CUTTINGHEIGHT
All wheels mustbe set
to the same height. For
roughor unevenlawns,
use a higher cutsetting.
7

WARNING
Thebladecontrolis a
safetydevice.DO NOT
attemptto bypassits
operation.
i Use extremecarewhen
i handling gasoline.
I Gasolineis extremely
flammable andthe vapors
are explosive. Neverfuel
the machine indoorsor
whilethe engineis hot
or running. Extinguish
cigarettes,cigars,pipes
andothersourcesof
ignition,
Keephands and feet
i away from the chutearea
on cuttingdeck. Referto
warninglabelon the unit.
I iMPORTANT:This unit is
' shippedwithoutgasoline
i or oil inthe engine.FUl
up gasolineand oil as
instructedinthe accom-
panyingenginemanual
BEFOREoperatingyour
mower.
Know Your Lawn Mower
r
DriveControl
BladeControl
HeightAdjustmentLever
RecoilStarter
GasolineFill
Side Discharge
Chute
MulchCover
DischargeChute
Figure4-1:The majorcomponentson the mower.
Nowthatyou havesetup your lawnmower,it's importantto becomeacquaintedwith its controlsand features.
Blade Control
Thebladecontrolis attachedto the upperhandleof
the mower.Depressand squeezeitagainstthe upper
handleto engagethe engineand blade.Releaseit to
stopengineand blade.
,_ WARNING:This blade controlis asafety
device. Do not bypass its operations.
Drive Control
Thedrivecontrolislocatedon the upperhandle.
Squeezethe drivecontrolleverto engagethe drive
system.Releaseit to disengagethe drivesystem.
Releasethe drivecontrolto slowdownwhenapproach-
ingan obstacle,makinga turn,or stopping.
Cutting Height Adjustment Lever
Thecuttingheightadjustmentleveris locatedabove
the left rear wheel.Referto the Setupand Adjustment
sectionfor instructionson adjustingthecuttingheight.
Recoil Starter
The recoilstarteris connectedto the support rod and
is locatedonthe rightsideof the lowerhandle.Stand
behindthe unitand pullthe recoilstarterropeto start
the engine.
Mulch Cover
Touse themoweras a mulcher,removethe discharge
chuteand installthe mulchcover.
Side Discharge Chute
Insteadof collectinggrass clippingsin the bag,you may
attachthe sidedischargechuteto expelthe clippings.
Discharge Chute
Thedischargechutemustbe attachedto the deckto use
the grassbag.
Gas and Oil Fill-Up
Referto enginemanualfor engineinstructions.
1. Checkoillevelandadd oil if necessary.Followengine
manualfor this.
2. Servicethe enginewith gasolineas instructedin the
enginemanual.
,_ WARNING:Useextremecare when handling
gasoline. Gasoline isextremelyflammable
and the vapors are explosive. Never fuel the
machine indoorsor while the engine is hot or run-
ning. Extinguish cigarettes, cigars, pipesand other
sources of ignition.
8
,_ WARNING:Theoperationof any lawn mower
can result in foreign objects being thrown
into the eyes,whichcandamageyoureyes
severely.Alwayswearsafetyglasses whileoperating
or maintainingthe mower.
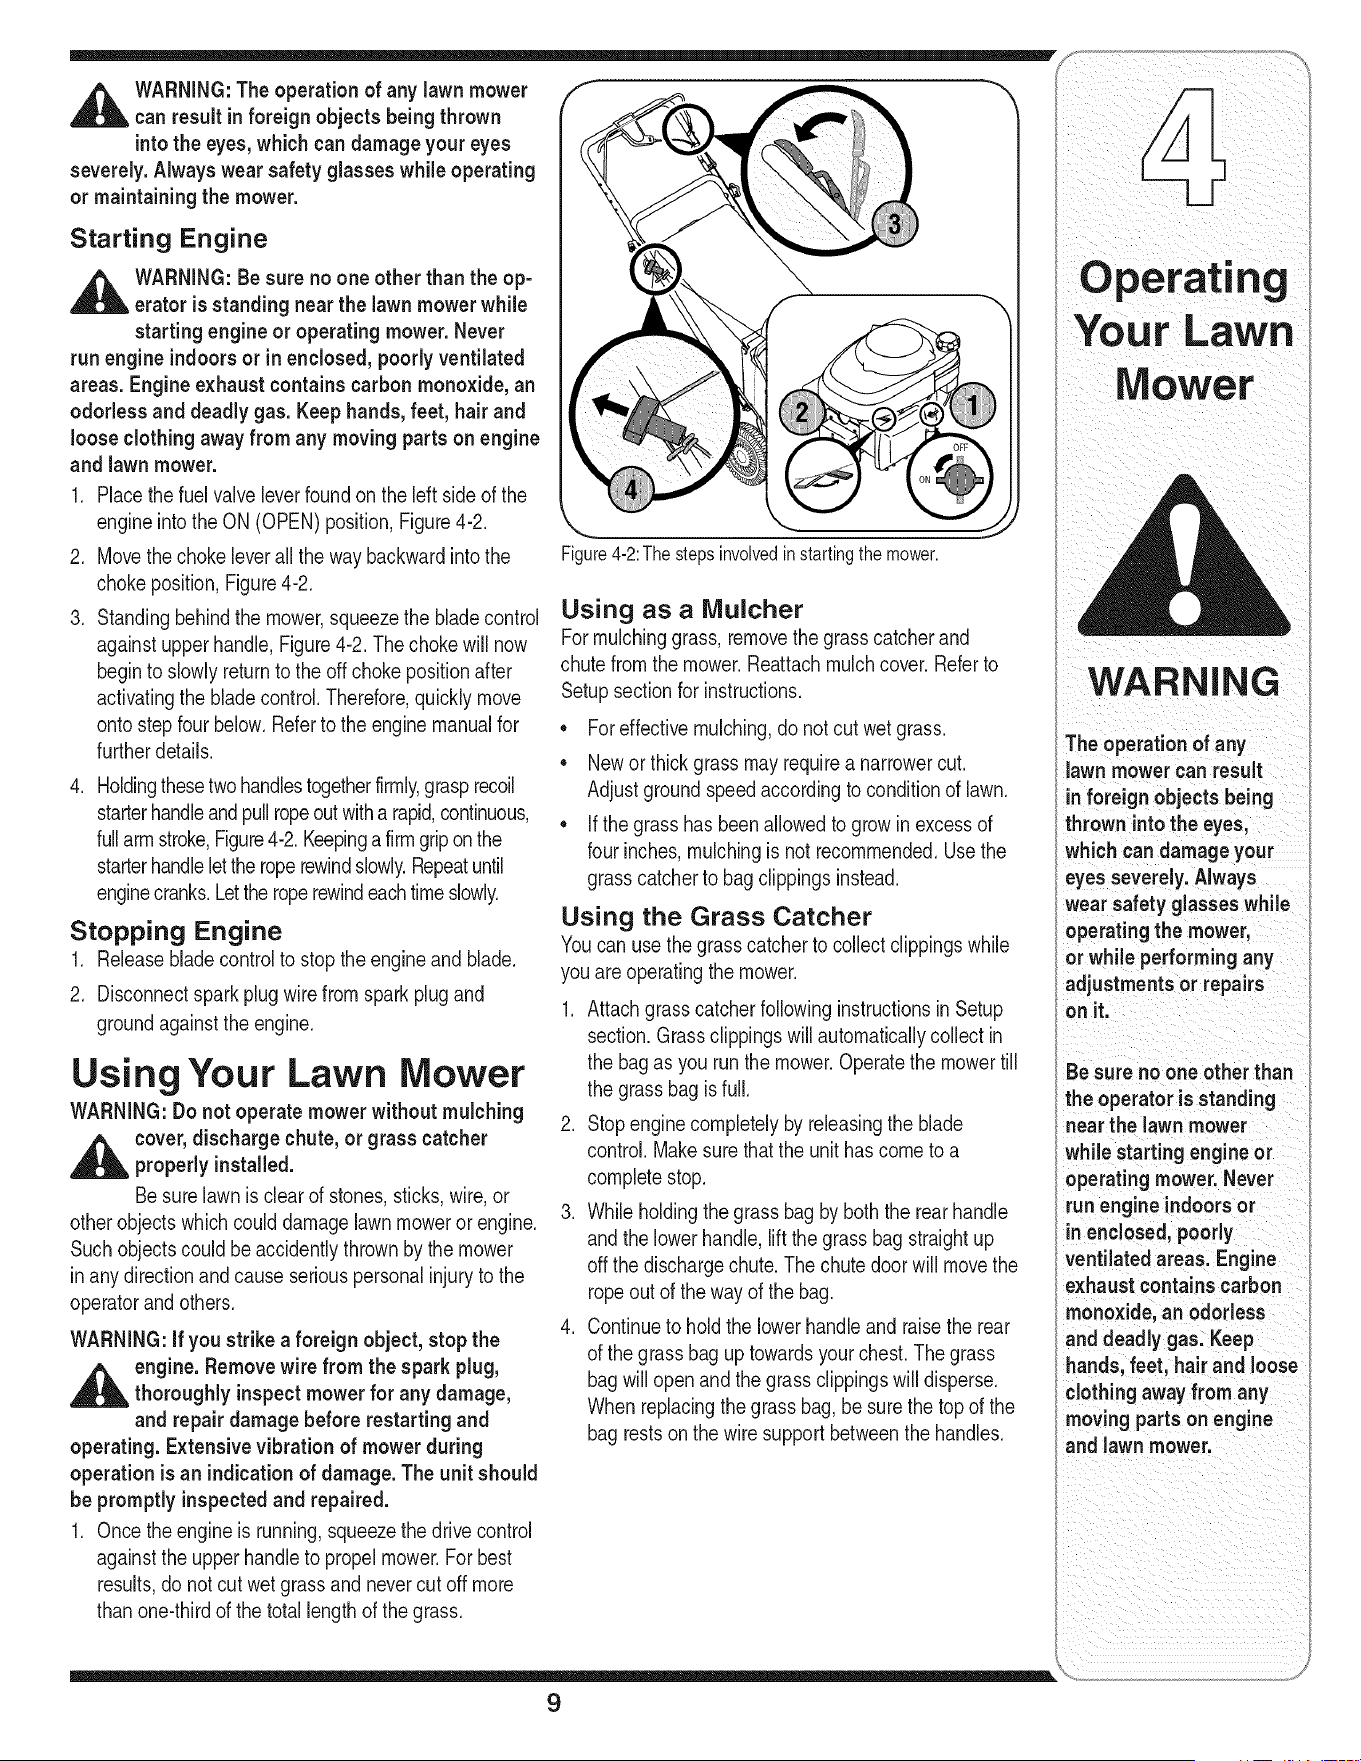
Starting Engine
,_ WARNING:Besurenoone otherthanthe op-
erator is standingnear the lawnmower while
startingengineor operatingmower.Never
run engineindoorsor in enclosed,poorly ventilated
areas.Engine exhaustcontainscarbon monoxide, an
odorlessand deadly gas. Keephands,feet, hair and
looseclothing awayfrom any movingpartson engine
and lawnmower.
1. Placethe fuel valveleverfoundonthe left sideof the
engineintothe ON (OPEN)position,Figure4-2.
2. Movethechokeleverall the waybackwardintothe
chokeposition,Figure4-2.
3. Standingbehindthe mower,squeezethe bladecontrol
againstupperhandle,Figure4-2.The chokewill now
beginto slowlyreturnto the off chokepositionafter
activatingthe bladecontrol.Therefore,quicklymove
onto stepfour below.Referto the enginemanualfor
furtherdetails.
4. Holdingthesetwo handlestogetherfirmly,grasprecoil
starterhandleand pullropeoutwitha rapid,continuous,
fullarmstroke,Figure4-2.Keepinga firmgripon the
starterhandleletthe roperewindslowly.Repeatuntil
enginecranks.Letthe roperewindeachtime slowly.
Stopping Engine
1. Releasebladecontrolto stop theengineand blade.
2. Disconnectsparkplugwirefromspark plug and
groundagainstthe engine.
Using Your Lawn Mower
WARNING:Donot operate mower without mulching
,_ cover, discharge chute, or grass catcher
properlyinstalled.
Besurelawnisclearof stones,sticks,wire,or
otherobjectswhichcoulddamagelawnmoweror engine.
Such objectscouldbe accidentlythrownby the mower
in anydirectionandcauseseriouspersonalinjuryto the
operatorandothers.
WARNING:If youstrikeaforeign object, stopthe
,_ engine.Removewirefrom the spark plug,
thoroughly inspectmower for any damage,
and repairdamage before restarting and
operating.Extensive vibration of mowerduring
operationis an indicationof damage.The unit should
be promptlyinspectedand repaired.
1. Once theengine is running,squeezethe drivecontrol
againstthe upper handleto propelmower.For best
results,do notcut wet grassand nevercut off more
than one-thirdof the total lengthof thegrass.
Figure4-2:The stepsinvolvedinstartingthe mower.
Using as a Nlulcher
Formulchinggrass,removethe grasscatcherand
chutefromthe mower.Reattachmulchcover.Referto
Setupsectionfor instructions.
• Foreffectivemulching,do notcut wetgrass.
• Newor thick grassmay requirea narrowercut.
Adjustgroundspeedaccordingto conditionof lawn.
• If thegrasshas beenallowedto growin excessof
fourinches,mulchingis not recommended.Usethe
grasscatcherto bagclippingsinstead.
Using the Grass Catcher
Youcan usethe grass catcherto collectclippingswhile
youareoperatingthe mower.
1. AttachgrasscatcherfollowinginstructionsinSetup
section.Grassclippingswillautomaticallycollectin
the bag as yourunthe mower.Operatethe mowertill
the grassbag is full.
2. Stopenginecompletelyby releasingthe blade
control.Makesurethatthe unithas cometo a
completestop.
3. Whileholdingthe grassbagby boththe rearhandle
andthe lowerhandle,lift thegrassbagstraightup
offthe dischargechute.The chutedoor will movethe
ropeoutof thewayof the bag.
4. Continueto hold the lowerhandleand raisethe rear
of the grassbag up towardsyourchest.The grass
bagwill openandthe grassclippingswill disperse.
Whenreplacingthegrassbag,be surethe topof the
bagrestsonthe wire supportbetweenthe handles.
Your Lawn
r r
e
WARNING
Theoperation of any
lawn mowercan result
inforeign objects being
thrown intothe eyes,
whichcan damageyour
eyesseverely. Always
wear safety glasses while
operatingthe mower,
orwhileperformingany
adjustments or repairs
onit.
Besure no oneother than
the operatoris standing
nearthe lawn mower
while starting engine or
operating mower. Never
runengine indoors or
inenclosed, poorly
ventilatedareas. Engine
exhaust contains carbon
monoxide, an odorless
and deadlygas. Keep
hands, feet, hair and loose
clothingawayfrom any
moving partson engine
and lawn mower.
9
Alwaysstopengine,
disconnect sparkplug
and groundagainst
engine before performing
anytype of maintenance
onyourmachine'
I
Do not usea pressure
washerOrgarden hose
to c!eanyour unit-These
may causedamage to
pu!leYS,bearings,orthe
engine,Theuse of water
wi!l resultinshortened
life andreduceservice,
ability,
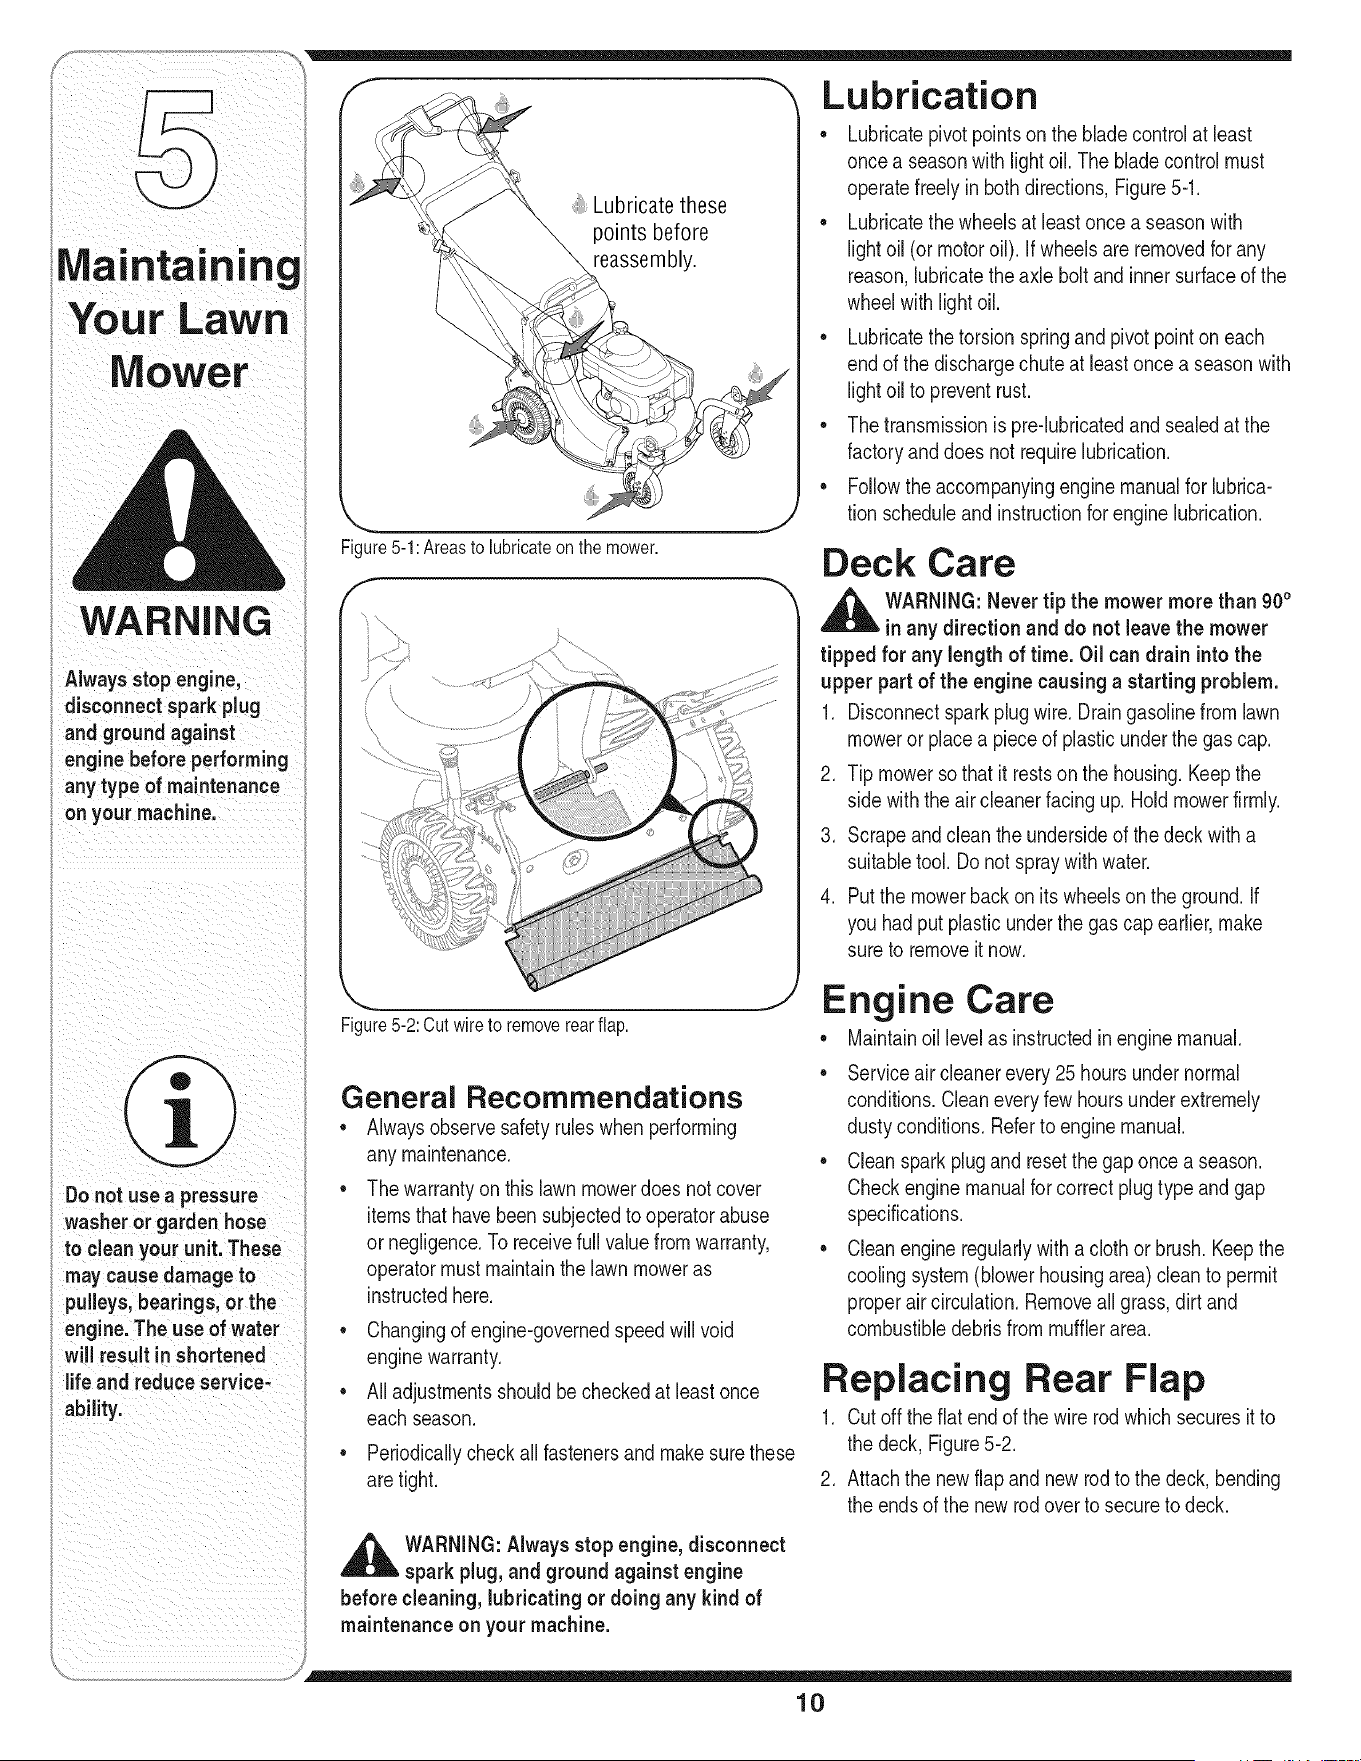
Figure5-1:Areasto lubricateonthe mower.
f
Lubricatethese
points before
reassembly.
Lubrication
• Lubricatepivot pointson theblade controlat least
oncea seasonwithlightoil. The bladecontrolmust
operatefreely in both directions,Figure5-1.
• Lubricatethe wheelsat least oncea seasonwith
lightoil (or motoroil). If wheelsare removedfor any
reason,lubricatethe axle boltand innersurfaceof the
wheelwithlightoil.
• Lubricatethe torsionspringand pivot pointon each
endof the dischargechuteat leastonce a seasonwith
lightoil to preventrust.
• Thetransmissionis pre-lubricatedand sealedat the
factoryanddoes not requirelubrication.
• Followtheaccompanyingengine manualfor lubrica-
tion scheduleand instructionfor engine lubrication.
Deck Care
,_ WARNING:Nevertip the mower more than 90°
inany directionand do not leavethe mower
tipped for any length of time. Oil can drain intothe
upper part of the enginecausinga startingproblem.
1. Disconnectsparkplug wire. Draingasolinefrom lawn
mowerorplacea pieceof plasticunderthegas cap.
2. Tip mowersothat it restsonthe housing.Keepthe
sidewiththe aircleanerfacingup. Hold mowerfirmly.
3. Scrapeand clean the undersideof the deck with a
suitabletool.Do notspraywithwater.
4. Putthe mowerbackonitswheelsonthe ground.If
youhadput plasticunderthe gas capearlier,make
sureto removeit now.
Figure5-2:Cutwireto removerearflap.
General Recommendations
• Alwaysobservesafetyruleswhen performing
anymaintenance.
• Thewarrantyon this lawnmowerdoesnot cover
itemsthathavebeensubjectedto operatorabuse
ornegligence.To receivefull valuefromwarranty,
operatormustmaintainthelawnmoweras
instructedhere.
• Changingof engine-governedspeedwill void
enginewarranty.
• All adjustmentsshouldbe checkedat leastonce
eachseason.
• Periodicallycheckall fastenersand makesurethese
aretight.
_ ARNING:Alwaysstopengine,disconnect
sparkplug,and groundagainst engine
before cleaning,lubricatingor doing any kind of
maintenanceon yourmachine.
Engine Care
• Maintainoil levelas instructedinenginemanual.
• Serviceair cleanerevery25 hoursundernormal
conditions.Cleaneveryfewhoursunderextremely
dustyconditions.Referto enginemanual.
• Cleansparkplug and resetthegaponce a season.
Checkenginemanualfor correctplugtype andgap
specifications.
• Cleanengineregularlywith a cloth or brush. Keepthe
coolingsystem(blowerhousingarea) cleanto permit
properaircirculation.Removeall grass,dirt and
combustibledebrisfrom mufflerarea.
Replacing Rear Flap
1. Cutoff theflat endof the wirerod which securesit to
the deck,Figure5-2.
2. Attachthe newflapand newrod to the deck,bending
the endsof the new rodoverto secureto deck.
10
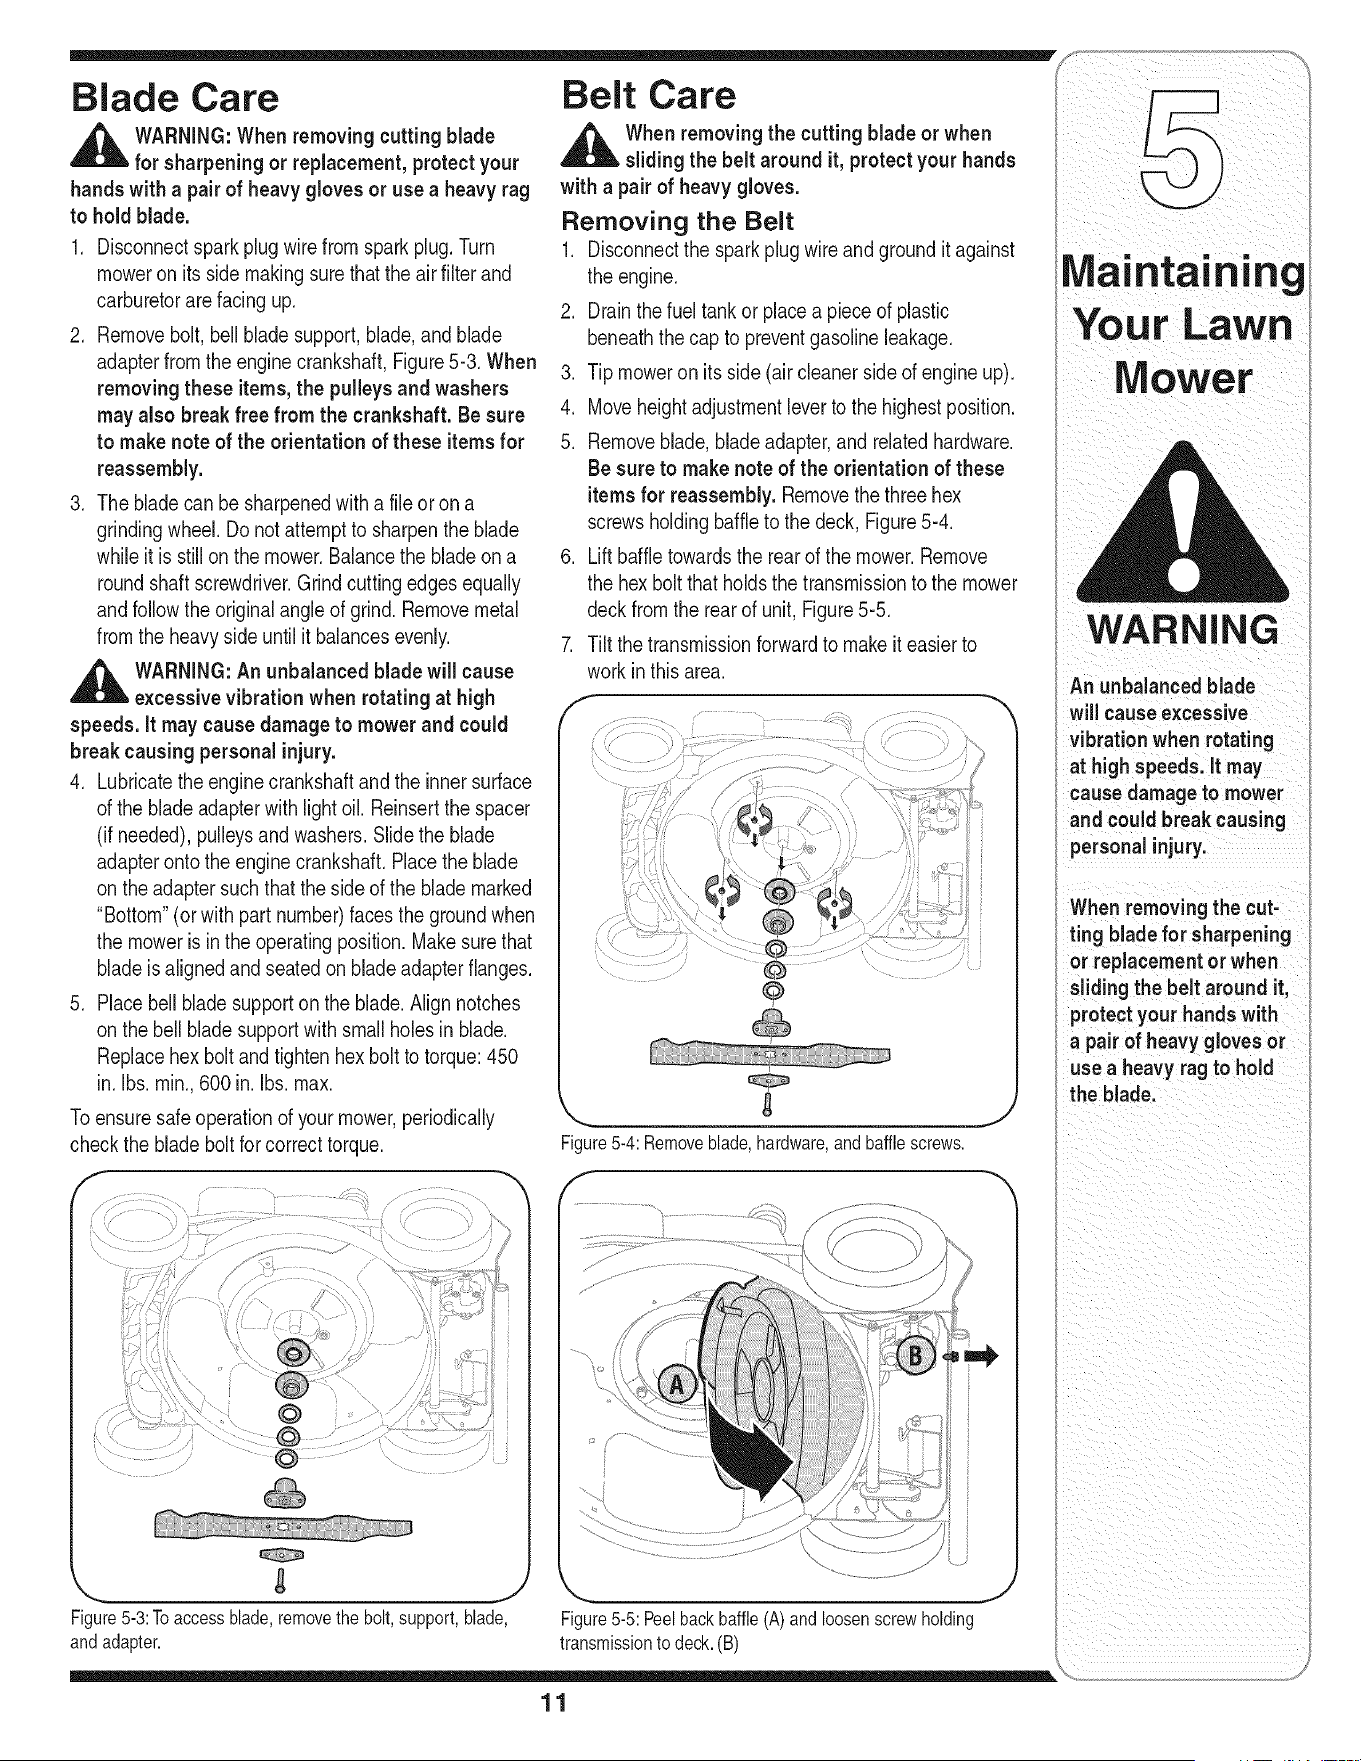
Blade Care
,_ WARNING:When removingcuttingblade
for sharpeningor replacement, protectyour
hands with a pairof heavy gloves or use a heavyrag
to holdblade.
1. Disconnectsparkplugwirefromspark plug.Turn
moweron itsside makingsurethatthe airfilterand
carburetorarefacingup.
2. Removebolt,bell blade support,blade,and blade
adapterfrom the enginecrankshaft,Figure5-3.When
removingthese items,the pulleysand washers
may also breakfree from the crankshaft.Be sure
to makenote of the orientation of these itemsfor
reassembly.
3. The bladecan be sharpenedwith a fileor on a
grindingwheel.Donot attemptto sharpenthe blade
while itisstillon the mower.Balancethe bladeon a
roundshaftscrewdriver.Grindcuttingedgesequally
andfollow theoriginalangleof grind. Removemetal
fromthe heavyside untilit balancesevenly.
,_ WARNING:An unbalanced blade willcause
excessivevibrationwhen rotating at high
speeds,it maycausedamageto mowerand could
break causingpersonal injury.
4. Lubricatetheenginecrankshaftandthe inner surface
of the blade adapterwith lightoil. Reinsertthe spacer
(if needed),pulleysand washers.Slidethe blade
adapteronto the enginecrankshaft.Placethe blade
on theadaptersuch thatthe sideof the blademarked
"Bottom"(or with part number)facesthe groundwhen
the mowerisin the operatingposition.Makesurethat
bladeis alignedand seatedon bladeadapterflanges.
5. Placebell bladesupportonthe blade.Align notches
on the bellbladesupportwith smallholesin blade.
Replacehex boltandtightenhex boltto torque:450
in.Ibs. rain.,600 in.Ibs.max.
Toensuresafeoperationof yourmower,periodically
checkthe bladeboltfor correcttorque.
: : : ................. .......
Figure5-3:Toaccessblade,removethebolt,support,blade,
andadapter.
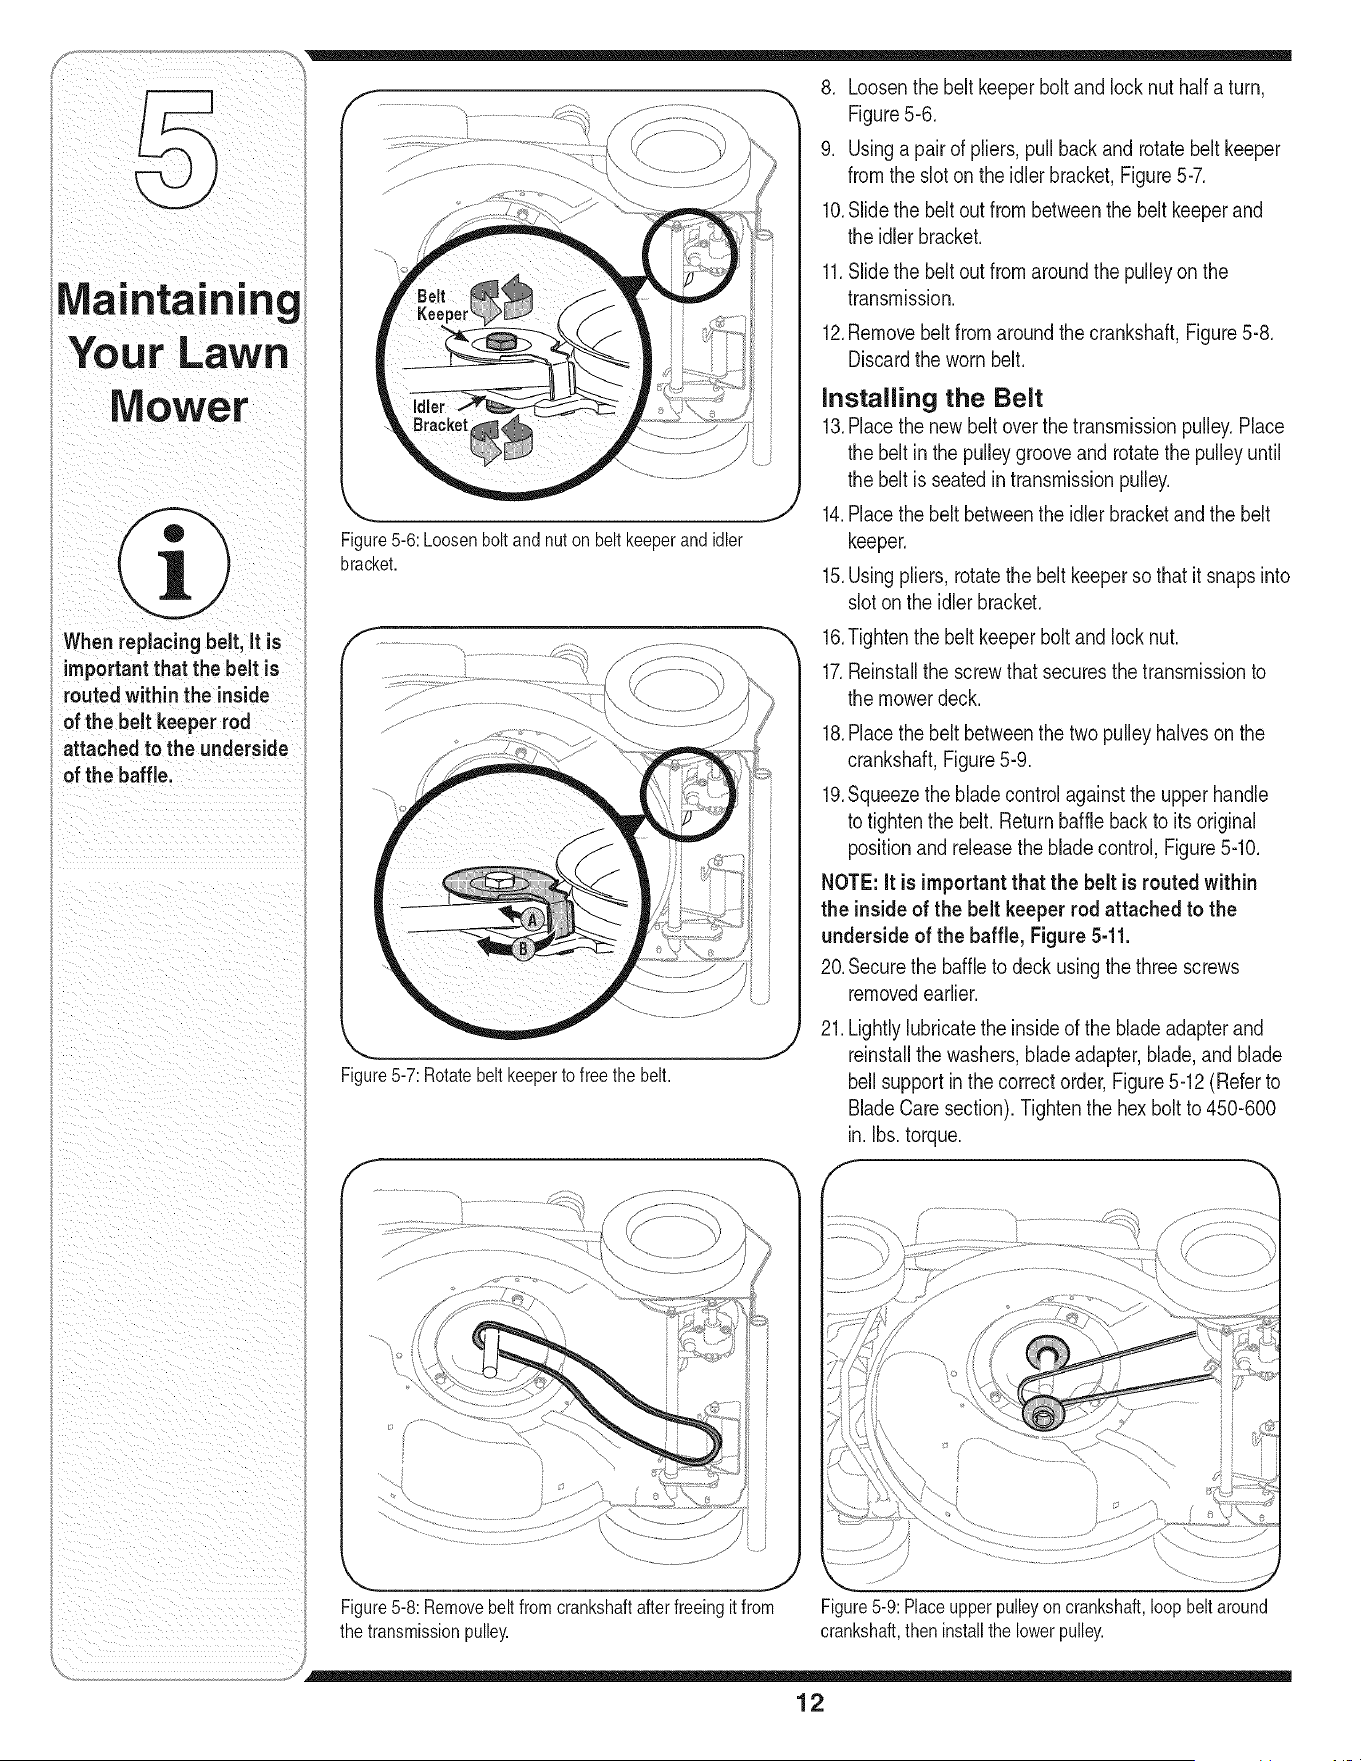
Belt Care
When removingthe cuttingblade or when
slidingthe belt around it, protectyourhands
with a pairof heavygloves.
Removing the Belt
1. Disconnectthe spark plugwire and grounditagainst
the engine.
2. Drainthe fueltankor placea pieceof plastic
beneaththe capto preventgasolineleakage.
3. Tip moweron its side(air cleanersideof engine up).
4. Moveheightadjustmentleverto thehighest position.
5. Removeblade,blade adapter,and relatedhardware.
Be sureto makenote of the orientation of these
itemsfor reassembly. Removethethree hex
screwsholdingbaffleto the deck, Figure5-4.
6. Liftbaffle towardsthe rear of the mower.Remove
the hexbolt that holdsthe transmissionto the mower
deckfromthe rearof unit, Figure5-5.
7. Tiltthe transmissionforwardto makeit easierto
workinthisarea.
Q
Figure5-4:Removeblade,hardware,andbafflescrews.
f
Figure5-5:Peelbackbaffle(A)andloosenscrewholding
transmissiontodeck.(B)
WARNING
An unbalanced blade
will causeexcessive
vibrationwhenrotating
at high speeds,it may
causedamageto mower
andcouldbreak causing
personalinjury,
When removingthe cut-
ting blade for sharpening
or replacementor when
slidingthe belt around it,
protectyour handswith
a pairof heavy gloves or
use a heavy ragto hold
the blade.
11
I aintaining
ur Lawn
Mower
Whenreplacingbelt, it is
importantthat the belt is
routedwithinthe inside
of the beltkeeper rod
attachedto the underside
of the baffle,
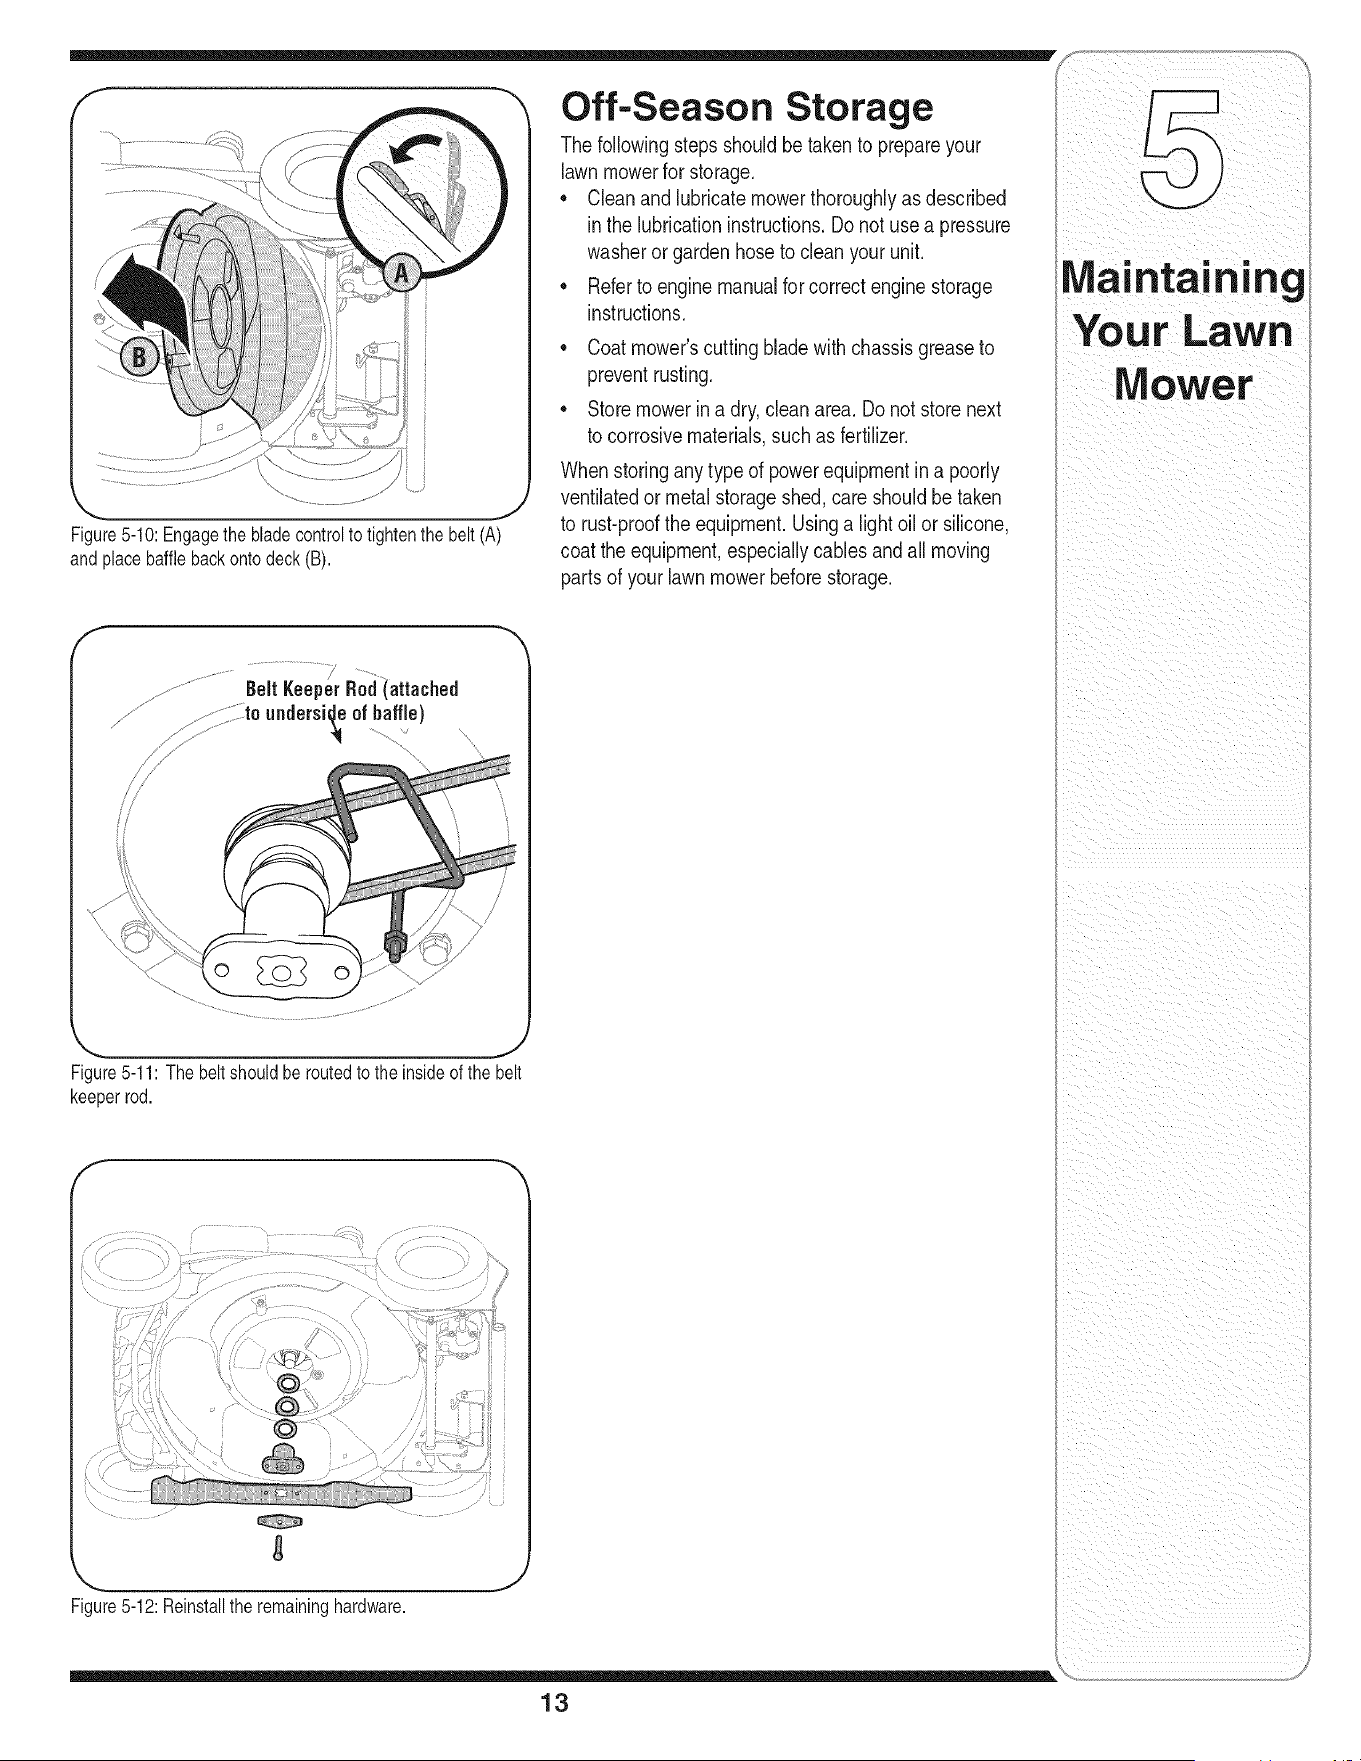
8. Loosenthe belt keeperbolt and lock nut halfa turn,
Figure5-6.
9. Usinga pairof pliers,pullbackand rotatebelt keeper
fromthe sloton the idlerbracket,Figure5-7.
10.Slidethe beltout from betweenthe belt keeperand
the idler bracket.
11.Slidethe beltout fromaround thepulleyonthe
transmission.
12.Removebeltfromaroundthe crankshaft,Figure5-8.
Discardthe wornbelt.
Figure5-6:Loosenboltand nuton belt keeperandidler
bracket.
Installing the Belt
13.Placethe newbeltoverthe transmissionpulley.Place
the beltinthe pulleygrooveand rotatethe pulleyuntil
the beltis seatedintransmissionpulley.
14.Placethe beltbetweenthe idlerbracketandthe belt
keeper.
15.Usingpliers,rotatethe beltkeeperso that it snaps into
slotonthe idlerbracket.
J
Figure5-7: Rotatebelt keeperto free the belt.
16.Tightenthe beltkeeperboltandlocknut.
17.Reinstallthe screwthat securesthetransmissionto
the mowerdeck.
18.Placethe beltbetweenthetwo pulleyhalveson the
crankshaft,Figure5-9.
19.Squeezethe blade controlagainstthe upperhandle
to tightenthe belt. Returnbaffle backto itsoriginal
positionandreleasethe bladecontrol,Figure5-10.
NOTE:it is importantthat the belt is routed within
the insideof the belt keeper rod attached to the
underside of the baffle, Figure 5-11.
20.Securethe baffle to deck usingthethree screws
removedearlier.
21.Lightlylubricatethe insideof the bladeadapterand
reinstallthe washers,bladeadapter,blade,and blade
bellsupportin the correctorder,Figure5-12(Referto
BladeCare section).Tightenthe hex boltto 450-600
in.Ibs.torque.
f
Figure5-8:Removebeltfromcrankshaftafterfreeingitfrom
thetransmissionpulley.
Figure5-9: Placeupperpulleyoncrankshaft,loopbelt around
crankshaft,theninstallthe lowerpulley.
12
'_., j
Figure5-10:Engagethe bladecontrolto tightenthe belt (A)
and place bafflebackontodeck (B).
Off-Season Storage
Thefollowingstepsshouldbe takento prepareyour
lawnmowerfor storage.
* Cleanand lubricatemowerthoroughlyas described
inthe lubricationinstructions.Donot usea pressure
washerorgardenhoseto cleanyourunit.
* Referto engine manualforcorrectengine storage
instructions.
* Coat mower'scuttingbladewith chassisgreaseto
preventrusting.
* Storemowerin a dry, cleanarea. Donot storenext
to corrosivematerials,suchas fertilizer.
Whenstoringanytypeof powerequipmentina poorly
ventilatedor metalstorageshed,careshouldbetaken
to rust-prooftheequipment.Usinga lightoil or silicone,
coattheequipment,especiallycablesand all moving
partsof yourlawnmowerbeforestorage.
F
Figure5-11: The belt shouldbe routedto the insideof the belt
keeperrod.
Figure5-12:Reinstalltheremaininghardware.
13
Maintaining
ii i ii i
i i i i i i ii
i i_i iii _ _ _iiii i _ii _ i_ii
ii i _iI_ ii
Troub.le
shooti
For repairs beyond
the minor adjustments
listed here, contact
an authorized service
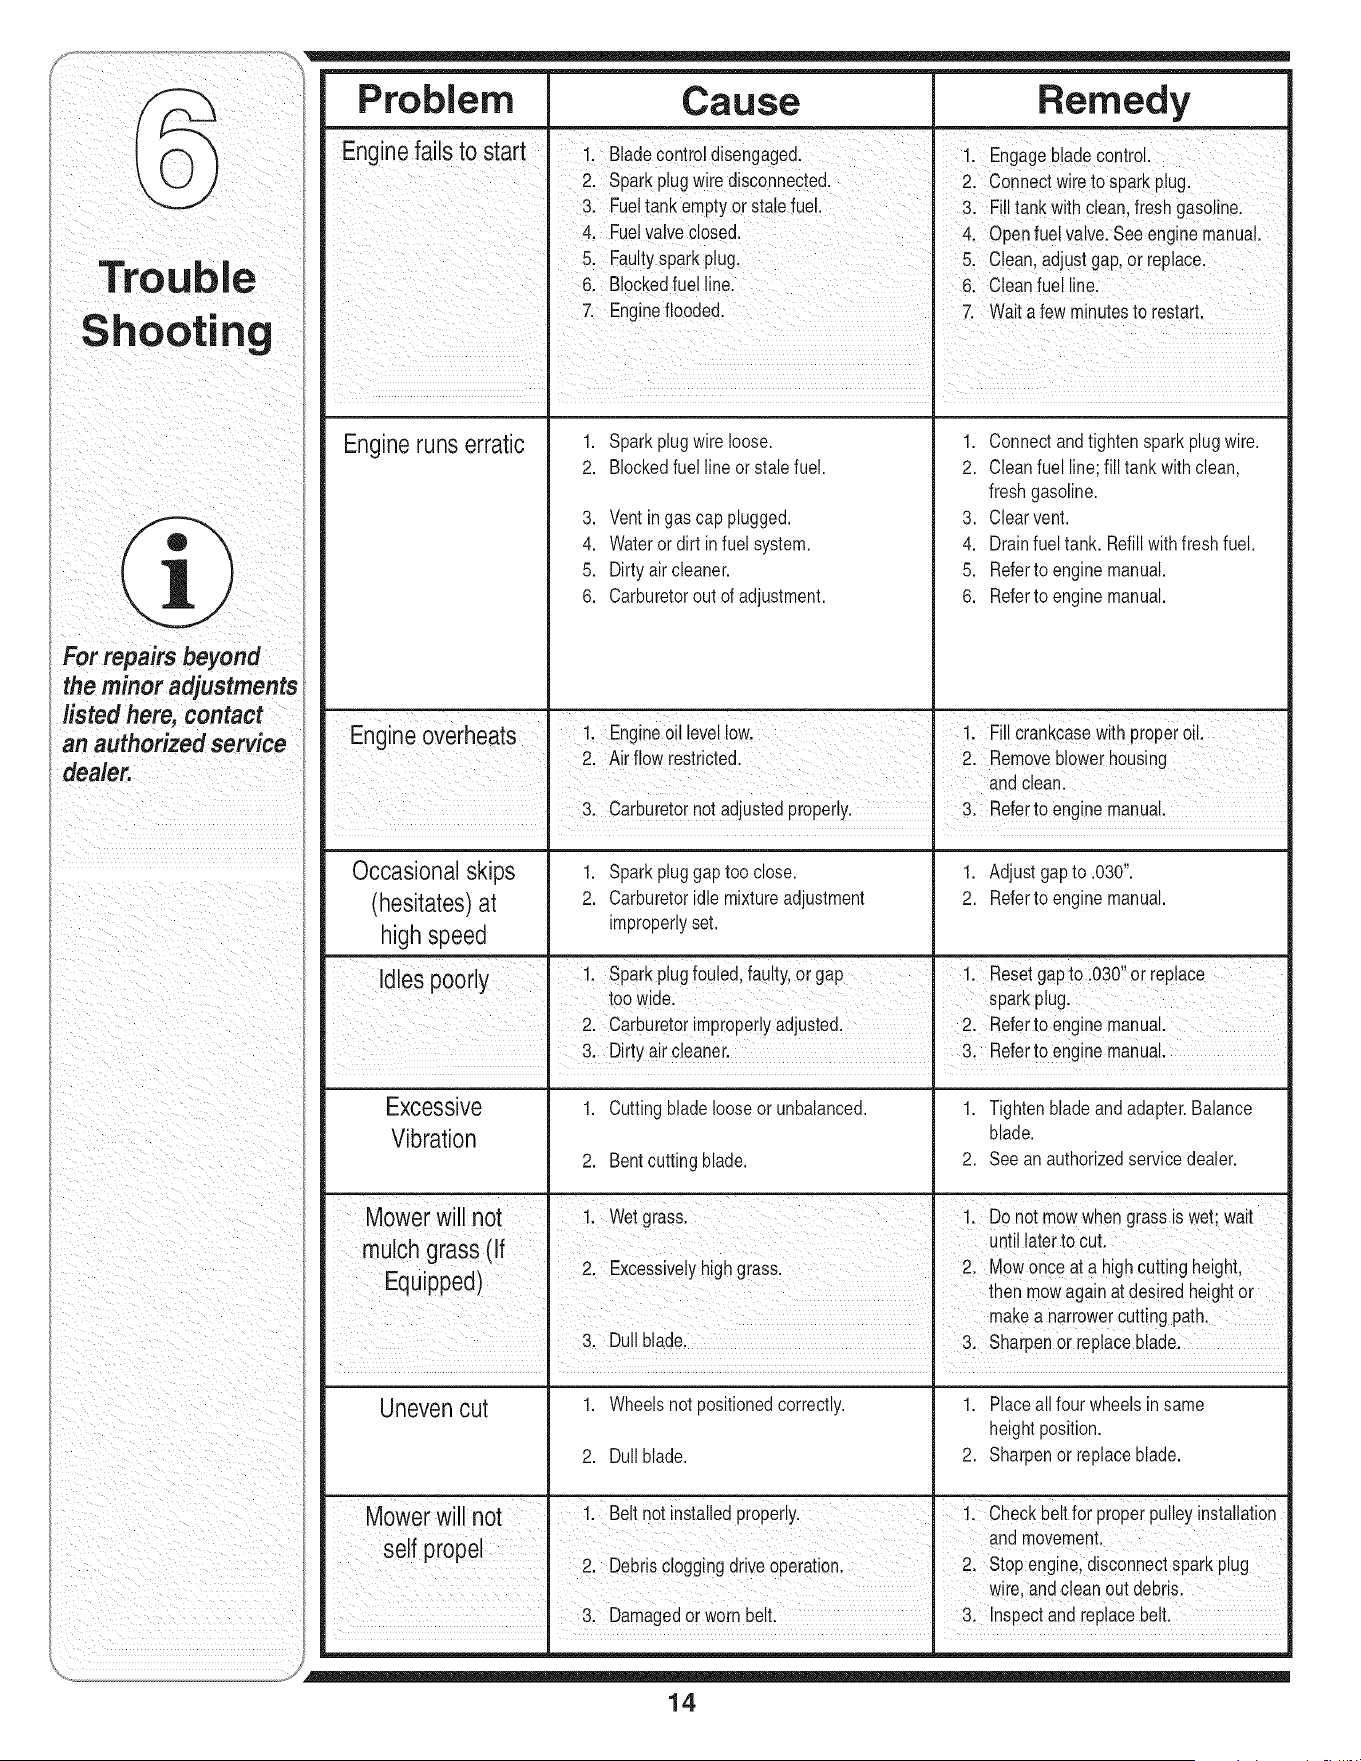
Problem Cause Remedy
Engine failsto start I Bladecontroldisengaged. !. EngagebladecOntroL
21 Spaik Plugwire disconnected. 21 connect wireto spark plugl
3. Fuel tankempty or Staiefuel. 31Fill tankWithclean,freshgasoline:
I 4. Fuel ValVeclosed. 4. open fuel valvelsee enginemanual.
I 5. Faultyspark p!ug, Clean adjustgap orreplace
i & Blockedfuel iinel 6 ceanfue ne
Enginefloode& 7. wait a few minutestOrestarL
I
I
Engineruns erratic
1. Sparkplugwire loose.
2. Blockedfuel lineor stalefuel.
3. Ventingas cap plugged.
4. Wateror dirt infuel system.
5. Dirtyair cleaner.
6. Carburetorout of adjustment.
1. Connect andtighten sparkplugwire.
2. Cleanfuel line; fill tank withclean,
fresh gasoline.
3. Clearvent.
4. Drainfuel tank. Refillwithfresh fuel.
5. Referto engine manual.
6. Referto engine manual.
Engine overheats 1. Engineoil levellow. 1. Fillcrankcasewith properoil.
I 2. Air flow restricted. 2. Removeblowerhousing
I and clean.
I 3. Carburetornotadjustedpropery. 3. Referto engne manua.
I I
=
Occasional skips 1. Sparkpluggap too close. 1. Adjust gapto .030".
(hesitates) at 2. Carburetoridlemixtureadjustment 2. Referto engine manual.
high speed improperlyset.
des noor,, 1. Sparkplugfouled faulty or gap 1. Resetgapto .030"or repace
_' J' I too wide. spark plug.
I 2. Carburetorimproperlyadjusted. 2 Referto engine manual.
I 3. Drtyarceaner. 3. Refertoengnemanua.
Excessive 1. Cuttingbladelooseor unbalanced. 1. Tighten bladeandadapter.Balance
Vibration blade.
2. Bentcutting blade. 2. See an authorizedservicedealer.
Mower will not I 1. Wetgrass. 1. Donot mowwhengrass is wet;
wait
mulch _rass 'If i _ until laterto cut.
E y ,,t I 2. Excessivelyhighgrass. I 2. Mowonceata highcuttng height
qu ppea) I then mowagainat desiredheight or
I I makea narrowerCuttingpath.
I 3. Du bade. 3. Sharpenor replaceblade.
Unevencut 1. Wheelsnotpositionedcorrectly. 1. Placeallfour wheelsin same
heightposition.
2. Dull blade. 2. Sharpenor replaceblade.
I 1. Belt not installedproperly. I 1 Check beltfor properpulleyinstallation
Mower
w not
If r I Ii I and movemeni
se p ope
I 2. Debrs clogg ng driveoperation. 2. Stop engine,disconnectsparkplug
I wire, and cleanout debris.
. 3. Damagedorworn belt. . 3. Inspectand replacebelt.
14
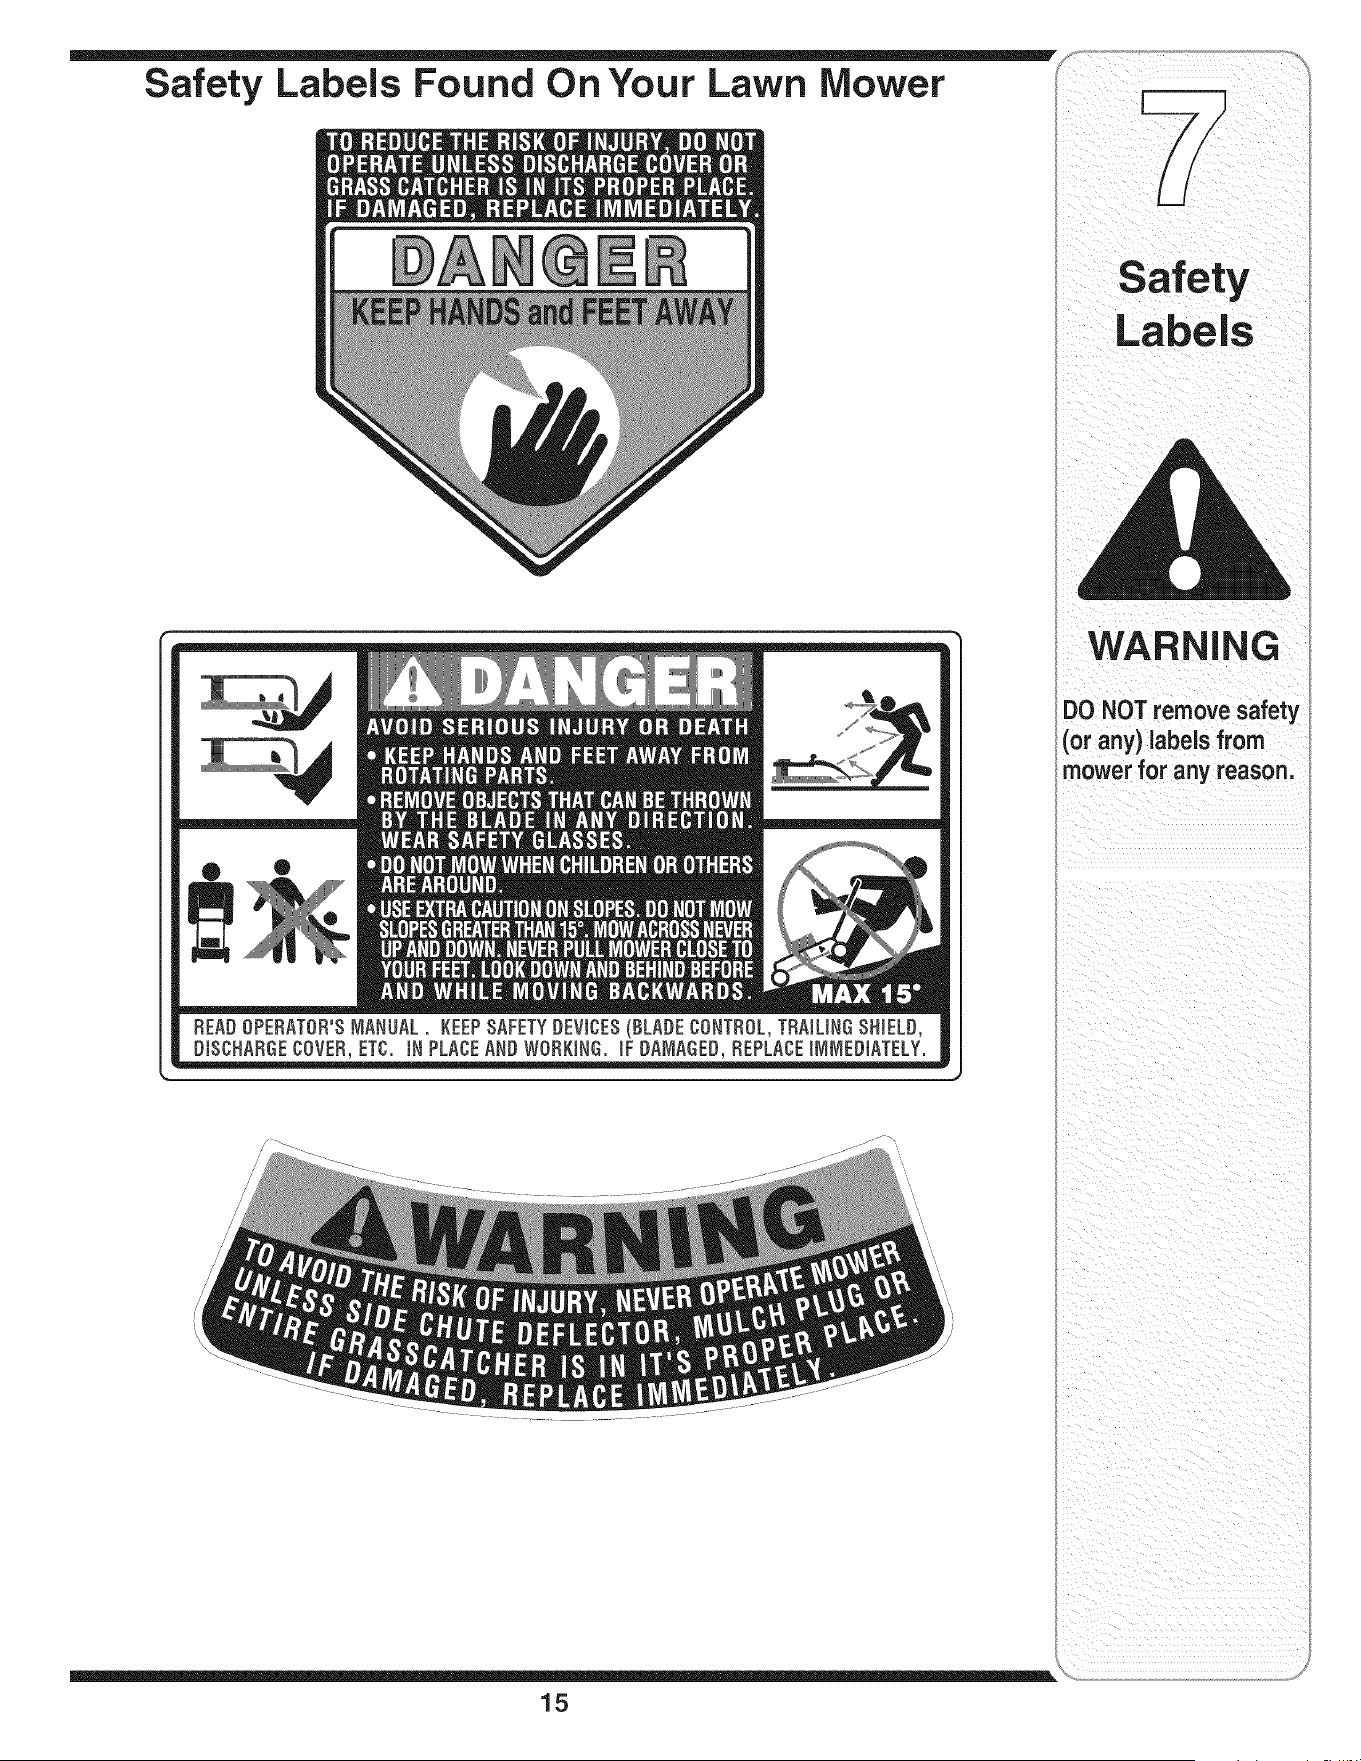
Safety Labels Found On Your Lawn Mower
/
/
/
15
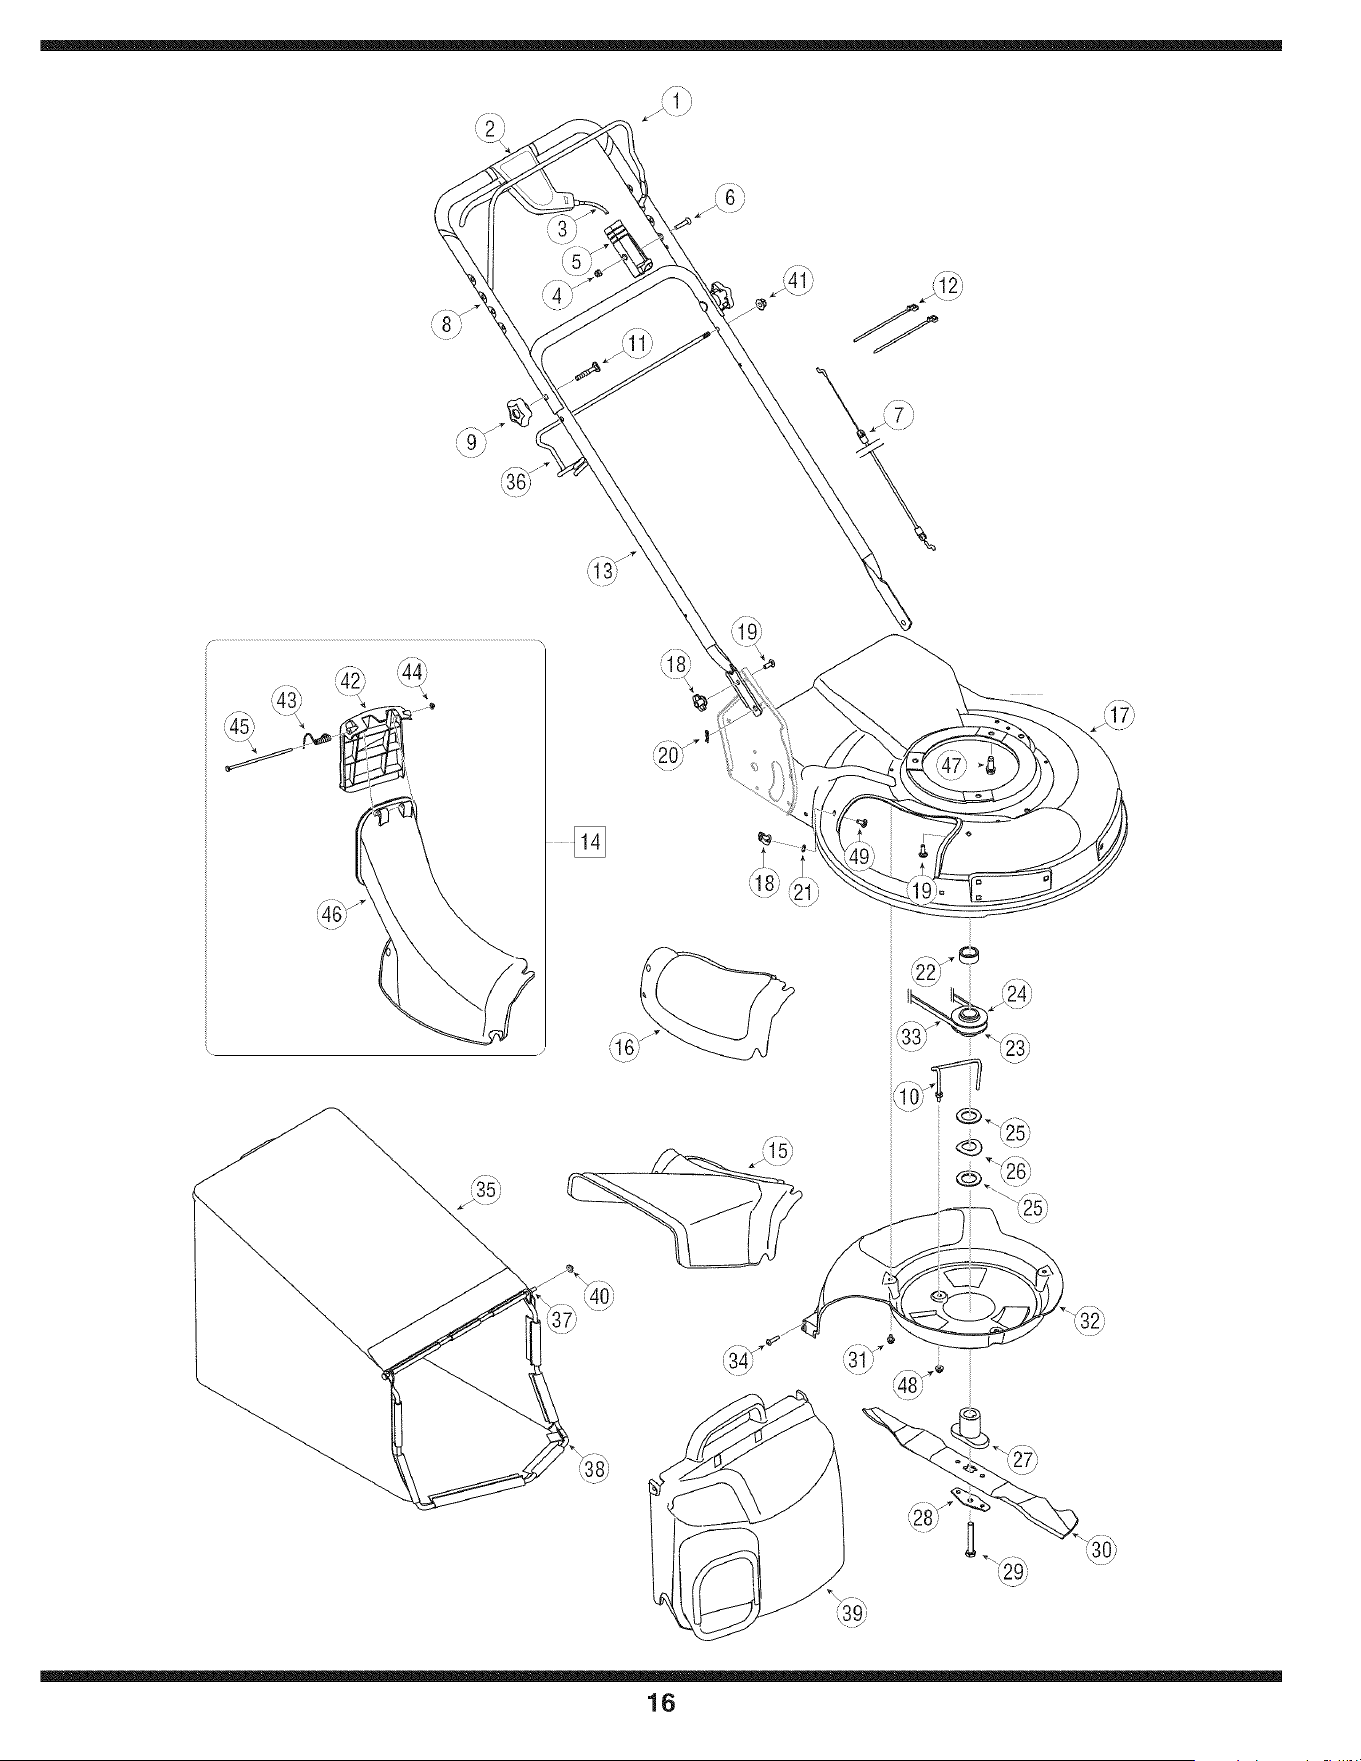
16

747-0824 ControlLever 736-04173 SpringWasher1.005x 1.825x .048
2 753-05096A Control LeverAssembly 27 748-04082 BladeAdapterKit
3 746-0711B DriveCable51" 28 736-0524B BladeBellSupport
4 712-0324 TopLock Nut 1/4-20 29 710-1257 Hex Bolt3/8-24x 2.5
5 746-0883 ControlHousing 30 742-0741 21" MulchingBlade
6 710-1270 OvalC-SunkScrew 31 710-0653 Screw1/4-20x 3.75
7 746-0557 ControlCable47" 32 731-1828 Baffle
8 749-0439D UpperHandle 33 754-0460 Belt3/8 x 39.24
9 720-04072 Star Knob 34 710-0969 HLScrew#12-16x 1.00
10 747-04451 Belt Keeper 35 664-0074 GrassCatcherAssembly
11 710-1174 CarriageBolt5/16-18x 2.0 36 747-0940A SupportRodw/Rope Guide
12 726-0240 CableTie 37 747-0939 PivotRod
13 749-0907B LowerHandle 38 747-0937 Grassbag Frame
14 631-0066 ChuteAssembly 39 631-0071 GrassbagCover
15 731-1832 Side-DischargeChute 40 726-0106 CapNut
16 731-1833A MulchCover 41 712-04063 Hex Nut5/16-18
17 782-0078B Deck21" 42 731-1874 ChuteDoor
18 712-0397 Wing Nut 43 732-0819 TorsionSpring
19 710-0703 CarriageBolt1/4-20x.75" 44 726-0111 PushCap
20 714-0104 CotterPin 45 747-0965 PivotRod
21 726-0233 Push Nut .25x ID x .50OD 46 731-1713B DischargeChute
22 750-04438A SleeveSpacer25mmx 1.375x.440 47 710-0654A SeresScrew3/8-16x 1.00
23 756-04160 Half Pulley:Key25ramx 2.62OD 48 712-04064 FlangeLockNut, 14-20
24 756-04161 Half Pulley:Upper25mmx 2.62 49 710-0134 CarriageBolt 1/4-20x.62
25 736-0250 Fiat Washer1.00x 1.75x .107
To order Genuine
Factory Parts, call at
(800) 800-7310
or visit us online at
www.yardman.com
iMPORTANT
Fora proper working
machine, use Factory
Approved Parts.
V-BELTS are specially
designed to engage
and disengage safely.
A substitute (non OEM)
V-Belt can be danger-
ous by not disengaging
:ompletely.
17
@
18

731-1901A TrailShield 682-7528 ChainCoverAssembly
2 732-0842 TrailShieldWire 30 741-0324A FlangeBearing.506 ID x .590Lg
3 736-0264 FlatWasher.330ID x.630OD 31 682-7526 TransmissionAxle Assembly
4 714-0104 CotterPin 32 618-0263A TransmissionAssemblyComplete
5 732-0306 CompressionSpring 33 710-0604A HexScrew5/16-18
6 734-2044 Wheel9 x2.125 34 713-0453 Chain
7 712-0414 TopLockTabWeld Nut 1/4-20 35 638-0012 RearAxleAssembly
8 16855 RatchetPawlPlate 36 741-0522
9 10622B PlasticSpringRatchet 37 732-0832
10 748-0381 PawlRH 38 750-0151
748-0188B PawlLH 39 710-1315
11 738-0137A ShoulderScrew.3401Dx.285OD 40 711-0835
FlangeBearing.506 ID x .715Lg
TorsionSpring
Spacer.550 IDx .750OD
Screw3/8-16x .25
ClevisPin.50 Diax 4.82 Lg.
12 748-0318 WheelRatchet 41 750-0807 Spacer.385 IDx.624 OD
13 736-0270 BellWasher.265ID x.75OD 42 782-0568 SpringBracket:HeightAdjustment
14 710-0751 HexCapScrew1/4-20x.620 43 710-1652 Screw1/4-14x .825
15 737-3000 GreaseFitting 44 714-0474 CotterPin
16 736-0931 FiatWasher.203ID x.403OD 45 682-3053 HandleBracketAssembly-LH
17 747-0924 WheelPinLock 46 682-3052 HandleBracketAssembly- RH
18 682-9020A CasterAssemblyRH 47 725-0157 CableTie
682-9021A CasterAssemblyLH 48 710-1348 Screw 1/4-14x.500
19 682-9024 CasterBracketAssemblyRH 49 710-0260A CarriageBolt5/16-18x.62
682-9026 CasterBracketAssemblyLH 50 711-1146 CasterAxle
20 720-0223 Grip 51 712-0397 Wing Nut
21 732-0803A SpringLever 52 712-04063 FlangeLockNut5/16-18
22 738-0529 ShoulderNut.825x.165 Lg. 53 726-0214 PushCap
23 736-0369 FiatWasher.508IDx 1.00D 54 736-0232 WaveWasher.531ID x.781 OD
24 782-0566B PivotArm Assembly 55 736-0366 FiatWasher.640ID x 1.12OD
25 750-0515 Spacer.510IDx.70 OD 56 741-0685 FlangeBearing
26 741-0978 SleeveBearing.504 ID x .830OD 57 734-1857 Wheel7 x 2
27 750-1056 ShoulderSpacer 58 731-1886 Hubcap- Spokew/ Hole
28 710-0653 TapScrew1/4-20x.375 59 731-1426A Hubcap- RadialSpoke
To order Genuine
actoryparts; at
(800) 800,7310
or Visitus onlineat
www.yardr.an:com
ii i _iI_ ii
19

MANUFACTURER'S LiMiTED WARRANTY FOR
YaRD-MaN,
The limitedwarrantyset forth belowisgivenby MTDLLCwith respectto
newmerchandisepurchasedandusedin the UnitedStates,itsposses-
sionsandterritories.
"MTD"warrantsthisproductagainstdefectsin materialandworkmanship
for a periodof two(2) yearscommencingonthe dateof originalpurchase
andwill, at its option,repairor replace,free of charge,anypart foundto
bedefectiveinmaterialsor workmanship.This limitedwarrantyshallonly
applyif this producthas beenoperatedandmaintainedin accordance
withthe Operator'sManualfurnishedwith the product,and has not been
subjectto misuse,abuse,commercialuse,neglect,accident,improper
maintenance,alteration,vandalism,theft, fire,water,or damagebecause
of otherperilor naturaldisaster.Damageresultingfromthe installationor
useof any part,accessoryorattachmentnotapprovedby MTDfor use
withthe product(s)coveredbythis manualwill voidyourwarrantyas to
any resultingdamage.
Normalwearpartsarewarrantedto be free fromdefects in materialand
workmanshipfor a periodof thirty (30) days fromthe dateof purchase.
Normalwearpartsinclude,butare notlimitedto itemssuch as: batteries,
belts,blades,bladeadapters,grass bags, riderdeck wheels,seats, snow
throwerskidshoes,shaveplates,augerspiralrubberandtires.
HOWTO OBTAINSERVICE:Warrantyserviceisavailable,WITH
PROOFOF PURCHASE,throughyour localauthorizedservicedealer.To
locatethe dealerin yourarea,checkyourYellowPages,or contact MTD
LLCat RO.Box 361131,Cleveland,Ohio44136-0019,or call 1-800-800-
7310or logon to ourWebsite at www.mtdproducts.com.
Thislimitedwarrantydoesnot providecoveragein the followingcases:
a. Theengineor componentpartsthereof.Theseitemsmaycarrya
separatemanufacturer'swarranty.Referto applicablemanufacturer's
warrantyfor termsand conditions.
b. Logsplitterpumps,valves,and cylindershavea separateoneyear
warranty.
c. Routinemaintenanceitemssuch as lubricants,filters, bladesharpen-
ing,tune-ups,brakeadjustments,clutch adjustments,deck
adjustments,and normaldeteriorationof the exteriorfinish due to use
orexposure.
d. Servicecompletedby someoneotherthananauthorizedservice
dealer.
e. MTDdoesnot extendanywarrantyfor productssoldor exported
outsideof the UnitedStates,its possessionsand territories,
exceptthosesold throughMTD'sauthorized channelsof export
distribution.
f. Replacementpartsthat are not genuineMTDparts.
g. Transportationchargesand servicecalls.
No impliedwarranty,includingany impliedwarranty of merchant-
ability of fitness for a particularpurpose,applies after the applicable
periodof express written warranty above as to the partsas identi-
fied. No other express warranty, whether written or oral, except as
mentionedabove,givenby any personor entity,includinga dealer
or retailer,with respect to any product,shallbind MTD. Duringthe
periodof the warranty, the exclusive remedyis repairor replacement
of the productas set forth above.
The provisionsas set forth in this warranty providethe sole and
exclusive remedy arising from the sale. MTDshall not be liable
for incidentalor consequential loss or damage including,without
limitation, expenses incurredfor substitute or replacementlawn care
services or for rentalexpenses to temporarily replacea warranted
product.
Somestatesdo not allowtheexclusionor limitationof incidentalor
consequentialdamages,or limitationson howlonganimpliedwarranty
lasts,so the aboveexclusionsor limitationsmay notapplyto you.
In no eventshall recoveryof any kind be greaterthan theamountof the
purchasepriceof the productsold.Alterationof safetyfeatures of the
productshall void this warranty. Youassumethe risk andliabilityfor
loss, damage,or injuryto youandyour propertyand/orto others and their
propertyarisingout of the misuseor inabilityto use theproduct.
Thislimitedwarrantyshall notextendto anyoneotherthanthe original
purchaseror to the personfor whom itwaspurchasedas a gift.
HOWSTATELAW RELATESTO THISWARRANTY: This limitedwar-
rantygivesyouspecificlegalrights,andyou mayalso haveother rights
whichvaryfromstateto state.
IMPORTANT: OwnermustpresentOriginalProofof Purchaseto obtain
warrantycoverage.
MTD LLC, P.O. BOX 361131 CLEVELAND, OHiO 44136-0019; Phone: 1-800-800-7310