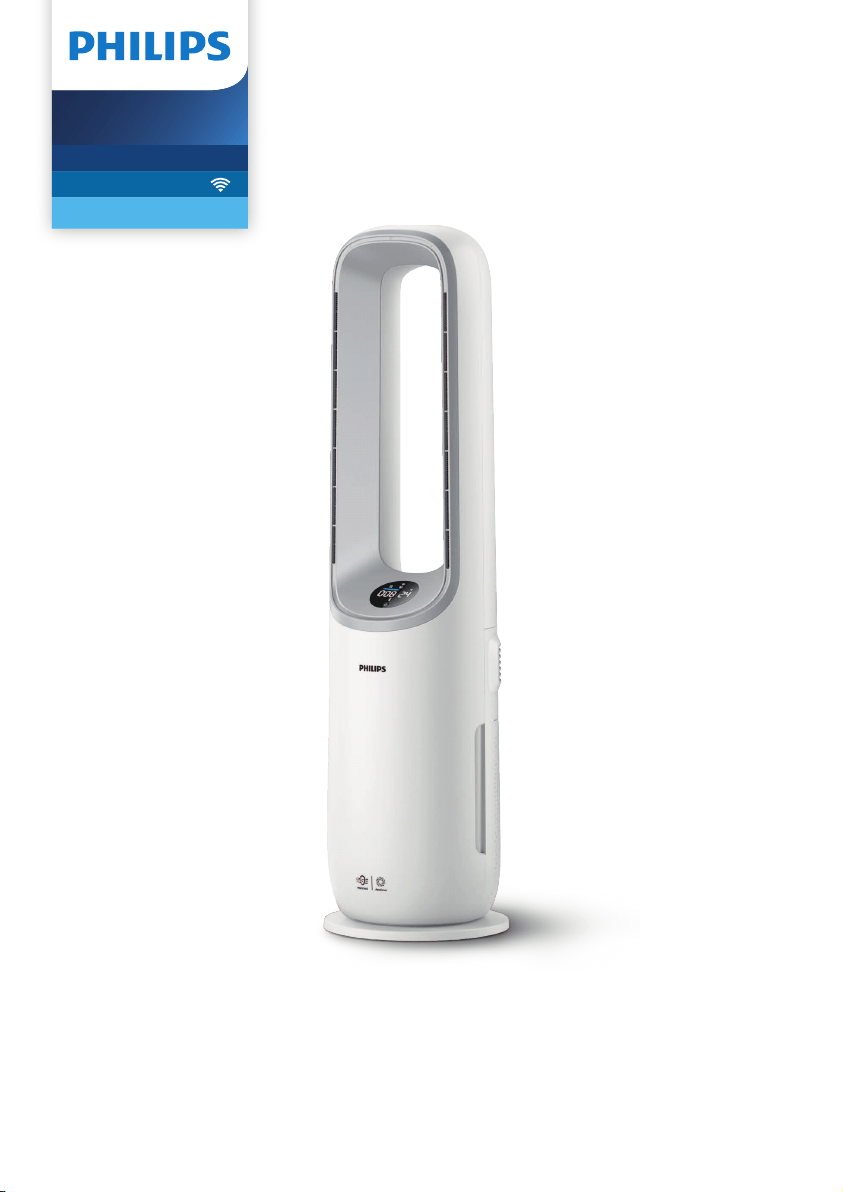
User manual
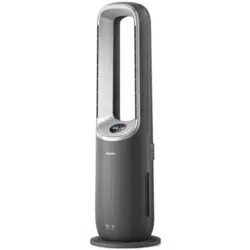
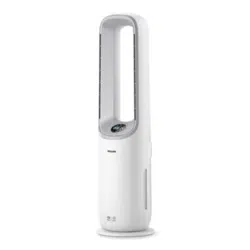
Air Performer
7000i Series
2-in-1 Air Puri�er and Fan
AMF765

Contents
1 Important �����������������������������������������������������������������������������������������1
Safety ����������������������������������������������������������������������������������������������������������������������������������������������� 1
Electromagnetic elds (EMF) ����������������������������������������������������������������������������������������������������� 3
Recycling ����������������������������������������������������������������������������������������������������������������������������������������� 3
2 YourAirPerformer �������������������������������������������������������������������������4
Product overview ������������������������������������������������������������������������������������������������������������������������� 4
Display overview ��������������������������������������������������������������������������������������������������������������������������� 5
Remote control overview ����������������������������������������������������������������������������������������������������������� 6
3 Gettingstarted �������������������������������������������������������������������������������7
Installing the lter ������������������������������������������������������������������������������������������������������������������������ 7
Using the remote control for the rst time ���������������������������������������������������������������������������� 7
Understanding the Wi-Fi indicator ������������������������������������������������������������������������������������������ 7
Wi-Fi connection ��������������������������������������������������������������������������������������������������������������������������� 8
4 UsingtheAirPerformer ����������������������������������������������������������������9
Understanding the air quality bar �������������������������������������������������������������������������������������������� 9
Turning on and o ����������������������������������������������������������������������������������������������������������������������10
Oscillation �������������������������������������������������������������������������������������������������������������������������������������10
Function switch ���������������������������������������������������������������������������������������������������������������������������10
Setting the fan speed ����������������������������������������������������������������������������������������������������������������11
Turbo mode ����������������������������������������������������������������������������������������������������������������������������������11
Mode switch ���������������������������������������������������������������������������������������������������������������������������������12
Setting the child lock �����������������������������������������������������������������������������������������������������������������12
Setting the timer ������������������������������������������������������������������������������������������������������������������������� 13
Light sensor ���������������������������������������������������������������������������������������������������������������������������������13
5 Cleaningandmaintenance ������������������������������������������������������� 13
Cleaning schedule ����������������������������������������������������������������������������������������������������������������������13
Cleaning the body of the Air Performer �������������������������������������������������������������������������������14
Cleaning the particle sensor ����������������������������������������������������������������������������������������������������14
Cleaning the surface of the lter �������������������������������������������������������������������������������������������� 14
Replacing the lter ���������������������������������������������������������������������������������������������������������������������15
Filter reset �������������������������������������������������������������������������������������������������������������������������������������16
Replacing the battery ����������������������������������������������������������������������������������������������������������������17
6 Storage ������������������������������������������������������������������������������������������� 18
7 Troubleshooting �������������������������������������������������������������������������� 18
8 Warrantyandsupport ��������������������������������������������������������������� 20
Order parts or accessories ��������������������������������������������������������������������������������������������������������20

1EN
1 Important
Safety
Read this user manual carefully before you use the appliance, and save it for future
reference�
To ensure the best performance, please ensure your Air Performer is upgraded to
the latest version. You can do this upgrade via the Air+ app.
Danger
•
Do not let any liquid or ammable detergent enter the appliance, to avoid
electric shock and/or a re hazard.
Warning
•
This appliance can be used by children aged from 8 years and above and
persons with reduced physical, sensory or mental capabilities or lack of
experience and knowledge if they have been given supervision or instruction
concerning use of the appliance in a safeway and understand the hazards
involved.
•
Children of less than 3 years should be kept away unless continuously
supervised.
•
Children shall not play with the appliance.
•
Cleaning and maintenance shall not be made by children without supervision.
•
Do not block the air inlet and outlet, e.g. by placing items on the air outlet or in
front of the air inlet.
•
Do not insert ngers, sticks or other objects into the machine, in order to avoid
electric shocks, physical injury or re.
•
Do not use the appliance near gas appliances, replaces.
•
Do not spray any ammable materials such as insecticides or fragrance around
the appliance.
•
Do not use if there are visible signs of damage to the device, the plug, the
power cord.
•
Do not use this device if it has been dropped.
•
If the power cord is damaged, you must have it replaced by Philips, a service
center authorized by Philips, or similarly qualied persons in order to avoid a
hazard.
Caution
•
Only use the original Philips lter, otherwise the ltration performance cannot
be guaranteed.
•
The device must not be located immediately below a socket outlet.
•
Always place and use the appliance on a dry, stable, and horizontal surface.
•
Do not use the appliance in surroundings with high humidity such as the
bathroom, toilet, kitchen, swimming pool, or any outdoor environment.
2 EN
•
Do not sit or stand on the appliance. Do not knock against appliance. Do not
place anything on top of the appliance.
•
Always unplug the appliance when you want to move, clean appliance, replace
the lter or carry out other maintenance.
•
When you turn on device, always keep lter in it.
•
The appliance is only intended for household use under normal operating
conditions.
•
Suggest to not use this appliance when you smoke, or use smoke type insect
repellents or burning incense, etc. it would impact purication performance,
and lter lifetime.
•
The appliance does not remove carbon monoxide (CO) or radon (Rn). It cannot
be used as a safety device in case of accidents with combustion processes and
hazardous chemicals.
WARNING
THIS PRODUCT CONTAINS A BUTTON BATTERY
If swallowed, a lithium button battery can cause severe or fatal injuries within 2
hours.
Keep batteries out of reach of children.
If you think batteries may have been swallowed or placed inside any part of the
body, seek immediate medical attention.
•
If the remote control is idle for a long time, please remove the battery from the
remote control to avoid battery leakage.
•
If leaking uid from the battery accidentally enters the eye, rinse the eye out
with plenty of clean water, and then seek immediate medical attention.
•
If leaking uid from the battery comes into contact with the skin or clothes,
please rinse with plenty of clean water immediately.
•
This is a class 3R laser product, avoid direct eye exposure. The laser component
is part of particle sensor, cannot be touched or saw in normal use.
•
Max output 5.0mW, wavelength 650nm, continuous wave, collimated beam.
Hereby, DAP B.V. declares that the radio equipment type AMF765 is in compliance
with Directive 2014/53/EU. The full text of the EU declaration of conformity is
available at the following internet address: www.philips.com.
Standard WiFi interface based on 802.11b/g/n at 2.4 GHz with a maximum output
power of 31.62 mW EIRP.
3EN
Electromagneticelds(EMF)
This appliance complies withtheapplicable standards and regulations regarding
exposure to electromagnetic elds.
Recycling
This symbol means that this product shall not be disposed of with normal
household waste (2012/19/EU).
This symbol means that this product contains disposable batteries which
shall not be disposed of with normal household waste (2006/66/EC).
Follow your country’s rules for the separate collection of electrical and
electronic products and batteries. Correct disposal helps prevent negative
consequences for the environment and human health.
Removing disposable batteries
Only the remote control contains disposable battery.
To remove disposable batteries, see the instructions for placing and/or removing
batteries in the user manual.
Always remove empty disposable batteries from the product. Take any necessary
safety precautions when you dispose of batteries.
4 EN
2 Your Air Performer
Congratulations on your purchase, and welcome to Philips!
To fully benet from the support that Philips oers, register your product at
www�philips�com/welcome�
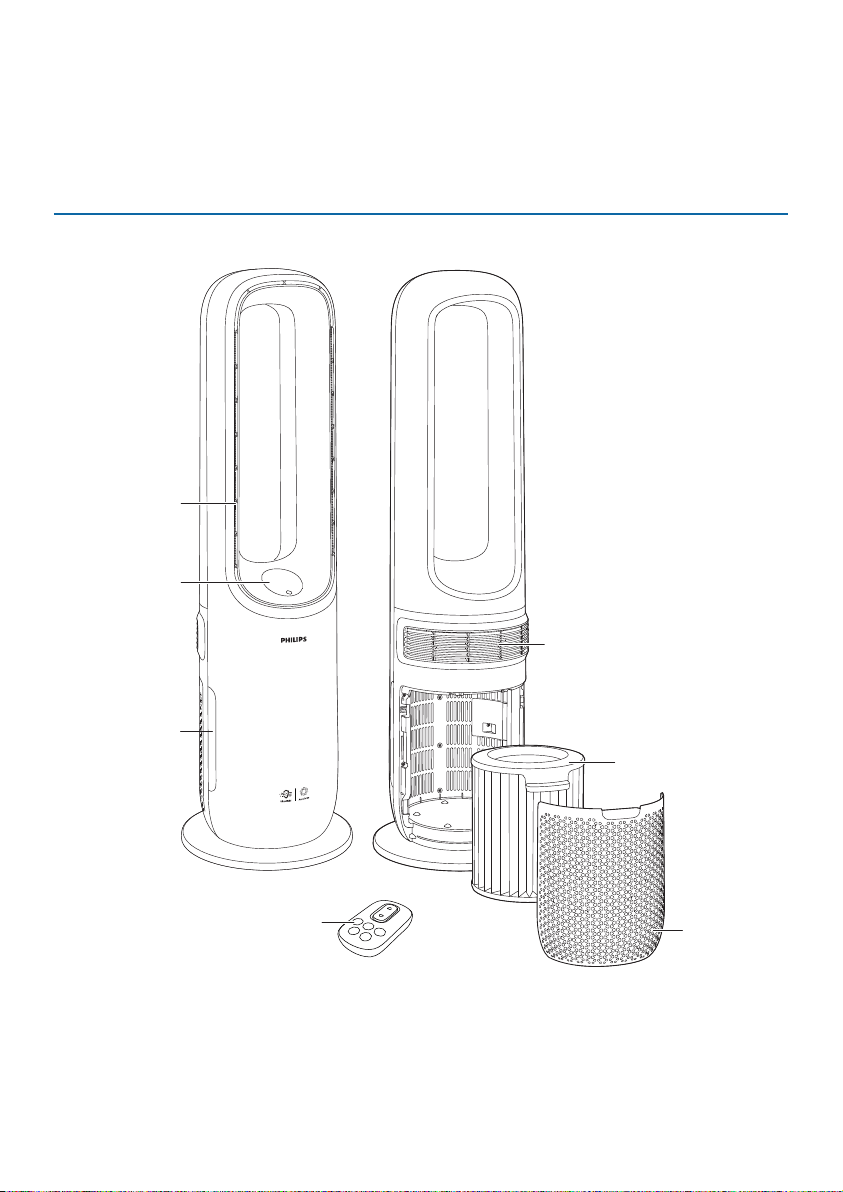
Product overview
Control panel
Particle sensor
Remote control
Back cover
Air outlet
(font)
Circulation air outlet
(back)
Filter (FYM860)
5EN
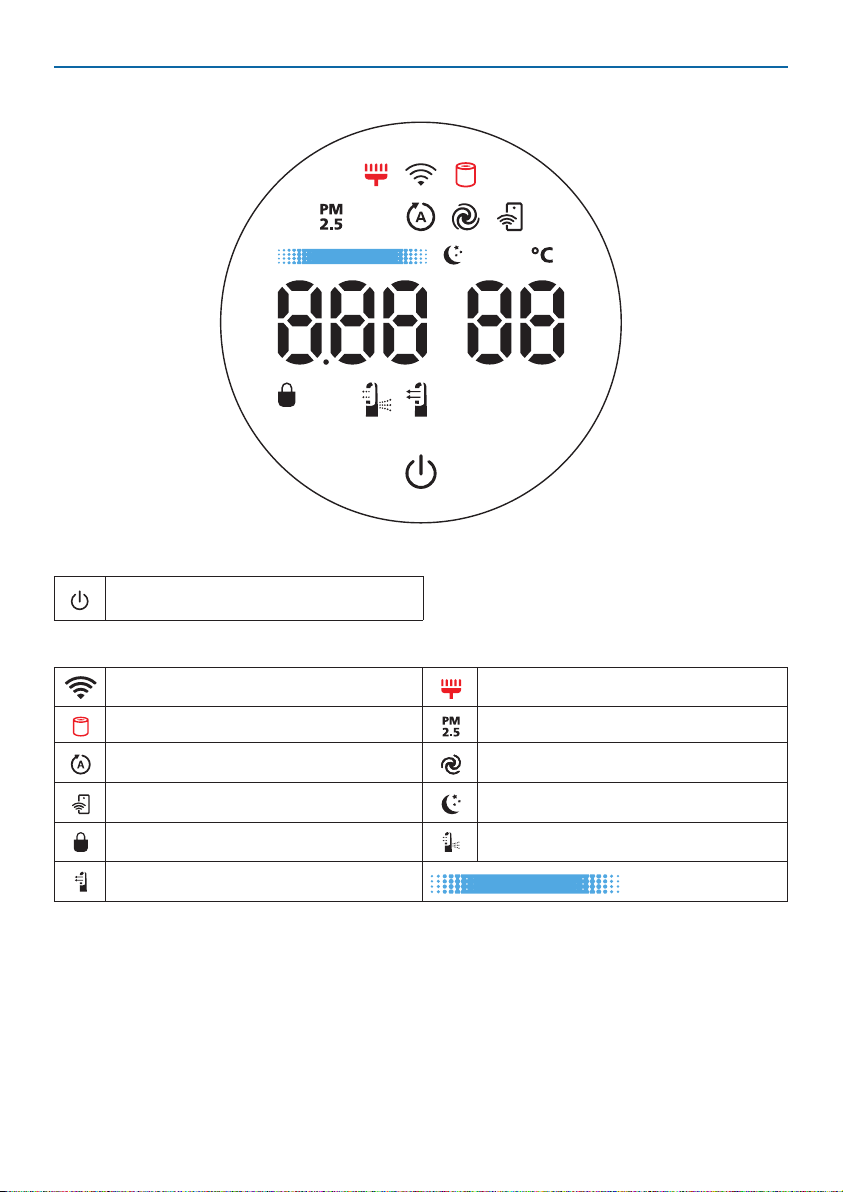
Display overview
Control button
Power on/o button
Display panel
Wi-Fi indicator Filter cleaning alert
Filter replacement alert PM2.5 display
Auto mode Turbo mode
App-operated mode Sleep mode
Child lock indicator Circulation function
Fan function
Air quality bar
6 EN
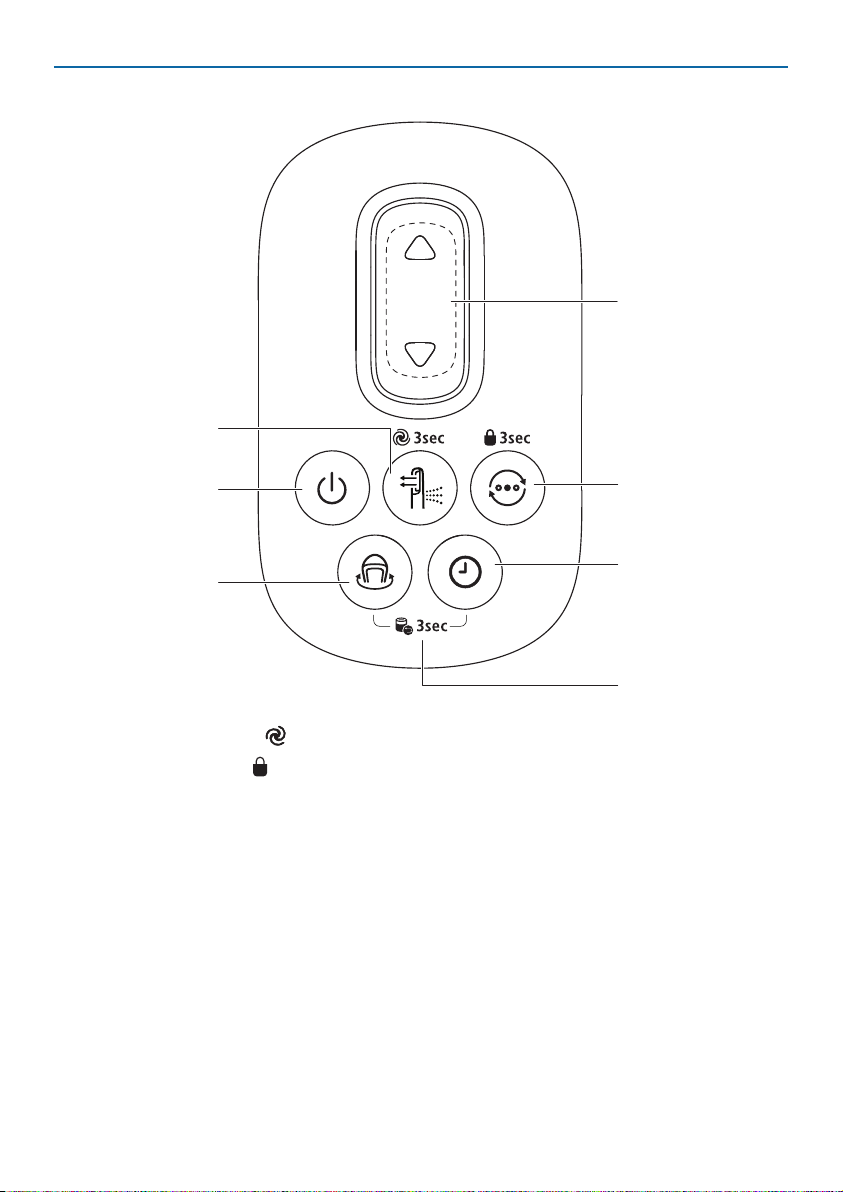
Remote control overview
Fan speed selection
Mode switch**
Power on/o
Oscillation
Function switch*
Timer
*Press 3s: Turbo mode ( )
**Press 3s: Child lock (
)
Filter reset
7EN
3 Getting started
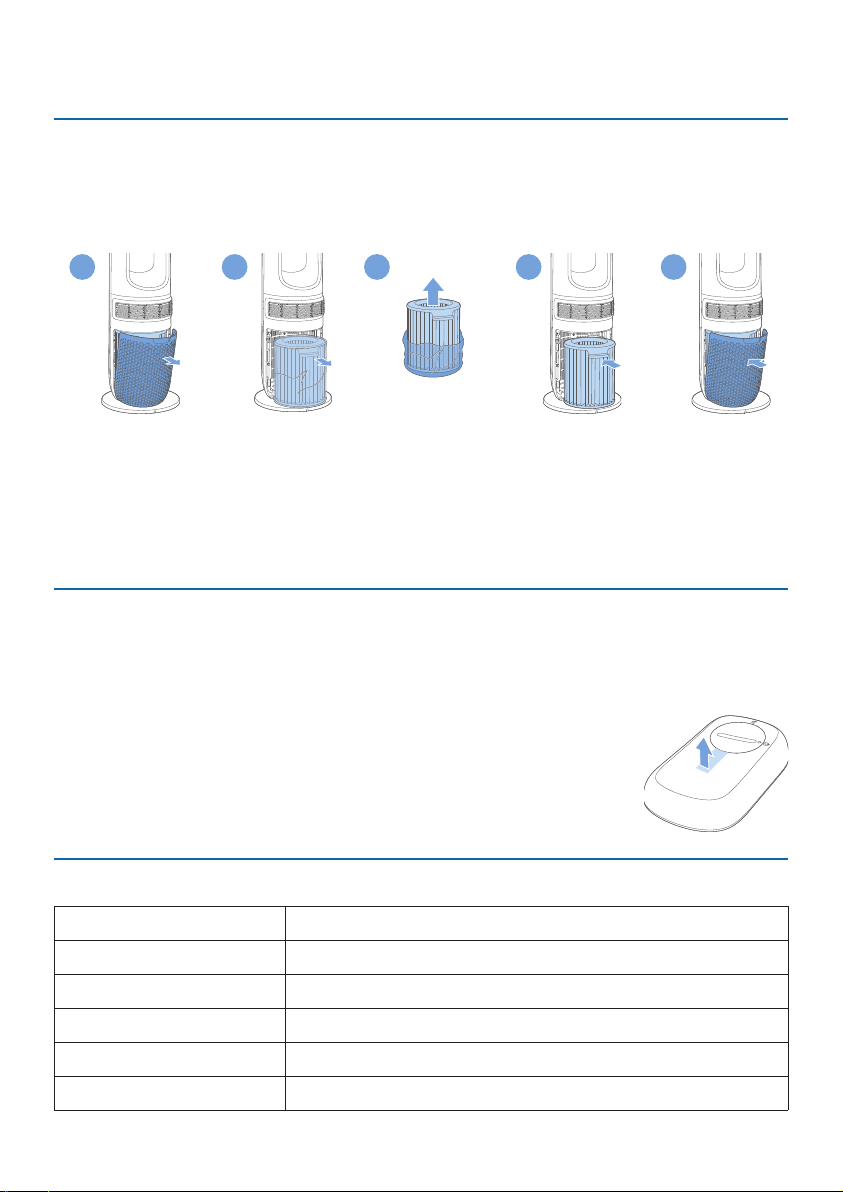
Installingthelter
Remove all packaging from the lter before rst use.
Note:MakesuretheAirPerformerisunpluggedfromtheelectricaloutletbeforeinstallingthe
lter.
1
2
3
4
5
1 Pull the back cover and remove it from the appliance.
2 Pull out the lter from the appliance.
3 Remove all packaging materials from the air purication lter.
4 Put the lter back into the appliance.
5 Reattach the back cover.
Using the remote controlforthersttime
Caution:
•
Riskofproductdamage!Whentheremotecontrolisnotusedforlongperiods,removethe
battery�
•
Batterycontainschemicalsubstances,sotheyshouldbedisposedofproperly.
•
Plug the appliance into the power outlet; do not use a power strip�
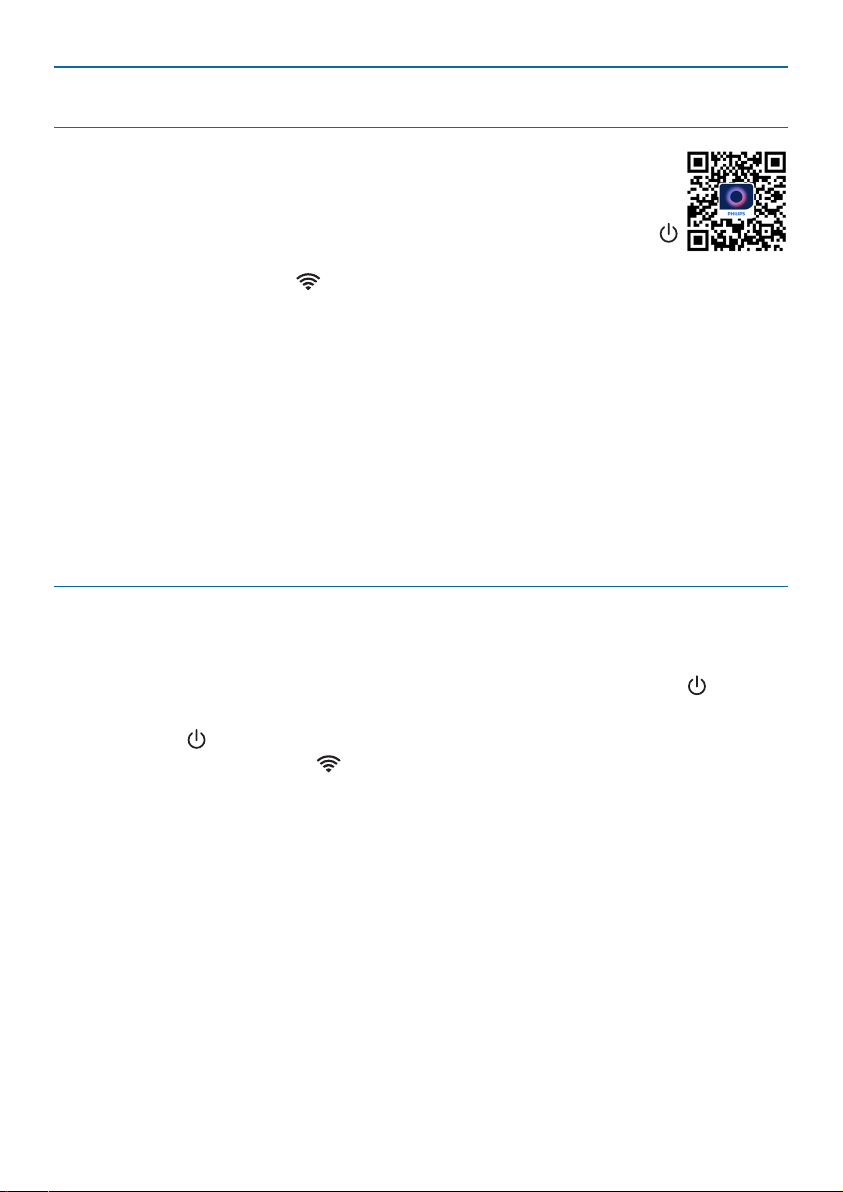
1 Pull out the plastic lm on the remote control to activate the
battery.
2 You can place the remote control on the top of the appliance,
and it snaps into place automatically.
UnderstandingtheWi-Fiindicator
Wi-Fiiconstatus Wi-Ficonnectionstatus
Blinking orange Connecting to the smartphone
Stable orange Connected to the smartphone
Blinking white Connecting to the server
Stable white Connected to the server
O Wi-Fi function disabled
8 EN
Wi-Ficonnection
SettinguptheWi-Ficonnectionforthersttime
1 Download and install the Philips Air+ app from the App Store or
Google Play�
2 Put the plug of the Air Performer in the power socket and touch
to turn on the Air Performer.
» The Wi-Fi indicator blinks orange for the rst time.
3 Make sure that your smartphone or tablet is successfully connected to your
Wi-Fi network.
4 Launch the Philips Air+ app and click on “Connect a New Device” or press
the “+” button at the top of the screen. Follow the onscreen instructions to
connect the Air Performer to your network.
Note:
•
TheseinstructionsareonlyvalidwhentheAirPerformerisbeingsetupforthersttime.Ifthe
networkhaschangedorthesetupneedstobeperformedagain,seeChapter“ResettheWi-Fi
connection” on page 8�
•
IfyouwanttoconnectmorethanoneAirPerformertoyoursmartphoneortablet,youhaveto
do it one by one�
•
MakesurethatthedistancebetweenyoursmartphoneortabletandtheAirPerformerisless
than 10 m without any obstructions�
ResettheWi-Ficonnection
Note:
•
ResettheWi-Ficonnectionwhenyourdefaultnetworkhaschanged.
1 Put the plug of the Air Performer in the power socket and press the button
to turn on the Air Performer.
2 Long press
on the appliance for 7 seconds until it powers o and powers on
again, the Wi-Fi indicator blinks orange.
» The Air Performer enters pairing mode.
3 Follow the steps 3-4 in “SettinguptheWi-Ficonnectionforthersttime”
section.
9EN
4 Using the Air Performer
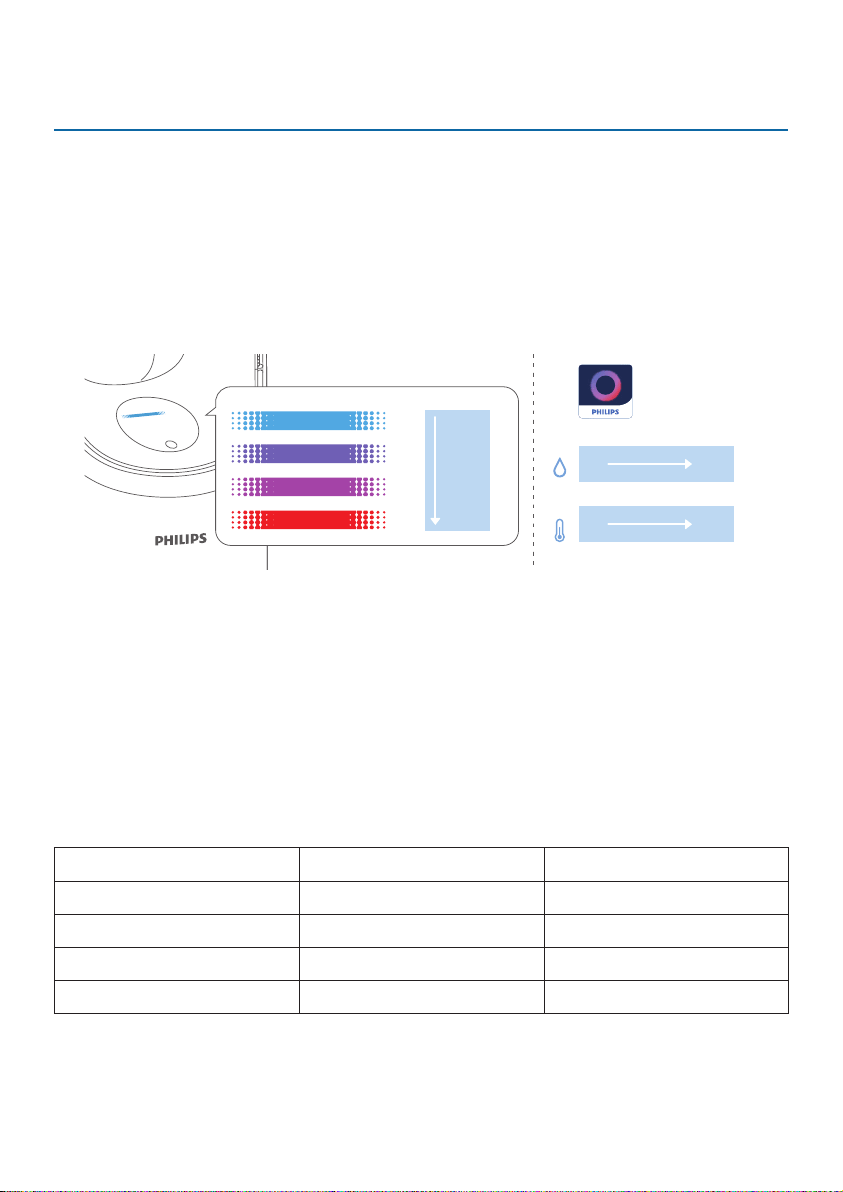
Understanding the air quality bar
The air quality bar automatically goes on when the Air Performer is switched on,
and lights up all colors in sequence. After approximately 30 seconds, the particle
sensor selects the color that corresponds to the surrounding air quality of airborne
particles.
The color of the air quality light is determined by PM2.5 (particles smaller than 2.5
microns). Relative Humidity (RH) level is only available through the app.
PM2.5
(μg/m
3
)
≤12
13-35
36-55
>55
-9 45℃
℃
RH
0 100%
Air+
PM2.5
AeraSense sensing technology accurately detects and quickly responds to even
the slightest particle change in the air. It provides you with reassurance with real-
time PM2.5 feedback.
Most of the indoor air pollutants fall under PM2.5 – which refers to airborne
particle pollutants smaller than 2.5micrometers. Common indoor sources of
ne particles are tobacco smoke, cooking, and burning candles. Some airborne
bacteria and the smallest mold spores, pet allergen and dust mite allergen
particles also fall under PM2.5.
PM2.5level Air quality light color Air quality level
≤12 Blue Good
13-35 Blue-purple Fair
36-55 Purple-red Poor
>55 Red Very poor
10 EN
Turningonando
Note:
•
Foroptimumpuricationperformance,closedoorsandwindows.
•
Keep curtains away from the air inlet or air outlet�
•
Plug the appliance into the power outlet; do not use a power strip�
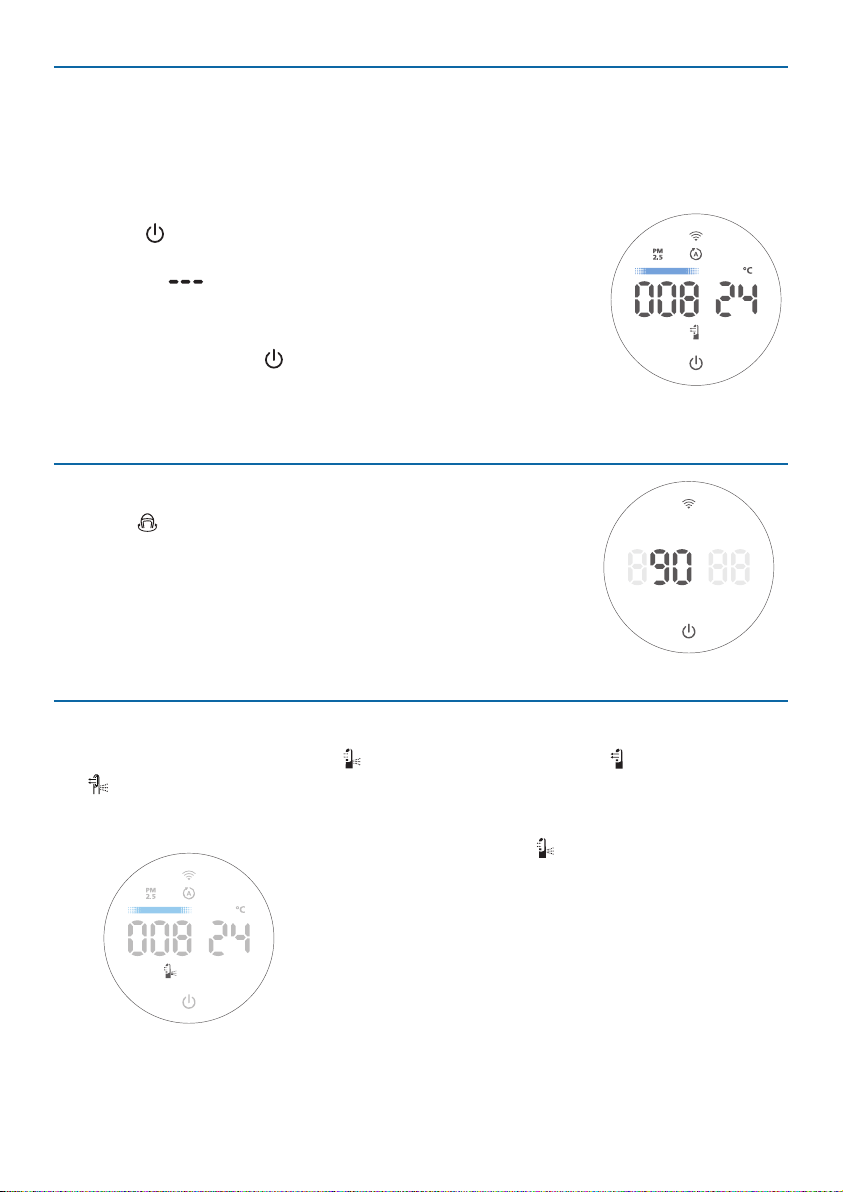
1 Plug the Air Performer into the power socket.
2 Touch
to switch on the Air Performer.
» The Air Performer beeps.
» The “ ” displays on the screen during warming
up. Then the Air Performer shows the PM2.5 level
after measuring the air quality.
3 Touch and hold the
button for 3 seconds to switch o
the Air Performer.
Note:IftheAirPerformerstaysconnectedtotheelectricaloutletafterturningitOFF,theAir
Performer will operate under the previous settings when turned ON again�
Oscillation
Press the button to activate the oscillation feature in your
Air Performer, the appliance can oscillate at these angles:
45°, 90°,180°, 270°, 350° and OFF.
» The oscillation angle displays on the screen.
» If no operation is performed within 3 seconds, the
appliance goes back to normal display.
Functionswitch
You can choose the Circulation (
) function, or Fan function ( ) by pressing
the button. You can adjust the fan speed manually; see section "Setting fan
speed�"
Circulation function (
):
It distributes diused airow for optimal
air circulation by opening the back outlet,
maximizing purication performance and
reducing cooling sensation. At higher speeds, a
soft current of airow will blow harder through
the front outlet to increase cleaning power.

11EN
Fan function ( ):
Creates a powerful, clean airow that feels
natural and pleasant. Thanks to its bladeless
design, it does not blow gusts of air, creating a
consistent stream of fan airow.
Setting the fan speed
You can manualy set the fan speed by pressing the arrow
button (
/
) on the remote control, which ranges from
1 to 10�
» If no operation is performed within 3 seconds, the
appliance goes back to the normal display.
Turbo mode
Note:
•
Thismodeswitchestheappliancetocirculationmodeinordertomaximizepurication
performance�
The appliance opens all air outlets and cleans the air at
maximum speed. Press and hold the button for 3 seconds
to active Turbo mode ( ).
» The indicator displays on the screen.
» The appliance automatically switches to the
Circulation function and runs in the highest speed.
12 EN
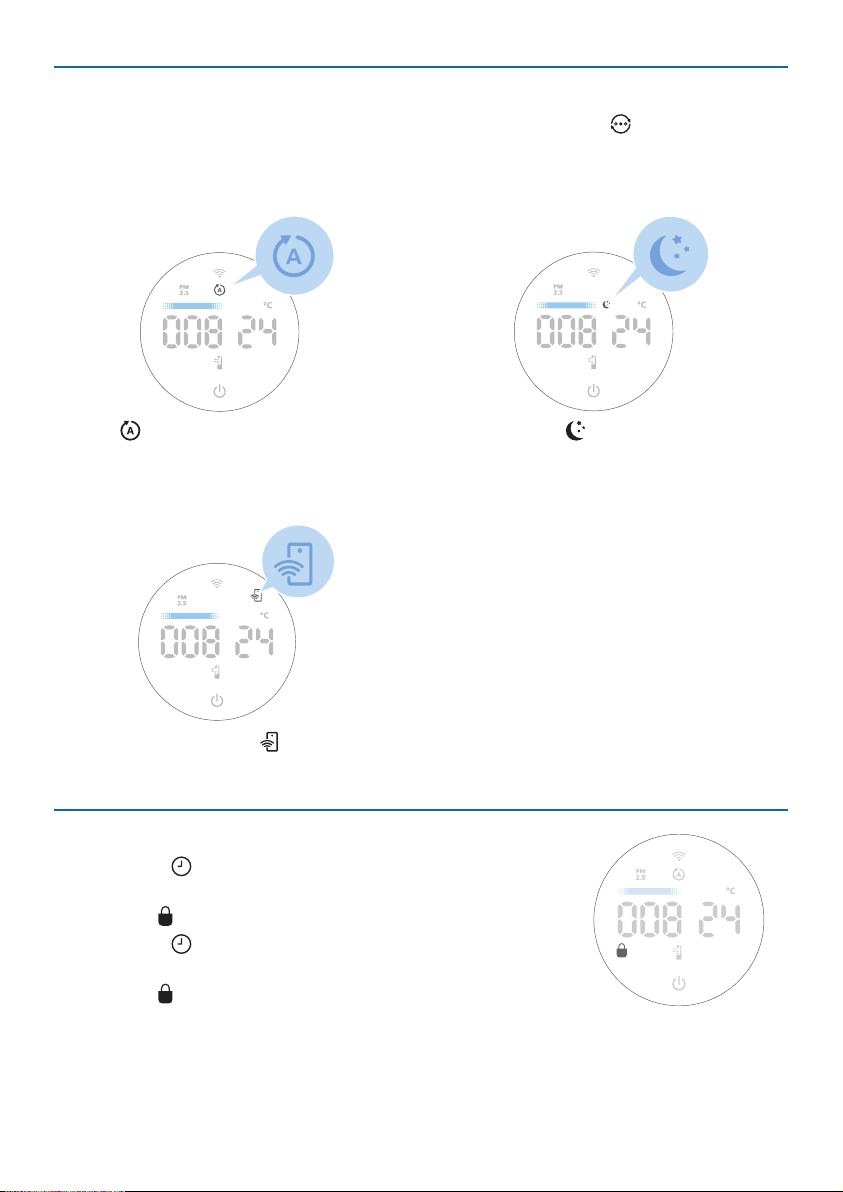
Modeswitch
You can choose the Auto mode or Sleep mode by pressing the button.
Note:
•
TheApp-operatedmodeisavailableONLYthroughtheappaftertheWi-Ficonnectionis
sucessful�
Auto( ):The appliance automatically
adjusts settings to deliver the best
performance.
Sleepmode( ): The appliance
operates quietly at a low speed. After
3 seconds, the screen's light switches
o.
App-operatedmode( ):The appliance is operating a mode that is only
available through the app.
Settingthechildlock
1 Press the button for 3 seconds to activate the child
lock.
» The
displays on the screen.
2 Press the
button for 3 seconds again to deactivate
the child lock.
» The
disappears from the screen.

13EN
Setting the timer
With the timer, you can let the appliance operate for a
set number of hours. When the set time has elapsed, the
appliance will automatically switch o.
1 Press the
button repeatedly to choose the number of
hours you want the appliance to operate �
» 0�5h, 1h, 4h, or 8h is available.
2 To deactivate the timer, press the button repeatedly
until OFF displays on the screen.
Light sensor
With the light sensor:
•
The control panel can automatically turn on, turn o or dim according to the
ambient light.
•
The control panel will be o or dim when the ambient light is dark.
You can touch any button to turn on all lights. If no further operation, all lights will
be o or dim again to match with the ambient light.
5 Cleaning and maintenance
Note:
•
Always unplug the appliance before you clean it�
•
Never immerse the appliance in water or any other liquid�
•
Neveruseabrasive,aggressive,orammablecleaningagentssuchasbleachoralcoholtoclean
any part of the appliance�
•
Neveruseanyliquids(includingwater)tocleanthelter.
Cleaning schedule
Frequency Cleaning method
When necessary
Wipe the plastic part of the appliance with a
soft, dry cloth
Clean the air outlet cover
Every two months
Clean the particle sensor with a vacuum cleaner
or a dry cotton swab.
The
displays on the screen.
Clean the surface of the lter
14 EN
Cleaning the body of the Air Performer
Regularly clean the inside and outside of the Air Performer to prevent dust from
collecting�
•
Use a soft, dry cloth to clean both the interior and exterior of the Air Performer
and the air outlet.
Cleaning the particle sensor
Clean the particle sensor every 2 months for optimal functioning of the appliance.
Note:
•
IftheAirPerformerisusedinadustyenvironment,itmayneedtobecleanedmoreoften.
•
Ifthehumiditylevelintheroomisveryhigh,condensationmaydevelopontheparticlesensor
and the air quality light may indicate a poorer air quality even though the air quality is actually
good.Ifthisoccurs,cleantheparticlesensor.
1
2
1 Switch o the Air Performer and unplug it from the power socket.
2 Clean the particle sensor with a vacuum cleaner or a dry cotton swab.
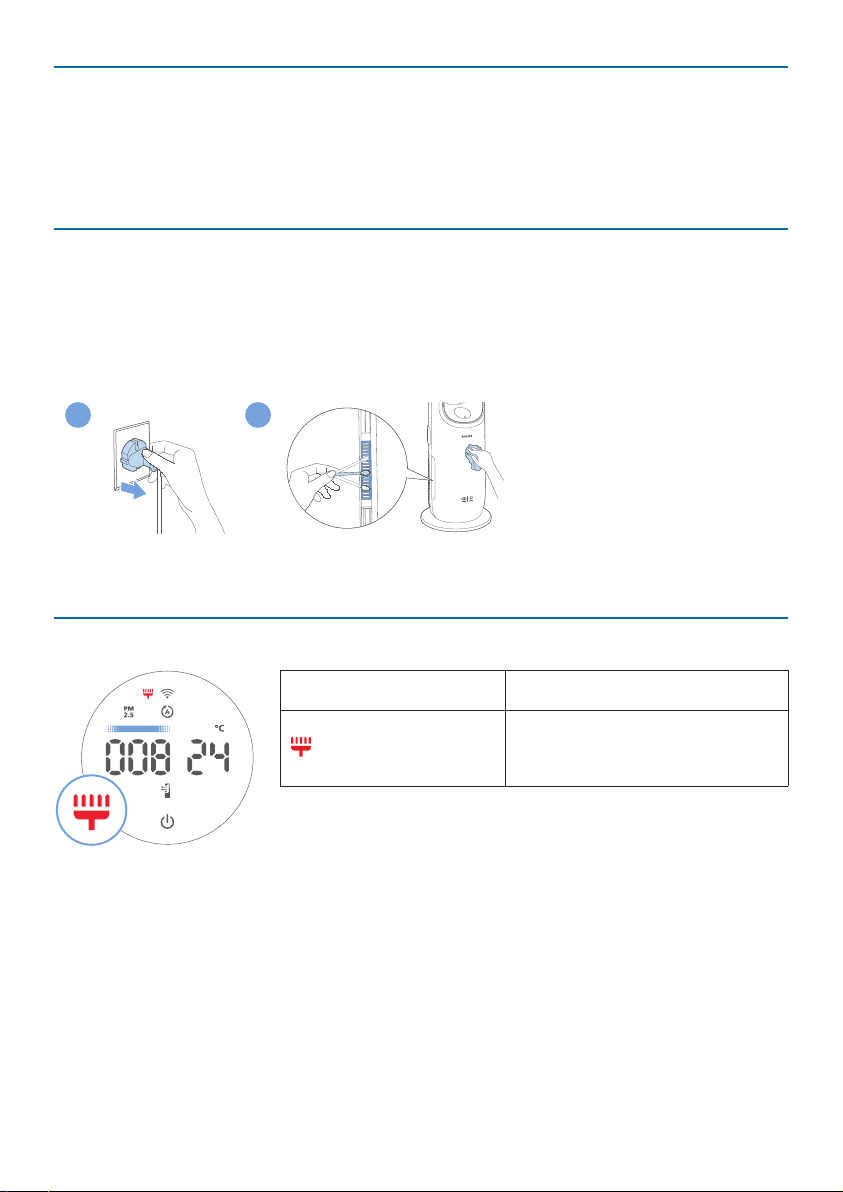
Cleaningthesurfaceofthelter
Filteralertlightstatus Action
The lter cleaning alert
displays on the
screen.
Clean the surface of the lter
with a vacuum cleaner.
15EN
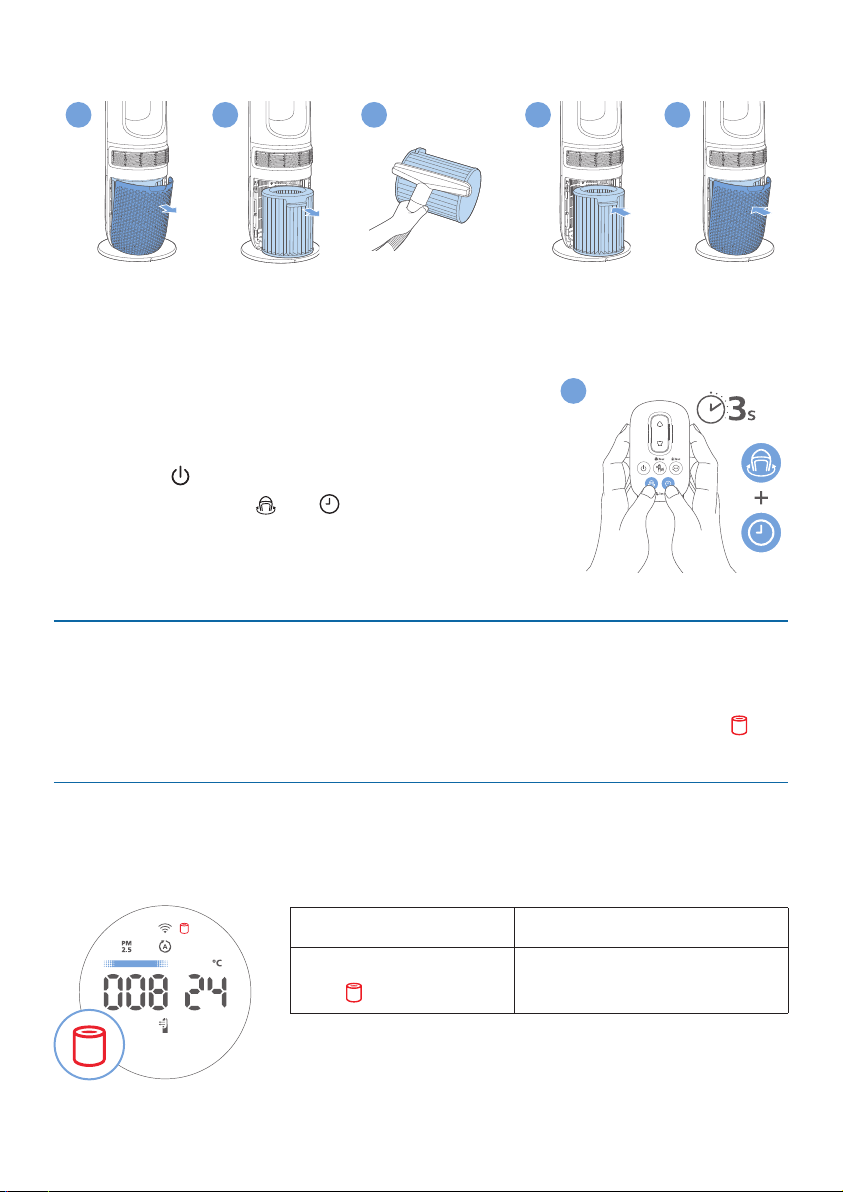
1 Switch o the Air Performer and unplug it from the power socket.
2
5
6
3
4
2 Pull the back cover and remove it from the appliance.
3 Pull out the lter from the appliance.
4 Clean the surface of the lter with a vacuum cleaner.
5 Put the lter back into the appliance.
6 Reattach the back cover.
7 Plug the Air Performer into the the power socket.
8 Press the
button to switch on the appliance.
9 Press and hold the
and button for 3seconds to
reset the lter cleaning time.
10 Wash your hands thoroughly after cleaning the lter.
Replacingthelter
This Air Performer is equipped with a lter replacement indicator to make sure
that the air purication lter is in optimal condition when the Air Performer is
operating. When the lter needs to be replaced, the lter replacement alert
lights up red.
Replacingthelter
Note:
•
Thelterisnotwashableorreusable.
•
AlwaysturnotheAirPerformerandunplugfromtheelectricaloutletbeforereplacingthe
lters.
Filteralertlightstatus Action
The lter replacement
alert
lights up
Replace the lter (FYM860)
9
16 EN
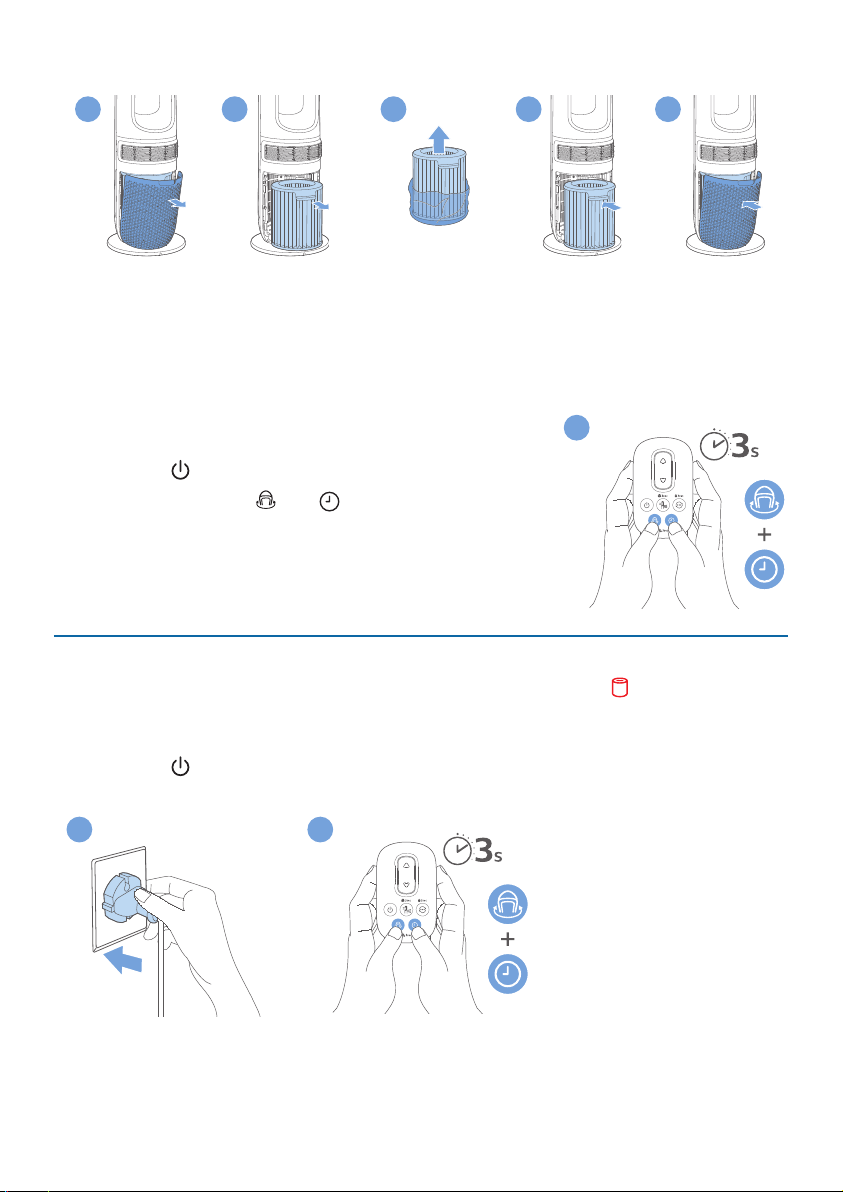
1 Switch o the Air Performer and unplug it from the power socket.
2
5
6
3
4
2 Pull the back cover and remove it from the appliance.
3 Pull out the lter from the appliance.
4 Remove all packaging materials from the new lter.
5 Put the new lter into the appliance.
6 Reattach the back cover.
7 Plug the Air Performer into the power socket.
8 Press the button to switch on the appliance.
9 Press and hold the
and button for 3seconds to
reset the lter lifetime counter.
10 Wash your hands thoroughly after replacing the
lter.
Note:Donotsmellthelterasithascollectedpollutantsfromthe
air�
Filterreset
You can replace the lter even before lter replacement alert ( ) displays on
the screen. After replacing a lter, you need to reset the lter lifetime counter
manually.
1 Press the
button for 3 seconds to turn o the appliance and unplug it from
the power socket.
2
3
9
17EN
2 Plug the appliance into the power socket.
3 Within 15 seconds after power on, press and hold the and button for 3
seconds to reset the lter lifetime counter.
Replacing the battery
Warning:
•
Riskofswallowingbatteries!
Theremotecontrolcontainsabuttonbattery,whichcanbe
swallowed.Keepthebatteryoutofreachofchildrenatalltimes!
•
Ifswallowed,thebatterycancauseseriousinjuryordeath.Severeinternalburnscanoccur
within two hours of ingestion�
•
Ifthebatteryhasbeenswallowed,seekimmediatemedicalattention.
•
Whenyouchangethebatteries,alwayskeepallnewandusedbatteriesoutofreachof
children�
•
Ensure that the battery compartment cover is completely secure after you replace the battery�
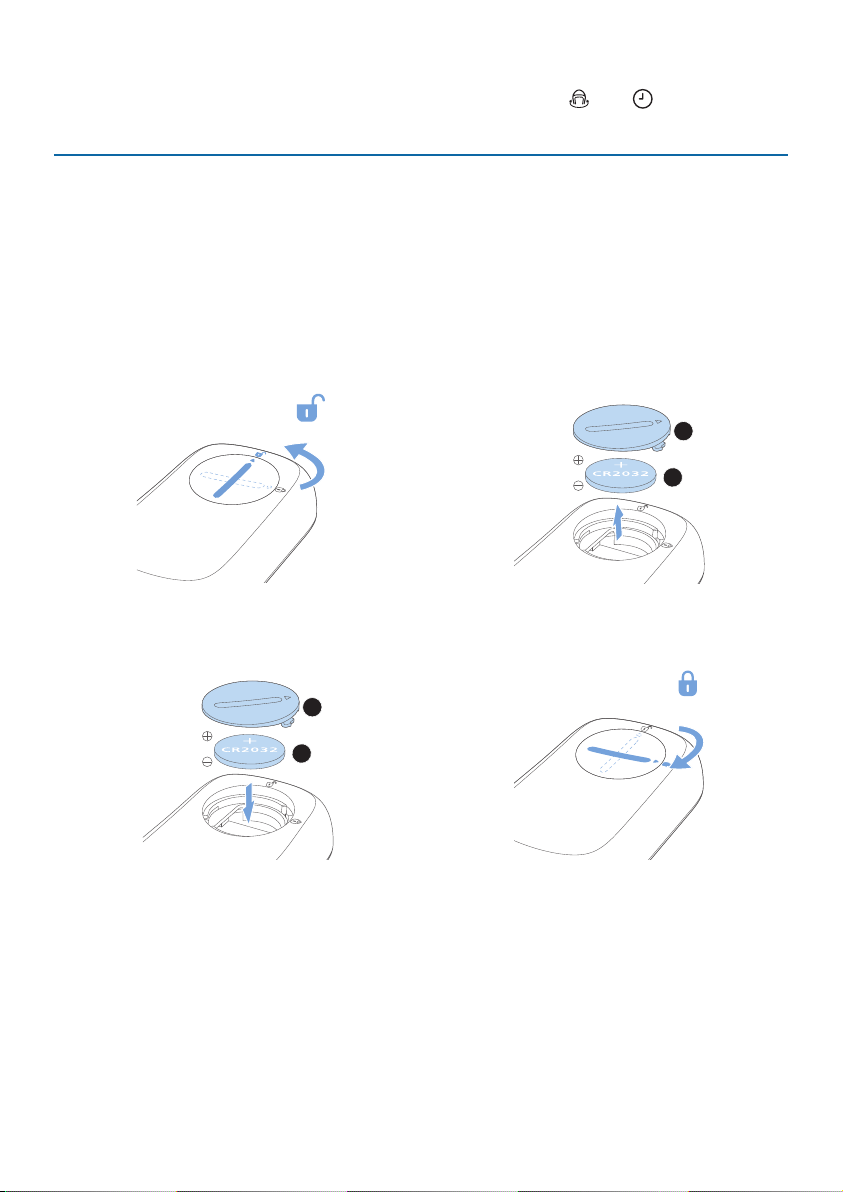
1
2
1 Rotate the battery compartment
cover counterclockwise to open it.
2 Take the used battery out from the
battery comparment.
2
1
3 Insert the new CR2032 battery with
correct polarities as indicated.
4 Close the battery compartment
cover and rotate it clockwise to
close it.

18 EN
6 Storage
1 Turn o the Air Performer and unplug it from the power socket.
2 Clean the Air Performer, particle sensor and the surface of the lter (see
chapter “Cleaning and maintenance”).
3 Let all parts air dry thoroughly before storing.
4 Wrap the lter in air tight plastic bags.
5 Store the Air Performer, lter in a cool, dry location.
6 Always thoroughly wash your hands after handling the lter.
7 Troubleshooting
This chapter summarizes the most common problems you could encounter with
the appliance. If you are unable to solve the problem with that information below,
contact the Consumer Care Center in your country.
Problem Possible solution
The airow from
the air outlet
is signicantly
weaker than
before.
•
The surface of the lter is dirty. Clean the surface of the
lter (see the chapter “Cleaning and maintenance” ).
The air quality
does not improve
even though the
appliance has been
operating for a
long time�
•
Check whether the packaging material is removed from
the lter.
•
Check whether the lter is installed in the appliance.
•
Clean the sensor with vacuum cleanser or a dry cotton
swab.
•
The room size is too large, or the outdoor air quality is
poor. For optimum purication performance, close the
doors and windows when operating the appliance.
•
There are indoor pollution sources. Examples include
cigarette smoke, cooking fumes, incense, perfume, and
alcohol.
•
The lter has reached its end of life. Replace the lter with
a new one.

19EN
Problem Possible solution
The appliance
produces a strange
smell.
•
The rst few times you use the appliance, it may produce a
plastic smell. This is normal.
•
If the appliance produces a burning smell, immediately
unplug it. Please contact your Philips dealer or an
authorized Philips service center.
•
The lter may produce an odor after being used for a
while because of the absorption of indoor gases. It’s
recommended that you reactivate the lter by putting it
in direct sunlight for repeated use. If the odor remains,
replace the lter.
The appliance is
too loud.
•
The noise level is higher if you select high speed. Please
change to a lower speed mode.
•
If there is an abnormal sound,contact the Consumer Care
Center in your country.
The appliance still
indicates that I
need to replace a
lter, but I already
did.
•
Perhaps you did not reset the lter lifetime counter. Switch
on the appliance. Then press and hold
and for
3seconds.
Can I switch o the
Wi-Fi feature on
my appliance?
•
Wi-Fi is a key feature of your appliance. For this reason, it
cannot be switched o manually. Please note the Wi-Fi
feature will be switched o automatically if your appliance
is not connected within 15 minutes of powering on the
device, after plugging the cable in for the rst time. Long
press
button on the appliance for 7 seconds to
re-activate the pairing mode.
What do the codes
on my appliance
mean ?
•
Error code "E1" displays on the screen. The motor has
malfunctioned. Contact the Consumer Care Center in your
country.
No airow or
airow is very
weak from the
circulation air
outlet.
•
Check if the appliance is on fan function.
•
Check if any objects are stuck around the circulation air
outlet.

20 EN
Problem Possible solution
The Wi-Fi setup is
not successful.
•
If the router your appliance is connected to is dual-band
and it is currently not connecting to a 2.4GHz network,
please switch to another band of the same router
(2.4GHz) and try to pair your Air Performer again. 5GHz
networks are not supported.
•
Web authentication networks are not supported.
•
Check if the appliance is within range of the Wi-Fi router.
You can try to place the Air Performer closer to the Wi-Fi
router.
•
Check if the network name is correct. The network name is
casesensitive.
•
Check if the Wi-Fi password is correct. The password is
case sensitive.
•
Retry the setup with the instructions in the section “Wi-Fi
connection“.
•
The Wi-Fi connectivity can be interrupted by
electromagnetic or other interferences. Keep the
appliance away from other electronic devices that may
cause interferences.
•
Check if the mobile device is in airplane mode. Make sure
to have airplane mode deactivated when connecting to
the Wi-Fi network.
•
Consult the help section in the app for extensive and up-
to-date troubleshooting tips.
8 Warranty and support
Versuni oers a two-year warranty after purchase on this product. This warranty
is not valid if a defect is due to incorrect use or poor maintenance. Our warranty
does not aect your rights under law as a consumer. For more information or for
invoking the warranty, please visit our website www�philips�com/support�
Order parts or accessories
If you have to replace a part or want to purchase an additional part, go to your
Philips dealer or visit www�philips�com/support�
If you have problems obtaining the parts, please contact the Philips Consumer
Care Center in your country.

21EN
PHILIPSandthePhilipsShieldEmblemareregisteredtrademarksofKoninklijkePhilipsN.V.
and are used under license�
ThisproducthasbeenmanufacturedbyandissoldundertheresponsibilityofVersuni
HoldingB.V.,andVersuniHoldingB.V.isthewarrantorinrelationtothisproduct.
2023©VersuniHoldingB.V.
AMF765_usermanual_v1.0(24/08/2023)