Loading ...
Loading ...
Loading ...
OPERATION GUIDELINES
• Place unit so that discharge does not blow directly on a wall. Ionizing Air Puriers can
sometimes leave a surface residue depending on the environment.
• Keep curtains and loose objects away from rear intake.
• Always operate unit on a stable surface with the cord routed away from foot trac.
• Please observe extreme caution when using this Air Purier in the proximity of children.
• Do not operate the Air Purier without Filters.
• Do not use in bathrooms, laundry areas or other damp indoor environments. Keep away
from water at all times.
HF11200ES
NEW 7/17
12
HF11200ES
NEW 7/17
5
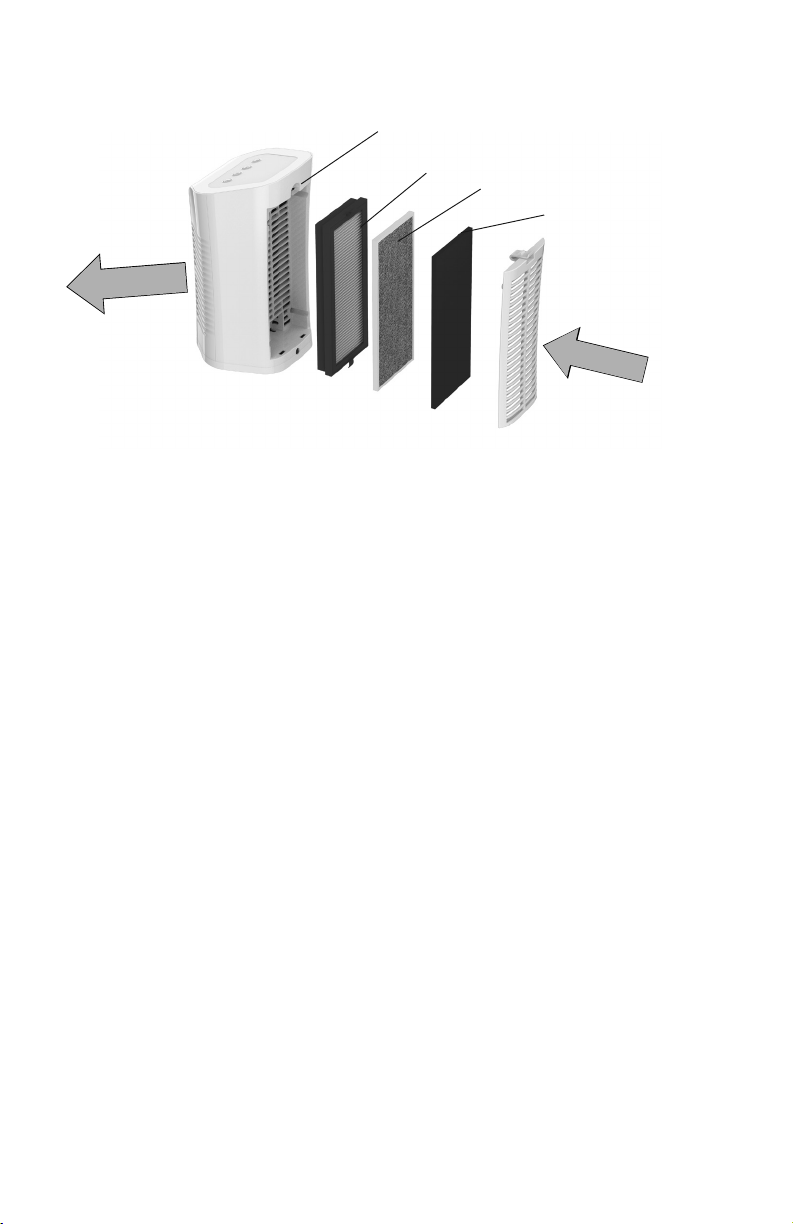
HEPA-Type
Activated Carbon
Pre Filter
Intake
Exhaust
Thumb Tab
ESPECIFICACIONES DEL PRODUCTO
ÁREA DE LIMPIEZA 56 SQ. FT
CADR DE HUMO 36
SUMINISTRO DE ENERGÍA 120V/60HZ
CONSUMO DE ENERGÍA 20 vatios
PESO DE LA UNIDAD 4 libras (1,8 kg)
Tipo de puricación del aire:
Incluido en el
paquete
FILTRO TIPO HEPA*
Elimina el 96% de las partículas de 0,3 micrones y
más grandes
1
FILTRO DE CARBÓN ACTIVADO* (opcional)
Filtro de carbón activado para olores
1
PRE-FILTRO* (opcional) 1
Generador de iones negativos Permanente
* Filtros incluidos
Dependiendo de la calidad del aire en su entorno, los ltros duran hasta 4 meses.
FILTRACIÓN DE ALTO RENDIMIENTO
Filtración de alto rendimiento personalizada
• El ltro tipo HEPA incluido está diseñado para puricar con ecacia y eciencia.
• El Filtro de carbón activado es sumamente ecaz para absorber olores, mientras que tam-
bién atrapa las partículas de mayor tamaño, manteniendo el ltro tipo HEPA más limpio y
durante más tiempo.
• El Pre-ltro está diseñado para capturar las partículas más grandes y extiende la vida útil
del ltro tipo HEPA.
INSTALACIÓN DEL FILTRO FIGURA EN LA PÁGINA 13
El Filtro tipo HEPA viene preinstalado. Retire el Filtro tipo HEPA y el Filtro de carbón activado del
empaque.
1. Retire la puerta del ltro trasero al presionar la lengüeta y jalarla de la unidad.
2. Los ltros se deben instalar en el siguiente orden:
1) Tipo HEPA
2) Filtro de carbón activado
3) Pre-ltro
3. Reemplace la puerta del ltro trasero al insertar la pestaña inferior en la parte trasera de la
unidad y presionar contra la parte superior de la cubierta trasera para jarla.
Loading ...
Loading ...
Loading ...