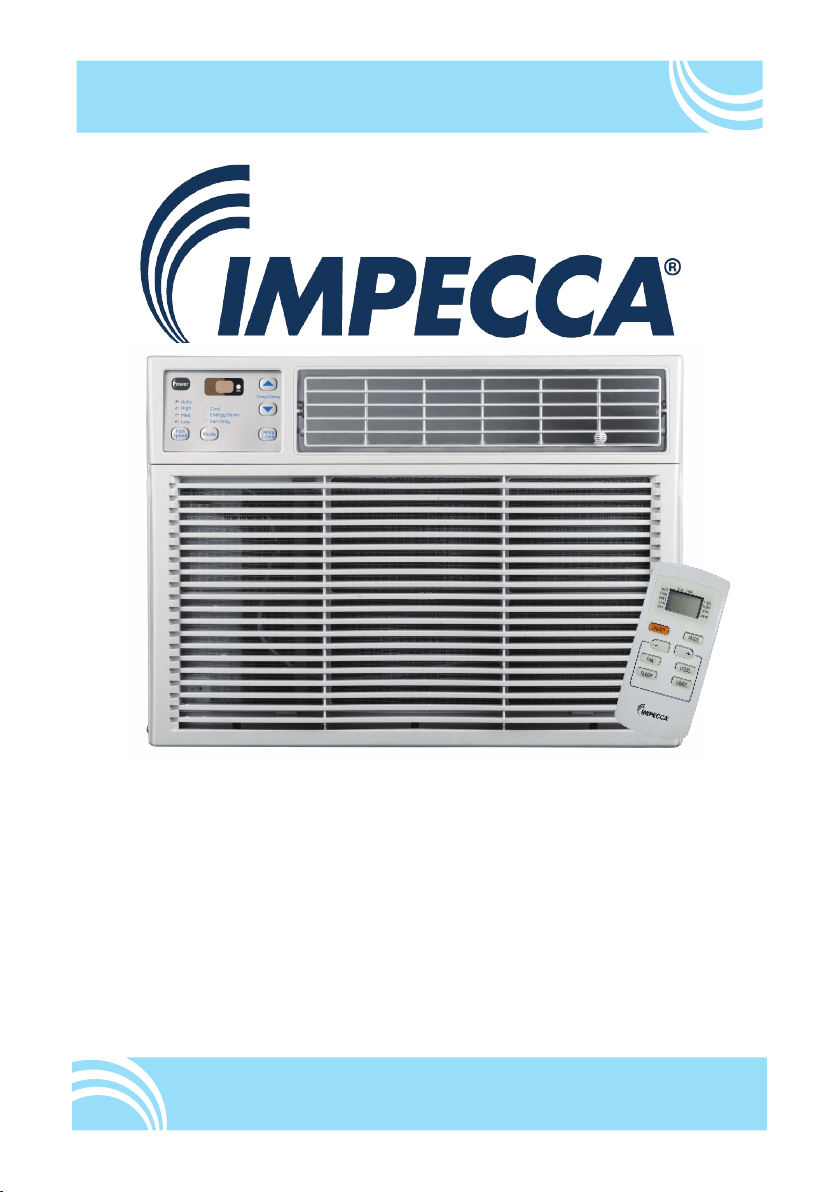
Impecca Electronic Controlled
Mini Window Air Conditioner
Users Manual
Models:
IWA05-BR26 - 5,050 BTU
v.0.1
www.impecca.com
Installation Procedure ...........................................................................................................................................9
Precautions .................................................................................................................
...........
..............................6
Safety Precautions ................................................................................................................................................3
Preparation before Installation .............................................................................................................................8
Air Conditioner Use .....................................................................................
........
...............................................15
TABLE OF CONTENTS
Troubleshooting ........................................................................................................
...
......................................
20
Assistance or Service ...................................................................................................
..........
............................21
READ THIS MANUAL
Inside you will find many helpful hints on how to use and maintain your air conditioner
properly. Just a little preventive care on your part can save you a great deal of time
and money over the life of your air conditioner. You'll find many answers to common
problems in the chart of troubleshooting tips. If you review our chart of Troubleshooting
Tips first, you may not need to call for service at all.
If the SUPPLY CORD is damaged, it must be replaced by the manufacturer, its service
agent or similarly qualified persons in order to avoid a hazard.
Contact the authorized service technician for repair or maintenance of this unit.
Contact the installer for installation of this unit.
CAUTION
The Refrigerant .....................................................................................................................................................1
Safety Operation of Flammable Refrigerant
.....................................................................................................22
Safety Notices for Maintenance
.........................................................................................................................24
The air conditioner is not intended for use by young children or infirm persons without
supervision.
Young children should be supervised to ensure that they do not play with the air
conditioner.
Information on Servicing
....................................................................................................................................26
Installation w
ork must be performed in accordance with the national wiring standards
by authorized personnel only.
When refrigerant leaks or requires discharge during installation, maintenance,
or disassembly, it should be handled by certified professionals or otherwise in
compliance with local laws and regulations.
This appliance is not intended for use by persons (including children) with reduc-
ed physical, sensory or mental capabilities or lack of experience and knowledge,
unless they have been given supervision or instruction concerning use of the ap-
pliance by a person responsible for their safety. Children should be supervised to
ensure they are away from the appliance.
This appliance can be used by children aged from 8 years and above and
persons with reduced physical,sensory or mental capabilities or lack of experience
and knowledge if they have been given supervision or instruction concerning use of
the appliance in a safe way and understand the hazards involved.
Children shall not play with the appliance.
Cleaning and user maintenance shall not be made by children without supervision.
The Refrigerant
Please read this operating manual carefully before operating the unit.
1
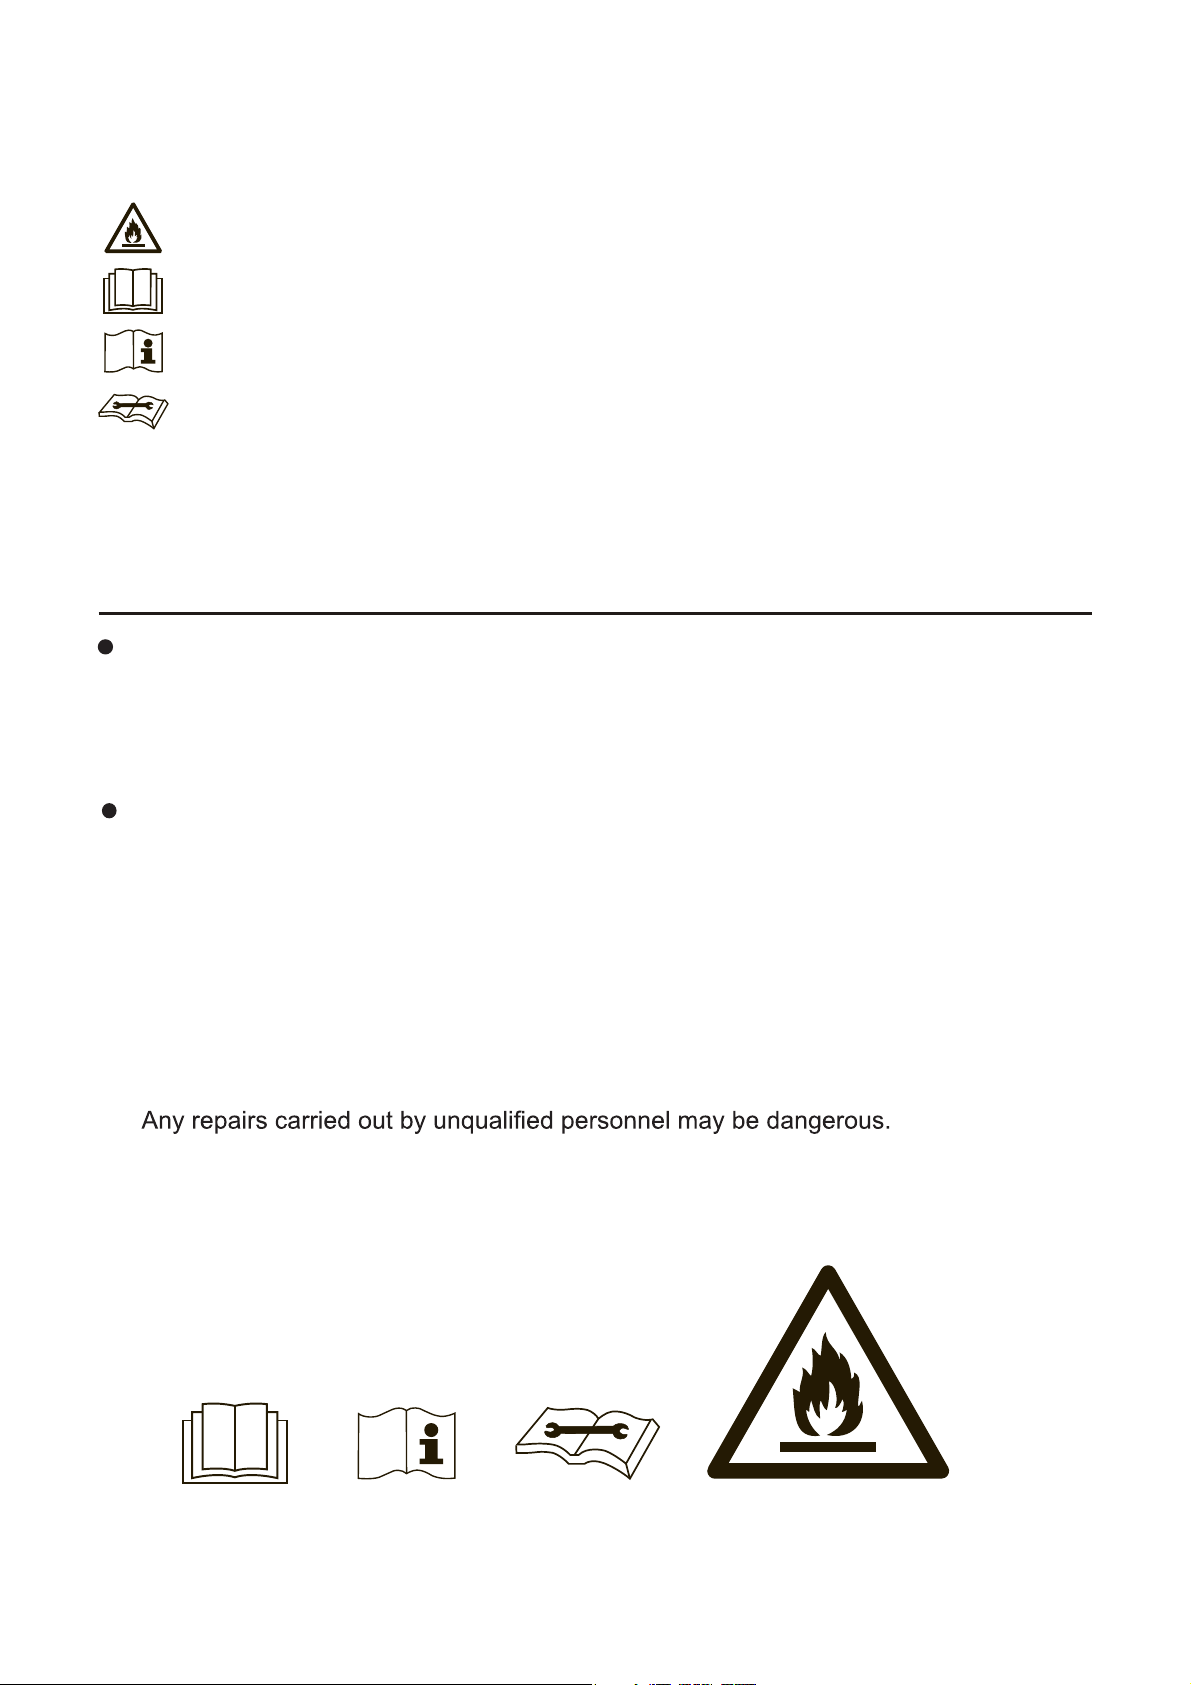
Caution, risk of fire.
Before use the appliance, read the owner’s manual first.
Before install the appliance, read the installation manual first.
WARNING:
Before repair the appliance, read the service manual first.
The figures in this manual may be different with the material objects, please refer to the
material objects for reference.
To realize the function of the air conditioner unit, a special refrigerant circulates
in the system. The used refrigerant is the fluoride R32,which is specially cleaned.
The refrigerant is flammable and inodorous. Furthermore, it can lead to explosion
under certain conditions. But the flammability of the refrigerant is very low. It can
be ignited
only by fire.
Compared to common refrigerants, R32 is a nonpolluting refrigerant with no harm
to the ozonosphere. The influence upon the greenhouse effect is also lower. R32
has got very good thermodynamic features which lead to a really high energy
efficiency. The units therefore need a less filling.
Keep ventilation openings, in the appliance enclosure or in the built-in structure,
clear of Obstruction.
Do not use means to accelerate the defrosting process or to clean, other than
those recommended by the manufacture.Should repair be necessary, contact your
nearest authorized Service Centre.
Do not pierce or burn.
Appliance shall be installed, operated and stored in a room with a floor area
larger than
X
2
m . (Please refer to table "a" in section of " Safety operation of
flammable refrigerant " for Space X.)
Appliance filled with flammable gas R32. For repairs,
strictly follow manufacturer’s instructions only.
Be aware that refrigerants may not contain an odour.
Read specialist’s manual.
2
The Refrigerant
WARNING:
NOTE:
Any person who is involved with working on or breaking into a refrigerant circuit
shouldhold a current valid certificate from an industry-accredited assessment
authority, whichsuthorizes their competence to handle refrigerants safely in
accordance with an industry recognized assessment specification.
Servicing shall only be performed as recommended by the equipment manufacturer.
Maintenance and repairrequiring the assistance of other skilled personnel shall be
carried out under the supervision of the person competent in the use of flammable
refrigerants.
Do not use means to accelerate the defrosting process or to clean, other than those
recommended by the manufacturer.
The appliance shall be stored in a room without continuously operating ignition
sources (for example: open flames, an operating gas appliance or an operating
electric heater.)
Do not pierce or burn. Be aware that refrigerants may not contain an odor.
Adopt R32 flammable refrigerant. When maintaining or disposing the unit, the
refrigerant inside the system must be eliminated. Refrigerant should be recovered,
which can’t be discharged freely.
Keep ventilation opening clear of obstruction.
The unit can only be maintained according to the method suggested by manufacturer.
Appliance shall be stored in a room without continuously operating open flames (for
example an operating gas appliance) and ignition sources (for example an operating
electric heater) close to the appliance. No open fire (fired equipment such as electrical
heater and gas stove etc. ) or any equipment (e.g. switch) that might generate arc
around the appliance.
The appliance shall be stored so as to prevent mechanical damage from occurring.
3
Do not disassemble or modify uni
t.
This symbol indicates the possibility of death or serious injury .
CAUTION
To prevent injury to the user or other people and property damage, the following instructions
must be
followed. Incorrect operation due to ignoring of instructions may cause harm or
damage. The
.snoitacidni gniwollo f eht yb deifissalc si ssensuoires
NEVER DO TH IS.
.SIHT OD SYAWLA
ƽ
T
h
is
symbol indicates the possibility of injury or damage to property.
Meaning of symbols used in this manual are as shown b elow.
!
!
Plug in power plug properly
Do not operate or stop the unit by
inserting or pulling out the power plug.
Do not damage or use an
unspecified power cord.
Do not modify power cord length or
!
share the outlet with other appliances.
Do not operate with wet hands or
in damp environment.
Do not direct airflow at room
occupants only.
Al
ways ensure effective grounding.
Ke
ep firearms away.
Unplug the unit if strange sounds ,
smell, or smoke comes from it.
Do not allow water to run into
electric parts.
Do not use the socket if it is loose o r
damaged.
Do not use the power cord close to
heating appliances.
Always install circuit breaker an d
a dedicated power circuit.
Do not open the unit during
operation.
!
!
!
ƽ I t may cause fire. ƽ
Do not use the power cord near
flammable gas or combustibles, s
uch as
gasoline, benzene, thinner
, etc.
ƽ
ƽ
It may cause electric shoc k.
I t may cause fire and electric shoc k.
ƽ It may cause an explosion or fi re.
ƽ
Incorrect installation may cause fire
and electric shock .
ƽ
This could damage your heal th.
ƽ I t may cause fire and electric shoc k.
ƽ
ƽ
I f the power cord is damaged, it
must be replaced by the
manufacturer or an authorized
service center in order to avoid
hazard.
ƽ
I t may cause electric shoc k.
It may cause failure of machine or
electric shock.
It may cause electric shock or fire due
to heat generation.
It may cause fire and electric shoc k.
ƽ
ƽ
ƽ
Incorrect grounding may cause
electric shock.
It may cause electric shock or fire
due to heat generat ion.
ƽ Otherwise, it may cause electric
shock or fire due to excess heat
generation.
ƽ
Ventilate room before operating air conditioner if there
!
is a gas leakage from another applianc e.
I t may cause explosion, fire and burn s.
ƽ
Safety Precautions
It may cause failure and electric sho ck.
WARNING
Safety Precautions
Ventilate the room well when use
d
!
together with a stove, etc.
A n oxygen shortage may occu r.
!
Do not use for special purpos
es.
!
!
Do not drink w
ater drained from
air conditioner.
If water enters the unit, turn the unit off at the powe r
outlet and switch off the circuit breaker. Isolate supp ly
by taking the power plug out and contact a
qualified service technician .
Use caution when unpacking a
nd installing.
S
harp edges could cause injury.
!
4
It may cause an injury.
Do no
t clean the air conditioner
with water.
Water may enter the unit and degrade
the insulation. It may cause an electric
shock.
Do not clean unit when power is on
as it may cause fire and electric
shock, it may cause an injury .
Do not put a pet or house pla nt
where it will be exposed to dire ct
air flow.
T his could injure the pet or plant .
Do not use this air conditioner to
preserve precision devices, food,
pets, plants, and art objects. It may
cause deterioration of quality, etc .
Turn off the main power switc h
when not using the unit fo r
a long time .
It may cause failure of product or fire .
Stop operation and close the
window in storm or hurricane.
Operation with windows opened may
cause wetting of indoor and soaking
of household furniture.
Hold the plug by the head of
th
e
power plug when taking it out.
It may cause electric shock and
damage.
n
nle
t pl
ts
ac
o
e
r i
o
n
s
sid
tac
e
l
f
es
air-o
aro
utl
u
e
n
t.
Ensure that the installation bracket
of the outdoor appliance is not
damages due to prolonged exposure
.
If bracket is damaged, there is concern
of damage due to falling of unit .
Always insert the filters secure
ly.
Clean the filter once every
two weeks
.
Operation without filters may cause
failure.
Do not use strong detergent such as
wax or thinner but use a soft cloth.
Appearance may be deteriorated due
to change of product color or
scratching of its surface.
Do not place heavy object on the
power cord and ensure that the
power cord is not compressed .
!
Do
air-i
o
d
It may cause failure of appliance or
accident.
When the air filter is to be
When the unit is to be cleane d,
witch off, and turn off th e
ircuit breaker .
T here is danger of fire or electric shoc k. It contains contaminants and could
make you sick.
emoved, do not touch the m etal
oft he unit.
r
parts
s
c
bo

Safety Precautions
The power supply cord
Operation of Current Device
NOTICE
Please contact Customer Service.
with a new cord - please
contact Customer Service.
5
WARNING!
with this air conditioner contains a
current detection device designed
to reduce the risk of fire.
Precautions
Air Conditioner should be properly grounded. Incorrect grounding may cause
electric shock.
Do not connect air conditioner to multipurpose socket. Otherwise, it may cause
Do not step on air conditioner, or put heavy objects. It may cause damage or
Indicator
Indicator
Note: Plug may be different with the
actual product.Please refer to actual
product.
Indoor side DB/WB(°C/°F)
Outdoor side DB/WB(°C/°F)
Maximum cooling
40°C(104°F)/26.7°C(80°F) 40°C(104°F)/26.7°C(80°F)
The operating temperature range (outdoor temperature) for cooling only unit is
1°C~ 0°C( ~ °F).
6
Do install the air switch. If not, it maycause malfunction.
Do not spill water on the remote controller, otherwise the remote controller
may be broken.
Do not spray water on air conditioner. It may cause electric shock or malfunction.
personal injury or damage.
personal injury.
Do not block air outlet or air inlet. It may cause malfunction.
Do disconnect power supply when cleaning air conditioner. Otherwise, it may
cause electric shock.
Do not repair air conditioner by yourself. It may cause electric shock or damage.
Please contact dealer when you need to repair air conditioner.
cause personal injury or damage.
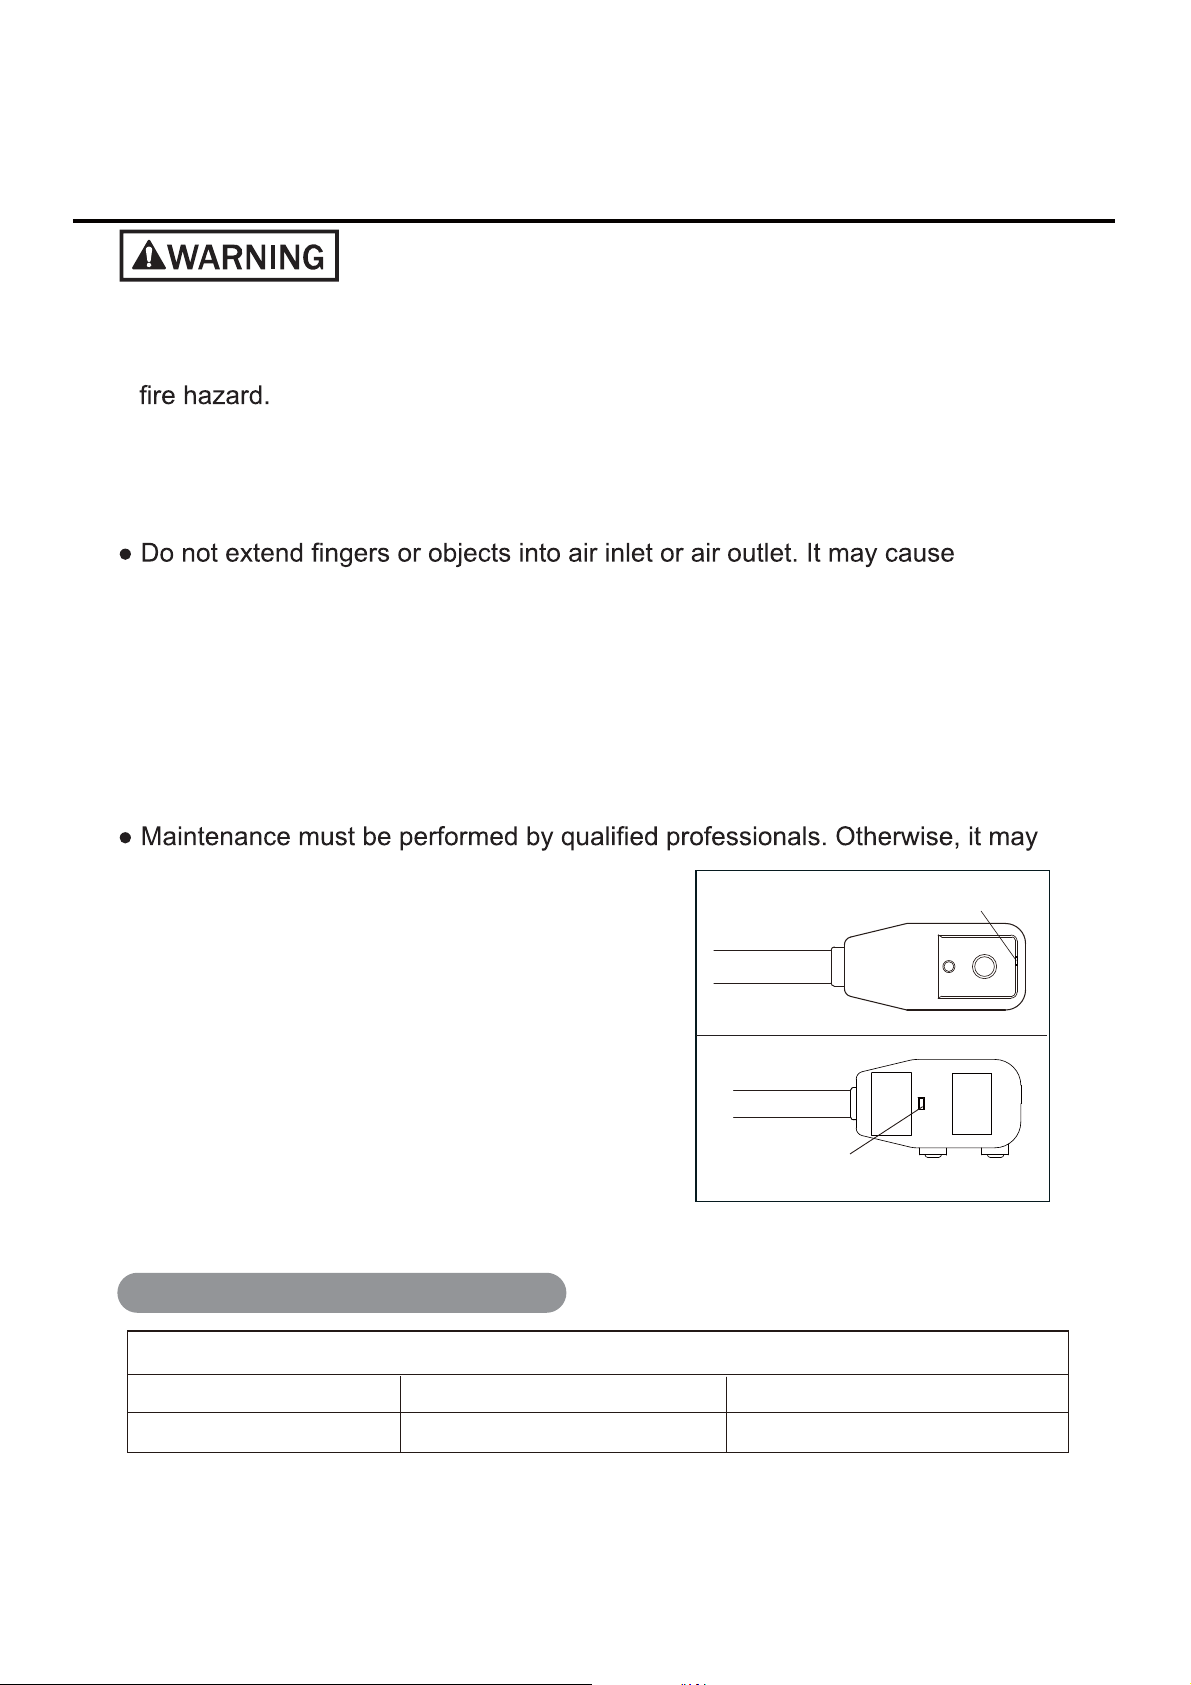
Note:
The power cord of window type unit has creepage
protection device. There're test button and reset
button on the plug. You are suggested to check
the power cord periodically.
Check method:
After putting through the power, indicator is ON.
After pressing test button, indicator is OFF and
you can heard a sound. Then press reset button,
indicator will be ON, which indicates the protection
device is normal.
Working temperature range
Ć
Operating Temperature Range
LCDI
TEST
POWER
RESET
RESET
TEST

7
Precautions
Electric wiring
y.
.B
y.
A3
Requirements for Electric Connection
Safety precaution
y.
y
9.
10.
Preparation before ,nstallation
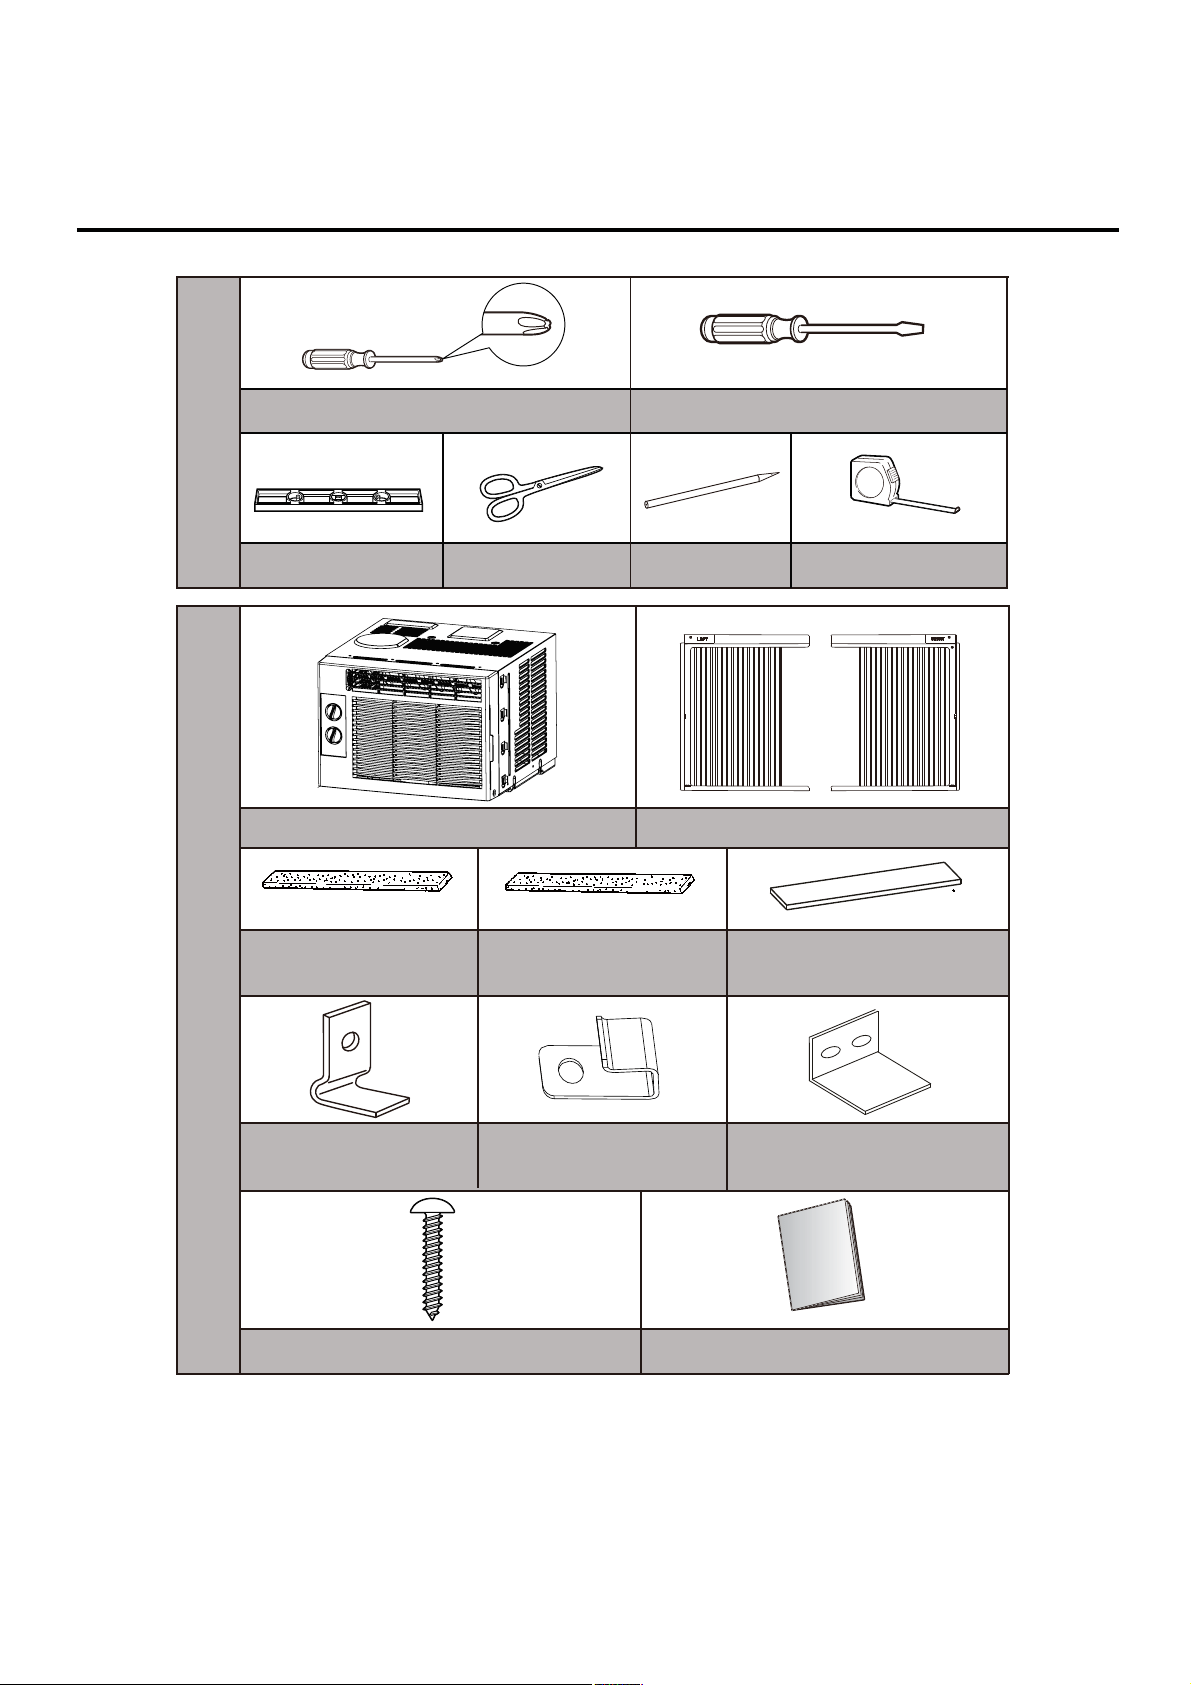
Phillips screwdriver
Sealing strip
( without adhesive)
Sealing strip
( with adhesive)
Window type unit Flexible screen
Screws(7)
Owner's manual
Sash lock
Level bar Scissors Pencil Measuring tape
Screwdriver
Tools for installation Products and spare parts list
Weather seals (5)
Lock frame(2)
(For wooden windows)
Lock frame(2)
(For Vinyl-Clad windows)

Installation Procedure
Note:
Left + right filler panel assembly
Top Rail and Side Panels at each side are offset to provide the proper pitch
to the rear of (5/16”). This is necessary for proper condensed water utilization and
drainage. If you are not using the Side Panels for any reason, this pitch to the rear
must be maintained!
Step 1:
Place unit on floor, a bench or a table. There is a Left and Right side Filler Panels -
be sure to use the proper panel for each side. When installed, the flange for
securing the panel in place to the window sill will be facing into the room.
A. Hold the side Panel in one hand and gently pull back the center to free the open
end. See FIG. 1.
B. Slide the free end “T” section of the panel directly into the cabinet as shown in
FIG. 2. Slide the panel down. Be sure to leave enough space to slip the top and
bottom of the frame into the rails on the cabinet.
C. Once the panel has been installed on the side of the cabinet, make sure it sits
securely inside the frame channel by making slight adjustments. Slide the top and
bottom ends of the frame into the top and bottom rails of the cabinet. See FIG. 3.
D. Slide the panel all the way in and repeat on the other side.
FIG. 2FIG. 1
FIG. 3
Top Rail
Bottom Rail
“T” section
9
How to install:
Choose a location where there are
no
any obstacle surrounding the unit,
and the plug is accessible.
cording to the following diagram.
Over
1500 mm
500mm 500mm
300mm
300mm
Location
7KHGLVWDQFHEHWZHHQWKHDLUFRQGLWLRQHU
DQGWKHDURXQGREVWDFOHVVKRXOGPHHW
WKHUHTXLUHPHQWDVEHORZRYHUPP
XSSHUVLGHRYHUPPOHIWVLGH
RYHUPPULJKWVLGHRYHUPP
IURQWVLGHDQGRYHUPPUHDUVLGH
Installation Procedure
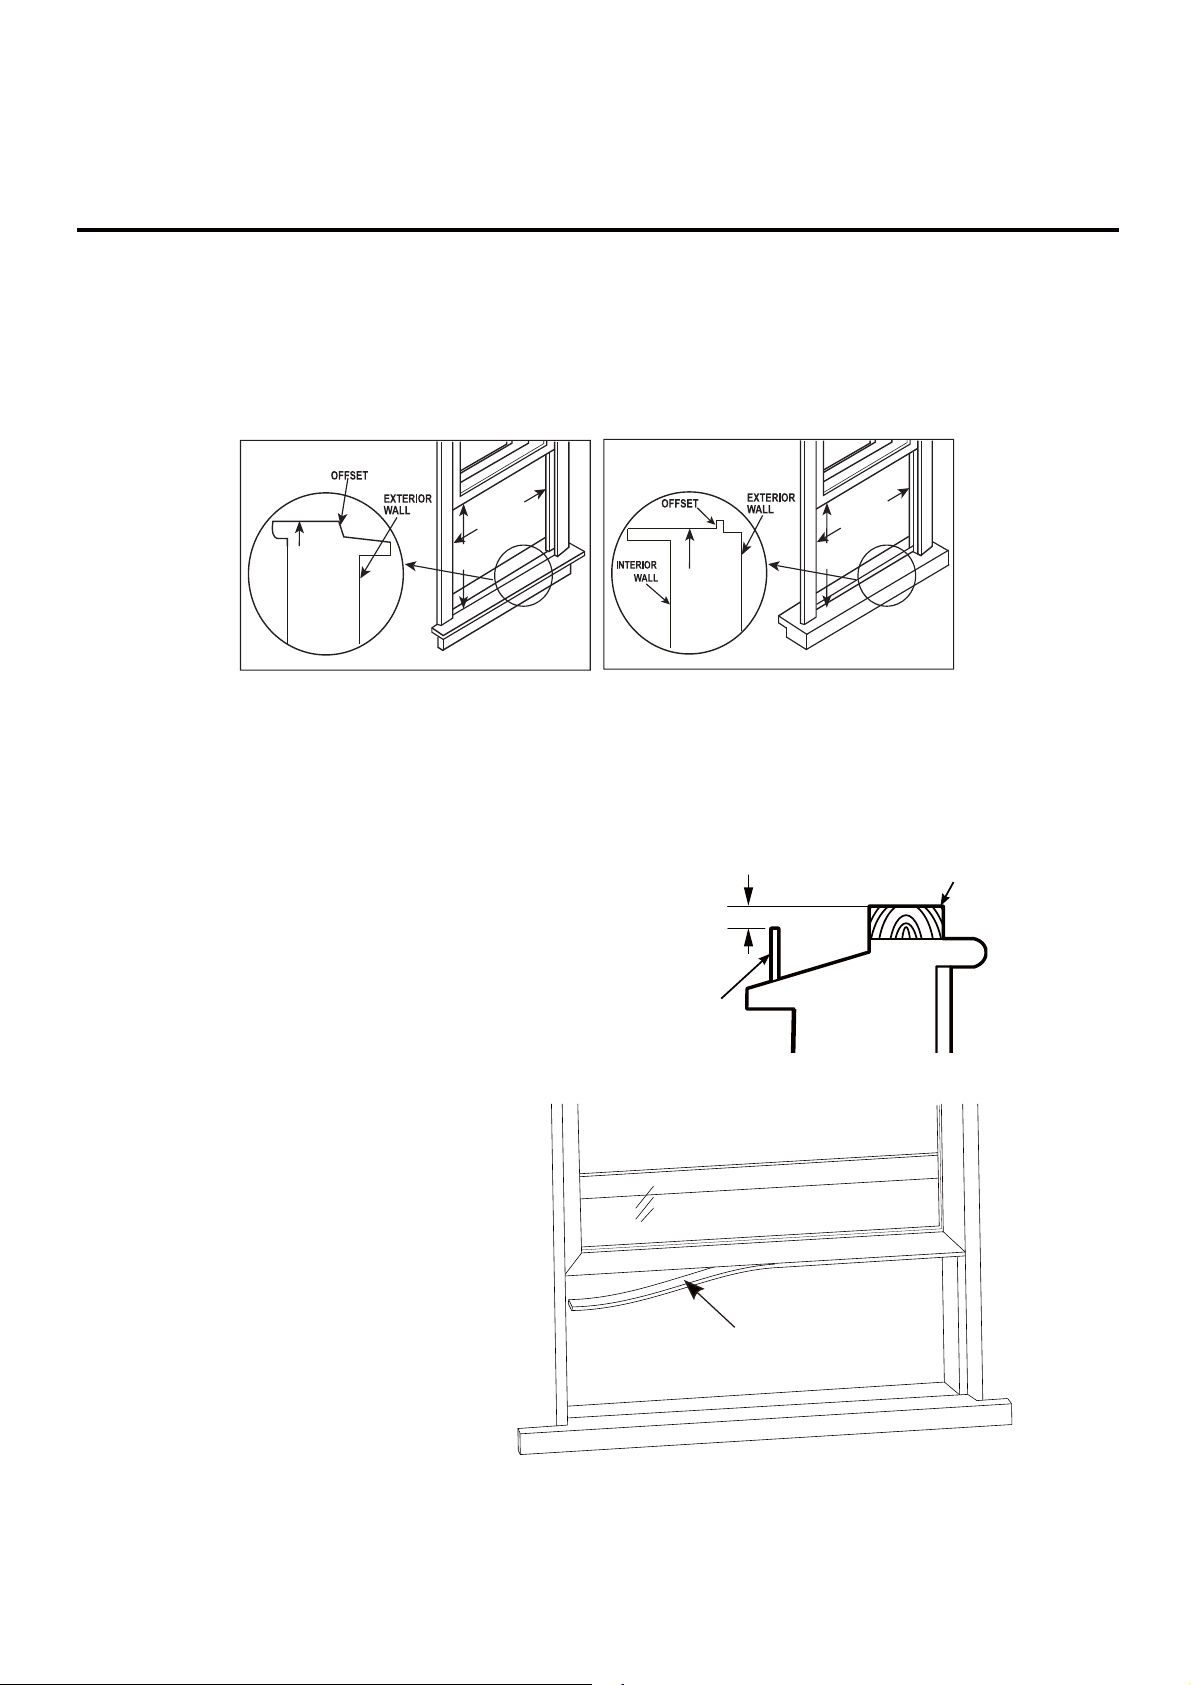
Step 2: Weather-proof type window:
The height of window frame is higher than windowsill for some weather-proof type
window, which will affect the installation of air conditioner. In this case, before
installing the air conditioner, add wooden strap on the windowsill, and fix the
wooden strap at the windowsill.
1/2"
wooden strap
weather-proof
window frame
or plastic window
frame
windowsill
inner
wall
Specification of wooden strap:
Width: about 2”
Length: same to the inner frame size of window
Height: Put the wooden strap on thewindow
top part of wooden strap and window frame
should be at the same horizontal level, or
higher than the top part of window frame
for about 1/2".
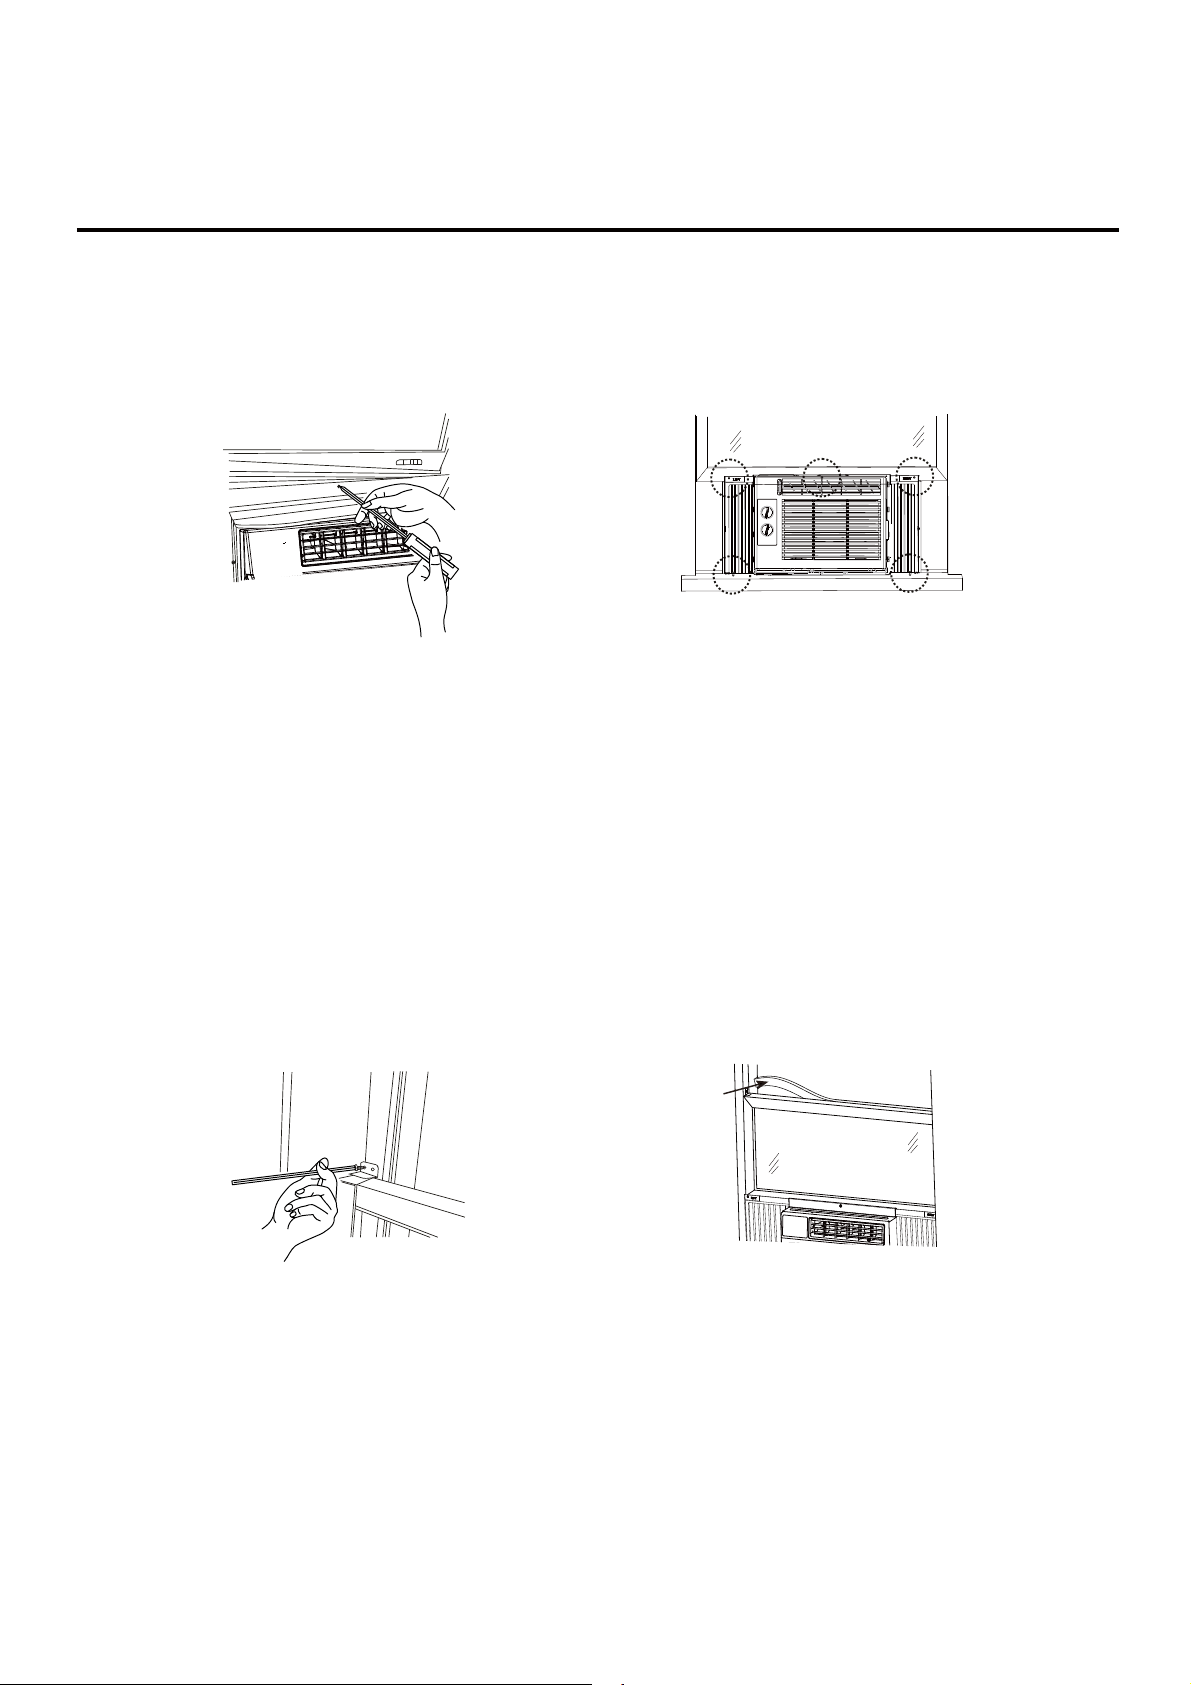
Sealing strip ( with adhesive)
Step 3: Stick sealing strip
Cut the sealing strip into proper
length. Tear off the paster and
then stick the sealing strip at the
lower part of the window frame.
FIG. 5
FIG. 6
10
Your air conditioner is designed to install in standard double hung windows with
opening widths of 23” to 36” (FIG. 4A , FIG. 4B) Lower sash must open
sufficiently to allow a clear vertical opening of 14 ½” min. Side louvers and the
rear of the air conditioner must have clear air space to allow enough airflow
through the
condenser, for heat removal. The rear of the unit must be outdoors,
not inside
a building or garage.
Fig. 4A
14 ½” min
Wooden Windows
Fig. 4B
Vinyl-Clad Windows
INNER
WINDOW SILL
INNER
WINDOW SILL
INTERIOR
WALL
23”-36”
23”-36”
14 ½” min

Installation Procedure
Step 5:
Extend the side panels out against the window frame (FIG. 8A for wooden
windows), (FIG. 8B for Vinyl-Clad windows).
FIG. 8A
window
frame
FIG. 9A FIG. 9B
Vinyl-Clad windows:wooden windows:
Step 6:
Place the frame lock between the frame extensions and the window sill as shown
(FIG. 9A for wooden windows), (FIG. 9B for Vinyl-Clad windows).
Step 7: Drive locking screws
A: For wooden windows:
Drive locking screws through the frame lock and into the sill (FIG. 10A).
NOTE:
To prevent window sill from splitting, drill 1/8” (3mm) pilot holes before driving
screws. Drive locking screws through frame holes into window sash (FIG.10B)
B: For Vinyl-Clad windows:
Drive locking screws through the frame lock and into the window sash (FIG.10B).
FIG. 8B
11
Keep a firm grip on the air conditioner, carefully place the unit into the window
opening so the bottom of the air conditioner frame is against the window sill
(FIG. 7 A & FIG. 7B). Carefully close the window behind the top rail of the unit.
INSIDE OUTSIDE
FIG. 7B
Wooden Windows Vinyl-Clad Windows
INSIDE
OUTSIDE
FIG. 7A
Step 4:
Installation Procedure
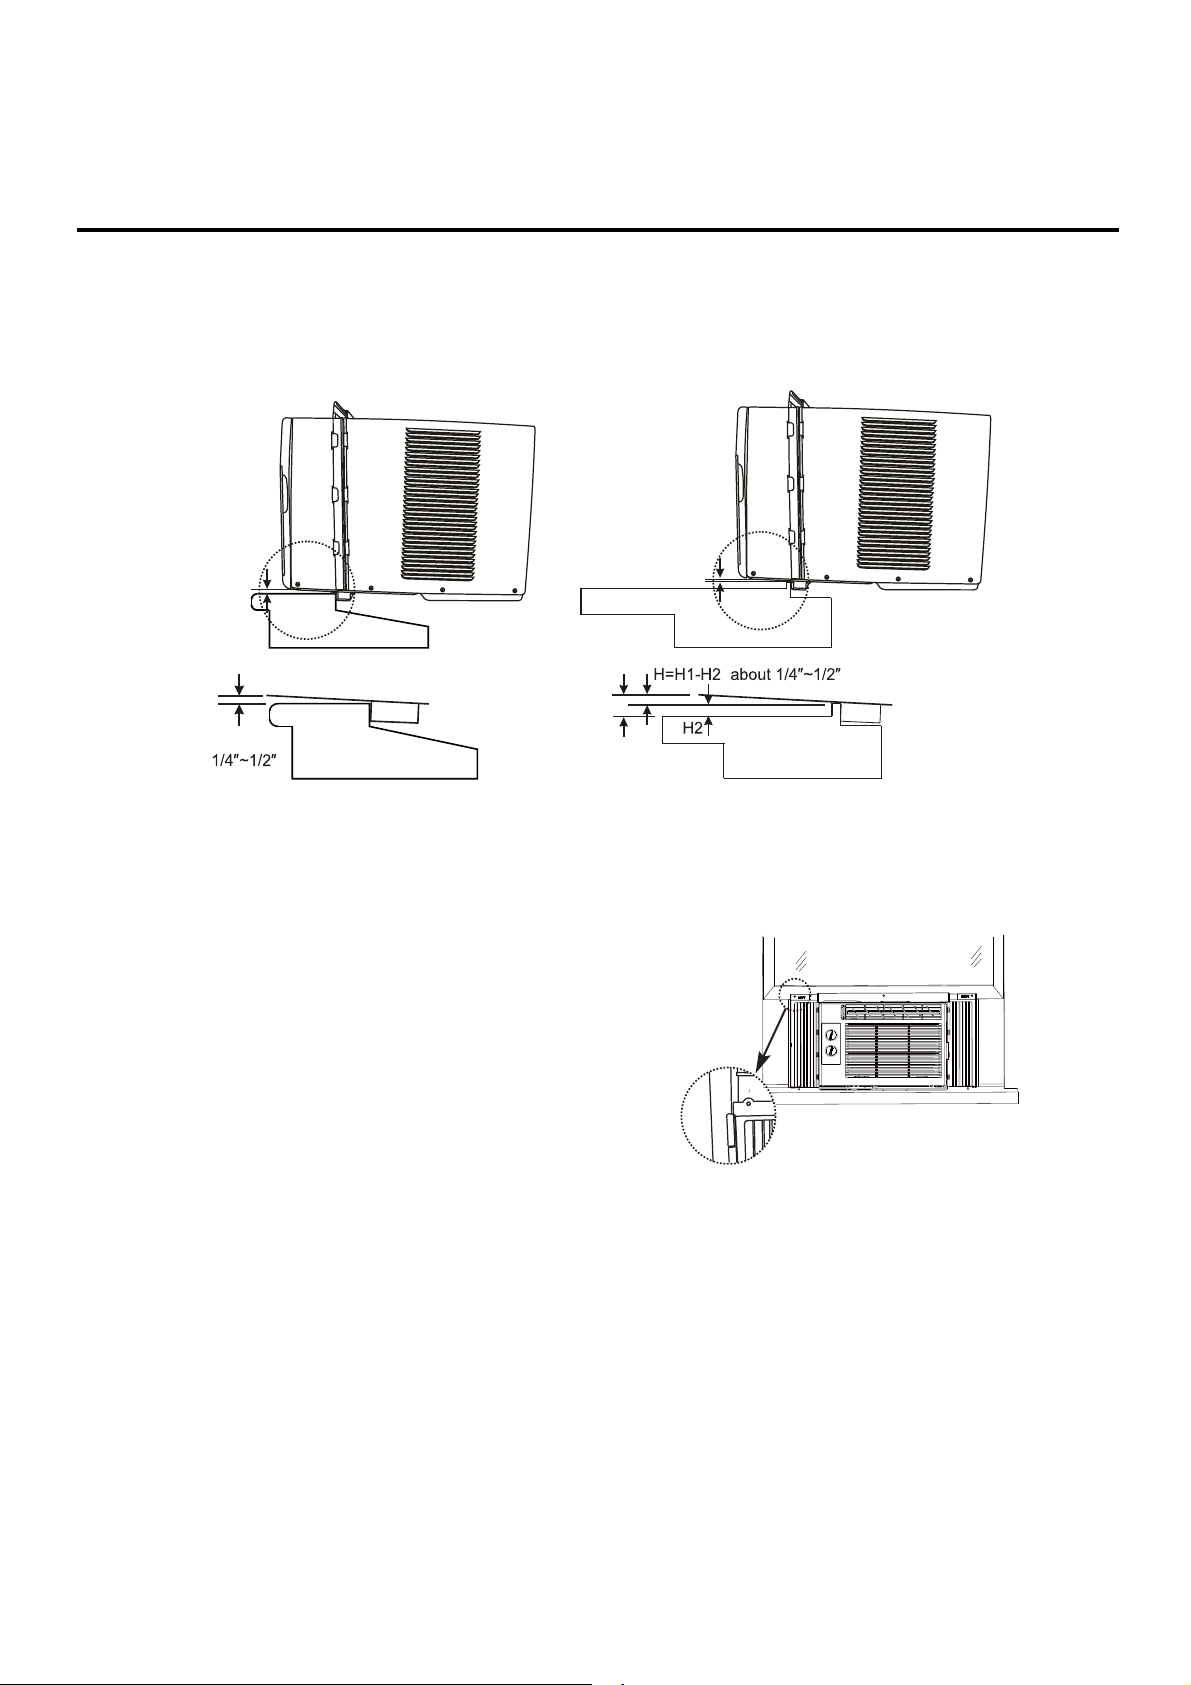
Step 8:
To secure lower sash in place, attach right angle sash lock with screw as shown
(FIG.11).
NOTE: It is difficult to lock the windows with the sash lock for Vinyl-Clad windows,
so you can use lock by window itself.
Step 9:
Cut the sealing strip into the length same to the width of window. Plug the sealing
strip between glasses and window to prevent rain and insects getting into the
room. (FIG. 12).
Note: If sealing strip is not proper to your window, you can select other proper to
replace it.
FIG. 11
FIG. 12
Sealing strip
( without adhesive)
12
NOTE:
Before driving the screws, use a drill to drill 5 holes through the holes in the frame
lock and frame extensions into the windows sash as shown (FIG.10B).
FIG. 10A FIG. 10B
Installation Procedure
FIG. 13B
H
OUTSIDE
INSIDE OUTSIDE
Bottom Rail
H1
Bottom Rail
Wooden Window Vinyl-Clad Window
FIG. 14
* Turn the air conditioner off, and disconnect
*
*
*
*
13
Step 10:
Check that air conditioner is tilted back about 1/4” to 1/2” (tilted about 2° to 4°
downward to the outside, see FIG. 13A & FIG. 13B). After proper installation,
condensate should not drain from the overflow drain hole during normal use,
correct the slope otherwise.
FIG. 13A
H
INSIDE
H
about
Step 11:
Trim the weather seal with a proper length peel
off the protective backing and plug any gaps if
needed as shown FIG. 14.
Removing the air conditioner From Window
power cord.
Remove sash seal from between windows,
and unscrew sash lock.
Remove screws installed through frame and
frame lock.
Close (slide) side panels into frame.
Keeping a firm grip on air conditioner, raise sash and carefully remove.Be
careful not to spill any condensate water while liftingunit from window.Store
parts WITH air conditioner.
Installation Procedure
14
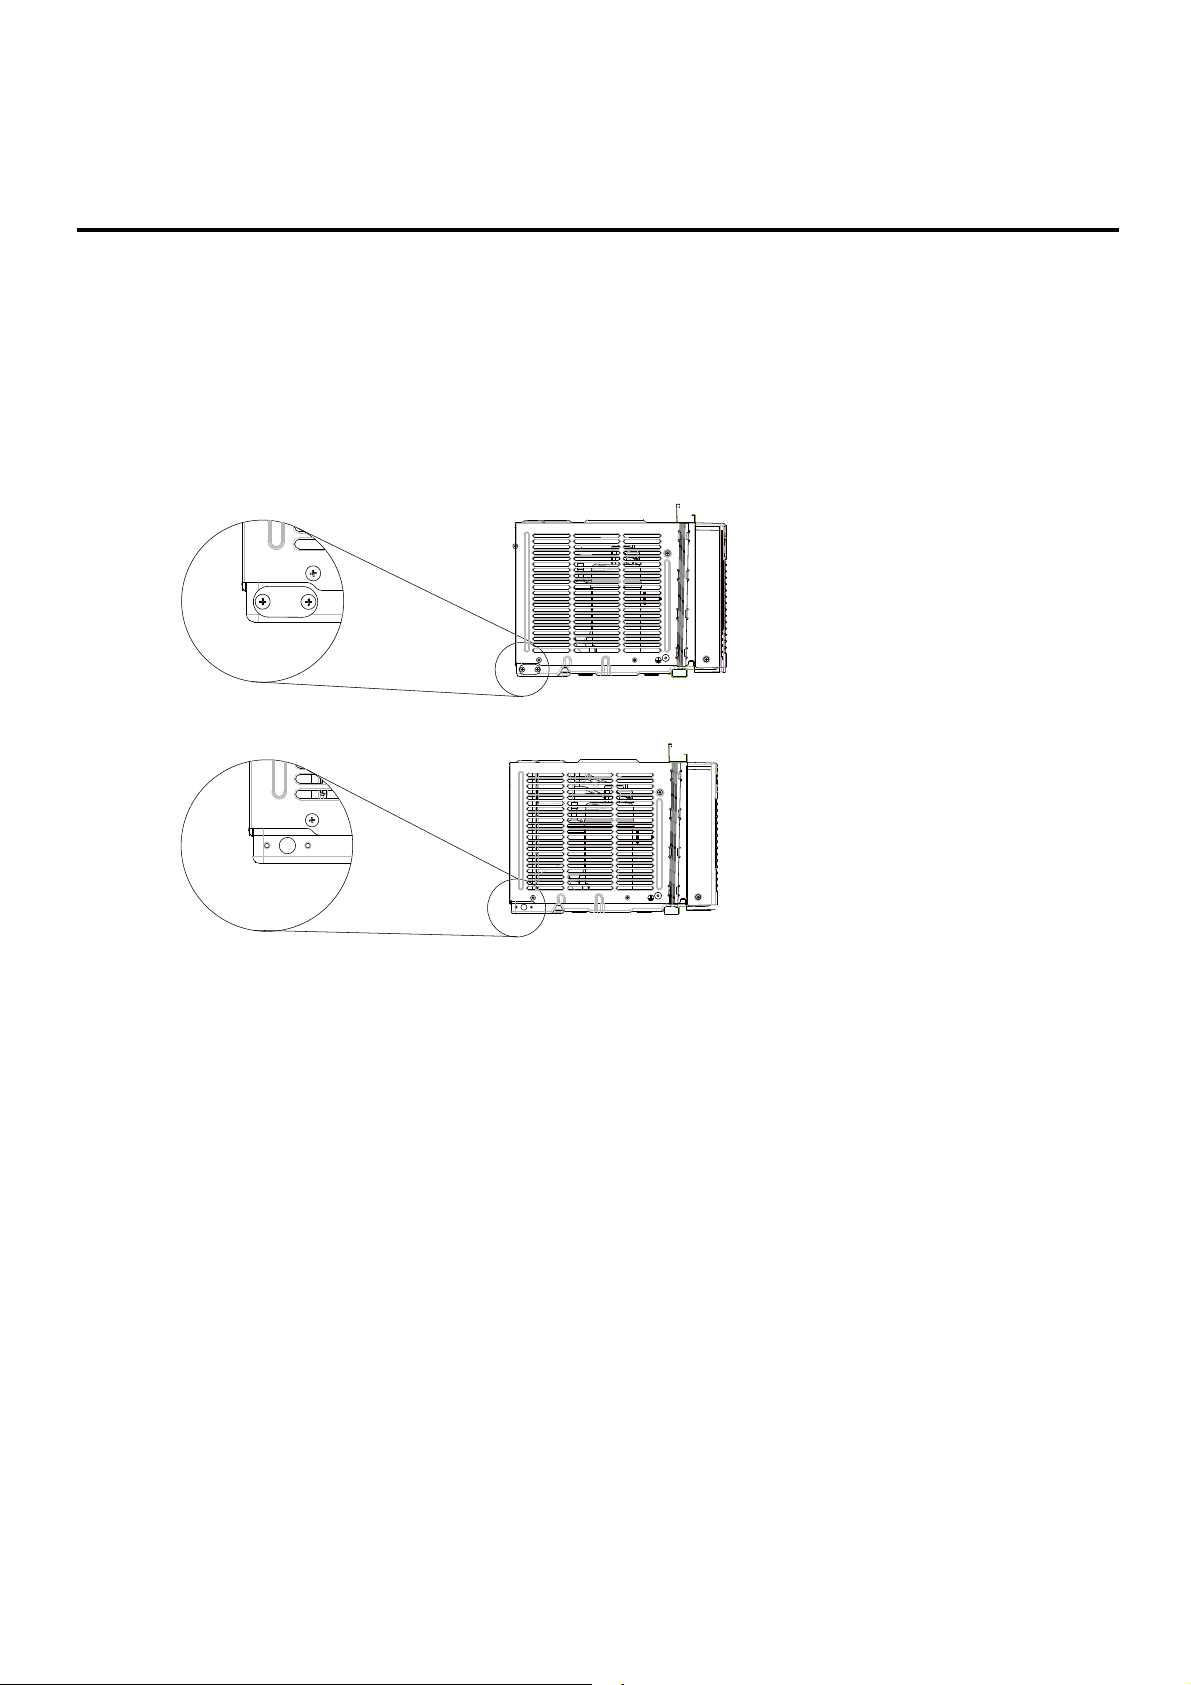
Step 12: Drain water
To get the maximum cooling efficiency , the air conditioner is designed to splash
the condensate on the condenser coil. If the splashing sound annoys you, you
can provide an outside drain by using the following procedure, which may however
cause a small loss of performance.
1. The air conditioner have the drainage gasket-FIG. 15A.
2. Remove the drainage gasket from the body base plate- FIG. 15B.
FIG. 15A
FIG. 15B
Air Conditioner Use
15
This section explains proper air conditioner operation.
Operating your air conditioner properly helps you to obtain the
best possible results.
If you turn off the air conditioner, wait at least 3 minutes
before turning it back on. This prevents the air conditioner
from blowing a fuse or tripping a circuit breaker.
Do not try to operate your air conditioner in the cooling mode
when outside temperature is below 65°F (18°C). The inside
evaporator coil will freeze up, and the air conditioner will
operate properly.
StartingYourAirConditioner—
DigitalControl
IMPOR TANT:
Power Pad
Lights next to the touch pads on the air conditioner control
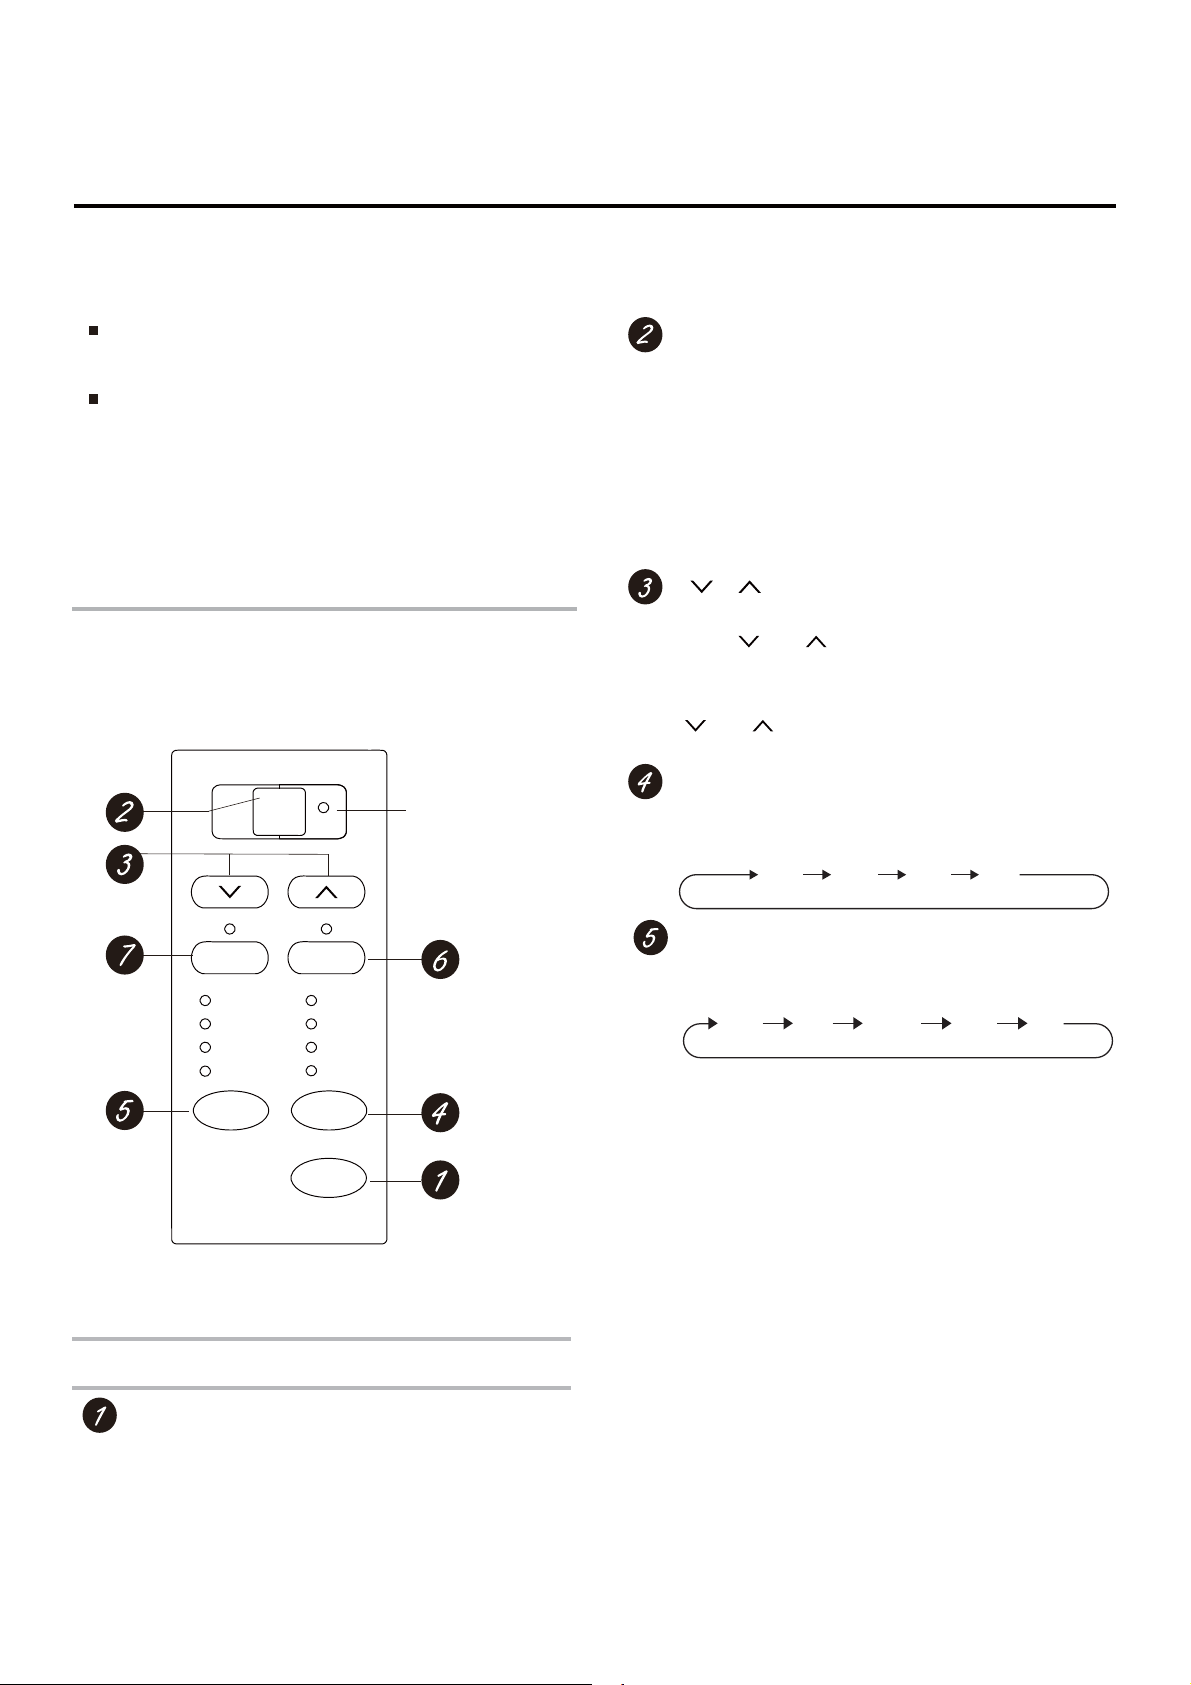
panel indicate the selected settings.
Controls
NOTE: In the event of a power failure, your air conditioner will
operate at the previous settings when the power is restored.
set
Filter check
Temp/Time
Timer
Med
Low
Dry
Fan Only
Mode
Speed
POWER
Cool Auto
Energy Saver
High
Fan
Air Conditioner Controls
Light indicates the unit
is in the temperature or
delay time Set mode.
Mode Pad
Display
/ button
Press this button can turn on or turn off air condi-
tioner.
NOTE: Press this button to turn on air conditioner,
Press this button can select your required fan
speed in turn. Corresponding speed indicator will
be on.
Press this button can your required operation
mode in turn. Corresponding indicator will be on.
Under temperature setting status, after each press
-
ing of “ ” or “ ” button,
temperature will increase or decrease 1°F.Tem
setting range: 61-86°F.
Under timer setting status, after each pressing of
“ ” or “ ” button, time will increase or decrease
0.5h or 1h.
Under ON status without timer setting, the oper-
ation mode is Auto, Cool, Energy Saver or Dry
mode, and the set temperature will be dis-
played.
Dry
Cool
Auto
Fan
Only
Energy
Saver
Auto
Under this mode, the unit will operate automatically
according to ex-factory setting. In this case, set
temperature cannot be adjusted.
Low Med High
Auto:
Cool:
Under this mode, air conditioner operates under
cooling mode. Cooling indicator will be on. Press
“Fan Speed” button can adjust the fan speed.
Energy Save:
Under this mode, air conditioner operates under
SE mode. SE indicator will be on. Press “Fan
Speed” button can adjust the fan speed.
Under this mode, the unit runs in low fan speed for
Dry:
Fan Only:
1.
Fan Speed Pads
Under this mode, air conditioner will not cool or
heat, only blow wind. Fan indicator will be on.
Press “Fan Speed” button can adjust the fan
speed.
2.
3. Time will be displayed under timer setting or
timer preview.
Under ON status without timer setting, the oper-
ation mode is fan mode and the ambient tem-
perature will be displayed.
the unit will operate in Energy Save mode; if the
unit is energized after power failure, the unit will
still operate according to the status before power
failure.
Remote Control
Timer Pad
Timer ON: Can be set under off state of unit. If
timer ON reaches, the system
will run under Energy Save mode. The se tting
range is 0.5~24hr.
Filter check Pad
Air Conditioner Use
16
NOTE: When user cleaned the filter, press Filter
check button to clear the operation time. Mean-
while, the warning indicator will turn off.
Timer OFF: Can be set under on state of unit. If
timer OFF reaches, the unit will
turn off. The timer can be set in 0.5 hour increment
below 10 hours and in 1 hour
increment for 10 hours or above.
After fan rotates for 250h totally, lamp of cleaning
filter is on to remind customer clean it.
dehumidification and the corresponding indicator is
on; under dry mode, the fan speed cannot be ad-
justed.
2
7
4
3
8
6
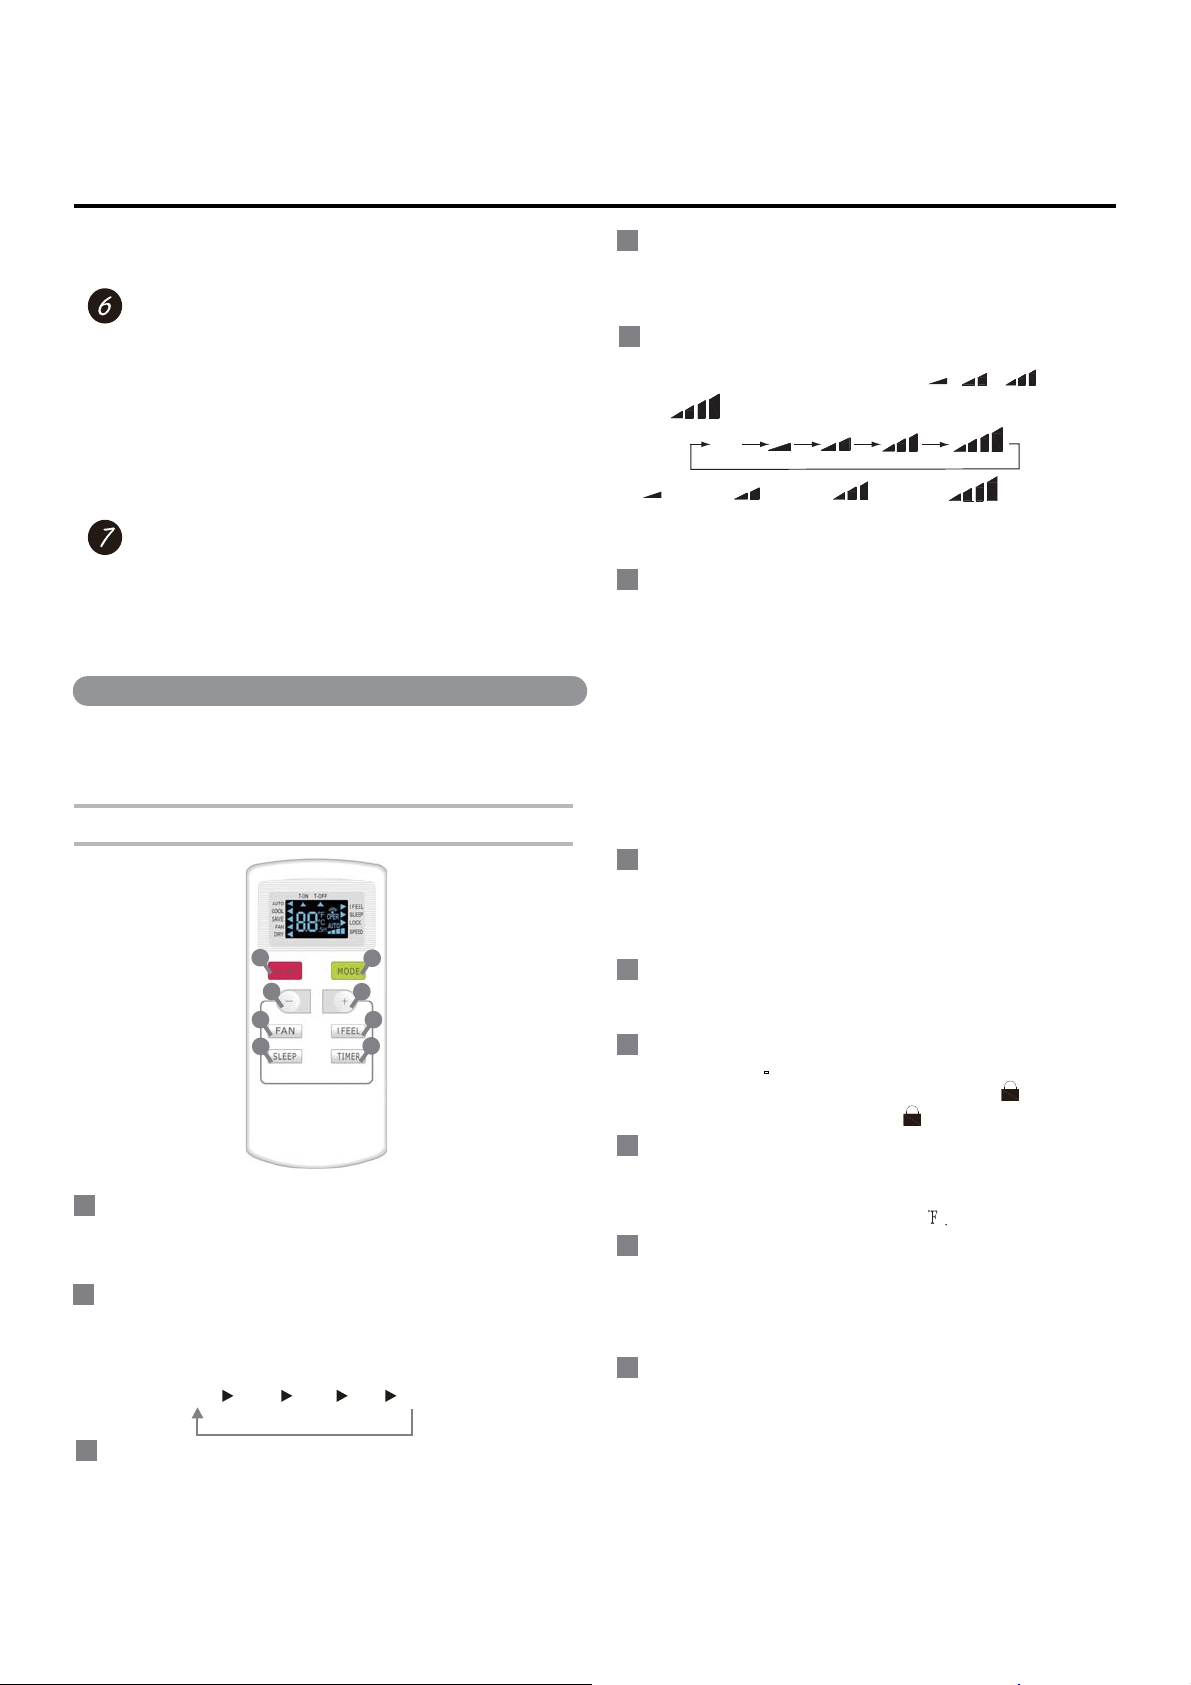
Remote Control
5
1
1
ON/OFF :
2
MODE :
3
4
+
:
Press this button to increase set temperature. Holding
it down above 2 seconds rapidly increases set temper-
ature.
In AUTO mode, set temperature is not adjustable.
AUTO
SAVE
COOL
FAN DRY
-
:
Press this button to decrease set temperature. Holding
.
it down above 2 seconds rapidly decreases set temper-
ature.In AUTO mode, set temperature is not adjustable.
model.
6
I FEEL:
I feel function will be action if pressing this button.
If controller receives I FEEL order, it will work under
ambient temperature value which sending by remote
controller, and remote controller will send ambient
temperature value to controller every 10min. After
11min, if controller does not receive ambient temperature
value which sending by remote controller, it will run with
AC ambient temperature; if I FEEL is not set, ambient
temperature will adopt sampling value of AC temperature
sensor. If power off happens, this function will not be
memorized.
Press " + " and " - " buttons simultaneously
to lock or unlock
the keypad. If the remote controller is locked,
is displayed
In this case,pressing any button,
blinks three times.
9
Combination of "+" and "-" buttons: About lock
12
About Energy saving
Under energy saving mode, lamp of energy saving mode
is on, and the temperature setting range is 61~86℉(16~
30℃). The buzzer will give out a beep if remote control
turbo speed by remote controller, and runs with high
speed.
,then back to A
uto.
Auto
5
FAN
:
to
This button is used for setting Fan Speed in the
sequence that goes from AUTO,
,
,
Speed 1 Speed 2
Speed 3
Speed 4
NOTE: There are 3 speeds for the Fan Speed of this
Press this button to turn on the unit. Press this button
again to turn off the unit.
7
SLEEP:
Each time you press the button, a mode is selected
in a sequence that goes from AUTO, COOL, SAVE
FAN, and DRY , as the following:
11
Press this button to go into the SLEEP operation mode. Pre-
ss it again to cancel this function. This function is available in
COOL, or DRY mode to maintain the most comfortable temp-
erature for you.
8
TIMER:
Under switch-on or switch-off state, you may hold "+"
and "FAN"
buttons simultaneously for
3 seconds to set
the lamp on or off and send the code. After being energi-
zed the lamp is
defaulted on.
Press this button to initiate auto-on/auto-off timer. To
cancel auto-timer program, press this button twice.
10
Combination of "MODE " and "-" buttons:
About switch between fahrenheit and cenrigrade
At unit OFF, press“ MODE ” and “ - ” buttons simultan-
eously to switch between ℃ and
About Lamp
Temperature display switchover function
ŀĿ
Press " " button and " " button simultaneously for
3 seconds can switch between °C and °F
Function introduction for combination buttons

1
Replacement of Batteries in Remote Controller
1. Press the mark “ ” on back cover of batteries box cover
for remote controller with fingers as shown in the fig, and then
remove the batteries box cover along the arrow direction.
Battery
Cover of battery box
Remove
Reinstall
2. Replace with two #7 (AAA 1.5V) dry batteries.
Make sure positions for “+” pole and “-” pole are
correct.
3. Reinstall batteries box cover.
The distance between signal sender and receiving
window should be no more than 8m, and there should
be no obstacles between them.
conditioner when using the remote controller.
Replace new batteries of the same model when
replacement is required.
When you don’t use remote controller for a long
time, please take out the batteries.
NOTICE
Air Conditioner Use
Please always wait 3 minutes when turning unit off and then on again, and when changing from cool to fan
and back to cool. This prevents the compressor from overheating and possible circuit breaker tripping.
(2-WAY)
AUGER WHEEL
Air Directional Louvers
Air directional louvers control air flow direction. Your air conditioner has
the louver type
described below.
Auger Type
Rotate the Auger Wheels until the desired Left/Right direction is obtained.

18
Clean your air conditioner occasionally to keep it looking new. Be sure to unplug the
unit before cleaning to prevent shock or fire hazards.
Air Filter Cleaning
The air filter should be checked at least once a month to see if cleaning is necessary.
Trapped particles in the filter can build up and cause an accumulation of frost on the
cooling coils.
Remove filter by sliding out from the right-hand side.
Wash the filter using liquid dishwashing detergent and warm water. Rinse filter thor-
oughly. Gently shake excess water from the filter. Be sure filter is thoroughly dry before
replacing.
Or, instead of washing you may vacuum the filter clean.
Cabinet Cleaning
Be sure to unplug the air conditioner to prevent shock or fire hazard. The cabinet and
front may be dusted with an oil-free cloth or washed with a cloth dampened in a solution
of warm water and mild liquid dishwashing detergent. Rinse thoroughly and wipe dry.
Never use harsh cleaners, wax or polish on the cabinet front.
Be sure to wring excess water from the cloth before wiping around the controls. Excess
water in or around the controls may cause damage to the air conditioner.
Plug in air conditioner.
Winter Storage
If you plan to store the air conditioner during the winter, remove it carefully from the
window according to the installation instructions. Cover it with plastic or return it to the
original carton.
Care and Cleaning
Normal Sounds
Whenyourairconditionerisoperating normally,youmayhear
soundssuchas:
Droplets of water hitting the condenser, causing a pinging or
clicking sound. The water droplets help cool the condenser.
Air movement from the fan.
Clicks from the thermostat cycle.
Vibrations or noise due to poor wall or window construction.
A high-pitched hum or pulsating noise caused by the modern
high-efficiency compressor cycling on and off.
Cleaning the Front Panel
1. Unplug air conditioner or disconnect power.
2. Clean front panel with a soft, damp cloth.
3. Air dry front panel completely.
4. Plug in air conditioner or reconnect power.
Repairing Paint Damage
Check once or twice a year for paint damage. This is very
important,especially inareas near oceansor whererust is
problem. If needed, touch up with a goodgrade enamel paint.
NOTE: To reduce paint damageduringthewinter,install a heavy
duty coverover air conditioner cabinet. For information on
ordering a heavy-duty cover, see“Accessories.”
Qualification of Workers
Qualification of the working personnel for maintenance, service and repair operations should according to
CAS/UL 60335-2-40:17 Annex HH.. Every working procedure that affects safety means shall only be carried out by competent
persons according to Annex HH. Special training additional to usual refrigerating equipment repair procedures is required when
equipment with FLAMMABLE REFRIGERANTS is affected.
Annual Maintenance
Yourair conditioner needs annualmaintenanceto help ensure
steady, top performance throughout the year. Call your local
authorized dealerto schedule an annual checkup.The expense
of an annualinspection isyourresponsibility.
Air Conditioner Use
19
You can solve many common air conditioner problems easily, saving you the cost of a service call. Try the suggestions below to
see whether you can solve your problem without outside help.
Air conditioner will not operate
The power supply cord is unplugged. Plug into grounded
3prong outlet. See “ Electrical Requirements.”
The power supply cord trips (Reset button will pop out).
Press and release RESET (listen for click; Reset button will
latch and on some devices, a green light will turn on) to
resume operation.
A household fuse has blown or circuit breaker has
tripped. Replace the fuse or reset the circuit breaker. See
“Electrical Requirements.ā
Depending on model, the Power button has not been
pressed or the Fan Speed control is turned to Off. Press
POWER button or turn the FAN SPEED control to an active
setting.
The local power has failed. Wait for power to be restored.
Air conditioner blows fuses or trips circuit breakers
Too many appliances are being used on the same circuit.
Unplug or relocate appliances that share the same circuit.
Time-delay fuse or circuit breaker of the wrong capacity
is being used. Replace with a time-delay fuse or circuit
breaker of the correct capacity. See “Electrical
Requirements.”
An extension cord is being used. Do not use an extension
cord with this or any other appliance.
You are trying to restart the air conditioner too soon after
turning the unit off. Wait at least 3 minutes after turning the
unit off before trying to restart the air conditioner.
Air conditioner power supply cord trips (Reset button
pops out)
Disturbances in your electrical current can trip (Reset
button will pop out) the power supply cord. Press and
release RESET (listen for click; Reset button will latch and on
some devices, a green light will turn on) to resume operation.
An electrical overloading, overheating, pinching or aging
can trip (Reset button will pop out) the power supply
FRUG After correcting the problem, press and release RESET
(listen for click; Reset button will latch and on some devices,
a green light will turn on) to resume operation.
NOTE: A damaged power supply cord must be replaced with a
new power supply cord obtained from the product manufacturer.
A damaged power supply cord must not be repaired.
Air conditioner seems to run too much
The current air conditioner replaced an older model. The
use of more efficient components may cause the air
conditioner to run longer than an older model, but the total
energy consumption will be less. Newer air conditioners do
not emit the Āblastā of cold air you may be accustomed to
from older units, but this is not an indication of lesser cooling
capacity or efficiency. Refer to the efficiency rating (EER) and
capacity rating (in BTU/hr.) marked on the air conditioner.
The air conditioner is in a heavily occupied room, or heat-
producing appliances are in use in the room. Use exhaust
vent fans while cooking or bathing and try not to use heat-
producing appliances during the hottest part of the day. A
higher capacity air conditioner may be required, depending
on the size of the room being cooled.
Air conditioner cycles on and off too much or does not
cool
The Mode is set to Power Saver (on some models). Use
Power Saver only when you are away from home or asleep,
since the fan does not circulate the room air continuously.
Use Low, High or Turbo for your best comfort.
The air conditioner is not properly sized for your room.
Check the cooling capabilities of your room air conditioner.
Room air conditioners are not designed to cool multiple
rooms.
The filter is dirty or obstructed by debris. Clean the filter.
The inside evaporator and outside condenser coils are
dirty or obstructed by debris. See “Annual Maintenance.”
There is excessive heat or moisture (open container
cooking, showers, etc.) in the room. Use a fan to exhaust
heat or moisture from the room. Try not to use heat-
producing appliances during the hottest part of the day.
The louvers are blocked. Install the air conditioner in a
location where the louvers are free from curtains, blinds,
furniture, etc.
The outside temperature is below 65 °F (18e&Do not try to
operate your air conditioner in the cooling mode when the
outside temperature is below 65eF (18°&
The temperature of the room you are trying to cool is
extremely hot. Allow extra time for the air conditioner to cool
off a very hot room.
Windows or doors to the outside are open. Close all
windows and doors.
The Exhaust control is set to OPEN (on some models).
Push the Exhaust control CLOSED for maximum cooling.
Depending on model, the Temp/Time or Temperature
control is not at a cool enough setting. Adjust the TEMP/
TIME control to a cooler setting by pressing the minus button
to reduce the temperature or adjust the TEMPERATURE
control to a cooler setting by turning the knob clockwise. Set
the FAN SPEED control to highest setting (Turbo or High,
depending on model).
Water drips from cabinet into your house
The air conditioner is not properly leveled. The air
conditioner should slope slightly downward toward the
outside. Level the air conditioner to provide a downward
slope toward the outside to ensure proper drainage. See the
Installation Instructions.
NOTE: Do not drill a hole in the bottom of the metal base and
condensate pan.
7URXEOHVKRRWLQJ
20
1. All the work men who are engaging in the refrigeration system should bear the
for dealing with the refrigeration system recognized by this industry. If it needs
other technician to maintain and repair the appliance, they should be supervised
2. It can only be repaired by the method suggested by the equipment’s manufac-
turer.
Installation notes
Maintenance notes
1. Check whether the maintenance area or the room area meet the requirement of
the nameplate.
- It’
s only allowed to be operated in the rooms that meet the requirement of the
nameplate.
2.
Check whether the maintenance area is well-ventilated.
- The continuous ventilation status should be kept during the operation process.
area.
warning board should be hanged.
4. Check whether the appliance mark is in good condition.
- Replace the vague or damaged warning mark.
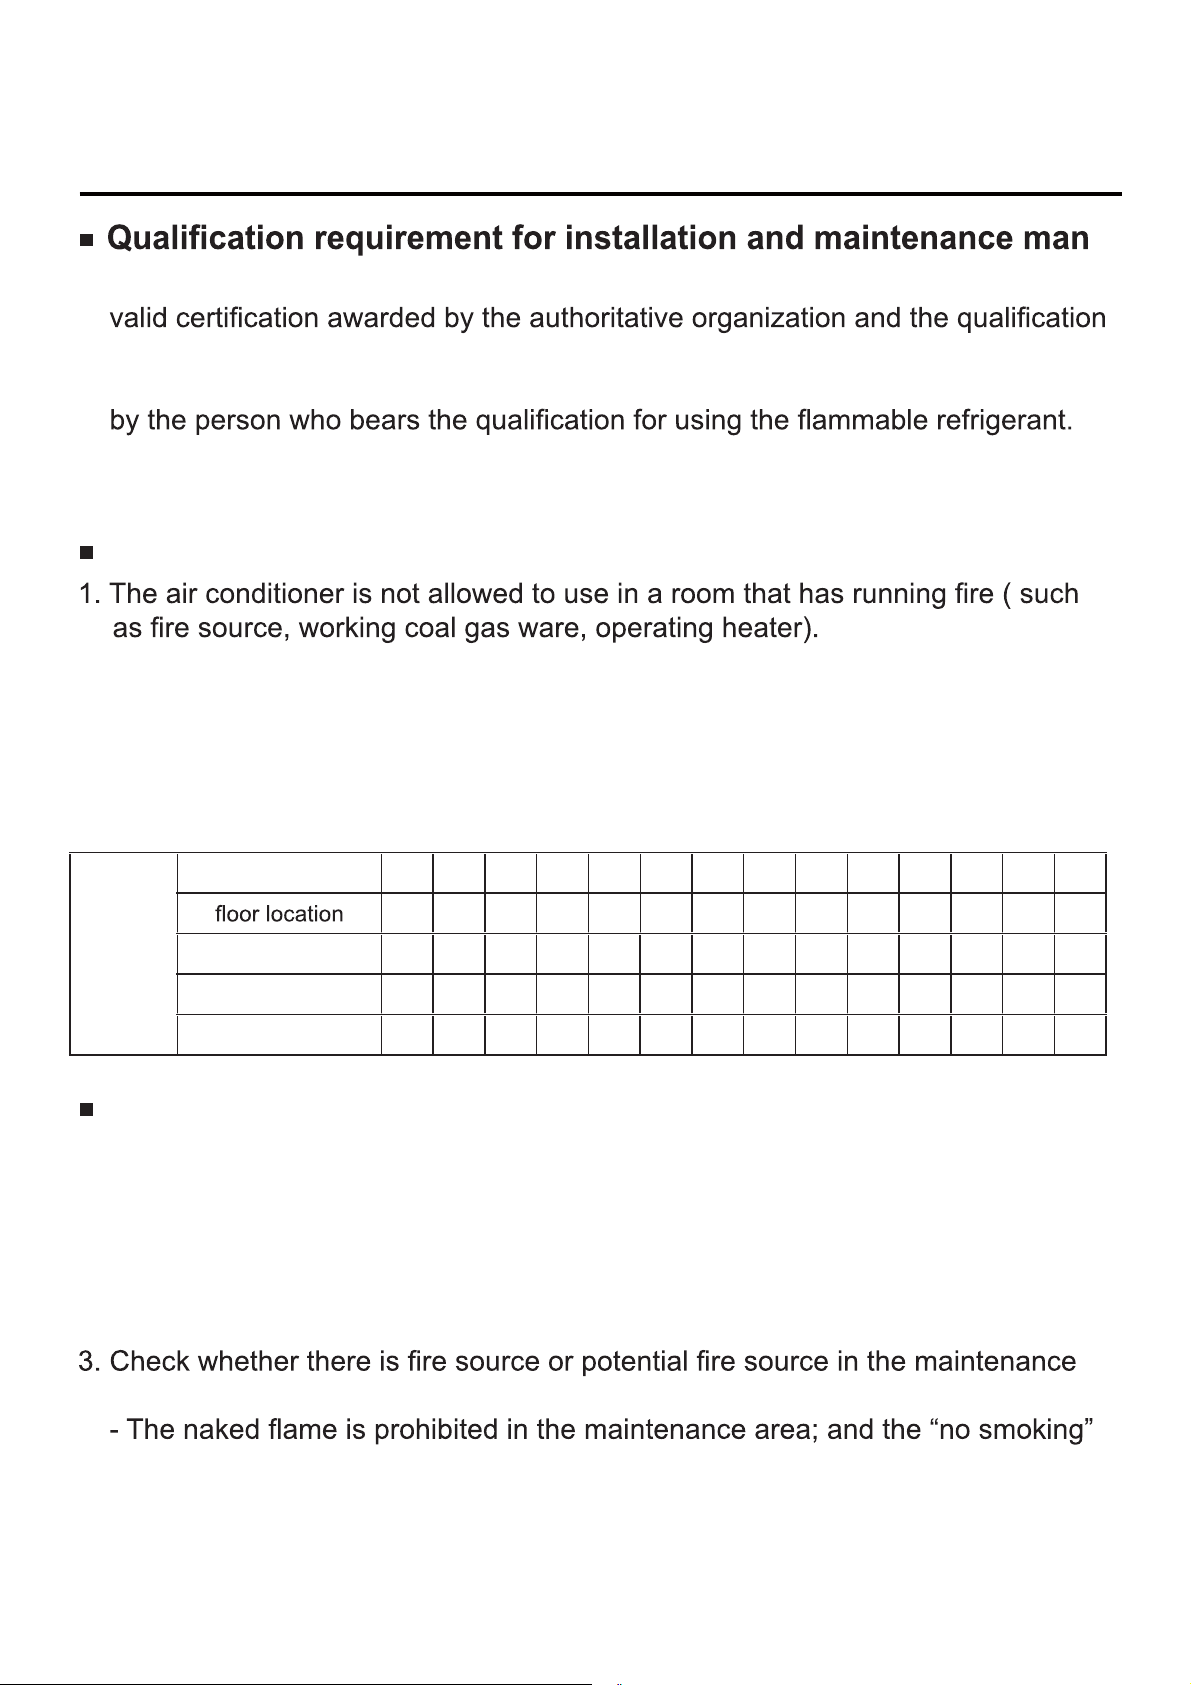
Safety Operation of Flammable Refrigerant
table a- Minimum room area (m
2
)
2. The air conditioner must be installed in a room that is larger than the minimum
room area.
The minimum room area is shown on the nameplate or following table.
3. Leak test is a must after installation.
Minimum
room
area( m
2
)
Charge amount (kg) 2 1.3 1.4 1.5 1.6 1.7 1.8 1.9 2 2.1 2.2 2.3 2.4 2.5
/ 14.5 16.8 19.3 22 24.8 27.8 31 34.3 37.8 41.5 45.4 49.4 53.6
window mounted / 5.2 6.1 7 7.9 8.9 10 11.2 12.4 13.6 15 16.3 17.8 19.3
wall mounted / 1.6 1.9 2.1 2.4 2.8 3.1 3.4 3.8 4.2 4.6 5 5.5 6
ceiling mounted / 1.1 1.3 1.4 1.6 1.8 2.1 2.3 2.6 2.8 3.1 3.4 3.7 4
21
Welding
1. If you should cut or weld the refrigerant system pipes in the process of maintain-
ing, please follow the steps as below
a. Shut down the unit and cut power supply
b. eliminate the refrigerant
c. vacuuming
d.
clean it with N2 gas
e. cutting or welding
f. carry back to the service spot for welding
2. The refrigerant should be recycled into the specialized storage tank.
and it’s well-ventilated.
Filling the refrigerant
fer-
ent kinds of refrigerant won’t contaminate with each other.
another time of leak detection should be done when it’s removed.
6. The filling-work must be performed by authorized personnel only.
Safety instructions for transportation and storage
container.
3. According to the local rules and laws.
Safety Operation of Flammable Refrigerant

2
1. Do not puncture or light the unit.
2. The unit shall be stored in a room without continuous fire source (e.g. naked
fire, litten gas appliance, operating electric heater).
3. The unit shall be stored in a ventilated place; the ventilation device shall operate
normally and ventilation port shall be without obstacle;
4. Check the unit periodically to see if there is collision mark and if the appearance
is good.
5. Check the electronic components (e.g. cable) periodically to see there is breakage.
6. Do not impact or collapse the unit to avoid leakage of refrigerant; if leakage is
founded, please arrange ventilation immediately and ask the professionals for
maintenance, in order to avoid a fire hazard.
Storage after moving the unit
Disposal and recycle
Disposal:
The technician shall be familiar with the device and all its characteristics before
disposal. Proceeding safe recycle of refrigerant is recommended. If the recycled
refrigerant shall be utilized, please analyze the sample of refrigerant and oil before
proceeding. Please ensure the required power supply before testing. Please take
the following operation:
1. Be familiar with the device and its operation;
2. Cut off power supply;
3. Make sure the following items before proceeding: If needed, mechanical operation
device shall be convenient for the operation of refrigerant tank; all personal
protection apparatuses shall be workable and they are used correctly; the whole
recycle procedure shall be done under the instruction of qualified person; recycle
device and refrigerant tank shall comply with relevant standards.
4. Please arrange vacuum pumping to the refrigeration system if possible; if
vacuum status cannot be reached, please arrange vacuum pumping from several
positions in order to recycle the refrigerant in different parts of the system;
5. Make sure the capacity of refrigerant tank is sufficient before starting recycle;
6. Start and operate the recycle device according to the operation instruction of
manufacturer;
7. The refrigerant tank shall not be too full. (the filled liquid shall not exceed 80% of
the capacity of refrigerant tank);
8. Do not exceed the maximum operation pressure although the duration is short;
9. Remove the refrigerant tank and device quickly after finishing operation and make
sure all cut-off valves in the device are closed;
10. The recycled refrigerant cannot be filled into another refrigeration system before
purification and inspection.
6DIHW\1RWLFHVIRU0DLQWHQDQFH

23
Disposal and recycle
Label:
The unit shall be labeled with data and note after scrapping and discharging
refrigerant. Make sure the label on the unit can reflect the R32 refrigerant which it
has been filled.
Recycle:
It's recommended to remove the refrigerant in the system before maintenance and
disposal.
Put the refrigerant into the specialized refrigerant tank with refrigerant label. The
refrigerant tank shall be equipped with pressure-relief valve and cut-off valve, which
are in good condition. If possible, the empty tank should be dealt with vacuum
pumping before using and keep it in normal temperature.
Recycling device shall be kept in good working status and equipped with operation
instructions for reference. The device shall be applicable for the recycle of R32
refrigerant. In addition, qualified weighing apparatus which can be used normally
shall be prepared. The hose shall adopt removable connector without leakage for
connection and keep it in good status. Check if the recycling device is in normal
status before using it and if it is properly stored with all electrical components sealed
to prevent fire hazard caused by refrigerant leakage. If you have any question,
please consult with the manufacturer.
The recycled refrigerant shall be put in proper container attached with transportation
instruction and send it back to the refrigerant manufacturer. Do not mix different
refrigerants in the refrigerant recycle device, especially the refrigerant tank.
When disassembling the compressor or clearing the compressor oil, make sure the
compressor has been dealt with vacuum pumping to suitable level, so that there is
no R32 refrigerant remained in the lubricant. Vacuum pumping shall be done
before the compressor is sent back to the supplier. Only electric heating can be
adopted for heating the shell of compressor in order to speed up the course. When
oil is drained from the system, please ensure the safety.
6DIHW\1RWLFHVIRU0DLQWHQDQFH
24
Information on Servicing
Prior to beginning work on systems containing FLAMMABLE REFRIGERANTS,
safety checks are necessary to ensure that the risk of ignition is minimised.
All maintenance staff and others working in the local area shall be instructed on
the nature of work being carried out. Work in confined spaces shall be avoided.
The area around the workspace shall be sectioned off. Ensure that the conditions
within the area have been made safe by control of flammable material.
The area shall be checked with an appropriate refrigerant detector prior to and
during work, to ensure the technician is aware of potentially toxic or flammable
atmospheres. Ensure that the leak detection equipment being used is suitable
for use with all applicable refrigerants, i.e. non-sparking, adequately sealed or
intrinsically safe.
Presence of fire extinguisher
If any hot work is to be conducted on the refrigeration equipment or any associated
parts, appropriate fire extinguishing equipment shall be available to hand. Have a
dry powder or CO
2 fire extinguisher adjacent to the charging area.
All possible ignition sources, including cigarette smoking, should be kept
sufficiently far away from the site of installation, repairing, removing and disposal,
during which refrigerant can possibly be released to the surrounding space.
Prior to work taking place, the area around the equipment is to be surveyed to
make sure that there are no flammable hazards or ignition risks. “No Smoking”
signs shall be displayed.
Ensure that the area is in the open or that it is adequately ventilated before
breaking into the system or conducting any hot work. A degree of ventilation shall
continue during the period that the work is carried out. The ventilation should
safely disperse any released refrigerant and preferably expel it externally into the
atmosphere
Checks to the area
General work area
Checking for presence of refrigerant
No ignition sources
Ventilated area

25
Information on Servicing
Where electrical components are being changed, they shall be fit for the purpose
and to the correct specification. At all times the manufacturer’s maintenance and
service guidelines shall be followed. If in doubt, consult the manufacturer’s
technical department for assistance.
Repair and maintenance to electrical components shall include initial safety
checks and component inspection procedures. If a fault exists that could
compromise safety, then no electrical supply shall be connected to the circuit
until it is satisfactorily dealt with. If the fault cannot be corrected immediately
but it is necessary to continue operation, an adequate temporary solution shall
be used. This shall be reported to the owner of the equipment so all parties
are advised.
Initial safety checks shall include:
During repairs to sealed components, all electrical supplies shall be disconnected
from the equipment being worked upon prior to any removal of sealed covers, etc.
If it is absolutely necessary to have an electrical supply to equipment during servicing,
manner to avoid
possibility of sparking;
le charging,
recovering or purging the system;
The following checks shall be applied to installations using FLAMMABLE
REFRIGERANTS:
ich the refrigerant
containing parts are installed;
y and are not
obstructed;
dary circuit shall be
checked for the presence of refrigerant;
Markings and
signs that are illegible shall be corrected;
where they are
unlikely to be exposed to any substance which may corrode refrigerant containing
components, unless the components are constructed of materials which are
inherently resistant to being corroded or are suitably protected against being
so corroded.
Checks to the refrigeration equipment
Checks to electrical devices
Repairs to sealed components

26
Information on Servicing
then a permanently operating form of leak detection shall be located at the most
critical point to warn of a potentially hazardous situation.
Particular attention shall be paid to the following to ensure that by working on
electrical components, the casing is not altered in such a way that the level of
protection is affected. This shall include damage to cables, excessive number
of connections, terminals not made to original specification,damage to seals,
incorrect fitting of glands, etc.
Ensure that the apparatus is mounted securely.
Ensure that seals or sealing materials have not degraded to the point that they
no longer serve the purpose of preventing the ingress of flammable atmospheres.
Replacement parts shall be in accordance with the manufacturer’s specifications.
Check that cabling will not be subject to wear, corrosion, excessive pressure,
vibration, sharp edges or any other adverse environmental effects. The check
shall also take into account the effects of aging or continual vibration from sources
such as compressors or fans.
Under no circumstances shall potential sources of ignition be used in the searching
for or detection of refrigerant leaks. A halide torch (or any other detector using a
naked flame) shall not be used.
The following leak detection methods are deemed acceptable for all refrigerant
systems Electronic leak detectors may be used to detect refrigerant leaks but, in
the case of FLAMMABLE REFRIGERANTS,the sensitivity may not be adequate,
or may need re-calibration. (Detection equipment shall be calibrated in a
refrigerant-free area.) Ensure that the detector is not a potential source of ignition
and is suitable for the refrigerant used. Leak detection equipment shall be set at a
percentage of the LFL of the refrigerant and shall be calibrated to the refrigerant
employed, and the appropriate percentage of gas (25 %maximum) is confirmed.
Do not apply any permanent inductive or capacitance loads to the circuit without
ensuring that this will not exceed the permissible voltage and current permitted for
the equipment in use. Intrinsically safe components are the only types that can be
worked on while live in the presence of a flammable atmosphere. The test
apparatus shall be at the correct rating. Replace components only with parts
specified by the manufacturer. Other parts may result in the ignition of refrigerant
in the atmosphere from a leak.
Repair to intrinsically safe components
Cabling
Detection of flammable refrigerants
Leak detection methods

27
Information on Servicing
Leak detection fluids are suitable for use with most refrigerants but the use of
detergents containing chlorine shall be avoided as the chlorine may react with the
refrigerant and corrode the copper pipe-work.
If a leak is suspected, all naked flames shall be removed/extinguished.
When breaking into the refrigerant circuit to make repairs – or for any other purpose –
conventional procedures shall be used. However, for flammable refrigerants it is
important that the best practice is followed since flammability is a consideration.
ng. The following
procedure shall be adhered to:
The refrigerant charge shall be recovered into the correct recovery cylinders. For
appliances containing FLAMMABLE REFRIGERANTS, the system shall be “flushed”
with OFN to render the unit safe. This process may need to be repeated several
times. Compressed air or oxygen shall not be used for purging refrigerant systems.
Ensure that the outlet for the vacuum pump is not close to any ignition sources
and that ventilation is available.
In addition to conventional charging procedures, the following requirements shall
be followed.
Ensure that contamination of different refrigerants does not occur when using
charging equipment. Hoses or lines shall be as short as possible to minimise the
amount of refrigerant contained in them.
For appliances containing FLAMMABLE REFRIGERANTS, flushing shall be
achieved by breaking the vacuum in the system with OFN and continuing to fill
until the working pressure is achieved, then venting to atmosphere, and finally
pulling down to a vacuum. This process shall be repeated until no refrigerant is
within the system. When the final OFN charge is used, the system shall be vented
down to atmospheric pressure to enable work to take place. This operation is
take place.
l of the refrigerant shall
be recovered from the system, or isolated (by means of shut off valves) in a part of
the system remote from the leak. For appliances containing FLAMMABLE
REFRIGERANTS, oxygen free nitrogen (OFN) shall then be purged through the
Removal and evacuation
Charging procedures

8
Information on Servicing
Prior to recharging the system, it shall be pressure-tested with the appropriate
purging gas. The system shall be leak-tested on completion of charging but prior
to commissioning. A follow up leak test shall be carried out prior to leaving the site.
Before carrying out this procedure, it is essential that the technician is completely
familiar with the equipment and all its detail. It is recommended good practice that
all refrigerants are recovered safely.
Prior to the task being carried out, an oil and refrigerant sample shall be taken in
case analysis is required prior to re-use of reclaimed refrigerant. It is essential that
electrical power is available before the task is commenced.
Equipment shall be labelled stating that it has been de-commissioned and emptied of
refrigerant. The label shall be dated and signed. For appliances containing
( a ) Become familiar with the equipment and its operation.
( b ) Isolate system electrically.
( c ) Before attempting the procedure, ensure that:
( d ) Pump down refrigerant system, if possible.
( e ) If a vacuum is not possible, make a manifold so that refrigerant can be
removed from various parts of the system.
( f ) Make sure that cylinder is situated on the scales before recovery takes place.
( g ) Start the recovery machine and operate in accordance with manufacturer’s
instructions.
( h ) Do not overfill cylinders. (No more than 80 % volume liquid charge).
( i ) Do not exceed the maximum working pressure of the cylinder, even temporarily.
( j ) When the cylinders have been filled correctly and the process completed,
make sure that the cylinders and the equipment are removed from site promptly
and all isolation valves on the equipment are closed off.
( k ) Recovered refrigerant shall not be charged into another refrigeration system
unless it has been cleaned and checked.
Cylinders shall be kept upright.
Ensure that the refrigeration system is earthed prior to charging the system
with refrigerant.
Label the system when charging is complete (if not already).
Extreme care shall be taken not to overfill the refrigeration system.
handling refrigerant
cylinders;
correctly;
t person;
tandards.
Decommissioning
Labelling

29
Information on Servicing
FLAMMABLE REFRIGERANTS, ensure that there are labels on the equipment
stating the equipment contains flammable refrigerant.
When removing refrigerant from a system, either for servicing or decommissioning,
it is recommended good practice that all refrigerants are removed safely.
When transferring refrigerant into cylinders, ensure that only appropriate refrigerant
recovery cylinders are employed. Ensure that the correct number of cylinders for
holding the total system charge are available.
All cylinders to be used are designated for the recovered refrigerant and labelled
for that refrigerant (i.e.special cylinders for the recovery of refrigerant). Cylinders
shall be complete with pressure-relief valve and associated shut-off valves in good
working order. Empty recovery cylinders are evacuated and, if possible, cooled
before recovery occurs.
The recovered refrigerant shall be returned to the refrigerant supplier in the correct
recovery cylinder, and the relevant waste transfer note arranged. Do not mix
refrigerants in recovery units and especially not in cylinders.
If compressors or compressor oils are to be removed, ensure that they have been
evacuated to an acceptable level to make certain that flammable refrigerant does
not remain within the lubricant. The evacuation process shall be carried out prior to
returning the compressor to the suppliers. Only electric heating to the compressor
body shall be employed to accelerate this process. When oil is drained from a
system, it shall be carried out safely.
The recovery equipment shall be in good working order with a set of instructions
concerning the equipment that is at hand and shall be suitable for the recovery of
all appropriate refrigerants including, when applicable, FLAMMABLE
REFRIGERANTS. In addition, a set of calibrated weighing scales shall be available
and in good working order. Hoses shall be complete with leak-free disconnect
couplings and in good condition. Before using the recovery machine, check that it
is in satisfactory working order, has been properly maintained and that any
associated electrical components are sealed to prevent ignition in the event of a
refrigerant release. Consult manufacturer if in doubt.
Recovery

30
Before contacting customer support, please see the troubleshooting guide
above.
Upon unpacking your air conditioner, please be sure to write down the model
and serial
number of your unit. This will be needed should your unit require
servicing in the future. The number is found on a barcode on the right side of
the air conditioner and on a simi-lar barcode on the outside of the box the unit
came in.
We recommend holding onto the box, but as many people do throw it away,
and the air conditioner itself gets installed in a window, it can be difficult to
access this serial num-ber later.
Model number: __________________ (One of the numbers mentioned on
the cover of this manual). Your exact number is found on your box or on the
rating label sticker on the right side of the unit.
Serial number (11 digits) __________________
Please keep this manual for your records!
Visit our website to contact us, find answers to Frequently Asked Questions,
and for other resources which may include an updated version of this user’s
guide.
WWW.IMPECCA.COM
If you wish to contact us by phone, please be sure to have your model
number and serial number ready and call us between 9:30am and 5:00pm
ET, at +1 866-954-4440.
Keep tabs on Impecca’s newest innovations & enter contests via our social
network feeds:
www.facebook.com/Impecca/
www.instagram.com/impecca/
@impeccausa
© 2021 Impecca, a division of LT Inc., Wilkes Barre, PA.
CUSTOMER SUPPORT
ENGLISH ESPAÑOL FRANÇAIS
–31–
Impecca™ warrants this product against defects in material and
workmanship to the original purchaser as specified below.
PARTS AND LABOR– if the product is determined to have
a manufacturing defect, within a period of one year
from the date of the original purchase, Impecca™, at its
own discretion, will repair or replace the product parts
at no charge to you in the U.S.A.
To obtain warranty service by an authorized Impecca™ service
center, please email us at: service@impecca.com to obtain a Re-
pair and Maintenance Authorization (RMA) number and received
instructions on how the repair and/or replacement procedure
will take place.
Any glass materials included with the appliance will be
covered for a period of 60 days from purchase.
Impecca™ specifically excludes from this warranty any non-elec-
tric/mechanical attachments, accessories and disposable parts
including but not limited to outside case, connecting cables,
batteries and AC adapters. Impecca™ reserves the right to repair
or replace defective products with the same, equivalent or new-
er models.
We reserve the right to either repair or replace product at our
discretion. Replacement may be either new or refurbished and
while every endeavor will be made to ensure it is the same mod-
el, if not possible it will be equal or higher specification.
Normal “Wear and Tear” is not covered by this warranty. Further,
Impecca™ hereby reserves the right to determine “Wear and
Tear” on any and all products. Tampering or opening the prod-
uct casting or shell will void this warranty in its entirety.
Exclusions: This warranty does not cover the following:
1. Any product that has a defaced or covered serial number.
2. Products that have been transferred to a second owner.
3. Rust on the interior or exterior of the unit.
4. Products listed as “As-Is” or “Refurbished.”
5. Food loss due to any product failure.
6. Window air conditioners installed in a wall.
7. The product if used in a commercial setting.
8. Service calls that do not involve product malfunction.
9. Service calls for a product ruined by not following the pro-
vided instructions.
10. Service calls to correct improper installation.
11. Costs associated with making the product accessible for ser-
vicing (including but not limited to removal of trim/molding/
cabinetry, etc.)
12. Service calls to replace any consumables such as light
bulbs, filters, etc.
13. Surcharges that may apply to service calls on weekends,
nights, holidays. Damages to the finish of appliance or
household furnishings due to installation of appliance.
14. Damages caused by any of the following: Acts of God;
fires; misuse; accidents; incorrect power supply; service
performed by unauthorized persons; use of non-genuine
Impecca parts, etc.
ALL IMPLIED WARR
ANTIES, INCLUDING IMPLIED WARRANTIES OF
MERCHANTABILITY AND FITNESS FOR A PARTICULAR PURPOSE
ARE LIMITED IN DURATION TO 1 YEAR FROM THE DATE OF THE
ORIGINAL RETAIL PURCHASE OF THIS PRODUCT.
THESE WARRANTIES AND REMEDIES ARE THE SOLE AND EXCLU-
SIVE WARRANTIES AND REMEDIES IN CONNECTION WITH THE
SALE AND USE OF THE PRODUCT. NO OTHER WARRANTIES, ORAL
OR WRITTEN, EXPRESSED OR IMPLIED, ARE GIVEN.
IMPECCA™ IS NOT RESPONSIBLE OR LIABLE FOR ANY DAMAGE,
WHETHER SPECIAL, INCIDENTAL, CONSEQUENTIAL, DIRECT OR
OTHERWISE, OR WHETHER KNOWN OR SHOULD HAVE BEEN
KNOWN TO IMPECCA™, INCLUDING LOST PROFITS, GOODWILL,
AND PROPERTY AND PERSONAL INJURY RESULTING FROM ANY
BREACH OF WARRANTY, THE INABILITY TO USE THE PRODUCT
OR UNDER ANY LEGAL THEORY IN CONTRACT OR TORT. IMPECCA
LIABILITY IS LIMITED TO THE ACTUAL PURCHASE PRICE PAID TO
THE RETAIL SELLER OF THE DEFECTIVE PRODUCT.
No Impecca™ dealer, agent or employee is authorized to make
any modification, extension, change or amendment to this
warranty without the written consent and authorization from
Impecca™.
Some states do not allow the exclusion or limitation of implied
warranties or liability for incidental or consequential damages,
or do not allow a limitation on how long an implied warranty
lasts, so the above limitations or exclusions may not apply to
you. This warranty gives you specific legal rights, and you have
other rights, which vary from state to state.
Note: Our Warranty center services only to Continental U.S.A.
ONE-YEAR LIMITED APPLIANCE WARRANTY (US)

ENGLISHESPAÑOLFRANÇAIS
–32–
Impecca™ garantiza al comprador original este producto con-
tra defectos en su material y mano de obra como se especifica
a continuación.
PARTES Y MANO DE OBRA– Si se determina que el
producto tiene defectos de fabricación, dentro del
periodo de un (1) año a partir de la fecha de compra
original, Impecca™, a su discreción, reparará o reem-
plazara las partes del producto sin ningún costo para
usted en los Estados Unidos.
Para obtener el servicio de garantía de un distribuidor autori-
zado de Impecca™ envíenos un correo electrónico a: service@
impecca.com para obtener un número de Autorización de
Reparación y Mantenimiento (RAM) y recibir las instrucciones
de cómo se llevará a cabo el procedimiento de reparación o
reemplazo.
Cualquier material de vidrio incluido en el electrodo-
méstico estará cubierto por un periodo de sesenta
(60) días a partir de la fecha de compra.
Impecca™ excluye de esta garantía accesorios no eléctricos
o mecánicos, accesorios y partes desechables incluyendo,
pero no limitado, a la carcaza, cables de conexión, baterías,
adaptadores A/C. Impecca™ se reserva el derecho de reparar
o reemplazar un producto defectuoso con un modelo igual,
equivalente o nuevo modelo.
Nos reservamos el derecho ya sea de reparar o reemplazar el
producto a nuestra discreción. El reemplazo puede ser nuevo
o reacondicionado tratando de asegurar de que se trate del
mismo modelo, si el mismo modelo no está disponible, se
reemplazará con un modelo de especificaciones iguales o
superiores.
El “desgaste” normal no está cubierto por esta ni por ninguna
otra garantía. Adicionalmente, Impecca™ se reserva el de-
recho de determinar el “desgaste” de cualquiera o todos los
productos. El violar o abrir el chasis del producto invalidará
esta garantía por completo.
Excepciones: Esta garantía no cubre lo siguiente:
1. Cualquier producto que tenga un número de serie defec-
tuosos o cubierto
2. Productos que han sido transferidos a un segundo pro-
pietario
3. Óxido en la parte interna o externa de la unidad
4. Los productos listados como “Tal cual” o “Reformados”
5. Pérdida de alimentos debido a la falla del producto
6. Aires acondicionados que han sido instalados en un
muro.
7. El producto si este ha sido utilizado en una ubicación
comercial
8. Llamadas de servicio que no involucren el mal funciona-
miento del producto
9. Llamadas de servicio de un producto estropeado por no
seguir las instrucciones proporcionadas
10. Llamadas de servicio para corregir una instalación inco-
rrecta
11. Costos asociados por hacer el producto accesible al ser-
vicio (incluido pero no limitado a la remoción de ajustes/
moldeo/gabinete, etc.)
12. Llamadas de servicio para reemplazar consumibles
como bombillas, filtros, etc.
13. Recargos que pueden aplicar a llamadas de servicio los
fines de semana, por las noches, o durante las festivida-
des. Daños al acabado del electrodoméstico o muebles
de la casa debido a la instalación del electrodoméstico.
14. Daños causados por cualquiera de las siguientes causas:
Actos de Dios, incendios, mal uso. accidentes, suministro
de energía incorrecto, servicio realizado por personal no
autorizado, el uso de partes no originales Impecca.
TODAS LAS GARANTÍAS IMPLÍCITAS, INCLUYENDO LAS GARAN-
TÍAS IMPLÍCITAS DE MERCADOTECNIA E IDONEIDAD PARA UN
PROPÓSITO EN PARTICULAR ESTÁN LIMITADAS A UNA DURA-
CIÓN DE (1) AÑO EN PARTES Y NOVENTA (90) DÍAS EN MANO
DE OBRA DESDE LA FECHA ORIGINAL DE COMPRA DEL PRO-
DUCTO.
ESTAS GARANTÍAS Y MEDIDAS SON ÚNICAS Y EXCLUSIVAS
EN RELACIÓN CON LA VENTA Y USO DEL PRODUCTO. NO SE
OTORGA NINGUNA OTRA GARANTÍA, ORAL O ESCRITA, EN
FORMA EXPRESA O IMPLÍCITA.
IMPECCA™ NO SE HACE RESPONSABLE DE NINGÚN DAÑO, YA
SEA ESPECIAL, INCIDENTAL, CONSECUENTE, DIRECTO O DE
CUALQUIER OTRA NATURALEZA, YA SEA CONOCIDO O POR
DAR A CONOCER A IMPECCA™, INCLUYENDO LA PÉRDIDA DE
GANANCIAS, PLUSVALÍA, DAÑOS PERSONALES O EN LA PRO-
PIEDAD RESULTANTES DE CUALQUIER INCUMPLIMIENTO DE
LA GARANTÍA, LA INCAPACIDAD DE UTILIZAR EL PRODUCTO O
BAJO NINGUNA TEORÍA LEGAL EN CONTRATO O AGRAVIO. LA
RESPONSABILIDAD DE IMPECCA SE LIMITA AL PRECIO ACTUAL
DE COMPRA PAGADO AL VENDEDOR DEL PRODUCTO DEFEC-
TUOSO.
Ningún distribuidor, agente o empleado de Impecca™ está
autorizado para hacer ninguna modificación, extensión, cam-
bio o enmienda de esta garantía sin el consentimiento y auto-
rización escrita de Impecca™.
Algunos estados no permiten la exclusión o limitación de ga-
rantías implícitas o la responsabilidad por daños incidentales
o consecuentes, y no permiten una limitación en la duración
de una garantía implícita, de modo que las anteriores limita-
ciones o exclusiones pueden no aplicarse a usted. Esta garan-
tía le otorga derechos específicos, y puede usted tener otros
derechos, los cuales varían de estado a estado.
Nota: El Centro de Servicio de Garantía hace envíos solo
dentro del territorio continental de E.U.
GARANTÍA LIMITADA POR UN AÑO (US)

ENGLISH ESPAÑOL FRANÇAIS
–33–
Impecca™ garantie auprès de l’acheteur original cet appareil
contre toutes défectuosités liées au matériel et à la fabrica-
tion tel que spécifié ci-dessous.
PIÈCES ET MAIN D’ŒUVRE- S’il est déterminé que
l’appareil a un problème lié à la fabrication, à
l’intérieur d’une période d’un an de la date d’achat
originale, Impecca™, à sa discrétion, pourra rempla-
cer ou réparer les pièces de l’appareil sans frais pour
vous aux États-Unis.
Afin d’obtenir des services sous garantie par un fournisseur
autorisé par le centre de service d’Impecca™, veuillez nous
rejoindre par courriel : servic[email protected]om afin d’obtenir un
numéro d’autorisation d’entretien et réparation (Repair and
Maintenance Authorization – RMA). Vous recevrez également
des détails liés au processus de réparation et/ou remplace-
ment.
Tout matériau en vitre inclus avec l’appareil est
couvert par une garantie de 60 jours à compter de la
date d’achat (lorsque applicable).
Impecca™ exclus spécifiquement de cette garantie tout atta-
chement non électrique / mécanique, accessoires ou pièce
jetable incluant, mais non limité au boîtier externe, les câbles
connecteurs, les piles et les adaptateurs secteurs. Impecca™ se
réserve le droit de réparer ou remplacer les appareils défec-
tueux par un modèle pareil, équivalent ou plus récent.
Nous nous réservons le droit de réparer ou de remplacer
l’appareil à notre discrétion. Le remplacement pourrait être
par un appareil nouveau ou remis à neuf. Bien que tous les
eorts soient mis de l’avant pour assurer qu’il s’agisse du
même modèle, s’il s’avère impossible, le remplacement sera
de qualité similaire ou supérieure.
L’usure normale de l’appareil n’est pas couverte par cette
garantie. Impecca™ se réserve le droit de déterminer le niveau
d’usure sur l’ensemble de ses appareils. Ouvrir le boîtier ou
modifier l’appareil annule dans son entièreté la présente
garantie.
Exclusions : la garantie présente exclut les points suivants :
1. Tout appareil dont le numéro de série est eacé ou rendu
illisible.
2. Tout appareil transféré à un second propriétaire.
3. La rouille formée à l’intérieur ou à l’extérieur de l’unité.
4. Les appareils marqués « Tel quel » ou « Remis à neuf ».
5. Pertes d’aliments dus à un mauvais fonctionnement de
l’appareil.
6. Climatiseur à fenêtre installés au mur.
7. Si l’appareil est utilisé à des fins commerciales.
8. Appels de service qui ne sont pas en lien avec un mal
fonctionnement de l’appareil.
9. Appels de service pour un appareil endommagé suite au
non-respect des instructions fournies.
10. Appels de service liés à une installation défectueuse.
11. Coûts entraînés à rendre l’appareil accessible pour l’entre-
tien (incluant, mais non limité à l’enlèvement de moulures,
plinthes, armoires, etc.)
12. Appels de service pour le remplacement de pièces
consommables tels que des ampoules, filtres, etc.
13. Des frais additionnels peuvent s’appliquer aux appels de
service en soirée, en fin de semaine, les jours fériés. Des
dommages à la finition de l’appareil ou à des ameuble-
ments suite à l’installation de l’appareil.
14. Dommages causés par : des circonstances exception-
nelles; incendie; mauvaise utilisation; accident; alimen-
tation électrique inappropriée; entretien eectué par
une personne non autorisée; utilisation de pièces non
d’origine d’Impecca, etc.
TOUTE GARANTIE IMPLICITE, Y COMPRIS LES GARANTIES DE
QUALITÉ MARCHANDE ET D’ADAPTATION À UN USAGE PARTI-
CULIER EST LIMITÉ POUR UNE DURÉE DE 1 AN À COMPTER DE
LA DATE DE L’ACHAT ORIGINAL DE CE PRODUIT.
CES GARANTIES ET RECOURS DEMEURENT EXCLUSIFS À LA
VENTE ET L’UTILISATION DE CE PRODUIT. AUCUNE AUTRE
GARANTIE, ORALE OU ÉCRITE, EXPLICITE OU IMPLICITE, NE
SERA ÉMISE.
IMPECCA™ NE PEUT PAS ÊTRE TENU RESPONSABLE POUR
DES DOMMAGES SPÉCIAUX, ACCIDENTELS, CONSÉQUENTS,
DIRECTS OU AUTRES CONNUS OU QUI AURAIENT PU ÊTRE
COMMUNIQUÉS À IMPECCA™, Y COMPRIS LA PERTE DE
PROFITS, DE BIENVEILLANCE, DE BIENS ET DE BLESSURES
RÉSULTANT D’UNE VIOLATION DE LA GARANTIE, L’INCAPACITÉ
D’UTILISER LE PRODUIT OU EN VERTU DE TOUTE THÉORIE
JURIDIQUE EN CONTRAT OU DÉLIT. LA RESPONSABILITÉ
D’IMPECCA EST LIMITÉE AU PRIX D’ACHAT PAYÉ AU VENDEUR
EN DÉTAIL DU PRODUIT DÉFECTUEUX.
Aucun revendeur, agent ou employé d’Impecca™ n’est
autorisé à eectuer une modification, une extension, un
changement ou un amendement de cette garantie sans le
consentement écrit et l’autorisation d’Impecca™.
Certains états ne permettent pas l’exclusion ou la limitation
des garanties implicites ou de responsabilité en lien avec des
dommages accidentels or des dommages conséquents ou
ne permettent pas une limitation sur la durée de la garantie
implicite. Donc, les limitations ou exclusions ci-dessus
peuvent ne pas s’appliquer à vous. Cette garantie vous donne
des droits légaux spécifiques et vous détenez d’autres droits,
qui peuvent varier d’état en état.
Note : Notre centre de la garantie eectue la livraison unique-
ment qu’aux États-Unis continentaux.
GARANTIE LIMITÉE D’UN AN (US)