20-60X80 SPOTTING SCOPE
WITH SMARTPHONE ADAPTER AND
BLUETOOTH REMOTE
LANDSCOUT
INSTRUCTION MANUAL | MODEL #53329


ENGLISH I 1
Thank you for purchasing a Popular Science™ by Celestron
®
LandScout spotting scope. We trust
this spotting scope will provide you with years of enjoyment and faithful service. Please read the
instructions carefully before using your spotting scope to ensure proper use and care.
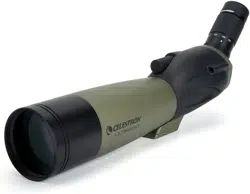
FIG. 1
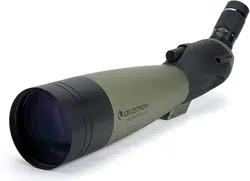
CELESTRON LANDSCOUT SPOTTING SCOPE
PARTS OF THE SPOTTING SCOPE
Pan/Tilt Handle
Tripod leg
Eyepiece
Lock Screw
Focus Wheel
Objective Lens
Tripod Mounting Plate and
Mounting Screw
Tripod Mount
(Rotating)
Objective Lens
Tripod Mount
(Rotating)

2 I ENGLISH
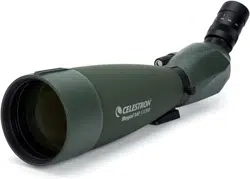
Attach your spotting scope to a sturdy tripod
before viewing as the size and power of the
spotting scope requires a solid tripod for stability
to achieve clear, sharp images.
BEFORE USE
FIG. 2
WARNING: Never look at the Sun while using your spotting scope. Looking at the Sun can cause permanent eye damage.

ENGLISH I 3
USING THE TABLETOP TRIPOD
Your spotting scope includes a tabletop tripod
for added stability when viewing. Follow the steps
below to set up the tripod.
1. Spread the three tripod legs until they come
to a stop.
2. Make sure the Pan/Tilt Handle is in the locked
position (turn clockwise) and the mounting
plate is level.
3. Place the bottom of the tripod on the top of
the mounting plate lining up the mounting
screw of the tripod and the mounting hole
on the spotting scope. Secure the spotting
scope to the tripod by turning the screw
counterclockwise.
4. The Pan/Tilt Handle controls the tripod’s
horizontal and vertical movement. To adjust
the spotting scope’s position, turn the handle
counterclockwise to unlock. Move the spotting
scope to the desired viewing position and turn
the handle clockwise to lock into place.
FOCUSING
To ensure a crisp, sharp image, the spotting
scope must be focused. To focus the spotting
scope, slowly rotate the focus wheel (located
behind the tripod mount) until the image in the
eyepiece is clear and sharp. If the focus wheel
will not rotate any further, you have reached the
end of its travel and need to turn the wheel in the
opposite direction.
FIG. 3
4 I ENGLISH
CHANGING THE MAGNIFICATION
To change the magnification of the zoom eyepiece,
simply rotate the eyepiece according to the
magnification markings on the eyepiece itself.
When changing magnification, the scope will
need to be refocused. The largest field of view
and brightest image will always be at the lowest
magnification.
ROTATING TRIPOD MOUNT
Your new spotting scope features a rotating
tripod mount that rotates a full 360° and allows
the eyepiece to be set in any viewing position.
To change the eyepiece position, loosen the lock
screw (located on the tripod mount) and turn the
scope to the desired position. Tighten the lock
screw and view through the eyepiece.
FIG. 4
FIG. 5B
Lock Screw
FIG. 5A
ENGLISH I 5
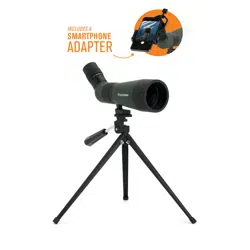
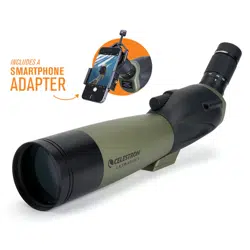
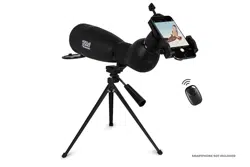
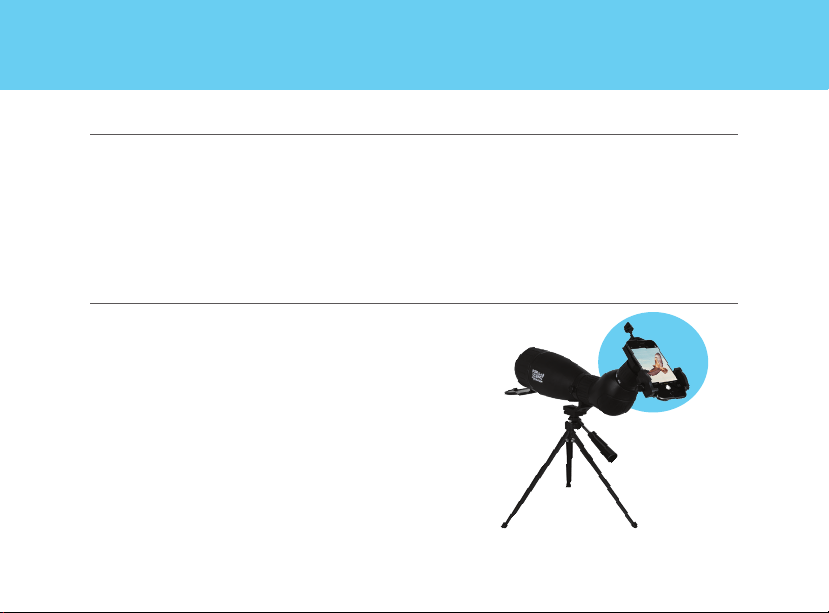
DIGISCOPING
SMARTPHONE DIGISCOPING
Popular Science™ by Celestron LandScout
spotting scope can be used for digiscoping with
smartphones or point-and-shoot digital cameras.
Please note that not all cameras are compatible
for vignetting (a circular image surrounded by
black) will occur. Point-and-shoot cameras with
an optical zoom of 3x or 4x, tend to be the most
compatible with the least amount of vignetting.
Most images will be sharpest and brightest
when using the lowest magnification on the
zoom eyepiece.
Your Popular Science™ by Celestron spotting
scope includes an easy-to-use smartphone
adapter to allow quick and effective digiscoping
with you own smartphone. Follow these simple
instructions to attach, position, and use this
adapter with your spotting scope.

6 I ENGLISH
With the eyecup of the spotting scope twisted down to its lowest position:
USING THE
SMARTPHONE ADAPTER
(A)
(B)
(C)
(D)
(E)
FRONT BACK

ENGLISH I 7
CAUTION: Do not carry the scope with the smartphone adapter
in place as it may be accidentally bumped and fall off,
potentially damaging the smartphone as a result.
1. Before attaching the adapter, look through your spotting scope,
and make sure that the view is in sharp focus.
2. Open the eyepiece clamp (B) by loosening the eyepiece clamp
knob (A) at the top of the eyepiece clamp.
3. Place the eyepiece clamp over the eyepiece of your
scope. Tighten the eyepiece clamp knob to secure the
eyepiece clamp tightly against the eyepiece.
NOTE: Make sure to mount the clamp on a section of the
eyepiece barrel that does not rotate freely, such
as the magnification zoom adjustment dial.
4. Loosen the holder clamp knob (D) until the holder clamp (C) is
open wide enough to accommodate the width of your phone.
Once the phone is in place, tighten the holder clamp knob until
the phone is secured.
NOTE: This adapter can be used with most phone cases,
but the case surface MUST be flat so it will fit in the
holder correctly. Any grips, stands, rings, or raised
surfaces on the case will impede the placement of the
phone. All folio-style phone cases must be removed.
5. Launch the camera app on your phone. Loosen the holder
alignment knob (E) and adjust the positioning of your
phone camera so that it lines up with the eyepiece of your
optic.
6. Once the camera is over the eyepiece and your camera is
capturing the view through the eyepiece, carefully tighten the
holder alignment knob to secure your phone in position.
7. If needed, adjust the focus on your scope again for the
sharpest possible view.
8. You are now ready to take images and videos using your
smartphone camera!
IMPORTANT: always be certain the eyepiece clamp knob is
sufficently loosened before attempting to remove the adapter from
the scope eyepiece

8 I ENGLISH
Press and hold the button on the remote
for 5 seconds. A blue light will turn on and,
after a few seconds, start to blink. The
remote is now in pairing mode.
Using the Bluetooth settings on your
phone, pair the device called “GBshutter”.
To insert or replace the battery, place your
thumb in the center of the back cover,
pressing inward and sliding downward
remove the battery door. The CR2032
battery should be inserted with the positive
(+) side facing upward. Replace the cover.
1
2
3
USING THE
BLUETOOTH REMOTE

ENGLISH I 9
Open your camera app. Press the button
on the remote to trigger the shutter on
your phone.
4
If your camera is in video mode, you can
press the button once to start recording
and again to stop the recording.
5
POINT-AND-SHOOT CAMERA DIGISCOPING
Your spotting scope can be used with the
Celestron Universal Digital Camera Adapter
#93626 for digiscoping with compact point-
and-shoot digital cameras. Please note that not
all cameras are compatible for digiscoping and
with some cameras, vignetting (a circular image
surrounded by black) will occur. Point-and-shoot
cameras with an optical zoom of 3x or 4x, tend
to be the most compatible with the least amount
of vignetting. Most images will be sharpest and
brightest when using the lowest magnification
on the zoom eyepiece.
FIG. 6

10 I ENGLISH
CARE AND STORAGE
Your Celestron spotting scope will provide you
years of dependable service if it is cared for and
stored properly.
1. Protect the spotting scope from impact and
do not force any of the moving parts beyond
their limits.
2. Protect the optics of your spotting scope by
putting on all lens caps when not in use.
3. Store your spotting scope in a cool, dry place
whenever possible.
4. When storing for an extended period of time,
place the spotting scope in a plastic bag or
airtight container with a desiccant.
5. Do not leave the spotting scope in a car on a
hot/sunny day or near anything that generates
heat as this may cause damage.
6. Clean any dust, dirt or water that may get on
the spotting scope or inside moving parts as
soon as possible to prevent any unforeseen
damage.
CLEANING
Proper cleaning of the lenses is essential to
maintaining the optical integrity of your spotting
scope. Dirty lenses diminish the amount of light
transmitted through the spotting scope and your
overall viewing experience.
1. Remove any dust on the lenses with a soft lens
brush or can of pressurized air.
2. Remove any fingerprints, stains or smudges
from the lens surface with a soft, clean lens
cloth or lens tissue by rubbing in a circular
motion. Start in the middle of the lens and
work your way to the edges. Breathe lightly on
the lens to provide moisture if needed.
3. For a more thorough cleaning we recommend

ENGLISH I 11
SERVICE AND REPAIR
If warranty problems arise or repairs are
necessary, contact the Celestron customer
service department if you live in the United States
or Canada. If you live outside of these countries,
please contact the dealer you purchased your
spotting scope from or the Celestron distributor
in your country. A list of our distributors can be
found on our website.
the use of a lens/optics cleaning kit available at
most photo or optical shops. Follow the directions
supplied with the cleaning kit for best results.

12 I ENGLISH
WARRANTY
Your spotting scope is covered under the
Celestron Limited Lifetime Warranty. Celestron
warrants the spotting scope to be free from
defects in materials and workmanship for
the spotting scope’s usable lifetime to the
original owner. Celestron will repair or replace
the spotting scope which, upon inspection by
Celestron, is found to be defective in materials
or workmanship and within the definitions of the
limits described below.
This warranty does not cover products that
have been subject to abuse, misuse, physically
damaged, altered, or had unauthorized repairs
or modifications. This warranty does not cover
defects due to normal wear and tear and
other conditions.
This warranty is valid to USA and Canadian
customers who have purchased their spotting
scope from an authorized Celestron dealer in the
USA or Canada. For products purchased outside
of the USA or Canada, please contact your
local Celestron Distributor or authorized Dealer
for applicable warranty information. Additional
warranty information and eligibility details can be
found on the Celestron website.
For complete specifications and product
information, visit: celestron.com

ENGLISH I 13
SAFETY INSTRUCTIONS
• Risk of explosion if battery is replaced by an
incorrect type.
• The included battery is not rechargeable.
• Please use the battery in its original purpose
to avoid causing the battery to short circuit.
When the conductive material is connected
directly to the battery positive and negative
will cause a short circuit.
• Do not use a damaged battery.
• Keeping the battery in an extremely cold or very
hot location can result in shortened battery life.
• When replacing the battery, please refer to
the instruction manual and pay attention to
the positive and negative direction of battery.
• Do not put the battery in the fire. Dispose of
the battery according to local regulations.
FCC IDENTIFIER: 2A2FG-X9
This device complies with Part 15 of the FCC
Rules. Operation is subject to the following two
conditions: (1) This device may not cause harmful
interference, and (2) this device must accept any
interference received, including interference that
may cause undesired operation.
CAUTION: Changes or modifications not expressly
approved by the party responsible for compliance could
void the user’s authority to operate the equipment.
NOTE: This equipment has been tested and found to
comply with the limits for a Class B digital device,
pursuant to part 15 of the FCC Rules. These limits
are designed to provide reasonable protection against
harmful interference in a residential installation.
This equipment generates, uses and can radiate
radio frequency energy and, if not installed

14 I ENGLISH
and used in accordance with the instructions,
may cause harmful interference to radio
communications. However, there is no guarantee
that interference will not occur in a particular
installation.
If this equipment does cause harmful
interference to radio or television reception,
which can be determined by turning the
equipment off and on, the user is encouraged to
try to correct the interference by one or more of
the following measures:
• Reorient or relocate the receiving antenna.
• Increase the separation between the
equipment and receiver.
• Connect the equipment into an outlet on
a circuit different from that to which the
receiver is connected.
• Consult the dealer or an experienced radio/
TV technician for help.
Product design and specifications are subject to
change without prior notification. This product is
designed and intended for use by those 14 years
of age and older.
© 2021 Celestron • All rights reserved
celestron.com/pages/technical-support
Telephone: 1(800) 421-9649
2835 Columbia Street • Torrance, CA 90503
U.S.A.
Popular Science is a trademark of Camden
Media, Inc., and used under license.
Printed in China • 07-21