Loading ...
Loading ...
Loading ...
2084239 (SPR)
2084239 (SPR)
Rev. C 4/17
2
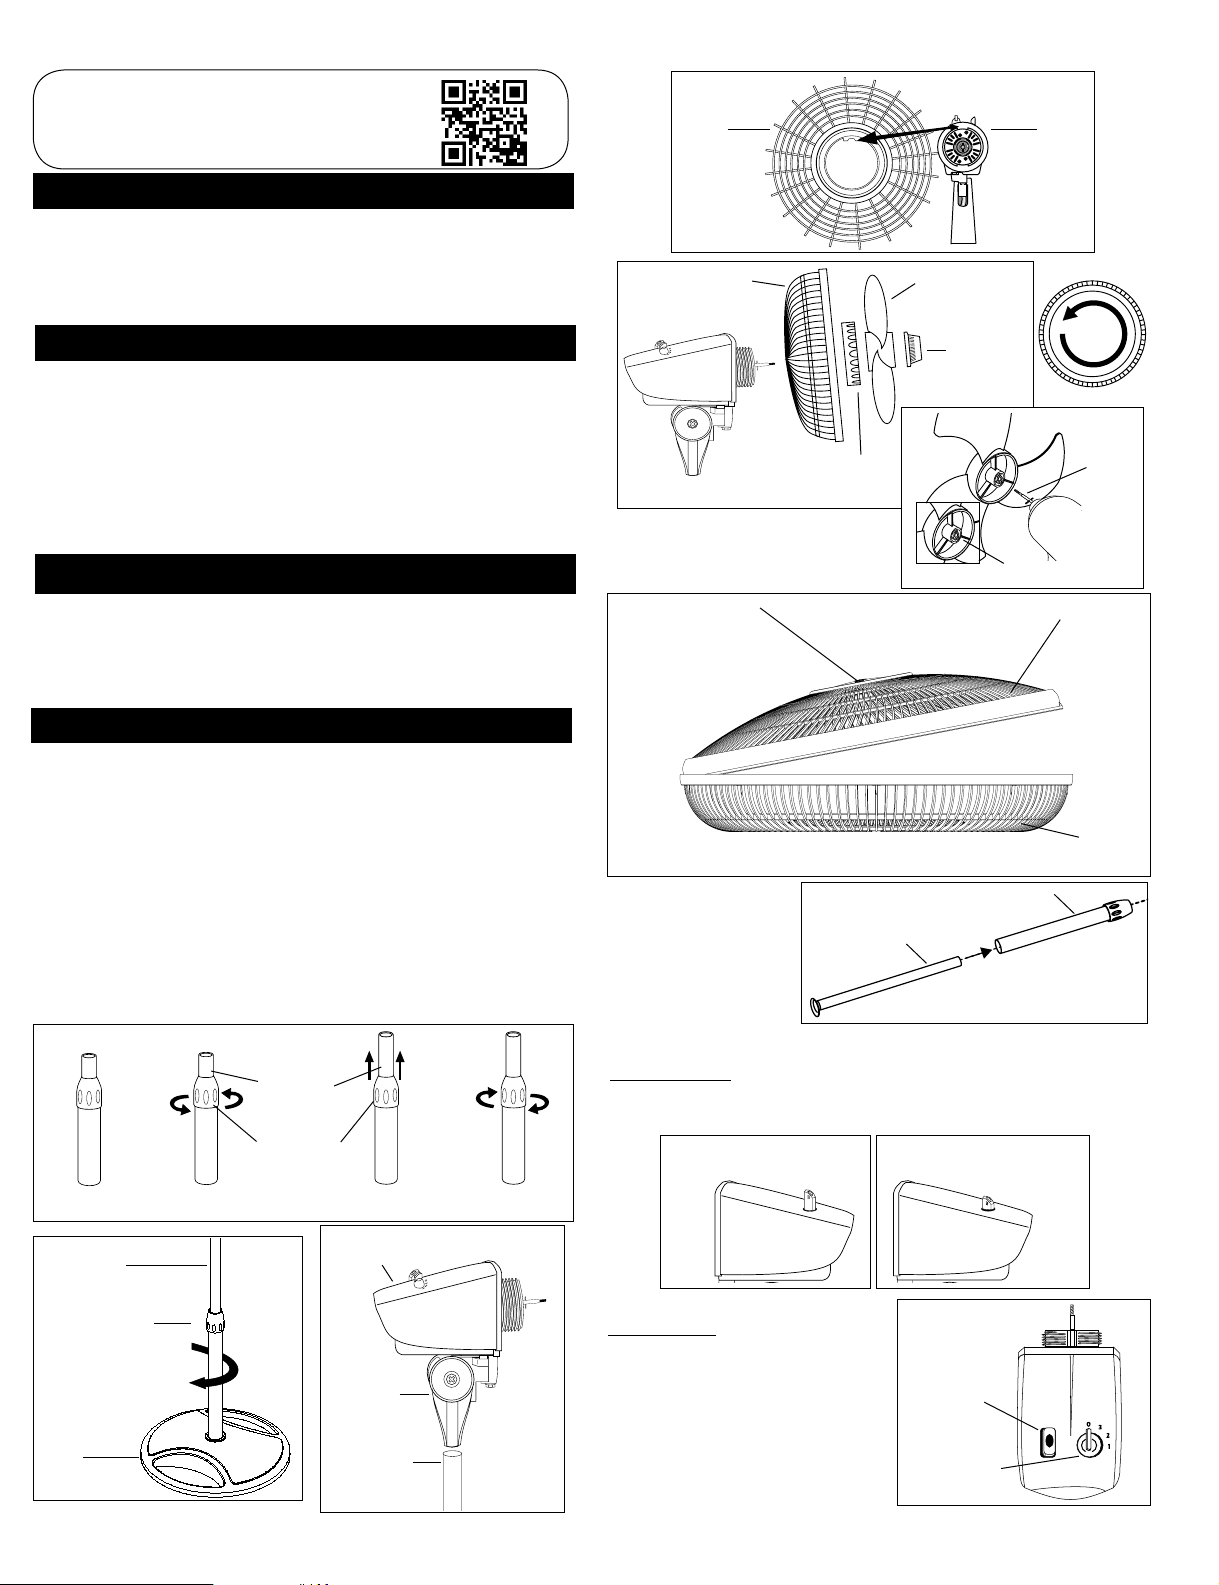
1. Inclinarla Cabeza del Ventilador hacia atrás. Coloque la Rejilla
Trasera en el Motor. (Figura 7)
2. Alinear la lengüeta de la Rejilla Trasera con la ranura en la parte
superior de la cubierta delantera del Motor.
3. Asiente la Parrilla Trasera y sujetela con la Tuerca de Plástico
hacia la Derecha. Deslice la Helice en el Eje del Motor. (Figura
8) Alinear la Ranura Del Cubo de la tapa con el Pasador del eje
del motor. (Figura 8A)
4. Para asegurar la Helice, enroscarla hasta que quede apretada
en el Cubo de la Tapa haciéndola girar Hacia la Izuierda.
5. Con la cabeza del ventilador en posición vertical, coloque la re-
jilla frontal alineando el ornamento en forma horizontal. Asegure
las rejillas insertando estas comenzando por la parte de abajo
y siguiendo hacia arriba. NO NECESITO EL GAN CHOS DE LA
REJILLA PARA ENSAMBLE. (Figura 9)
PASO 4: ENSAMBLE DEL ASPAY REJILLA
PASO 2: ENSAMBLE DEL PIE
COLOQUE LA BASE EN EL PISO
1. Utilizando un movimiento giratorio, inserte el extremo del tubo de
diámetro grande en el agujero de la Base. (Figura 5) El girar el
tubo a medida que se lo empuja asegura que el tubo quede
plenamente asentado en la Base.
2. Para ajustar la altura:
a) Afloje la Tuerca de Ajuste de Altura.
b) Eleve o baje el Tubo de Extensión hasta obtener la
altura deseada.
c) Apriete la Tuerca de Ajuste de Altura.
1. Coloque el Conjunto de Cabezal con el Collar en el Tubo de
Extensión. (Figura 6)
2. Sostenga firmemente el Tubo de Extensión y empuje el Conjunto
de Cabezal hacia abajo con un movimiento giratorio hasta que
quede asentado en el Tubo de Extensión.
PASO 3: CONJUNTO DE LA CABEZA
1. Saque el conjunto de la tubería del cartón como muestra. (Figura 1)
2. Desafloje la Tuerca de Ajuste de Altura, girando en sentido
contrahorario. (Figura 2)
3. Eleve la Extensión De La Tubería. (Figura 3)
4. Apriete la Tuerca de Ajuste de Altura, girando en sentido horario.
(Figura 4)
PASO 1: ARMADO DE LA TUBERÍA
Conjunto de
Cabezal
Figura 2
Figura 4Figura 3
Figura 1
Tuerca de
Ajuste de
Altura
Tubería de
Extension
Figura 5
Tubo de
Extensión
Tuerca de
Ajuste de Altura
Base
Collar
Tubo de
Extensión
Figura 6
Rejilla
Trasera
Figura 7
Motor
Adorno
Parrilla
Trasera
Parrilla
Delantera
Figura 9
Figura 8
Parrilla Trasera
Helice
Tuerca de
Plastico
Tapa de
Ventilador
Figura 8A
Pasador
Ranura del
Cubo
Rev. C 4/17
7
SAVE THESE INSTRUCTIONS
IMPORTANT SAFETY INFORMATION
When using electrical appliances, basic precautions should always be followed to reduce
the risk of fire, electrical shock and injury to persons, including the following:
Read all instructions before using this Fan.
TO REDUCE THE RISK OF FIRE, ELECTRICAL SHOCK OR PERSONAL INJURY, ALWAYS
FOLLOW THESE IMPORTANT SAFETY INSTRUCTIONS AND WARNINGS:
DO NOT use this fan to ventilate areas where flammable liquids or vapors are used, stored or are present, including paints,
gasoline, varnishes, floor refinishing products or solvents. ALWAYS read and follow all warnings and instructions on the
containers for these products!
ALWAYS be sure the plug fits tightly into the outlet. When plugs fit loosely into outlets, they may slip partially out of the
outlet and create a poor connection. This may cause outlets to overheat and create a potential fire hazard. Outlets in this
condition should be replaced by a qualified electrician.
ALWAYS unplug the power cord when servicing, cleaning or moving the Fan. DO NOT use the ON/OFF switch as the sole
means of disconnecting power. NEVER leave children unattended when the Fan is on or plugged in. ALWAYS turn off and
unplug the Fan when not in use.
BE CERTAIN that the power source for the Fan is 120V AC. DO NOT plug the Fan into 240V or other power source.
The Blue Plug™ on your Lasko fan is a safety feature. It contains a non-replaceable safety device (fuse) that should not be
removed or tampered with. To reduce the risk of fire, electric shock and personal injury, DO NOT attempt to remove, replace,
repair or tamper with the originally supplied plug. If the Fan has stopped functioning, it may be due to the safety device
incorporated in this plug.
THIS FAN HAS A POLARIZED PLUG (one blade is wider than the other). This plug is designed to fit into the outlet only one
way. Match the wide blade to wide slot in outlet and FULLY INSERT. DO NOT attempt to bypass or defeat this safety fea-
ture. If the plug does not fit in the outlet, consult a qualified electrician. The outlet may need to be replaced.
• AVOID the use of extension cords, power strips, power taps, outlet style air fresheners or other cord connected device, as these
devices may overheat and cause a fire hazard.
•DO NOT route power cord under rugs, carpets, runners or furniture. This may damage the cord or cause it to overheat creating a fire
hazard.
•ALWAYS place the Fan on a stable, flat, level surface while in operation to prevent the Fan from overturning.
•NEVER insert or allow fingers or objects to enter grill openings while Fan is in operation or injury and/or damage to the Fan may occur.
•DO NOT block, cover or obstruct air flow to or from the fan while in operation.
•DO NOT use this Fan outdoors or near water or wet locations such as a bath tub, pool or hot tub. Use of this Fan in a wet location
may create a shock hazard.
•DO NOT run cord under carpeting. Do not cover cord with throw rugs, runners, or similar coverings. Do not route cord under furniture
or appliances. Arrange cord away from traffic area and where it will not be tripped over.
•NEVER use a single extension cord to operate more than one Fan or other electrical device.
•DO NOT use this Fan if it has been damaged or is not functioning properly.
•THIS FAN DOES NOT MEET THE REQUIREMENTS OF NEC ARTICLE 547-7 (2008).This Fan is not suitable for use in agricultural
facilities including areas where livestock, poultry or other animals are confined. Please refer to National Electric Code (NEC) Article
547-7 (2008), or applicable state or local codes or standards relating to electrical requirements for agricultural buildings.
•THIS FAN DOES NOT MEET THE REQUIREMENTS OF NEC ARTICLE 500 (2008).This Fan is not suitable for use in hazardous
locations. Please refer to National Electric Code (NEC) Article 500 or applicable state or local codes or standards relating to electrical
requirements for hazardous locations.
CAUTION
A
B
No tome tubos
separados. En caso de
tuberías se
separados, insertar un tubo
en el tubo B.
Video Tutorial de Ensamblaje: Escanee con
un teléfono inteligente o visita nuestra página
www.laskoproducts.com/how-to
OSCILACION: Empuje la perilla ubicada en la parte superior de la
caja del motor para hacer que la cabeza del Ventilador se mueva
de un lugar hacia otro.
Hacia Arriba:
Estacionario
Hacia Adelante: Oscilar
FUNCIONAMIENTO
VELOCIDAD: Ajuste la velocidad
del ventilador con el control de
velocidad ubicado en la parte
posterior del motor.
3 – Velocidad Alta
2 – Velocidad Mediana
1 – Velocidad Baja
Control de
Velocidad
Perilla de
Oscilación
Loading ...