
OPERATOR'S MANUAL
ICRFIFTSM FIN°I
WORKBENCH
CAUTION: Read and follow all Safety Rules and Operating Instructions before first use of this product.
Sears, Roebuck and Co., Hoffman Estates, IL 60179, USA.
F1481
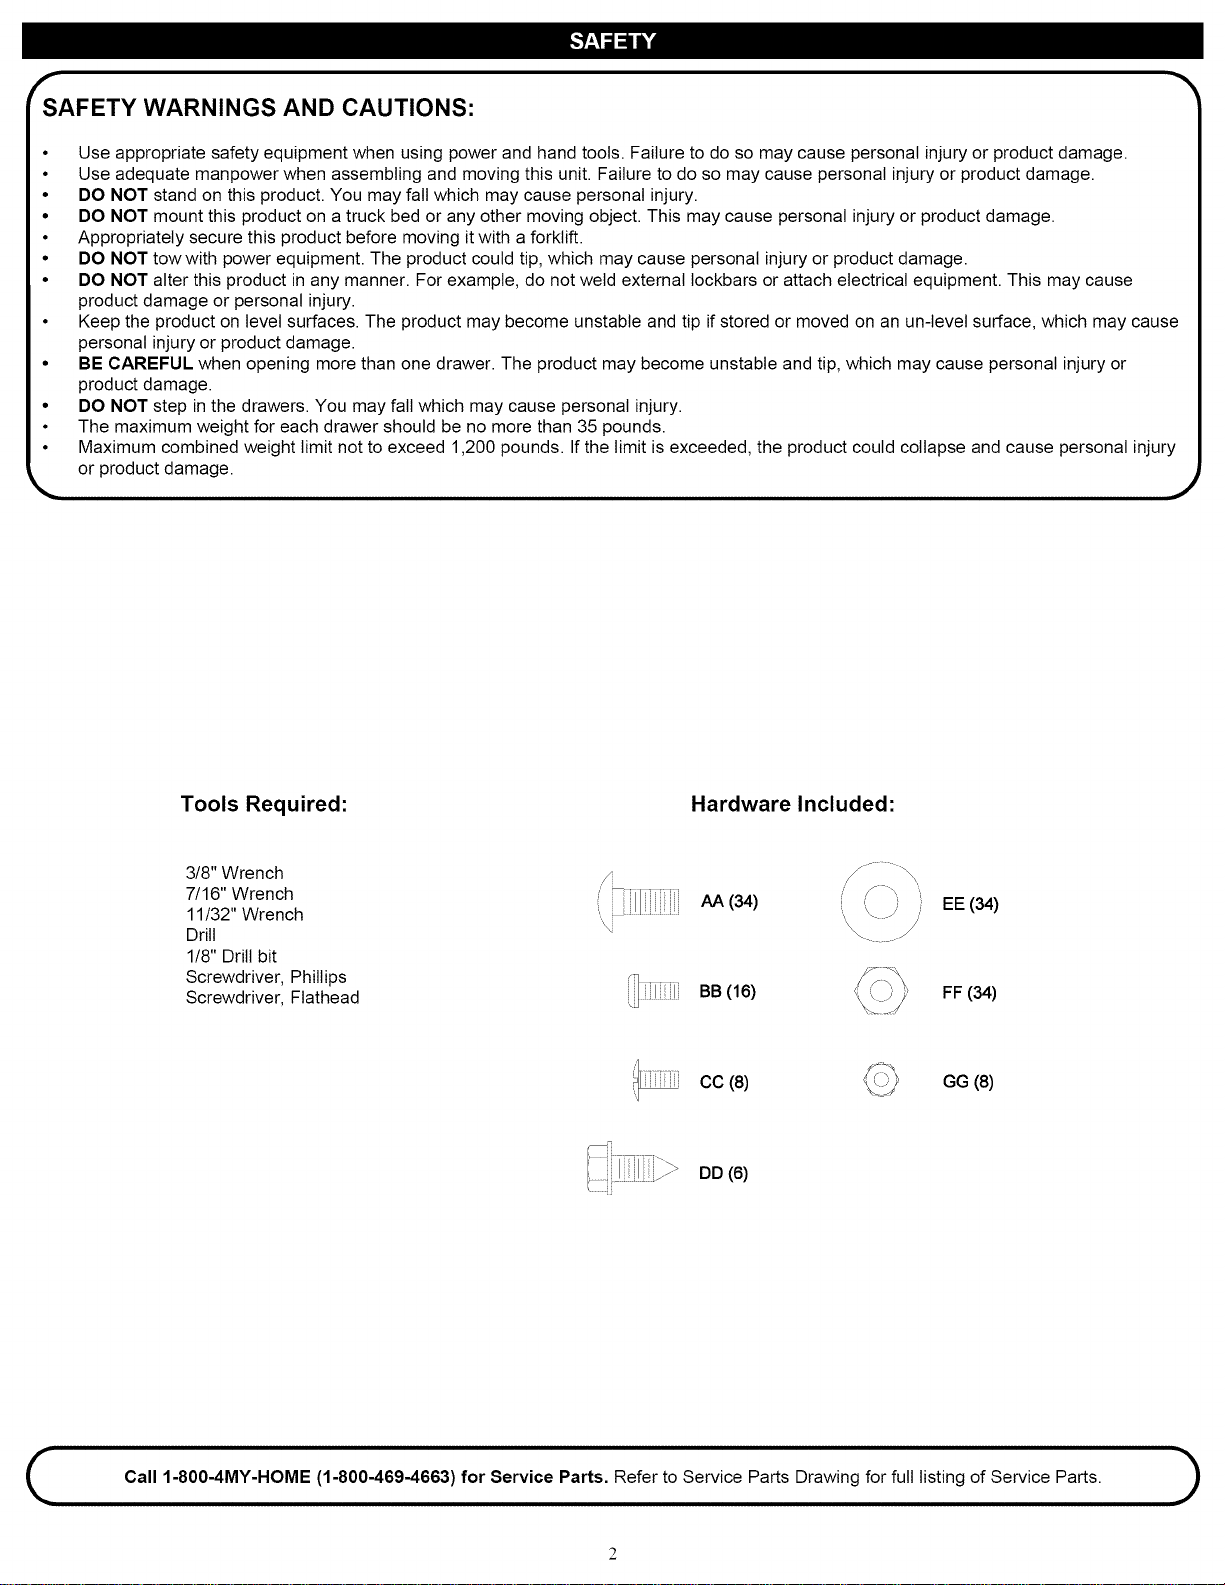
SAFETY WARNINGS AND CAUTIONS:
• Use appropriate safety equipment when using power and hand tools. Failure to do so may cause personal injury or product damage.
• Use adequate manpower when assembling and moving this unit. Failure to do so may cause personal injury or product damage.
• DO NOT stand on this product. You may fall which may cause personal injury.
• DO NOT mount this product on a truck bed or any other moving object. This may cause personal injury or product damage.
• Appropriately secure this product before moving it with aforklift.
• DO NOT tow with power equipment. The product could tip, which may cause personal injury or product damage.
• DO NOT alter this product in any manner. For example, do not weld external tockbars or attach electrical equipment. This may cause
product damage or personal injury.
• Keep the product on level surfaces. The product may become unstable and tip if stored or moved on an un-level surface, which may cause
personal injury or product damage.
• BE CAREFUL when opening more than one drawer. The product may become unstable and tip, which may cause personal injury or
product damage.
• DO NOT step in the drawers. You may fall which may cause personal injury.
• The maximum weight for each drawer should be no more than 35 pounds.
• Maximum combined weight limit not to exceed 1,200 pounds. If the limit is exceeded, the product could collapse and cause personal injury
or product damage.
Tools Required:
Hardware Included:
3/8" Wrench
7/16" Wrench
11/32" Wrench
Drill
1/8" Drill bit
Screwdriver, Phillips
Screwdriver, Flathead
i' ililil}
AA (34)
EE(34)
/
BB (16) FF (34)
CC (8) GG (8)
DD(6)
i
Call 1-800-4MY-HOME (1-800-469-4663) for Service Parts. Refer to Service Parts Drawing for full listing of Service Parts.
)

J
/
/
/
/
//\\\\ /
D(3)
G(4)
/
/"
//
/
/
//
E(2)
J
/
/
./
A(2)
/
/
/
B(2)
H(2)
k. ,J
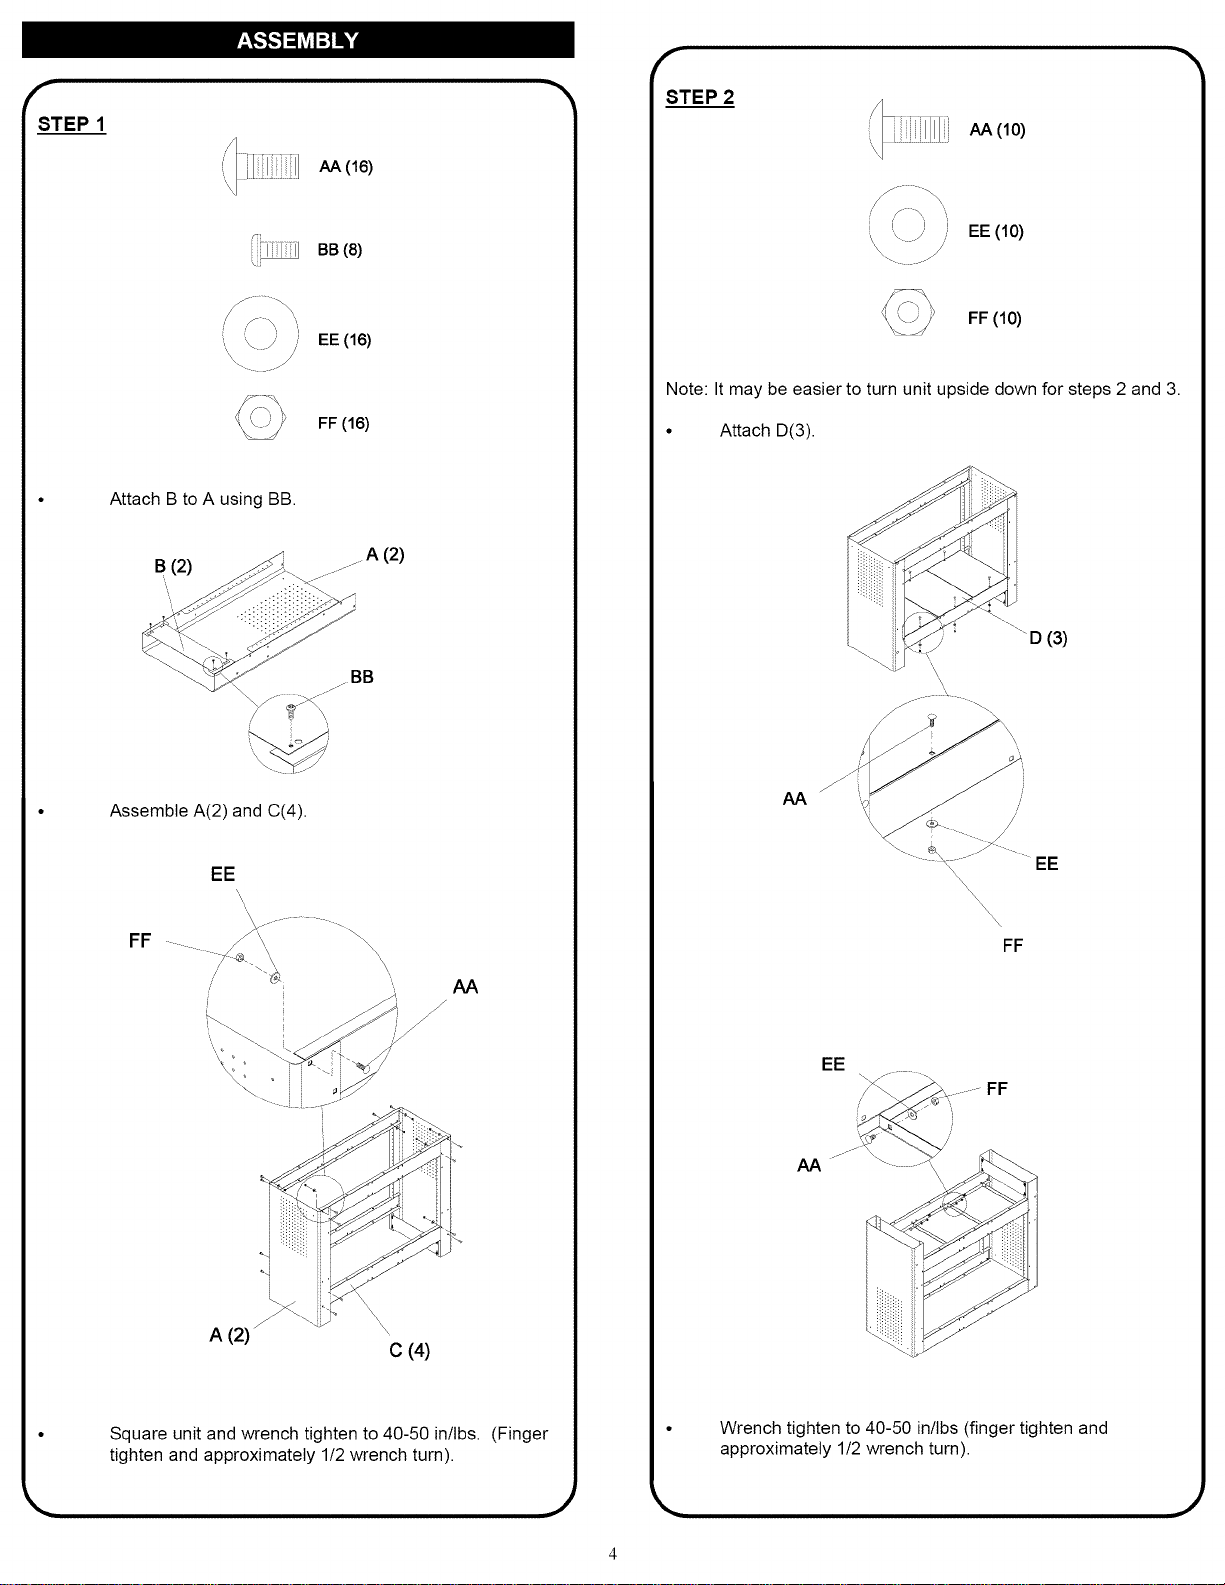
AA(16)
BB (8)
S \
,\ ./ /i EE(16)
\
A\.. fY
FF (16)
Attach B to A using BB.
B (2)
Assemble A(2) and C(4).
FF
EE
\\\
\
AA
J
A (2) _
C (4)
Square unit and wrench tighten to 40-50 in/lbs.
tighten and approximately 1/2 wrench turn).
(Finger
STEP2
AA(10)
FF (10)
Note: It may be easier to turn unit upside down for steps 2 and 3.
• Attach D(3).
......D (3)
AA
\
FF
EE
AA
Wrench tighten to 40-50 in/lbs (finger tighten and
approximately 1/2 wrench turn).
f
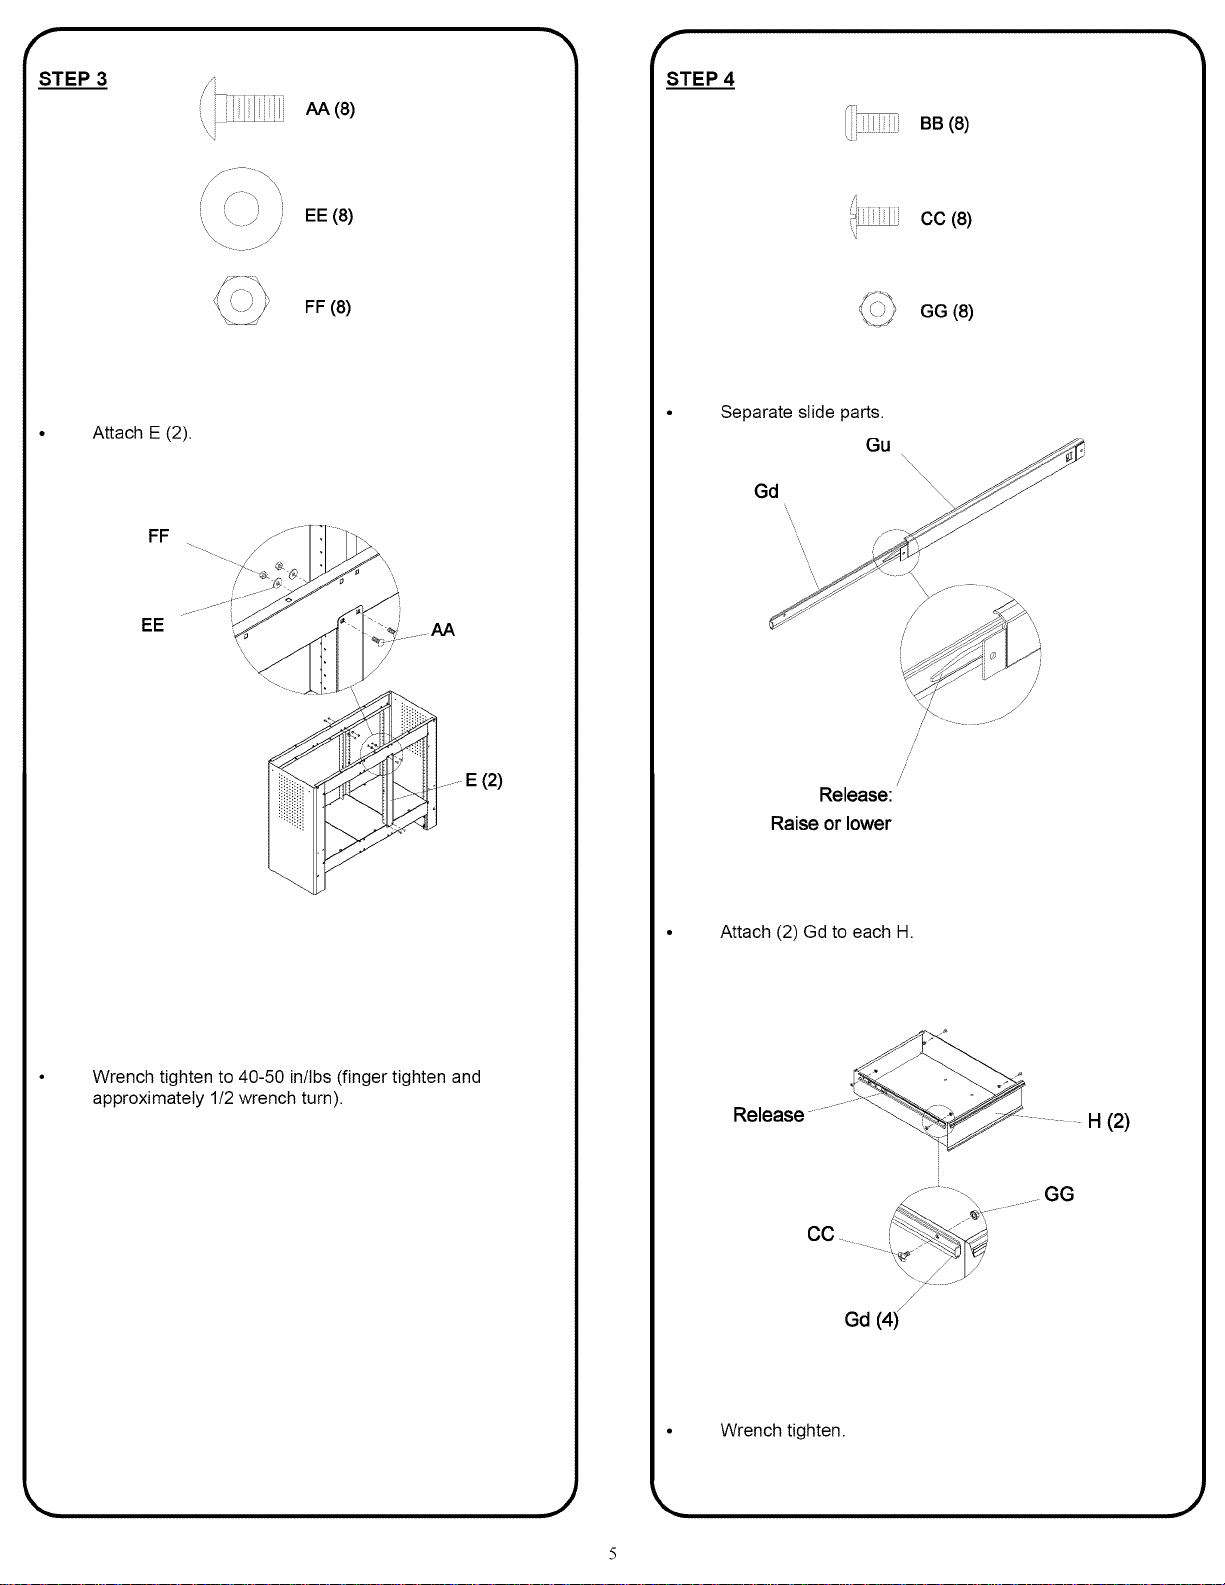
STEP 3
AA(8)
....'_ ) EE (8)
FF (8)
Attach E (2).
FF
EE
Wrench tighten to 40-50 in/lbs (finger tighten and
approximately 1/2 wrench turn).
f
STEP 4
Separateslide parts.
Gu
Gd
Release:
Raise or lower
/
!/
Attach (2) Gd to each H.
CO.
/
Gd (41
Release
BB (8)
cc (8)
GG (8)
Wrench tighten.
/
/
/
/
/
/
/
. GG
H (2)
,J
F
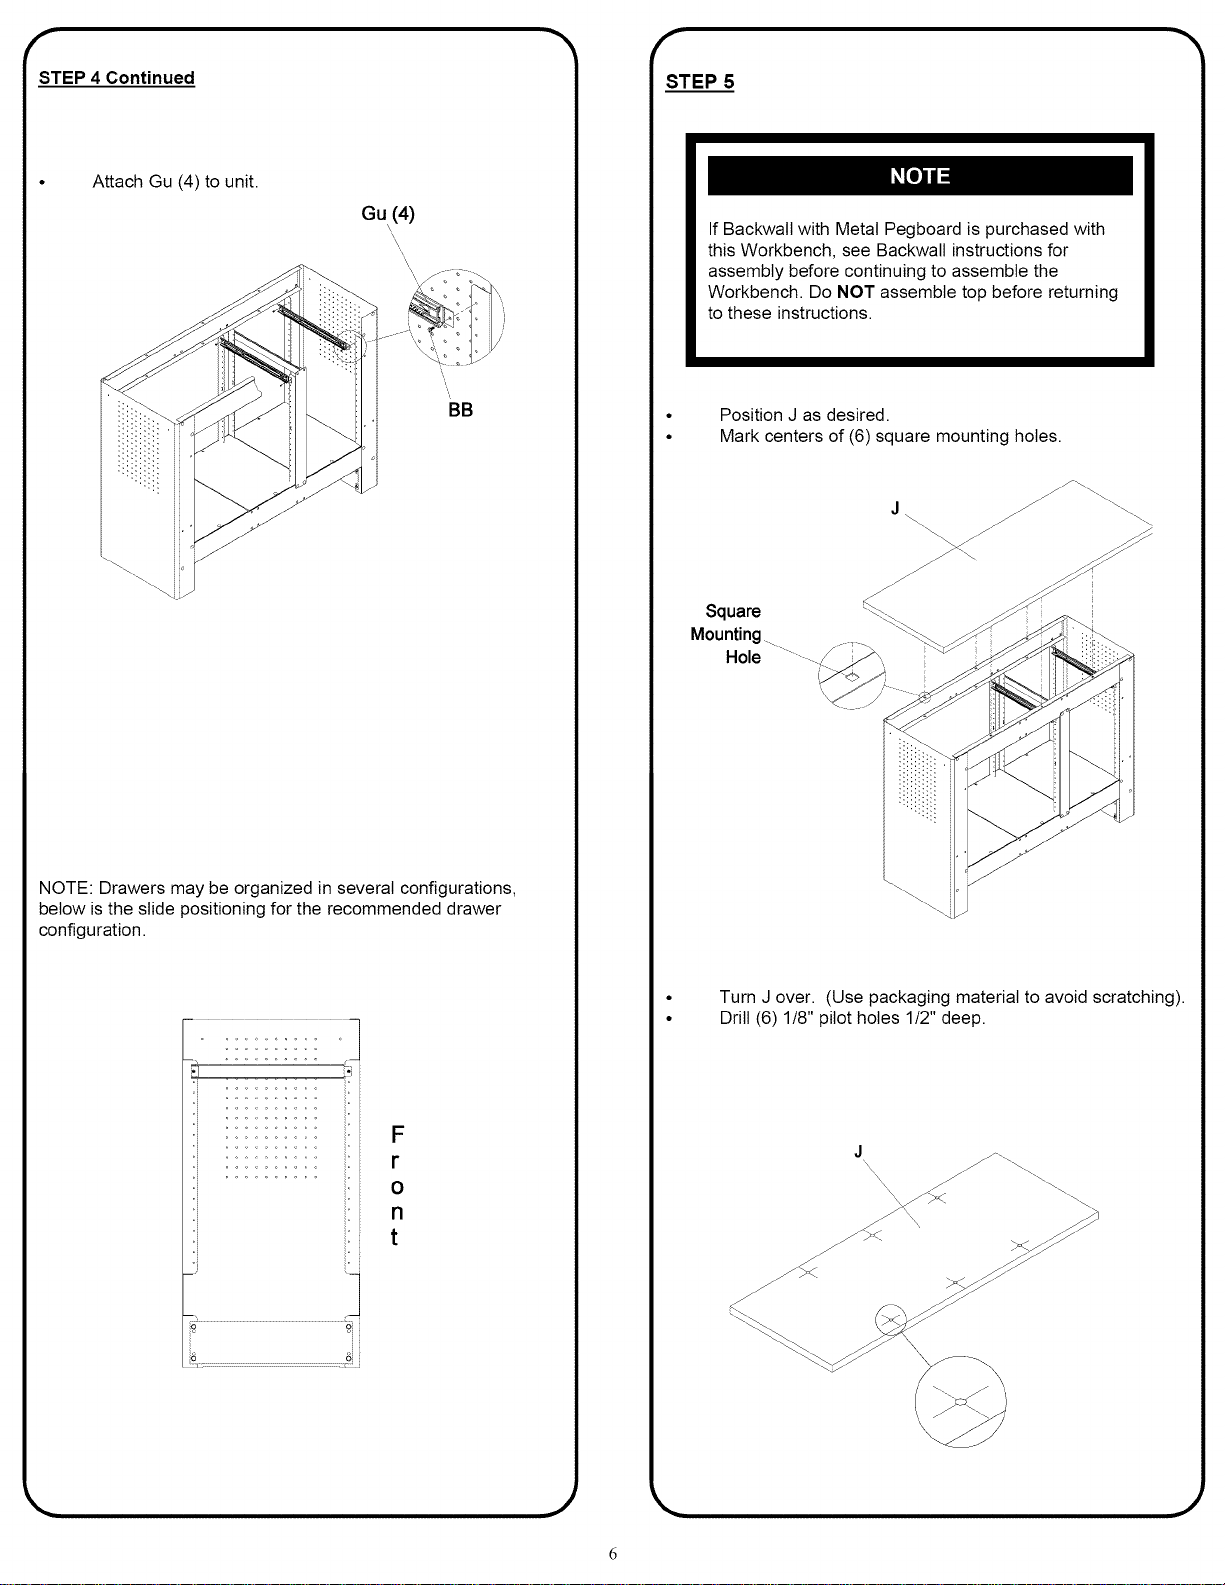
STEP 4 Continued
Attach Gu (4) to unit.
Gu(4)
'\
BB
NOTE: Drawers may be organized in several configurations,
below is the slide positioning for the recommended drawer
configuration.
i .......... i_
ii .......... i_
q .......... i_ i
"i .......... i_ i
F
r
O
n
t
F
STEP 5
If Backwalt with Metal Pegboard is purchased with
this Workbench, see Backwalt instructions for
assembly before continuing to assemble the
Workbench. Do NOT assemble top before returning
to these instructions.
Square
Mounting ......
Hole
Position J as desired.
Mark centers of (6) square mounting holes.
Turn J over. (Use packaging material to avoid scratching).
Drill (6) 1/8" pilot holes 1/2" deep.
J
"\\\\
,J
.J
F
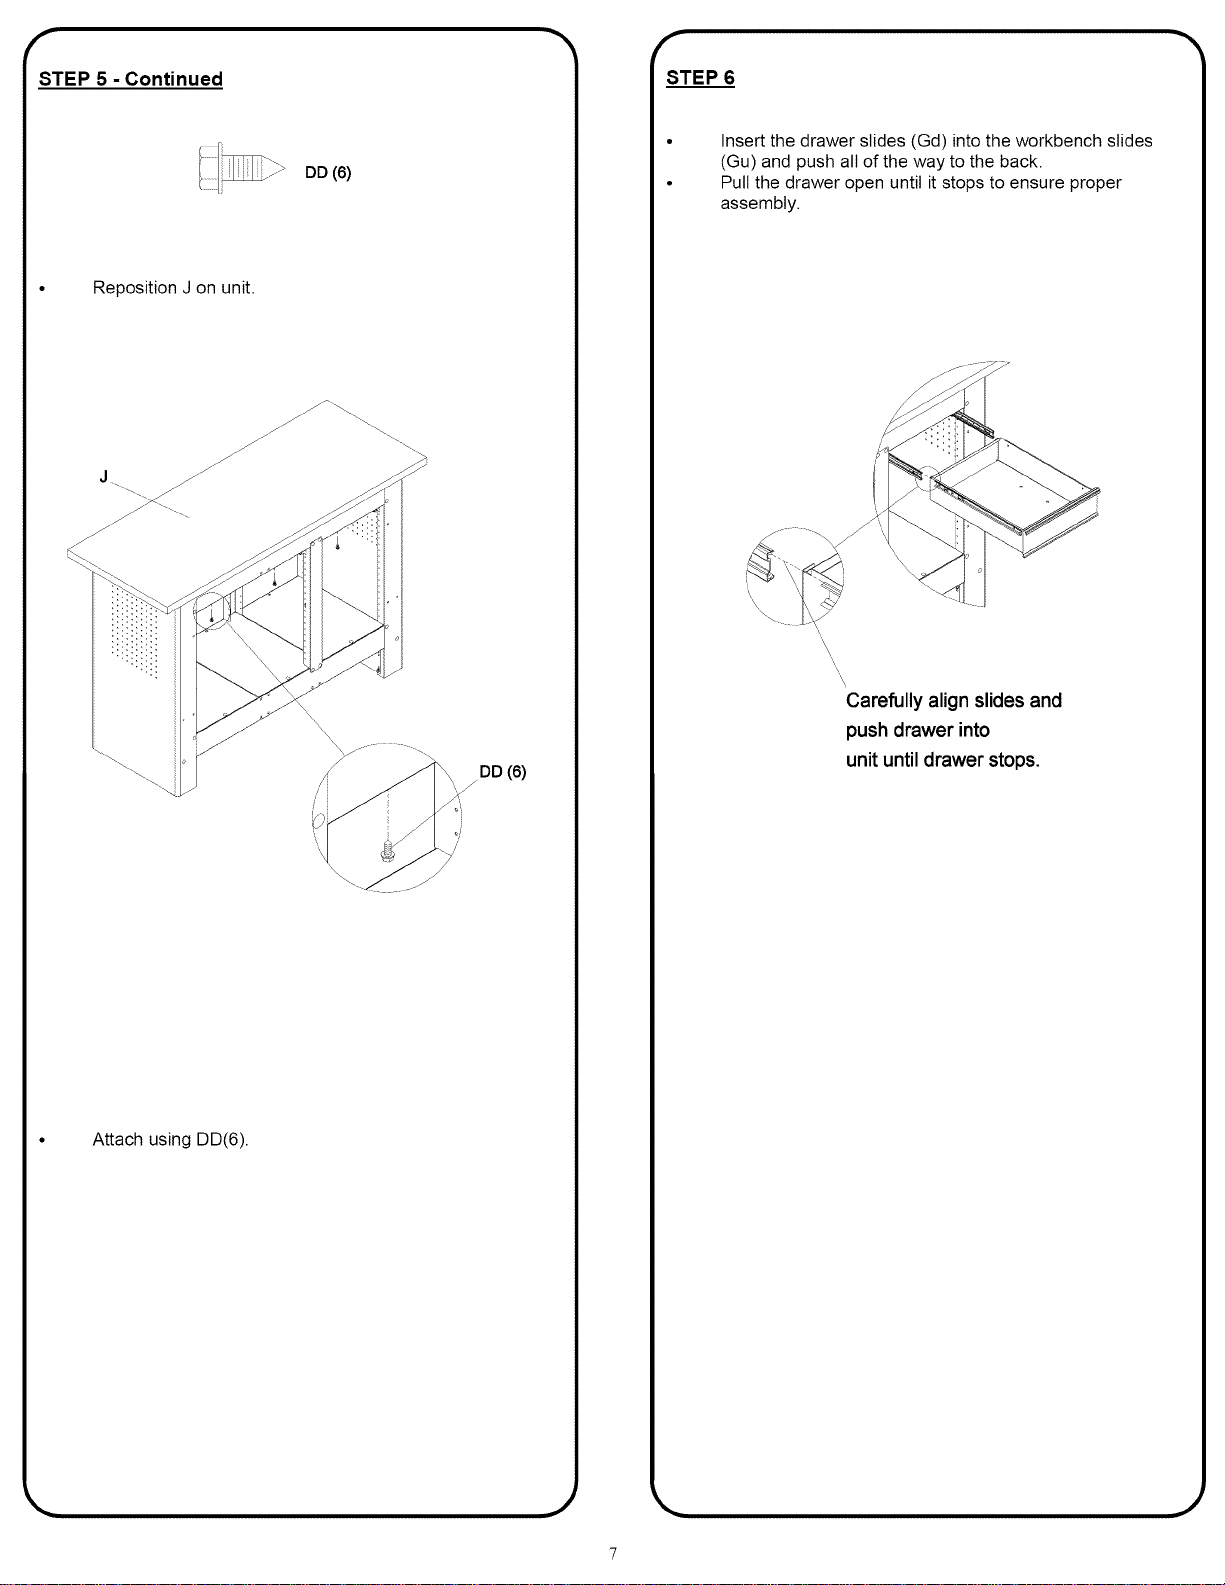
STEP 5 - Continued
DD (6)
• Reposition J on unit.
• Attach using DD(6).
DD (6)
f
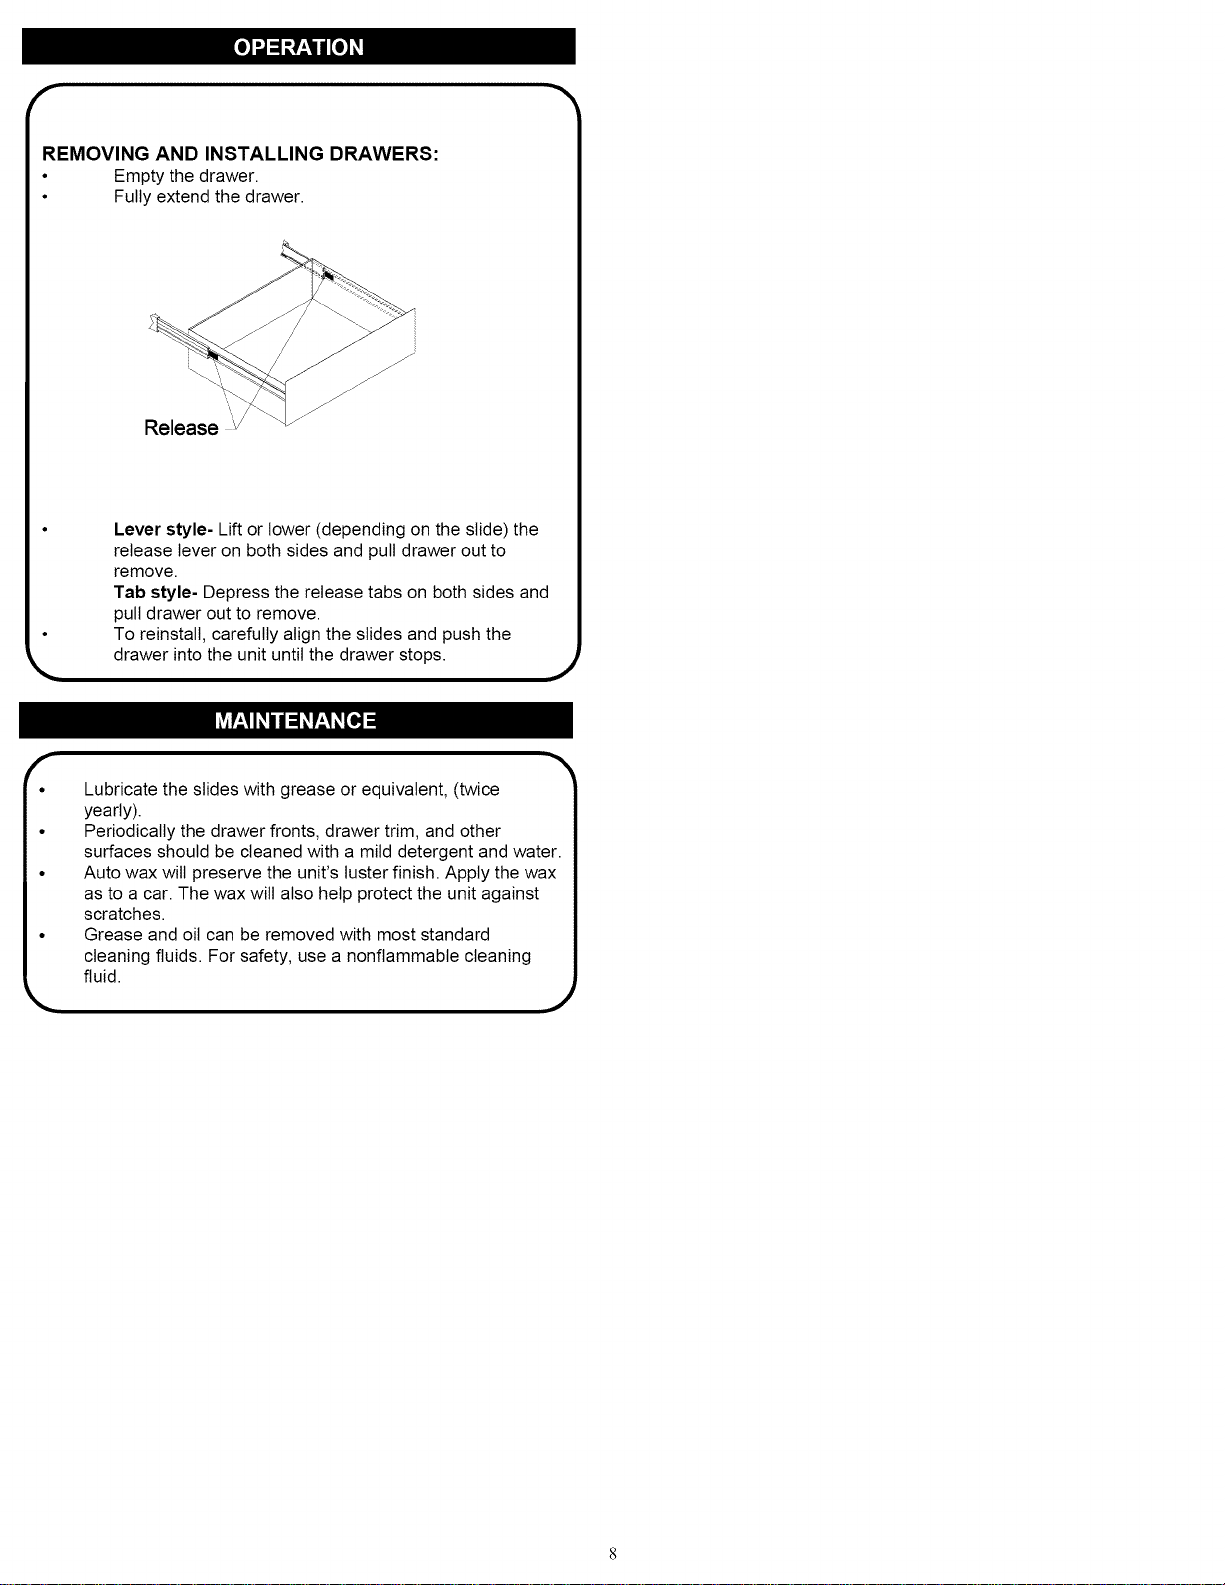
STEP 6
Insert the drawer slides (Gd) into the workbench slides
(Gu) and push all of the way to the back.
Pull the drawer open until it stops to ensure proper
assembly.
\\
\\
\
\
\
Carefully align slides and
push drawer into
unit until drawer stops.
J
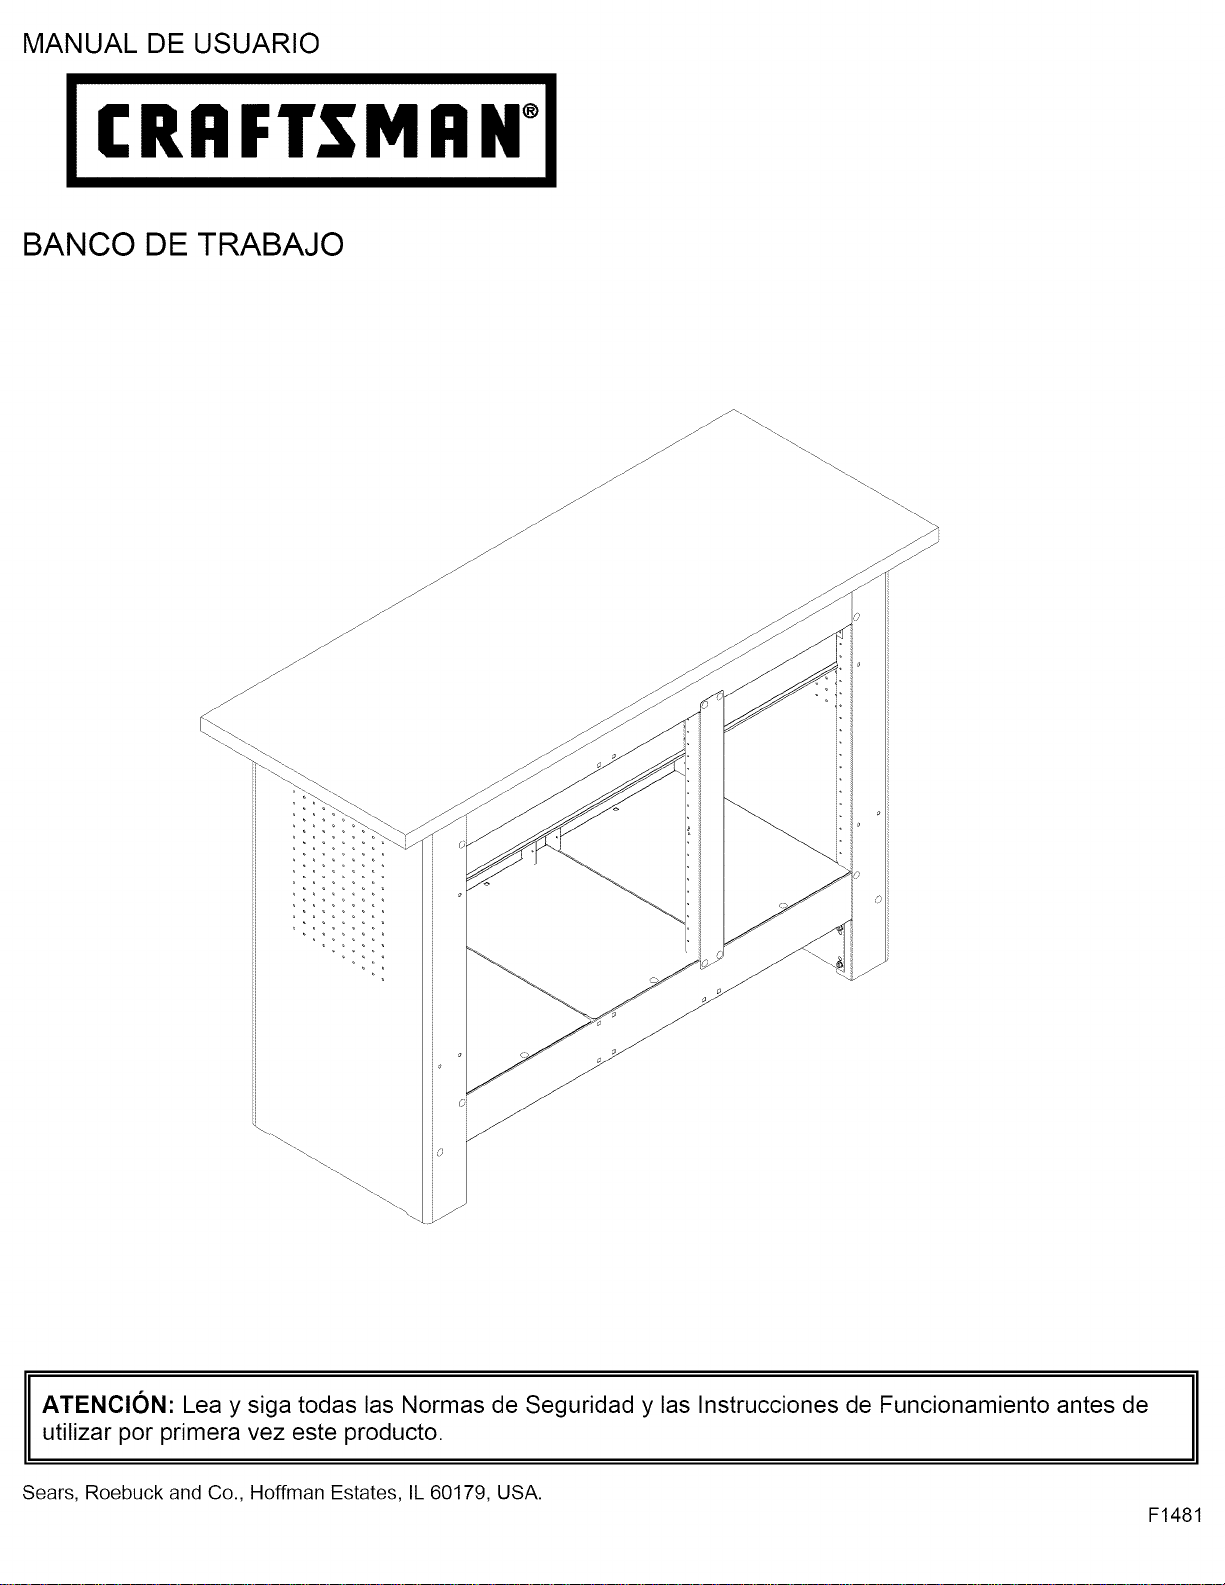
REMOVING AND INSTALLING DRAWERS:
• Empty the drawer.
• Fully extend the drawer.
Lever style- Lift or lower (depending on the slide) the
release lever on both sides and pull drawer out to
remove.
Tab style- Depress the release tabs on both sides and
pult drawer out to remove.
To reinstall, carefully align the slides and push the
drawer into the unit until the drawer stops.
f
• Lubricate the slides with grease or equivalent, (twice
yearly).
• Periodically the drawer fronts, drawer trim, and other
surfaces should be cleaned with a mitd detergent and water.
• Auto wax will preserve the unit's luster finish. Apply the wax
as to a car. The wax will also help protect the unit against
scratches.
• Grease and oit can be removed with most standard
cleaning fluids. For safety, use a nonflammable cleaning
L fluid.
J
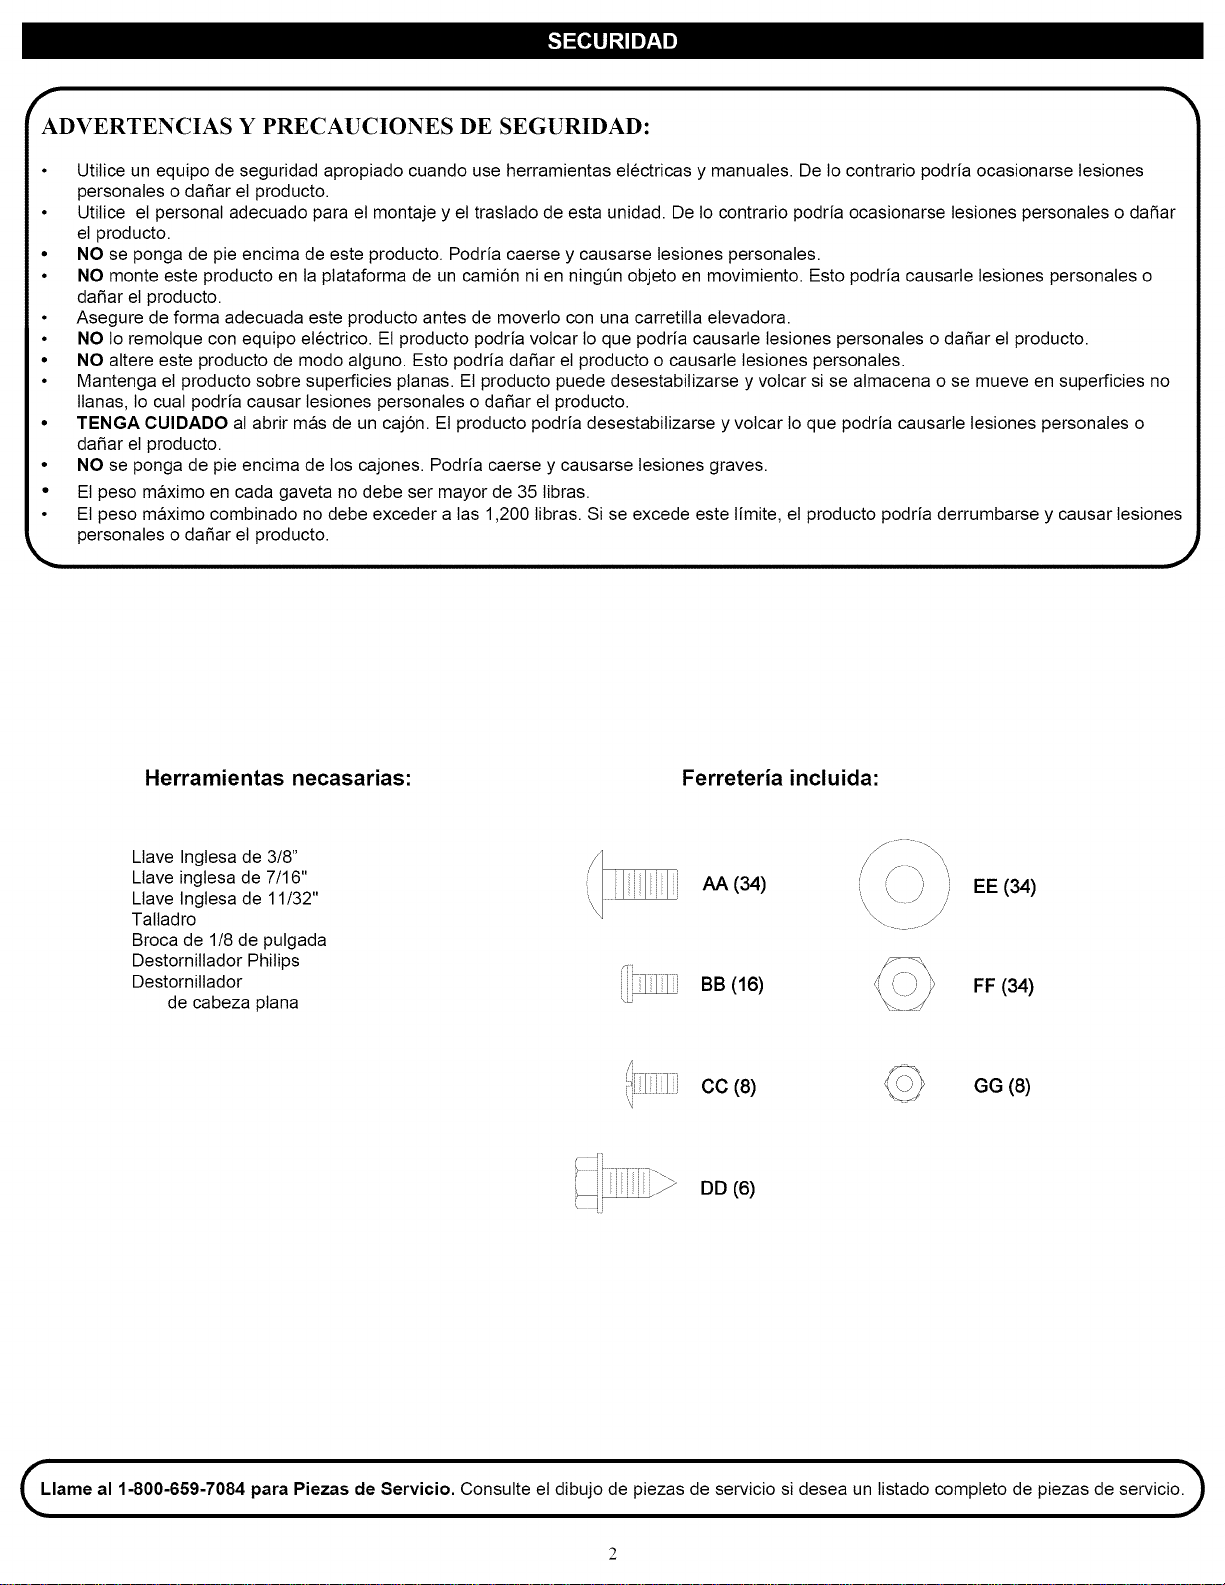
MANUAL DE USUARIO
ICRAFTSMI_N°l
BANCO DE TRABAJO
ATENClON" Lea y siga todas las Normas de Seguridad y las Instrucciones de Funcionamiento antes de
utilizar por primera vez este producto.
Sears, Roebuck and Co., Hoffman Estates, IL 60179, USA.
F1481
r
ADVERTENCIAS Y PRECAUCIONES DE SEGURIDAD:
• Utilice un equipo de seguridad apropiado cuando use herramientas electricas y manuales. De 1ocontrario podria ocasionarse lesiones |
personales o dafiar el producto. |
• Utitice el personal adecuado para el montaje y el traslado de esta unidad. De 1ocontrario podria ocasionarse lesiones personales o dafiar _
el producto. |
• NO se ponga de pie encima de este producto Podria caerse y causarse tesiones personales |
• NO monte este producto en la plataforma de un cami6n ni en ningQn objeto en movimiento Esto podria causarle lesiones personales o |
dafiar el producto. |
• Asegure de forma adecuada este producto antes de moverto con una carretitta elevadora. |
• NO 1oremolque con equipo electrico El producto podria volcar to que podria causarle tesiones personales o dafiar el producto |
• NO altere este producto de modo alguno Esto podria dafiar el producto o causarte lesiones personales |
• Mantenga el producto sobre superficies planas El producto puede desestabilizarse y volcar si se almacena o se mueve en superficies no|
lianas, 1ocual podria causar tesiones personales o dafiar el producto. |
• TENGA CUlDADO al abrir mas de un caj6n. El producto podria desestabilizarse y volcar 1oque podria causarle lesiones personales o |
dafiar el producto. |
• NO se ponga de pie encima de los cajones. Podria caerse y causarse lesiones graves. /
° Et peso maximo en cada gaveta no debe ser mayor de 35 tibras. |
• El peso maximo combinado no debe exceder alas 1,200 libras. Si se excede este limite, el producto podria derrumbarse y causar lesiones _
personales o dafiar el producto. J
Herramientas necasarias: Ferreteria incluida:
Llave Ingtesa de 3/8"
Llave ingtesa de 7/16"
Ltave Ingtesa de 11/32"
Taltadro
Broca de 1/8 de pulgada
Destornittador Philips
Destornillador
de cabeza plana
,4i
AA (34) EE (34)
BB (16)
FF (34)
CC (8) GG (8)
DD(6)
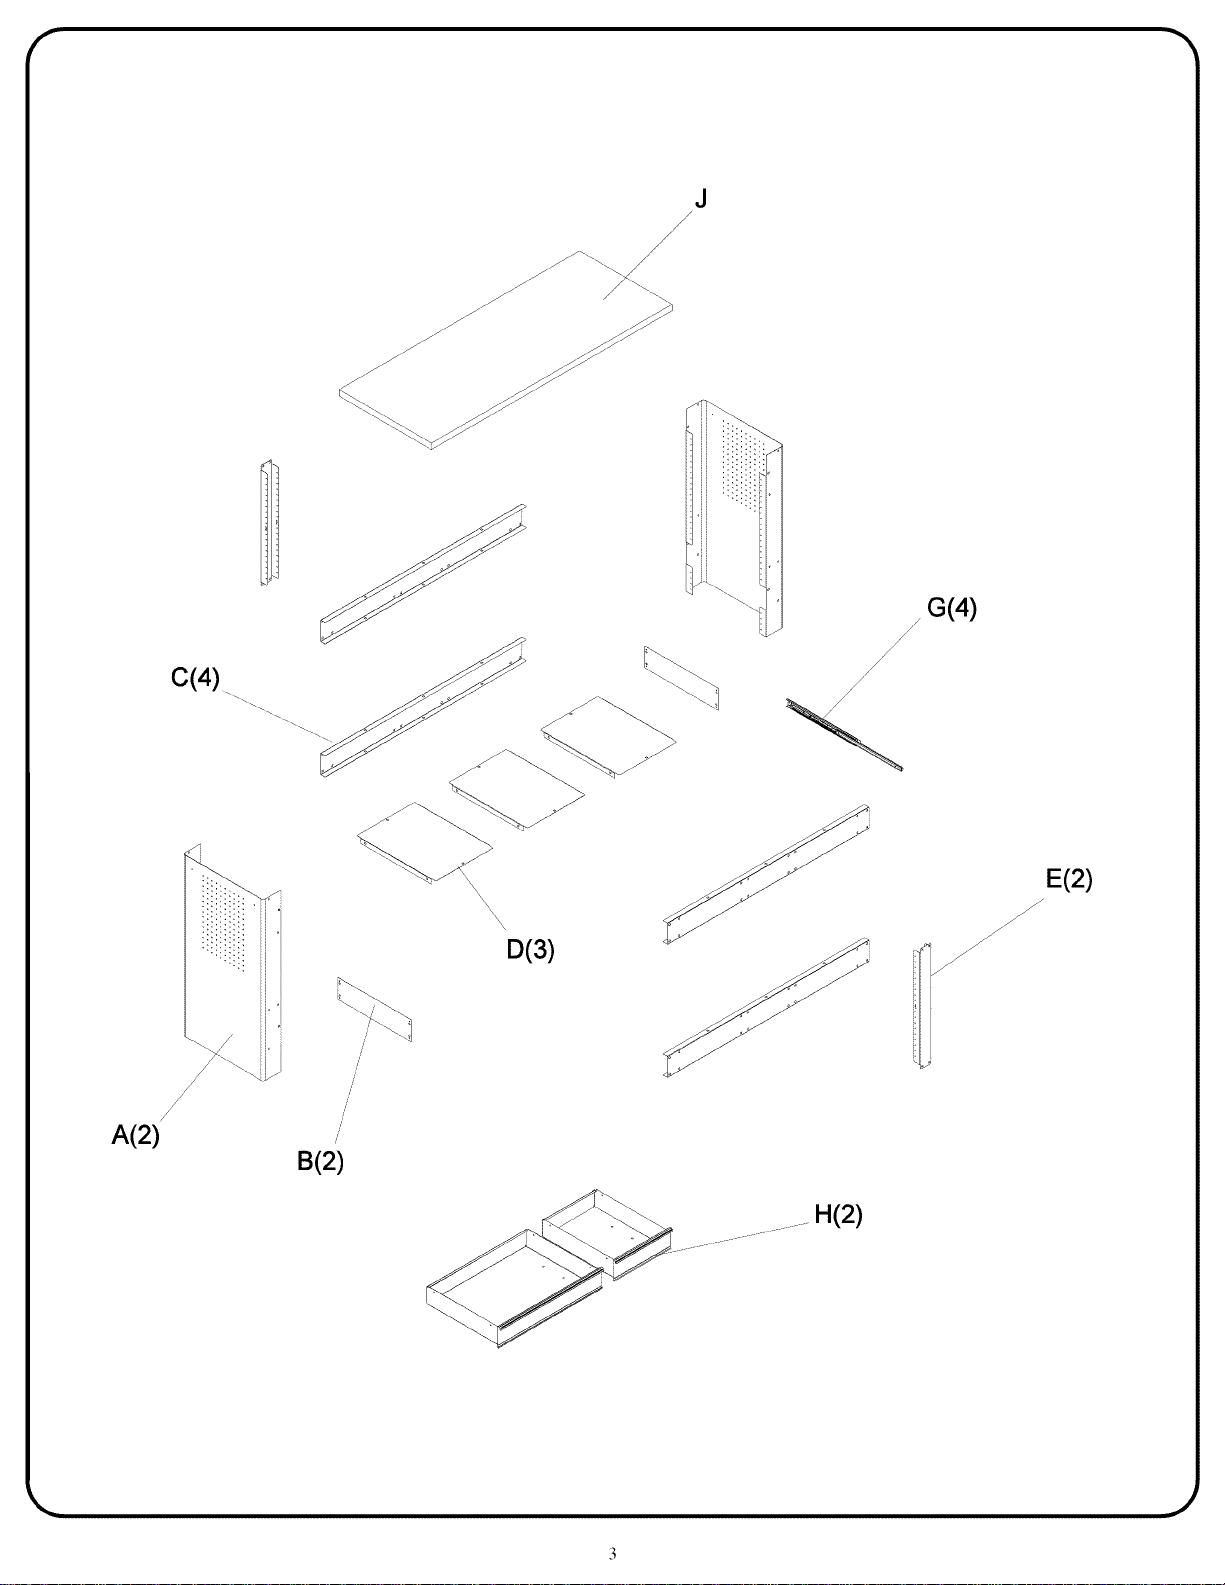
J
/
/
/
/
//\\\\ /
D(3)
G(4)
/
/"
//
/
/
//
E(2)
J
/
/
./
A(2)
/
/
/
B(2)
H(2)
k. ,J
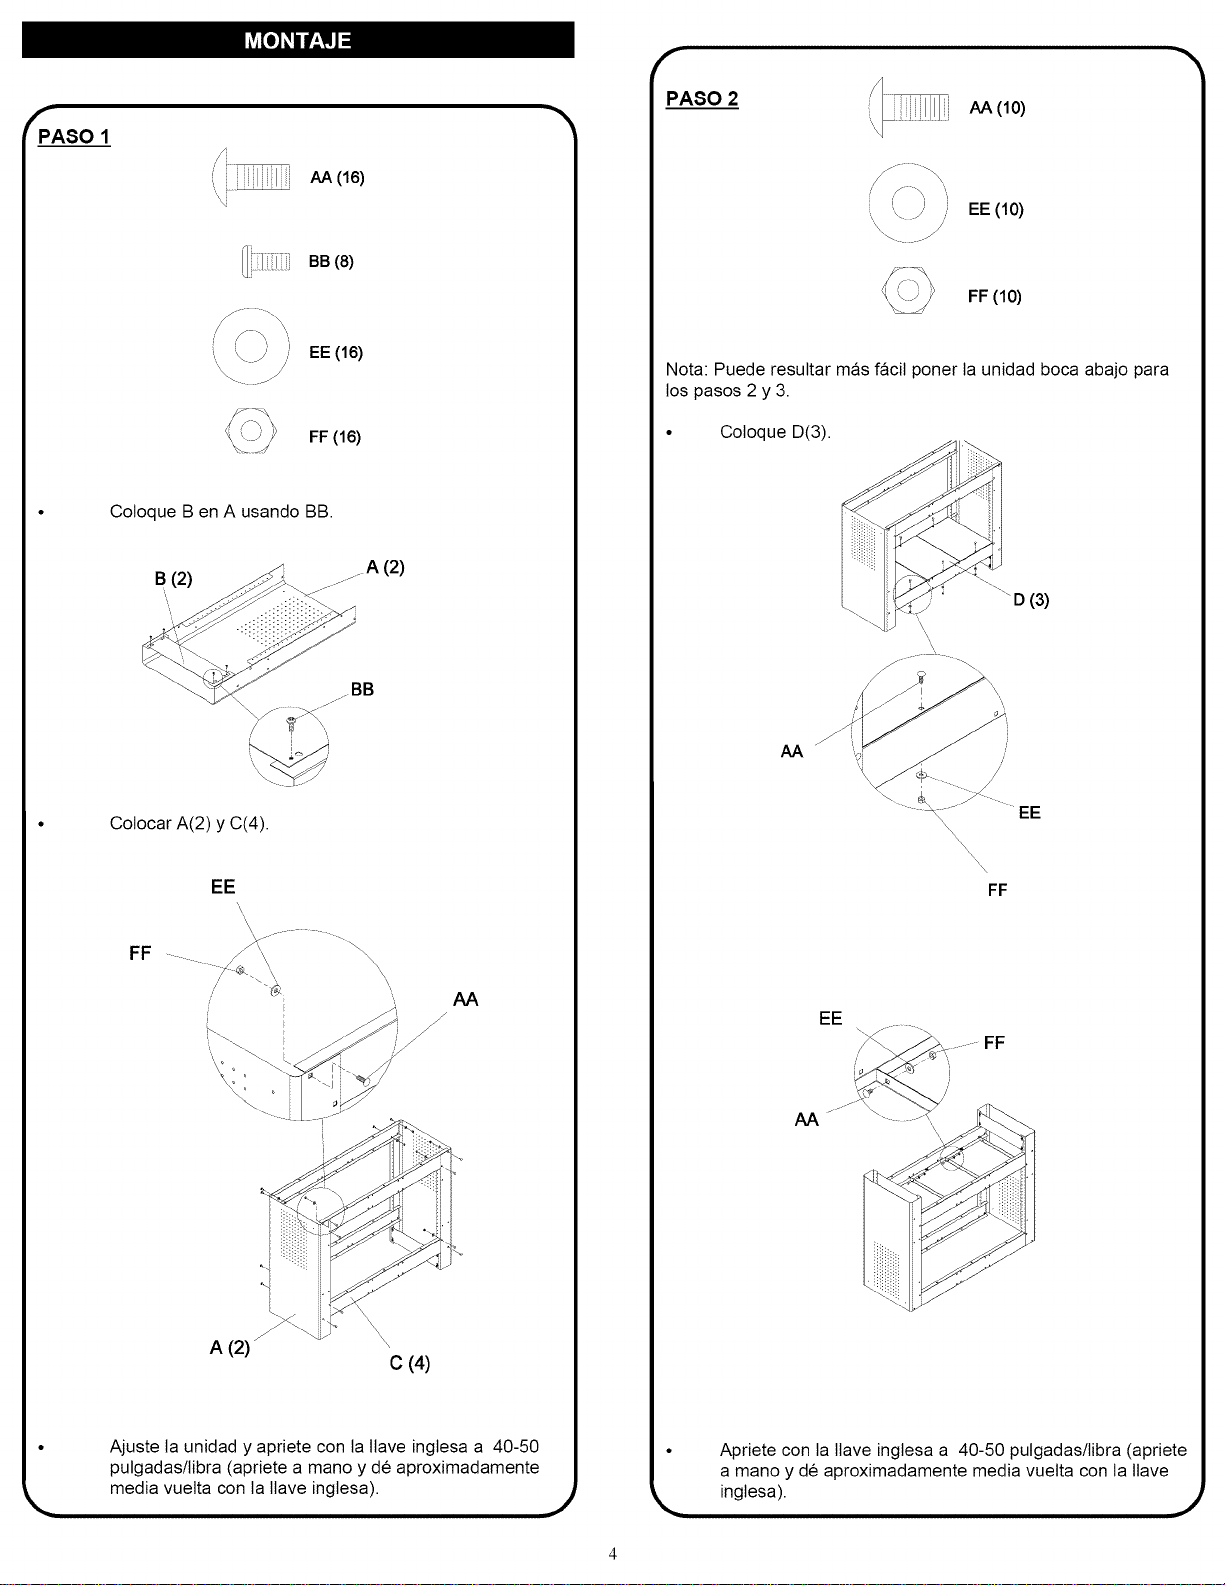
PASO1
k,.
AA(16)
BB (8)
EE (16)
L\ J
_..jJ
FF (16)
Coloque B en A usando BB.
B (2)
Colocar A(2) y C(4).
FF _
EE
\
\
\
/
A (2)"
C (4)
Ajuste la unidad y apriete con la ltave inglesa a 40-50
pulgadas/tibra (apriete a mano y de aproximadamente
media vuelta con la llave inglesa).
J
PASO2
AA (10)
EE (10)
FF (10)
Nota: Puede resultar mas facil poner la unidad boca abajo para
los pasos 2 y 3.
• Coloque D(3).
AA
iiiiii_
iiiiiiiiii
%iiii
......D (3)
\
\
EE
FF
EE
AA
Apriete con la llave inglesa a 40-50 pulgadas/libra (apriete
a mano y de aproximadamente media vuelta con la llave
inglesa).
f
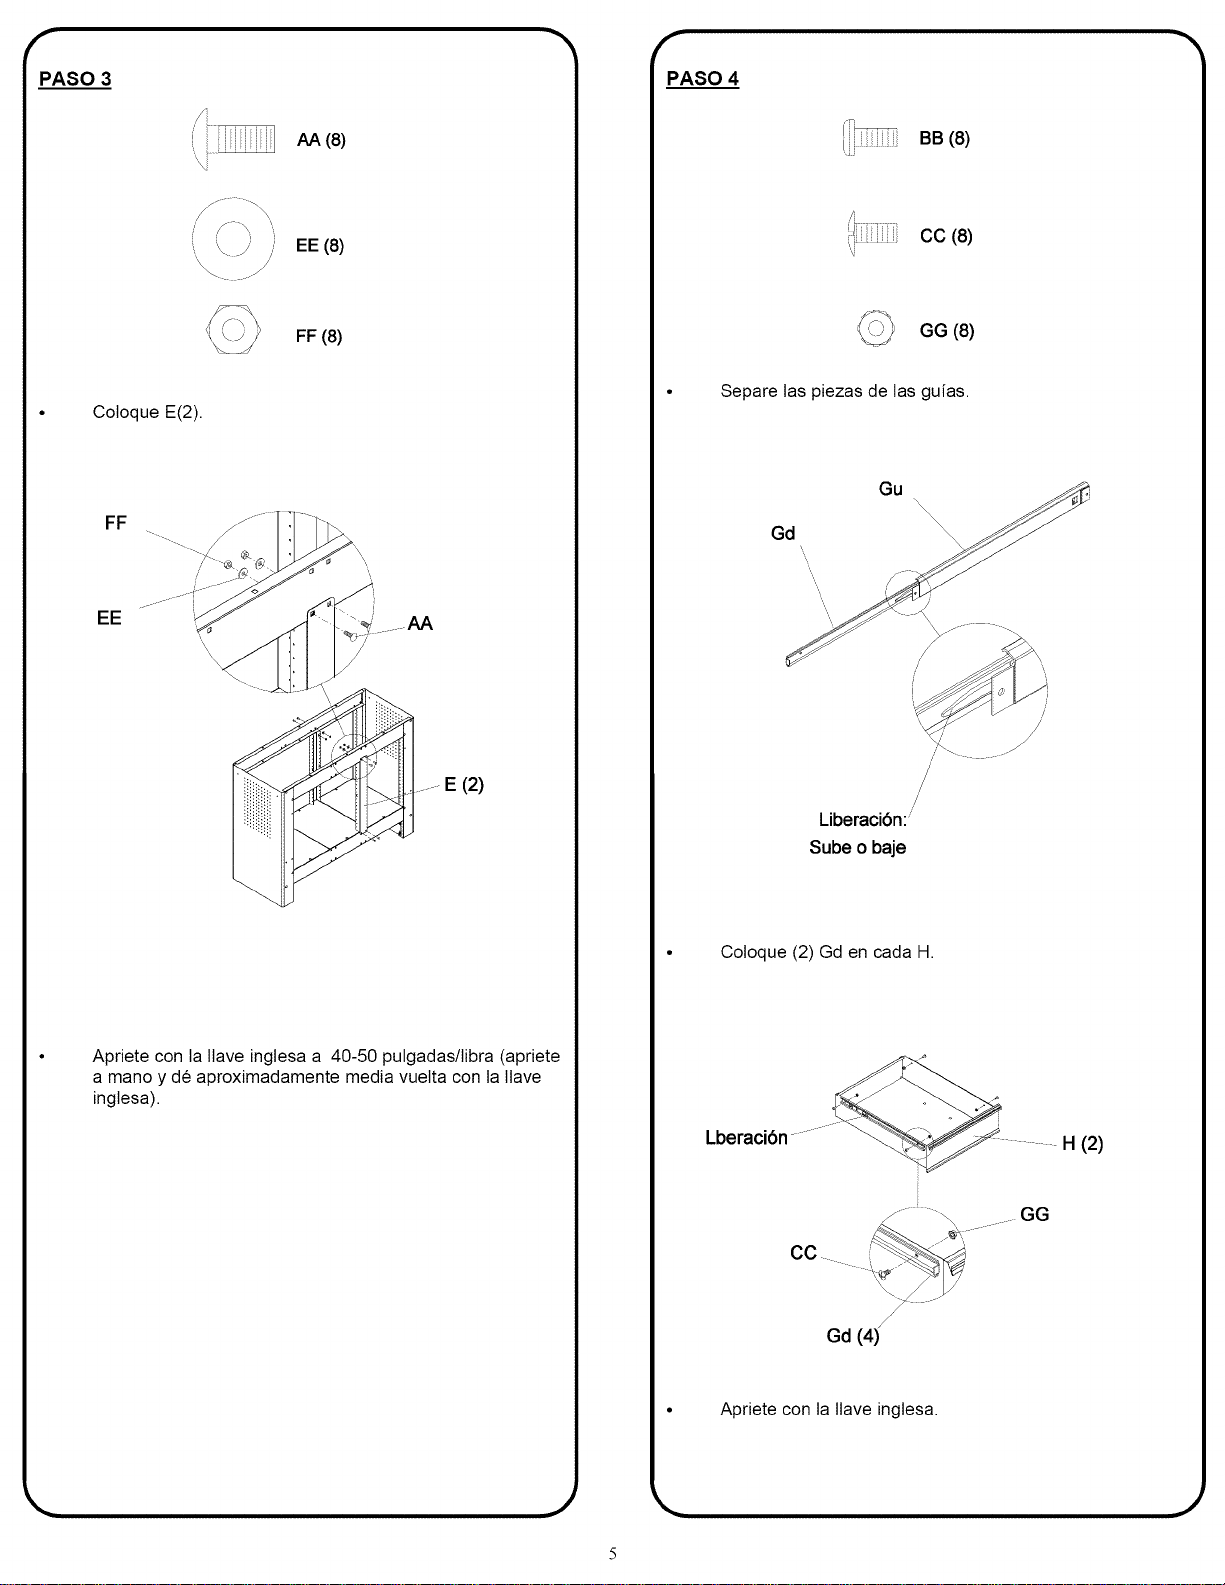
PASO 3
AA (8)
EE (8)
'\\\
FF (8)
Coloque E(2).
FF
EE
/
(2)
Apriete con la Ilave inglesa a 40-50 pulgadas/libra (apriete
a mano y de aproximadamente media vuelta con la llave
inglesa).
f
PASO 4
BB (8)
4
cc (8)
GG (8)
Separe las piezas de las guias.
Gd
\
\
\
GM
/
/
/
Liberacibn:"
Sube o baje
/: -_ . --
Coloque (2) Gd en cada H.
Lberacibn
CC
/
Gd (4)
GG
Apriete con la Ilave inglesa.
H (2)
,J
f
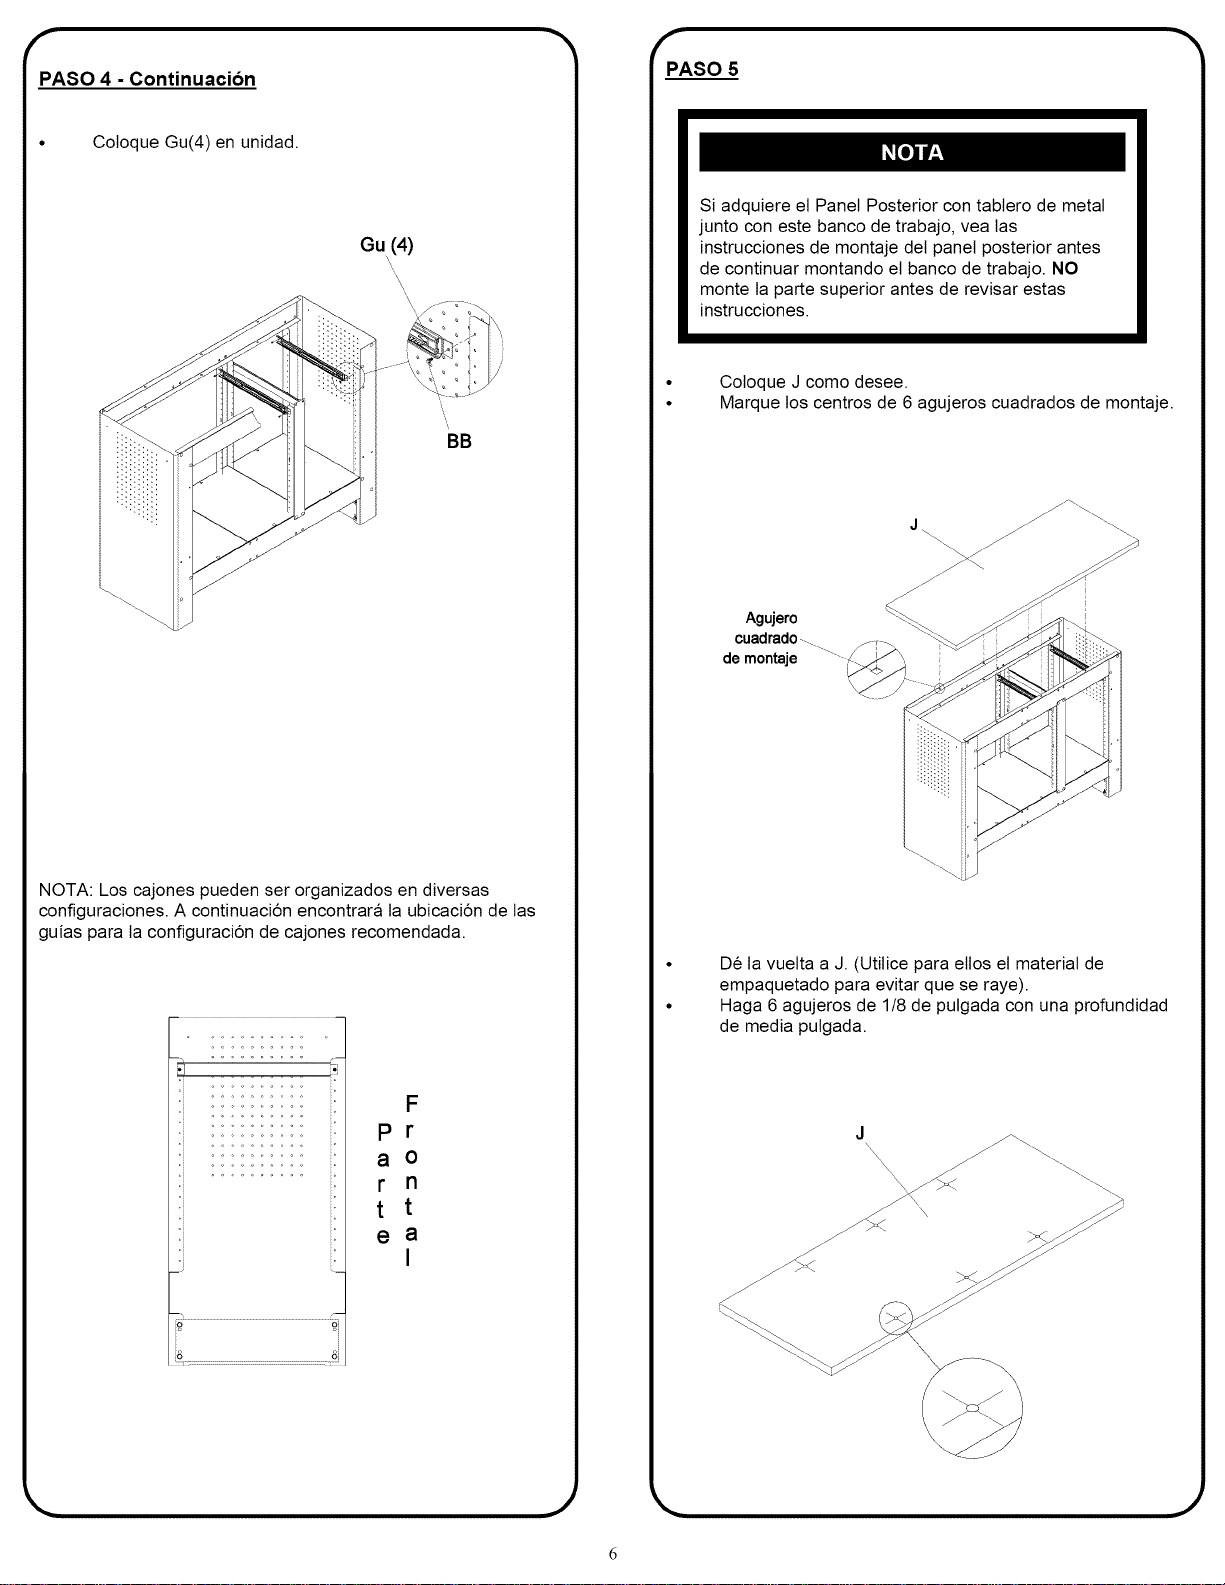
PASO 4 - Continuacion
• Coloque Gu(4) en unidad.
Gu(4)
,\
\\
....iii!
BB
NOTA: Los cajones pueden ser organizados en diversas
configuraciones. A continuaci6n encontrara la ubicaci6n de las
guias para la configuraci6n de cajones recomendada.
i
F
pr
a o
r n
t t
e a
I
f
PASO 5
Si adquiere el Panel Posterior con tablero de metal
junto con este banco de trabajo, vea las
instrucciones de montaje del panel posterior antes
de continuar montando el banco de trabajo. NO
monte la parte superior antes de revisar estas
instrucciones.
Coloque J como desee.
Marque los centros de 6 agujeros cuadrados de montaje.
Agujero
cuadrado........
de montaje .....
De ta vuelta a J. (Utitice para eltos el material de
empaquetado para evitar que se raye).
Haga 6 agujeros de 1/8 de pulgada con una profundidad
de media pulgada.
J
_lllll
,J
,J
f
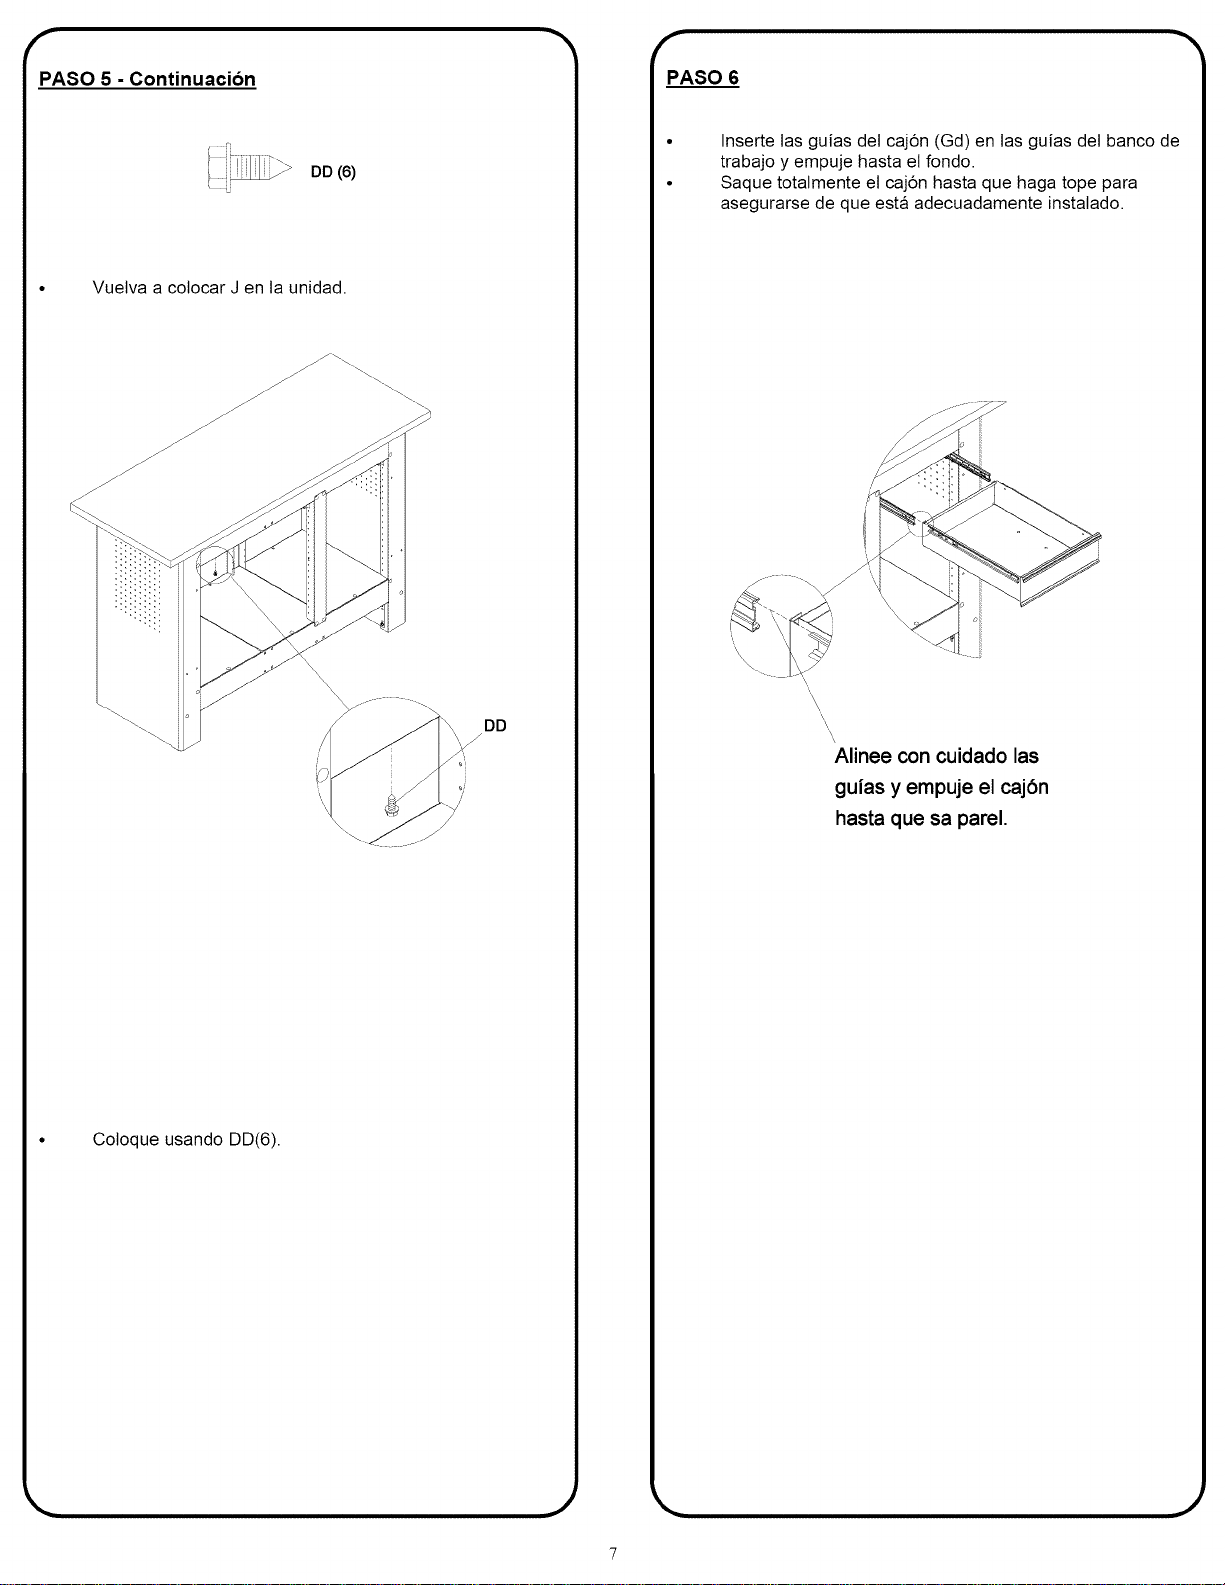
PASO 5 - Continuacion
DD(6)
• Vuelva a colocar J en la unidad.
• Coloque usando DD(6).
DD
/
f
PASO 6
Inserte tas guias del caj6n (Gd) en las guias del banco de
trabajo y empuje hasta el rondo.
Saque totalmente el caj6n hasta que haga tope para
asegurarse de que esta adecuadamente instalado.
\
\
\\
\
\
\
\,
Alinee con cuidado las
guias y empuje el cajdn
hasta que sa parel.
,J

QUITAR E INSTALAR CAJONES:
• Vacie el caj6n.
• Saque el caj6n por completo.
i
Dispositivo de liberacibn
Estilo palanca - Suba o baje (dependiendo de ta guia)
la palanca de tiberaci6n de ambos lados (esto permite
que las guias se salten los topes). Tire para sacar.
Estilo lengieta - Presione tas tengeetas de tiberaci6n
en ambos tados (esto permite que las guias se salten
los topes). Tire para sacar.
Para volver a colocarlo, alinee con cuidado las guias y
empuje el caj6n hasta que se pare.
Lubrique las guias con grasa o equivalente (dos veces por
afio).
Limpie con detergente suave y agua los frontales y los
bordes taterales de los cajones y tas demas superficies
La cera de autom6vit ayudara a preservar el acabado
brittante de ta unidad. Aplique la cera como a un coche. La
cera tambien ayudara a proteger ta unidad de rayados.
La grasa y el aceite se pueden limpiar con la mayoria de los
liquidos de timpieza estandar. Pot seguridad, utilice liquidos
de limpieza no inflamables.
J


