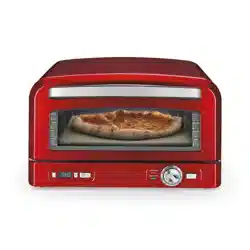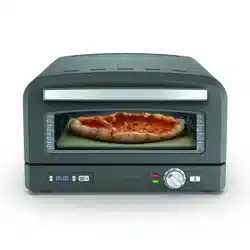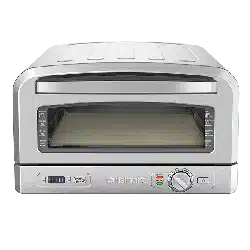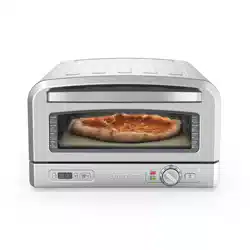
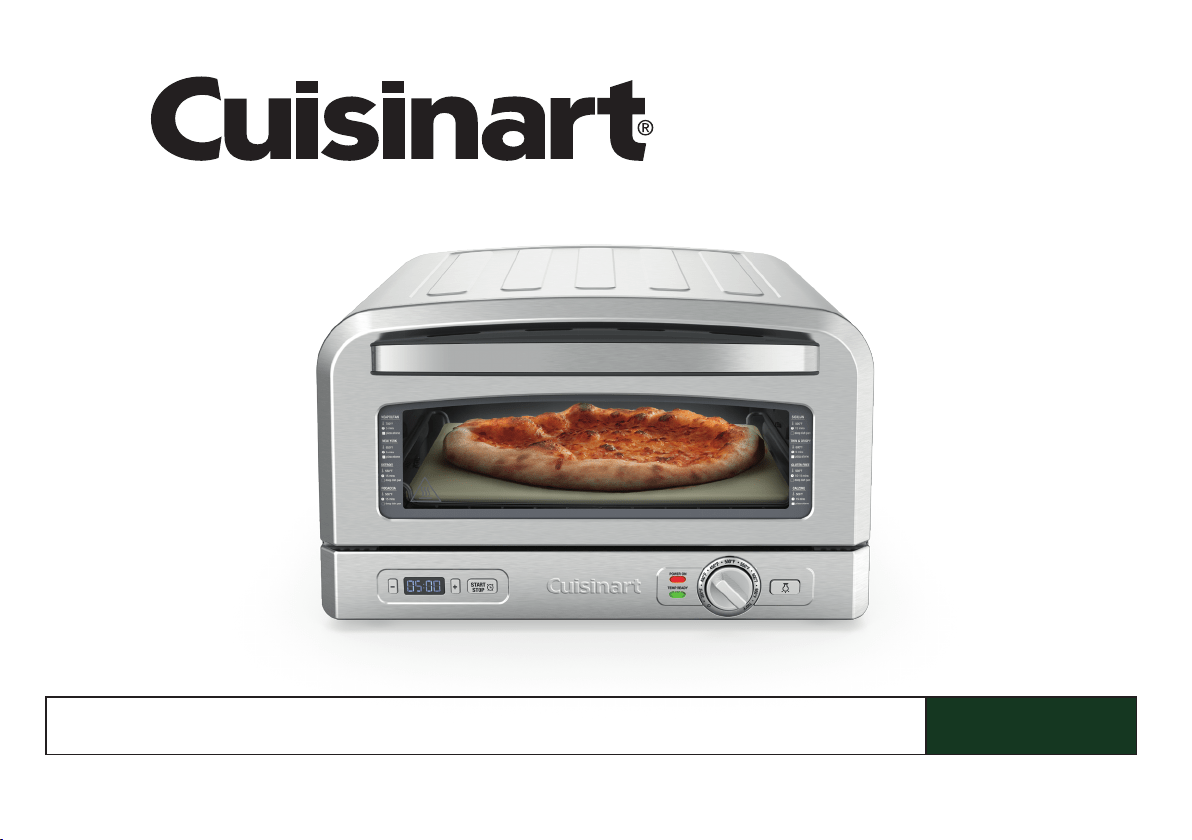
Indoor Pizza Oven
CPZ-120
For your safety and continued enjoyment of this product, always read the instruction book carefully before using.
Instruction Booklet
& Recipes

2
IMPORTANT SAFEGUARDS
When using an electrical appliance, especially when children are present, basic safety
precautions should always be taken, including the following:
1. Read all instructions.
2. UNPLUG FROM OUTLET WHEN NOT IN USE AND BEFORE CLEANING. Allow to
cool before cleaning or handling, or putting on or taking off parts.
3. Do not touch hot surfaces. Use handles or dials.
4. To protect against electric shock, do not place any part of the pizza oven in water
or other liquids. See instructions for cleaning.
5. This appliance should not be used by or near children or individuals with
certain disabilities.
6. Do not operate any appliance with a damaged cord or plug, after the appliance
has malfunctioned or has been dropped or damaged in any way, or has been
dropped in water. Return the pizza oven to the store or retailer where purchased
for examination, repair, or adjustment.
7. The use of accessory attachments not recommended by Cuisinart may cause
personal injury or damage to the unit or accessories.
8. Do not use outdoors.
9. Do not let cord hang over the edge of the table or countertop where it could
be pulled on inadvertently by children or pets, or touch hot surfaces, which could
damage the cord.
10. Do not place pizza oven on or near a hot gas or electric burner or in a heated oven.
11. Extreme caution must be used when moving an appliance containing hot oil
or other hot liquids.
12. Do not use this pizza oven for anything other than its intended purpose.
13. Extreme caution should be exercised when using containers constructed
of materials other than metal in the oven.
14. To avoid burns, use extreme caution when removing the pizza oven accessories
or inserting and removing food.
15. When not in use, always unplug the unit. Do not store any materials other than
manufacturer’s recommended ovenproof accessories in this pizza oven.
16. Do not place any of the following materials in the pizza oven: paper, cardboard,
plastic, and similar products.
17. Do not cover crumb tray or any part of the oven with metal foil. This will cause
overheating of the oven.
18. Oversize foods, metal foil packages, and utensils must not be inserted in the pizza
oven, as they may involve a risk of re or electric shock.
19. A re may occur if the pizza oven is covered or touching ammable materials such
as curtains, draperies, or walls when in operation. Do not store any items on top
of the appliance when in operation. Do not operate under wall cabinets.
20. Do not clean with metal scouring pads. Pieces can break off the pad and touch
electrical parts, involving a risk of electric shock.
21. This appliance is not intended for use by persons (including children) with reduced
physical, sensory, or mental capabilities, or lack of experience and knowledge,
unless they have been given supervision or instruction concerning use of the
appliance by a person responsible for their safety.
22. Children should be supervised to ensure that they do not play with the appliance.
23. If the power cord is damaged, it must be replaced by the manufacturer,
its service agent, or a similarly qualied person in order to avoid a hazard.
24.
This symbol means the surface of this product is hot; please be careful when
touching it.
25. This appliance is not intended to be operated by means of an external timer
or separate remote-control system.

3
SAVE THESE INSTRUCTIONS
SPECIAL CORD SET INSTRUCTIONS
A short power-supply cord is provided to reduce the risks resulting from becoming
entangled in or tripping over a longer cord. An extension cord may be used if caution is
taken in its use. If an extension cord is used, the marked electrical rating of the extension
cord must be at least as great as the electrical rating of the appliance, and the longer
cord should be arranged so that it will not drape over the countertop or tabletop, where
it can be tripped over unintentionally or pulled on by children.
NOTICE: This appliance has a polarized plug (one blade is wider than the other). As a
safety feature, this plug will t in a polarized outlet only one way. If the plug does not t
fully in the outlet, reverse the plug. If it still does not t, contact a qualied electrician. Do
not attempt to defeat this safety feature.
FOR HOUSEHOLD USE ONLY
NOT INTENDED FOR
COMMERCIAL USE
CONTENTS
Important Safeguards................................................. 2
Features and Benefits ................................................ 4
Before First Use ..................................................... 5
Operation .......................................................... 5
Pizza Styles ........................................................ 5
Making the Perfect Pizza .............................................. 6
Pizza Tips from Start to Finish.......................................... 7
Pizza Dough Making Tips ............................................. 8
Troubleshooting .................................................... 10
Cleaning & Care .................................................... 10
Warranty .......................................................... 11
Recipes........................................................... 12
4
4
5
3
FEATURES AND BENEFITS
1. Control Panel
Easily adjustable temperature control, digital timer, and interior light selector.
a. Independent Cooking Timer
Adjust using the +/- buttons to select desired cook time. Press
START/STOP
to begin countdown. When the timer reaches 00:00, the oven will remain on so
the next pizza can be cooked without interruption.
b. TEMP READY Indicator
Indicates the oven has reached temperature and is ready to cook
c. POWER ON Indicator
Indicates when the unit is on and remains lit while in use
d. Temperature Dial
Smooth-feel temperature control with selection range of 350°F to 700°F
e. Interior Light Button
Illuminates interior to view food during the cooking process
2. Cooking Guide
Built-in guide with recommendations for time and temperature for different
styles of pizza.
3. Pizza Stone
Ideal surface for cooking Neapolitan style, New York, thin and crispy,
and more. When using the pizza stone, always preheat the oven with the
stone in place.
4. Wire Rack
Holds the pizza stone and deep dish pan in place while in use.
This diagram shows the proper position for the wire rack.
5. Enameled Deep Dish Pan
This 12”x12”x1.5” baking pan can be used for pan pizza styles such as deep
dish, Detroit style, Grandma pizza, and focaccia.
6. Foldable Pizza Peel
Use the pizza peel to easily slide in and remove pizza. The handle can be
rotated to rest on top of the peel for compact storage when not in use.
7. Internal Crumb Tray (not shown)
This tray sits on the bottom of the oven and can be removed when the oven
is fully cool by gently tilting upwards and pulling out.
8. Active Cooling Technology (not shown)
Internal fans cool the exterior of the oven and internal electronics during
and after use.
6
1
d
a eb
c
2

5
BEFORE FIRST USE
1. Remove all packing materials and labels from the inside and outside of the oven,
and safely discard.
2. Place the pizza oven on a at, level surface.
3. Move oven 2 to 4 inches away from the wall or from any objects on the countertop.
Do not use on heat-sensitive surfaces.
4. Check that the crumb tray is in place and insert the wire rack and pizza stone.
NOTE: OBJECTS SHOULD NOT BE STORED ON THE TOP OF THE OVEN.
IF THEY ARE, REMOVE ALL OBJECTS BEFORE YOU TURN ON YOUR OVEN.
THE EXTERIOR WALLS GET HOT WHEN IN USE. KEEP OUT OF REACH OF
CHILDREN.
OPERATION
Follow these steps for cooking operation:
1. Place the appliance on a stable, at, heat-resistant surface. Plug the Cuisinart
®
Indoor Pizza Oven into a wall outlet. Ensure the oven is in a well-ventilated area,
as some smoke may be emitted due to high temperatures.
2. Ensure the wire rack and pizza stone are inserted in the proper position and close
the oven door.
3. Turn the dial to the desired temperature. The POWER ON indicator light will illuminate,
an audio alert will sound, and the oven will begin preheating.
4. Preheating the oven:
a. Turn the temperature dial to the desired temperature. The oven will automatically
preheat for 20-30 minutes, depending on the temperature needed. The preheat
time ensures the pizza stone becomes saturated with heat, which is imperative
for a crisp bottom pizza crust.
b. While the oven is preheating, assemble pizzas (see page 7).
NOTE: Pan pizzas require signicant time to put together, so they are best
assembled either while the oven is preheating or even before.
c. Once preheat is complete, an audio alert will sound and TEMP READY will illuminate.
NOTE: This unit will automatically shut off after 2 hours; an audio alert of 3 beeps
will sound at this time.
5. Carefully slide assembled pizza into the oven and set timer (if desired) using the
+/- button. Press
START/STOP to start timer. When the timer reaches 00:00, an
audio alert will sound. IMPORTANT: Please note that the end of a timer cycle
does not turn off the oven.
NOTE: When cooking at higher temperatures, closely monitor cooking progress
as pizzas cook quickly.
6. When pizza is ready, remove from the oven and enjoy!
7. To turn off the oven at any time, turn the dial to
position. The POWER ON indicator
light will go off, and an audio alert will sound.
IMPORTANT: Leave the unit plugged in after use until the fans shut off to ensure
proper cooling of the oven and electronics.
NOTE: Always make sure the oven is preheated (indicated by the TEMP READY light)
before cooking your pizza. This will ensure the best results for all styles of pizza.
If cooking multiple styles of pizza, we suggest starting with pizzas that require
a lower temperature.
If you notice pizzas coming out more pale or undercooked when cooking pizzas back
to back, give the oven 5-10 minutes to heat up again.
Factors like leaving the oven door open, opening the door too often, or insufciently
heating the pizza stone can lead to heat loss.
PIZZA STYLES
Neapolitan, 700°F, 5 minutes
Neapolitan pizza is often referred to as “wood-red” pizza since it is traditionally cooked
in wood-red pizza ovens. The characteristics are the dark bottom crust, and a high
and chewy outer crust. This style pizza is all about the avor of the dough and less
about the toppings, so go light on toppings.
New Haven, 700°F, 5 minutes
New Haven is really a “neo” Neapolitan pizza since it is based in the Neapolitan method
with avorful dough and chewy crust. It is often either oblong or rectangular shaped.
New York, 650°F, 5 minutes
This is the pizza that is in most neighborhood slice shops and pizzerias in New York.
It is chewy and crispy and topped with sauce and plenty of cheese.
Thin and crispy, 600°F, 5 minutes
This is similar to the popular “bar” pizza that is found across the country. The dough is a
bit sweeter and sometimes calls for more oil or other fat than traditional pizza dough. It
is thin with little exterior crust.

6
Deep dish, 550°F, 15 minutes
Deep dish pizza, considered a Chicago specialty, is traditionally prepared in a tall pan
and has a thick crust lled with an ample amount of sauce, cheese, and other traditional
pizza toppings. The cheese often melts over the crust and forms a crispy texture where
it contacts the pan while baking.
Detroit, 550°F, 15 minutes
This popular deep-dish style pizza consists of a very thick dough that is generously
oiled and studded with fatty cheese. The most popular topping is stripes of pizza
sauce, but pepperoni is also a regional favorite. It should be baked until the edges and
bottom of the pizza are very browned and crispy.
Sicilian, 500°F, 15 minutes
While this also falls under the heading of a “deep dish” pizza, it is more like a focaccia
with toppings. Focaccia dough, baked with rich olive oil, is rst parbaked and then
topped either with a little bit of cheese and herbs, or fully topped with sweet pizza
sauce, cheese, and a light scattering of toppings.
Grandma, 500°F, 15 minutes
Grandma-style pizza is the New York region’s take on Sicilian pizza. It is a bit thinner
and most often sold in shops by the slice. It has lighter and fresher toppings than
the typical New York slices.
Focaccia, 500°F, 15 minutes
Focaccia is a bread enriched with olive oil. Sometimes it is just served with light
toppings of herbs and salt, or maybe a little grated cheese. Other times it is twice
baked, where it is rst parbaked, then stuffed with cheese and llings, then nished
to make it more of a stuffed bread.
Calzone, 500°F, 15 minutes
The simplest way to describe this pizzeria staple is as a stuffed pizza. Pizza dough is
stretched to an oval or circle and lled with cheese, typically ricotta and mozzarella,
and often a mixture of vegetables and meats. It is cooked directly on the pizza stone
to ensure a crispy exterior and fast cooking.
Frozen, 450°F, 15 to 20 minutes
Cook frozen pizza directly on preheated stone. Keep in mind that thicker crusts will
require more time while thinner crust and personal pizzas will take less time. For best
results, turn pizzas with peel halfway through cooking time.
Gluten free, 500°F, 10 to 15 minutes
Gluten-free crusts require special attention. Since the doughs are typically stickier,
they are best cooked in the baking pan as opposed to directly on the pizza stone.
They may need to be parbaked before topping to ensure that they are fully cooked
through and can withstand the weight and moisture of toppings.
Our cooking recommendations are based on our gluten-free pizza dough
recipe (page 16). Gluten-free dough may be used for any pizza recipe.
Cauliflower, 500°F, 4 to 5 minutes
Cauliower crusts (page 17) require special attention similar to that of gluten-free
doughs. They need to be baked in the baking pan, if preparing fresh, and require the
pan to be well oiled. The crust must be parbaked prior to topping.
MAKING THE PERFECT PIZZA
Pizza making takes practice – here are some key steps for success.
Great pizza begins with great ingredients—high quality and simple ingredients go a
long way.
Dough is the important foundation of a pizza. Store-bought dough is convenient and
consistent. It is also a great starter dough for practicing pizza making.
Our recommendation is using 8 to 10 ounces of dough for each pizza.
Once you get the hang of pizza making, we highly recommend trying some of our
dough recipes. Our Neapolitan-style dough (page 13) with the addition of the optional
sugar makes for an authentic Neapolitan pizza.
For maximum avor and fermentation, we recommend resting homemade dough in the
refrigerator for 24 and up to 72 hours before preparing for best results. Remove dough
from refrigerator at least 1 hour and up to 3 hours before shaping. Keep covered as it
rests at room temperature.
For the best avor and ultimate nal pizza, our dough recipes tend to be a bit more
sticky and wet than a traditional dough ball. This wet consistency requires extra our
and patience for success. Use oured hands when handling dough – this way dough
will not stick to your hands plus you can control the amount of our used. Brush off
excess our before topping.
Go light on the toppings! This helps with both transferring pizza from peel to stone, and
it is true in pizza making that a little goes a long way in terms of toppings. Wet toppings
weigh down the pizza and cause the dough to stick to the pizza peel.
Preheat the oven before preparing and assembling your pizza. It is important that the
pizza stone is hot and ready before you begin.
7
Although not essential, we recommend turning your pizza 180° about halfway through
baking time for the most even end results.
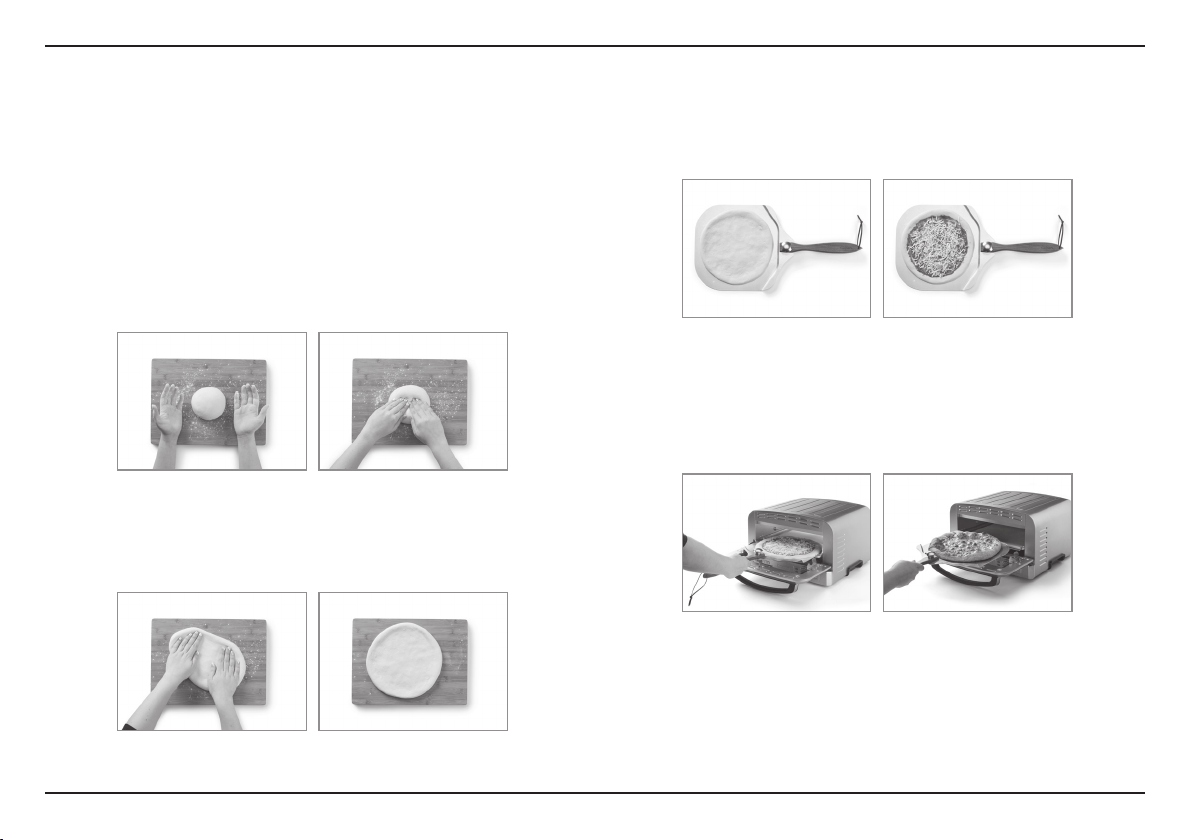
PIZZA TIPS FROM START TO FINISH: HOW TO
SHAPE AND LAUNCH PIZZAS
Pizza making and launching is an art that takes practice. Do not be discouraged
should your first attempt not be perfect! Use any store-bought dough or our
Neapolitan or New York style dough recipes (page 13).
1. Once dough has sufciently rested at room temperature, lightly our work surface
and place dough ball in center. For stickier doughs it is helpful to our hands as well.
We recommend 8 to 10 ounces of dough for pizza making. Sixteen ounces of dough
is the maximum recommended amount per individual pizza.
2. Press dough ball to atten into a disc.
3. Continue to shape to larger circle, ipping dough at least once to prevent sticking
(add additional our as necessary) while stretching and shaping dough evenly,
from the center outward.
4. If dough is not spreading or stretching to desired shape, let it rest. Cover for 10 to 15
minutes and then try again.
5. Once stretched to desired size, lightly our the pizza peel.
6. Place dough onto cool peel. Be sure the size of the dough is not larger than the peel.
Trim any dough that hangs over the peel.
7. Working quickly, top with sauce and desired toppings. With toppings, keep in mind
that a little goes a long way. Adding too much sauce or cheese will weigh down the
dough so that it will stick to the peel.
8. Confirm dough can move on peel by shaking slightly. Should any area be stuck,
gently lift and sprinkle the peel lightly with additional flour to loosen. Do not
attempt to launch pizza if any area seems to be sticking to the peel.
9. Open oven door and put peel into oven. Slide the pizza onto the stone with
a quick yet condent forward and then backwards motion, shimmying the peel
slightly if necessary.
10. When the pizza is done, slide the peel under the pizza. Gently lift and remove from
the oven, then slide the pizza onto a cutting board. Let the pizza cool slightly before
slicing and serving. Allow peel to cool before assembling the next pizza.

8
To prepare a thin and crispy pizza
1. Follow steps 1 to 3 in preparing pizza that bakes directly on the stone (page 7).
2. Place stretched dough on a oured work surface. Using a rolling pin, roll dough out
to a thin 12-inch circle or rectangle.
3. Lightly our the pizza peel and carefully move the rolled dough onto the peel.
Working quickly, top the dough as desired.
4. Conrm dough can move on peel by shaking slightly. Should any area be stuck, gently
lift and sprinkle the peel lightly with additional our.
5. Open oven door. Put peel into oven and slide the pizza onto the stone with a quick yet
condent forward and then backwards motion.
6. When the pizza is done, slide the peel under the pizza. Gently lift and remove from the
oven, then slide the pizza onto a cutting board. Let the pizza cool slightly before
slicing and serving.
To prepare a pan style pizza
1. Coat the interior of the deep dish pan with 3 to 4 tablespoons of olive oil, depending
on the style being prepared.
2. Transfer the dough to the oiled pan and turn the dough over a few times so that it is
fully coated with the olive oil.
3. Press the dough gently using your ngertips, spreading it towards the 4 sides of the
pan (do not force it; it will eventually spread).
4. Cover the pan and allow to rest for 20 minutes. After resting, uncover and repeat the
process, focusing on the spreading of the dough to the edges of the pan. Cover and
repeat this process until the dough lls the pan. This process can take up to 3 rounds
(60 minutes total).
5. Once the dough lls the pan, then add desired toppings, depending on the style
of pan pizza being prepared.
6. Cover loosely with plastic wrap and let rise while oven preheats.
7. Once oven is preheated, place pan in oven directly on the pizza stone.
8. When the pizza is done, remove from oven using oven mitts, then slide the pizza from
the pan onto a cutting board before slicing and serving.
PIZZA DOUGH MAKING TIPS
Yeasted pizza dough can be prepared a number of different ways. Regardless of the
method you choose, follow the specic recipe for proong instructions once the dough
is made.
Bread our or 00 our is recommended for most pizza dough styles.
For all methods: If using instant yeast, the yeast can be added with the dry ingredients.
Active dry yeast should be proofed rst with liquid ingredients at appropriate proong
temperature (105°-110°F).
Patience is key for a good dough–the longer it can slow proof and rest in the refrigerator,
the longer the avors have to develop (up to 72 hours for best results).
By hand
1. Have all ingredients and tools ready. The best tools for making dough by hand are a
large, wide, shallow bowl for a mixing, a small bowl of all-purpose or bread our to
dust hands and work surface, and a measuring cup. A plastic dough/bowl scraper is
useful, but not necessary.
2. Put dry ingredients in the mixing bowl and the water/liquid in a measuring cup.
First mix the dry ingredients together either with a whisk or with the bowl scraper,
if using.
3. Add the minimum amount of water/liquid (if there is a range given) and start to mix. If
using your hands, generously coat them with our. Once the dough comes together,
you can completely mix and knead it in the bowl, or transfer to a clean work surface
that has then been dusted with our.
4. Knead the dough on the work surface, until it springs back to the touch. Try not to add
too much additional our if it is sticking–rather just keep kneading (adding more to
your hands is OK if the dough is indeed sticking to your hands). Eventually it will
come together.
5. A good method is to pull part of the dough toward you and then fold it over itself;
turn the dough 45 degrees and then repeat, repeat, repeat, until the dough is nicely
springy.

9
Food processor
The food processor is the tool to use to make dough quickly and easily. Since the dough
is kneading at a higher speed, and therefore warming the dough up more than if
prepared by hand or in the stand mixer, the perfect dough ball comes together in
seconds as opposed to minutes like in the other methods.
1. Put the dry ingredients into the work bowl tted with metal blade or dough blade.
2. Process on a low or dough speed if available. With machine running, slowly add the
water/liquid through the feed tube only as fast as the dry ingredients can absorb it. If
the dough seems too sticky or wet, then add additional our 1 teaspoon at a time.
Once the dough forms a ball, only knead it for an additional 45 to 60 seconds.
3. Turn the dough out onto a clean surface that has been lightly dusted with our to
knead a few times by hand to be sure it is a smooth ball and springs back to the
touch when lightly pressed.
Stand mixer
The stand mixer is a favorite tool of many for preparing pizza dough. It is easier to
prepare larger batches than in the food processor, and it is mostly a hands-off method
for those that don’t want to get their hands too messy.
1. Fit stand mixer with dough hook. Add the liquid ingredients to the mixing bowl.
2. Add in the dry ingredients (that have been premixed in a separate bowl). Follow recipe
whether dry ingredients are added all at once or gradually.
3. Mix dough on the lowest speed.
4. Once dough ball is formed, continue to knead on low speed for 10 minutes.
ADDITIONAL PIZZA TIPS
Toppings
When preparing fresh pizzas, don't use too much sauce or overload the toppings.
Adding too much sauce will make the dough gummy after being cooked and can
make it more difcult to remove from the peel when sliding into the oven. New York
style pies call for a chewy and saucy marriage between the dough and cheese, so
that is one exception to the rule. Just be sure the peel has enough our to allow
the pizza to slide onto the stone.
For Neapolitan and New Haven-style pizzas, we recommend about 3 tablespoons
of pizza sauce if making a red pie. For New York and thin and crispy styles, a bit more
sauce is typical. If an extra saucy pie is desired, it is best to parbake the crust to get
a crispy bottom, then top with the desired sauce and toppings.
It is best to precook most pizza toppings. Raw ingredients have more moisture and that
moisture can seep into your cooking pizza and produce an unpleasantly soggy dough.
Also, because the pizza takes little time to cook, certain toppings may not nish if they
are not precooked.
If topping with fresh herbs, keep them fresh by adding to pizza after baking.
Leftover dough suggestions
Freezing dough saves time for the next pizza night. Prepare desired dough and allow
to rise for the full amount of time directed in the recipe (prior to shaping). Divide dough
into individual portions (either individual pizzas, 8 to 10 ounces each, or for pan pizzas
enough to ll the full pan). Wrap well in plastic and place in the freezer. Doughs can be
frozen up to 2 months.
To defrost, remove dough from the plastic and place in a bowl or on a pan and cover.
Place in refrigerator overnight. Bring to room temperature for 1 to 3 hours prior to using
and follow desired pizza style to prepare.
Garlic knots: Brush the deep dish pan with 1 tablespoon olive oil. Divide 1 pound of
pizza dough into equal pieces. Roll each into a rope and tie into a knot. Melt 4
tablespoons of butter with nely chopped garlic (about 4 cloves). Dip each knot into the
melted garlic butter and place evenly into deep dish pizza pan. Cover with plastic and
allow to rise for 30 minutes. Bake at 450°F until golden, about 15 minutes. Rotate pan
halfway through baking time for the most even results.
Cinnamon sugar twists: Prepare the dough the same as above. Brush each knot
with melted butter and then sprinkle liberally with cinnamon sugar. Bake at 450°F until
golden, about 15 minutes. Rotate pan halfway through baking time for the most even
results.
Reheat: Reheat leftover pizza at 350°F for 5 to 8 minutes.

10
CLEANING & CARE
• Before cleaning any part of the oven or removing internal accessories, be sure the
exterior and interior of the oven are completely cooled.
• Always unplug the oven from the electrical outlet before cleaning.
• Do not use abrasive cleaners, as they will damage the nish. Simply wipe the exterior
with a clean, damp cloth and dry thoroughly. Apply the cleansing agent to a cloth, not
directly onto the oven, before cleaning.
• To clean interior walls, use a damp cloth and a mild liquid soap solution or a spray
solution on a sponge. Remove any residue with a clean, damp rag. Never use harsh
abrasives or corrosive products. These could damage the oven surface. Never use
products such as steel wool pads on the interior of the oven.
Cleaning the accessories
• Deep dish pan, oven rack, pizza peel, and crumb tray: hand-wash in hot, sudsy water,
using a nylon scouring pad or nylon brush, and thoroughly rinse. These items are
NOT dishwasher safe.
• Pizza peel: Carefully unscrew the handle and set aside. Wash the metal part of the peel
in warm sudsy water. Wipe down the handle with a damp cloth if needed. When the
peel is dry, screw the handle back in place, making sure it's securely tightened.
• Pizza stone: To maintain the longevity of your pizza stone, we recommend routine
maintenance. Make sure the stone is completely cool before handling. Use a metal
spatula or food scraper to remove any stuck–on food debris. Brush off any burnt our
or other debris and wipe with a damp towel. Be sure the pizza stone is completely dry
before placing back in the oven. Store the pizza stone in the oven when not in use.
Discoloration and darkening of the pizza stone are normal and expected. Over time the
pizza stone will become seasoned, which improves cooking performance and avor.
IMPORTANT: Since the pizza stone is very porous, you should never use any soap or
detergent on it. It should also never be submerged in water as the stone can be
permanently damaged or cracked when heated if wet.
• To remove crumbs, slide out the internal crumb tray and discard crumbs. Wipe clean
and replace. To remove any stuck-on food, soak the tray in hot, sudsy water or use
nonabrasive cleaners.
• Any other servicing should be performed by an authorized service representative.
SUBJECT QUESTION ANSWER/SOLUTION
Power
Why won’t my unit turn
on?
Make sure your unit is plugged into a functional outlet.
Call Consumer Service at 1-800-726-0190.
Cooking
Why is my dough stick-
ing to the peel?
When shaping dough, be sure to have extra our on hand. Lightly dust hands and work surface when shaping. Lightly dust
peel. Once pizza is topped, be sure it can move on the peel before attempting to slide into oven. Should any spot be stuck,
lightly dust underneath with our so that pizza moves on the peel.
Go sparingly on sauce and toppings–too much of these can cause dough to stick to the peel.
Make sure peel is completely cool before placing shaped, fresh dough.
Why is smoke coming
out of the oven?
A small amount of smoke is normal and due to the high temperatures. To reduce smoke, try using less our on the pizza peel.
Food re in the oven
Small food res in the oven are possible in some scenarios, such as when using excessive amounts of our or oil. If this
happens, ensure the oven door is closed. If the re does not self-extinguish within 10 seconds, turn the oven off and unplug
until the re is out.
TROUBLESHOOTING

11
WARRANTY
Limited Three-Year Warranty
This warranty is available to U.S. consumers who purchase products
directly from Cuisinart or an authorized Cuisinart
®
reseller. You are
a consumer if you own a Cuisinart
®
Indoor Pizza Oven that was
purchased at retail for personal, family, or household use. Except as
otherwise required under applicable law, this warranty is not available
to retailers or other commercial purchasers or owners. We warrant that
your Cuisinart
®
Indoor Pizza Oven will be free of defects in materials
and workmanship under normal home use for 3 years from the date
of original purchase.
We recommend that you visit our website, https://cuisinart.registria.
com, for a fast, efficient way to complete your product registration.
However, product registration does not eliminate the need for the
consumer to maintain the original proof of purchase in order to obtain the
warranty benefits. In the event that you do not have proof of purchase
date, the purchase date for purposes of this warranty will be the date of
manufacture.
CALIFORNIA RESIDENTS ONLY
California law provides that for in-warranty service, California residents
have the option of returning a nonconforming product (A) to the store
where it was purchased or (B) to another retail store that sells Cuisinart
products of the same type. The retail store shall then, according to its
preference, either repair the product, refer the consumer to an
independent repair facility, replace the product, or refund the purchase
price less the amount directly attributable to the consumer’s prior usage
of the product. If neither of the above two options results in the
appropriate relief to the consumer, the consumer may then take the
product to an independent repair facility, if service or repair can be
economically accomplished. Cuisinart and not the consumer will be
responsible for the reasonable cost of such service, repair, replacement,
or refund for nonconforming products under warranty. California
residents may also, according to their preference, return nonconforming
products directly to Cuisinart for repair or, if necessary, replacement
by calling our Consumer Service Center toll-free at 1-800-726-0190.
Cuisinart will be responsible for the cost of the repair, replacement,
and shipping and handling for such nonconforming products
under warranty.
HASSLE-FREE REPLACEMENT WARRANTY
Your ultimate satisfaction in Cuisinart products is our goal, so if
your Cuisinart
®
Indoor Pizza Oven should fail within the generous
warranty period, we will repair it or, if necessary, replace it at no cost
to you. To obtain a return shipping label, visit us at https://www.
cuisinart.com/customer-care/product-assistance/product-inquiry/.
Or call our customer service department toll-free at 1-800-726-0190
to speak with a representative.
Your Cuisinart
®
Indoor Pizza Oven has been manufactured to the strictest
specifications and has been designed for use only in 120-volt outlets and
only with authorized accessories and replacement parts. This warranty
expressly excludes any defects or damages caused by attempted use of
this unit with a converter, as well as use with accessories, replacement
parts, or repair service other than those authorized by Cuisinart. This
warranty does not cover any damage caused by accident, misuse,
shipment, or other than ordinary household use. This warranty excludes
all incidental or consequential damages. Some states do not allow the
exclusion or limitation of these damages, so these exclusions may not
apply to you. You may also have other rights, which vary from state to
state.
Important: If the nonconforming product is to be serviced by someone
other than Cuisinart’s Authorized Service Center, please remind the
servicer to call our Consumer Service Center at 1-800-726-0190 to
ensure that the problem is properly diagnosed, to ensure the product
is serviced with the correct parts, and to ensure that the product
is still under warranty.

12
Recipes
Neapolitan-Style Pizza Dough ............................................................................13
New York-Style Pizza Dough ..............................................................................13
Thin and Crispy Pizza Dough .............................................................................14
Deep-Dish Pizza Dough .......................................................................................15
Focaccia or Sicilian Pizza Dough .......................................................................15
Gluten-Free Pizza Dough .................................................................................... 16
Parmesan Cauliflower Crust ............................................................................. 17
Naan Pizza Crust ...................................................................................................17
Simple Pizza Sauce............................................................................................... 18
Basil Pesto .............................................................................................................. 18
Spring Pea Pesto....................................................................................................19
Pistachio-Arugula Pesto ......................................................................................19
Margherita Pizza ..................................................................................................20
Four-Cheese Pizza with Roasted Tomatoes ..................................................20
Pistachio-Arugula Pesto, Prosciutto, and Burrata Pizza ............................21
White Pizza with Sausage, Broccoli Rabe, and Cherry Peppers .............22
Apple, Bacon, Red Onion, and Blue Cheese Pizza .......................................22
Spring Pea Pesto Pizza .......................................................................................23
Spicy Hawaiian Pizza ...........................................................................................24
New Haven-Style White Clam Pizza ...............................................................24
Mexican Street Corn Pizza .................................................................................25
Naan Pizza with Spicy Lamb, Feta, and Herbs ..............................................26
Potato, Sausage, and Rosemary Pizza ............................................................26
Short Rib, Caramelized Onion, and Smoked Gouda Pizza ........................ 27
Cauliflower Pizza with Brussels Sprouts, Bacon,
and Shaved Parmesan ......................................................................................28
Rosemary Focaccia .............................................................................................29
Detroit Classic Pepperoni Pie ........................................................................... 30
Sicilian Meatball Pie ........................................................................................... 30
Broccoli Calzones .................................................................................................31
Chicken Parmesan Calzones ............................................................................32
Chocolate Hazelnut Pizza with Strawberries ................................................33
Apple Galette .........................................................................................................33

13
Neapolitan-Style Pizza Dough
The original in pizza – simple ingredients and patience
add up to a delicious pizza base.
Makes dough for two 10- to 12-inch pizzas
1 cup water, room temperature
1. Put the water in the mixing bowl of a stand mixer fitted with
the dough hook.
2. Add the flour, yeast, and sugar if using. Turn the stand mixer
on to the lowest speed, and mix until a ball of dough forms.
3. After the mixture forms a ball, continue to knead on the lowest
speed for 10 minutes.
4. Transfer the dough to a large stainless-steel bowl and cover
with plastic wrap. Allow to ferment at room temperature for
about 4 hours.
5. Divide the dough into two equal portions, and shape each into
a smooth, rounded ball. Place the dough in a clean bowl with
enough room for each piece to expand without touching. Cover
tightly and refrigerate for at least 24 hours and up to 3 days.
6. When ready to use, remove from the refrigerator and let sit at
room temperature at least 1 hour before shaping into a crust.
Insider's tip: Although not a traditional ingredient, a pinch of
sugar gives your pizza optimal "leopard spotting" when baked.
*If using instant yeast, prepare as this recipe is written. If using
active dry yeast it must be proofed in warm (105°F-110°F)
water first. Sprinkle the yeast into the warm water and once it
gets foamy, it is ready to use. All other dry ingredients can be
mixed as written above.
Nutritional information per serving (based on 16 servings):
Calories 129 (0% from fat) • carb. 28g • pro. 4g • fat 0g • sat. fat 0g
chol. 0mg • sod. 401mg • calc. 1mg • fiber 1g
New York-Style Pizza Dough
The addition of olive oil creates a nice balance between crunch and
chew, both characteristic of a classic New York pie.
Makes dough for two 10– to 12-inch pizzas
1 cup water, room temperature
1. Combine the water and olive oil in a 2-cup liquid measuring cup.
2. Put the bread flour, salt, yeast, and sugar in the work bowl of a
food processor fitted with the chopping blade. Process briefly
to mix, about 10 seconds.
3. With the machine running, pour the liquid through the feed
tube, only as fast as the flour will absorb it. After the mixture
forms a ball, process the dough to knead for an additional 45
seconds.
4. Transfer the dough to a stainless-steel mixing bowl and cover
with plastic wrap. Allow to ferment at room temperature for
about 4 hours.
5. Divide the dough into two equal portions, and shape each into
a smooth, rounded ball. Place the dough in a clean pan with

14
enough room for each piece to expand without touching. Cover
tightly and refrigerate for at least 24 hours and up to 3 days.
6. When ready to use, remove from the refrigerator and let sit at
room temperature at least 1 hour before shaping into a crust.
*If using instant yeast, prepare as written. If using active
dry yeast, it must be proofed in warm (105°F-110°F) water
first. Sprinkle the yeast into the warm water, along with the
sugar, and once it gets foamy, it is ready to use. All other dry
ingredients can be mixed as written above.
**Honey is a great alternative to sugar in pizza dough. If using,
add to the recipe with the liquid ingredients.
Nutritional information per serving (based on 16 servings):
Calories 80 (10% from fat) • carb. 16g • pro. 2g • fat 1g • sat. fat 0g
chol. 0mg • sod. 222mg • calc. 0mg • fiber 0g
Thin and Crispy Pizza Dough
Rolled out thin, this dough works for any style
of thin and crispy pizza.
Makes dough for two 10- to 12-inch pizzas
¾ cup water, room temperature
1. Combine the water and olive oil in a 2-cup liquid measuring cup.
2. Put the flour, sugar, salt, and yeast in the work bowl of a food
processor fitted with the chopping blade. Process briefly to mix,
about 10 seconds.
3. With the machine running, pour the liquid through the feed
tube, only as fast as the flour will absorb it. Once the mixture
forms a ball, process the dough to knead for an additional
45 seconds.
4. Transfer the dough to a stainless-steel mixing bowl and
cover with plastic wrap**, or put in a resealable plastic bag.
Refrigerate at least overnight and for a maximum of 3 days.
5. When ready to use, remove from the refrigerator and let sit
at room temperature for at least 1 hour. Divide the dough into
two equal portions, and form each into a smooth, rounded ball.
Place each piece of dough into an individual bowl and cover
with plastic wrap.
6. Once doubled in size, the dough is ready to use for a pizza crust.
*If using instant yeast, prepare as written. If using active dry
yeast it must be proofed in warm (105°F-110°F) water first.
Sprinkle the yeast, into the warm water, along with a pinch
of the sugar, and once it gets foamy, it is ready to use.
All other dry ingredients can be mixed as written above.
**For best results, an overnight rest is highly recommended.
However, dough can be used after kneading with an hour rest
at room temperature. Watch as it bakes; with a short rest it
may puff up too much. If so, remove and pierce the bubbles to
deflate and return to finish baking.
Nutritional information per serving (based on 16 servings):
Calories 90 (26% from fat) • carb. 15g • pro. 2g • fat 3g • sat. fat 0g
chol. 0mg • sod. 148mg • calc. 0mg • fiber 0g

15
Deep-Dish Pizza Dough
This dough is ideal for Detroit-style or other deep-dish pizzas.
Makes dough for 1 deep-dish pizza
1. Put the flour, salt, and yeast in a large mixing bowl. Whisk to
combine. Pour the water over the dry ingredients. Using your
hands or a bowl scraper, work the ingredients to form a dough.
Knead a few more times, and then cover and let sit at room
temperature for at least 16 or up to 24 hours.
2. Fold the dough over a few times, then use in your favorite pan-
pizza style.
NOTE: This recipe can be made in a food processor or stand
mixer; see tips on page 7.
*If using instant yeast, prepare as written. If using active dry
yeast, it must be proofed in warm (105°F-110°F) water first.
Sprinkle the yeast into the warm water and once it gets foamy,
it is ready to use. All other dry ingredients can be mixed as
written above.
Nutritonal information per serving (based on 8 servings):
Calories 154 (0% from fat) • carb. 33g • pro. 5g • fat 0g • sat. fat 0g
chol. 0mg • sod. 401mg • calc. 1mg • fiber 1g
Focaccia or Sicilian Pizza Dough
In addition to making a delicious focaccia, this dough is a great
base for Sicilian or Grandma-style pizzas.
Makes 1 pan focaccia or Sicilian-style pizza
1 teaspoon olive oil
1. Put the flour, salt, sugar, and yeast into a large mixing bowl.
Whisk to combine. Pour the water over the dry ingredients.
Using your hands or a bowl scraper, work the ingredients to
form a dough. Knead a few more times, and then cover and let
sit at room temperature for at least 2 hours or up to 12 hours.
2. Fold the dough over a few times, then use in your favorite
focaccia or Sicilian or Grandma-style pizza.
NOTE: This recipe can be made in a food processor or stand
mixer; see tips (page 9).
*If using instant yeast, prepare as written. If using active dry
yeast it must be proofed in warm (105°F-110°F) water first.
Sprinkle the yeast into the warm water, along with a pinch of
the sugar, and once it gets foamy, it is ready to use. All other
dry ingredients can be mixed as written above.
Nutritonal information per serving (based on 8 servings):
Calories 139 (8% from fat) • carb. 28g • pro. 4g • fat 1g • sat. fat 0g
chol. 0mg • sod. 534mg • calc. 1mg • fiber 1g

16
Gluten-Free Pizza Dough
Simple gluten-free dough acts as the perfect blank canvas
for pizza lovers avoiding gluten. Roll it thick for a softer crust
or thin for thin and crispy.
Makes dough for two 10-inch pizzas
¾ cup rice milk, room temperature
1. Combine the rice milk and olive oil in a 2-cup liquid
measuring cup.
2. Put the rice and oat flours, arrowroot, potato starch, salt,
xanthan gum, and yeast in the work bowl of a food processor
fitted with the chopping blade. Process briefly to mix,
about 10 seconds.
3. With the machine running, pour the liquid through the feed
tube, only as fast as the dry ingredients will absorb it. Once
the mixture forms a ball, process the dough to knead for an
additional 45 seconds.
4. Transfer the dough to a stainless-steel mixing bowl and cover
with plastic wrap. Allow to rest at room temperature for at
least 2 hours.
5. Divide the dough into two equal portions. The dough can be
used immediately or wrapped and stored in the refrigerator for
up to 4 days.
To bake:
1. When ready to use, preheat pizza oven to 500°F. Dust work
surface with rice flour and roll dough into an 8- to 9-inch circle
or square, ¼ inch thick for a thinner, crispy pizza and ½ inch
thick for a thicker, more chewy one. Oil the deep dish pan well
and put the dough into the pan.
2. Top as desired (any pizza recipe can easily be used with this
gluten-free crust).
3. Bake in pizza oven until crust is golden and cheese is melted
(if using), about 10 minutes for thin crust and about 12 to 13
for thick.
*If using instant yeast, prepare as written. If using active dry
yeast, it must be proofed in warm (105°F-110°F) water first.
Sprinkle the yeast into the warm water, along with a pinch of
the sugar, and once it gets foamy, it is ready to use. All other
dry ingredients can be mixed as written above.
Nutritional information per serving (based on 16 servings):
Calories 76 (44% from fat) • carb. 10g • pro. 1g • fat 4g • sat. fat 1g
chol. 0mg • sod. 142mg • calc. 24mg • fiber 0g

17
Parmesan Cauliflower Crust
This cauliflower crust is a perfect alternative
for gluten-free pizza fans.
Makes crust for 1 pizza
1. Preheat pizza oven to 500°F. Brush the deep dish pan with the
oil and set aside.
2. Insert the chopping blade into the work bowl of a food
processor. Add the cauliflower and pulse 5 to 6 times to break
up, and then process on High until finely chopped. Transfer to
a microwave-safe bowl. Microwave the cauliflower until tender,
about 5 minutes. Let cool for 10 minutes.
3. Once cool, transfer cauliflower to a large bowl lined with
cheesecloth. Using the cheesecloth, squeeze the cauliflower to
remove as much liquid as possible. (Take your time with this
step—it will help ensure a crisper crust.)
4. In a medium bowl, combine the cauliflower, Parmesan,
almond flour, egg, onion powder, garlic powder, oregano, salt,
and pepper.
5. Transfer the cauliflower mixture to the oiled deep dish pan.
Press evenly along the bottom of the pan.
6. Bake until golden-brown and slightly firm, about 18 minutes.
Cool slightly.
7. This crust can now be used as a traditional pizza crust. Top
with your favorite pizza toppings and return to the oven to
finish cooking.
Nutritional information per serving (based on 8 servings):
Calories 106 (58% from fat) • carb. 4g • pro. 7g • fat 7g • sat. fat 2g
chol. 22mg • sod. 270mg • calc. 127mg • fiber 2g
Naan Pizza Crust
The main difference between traditional pizza dough
and naan is that naan includes dairy, resulting in a crust
with a much softer texture.
Makes dough for 2 pizzas
½ cup water, room temperature
1. Put the water into the bowl of a stand mixer.
2. Attach the dough hook to the mixer. Add the flour, yeast, sugar,
sour cream or yogurt, olive oil, and salt to the bowl. Mix on low
to combine the ingredients, then increase the speed to medium
and knead until smooth, about 5 minutes. The dough should be
soft and spring back to the touch.
3. Cover the bowl and let dough rise in a warm, draft-free place
until doubled in volume, 1 to 1½ hours. Line a large rimmed
baking sheet with parchment paper.

18
4. Transfer the dough to a lightly floured surface and punch
down. Divide the dough into 2 equal pieces. Roll each piece
into a ball and place on the parchment-lined baking sheet.
Cover with plastic wrap and let rise until doubled in size,
about 45 minutes.
5. Preheat the pizza oven with the pizza stone on the rack to 500°F.
6. On a lightly floured surface, flatten each ball into a 12-inch
the preheated pizza oven until crust is golden and crispy,
about 5 minutes.
*If using instant yeast, prepare as written. If using active dry
yeast, it must be proofed in warm (105°F-110°F) water first.
Sprinkle the yeast, into the warm water, along with a pinch of
the sugar, and once it gets foamy, it is ready to use. All other
dry ingredients can be mixed as written above.
Nutritional information per serving (based on 16 servings):
Calories 117 (26% from fat) • carb. 17g • pro. 4g • fat 3g • sat. fat 1g
chol. 2mg • sod. 153mg • calc. 4mg • fiber 1g
Simple Pizza Sauce
This no-cook sauce comes together in seconds
with a food processor.
1. Put the tomatoes and all juices, olive oil, garlic, basil, and
salt in the work bowl of a food processor fitted with a metal
chopping blade. Process until smooth, about 1 minute.
2. Use immediately or store in an airtight container in the
refrigerator for about a week.
Calories 41 (61% from fat) • carb. 5g • pro. 1g • fat 2g • sat. fat 0g
chol. 0mg • sod. 557mg • calc. 28mg • fiber 1g
Basil Pesto
Pesto is an alternative yet delicious pizza topping, especially when
paired with fresh garden tomatoes for the ultimate taste of summer.

19
1. Insert the chopping blade in the work bowl of a food processor.
With the machine running, drop the Parmesan and garlic
through the feed tube to finely chop.
2. Add the pine nuts and pulse 5 to 6 times to chop. Add the
basil and salt, and pulse 10 to 12 times to chop. Scrape the
work bowl.
3. With the machine running, add the olive oil in a steady stream
through the feed tube. Process until combined.
4. Transfer the pesto to a glass jar or airtight container; tap to
remove air bubbles and even out the surface. Cover the surface
directly with plastic wrap and refrigerate. The pesto will keep for
5 days in the refrigerator, or it may be frozen for up to 2 months.
Nutritional information per serving (2 tablespoons):
Calories 120 (90% from fat) • carb. 1g • pro. 2g • fat 13g • sat. fat 2g
chol. 3mg • sod. 121mg • calc. 74mg • fiber 0g
Spring Pea Pesto
This pesto is somewhat thick, making it perfect for a pizza topping.
To use it as a pasta sauce, thin it with a little water.
Makes 1¾ cups
1. Insert the chopping blade in the work bowl of a food processor.
With the unit running, drop the garlic through the feed tube
and process until finely chopped. Add the cheese and pulse 4
to 5 times to roughly chop, and then process until finely grated.
2. Add the peas, basil, pine nuts, lemon zest, salt, and pepper.
Pulse to roughly chop. Scrape down the sides of the bowl. With
the machine running, add the olive oil in a slow, steady stream
through the feed tube, processing until combined, about 1
minute.
3. Scrape down the sides of the work bowl. Process a bit of water
into the mixture for a thinner pesto.
4. Transfer to a glass jar or airtight container; tap to remove air
bubbles and even out the surface. Cover the surface directly
with plastic wrap and refrigerate. The pesto will keep for 5 days
in the refrigerator, or it may be frozen for up to 2 months.
Nutritional information per serving (2 tablespoons):
Calories 77 (74% from fat) • carb. 3g • pro. 2g • fat 6g • sat. fat 1g
chol. 2mg • sod. 135mg • calc. 1mg • fiber 1g
Pistachio-Arugula Pesto
Ready in under 5 minutes, this versatile pesto is delicious baked
on a pizza, spread on a sandwich, or tossed on pasta.
Makes about 2 cups

20
1. Insert the chopping blade in the work bowl of a food processor.
Add the cheese, nuts, and garlic, and process on High until
roughly chopped, about 10 seconds.
2. Add the arugula, lemon juice, lemon zest, salt, and pepper;
pulse 10 to 15 times to chop. With the machine running, add
the olive oil in a slow, steady stream through the feed tube,
processing to combine and form an emulsion, about 1 minute.
Scrape down the sides of the work bowl. For a thinner pesto,
process with additional oil or water.
3. Transfer the pesto to a glass jar or airtight container; tap to
remove air bubbles and even out the surface. Cover the surface
directly with plastic wrap and refrigerate. The pesto will keep for
5 days in the refrigerator, or it may be frozen for up to 2 months.
Nutritional information per serving (1 tablespoon):
Calories 25 (84% from fat) • carb. 0g • pro. 1g • fat 2g • sat. fat 0g
chol. 1mg • sod. 56mg • calc. 14mg • fiber 0g
Margherita Pizza
So simple yet so delicious—this pizza is a classic for a reason!
Makes one pizza
1. Preheat the pizza oven with the pizza stone on the rack
to 700°F.
2. Stretch the pizza dough out to a 10- to 12-inch round.
3. Transfer the dough to the pizza peel generously dusted
with flour.
4. Spread the sauce evenly around the center of the dough,
leaving a 1-inch border.
5. Scatter the mozzarella over the sauce.
6. Gently shimmy pizza on peel to make sure it’s not sticking.
If the dough sticks anywhere, gently lift the dough and spread
additional flour underneath.
7. Set the timer for 5 minutes. Slide the pizza off the peel and
onto the pizza stone. Start the timer.
8. When the timer sounds, check the pizza. If baked to desired
doneness, use the peel to remove the pizza from the oven,
or bake for about 1 more minute. Slide the pizza onto a cutting
board. Garnish with the Parmesan, basil, and olive oil.
Slice and serve.
Nutritional information per serving (based on 8 servings):
calories 166 (15% from fat) • carb. 29g • pro. 7g • fat 3g • sat. fat 1g
chol. 9mg • sod. 510mg • calc. 62mg • fiber 1g
Four-Cheese Pizza with Roasted Tomatoes
Perfect for every cheese lover!
Makes one pizza

21
1. Preheat the pizza oven with the pizza stone on the rack to 700°F.
2. Heat the oil in a medium skillet over medium-high heat. Add
the tomatoes and cook, shimmying them around the pan, until
they blister and the skins begin to burst. Remove the pan from
the heat and set aside.
3. Stretch the pizza dough out to a 10- to 12-inch round.
4. Transfer the dough to the pizza peel generously dusted
with flour.
5. Spread the ricotta evenly around the center of the pizza dough,
leaving a 1-inch border.
6. Sprinkle the mozzarella and fontina over the ricotta, followed
by the tomatoes.
7. Gently shimmy the pizza on the peel to ensure it isn’t sticking.
If the dough is sticking, gently lift the dough and spread
additional flour underneath.
8. Set the timer for 5 minutes. Slide the pizza off the peel and
onto the pizza stone. Start the timer.
9. When the timer sounds, check the pizza. If baked to desired
doneness, use the peel to remove the pizza from the oven, or
bake for about 1 more minute. Slide the pizza onto a cutting
board. Garnish with the Parmesan and oregano. Slice and serve.
Nutritional information per serving (based on 8 servings):
Calories 147 (37% from fat) • carb. 18g • pro. 5g • fat 6g • sat. fat 2g
chol. 70mg • sod. 250mg • calc. 65mg • fiber 1g
Pistachio-Arugula Pesto, Prosciutto,
and Burrata Pizza
Slightly upscale but incredibly simple. Bring the pizzeria home
with this flavorful pie.
Makes one pizza
2 slices prosciutto
1. Preheat the pizza oven with the pizza stone on the rack
to 700°F.
2. Stretch the pizza dough out to a 10- to 12-inch round.
3. Transfer the dough to the pizza peel generously dusted with flour.
4. Spread the pesto evenly around the center of the pizza dough,
leaving a 1-inch border.
5. Gently shimmy the pizza on the peel to ensure it isn’t sticking.
If the dough is sticking, gently lift the dough and spread
additional flour underneath.
6. Set the timer for 5 minutes. Slide the pizza off the peel and
onto the pizza stone. Start the timer.

22
7. When the timer sounds, check the pizza. If baked to desired
doneness, use the peel to remove the pizza from the oven, or
bake for about 1 more minute. Slide the pizza onto a cutting
board. Top with the arugula. Tear the burrata and place the
pieces over the arugula, followed by the prosciutto. Garnish
with the honey, olive oil, flaky sea salt, and black pepper. Slice
and serve.
Nutritional information per serving (based on 8 servings):
Calories 91 (45% from fat) • carb. 12g • pro. 5g • fat 6g • sat. fat 2g
chol. 10mg • sod. 326mg • calc. 17mg • fiber 1g
White Pizza with Sausage, Broccoli Rabe,
and Cherry Peppers
Broccoli rabe and sausage pair perfectly
on this veggie-forward pizza.
Makes one pizza
½ lemon
1. Preheat the pizza oven with the pizza stone on the rack to 700°F.
2. Stretch the pizza dough out to a 10- to 12-inch round.
3. Transfer the dough to the pizza peel generously dusted with flour.
4. Spread the ricotta evenly around the center of the dough,
leaving a 1-inch border.
5. Sprinkle the mozzarella over the ricotta, followed by the
sausage, cherry peppers, and broccoli rabe.
6. Gently shimmy the pizza on the peel to ensure it isn’t sticking.
If the dough is sticking, gently lift the dough and spread
additional flour underneath.
7. Set the timer for 5 minutes. Slide the pizza off the peel and
onto the pizza stone. Start the timer.
8. When the timer sounds, check the pizza. If baked to desired
doneness, use the peel to remove the pizza from the oven,
or bake for about 1 more minute. Slide the pizza onto a cutting
board. Squeeze the lemon over the pizza. Garnish with crushed
red pepper, olive oil, and flaky sea salt. Slice and serve.
Nutritional information per serving (based on 8 servings):
Calories 163 (37% from fat) • carb. 18g • pro. 7g • fat 7g • sat. fat 2g
chol. 15mg • sod. 385mg • calc. 66mg • fiber 1g
Apple, Bacon, Red Onion,
and Blue Cheese Pizza
Unpeeled red apple adds a pop of color to this pizza and sweetness
to contrast the sharp blue cheese and salty bacon.
Makes one pizza

23
1. Preheat the pizza oven with the pizza stone on the rack to
700°F.
2. Stretch the pizza dough to a 10- to 12-inch round.
3. Transfer the dough to the pizza peel generously dusted with flour.
4. Scatter the onion over the dough, followed with the apple, blue
cheese, and then the bacon.
5. Gently shimmy the pizza on the peel to ensure it isn’t sticking.
If the dough is sticking, gently lift the dough and spread
additional flour underneath.
6. Set the timer for 5 minutes. Slide the pizza off the peel and
onto the pizza stone. Start the timer.
7. When the timer sounds, check the pizza. If baked to desired
doneness, use the peel to remove the pizza from the oven, or
bake for 1 to 2 more minutes. Slide the pizza onto a cutting
board. Slice and serve.
Nutritional information per serving (based on 8 servings):
Calories 114 (23% from fat) • carb. 18g • pro. 4g • fat 3g • sat. fat 1g
chol. 4mg • sod. 256mg • calc. 24mg • fiber 1g
Spring Pea Pesto Pizza
The bright green and white colors of this pizza just shout springtime.
The egg adds a pleasant jammy touch to the finished pie.
Makes one pizza
¼ cup ricotta
1. Preheat the pizza oven with the pizza stone on the rack to 700°F.
2. Stretch the pizza dough out to a 10- to 12-inch round.
3. Transfer the dough to the pizza peel generously dusted with
flour.
4. Spread the pesto over the dough, leaving a 1-inch border.
Dollop the ricotta over the pesto and the sprinkle with the
Pecorino.
5. Gently shimmy the pizza on the peel to ensure it isn’t sticking.
If the dough is sticking, gently lift the dough and spread
additional flour underneath.
6. Set the timer for 3 minutes. Slide the pizza off the peel
and onto the pizza stone. Start the timer.
7. When the timer sounds, carefully pull the pizza out a little
and put the raw egg in the center. Carefully slide the pizza back
into the oven and close the door. Bake for 1 to 2 more minutes,
or until the egg white is fully cooked. Add more time if you
prefer a darker or more firmly cooked egg.
8. Use the peel to remove the pizza from the oven, and then top
with the pea shoots.
9. Transfer to a cutting board. Slice and serve.
Nutritional information per serving (based on 8 servings):
Calories 137 (32% from fat) • carb. 18g • pro. 5g • fat 5g • sat. fat 2g
chol. 29mg • sod. 247mg • calc. 20mg • fiber 1g

24
Spicy Hawaiian Pizza
The sweet and salty combination of pineapple and chorizo makes
this play on the Hawaiian pizza one that even the naysayers out
there can’t resist. Extra chorizo can be wrapped well and frozen
for up to 6 months.
Makes one pizza
*Note:
1. Preheat the pizza oven with the pizza stone on the rack
to 650°F.
2. Stretch the pizza dough to a 10- to 12-inch round.
3. Transfer the dough to the pizza peel generously dusted
with flour.
4. Spread the sauce over the dough, leaving a 1-inch border, then
sprinkle with the cheese. Finish with the pineapple and chorizo
slices.
5. Gently shimmy the pizza on the peel to ensure it isn’t sticking.
If the dough is sticking, gently lift the dough and spread
additional flour underneath.
6. Set the timer for 5 minutes. Slide the pizza off the peel
and onto the pizza stone. Start the timer.
7. When the timer sounds, check the pizza. If baked to desired
doneness, use the peel to remove the pizza from the oven,
or bake for 1 to 2 more minutes. Slide the pizza onto a cutting
board. Let cool a few minutes, and then slice and serve.
Nutritional information per serving (based on 8 servings):
Calories 177 (18% from fat)
carb. 29g • pro. 7g • fat 4g • sat. fat 1g • chol. 29mg • sod. 468mg
calc. 21mg • fiber 1g
New Haven-Style White Clam Pizza
This Connecticut classic is a favorite among seafood lovers.
Makes one pizza
1. Preheat the pizza oven with the pizza stone on the rack to 700°F.
2. Toss the clams with olive oil, garlic, oregano, salt, and pepper.
3. Stretch the pizza dough to a 10- to 12-inch round.
4. Transfer the dough to the pizza peel generously dusted with flour.

25
5. Sprinkle the Parmesan over the dough, followed with the
clam mixture.
6. Gently shimmy the pizza on the peel to ensure it isn’t sticking.
If the dough is sticking, gently lift the dough and spread
additional flour underneath.
7. Set the timer for 5 minutes. Slide the pizza off the peel and
onto the pizza stone. Start the timer.
8. When the timer sounds, check the pizza. If baked to desired
doneness, use the peel to remove the pizza from the oven, or
bake for 1 to 2 more minutes. Slide the pizza onto a cutting
board, and then top with the parsley, lemon zest, and crushed
red pepper. Slice and serve.
Nutritional information per serving (based on 8 servings):
Calories 155 (35% from fat) • carb. 18g • pro. 7g • fat 6g • sat. fat 1g
chol. 11mg • sod. 427mg • calc. 22mg • fiber 1g
Mexican Street Corn Pizza
This pizza is extra delicious in the summer
when fresh corn is sweetest.
Makes one pizza
¼ cup sour cream
1. Preheat the pizza oven with the pizza stone on the rack
to 700°F.
2. In a small bowl, combine the sour cream, lime juice, and salt.
Set aside.
3. Stretch the pizza dough to a 10- to 12-inch round.
4. Transfer the dough to the pizza peel generously dusted with flour.
5. Scatter the Oaxaca cheese over the dough. Top with the corn
and poblanos.
6. Gently shimmy the pizza on the peel to ensure it isn’t sticking.
If the dough is sticking, gently lift the dough and spread
additional flour underneath.
7. Set the timer for 5 minutes. Slide the pizza off the peel
and onto the pizza stone. Start the timer. When the timer
sounds, check the pizza. If baked to desired doneness, use the
peel to remove the pizza from the oven, or bake for about 1
more minute. Slide the pizza onto a cutting board.
8. Drizzle the lime-sour cream crema to taste over the pizza.
Garnish with the cotija, chile powder, cilantro, flaky sea salt,
and pepper. Slice and serve.
Nutritional information per serving (based on 8 servings):
Calories 193 (33% from fat) • carb. 25g • pro. 8g • fat 7g • sat. fat 4g
chol. 17mg • sod. 588mg • calc. 11mg • fiber 1g

26
Naan Pizza with Spicy Lamb,
Feta, and Herbs
We recommend making this pizza using our Naan Pizza Crust,
but it is just as delicious using traditional pizza dough.
Makes one pizza
1. Preheat the pizza oven with the pizza stone on the rack to 500°F.
2. In a large bowl, combine ground lamb, cinnamon, paprika, onion
powder, garlic powder, cumin, salt, harissa, and ketchup.
3. Heat the oil in a medium skillet over medium-high heat. Add
the lamb mixture and cook until the meat is no longer pink.
Remove the pan from the heat and set aside.
4. Stretch the dough to a 10- to 12-inch round round.
5. Transfer the dough to the pizza peel generously dusted with flour.
6. Spread the cooked lamb over the dough, leaving a 1-inch
border. Scatter the onion over the lamb.
7. Gently shimmy the pizza on the peel to ensure it isn’t sticking.
If the dough is sticking, gently lift the dough and spread
additional flour underneath.
8. Set the timer for 5 minutes. Slide the pizza off the peel and
onto the pizza stone. Start the timer. When the timer sounds,
check the pizza. If baked to desired doneness, use the peel
to remove the pizza from the oven, or bake for about 1 more
minute. Slide the pizza onto a cutting board.
9. Garnish with the feta, parsley, and mint. Slice and serve.
Nutritional information per serving (based on 8 servings):
Calories 226 (49% from fat) • carb. 19g • pro. 9g • fat 12g • sat. fat 4g
chol. 26mg • sod. 398mg • calc. 33mg • fiber 1g
Potato, Sausage, and Rosemary Pizza
Potatoes are a popular Roman pizza topping that results in a simple
yet delicious meal. Try this pie with a cracked egg on top
for a breakfast pizza!
Makes one pizza

27
1. Preheat the pizza oven with the pizza stone on the rack
to 700°F.
2. Stretch the pizza dough to a 10- to 12-inch round.
3. Transfer the dough to the pizza peel generously dusted with flour.
4. Scatter half of the fontina over the dough.
5. Lay the potato slices over the fontina, covering the first layer of
cheese. Brush the potatoes with the olive oil, then season with
the kosher salt.
6. Scatter the remaining cheese and then the sausage over the
potatoes. Sprinkle with the rosemary.
7. Gently shimmy the pizza on the peel to ensure it isn’t sticking.
If the dough is sticking, gently lift the dough and spread
additional flour underneath.
8. Set the timer for 5 minutes. Slide the pizza off the peel and
onto the pizza stone. Start the timer. When the timer sounds,
check the pizza. If baked to desired doneness, use the peel
to remove the pizza from the oven, or bake for about 1 more
minute. Slide the pizza onto a cutting board. Garnish with the
Parmesan, crushed red pepper, extra-virgin olive oil, flaky sea
salt, and black pepper. Slice and serve.
Nutritional information per serving (based on 8 servings):
Calories 183 (37% from fat) • carb. 21g • pro. 7g • fat 7g • sat. fat 3g
chol. 20mg • sod. 455mg • calc. 82mg • fiber 1g
Short Rib, Caramelized Onion,
and Smoked Gouda Pizza
Braised short ribs are the star of this delectable pizza.
Makes one pizza
1. Heat 2 teaspoons of the vegetable oil in a Dutch oven over
medium-high heat. Season the ribs with the salt and pepper.
Add the ribs and garlic to the Dutch oven, making sure that the
exposed garlic cloves sear on the bottom of the pan. Brown the
ribs on all sides. Add the stock, rosemary, and thyme to the
Dutch oven and bring to a boil. Reduce to a simmer and cook,
partially covered, over low heat until tender and starting to fall
off the bone, 2½ to 3 hours. Let cool completely, then shred
the short ribs and set aside.
2. Heat the remaining oil in a medium skillet over medium heat.
Add the onions and sauté for 10 minutes, stirring occasionally.
Reduce the heat to medium-low and cook for an additional 20

28
to 25 minutes, until the onions are browned and caramelized.
Remove the pan from the heat and set aside.
3. Preheat the pizza oven with the pizza stone on the rack
to 700°F.
4. Stretch the pizza dough to a 10- to 12-inch round.
5. Transfer the dough to the pizza peel generously dusted with flour.
6. Spread the pizza sauce evenly around the center of the dough,
leaving a 1-inch border.
7. Scatter the Gouda over the sauce, followed by the shredded
ribs and caramelized onions.
8. Gently shimmy the pizza on the peel to ensure it isn’t sticking.
If the dough is sticking, gently lift the dough and spread
additional flour underneath.
9. Set the timer for 5 minutes. Slide the pizza off the peel and
onto the pizza stone. Start the timer.
10. When the timer sounds, check the pizza. If baked to desired
doneness, use the peel to remove the pizza from the oven, or
bake for about 1 more minute. Slide the pizza onto a cutting
board. Garnish with the scallions. Slice and serve.
Nutritional information per serving (based on 8 servings):
Calories 274 (54% from fat) • carb. 20g • pro. 11g • fat 16g • sat. fat 6g
chol. 35mg • sod. 288mg • calc. 64mg • fiber 2g
Cauliflower Pizza with Brussels Sprouts,
Bacon, and Shaved Parmesan
Salty bacon, sweet and tangy balsamic Brussels sprouts,
and creamy cheese come together in this tasty pizza. Use a food
processor or mandoline for thin Brussels sprouts slices.
Makes 1 pan pizza
1. Preheat the pizza oven with the pizza stone on the rack to 500°F.
2. In a medium bowl, whisk together the balsamic vinegar, oil,
honey, and salt. Toss the Brussels sprouts in the balsamic
mixture and set aside.
3. Scatter the Cheddar over the cauliflower crust, followed by the
Brussels sprouts and the bacon.
4. Set the timer for 5 minutes. Slide the deep dish pan onto the
pizza stone. Start the timer.
5. When the timer sounds, check the pizza. If baked to desired
doneness, remove the pan from the oven, or bake for about 1
more minute. Let cool for 2 minutes on a cooling rack and then
remove from the pan.

29
6. Garnish with the Parmesan, chives, flaky sea salt, and black
pepper before slicing and serving.
Nutritional information per serving (based on 8 servings):
Calories 186 (62% from fat) • carb. 6g • pro. 11g • fat 13g • sat. fat 5g
chol. 36mg • sod. 535mg • calc. 255mg • fiber 2g
Rosemary Focaccia
Fresh focaccia is a real treat. Serve it warm with a dish
of your best olive oil for dipping.
Makes one pan of focaccia
1. Follow the process for preparing the focaccia dough. Once
sufficiently rested, proceed with the following steps.
2. Coat the interior of the deep dish pan with 2 tablespoons of
the olive oil.
3. Transfer the dough to the oiled pan and turn it over a few
times so that it is fully coated with the olive oil.
4. Using your fingertips, make indentations in the dough without
fully pushing through, being sure to cover the entire surface.
While making the indentations, gently press the dough toward
the sides of the pan (do not force it—it will eventually spread).
5. Cover the pan and allow to rest for 20 minutes. After resting,
uncover and repeat the process, focusing on the spreading of
the dough to the edges of the pan. Cover and rest for 20 more
minutes. Repeat this process until the dough easily covers the
bottom of the pan. This process can take up to 3 rounds (60
minutes total).
6. Brush the dough with the remaining 2 tablespoons olive oil, and
then sprinkle with the rosemary and salt.
7. Cover loosely with plastic wrap and let rise while the pizza
oven is preheating.
8. Preheat the pizza oven with the pizza stone on the rack to 500°F.
9. When the oven is preheated, set the timer for 10 minutes. Uncover
the pan and slide into the hot oven. Start the timer. Bake until
evenly golden brown. When the timer sounds, check the focaccia.
If it needs more time to reach golden brown, rotate the pan and
slide it back in the oven for up to 5 more minutes.
10. Transfer the pan to a heat-safe rack or trivet. Allow the
focaccia to cool slightly, then remove from the pan. Slice
and serve.
Nutritional information per serving (based on 8 servings):
Calories 199 (36% from fat) • carb. 28g • pro. 4g • fat 8g • sat. fat 1g
chol. 0mg • sod. 819mg • calc. 2mg • fiber 1g

30
Detroit Classic Pepperoni Pie
Thick-crust Detroit-style pizza is notable for its use of cubed
cheese rather than shredded.
Makes one pan pizza
1. Coat the interior of the deep dish pan with the olive oil.
2. Transfer the dough to the oiled pan and turn the dough over a
few times so that it is fully coated with the olive oil.
3. Using your fingertips, make indentations in the dough without
fully pushing through, being sure to cover the entire surface.
While making the indentations, gently press the dough toward
the sides of the pan (do not force it—it will eventually spread).
4. Cover the pan and allow to rest for 20 minutes. After resting,
uncover and repeat the process, focusing on the spreading of
the dough to the edges of the pan. Cover and rest for 20 more
minutes. Repeat this process until the dough easily covers the
bottom of the pan. This process can take up to 3 rounds (60
minutes total).
5. When the dough is ready, spread ½ cup of the sauce over it and
then scatter the cubed cheese on top. Press the cheese gently
into the dough without pressing it through to the bottom.
6. Cover the pan loosely with plastic wrap and let the dough rise
while the pizza oven is preheating.
7. Preheat the pizza oven with the pizza stone on the rack to 550°F.
8. Once the oven is preheated, uncover the pan, top with the
remaining sauce, either in traditional Detroit-style stripes or
spread evenly over the dough. Set the timer for 14 minutes.
Slide the pan into the oven. Start the timer and bake until
the pizza is evenly brown in color. Carefully pull the deep dish
pan out a bit, and top evenly with the pepperoni slices. Return
to the oven and cook for another 2 to 3 minutes, or until the
pepperoni is curled at the edges, but not too brown, and the
edges of the pizza are crispy and dark.
9. Remove from the oven and sprinkle the top with a pinch of
salt. Allow to cool for a minute in the deep dish pan before
transferring to a cutting board. Slice and serve.
Nutritional information per serving (based on 8 servings):
Calories 368 (45% from fat) • carb. 38g • pro. 13g • fat 18g • sat. fat 8g
chol. 31mg • sod. 777mg • calc. 194mg • fiber 2g
Sicilian Meatball Pie
This hearty deep-dish pie will please meatball fans who
also love a great pizza.
Makes one pan pizza
¼ cup ricotta
1. Coat the interior of the deep dish pan with the olive oil.
2. Transfer the dough to the oiled pan and turn the dough over
a few times so that it is fully coated with the olive oil.
3. Using your fingertips, make indentations in the dough without
fully pushing through, being sure to cover the entire surface.

31
While making the indentations, gently press the dough toward
the sides of the pan (do not force it—it will eventually spread).
4. Cover the pan and allow to rest for 20 minutes. After resting,
uncover and repeat the process, focusing on the spreading
of the dough to the edges of the pan. Cover and rest for 20
more minutes. Repeat this process until the dough easily covers
the bottom of the pan. This process can take up to 3 rounds
(60 minutes total).
5. When the dough is ready, preheat the pizza oven with the
pizza stone on the rack to 500°F. Set the timer for 5 minutes.
Uncover the pan and slide into the oven. Start the timer. After 5
minutes, slide the pan out of the oven and cover the parbaked
crust with the sauce, and then scatter the mozzarella over the
sauce. Dollop with the ricotta, and then put the meatball slices
on top.
6. Set the timer for 10 minutes. Return the pizza to the oven.
Start the timer. Cook until the edges are nicely browned and
crispy and the cheese is bubbling.
7. Remove from the oven and allow to cool for a minute in the
deep dish pan before transferring to a cutting board. Slice
and serve.
Nutritional information per serving (based on 8 servings):
Calories 270 (39% from fat) • carb. 32g • pro. 11g • fat 12g • sat. fat 4g
chol. 19mg • sod. 1015mg • calc. 133mg • fiber 1g
Broccoli Calzones
Filled with broccoli and cheese, these calzones are a great family-
friendly dinner, quickly baked in the Cuisinart
®
Indoor Pizza Oven.
Makes 4 calzones
1. Divide the dough into 4 equal pieces, and shape into smooth
rounds. Place on a lightly floured surface, and cover with
plastic wrap or a damp towel while preparing the filling and
preheating the oven.
2. Preheat the pizza oven with the pizza stone on the rack
to 500°F.
3. While the oven is preheating, prepare the filling. In a small
bowl, combine the broccoli, cutting into smaller pieces if the
florets are especially large, with the chopped garlic.
4. In a separate medium mixing bowl, combine the ricotta,
Parmesan, mozzarella, and black pepper. Stir well to combine.
5. Once the oven is almost fully heated, assemble the calzones.
6. Stretch the pizza dough into 8-inch rounds. Divide the ricotta
mixture evenly among the four pieces of dough, spreading to
cover one-half of each piece of dough, then top the cheese

32
with an even amount of the broccoli-garlic mixture. Brush the
outer edges of the dough with water and pull the top half over
to cover the filling. Using your fingers or a fork, press or crimp
to seal the calzones.
7. Brush the calzones with olive oil.
8. Once the oven is preheated, set the timer for 15 minutes. Using the
pizza peel, carefully transfer two of the calzones onto the pizza
stone. Start the timer. Bake until evenly browned. Transfer the
calzones to a cooling rack. Repeat with the two remaining calzones.
9. Allow to cool for a few minutes before serving.
*If New York-Style Pizza Dough is being used for calzones
as opposed to pizza, it can have a short rest time in the
refrigerator. Four hours is sufficient for calzones.
Calories 168 (33% from fat) • carb. 20g • pro. 9g • fat 6g • sat. fat 3g
chol. 18mg • sod. 309mg • calc. 109mg • fiber 1g
Chicken Parmesan Calzones
What’s better than chicken Parm? Chicken Parm
in a delicious pizza-dough crust.
Makes 4 calzones
1. Divide the dough into 4 equal pieces, and shape into smooth
rounds. Place on a lightly floured surface, and cover with
plastic wrap or a damp towel while preparing the filling and
preheating the oven.
2. Preheat the pizza oven with the pizza stone on the rack to 500°F.
3. While the oven is preheating, prepare the filling.
4. In a medium mixing bowl, combine the ricotta, Parmesan,
mozzarella, and black pepper. Stir well to fully combine.
5. Slice the chicken into ¼-inch-wide strips, no longer than 2
inches in length.
6. Once the oven is almost fully heated, assemble the calzones.
7. Stretch the dough into 8-inch rounds. Divide the ricotta mixture
evenly among the four pieces of dough, spreading to cover
one-half of each piece of dough. Divide the chicken evenly
among the dough rounds, placing it on the cheese, then top
the chicken in each calzone with 2 tablespoons of pizza sauce.
Brush the outer edges of the dough with water and pull the top
half over to cover the filling. Using your fingers or a fork, press
or crimp to seal the calzones.
8. Brush the calzones with olive oil.
9. Once the oven is preheated, set the timer for 15 minutes. Using
the pizza peel, carefully transfer two of the calzones onto the
pizza stone. Start the timer. Bake until evenly browned. Transfer
to a cooling rack. Repeat with the remaining calzones.
10. Allow to cool for a few minutes before serving.
*If the New York-Style Pizza Dough is being used for calzones
as opposed to pizza, it can have a short rest time in the
refrigerator. Four hours is sufficient for calzones
Calories 220 (32% from fat) • carb. 24g • pro. 14g • fat 8g • sat. fat 4g
chol. 46mg • sod. 442mg • calc. 109mg • fiber 1g

33
Chocolate Hazelnut Pizza with Strawberries
Pizza for dessert? Why yes, this dessert pie is a favorite for all ages.
Makes one pizza
1. Preheat the pizza oven with the pizza stone on the rack
to 600°F.
2. Stretch or roll (if thin and crispy) the pizza dough to a
12-inch round.
3. Transfer the dough to the pizza peel dusted with flour.
4. Spread the dough with the chocolate hazelnut spread, leaving
a 1-inch border, and then top evenly with the marshmallows.
5. Gently shimmy the pizza on the peel to ensure it isn’t sticking.
If the dough is sticking, gently lift the dough and spread
additional flour underneath.
6. Set the timer for 4 minutes. Slide the pizza off the peel and
onto the pizza stone. Start the timer.
7. Check the pizza as it bakes. Pizza is ready when crust is golden
and the marshmallows are melted. Use the peel to remove the
pizza from the oven, or bake for 1 to 2 more minutes to desired
doneness. Slide the pizza onto a cutting board.
8. Scatter the strawberries evenly over the pizza. Slice and serve
immediately.
Nutritional information per serving (based on 12 servings):
Calories 101 (32% from fat) • carb. 15g • pro. 2g • fat 4g • sat. fat 1g
• chol. 0mg • sod. 102mg • calc. 9mg • fiber 1g
Apple Galette
For flaky, perfectly cooked pie dough, look no further
than the Cuisinart
®
Indoor Pizza Oven. Any fruit could work
in this simple galette, so substitute your favorite!
Makes 12 servings
1. Preheat the pizza oven with the pizza stone on the rack to 400°F.
2. While the oven is preheating, put the jam and water in a small
saucepan. Heat over low heat, stirring until smooth. Reserve.
3. Toss the apple slices with the sugar, starch, cinnamon, salt,
and lemon juice.
4. Roll out the pie dough to a large circle about ¼ inch thick.
Gently center in the middle of the deep dish pan.
5. Brush half of the jam in the center of the dough, leaving a
2-inch border.
6. Fan the apples decoratively over the jam, overlapping as
necessary. Fold the border of the dough toward the center,
pleating the dough as you fold to create a rustic border.
7. Set the timer for 25 minutes. Slide the pan onto the pizza
stone. Start the timer. Galette is ready when the dough is

34
golden and the apples yield to a knife tip when pierced.
When finished, transfer the pan to a cooling rack or trivet.
8. Brush the remaining jam on the apples. Allow to cool slightly
before slicing and serving.
Nutritional information per serving:
Calories 133 (63% from fat) • carb. 9g • pro. 4g • fat 1g • sat. fat 2g
chol. 19mg • sod. 242mg • calc. 77mg • fiber 2g

3535
Notes:

©2023 Cuisinart
Glendale, AZ 85307
Printed in China
23CE087218
IB-17963

Horno de pizza
CPZ-120
Para su seguridad y para disfrutar plenamente de este producto, siempre lea atentamente las instrucciones antes del uso.
Manual de
Instrucciones
& Recetas

2
MEDIDAS DE SEGURIDAD
IMPORTANTES
Al usar aparatos eléctricos, especialmente en presencia de niños, siempre se deben
tomar precauciones básicas de seguridad, entre ellas las siguientes:
1. Lea todas las instrucciones.
2. DESENCHUFE EL APARATO CUANDO NO ESTÉ EN USO Y ANTES DE
LIMPIARLO. Deje que se enfríe antes de limpiarlo, manipularlo o
instalar/quitar piezas.
3. No toque las superficies calientes; use los mangos/asas/agarraderas o los
botones/perillas/diales.
4. Para reducir el riesgo de descarga eléctrica, no sumerja ninguna parte del
aparato en agua u otros líquidos. Véase las instrucciones de limpieza.
5. Este aparato no debe ser usado por o cerca de niños o personas con ciertas
discapacidades.
6. No use este aparato si el cable o el enchufe están, después de un mal
funcionamiento, después de una caída/caída en agua, o si está dañado;
devuélvalo a un centro de servicio autorizado o al lugar de compra para su
revisión, reparación o ajuste.
7. El uso de accesorios no recomendados por Cuisinart puede causar
lesiones personales.
8. No lo use en exteriores.
9. No deje que el cable cuelgue de la encimera o de la mesa donde niños o animales lo
puedan jalar o tropezar, ni que tenga contacto con superficies calientes.
10. No coloque el aparato sobre o cerca de un quemador a gas o de un hornillo
eléctrico caliente, ni en un horno caliente.
11. Tenga sumo cuidado al mover un aparato que contenga aceite u otros
líquidos calientes.
12. Solo use este aparato para el uso previsto.
13. Tenga sumo cuidado al usar fuentes que no sean de metal en el horno.
14. Para evitar las quemaduras, tenga sumo cuidado al introducir/retirar los
accesorios o los alimentos en/del horno.
15. Desenchufe el aparato cuando no esté en uso. Almacene solamente los
accesorios resistentes al calor recomendados por el fabricante en el horno.
16. No coloque papel, cartón, plástico o materiales similares en el horno.
17. No cubra la bandeja recogemigas ni ninguna parte del horno con papel de
aluminio; esto puede provocar un sobrecalentamiento.
18. No coloque alimentos, envoltorios de aluminio ni bandejas muy grandes en el
horno; esto presenta un riesgo de incendio o descarga eléctrica.
19. Puede ocurrir un incendio si el aparato está cubierto, toca o se encuentra cerca
de materiales inflamables tales como cortinas, colgaduras o paredes. No
coloque ningún artículo sobre el aparato durante el funcionamiento. No haga
funcionar el aparato debajo de un armario/gabinete.
20. No use estropajos metálicos para limpiar el aparato; partículas de metal
podrían depositarse en sus componentes eléctricos, presentando un riesgo
de descarga eléctrica.
21. Los niños o las personas que carezcan de la experiencia o de los conocimientos
necesarios para manipular el aparato, o aquellas cuyas capacidades físicas,
sensoriales o mentales estén limitadas, no deben usar el aparato sin la
supervisión o la dirección de una persona responsable por su seguridad.
22. No deje que los niños jueguen con este aparato.
23. Para su seguridad, si el cable está dañado, debe ser sustituido por el fabricante,
un técnico autorizado u otra persona calificada.
24.
Este símbolo significa que la superficie del aparato se pone muy caliente;
tenga cuidado al tocarla.
25. Este aparato no ha sido diseñado para ser puesto en marcha mediante un
temporizador o control remoto independiente.

3
GUARDE ESTAS INSTRUCCIONES
USO DE ALARGADORES
El cable provisto con este aparato es corto, para reducir el peligro de que alguien se
enganche o tropiece con un cable más largo. Puede usarse un cable alargador/de
extensión, pero con cuidado. La clasificación nominal del cable alargador/de
extensión debe ser por lo menos igual a la del aparato. El cable más largo debe ser
acomodado de tal manera que no cuelgue de la encimera/mesa, donde puede ser
jalado por niños o causar tropiezos.
AVISO: El cable de este aparato cuenta con un enchufe polarizado (una pata es más
ancha que la otra). Como medida de seguridad, se podrá enchufar de una sola
manera en la toma de corriente polarizada. Si no entra en la toma de corriente,
inviértalo. Si aun así no entra completamente, comuníquese con un electricista. No
intente modificar esta función de seguridad.
PARA USO DOMÉSTICO
SOLAMENTE
NO APROBADO PARA USO
COMERCIAL
ÍNDICE
Medidas de seguridad importantes ...................................... 2
Piezas y características ............................................... 4
Antes del primer uso ................................................. 5
Instrucciones de uso ................................................. 5
Estilos de pizza ..................................................... 5
Consejos para pizzas perfectas......................................... 6
Cómo dar forma a la masa y meter la pizza al horno . . . . . . . . . . . . . . . . . . . . . . . . 7
Consejos de elaboración de la masa..................................... 8
Resolución de problemas ............................................ 10
Limpieza y mantenimiento ............................................ 10
Garantía .......................................................... 11
Recetas .......................................................... 12

4
4
5
3
PIEZAS Y CARACTERÍSTICAS
1. Panel de control
Control de temperatura fácilmente ajustable, temporizador digital y luz interior.
a. Temporizador (opcional)
Use los botones +/- para seleccionar el tiempo de cocción. Presione el botón
START/STOP para iniciar la cuenta regresiva. Cuando el tiempo llegue a
“00:00”, el horno permanecerá encendido para cocinar la pizza siguiente sin
interrupciones.
b. Indicador “TEMP READY” (listo)
Indica que el horno ha alcanzado la temperatura deseada
c. Indicador “POWER ON” (encendido)
Indica que el aparato está encendido
d. Control de temperatura
Perilla de tacto suave con opciones de temperatura desde 350°F (175°C)
hasta 700°F (370°C)
e. Botón de luz
Ilumina el interior del horno para poder vigilar la cocción
2. Guía de cocción
Indica el tiempo y la temperatura para diferentes estilos de pizza.
3. Piedra de pizza
Superficie de cocción ideal para las pizzas napolitanas, New York, delgadas y
crujientes, y más. Siempre precaliente la piedra de pizza al mismo tiempo que
se precaliente el horno.
4. Rejilla del horno
Diseñada para sostener la piedra de pizza y la bandeja.
Siempre colóquela en esta posición:
5. Bandeja esmaltada
Bandeja de 12 x 12 x 1.5 in (30 x 30 x 4cm), ideal para las pizzas al
molde/de masa gruesa y las focaccias.
6. Pala de pizza plegable
Permite introducir/retirar las pizzas en/del horno con facilidad. Gire el mango
para un almacenamiento compacto.
7. Bandeja recogemigas removible (no ilustrada)
Situada en la parte inferior del horno; para retirarla, inclínela suavemente hacia
arriba y tire hacia fuera.
8. Tecnología de enfriamiento activo (no ilustrada)
Ventiladores internos enfrían la carcasa y los componentes electrónicos
durante y después del uso.
6
1
d
a eb
c
2

5
ANTES DEL PRIMER USO
1. Quite todo el material de embalaje y las etiquetas del interior y exterior del horno.
2. Coloque el aparato sobre una superficie plana y nivelada.
3. Deje un espacio libre de 2-4in (5-10cm) todo alrededor del aparato.
No lo coloque sobre una superficie sensible al calor.
4. Compruebe que la bandeja recogemigas esté en su sitio y coloque la rejilla en el horno.
NOTA: NO GUARDE NINGÚN OBJETO ENCIMA DEL HORNO. SI LO HACE,
QUÍTELOS ANTES DE ENCENDERLO. EL EXTERIOR DEL HORNO SE PONE
MUY CALIENTE DURANTE EL USO; MANTÉNGALO FUERA DEL ALCANCE DE
LOS NIÑOS.
INSTRUCCIONES DE USO
1. Coloque el aparato sobre una superficie llana, estable y resistente al calor.
Enchufe el cable en una toma de corriente. Cerciórese de colocar el horno en un
lugar bien ventilado, ya que puede emitir humo debido a las altas temperaturas
usadas durante la cocción.
2. Compruebe que la rejilla del horno y la piedra de pizza estén en la posición
deseada, y cierre la puerta del horno.
3. Ajuste la temperatura al nivel deseado; el indicador “POWER ON” se encenderá,
se escuchará un pitido breve y el horno se calentará.
4. Precalentamiento:
a. Ajuste la temperatura al nivel deseado; el horno se precalentará
automáticamente por 20-30 minutos (dependiendo de la temperatura elegida).
Coloque la piedra de pizza en el horno antes de encenderlo para que también
se precaliente; esto asegurará una masa crujiente.
b. Mientras el horno se está calentando, arme la pizza (véase la página7).
NOTA: Las pizzas al molde requieren bastante tiempo de preparación, por lo
que es preferible armarlas durante (o incluso antes) del precalentamiento.
c. Cuando el horno esté caliente, se escuchará un pitido y el indicador “TEMP
READY” se encenderá.
NOTA: El aparato se apagará automáticamente después de 2 horas (se
escucharán 3 pitidos).
5. Meta la pizza al horno con cuidado y, si desea, programe el temporizador usando
los botones +/-. Presione el botón
START/STOP para iniciar la cuenta.
Cuando el tiempo llegue a “00:00”, el aparato emitirá un pitido. IMPORTANTE: El
horno no se apagará al final del tiempo. NOTA: Vigile atentamente la cocción, ya
que las pizzas se cocinan rápidamente.
6. Cuando la pizza esté lista, retírela del horno ¡y disfrútela!
7. Para apagar el horno en cualquier momento, ponga el control de temperatura en
“
”; el indicador “POWER ON” se apagará y el aparato emitirá un pitido.
IMPORTANTE: Después del uso, deje el aparato enchufado hasta que los
ventiladores internos se apaguen para garantizar un enfriamiento adecuado de
la carcasa y de los componentes electrónicos.
NOTA: Siempre espere hasta que el indicador “TEMP READY” se encienda para
meter la pizza al horno; esto garantizará los mejores resultados para todos los
estilos de pizza. Cuando hornee varios estilos de pizza uno tras otro, empiece por
las pizzas que requieran una temperatura de cocción más baja.
Si las pizzas no están bien cocinadas, deje que el horno se caliente por 5-10
minutos entre las pizzas. Nota: Factores tales como dejar la puerta abierta, abrir la
puerta con demasiada frecuencia o calentar insuficientemente la piedra de pizza
pueden hacer que se pierda calor.
ESTILOS DE PIZZA
Napolitana, 700 °F, 5 minutos
La pizza napolitana suele denominarse “de leña”, ya que tradicionalmente se cocina
en hornos de leña. Se caracteriza por un fondo oscuro y bordes altos y masticables.
En este estilo de pizza, lo más importante es el sabor de la masa, así que no se pase
con las coberturas.
“New Haven”, 700 °F, 5 minutos
La pizza “New Haven” es realmente una pizza napolitana, ya que se basa en el método
napolitano (masa sabrosa y masticable). Suele tener forma oblonga o rectangular.
“New York”, 650 °F, 5 minutos
Esta es la pizza que se encuentra en la mayoría de las pizzerías neoyorquinas.
Es a la vez crujiente y masticable, y lleva bastante queso.
Delgada y crujiente, 600 °F, 5 minutos
Similar en textura a la pizza sin levadura, esta pizza tiene una masa un poco más
dulce, con un contenido de aceite más alto que las masas tradicionales. Es delgada,
con un borde delgado y crujiente.

6
Al moldes/de masa gruesa, 550 °F, 15 minutos
Considerada como una especialidad de Chicago, la pizza al molde/de masa gruesa se
prepara tradicionalmente en una bandeja y lleva abundante salsa, queso y coberturas. El
queso suele derretirse por encima del borde, dándole una textura crujiente.
“Detroit”, 550 °F, 15 minutos
Esta popular pizza al molde tiene una masa muy gruesa y aceitada, y lleva queso
graso. Suele cubrirse con tiras de salsa de tomate, pero también se le puede añadir
pepperoni o las coberturas deseadas. Debe hornearse hasta que el fondo y los
bordes estén muy dorados y crujientes.
Siciliana, 500 °F, 15 minutos
Aunque esta pizza se considera como una pizza de masa gruesa, se parece más a
una focaccia con cobertura. Primero se precocina la masa de focaccia con una
buena cantidad de aceite de oliva, y luego se cubre con un poco de queso y hierbas,
o bien con salsa de pizza dulce, queso y unas cuantas coberturas ligeras.
“Grandma”, 500 °F, 15 minutos
La pizza “Grandma”, originaria de Long Island, es parecida a la pizza siciliana. Es
una pizza al molde de masa un poco más delgada, con coberturas más ligeras que
la tradicional pizza “New York”.
Focaccia, 500 °F, 15 minutos
La focaccia es un pan enriquecido con aceite de oliva. Típicamente, se cubre con
hierbas y sal (o, a veces, un poco de queso rallado). En algunas recetas, se
precocina primero, y luego se rellena con queso y otros ingredientes.
Calzone, 500 °F, 15 minutos
La forma más sencilla de describir este plato clásico es como una pizza rellena. La
masa de pizza se estira hasta formar un óvalo o un círculo, y se rellena con queso
(por lo general, ricotta/requesón y mozzarella) y, a menudo, una mezcla de vegetales
y carnes. Se hornea directamente en la piedra de pizza para garantizar un exterior
crujiente y una cocción rápida.
Congelada, 450 °F, 15-20 minutos
Hornee las pizzas congeladas directamente en la piedra de pizza precalentada.
Tenga presente que las pizzas de masa gruesa necesitarán más tiempo que las
pizzas de masa delgada y las pizzas personales. Para conseguir mejores resultados,
gire la pizza a mitad de la cocción con la pala de pizza.
Sin gluten, 500°F, 10-15 minutos
Las masas sin gluten requieren una atención especial. Es preferible hornearlas en la
bandeja, ya que suelen ser más pegajosas. Puede que sea necesario precocinarlas
antes de añadir coberturas para evitar que la masa se remoje. Nota: Nuestras
recomendaciones están basadas en nuestra receta de masa de pizza sin gluten
(p.16). Las masas sin gluten pueden usarse para preparar cualquier receta de pizza.
Masa de coliflor, 500 °F, 4-5 minutos
La masa de coliflor (p.17), igual que las demás masas sin gluten, requiere una
atención especial. Debe hornearse en una bandeja bien aceitada, y debe
precocinarse antes de añadir las coberturas.
CONSEJOS PARA PIZZAS PERFECTAS
Hacer pizza requiere práctica. Aquí tiene algunos pasos clave para el éxito.
Una buena pizza empieza por buenos ingredientes: ingredientes simples y de calidad.
La masa es la base más importante de la pizza. La masa comprada es práctica y
consistente. También es perfecta para practicar la elaboración de pizzas.
Se recomienda usar un máximo de 8-10oz (225-285g) de masa por pizza.
Una vez que le haya cogido el truco a la elaboración de pizzas, pruebe alguna de
nuestras recetas de masa. Nuestra masa de pizza napolitana (p.13) con azúcar
(opcional) es perfecta para preparar pizza napolitana auténtica.
Para obtener el máximo sabor y la mejor fermentación, se recomienda dejar reposar
la masa casera en el refrigerador por 24-72 horas antes de la preparación. Saque
masa del refrigerador al menos 1 hora (pero no más de 3 horas) antes de darle
forma. Manténgala cubierta mientras reposa a temperatura ambiente.
Nuestras recetas tienden a rendir masas un poco más pegajosas y húmedas que las
masas tradicionales, para conseguir el mejor sabor y el mejor resultado final. Esta
consistencia húmeda requiere más harina y paciencia para lograr buenos resultados.
Enharínese las manos antes de manipular la masa; de este modo, la masa no se
pegará a sus manos y podrá controlar la cantidad de harina en la receta con mayor
precisión. Quite el exceso de harina con una brocha antes de añadir las coberturas.
¡No se pase con las coberturas! Esto ayudará a pasar la pizza de la pala a la piedra,
ya que mucha cobertura (especialmente mucha salsa) puede hacer que la masa se
pegue a la pala de pizza.
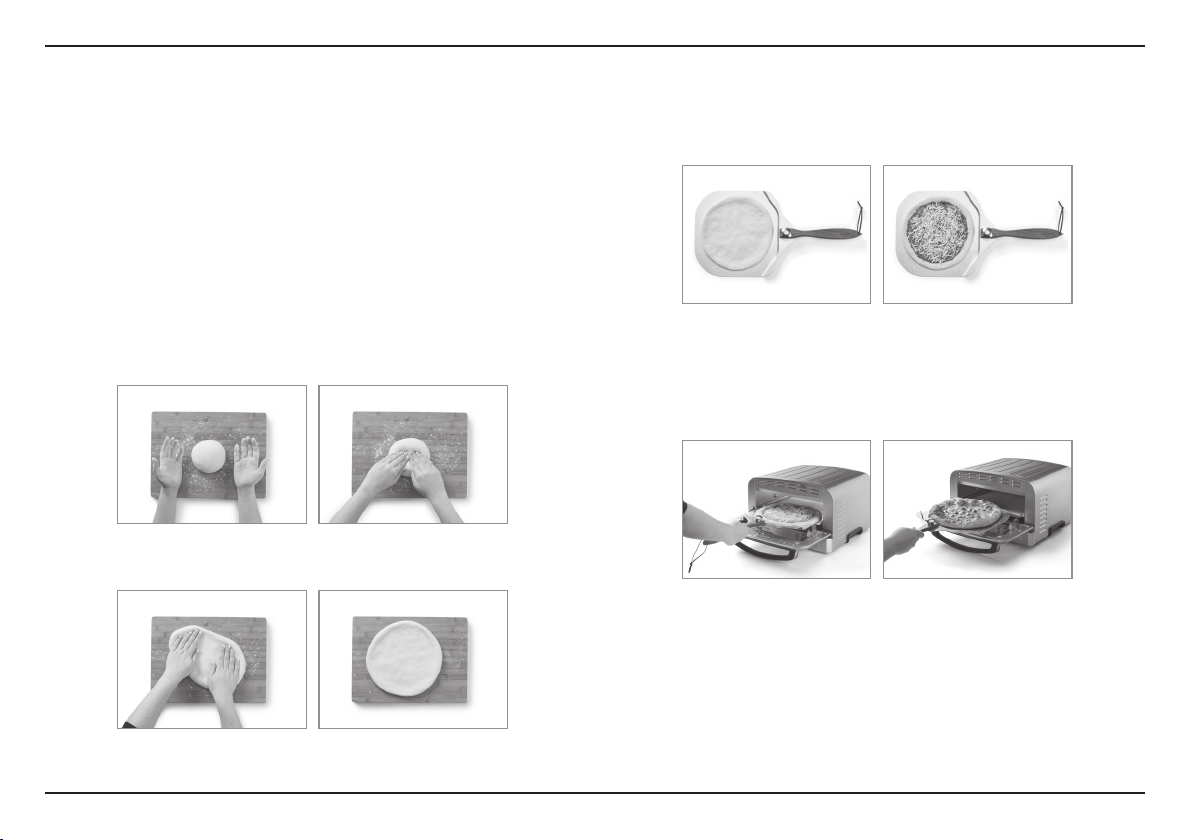
7
Precaliente el horno antes de armar la pizza. Es importante que la piedra de pizza
esté caliente antes de que meta la pizza al horno.
Aunque no es imprescindible, se recomienda girar la pizza 180° aprox. a la mitad del
tiempo para una cocción más uniformes.
CÓMO DAR FORMA A LA MASA Y METER LA
PIZZA AL HORNO
Dar forma a la masa y meter la pizza al horno es un arte que requiere práctica. No
se desanime si su primer intento no es perfecto. Use masa comprada o nuestras
recetas de masa de pizza napolitana o masa de pizza “New York” (p.13).
1. Después de que la masa haya descansado a temperatura ambiente, enharine
ligeramente la superficie de trabajo y coloque una bola de masa en el centro. Si la
masa es pegajosa, también enharine sus manos. Se recomienda usar un máximo
de 8-10oz (225-285g) de masa por pizza. Nota: 16oz (455g) es la cantidad
máxima recomendada para una pizza.
2. Presione la masa para formar un disco.
3. Siga presionando y estirando a masa hacia fuera, volteándola al menos una vez,
hasta que tenga la forma y el tamaño deseados (agréguele harina si es necesario).
4. Si la masa no se estira lo suficiente, esto significa que necesita descansar por
más tiempo. Cúbrala por 10-15 minutos, y luego intente otra vez.
5. Cuando la masa tenga el tamaño deseado, enharine ligeramente la pala de pizza.
6. Coloque la masa en la pala de pizza fría, cerciorándose de que quepa (corte el
exceso de masa).
7. Trabajando rápidamente, añada la salsa y las coberturas deseadas, cerciorándose de
no usar demasiado (esto puede hacer que la masa sea difícil de deslizar de la pala).
8. Agite suavemente la pala para comprobar que la masa pueda moverse. Si
algunas áreas de la masa se pegan a la pala, levántelas y rocíe la pala con
una pequeña cantidad de harina para aflojarlas. Importante: No intente
meter la pizza al horno si parece que algunas áreas están pegadas a la pala.
9. Introduzca la pala en el horno y deslice la pizza en la piedra usando un movimiento
rápido de ida y vuelta, y, de ser necesario, sacudiendo ligeramente la pala.
10. Cuando la pizza esté cocinada, deslice la pala de pizza debajo de ella y retírela
con cuidado del horno. A continuación, deslícela en una tabla de picar. Deje que
la pizza se enfríe ligeramente antes de cortarla. Deje que la pala se enfríe antes
de volver a usarla.

8
Para preparar pizzas delgadas y crujientes
1. Siga los pasos 1-3 en la página anterior.
2. Coloque la masa ligeramente estirada sobre una superficie enharinada. Usando un
rodillo, extienda la masa hasta que forme un círculo o un rectángulo de 12 in (30 cm).
3. Enharine ligeramente la pala de pizza, coloque la masa en ella y añada rápidamente
las coberturas deseadas.
4. Agite suavemente la pala para comprobar que la masa pueda moverse. Si
algunas áreas se pegan a la pala, levántelas y rocíe la pala con una pequeña
cantidad de harina.
5. Abra la puerta del horno, introduzca la pala de pizza en él, y deslice la pizza en la
piedra usando un movimiento rápido de ida y vuelta.
6. Cuando la pizza esté cocinada, deslice la pala de pizza debajo de ella y retírela con
cuidado del horno. A continuación, deslícela en una tabla de picar. Deje que la
pizza se enfríe ligeramente antes de cortarla.
Para preparar pizza al molde/de masa gruesa
1. Engrase en interior de la bandeja con 3-4 cucharadas (45-60ml) de aceite de oliva.
Nota: La cantidad exacta de aceite depende del estilo de pizza preparado.
2. Coloque la masa en la bandeja y voltéela varias veces para cubrirla con el aceite.
3. Estire la masa hacia los lados de la bandeja poco a poco y sin forzar,
presionándola suavemente con la punta de los dedos.
4. Cubra la bandeja con un paño de cocina y deje la masa descansar por 20 minutos.
Después de este tiempo, repita el proceso, enfocándose en estirar la masa hacia
los lados de la bandeja. Cubra la bandeja, deje la masa descansar otra vez y
estírela otra vez. Repita este proceso hasta que la masa cubra el fondo de la
bandeja. Nota: Este proceso puede tomar 60 minutos en total.
5. Cuando la masa cubra el fondo de la bandeja, agregue las coberturas deseadas.
6. Cubra sin apretar con papel film/plástico y deje descansar mientras el horno se
está calentando.
7. Cuando el horno esté caliente, coloque la bandeja en la piedra de pizza.
8. Cuando la pizza esté cocinada, retírela del horno (usando manoplas/agarraderas/
guantes de horno) y desmóldela antes de cortarla.
CONSEJOS DE ELABORACIÓN DE LA MASA
Las masas de levadura pueden prepararse de varias maneras. Independientemente del
método elegido, siga las instrucciones de subida de la masa indicadas en la receta.
Se recomienda usar harina de pan o harina “00” para preparar la mayoría de las pizzas.
Para todos los métodos: Si usa levadura instantánea, agréguela con los ingredientes
secos. Si usa levadura seca activa, deje que se fermente en líquido tibio primero.
La paciencia es la clave de una buena masa. Cuanto más tiempo pueda reposar y
subir lentamente (hasta 72 horas) en el refrigerador, más sabor tendrá.
A mano
1. Tenga todos los ingredientes y el material listos. Material recomendado: Un tazón
grande y ancho, un tazón pequeño con harina (para enharinar las manos y la
superficie de trabajo), y una taza medidora. Un rascador de masa de plástico es
práctico, pero no necesario.
2. Coloque todos los ingredientes secos en el tazón grande, y el agua/líquido en la taza
medidora. Revuelva los ingredientes secos con un batidor o un rascador de masa.
3. Agregue la cantidad mínima de agua/líquido indicada en la receta y empiece a mezclar.
Enharínese las manos con una buena cantidad de harina. Cuando la masa empiece a
unirse, termine de amasarla en el tazón o en una superficie de trabajo enharinada.
4. Amase la masa hasta que esté suave y elástica. Si la masa es pegajosa, amásela por
más tiempo (enharínese más las manos si es necesario) antes de agregarle harina.
5. Estire la masa hacia su cuerpo, y luego dóblela sobre sí misma. A continuación,
gire la masa 45 grados y repita. Repita una y otra vez hasta que la masa esté suave
y elástica.
Procesadora de alimentos
Una procesadora de alimentos permite amasar rápida y fácilmente. Las procesadoras
de alimentos amasan a alta velocidad, calentando la masa más rápidamente y
haciendo que se una en segundos.
1. Coloque los ingredientes secos en el bol (equipado con una cuchilla picadora o
amasadora).
2. Procese a velocidad baja (o usando la velocidad para amasar, si la hay). Sin apagar la
procesadora, agregue lentamente el agua/líquido por el tubo de alimentación,
cerciorándose de que la harina lo absorba antes de agregar más. Si la masa se pone
demasiado pegajosa o húmeda, agregue harina, 1 cucharadita a la vez. Cuando la
masa forme una bola, amásela por 45-60 segundos adicionales (no más).
3. Coloque la masa en una superficie limpia ligeramente enharinada y amásela a
mano unas cuantas veces hasta que esté suave y elástica.

9
Batidora de pie
Las batidoras de pie son perfectas para hacer masa de pizza, ya que permiten
preparar altas cantidades de masa limpia y rápidamente.
1. Instale el gancho amasador. Coloque los ingredientes líquidos en el bol.
2. Agregue los ingredientes secos (premezclados), como se describe en la receta.
3. Mezcle los ingredientes usando la velocidad más baja.
4. Cuando la masa forme una bola, siga amasando a velocidad baja por 10 minutos
adicionales.
CONSEJOS ADICIONALES
Salsa/Coberturas
No use salsa/coberturas en exceso. Esto puede hacer que sea difícil deslizar la pizza
de la pala, y puede resultar en una masa gomosa. Nota: La pizza “New York” es una
excepción a esta regla, ya que su textura debe ser gomosa. Cerciórese de enharinar
suficientemente la pala para que la pizza se deslice fácilmente en la piedra.
Se recomienda usar aprox. 3 cucharadas (45ml) de salsa de pizza en las pizzas
napolitanas y “New Haven”. Las pizzas “New York” y las pizzas delgadas y crujientes
suelen llevar un poco más de salsa. Si desea usar más salsa, es preferible precocinar
la masa (hasta que el fondo esté crujiente) antes de cubrirla con salsa.
Se recomienda precocinar las coberturas, ya que el contenido en húmeda de los
ingredientes frescos es alto, lo que puede resultar en una masa pastosa. Además,
puede que ingredientes frescos no se cocinen por completo, ya que las pizzas se
hornean muy rápidamente.
Si usa hierbas frescas, añada estas después de hornear la pizza.
Sobras de masa
Congelar la masa ahorra tiempo la próxima vez que quiera hacer pizza. Prepare la
masa y deje que suba (siga las instrucciones de la receta). Divida la masa en
porciones del tamaño adecuado: 8-10 oz (225-285 g) para pizzas individuales, o la
cantidad suficiente para una pizza al molde. Envuelva cuidadosamente la masa en
papel film/plástico y congélela hasta 2 meses.
Para descongelar la masa, quite el papel film/plástico, colóquela en un tazón y cubra
este con un paño de cocina. Deje la masa en el refrigerador por una noche. Lleve la
masa a temperatura ambiente por 1-3 horas antes del uso.
Nudos de ajo: Aceite la bandeja con 1 cucharada de aceite de oliva. Divida 455g de
masa en porciones iguales. Forme una “soga” con cada porción y haga un nudo.
Derrita 4 cucharadas (55g) de mantequilla con 4 dientes de ajo finamente picados.
Sumerja cada nudo en la mantequilla de ajo y dispóngalos en la bandeja. Cubra la
bandeja con papel film/plástico y deje reposar por 30 minutos. Hornee en 450°F por
aprox. 15 minutos, hasta que estén dorados. Nota: Para resultados más uniformes,
gire la bandeja a mitad de cocción.
Nudos de azúcar y canela: Prepare la masa y forme nudos como se describió en la
sección anterior. Pincele cada nudo con mantequilla y rocíelos con azúcar con
canela. Hornee en 450°F por aprox. 15 minutos, hasta que estén dorados. Nota: Para
resultados más uniformes, gire la bandeja a mitad de cocción.
Recalentamiento: Recaliente las sobras de pizza en 350°F (175°C) por 5-8
minutos.

10
LIMPIEZA Y MANTENIMIENTO
• Espere hasta que el interior y el exterior del horno estén completamente fríos antes
de limpiarlo o tocar los accesorios internos.
• Siempre desenchufe el aparato antes de limpiarlo.
• No use limpiadores abrasivos; esto dañará el acabado. Limpie el exterior del horno
con un paño húmedo y séquelo bien. Si desea usar un limpiador, aplique este en el
paño; no en el horno.
• Para limpiar el interior del horno, use una esponja ligeramente humedecida con
agua jabonosa o limpiador. Quite los residuos con un paño limpio humedecido con
agua. Nunca use productos abrasivos o corrosivos; esto puede dañar la superficie
del horno. Nunca use materiales abrasivos, tales como estropajos metálicos.
Limpieza de los accesorios
• Lave la bandeja, la rejilla del horno, la pala de pizza y la bandeja recogemigas a
mano, en agua jabonosa caliente, usando un estropajo o un cepillo de nylon.
Enjuáguelos bien. Importante: Estos accesorios NO son aptos para lavavajillas.
• Pala de pizza: Desenrosque con cuidado el mango y déjelo a un lado. Lave la parte
metálica de la pala en agua jabonosa tibia. De ser necesario, limpie el mango con
un paño humedecido con agua. Cuando la pala esté seca, vuelva a enroscar el
mango, comprobando que esté bien apretado.
• Piedra de pizza: Se recomienda limpiar la piedra de pizza regularmente para
mantener su longevidad. Compruebe que la piedra esté completamente fría antes
de manipularla. Use una espátula de metal o un rascador para quitar los residuos
de alimentos. Limpie la piedra con una toallita húmeda. Compruebe que la piedra
esté completamente seca antes de colocarla en el horno. Guarde la piedra en el
horno. Nota: Es normal que la piedra cambie de color. Con el tiempo, absorbe
aceite, lo que mejora su rendimiento y el sabor de las pizzas.
IMPORTANTE: Nunca use jabón o detergente en la piedra de pizza, ya que es muy
porosa. Tampoco la sumerja en agua; esto puede agrietarla o dañarla
permanentemente.
• Para limpiar la bandeja recogemigas, deslícela fuera del horno. Limpie la bandeja
con un paño y vuelva a colocarla en su sitio. Si hay residuos pegados en ella,
remójela en agua jabonosa caliente o use un limpiador no abrasivo.
• Cualquier otro servicio debe ser realizado por un técnico autorizado.
TEMA PROBLEMA SOLUCIÓN
Suministro
eléctrico
El aparato no se
enciende.
Compruebe que la toma de corriente en la cual está enchufado el aparato esté funcionando.
Llame a nuestro servicio de atención al cliente al 1-800-726-0190.
Cocción
La masa se pega a la
pala de pizza.
Asegúrese de tener harina de sobra a mano para dar forma a la masa. Enharine ligeramente sus manos y la superficie de
trabajo durante la elaboración. Enharine ligeramente la pala. Antes de meter la pizza al horno, compruebe que la masa se
deslice fácilmente de la pala. Si algún área se queda pegado, espolvoree ligeramente por debajo con harina.
No use salsa/coberturas en exceso. Compruebe que la pala esté completamente fría antes de colocar la masa en ella.
Humo sale del horno.
Debido a las altas temperaturas usadas, es normal que una pequeña cantidad de humo salga del horno. Para reducir la
cantidad de humo, procure usar menos harina en la pala de pizza.
Se prende fuego en
el horno.
Es posible que se prendan pequeños fuegos en el horno en algunos casos, p.ej., cuando se usan cantidades excesivas de
harina o aceite. En caso de que esto suceda, mantenga la puerta del horno cerrada. Si el fuego no se extingue dentro de
10 segundos, apague el horno, desenchúfelo. y espere hasta que el fuego se extinga.
RESOLUCIÓN DE PROBLEMAS

11
GARANTÍA
Garantía limitada de tres años
Esta garantía es válida en los Estados Unidos, para los consumidores que
hayan comprado este producto directamente a Cuisinart o a un
revendedor autorizado de Cuisinart. Usted es un consumidor si posee un
horno de pizza Cuisinart
®
que haya sido comprado en una tienda para uso
personal, familiar o casero. A menos que la ley aplicable exija lo contrario,
esta garantía no es para los minoristas u otros consumidores/compradores
comerciales. Cuisinart garantiza este producto contra todo defecto de
materiales o fabricación durante 3 años después de la fecha de compra
original, siempre que haya sido usado para uso doméstico y de acuerdo
con las instrucciones.
Se recomienda llenar el formulario de registro disponible en https://
cuisinart.registria.com a fin de facilitar la verificación de la fecha de
compra original de este producto. Sin embargo, no es necesario registrar
el producto para recibir servicio bajo esta garantía. En ausencia de prueba
de la fecha de compra, el período de garantía será calculado a partir de la
fecha de fabricación del producto.
RESIDENTES DE CALIFORNIA
La ley del estado de California ofrece dos opciones bajo el período de
garantía. Los residentes del estado de California pueden (A) regresar el
producto defectuoso a la tienda donde lo compraron o (B) a otra tienda
que venda productos Cuisinart
®
de este tipo. La tienda podrá, a su
elección, reparar el producto, referir al consumidor a un centro de servicio
independiente, sustituir el producto, o reembolsar al consumidor el precio
de compra menos la cantidad directamente atribuible al uso anterior del
producto por el consumidor. Si estas dos opciones no satisfacen al
consumidor, podrá llevar el aparato a un centro de servicio independiente,
siempre que se pueda arreglar o reparar el aparato de manera económica.
Cuisinart (no el consumidor) será responsable por los gastos de servicio,
reparación, sustitución o reembolso de los productos defectuosos bajo
garantía. Los residentes de California también pueden, si lo desean,
mandar el producto defectuoso directamente a Cuisinart para que sea
reparado o sustituido. Para esto, se debe llamar a nuestro servicio de
atención al cliente al 1-800-726-0190.
Cuisinart será responsable por los gastos de reparación, reemplazo, manejo y
envío de los productos defectuosos durante el período de garantía.
GARANTÍA DE REEMPLAZO SIN DIFICULTADES
Su máxima satisfacción es nuestra prioridad, así que si este producto falla
dentro del generoso período de garantía, lo repararemos o, de ser
necesario, lo reemplazaremos, sin costo alguno para usted. Para obtener
una etiqueta de devolución, visite https://www.cuisinart.com/customer-
care/product-assistance/product-inquiry/. O llame sin cargo a nuestro
servicio de atención al cliente, al 1-800-726-0190, para hablar con un
representante.
Este producto satisface las más altas exigencias de fabricación y ha sido
diseñado para funcionar con 120V, usando accesorios y repuestos
autorizados solamente. Esta garantía excluye expresamente los defectos o
daños causados por accesorios, piezas o reparaciones no autorizados por
Cuisinart, así como los defectos o daños causados por el uso de un
convertidor de voltaje. Esta garantía no cubre el uso comercial o industrial
del producto, y no es válida en caso de daños causados por mal uso,
negligencia o accidente. Esta garantía excluye todos los daños
incidentales o consecuentes. Algunos Estados no permiten la exclusión o
limitación de daños incidentales o consecuentes, de modo que las
limitaciones mencionadas pueden no regir para usted. Usted puede tener
otros derechos que varían de un Estado a otro.
Importante: Si debe llevar el producto defectuoso a un centro de
servicio no autorizado, por favor informe al personal del centro de
servicio que deben llamar al servicio de atención al cliente de Cuisinart,
al 1-800-726-0190, a fin de diagnosticar el problema correctamente,
usar las piezas correctas para repararlo y comprobar que el producto
aún esté bajo garantía

12
Recetas
Masa de pizza napolitana ....................................................................................13
Masa de pizza “New York” ...................................................................................13
Masa de pizza delgada y crujiente .....................................................................14
Masa de pizza al molde/de masa gruesa ..........................................................15
Masa de focaccia o pizza siciliana .....................................................................15
Masa de pizza sin gluten ..................................................................................... 16
Masa de coliflor con Parmesano .......................................................................17
Masa de naan..........................................................................................................17
Salsa de pizza simple ........................................................................................... 18
Pesto de albahaca ................................................................................................. 18
Pesto de arvejas tiernas .......................................................................................19
Pesto de rúcula y pistachos ................................................................................19
Pizza Margarita .....................................................................................................20
Pizza de cuatro quesos con tomates asados .................................................20
Pizza de pesto de rúcula-pistachos, Prosciutto y Burrata ..........................21
Pizza blanca con salchicha, grelos y pimientos dulces ...............................22
Pizza de manzana, tocino, cebolla roja y queso azul ...................................22
Pizza de pesto de arvejas tiernas ......................................................................23
Pizza hawaiana picante .......................................................................................24
Pizza “New Haven” blanca de almejas .............................................................24
Pizza de maíz al estilo mexicano ......................................................................25
Pizza de naan de cordero picante, queso Feta y hierbas ............................26
Pizza de papa, salchicha y romero ...................................................................26
Pizza de carne desmechada, cebolla caramelizada y Gouda ahumado . . 27
Pizza de coliflor con coles de Bruselas, tocino y hojuelas
de queso Parmesano ...........................................................................................28
Focaccia con romero ...........................................................................................29
Pizza “Detroit” de pepperoni clásica .............................................................. 30
Pizza siciliana de albóndigas ............................................................................ 30
Calzones de brócoli ...............................................................................................31
Calzones de pollo a la Parmesana ....................................................................32
Pizza de crema de chocolate-avellanas y fresas ...........................................33
Tarta de manzana .................................................................................................33

13
Masa de pizza napolitana
La pizza original. Con ingredientes simples y paciencia, se consigue
una base de pizza deliciosa.
Rinde suficiente masa para 2 pizzas de 10-12in (25-30cm)
1. Colocar el agua en el bol de una batidora de pie equipada con
gancho amasador.
2. Agregar la harina, la levadura y el azúcar (opcional). Encender la
máquina a la velocidad más baja y mezclar hasta que se forme
una bola de masa.
3. Cuando la masa forme una bola, seguir amasando a la
velocidad más baja por 10 minutos adicionales.
4. Pasar la masa a un tazón de acero inoxidable grande y cubrir
con papel film/plástico. Dejar reposar a temperatura ambiente
por aprox. 4 horas.
5. Dividir la masa en dos porciones iguales y formar una bola
suave con cada porción. Colocar cada porción de masa en un
bol más grande limpio. Cubrir y refrigerar por un mínimo de 24
horas, hasta un máximo de 72 horas.
6. Dejar la masa a temperatura ambiente por al menos 1 hora
antes de estirarla.
Consejo: El azúcar da a la masa cocinada un aspecto
manchado.
*Mezclar la levadura instantánea directamente con la harina.
Dejar que la levadura seca activa se fermente en agua tibia
(105-110 °F/40-43 °C) primero. Rociar la levadura en el agua
tibia. Cuando se ponga espumosa, está lista para su uso.
Información nutricional por porción (basado en 16 porciones):
Calorías 129 (0 % degrasa) • Carbohidratos 28 g • Proteínas 4 g • Grasa 0g
Grasa saturada 0g • Colesterol 0 mg • Sodio 401 mg • Calcio 1 mg • Fibra 1 g
Masa de pizza “New York”
La adición de aceite de oliva crea un agradable equilibrio entre lo
crujiente y lo masticable, característico de la clásica pizza “New York”.
Rinde suficiente masa para 2 pizzas de 10-12in (25-30cm)
1. Colocar el agua y el aceite de oliva en una taza medidora
grande; revolver.
2. Colocar la harina, la sal, la levadura y el azúcar en el bol de una
procesadora de alimentos equipada con una cuchilla picadora.
Procesar por aprox. 10 segundos para combinar.
3. Sin apagar la máquina, agregar lentamente el líquido por el
tubo de alimentación pequeño, cerciorándose de que la harina
absorba el líquido antes de agregar más. Cuando la masa forme
una bola, procesar por 45 segundos adicionales para amasar.
4. Pasar la masa a un tazón de acero inoxidable y cubrir con papel
film/plástico. Dejar reposar a temperatura ambiente por aprox.
4 horas.

14
5. Dividir la masa en dos porciones iguales y formar una bola
suave con cada porción. Colocar cada porción de masa en un
bol más grande limpio. Cubrir y refrigerar por un mínimo de 24
horas, hasta un máximo de 72 horas.
6. Dejar la masa a temperatura ambiente por al menos 1 hora
antes de estirarla.
*Mezclar la levadura instantánea directamente con la harina.
Dejar que la levadura seca activa se fermente en agua tibia
(105-110 °F/40-43 °C) primero. Rociar la levadura en el agua
tibia. Cuando se ponga espumosa, está lista para su uso.
**La miel es una excelente alternativa al azúcar en las masas
de pizza. Añadirla con los ingredientes líquidos.
Información nutricional por porción (basado en 16 porciones):
Calorías 80 (10 % degrasa) • Carbohidratos 16 g • Proteínas 2 g • Grasa 1 g
Grasa saturada 0 g • Colesterol 0 mg • Sodio 222 mg • Calcio 0 mg • Fibra 0 g
Masa de pizza delgada y crujiente
Este masa es perfecta para cualquier estilo de pizza
delgada y crujiente.
Rinde suficiente masa para 2 pizzas de 10-12in (25-30cm)
1. Colocar el agua y el aceite de oliva en una taza medidora
grande; revolver.
2. Colocar la harina, el azúcar la sal y la levadura en el bol de una
procesadora de alimentos equipada con una cuchilla picadora.
Procesar por aprox. 10 segundos para combinar.
3. Sin apagar la máquina, agregar lentamente el líquido por el
tubo de alimentación pequeño, cerciorándose de que la harina
absorba el líquido antes de agregar más. Cuando la masa forme
una bola, procesar por 45 segundos adicionales para amasar.
4. Pasar la masa a un tazón de acero inoxidable y cubrir con papel
film/plástico** (o colocarla en una bolsa hermética). Refrigerar
por un mínimo de una noche, hasta un máximo de 3 días.
5. Dejar la masa a temperatura ambiente por al menos 1 hora
antes de estirarla. Dividir la masa en dos porciones iguales y
formar una bola suave con cada porción. Colocar cada porción
en un tazón y cubrir con papel film/plástico.
6. Cuando la masa haya doblado de volumen, estirarla.
*Mezclar la levadura instantánea directamente con la harina.
Dejar que la levadura seca activa se fermente en agua tibia
(105-110 °F/40-43 °C) primero. Rociar la levadura y un pizca de
azúcar en el agua tibia. Cuando se ponga espumosa, está lista
para su uso.
**Para mejores resultados, se recomienda dejar descansar
la masa por una noche. Sin embargo, la masa puede usarse
después de 1 hora de descanso a temperatura ambiente (Nota:
Si se forman burbujas en la masa durante la cocción, retirar
la pizza del horno y pinchar las burbujas antes de seguir
horneando).
Información nutricional por porción (basado en 16 porciones):
Calorías 90 (26 % degrasa) • Carbohidratos 15 g • Proteínas 2 g • Grasa 3 g
Grasa saturada 0 g • Colesterol 0 mg • Sodio 148 mg • Calcio 0 mg • Fibra 0 g

15
Masa de pizza al molde/de masa gruesa
Esta masa es ideal para las pizzas “Detroit” y otras pizzas
al molde/de masa gruesa.
Rinde 1 pizza al molde/de maza gruesa
1. Colocar la harina, la sal y la levadura en un tazón grande; batir
para combinar. Verter el agua por encima de los ingredientes
secos. Amasar (a mano o usando un rascador) hasta que los
ingredientes se unen. Amasar unas cuantas veces más, cubrir
con un paño de cocina y dejar reposar a temperatura ambiente
por 16-24 horas.
2. Doblar la masa sobre sí misma varias veces, y luego estirarla.
NOTA: Esta receta también puede prepararse con una
procesadora de alimentos o una batidora de pie (ver la sección
“Consejos de elaboración de la masa”).
*Mezclar la levadura instantánea directamente con la harina.
Dejar que la levadura seca activa se fermente en agua tibia
(105-110 °F/40-43 °C) primero. Rociar la levadura en el agua
tibia. Cuando se ponga espumosa, está lista para su uso.
Información nutricional por porción (basado en 8 porciones):
Calorías 154 (0 % degrasa) • Carbohidratos 33 g • Proteínas 5 g • Grasa 0 g
Grasa saturada 0 g • Colesterol 0 mg • Sodio 401 mg • Calcio 1 mg • Fibra 1 g
Masa de focaccia o pizza siciliana
Esta deliciosa masa de focaccia es una excelente base para la
pizza siciliana o la pizza “Grandma”.
Rinde 1 focaccia o 1 pizza siciliana
1. Colocar la harina, la sal, el azúcar y la levadura en un tazón
grande; batir para combinar Verter el agua por encima de los
ingredientes secos. Amasar (a mano o usando un rascador)
hasta que los ingredientes se unen. Amasar unas cuantas
veces más, cubrir con un paño de cocina y dejar reposar a
temperatura ambiente por 2-12 horas.
2. Doblar la masa sobre sí misma varias veces, y luego estirarla.
NOTA: Esta receta también puede prepararse con una
procesadora de alimentos o una batidora de pie (ver la sección
“Consejos de elaboración de la masa”).
*Mezclar la levadura instantánea directamente con la harina.
Dejar que la levadura seca activa se fermente en agua tibia
(105-110 °F/40-43 °C) primero. Rociar la levadura y un pizca de
azúcar en el agua tibia. Cuando se ponga espumosa, está lista
para su uso.
Información nutricional por porción (basado en 8 porciones):
Calorías 139 (8 % degrasa) • Carbohidratos 28 g • Proteínas 4 g • Grasa 1 g
Grasa saturada 0 g • Colesterol 0 mg • Sodio 534 mg • Calcio 1 mg • Fibra 1 g

16
Masa de pizza sin gluten
Esta masa simple es un libro en blanco perfecto para todos los
amantes de la pizza que deseen evitar el gluten. Gruesa, producirá una
masa blanda y masticable. Delgada, producirá una masa crujiente.
Rinde suficiente masa para 2 pizzas de 10in (25cm)
1. Colocar la leche de arroz y el aceite de oliva en una taza
medidora grande; revolver.
2. Colocar el resto de los ingredientes en el bol de una
procesadora de alimentos equipada con una cuchilla picadora.
Procesar por aprox. 10 segundos para combinar.
3. Sin apagar la máquina, agregar lentamente el líquido por el
tubo de alimentación pequeño, cerciorándose de que los
ingredientes secos absorban el líquido antes de agregar más.
Cuando la masa forme una bola, procesar por 45 segundos
adicionales para amasar.
4. Pasar la masa a un tazón de acero inoxidable y cubrir con papel
film/plástico. Dejar reposar a temperatura ambiente por al
menos 2 horas.
5. Dividir la masa en dos porciones iguales. Usar inmediatamente
o refrigerar (envuelta) hasta el momento de usar, por un
máximo de 4 días.
Para hornear:
1. Precalentar el horno a 500°F. Enharinar la superficie de trabajo con
harina de arroz. Estirar la masa para formar un círculo/rectángulo de
8-9in (20-23cm). Usar masa de aprox. ¼in (5 mm) de espesor para
resultados crujientes, o masa de aprox. ½in (1cm) de espesor para
resultados masticables. Engrasar la bandeja con una buena cantidad
de aceite y colocar la masa en ella.
2. Cubrir con las coberturas deseadas.
3. Hornear hasta que la masa esté dorada y que el queso se haya
derretido, aprox. 10 minutos para masa delgada o 12-13 minutos
para masa gruesa.
*Mezclar la levadura instantánea directamente con la harina.
Dejar que la levadura seca activa se fermente en agua tibia
primero. Rociar la levadura y un pizca de azúcar en el agua
tibia. Cuando se ponga espumosa, está lista para su uso.
Información nutricional por porción (basado en 16 porciones):
Calorías 76 (44 % degrasa) • Carbohidratos 10 g • Proteínas 1g • Grasa 4 g
Grasa saturada 1g • Colesterol 0 mg • Sodio 142 mg • Calcio 24 mg • Fibra 0 g

17
Masa de coliflor con Parmesano
La perfecta alternativa para los aficionados de la pizza sin gluten.
Rinde suficiente masa para 1 pizza
1. Precalentar el horno a 500°F. Pincelar la bandeja con el
aceite; reservar.
2. Instalar la cuchilla picadora en el bol de una procesadora de
alimentos. Agregar la coliflor y pulsar 5-6 veces para romper.
A continuación, procesar a alta velocidad hasta que esté
finamente picada. Pasar a un tazón apto para microondas.
Cocinar al microondas por aprox. 5 minutos, hasta que esté
tierna. Dejar enfriar por 10 minutos.
3. Pasar la coliflor a un tazón grande forrado con una estopilla.
Usando la estopilla, exprimir la coliflor para eliminar todo el
líquido posible. Nota: Tomar su tiempo para esto; cuanto menos
líquido tenga, más crujiente será el resultado.
4. Colocar la coliflor y el resto de los ingredientes en un tazón
mediano; revolver para combinar.
5. Colocar la mitad la mezcla de coliflor en la bandeja aceitada.
Comprimir en el fondo de la bandeja.
6. Hornear por aprox. 18 minutos, hasta que esté bien dorada y
ligeramente firme. Dejar enfriar ligeramente.
7. Usar la masa como una masa de pizza tradicional: Añadir sus
coberturas favoritas y devolverla al horno para que se termine
de hornear.
Información nutricional por porción (basado en 8 porciones):
Calorías 106 (58 % degrasa) • Carbohidratos 4 g • Proteínas 7 g • Grasa 7 g
Grasa saturada 2 g • Colesterol 22 mg • Sodio 270 mg • Calcio 127 mg • Fibra 2 g
Masa de Naan
La principal diferencia entre la masa de pizza tradicional y la masa
de naan es que esta incluye lácteos, lo que le da una textura
mucho más blanda.
Rinde suficiente masa para 2 pizzas
1. Colocar el agua en el bol de una batidora de pie.
2. Instalar el gancho amasador. Colocar la harina, la levadura, el
azúcar, la crema, el yogur, el aceite de oliva y la sal en el bol.
Mezclar a velocidad baja para combinar. A continuación, ajustar
la velocidad al nivel medio y amasar por aprox. 5 minutos. La
masa debe estar suave y elástica.

18
3. Cubrir el bol y dejar subir al doble de su volumen, en un lugar
templado y libre de corriente de aire, por 1-1½ horas. Forrar una
placa para horno con bordes con papel sulfurizado.
4. Colocar la masa sobre una superficie ligeramente enharinada y
aplastar para desinflar. Dividir la masa en 2 porciones iguales.
Formar una bola con cada porción y disponer las bolas en la
placa para horno. Cubrir sin apretar con papel film/plástico y
dejar subir al doble de su volumen por aprox. 45 minutos.
5. Precalentar el horno y la piedra de pizza en 500°F.
6. Colocar las bolas en una superficie ligeramente enharinada y
aplastarlas para formar discos aprox. 12 x ¼in (30x 0.5cm).
Añadir las coberturas deseadas y hornear por aprox. 5 minutos,
hasta que la masa esté dorada y crujiente.
*Mezclar la levadura instantánea directamente con la harina.
Dejar que la levadura seca activa se fermente en agua tibia
primero. Rociar la levadura y un pizca de azúcar en el agua
tibia. Cuando se ponga espumosa, está lista para su uso.
Información nutricional por porción (basado en 16 porciones):
Calorías 117 (26 % degrasa) • Carbohidratos 17 g • Proteínas 4 g • Grasa 3 g
Grasa saturada 1 g • Colesterol 2 mg • Sodio 153 mg • Calcio 4 mg • Fibra 1 g
Salsa de pizza simple
Esta salsa cruda está lista en segundos usando una procesadora
de alimentos.
Rinde aprox. 3½ tazas (830ml)
1. Colocar todos los ingredientes en el bol de una procesadora de
alimentos equipada con cuchilla picadora. Procesar por aprox. 1
minuto, hasta conseguir una mezcla suave.
2. Usar inmediatamente o refrigerar en un recipiente hermético,
por un máximo de 7 días.
Información nutricional por porción de ½ taza (120ml):
Calorías 41 (61 % degrasa) • Carbohidratos 5 g • Proteínas 1g • Grasa 2 g
Grasa saturada 0 g • Colesterol 0 mg • Sodio 557 mg • Calcio 28 mg • Fibra 1 g
Pesto de albahaca
El pesto es una deliciosa alternativa a la salsa de tomate.
Combínelo con tomates frescos del huerto para disfrutar del mejor
sabor del verano.
Rinde aprox. 1½ tazas (355ml)

19
1. Instalar la cuchilla picadora en el bol de una procesadora de
alimentos. Encender el aparato y dejar caer el queso Parmesano
y el ajo en el tubo de alimentación; procesar hasta que estén
finamente picados.
2. Agregar los piñones y pulsar 5-6 veces para picar. Agregar la
albahaca y pulsar 10-12 veces para picar. Raspar el bol.
3. Encender el aparato y agregar lentamente el aceite de oliva por
el tubo de alimentación. Procesar para combinar.
4. Colocar el pesto en un recipiente de vidrio o hermético,
dar golpecitos para eliminar las burbujas de aire y allanar
la superficie. Cubrir la superficie directamente con papel
film/plástico y refrigerar. El pesto dura hasta 5 días en el
refrigerador, o hasta 2 meses en el congelador.
Información nutricional por porción de 2 cucharadas:
Calorías 120 (90 % degrasa) • Carbohidratos 1 g • Proteínas 2 g • Grasa 13 g
Grasa saturada 2 g • Colesterol 3 mg • Sodio 121 mg • Calcio 74 mg • Fibra 0 g
Pesto de arvejas tiernas
Este pesto es algo espeso, por lo que es perfecto para cubrir una pizza.
Para usarlo como salsa para pasta, dilúyalo con un poco de agua.
Rinde 1¾ tazas (415ml)
1. Instalar la cuchilla picadora en el bol de una procesadora de
alimentos. Encender el aparato y dejar caer el ajo en el tubo
de alimentación; procesar hasta que esté finamente picado.
Agregar el queso y pulsar 4-5 veces para romper; luego,
procesar hasta que esté finamente picado.
2. Agregar las arvejas, la albahaca, los piñones, la ralladura, la
sal y la pimienta. Pulsar para picar. Raspar el bol. Encender el
aparato y agregar lentamente el aceite de oliva por el tubo de
alimentación; procesar por aprox. 1 minuto para combinar.
3. Raspar el bol. Si desea que el pesto sea menos espeso, agregar
un poco de agua y procesar por unos segundos.
4. Colocar en un recipiente de vidrio o hermético, dar golpecitos
para eliminar las burbujas de aire y allanar la superficie. Cubrir
la superficie directamente con papel film/plástico y refrigerar.
El pesto dura hasta 5 días en el refrigerador, o hasta 2 meses
en el congelador.
Información nutricional por porción de 2 cucharadas:
Calorías 77 (74 % degrasa) • Carbohidratos 3 g • Proteínas 2 g • Grasa 6 g
Grasa saturada 1 g • Colesterol 2 mg • Sodio 135 mg • Calcio 1 mg • Fibra 1 g
Pesto de rúcula y pistachos
Listo en menos de 5 minutos, este pesto versátil es perfecto en
pizzas, sándwiches o pasta.
Rinde aprox. 2 tazas (475ml)

20
1. Instalar la cuchilla picadora en el bol de una procesadora de
alimentos. Agregar el queso, los pistachos y el ajo; procesar a
alta velocidad por aprox. 10 segundos para picar.
2. Agregar la rúcula, el jugo de limón, la ralladura, la sal y la
pimienta; pulsar 10-15 veces para picar. Encender el aparato
y agregar lentamente el aceite por el tubo de alimentación;
procesar por aprox. 1 minuto para emulsionar. Raspar el bol.
Para conseguir una consistencia menos espesa, simplemente
agregar más aceite o agua.
3. Colocar el pesto en un recipiente de vidrio o hermético,
dar golpecitos para eliminar las burbujas de aire y allanar
la superficie. Cubrir la superficie directamente con papel
film/plástico y refrigerar. El pesto dura hasta 5 días en el
refrigerador, o hasta 2 meses en el congelador.
Información nutricional por porción de 1 cucharada:
Calorías 25 (84 % degrasa) • Carbohidratos 0 g • Proteínas 1g • Grasa 2 g
Grasa saturada 0 g • Colesterol 1 mg • Sodio 56 mg • Calcio 14 mg • Fibra 0 g
Pizza Margarita
Simple pero deliciosa, ¡por algo esta pizza es un clásico!
Rinde 1 pizza
1. Precalentar el horno y la piedra de pizza en 700°F.
2. Estirar la masa para formar un rectángulo de aprox. 10-12in
(25-30cm).
3. Colocar la masa en la pala de pizza bien enharinada.
4. Esparcir uniformemente la salsa de pizza en la masa, dejando
una orilla de 1in (2.5cm).
5. Rociar con queso Mozzarella.
6. Agitar suavemente la pala para comprobar que la masa no esté
pegada a ella. Si la masa se pega, levantarla suavemente y
rociar un poco más de harina debajo.
7. Fijar el temporizador en 5 minutos. Meter la pizza al horno, en
la piedra de pizza. Iniciar la cuenta.
8. Al final del tiempo, comprobar el estado de cocción. Si la pizza
está lista, retirarla del horno con la pala de pizza. Si le falta,
hornearla por aprox. 1 minuto adicional. Deslizar la pizza en una
tabla de picar. Rociar con queso Parmesano, albahaca y aceite
de oliva. Cortar y servir.
Información nutricional por porción (basado en 8 porciones):
Calorías 166 (15 % de grasa) • Carbohidratos 29 g • Proteínas 7 g • Grasa 3 g
Grasa saturada 1 g • Colesterol 9 mg • Sodio 510 mg • Calcio 62 mg • Fibra 1 g
Pizza de cuatro quesos con tomates asados
¡Perfecta para los amantes del queso!
Rinde 1 pizza

21
1. Precalentar el horno y la piedra de pizza en 700 °F.
2. Calentar el aceite de oliva a fuego medio-alto, en una sartén
mediana. Agregar los tomates y cocinarlos, agitando la sartén,
hasta que la piel se agriete. Retirar del fuego y reservar.
3. Estirar la masa para formar un rectángulo de aprox. 10-12in
(25-30cm).
4. Colocar la masa en la pala de pizza bien enharinada.
5. Esparcir uniformemente el queso ricota en la masa, dejando
una orilla de 1in (2.5cm).
6. Rociar con la Mozzarella y el queso Fontina, y esparcir los
tomates por encima.
7. Agitar suavemente la pala para comprobar que la masa no esté
pegada a ella. Si la masa se pega, levantarla suavemente y
rociar un poco más de harina debajo.
8. Fijar el temporizador en 5 minutos. Meter la pizza al horno, en
la piedra de pizza. Iniciar la cuenta.
9. Al final del tiempo, comprobar el estado de cocción. Si la pizza está
lista, retirarla del horno con la pala de pizza. Si le falta, hornearla
por aprox. 1 minuto adicional. Deslizar la pizza en una tabla de picar.
Rociar con queso Parmesano y orégano. Cortar y servir.
Información nutricional por porción (basado en 8 porciones):
Calorías 147 (37 % degrasa) • Carbohidratos 18 g • Proteínas 5 g • Grasa 6 g
Grasa saturada 2 g • Colesterol 70 mg • Sodio 250 mg • Calcio 65 mg • Fibra 1 g
Pizza de pesto de rúcula-pistachos,
Prosciutto y Burrata
Ligeramente sofisticada pero increíblemente sencilla. Traiga la
pizzería a casa con esta sabrosa pizza.
Rinde 1 pizza
1. Precalentar el horno y la piedra de pizza en 700°F.
2. Estirar la masa para formar un rectángulo de aprox. 10-12
in (25-30cm).
3. Colocar la masa en la pala de pizza bien enharinada.
4. Esparcir uniformemente el pesto en la masa, dejando una orilla
de 1in (2.5cm).
5. Agitar suavemente la pala para comprobar que la masa no esté
pegada a ella. Si la masa se pega, levantarla suavemente y
rociar un poco más de harina debajo.
6. Fijar el temporizador en 5 minutos. Meter la pizza al horno, en
la piedra de pizza. Iniciar la cuenta.

22
7. Al final del tiempo, comprobar el estado de cocción. Si la pizza
está lista, retirarla del horno con la pala de pizza. Si le falta,
hornearla por aprox. 1 minuto adicional. Deslizar la pizza en una
tabla de picar. Cubrir con rúcula. Romper la burrata y colocar
los trozos sobre la rúcula, seguidos del jamón. Rociar con miel,
aceite de oliva, copos de sal marina y pimienta negra. Cortar y
servir.
Información nutricional por porción (basado en 8 porciones):
Calorías 91 (45 % degrasa) • Carbohidratos 12 g • Proteínas 5 g • Grasa 6 g
Grasa saturada 2 g • Colesterol 10 mg • Sodio 326 mg • Calcio 17 mg • Fibra 1 g
Pizza blanca con salchicha, grelos y
pimientos dulces
Los grelos y la salchicha se unen a la perfección en esta sabrosa pizza.
Rinde 1 pizza
1. Precalentar el horno y la piedra de pizza en 700 °F.
2. Estirar la masa para formar un rectángulo de aprox. 10-12in
(25-30cm).
3. Colocar la masa en la pala de pizza bien enharinada.
4. Esparcir uniformemente el queso ricota en la masa, dejando
una orilla de 1in (2.5cm).
5. Añadir la Mozzarella, la salchicha, los pimientos dulces y los grelos.
6. Agitar suavemente la pala para comprobar que la masa no esté
pegada a ella. Si la masa se pega, levantarla suavemente y
rociar un poco más de harina debajo.
7. Fijar el temporizador en 5 minutos. Meter la pizza al horno, en
la piedra de pizza. Iniciar la cuenta.
8. Al final del tiempo, comprobar el estado de cocción. Si la pizza
está lista, retirarla del horno con la pala de pizza. Si le falta,
hornearla por aprox. 1 minuto adicional. Deslizar la pizza en una
tabla de picar. Rociar con jugo de limón, hojuelas de pimiento
rojo, aceite de oliva y copos de sal marina. Cortar y servir.
Información nutricional por porción (basado en 8 porciones):
Calorías 163 (37 % degrasa) • Carbohidratos 18 g • Proteínas 7 g • Grasa 7 g
Grasa saturada 2 g • Colesterol 15 mg • Sodio 385 mg • Calcio 66 mg • Fibra 1 g
Pizza de manzana, tocino, cebolla roja y
queso azul
La manzana roja sin pelar añade un toque de color, así como un
toque de dulzura para compensar el sabor intenso del queso azul y
el salado del tocino.
Rinde 1 pizza

23
1. Precalentar el horno y la piedra de pizza en 700 °F.
2. Estirar la masa para formar un círculo de 10-12in (25-30cm).
3. Colocar la masa en la pala de pizza bien enharinada.
4. Esparcir la cebolla sobre la masa, seguida de la manzana, del
queso azul y del tocino.
5. Agitar suavemente la pala para comprobar que la masa no esté
pegada a ella. Si la masa se pega, levantarla suavemente y
rociar un poco más de harina debajo.
6. Fijar el temporizador en 5 minutos. Meter la pizza al horno, en
la piedra de pizza. Iniciar la cuenta.
7. Al final del tiempo, comprobar el estado de cocción. Si la pizza
está lista, retirarla del horno con la pala de pizza. Si le falta,
hornearla por 1-2 minutos adicionales. Deslizar la pizza en una
tabla de picar. Cortar y servir.
Información nutricional por porción (basado en 8 porciones):
Calorías 114 (23 % degrasa) • Carbohidratos 18 g • Proteínas 4 g • Grasa 3 g
Grasa saturada 1 g • Colesterol 4 mg • Sodio 256 mg • Calcio 24 mg • Fibra 1 g
Pizza de pesto de arvejas tiernas
¡Los colores verde vivo y blanco de esta pizza gritan a primavera!
El huevo le da un agradable toque salado y afrutado.
Rinde 1 pizza
1. Precalentar el horno y la piedra de pizza en 700 °F.
2. Estirar la masa para formar un rectángulo de aprox. 10-12in
(25-30cm).
3. Colocar la masa en la pala de pizza bien enharinada.
4. Esparcir el pesto sobre cada círculo, dejando una orilla de 1in
(2.5cm). Esparcir cucharadas del queso ricota y rociar con el
queso Pecorino.
5. Agitar suavemente la pala para comprobar que la masa no esté
pegada a ella. Si la masa se pega, levantarla suavemente y
rociar un poco más de harina debajo.
6. Fijar el temporizador en 3 minutos. Meter la pizza al horno, en
la piedra de pizza. Iniciar la cuenta.
7. Al final del tiempo, romper el huevo en el centro de la pizza
y devolverla con cuidado al horno. Hornear hasta que la clara
esté completamente cocinada, aprox. 1-2 minutos (o más si
prefiere huevo más cocinado).
8. Retirar la pizza del horno con la pala de pizza y cubrir con
brotes de arvejas.
9. Pasar a una tabla de picar. Cortar y servir.
Información nutricional por porción (basado en 8 porciones):
Calorías 137 (32 % degrasa) • Carbohidratos 18 g • Proteínas 5 g • Grasa 5 g
Grasa saturada 2 g • Colesterol 29 mg • Sodio 247 mg • Calcio 20 mg • Fibra 1 g

24
Pizza hawaiana picante
La combinación dulce y salada de la piña y del chorizo hace que esta
versión de la pizza hawaiana sea irresistible incluso para los detractores.
Envolver las sobras de chorizo y congelar por un máximo de 6 meses.
Rinde 1 pizza
1. Precalentar el horno y la piedra de pizza en 650 °F.
2. Estirar la masa para formar un círculo de 10-12in (25-30cm).
3. Colocar la masa en la pala de pizza bien enharinada.
4. Cubrir la masa con la salsa, dejando una orilla de 1in (2.5cm),
y rociar con queso. Añadir la piña y el chorizo.
5. Agitar suavemente la pala para comprobar que la masa no esté
pegada a ella. Si la masa se pega, levantarla suavemente y
rociar un poco más de harina debajo.
6. Fijar el temporizador en 5 minutos. Meter la pizza al horno, en
la piedra de pizza. Iniciar la cuenta.
7. Al final del tiempo, comprobar el estado de cocción. Si la pizza
está lista, retirarla del horno con la pala de pizza. Si le falta,
hornearla por 1-2 minutos adicionales. Deslizar la pizza en una
tabla de picar. Dejar enfriar por unos minutos antes de cortar.
Información nutricional por porción (basado en 8 porciones):
Calorías 177 (18 % de grasa)
Carbohidratos 29 g • Proteínas 7 g • Grasa 4 g • Grasa saturada 1 g • Colesterol
29 mg • Sodio 468 mg • Calcio 21 mg • Fibra 1 g
Pizza “New Haven” blanca de almejas
Este pizza clásica de Connecticut es una de las favoritas
de los amantes de los mariscos.
Rinde 1 pizza
escurridas
1. Precalentar el horno y la piedra de pizza en 700 °F.
2. Colocar las almejas, el aceite de oliva, el ajo, el orégano, la sal y
la pimienta en un tazón; revolver.
3. Estirar la masa para formar un círculo de 10-12in (25-30cm).
4. Colocar la masa en la pala de pizza bien enharinada.
5. Rociar con el queso Parmesano, y luego la mezcla de almejas.

25
6. Agitar suavemente la pala para comprobar que la masa no esté
pegada a ella. Si la masa se pega, levantarla suavemente y
rociar un poco más de harina debajo.
7. Fijar el temporizador en 5 minutos. Meter la pizza al horno, en
la piedra de pizza. Iniciar la cuenta.
8. Al final del tiempo, comprobar el estado de cocción. Si la pizza
está lista, retirarla del horno con la pala de pizza. Si le falta,
hornearla por 1-2 minutos adicionales. Deslizar la pizza en una
tabla de picar. Rociar con el perejil, la ralladura y las hojuelas
de pimiento rojo. Cortar y servir.
Información nutricional por porción (basado en 8 porciones):
Calorías 155 (35 % degrasa) • Carbohidratos 18 g • Proteínas 7 g • Grasa 6 g
Grasa saturada 1 g • Colesterol 11 mg • Sodio 427 mg • Calcio 22 mg • Fibra 1 g
Pizza de maíz al estilo mexicano
Esta pizza es extra-deliciosa durante el verano, cuando el
maíz fresco es más dulce.
Rinde 1 pizza
1. Precalentar el horno y la piedra de pizza en 700°F.
2. Colocar la crema agria, el jugo de lima y la sal en un tazón
pequeño; revolver. Póngalo de un lado.Reservar.
3. Estirar la masa para formar un círculo de 10-12in (25-30cm).
4. Colocar la masa en la pala de pizza bien enharinada.
5. Rociar el queso Oaxaca sobre la masa. Añadir el maíz y el
chile poblano.
6. Agitar suavemente la pala para comprobar que la masa no esté
pegada a ella. Si la masa se pega, levantarla suavemente y
rociar un poco más de harina debajo.
7. Fijar el temporizador en 5 minutos. Meter la pizza al horno,
en la piedra de pizza. Iniciar la cuenta. Al final del tiempo,
comprobar el estado de cocción. Si la pizza está lista, retirarla
del horno con la pala de pizza. Si le falta, hornearla por aprox. 1
minuto adicional. Deslizar la pizza en una tabla de picar.
8. Rociar la pizza con la mezcla de crema-lima, al gusto, seguidos
del queso Cotija, del chile en polvo, del cilantro, de los copos
de sal marina y de la pimienta. Cortar y servir.
Información nutricional por porción (basado en 8 porciones):
Calorías 193 (33 % degrasa) • Carbohidratos 25 g • Proteínas 8 g • Grasa 7 g
Grasa saturada 4 g • Colesterol 17 mg • Sodio 588 mg • Calcio 11 mg • Fibra 1 g

26
Pizza de naan de cordero picante, queso
Feta y hierbas
Recomendamos hacer esta pizza con nuestra masa de naan, pero
es igual de deliciosa con masa de pizza tradicional.
Rinde 1 pizza
1. Precalentar el horno y la piedra de pizza en 500°F.
2. Colocar el cordero, la canela, la páprika, la cebolla en polvo,
el ajo en polvo, el comino, la sal, la harissa y el kétchup en un
tazón grande; revolver para combinar.
3. Calentar el aceite de oliva a fuego medio-alto, en una sartén
mediana. Agregar la mezcla de cordero y cocinar hasta que la
carne ya no esté rosada. Retirar del fuego y reservar.
4. Estirar la masa para formar un círculo de 10-12in (25-30cm).
5. Colocar la masa en la pala de pizza bien enharinada.
6. Esparcir el cordero cocinado en la masa, dejando una orilla de
1in (2.5cm). Cubrir con la cebolla.
7. Agitar suavemente la pala para comprobar que la masa no esté
pegada a ella. Si la masa se pega, levantarla suavemente y
rociar un poco más de harina debajo.
8. Fijar el temporizador en 5 minutos. Meter la pizza al horno,
en la piedra de pizza. Iniciar la cuenta. Al final del tiempo,
comprobar el estado de cocción. Si la pizza está lista, retirarla
del horno con la pala de pizza. Si le falta, hornearla por aprox. 1
minuto adicional. Deslizar la pizza en una tabla de picar.
9. Rociar con queso Feta, perejil y menta. Cortar y servir.
Información nutricional por porción (basado en 8 porciones):
Calorías 226 (49 % degrasa) • Carbohidratos 19 g • Proteínas 9 g • Grasa 12 g
Grasa saturada 4 g • Colesterol 26 mg • Sodio 398 mg • Calcio 33 mg • Fibra 1 g
Pizza de papa, salchicha y romero
Las papas son un popular ingrediente de la pizza romana, que
resultan en una comida sencilla pero deliciosa. ¡Pruébela con un
huevo roto por encima para una pizza de desayuno!
Rinde 1 pizza

27
1. Precalentar el horno y la piedra de pizza en 700°F.
2. Estirar la masa para formar un círculo de 10-12in (25-30cm).
3. Colocar la masa en la pala de pizza bien enharinada.
4. Rociar la mitad del queso Fontina en la masa.
5. Disponer las rodajas de papa por encima del queso. Pincelar las
papas con el aceite de oliva y rociar con la sal kosher.
6. Cubrir con el queso restante y la salchicha. Rociar con romero.
7. Agitar suavemente la pala para comprobar que la masa no esté
pegada a ella. Si la masa se pega, levantarla suavemente y
rociar un poco más de harina debajo.
8. Fijar el temporizador en 5 minutos. Meter la pizza al horno,
en la piedra de pizza. Iniciar la cuenta. Al final del tiempo,
comprobar el estado de cocción. Si la pizza está lista, retirarla
del horno con la pala de pizza. Si le falta, hornearla por aprox. 1
minuto adicional. Deslizar la pizza en una tabla de picar.
Rociar con queso Parmesano, hojuelas de pimiento rojo, aceite
de oliva virgen extra, copos de sal marina y pimienta negra.
Cortar y servir.
Información nutricional por porción (basado en 8 porciones):
Calorías 183 (37 % degrasa) • Carbohidratos 21 g • Proteínas 7 g • Grasa 7 g
Grasa saturada 3 g • Colesterol 20 mg • Sodio 455 mg • Calcio 82 mg • Fibra 1 g
Pizza de carne desmechada, cebolla
caramelizada y Gouda ahumado
Las costillas estofadas son la estrella de esta deliciosa pizza.
Rinde 1 pizza
1. Calentar 2 cucharaditas (10ml) del aceite vegetal a fuego
medio-alto, en un horno holandés. Sazonar las costillas con sal
y pimienta. Colocar las costillas y el ajo en el horno holandés,
comprobando que la parte cortada del ajo apunte hacia el
fondo de la olla. Dorar la carne por todos lados. Agregar el
caldo, el romero y el tomillo. Cuando el caldo empiece a
hervir, reducir el fuego y hervir a fuego lento por 2½-3 horas,
parcialmente tapado, hasta que la carne esté muy suave y
se despegue de los huesos. Dejar enfriar completamente. A
continuación, desmenuzar la carne; reservar.
2. Calentar el aceite restante a fuego medio, en una sartén
mediana. Agregar las cebollas y saltear por 10 minutos,
revolviendo de vez en cuando.

28
Reducir el fuego y cocinar a fuego medio-bajo por 20-25
minutos adicionales, hasta que se caramelicen. Retirar del
fuego y reservar.
3. Precalentar el horno y la piedra de pizza en 700°F.
4. Estirar la masa para formar un círculo de 10-12in (25-30cm).
5. Colocar la masa en la pala de pizza bien enharinada.
6. Esparcir uniformemente la salsa de pizza en la masa, dejando
una orilla de 1in (2.5cm).
7. Rociar con el queso Gouda, seguido de la carne desmenuzada y
de la cebolla caramelizada.
8. Agitar suavemente la pala para comprobar que la masa no esté
pegada a ella. Si la masa se pega, levantarla suavemente y
rociar un poco más de harina debajo.
9. Fijar el temporizador en 5 minutos. Meter la pizza al horno, en
la piedra de pizza. Iniciar la cuenta.
10. Al final del tiempo, comprobar el estado de cocción. Si la pizza
está lista, retirarla del horno con la pala de pizza. Si le falta,
hornearla por aprox. 1 minuto adicional. Deslizar la pizza en una
tabla de picar. Rociar con las cebolletas. Cortar y servir.
Información nutricional por porción (basado en 8 porciones):
Calorías 274 (54 % degrasa) • Carbohidratos 20 g • Proteínas 11 g • Grasa 16 g
Grasa saturada 6g • Colesterol 35 mg • Sodio 288 mg • Calcio 64 mg • Fibra 2 g
Pizza de coliflor con coles de Bruselas,
tocino y hojuelas de queso Parmesano
El tocino salado, las coles de Bruselas balsámicas dulces y ácidas
y el queso cremoso se unen deliciosamente en esta sabrosa pizza.
Use una procesadora de alimentos o una mandolina para rebanar
finamente las coles de Bruselas.
Rinde 1 pizza
1. Precalentar el horno y la piedra de pizza en 500°F.
2. Colocar el vinagre balsámico, el aceite, la miel y la sal en
un tazón mediano; batir para combinar. Agregar las coles de
Bruselas y revolver; reservar.
3. Rociar el queso Cheddar en la masa de coliflor y agregar las
coles de Bruselas y el tocino.
4. Fijar el temporizador en 5 minutos. Meter la bandeja al horno,
en la piedra de pizza. Iniciar la cuenta.
5. Al final del tiempo, comprobar el estado de cocción. Si la pizza
está lista, retirarla del horno con la pala de pizza. Si le falta,
hornearla por aprox. 1 minuto adicional. Dejar enfriar en una
rejilla por 2 minutos y, a continuación, retirarla de la bandeja.

29
6. Rociar con queso Parmesano, cebollinos, copos de sal marina y
pimienta. Cortar y servir.
Información nutricional por porción (basado en 8 porciones):
Calorías 186 (62 % degrasa) • Carbohidratos 6 g • Proteínas 11 g • Grasa 13 g
Grasa saturada 5 g • Colesterol 36 mg • Sodio 535 mg • Calcio 255 mg • Fibra 2 g
Focaccia con romero
La focaccia fresca es una delicia. Sírvala tibia con un pequeño
cuenco de su mejor aceite de oliva para mojar.
Rinde 1 focaccia
1. Preparar la masa de focaccia. Dejar descansar por 2 horas
antes de preparar la pizza.
2. Engrasar la bandeja con 2 cucharadas (30ml) del aceite de oliva.
3. Colocar la masa en la bandeja y voltearlas varias veces para
cubrirla bien con el aceite.
4. Aplastar toda la superficie de la masa con la yema de los dedos
para hacer abolladuras. Al mismo tiempo, estirarla hacia los
lados de la bandeja poco a poco y sin forzar.
5. Cubrir la bandeja y dejar la masa descansar por 20 minutos.
Después de este tiempo, repetir el proceso, enfocándose en
estirar la masa hacia los lados de la bandeja. Cubrir y dejar
reposar por 20 minutos adicionales. Repetir este proceso hasta
que la masa cubra el fondo de la bandeja. Nota: Este proceso
puede tomar 60 minutos en total.
6. Pincelar la masa con el aceite de oliva restante y rociar con el
romero y la sal.
7. Cubrir sin apretar con papel film/plástico y dejar descansar
mientras el horno se está calentando.
8. Precalentar el horno y la piedra de pizza en 500°F.
9. Fijar el temporizador en 10 minutos. Quitar el papel film/
plástico y meter la bandeja al horno. Iniciar la cuenta. Hornear
hasta que la focaccia esté uniformemente dorada. Al final del
tiempo, comprobar el estado de cocción. Si le falta, girar la
bandeja y hornear por hasta 5 minutos adicionales.
10. Colocar la bandeja sobre una rejilla resistente al calor. Dejar
enfriar ligeramente, y retirar la focaccia de la bandeja. Cortar
y servir.
Información nutricional por porción (basado en 8 porciones):
Calorías 199 (36 % degrasa) • Carbohidratos 28 g • Proteínas 4 g • Grasa 8 g
Grasa saturada 1 g • Colesterol 0 mg • Sodio 819 mg • Calcio 2 mg • Fibra 1 g

30
Pizza “Detroit” de pepperoni clásica
La pizza de masa gruesa “Detroit” se caracteriza por el uso de
cubos de queso en lugar de queso rallado.
Rinde 1 pizza
1. Engrasar la bandeja con el aceite de oliva.
2. Colocar la masa en la bandeja y voltearla varias veces para
cubrirla con el aceite.
3. Aplastar toda la superficie de la masa con la yema de los dedos
para hacer abolladuras. Al mismo tiempo, estirar la masa hacia
los lados de la bandeja poco a poco y sin forzar.
4. Cubrir la bandeja y dejar la masa descansar por 20 minutos.
Después de este tiempo, repetir el proceso, enfocándose en
estirar la masa hacia los lados de la bandeja. Cubrir y dejar
reposar por 20 minutos adicionales. Repetir este proceso hasta
que la masa cubra el fondo de la bandeja. Nota: Este proceso
puede tomar 60 minutos en total.
5. Cuando la masa esté lista, cubrirla con ½ taza (120ml) de salsa
y el queso, hundiendo ligeramente los cubos en la masa.
6. Cubrir la sin apretar con papel film/plástico y dejar subir
mientras el horno se está calentando.
7. Precalentar el horno y la piedra de pizza en 550 °F.
8. Cuando el horno esté caliente, quitar el papel film/plástico
y cubrir con la salsa restante (uniformemente o formando
tiras). Fijar el temporizador en 14 minutos. Meter la bandeja
al horno. Iniciar la cuenta. Hornear la pizza hasta que esté
uniformemente dorada. Cuando la pizza esté lista, cubrir con
las rodajas de pepperoni. Devolver al horno y hornear por 2-3
minutos adicionales, hasta que las orillas del pepperoni estén
crujientes.
9. Retirar del horno y rociar con una pizca de sal. Retirar del
horno, dejar enfriar en la bandeja por 1 minuto, y pasar a una
tabla de picar. Cortar y servir.
Información nutricional por porción (basado en 8 porciones):
Calorías 368 (45 % degrasa) • Carbohidratos 38 g • Proteínas 13 g • Grasa 18 g
Grasa saturada 8 g • Colesterol 31 mg • Sodio 777 mg • Calcio 194 mg • Fibra 2 g
Pizza siciliana de albóndigas
Esta sustanciosa pizza de masa gruesa les encantará a los
amantes de las albóndigas.
Rinde 1 pizza
1. Engrasar la bandeja con el aceite de oliva.
2. Colocar la masa en la bandeja y voltearlas varias veces para
cubrirla bien con el aceite.
3. Aplastar toda la superficie de la masa con la yema de los dedos
para hacer abolladuras. Al mismo tiempo, estirar la masa hacia
los lados de la bandeja poco a poco y sin forzar.

31
4. Cubrir la bandeja y dejar la masa descansar por 20 minutos.
Después de este tiempo, repetir el proceso, enfocándose en
estirar la masa hacia los lados de la bandeja. Cubrir y dejar
reposar por 20 minutos adicionales. Repetir este proceso hasta
que la masa cubra el fondo de la bandeja. Nota: Este proceso
puede tomar 60 minutos en total.
5. Precalentar el horno y la piedra de pizza en 500°F. Fijar el
temporizador en 5 minutos. Quitar el papel film/plástico y
meter la bandeja al horno. Iniciar la cuenta. Después de 5
minutos de cocción, cubrir la masa precocinada con salsa y
Mozzarella. Añadir cucharadas del queso ricota y las rodajas de
albóndigas.
6. Fijar el temporizador en 10 minutos. Devolver la pizza al horno.
Iniciar la cuenta. Hornear hasta que el borde esté bien dorado y
crujiente, y que el queso esté burbujeante.
7. Retirar del horno, dejar enfriar en la bandeja por 1 minuto, y
pasar a una tabla de picar. Cortar y servir.
Información nutricional por porción (basado en 8 porciones):
Calorías 270 (39 % degrasa) • Carbohidratos 32 g • Proteínas 11 g • Grasa 12 g
Grasa saturada 4 g • Colesterol 19 mg • Sodio 1015 mg • Calcio 133 mg • Fibra 1 g
Calzones de brócoli
Rellenos de brócoli y queso, estos calzones son una cena
estupenda y rápida para toda la familia
.
Rinde 4 calzones
1. Dividir la masa en 4 porciones iguales y formar 4 bolas suaves.
Colocar las bolas de masa en una superficie ligeramente
enharinada y cubrir con papel film/plástico o una toalla húmeda
mientras el horno se está calentando.
2. Precalentar el horno y la piedra de pizza en 500 °F.
3. Mientras el horno se está calentando, preparar el relleno.
Colocar el brócoli y el ajo en un tazón pequeño. Nota: Cortar
los cogollos en pedazos más pequeños si son muy grandes.
4. En otro tazón, combinar el queso ricota, el queso Parmesano, la
Mozzarella y la pimienta; revolver bien para combinar.
5. Cuando el horno esté casi listo, armar los calzones.
6. Estirar cada bola de masa para formar un círculo de 8in
(20cm). Dividir la mezcla de queso ricota entre los círculos,
esparciéndola en la mitad inferior. Cubrir con queso y le mezcla
de brócoli-ajo.

32
Pincelar la orilla de la masa con agua y doblar la mitad superior
para cubrir el relleno. Pellizcar/pinchar el borde con los dedos o
un tenedor para sellar.
7. Pincelar la parte superior de los calzones con aceite de oliva.
8. Fijar el temporizador en 15 minutos. Usando la pala de pizza,
deslizar con cuidado dos calzones en la piedra de pizza. Iniciar
la cuenta. Hornear hasta que estén uniformemente dorados.
Retirar del horno y dejar enfriar sobre una rejilla. Repetir con el
resto de los calzones.
9. Dejar enfriar por unos minutos antes de servir.
*Nota: La masa de pizza “New York” puede dejarse descansar
(en el refrigerador) por menos tiempo que cuando se usa para
hacer pizza. Cuatro horas son suficientes para hacer calzones.
Información nutricional por porción (medio calzone):
Calorías 168 (33 % degrasa) • Carbohidratos 20 g • Proteínas 9 g • Grasa 6 g
Grasa saturada 3 g • Colesterol 18 mg • Sodio 309 mg • Calcio 109 mg • Fibra 1 g
Calzones de pollo a la Parmesana
¿Qué es aún mejor que pollo a la Parmesana? ¡Pollo a la
Parmesana en una sabrosa masa de pizza!
Rinde 4 calzones
1. Dividir la masa en 4 porciones iguales y formar 4 bolas suaves.
Colocar las bolas de masa en una superficie ligeramente
enharinada y cubrir con papel film/plástico o una toalla húmeda
mientras el horno se está calentando.
2. Precalentar el horno y la piedra de pizza en 500°F.
3. Mientras el horno se está calentando, preparar el relleno.
4. Colocar el queso ricota, el queso Parmesano, la Mozzarella y la
pimienta en un tazón mediano; revolver bien para combinar.
5. Cortar el pollo en tiras de ¼in (5mm) de ancho por no más de
2in (5cm) de largo.
6. Cuando el horno esté casi listo, armar los calzones.
7. Estirar cada bola de masa para formar un círculo de 8in
(20cm). Dividir la mezcla de queso ricota entre los círculos,
esparciéndola en la mitad inferior. Cubrir con pollo y 2
cucharadas (30ml) de salsa. Pincelar la orilla de la masa con
agua y doblar la mitad superior para cubrir el relleno. Pellizcar/
pinchar el borde con los dedos o un tenedor para sellar.
8. Pincelar la parte superior de los calzones con aceite de oliva.
9. Fijar el temporizador en 15 minutos. Usando la pala de pizza,
deslizar con cuidado dos calzones sobre la piedra de pizza.
Iniciar la cuenta. Hornear hasta que estén uniformemente
dorados. Retirar del horno y dejar enfriar sobre la rejilla. Repetir
con el resto de los calzones.
10. Dejar enfriar por unos minutos antes de servir.
*Nota: La masa de pizza “New York” puede dejarse descansar
(en el refrigerador) por menos tiempo que cuando se usa para
hacer pizza. Cuatro horas son suficientes para hacer calzones
Información nutricional por porción (medio calzone):
Calorías 220 (32 % degrasa) • Carbohidratos 24 g • Proteínas 14 g • Grasa 8 g
Grasa saturada 4 g • Colesterol 46 mg • Sodio 442 mg • Calcio 109 mg • Fibra 1 g

33
Pizza de crema de chocolate-avellanas y fresas
¿Pizza para el postre? ¿Por qué no? Esta pizza dulce es un
favorito de todos.
Rinde 1 pizza
1. Precalentar el horno y la piedra de pizza en 600 °F.
2. Estirar la masa a mano o extenderla con un rodillo
(dependiendo del espesor deseado) hasta que forme un círculo
de 12in (30cm).
3. Colocar la masa en la pala de pizza enharinada.
4. Untar la masa con crema de chocolate y avellanas, dejando una
orilla de 1in (2.5cm), y cubrir uniformemente con malvaviscos.
5. Agitar suavemente la pala para comprobar que la masa no esté
pegada a ella. Si la masa se pega, levantarla suavemente y
rociar un poco más de harina debajo.
6. Fijar el temporizador en 4 minutos. Meter la pizza al horno, en
la piedra de pizza. Iniciar la cuenta.
7. Vigilar la pizza mientras se hornea. Cuando la masa esté dorada
y los malvaviscos se hayan derretido, retirar la pizza del horno
con la pala de pizza. Si le falta, hornearla por 1-2 minutos
adicionales. Deslizar la pizza en una tabla de picar.
8. Cubrir uniformemente con rodajas de fresa. Cortar y servir
inmediatamente.
Información nutricional por porción (basado en 12 porciones):
Calorías 101 (32 % degrasa) • Carbohidratos 15 g • Proteínas 2 g • Grasa 4 g
Grasa saturada 1 g • Colesterol 0 mg • Sodio 102 mg • Calcio 9 mg • Fibra 1 g
Tarta de manzana
Para una masa de tarta hojaldrada y perfectamente cocinada, no busque
más que el horno de pizza Cuisinart
®
. Cualquier fruta sirve para esta
sencilla tarta, así que sustituya la manzana por su fruta favorita.
Rinde 12 porciones
1. Precalentar el horno y la piedra de pizza en 400 °F.
2. Colocar la mermelada y el agua en una cacerola pequeña.
Calentar a fuego lento, revolviendo, hasta conseguir una mezcla
suave. Reservar.
3. Colocar la manzana, el azúcar, la maicena, la canela, la sal y el
jugo de limón en un tazón; revolver.
4. Estirar la masa para formar un círculo de aprox. ¼ in (5 mm) de
espesor. Con cuidado, colocar la masa en el centro de la bandeja.
5. Pincelar uniformemente la mitad de la mermelada en la masa,
dejando una orilla de 2in (2.5cm).

34
6. Disponer las manzanas decorativamente por encima de la
mermelada, superponiéndolas si es necesario. Doblar el borde
de la masa, plisándolo para darle un aspecto rústico.
7. Fijar el temporizador en 25 minutos. Meter la bandeja al horno,
en la piedra de pizza. Iniciar la cuenta. Hornear hasta que la
tarta esté dorada y que las manzanas estén tiernas.
Retirar del horno y dejar enfriar en una rejilla.
8. Pincelar las manzanas con la mermelada restante. Dejar enfriar
ligeramente antes de cortar y servir.
Información nutricional por porción:
Calorías 133 (63 % degrasa) • Carbohidratos 9 g • Proteínas 4 g • Grasa 1 g
Grasa saturada 2 g • Colesterol 19 mg • Sodio 242 mg • Calcio 77 mg • Fibra 2 g

3535
Notas:

©2023 Cuisinart
Glendale, AZ 85307
Impreso en China
23CE087218
IB-17963-ESP