Loading ...
Loading ...
Loading ...

Installing Your Heater
WALL MOUNTING CONTINUED
Bracket shown above in located in position.
Carefully lift the heater up ensuring that the top rear ledge of heater engages with the wall
bracket and is sitting centrally. This process should be carried out by two people to avoid injury
or damage to property or the appliance. Gently bring the heater down against the wall. Mark
the lower fixing bracket two fixing hole positions on the wall. Remove the heater and drill the
wall and insert the wall plugs. Refit the heater to the wall and fasten the bottom fixing bracket
to the wall using the screws provided to permanently fix the heater in place.
SET UP
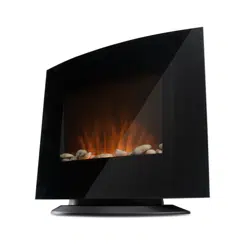
Unpack the pebbles from the bag and place them along the light unit in the desired position.
Place the front surround over the front of the fire aligning the slots in the brackets at each side
of the front panel with the lugs on the sides of the fire. Two people will be required for this
operation.
Then fit the one-way screw into the hole on the bottom of the right lateral hook to stop the
front surround from being removed.
FIREPLACE STAND
It is possible to install the electric fireplace on a stand, instead mounting it on the wall.
Remove the tempered glass panel from the metal body and place the heater face up on a
suitable surface.
In the lower part of the body there are some screws. Which need to be aligned to the holes on
the stand. This will then mean the screw holes on the base and the bottom of the unit will then
line up correctly.
Use the 4 screws that are supplied, secure the base to the lower side of the main body.
Replace the front surround over the front of the fire aligning the slots in the brackets at each
side of the front panel with the lugs on the sides of the fire. Two people will be required for this
operation.
Then fit the one-way screw into the hole on the bottom of the right lateral hook to stop the
front surround from being removed.
Place the unit on a flat and stable surface.
This side goes to front of heater
Loading ...
Loading ...
Loading ...