
MAVO Edge 8K Operation Manual (KineOS 7.0)
For KineOS 5.0
MAVO EDGE 8K
For KineOS 7.0
OPERATION MANUAL

MAVO Edge 8K Operation Manual (KineOS 7.0)
©2021 Kinefinity Inc. Page 2 / 61
MAVO Edge 8K BRIEF INTRODUCTION
Kinefinity Inc. has been developing cinema cameras covering optical design to FPGA, circuits and software,
with assistance from filmmakers, broadcasting industry and academic schools.
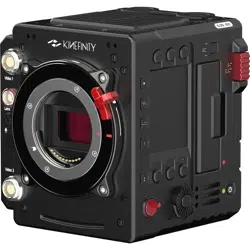
MAVO Edge 8K is a brand-new large-format 8K cine camera. With a whole-new carbon fiber camera body,
MAVO Edge 8K is equipped with a stunning 8K 70P CMOS imaging sensor and cutting-edge image
processing engine, which elevate the Kinefinity camera system to a whole new level. 8K wide up to 70fps, 6K
wide up to 92fps and 4K wide up to 145fps can realize smooth post-production by direct recording with
ProRes.
Full frame 3:2 8K CMOS imaging sensor;
Dual native ISO: 640/2560, low noise level and high latitude image at both settings;
ProRes: In-camera ProRes recording at full resolution, in-camera oversampling 4K;
High frame rate: Up to 92fps@6K Wide, up to 145fps@4K Wide;
Low rolling effect: Fast CMOS imaging sensor readout speed, barely suffer any rolling shutter effect;
14+ stops with KineLOG3: Preserve highlight and shadow perfectly, provide maximum room in post
production;
KineMAG Nano: Fully optimized NVMe-based M.2 SSD;
Custom LUT: Support third-party 3D LUT in both shooting and post production;
KineMOUNT (Interchangeable mounting system): Support PL/EF/Sony E/ARRI LPL Mount;
Video outputs: Video port x2, 3G SDI port x2.
MAVO Edge 8K keeps the very compact and modular body and is compatible with some TERRA/MAVO
accessories such as KineMON-5U/7U, KineEVF and mounting adapters. Thanks to the advanced image
process platform and low consumption design, the highly integrated camera is suitable for both one-man
job and film crew. Besides, Apple ProRes codecs enable fluent post workflow. With professional ports, MAVO
Edge 8K is a powerful cinema camera that offers amazing footage while supporting an effective post
workflow.

MAVO Edge 8K Operation Manual (KineOS 7.0)
©2021 Kinefinity Inc. Page 3 / 61
FOR YOUR SAFETY
Before use, please read all instructions in this manual carefully:
Pay attention to the CAUTION and NOTICE;
Avoid near water use in case of water droplets splashing on the camera;
Protect the camera from severe vibration;
Avoid using the camera under direct sunlight; the operating temperature should be from 0 ℃ to 40℃;
Protect the camera from strong magnetic field, dirt, moisture, or lightning storm environments;
Avoid condensation during transportation or transition;
Never block the air intake/vent, or the camera will be damaged for the overheat ;
Avoid exposing the LCD/OLED screen to harsh direct sunlight, and squeezing or hiting the monitor ;
Only use accessories recommended by Kinefinity.
While using the camera, please:
Turn off the camera when attaching or detaching a Lens Mount;
Avoid touching the OLPF when attaching or detaching a lens mount, as the optical element is fragile;
Make sure the EF lens is aligned pogo-pin contact inside of the EF mount;
Hold the lens while detaching it from the lens mount, to prevent it from accident.

MAVO Edge 8K Operation Manual (KineOS 7.0)
©2021 Kinefinity Inc. Page 4 / 61
Contents
MAVO Edge 8K BRIEF INTRODUCTION ................................................................................ 2
FOR YOUR SAFETY ................................................................................................................... 3
1. CAMERA OVERVIEW ............................................................................................................ 6
1.1 Interfaces and Buttons .................................................................................................................. 6
1.2 Functions of Buttons ..................................................................................................................... 8
1.3 Interface and Parameters .............................................................................................................. 9
1.4 Default Settings ............................................................................................................................ 10
2. QUICK GUIDE ..................................................................................................................... 11
2.1 Power Supply ................................................................................................................................ 11
2.2 Mount ............................................................................................................................................ 13
2.3 Lens ................................................................................................................................................ 14
2.4 Monitoring .................................................................................................................................... 15
2.5 Recording Media SSD .................................................................................................................. 19
2.5.1 Introducing KineMAG Nano ...................................................................................................................... 19
2.5.2 The Use of KineMAG Nano ........................................................................................................................ 20
2.6 Audio .............................................................................................................................................. 21
2.7 e-ND ............................................................................................................................................... 22
2.8 Playback ......................................................................................................................................... 23
2.9 Codec ............................................................................................................................................. 24
2.10 Downscaling and Cropping Mode ........................................................................................... 25
2.11 Access clips on PC/MAC ............................................................................................................ 26
3. SETTINGS AND ADVANCED OPERATIONS ..................................................................... 27
3.1 Footage and Slate ........................................................................................................................ 27
3.2 Exposure and White Balance ...................................................................................................... 28
3.2.1 Color Temperature List ................................................................................................................................ 28
3.2.2 Auto White Balance ...................................................................................................................................... 28
3.2.3 Waveforms ....................................................................................................................................................... 29
3.2.4 Zebra Pattern................................................................................................................................................... 29
3.2.5 Digital Horizon ................................................................................................................................................ 30
3.3 Slow-Mo and Quick-Mo .............................................................................................................. 30
3.3.1 Two Types of FPS ........................................................................................................................................... 30
3.3.2 User-defined CMOS Imaging Sensor FPS ............................................................................................. 30

MAVO Edge 8K Operation Manual (KineOS 7.0)
©2021 Kinefinity Inc. Page 5 / 61
3.4 Custom LUT ................................................................................................................................... 32
3.4.1 Upload Custom LUT ...................................................................................................................................... 32
3.4.2 Erase Custom LUT .......................................................................................................................................... 32
3.5 Firmware Update .......................................................................................................................... 33
3.6 Calibration Mode.......................................................................................................................... 34
3.6.1 Black Balancing ............................................................................................................................................... 34
3.6.2 Update/Downgrade the Firmware ........................................................................................................... 34
3.7 TimeCode and SYNC .................................................................................................................... 35
3.7.1 TC port and TC cord ..................................................................................................................................... 35
3.7.2 External TC ....................................................................................................................................................... 36
3.7.3 Beeper and SYNC ........................................................................................................................................... 36
3.8 Configure the Camera ................................................................................................................. 37
3.8.1 Preset ................................................................................................................................................................. 37
3.8.2 Shutter Display Mode .................................................................................................................................. 38
3.8.3 Camera Fan and Core Temperature ........................................................................................................ 38
3.8.4 ISO/EI ................................................................................................................................................................. 39
3.9 Anamorphic Recording ............................................................................................................... 40
3.10 Kinefinity App Instruction ........................................................................................................ 41
4. TECH & SPEC AND CONNECTORS ................................................................................... 43
4.1 Technical Specifications .............................................................................................................. 43
4.1.1 MAVO Edge 8K SPEC .................................................................................................................................... 43
4.1.2 MAVO Edge 8K Frame Rates and FPS .................................................................................................... 45
4.2 Connectors .................................................................................................................................... 46
4.2.1 DC IN .................................................................................................................................................................. 46
4.2.2 RS ......................................................................................................................................................................... 46
4.2.3 LENS.................................................................................................................................................................... 47
4.2.4 SYNC ................................................................................................................................................................... 47
4.2.5 TC ......................................................................................................................................................................... 48
4.3 Mechanical Drawings................................................................................................................... 49
4.3.1 MAVO Edge 8K Body with KineMOUNT ................................................................................................ 49
4.3.2 MAVO Edge 8K Body with KineMOUNT and EF 3 Mounting Adapter ....................................... 52
4.3.3 MAVO Edge 8K Body with KineMOUNT and E Mounting Adapter ............................................. 55
4.3.4 MAVO Edge 8K Body with KineMOUNT and PL Mounting Adapter ........................................... 58
MAVO Edge 8K Operation Manual (KineOS 7.0)
©2021 Kinefinity Inc. Page 6 / 61
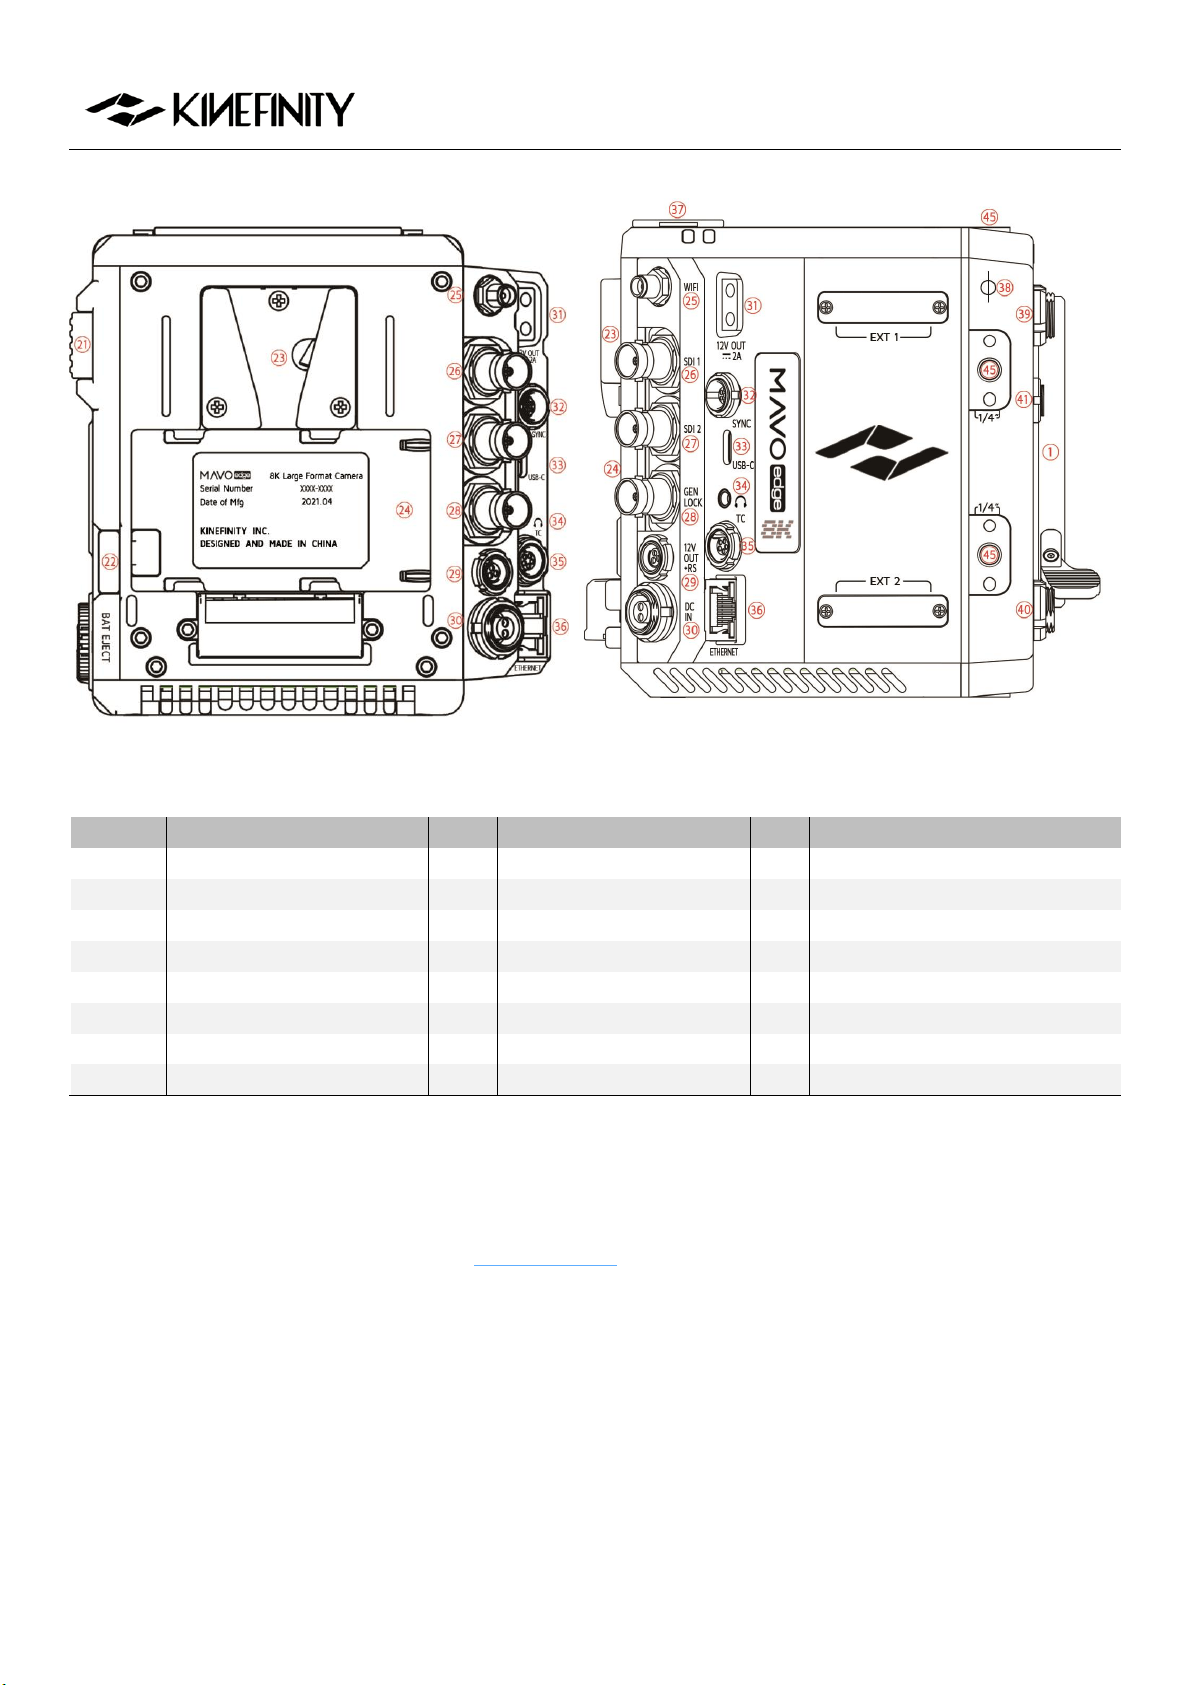
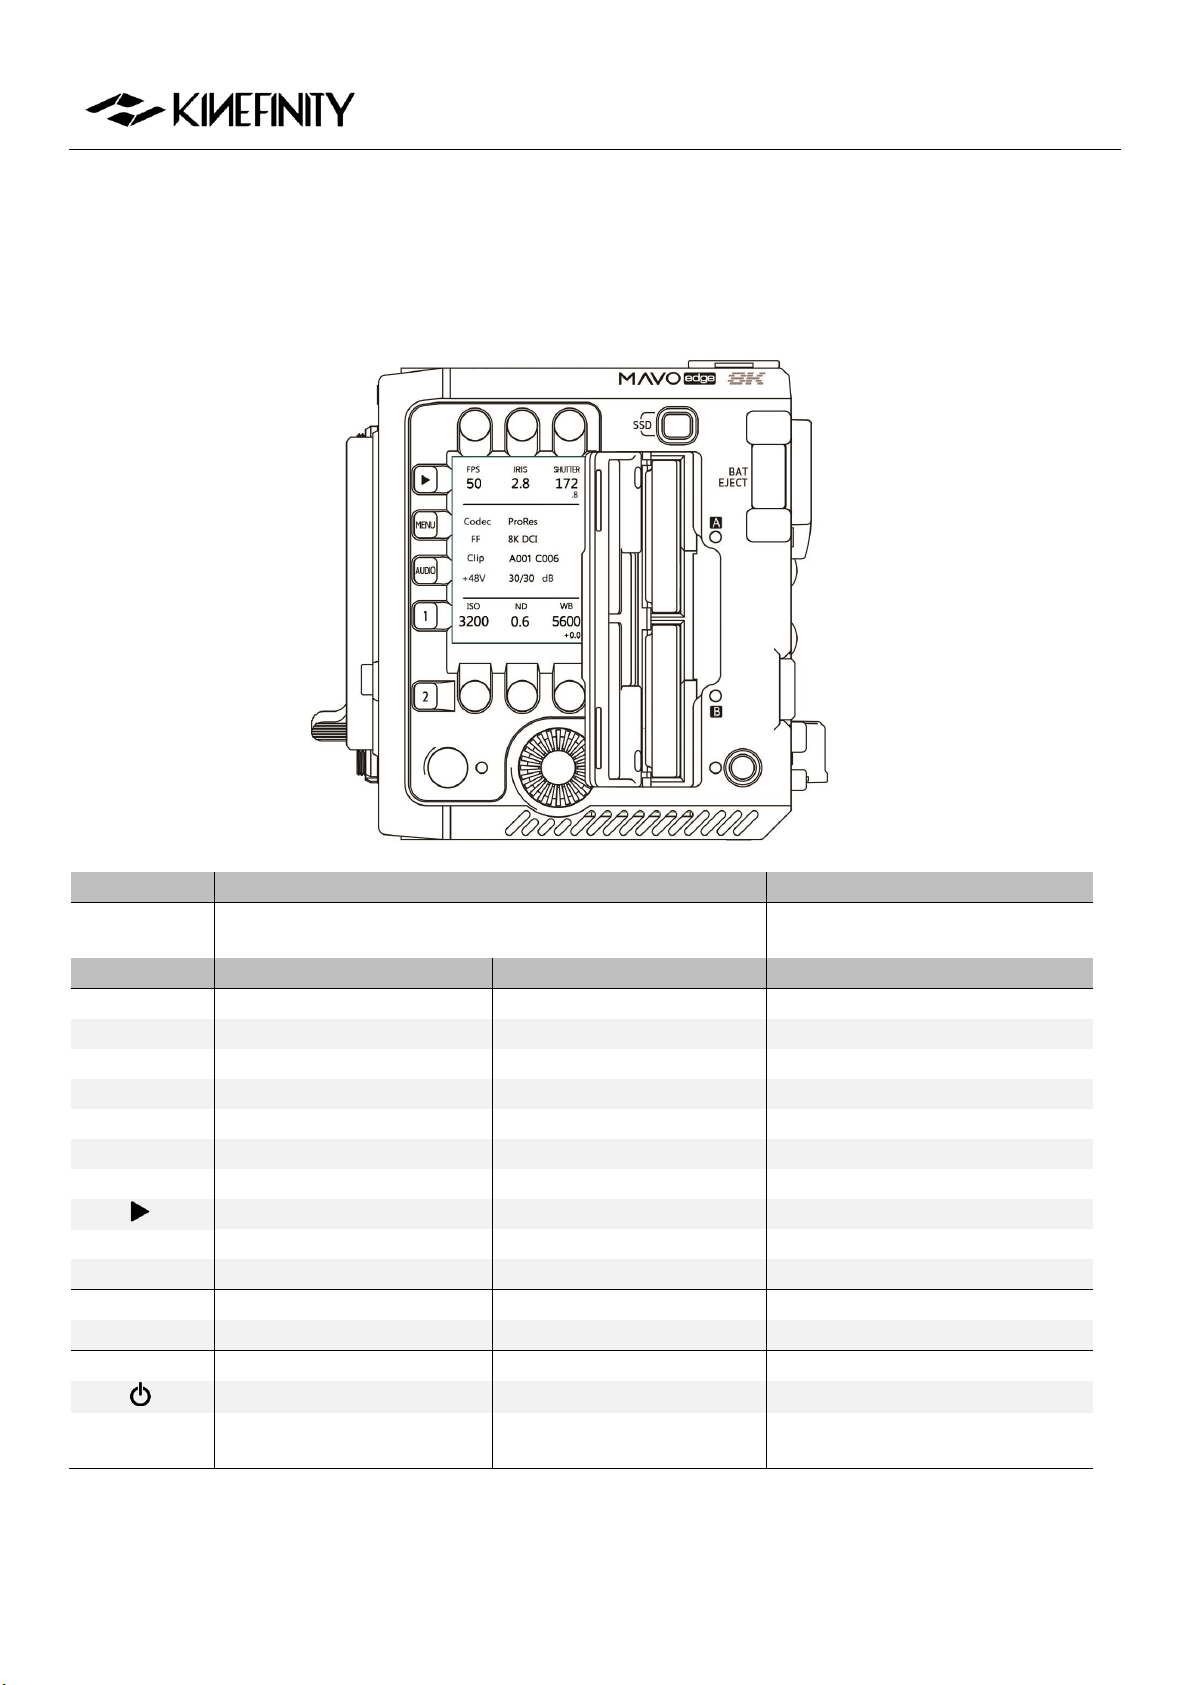
1. CAMERA OVERVIEW
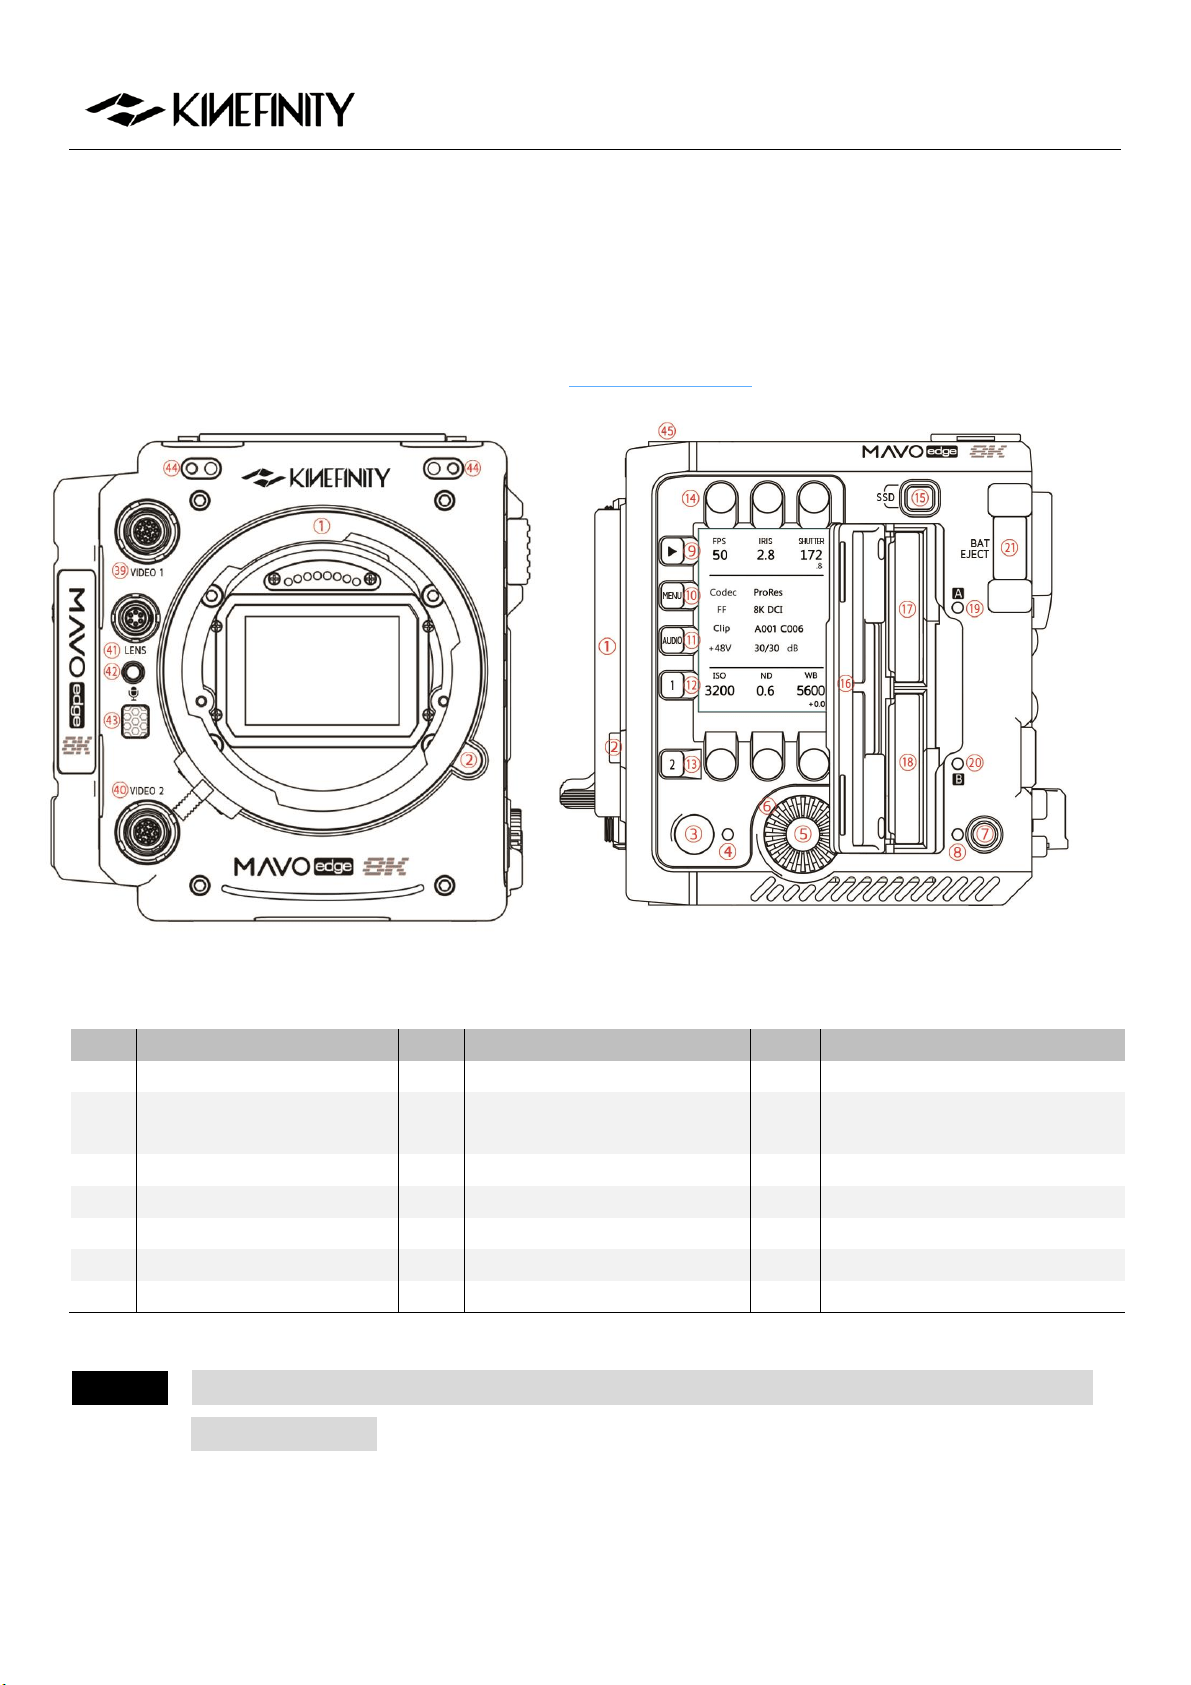
1.1 Interfaces and Buttons
The native mount is KineMOUNT, which works with mounting adapters to adapt different lenses.
Camera Front (KineMOUNT) Camera Left (KineMOUNT)
#
Name
#
Name
#
Name
1
KineMOUNT
8
Power Status LED
15
SSD Button
2
KineMOUNT Release
Button
9
Playback Button
16
SSD Door
3
Record Button
10
MENU Button
17
SSD A
4
Camera Status LED
11
AUDIO Button
18
SSD B
5
Wheel Button
12
LUT/Preset List
19
SSD A Status LED
6
Wheel
13
Zoom Button
20
SSD B Status LED
7
Power Button
14
FPS/Iris/Shutter/ISO/ND/WB
21
V-Mount Battery Release Button
CAUTION Never cover the air intake at the rear of the body and the air vent at top of the body when the
camera is powered.
MAVO Edge 8K Operation Manual (KineOS 7.0)
©2021 Kinefinity Inc. Page 7 / 61
Camera Back Camera Right (KineMOUNT)
#
Name
#
名称
#
名称
22
BP-U30 Release Button
30
DC Power Input
38
Optical Indicator
23
V-mount Battery Plate
31
D-Tap Power Output
39
Video Port 1
24
BP-U30 Plate
32
SYNC Port
40
Video Port 2
25
WIFI Antenna Port*
33
USB-C Port
41
LENS Port
26
3G-SDI Port 1
34
3.5mm Headphone Jack
42
3.5mm MIC Port
27
3G-SDI Port 2
35
TC Port
43
In-camera MIC
28
GENLOCK Port
36
ETHERNET Port
44
KineMON Screw Holes (M3 x2)
29
RS Port
37
Audio XLR Port x2
45
1/4" Threaded Hole
* The WIFI port is manufactured with internal-pin and internal-bore; the antenna is SMA male pin and female
head featured with 5dBi and supports WIFI frequency band.
For the definition of ports, please refer to 4.2 Connectors. SYNC, RS, Lens and Video ports are proprietary.
MAVO Edge 8K Operation Manual (KineOS 7.0)
©2021 Kinefinity Inc. Page 8 / 61
1.2 Functions of Buttons
In Live View mode, use buttons and the wheel to set the parameters; in Playback mode, use the Wheel and
shortcut buttons [1] and [2] to quickly select and switch between clips.
Operation
Rotation
Note
Wheel Rotation
Set Iris or ND/Quick Select
In Playback mode, fast forward and fast
reverse the clip by the wheel.
Operation
Press
Press and Hold for 1 sec
Note
Wheel Button
Waveform/Confirm Operation
FPS
Set FPS
Shooting(CMOS imaging sensor) FPS
IRIS
Set Iris
SHUTTER
Set Shutter
Shutter Angle or Speed
ISO
Set ISO/EI
ND
Set ND (When ND is on)
Switch ND/Clear
Set ND value while ND is chosen
WB
Set Color Temp
Set Tint
Set complete list by menu
Play/Pause (In Playback mode)
Playback/Live View mode
MENU
System settings
AUDIO
Gain Adjustment
Audio Setting
Set Audio by the wheel
1
Switch LUT
Preset List
In Playback Mode, previous clip
2
Zoom
In Playback Mode, next clip
Record
Switch from Playback to Live View
Power on/off
Force Power-off (Hold for 5 secs)
SSD
Choose KineMAG in Slot A/B
Slot A is with full speed and Slot B is
with high speed.
MAVO Edge 8K Operation Manual (KineOS 7.0)
©2021 Kinefinity Inc. Page 9 / 61
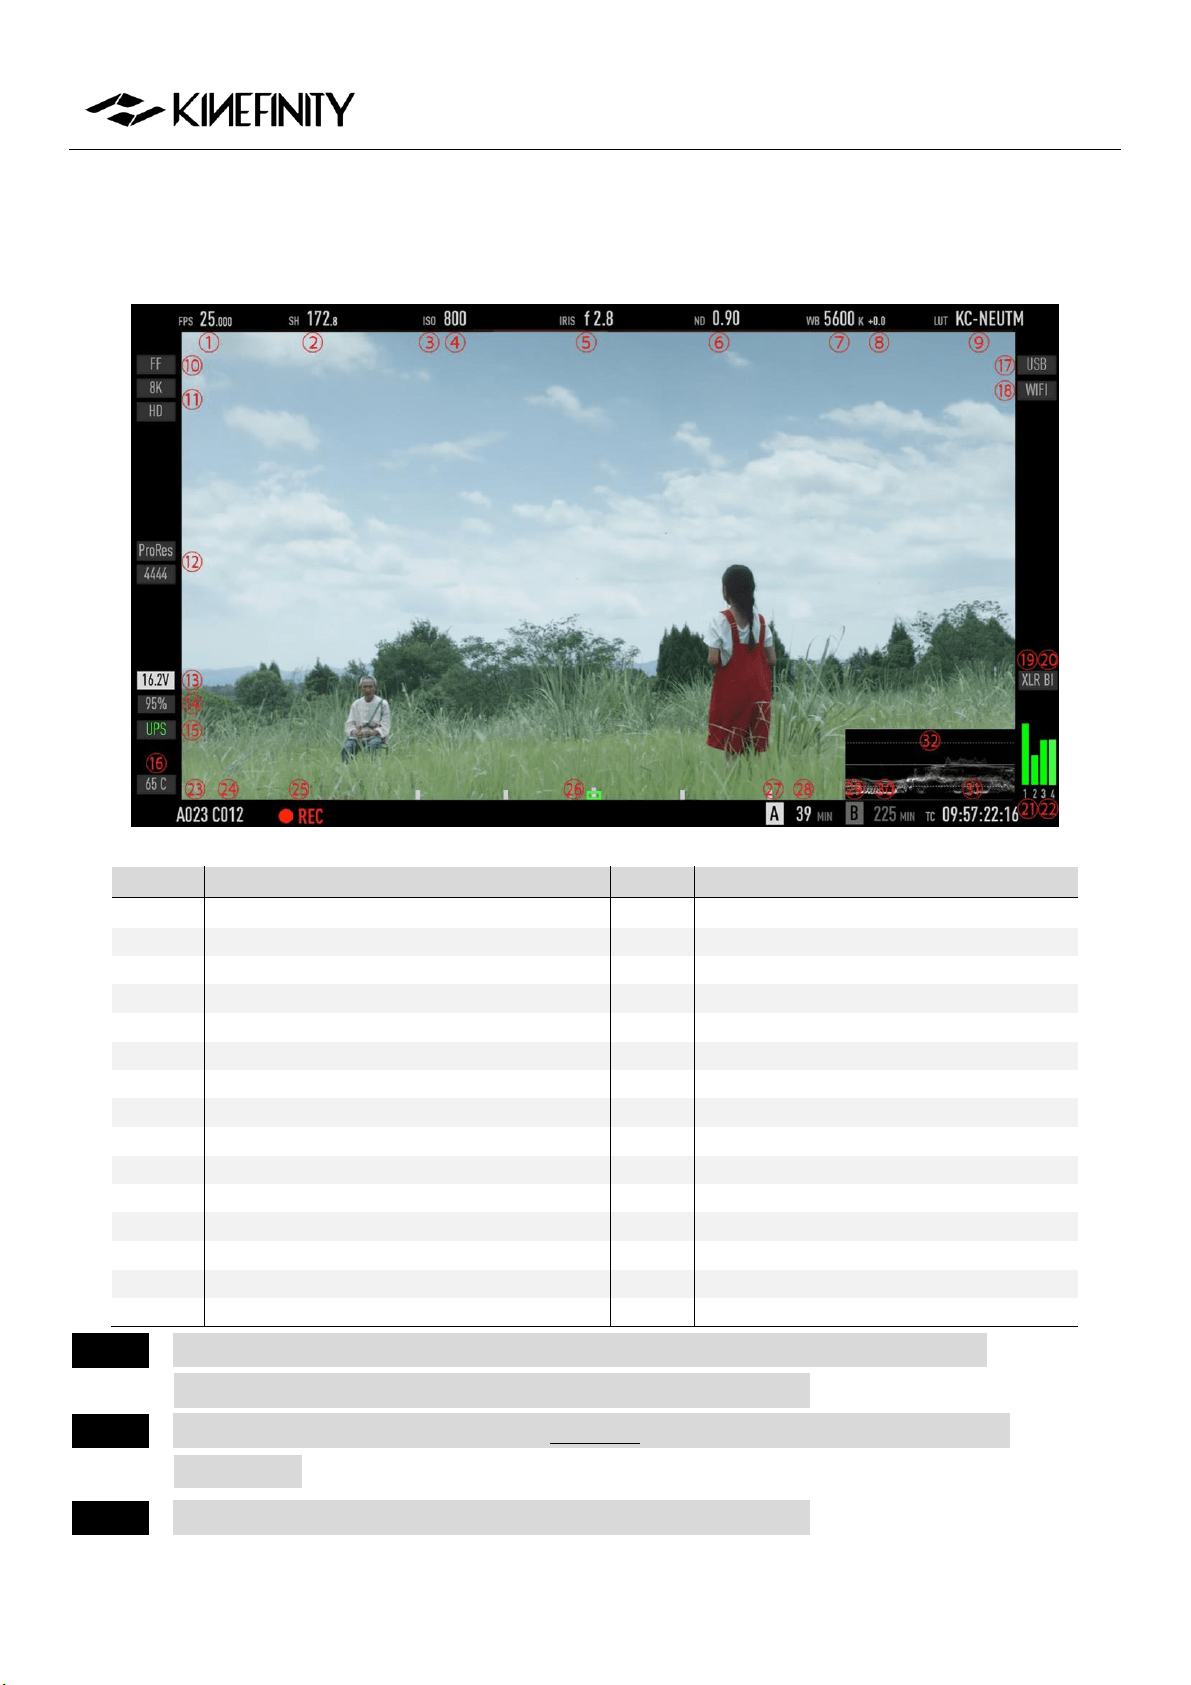
1.3 Interface and Parameters
After booting up, the camera enters Live View mode: parameters of the current scene display on the screen.
#
Name
#
Name
1
CMOS Imaging Sensor FPS
16
Real-time Core Temperature
2
Shutter Speed/Shutter Angle
17
USB Indicator
3
Exposure Mode
18
WIFI Indicator (When WIFI is connected)
4
ISO/EI ASA
19
CH1/2 Audio XLR Indicator
5
Iris Number (If applicable)
20
CH3/4 BI/3.5mm MIC Indicator
6
ND Value (Only with ND on)
21
CH1/2 VU Meter
7
Color Temperature
22
CH3/4 VU Meter
8
Tint
23
Roll Number
9
Monitoring LUT
24
Clip Number
10
Image Format
25
Record Indicator
11
Record Resolution
26
Digital Horizon
12
Codec
27/29
SSD A/B Indicator
13
Real-time Power Voltage
28/30
SSD A/B Status/Capacity
14
KineBAT Remaining Capacity
31
Time Code
15
UPS Indicator
32
Waveform
NOTICE CMOS Imaging Sensor FPS is the actual capturing FPS of the CMOS imaging sensor;
Project FPS is the playback FPS of the footage in post-production.
NOTICE EF Iris control is only for lenses on the White list; other lenses might not be recognized
or controlled.
NOTICE Clean image output: set by [MenuSettingMain ScreenBrief].
MAVO Edge 8K Operation Manual (KineOS 7.0)
©2021 Kinefinity Inc. Page 10 / 61
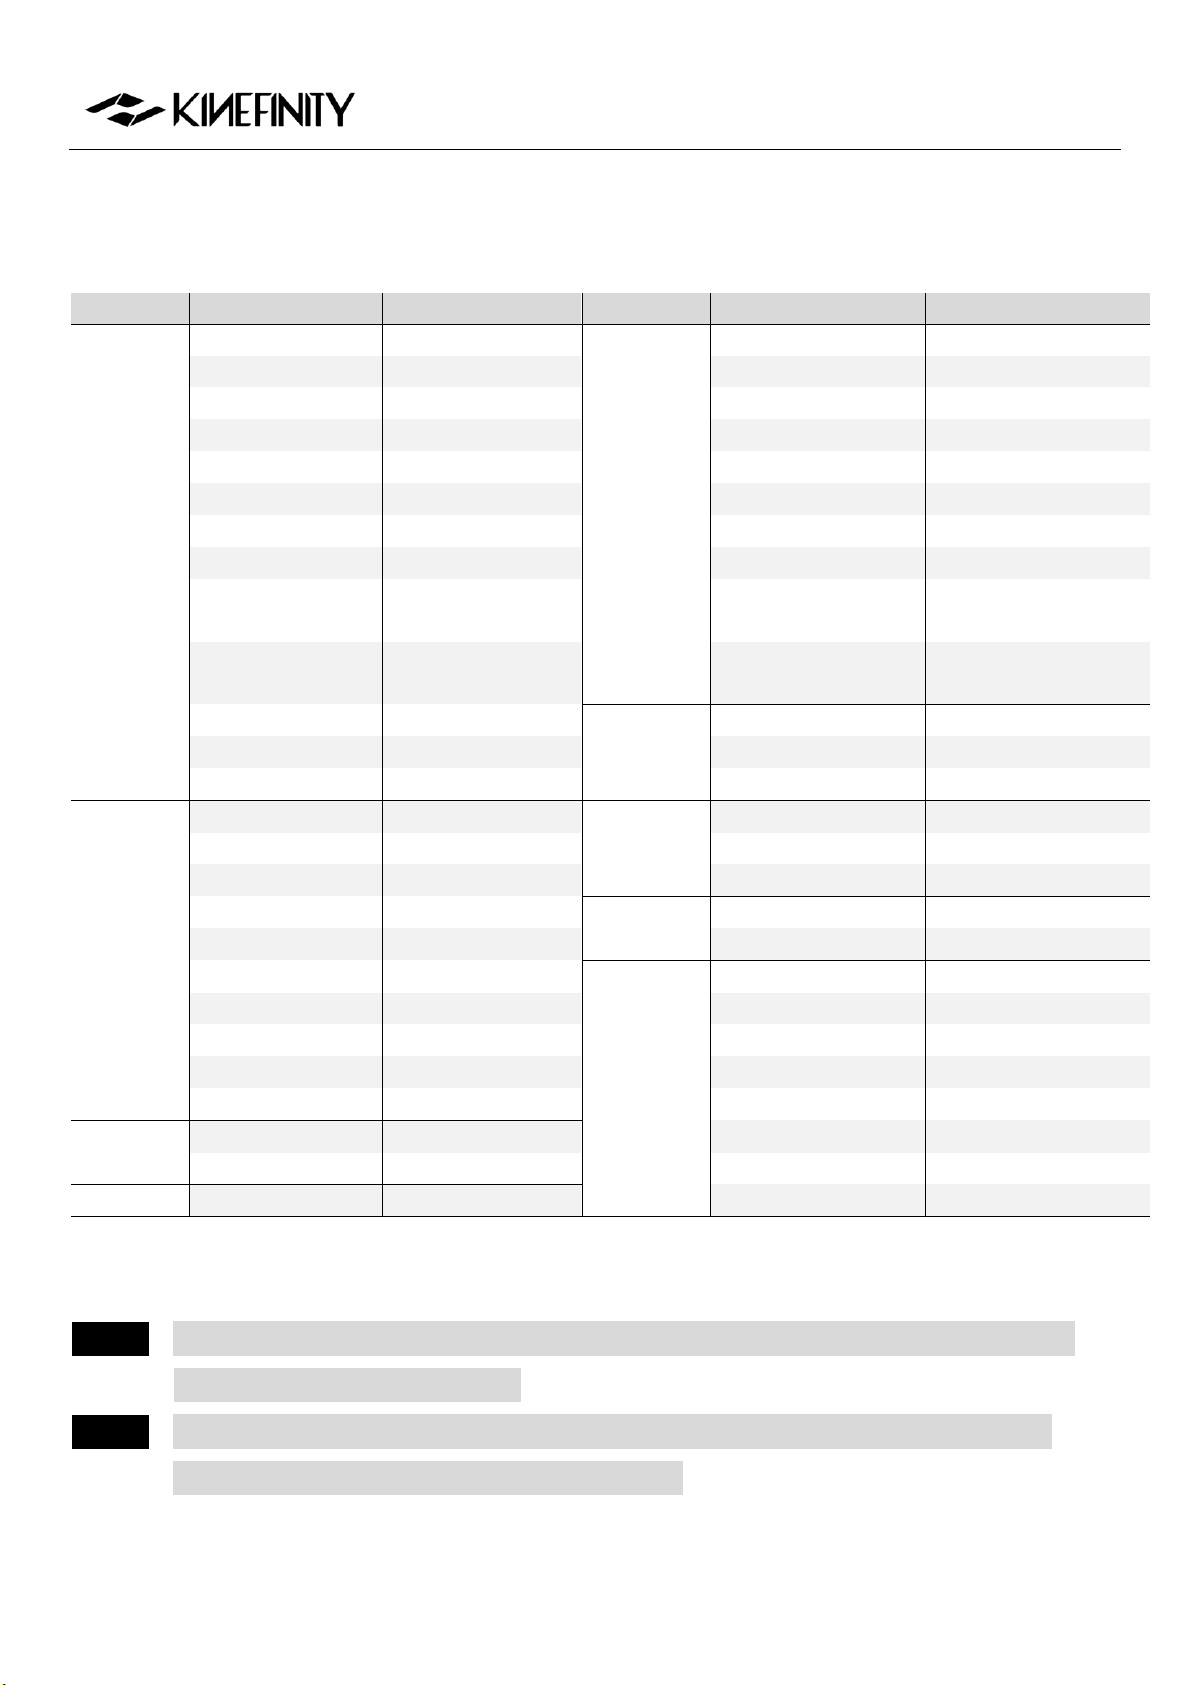
1.4 Default Settings
The list below features the default settings of MAVO Edge 8K:
Type
Name
Default Value
Type
Name
Default Value
SHOOTING
Default Codec
ProRes 422HQ
SETTINGS
Active Mount
Enhanced
Project FPS
25fps
Wheel Control
EF Iris
Project Blanking
None
Fan Speed
40%
Image Format
FF
Fan Control
Slow While Recording
Rec Resolution
4K DCI (4096x2160)
TimeCode
Free Run
Sensitivity Mode
ISO Mode
ND tuning
0.03
ISO Highlight Stops
5.0
Main Screen
Brief
Sensor FPS
25fps
SSD File System
HFS
Shutter Mode:
Angle
1/50s
Power Threshold (V)
12V
ISO/EI
ISO 800
Low Voltage
Shutdown
On
Color Temperature
5600K
NETWORK
WIFI
Off
ND
Clear
Stream
Off
LUT
KC_NEUTM
Bit Rate
Regular
LIVE VIEW
Waveform Based
LUT
SYNC
Tally Lamp
On
Waveform Size
Short
Beeper
On
Zebra Pattern
None
Recording Beeper
On
Zoom Ratio
100%: On
SDI
OSD
On
Anamorphic Ratio
None
LUT
KC_NEUTM
Monitoring FPS
60
AUDIO
CH1/CH2 Level (48V)
30dB
Shutter Mode
Time
CH3/CH4 Level (48V)
30dB
Color Temp List
Simple
Headphone Volume
0dB
SSD
Remaining Time
Headphone Source
CH1/2
Digital Horizon
On
CH1 Phantom 48V
On
PLAYBACK
Playback at
×1
CH2 Phantom 48V
On
Clip End
Loop
CH1/2 Record
CH1/2
SYSTEM
Language
English
CH3/4 Source
Built-in MIC
Restore to factory settings by:
[Menu System Factory Reset]
NOTICE When the camera is powered with a USB storage device plugged in, it will automatically revert
to factory settings while booting up.
NOTICE Before perform factory reset, user settings can be exported from the camera. After the reset
is done, user settings can be imported to the camera.
[MENUSystemExport/Import User Settings]
MAVO Edge 8K Operation Manual (KineOS 7.0)
©2021 Kinefinity Inc. Page 11 / 61
2. QUICK GUIDE
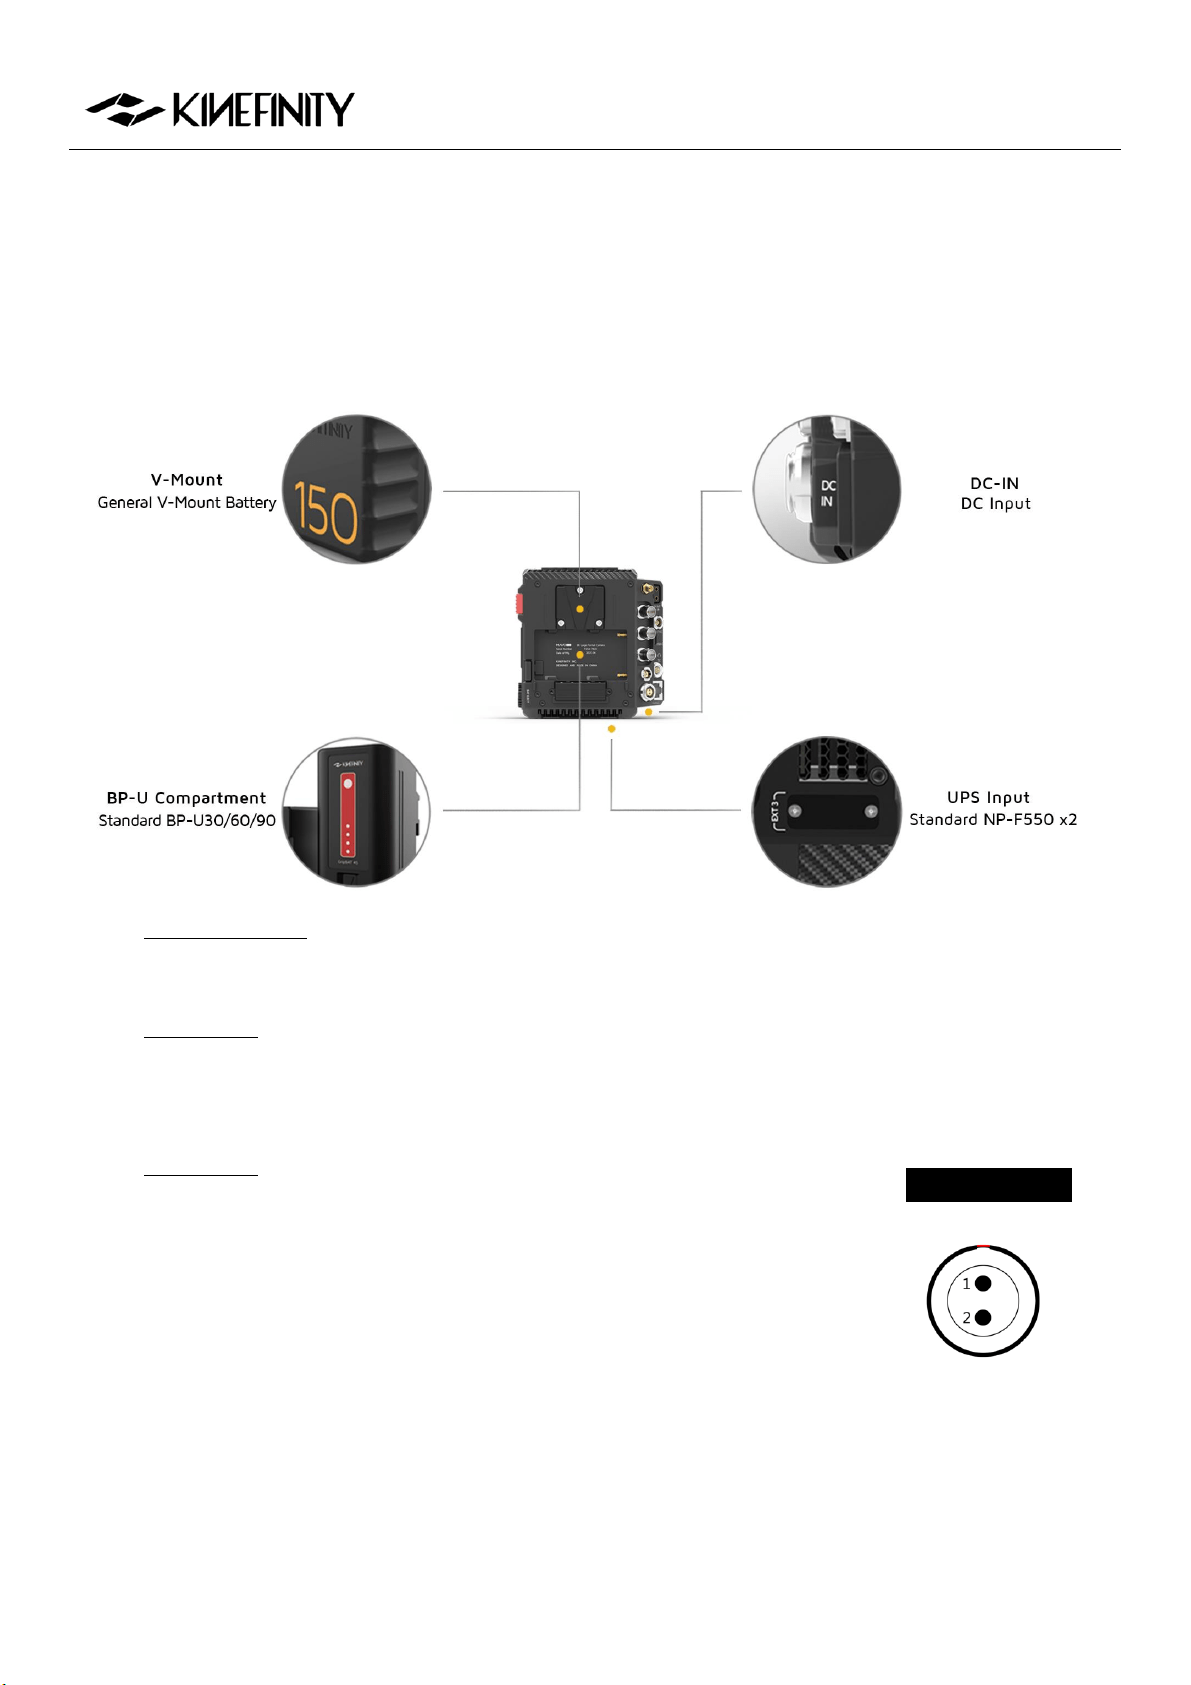
2.1 Power Supply
The MAVO Edge 8K allows different types of power supply:
PD KineBAT 150 (Compatible with V-mount batteries) fits Edge V-Mount hybrid battery plate on the
back. Single PD KineBAT 150 can power the camera for more than 3 hours.
GripBAT 4S (Compatible with BP-U30) can be installed on the BP-U compartment on the back of
MAVO Edge 8K. With a higher capacity up to 52Wh, the GripBAT 4S still enables a power supply
about 60 mins even mounting KineMON-5U monitor on the camera.
GripBAT 2S: Due to specialized UPS power contacts at the bottom of the
camera, MAVO Edge 8K can be constantly powered by two NP-F550
batteries with the UPS Baseplate designed by Movcam. (Recommend
using GripBAT 2S as its capacity is 75% higher than regular 2000mAh
batteries in the market. It has high working current with long battery
time.) No need to turn off the camera when replacing the battery.
Power Cords: Connect different power cords to the 2-pin DC IN port
of the camera body:
1. VDD
2. Ground
DC IN Definition

MAVO Edge 8K Operation Manual (KineOS 7.0)
©2021 Kinefinity Inc. Page 12 / 61
D-Tap Power Cord: Connect the D-Tap plug to the D-Tap socket of battery/battery plate, and
connect 2-pin push-pull connector to the 2-pin power socket of the camera body;
XLR Power Cord: Connect the 4-pin standard XLR connector to the XLR socket on the storage
battery (11~26V), and connect the 2-pin push-pull connector to the 2-pin power port on the
camera body;
100W Power Cord: Its output is a professional 2-pin push-pull connector, which matches the
power sock of Kine Cameras; another port is USB-C with an E-Mark chip, which best matches 65W
PD Power Adapter to power the camera easily.
CAUTION The voltage of power supply recommends as 11V~26V. Using a Power supply higher than 26V
may burn the body.
CAUTION Please heed the direction of the 2-pin DC IN port on the camera body while plugging/
unplugging the power cords. The red dot/notch indicates the direction in which the power
cable is inserted. Please pay attention to the positive and negative poles of the D-Tap port.
NOTICE A V-mount to Anton-Bauer Plate Adapter is required if you use Anton-Bauer (Gold Mount)
broadcast batteries.
NOTICE When two of the four power supplies are available at the same time, the camera automatically
chooses the source with higher voltage, and allows hot-swap of batteries.
NOTICE To save power, use a different power supply for monitors and turn off WIFI.
NOTICE If the voltage detected is too low to continue shooting, the camera will automatically stop
recording to avoid damage to the clip.
MAVO Edge 8K Operation Manual (KineOS 7.0)
©2021 Kinefinity Inc. Page 13 / 61
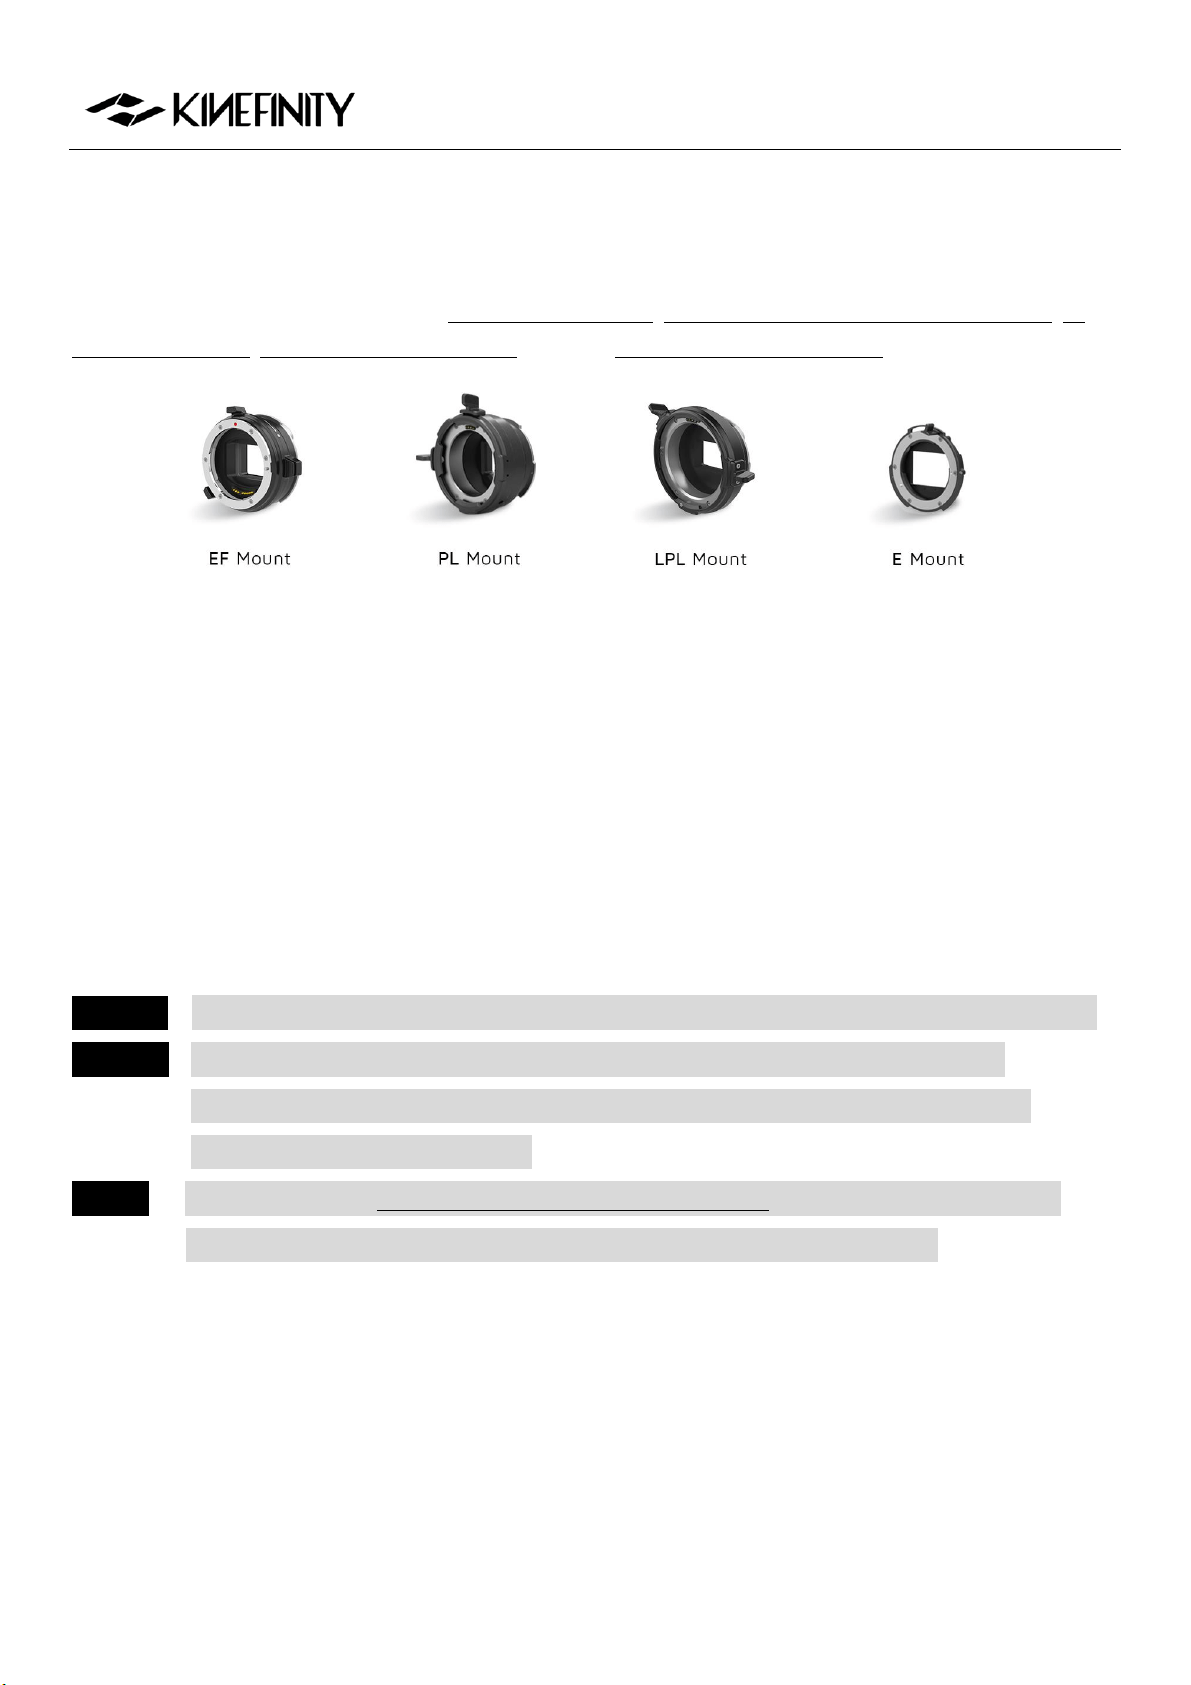
2.2 Mount
MAVO Edge 8K comes with a native KineMOUNT, which needs a mounting adapter to attach a lens to the
camera. The available adapters include EF Mounting Adapter, EF Mounting Adapter with KineEnhancer, PL
Mounting Adapter, SONY E Mounting Adapter, and also ARRI LPL Mounting Adapter.
There are only three steps to install mounting adapters to the KineMOUNT. Here we take EF adapter as an
example. Turn off the camera and then:
1. Release: Keep pressing the KineMOUNT Release Button and rotate the locking ring of the
KineMOUNT counter-clockwise, then take off the KineMOUNT cover;
2. Install: There is a positioning slot above the electronic contacts of the KineMOUNT, please align the
arcuate protrusion on the adapter with the locating slot of KineMOUNT when attaching the mounting
adapter to the camera;
3. Lock: Rotate the locking ring of KineMOUNT clockwise to fasten the adapter to KineMOUNT firmly.
Power on the camera after the adapter is mounted. Press [MENU] button and check the bottom of the menu.
If it presents EF sys 9 (Or a different number), that means you have mounted the adapter successfully.
CAUTION Power off camera when swapping different adapters, else camera or adapters may get burned.
CAUTION As the FFD of KineMOUNT is very short, please don't try to attach any lens directly to
KineMOUNT, except lenses tailored for KineMOUNT, or it will cause permanent damage
to CMOS imaging sensor and OLPF.
NOTICE When installing the EF Mounting Adapter with KineEnhancer, please don't touch the optical
glass. Any damage to the glass is irreversible, and the glass has to be replaced.

MAVO Edge 8K Operation Manual (KineOS 7.0)
©2021 Kinefinity Inc. Page 14 / 61
2.3 Lens
Based on active locking mount as EF Mounting Adapter II, the whole-new EF 3 Mounting Adapter is
designed in accordance with the traditional DSLR lens rotation method and has been much improved.
Compared to the previous version, EF 3 Mounting Adapter not only possesses the traditional way to rotate
the lens clockwise, but also keeps active locking to fasten the lens, thus the EF lens can be installed quickly
and locked clockwise as the PL lens, which is suitable for the utilization of Follow Focus when shooting.
Steps of attaching EF lens to new EF 3 mount:
1. Unlock: Rotate the locking ring of the EF 3 mount counterclockwise till stop; (Take off all the caps or
covers from the camera and the lens mount);
2. Install EF lens: Align the red dot on the lens, the white line on the locking ring and the dot on the
mount. And make sure that the pin on the mount matches the hole of the lens; rotate the EF lens
clockwise till the release button up;
3. Lock: Rotate the locking ring of the EF 3 mount clockwise as the arrow direction until fastened firmly.
Steps of detaching EF lens from new EF 3 mount:
1. Unlock: Rotate the locking ring of the EF 3 mount counterclockwise till stop;
2. Detach EF lens: Fully press the release button on the right side of the EF 3 mount and rotate the EF
lens counter-clockwise.
Steps to attach EF lenses by EF II adapter:
1. Release: Rotate the locking ring of the EF mount clockwise, take off the cover and the lens cover;
2. Install: Align the "red dot" on the lens with the "red dot" on the mounting adapter. Make sure that
the pin on the mount engages with the hole in the mount of the lens. For the EF-S lens, align the
white square on the lens with the one on the mount.
3. Lock: Rotate the locking ring (NOT the lens) counterclockwise (Follow the arrow of "lock sign" on the
mount) until it is fastened firmly.
CAUTION The mounting adapter might be burned if a lens/adapter with all-metal rear end is attached
directly to the camera body. In this case, please keep electronic iris control off:
[MENUSettings Active MountDisable].
MAVO Edge 8K Operation Manual (KineOS 7.0)
©2021 Kinefinity Inc. Page 15 / 61
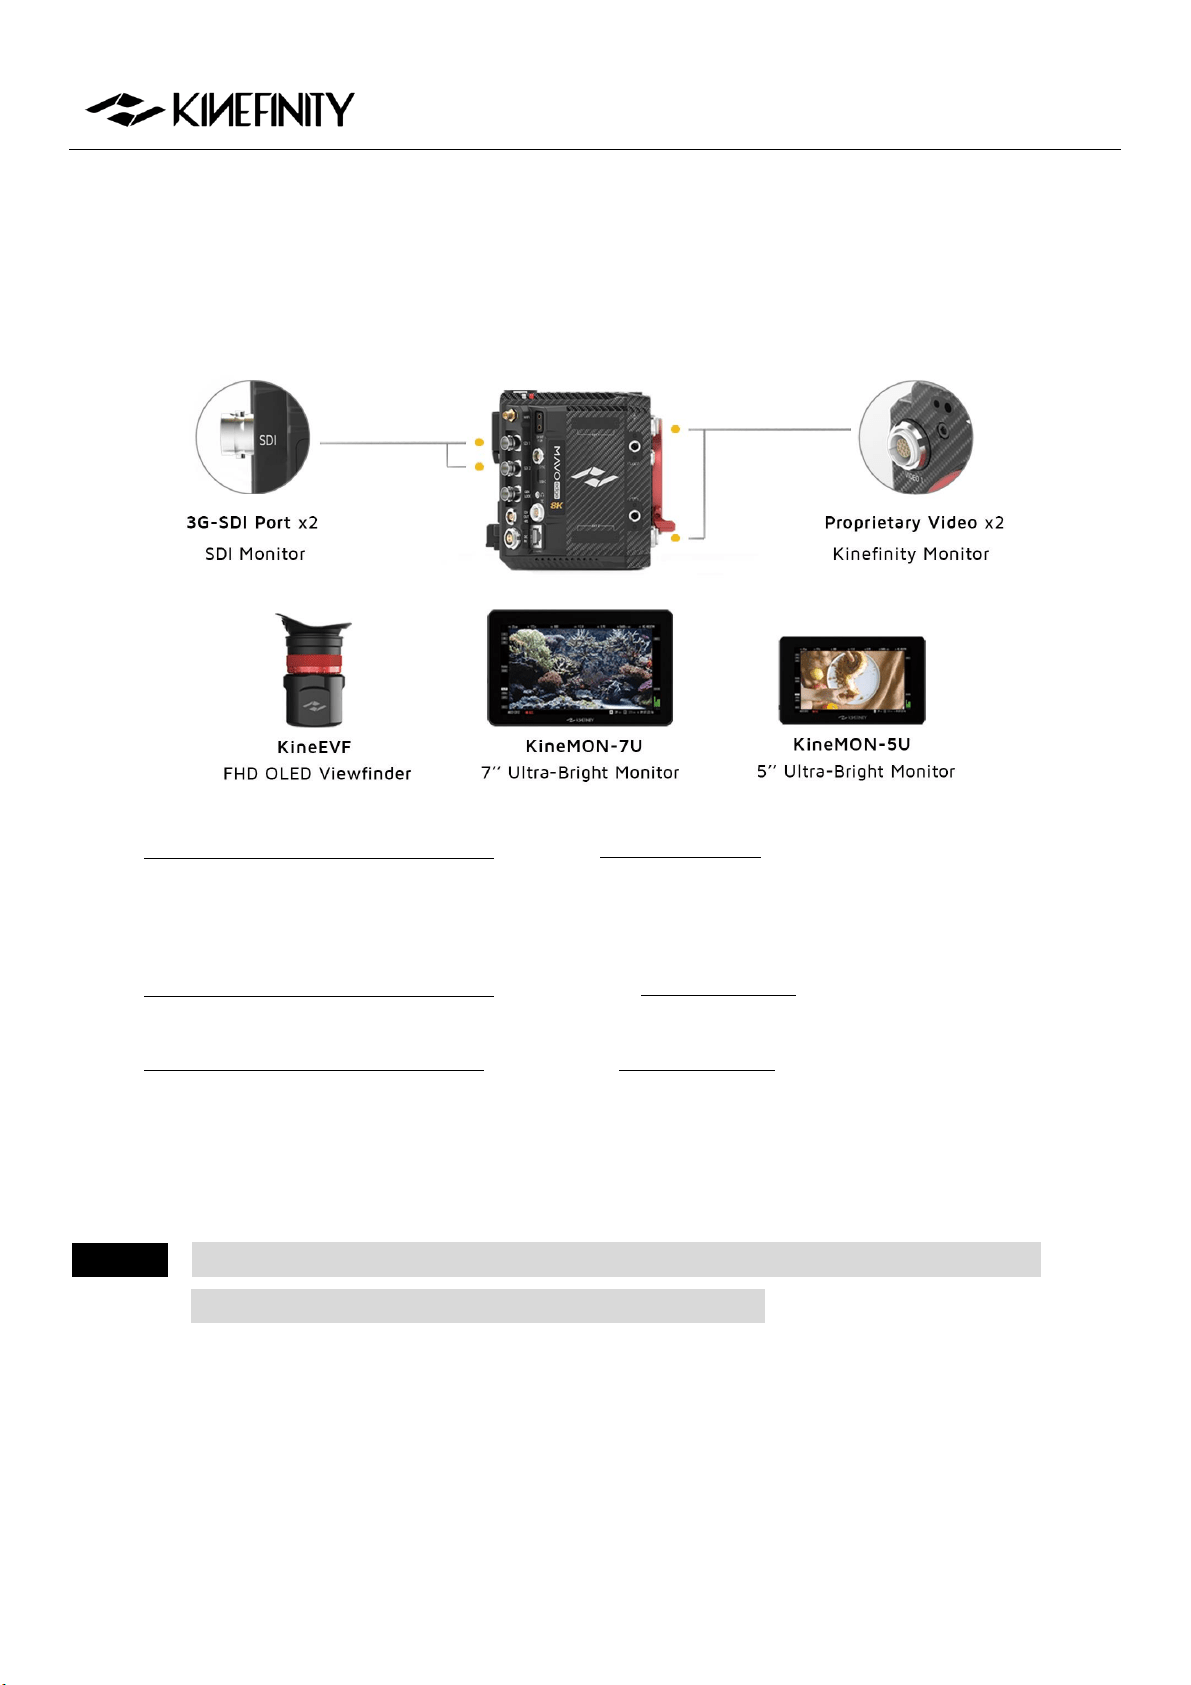
2.4 Monitoring
Please use a recommended EVF or field Monitor with Video port, 3G-SDI (Not HD-SDI) ports, and connect
the input port of EVF or monitor to the output port of the camera body with a high quality cable.
KineMON-5U Ultra-Bright Monitor: With the Kine Video Cord, our monitor gets both power supply
and video signal through the same cable. It is easy to mount it on the camera body firmly by using
appropriate accessories for different needs.
KineMON-7U Ultra-Bright Monitor: Use the same Kine Video Cord as KineMON-5U to get both
power supply and video signal.
KineEVF Full-HD OLED Viewfinder: Also use the Kine Video Cord for power supply and video signal,
and could be mounted on the camera with the tailored KineEVF Bracket.
SDI monitor: With 3G-SDI ports, monitoring by the director monitor or the DIT monitor.
With the KineMON-5U and KineMON-7U, the latency is lower than 100ms; with KineEVF, the latency is lower
than 80ms.
CAUTION Connect the monitors to the camera by a SDI cable (75Ω) before they are turned on, and
please also pay attention to the direction of the D-Tap cord.
MAVO Edge 8K Operation Manual (KineOS 7.0)
©2021 Kinefinity Inc. Page 16 / 61
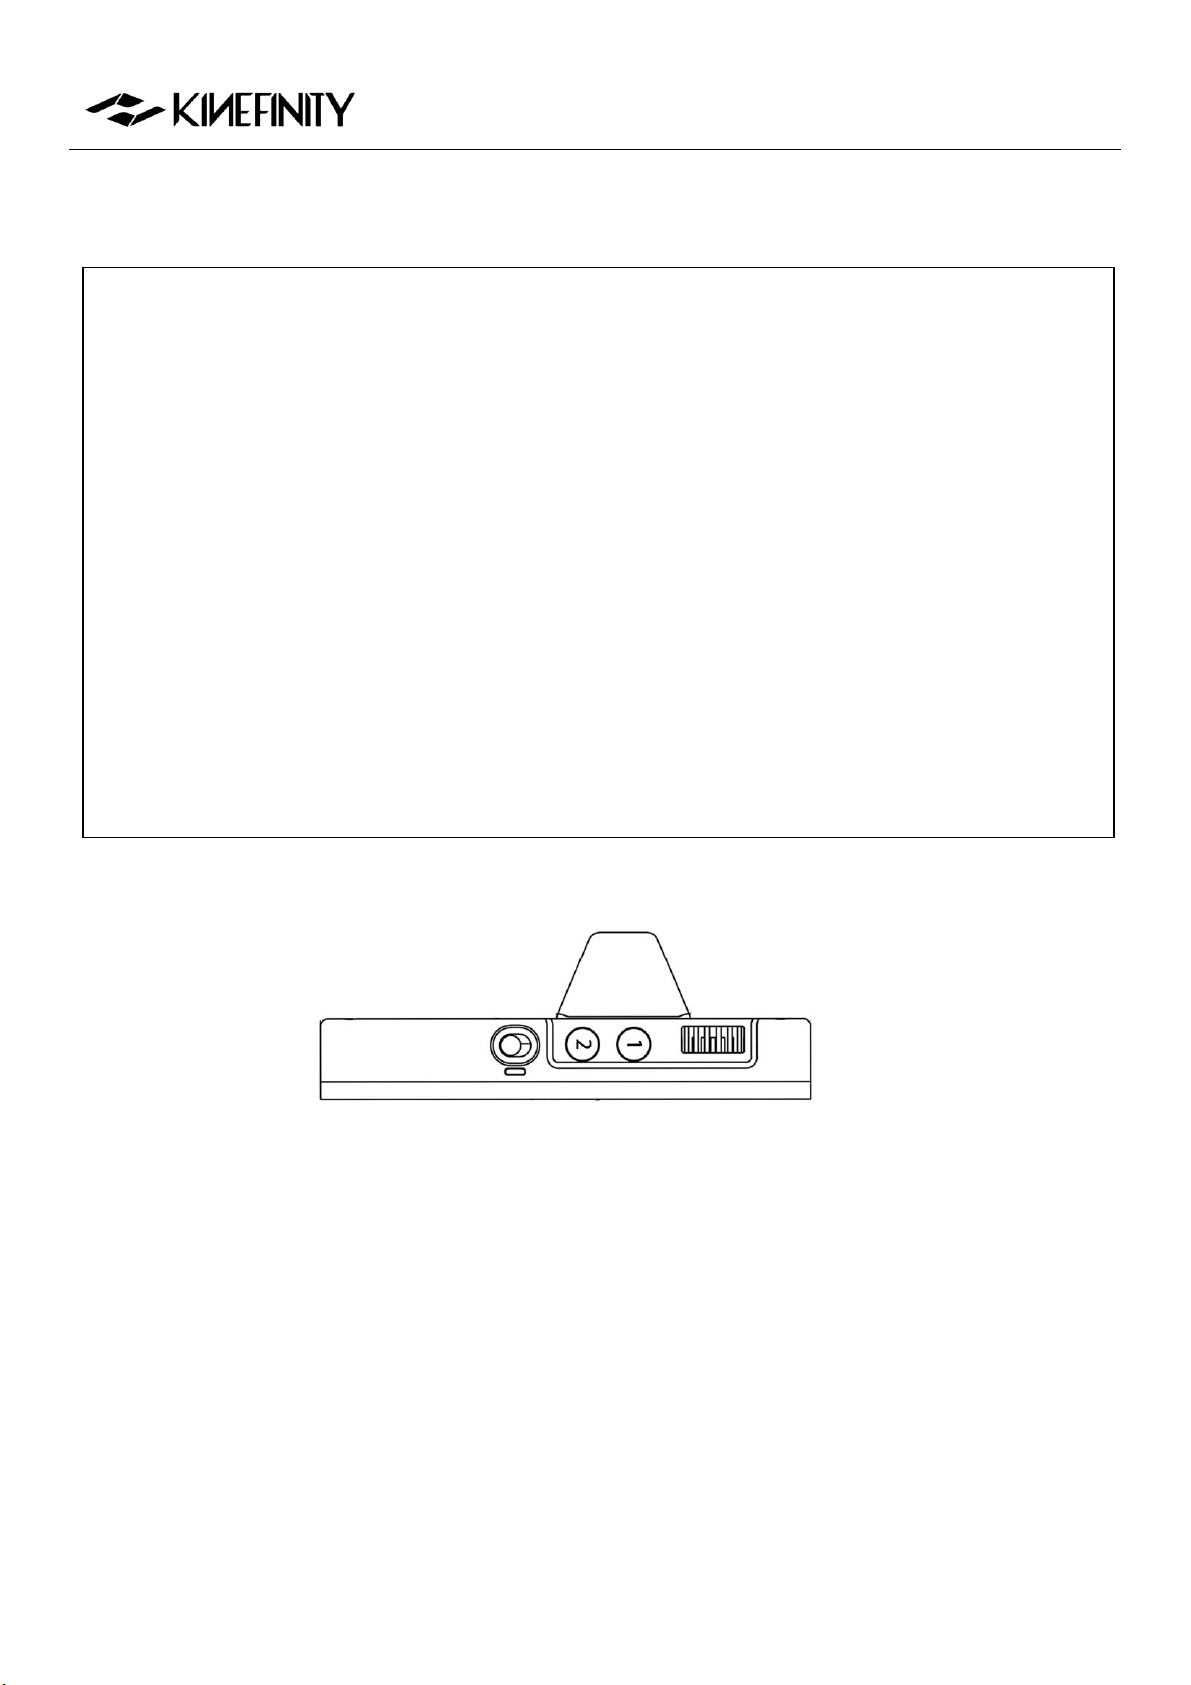
The functions of Buttons on KineMON-7U
The KineMON-7U is added with record and playback buttons and Tally light to trigger corresponding functions on camera body.
Liveview Mode
Button 1:
Peaking focus: Press Button 1, to show peaking with red line or not, assist cameraman on image focus;
Peaking focus sensitivity:
Press Button 1 for three seconds to enable setting of sensitivity of peaking function.
Button 2:
RGB Histogram on input video: Press Button 2, to show histogram at the left corner of screen;
False color on input video: Press Button 2 for three seconds to show false color which IRE based on Arri False
Color scale.
Power Button: Push up or down Power button at the side to turn on or off the monitor quickly. There is also an LED
indicator for status of monitor.
Record Button: Press record button to trigger the function on camera body. Tally light shows red; press record button
one more time to stop record.
Playback Button: Press playback button (triangle icon) to enter the playback mode.
Wheel:
Tuning brightness of monitor. Press Wheel, and rotate the wheel, will change brightness of monitor at 10% step
while 60% brightness in default;
Set rotation of monitor. Press Wheel for three seconds, the monitor can be set rotation 180 deg manually or
auto rotation based on rotation angle of monitor itself.
Playback Mode
In playback mode, button 1, button 2 and wheel on the side of monitor upgrade with new functions:
Button 1: switch to the previous clip.
Button 2: switch to the next clip.
Wheel: Press wheel to play or pause the current clip.
Wheel: Rotate wheel to speed or back the current clip.
MAVO Edge 8K Operation Manual (KineOS 7.0)
©2021 Kinefinity Inc. Page 17 / 61
Function of Buttoms on KineMON-5U
Button 1:
Peaking focus: Press Buttin 1, to show peaking with red line or not, assist cameraman on image
focus;
Peaking focus sensitivity: Press Button 1 for three seconds to enable setting of sensitivity of
peaking function.
Button 2:
RGB Histogram on input video: Press Button 2, to show histogram at the left corner of screen;
False color on input video: Press Button 2 for three seconds to show false color which IRE based
on Arri False Color scale.
Power Button: Push up or down Power button at the side to turn on or off the monitor quickly. There is
also an LED indicator for status of monitor.
Wheel:
Tuning brightness of monitor. Press Wheel, then rotate the wheel, it will change brightness of
monitor at 10% step while 60% brightness in default;
Set rotation of monitor. Press Wheel for three seconds, the monitor can be set rotation 180 deg
manually or auto rotation based on rotation angle of monitor itself.
MAVO Edge 8K Operation Manual (KineOS 7.0)
©2021 Kinefinity Inc. Page 18 / 61
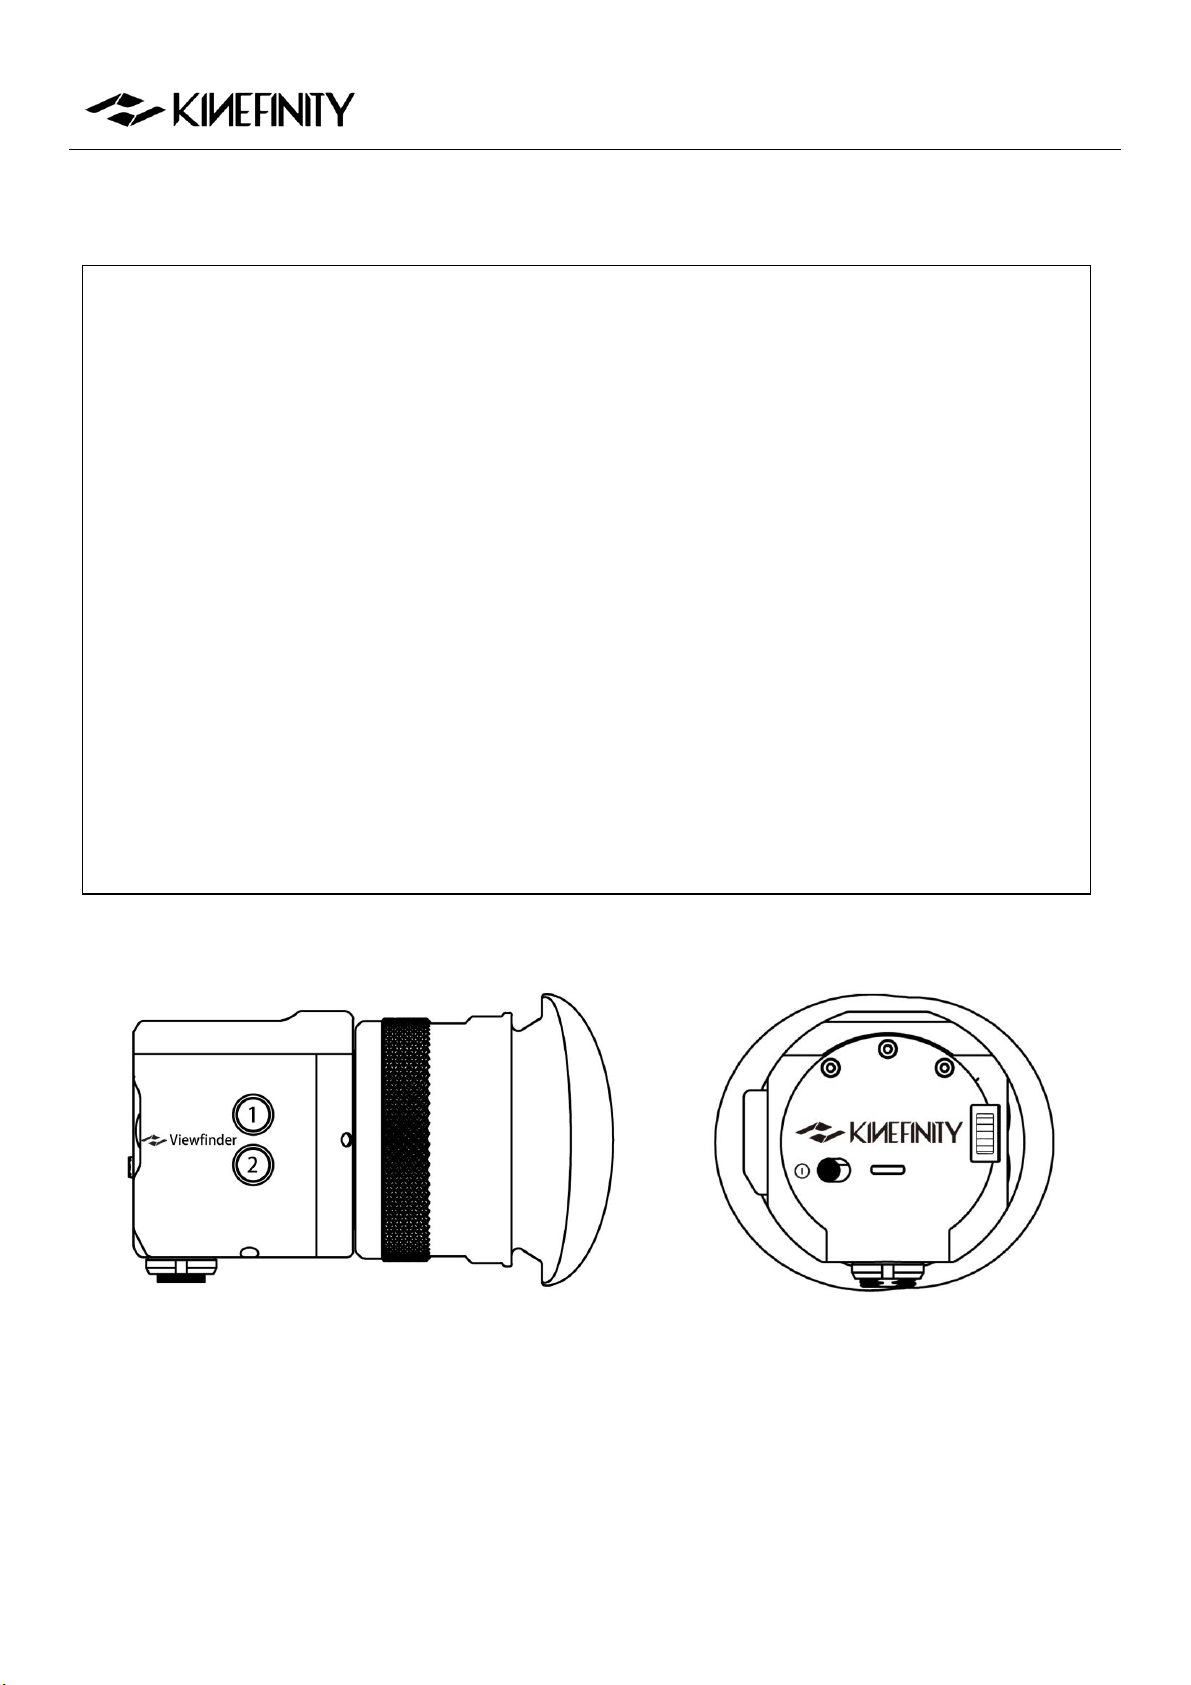
Function of Buttons on KineEVF
Button 1:
Peaking focus:
Press Button 1, to show peaking with red line or not, assist cameraman on image
focus;
Peaking focus sensitivity: Press Button 1 for three seconds to enable setting of sensitivity of
peaking function.
Button 2:
RGB Histogram on input video: Press Button 2, to show histogram at the left corner of screen;
False color on input video: Press Button 2 for three seconds to show false color which IRE
based on Arri False Color scale.
PowerButton: Push up or down Power button at the side to turn on or off the monitor quickly. There is
also an LED indicator for status of monitor.
Wheel:
Tuning brightness of KineEVF. Press Wheel, then rotate the wheel, it will change brightness of
KineEVF at 10% step while 60% brightness in default;
Proximity Sensor, on/off. Press Wheel for three seconds.
Diopter ring. Set from -6D to +2D based on military spec (from 600 degrees of myopia to 200 degrees of
hyperopia).
MAVO Edge 8K Operation Manual (KineOS 7.0)
©2021 Kinefinity Inc. Page 19 / 61
2.5 Recording Media SSD
Different from the previous Kinefinity cameras, the MAVO Edge 8K is designed to have dual-card slots
internally, using a solid-state drive based on the NVMe M.2 interface, which is smaller in size and has a
higher read and write speed.
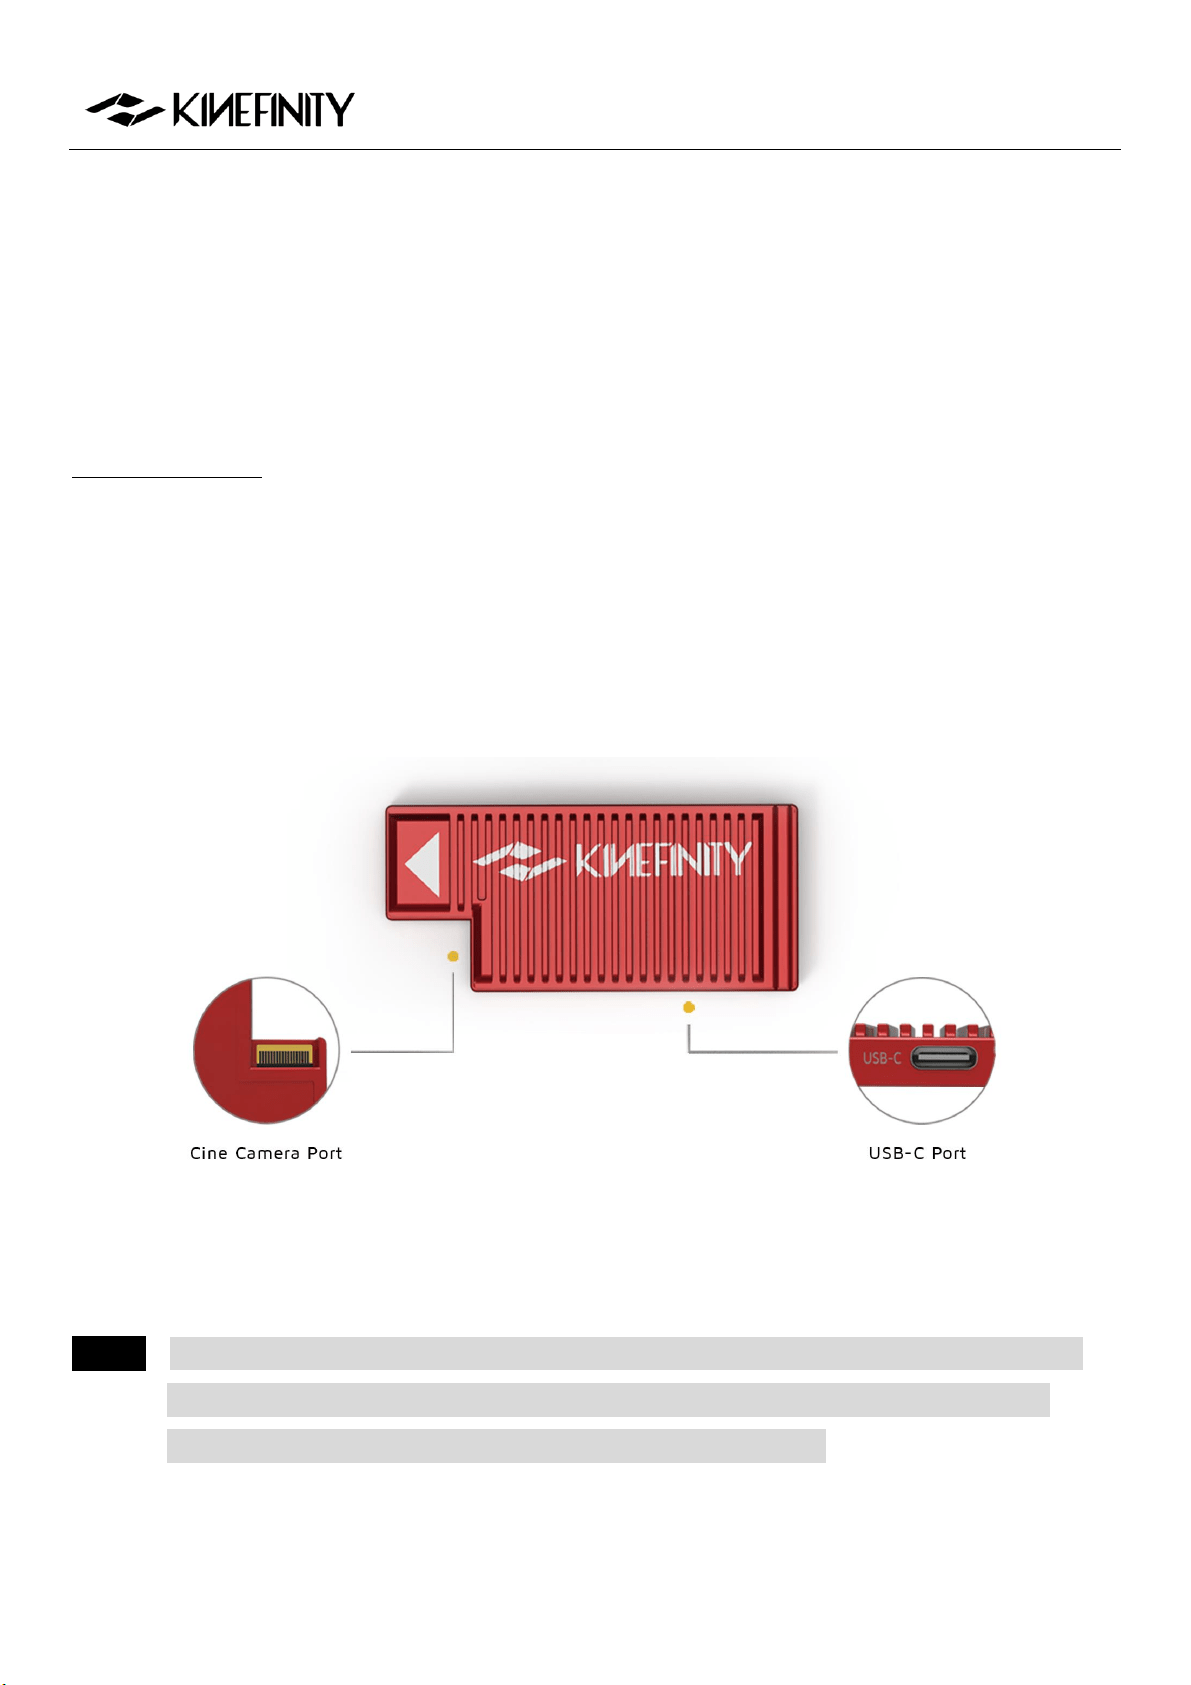
2.5.1 Introducing KineMAG Nano
KineMAG Nano 1TB is composed of KineMAG Nano body and M.2 NVMe internal 2280 SSD, which has a
read and write speed up to 10Gbps. The card body itself has two high-speed ports:
Camera port: Designed for the dual PCIe 3.0 interface card slot of the MAVO Edge 8K camera;
Universal USB-C port: The USB-C port supports the USB3.1 Gen2 protocol. No card reader is needed,
and just one Type-C cable that supports USB3.1 Gen2 can quickly transfer the contents of the
memory card to a Windows-based PC workstation/notebook or Mac. The card write can write at
speeds of up to 10Gbps.
More importantly, the KineMAG Nano 1TB has a built-in specially optimized NVMe M.2 1TB SSD, which
makes the KineMAG Nano 1TB have two major safety features: Read-only feature and RAID 5 redundancy, so
that whether you are copying the card or the card being written at high speed in the camera, the safety and
robustness of the memory card are greatly improved, and no need to worry about the card safety.
NOTICE MAVO Edge 8K features different write speeds in slot A and slot B. Slot A is with Full Speed and
slot B is with High Speed. Remember to choose KineMAG Nano in slot A when you shoot 8K
30fps ProRes 4444 and above, or it will interrupt your shooting work.

MAVO Edge 8K Operation Manual (KineOS 7.0)
©2021 Kinefinity Inc. Page 20 / 61
2.5.2 The Use of KineMAG Nano
The use of KineMAG Nano is very simple. Open the SSD door and insert the KineMAG Nano 1TB SSD into the
A or B card slot before powering on the camera; you can also insert two SSD cards at the same time. The SSD
card slot is equipped with a built-in magnet door. Above the SSD card slot is the SSD function button, which
has the function of managing the SSDs in the A and B slots; on the right side of the card slot are two SSD
indicator lights for the upper slot A and lower slot B, which indicate the status of the SSD in the slot.
Status of SSD indicator (A, B):
Red: KineMAG Nano in the slot is recording/playing the clip;
Green: KineMAG Nano in the slot is selected;
Orange: KineMAG Nano in the slot is not selected;
Grey: KineMAG Nano is not in the slot.
The monitor screen will show the SSD status:
Yellow [STBY]: The SSD indicator is off, which means that there is no SSD in the slot, so the camera
cannot record. Insert the SSD and reboot the camera;
Yellow [STBY]: The SSD indicator is yellow, which means there is an SSD in the card slot but it is not
displayed on the screen. The file system might be incorrect or the card data is faulty, you still can't
shoot under this status. Please follow the following steps:
The first step: Ensure the data security of the card;
The second step: Format the SSD by [MENUShootFormat SSD]. After the SSD formatting is
completed, the camera will automatically detect the SSD. Then, the SSD will display the remaining
time, roll number and footage serial number of the selected card A/B.
Green [STBY]: The SSD will display the remaining time and roll number of the selected card A/B. At
this time, the SSD indicator of the relevant card is green, and you can shoot and the footage will be
stored in the SSD.
Red [REC]: The camera is recording. The indicator of the selected card A/B card is red at this time.
CAUTION Data can't be recovered after the SSD is rebuilt/formatted; please backup all data before
formatting. Before confirm the operation, please check the SSD you format is SSD A or SSD B.
NOTICE Please insert the SSD before the camera is powered on, or the SSD will not be detected.
NOTICE We only recommend KineMAG Nano. The performances of a 3
rd
-party SSD are not guaranteed.
We cannot provide technical support or help on recording issues such as frame drop or data loss
for 3
rd
-party SSD.
NOTICE Please prepare backup SSD cards in case of emergency on set.

MAVO Edge 8K Operation Manual (KineOS 7.0)
©2021 Kinefinity Inc. Page 21 / 61
2.6 Audio
Compared with the previous Kinefinity cameras, MAVO Edge 8K integrates KineBACK-W functions such as
the XLR port into the body. There are three audio recording interfaces that support four audio tracks
recording at a time:
In-camera MIC (CH3/4): Record audio by in-camera MIC even if there is no KineAudio or 3.5mm MIC;
3.5mm Plug-in-power port (CH3/4): Suited for 3.5mm MIC;
KineAudio dual XLR ports with Phantom 48V (CH1/2): KineAudio is a high-quality pre-amp audio
module with Phantom 48V, and it also has dual XLR input, dual channel and supports 48V phantom
microphone. KineAudio CH1 and CH2 channel can be set independently.
Adjust volume gain and set audio function by [AUDIO] button:
Press [AUDIO] button: Set Gain size and headphone volume of CH1, CH2 and CH3/4;
Press and hold [AUDIO] button for one sec:
Headphone Source: Choose CH1/2 or CH3/4 as the headphone source;
Phantom 48V Input: Choose CH1 or CH2 Phantom 48V input on/off;
CH1/2 Record: Choose to record CH1/2 at the same time or record CH1 or CH2;
CH3/4 Source: Choose CH3/4 as the source of in-camera MIC or 3.5mm MIC.
Audio input with In-camera MIC and 3.5mm MIC Port
To use the In-camera MIC for audio recording, press and hold the [AUDIO] button for one sec, set
[AUDIO ButtonHeadphone SourceCH3/4], then select [CH3/4 sourceIn-camera MIC]. The audio
will be recorded by In-camera MIC.
To use 3.5mm audio jack to connect an external microphone for audio recording, press and hold the
[AUDIO] button for one sec, set [AUDIO ButtonHeadphone SourceCH3/4], then select [CH3/4
source3.5MM]. The audio will be recorded by 3.5mm MIC.
Phantom 48V audio input
To use a microphone that needs phantom power, press and hold the [Audio] button for one sec, set
[AUDIOHeadphone SourceCH1/2]
In addition, the channel can also be set in three modes:
Two audio channels as CH1: Left Channel =Right Channel = CH1;
Two audio channels as CH2: Right Channel = Left Channel = CH2;
Stereo: Left Channel = CH1, Right Channel = CH2 (Default).

MAVO Edge 8K Operation Manual (KineOS 7.0)
©2021 Kinefinity Inc. Page 22 / 61
Generally, the camera audio can be set as one input if just using one MIC.
3.5mm Headphone Jack
To use a 3.5mm headphone for audio checking, the channel can be selected to CH1/2 or CH3/4:Press and
hold the [Audio] button for one sec, set
[AUDIO buttonHeadphone SourceCH1/2]
CAUTION When using microphones that don't need Phantom power, please turn off the Phantom 48V.
NOTICE The audio will be packed into mov file only when the project FPS is the same as CMOS imaging
sensor FPS, or it will be recorded into a separate wav file. For example, if the project FPS is
25.000, when the CMOS imaging sensor FPS is set to 30.000, it will show yellow 30.000 on the UI
in the beginning, which indicates the audio is recorded into a separate WAV file.
2.7 e-ND
MAVO Edge 8K incorporates with internal full-spectrum e-ND which is
quite different from previous cameras.
E-ND is based on modern liquid crystal materials and optics controlled
electronically, which is completely unlike conventional technology such as
a rotating filter wheel or polarizing ND Filters. It covers a wide range from
0.6 to 2.4 (2 stops to 8 stops), and brings sharp images with color fidelity.
Seamless adjustment brings a very important feature: accurate exposure
stop, which is what traditional glass ND filters don't have. You can also set
the accuracy to one stop (0.3) for each rotation, but the default setting is
seamless adjustment by 0.1 stop (0.03).
The ND function is convenient to use:
Switch internal ND : press and hold the [ND] button for one sec;
Set the ND value when the ND is on: press the [ND] button and rotate the wheel,to set the ND value
from 0.6 to 2.4 (2 stops to 8 stops).
When the camera is mounted with cinema/manual lenses, using the wheel to set the ND value
(default is Wheel Control: Iris value)
[MENUSettingWheel Control: e-ND]
In such way, the ND value can be set directly without pressing the [ND] button.
Menu Operation
Set e-ND
[MENU
SettingsND: 0.03/0.3]

MAVO Edge 8K Operation Manual (KineOS 7.0)
©2021 Kinefinity Inc. Page 23 / 61
2.8 Playback
To enter the playback mode, you can press and hold the [Playback] button for one sec in Live View mode,
and then you are able to trigger play/pause of the current clip by pressing the [Playback] button again.
Loop playback
The way to play a clip in a loop is to set by [MENUPlaybackClip End: Loop]. Playback continues from the
beginning of the same clip again in accordance with project fps.
Clip switching
Press the shortcut button [1] to switch to the previous clip; press shortcut button [2] to switch to the next
clip. Fast forward and fast reverse are available by the wheel. Please note the parameters in Playback mode
are different from the ones in Live View Mode.
Playback speed
To change the playback speed in the menu, press [MENUPlaybackPlayback at: ×1]. There are seven
speed choices: ×1/4, ×1/2, ×1, ×2, ×4, ×8, ×16.
Switch back to Live View mode
Press [REC] button or press and hold [Playback] button for one sec to switch back to Live View mode.

MAVO Edge 8K Operation Manual (KineOS 7.0)
©2021 Kinefinity Inc. Page 24 / 61
2.9 Codec
The camera comes with ProRes codecs, set the default codec by:
[MENUShoot Default Codec ProRes (.mov)]
MAVO Edge 8K supports in-camera ProRes recording at all resolution and fps: 8K/6K/5K/4K/2K even 4K
Wide 100fps for 422 format. Besides ProRes422HQ, MAVO Edge 8K also supports ProRes4444XQ, 4444 and
keeps all dynamic range of ProRes clips with KineLOG3, while the monitoring LUT will not be burned into the
clips.
NOTICE The camera supports ProRes4444XQ recording to 8K up to 30fps, ProRes4444 to 8K up to 50fps.
Duration Reference
Settings
Duration
@KineMAG Nano 1TB
4K@25fps ProRes422LT(.mov)
6 hours 51 mins
4K@25fps ProRes422HQ(.mov)
2 hours 42 mins
4K@25fps ProRes4444(.mov)
1 hour 48 mins
5K@25fps ProRes422LT(.mov)
3 hours 44 mins
5K@25fps ProRes422HQ(.mov)
1 hour 44 mins
5K@25fps ProRes4444(.mov)
1 hour 09 mins
6K@25fps ProRes422LT(.mov)
2 hours 36 mins
6K@25fps ProRes422HQ(.mov)
1 hour 12 mins
6K@25fps ProRes4444(.mov)
48 mins
8K@25fps ProRes422LT(.mov)
1 hour 27 mins
8K@25fps ProRes422HQ(.mov)
40 mins
8K@25fps ProRes4444(.mov)
27 mins

MAVO Edge 8K Operation Manual (KineOS 7.0)
©2021 Kinefinity Inc. Page 25 / 61
2.10 Downscaling and Cropping Mode
Oversampling/Downscale
Oversampling/Downscale: recording (Output) resolution is less than the actual sampling resolution by CMOS
imaging sensor, while the image format of the recording is the same as the image format of sampling. As all
effective area of the CMOS imaging sensor is used, there is lower noise level and sharper image.
Oversampling at FF is 4K. For most cases, downscaling 4K ProRes at FF is recommended.
Cropping Mode
Cropping means that the CMOS imaging sensor only utilizes a center part of the image as effective sampling
area. Cropping mode boosts frame rate higher than full resolution sampling:
Output 8K Wide full resolution sampling, up to 70fps;
Cropping Mode, 5K Wide (S35), up to 108fps;
Cropping Mode, 4K Wide (M4/3), up to 145fps.
Oversampling + Cropping = infinity combination of resolution, fps and framing.
Select Cropping Mode by:
Press and hold shortcut button [1] for one sec or by:
[MENUShootingImage Format]

MAVO Edge 8K Operation Manual (KineOS 7.0)
©2021 Kinefinity Inc. Page 26 / 61
2.11 Access clips on PC/MAC
Access KineMAG Nano on PC/MAC
To access Clips from KineMAG Nano on PC/MAC,a USB-C cable is used to connect SSD to the workstation:
MAC platform (MacOS Sierra or higher version) can access KineMAG Nano with HFS file format;
Windows platform can access KineMAG Nano with HFS file format after installing software such as
HFS+ or MacDrive.
Play ProRes Clips on PC/MAC
All dynamic range of KineLOG3 ProRes clips is retained, and monitoring LUTs will not be burned into the
clips. Therefore, LOG clips retain all of their dynamic range and color information. While playbacking the
footage at a computer, using the LUT file that was used inside the camera will make the image look identical
to the one while monitoring during the recording.
When using Windows you need to install Quicktime7 to access ProRes MOV file.
Clip Folder
Each clip is saved in the SSD as a folder. The folder name is the same as the clip name, but no file extension,
eg: folder A003C027_20210421_91B2 (for the meaning of the clip name, see 3.1 Footage and Projects
Information) includes:
A003C027_20210421_91B2.mov: ProRes mov file
A003C027_20210421_91B2-CH1.wav, A003C027_20210421_91B2-CH2.wav,
A003C027_20210421_91B2-CH3.wav and A003C027_20210421_91B2-CH4.wav: are the uncompressed
audio files of CH1, CH2, CH3 and CH4;
***.cube and ***.look: the LUT while monitoring, and the format is cube or look format;
A003C027_20210421_91B2_snapshot.bmp: the snapshot of this clip, resolution 1/2x1/2;
A003C027_20210421_91B2-slate.txt: contains most of the information when shooting the clip, like
shutter speed, ISO, highlight, color temp, etc;
0.mt: internal camera information when recording.
Please send xxx-slate.txt and 0.mt to Kinefinity if clip files appear to be abnormal.
NOTICE If Project FPS is the same as CMOS Imaging Sensor FPS (Shooting FPS), audio is embedded into
ProRes mov file, else audio is not embedded into mov file. But the camera always records audio
into four wav files at the same time, no matter slow-mo, quick-mo or regular speed.
NOTICE When importing mov files into editing software, enter and search *.mov in the dialog box, all mov
files will be listed automatically, then press CTRL+A / ⌘+A to select all mov files and drag them
into your NLE.
MAVO Edge 8K Operation Manual (KineOS 7.0)
©2021 Kinefinity Inc. Page 27 / 61
3. SETTINGS AND ADVANCED OPERATIONS
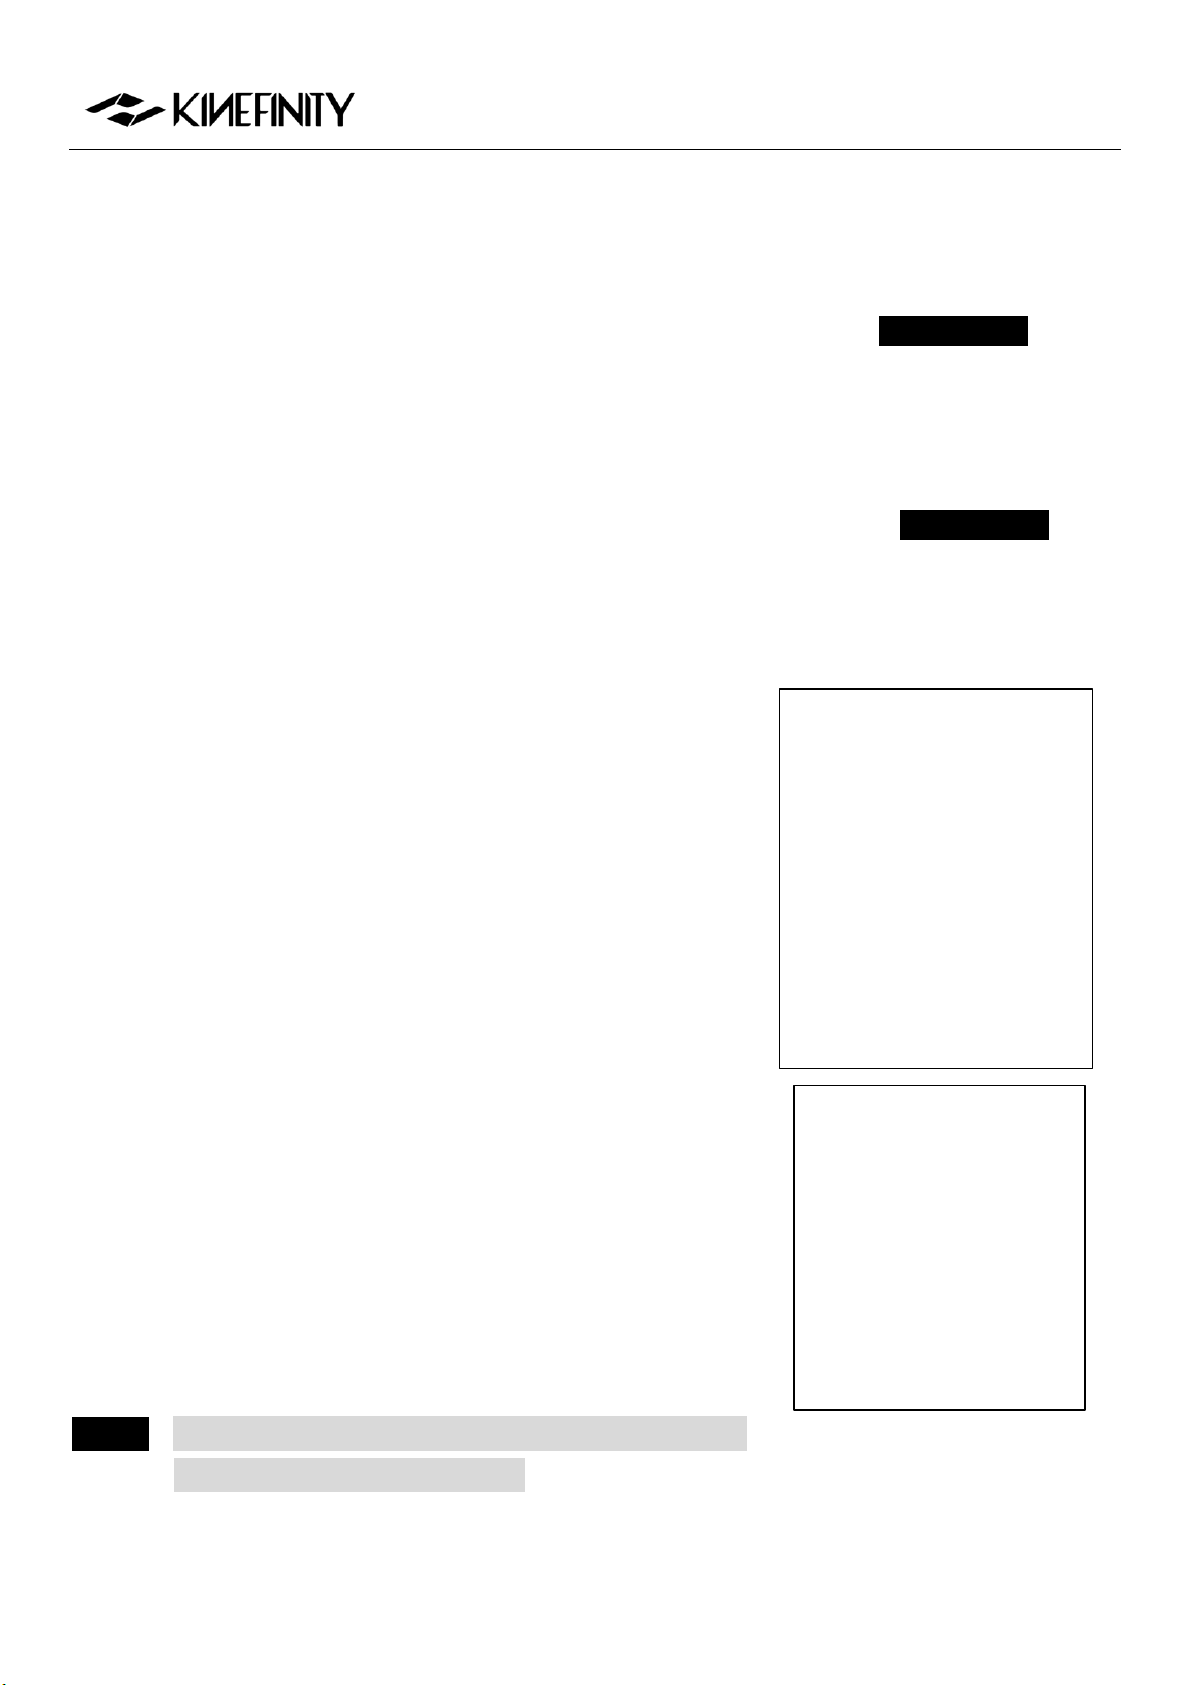
3.1 Footage and Slate
When starting a new project, please make sure:
Project FPS: the fps used by playback clips, editing clips or delivery
matches up with the project FPS of the camera. For example: 24fps
for feature movie and 25fps for TV (PAL). Project FPS should not be
changed after the project kicks off;
Slate information: set clip name, director's name, DoP's name, etc. of
the project. You can find all the information in slate.txt.
Codec: choose in-camera ProRes;
Project Blanking: choose from 2.4:1, 2:1, 17:9, 16:9, 4:3 or Instagram
ratio 1:1, also 9:16 and 1:2 for smartphone screens. Project
Blanking is also applicable for anamorphic shooting.
Codec: based on the project and post workflow:
In-camera ProRes: most of the projects can be recorded in
ProRes 422HQ (Visually lossless), and in-camera oversampling
to 4K ProRes with high image quality, efficiency and reliability.
Set the project and clip information, such as Project Name, DoP's Name,
Roll Num., Take Num. and so on, in [MENU]
Set Project FPS: [MENUShootingProject FPS]
Set Slate: [MENUShootingSlate]
Set Project Blanking: [MENUShootingProject Blanking]
Use the wheel and the shortcut button [FPS] to change the information.
Everything will be on the Slate and the SSD Roll Label, see the example
on the right:
Before a new project, we suggest setting Scene Num., Roll Num. and
Take Num. as "1". Then Roll Num. of the SSD card will be incremented by
1 each time of shooting after formatted in the camera, convenient for
DIT backing-up clips. The roll number is changeable when formatting
SSD.
NOTICE Project Blanking only acts as a reference for monitoring, the
camera records the full active image.
Menu Operation
Change Project FPS
[MENUShootingProject
FPS]
Menu Operation
Set Project Information
[MENUShootingSlate]
Clip Name
A003C027_20210421_91B2
A: Camera Unit;
003: Take Num.;
C: Abb. Of Clip;
027: Clip Num.;
20210421: Date;
91B2: Random numbers.
SSD Roll Label
A003_6D09B6
A: Camera Unit;
002: Roll Num;
6D09: First Four Digits
of Serial Number;
B6: Random numbers.

MAVO Edge 8K Operation Manual (KineOS 7.0)
©2021 Kinefinity Inc. Page 28 / 61
3.2 Exposure and White Balance
The color temperature is tuned by directly adjusting the RGB channels of the
CMOS imaging sensor to change original RAW data, rather than apply a digital
LUT. Although you can modify the white balance of RAW data or change color
temperature by post processing, all the modifications are based on the data
you shoot previously. In order to minimize the distortion in post processing, it
is essential to gain as accurate color temperature as possible in the shooting
stage.
3.2.1 Color Temperature List
The camera has two types of color temperature lists for white balance:
Simple List and Complete List.
Simple List: With typical color temperatures such as 2800K, 3200K,
4300K, 5500K, 5600K, 6400K and User WB. Among them, UserWB is
user-defined value, automatically generated when do the Auto WB
manually.
Complete List: Complete color temperatures according to the
portfolios of color temperatures (In accordance with the 100K for a
step) and lighting types. You can simply choose the one to match
with your shooting condition.
You can change color temperatures by the operation on the right.
Also, the Tint value can be changed by pressing and holding the shortcut button [WB] for one sec. When the
number shows green, the Tint value is able to increase or decrease by rotating the wheel.
3.2.2 Auto White Balance
The Complete List of color temperatures meets the need for most cases. If the
color temperatures listed in the built-in list are not enough to meet complex
shooting lighting conditions, use a gray card or white card to conduct Auto
WB to achieve a specific color temperature.
To conduct the Auto WB:
1. Put a gray/white card in front of the camera;
2. Make the gray/white card cover the whole display by zooming;
3. Choose: [MENULiveview Custom White Balance]
The camera corrects the white balance parameters and writes the color temperature value to the UserWB.
Once the UserWB is set, it can be used anytime later on.
Menu Operation
Change Color Temperature List
[MENULiveview Color
Temperature List]
Menu Operation
Auto WB
[MENULiveview
Custom White Balance]

MAVO Edge 8K Operation Manual (KineOS 7.0)
©2021 Kinefinity Inc. Page 29 / 61
3.2.3 Waveforms
Waveforms, zebra stripes and histogram help cinematographers determine
the exposure of images. Waveform indicates the brightness of images over
the horizontal direction, while histogram shows the statistical information
on the brightness of the whole image.
The Waveform matches the images by default and shows the LUT NeutM.
Waveform will change according to the different LUT. Waveform without
LUT can also be checked by the menu operation.
You can choose different displays for waveforms:
LUT: The waveform information displays the distribution of RGB,
which bases on RAW data after the processing of monitoring LUT
loaded.
LOG: The waveform information display R/G/B three color channels
distribution based on the RAW data with KineLOG.
You can also choose a short waveform or complete waveform on the screen.
NOTICE When over 100% on the waveform of LUT, images do not mean
overexposure definitely. The images are sure to be overexposed
only over clipping line on waveform with LOG.
When choosing to monitor the LUT, even if the waveform exceeds
100%, it may not be overexposed because the LUT is loaded.
NOTICE Use [Zoom] button to check the exposure. Other functions can be
used normally when waveform is on.
The waveform remains when you use the [Zoom] button to check the exposure or use other functions.
3.2.4 Zebra Pattern
Zebra strip is a very straightforward feature to show the overexposed area in
an image.
For Kine cameras, the zebra calculation is based on RAW data: RAW data is
overexposed when the zebra stripes appears. So observe carefully to avoid
unintentional over-exposure in most cases, as it will be pure white in the post
workflow.
A threshold level can be set by pressing:
[MENULiveviewZebra Pattern].
Menu Operation
Switch between different
sources
[MENULiveview
Waveform Based]
Menu Operation
Switch Size
[MENULiveview
Waveform Size]
Menu Operation
Set Zebra Threshold
[MENULiveview
Zebra Pattern]

MAVO Edge 8K Operation Manual (KineOS 7.0)
©2021 Kinefinity Inc. Page 30 / 61
The default threshold level is 90%, which means the zebra strip will display when the light exceeds 90% of
the maximum range.
3.2.5 Digital Horizon
With digital horizontal guidance on the UI, cameramen are able to judge the
image level precisely and quickly when shooting with shoulder, in handheld
and other motion works.
In-camera Digital Horizon calibration: after updating the firmware, the digital
horizon should be calibrated in a horizontal place. The steps are:
[MENUSystemDigital Horizon Calibrate]
3.3 Slow-Mo and Quick-Mo
3.3.1 Two Types of FPS
Sensor fps: The capturing fps of the CMOS imaging sensor. Shown on the up
center of the UI as well as on the slate, it can be set with the shortcut button
[FPS].
Project fps: The fps for clips playback, editing or delivery. You can choose
one of them based on your need. For example: 24fps for movie and 25fps for
TV release (PAL). To set the Project FPS: see the steps on the right.
When the Project fps is 25fps, whatever the CMOS imaging sensor fps is set,
clips will be played at 25fps in post-production or in-camera playback. For
example: action movies usually choose 22 Sensor fps for shooting, but 25
Project fps for playback, which makes the action seems faster.
The default setting of project fps is 25fps.
3.3.2 User-defined CMOS Imaging Sensor FPS
Regular fps, like 24, 25, 30, 48, 50, 96, 200, are available in the FPS Shortcut
List; you may also customize other fps in the menu.
You can define three fps to any value between minimum fps (0.2fps) and the
max fps of the current resolution w/ accuracy 0.001fps.
When defining the CMOS imaging sensor FPS to 22fps, there will be a
22fps option in the CMOS imaging sensor shortcut list at any
resolutions;
Menu Operation
Open Digital Horizon
[ConfigLiveview
Digital Horizon: on]
Menu Operation
Change Project FPS
[MENUShootingProject
FPS]
Shortcut List
Change Sensor FPS
Press short button [FPS]
Menu Operation
Custom sensor FPS
[MENUShooting
Custom Sensor FPS]

MAVO Edge 8K Operation Manual (KineOS 7.0)
©2021 Kinefinity Inc. Page 31 / 61
When defining the CMOS imaging sensor FPS to 119fps, the 119fps option would not appear at S35
5K DCI resolution, but will appear in the Sensor fps menu at S35 5K Wide resolution.
You can delete the customized Sensor fps by modifying it to 24 fps.
NOTICE When shoot slow-mo or fast-mo (CMOS Imaging Sensor FPS is different from Project FPS), the
audio track will not be packaged into a mov file if the recording codec is ProRes mov, but instead
two uncompressed audio files are in the clip folder.

MAVO Edge 8K Operation Manual (KineOS 7.0)
©2021 Kinefinity Inc. Page 32 / 61
3.4 Custom LUT
The camera supports custom LUT perfectly: from shooting to post-processing.
There is one in-camera preset LUT: KC_NeutM. KC_NeutM has more accurate
highlights and details in shadow than Kine709 and covers balanced tone with
normal saturation and contrast.
You can upload a LUT to the camera, and switch different LUT/Look instantly
when monitoring. While recording ProRes with custom LUT; it does not get
burned into the footage. You can upload 3
rd
-party LUT to the camera as
many as you want; supporting up to 33x33x33 3D LUT Cube, SCRATCH and
DaVinci Resolve can output cube LUT.
3.4.1 Upload Custom LUT
It just needs three simple steps:
1. Export the LUT from DI software and rename it as four English
characters, like CAN1.cube;
2. Copy the LUT into the root folder of the USB-C stick as FAT/FAT32;
3. Upload the LUT to the camera: insert the USB stick to the USB-C port,
and then load the Custom LUT with the menu. The process only takes
one second.
Reboot the camera, and the new LUT will be shown in the LUT shortcut list by
pressing the shortcut button [1].
NOTICE The LUT will be overwritten when the name is same, and there
should be no blank in the name and not more than four characters.
3.4.2 Erase Custom LUT
Erasing the uploaded custom LUT is also intuitive,
[MENULUTClean Custom LUT]
Then all custom LUT will be deleted in a second, only with native KC_NeutM
remained.
Menu Operation
Load Custom LUT
[MENUSetting
Load Custom LUT]
Menu Operation
Erase custom LUT
[MENUSetting
Clean Custom LUT]

MAVO Edge 8K Operation Manual (KineOS 7.0)
©2021 Kinefinity Inc. Page 33 / 61
3.5 Firmware Update
Kinefinity always optimizes the current features and adds new functions to
the cameras by firmware update. Users can download the latest firmware
from Kinefinity website to get their cameras updated.
The firmware version is shown at the bottom of MENU, for example,
firmware: KineOS V7.0(00), means the KineOS version is 7.0 with a building
number of 7000. To upgrade the firmware as the following steps:
1. Download: Download and copy the latest firmware to the root folder
of a FAT32 USB disk; insert the USB-C disk into the USB-C socket of the
camera;
2. Update: Choose Update Firmware in the System menu, and then
confirm to updade. When the successful message appears on the
display, it means the update is completed (approx. 30 mins);
3. Reboot: Power down the camera, and remove the USB-C disk. Repower
the camera, then the new firmware will take effect.
Downgrading the firmware to the previous version is also available to perform,
which is identical to the steps of firmware update.
CAUTION Do NOT take any other operation and never lose power firmware
update, else it may lead to failure of the update, and the camera
has to be sent to Kinefinity for repair, or you can to update the
firmware under calibration mode, please refer to 3.6.2.
CAUTION Remove any lenses before updating the firmware.
NOTICE Before updating the firmware, the user settings can be exported
from the camera. After the update is done, the user settings can
be imported to the camera by:
[MENUSystemExport/Import User Settings]
Menu Operation
Update Firmware
[MENUSystemUpdate
Firmware]

MAVO Edge 8K Operation Manual (KineOS 7.0)
©2021 Kinefinity Inc. Page 34 / 61
3.6 Calibration Mode
The camera can conduct the operations like black balancing, downgrading the firmware under this mode.
Please reboot the camera after the foregoing operations are done.
3.6.1 Black Balancing
Every Kine camera has been calibrated in black balancing under Calibration Mode before shipping. After a
long period of usage, please do the balancing again, and then reset to the factory. Factory reset would not
change the balancing data. Please do as following:
1. Enter into Calibration Mode: hold the [MENU] button for three
seconds while turn on the camera, then release the [MENU] button;
2. Calibration: put on the lens cover or mount cover to make sure a
total black display, then choose [Black Balancing] in the menu, and
wait about 5 mins until the cablibration is done;
3. Factory Reset: by [MENUSystem Factory Reset], then reboot the camera.
NOTICE After black balancing, there is no dead pixel in the normal ISO range, but there might be a few
red/green/blue spots when ISO is extremely high.
NOTICE If there are white dots in some frames, it may be due to the cosmic rays, not the malfunction of
the CMOS imaging sensor.
3.6.2 Update/Downgrade the Firmware
If the camera is powered down during the firmware update, it may be not powered on because of damaged
system. Please try to turn on the camera under Calibration Mode before send it to factory:
1. Enter the Calibration Mode: hold the MENU button when press and release
power button, after three seconds, release the [MENU] button;
2. Update: In the System menu, select Update Firmware, and then confirm to
update. When the successful message appears on the display, it means the
update is completed (approx. 30 mins);
3. Reboot: Power down the camera, and remove USB flash drive. Power on the
camera, and then the new firmware takes effect.
NOTICE After the update is done, please perform the factory reset.
Menu Operation
Black Balancing
[MENUSystem
Black Balancing]
Menu Operation
Update Firmware
[MENUSystemUpdate
Firmware]

MAVO Edge 8K Operation Manual (KineOS 7.0)
©2021 Kinefinity Inc. Page 35 / 61
3.7 TimeCode and SYNC
Timecode is one of the key features of cinema camera. The camera shows time
code in Live View and Playback state. Timecode is written into recorded clips.
For ProRes, the mov file contains a single timecode track.
The camera enables three types of timecodes:
Free run: timecode runs all the time, no matter you are recording or
not. The timecode is embedded into recorded clips;
Record run: timecode runs only when recording. We recommend to
set timecode to 00: 00: 00: 00 when a new project begins;
External TC: the camera can use timecode from an external device like
Ambient NanoLockit as timecode of camera: using a special cable to
connect a timecode generator to the TC port, then set timecode
source as external in the menu.
To choose or reset the timecode, please follow the operation on the right.
3.7.1 TC port and TC cord
The TC port is 0B 5-pin push-pull socket. It is compatible with the ARRI
Alexa camera TC port for LTC IN and OUT.
Timecode generator based on Ambient timecode system, such as
NanoLockit, is also a 0B 5-pin socket. You can check the TC cord on the
Kinefinity official website or contact sales@kinefinity.com.
In addition, the camera can output timecode to other devices: connect the
TC input port of the device to the TC output port of the camera by a special
TC cord.
NOTICE When the camera is set to external timecode, the Jam TC input
mode is not supported.
Menu Operation
Set the TimeCode
[MENUSettings
TimeCode]
Port Definition
1. GND
2. LTC IN
3,4. NC
5. LTC OUT
MAVO Edge 8K Operation Manual (KineOS 7.0)
©2021 Kinefinity Inc. Page 36 / 61
3.7.2 External TC
There are three kinds of frame rates when using external TC: Project FPS,
Sensor FPS and External FPS of TC generator. Make sure that the Sensor FPS
is an integral multiple of the External FPS.
Timecode on UI will be green if the system is successfully connected. If there
is no external timecode feeding into the camera, it will automatically employ
the internal timecode of the camera and the indicator shows in yellow. If the
timecode blinks in green/red/yellow, you need to check if the following
situations exist:
Improper settings on the frame rates
Poor cable connection;
Power loss of external timecode device;
Special settings needed for the timecode device. For example,
NanoLockit TC output needs to be activated manually.
3.7.3 Beeper and SYNC
The beeper has two usages:
It makes a tone of 1KHz and 2KHz respectively when the camera is
triggered on/off record, to give a signal to the crew in the field. You
can disable the beeper by the operation on the right.
The tone of 1KHz and 2KHz at the beginning of the video and end of
the video can be recorded when the camera is triggered on/off
record, as pilot for post-workflow. Disable the function by the
operation on the right.
Menu Operation
Set Beeper
[MENUSYNC
Beeper: on/off]
Menu Operation
Set recording of Beeper
[MENUSYNC
Recording Beeper: on/off]

MAVO Edge 8K Operation Manual (KineOS 7.0)
©2021 Kinefinity Inc. Page 37 / 61
3.8 Configure the Camera
You can save these settings to the camera: preset list, body fan speed, EI/ISO
mode, shutter mode, etc. When powered on with a USB-C disk, the camera
will be restored to factory default.
3.8.1 Preset
In-Camera Presets are a set of parameters for recording and shooting:
Image Format; Resolution; FPS; Shutter Speed; Record Format
Moreover, there are eight in-camera presets, and the camera provides quick
switch for these presets: in Live View mode, press and hold the button [1] for
one sec to pop up the Preset list.
Besides, these in-camera presets can also be defined and saved. After setting
these parameters in Liveview state, you can save a Preset according to the
operation on the right. Then the preset you save will be on the list.
NOTICE User settings can be exported or imported from the camera
with the following steps:
[MENUSystemExport/Import User Settings].
Menu Operation
Change Presets
[MENUShootingSave as
Preset]

MAVO Edge 8K Operation Manual (KineOS 7.0)
©2021 Kinefinity Inc. Page 38 / 61
3.8.2 Shutter Display Mode
There are two modes for shutter display: Shutter Speed and Shutter Angle:
[MENULiveviewShutter Mode: Time/Angle]
Calculation between Speed and Angle as following: if Shutter Speed is 1/50s,
and fps is 25, the shutter angle is:
25*360*(1/50) = 180 Degree.
The Shutter Angle ranges from 0.7~358 Degree; the Shutter Speed has min
value of 1/2000, and the max value depends on the FPS.
Besides, Shutter Speed List does NOT match Shutter Angle List.
NOTICE Set the appropriate shutter speed to avoid flickering: for example,
1/50s, or 172.8 Degree.
3.8.3 Camera Fan and Core Temperature
Core Temperature is the real-time temperature of the core processor. It is
shown on the UI with full parameters so that users can monitor it. When the
core temperature reaches up to 75 degrees, the camera will be cooled down
automatically by the fan at full speed until the core temperature is down to
70 degrees and under. Meanwhile, the fan speed will return to its normal
setting.
You can adjust the fan speed (Default: 40%) from 25% to 100% or even turn
off the fan by the operation on the right.
Besides, you can choose to slow down the fan while recording in case there
will be less noise; the fan will be turned on automatically when the camera
stops recording.
Menu Operation
Change Fan Speed
[MENU
SettingsFan Speed]
Manu Operation
Stop Fan
[MENU
SettingsFan Control: Slow
While Recording]
Menu Operation
Change Shutter Display
[MENU
LiveviewShutter Mode:
Time/Angle]

MAVO Edge 8K Operation Manual (KineOS 7.0)
©2021 Kinefinity Inc. Page 39 / 61
3.8.4 ISO/EI
EI/ISO is a group of settings to capture light on the CMOS imaging sensor. MAVO Edge 8K supports both
ISO and EI mode, whose value display at the top of the screen.
ISO Mode
The nominal value of ISO is ISO ASA, which takes effect on the RAW data, applying different gain on the
CMOS imaging sensor. The default mode is ISO mode, ISO 640; the highlight level (Highlight means stops
from 18% gray to ADC Clip) is 5.0 stops.
Highlight Stops
As the name suggests, more highlight stops means less shadows details but
more noise. If you want to retain more highlight details, recommend to set 5.0
stops and above or using EI mode. Changing ISO will not change highlight stop.
The highlight stop is able to change from 4.3 to 7.3 stops in the menu. For
different highlight stops, the camera has a minimum ISO value, for example:
when the highlight stop is 4.6, minimum ISO is 200; while for 5.0 stops,
minimum ISO is 250.
EI Mode
The nominal EI value is similar to the settings in Alexa or RED cameras. The
highlight stop follows the change of EI value, but image brightness adjusted by
digital gain while analog gain of the CMOS imaging sensor remains unchanged.
Changing EI will change highlight stop and image brightness, while sensitivity and
dynamic range are unchanged. The highlight of EI 640 is 6.3 stops and EI 800 is 6.6
stops. You can switch between EI/ISO by the operation on the right.
Difference between ISO and EI mode:
In ISO mode, changing the ISO value means using analog gain on the camera, which changes the sensitivity
of CMOS imaging sensor, but the highlight stop remains unchanged.
In EI mode, changing the EI value doesn't change the sensitivity of the CMOS imaging sensor, but using
digital gain on the camera changes highlight as a result.
NOTICE In Live View, 18% gray matches EI value to maintain the same brightness for shooting and
post work.
NOTICE Recommend shooting in ISO mode if you don't fully understand the EI and ISO.
Dual ISO
MAVO LF supports Dual Native ISO: 640/2560, allowing it to capture low-noise image with high dynamic
range in regular scenes or low-light environment. When highlight level is 5.0, the native ISO from 200 to 640
is 640, and from 800 to higher is 2560. For EI mode, the native EI from 160 to 1280 is 640, and from 1280 to
higher ISO is 2560.
Menu Operation
Change Sensitivity Mode
[MENUShooting
Sensitivity Mode]
Menu Operation
Set Highlight
[MENUShootingISO
Highlight Stops]

MAVO Edge 8K Operation Manual (KineOS 7.0)
©2021 Kinefinity Inc. Page 40 / 61
3.9 Anamorphic Recording
Anamorphic was a technical choice for filming, but now it is an aesthetic preference. Echo to more
affordable anamorphic lenses, TERRA 4K, MAVO and MAVO LF are also good choices for anamorphic
shooting, as the CMOS imaging sensors are all 3:2.
The 36x24mm full frame CMOS imaging sensor of MAVO Edge 8K is like a huge canvas, allowing creators to
easily achieve various anamorphic shots on it:
S35 anamorphic;
Full frame anamorphic, obtaining a field of view equivalent to 65mm;
Open Gate: 8192x5288. All pixels of the CMOS imaging sensor are captured, leaving maximum space
for post processing.
The camera supports 2x, 1.8x, 1.75x, 1.5x, 1.33x, 1.25x, 0.5x, 0.67x anamorphic shooting, which falls into
almost all anamorphic lenses on the market.
When use 2x anamorphic lens:
Format
Resolution
FPS
De-Squeezed
FF 8K 3:2, OG
8192x5288
45
16384x5288
S35 4:3 Ana
4864x3600
60
9728×3600
S35 6:5 Ana
4864x3840
60
9728×3840
When shooting at 4:3 with anamorphic lens, you can de-squeeze the images
on the monitor into normal image by setting anamorphic lens factor in
MENU. For example, when anamorphic lens factor is 2, set the factor in
camera to 2, then you can get 2.66:1 instead of normal view of 4:3.
To set the ratio, see the operation on the right.
NOTICE The recorded clips are 4:3 instead of de-squeezed images. The monitoring images depend on
the ratio you set. You can see a normal image while monitoring, but the actual clips are still 4:3.
Menu Operation
Set Anamorphic Lens
[MENULiveview
Anamorphic Lens]

MAVO Edge 8K Operation Manual (KineOS 7.0)
©2021 Kinefinity Inc. Page 41 / 61
3.10 Kinefinity App Instruction
Kinefinity App which is re-designed thoroughly works with MAVO Edge 8K. The App can tune the shooting
parameters or get the status of cinema cameras responsively. The brilliant thing is that the App displays the
video stream from cameras in real time with super low latency, if the iOS devices and camera work in stable
and good WIFI environment
Preparation before running Kinefinity APP:
1. Make sure a high-gain dual-band internal-pin Wi-Fi antenna is mounted to the camera (The WIFI port
is manufactured with internal-pin and internal-bore; the antenna is SMA male pin and female head
with 5dBi and supports WIFI frequency band);
2. The cinema camera works as WIFI Client mode, so it needs an external wireless AP (access point),
which could be Android or iPhone12 hotspot (do not recommend iPhone 11 or below as hotspot for
this application) or wireless router, dual band preferred.
Take Android hotspot and iPad with Kinefinity App as the example:
1. Set the camera:
[MENUNetwork WIFI: on and Stream: on]
2. Prepare WIFI QR code: Generate the code by QR Code Generation website or WIFI hotspot code by
Android Phone;
3. iPad access to WIFI: Set iPad WIFI or use iOS camera to recognize the WIFI code to access to the
WIFI;
4. Camera access to WIFI by scanning the QR code:
[MENUNetworkConnect to Newwork…]

MAVO Edge 8K Operation Manual (KineOS 7.0)
©2021 Kinefinity Inc. Page 42 / 61
The camera scans the Wi-Fi QR code, obtains the SSID name and password, and connects to the Wi-
Fi network; if it is successful, the camera accesses the Wi-Fi network and assigns an IP address;
5. Set iPad App: open Kinefinity App, click:
[Configuration icon on the UISet upCamera ServerIP address]
Input IP address of the camera, then the App will automatically connect to the camera.
Then you are able to use three mode/pages:
1. Video mode: real-time video and key parameters. Users is capable of changing the key parameters
by simply touching the UI;
2. Panel mode: key parameters only;。
3. Setup mode: or menu/configuration mode. Input slate information and project information very
easily.
NOTE
1. The performance of camera may be affected if number of active links is over six at the same time;
2. Kinefnity App is available to iPhone with iOS10 or above. But if as WIFI hotspot, strongly recommend
iPhone 12;
3. QR code from some Android Phones may not be recognized by the camera. In this way, please
generate the code by:
QR code generation website: https://qifi.org/;
Operation: fill in the SSID and Key on the website and generate the QR code to use;
4. Kine cameras enables to record same WIFI information, no need to have extra setting in next time
boot up;
5. The IP address of the camera depends on the WIFI. As the WIFI changes, the camera IP address will
change.

MAVO Edge 8K Operation Manual (KineOS 7.0)
©2021 Kinefinity Inc. Page 43 / 61
4. TECH & SPEC AND CONNECTORS
4.1 Technical Specifications
4.1.1 MAVO Edge 8K SPEC
The following are typical settings.
Camera Type
Large Format Digital Cinema Camera
Imaging Sensor
8K 3:2 Full Frame CMOS Imaging Sensor
Active Area: 36x24mm, ø 43.3mm
Lens Mount
Native KineMOUNT as omni mount
*PL
to be PL/EF/SONY E/ARRI LPL by solid mounting adapters
*EF
*SONY E
*ARRI LPL
Dual Base ISO
Dual Base ISO
Max
2560 (from 800)
640 (from 800)
20480
Latitude
>14 stops
Full Frame
FF 8K DCI
8192x4320, 6~55fps
Active Size: 36x19mm, ø 40.7mm
FF 8K Wide
8192x3384, 6~70fps
Active Size: 36x15.2mm, ø 39.1mm
FF 8K HD
7680x4320, 6~55fps
Active Size: 33.8x19mm, ø 38.7mm
FF 4K OG (oversample)
4096x2644, 6~45fps
Active Size: 36x24mm, ø 43.3mm
FF 4K DCI (oversample)
4096x2160, 6~55fps
Active Size: 36x19mm, ø 40.7mm
FF 4K HD (oversample)
3840x2160, 6~55fps
Active Size: 33.8x19mm, ø 38.7mm
S35
S35 6K DCI
6144x3240, 6~72fps
Active Size: 27x14.2mm, ø 30.5mm
S35 6K Wide
6144x2560, 6~92fps
Active Size: 27x11.3mm, ø 29.3mm
S35 6K HD
5760x3240, 6~72fps
Active Size: 25.2×14.2mm,ø 29.0mm
S35 5K DCI
5120x2700, 6~85fps
Active Size: 22.5x11.9mm, ø 25.5mm
S35 5K Wide
5120x2160, 6~108fps
Active Size: 22.5x9.5mm, ø 24.4mm
S35 6:5 Ana
4864x3840, 6~60fps
Active Size: 22.5x18mm, ø 28.8mm
S35 4:3 Ana
4864x3600, 6~60fps
Active Size: 22.5x16.9mm, ø 28.1mm
S35 4K DCI (oversample)
4096x2160, 6~72fps
Active Size: 27x14.2mm, ø 30.5mm
S35 4K HD (oversample)
3840x2160, 6~72fps
Active Size: 25.2×14.2mm,ø 29.0mm
Other Cropping
4K DCI
4096x2160, 6~108fps
4K Wide
4096x1600, 6~145fps
4K HD
3840×2160, 6~108fps
4K HD 2.4:1
3840×1600, 6~145fps
2K DCI
2048x1080, 6~215fps
2K Wide
2048x800, 6~280fps

MAVO Edge 8K Operation Manual (KineOS 7.0)
©2021 Kinefinity Inc. Page 44 / 61
Record Codec
Codec Type
Encapsulation Format
Bit Depth
Notes
ProRes4444XQ
Quicktime mov
12bits
ProRes4444
Quicktime mov
12bits
ProRes422HQ/422/LT
Quicktime mov
10bits
Preview File
H264
mp4
8bits
Recording when fps <=30
Shutter Angle
0.7°~358° Rolling Shutter
Monitoring
Video Port x2
SDI x2
SYNC
Tally, AutoSlate, Beeper, TC, 3D/Multi-cam Sync
LUT
Preset: KineLOG3, Neutral(Rec 709), Support Custom 3D LUT
Audio Capture
In-cam MIC; 3.5mm MIC-IN; 48V Phantom Power Input x2 (regular XLR)
Record Media
Media Slot x2, for KineMAG Nano SSD based on NVMe M.2 SSD
Power Source
Power in
Consumption
DC IN (1B2P), 11~26V/Integrated V-mount battery
plate
32W
8K 25p under the Liveview, 32W
Body Material
Carbon Fiber with Aluminum Alloy
Body Weight
3.3lb/1.5kg
*Only camera body
Size
4.1x4.8x4.3"/106x124x109 mm
*W/o projections, WxHxL
Operating
Temp
0°C ~ 40°C
All specifications shown are preliminary and subject to change without notice.

MAVO Edge 8K Operation Manual (KineOS 7.0)
©2021 Kinefinity Inc. Page 45 / 61
4.1.2 MAVO Edge 8K Frame Rates and FPS
The following chart contains resolution, frame rate and codecs. For the latest complete list, please refer to
SPEC of MAVO Edge 8K on the website.
Image Format
Format
Resolution
Max FPS
Codec
FF
FF 8K DCI
8192x4320
55
ProRes
FF 8K Wide
8192x3384
70
ProRes
FF 8K HD
7680x4320
55
ProRes
FF 4K OG (Oversample)
4096x2644
45
ProRes
FF 4K DCI (Oversample)
4096x2160
55
ProRes
FF 4K HD (Oversample)
3840x2160
55
ProRes
S35
S35 6K DCI
6144x3240
72
ProRes
S35 6K Wide
6144x2560
92
ProRes
S35 6K HD
5760x3240
72
ProRes
S35 5K DCI
5120x2700
85
ProRes
S35 5K Wide
5120x2160
108
ProRes
S35 6:5 Ana
4864x3840
60
ProRes
S35 4:3 Ana
4864x3600
60
ProRes
S35 4K DCI (Oversample)
4096x2160
72
ProRes
S35 4K HD (Oversample)
3840x2160
72
ProRes
Other Cropping
4K Wide
4096x1600
145
ProRes
4K DCI
4096x2160
108
ProRes
4K HD
3840×2160
108
ProRes
4K HD 2.4:1
3840×1600
145
ProRes
2K DCI
2048x1080
215
ProRes
2K Wide
2048x800
280
ProRes
NOTICE The oversampling images are sharper and have less noise.
NOTICE Any frame rate can be defined between the minimum fps (0.2fps, with the current firmware)
and the maximum CMOS imaging sensor fps of the current resolution, with an accuracy of
0.001fps.
NOTICE ProRes4444XQ is up to 8K 30fps; ProRes4444 is up to 8K 50fps.
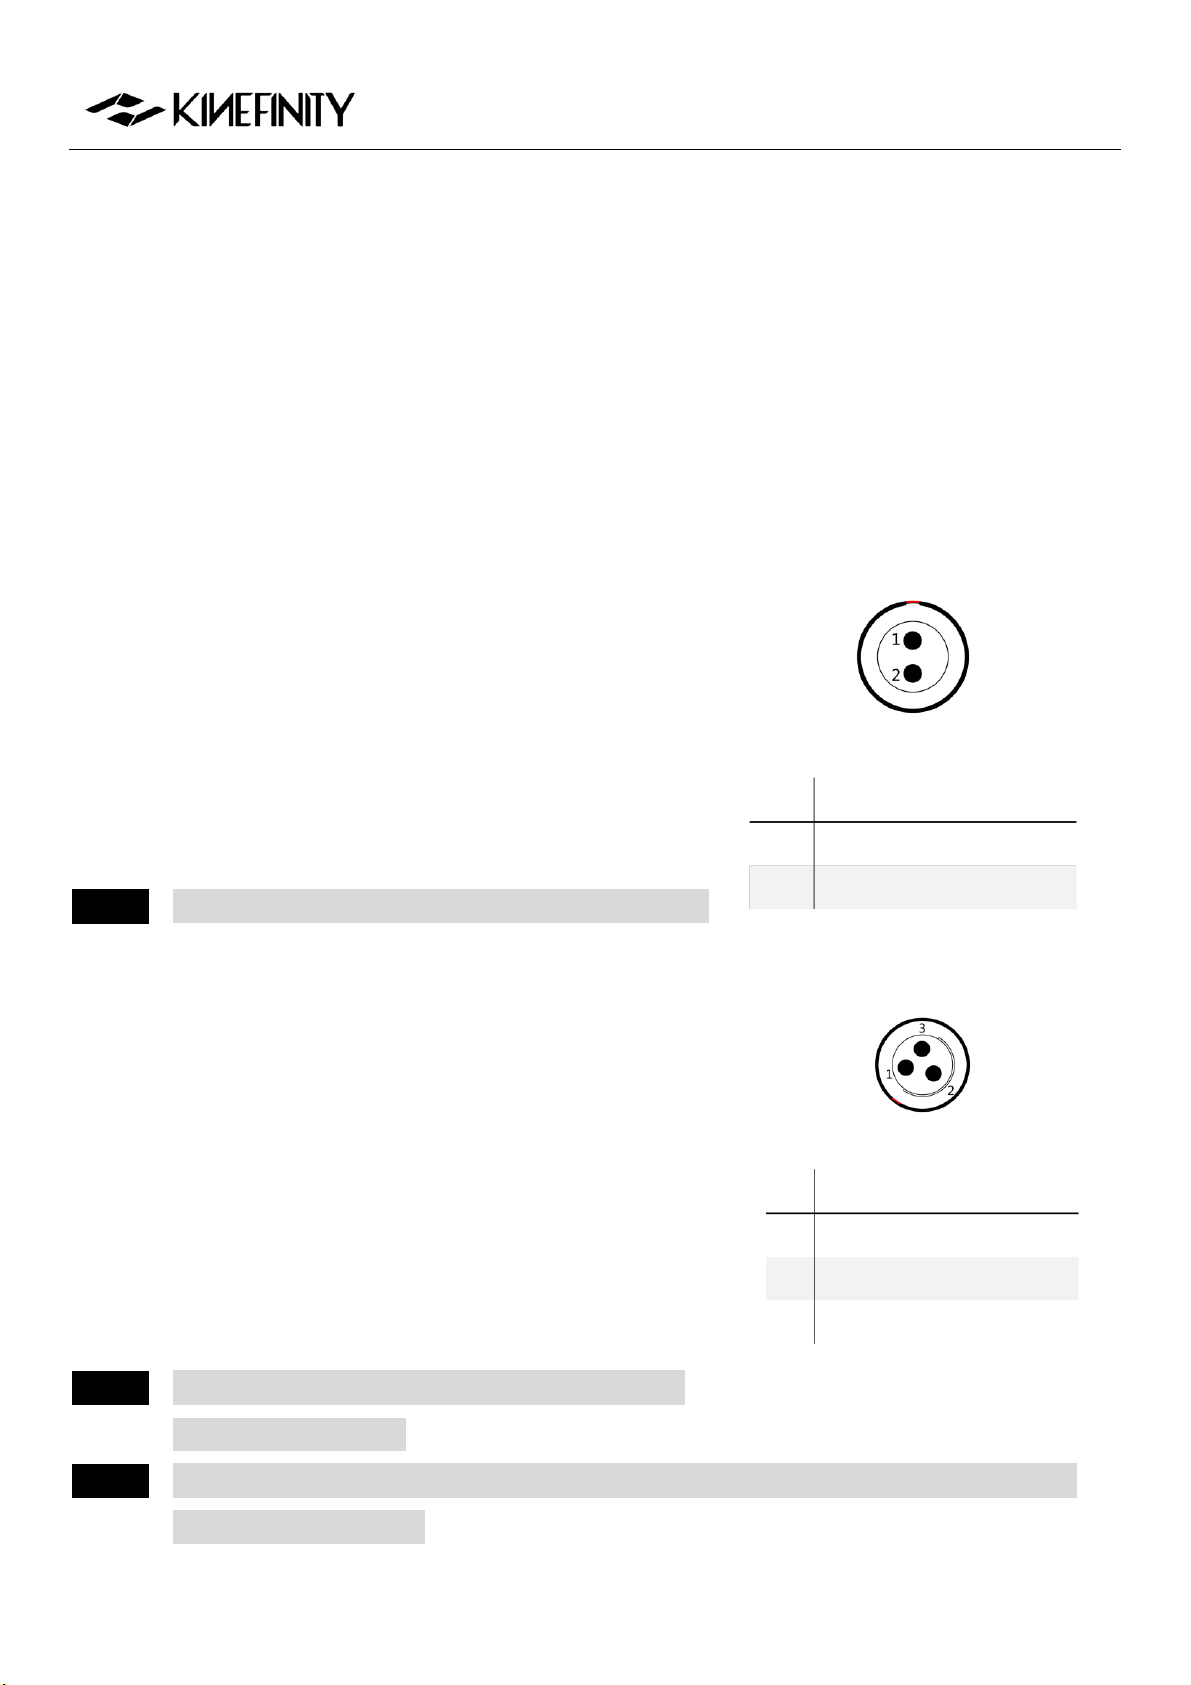
MAVO Edge 8K Operation Manual (KineOS 7.0)
©2021 Kinefinity Inc. Page 46 / 61
4.2 Connectors
MAVO Edge 8K brings multiple ports:
Universal ports: video output (SDI), phantom 48V power input (Standard XLR port), audio input
(3.5mm stereo MIC), audio output (3.5mm stereo headphone), USB-C port, power output (D-Tap),
GENLOCK port, ETHERNET (RJ45) port.
Proprietary ports: power input (DC IN), LENS port, SYNC port, TC input and output (TC), video
output (Video), high speed extension (EXT1&EXT2), bottom UPS power (EXT3), record trigger (RS).
4.2.1 DC IN
DC IN is located at the back right of the camera body, a 1B 2-pin
push-pull socket. The recommended input voltage of DC is
11V~26V. Please notice the following for a stable workflow:
Max current of external power is 5A;
Max consumption of camera body is 32W;
Max consumption of camera body with KineMON-5U is 38W.
NOTICE Red dot and groove on the socket should match pin #1.
4.2.2 RS
RS is a 3-pin Fischer push-pull connector for run/stop trigger on
MAVO Edge 8K.
Pin 2: VBAT output is equal to camera body power input
(voltage as 11V~26V), max current up to 3A.
Pin 3: Record on/off input signal, input voltage up to 3.3V.
Shorten pin #3 and pin #1 can trigger on/off.
NOTICE A combined power output of RS connector and VBAT
on D-Tap is not over 3A.
NOTICE The input voltage of RS connector cannot exceed 3.3V. Otherwise the camera will be damaged
and be sent to the factory.
#
Definition
1
VDD
2
GND
#
Definition
1
GND
2
VBAT
3
RS
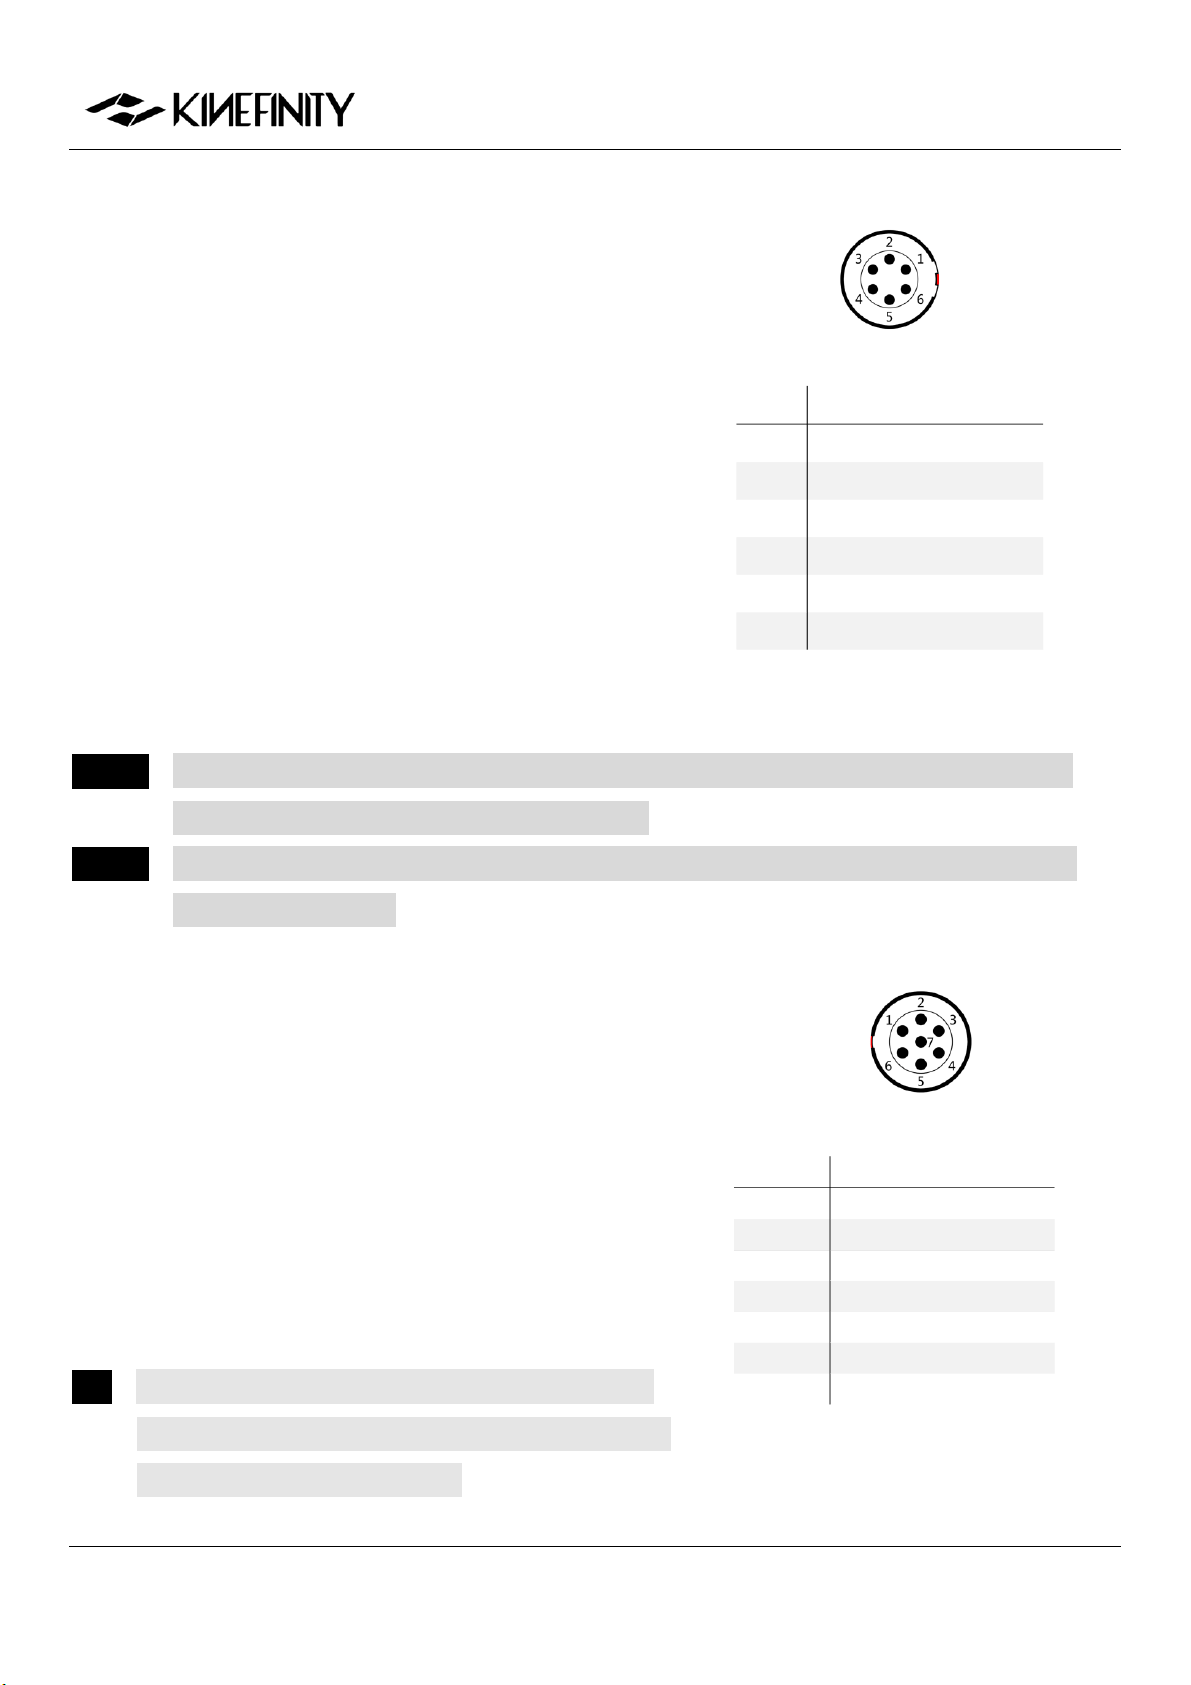
MAVO Edge 8K Operation Manual (KineOS 7.0)
©2021 Kinefinity Inc. Page 47 / 61
4.2.3 LENS
The control port (LENS) is located at the front of the camera
body, a 0B 6-pin push-pull socket.
Pin 1: Record on/off input signal, input voltage up to
3.3V.
Pin 3 and pin 4: standard voltage of RS232 connector
(-15V~+15V).
Pin 6: VBAT output is equal to camera body power
input (voltage as 11V~26V), max current up to 3A.。
NOTICE The VBAT is only available on compatible accessories. Please confirm with Kinefinity when you
use this port or customize third-party accessories.
NOTICE The input voltage of RS connector cannot exceed 3.3V. Otherwise the camera will be damaged
and sent to the factory.
4.2.4 SYNC
SYNC is a 0B7-pin push-pull socket on MAVO Edge 8K.
Pin 1 and Pin 7: Voltage range, 0~3.3V.
Pin 2 and Pin 3: standard voltage of RS232 connector, -
15V~+15V.
Pin 5: Voltage output range, 0~3.3V.
提示 The VBAT is only available on compatible accessories.
Please confirm with Kinefinity when you use this port or
customize third-party accessories.
#
Definition
1
RS
2
DET
3
RS232 TX
4
RS232 RX
5
GND
6
VBAT
#
Definition
1
CAN_L
2
RS232_RX
3
RS232_TX
4
Reserved
5
TALLY
6
GND
7
CAN_H
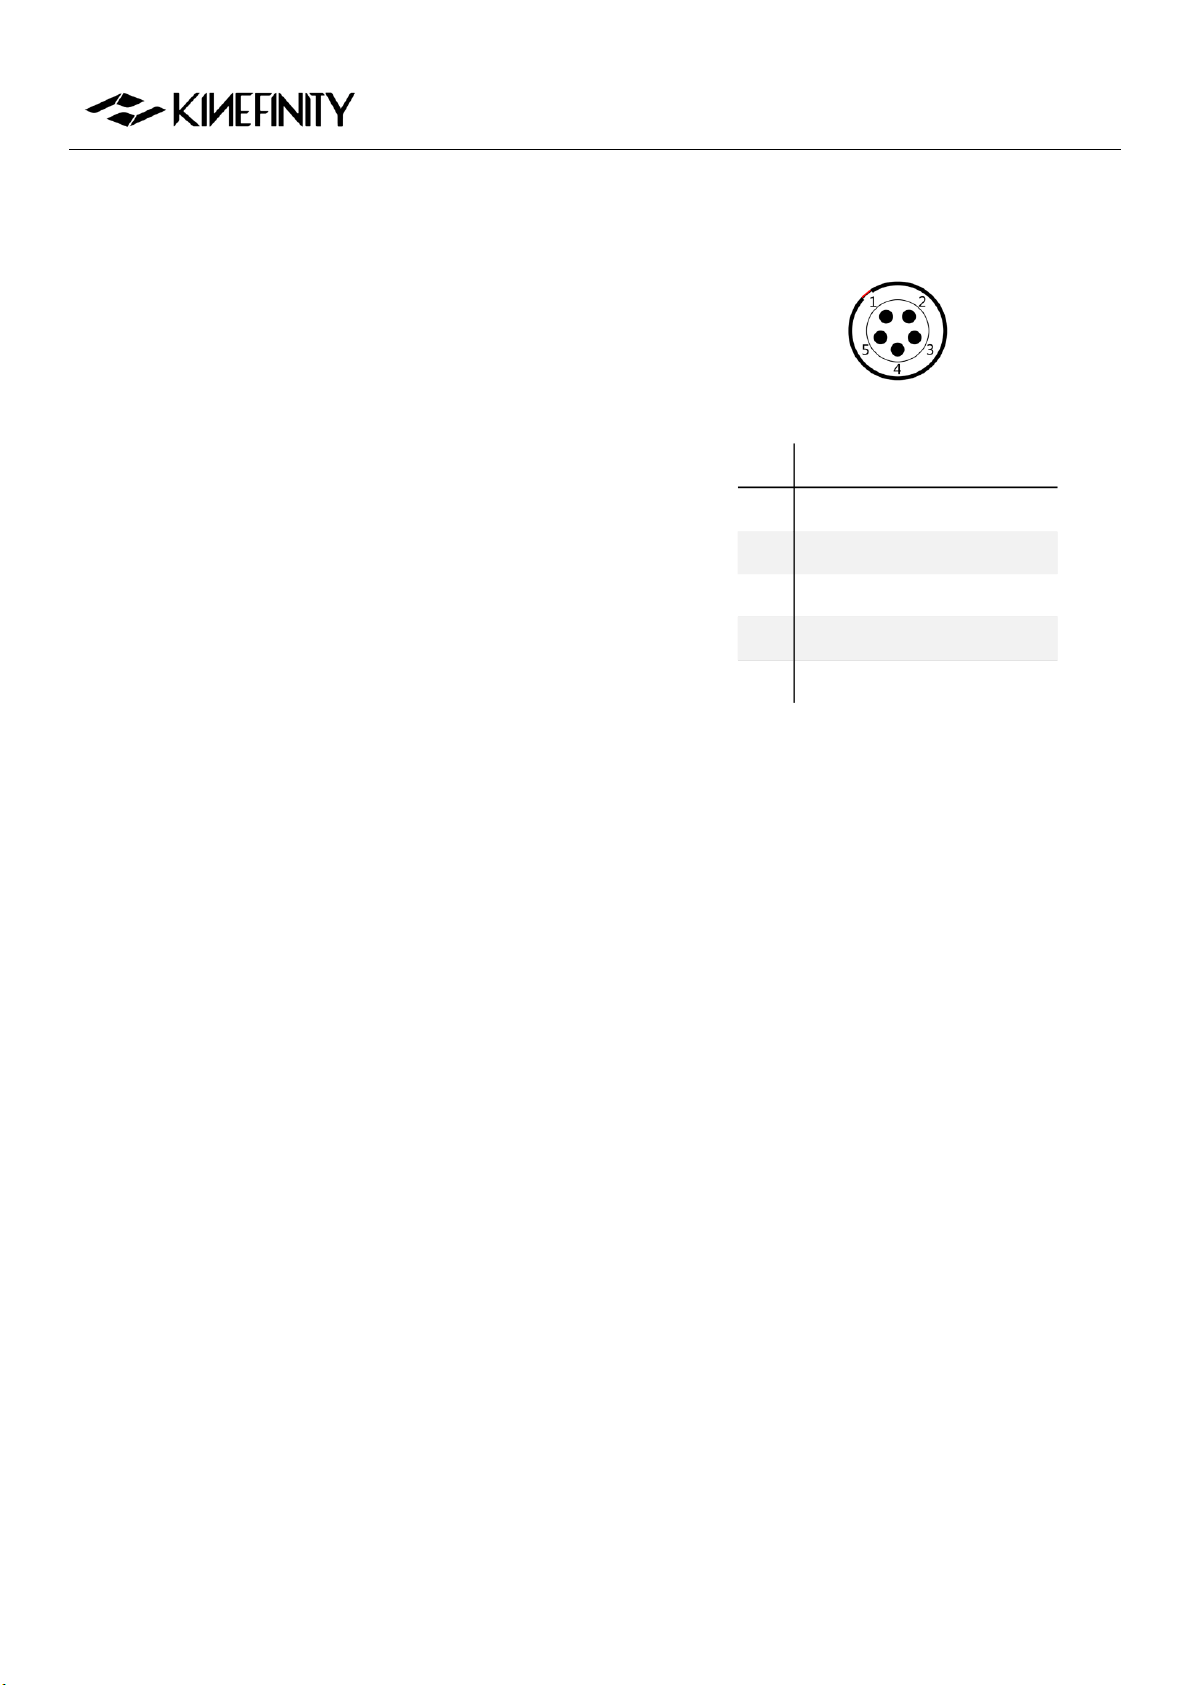
MAVO Edge 8K Operation Manual (KineOS 7.0)
©2021 Kinefinity Inc. Page 48 / 61
4.2.5 TC
The TC port is a 0B 5-pin push-pull socket for timecode input or
output. For different timecode generators, such as Ambient
timecode generator Nano Lockit, or SoundDevice recorder
which has a TC system, the physical spec and definition are the
same.
#
Definition
1
NC, unused
2
NC, unused
3
LTC IN
4
GND
5
LTC OUT
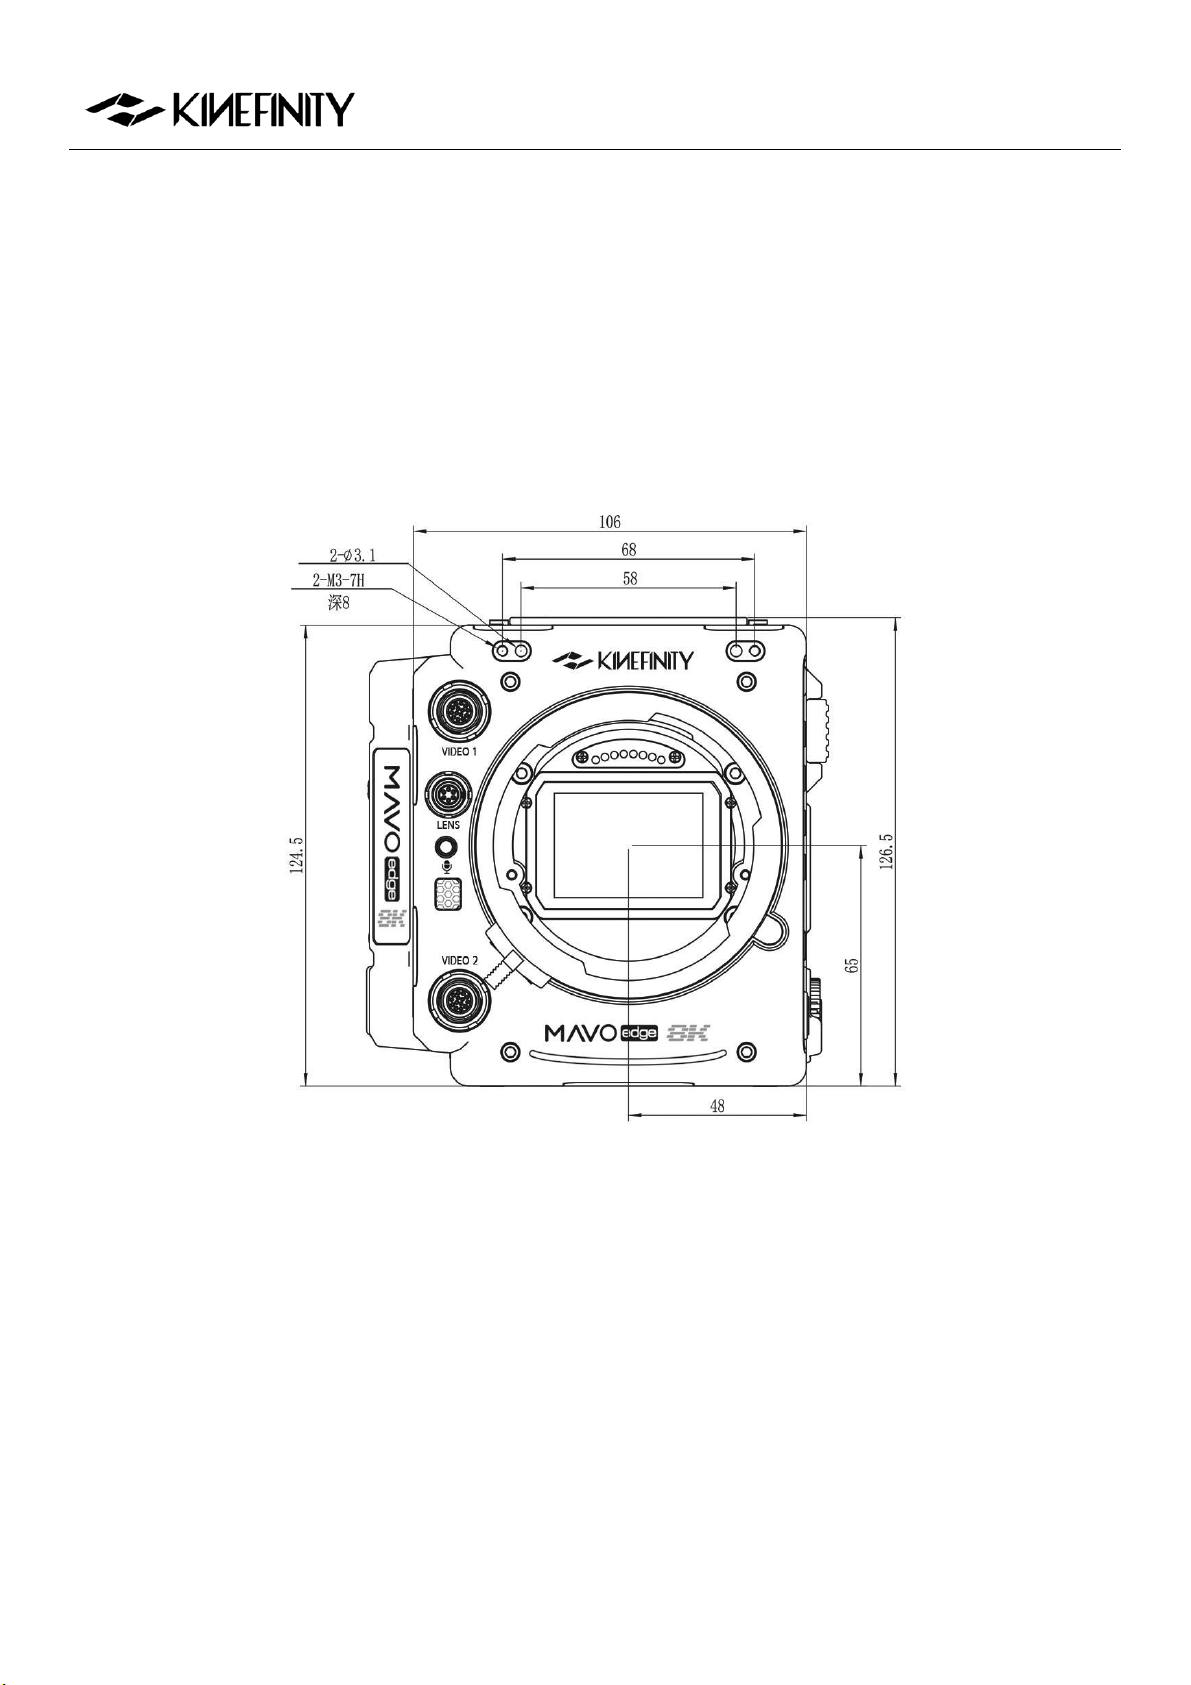
MAVO Edge 8K Operation Manual (KineOS 7.0)
©2021 Kinefinity Inc. Page 49 / 61
4.3 Mechanical Drawings
4.3.1 MAVO Edge 8K Body with KineMOUNT
Front View
Dimensions are shown in mm.

MAVO Edge 8K Operation Manual (KineOS 7.0)
©2021 Kinefinity Inc. Page 50 / 61
Top View
Dimensions are shown in mm.
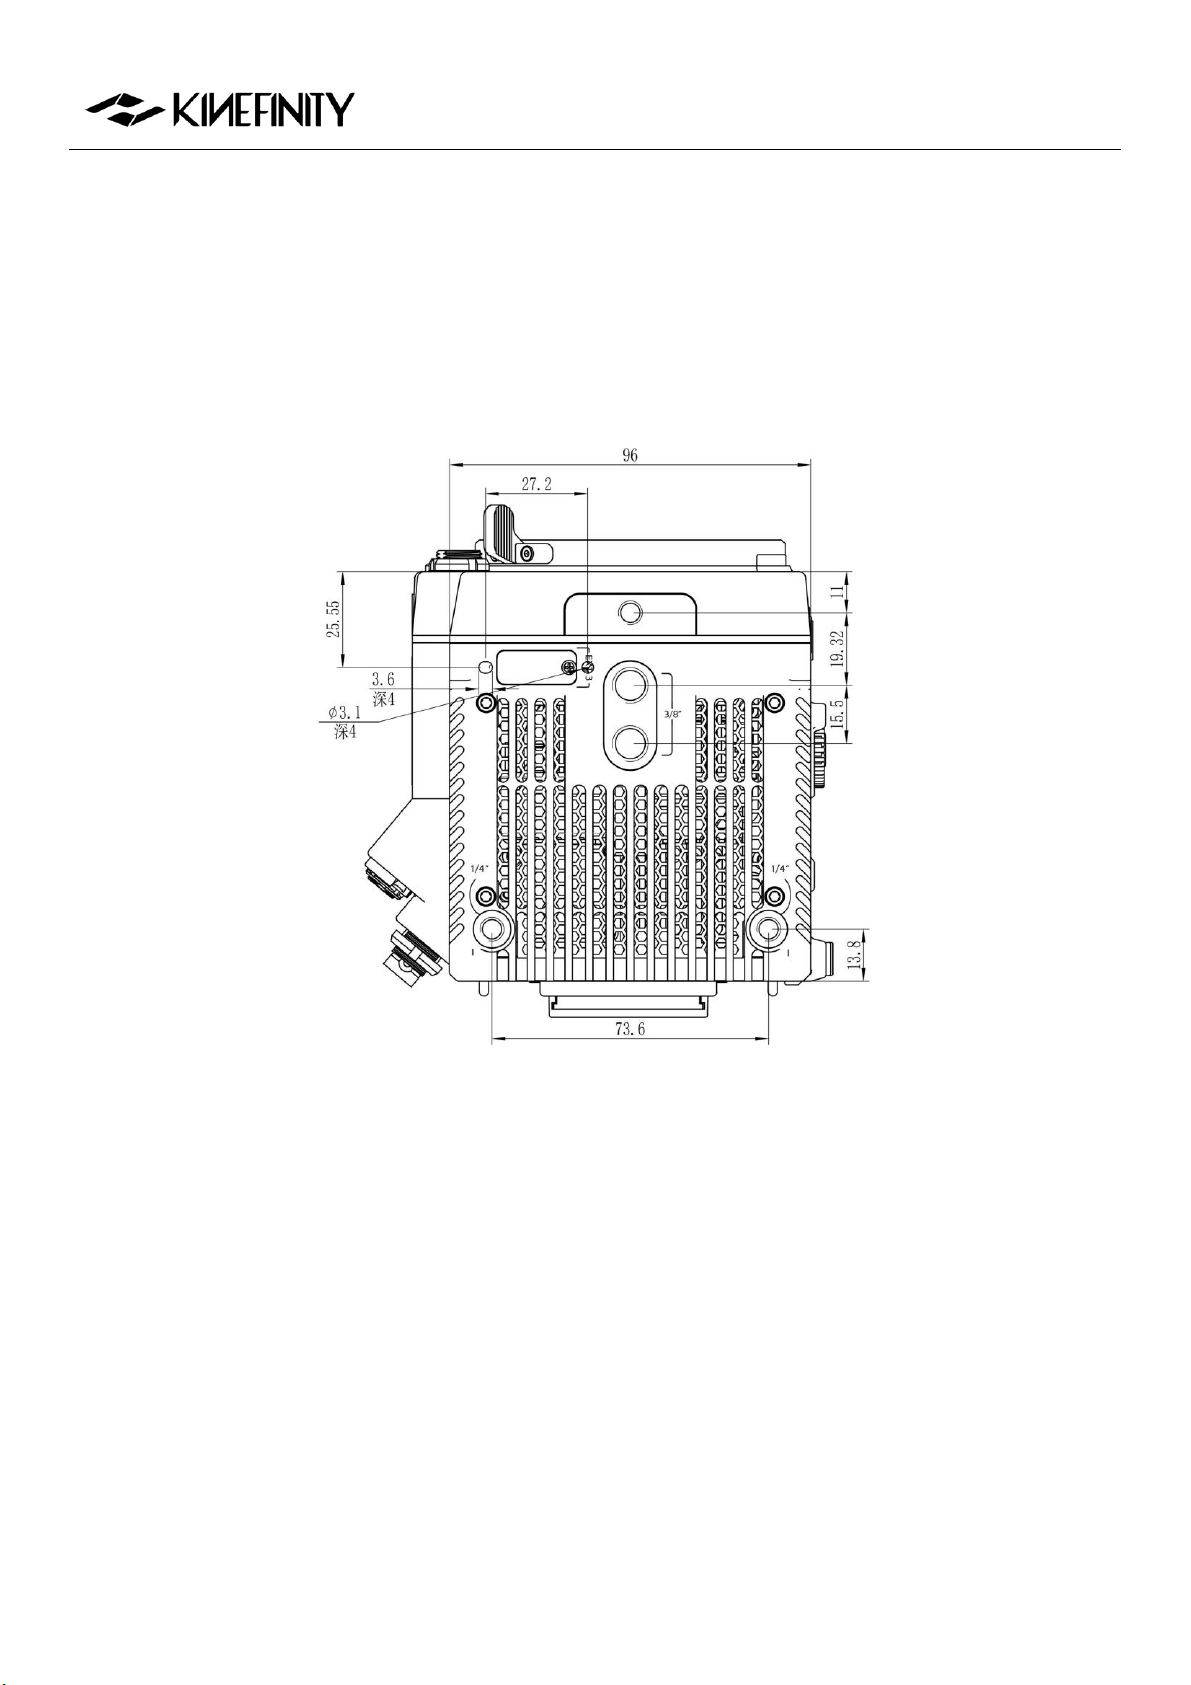
MAVO Edge 8K Operation Manual (KineOS 7.0)
©2021 Kinefinity Inc. Page 51 / 61
Bottom View
Dimensions are shown in mm.
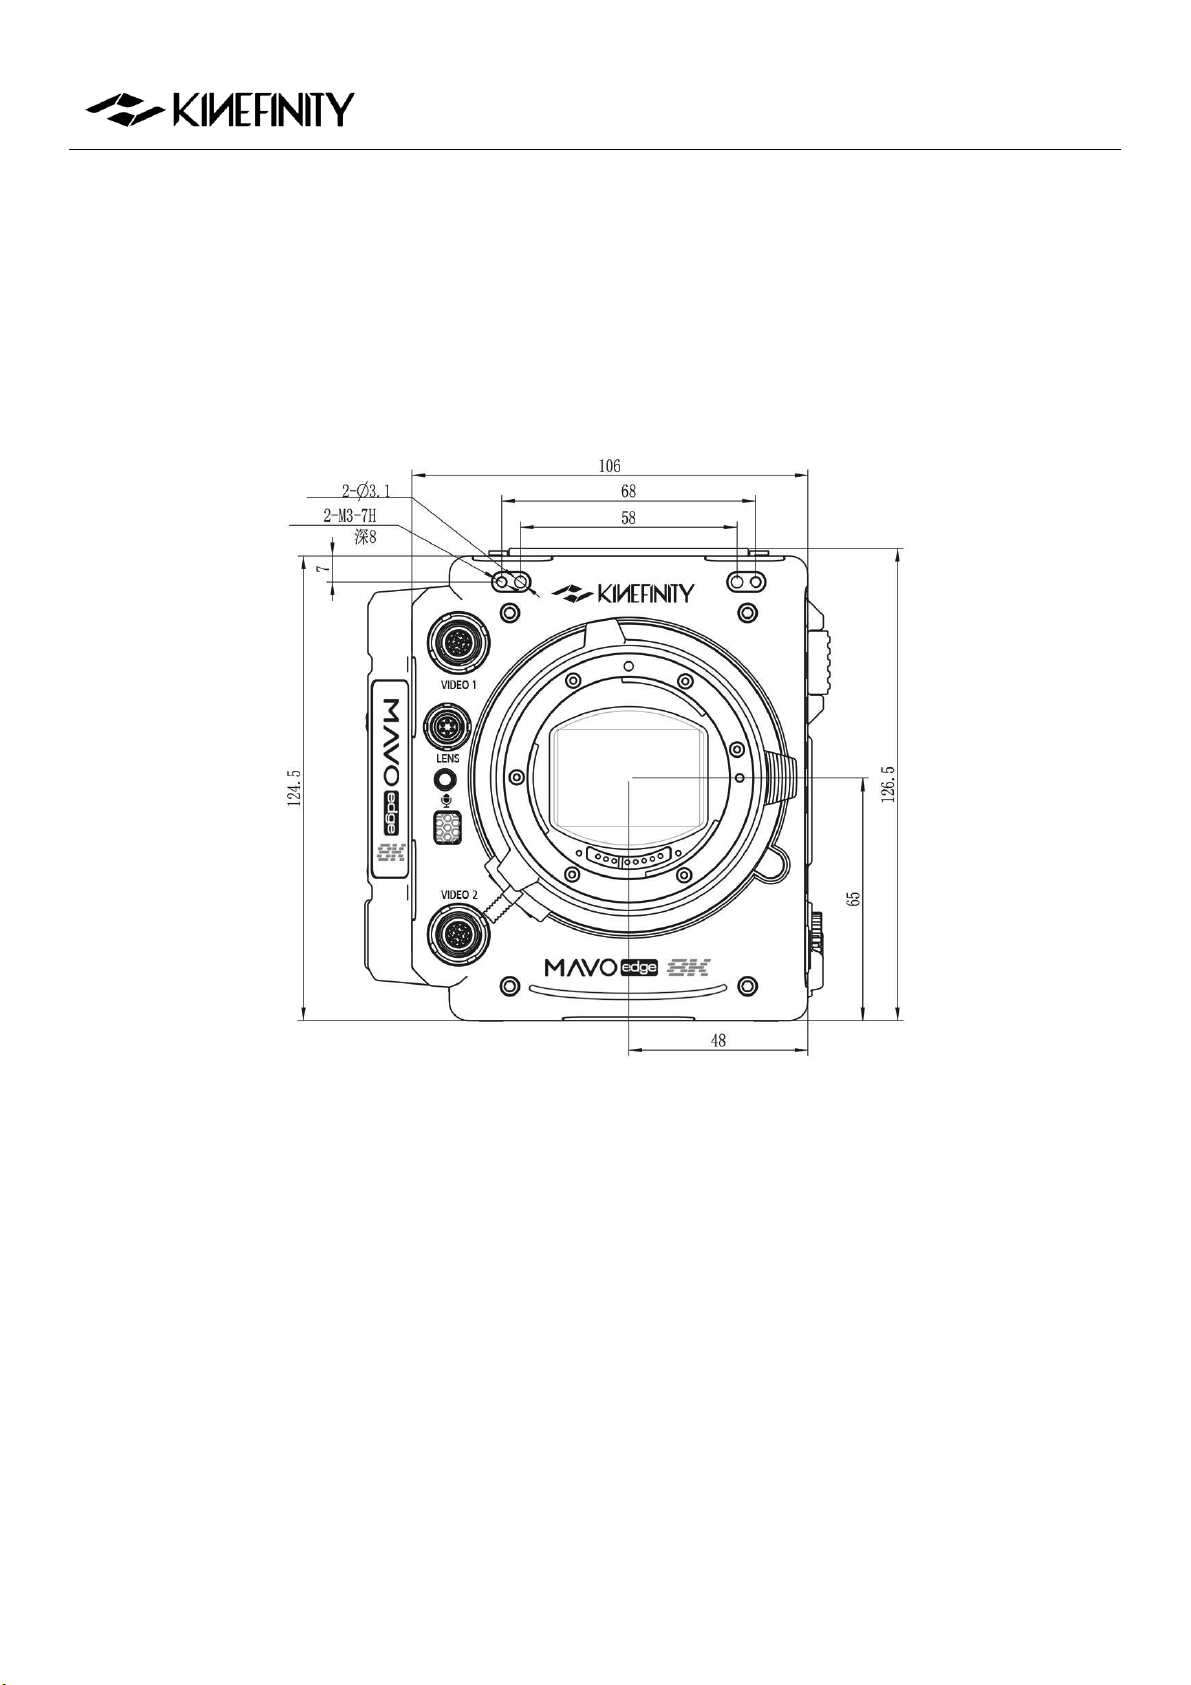
MAVO Edge 8K Operation Manual (KineOS 7.0)
©2021 Kinefinity Inc. Page 52 / 61
4.3.2 MAVO Edge 8K Body with KineMOUNT and EF 3 Mounting Adapter
Front View
Dimensions are shown in mm.
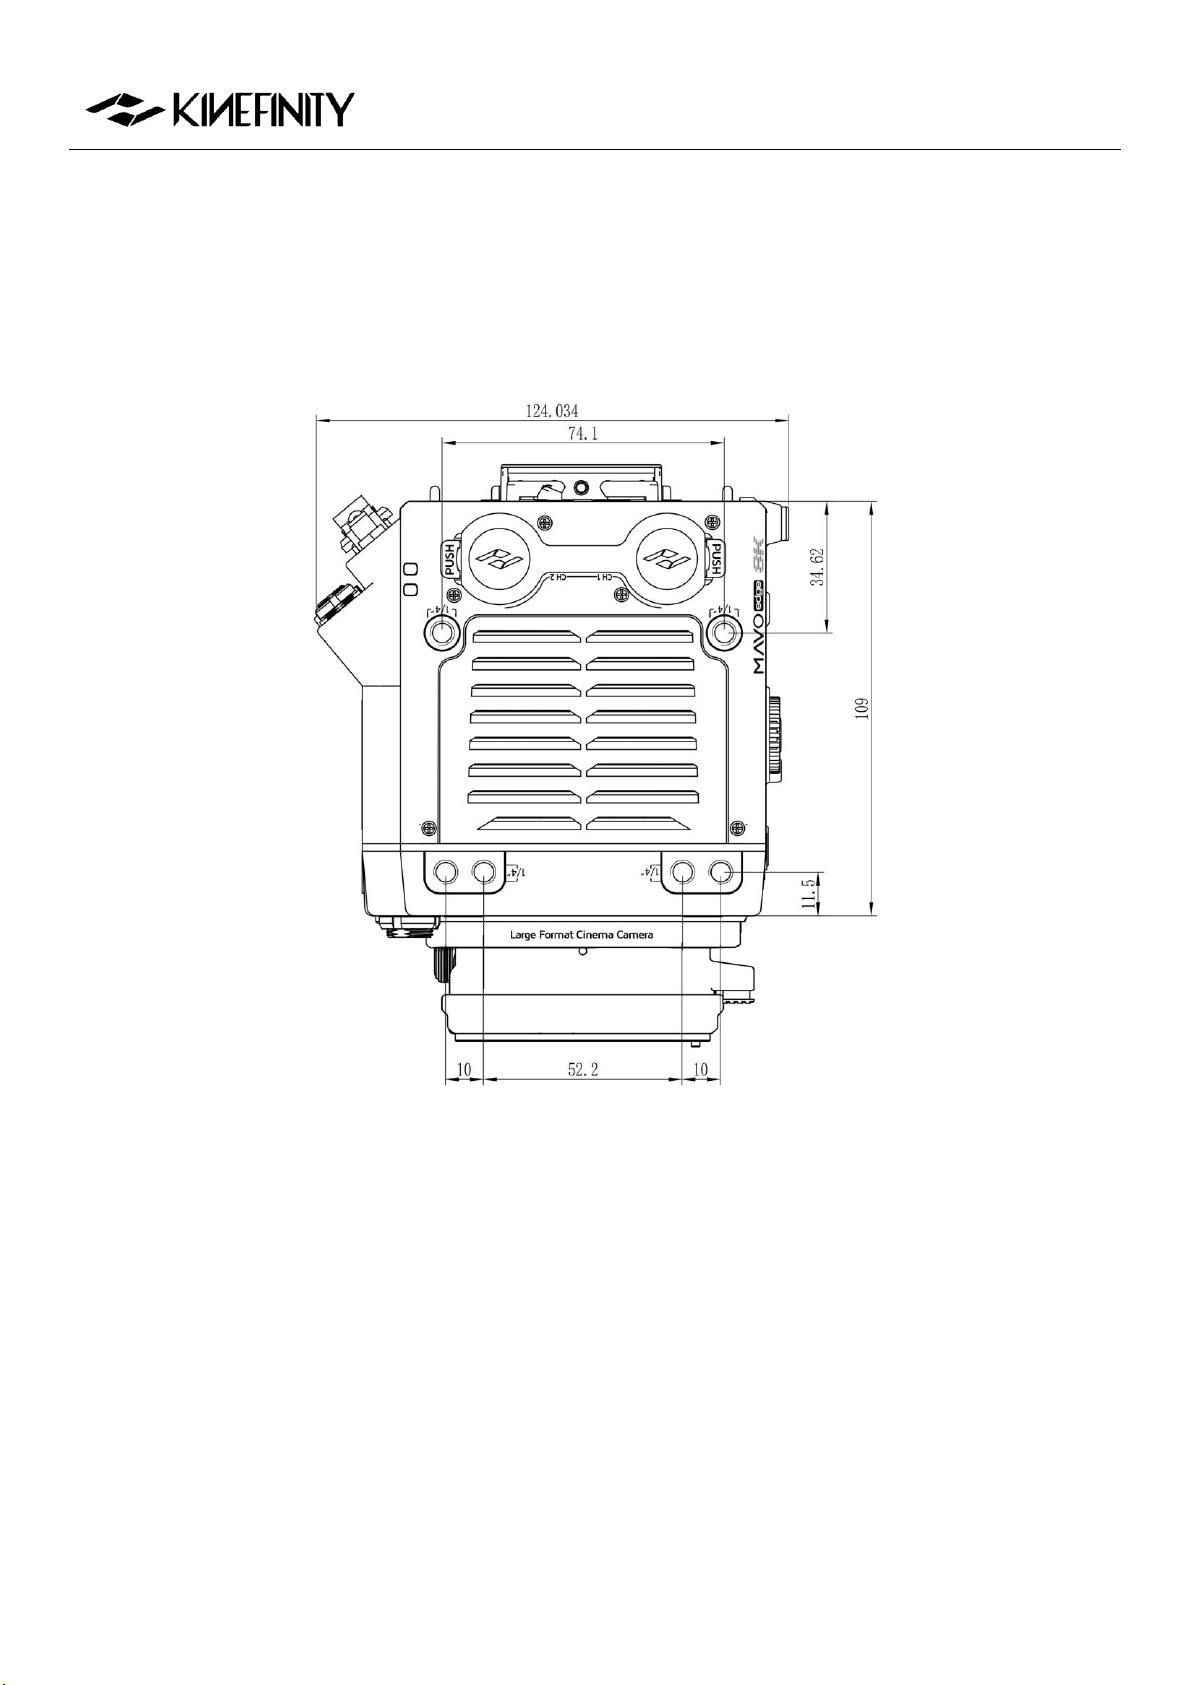
MAVO Edge 8K Operation Manual (KineOS 7.0)
©2021 Kinefinity Inc. Page 53 / 61
Top View
Dimensions are shown in mm.
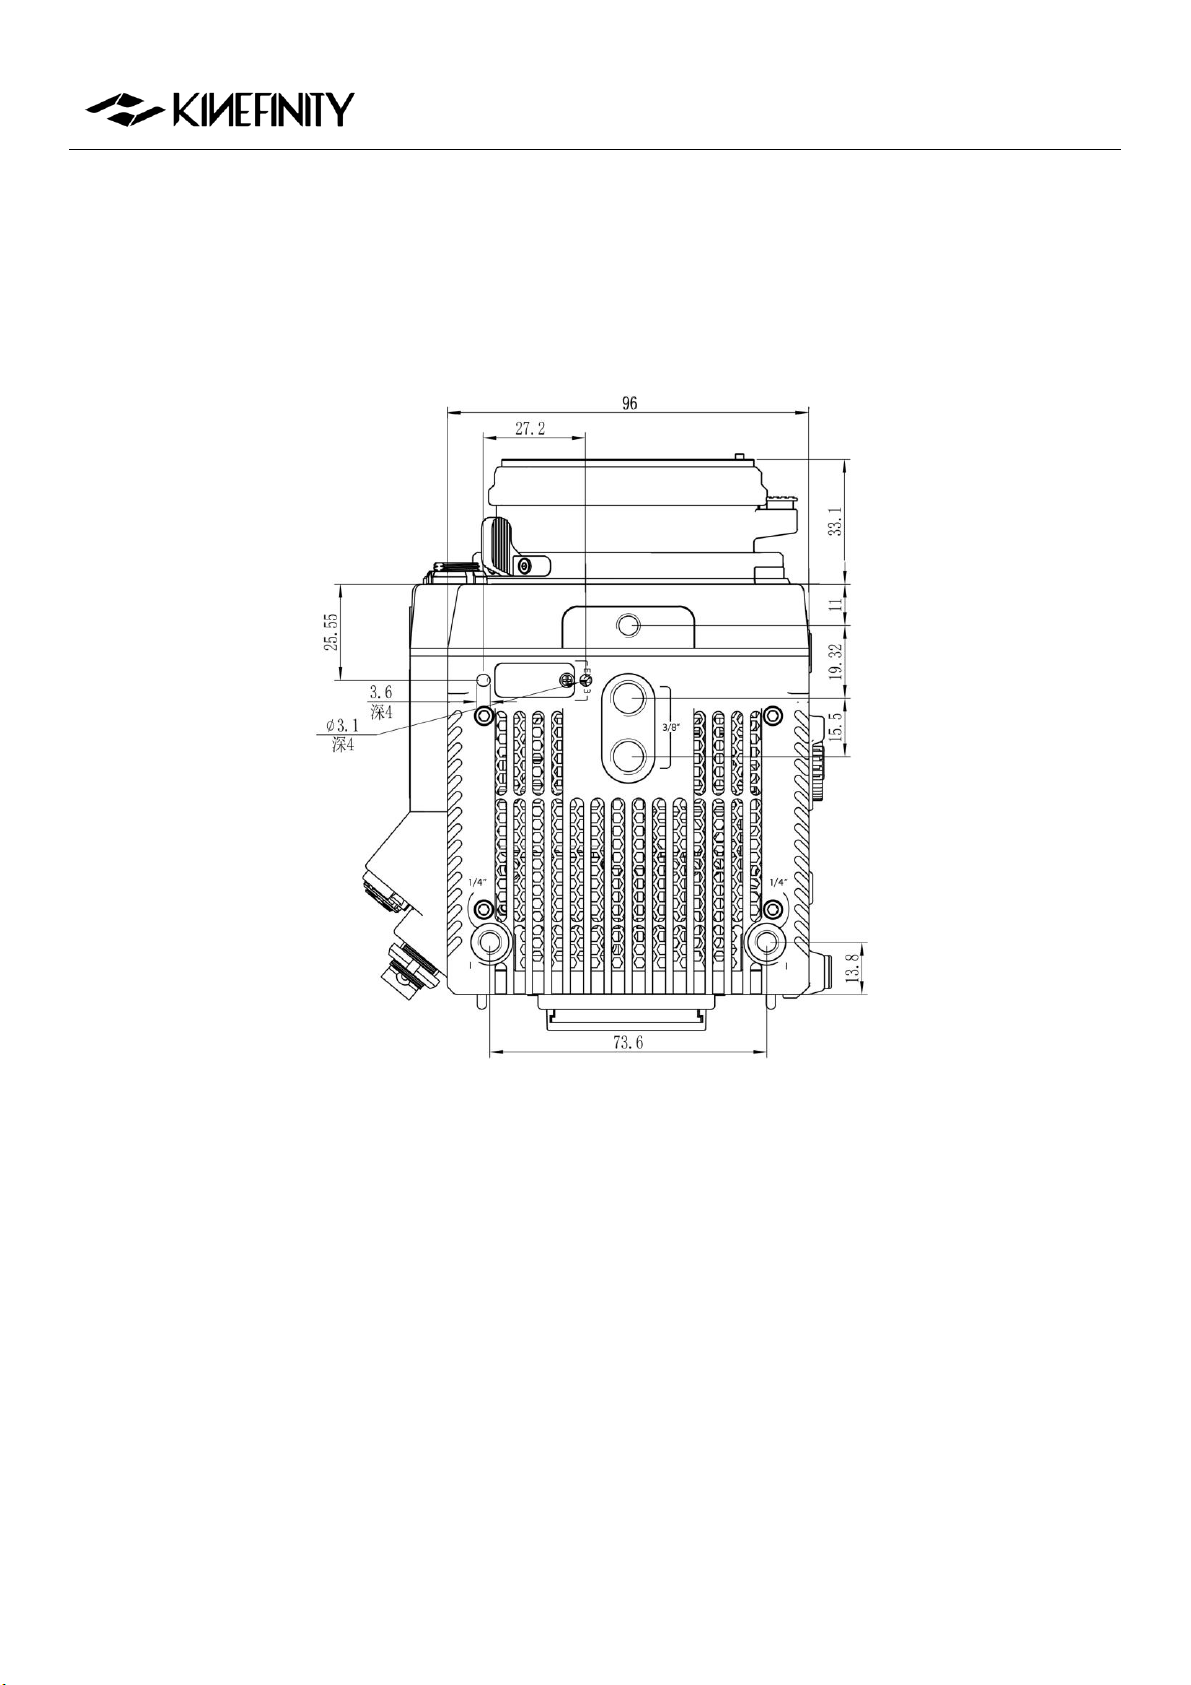
MAVO Edge 8K Operation Manual (KineOS 7.0)
©2021 Kinefinity Inc. Page 54 / 61
Bottom View
Dimensions are shown in mm.
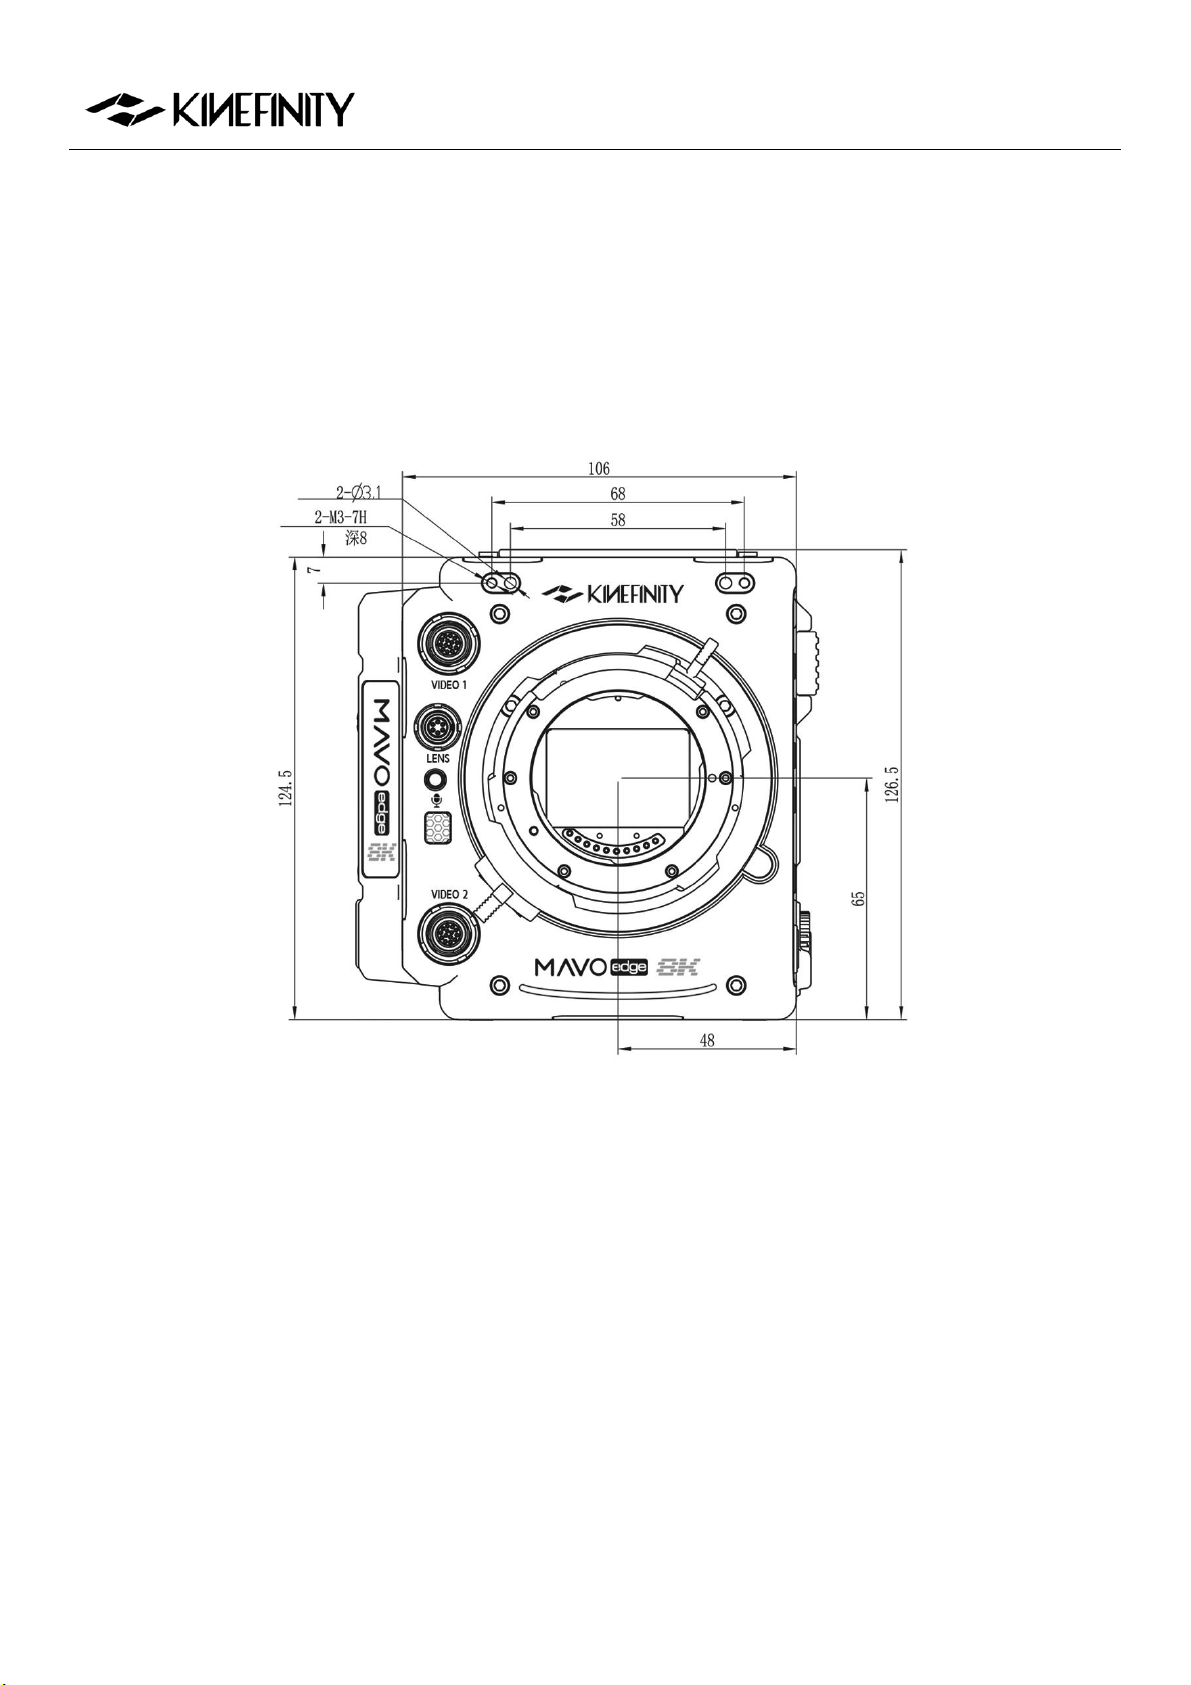
MAVO Edge 8K Operation Manual (KineOS 7.0)
©2021 Kinefinity Inc. Page 55 / 61
4.3.3 MAVO Edge 8K Body with KineMOUNT and E Mounting Adapter
Front View
Dimensions are shown in mm.
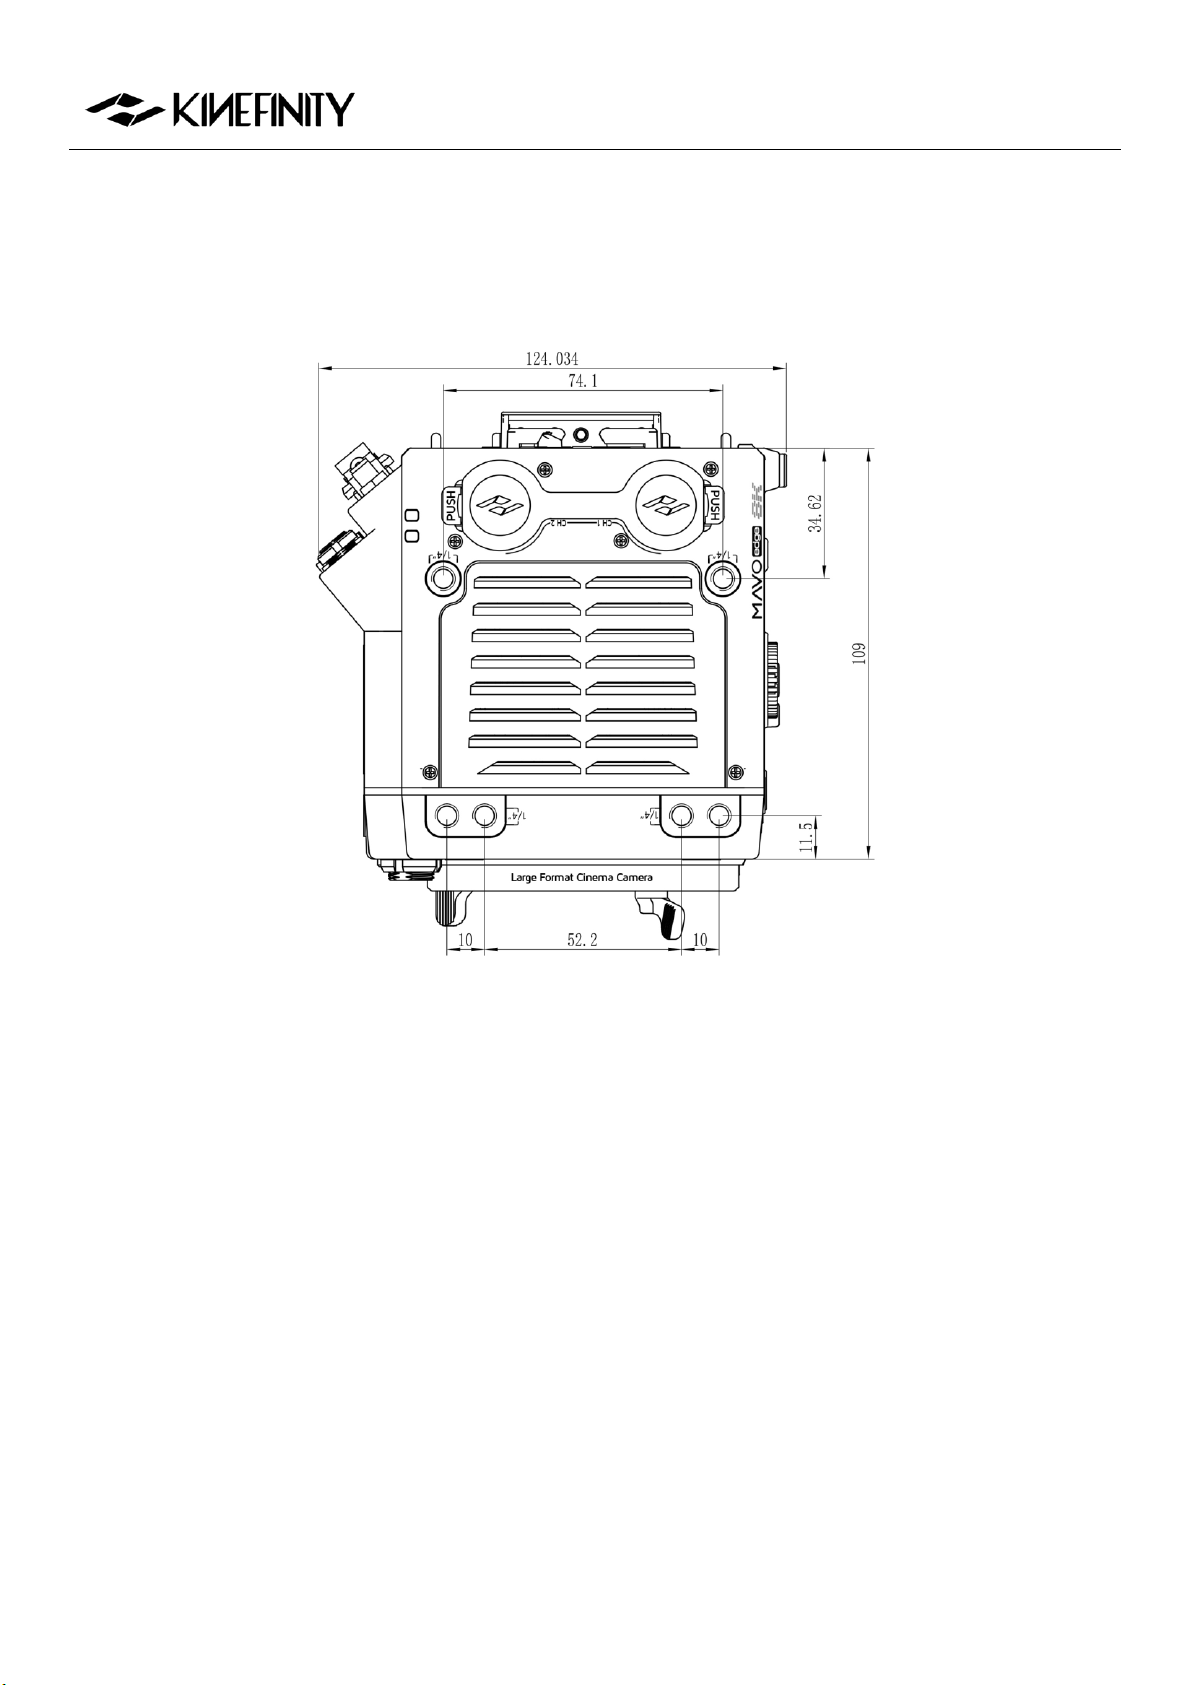
MAVO Edge 8K Operation Manual (KineOS 7.0)
©2021 Kinefinity Inc. Page 56 / 61
Top View
Dimensions are shown in mm.
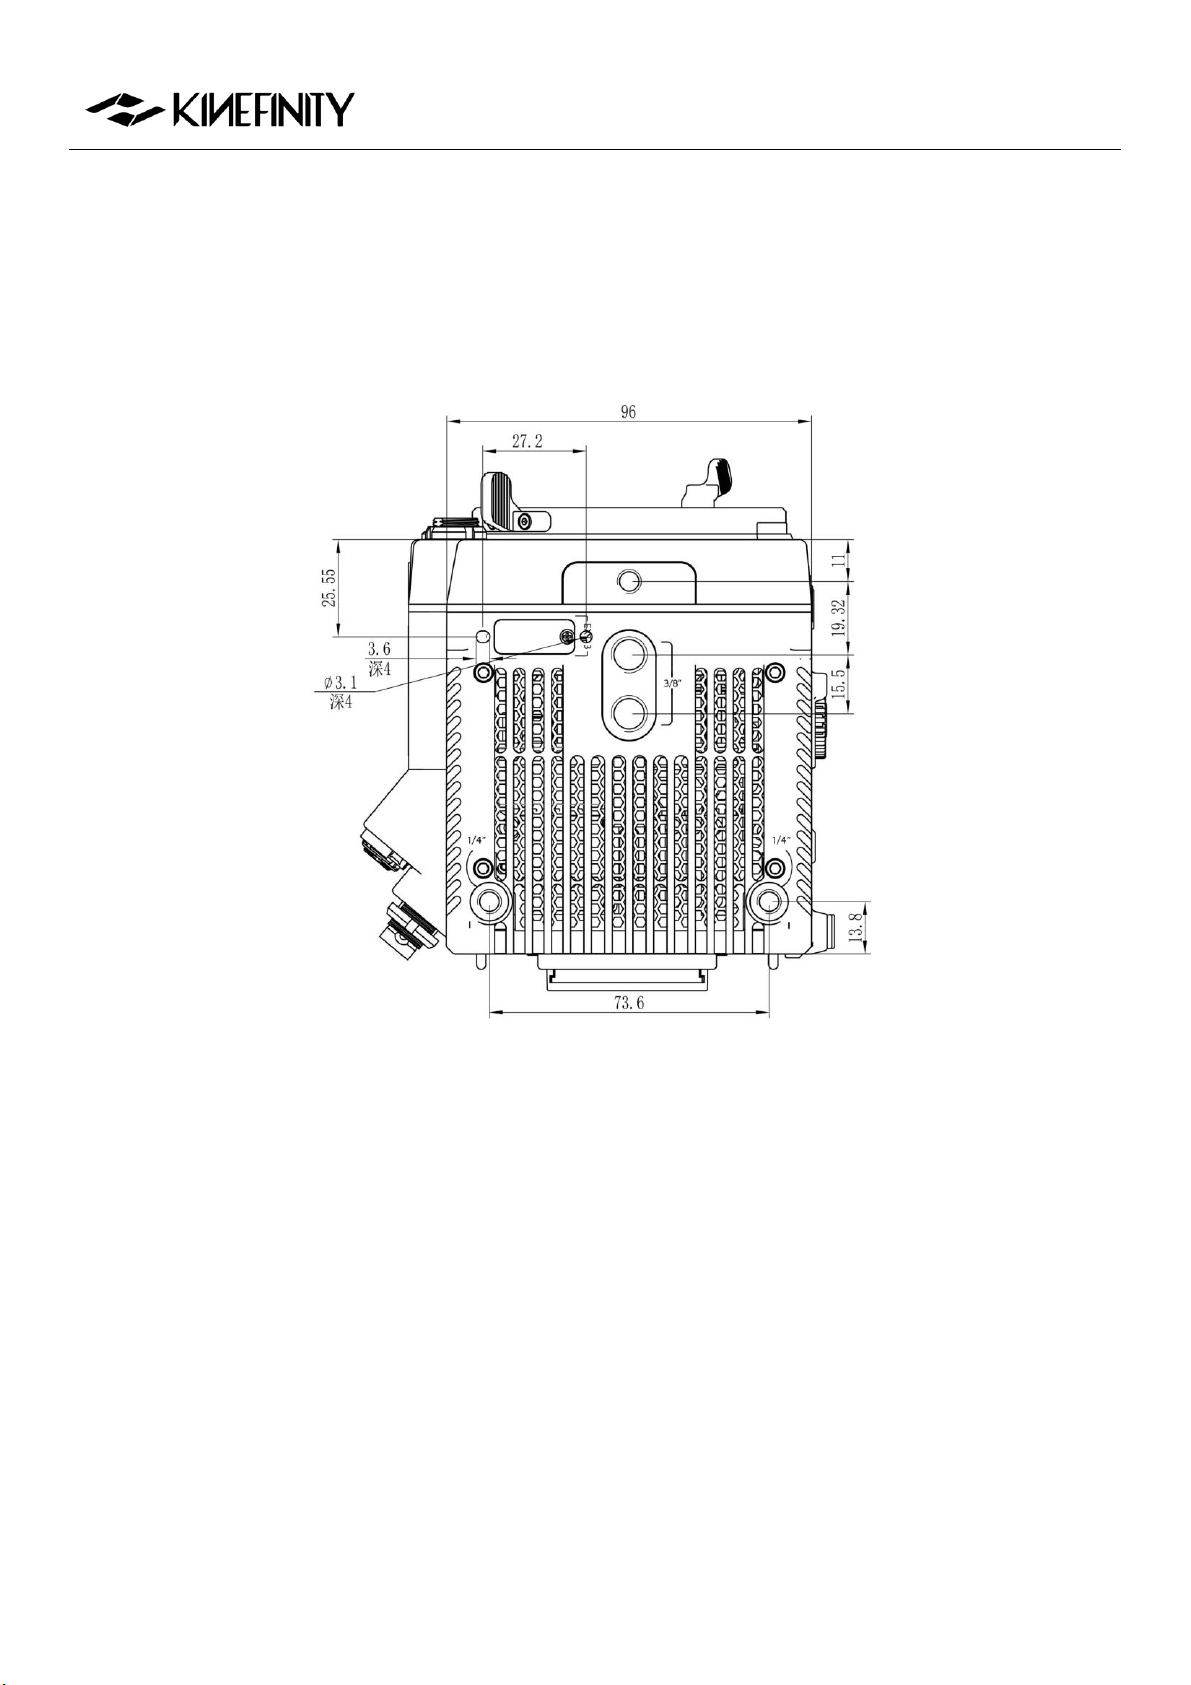
MAVO Edge 8K Operation Manual (KineOS 7.0)
©2021 Kinefinity Inc. Page 57 / 61
Bottom View
Dimensions are shown in mm.
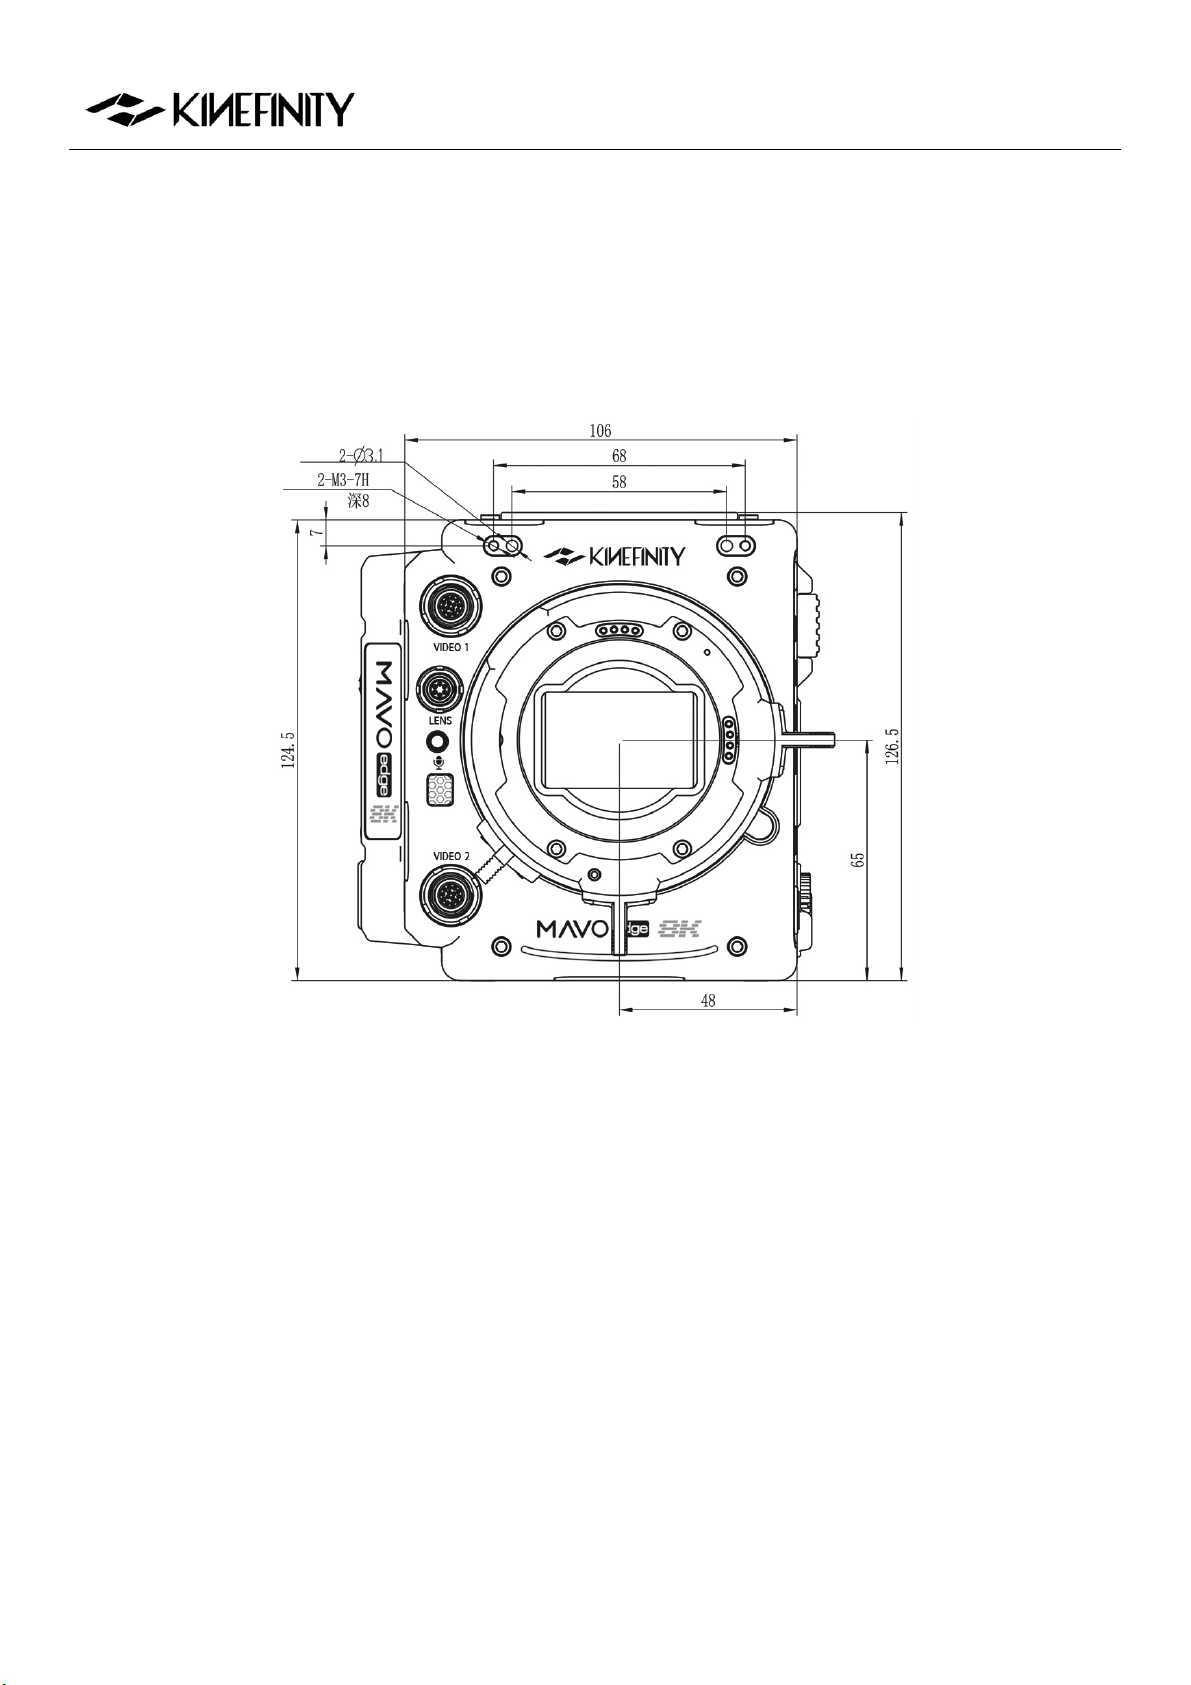
MAVO Edge 8K Operation Manual (KineOS 7.0)
©2021 Kinefinity Inc. Page 58 / 61
4.3.4 MAVO Edge 8K Body with KineMOUNT and PL Mounting Adapter
Front View
Dimensions are shown in mm.
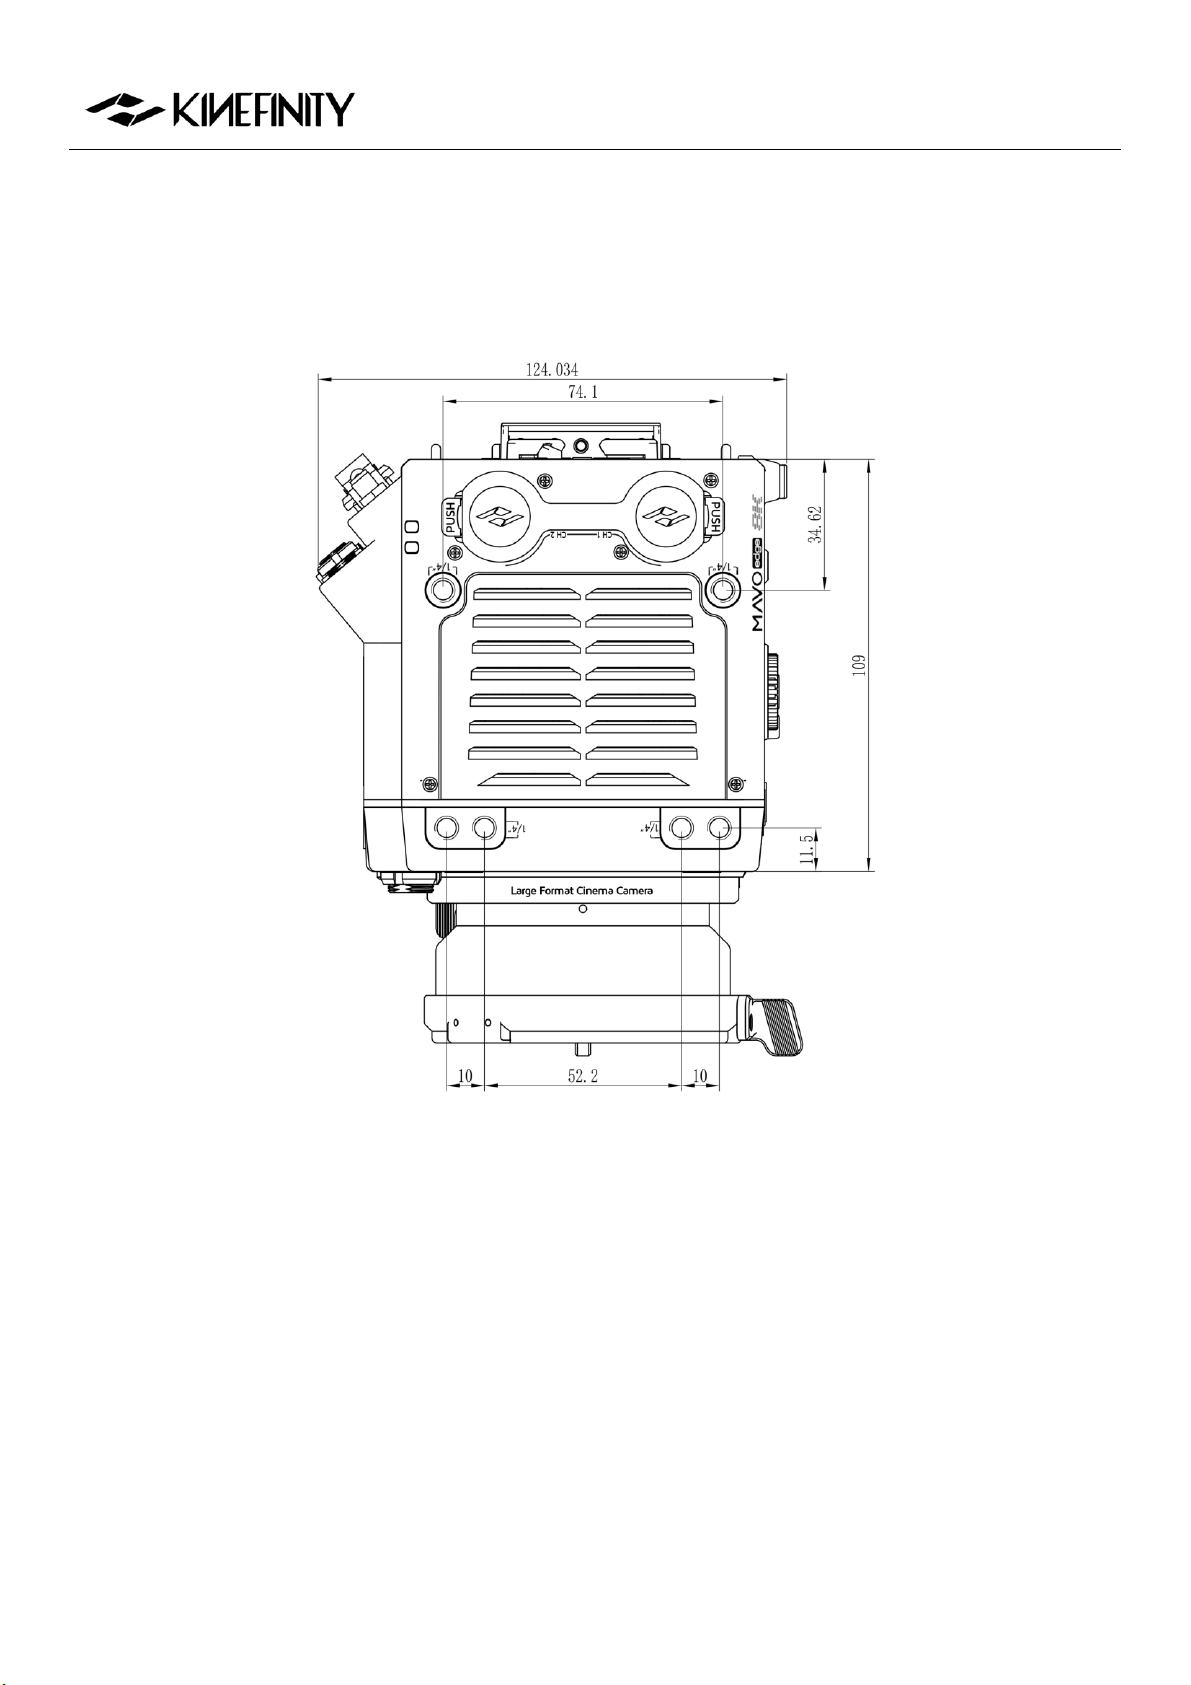
MAVO Edge 8K Operation Manual (KineOS 7.0)
©2021 Kinefinity Inc. Page 59 / 61
Top View
Dimensions are shown in mm.
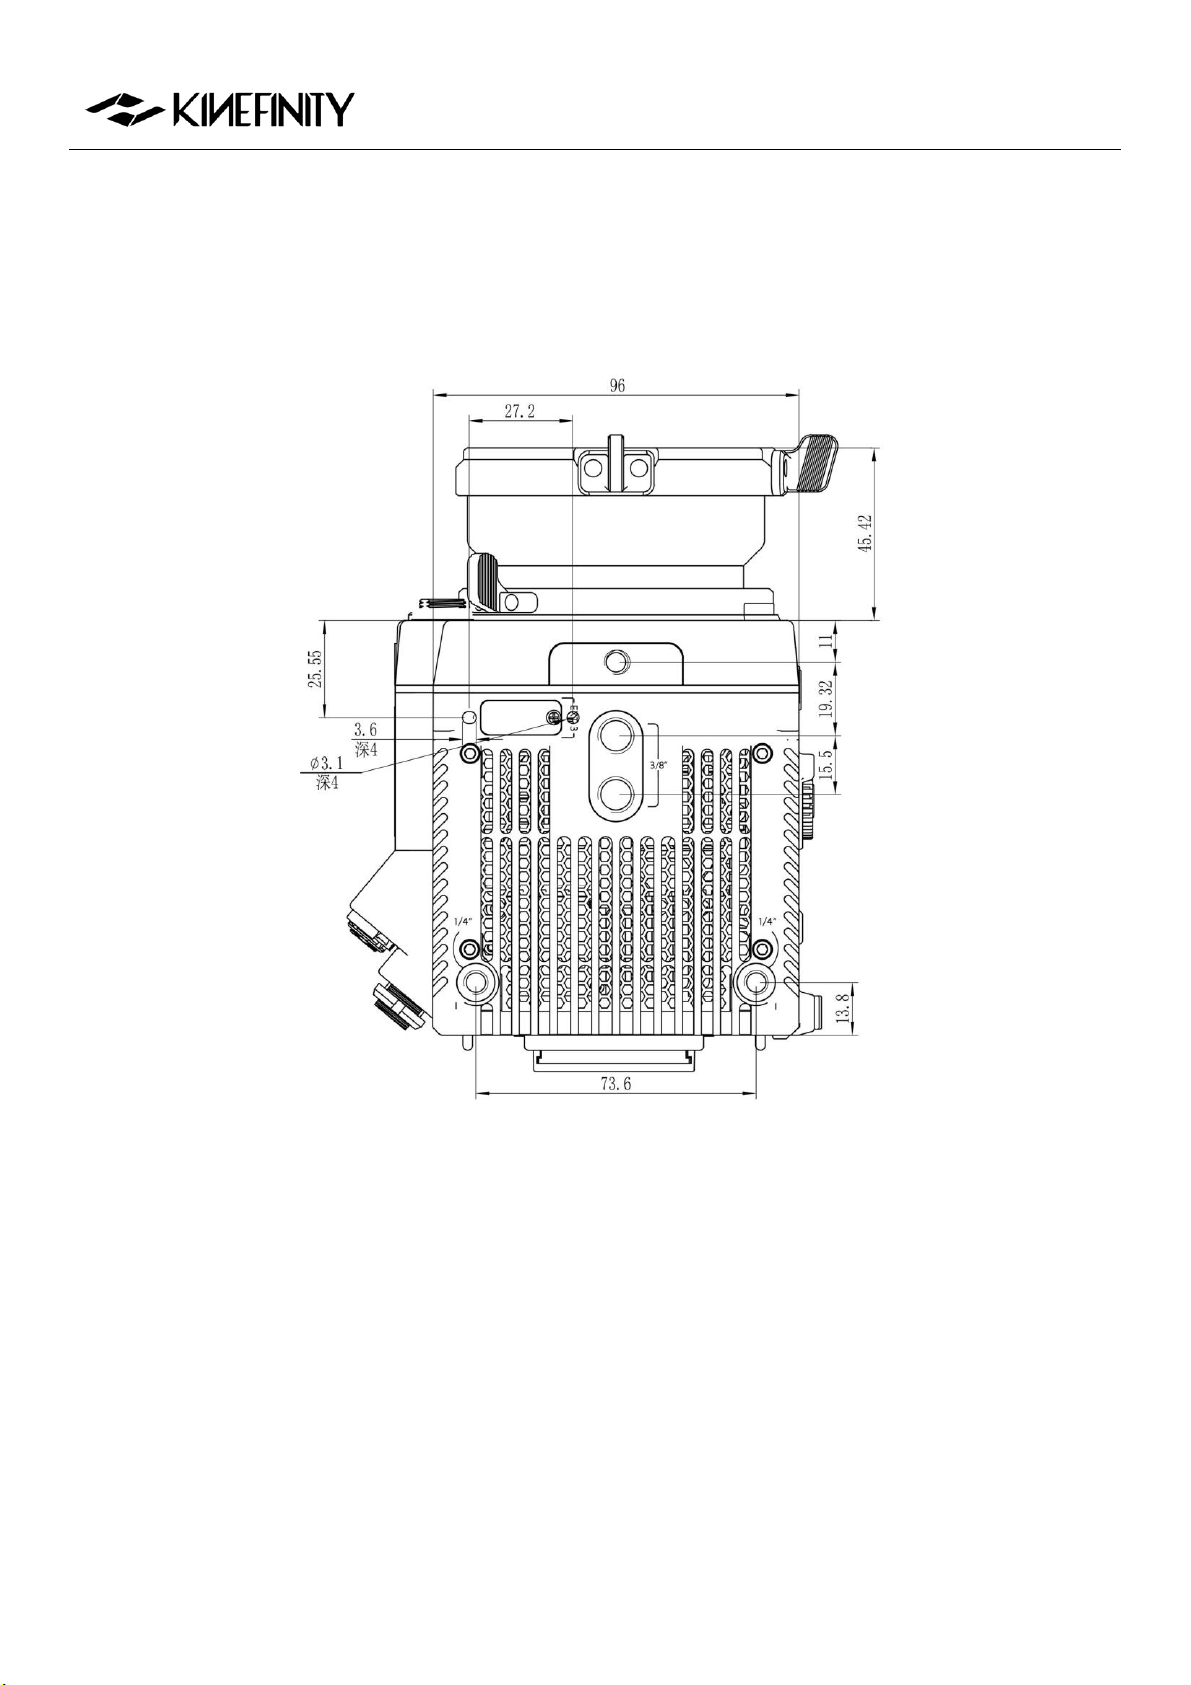
MAVO Edge 8K Operation Manual (KineOS 7.0)
©2021 Kinefinity Inc. Page 60 / 61
Bottom View
Dimensions are shown in mm.