Home
Bookmarks
Home
Miele
Miele 10796510 User Manual
Page 99
Operating Instructions - Page 99
For 10796510.
Page 99/100
Page 1
Page 2
Page 3
Page 4
Page 5
Page 6
Page 7
Page 8
Page 9
Page 10
Page 11
Page 12
Page 13
Page 14
Page 15
Page 16
Page 17
Page 18
Page 19
Page 20
Page 21
Page 22
Page 23
Page 24
Page 25
Page 26
Page 27
Page 28
Page 29
Page 30
Page 31
Page 32
Page 33
Page 34
Page 35
Page 36
Page 37
Page 38
Page 39
Page 40
Page 41
Page 42
Page 43
Page 44
Page 45
Page 46
Page 47
Page 48
Page 49
Page 50
Page 51
Page 52
Page 53
Page 54
Page 55
Page 56
Page 57
Page 58
Page 59
Page 60
Page 61
Page 62
Page 63
Page 64
Page 65
Page 66
Page 67
Page 68
Page 69
Page 70
Page 71
Page 72
Page 73
Page 74
Page 75
Page 76
Page 77
Page 78
Page 79
Page 80
Page 81
Page 82
Page 83
Page 84
Page 85
Page 86
Page 87
Page 88
Page 89
Page 90
Page 91
Page 92
Page 93
Page 94
Page 95
Page 96
Page 97
Page 98
Page 99
Page 100
Contents
Table of Contents
Search
Previous
Next
Bookmarks
Loading ...
Loading ...
Loading ...
3
3
3
4
3
5
3
6
3
7
38
39
4
0
4
1
4
2
4
3
Loading ...
<
96
97
98
99
100
>
File type: PDF
File name: 61808724_10796510.pdf
File size: 2.29 MB
File Language: English
Pages: 100
Author: Miele
File created: 2019-05-08
Published: 2023-07-20
Updated: 2023-07-20
Download File
Table of Contents
×
Title page
1
Contents
3
IMPORTANT SAFETY INSTRUCTIONS
4
READ ALL INSTRUCTIONS BEFORE USING THIS APPLIANCE
4
Correct use
4
Safety with children
5
WARNING To reduce the risk of fire, electric shock or injury:
5
Technical safety
6
Proper use
8
Accessories
9
California Proposition 65
10
THE FOLLOWING WARNING IS REQUIRED BY THE STATE OF CALIFORNIA FOR CALIFORNIA RESIDENTS ONLY:
10
SAVE THESE INSTRUCTIONS
10
Caring for the environment
11
Disposal of the packing material
11
Disposing of the FilterBags and filters
11
Disposing of your old appliance
11
Disposal of old batteries and power packs
11
Appliance description
12
References to illustrations
14
Preparing for use
14
Attaching the suction hose (Fig. 01)
14
Disconnecting the suction hose (Fig. 02)
14
Connecting the suction hose to the handle (Fig. 03)
14
Connecting the handle to the wand (Fig. 04)
14
Adjusting the telescopic suction wand
14
Telescopic suction wand (Fig. 05)
14
Comfort telescopic suction wand (Fig. 05)
14
Connecting the telescopic wand to the floorhead/floorbrush (Fig. 06)
14
Adjusting the floorhead (Figs. 07 + 08)
15
Activating the exhaust filter change indicator on the exhaust filter
15
How the TimeStrip exhaust filter change indicator works
15
Inserting batteries into the LED handle (Figs. 15 + 16)
15
Using the accessories supplied (Fig. 17)
16
Opening the accessories compartment (Fig. 18)
16
Reversible floorhead (Fig. 19)
16
Use
16
Power cord
16
Unwinding the cord (Fig. 20)
16
Rewinding the cord (Fig. 21)
17
Turning the vacuum cleaner on and off (Fig. 22)
17
Regulating the suction power
17
17
Footswitches (Fig. 23)
18
Footswitches with Auto function (Figs. 24 + 25)
18
Footswitches with SoftCarpet function (Figs. 26 + 27)
18
Opening the air inlet valve (Figs. 28 + 29)
18
During vacuuming
18
Illuminating the work area (Fig. 32)
19
Parking, transport and storage
19
Park system for pauses during vacuuming (Fig. 33)
19
Park system On/Off switch
19
Park system for storage (Fig. 34)
19
Maintenance
19
Purchasing new FilterBags and filters
20
Ordering the correct FilterBags and filters
20
When to change the FilterBag (Fig. 35)
20
Checking the FilterBag change indicator
20
How the FilterBag change indicator works
21
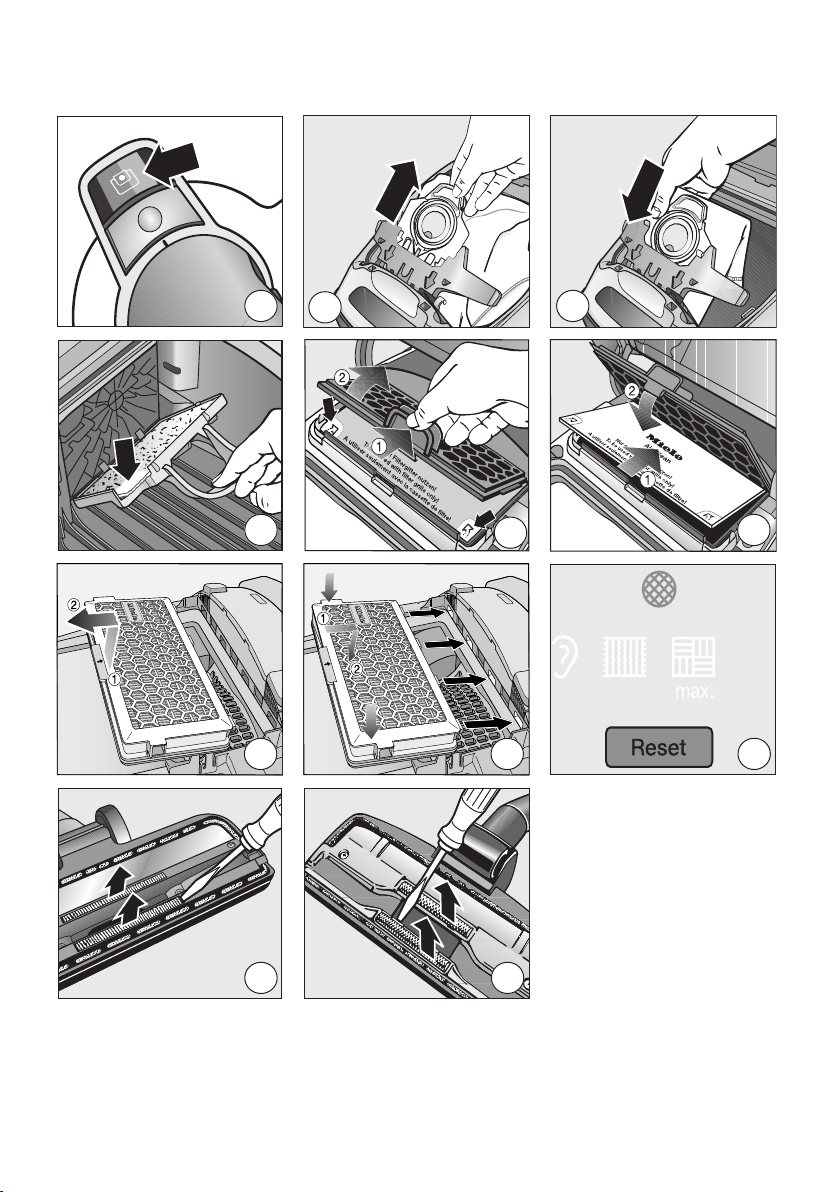
Replacing the FilterBag (Figs. 36 + 37)
21
When to change the motor protection filter
21
Changing the motor protection filter (Fig. 38)
21
When to replace the exhaust filter
22
How to replace the AirClean filter (Figs. 39 + 40)
22
Replacing the Active AirClean 50 and HEPA AirClean 50 exhaust filters (Figs. 41 + 42)
22
Replacing one type of exhaust filter with another (Fig. 09)
23
When changing the filter please note
23
Maintenance indicator with reset button (Fig. 43)
23
Inserting batteries into the LED handle (Figs. 15 + 16)
23
When to change the thread catchers?
24
How to replace the thread lifters (Figs. 44 + 45)
24
Cleaning the roller on the AllTeQ floorhead (Fig. 46)
24
Cleaning and care
24
Vacuum cleaner and accessories
24
Dust compartment
24
Frequently asked questions
25
After sales service
26
Contact in the event of a fault
26
Warranty
26
Optional accessories
26
Powerbrushes
26
Electro Comfort Electrobrush (SEB 217-3)
26
Electro Plus Electrobrush (SEB 228)
26
Electro Premium Electrobrush (SEB 236)
26
Floor brushes
26
AllergoTeQ floorhead (SBDH 285-3)
26
TurboTeQ (STB 305-3) / Turbobrush (STB 205-3)
26
Floor brush Parquet (SBB Parquet-3)
27
Parquet Twister floorbrush with swiveling head (SBB 300-3)
27
Floorbrush Parquet Twister XL with swiveling head (SBB 400-3)
27
Other accessories
27
MicroSet accessory case (SMC 20)
27
Flexible Mini Turbobrush XS (STB 20) / Turbo Mini (STB 101)
27
Universal brush (SUB 20)
27
Radiator brush (SHB 30)
27
Mattress tool (SMD 10)
27
Crevice nozzle, 12" (300Â mm) (SFD 10)
27
Crevice nozzle, 22" (560Â mm) (SFD 20)
27
Upholstery nozzle, 7 1/2" (190Â mm) (SPD 10)
27
Spotlight Handle (SGC 20)
27
Filters
27
Active AirClean 50 exhaust filter (SF-AA 50)
27
HEPA AirClean 50 exhaust filter (SF-HA 50)
27
Filter frame
27
Table des matières
30
INSTRUCTIONS IMPORTANTES DE SÃCURITÃ
31
LISEZ ATTENTIVEMENT TOUTES LES INSTRUCTIONS AVANT D'UTILISER L'APPAREIL
31
Utilisation conforme
31
Sécurité des enfants
32
AVERTISSEMENT Pour diminuer le risque d'incendie, de décharge électrique ou de blessure, respectez les instructions ci-après :
33
Sécurité technique
33
Utilisation appropriée
36
Accessoires
38
L'AVERTISSEMENT SUIVANT EST IMPOSÃ PAR L'ÃTAT DE CALIFORNIE ET S'APPLIQUENT UNIQUEMENT AUX RÃSIDENTS CALIFORNIENSÂ :
38
CONSERVEZ CES INSTRUCTIONS
38
Protection de l'environnement
39
Ãlimination des produits
39
Ãlimination des sacs à poussière et des filtres
39
Mise au rebut de votre ancien appareil
39
Mise au rebut des piles et blocs d'alimentation usagés
39
Description de l'appareil
40
Références aux illustrations
42
Préparer pour l'utilisation
42
Attacher le tuyau dâaspiration (Figure 01)
42
Enlever le tuyau d'aspiration (Figure 02)
42
Raccorder la poignée au tuyau d'aspiration (Figure 03)
42
Raccordement de la poignée et du tube (Figure 04)
42
Réglage de la longueur du tube télescopique
42
Tube d'aspiration télescopique (Figure 05)
42
Tube télescopique Comfort (Figure 05)
42
Raccordement du tube télescopique à la brosse à plancher/électrobrosse (Figure 06)
42
Réglage de la brosse à plancher (Figures 07 + 08)
43
Activer le voyant de remplacement du filtre d'évacuation sur le filtre d'évacuation
43
Fonctionnement du voyant de remplacement TimeStrip du filtre d'évacuation
43
Insérer des piles dans la poignée comportant un voyant DEL (Figures 15 + 16)
44
Utilisation des accessoires inclus (Figure 17)
44
Ouvrir le compartiment à accessoires (Figure 18)
44
Brosse à plancher (Figure 19)
44
Utilisation
45
Cordon d'alimentation
45
Dérouler le cordon d'alimentation (Figure 20)
45
Enrouler le cordon d'alimentation (Figure 21)
45
Mettre en marche et arrêter lâaspirateur (Figure 22)
45
Régler la puissance d'aspiration
45
46
Interrupteurs au pied (Figure 23)
46
Interrupteurs au pied avec fonction Automatique (Figures 24 + 25)
46
Interrupteurs au pied avec fonction SoftCarpet (Figures 26 + 27)
47
Ouvrir la soupape d'entrée d'air (Figures 28 + 29)
47
Pendant le nettoyage
47
Ãclairer la zone de travail (Figure 32)
47
Immobilisation, transport et rangement
47
Système de fixation de tube avec arrêt automatique pour les pauses (Figure 33)
47
Interrupteur marche/arrêt pour immobiliser l'appareil
48
Système de fixation de tube pour rangement (Figure 34)
48
Entretien
48
Achat de nouveaux sacs à poussière et de filtres
49
Commande des bons sacs à poussière et des bons filtres
49
Quand remplacer le sac à poussière (Figure 35)
49
Vérifier le voyant de remplacement du sac à poussière
49
Comment fonctionne le voyant de remplacement du sac à poussière
50
Remplacer le sac à poussière (Figures 36 + 37)
50
Quand remplacer le filtre de protection du moteur
51
Comment remplacer le filtre moteur ? (Figure 38)
51
à quel moment remplacer le filtre d'évacuation?
51
Comment remplacer le filtre AirClean (Figures 39 + 40)
51
Remplacer les filtres d'évacuation Active AirClean 50 et HEPA AirClean 50 (Figures 41 + 42)
52
Remplacer un type de filtre d'évacuation par un autre (Figure 09)
52
Conseils lors du changement du type de filtre
52
Voyant d'entretien avec bouton de réinitialisation (Figure 43)
52
Insérer des piles dans la poignée comportant un voyant DEL (Figures 15 + 16)
53
Quand remplacer les ramasse-fils?
53
Comment remplacer les ramasse-fils (Figures 44 + 45)
53
Nettoyer le rouleau sur la brosse AllTeQ (Figure 46)
53
Nettoyage et entretien
53
L'aspirateur et ses accessoires
53
Réservoir à poussière
54
Foire aux questions
55
Service après-vente
56
En cas de défaillance
56
Garantie
56
Accessoires optionnels
56
Ãlectrobrosses
56
Electrobrosse Electro Comfort (SEB 217-3)
56
Ãlectrobrosse Electro Plus (SEB 228)
56
Electrobrosse Electro Premium (SEB 236)
56
Brosses à plancher
57
Brosse AllergoTeQ (SBDH 285-3)
57
TurboTeQ (STB 305-3) / Turbobrosse (STB 205-3)
57
Brosse de parquet (SBBÂ Parquet-3)
57
Brosse à plancher Parquet Twister munie d'une tête pivotante (SBB 300-3)
57
Brosse à plancher Parquet Twister XL munie d'une tête pivotante (SBB 400-3)
57
Autres accessoires
57
Boîtier d'accessoires MicroSet (SMC 20)
57
Mini-turbobrosse XS flexible (STBÂ 20) / Turbo Mini (STB 101)
57
Brosse universelle (SUBÂ 20)
57
Brosse à radiateur (SHB 30)
57
Brosse à matelas (SMD 10)
57
Embout à interstices de 300 mm (12 po) (SFD 10)
57
Embout à interstices de 560 mm (22 po) (SFD 20)
57
Embout pour meubles rembourrés de 190 mm (7 1/2 po) (SPD 10)
57
Poignée Spotlight (SGC 20)
58
Filtres
58
Filtre d'évacuation Active AirClean 50 (SF-AA 50)
58
Filtre d'évacuation HEPA AirClean 50 (SF-HA 50)
58
Grille du filtre
58
Indice
64
INSTRUCCIONES IMPORTANTES DE SEGURIDAD
65
LEA TODAS LAS INSTRUCCIONES ANTES DE USAR EL APARATO
65
Uso correcto
65
Seguridad con los niños
66
ADVERTENCIA Para reducir el riesgo de incendio, descarga eléctrica o lesiones:
67
Seguridad técnica
67
Uso correcto
70
Accesorios
71
LA SIGUIENTE ADVERTENCIA ES REQUERIDA POR EL ESTADO DE CALIFORNIA SOLO PARA RESIDENTES DE CALIFORNIA:
71
CONSERVE ESTAS INSTRUCCIONES
71
Medidas para la protección del medioambiente
72
Eliminación de los materiales de empaque
72
Eliminación de las bolsas para polvo y los filtros
72
Eliminación de su aparato antiguo
72
Desecho de baterÃas y fuentes de energÃa viejas
73
Descripción del aparato
74
Referencias de las ilustraciones
76
Preparación para su uso
76
Cómo conectar la manguera de succión (Fig. 01)
76
Cómo desconectar la manguera de succión (Fig. 02)
76
Cómo conectar la manguera de succión y la manija (Fig. 03)
76
Cómo conectar la manija al mango (Fig. 04)
76
Cómo ajustar el mango telescópico de succión
76
Mango telescópico de succión (Fig. 05)
76
Mango telescópico de succión Comfort (Fig. 05)
76
Cómo conectar el mango telescópico a la tobera/cepillo para pisos (Fig. 06)
76
Cómo ajustar la tobera (Figs. 07 + 08)
77
Cómo activar el indicador de cambio del filtro
77
Cómo funciona el indicador de cambio del filtro extractor TimeStrip
77
Cómo colocar las baterÃas en la manija LED (Figs. 15 + 16)
78
Uso de accesorios suministrados (Fig. 17)
78
Cómo abrir el compartimiento de accesorios (Fig. 18)
78
Cepillo para pisos (Fig. 19)
78
Uso
79
Cable de alimentación
79
Cómo desenrollar el cable (Fig. 20)
79
Cómo enrollar el cable (Fig. 21)
79
Encendido y apagado de la aspiradora (Fig. 22)
79
Cómo regular la potencia de succión
79
80
Interruptores de pie (Fig. 23)
80
Interruptores de pie con control Auto (Figs. 24 + 25)
80
Interruptores de pie con control para SoftCarpet (Figs. 26 + 27)
80
Cómo abrir la válvula de admisión de aire (Figs. 28 + 29)
81
Mientras limpia
81
Cómo iluminar el área de trabajo (Fig. 32)
81
Sistema de soporte, transporte y almacenamiento
81
Sistema de soporte Park para interrupciones breves durante la limpieza (Fig. 33)
81
Interruptor de Encendido/Apagado del sistema de soporte Park
82
Almacenamiento del sistema de soporte Park (Fig. 34)
82
Mantenimiento
82
Compre bolsas recoge polvo y filtros nuevos
83
Cómo solicitar las bolsas recoge polvo y los filtros correctos
83
Cuándo cambiar la bolsa recoge polvo (Fig. 35)
83
Verifique el indicador de cambio de bolsa para polvo
83
Cómo funciona el indicador de cambio de bolsa para polvo
83
Cómo reemplazar la bolsa para polvo (Figs. 36 + 37)
84
Cuándo cambiar el filtro para la protección del motor
84
Cómo cambiar el filtro del compartimiento de polvo (Fig. 38)
84
Cuándo reemplazar el filtro extractor
85
Cómo reemplazar el filtro AirClean (Figs. 39 + 40)
85
Cómo reemplazar los filtros extractores (Figs. 41 + 42) Active AirClean 50 y HEPA AirClean 50
85
Cómo reemplazar un tipo de filtro extractor por otro (Fig. 09)
85
Cuando cambie el filtro, tenga en cuenta
86
Indicador de mantenimiento con botón de reinicio (Fig. 43)
86
Cómo colocar las baterÃas en la manija LED (Figs. 15 + 16)
86
Cuándo reemplazar los atrapa fibras
86
Cómo reemplazar los atrapa fibras (Figs. 44 + 45)
87
Cómo limpiar el rodillo de la tobera AllTeQ (Fig. 46)
87
Limpieza y cuidado
87
Aspiradora y accesorios
87
Compartimiento de polvo
87
Preguntas más comunes
88
Servicio posventa
89
Contacto en caso de falla
89
GarantÃa
89
Accesorios opcionales
89
Cepillos Powerbrush
89
Cepillo eléctrico Comfort Electrobrush (SEB 217-3)
89
Cepillo eléctrico Electrobrush Plus (SEB 228)
89
Cepillo eléctrico Electrobrush Premium (SEB 236)
89
Cepillos para pisos
89
Tobera AllergoTeQ (SBDH 285-3)
89
Turbobrush TurboTeQ (STB 305-3)
89
Cepillo para pisos (SBB Parquet-3)
89
Cepillo para pisos Parquet Twister con cabeza giratoria (SBB 300-3)
90
Cepillo para pisos Parquet Twister XL con cabeza giratoria (SBB 400-3)
90
Otros accesorios
90
Caja de accesorios MicroSet (SMC 20)
90
Cepillo de mano flexible mini XS (STB 20) / Turbo Mini (STB 101)
90
Cepillo universal (SUB 20)
90
Cepillo para radiadores (SHB 30)
90
Tobera para colchón (SMD 10)
90
Tobera plana de 30Â cm (12") (SFD 10)
90
Tobera plana de 56Â cm (22") (SFD 20)
90
Tobera para tapicerÃa de 19Â cm (7 1/2") (SPD 10)
90
Manija Spotlight (SGC 20)
90
Filtros
90
Filtro Active AirClean 50 (SF-AA 50)
90
Filtro HEPA AirClean 50 (SF-HA 50)
90
Marco para filtro
90
POLIZA DE GARANTIA - Aspiradoras México
91
Leere Seite
93
Search:
×
Search