®
Self-Cleaning Dual Fuel Gas Range
Estufa de gas a doble combustible con autolimpieza
I_ = =:"'W0
,.=,.,._J.,>oY ,,.u_d_.do
Model/Modelo 665.7596#
# = color number, nQmero de color
To the installer: Please leave this instruction book with the unit.
To the consumer: Please read and keep this book for future reference.
Para el instalador : Favor de dejar este manual de instruccciones con las unidad.
Para el consumidor : Favor de leer y guardar este manual para futuras referencias.
TM
Super Capacity with ULTRABAKE System
Capacidad extra con el Sistema ULTRABAKE TM
9755739 Sears Roebuck and Co., Hoffman Estates, IL 60179 U.S.A. www, sears,com
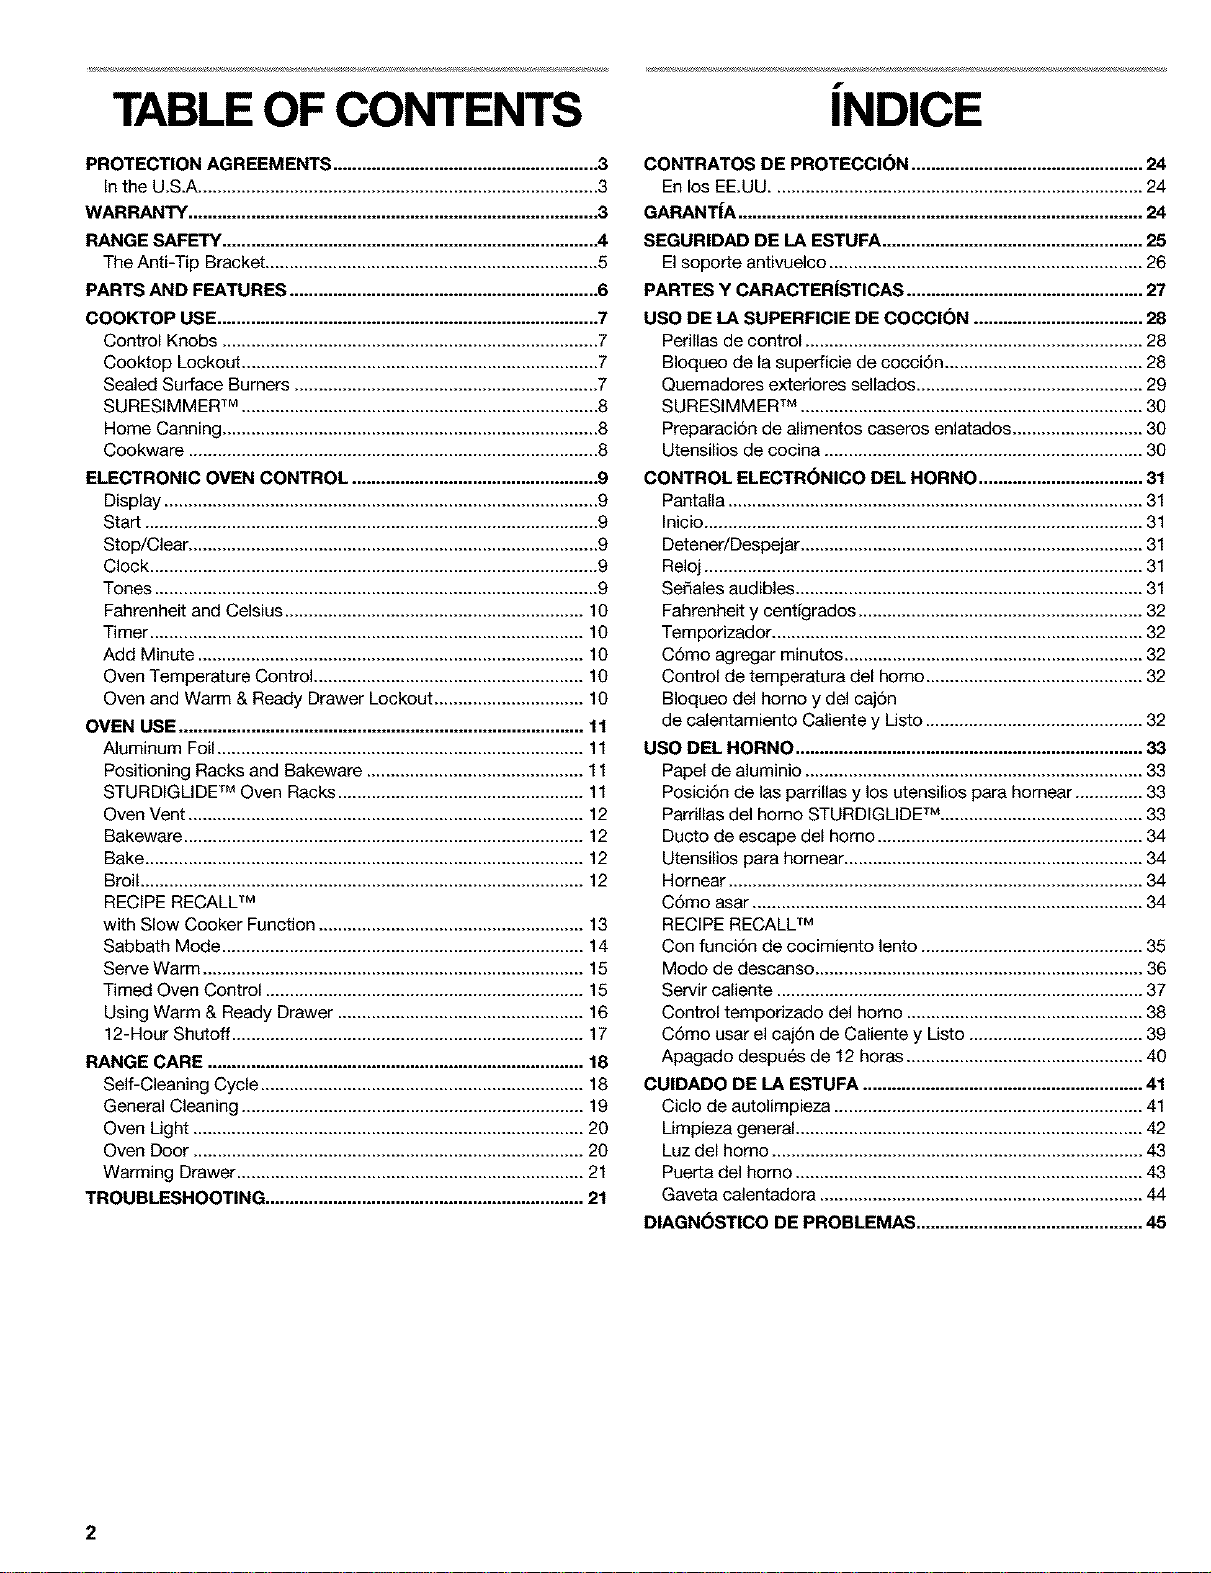
TABLE OF CONTENTS
PROTECTION AGREEMENTS ....................................................... 3
Inthe U.S.A ................................................................................... 3
WARRANTY ..................................................................................... 3
RANGE SAFETY ............................................................................. .4
The Anti-Tip Bracket ..................................................................... 5
PARTS AND FEATURES ................................................................ 6
COOKTOP USE............................................................................... 7
Control Knobs .............................................................................. 7
Cooktop Lockout.......................................................................... 7
Sealed Surface Burners ............................................................... 7
SURESlMMER TM .......................................................................... 8
Home Canning .............................................................................. 8
Cookware ..................................................................................... 8
ELECTRONIC OVEN CONTROL ................................................... 9
Display .......................................................................................... 9
Start .............................................................................................. 9
Stop/Clear ..................................................................................... 9
Clock ............................................................................................. 9
Tones ............................................................................................ 9
Fahrenheit and Celsius .............................................................. 10
Timer .......................................................................................... 10
Add Minute ................................................................................ 10
Oven Temperature Control ........................................................ 10
Oven and Warm & Ready Drawer Lockout ............................... 10
OVEN USE .................................................................................... 11
Aluminum Foil ............................................................................ 11
Positioning Racks and Bakeware ............................................. 11
STURDIGLIDE TM Oven Racks ................................................... 11
Oven Vent .................................................................................. 12
Bakeware ................................................................................... 12
Bake ........................................................................................... 12
Broil ............................................................................................ 12
RECIPE RECALL TM
with Slow Cooker Function ....................................................... 13
Sabbath Mode ........................................................................... 14
Serve Warm ............................................................................... 15
Timed Oven Control .................................................................. 15
Using Warm & Ready Drawer ................................................... 16
12-Bour Shutoff ......................................................................... 17
RANGE CARE .............................................................................. 18
Self-Cleaning Cycle ................................................................... 18
General Cleaning ....................................................................... 19
Oven Light ................................................................................. 20
Oven Door ................................................................................. 20
Warming Drawer ........................................................................ 21
TROUBLESHOOTING .................................................................. 21
f
INDICE
CONTRATOS DE PROTECCI(_N ................................................ 24
En los EE.UU............................................................................. 24
GARANT|A .................................................................................... 24
SEGURIDAD DE LA ESTUFA ...................................................... 25
El soporte antivuelco ................................................................. 26
PARTES Y CARACTER|STICAS ................................................. 27
USO DE LA SUPERFICIE DE COCCI(SN ................................... 28
Perillas de control ...................................................................... 28
Bloqueo de la superficie de coccidn ......................................... 28
Quemadores exteriores sellados ............................................... 29
SURESlMMER TM ....................................................................... 30
Preparaci6n de alimentos caseros enlatados ........................... 30
Utensilios de cocina .................................................................. 30
CONTROL ELECTR(_NICO DEL HORNO .................................. 31
Pantalla ...................................................................................... 31
Inicio ........................................................................................... 31
Detener/Despejar ....................................................................... 31
Reloj ........................................................................................... 31
Sefiales audibles ........................................................................ 31
Fahrenheit y centigrados ........................................................... 32
Temporizador ............................................................................. 32
C6mo agregar minutos .............................................................. 32
Control de temperatura del homo ............................................. 32
Bloqueo del homo y del caj6n
de calentamiento Caliente y Listo ............................................. 32
USO DEL HORNO ........................................................................ 33
Papel de aluminio ...................................................................... 33
Posici6n de las parrillas y los utensilios para hornear .............. 33
Parrillas del homo STURDIGLIDE TM .......................................... 33
Ducto de escape del homo ....................................................... 34
Utensilios para hornear .............................................................. 34
Homear ...................................................................................... 34
C6mo asar ................................................................................. 34
RECIPE RECALL TM
Con funci6n de cocimiento lento .............................................. 35
Modo de descanso .................................................................... 36
Servir caliente ............................................................................ 37
Control temporizado del homo ................................................. 38
C6mo usar el caj6n de Caliente y Listo .................................... 39
Apagado despu_s de 12 horas ................................................. 40
CUIDADO DE LA ESTUFA .......................................................... 41
Ciclo de autolimpieza ................................................................ 41
Limpieza general ........................................................................ 42
Luz del homo ............................................................................. 43
Puerfa del homo ........................................................................ 43
Gaveta calentadora ................................................................... 44
DIAGN(_STICO DE PROBLEMAS ............................................... 45
2
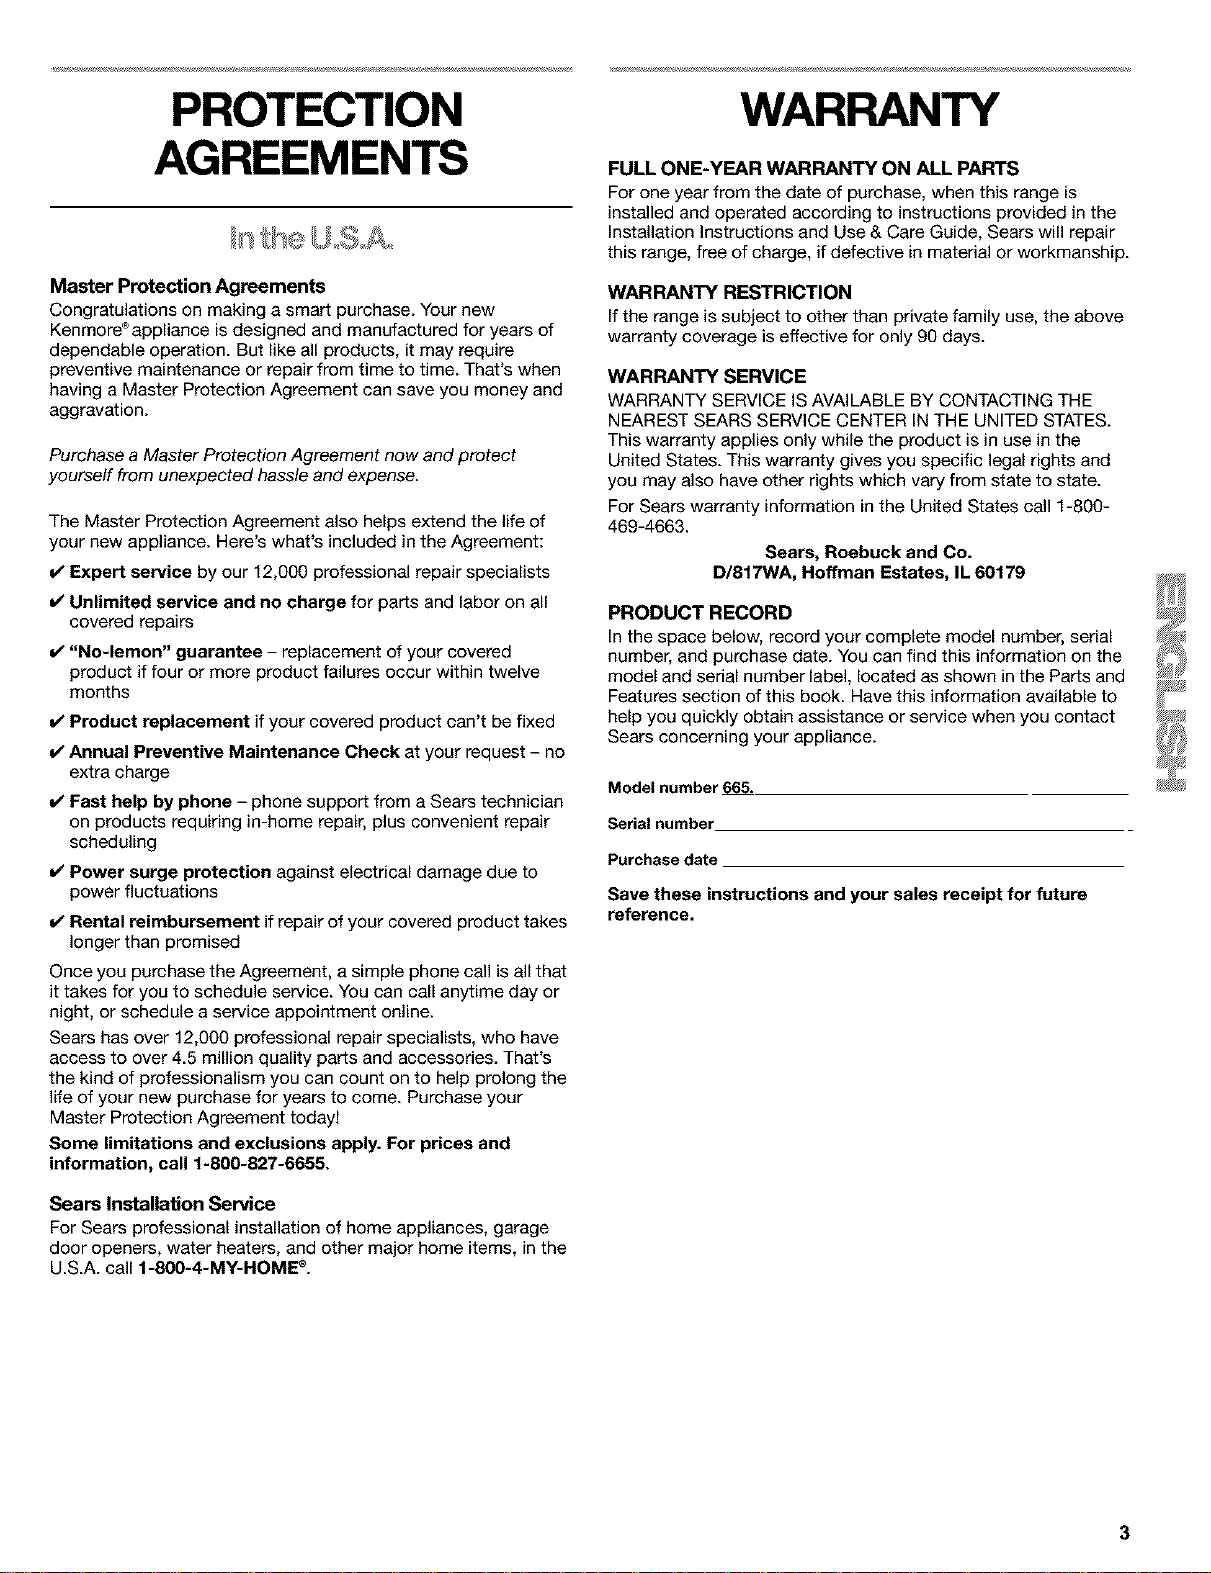
PROTECTION
AGREEMENTS
/ st/seU S o
Master Protection Agreements
Congratulations on making a smart purchase. Your new
Kenmore ®appliance is designed and manufactured for years of
dependable operation. But like all products, it may require
preventive maintenance or repair from time to time. That's when
having a Master Protection Agreement can save you money and
aggravation.
Purchase a Master Protection Agreement now and protect
yourself from unexpected hassle and expense.
The Master Protection Agreement also helps extend the life of
your new appliance. Here's what's included in the Agreement:
Expert service by our 12,000 professional repair specialists
_/Unlimited service and no charge for parts and labor on all
covered repairs
=/"No-lemon" guarantee - replacement of your covered
product if four or more product failures occur within twelve
months
Product replacement if your covered product can't be fixed
=/Annual Preventive Maintenance Check at your request - no
extra charge
Fast help by phone - phone support from a Sears technician
on products requiring in-home repair, plus convenient repair
scheduling
Power surge protection against electrical damage due to
power fluctuations
Rental reimbursement if repair of your covered product takes
longer than promised
Once you purchase the Agreement, a simple phone call is all that
it takes for you to schedule service. You can call anytime day or
night, or schedule a service appointment online.
Sears has over 12,000 professional repair specialists, who have
access to over 4.5 million quality parts and accessories. That's
the kind of professionalism you can count on to help prolong the
life of your new purchase for years to come. Purchase your
Master Protection Agreement today!
Some limitations and exclusions apply. For prices and
information, call 1-800-827-6655.
Sears Installation Service
For Sears professional installation of home appliances, garage
door openers, water heaters, and other major home items, in the
U.S.A. call 1-800-4-MY-HOME ®.
WARRANTY
FULL ONE-YEAR WARRANTY ON ALL PARTS
For one year from the date of purchase, when this range is
installed and operated according to instructions provided in the
Installation Instructions and Use & Care Guide, Sears will repair
this range, free of charge, if defective in material or workmanship.
WARRANTY RESTRICTION
If the range is subject to other than private family use, the above
warranty coverage is effective for only 90 days.
WARRANTY SERVICE
WARRANTY SERVICE IS AVAILABLE BY CONTACTING THE
NEAREST SEARS SERVICE CENTER IN THE UNITED STATES.
This warranty applies only while the product is in use in the
United States. This warranty gives you specific legal rights and
you may also have other rights which vary from state to state.
For Sears warranty information in the United States call 1-800-
469-4663.
Sears, Roebuck and Co.
D/817WA, Hoffman Estates, IL 60179
PRODUCT RECORD
In the space below, record your complete model number, serial
number, and purchase date. You can find this information on the
model and serial number label, located as shown in the Parts and
Features section of this book. Have this information available to
help you quickly obtain assistance or service when you contact
Sears concerning your appliance.
Model number 665.
Serial number
Purchase date
Save these instructions and your sales receipt for future
reference.

RANGE SAFETY
Your safety and the safety of others are very important.
We have provided many important safety messages in this manual and on your appliance. Always read and obey all
safety messages.
l_ his is the safety alert symbol.
This symbol alerts you to potential hazards that can kill or hurt you and others.
All safety messages will follow the safety alert symbol and either the word "DANGER" or
"WARNING." These words mean:
You can be killed or seriously injured if you don't
immediately follow instructions.
You can be killed or seriously injured if you don't
follow instructions.
All safety messages will tell you what the potential hazard is, tell you how to reduce the chance of injury, and tell you
what can happen if the instructions are not followed.
I ARNING: If the information in this manual is not followed exactly, a fire or explosion
may result causing property damage, personal injury or death.
- Do not store or use gasoline or other flammable vapors and liquids in the vicinity of this
or any other appliance.
- WHAT TO DO IF YOU SMELL GAS:
• Do not try to light any appliance.
• Do not touch any electrical switch.
• Do not use any phone in your building.
• Immediately call your gas supplier from a neighbor's phone. Follow the gas supplier's
instructions.
• If you cannot reach your gas supplier, call the fire department.
- Installation and service must be performed by a qualified installer, service agency or
the gas supplier.
The California Safe Drinking Water and Toxic Enforcement Act requires the Governor of California to publish a list
of substances known to the State of California to cause cancer, birth defects, or other reproductive harm, and
requires businesses to warn of potential exposure to such substances.
WARNING: This product contains a chemical known to the State of California to cause cancer, birth defects, or
other reproductive harm.
This appliance can cause low-level exposure to some of the substances listed, including benzene, formaldehyde,
carbon monoxide, toluene, and soot.
4
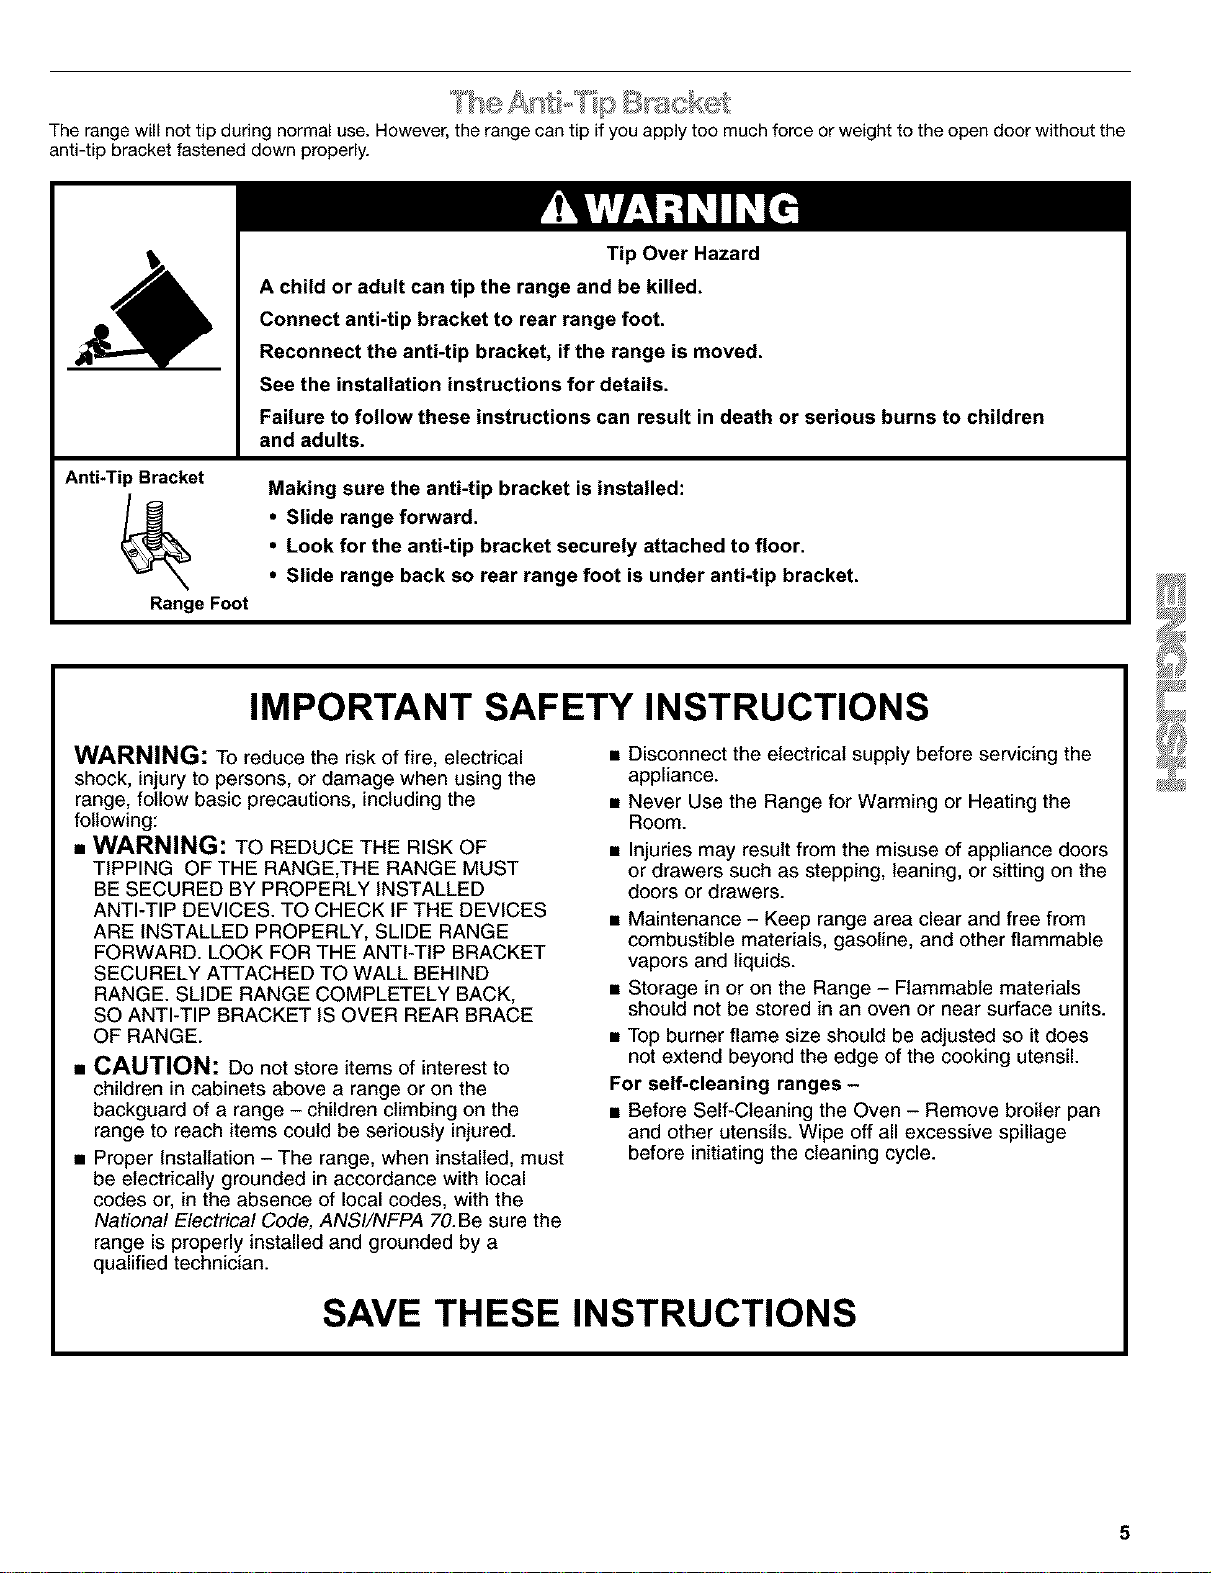
Therangewillnottipduringnormaluse.However,therangecantipifyouapplytoomuchforceorweighttotheopendoorwithoutthe
anti-tipbracketfasteneddownproperly.
Anti-Tip Bracket
Range Foot
Tip Over Hazard
A child or adult can tip the range and be killed.
Connect anti-tip bracket to rear range foot.
Reconnect the anti-tip bracket, if the range is moved.
See the installation instructions for details.
Failure to follow these instructions can result in death or serious burns to children
and adults.
Making sure the anti-tip bracket is installed:
• Slide range forward.
• Look for the anti-tip bracket securely attached to floor.
• Slide range back so rear range foot is under anti-tip bracket.
IMPORTANT SAFETY INSTRUCTIONS
WARNING: To reduce the risk of fire, electrical
shock, injury to persons, or damage when using the
range, follow basic precautions, including the
following:
• WARNING: TO REDUCE THE RISK OF
TIPPING OF THE RANGE,THE RANGE MUST
BE SECURED BY PROPERLY INSTALLED
ANTI-TIP DEVICES. TO CHECK IF THE DEVICES
ARE INSTALLED PROPERLY, SLIDE RANGE
FORWARD. LOOK FOR THE ANTI-TIP BRACKET
SECURELY ATTACHED TO WALL BEHIND
RANGE. SLIDE RANGE COMPLETELY BACK,
SO ANTI-TIP BRACKET IS OVER REAR BRACE
OF RANGE.
• CAUTION: Do not store items of interest to
children in cabinets above a range or on the
backguard of a range - children climbing on the
range to reach items could be seriously injured.
• Proper Installation - The range, when installed, must
be electrically grounded in accordance with local
codes or, in the absence of local codes, with the
National Electrical Code, ANSI/NFPA 70.Be sure the
range is properly installed and grounded by a
qualified technician.
• Disconnect the electrical supply before servicing the
appliance.
• Never Use the Range for Warming or Heating the
Room.
• Injuries may result from the misuse of appliance doors
or drawers such as stepping, leaning, or sitting on the
doors or drawers.
• Maintenance - Keep range area clear and free from
combustible materials, gasoline, and other flammable
vapors and liquids.
• Storage in or on the Range - Flammable materials
should not be stored in an oven or near surface units.
• Top burner flame size should be adjusted so it does
not extend beyond the edge of the cooking utensil.
For self-cleaning ranges -
• Before Self-Cleaning the Oven - Remove broiler pan
and other utensils. Wipe off all excessive spillage
before initiating the cleaning cycle.
SAVE THESE INSTRUCTIONS
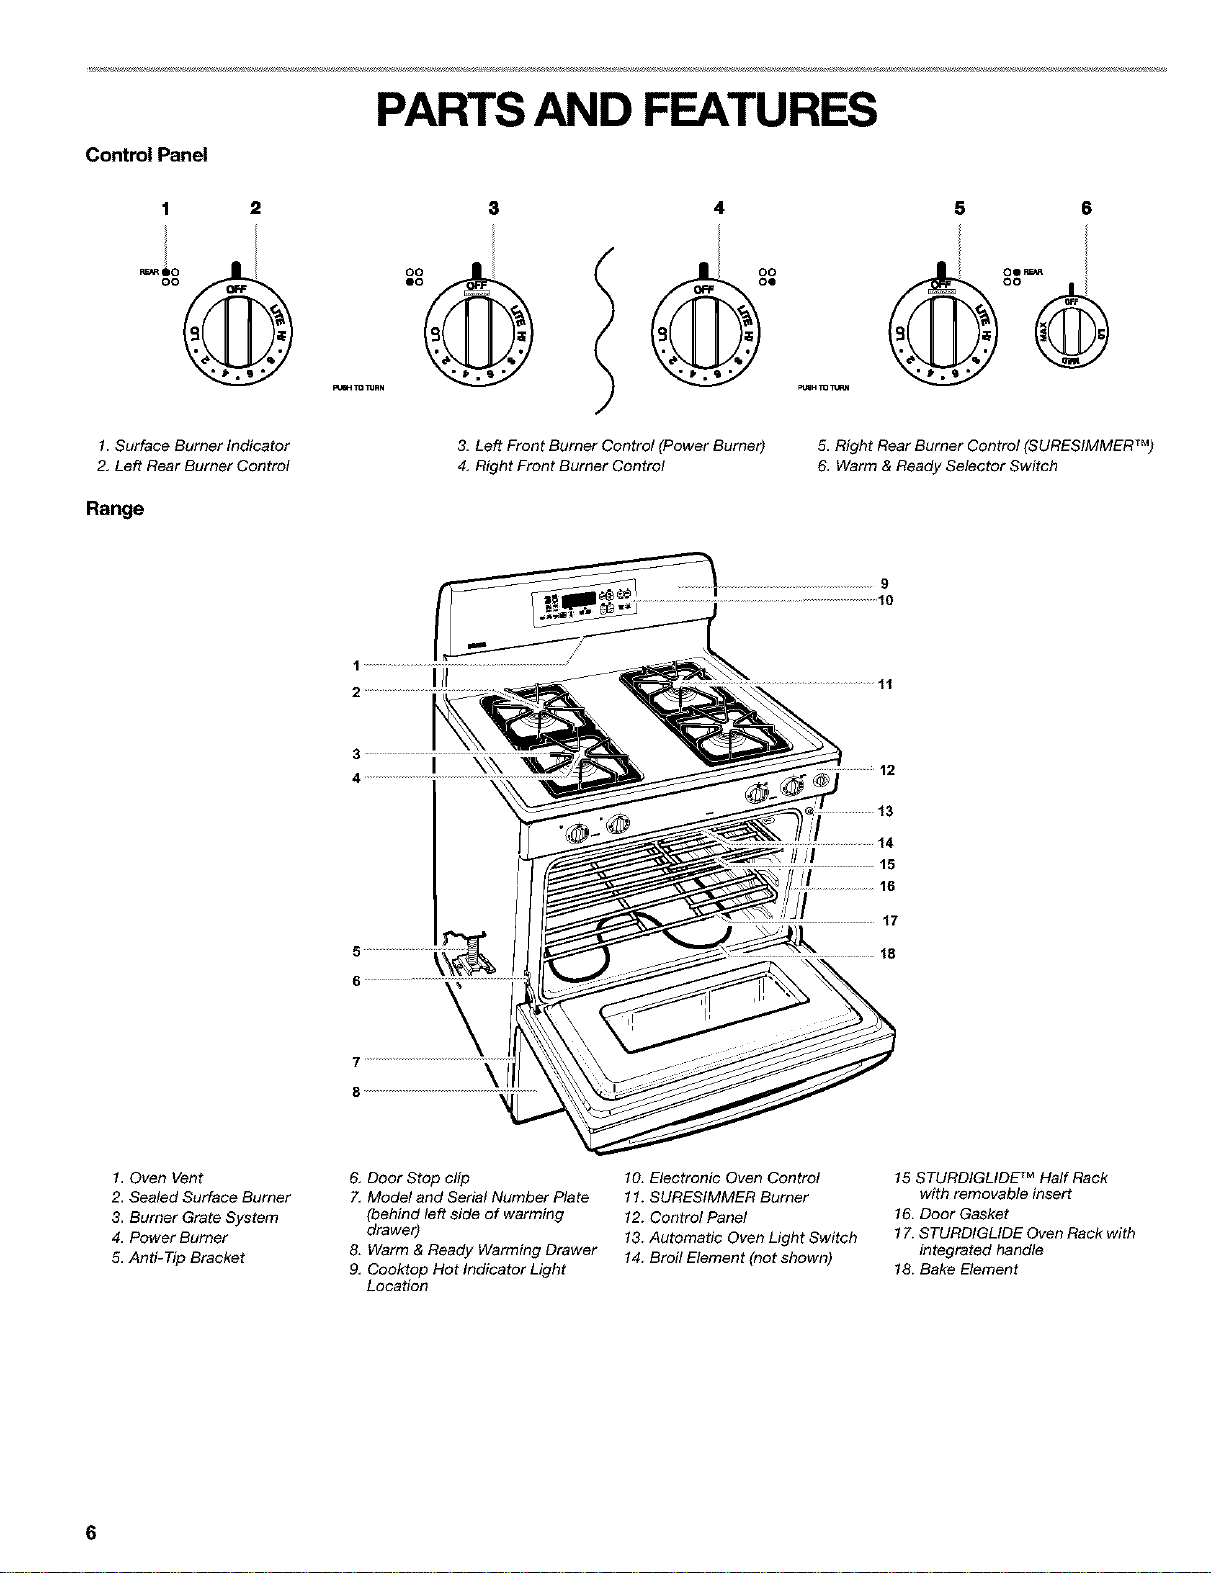
PARTS AND FEATURES
Control Panel
1 2
oo
1. Surface Burner Indicator
2. Left Rear Burner Control
Range
3. Left Front Burner Control (Power Burner)
4. Right Front Burner Control
5 6
5. Right Rear Burner Control (SURESIMMER TM)
6. Warm & Ready Selector Switch
9
11
I \\\
12
///I
14
15
16
1. Oven Vent
2. Sealed Surface Burner
3. Burner Grate System
4, Power Burner
5, Anti-Tip Bracket
& Door Stop clip
7, Model and Serial Number Plate
(behind/eft side of warming
drawer)
8. Warm & Ready Warming Drawer
9, Ceoktop Hot Indicator Light
Location
10. Electronic Oven Control
11. SURESIMMER Burner
12. Control Panel
13. Automatic Oven Light Switch
14. Broil Element (not shown)
15 STURDIGLIDE TM Half Rack
with removable insert
16. Door Gasket
17. STURDIGLIDE Oven Rack with
integrated handle
18. Bake Element
6
Fire Hazard
Do not let the burner flame extend beyond the
edge of the pan.
Turn off all controls when not cooking.
Failure to follow these instructions can result in
death or fire.
Electric igniters automatically light the surface burners when
control knobs are turned to LITE. Before setting a control knob,
place filled cookware onto the grate. Do not operate a burner
using empty cookware or while the grate is vacant.
To Set:
1. Push in and turn knob counterclockwise to LITE. All four
surface burners will click. Only the burner with the control
knob turned to LITE will produce a flame.
2. Turn knob anywhere between HI and LO. Use the following
chart as a guide when setting heat levels.
SETTING RECOMMENDED USE
LITE • Light the burner,
HI • Start food cooking.
• Bring liquid to a boil.
Mid-range • Hold a rapid boil.
(between HI and LO) • Quickly brown or sear food.
• To fry chicken.
• Maintain a slow boil.
• Fry or saute foods.
• Cook soups, sauces and gravies.
LO • Keep food warm.
• To simmer.
Power Burner • Provide highest heat setting
(left front burner)
SURESIMMER TM • Provide lowest simmer/heat setting.
(right rear burner) • Melt chocolate or butter,
COOKTOP USE
Power Burner
The left front burner is designed to give ultra-high power when it
is turned to HI. It can be used to rapidly bring liquid to a boil and
to cook large quantities of food. On some models both front
burners are Power Burners.
Cooktop Hot Indicator Light
The cooktop hot indicator light is located on the control console.
This indicator light will glow red as long as any surface cooking
area is too hot to touch, even after the surface cooking area(s) is
turned off.
'¢ _C ; "f
Ceek; op
The Cooktop Lockout prevents unintended use of the surface
burners. When the cooktop is locked out, the surface burners
cannot be turned on by the control knobs.
When power is first supplied to the range, or if the range loses
power, the surface burners will be in the Cooktop Lockout
position. The surface burners cannot be activated until power is
restored to the range and (or) the Cooktop Lockout is
disengaged.
To Lock/Unlock Coektep:
Before using, turn all control knobs to OFF. Press and hold the
TOP keypad for 5 seconds until a single tone and "Loc on" will
appear on the display. After 5 seconds, "Loc On" will disappear
from the display, and a picture of the cooktop will appear.
Repeat to unlock cooktop. "Loc OFF" will appear on the display
for 5 seconds and the picture of the cooktop will disappear from
the display.
2
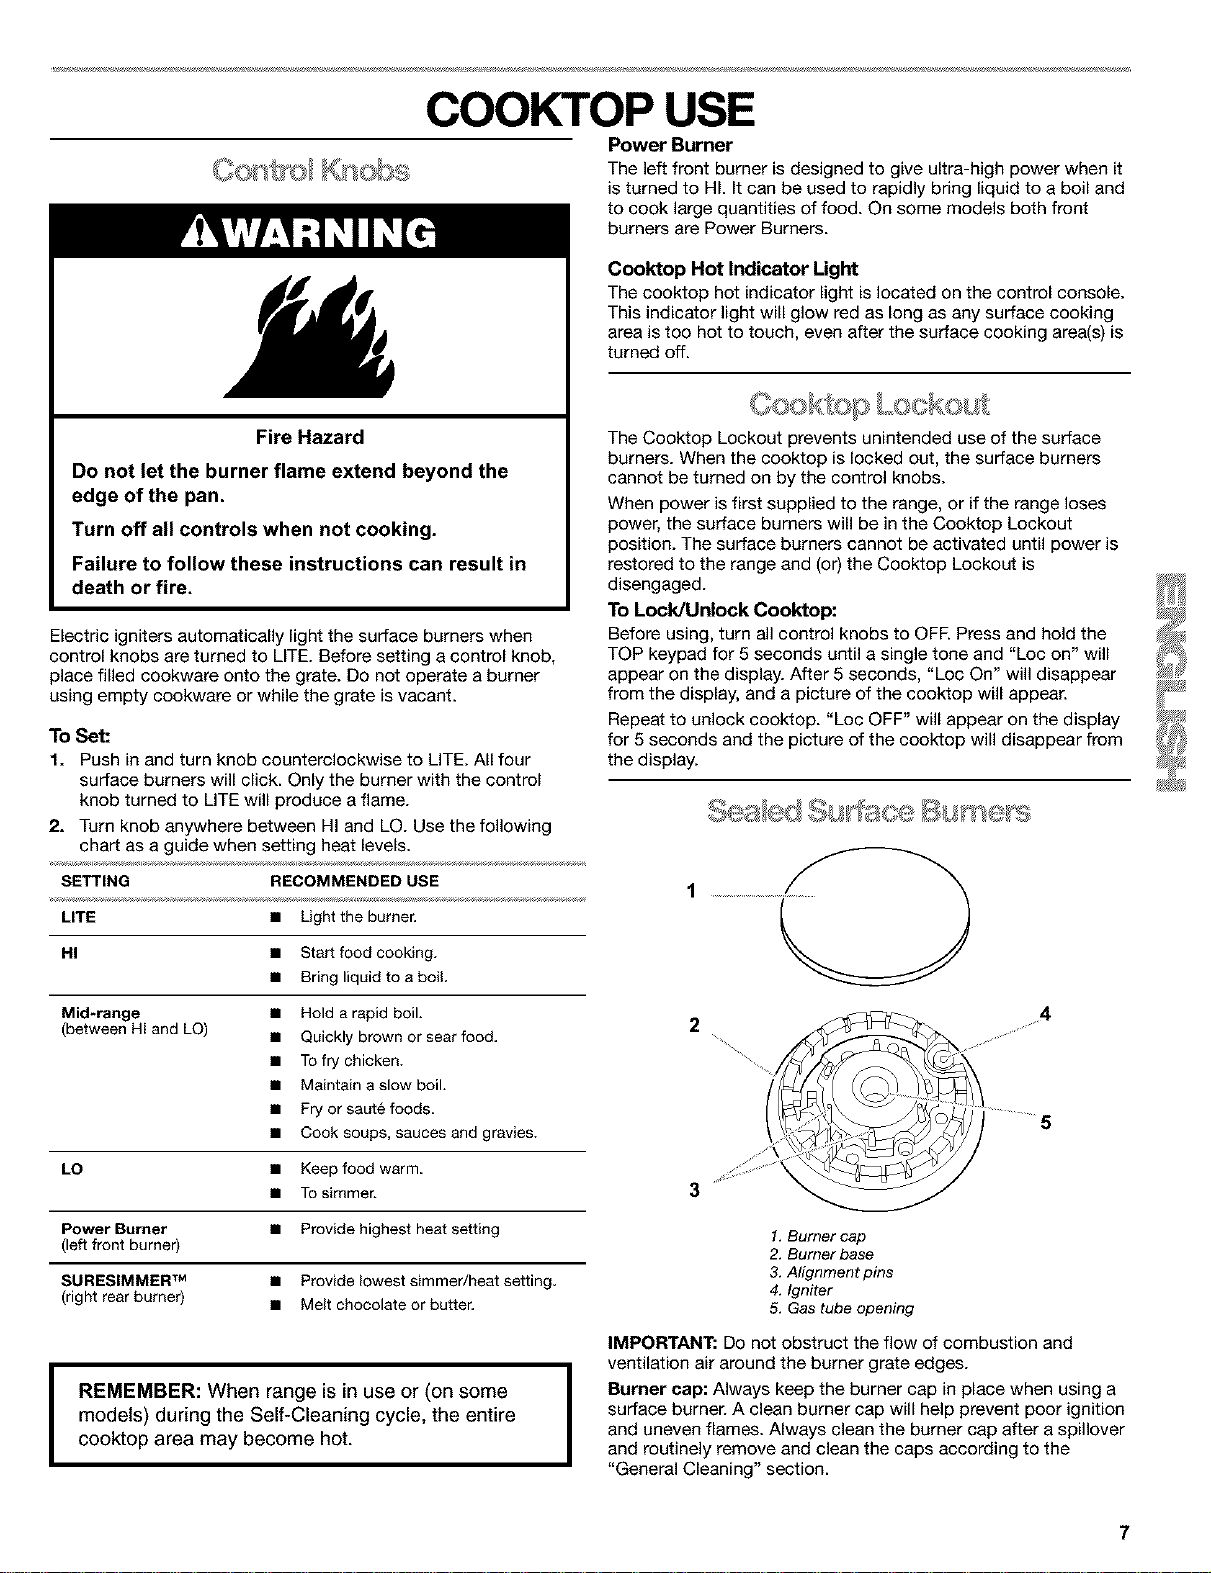
3
1. Burner cap
2. Burner base
3. Alignment pins
4. Igniter
5. Gas tube opening
4
I ..........5
I
REMEMBER: When range is in use or (on some
models) during the Self-Cleaning cycle, the entire
cooktop area may become hot.
IMPORTANT: Do not obstruct the flow of combustion and
ventilation air around the burner grate edges.
I Burner cap: Always keep the burner cap in place when using a
surface burner. A clean burner cap will help prevent poor ignition
and uneven flames. Always clean the burner cap after a spillover
and routinely remove and clean the caps according to the
"General Cleaning" section.
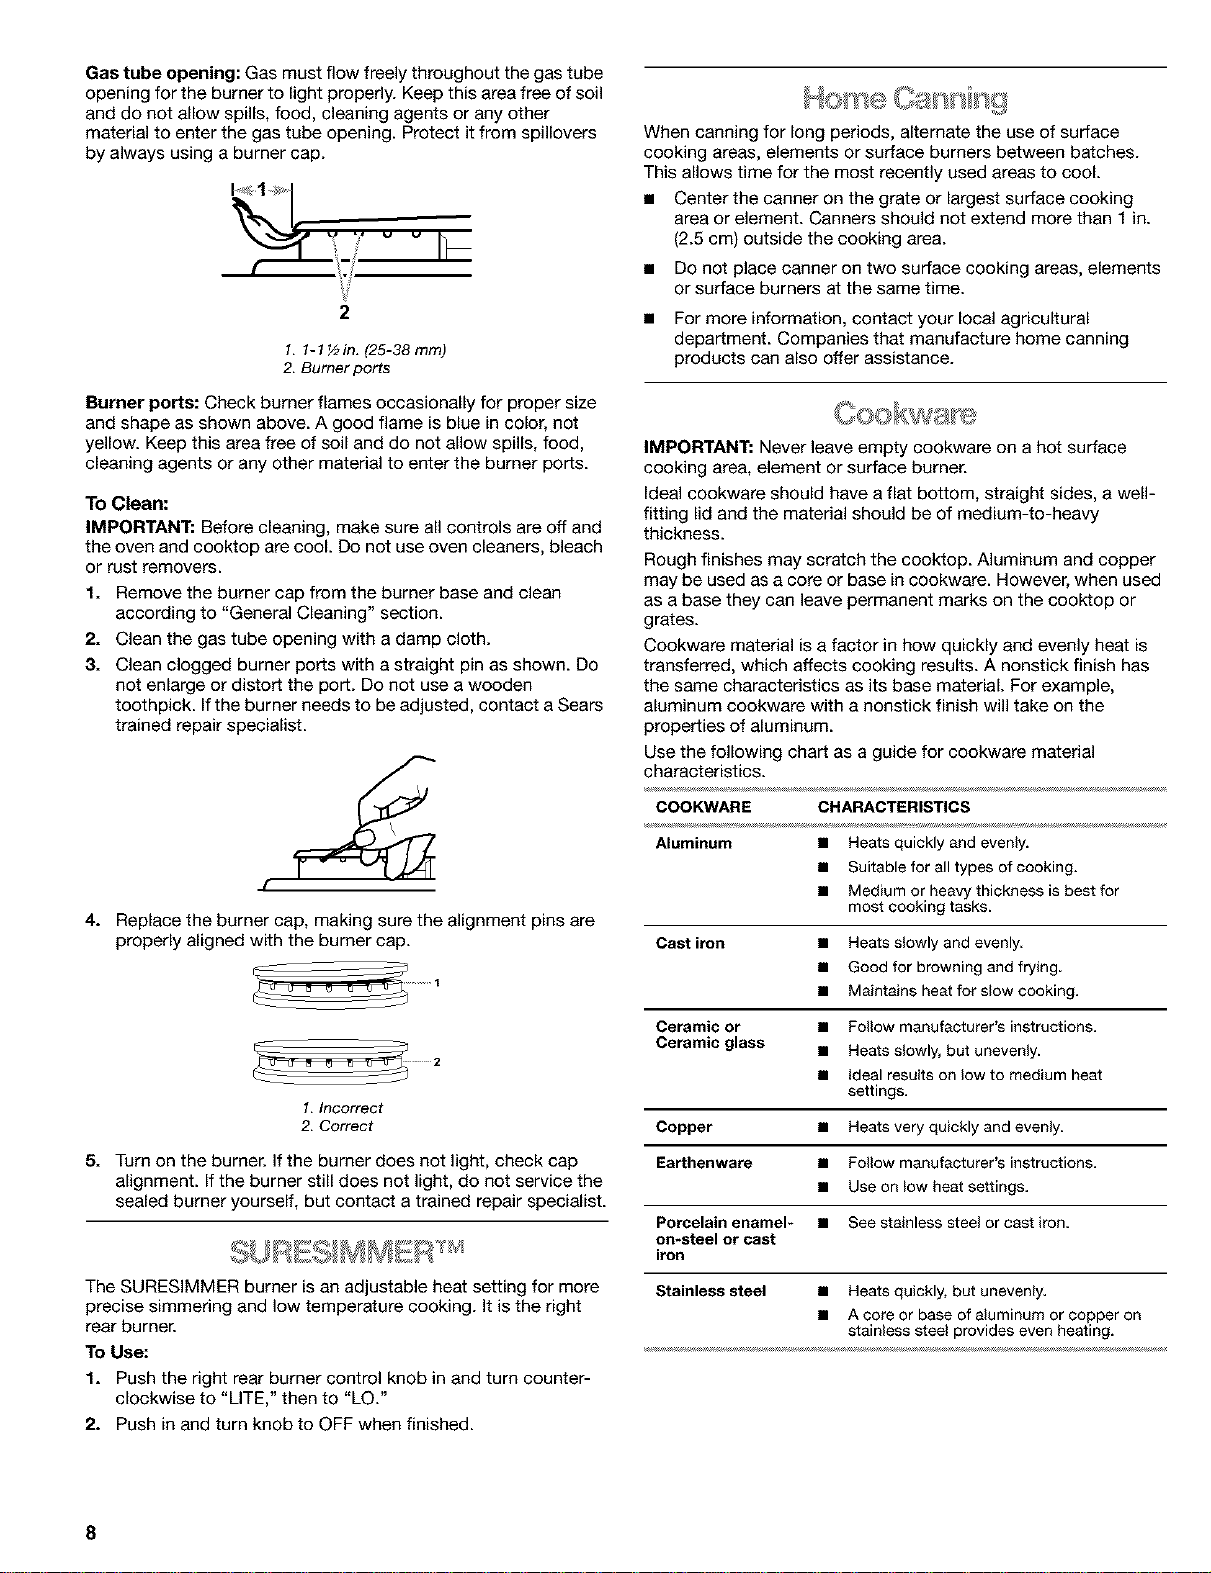
Gas tube opening: Gas must flow freely throughout the gas tube
opening for the burner to light properly. Keep this area free of soil
and do not allow spills, food, cleaning agents or any other
material to enter the gas tube opening. Protect it from spillovers
by always using a burner cap.
i!
2
1. 1-1 ½in. (25-38 ram)
2. Burner ports
Burner ports: Check burner flames occasionally for proper size
and shape as shown above. A good flame is blue in color, not
yellow. Keep this area free of soil and do not allow spills, food,
cleaning agents or any other material to enter the burner ports.
To Clean:
IMPORTANT: Before cleaning, make sure all controls are off and
the oven and cooktop are cool. Do not use oven cleaners, bleach
or rust removers.
1. Remove the burner cap from the burner base and clean
according to "General Cleaning" section.
2. Clean the gas tube opening with a damp cloth.
3. Clean clogged burner ports with a straight pin as shown. Do
not enlarge or distort the port. Do not use a wooden
toothpick. If the burner needs to be adjusted, contact a Sears
trained repair specialist.
f
4. Replace the burner cap, making sure the alignment pins are
properly aligned with the burner cap.
1. Incorrect
2. Correct
5. Turn on the burner. If the burner does not light, check cap
alignment. If the burner still does not light, do not service the
sealed burner yourself, but contact a trained repair specialist.
The SURESIMMER burner is an adjustable heat setting for more
precise simmering and low temperature cooking. It is the right
rear burner.
To Use:
1. Push the right rear burner control knob in and turn counter-
clockwise to "LITE," then to "LO."
2. Push in and turn knob to OFF when finished.
When canning for long periods, alternate the use of surface
cooking areas, elements or surface burners between batches.
This allows time for the most recently used areas to cool.
• Center the canner on the grate or largest surface cooking
area or element. Canners should not extend more than 1 in.
(2.5 cm) outside the cooking area.
• Do not place canner on two surface cooking areas, elements
or surface burners at the same time.
• For more information, contact your local agricultural
department. Companies that manufacture home canning
products can also offer assistance.
IMPORTANT: Never leave empty cookware on a hot surface
cooking area, element or surface burner.
Ideal cookware should have a flat bottom, straight sides, a well-
fitting lid and the material should be of medium-to-heavy
thickness.
Rough finishes may scratch the cooktop. Aluminum and copper
may be used as a core or base in cookware. However, when used
as a base they can leave permanent marks on the cooktop or
grates.
Cookware matedal is a factor in how quickly and evenly heat is
transferred, which affects cooking results. A nonstick finish has
the same characteristics as its base material. For example,
aluminum cookware with a nonstick finish will take on the
properties of aluminum.
Use the following chart as a guide for cookware material
characteristics.
COOKWARE CHARACTERISTICS
Aluminum • Heatsquickly andevenly.
• Suitable forall types of cocking.
• Medium or heavy thickness is best for
mostcooking tasks.
Cast iron • Heats slowly and evenly
• Good for browning and frying.
• Maintains heat for stow cooking.
Ceramic or • Follow manufacturer's instructions.
Ceramic glass • Heats s_owly, but unevenly.
• Ideal results on low to medium heat
settings.
Copper • Heats very quickly and evenly.
Earthenware • Follow manufacturer's instructions.
• Use on _ow heat settings.
Porcelain enamel* • See stainless steel or cast iron
on-steel or cast
iron
Stainless steel • Heatsquickly, but unevenly.
• A core or base of aluminum or copper on
stainless steel provides even heating.
8

ELECTRONIC OVEN CONTROL
3 4 5 6 7
®.°
Et,,= _
/
1. RECIPE RECALL TM
2. Slow Cooker
3. Display
4. Add 1 Minute
5, Timer
6, Cooktop Lockout (Cooktop Light)
9 10 11 12 13 14 15 16
7. Oven Light/Oven Lockout
8. Oven Selectors (SERVE WARM)
9. LOGI-CLEAN TM
10. Temperature Setting
11. Ttmed Cooking
12. C_ck
13. Hour
14. Minu_
15. S_d
16. Stop/Clear
When power is first supplied to the appliance, make sure the
surface burners are in the OFF position. Everything on the display
will light up for 5 seconds. Then the time, "PF" will appear on the
display.
Any other time "PF" appears, a power failure occurred. To
remove "PF" and to reset the clock, press STOP/CANCEL.
When the oven is in use, this display shows time, temperature
and what command pads have been pressed.
When the oven is not in use, the display will show the time of day.
The START pad begins any function, if the START pad is not
touched after touching another pad, "START?" will appear in the
display.
If cooking is interrupted, touching START will resume the preset
cycle.
The STOP/CLEAR pad clears any incorrect command and
cancels any program during cooking. It will not erase the time
of day.
The oven will also turn off when the door is opened. Close the
door and touch START to resume the cycle.
This is a 12-hour clock and does not show a.m. or p.m.
To Set:
1. Press CLOCK.
2. Press the HOUR/MIN "up" or "down" arrow pads until the
correct time of day shows on the display.
Press CLOCK or START.
Tones are audible signals, indicating the following:
One tone
• Valid pad press
• Oven is preheating, or has been preheated
• Function has been entered
Three tones
• Invalid pad press
Four tones
• End of cycle
• Reminder, repeating each minute after the end-of-cycle tones
Error Tones
Error tones indicate a problem with the electronic oven control.
An error code will appear in the display.
Tone Volume
The volume can be adjusted between high and low.

ToChange:PressandholdDELAYSTARTfor5seconds.Ashor_
tonewillsoundandeither "Snd HI" or "Snd Lo" will appear on the
display. Press and hold DELAY START again for 5 seconds to
change to desired setting.
To remove "Snd on," "Snd OFF," "rEP on," "rEP off," "Snd HI" or
"Snd Lo" press any pad, and the keyed function will appear on
the display.
Reminder Tones
Reminder tones are four 1-second tones which indicate that the
set time has expired for a timer or a timed oven control function.
Timer
To Turn Tones Off/On: Press and hold SET for 5 seconds. A
shor_ tone will sound and "rEP OFF" will appear on the display.
Repeat to turn back on.
Timed Cooking
To Turn Tones Off/On: Press and hold COOK TIME. A short tone
will sound and "Snd OFF" will appear on the display. Repeat to
turn back on.
The temperature is preset at Fahrenheit, but can be changed to
Celsius.
To Change: Press and hold BROIL for 5 seconds. A short tone
will sound and the temperatures displayed will switch to "°C."
Repeat to change back to Fahrenheit.
The Timer can be set in minutes and seconds or hours and
minutes and counts down the set time. The Timer does not start
or stop the oven.
To Set:
1. PressTIMER SET.
2. Press the HOUR/MIN "up" or "down" arrow pads until the
correct length of time shows on the display.
3. Press TIMER SET.
The Timer will begin counting down after the Timer is started.
The display will count down in hours and minutes if remaining
time is one hour or more, and in minutes and seconds if
remaining time is less than one hour.
When the set time ends, four 1-second tones, if enabled, will
sound, then reminder tones will sound every minute.
4. Press TIMER OFF anytime to cancel the Timer and/or stop
reminder tones.
Cook time may be added in 1-minute increments, up to 99
minutes, by touching the ADD 1 MIN pad.
Touching ADD 1 MIN during a cook cycle will add 1 minute of
cook time at the current cook power.
IMPORTANT: Do not use a thermometer to measure oven
temperature because opening the oven door and element or
burner cycling may give incorrect readings.
The oven provides accurate temperatures; however, it may cook
faster or slower than your previous oven, so the temperature
calibration can be adjusted. It can be changed in Fahrenheit or
Celsius.
A minus sign means the oven will cook cooler by the adjustment
amount. No sign means the oven will cook warmer by the
adjustment amount. Use the following chart as a guide.
ADJUSTMENT °F COOKS FOOD
(ADJUSTMENT °C)
10°F (5°C) ...a little more
20°F (10°C) ...moderately more
30°F (15°C) ...much more
-10°F (-5°C) ...a little less
-20°F (-10°C) ...moderately less
-30°F (-15°C) ...much less
To Adjust Oven Temperature Calibration:
1. Press and hold BAKE for 5 seconds until the oven display
shows the current calibration, for example, "0° CAL."
2. Press the TEMP "up" or "down" arrow pad to increase or to
decrease the temperature in 10°F (5°C) amounts. The
adjustment can be set between 30°F (15°C) and -30°F
(-15°C).
3. Press START.
Warn: & Ready l) 'sw J
The Oven Lockout prevents unintended use of the control panel
command keypads. The oven and warming drawer can only be
locked out when the oven is not in use or the oven control has
not been set.
The oven will remain locked out after a power failure if it was
locked before the power failure.
To Enable/Disable Oven Lockout:
Press and hold OVEN for 5 seconds. A single tone will sound,
and "Loc on" and a lock icon will appear on the display. After 5
seconds, "Loc on" will disappear from the display and "Loc" will
appear.
Three tones will sound when the oven is locked and any
command pad other than CLOCK, TIMER, START, STOP/CLEAR
or OVEN has been pressed.
To unlock oven, press and hold OVEN for 5 seconds. "Loc OFF"
will appear on the display, and lock icon will disappear from the
display.
10
OVEN USE
Odors and smoke are normal when the oven is used the first few
times, or when it is heavily soiled.
IMPORTANT: The health of some birds is extremely sensitive to
the fumes given off. Exposure to the fumes may result in death to
certain birds. Always move birds to another closed and well
ventilated room.
BAKEWARE
TOcook food evenly, hot air must be able to circulate. Allow 2 in.
(5 cm) of space around bakeware and oven walls. Use the
following chart as a guide.
NUMBER OF POSITION ON RACK
PAN(S)
1 Center of rack.
IMPORTANT: DO not line the oven bottom with any type of foil,
liners or cookware because permanent damage will occur to the
oven bottom finish.
• Do not cover entire rack with foil because air must be able to
move freely for best cooking results.
• To catch spills, place foil on rack below dish. Make sure foil is
at least 1 in. (2.5 cm) larger than the dish and that it is turned
up at the edges.
:_ _;,z° '_i %_: _'......
scks Bskewa s
IMPORTANT: Never place food or bakeware directly on the oven
door or bottom. Permanent damage will occur to the porcelain
finish.
2 Side by side or sfightly staggered.
3 or 4 Opposite corners on each rack Make sure that no
bakeware piece is directly over another.
_ D _ _ _ _ _'_M
Rack with Integrated Handle
The integrated handle area makes pulling out the rack easy. The
opening is large enough for a potholder or oven mitt.
RACKS
Position racks before turning the oven on. De not move racks
with bakeware on them. Make sure racks are level. To move a
rack, pull it out to the stop position, raise the front edge, then lift
out. Use the following illustration and chart as a guide.
FOOD RACK POSITION
Frozen pies, large roasts, turkeys, angel 1or 2
food cakes
Bundt cakes, most quick breads, yeast 2
breads, casseroles, meats
Cookies, biscuits, muffins, cakes, pies 2 or 3
Extra-large items 6
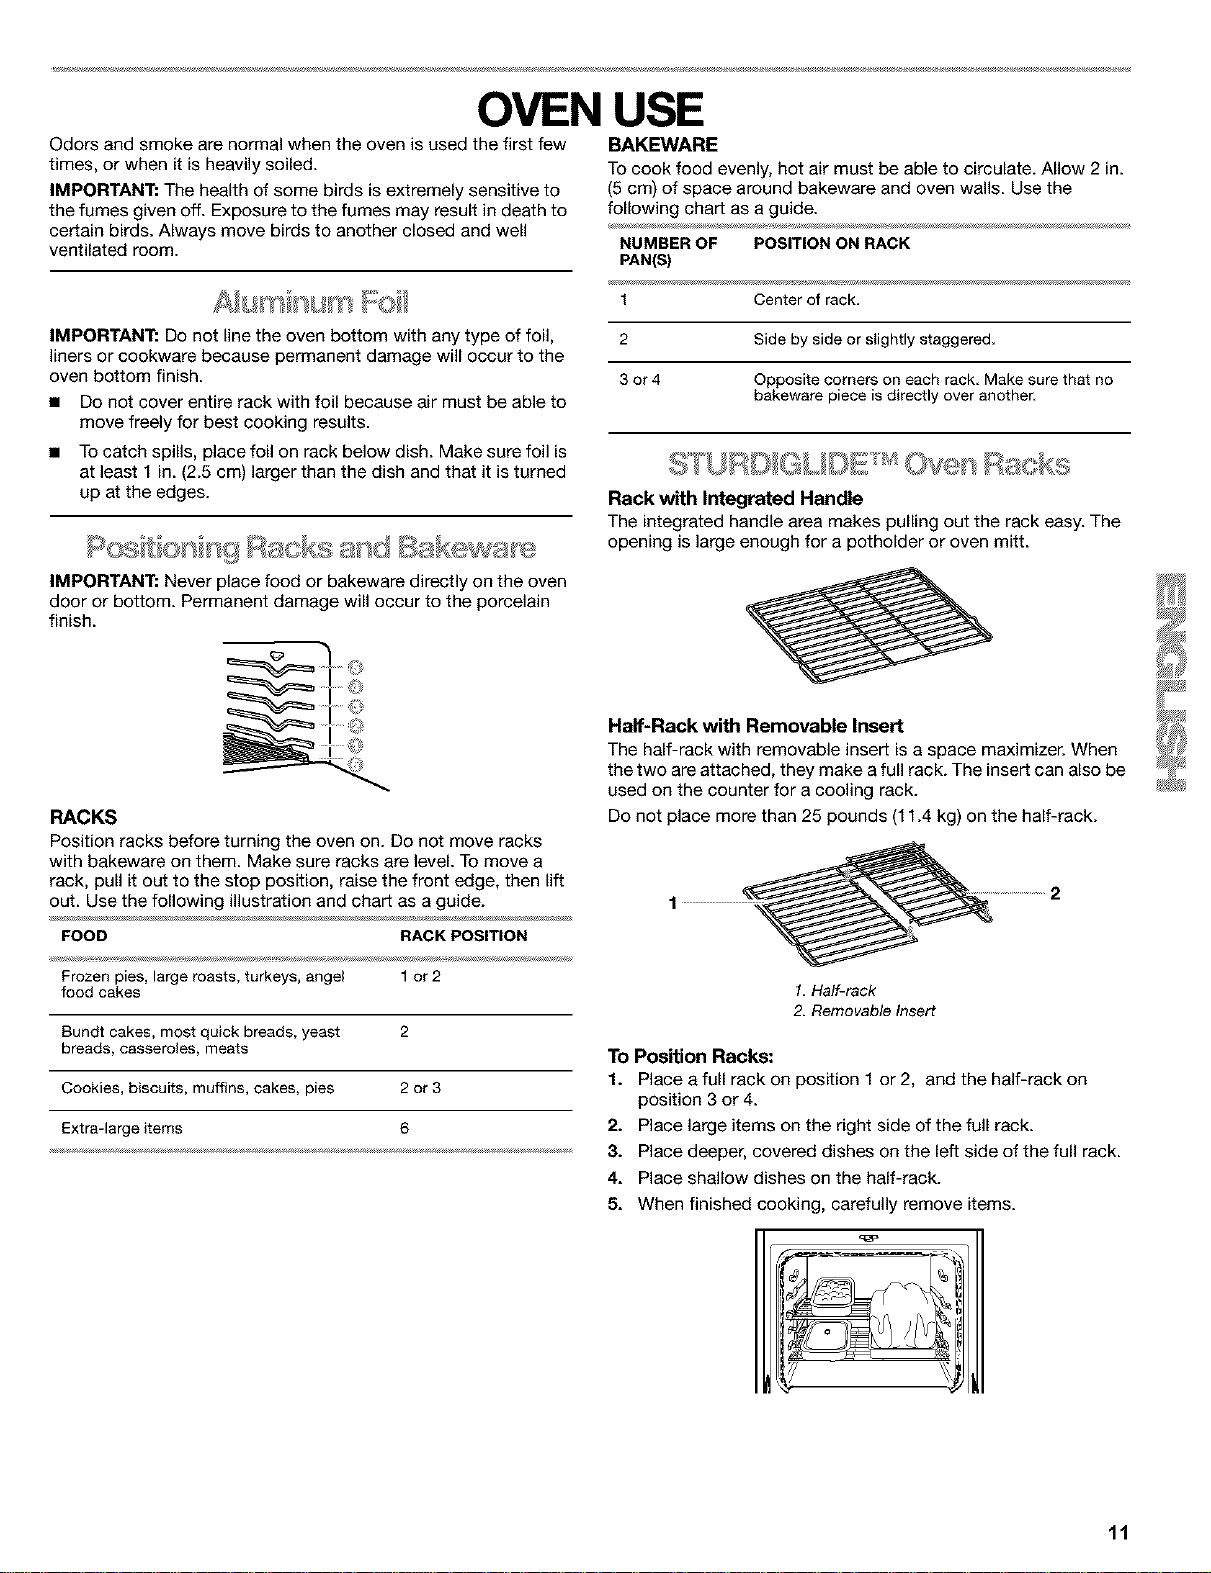
Half-Rack with Removable Insert
The half-rack with removable insert is a space maximizer. When
the two are attached, they make afull rack. The insert can also be
used on the counter for a cooling rack.
Do not place more than 25 pounds (11.4 kg) on the half-rack.
1. Half-rack
2. Removable Insert
To Position Racks:
1. Place a full rack on position 1 or 2, and the half-rack on
position 3 or 4.
2. Place large items on the right side of the full rack.
3. Place deeper, covered dishes on the left side of the full rack.
4. Place shallow dishes on the half-rack.
5. When finished cooking, carefully remove items.
11
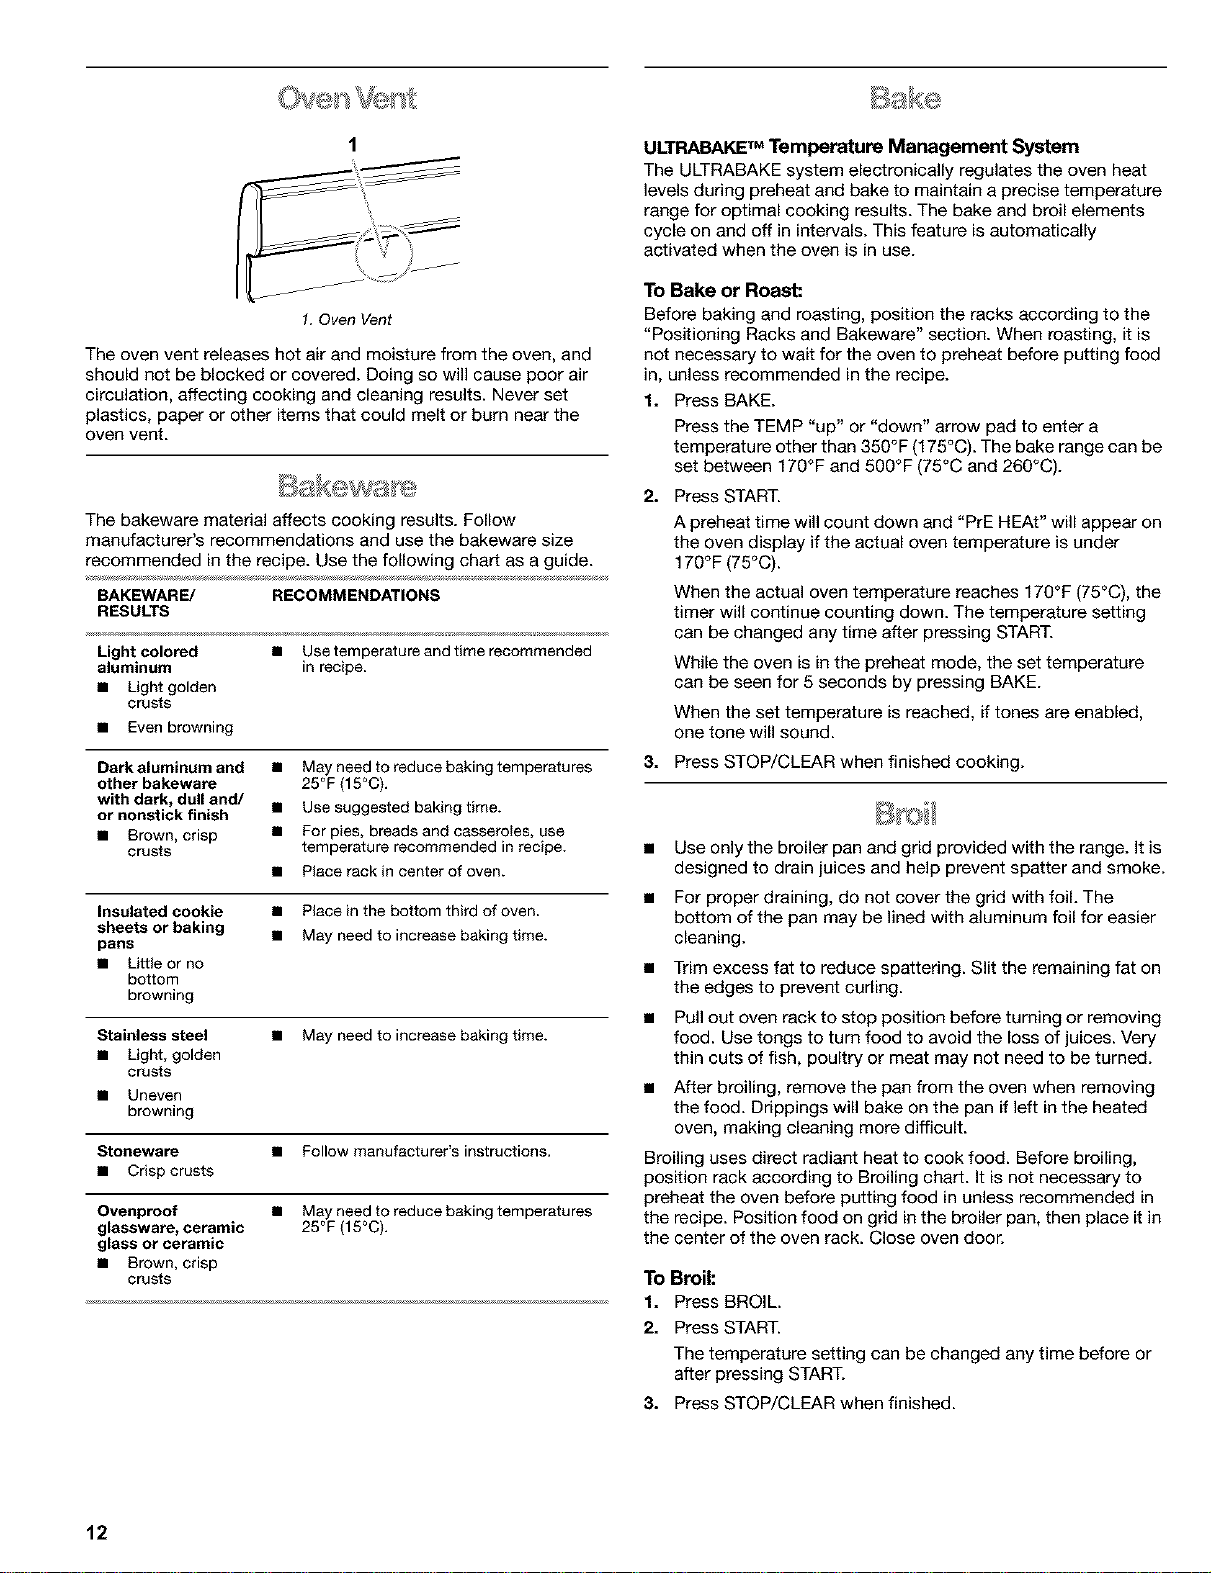
1. Oven Vent
The oven vent releases hot air and moisture from the oven, and
should not be blocked or covered. Doing so will cause poor air
circulation, affecting cooking and cleaning results. Never set
plastics, paper or other items that could melt or burn near the
oven vent.
The bakeware material affects cooking results. Follow
manufacturer's recommendations and use the bakeware size
recommended in the recipe. Use the following char_ as a guide.
BAKEWARE/ RECOMMENDATIONS
RESULTS
Light colored • Usetemperature and timerecommended
aluminum in recipe,
• Light golden
crusts
• Evenbrowning
Dark aluminum and
other bakeware
with dark, dull and/
or nonstick finish
• Brown, crisp
crusts
• May need to reduce baking temperatures
25°F (15°C).
• Use suggested baking time.
• For pies, breads and casseroIes, use
temperature recommended in recipe.
• Place rackin center of oven.
Insulated cookie • Place in the bottom third of oven
sheets or baking
pans • May need to increase baking time.
• Little or no
bottom
browning
Stainless steel • May need to increase baking time.
• Light, golden
crusts
• Uneven
browning
Stoneware • Follow manufacturer's instructions.
• Crisp crusts
Ovenproof • May need to reduce baking temperatures
glassware, ceramic 25°F (15°C).
glass or ceramic
• Brown, crisp
crusts
ULTRABAKE TM Temperature Management System
The ULTRABAKE system electronically regulates the oven heat
levels during preheat and bake to maintain a precise temperature
range for optimal cooking results. The bake and broil elements
cycle on and off in intervals. This feature is automatically
activated when the oven is in use.
To Bake or Roast:
Before baking and roasting, position the racks according to the
"Positioning Racks and Bakeware" section. When roasting, it is
not necessary to wait for the oven to preheat before putting food
in, unless recommended in the recipe.
1. Press BAKE.
Press the TEMP "up" or "down" arrow pad to enter a
temperature other than 350°F (175°C). The bake range can be
set between 170°F and 500°F (75°C and 260°C).
2. Press START.
A preheat time will count down and "PrE HEAt" will appear on
the oven display if the actual oven temperature is under
170°F (75°C).
When the actual oven temperature reaches 170°F (75°C), the
timer will continue counting down. The temperature setting
can be changed any time after pressing START.
While the oven is in the preheat mode, the set temperature
can be seen for 5 seconds by pressing BAKE.
When the set temperature is reached, if tones are enabled,
one tone will sound.
3. Press STOP/CLEAR when finished cooking.
• Use only the broiler pan and grid provided with the range. It is
designed to drain juices and help prevent spatter and smoke.
• For proper draining, do not cover the grid with foil. The
bottom of the pan may be lined with aluminum foil for easier
cleaning.
• Trim excess fat to reduce spattering. Slit the remaining fat on
the edges to prevent curling.
• Pull out oven rack to stop position before turning or removing
food. Use tongs to turn food to avoid the loss of juices. Very
thin cuts of fish, poultry or meat may not need to be turned.
• After broiling, remove the pan from the oven when removing
the food. Drippings will bake on the pan if left in the heated
oven, making cleaning more difficult.
Broiling uses direct radiant heat to cook food. Before broiling,
position rack according to Broiling chart. It is not necessary to
preheat the oven before putting food in unless recommended in
the recipe. Position food on grid in the broiler pan, then place it in
the center of the oven rack. Close oven door.
To Broil:
1. Press BROIL.
2. Press START.
The temperature setting can be changed any time before or
after pressing START.
3. Press STOP/CLEAR when finished.
12
Precision Broiling
Precision Broiling allows more precise temperature control while
cooking. The lower the temperature, the slower the cooking.
Thicker cuts and unevenly shaped pieces of meat, fish and
poultry may cook better at lower broiling temperatures.
To Precision Broil:
1. Press BROIL.
2. Press the TEMP "down" arrow pad to lower the temperature
in 5°F amounts. The broil range is 300°F to 500°F (145°C to
260°0).
3. Press START.
4. Press STOP/CLEAR when finished.
BROILING CHART
For best results, place food 3 in. (7 cm) or more from the broil
element. Times are guidelines only and may need to be adjusted
for individual tastes. Recommended rack positions are numbered
from the bottom (1) to the top (5). For diagram, see the
"Positioning Racks and Bakeware" section.
TOTAL
RACK MINUTES
FOOD POSITION TEMP Side 1 Side 2
Steak
1in. (2.5cm)
thick
medium rare 4 HI 14-15 7-8
medium 4 HI 15-16 8-9
well done 4 HI 18-19 9-10
Groundmeat
patties*
3/4in. (2cm) thick 4 HI 13-14 6-7
well done
Pork chops
1in. (2.5cm) 4 HI 18-21 8-10
thick
Hem slice
[precooked] 4 HI 8-10 4-5
1/2in. (1.25 cm)
thick
Bacon 4 500°F 8-9 1-2
(260°C)
Frankfurters 4 HI 6-7 3-4
Lamb chops
1in. (2.5cm) 4 HI 15-17 8-9
thick
Chicken
bone-in pieces 3 HI 20-24 15-18
boneless 4 HI 12-16 11-16
Fish
1/2in. (1.25 cm) 4 HI 8-10 4-5
thick
1in. (2.5cm) 4 500°F 13-15 10-13
thick (260°0)
* Place up to 9 patties, equallyspaced, on broilerpan grid.
RECIPE RECALL with Slow Cooker function makes cooking
favorite foods faster and easier. The temperatures and times have
been chosen to cover a variety of choices in each food category.
Cooking times and temperatures are adjustable for individual
recipes and can be saved. When changed, the display will not
show "PrEHEAt" while the oven is preheating.
If recipe recommends no preheat is needed, put food in oven.
Use the following chart as a guide when using RECIPE RECALL:
KEYPAD SETTEMP PRESETTIME
MEATS/POULTRY* 325°F (163°C) 1 hour
3 lb.(1.4 kg)
SLOW COOKER High Timer counts
Low up. Tracks
elapsed time.
COOKIES 375°F (191°C) 10 minutes
PIZZA 400°F (204°C) 20 minutes
*The MEATS/POULTRY functions do not have a programmed
preheat. If your recipe suggests you preheat before cooking
meats, poultry or casseroles, preheat using the BAKE function.
Once the preheat temperature has been reached, cancel BAKE
and select MEATS/POULTRY function.
To Use RECIPE RECALL:
1. Press one of the three keypads MEATS POULTRY, COOKIES
or PIZZA.
21
31
Press START.
The cook time can be changed after pressing START, by
pressing the HOUR/MIN pads. The oven will finish cooking
with the new time.
When cook time ends, the oven will automatically shut off.
"End" and COOK TIME will appear on the display. Four tones
will sound, then four 1-second reminder tones will sound
every minute after.
COOKIES and PIZZA keypads include a preheat. When the
preheat ends, a single tone will sound and the cooking time
will appear counting down on the display.
Press STOP/CLEAR or open the oven door to stop reminder
tones and remove "End" from display. The time of day will
appear on the display.
To Change Preset Cook Time and Temperature:
The temperature and length of cooking time for each of the 3
keypads can be changed, and the range will store the new
information for the next use.
1. Press one of the three keypads MEATS POULTRY, COOKIES
or PIZZA.
2. Press the HOUR/MIN "up" or "down" arrow pads until the
length of cooking time shows on the display.
3. Press the TEMP "up" or "down" arrow pad until the desired
cooking temperature shows on the oven display.
4. Press same pad selected in step I to save the change for the
next use.
51
A single tone will sound.
Press STOP/CLEAR if only changing the stored preset cook
time. Press START if proceeding to cook with new set cook
time.
13
Slow Cooker Function
The SLOW COOKER function cooks food slowly at a low
temperature, similar to the way a crock pot cooks. There are two
settings, High and Low. The maximum time the SLOW COOKER
function will operate is 12 hours unless the Sabbath Mode has
been activated. The time counts up when the function starts.
The SLOW COOKER is ideal for roasting beef, pork and poultry.
The exterior of beef and pork will become very dark, but not
burnt. This is normal. However, the interior will remain juicy and
tender. Poultry will also darken, especially in areas not covered
with skin, and it will become crispier than if roasted
conventionally.
• Thaw all frozen foods before cooking using the SLOW
COOKER function.
• It is not necessary to preheat the oven.
• Cook on a single rack, using rack positions 2 or 3. See
"Positioning Racks and Bakeware" section.
• Do not open the oven door often, or leave the door open
when checking foods. If heat loss occurs, cooking time may
need to be extended.
• Cover foods to keep them moist, or use a loose or vented
cover to allow foods to brown and crisp.
• Roasts can be left uncovered so browning can occur. Cook
time will vary, however, depending on the weight, amount of
fat and bone and the shape of the roast.
• Use a meat thermometer to check food temperatures.
• Stirring, turning or rearranging the food is not necessary.
The Sabbath Mode sets the oven to remain on in a bake setting
until turned off. A timed Sabbath Mode can also be set to keep
the oven on for only part of the Sabbath.
When the Sabbath Mode is set, the start pads and BAKE, BROIL,
CLEAN, COOK TIME, DELAY START, CLOCK HOUR UP MINUTE
UP,TIMER SET will be used for adjusting the oven temperatures.
No tones will sound, and the displays will not show messages or
temperature changes. The heat icons will appear lit on the oven
display throughout the Sabbath Mode.
When the oven door is opened or closed, the oven light will not
turn on or off. The heating elements will not turn on or off
immediately after the temperature has been changed.
If a power failure occurs when the Sabbath Mode is set, the oven
will return to the OFF mode and will turn off the power to the
oven. The oven will stay in the Sabbath Mode until exited.
To Activate:
Before the Sabbath Mode can be regularly set, the oven must
first be enabled with a one time only set up.
1. Open the oven door.
2. Press STOP/CLEAR.
3. Press the HOUR "up" and "down" arrow pad and hold for 5
seconds. "SAb On" will appear on the display.
4. Press START.
5. Close the oven door. "SAb On" will disappear from display.
To Deactivate:
The oven can be disabled of the ability to set the Sabbath Mode
by repeating the steps above. "SAb OFF" will appear on the
display. When disabled the Sabbath Mode cannot be regularly
set until re-enabled.
To Set Range for Sabbath Mode (all other uses):
To set the range to meet "no work" requirements for the Sabbath,
first activate the Sabbath Mode using the steps shown in the "To
Activate" section, and then proceed using the following steps.
1. Press BAKE.
2. Press the TEMP "up" and "down" arrow pad to enter a
temperature other than 350°F (177°C). The bake range can be
set between 170°F and 500°F (77°C and 260°C).
3. Press DELAY START to set a delayed bake start time
(optional).
4. Press and hold SET TIMER OFF for 5 seconds. "SAb" and
"START?" will appear on the display indicating the Sabbath
Mode is ready.
5. Press START.
6. TO End the Sabbath Mode, press STOP/CANCEL
Temperature Change
The oven temperature can be changed when the oven is in the
Sabbath Mode. No tones will sound and the display will not
change. The heating elements will not turn on or off for a random
time, anywhere from 16 to 30 seconds. It may take up to one-half
hour for the oven to change temperature.
The following keypads represent temperatures. Use the following
chart as a guide.
KEY PAD OVEN TEMPERATURE
BAKE 170°F(77°C)
BROIL 200°F (93°C)
CLEAN 250°F (121°C)
COOK TIME 275°F (135°C)
DELAY START 300°F (149°C)
CLOCK 325°F (163°C)
HOUR "up" 350°F (177°C)
MIN (minute) "up" 375°F (191°C)
TIMER SET 400°F (204°C)
OVEN 450°F _32°0)
To Change Temperature:
1. Press the key pad from the chart for 1 second.
2. Press START.
14
FoodPoisoningHazard
Donot let food sit in oven more than one hour
before or after cooking.
Doing so can result in food poisoning or
sickness.
IMPORTANT: Food must be at serving temperature before
placing it in the warmed oven. Food may be held up to one hour.
Serve Warm allows hot cooked foods to stay warm before
serving. It can also be used at the end of a timed cook.
To Use:
1. PressSERVEWARM.
2. Set the temperature (optional).
Press the TEMP "up" or "down" arrow pad to raise or lower
the temperature in 5°F (5°C) amounts to set a temperature
other than 150°F (65°C). The warm range is 100°F-200°F
(35°C-90°C).
3. Press START.
4. Press STOP/CLEAR when finished.
To Add to the End of a Set Cook Time:
1. Press BAKE.
2. Set the temperature (optional).
Press the TEMP "up" or "down" arrow pad to set a
temperature other than 350°F (177°C).
3. Press COOK TIME.
4. Press the HOUR/MIN "up" or "down" arrow pads to set cook
time.
5. Press SERVE WARM.
A one hour warm time will automatically be set.
6. Set the warm temperature (optional).
Press the TEMP "up" or "down" arrow pad to raise or lower
the temperature in 5°F (5°C) amounts to set a temperature
other than 150°F (65°C). The warm range is 100°F-200°F
(38°C-93°C).
7. Press START.
The display will show the cook time counting down. When
cook time ends, the display will show a warming time.
When warming time ends, the oven will automatically shut off
and "End" and COOK TIME will show on the display. Four
tones will sound and then four 1-second reminder tones will
sound every minute thereafter.
8. Press STOP/CLEAR or open the oven door to stop reminder
tones and remove "End" from display. The time of day will
return to the display.
To Add to the End of a Delay Start/Set Cook Time:
1. Press BAKE.
2. Set the temperature (optional).
Press the TEMP "up" or "down" arrow pad to set a
temperature other than 350°F (177°C).
3. Press COOK TIME.
Press the HOUR/MIN "up" or "down" arrow pads to set cook
time.
4. Press DELAY START.
Press the HOUR/MIN "up" or "down" arrow pads to set the
time of day to start cooking.
5. Press SERVE WARM.
A one hour warm time will automatically be set.
6. Set the warm temperature (optional).
Press the TEMP "up" or "down" arrow pad to raise or lower
the temperature in 5°F (5°C) amounts to set a temperature
other than 150°F (65°C). The warm range is 100°F-200°F
(38°C-93°C).
7. Press START.
When the start time is reached, the display will show the cook
time counting down. When cook time ends, the display will
show a warming time.
When warming time ends, the oven will automatically shut off
and "End" and COOK TIME will show on the display. Four
tones will sound and then four 1-second reminder tones will
sound every minute thereafter.
8. Press STOP/CANCEL or open the oven door to stop reminder
tones and remove "End" from display. The time of day will
return to the display.
Food Poisoning Hazard
Do not let food sit in oven more than one hour
before or after cooking.
Doing so can result in food poisoning or
sickness.
The Timed Oven Control allows the oven to be set to turn on at a
certain time of day, cook for a set length of time, and/or shut off
automatically. Delay start should not be used for foods such as
breads and cakes because they may not bake properly.
To Set a Cook Time:
Before setting, make sure the clock is set to the correct time of
day. See "Clock" section.
1. Press BAKE.
Press the TEMP "up" or "down" arrow pad to set a
temperature other than 350°F (177°C).
2. Press CQQKTIME.
3. Press the HOUR/MIN "up" or "down" arrow pads to enter the
length of time to cook.
15
4. Press START.
The cooktime will appear on the oven display. The display will
count down the baking/roasting time in hours and minutes (if
cook time is more than 1 hour), or in minutes and seconds (if
cook time is less than 1 hour).
The time settings can be changed any time after pressing
START by repeating step 3.
When the countdown is complete, the oven will shut off
automatically and "End" and COOK TIME will appear on the
oven display. Four tones will sound, then four 1-second
reminder tones will sound every minute thereafter.
5. Press STOP/CLEAR or open the oven door to remove "End"
from display. The time of day will appear on the display.
To Set a Cook Time and Stop Time [Delay Start]:
1. Press BAKE.
Press the TEMP "up" or "down" arrow pad to set a
temperature other than 350°F (175°C).
2. Press COOK TIME.
3. PresstheHOUR/MIN"up"or"down"arrowpadstoenterthe
length of time to cook.
4. Press DELAY START.
5. PresstheHOUR/MIN"up"or"down"arrowpadstoenterthe
time of day to start.
6. Press START.
"DELAY" and the time of day will appear on the oven display.
When the start time isreached, the oven will automatically
turn on, display the cook time, and immediately start
counting down.
When cook time ends, four tones will sound, then four 1-
second reminder tones will sound every minute.
7. Press STOP/CLEAR or open the oven door to remove "End"
from display. The time of day will appear on the display.
To Recall Programmed Timed Settings (displayed for 5
seconds):
To RecallSet Press
Cook Time COOKTIME*
Delay Start DELAY START
Temperature BAKE
*If cook time has begun, when DELAY START is pressed, the
display will show the time it started. When COOK TIME is
pressed, the display will remove the seconds from the remaining
countdown time.
To Change Programmed Timed Settings:
ToChange Set Press Setting Displayed
Cook Time COOKTIME Press HOUR/MIN
"up/down" arrow
Press START
DelayStart* DELAYSTART Press HOUR/MIN
"up/down" arrow
Press START
Temperature BAKE PressTEMP "up/
down" arrow
Press START
*Cannot change the set delay start time once it has been
reached.
Food Poisoning Hazard
Do not let food sit for more than one hour before
or after cooking.
Doing so can result in food poisoning or
sickness.
The Warm & Ready warming drawer is ideal for keeping hot
cooked foods at serving temperature. It may also be used for
warming breads and pastries.
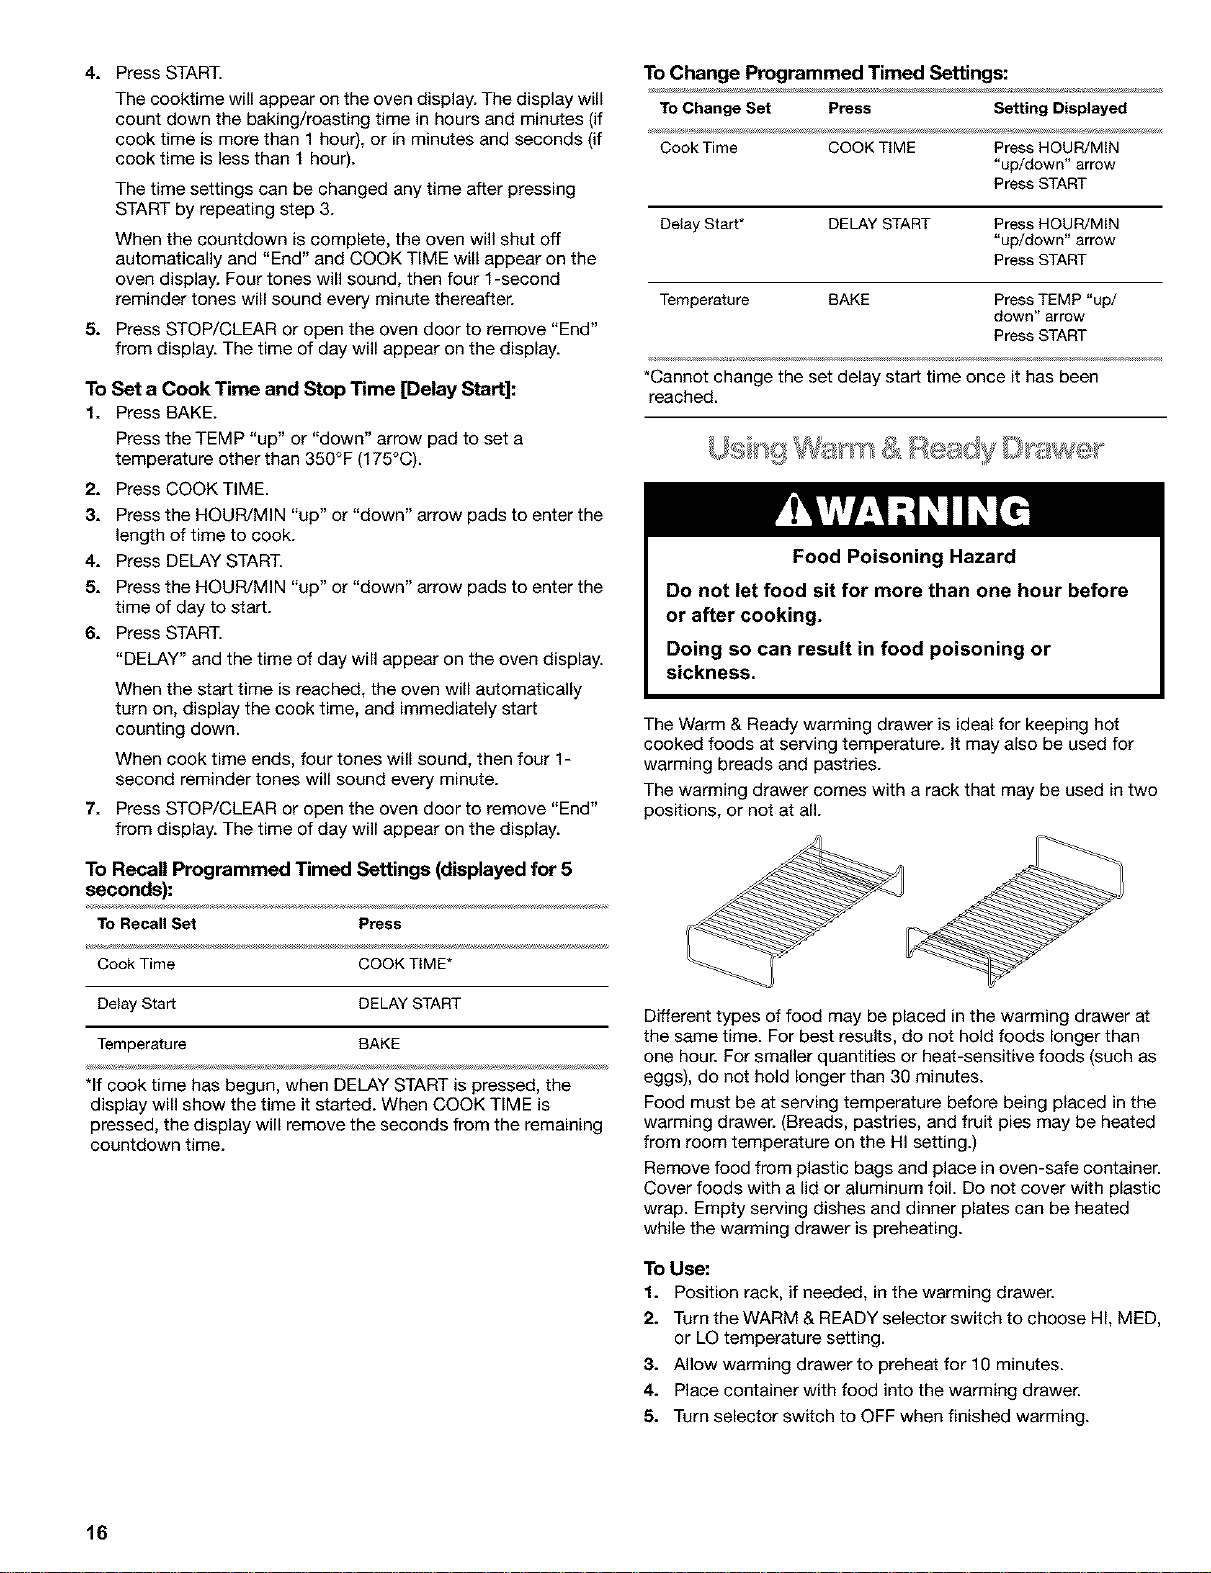
The warming drawer comes with a rack that may be used in two
positions, or not at all.
Different types of food may be placed in the warming drawer at
the same time. For best results, do not hold foods longer than
one hour. For smaller quantities or heat-sensitive foods (such as
eggs), do not hold longer than 30 minutes.
Food must be at serving temperature before being placed in the
warming drawer. (Breads, pastries, and fruit pies may be heated
from room temperature on the HI setting.)
Remove food from plastic bags and place in oven-safe container.
Cover foods with a lid or aluminum foil. Do not cover with plastic
wrap. Empty serving dishes and dinner plates can be heated
while the warming drawer is preheating.
To Use:
1. Position rack, if needed, in the warming drawer.
2. Turn the WARM & READY selector switch to choose HI, MED,
or LO temperature setting.
3. Allow warming drawer to preheat for 10 minutes.
4. Place container with food into the warming drawer.
5. Turn selector switch to OFF when finished warming.
16

WARM & READY "I_MPERATURE CHART
Different foods require different settings in order to maintain the
ideal serving temperature. Use the following chart as a guide.
FOOD SETTING
Bacon* HI
Beef, medium and well done HI
Bread, hard rolls LO
Bread, soft rolls LO
Casseroles HI
Coffee cake, pastries LO
Cooked cereal MED
Eggs MED
Fish, Seafood (No breading) MED
Fish, Seafood (Breaded)* MED
Fried foods HI
Gravy, Cream Sauces HI
Ham MED
Hors d'oeuvres (soft) HI
Hors d'oeuvres (crisp) HI
Lamb MED
Pancakes, waffles* MED
Pies, custard MED
Pies, single crust LO
Pies, double crust LO
Pizza HI
Pork MED
Potatoes, baked HI
Potatoes, mashed MED
Poultry HI
Quiche MED
Vegetables MED
All foods should be covered, except those marked with an asterisk (*)
The oven control is set to automatically shut the oven off 12
hours after the oven turns on. This will not interfere with any
timed or delayed cook function.
The oven light will come on when the oven door is opened. To
keep the light on continuously, turn the light on by pressing
OVEN.
To Override:
For longer cooking periods that require oven usage longer than
12 hours, press and hold CLOCK for 5 seconds. A single tone will
sound and "12H OFF" will appear on the display. The oven will
remain on until turned off.
To Reset:
Press and hold CLOCK for 5 seconds. A single tone will sound
and "12H on" will appear on the display.
17
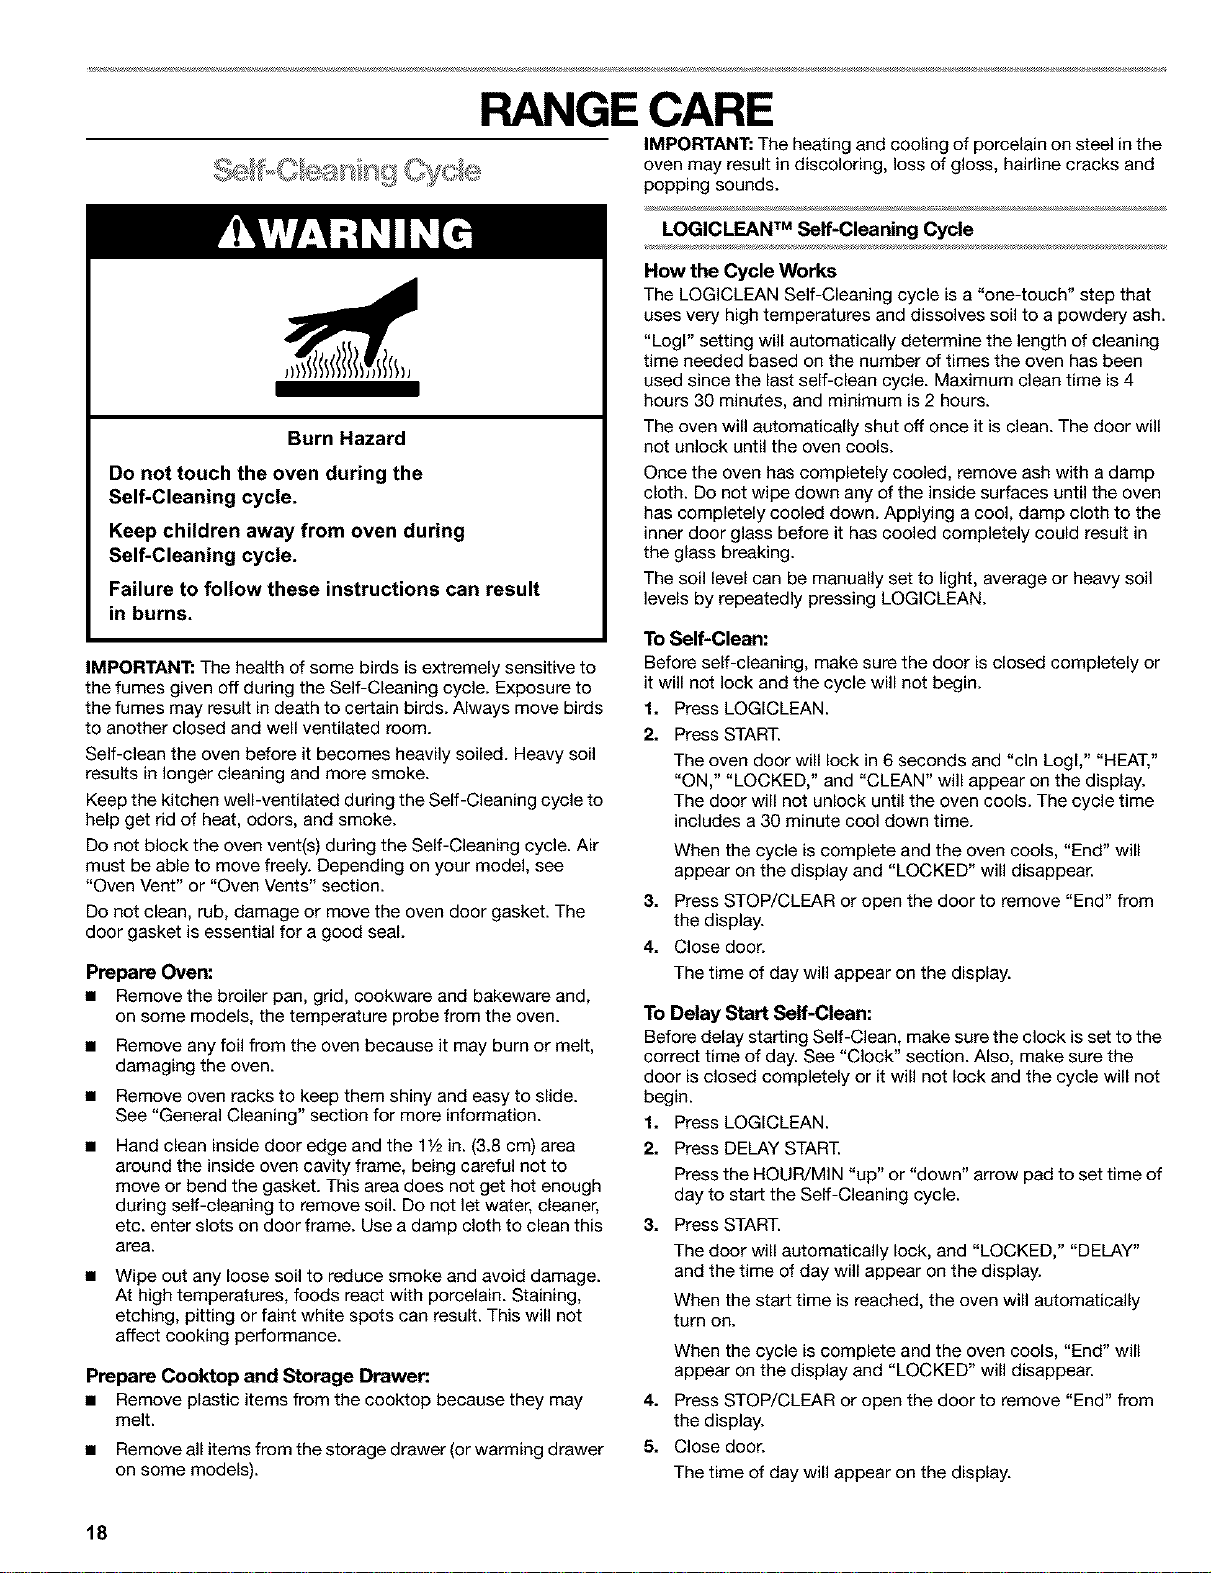
RANGE CARE
_ _ _ ,,% _ _ _ _
Burn Hazard
Do not touch the oven during the
Self-Cleaning cycle.
Keep children away from oven during
Self-Cleaning cycle.
Failure to follow these instructions can result
in burns.
IMPORTANT: The health of some birds is extremely sensitive to
the fumes given off during the Self-Cleaning cycle. Exposure to
the fumes may result in death to certain birds. Always move birds
to another closed and well ventilated room.
Self-clean the oven before it becomes heavily soiled. Heavy soil
results in longer cleaning and more smoke.
Keep the kitchen well-ventilated during the Self-Cleaning cycle to
help get rid of heat, odors, and smoke.
Do not block the oven vent(s) during the Self-Cleaning cycle. Air
must be able to move freely. Depending on your model, see
"Oven Vent" or "Oven Vents" section.
Do not clean, rub, damage or move the oven door gasket. The
door gasket is essential for a good seal.
Prepare Oven:
• Remove the broiler pan, grid, cookware and bakeware and,
on some models, the temperature probe from the oven.
Remove any foil from the oven because it may burn or melt,
damaging the oven.
Remove oven racks to keep them shiny and easy to slide.
See "General Cleaning" section for more information.
Hand clean inside door edge and the 11/2in. (3.8 cm) area
around the inside oven cavity frame, being careful not to
move or bend the gasket. This area does not get hot enough
during self-cleaning to remove soil. Do not let water, cleaner,
etc. enter slots on door frame. Use a damp cloth to clean this
area.
Wipe out any loose soil to reduce smoke and avoid damage.
At high temperatures, foods react with porcelain. Staining,
etching, pitting or faint white spots can result. This will not
affect cooking performance.
Prepare Cooktop and Storage Drawer:
• Remove plastic items from the cooktop because they may
melt.
• Remove all items from the storage drawer (or warming drawer
on some models).
IMPORTANT: The heating and cooling of porcelain on steel in the
oven may result in discoloring, loss of gloss, hairline cracks and
popping sounds.
LOGICLEAN TM Self-Cleaning Cycle
How the Cycle Works
The LOGICLEAN Self-Cleaning cycle is a "one-touch" step that
uses very high temperatures and dissolves soil to a powdery ash.
"Logl" setting will automatically determine the length of cleaning
time needed based on the number of times the oven has been
used since the last self-clean cycle. Maximum clean time is 4
hours 30 minutes, and minimum is 2 hours.
The oven will automatically shut off once it is clean. The door will
not unlock until the oven cools.
Once the oven has completely cooled, remove ash with a damp
cloth. Do not wipe down any of the inside surfaces until the oven
has completely cooled down. Applying a cool, damp cloth to the
inner door glass before it has cooled completely could result in
the glass breaking.
The soil level can be manually set to light, average or heavy soil
levels by repeatedly pressing LOGICLEAN.
To Self-Clean:
Before self-cleaning, make sure the door is closed completely or
it will not lock and the cycle will not begin.
1. Press LOGICLEAN.
2. Press START.
The oven door will lock in 6 seconds and "cln Logl," "HEAT,"
"ON," "LOCKED," and "CLEAN" will appear on the display.
The door will not unlock until the oven cools. The cycle time
includes a 30 minute cool down time.
When the cycle is complete and the oven cools, "End" will
appear on the display and "LOCKED" will disappear.
3. Press STOP/CLEAR or open the door to remove "End" from
the display.
4. Close doo_
The time of day will appear on the display.
To Delay Start Self-Clean:
Before delay starting Self-Clean, make sure the clock is set to the
correct time of day. See "Clock" section. Also, make sure the
door is closed completely or it will not lock and the cycle will not
begin.
1. Press LOGICLEAN.
2. Press DELAY START.
Press the HOUR/MIN "up" or "down" arrow pad to set time of
day to start the Self-Cleaning cycle.
3. Press START.
The door will automatically lock, and "LOCKED," "DELAY"
and the time of day will appear on the display.
When the start time is reached, the oven will automatically
turn on.
When the cycle is complete and the oven cools, "End" will
appear on the display and "LOCKED" will disappear.
4. Press STOP/CLEAR or open the door to remove "End" from
the display.
5. Close doo£
The time of day will appear on the display.
18
To Manually Set Soil Level:
• Press twice for light soils, and "SoilL" will appear on the
display.
Press three times for average soils, and "SoilA" will appear
on the display.
Press four times for heavy soils, and "SoiIH" will appear on
the display.
The oven light will not work during the Self-Cleaning cycle.
To Stop Self-Clean any time:
Press STOP/CLEAR, and "cln," "ON," "cool," and "LOCKED" will
appear on the display until the oven cools. Then "End" will
appear and the door will unlock.
IMPORTANT: Before cleaning, make sure all controls are off and
the oven and cooktop are cool. Always follow label instructions
on cleaning products.
Soap, water and a soft cloth or sponge are suggested first unless
otherwise noted.
EXTERIOR PORCELAIN ENAMEL SURFACES
(on some models)
Food spills containing acids, such as vinegar and tomato, should
be cleaned as soon as the entire appliance is cool. These spills
may affect the finish.
• Glass cleaner, mild liquid cleaner or nonabrasive scrubbing
pad: Gently clean around the model and serial number plate
because scrubbing may remove numbers.
PORCELAIN-COATED GRATES AND CAPS
Food spills containing acids, such as vinegar and tomato, should
be cleaned as soon as the cooktop, grates and caps are cool.
These spills may affect the finish.
To avoid chipping, do not bang grates and caps against each
other or hard surfaces such as cast iron cookware.
Do not reassemble caps on burners while wet.
Do not clean in the Self-Cleaning cycle.
• Nonabrasive plastic scrubbing pad and mildly abrasive
cleanser: Clean as soon as cooktop, grates and caps are
cool.
• Dishwasher (grates only,not caps): Use the most aggressive
cycle.
SURFACE BURNERS
Sealed Burner models
See "Sealed Surface Burners" section.
COOWFOP CONTROLS
Do not use steel wool, abrasive cleansers or oven cleaner.
Do not soak knobs.
When replacing knobs, make sure knobs are in the Off position.
On some models, do not remove seals under knobs.
• Soap and water or dishwasher: Pull knobs straight away from
control panel to remove.
CONTROL PANEL
Do not use abrasive cleaners, steel-wool pads, gritty washcloths
or some paper towels. Damage may occur.
• Glass cleaner and soft cloth or sponge: Apply glass cleaner
to soft cloth or sponge, not directly on panel.
OVEN DOOR EXTERIOR
• Glass cleaner and paper towels or nonabrasive plastic
scrubbing pad: Apply glass cleaner to soft cloth or sponge,
not directly on panel.
• For models with stainless steel oven doors, see "Stainless
Steel" section in "General Cleaning."
STAINLESS STEEL (on some models)
Do not use soap-filled scouring pads, abrasive cleaners, Cooktop
Polishing Creme, steel wool pads, gritty washcloths or some
paper towels. Damage may occur.
Rub in direction of grain to avoid damaging.
• Stainless Steel Cleaner & Polish: See back cover for ordering
information.
• Liquid detergent or all-purpose cleaner: Rinse with clean
water and dry with soft, lint-free cloth.
• Vinegar for hard water spots
OVEN CAVITY
Do not use oven cleaners.
Food spills should be cleaned when oven cools. At high
temperatures, foods react with porcelain and staining, etching,
pitting or faint white spots can result.
• Self-Cleaning cycle: See "Self-Cleaning Cycle" first.
OVEN RACKS AND ROASTING RACKS
• Self-Cleaning cycle: See "Self-Cleaning Cycle" first. Remove
racks or they will discolor and become harder to slide. If this
happens, a light coating of vegetable oil applied to the rack
guides will help them slide.
• Steel-wool pad
BROILER PAN AND GRID
DOnot clean in the Self-Cleaning cycle (on some models).
• Mildly abrasive cleanser: Scrub with wet scouring pad.
• Solution of 1/2cup (125 mL) ammonia to 1 gal. (3.75 L) water:
Soak for 20 minutes, then scrub with scouring or steel-wool
pad.
• Oven cleaner: Follow product label instructions.
Porcelain enamel only, not chrome
• Dishwasher
WARMING DRAWER
Make sure drawer is cool.
• Mild detergent
19
Oven
The oven light is a standard 40-watt appliance bulb. It will some
on when the oven door is open. It will not work during the Serf-
Cleaning cycle. When the oven door is closed, press the OVEN
pad to turn on and off.
Before replacing, make sure the oven and cooktop are cool and
the control knobs are off.
To Replace:
1. Unplug range or disconnect power.
2. Turn the glass bulb cover in the back of the oven
counterclockwise to remove.
3. Turn bulb counterclockwise to remove from socket.
4. Replace bulb, then bulb cover by turning clockwise.
5. Plug in range or reconnect power.
For normal range use, it is not suggested to remove the oven
door. However, if necessary, follow these instructions. The oven
door is heavy.
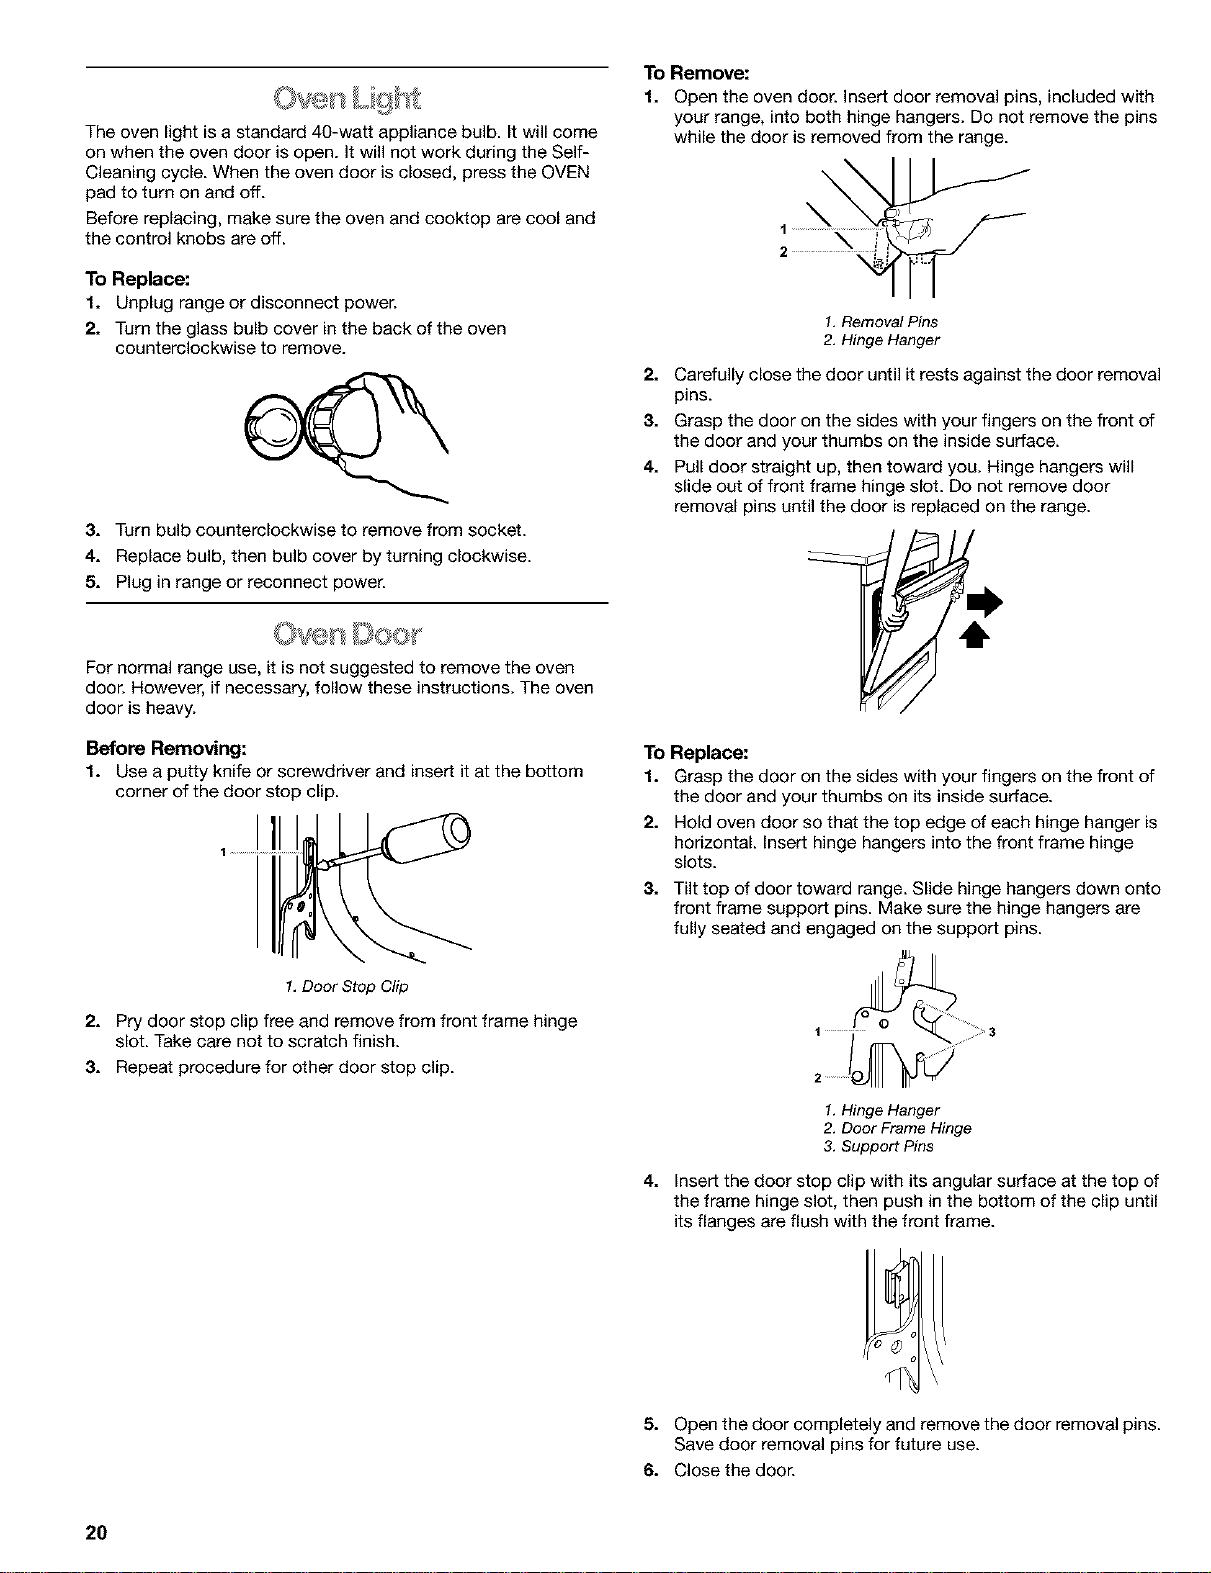
Before Removing:
1. Use a putty knife or screwdriver and insert it at the bottom
corner of the door stop clip.
1.Door Stop Clip
2. Pry door stop clip free and remove from front frame hinge
slot. Take care not to scratch finish.
3. Repeat procedure for other door stop clip.
To Remove:
1. Open the oven door. Insert door removal pins, included with
your range, into both hinge hangers. Do not remove the pins
while the door is removed from the range.
\
\
1
1. Removal Pins
2. Hinge Hanger
2. Carefully close the door until it rests against the door removal
pins.
3. Grasp the door on the sides with your fingers on the front of
the door and your thumbs on the inside surface.
4. Pull door straight up, then toward you. Hinge hangers will
slide out of front frame hinge slot. Do not remove door
removal pins until the door is replaced on the range.
To Replace:
1. Grasp the door on the sides with your fingers on the front of
the door and your thumbs on its inside surface.
2. Hold oven door so that the top edge of each hinge hanger is
horizontal. Insert hinge hangers into the front frame hinge
slots.
3. Tilt top of door toward range. Slide hinge hangers down onto
front frame support pins. Make sure the hinge hangers are
fully seated and engaged on the support pins.
1. Hinge Hanger
2. Door Frame Hinge
3. Support Pins
4. Insert the door stop clip with its angular surface at the top of
the frame hinge slot, then push in the bottom of the clip until
its flanges are flush with the front frame.
5. Open the door completely and remove the door removal pins.
Save door removal pins for future use.
6. Close the door.
2O
TROUBLESHOOTING
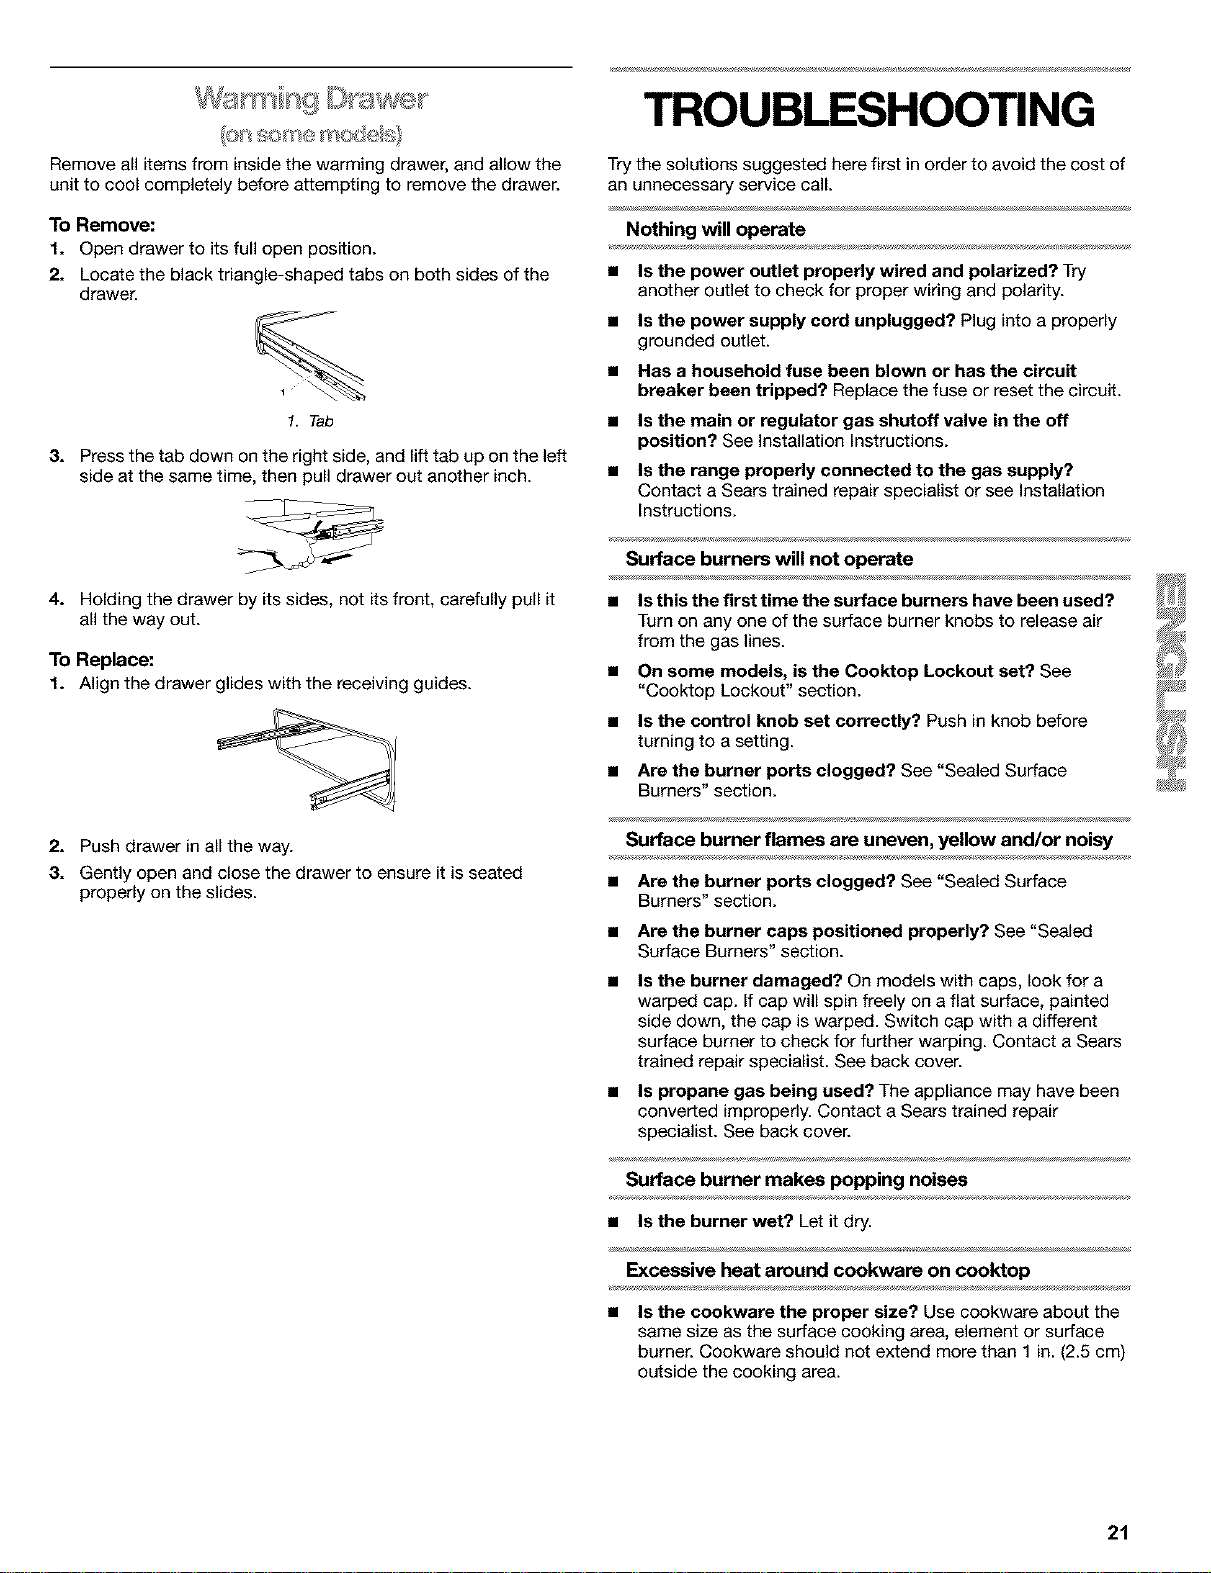
Remove all items from inside the warming drawer, and allow the
unit to cool completely before attempting to remove the drawer.
To Remove:
f. Open drawer to its full open position.
2. Locate the black triangle-shaped tabs on both sides of the
drawer.
1. Tab
3. Press the tab down on the right side, and lift tab up on the left
side at the same time, then pull drawer out another inch.
4. Holding the drawer by its sides, not its front, carefully pull it
all the way out.
To Replace:
1. Align the drawer glides with the receiving guides.
2. Push drawer in all the way.
3. Gently open and close the drawer to ensure it is seated
properly on the slides.
Try the solutions suggested here first in order to avoid the cost of
an unnecessary service call.
Nothing will operate
• Is the power outlet properly wired and polarized? Try
another outlet to check for proper wiring and polarity.
IS the power supply cord unplugged? Plug into a properly
grounded outlet.
Has a household fuse been blown or has the circuit
breaker been tripped? Replace the fuse or reset the circuit.
Is the main or regulator gas shutoff valve in the off
position? See Installation Instructions.
Is the range properly connected to the gas supply?
Contact a Sears trained repair specialist or see Installation
Instructions.
Surface burners will not operate
• Is this the first time the surface burners have been used? )_
Turn on any one of the surface burner knobs to release air
from the gas lines.
• On some models, is the Cooktop Lockout set? See
"Cooktop Lockout" section.
• Is the control knob set correctly? Push in knob before
turning to a setting.
• Are the burner ports clogged? See "Sealed Surface
Burners" section.
Surface burner flames are uneven, yellowand/or noisy
• Are the burner ports clogged? See "Sealed Surface
Burners" section.
Are the burner caps positioned properly? See "Sealed
Surface Burners" section.
Is the burner damaged? On models with caps, look for a
warped cap. If cap will spin freely on a flat surface, painted
side down, the cap is warped. Switch cap with a different
surface burner to check for further warping. Contact a Sears
trained repair specialist. See back cover.
Is propane gas being used? The appliance may have been
converted improperly. Contact a Sears trained repair
specialist. See back cover.
Surface burner makes popping noises
• Is the burner wet? Let it dry.
Excessive heat around cookwara on cooktop
• Is the cookware the proper size? Use cookware about the
same size as the surface cooking area, element or surface
burner. Cookware should not extend more than 1 in. (2.5 cm)
outside the cooking area.
21
Oven will not operate Oven cooking results not what expected
• Is the electronic oven control set correctly? See •
"Electronic Oven Control" section.
• Has a delay start been set? See "Timed Oven Control" •
section.
• Is the Oven Lockout set? See "Oven Lockout" section. •
• Has the Sabbath Mode been set?. See "Sabbath Mode"
section. •
• IS the f2-Hour Shut-off set? See "12 Hour Shut-Off" •
section.
Oven temperature too high or too low
• Does the oven temperature calibration need adjustment?.
See "Oven Temperature Control" section.
Display shows messages
• Is the display showing "PF"? There has been a power
failure. Press STOP/CLEAR to clear the display. Reset the
clock, if needed. See "Clock" section. •
On some models, is the display showing a "PF" and a
cooktop icon? The Cooktop Lockout feature is engaged.
See "Cooktop Lockout" section.
IS the display showing "F" followed by a number? Press
STOP/CLEAR to clear the display. If an "F" code reappears,
contact a Sears trained repair specialist. See back cover.
Is the display showing a "EO F5"? The Self-Cleaning latch
is interfering with the oven door closing.
if the oven door is open, press STOP/CLEAR to clear display,
then depress and hold door switch plunger (located in the
upper right corner of the oven front. Latch mechanism will
unlock after 6 seconds.
Is the appliance level? Level the appliance. See the
Installation Instructions.
Is the proper temperature set? Double-check the recipe in
a reliable cookbook.
Is the proper oven temperature calibration set? See "Oven
Temperature Control" section.
Was the oven preheated? See "Bake" section.
Is the proper bakeware being used? See "Bakeware"
section.
Are the racks positioned properly? See "Positioning Racks
and Bakeware" section.
Is there proper air circulation around bakeware? See
"Positioning Racks and Bakeware" section.
Is the batter evenly distributed in the pan? Check to make
sure batter is level in the pan.
Is the proper length of time being used? Adjust cooking
time.
Has the oven door been opened while cooking? Oven
peeking releases oven heat and can result in longer cooking
times.
Are baked items too brown on the bottom? Move rack to
higher position in the oven.
Are pie crust edges browning early? Use aluminum foil to
cover the edge of the crust and/or reduce baking
temperature.
if the oven door is locked, apply pressure to the upper right
corner of the oven door and press STOP/CLEAR at the same
time. This will unlock the oven door.
Self-Cleaning cycle will not operate
• Is the oven door open? Close the oven door all the way.
• Has the function been entered? See "Self-Cleaning Cycle"
section.
• Has a delay start Self-Clean cycle been set? See "Self-
Cleaning Cycle" section.
• Has a delay start been set? See "Timed Oven Control"
section.
22

23
CONTRATOS DE
f
PROTECCION
Contratos Maestros de Proteccibn
iFelicitaciones per su inteligente adquisici6n! Su nuevo
electrodom6stico Kenmore ®ha sido diseSado y fabricado para
brindade aSos de funcionamiento confiable. Pero al igual que
todos los productos, puede necesitar mantenimiento preventive
o reparaci6n de vez en cuando. Es all[ donde el Contrato Maestro
de Protecci6n puede ahorrarle dinero e inconvenientes.
Adquiera un Contrato Maestro de Protecci6n hoy y prot_jase
contra molestias y gastos inesperados.
El Contrato Maestro de Protecci6n tambi_n ayuda a prolongar la
vida de su nuevo artefacto. He aqu[ Io que se incluye en el
Contrato:
V Servicio experto per nuestros 12.000 especialistas en
reparaci6n competentes
Servicio ilimitado y gratuito para repuestos y mane de obra
en todas las reparaciones protegidas por el contrato
_/Garantia "sin disgustos" - reemplazo de su producto
protegido si ocurren cuatro o m&s fallas del producto en el
transcurso de dooe meses
Reemplazo del producto si su producto protegido no puede
ser reparado
_/Revisibn Anual de Mantenimiento Preventivo a solicitud
suya - sin costo adicional
Ayuda r_pida per teldfono - asistencia per tel6fono a cargo
de un t6cnico de Sears para productos que deban se
reparados en su hogar, adem&s de un horario de reparaci6n
conveniente
Proteccibn de sobrevoltaje contra daSos el6ctricos debido a
fluctuaciones de electricidad
Reembolso de la renta si la reparaci6n de su producto
protegido tarda m&s de Io prometido
Una vez adquirido el Contrato, tan s61o tiene que Ilamar para fijar
la visita de servicio t6cnico. Usted puede Ilamar a cualquier hora,
de dia o de noche, o fijar una visita t6cnica en Internet.
Sears cuenta con un equipo de m&s de 12.600 especialistas en
reparaci6n competentes, quienes tienen a disposici6n m&s de
4,5 millones de repuestos y accesorios de calidad. I_sees el tipo
de profesionalismo con el que usted puede contar para ayudade
a prolongar la vida de su nuevo artefacto per touches aSos m&s.
iAdquiera hoy su Contrato Maestro de Protecci6n!
Se aplican algunas limitacionee y exclusiones. Para obtener
precios e informacibn adicional, Ilame al 1-888-784-6427.
Servicio de Instalacibn de Sears
Para la instalaci6n profesional de ar_efactos electrodom6sticos,
arbridores de puertas de garaje, calentadores de agua y otros
articulos impor_antes de la casa, en los EE.UU. Ilame al
1-800-4-MY-HOME ®.
f
GARANTIA
GARANT_, COMPLETA DE UN AI_IO PARA TODAS LAS
PIEZAS
Durante un aSo a partir de la fecha de compra, siempre y cuando
la estufa sea instalada y operada de acuerdo con las
instrucciones proporcionadas en el Manual de uso y cuidado y
las instrucciones de instalaci6n, Sears reparar_ esta estufa, sin
costo alguno, si tuviese defectos de materiales o de mano de
obra.
RESTRICCION DE LA GARANT_,
Si se somete a la estufa a un use ajeno al dom6stico privado, la
cobertura de las garant[as arriba citadas queda restringida a s61o
90 d[as.
SERVIClO DE REPARACI(_N DE LA GARANT|A
EL SERVICIO DE REPARACION DE LA GARANT[A ESTA A SU
DISPOSICION AL CONTACTARSE CON EL CENTRO DE
SERVlCIO SEARS M,_S CERCANO EN LOS ESTADOS UNIDOS.
Esta garantia corresponde s61omientras se use el producto en
los Estados Unidos. Esta garantia le otorga derechos legales
especfficos yes posible que usted tenga tambi6n otros derechos
que pueden variar de un estado a otro.
Para obtener informaci6n respecto a la garant[a en los Estados
Unidos, Ilame al 1-800-469-4663. en contacto con un Centro de
Servicio de Sears, s[rvase tomar come referencia los nt]meros de
servicio t6cnico ubicados en la contraportada del manual.
Sears, Roebuck and Co.
[:)/817WA, Hoffman Estates, IL 60179
REGISTRO DEL PRODUCTO
En el espacio a continuaci6n anote el nQmero completo del
modelo y de la serie asi como la fecha de compra. Usted podr&
encontrar esta informaci6n en la etiqueta con el nQmero del
modelo y de la serie, Iocalizada tal come se ilustra en la secci6n
de Piezas y caracteristicas de este manual. Siempre que se
ponga en contacto con Sears respecto a su electrodom_stico,
tenga esta informaci6n a mane para facilitar la obtenci6n de
asistencia o servicio.
Nt_mero de modelo 665.
Ndmero de serie
Fecha de compra
Guarde estas instruccionee y eu comprobante de compra
para consulta futura.
24
SEGURIDAD DE LA ESTUFA
Su seguridad y la seguridad de los demd es muy importante.
Hemos incluido muchos mensajes importantes de seguddad en este manual yen su etectrodomestico.
Lea y obedezca siempre todos los mensajes de seguridad.
Este es et simbolo de advertencia de seguridad.
Este sfmbolo le llama la atenci6n sobre petigros potenciales que pueden ocasionar la muerte o una
lesi6n a usted y a los demAs.
Todos los mensajes de seguridad iran a continuaci6n del simbolo de advertencia de seguridad
y de la palabra "PELIGRO" o "ADVERTENCIA". Estas palabras significan:
Si no sigue las instrucciones de inmediato, usted
puede morir o sufrir una lesid grave.
Si no sigue las instrucciones, usted puede morir
o sufrir una lesid grave.
Todos los mensajes de seguridad le diran el petigro potencial, le dirAn c6mo reducir las posibilidades de sufrir
una lesi6n y 1oque puede suceder si no se siguen las instrucciones.
I
ADVERTENCIA: Para su seguridad, la informacibn en este manual debe ser observada I
para minimizar el riesgo de incendio o explosibn, o para prevenir dafios a propiedades,
I
heridas o la muerte.
- No almacene o use gasolina u otros liquidos y vapores inflamables cerca de este u otro
aparato electrodom_stico.
- PASOS QUE USTED DEBE SEGUIR SI HUELE A GAS:
• No trate encender ningt_n aparato electrodom_stico.
• No toque ningt_n enchufe el_ctrico.
• No use ningt_n tel_fono en su casa o edificio.
• Llame inmediatamente a su proveedor de gas desde el tel_fono de un vecino.
Siga las instrucciones de su proveedor de gas.
• Si usted no puede comunicarse con su proveedor de gas, Ilame al departamento
de bomberos.
- La instalacibn y el servicio deben ser efectuados por un instalador calificado, una
agencia de servicio o por el proveedor de gas.
La California Safe Drinking Water and Toxic Enforcement Act (La ley de la protecci6n det agua potable y
la etiminaci6n de sustancias t6xicas de California) exige que el gobernador de California publique una lista de
aquetlas sustancias identificadas por et estado de California como causantes de cancer, defectos cong6nitos
o algQn otro tipo de dafios en la funci6n reproductora y exige a los comerciantes que adviertan de los posibles
riesgos de exposici6n a tales sustancias.
ADVERTENCIA: Este producto contiene una sustancia qufmica identificada por el estado de California como
causante de cancer, defectos cong6nitos o atgQn otro tipo de dafios en la funci6n reproductora.
Este electrodomestico puede producir una exposici6n de bajo nivet a alguna de las sustancias enumeradas,
incluyendo et benceno, formaldeh/do, mon6xido de carbono, tolueno y holl/n.
25

a ' tiivue ee
La estufa no sevoltear_ durante e]use normal Sin embargo, si usted ap]ica mucha fuerza o peso a la puerta abierta sin haber fijado
adecuadamente el sopo_e antivue]eo, ]a estufa puede voltearse.
Elsoporte anti-vuelco
La pata trasera
Peligro de Vuelco
Un niho o un adulto puede volcar accidentalmente la estufa y resultar muerto.
Conecte el soporte anti-vuelco a la pata trasera de la estufa.
Si traslada de lugar la estufa, vuelva a conectar el soporte anti-vuelco.
Consulte las instrucciones de instalacibn para mbs detalles.
No seguir estas instrucciones puede ocasionar la muerte o quemaduras graves en nihos
y adultos.
Aseg_rese de que el soporte anti-vuelco haya sido instalado:
• Deslice la estufa hacia adelante.
• Verifique que el soporte anti-vuelco est_ bien asegurado al piso.
• Deslice la estufa para colocarla de nuevo en su lugar asegur&ndose de que la pata
trasera quede debajo del soporte anti-vuelco.
INSTRUCCIONES IMPORTANTES DE SEGURIDAD
ADVERTENCIA: Para reducir el riesgo de
incendio, electrocuci6n, lesiones a personas o dafios at
usar la estufa de gas, siga precauciones basicas,
incluyendo las siguientes:
• ADVERTENClA: PARA REDUCIR EL RIESGO
DE VOLTEO DE LA ESTUFA DE GAS, E_STADEBE
ASEGURARSE EN EL PISO MEDIANTE LA
INSTALACION DE DISPOSITIVOS DE ANTI-VUELCO.
PARA VERIFICAR SI LOS DISPOSITIVOS ESTAN
INSTALADOS ADECUADAMENTE, DESLICE LA
ESTUFA DE GAS HACIA ADELANTE, CERCIORESE
QUE EL SOPORTE ANTI-VUELCO ESTE BIEN FIJO
EN EL PISO Y DESLICE LA ESTUFA DE GAS HACIA
ATR,_S DE MANERA QUE LA PATA TRASERA DE LA
ESTUFA DE GAS QUEDE FIJA DEBAJO DEL
SOPORTE DE ANTI-VUELCO.
• AVISO: No almacene articulos que interesen a los
nifios en los armarios que estAn encima de una estufa
o en el respaldo de protecci6n de una estufa
- at trepar los nifios encima de la estufa para
alcanzar atgen objeto, podrfan lastimarse seriamente.
• Instalaci6n Apropiada - AI instalar la estufa de gas
debe hacer la conexi6n electrica a tierra de acuerdo
con las normas locales o, en ausencia de normas
locales, con el C6digo Electrico Nacional (National
Electrical Code), ANSI/NFPA 70. Cerci6rese que la
instalaci6n y puesta a tierra de la estufa de gas
sean efectuadas adecuadamente por un tecnico
competente.
• Esta estufa de gas esta equipada con un enchufe de
tres puntas con contacto a tierra para su protecci6n
contra riesgo de etectrocuci6n y deberia enchufarse
directamente a un tomacorriente que tiene conexi6n
a tierra. No corte ni quite la punta para conexi6n a
tierra de este enchufe.
• Desconecte et suministro de energia antes de hacer
una revisi6n at aparato electrodomestico.
• Nunca use la estufa de gas como catefacci6n det
cuarto.
• Et mal uso de las puertas o gavetas del aparato
etectrodomestico, tales como pisar, recostarse o
sentarse en las puertas o gavetas, puede ocasionar
heridas.
• Mantenimiento - Mantenga el &rea de la estufa
despejada y libre de matefiales combustibles,
gasolina y otros vapores y l/quidos inftamables.
• Almacenaje dentro o encima de la estufa de gas -
No se debe atmacenar materiales inflamables en
et homo o cerca de las unidades que est&n en la
superficie.
• Et tamafio de la llama det quemador superior debe
ajustarse de manera que no se extienda m&s all&
de los bordes det utensilio de cocina.
Para estufas de limpieza autombtica -
• Antes de efectuar la limpieza automatica del homo -
quite la charola para asar y otros utensitios. Limpie
con un trapo hemedo todo derrame excesivo antes
de iniciar el cicto de autolimpieza.
GUARDE ESTAS INSTRUCCIONES
26
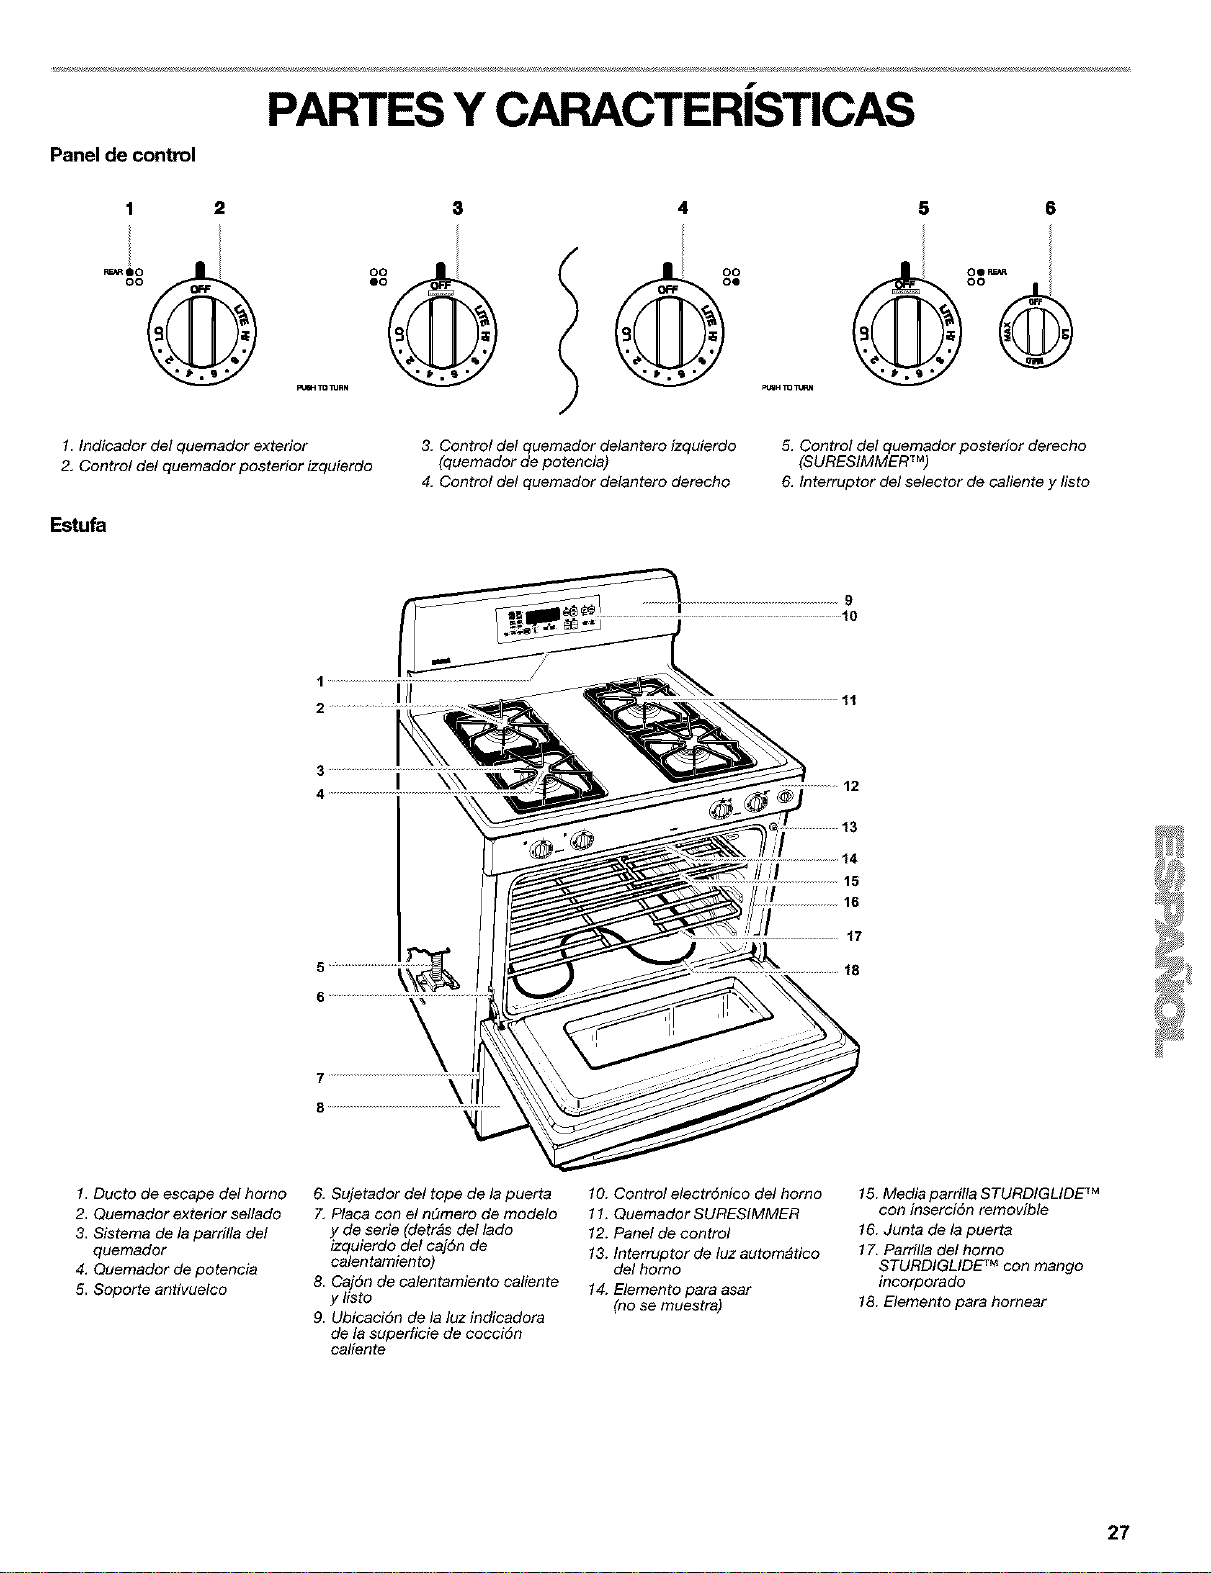
f
PARTES Y CARACTERISTICAS
Panel de control
1
1. Indicador del quemador exterior
2, Control del quemador posterior izquierdo
E_u_
4
3. Control del quemador delantero izquierdo
(quemador de potencia)
4, Control del quemador delantero derecho
5 6
oo
5. Control del quemador posterior derecho
(SURESIMMER TM)
6, Interruptor del selector de caliente y listo
9
10
1 ....................................................................... /
Ill
2
11
3
4
\\\
14
15
16
17
18
1. Ducto de escape del homo
2. Quemador exterior sellado
3. Sistema de la parrilla del
quemador
4, Quemador de potencia
5. Soporte antivuelco
6, Sujetador del tope de la puerta
7. Placa con el n_mero de modelo
y de serie (detr_s del lado
izquierdo del caj6n de
calentamiento)
8. Caj6n de calentamiento caliente
ylisto
9. Ubicaci6n de la luz indicadora
de la superficie de cocciSn
caliente
10. Control electrSnico del homo
11. Quemador SURESIMMER
12. Panel de control
13. Interruptor de luz autom_tico
del homo
14. Elemento para asar
(no se muestra)
15. Media parrilla STURDIGLIDE TM
con inserciSn removible
16. Junta de la puerta
17. Parrilla del homo
STURDIGLIDE TM con mango
incorporado
18. Elemento para hornear
27
f
USO DE LA SUPERFICIE DE COCCION
Peligro de Incendio
No permita que la llama del quemador extienda
m_s allb que la orUla de la cacerola.
Apague todas las perUlas de los controles
cuando no estd cocinando.
No seguir estas instrucciones puede ocasionar la
muerte o incendio.
Los encendedores el6ctricos encienden autom&ticamente los
quemadores exteriores cuando las perillas de control est&n
giradas a la posici6n LITE (Encendido). Coloque el utensilio de
cocina Ileno sobre la parrilla antes de fijar una perilla de control.
No haga funcionar un quemador con el utensilio de cocina vac[o
o cuando la parrilla est6 vacia.
Para fljan
1. Empuje hacia adentro y gire la perilla hacia la izquierda hacia
LITE. Los cuatro quemadores har&n un ruido seco.
Solamente producir& una llama el quemador cuya perilla de
control est6 girada a LITE.
2. Gire la perilla en cualquier posici6n entre HI (Alto) y LQ (Bajo).
Utilice la tabla siguiente como guia cuando fije los niveles de
calor.
AJUSTE USO RECOMENDADO
LITE (Encendido) • Paraencender el quemador.
HI (Alto) • Paracomenzar a cocinar los
alimentos.
• Para hacer hervir liquidos.
Ajuste medio • Paramantener un hervor r&pido.
(entre HI y LO) • Paradorar r&pidamenteo chamuscar
los alimentos.
• Parafreir polio.
• Paramantener un hervor lento.
• Parafrelr o sofre[r los alimentos.
• Paracocer sopasy salsas.
LO (Bajo) • Para mantener el alimento caliente.
• Para hervir a fuego lento.
Quemadorde potencia • Para proporcionar el ajuste de calor
(quemador delantero m&s alto
izquierdo)
SURESIMMER TM • Para proporcionar el ajuste de calor/
(quemador posterior hervora fuego lento m&sbajo.
derecho) • Paraderretir chocolate omantequilla.
I
RECUERDE: Cuando se est6 usando la estufa o (en
algunos modelos) durante el ciclo de auto limpieza,
toda la superficie de cocci6n se calienta.
I
Quemador de potencia
El quemador delantero izquierdo ha sido diseSado para
proporcionar una intensidad ultra alta cuando se gire hacia HI.
Puede usarse para hacer hervir r&pidamente un liquido y para
cocinar grandes cantidades de alimentos. En algunos modelos,
ambos quemadores delanteros son quemadores de potencia.
Luz indicadora de la superficie de coccibn caliente
La luz indicadora de la superficie de cocci6n caliente est&
ubicada en la consola de control. Esta luz indicadora
permanecer& roja mientras cualquier &tea de la superficie de
cocci6n est6 demasiado caliente al tacto, ann
despu6s de que 6sta(s) se haya(n) apagado.
El bloqueo de la superficie de cocci6n evita el uso accidental de
los quemadores exteriores. Cuando la superficie de cocci6n est6
bloqueada, los quemadores exteriores no podr&n encenderse
con las perillas de control.
Cuando se suministre energia a la estufa pot primera vez, o si la
misma se ha quedado sin energia, los quemadores exteriores
estar&n en la posici6n de bloqueo de la superficie de cocci6n.
Los quemadores exteriores no podr_n set activados hasta que se
restablezca la energia a la estufa y (o) hasta que est6 desactivado
el bloqueo de la superficie de cocci6n.
Para bloquear/desbloquear la superficie de coccibn:
Antes de usar, gire todas las perillas de control hacia OFF
(Apagado). Presione y sostenga el bot6n TOP (Superior) por 5
segundos hasta que se escuche una sola seSal audible y
aparezca en la pantalla "Loc on"(Bloqueo activado). Despu6s de
5 segundos, "Loc On" desaparecer_ de la pantalla y aparecer&
una ilustraci6n de la superficie de cocci6n.
Repita el procedimiento para desbloquear la superficie de
cocci6n. Aparecer_ en la pantalla "Loc OFF" (BIoqueo apagado)
por 5 segundos y la ilustraci6n de la superficie de cocci6n
desaparecer_ de la pantalla.
28
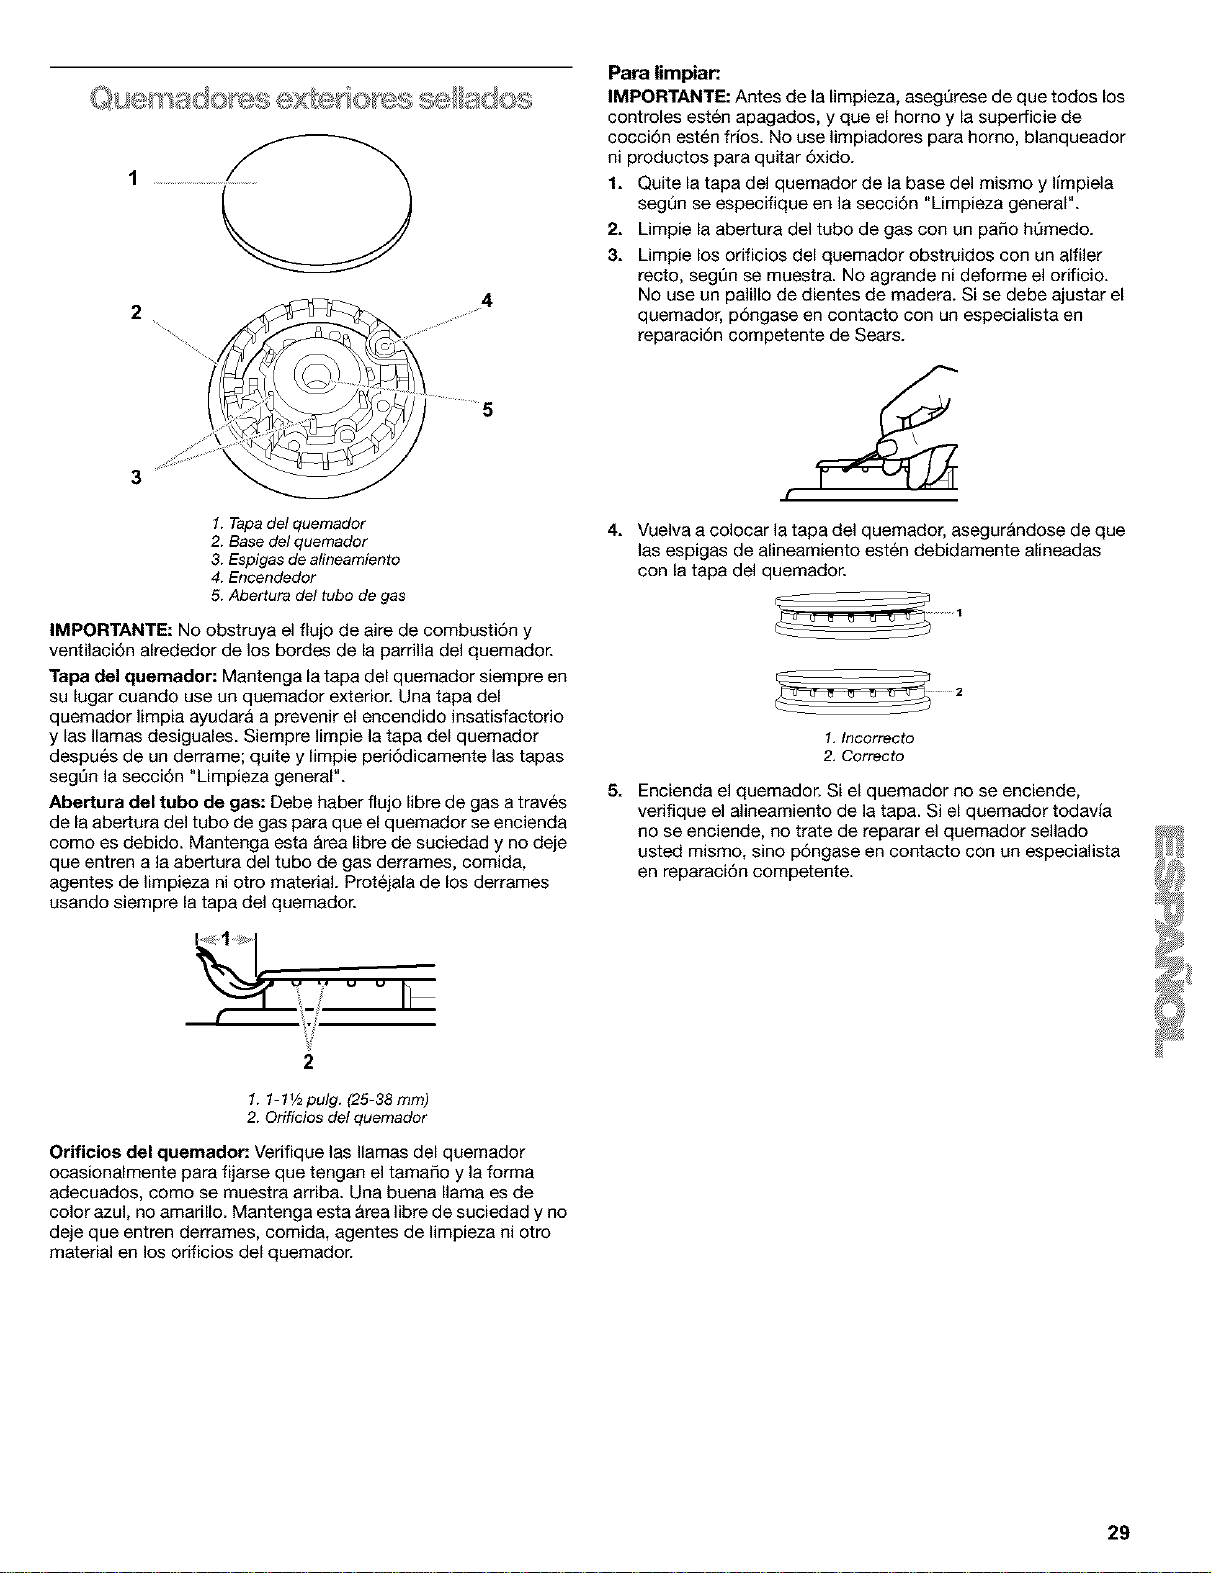
2
"%,%,
%
,,y'!
4
I ..........5
1. Tapa del quemador
2. Base del quemador
3. Espigas de alineamiento
4. Encendedor
5. Abertura del tube de gas
IMPORTANTE: NOobstruya el flujo de aire de combusti6n y
ventilaci6n alrededor de los bordes de la parrilla del quemador.
Tapa del quemador: Mantenga la tapa del quemador siempre en
su lugar cuando use un quemador exterior. Una tapa del
quemador ]impia ayudar& a prevenir el encendido insatisfactorio
y las llamas desiguales. Siempre ]impie ]a tapa del quemador
despu6s de un derrame; quite y limpie peri6dicamente ]as tapas
segt_n la secci6n "Limpieza general".
Abertura del tube de gas: Debe haber flujo libre de gas atrav6s
de la aber_ura del tube de gas para que el quemador se encienda
come es debido. Mantenga esta &rea libre de suciedad y no deje
que entren a la abertura del tube de gas derrames, comida,
agentes de ]impieza ni otto material. Prot6jala de los derrames
usando siempre la tapa del quemador.
Para limpiar:
IMPORTANTE: Antes de la limpieza, asegerese de que todos los
controles est6n apagados, y que el homo y la superficie de
cocciSn est6n fries. No use limpiadores para homo, blanqueador
ni productos para quitar 5xido.
1. Quite la tapa del quemador de la base del mismo y limpiela
segQn se especifique en la secci6n "Umpieza general".
2. Limpie la abertura del tube de gas con un paso hQmedo.
3. Limpie los orificios del quemador obstruidos con un alfiler
recto, segt]n se muestra. No agrande ni deforme el orificio.
No use un palillo de dientes de madera. Si se debe ajustar el
quemador, pSngase en contacto con un especiafista en
reparaci6n competente de Sears.
4. Vuelva a colocar la tapa del quemador, asegur&ndose de que
las espigas de alineamiento est6n debidamente alineadas
con la tapa del quemador.
1. Incorrecte
2. Correcto
5. Encienda el quemador. Si el quemador no se enciende,
verifique el alineamiento de la tapa. Si el quemador todavia
no se enciende, no trate de reparar el quemador sellado
usted mismo, sine p6ngase en contacto con un especialista
en reparaci6n competente.
2
1.1-1V2pulg. (25-38rnm)
2. Orificies del quemador
Orificios del quemador: Verifique las llamas del quemador
ocasionalmente para fijarse que tengan el tamaSo y la forma
adecuados, come se muestra arriba. Una buena llama es de
color azul, no amarillo. Mantenga esta &rea libre de suciedad y no
deje que entren derrames, comida, agentes de limpieza ni otro
material en los orificios del quemador.
29
El quemador SURESIMMER (Hervor afuego lento seguro) es un
ajuste de calor regulable para obtener un hervor a fuego lento
m&s preciso y una temperatura de cocci6n baja. Esel quemador
posterior derecho.
Cbmo usar:
1. Presione hacia adentro la perilla de control del quemador
posterior derecho y girela hacia la izquierda hacia "LITE";
luego hacia "LO".
2. Cuando haya terminado, oprima y gire la perilla de control del
homo a OFF (apagado).
Cuando est6 haciendo enlatados por largos periodos, alterne y
use las &reas, los elementos o los quemadores exteriores de
cocci6n entre una tanda y otra. Esto le da tiempo a que se
enfrien las &reas que se han usado recientemente.
• Centre el enlatador sobre la parrilla o sobre el &rea o el
elemento m&s grande de la superficie de cocci6n. Los
eniatadores no deber&n extenderse m&s de 1 pulg. (2,5 cm)
pot fuera del Area de cocci6n.
• No coloque el enlatador sobre dos &reas, elementos o
quemadores exteriores de cocci6n al mismo tiempo.
Para obtener m&s informaci6n, p6ngase en contacto con el
departamento de agricultura de su Iocalidad. Tambi6n
pueden ofrecer ayuda las compaSias que fabrican productos
para enlatado casero.
IMPORTANTE: Nunca deje un utensilio de cocina vacio sobre un
&tea de cocci6n, elemento o quemador exterior caliente.
El utensilio de cocina ideal deber& tener un fondo piano, lados
rectos, una tapa que encaje bien y el material debe ser de un
grosor mediano a pesado.
Los acabados &speros pueden rayar la superficie de cocci6n. El
aluminio y el cobre pueden usarse como centro o base en el
utensilio de cocina. Sin embargo, cuando se use como base
puede dejar marcas permanentes en la superficie de cocci6n o
en las parrillas.
El material de los utensilios de cocina es un factor que influye en
la rapidez y la uniformidad como se trasmite el calor, Io que
afecta los resultados de cocci6n. Un acabado no adherente tiene
las mismas caractedsticas que su material de base. Por ejemplo,
un utensilio de cocina de aluminio con un acabado no adherente
tendr& las mismas propiedades que el aluminio.
Utilice la siguiente tabla como guia para ver las caracteristicas de
los materiales de los utensilios de cocina.
UTENSILIO DE CARACTERISTICAS
COCINA
Aluminio • Secalienta de manerar&pida y uniforme.
• Sirve paratodos los tipos de cocci6n.
• Es mejor que seade espesor mediano o
pesado para cumpIir mejor con las
funciones de cocci6n.
Hierro fundido • Se calienta de manera lenta y uniforme.
• ES bueno para dorar y freir,
• Mantiene el ealor para una cocci6n lenta.
Cer&mica o vidrio • Siga las instrucciones del fabricante.
de cer_mica • Calienta de manera lenta pete no
uniforme.
• Da los mejores resultados en los ajustes
de calor bajo a medic.
Cobre • Se calienta de manera r&pida y uniforme.
Barro cocido • Siga las instrucciones del fabricante.
• Use en los ajustes de calor bajo.
Hierro fundido o • Yea acero inoxidable o hierro fundido.
esmalte de
poreelana en
acero
Acero inoxidable • Se calienta de manera r&pida pero no
uniforme.
• Un centro o base de aluminio o cobre
sobre acero inoxidable proporciona un
ealor uniforme.
30
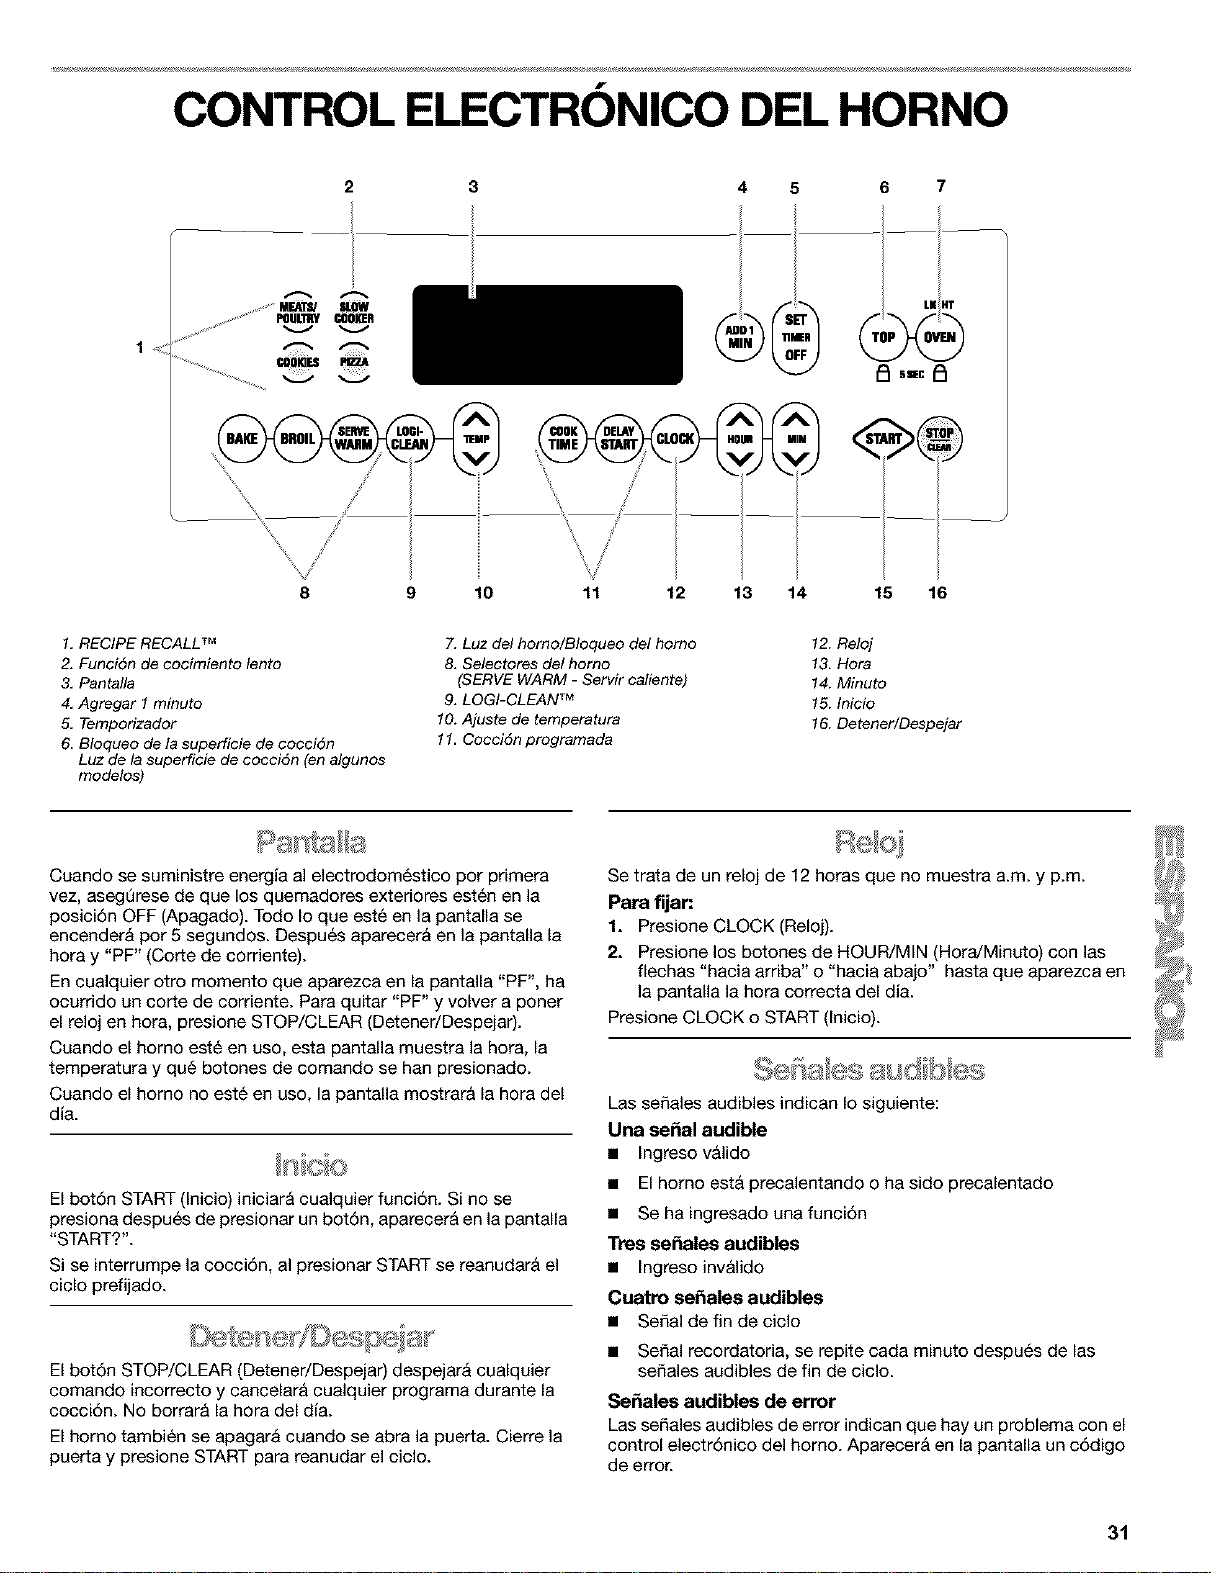
f
CONTROL ELECTRONICO DEL HORNO
2 3
..........u_u mow
S
%
x
\
\ /
5
--!
6 7
LI(HT
9 10 11 12 13 14 15 16
1. RECIPE RECALL TM
2. Funci6n de cocimiento lento
3. Pantalla
4, Agregar 1 minuto
5, Temporizador
6. Bloqueo de la superficie de cocci6n
Luz de la superficie de cocci6n (en algunos
modelos)
7. Luz del horno/Bloqueo del homo
8. Selectores del homo
(SERVE WARM - Servir caliente)
9. LOGI-CLEAN TM
10. Ajuste de temperatura
11. Cocci6n programada
12. Reloj
13. Hora
14. Minuto
15. Inicio
16. Detener/Despejar
Cuando se suministre energia al electrodom_stico por primera
vez, asegerese de que los quemadores exteriores esten en la
posici6n OFF (Apagado). Todo Io que est6 en la pantalla se
encender& per 5 segundos. Despu6s aparecer& en la pantalla la
hora y "PF" (Corte de corriente).
En cualquier otro momento que aparezca en la pantalla "PF", ha
ocurrido un corte de corriente. Para quitar "PF" y volver a poner
el reloj en hora, presione STOP/CLEAR (Detener/Despejar).
Cuando el homo est6 en uso, esta pantalla muestra la hera, la
temperatura y qu6 botones de comando se han presionado.
Cuando el homo no est6 en uso, la pantalla mostrar& la hora del
dia.
El bot6n START (Inicio) iniciar& cualquier funci6n. Si no se
presiona despu6s de presionar un bot6n, aparecer& en la pantalla
"START?".
Si se interrumpe la cocci6n, al presionar START se reanudar& el
ciclo prefijado.
El bot6n STOP/CLEAR (Detener/Despejar) despejar& cualquier
comando incorrecto y cancelar& cualquier programa durante la
cocci6n. No borrar& la hora del dfa.
El horno tambi6n se apagar& cuando se abra la puerta. Cierre la
puerta y presione START para reanudar el ciclo.
Se trata de un reloj de 12 horas que no muestra a.m. y p.m.
Para fijan
1. Presione CLOCK (Reloj).
2. Presione los botones de HOUR/MIN (Hora/Minuto) con las
flechas "hacia arriba" o "hacia abajo" hasta que aparezca en
la pantalla la hora correcta del dia.
Presione CLOCK o START (Inicio).
Las sefiales audibles indican Io siguiente:
Una sepal audible
• ingreso v_lido
• El homo est& precalentando o ha sido precalentado
• Se ha ingresado una funci6n
Tres se_ales audibles
• Ingreso inv_lido
Cuatro se_ales audibles
• Serial de fin de ciclo
• Serial recordatoria, se repite cada minuto despu6s de las
sefiales audibles de fin de ciclo.
Se_ales audibles de error
Las sefiales audibles de error indican que hay un problema con el
control electr6nico del homo. Aparecer& en la pantalla un c6digo
de error.
31
Volumen de la sepal audible
Puede ajustarse el volumen entre alto y bajo.
Para cambiar: Presione y sostenga DELAY START (Retraso de
inicio) por 5 segundos. Se escuchar& una seSal audible corta y
aparecer& en la pantalla "Snd HI" (Sonido alto) o "Snd LO"
(Sonido bajo). Presione y sostenga DELAY START nuevamente
por 5 segundos para cambiar al ajuste deseado.
Para quitar "Snd on", "Snd OFF", "rEP on", "rEP off", "Snd HI" o
"Snd Lo" presione cualquier bot6n y ]uego ]a funci6n que
presion6 aparecer& en la pantalla.
So,ales audibles de alerta
Las seSales audibles de aler_a son cuatro seSales de 1 segundo
que indican que ha pasado el tiempo establecido por un
temporizador o por una funci6n de control temporizado del
homo.
Temporizador
Para encender/apagar las so,ales audibles: Presione y
sostenga SET (Fijar) por 5 segundos. Se repetir_ un tono corto y
aparecer& "rEP OFF" en la pantalla. Repita para volver a
enGender.
Coccibn programada
Para encender/apagar las seSales audibles: Presione y
sostenga COOK TIME (Tiempo de cocci6n). Se repetir& un tono
corto y aparecer& "Snd OFF" en la pantalla. Repita para volver a
encender.
La temperatura est& prefijada en Fahrenheit, pero puede
cambiarse a centigrados.
Para cambiar: Presione y sostenga BROIL (Asar) por 5
segundos. Se escuchar& un tono corto y las temperaturas de la
pantalla cambiar&n a "°C'. Repita el procedimiento para volver a
Fahrenheit.
El temporizador de cocina puede ser fijado en minutos y
segundos u horas y minutos y hace la cuenta regresiva del
tiempo fijado. El temporizador no pone en marcha ni detiene el
homo.
Para fljar.
1. Presione TIMER SET (Ajuste del temporizador).
2. Presione los botones de HOUR/MIN (Hora/Minuto) con las
flechas "hacia arriba" o "hacia abajo" hasta que aparezca en
la pantalla la duraci6n de tiempo correct&
3. Presione TIMER SET (Ajuste del temporizador).
El temporizador bar& la cuenta regresiva despu6s de haber
comenzado. La pantalla har& la cuenta regresiva en horas y
minutos si el tiempo restante es de una hora o re&s, yen
minutos y segundos si el tiempo restante es de menos de
una hora.
Cuando termine el tiempo fijado, se escuchar&n 4 seSales
audibles de un segundo, si hart sido activadas; luego las
seSales audibles de alerta sonar&n cada minuto.
4. Presione TIMER OFF (Temporizador apagado) en cualquier
momento para cancelar el temporizador y/o detener las
seSales audibles de alert&
Puede agregarse tiempo de cocci6n en incrementos de 1 minuto,
hasta 99 minutos presionando el bot6n ADD 1 MIN (Agregar 1
minuto).
Si usted presiona ADD 1 MIN durante un ciclo de cocci6n,
agregar& 1 minuto de tiempo de cocci6n a la intensidad de
cocci6n actual.
de
IMPORTANTE: No use un term6metro para medir la temperatura
del homo, ya que al abrir la puerta del mismo y el elemento o el
quemador cuando est6 en un ciclo puede dar una lectura
incorrect&
El homo proporciona temperaturas acer_adas; sin embargo, es
posible que cocine m&s r&pido o m&s despacio que su homo
anterior, de manera que se puede ajustar el calibrado de la
temperatura. Puede cambiarse a Fahrenheit o a centigrados.
Un signo de menos significa que el homo cocinar& a temperatura
m_s fria con la cantidad regulada. La ausencia de signo significa
que el homo cocinar& a temperatura m&s caliente con la
cantidad regulada. Use como guia la siguiente tabla.
AJUSTE en °F (AJUSTEen °C) COCINA LOSAMMENTOS
10°F(5°C) ...un poco m&s
20°F (10°C) ...moderadamente mAs
30°F (15°C) ...mucho m&s
-10°F (-5°0) ...un poco menos
-20°F (-10°C) ...moderadamente menos
-30°F (-15°C) ...mucho menos
Para ajustar el calibrado de la temperatura del homo:
1. Presione y sostenga BAKE (Hornear) por 5 segundos hasta
que la pantalla del homo muestre el calibrado actual, por
ejemplo "0 ° CAL".
2. Presione el bot6n de TEMP (Temperatura) con las flechas
hacia "arriba" o hacia "abajo', para aumentar o disminuir la
temperatura en cantidades de 10°F (5°C). El ajuste puede
fijarse entre 30°F (15°C) y -30°F (-15°C).
3. Oprima START (Inicio).
El bloqueo del homo evita el uso accidental de los botones de
comando del panel de control. El homo y el caj6n de
calentamiento pueden ser bloqueados solamente cuando el
homo no est_ en uso ni se haya fijado el control del mismo.
El homo permanecer& bloqueado despu6s de un corte de
corriente si ha sido bloqueado antes del corte de corriente.
Para activar/desactivar el bloqueo del homo:
Presione y sostenga OVEN (Homo) por 5 segundos. Se
escuchar& una seSal audible y aparecer&n en la pantalla "Loc on"
y el icono con el candado. Despu_s de 5 segundos, "Loc On"
desaparecer& de la pantalla y aparecer& "Loc'.
Se escuchar&n tres seSales audibles cuando el homo est6
bloqueado y se haya presionado un comando diferente de
CLOCK, TIMER, START, STOP/CLEAR u OVEN.
Para desbloquear el homo, presione y sostenga OVEN pot 5
segundos. Aparecer& en la pantalla "Loc OFF" y el icono con el
candado desaparecer& de la pantalla.
32
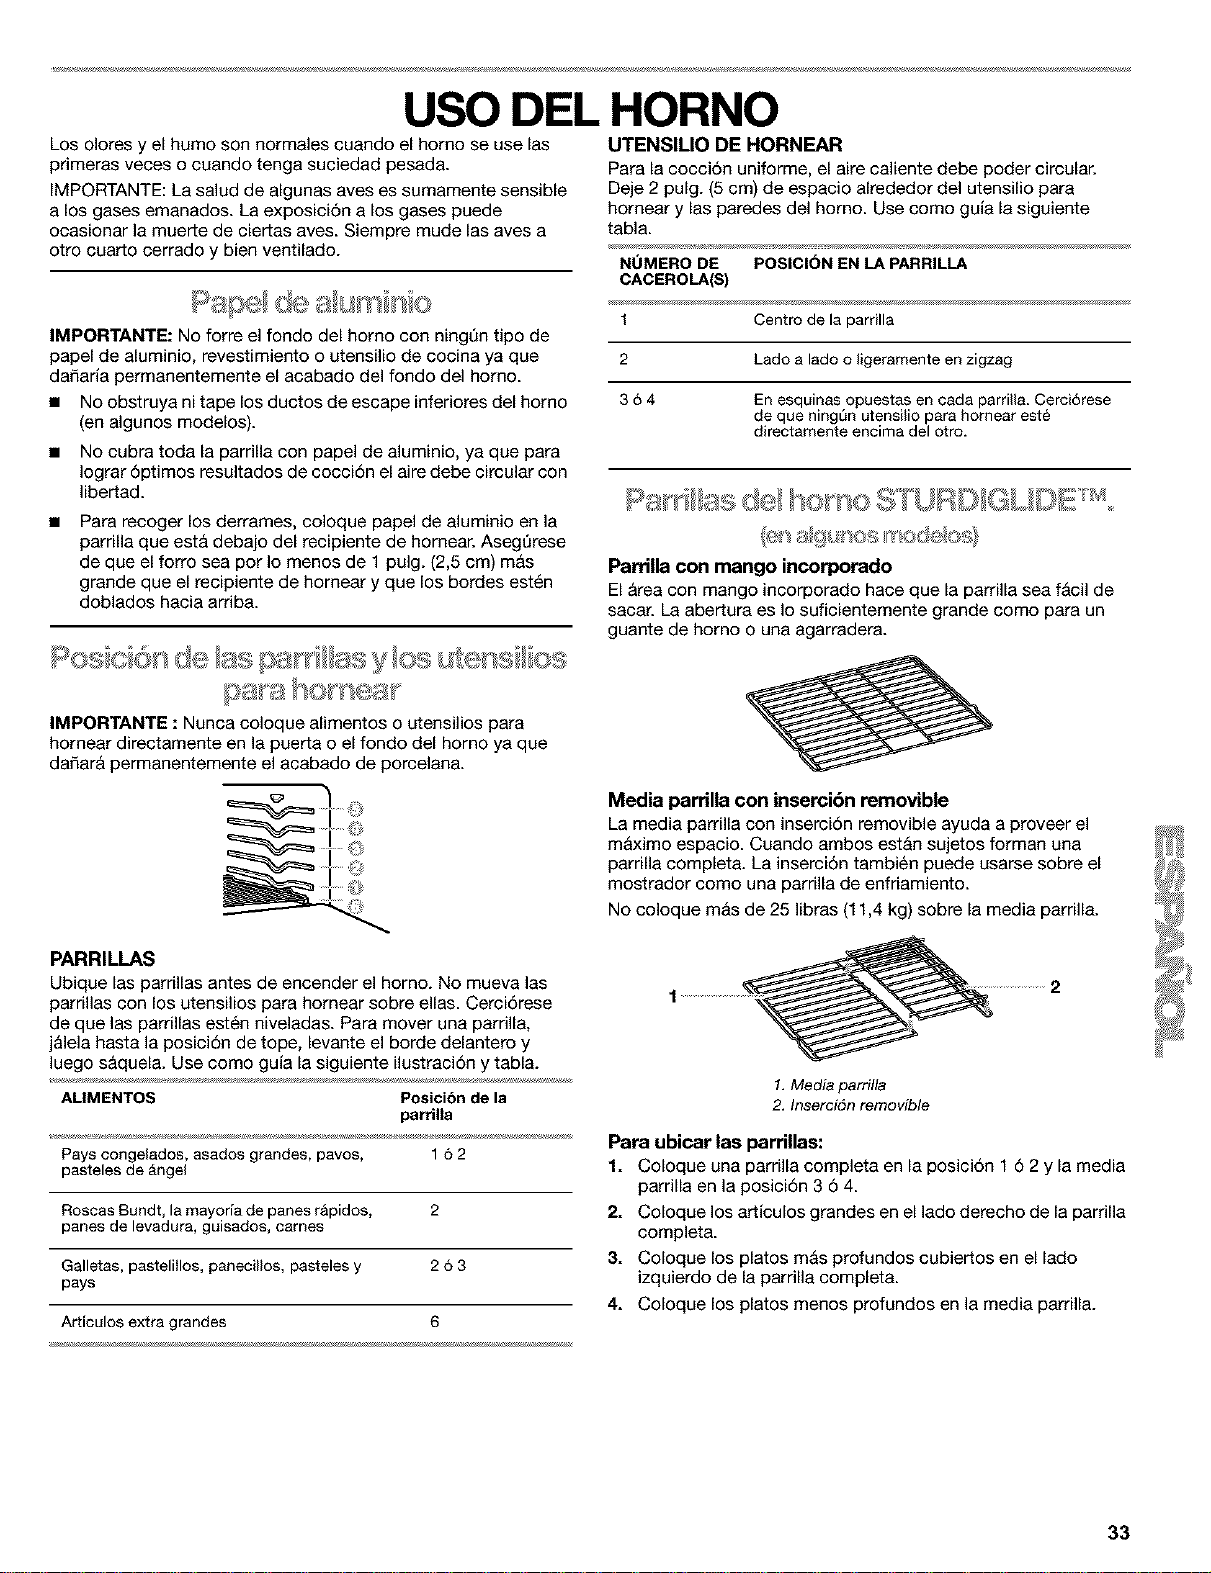
USO DEL HORNO
Los olores y el humo son normales cuando el homo se use las
primeras veces o cuando tenga suciedad pesada.
IMPORTANTE: La salud de algunas aves es sumamente sensible
a los gases emanados. La exposiciSn a los gases puede
ocasionar la muerte de ciertas aves. Siempre mude las aves a
otto cuarto cerrado y bien ventilado.
IMPORTANTE: No forte el fondo del homo con ningt]n tipo de
papel de aluminio, revestimiento o utensilio de cocina ya que
dafiaria permanentemente el acabado del fondo del homo.
• No obstruya nitape los ductos de escape inferiores del homo
(en algunos modelos).
• NO cubra toda la parrilla con papel de aluminio, ya que para
Iograr 6ptimos resultados de coccidn el aire debe circular con
libertad.
Para recoger los derrames, coloque papel de aluminio en la
parrilla que est& debajo del recipiente de hornear. Asegt]rese
de que el forro sea por Io menos de 1 pulg. (2,5 cm) m&s
grande que el recipiente de hornear y que los bordes est_n
doblados hacia arriba.
UTENSILIO DE HORNEAR
Para la cocci6n uniforme, el aire caliente debe poder circular.
Deje 2 pulg. (5 cm) de espacio alrededor del utensilio para
hornear y las paredes del homo. Use como guia la siguiente
tabla.
NUMERO DE POSICION EN LAPARRILLA
CACEROLA(S)
1 Centro de la parrilla
2 Lado alado o ligeramenteen zigzag
3 6 4 En esquinas opuestas en cada parrilla. Cerci6rese
de que ning_n utensilio para hornear este
directamente eneima del otro.
ParriUa con mango incorporado
El Area con mango incorporado hace que la parrilla sea f_cil de
sacar. La abertura es Io suficientemente grande come para un
guante de homo o una agarradera.
IMPORTANTE : Nunca coloque alimentos o utensilios para
hornear directamente en la puerta o el fondo del horno ya que
dafiar& permanentemente el acabado de porcelana.
PARRILLAS
Ubique las parrillas antes de encender el horno. No mueva las
parrillas con los utensilios para homear sobre elias. Cercidrese
de que las parrillas est_n niveladas. Para mover una parrilla,
j&lela hasta la posicidn de tope, levante el borde delantero y
luego s&quela. Use como guia la siguiente ilustracidn y tabla.
AMMENTOS Poeicibn dela
parrilla
Pays congelados, asados grandes, pavos, 16 2
pasteles de Angel
Roscas Bundt, la mayoria de panes rApidos, 2
panes de levadura, guisados, cames
Galletas, pasteliilos, panecillos, pasteles y 2 6 3
pays
Articulos extra grandes 6
Media parrilla con insercibn removible
La media parrilla con insercidn removible ayuda a proveer el
m&ximo espacio. Cuando ambos est&n sujetos forman una
parrilla completa. La insercidn tambi_n puede usarse sobre el
mostrador come una parrilla de enfriamiento.
No coloque m&s de 25 libras (11,4 kg) sobre la media parrilla.
1.Media parrilla
2. Inserci6n removible
Para ubicar las parriUas:
1. Coloque una parrilla completa en la posici6n 16 2 y la media
parrilla en la posicidn 3 6 4.
2. Coloque los ar_iculos grandes en el lado derecho de la parrilla
completa.
3. Coloque los platos m&s profundos cubiertos en el lado
izquierdo de la parrilla completa.
4. Coloque los platos menos profundos en la media parrilla.
33
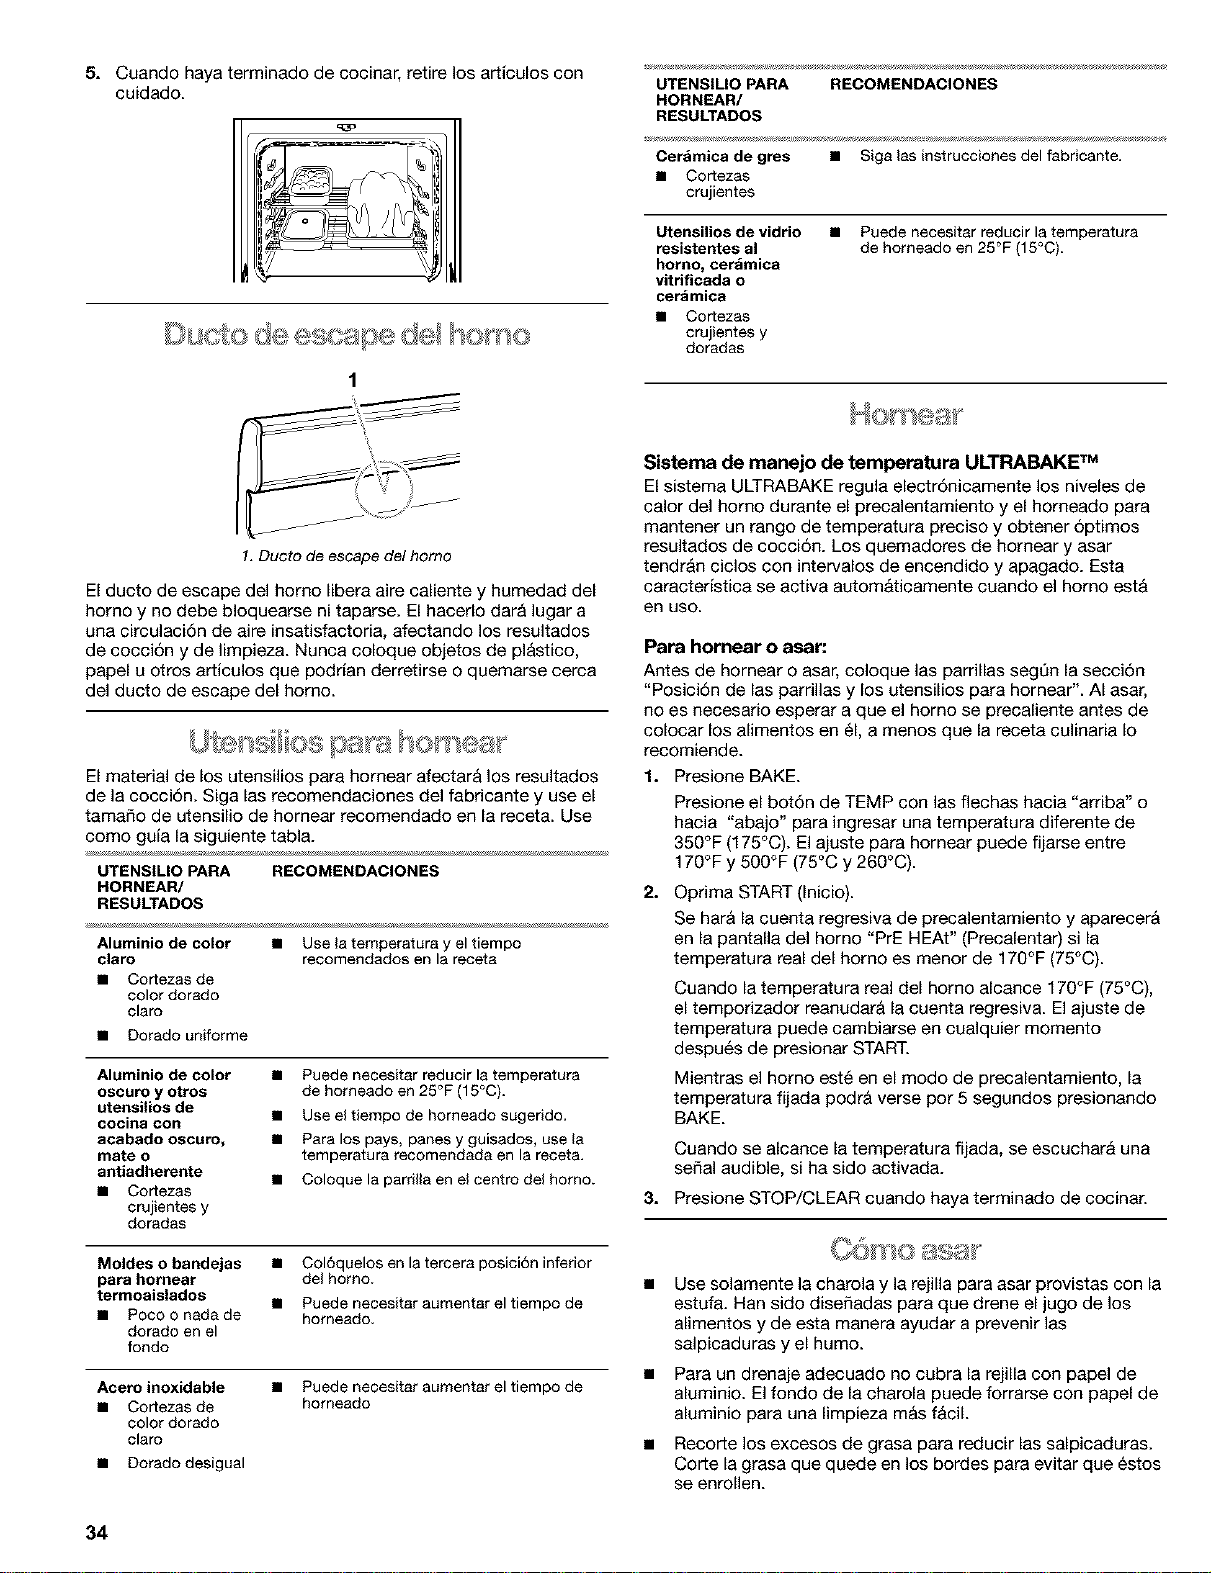
5. Cuando haya terminado de cocinar, retire los articulos con
cuidado.
Du de ape dd e
1
UTENSILIO PARA RECOMENDACIONES
HORNEAR/
RESULTADOS
Cer_mica de gres • Siga las instrucciones del fabricante.
• Cortezas
crujientes
Utensilios de vidrio
resistentes al
homo, cerdmica
vitrificada o
cer_mica
• Cortezas
crujientes y
doradas
• Puede necesitar reducir la temperatura
de homeado en 25°F (15°C).
1. Ducto de escape del homo
El ducto de escape del homo libera aire caliente y humedad del
homo y no debe bloquearse ni taparse. El hacerlo dar& lugar a
una circulaci6n de aire insatisfactoria, afectando los resultados
de cocci6n y de limpieza. Nunca coloque objetos de pl&stico,
papel u otros articulos que podrian derretirse o quemarse cerca
del ducto de escape del homo.
El material de los utensilios para hornear afectar& los resultados
de la cocci6n. Siga las recomendaciones del fabricante y use el
tamale de utensilio de homear recomendado en la receta. Use
como guia la siguiente tabla.
UTENSILIO PARA RECOMENDACIONES
HORNEAR/
RESULTADOS
Aluminio de color • Use la temperatura y eltiempo
claro recomendados en la receta
• Cortezasde
color dorado
claro
• Dorado uniforme
Aluminio de color
oscuro y otros
utensUios de
cocina con
acabado oscuro,
mate o
antiadherente
• Cortezas
crujientes y
doradas
• Puede necesitar reducir la temperatura
de horneado en 25°F (15°C).
• Use eltiempo de horneado sugerido.
• Para los pays, panes y guisados, use la
temperatura recomendada en la receta.
• Coloque la parrilla en el centro del homo.
Moldes o bandejas •
para hornear
termoaislados •
• Pocoo nadade
dorado en el
fondo
Col6quelos en la tercera posici6n inferior
del homo.
Puede necesitar aumentar el tiempo de
homeado,
Acero inoxidable
• Cortezasde
color dorado
claro
• Dorado desigual
• Puede necesitar aumentar el tiempo de
homeado
Sistema de manejo de temperatura ULTRABAKE TM
El sistema ULTRABAKE regula electr6nicamente los niveles de
calor del homo durante el precalentamiento y el horneado para
mantener un range de temperatura precise y obtener 6ptimos
resultados de cocci6n. Los quemadores de hornear y asar
tendr&n ciclos con intervalos de encendido y apagado. Esta
caracteristica se activa autom&ticamente cuando el homo est&
en use.
Para homear o asar:
Antes de hornear o asar, coloque las parrillas segt]n la secci6n
"Posici6n de las parrillas y los utensilios para hornear". AI asar,
no es necesario esperar a que el homo se precaliente antes de
colocar los alimentos en 61,a menos que la receta culinaria Io
recomiende.
1. P_sione BAKE.
Presione el bot6n de TEMP con las flechas hacia "arriba" o
hacia "abajo" para ingresar una temperatura diferente de
350°F (175°C). El ajuste para hornear puede fijarse entre
170°F y 500°F (75°C y 260°C).
2.
Oprima START (Inicio).
Se bar& la cuenta regresiva de precalentamiento y aparecer&
en la pantalla del horno "PrE BEAt" (Precalentar) si la
temperatura real del homo es menor de 170°F (75°C).
Cuando la temperatura real del homo alcance 170°F (75°C),
el temporizador reanudar& la cuenta regresiva. El ajuste de
temperatura puede cambiarse en cualquier memento
despu6s de presionar START.
Mientras el homo est6 en el mode de precalentamiento, la
temperatura fijada podr& verse pot 5 segundos presionando
BAKE.
Cuando se alcance la temperatura fijada, se escuchar& una
sepal audible, si ha sido activada.
3. Presione STOP/CLEAR cuando haya terminado de cocinar.
Use solamente la charola y la rejilla para asar provistas con la
estufa. Han side diseSadas para que drene el jugo de los
alimentos y de esta manera ayudar a prevenir las
salpicaduras y el humo.
Para un drenaje adecuado no cubra la rejilla con papel de
aluminio. El fondo de la charola puede forrarse con papel de
aluminio para una limpieza m&s f&cil.
Recorte los excesos de grasa para reducir las salpicaduras.
Corte la grasa que quede en los bordes para evitar que 6stos
se enrollen.
34
• Jale hacia fuera la pardlla hasta que se detenga antes de dar
vuelta o de sacar los alimentos. Use pinzas para dar vuelta a
los alimentos y evitar que se pierda el jugo de los mismos. Es
posible que no sea necesario dar vuelta los cortes muy
delgados de pescado, aves o came.
• Despu6s de asar, retire la charola del homo cuando saque la
comida. Si se dejan derrames en la charola, 6stos se
cocinar&n y har&n la limpieza m&s dificil.
AI asar, se usa el calor directo radiante para cocinar los
alimentos. Antes de asar, coloque la parrilla de acuerdo al cuadro
para asar. No es necesario precalentar el homo antes de colocar
los alimentos en el mismo, a menos que Io recomiende la receta.
Coloque la comida sobre la parrilla en la charola para asar; luego
col6quela en el centro de la parrilla del homo. Cierre la puerta del
homo.
Para asar:
1. Presione BROIL (Cdmo asar).
2. Opdma START (Inicio)
El ajuste de temperatura puede cambiarse en cualquier
momento antes o despu6s de presionar START.
& Presione STOP/CLEAR cuando haya terminado.
Asado con precisibn
El asado con precisidn permite un control de temperatura m&s
preciso mientras est& cocinando. Cuanto m&s baja sea la
temperatura, m&s lenta set& la cocci6n. Los cortes m&s gruesos
e irregulares de came, pescado y aves pueden cocinarse mejor a
temperaturas para asar m&s bajas.
Para asar con precisibn:
1. Presione BROIL.
2. Presione el bot6n de TEMP con las flechas hacia "abajo"
para bajar la temperatura en cantidades de 5°R El rango para
asar es de 300°F a 500°F (149°C a 260°C).
3. Oprima START (Inicio)
4. Presione STOP/CLEAR cuando haya terminado.
CUADRO PAPA ASAR
Para obtener 6ptimos resultados, coloque la comida a 3 pulg.
(7 cm) o m_s lejos del elemento para asar. Los tiempos son
solamente como guia yes posible que deban ser ajustados
segt]n el gusto individual. Las posiciones recomendadas para la
parrilla est_n numeradas del fondo (1) a la parte superior (5). Para
el diagram& vea la secci6n "Posici6n de las parrillas y los
utensilios para hornear".
ALIMENTOS POSICION TEMP TOTAL
DE LA MINUTOS
PARRILLA Lado 1 Lado 2
Bistec
1pulg. (2,5cm)
de grosor
medio crudo 4 HI 14-15 7-8
4 HI 15-16 8-9
mediano 4 HI 18-19 9-10
bien cocido
Hamburgues
de came
molida*
_Apulg. (2 cm)
de grosor
Bien cocida
4 HI 13-14 6-7
Chuletas de
cerdo
1 pulg. (2,5 cm)
de grosor
4 HI 18-21 8-10
ALIMENTOS POSICION TEMP TOTAL
DE LA MINUTOS
PARRILLA Lado 1 Lado 2
Trozodejambn
[precocido] 4 HI 8-10 4-5
1/2pulg.(1,25
cm)degroso_
Tocino 4 500°F 8-9 1-2
(260°C)
Salchichas 4 HI 6-7 3-4
alemanas
Chuletas de
cordero 4 HI 15-17 8-9
1pulg. (2, cm)
de grosor
Polio
Piezascon 3 HI 20-24 15-18
hueso 4 HI 12-16 11-16
Sinhueso
Pescado
1/2in. (1,25 cm) 4 HI 8-10 4-5
de grosor
1pulg. (2,5 cm) 4 500°F 13-15 10-18
de grosor (260°C)
*Coloque basra 9hamburguesas, con del mismoespacio, sobre el
la rejillade la charola+
La funci6n para recordar la receta RECIPE RECALL con la
funci6n de cocimiento lento hace que la cocci6n de los
alimentos preferidos sea m&s r&pida y m&s f_cil. La temperatura _i
y el tiempo han sido elegidas para cubrir una variedad de _7
opciones en cada categorfa de alimentos. Los tiempos de _'_f<JJ#
cocci6n y las temperaturas son ajustables para las recetas _YJ/_;_
individuales y se pueden guardar. Cuando se cambian, la pantalla _&
no mostrar& "PrEHEAt" mientras se est6 precalentando el homo. ]._//J
Si la receta recomienda que no es necesario el precalentamiento,
coloque la comida en el homo. _
Use el cuadro siguiente como guia cuando use RECIPE RECALL: 7_
Botbn Temperatura Temperatura
fijada prefijada
MEATS/POULTRY* 325°F (165°C) 1hora
(CARNES/AVES)
3 lb. (1,4 kg)
SLOW COOKER Alta El temporizador
(COCIMIENTO LENTO) Baja cuenta+ Sigue el
tiempo
transcurrido.
COOKIES (GALLETAS) 375°F (191°C) 10 minutos
PIZZA 400°F (204°C) 20 minutos
* Las funciones MEATS/POULTRY no tienen un precalentamiento
programado. Si la receta sugiere precalentar antes de cocer
carnes, ayes o guisados, precaliente usando la funci6n BAKE.
Una vez que se haya alcanzado la temperatura de
precalentamiento, cancele BAKE y seleccione la funci6n
MEATS/POULTRY.
35
Cbmo usar RECIPE RECALL:
1. Presione uno de los tres botones MEATS POULTRY,
COOKIES o PIZZA.
2. Optima START (Inicio).
Puede cambiar el tiempo de coccidn despu6s de presionar
START, presionando los botones de HQUR/MIN. El homo
terminar& de cocinar con el nuevo tiempo.
Cuando termine la cocci6n, el homo se apagar&
autom&ticamente. Aparecer&n en la pantalla "End" y COOK
TIME. Se escuchar&n cuatro sefiales audibles, y luego
sefiales audibles de alerta cada minuto.
Los botones de COOKIES y PIZZA incluyen
precalentamiento. Cuando termine el precalentamiento, se
escuchar& una serial audible y aparecer& en la pantalla la
cuenta regresiva del tiempo de cocci6n.
3. Presione STOP/CLEAR o abra la puerta del horno para
detener las sefiales audibles de alerta y quitar "End" de la
pantalla. Aparecer& en la pantalla la hora del dia.
Para cambiar el tiempo y la temperatura prefijados de
coccibn:
Pueden cambiarse la temperatura y el tiempo de cocci6n para
cada uno de los 3 botones; la estufa almacenar& la nueva
informaci6n para uso futuro.
1. Presione uno de los tres botones MEATS POULTRY,
COOKIES o PIZZA.
2. Presione los botones HOUR/MIN con las flechas hacia
"arriba" o hacia "abajo" hasta que aparezca en la pantalla la
duraci6n del tiempo de cocci6n.
3. Presione los botones HOUR/MIN con las flechas hacia
"arriba" o hacia "abajo" hasta que aparezca en la pantalla la
temperatura de cocci6n deseada.
4. Presione el mismo bot6n seleccionado en el paso 1 para
guardar el cambio para el pr6ximo uso.
Se escuchar& una sola serial audible.
5. Presione STOP/CLEAR si est& cambiando solamente el
tiempo de cocci6n preestablecido. Presione START si va a
cocinar con el tiempo de coccidn reci6n establecido.
Funci6n de cocimiento lento
La funci6n de SLOW COOKER (cocimiento lento) cocina
lentamente los alimentos a temperatura baja, de manera similar a
como funciona una olla con vasija. Hay dos ajustes, High (Alto) y
Low (Bajo). El tiempo mAximo en que puede fijarse la funci6n de
SLOW COOKER es de 12 horas, a menos que haya sido activado
Sabbath Mode (Modo de descanso). El tiempo se cuenta cuando
comience la funci6n.
La funci6n SLOW COOKER es ideal para asar came de res, de
cerdo y ayes. El exterior de la came y del cerdo se pondr&n muy
oscuros, pero no se quemar&n. Esto es normal. At]n as[, el
interior permanecer& jugoso y blando. La came de polio tambi6n
quedar& oscura, especialmente en las &reas que no est6n
cubiertas con la piel, y quedar& m&s crujiente que si se asa de la
manera convencional.
• Descongele todos los alimentos congelados antes de usar la
SLOW COOKER.
• No es necesario precalentar el homo.
• Cueza en una sola parrilla, usando las posiciones 2 6 3. Vea
la secci6n "Posici6n de las parrillas y los utensilios para
hornea¢'.
No abra la puerta del horno a menudo ni la deje abierta
cuando se est6 fijando en los alimentos. Si hay una p_rdida
de calor, tal vez necesite necesite extender el tiempo de
coccidn.
Cubra los alimentos para mantenerlos ht]medos o usen una
cubierta suelta o con orificios de ventilaci6n para permitir que
los alimentos se doren y queden crujientes.
Los asados pueden dejarse sin cubrir, para que se puedan
dorar. At]n as[, el tiempo de cocci6n podr& variar
dependiendo del peso, la cantidad de grasa y huesos y la
forma del asado.
Use un term6metro de came para verificar la temperatura de
los alimentos.
No es necesario revolver, dar vuelta ni volver a arreglar los
alimentos.
El modo de descanso (Sabbath Mode) fija el homo para que
est6 encendido en un ajuste de horneado hasta que se Io
apague. Puede tambi6n fijarse el modo de descanso para
mantener el homo encendido solamente por una parte del
descanso.
Cuando se haya fijado el modo de descanso, los botones de
inicio y los de BAKE, BROIL, CLEAN, COOK TIME, DELAY
START, CLOCK, HOUR UP, MINUTE UP, TIMER SET se
usar&n para ajustar las temperaturas del homo. No se
escuchar&n sefiales audibles, ni se mostrar&n en la pantalla
mensajes ni cambios de temperatura. Los iconos de las
fuentes de calor aparecer_n encendidos en la pantalla del
homo a Io largo del modo de descanso.
Cuando se abra o se cierre la puerta del homo, la luz del
homo se encender& o se apagar& y los elementos de
calentamiento no se encender&n ni se apagar&n
inmediatamente.
Si ocurre un corte de corriente cuando est6 fijo el modo de
descanso, el homo volver& al modo OFF (Apagado) y se
apagar&. El homo permanecer& en el modo de descanso
hasta que 6ste se desactive.
Para acUvar:
Antes de fijar el mode de descanso de manera regular, el homo
deber& primero ser activado una vez.
1. Abra la puerta del homo.
2. Presione STOP/CLEAR.
3. Presione el bot6n HOUR con las flechas hacia "arriba" y
hacia "abajo" y sostenga pot 5 segundos. Aparecer& en la
pantalla "SAb On" (Modo de descanso activado).
4. Optima START (Inicio).
5. Cierre la puerta del homo. Desaparecer& de la pantalla "SAb
On _"
Para desacUvar.
Para desactivar el homo de la funci6n de modo de descanso,
repita los pasos de arriba. Aparecer& en la pantalla "SAb OFF"
(Modo de descanso apagado). Una vez que se haya desactivado
el mode de descanso, no podr& volver a reestablecerse hasta
que vuelva a activarse.
36
Cbmo fijar el rango para el modo de descanso (para todos
los otros usos):
Para fijar el range que cumpla con los requisites de "no trabajar"
para el mode de descanso, active primero el mode de descanso
segt]n los pasos de la secci6n "Para activar'; luego proceda
segt]n los pasos siguientes.
1. Presione BAKE.
2. Presione el bot6n TEMP con las flechas hacia "arriba" y hacia
"abajo" para ingresar una temperatura diferente de 350°F
(177°C). El rango de homear puede fijarse entre 170°F y
500°F (77°C y 260°C).
& Presione DELAY START para fijar un inicio de horneado
diferido (opcional).
4. Presione y sostenga SET TIMER OFF (Apagar el
tempotizador) pot 5 segundos. Aparecer_n en la pantalla
"SAb" y "START?", indicando que est_ listo el modo de
descanso.
5. Optima START (inicio)
6. Para terminar el mode de descanso, presione STOP/CLEAR.
Peligro de Intoxicacibn Alimentaria
No deje sus alimentos en el horno per m6s de
una hora antes o despa_s de su coccibn.
No seguir esta instruccibn puede ocasionar
intoxicacibn alimentaria o enfermedad.
IMPORTANTE : Los alimentos deber&n estar a la temperatura de
servir antes de colocarlos en el homo caliente. Puede dejar los
alimentos per hasta una hera.
La funci6n de servir caliente permite que los alimentos cocidos
calientes permanezcan calientes antes de servitios. Tambi_n
puede usarse al final de la coccidn programada.
Cambio de temperatura
Puede cambiar la temperatura del homo cuando el homo est6 en
el mode de descanso. No se escuchar&n las seSales audibles ni
cambiar& la pantalla. Los elementos de calentamiento no se
encender&n ni se apagar&n en ningt]n momento entre 16 y 30
segundos. Puede tomar hasta media hera para que el homo
cambie de temperatura.
Los botones siguientes representan las temperaturas. Use come
guia la siguiente tabla.
BOT()N TEMPERATURA DEL HORNO
4.
BAKE (Hornear) 170°F(77°C)
BROIL (Asar) 200°F (93°C)
CLEAN (Limpiar) 250°F (121°C)
COOKTIME (Tiempo 275°F (135°C)
de cocci6n)
DELAY START (Inicio 300°F (149°C)
diferido)
CLOCK (Reloj) 325°F (163°O)
HOUR (Hora) "hacia 350°F (177°C)
arriba"
MIN (Minuto) "hacia 375°F (191°C)
arriba"
TIMER SET (Fijar 400°F (204°0)
temporizador)
OVEN(Homo) 450°F (232°0)
Para cambiar la temperatura:
1. Presione el bot6n del cuadro per 1 segundo.
2. Optima START (Inicio).
Cbmo usar
1. Presione SERVE WARM (Servir caliente).
2. Fije la temperatura (opcional).
Presione el bot6n TEMP con las flechas hacia "arriba" y hacia
"abajo" para subir o bajar la temperatura en cantidades de
5°F (5°C), para fijar la temperatura a una cantidad distinta
de 150°F (65°C). El rango de calor es de 100°F-200°F
(35°C-93°C).
Optima START (Inicio).
Presione STOP/CLEAR cuando haya terminado.
Para agl_gar al final del tiempo de coccibn establecido:
1. PresioneBAKE.
2. Fije la temperatura (opcional).
Presione el botdn TEMP con las flechas hacia "arriba" y hacia
"abajo" para fijar una temperatura diferente de 350°F (177°C).
3. Presione COOKTIME
4. Presione los botones HOUR/MIN con ias flechas hacia
"arriba" y hacia "abajo" para fijar el tiempo de cocci6n.
5. Presione SERVE WARM.
Se fijar& autom&ticamente una hera de temperatura caliente.
6.
Fije la temperatura caliente (opcional).
Presione el bot6n TEMP con las flechas hacia "arriba" y hacia
"abajo" para subir o bajar la temperatura en cantidades de
5°F (5°C) para fijar una temperatura diferente de 150°F
(65°C). El rango de calor es de 100°F-200°F (35°C-93°C).
7.
Optima START (Inicio).
La pantalla mostrar_ la cuenta regresiva del tiempo de
cocci6n. Cuando termine el tiempo de cocciOn, la pantalla
mostrar_ el tiempo de calentamiento.
Cuando termine el tiempo de calentamiento, el homo se
apagar& autom&ticamente y aparecer&n en la pantalla "End"
y COOK TIME. Se escuchar_n cuatro seSales audibles, y
luego se_ales audibles de alerta cada minute.
8. Presione STOP/CLEAR o abra la puerta del horno para
detener las seSales audibles de alerta y sacar "End" de la
pantalla. Volver& a la pantalla la hora del dia..
37
Paraagl_cjartiempodecoccibnalfinaldeliniciodiferido/
tiempodecoccibn:
1. PresioneBAKE.
2. Fije la temperatura (opcional).
Presione el bot6n TEMP con las flechas hacia "arriba" y hacia
"abajo" para fijar una temperatura diferente de 350°F (177°C).
3. Presione COOK TIME.
Presione los botones HOUR/MIN con las flechas hacia
"arriba" y hacia "abajo" para fijar el tiempo de cocci6n.
4. Presione DELAY START.
Presione el botdn HOUR/MIN con las flechas hacia "artiba" y
hacia "abajo" para fijar la hora del dia para comenzar la
coccidn.
5. Presione SERVE WARM.
Se fijar& autom&ticamente una hora de temperatura caliente.
6. Fije la temperatura caliente (opcional).
Presione el botdn TEMP con las flechas hacia "arriba" y hacia
"abajo" para subir o bajar la temperatura en cantidades de
5°F (5°C) para fijar una temperatura diferente de 150°F
(65°C). El rango de calor es de 100°F-200°F (35°C-93°C).
7. Optima START (Inicio).
Cuando haya alcanzado la hera de inicio, la pantalla mostrar&
la cuenta regresiva del tiempo de coccidn. Cuando termine el
tiempo de cocci6n, la pantalla mostrar_ el tiempo de
calentamiento.
Cuando termine el tiempo de calentamiento, el homo se
apagar_ autom_ticamente y aparecer_n en la pantalla "End"
y COOK TIME. Se escuchar_n cuatro se_ales audibles, y
luego se_ales audibles de alerta cada minute.
8. Presione STOP/CLEAR o abra la puerta del homo para
detener las seSales audibles de alerta y sacar "End" de la
pantalla. Volver& a la pantalla la hora del dia.
Peligro de Intoxicacibn Alimentaria
No deje sus alimentos en el homo por m&s de
una hora antes o despa_s de su coccibn.
No seguir esta instruccibn puede ocasionar
intoxicacibn alimentaria o enfermedad.
El control temporizado del horno permite fijar el homo para que
se encienda a determinada hora del dia, cocine pot un periodo
fijo de tiempo y/o se apague autom_ticamente. El inicio diferido
no deber_ usarse para los alimentos tales come panes y
pasteles, ya que tal vez no se horneen como es debido.
Para fijar un tiempo de coccibn:
Antes de fijado, asegQrese de que el reloj est6 a la hora correcta
del dia. Vea la seccidn "Reloj".
1. Presione BAKE.
Presione el botdn TEMP con las flechas hacia "arriba" y hacia
"abajo" para fijar una temperatura diferente de 350°F (175°C).
2. Presione COOK TIME.
3.
4.
Presione el botdn HOUR/MIN con las flechas hacia "artiba" y
hacia "abajo" para fijar la duraci6n del tiempo de coccidn.
Optima START (Inicio).
El tiempo de coccidn aparecer& en la pantalla del homo. Esta
bar& la cuenta regresiva del tiempo de horneado/asado en
horas y minutos (si el tiempo de cocci6n de m&s de una hora)
o en minutos y segundos (si el tiempo de cocci6n es de
menos de una hora).
Puede cambiar los ajustes de tiempo en cualquier momento
despu6s de presionar START repitiendo el paso 3.
Cuando haya terminado la cuenta regresiva, el homo se
apagar& autom&ticamente y aparecer&n en la pantalla "End"
y COOK TIME. Se escuchar&n cuatro seSales audibles, y
luego seSales audibles de alerta cada minute.
5. Presione STOP/CLEAR o abra la puerta del homo para
detener las seSales audibles de alerta y sacar "End" de la
pantalla. Volver& a la pantalla la hora del dia.
Para fijar un tiempo de cocci6n y un tiempo de parada
[Inicio diferido]:
1. PresioneBAKE.
Presione el botdn TEMP con las flechas hacia "arriba" y hacia
"abajo" para fijar una temperatura diferente de 350°F (175°C).
2. Presione COOK TIME.
3. Presione el bot6n HOUR/MIN con las flechas hacia "artiba" y
hacia "abajo" para fijar la duraci6n del tiempo de cocci6n.
4. Presione DELAY START.
5. Presione el bot6n HOUR/MIN con las flechas hacia "artiba" y
hacia "abajo" para fijar la hora de comienzo del tiempo de
cocci6n.
38
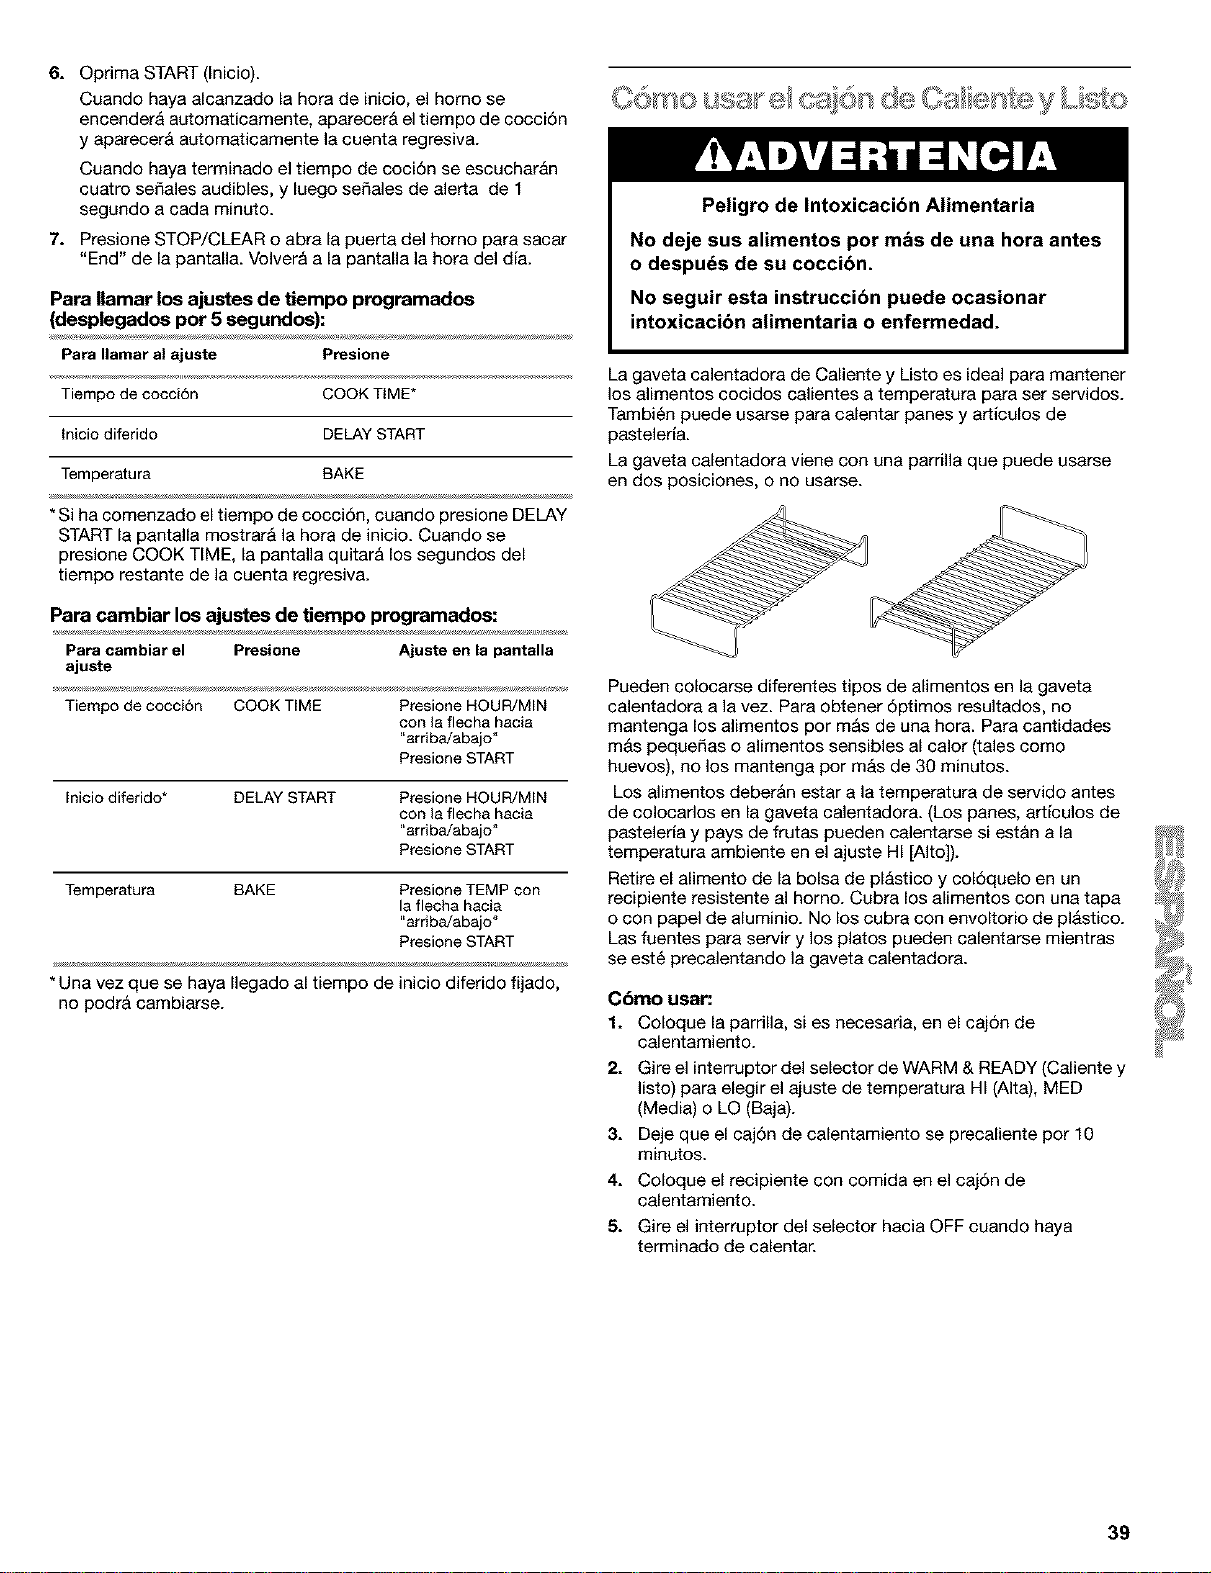
6. Optima START (Inicio).
Cuando haya alcanzado la hora de inicio, el homo se
encender& automaticamente, aparecer& el tiempo de coccidn
y aparecer& automaticamente la cuenta regresiva.
Cuando haya terminado el tiempo de cocidn se escuchar_n
cuatro sefiales audibles, y luego sefiales de alerta de 1
segundo a cada minuto.
7. Presione STOP/CLEAR o abra la puerta del horno para sacar
"End" de la pantalla. Volver& a la pantalla la hora del dia.
Para Ilamar los ajustes de tiempo programados
(desplegados pot 5 segundos):
Para Ilamar al ajuste Presione
Tiempo de cocci6n COOKTIME*
Inicio diferido DELAY START
Temperatura BAKE
* Si ha comenzado el tiempo de cocci6n, cuando presione DELAY
START la pantalla mostrar& la hora de inicio. Cuando se
presione COOK TIME, la pantalla quitar& los segundos del
tiempo restante de la cuenta regresiva.
Para cambiar los ajustes de tiempo programados:
Para cambiar el Presione Ajusteen la pantalla
ajuste
Tiempo de cocci6n COOK TIME Presione HOUR/MIN
con la flecha hacia
"arriba!abajo"
Presione START
Inicio diferido* DELAY START Presione HOUR/MIN
con la flecha hacia
"arriba!abajo"
Presione START
Temperatura BAKE Presione TEMP con
la flecha hacia
"arriba!abajo"
Presione START
* Una vez que se haya Ilegado al tiempo de inicio diferido fijado,
no podr& cambiarse.
Peligro de Intoxicacibn Alimentaria
No deje sus alimentos por mbs de una hora antes
o despuds de su coccibn.
No seguir esta instruccibn puede ocasionar
intoxicacibn alimentaria o enfermedad.
La gaveta calentadora de Caliente y Listo es ideal para mantener
los alimentos cocidos calientes a temperatura para set servidos.
Tambi6n puede usarse para calentar panes y artieulos de
pasteleda.
La gaveta calentadora viene con una partilla que puede usarse
en dos posiciones, o no usarse.
Pueden colocarse diferentes tipos de alimentos en la gaveta
calentadora a la vez. Para obtener 6ptimos resultados, no
mantenga los alimentos por m&s de una hora. Para cantidades
m_s pequefias o alimentos sensibles al calor (tales como
huevos), no los mantenga por mAs de 30 minutos.
Los alimentos deber&n estar a la temperatura de servido antes
de colocarlos en la gaveta calentadora. (Los panes, articulos de
pasteleria y pays de frutas pueden calentarse si est&n a la
temperatura ambiente en el ajuste HI [Alto]).
Retire el alimento de la bolsa de plAstico y col6quelo en un
recipiente resistente al horno. Cubra los alimentos con una tapa
o con papel de aluminio. No los cubra con envoltorio de pl_stico.
Las fuentes para servir y los platos pueden calentarse mientras
se est6 precalentando la gaveta calentadora.
Cbmo usar:
1. Coloque la parrilla, si es necesatia, en el caj6n de
calentamiento.
2. Gire el interruptor del selector de WARM & READY (Caliente y
listo) para elegir el ajuste de temperatura HI (AIta), MED
(Media) o LO (Baja).
3. Deje que el caj6n de calentamiento se precaliente por 10
minutos.
4. Coloque el recipiente con comida en el caj6n de
calentamiento.
5. Gire el interruptor del selector hacia OFF cuando haya
terminado de calentar.
39
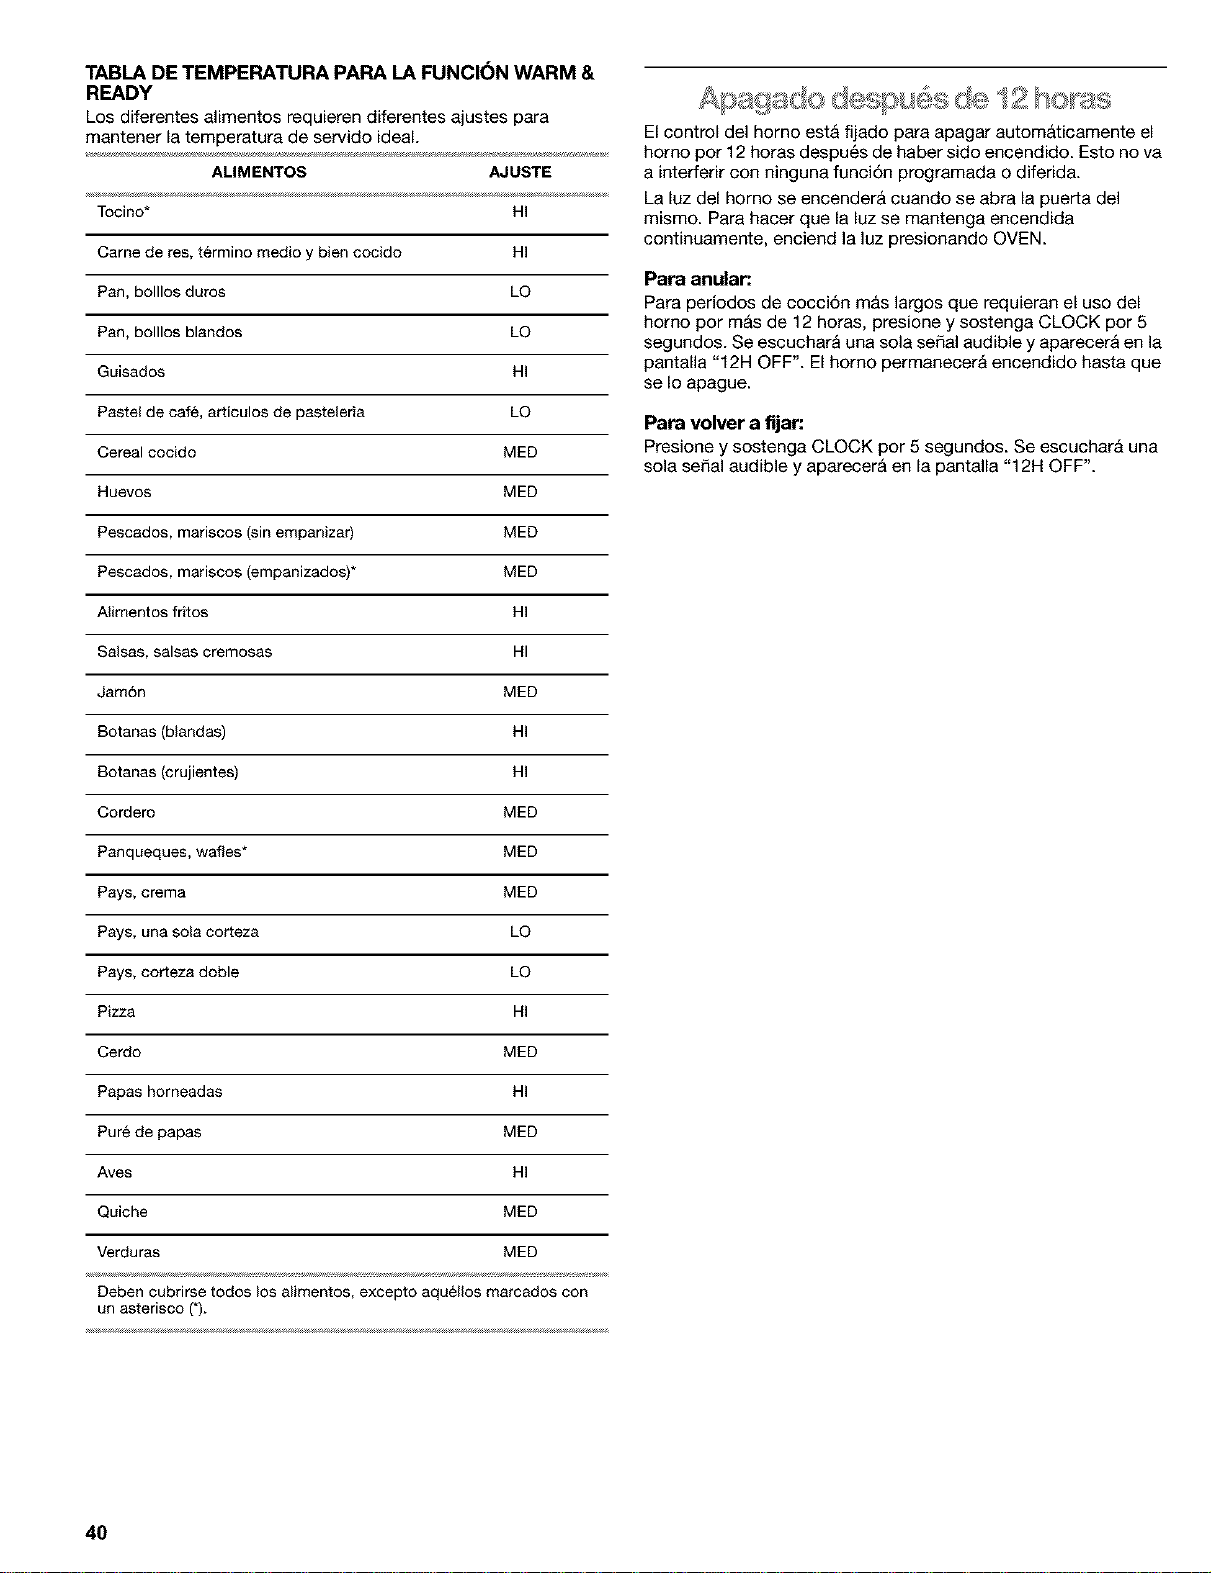
TABLA DE TEMPERATURA PARA LA FUNCI6N WARM &
READY
Los diferentes alimentos requieren diferentes ajustes para
mantener la temperatura de servido ideal.
ALIMENTOS AJUSTE
Tocino* HI
Came de res, t_rmino medio y bien cocido HI
Pan, bolllos duros LQ
Pan, bolllos blandos LQ
Guisados HI
Pastel de cafe, articulos de pasteleria LO
Cereal cocido MED
Huevos MED
Pescados, mariscos (sin empanizar) MED
Pescados, mariscos (empanizados)* MED
Alimentos fritos HI
Salsas, salsas eremosas HI
Jam6n MED
Botanas (blandas) HI
Botanas (crujientes) HI
Cordero MED
Panqueques, wafles* MED
Pays, crema MED
Pays, una sola corteza LO
Pays, corteza doble LQ
Pizza HI
Cerdo MED
Papas horneadas HI
Pure de papas MED
Ayes HI
Quiche MED
Verduras MED
Deben cubrirse todos los alimentos, excepto aquellos marcados con
un asterisco (*).
El control del homo estA fijado para apagar autom&ticamente el
homo pot 12 horas despu6s de haber sido encendido. Esto no va
a interferir con ninguna funci6n programada o diferida.
La luz del homo se encender& cuando se abra la puerta del
mismo. Para hacer que la luz se mantenga encendida
continuamente, enciend la luz presionando OVEN.
Para anular:
Para periodos de cocci6n m&s largos que requieran el uso del
homo por m&s de 12 horas, presione y sostenga CLOCK por 5
segundos. Se escucharA una sola sepal audible y aparecerA en la
pantalla "12H OFF". El homo permanecer_ encendido hasta que
se Io apague.
Para volver a fijar:
Presione y sostenga CLOCK por 5 segundos. Se escuchar& una
sola seSal audible y aparecer& en la pantalla "12H OFF".
4O
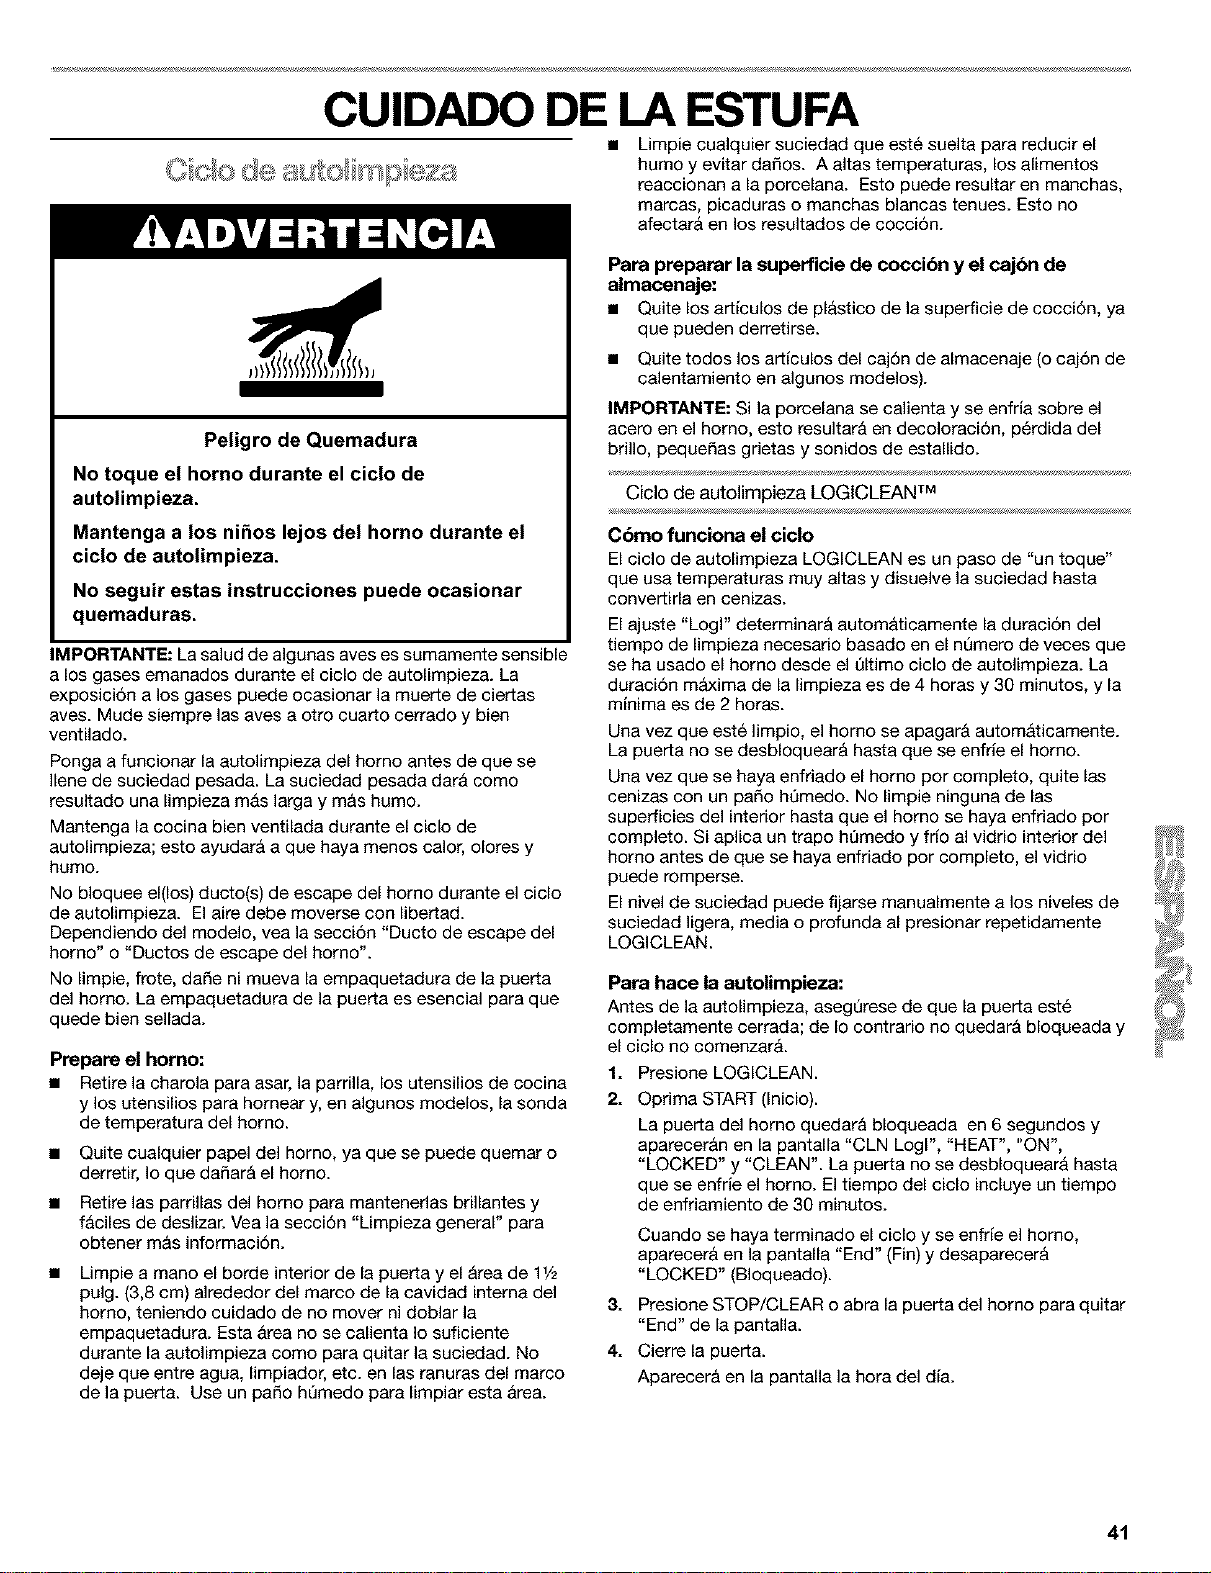
CUIDADO DE LA ESTUFA
Peligro de Quemadura
No toque el horno durante el ciclo de
autolimpieza.
Mantenga a los nihos lejos del homo durante el
ciclo de autolimpieza.
No seguir estas instrucciones puede ocasionar
quemaduras.
IMPORTANTE: La salud de algunas ayes es sumamente sensible
a los gases emanados durante el ciclo de autoUmpieza. La
exposici6n a los gases puede ocasionar la muerte de ciertas
aves. Mude siempre las aves a otro cuar_o cerrado y bien
ventUado.
Ponga a funcionar la autolimpieza del homo antes de que se
Ilene de suciedad pesada. La suciedad pesada dar& como
resultado una limpieza m&s larga y m&s humo.
Mantenga (a cocina bien ventilada durante el cic(o de
autoUmpieza; esto ayudar& a que haya menos calor, olores y
humo.
No bloquee el(los) ducto(s) de escape del homo durante el ciclo
de autolimpieza. El aire debe moverse con libertad.
Dependiendo del modelo, yea la secci6n "Ducto de escape del
horno" o "Ductos de escape del horno'.
No limpie, frote, dafie ni mueva la empaquetadura de la puer_a
del horno. La empaquetadura de la puer_a es esencial para que
quede bien seUada.
Prepare el homo:
• Retire la charola para asar, la parrilla, los utensilios de cocina
y los utensilios para homear y, en algunos modelos, la sonda
de temperatura del homo.
• Quite cualquier papel del homo, ya que se puede quemar o
derretir, Io que dafiar& el homo.
• Retire las parrillas del homo para mantenetias brillantes y
f&ciles de deslizar. Vea la secci6n "Limpieza general" para
obtener m_s informaci6n.
Limpie a mano el borde interior de la puerta y el &rea de 11/2
pulg. (3,8 cm) alrededor del marco de la cavidad intema del
homo, teniendo cuidado de no mover ni doblar la
empaquetadura. Esta &tea no se calienta Io suficiente
durante la autolimpieza como para quitar la suciedad. No
deje que entre agua, limpiador, etc. en las ranuras del marco
de la puerta. Use un patio hQmedo para limpiar esta &rea.
• Limpie cualquier suciedad que est6 suelta para reducir el
humo y evitar dafios. A altas temperaturas, los alimentos
reaccionan a la porcelana. Esto puede resultar en manchas,
marcas, picaduras o manchas blancas tenues. Esto no
afectar& en los resultados de cocci6n.
Pare preparer la superficie de cocci6n y el cajbn de
almacenaje:
• Quite los arficulos de pl&stico de la superficie de cocci6n, ya
que pueden derretirse.
• Quite todos los arficulos del caj6n de almacenaje (o caj6n de
calentamiento en algunos modelos).
IMPORTANTE: Si la porcelana se calienta y se enfria sobre el
acero en el homo, esto resultar_ en decoloraci6n, p6rdida del
brillo, pequefias grietas y sonidos de estallido.
Ciclo de autolirnpieza LOGICLEAN TM
Cbmo funciona el ciclo
El ciclo de autolimpieza LOGICLEAN es un paso de "un toque"
que usa temperaturas muy altas y disuelve la suciedad hasta
converfirla en cenizas.
El ajuste "Logl" determinar& autom&ticamente la duraci6n del
tiempo de limpieza necesario basado en el nQmero de veces que
se ha usado el homo desde el t]ltimo ciclo de autolimpieza. La
duraci6n m_lxima de la limpieza es de 4 horas y 30 minutos, y la
minima es de 2 horas.
Una vez que est6 limpio, el homo se apagar& autom&ticamente.
La puerfa no se desbloquear& hasta que se enfrie el homo.
Una vez que se haya enfriado el homo por completo, quite las
cenizas con un patio ht]medo. No limpie ninguna de las
superficies del interior hasta que el homo se haya enfriado por
completo. Si aplica un trapo ht]medo y frio al vidrio interior del
homo antes de que se haya enfriado por completo, el vidtio
puede romperse.
El nivel de suciedad puede fijarse manualmente a los niveles de
suciedad ligera, media o profunda al presionar repetidamente
LOGICLEAN.
Pare hace la autolimpieza:
Antes de la autolimpieza, asegQrese de que la puerfa est6
completamente cerrada; de Io contratio no quedar& bloqueada y
el ciclo no comenzar&.
1. Presione LOGICLEAN.
21
Optima START (Inicio).
La puerfa del homo quedar& bloqueada en 6 segundos y
aparecer_n en la pantalla "CLN Logl", "HEAT", "ON",
"LOCKED" y "CLEAN". La puerta no se desbloquear& hasta
que se enfrie el homo. El tiempo del ciclo incluye un tiempo
de enfriamiento de 30 minutos.
Cuando se haya terminado el ciclo y se enfde el homo,
aparecer_ en la pantalla "End" (Fin) y desaparecer_
"LOCKED" (BIoqueado).
3. Presione STOP/CLEAR o abra la puerta del horno para quitar
"End" de la pantalla.
4. Cierre la puerfa.
Aparecer& en la pantalla la hora del dia.
41
Para retrasar el inicio de la autolimpieza:
Antes de retrasar el inicio de la autolimpieza, asegt]rese de que el
reloj est6 en la hora correcta del dia. Vea la seccidn "Reloj".
Adem&s, asegt]rese de que la puerta est6 completamente
cerrada; de Io contrario no quedar& bloqueada y el ciclo no
comenzar&
1. Presione LOGICLEAN.
2. Presione DELAY START (Inicio diferido).
Presione el bot6n HOUR/MIN con la flecha hacia "arriba" o
hacia "abajo" para fijar la hora del dia y asi comenzar el ciclo
de autolimpieza.
3. Optima START (Inicio).
La puerta quedar& bloqueada autom&ticamente y aparecer&n
en la pantalla "LOCKED", "DELAY" y la hora del dia.
El homo se encender& autom&ticamente cuando haya
alcanzado la hora de inicio.
Cuando se haya terminado el ciclo y se enfrie el homo,
aparecer& en la pantalla "End" (Fin) y desaparecer&
"LOCKED" (BIoqueado).
4. Presione STOP/CLEAR o abra la puerta del horno para quitar
"End" de la pantalla.
5. Cierre la puerta.
Aparecer& en la pantalla la hora del dia.
Para fljar manualmente el nivel de suciedad:
• Presione dos veces para suciedad ligera y aparecer_ en la
pantalla "SoilL" (Suciedad ligera).
• Presione tres veces para suciedad media y aparecer& en la
pantalla "SoilA" (Suciedad media).
• Presione cuatro veces para suciedad profunda y aparecer&
en la pantalla "SoiIH" (Suciedad profunda).
La luz del horno no funcionar& durante el ciclo de autolimpieza.
Para detener la autolimpieza en cualquier momento:
Presione STOP/CLEAR (Detener/Despejar) y aparecer&n en la
pantalla "cln," (Limpio) "ON" (Encendido), "cool" (Frb) y
"LOCKED" (BIoqueado) hasta que se enfrie el homo. Despu6s
aparecer& en la pantalla "End" (Fin) y la puerfa se desbloquear&
IMPORTANTE: Antes de limpiar, asegerese de que todos los
controles est6n apagados y que el horno y la superficie de
cocci6n est6n frios. Siga siempre las instrucciones que vienen en
las etiquetas de los productos de limpieza.
A menos que se indique Io contrario, se sugiere primero el jab6n,
agua y un patio suave o una esponja.
SUPERFICIES EXTERIORES DE ESMALTE DE
PORCELANA (en algunos modelos)
Los derrames de alimentos que contienen &cidos, tales como
vinagre y tomate, deber&n limpiarse tan pronto se enfrie el
electrodom6stico. Estos derrames pueden afectar el acabado.
• Producto para limpiar vidrios, producto de limpieza liquido
suave o estropajo no abrasivo : Limpie cuidadosamente
alrededor de la placa con el nt]mero de modelo y de serie
porque el refregar puede borrar los nQmeros.
PARRILLAS Y TAPAS REVESTIDAS DE PORCELANA
Los derrames de alimentos que contienen &cidos tales como
vinagre y tomate se deben limpiar tan pronto la superficie de
cocci6n, las parrillas y las tapas se hayan enfriado. Estos
derrames pueden afectar el acabado.
Para evitar que se piquen, no golpee las parrillas y las tapas entre
si o con superficies duras como utensilios de estufa de hierro
fundido.
No vuelva a montar las tapas en los quemadores mientras est6n
mojados.
No las limpie en el ciclo de autolimpieza.
• Estropajo de pl_stico no abrasivo y producto de limpieza
ligeramente abrasivo: Limpie tan pronto la superficie de
cocci6n, las parrillas y las tapas se hayan enfriado.
• Lavavajillas (s61olas parrillas, no las tapas): Use el ciclo m_s
fuerte.
QUEMADORES EXTERIORES
Modelos con quemadores sellados
Vea la secci6n "Quemadores exteriores sellados."
CONTROLES DE LA SUPERFIOIE DE COOCI(_N
No use productos de limpieza abrasivos, de fibra met&lica o para
limpiar hornos.
No remoje las perillas.
AI volver a montar las perillas, asegQrese de que las mismas
est6n en la posici6n OFF (Apagado).
En algunos modelos, no quite los obturadores que est&n debajo
de las perillas.
• Agua y jab6n o lavavajillas: Jale las perillas en sentido recto
para quitarlas del tablero de control.
TABLERO DE CONTROL
No use productos de limpieza abrasivos, estropajos de fibra de
acero, patios &speros o cierfas toallas de papel ya que podrian
dafiar el tablero.
• Producto para limpiar vidrios y un patio suave o esponja:
Aplique el producto para limpiar vidrios al patio suave o
esponja, no Io haga directamente sobre el tablero.
EXTERIOR DE LA PUERTA DEL HORNO
Producto para limpiar vidrios y toallas de papel o estropajo
de pl_stico no abrasivo : Aplique el producto para limpiar
vidrios al patio suave o esponja, no Io haga directamente
sobre el tablero.
• En los modelos de homo con puerta de acero inoxidable, vea
la secci6n "Acero inoxidable" en "Limpieza general".
42
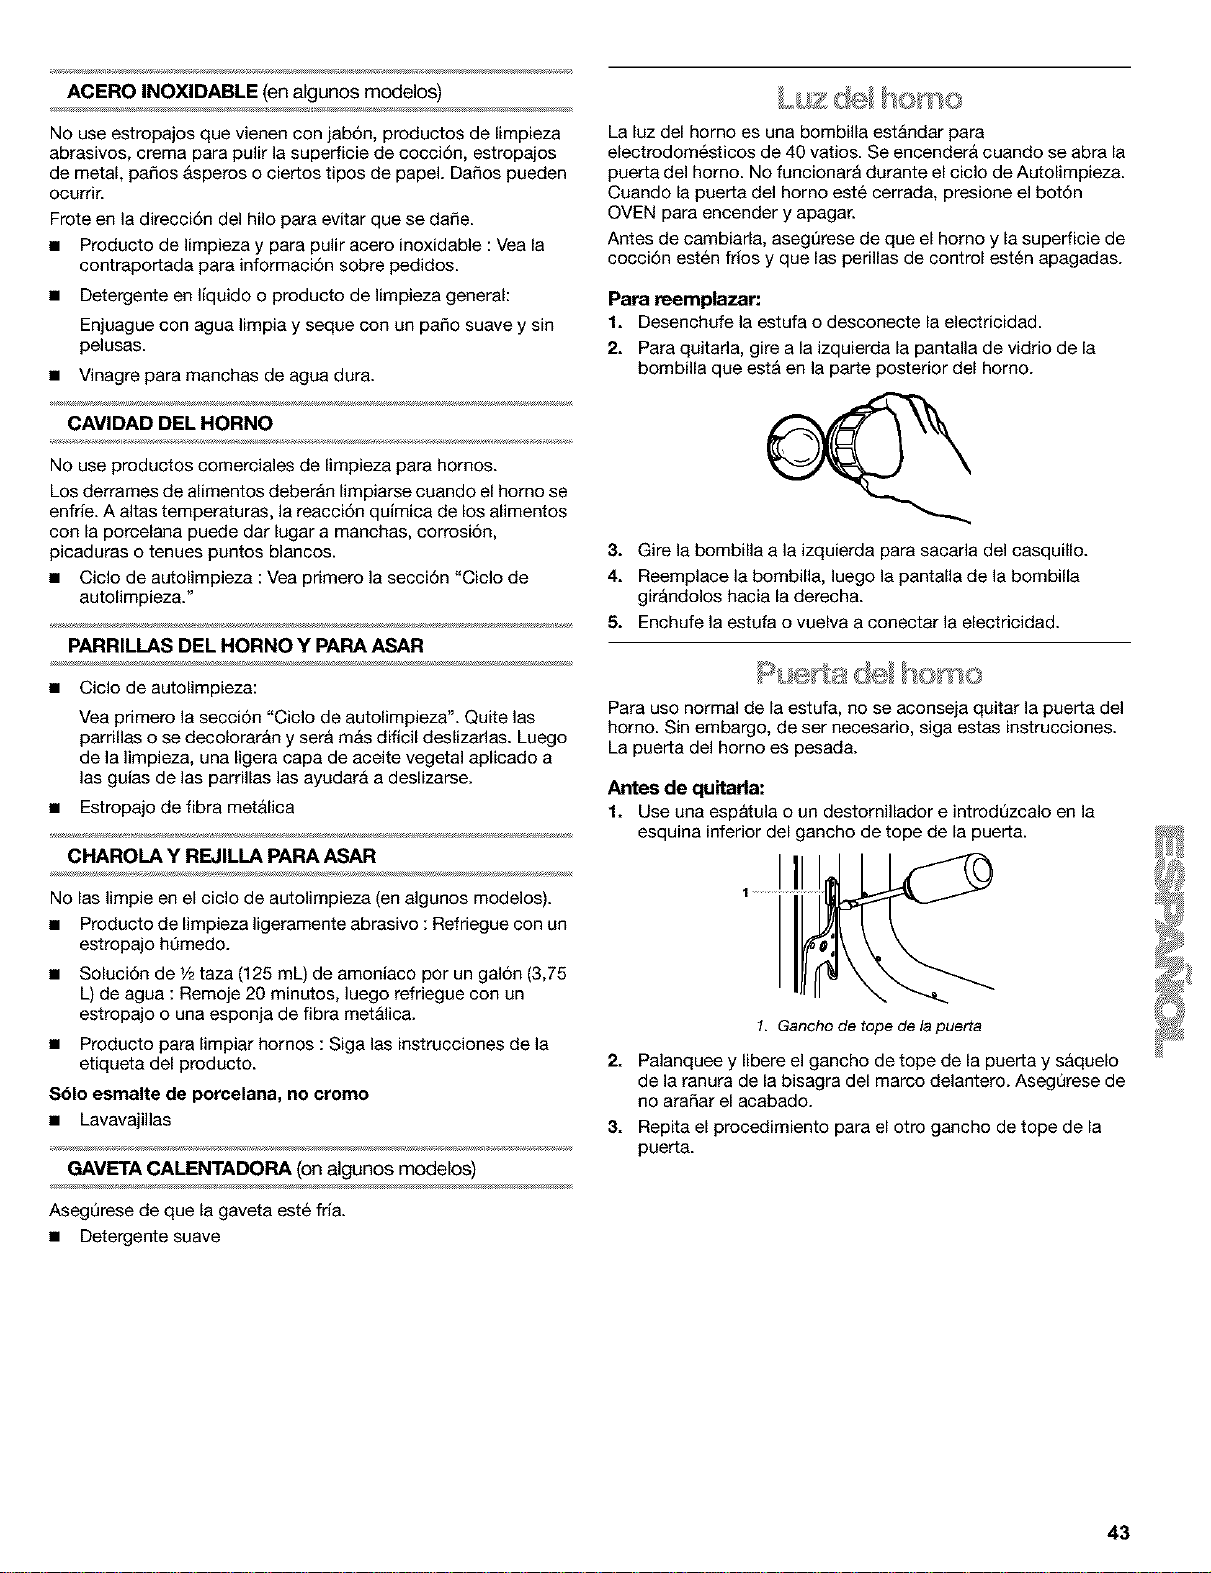
ACERO INOXIDABLE (en algunos modelos)
No use estropajos que vienen con jab6n, productos de limpieza
abrasivos, crema para pulir la superficie de coccidn, estropajos
de metal, paSos &speros o ciertos tipos de papeL DaSos pueden
ocurrir.
Frote en la direcci6n del hue para evitar que se dafie.
• Producto de Iimpieza y para puUr acero inoxidable : Vea la
contraportada para informaci6n sobre pedidos.
• Detergente en Ifquido o producto de Iimpieza general:
Enjuague con agua limpia y seque con un paso suave y sin
pelusas.
• Vinagre para manchas de agua dura.
CAVIDAD DEL HORNO
No use productos comerciales de limpieza para hornos.
Los derrames de aUmentos deber&n limpiarse cuando el homo se
enfrie. A altas temperaturas, la reaccidn quimica de los alimentos
con la porcelana puede dar lugar a manchas, corrosi6n,
picaduras o tenues puntos blancos.
• Ciclo de autolimpieza : Vea primero la seccidn "Ciclo de
autolimpieza."
PARRILLAS DEL HORNO Y PARA ASAR
• Ciclo de autolimpieza:
Yea primero la secci6n "Ciclo de autolimpieza". Quite las
parrillas o se decolorar&n y set& m&s dificil deslizarlas. Luego
de la limpieza, una ligera capa de aceite vegetal aplicado a
las guias de las parrillas las ayudar& a deslizarse.
• Estropajo de fibra met&lica
CHAROLA Y REJILLA PARA ASAR
No las limpie en el ciclo de autolimpieza (en algunos modelos).
• Producto de limpieza ligeramente abrasive : Refriegue con un
estropajo hemedo.
• Solucidn de 1/2taza (125 mL) de amoniaco per un gal6n (3,75
L) de agua : Remoje 20 minutos, luego refriegue con un
estropajo o una esponja de fibra met&lica.
• Producto para limpiar homes : Siga las instrucciones de la
etiqueta del producto.
$61o esmalte de porcelana, no cromo
• Lavavajillas
GAVETA CALENTADORA (on algunos modelos)
Asegerese de que la gaveta est6 fria.
• Detergente suave
t' ome
La luz del horno es una bombilla est&ndar para
electrodom6sticos de 40 vatios. Se encender& cuando se abra la
puerta del homo. No funcionar& durante el eiclo de Autolimpieza.
Cuando la puerta del homo est6 cerrada, presione el botdn
OVEN para eneender y apagar.
Antes de eambiarla, asegt_rese de que el homo y la superficie de
coecidn est6n frios y que las perillas de control est6n apagadas.
Para reemplazar:
1. Desenchufe la estufa o desconecte la electricidad.
2. Para quitada, gire a la izquierda la pantalla de vidrio de la
bombilla que est& en la parte posterior del homo.
3. Gire la bombilla a la izquierda para sacada del casquillo.
4. Reemplace la bombilla, luego la pantalla de la bombilla
gir&ndolos hacia la derecha.
5. Enchufe la estufa o vuelva a conectar la electricidad.
Para use normal de la estufa, no se aconseja quitar la puerta del
homo. Sin embargo, de ser necesario, siga estas instrucciones.
La puerta del homo es pesada.
Antes de quitarla:
1. Use una espbtula o un destornillador e introd_zcalo en la
esquina inferior del gancho de tope de la puerta.
1. Gancho de tope de la puerta
2. Palanquee y libere el gancho de tope de la puerta y s&quelo
de la ranura de la bisagra del marco delantero. AsegQrese de
no araSar el acabado.
3. Repita el procedimiento para el otro gancho de tope de la
puerta.
43

Para quitarla:
1. Abra la puerta del homo. Introduzca los pernos para quitar la
puerta, los euales vienen con su estufa, en los ganehos de
suspensi6n de la bisagra. No quite los pernos mientras est6
sacando la puerta de la estufa.
\
\
4. Introduzca el gancho de tope de la puerta con la superficie
angular en la parte superior de la ranura de la bisagra del
marco, luego oprima la parte inferior del gancho hasta que
las pestaSas est6n niveladas con el marco delantero.
1. Pernos para quitar la puerta
2. Ganchos de suspensi6n de la bisagra
2. Cierre la puerta cuidadosamente hasta que descanse contra
los pernos para quitar la puerta.
3. Sujete ambos lados de la pare delantera de la puerta con
sus dedos y use sus pulgares en la superficie interior.
4. Jale la puerta hacia arriba y luego hacia usted. Los ganchos
de suspensi6n de la bisagra se deslizar&n de la ranura de la
bisagra del marco delantero. No quite los pernos para quitar
la puerta hasta que 6sta haya sido colocada de nuevo en la
estufa.
Para volver a colocarla:
1. Sujete ambos lados de la pare delantera de la puerta con
sus dedos y use sus pulgares en la superficie interior.
2. Sostenga la puerta del homo de modo que el borde superior
de cada gancho de suspensi6n est6 en posicidn horizontal.
Introduzca los ganchos de suspensidn de la bisagra en las
ranuras de bisagras del marco delantero.
3. Incline la pare superior de la puerta hacia la estufa. Deslice
los ganchos de suspensidn de la bisagra hacia donde se
encuentran los pemos de apoyo del marco delantero.
Aseg0rese que los ganchos de suspensi6n de las bisagras
est6n debidamente sentados y enganchados en los pernos
de apoyo.
5. Abra la puerta por completo y quite los pernos para quitar la
puerta. Guarde los pernos para quitar la puerta para un uso
posterior.
6. Cierre la puerta.
Desocupe la gaveta calentadora y permita que la unidad se enfrie
completamente antes de intentar quitar la gaveta.
Cbmo quitar.
1. Jale la gaveta hasta que est6 abierta completamente.
2. Encuentre las pesta_as triangulates negras aambos lados de
la gaveta.
1
1. Pestat_a
8. Presione hacia abajo la pestaSa del lado derecho y levante la
pesta_a del lado izquierdo simult&neamente. Luego jale la
gaveta hacia afuera otra pulgada m&s.
4. Con mucho cuidado, jale la gaveta totalmente hacia afuera,
sosteni6ndola de los lados y no del frente de la gaveta.
Cbmo reinstalar.
1. Alinee los deles de la gaveta con los deles guia.
2. Empuje la gaveta hasta que tope completamente.
3. Con mucho cuidado, abra y cierre la gaveta para cerciorarse
de que asent6 correctamente en los deles.
1. Ganchos de suspensidn de las bisagras
2. Bisagra del marco de la puerta
3. Pernos de apoyo
44
DIAGNOSTICO DE PROBLEMAS
Primero pruebe las soluciones sugeridas aqui para evitar el costo
innecesario del servicio.
Nada funciona
• &Estd el contacto de suministro de energia
correctamente cableado y polarizado? Pruebe otto
contacto para verificar el cableado y la polaridad correctos.
• &Eetd desconectado el cable el_ctrico? Enchufe a un
tornacorriente conectado a tierra apropiadarnente.
• &Se ha quemado el fusible de la casa o se ha disparado el
disyuntor? Reemplace el fusible o arregle el cortacircuito.
• &Estd la vdlvula de cierre de gas principal o reguladora en
la posici6n apagada? Consulte las Instrucciones de
instalaci6n.
El quemador exterior hace ruidos como estallidos
• &Estd mojado el quemador? D6jelo secar.
Hay demasiado calor alrededor de los utensilios de
cocina sobre la superficie de cocci6n
• &Son los utensilios de cocina del tama_o correcto? Use
utensilios de cocina que sean mAs o menos del mismo
tamafio que el &rea, el elemento o el quemador exterior de
cocci6n. Los utensilios no deben extenderse mAs de 1 pulg.
(2,5 cm) por fuera del &rea de la superficie de cocci6n.
El homo no funciona
• &Se ha conectado debidamente la eetufa al suminietro de
gas? P6ngase en contacto con un especialista en reparaci6n
competente de Sears o yea las Instrucciones de instalaci6n.
Los quemadores exteriores no funcionan
• _,Es _sta la primera vez se han usado los quemadores
exteriores? Encienda cualquiera de las perillas de los
quemadores exteriores para despejar el aire de las lineas de
gas.
• En algunos modelos, &se ha fijado el bloqueo de la
superficie de coccibn? Consulte la secci6n "BIoqueo de la
superficie de cocci6n'.
• i.Se ha fijado correctamente la perilla de control? Empuje
hacia adentro la perilla antes de girar hacia un ajuste.
• &Eetdn bloqueados los orificios del quemador? Vea la
secci6n "Quemadores sellados de la superficie'.
Las llamas del quemador exterior son desparejas,
amarillas y/o hacen ruido
• &Eetdn bloqueados los orificios del quemador? Vea la
secci6n "Quemadores sellados de la superficie'.
• i.Se han colocado debidamente las tapas de los
quemadores? Yea la secci6n "Quemadores sellados de la
superficie'.
• &Se ha daiiado el quemador? En modelos con tapas, fijese
si la tapa est& alabeada. Si la tapa gira libremente en una
superficie plana, con el lado pintado hacia abajo, la tapa estA
alabeada. Cambie la tapa con un quemador exterior diferente
para verificar si sigue alabeada. P6ngase en contacto con un
especialista de reparaci6n competente de Sears. Vea la
contraportada.
• &Se est_ usando gas propane? Es probable que el
electrodom6stico haya side convertido incorrectamente.
P6ngase en contacto con un especialista de reparaci6n
competente de Sears. Vea la contraportada.
&Se ha ajustado correctamente el control electrbnico del
horno? Consulte la secci6n "Control electr6nico del horno'.
&Se ha fijado un inicio diferido? Consulte la secci6n
"Control temporizado del homo".
&Se ha fijado el bloqueo del horno? Consuite la secci6n
"Bloqueo del horno'.
&Se ha fijado el modo de descanso? Consulte la secci6n
"Modo de descanso".
&Se ha fijado el cierre de 12 horas? Vea la secci6n "Cierre
de 12 horas'.
La tempemtura del homo estb muy alta o muy baja
• &Necesita ajustarse el calibre de la temperatura del
horno? Consulte la secci6n "Control de la temperatura del
horno'. _i
La pantalla muestra mensajes _JJ#
............................................................................................................_F//_
• _,Est_t la pantalla mostrando "PF"? Ha ocurrido un corte de _
electricidad. Presione STOP/CLEAR para despejar la Jy//J_'
pantalla. Vuelva a poner el reloj a la hera de ser necesario. _
Yea la secci6n "Reloj'. ;_:_'
• &En algunos modelos, est_i la pantalla mostrando "PF" y
un icono de superficie de cocci6n? Se est_t usando el YSJ_I<_
bloqueo de la superficie de cocci6n. Vea la secci6n "Bloqueo
de la superficie de cocci6n".
&Est& la pantalla mostrando "F" seguida de un ndmero?
Presione STOP/CLEAR para despejar la pantalla. Si vuelve a
aparecer el c6digo "F', p6ngase en contacto con un
especialista competente en reparationes de Sears. Vea la
contraportada.
• &Muestra la pantalla "EO F5"? El pestillo de autolimpieza
est_ impidiendo que la puer_a del homo se cierre.
Si est& abierta ia puerta del homo, presione STOP/CLEAR
(Detener/Despejar) para despejar la pantalla, luego oprirna y
sostenga el bot6n interruptor (ubicado en la esquina superior
derecha del frente del homo). El mecanismo de seguridad se
desbloquear& despues de 6 segundos.
Si est& bloqueada la puerta del horno, aplique presi6n sobre
la esquina superior derecha del homo y presione STOP/
CLEAR al mismo tiempo. Esto desbloquear& la puerta del
homo.
45
No funciona el ciclo de autolimpieza
• &Estd abierta la puerta del homo? Cierre bien la puerta del
homo.
• &Se ha ingresado la funci6n? Vea la secci6n "Ciclo de
autolimpieza".
• &Se ha fijado un ciclo de autolimpieza? Vea la secci6n
"Ciclo de autoJimpieza".
• &Se ha fijado un inicio diferido? Consulte la secci6n
"Control temporizado del homo".
Los resultados de coccibn del homo no son los que se
esperaba
• &Estd nivelado el electrodomdstico? Nivele el
electrodom6stico. Vea las Instrucciones de instalaci6n.
&Se ha fijado la temperatura deseada? Vuelva a verificar la
receta en un libro de cocina confiable.
&Se ha fijado el calibre de temperatura debido? Consulte
la secci6n "Control de la temperatura del homo".
&Se ha precalentado el horno? Vea la secci6n "C6mo
hornear'.
&Se ha usado el utensilio para hornear adecuado? Vea la
secci6n "Utensilios para hornear".
&Se han colocado las parrillas en forma adecuada? Vea la
secci6n "Posici6n de las parrillas y los utensilios para
hornear'.
&Circula el aire de manera adecuada alrededor del
utensilio para hornear? Vea la secci6n "Posici6n de las
parrillas y los utensilios para hornear".
&Estd la masa distribuida de manera uniforme en la
charola? Asegt]rese de que la masa est6 nivelada en la
charola.
&Se ha usado la cantidad de tiempo adecuada? Ajuste el
tiempo de cocciSn.
&Se ha abierto la puerta del horno durante la coccibn? AI
abrir el homo, se libera el calor y esto puede dar como
resultado tiempos de cocci6n m_s largos.
&Estdn los articulos horneados demasiado dorados en el
fondo? Mueva la parrilla hacia una posici6n m&s alta en el
homo.
• i,8e estdn dorando los bordes de las cortezas demasiado
pronto? Use papel de aluminio para cubrir el borde de la
cor_eza y/o reducir la temperatura de horneado.
46

47

Get it fixed, atyour home or ours!
Your Home
For repair-in your home-of all major brand appliances,
lawn and garden equipment, or heating and cooling systems,
no matter who made it, no matter who sold it!
Forthe replacement parts, accessories and
owner's manuals that you need to do-it-yourself,
For Sears professional installationof home appliances
and items like garage door openers and water heaters,
1-800-4-MY-HOME ® (1-800-469-4663)
Call anytime, day or night (U.S.A. and Canada)
www,sears,com www,sears,ca
Our Home
For repair of carry-in items likevacuums, lawn equipment,
and electronics, call or go on-linefor the locationof your nearest
Sears Parts & Repair Center,
1-800-488-1222
Call anytime, day or night (U.S.A. only)
www.sears.com
To purchase a protection agreement (U,S,A,)
or maintenance agreement (Canada) on a product serviced by Sears:
1-800-827-6655 (U.S.A.) 1-800-361-6665 (Canada)
Para pedir servicio de reparaci6n
a domicilio, y para ordenar piezas:
1-888-SU-HOGAR sM
(1-888-784-6427)
Au Canada pour service en frangais:
I"800"LE'FOYER "c
(1-800-533-6937)
www.sears.ca
SEARS
6 03
9755739 TM S_,
® Registered Trademark / Trademark / Service Mark of Sears r Roebuck and Co Printed _nU S A
r_ Sears Roebuck and Co ® Marca RegBtrada THMarca de Fabnca SMMarca de Servlclo de Sears Roebuck and Co Impreso en EE UU