
Loading ...
Loading ...
Loading ...
ENGLISH
8
Belt Hook (Fig. A)
WARNING: To reduce the risk of serious personal
injury, DO NOT suspend tool overhead or suspend
objects from the belt hook. ONLY hang tool’s belt
hook from a work belt. DO NOT use the belt hook for
tethering or securing the tool to a person or object
during use.
WARNING: To reduce the risk of serious personal
injury, ensure the screw holding the belt hook
issecure.
IMPORTANT: When attaching or replacing the belt hook
12
, use only the screw that is provided. Be sure to securely
tighten the screw.
The belt hook
12
can be be attached to either side of the
tool using only the screw provided, to accommodate left- or
right- handed users. If the hook is not desired at all, it can be
removed from the tool.
To move belt hook, remove the screw that holds it in place
then reassemble on the opposite side. Be sure to securely
tighten the screw.
OPERATION
WARNING: To reduce the risk of serious personal
injury, turn unit off and remove the battery pack
before making any adjustments or removing/
installing attachments or accessories. An
accidental start-up can causeinjury.
Installing and Removing the Battery Pack
(Fig. D)
NOTE: For best results, make sure your battery pack is
fullycharged.
To install the battery pack
11
into the tool handle, align the
battery pack with the rails inside the tool’s handle and slide
it into the handle until the battery pack is firmly seated in
the tool and ensure that it does notdisengage.
To remove the battery pack from the tool, press the release
button
10
and firmly pull the battery pack out of the tool
handle. Insert it into the charger as described in the charger
section of thismanual.
Fig. D
10
11
Proper Hand Position (Fig. E)
WARNING: To reduce the risk of serious personal injury,
ALWAYS use proper hand position as shown.
WARNING: To reduce the risk of serious personal injury,
ALWAYS hold securely in anticipation of a sudden
reaction.
Proper hand position requires one hand on the rear grip or
main handle. Take care to not block the air vents
14
.
Fig. E
14 14
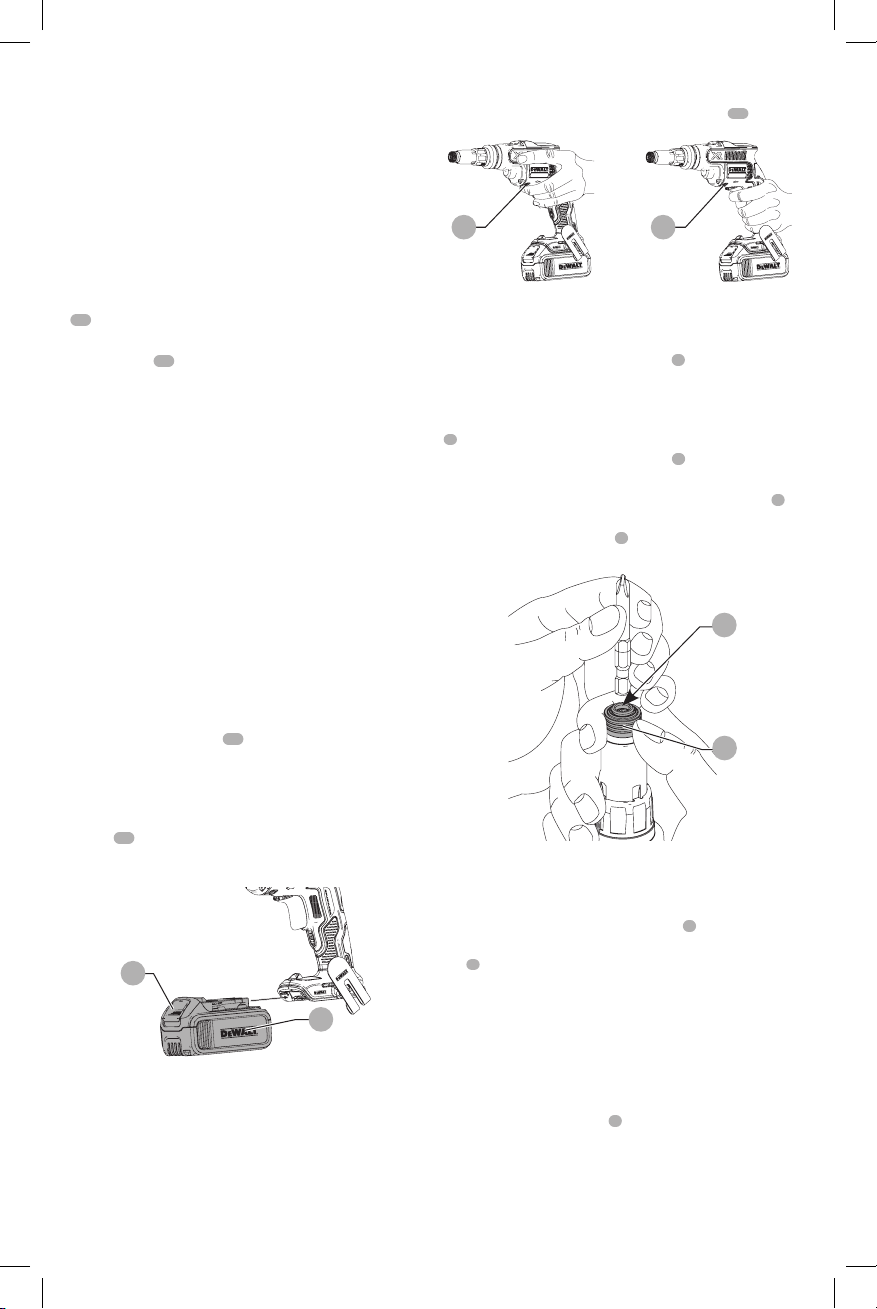
Quick-Change Chuck (Fig. A, F)
NOTE: The chuck accepts 1/4" (6.35 mm) hex accessories.
Place the forward/reverse control lever
6
in the lock-off
(center) position and remove battery pack before changing
accessories.
To install an accessory, pull the quick-change sleeve
2
away from the front of the tool then fully insert the
accessory into the quick-change chuck
1
. When the sleeve
is released, the accessory is locked into place (Fig.F).
To remove an accessory, pull the quick-change sleeve
2
away from the front of the tool, then remove the accessory
from the quick-release chuck
1
(Fig.F).
Fig. F
2
1
Versa Clutch™ (Fig. G)
This tool features the Versa Clutch™ which allows a wide
range of fastener sizes. To adjust:
1. Pull forward, then rotate chuck collar
5
in the
"Increase" direction as indicated on adjustment collar
3
, to increase the amount of clutch engagement and
torque output. Maximum rotation of the collar in the
"Increase" direction results in full clutch engagement
and maximum torque output and fastener capacity.
The collar and adjustable stop will not screw off the
clutchhousing.
2. If after pushing the screw into the work piece there is
no chuck rotation, check the adjustment range on the
collar marked MAX/MIN
4
. Rotate the collar to increase
the clutch engagement.
Loading ...
Loading ...
Loading ...