Loading ...
Loading ...
PAGE: 5 / 12 PAGE: 6 / 12
ASSEMBLY INSTRUCTIONS ASSEMBLY INSTRUCTIONS (continued)
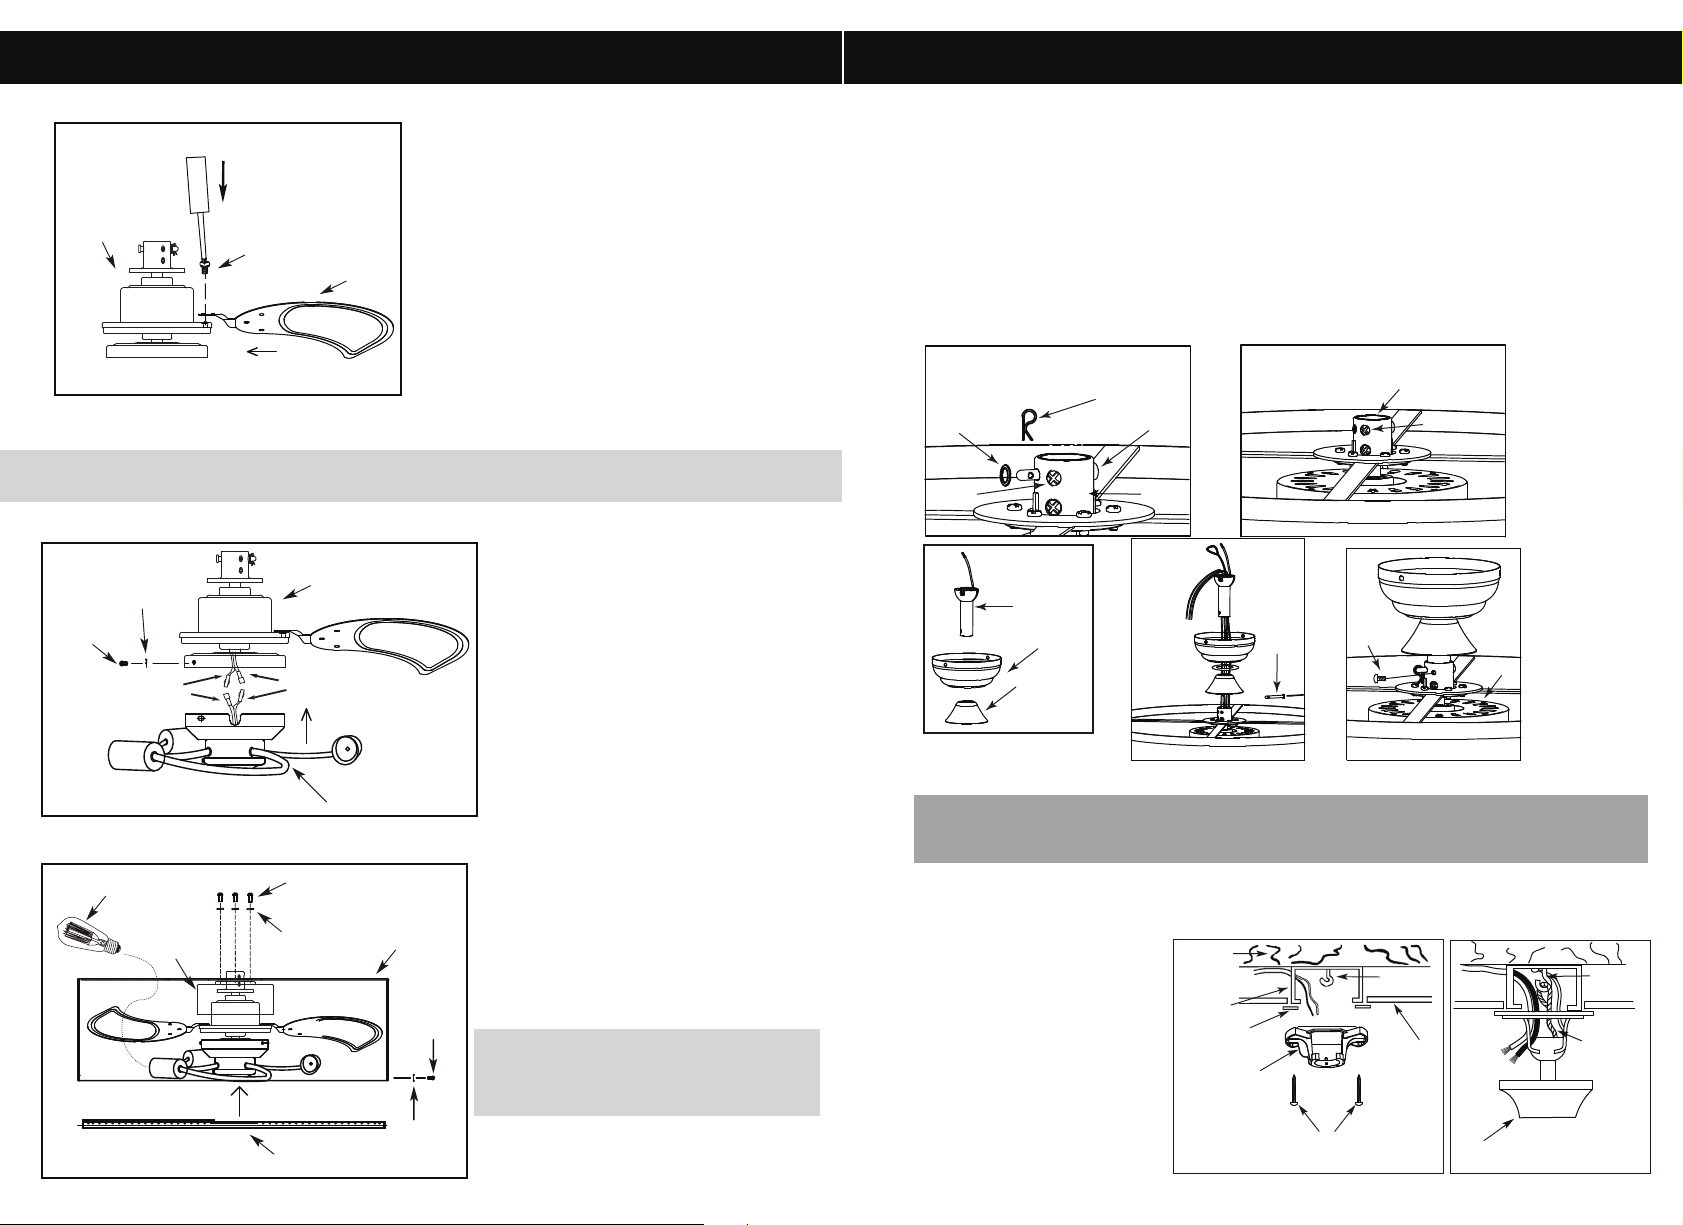
Motor Screw
Fan Motor
Fan Blade
- Attach the fan blades to the fan motor assembly using the pre-installed screws.
1. ATTACH THE FAN BLADES
NOTE:
All set screws must be checked and retightened where necessary,
before and after installation.
2. LIGHT KIT
White Wire
Blue or Red
or Black Wire
Light Kit
Lock
washer
Light Kit
Screws
DETACHABLE LIGHT KIT
- Remove light kit screws and washers.
- Connect polarized connectors of light
kit to corresponding connectors found
in switch housing.
WARNING: BE SURE TO TURN
OFF POWER BEFORE
INSTALLING
- Carefully tuck electrical wires back into
switch housing, align light kit with
switch housing and secure with three
light kit screws and washers
- Remove the 6 pre-installed screws
from the yoke.
- Place the fan motor cover on top of the yokes.
Then place the fan upper cover on top of
the fan motor cover while feeding the fan
motor wires through both.
- Re-install the 6 upper cover screws
- Install specified bulb type and wattage.
.
3.
- Seperate mounting bracket from canopy by removing screws.
- Remove cotter pin and bolt from yoke.
- Loosen the jam screws in yoke until they are flush with the inside surface of the yoke.
- Obtain downrod, canopy and yoke cover.
- Place downrod through the canopy and yoke cover.
- Route wires exiting motor through yoke cover, canopy and downrod, insert downrod into yoke.
- Insert bolt through hole in shaft and downrod. Be careful not to damage or cut the fan wires.
- Place flat wasger on the end of the bolt. Secure with cotter pin through hole
in the end of the bolt.
- Secure downrod in position by tightening jam screws. Slide yoke cover down so it is flush
with the upper cover.
4. MOUNTING
Motor
Bolt
DOWNROD MOUNT
5. INSTALL MOUNTING BRACKET
- Install J-Hook through center of outlet box and into the wooden joist.
- Secure mounting bracket and rubber gaskets to outlet box
(attach rubber gasket to mounting bracket).
- Hang fan on mounting bracket
by aligning groove in downrod
ball with tab on
mounting bracket
and install safety cable.
- Hang the safety cable
onto the J-hook.
Canopy
WARNING: To Reduce The Risk Of Fire, Electric Shock, Or Personal Injury, Mount
To UL/CSA Listed Outlet Box Marked Acceptable For Fan Support And Use Mounting
Screws Provided With The Outlet Box.
Yoke
Jam
Screw
Jam
Screw
Downrod
Canopy
Yoke
Cover
J-Hook
Safety
Cable
Wood
Joist
Outlet
Box
Rubber
Gasket
Mounting
Bracket
Outlet box screws
(not provided)
Ceiling
J-Hook
Bolt
Flat
Washer
Cotter Pin
Yoke
Jam
Screw
a.
b.
c.
d.
e.
WARNING: To reduce the risk of injury
to persons, ensure the fan lower cover
is securely attached on the fan upper
cover before use.
Lock
washer
Upper
Cover
Fan Lower Cover
Lower
Cover
Screws
Star
washer
Bulb
Upper Cover
Screws
Fan Motor
Cover
Fan Motor
Loading ...
Loading ...
Loading ...