Loading ...
Loading ...
Loading ...

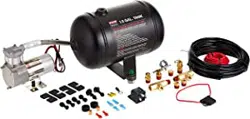
98C AIR COMPRESSOR INSTALLATION
Your Ultra Light Duty Onboard Air System comes complete with a 98C, 10% duty cycle compressor.
Please follow the installation instructions that follow to enjoy the best use of your onboard air system.
CAUTION - To reduce risk of electrical shock or electrocution:
- Do not disassemble the compressor. Do not attempt repairs or modications.
Refer to qualied service agencies for all service and repairs.
- Do not use this product in an area where it can fall or be pulled into water or liquids.
- Do not reach for this product if it has fallen into liquid.
- Use this compressor with 12-volt DC systems only.
- This product should never be left unattended during use.
Guidelines for Selecting Mounting Location:
The selection of proper mounting location for your air compressor will help ensure a long
and trouble free compressor service life. Please pay close attention to the following:
- Select a FLAT, UPRIGHT & SECURE LOCATION where the compressor can be mounted.
- To maximize air compressor performance, install compressor as CLOSE TO THE BATTERY
as possible so that length of positive lead wire is as short as possible.
- This compressor is moisture & dust resistant, but NOT WATERPROOF or DUSTPROOF.
Do not mount compressor in locations where the unit is likely to come in contact with water or excessive dirt.
- If it is necessary to mount the air compressor further from the battery, such as inside your vehicle or in
the bed of your pickup, VIAIR recommends using wire larger than 12 AWG as a positive lead for
remote installation.
- Do not mount compressor near areas where ammable liquids are stored.
- Use thread sealant for proper tting installation. Thread tape is not recommended.
Properly sealed, recommended torque for 1/4" and 3/8" is 12~15 ft. lbs.
Recommended torque for 1/8" is 10~11 ft. lbs.
98C Compressor Wiring: (See Figure 3 on back of manual)
1. Disconnect ground cable from vehicle’s battery.
2. Temporarily position the air compressor in the location where it will be mounted.
3. Route ground wire to the negative post of the battery or to an appropriate grounding point and
cut ground wire to length as needed.
4. Mount the 98C air compressor with the two 13/64" (5 mm) bolts, nuts, washers, and locking washers
provided. Use of thread locker is recommended.
5. This air compressor comes with a heavy duty heat resistant stainless steel braided leader hose. This leader
hose is designed to prolong the life of your air line. Do not remove this leader hose from air compressor.
6. IMPORTANT: Please note; the leader hose that came with your compressor has a built-in inline check valve
pre-installed. Do not remove inline check valve from leader hose.
7. To mount hose bracket, drill holes with 3/16" drill bit and push self–anchoring hose bracket pin into hole.
Route leader hose through hose bracket and secure hose by pressing bracket clamp into locked position.
8. To remove hose from the hose bracket, simply press down on the hose clamp release tab to release
bracket clamp.
9. Connect compressor’s positive lead wire to one of the leads of your pressure switch.
10. Make sure that your compressor setup is properly fused. The 98C pulls approximately 13 amps of power.
11. Always locate fuse as close as possible to power source.
12. Before connecting to power source, check to make sure that all connections are made properly.
13. Connect and test compressor system by running the compressor for a short time to build up pressure
in your air tank.
14. Once air pressure reaches preset cut out pressure of your pressure switch, the compressor will shut o.
Inspect all air line connections for leaks with soap and water solution. If a leak is detected, the air line may
not be cut squarely or pushed all the way in. Tighten connections if needed.
USER MANUAL
ULTRA-LIGHT DUTY ONBOARD AIR SYSTEM
Loading ...
Loading ...
Loading ...