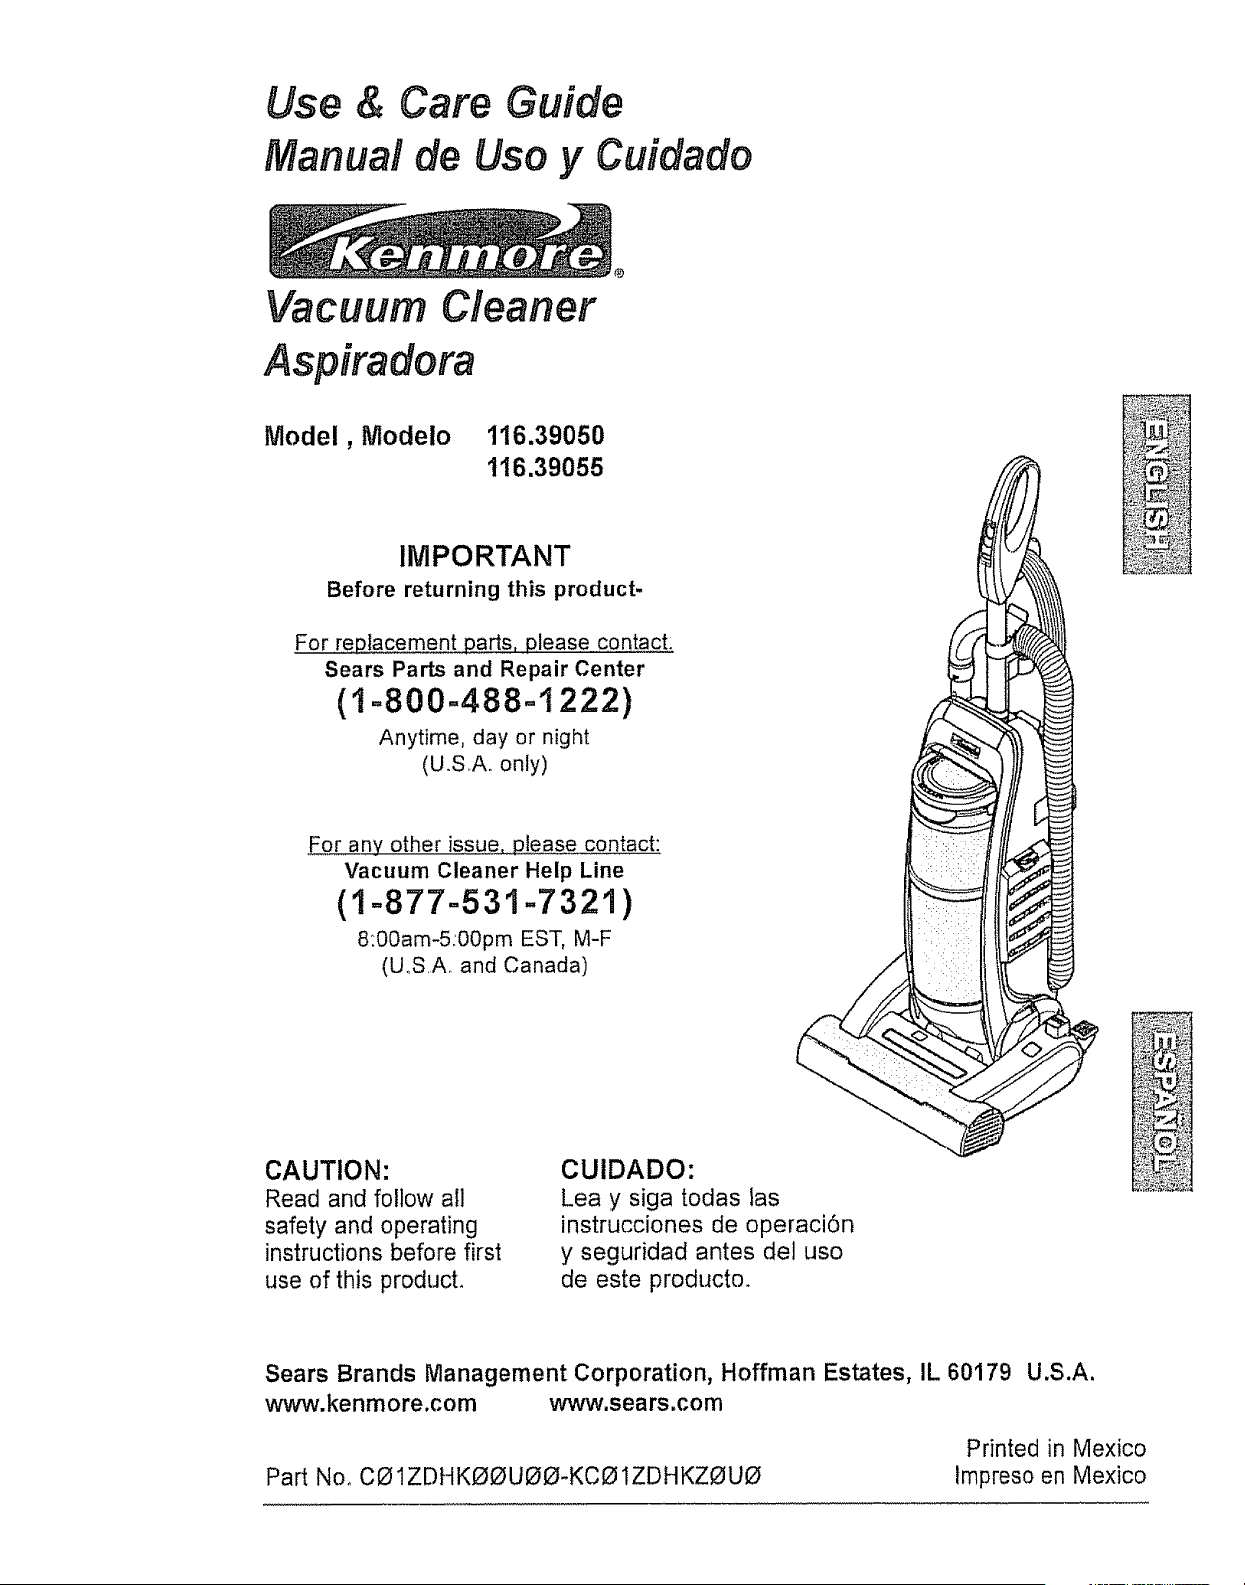
Use & Care Guide
Manual de Uso y Cuidado
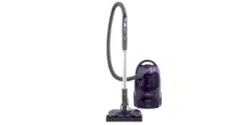
Cleaner
Vacuum
Aspiradora
Model, Modelo
116.39050
116.39055
IMPORTANT
Before returning this product-
For [eplacement parts, please contact:
Sears Parts and Repair Center
(I =800-488-1222)
Anytime, day or night
(U.SA. only)
For any other issue, please contact:
Vacuum Cleaner Help Line
(1-877-531-7321)
8:00am-5:00pm EST, M-F
(U.SA and Canada)
_-_,_?1
CAUTION:
Read and follow all
safety and operating
instructions before first
use of this producL
CUIDADO:
Lea y siga todas las
instrucciones de operaci6n
y seguridad antes del uso
de este producto.
Sears Brands Management Corporation, Hoffman Estates, IL 60179 U.S.A,
www.kenmore,com www,sears.com
Part No. C01ZDHK_UOO-KCO1ZDHKZOU0
Printed in Mexico
Impreso en Mexico
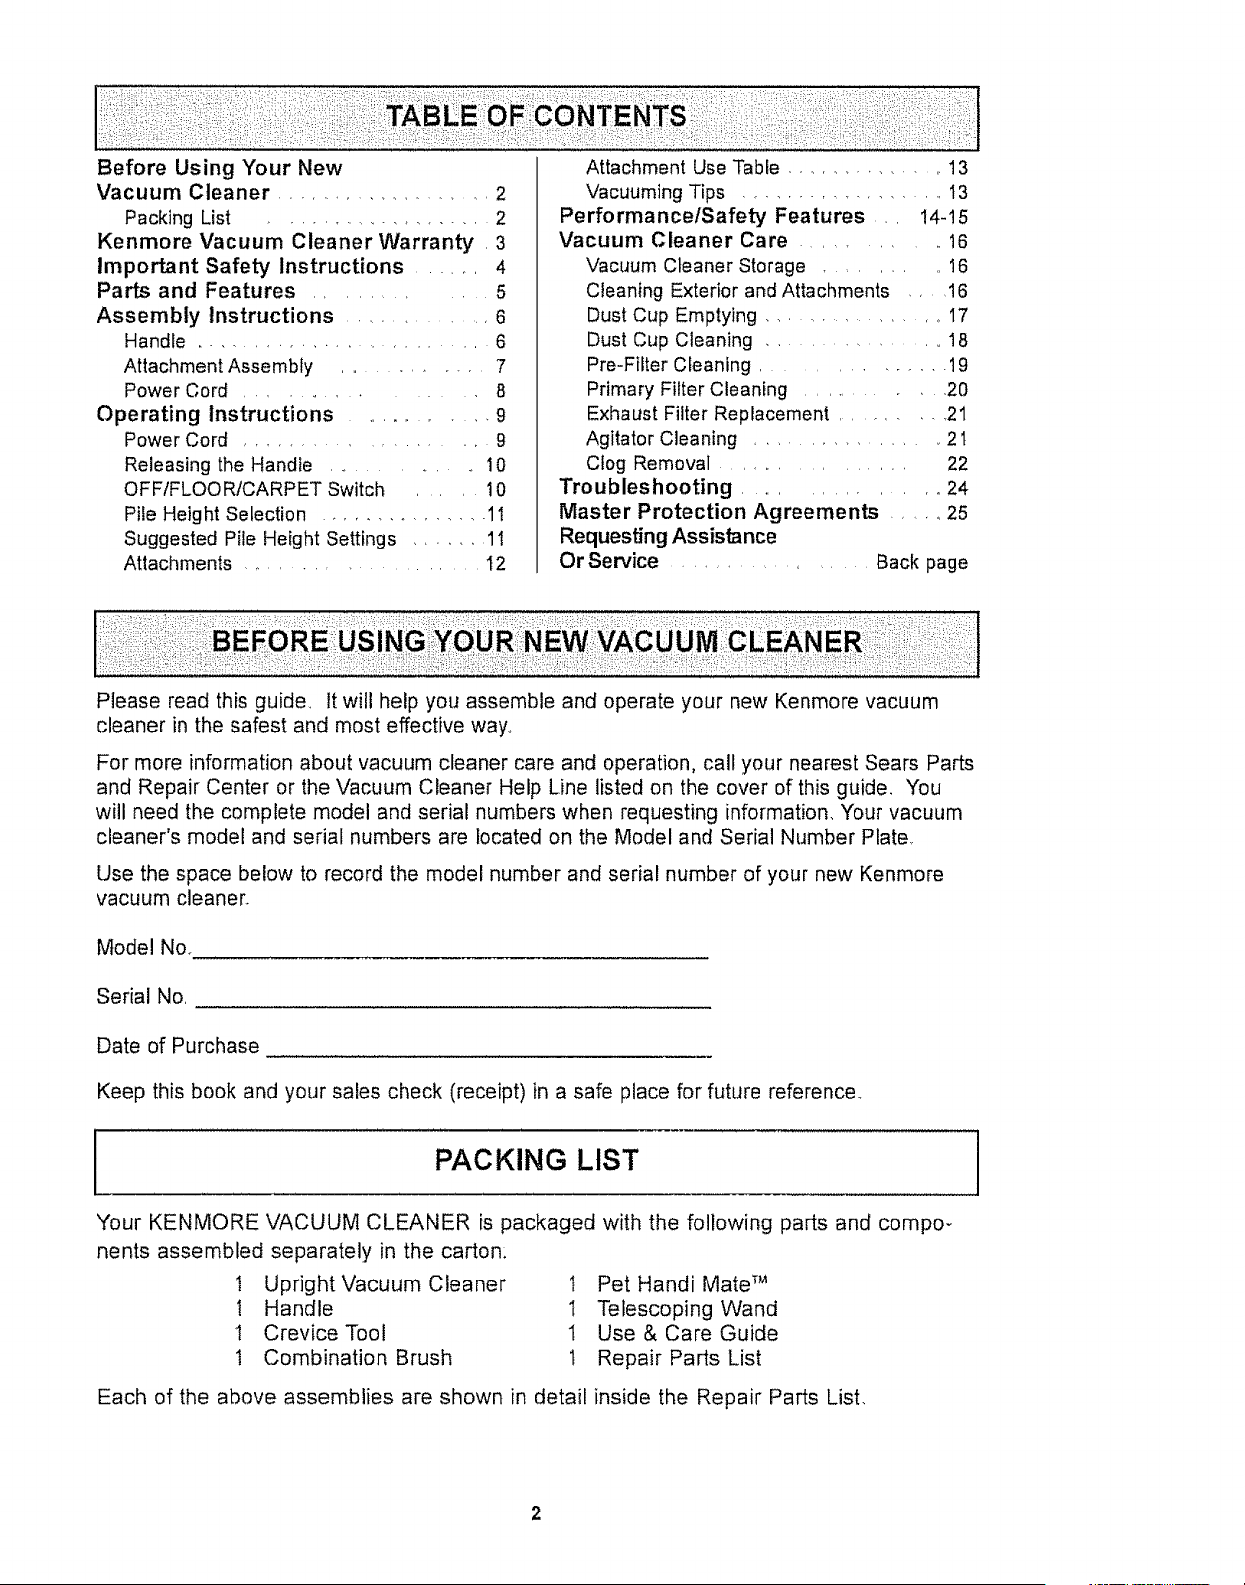
Before Using "four New
Vacuum Cleaner .................. 2
Packing List .................... 2
Kenmore Vacuum Cleaner Warranty , 3
Important Safety Instructions ...... 4
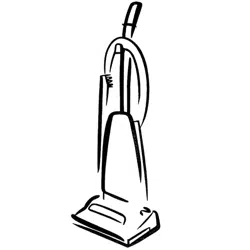
Parts and Features ......... 5
Assembly Instructions ............. 6
Handle .......................... 6
Attachment Assembly ......... 7
Power Cord .......... 8
Operating Instructions ......... 9
Power Cord ..................... 9
Releasing the Handte ............. 10
OFFtFLOO RtCARPET Switch ..... 10
Pile Height Selection ............... 11
Suggested Pile Height Settings ....... 11
Attachments ..................... I2
Attachment Use Table ............... 13
Vacuuming Tips ................... 13
Performance/Safety Features ,. 14-15
Vacuum Cleaner Care .......... IB
Vacuum Cleaner Storage ....... 16
Cleaning Exterior and Attachments .... 16
Dust Cup Emptying .................. 17
Dust Cup Cleaning ................. 18
Pre-Filter Cleaning .............. 1g
Primary Filter Cleaning ........... 20
Exhaust Filter Replacement .......... 21
Agitator Cleaning .................. 2 t
Clog Removal ................ 22
Troubleshooting .............. 24
Master Protection Agreements ..... 25
Requesting Assistance
Or Service ................ Back page
Please read this guide. It will help you assemble and operate your new Kenmore vacuum
cleaner in the safest and most effective way,
For more information about vacuum cleaner care and operation, call your nearest Sears Parts
and Repair Center or the Vacuum Cleaner Help Line listed on the cover of this guide. You
will need the complete model and serial numbers when requesting information, "four vacuum
cleaner's model and serial numbers are located on the Model and Serial Number Plate
Use the space below to record the model number and serial number of your new Kenmore
vacuum cleaner_
Model No..
Serial No,
Date of Purchase
Keep this book and your sales check (receipt) in a safe place for future reference.
PACKING LIST
Your KENMORE VACUUM CLEANER is packaged with the following parts and compo-
nents assembled separately in the carton:
1 Upright Vacuum Cleaner t Pet Handi Mate TM
I Handle I Telescoping Wand
1 Crevice Tool 1 Use & Care Guide
t Combination Brush t Repair Parts List
Each of the above assemblies are shown in detail inside the Repair Parts List,
One"fear Limited Warranty
Whenassembled,operatedand maintainedaccordingto all instructionssuppliedwith
theproduct,if thisvacuumcleanerfails due to a defectin materialor workmanshipwithin
oneyear fromthe dateof purchase,returnit to any Searsstore, SearsParts& Repair
Centeror other Kenmoreoutletfor free repair.
Ifthisvacuumcleaneris usedfor otherthan privatefamily purposes,thiswarranty
appliesfor only90 daysfromthe date of purchase.
This warranty covers only defects in material and workmanship. Sears will NOT
pay for:
1,. Expendable items that can wear out from normal use, including but not limited to
filters, belts, light bulbs, and bags.
2.. A service technician to instruct the user in correct product assembly, operation or
maintenance.
3 A service technician to clean or maintain this product.,
4. Damage to or failure of this product if it is not assembled, operated or maintained
according to all instructions supplied with the product.
5. Damage to or failure of this product resulting from accident, abuse, misuse or use for
other than its intended purpose.
6. Damage to or failure of this product caused by the use of detergents, cleaners,
chemicals or utensils other than those recommended in all instructions supplied with
the product..
7. Damage to or failure of parts or systems resulting from unauthorized modifications
made to this product.
Disclaimer of implied warranties; limitation of remedies
Customer's sole and exclusive remedy under this limited warranty shall be product repair
as provided herein, implied warranties, including warranties of merchantability or fitness
for a particular purpose, are limited to one year or the shortest period allowed by law.
Sears shall not be liable for incidental or consequential damages° Some states and
provinces do not allow the exclusion or limitation of incidental or consequential damages,
or limitations on the duration of implied warranties of merchantability or fitness, so these
exclusions or limitations may not apply to you.
This warranty applies only while this vacuum cleaner is used in the United States and
Canada.
This warranty gives you specific legal rights, and you may also have other rights which
vary from state to state.
Sears, Roebuck and Co., Hoffman Estates, IL 60179
Sears Canada Inc., Toronto, Ontario, Canada MSB 2B8
WARNI G:
Your safety is important to us. To reduce the risk of fire, electrical shock, injury
to persons or damage when using your vacuum cleaner, follow basic safety
precautions including the following:
Use your vacuum cleaner only as
described in this manual. Use only with
Sears recommended attachments,
Disconnect electrical supply before ser-
vicing or cleaning out the brush area
Failure to do so could result in the brush
unexpectedly starting, causing personal
injury from moving parts.
Do not leave vacuum cleaner when
plugged in, Unplug from outlet when
not in use and before performing main-
tenance,
To reduce the risk of electrical shock -
Do not use outdoors or on wet surfaces.
Do not allow to be used as a toy. Close
attention is necessary when used by or
near children.
Do not use with a damaged cord or
plug. If vacuum cleaner is not working
as it should, has been dropped, dam-
aged, left outdoors, or dropped in water,
return it to a Sears Service Center for
assessment before using again.
Do not pull or carry by cord, use cord
as a handle, close a door on cord, or
pull cord around sharp edges or cor-
ners Do not run vacuum cleaner over
cord,. Keep cord away from heated sur-
faces r
Do not unplug by pulling on cord. To
unplug, grasp the plug, not the cord..
Do not handle plug or vacuum cleaner
with wet hands.
Do not put any objects into openings..
Do not use with any opening blocked;
keep free of dust, lint, hair, and anything
that may reduce air flow,.
Keep hair, loose clothing, fingers, and
all parts of body away from openings
and moving parts
Turn off all controls before unplugging.
Use extra care when cleaning on stairs.
Do not put on chairs, tables, etc. Keep
on floor.
Do not use vacuum cleaner to pick up
flammable or combustible liquids (gaso-
line, cleaning fluid, perfumes, etc,), or
use in areas where they may be pre-
sent The fumes from these substances
can create a fire hazard or explosion.
Do not pick up anything that is burning
or smoking, such as cigarettes, match-
es, or hot ashes.
Do not use vacuum cleaner without
dust cup and/or filters in place..
Always clean the dust cup after vacu-
uming carpet cleaners or freshener,
powders, and fine dust° These products
clog the filters, reduce airflow and can
cause damage to the vacuum cleaner_
Failure to clean the dust cup could
cause permanent damage to the vacu-
um cleaner,
Do not use the vacuum cleaner to pick
up sharp hard objects, small toys, pins,
paper clips, etc. They may damage the
vacuum cleaner or dust cup_
Unplug before connecting Pet Handi
Mate T_
You are responsible for making sure
that your vacuum cleaner is not used by
anyone unable to operate it properly,
SAVE THESE INSTRUCTHO
Proper assembly and safe use of your vacuum cleaner are your responsibilities. Your
vacuum cleaner is intended for Household use. Read this Use & Care Guide carefully for
important use and safety information. This guide contains safety statements under warning
and caution symbols.
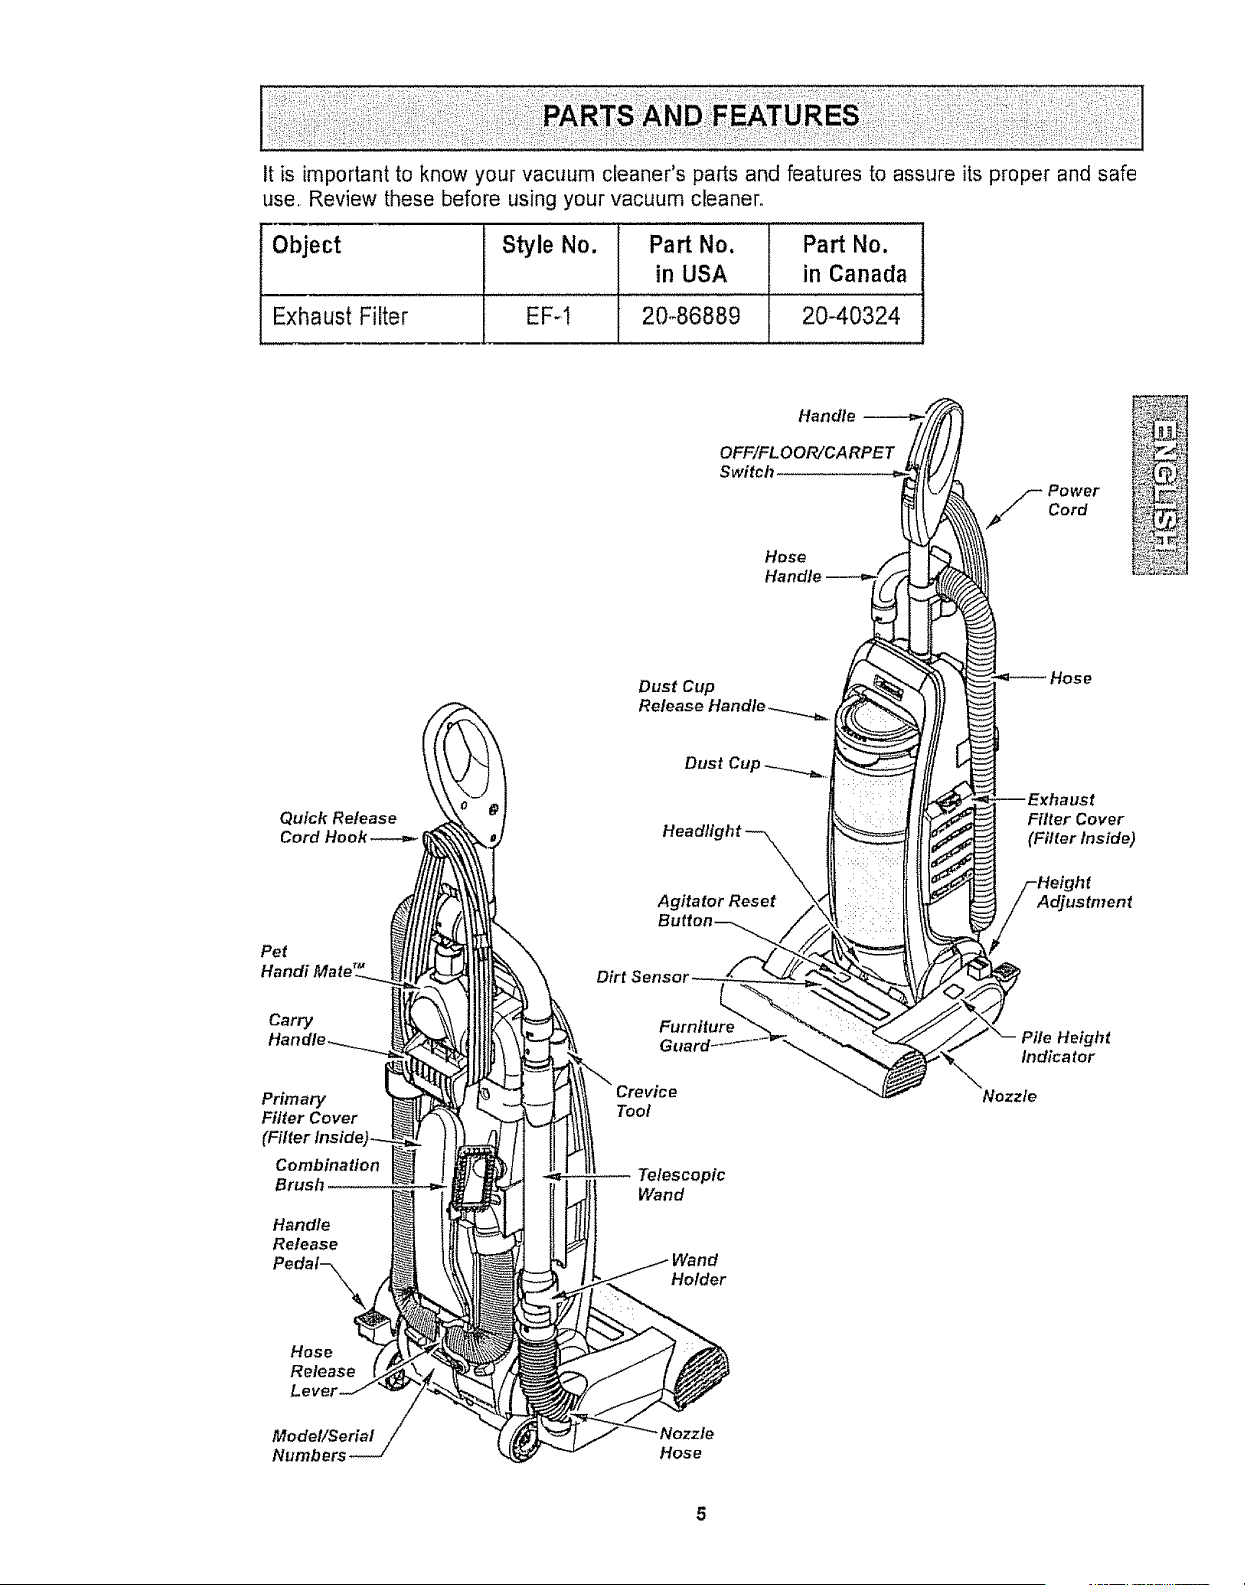
It is importantto knowyourvacuumcleaner'spartsandfeaturesto assureitsproperandsafe
use Reviewthesebeforeusingyourvacuumcleaner.
Object Style No. Part No. Part No,
in USA in Canada
E
Exhaust Filter f EFq 20_86889 20-40324
I
Quick Release
Cord Hook----_ !
Pet
Carry
Primary
Filter Cover
(Filter Inside
Combination
Brush
Handle
Release
Pedal-\_ k
Dirt
Tool
Telescopic
Wand
Wand
Holder
Hose
Release
Level
Model/Serial
Numbers
Hose
...... .......Pi_ease pay speciai attentio n to_ihese haza;d ate d boxesl and fo flow any inStr"c _I
tions given. WARNING statements alert you to such hazards as fire, electric
shock, burns and personal injury CAUTION statements alert you to such haz-
ards as personal injury andtor property damage.
kWARNING
Electrical Shock Hazard
Do not plug vacuum cleaner into the
electrical supply until the assembly is
complete. Failure to do so could
result in eletrical shock or injury.
Before assembling the vacuum cleaner,
check the PACKING LISTo Use this list to
verify that you have received all the
components of your new Kenmore
vacuum cleaner.
HANDLE
CAUTION
Do not overtighten handle screw,
Overtightening could strip the screw
holes,
Do not operate the vacuum cleaner
without the screw in place,
I, Remove the handle screw from the
body of the vacuum cleaner°
2. Position the handle assembly as
shown in the illustration.
3. Using a screwdriver, tighten handle
screw,
NOTE: It may be necessary to adjust the
handle slightly.
Handle
Screw
Hole
Handle
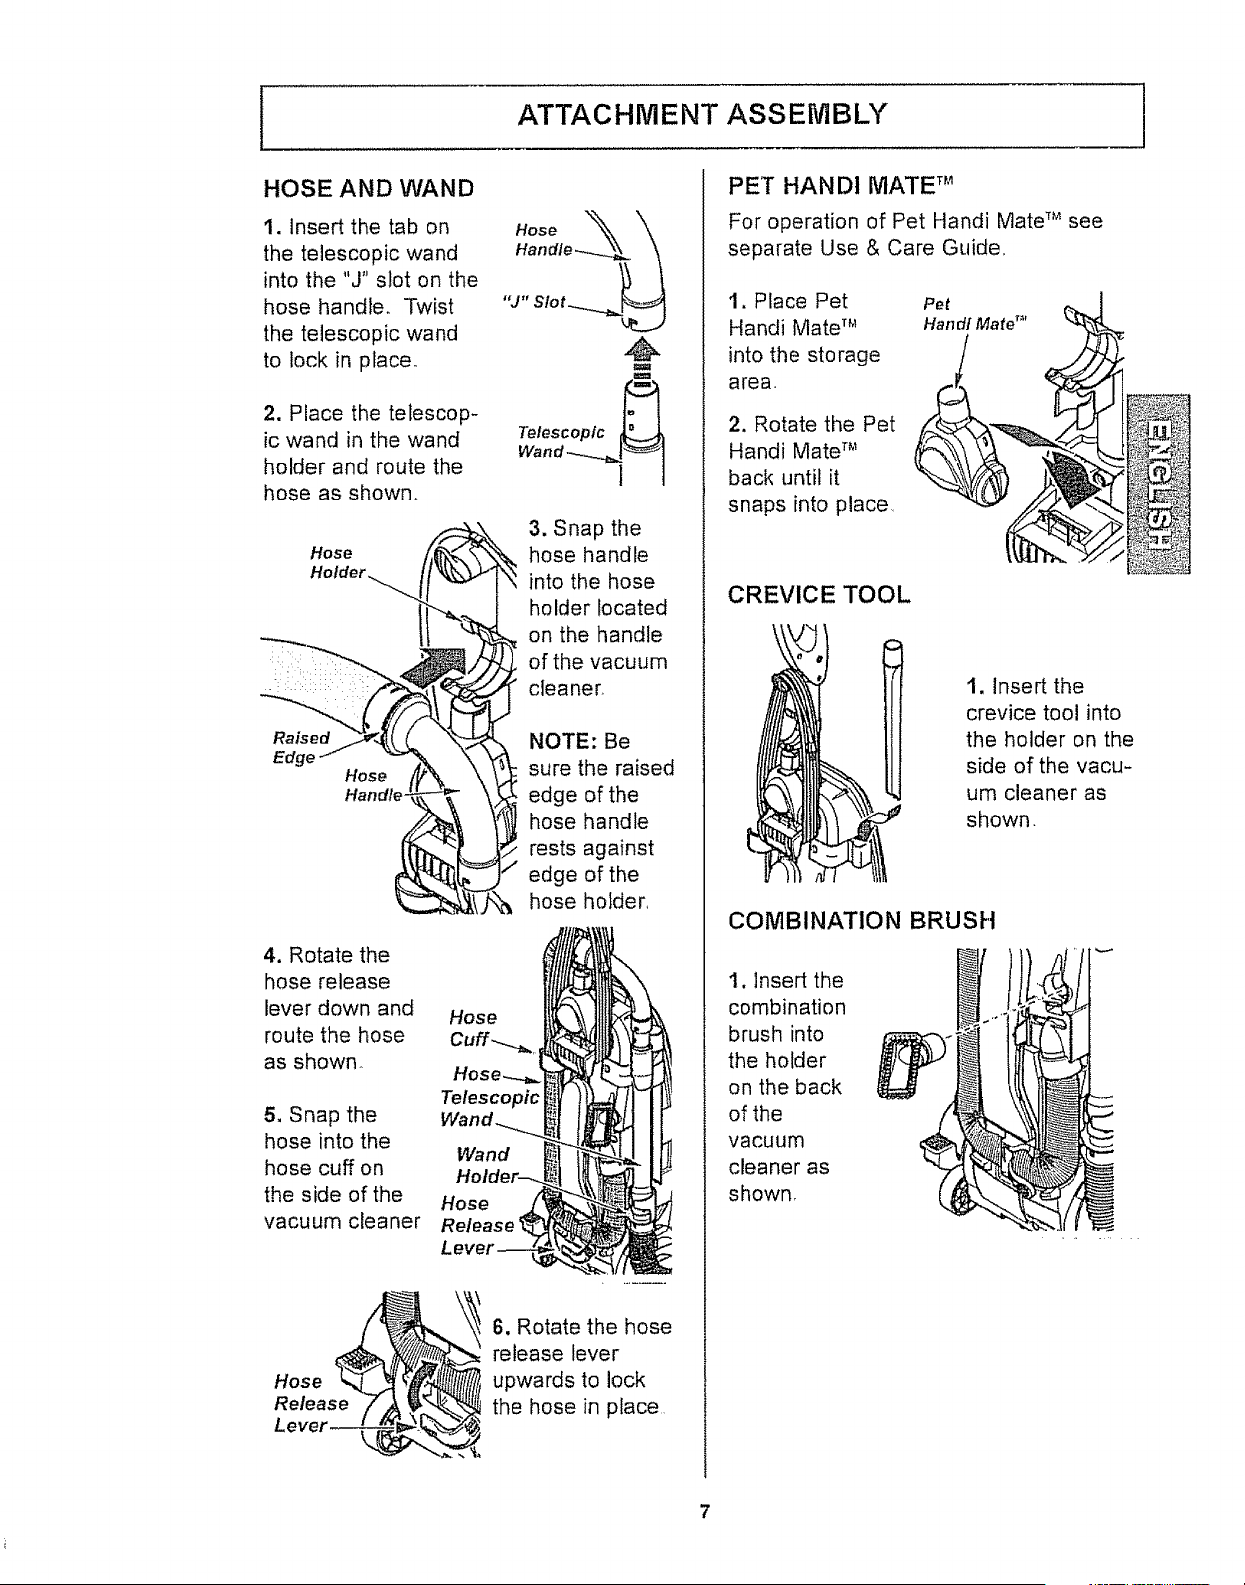
ATTACHMENT ASSEMBLY
HOSEAND WAND
1, Insert the tab on
the telescopic wand
into the "J" slot on the
hose handle. Twist
the telescopic wand
to lock in place°
2. Place the telescop-
ic wand in the wand
holder and route the
hose as shown.
Hose /
Holder _( /
Raised
Edge
Hose
Handle
3, Snap the
hose handle
into the hose
holder located
on the handle
of the vacuum
cleaner_
NOTE: Be
sure the raised
edge of the
hose handle
rests against
edge of the
hose holder,
4, Rotate the
hose release
lever down and
route the hose
as shown
5, Snap the
hose into the
hose cuff on
the side of the
vacuum cleaner
Hose
Telescopic
Wand
Hose
Release
Hose
Release
6, Rotate the hose
release lever
upwards to lock
the hose in place
PET HANDI MATE TM
For operation of Pet Handi Mate TM see
separate Use & Care Guide,
1, Place Pet
Handi Mate TM
into the storage
area
2. Rotate the Pet
Handi Mate TM
back until it
snaps into place,
Pet
Ha n dl Mate TM
CREVICE TOOL
t, Insert the
crevice tool into
the holder on the
side of the vacu-
um cleaner as
shown.
COMBINATION BRUSH
1, Insert the
combination
brush into
the holder
on the back
of the
vacuum
cleaner as
shown.
[
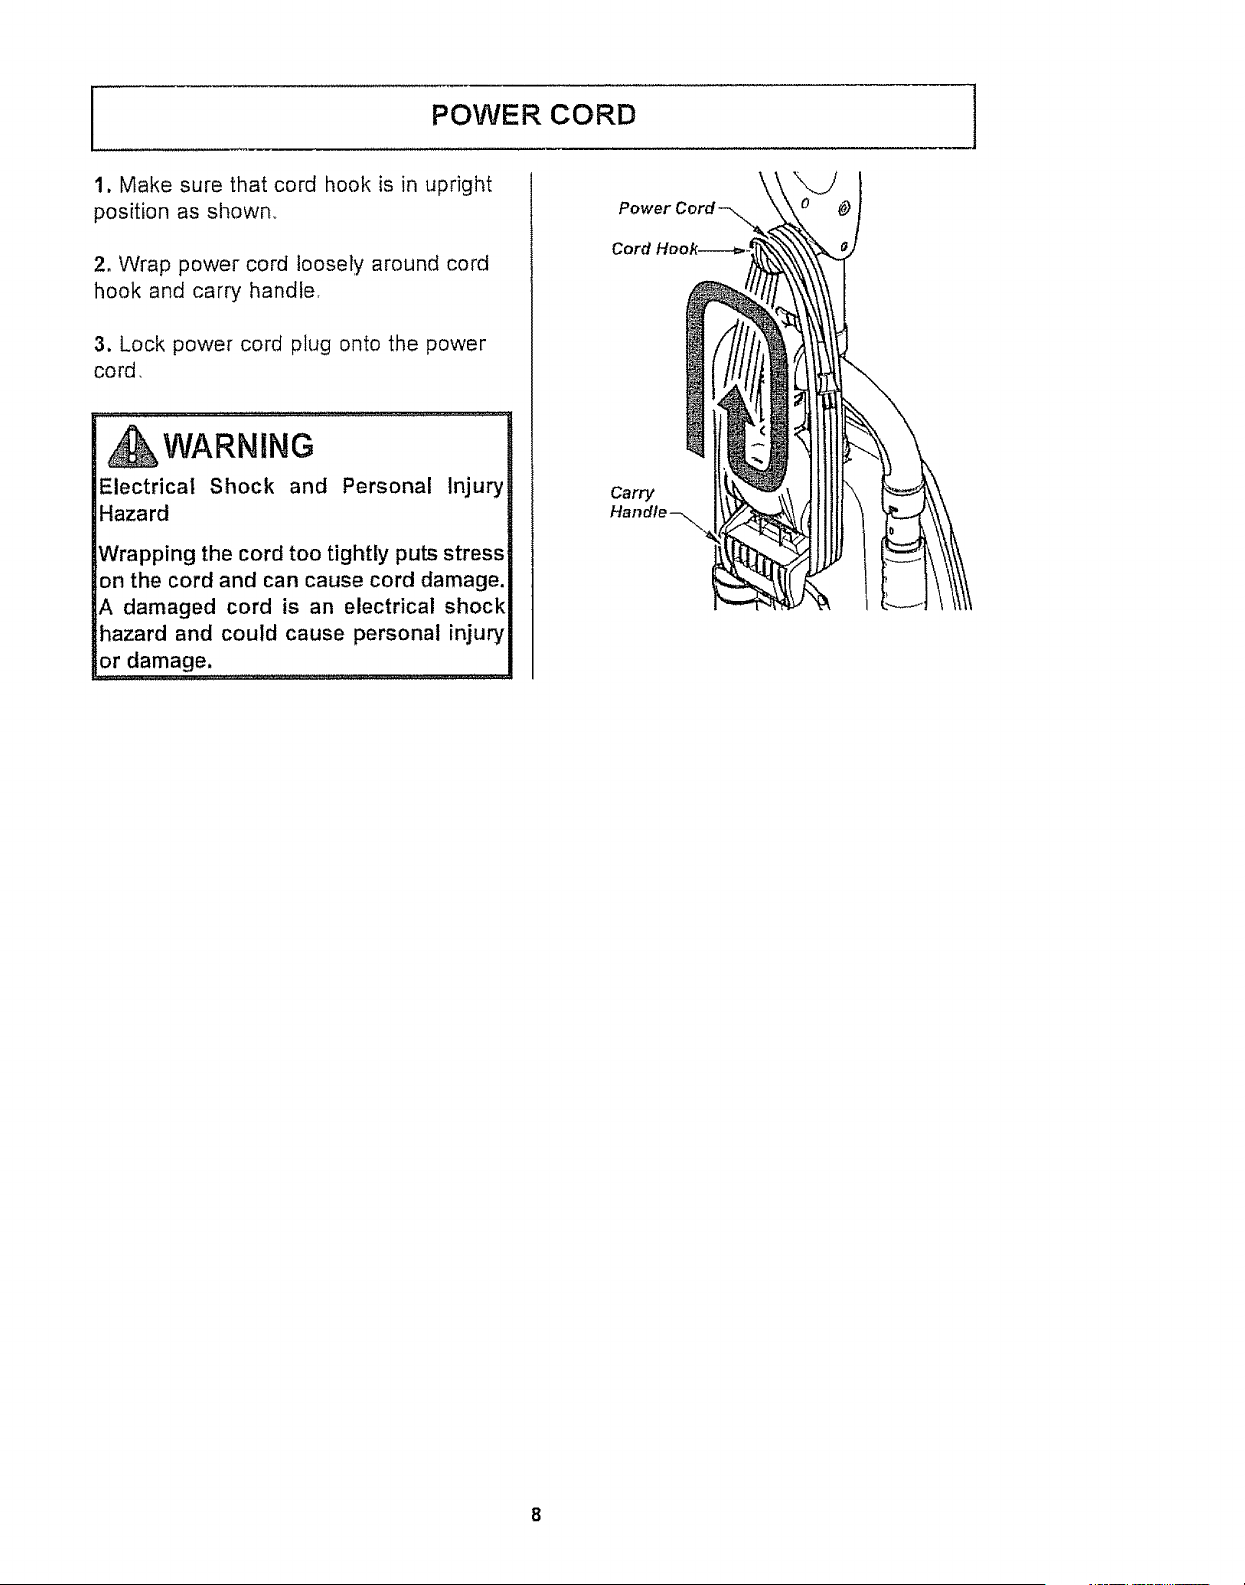
POWER CORD
1. Make sure that cord hook is in upright
position as shown,
2, Wrap power cord loosely around cord
hook and carry handle,
3. Lock power cord plug onto the power
cord,
WARNBNG
Electrical Shock and Personal Injury
Hazard
Wrapping the cord too tightly puts stress
on the cord and can cause cord damage.
A damaged cord is an electrical shock
hazard and could cause personal injury
or damage.
Carry
CAUTtON
Moving partsl To reduce the risk of personal
injury, DO NOT touch the agitator when vacuum
cleaner is on. Contacting the agitator while it is
rotating can cut, bruise or cause other injuries°
Always turn off and unplug from electrical outlet
before servicing.
Use caution when operating near children.
\
!
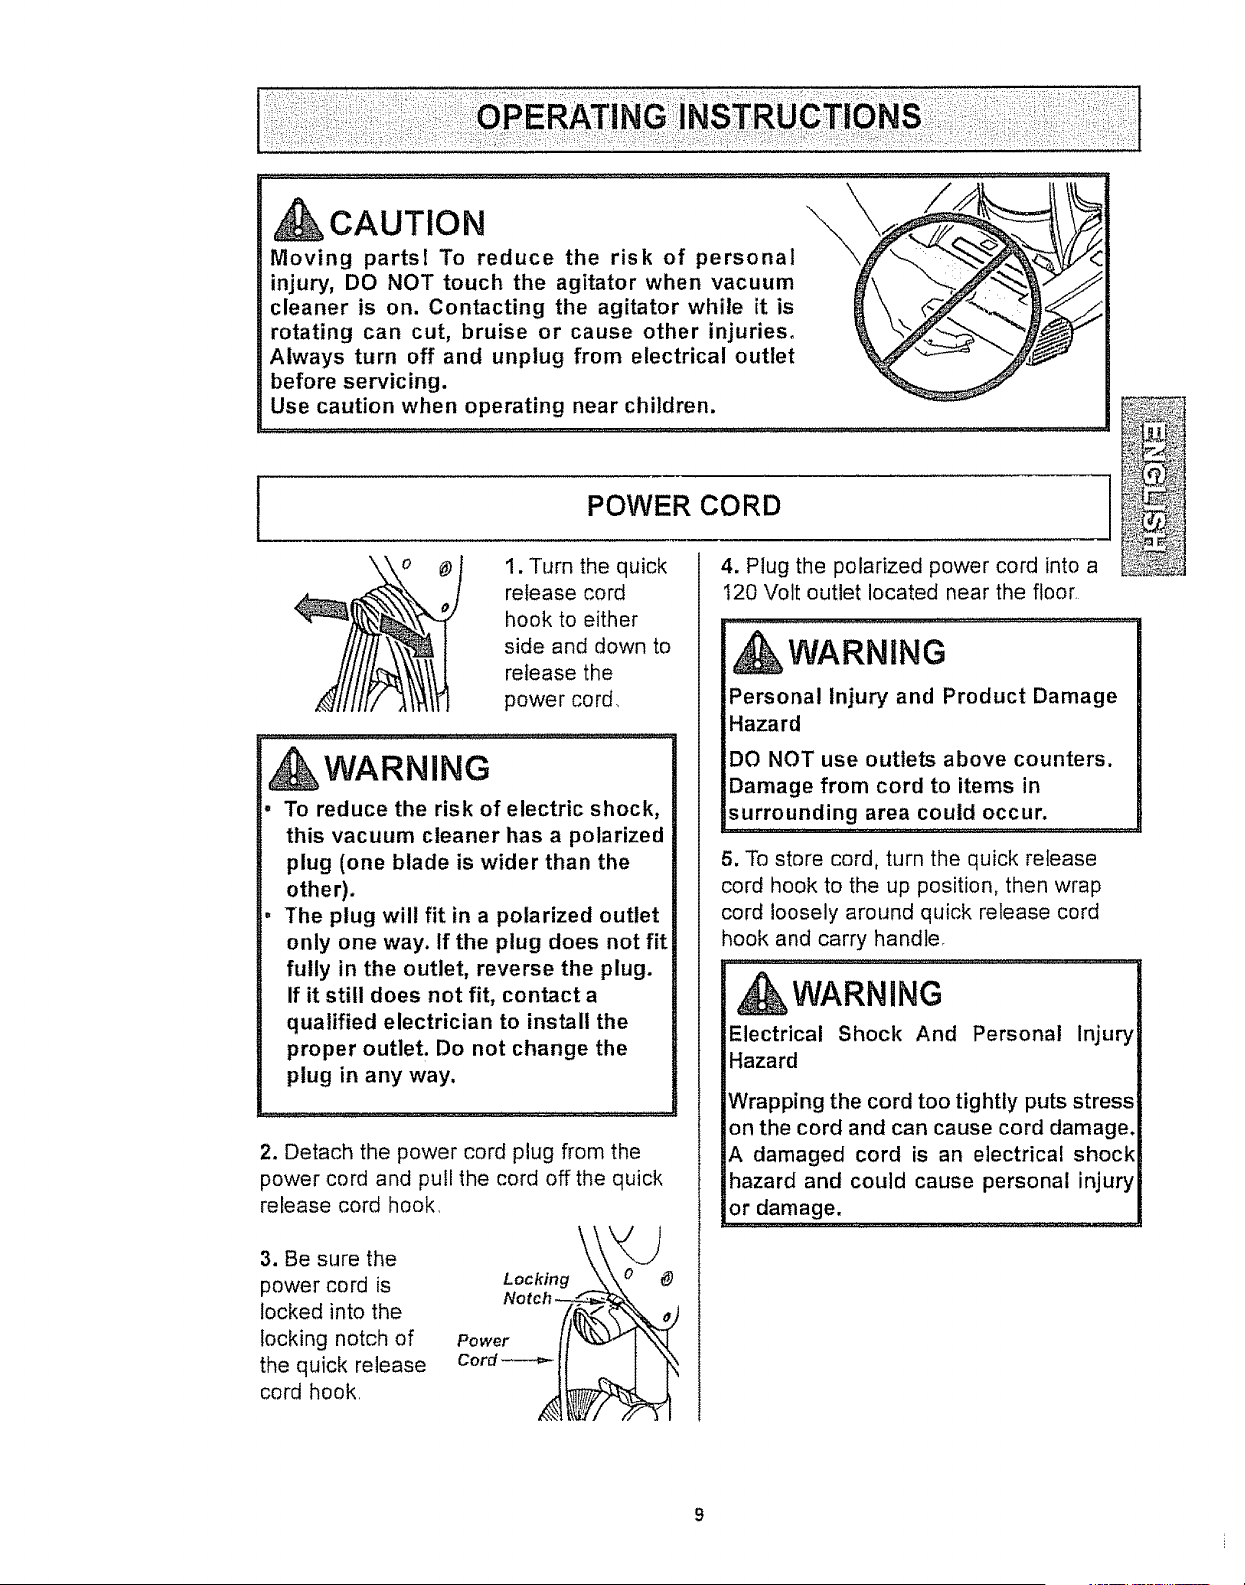
POWER CORD
]
I. Turn the quick
release cord
hook to either
side and down to
release the
power cord,
, WARN NG I
• To reduce the risk of electric shock,
this vacuum cleaner has a polarized
plug (one blade is wider than the
other).
The plug will fit in a polarized outlet
only one way. If the plug does not fit
fully in the outlet, reverse the plug.
If it still does not fit, contact a
qualified electrician to install the
proper outlet. Do not change the
plug in any way.
2. Detach the power cord plug from the
power cord and pull the cord off the quick
release cord hook
3. Be sure the
power cord is
locked into the
locking notch of
the quick release
cord hook
\
Locking
Power
Cord
4. Plug the polarized power cord into a
120 Volt outlet located near the floor
WARNING
Personal Injury and Product Damage
Hazard
DO NOT use outlets above counters.
Damage from cord to items in
surrounding area could occur.
5. To store cord, turn the quick release
cord hook to the up position, then wrap
cord loosely around quick release cord
hook and carry handle.
WARNING
Electrical Shock And Personal Injury
Hazard
Wrapping the cord too tightly puts stress
on the cord and can cause cord damage.
A damaged cord is an electrical shock
hazard and could cause personal injury
or damage.
[
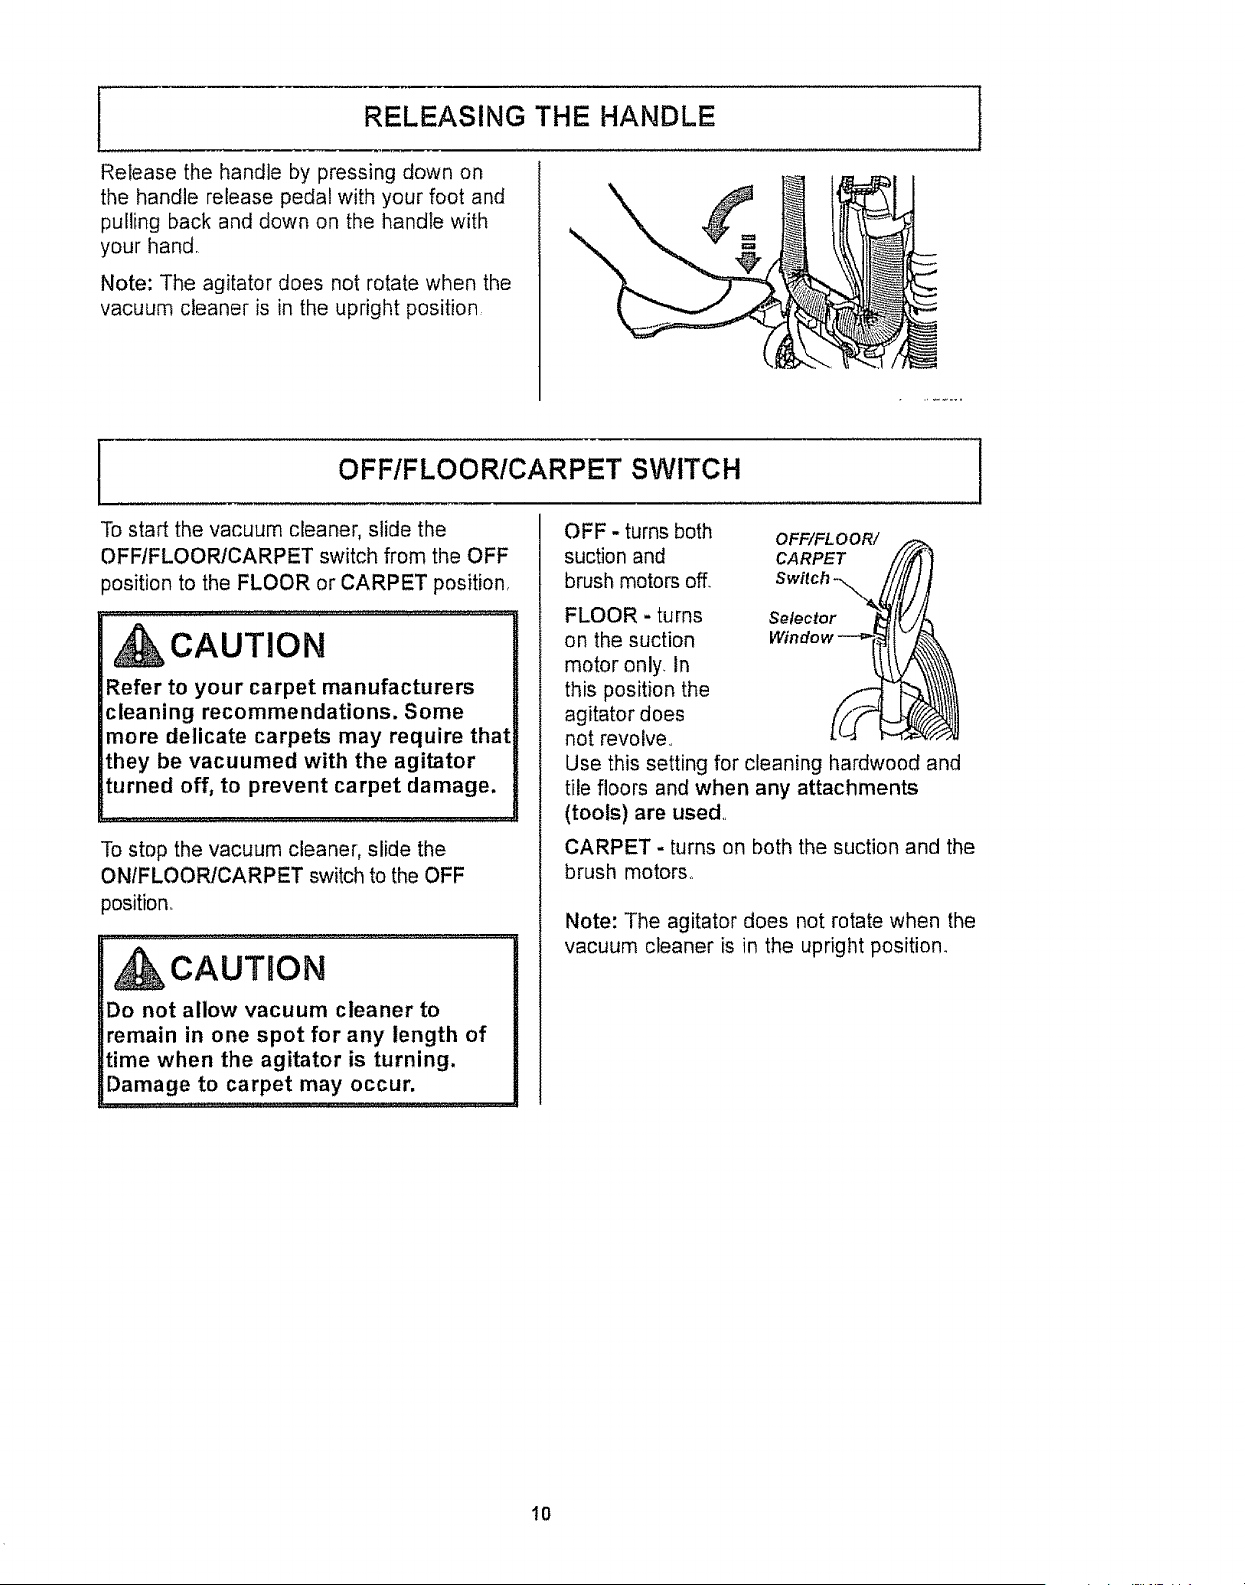
Release the handle by pressing down on
the handle release pedal with your foot and
pulling back and down on the handle with
your hand,
]
RELEASING THE HANDLE t
Note: The agitator does not rotate when the
vacuum cleaner is in the upright position
\
I
OFFIFLOOR/CARPET SWITCH 1
To start the vacuum cleaner, slide the
OFFtFLOOR/CARPET switch from the OFF
position to the FLOOR or CARPET position
d CAUTION
Refer to your carpet manufacturers
cleaning recommendations. Some
more delicate carpets may require that
they be vacuumed with the agitator
turned off, to prevent carpet damage.
To stop the vacuum cleaner, slide the
ON/FLOORICARPET switch to the OFF
position,
CAUTmON
Do not allow vacuum cleaner to
remain in one spot for any length of
time when the agitator is turning.
Damage to carpet may occur.
OFF - turns both OFF/FLOOR/
suction and CARPET
brush motors off
FLOOR - turns Selector
on the suction
motor only In
this position the
agitator does
not revolve
Use this setting for cleaning hardwood and
tile floors and when any attachments
(tools) are used
CARPET - turns on both the suction and the
brush motors.
Note: The agitator does not rotate when the
vacuum cleaner is in the upright position.
10
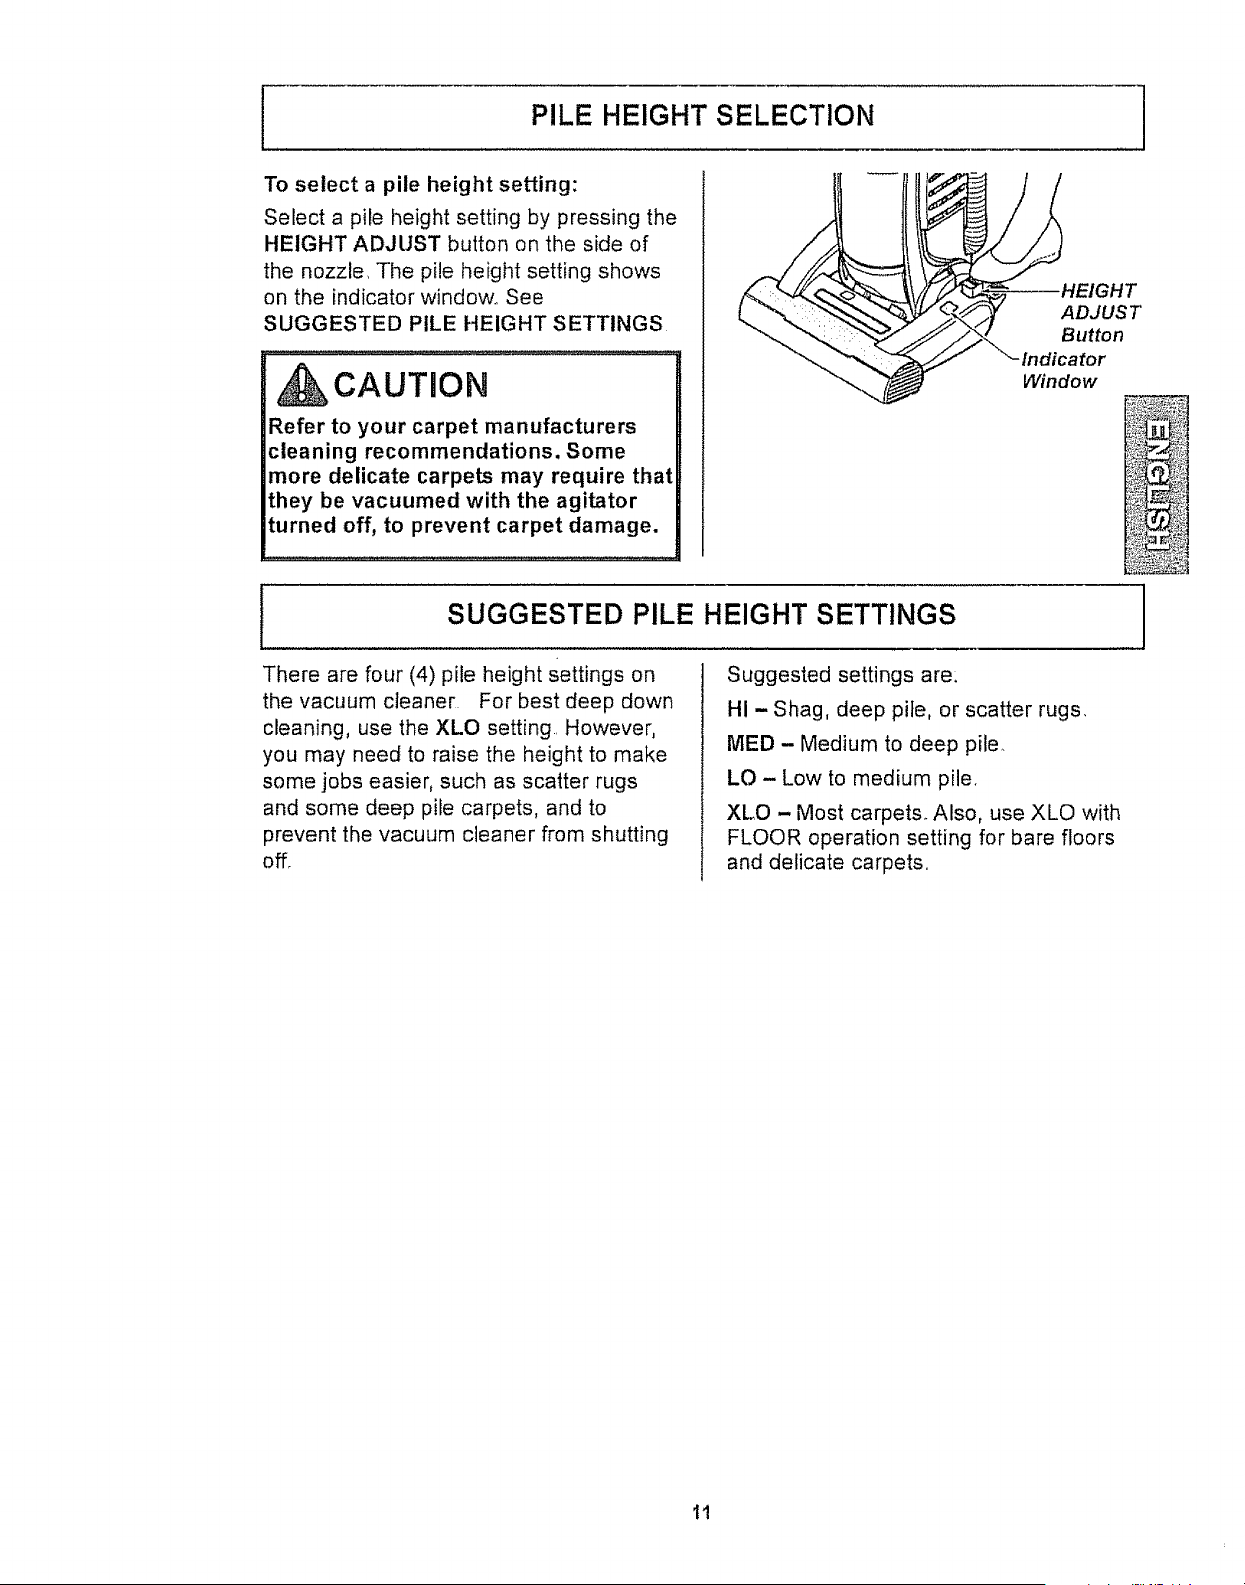
PILE HEIGHT SELECTION
To select a pile height setting:
Select a pile height setting by pressing the
HEIGHT ADJUST button on the side of
the nozzle, The pile height setting shows
on the indicator window., See
SUGGESTED PILE HEIGHT SETTINGS
CAUTION
Refer to your carpet manufacturers
cleaning recommendations. Some
more delicate carpets may require that
they be vacuumed with the agitator
turned off, to prevent carpet damage.
SUGGESTED PILE HEIGHT SETTINGS
r_HEIGH T
• %_.//'-3Y ADJUST
J.---------------_'/_-../Button
_J'_-lndi;ator
Window
[
There are four (4) pile height Settings on
the vacuum cleaner. For best deep down
cleaning, use the XLO setting.. However,
you may need to raise the height to make
some jobs easier, such as scatter rugs
and some deep pile carpets, and to
prevent the vacuum cleaner from shutting
offr
Suggested settings are:
HI - Shag, deep pile, or scatter rugs.
MED - Medium to deep pile.
LO - Low to medium pile.
XLO - Most carpets_ Also, use XLO with
FLOOR operation setting for bare floors
and delicate carpets..
11
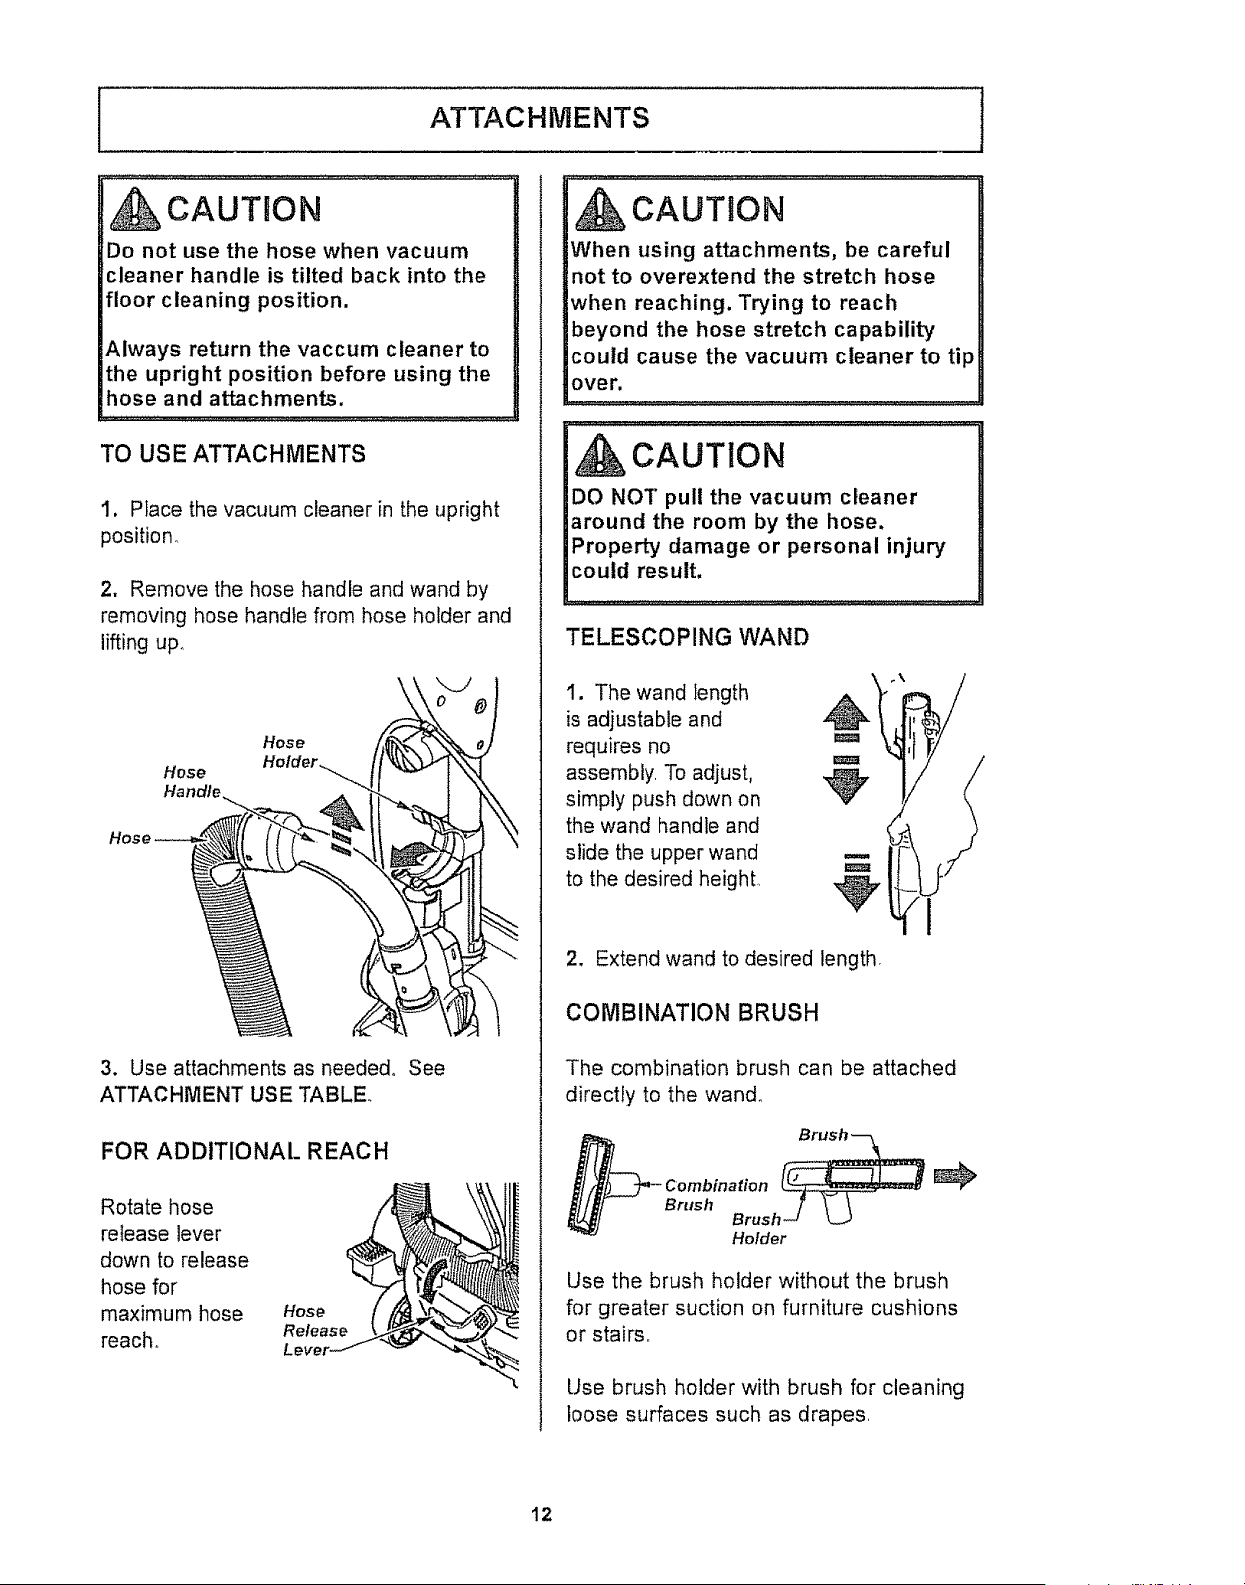
ATTACHiVIENTS
CAUTION
Do not use the hose when vacuum
cleaner handle is tilted back into the
floor cleaning position.
Always return the vaccum cleaner to
the upright position before using the
hose and attachments.
TO USE ATTACHMENTS
1, Place the vacuum cleaner in the upright
position.
2, Remove the hose handle and wand by
removing hose handle from hose holder and
lifting upo
3. Use attachments as needed° See
ATTACHMENT USE TABLE.
FOR ADDITIONAL REACH
Rotate hose
release lever
down to release
hose for
maximum hose
reach,
Hose
Release
CAUTION
When using attachments, be careful
not to overextend the stretch hose
when reaching. Trying to reach
beyond the hose stretch capability
could cause the vacuum cleaner to tip
over,
kCAUTION
DO NOT pull the vacuum cleaner
around the room by the hose,
Property damage or personal injury
could result.
TELESCOPING WAND
1. The wand length
is adjustable and
requires no
assembly To adjust,
simply push down on
the wand handle and
slide the upper wand
to the desired heighL
/
2. Extend wand to desired length
COMBINATION BRUSH
The combination brush can be attached
directly to the wan&
Combination [_
""'" /o,S
Use the brush holder without the brush
for greater suction on furniture cushions
or stairs
Use brush holder with brush for cleaning
loose surfaces such as drapes,
12
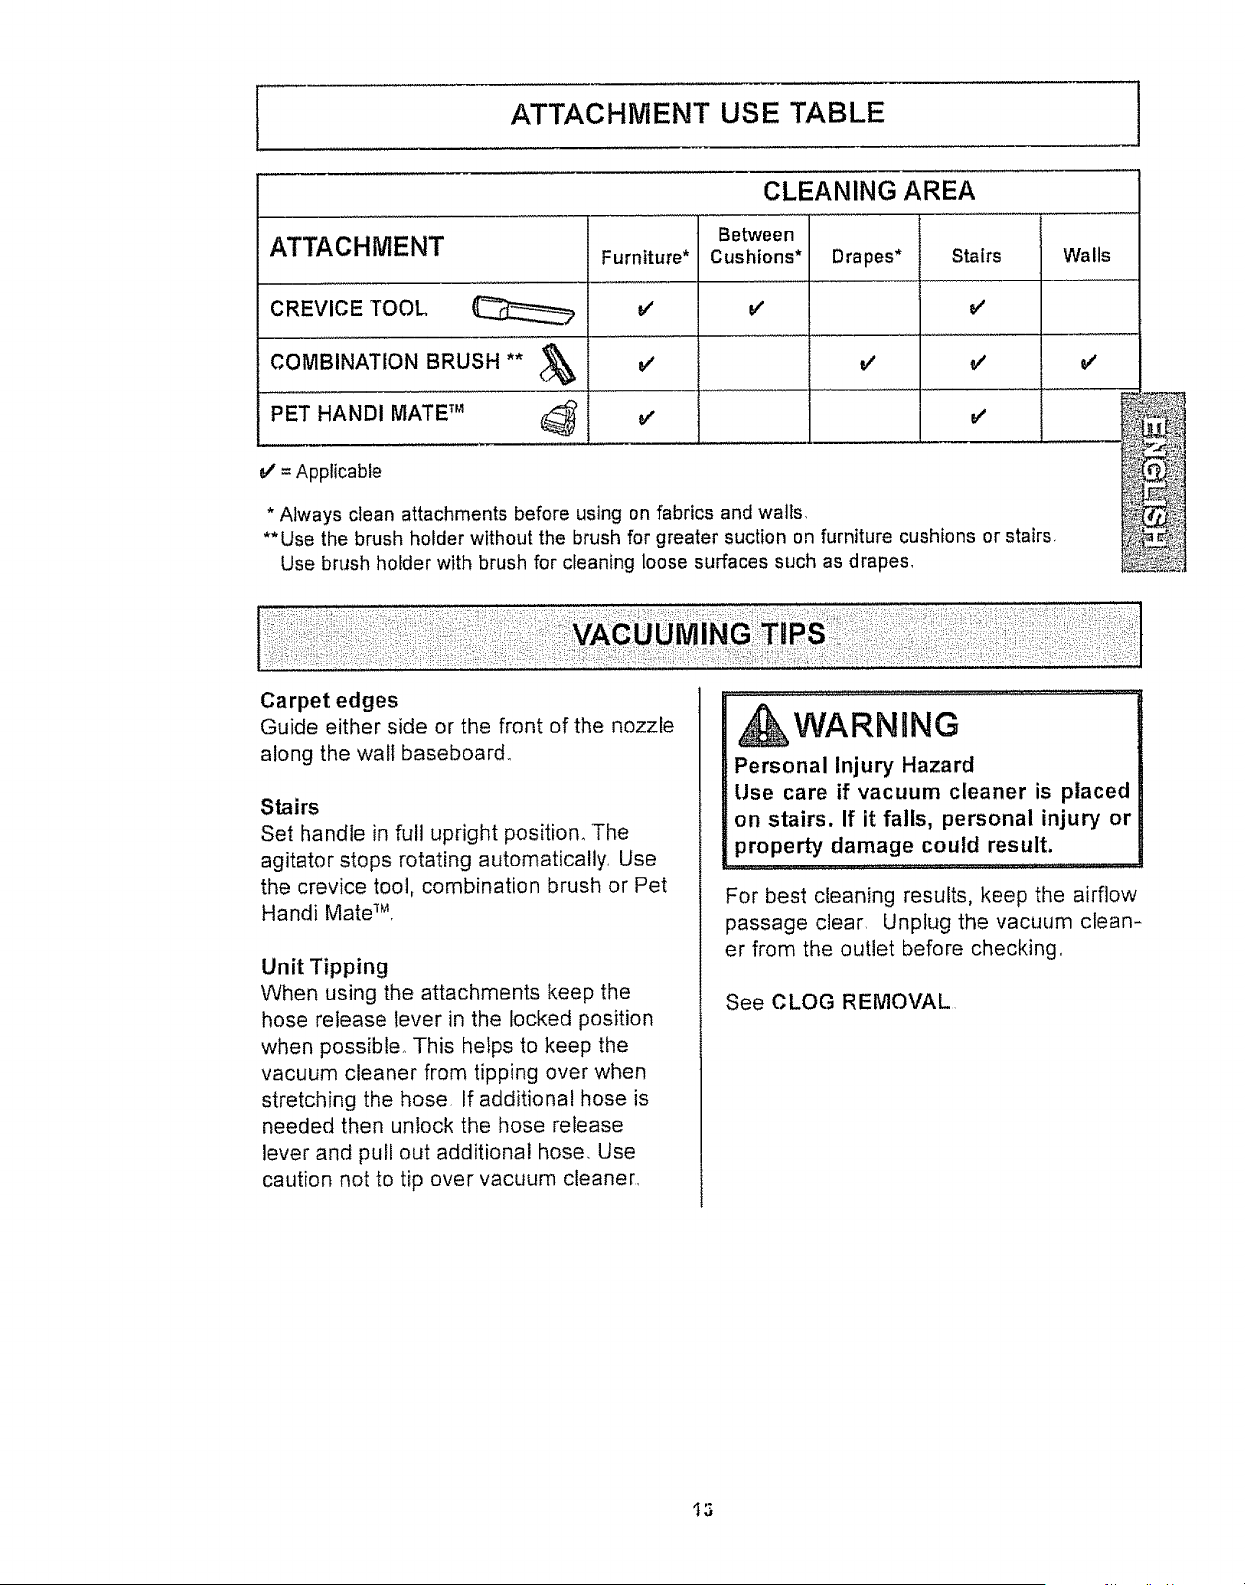
ATTACHMENT USE TABLE
ATTACHMENT
CREVICE TOOL
coMBINATION BRUSH '*_*
PET HANDI MATE TM _d_
Furniture*
v"
J
CLEANING AREA
Between
Cushions*
J
Drapes*
v'
Stairs
L
_/= Applicable
* Always clean attachments before using on fabrics and waits,
**Use the brush holder without the brush for greater suction on furniture cushions or stairs+
Use brush holder with brush for cleaning loose surfaces such as drapes,
Walls
v'
+
_'._$_,,_
N
Carpet edges
Guide either side or the front of the nozzle
along the walt baseboard°
Stairs
Set handle in full upright position. The
agitator stops rotating automatically Use
the crevice tool, combination brush or Pet
Handi Mate TM
Unit Tipping
When using the attachments keep the
hose release lever in the locked position
when possible This helps to keep the
vacuum cleaner from tipping over when
stretching the hose+ If additional hose is
needed then unlock the hose release
lever and pull out additional hose, Use
caution not to tip over vacuum cleaner
WARNING
Personal Injury Hazard
Use care if vacuum cleaner is placed
on stairs. If it falls, personal injury or
property damage could result.
For best cleaning results, keep the airflow
passage clear, Unplug the vacuum clean-
er from the outlet before checking.
See CLOG REMOVAL
t3
MOTOR PROTECTION
SYSTEM
Thermal Protector- Suction Motor
This vacuum cleaner has a thermal
protector which automatically trips to
protect the vacuum cleaner suction motor
Ifa clog prevents the normal flow of air to
the motor, the thermal protector turns the
motor off automatically This allows the
motor to cool in order to prevent possible
damage to the vacuum cleaner
Thermal Protector - Agitator Motors
This vacuum cleaner has thermal
protectors which automatically trip to
protect the agitator motorsThe thermal
protectors turn the motors off
automatically, This allows the motors to
cool in order to prevent possible damage
to the vacuum cleaner_
CAUTION
Always return the vaccum cleaner to
the upright position before using the
hose and attachments. Failure to do
so may result in overheating of the
agitator motors and can cause the
thermal protectors to trip.
To reset thermal protectors: Turn the
vacuum cleaner off and unplug the power
cord from the outlet to allow the vacuum
cleaner to cool and the thermal protectors
to reset
Check for and remove clogs, and
empty dust cup if necessary. See
CLOG REMOVAL section. Also check
and replace any clogged filters. Wait
approximately 40-50 minutes before
restarting vacuum cleaner.
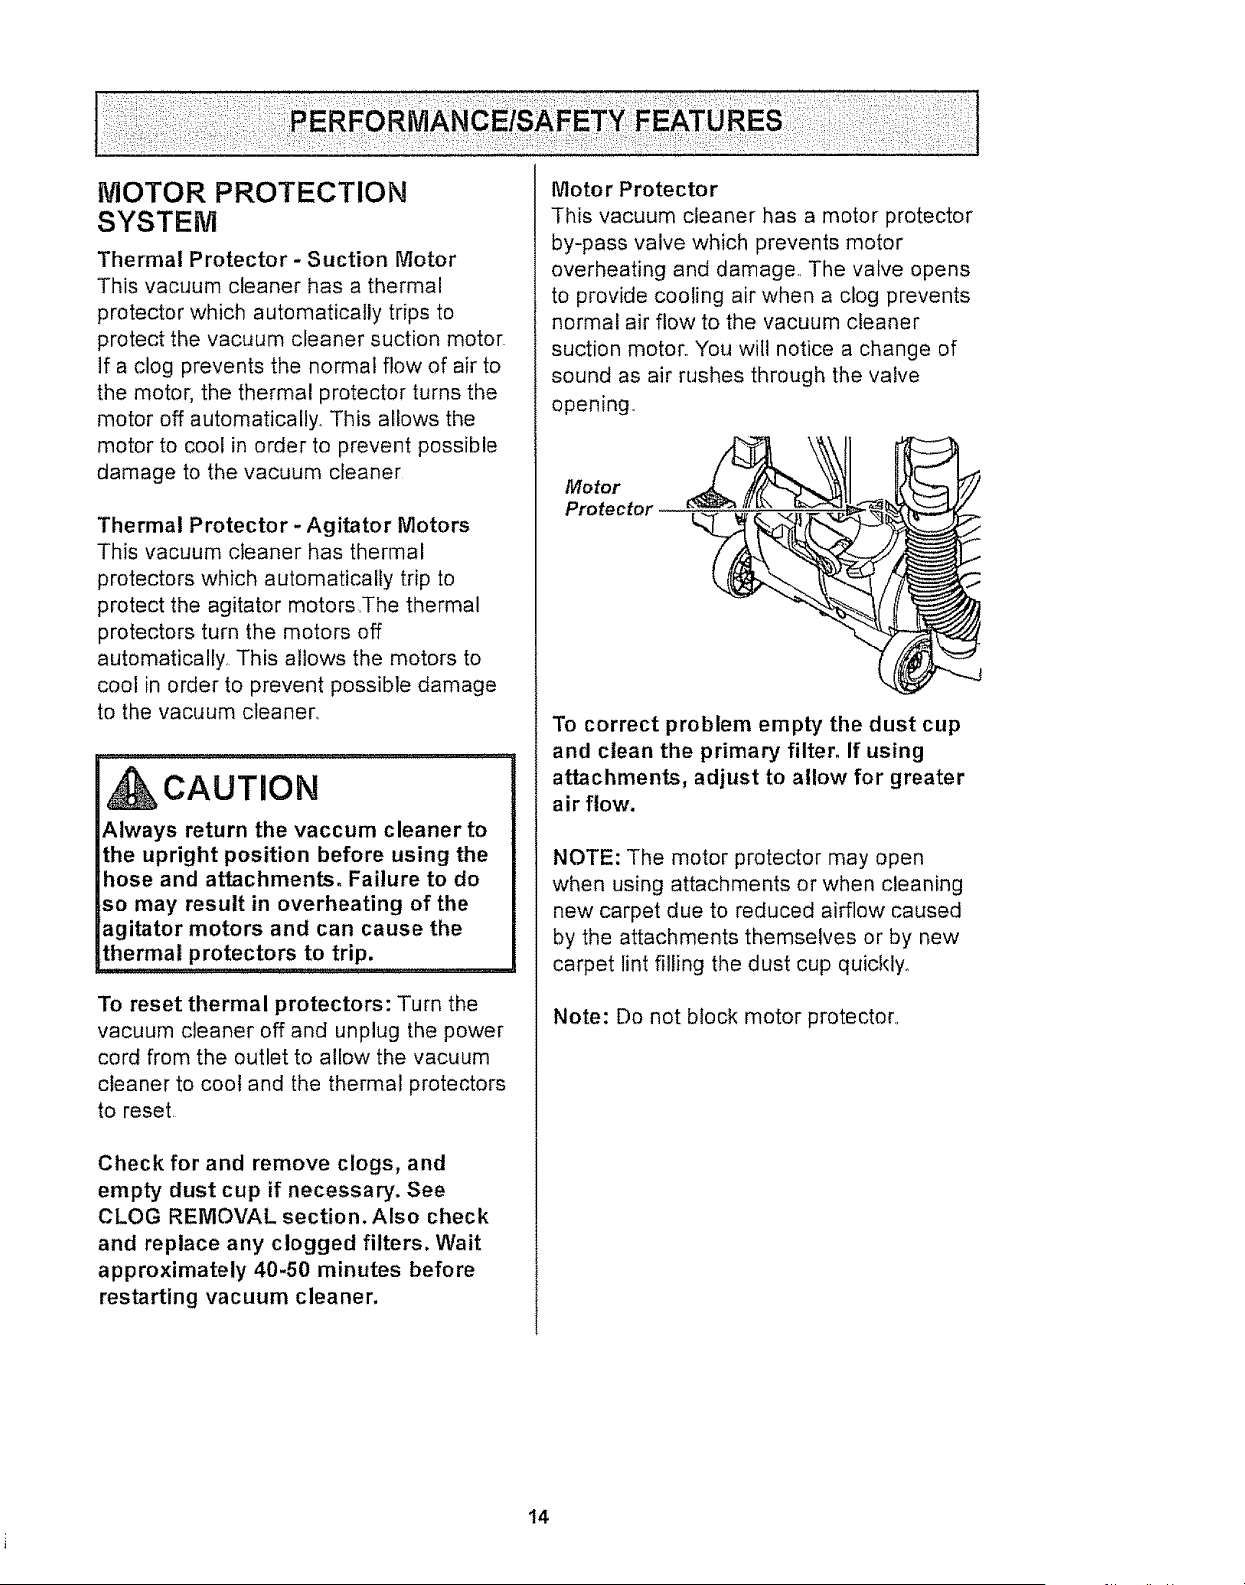
Motor Protector
This vacuum cleaner has a motor protector
by-pass valve which prevents motor
overheating and damage The valve opens
to provide cooling air when a clog prevents
normal air flow to the vacuum cleaner
suction motor You will notice a change of
sound as air rushes through the valve
opening.
Motor
Protectol
To correct problem empty the dust cup
and clean the primary filter. If using
attachments, adjust to allow for greater
air flow.
NOTE: The motor protector may open
when using attachments or when cleaning
new carpet due to reduced airflow caused
by the attachments themselves or by new
carpet lint filling the dust cup quickly_
Note: Do not block motor protector.
14
WARNING
Electrical Shock And PersonaJ Injury
Hazard
Disconnect electrical supply before per-
forming maintenance to the vacuum
cleaner. Failure to do so could result in
electrical shock or personal injury from
vacuum cleaner suddenly starting.
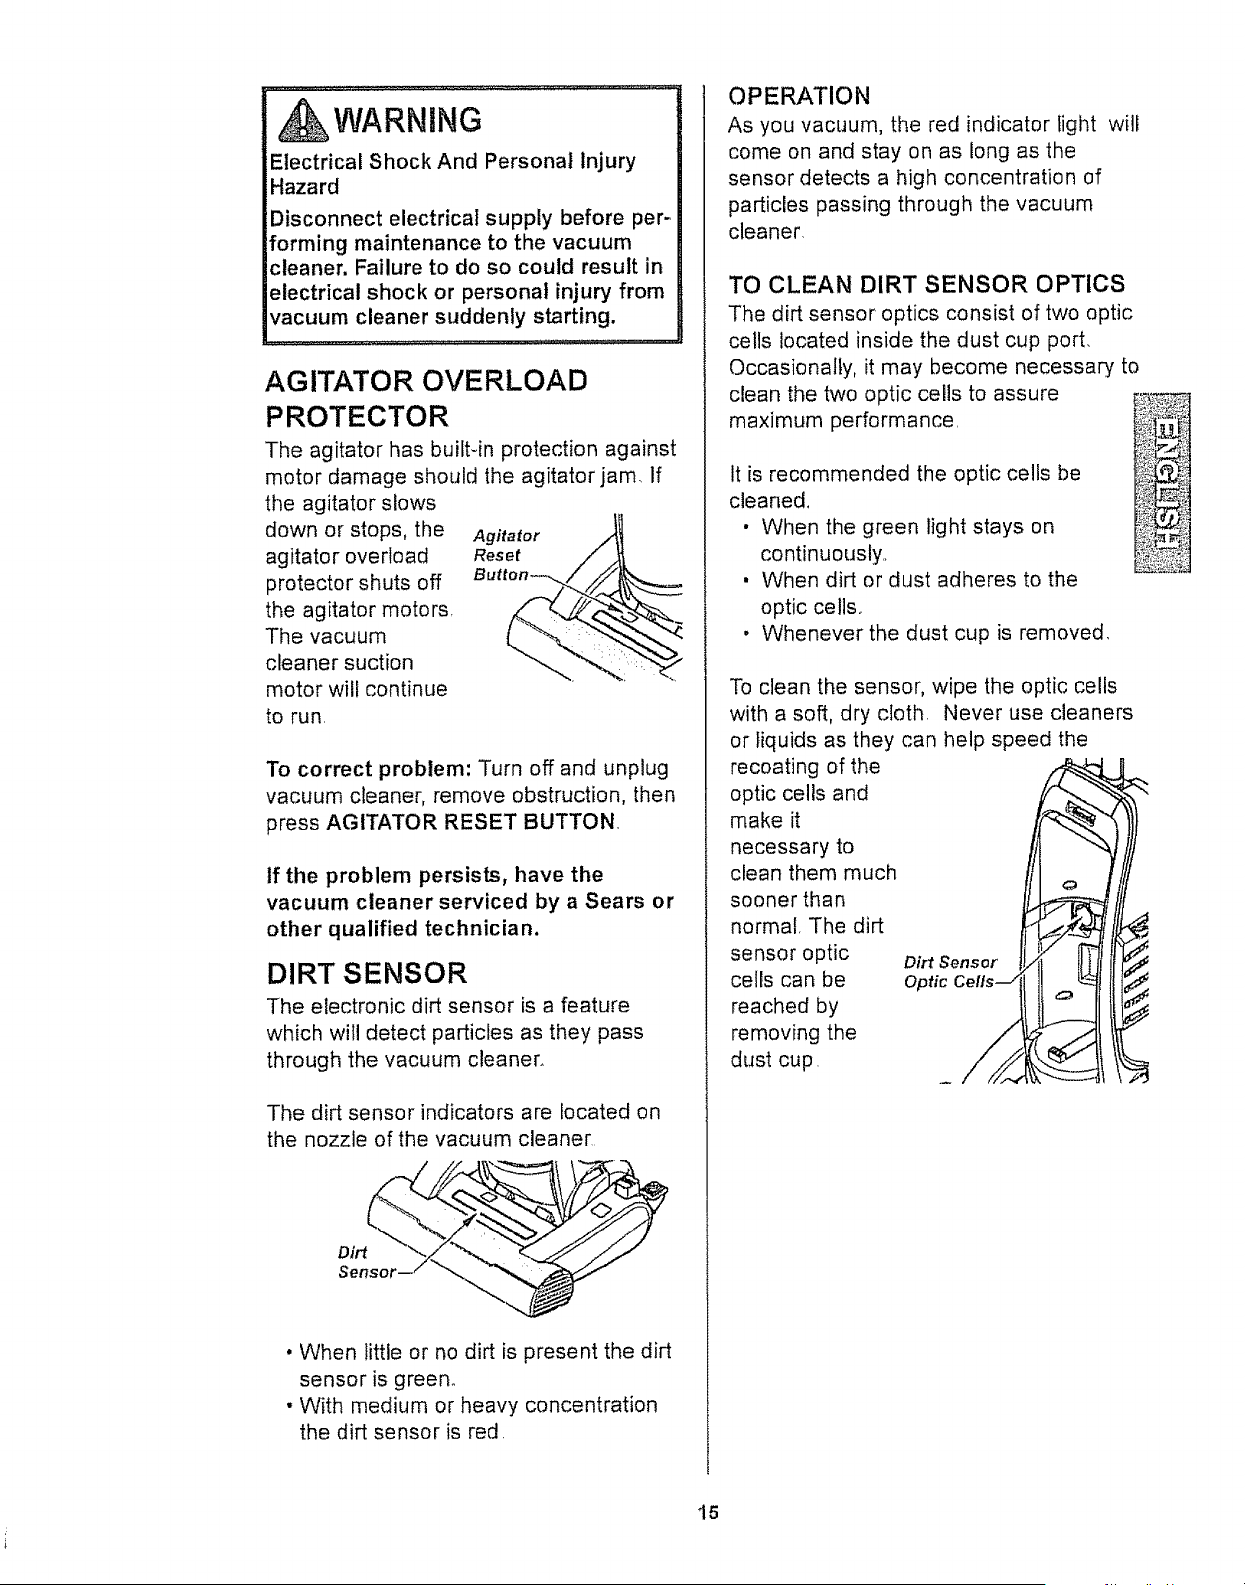
AGITATOR OVERLOAD
PROTECTOR
The agitator has builtdn protection against
motor damage should the agitator jam. If
the agitator slows
down or stops, the
agitator overload
protector shuts off
the agitator motors,
The vacuum
cleaner suction
motor will continue
to run
To correct problem: Turn off and unplug
vacuum cleaner, remove obstruction, then
press AGITATOR RESET BUTTON.
if the problem persists, have the
vacuum cleaner serviced by a Sears or
other qualified technician.
DIRT SENSOR
The electronic dirt sensor is a feature
which will detect particles as they pass
through the vacuum cleaner.
The dirt sensor indicators are located on
the nozzle of the vacuum cleaner
. When little or no dirt is present the dirt
sensor is green°
• With medium or heavy concentration
the dirt sensor is red.
OPERATION
As you vacuum, the red indicator light will
come on and stay on as long as the
sensor detects a high concentration of
particles passing through the vacuum
cleaner.
TO CLEAN DIRT SENSOR OPTICS
The dirt sensor optics consist of two optic
cells located inside the dust cup port.
Occasionally, it may become necessary to
clean the two optic cells to assure
maximum performance
It is recommended the optic cells be
cleaned,
• When the green light stays on
continuously,.
• When dirt or dust adheres to the
optic cells°
• Whenever the dust cup is removed,
To clean the sensor, wipe the optic cells
with a soft, dry cloth, Never use cleaners
or liquids as they can help speed the
recoating of the
optic cells and
make it
necessary to
clean them much
sooner than
normal, The dirt
sensor optic
cells can be
reached by
removing the
dust cup,
Dirt Sensor
Optic Cells _/
i5
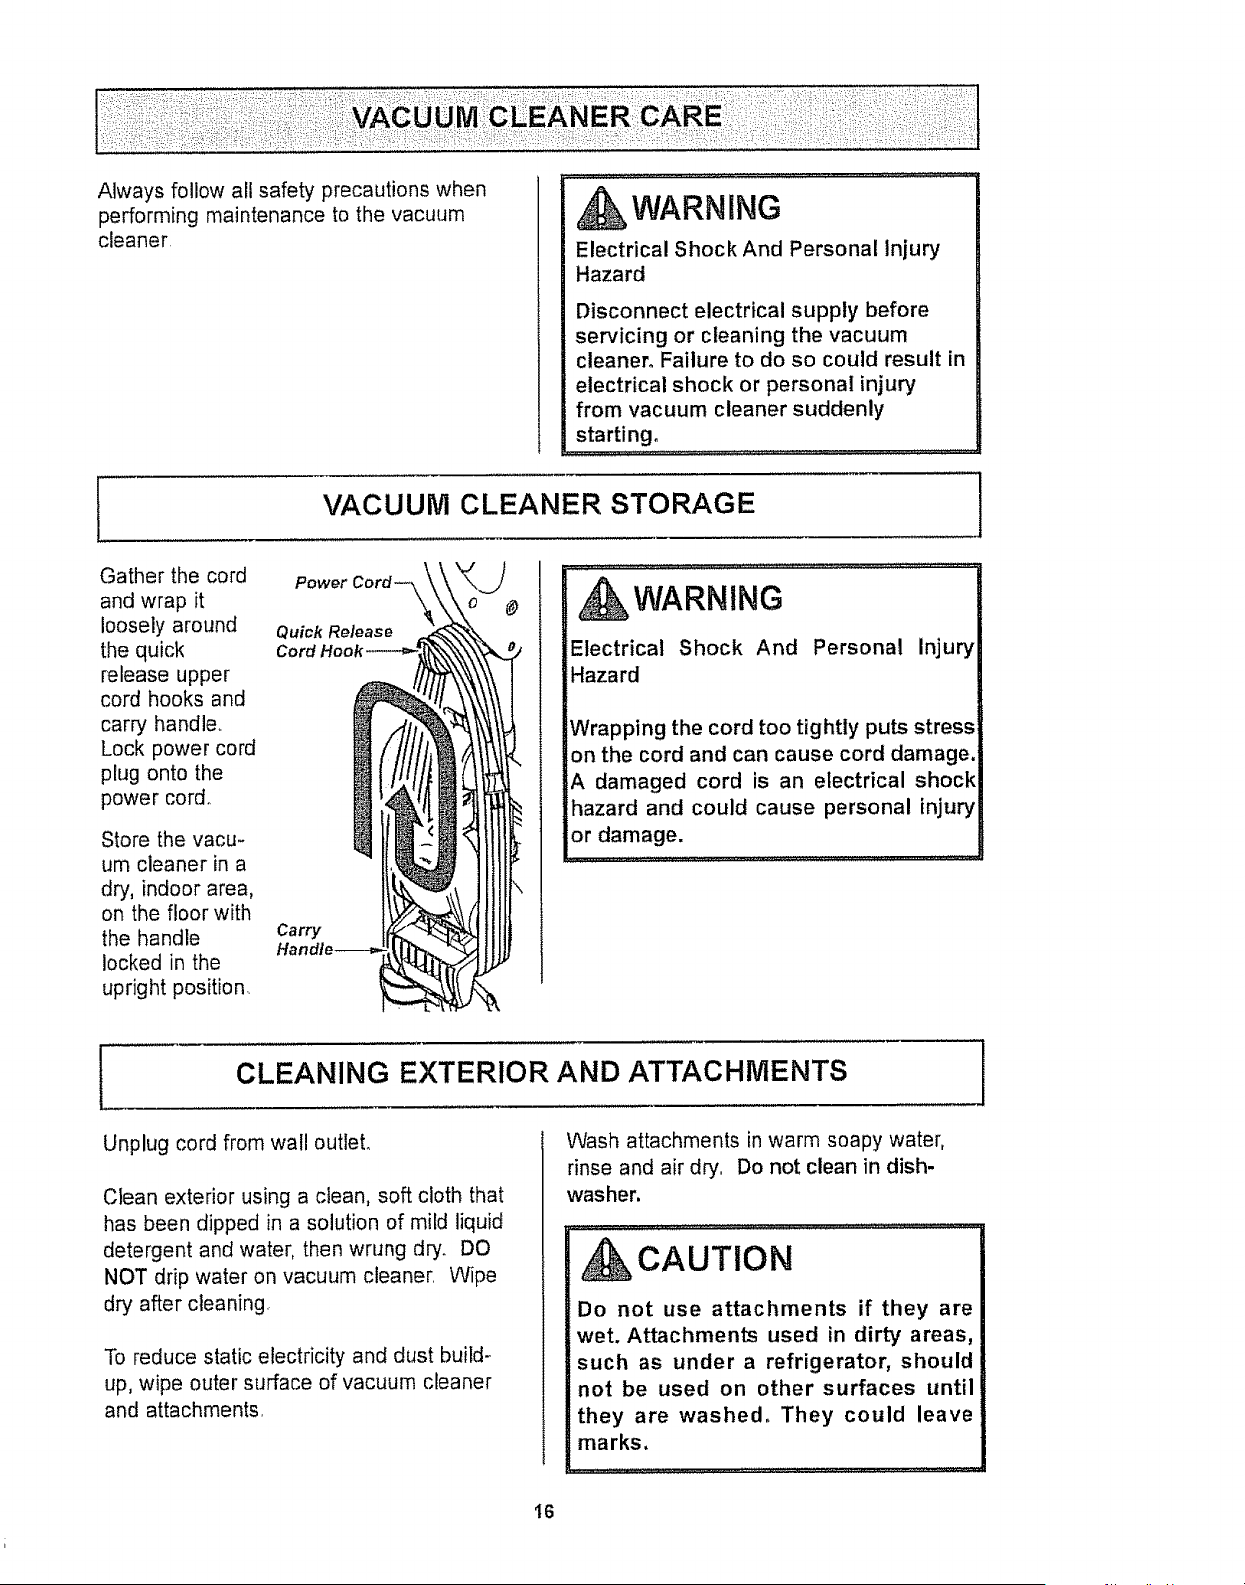
Always follow all safety precautions when
performing maintenance to the vacuum
cleaner
.................._,:r_::¸...............
WARNING
Electrical Shock And Personal Injury
Hazard
Disconnect electrical supply before
servicing or cleaning the vacuum
cleaner. Failure to do so could result in
electrical shock or personal injury
from vacuum cleaner suddenly
starting.
'vACUUM CLEANER STORAGE
Gather the cord
and wrap it
loosely around
the quick
release upper
cord hooks and
carry handle,
Lock power cord
plug onto the
power cord.
Store the vacu-
um cleaner in a
dry, indoor area,
on the floor with
the handle
locked in the
upright position.
Power Cord--_
Quick Release
Carry
WARNING
Electrical Shock And Personal Injury
Hazard
Wrapping the cord too tightly puts stress
on the cord and can cause cord damage.
A damaged cord is an electrical shock
hazard and could cause personal injury
or damage.
i
1
CLEANING EXTERIOR AND ATTACHMENTS
J
Unplug cord from wall outlet.
Clean exterior using a clean, soft cloth that
has been dipped in a solution of mild liquid
detergent and water, then wrung dry. DO
NOT drip water on vacuum cleaner. Wipe
dry after cleaning
To reduce static electricity and dust build-
up, wipe outer surface of vacuum cleaner
and attachments,
Wash attachments in warm soapy water,
rinse and air dry.. Do not clean in dish-
washer,
CAUTION
Do not use attachments if they are
wet. Attachments used in dirty areas,
such as under a refrigerator, should
not be used on other surfaces until
they are washed. They could leave
marks.
t6
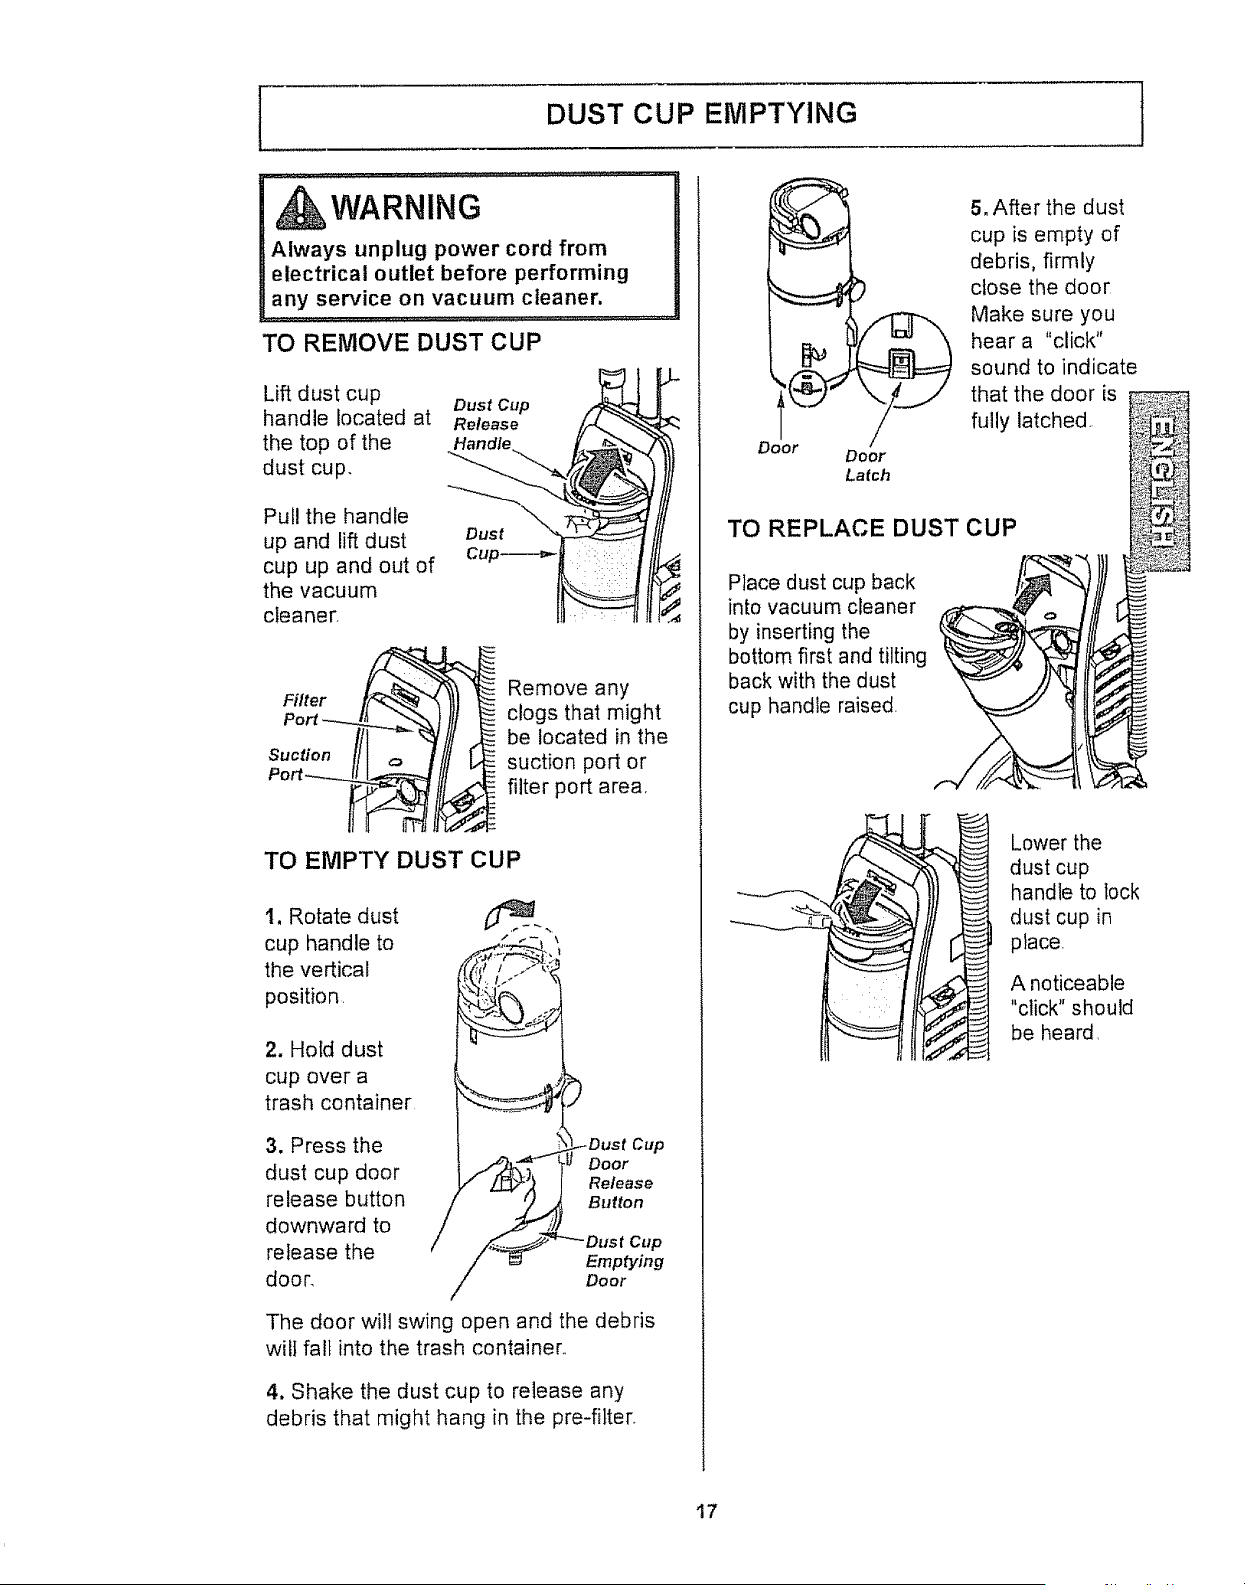
DUST CUP EMPTYING
WARNING
Always unplug power cord from
electrical outlet before performing
any service on vacuum cleaner,
TO REMOVE DUST CUP
Lift dust cup
handle located at
the top of the
dust cup.
Pul! the handle
up and lift dust
cup up and out of
the vacuum
cleaner_
Dust Cup
Release
Handle
Filter
Suction
Remove any
clogs that might
be located in the
suction port or
filter port area_
TO EMPTY DUST CUP
1. Rotate dust
cup handle to
the vertical
position
2. Hold dust
cup over a
trash container
3. Press the
dust cup door
release button
downward to
release the
door.
Cup
Door
Release
Button
Emptying
Door
The door will swing open and the debris
wilt fall into the trash container.
4. Shake the dust cup to release any
debris that might hang in the pre-fiiten
Door
Door
Latch
5. After the dust
cup is empty of
debris, firmly
close the door
Make sure you
hear a "click"
sound to indicate
that the door is
fully latched.
TO REPLACE DUST CUP
Place dust cup back
into vacuum cleaner
by inserting the
bottom first and tilting
back with the dust
cup handle raised.
Lower the
dust cup
handle to lock
dust cup in
place
A noticeable
"click" should
be heard
t7
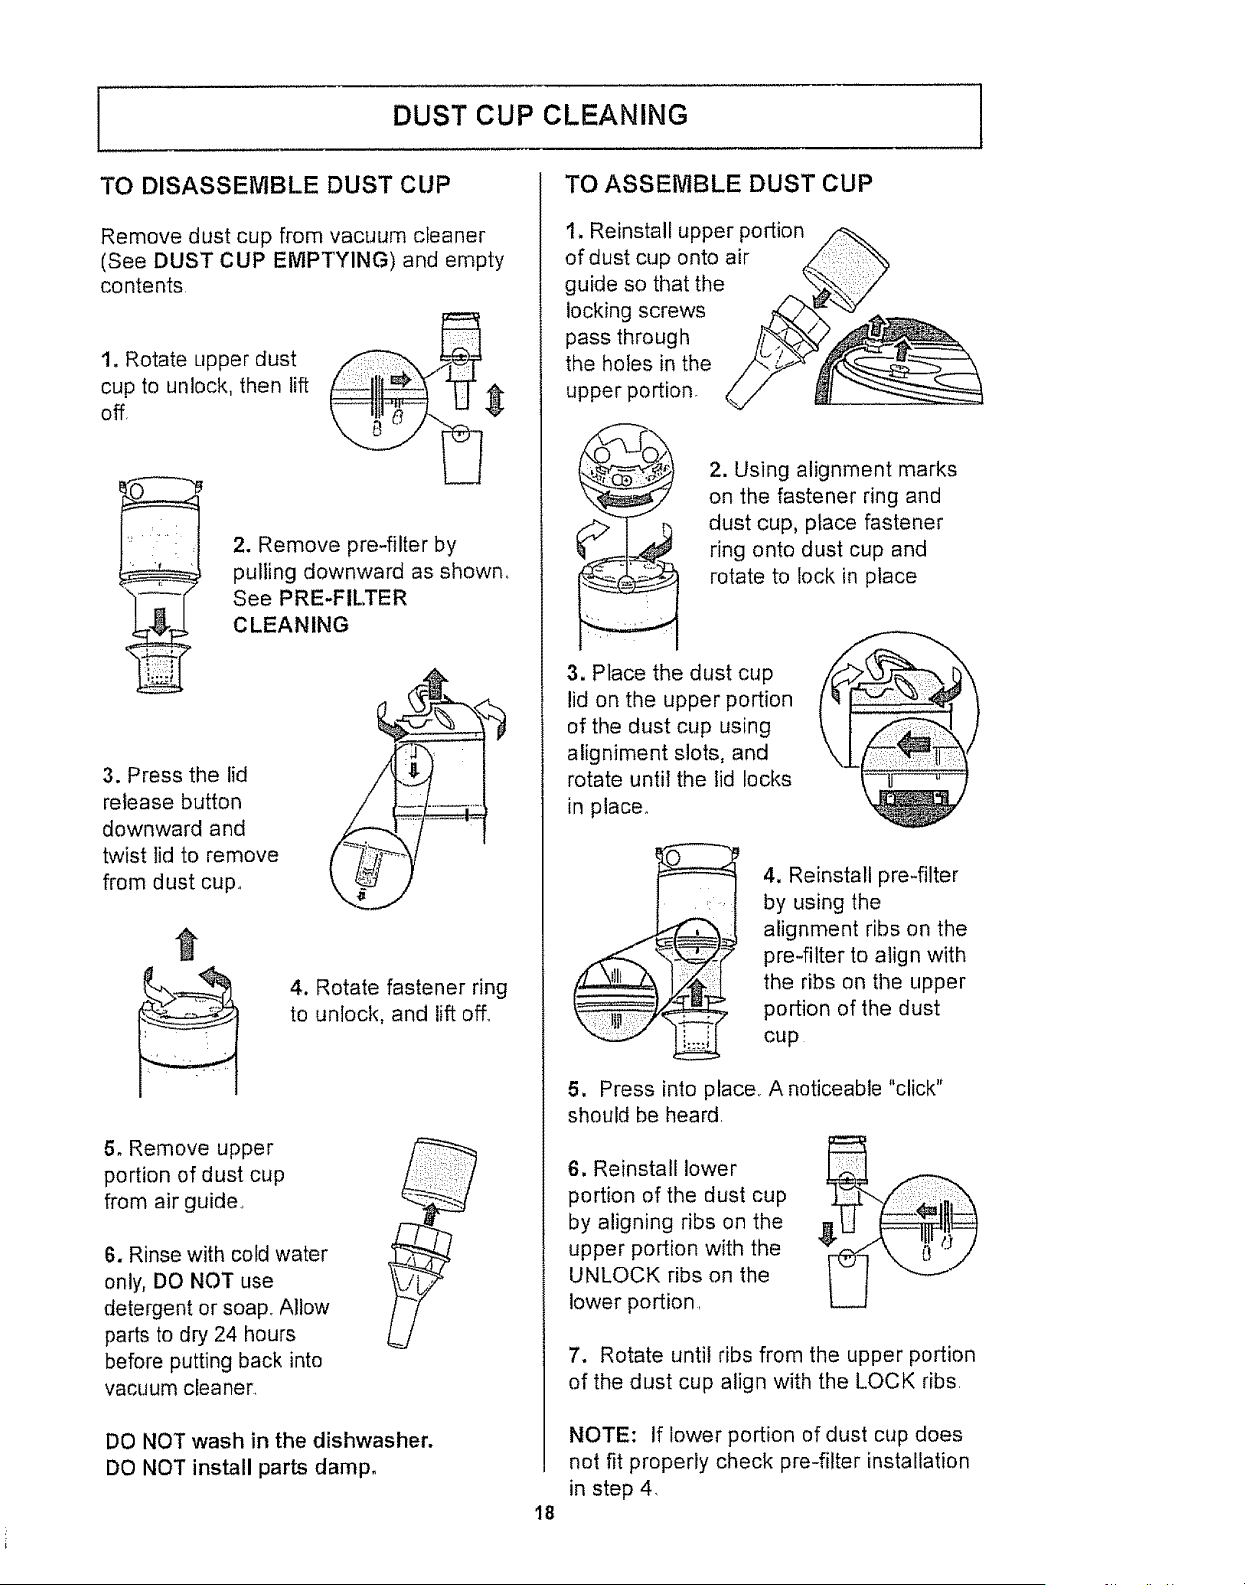
DUST CUP CLEANING
TO DISASSEMBLE DUST CUP TO ASSEMBLE DUST CUP
Remove dust cup from vacuum cleaner
(See DUST CUP EMPTYING) and empty
contents
1. Rotate upper dust
cup to unlock, then lift
off,
2. Remove pre-filter by
pulling downward as shown,
See PRE-FILTER
CLEANING
3. Press the lid
release button
downward and
twist lid to remove
from dust cup,,
4. Rotate fastener ring
to unlock, and lift off,,
5o Remove upper
portion of dust cup
from air guide,,
6. Rinse with cold water
only, DO NOT use
detergent or soap, Allow
parts to dry 24 hours
before putting back into
vacuum cleaner,
DO NOT wash in the dishwasher.
DO NOT install parts damp.
18
1, Reinstall upper portion
of dust cup onto air
guide so that the
locking screws
pass through
the holes in the
upper portion,
3. Place the dust cup
lid on the upper portion
of the dust cup using
aligniment slots, and
rotate until the lid locks
in place.
2. Using alignment marks
on the fastener ring and
dust cup, place fastener
ring onto dust cup and
rotate to lock in place
4. Reinstall pre-filter
by using the
alignment ribs on the
pro-filter to align with
the ribs on the upper
portion of the dust
cup
5, Press into place A noticeable "click"
should be heard,
6. Reinstall lower I_
portion of the dust cup _
by aligning ribs on the
upper portion with the
UNLOCK ribs on the I v
lower portion,
L_
7. Rotate until ribs from the upper portion
of the dust cup align with the LOCK ribs.
NOTE: If lower portion of dust cup does
not fit properly check pre-filter installation
in step 4,
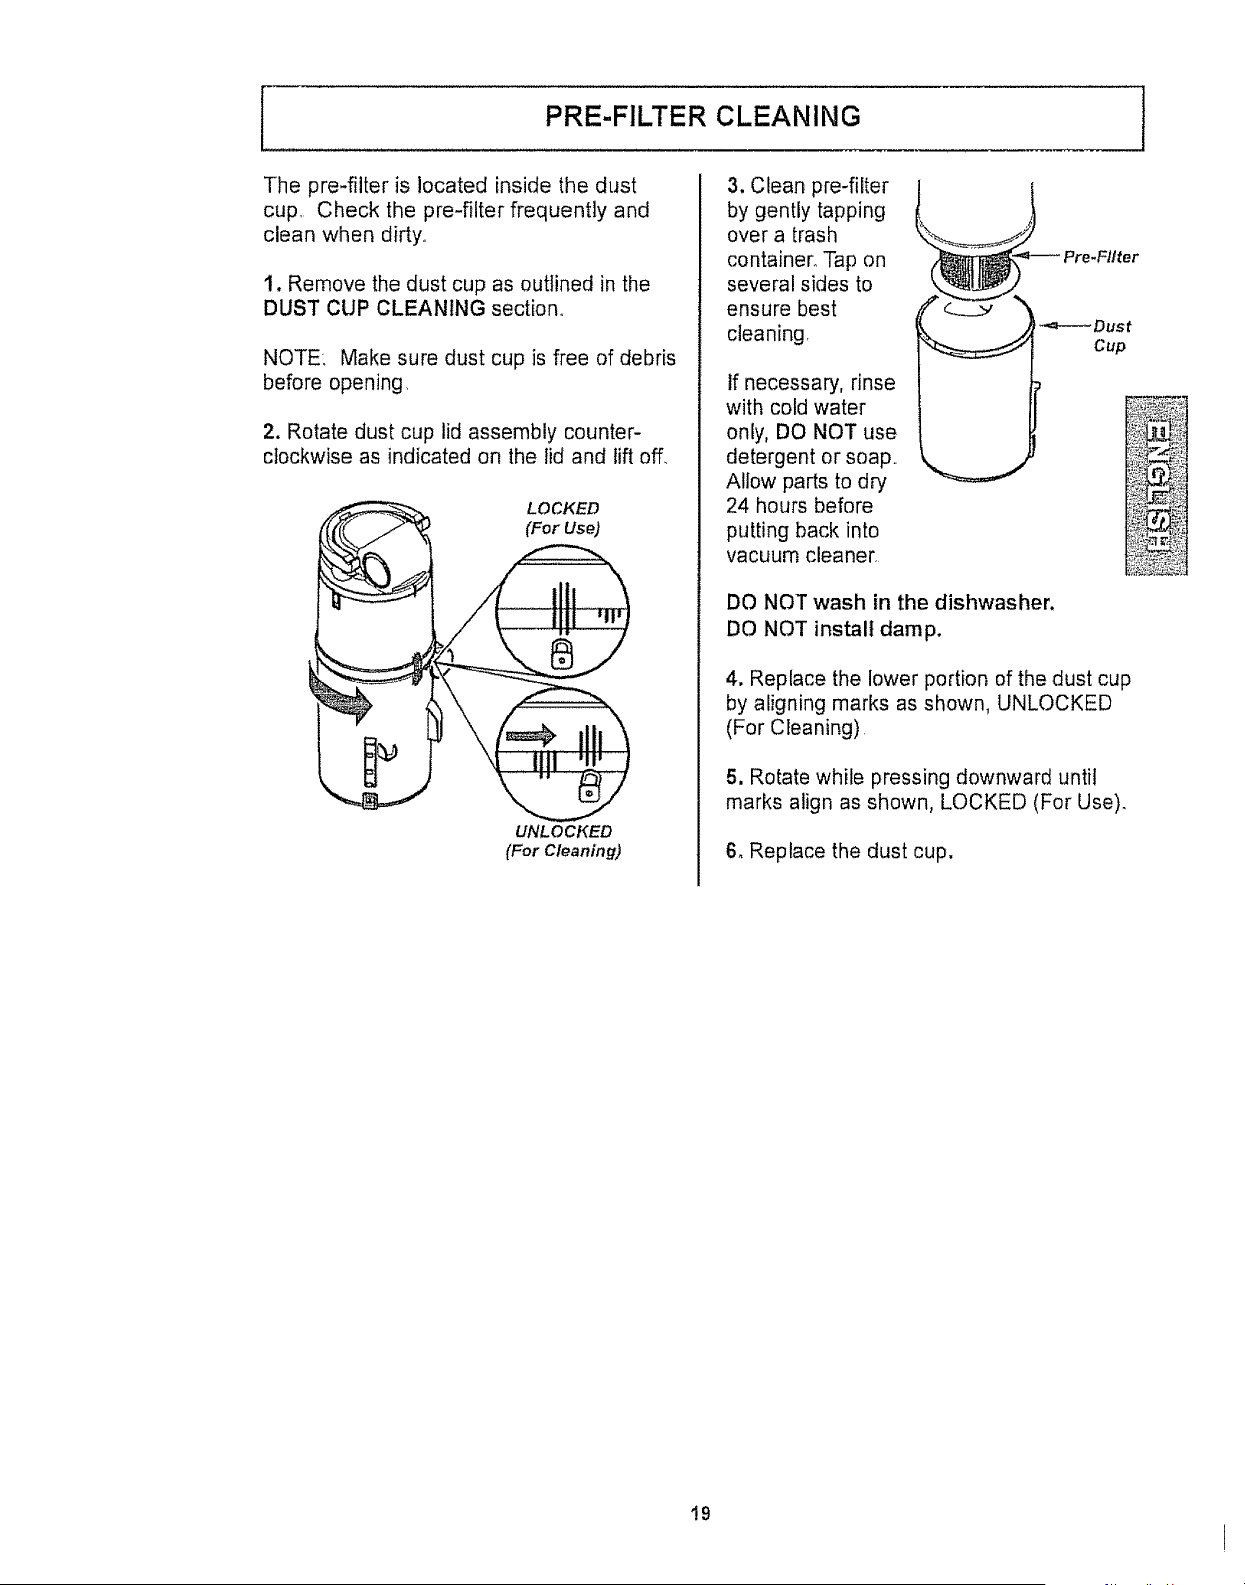
PRE..F1LTER CLEANING
The pre4ilter is located inside the dust
cup, Check the pre-filter frequently and
clean when dirty.
t. Remove the dust cup as outlined in the
DUST CUP CLEANING section.
NOTE: Make sure dust cup is free of debris
before opening,
2. Rotate dust cup lid assembly counter-
clockwise as indicated on the lid and lift off.
LOCKED
(For Use)
UNLOCKED
(For Cleaning)
3. Clean pre-filter
by gently tapping
over a trash
container., Tap on
several sides to
ensure best
cleaning
If necessary, rinse
with cold water
only, DO NOT use
detergent or soap,,
Allow parts to dry
24 hours before
putting back into
vacuum cleaner,
DO NOT wash in the dishwasher,
DO NOT install damp.
4, Replace the lower portion of the dust cup
by aligning marks as shown, UNLOCKED
(For Cleaning)
5. Rotate while pressing downward until
marks align as shown, LOCKED (For Use).
6_ Replace the dust cup.
t9
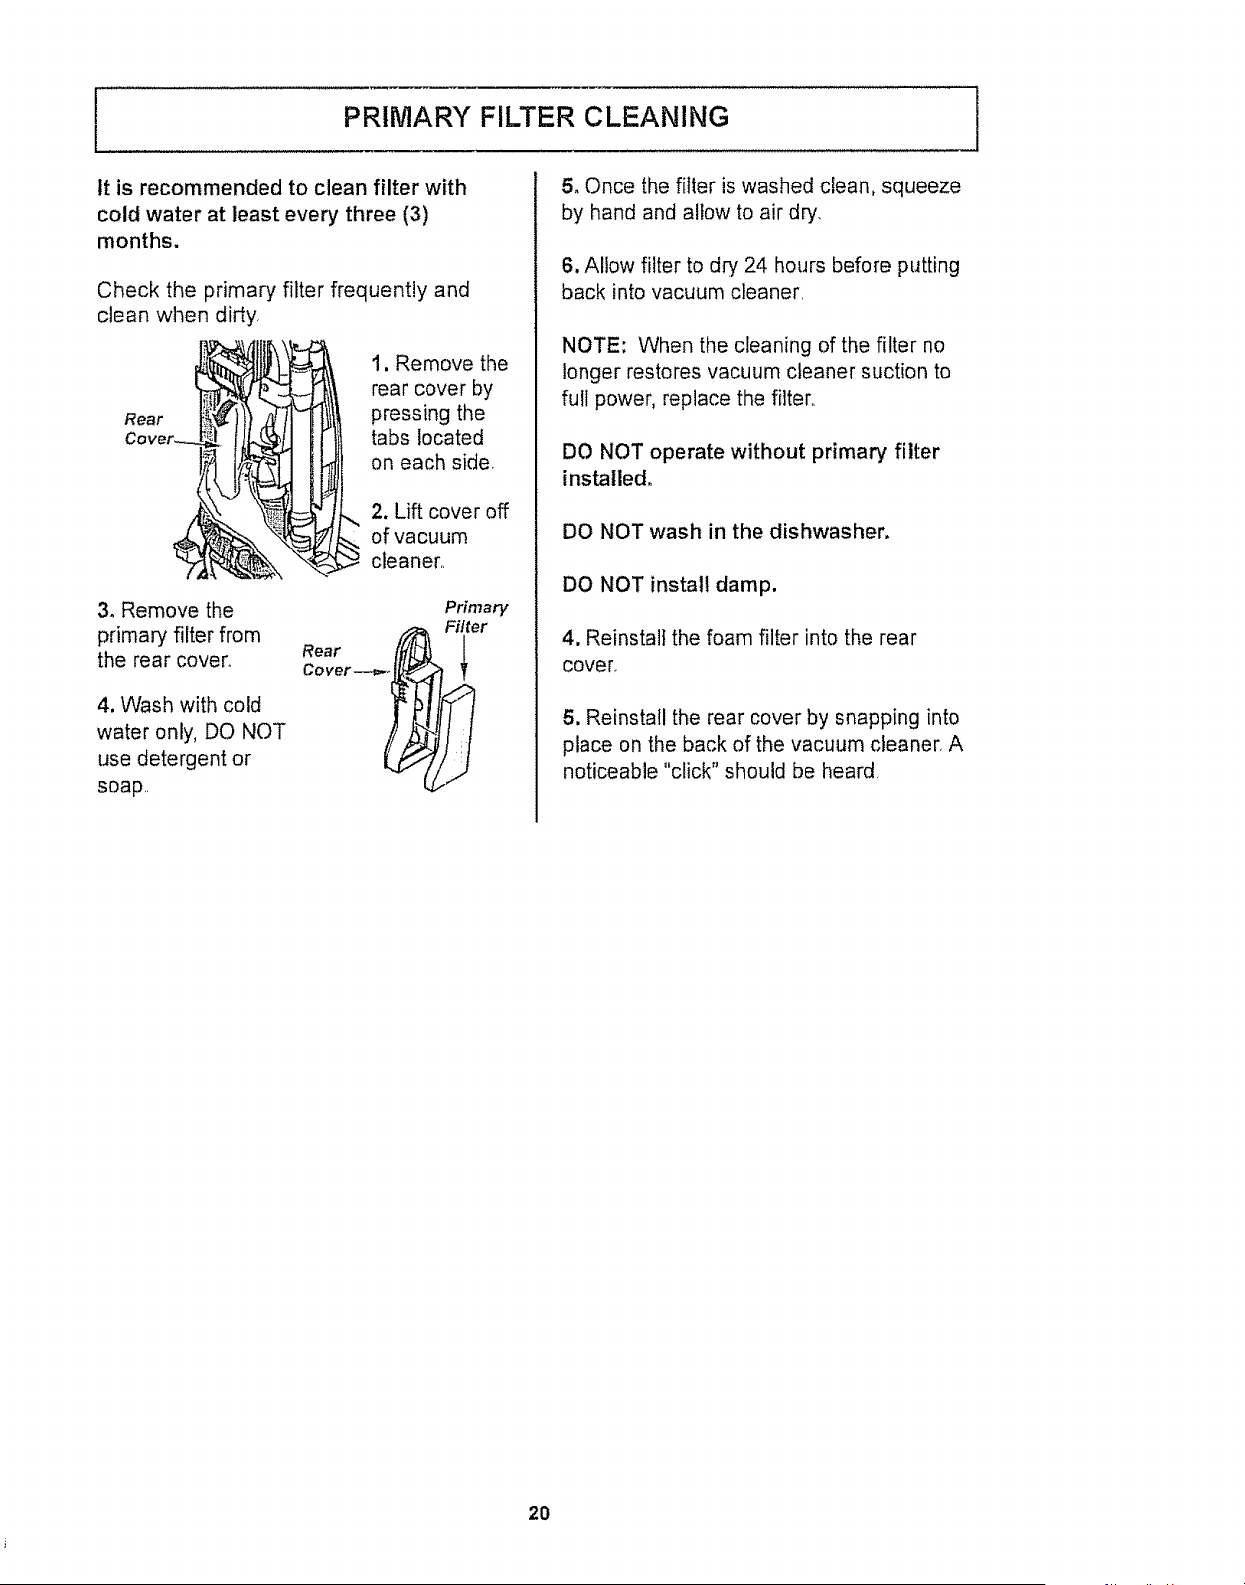
PRIMARY FILTER CLEANING
it is recommended to clean filter with
cold water at least every three (3)
months.
Check the primary filter frequently and
clean when dirty,
Rear
1. Remove the
rear cover by
pressing the
tabs located
on each side,
2. Lift cover off
of vacuum
cleaner
3o Remove the
primary filter from
the rear cover,
4. Wash with cold
water only, DO NOT
use detergent or
soap
Primary
Filter
Ro°r I
Cover---__
5, Once the filter is washed clean, squeeze
by hand and allow to air dry,
6, Allow filter to dry 24 hours before putting
back into vacuum cleaner,
NOTE: When the cleaning of the filter no
longer restores vacuum cleaner suction to
full power, replace the filten
DO NOT operate without primary filter
installed.
DO NOT wash in the dishwasher,
DO NOT install damp.
4. Reinstall the foam filter into the rear
cover,
5. Reinstall the rear cover by snapping into
place on the back of the vacuum cleaner, A
noticeable "click" should be heard
2O
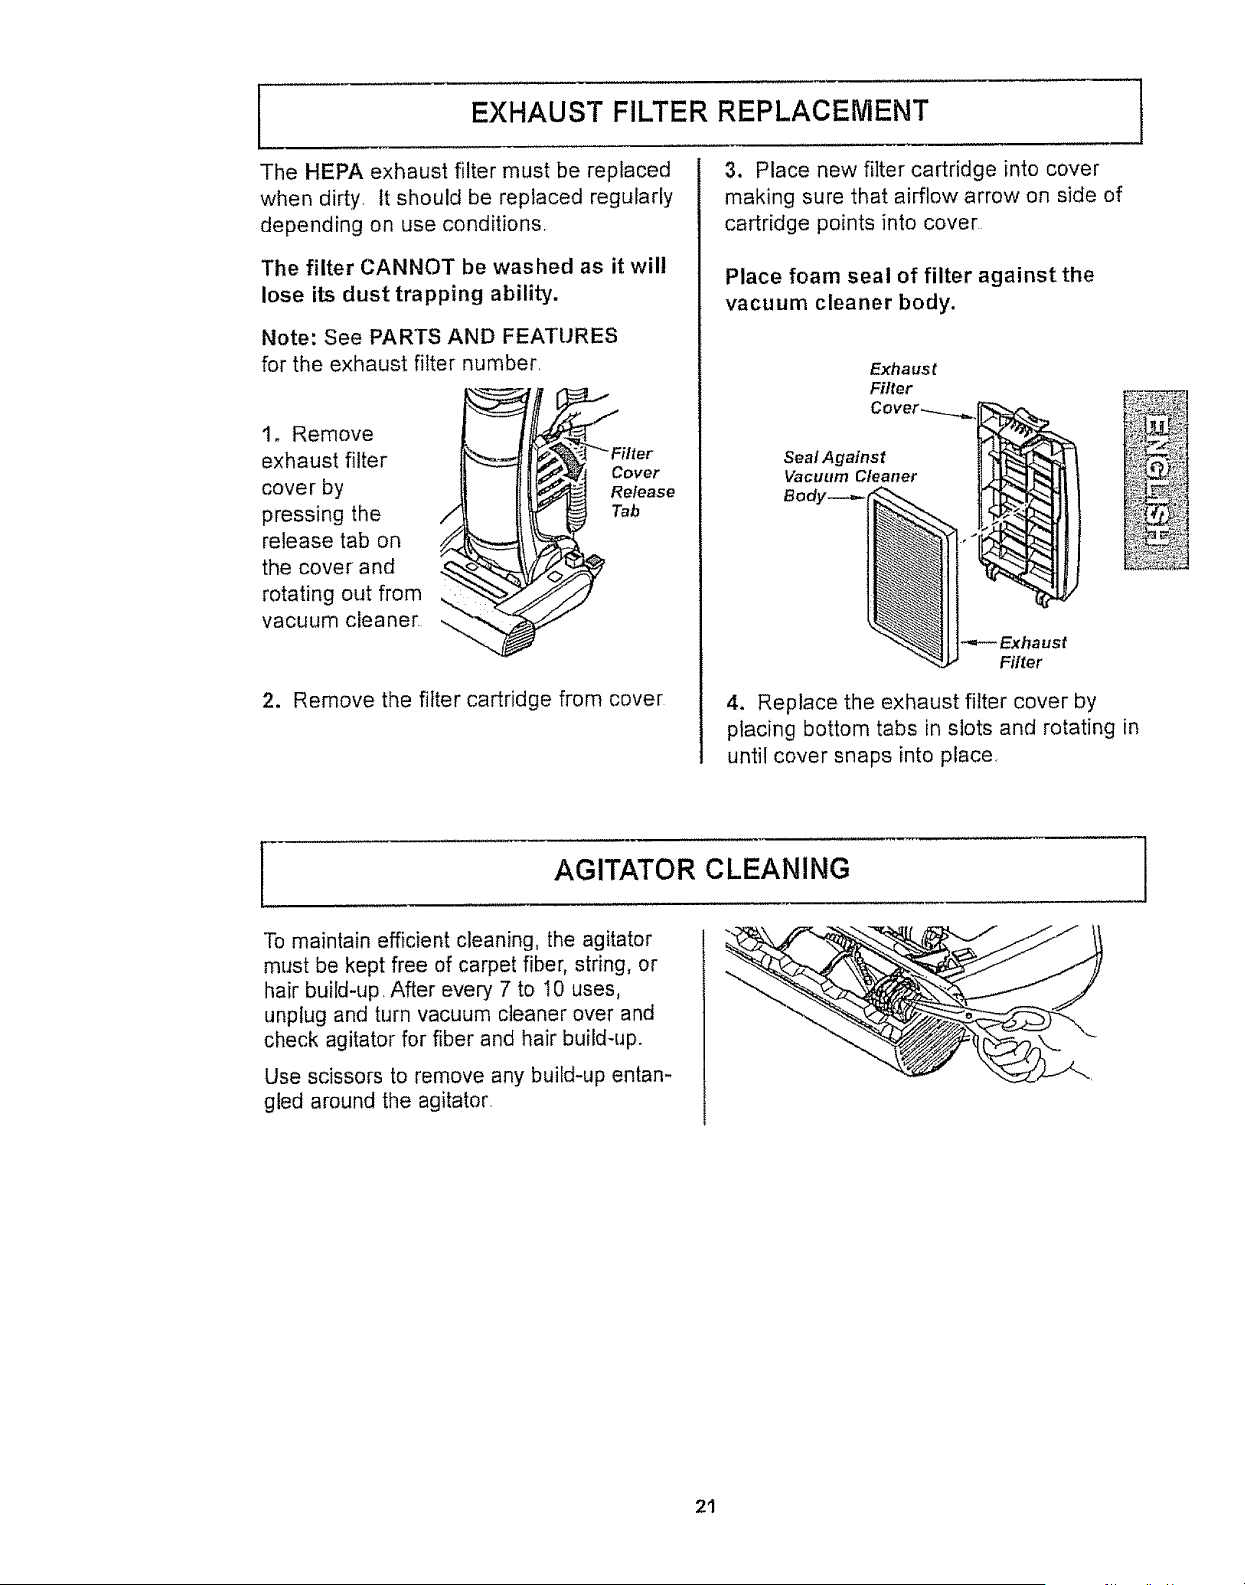
EXHAUST FILTER REPLACEMENT t
The HEPA exhaust filter must be replaced
when dirty, tt should be replaced regularly
depending on use conditions,
The filter CANNOT be washed as it will
lose its dust trapping ability.
Note: See PARTS AND FEATURES
for the exhaust filter number,
1. Remove
exhaust filter
cover by
pressing the
release tab on
the cover and
rotating out from
vacuum cleaner.
Cover
Release
Tab
2. Remove the filter cartridge from cover
3. Place new filter cartridge into cover
making sure that airflow arrow on side of
cartridge points into cover
Place foam seal of filter against the
vacuum cleaner body.
Exh a us t
Filter
Seal Against
Vacuum Cleaner
Body--_
Exhaust
Filler
4. Replace the exhaust filter cover by
placing bottom tabs in slots and rotating in
until cover snaps into place
_s_j
[
AGITATOR CLEANING
To maintain efficient cleaning, the agitator
must be kept free of carpet fiber, string, or
hair build-up. After every 7 to !0 uses,
unplug and turn vacuum cleaner over and
check agitator for fiber and hair build-up.
Use scissors to remove any build-up entan-
gled around the agitator.
]
21
[
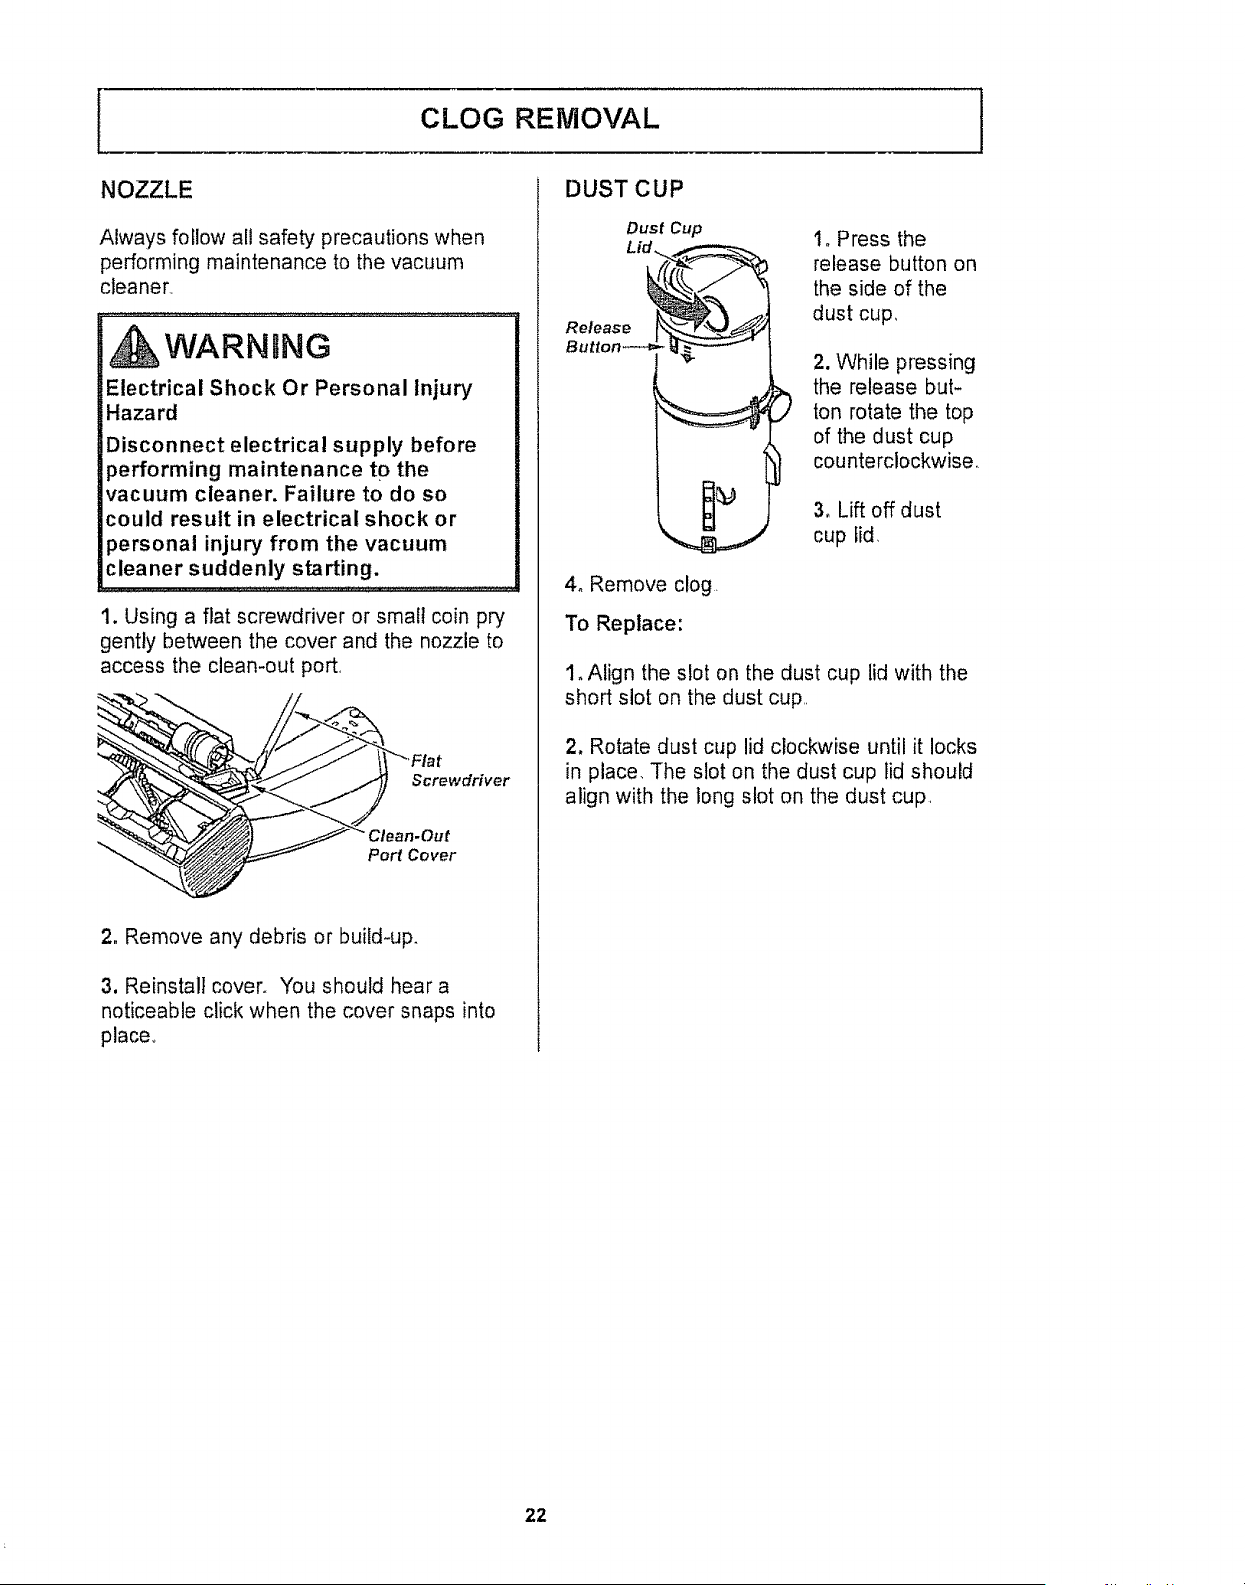
CLOG REMOVAL
NOZZLE
Always follow all safety precautions when
performing maintenance to the vacuum
cleaner,,
WARNRNG
Electrical Shock Or Personal Injury
Hazard
Disconnect electrical supply before
performing maintenance to the
vacuum cleaner. Failure to do so
could result in electrical shock or
personal injury from the vacuum
cleaner suddenly starting.
1, Using a flat screwdriver or small coin pry
gently between the cover and the nozzle to
access the clean-out port,
__'Flat
2, Remove any debris or build-up.
3. Reinstall cover, You should hear a
noticeable click when the cover snaps into
place,,
DUST CUP
Dust Cup
Release
to Press the
release button on
the side of the
dust cup,
2. While pressing
the release but-
ton rotate the top
of the dust cup
counterclockwise,
3, Lift off dust
cup lid,
4o Remove clog.
To Replace:
1, Align the slot on the dust cup lid with the
short slot on the dust cup,,
2, Rotate dust cup lid clockwise until it locks
in place, The slot on the dust cup lid should
align with the long slot on the dust cup,
22
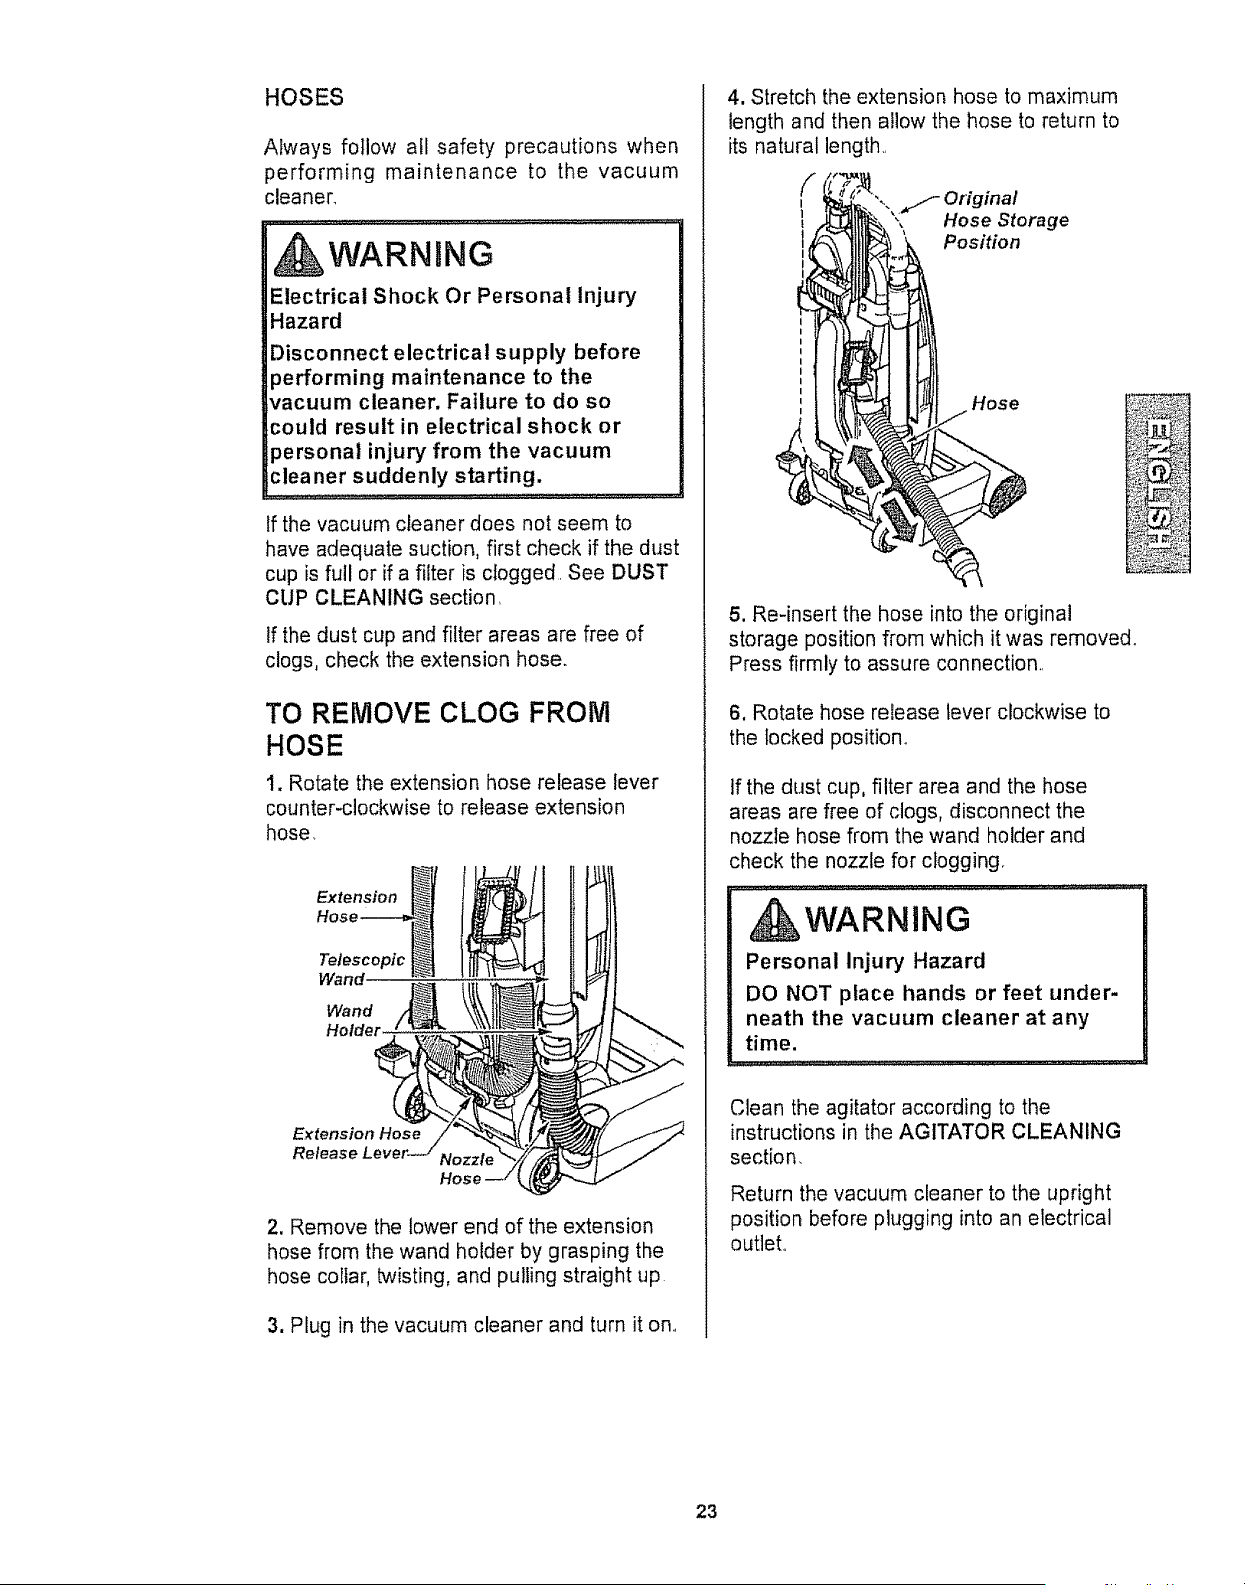
HOSES
Always follow all safety precautions when
performing maintenance to the vacuum
cleaner_
WARN6NG
Electrical Shock Or Personal injury
Hazard
Disconnect electrical supply before
performing maintenance to the
vacuum cleaner. Failure to do so
could result in electrical shock or
personal injury from the vacuum
cleaner suddenly starting.
If the vacuum cleaner does not seem to
have adequate suction, first check if the dust
cup is full or if a filter is clogged. See DUST
CUP CLEANING section,
If the dust cup and filter areas are free of
clogs, check the extension hose.
TO REMOVE CLOG FROM
HOSE
1. Rotate the extension hose release lever
counter-clockwise to release extension
hose
Extension _I
Wand
Holder
Extension Hose
Release
2. Remove the lower end of the extension
hose from the wand holder by grasping the
hose collar, twisting, and pulling straight up.
3. Plug in the vacuum cleaner and turn it on.,
4. Stretch the extension hose to maximum
length and then allow the hose to return to
its natural length.,
Hose Storage
Position
Hose
_:_ _.
5. Re-insert the hose into the original
storage position from which it was removed.
Press firmly to assure connection,
6. Rotate hose release lever clockwise to
the locked position.
If the dust cup, filter area and the hose
areas are free of clogs, disconnect the
nozzle hose from the wand holder and
check the nozzle for clogging
d WARNING
Personal Injury' Hazard
DO NOT place hands or feet under-
neath the vacuum cleaner at any
time.
Clean the agitator according to the
instructions in the AGITATOR CLEANING
section.
Return the vacuum cleaner to the upright
position before plugging into an electrical
outlet,,
23
Reviewthistabletofind do-it-yourselfsolutionsfor minorperformanceproblems,Anyservice
needed,otherthanmaintenancedescribedin thisUse& CareGuide,shouldbe performedby
a Searsorotherqualifiedserviceagent.,
WARNBNG
Disconnect electrical supply before performing maintenance to the vacuum cleaner.
Failure to do so could result in electrical shock or personal injury.
Vacuum cleaner
won't run.
Poor job of dirt
pick.up.
Vacuum cleaner picks
up moveable rugs or
pushes too hard.
Agitator does not
turn.
Airflow restricted
with attachment use;
sound changes.
OSSt
1. Unplugged at wall outlet.
2.. Tripped circuit breakerlbtown fuse
at household service panel-
3. Thermal protector tripped.
4. Defective wall outlet,,
I, Full or clogged dust cup.
2, Wrong pile height setting.
3, Worn agitator
4, Clogged nozzle.
& Clogged hose.
6, Hole in hose.
7, Hose not inserted fully.
8o Motor protection system
activated.
9. Dirty filter(s).
t0. Dust cup not assembled
correctly
1. Wrong pile height setting.
I. Handle in full upright position,
2, Agitator overload tripped,
3, Thermal protector tripped,
t, Attachment use restricts air flow.
2, New carpet fuzz clogged air path
1. Plug in firmly, select the
desired setting on the touch
control_
2. Reset circuit breaker or replace
fuse
3. Allow vacuum cleaner to cool
40-50 minutes,
4. Check with a good appliance or
lamp Have outlet properly
serviced.
1. Empty dust cup
2. Adjust setting.
3, Replace agitator,
4. Check CLOG REMOVAL.
5. Check for clogs
6. Replace hose
7. Insert hose fully
8. Check for clogs.
9, Ctean or change primary filter
and/or change exhaust filter.
10, Remove dust cup and reinstall.
I. Adjust setting,
1. Move handle from upright
position.
2o Reset agitator overload protector
3, Allow vacuum cleaner to cool
40-50 minutes.
I_ Check ATTACHMENTS for fuzz,
lint, pet hair or olher debris.
2. Check CLOG REMOVAL and
clean hose.
24
Master Protection Agreements
Congratulations on making a smart purchase Your new Kenmore® product is designed and manu-
factured for years of dependable operation_ But like all products, it may require preventive mainte-
nance or repair from time to time q]_at's wKen Kaying a Master Protection Agreement can saye you
money and aggravation
"[Ke Master Protection Agreement afsoKetps extend Ke life of your new product, Here's wKat Ke
Agreement* includes:
[]
[]
[]
[]
[]
[]
[]
[]
[]
[]
[]
Parts and labor needed to help keep products operating properly under normal use, not just
defects fur coverage goes well beyond the product warranty No deductibles, no functional
failure excluded from coyerage-- real protection
Expert service by a force of more than 10,000 authorized Sears service technicians,
which means someone you can trust will be working on your product
Unlimited service calls and nationwide service, as often as you want us, whenever you
want us,
"lo-le pon" guaJantee - replacement of your coyered product if four or more product fail-
ures occur within twelve months
Product replacement if your coyered product can't be fixed,
Annual Preventive Maintenance Check at your request - no extra d<arge
Fast help by phone - we call it Oapid Oesolution - I:Kone support from a Sears representa-
tiy'e on all products TKinN of us as a "taNing Use & Care *uide"
Power surge protection against electrical damage due to power fluctuations,
$250 Food Loss Protection annualty for any food spoilage that is the result of mechanica_ fail-
ure of any covered refrigerator or freezer
Oentai reimbursement if repair of your covered product takes longer than promised
10% discount off the regular price of any non-covered repair service and related installed
pads,
fnce you purchase the Agreement, a simple phone call is all that it takes for you to schedule ser-
vice, You can call anytime day or night, or schedule a service appointment online,
qhe Mastermrotection Agreement is a risk free purchase ff you cancel for any reason during the
product warranty period, we will provide a full refund Ir, a prorated refund anytime after the product
warranty period expires, murchase your Master mrotection Agreement today!
Some limitations and exclusions apply. For prices and additional information In the U.S,A,
call 1-800-827-6655o
* Coverage in Canada varies on some Items. For full details call Sears Canada at 1-800-361-
6665.
Sears Installation Service
For Sears professional installation of home appliances, garage door openers, water heaters, and
other major home items, in the r p A or Canada call 1-800-4-MY-e tME®
25
Antes de usar su aspiradoranueva _, I
Listadeembataje.................. 1
Garantiade la aspiradorade Kenmore 2
Instruccionesimportantesde
seguridad .................... 3
Piezas y caracteristicas de aspiradora
vertical ....................... 4
instrucciones de ensamble .......... 5
Montaje del mango .............. 5
Montaje del accesorios ........ 6
Cord6n ei_ctrico ................... 7
Instrucciones de operaci6n ......... 8
Cord6n et_ctrico ................ B
Desprendimiento de] mango ........... 9
lnterruptor OFFIP1SOfALFROMBRA ..... 9
Ajuste y selecci6n de nivel de pelo de la
alfrombra ....................... t 0
Sugerencias sobre el ajuste de nivel de pelo
de la alfrombra ..................... t0
Accesorios ......................... 11
Cuadro de uso de los accesorios ...... 12
Sugerencias para aspirar ............ 12
Caracteristicasde rendimiento , .. 13-14
Cuidado de la aspiradora ......... 15
Almacenamiento de la aspiradora .... 15
Limpieza del exterior y de los accesorios , 15
Vaciar et contenedor de polvo ......... 16
Limpiar el contenedor de polvo ......... t7
Limpiar el sistema de pre flltraci6n ...... 18
Limpiar el filtro primario .............. 19
Fiftro de escape ..................... 20
Limpieza del adilador ............. 20
C6mo eliminar los residuos de basura
en los conductos ............... 2t-22
Reconocimiento de probtemas ..... 23
Acuerdos maestros de protecci6n .,. 24
Informaci6n de assistancia
o servicio ............. pagina poslerior
Por favor lea esta guia que le ayudara a assemblar y operar su aspiradora nueva de Kenmore en una manera
m&ssegura y efectiva
Para mas informaci6n acerca del cuidado y operaciSnde esta aspirador, flame a su centro de pades y servicio
m&scercano o !lamea fa linea de ayuda al cfiente que se encuentra en la primera pagina. Cuando pregunte
por informaci6n usted necisttar&el numero de serie completo y modetode la aspiradora que estan en la placa
de los n_meros de modelo y serie
Use el espacio de abajo para registrar el nt]mero de modelo y serie de su nueva aspiradora de Kenmore
Numero de Modeio
Numero de Serie
Fecha de Compra
Matenga este libro y su recibo en un lugar seguro para referencias futuras
LISTA DE EMBALAJE
Su ASPIRADOR KENMORE se empaca con las siguientes piezas y componentes
por separado:
1 Aspiradora I Pet Handi Mate TM
1 Cepillo para sacudir t Tubo telescopico
I Herramienta para I Manual de uso y cuidado
hendiduras 1 Lista de partes
I Cepillo para combinaci6n
Cada uno de estos ensambles es mostrado detalfadamente en la lista de piezas
para reparaciSn,
1
Garantia limitada de un a5o
Si estaaspiradorafalla por un defectoen sus materialeso fabricaci6nen el periodode
un aSodesdela fecha de compra,cuandose instala,manejay mantienesiguiendo
todas las instruccionesincluidascon el producto,devu6lvalaa cualquiertienda Sears,
SearsParts& RepairCenter(Centrode Reparacionesy PiezasSears)u a otro
distribuidorKenmoreparaque reparenel aparatode formagratuita.
Siesta aspiradorase utilizaparaotrosfines queno sea uso familiarprivado,esta
garantiaes v_lidasolamentedurante90 dias desdela fechade compra,
Esta garantia cubre exclusivamente los defectos de materiales y fabricaciSn.
Sears NO pagar_:
1.. Los etementos desechables que puedan desgastarse con un uso normal, incluyendo
sin car&cter excluyente, filtros, correas, l_mparas y bolsas..
2.. A un tecnico del servicio t_cnico para que enseSe al usuario a instalar, manejar o
mantener correctamente el productoo
3. A un t_cnico del servicio t_cnico para timpiar o mantener este producto,.
4. Dafios o averia de este producto si no se ha instalado, manejado o mantenido
siguiendo todas las instrucciones incluidas con el productoo
5. Dar_os o averia de este producto originados por accidente, abuso, uso incorrecto u
uso del producto para otros fines distintos de los indicados.
6. Dar_os o averia de este producto causados por el uso de detergentes, limpiadores,
productos quimicos o utensilios diferentes a los recomendados en todas las
instrucciones que se incluyen con el producto.
7.. Daflos o averia de las piezas o sistemas causados por modificaciones no
autorizadas que se hayan hecho a este producto.
Limitaci6n de responsabilidad de las garantias implicitas; limitaci6n de remedios
1_1_nico y exclusivo remedio del cliente bajo esta garantia limitada ser& la reparaciSn del
producto segQn io indicado en este documento.. Las garantias imptlcitas, incluyendo las
garantias de comerciabitidad o idoneidad para un prop6sito especifico, se limitan a un
argo o et periodo m&s corto permitido por la ley. Sears no ser& responsabte por daSos
incidentales ni consecuencialeso Algunos estados o provincias no permiten la exclusi6n
o limitaci6n de daSos incidentales o consecuenciales, ni limitaciones en la duraci6n de
las garantias implicitas de comerciabilidad o idoneidad, por Io que estas exclusiones o
limitaciones podrian no aplicar en su caso.
Esta garantia aplica solamente cuando esta aspiradora se utiliza en Estados Unidos o
Canadfi,
Esta garantia le otorga derechos legates especificos, y usted podria tener otros
derechos que varian en funciSn de cada estado,
Sears, Roebuck and Co., Hoffman Estates, IL 60179
Sears Canada inc., Toronto, Ontario, Canada NISB 2B8
Lea todas°_"iasinstrucciones en este manuai antes de armar o usar su asptradora.
ADVERTENC A
Su seguridad es muy importante paranosotros, Para
reducirel desgo de incendio,choque el6ctrico,lesi6n cor-
poral o da£msal utilizarsu aspiradora,actue de acuerdo
con las precauciones b_stcasde seguridad, entre elias:
Use su aspiradora solamente como se
describe en este manual. Use solamente con
los accesorios Sears recomendados
Desconecte la fl_ente de eiectricidad antes de
hacer el ser_,icio o limpiar el &rea del cepillo,
La faila de hacer esto puede resuitar en
choque el6ctrico o et s_bito arranque del
cepiilo_
No deje la aspiradora cuando est_
enchufada Desenchufe del tomacorriente
cuando no est_ en uso y antes de hacer et
servicio.
Para reducir el riesgo de choque el_ctrico -
No la use afuera o sobre superficies mojadas
No permita que se le use como un juguete.
Especial atenci6n es necesaria cuando es
usada por o cerca de niSos.
No la use con un cord6n o clavija daSados.. Si
Ia aspiradora no est& trabajando como debe,
se le ha dejado caer, daSado, dejada afuera, o
volteada en el agua, ret6rnela a un Centro de
Servicto Sears.
No la tire o arrastre del cord6n, no use e!
cord6n como una manija, no cierre una puerta
sobre el cord6n, o tire del cord6n alrededor
de bordes afilados o esquinas. No pase la
aspkadora sobre el cord6n, Mantenga el
cord6n iejos de superficies calientes
No desenchufe tirando del cord6n Para
desenchufar, tome la clavija, no et cordSn
No tome la ctavija o la aspiradora con las
manos mojadas
No ponga ning0n objeto en tas aberturas.
No la use con ninguna abertura bloqueada;
mant6ngala libre de pofvo, httachas, pelo, y
cuatquier cosa que pueda reducir la
circulaci6n del aire.
Mantenga los cabellos, ropas sueltas, dedos,
y todas tas panes del cuerpo lejos de
aberturas y partes movibies.
Apague todos Loscontroles antes de
desenchufar.
Use cutdado extra cuando limpie escaieras_
No la ponga sobre sillas, mesas, etc
Mant6ngala sobre el piso
No use [a aspiradora para levantar I{quidos
inflamables o combustibles (gasolina, fluido
de limpiar, perfumes, etc ), o la use en _reas
donde puedan estar presentes. Los vapores
de estas substancias pueden crear un peligro
de incendio o explosi6n.
No levante nada que est6 ardiendo o echando
humo, ta] como cigarritlos, f6sforos, o cenizas
calientes.
No use la aspiradora sin el canasto del polvo
yfo filtros en su lugar
Siempre limpie ef canasto del po{vo despu6s
de limpiar la atfombra, limpiadores o
refrescantes, polvos, y polvo fino. Estos
productos obstruyen !os filtros, reducen la
circulaci6n del alre y pueden causar daSo a la
aspiradora, La falia en limpiar el canasto de la
basura puede causar daSo permanente a la
aspiradora,
No use la aspiradora para levantar objetos
duros afilados, pequeSos juguetes, alfileres,
sujetapapeles, etc EIIos pueden dar_ar ia
aspiradora o e! canasto de la basura
Desenchufe antes de conectar et Pet Handi
Mate_.
Usted es responsable de estar seguro de
que su aspfradora no es usada por alguien
incapaz de operarla correctamente
GUARDE ESTA$ STRUCC O E$
El armado y uso seguro de su aspiradora son su responsabilidad. Esta aspiradora ha sido disefiada
exctusivamente para uso dom6stico Lea este Manual del propietario detenidamente, pues cont{eneinforma-
c]6n importante sobre seguridady uso Esta guia contiene informaci6n sobre seguridad debajo de simbotos
de advertiencia o cuidado.
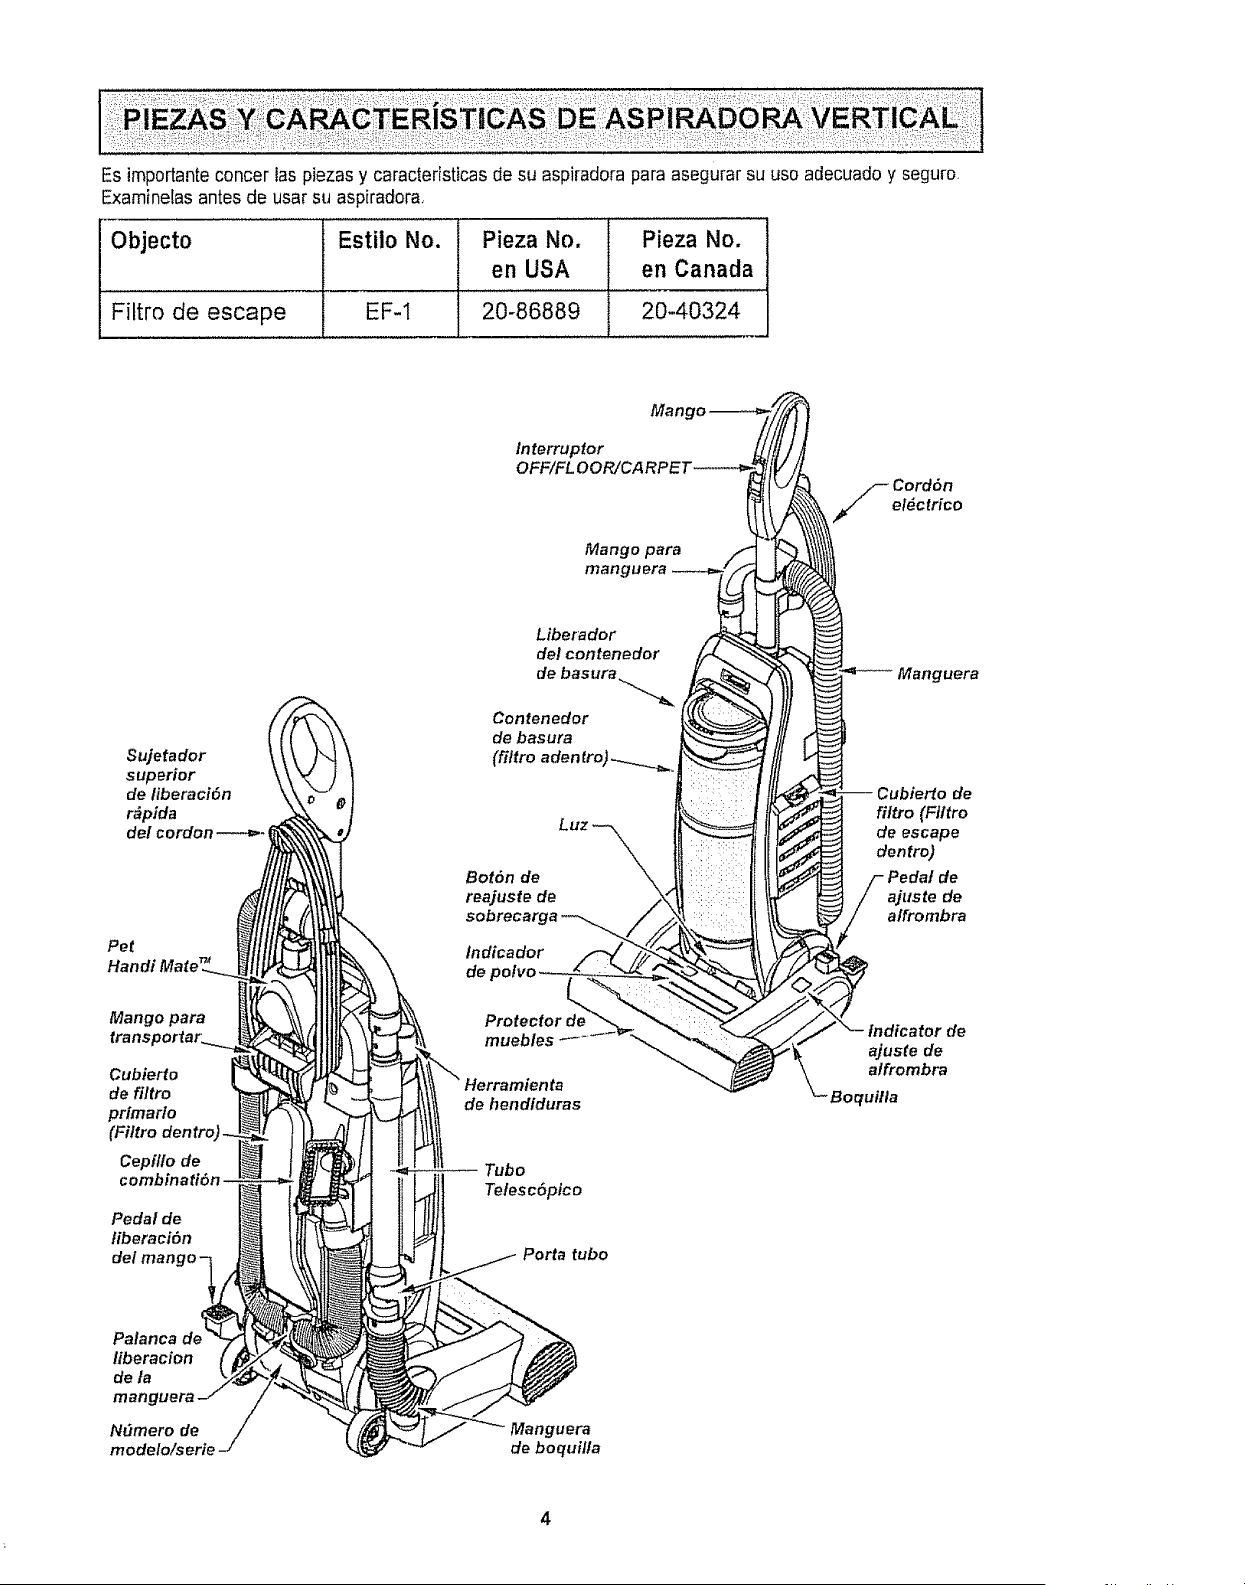
:_i_!_ i_:_i!_iiii_i_:.i__!_ _i_!!_:_!__!!i_ii:!i!!_::!_i_i _!:i_!i!_!_iiii!!_i!i'_!_i_
Es importante concer las piezas y caracteristicas de su aspiradora para asegurar su use adecuado y seguro_
Examinelas antes de usar su aspiradora,
Objecto Estilo No. Pieza No. Pieza No.
en USA en Canada
Filtro de escape EF-I 20-86889 20-40324
Sujetador
superior
de liberaci6n
r&pida
del cordon---_-
Pet
Mango para
Cubierte
de filtro
primarlo
(Filtro dentrc
Cepillo de
Pedal de
tiberaci6n
de/man
Interrupter
Mango para
mang
Liberador
del conteneder
Conteneder
de basura
(filtro aden tre) _._._._..
Luz
BotSn de
reajuste de
sobrecarga
lndicador
de
Protector de
muebles _ ....
de hendiduras
Tube
Telesc6pico
Porta tube
i M nguer
f" indicator de
ajuste de
atfrombra
Boqultla
Palanca
liberacien
de la
marl
NO,mere de
modelo/serie
'uet_
de boquilla
4
Por favor ponga atenciSn especial a los cuadros que le alertaran de pesibles peligros
Advertencia: Este informaciSn le alertar_ de peligro de fuego, choques electricos,
quemadas y lesiones Cuidado: Este informaci6n le alertara de peligros como
lesiones y daSos de propiedado
ADVERTENCnA
Peligro de lesi6n personal y daRo al
producto
No conecte la aspiradora hasta que
termine de armarla. De Io contrario
podria causar un choque el_ctrico o
lesi6n corporal.
Antes de armar la aspiradora, revise la
LISTA DE EMBALAJEo Use esta lista
para verificar que ha recibido todos los
componentes de su nueva aspiradora
Kenmore,
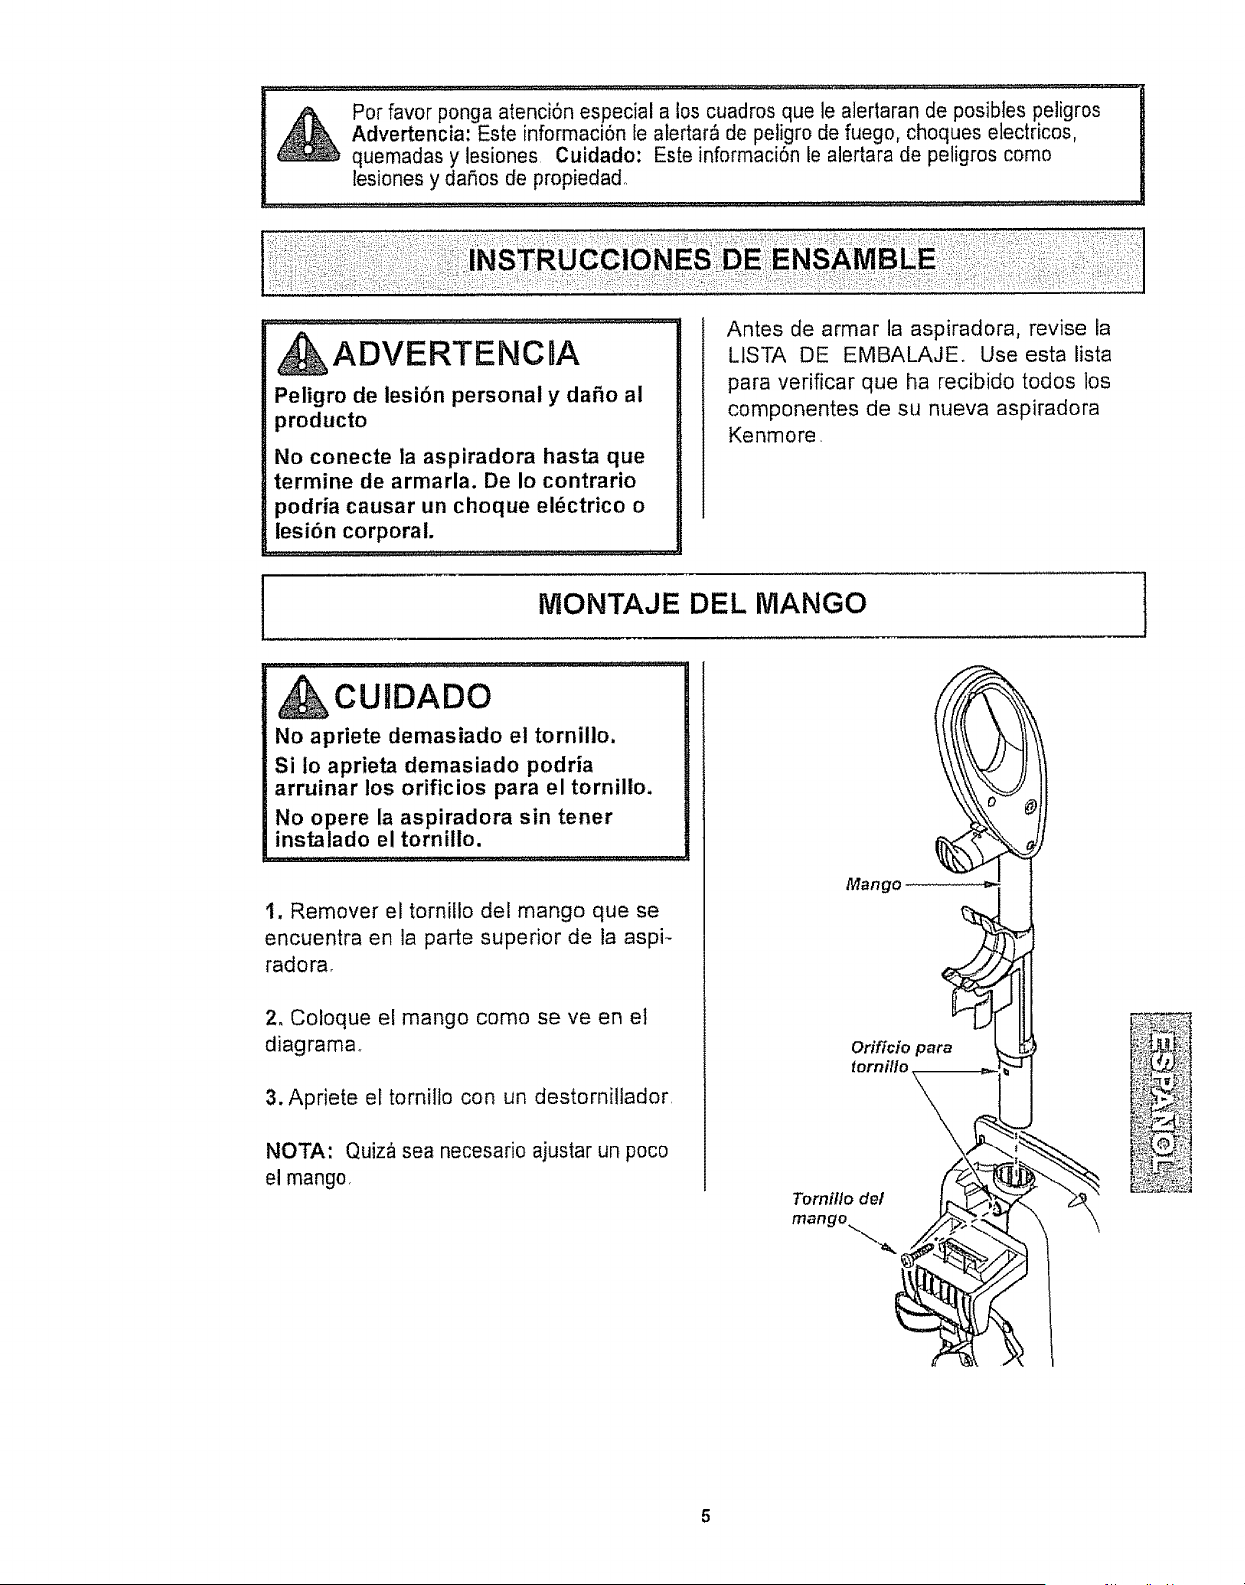
MONTAJE DEL MANGO
..... !IIL,, ,LI ),[i!,,) ), )!,i!,,!i,i,,i,,i . : :
CUJDADO
No apriete demasiado el tornillo,
Si Io aprieta demasiado podria
arruinar los orificios para el tornillo.
No opere la aspiradora sin tener
instalado el torniilo.
t, Remover el tomillo del mango que se
encuentra en la parte superior de la aspi-
radora,
2o Coloque el mango como se ve en el
diagrama,
3. Apriete el tornillo con un destornillador,
NOTA: Quiz& sea necesario ajustar un poco
el mango,
Mango
Orificio para
tornillo
Ternillo del
mango...
"...._
t
_
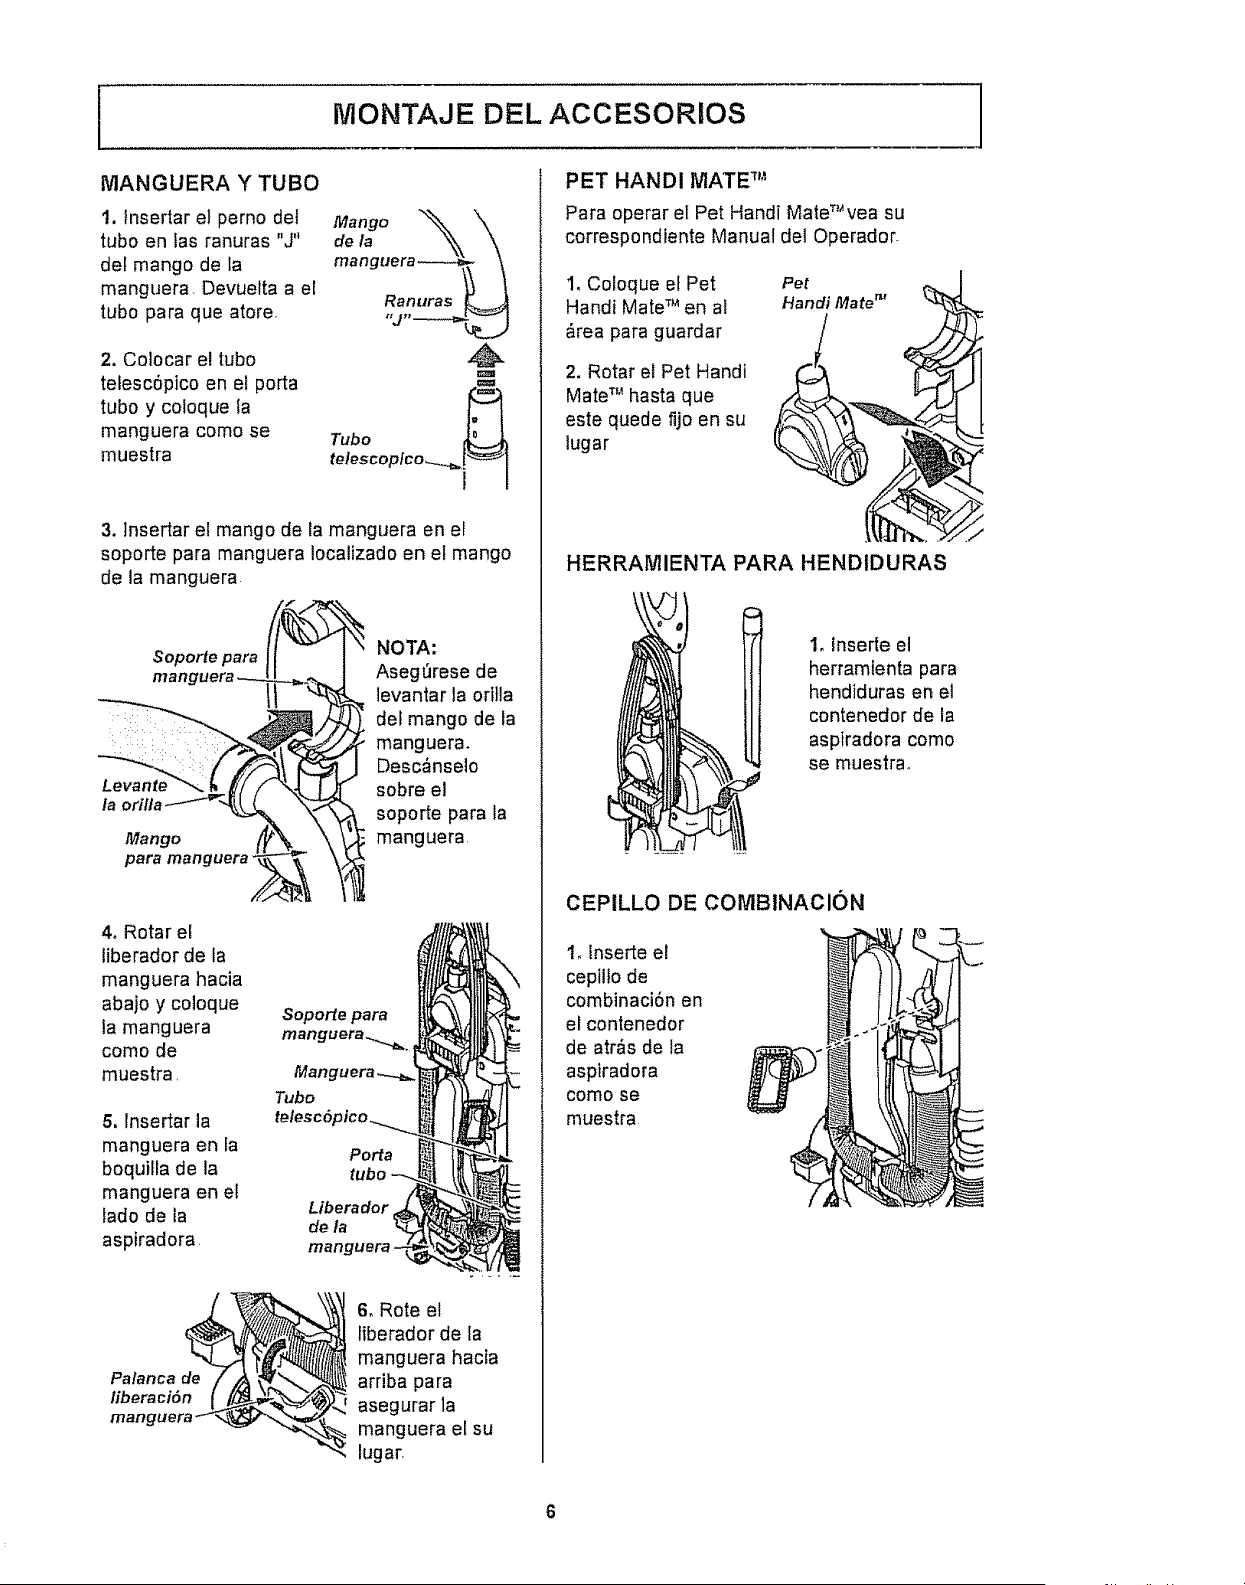
MONTAJE DEL ACCESORIOS
MANGUERA Y TUBO
t, tnsertar el perno det
tubo en las ranuras "J"
def mango de la
manguera, Devuelta a el
tubo para que atore
2, Colocar el tubo
telesc6pico en el porta
tubo y coloque la
manguera como se
muestra
Mango _\
de la
mang
Ranuras
Tubo _
telescopico_--_=.,l_ [
3, lnsertar el mango de la manguera en el
soporte para manguera Iocalizado en el mango
de la manguera
la
para
Soporte para
NOTA:
AsegDrese de
levantar la oritla
del mango de la
manguera.
Desc_nselo
sobre el
soporte para la
manguera
4, Rotar eE
liberador de ta
manguera hacia
abajo y coloque
la manguera
como de
muestra
5, rnsertar la
manguera en ta
boquitla de la
manguera en et
lado de la
aspiradora.
Palanca de
liberaci6n
man
Soporte para
manguera_.
Manguera
Tubo
Porfa
Liberador
de la
manl
6, Rote el
liberador de la
manguera hacta
arriba para
asegurar la
manguera et su
lugar
PET HAND! MATE TM
Para operar el Pet Handi MateT_vea su
correspondiente Manual del Operador
1, Coloque el Pet
Handi Mate TM en at
&rea para guardar
2, Rotar el Pet Handi
MateTM hasta que
este quede fijo en su
lugar
Pet
Handi Mate TM
HERRAMIENTA PARA HENDIDURAS
1, tnserte el
herramlenta para
hendiduras en el
contenedor de ia
aspiradora como
se muestrao
CEPILLO DE COMBINACION
!_ lnserte el
cepillo de
combinaciOn en
el contenedor
de atr&s de la
aspiradora
como se
muestra
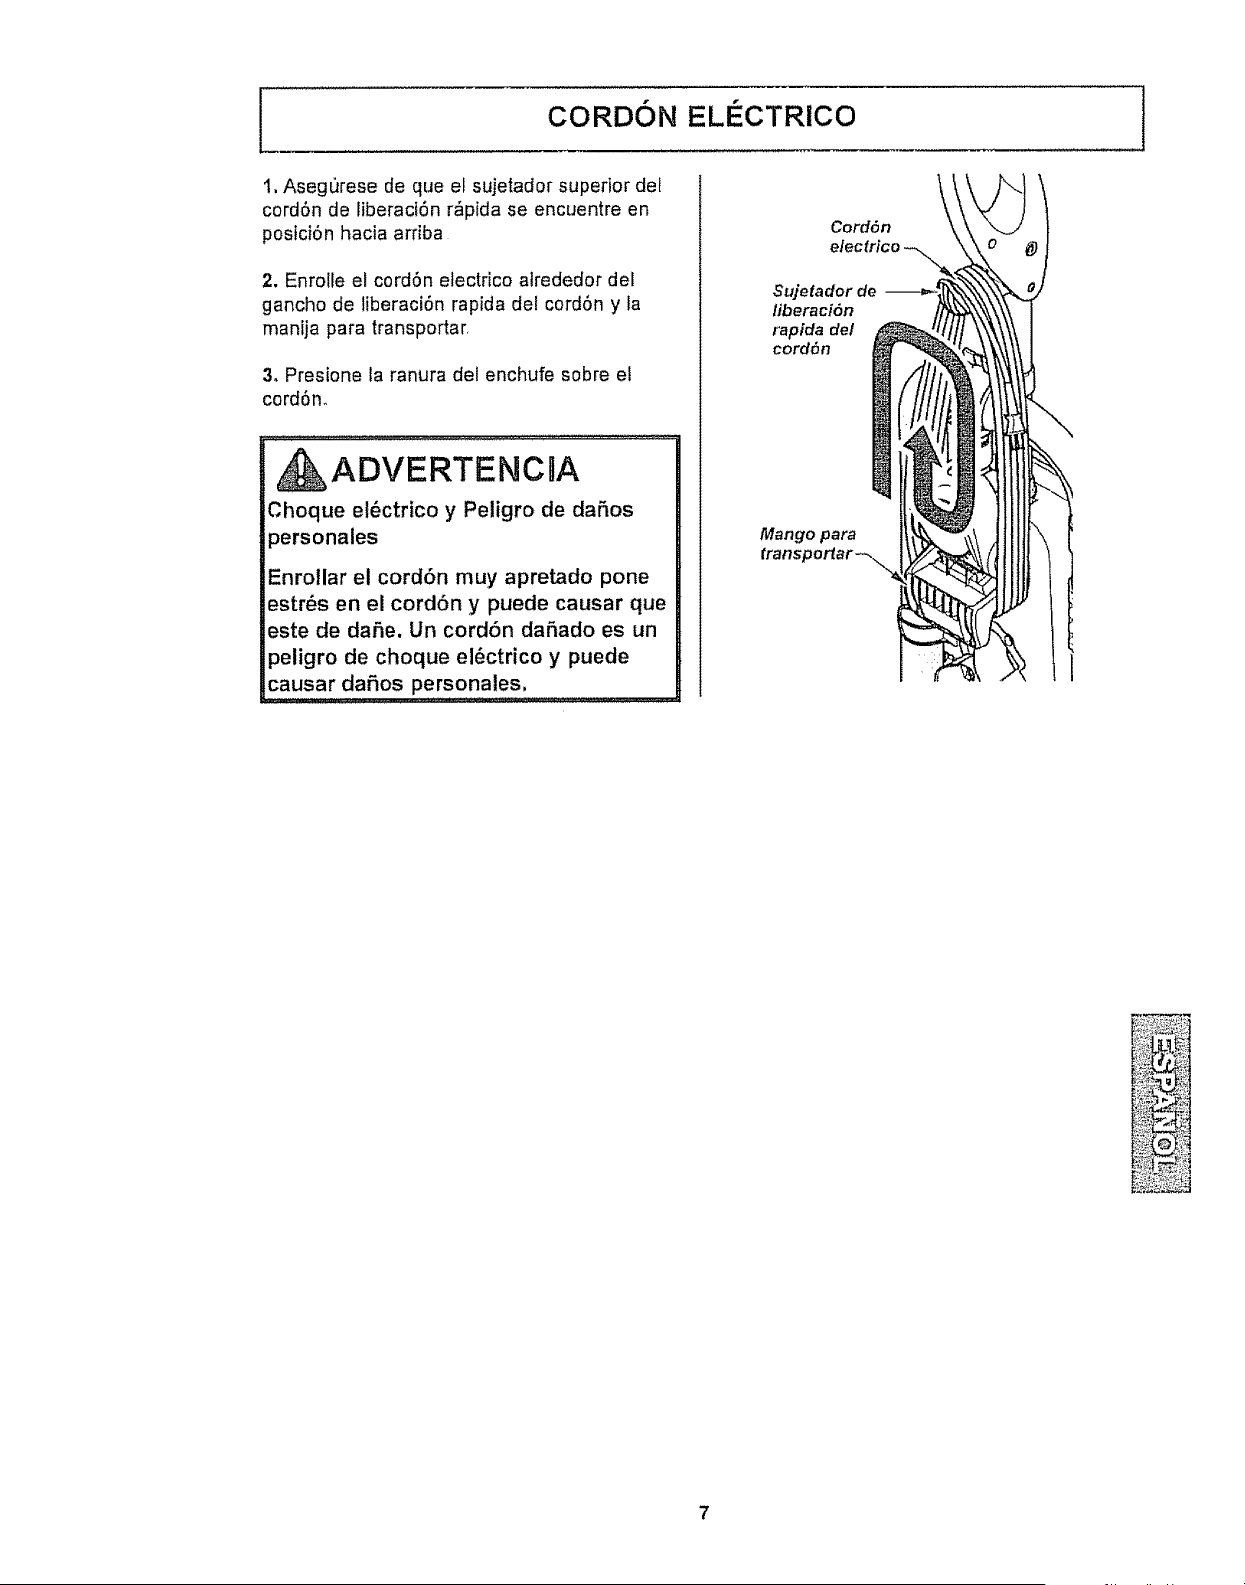
CORDON ELECTRICO
1, Asegurese de que el sujetador superior det
cord6n de liberact6n r_pida se encuentre en
postci6n hacia ardba
2. Enrolle el cord6n electrico atrededor del
gancho de liberaci6n rapida dei cerd6n y la
manija para transportar,
3, Presione la ranura del enchufe sobre el
cord6n.
ADVERTENCRA
Choque el@ctrico y Peligro de daSos
personales
Enrollar el cord6n muy apretado pone
estr_s en el cord6n y puede causar que
este de daSe. Un cord6n dar3ado es un
peligro de choque el@ctrico y puede
causar daSos personales,
........................................... ...;,.,;.;.,,,;m;
CordOn
electrico
Sujetador de
liberaci6n
rapida de/
cord6n
Mango para
N
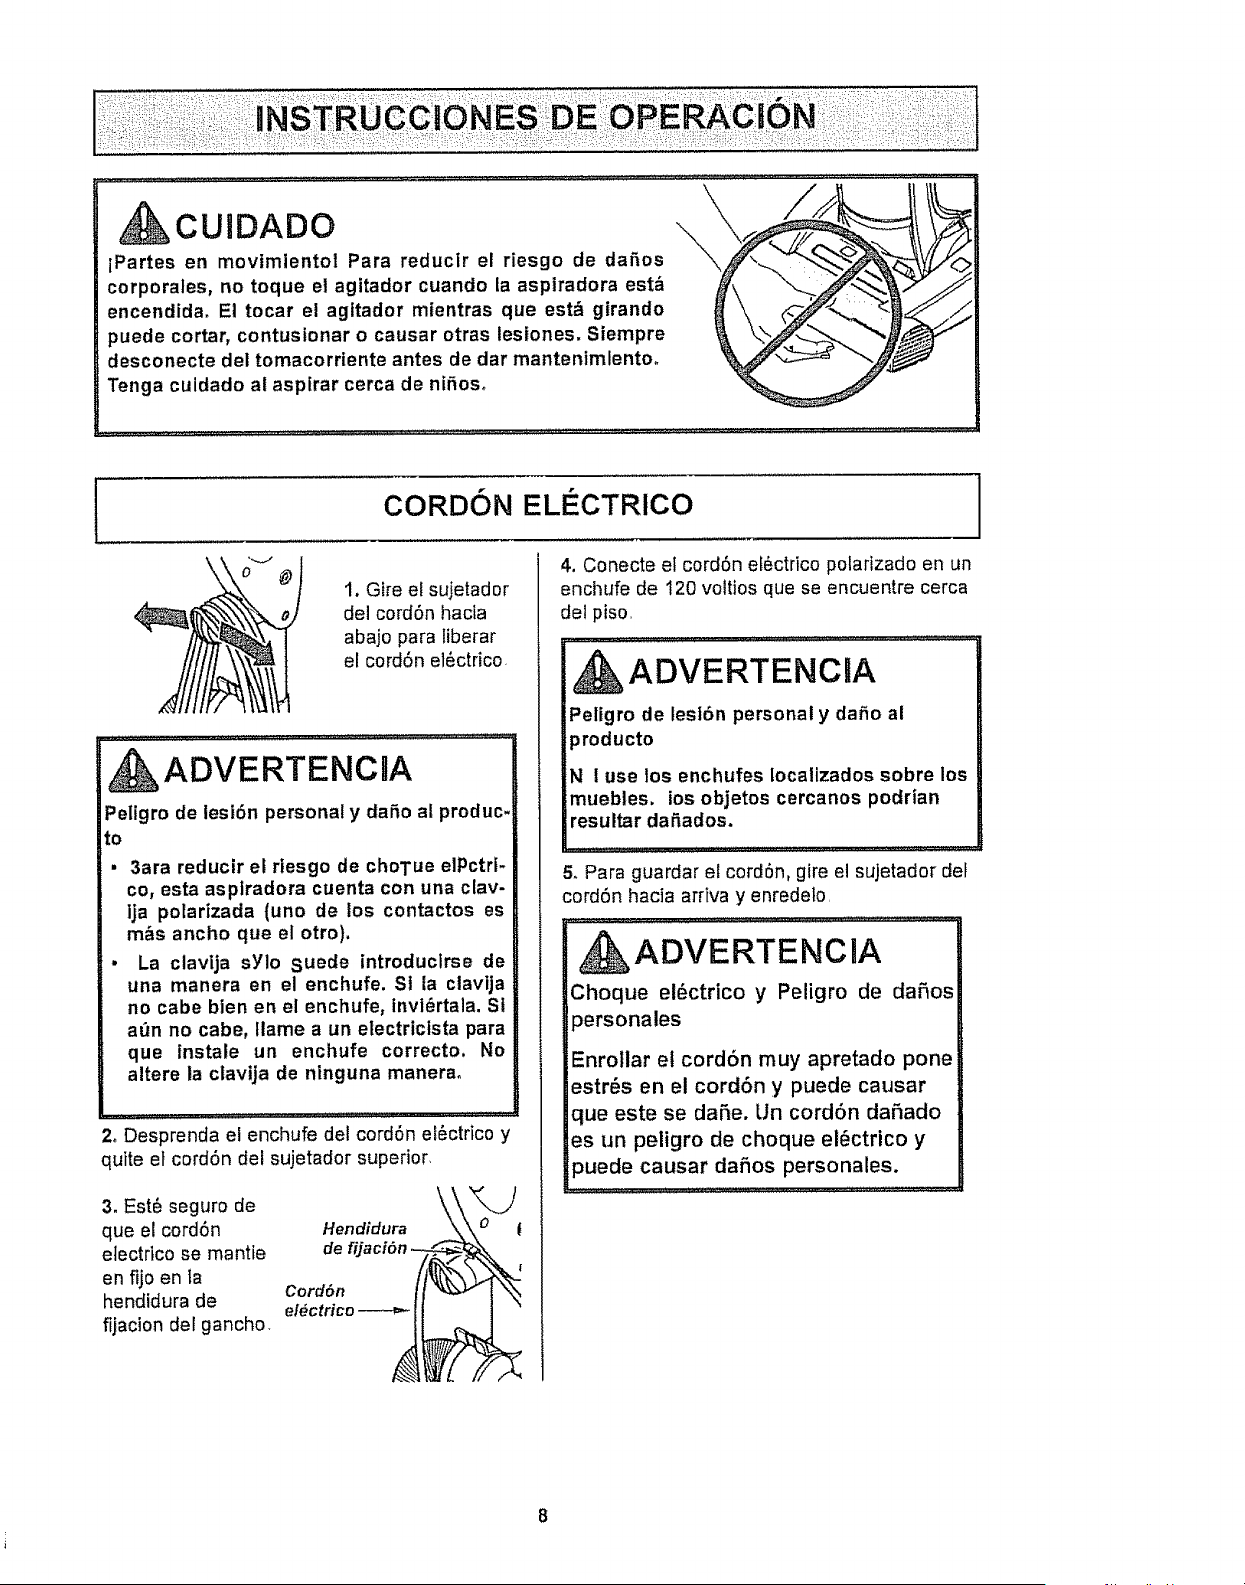
, CUIDADO
iPartes en movimientol Para reducir el riesgo de dafios
corporales, no toque el agltador cuando la aspiradora est&
encendida, El tocar el agitador mientras que est& girando
puede cortar, contusionar o causar otras lesiones. Siempre
desconecte del tomacorriente antes de dar mantenimlento,
Tenga culdado at asptrar cerca de nifioso
\
\
t coRoo.E,Eo R,co 1
\
t. Gire e! sujetador
del cord6n hacia
4. Conecte el cord6n ef6ctrico polarizado en un
enchufe de 120 voltios que se encuentre cerca
del piso,
abajo para tiberar
el cord6n el6ctrico.
ADVERTENCRA
Peligro de lesi6n personal y dafio al produc-
to
, 3ara reducir el rtesgo de choTue elPctrt-
co, esta asptradora cuenta con una clav-
lja polarizada (uno de los contactos es
Peligro de lesl6n personal y dafio al
producto
N I use los enchufes Iocalizados sobre los
muebles, los objetos cercanos podrian
resultar dafiados.
5. Para guardar el cord6n, gire el sujetador del
cord6n hacia arriva y enredelo,
m&s ancho que el otro),
La clavija sYlo suede introduclrse de
una manera en el enchufe, SI la clavija
no cabe bien en el enchufe, invl6rtala. St
a_n no cabe, flame a un electrtcista para
que instale un enchufe correcto. No
altere la ctavija de ninguna manerao
/i ,_1_ .... _11,i,,, ,i
2, Desprenda el enchufe del cord6n el6ctrico y
quite el cordSn del sujetador superior,
3. Est6 seguro de
que el cord6n Hendidura
electdco se mantle de
en fijo en ta
Cord6n
hendidura de e!_ctrico
fijacion del gancho,
ADVERTENClA
Cheque el6ctrico y Peligro de dafios
personales
Enrollar el cord6n muy apretado pone
estr6s en el cord6n y puede causar
que este se dafie, Un cord6n dafiado
es un peligro de cheque el6ctrico y
puede causar dafios personales.
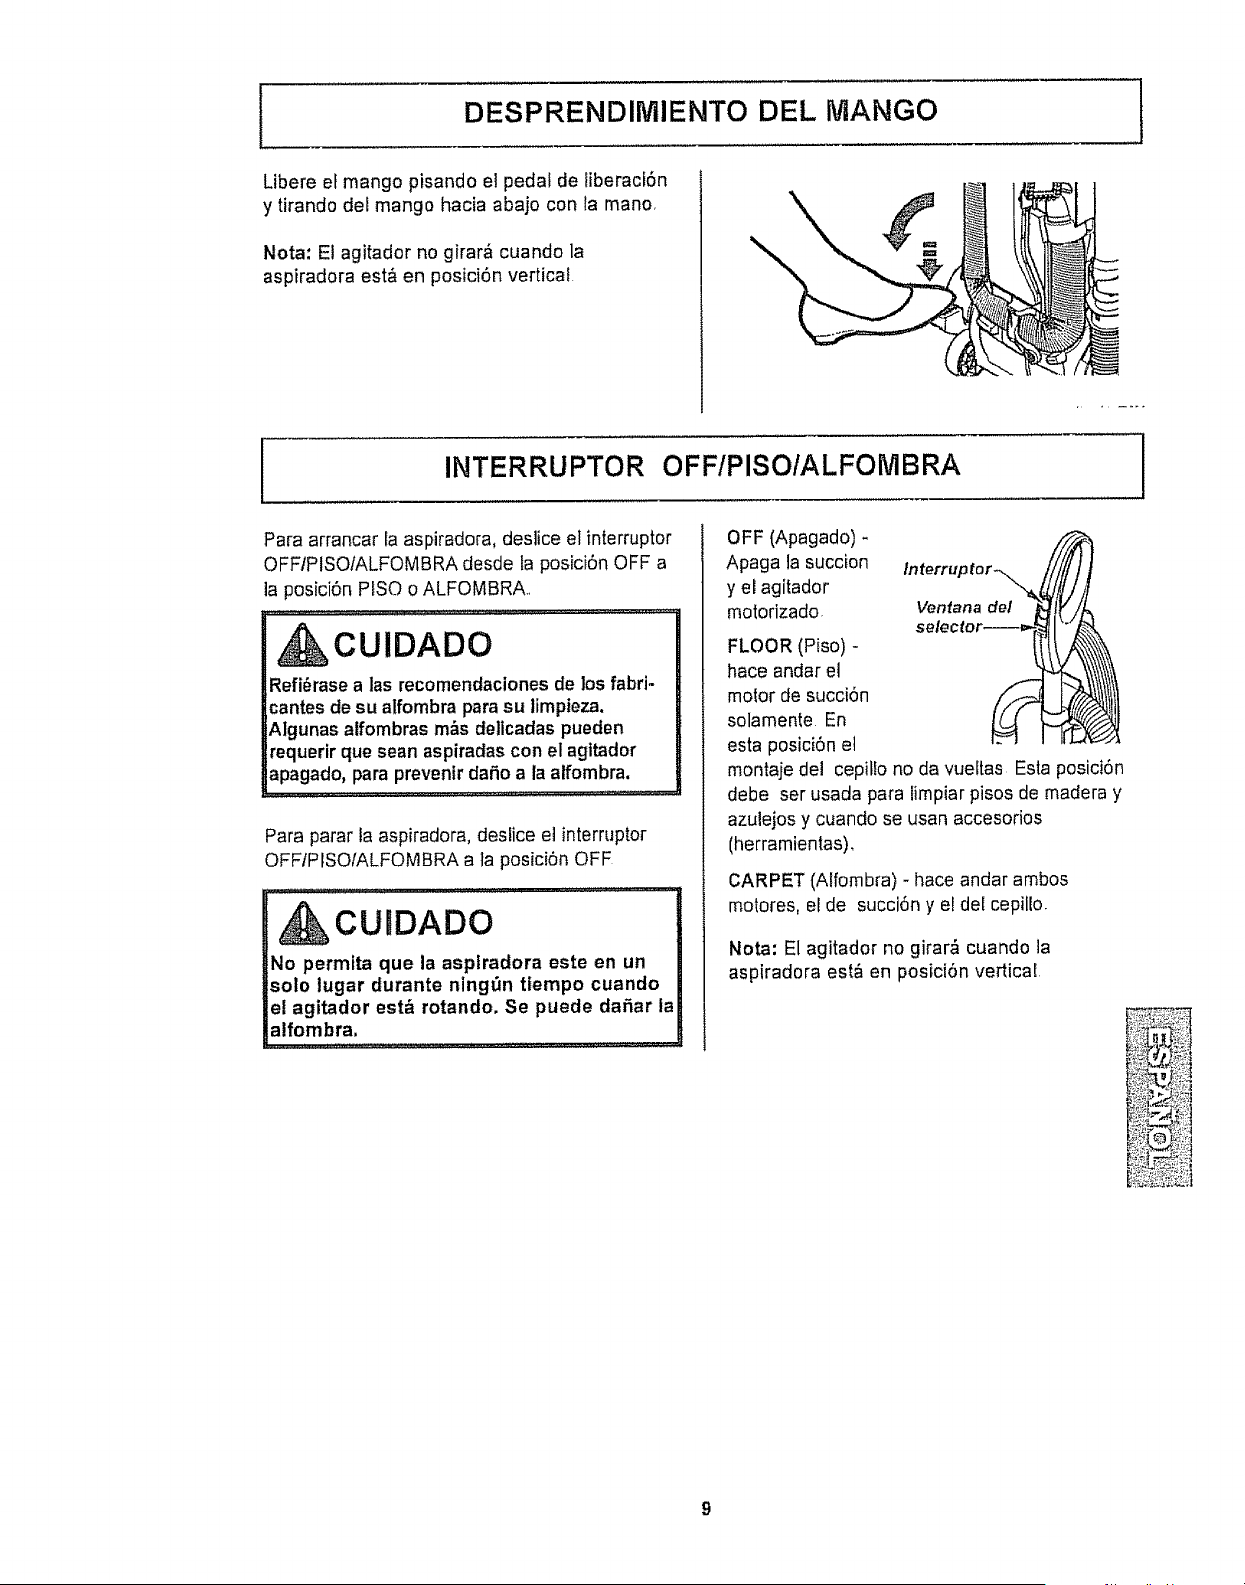
DESPRENDIMIENTO DEL MANGO
Libere el mango pisando el pedal de liberact6n
y tirando del mango hacia abajo con la manor
Nota: El agitador no girar& cuando la
aspiradora est_ en posici6n vertical
!
INTERRUPTOR OFFIPISO/ALFOMBRA
Para arrancar la aspiradora, deslice el interruptor
OFF/PISOIALFOMBRA desde ta posici6n OFF a
la posici6n PfSO o ALFOMBRA
CUIDADO
Refi_rase a las recomendaciones de los fabri-
cantes de su alfombra para su limpieza.
Algunas alfombras m&s dellcadas pueden
requerir que sean aspiradas con el agttador
apagado, para prevenfr dafio a ia alfombra,
Para parar ta aspiradora, deslice el interruptor
OFFIPISOIALFOMBRA a la posici6n OFF
CUIDADO
No permita que la asptradora este en un
solo lugar durante ning_n ttempo cuando
el agitador est& rotando. Se puede da5ar ia
alfombra,
OFF (Apagado) -
Apaga la succion
y el agitador
motorizado.
Ventana del
FLOOR (Piso) -
hace andar el
motor de succi6n
solamente En
esta posici6n el
montaje del cepillo no da vueltas Esla posici6n
debe ser usada para limpiar pisos de madera y
azulejos y cuando se usan accesorios
(herramientas),
CARPET (Alfombra) - hace andar ambos
motores, el de succi6n y el del cepillo.
i
Nota: El agitador no girar& cuando la
aspiradora est_ en posici6n vertical
AJUSTE Y SELECClON DE NIVEL DE PELO DE LAALFOMBRA t
]
f
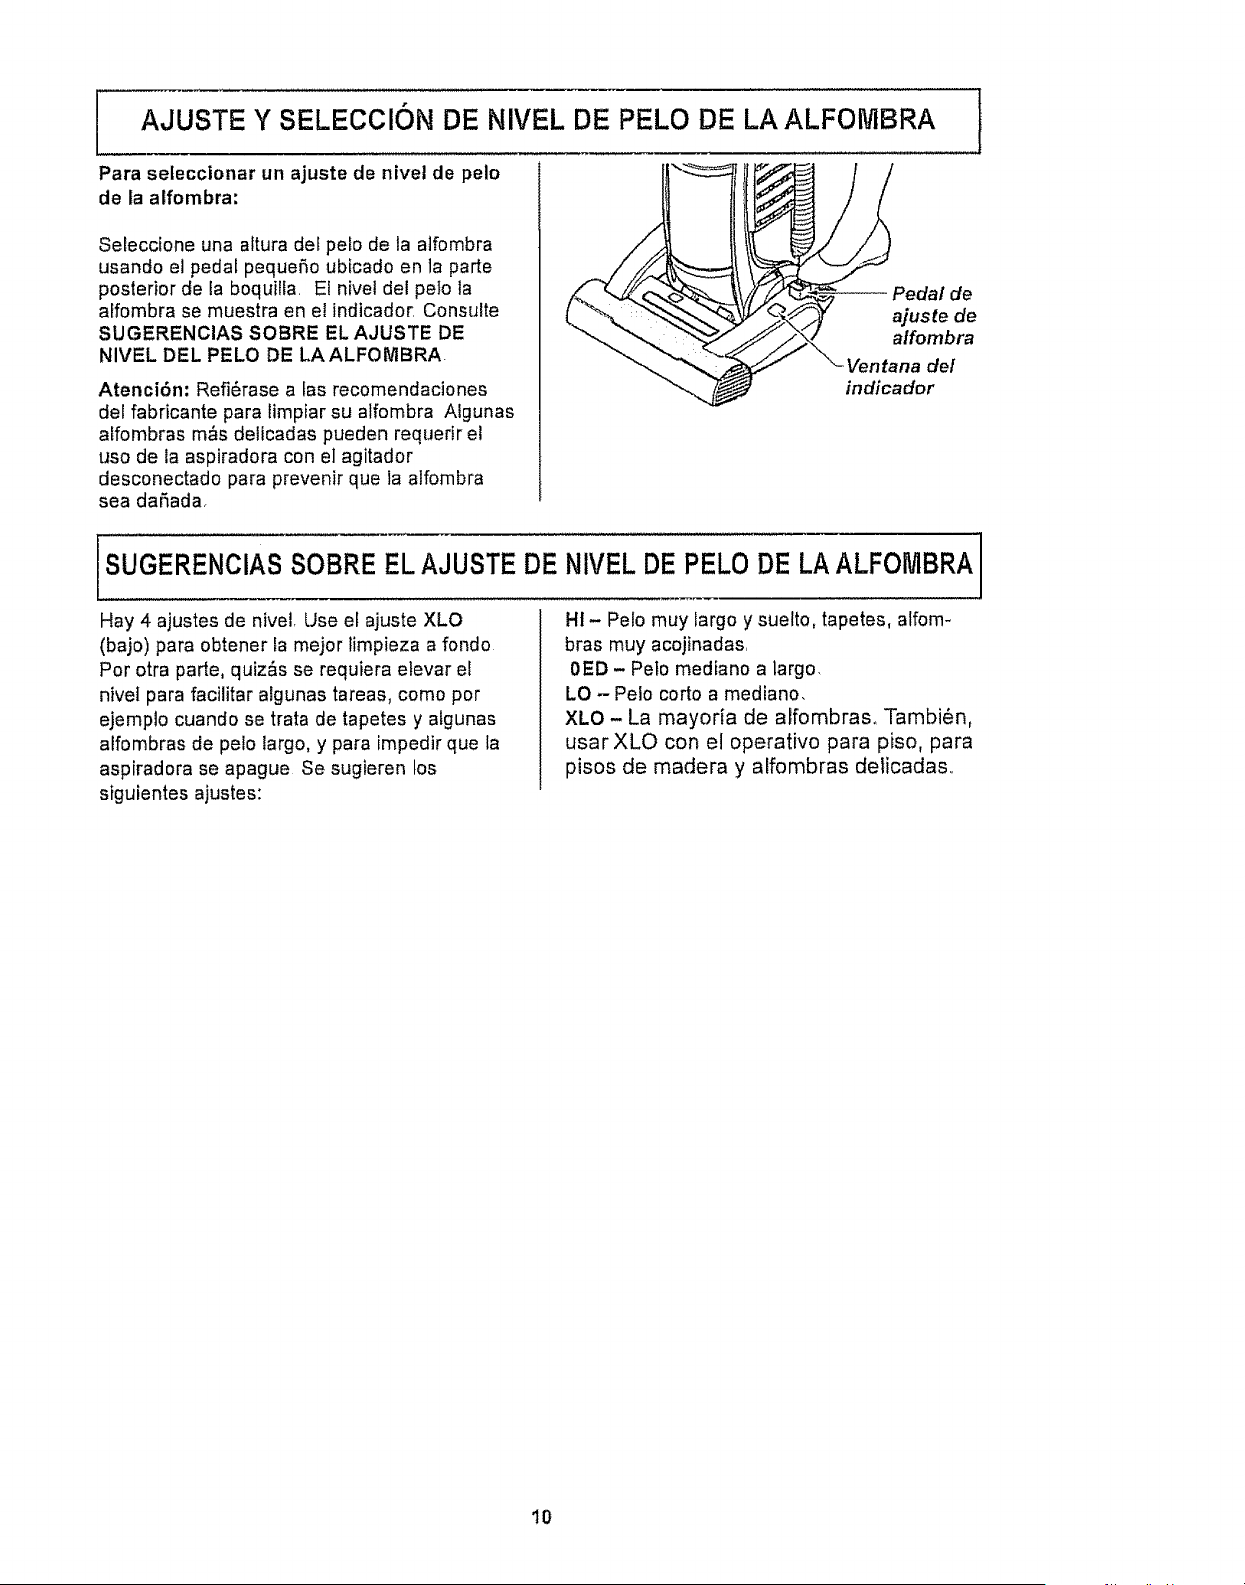
Para seteccionar un ajuste de nivel de pelo
de ta alfombra:
Seleccione una altura def pelo de la atfombra
usando el pedal pequeSo ubicado en la parte
posterior de la boquiIfa, Ef nivel del pe]o la
alfombra se muestra en el indlcador Consulte
SUGERENCIAS SOBRE EL AJUSTE DE
NIVEL DEL PELO DE LAALFOMBRA
Atenci6n: Refi6rase afas recomendaciones
del fabricante para timpiar su alfombra AIgunas
alfombras m,_sdelicadas pueden requerir el
uso de la aspiradora con el agitador
desconectado para prevenir que la alfombra
sea daSada,
indicador
SUGERENCiAS SOBRE EL AJUSTE DE NIVEL DE PELO DE LA ALFOMBRA
Hay 4 ajustes de nivet, Use el ajuste XLO
(bajo) para obtener la mejor limpieza a rondo
Por otra parte, quiz&s se requiera etevar el
nivet para facilitar algunas tareas, COmBpor
ejemplo cuando se trata de tapetes y atgunas
alfombras de pelo largo, y para impedir que la
aspiradora se apague Se sugieren los
siguientes ajustes:
HI - Pelo muy Iargo y suelto, tapetes, atfom-
bras muy acojinadas,
OED - Peto mediano a largo,
LO - Pelo corto a mediano,
XLO - La mayor{a de alfombraso Tambi6n,
usar XLO con el operativo para piso, para
pisos de madera y alfombras deficadas,,
10
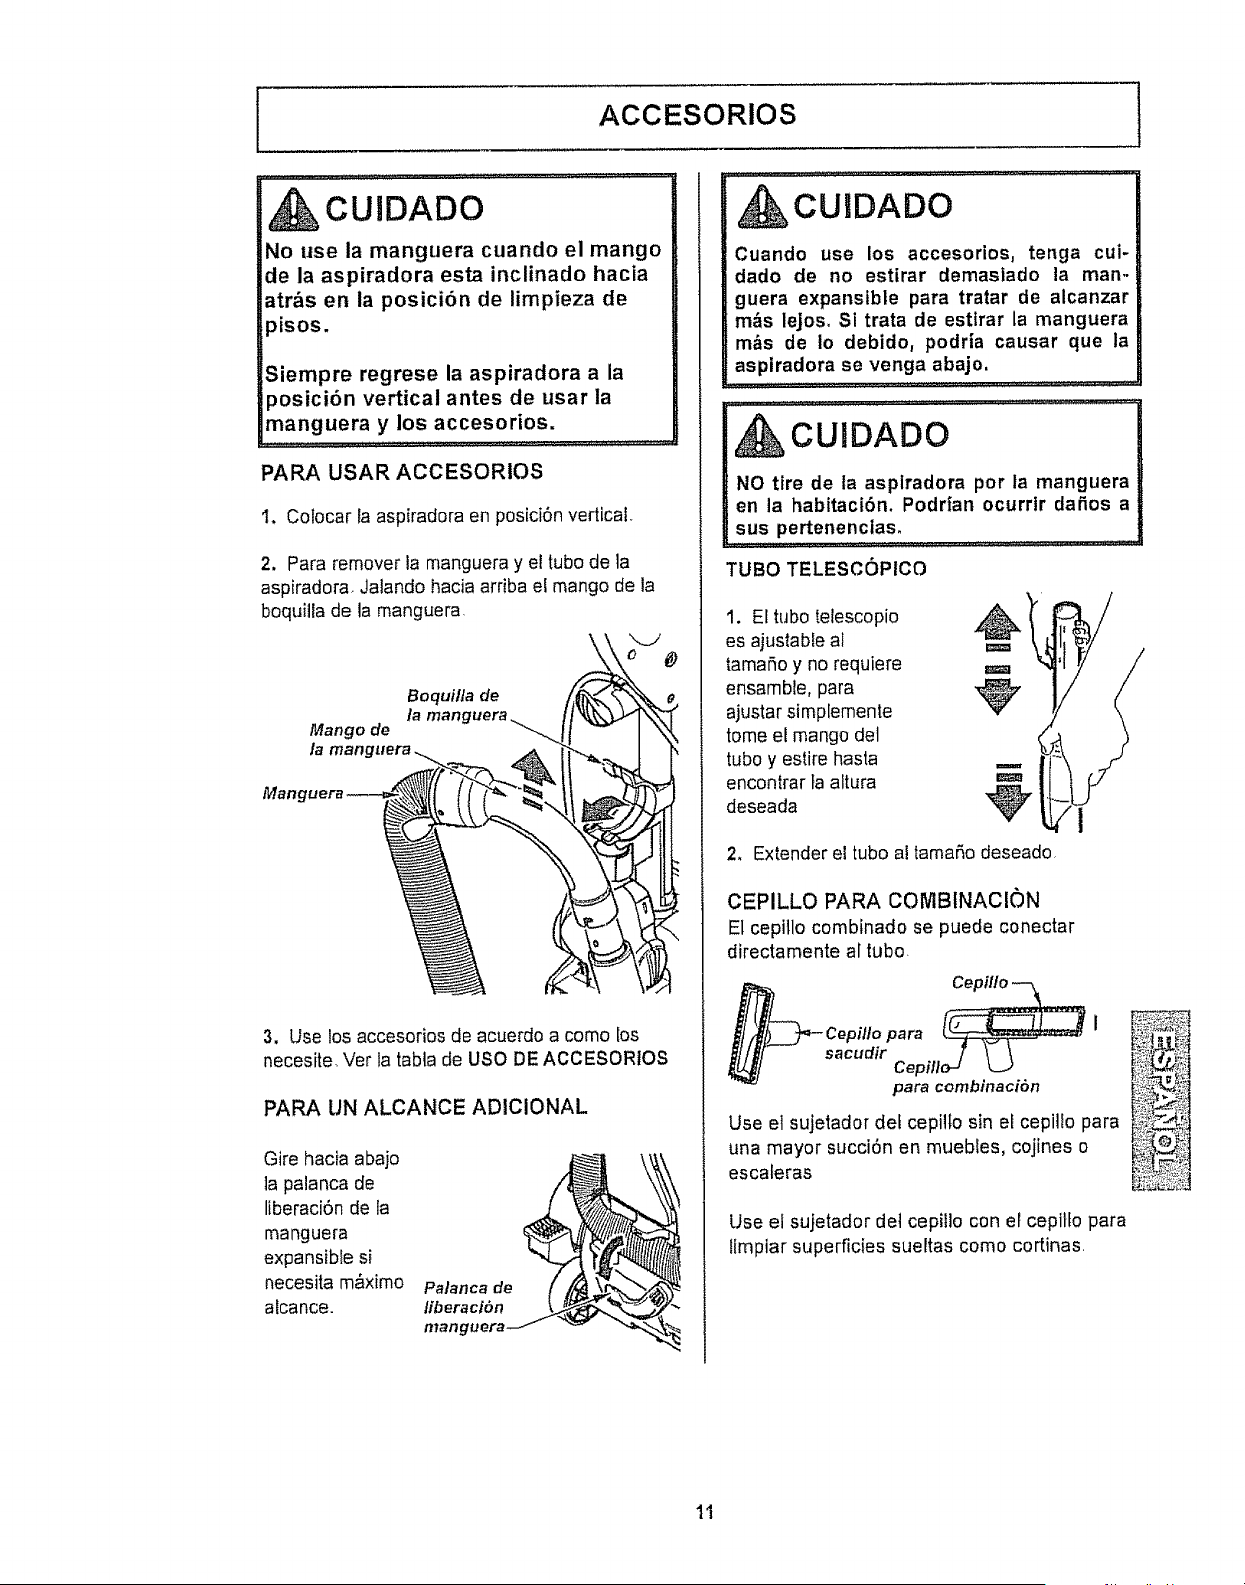
I ACCESORIOS
CUIDADO
No use la manguera cuando el mango
de la aspiradora esta inclinado hacia
atr&s en la posici6n de limpieza de
_isos.
3iempre regrese la aspiradora a ia
posici6n vertical antes de usar la
manguera y los accesorios.
PARA USAR ACCESORIOS
I. Colocar la aspiradora en pesici6n vertical.
2, Para remover la manguera y el tubo de la
aspiradora. Jatando hacia arriba el mango de la
boquilla de la manguera
\ "-J
Mango de
la mane
Boquilla de
la man
Mangl
3. Use los accesofios de acuerdo a como los
necesite, Ver la tabla de USO DE ACCESORIOS
PARA UN ALCANCE ADiClONAL
Gire hacia abajo
]a palanca de
liberaci6n de la
manguera
expansible si
necesita m&ximo
alcance.
Palanca de
liberacf6n
mang
.............. ,,........ :,:,,:,,,,
, CUIDADO
Cuando use los accesories, tenga cui-
dado de no estirar demaslado la man..
guera expansible para tratar de alcanzar
m_s lejoso Si trata de esttrar la manguera
m&s de Io debido, podria causar que la
asplradora se venga abajo,
&oulDADo
NO tire de la asplradora por la manguera
en la habitaci6n. Podrfan ocurrtr dafios a
sus pertenenclas.
TUBO TELESGOPICO
t. El tubo telescopio ._
es ajustable al
tamafio y no requiere m
ensamble, para
ajustar simplemente _"
tome el mango del
tubo y estire hasta
encontrar fa altura m
deseada '_
2, Extender el tubo al tamaSo deseado
CEPILLO PARA COMBtNACl0N
El cepitlo combinado se puede conectar
directamente al tubo
b
Cepillo para
sacudir j ___
Use et sujetador def cepilto sin el cepillo para
una mayor succi6n en muebles, cojines o
escaleras
Use el sujetador det cepi!lo con el cepitfo para
fimpiar superficies sueltas como cortinas.
1t
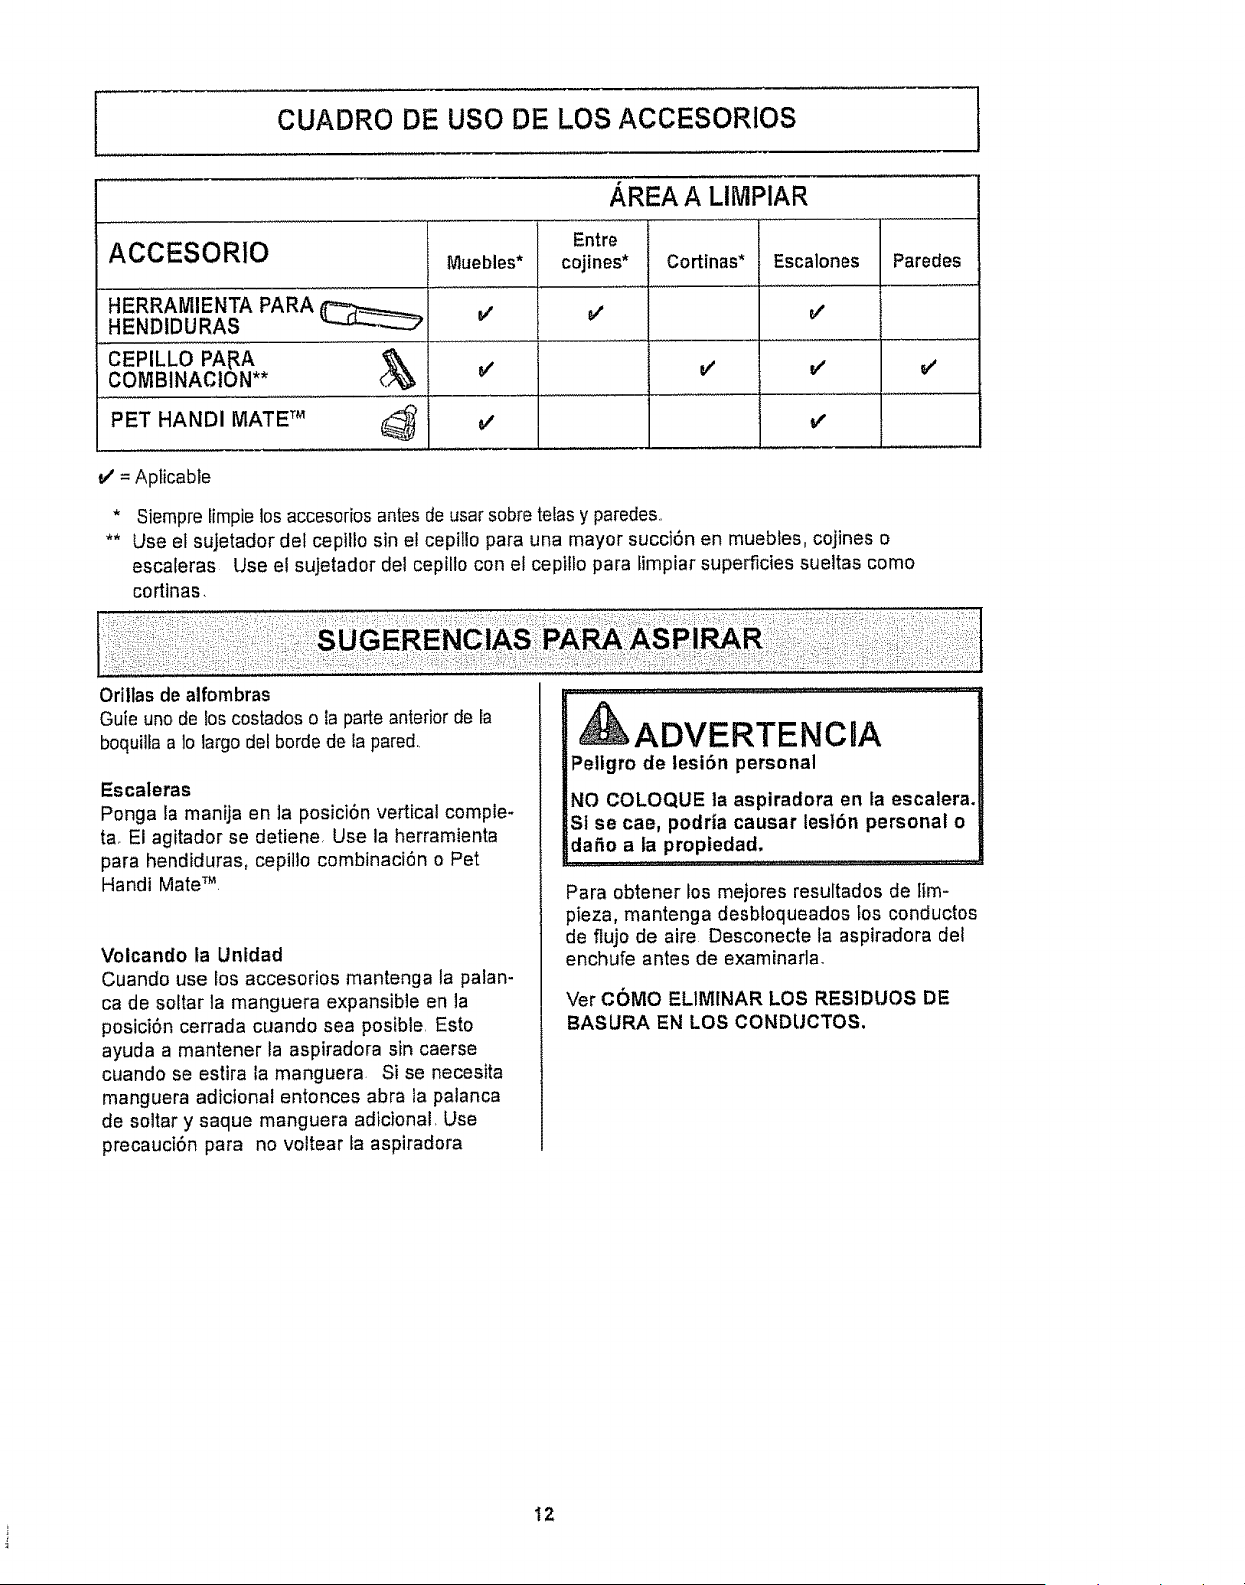
CUADRO DE USO DE LOS ACCESORIOS
AREA A LIMPIAR
Entre
ACCESORIO Muebles* cojines* Cortinas* Escalones Paredes
HERRAMIENTA PARA ..........................................................
HENDIDURAS _ V' V' v'
CEPILLO PApA
COMBINACION** v' v' v' v'
PET HANDI MATE TM _ V' V'
V' = Apticable
* Siempre fimpie los accesorios antes de usar sobre tefas y paredes.,
** Use el sujetador del cepftlo sin el cepil!o para una mayor succi6n en muebtes, cojines o
escaleras Use el sujetador del cepillo con el cepiflo para fimpiar superficies sueltas como
corttnas.
Orillas de alfombras
Guie uno de los costados o ia parte anterior de la
boquilla a 1olargo del borde de la pared,,
Escateras
Ponga la manija en Ja posici6n vertical comple-
ta, El agitador se detiene, Use la herramienta
para hendiduras, cepillo combtnaciOn o Pet
Handi Mate TM`
Voicando ta Untdad
Cuando use los accesorios mantenga la palan-
ca de soltar la manguera expansible en la
posici6n cerrada cuando sea posible, Esto
ayuda a mantener la aspiradora sin caerse
cuando se estira la manguera Si se necesita
manguera adicional entonces abra la palanca
de soltar y saque manguera adicional, Use
precauci6n para no voltear la aspiradora
,ADVERTENCUA
Pellgro de lesi6n personal
NO COLOQUE la aspiradora en la escalera.
Sl se cae, podria causar lest6n personal o
daSo a ia propiedad,
.... :: ::....... .,,,=-
Para obtener los mejores resultados de tim-
pieza, mantenga desbloqueados los conductos
de flujo de aire Desconecte la aspiradora del
enchufe antes de examinarla.
Vet COMO ELIMINAR LOS RESIDUOS DE
BASURA EN LOS CONDUCTOS.
12
DE MOTOR
Protector Termal - Succi6n del Motor
Esta aspiradora tiene un protector termal que
se ajusta autom,_ticamente para proteger a ta
asptradora del sobrecalentamiento S[ una
obstrucci6n impide el flujo normaE de aire al
motor, el protector termal apaga el motor
autom,_ticamente para permitir que ei motor se
enfde a fin de evitar posibles dafios a la
aspiradora
Protector Termal- Motores del agitador
Esta aspiradora esta equ[pada con protectores
de sobre calentamiento en los motores del
agitador que se activan autom&ticamente para
la protecciSn de losmotores Estos protectores
desconectan de toda corriente eibctrica a los
motores autombticamente cuando existe un
sobrecalentamiento Esto permite que los
motores se enfrien y que no se vayan a fundir
o sufrir un desperfecto
CUIDADO
Siempre regrese la aspiradora a la
posicibn vertical antes de usar la
manguera y los accesorios. La falla de
este es el resultado del sobre
calentamiento de los motores del
agitador. Esto puede causar que el
protector termal se active.
Para correglr el problema: Si esto ocurre,
apague la aspiradora y desenchufe el cord6n
del tomacorriente para permttir que la
aspiradora se enfr{e y que el protector termal
se reajuste Busque y saque las
obstrucctones o cambte la bolsa, si es
necesarto. Examine tambi6n y reemptace
cualquier filtro obstruidm Espere
aproxtmadamente 40-50 minutos y enchufe
la aspiradora y pr_ndala para ver sl el
protector del motor se ha reajustado,
Protector de motor
Esta aspiradora contiene una v_lvula de aire
que sirve corno protector de motor y cuando un
b!oqueo impida que circule el aire al motor se
abre autom_ticamente para proveer un flujo de
aire fresco al motor As{ esta v&lvuia impide el
sobre calentamiento del motor y como
consecuencia que esta se dafie Usted podr&
notar un sonido diferente al norman cuando
esta v_Ivula se activa y el aire pasa pot ella
Protector
de motor
Para corregir el problema vacia el
contenedor de poivo y limpia el flltro
primario. SI usa las herramientas, ajustar
estas para permitir la mayor corriente de
aire,
Nota: La v_lvula de desviaciSn puede estar
abierta mientras se usan los accesorios o para
limpiar una aifombra nueva a causa de un fluio
reducido de atre por los accesorios mismos o
por la petusa de la alfombra que Ilene la bolsa
rapidamente Consulte e! cuadro
RECONOCIMIENTO DE PROBLEMAS,
Nota: No obstruya el protector de motor
t3
, ADVERTENCnA
Peligro de choque etSctrico o lesi6n cor-
poral
Desconecte ta unidad antes de limplarla o
darte servicio. De Io contrarlo podrfa pro-
ductrse un choque eldctrico o causar
lest6n corporal si la asplradora arranca de
manera imprevista.
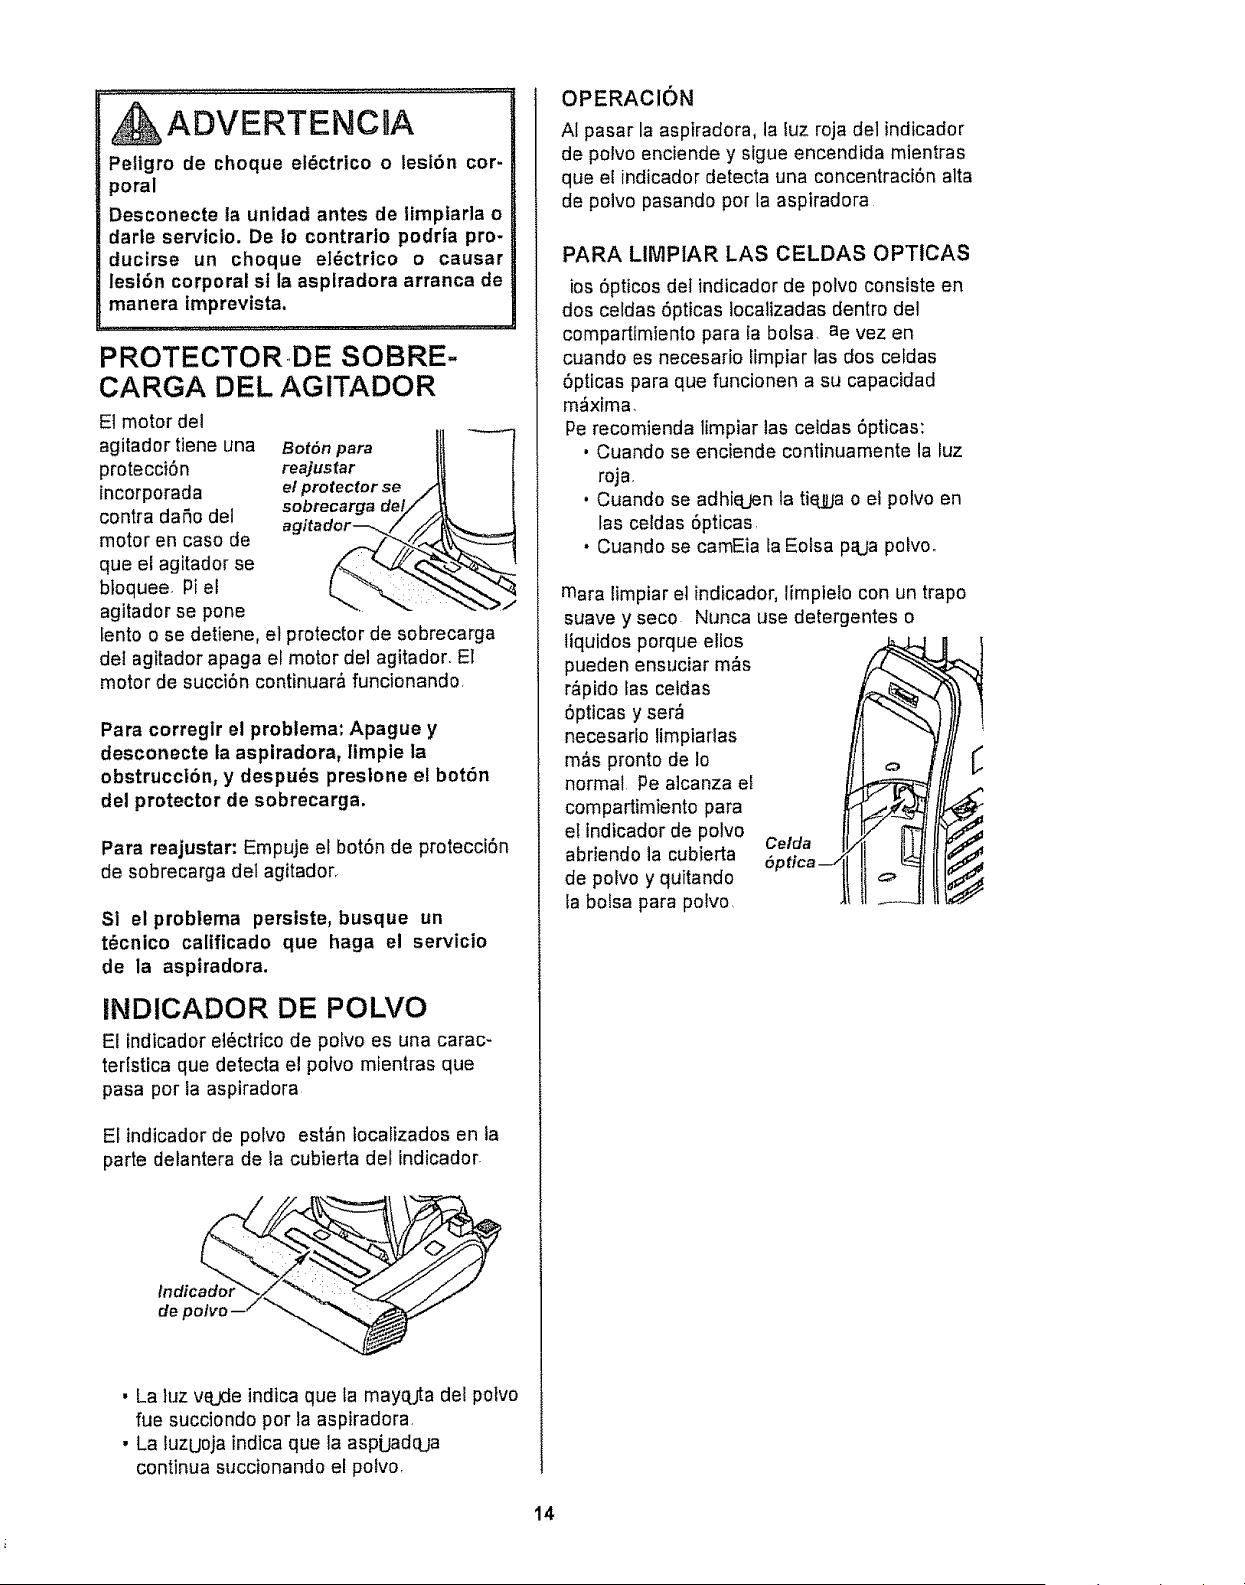
PROTECTOR.DE SOBRE-
CARGA DEL AGITADOR
El motor del
agitador ttene una
protecci6n
incorporada
contra daSo dei
motor en caso de
que el agitador se
btoquee, Pi el
agitador se pone
Bot6n para
reajusfar
et protector se /
sobrecarga del/
agttador_._i/ _
lento o se detiene, el protector de sobrecarga
de! agitador apaga el motor del agitador, El
motor de succi6n continuar,_ funcionando,
Para correglr el problema: Apague y
desconecte la aspiradora, ltmple ta
obstrucci6n, y despu_s preslone el bot6n
del protector de sobrecarga.
Para reajustar: Empuje el bot6n de protecciSn
de sobrecarga det agitador_
SI el problema persiste, busque un
t_cnico calificado que haga el servicio
de la aspiradora.
INDICADOR DE POLVO
El indicador el_ctrico de polvo es una carac-
ter[stica que detecta el potvo mientras que
pasa por la aspiradora
El indicador de pofvo est_n localizados en la
parte delantera de la cubierta del indicador-
• La luz veJde indica que la mayqjta del polvo
rue succiondo por la aspiradora,
• La tuzuoja indica que la aspiJadqJa
continua succionando el polvo,
OPERACION
AI pasar la aspiradora, la luz roja de1indicador
de polvo enciende y sigue encendida mientras
que el indicador detecta una concentraci6n alta
de potvo pasando pot la aspiradora
PARA LIMPIAR LAS CELDAS OPTlCAS
ios 5pticos del indicador de polvo consiste en
dos celdas 5pticas localizadas dentro del
compartimiento para ta bolsa, ae vez en
cuando es necesario fLmpiar las dos celdas
5pticas para que funcionen a su capacidad
m_xima,
Pe recomienda timpiar las celdas 6pticas:
. Cuando se enciende continuamente la luz
roja,
. Cuando se adhieJen la tie,jlJa o el potvo en
las celdas 5pticas,
. Cuando se camEia la Eolsa paja polvoo
mara limpiar et indicador, limpielo con un trapo
suave y seco Nunca use detergentes o
tiquidos porque ellos
pueden ensuciar m,_s
r,_pido las ceJdas
5pticas y ser_
necesafio limpiarlas
m,_s pronto de Io
normal Pe alcanza el
compartimiento para
el lndicadorde polvo Celda
abriendo la cubierta
de polvo y quitando
ta bofsa para potvo,
t4
Siga siempre todas las instrucciones de
seguridad antes de efectuar el mantenimiento a
su aspiradora,
ADVERTENCIA
Peligro de choque el_ctrtco o lesi6n
corporal
Desconecte la unidad antes de efectuar el
mantenimiento a su asplradora. De Io
contrarto podria producirse un choque
el_ctrico o causar lesl6n corporal si la
asplradora arranca de manera lmprevista.
ALiVlACENANliENTO DE LA ASPIRADORA ]
Cord6nRecoja el
cord6n y
enrr611eioen los
sujetadores
superior e
inferior, sin que
quede muy
apretado_
Asegure la
ciavija sobre el
cord6n de
poder,
Guarde la
aspiradora bajo
techo en un
lugar seco, con
el mango en
posici6n
vertical
Sujetador
liberaci6n
rapida del
cordSn
ADVERTENClA
Pellgro de choque el_ctrtco o lesl6n
corporal
Si enroila el cord6n muy apretado puede
tensarto mucho y causarle dafios, De
dafiarse, el cord6n podria causar
descargas el_ctrtcas y lestones o dafios
personales,
LIMPIEZA DEL EXTERIOR Y DE LOS ACCESORIOS
Desconecte el cord6n el_ctrico de la clavija de
ta pared
Limpie ei exterior con un trapo suave y limpio,
que ha sido exprimido despu6s de remojar en
una soluci6n de agua y detergente I{quido
ligero, NO rocfe agua sobre la asptradorm
Seque el exterior con un trapo seco despu6s
de limpiar
Limpie fa superficie exterior de la aspiradora y
de los accesorios para reducir la electricidad
est&tica y la acumufaci6n de polvo
Lave los accesorios en agua tibia jabonosa,
enjuague y deje secar al aire No los lave
en lavadora de platos
j
CUIDADO
No use los accesorios si estan mojdos.
Los accesorios que se utilicen en &reas
suctas, debajo clef refrigerador, no deben
usarse en otras superficies sin antes ser
favados. Podrian dejar marcas,
t5
I
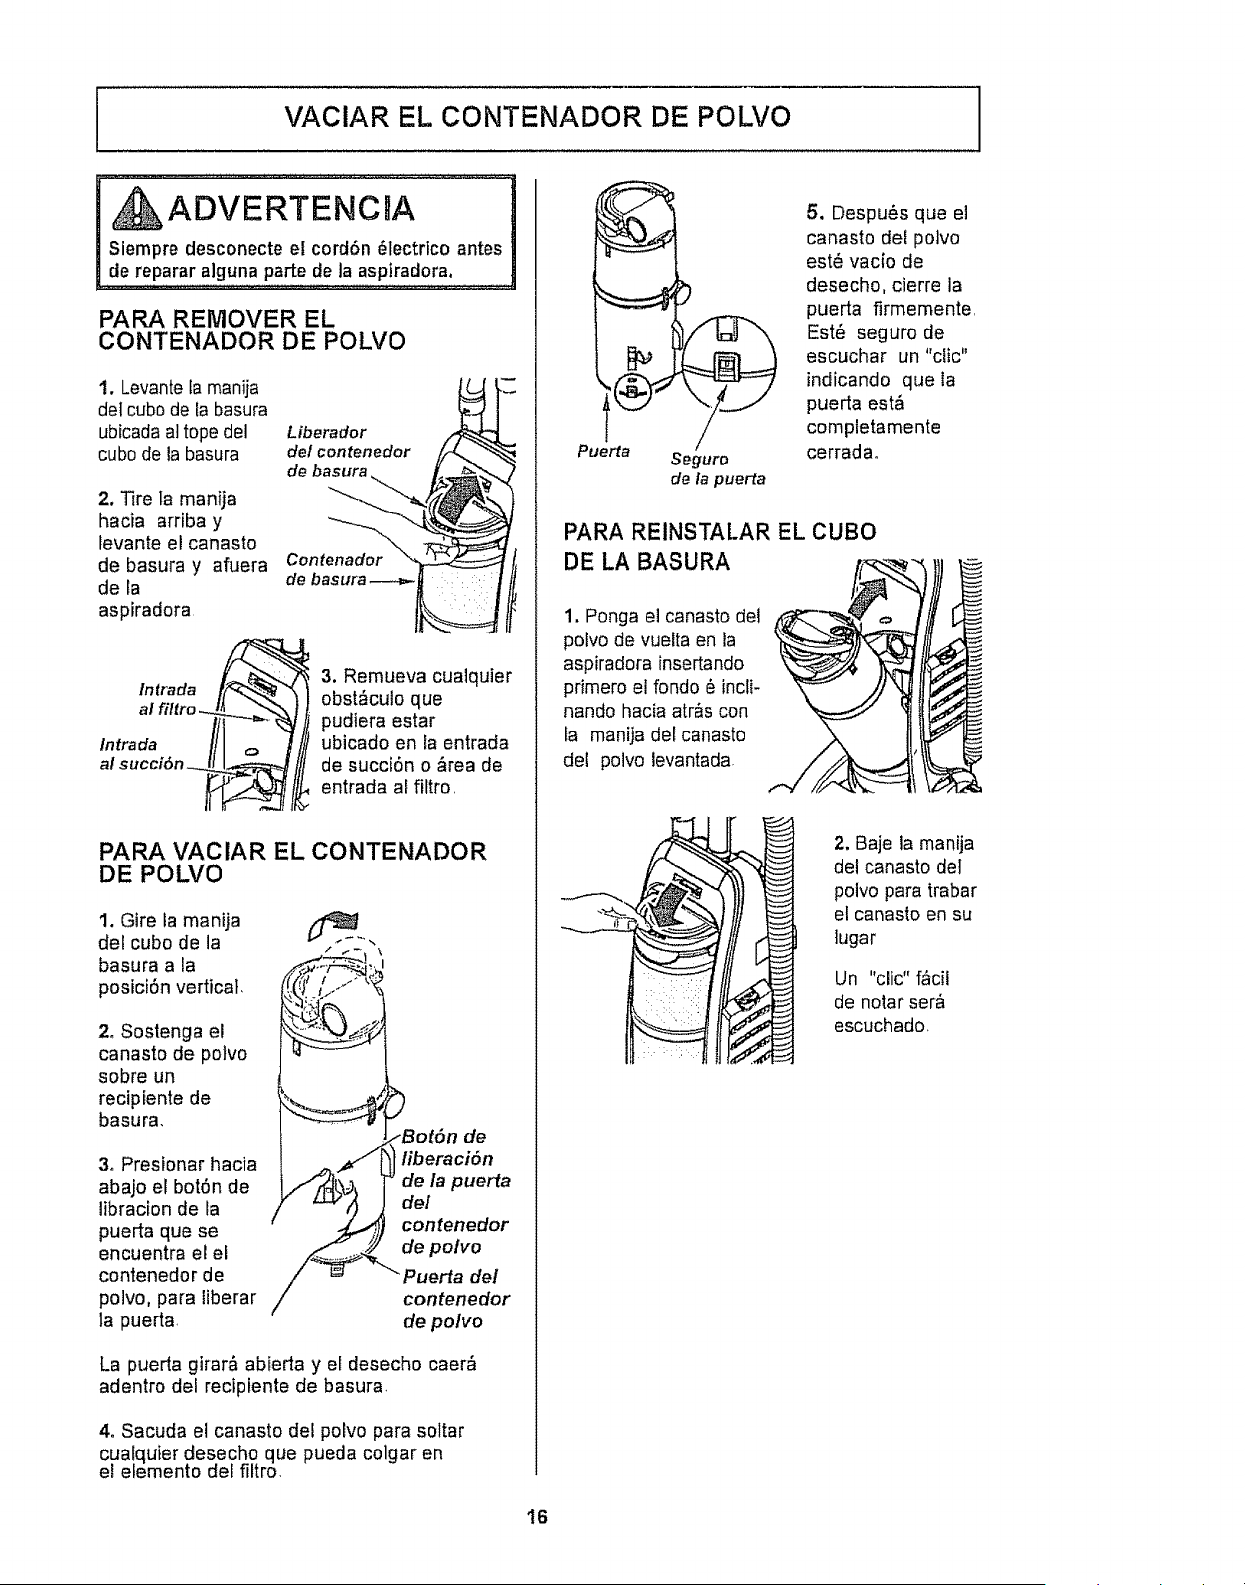
VAClAR EL CONTENADOR DE POLVO
i
! ADVERTENCIA
Siempre desconecte et cord6n 61ectrico antes
de reparar alguna parte de la aspiradora,
PAPA REMOVER EL
CONTENADOR DE POLVO
1. Levante fa manija
det cube de la basura
ubicada at tope del
cube de la basura
2, Tire ta manila
hacia arriba y
fevante el canasto
de basura y afuera
de la
aspiradora
Liberador
de! contenedor IF
de basura.
Contenador
de basura ----4_1_.__
3. Remueva cualquier
lntrada obst_culo que
al
pudiera estar
lntrada ubicado en la entrada
a! de succi6n o _trea de
entrada al filtro
PARA VAClAR EL CONTENADOR
DE POLVO
1. Gire la manija
del cube de la
basura a la
posiciOn vertical
2oSostenga el
canasto de potvo
sobre un
recipiente de
basura,
t'.<t_{.-!,-'"
de
3, Presionar hacia liberaciSn
abajo el bot6n de de la puerta
libracion de la del
puerta que se contenedor
encuentra el el de polvo
contenedor de "_ Puerta de!
po]vo, para liberar contenedor
la puerta de polvo
La puerta girar& abierta y el desecho caer_
adentro del recipiente de basura
4, Sacuda el canasto del polvo para soltar
cualquier desecho que pueda colgar en
e! etemento del filtro,
Pue_a
b
Seguro
de la puerta
5, Despu_s que el
canasto del polvo
est_ vacio de
desecho, cierre ia
puerta firmemente.
Est6 seguro de
escuchar un "clic"
indicando que ia
puerta est&
completamente
cerrada,
PARA REINSTALAR EL CUBe
DE LA BASURA
1. Ponga el canasto del
polvo de vuelta en la
aspiradora insertando
primero el rondo _ incli-
nando hacia atr&s con
fa manija del canasto
del polvo levantada
2. Baje la manija
del canasto del
polvo para trabar
el canasto en su
lugar
Un "clic" f<_cil
de notar set&
escuchado
16
r
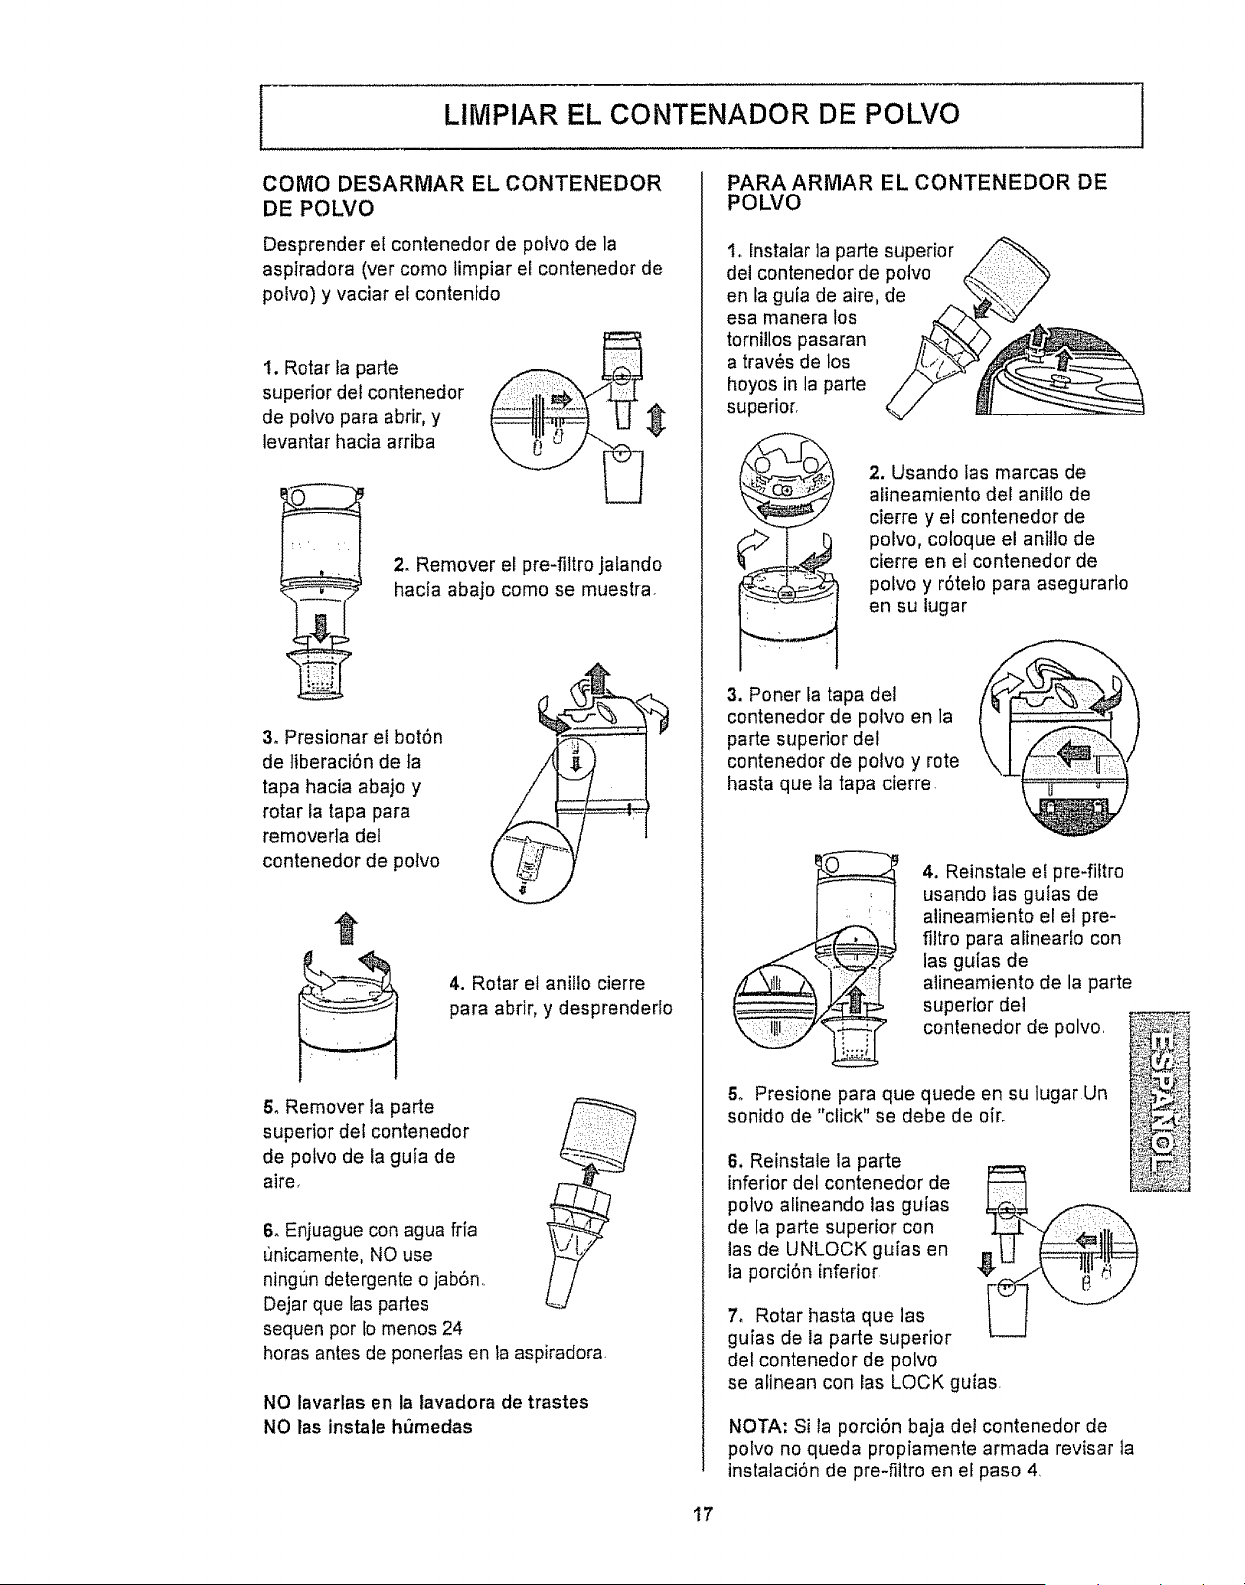
LIMPIAR EL CONTENADOR DE POLVO
COMO DESARMAR EL CONTENEDOR
DE POLVO
Desprender e[ contenedor de potvo de la
aspiradora (ver como timpiar et contenedor de
polvo) y vaciar et contenido
I. Rotar la parte
superior del contenedor
de poivo para abrir, y
tevantar hacia arriba
2_ Remover et pre-filtro jafando
hacia abajo como se muestra
3oPresionar el botSn
de liberaci6n de ta
tapa hacia abajo y
rotar la tapa para
removerla del
contenedor de potvo
4. Rotar el ani!lo cierre
para abrir, y desprenderlo
5. Remover la parte
superior del contenedor
de polvo de la guia de
aire.
6oEnjuague con agua fria
unicamente. NO use
ningun detergente o jab6n.
Dejar que las partes
sequen por Io rnenos 24
horas antes de ponerfas en la aspiradora
NO lavarlas en la tavadora de trastes
NO las instale ht_medas
PARA ARMAR EL CONTENEDOR DE
POLVO
1, fnstalar la parte superior
del contenedor de polvo
en ta gufa de aire, de
esa manera los
tornillos pasaran
a trav6s de los
hoyos in la parte
superior
2. Usando las marcas de
a_ineamiento det anillo de
cierre y el contenedor de
poEvo,coloque el anitlo de
cierre en el contenedor de
poLvo y rStelo para asegurarlo
en su lugar
3. Poner la tapa del
contenedor de polvo en la
parte superior del
contenedor de polvo y rote
hasta que la tapa cierre
4. Reinstale et pre-fittro
usando las gutas de
alineamiento el el pre-
filtro para aEinearlo con
las guias de
alineamiento de la parte
superior del
contenedor de polvo
5o Presione para que quede en su lugar Un
sonido de "click" se debe de oir.
6. Reinstale la parte
inferior del contenedor de
polvo arineando tas gufas
de la parte superior con
las de UNLOCK gufas en
la porciSn inferior
r_'f
7o Rotar hasta que las !-
gufas de ia parte superior
del contenedor de polvo
se alinean con las LOCK guias
NOTA: Si la porct6n baja del contenedor de
polvo no queda propiamente armada revisar la
instalaci6n de pre-fittro en el paso 4
17
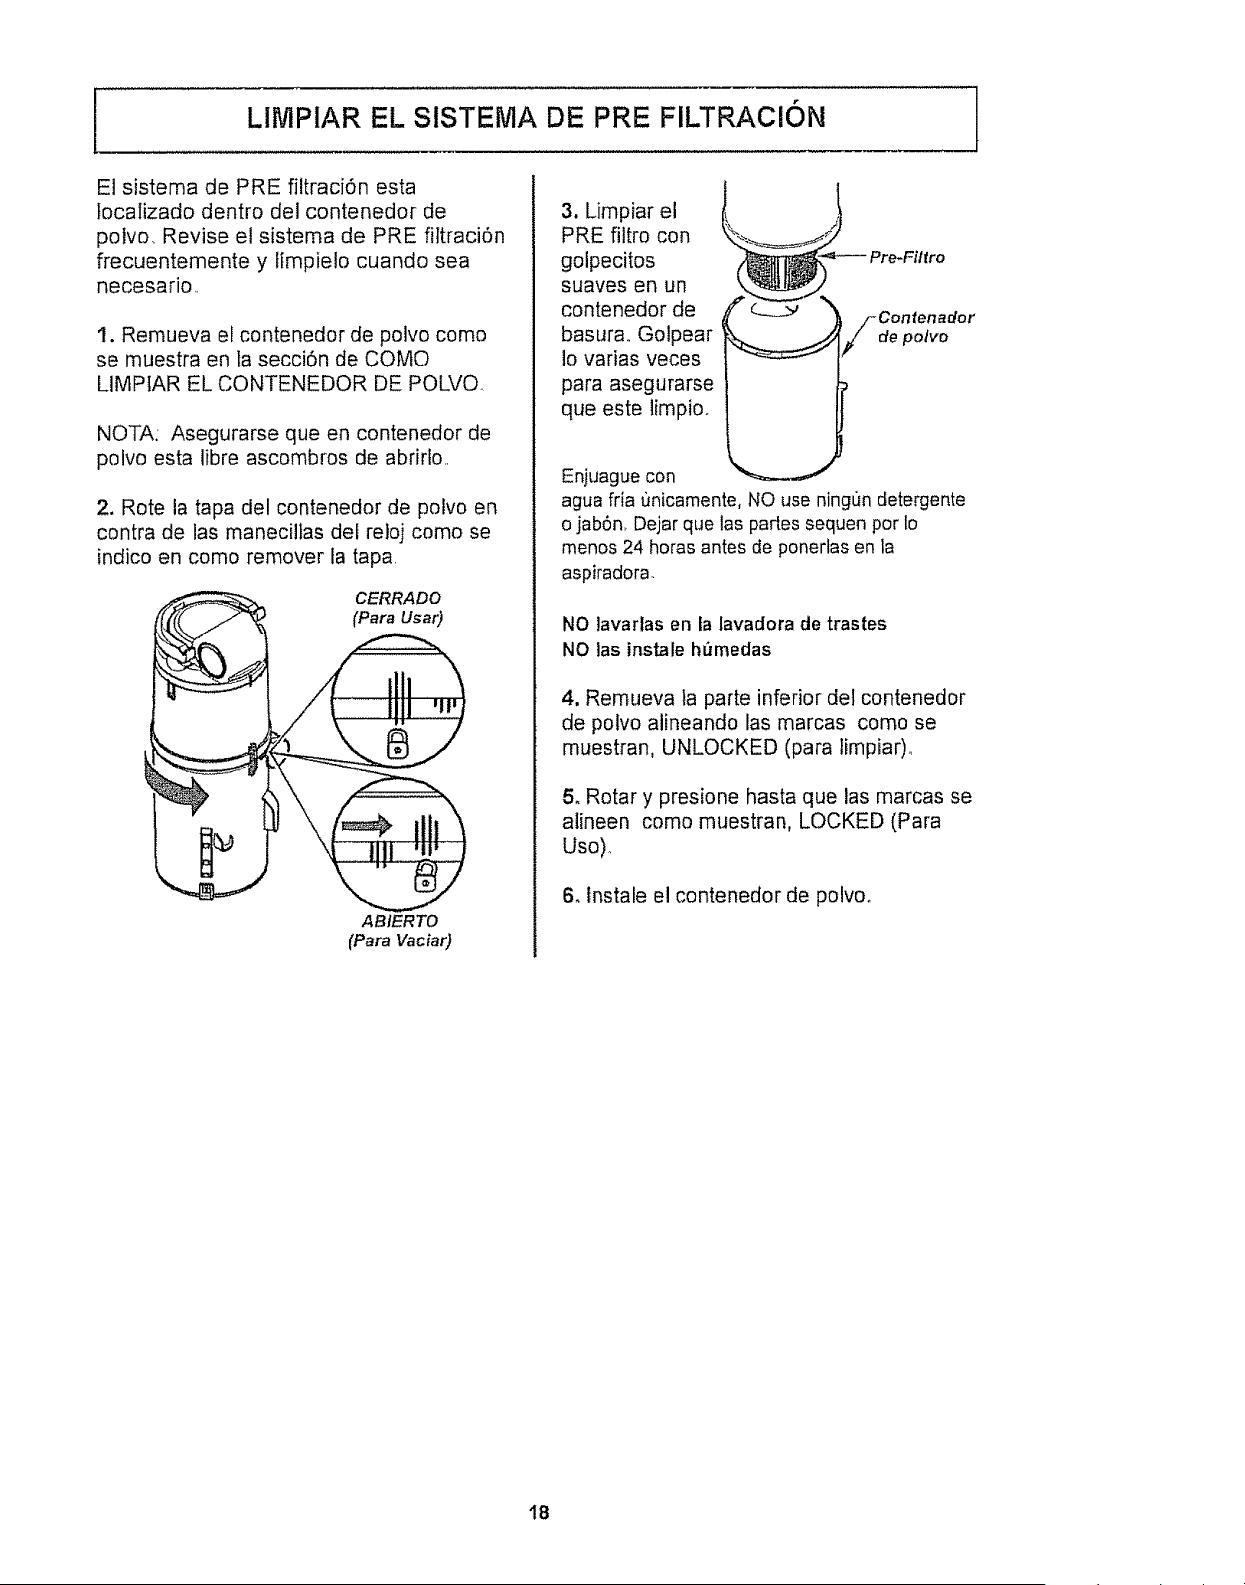
LIMPIAR EL SISTEMA DE PRE FILTRACION i
El sistema de PRE filtraci6n esta
localizado dentro del contenedor de
polvo, Revise el sistema de PRE filtraci6n
frecuentemente y limpielo cuando sea
necesario
1. Remueva el contenedor de poivo como
se muestra en la secci6n de COMO
LIMPIAR EL CONTENEDOR DE POLVQ
NOTA: Asegurarse queen contenedor de
polvo esta libre ascombros de abrirlo.
2. Rote la tapa del contenedor de polvo en
contra de las manecillas del reloj como se
indico en como remover la tapa
CERRADO
(Para Usar)
ABIERTO
(Para Vaciar)
3, Limpiar el
PRE filtro con
golpecitos
suaves en un
contenedor de
basura Golpear
1ovarias veces
para asegurarse
que este limpio.
Enjuague con
agua fria t]nicamente, NO use ningun detergente
o jabSn, Dejar que las partes sequen por Io
menos 24 horas antes de ponerlas en la
aspiradora.
NO lavarlas en la lavadora de trastes
NO las instale ht_medas
4, Remueva la parte inferior def contenedor
de polvo alineando las marcas como se
muestran, UNLOCKED (para limpiar)_
5. Rotary presione hasta que las marcas se
alineen como muestran, LOCKED (Para
Uso).
6. Instale el contenedor de polvo.
18
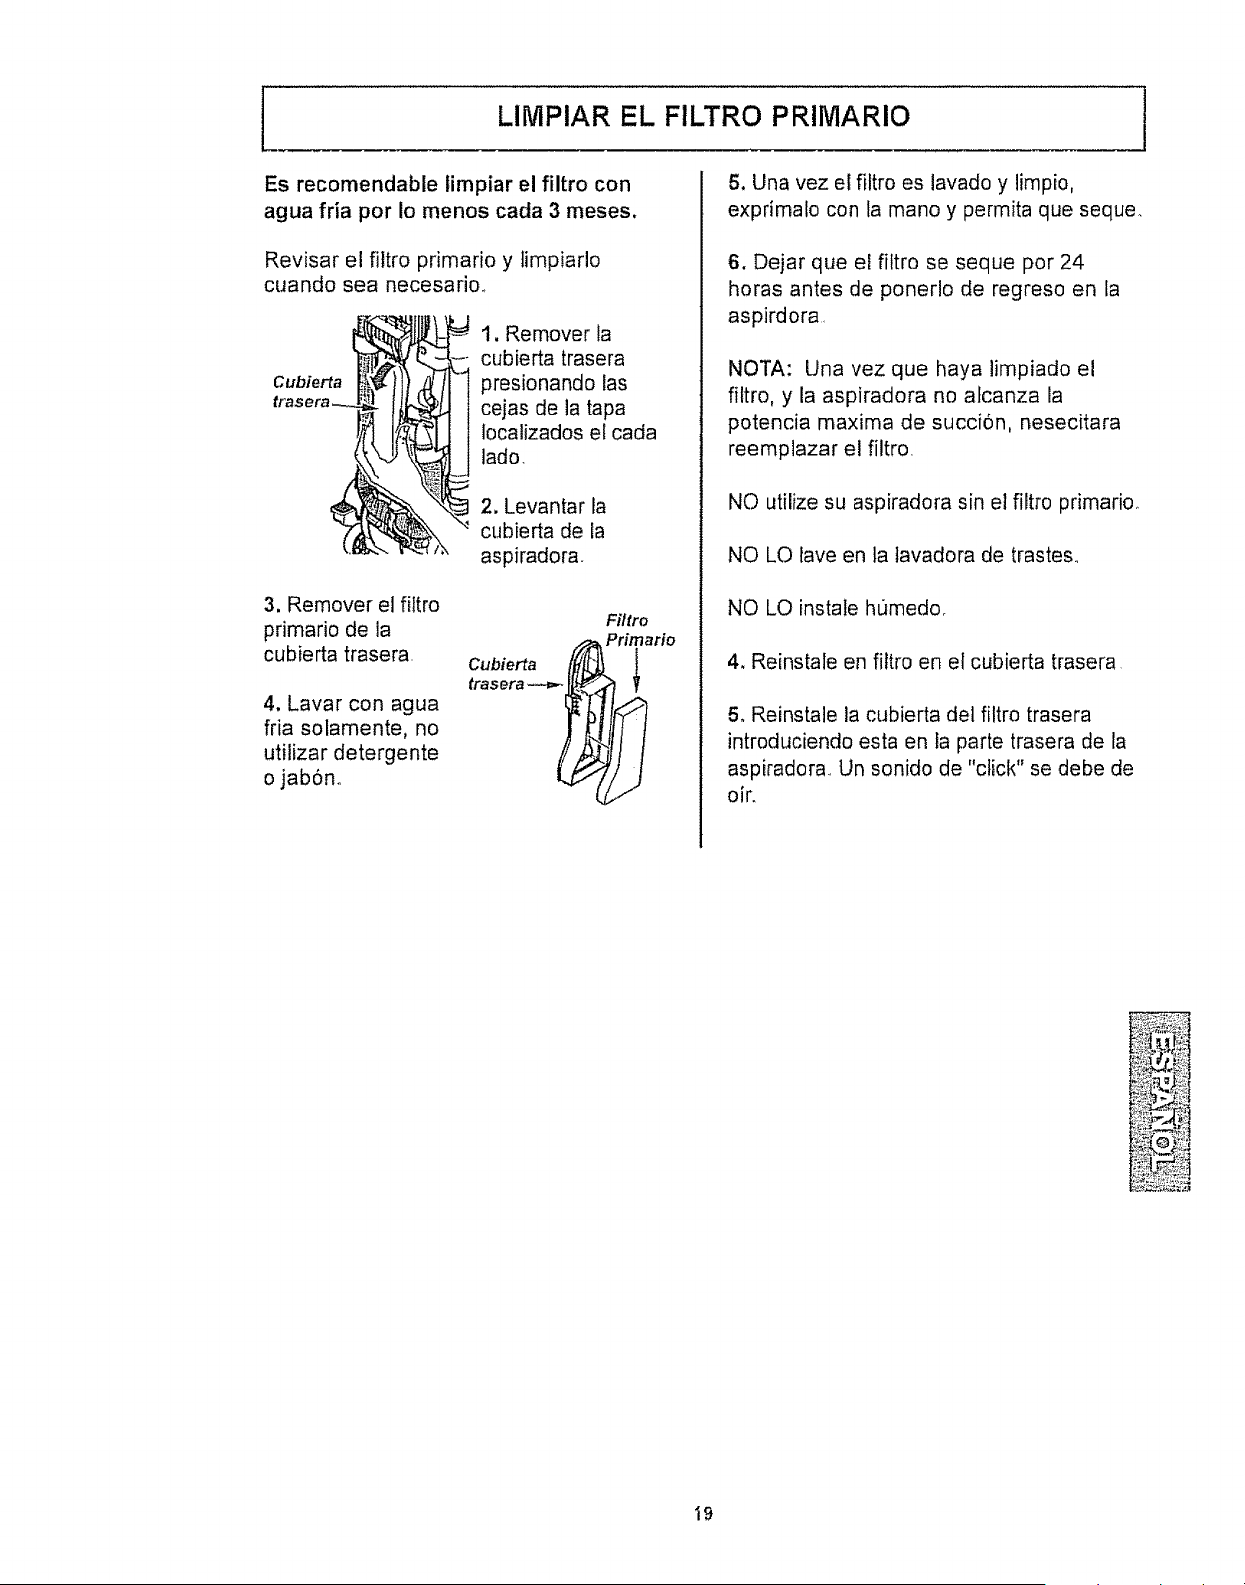
LIIViPIAR EL FILTRO PRliVlARIO 1
Es recomendable limpiar el filtro con
agua fria por Io menos cada 3 meses.
Revisar el filtro primario y timpiarlo
cuando sea necesario
Cubierta
1, Remover la
cubierta trasera
presionando las
cejas de la tapa
localizados el cada
lado
2, Levantar la
cubierta de la
aspiradora.
3. Remover el fittro
primario de la
cubierta trasera.
4, Lavar con agua
fria solamente, no
utilizar detergente
o jab6no
Cubierta _"
trasera --4=.-_
Filtro
Primario
5. Una vez el filtro es lavado y limpio,
exprimalo con la mano y permita que seque.
6. Dejar que el filtro se seque por 24
horas antes de ponerlo de regreso en la
aspirdora
NOTA: Una vez que haya limpiado el
filtro, y la aspiradora no alcanza la
potencia maxima de succi6n, nesecitara
reemplazar el filtro.
NO utilize su aspiradora sin el filtro primario_
NO LO lave en la tavadora de trastes.,
NO LO instate humedoo
4. Reinstale en filtro en el cubierta trasera
5. Reinstale la cubierta del filtro trasera
introduciendo esta en ta parte trasera de la
aspiradora Un sonido de "click" se debe de
oir.
19
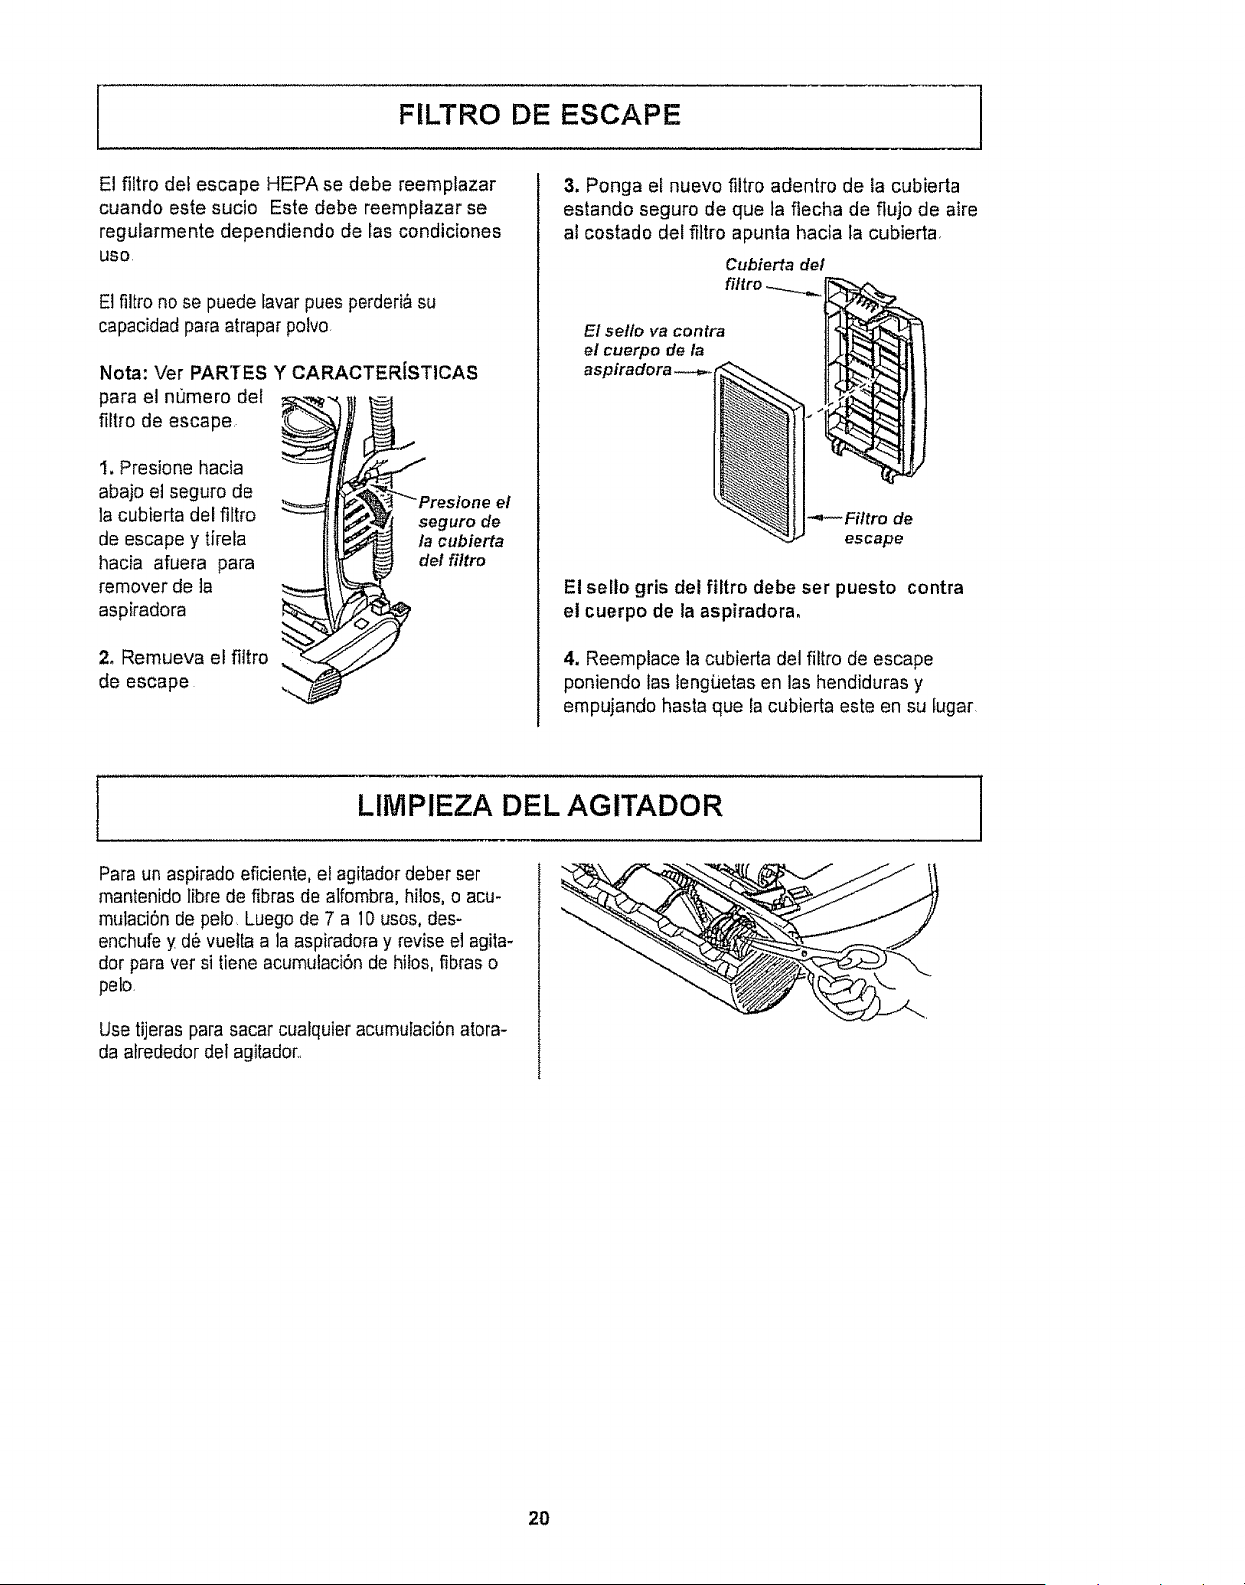
FILTRO DE ESCAPE
E! filtro del escape HEPA se debe reemplazar
cuando este sucio Este debe reemplazar se
regularmente dependiendo de las condiciones
USO
El filtro no se puede lavar pues perderi&su
capacidad para atrapar polvo.
Nota: Ver PARTES Y CARACTERiST!CAS
para el numero del
filtro de escape.
I. Presione hacia
abajo et seguro de
la cubierta del filtro
de escape y tirela
hacia afuera para
remover de la
aspiradora
el
seguro de
la cubierta
del filtro
2_ Remueva el filtro
de escape
3. Ponga el nuevo filtro adentro de la cubierta
estando seguro de que ta fiecha de flujo de aire
al costado del fittro apunta hacla la cubierta
Cubierta del
El sello va contra
el cuerpo de la
aspiradora--_.
Fi/tre de
escape
El selte gris del filtro debe ser puesto contra
el cuerpo de la aspiradora,
4. Reemplace la cubierla del filtro de escape
poniendo las lengi.ietas en las hendiduras y
empujando basra que la cubierta este en su fugar,
I LIMPIEZA DEL AGITADOR
Para un aspirado eficiente, el agitador deber ser
mantenido Iibre de fibras de alfombra, hiios, o acu-
mulaci6n de pelo, Luego de 7 a 10usos0des-
enchufe y d6 vuelta a ]a aspiradora y revise el agita-
dor para vet si tiene acumutaci6n de hitos, fibras o
peto.
Use tijeras para sacar cualquier acumutaciSnatora-
da afrededor del agitador.,
2O
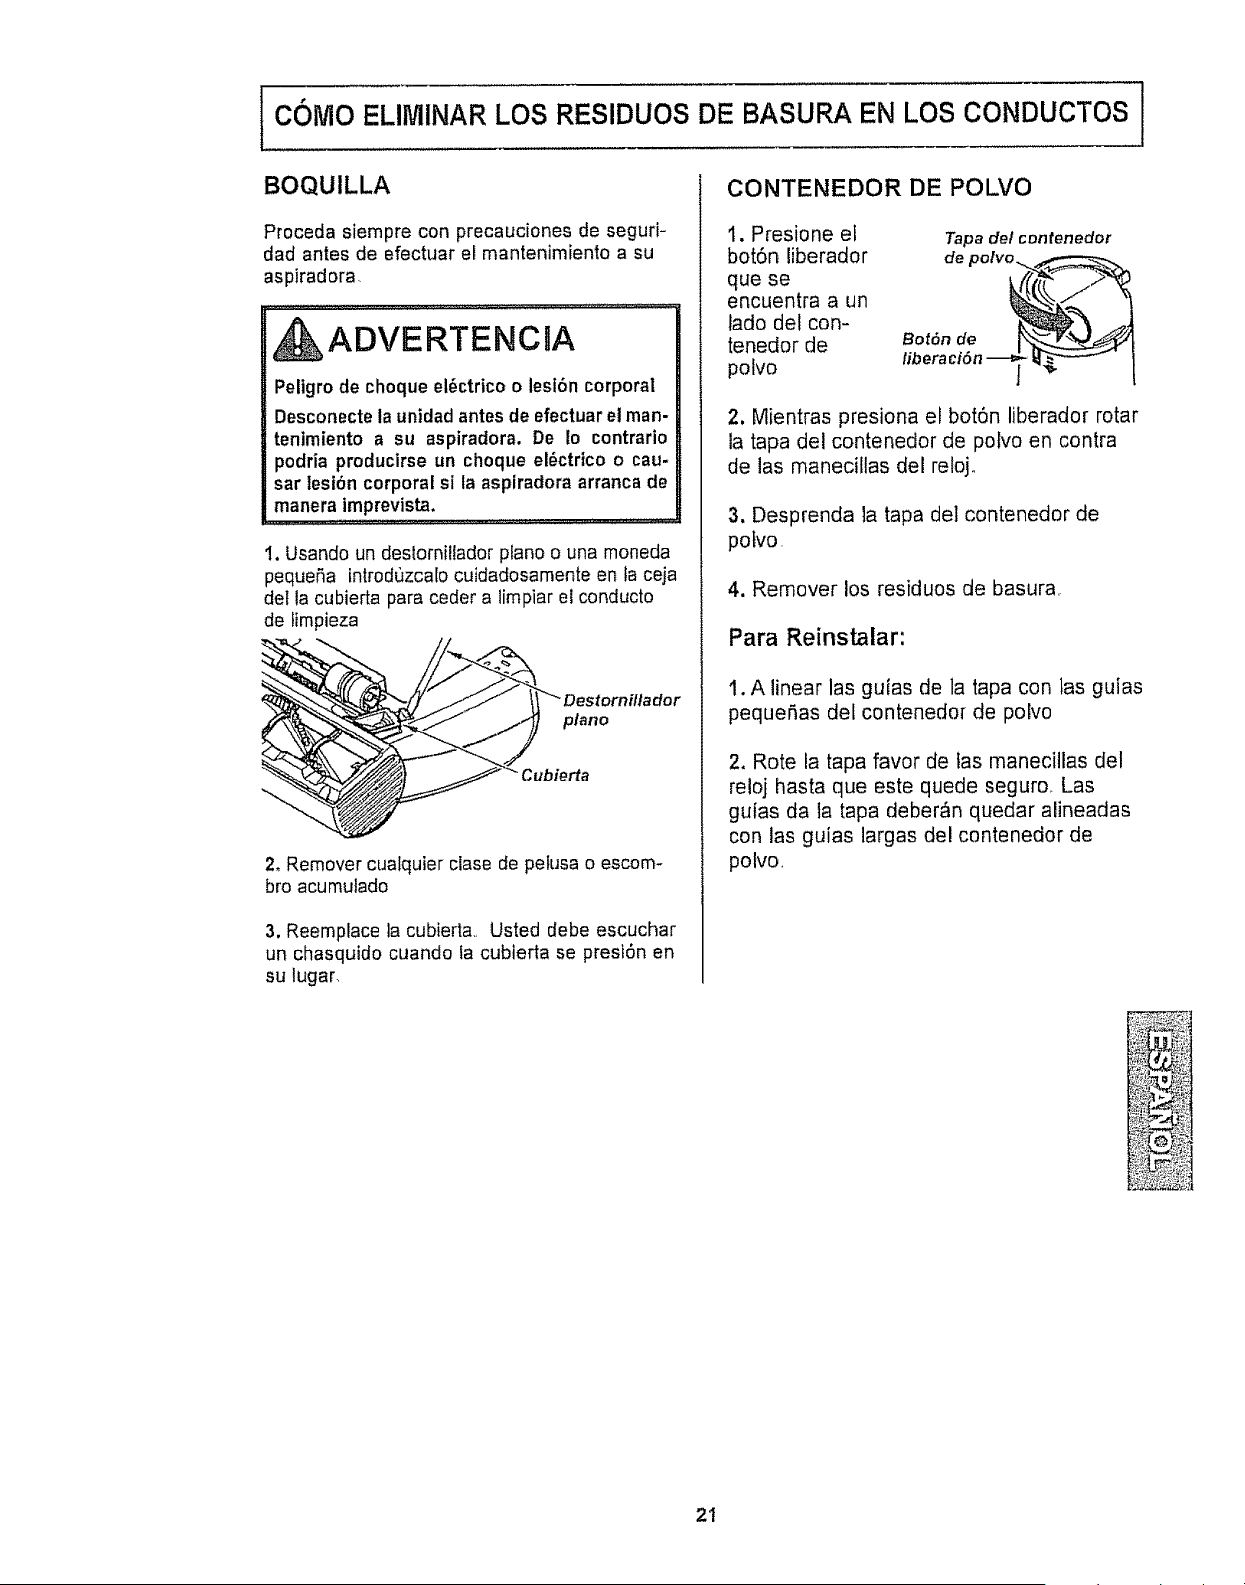
COMO ELIMINAR LOS RESIDUOS DE BASURA EN LOS CONDUCTOS ]
BOQUILLA
Proceda siempre con precauciones de seguri-
dad antes de efectuar el mantenimiento a su
aspiradora,
g ADVERTENClA
Pellgro de choque el6ctrico o lesl6n corporal
Desconecteia unidad antes de efectuarel man-
tenimiento a su aspiradora. De Io contrario
podria producirse un choque el_ctrico o cau-
sar lesi6n corporal sl la aspiradora arranca de
manera imprevista.
1. Usando un deslornillador piano o una moneda
pequeSa introduzca[o cuidadosamente en fa ceja
det la cubierta para ceder a limpiar el conducto
de limpieza
D_st_rnillador
_j Cubierta
2oRemover cualquier clase de petusa o escom-
bro acumulado
3. Reemplace la cubierta., Usted debe escuchar
un chasquido cuando la cubierta se presl6n en
su lugar,
CONTENEDOR DE POLVO
1. Presione el
bot6n liberador
que se
encuentra a un
lado del con-
tenedor de
polvo
Tapa de/contenedor
de polv__
Bot6n de ___
fiberaci6n _ I_-----_
2. Mientras presiona el bot6n liberador rotar
la tapa del contenedor de polvo en contra
de las manecillas del relojo
3. Desprenda la tapa del contenedor de
polvo.
4. Remover los residuos de basura,
Para Reinstalar:
1. A linear las guias de la tapa con las guias
pequeSas del contenedor de polvo
2. Rote la tapa favor de tas manecillas del
reloj hasta que este quede seguro, Las
guias da la tapa deber&n quedar alineadas
con las guias largas del contenedor de
polvo,
2!
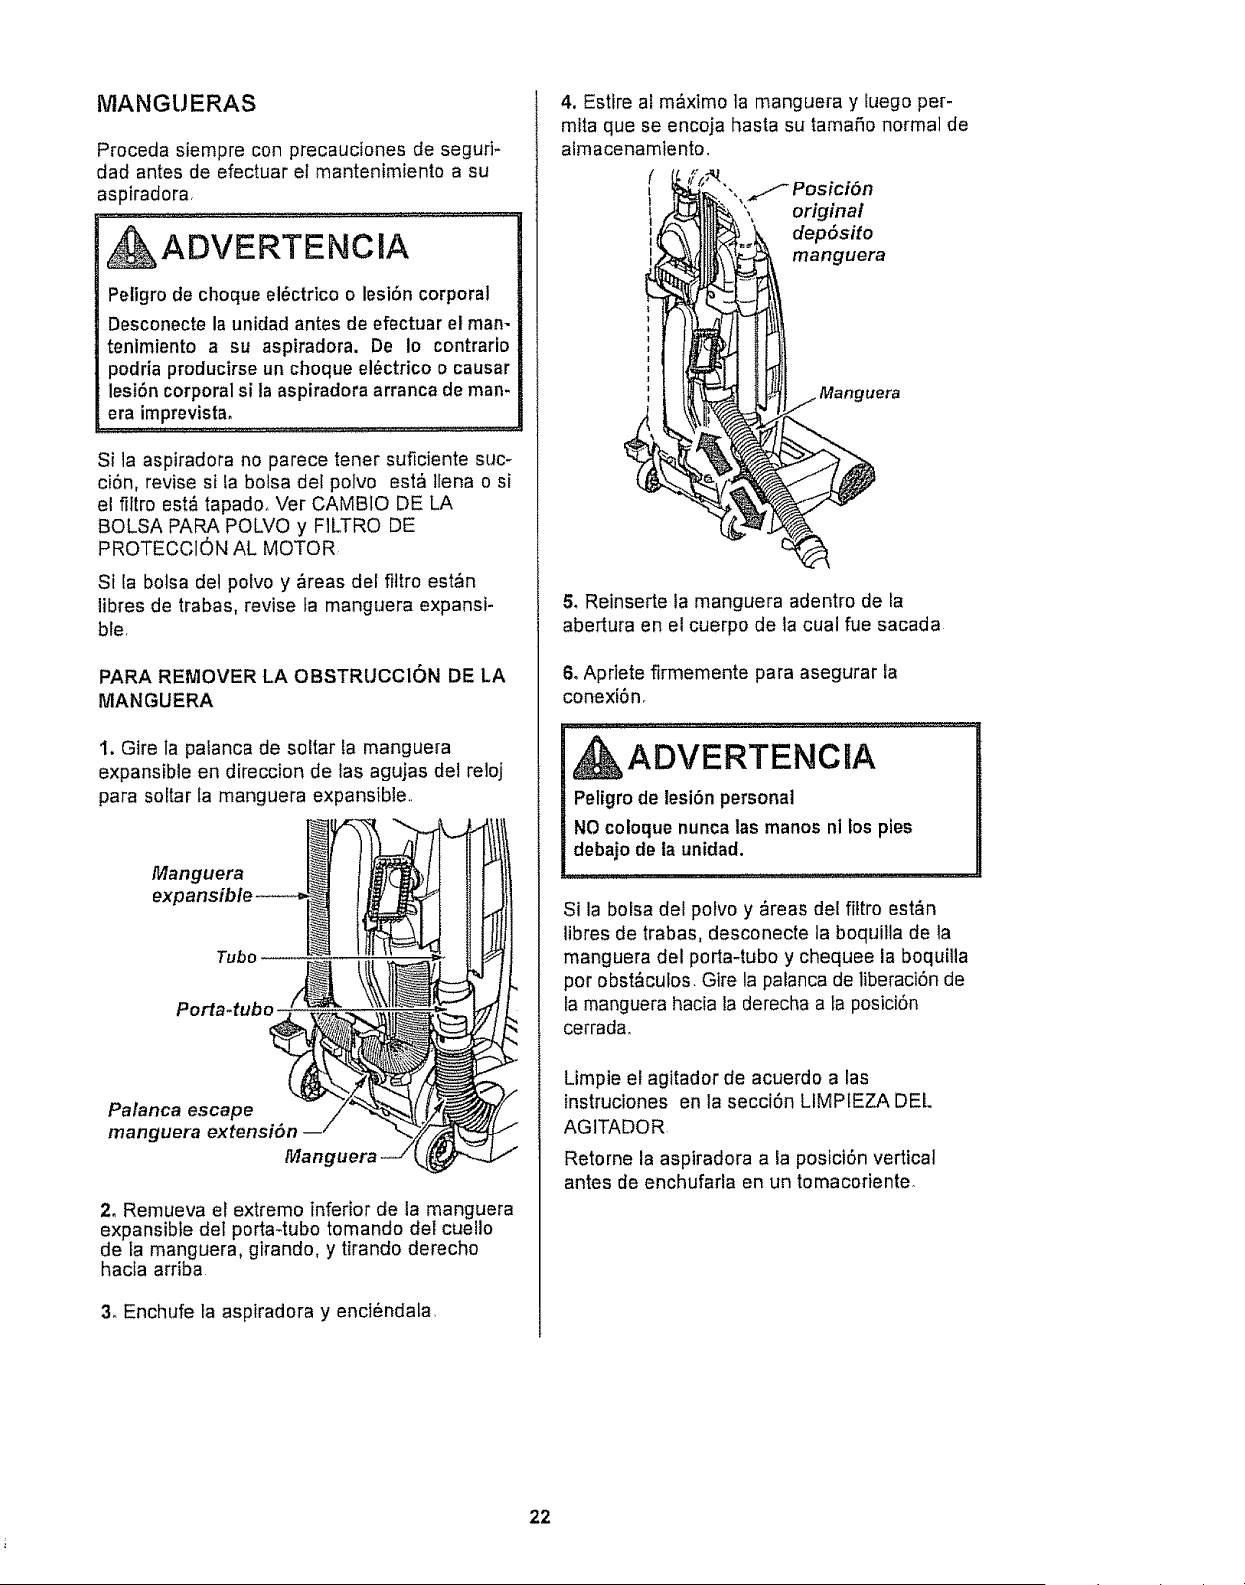
MANGUERAS
Proceda siempre con precauciones de segurt-
dad antes de efectuar el mantenimiento a su
aspiradora
d ADVERTENClA
Petigro de choque el6ctrico o lesi6n corporal
Desconecte la unidad antes de efectuar et man-
tenimiento a su aspiradora. De Io contrario
podria producirse un choque el6ctrico o causar
lesi6n corporal si ta aspiradora arranca de man,
era imprevista,
Si la aspiradora no parece tenet suficiente suc-
ci6n, revise si ta bolsa del polvo est& llena o si
el fittro est& tapado, Ver CAMBIO DE LA
BOLSA PAPA POLVO y FILTRO DE
PROTECCI(_N AL MOTOR
Si la bolsa del potvo y &teas del fittro est_n
libres de trabas, revise fa manguera expansi-
ble,
PARA REMOVER LA OBSTRUCClON DE LA
MANGUERA
t, Gire Ia palanca de soltar la manguera
expansible en direccion de las agujas del reloj
para soltar Ia manguera expansible,
Manguera
Tubo
Porta.tubo /_
Palanca escape
manguera extensibn
Manguera
2. Remueva el extremo inferior de ia manguera
expansible det porta-tubo tomando del cuello
de ta manguera, girando, y tirando derecho
hacfa arriba
3, Enchufe ta aspiradora y enci6ndala
4. Estire at m&ximo ]a manguera y luego per-
mira que se encoja basra su tamafio normal de
atmacenamiento.
,, _ Posici6n
', original
dep6sito
manguera
S, Reinserte la manguera adentro de la
abertura en el cuerpo de la cual fue sacada
6oApriete firmemente para asegurar la
conexi6nr
ADVERTENCIA
Peligrode lesi6n personal
NO coloque nunca las manos nl los pies
debajo de ta unidad.
Si la bolsa del pofvo y &reas del fittro est&n
libres de trabas, desconecte la boquilla de la
manguera del porta-tubo y chequee la boqui!la
por obst&cufos, Gire la palanca de liberaci6n de
la manguera hacia la derecha a ta posici6n
cerrada.
Limpie el agitador de acuerdo a las
instruciones en la secci6n LIMPtEZA DEL
AGITADOR
Retorne la asptradora a la posict6n vertical
antes de enchufarla en un tomacoriente
22
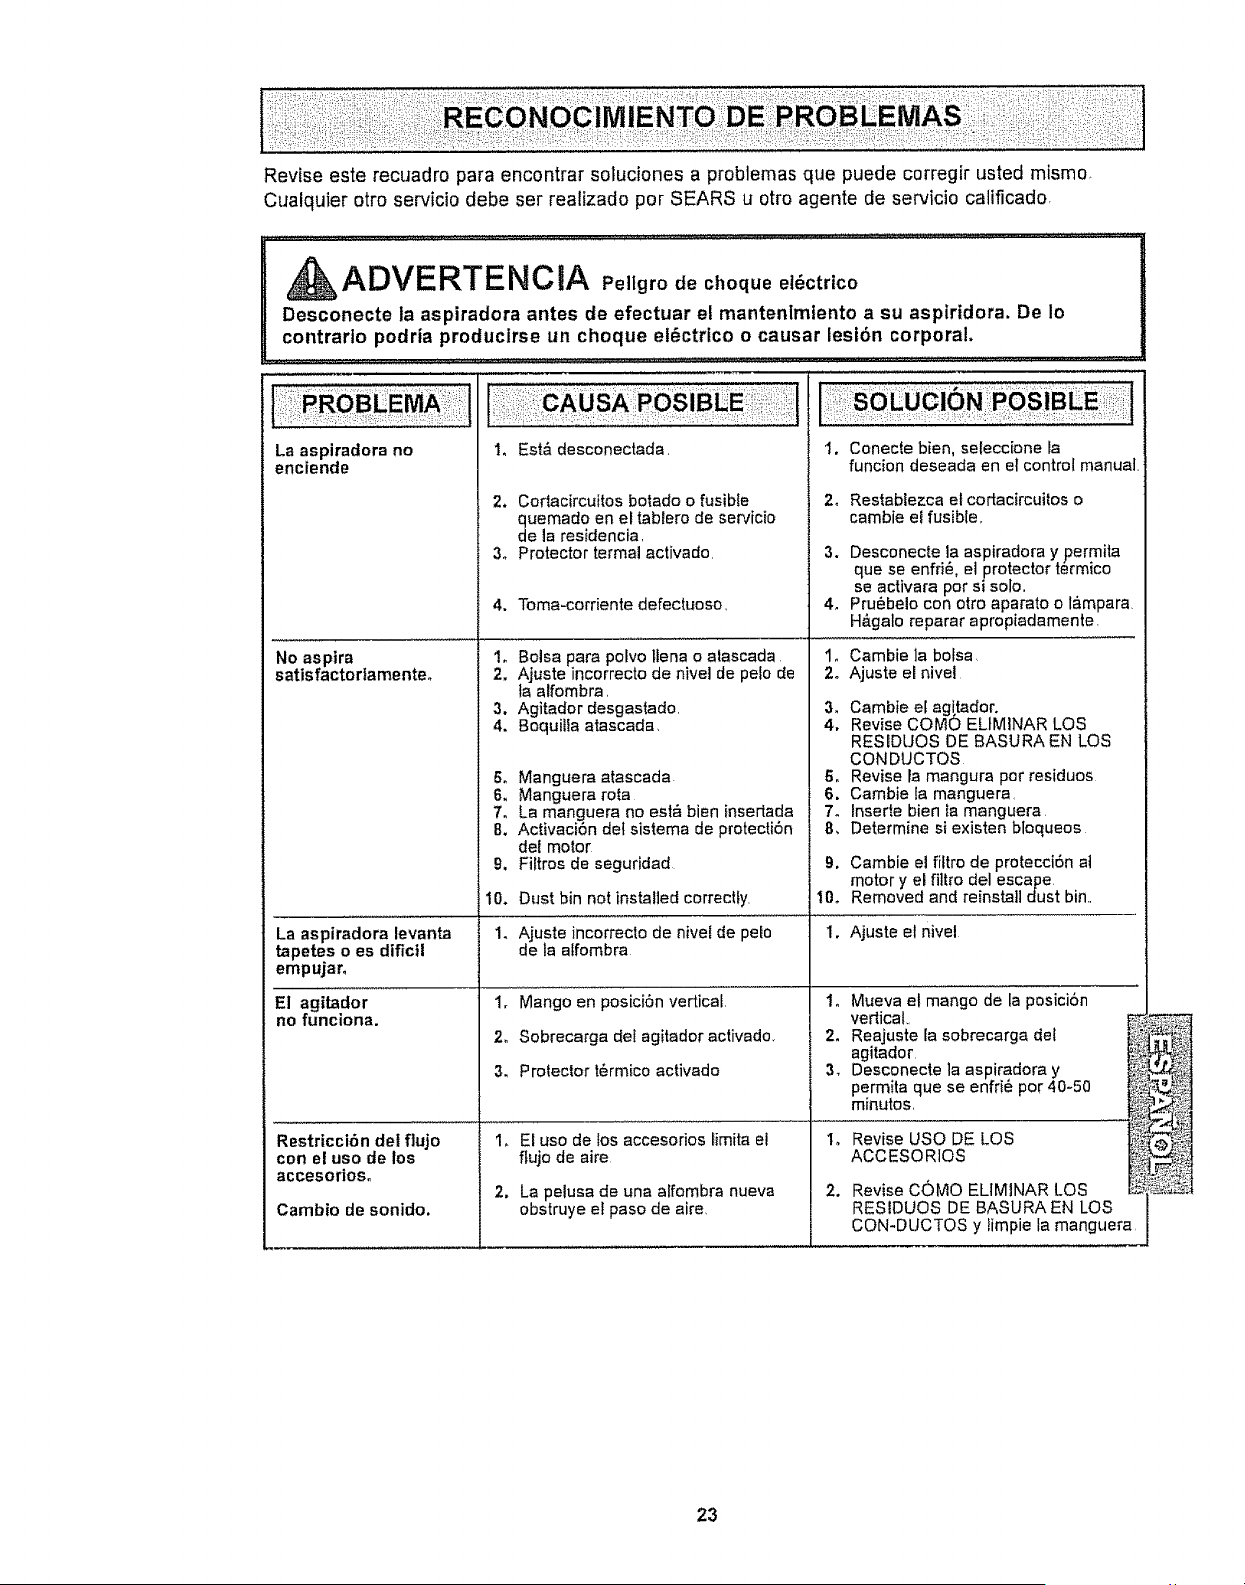
Reviseesterecuadroparaencontrarsolucionesaproblemasquepuedecorregirustedmismo,
CualquierotroserviciodebesetrealizadoperSEARSuotroagentedeserviciocalificado
I ADVERTENC A Po,,grodec.oqueel ctrico
Desconecte la aspiradora antes de efectuar el mantentmtento a su aspiridora. De Io
_ contrarlo podria producirse un choque el_ctrtco o causar lesidn corporal.
La aspiradora no
enciende
No aspire
satisfactodamente.
La aspiradora levanta
tapetes o es difictl
empujar.
El agitador
no funciona.
Restricci6n del f]ujo
con el use de los
accesodoso
Cambio de sonido.
I. Est& desconectada,
2. Cortacircuitos botado o fusibte
uemado en el tablero de servicio
e la residencia,
3. Protector termal activado,
4. Toma-corriente defectuoso,
1. Bolsa pare polvo tlena o alascada
2. Ajuste incorrecto de nivel de pelo de
la alfombra,
3. Agitador desgastado.
4. Boquitfa atascada,
6, Manguera atascada
6. Manguera rota
7. La manguera no est& bien insertada
8, Activacibn det sistama de protecti6n
deemotor
9. Fiffres de seguridad
10,
1.
Dust bin not installed correctly.
Ajuste incorrecto de nivel de pelo
de la alfombra
1, Mango en posici6n vertical,
2o Sobrecarga del agitador activado,
3. Protector t6rmico activado
I, El use de fos accesorios limita e!
ftujo de aire
2, La pelusa de una alfombra nueva
obstruye ef paso de aire
1.
2,
3.
4_
1o
2o
3.
4,
5,
6.
7_
8,
9,
10_
1.
Conecte bien, seleccione ta
funcion deseada en el control manual,
Restablezca el codacircuitos o
cambie el fusible,,
Desconecte la aspiradora y permita
que se enfri_, el protector termico
se activara per si solo.
Pru_belo con otro aparato o I&mpara
H_.galo reparar apropiadamente.
Cambie ]abolsa,
Ajuste el nivei
Cambie el ag[tador.
Revise come ELtMINAR LOS
RESIDUES DE BASURA EN LOS
CONDUCTOS
Revise la mangura per residues
Cambie la manguera,
Inserte bien la manguera
Determine si existen bloqueos
Cambie el filtro de protecciSn at
motor y el fi]tro del escape
Removed and reinstall dust bin.,
Ajuste el nivel
1_ Mueva el mango de la posici6n
vertical,,
2. Reajuste [a sobrecarga del
agitador,
3, Desconecte la aspiradora y
permita que se enfri_ per 40-50
minutes,
Io Revise use DE LOS
ACCESORIOS
2.
Revise COMO ELIMiNAR LOS
RESIDUES DE BASURA EN LOS
CON-DUCTOS y fimpie la manguera,
23

Acuerdos Maestros de ProtecciSn
Enhorabuena pot hacer una compra intefigente Su nuevo producto Kenmore® est_ diseP,ado y
fabricado para ofrecerle aSos de funcionarniento confiable Pero al igual que todos los productos
pueden precisar un mantenimiento preventivo o atguna reparaci6n de vez en cuando Pot este
rnotivo, tener un Acuerdo Maestro de Protecci6n puede ahorrarle dinero e inconvenientes
Et Acuerdo Maestro de ProtecciSn tarnbi_n fe ayuda a prolongar la vida util de su nuevo producto A
continuaciSn indicarnos 1oque el Acuerdo* incluye:
[] Partes y mano de obra necesarios para ayudar a que estos productos funcione correctarnente
baJo condicionales normales de uso, no simpfemente defectos Nuestra cobertura va mucho
m&s all& de la garantia del producto, NingQn deducible, ninguna averia funcional queda
excluida de ta cobertura- protecci6n real.
I_ Servicto experto ofrecido per una ]ista de rn_s de 10_000 t6cnicos autorizados del servlclo
t_cnico de Sears, Io que significa que atguien en quien usted puede confiar estar& trabajando
en su producto
[] N_mero ilimitado de Ilamadas al ser_,,iclo t_cnico y servicto en toda ta nacl6n, tan continuo
como usted nos fo solicite, sin importar donde est_
@ Garantia serla de sustituci6n del producto. La sustituci6n de su producto cubierto si se
producen cuatro o m&s averias en doce meses
Sustitucibn del producto por otto nuevo si su producto cubierto no puede repararse
[] Revisibn y mantenimiento anuat preventivo siempre que Io desee y sin cargo alguno.
@ Ayuda rbpida por tet_fono * Nosotros 1ollarnamos Resoluci6n rbpida, Soporte telef6nico de
un representante de Sears en todos los productos Piense en nosotros como un "manual de
uso y cuidado"
[] Protecci6n contra subidas de tensi6n que provoquen daSos el_ctricos causados por ias
fluctuaciones de ]a corriente
[] $250 de proteccf6n contra la p6rdtda de alimentos anualmente en caso de que se estropee
alg_n alimento como resuttado de una averla rnec&nica de cualquier congelador o refrigerador
cubierto_
Reernbolso del alquiler si la reparaci6n de su producto cubierto toma rn&s ttempo del
prometido
10% de descuento en el precio regular de cualquier servicio de reparaciSn no cubierto y de las
piezas instaladas relacfonadas
Una vez que compre el Acuerdo, s6to bastar& una simple llarnada telef6nica para que pueda
programar un servicio Puede !lamar a cuatquJer hora del dla o de la noche, o concedar una cita de
servicio en linea.
El Acuerdo maestro de protecci6n es una compra libre de riesgos. Si por cuatquier raz6n cancela
durante el perfodo de garantia det producto, le devolveremos todo el dinero O, un reembolso
prorrateado despu6s del periodo de vencirniento de la garantfa ICompre su Acuerdo maestro hoy[
Apllcan algunas timitaclones y exctusioneso Para precios y m&s informaci6n en EE.UU. llame
at 1-800-827-6655.
* La cobertura en Canada varia en algunos articulos. Para obtener todos los detalles, Ilame a
Sears Canada al 1-800-361-6665o
Servicio de instalaciSn de Sears
Para la instalaciSn profesional por parte de Sears de electrodom6sticos, abridores de puertas de
garajes, calentadores de agua y otros articu!os principaies para el hogar, en EEUU o Canad& tlame
al 1-800-4-MY_HOME®o
24

Get !t:fixe: ,at your home: :or ours!
Your Home
For expert troubleshooting and home solutions advice:
manage home
www,managemyhome.com
For repair - in your home - of all major brand appliances,
lawn and garden equipment, or heating and cooling systems,
no matter who made it, no matter who sold it!
For the replacement parts, accessories and
owner's manuals that you need to do-it-yourself
For Sears professional installation of home appliances
and items like garage door openers and water heaters
1-80()-4-MY-HOiViE ®
(1-800-469-4663)
www.sears,com
Call anytime, day or night
(U S,A. and Canada)
www.sears.ca
Our Home
For repair of carry-in items like vacuums, lawn equipment,
and electronics, call anytime for the location of the nearest
Sears Parts & Repair Service Center
1-800-488-1222 (U.S.A.) 1-800469,4663 (Canada)
www°sears.com www.sears.ca
To purchase a protection agreement on a product serviced by Sears:
1-800-827-6655 (u SA.) 1-800-361-6665(Canada)
Para pedir servicio de reparaci6n Au Canada pour service en fran(;;ais:
a domicilio, y para ordenar piezas: 1-800-LE-FOYER Mc
1-888-S U-H OGAR® (1-800-533-6937)
(t-888-784-6427) www sears ca
© SearsB_ands,LLC
® Registered Trademark I _r_Trademark / s_,_Service Mark of Sears Brands, LLC
@Marca Registrada I T_,_Marca de F&bricaI SMMarca de Servlcio de Sears Brands, LLC
_'_CMarquede commerce I _,_DMarque d6pos6e de Sears Brands, LLC