Instruction
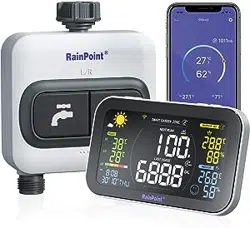
1 Zone WiFi Water Timer with WiFi Hub
Model: TTV103WRF + TWG004FRF
US Free Hotline: +1-833-3815659
E-mail: seice@rainpointus.com
Facebook: @Rainpointglobal
Customer Suppo
www.rainpointus.com
RAINPOINT
®
*SAVE THIS MANUAL FOR FUTURE REFERENCE.
Thank you for chosing RAINPOINT 1 Zone WiFi Water Timer with WiFi Hub!
After using the RainPoint WiFi water timer, you'll nd it easier, faster and more convenient than ever before! You are
able to schedule, manually operate, auto watering and monitor ow just with your sma phone. When the timer is
connected to the hub and your WiFi, it can synchronize the weather forecast from internet to automatic update and
adjustment your watering plan. The timer works much like other WiFi devices: as long as your phone can access the
internet , you can connect the device and control your timer no matter where you are.
Whatever your outdoor watering needs, RainPoint provides best-in-class irrigation products to help you more
eectively manage and control your watering.
Let's sta to enjoy the wondeul sma irrigation life!
WELCOME TO RAINPOINT
More product information and user guide will happen on
Have Questions?
: RainPoint
: @Rainpointglobal
: 1-833-3815659
: seice@rainpointus.com
TABLE OF CONTENTS
CONTENTS IN THE BOX
01
TTV103WRF 1 Zone WiFi Water Timer
TWG004FRF WiFi Hub
PRODUCTS OVERVIEW 02
FEATURES OVERVIEW 04
INTRODUCTION 1-4
Manual Power ON/OFF
Power ON/OFF By Schedule
WIFI SOCKET
17
RESET THE DEVICE 22
STEP 1. INSTALL APP ON YOUR PHONE
05
STEP 2. CONNECT THE WIFI HUB 06
STEP 3. CONNECT THE WIFI TIMER 07
INSTALLATION 5-10
Automation & Tap-to-Run
How to set the automatic rain delay?
SMART AUTOMATION
18
HOME MANAGEMENT 21
APP HOME SCREEN
11
Device Parameter
Manual Watering
WIFI WATER TIMER 12
Watering Plan & Manual Rain Delay
WiFi Soil Sensor & Water Flow Meter*
APP PROGRAMMING 11-22
TROUBLESHOOTING 23
WARRANTY 26
CUSTOMER SUPPORT 26
STEP 4. INSTALL THE WIFI TIMER 09
STEP 5. TEST BEFORE USE 10
*WiFi soil sensor is sold separately, this kit does not
contain WiFi soil sensor
INTRODUCTION
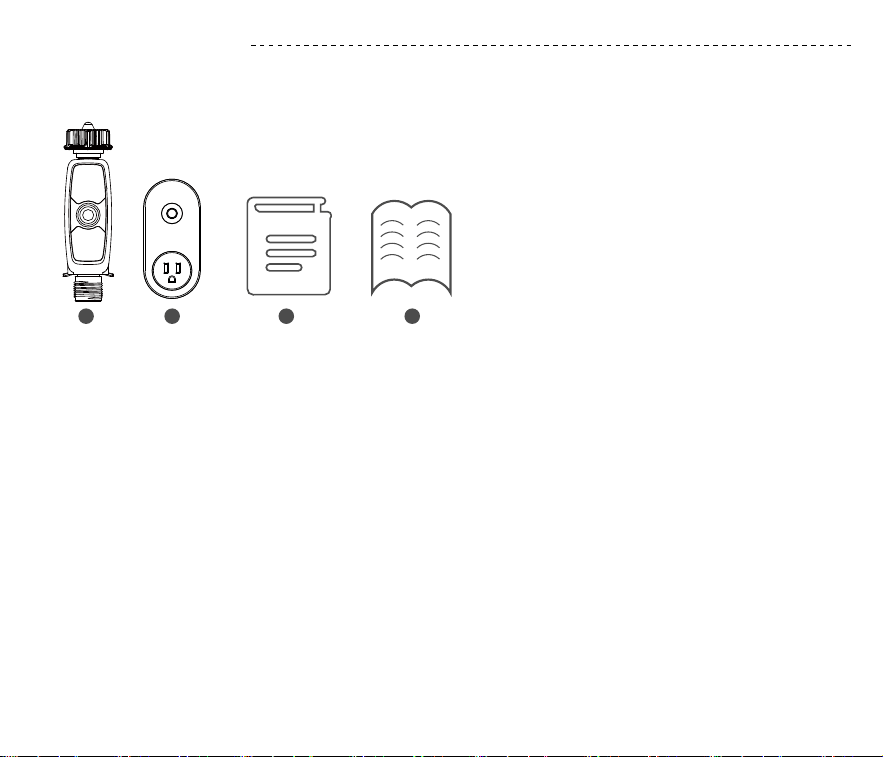
A.1 x TTV103WRF 1 Zone WiFi Water Timer
B.1 x TWG004FRF WiFi Hub
C.1 x Instruction Manual
D.1 x Quick Setup Guide
FCC Notice:
This device generates radio frequency energy and may cause inteerence to radio and television reception. It has
been type tested and found to comply with the limits for a Class B computing device in accordance with the
specications in Pa 15 of FCC Rules, which are designed to provide reasonable protection against such inteerence
in a residential installation. However, there is no guarantee that inteerence will not occur in a paicular installation.
If this equipment does cause inteerence to radio or television reception, which can be determined by turning the
equipment o and on, the user is encouraged to t to correct the inteerence by one or more of the following
measures:
• Reorient the receiving antenna
• Move the device away from the receiver
• Plug the device into a dierent outlet so that device and receiver are on dierent branch circuits.
If necessa, the user should consult the dealer or an experienced radio/television technician for additional
suggestions.
- 01 -
CONTENTS IN THE BOX
A B C D
Specication
Range Between WiFi Hub and Timer: 160 ft in the open area without inteerence
Working Water Pressure: 0.5 bar to 8 bar(7.25-116.03PSI)
Temperature Operating Range: 3°C - 50°C (37°F-122°F )
Power By: 4 AA alkaline batteries (not included)
WaterProof: IP54
- 02 -
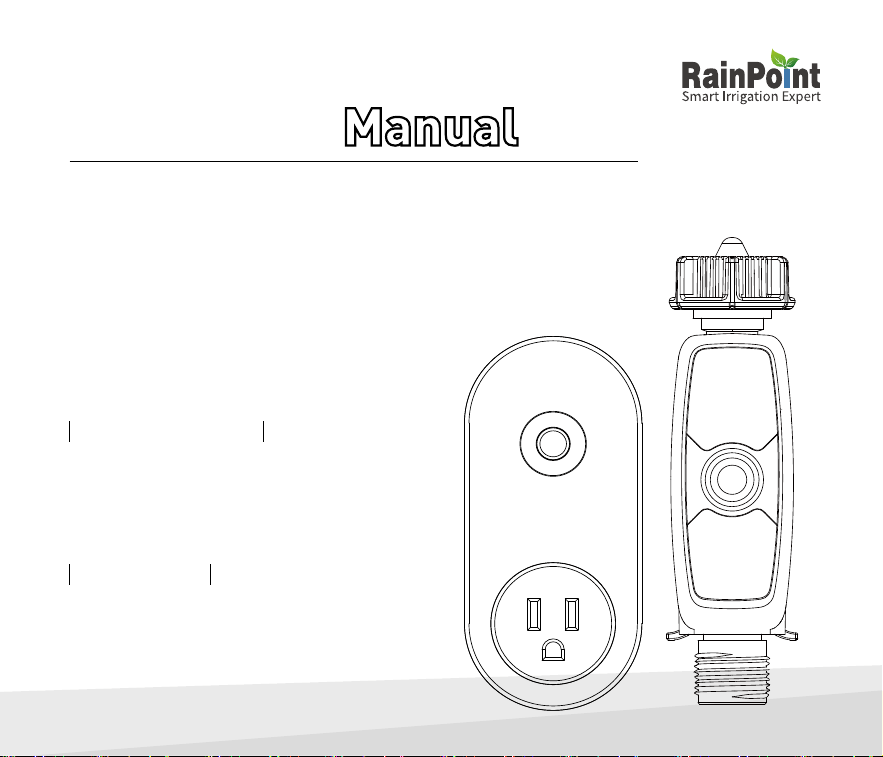
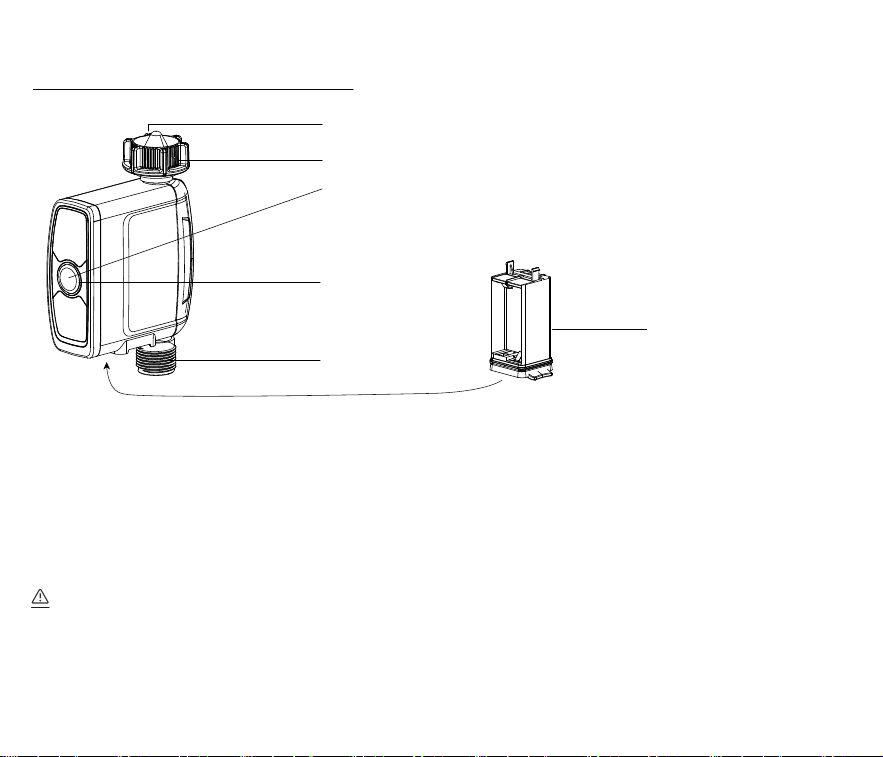
PRODUCTS OVERVIEW
For outdoor use with cold water only.
Keep away from freezing. In freezing weather, the timer should be placed indoors.
Used up or dead batteries must be removed from the timer and disposed of properly.
Inlet Filter
Water Inlet
Timer Button
LED Indicator
Water Outlet
Batte Compament
TTV103WRF 1 Zone WiFi Water Timer
Specication
Range Between WiFi Hub and Router: 160 ft in the open area without inteerence
Temperature Operating Range: 3°C - 40°C (37°F-104°F )
WiFi Frequency Band: 2.4Ghz Only
Input: 100-240V ~ 50/60Hz 0.2A
Output: 5V-1.0A
- 03 -
For indoor use only.
Only applicable to 2.4Ghz WiFi. If your router is a dual-band router, please independently enable the 2.4GHz
WiFi band and name it dierently from the 5GHz WiFi band.
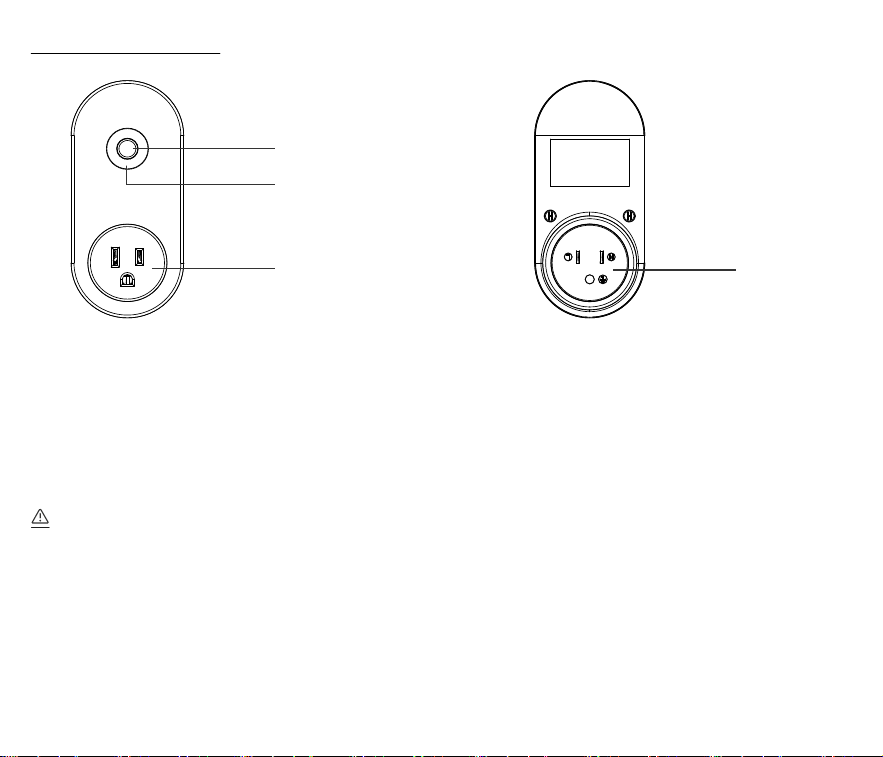
TWG004FRF WiFi Hub
Power Plug
Hub Button
Power Indicator
WiFi Socket with Power Supply
1) WiFi Remote Control: Connect with 2.4GHz WiFi, set and check irrigation schedule by APP.
2) WiFi Socket: The WiFi Hub can be use as WiFi socket.
3) Manual Watering: Manually turn on/o watering and set watering time.
4) Watering on Schedule: The timer can set up to 3 separate watering programs eve day. Each watering programs
has dierent sta time and watering duration.
5) Automatic Watering: ① When the WiFi timer is connected to the WiFi soil sensor (not included), it can
automatically irrigate or stop according to the soil temperature and humidity data; ② When you locate the home
address for the timer, the APP will automatically synchronize the local weather information, and the timer can be
automatically executed according to the weather trigger conditions you set.
6) Rain Delay: Manual Rain Delay and Automatic Rain Delay
7) Water Flow Meter: Built-in water ow meter to track water usage in the last 10 days.
8) Two Watering Modes: Irrigation mode and Mist mode.
9) Co-management with family: Home Management allows you to Add family members and give them permissions,
manage the irrigation of your home garden together.
10) Low Batte and Water Leak Alarm: APP will send you ale messages when low batte or product failure.
11) One WiFi hub can pair with maximum 4 WiFi water timers.
12) One WiFi water timer can pair with 1 WiFi soil sensor*.
- 04 -
FEATURES OVERVIEW
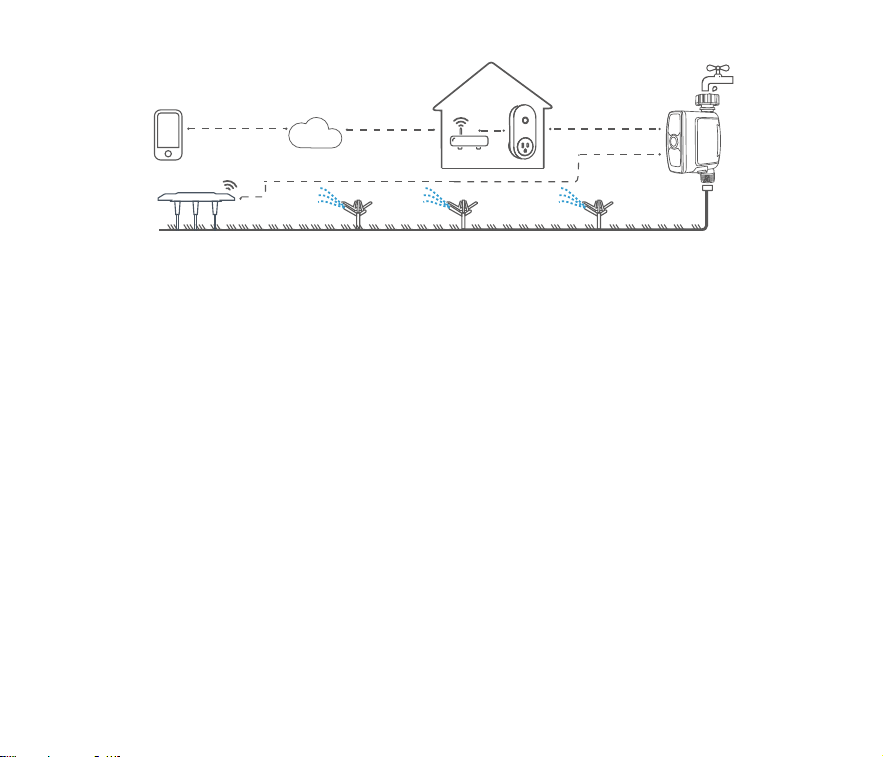
WiFi
wi
RF
RF
ROUTER
CLOUD
2.4Ghz WiFi
* Only compatible with Rainpoint TCS005FRF Wi-Fi soil sensor (not included).
* Only applicable to 2.4Ghz WiFi
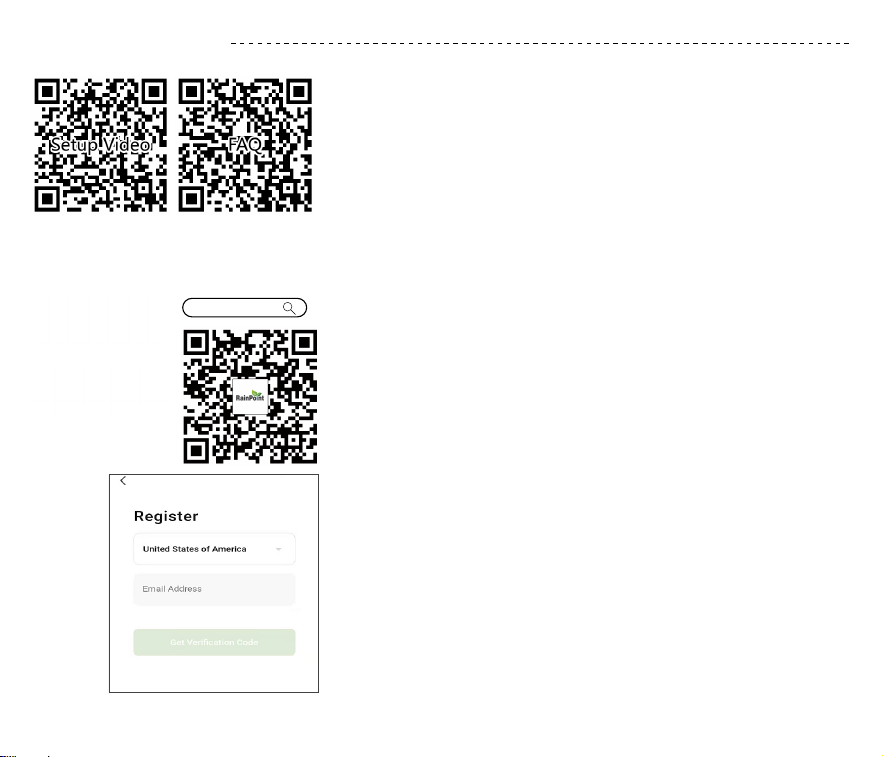
INSTALLATION
Please scan the QR code or search the link to access the setup video
or FAQ to install the device quickly and easily.
Setup Video: www.rainpointus.com/pages/playlist
FAQ: www.rainpointus.com/downloads/faq
Tips:
- 05 -
STEP 1. INSTALL APP ON YOUR PHONE
FAQ
Setup Video
Rainpoint
1 Download the RainPoint App
Search for RainPoint on Google Play or App Store or scan the QR
code to download the RainPoint APP.
2 Register your RainPoint account
Open your RainPoint APP, select Set Up
Follow the prompts to register a RainPoint account with your email
or mobile number.
Note:
Ensure your count/region details are correct at this stage.
You may be prompted to allow access your location. This allows the
app to show weather information, and can still function if you choose
to opt out.
- 06 -
STEP 2. CONNECT THE WIFI HUB
Tips:
If your router is a dual-band router, and you cannot identify
the 2.4Ghz or 5Ghz WiFi, please tap the blue words Common
router setting method to name the 2.4Ghz WiFi dierently,
then you can select it individually.
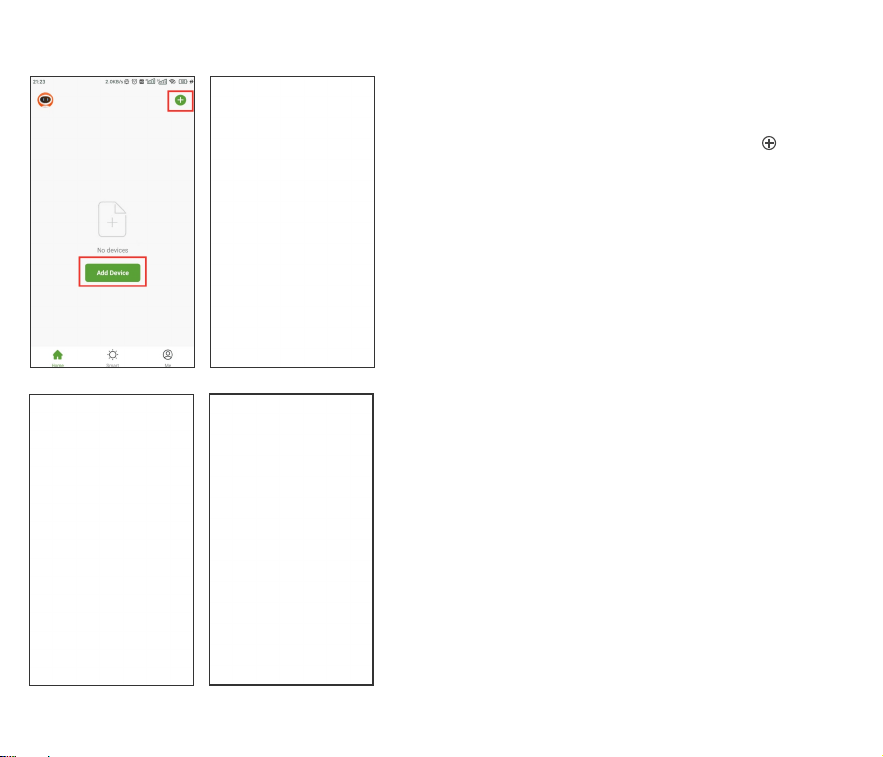
1. Plug your WiFi Hub to an indoor power source near your
WiFi router and the outdoor location of your timer.
2. Open RainPoint App and tap Add device or to add a
new device.
3. Tap Sma Irrigation and Add Manually, then select
Irrigation Hub.
4. select 2.4Ghz WiFi, and enter the password.
- 07 -
STEP 3. CONNECT THE WIFI TIMER
Tips:
If the indicator doesn’t blink rapidly (2 times per second),
please tap Resetting Devices and follow the prompts (Or
refer to the RESET THE DEVICE section of this manual) to
reset the WiFi hub and make the hub indicator blink rapidly.
5. Conrm the power indicator on your WiFi hub blink rapidly
(2 times per second). Then the APP will search and pair
your WiFi Hub automatically.
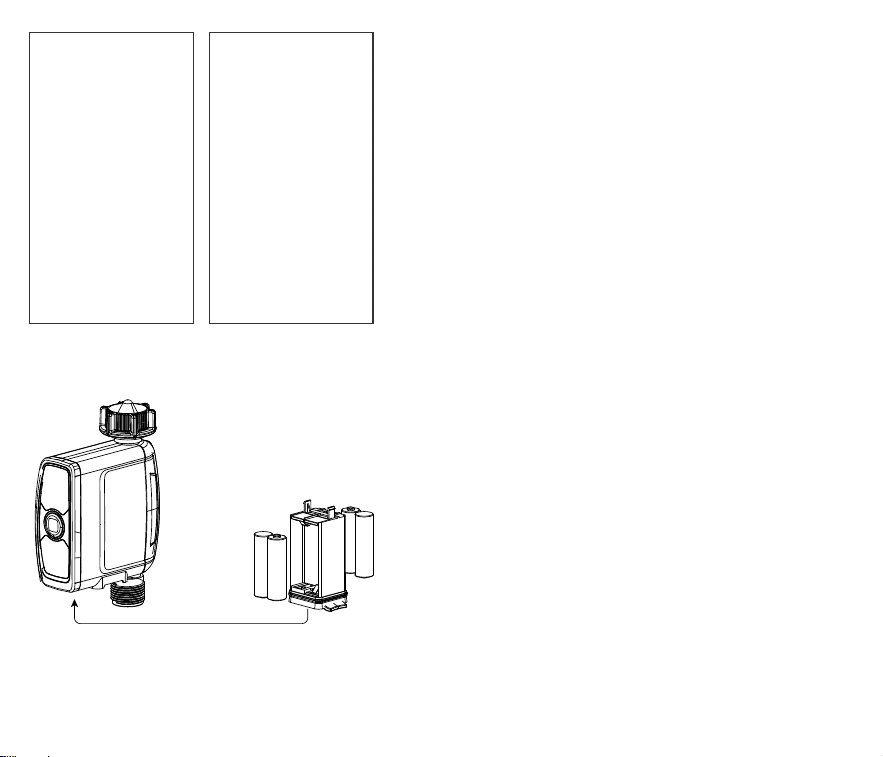
1. Inse 4 new AA alkaline batteries into the batte tray of
the timer. Restore the batte tray and make ceain it is
secured.
Warnning:
*Please use only alkaline batteries.
*Do not mix old and new batteries.
*Batteries are to be inseed with the correct polarity.
*Exhausted batteries are to be removed from the product.
*Please remove the batte from long-term no use.
6. After the connection is successful, the color icon of
irrigation hub will be displayed on the APP home screen.
+
+
-
+
-
+
-
+
-
Tips:
If the indicators don’t blink rapidly (2 times per second),
please tap Resetting Devices and follow the prompts (Or
refer to the RESET THE DEVICE section of this manual) to
reset the WiFi timer and make the timer indicators blink
rapidly.
2. Return to the APP home screen, and tap to add the WiFi
timer.
4. Press and hold the button on the timer until the LED
indicator blink rapidly (2 times per second). Then select
conrm indicatorrapidly blink and tap Next. The APP
will search and pair your WiFi timer automatically.
- 08 -
3. Tap Sma Irrigation and Add Manually, then select
WIFI Water Timer
- 09 -
STEP 4. INSTALL THE WIFI TIMER
Tips:
If necessa, three additional WiFi timers can be added to
the RainPoint APP through a WiFi hub. A separate WiFi
timer is available on Amazon.
5. After the connection is successful, the color icons of WiFi
timer and WiFi socket will be displayed on the APP home
screen.
1. Attach the timer inlet to the outdoor faucet/spigot (hand tighten only). From the timer outlet connect a drip
irrigation system or a garden hose.
Outlet
Inlet
Less than 160 feets
(No bushes, walls blocking)
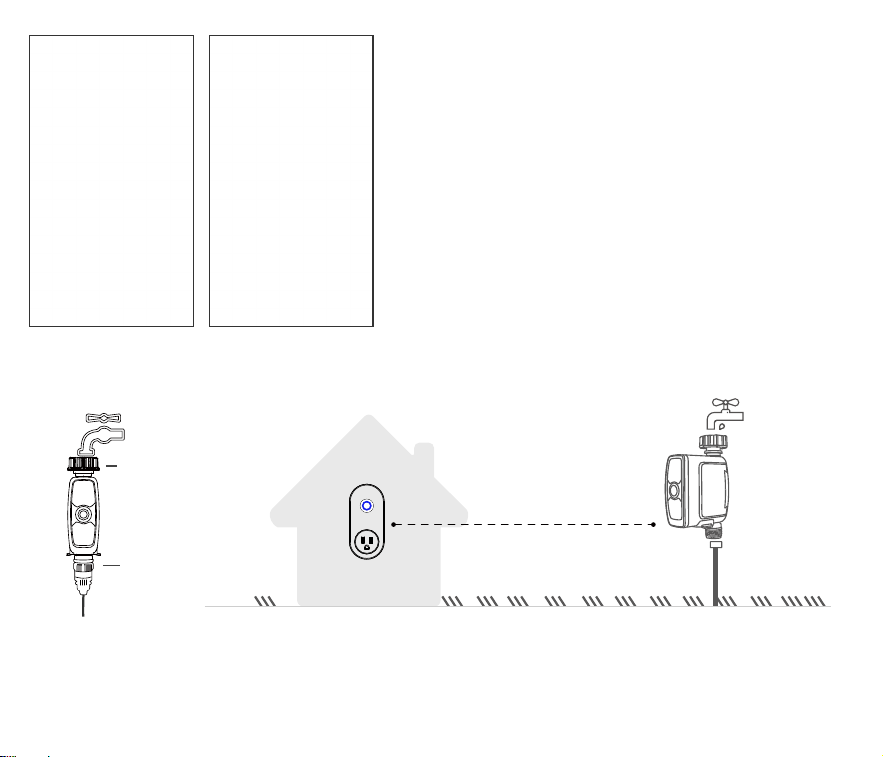
STEP 5. TEST BEFORE USE
Warnning
* The WiFi timer can only be used for cold water.
* The WiFi timer uses a 433mHz RF connection to communicate with the WiFi Hub, and must be within a 160ft
range, line of sight, of the WiFi Hub. If there are walls, iron gates or bushes blocking, please shoen the
distance between them to better receive the signal.
* Soil will absorb WiFi and RF signals, the best location of the timer is on the faucet 4 to 8 feet (1.2 to 2.4 meters)
above the ground.
* Do not place the WiFi timer in an underground valve box or anywhere your WiFi and RF signal will be obstructed.
* Under freezing weather, the water timer should be removed from the tap and placed properly indoor to avoid any
danger of freezing.
Note:
When testing, please keep away from the water outlet of the timer to avoid being splashed
and wet.
Congratulations, you have completed the connection and installation of the WiFi water timer.
Please test whether the internal valve of your water timer is normal before using it.
- 10 -
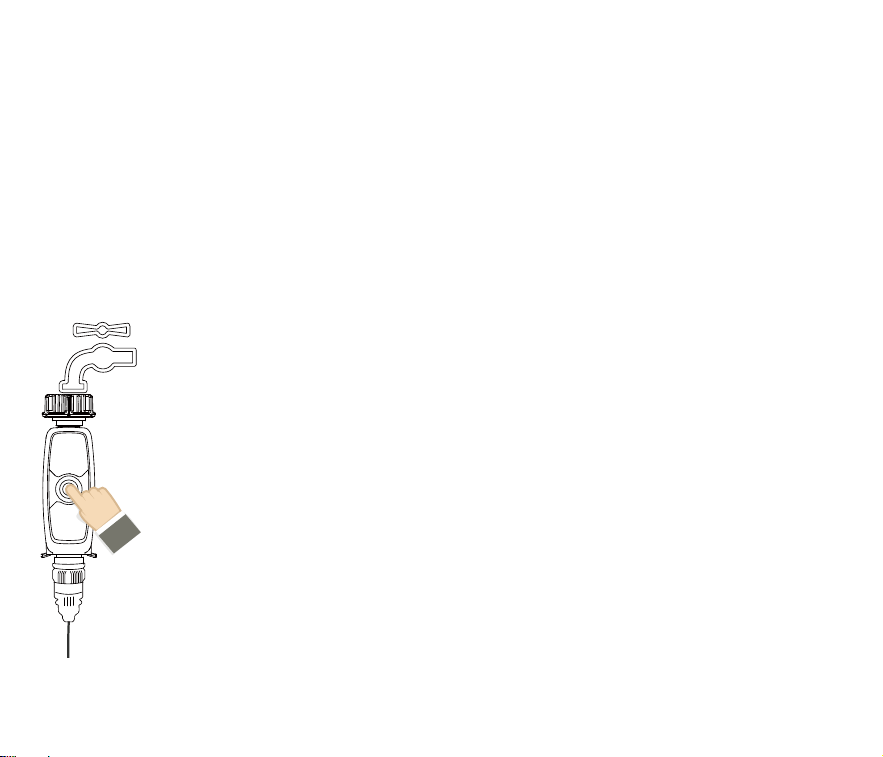
1. Keep the faucet turned o.
2. Press and hold the button of the timer for 3-5 seconds, with a click sound, the valve inside
the timer opens for manual watering. After a few seconds, press and hold the button again,
the click will sound again, and the valve will close.
3. Turn on the faucet a little bit, press and hold the button of the timer to check if the water
ow out or shut o as expected. If yes, the valve is normall, please use it with condence! If
not, please repeat the above steps several times.
The test is over, evething is normal, please keep the faucet fully turned on!
- 11 -
APP PROGRAMMING
APP HOME SCREEN
Local Weather Forecast
Get your local weather forecast from
website to realize intelligent watering.
Home Management
You can locate your home, customize
the home name and add family
members. It is convenient for you to
manage irrigation schedules for
dierent residences.
Add Devices
You can add multiple RainPoint
devices on the APP to create a sma
home irrigation system.
Room Management
Room Management is for indoor
automatic irrigation system in
dierent room.
Me
On the Me screen, there is Message
Center and FAQ & Feedback
functions. You will receive water leak
and low batte ales on Message
Center. And you can get FAQ and
repo issue on FAQ & Feedback.
All Devices
A check list of all the devices you have
connected. Tap to enter the operation
page of devices you have added to
program the operation schedule of the
device.
Sma
On the Sma screen, there is Tap -
to-Run and Automation functions.
You can automate multiple sma
products by setting conditions and
tasks.
Tap the WiFi water timer on the all devices list of APP home screen.It will display all the
parameters and functions of the timer manually set on the APP.
- 12 -
Note:
The WiFi timer will follow and peorm the preset watering schedule
after application set successfully, even if the phone or device loses
network connection.
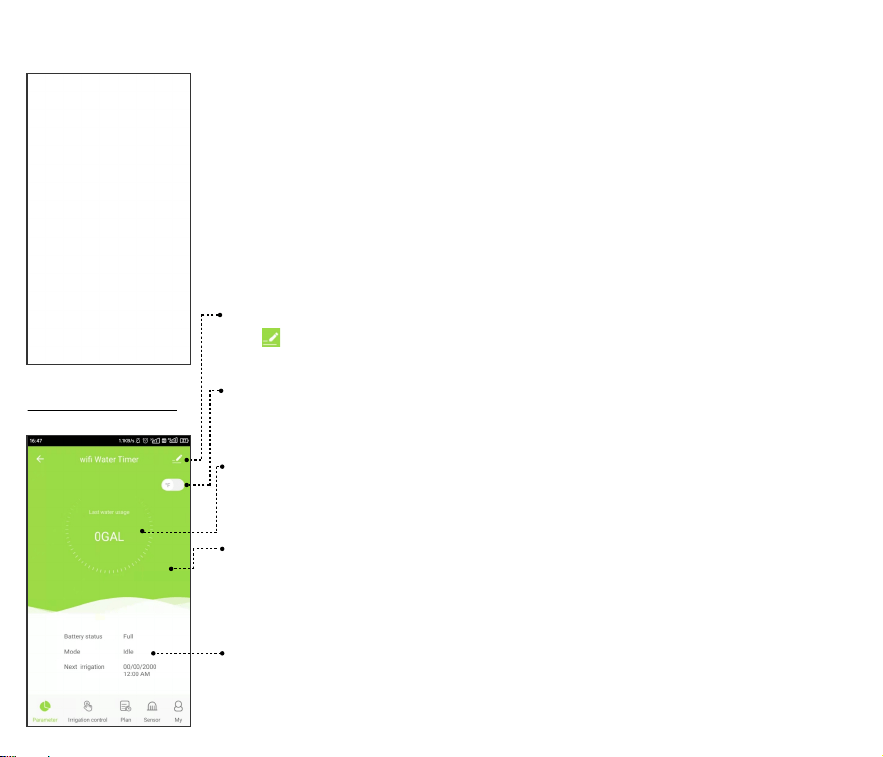
WIFI WATER TIMER
Device Parameter
Device & Third Pay Control
Tap on the top right of the screen, you will enter the page for device information
and third-pay control.
Unit Switch
Tap ℉/℃ switch, it will change the unit (℉/℃) of soil temperature and the unit (GAL/L)
of water usage.
Last Water Usage
The WiFi water timer has built-in water fow meters, it will display the last water usage
on the screen.
Soil Temperature & Moisture
Paired with the RAINPOINT WiFi soil sensor (sold separately), it can also display soil
temperature and moisture. If the soil moisture is higher than the water prohibition level
set on the soil sensor, the APP background color will change to red.
Working Status
Display the batte level of the timer, the current working mode and the time of the next
watering.
How to get third-pay control / voice control?
If you have an Amazon Alexa or Google Assistant, please tap
the icon in the upper right corner of the device page,
select a third-pay voice control device you own, then tap
the operation guide, and follow the instructions to connect
your WiFi water timer to the voice control device. After
successfully connecting, you can control the WiFi water timer
by voice.
- 13 -
Note:
The WiFi water timer can only peorm simple voice
commands, such as turn on or turn o .
If you have any questions or suggestions about this feature,
please contact our US seice hotline: +1-833-3815659 or
send an email to seice@rainpointus.com
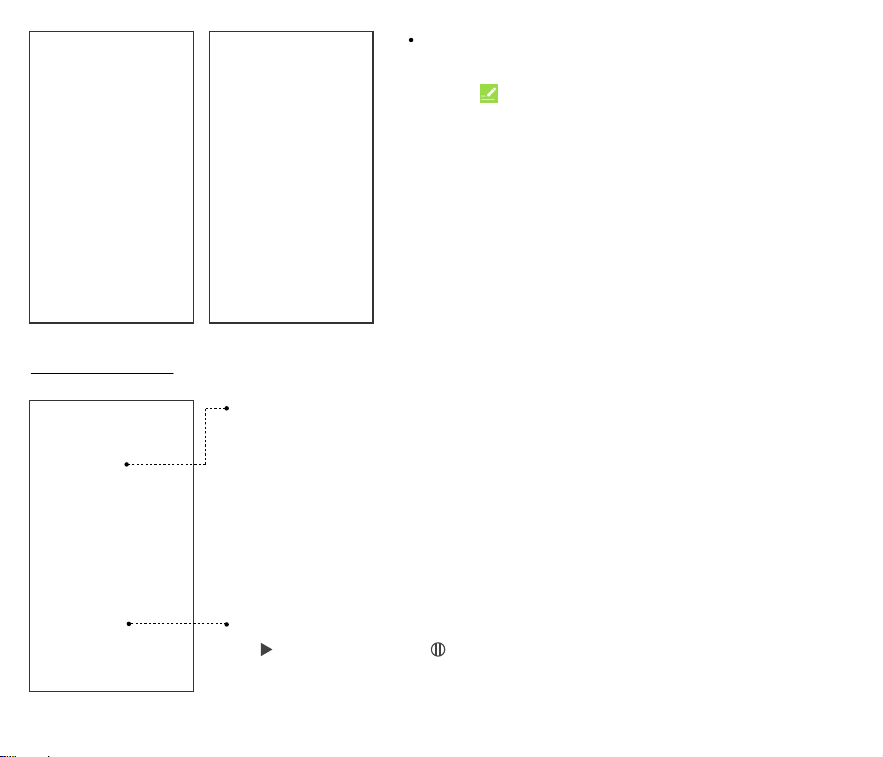
Manual Watering
Manual Watering Duration
Move the hollow green circle on the dial to set the desired manual watering duration
(0~60min).
Manual Watering Duration
Tap to sta watering and to stop
- 14 -
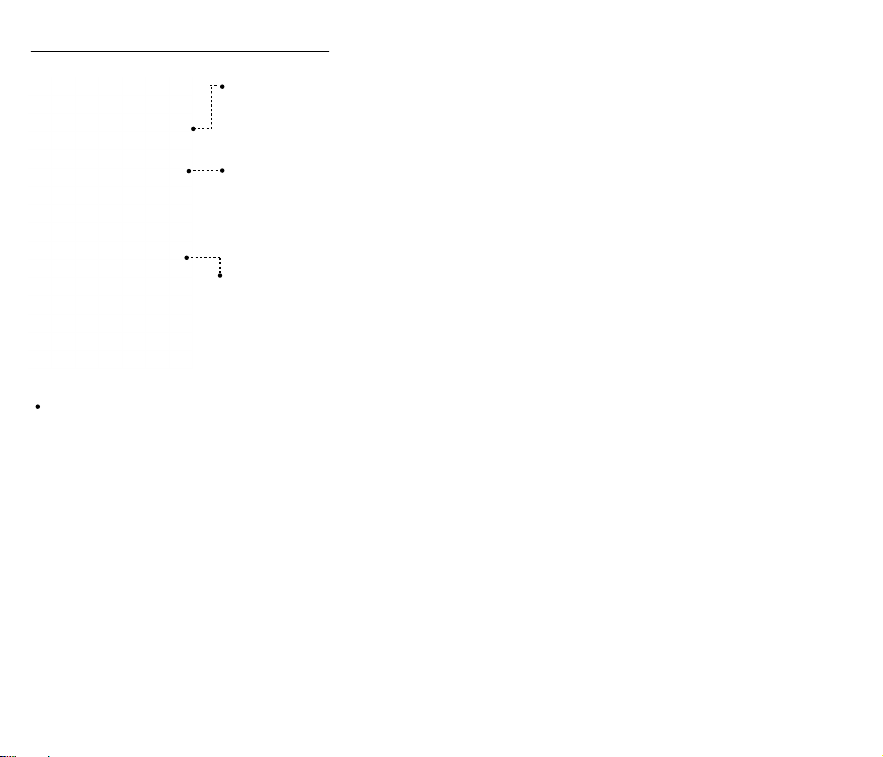
Watering Plan & Manual Rain Delay
How to set the watering plan?
1. Tap Plan A/ Plan B/ Plan C on the plan screen of the WiFi water timer.
2. Each watering plan has two watering modes: Irrigation Mode and Mist Mode.
These two modes do not refer to the dierence in the water output of the timer, but the dierent settings of the
watering frequency and duration.
Irrigation Mode: Watering at longer inteals
Mist Mode: Watering at shoer inteals
Watering Day Of The Week
Each plan has a specic color punctuation. The punctuation in a specic color on the
day of the week indicates that there is a corresponding watering plan for that day.
Plan A / Plan B / Plan C
The WiFi timer can set 3 dierent watering plans eve day. Each watering plan can be
set with dierent sta time, duration and watering day (frequency). Slide the switch of
the watering plan to turn it on or o.
Manual Rain Delay
Rain delay applies to rainy days or other weather that causes high soil moisture. During
the rain delay, the timer stops watering. After the rain delay ends, the timer will be
executed according to the next watering plan. The timer can set 24/48/72 hours of rain
delay.

- 15 -
Irrigation Mode
3. Tap Irrigation Mode.
4. Use the 24H time switch to toggle between 24hr and AM/PM time.
5. Tap Sta time to open the clock and set a sta time.
6. Tap Duration(H:M) to set a watering duration (from 0 hour 0 minute to 11 hours to
59 minutes).
7. Select the days to repeat watering eve week as needed.
8. Save your settings.
Mist Mode
3. Tap Mist Mode
4. Use the 24H time switch to toggle between 24hr and AM/PM time.
5. Tap Sta time to open the clock and set a sta time.
6. Tap Misting Period(H:M) to set the overall duration of the misting program (from
0 hour 0 minute to 11 hours to 59 minutes).
7. Tap Mist time to set the duration for each misting.
8. Tap Inteal to to set the inteal time between each misting.
9. Select the days to repeat watering eve week as needed.
10. Save your settings.
For example:
The picture on the left shows that the WiFi water timer will water for 2 hours in
irrigation mode. The sta time is eve Monday, Thursday and Saturday at 7�30 am.
For example:
The picture on the left shows the WiFi water timer will water for 59 seconds and then
rest for 2 minutes in mist mode cyclically. The cycle lasts for 2 hours, staing at 7�30
in the morning eve Wednesday, Friday and Sunday.

- 16 -
WiFi Soil Sensor & Water Flow Meter*
WiFi Soil Sensor (sold separately, not included)
If you have a Rainpoint WiFi soil sensor, you can pair it with your Rainpoint WiFi water
timer and WiFi hub. One WiFi timer can pair with one WiFi soil sensor. And the soil
temperature and moisture data monitored by the soil sensor will be displayed on your
Rainpoint APP.
The soil sensor can also control the watering schedule of the timer. When the soil
moisture is higher than the water prohibition level set on the soil sensor, the timer
automatically interrupts the watering plan and stops watering until the soil moisture
decreases.
Water Flow Meter
Each WiFi water timer has buil-in a water ow meter.
It will show you the daily water consumption in the last few days and help you quantify
the daily water consumption to save water.
Note:
How to switch the unit of soil temperature and moisture and water ow meter ?
Please tap the parameter screen and then tap “℉/℃” switch to toggle the unit.
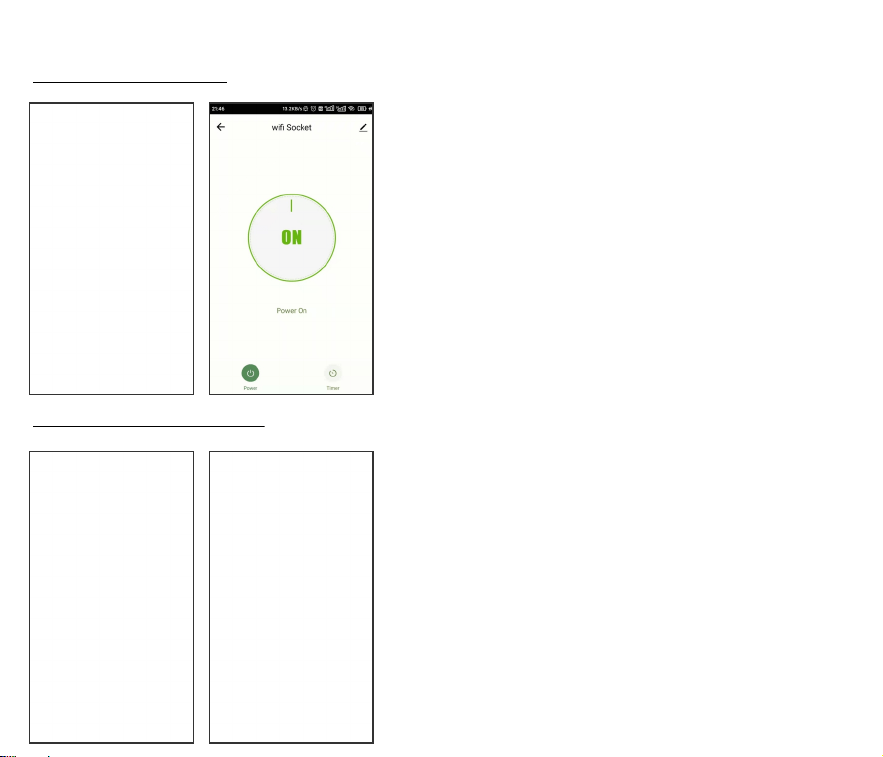
WIFI SOCKET
- 17 -
Manual Power ON/OFF
Power ON/OFF By Schedule
1. Tap the WiFi Socket on the all devices list of APP home
screen.
2. Tap the Power to toggle the WiFi socket power on or o
1. Tap the Timer on the WiFi Socket screen.
2. Tap the Add Schedule to setup a schedule for the WiFi
Socket.
3. Use the clock wheels to set the desired switch time of day.
4. Tap Repeat to choose which days of the week to toggle the
socket.
5. Tap Note to add a custom description to your schedule.
6. Toggle the Notication switch to receive ales when the
schedule is triggered.
7. Tap Save to set your schedule, or exit without saving.
8. The schedule of the WiFi socket will be displayed on the
previous add schedule screen.
Note:
Each RainPoint WiFi hub can be used as a WiFi socket. But
only when the WiFi timer is successfully paired with the
WiFi hub, the WiFi socket device can be added to the APP.

SMART AUTOMATION
Automation & Tap-to-Run
Automation means the devices can execute automatically
according to the set conditions such as the local weather,
device status and time.
For example, RAINPOINT APP can obtain the weather forecast
information of your home location. When you set the
conditions for immediately delaying the watering plan when it
rains, the timer will automatically execute the watering delay
when it rains in your local area. When you travel, you don’t
need to wor about whether the weather at home is raining.
3 Steps To Set Automation Or Tap-To-Run
1. Set a condition: According to your needs, set the conditions
for automation or tap-to-run.
2. Set tasks: Set the tasks that the device needs to peorm
when the conditions are met
3. Save the settings: Please remember to save all the settings.
The device will automatically execute according to what
you set.
Tap-to-Run means you can control multiple devices and plans
with one tap.
- 18 -

-19 -
How to set the automatic rain delay?
1. Tap Sma at the bottom of the APP home screen.
2. Select Automation and tap Create Scene.
3. Set a condition when the weather changes to rain.
4. Tap Run the device to set up a task about device operation.
5. Select WiFi Water Timer
6. Set the watering delay time
Note:
Please accurately locate the city where your home is located.
The APP will automatically obtain weather forecast data based
on the city you locate. When the weather forecast turns to rain,
the conditions for execution will be triggered.
Note:
For the task peormed by the device, select Run the device

- 20 -
7. Select the trigger condition of your condition to be when
all conditions are met or when any one of the conditions
is met. If there is only one trigger condition, there is no
need to set it here.
8. Check your execution conditions and tasks.
9. Save your settings.
For example:
The picture on the left shows that when it rains in New York,
the valve of the WiFi water timer will be automatically closed,
and watering will be delayed for 24 hours.

- 21 -
Rainpoint suppos adding family members and sharing your
home device to achieve co-management the home irrigation
system with your family.
1. Tap Me at the bottom of the APP home screen.
2. Select Home Management. You can set the current home
or create a home or join another home.
3. Set your home name, room management and home location.
4. Add Home Member and set the corresponding usage
permissions for the members.
Note:
Home location is related to the weather forecast information
obtained by the system.
HOME MANAGEMENT
RESET THE DEVICE
- 22 -
How to reset the WiFi Hub ?
How to reset the WiFi timer ?
Search the link below to visit the WiFi Hub resetting video
https://rainpointus.com/pages/playlist
Step 1. Power OFF or Remove the WiFi Hub from the power source.
Step 2. After 10 seconds, power on or plug the WiFi hub to the power source.
Step 3. Press and hold the middle button on the WiFi hub without releasing the button until the indicator light
quickly ashed (2 times per second), then the WiFi hub is restored to pair mode.
Step 1. Remove all batteries from the batte compament.
Step 2. After 10 seconds, inse 4 fresh AA Alkaline batteries into the batte compament of the timer.
Step 3. Press and hold the button on the timer without releasing the button until the LED indicator quickly ashed
(2 times per second), then the WiFi timer is restored to pair mode.
Search the link below to visit the WiFi Timer resetting video
https://rainpointus.com/pages/playlist
Please scan the QR code below to get the resetting video quickly.
TROUBLESHOOTING
- 23 -
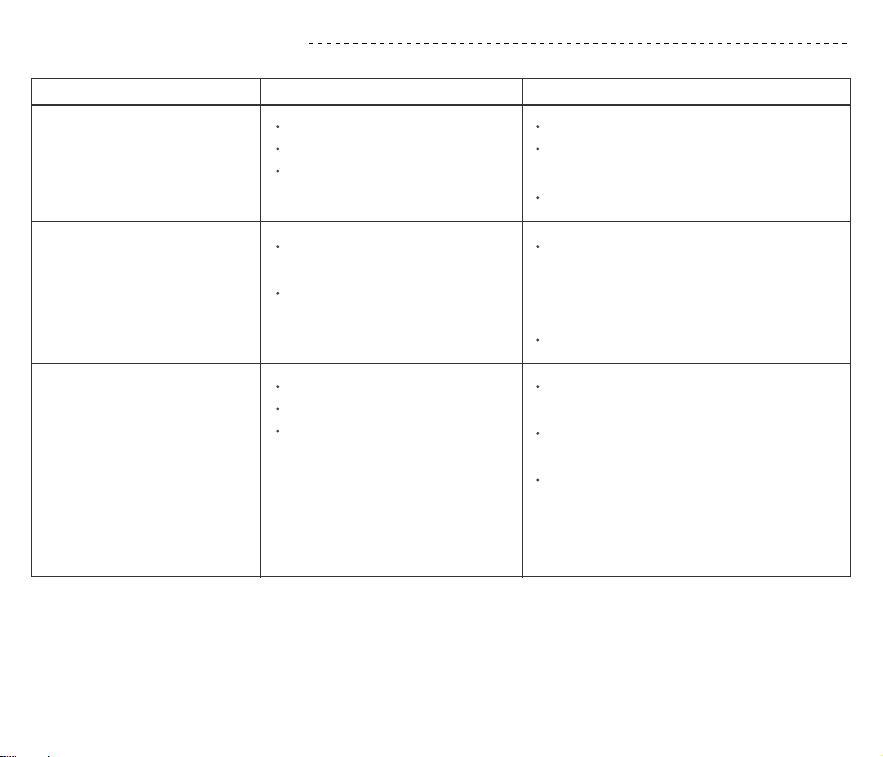
Problem Possible Cause Possible Solution
Can't turn on /o the valve
Inaccurate water ow meter
Timer won't connect
Low batte
Impurities in water inlet
Unstable network or delayed
response.
Inaccurate statistics due to tilted
mounting angle.
Low or erratic water pressure
from the tap
Replace fresh batteries
Regularly clean the lter po of impurities
to avoid disruptions in use.
Wait a while and t again.
The water timer needs to be installed
perpendicular to the ground and it is
recommended that it is not installed at an
angle to avoid aecting the water count.
Normal error values for water counts ± 5%
Check that the WIFI network environment
is working.
Close to hubs and routers when connected
to irrigation timers.
Re-pair the timer: Press and hold the timer
button until the white light ashes rapidly
to indicate pairing. (Or remove the device
from the homepage and reconnect)
Unstable WIFI network.
Long distance from the hub
Timer not in pairing state.
- 24 -
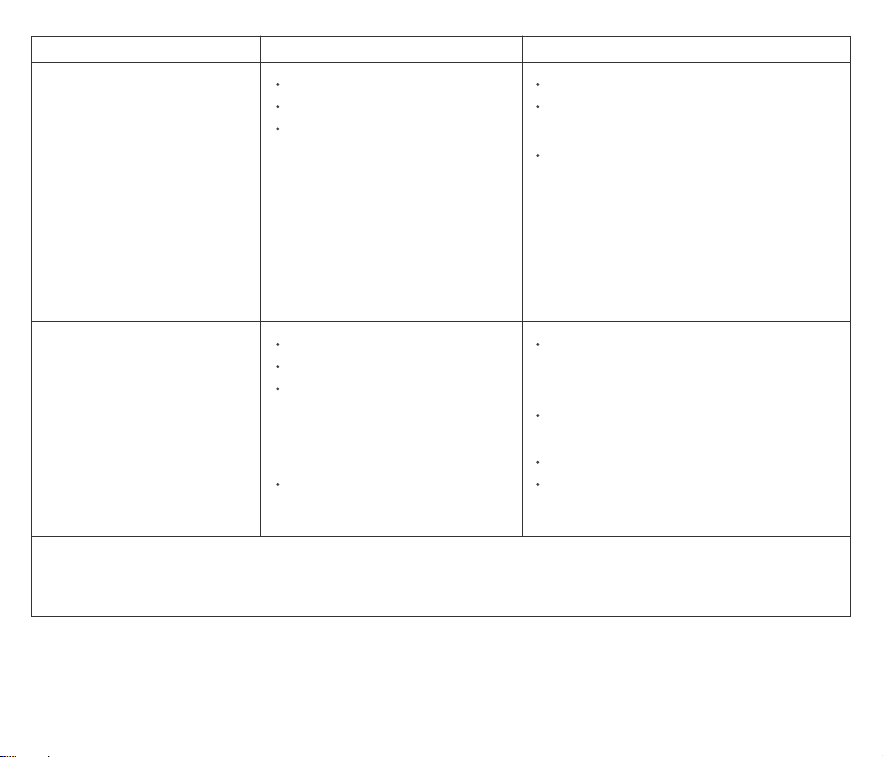
Problem Possible Cause Possible Solution
Hub cannot connect
Plan not executed on time
Not using 2.4GHZ WIFI.
Incorrect WIFI password.
Hub not in pairing state.
Conrm 2.4GHZ WIFI connection.
Conrm that the WIFI password has been
entered correctly.
Press and hold the middle button and
inse it into the socket again without
releasing the button, do not release the
button during this time. After a few
seconds the indicator light will come on
for a while and then sta ashing rapidly.
This means that pairing has been entered.
Inlet impurities need to be cleared
regularly so that they do not clog up and
inteere with the irrigation programme.
Check that the rainfall delay parameter
is set.
Replace fresh batteries.
Check that the irrigation duration/period
is not set with parameters.(Note 12H/24H)
Impurities in water inlet lter.
Rainfall delay parameters are set.
In a low power state, the timer
goes into a low power protection
state and does not execute the
schedule.
irrigation duration/period is not
set with parameters.
If your Rainpoint product does not operate properly after ting the troubleshooting steps, please contact us
by phone or email : 1-833-3815659 (US Hotline) | seice@rainpointus.com

- 25 -
The meaning of LED light
1. Power-on reset: The red and white lights ash alternately 4 times when the machine is turned on.
2. Restore facto settings: Press and hold the timer button while turning on the timer, release the button after
the red light ashes, and the timer will enter the facto reset state.
3. Irrigation status: The white light ashes for 3 seconds and lights for 200mS, indicating that the timer is in
irrigation status.
4. Water leakage alarm: The red light ashes alternately for 1 second.
5. Pairing state: The white light ashes quickly (2 times per second) to indicate that the timer enters the timing
pairing status, and waits for the 60-second pairing timeout to end.
6. Low batte state: The red light ashes for 3 seconds, and 200mS on indicates that the batte is in a low
voltage state.
The meaning of App background color
LED indicator color of TTV103WRF WiFi water timer
1. Sma pairing status: Blue LED light ashing fast(2 times per second)
2. AP pairing status: Blue LED light slow ashing
3. Socket function open: Blue LED light is always on
4. Socket function o: No light
Power indicator color of TWG004FRF WiFi Hub
Green means evething works well.
Red means the soil moisture is too high over the set level.
WARRANTY
- 26 -
Rainpoint provides a 1-year limited warranty on this product against manufacturing defects in materials and
workmanship.
CUSTOMER SUPPORT
If you nd it dicult to set up and want to watch the setting tutorial video, please subscribe to our channel:
RainPoint on YouTube.
If the app and the user manual don’t have what you’re looking for, and you need some help, please prepare the
Model NO. and LOT NO. of your device and contact us before returning the Rainpoint to the store.
US Free Hotline: 1-833-3815659
Email: seice@rainpointus.com
Model NO.: xxxxxxxxxx(On the timer label)
LOT NO.: xxxxxxxxxxxxxxxx(On the timer label)
Please scan the QR code to visit the RainPoint channel on YouTube quickly.