
User Manual
用户手册
Ultracompact 2.4GHz Dual-Channel Wireless
Microphone System
2.4GHz 迷你双通道无线麦克风系统
Blink900

Statement
Please read this manual carefully before use and operate and store in strict
accordance with the instructions provided. Please retain for future reference.
For any issues that cannot be resolved with the user manual, please refer to your
retailer for help or contact us at: [email protected].
General Introduction
Saramonic Blink900 is an incredibly lightweight, ultracompact and easy-to-
use wireless microphone system for up to 2 people. The microphone delivers
exceptional, broadcast-quality sound to DSLR, mirrorless and video cameras,
smartphones, tablets, computers, etc. It is ideal for content creation, vlogging,
mobile journalism, and more.
Features
·
2.4GHz wireless transmission technology
·
Compatible with cameras, mobile devices and more
·
Clip-on transmitter with built-in omnidirectional microphone
·
Dual-channel receiver with 3.5mm output
·
High-resolution and easy-to-use LCD display
·
Auto-brightness adjustment & auto gain control
·
Low cut filter (160Hz/120Hz/80Hz)
·
3.5mm headphone jack for real-time monitoring
·
Built-in rechargeable battery provides up to 6-hour runtime
·
Selectable mono and stereo output
·
Operating range of up to 200m

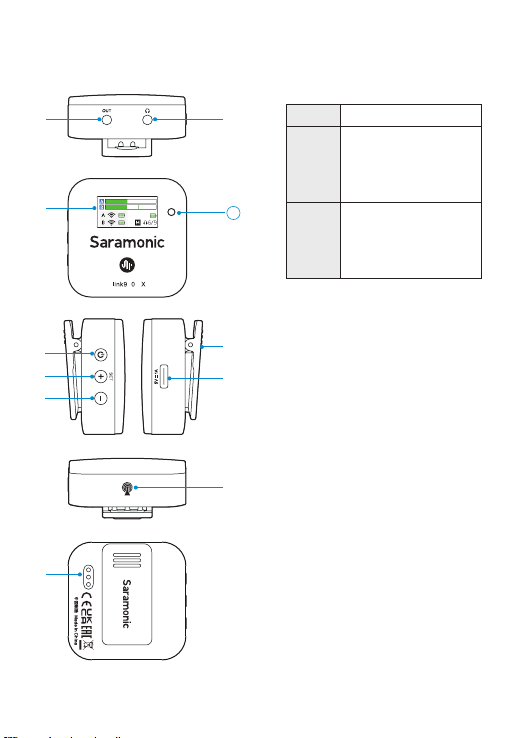
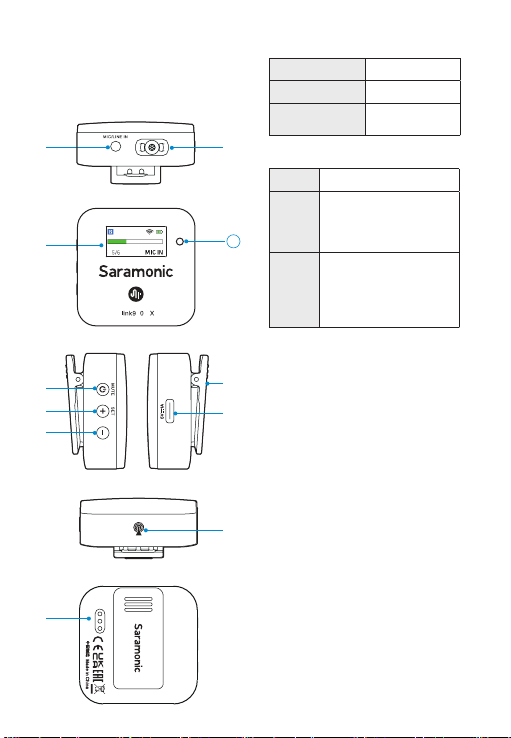
①
Power/Mute button
Mode Operation
Power ON/
OFF
Press and hold for 2
seconds
Mute ON/OFF Short press
②
+/SET button
Function
Operation
+
On home screen, short
press to adjust mic gain.
On menu screen, short
press to select different
functions or values shown
on the display.
SET
On home screen, long press
to enter the menu screen.
On menu screen, long
press to enter the displayed
menu. Then, long press
again to confirm your
option.
③
- button
On home screen, short press to adjust mic
gain.
On menu screen, short press to select
different functions or values shown on
the display; long press to return to home
screen.
④
LCD display
For more details, please refer to “LCD
Display Operation Guide”.
⑤
USB-C charging port
⑥
Built-in microphone
⑦
MIC/LINE IN jack
It can be connected to the supplied 3.5mm
lavalier microphone, or other 3.5mm TRS
microphones or line-in devices.
⑧
Antenna
⑨
Charging contacts
⑩
Magnetic belt clip
⑪
Ambient light sensor
Product Structure
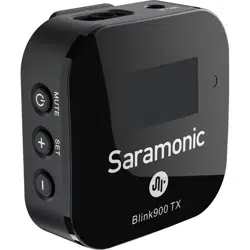
Blink900 TX: clip-on transmitter
with built-in microphone
④
⑥
①
②
⑤
⑦
⑧
⑩
③
⑨
B 0 T
11
B 0 R
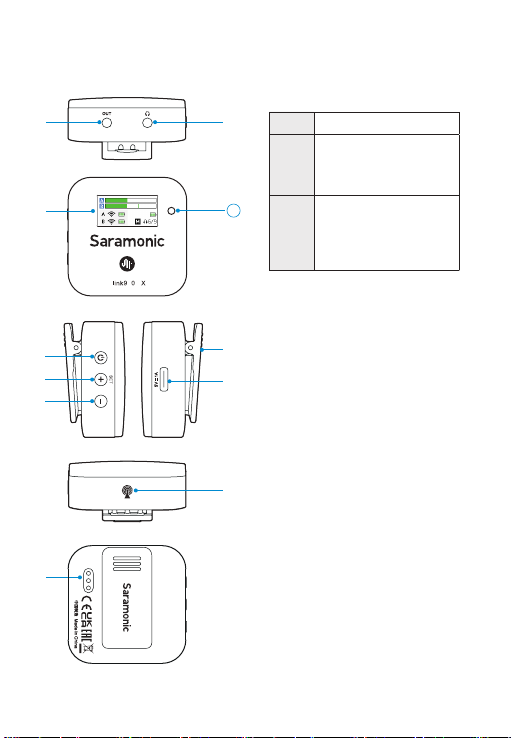
Blink900 RX: clip-on and
camera-mountable receiver
①
Power button
Press and hold the button for 2 seconds to
turn on/off the receiver.
②
+/SET button
Function Operation
+
On home screen, short press
to increase volume.
On menu screen, short press
to select different functions
or values shown on the
display.
SET
On home screen, long press
to enter the menu screen.
On menu screen, long press
to enter the displayed menu.
Then, long press again to
confirm your option.
③
- button
On home screen, short press to decrease
volume.
On menu screen, short press to select
different functions or values shown on
the display; long press to return to home
screen.
④
LCD display
For more details, please refer to “LCD
Display Operation Guide”.
⑤
USB-C charging port
⑥
Output jack
Connect the Blink900 RX to a smartphone,
tablet, camera, recorder or mixer with the
supplied output cables.
⑦
3.5mm headphone output
Connect headphones for audio
monitoring.
⑧
Antenna
⑨
Charging contacts
⑩
Magnetic belt clip
⑪
Ambient light sensor
④
⑥
①
②
⑤
⑦
⑧
⑩
③
⑨
11
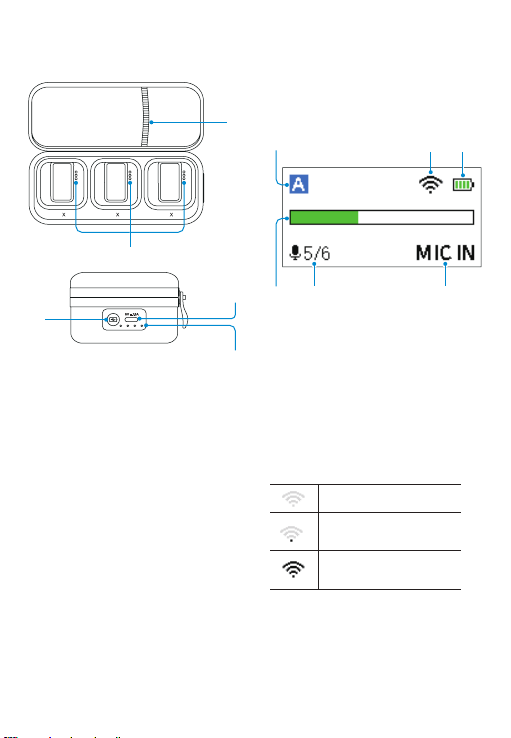
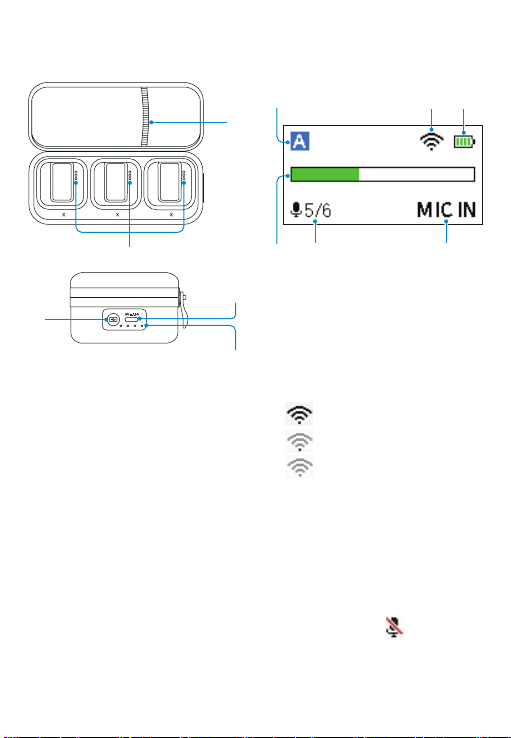
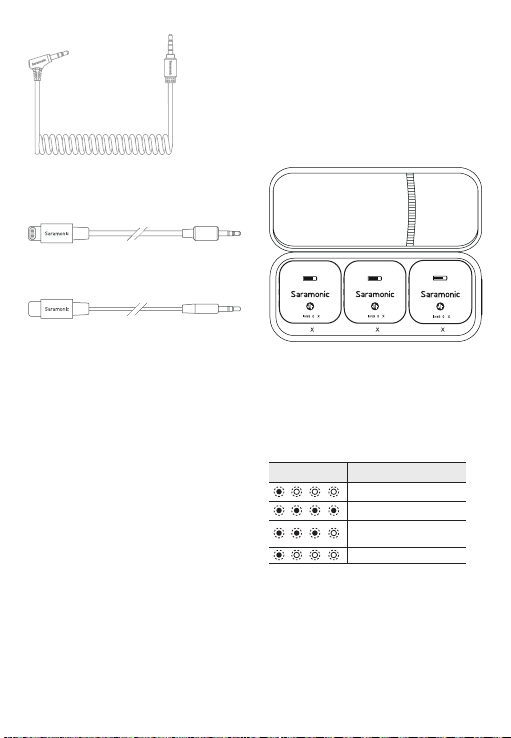
Blink900 B2BOX: portable
charging case
①
Charging contacts
②
Indicator button
Press to light up the indicator and display
current battery level of the charging case.
③
Battery level indicator
④
USB-C charging port
⑤
Accessory storage pocket
④
T T R
①
②
③
LCD Display Operation
Guide
Wireless Transmitter
Blink900 TX
Home screen
If no operation is performed within 20
seconds on menu screens, the display
will automatically return to home
screen.
①
Channel
indicator
Indicates the current channel.
②
Pairing
status
&
signal
strength
indicator
③
TX’s
battery
level
indicator
Displays the battery level. Please
recharge the transmitter immediately
as soon as the indicator starts flashing.
④
Audio
input
level
meter
Displays the audio input level.
Unpaired
Signal is weak
(Successfully paired)
Signal is strong
(Successfully paired)
⑤
①
④
③
②
⑤ ⑥
Mute OFF Mute ON
⑥
Input mode
The input mode can be set to Mic in or
Line in.
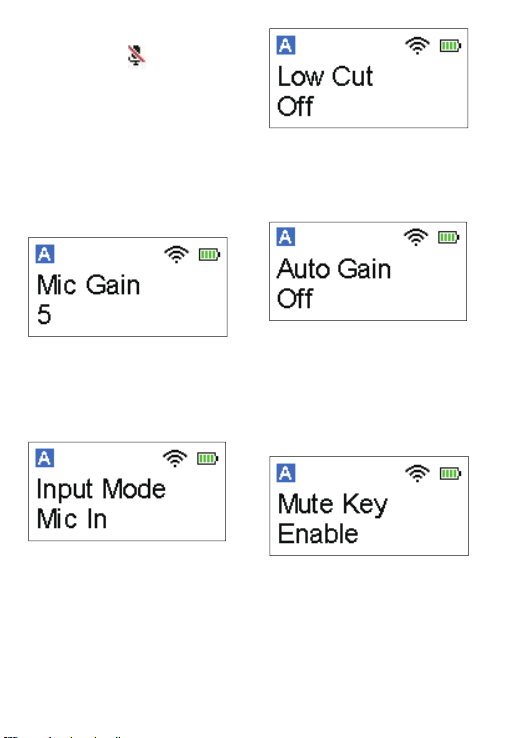
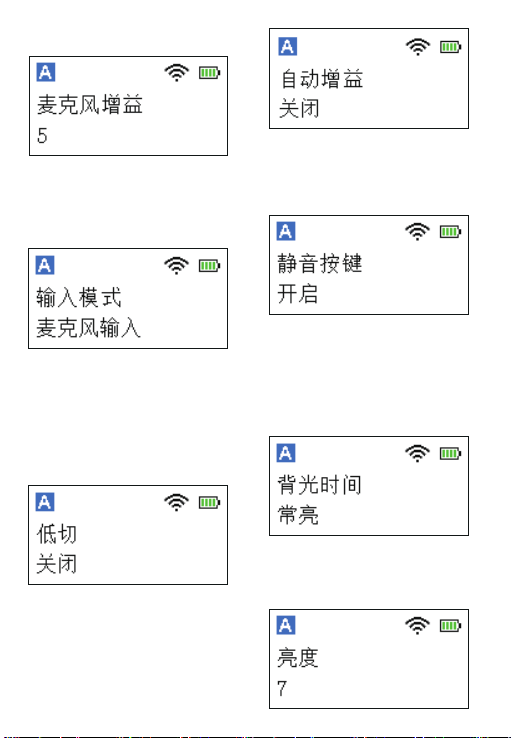
Menu screen
Mic Gain Setting
Adjust the microphone’s input gain
level (0~6).
Default is “5”.
(The setting is retained even after the
unit is turned off.)
Input Mode Setting
The input mode can be set to Mic In or
Line In. When Mic In mode selected,
the transmitter can be connected to
the supplied lavalier microphone, or
other microphones with a 3.5mm TRS
output. When Line In mode selected,
the transmitter can be connected to
line-level devices.
Default is "Mic In".
⑤
Mic gain & mute indicator
Mute Key Setting
Enable or disable mute key button
function. If “Enable” is selected, short
press the mute button can mute/
unmute the microphone. If “Disable”
is selected, the mute key function is
disabled, and short press the button
won’t mute the microphone.
Default is “Enable”.
Auto Gain Setting
Turn on/off the auto gain function.
If “On” selected, input from the
microphone will be boosted or
lowered automatically to normalize the
output of the captured signal.
Default is “Off”.
Low Cut Setting
Turn the input low-cut filter on/off and
select the cut off frequency: 160Hz,
120Hz or 80Hz.
Default is “Off”.
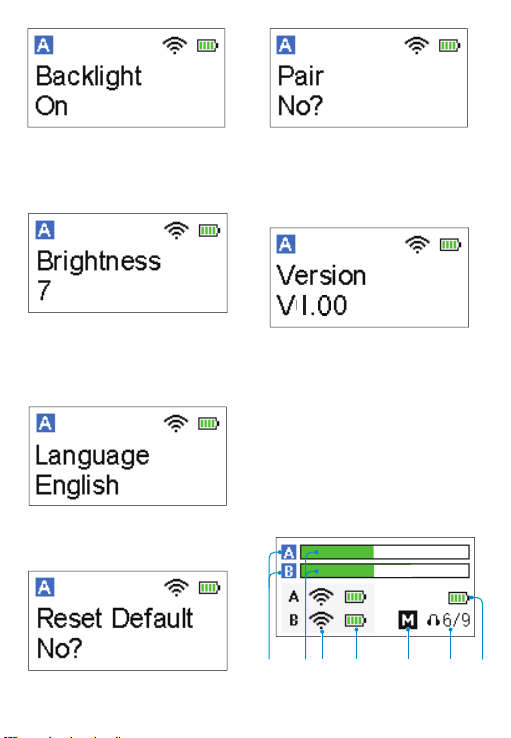
Backlight Setting
Set backlight to always on or on for
10/30/60 seconds.
Default is “On”.
Language Setting
English and Chinese are available.
Default is English.
Restore Default Setting
Brightness Setting
You can set the brightness to “Auto”
or manually select a value within the
range of 1-10.
Default is “7”.
Pairing
Select “Yes?” to pair the transmitter
with the receiver. For details of
operation, please refer to “Operation
Guide”.
Version of the Blink900 TX
Wireless Receiver Blink900
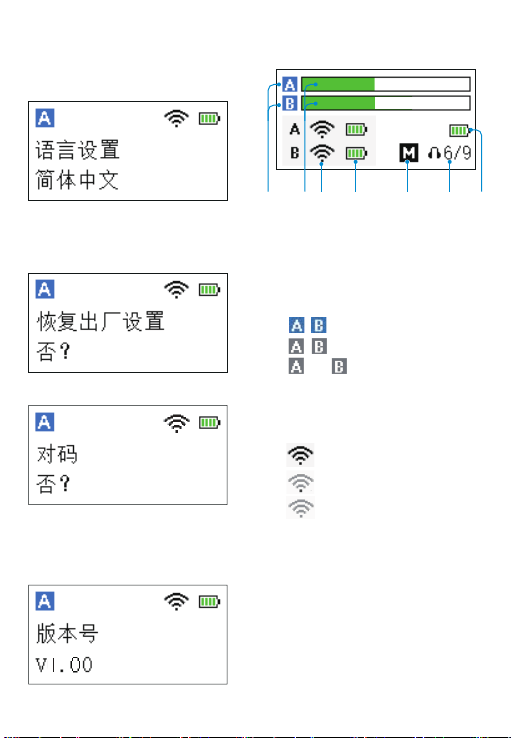
RX
①
④ ⑤ ⑥③②
⑦
Home screen
If no operation is performed within 20
seconds on menu screens, the display
will automatically return to home
screen.
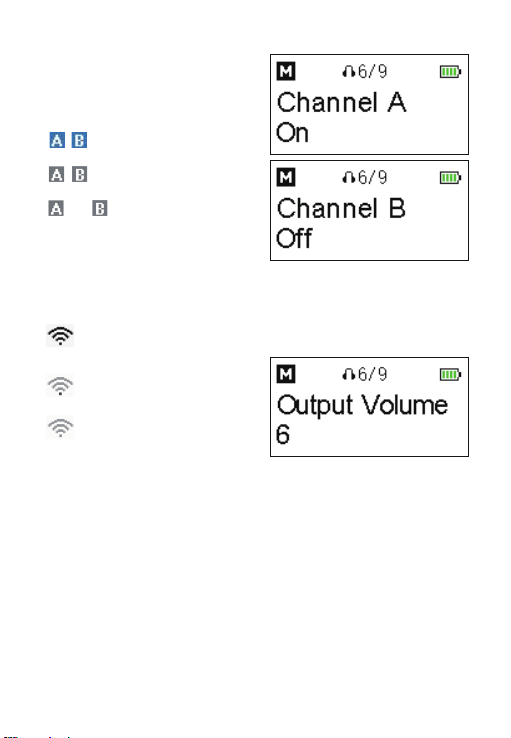
①
Channel icon
/ Indicates channel A/B is
successfully paired.
/ Indicates channel A/B is
unpaired.
off / off
Indicates channel A/
B is turned off.
②
Audio input level meter
Displays the audio input level.
③
Pairing status & signal strength
indicator
Signal is strong (Successfully
paired)
Signal is weak (Successfully
paired)
Unpaired
④
TX’s battery level indicator
Displays the battery level.
Please recharge the transmitter
immediately as soon as the
indicator starts flashing.
⑤
RX’s output mode
M: Mono
S: Stereo
⑥
Output volume
⑦
RX’s battery level indicator
Displays the battery level. Please
recharge the receiver immediately
as soon as the indicator starts
flashing.
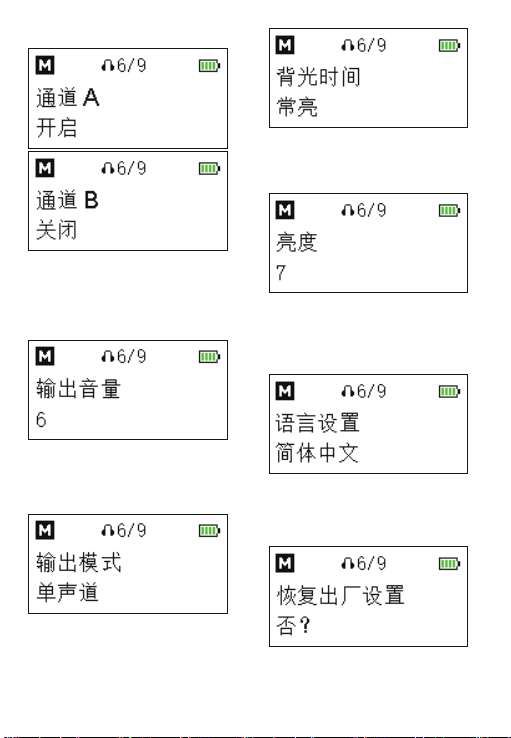
Menu screen
Channel
Setting
Turn on/off the channel A/B.
Default setting:
Channel A : On
Channel B : Off
Output
Volume
Setting
Output volume can be set from 0 to 9.
Default is “6”.
(The setting is retained even after the
unit is turned off.)
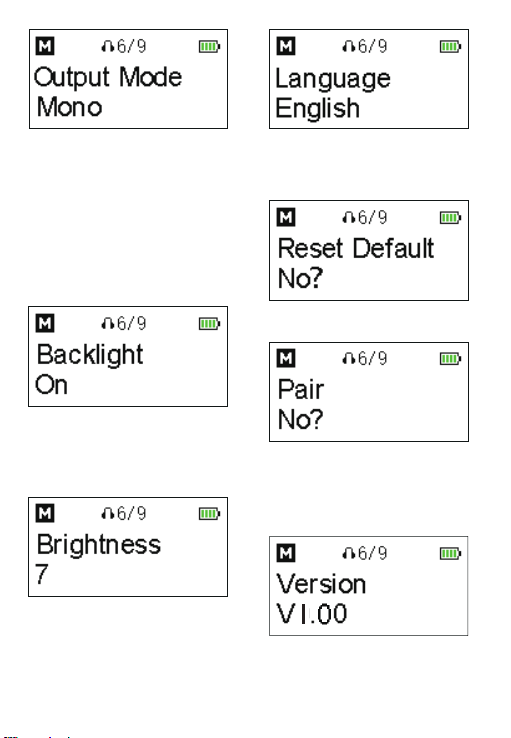
Backlight
Setting
Set backlight to always on or on for
10/30/60 seconds.
Default is “On”.
Brightness
Setting
You can set the brightness to “Auto”
or manually select a value within the
range of 1-10.
Default is “7”.
Language
Setting
English and Chinese are available.
Default is English.
Output
Mode
Setting
The output mode can be set to either
mono or stereo. When in mono mode,
the audio from the transmitter, or
transmitters will be mixed to both the
left and right sides. When in stereo
mode, the two transmitters' audio
output will be separated to the left and
right sides.
Default is mono.
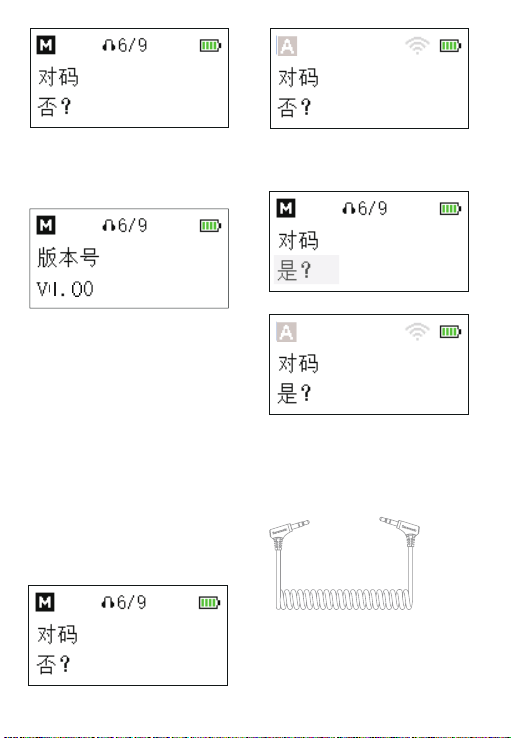
Pairing
Select “Yes?” to pair the receiver
with the transmitter. For details of
operation, please refer to “Operation
Guide”.
Restore
Default
Setting
Version of the Blink900 RX

Operation Guide
1. Long press the power button
to turn on the transmitter and the
receiver.
2. Pairing
Before leaving factory, the system is
pre-paired. Therefore, the connection
will be established once they are
powered on. If they are disconnected,
please follow below steps:
①
Long press the + button to enter the
menu screen. Then, use the - button to
display the Pair menu on both
transmitter and receiver.
②
Long press the SET button to enter
the menu.
③
Select Yes, and long press the SET
button to confirm
.
RX
TX
RX
TX
④
Transmitter and receiver will be
successfully paired within 10s
.
3.5mm TRS to TRS Output cable: for
cameras, recorders, mixers, or other
devices with a 3.5mm TRS jack.
3.5mm TRS to TRRS Output cable: for
smartphones, tablets, or other devices
with a 3.5mm TRRS jack.
3.5mm TRS to Lightning Output cable:
for iOS devices
.
3. Connect the receiver to your
smartphone, camera or other
compatible devices with the supplied
cables.
3.5mm TRS to USB-C Output cable:
for Android phones, tablets or other
USB-C devices.
Note:
(1) When pairing two transmitters to
one receiver, if one of the transmitters
fails to be paired, please turn off the
transmitter that has been successfully
paired, and then repeat the pairing
operation to pair the transmitter with
the receiver.
(2) Due to 2.4GHz wireless frequency,
signal can be easily attenuated.
Please try to avoid obstacles, such as
walls and buildings, and avoid close
proximity to devices with 2.4GHz
signal, such as high-power wifi
antennas, smartphones with wifi in use,
radios, etc.
4. You are ready to record.
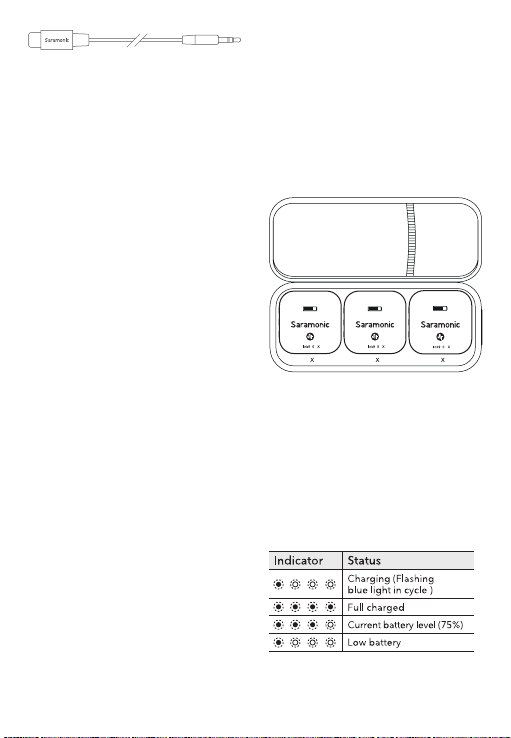
Charging Guide
Please recharge the device when
battery is low.
1. Charge the transmitter/receiver
①
Use the charging case to charge the
transmitter/receiver.
Place the transmitter and the receiver
into the charging case to start
charging.
2. Charge the charging case
Use the supplied USB-C cable to
charge the charging case
②
Use the supplied USB-C cable to
charge the transmitter/receiver.
Note:
The transmitter/receiver will
automatically turn off after being
placed in the charging case.
T T R
B 0 T B 0 T
B 0 R

1× Blink900 RX Receiver
1× Blink900 TX Transmitter
2× USB-C Charging Cable
1× DK3G Lavalier Microphone
1× Mic Clip for Lavalier Microphone
1× Foam Windscreen for Lavalier
Microphone
1× Fur Windshield for Built-in
Microphone
1× 3.5mm TRS to TRS Output Cable
1× 3.5mm TRS to TRRS Output Cable
1× 3.5mm TRS to Lightning Output
Cable
1× 3.5mm TRS to USB-C Output Cable
1× Carrying Case
1× Blink900 RX Receiver
2× Blink900 TX Transmitter
1× Blink900 B2BOX Charging Case
1× USB-C Charging Cable
2× DK3G Lavalier Microphone
2× Mic Clip for Lavalier Microphone
2× Foam Windscreen for Lavalier
Microphone
2× Fur Windshield for Built-in
Microphone
1× 3.5mm TRS to TRS Output Cable
1× 3.5mm TRS to TRRS Output Cable
1× 3.5mm TRS to Lightning Output
Cable
1× 3.5mm TRS to USB-C Output Cable
Packing List
Blink900 B1 Blink900 B2

Specification
Blink900 TX
Mic Capsule 4mm Built-in Capsule
Polar Pattern Omnidirectional
Transmission Type 2.4GHz Digital Frequency
Operating Range (without obstacle) Up to 200m
Frequency Response 20Hz-20kHz
Maximum SPL 100 dB SPL (1kHz @ 1m) dBu
SNR > 80dB
Sampling Rate 48kHz
Bit Rate 24bit
Distortion ≤0.1%
Audio Input Connector 3.5mm TRS MIC/LINE IN Jack
Power Requirements Built-in Battery (400mAh)
Built-in Battery Life 6 hours
Antenna Built-in PIFA Antenna
Weight 33.6g (1.19oz)
Dimensions 43.5×43.5×16.4mm

Blink900 RX
Transmission Type 2.4GHz Digital Frequency
Operating Range (without obstacle) Up to 200m
Frequency Response 20Hz-20kHz
Maximum SPL 100 dB SPL (1kHz @ 1m) dBu
SNR
>
80dB
Sampling Rate 48kHz
Bit Rate 24bit
Distortion ≤0.1%
Audio Output Connector
3.5mm Headphone Jack
3.5mm TRS Line Out Jack
Power Requirements Built-in Battery (450mAh)
Built-in Battery Life 6 hours (working with two transmitters)
Antenna Built-in PIFA Antenna
Weight 35.3g (1.25oz)
Dimensions 46×46×16.4mm
Blink900 B2BOX
Power Requirements Powered by USB-C Port (5V/1.5A)
Battery Capacity 4500mAh
Box's Charging Time < 4 hours
Weight Approx. 278g (9.81oz)
Dimensions 186×87.2×51mm

声明
请在使用前仔细阅读本手册,并严格按照说明进行操作和存储。请保存以供将来参考。
如果用户手册不能帮助您解决某些问题,请向零售商寻求帮助或给我们发送电子邮件:
概述
枫笛 Blink900 是一款轻巧便携、操作简单的双通道无线麦克风系统,提供出色的广播
级音质,适用于单反、无反相机、摄像机、手机、平板、电脑等设备,是内容创作、
Vlog 拍摄、移动新闻等应用场景的理想选择。
特点
·
2.4GHz 无线传输技术
·
兼容相机、移动设备等
·
背夹式发射器,内置全向型麦克风
·
双通道接收器,带 3.5mm 输出孔
·
高分辨率 LCD 显示屏,操作简单
·
自动亮度调节、自动增益控制功能
·
低切滤波器(160Hz/120Hz/80Hz)
·
3.5mm 实时监听耳机孔
·
内置可充电电池,续航时间长达 6 小时
·
单声道和立体声模式自由切换
·
操作范围可达 200 米
产品结构
Blink900 TX: 背夹式发射器
(带内置麦 克风)
①
电源键 / 静音键
功能 操作
开机 / 关机 长按按键 2 秒
静音模式 / 取消
静音
短按按键
②
+/SET 键
功能 操作
+
在主界面上,短按 + 键
调节麦克风增益;
在菜单界面上,短按 +
键调整各参数值或功能。
SET
在主界面上,长按设置键
进入菜单界面;
在菜单界面,长按设置键
进入选定界面,再次长按
保存设定。
③
-键
主界面上,短按 - 键调节麦克风增益;
在菜单界面上,短按 - 键调整各参数
值或功能;长按 - 键回到主界面。
④
LCD 显示屏
详情参考“LCD 屏幕操作指南”。
⑤
USB-C 充电口
⑥
内置麦克风
⑦
麦克风 / 线路输入孔
可接入随附的 3.5 mm 领夹麦或其他
3.5 mm TRS麦克风或线路输入设备。
⑧
天线
⑨
充电触点
⑩
磁吸背夹
⑪
感光元器件
④
⑥
①
②
⑤
⑦
⑧
⑩
③
⑨
B 0 T
11
B 0 R
Blink900 RX: 背夹式接收器
(可安装至相机热 靴座)
①
电源键
长按电源键 2 秒,可开启 / 关闭接收
器。
②
+/SET 键
功能 操作
+
在主界面上,短按 + 键增
大音量;
在菜单界面上,短按 + 键
调整各参数值或功能。
SET
在主界面上,长按设置键
进入菜单界面;
在菜单界面,长按设置键
进入选定界面,再次长按
保存设定
③
-键
在主界面上,短按 - 键减小音量;
在菜单界面上,短按 - 键调整各参数
值或功能;长按 - 键回到主界面。
④
LCD 显示屏
详情参考“LCD 屏幕操作指南”。
⑤
USB-C 充电口
⑥
输出孔
使用随附的转接线,将 Blink900 RX
连接至手机、平板电脑、相机、录音
笔或混音器等设备。
⑦
3.5mm 耳机插孔
接入耳机进行音频监听。
⑧
天线
⑨
充电触点
⑩
磁吸背夹
⑪
感光元器件
④
⑥
①
②
⑤
⑦
⑧
⑩
③
⑨
11
①
充电触点
②
电量检测键
按下此键,电量指示灯亮起,显示充
电盒当前电量。
③
电量指示灯
④
USB-C 充电孔
⑤
配件收纳袋
Blink900 B2BOX: 便携式充
电盒
主界面
若超过 20 秒不操作,显示屏会自动跳转
回主界面上。
①
通道指示
显示发射器所处通道
②
配对状态、信号强度指示
信号最强(配对成功)
信号最弱(配对成功)
未联机
③
发射器电量指示
显示发射器当前电量。当图标开始闪
烁时,请及时为发射器充电。
④
实时输入电平指示
显示实时输入电平大小。
⑤
麦克风增益、静音状态指示
静音关闭 静音开启
⑥
输入模式
输入模式可设置为 MIC IN(麦克风输
入)或 LINE IN(线路输入)。
LCD 屏幕操作指南
无线发射器 Blink900 TX
①
④
③
②
⑤ ⑥
④
②
③
T T R
①
⑤
菜单界面
麦克风增益设置
调节麦克风增益(0~6),默认设置为“5”。
(即使在电源关闭后,该参数设定仍然
保留。)
低切设置
打开或关闭低切功能并选择低切频率:
160Hz、120Hz 或 80Hz。
默认设置为“关闭”。
输入模式设置
输入模式可设置为麦克风输入或线路输
入。
麦克风输入模式:可接入 3.5mm 领夹麦
克风或其他 3.5mm TRS 麦克风;
线路输入模式:可接入线路输入设备。
默认设置为“麦克风输入”。
静音按键功能设置
开启或关闭静音按键功能。
开启:短按静音键可将麦克风静音 / 取消
静音;
关闭:静音键功能关闭,短按按钮不会
使麦克风静音。
默认设置为“开启”。
自动增益设置
打开 / 关闭自动增益功能。若打开此功能,
麦克风增益将自动随信号强度进行调整。
默认设置为“关闭”。
背光时间设置
背光灯时间可设置为常亮、10 秒、30 秒、
或 60 秒,默认设置为“常亮”。
亮度设置
可将亮度设置为“自动”或在 1-10 范围
内手动设置亮度。
默认设置为“7”
语言设置
English/ 简体中文可供选择,默认设置为
“English”。
对码
选择“是?”将发射器与接收器配对。
具体操作请参考“操作指南”。
Blink900 TX 版本号
恢复默认设置
主界面
若超过 20 秒不操作,显示屏会自动跳转
回主界面上。
① 通道开关图示
/ 表示 A/B 通道已连接。
/ 表示 A/B 通道未连接。
off / off
表示A/B通道已关闭。
②
实时输入电平指示
显示实时输入电平大小
③
配对状态、信号强度指示
信号最强(配对成功)
信号最弱(配对成功)
未联机
④
发射器电量指示
显示发射器当前电量。当图标开始闪
烁时,请及时为发射器充电。
⑤
接收器输出模式
M:单声道
S:立体声
⑥
输出音量
⑦
接收器电量指示
显示接收器当前电量。当图标开始闪
烁时,请及时为接收器充电。
无线接收器 Blink900 RX
①
④ ⑤ ⑥③②
⑦
通道设置
开启 / 关闭通道 A/B。
默认设置:
通道 A: 开启
通道 B:关闭
输出音量设置
音量调节范围为 0-9,默认设置为“6”。
(即使在电源关闭后,该参数设定仍然
保留。)
输出模式设置
输出模式可以设置为单声道或立体声。
设置为单声道模式时,音频将混合到左
右两边。设置为立体声模式时,两个发
射器的音频输出将左右分开。默认设置
为“单声道”。
菜单界面
背光时间设置
背光灯时间可设置为常亮、10 秒、30 秒、
或 60 秒,默认设置为“常亮”。
亮度设置
可将亮度设置为“自动”或在 1-10 范围
内手动设置亮度。
默认设置为“7”。
语言设置
English/ 简体中文可供选择,默认设置为
“English”。
恢复默认设置
Blink900 RX 版本号
对码
选择“是?”将接收器与发射器配对。
具体操作请参考“操作指南”。
操作指南
1. 长按电源键,将发射器、接收器开机。
2. 配对
发射器和接收器出厂前已配对成功。因
此,产品开机之后会自动联机。
若无成功连接,请进行如下配对操作:
①长按 + 键进入菜单界面,然后使用 -
键在发射器和接收器上选择“对码”菜单。
接收器
接收器
发射器
发射器
② 长按 SET 键进入菜单。
③ 选择是,长按 SET 键确认。
④发射器和接收器将在 10 秒内完成配对。
3. 使用随附的转接线将接收器连接至手
机、相机或其他兼容设备。
3.5mm TRS 转 TRS 输出线:适用于相机、
录音笔、混音器或其他带 3.5mm TRS 插
孔的设备。
3.5mm TRS 转 TRRS 输出线:适用于手
机、平板或其他带 3.5mm TRRS 插孔的
设备。
3.5mm TRS 转 Lightning 输出线:适用
于 iOS 设备。
3.5mm TRS 转 USB-C 输出线:适用于
安卓手机、平板或其他 USB-C 设备。
4. 开始录制。
注意:
(1)产品在一拖二对码过程中,若出现
了一台发射器对码不成功的情况,需要
先将已经对码成功的发射器关机后,再
重复配对操作,将未对码的发射器与接
收器进行对码。
(2)由于在 2.4GHz 频谱下,信号很容
易受干扰,请尽量避开墙壁和建筑物等
障碍物,避免接近 2.4GHz 频率的设备,
如大功率 WiFi 天线、正在使用 WiFi 的智
能手机、收音机等。
充电指南
若电池进入低电量状态,请及时进行充
电:
1. 发射器 / 接收器充电指示
① 使用充电盒给发射器 / 接收器充电
将发射器和接收器放入充电盒即可开始
充电。
注意:发射器 / 接收器放入充电盒内后
会自动关机,进入关机充电状态。
② 使用随附的 USB-C 充电线给发射器 /
接收器充电。
2. 充电盒充电指示
使用随附的 USB-C 充电线给充电盒充电。
T T R
B 0 T B 0 T
B 0 R
状态
充电中(蓝灯循环闪烁)
充满电
当前电量
(仅为示意:电量75%)
低电量
指示灯

包装清单
Blink900 B1
1× Blink900 RX 接收器
1× Blink900 TX 发射器
2× USB-C 充电线
1× DK3G 领夹麦
1× 领夹麦克风夹子
1× 领夹麦防风海绵
1× 内置麦克风防风毛套
1× 3.5mm TRS 转 TRS 输出线
1× 3.5mm TRS 转 TRRS 输出线
1× 3.5mm TRS 转 Lightning 输出线
1× 3.5mm TRS 转 USB-C 输出线
1× 收纳盒
Blink900 B2
1× Blink900 RX 接收器
2× Blink900 TX 发射器
1×Blink900 B2BOX 充电盒
1× USB-C 充电线
2× DK3G 领夹麦
2× 领夹麦克风夹子
2× 领夹麦防风海绵
2× 内置麦克风防风毛套
1× 3.5mm TRS 转 TRS 输出线
1× 3.5mm TRS 转 TRRS 输出线
1× 3.5mm TRS 转 Lightning 输出线
1× 3.5mm TRS 转 USB-C 输出线

参数
Blink900 TX
拾音器 内置 4mm 咪头
极性模式 全向型
传输方式 2.4GHz 数字频段
操作距离(无障碍) 最远至 200 米
频率响应 20Hz-20kHz
最大声压级 100 dB SPL (1kHz @ 1m) dBu
信噪比 >80dB
采样率 48kHz
比特率 24bit
失真 ≤ 0.1%
音频输入接口 3.5mm TRS 麦克风 / 线路输入
供电方式 内置 400mAh 电池
内置电池续航时间 6 小时
天线 PIFA 天线
重量 33.6g
尺寸 43.5×43.5×16.4mm

Blink900 RX
传输方式 2.4GHz 数字频段
操作距离(无障碍) 最远至 200 米
频率响应 20Hz-20kHz
最大声压级 100 dB SPL (1kHz @ 1m) dBu
信噪比 >80dB
采样率 48kHz
比特率 24bit
失真 ≤ 0.1%
音频输出接口
3.5mm 耳机插孔
3.5mm TRS 线路输出孔
供电方式 内置 450mAh 电池
内置电池续航时间 6 小时(一拖二状态下)
天线 PIFA 天线
重量 35.3g
尺寸 46×46×16.4mm
Blink900 B2BOX
供电方式 USB-C 接口(5V/1.5A)
充电盒电池容量 4500mAh
充电盒充电时间 < 4 小时
重量 约 278g
尺寸 186×87.2×51mm

ShenzhenJiayzPhotoIndustrial.,Ltd
深圳市长丰影像器材有限公司
A16Building,IntelligentTerminalIndustrialParkofSiliconValley
Power,Guanlan,LonghuaDistrict,Shenzhen,China
深圳市龙华区观澜街道大富工业区硅谷动力智能终端产业园A16栋
400-613-1096
www.saramonic.com
ScantheQRcodeandfollowus!
扫描微信关注枫笛公众号!
For better recording experience, the application
SmartRecorderis recommended.
为获得更好的录制体验,推荐使用枫笛Saramonic
自主研发应用软件SmartRecorder。
