Components
T
ools required
Toughened
Splashback
Before you start... Check the pack and make sure all the components are included – if not call the
Helpline on 0844 815 37447 (UK and Northern Ireland only) and our team will get things sorted. When you are ready
to start make sure you have the right tools to hand, plenty of space and a clean dry area for building. Don't rush, read
the instructions first and run through the sequence before you begin. Assembly should be done in the stages shown in the
following diagrams, keeping fittings together to avoid loss.
Cleaning - Use mild soap and water only. Do not use abrasive cleaners.
Please note:
If this product has been stored or transported in cold conditions, it is essential to ensure that the adhesive backing has
been allowed to warm naturally (without the aid of artificial means e.g radiator, blow torch, heat gun or hair dryer) for
4-6 hours prior to fitting and must not be fitted into a room that has an ambient temperature below 10˚C/50˚F. This
ensures that the adhesive pad is giving its maximum amount of adhesion when being fitted. If these steps are not followed
this could result in the splashback either coming away from the wall or not fixing to the wall correctly.
For customers outside the UK and Northern Ireland, please contact your local supplier.
Your 1st Year Guarantee
To fulfil the conditions of your guarantee, this appliance must be correctly installed and operated, in accordance with
these instructions, and only be used for normal domestic purposes.
Please note that the guarantee, and Service availability, only apply to the UK and Republic of Ireland.
Sealant - only use CLEAR low modular neutral
cure silicone (BS 5889A or BS EN ISO 11600)
1 x Glass splashback
2 x Spacers 3 mm thick
Please note:
Glass is toughened and cannot be cut or drilled.
LASSEMB Y GUIDE
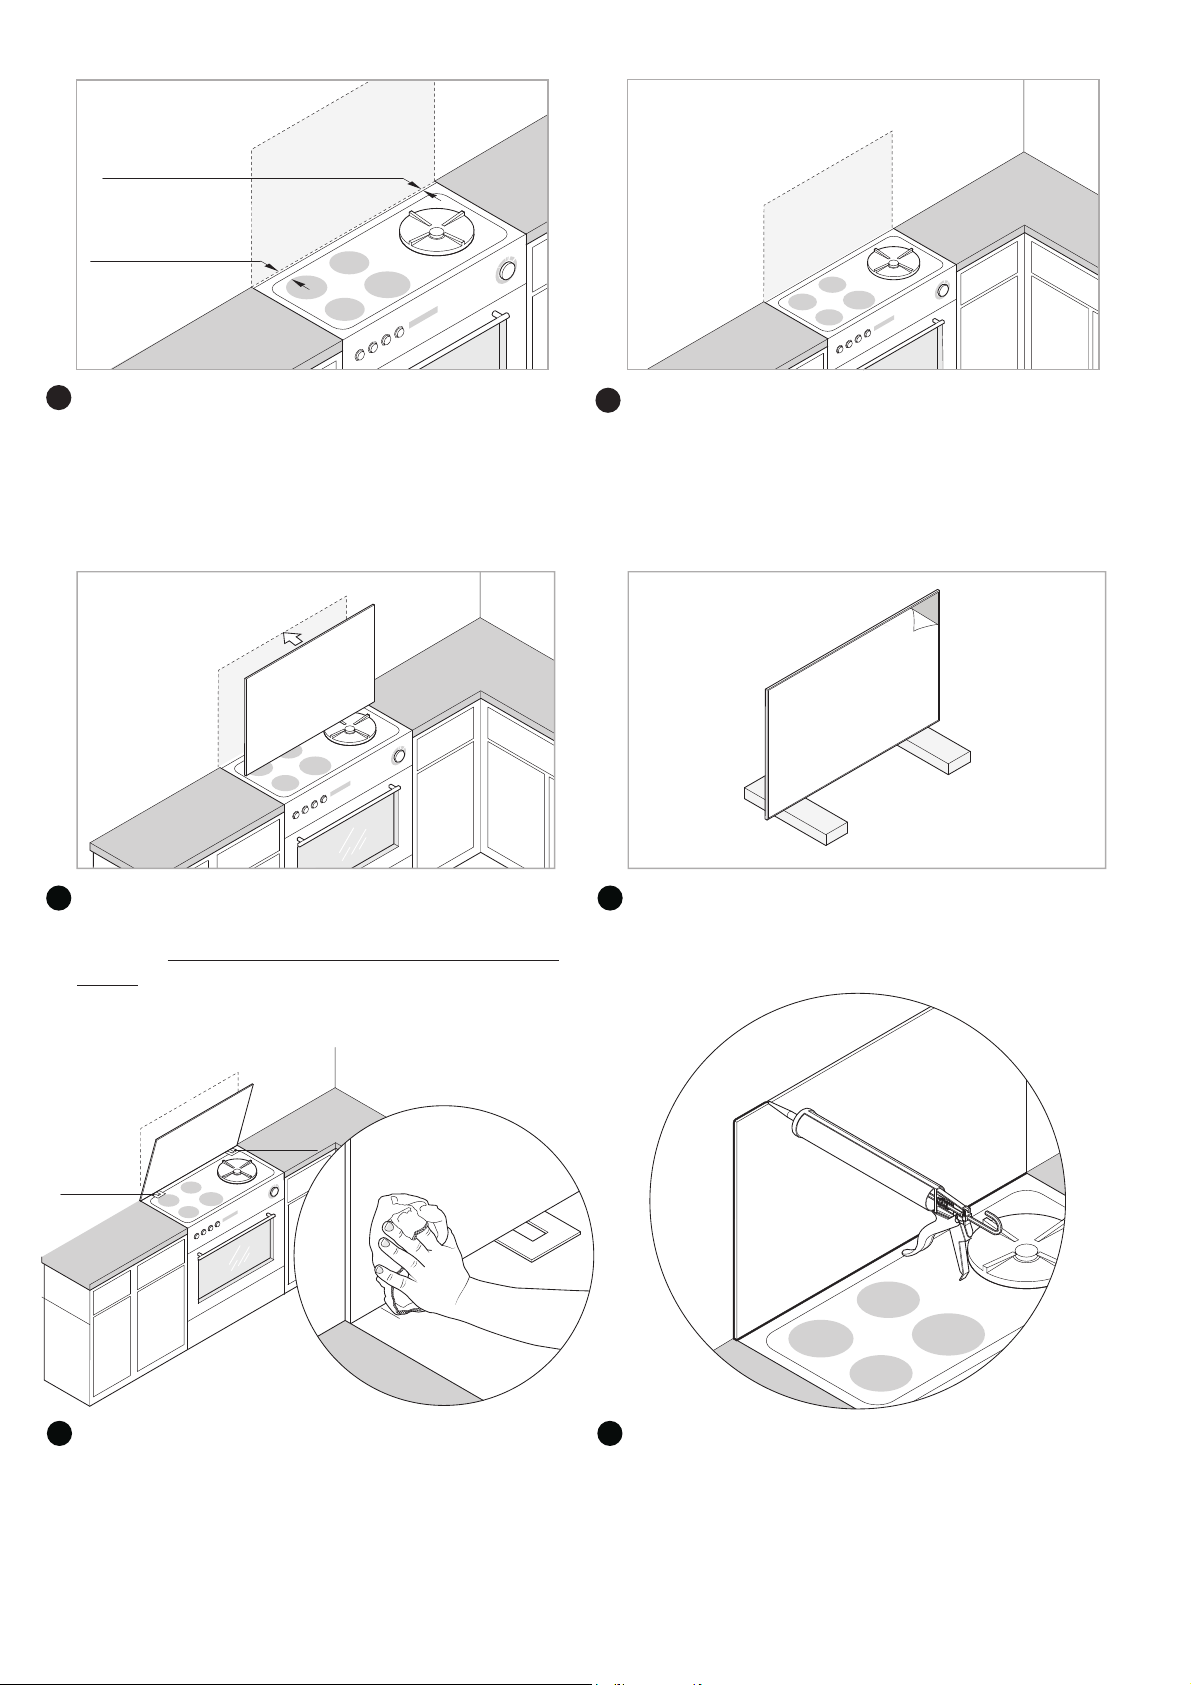
3
Firstly offer up the back of the Splashback to the worktop
/wall to check the fit. Use the spacers provided to achieve
a good fit. There needs to be a gap of 2-3 mm around all
4 sides.
4
Take the Splashback away from the wall making sure to
keep all corners safe from hard surfaces.
Remove the covering from the self adhesive backing.
Place the bottom edge of the splashback to the back lip
of the worktop / wall on the spacers provided then push
the splashback to the wall and apply firm pressure evenly
over the whole surface area. Please note once the adhesive
has made contact with the wall you will not be able to adjust
or remove. Please take extra care when fitting.
Ensure that the 3mm spacers are left while the sealant bonds
to the wall. Finally after 2-3 hours remove the spacers.
5
The 4 exposed edges of the Splashback must be sealed with a
bead of silicone sealant no less than 2-3 mm in thickness.
6
Spacer
A
p
p
l
y
f
i
r
m
p
r
e
s
s
u
r
e
e
v
e
n
l
y
o
v
e
r
t
h
e
w
h
o
l
e
s
u
r
f
a
c
e
a
r
e
a
.
Spacer
110mm min.
40mm min.
Firstly check the dimensions. The minimum distance
from the rear of the hob should be no less than 40mm or
110mm to a heat source dependant on the installation.
1
Ensure that the wall being fixed to is completely flat, non
porous, dry, dust and grease free. Any gap between the
worktop and the wall must be sealed to exclude moisture.
PLEASE NOTE: This product should not be fitted over
any existing tiling or splashbacks.
2