Loading ...
Loading ...
Loading ...
12 ENGLISH
Operation with abrasive cut-off /
diamond wheel
Optional accessory
WARNING: When using an abrasive cut-off
/ diamond wheel, be sure to use only the special
wheel guard designed for use with cut-off wheels.
WARNING: NEVER use cut-off wheel for side
grinding.
WARNING: Do not "jam" the wheel or apply
excessive pressure. Do not attempt to make an
excessive depth of cut. Overstressing the wheel
increases the loading and susceptibility to twisting
or binding of the wheel in the cut and the possibility
of kickback, wheel breakage and overheating of the
motor may occur.
WARNING: Do not start the cutting operation
in the workpiece. Let the wheel reach full speed
and carefully enter into the cut moving the tool
forward over the workpiece surface. The wheel
may bind, walk up or kickback if the power tool is
started in the workpiece.
WARNING: During cutting operations, never
change the angle of the wheel. Placing side pres-
sure on the cut-off wheel (as in grinding) will cause
the wheel to crack and break, causing serious per-
sonal injury.
WARNING: A diamond wheel shall be oper-
ated perpendicular to the material being cut.
1
2
3
4
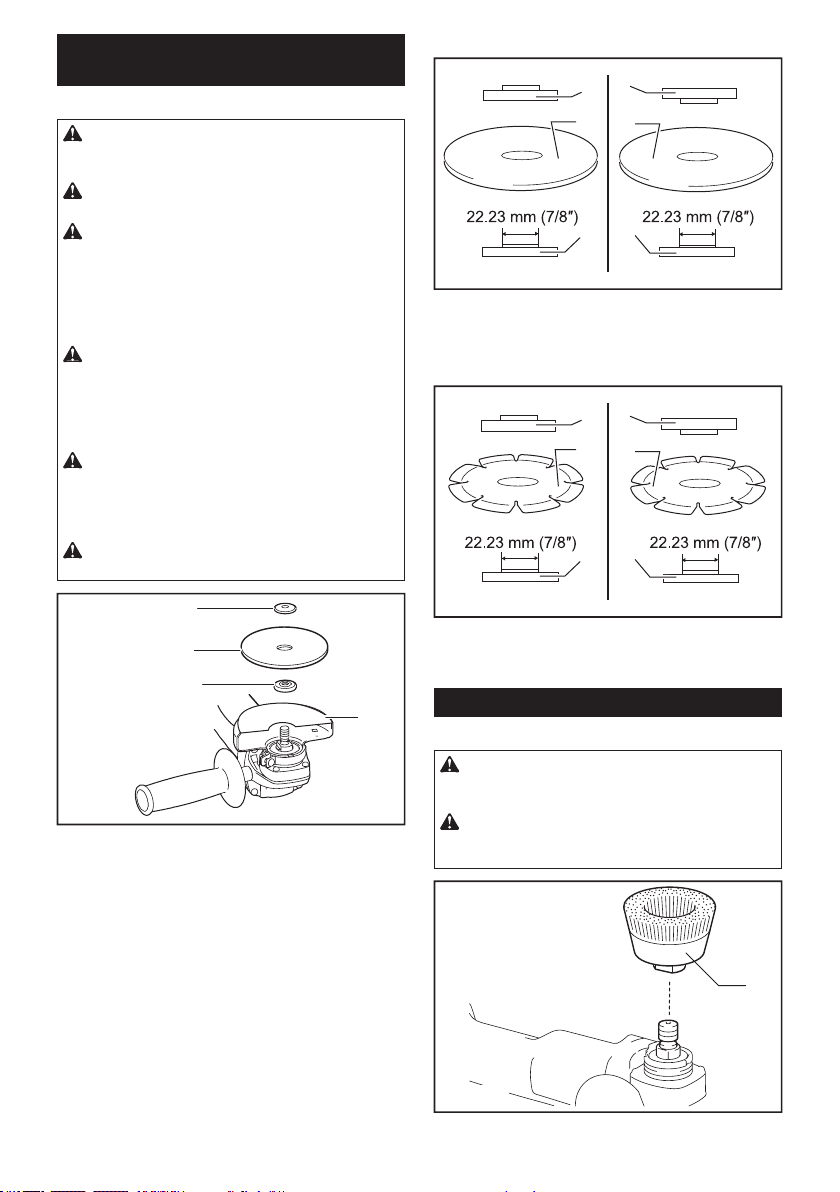
► 1. Lock nut 2. Abrasive cut-off wheel / diamond
wheel 3. Inner ange 4. Wheel guard for abrasive
cut-off wheel / diamond wheel
As for the installation, follow the instructions for
depressed center wheel.
The direction for mounting the lock nut and the
inner ange varies by wheel type and thickness.
Refer to the following gures.
When installing the abrasive cut-off wheel:
11
44
23
► 1. Lock nut 2. Abrasive cut-off wheel (Thinner than
4mm (5/32")) 3. Abrasive cut-off wheel (4mm (5/32")
or thicker) 4. Inner ange
When installing the diamond wheel:
11
44
23
► 1. Lock nut 2. Diamond wheel (Thinner than 4mm
(5/32″)) 3. Diamond wheel (4mm (5/32″) or thicker)
4. Inner ange
Operation with wire cup brush
Optional accessory
CAUTION: Check operation of brush by run-
ning tool with no load, insuring that no one is in
front of or in line with brush.
CAUTION:
Do not use brush that is damaged, or
which is out of balance. Use of damaged brush could increase
potential for injury from contact with broken brush wires.
1
► 1. Wire cup brush
Loading ...
Loading ...
Loading ...