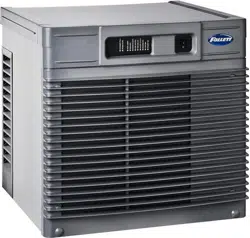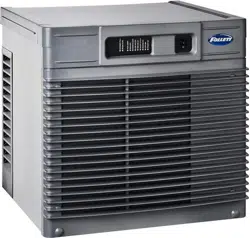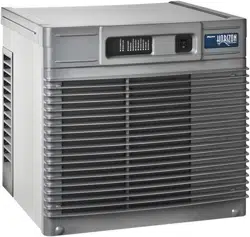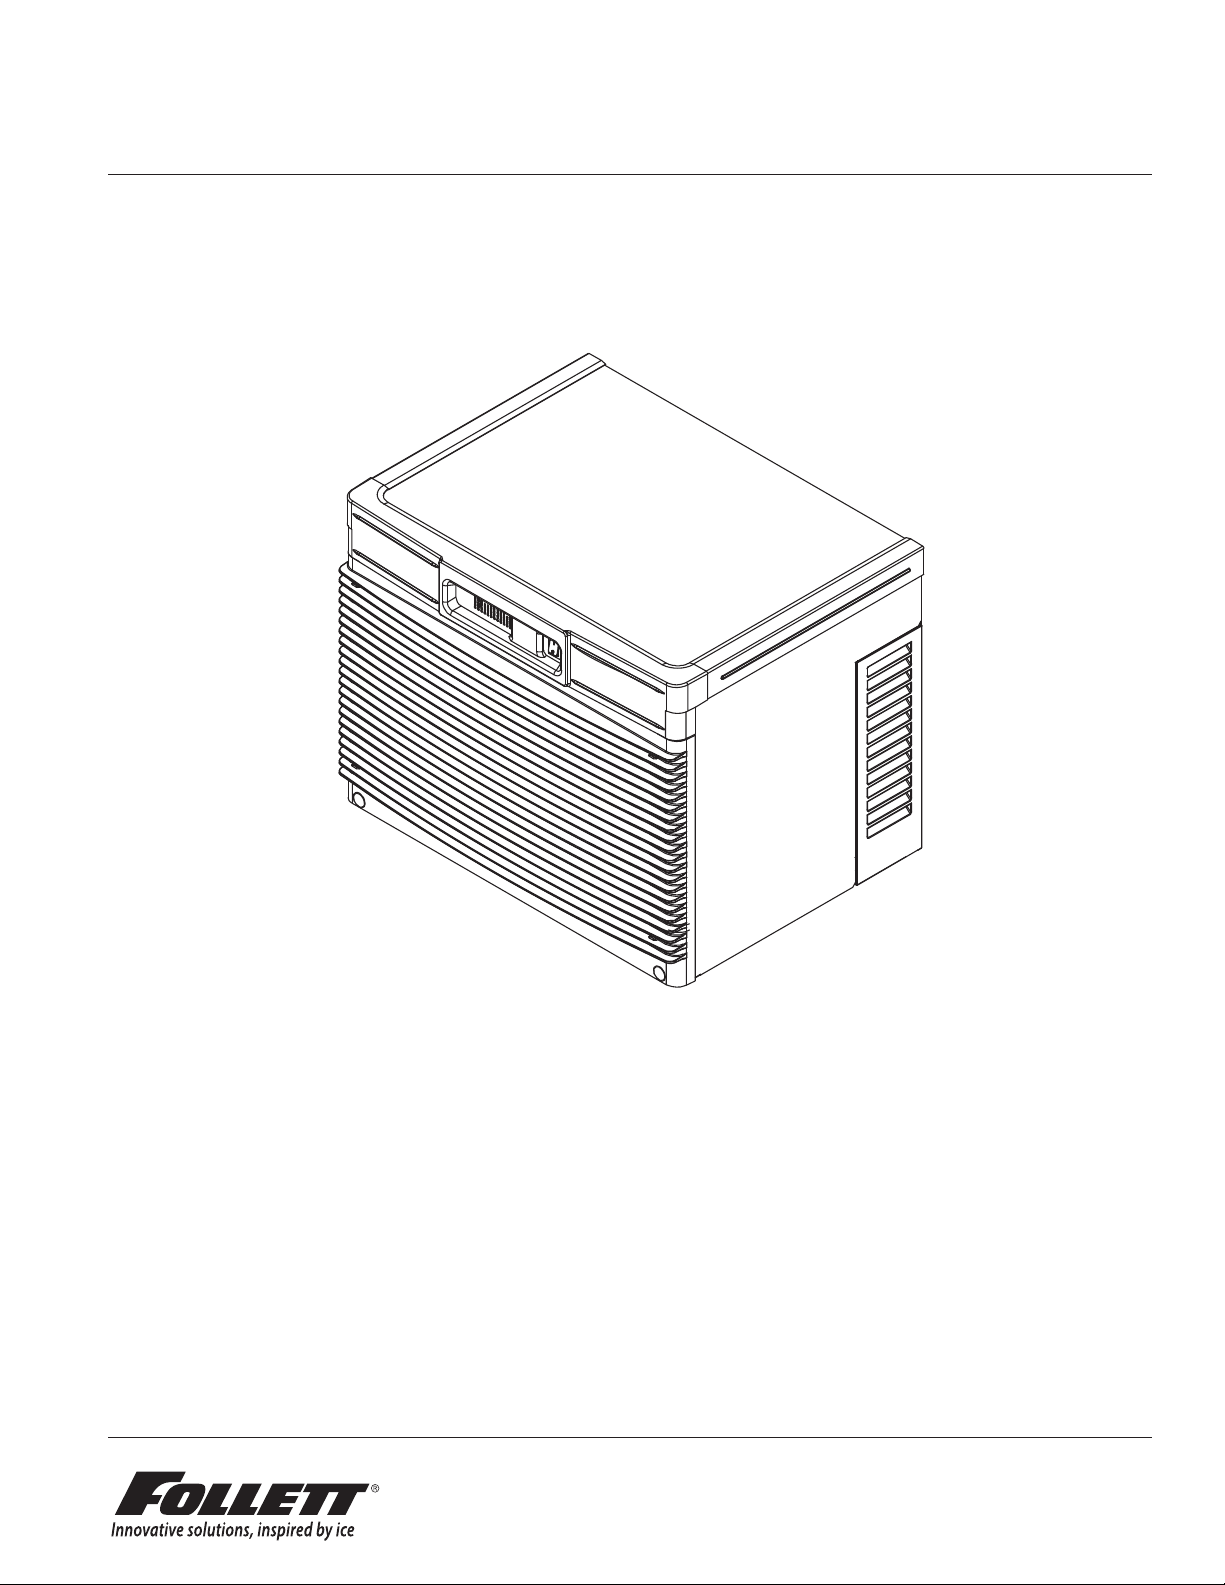
Horizon Elite 710 Self-Contained 1
HCD710A, HMD710A
Horizon Elite™ Ice Machines (Self-contained)
801 Church Lane • Easton, PA 18040, USA
Toll free (877) 612-5086 • +1 (610) 252-7301
www.follettice.com
01266543R01
Welcome to Follett
Follett equipment enjoys a well-deserved reputation for excellent performance, long-term reliability and outstanding
after-the-sale support. To ensure that this equipment delivers that same degree of service, review this guide
carefully before you begin your installation.
Should you need technical help, please call our Technical Service group at (877) 612-5086 or (610) 252-7301.
Please have your model number, serial number and complete and detailed explanation of the problem when
contacting Technical Service.
Getting Started
After uncrating and removing all packing material, inspect the equipment for concealed shipping damage. All freight
is to be inspected upon delivery. If visible signs of damage exist, please refuse delivery or sign your delivery receipt
"damaged." Follett Customer Service must be notied within 48 hours. Wherever possible, please include detailed
photos of the damage with the original packaging so that we may start the freight claim process.
User Guide
Please visit www.follettice.com/technicaldocuments
for the Operation and Service manual for your unit.
2 Horizon Elite 710 Self-Contained
CAUTION!
§ Warranty does not cover exterior or outside installations.
§ Do not tilt unit further than 30° off vertical during uncrating or installation.
§ Dispenser bin area contains mechanical, moving parts. Keep hands and arms clear of this area at all times. If access to
this area is required, power to unit must be disconnected rst.
§ This appliance is not suitable for installation in an area where a water jet could be used.
§ This appliance must not be cleaned by a water jet.
§ User maintence should not be done by children.
§ Follett recommends a Follett water lter system be installed in the ice machine inlet water line (standard capacity
#00130229, high capacity #00978957, carbonless high capacity #01050442).
§ Prior to operation clean the dispenser in accordance with instructions found in this manual.
§ Do not block air intake or exhaust.
§ This appliance should be permanently connected by a qualied person in accordance with application codes.
§ A qualied person shall provide a readily accessible disconnect device incorporated into the xed wiring.
§ If the supply cord is damaged, it must be replaced by the manufacturer, its service agent or similarly qualied persons in
order to avoid a hazard.
§ This appliance can be used by children aged 8 years and above and persons with reduced physical, sensory, or mental
capabilities, or lack of experience and knowledge if they have been given supervision or instruction concerning use of the
appliance in a safe way and understand the hazards involved. Children should be supervised to ensure that they do not
play with the appliance.
§ This appliance is designed for commercial use.
§ WARNING! To avoid a hazard due to instability of the appliance, it must be xed in accordance with the instructions.
§ Warranty does not cover exterior or outside installations.
§ To reduce risk of shock, disconnect power before servicing.
§ Connect to potable water supply only.
§ Ice is slippery. Maintain counters and oors around dispenser in a clean and ice-free condition.
§ Ice is food. Follow recommended cleaning instructions to maintain cleanliness of delivered ice.
Specications
Electrical
Each ice machine requires its own separate circuit with electrical disconnect within 10 ft (6m).
Equipment ground required.
Standard electrical:
§ 115 V/60/1 (6 ft (2 m) NEMA 5-15 cord and plug provided)
§ Amperage: 11.3A, dedicated 15A circuit required
Plumbing
WARNING
This equipment to be installed with adequate backow protection to comply with applicable federal, state,
and local codes.
§ 3/8" OD push-in water inlet (connection inside machine) - 3/8" OD tubing required
§ 3/4" MPT drain
Notes:
§ Water shut-off recommended within 10 feet (3m).
§ Water supply must have particle ltration. Follett recommends the lter system that has integral scale inhibitors.
(Follett item# 00130286).
§ Follett does not recommend the use of water softeners or bowl scale inhibitors.
Horizon Elite 710 Self-Contained 3
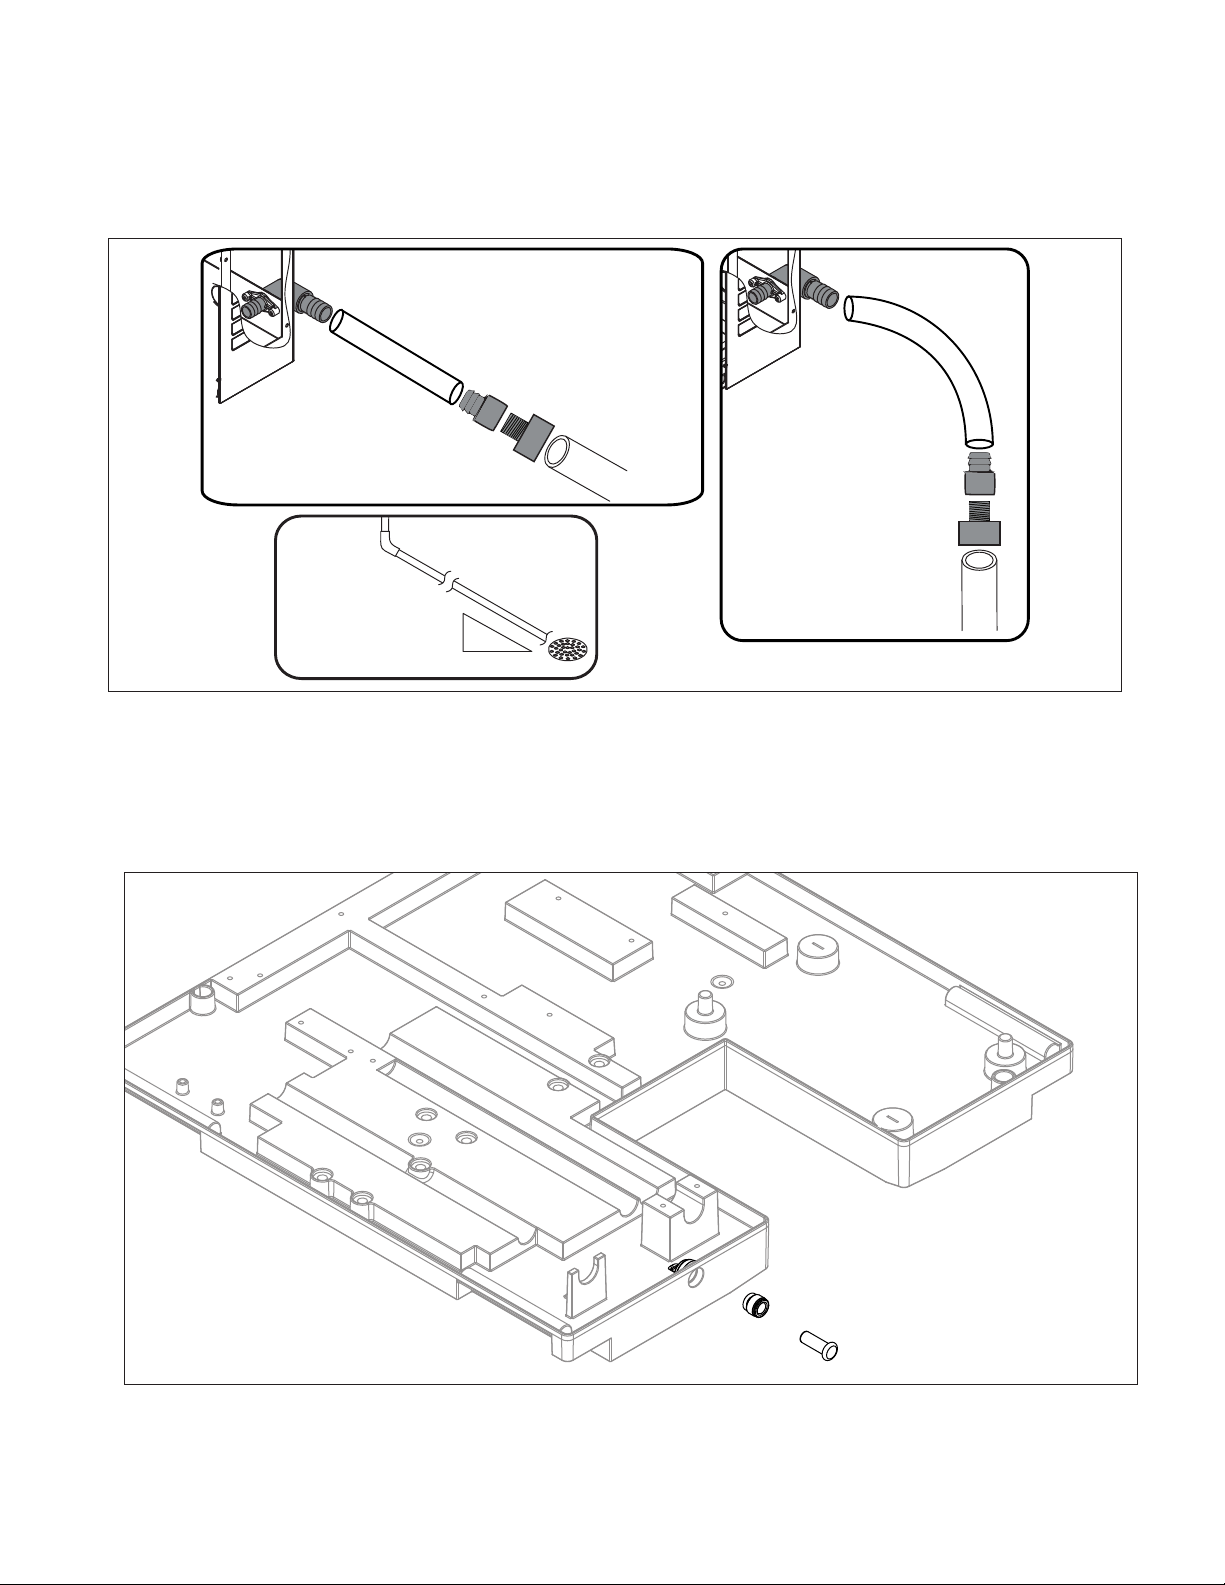
Drain plumbing
§ 3/4" MPT drain connection at the rear of the machine.
§ Drain must slope 1/4" inch per foot (6 mm per 30.4 cm).
§ Drain line should not be shared with any other piece of equipment.
§ Drain line cannot be reduced to a size smaller than 1 inch.
§ Drain should be piped without a vent.
3/4" barb x 3/4" FPT
1" Stand pipe/Drain
2 ft. x 1" OD
silicone tubing
Minimum 8"
radius
3/4" MPT x 1" slip
1" PVC Drain
2 ft. x 1" OD
silicone tubing
3/4" MPT x 1" slip
3/4" barb x 3/4" FPT
1'
1/4" per foot
(6,4 mm per 0,3 m)
Chassis drain plumbing
§ Plug must be removed from John Guest tting.
§ Route 3/8" drain tubing through knockout in back of docking station and insert fully into John Guest tting
connection at the rear of the machine chassis. Route other end of 3/8" drain tubing to drain.
§ Drain must slope 1/4" inch per foot (6 mm per 30.4 cm).
4 Horizon Elite 710 Self-Contained
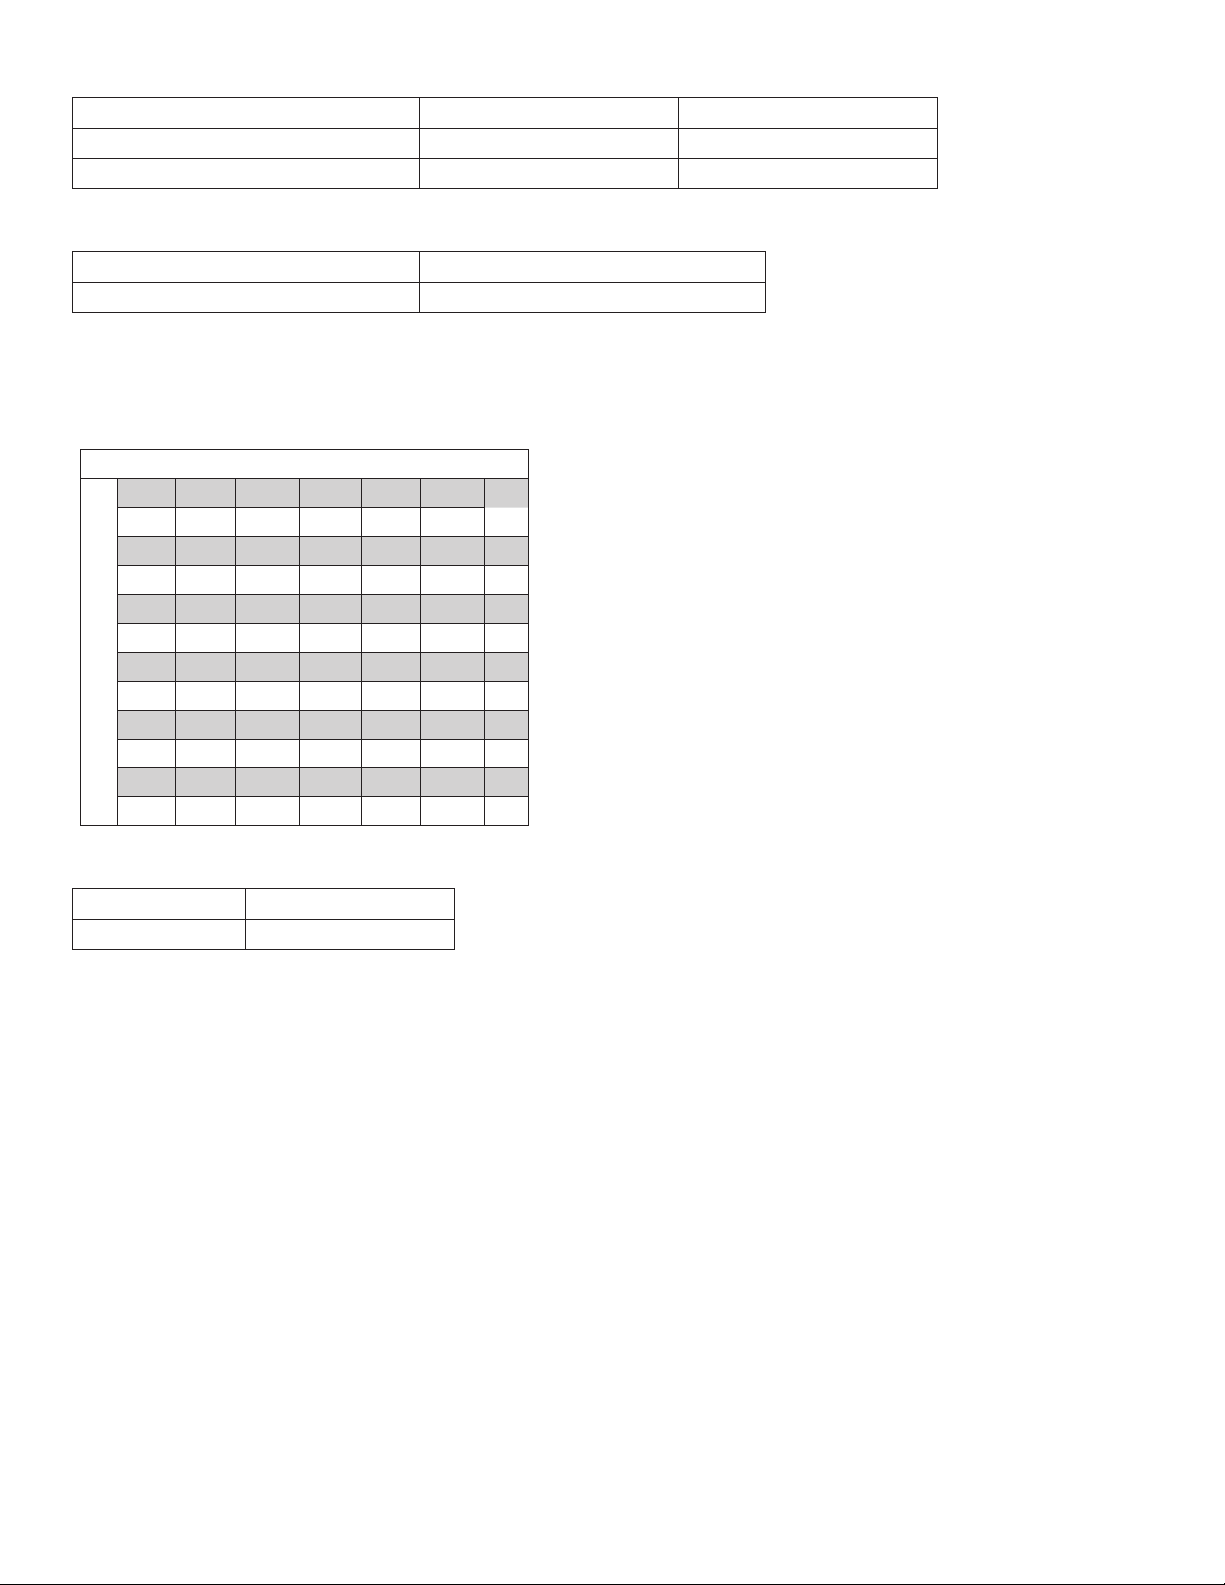
Ambient
Air temperature 100 F/38 C max. 50 F/10 C min.
Water temperature 90 F/32 C max. 45 F/7 C min.
Water pressure – potable 70 psi max. (483 kPa) 10 psi min. (89 kPa)
Heat rejection
710
Air-cooled 8,500 BTU/hr
Ice production
710 Air-cooled ice machine capacity/24 hrs.
Ambient Air Temperature F/C
Evap Potable Water Temperature F/C
F 60 70 80 90 100
C 16 21 27 32 38
50 787 759 705 639 603 lbs
10 357 344 320 290 274 kg
60 750 702 666 624 570 lbs
16 340 318 302 283 259 kg
70 707 681 636 586 542 lbs
21 321 309 288 266 246 kg
80 677 629 611 559 518 lbs
27 307 285 277 254 235 kg
90 642 600 580 539 497 lbs
32 291 272 263 244 225 kg
Weight
Shipping 190 lb (86.2 kg)
Net 170 lb (77.2 kg)
Horizon Elite 710 Self-Contained 5
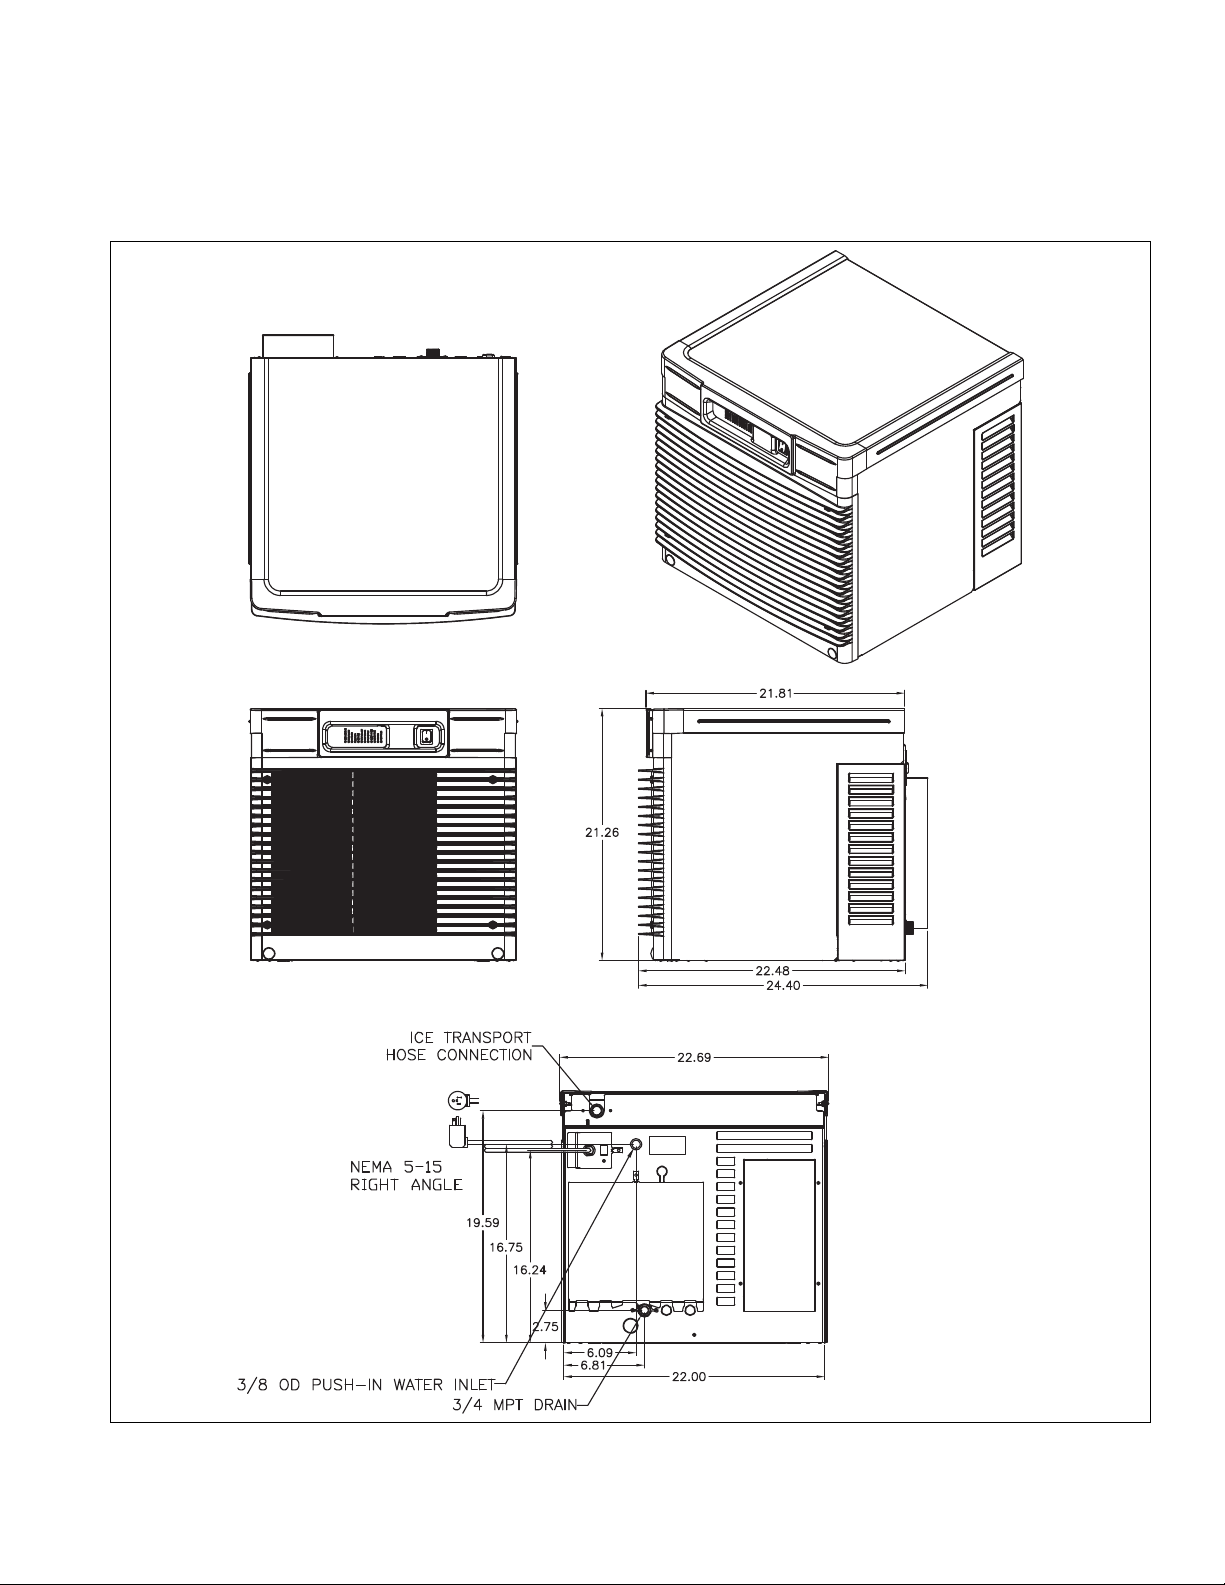
Dimensions and clearances
§ Entire front of ice machine must be clear of obstructions/connections to allow removal.
§ 1" (26 mm) clearance above ice machine for service.
§ 1" (26 mm) minimum clearance on sides.
§ The intake and exhaust air grilles must provide at least 250 sq in (1615 sq cm) of open area.
§ Air-cooled ice machines – 18" (458 mm) minimum clearance between discharge and air intake-grilles.
6 Horizon Elite 710 Self-Contained
Operation
Cleaning/sanitizing and preventive maintenance (all models)
Note: Do not use bleach to sanitize or clean the icemaker.
Preventive maintenance
Periodic cleaning of Follett’s icemaker system is required to ensure peak performance and delivery of clean,
sanitary ice. The recommended cleaning procedures that follow should be performed at least as frequently as
recommended, and more often if environmental conditions dictate.
Cleaning of the condenser can usually be performed by facility personnel. Cleaning of the icemaker system,
in most cases, should be performed by your facility’s maintenance staff or a Follett authorized service agent.
Regardless of who performs the cleaning, it is the operator’s responsibility to see that this cleaning is performed
according to the schedule below. Service problems resulting from lack of preventive maintenance will not be
covered under the Follett warranty.
Weekly exterior care
The exterior may be cleaned with a stainless cleaner such as 3M Stainless Steel Cleaner & Polish or equivalent.
Monthly condenser cleaning (air-cooled icemaker only)
1. Use a vacuum cleaner or stiff brush to carefully clean condenser coils of air-cooled icemakers to ensure
optimal performance.
2. When reinstalling counter panels in front of remote icemakers, be sure that ventilation louvers line up with
condenser air duct.
Semi-annual evaporator cleaning (every 6 months)
WARNING
• Wear rubber gloves and safety goggles (and/or face shield) when handling ice machine cleaner or sanitizer.
CAUTION
• Use only Follett approved SafeCLEAN Plus™ cleaning solution.
• DO NOT USE BLEACH.
• It is a violation of federal law to use these solutions in a manner inconsistent with their labeling.
• Read and understand all labels printed on packaging before use.
Note: Complete procedure for cleaning and sanitizing MUST be followed. Ice must be collected for
10minutes before putting ice machine back into service.
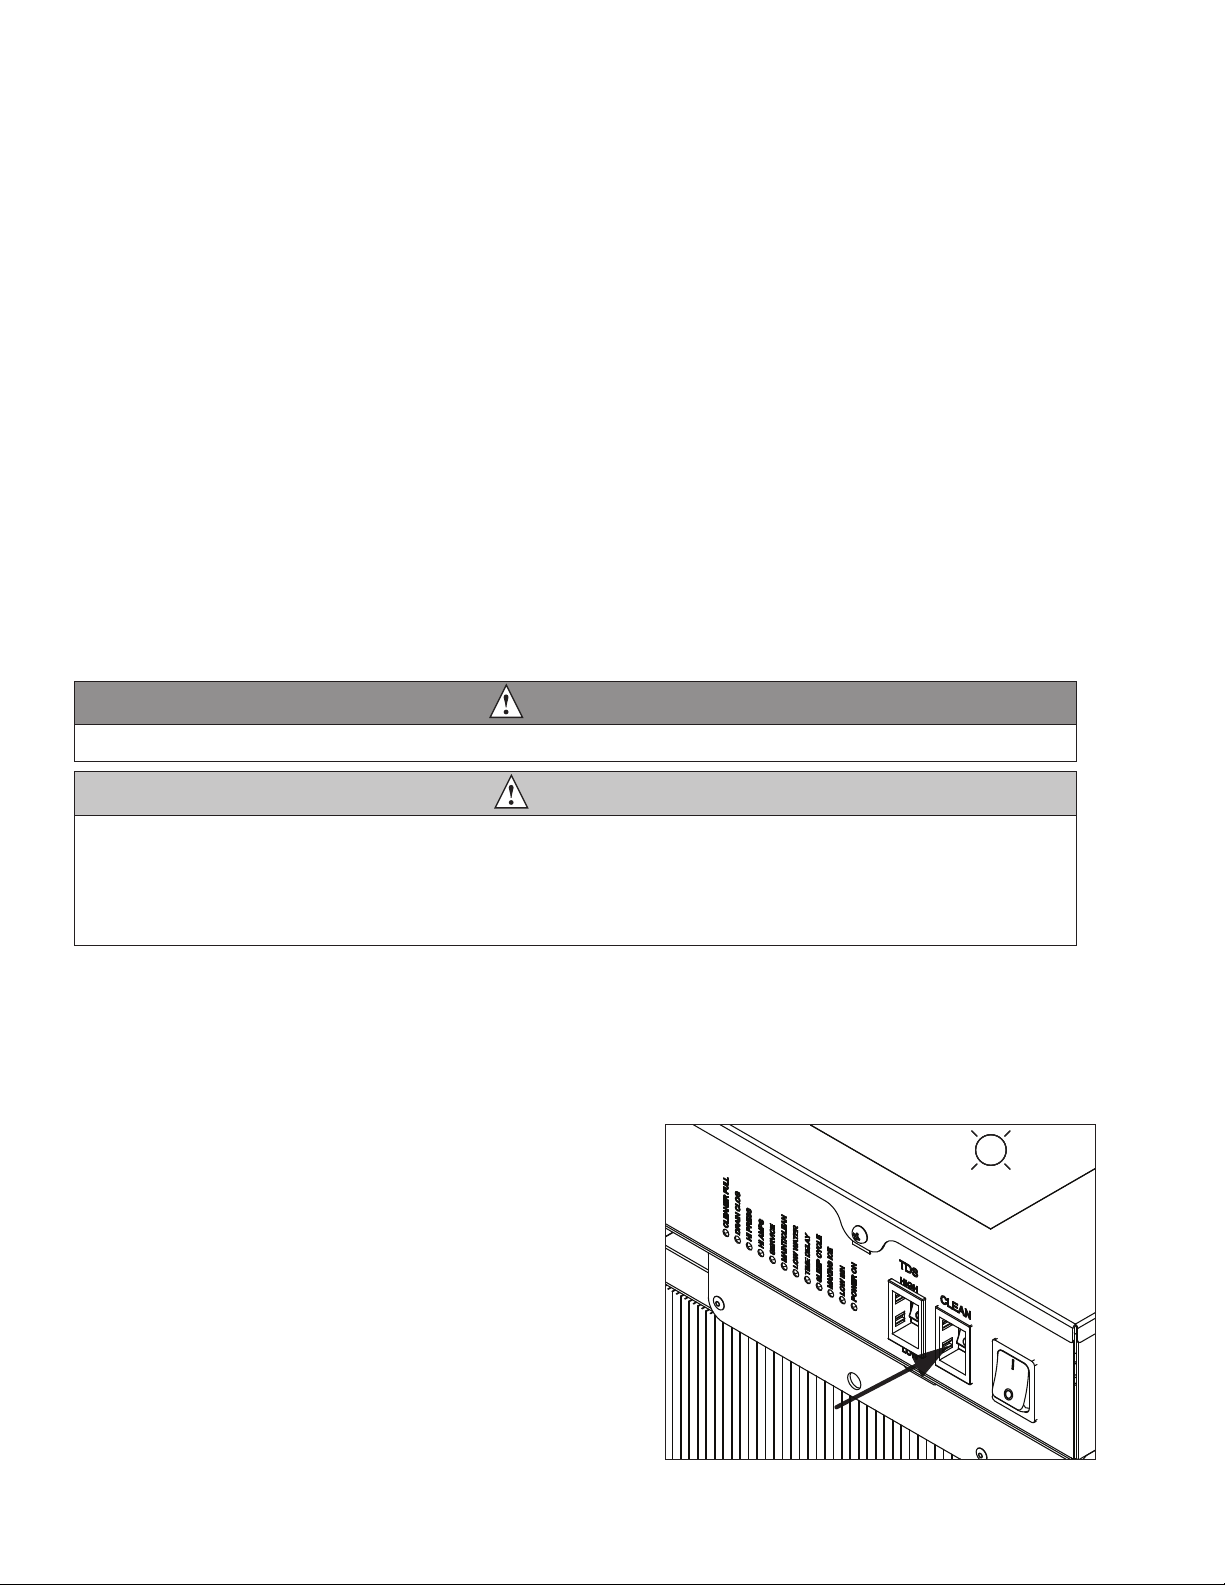
Fig. 1
1. Press the CLEAN button. The machine will drain. The
auger will run for a short time and then stop. Wait for
the LOW WATER light to come on.
LO WATER
Horizon Elite 710 Self-Contained 7
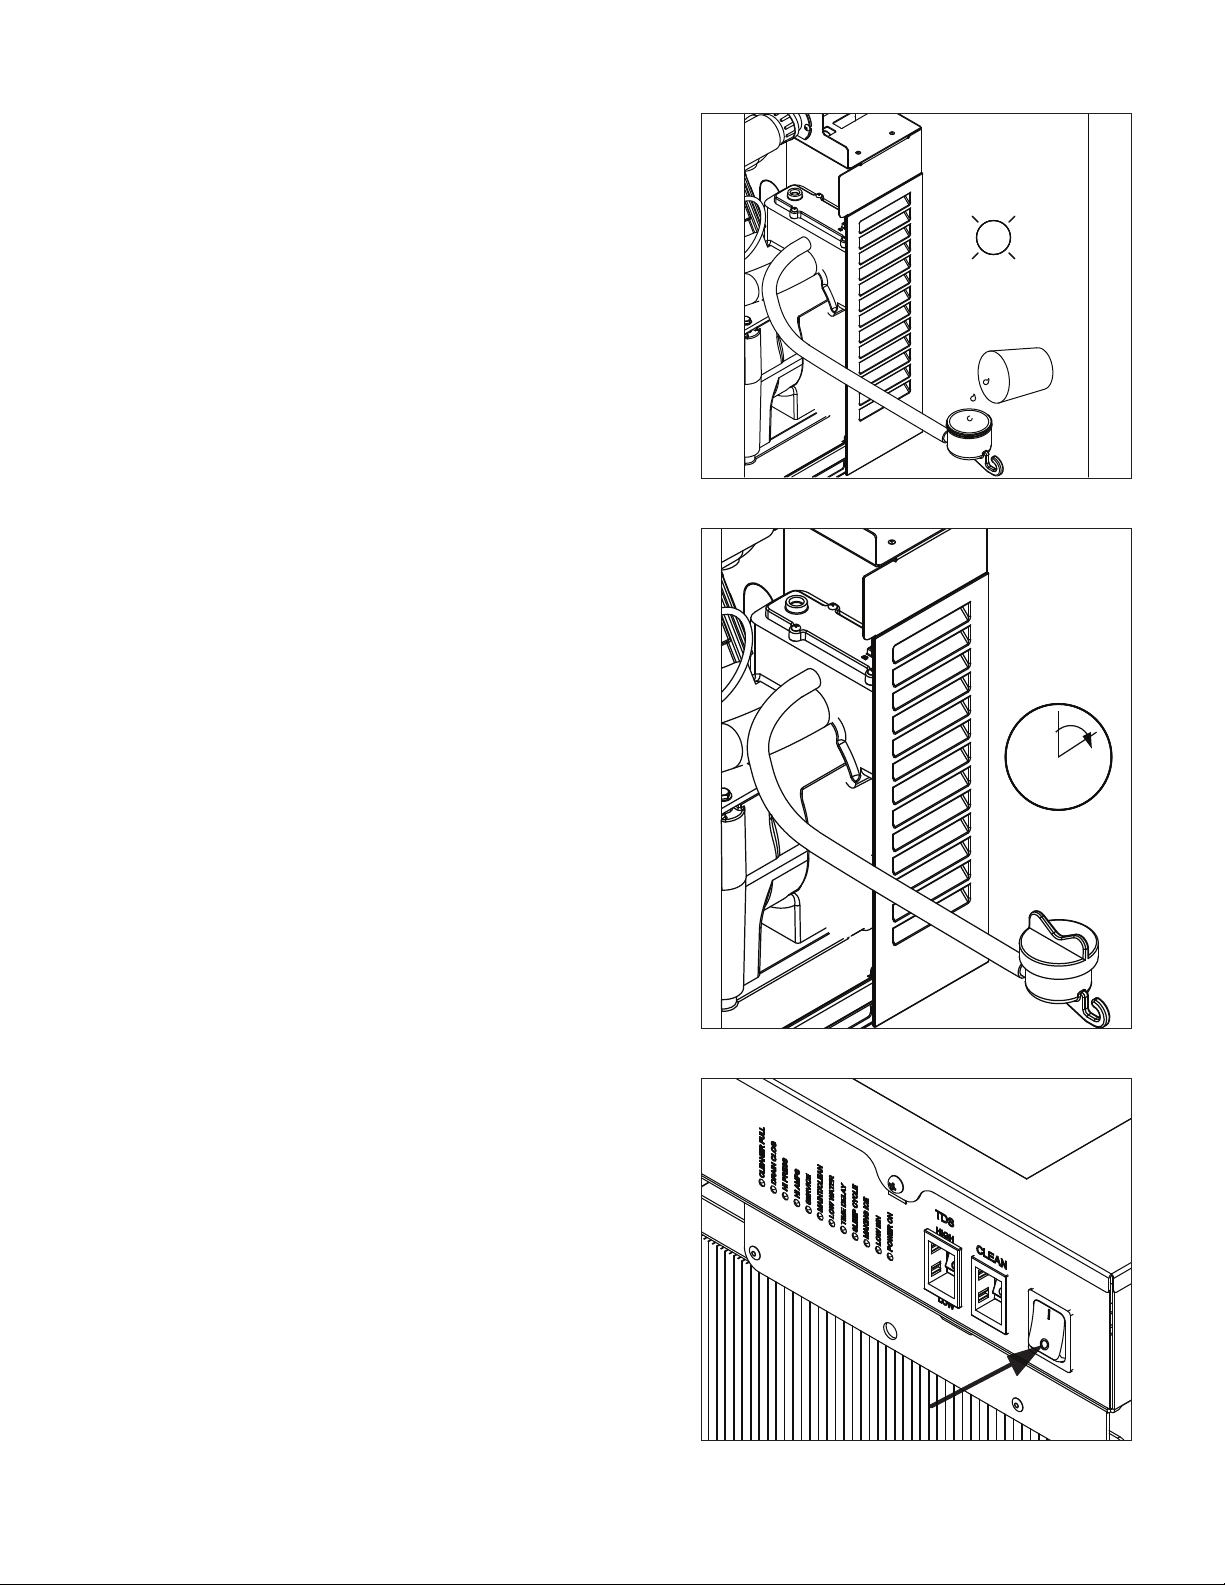
Fig. 2
2. Follow the directions on the SafeCLEAN Plus
packaging to mix 1 gal. (3.8 L) of Follett SafeCLEAN
Plus solution. Use 100 F (38 C) water.
3. Using a 1 quart (1L) container, slowly ll cleaning cup
until CLEANER FULL light comes on. Do not overll.
4. Soak one SaniSponge™ cleaning sponge in
remaining sanitizing and cleaning solution and retain
for Step 9.
Note: Do not use bleach to sanitize or clean the icemaker.
CLEANER FULL
Fig. 3
5. Replace cover on cleaner cup. Machine will clean,
then ush 3 times in approximately 15 minutes. Wait
until machine restarts.
15
Fig. 4
6. To clean/sanitize ice transport tube – Press power
switch OFF
8 Horizon Elite 710 Self-Contained
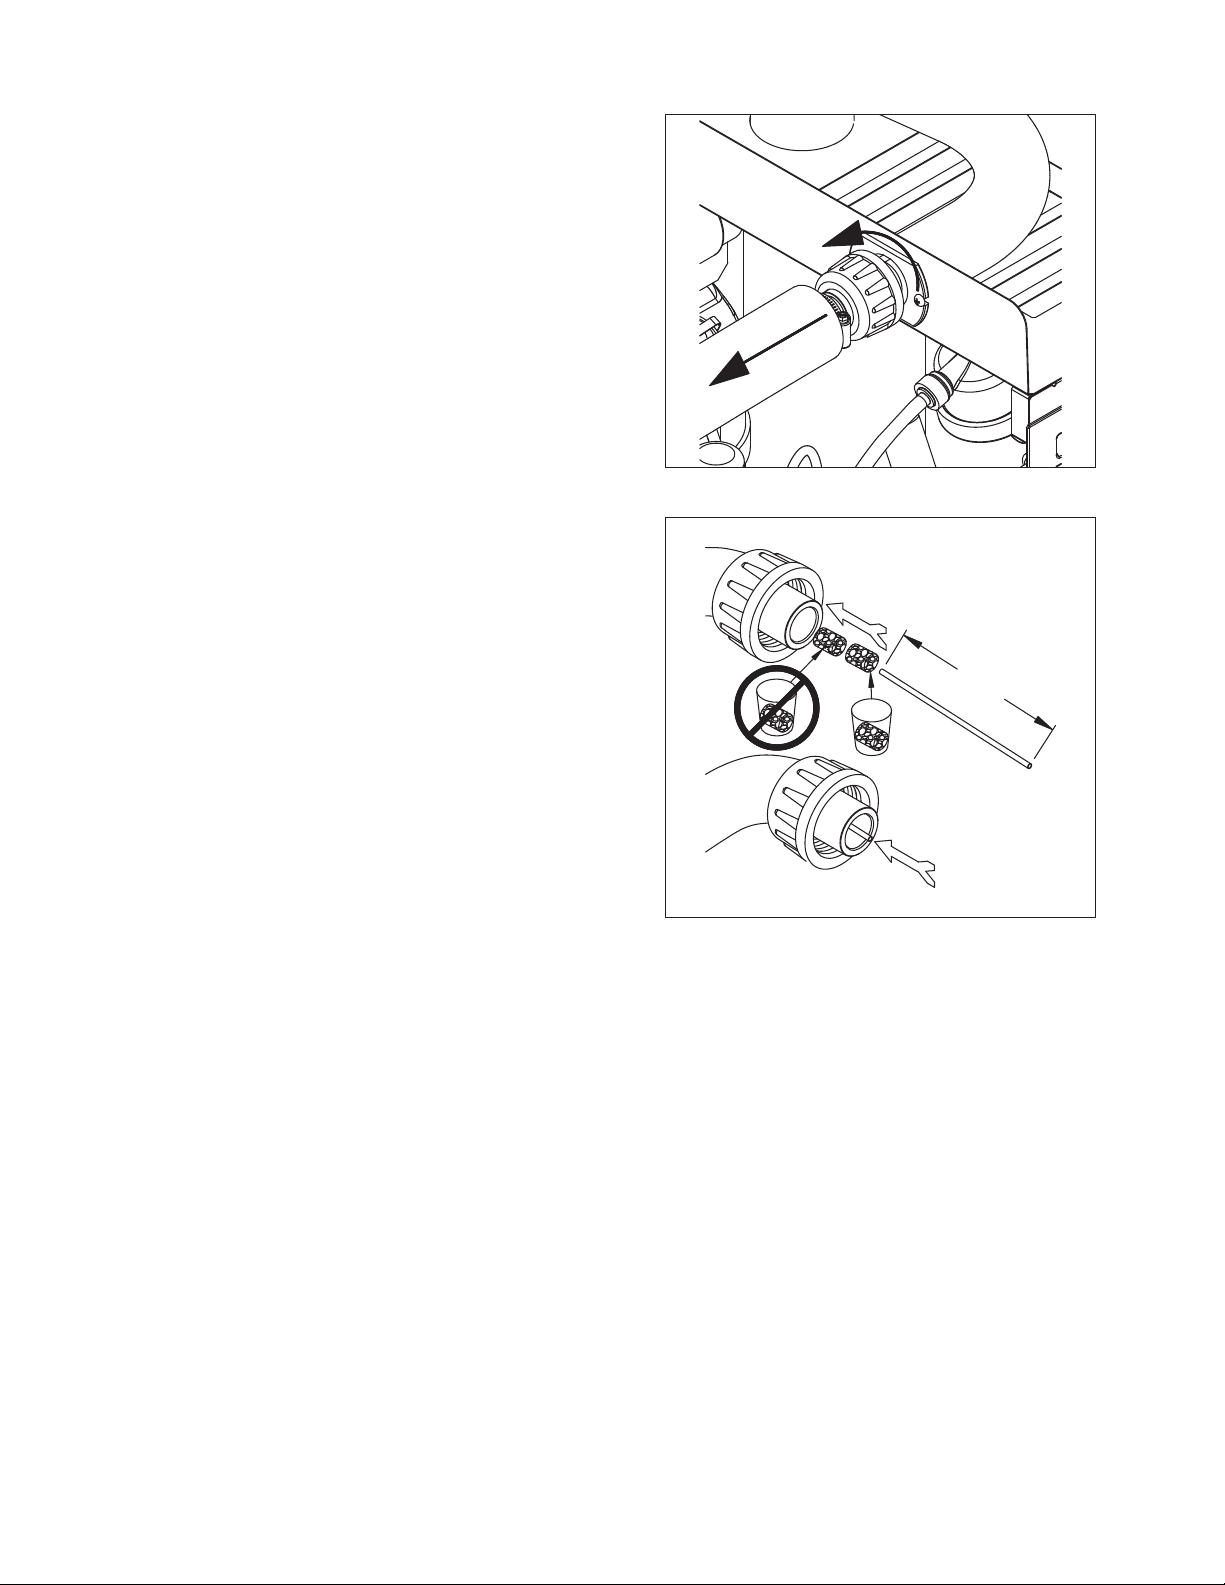
Fig. 5
7. Disconnect coupling as shown.
Fig. 6
8. Using disposable foodservice grade gloves, insert dry
SaniSponge cleaning sponge.
9. Insert SaniSponge cleaning sponge soaked in
SafeClean Plus (from Step 4).
10. Push both SaniSponge cleaning sponges down ice
transport tube with supplied pusher tube.
1
2
3
16"
(407 mm)
Horizon Elite 710 Self-Contained 9
Fig. 7
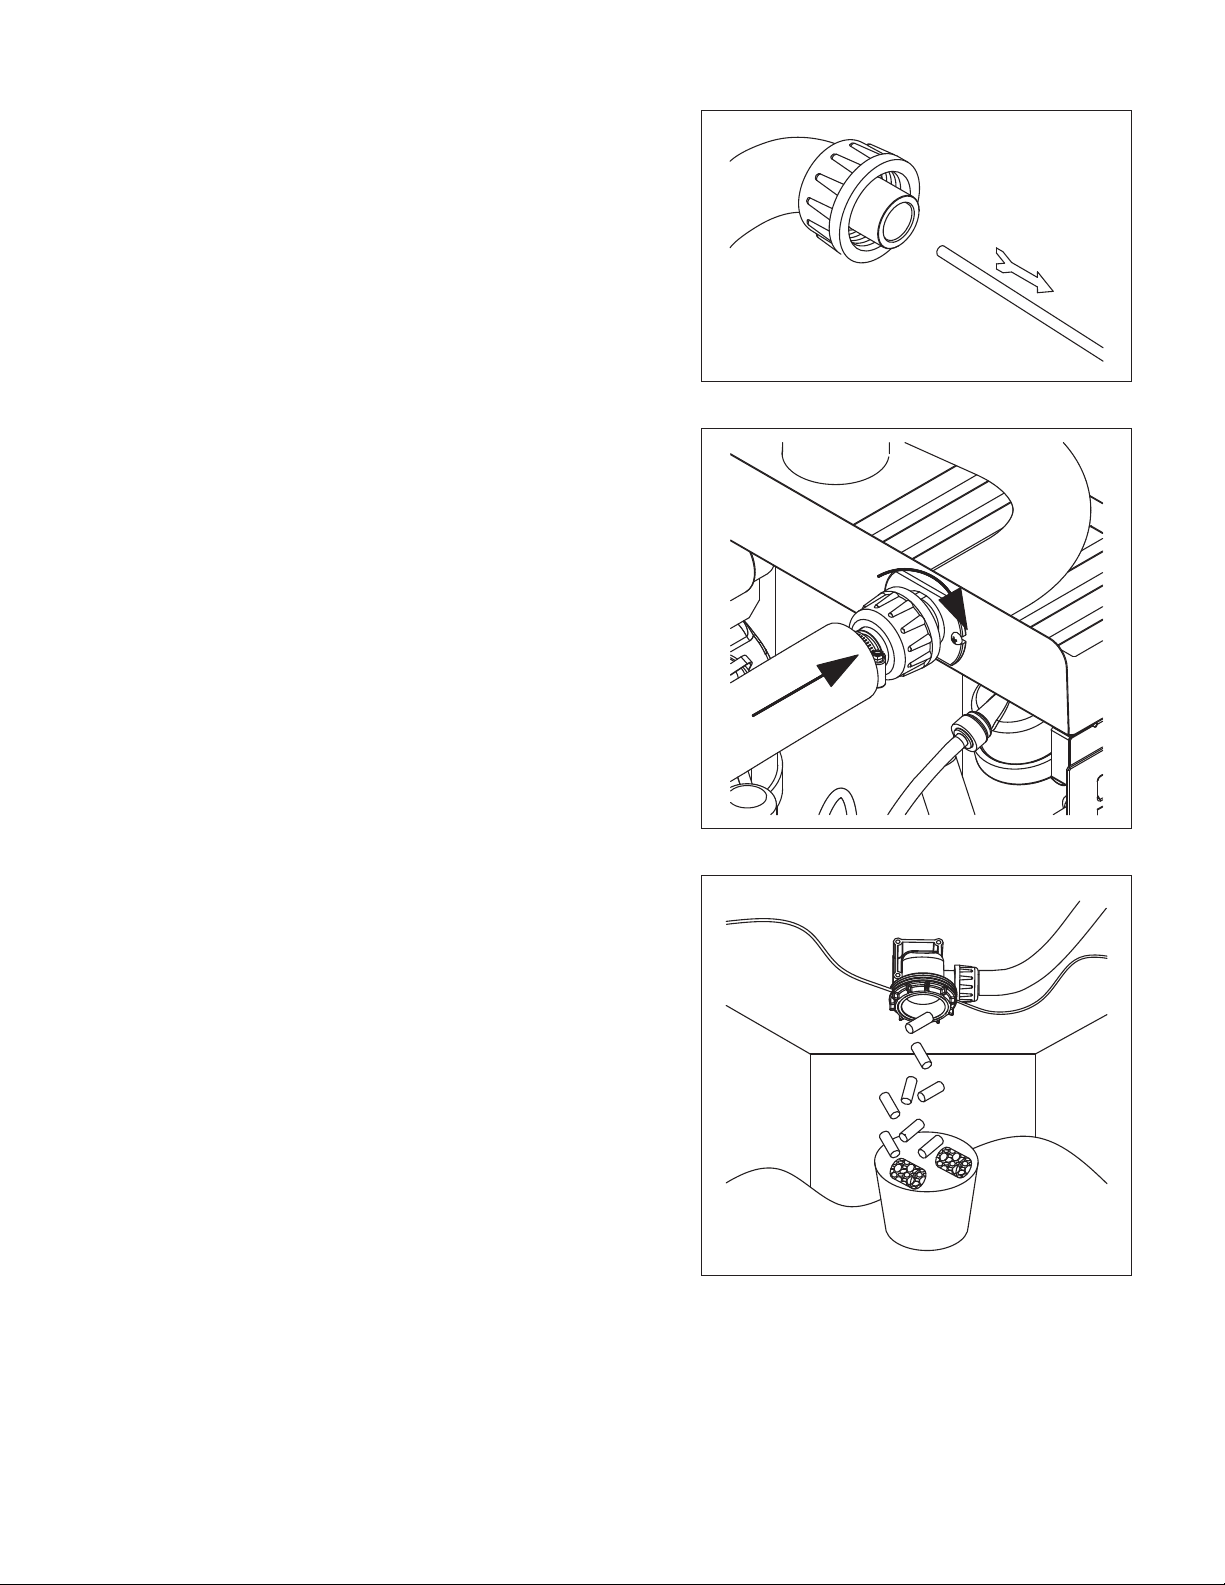
11. Remove and discard 16 inch (407 mm) pusher tube.
Fig. 8
12. Reconnect coupling. Press power switch ON. Ice
pushes SaniSponge cleaning sponges through ice
transport tube.
Fig. 9
13. Place a sanitary (2 gal. or larger) container in bin or
dispenser to collect SaniSponge cleaning sponges
and ice for 10 minutes.
14. Collect 5.5 lbs (3 kg) of ice from unit. Discard ice and
SaniSponge cleaning sponges.

10 Horizon Elite 710 Self-Contained
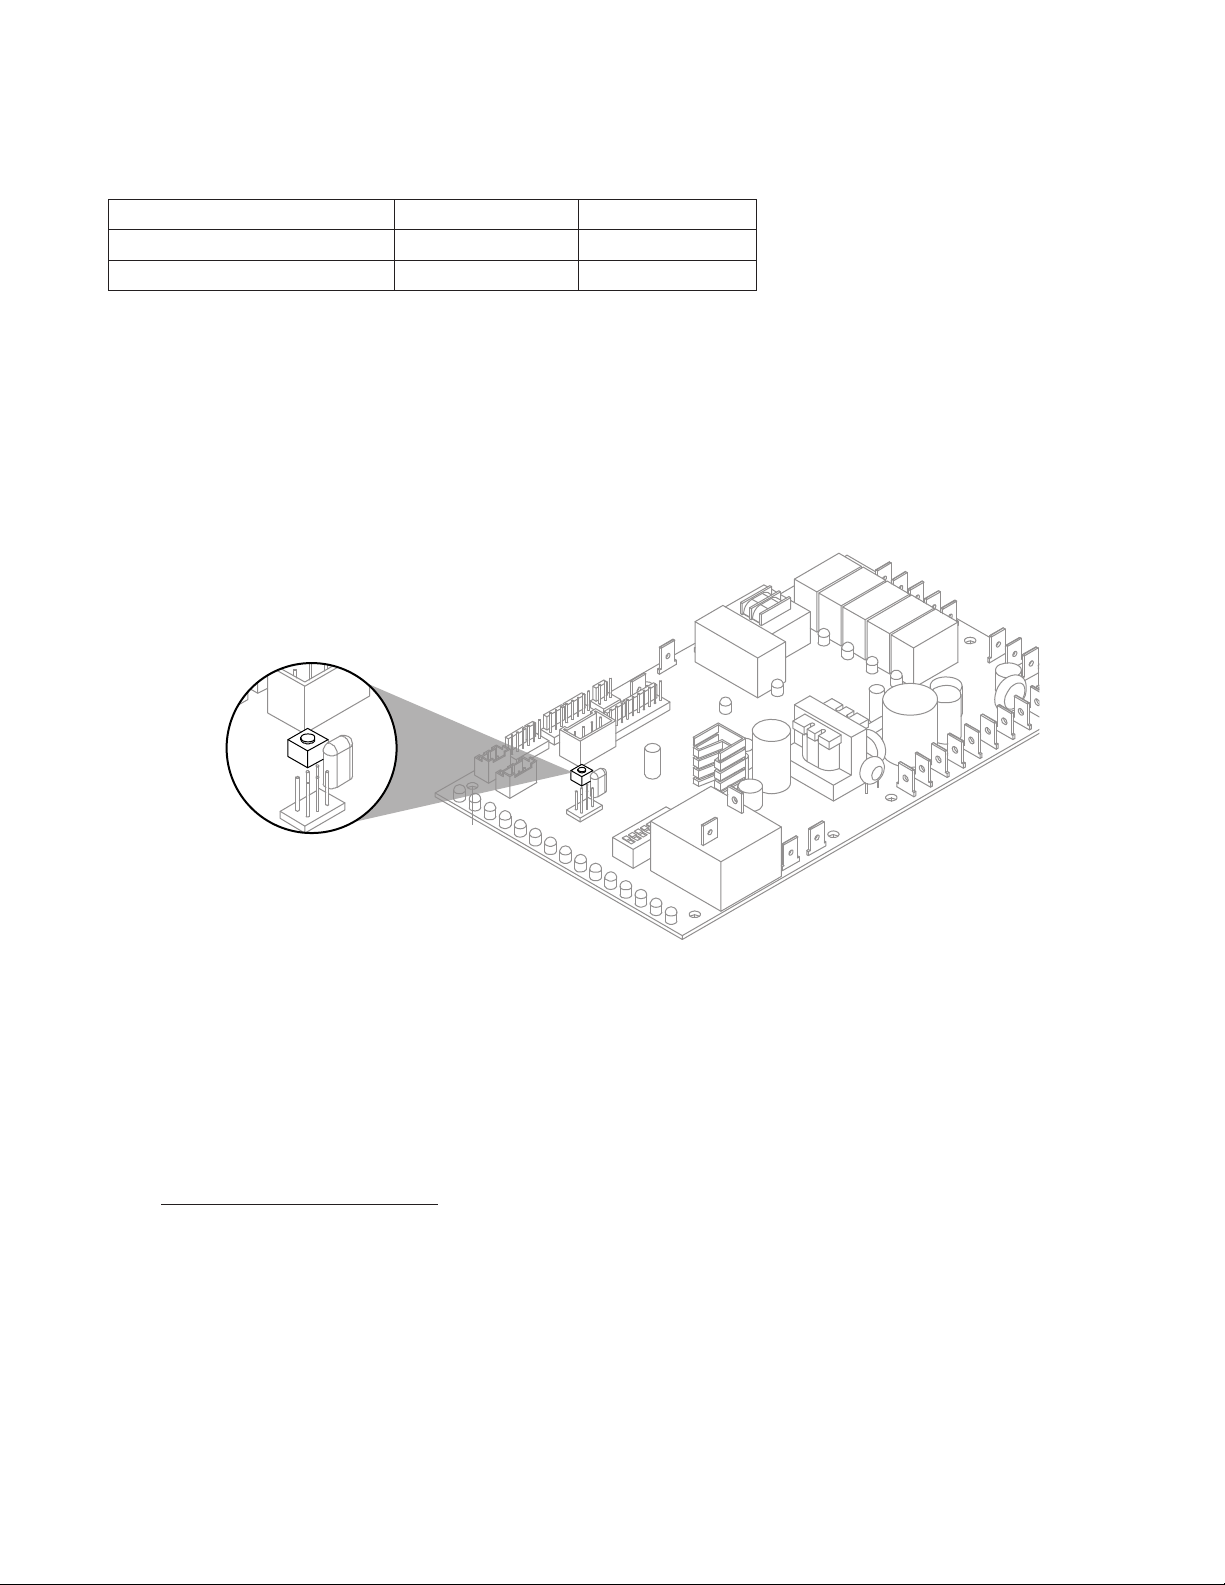
Wiring diagram

Horizon Elite 710 Self-Contained 11
Compressor data
710
Compressor current draw at 120 V VAC, 90 F/32.2 C
7.8A
Locked rotor amps @
120 V
93.0A
Compressor start winding
120 V
2.23Ω
Compressor run winding
120 V
0.32Ω
Gearmotor data
Gearmotor current 1.2A @
120 V
Gearmotor torque-out (high amp) trip point: 1.8A @
120 V
Resistance of windings
115 vac gearmotor (Brother):
Gray to black: 15.5Ω
Blue to gray: 15.5Ω
Blue to black: 31Ω
Fan motor data
Fan motor current 0.2A @
120 V
Fan motor resistance 100Ω
12 Horizon Elite 710 Self-Contained
Refrigeration system
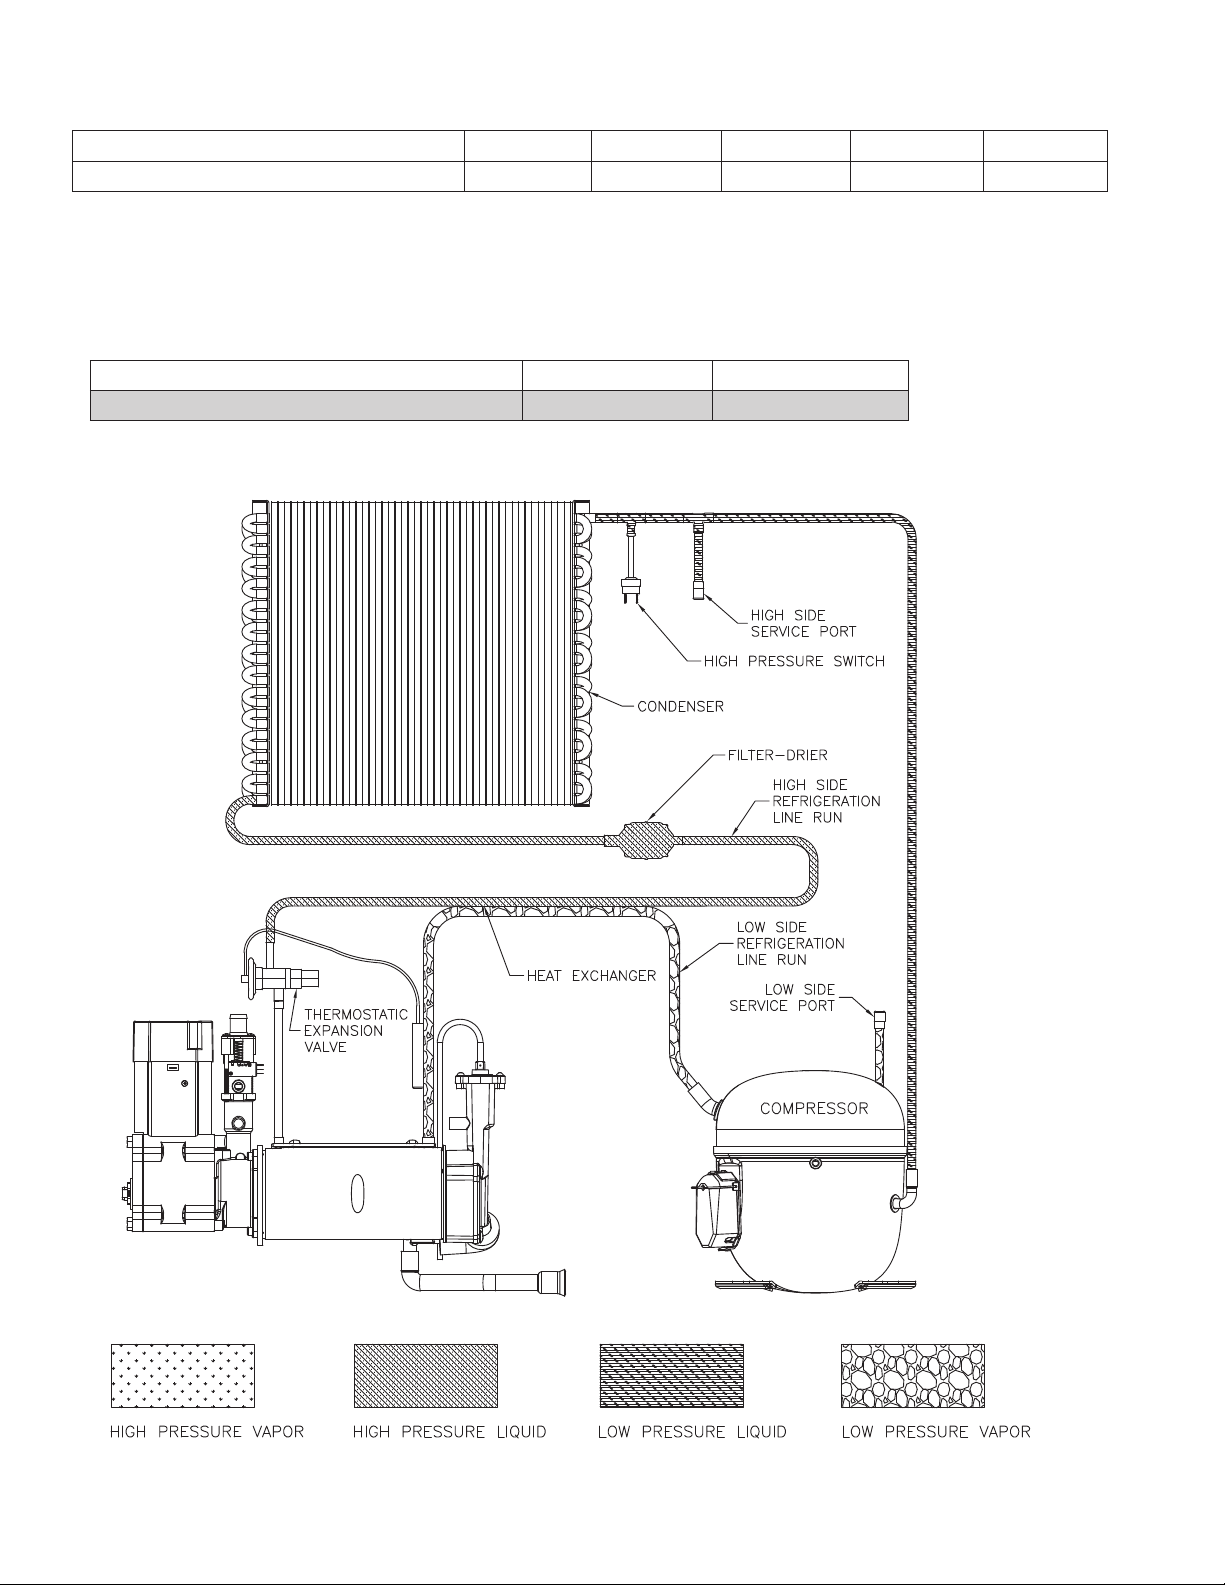
Refrigerant pressure data
Air-cooled condensers (air) 60 F/16 C 70 F/21 C 80 F/27 C 90 F/32 C 100 F/38 C
Pressure (psig) discharge/suction 190/32 225/34 258/36 292/39 325/41
Refrigeration charge
All service on refrigeration systems must be performed in accordance with all federal, state and local laws. It is the
responsibility of the technician to ensure that these requirements are met. Recharging ice machine to other than
factory specications will void the warranty.
R404A ice machine charge specications
Model Charge Refrigerant type
710A (air-cooled) 21 oz (595 g) R404A
Refrigeration system diagram
Horizon Elite 710 Self-Contained 13
Evacuation
Evacuate the system to a level of 500 microns. When the 500 micron level is reached, close all valves. Allow the
system to sit for approximately 20 minutes. During this period the system pressure should not rise. If the system
pressure rises and stabilizes there is moisture in the system and further evacuation is needed. If the pressure
continues to rise check the system for leaks.
Ambients Minimum Maximum
Air temperature
1
50 F/10 C 100 F/37.8 C
Water temperature
2
45 F/7 C 90 F/32.2 C
1
Ambient air temperature is measured at the air-cooled condenser coil inlet.
2
Ambient water temperature is measured at the water feed valve inlet.
Ice capacity test
Ice machine production capacity can only be determined by weighing ice produced in a specic time period.
1. Replace all panels on ice machine.
2. Run ice machine for at least 15 minutes.
3. Move TDS switch to LOW.
4. Press the reset button on the board.
5. Weigh and record weight of container used to catch ice.
6. Catch ice for 15 minutes.
7. Weigh harvested ice and record total weight.
8. Subtract weight of container from total weight.
9. Convert fractions of pounds to decimal equivalents (ex. 6 lbs 8 oz = 6.5 lbs).
10. Calculate production using following formula:
1440 min. x wt. of ice produced
Total test time in minutes
=
Production capacity/24 hr.
11. Calculated amount per 24 hours should be checked against rated capacity for same ambient and water
temperatures in Ice Production Tables.
12. Move TDS switch to the HI TDS position.
14 Horizon Elite 710 Self-Contained
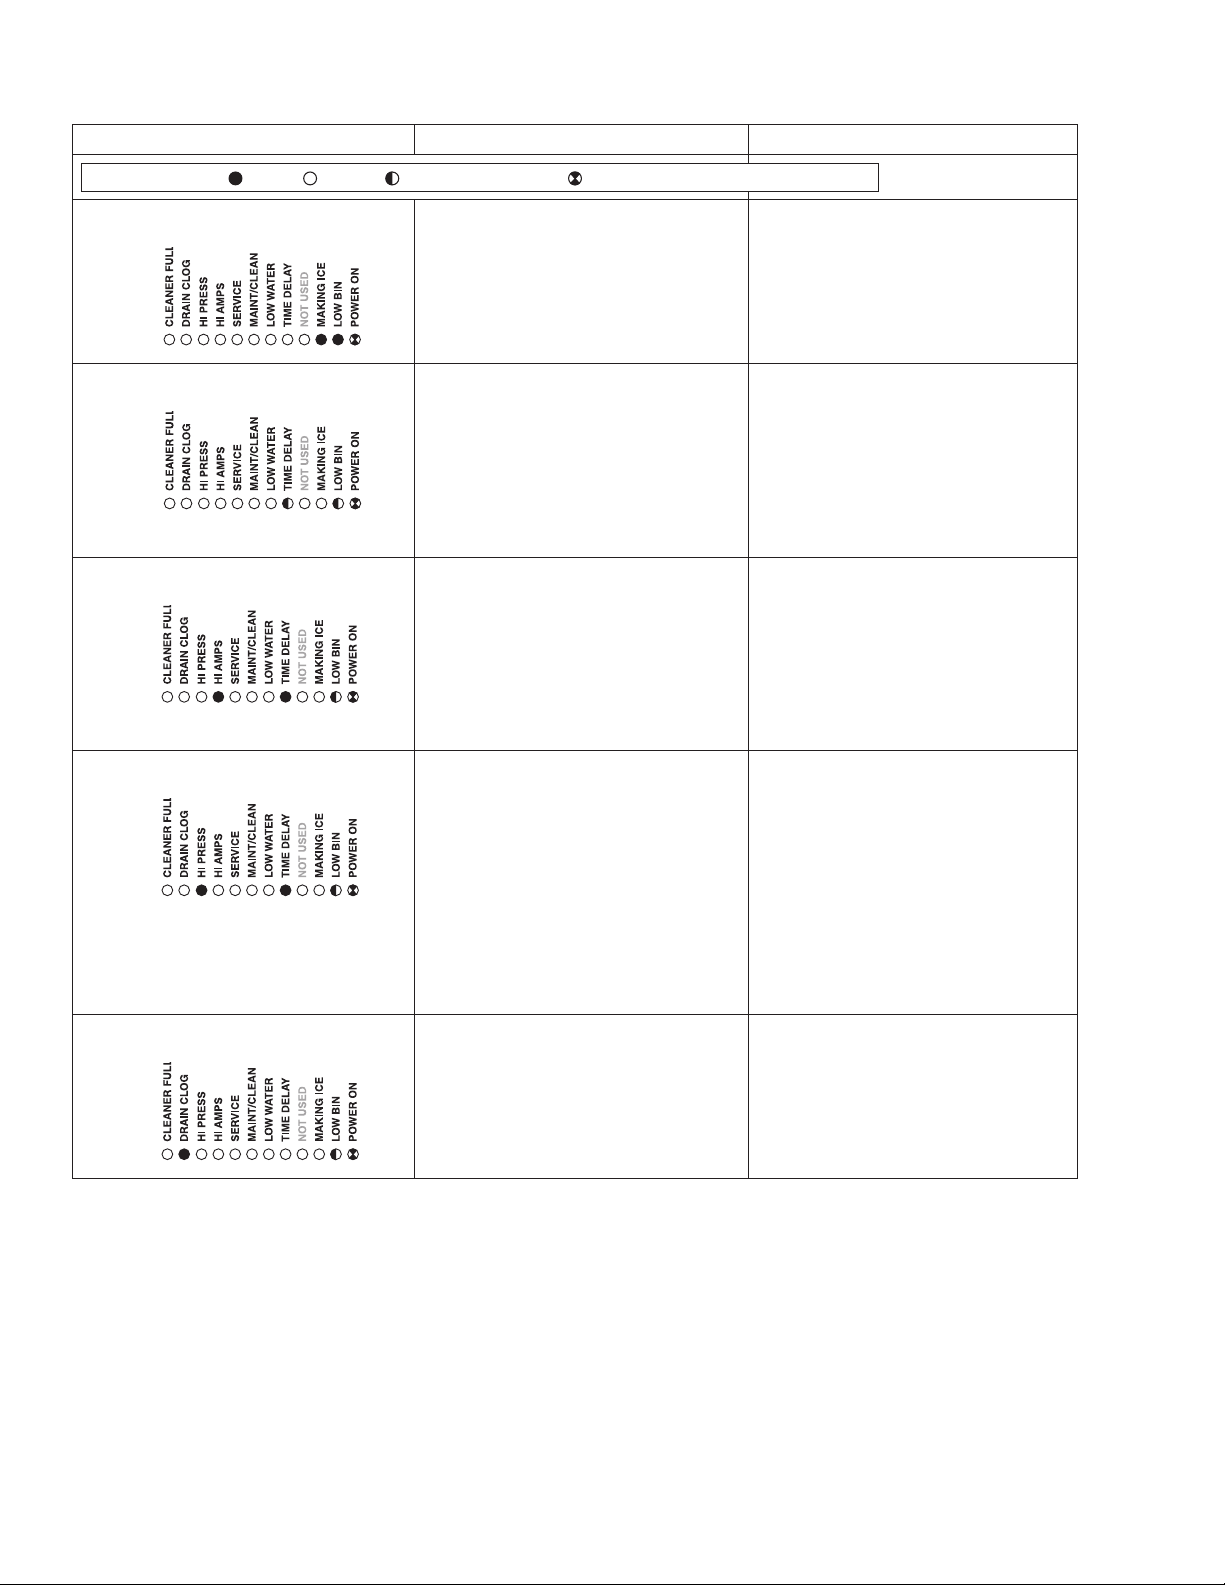
Troubleshooting
Please see “Service” section for a description of each function.
Ice machine disposition Possible causes Corrective action
FLASHINGON or OFF
Legend:
OFFON
1. Ice machine is in running
condition but not making ice.
.
1. Defective compressor.
2. Defective start relay.
3. Defective start capacitor.
4. Defective run capacitor.
5. Defective main contactor.
6. No output from PC board.
1. Replace compressor.
2. Replace start relay.
3. Replace start capacitor.
4. Replace run capacitor.
5. Replace main contactor.
6. Replace PC board.
2. Machine in TIME DELAY without full
bin.
1. Ice jamming due to improperly
installed transport tube causing a
false shuttle.
2. Shuttle stuck in up position.
3. Damaged or improperly installed
thermostat (open).
4. Transport tube backed-out of
coupling.
1. Correct transport tube routing.
2. Repair or replace shuttle
mechanism.
3. Replace or reposition thermostat.
4. Correct coupling installation.
3. Ice machine is not making ice.
HI AMPS.
.
1. Poor water quality causing ice to jam
auger.
2. Drain not draining/slow to drain.
3. Damaged shuttle mechanism.
4. Intermittent drive output from
PC board. Evaporator will freeze
causing a HI AMPS error.
5. Gearmotor is unplugged.
1. Clean ice machine. Position TDS
switch to High TDS setting.
2. Clear and/or correct drain.
3. Replace or repair shuttle
mechanism.
4. Replace PC board.
5. Plug in gearmotor.
4. Ice machine is not making ice.
HI PRESSURE.
.
1. High ambient temperatures
>100 F (38 C).
2. Poor ventilation or air recirculation.
3. Clogged condenser (air-cooled).
4. Fan not working properly. No
air ow.
• Blocked fan blades
• No fan output from PC board
• Faulty fan motor
1. Air condition area to below 100F
(38 C).
2. Reposition ice machine or properly
ventilate. Prevent ice machine
exhaust from recirculating.
3. Clean condenser grille (air-cooled).
4. Correct air ow.
• Remove any blockage from fan
blades
• Replace PC board
• Replace fan motor
5. Ice machine is not making ice.
Drain clog.
.
1. Internal water leak touching chassis
sensor.
1. Identify and repair leak. Clean/dry
chassis and sensors and restart
machine.
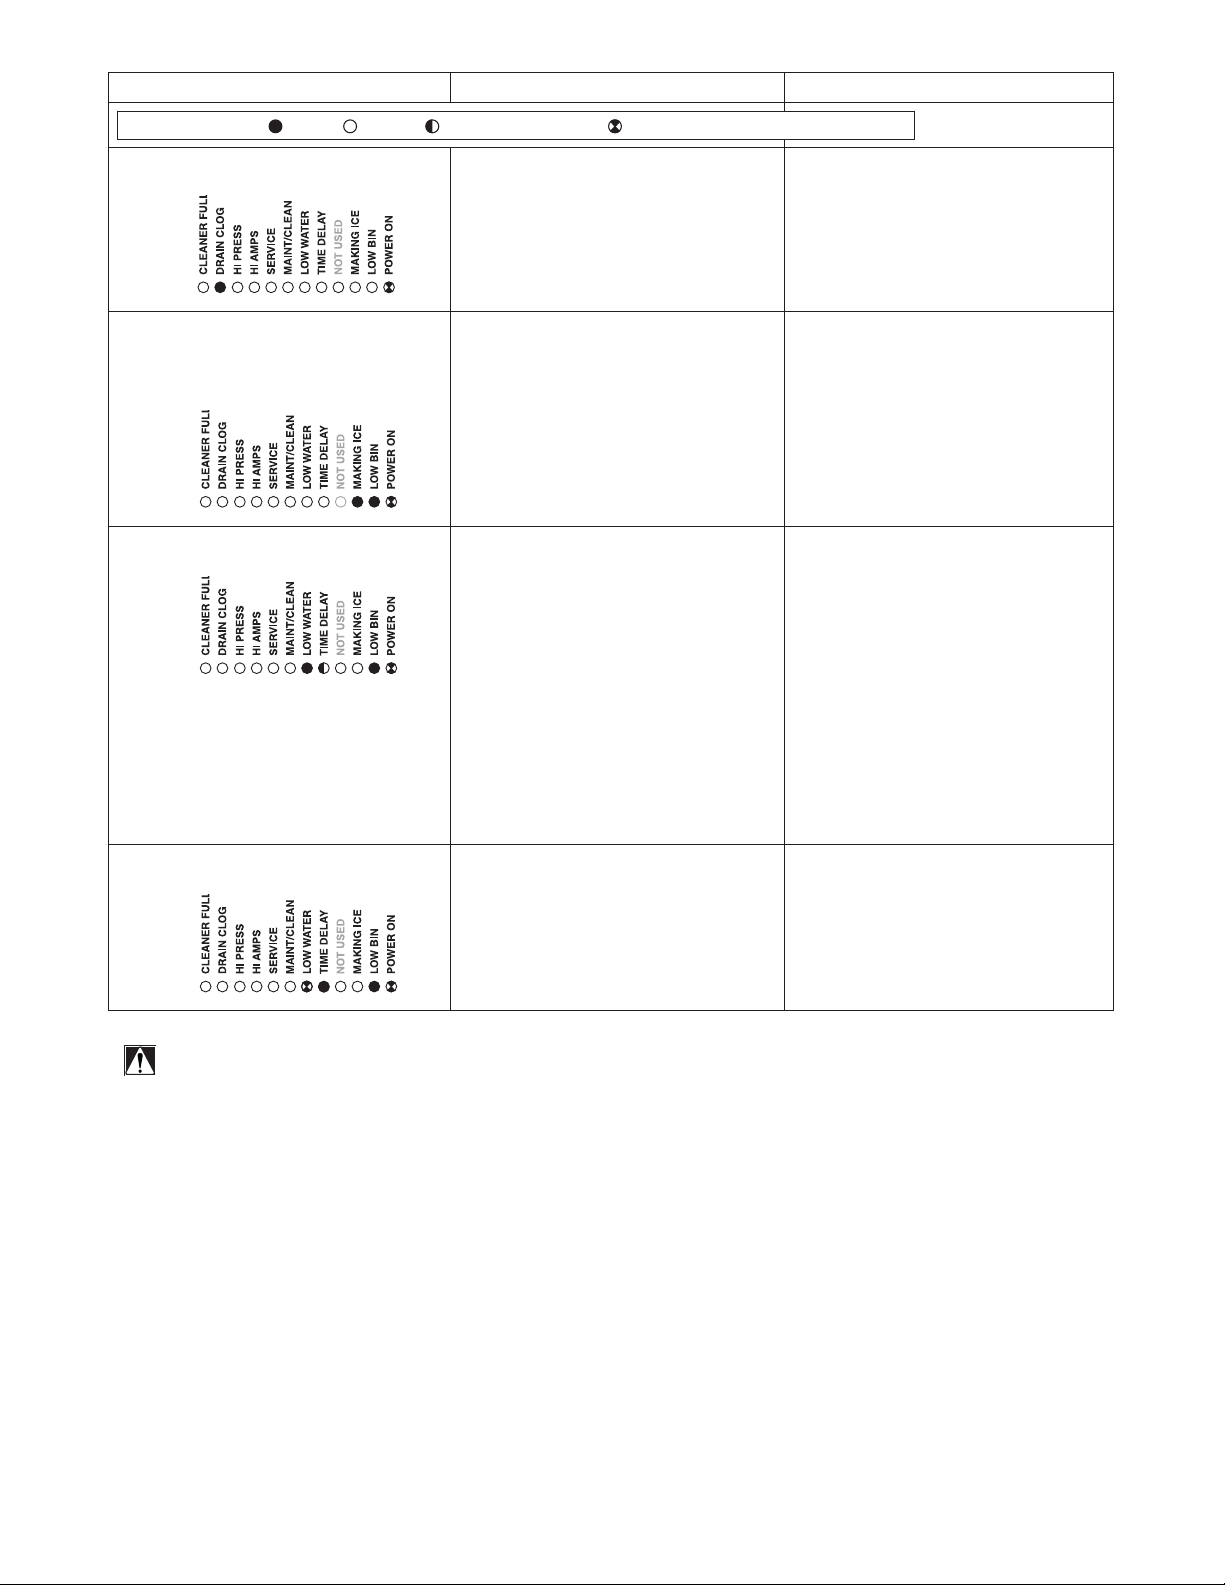
Horizon Elite 710 Self-Contained 15
Ice machine disposition Possible causes Corrective action
FLASHINGON or OFF
Legend:
OFFON
6. Ice machine is making ice.
Drain clog.
.
1. Improper ow in drain system. 1. Correct/clean drain system.
7. Ice machine is making ice.
Excessive water in bin or
coming into bin from transport
tube.
1. Failed water sensors. Processor
assumes there is no water when
there is water.
2. Blocked reservoir vent.
3. Defective water feed solenoid
valve. Stuck in open position.
1. Clean or replace water probe
assembly. Check wiring
connections.
2. Clean or replace vent tubes.
3. Replace water feed solenoid
valve.
8. Ice machine is not making ice.
Lo water.
1. Water supply is insufficient.
2. Low water pressure.
3. Defective water feed solenoid
valve. Stuck in closed position.
4. No water feed output from
PC board.
5. Plugged screen on inlet side of
ll solenoid.
6. Plugged check valve.
1. Restore water supply and check
water lters. If evaporator was
completely empty the reset
button may have to be pressed
to restart the ice machine.
2. Ice machine will eventually start
when water reaches normal lo
level.
3. Replace water feed solenoid
valve.
4. Replace PC board.
5. Remove and clean screen.
6. Remove and clean.
9. LOW WATER blinking and low
bin.
1. Refrigeration issue. 1. Check outdoor condensing unit
for proper function.
ATTENTION!
To prevent circuit breaker overload, wait 5 minutes before restarting
this unit. This allows the compressor to equalize and the evaporator
to thaw.

801 Church Lane • Easton, PA 18040, USA
Toll free (877) 612-5086 • +1 (610) 252-7301
www.follettice.com
Harmony, Ice Manager, Micro Chewblet, SafeCLEAN Plus, SaniSponge and Vision are trademarks of Follett LLC.
Chewblet, RIDE and Follett are registered trademarks of Follett LLC, registered in the US.
01266543R01
© Follett LLC 2/20
Warranty Registration and Equipment Evaluation
Thank you for purchasing Follett equipment. Our goal is to earn your complete satisfaction by delivering high-value products and
services backed by outstanding customer and technical support.
Please review the installation instructions thoroughly. It is important that the installation be performed to factory specications so
your equipment operates at its maximum efficiency.
Follett LLC will not be liable for any consequential damages, expenses, connecting or disconnecting charges, or any losses
resulting from a defect of the machine. For full warranty details, visit our website www.follettice.com/productwarranties.
Registering your equipments helps Follett track your equipment's service history should you need to contact us for technical
support, and your feedback helps us improve our products and services. Please visit www.follettice.com/support to complete the
Warranty Registration form.
Should you have any questions, please contact Follett's technical support group at (877) 612-5086 or
(610) 252-7301 and we will be happy to assist you.