
2
3
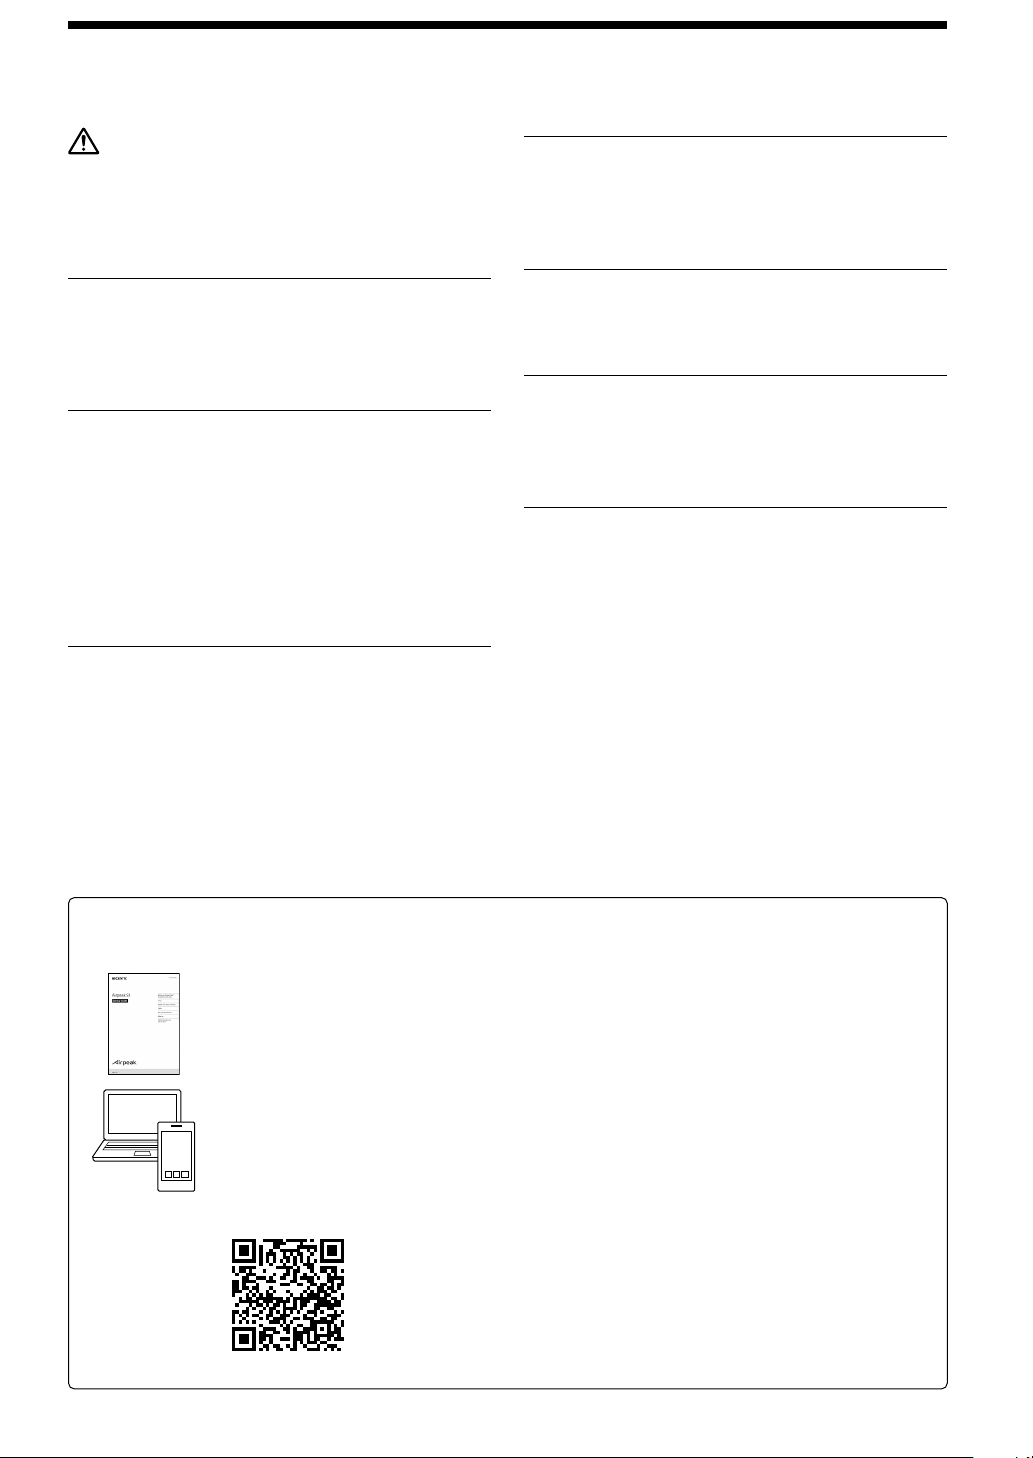
Product manuals
Startup Guide (this manual)
Describes preparations from aircraft assembly to “Airpeak Flight” app setup and flights. Also
includes safety precautions and specifications.
Help Guide (Web manual)
Explains aircraft operation and features in detail and provides “Airpeak Flight” app and “Airpeak
Base” app instructions. You can view the Help Guide online. Use a tablet, smartphone or
computer.
https://rd1.sony.net/help/airpeak/arss1/en/
Table of contents
WARNING ............................................................ 4
Compliance Information
............................................. 7
Introduction
.............................................................. 10
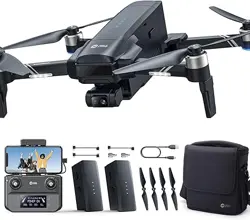
Package contents
..................................................... 12
Guide to parts and controls
...................................... 14
Mobile app “Airpeak Flight” installation/
initial setup
Installing the “Airpeak Flight” app ............................ 16
Signing in to the “Airpeak Flight” app
...................... 16
Setup
Charging the batteries ...............................................17
Assembling the aircraft
............................................ 18
Attaching a mobile device to
the remote controller
................................................23
Loading battery packs in the aircraft
.......................25
Linking/setting up the remote controller and
aircraft
.......................................................................26
Gimbal and camera mounting
Preparing a camera...................................................28
Mounting the gimbal on the aircraft
........................ 29
Mounting a camera on the gimbal
..........................30
Adjusting the gimbal parameters
............................36
Flights
Attaching the propellers ........................................... 37
Checking settings before flights
..............................39
Flying and shooting video
........................................40
Web app “Airpeak Base”
“Airpeak Base” features ............................................ 41
Recommended computer/iPad environment.......... 41
After use
Removing the propellers ..........................................42
Removing the gimbal
...............................................44
Removing the landing gear
......................................44
Flight Information and Specifications
Flight Information .....................................................46
General Information
.................................................49
Troubleshooting
........................................................ 51
Specifications
............................................................52
4
Owner’s Record
Record the model and serial number (which are located
on the product) in the space provided below. Refer to
these numbers whenever you call your Sony dealer
regarding this product.
• Aircraft:
Model No.
Serial No.
• Remote Controller:
Model No.
Serial No.
WARNING
• No user serviceable parts inside. Do not disassemble
or modify. This may cause a fire, electric shock, or
malfunction. For repair or maintenance services,
contact Sony Customer Support.
• Do not touch or get close to propellers when product is
in operation.
IMPORTANT SAFETY INSTRUCTIONS
– SAVE THESE INSTRUCTIONS AND REFER TO
THEM WHEN OPERATING THE PRODUCT
TO REDUCE THE RISK OF FIRE OR ELECTRIC
SHOCK, CAREFULLY FOLLOW THESE
INSTRUCTIONS
Aircraft/Gimbal
NOTICE
• Before operating the aircraft, ensure the aircraft is
registered with the Federal Aviation Administration and
the registration number is appropriately displayed.
• Before operating the aircraft, ensure the operator has
passed any relevant test and received any relevant
certification from the Federal Aviation Administration.
• Always yield the right of way to other aircraft.
• Do not operate the aircraft in a careless or reckless
manner.
• Report any collision, damage or injury to relevant
authorities as required by law, regulation or ordinance.
• This product is designed for uses permitted by the
Federal Aviation Administration. Any modification for
improper use is prohibited.
• Do not use or store the products in a place exposed
to smoke, steam, humidity, or dust. This may cause
malfunction, fire or electric shock.
• Do not let water or foreign objects get inside the
product. This may cause a fire or electric shock. If
water or foreign objects get inside the product, turn it
off immediately, and disconnect the power cord and
connection cables.
• Do not use any battery charger(s) other than the one
included or a battery charger, manufactured and/or
recommended by Sony.
• Use only the dedicated Sony manufactured battery
packs for the aircraft. Use of a different battery pack
may cause fire or electric shock.
• Do not use the product with wet hands. This may cause
an electric shock.
• Turn off the power and remove the battery packs from
the aircraft before cleaning.
• Firmly connect the connectors.
– Do not insert metal objects into the connector ports.
This may short-circuit the pins and cause a fire.
– Insert the connectors straight into the ports. If the
connectors are inserted at an angle, the pins may
short-circuit, causing a fire.
• Disconnect the connection cables before moving
the product. Otherwise, the connection cable may
be damaged, resulting in a fire or electric shock, or
connected equipment may fall or topple over, causing
injuries.
• Remove the battery packs from the aircraft before
moving the aircraft.
• Be sure to remove the gimbal after use. Leaving it
attached to the aircraft may damage the damping
rubber of the damping plate.
• Do not place or store the product in a location
exposed to direct sunlight or close to a heater. It is
recommended that you store the product at an ambient
temperature of 18 °C (64 °F) to 30 °C (86 °F).
• Do not insert foreign objects or other items into the air
inlet or the air vent. This may cause product failure or
injuries.
• Do not subject the product to strong impacts. If you
apply excessive force to the product, such as by putting
a heavy object on top of it, dropping it, or stepping on
it, this may cause an injury or product failure.
• Keep the product away from infants and young
children. If a person accidentally touches the moving
parts of the product while it is in operation, this may
cause damage to the product or injuries.
• Do not touch the landing gear while the aircraft is in
use, and do not turn on the aircraft while an operator
(s) is touching the landing gear. These actions may
damage the aircraft or cause injuries such as pinched
fingers.
• Be careful not to touch the motor and its surrounding
parts as they become hot after use. There is a risk of
burns.
5
• Do not place this unit close to medical devices.
– This unit has magnet(s) which may interfere with
pacemakers, programmable shunt valves for
hydrocephalus treatment, or other medical devices.
– Do not place this unit close to persons who use such
medical devices. Consult your doctor before using
this unit if you use any such medical device.
Remote Controller
WARNING
• A damaged power cord may cause a fire or electric
shock. Observe the following cautions to avoid
damaging the power cord.
– Do not pinch the power cord between the unit and a
table, wall, or other object.
– Do not modify or damage the power cord.
– Do not place heavy objects on the power cord or pull
on the power cord.
– Keep the power cord away from heaters and other
heat sources.
– When you disconnect the power cord, always hold it
by the plug.
• Do not wrap the power cord or connection cables
around the AC adapter. This may cause the cord or
cables to break.
• Disconnect the power cord and connection cables
before moving the product. Otherwise, the power cord
and connection cables may be damaged, resulting in a
fire or electric shock, or connected equipment may fall
or topple over, causing injuries.
Also, take care not to drop the product.
• For safety reasons, if the product is not to be used for
long periods, unplug it from the wall outlet.
• Do not place or store the product in a location exposed
to direct sunlight or close to a heater. We recommend
storing the product at an ambient temperature of 18 °C
(64 °F) to 30 °C (86 °F).
• Do not let water or foreign objects get inside the
unit. This may cause a fire or electric shock. If water
or foreign objects get inside the unit, turn it off
immediately, and disconnect the power cord and
connection cables.
• Do not disassemble the product. Disassembly or
modification of the unit and the included AC adapter or
power cord may cause a fire or electric shock.
• Use only the included AC adapter. Use of a different AC
adapter may cause a fire, electric shock, or malfunction.
• Do not use the product if there is a possibility of
lightning strike. A lightning strike may cause an electric
shock. If lightning is likely, unplug the product from the
wall outlet to prevent a fire, electric shock, or product
failure.
• Use only the power cord supplied or recommended by
Sony.
• Do not use the unit with the air inlet/vent of the unit
blocked or with the unit or AC adapter covered by a
cloth or other object. Heat will build up and may cause
product failure. Turn off the unit before placing it in a
bag, etc.
• Turn off the power and unplug the product from the
wall outlet before cleaning it with a dry cloth. If the
product is cleaned with the power connected, this may
cause an electric shock.
• Firmly connect the connectors.
• Do not insert metal objects into the connector ports.
This may short-circuit the pins and cause a fire.
• Insert the connectors straight into the ports. If the
connectors are inserted at an angle, the pins may short-
circuit, causing a fire.
• Do not place this unit close to medical devices.
– This unit has magnet(s) which may interfere with
pacemakers, programmable shunt valves for
hydrocephalus treatment, or other medical devices.
– Do not place this unit close to persons who use such
medical devices. Consult your doctor before using
this unit if you use any such medical device.
• This product is designed for use only in the U.S.A.
– Use with 120 V AC power.
– Use with other voltages, such as in other countries
or regions, may cause a fire or electric shock. Note
that the AC adapter and power cord may support
different input voltages. Be sure to check the
descriptions of the AC adapter and power cord.
CAUTION
• Do not insert foreign objects or other items into the air
inlet or the air vent. This may cause product failure or
injuries.
• Do not subject the product to strong impacts. If you
apply excessive force to the product, such as by putting
a heavy object on top of it, dropping it, or stepping on
it, this may cause an injury or product failure.
• Keep the product away from infants and young
children. If a person accidentally touches the moving
parts of the product while it is in operation, this may
cause damage to the product or injuries.
Battery safety
Be sure to observe the following cautions to avoid
heat generation, ignition, rupture, or other hazards.
• This product has a built-in battery.
• Charge the battery only by the method specified by
Sony. Please refer to the Startup Guide and Help Guide
for the aircraft.
• To reduce the risk of injury or property damage, do not
expose the batteries (battery pack or installed batteries)
to fire or other heat sources. Also, do not crush or drop
the battery pack or battery cell.
6
Battery Charger
WARNING
• A damaged power cord may cause a fire or electric
shock. Observe the following cautions to avoid
damaging the power cord.
– Do not pinch the power cord between the unit and a
table, wall, or other object.
– Do not modify or damage the power cord.
– Do not place heavy objects on the power cord or pull
on the power cord.
– Keep the power cord away from heaters and other
heat sources.
– When you disconnect the power cord, always hold it
by the plug.
• Do not wrap the power cord around the AC adapter.
This may cause the cord to break.
• Disconnect the AC adapter and power cord before
relocating the product. Otherwise, the AC adapter and
power cord may be damaged, resulting in a fire or
electric shock.
Also, take care not to drop the product.
• Do not place or store the product in a location exposed
to direct sunlight or close to a heater.
• Do not use or store the product where there is
excessive smoke, steam, moisture, or dust. This may
cause a fire or electric shock. Use or storage in an
environment other than the operating conditions
described in this manual may cause a fire or electric
shock.
• Do not let water or objects get inside the unit. This may
cause a fire or electric shock. If water or foreign objects
get inside the unit, remove the battery pack from the
unit immediately, and disconnect the AC adapter and
power cord.
• Do not disassemble the product. Disassembly or
modification of the unit and the included AC adapter or
power cord may cause a fire or electric shock.
• Use only the included AC adapter. Use of a different AC
adapter may cause a fire, electric shock, or malfunction.
• Do not charge the battery pack if there is a possibility of
lightning strike. A lightning strike may cause an electric
shock. If lightning is likely, unplug the product from the
wall outlet to prevent a fire, electric shock, or product
failure. Also, if you hear thunder, refrain from touching
the product.
• Use only the dedicated Sony manufactured battery
pack for the aircraft. Use of a different battery pack may
cause fire or electric shock.
• Do not operate the product or touch the power cord
with wet hands. This may cause an electric shock.
• Use only the power cord supplied or recommended by
Sony.
• Do not use the unit while it or the AC adapter is covered
by a cloth or other object.
• Unplug the product from the wall outlet before
cleaning it with a dry cloth.
• Firmly connect the connectors.
– Do not insert metal objects into the connector ports.
This may short-circuit the pins and cause a fire.
– Insert the connectors straight into the ports. When
inserting the connectors, do not apply excessive force
to the ports.
• This product is designed for use only in the U.S.A.
– Use with 120 V AC power.
– Use with other voltages, such as in other countries
or regions, may cause a fire or electric shock. Note
that the AC adapter and power cord may support
different input voltages. Be sure to check the
descriptions of the AC adapter and power cord.
CAUTION
• Do not subject the product to strong impacts. If you
apply excessive force to the product, such as by putting
a heavy object on top of it, dropping it, or stepping on
it, this may cause an injury or product failure.
• Keep the product away from children.
7
Battery Pack
CAUTION
Risk of Fire and Burns. Do Not Open, Crush, Heat Above
70 °C (158 °F) or Incinerate. Follow Manufacturer’s
Instructions.
• Do not short-circuit the battery terminals.
• Do not disassemble or modify the battery pack.
• Do not place the battery pack in a fire, in direct sunlight,
near a stove, inside a hot vehicle, or heat it in a
microwave oven, conventional oven or any other heat
source.
• Do not allow the battery pack to get moist or wet and
do not charge or use the battery pack while it is moist
or wet.
• Do not use or charge the battery pack in a poorly
ventilated environment such as inside a backpack or
bag.
• Do not subject the battery pack to impact or force such
as by striking it with a hammer or other object, putting
a heavy object on top of it, stepping on it, or allowing
it to fall.
• Do not use the battery pack in strong electrostatic or
electromagnetic environments.
• Do not allow children to use the battery pack, and do
not use the battery pack within the reach of young
children.
• Do not use the battery pack in locations where ignitable
gas may be present, such as a gasoline station.
• Do not continue to use a battery pack that has been
subjected to a severe impact such as a crash.
• Periodically inspect the battery pack to make sure that
dust has not accumulated on the battery terminals.
• Do not directly touch the battery terminals.
• Do not touch the battery packs immediately after
flights. The battery packs will still be hot and there is a
risk of burns.
Compliance Information
Aircraft
This equipment complies with FCC radiation exposure
limits set forth for an uncontrolled environment and
meets the FCC radio frequency (RF) Exposure Guidelines.
This equipment should be installed and operated
keeping the radiator at least 20 cm (7.9 in.) or more away
from person’s body.
Contains FCC ID: AK8100224111
This transmitter must not be co-located or operated in
conjunction with any other antenna or transmitter.
You are cautioned that any changes or modifications
not expressly approved in this manual could void your
authority to operate this equipment.
Supplier’s Declaration of Conformity
Trade Name: SONY
Model: ARS-S1
Responsible Party: Sony Electronics Inc.
Address: 16535 Via Esprillo, San Diego, CA 92127 U.S.A.
Telephone Number: 858-942-2230
This device complies with part 15 of the FCC rules.
Operation is subject to the following two conditions:
(1) This device may not cause harmful interference, and
(2) this device must accept any interference received,
including interference that may cause undesired
operation.

8
Note:
This equipment has been tested and found to comply
with the limits for a Class B digital device, pursuant
to part 15 of the FCC Rules. These limits are designed
to provide reasonable protection against harmful
interference in a residential installation. This equipment
generates, uses and can radiate radio frequency energy
and, if not installed and used in accordance with the
instructions, may cause harmful interference to radio
communications. However, there is no guarantee that
interference will not occur in a particular installation.
If this equipment does cause harmful interference to
radio or television reception, which can be determined
by turning the equipment off and on, the user is
encouraged to try to correct the interference by one or
more of the following measures:
– Reorient or relocate the receiving antenna.
– Increase the separation between the equipment and
receiver.
– Connect the equipment into an outlet on a circuit
different from that to which the receiver is connected.
– Consult the dealer or an experienced radio/TV
technician for help.
RECYCLING RECHARGEABLE BATTERIES
Rechargeable batteries are recyclable.
You can help preserve our environment by returning
your used rechargeable batteries to the collection
and recycling location nearest you.
For more information regarding recycling of
rechargeable batteries, visit
www.sony.com/electronics/eco/environmental-
management
Caution: Do not handle damaged or leaking
rechargeable batteries.
Remote Controller
The available scientific evidence does not show that
any health problems are associated with using low
power wireless devices. There is no proof, however, that
these low power wireless devices are absolutely safe.
Low power Wireless devices emit low levels of radio
frequency energy (RF) in the microwave range while
being used. Whereas high levels of RF can produce
health effects (by heating tissue), exposure of low-level
RF that does not produce heating effects causes no
known adverse health effects. Many studies of low-level
RF exposures have not found any biological effects.
Some studies have suggested that some biological
effects might occur, but such findings have not been
confirmed by additional research. This equipment has
been tested and found to comply with FCC radiation
exposure limits set forth for an uncontrolled environment
and meets the FCC radio frequency (RF) Exposure
Guidelines.
Contains FCC ID: AK8100224111
This transmitter must not be co-located or operated in
conjunction with any other antenna or transmitter except
Grant conditions.
You are cautioned that any changes or modifications
not expressly approved in this manual could void your
authority to operate this equipment.
Supplier’s Declaration of Conformity
Trade Name: SONY
Model: RCR-VH1
Responsible Party: Sony Electronics Inc.
Address: 16535 Via Esprillo, San Diego, CA 92127 U.S.A.
Telephone Number: 858-942-2230
This device complies with part 15 of the FCC rules.
Operation is subject to the following two conditions:
(1) This device may not cause harmful interference, and
(2) this device must accept any interference received,
including interference that may cause undesired
operation.
9
Note:
This equipment has been tested and found to comply
with the limits for a Class B digital device, pursuant
to part 15 of the FCC Rules. These limits are designed
to provide reasonable protection against harmful
interference in a residential installation. This equipment
generates, uses and can radiate radio frequency energy
and, if not installed and used in accordance with the
instructions, may cause harmful interference to radio
communications. However, there is no guarantee that
interference will not occur in a particular installation.
If this equipment does cause harmful interference to
radio or television reception, which can be determined
by turning the equipment off and on, the user is
encouraged to try to correct the interference by one or
more of the following measures:
– Reorient or relocate the receiving antenna.
– Increase the separation between the equipment and
receiver.
– Connect the equipment into an outlet on a circuit
different from that to which the receiver is connected.
– Consult the dealer or an experienced radio/TV
technician for help.
RECYCLING RECHARGEABLE BATTERIES
Rechargeable batteries are recyclable.
You can help preserve our environment by
returning your used rechargeable batteries to
the collection and recycling location nearest
you.
For more information regarding recycling of
rechargeable batteries, visit
www.sony.com/electronics/eco/
environmental-management
Caution: Do not handle damaged or leaking
rechargeable batteries.
Battery Charger
Supplier’s Declaration of Conformity
Trade Name: SONY
Model: LBG-H1
Responsible Party: Sony Electronics Inc.
Address: 16535 Via Esprillo, San Diego, CA 92127 U.S.A.
Telephone Number: 858-942-2230
Note:
This equipment has been tested and found to comply
with the limits for a Class B digital device, pursuant
to part 15 of the FCC Rules. These limits are designed
to provide reasonable protection against harmful
interference in a residential installation. This equipment
generates, uses and can radiate radio frequency energy
and, if not installed and used in accordance with the
instructions, may cause harmful interference to radio
communications. However, there is no guarantee that
interference will not occur in a particular installation.
If this equipment does cause harmful interference to
radio or television reception, which can be determined
by turning the equipment off and on, the user is
encouraged to try to correct the interference by one or
more of the following measures:
– Reorient or relocate the receiving antenna.
– Increase the separation between the equipment and
receiver.
– Connect the equipment into an outlet on a circuit
different from that to which the receiver is connected.
– Consult the dealer or an experienced radio/TV
technician for help.
You are cautioned that any changes or modifications
not expressly approved in this manual could void your
authority to operate this equipment.
10
Introduction
This product is an aircraft system that realizes dynamic and stable remote photography and videography. With a
full-frame mirrorless Sony Alpha camera (sold separately; hereafter, “camera”) equipped, you can capture high-quality
images in aerial photography and videography.
Sony is not liable or responsible for any experience, including but not limited to videography, photography, content,
income, fees, and/or other compensation associated with or related to the use and/or misuse of the aircraft, its parts,
and/or accessories including hardware and software.
Highlights
Agile flying performance and control that unleashes the potential of cameras
Capture impressive, dynamic images from an agile aircraft with intuitive control.
Expands possibilities in aerial photography
Stable flight even in strong wind or where GNSS (Global Navigation Satellite System) signals are weak or unavailable.
Multi-directional sensors assist in obstacle detection and braking.
Streamlines workflows with automation
Create sophisticated flight plans with the web app “Airpeak Base.” Besides automated flights based on flight plans, you
can use past flight logs to automatically fly the same routes you have flown.
System configuration
This product consists of the following:
• Aircraft
A camera can be mounted using a 3-axis gimbal (sold separately; hereafter, “gimbal”)
• Remote controller/dedicated mobile app “Airpeak Flight”
Install the “Airpeak Flight” app to your mobile device (tablet or smartphone) and attach your mobile device to the
remote controller. After completing the process of linking the remote controller and aircraft, you can operate the
aircraft, gimbal, and camera (the latter two both sold separately). On the “Airpeak Flight” app screen, you can check
the flight distance and battery level, perform various operations, and change settings.
This data and information is synchronized between the “Airpeak Base” and “Airpeak Flight” apps while your mobile
device is connected to the cloud.
• Dedicated web app “Airpeak Base”
“Airpeak Base” is a dedicated cloud-based web application that can be used on a computer or iPad to manage
devices, plan flights, and view flight logs.
Web app
“Airpeak Base”-ready
computer or iPad
Manage the devices, plan
flights, and view flight logs.
Control the aircraft and a
gimbal/camera (both sold
separately).
Mobile app
“Airpeak Flight”-ready
remote controller
Equip with a camera on
the aircraft using a gimbal
(both sold separately).
Aircraft
Cloud
11
Note
”Airpeak Flight,” “Airpeak Base,” “Airpeak Plus,” and any other Airpeak or third-party network services, content, operating systems, or
software are subject to terms and conditions and may be changed, interrupted, or discontinued at any time. Fees, registration, and credit
card information may also be required.
Supported mobile devices
Make sure the supported mobile devices and system versions on following site.
https://electronics.sony.com/airpeak/support/compatibility
Compatible iPad models
• iPad Air (3rd generation)
• iPad mini (5th generation)
• iPad (8th generation)
• iPad (7th generation)
• iPad (6th generation)
Supported cameras and lenses
Visit the support site for details on camera bodies and lenses you can use.
https://electronics.sony.com/airpeak/support/compatibility
12
Package contents
Contact the place of purchase or Sony Customer Support if any components are missing. Quantities are indicated in
parentheses.
Please retain the cushionings as they will be used when assembling the aircraft.
Bottom cushioning
Top cushioning
Bottom cushioning
Aircraft (1)
Battery pack (2)
Battery charger (1)
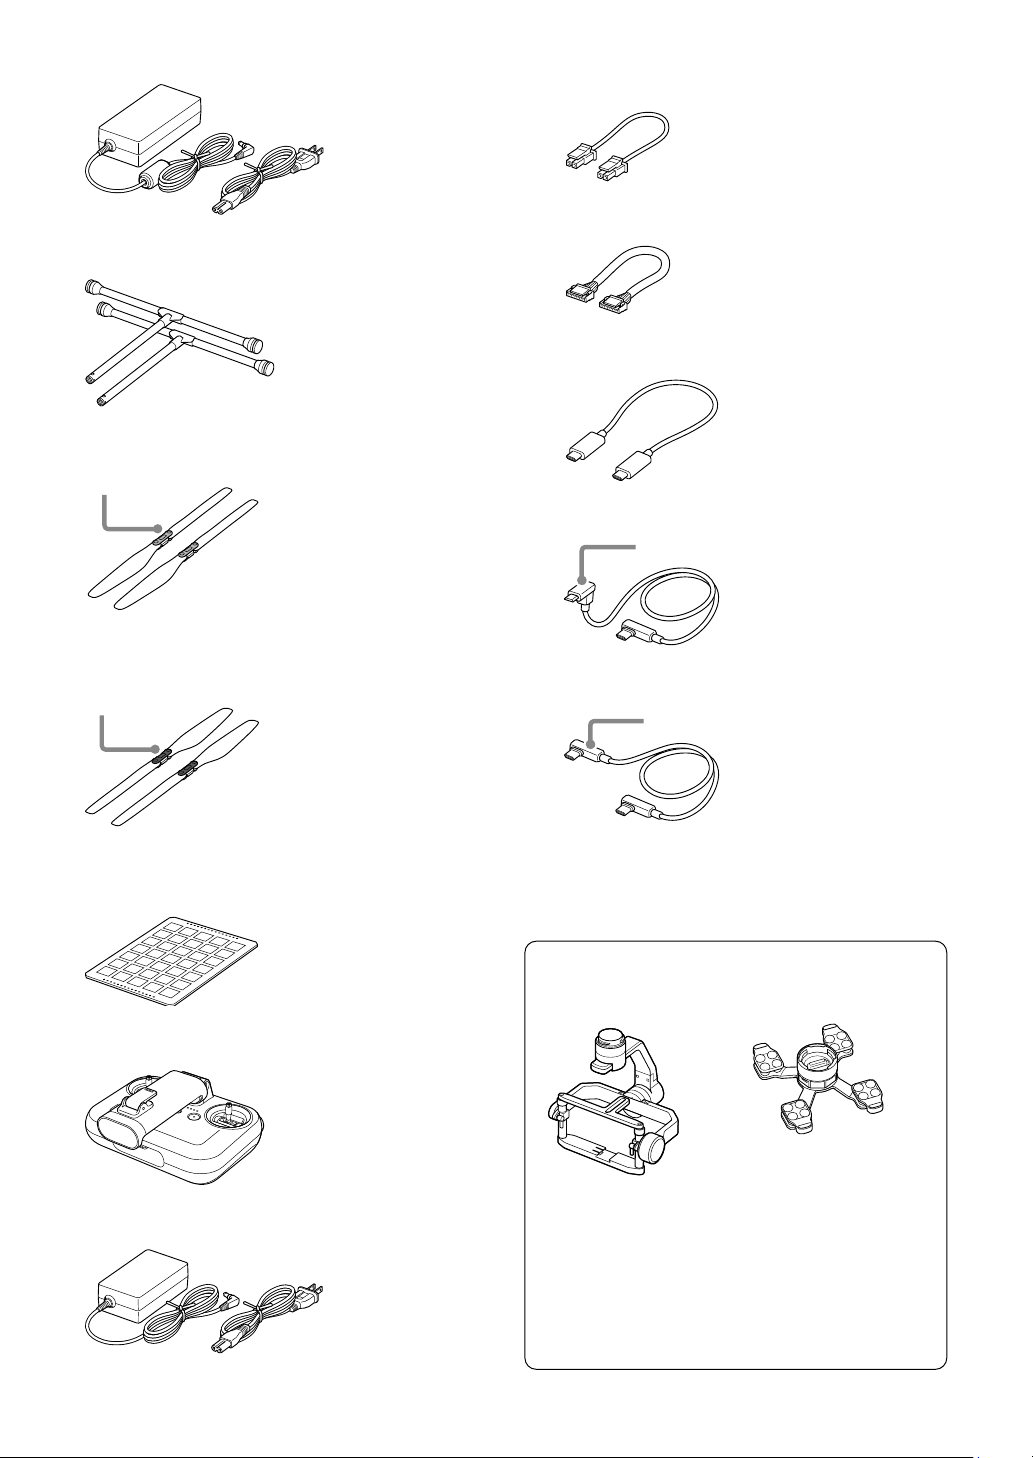
13
AC adapter for battery charger (1)/power cord (1)
Landing gear (2)
Propeller (CW: clockwise rotation) (2)*
Hub: silver
*
Not capable of being folded
Propeller (CCW: counterclockwise rotation) (2)*
Hub: black
*
Not capable of being folded
Calibration board (1)
Remote controller (1)
AC adapter for remote controller (1)/power cord (1)
Cables
• Power cable (aircraft — gimbal) (1)
• Control cable (aircraft — gimbal) (1)
• USB Type-C
®
cable (aircraft — gimbal) (1)
• Micro USB cable (gimbal — camera) (1)
Micro USB
• USB Type-C
®
cable (gimbal — camera) (1)
USB Type-C®
Startup Guide (this manual) (1)/Warranty (1)
Gimbal set (sold separately)
• Gimbal (1)
• Damping plate (1)*
*
Quick-release is pre-
installed.
• Hot shoe adapter (1)
• Top camera screw (1)
• Camera plate (1)
• Micro USB cable (gimbal — computer) (1)
• Hot shoe extension (1)
• Hex screw (10) (including two spare screws)
• Hex wrench (1)
14
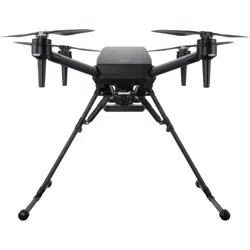
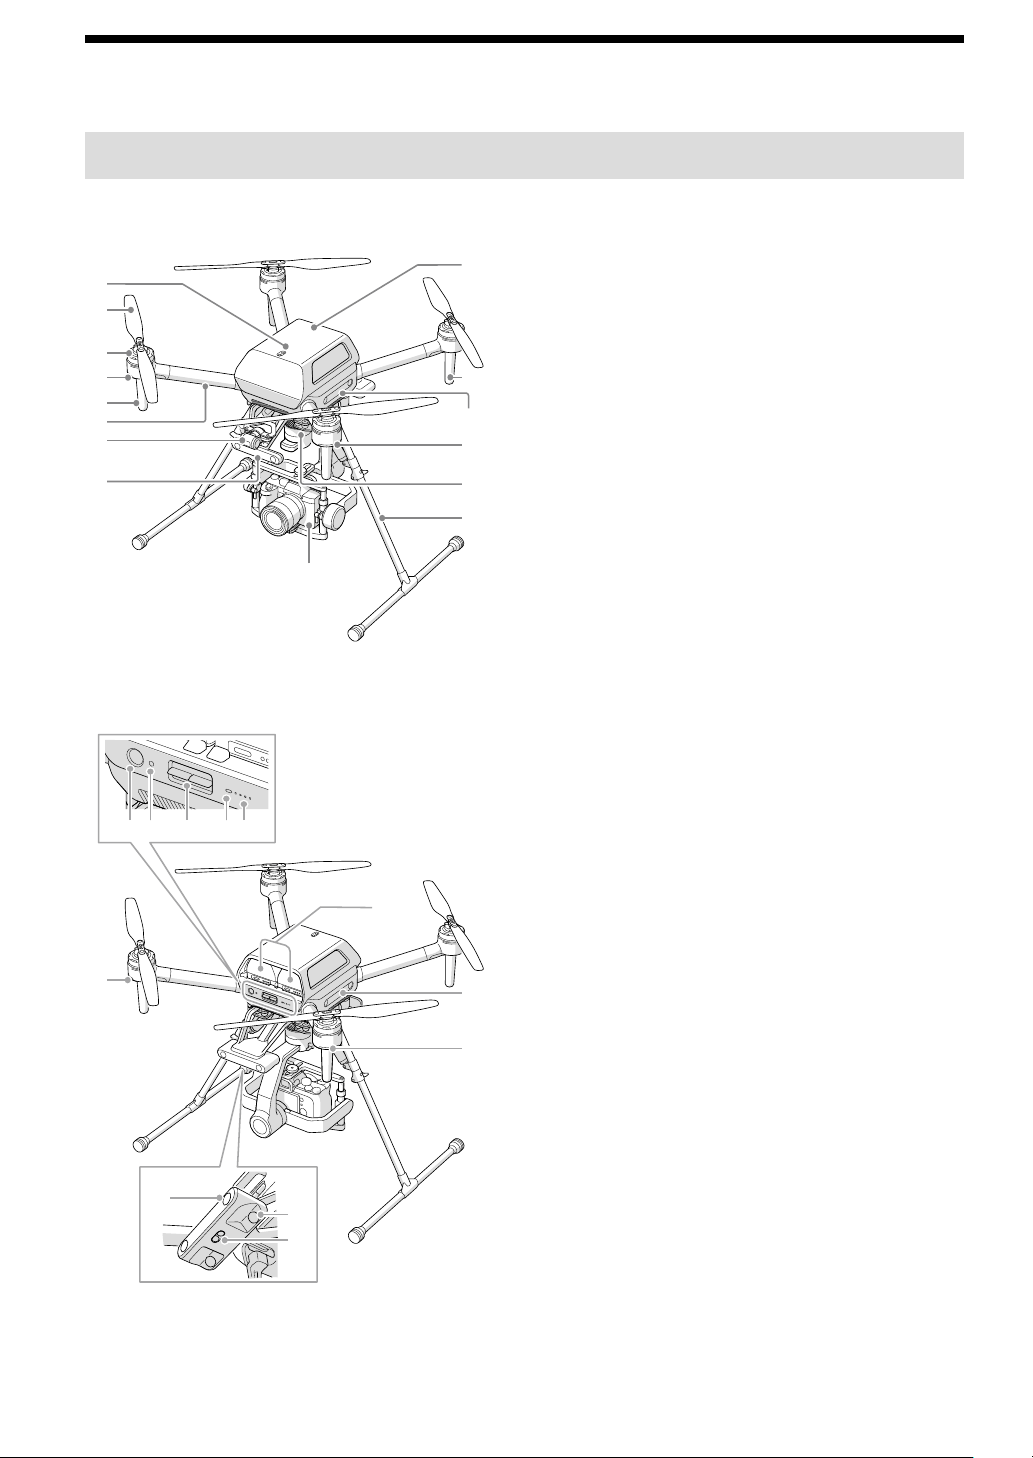
Guide to parts and controls
Aircraft
Front
Rear
Upward infrared range sensor
Propellers
Motors
Flight status LEDs (Front LEDs)
Antennas (built-in)
Frame arms
FPV gimbal camera
Forward-facing stereo camera
Camera (sold separately)
Landing gear
Gimbal (sold separately)
Side-facing stereo cameras
GNSS (Global Navigation Satellite System) antenna
(built-in)
(Power) button
LINK button
BATTERY RELEASE levers
Power status LED
Battery level LEDs
Flight status LEDs (Rear LEDs)
Backward-facing stereo camera
Downward-facing stereo camera
Downward infrared range sensor
Battery packs
15
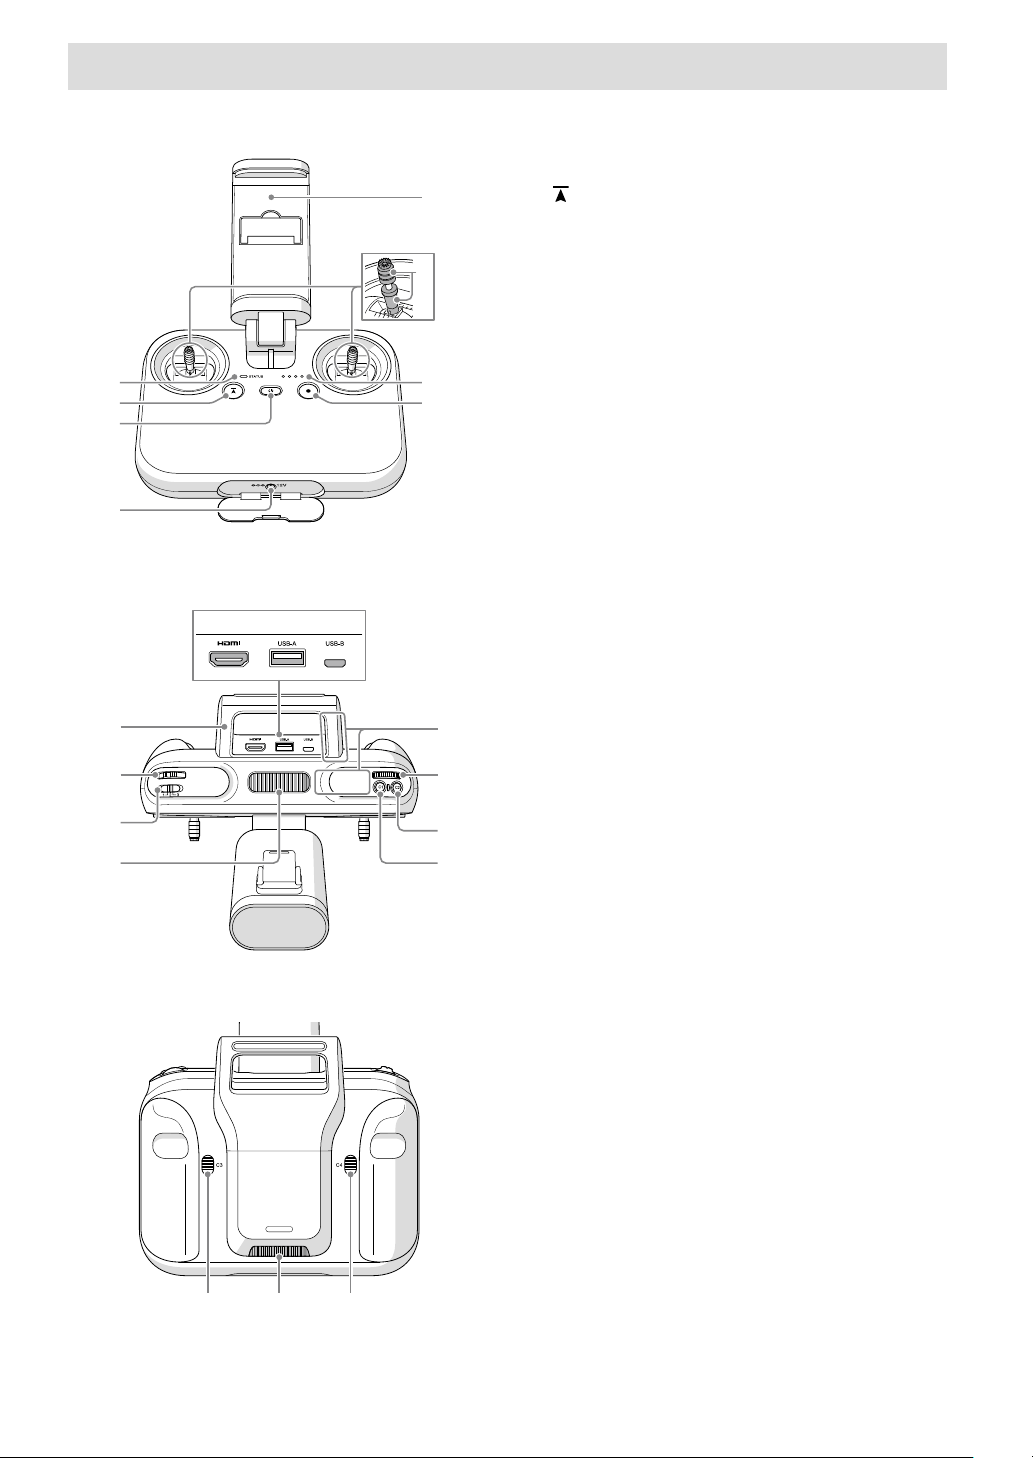
Remote controller
Status LED
(Automated flight pause) button
(Power) button
Power port
(MOVIE) button
Battery level LEDs
Control sticks
Lever heads
Mobile device holder
HDMI port
USB port (USB-A)
Micro USB port (USB-B)
Handle bar
Control lever
Flight mode switch
Air vent
C1 (Custom 1) button
C2 (Custom 2) button
Control dial
Antennas (built-in)
C3 (Custom 3) button
Air inlet
C4 (Custom 4) button
16
Mobile app “Airpeak Flight” installation/
initial setup
Installing the “Airpeak Flight” app
Before using this product, you will need to download and install the dedicated app “Airpeak Flight” on your mobile
device. The “Airpeak Flight” app is available for downloading and installation as shown below.
https://electronics.sony.com/airpeak/mobileapp
Notes
• To use the “Airpeak Flight” app, you must accept the terms of use and privacy policy. Carefully read and agree to the terms of use and
privacy policy displayed during the initial setup process before proceeding.
• ”Airpeak Flight,” “Airpeak Base,” “Airpeak Plus,” and any other Airpeak or third-party network services, content, operating systems, or
software are subject to terms and conditions and may be changed, interrupted, or discontinued at any time. Fees, registration, and
credit card information may also be required.
Signing in to the “Airpeak Flight” app
A Sony account and an internet connection are required when setting up the aircraft.
1
Start the “Airpeak Flight” app.
The initial setup screen is displayed. Tap [Next] to begin the initial setup process.
2
Follow the on-screen instructions to create a Sony account.
After you submit a request to create a new account with the basic information you entered, such as your user ID
(email address) and password, you will receive a message by email for email address validation. Follow the
instructions in the email to finish creating the account.
You can also sign in with a Sony account if you have one.
3
Sign in to the “Airpeak Flight” app.
Sign in with the user ID and password you specified when creating your account. After signing in, follow the
on-screen instructions and instructions in this manual (page 17) to set up the remote controller and aircraft.
Setup
17
Setup
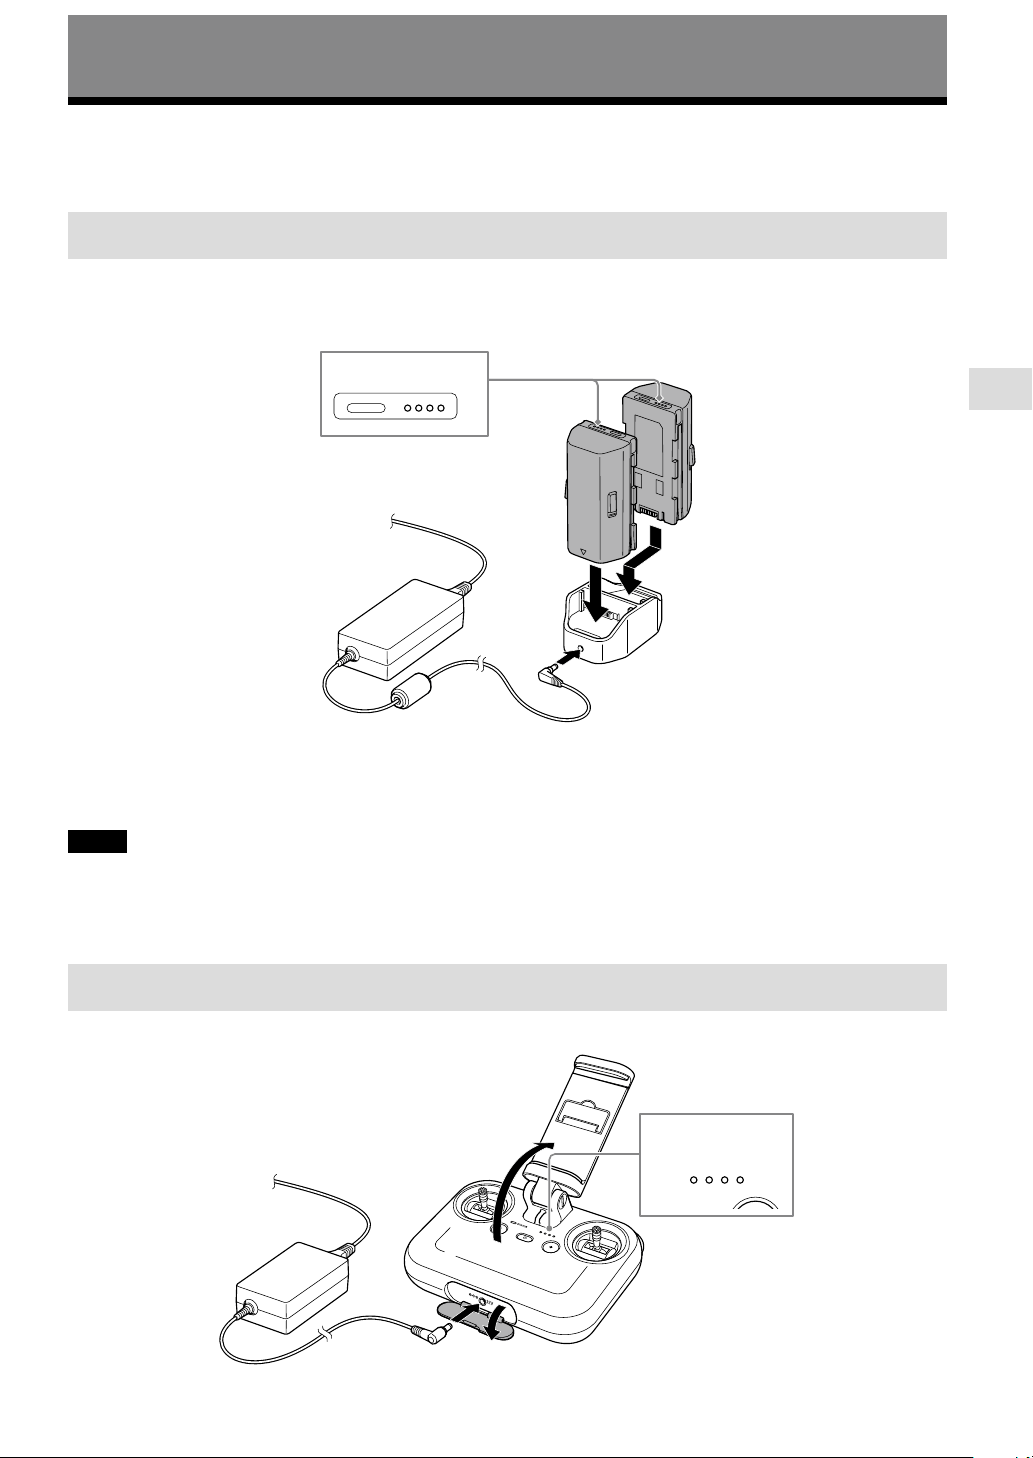
Charging the batteries
First charge the aircraft battery packs and built-in remote controller battery.
[1] Charging the aircraft battery packs
The battery level LEDs flash during charging and go off when the battery pack is fully charged.
The battery charger can hold two battery packs and will charge the second one after the first one is charged. Both
cannot be charged at the same time.
Battery level LEDs
To check the battery level
You can check the battery level by pressing the battery level button on each battery pack.
Notes
• It may take about 20 sec. before charging begins. Wait until the battery level LEDs start flashing.
• A safety mechanism prevents charging when battery packs are hot or cold. Charging begins automatically once battery packs can be
charged at room temperature.
• If the difference between the remaining battery level in the two battery packs is 20% or more, the aircraft motor will not start.
[2] Charging the built-in remote controller battery
The battery level LEDs flash during charging and go off when the battery is fully charged.
Battery level LEDs
18
To check the battery level
You can check the battery level by pressing the (Power) button on the remote controller once.
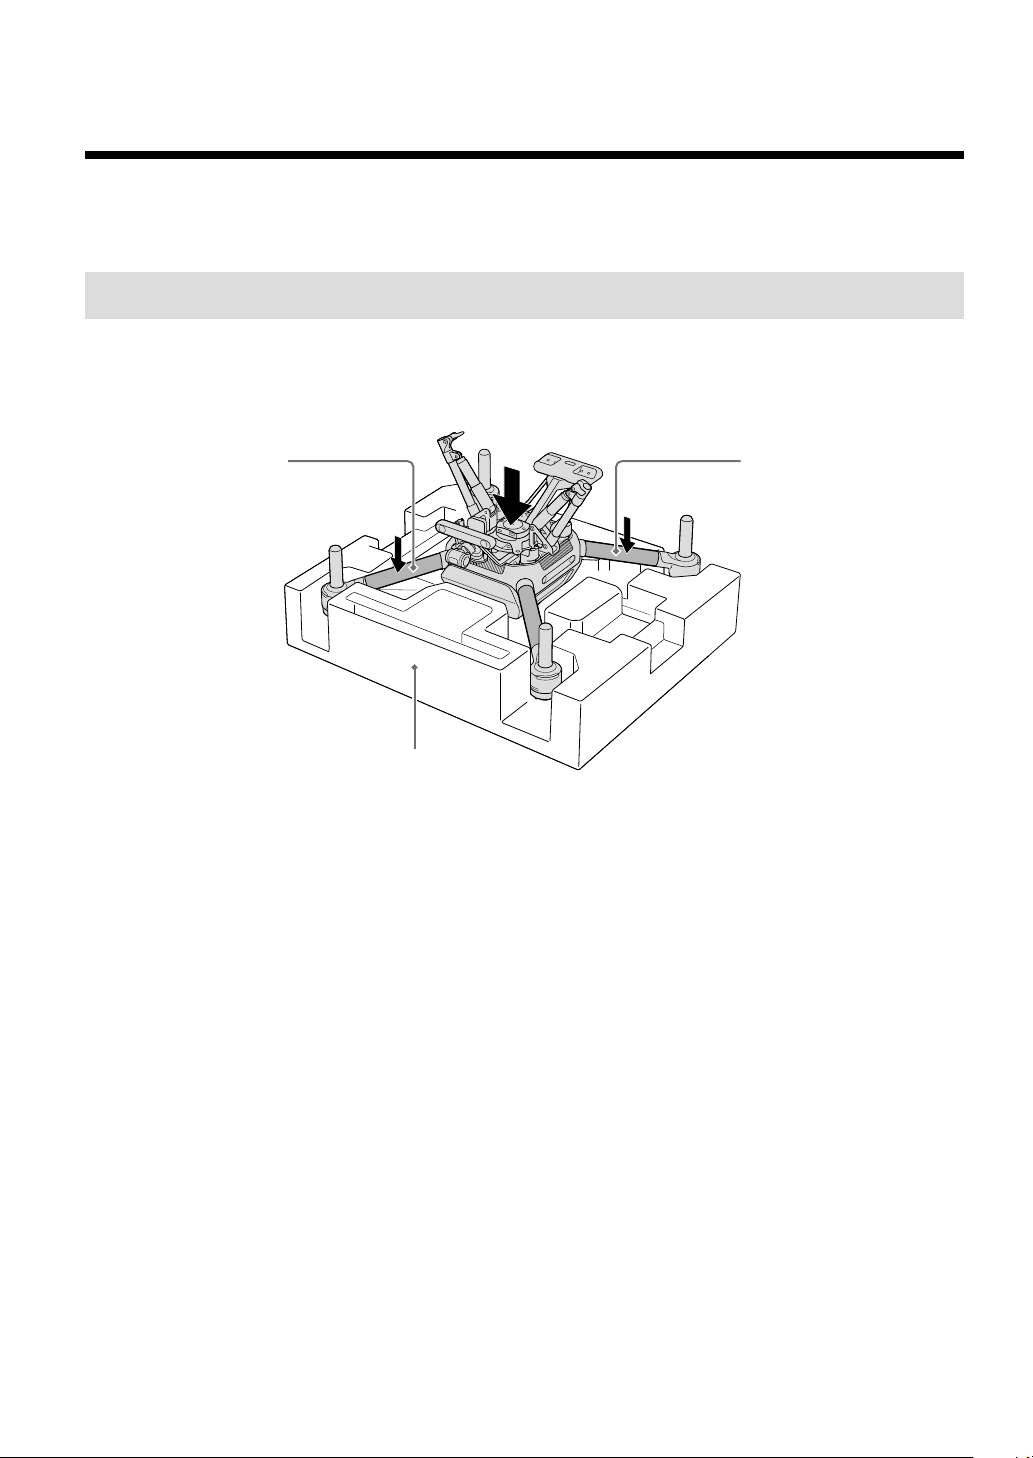
Assembling the aircraft
You can view an animation of the assembly procedure in the “Airpeak Flight” app.
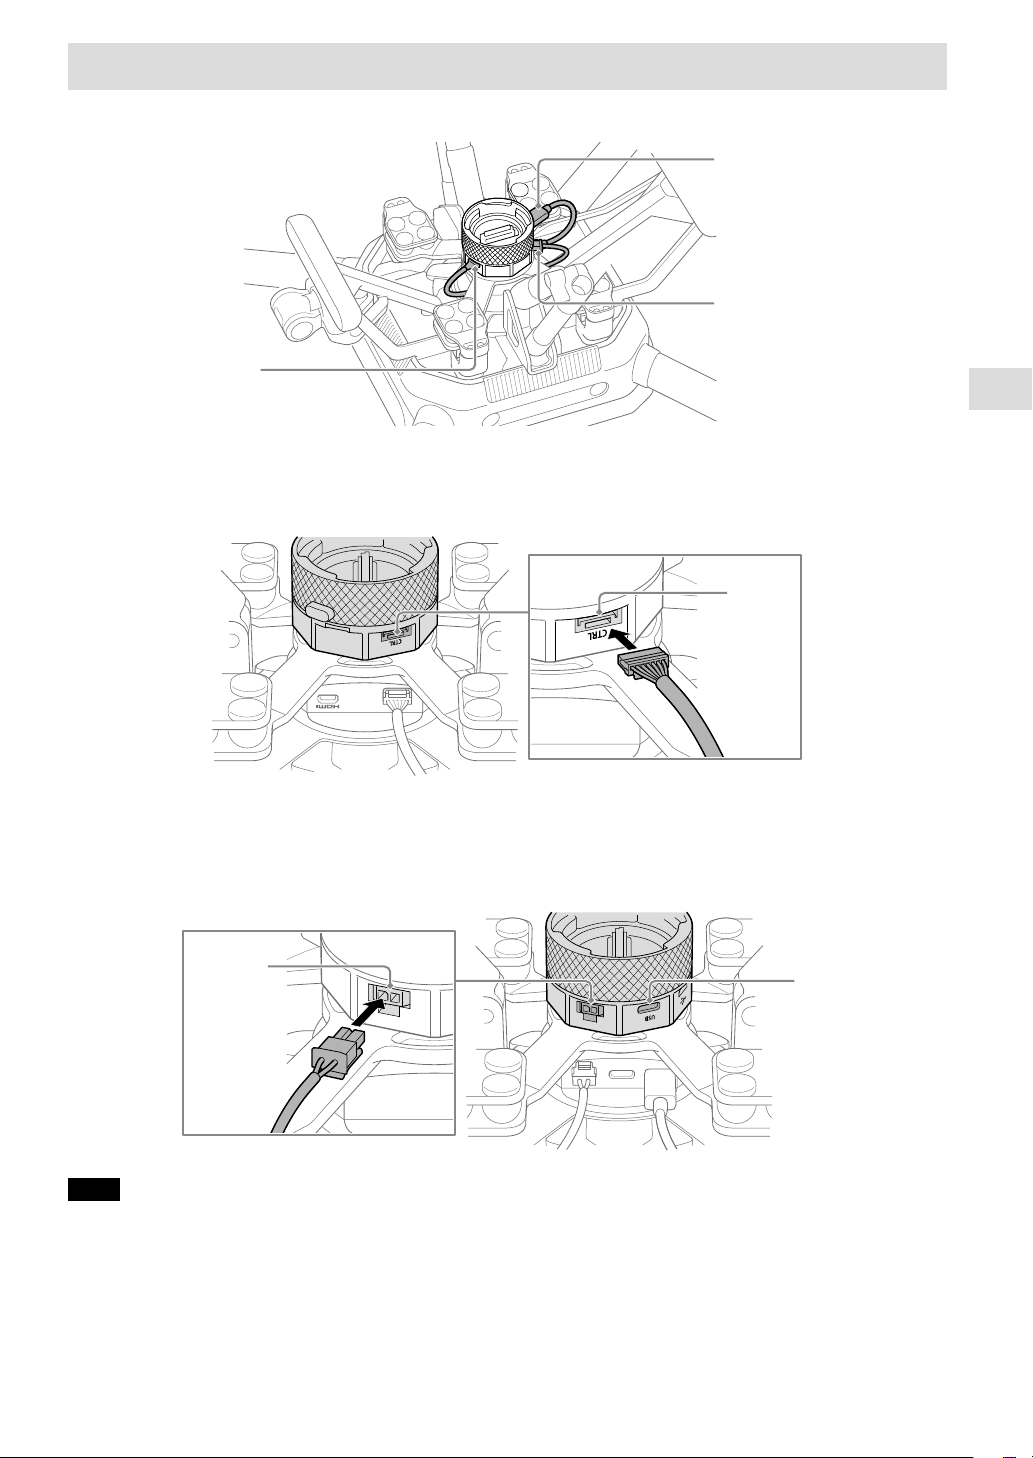
[1] Connecting cables to the aircraft
1
Place the aircraft upside down.
After removing the aircraft from the outer box, place the top cushioning on a flat surface. Holding the aircraft
securely by the frame arms, place it upside down on the cushioning.
Frame arm Frame arm
Top cushioning
Setup
19
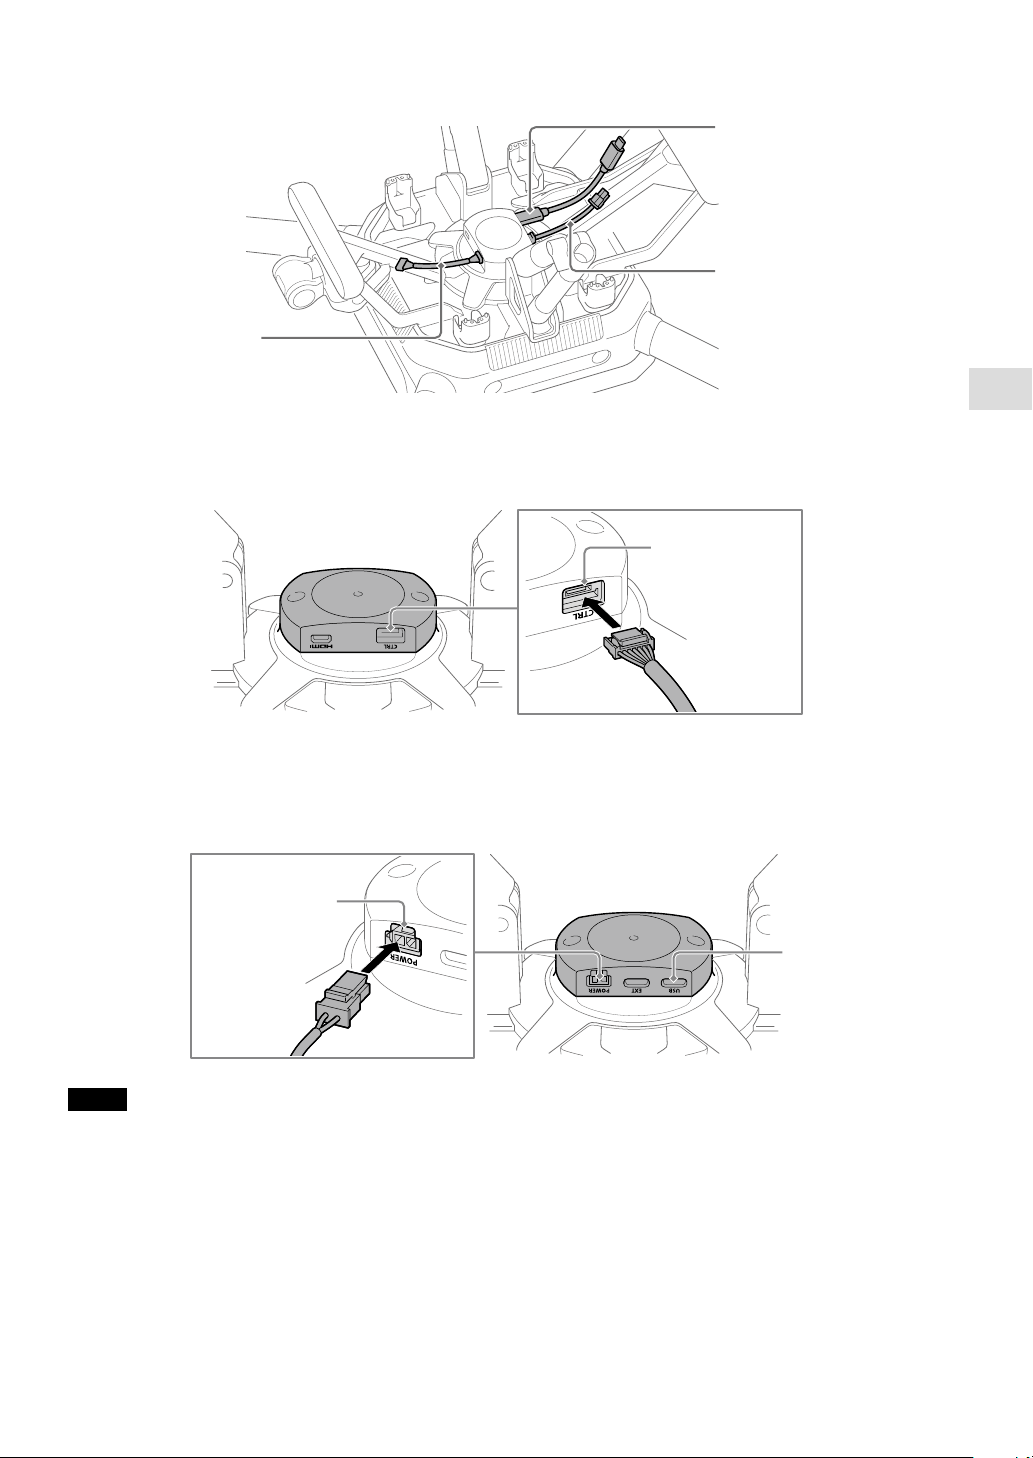
2
Connect the cables to the aircraft.
Connect the cables to the connection hub on the aircraft.
Control cable
(aircraft — gimbal)
Power cable
(aircraft — gimbal)
USB Type-C® cable
(aircraft — gimbal)
Front of aircraft
Connect the control cable (aircraft — gimbal) to the control port.
Rear of aircraft
Connect the power cable (aircraft — gimbal) to the POWER port.
Connect the USB Type-C® cable (aircraft — gimbal) to the USB port.
Notes
• When placing the aircraft upside down, be careful to keep the propeller attachment points of each motor off the surface.
• A locking mechanism is used on the control cable (aircraft — gimbal) and power cable (aircraft — gimbal). Insert fully until the plug
locks into place.
¼
Hint
You can connect the USB Type-C® cable (aircraft — gimbal) to either USB port (USB or EXT port).
20
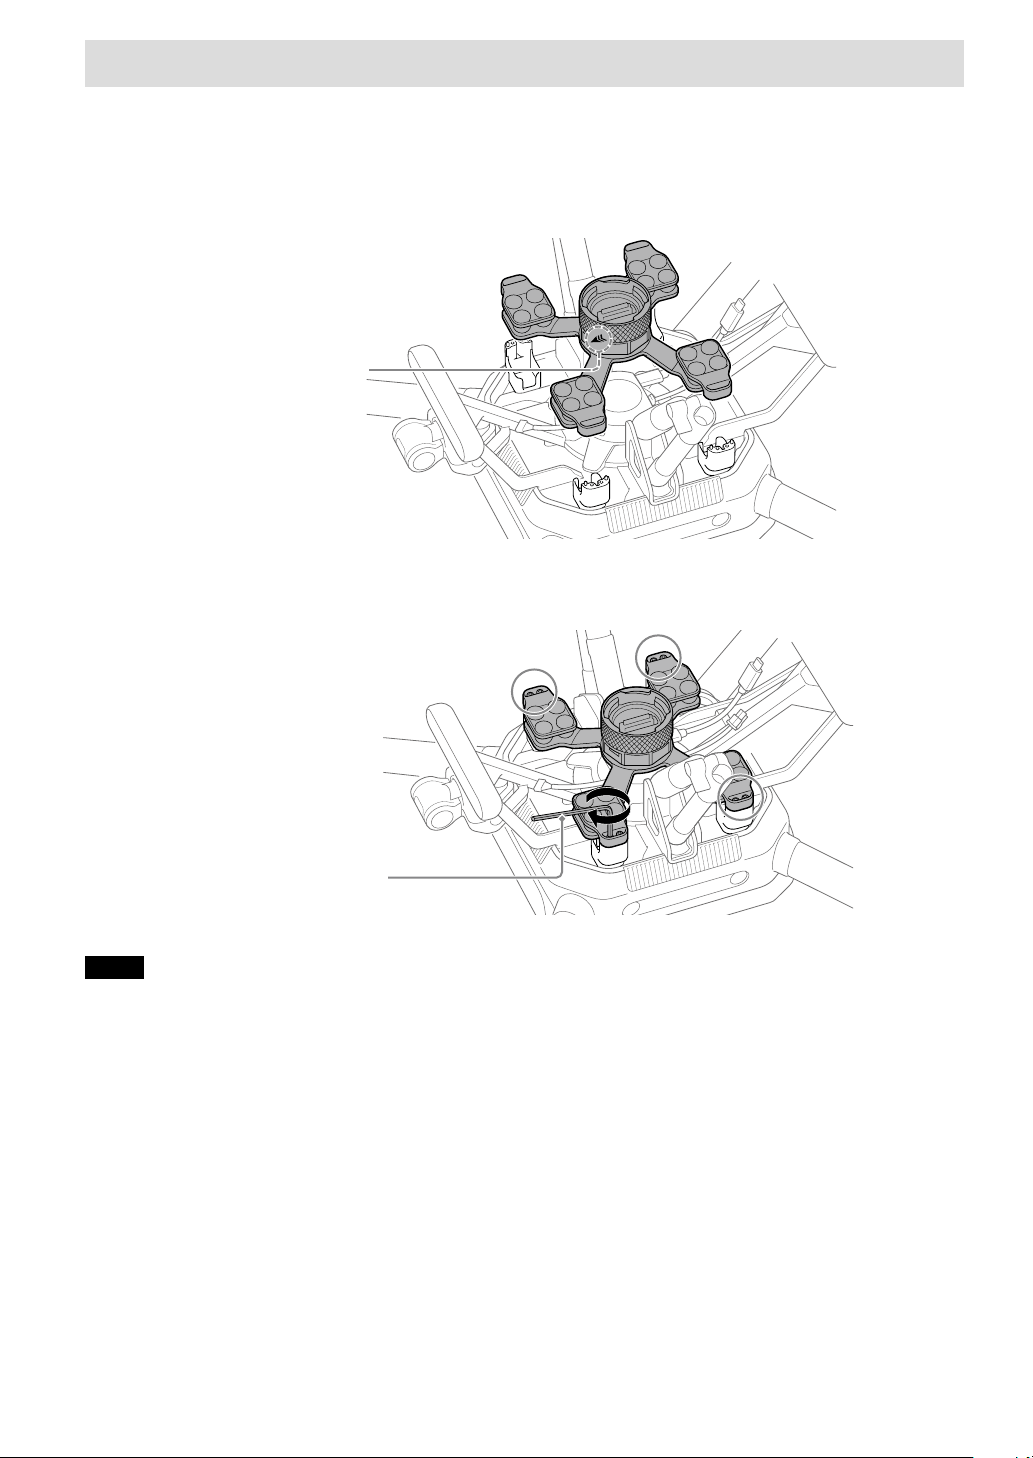
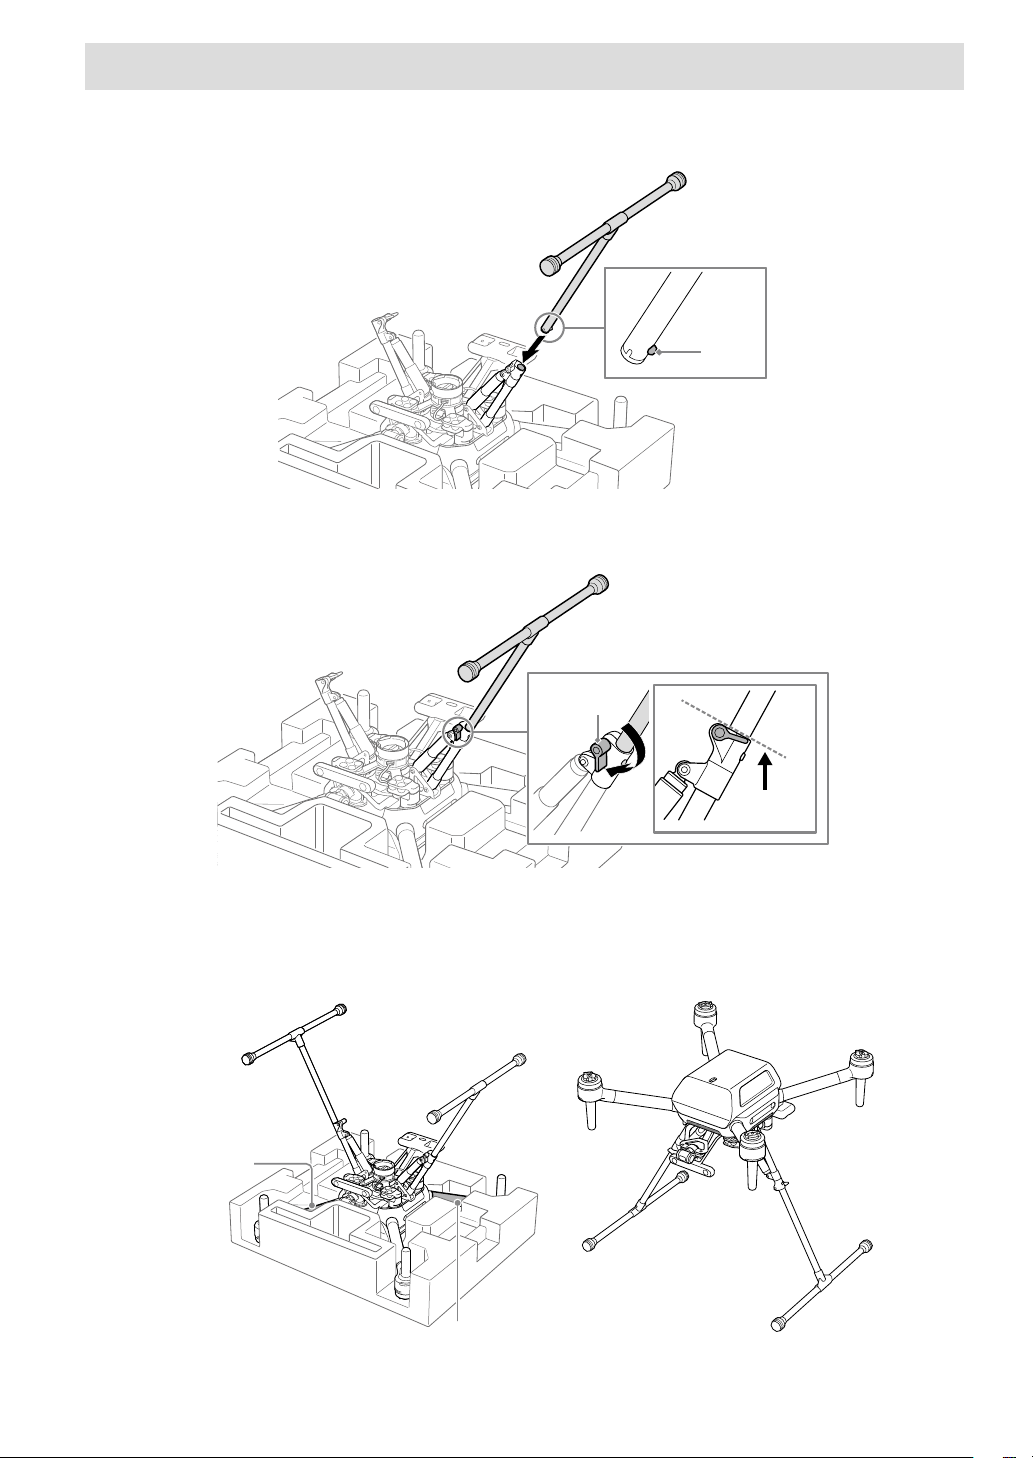
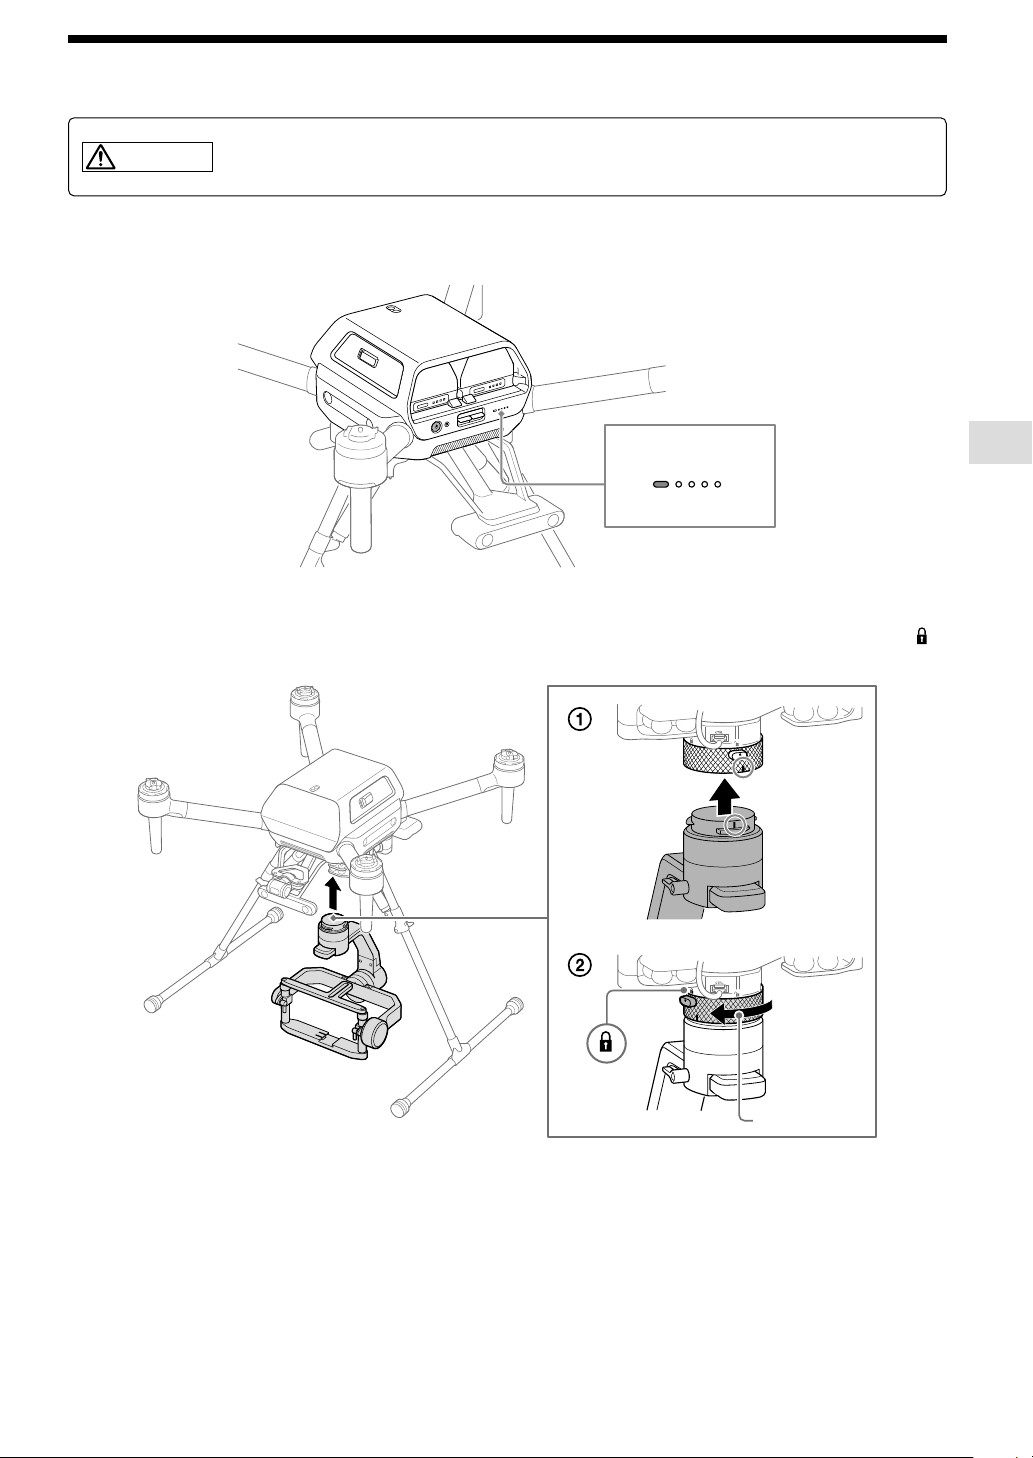
[2] Attaching the damping plate to the aircraft
The damping plate (with the quick-release pre-installed), hex wrench, and hex screws are included in the gimbal set
(sold separately).
1
Confirm the orientation of the damping plate and place it on the aircraft.
With the quick-release arrow surface face-down and the arrow pointing toward the front of the aircraft, place the
damping plate on the attachment points of the aircraft.
Quick-release arrow
2
Attach the damping plate to the aircraft.
Attach it with the hex wrench (H2.5 mm) (0.1 in.) and hex screws included in the gimbal set (sold separately).
Attach at two positions
on each leg (eight total).
Notes
• Tighten the screws firmly using the hex wrench included in the gimbal set (sold separately). Otherwise, the screws may loosen and
detachment may occur during flight.
• When using tools other than the hex wrench included in the gimbal set (sold separately), be sure to tighten the screws with a torque
of 1.5 ±0.5 Nm.
Setup
21
[3] Connecting cables to the quick-release
Insert the plugs at the other ends of the cables connected to the aircraft in the corresponding quick-release ports.
Control cable
(aircraft — gimbal)
Power cable
(aircraft — gimbal)
USB Type-C® cable
(aircraft — gimbal)
Front of aircraft
Connect the control cable (aircraft — gimbal) to the control port.
CTRL
Rear of aircraft
Connect the power cable (aircraft — gimbal) to the POWER port.
Connect the USB Type-C® cable (aircraft — gimbal) to the USB port.
EXTUSB POWER
POWER
POWER
Note
A locking mechanism is used on the control cable (aircraft — gimbal) and power cable (aircraft — gimbal). Insert fully until the plug locks
into place.
22
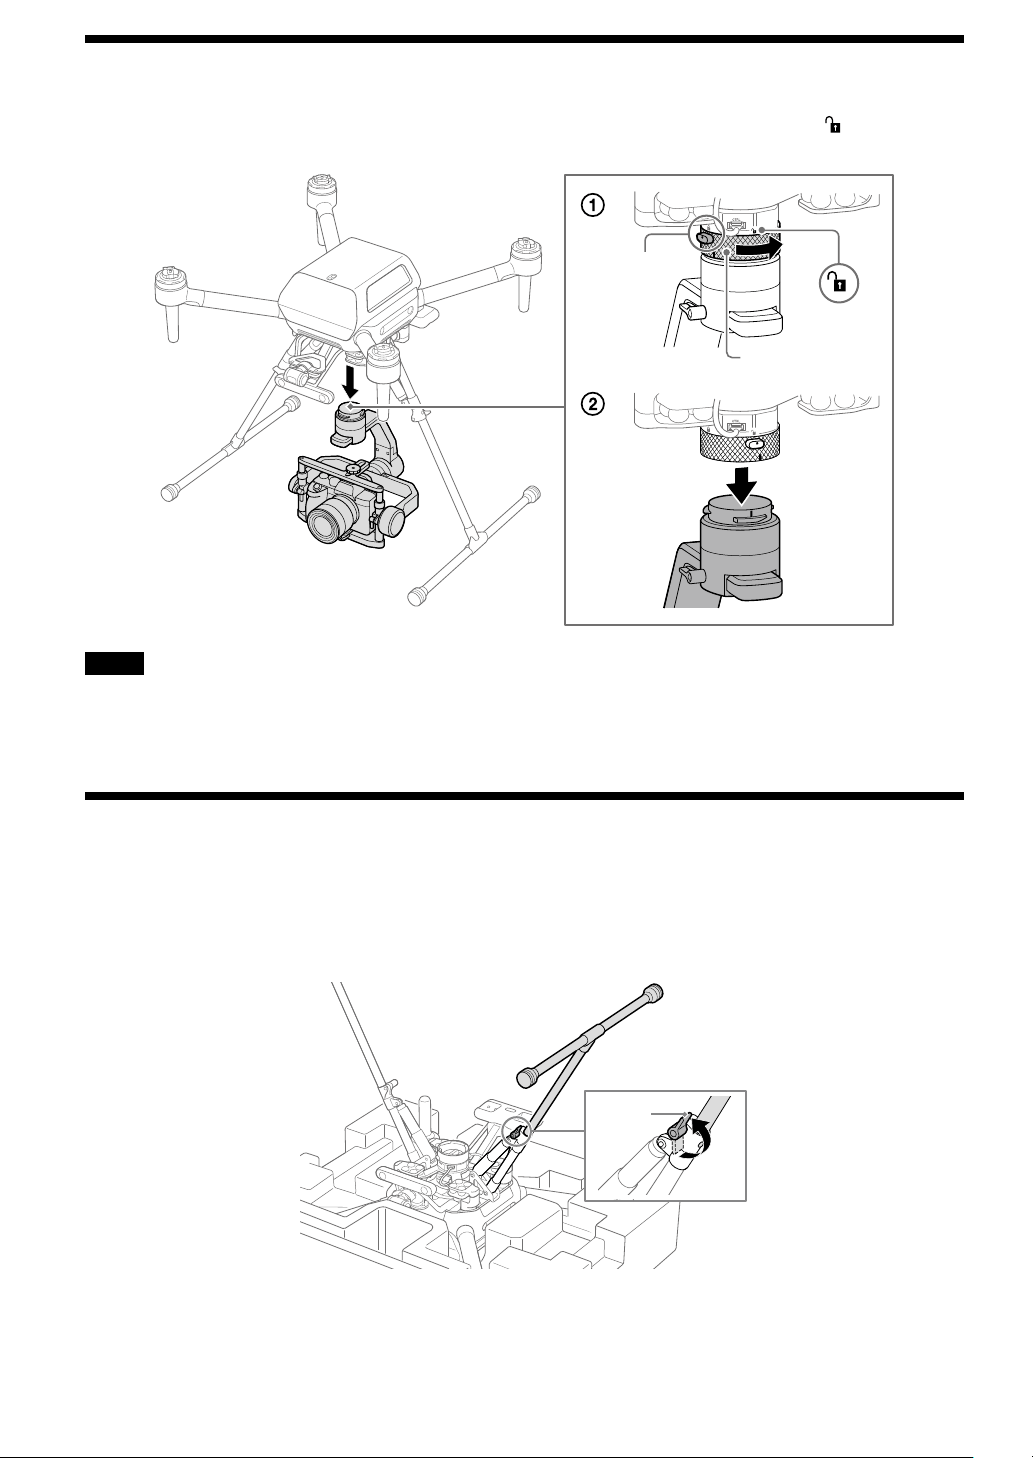
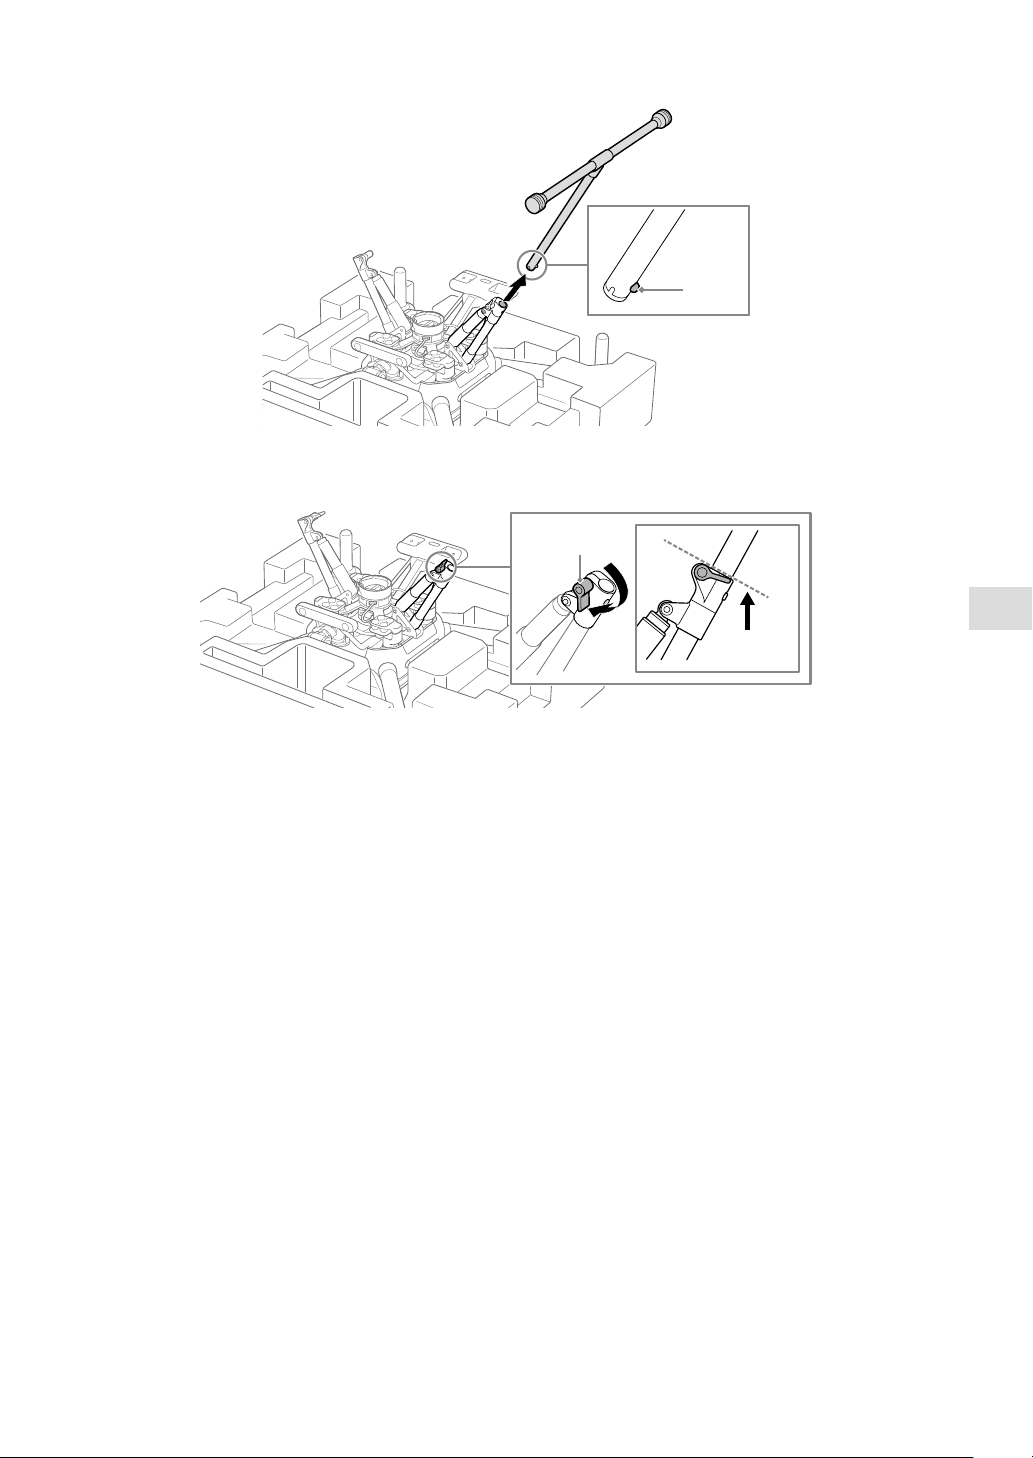
[4] Attaching landing gear to the aircraft
1
Press in the ball detent and insert the landing gear.
Make sure that the ball detent is fully engaged.
Ball
detent
2
Turn the lever to lock the landing gear.
Turn both landing gear levers below the dotted line as shown below.
Lever
3
Attach the other landing gear the same way.
4
Turn the aircraft over.
Holding the aircraft securely by two frame arms, turn it over.
Frame arm
Frame arm
Setup
23
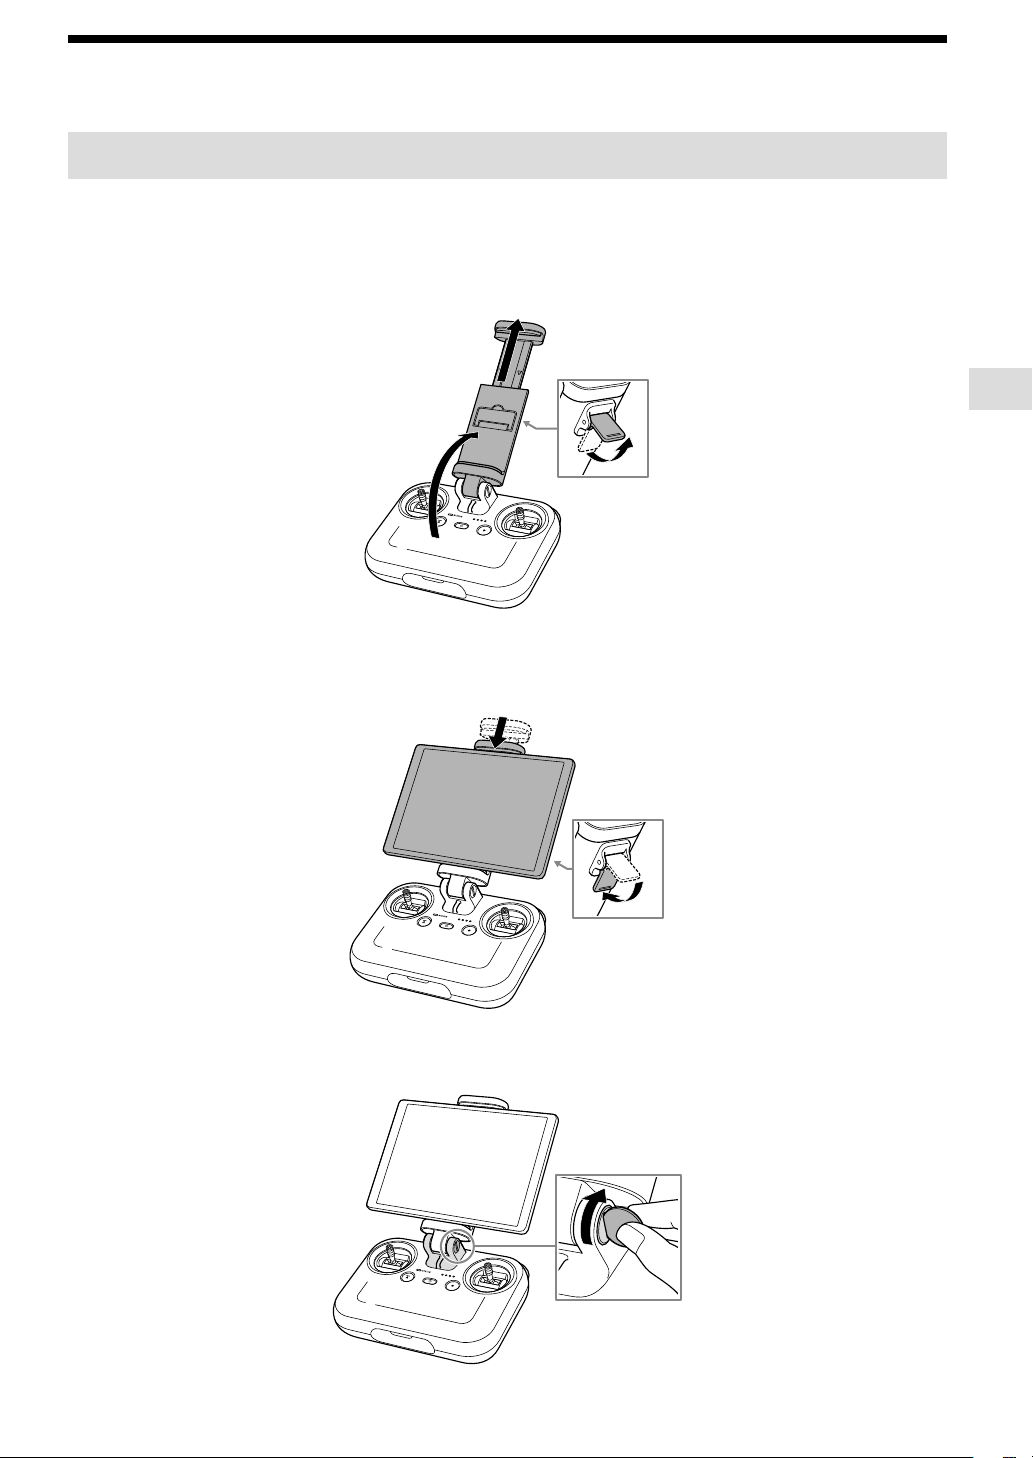
Attaching a mobile device to the remote controller
[1] Attaching a mobile device
On the remote controller, mount the mobile device (tablet or smartphone) on which you have installed the “Airpeak
Flight” app.
1
Extend the mobile device holder.
Raise the lever on the back and extend the mobile device holder.
2
Mount and secure the mobile device.
Place the mobile device on the mobile device holder, adjust the holder height, and then lower the lever to secure
the mobile device.
3
Stabilize the mobile device holder.
Tighten the screw at the base of the holder by turning it with a coin or tool.
24
Mounting smartphones
Raise the smartphone holder in the middle of the mobile device holder, and then mount the smartphone.
Smartphone
holder
Note
Mobile devices may fall off unless they are correctly secured with the lever.
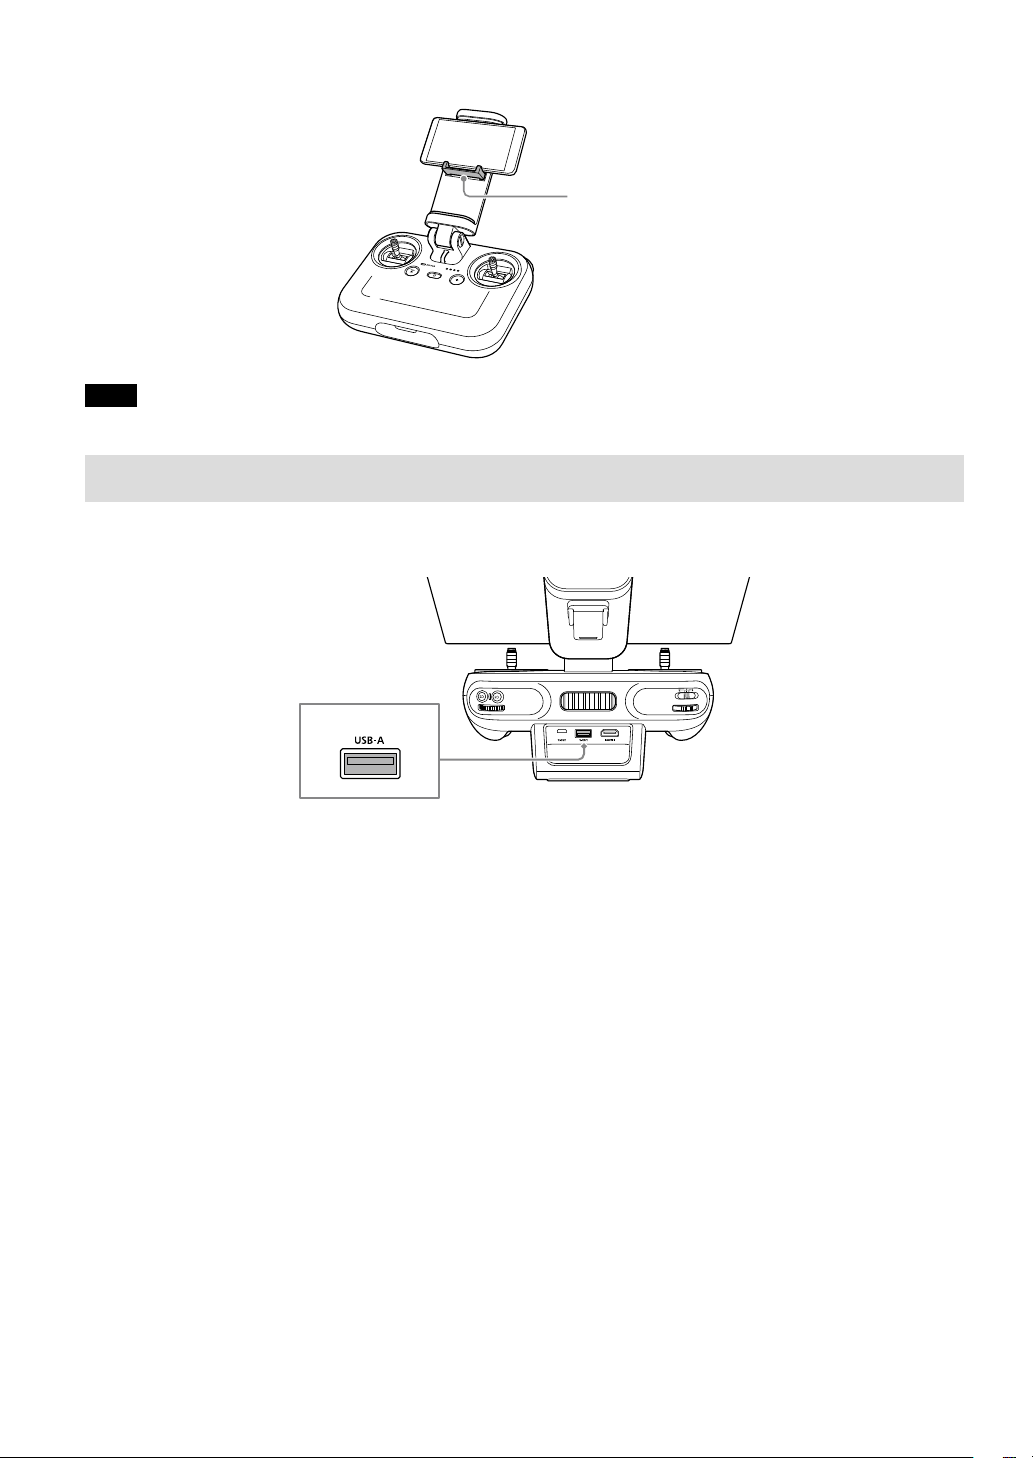
[2] Connecting the cable
Connect the cable included with your mobile device or another compatible cable to the remote controller USB port
(USB-A) and the mobile device port.
USB port (USB-A)
Setup
25
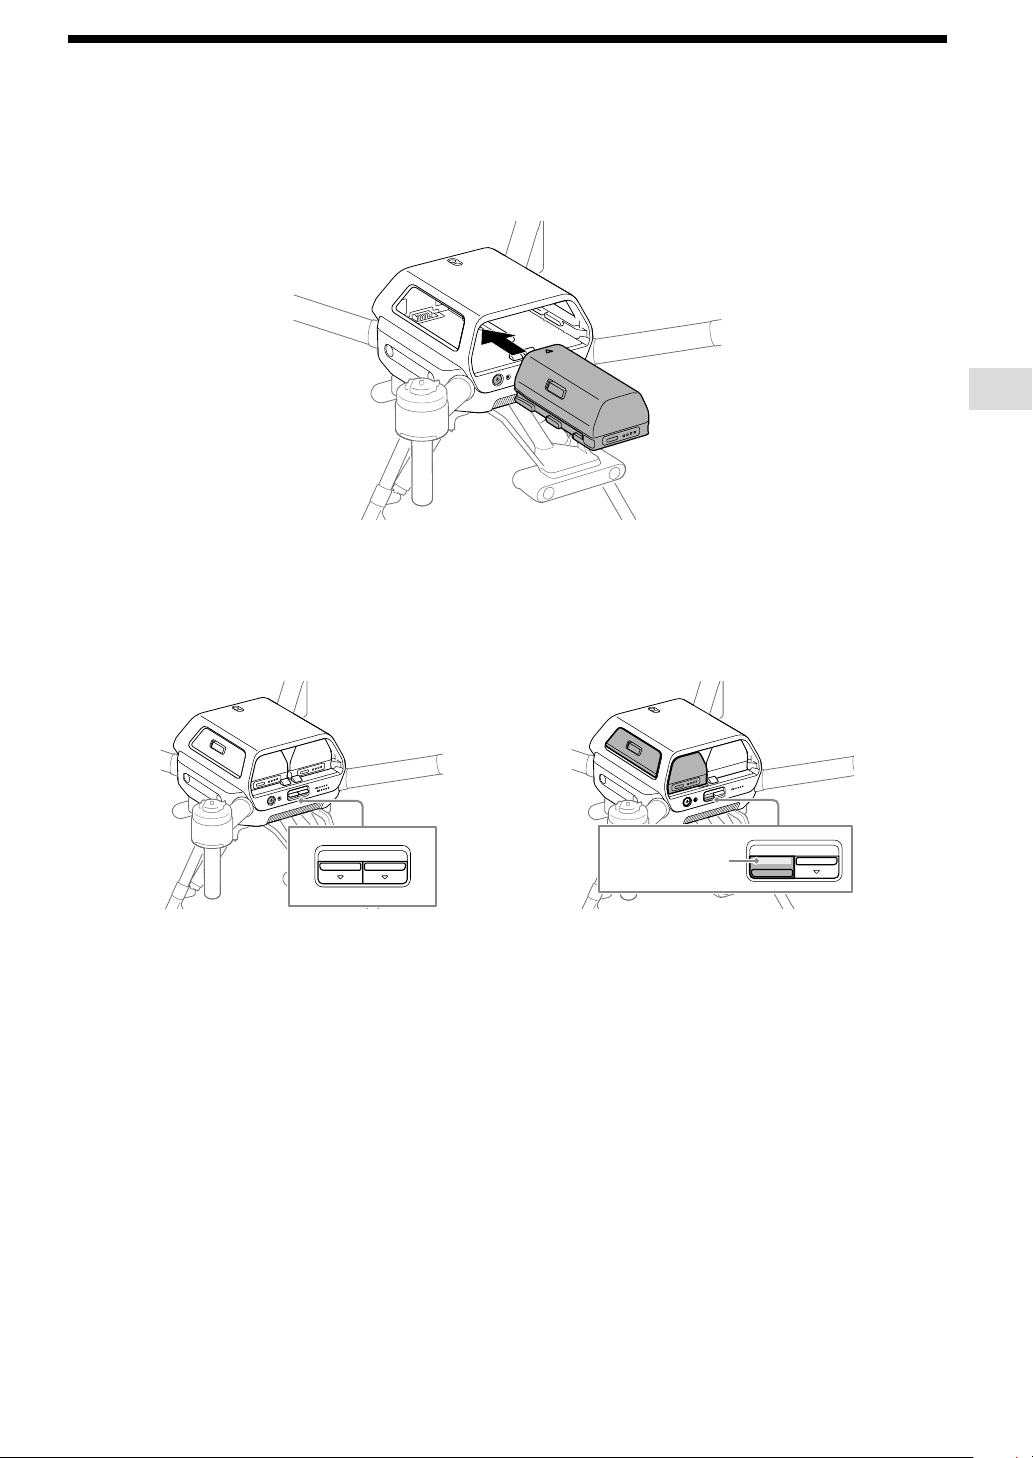
Loading battery packs in the aircraft
Load the two battery packs in battery slots 1 and 2 at the rear of the aircraft.
1
Load the battery packs in the aircraft.
Insert firmly until the battery packs click and lock into place.
BATTERY RELEASE
2
Confirm that the battery packs are loaded correctly.
Battery packs are not loaded correctly if a yellow line is visible and the BATTERY RELEASE lever has not returned to
the original position. Firmly insert battery packs all the way in.
BATTERY RELEASE
BATTERY RELEASE
Loaded correctly
BATTERY RELEASE
BATTERY RELEASE
Yellow line
Loaded incorrectly
¼
Hint
• Battery levels can be checked by pressing the battery level button on each battery pack. Before flights, be sure to confirm that the
battery levels are enough for the flights you have planned.
• To unload a battery pack, press the BATTERY RELEASE lever and remove it.
26
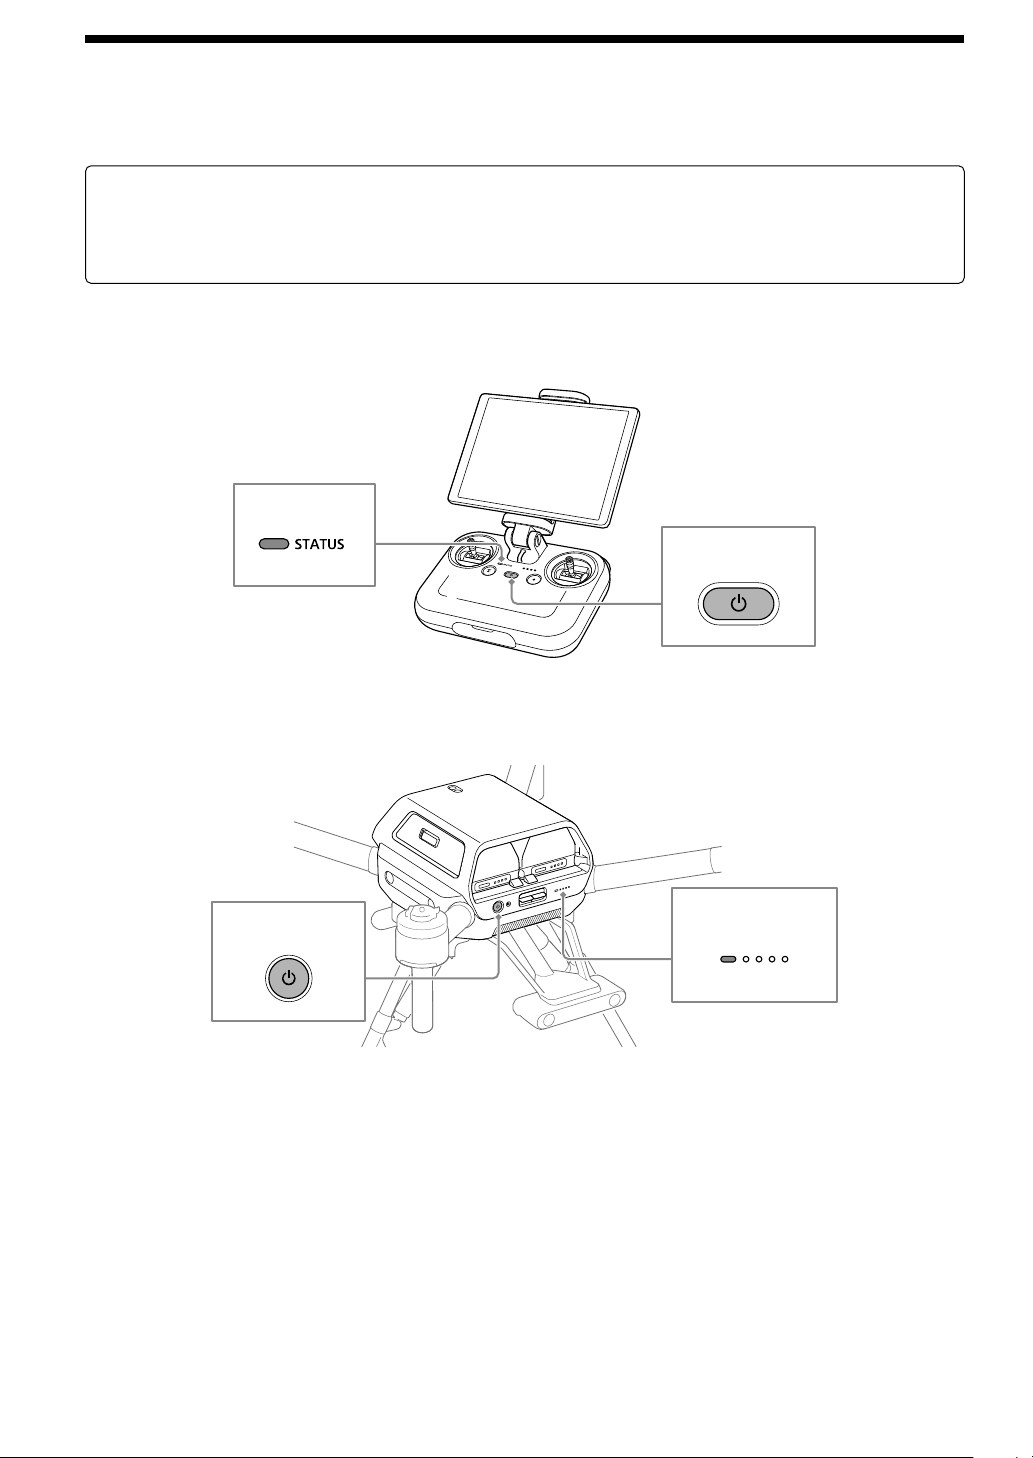
Linking/setting up the remote controller and aircraft
Follow the on-screen instructions in the “Airpeak Flight” app to link the remote controller and aircraft and set up the
aircraft.
Preparation
• Confirm that the mobile device mounted on the remote controller is connected to the internet.
• Charge the built-in remote controller battery sufficiently (page 17).
• Charge both aircraft battery packs sufficiently (page 17).
1
Turn on the remote controller.
Press and hold the (Power) button for at least 2 sec. to turn on the power. After startup, the status LED stops
flashing and remains on.
(Power) button
Status LED
2
Turn on the aircraft.
Press and hold the (Power) button for at least 2 sec. to turn on the power. After startup, the power status LED
stops flashing and remains on.
BATTERY RELEASE
(Power) button
Power status LED
3
Tap [Start link] in the “Airpeak Flight” app.
As you proceed with the [Initial setup] procedure in the “Airpeak Flight” app, the [Link remote controller to aircraft]
screen will be displayed. On this screen, tap [Start link] to initiate the process of linking the remote controller and
aircraft.
Setup
27
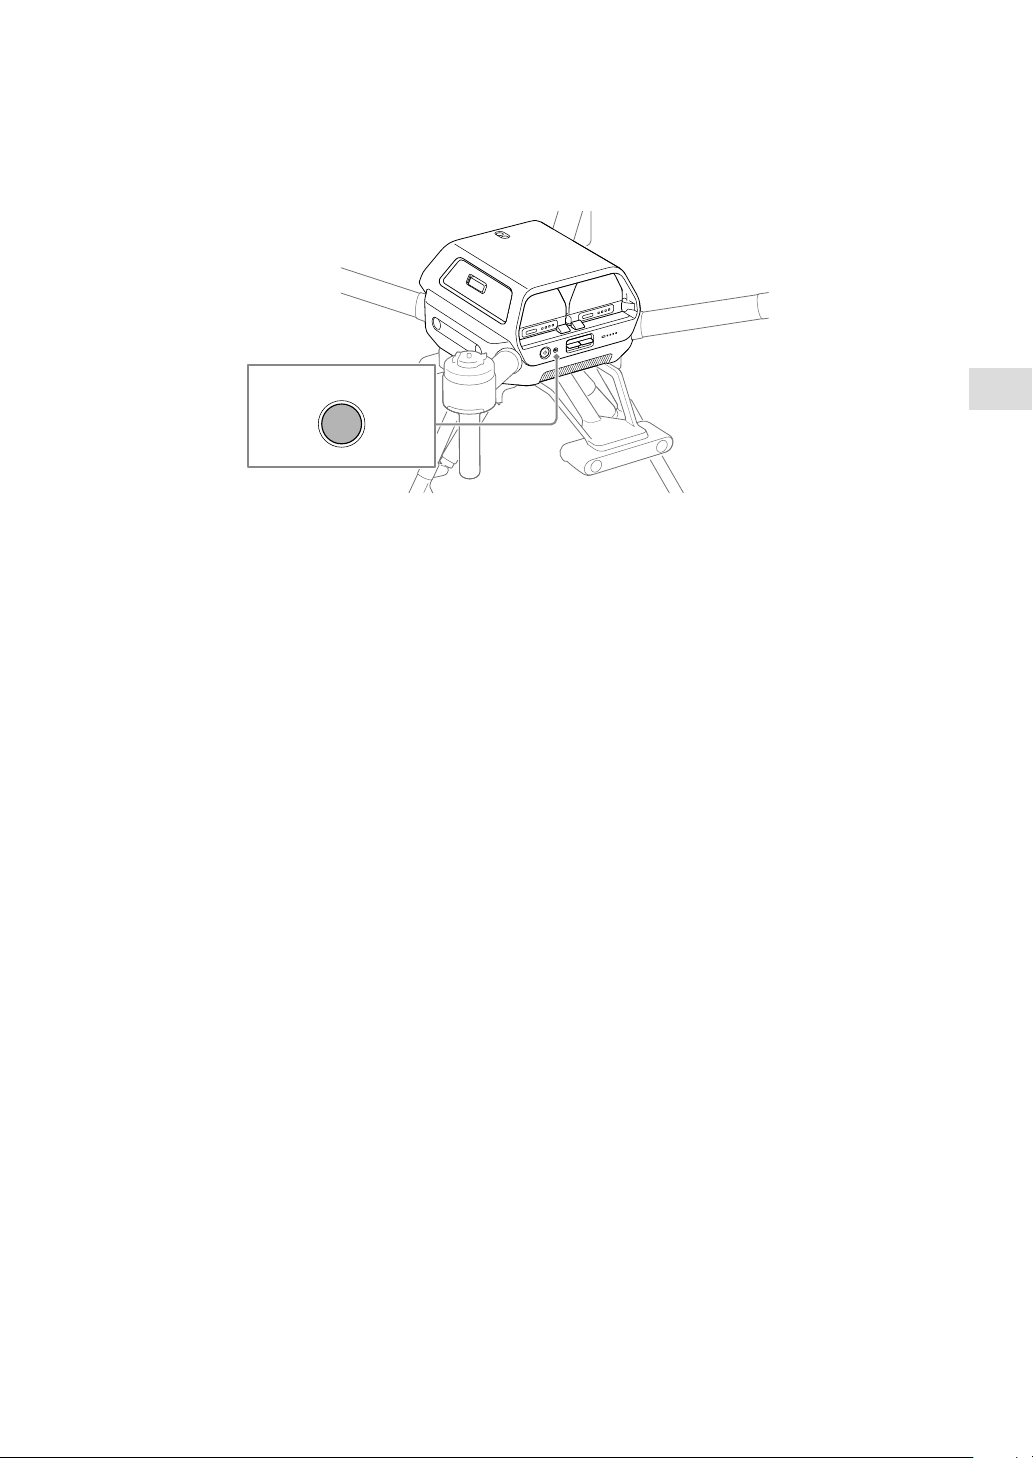
4
Press and hold the LINK button on the aircraft.
Within 2 min., press and hold the LINK button on the aircraft for 2 sec. to link it and remote controller. Successful
linkage is indicated by a remote controller blue status LED (in purple when linked as [Sub] in dual operation mode)
and the message [Aircraft and remote controller connected] on the “Airpeak Flight” app screen.
If linkage fails, check for obstacles between the aircraft and the remote controller. Move the aircraft and remote
controller to avoid obstacles and tap [Retry] to try again.
BATTERY RELEASE
LINK button
5
Perform aircraft setup.
After the successful linkage screen displayed, tap [Start using] to set up the aircraft. When the message
[Now the aircraft is ready to fly] is displayed, setup is complete.
28
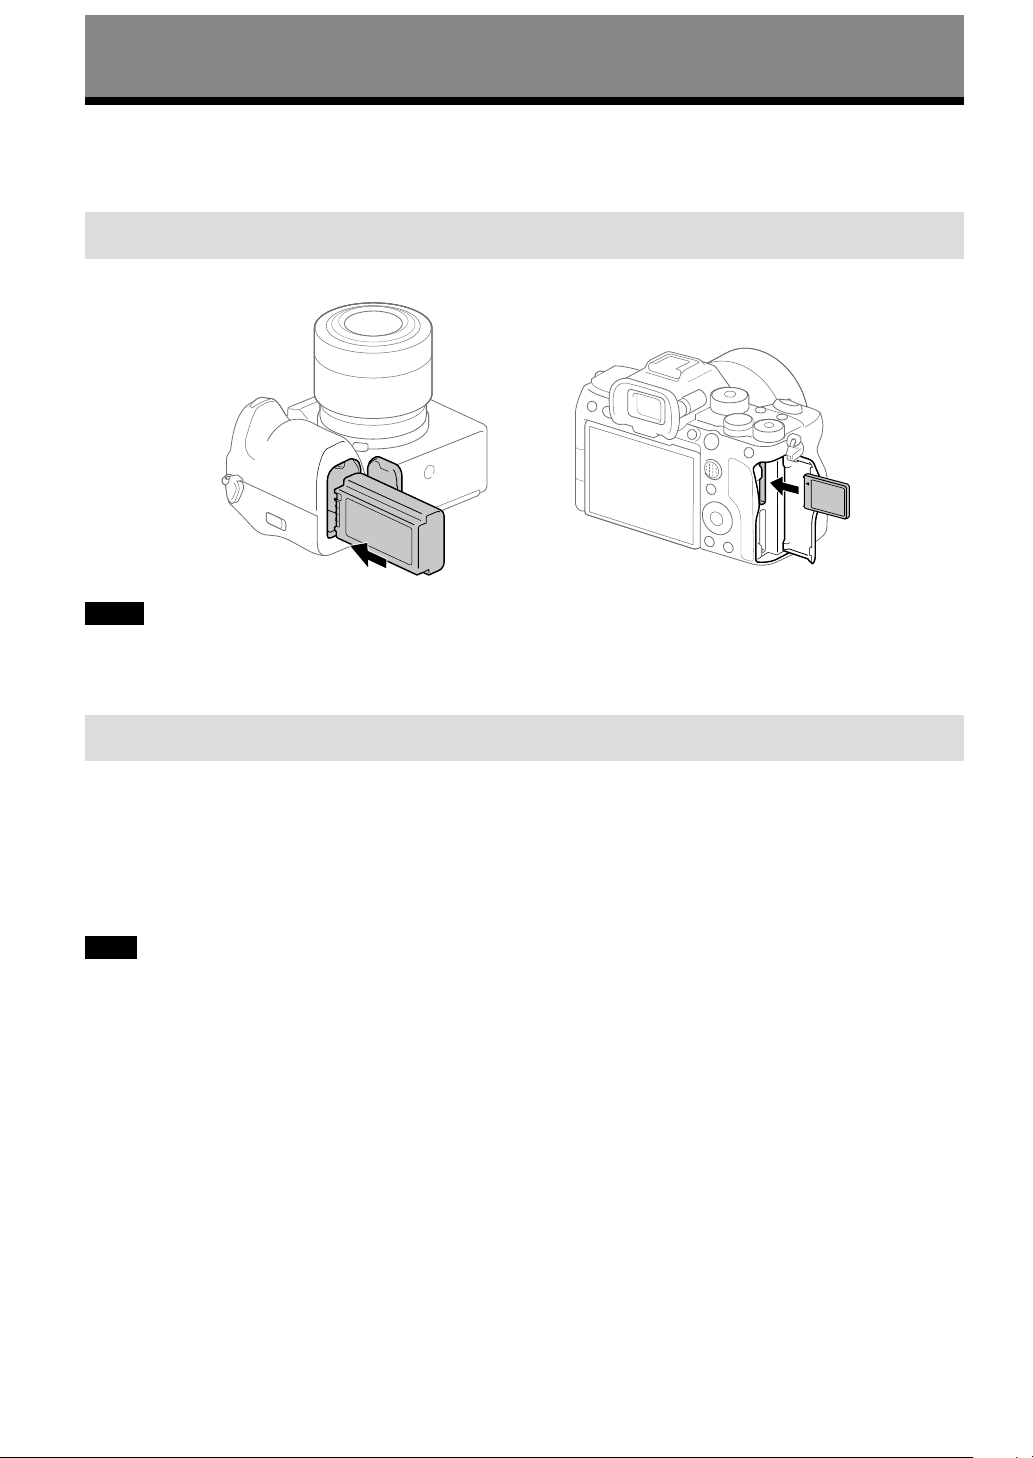
Gimbal and camera mounting
Preparing a camera
Prepare the camera before mounting it on the gimbal. (Both the camera and gimbal are sold separately.)
[1] Inserting a battery pack and memory card
Insert a battery pack and memory card in the camera in advance. (ILCE-7SM3 is used in this example.)
Memory card
Battery pack
Notes
• During flights, cameras consume battery power as you shoot. Always charge the camera battery sufficiently before mounting on the
gimbal.
• Use memory cards with sufficient free space for recording images.
[2] Configuring required settings on the camera
Configure the following setting items on the camera. For setting instructions, refer to the camera operating instructions
or online Help Guide (Web manual).
• [PC Remote Function] — [PC Remote]: [On]
• [PC Remote Function] — [Still Img. Save Dest.]: [Camera Only]
• [Ctrl w/ Smartphone] — [Ctrl w/ Smartphone]: [Off]
• [USB Power Supply]: [Off]
Note
Be sure to set the Bluetooth function of the camera to [Off]. If it is set to [On], it may affect the wireless transmission function.
Gimbal and camera mounting
29
Mounting the gimbal on the aircraft
WARNING
Carefully follow these instructions. Errors in set-up may cause the camera to detach and fall
from the aircraft when in flight, which could result in injury or property damage.
1
Make sure the aircraft is off.
Confirm that the power status LED of the aircraft is off.
BATTERY RELEASE
Power status LED
2
Mount the gimbal on the aircraft.
With the marks on the gimbal and quick-release aligned, attach the gimbal. Turn the ring toward the lock icon ( )
until it clicks and locks into place.
Ring
Align the
marks and
attach the
gimbal.
30
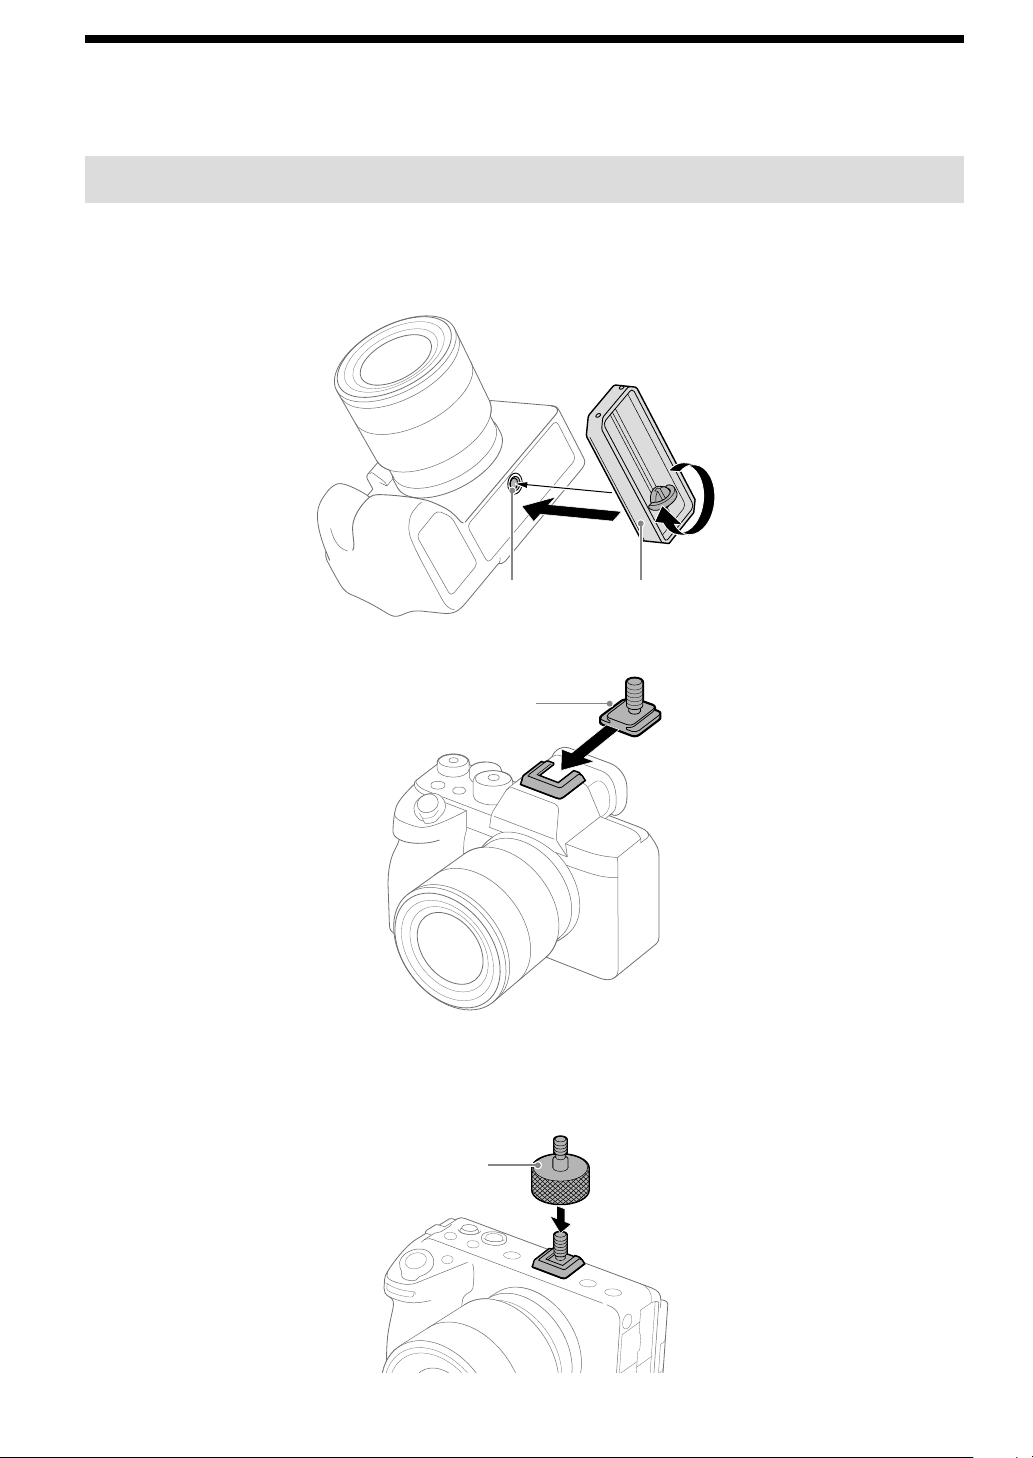
Mounting a camera on the gimbal
The camera plate, hot shoe adapter, and top camera screw are included in the gimbal set (sold separately).
[1] Attaching the camera plate and hot shoe adapter to the camera
1
Attach the camera plate to the camera.
Attach the camera plate to the tripod socket on the bottom of the camera. Tighten the thumbscrew to secure it
firmly.
Camera plateTripod socket
2
Attach the hot shoe adapter to the camera.
Hot shoe
adapter
To use a camera with a short height
When using a camera with a short height such as the ILME-FX3 or ILCE-7C, attach the hot shoe extension to the hot
shoe adapter. The hot shoe extension is included in the gimbal set (separately sold).
Hot shoe
extension
Gimbal and camera mounting
31
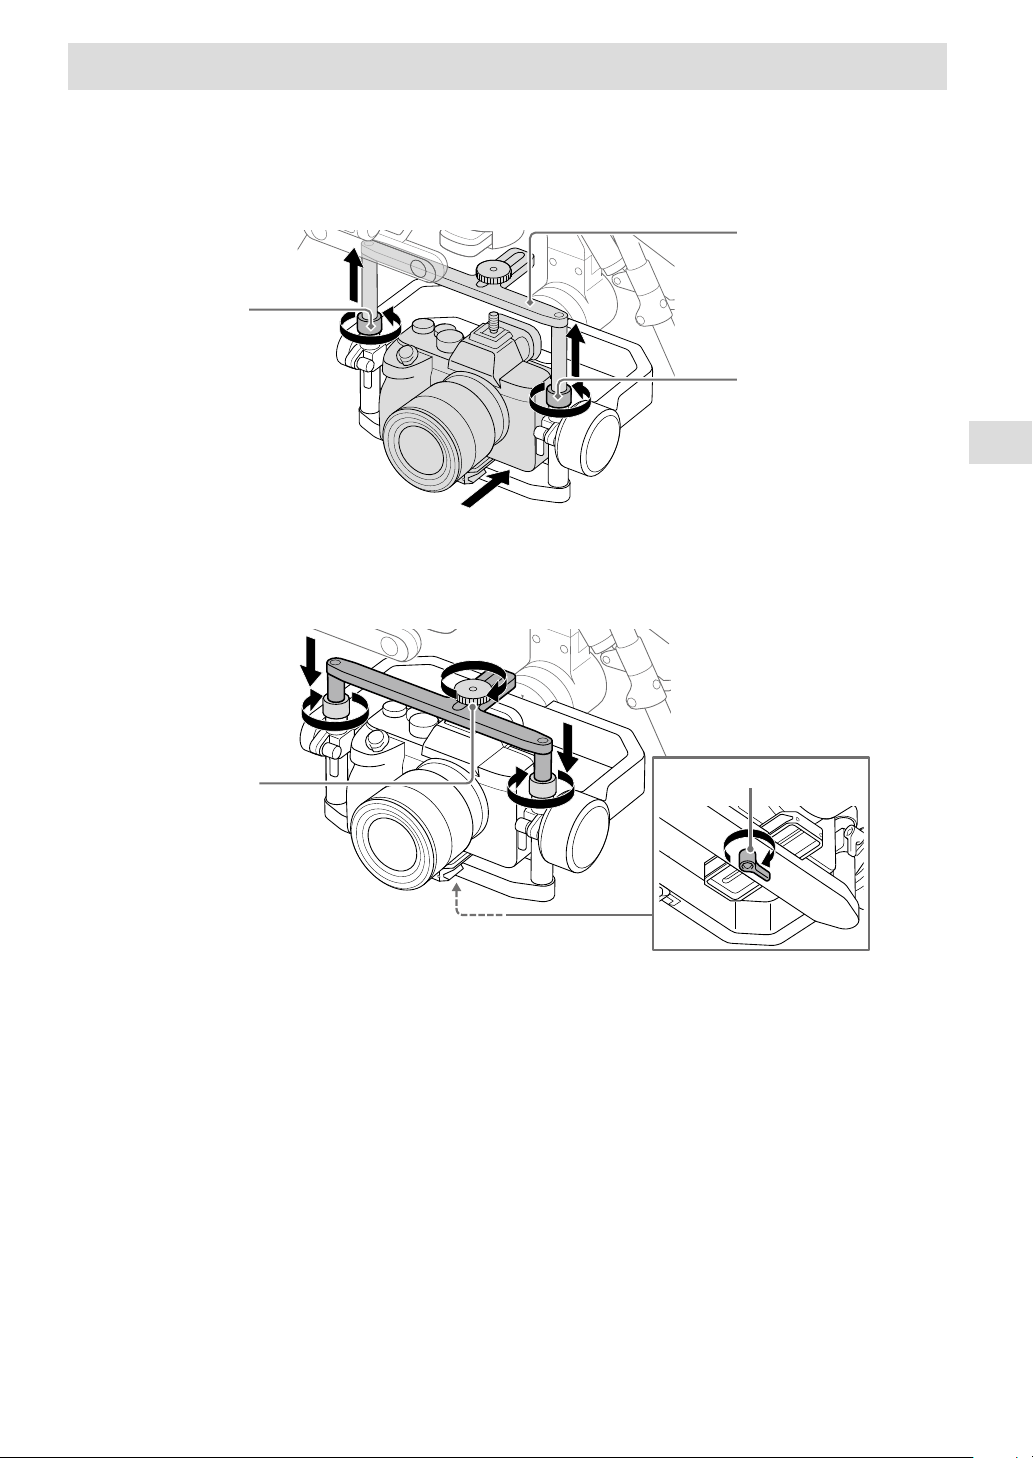
[2] Mounting the camera on the gimbal
1
Place the camera in the gimbal.
Loosen the locking screws on both sides of the gimbal frame, extend the tilt top bar to make it higher, and place the
camera in the gimbal from the front. Slide the camera plate attached to the camera into the groove on the bottom
part of the frame.
Tilt top bar
Locking
screw
Locking
screw
2
Secure the camera in the gimbal.
Lower the tilt top bar, tighten the locking screws on both sides, and tighten the top camera screw on the hot shoe
adapter screw. Tighten the lever on the bottom of the frame to secure the camera.
Top camera
screw
Lever
32
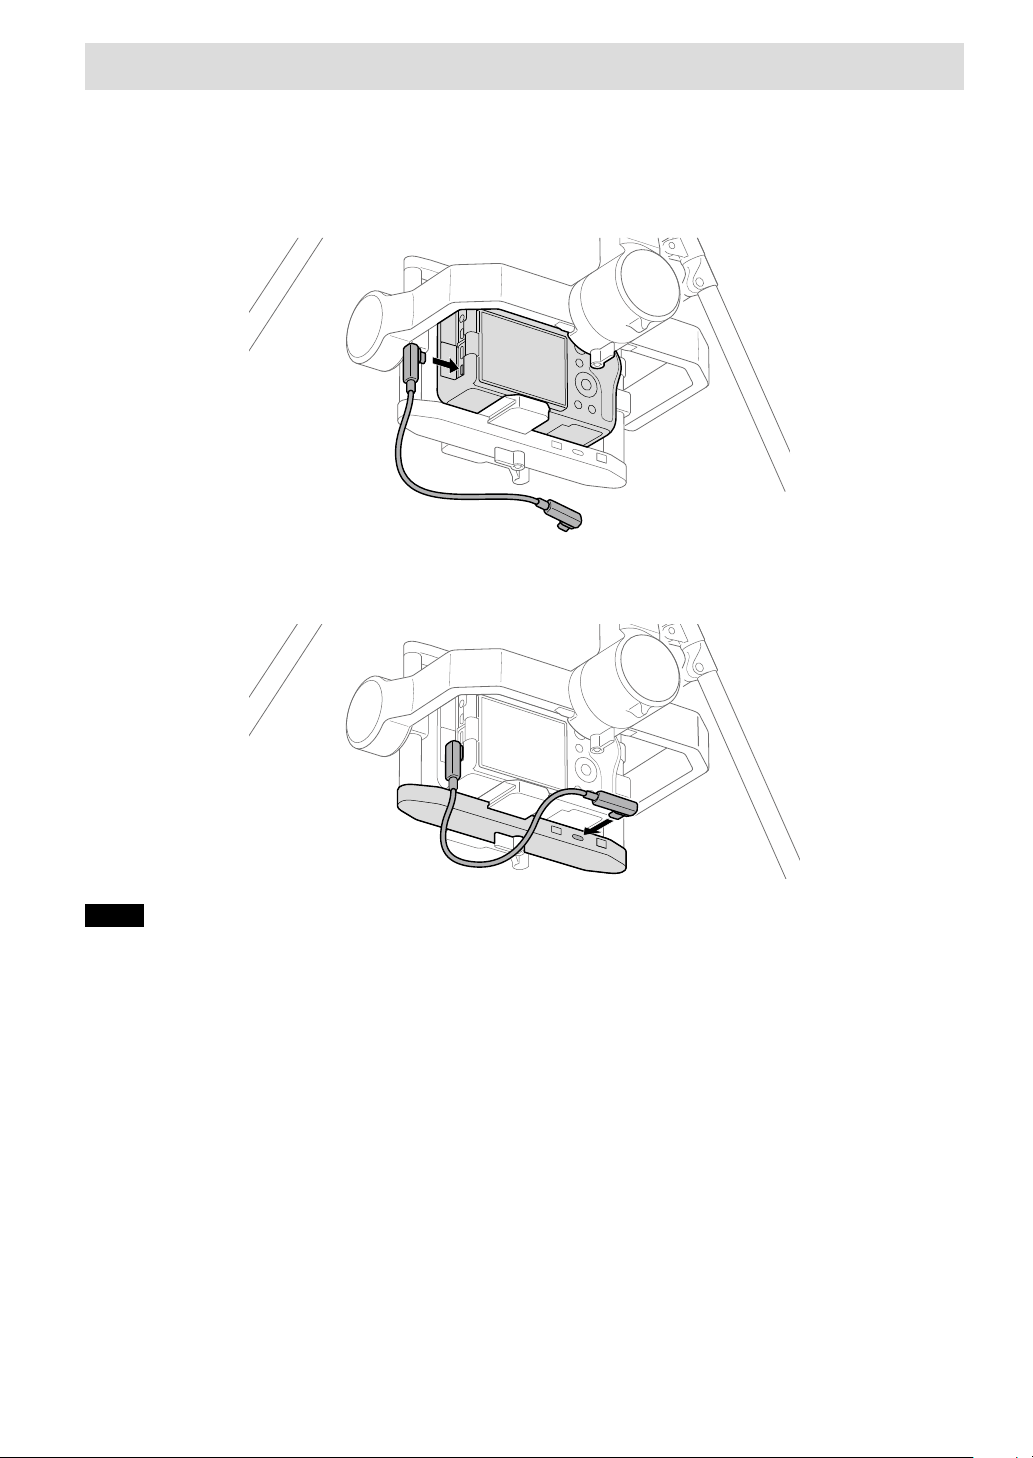
[3] Connecting cables between the camera and gimbal
Use the included USB cable to connect ports on the camera and gimbal.
1
Connect the USB cable to the camera.
Insert the plug of the included USB Type-C® cable (gimbal — camera) or micro USB cable (gimbal — camera) in the
camera USB port. Connect the USB cable that matches your camera port.
2
Connect the USB cable to the gimbal.
Insert the other end of the USB cable connected to the camera in the gimbal USB port.
Notes
• Positions of camera ports vary by camera.
• If you adjust the tilt axis of the gimbal, the USB cable may come into contact with the frame of the gimbal. Route the USB cable so that
it does not come into contact with the gimbal frame.
Gimbal and camera mounting
33
[4] Adjusting the balance of the gimbal
Adjust the balances of the tilt, roll, and pan axes.
Preparation
• Confirm that the camera lens cap is removed.
• Confirm that the camera and gimbal are connected using the USB cable (page 32).
• Turn on the camera to avoid movements of the focus unit in the lens.
• Confirm that the aircraft is turned off.
• Confirm that you have installed all the accessories you want to use.
Pan
axis
Tilt axis
Roll axis
Roll axis
1
Adjust the balance of the tilt axis.
Adjust the horizontal and vertical balances of the tilt axis.
Horizontal balance adjustment of the tilt axis
Loosen the top camera screw and bottom lever, and then slide the camera plate forward or backward to adjust the
balance.
After adjusting the balance, firmly tighten the top camera screw and bottom lever.
Rotate the tilt frame by about ±15° to check if the balance is adjusted properly.
If properly adjusted, the tilt frame will stay still or return to the horizontal position.
Top camera
screw
Tilt frame
Lever Camera plate

34
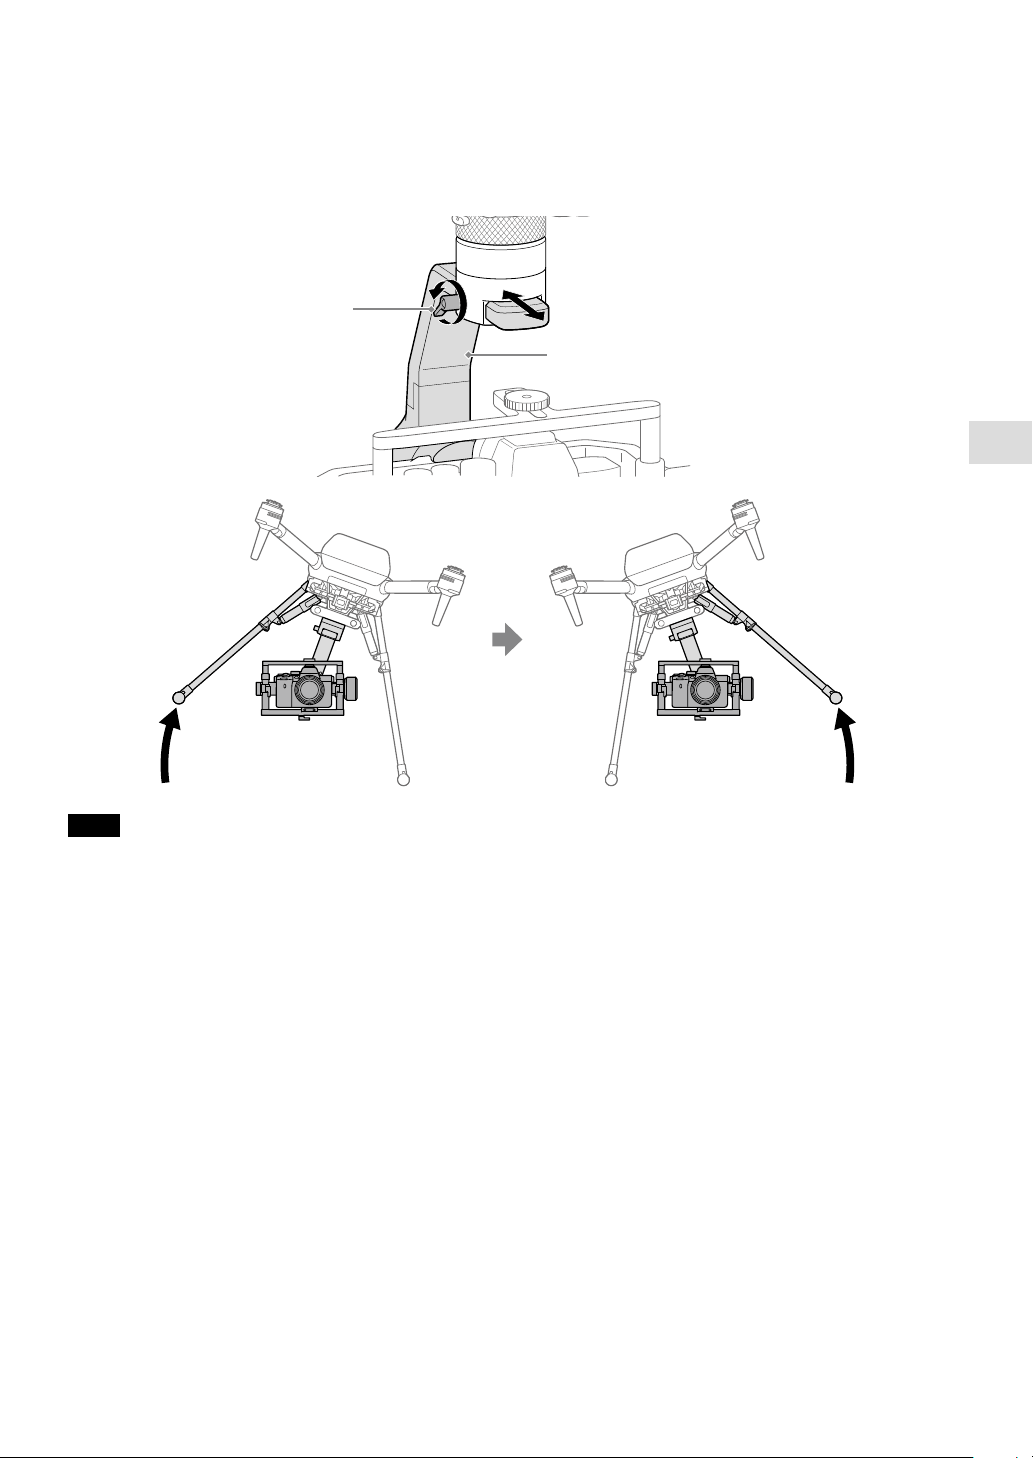
Vertical balance adjustment of the tilt axis
Rotate the gimbal tilt frame to aim the camera lens upward.
Loosen the levers on both sides and slide the tilt frame back and forth to adjust the balance.
Adjust so that the left and right adjusters are at the same level.
After adjusting the balance, firmly tighten the levers on both sides.
Rotate the tilt frame by about ±45° to check if the balance is adjusted properly.
If properly adjusted, the tilt frame will stay still.
Lever
Tilt frame
2
Adjust the balance of the roll axis.
Loosen the lever and slide the roll frame left and right to adjust the balance.
After adjusting the balance, firmly tighten the lever.
Rotate the roll frame by about ±45° to check if the balance is adjusted properly.
If properly adjusted, the roll frame will stay still.
Lever
Roll frame
Gimbal and camera mounting
35
3
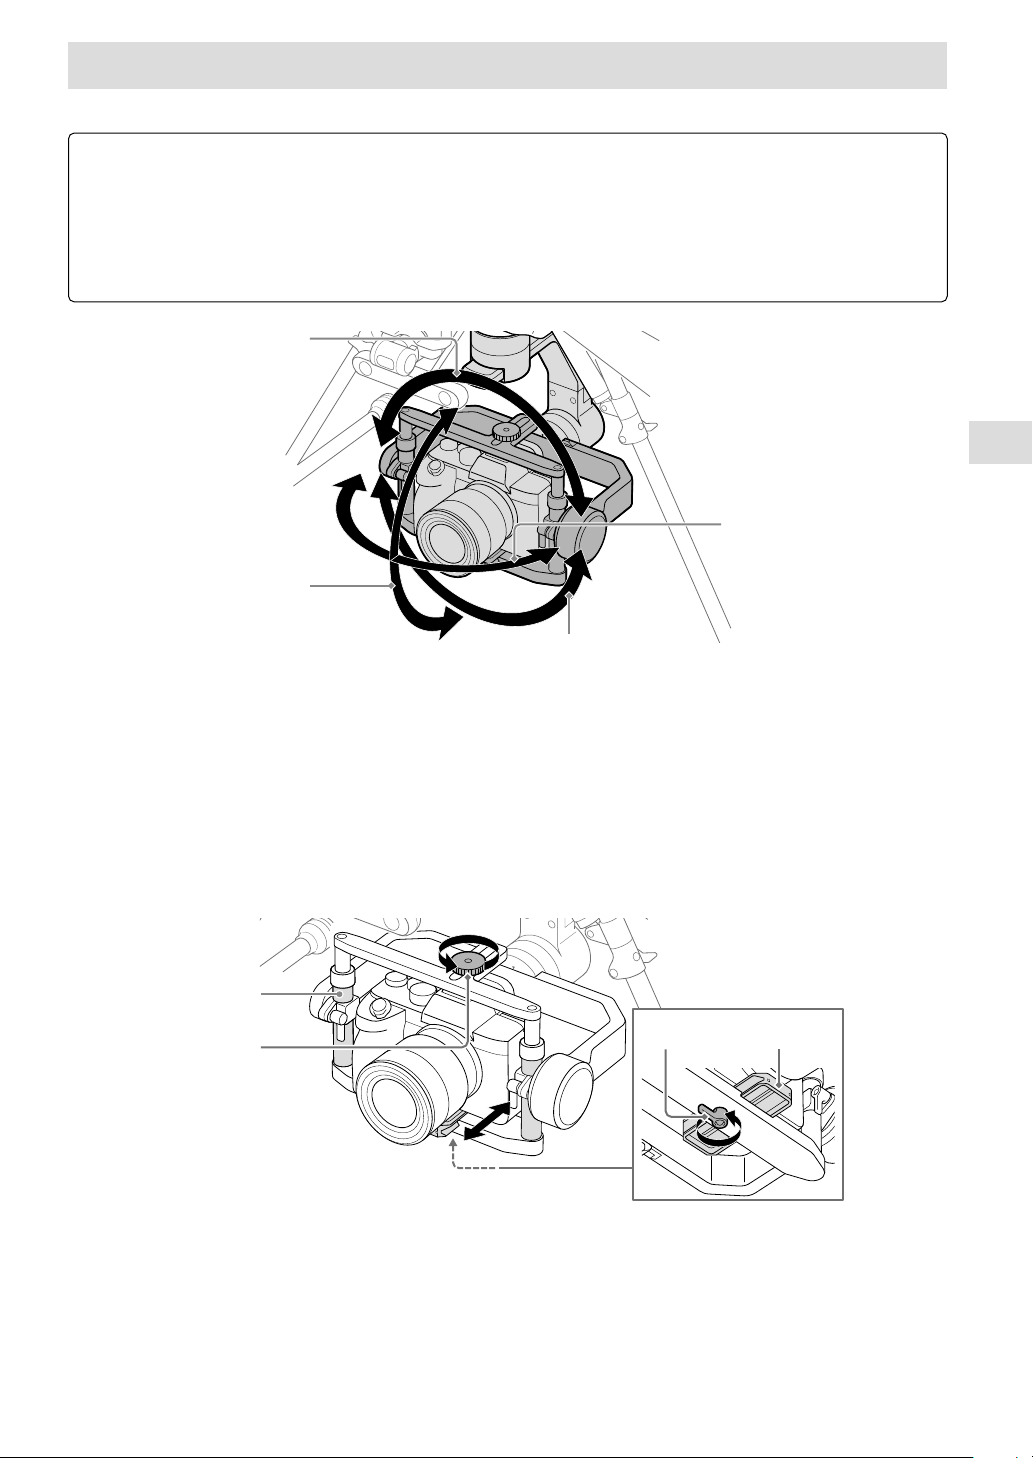
Adjust the balance of the pan axis.
Loosen the lever and slide the pan frame back and forth to adjust the balance.
After adjusting the balance, firmly tighten the lever.
With the gimbal stationary, tilt the aircraft forward, backward, left, and right to check if the balance is adjusted
properly.
If properly adjusted, the pan frame will stay still.
Lever
Pan frame
Note
Do not adjust the gimbal balance with the aircraft upside down. Doing so may deteriorate or damage the damping rubber of the
damping plate.
Flights
37
Flights
Operating an aircraft in the United States is regulated by federal law, regulations and ordinances. State and local
ordinances may also apply to certain operations. When operating an aircraft, it is the remote pilot’s responsibility to
always comply with applicable law, regulations and ordinances.
Attaching the propellers
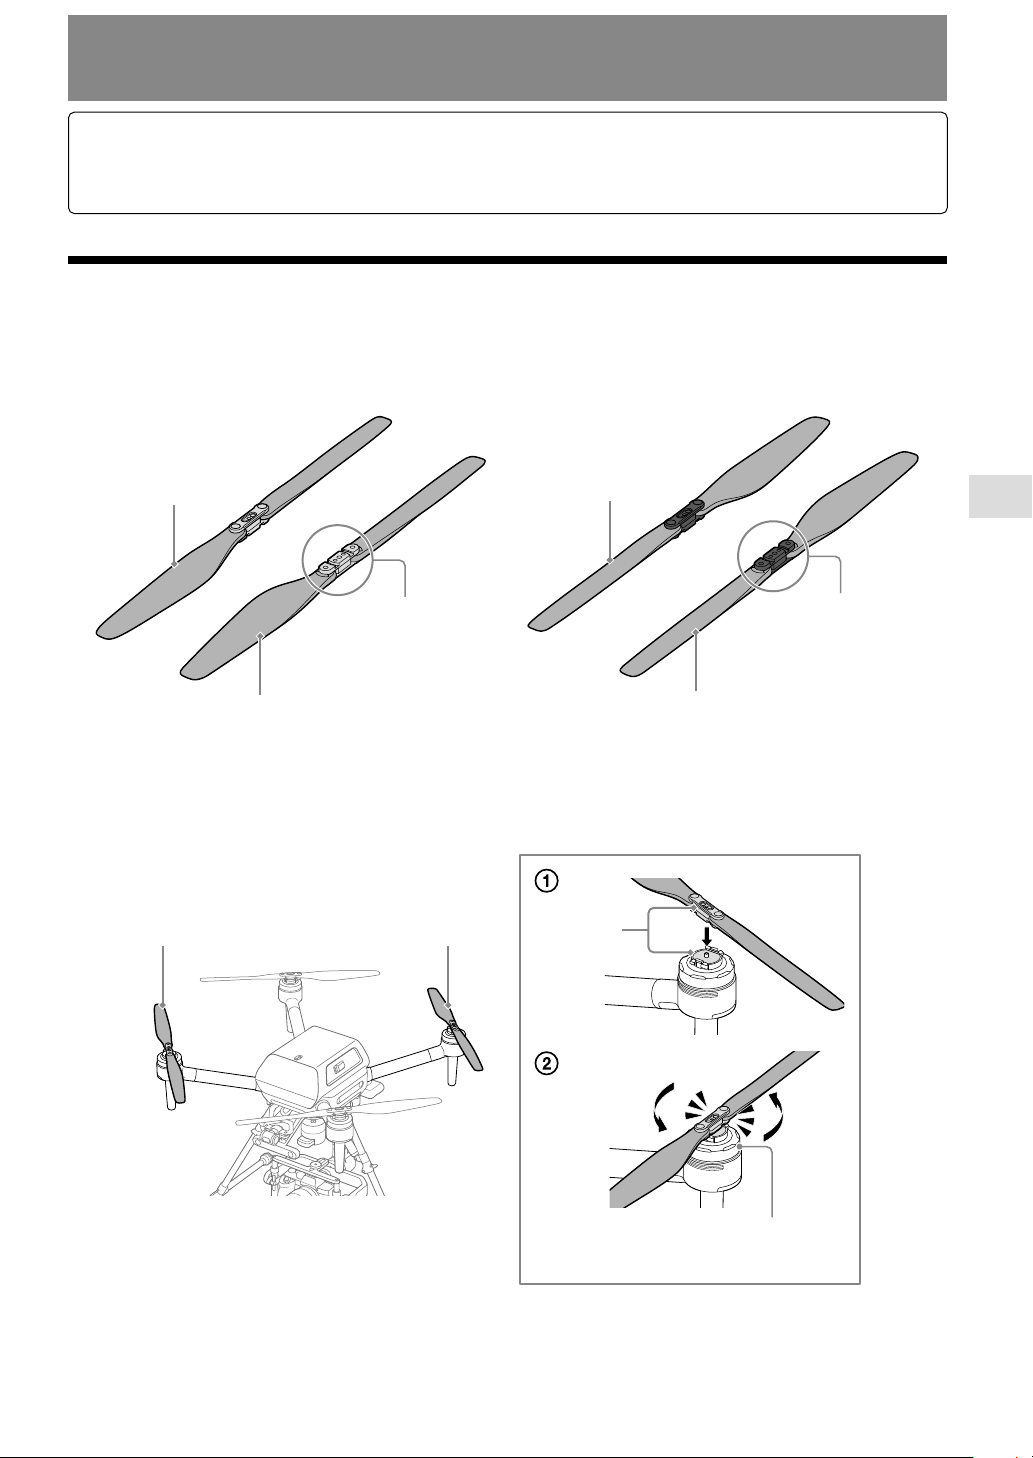
The aircraft uses two types of propellers: clockwise (CW) and counterclockwise (CCW) propellers, which rotate in
different directions. Using the hub color as a guide, attach propellers with hubs of the same color.
1
Check the propeller hub.
Underside of the
propeller
Top side of the
propeller
Propeller (CW)
Hub (silver)
Underside of the
propeller
Top side
Propeller (CCW)
Hub (black)
2
Attach the propellers (CW).
Place the propeller on the propeller attachment point and turn the propeller counterclockwise until it clicks into
place.
Propeller (CW)Propeller (CW)
Silver
Hold the motor firmly in place with your
other hand to prevent it from turning.

38
3
Attach the propellers (CCW).
Place the propeller on the propeller attachment point and turn the propeller clockwise until it clicks into place.
Propeller (CCW)
Black
Hold the motor firmly in place with your
other hand to prevent it from turning.
Propeller
(CCW)
Notes
• Attach the propellers carefully to avoid injury from the edges.
• Before each flight, confirm that the propellers are securely attached.
• If you do not hear a clicking sound when attaching the propellers, the propellers may not have been attached properly and pose a risk
of crash. Refrain from using the aircraft and contact Sony Customer Support.
• If the metal part of the propeller attachment point does not move smoothly, the propeller may fall off during flight and pose a risk of
crash. Refrain from using the aircraft and contact Sony Customer Support.
• Before attaching the propellers, make sure that the stickers on the motors are not damaged. If the stickers on the motors are peeled
off or the adhesive layers of the stickers are exposed, the propellers may not have been attached properly and pose a risk of crash.
Refrain from using the aircraft and contact Sony Customer Support.
Flights
39
Checking settings before flights
[1] Checking error messages in the flight screen
Error messages can be checked by accessing the flight screen from the “Airpeak Flight” app home page.
1
Tap [Start flight] in the “Airpeak Flight” app home page.
2
Confirm that no error messages are displayed on the flight screen.
Confirm that no warnings, cautions, or dialogs are displayed.
[2] Checking settings and status
Settings and status can be checked from the setting menu on the flight screen.
1
Tap (Settings) to open the setting menu.
2
Check the settings and status.
Check the status of these items in the [Aircraft] and [Remote controller] categories.
Ą Aircraft status
• Flight mode: [Aircraft] — [Flight mode]
• Maximum flight altitude: [Aircraft] — [Safety functions] — [Maximum altitude]
• Wireless performance: [Aircraft] — [Sensors/Radio]
Ą Remote controller status
• Remote controller operation mode: [Remote controller] — [Connection]
• Remote controller battery: [Remote controller] — [Details] — [Battery details]
Ą Battery pack status
• Aircraft battery packs: [Aircraft] — [Batteries]
• Aircraft battery pack temperature: [Aircraft] — [Batteries]

40
Flying and shooting video
1
Bring the aircraft to the take-off site.
Regarding the flight environment, see “Flight environment” (page 46).
2
Start the “Airpeak Flight” app and tap [Start flight].
3
Launch the aircraft.
Manual takeoff
Tilt the left and right control sticks of the remote controller either inward and downward or outward and downward
at the same time.
The motors will start and the propellers will rotate.
Operate the control sticks on the remote controller to make the aircraft ascend.
Automated takeoff
On the flight screen of the “Airpeak Flight” app, tap
(Automated takeoff) and follow the instructions on the screen.
The motors will start and the propellers will rotate so that the aircraft ascends*.
*
The landing gear will rise when the aircraft ascends to a certain altitude from the takeoff position.
4
Operate the control sticks on the remote controller to fly.
The left and right control sticks work as follows under default stick operating mode ([Mode 2]).
Ą Left stick
• Tilt up/down: Ascend/descend.
• Tilt left/right: Turn left/right.
Ą Right stick
• Tilt up/down: Fly forward/backward.
• Tilt left/right: Fly left/right.
5
Tap (MOVIE) on the “Airpeak Flight” app flight screen to start recording.
To stop recording, tap (stop) on the “Airpeak Flight” app flight screen.
6
Land the aircraft.
Manual landing
Operate the control sticks on the remote controller to make the aircraft descend.
The landing gear will lower when the aircraft descends to a certain altitude from the ground.
Keep operating the control sticks until the aircraft lands and the motors stop. After the motors stop, release the
control sticks to return them to the central position.
Automated landing
On the flight screen of the “Airpeak Flight” app, tap
(Automated landing) and follow the instructions on the screen.
The landing gear will lower when the aircraft descends to a certain altitude from the ground, and then the aircraft will
land and the motors will stop.
Notes
• Keep away from the spinning propellers and motors in use.
• When [Auto landing gear control] is turned off, raise or lower the landing gear manually.
Web app “Airpeak Base”
41
Web app “Airpeak Base”
“Airpeak Base” features
“Airpeak Base” is a dedicated web application for managing Airpeak products, creating mission flight paths, viewing
flight logs, and more. It is available from browsers on a computer or iPad.
https://base.airpeak.sony.com/
You can also take advantage of the “Airpeak Plus” cloud service for greater convenience. For detailed information on
the cloud service, visit the product page.
https://electronics.sony.com/airpeak/p/arss1/
Notes
• To use the “Airpeak Base” app, you must accept the terms of use and privacy policy.
• ”Airpeak Flight,” “Airpeak Base,” “Airpeak Plus,” and any other Airpeak or third-party network services, content, operating systems, or
software are subject to terms and conditions and may be changed, interrupted, or discontinued at any time. Fees, registration, and
credit card information may also be required.
Recommended computer/iPad environment
Computer environment
• Windows® 8.1 or later (Google Chrome
TM
, Microsoft Edge®)
• macOS® 10.14 or later (Safari®, Google Chrome
TM
)
iPad environment
• iPadOS® 13 or later (Safari®)

42
After use
Removing the propellers
1
Make sure the aircraft is off.
Confirm that the power status LED of the aircraft is off.
BATTERY RELEASE
Power status LED
2
Remove the battery packs from the aircraft.
While pressing the BATTERY RELEASE levers (), push out the projecting parts on the sides of the battery packs in
the directions of the arrows to remove both battery packs ().
BATTERY RELEASE
BATTERY RELEASE
BATTERY RELEASE levers
Notes
• Battery packs are still hot immediately after use. Handle with care.
• When removing the battery packs, be careful not to drop them.
• When removing the battery packs, carefully press the BATTERY RELEASE levers so that the battery packs do not hit your fingers when
they come out.

After use
43
3
Remove the propellers (CW).
Press the propeller hub against the metal part of the motor and turn the propeller clockwise to
remove it.
Propeller (CW)Propeller (CW)
Hold the motor firmly in place with your
other hand to prevent it from turning.
Remove the
propeller (CW).
Turn the
propeller while
pressing it
against the
metal part.
4
Remove the propellers (CCW).
Press the propeller hub against the metal part of the motor and turn the propeller counterclockwise
to remove it.
Propeller (CCW)
Turn the
propeller
while pressing
it against the
metal part.
Remove the
propeller (CCW).
Propeller
(CCW)
Hold the motor firmly in place with your
other hand to prevent it from turning.
Notes
• Be careful not to touch the motor and its surrounding parts as they become hot after use. There is a risk of burns.
• Remove the propellers carefully to avoid injury from the edges.
• If the metal part does not move smoothly when you press the propeller against it for removal, the propeller may fall off during flight
and pose a risk of crash. Refrain from using the aircraft and contact Sony Customer Support.
• Before attaching the propellers, make sure that the stickers on the motors are not damaged. If the stickers on the motors are peeled
off or the adhesive layers of the stickers are exposed, the propellers may not have been attached properly and pose a risk of crash.
Refrain from using the aircraft and contact Sony Customer Support.
44
Removing the gimbal
Hold down the gimbal detach button on the quick-release and turn the ring toward the unlock icon ( ) to remove the
gimbal from the quick-release.
Ring
Gimbal
detach
button
Notes
• Hold the gimbal with both hands when removing it. The gimbal or camera may be scratched or damaged if the gimbal rotates or
drops.
• Be sure to remove the gimbal after use. Leaving it attached to the aircraft may damage the damping rubber of the damping plate.
Removing the landing gear
1
Place the aircraft upside down.
Put the top cushioning on a flat surface and place the aircraft upside down on it (page 18).
2
Turn the landing gear lever to unlock it.
Lever
After use
45
3
Remove the landing gear from the aircraft.
Press in the ball detent and remove the landing gear.
Ball
detent
4
Turn the landing gear levers until they are positioned in place.
When storing the aircraft in the outer box, turn both landing gear levers below the dotted line as shown below.
Lever

46
Flight Information and
Specifications
Flight Information
Operator’s responsibilities
Before flights, read this Startup Guide and the Help
Guide carefully to understand all safety features,
warnings, and operations.
This product is intended for skilled persons who
understand the maneuvering of the drone, relevant
laws and regulations, and the dangers of exposed rotor
blades.
• Operators should not fly the aircraft when they cannot
recognize risks, such as after drinking or taking medication.
• Although the aircraft features advanced technologies, careful
decision-making by the operator is still necessary during flight.
Flight assistance functions such as automated flight are
designed to support the operator and are not intended as
substitutes for the operator. The performance of the stereo
cameras and other sensors may be affected by environmental
factors such as the surrounding light, surface texture of
obstacles, etc. Operators must be well-trained and aware of
emergency measures in the event of an accident.
• When flying the aircraft for videography/photography, respect
the privacy of others and comply with state and local privacy
laws and regulations as well as the reasonable expectation of
privacy of the shooting location.
• Do not use this product for any illegal or improper purposes.
• Do not use this product for abuse, harassment, stalking,
intimidation, or infringement upon the legal rights of others
such as privacy or publicity rights.
• Do not allow the aircraft to trespass on the private property of
others.
• Unless permitted by separate prior written agreement between
you and Sony, Airpeak is not for military use, including but not
limited to the following: development of arms or munitions
(including manufacturing, installation, and inspection),
transportation of explosives or chemical or biological weapons
and other harmful items, or activities such as intelligence,
surveillance, and reconnaissance. Additionally, the
aforementioned shall also apply to civilians and private citizens
and entities, except with regard to surveillance, which is
unauthorized only if such use is illegal and otherwise
prohibited.
• If any of the external devices installed on the aircraft falls off, it
may cause injury or damage to buildings, people, or animals.
• Do not fly an aircraft that is in poor condition or has been
damaged due to a crash or collision.
Flight environment
• Avoid obstacles such as large trees and power lines.
• Do not fly over people or near large crowds of people, unless
you have received a waiver or your aircraft has a declaration of
compliance to conduct such operations under applicable
federal regulations.
• Do not fly at altitudes higher than 122 m (400 feet) above
ground level (AGL) or, if higher than 122 m (400 feet) AGL,
remain within 122 m (400 feet) of a structure.
• Fly in favorable weather conditions between -10° C (14 °F) and
40° C (104 °F).
• Do not fly in winds exceeding 20 m (66 feet)/s.
• Do not fly in rain, snow, or heavy fog, or during weather
visibility that is less than 4.8 km (3 miles) from a control station.
• Do not use the aircraft when there is an accident, fire,
explosion, flood, tidal wave, avalanche, landslide, earthquake,
dust, or sandstorm.
• Fly outdoors. In buildings, the aircraft sensor system may be
affected by interference, and accuracy of compass and GNSS
(Global Navigation Satellite System) features may be impaired.
• Do not fly low over water, ice, or snow surfaces. Flying too close
to water, ice, or snow surfaces may cause a malfunction to the
aircraft sensor system.
• The vision positioning may not work properly in the following
environments or under the following conditions:
— Areas where transparent objects such as water or glass are
present, or where highly reflective objects such as mirrors
are present
— When no objects that show clear surface patterns are
present within an altitude of 20 m (66 feet) or more and a
circumference of 20 m (66 feet)
— Areas where regular patterns are continuously present
— Areas exposed to strong light or areas where there are
objects that emit light
— Areas where the illumination changes rapidly
— Areas with illuminance equivalent to 100 lux or darker
— When the stereo camera lenses are dirty or when the stereo
camera view is obstructed
— When the aircraft is flying low at a high speed or the aircraft
is surrounded by objects at a short distance
— When the obstacle is small
— When the surroundings or obstacles are moving
— When there are objects in the blind spots of the stereo
cameras and other sensors
— When the stereo cameras and other sensors are not
calibrated properly
• The lateral performance of the vision positioning is reduced
when the landing gear is up.
• The flight assistance provided by the vision positioning and
other sensors only supports the operator and does not
guarantee the perfect safety of the flight. Always be cautious
when flying the aircraft.
• Note the following precautions during takeoff and landing and
during flights:
— Keep people other than the flight operators away from the
aircraft. Unexpected events such as gusts against the aircraft
may cause injury.
— Take off and land on flat ground.
— Consider using a landing pad for takeoff and landing. In
sandy environments, the aircraft may be damaged by
wind-borne sand.

47
Flight Information and Specifications
• Flight direction and positioning accuracy may be affected by
degradation of wireless transmission quality and operating
problems near airspace susceptible to magnetic or radio
interference, such as near high-voltage power lines, large-scale
power transmission stations, cell towers, and broadcast towers.
Do not fly near this airspace, because you may lose control of
the aircraft if the interference is too strong.
• Before flights, make sure that flying is legally permitted in the
airspace where you plan to fly.
• Do not fly when visibility is poor, such as when there is heavy
fog, and when you cannot see the aircraft with your own eyes.
Only operate before sunrise, after sunset if you comply with
federal regulations to do so and determine such an operation
can be performed safely.
• Do not fly the aircraft from a moving vehicle.
• To avoid affecting the service life of the motors, do not launch
or land the aircraft in sandy or dusty areas.
• Do not load anything onto the aircraft with the intent to drop it
during flight.
• Comply with all local laws, regulations or ordinances and
obtain any required approval. Operators are responsible for
complying with all applicable local laws, regulations or
ordinances while using the aircraft and remote controller.
• Do not fly in the No-fly zones. Contact the local aviation
authorities for the latest No-fly zone list and law, regulation or
ordinance.
• Flight altitude restrictions vary by jurisdiction. Do not fly above
the maximum altitude stipulated by local laws and regulations.
• Avoid flying in airspaces where rescue operations are
underway.
Preflight checks
• Confirm that the aircraft and remote controller batteries are
fully charged.
• Confirm that both battery packs are loaded in the aircraft.
• Use only genuine Sony parts or parts recommended by Sony,
and confirm that all parts are free of damage and defects.
• Before loading battery packs, confirm that there is no moisture
or foreign objects on battery pack terminals, terminals in the
aircraft battery slots, on battery pack surfaces, or in the battery
slots.
• Confirm that the propellers are free of damage and securely
attached.
• If the propeller attachment point does not move smoothly, the
propeller may fall off during flight and pose a risk of crash.
Contact Sony Customer Support.
• Calibrate the aircraft compass by following the instructions
displayed in the “Airpeak Flight” app.
• Before turning on the aircraft, confirm that there are no objects
near the propellers that may come into contact with them.
• Confirm that the screws securing the damping plate to the
aircraft are tight. Loose screws pose a risk of the gimbal and
camera in it falling off during flights. As a preflight check item,
always confirm that the screws are securely tightened.
• Confirm that aircraft motors are free of problems and work
correctly.
• Confirm that the aircraft’s stereo cameras, infrared range
sensors, and FPV gimbal camera are free of dirt and debris.
• Confirm that there are no problems with gimbal operation.
• Calibrate the compass, IMU (Inertial Measurement Unit) and
stereo cameras when prompted to do so in the “Airpeak Flight”
app.
• Do not calibrate the compass in areas subject to strong
magnetic interference, such as multi-storey parking facilities or
underground steel-reinforced structures.
• Do not calibrate the aircraft’s stereo cameras in a dark place or
a place that is backlit by the sun or other light sources.
• Do not place ferromagnets near the product during calibration.
• Confirm that the number of GNSS (Global Navigation Satellite
System) satellites is six or more in the “Airpeak Flight” app.
• Make sure that you fully understand the flight mode that you
have selected, as well as the safety functions and warnings.
• Make sure that the “Airpeak Flight” app is working properly to
assist you in controlling the aircraft. Sony may not be able to
provide after-sales services or take responsibility under certain
circumstances, such as when flight data recorded by the
“Airpeak Flight” app is not present or the aircraft is lost.
• When you fly the aircraft with an external device loaded, check
the following items before flight.
— Test the hovering performance of the aircraft prior to each
flight.
— Confirm that the total takeoff weight does not exceed normal
specifications.
— Confirm that there is no strong mechanical vibration in the
aircraft, electromagnetic interference, or malfunction of the
stereo cameras or infrared range sensors.
• Check the version numbers of the “Airpeak Flight” app and
system software of the aircraft and remote controller to
confirm that they are up to date.
Precautions during flights
• Always operate the aircraft within the visual line of sight of the
operator or a visual observer, unless you have received a
waiver from the FAA to conduct an operation beyond visual
line of sight.
• Keep away from the spinning propellers and motors in use.
• Propellers in motion are dangerous and should never be
touched with your hands, rods or sticks, or by any other means.
• Do not touch the landing gear while the aircraft is in use. This
may damage the aircraft or cause injury.
• Be careful not to cover aircraft or remote controller antennas by
mistake. This may affect wireless transmission.
• Be careful not to cover the GNSS (Global Navigation Satellite
System) antenna part of the aircraft by mistake. This may affect
the attitude control of the aircraft.
• When the aircraft descends to a certain altitude from the
ground, the landing protection function is activated to check if
the terrain below is suitable for landing. If no problem is
detected, the landing gear will be automatically lowered.
However, the stereo cameras may not work properly or the
ground surface may not be recognized under certain
circumstances, such as when there is not enough light or there
is an obstacle with an unclear surface pattern. Operate the
aircraft with great caution.
• If the flight is unstable, land the aircraft immediately, and then
check for any dirt on the sensors and calibrate them.

48
• Since the video transmission signal may be delayed or lost due
to interference, the wireless transmission settings of the
“Airpeak Flight” app ([Aircraft] — [Sensors/Radio]) should be
changed carefully with a full understanding of the changes.
• After landing, first stop the motors, turn off the aircraft, and
then turn off the remote controller. For safety, be sure to check
that the motors have stopped rotating before turning off the
aircraft and remote controller.
• Do not use mobile device features that may interfere with the
operation of the aircraft, such as answering calls or replying to
emails.
• To execute an emergency motor stop during a flight, tilt the left
and right control sticks of the remote controller either inward
and downward, or outward and downward at the same time.
The aircraft will crash if the motors stop during a flight.
• To turn off the power, do the following:
— Aircraft: Press and hold the (Power) button for at least 2
sec.
— Remote controller: Press and hold the (Power) button for
at least 5 sec.
• To force the power off, do the following:
— Aircraft: Remove the battery packs.
— Remote controller: Press and hold the (Power) button for
at least 10 sec. If this does not turn off the remote controller,
simultaneously press and hold the C2 (Custom 2) button and
the (Power) button for at least 10 sec.
About the RTH (Return to Home) function
• The RTH (Return to Home) function may be affected by
weather, the surrounding environment, or nearby magnetic
fields.
• The aircraft cannot avoid obstacles if there is not enough
surrounding light during RTH (Return to Home).
• Set the altitude for obstacle avoidance before performing RTH
(Return to Home).
• RTH (Return to Home) does not work when there is an
insufficient GNSS (Global Navigation Satellite System) signal (3
or fewer signal bars in the status bar of the “Airpeak Flight”
app) or no signal is received from the GNSS (Global Navigation
Satellite System).
About the remaining battery level
• If you are notified of low battery, land the aircraft immediately
and safely.
• When the battery level drops below a certain level, a warning is
displayed and the aircraft automatically starts descending to
perform a forced landing. In order to steer the aircraft to an
appropriate landing point while maintaining altitude, operate
the remote controller to perform ascent while the aircraft is
descending.
• If a battery level warning appears on the “Airpeak Flight” app
screen, land the aircraft at the Home Point or a landing point
immediately. If the battery packs run out of battery during
flight, the aircraft may crash onto the ground, including private
property, causing injury or damage to people or animals.
About the “Airpeak Flight” app
• Fully charge your mobile device before starting the “Airpeak
Flight” app.
• When you operate the remote controller, be sure to start the
“Airpeak Flight” app to assist in operating the aircraft.
• The “Airpeak Flight” app may use cellular data communication
and incur usage charges according to the data plan provided
by your carrier. For cellular data communication usage charges,
contact your carrier.
• Read the safety tips, warning messages, and disclaimers
displayed on the “Airpeak Flight” app screen carefully.
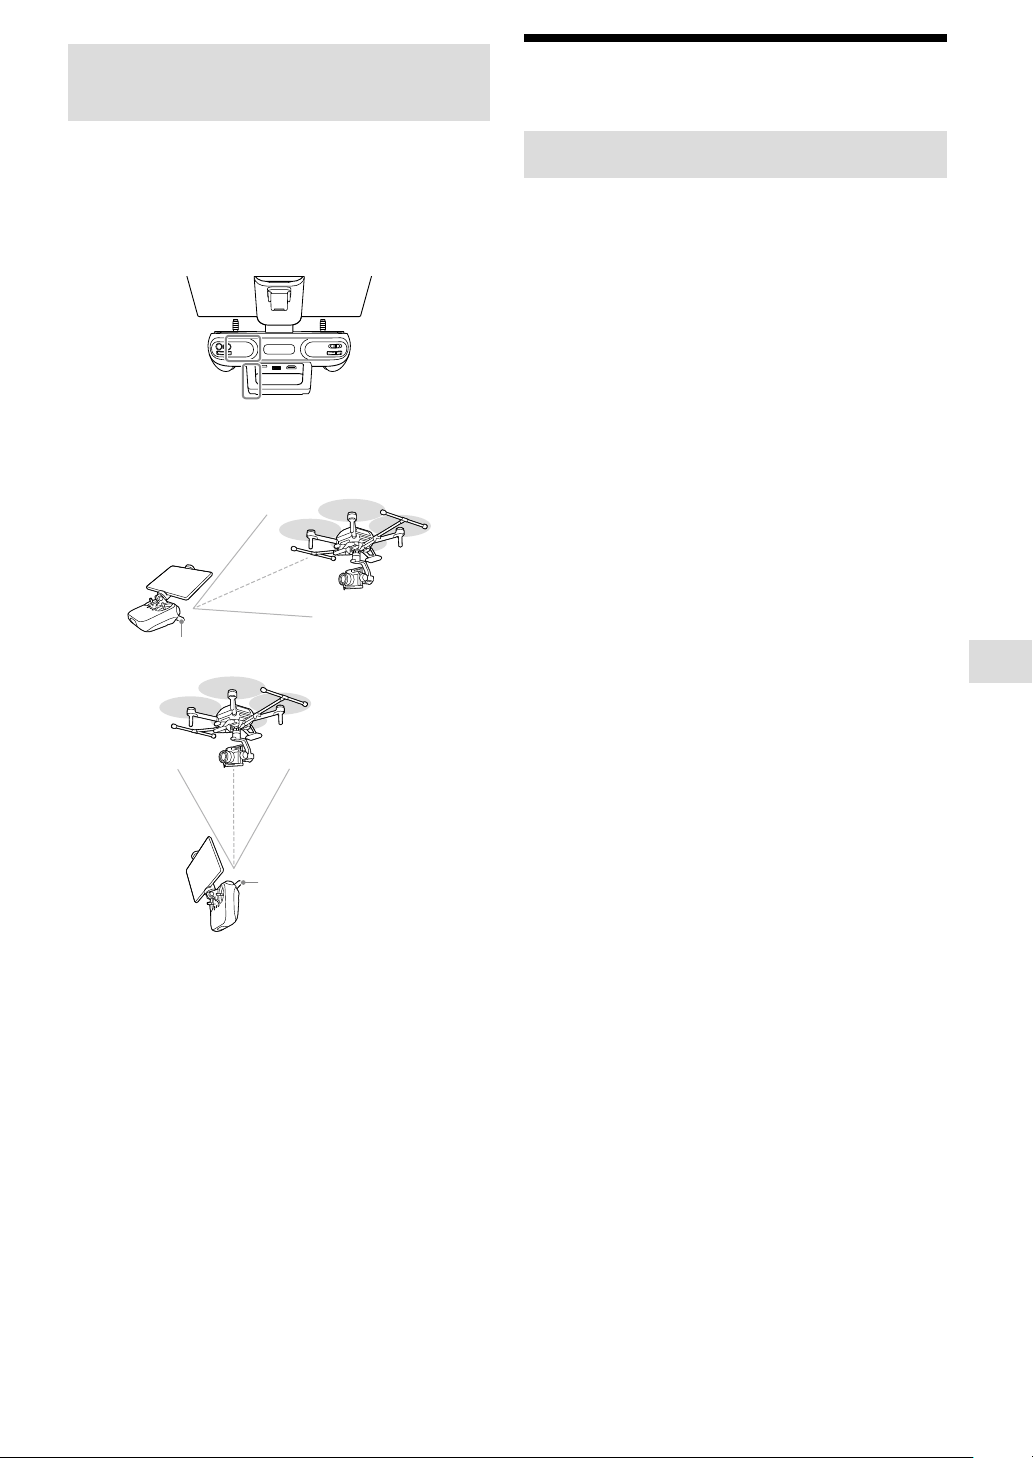
49
Flight Information and Specifications
About the Wireless Transmission
Function
Cautions when using the remote controller
• When using the remote controller to fly an aircraft, turn off the
Wi-Fi® and Bluetooth® functions of the tablet or other mobile
device mounted on the remote controller.
• Take care not to cover the parts containing the built-in
antennas with your hand, cables, or other objects.
Built-in antenna position
• Point the handle bar (with built-in antenna) of the remote
controller toward the aircraft as shown in the illustrations
below.
Handle bar (with built-in antenna)
Handle bar (with
built-in antenna)
• If you do not operate the remote controller for 5 minutes while
it is turned on, an alarm will go off. After another minute, the
remote controller will automatically go into a standby state.
You can stop the alarm by performing an operation such as
moving the control stick, pressing a button, etc.
• If you notice any damage to the remote controller antenna,
contact Sony Customer Support. It may not be possible to
operate the aircraft.
• You need to link the remote controller and aircraft when you
replace the remote controller or are using a new one. Refer to
the Help Guide for details.
• When you turn off this product, be sure to turn off the aircraft
first and then the remote controller. If you turn off the remote
controller while the aircraft is still turned on, you will not be
able to operate the aircraft in case it moves accidentally. If this
happens, it may cause an accident or damage to the aircraft.
General Information
Aircraft/Gimbal
Using the product
• Comply with all applicable laws, regulations and ordinances,
including the Federal Aviation Administration’s regulations in
14 C.F.R. Part 107, while using the aircraft and remote controller.
• For safety, do not change or modify aircraft components. When
installing external devices, be aware of the aircraft weight after
installation. Do not install external devices that exceed the
maximum payload. As external devices, use only genuine Sony
devices or devices recommended by Sony, and install in the
correct position as described in the instruction manual. Devices
that shift the aircraft center of gravity pose a risk of crashes.
Included AC power cord
Use only the included or Sony recommended AC adapters.
AC adapters
As AC adapters, use the included adapters.
Carrying components
• When carrying the aircraft, hold it securely by the frame arms.
If you do not hold it securely by the frame arms, you may drop
and damage the aircraft or hurt yourself.
• When carrying the remote controller, hold it by the handle bar.
Do not apply excessive force to the handle bar, control sticks, or
mobile device holder, which may damage these parts.
• Be careful not to drop the aircraft or remote controller when
carrying these components. Drops may cause damage or injury.
Installing external devices
The aircraft USB port can supply up to 500 mA of current. If
overcurrent conditions exceeding 500 mA occur while an external
device is installed, it may affect flight performance.
Maintenance and storage
• The recommended ambient temperature range for storage is
18 °C (64 °F) to 30 °C (86 °F).
• Thoroughly wipe off any water that has adhered to the aircraft
before storing it.
• Do not use the product if you notice any damage or
deterioration to the propellers or propeller attachment points
of the aircraft.
• Gently wipe off any dirt or dust on the aircraft, remote
controller, battery charger, or battery packs with a soft, dry
cloth.
• Do not use volatile substances such as alcohol or paint thinner
as they may damage the parts and cause deterioration.

50
Remote Controller
• This product is designed for use only in the U.S.A. Operation is
not guaranteed when used in other countries or regions.
• Do not connect the AC adapter to an electronic transformer
(travel converter). This may cause heat generation or product
failure.
• The wireless transmission function of the product is designed
for use only in the U.S.A. Use in other countries or regions may
be punishable by law.
Caution when carrying the unit
Carry the unit by the handle bar. The handle bar, control sticks,
and mobile device holder may break if excessive force is applied
to these parts.
Battery Charger
• This product is designed for use only in the U.S.A. Operation is
not guaranteed when used in other countries or regions.
• Do not connect the AC adapter to an electronic transformer
(travel converter). This may cause heat generation or product
failure.
About charging
• Two battery packs can be inserted into the unit, but they
cannot be charged at the same time. After one battery pack is
fully charged, the other will start charging.
• It may take about 20 seconds to start charging. Wait until the
battery level LEDs on the battery pack blink.
• If the battery temperature is too high or low, charging will not
start due to the protection function. When the battery
temperature enters the chargeable range in a room-
temperature environment, charging will start automatically.
• If charging does not start indefinitely, remove the battery pack
from the unit, unplug the AC adapter power cord from the wall
outlet, and then reconnect it. If charging still does not start,
refer to our support website for a solution.
https://www.sony.com/electronics/support
Caution when carrying the unit
When carrying the unit, take care not to drop it. If the unit is
dropped, this may cause damage to the unit or injuries.
Battery Pack
Charging the battery pack
• Before using the battery pack, be sure to charge it with a Sony
dedicated battery charger or a Sony device with a battery-
charging function (a device capable of charging this battery
pack). To charge the battery efficiently, fully charge it in an
ambient temperature of 5 °C — 40 °C (41 °F — 104 °F). See the
instruction manual of the device that is to perform charging for
details of the charging method and the charging time.
• Do not touch the battery pack while charging is in process.
• Do not charge the battery pack for longer than the specified
charging time.
Effective use of the battery pack
Battery pack performance decreases in low-temperature
surroundings.
How to store the battery pack
• Do not short-circuit or allow metal objects to come into contact
with the battery terminals when carrying or storing a battery
pack.
• Do not store the battery pack for long periods in a completely
discharged state.
• When storing the battery pack for long periods, first remove it
from the aircraft or battery charger and then store it in a cool
place.
Battery life
• The battery life is limited. The battery capacity will decrease
little by little with repeated use and over time. If the remaining
battery time is considerably shortened, the battery pack is
reaching the end of its life. Replace with a new battery pack.
• The battery life varies according to the storage, operating
conditions and environment.
51
Flight Information and Specifications
Troubleshooting
If you experience trouble with the product, try the
following solutions.
Cycle the power.
Remote controller:
Turn off the power and then turn it back on after
about 1 minute.
Aircraft:
Turn off the power and remove both battery packs.
After about 1 minute, reinsert the battery packs and
turn the power back on.
Check the additional information on our
Customer Support Website.
https://www.sony.com/electronics/support
Consult Sony Customer Support.

52
Transmission
Operating Frequency:
2.4 GHz — 2.4835 GHz,
5.15 GHz — 5.25 GHz,
5.725 GHz — 5.85 GHz
EIRP:
2.4 GHz — 2.4835 GHz: 23.8 dBm,
5.15 GHz — 5.25 GHz: 18 dBm,
5.725 GHz — 5.85 GHz: 25.6 dBm
Max Transmitting Distance:
2.4 GHz — 2.4835 GHz: 2 km (1.2 miles)
5.15 GHz — 5.25 GHz: 1 km (0.6 miles)
5.725 GHz — 5.85 GHz: 2 km (1.2 miles)
(Unobstructed, free of interference)
Propeller
Model: PPL1785
Propeller Size: 17 in.
Landing Gear
Landing Gear Position: Raise and lower
GNSS
GPS, GLONASS, QZSS
Sensor
Vision Sensor:
Method: Stereo camera
Direction:
Front, back, right, left and downward directions
Operating Environment:
Surfaces with clear patterns and adequate lighting
Sensing Range, FOV:
0.5 m (1.6 ft) — 54 m (177.2 ft), HFOV & VFOV 80°
Infrared Range Sensor:
Method: Infrared, Direction: Up and downward directions
Sensing Range, FOV: 0.1 m (0.3 ft) — 2 m (6.6 ft), FOV ±20°
FPV gimbal camera
Image Sensor: 1/4 in. 8.17 Mpx CMOS Sensor
Max Frame Rate: 30fps
FOV: DFOV 120°
Gimbal Axis: 2 Axes Gimbal (Tilt, Roll)
Gimbal Compatibility
Gimbal: GBL-T3 (Gremsy Gimbal)
Specifications
Aircraft (ARS-S1)
Size
Dimensions:
Approx. 526.8 mm (20.75 in.) × 591.9 mm (23.38 in.)* ×
511.8 mm (20.25 in.) (H × W × D) (Landing position, without
propellers)
*
Approx. 1 010.9 mm (39.88 in.) (W) (Landing gear is up)
Diagonal Wheelbase:
Approx. 644.6 mm (25.5 in.) (without propellers)
Mass
Aircraft Mass:
Approx. 3.1 kg (6 lb 14.9 oz) (without battery packs)
Max Payload: Approx. 2.5 kg (5 lb 9.4 oz)
Max Takeoff Mass: Approx. 7.0 kg (15 lb 5.7 oz)
Flight Speed
Max Speed:
25 m (82 ft)/s (90 km (55.9 miles)/h)
(without payload, obstacle brake disabled)
Max Ascent Speed:
7 m (23 ft)/s (without payload, obstacle brake disabled)
Max Descent Speed:
4 m (13 ft)/s (without payload, obstacle brake disabled)
Acceleration:
Approx. 3.5 seconds
(from 0 km (0 miles)/h to 80 km (49.7 miles)/h, without
payload)
Flight Control
Max Angular Velocity:
Pitch: 180°/s, Yaw: 180°/s, Roll: 180°/s
(Vision Positioning disabled)
Max Pitch Angle:
55° (Obstacle brake disabled), 35° (Obstacle brake enabled)
Operational Limit
Max Wind Resistance:
20 m (66 ft)/s (72 km (44.7 miles)/h) (without payload)
Max Service Ceiling:
2 500 m (8 202 ft) (Above Sea Level, with max payload)
Operating Temperature: -10 °C (14 °F) — 40 °C (104 °F)
Flight Time
Max Flight Time*
Approx. 22 minutes (without payload)
Approx. 12 minutes (with α7SIII and SEL24F14GM)
*
Cruising speed 9 m (30 ft)/s, sea level, no wind
Hovering Accuracy
Vertical: ±0.1 m (0.3 ft), Horizontal: ±0.1 m (0.3 ft)
(GNSS and Vision Positioning enabled)
Vertical: ±0.5 m (1.6 ft), Horizontal: ±1.5 m (4.9 ft)
(GNSS enabled and Vision Positioning disabled)

53
Flight Information and Specifications
Battery Pack (LBP-HS1)
Capacity
2 518 mAh
Voltage
37 V
Battery Type
10S
Energy
93 Wh
Dimensions
Approx. 150.1 mm (6.0 in.) × 55.0 mm (2.3 in.) ×
74.5 mm (3.0 in.)
Mass
Approx. 646 g (1 lb 6.8 oz)
Operating Temperature
-10 °C (14 °F) — 40 °C (104 °F)
Storage Temperature
-20 °C (-4 °F) — 45 °C (113 °F)
Battery Charger (LBG-H1)
Specification
AC Adapter (ACDP-160M01)
Power requirements: 100 V — 240 V, 2.45 A, 50/60 Hz
Output voltage: 19.5 V, 8.21 A
Charging Time
Approx. 1 hour/each (Charging one by one)
Dimensions
Battery Charger:
Approx. 135.7 mm (5.4 in.) × 61.0 mm (2.5 in.) ×
91.3 mm (3.6 in.)
AC Adapter:
Approx. 189.9 mm (7.5 in.) × 38.2 mm (1.6 in.) ×
80.0 mm (3.3 in.)
DC Cable: Approx. 1.5 m (59.1 in.)
Power Cable: Approx. 1.5 m (59.1 in.)
Mass
Battery Charger: Approx. 350 g (12.3 oz)
AC Adapter: Approx. 659 g (1 lb 7.2 oz)
Operating Temperature
0 °C (32 °F) — 40 °C (104 °F)
Remote Controller (RCR-VH1)
Transmission
Operating Frequency:
2.4 GHz — 2.4835 GHz,
5.15 GHz — 5.25 GHz,
5.725 GHz — 5.85 GHz
EIRP:
2.4 GHz — 2.4835 GHz: 24.6 dBm,
5.15 GHz — 5.25 GHz: 19.1 dBm,
5.725 GHz — 5.85 GHz: 25.6 dBm
Max Transmitting Distance*:
2.4 GHz — 2.4835 GHz: 2 km (1.2 miles)
5.15 GHz — 5.25 GHz: 1 km (0.6 miles)
5.725 GHz — 5.85 GHz: 2 km (1.2 miles)
*Unobstructed, free of interference
Size
Dimensions:
Approx. 213.1 mm (8.5 in.) × 157.9 mm (6.3 in.) ×
60.5 mm (2.5 in.)
Mass
Approx. 1.1 kg (2 lb 5.8 oz)
Built-in Battery
Battery Life: Approx. 6 hours
Battery Type: 5 100 mAh 2S
Rated Power: 6 W
Charger
Specification:
AC Adapter (AC-UES1230M T)
Input: 100 V — 240 V, 0.75 A — 0.4 A, 50/60 Hz
Output: 12 V, 3 A
Dimensions
AC Adapter:
Approx. 102.5 mm (4.2 in.) × 32.0 mm (1.3 in.) ×
51.7 mm (2.1 in.)
DC Cable: Approx. 1 m (39.4 in.)
Power Cable: Approx. 1.5 m (59.1 in.)
Mass: Approx. 183 g (6.5 oz) (AC Adapter only)
Charging Time: Approx. 3 hours
Operational Limit
Operating Temperature: -10 °C (14 °F) — 40 °C (104 °F)
Interface
USB Terminal: Type-A, Output 0.5 A (Max.)
micro USB Terminal: micro-B
HDMI Terminal: Type-A
Dual Operation Mode
Yes (Star Connection)
Mobile Device Holder
Max Width of Device: Approx. 178.5 mm (19.8 in.)
• Design and specifications are subject to change without notice.
• Product performance is subject to environmental factors and
how to use.
54
Trademarks and copyrights
• Wi-Fi is registered trademark of Wi-Fi Alliance.
• The Bluetooth® word mark and logos are registered trademarks
owned by Bluetooth SIG, Inc. and any use of such marks by
Sony Group Corporation and its subsidiaries is under license.
• The terms HDMI and HDMI High-Definition Multimedia
Interface, and the HDMI Logo are trademarks or registered
trademarks of HDMI Licensing Administrator, Inc. in the United
States and other countries.
• USB Type-C® and USB-C® are trademarks of USB Implementers
Forum.
• Microsoft, Microsoft Edge and Windows are either trademarks
or registered trademarks of Microsoft Corporation in the United
States and/or other countries.
• Google Chrome is a trademark of Google LLC.
• Apple®, macOS®, iPadOS®, Safari®, iPad®, iPad mini®, iPad Air®
and iPhone
® are either trademarks or registered trademarks of
Apple Inc., registered in the U.S. and other countries.
• Use of the Made for Apple badge means that an accessory has
been designed to connect specifically to the Apple product(s)
identified in the badge and has been certified by the developer
to meet Apple performance standards. Apple is not responsible
for the operation of this device or its compliance with safety
and regulatory standards.
• Please note that use of an accessory with an Apple product
may affect wireless performance.
System and/or product names mentioned in this document
are, in general, registered trademarks or trademarks of their
respective developers and the “™” and “®” marks are omitted in
the text. Furthermore, any copyrights not explicitly mentioned in
this document are the property of their respective owners.
About software
Information about the system software
By updating the system software, you can add new
features to this product, improve user experience of the
product, and enhance security of the product. Please use
the dedicated app to keep your product updated.
Information about the third-party software
This product contains the software that includes software
components publicly available as the source code or as
free software or its derivative granted for use under the
license agreement imposed by the software right holder
other than Sony Group Corporation (hereinafter referred
to as “third-party software”).
To use any third-party software, you are bind to comply
with its license agreement. The license agreement of
each third-party software is provided on the website at
the following URL. You are advised to visit this website
and read each and every license agreement.
https://oss.sony.net/License/ARS-S1/
https://oss.sony.net/License/RCR-VH1/
Some of the third-party software is applicable to GNU
General Public License (GPL) or GNU Lesser General
Public License (LGPL) described on the website at the
above URL. With compliance to the GPL/LGPL conditions,
you are entitled to obtain, alter, and distribute the
software code of such software. The software code of
each of such software is provided on the website at the
following URL. To download the software code, access
the website and select “ARS-S1” or “RCR-VH1.”
https://www.sony.net/Products/Linux/
Please be advised that no answer will be provided by
Sony to the inquiry concerning the contents of the
software code.

55

©2021 Sony Group Corporation Printed in Japan