Before using your new product, please read these instructions to prevent any damage.
USER GUIDE
Ice Maker
NS-ICEF2W2

www.insigniaproducts.com
2
Contents
Introduction . . . . . . . . . . . . . . . . . . . . . . . . . . . . . . . . . . . . . . . . . . . . . . . . . . . . . . . . . . . . 2
IMPORTANT SAFETY INSTRUCTIONS . . . . . . . . . . . . . . . . . . . . . . . . . . . . . . . . . . . . . 3
Features . . . . . . . . . . . . . . . . . . . . . . . . . . . . . . . . . . . . . . . . . . . . . . . . . . . . . . . . . . . . . . . . 4
Package contents . . . . . . . . . . . . . . . . . . . . . . . . . . . . . . . . . . . . . . . . . . . . . . . . . . . 4
Tools and materials needed . . . . . . . . . . . . . . . . . . . . . . . . . . . . . . . . . . . . . . . . . 5
Installing the ice maker . . . . . . . . . . . . . . . . . . . . . . . . . . . . . . . . . . . . . . . . . . . . . . . . . . 5
Installing the ice maker in a top mount freezer . . . . . . . . . . . . . . . . . . . . . . . 5
Installing the ice maker in a bottom mount freezer . . . . . . . . . . . . . . . . . .13
Connecting the ice maker to the water supply . . . . . . . . . . . . . . . . . . . . . .19
Tips for using your automatic ice maker . . . . . . . . . . . . . . . . . . . . . . . . . . . . . . . . .21
Maintaining your ice maker . . . . . . . . . . . . . . . . . . . . . . . . . . . . . . . . . . . . . . . . . . . . .21
Troubleshooting . . . . . . . . . . . . . . . . . . . . . . . . . . . . . . . . . . . . . . . . . . . . . . . . . . . . . . .22
Specifications . . . . . . . . . . . . . . . . . . . . . . . . . . . . . . . . . . . . . . . . . . . . . . . . . . . . . . . . . .23
ONE-YEAR LIMITED WARRANTY . . . . . . . . . . . . . . . . . . . . . . . . . . . . . . . . . . . . . . . . .24
Introduction
Congratulations on your purchase of a high-quality Insignia product. Your
NS-ICEF2W2 represents the state of the art in ice maker design and is designed for
reliable and trouble-free performance.
3
Ice Maker
www.insigniaproducts.com
IMPORTANT SAFETY
INSTRUCTIONS
WARNING
1 Read these instructions.
2 Keep these instructions.
3 Heed all warnings.
4 Follow all instructions.
5 Do not place fingers or hands into the automatic ice making mechanism while
the refrigerator is plugged in. Doing so my expose you to possible injury.
6 Keep your hands away from the ejector mechanism and the heating element
that releases the ice cubes, located on the bottom of the ice maker.
7 Refer all servicing to qualified service personnel. Servicing is required when
the appliance has been damaged in any way, such as the power-supply cord
or plug is damaged, liquid has been spilled or objects have fallen into the
appliance, the appliance has been exposed to rain or moisture, does not
operate normally, or has been dropped.
WARNING
Electric Shock Hazard
Failure to follow these instructions can result in electric shock, fire, or death.
1 WARNING–Do not touch the interior of the freezer compartment with wet
hands. This could result in frost bite.
2 WARNING–Do not use electrical appliances inside the food storage
compartment of the refrigerator, unless they are of the type recommended by
the manufacturer.
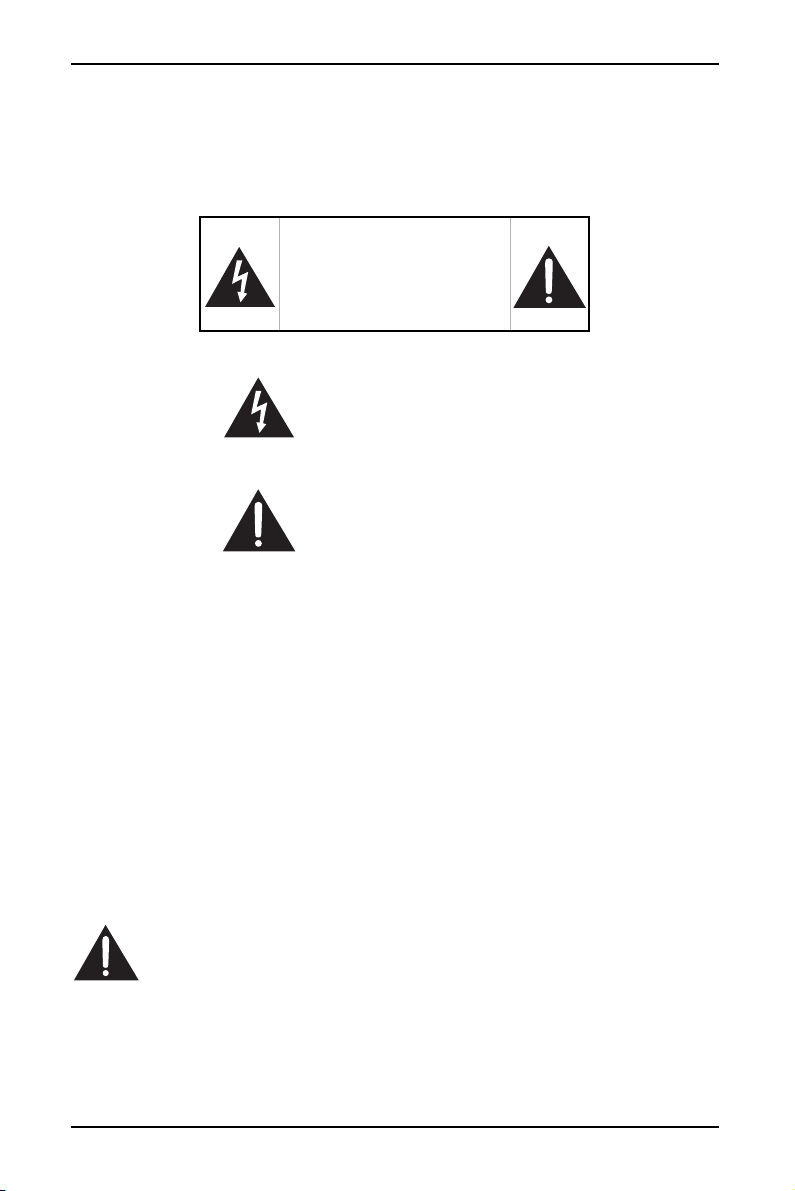
CAUTION
RISK OF ELECTRIC
SHOCK
DO NOT OPEN
This symbol indicates that
dangerous voltage constituting a
risk of electric shock is present
within your refrigerator.
This symbol indicates that there
are important operating and
maintenance instructions in the
literature accompanying your
refrigerator.
4
www.insigniaproducts.com
3 Unplug the refrigerator before performing user maintenance on it.
4 This appliance can be used by children age eight years and older and persons
with reduced physical or mental capabilities or lack of experience and
knowledge if they are given supervision or instruction concerning the use of
the appliance in a safe way and understand the hazards involved. Children
should not play with the appliance. Cleaning and maintenance should not be
performed by children without supervision.
5 If a component part is damaged, it must be replaced by the manufacturer, its
service agent, or similar qualified persons in order to avoid a hazard.
6 WARNING: Connect this refrigerator to a potable water supply only.
7 To eliminate the danger of electric shock during installation, you must unplug
the refrigerator.
8 The minimum inlet water pressure should be no lower than 138 kPa (20 PSIG).
The maximum should be no higher than 827 kPa (120 PSIG).
Features
• Produces up to 2.7 pounds of ice a day, depending on the size of your
refrigerator.
• Stores up to 5.5 pounds of ice
• Prevents overflow by automatically detecting when storage bin is full
• Works with these Insignia refrigerators: NS-RBM18SS0, NS-RTM18SS2,
NS-RTM18WH2, NS-RTM18BK2L, NS-RTM18SS2L, NS-RTM18BK2,
NS-RTM18WHD2, and RTM18BKD2
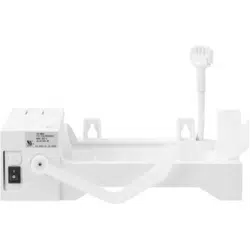
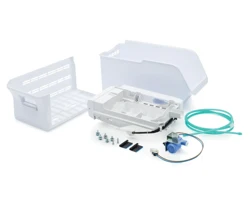
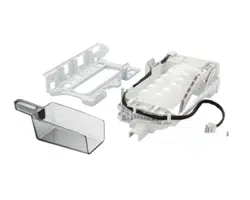
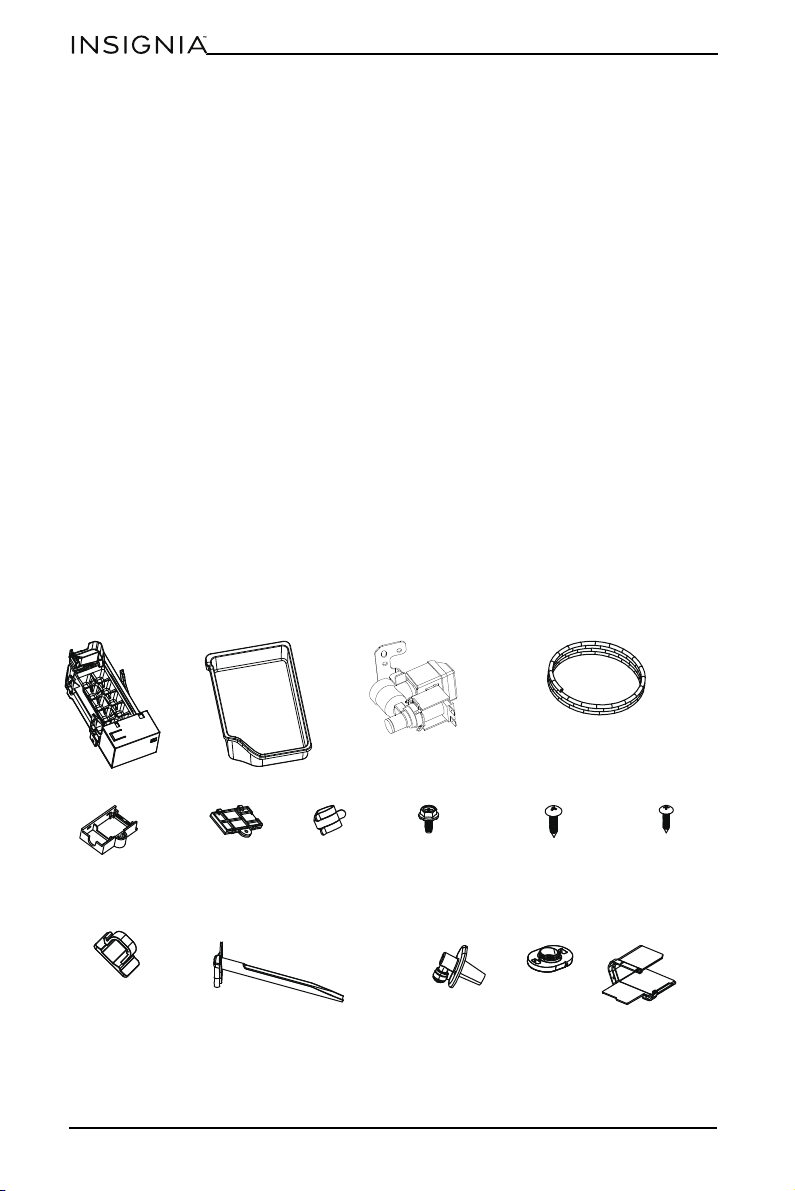
Package contents
Ice maker unit
Ice storage bin
Plastic water supply tubing
Water valve
Water inlet tube
Tube clamp
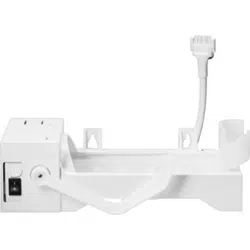
Leveling bracket
screw
Self-tapping
screws (3)
Ice maker mounting
screws (3)
Plastic clamp (3)
Mounting box
Box cover
Top Mount Freezer only Bottom Mount Freezer only
Water pipe
joint
Sealed silica gel
block
Connecting
plate
5
Ice Maker
www.insigniaproducts.com
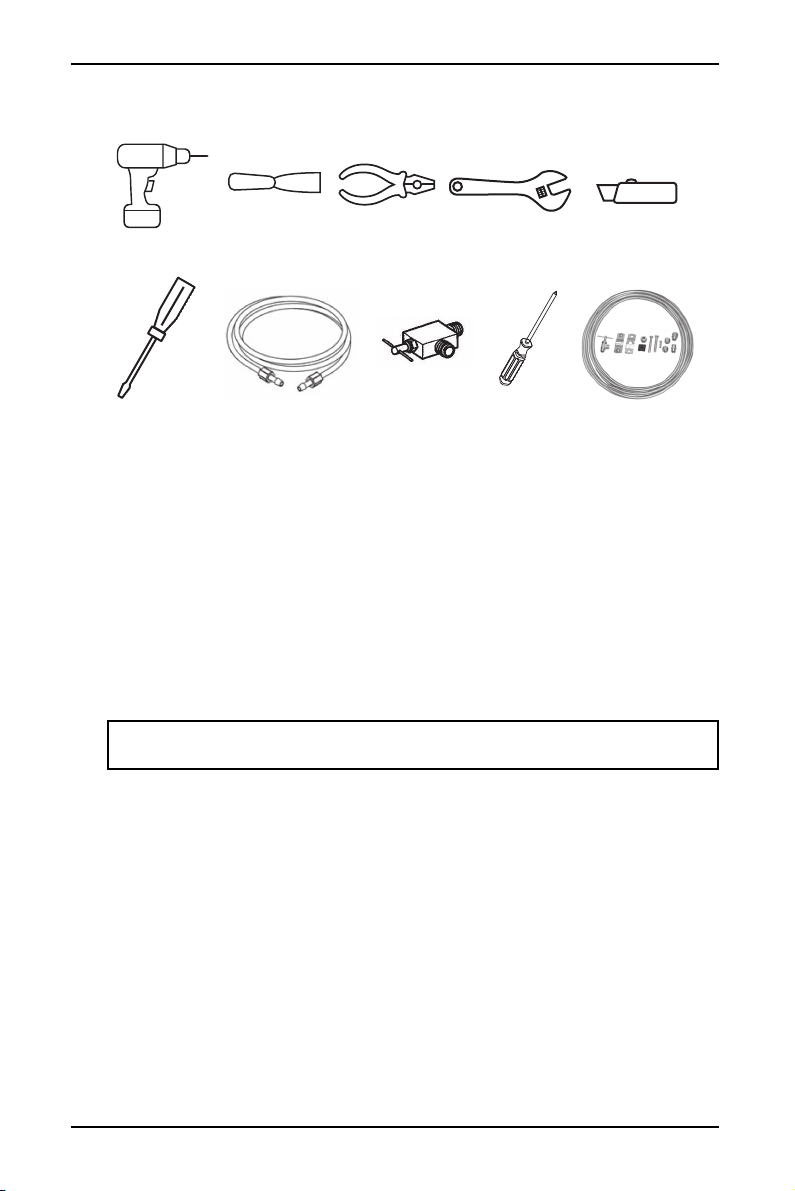
Tools and materials needed
You’ll also need:
• A freezer shelf to hold the ice storage bin. If your model does not have one,
contact your dealer to order one.
• Access to a household cold water line with water pressure between 20 and
120 psi.
The water line kit (including copper tubing and shut off valve) are available in a kit
(#5303917950) from your local hardware or plumbing supply store.
Installing the ice maker
Your Insignia refrigerator comes set up for ice maker installation.
Installing the ice maker in a top mount freezer
1 Unplug the refrigerator from the wall outlet.
2 Remove the freezer shelf and ice tray rack from the freezer.
CAUTION: To eliminate the danger of electric shock during installation, you
must first unplug the refrigerator.
Putty knife
Needle nose pliers or
nut driver
Adjustable wrench
1/4” OD copper supply
line with compression
nuts and ferrules
Knife
Phillips
screwdriver
Flat blade
screwdriver
Shut off valve (non
self piercing)
Water line kit
#5303917950
Electric drill with a
1/4” drill bit
6
www.insigniaproducts.com
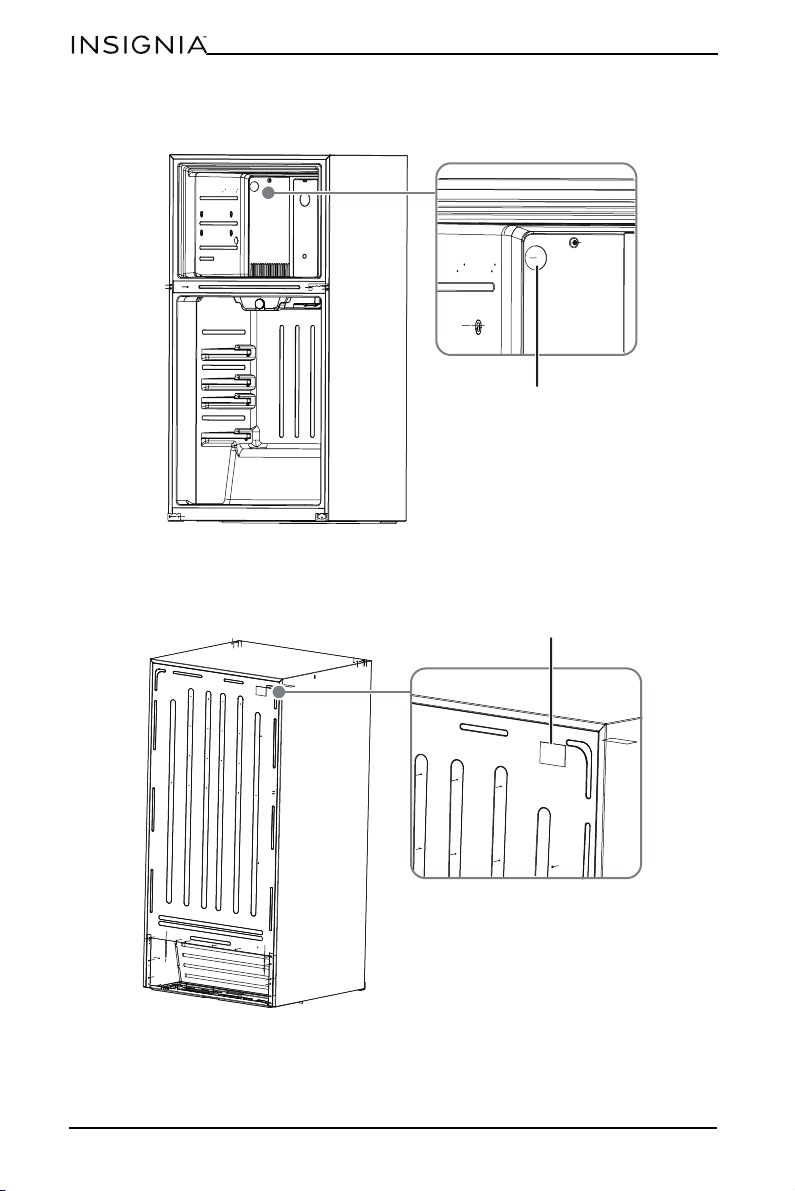
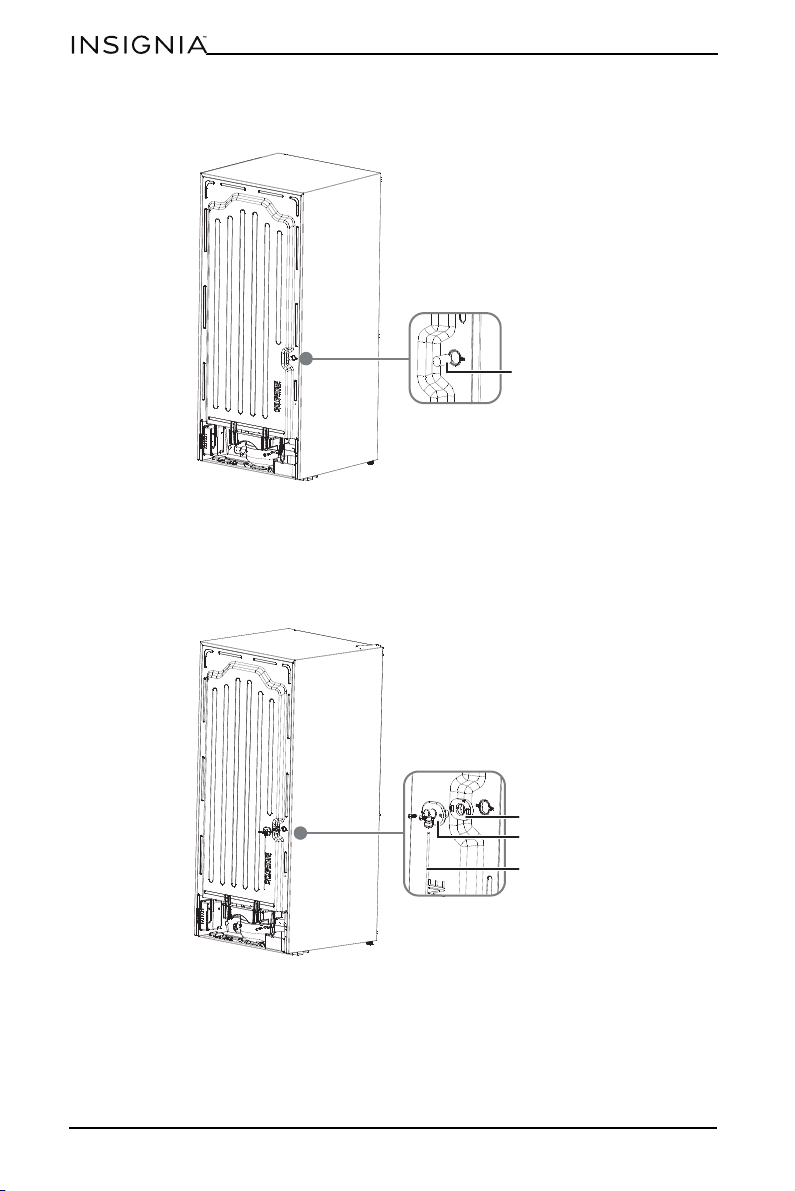
3 Remove the plug from the inside of the freezer compartment with a putty
knife.
4 Peel off the label covering the ice maker hole on the back of the refrigerator,
then remove the foam from the hole with the needle nose pliers. Retain the
foam for future use.
Plug
Remove label
7
Ice Maker
www.insigniaproducts.com
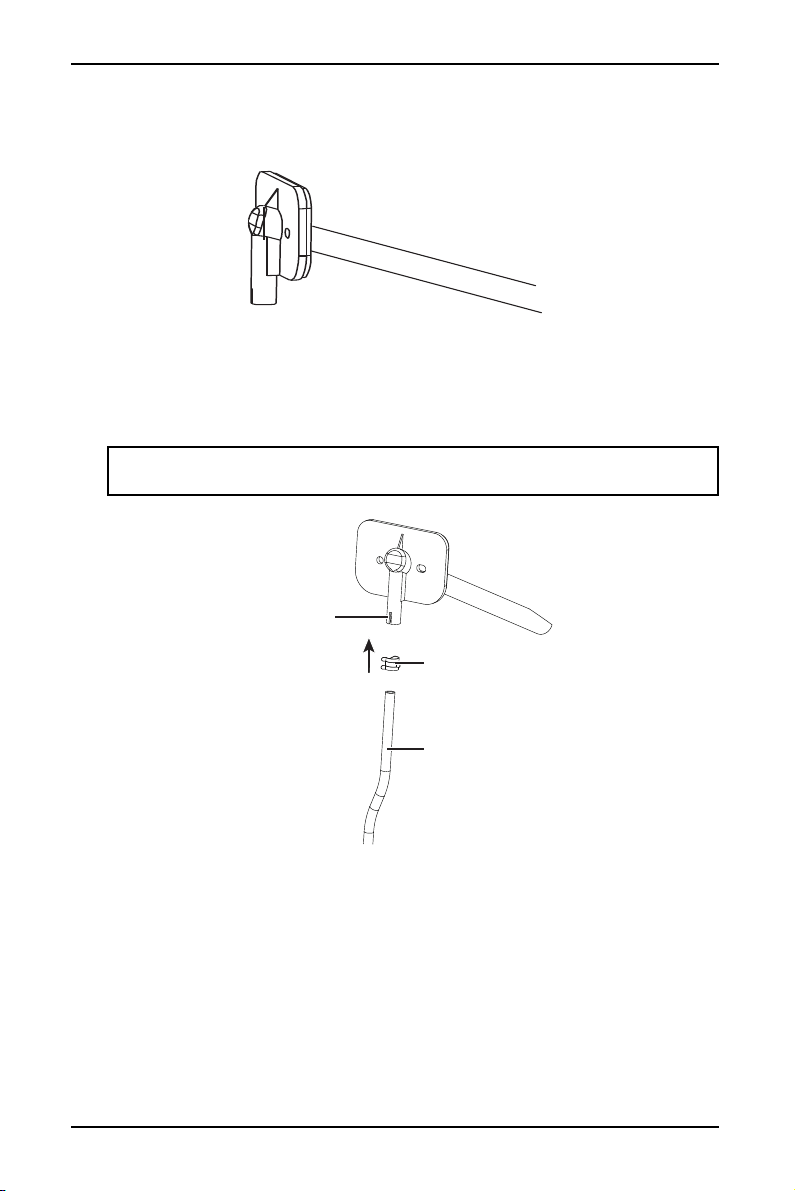
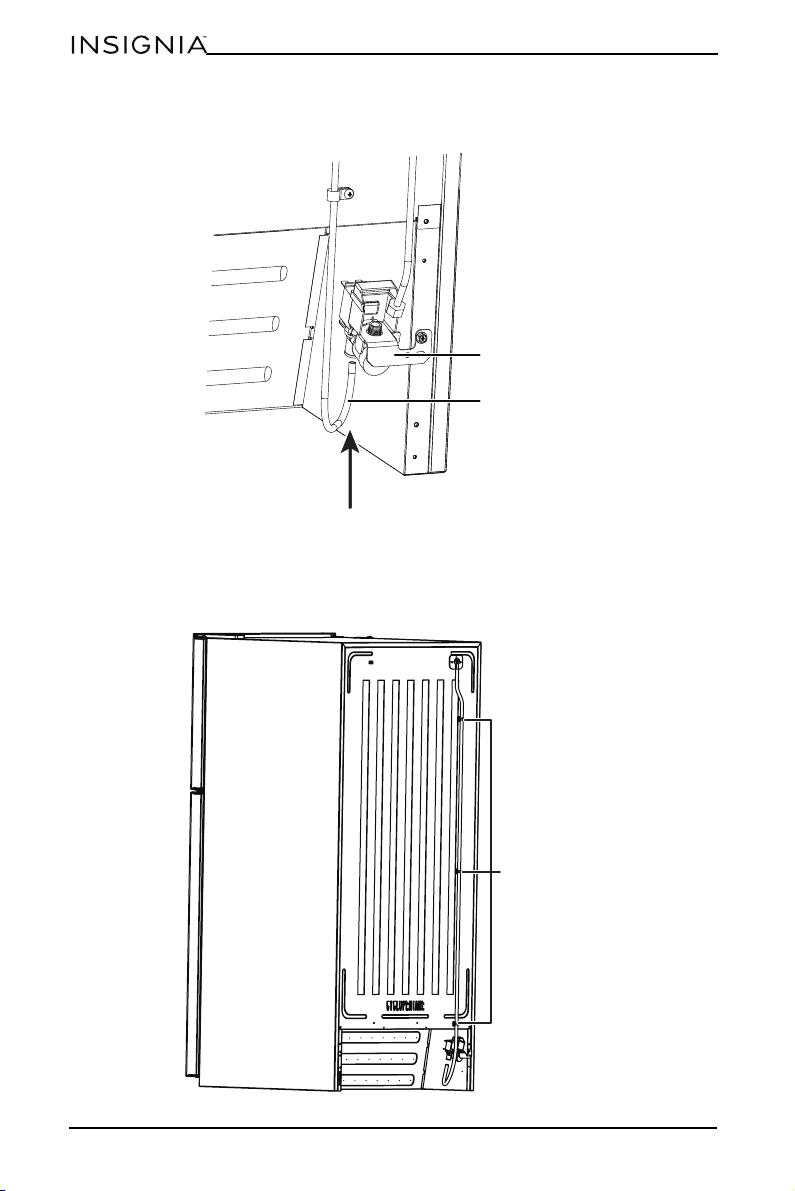
5 Push the water inlet tube into the small hole on back of refrigerator. Rotate
while inserting the tube until the flat surface of inlet tube is tight against the
back of the refrigerator.
6 Secure the water inlet tube to the back of the refrigerator with two self-drilling
screws (provided).
7 Squeeze together and slide the tube clamp over the fill tube. While still
squeezing the clamp, insert one end of the plastic tube into the fill tube as far
as it will go, then slide the clamp downward to capture the fill tube in place.
CAUTION: Leaks may result if the plastic tube is not pushed in as far as it can go
and the tube clamp is not in place over the fill tube.
Fill tube
Water supply tube
Tube clamp
8
www.insigniaproducts.com
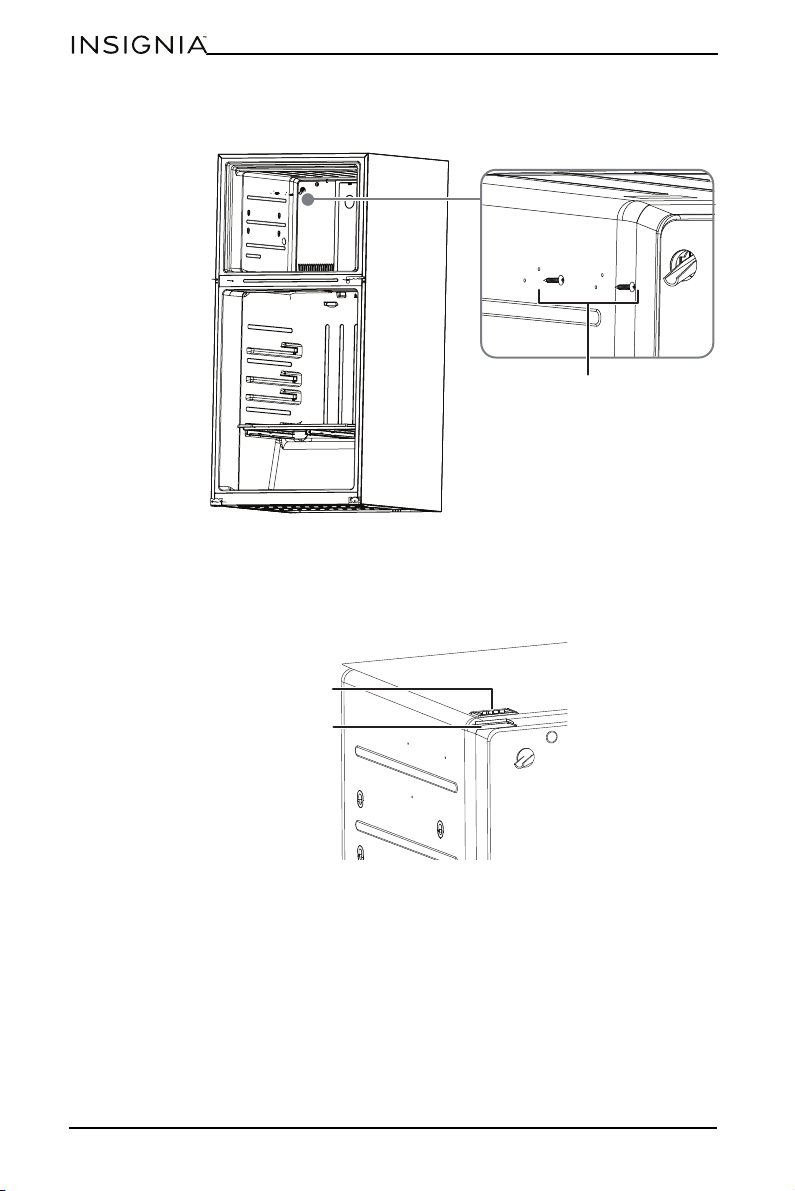
8 Insert the two ice maker mounting screws into the holes in the freezer wall.
Turn each screw clockwise five times.
9 Use needle nose pliers to remove the terminal cover located at the top of the
freezer by first pulling down one side of the cover, then pulling down the
other side. Save the terminal cover for future use in case the ice maker is
removed.
Ice maker mounting
screws
Ter mi na l
Terminal cover
9
Ice Maker
www.insigniaproducts.com
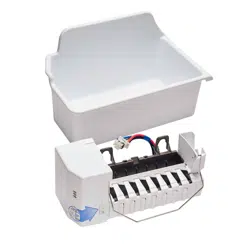
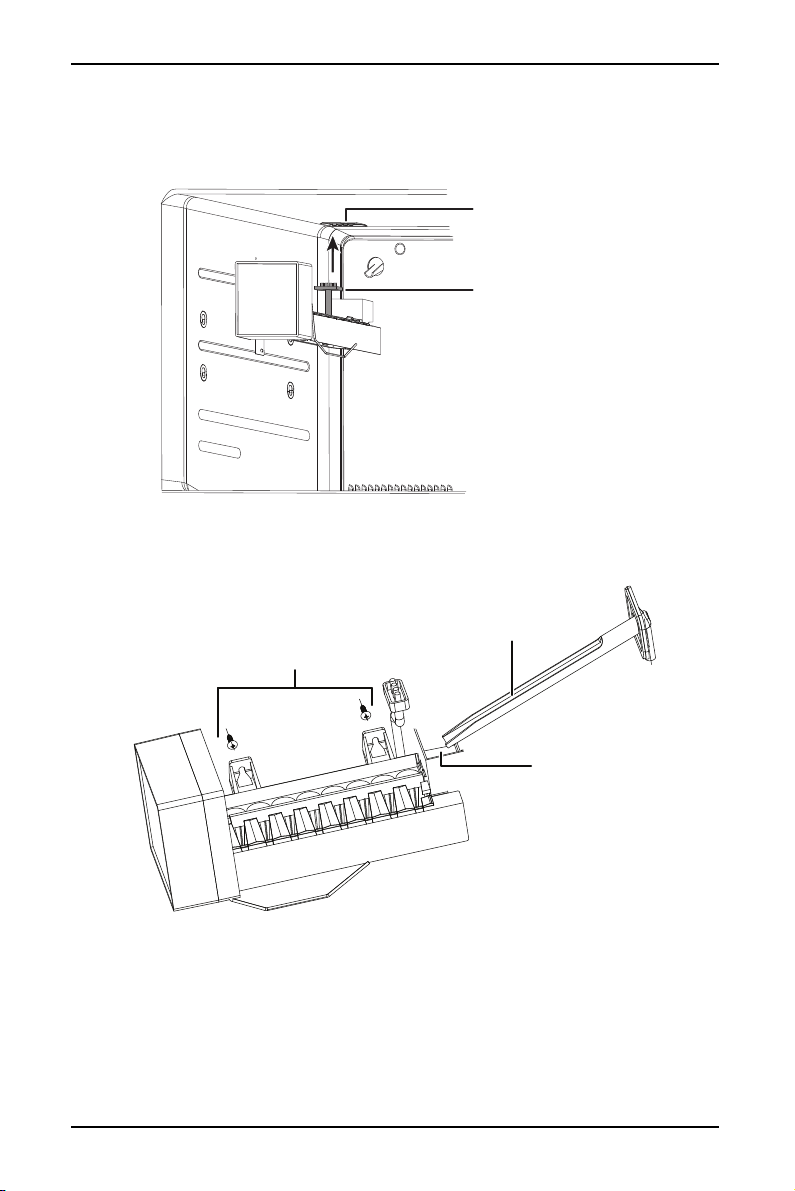
10 With the ice maker in one hand, plug the wiring harness connector into the
terminal located at the top of the freezer panel. Make sure that the connection
is tight. Make sure that the wiring harness is still in the hook on the back of ice
maker.
11 Mount the ice maker onto the two ice maker mounting screws you installed in
step 8. Make sure that the water inlet tube is sitting inside the fill cup, then
tighten the screws.
Wiring harness connector
Ter mi na l
Ice maker mounting
screws
Fill cup
Water inlet tube
10
www.insigniaproducts.com
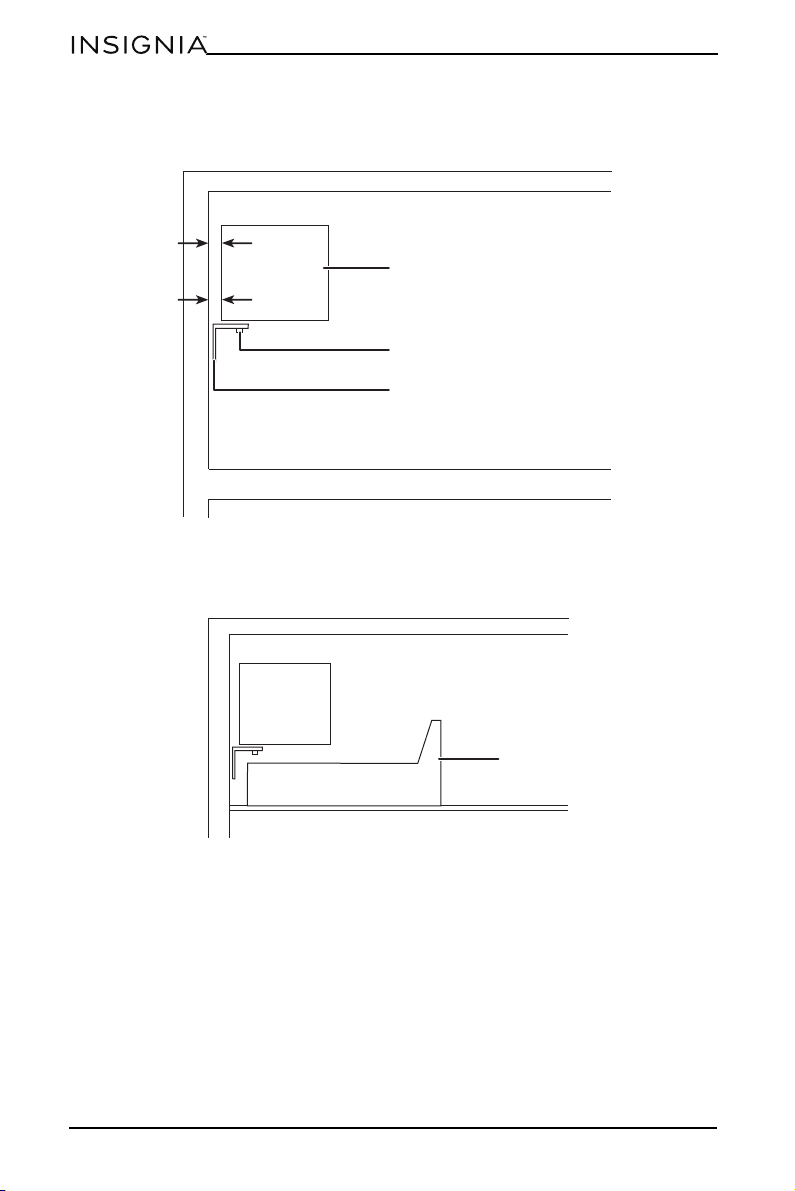
12 Adjust the leveling bracket to level the ice maker. The ice maker is level when
the gap between the freezer wall and the ice maker is the same at the top and
bottom.
13 With the ice maker level, insert the third ice maker mounting screw at the
bottom of the ice maker and tighten.
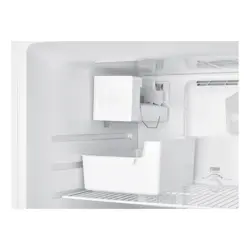
14 Reinstall the freezer shelf and set the ice storage bin on the shelf.
Ice maker
Screws
Leveling bracket
Ice storage bin
11
Ice Maker
www.insigniaproducts.com
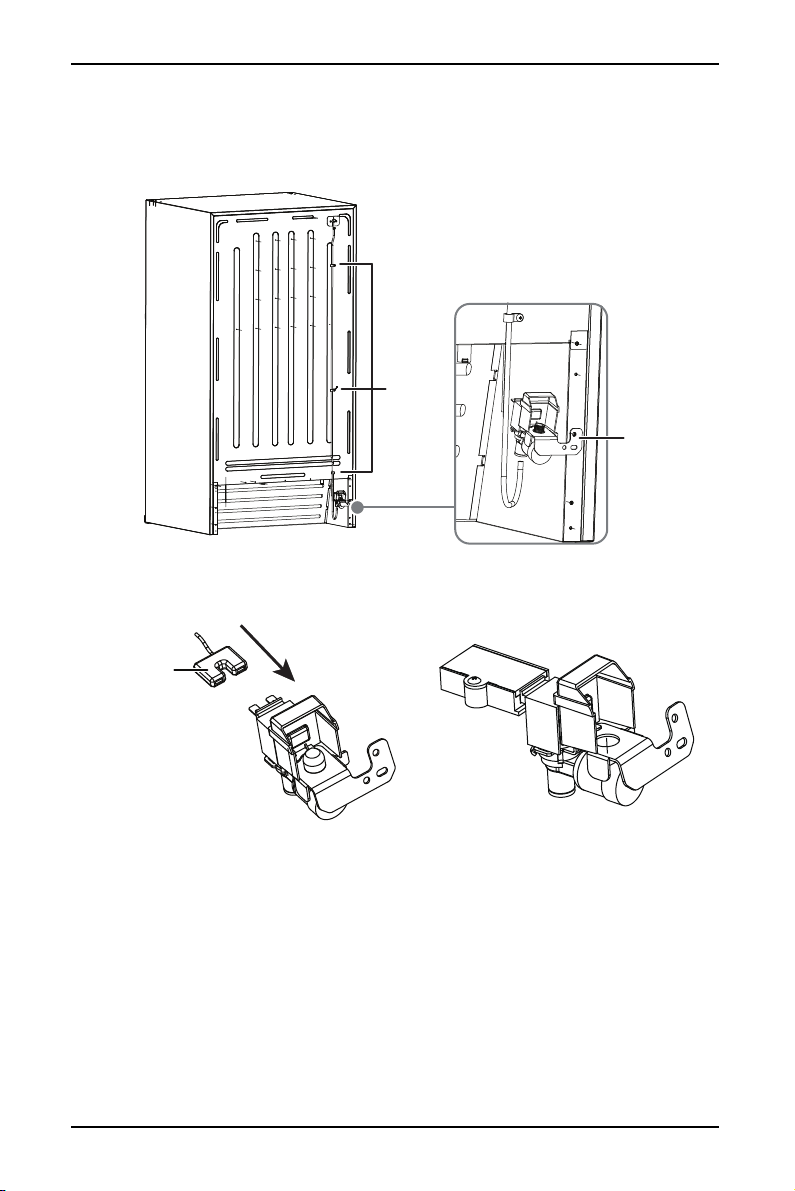
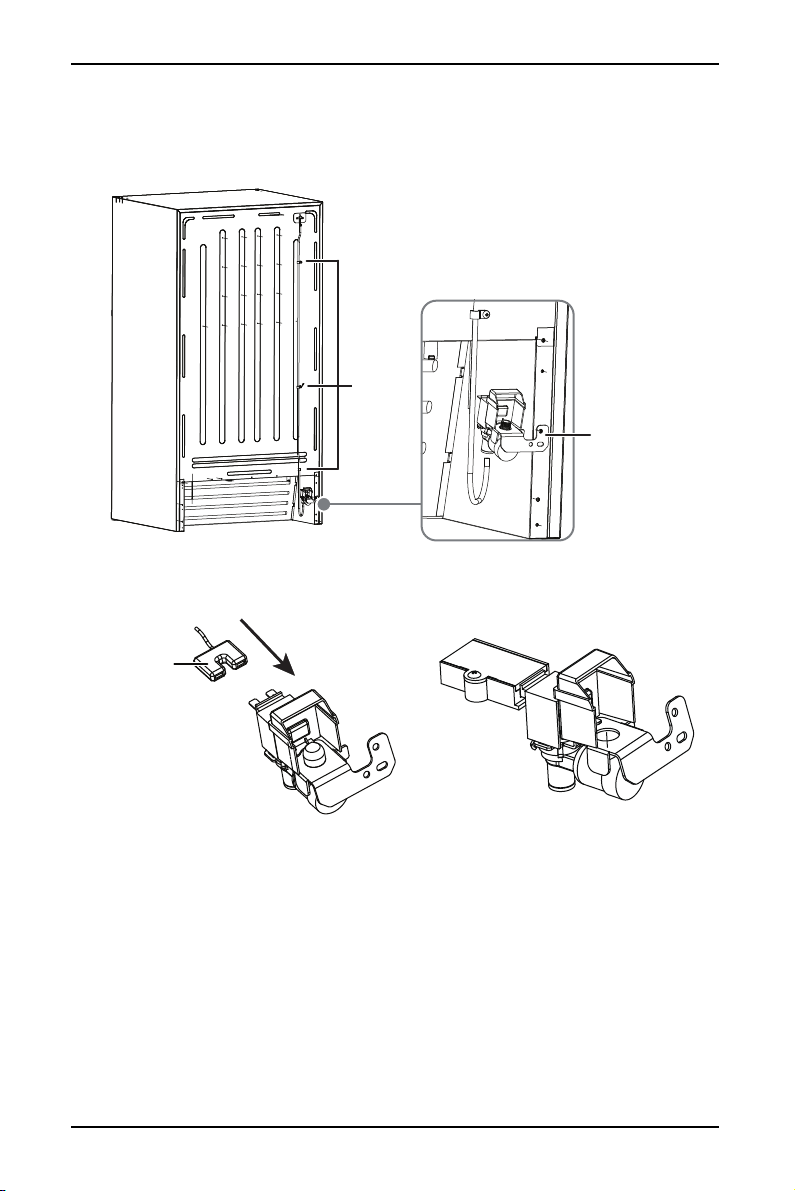
15 Locate the pre-punched holes at the bottom right corner of the back panel of
the refrigerator. Align the water valve bracket with the factory drilled holes,
then use a Phillips head screwdriver to drive the two self-drilling screws
through the bracket and into the cabinet.
16 Connect the wiring harness to the water valve, making sure that the
connection is tight, then install the mounting box and box cover on the plug.
Water valve
Fixing
clamps
Wiring harness
plug
12
www.insigniaproducts.com
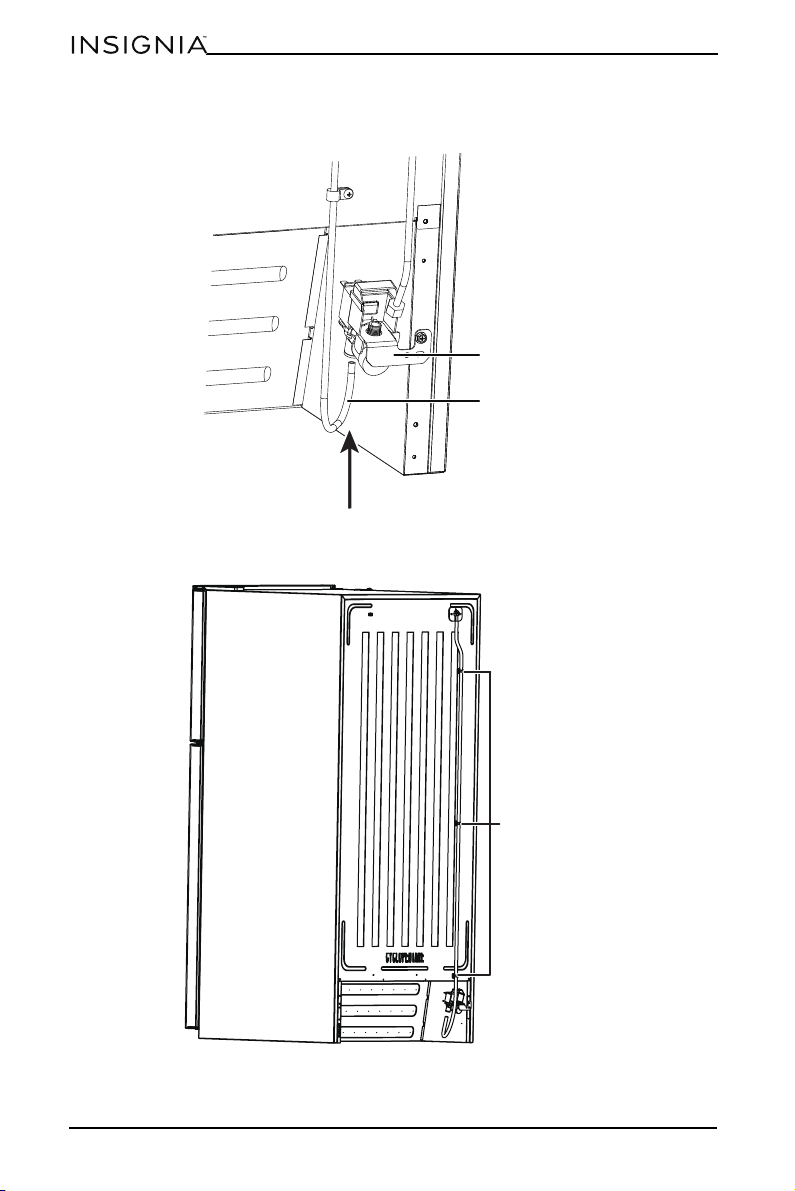
17 Grasp the other end of the plastic tube and push it firmly into the
quick-connection on the valve until it bottoms out.
18 Clean the back of the cabinet with a commercial household cleaner, ammonia,
or alcohol before applying the clamps.
19 Secure the plastic water supply tubing to the back of the cabinet with three
plastic clamps.
Water valve
Plastic water supply
tubing
Plastic clamps
13
Ice Maker
www.insigniaproducts.com
Installing the ice maker in a bottom mount freezer
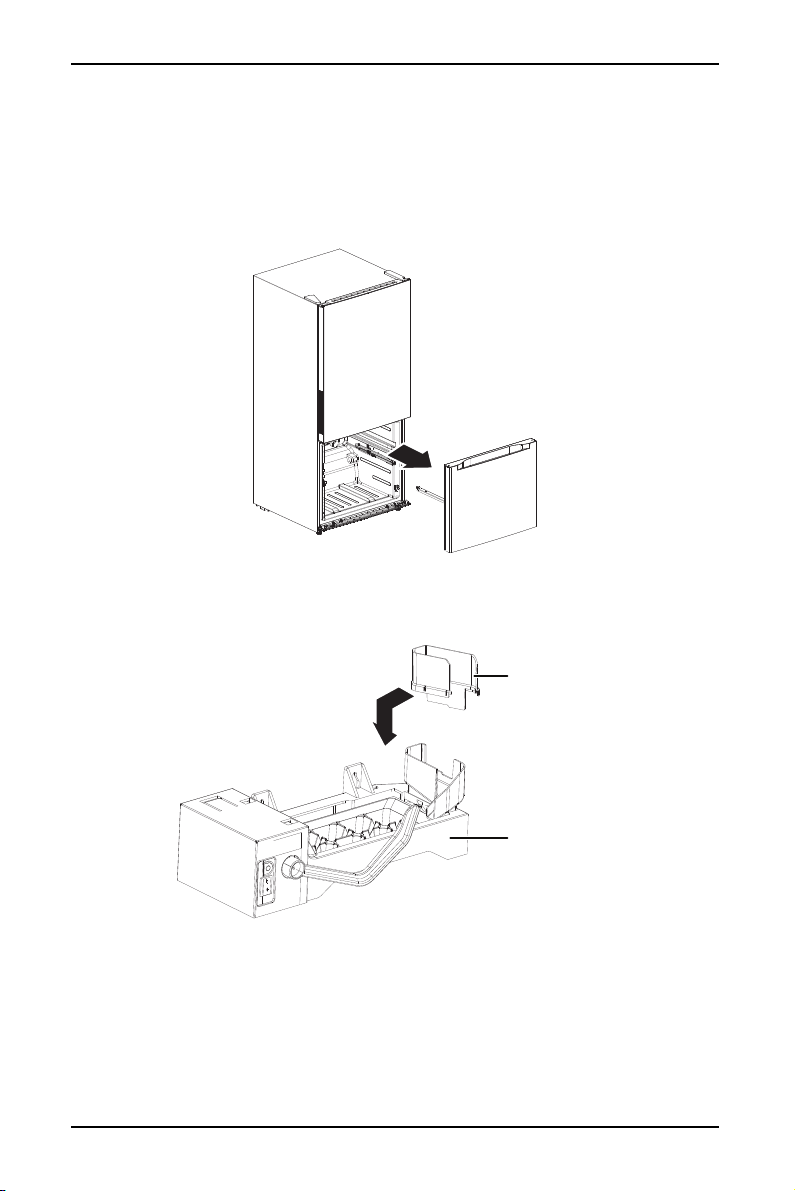
1 Unplug the refrigerator from the wall outlet.
2 Remove the drawers from the freezer compartment.
3 Remove the small screws on both sides of the guide rail of the freezer
compartment door, then remove the freezer compartment door, with the
guide rail support, from the guide rail.
4 Remove the ice maker unit and the connection plate from the accessories bag,
then insert the connection plate into the ice maker unit (as shown below) by
aligning the connection plate with the notch in the ice maker unit.
Connection
plate
Ice maker unit
14
www.insigniaproducts.com
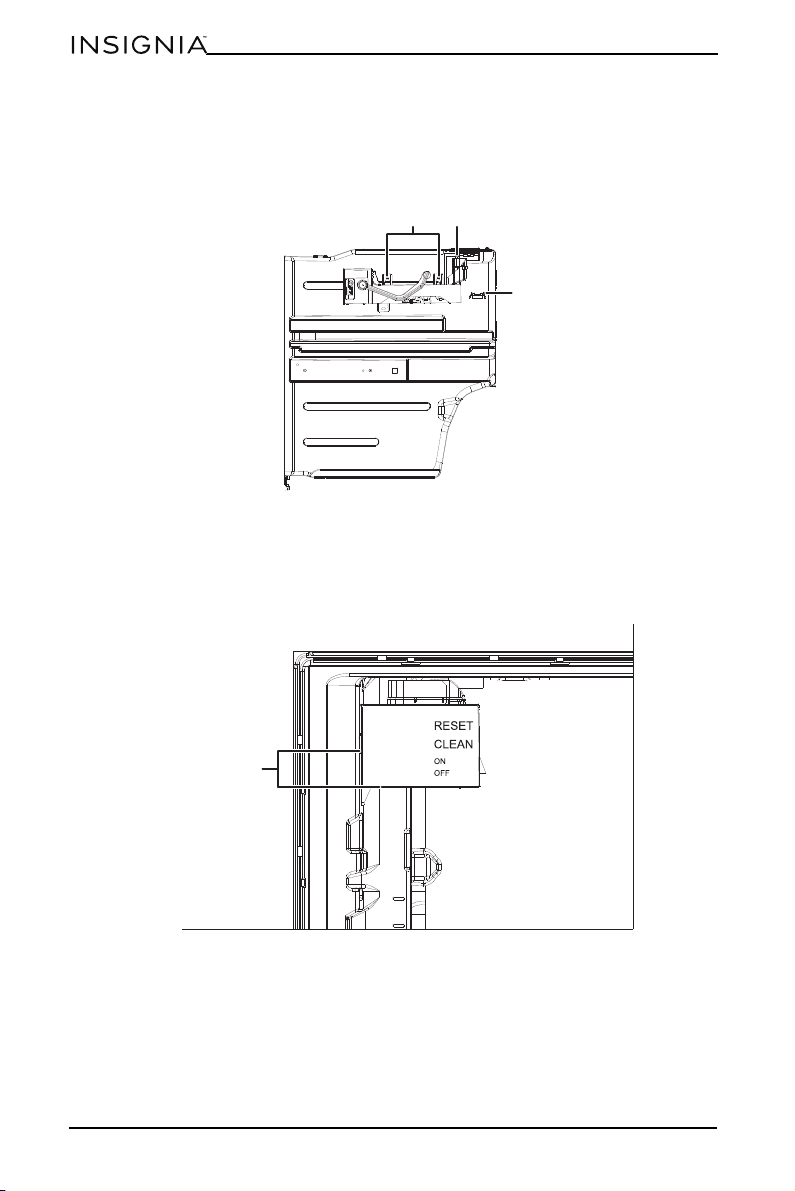
5 Remove the terminal cover from the upper left corner of the freezer
compartment, then remove the ice maker mounting screws from the
accessory bag and attach them loosely to the two mounting holes in the back
of the freezer compartment.
6 Insert the power connector of the ice maker into the socket in the freezer
compartment, then loosely mount the ice maker onto the ice maker mounting
screws.
7 Move the ice maker to the left as far as it will go, then align it vertically and
tighten the ice maker mounting screws.
Mounting
screws
Ter mi na l
Remove terminal
cover
Position as far left as
possible
15
Ice Maker
www.insigniaproducts.com
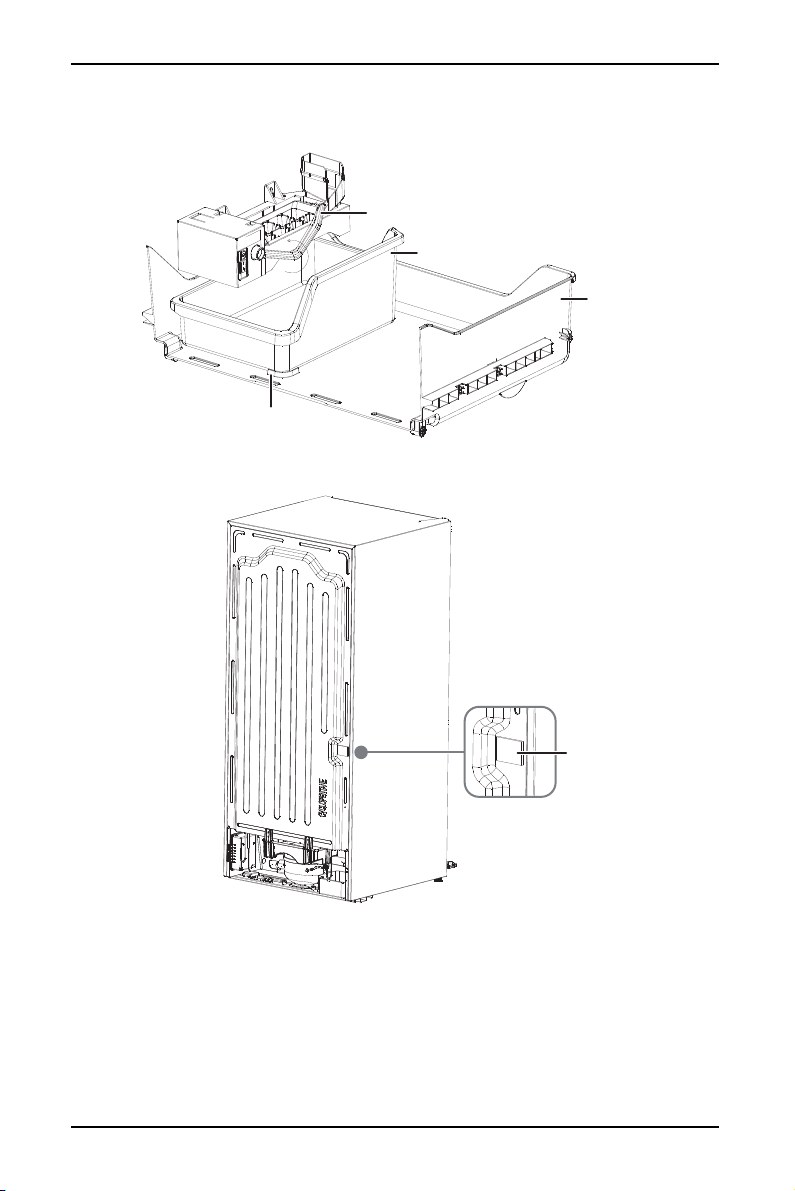
8 Reinstall the freezer door guide rail and replace the freezer drawers, then place
the ice storage bin in the top freezer drawer.
9 Peel the label off the water hole on the back of your refrigerator.
Wire signal arm
Ice storage bin
Freezer
drawer
Limit rib
Label
16
www.insigniaproducts.com
10 Use needle nose pliers to remove the thermal insulation foam strip from the
hole you just exposed.
11 Remove the water tube connector, silicone seal, long water supply tube, and
white head screw from the accessory bag, then assemble the parts by aligning
the notch on the silicone seal with the notch on the water tube connector,
inserting one end of the water supply tube into the quick change sealing ring
at the bottom of the connector. Make sure that all parts are securely
assembled.
12 Insert the water supply assembly into the water inlet hole on the back of your
refrigerator, and secure it with the long screw from the accessory bag.
Thermal
insulation
Silicone seal
Water tube connector
Water tube
17
Ice Maker
www.insigniaproducts.com
13 Locate the pre-punched holes at the bottom right corner of the back panel of
the refrigerator. Align the water valve bracket with the factory drilled holes,
then use a Phillips head screwdriver to drive the two self-drilling screws
through the bracket and into the cabinet.
14 Connect the wiring harness to the water valve, making sure that the
connection is tight, then install the mounting box and box cover on the plug.
Water valve
Factory
pre-punched
holes
Wiring harness
plug
18
www.insigniaproducts.com
15 Grasp the other end of the plastic tube and push it firmly into the
quick-connection on the valve until it bottoms out.
16 Secure the plastic water supply tubing to the back of the cabinet with three
plastic clamps.
Water valve
Plastic water supply
tubing
Plastic clamps
19
Ice Maker
www.insigniaproducts.com
Connecting the ice maker to the water supply
Before you begin, please note:
• This water line installation is not warranted by the refrigerator or ice maker
manufacturer.
• Follow these instructions carefully to minimize the risk of water damage.
• Water hammer (water banging in the pipe) in house plumbing can cause
damage to refrigerator parts and lead to water leakage or flooding. Call a
qualified plumber to correct water hammer before installing the water
supply line to the refrigerator.
• To prevent burns and product damage, do not hook up the water line to the
hot water line.
• If you use your refrigerator before connecting the water line, make sure that
the ice maker wire signal arm is in the OFF position.
• Do not install the ice maker tubing in areas where temperature falls below
freezing.
• When using any electrical devices (such as a power drill) during installation,
be sure the device is double insulated or grounded in a manner to prevent
the hazard of electric shock, or the device is battery powered.
• All installations must be in accordance with local plumbing code
requirements.
1 Disconnect the refrigerator from the electric wall outlet.
2 Remove the parts in the water line kit that you purchased for this purpose.
3 Connect the end of the water supply line to the household cold water line
behind the refrigerator. Choose a location for the valve that is easy to access.
We recommend that you connect it to the side of a vertical water pipe. If it is
necessary to connect it to a horizontal water pipe, make the connection to the
top or side, rather than at the bottom, to avoiding drawing off any sediment
from the water pipe.
4 Make sure that the household water supply is turned off, then drill a ¼” hole in
the water pipe (even if using a self-piercing valve), using a sharp bit. Remove
any burrs resulting from drilling the hole. Take care not to allow water to drain
into the drill. Failure to drill a ¼” hole may result in reduced ice production or
smaller cubes.
5 Fasten the shutoff valve to the cold water pipe with the pipe clamp, then
tighten the pipe clamp screws until the sealing washer begin to swell. Do not
over-tighten or you may crush the tubing.
6 Route the tubing through a hole drilled in the wall or floor (behind the
refrigerator or adjacent base cabinet) as close to the wall as possible.
7 Connect the tubing to the valve by placing the compression nut and ferrules
(sleeves) for copper tubing onto to the end of the tubing and connect it to the
shutoff valve. Make sure that the tubing is fully inserted into the valve.
WARNINGS:
• The ice maker should be installed by an authorized service technician.
• Make sure that the refrigerator is unplugged to eliminate the danger of
electric shock during installation.
Note: Make sure that there is sufficient extra tubing to allow the refrigerator to
move out from the wall after installation.
20
www.insigniaproducts.com
8 Tighten the compression nut securely. For plastic tubing, insert the molded
end of the tubing into the valve and tighten the compression nut until it is
hand-tight, then tighten one additional turn with a wrench. Over-tightening
may cause leaks.
9 Place the end of the water supply line into a sink or bucket and flush the water
supply line with water until the water runs clear.
10 Unscrew the plastic cap from the water inlet valve and discard it.
11 Slide a brass compression nut, then a ferrule (sleeve), onto the water supply
line.
12 Push the end of the tubing into the water inlet valve as far as it will go or
¼-inch, then slide the ferrule (sleeve) into the valve inlet and finger tighten the
compression nut onto the valve. Tighten another half turn with a wrench. DO
NOT overtighten.
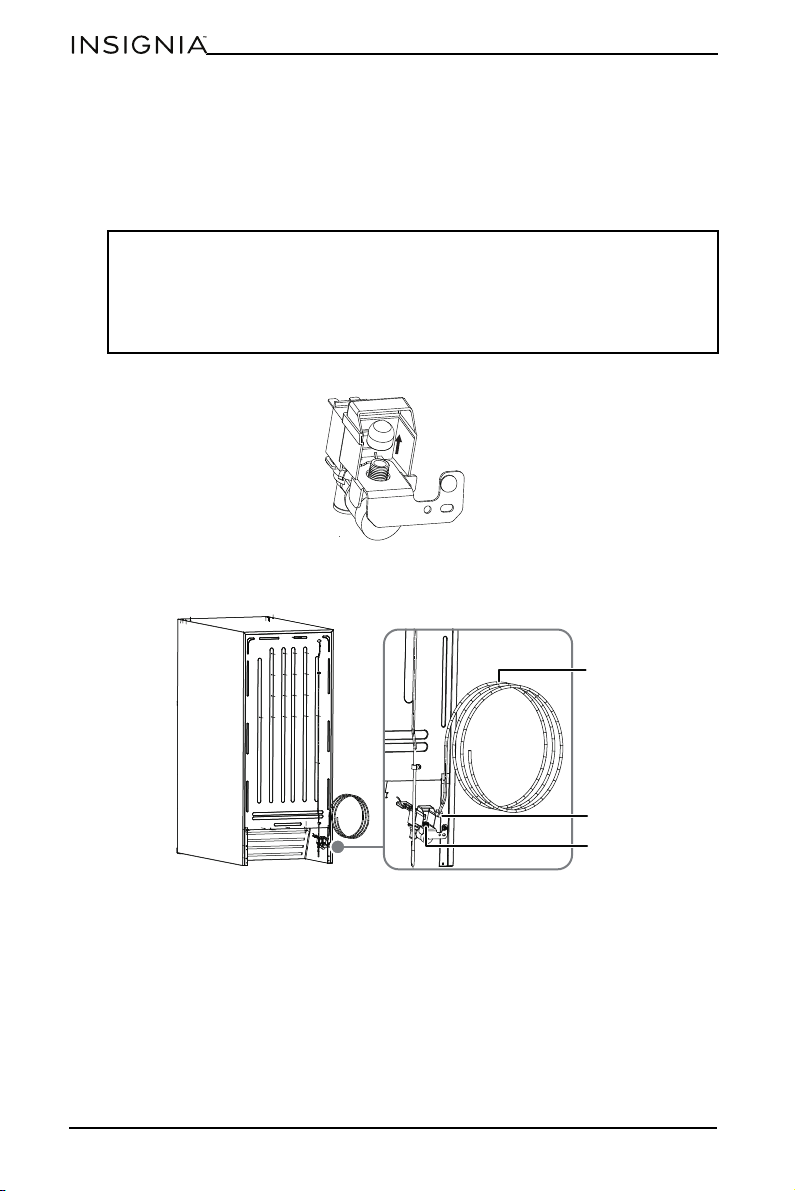
13 Secure the water supply line to the back panel of your refrigerator with a steel
clamp and screw at the location shown on the illustration.
14 Coil the excess water supply line (about 2-½ turns) behind the refrigerator and
arrange the coils so they do not vibrate or wear against any other surface.
15 Turn on the water supply at the shutoff valve and tighten any connections that
leak.
Notes:
• Before making the connection to the refrigerator, be sure the refrigerator
power cord is not plugged into the wall outlet.
• If your refrigerator does not have a water filter, we recommend installing one
if your water supply has sand or particles that could clog the screen of the
refrigerator’s water valve.
1/4” tubing
1/4” compression nut
Water inlet valve
21
Ice Maker
www.insigniaproducts.com
16 Reconnect the refrigerator to the electric wall outlet.
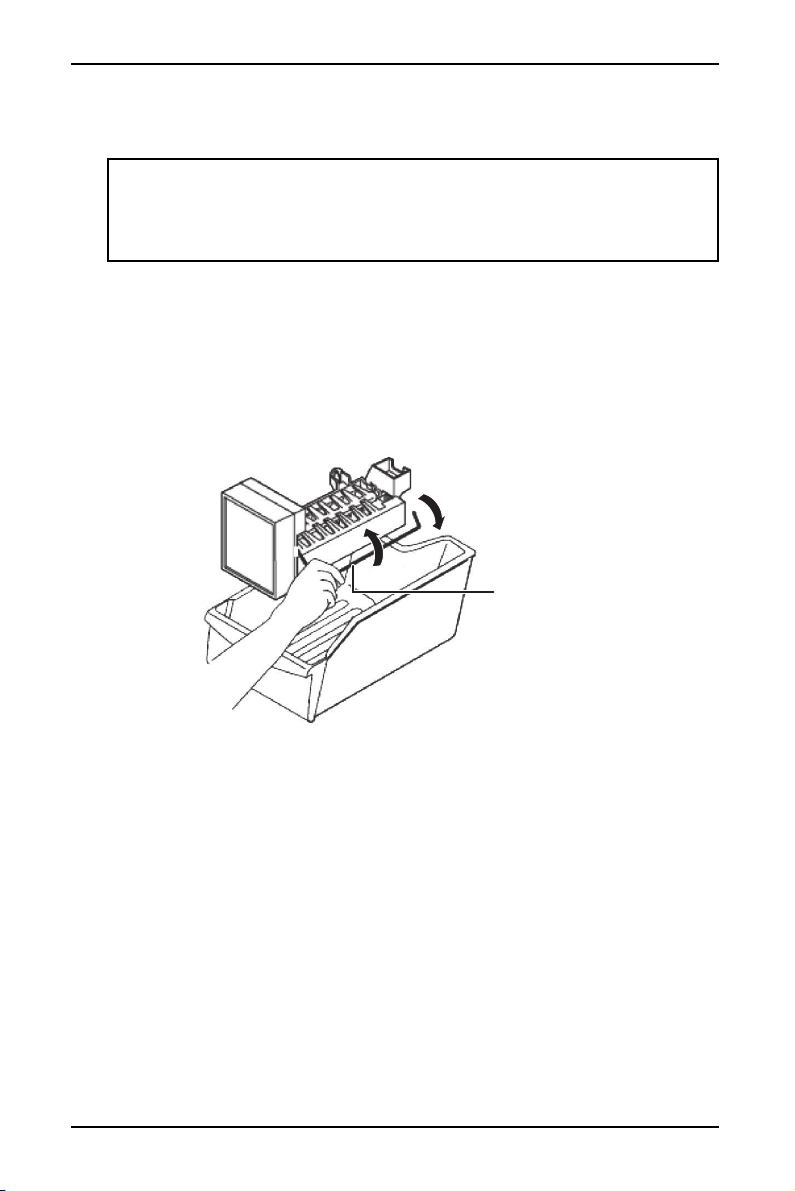
17 To turn on the ice maker, lower the wire signal arm.
Tips for using your automatic ice maker
Remember that water quality determines the quality of ice. The ice maker should
not be connected to softened water. If the water softener has problems, chemical
substances can damage the ice maker.
To turn off the ice maker, raise the wire signal arm until it locks in the “up” off
position. When the ice storage bin is full, the wire signal arm will hit the ice cubes
and the ice maker will automatically shut down.
If you store ice cubes too long they may produce a peculiar smell. To eliminate the
smell, empty the ice storage bin, wash it out, then replace it. The ice maker will
produce more ice cubes.
Shake the ice storage bin from time to time to ensure that the ice cubes separate
from each other.
Before the refrigerator is connected to the water supply system, or any time the
water supply is turned off, the wire signal arm should be in the “up” or closed
position.
Maintaining your ice maker
Use mild detergent in warm water to clean the ice storage box, then rinse and dry
it.
Turn off the ice maker when you clean your refrigerator or plan to be away for a
short period.
If you are going away for an extended period, turn off the water supply valve.
Important: It takes approximately 24 hours for the ice maker to begin
producing usable ice. Air in new plumbing lines may cause the ice maker to
cycle two or three times before making a full tray of ice. New plumbing may
cause ice to be discolored or have poor flavor. Discard ice made during the first
24 hours.
On
Off
Wire signal arm
22
www.insigniaproducts.com
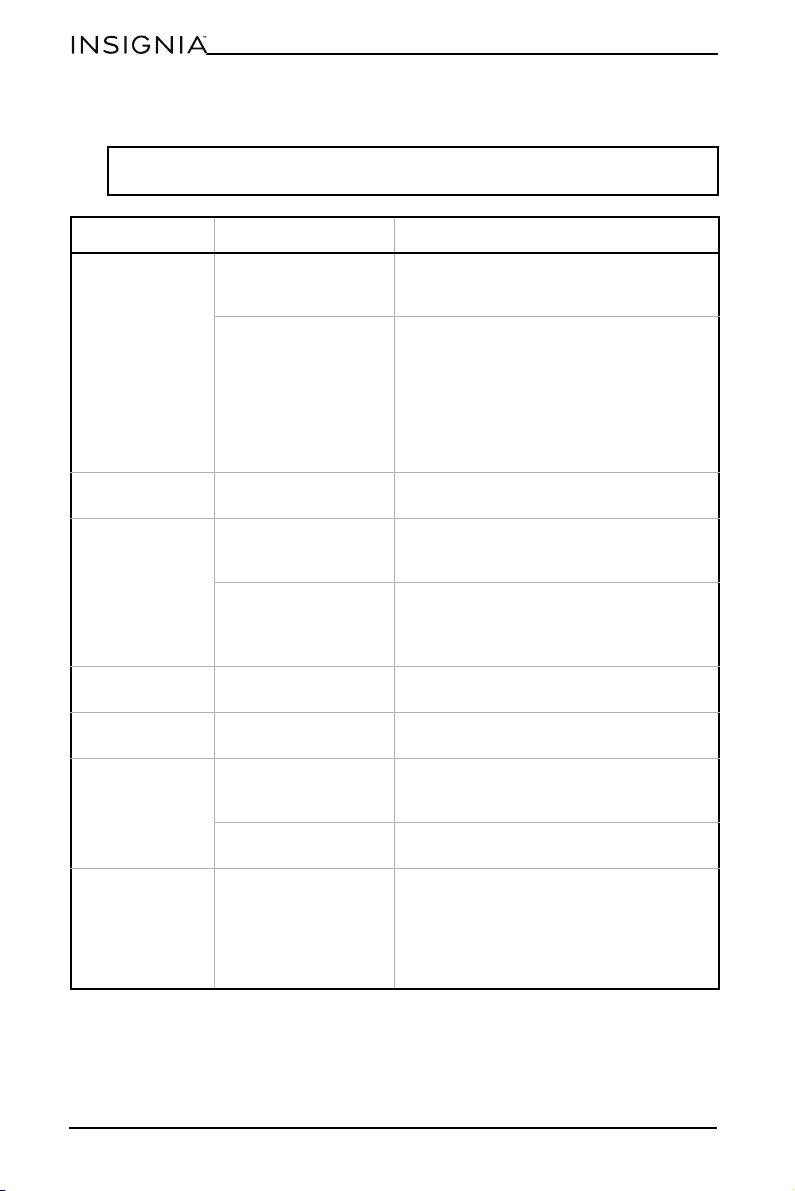
Troubleshooting
CAUTION: Do not try to repair your ice maker yourself. Doing so invalidates the
warranty.
PROBLEM POSSIBLE CAUSE POSSIBLE SOLUTION
The ice maker
makes no ice
The freezer
temperature is too
high.
Make sure that the freezer temperature is
low enough to make ice.
There may be
something
mechanically wrong
with the ice maker.
Test or have tested the following:
•The ejector gear
• The ejector motor
• The ice mold heater
• The holding switch
• The water inlet switch
•The thermostat
• The water inlet valve
The ice maker is
not working
The ice maker is not
plugged in correctly.
Make sure that the ice maker connector
plug is fully inserted into the socket.
The ice tray is not
filling
The fill tube is not
correctly seated in the
fill cup.
Make sure that the fill tube is correctly
inserted into the fill cup opening.
The water supply
valve is turned off.
Make sure that the water supply valve is
turned on.
Inspect the water supply line for
problems.
The ice smells
funny
The ice storage bin
needs cleaning.
Empty and wash the ice storage bin and
discard the old ice cubes.
The ice maker
buzzes
Normal The ice maker water valve buzzes when
the ice maker fills with water.
The ice maker
makes too much
ice or will not
shut off
The wire signal arm is
jammed in the wrong
position.
Make sure that the ice maker wire signal
arm is not jammed and free it if it is.
The shutoff switch is
broken.
Call an appliance technician and have the
switch tested.
The ice cubes will
not eject
There may be
something
mechanically wrong
with the ice maker.
Test or have tested the following:
•The ejector gear
• The ejector motor
• The ice mold heater
• The holding switch
•The thermostat
23
Ice Maker
www.insigniaproducts.com
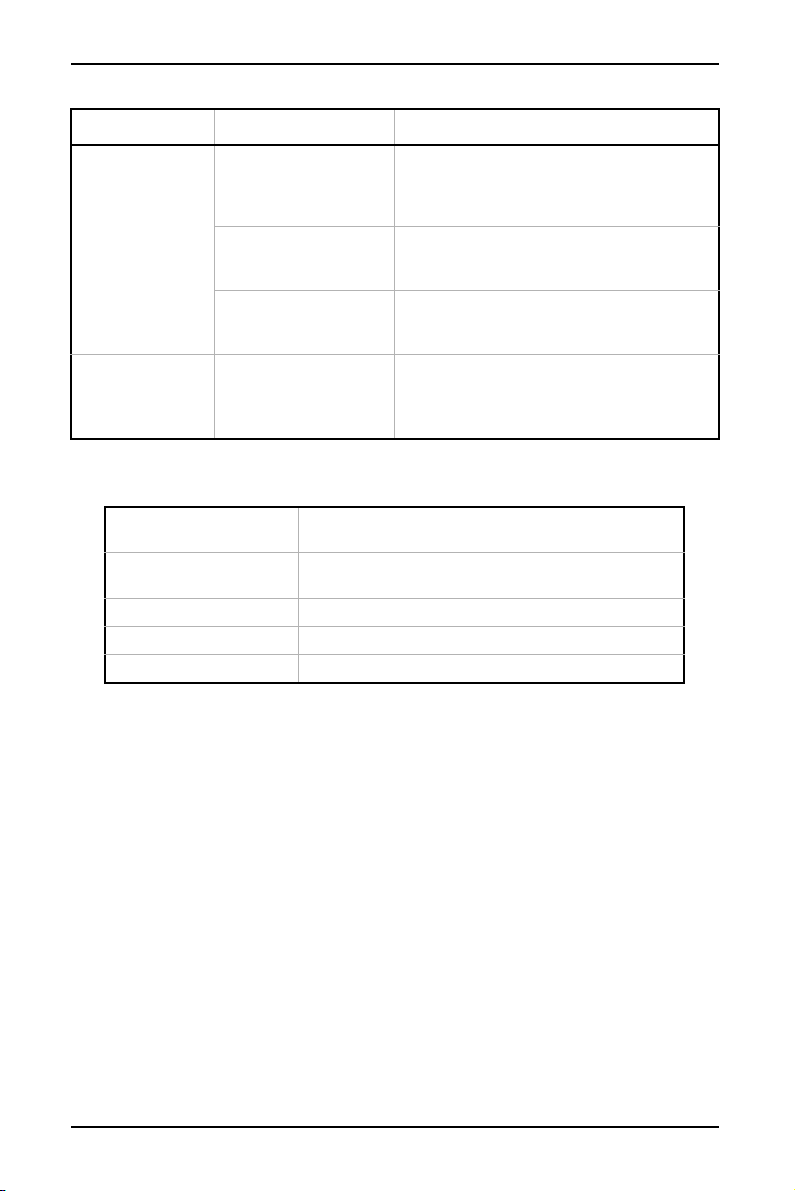
Specifications
The ice smells
funny or tastes
bad
The ice storage bin or
freezer needs
cleaning.
Empty and wash the ice storage bin and
discard the old ice cubes. Wash the
interior of the freezer. Remove any old
food.
The water inlet filter (if
you are using one)
needs to be replaced.
Replace the water inlet filter.
There may be
impurities in the water
supply line.
Flush out the water supply line.
The ice is
discolored
There may be
impurities in the water
supply line or the ice
mold tray.
Flush out the water supply line and clean
the ice mold tray.
Install a water supply line filter if your
refrigerator doesn’t have one.
Ice Maker Dimensions
(H×W×D)
4.4 × 5.4 × 12.2 in. (11.3 × 13.8 × 31.1 cm)
Ice Storage Bin
Dimensions (H×W×D)
6.2 × 10 × 14.3 in. (15.7 × 25.3 × 36.3 cm)
Weight 5.5 lbs (2.5 kg)
Power requirements 115 V~60 Hz
Power 6 W
PROBLEM POSSIBLE CAUSE POSSIBLE SOLUTION
24
www.insigniaproducts.com
ONE-YEAR LIMITED WARRANTY
Definitions:
The Distributor* of Insignia branded products warrants to you, the original purchaser of this
new Insignia-branded product (“Product”), that the Product shall be free of defects in the
original manufacturer of the material or workmanship for a period of one (1) year from the
date of your purchase of the Product (“Warranty Period”).
For this warranty to apply, your Product must be purchased in the United States or Canada
from a Best Buy branded retail store or online at www.bestbuy.com
or www.bestbuy.ca and
is packaged with this warranty statement.
How long does the coverage last?
The Warranty Period lasts for 1 year (365 days) from the date you purchased the Product.
Your purchase date is printed on the receipt you received with the Product.
What does this warranty cover?
During the Warranty Period, if the original manufacture of the material or workmanship of
the Product is determined to be defective by an authorized Insignia repair center or store
personnel, Insignia will (at its sole option): (1) repair the Product with new or rebuilt parts; or
(2) replace the Product at no charge with new or rebuilt comparable products or parts.
Products and parts replaced under this warranty become the property of Insignia and are
not returned to you. If service of Products or parts are required after the Warranty Period
expires, you must pay all labor and parts charges. This warranty lasts as long as you own your
Insignia Product during the Warranty Period. Warranty coverage terminates if you sell or
otherwise transfer the Product.
How to obtain warranty service?
If you purchased the Product at a Best Buy retail store location or from a Best Buy online
website (www.bestbuy.com
or www.bestbuy.ca), please take your original receipt and the
Product to any Best Buy store. Make sure that you place the Product in its original packaging
or packaging that provides the same amount of protection as the original packaging.
To obtain warranty service, in the United States and Canada call 1-877-467-4289. Call agents
may diagnose and correct the issue over the phone.
Where is the warranty valid?
This warranty is valid only in the United States and Canada at Best Buy branded retail stores
or websites to the original purchaser of the product in the country where the original
purchase was made.
What does the warranty not cover?
This warranty does not cover:
• Food, beverage, and or medicine loss/spoilage
• Customer instruction/education
• Installation
• Set up adjustments
• Cosmetic damage
• Damage due to weather, lightning, and other acts of God, such as power surges
• Accidental damage
•Misuse
•Abuse
•Negligence
• Commercial purposes/use, including but not limited to use in a place of business or in
communal areas of a multiple dwelling condominium or apartment complex, or
otherwise used in a place of other than a private home.
• Modification of any part of the Product, including the antenna
• Display panel damaged by static (non-moving) images applied for lengthy periods
(burn-in).

25
Ice Maker
www.insigniaproducts.com
• Damage due to incorrect operation or maintenance
• Connection to an incorrect voltage or power supply
• Attempted repair by any person not authorized by Insignia to service the Product
• Products sold “as is” or “with all faults”
• Consumables, including but not limited to batteries (i.e. AA, AAA, C etc.)
• Products where the factory applied serial number has been altered or removed
• Loss or Theft of this product or any part of the product
• Display panels containing up to three (3) pixel failures (dots that are dark or incorrectly
illuminated) grouped in an area smaller than one tenth (1/10) of the display size or up to
five (5) pixel failures throughout the display. (Pixel based displays may contain a limited
number of pixels that may not function normally.)
• Failures or Damage caused by any contact including but not limited to liquids, gels or
pastes.
REPAIR REPLACEMENT AS PROVIDED UNDER THIS WARRANTY IS YOUR EXCLUSIVE REMEDY
FOR BREACH OF WARRANTY. INSIGNIA SHALL NOT BE LIABLE FOR ANY INCIDENTAL OR
CONSEQUENTIAL DAMAGES FOR THE BREACH OF ANY EXPRESS OR IMPLIED WARRANTY ON
THIS PRODUCT, INCLUDING, BUT NOT LIMITED TO, LOST DATA, LOSS OF USE OF YOUR
PRODUCT, LOST BUSINESS OR LOST PROFITS. INSIGNIA PRODUCTS MAKES NO OTHER
EXPRESS WARRANTIES WITH RESPECT TO THE PRODUCT, ALL EXPRESS AND IMPLIED
WARRANTIES FOR THE PRODUCT, INCLUDING BUT NOT LIMITED TO ANY IMPLIED
WARRANTIES OF AND CONDITIONS OF MERCHANTABILITY AND FITNESS FOR A PARTICULAR
PURPOSE, ARE LIMITED IN DURATION TO THE WARRANTY PERIOD SET FORTH ABOVE AND
NO WARRANTIES, WHETHER EXPRESS OR IMPLIED, WILL APPLY AFTER THE WARRANTY
PERIOD. SOME STATES, PROVINCES AND JURISDICTIONS DO NOT ALLOW LIMITATIONS ON
HOW LONG AN IMPLIED WARRANTY LASTS, SO THE ABOVE LIMITATION MAY NOT APPLY TO
YOU. THIS WARRANTY GIVES YOU SPECIFIC LEGAL RIGHTS, AND YOU MAY ALSO HAVE OTHER
RIGHTS, WHICH VARY FR OM STATE TO STATE OR PROVINCE TO PROVINCE.
Contact Insignia:
1-877-467-4289
www.insigniaproducts.com
INSIGNIA is a trademark of Best Buy and its affiliated companies.
*Distributed by Best Buy Purchasing, LLC
7601 Penn Ave South, Richfield, MN 55423 U.S.A.
©2021 Best Buy. All rights reserved.

www.insigniaproducts.com
1-877-467-4289 (U.S. and Canada)
INSIGNIA is a trademark of Best Buy and its affiliated companies.
Distributed by Best Buy Purchasing, LLC
7601 Penn Ave South, Richfield, MN 55423 U.S.A.
©2021 Best Buy. All rights reserved.
V2 ENGLISH
21-0978