BLUETOOTH
®
ENABLED
GAUGE HOLE RADIO
MGR350B
USER MANUAL
FEATURING ZERO
STANDBY CURRENT DRAIN
QUICK INSTALLATION GUIDE
MGR350B
USER MANUAL
QUICK INSTALLATION GUIDE
BLUETOOTH
®
GAUGE HOLE RADIO
PRINTED IN CHINAVER:1.0 EN0215
BOSS Audio Systems
3451LunarCourt•Oxnard,CA93030
www.bossaudio.com
Tech Support: www.bossaudio.com/support
The Bluetooth® word mark and logos are registered trademarks
ownedbyBluetoothSIG,Inc.andanyuseofsuchmarksisunder
license.Othertrademarksandtradenamesarethoseoftheir
respective owners.
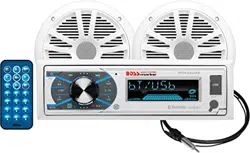
Thank you for purchasing this
MGR350B Bluetooth Gauge Hole Radio
Please read thorough these instructions
carefullysoyouwillknowhowtooperate
your model properly.
Afteryouhave�nishedreadingtheinstructions,
keepthisdocumentinasafeplace
forfuturereference.
INFORMATION TO THE USER
!! WARNING !!
ADJUSTMENT OR ALTERATIONS OF THIS DEVICE MAY
RESULT IN HAZARDOUS RADIATION EXPOSURE.
MGR350B
(1pc)
Hexagon Mounting Studs
(2pcs)
M4 Secure Nuts
(8pcs)
User Manual
(1pc)
Metal Bracket
(1pc)
B
A
N
D
S
RC
F
U
N
C
M
E
N
U
ENTER
DISP
VOL VOL
50w x4
USB
Warranty Card
(1pc)
Facebook Card
(1pc)
Thank You Card
(1pc)
THIS PACKAGE CONTAINS
Thisdevicecomplieswithpart15oftheFCCRules.Operationis
subjecttothefollowingtwoconditions:
(1)thisdevicemaynotcauseinterference,and
(2)thisdevicemustacceptanyinterference,includinginterference
thatmaycauseundesiredoperationofthisdevice.
This transmitter must not be co-located or operated in conjunction
with any other antenna or transmitter. The Bluetooth antenna cannot
beremoved(orreplaced)byuser.Thisequipmentcomplieswith
FCC/ICradiationexposurelimitssetforthforanuncontrolled
environmentandmeetstheFCCradiofrequency(RF)Exposure
GuidelinesandRSS-102oftheICradiofrequency(RF)Exposure
rules.ThisequipmenthasverylowlevelsofRFenergythatit
deemedtocomplywithoutmaximumpermissiveexposure
evaluation(MPE).Butitisdesirablethatitshouldbeinstalledand
operatedkeepingtheradiatoratleast20cmormoreawayfrom
person’sbody(excludingextremities:hands,wrists,feetand
ankles).Alterationormodi�cationscarriedoutwithoutappropriate
authorization may invalidate the user’s right to operate the
equipment.
NOTE: Thisequipmenthasbeentestedandfoundtocomplywith
thelimitsforaClassBdigitaldevice,pursuanttoPart15oftheFCC
Rules. These limits are designed to provide reasonable protection
againstharmfulinterferenceinaresidentialinstallation.This
equipmentgenerates,usesandcanradiateradiofrequencyenergy
and,ifnotinstalledandusedinaccordancewiththeinstructions,
maycauseharmfulinterferencetoradiocommunications.However,
thereisnoguaranteethatinterferencewillnotoccurinaparticular
installation.Ifthisequipmentdoescauseharmfulinterferenceto
radioortelevisionreception,whichcanbedeterminedbyturning
theequipmentoffandon,theuserisencouragedtotrytocorrect
theinterferencebyoneormoreofthefollowingmeasures:
• Relocate or reorient the receiving antenna.
• Increase the separation between the equipment and receiver.
•Connecttheequipmentintoanoutletonacircuitdifferentfrom
that to which the receiver is connected.
•Consultthedealeroranexperiencedradio/TVtechnicianforhelp.
FCC COMPLIANCE STATEMENT
iPod
®
and iPhone
®
areregisteredtrademarksofAppleInc.
registered in the USA and other countries.
BOSSAudioSystemsisnotaf�liatedwithAppleInc.
Copyright © 2015
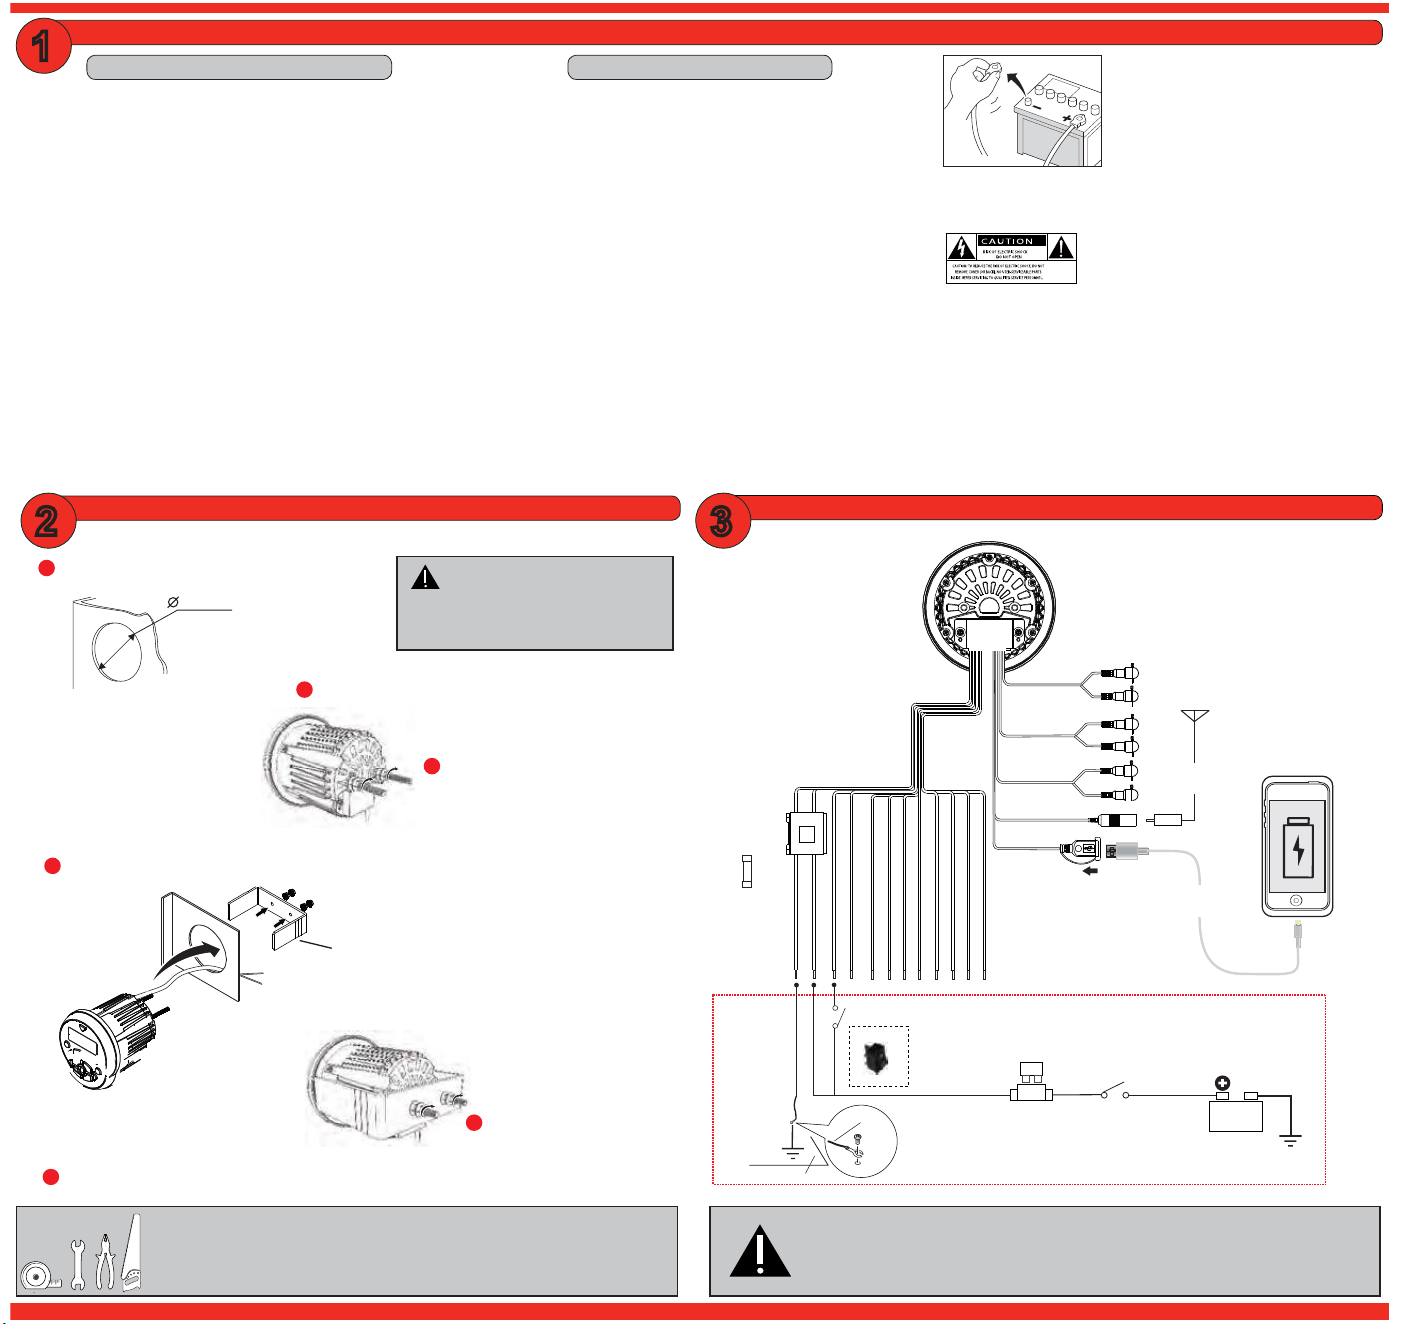
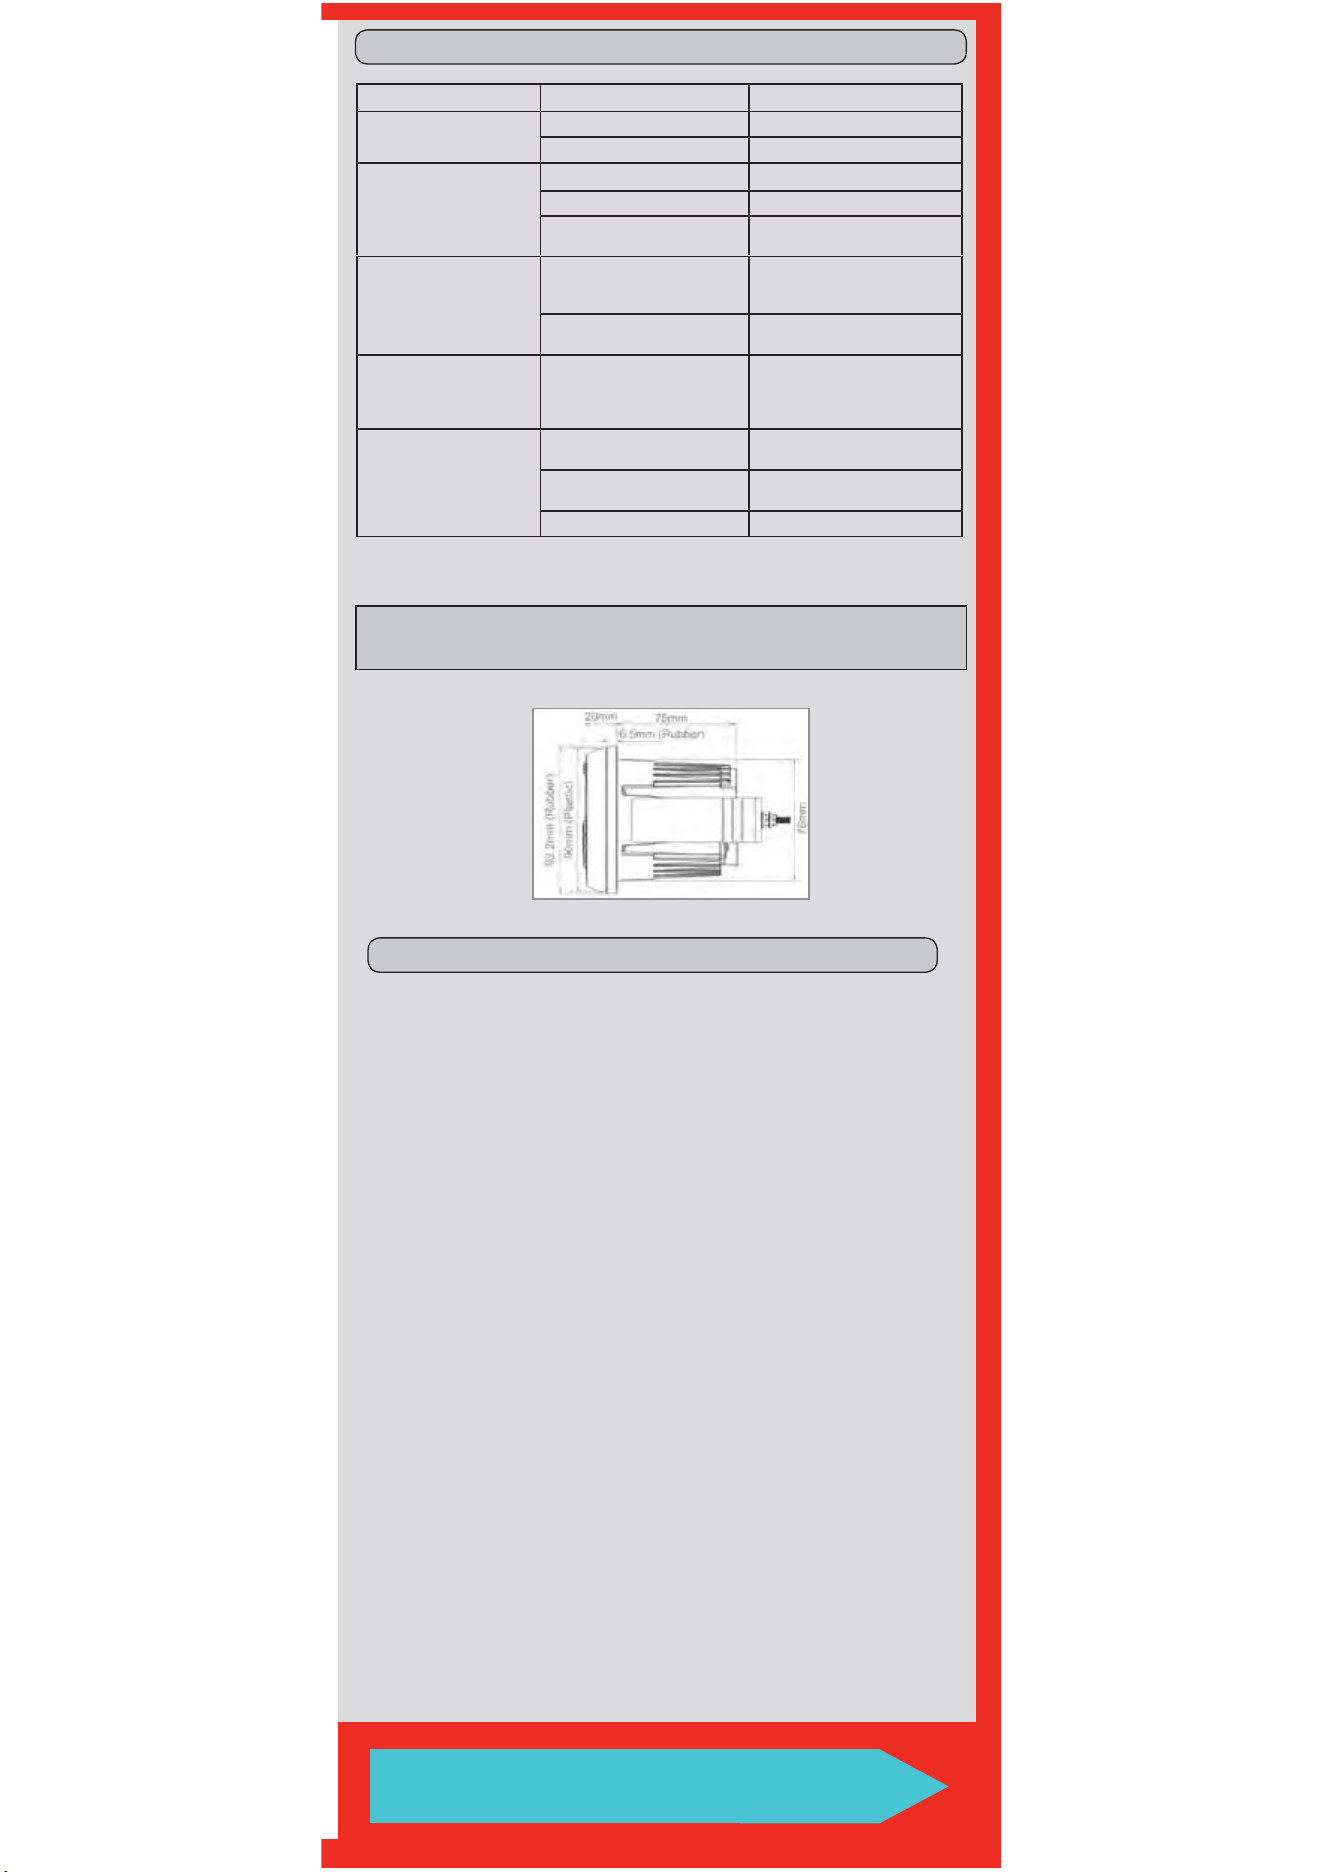
Make the mounting hole size as follows
3.00” / 76mm
1
2
Snap off break-away tabs to best fit
your applications depth
Slip the unit through the hole cutout and into U-bracket
4
Install studs mounts into rear of chassis
5
3
Adjust M4 nuts for the best mounting depth
Firmly tighten remaining M4 nuts
6
Secure and waterproof the wiring
BEFORE YOU START
IMPORTANT SAFETY PRECAUTIONS
BE SURE TO OBSERVE THE FOLLOWING GUIDELINES:
•Do not turn up the volume so high that you can’t hear what’s
around you.
• Use caution or temporarily discontinue use in potentially
hazardous situations.
• Do not operate mobile video equipment while driving a motorized
vehicle–safedrivingandsafetyconsiderationofothersshould
always be your highest priority.
•Setyourvolumecontrolatalowsetting,thenslowlyincreasethe
sounduntilyoucanhearitcomfortablywithoutdistortion,orear
discomfort.
•Intheeventyoushouldnoticesmoke,strangenoisesorodorfrom
thisproduct,oranyotherabnormalsigns,immediatelyturnoffthe
power and consult your dealer or the nearest authorized
BOSS AUDIO Service Center Using this product in this condition
may result in permanent damage to the system.
WIRE DIAGRAM
SUGGESTED MOUNTING METHODS
White
Red
Yellow
Aux-In
Left
Right
Black
Rear Line Out
White
Red
Left
Right
Antenna
Fuse Box
Left Rear Speaker (+) Green
15A
Left Rear Speaker (-) Green/Black
Left Front Speaker (+) White
Left Front Speaker (-) White/Black
Right Front Speaker (+) Gray
Right Front Speaker (-) Gray/Black
Right Rear Speaker (+) Purple
Right Rear Speaker (-) Purple/Black
Accessory (+12V) Red
Ground (-) Black
Battery (+12V) Yellow
Amp Remote (+12V) Blue
1A
CHARGING MAX
Replace Fuse
with AGU
type only
BATTERY
20A
Fuse and Fuse Holder
(not included)
Chassis
ground
point
Battery Kill Switch
(not included)
OPTIONAL DIRECT BATTERY WIRING CIRCUIT
BLACK
Chassis
ground
point
Ground wire
Metal frame
Recommended
12 ~ 14ga
Primary Wire
(not included)
15A
INSERT
USB
YOUR
USB CABLE
YOUR
ANTENNA
C
NO
Normally open
ACC switch
(not included)
Grey
Subwoofer
Front Line Out
White
Red
Left
Right
To avoid potential shorts in the electrical
system,besuretodisconnectthe(–)
batterycablebeforeinstallation.Usethis
unit with a 12-Volt battery and negative
grounding only. Failure to do so may result
ina�reormalfunction.
Whenreplacingthefuse,besuretoonlyusea
fuseoftheratingspeci�edonthisproduct.To
avoidshort-circuiting,coveranydisconnected
leads with insulating tape. It is specially impor-
tanttoinsulateanyunusedwires,whichifleftuncoveredmaycausea
shortcircuit.Whenconnectingotherdevicestothisproduct,referto
themanualfortheproducttobeconnected.Theblackcableisground,
makesuretoconnectthegroundwire�rst.
Ensurethatthegroundcableisproperlyconnectedtometalpartsof
thevehiclesbodyframeordirecttothebatteryifyourvehicledoesnot
haveagroundedchassisframe.Thegroundcableofthisunitspower
ampandasecondpoweredsystemmustbeconnectedtotheframe
separatelywithdifferentscrews.Ifthescrewforthegroundwire
loosensorfallsout,itcouldresultin�reormalfunction.
CAUTION!!
Do not ground or short the speaker leads
1
32
INSTALLATION PRECAUTIONS
Always consult with a professional installer
•Donotattempttoinstallorservicethisproductbyyourself.
Installationorservicingofthisproductbypersonswithout
professionaltrainingandexperienceinelectronicequipmentandmo-
torizedvehicleaccessoriesmaybedangerousandcouldexposeyou
totheriskofelectricshock,injuryorotherhazards
•Referanyrepairstoaquali�edBOSS AUDIO SYSTEMS Service
Center
• The MGR350B should be wired directly to a vehicles battery
•Whenwiringdirectlytothevehiclesbattery,besuretodisconnect
thebatteriesnegativeterminalwirebeforestartinganywiring
procedures,ifextendingthemainpowerprimarywire,itis
suggestedthatanoptionalfuseandfuseholder(notincluded)with
minimumratingof20Amperesbein-linewiththepositivebattery
terminal
•Thegroundcablelengthshouldbeasshortaspossible,if
extendingfromyoubattery,besuretouseapropergaugeratingfor
thelengthoftherun,useonlyhighqualitycopperprimarytypewire
•TheMGR350BhasaIPX6weatherresistantdesign,itshouldnotbe
submerged in or under water under any circumstances
• Do not use abrasive cleaning materials on the lens or bezel
• Use only the installation parts provided with the MGR350B
TOOLS NEEDED:
- Measuring Tape / Ruler
- Wrench and/or Pliers
- Hole Saw
- Crimp Tool
CAUTION!!
Using other mounting methods may void
this warranty
FOR CHARGING ONLY: Cell Phone and iPod
MediaPlaybackNotSupported
TROUBLE SHOOTING GUIDE
-
tanttoinsulateanyunusedwires,whichifleftuncoveredmaycausea
themanualfortheproducttobeconnected.Theblackcableisground,
thevehiclesbodyframeordirecttothebatteryifyourvehicledoesnot
1-805-751-4853
www.bossaudio.com/support
TECHNICAL SUPPORT
TROUBLE CAUSE SOLUTION
Unit will not turn on
The fuse is blown Check / replace the fuse
Ignition not engaged Turn ignition to on position
No sound is heard
Blown speaker Replace faulty speaker
Volume is low / muted Press the volume level up
Device is paused or muted
Check your devices playing /
volume status
Cannot pair Bluetooth
The Bluetooth function of the
device is not enabled
Refer to the user manual of the
device for how to enable the
Bluetooth function
The MGR350B BT memory
is full
Follow how to reconnect a
device in section E
The audio quality is poor
after connection with a
Bluetooth enabled device The Bluetooth reception is poor
Move the device closer to the
audio system or remove any
obstacle between the device
and the systems antenna
Unit has become
unresponsive
Power glitch or interference
Disconnect power for
10 seconds to reset
Low battery power
Charge battery, run the engine
to recharge the battery
Reset the main system Follow steps in section B
FM TUNER FREQUENCY RANGE
• USA87.5~107.9MHz
• Europe 87.5~108MHz
• Asia 87.5~108MHz
• Australia 87.5~108MHz
• UsableSensitivity:12dB(S/N=30dB)
• Bands: 2
AM TUNER FREQUENCY RANGE
• USA 530~1710KHz
• Europe 522~1620KHz
• Asia 522~1620KHz
• Australia 522~1620KHz
• UsableSensitivity:40dB(S/N=20dB)
• Bands: 1
WEATHER BAND SELECTION
• CH.1 162.400MHz
• CH.2 162.425MHz
• CH.3 162.450MHz
•CH.4 162.475MHz
• CH.5 162.500MHz
• CH.6 162.525MHz
• CH.7 162.550MHz
• Bands: 1
BLUETOOTH
• BT: 3.0
•BTRange:33Ft/10M(Class2)
•BTPro�les:A2DP/AVRCP1.3
USB DRIVE MEDIA SUPPORTED
• MP3
• WMA
• 65,000Songs
• 32GB / FAT 32
• USB 2.0 High Speed
• USB Output Voltage: 5VDC @ 1A
INTEGRATED AMPLIFIER
• MOSFET
• MAX Continuous Output: 240W
(Allchannelsdriven)
• PEAK Power Rating: 60W / channel
• RMS Total Power Output: 80W
• Channels: 4
• Class: AB
• Frequency Response: 20-20kHz
•4Ωstable
CHASSIS
• Button Backlight Illumination: BLUE LED
• F/R/S RCA Preamp Output:
2VRMS
•RCAInputImpedance:10kΩ
•LCD:TNType/ActiveMatrix
GENERAL
• Power Source: 14.4VDC
(10.8V~16Vallowable)
• Grounding System: Negative type
•MaximumCurrentConsumption:15A
•3-wayprotectioncircuitry(thermal,
overload,andspeakershortprotection)
• Unit Weight: 1.08lbs / 0.52kg
• Storage Temperature:
-22
o
F to 176
o
F / -30
o
C to 80
o
C
• Operation Temperature:
-4
o
F to 158
o
F / -20
o
C to 70
o
C
• Replacement Fuse: 15A
(ReplacewithATGFuseTypeOnly)
SPECIFICATIONS
Speci�cationssubjecttochangewithoutnotice
QUICK START GUIDE
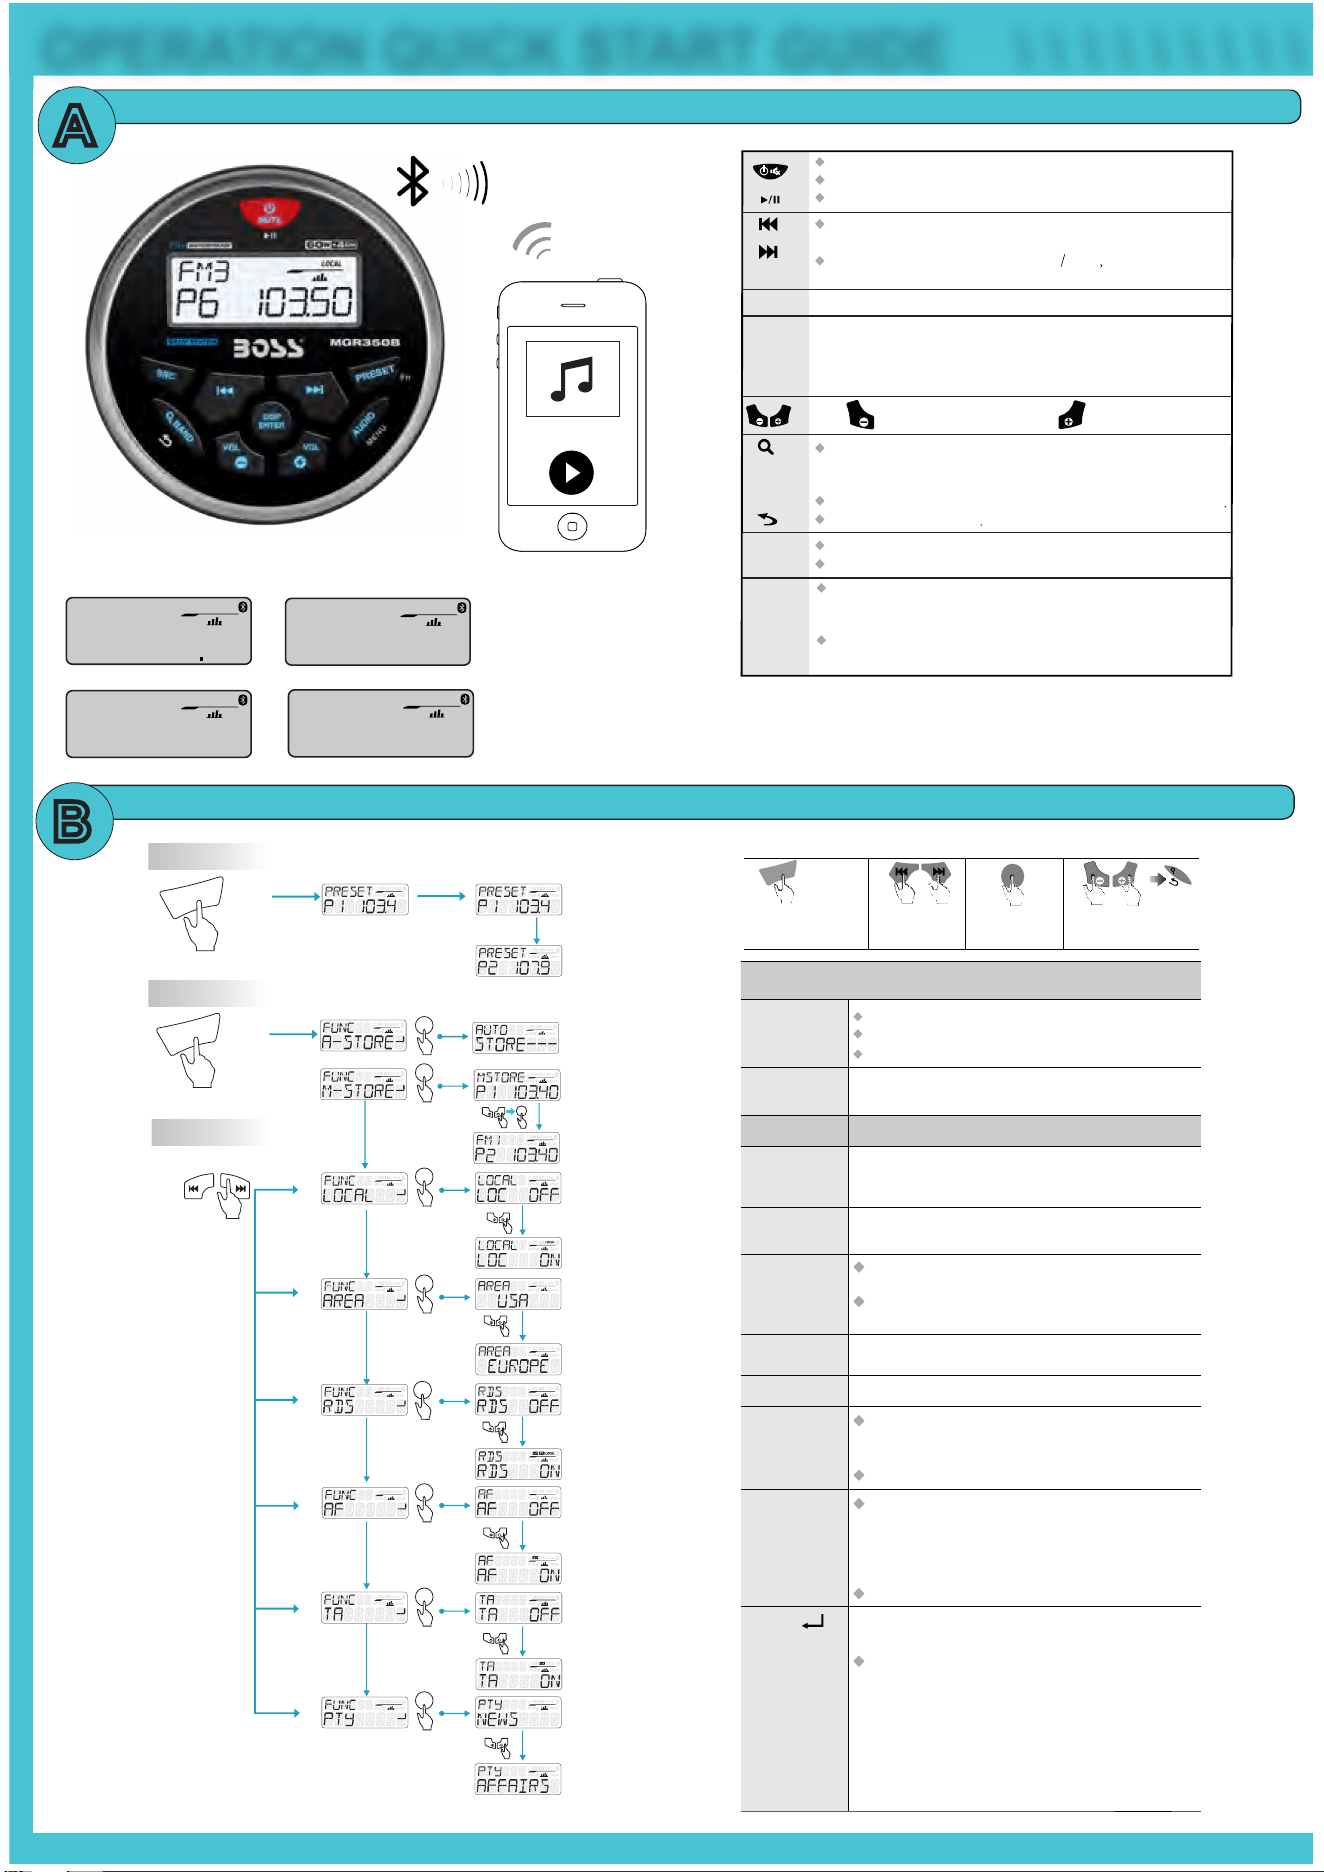
GETTING STARTED
Tuner/Weather Band Mode: Press to enter into the Manual Seek mode,
press and hold to enter into the Auto Seek mode.
Media Playback Mode: Press to TrackUp Down press and hold for
Fast Forward/Rewind.
Short press to mute or restore volume.
Turn the unit on, Press and hold again to turn the unit off.
Press to pause, Press again to resume playback.
Press to scroll and select available Source.
Press to decrease the volume, press to increase the volume.
Press and hold to enter into the Tuner Function modes:
A-STORE / M-STORE / LOCAL / AREA / RDS / AF / TA / PTY
SRC
PRESET
Fn
Tuner Mode: To change different Band. Press and hold to
access into Auto Store mode, the strongest stations of the selected band
will be saved in preset channel automatically.
Media Playback Mode: Press to access into search Folder/File music mode
Returns to the previous item
/Weather Band
Tuner Mode: Press to view RDS receiver information.
Media Playback: Press to view ID3 information.
BAND
DISP
ENTER
AUDIO
VOL
VOL
VOL
VOL
MENU
Press to scroll and select Presets 1 ~ 6
FM1, FM2, AM1, WB1
Press to access into the Audio Menu mode for adjustments:
EQ / XBASS / BASS / MIDDLE / TREBLE / BALANCE / FADER /
REAROUT / SUBW / SUBW LPF / SUBW LEVEL
Press and hold to access into the System Menu:
BT RECONNECT / BEEP ON/OFF / ABOUT / RESET
TUNER SETUP
MY SONGS
SUBW
BT
A
B
OPERATION QUICK START GUIDE
\ \ \ \ \ \ \ \ \ \ \ \ \ \ \ \
MY SONGS
TITLE
SUBW
USB
AUX-IN
TITLE
SUBW
AUX-IN
P6 10350
SUBW
LOCAL
RADIO
BT
Turn On or Off the RDS function.
RDS On/Off
Media Playback
Mode
Tuner Mode
Selectable settings
Selectable settings
This function allows you to play tracks/songs from the
current album, songs or artists in a random order.
When a desired radio station is set, press M-STORE to save
it in the memory, you can store a total of 12 FM or 6 AM.
Repeat
Auto Store
Random
On/Off
Manual Store
Local On/Off
ALL:
Song:
to repeat all tracks on the storage media
the current track will be repeated
Folder: repeats all tracks in the current folder
Press to access into A-STORE mode, the strongest
stations of the selected band will be saved in FM 1 or
FM 2, AM 1 BAND presets automatically
ON:
OFF:
only stations with strong signal can be broadcast.
The Local indicator will light up
Stations of both strong and weak signals can be
broadcast.
Area
Select suitable country area for this unit:
USA / EUROPE / ASIA / AUST
ON: The unit will search for another station with stronger
signal, but with the same program identification as the
current station automatically.
OFF: Turn off AF function
ON: When there is traffic announcement, unit will
automatically switch to the tuner mode (regardless of the
current mode) and begins to broadcast the announcement
on traffic conditions. When the traffic announcement is
over, unit will automatically return to the previous mode.
OFF: Traffic announcement does not cut in.
AF On/off
TA On/off
Once inside the PTY mode, press the get into program type
item, and rotat encoder volume knob to selected category.
PTY
Available Program Type:
POP M; ROCK M; EASY M; LIGHT M; CLASSICS;
OTHER M; JAZZ M; COUNTRY; NATION M; OLDIES
M; FOLK M; A-TEST; ALARM; NEWS; AFFAIRS; INFO;
SPORT; EDUCATE; DRAMA; CULTURE; SCIENCE;
VARIED; WEATHER; FINANCE; CHILDREN; SOCIAL;
RELIGION; PHONE IN; TRAVEL; LEISURE; DOCUMENT
VOL
VOL
1
2 3 4
ENTER
DISP
B
A
N
D
Long Press for
FUNCTION options
Fn
P
R
E
S
E
T
Navigate Main
System Tree
To select through
FUNCTION options
Press ENTER
to select option
Exit
ENTER
DISP
Fn
P
RE
S
E
T
PRESET AUTO STORE 1 ~ 6
PRESET RECALL
Fn
P
RE
S
ET
Short Press
Long Press
ENTER
DISP
ENTER
DISP
VOL
VOL
VOL
VOL
ENTER
DISP
VOL
VOL
ENTER
DISP
ENTER
DISP
ENTER
DISP
VOL
VOL
VOL
VOL
VOL
VOL
VOL
VOL
ENTER
DISP
ENTER
DISP
MORE SETTINGS
FM1 / FM2 / AM1 / WB1
SOURCE MODES
Allrightsreserved.Nopartofthispublicationmaybereproduced,distributed,ortransmittedinany
formorbyanymeans,includingphotocopying,recording,orotherelectronicormechanicalmethods,
withoutthepriorwrittenpermissionofBOSSAUDIOSYSTEMSInc.
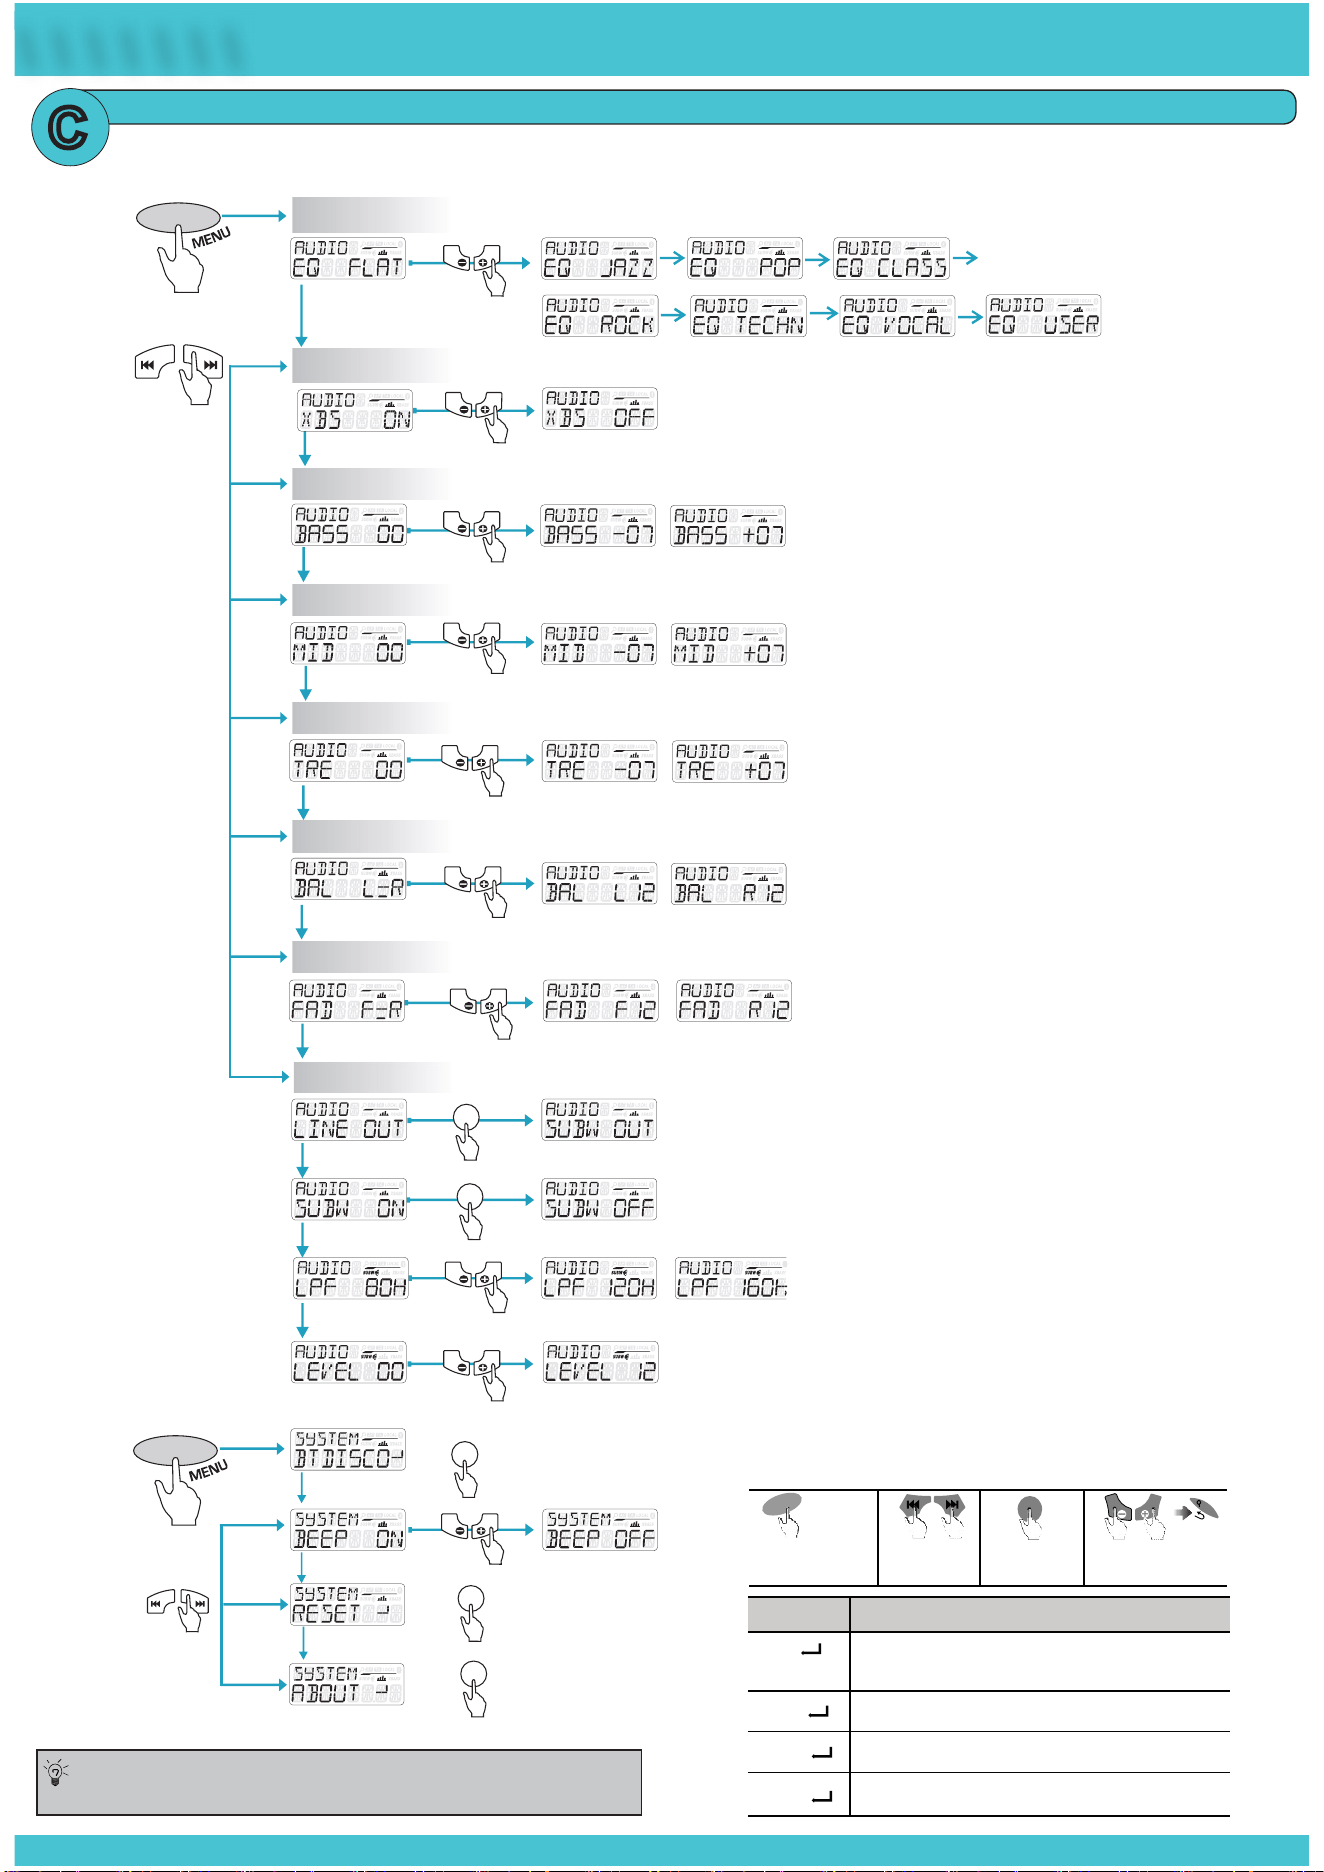
AUDIO
xBass On/Off
MID Level
Treble Level
Balance Level
Fader Level
AUDIO
Short Press
VOL
VOL
VOL
VOL
VOL
VOL
VOL
VOL
VOL
VOL
VOL
VOL
AUDIO
Long Press
ENTER
DISP
VOL
VOL
ENTER
DISP
ENTER
DISP
EQ
BASS Level
SYSTEM
AUDIO
VOL
VOL
Subwoofer Settings
ENTER
DISP
VOL
VOL
VOL
VOL
ENTER
DISP
\ \ \ \ \ \ \ \ \ \ \ \ \ \ \ \
AUDIO and SYSTEM SETUP
C
VOL
VOL
1
2 3 4
Item Selectable settings
This feature allows to Reconnect or Disconnect to the
paired mobile phone or Bluetooth device manually.
Turn On or Off beep sound.
To restore the factory defult settings.
To view the device hardward and software versions.
BT
BEEP
RESET
ABOUT
ENTER
DISP
B
A
N
D
Long Press for
MAIN MENU options
MENU
A
UD
I
O
Navigate Main
MENU Tree
To select through
MENU options
Press ENTER
to select option
Exit
Toavoidbatteryexhaustionbesuretorunthe
vehicles engine while using this product.
Using this product without running the engine can drain the battery.
Tips:
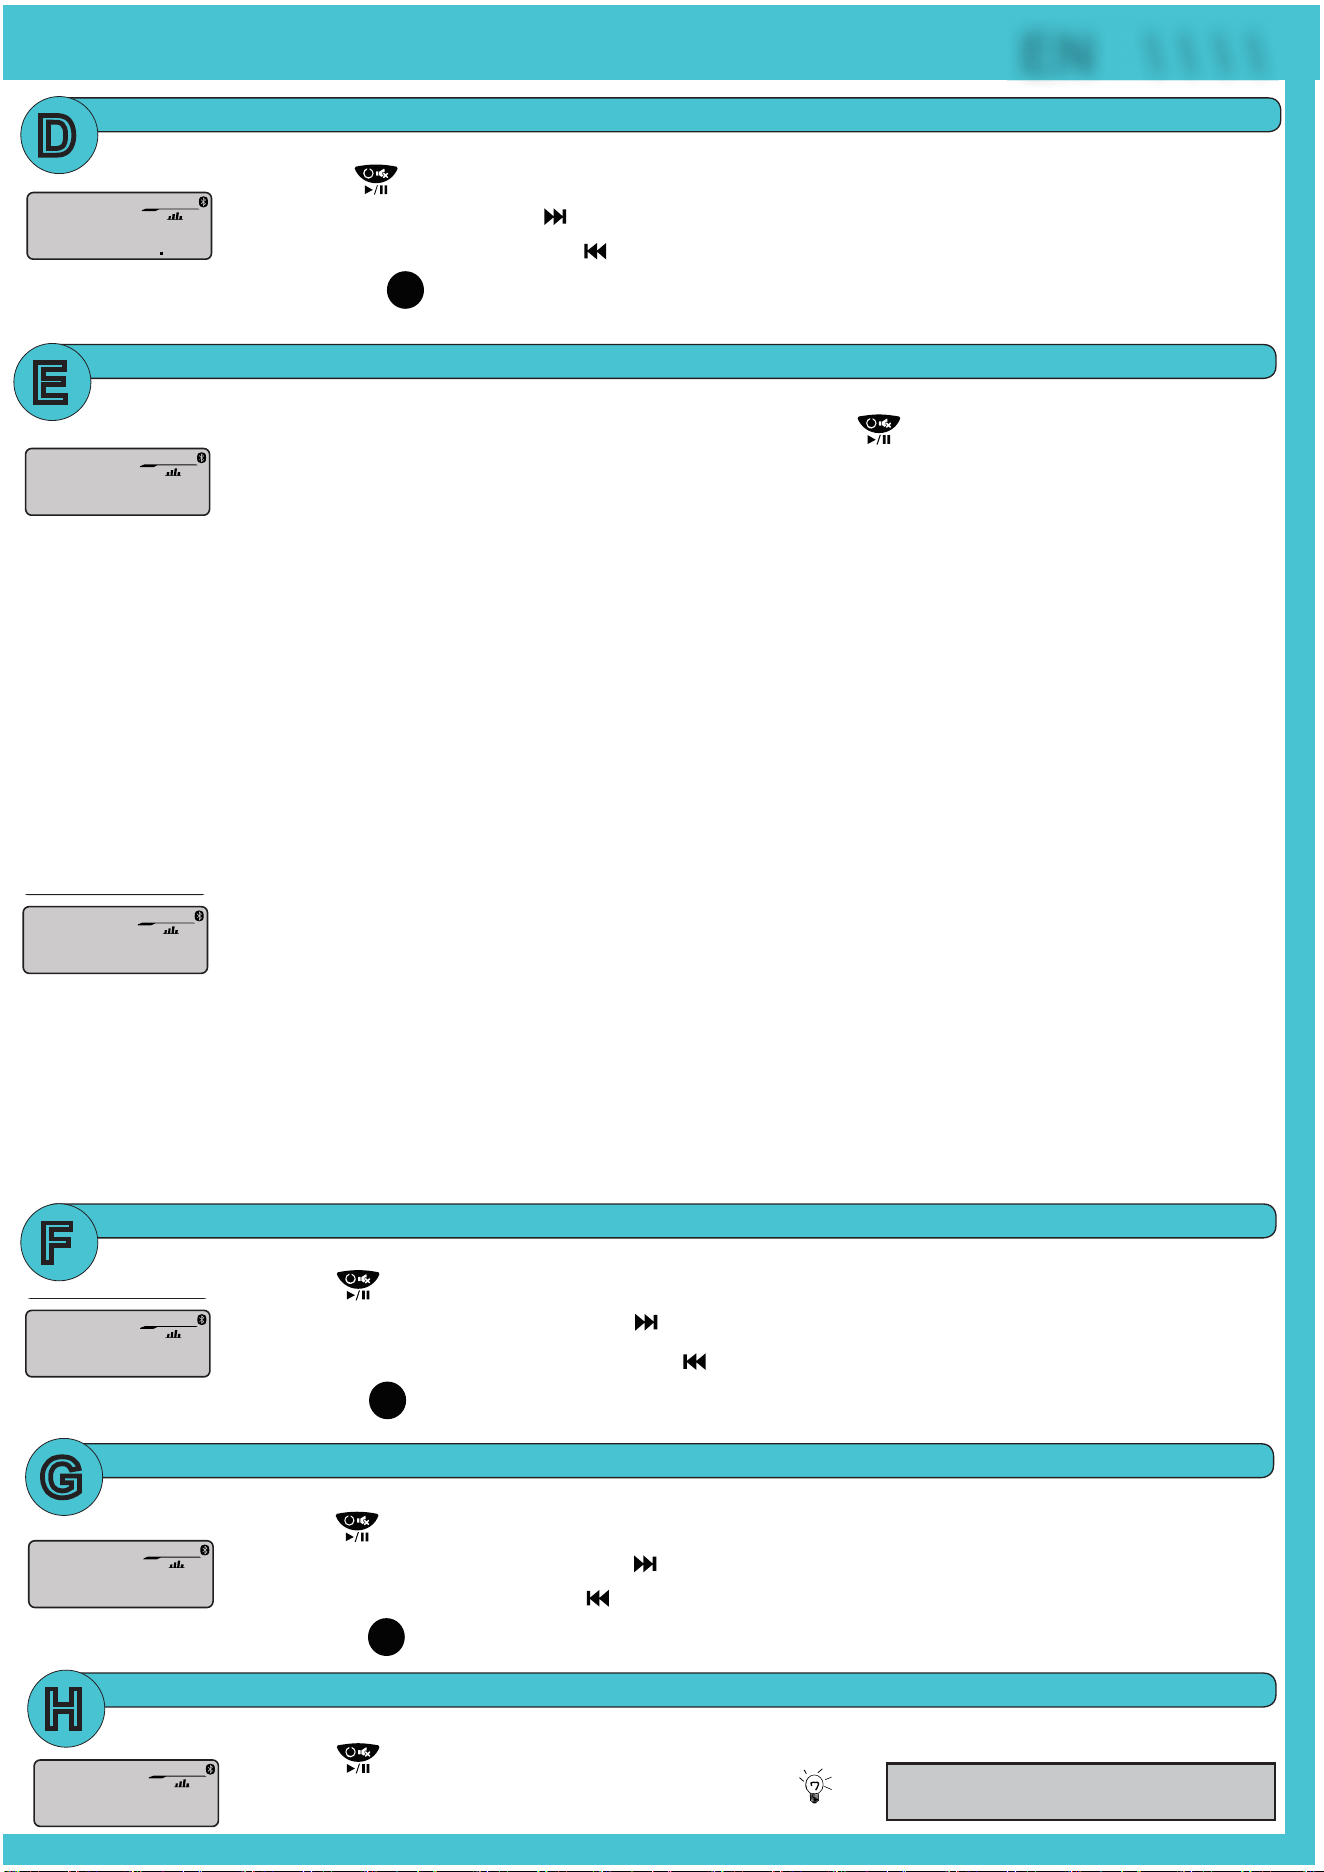
BLUETOOTH OPERATION
BLUETOOTH STREAMING MUSIC
PAIRING & DISCOVERING A NEW BLUETOOTH CONNECTION
1)PowerontheMGR350BbypressingandholdingdownthePower buttonfor1second,theBluetoothICON
willstarttoashsignallingthattheMGR350BisnowreadyforBluetoothpairing.
NOTE:Youhave2minutesbeforeyoumustrestartthisprocedureoveragain.
2)NowthattheMGR350Bisinpairingmode:
ANDROID users:
a.GointotheSettingsMenuofyourANDROIDdevice
b. Enter the Bluetooth Menu and press SCAN
d.Ifprompted,enterpasscode:“0000”
iOS users:
a.GointotheSettingsMenuofyouriOSdevice
b. Enter the Bluetooth Menu
d.Ifprompted,enterpasscode:“0000”
3)IftheMGR350Bisnotseen,repeattheabovestepstorefreshthe“DeviceList”
4)WhentheBTconnectionissuccessfulyouwillseeBTCONNECTEDmessageontheMGR350B LCD display,you
arenowreadytostreammusicfromyourdevicesfavoritemediaplayertotheMGR350B
RECONNECTION
1)PowerontheMGR350B and your last paired device Bluetooth
2)Theunitwillnowautomaticallybereconnected
3)IfyourdevicewaspreviouslypairedwiththeMGR350B,butitwasn’tthelastpaireddevice:
a. Ensure no other devices are currently paired
b. Press and hold MENU button to manually connect / reconnect to the MGR350B
4)IfthedeviceisoutofrangefromtheMGR350B,itwilldisconnectautomatically:
5)TheMGR350Bwillreconnecttothedeviceonceinrange,acon�rmationmessagewillbedisplayedontheLCD
AUX-INPUT
1)PresstheSRCbuttontoselectBTAUDIO
2)Press tostartPLAY,pressagaintoPAUSE
3)Toskipsongsoradvancetrackspress ,pressandholdtoFASTFORWARD
4)Toselecttheprevioustrackpressthebutton ,pressandholdtoFASTREWIND
5)Press the
Press to view song title information.
ENTER
DISP
buttontodisplaysongID3information
1)PresstheSRCbuttontoselectAUXIN
2)Press toMUTE,pressagaintoUNMUTE
Ensuretoadjustthelevelofyour
devices master volume to 75%
Tips:
USB OPERATION
RADIO OPERATION
1)PresstheSRCbuttontoselectUSB
2)Press tostartPLAY,pressagaintoPAUSE
3)Toskipsongsoradvancetrackspress ,pressandholdtoFASTFORWARD
4)Toselecttheprevioustrackpress ,pressandholdtoFASTREWIND
5)Press the
Press to view song title information.
ENTER
DISP
buttontodisplaysongID3information
1)PresstheSRCbuttontoselectRADIO
2)Press toMUTE,pressagaintoUNMUTE
3)Toadvancestationspress
4)Toskippreviousstationspress
5)Press the
Press to view song title information.
ENTER
DISP
buttontodisplayRADIOinformation
6)PressthePRESETbuttontorecallPRESETS1~6
P6 10350
MY SONGS
SUBW
BT
MY SONGS
TITLE
SUBW
USB
AUX-IN
TITLE
SUBW
AUX-IN
P6 10350
SUBW
LOCAL
RADIO
BT
BT
SUBW
SYSTEM
D
E
F
G
H
P6 10350
MY SONGS
SUBW
BT
EN \ \ \ \
c. “BOSS MGR350” will now be displayed
c. “BOSS MGR350” will now be display under AVAILABLE DEVICES