BLENDER
Model Number: 103742
UPC: 681131037426
Customer Assistance
1-855-451-2897 (US)
Please consider the option to recycle the packaging material and donate any
appliance you are no longer using.
Blender_103742_IM_US_V5_121214.indd 1 12/14/12 9:54:58 AM

2
3
IMPORTANT SAFEGUARDS
When using electrical appliances, basic safety precautions should always be
followed, including the following:
Read all instructions before use.•
To protect against electric shock do not immerse cord or plugs or motor unit in •
water or other liquid.
Close supervision is necessary when any appliance is used by or near children.•
Unplug from wall outlet when not in use, before putting on or taking o parts, •
and before cleaning.
Flashing light indicates the appliance is ready to operate. Avoid any contact •
with blades or moving parts.
Do not operate any appliance with a damaged cord or plug, or after the •
appliance malfunctions or has been dropped or damaged in any manner. Call
our toll-free customer assistance number for information on examination,
repair, or adjustment.
The use of accessory attachments, including canning jars, not recommended •
by the appliance manufacturer may result in re, electric shock or injuries to
persons.
Do not use outdoors or in a damp area.•
Do not let power cord hang over edge of table or counter.•
To disconnect, switch o appliance by pressing • button (on/o), then remove
plug from wall outlet.
Do not use appliance for other than intended use.•
Keep hands and utensils out of container while blending to reduce the risk of •
severe injury to persons or damage to the appliance. A scraper may be used
but must be used only when the appliance is not running.
Blades are sharp. Handle carefully.•
To reduce the risk of injury, never place blade unit and base on motor unit •
without jar or cup properly attached.
Container must be properly in place before operating appliance.•
Always operate appliance with the jar lid in place.•
Do not blend hot liquids in the jar or cup. Allow any hot liquids to cool to a •
lukewarm temperature before pouring them into the blending attachment.
Press the • DRINK CUP button when operating the cup. Do not press any other
function button.
Do not blend ice or nuts in the cup.•
Do not place the appliance close to the edge of the counter-top.•
SAvE ThESE INSTRUCTIONS!
Blender_103742_IM_US_V5_121214.indd 2 12/14/12 9:54:58 AM

2
3
ADDITIONAL SAFEGUARDS
This appliance is for hOUSEhOLD USE ONLY.
DO NOT OPERATE APPLIANCE IF ThE LINE CORD ShOWS ANY DAMAGE OR IF
APPLIANCE WORKS INTERMITTENTLY OR STOPS WORKING ENTIRELY.
Extension cords
A short detachable power-supply cord is to be provided to reduce the risk •
resulting from becoming entangled in or tripping over a longer cord. Longer
extension cords are available and may be used if care is exercised in their use. If
long detachable power-supply cord or extension is used:
The marked electrical rating of the cord or extension cord should be at least -
as great as the electrical rating of the appliance.
If the appliance is of the grounded type, the extension cord should be a -
grounding 3-wire cord; and
The longer cord should be arranged so that it does not drape over the -
countertop or table top where it can be pulled on by children or tripped
over unintentionally.
Polarized plug
This appliance has a polarized plug (one blade is wider than the other). To reduce
the risk of electric shock, this plug is intended to t into a polarized outlet only one
way. If the plug does not t fully into the outlet, reverse the plug. If it still does not
t, contact a qualied electrician. Do not attempt to modify the plug in any way.
Blender_103742_IM_US_V5_121214.indd 3 12/14/12 9:54:58 AM
4
5
PARTS
1
2
3
4
5
7
8
9
10
11
12
13
14
6
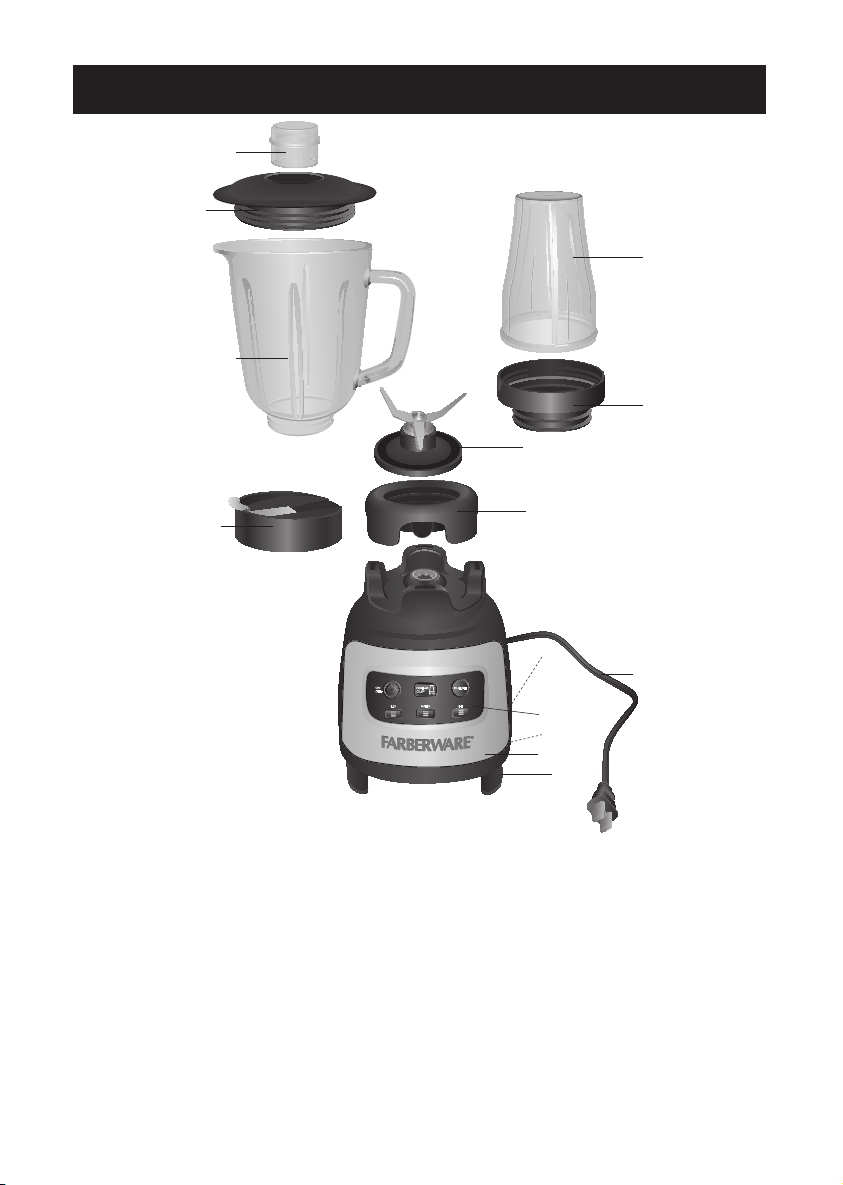
Drink cup1.
Adaptor ring with seal2.
Blade unit with seal3.
Blade base4.
Cord cut-out5.
Power cord with plug6.
Control panel7.
Cord storage8.
Motor unit9.
Anti-slip feet10.
Cup lid with seal11.
Jar12.
Jar lid with spout covers13.
Measuring cup14.
Blender_103742_IM_US_V5_121214.indd 4 12/14/12 9:54:59 AM
4
5
PARTS
15
16
17181920
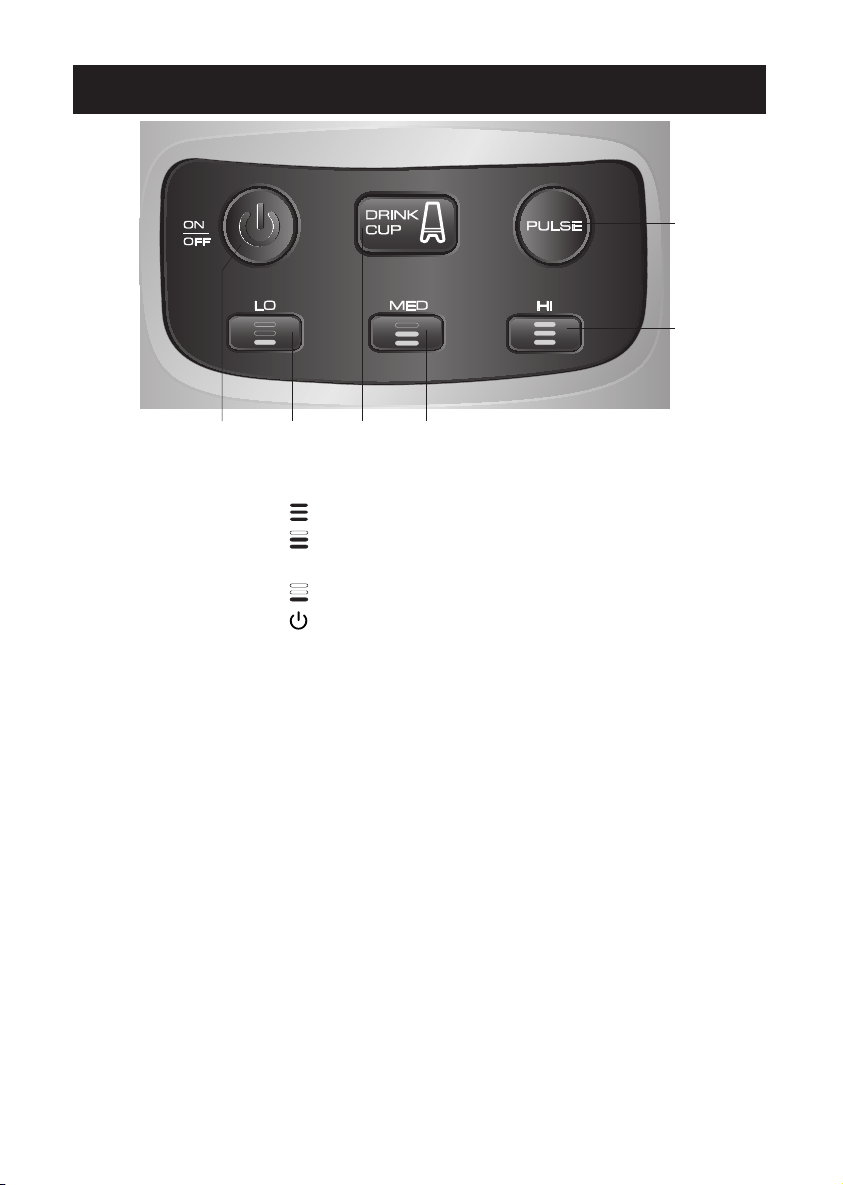
PULSE15. button
16. hI button (high speed)
17. MED button (medium speed)
DRINK CUP18. button
19. LO button (low speed)
20. button (on/o)
Blender_103742_IM_US_V5_121214.indd 5 12/14/12 9:55:00 AM

6
7
ILLUSTRATIONS
OPERATION
Before rst use
Remove all packaging materials, labels and/or stickers from your appliance. •
Check package contents for completeness and damage. Do not operate the •
appliance if package content is incomplete or appears damaged. Return it
immediately to the dealer.
CAUTION: Danger of suocation! Packaging materials are not toys. Always keep
plastic bags, foils and Styrofoam parts away from babies and children. Packaging
material could block nose and mouth and prevent breathing.
Clean your appliance thoroughly before using for the rst time (• Cleaning).
Assembly
Place the motor unit • (9) on a clean, at and stable surface.
NOTE: Ensure all seals are correctly placed during assembly and not damaged. Do
not use the appliance without the seals.
CAUTION: The blades on the blade unit (3) are very sharp. Always handle blade
assemblies with care. Do not touch blades; this may cause injuries (ill. ).
ILLUSTRATIONS
a
b
c
e
d
f
i
g
h
j
k
l
Blender_103742_IM_US_V5_121214.indd 6 12/14/12 9:55:12 AM
6
7
ILLUSTRATIONS
n
m
OPERATION
Before rst use
Remove all packaging materials, labels and/or stickers from your appliance. •
Check package contents for completeness and damage. Do not operate the •
appliance if package content is incomplete or appears damaged. Return it
immediately to the dealer.
CAUTION: Danger of suocation! Packaging materials are not toys. Always keep
plastic bags, foils and Styrofoam parts away from babies and children. Packaging
material could block nose and mouth and prevent breathing.
Clean your appliance thoroughly before using for the rst time (• Cleaning).
Assembly
Place the motor unit • (9) on a clean, at and stable surface.
NOTE: Ensure all seals are correctly placed during assembly and not damaged. Do
not use the appliance without the seals.
CAUTION: The blades on the blade unit (3) are very sharp. Always handle blade
assemblies with care. Do not touch blades; this may cause injuries (ill.
j
).
ILLUSTRATIONS
Blender_103742_IM_US_V5_121214.indd 7 12/14/12 9:55:14 AM

8
9
OPERATION
NOTE: Peel or core any fruits or vegetables and cut them into small chunks. Cut solid
food into small cubes. Do not overll the attachments, jar (12) or drink cup (1).
Attach either the jar• (12) or drink cup (1) on the motor unit (9). Align the
bottom of the blade base (4) with the top of the motor unit (9) (ill. ).
Connect the plug• (6) to a wall outlet (ill. ).
CAUTION: Ensure that the attachment is securely fastened to the motor unit (9)
before switching the appliance on.
Press the • button (20). The appliance is now is stand-by mode and the
button (20) is ashing blue.
NOTE: If no function is selected, the appliance will switch o automatically after
3:30 minutes. To start using the appliance again, press the button (20).
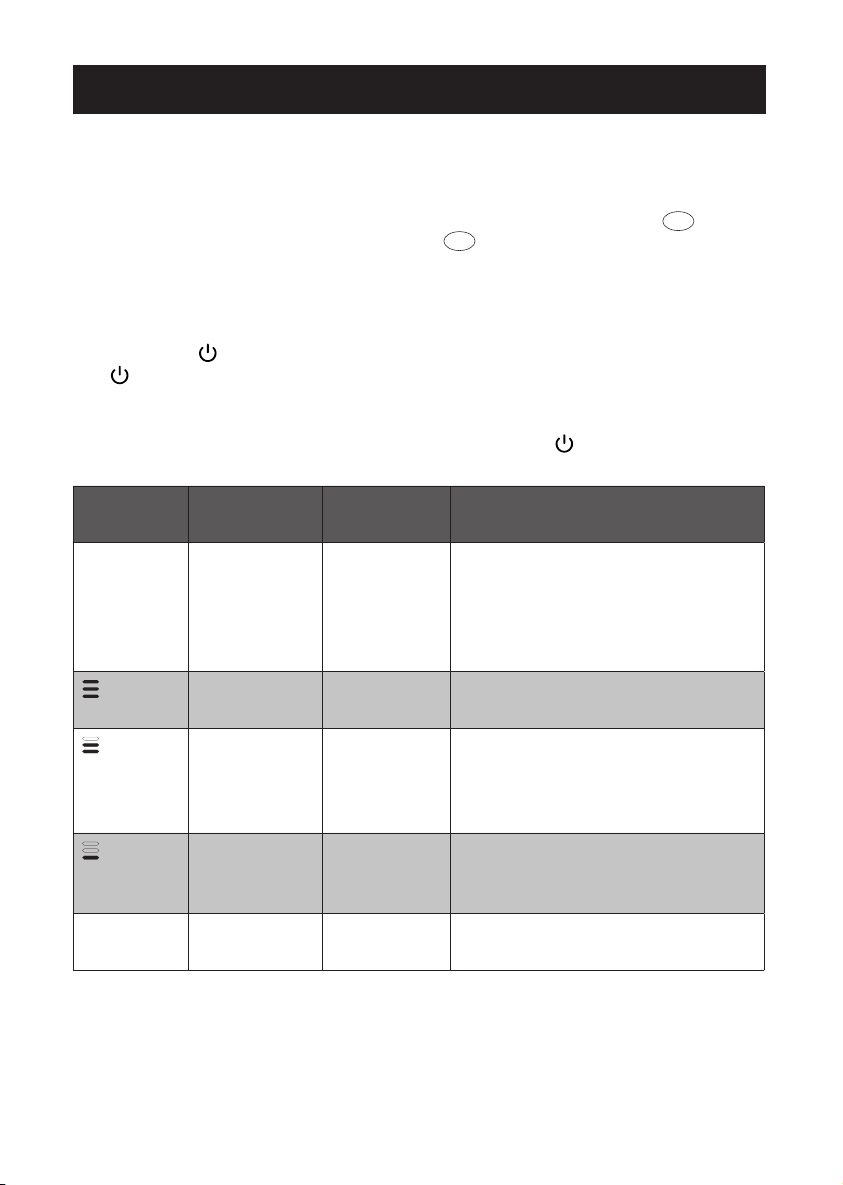
BUTTON DURATION SPEED
(CYCLE)
USE
PULSE until released max short bursts of power•
allows varying levels of •
blending
use for ice crushing, chopping •
nuts, herbs or biscuit crumbs
hI
about 60sec max - low liquefying and whipping•
blending at high speed•
MED
about 60sec high - low blending smoothies, milk •
shakes and frozen drinks
chopping larger ingredients•
blending at medium speed•
LO
about 60sec med - low making baby food, chopping •
and mixing
blending at low speed•
DRINK
CUP
about 50sec med - low preparing smoothies, fruit or •
vegetable drinks
NOTE: During use, the appliance circulates the speed output as mentioned above.
NOTE: Allow the appliance some time to cool down during operation cycles. It is
recommended to allow a cooling down of equal cycle time after each usage.
OPERATION
Carefully assemble the jar or cup (ill. •
a
+
b
+
c
).
Jar: -
Place the blade unit with seal • (3) on the blade base (4).
Slightly tilt the jar • (12) while carefully guiding it over the blade unit (3).
Secure the jar • (12) to the blade base (4) by turning it clockwise. Ensure
a tight seal.
Once food has been placed in the jar• (12), place the jar lid (13) together
with the measuring cup (14) in on the jar (12). Ensure one of the spout
covers is placed over the spout.
Cup: -
Place the blade unit with seal • (3) on the blade base (4).
Slightly tilt the adaptor ring with seal • (2) while carefully guiding it over
the blade unit (3).
Secure the adaptor ring • (2) to the blade base (4) by turning it clockwise.
Ensure a tight seal.
Once food has been placed in the drink cup• (1), place the assembled
adaptor ring (2), blade unit (3) and blade base (4) on the drink cup (1)
and secure it by turning it clockwise.
Align the bottom of the blade base • (4) with the top of the motor unit (9)
(ill.
d
).
CAUTION: Never place the blade assembly (3+4) on the motor unit (9) without rst
assembling it to the jar (12) or drink cup (1).
To remove either the drink cup • (1) or jar (12), make sure the blender is o and
then lift them upwards o the motor unit (9).
Using the appliance
Use the blender for pureeing very nely and for blending. Use the jar for preparing
sauces, smoothies, shakes, baby food, vegetables, fruit thin batter, puree. Use the
cup only for preparing smoothies and shakes.
NOTE: The appliance has a rated power of 800W. Before plugging it into the wall
outlet, ensure that the electrical circuit is not overloaded with other appliances. This
appliance should always be operated on a separate 120V ~ 60Hz wall outlet.
CAUTION: Always ensure there is food in the jar (12) or drink cup (1) before using
the appliance. Do not use the jar (12) or drink cup (1) to blend hot liquids. Do not
overll the appliance. The MAX line of the drink drink cup (1) is for liquid only, not
for solid food. Do not use the appliance without the jar (12), drink cup (1) or without
the jar lid (13) (ill.
h
+
i
). Do not use the jar or drink cup in a microwave.
CAUTION: Never leave the appliance unattended during operation.
Assemble the required attachment, jar• (12) or drink cup (1) ( Assembly).
Place the food in either the jar • (12) or drink cup (1).
Blender_103742_IM_US_V5_121214.indd 8 12/14/12 9:55:15 AM
8
9
OPERATION
NOTE: Peel or core any fruits or vegetables and cut them into small chunks. Cut solid
food into small cubes. Do not overll the attachments, jar (12) or drink cup (1).
Attach either the jar• (12) or drink cup (1) on the motor unit (9). Align the
bottom of the blade base (4) with the top of the motor unit (9) (ill.
d
).
Connect the plug• (6) to a wall outlet (ill.
e
).
CAUTION: Ensure that the attachment is securely fastened to the motor unit (9)
before switching the appliance on.
Press the • button (20). The appliance is now is stand-by mode and the
button (20) is ashing blue.
NOTE: If no function is selected, the appliance will switch o automatically after
3:30 minutes. To start using the appliance again, press the button (20).
BUTTON DURATION SPEED
(CYCLE)
USE
PULSE until released max short bursts of power•
allows varying levels of •
blending
use for ice crushing, chopping •
nuts, herbs or biscuit crumbs
hI
about 60sec max - low liquefying and whipping•
blending at high speed•
MED
about 60sec high - low blending smoothies, milk •
shakes and frozen drinks
chopping larger ingredients•
blending at medium speed•
LO
about 60sec med - low making baby food, chopping •
and mixing
blending at low speed•
DRINK
CUP
about 50sec med - low preparing smoothies, fruit or •
vegetable drinks
NOTE: During use, the appliance circulates the speed output as mentioned above.
NOTE: Allow the appliance some time to cool down during operation cycles. It is
recommended to allow a cooling down of equal cycle time after each usage.
Blender_103742_IM_US_V5_121214.indd 9 12/14/12 9:55:15 AM
10
11
OPERATION
NOTE: hI, MED, LO programs are changeable during operation and total operation
time is about 60 sec. Press button (20) or PULSE button (15) to nish the program
during operation.
DRINK CUP program is independent with others. Press other function keys will not
aect its operation. Only press button (20) to nish the program.
NOTE: This is appliance is featured with the perfect blend technology. The appliance
is programmed to change speeds during operation. The change of speeds allows
the food to drop toward the blades giving an improved performance.
Press the button representing the required function then the • button (20)
is steady blue. Once the operation cycle has nished the button (20) starts
ashing again.
For drink cup operation use the • DRINK CUP button (18) only. Use of other
function buttons may damage the appliance.
To stop an operation cycle prematurely, press the • button (20).
NOTE: When using the jar (12), it is possible to add additional food during the
operation cycle by removing the measuring cup (14) from the jar lid (13) (ill.
g
).
NOTE: Do not hold drink cup during operation. When blending heavy loads using
the drink cup, the appliance may turn slightly. If desired the appliance can be
stabilized by holding the left side of the base.
Disconnect the plug • (6) from the wall outlet (ill.
k
).
When too much food is placed in the blender, the load can exceed its rated •
power and preventing blade from turning. When this occurs the appliance will
stop working within a few seconds and the button (20) light starts ashing.
If this occurs, press the button (20) to switch o the appliance. Remove some
of the load. Turn appliance on and press desired speed.
If the appliance is operated with heavy loads for long period of time or multiple •
cycles, it will turn o to protect from overheating. The appliance will stop and
the button (20) light starts ashing. Press the button (20) to switch o the
appliance and unplug from wall outlet. Wait at least 10 to 15 minutes before
plugging appliance back in for normal operation.
RECIPES
Strawberry Smoothie (Speed – MED)
1 cup frozen fruit
1 cup milk
1 cup strawberry yogurt
½ scoop unavored or strawberry protein powder (optional)
2 tbsps sugar (sweeten to taste)
1 cup ice
Place ingredients in blender jar in the order given above.•
Make sure ice is evenly distributed over the mixture.•
Protein powder, if used, should be evenly distributed over the ingredients.•
Turn appliance on and use • MED button (17). Stop when desired consistency is
achieved.
Strawberry Banana Smoothie (Speed – MED)
1 cup frozen fruit
1 cup milk
½ cup banana
1 cup strawberry yogurt
½ scoop unavored or strawberry protein powder (optional)
2 tbsps sugar (sweeten to taste)
1 cup ice
Place ingredients in blender jar in the order given above.•
Make sure ice is evenly distributed over the mixture. •
Protein powder, if used, should be evenly distributed over the ingredients.•
Turn appliance on and use • MED button (17). Stop when desired consistency is
achieved.
Blender_103742_IM_US_V5_121214.indd 10 12/14/12 9:55:15 AM

10
11
RECIPES
Strawberry Smoothie (Speed – MED)
1 cup frozen fruit
1 cup milk
1 cup strawberry yogurt
½ scoop unavored or strawberry protein powder (optional)
2 tbsps sugar (sweeten to taste)
1 cup ice
Place ingredients in blender jar in the order given above.•
Make sure ice is evenly distributed over the mixture.•
Protein powder, if used, should be evenly distributed over the ingredients.•
Turn appliance on and use • MED button (17). Stop when desired consistency is
achieved.
Strawberry Banana Smoothie (Speed – MED)
1 cup frozen fruit
1 cup milk
½ cup banana
1 cup strawberry yogurt
½ scoop unavored or strawberry protein powder (optional)
2 tbsps sugar (sweeten to taste)
1 cup ice
Place ingredients in blender jar in the order given above.•
Make sure ice is evenly distributed over the mixture. •
Protein powder, if used, should be evenly distributed over the ingredients.•
Turn appliance on and use • MED button (17). Stop when desired consistency is
achieved.
Blender_103742_IM_US_V5_121214.indd 11 12/14/12 9:55:15 AM

12
13
RECIPES
Frozen Drinks – Margaritas, Daiquiris, and Pina Coladas
(Speed – MED)
16 oz. frozen peach slices
4 oz. alcohol – tequila, rom, or as recommended by drink mix instructions
4 cups ice
Place liquids in blender jar in the order given above•
Make sure ice is evenly distributed in the jar•
Turn appliance on and use • MED button (17). Stop when desired consistency is
achieved.
vanilla Milk Shake (Speed – MED)
1 cup milk
4 tsps vanilla extract
1 tbsps sugar (sweeten to taste)
2 cups vanilla ice cream
Place ingredients in blender jar in order given above.•
Do not pack the ice cream to tight. Liquids should be able to ow through the •
ice cream.
Turn appliance on and use • MED button (17). Stop when desired consistency is
achieved.
RECIPES
Peach Smoothie (Speed – MED)
1 cup frozen peach slices
1 tbsp unsweetened natural peach preserve
1 cup milk
1 cup vanilla yogurt
½ scoop unavored or vanilla protein powder (optional)
2 tbsps sugar (sweeten to taste)
1 cup ice
Place ingredients in blender jar in the order given above.•
Make sure ice is evenly distributed over the mixture.•
Protein powder, if used, should be evenly distributed over the ingredients.•
Turn appliance on and use • MED button (17). Stop when desired consistency is
achieved.
Peach / Mango Smoothie (Speed – MED)
½ cup frozen peach slices
½ cup frozen mango pieces
1 tbsp unsweetened natural peach preserve
1 cup milk
1 cup vanilla yogurt
½ scoop unavored or vanilla protein powder (optional)
1 tbsps sugar (sweeten to taste)
1 cup ice
Place ingredients in blender jar in the order given above.•
Make sure ice is evenly distributed over the mixture.•
Protein powder, if used, should be evenly distributed over the ingredients.•
Turn appliance on and use • MED button (17). Stop when desired consistency is
achieved.
Blender_103742_IM_US_V5_121214.indd 12 12/14/12 9:55:15 AM

12
13
RECIPES
Frozen Drinks – Margaritas, Daiquiris, and Pina Coladas
(Speed – MED)
16 oz. frozen peach slices
4 oz. alcohol – tequila, rom, or as recommended by drink mix instructions
4 cups ice
Place liquids in blender jar in the order given above•
Make sure ice is evenly distributed in the jar•
Turn appliance on and use • MED button (17). Stop when desired consistency is
achieved.
vanilla Milk Shake (Speed – MED)
1 cup milk
4 tsps vanilla extract
1 tbsps sugar (sweeten to taste)
2 cups vanilla ice cream
Place ingredients in blender jar in order given above.•
Do not pack the ice cream to tight. Liquids should be able to ow through the •
ice cream.
Turn appliance on and use • MED button (17). Stop when desired consistency is
achieved.
RECIPES
Peach Smoothie (Speed – MED)
1 cup frozen peach slices
1 tbsp unsweetened natural peach preserve
1 cup milk
1 cup vanilla yogurt
½ scoop unavored or vanilla protein powder (optional)
2 tbsps sugar (sweeten to taste)
1 cup ice
Place ingredients in blender jar in the order given above.•
Make sure ice is evenly distributed over the mixture.•
Protein powder, if used, should be evenly distributed over the ingredients.•
Turn appliance on and use • MED button (17). Stop when desired consistency is
achieved.
Peach / Mango Smoothie (Speed – MED)
½ cup frozen peach slices
½ cup frozen mango pieces
1 tbsp unsweetened natural peach preserve
1 cup milk
1 cup vanilla yogurt
½ scoop unavored or vanilla protein powder (optional)
1 tbsps sugar (sweeten to taste)
1 cup ice
Place ingredients in blender jar in the order given above.•
Make sure ice is evenly distributed over the mixture.•
Protein powder, if used, should be evenly distributed over the ingredients.•
Turn appliance on and use • MED button (17). Stop when desired consistency is
achieved.
Blender_103742_IM_US_V5_121214.indd 13 12/14/12 9:55:15 AM

14
15
RECIPES
Strawberry Milk Shake (Speed – MED)
1 cup frozen strawberries
1 cup milk
1 tsp vanilla extract
2 tbsps sugar (sweeten to taste)
2 cups vanilla ice cream
Place ingredients in blender jar in order given above.•
Do not pack the ice cream to tight. Liquids should be able to ow through the •
ice cream.
Turn appliance on and use • MED button (17). Stop when desired consistency is
achieved.
Strawberry Banana Milk Shake (Speed – MED)
1 cup frozen strawberries
½ banana
1 cup milk
1 tsp vanilla extract
2 tbsp sugar (sweeten to taste)
2 cups vanilla ice cream
Place ingredients in blender jar in order given above.•
Do not pack the ice cream to tight. Liquids should be able to ow through the •
ice cream.
Turn appliance on and use • MED button (17). Stop when desired consistency is
achieved.
RECIPES
Chocolate Milk Shake (Speed – MED)
1 cup milk
1 tbsp chocolate syrup
1 tsp vanilla extract
2 tbsp sugar (sweeten to taste)
2 cups chocolate ice cream
Place ingredients in blender jar in order given above.•
Do not pack the ice cream to tight. Liquids should be able to ow through the •
ice cream.
Turn appliance on and use • MED button (17). Stop when desired consistency is
achieved.
Tootie-Fruity Milk Shake (Speed – MED)
1 cup milk
1 tsp vanilla extract
½ cup frozen strawberries
½ cup canned pineapple tidbits
¼ cup maraschino cherries
2 tbsps sugar (sweeten to taste)
2 cups vanilla ice cream
Place ingredients in blender jar in order given above.•
Do not pack the ice cream to tight. Liquids should be able to ow through the •
ice cream.
Turn appliance on and use • MED button (17). Stop when desired consistency is
achieved.
Blender_103742_IM_US_V5_121214.indd 14 12/14/12 9:55:15 AM

14
15
RECIPES
Strawberry Milk Shake (Speed – MED)
1 cup frozen strawberries
1 cup milk
1 tsp vanilla extract
2 tbsps sugar (sweeten to taste)
2 cups vanilla ice cream
Place ingredients in blender jar in order given above.•
Do not pack the ice cream to tight. Liquids should be able to ow through the •
ice cream.
Turn appliance on and use • MED button (17). Stop when desired consistency is
achieved.
Strawberry Banana Milk Shake (Speed – MED)
1 cup frozen strawberries
½ banana
1 cup milk
1 tsp vanilla extract
2 tbsp sugar (sweeten to taste)
2 cups vanilla ice cream
Place ingredients in blender jar in order given above.•
Do not pack the ice cream to tight. Liquids should be able to ow through the •
ice cream.
Turn appliance on and use • MED button (17). Stop when desired consistency is
achieved.
RECIPES
Chocolate Milk Shake (Speed – MED)
1 cup milk
1 tbsp chocolate syrup
1 tsp vanilla extract
2 tbsp sugar (sweeten to taste)
2 cups chocolate ice cream
Place ingredients in blender jar in order given above.•
Do not pack the ice cream to tight. Liquids should be able to ow through the •
ice cream.
Turn appliance on and use • MED button (17). Stop when desired consistency is
achieved.
Tootie-Fruity Milk Shake (Speed – MED)
1 cup milk
1 tsp vanilla extract
½ cup frozen strawberries
½ cup canned pineapple tidbits
¼ cup maraschino cherries
2 tbsps sugar (sweeten to taste)
2 cups vanilla ice cream
Place ingredients in blender jar in order given above.•
Do not pack the ice cream to tight. Liquids should be able to ow through the •
ice cream.
Turn appliance on and use • MED button (17). Stop when desired consistency is
achieved.
Blender_103742_IM_US_V5_121214.indd 15 12/14/12 9:55:15 AM

16
17
RECIPES
Oreo Milk Shake Treat (Speed – hI)
½ cup milk
1 tsp vanilla extract
2 tbsps sugar (sweeten to taste)
2 cups vanilla ice cream
1 cup Oreo cookies (whole)
Place ingredients in blender jar in order given above.•
Do not pack the ice cream to tight. Liquids should be able to ow through the •
ice cream.
Turn appliance on and use • hI button (16).
Run until ingredients are completely mixed. •
To thicken treat by adding more ice cream after ingredients have been blended. •
Be sure to stop appliance before adding ice cream. Thicken shake to preference.
Limit ice cream to no more than 3 cups per batch.
heath-Bar Milk Shake Treat (Speed – hI)
½ cup milk
1 tsp vanilla extract
2 tbsps sugar (sweeten to taste)
2 cups vanilla ice cream
½ cup small heath bars or crushed heath bar
Place ingredients in blender jar in order given above.•
Do not pack the ice cream to tight. Liquids should be able to ow through the •
ice cream.
Turn appliance on and use • hI button (16).
Run until ingredients are completely mixed. •
To thicken treat by adding more ice cream after ingredients have been blended. •
Be sure to stop appliance before adding ice cream. Thicken shake to preference.
Limit ice cream to no more than 3 cups per batch.
RECIPES
Chocolate, Cherry and Caramel Milk Shake Treat (Speed –
hI)
½ cup milk
1 tsp vanilla extract
1 tsbp caramel syrup
1 tsbp chocolate syrup
2 tbsps sugar (sweeten to taste)
2 cups vanilla ice cream
¼ cup maraschino cherries
Place ingredients in blender jar in order given above.•
Do not pack the ice cream to tight. Liquids should be able to ow through the •
ice cream.
Turn appliance on and use • hI button (16).
Run until ingredients are completely mixed. •
To thicken treat by adding more ice cream after ingredients have been blended. •
Be sure to stop appliance before adding ice cream. Thicken shake to preference.
Limit ice cream to no more than 3 cups per batch.
Blender_103742_IM_US_V5_121214.indd 16 12/14/12 9:55:15 AM

16
17
RECIPES
Oreo Milk Shake Treat (Speed – hI)
½ cup milk
1 tsp vanilla extract
2 tbsps sugar (sweeten to taste)
2 cups vanilla ice cream
1 cup Oreo cookies (whole)
Place ingredients in blender jar in order given above.•
Do not pack the ice cream to tight. Liquids should be able to ow through the •
ice cream.
Turn appliance on and use • hI button (16).
Run until ingredients are completely mixed. •
To thicken treat by adding more ice cream after ingredients have been blended. •
Be sure to stop appliance before adding ice cream. Thicken shake to preference.
Limit ice cream to no more than 3 cups per batch.
heath-Bar Milk Shake Treat (Speed – hI)
½ cup milk
1 tsp vanilla extract
2 tbsps sugar (sweeten to taste)
2 cups vanilla ice cream
½ cup small heath bars or crushed heath bar
Place ingredients in blender jar in order given above.•
Do not pack the ice cream to tight. Liquids should be able to ow through the •
ice cream.
Turn appliance on and use • hI button (16).
Run until ingredients are completely mixed. •
To thicken treat by adding more ice cream after ingredients have been blended. •
Be sure to stop appliance before adding ice cream. Thicken shake to preference.
Limit ice cream to no more than 3 cups per batch.
RECIPES
Chocolate, Cherry and Caramel Milk Shake Treat (Speed –
hI)
½ cup milk
1 tsp vanilla extract
1 tsbp caramel syrup
1 tsbp chocolate syrup
2 tbsps sugar (sweeten to taste)
2 cups vanilla ice cream
¼ cup maraschino cherries
Place ingredients in blender jar in order given above.•
Do not pack the ice cream to tight. Liquids should be able to ow through the •
ice cream.
Turn appliance on and use • hI button (16).
Run until ingredients are completely mixed. •
To thicken treat by adding more ice cream after ingredients have been blended. •
Be sure to stop appliance before adding ice cream. Thicken shake to preference.
Limit ice cream to no more than 3 cups per batch.
Blender_103742_IM_US_V5_121214.indd 17 12/14/12 9:55:16 AM

18
19
SALSA RECIPES
Fresh Tomato Salsa (Speed – LO)
28 oz. can tomatoes
1 clove garlic
1 tbsp lemon juice
1 tsp salt
1 jalapeno peppers (increase or decrease to taste)
1 small onion
½ cup cilantro
Cut Roma tomatoes in eighths•
Place 2 tomatoes in the blender jar. Make sure that the tomato is evenly •
distributed in the jar.
Place garlic, lemon juice and salt in the jar next.•
Quarter the jalapeno pepper and place in the jar.•
Cut onion into eighths and put into jar. Remove outer layer of onion before •
placing in the jar.
Make sure to remove the stems of the Cilantro. Use only the leaves. Distribute •
the Cilantro evenly in the jar.
Place the remaining tomato in the jar. Be sure to cut tomato into eight equal •
parts
Turn appliance on and use • LO button (19). Stop when desired consistency is
achieved.
SALSA RECIPES
Canned Tomato Salsa (Speed – LO)
28 oz. can whole can tomatoes
1 cloves garlic
1 tbsp lemon juice
1 tsp salt
1 jalapeno peppers (increase or decrease to taste)
1 small onion
½ cup cilantro
Drain whole tomatoes•
Place half of the tomatoes in the blender jar. Make sure that the tomatoes are •
evenly distributed in the jar.
Place garlic, lemon juice and salt in the jar next.•
Quarter the jalapeno peppers and place in the jar.•
Cut onion into eighths and put into jar. Remove outer layer of onion before •
placing in the jar.
Make sure to remove the stems of the cilantro. Use only the leaves. Distribute •
the cilantro evenly in the jar.
Place the remaining tomatoes in the jar. •
Turn appliance on and use • LO button (19). Stop when desired consistency is
achieved.
Blender_103742_IM_US_V5_121214.indd 18 12/14/12 9:55:16 AM

18
19
SALSA RECIPES
Fresh Tomato Salsa (Speed – LO)
28 oz. can tomatoes
1 clove garlic
1 tbsp lemon juice
1 tsp salt
1 jalapeno peppers (increase or decrease to taste)
1 small onion
½ cup cilantro
Cut Roma tomatoes in eighths•
Place 2 tomatoes in the blender jar. Make sure that the tomato is evenly •
distributed in the jar.
Place garlic, lemon juice and salt in the jar next.•
Quarter the jalapeno pepper and place in the jar.•
Cut onion into eighths and put into jar. Remove outer layer of onion before •
placing in the jar.
Make sure to remove the stems of the Cilantro. Use only the leaves. Distribute •
the Cilantro evenly in the jar.
Place the remaining tomato in the jar. Be sure to cut tomato into eight equal •
parts
Turn appliance on and use • LO button (19). Stop when desired consistency is
achieved.
SALSA RECIPES
Canned Tomato Salsa (Speed – LO)
28 oz. can whole can tomatoes
1 cloves garlic
1 tbsp lemon juice
1 tsp salt
1 jalapeno peppers (increase or decrease to taste)
1 small onion
½ cup cilantro
Drain whole tomatoes•
Place half of the tomatoes in the blender jar. Make sure that the tomatoes are •
evenly distributed in the jar.
Place garlic, lemon juice and salt in the jar next.•
Quarter the jalapeno peppers and place in the jar.•
Cut onion into eighths and put into jar. Remove outer layer of onion before •
placing in the jar.
Make sure to remove the stems of the cilantro. Use only the leaves. Distribute •
the cilantro evenly in the jar.
Place the remaining tomatoes in the jar. •
Turn appliance on and use • LO button (19). Stop when desired consistency is
achieved.
Blender_103742_IM_US_V5_121214.indd 19 12/14/12 9:55:16 AM

20
21
SALSA RECIPES
Tomato / Tomatillo Salsa (Speed – LO)
14.5 oz. can whole can tomatoes
4 tomatillos
1 cloves garlic
1 tbsp lemon juice
1 tsp salt
1 jalapeno peppers (increase or decrease to taste)
1 small onion
½ cup cilantro
Drain whole tomatoes•
Place the tomatoes in the blender jar. Make sure that the tomatoes are evenly •
distributed in the jar.
Place garlic, lemon juice and salt in the jar next.•
Quarter the jalapeno peppers and place in the jar.•
Cut onion into eighths and put into jar. Remove outer layer of onion before •
placing in the jar.
Make sure to remove the stems of the Cilantro. Use only the leaves. Distribute •
the Cilantro evenly in the jar.
Place the Tomatillos in the jar. Tomatillos should be quartered.•
Turn appliance on and use • LO button (19). Stop when desired consistency is
achieved.
SALSA RECIPES
Marinara Sauce (Speed – LO)
28 oz. can whole can tomatoes
6 oz. can tomato paste
1 cloves garlic
4 tbsps chopped parsley
1 tsbp oregano
1 tsp salt
¼ tsp black pepper
1 small onion
½ cup white wine
6 tbsp olive oil
Drain whole tomatoes.•
Place the tomatoes in the blender jar. Make sure that the tomatoes are evenly •
distributed in the jar.
Place garlic, parsley, oregano, salt and black pepper in the jar next.•
Cut onion into eighths and put into jar. Remove outer layer of onion before •
placing in the jar.
Add white wine and 6 tbsps olive oil.•
Turn appliance on and use • LO button (19). Stop when desired consistency is
achieved.
After the blender stops place ingredients in a sauce pan and simmer for •
20 minutes.
Whipped Cream Recipe Speed (Speed – hI)
2 cups whipped cream
2 tbs sugar
1 tsp vanilla
Blender_103742_IM_US_V5_121214.indd 20 12/14/12 9:55:16 AM

20
21
SALSA RECIPES
Tomato / Tomatillo Salsa (Speed – LO)
14.5 oz. can whole can tomatoes
4 tomatillos
1 cloves garlic
1 tbsp lemon juice
1 tsp salt
1 jalapeno peppers (increase or decrease to taste)
1 small onion
½ cup cilantro
Drain whole tomatoes•
Place the tomatoes in the blender jar. Make sure that the tomatoes are evenly •
distributed in the jar.
Place garlic, lemon juice and salt in the jar next.•
Quarter the jalapeno peppers and place in the jar.•
Cut onion into eighths and put into jar. Remove outer layer of onion before •
placing in the jar.
Make sure to remove the stems of the Cilantro. Use only the leaves. Distribute •
the Cilantro evenly in the jar.
Place the Tomatillos in the jar. Tomatillos should be quartered.•
Turn appliance on and use • LO button (19). Stop when desired consistency is
achieved.
SALSA RECIPES
Marinara Sauce (Speed – LO)
28 oz. can whole can tomatoes
6 oz. can tomato paste
1 cloves garlic
4 tbsps chopped parsley
1 tsbp oregano
1 tsp salt
¼ tsp black pepper
1 small onion
½ cup white wine
6 tbsp olive oil
Drain whole tomatoes.•
Place the tomatoes in the blender jar. Make sure that the tomatoes are evenly •
distributed in the jar.
Place garlic, parsley, oregano, salt and black pepper in the jar next.•
Cut onion into eighths and put into jar. Remove outer layer of onion before •
placing in the jar.
Add white wine and 6 tbsps olive oil.•
Turn appliance on and use • LO button (19). Stop when desired consistency is
achieved.
After the blender stops place ingredients in a sauce pan and simmer for •
20 minutes.
Whipped Cream Recipe Speed (Speed – hI)
2 cups whipped cream
2 tbs sugar
1 tsp vanilla
Blender_103742_IM_US_V5_121214.indd 21 12/14/12 9:55:16 AM

22
23
DRINK CUP
Frozen Drinks – Margaritas, Daiquiris, and Pina Coladas
(Drink Cup Button)
4-6 oz. drink mix
1-2 oz. alcohol – tequila, rom, or as recommended by drink mix
instructions
1 cup ice
Place liquids in blender jar in the order given above.•
Make sure ice is evenly distributed in the jar.•
Turn appliance on and only use • DRINK CUP button (18).
Strawberry Smoothie (Drink Cup Button)
½ cup frozen fruit
½ cup milk
½ cup strawberry yogurt
½ scoop unavored or strawberry protein powder (optional)
1 tbsp sugar (sweeten to taste)
½ cup ice
Place ingredients in blender jar in the order given above.•
Make sure ice is evenly distributed over the mixture.•
Protein powder, if used, should be evenly distributed over the ingredients.•
Turn appliance on and only use • DRINK CUP button (18).
Strawberry Smoothie (Drink Cup Button)
1 cup frozen fruit
1 cup fruit juice
1 tbsp sugar (sweeten to taste)
Place ingredients in blender jar in the order given above.•
Make sure frozen fruit is evenly distributed in juice.•
Turn appliance on and only use • DRINK CUP button (18).
Blender_103742_IM_US_V5_121214.indd 22 12/14/12 9:55:16 AM

22
23
DRINK CUP
Frozen Drinks – Margaritas, Daiquiris, and Pina Coladas
(Drink Cup Button)
4-6 oz. drink mix
1-2 oz. alcohol – tequila, rom, or as recommended by drink mix
instructions
1 cup ice
Place liquids in blender jar in the order given above.•
Make sure ice is evenly distributed in the jar.•
Turn appliance on and only use • DRINK CUP button (18).
Strawberry Smoothie (Drink Cup Button)
½ cup frozen fruit
½ cup milk
½ cup strawberry yogurt
½ scoop unavored or strawberry protein powder (optional)
1 tbsp sugar (sweeten to taste)
½ cup ice
Place ingredients in blender jar in the order given above.•
Make sure ice is evenly distributed over the mixture.•
Protein powder, if used, should be evenly distributed over the ingredients.•
Turn appliance on and only use • DRINK CUP button (18).
Strawberry Smoothie (Drink Cup Button)
1 cup frozen fruit
1 cup fruit juice
1 tbsp sugar (sweeten to taste)
Place ingredients in blender jar in the order given above.•
Make sure frozen fruit is evenly distributed in juice.•
Turn appliance on and only use • DRINK CUP button (18).
hINTS AND TIPS
Cut foods into smaller pieces will allow a quicker blending process.•
Add liquid food into the jar or cup rst before adding solid food. This way all •
ingredients are mixed evenly.
For best results, cut solid food into approximately 0.5 inch (1.3 cm) to 1 inch •
(2.5 cm) cubes. Cut cheese into pieces no larger than 0.5 inch (1.3 cm).
Operate the appliance for only as long as needed to reach the right consistency. •
To stop an operation cycle, press the button (20).
Do not operate the appliance for more than three minutes at a time. After each •
use, allow appliance to cool for at least three minutes.
It is recommended to clean all accessories used after each operation. •
It is recommended to use the cup lid • (11) when storing food in the drink cup
(1) or for easy consumption of a prepared smoothie.
Allow the appliance to come to a complete stop before changing speed •
settings.
CAUTION: Do not rinse the jar (12) with hot water after preparing cold food. Danger
of injuries and shattering of jar (12).
CLEANING
Proper maintenance will ensure many years of service from your appliance. Clean
the appliance after every use. The appliance contains no user serviceable parts and
requires little maintenance. Leave any servicing or repairs to qualied personnel.
CAUTION: Disconnect the plug (6) from the wall outlet. Allow all parts of the
appliance to cool down completely.
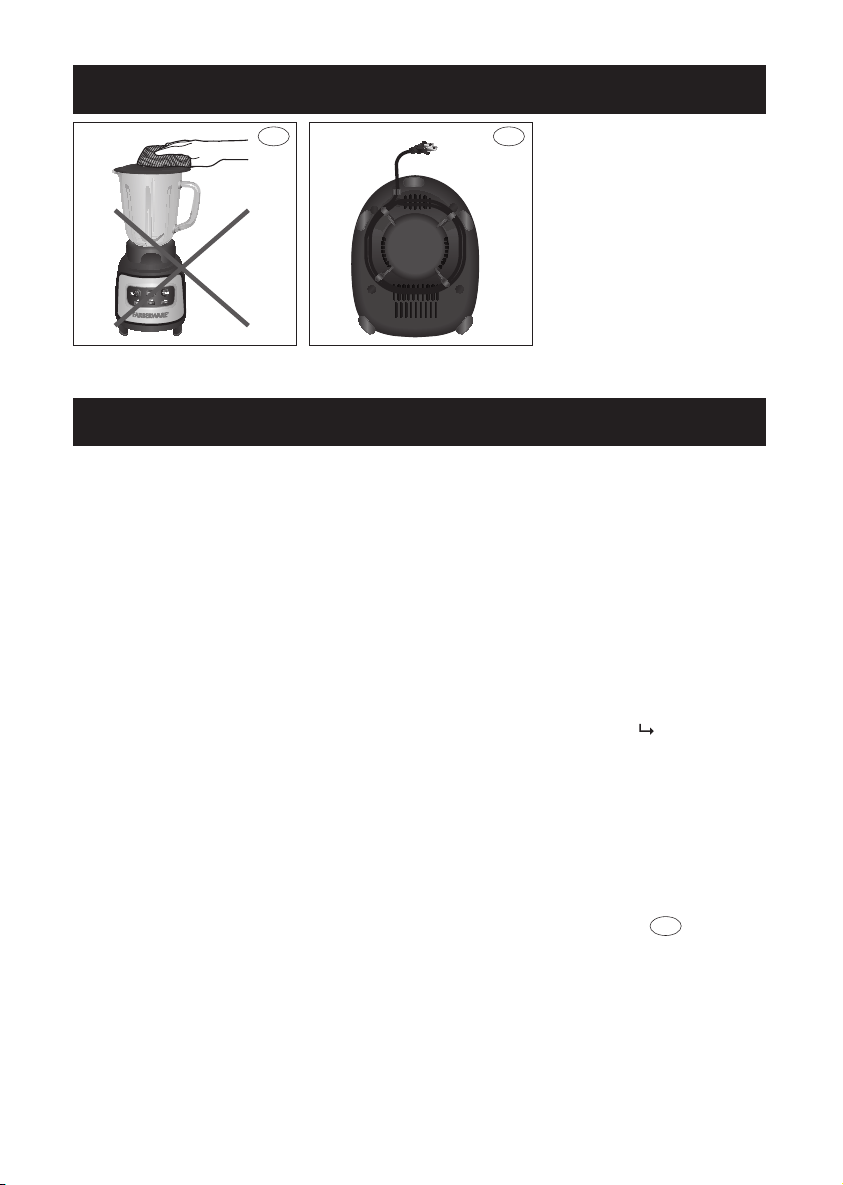
NOTE: Do not immerse the power cord with plug (6) and motor unit (9) into water
or any other liquid. Do not use abrasive cleaners, steel wool or scouring pads
(ill.
m
). Dry all parts thoroughly after cleaning, before using or storing the
appliance. Ensure that no water enters the appliance housing.
All parts, apart from power cord with plug • (6), motor unit (9) and blade unit (3)
can be fully immersed in water and are dishwasher safe.
Clean all parts of the appliance after each use.•
Clean the motor unit • (9) with a slightly damp, soft cloth.
Disassemble the jar and cup in reverse of assembly (• Assembly).
Do not put the jar or any other part in boiling water.•
Blender_103742_IM_US_V5_121214.indd 23 12/14/12 9:55:16 AM

24
25
CLEANING
CAUTION: The blades are very sharp. Clean carefully. Danger of injuries!
NOTE: Be careful not to damage or lose the seals.
NOTE: Dry all parts and surfaces thoroughly before use. Make sure that all parts and
surfaces are completely dry before connecting the appliance to a wall outlet.
Storage
Before storage, always make sure the appliance is completely cool, clean and •
dry.
It is recommended to store the appliance in a dry place. •
Store the power cord in the cord storage • (8) of the appliance (ill.
n
).
Store the appliance on a stable shelf or in a cupboard, preferably in its original •
packaging. To avoid accidents, ensure that both the appliance and its power
cord are beyond reach of children or pets.
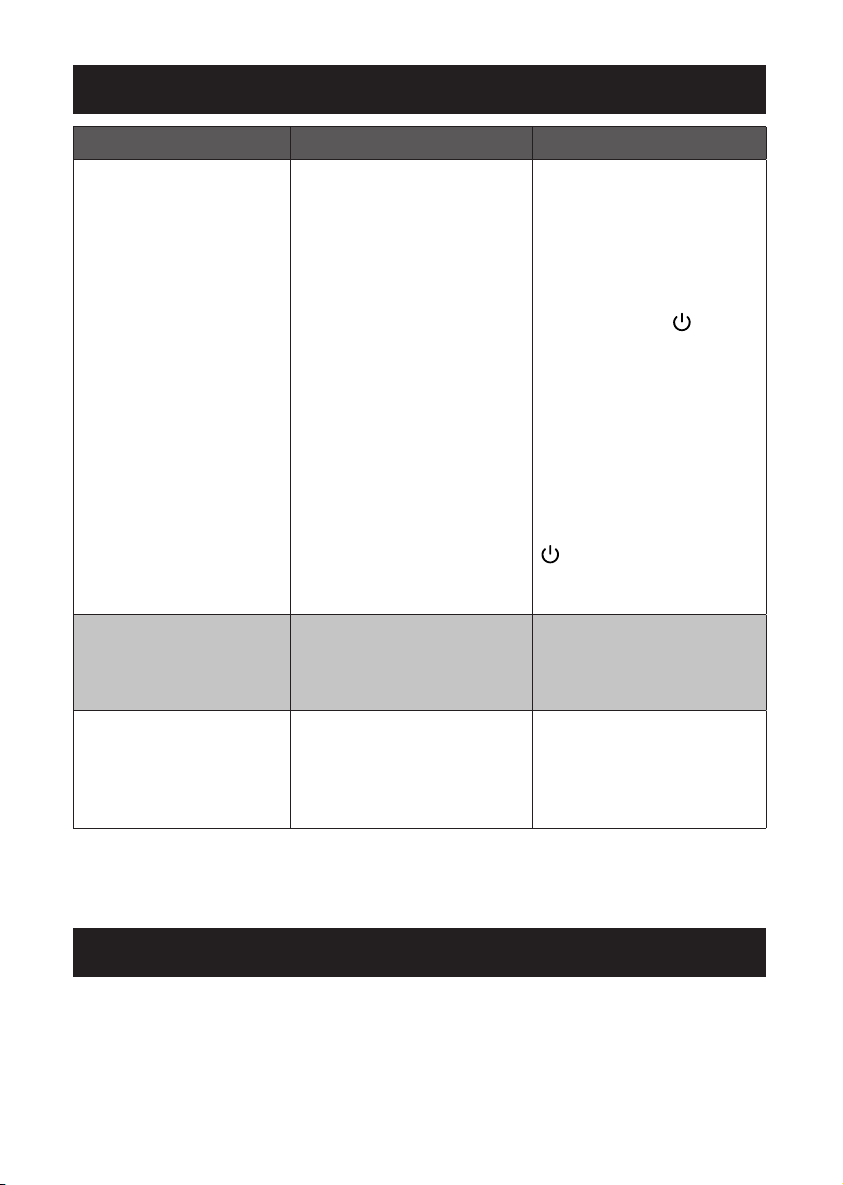
TROUBLEShOOTING
PROBLEM CAUSE SOLUTION
The appliance is not
working
Appliance not plugged in
Wall outlet not energized
Appliance not switched on
The motor is overheated
Too much food in drink
cup (1)
Insert the plug (6) into
the wall outlet
Check fuses and circuit
breaker
Switch the appliance on
by pressing the button
(20)
Unplug the appliance
and allow the appliance
to cool down for at least
10-15 minutes. Restart
cycle
Switch the appliance o
by pressing the
button (20). Remove
some food and restart the
cycle.
The blades are rotating
very slowly
Too much food in the drink
cup (1) or jar (12)
Remove some food and
restart cycle
Add some liquid and
restart cycle
Water Leakage Between parts not fully
tight
Missing seal ring
Secure the parts carefully
Place the required seal
ring
If additional assistance is needed, please contact our Customer Assistance at
1-855-451-2897 (US).
TEChNICAL DATA
Rated voltage: 120V ~ 60Hz Rated power input: 800 W
Rated current: 6.67 A Capacity: Cup: max. 20oz (590 ml)
Jar: max. 48oz (1500 ml)
Blender_103742_IM_US_V5_121214.indd 24 12/14/12 9:55:16 AM
24
25
TROUBLEShOOTING
PROBLEM CAUSE SOLUTION
The appliance is not
working
Appliance not plugged in
Wall outlet not energized
Appliance not switched on
The motor is overheated
Too much food in drink
cup (1)
Insert the plug (6) into
the wall outlet
Check fuses and circuit
breaker
Switch the appliance on
by pressing the button
(20)
Unplug the appliance
and allow the appliance
to cool down for at least
10-15 minutes. Restart
cycle
Switch the appliance o
by pressing the
button (20). Remove
some food and restart the
cycle.
The blades are rotating
very slowly
Too much food in the drink
cup (1) or jar (12)
Remove some food and
restart cycle
Add some liquid and
restart cycle
Water Leakage Between parts not fully
tight
Missing seal ring
Secure the parts carefully
Place the required seal
ring
If additional assistance is needed, please contact our Customer Assistance at
1-855-451-2897 (US).
TEChNICAL DATA
Rated voltage: 120V ~ 60Hz Rated power input: 800 W
Rated current: 6.67 A Capacity: Cup: max. 20oz (590 ml)
Jar: max. 48oz (1500 ml)
Blender_103742_IM_US_V5_121214.indd 25 12/14/12 9:55:16 AM

CUSTOMER ASSISTANCE
If you have a claim under this warranty, please call our Customer Assistance Number.
For faster service, please have the model number and product name ready for the
operator to assist you. This number can be found on the bottom of your appliance
and on the front page of this manual.
Model Number: __________________ Product Name: __________________
Customer Assistance Number 1-855-451-2897 (US)
Keep these numbers for future reference!
Two-year limited warranty
What does your warranty cover?
• Anydefectinmaterialorworkmanship.
For how long after the original purchase?
• Twoyears.
What will we do?
• Provideyouwithanewone.
• Forthoseitemsstillunderwarrantybut
no longer available, WAL-MART reserves
the right to replace with a similar
FARBERWARE branded product of equal
or greater value.
how do you make a warranty claim?
• Saveyourreceipt.
• Properlypackyourunit.Werecommend
using the original carton and packing
materials.
• Returntheproducttoyournearest
WAL-MART store or call Customer
Assistance at 1-855-451-2897 (US).
What does your warranty not cover?
• Partssubjecttowear,including,
without limitation, glass parts, glass
containers, cutter/strainer, blades, seals,
gaskets, clutches, motor brushes, and/
or agitators, etc.
• Commercialuseoranyotherusenot
found in printed directions.
• Damagefrommisuse,abuse,or
neglect, including failure to clean
product regularly in accordance with
manufacturer's instructions.
how does state law relate to this
warranty?
• Thiswarrantygivesyouspeciclegal
rights, and you may also have other
rights which vary from state to state or
province to province.
• Thiswarrantyisinlieuofanyother
warranty or condition, whether
express or implied, written or oral,
including, without limitation, any
statutory warranty or condition
of merchantability or tness for a
particular purpose.
• WAL-MART,FARBERWAREandthe
product manufacturer expressly
disclaim all responsibility for special,
incidental, and consequential
damages or losses caused by use
of this appliance. Any liability is
expressly limited to an amount equal
to the purchase price paid whether
a claim, however instituted, is based
on contract, indemnity, warranty, tort
(including negligence), strict liability, or
otherwise. Some states or provinces do
not allow this exclusion or limitation of
incidental or consequential losses, so
the foregoing disclaimer may not apply
to you.
What if you encounter a problem with this
product while using it outside the country
of purchase?
• Thewarrantyisvalidonlyinthecountry
of purchase and if you follow the
warranty claim procedure as noted.
© 2012 Farberware Licensing Company, LLC. All Rights Reserved.
Copyrights and Trademarks of Farberware Licensing Company,
LLC, including FARBERWARE®, are used under license from
Farberware Licensing Company, LLC.
Blender_103742_IM_US_V5_121214.indd 26 12/14/12 9:55:16 AM