
www. GEAppliances.com
©
©
Safety Instruc_tions ......... 2, 3
Operating. Instructions ....... 4, 5
Care and Cleaning ........... 6
Installation Instruc_tions
Preparing to Install the
Air Conditioner . ............. 7
Window Installation ........ 8-12
Troubleshooting Tips ..... 13-15
Normal Operating Sounds ..... 15
Consumer Support
Consumer Support .... Back Co_er
Product Registration ....... 17, 18
Warranty ................... ]9
A(;EO/
A (;E l2
©
Write the model and serial numbers here:
Model #
Serial #
Find these nmnbers on a label on the
side ot the air conditioner.
3828A2051#J 49-7507-1 03-05JR
IMPORTANTSAFETYINFORMATION.
READALLINSTRUCTIONSBEFOREUSING.
WARNING!
For your safe_ the information in this manual must be followed to minimize the risk of fire, electric shock
or personal injury.
SAFETYPRECAUTIONS
iiiiiiiiiiii_iii
iiiiiiiiiiii_iii
iiiiiiiiiiii_iii
Use this appliance only %r its intended
pui])ose as described in this Owner's
Manual.
This air conditioner must be properly
installed in accordance with d_e Installation
h_structions before it is used.
Nexer unplug your air conditioner by pulling
on the power cord. Always gxip plug firmly
and pull straight out fiom the receptacle.
Replace immediamly all electric service
cords dlat have become frayed or otherwise
damaged. Do not use a cord that shows
cracks or abrasion damage along its length
or at either the plug or connector end.
Turn the mode control to 0ffand unplug
your air conditioner before making any
repairs or cleaning.
NOTE."Westronglyrecommendthatanyservicing
beperformedbya qualifiedindividual.
For your safety...do not store or use
combustible mamrials, gasoline or other
flammable vapors or liquids in the vicinity
of this or any other appliance.
All air conditioners contain refrigerants,
which under federal law must be remox_d
prior to product disposal. If you are g>tting
rid of an old product wifl_ refrigerants, check
Mfl_ fl_e company handling disposal about
what to do.
HOWTOCONNECTELECTRICITY
Do not, under any circumstances, cut or remove
the third (ground) prong from the power cord. For
personal safetg this appliance must be properly
grounded.
The power coM of dfis appliance is equipped
with a 3-prong (grounding) plug which mates
with a standard 3-prong (grounding) wall
outlet m minimize the possibility of electric
shock hazard from this appliance.
Power cord includes a cmxent intenupmr
device. A test and reset button is provided
on the plug case. The device should be tesmd
on a periodic basis by first pressing the rEsr
button and then the RESETbutton. If the rest
button does not trip or if fl)e RfSETbutton
will not stay engaged, discontinue use of file
air conditioner and contact a qualified
service technician.
Where a 2-prong wall outlet is encounmred,
it is your personal responsibility and obligation
to lame it replaced with a properly grounded
3-prong wall outlet.
The air conditioner should always be
plugged into its own individual electrical
outlet which has a xoltage rating that matches
the rating plate.
This provides the best performance and also
prexents overloading house wiring circuits
which could cause a fire hazard from
oxeflleated wires.
See the Installation Instructions, Electrical
Requirements section for specific electlJca]
connection requirements.
Haxe the wall outlet and circuit checked by a
qualified electrician to make sure the outlet is
properly grounded.
2
www.GEAppliances.com
WARNING!
USEOFEXTENSIONCORDS--115-Voltmodelsonly
Because of potential safety hazards under certain _ CAUtiON" DONOT usean extension
conditions, we strongly recommend against the
use of an extension cord. cord with anyof the 230/208 voltmodels.
Howe_; ifvotl H]/lSt use an extension cord,
it is absolutely necessary that it be a UiAisted,
14 gaug_, 3-wire grounding wpe appliance
extension cord having a grounding type plug
and outlet and fllat file elecuical rating of tile
cord be 15 ami)e_es (minimum) and 195 volts.
USEOFADAPTERPLUGS--115-Voltmodelsonly
Because of potential safety hazards under certain
conditions, we strongly recommend against the
use of an adapter plug.
Howe\_l. if you must use an adai)tei; where
local codes permit, a temporaryconnectionmay
be made to a i)roi)erly grounded 21)tong wall
outlet 1)yuse of a UL-lismd adaptor available
at most local hardware stores.
Tile larger slot in tile adaptor must be aligned
with tile larger slot in the wall outlet to provide
proper polarity in the connection of the
power cord.
When disconnecting file power cord from the
adapte_; alwws hold the adaptor in place with
one hand while pulling the power cord plug
with tile other hand. If this is not done, tile
adapter ground mrmina] is ve U likely to bleak
with repeated use.
If the adapter ground terminal breaks, DO NOT
USEthe air conditioner until aproper ground
has been established.
Attachingthe adaptergreundterminalto a waftoutlet
coverscrewdoesnot groundtheapplianceunlessthe
coverscrewis metal,andnot bsulated,and the wall
outlet isgroundedthreughthe housewiring. Youshould
havethecircuitcheckedby a qualifiedelectricianto
makesuretheoutlet is properlygrounded.
READANDFOLLOWTHISSAFETYINFORMATIONCAREFULLY.
SAVETHESEINSTRUCTIONS
Aboutthe controlsontheair conditioner.
Features and appearance will vary.
OFF
LOW _Tk,_
HEATv_-v/
HIGHHEAT HIGHCOOL
LOW
COOL
TEMPCONTROL
0
MODECONTROL
0
Controls
0
TempControl
The temp control is used to maintain the
room temperature. The compressor will
wcle on and off to kee I) the room at the
same level of comtiwt. Turn the knob
clockwise to COOLER(blue) and the indoor
air will become coole_: Turn the knob
counterclockwise to WARMER(red) and
the indoor air will become wam_e_:
@
Mode Control
HIGH COOLand LOW COOL provide cooling
with different Lm speeds.
HIGH HEATand LOW HEATprovide heating
with different tim speeds.
FAN settings provide air circulation and
filtering without cooling or heating.
NOTE:If youmove themode control froma cool
setting to OFF,a fan setting or aheat setting wait
at least3 minutes beforeswitching back toa cool
setting
CoolingDescriptions
ForNormalCooling--SelectHIGHCOOL
or LOWCOOLwith the temp control at
midpoint.
ForMaximumCoolino---Select HIGHCOOLwith
the temp control turned clockwise as tar as
possible.
ForQuieter& NighttimeCeelino---Select LOW
COOLwith the temp control at midpoint.
Heating Descriptions
ForNormalHeatin_Select HIGHHEAT
or LOWHEATwiththe temp control at
midpoint.
ForMaximumHeatino---.Select HIGHHEATwith
the temp control turned counte_clockwise as
flu"as possible.
ForQuieter& NighttimeHeatino---Select LOW
HEATwiththe temp control at midpoint.
4
www.GEAppliances.com
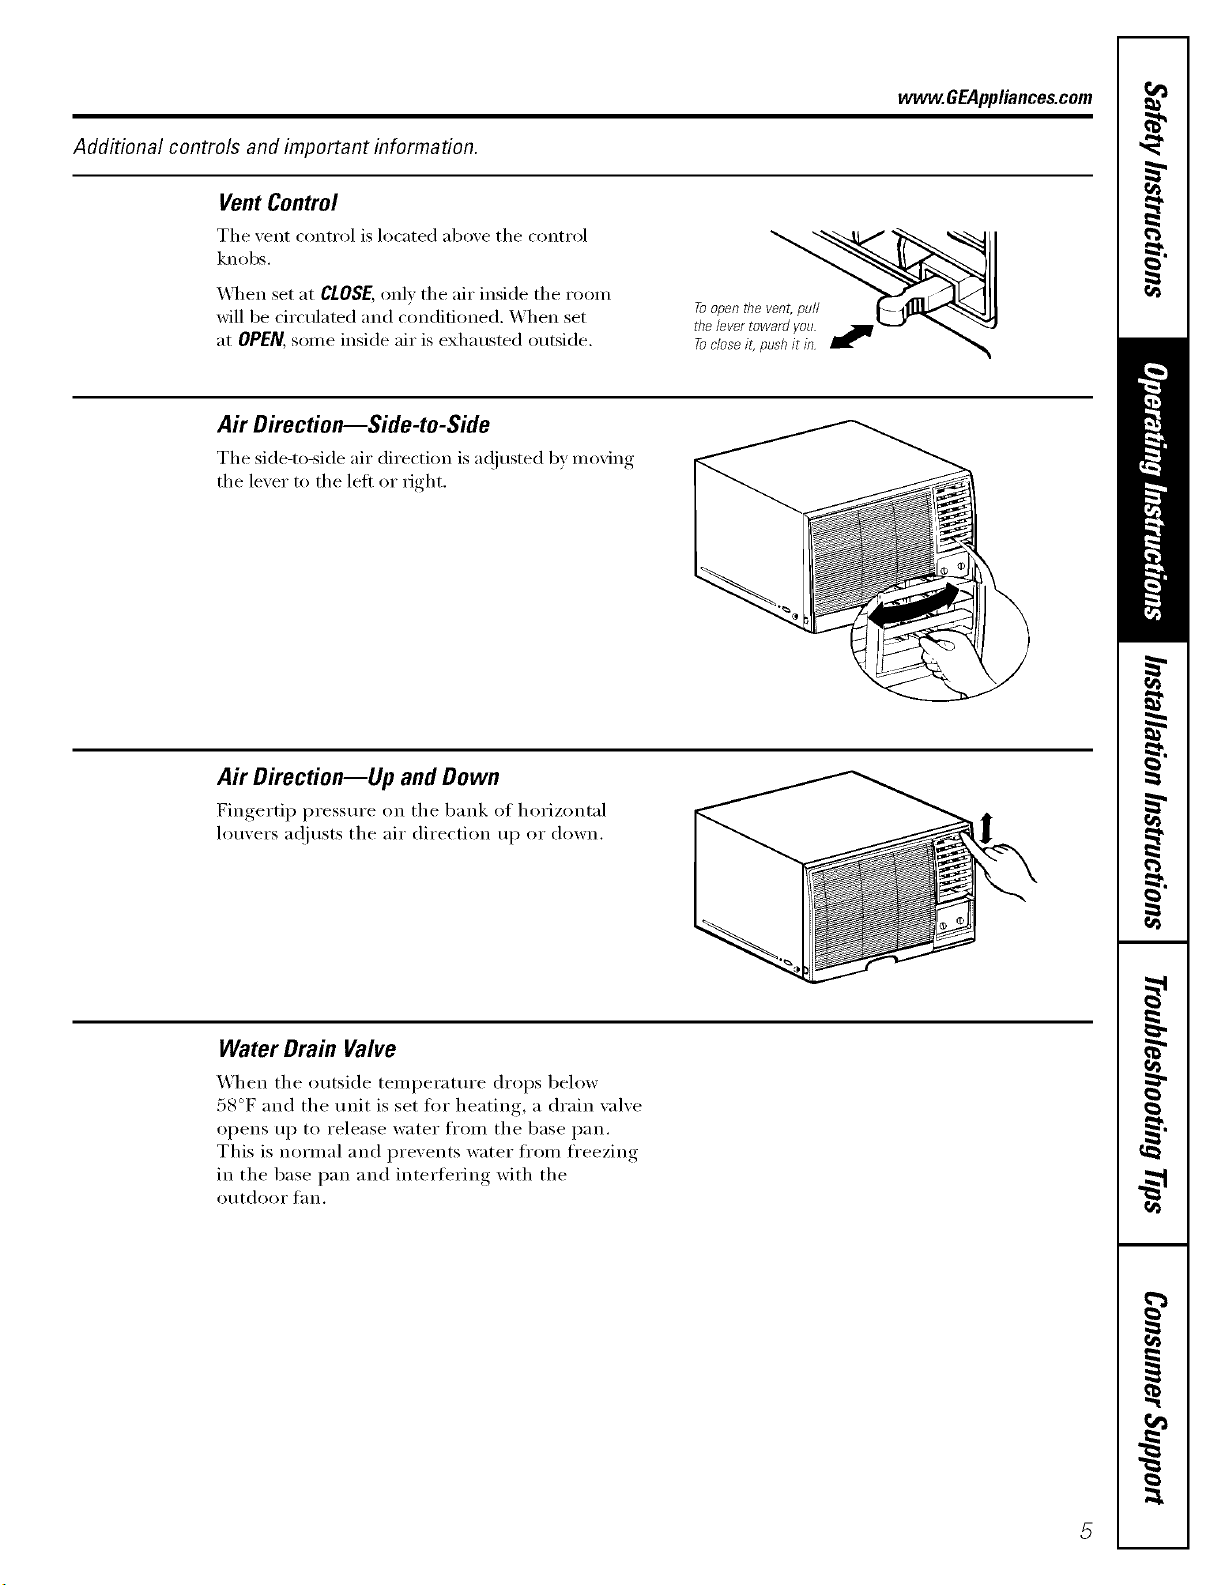
Additional controls and important information.
Vent Control
The vent control is located above the control
knobs.
_]_en set at CLOSE, only the air inside the ro(nn
will be circulated and conditioned. When set
at OPEN, SOlne inside air is exhausted outside.
A# Direction--Side-to-Side
The side-to-side air direction is a(!iusted 1;,ymoving
the lever to the left or right.
Air Direction--Up and Down
Fingertip pressm'e on the bank oI horizontal
louvers at!justs the air direction up or down.
Water Drain Valve
When the outside temperatm'e drops 1)elow
58°F and the trait is set fl)r heating, a drain valve
opens up to release water fl'om the base pan.
This is normal and prevents water fl'om fl'eezing
in the base pan and interfering with the
Otltdoof t_lIl.
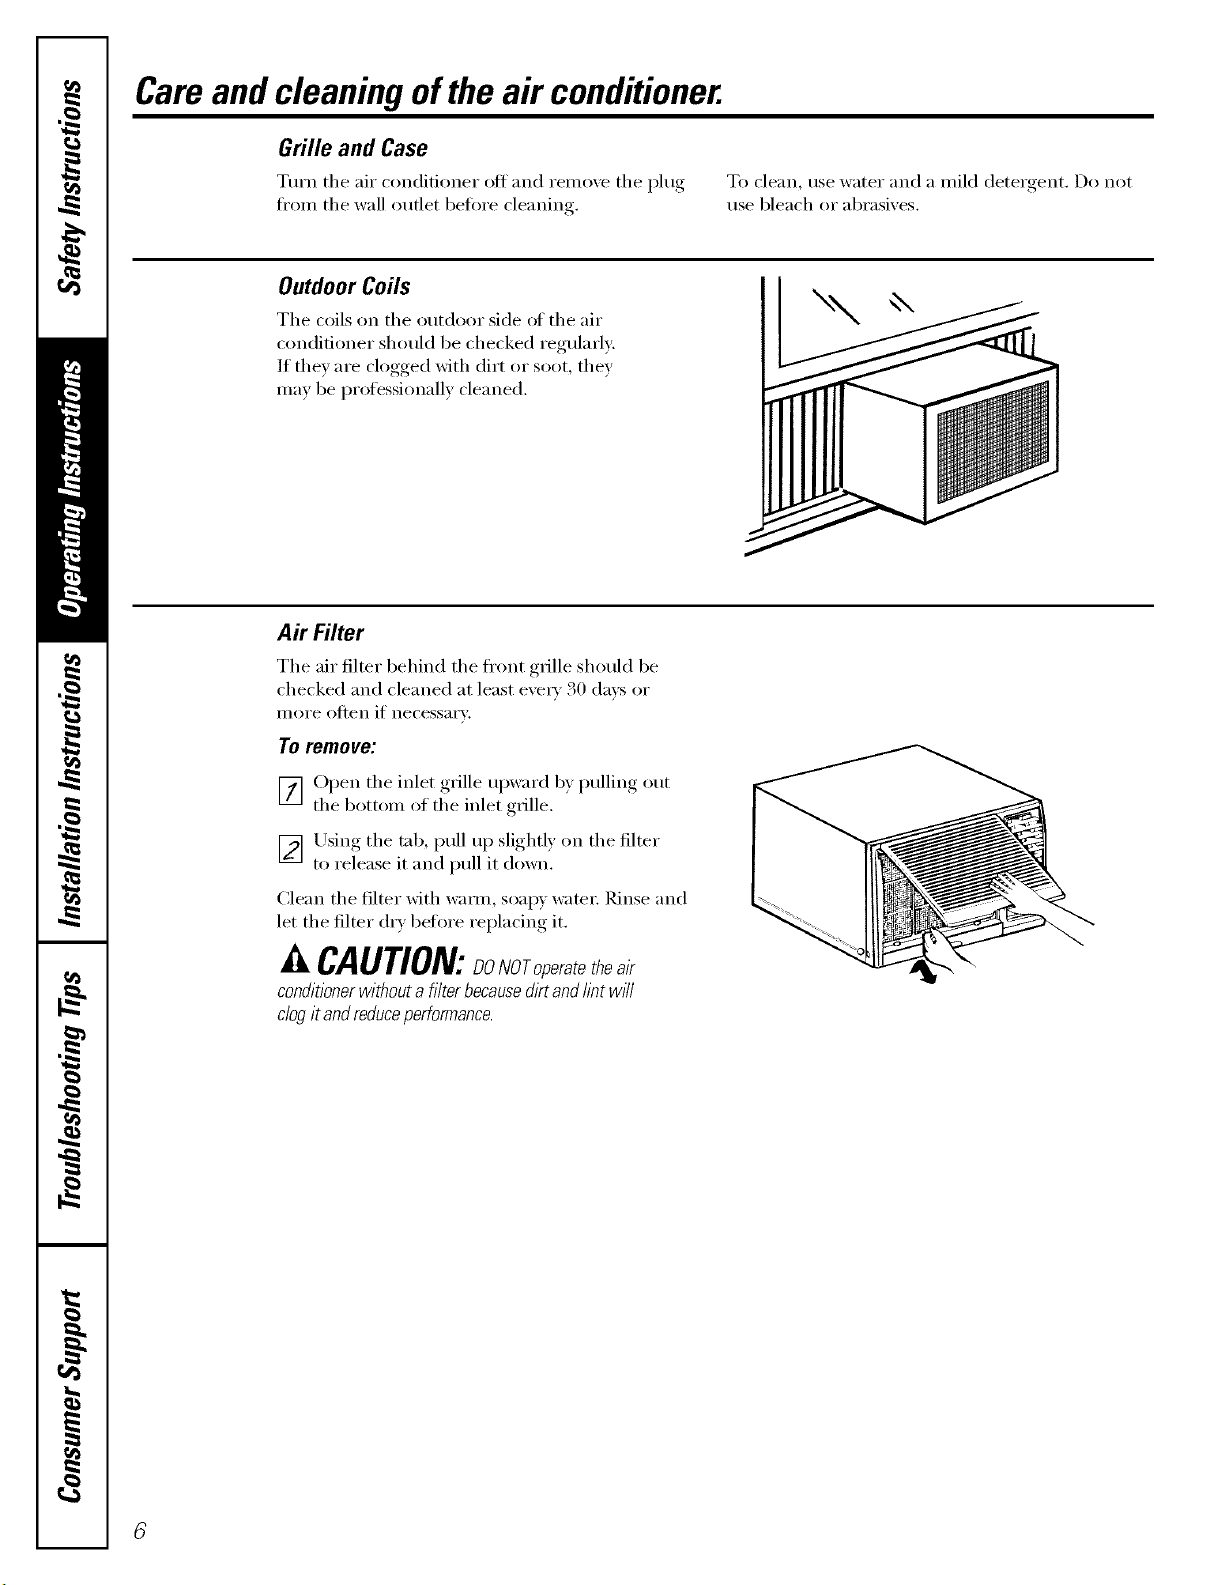
Careand cleaningoftheair conditioner.
Grille and Case
Turn the air conditioner ott and remo;e the I_lug, To clean, use water and a mild deter_,ent Do not
fl'om the wall outlet betore cleaning, use bleach or abrasives.
OutdoorCoils
The coils on the outdoor side ot the air
conditioner should be checked regularly:
If thev are clogged with dirt or soot, they
may be professionally cleaned.
Air Filter
The air filter behind the fl'ont g_ille should be
checked and cleaned at least exe_' 30 daxs or
illOi'e otten if necessai'v:
To remove:
[_] Open the inlet gx_ille upward b) pulling out
the bottom of the inlet grille.
_ Using the tab, pull up slightly on the filter
to release it and pull it down.
Clean the filter with wam_, soap)' water; Rinse and
let the filter d_T betkn'e replacing it.
A CAUTION:DONOro_eratetbeair
conditioner without a filter becausedirt and tint w/7I
ciog it andreduceperformance.
Installation
Instructions
Air Conditioner
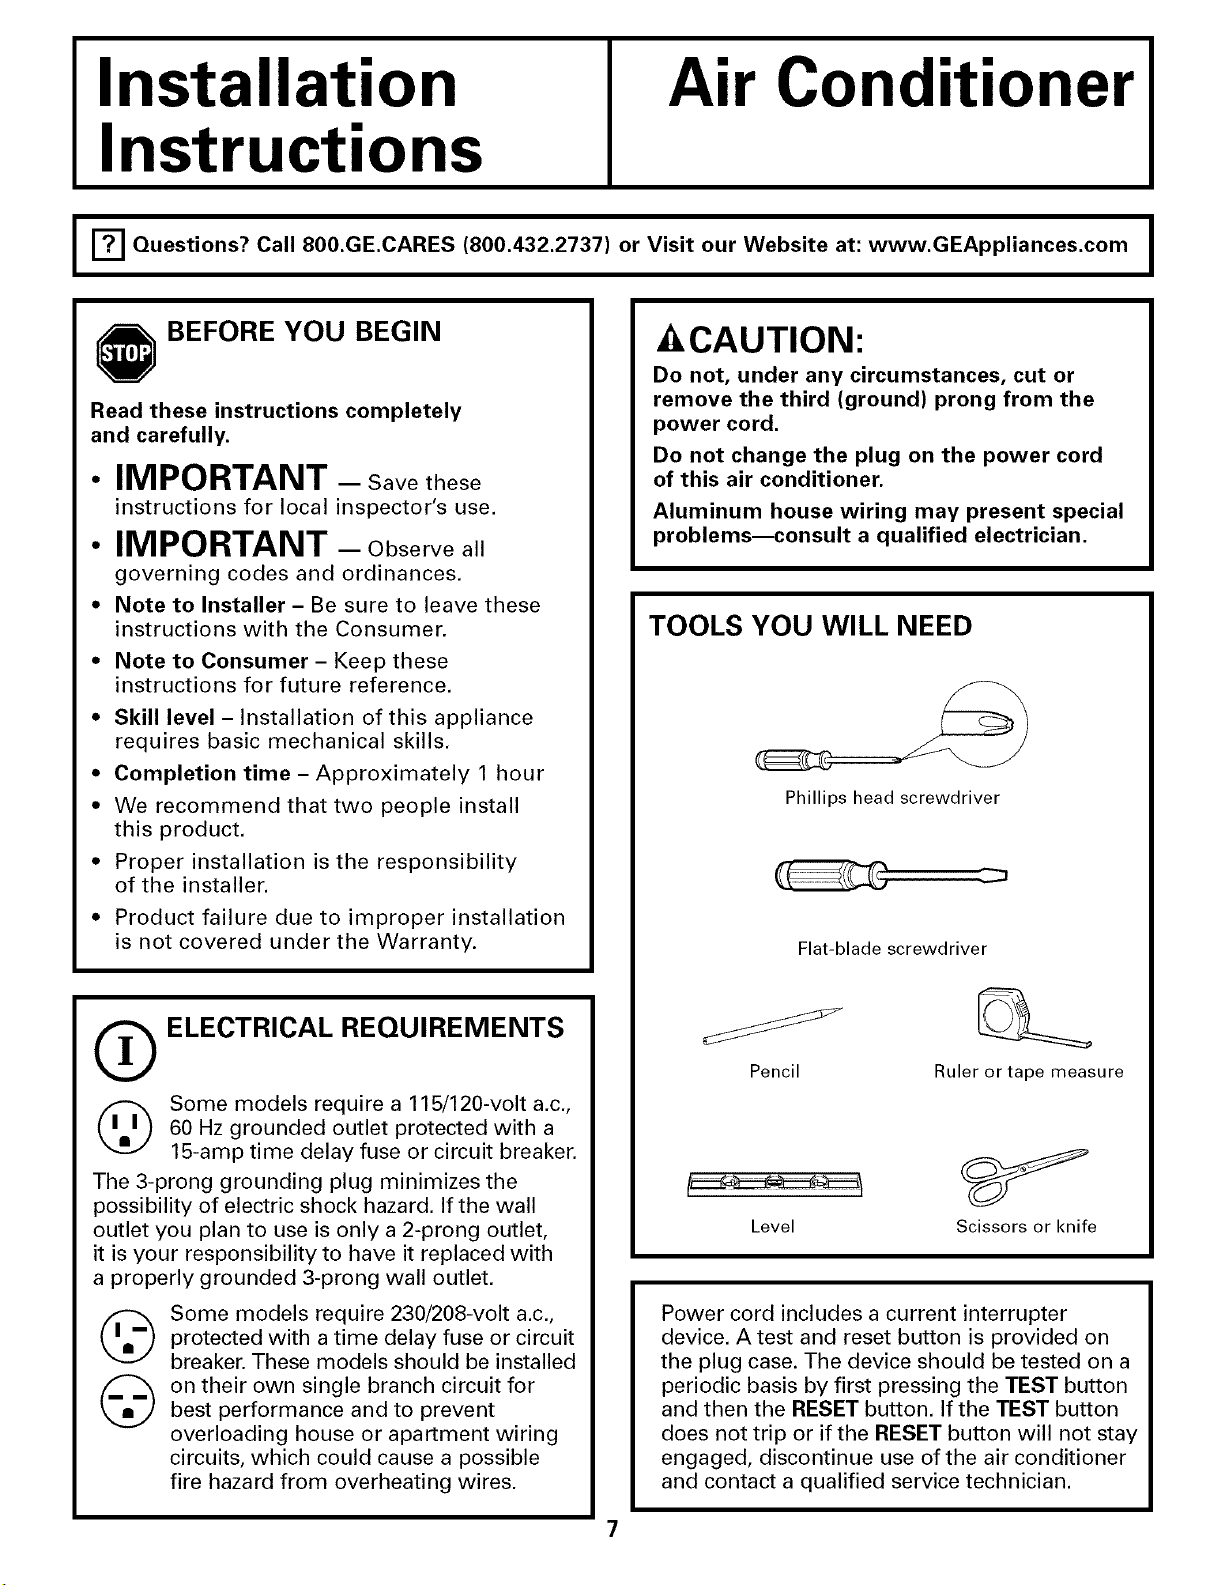
"_1 Questions? Call 800.GE.CARES (800.432.2737) or Visit our Website at: www.GEAppliances.com I
BEFORE YOU BEGIN
Read these instructions completely
and carefully.
• IMPORTANT - Savethese
instructions for local inspector's use.
• IMPORTANT - Observeall
governing codes and ordinances.
• Note to Installer - Be sure to leave these
instructions with the Consumer.
• Note to Consumer - Keep these
instructions for future reference.
• Skill level - Installation of this appliance
requires basic mechanical skills,
• Completion time - Approximately 1 hour
• We recommend that two people install
this product.
• Proper installation is the responsibility
of the installer.
• Product failure due to improper installation
is not covered under the Warranty.
O ELECTRICAL REQUIREMENTS
Some models require a 115/120-volt a.c.,
60 Hz grounded outlet protected with a
15-amp time delay fuse or circuit breaker.
The 3-prong grounding plug minimizes the
possibility of electric shock hazard. If the wall
outlet you plan to use is only a 2-prong outlet,
it is your responsibility to have it replaced with
a properly grounded 3-prong wall outlet.
Some models require 230/208-volt a.c.,
protected with a time delay fuse or circuit
breaker. These models should be installed
on their own single branch circuit for
best performance and to prevent
overloading house or apartment wiring
circuits, which could cause a possible
fire hazard from overheating wires.
CAUTION:
Do not, under any circumstances, cut or
remove the third (ground) prong from the
power cord.
Do not change the plug on the power cord
of this air conditioner.
Aluminum house wiring may present special
problems--consult a qualified electrician.
TOOLS YOU WILL NEED
Phillips head screwdriver
Flat-blade screwdriver
Pencil Ruler or tape measure
Level Scissors or knife
Power cord includes a current interrupter
device. A test and reset button is provided on
the plug case. The device should be tested on a
periodic basis by first pressing the TEST button
and then the RESET button, If the TEST button
does not trip or if the RESET button will not stay
engaged, discontinue use of the air conditioner
and contact a qualified service technician.

Installation Instructions
PARTS INCLUDED
(Appearance may vary)
Left
accordion
panel
\.
Window
rai/°_!!i_g p Foam top __
_mo_i!ing w'ndow ga sket _
Frame guide (2)
_--Sill support (2)
Window locking
bracket
Type A (16) Type B (3) Type C (5)
Right
accordion
panel
Nut (2)
Bolt (2)
8
Installation Instructions
[] WINDOW REQUIREMENTS
• These instructions are for a standard
double-hung window. You will need to
modify them for other types of windows.
• The air conditioner can be installed
without the accordion panels if needed
to fit in a narrow window. See the
window opening dimensions.
• All supporting parts must be secured
to firm wood, masonry or metal.
• The electrical outlet must be within
reach of the power cord.
For AGE07 model only.
15" min.
22" to 36"
(With accordion panels)
I
181_" min.
(Without accordion panels)
For AGE12 model only.
16" min.
27" to 39"
{With accordion panels)
237/8" min.
(Without accordion panels)
jim
l
I
[]
STORM WINDOW REQUIREMENTS
A storm window frame will not allow the
air conditioner to tilt toward the outside,
and will keep it from draining properly.
To adjust for this, attach a piece of wood
to the stool.
WOOD PIECES-
WIDTH: 2"
LENGTH: Long enough to fit inside the
window frame.
THICKNESS: To determine the thickness,
place a piece of wood on the stool to
make it 1/2" higher than the top of the
storm window frame.
Attach securely with nails or screws
provided by the installer.
1/2" hi
than frame Stool
Storm
window
fra me
Installation Instructions
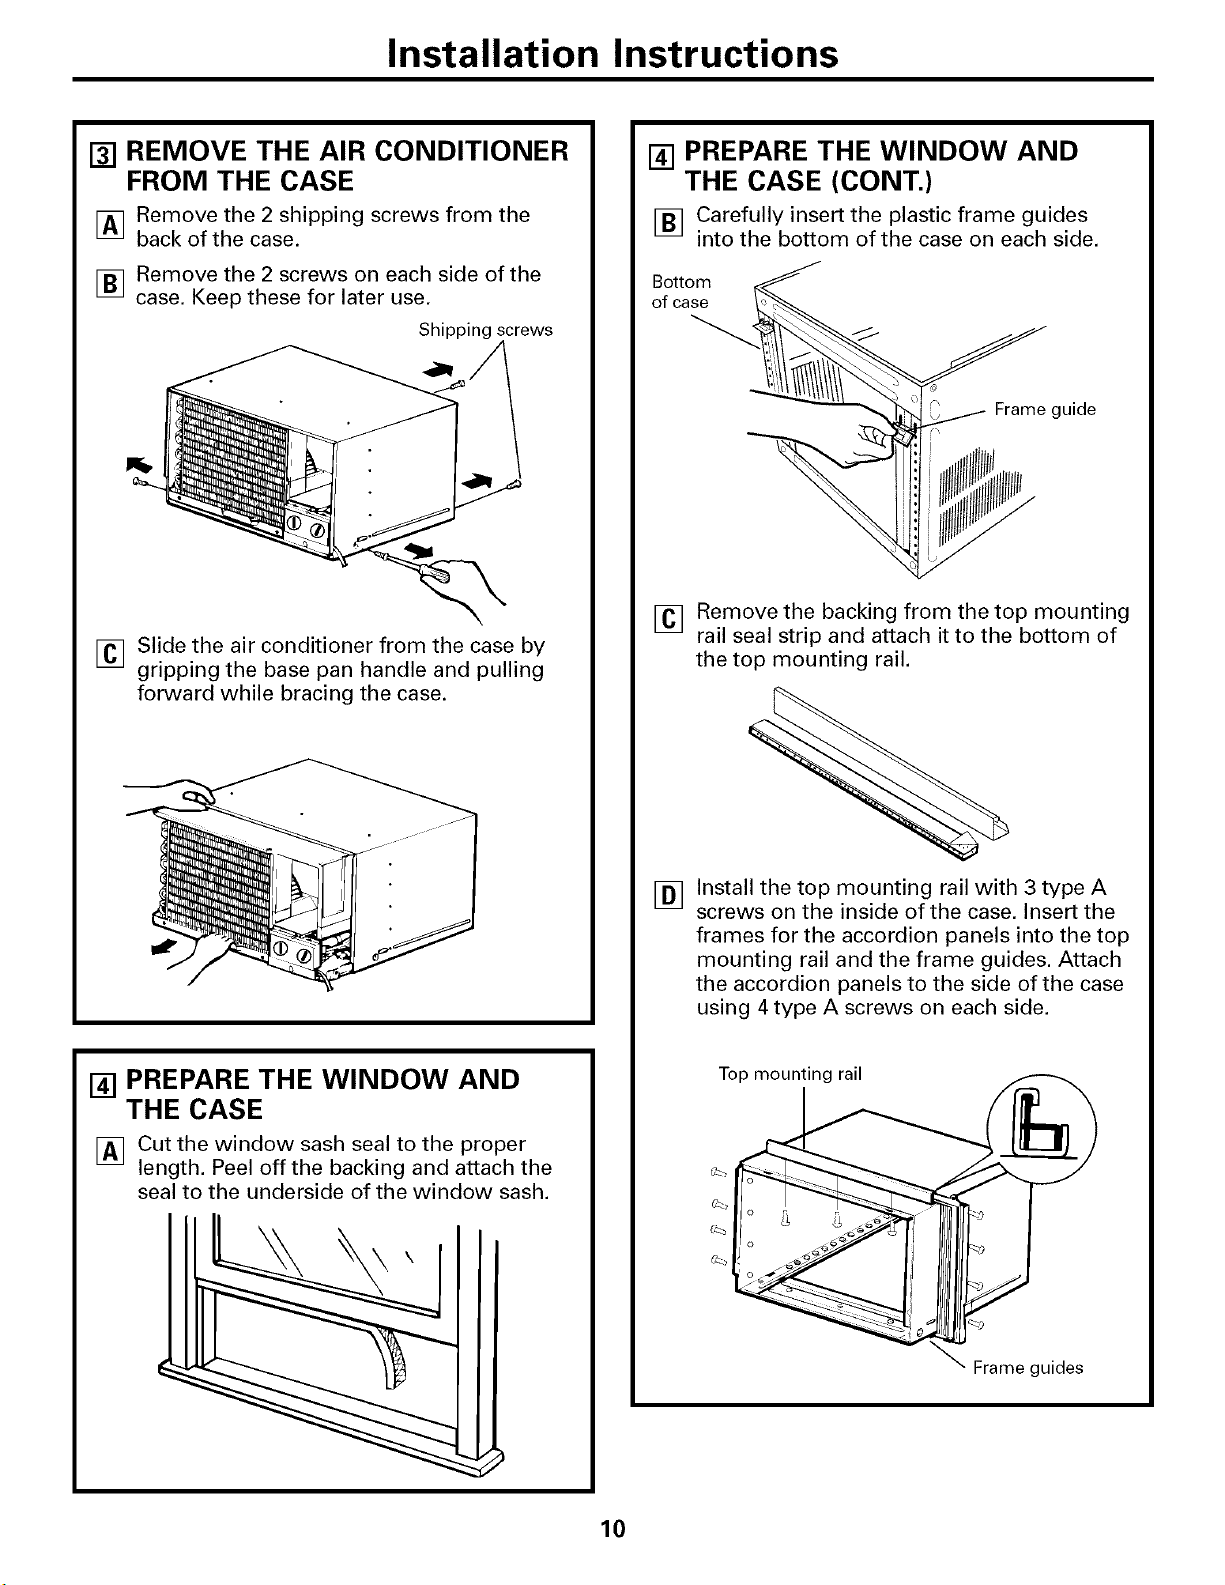
[] REMOVE THE AIR CONDITIONER
FROM THE CASE
IAq Remove the 2 shipping screws from the
back of the case.
F_ Remove the 2 screws on each side of the
case. Keep these for later use.
Shipping screws
[] Slide the air conditioner from the case by
gripping the base pan handle and pulling
forward while bracing the case.
[] PREPARE THE WINDOW AND
THE CASE
[] Cut the window sash seal to the proper
length. Peel off the backing and attach the
seal to the underside of the window sash.
[] PREPARE THE WINDOW AND
THE CASE (CONT.)
[] Carefully insert the plastic frame guides
into the bottom of the case on each side.
Botto _
of case
f
_ Frame guide
[] Remove the backing from the top mounting
rail seal strip and attach it to the bottom of
the top mounting rail.
[]
Install the top mounting rail with 3 type A
screws on the inside of the case. Insert the
frames for the accordion panels into the top
mounting rail and the frame guides. Attach
the accordion panels to the side of the case
using 4 type A screws on each side.
Top mounting rail
Frame guides
10
Installation Instructions
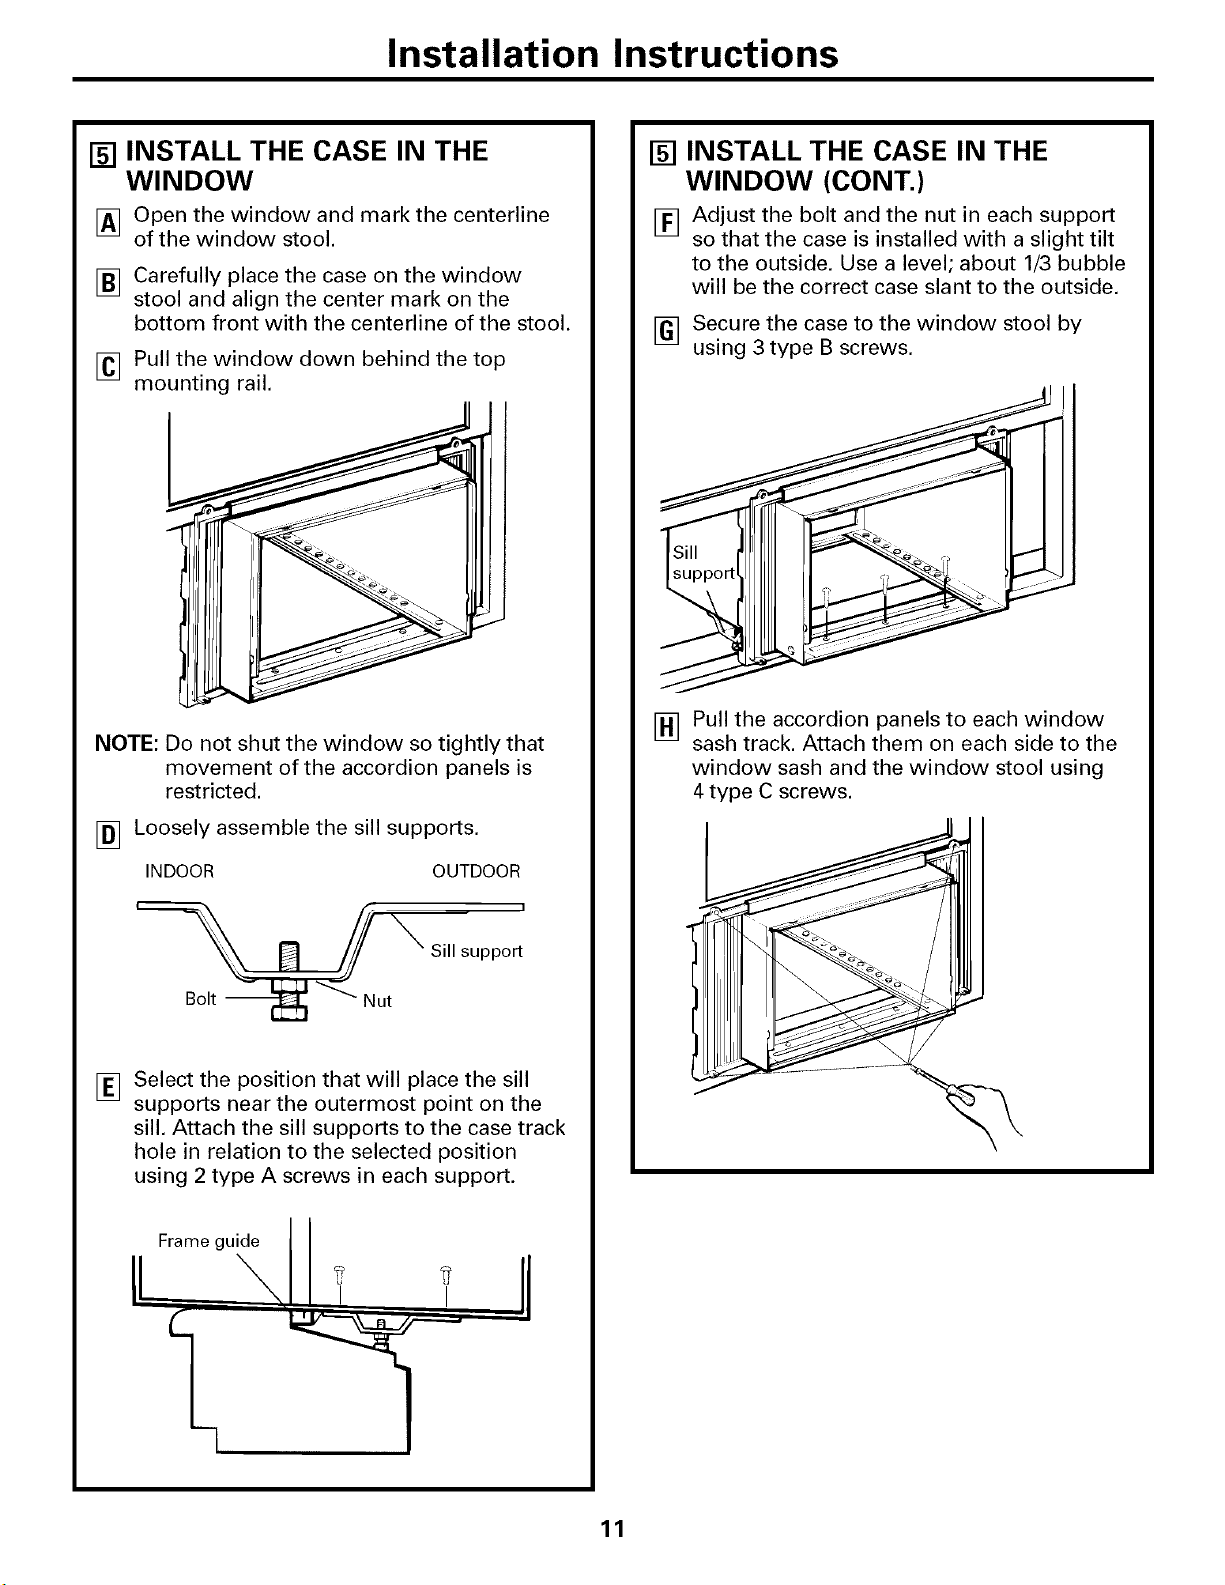
[] INSTALL THE CASE IN THE
WINDOW
[] Open the window and mark the centerline
of the window stool.
[] Carefully place the case on the window
stool and align the center mark on the
bottom front with the centerline of the stool.
[]
Pull the window down behind the top
mounting rail.
NOTE: Do not shut the window so tightly that
movement of the accordion panels is
restricted.
[] Loosely assemble the sill supports.
INDOOR OUTDOOR
i
Sill support
[]
Select the position that will place the sill
supports near the outermost point on the
sill. Attach the sill supports to the case track
hole in relation to the selected position
using 2 type A screws in each support.
Frame guide
I
I
[] INSTALL THE CASE IN THE
WINDOW (CONT.)
[] Adjust the bolt and the nut in each support
so that the case is installed with a slight tilt
to the outside. Use a level; about 1/3 bubble
will be the correct case slant to the outside.
[] Secure the case to the window stool by
using 3 type B screws.
[] Pull the accordion panels to each window
sash track. Attach them on each side to the
window sash and the window stool using
4 type C screws.
11
Installation Instructions
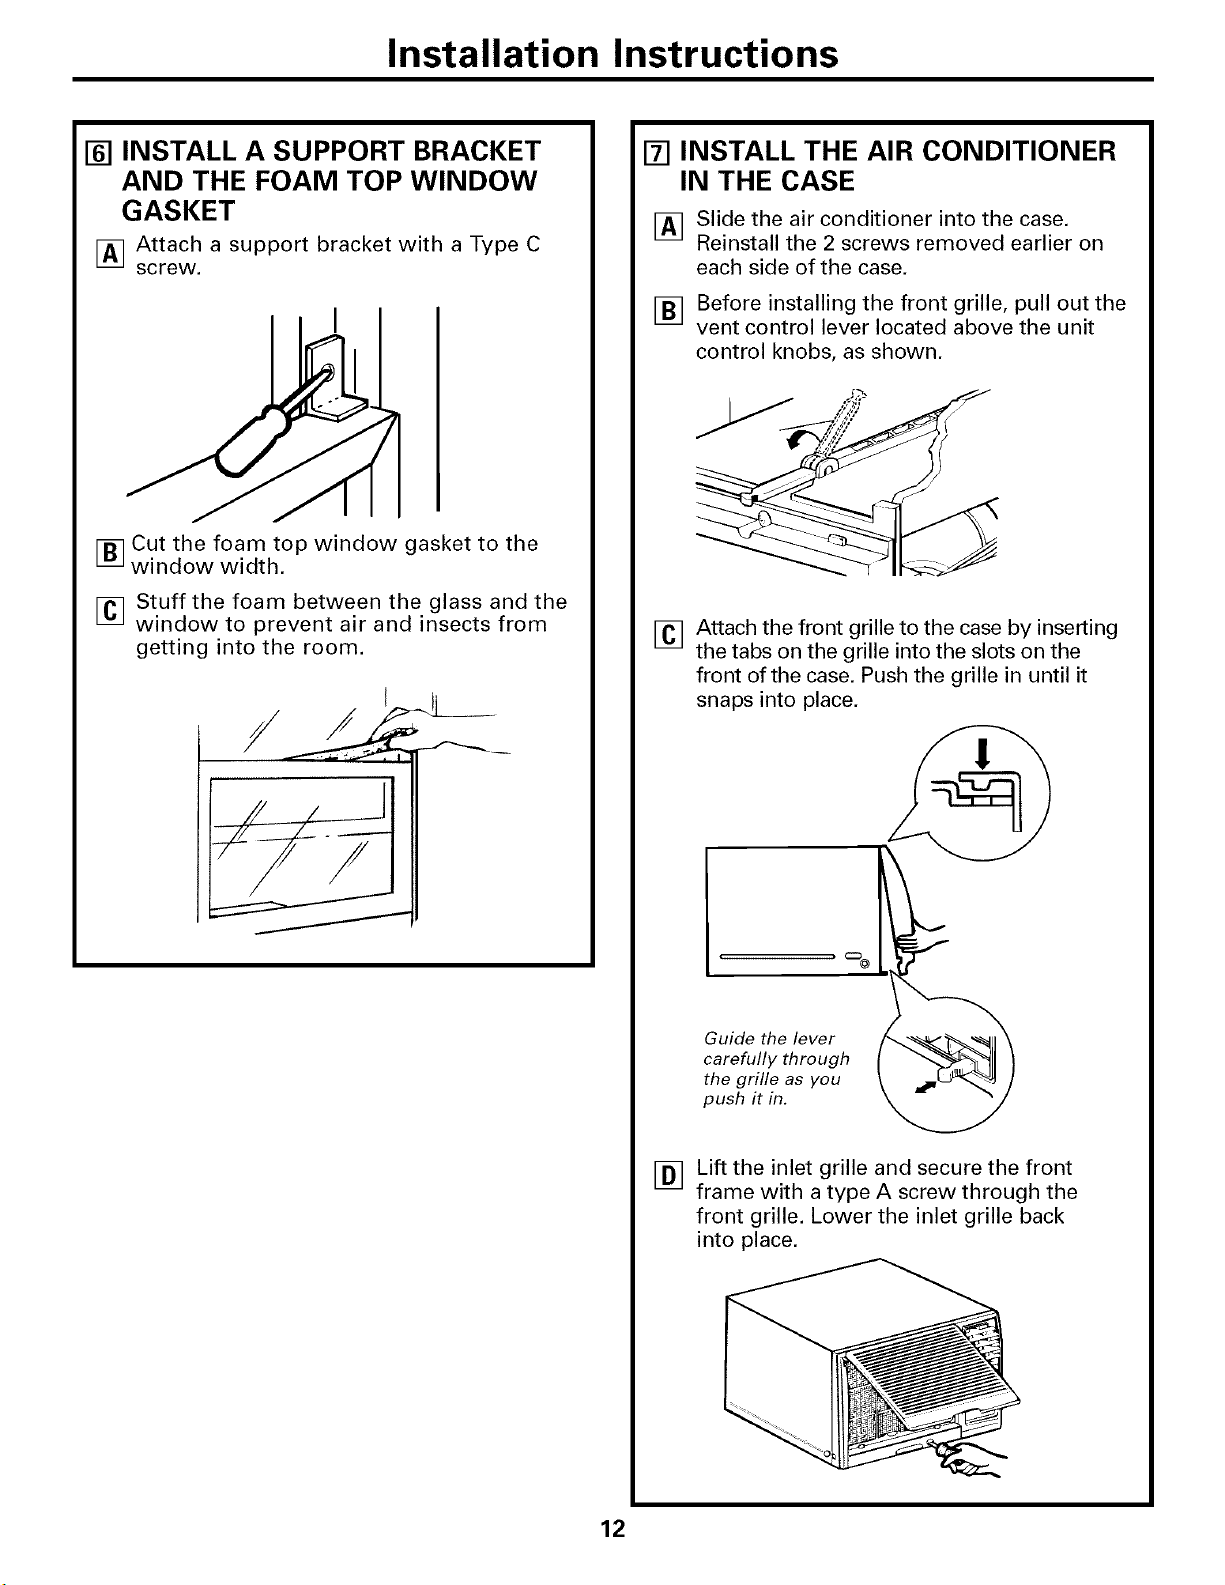
[] INSTALL A SUPPORT BRACKET
AND THE FOAM TOP WINDOW
GASKET
[] Attach a support bracket with a Type C
screw.
[] Cut the foam top window gasket to the
window width.
[] Stuff the foam between the glass and the
window to prevent air and insects from
getting into the room.
[] INSTALL THE AIR CONDITIONER
IN THE CASE
I_q Slide the air conditioner into the case.
Inl
Reinstall the 2 screws removed earlier on
each side of the case.
[] Before installing the front grille, pull out the
vent control lever located above the unit
control knobs, as shown.
[]
Attach the front grille to the case by inserting
the tabs on the grille into the slots on the
front of the case. Push the grille in until it
snaps into place.
[]
Guide the lever
carefully through
the grille as you
push it in.
Lift the inlet grille and secure the front
frame with a type A screw through the
front grille. Lower the inlet grille back
into place.
12
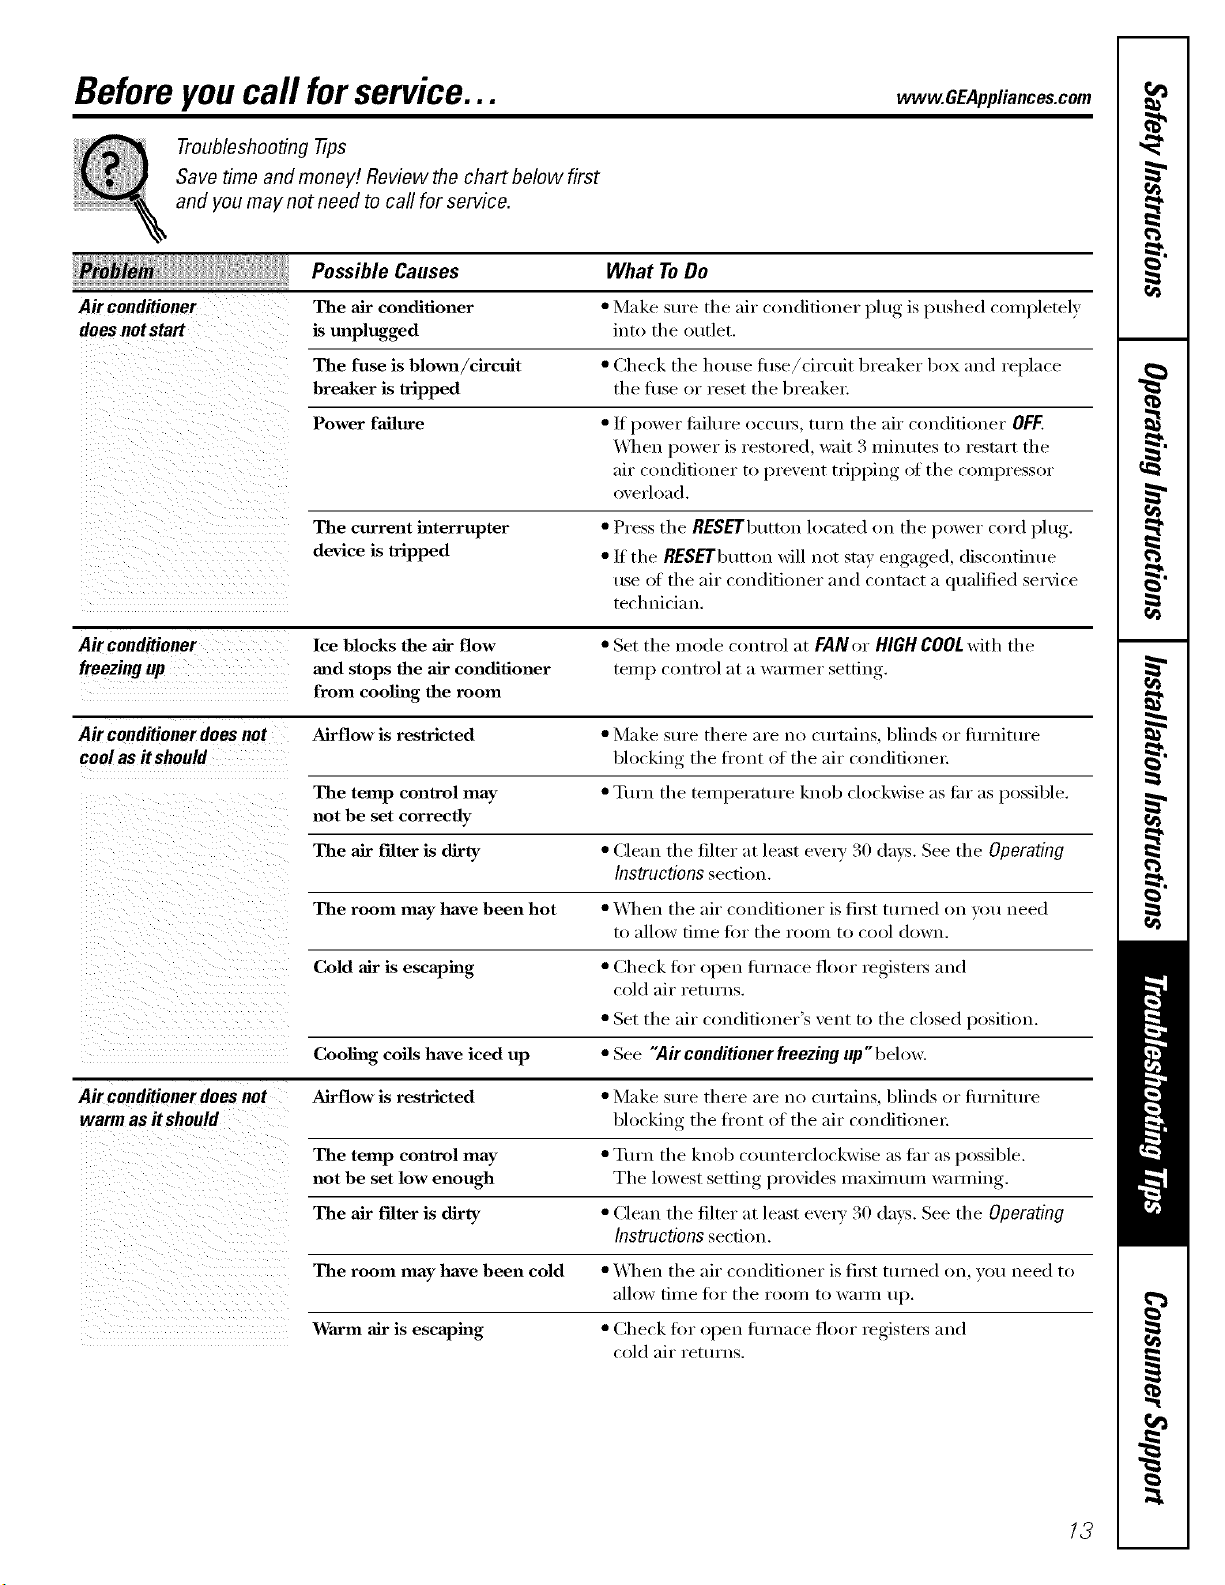
Beforeyoucall forservice...
Troubleshooting -tips
Save time and money! Review the chart below first
and you may not need to call for service.
vvww.GEAppliances.com
Possible Causes What To Do
Air conditioner The air conditioner • Make sure tile air conditioner plug is pushed completely
does not start is unplugged int() th e ()t/tlet.
The fuse is blowll/circuit • Check tile house fllse/ciI'cuit breaker box and i'eplace
breaker is tripped the fl/se or reset the breaker:
Power failure •/f power tifilm'e occm_, tm'n tile air conditioner OFF.
_lwn power is restored, wait 3 minutes to restnrt the
air condifi(mer t() l)revent tvil/l)ing ()t the c()mpress()r
()verload.
The current interrupter • Press the RESEFbutton located on the power cord plug.
device is tripped • If the RESEFbutton will not stnv enga,_ed discontinue
use ot the air conditioner and contnct a qualified service
technician.
Air conditioner lee blocks the air flow • Set the m ode c(mtrol at FAN or HIGHCOOLwith the
freezing up and stops the air conditioner temI) control at a wmmer setting
from cooling the room
Air conditioner does not Airflow is restricted • Make sm'e there are no curtnins, blinds or flu'nitm'e
comas itshould blocking the fl'ont of the air con(lifione_:
The temp control may • Turn the temperature knob clockwise as thr as l)ossible.
not be set correctly
The air Filter is dirty • (]lean the filter :at least e\'e_a' 30 days. See tile Operating
Instructions section.
The room may have been hot • _]wn flw air conditioner is fi_st turned on you need
to allow time fin" the room to cool down.
Cold air is escaping • Check fi)r oi/en flu'hate floor registers and
cold air returns.
• Set the air c(mdifi(>ner's vent t(> the closed position.
Cooling coils have iced up • See "Air conditioner freezing up" beh)w.
Air conditioner does not Airflow is restricted • Make sm'e there are no curtnins, blinds or fl/rnitm'e
warm as itshould blocking the fl'ont of the air conditione_:
The temp control may • Tt,rn the knob counterclockwise as flu" as I/ossible.
not be set low enough The h)west setting ln'ovides maximmn wamfing.
The air filter is dirty • (_lean the filter :It least e\'eYv 30 days. See tile Operating
Instructions section.
The room may have been cold • _]wn the air conditioner is ti_st turned on, you need to
allow till_e _'or the 1"oo1// to W;II]II up.
Warm air is escaping • (_heck fi)r open fl/rnace floor registels and
c()ld air returns.
/3
Beforeyoucall forservice...
Troubleshooting -tips
Waterdripsoutside
Possible Causes
F_cessively hot and
hmnid weather
Outside temperature has
dropped below 58°F
What ToDo
• This is noHnal when the control is set for cooling.
• This is nomml when the control is set fi_r heating.
The di'ain wflve has opened up to release water fl'Oln
the base pail This i_revents _z_ter fi'om fl'eezing in the
base pan and interibrii_g with the outdoor tim.
Waterdrips indoors The air conditioner is not • For l)roper water disl)OS_d, make sure the air conditioner
tilted to the outside slm_ts slightly fl'om the cnse ti'ont to the rein:
Water collects iu Moisture is removed from • This is nom_d for _lshort period in m'eas with
base pan indoor air and drains into little h umidit}'; n(mlial fi)r n l(mger l)eri()d in \'el 3'
rear of a cabinet where a fan humid m'ens.
blows it against the outdoor
condenser coil
/4
www.GEAppliances.com
Normal Operating Sounds
Y}m may hear a pinging noise caused by water
being picked up and thrown against the
condenser on rainy (la}:s or when the humidity
is high. This design tbatm'e hell)s remove
moistm'e and improve eflidencv.
You may hear the them_ostat click when the
COlIll)I'essoI"cycles on and ()t_
Water will collect in the base pan dm'Jng high
humidity or on rainy days. The water may
ove_-flow and dil I) from the outdoor side ot
the tmit.
The tan may rtm even when the compressor
does not.
lg
m
_ Notes_
€_
r_
m
m
Q_
€_
1C
GE Service Protection Plus 'M
GE, a name recognized worldwide for quality' and dependability, oflers y'ou
Service Protection Plus"--comprehensive protection on all y'our appliances--
No Matter What Brand!
Benefits Include:
• Backed by GE
• All brands covered
• Unlimited service calls
• All parts and labor costs included
• No out-of-pocket expenses
• No bidden deductibles
• One 800 number to call
We71CoverAnyAppliance.
Anywhere. Anytime.*
You will be coxnpletely satisfied with our service i)x'otection or )ou ma) request your inone) back
on the reuaailaing "_alue of your contract. No questions asked. It's that silnple.
Protect your refl'igeratoi; dishwashei; washer and dryei; range, TV, VCR and nmch more--aaay brand!
Plus there's no extra charge fi)r eu_ergency service and low molKhly fii_ai_cing is awfilable. Even icelnaker
coverage and tood spoilage protection is offered. You can rest easy; knowing that all your wduable
household products are protected against expensive repairs.
Place your confidence in (;E and call t,s in the U.S. toll-free at _(IU.OZO.ZZZ_
for UlOi'e ilatorlnatiola.
"*AllImmds cmered, up to 20 )¢ms old. in the contin¢ ntal [.S.
Please place in envelope and mail to:
General Electric Company
Warranty Registration Department
EO. Box 32150
Louisville, KY 40232-2150
17
Consumer Product Ownership Registration
Dear Customer:
Thank you for purchasing our product and thank you for placing your confidence in us.
We are proud to haxe you as a C/lStonler!
Follow these three steps to protect your new appliance investment:
Complete mid mail
your Consumer
Product Ownership
Registration today.
ttave the l),:ac,: ot
mind of knowing we
Call COlltklCI VOII ill
the unlikelx (v(nt of a
sai_qv modificalion.
LMtel- mailing tile
registration below,
store this (locIImellI
in a sati,, place. It
contains infi_rmation
you will need should
you require selMce.
Our serxice number is
800.(;E.CARES
(800.432.27!:,7).
Read your Owner's
Manual carefully.
It will help you
Ol)(_l'_lt(' }'O111" ll("d,"
applian(e properly.
Model Number Serial Number
I I I
Important: If you did not get a registration card with your
product, detach and return the form below to
ensure that your product is registered, or register
online at www.GEAppliances.com.
(_lll here
Consumer Product Ownership Registration
Model Number Serial Number
I I
Mr. Ms. M_s. Mi_s i
Fil"_l I I Lasll
Nanl( I I I I I I I I I Nanle I I I I I I I I I I I I
Streel I
A&hx ss I I I I I I I I I I I I I I I I I I I I I I I I
Apt#I , , , , , , , I E-nlailm(l(lress:{
Zip
1)a_ePlaced t)ll()ll(!
Month I I
GEAppliances
GEConsumer & Itldustrial
Louisville, Kentucky
www, GEAppliances, aom
* Please provide your e-mail address to receive, via e-mail, discounts, special ottk,p, and other important
communications trolll (_E Appliances (GEA).
Check here if you do not want to receive commtmications ti-om GEA's carefidly selected partners.
FAII.I 5RE T() C()MPI.ETE AND RE'F[ RN Tt tIS CARD DOES NOT DIMINISII Y( )l 5R
x,_L\RRAN'IY RIGIH'S.
For intormation about GEA's prixacy and data usage poliQ, go to _avw.GEAppliances.com and click
on 'Prixacv Policy" or call 800.626.2224.
13
Air ConditionerWarranty.
Aft warranty service provided by our Factory Service Centers,
or an authorized Customer Care®technician. Toschedule service,
on-line, 24 hours a day, visit us at GEAppliances.com, or carl
800.GE.CARES (800.432.2737).
Staple your receipt here.
Proofof the original purchase
date is needed to obtain service
under the warrant_
Fromthedateof the
origina!purchase
Fromthedateof the
originalpurchase
We Will Replace:
Anypartof the air conditioner which thils due to a defect in materials or workmanship,
During this full one-year warranty, we will also provide, free of charge, all lab(n" and in-home
serxice to replace the (lefecti',e part,
Any part ofthe sealed refrigerating system (the comi)ressoi; condensei; evaporator and
all connecting tubing) which fifils due to a defect in materials or workmanship, During this
four-year additional warranty, we will also provide, free of charge, all labor and in-home service
to replace the defecti\'e part,
Service trips to your home to teach you how to
use the product.
hnproper h_staJlation, delivery or maintenance. If you
have ml installation problem, or if the air conditioner
is of improper cooling capacity for the intended use,
contact your dealer or installer. You axe responsible
for providing adequate electrical cmmecthag facilities.
Failure of the product resulting from modifications to
the product or due to mlreasonable use including failure
to provide reasonable m_d necessary maJntenm_ce.
In commerciaJ locations labor necessary to move the
unit to a location where it is accessible for service
by m_ individual technician.
Replacement of house fuses or resetting of circuit
breakers.
Failure due to corrosion on models not corrosion-
protected.
Dmnage to the product caused by hnproper power supply
voltage, accident, fire, floods or acts of God.
Incidental or consequentiaJ dmnage caused by possible
defects with this air conditioner.
Dmnage caused after delivery.
This warranty is extended to the original purchaser and any succeeding owner for products purchased for home
use within the USA. In Alaska, the warranty excludes the cost of shipping or service calls to your home.
Some states do not aflow the exclusion or limitation of incidental or consequential damages. This warranty gives
you specific legal rights, and you may also have other rights which vary from state to state. Toknow what your
legal rights are, consult your local or state consumer affairs office or your state's Attorney General
Warrantor: General Electric Company. Louisville, KY 40225
19
ConsumerSupport.
q
"I GEAppliancesWebsite www.GEAppliances.com
Haxe a question or need assist;race with your appliance? Try the GE Al)pliances _._ebsite 24 hotu_ a day,
any da)of the year'. For greater comenience and faster service, )ou can now download Owner s Manuals,
j order parts, catalogs, or e_en schedule serxice on-line. You can also "_sk Our Team of Experts ....
} O/lI" questions, and so I/It/el/i/loi'e...
ScheduleService
www.GEAppliances.com
Expert (;E repair set_,ice is onl) one step awa) fl'om your cleat; Get on-line and schedule your service at
your, comenience 24 hou_ am dm of the '_ear! Or call 800.GE.CARES (8(t(I.432.2737) during n(mnal
business hom_.
RealLifeDesignStudio www.GEAppliances.com
GE SUl_ports tile Universal Design concel_t--products, services and environments that can be used b)'
people _ff all ages, sizes and capabilities. We recognize tile need to design for a wide range _ffphysical and
ment;d abilities and impaim_ents. For details of GE's Universal Design api)lications, including kitchen
design ideas fin" people with disabilities, check out o/ix"_.Vebsite today. For tile hearing impaired, please call
800.TDD.GEAC (800.833.4322).
Extended Warranties www.GEAppliances.com
Purchase a GE extended warrant_ and learn about special discounts that are a_ailable while _our, warrant_
, 00 ....is still in effect. You can purchase it on-line anytime, or call 8 .626.2224 during nomml business l/otu_.
(;E Consumer Home Serxices will still be there after )our warrant}, expires.
I "I
J
PartsandAccessories www.GEAppliances.com
Individuals qualified to se_'ice their own appliances can have parts or accessories sent directly to their
homes (VISA, MasterCard and Discover cards are accepted). Order on-line today, 24 hou_ eve_' day or
by phone at 800.626.2002 during natural business hou_.
Instructions contained in thN manual cover procedures tobe performed by any user. Other servicing generally
should be referred to qualified service personnel. Cautionmust be exercised, since improper servicing may cause
unsafe operation.
ContactUs www.GEAppliances.com
If'you are not satisfied with tile service you receive from GE, contact us on our _.Vebsite with all tile details
including your phone numbe_; or write to: General Manage_; Customer Relations
GE Appliances, Appliance Park
i,ouisville, KY 40225
l RegisterYourAppliance www.GEAppliances.com
Register your new applimace on-Ibm---at your convenience! Timely product registration will allow for
' enhanced communication and prompt service under tile terms of )our warranty, should tile need arise.
You may also mail in tile pre-p_inted registration card included in tile packing material.
Printed in Korea

