GEAppliances.com
H-,
W(I,)
6.
2
a
-0
$
-0
om
m
Safety Instructions ............................ 2-5
Operating Instructions
Kitchen Timer .......................................... 21
Oven ............................................... 14-35
Adjust Oven Thermostat .............................. 22
Baking or Roasting .................................... 17
Broiling, Broiling Guide ................................ 18
Controls ........................................... 14, 15
Convection Oven .................................. 2:3-26
Lower Oven Drawer ................................... :35
Preheating ............................................ 17
Probe ................................................. 20
Sabbath Feature......................................:3:3
Self-Cleaning......................................29,:30
SlowCook,Warming and ProofingFeatures...........27,28
SpecialFeatures...................................:31,:32
Timed Bakingand Roasting...........................19
Warming Drawer .....................................:34
SurfaceUnits........................................6-1:3
Cookware ..............................................7
Griddle............................................12,1:3
Knob-ControlledModels ...........................i0,ii
Touch Pad-ControlledModels ........................8,9
Care and Cleaning
Control Knobs ......................................... :36
Control Panel .......................................... :B6
Glass Cooktop ..................................... 42, 43
Lift-Off Oven Door ................................. 37, 38
Light ............................................... 40, 41
Oven Floor ............................................. 39
Oven Heating Elements ................................ 41
Racks .................................................. :38
RemovableWarming Drawer/Lower Oven Drawer Pan ..... :39
StorageDrawer ........................................:39
Surfaces...............................................:36
Vent ................................................:37,:39
Troubleshooting Tips ......................... 44-48
Accessories ......................................... so
Consumer Support
Consumer Support .................................... 52
Warrantg..............................................51
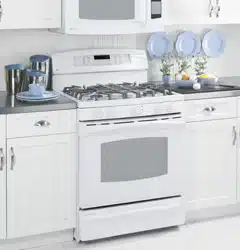
Quick Set V,
Quick Set VI and
Next Step Control
In Canada:
www.GEAppliances.ca
Write the model and serial
numbers here:
Model #
Serial #
You can find them on a label
behind the drawer or behind the
lower oven door on the front of
the range frame.
@
Printed on
Recgcled Paper
Printed in the United States 49-80602 08-09 JR

IMPORTANT SAFETY INFORMATION.
READ ALL INSTRUCTIONS BEFORE USING.
I-AWARNING I
Read oll safety instructions before using the product. Failure to follow these instructions may result in fire, electric
shock, serious injury or death.
ANTI-TIP DEVICE
• All ranges can tip.
• BURNS or other SERIOUS
INJURIES can result.
• INSTALLand CHECKthe
ANTI-TIP bracket following
the instructions supplied
with the bracket.
To reduce the risk of tipping the range, the range must be secured
bg o properlg installed anti-tip bracket. Seeinstallation instructions
shipped with the bracket for complete details before attempting
to install
For Freestanding Ranges:
To check if the bracket is installedand engagedproperly, remove
the storage drawer or kick panel and look underneath the range
to see that the leveling leg is engaged in the bracket. Onmodels
without o storage drawer or kick panel, carefully tip the range
forward. Thebracket should stop the range within 4 inches.If it
does not, the bracket must be reinstalled.If the range is pulled
from the wall for any reason,always repeat this procedure to
verify the range is properly secured by the anti-tip bracket.
Nevercompletely remove the levelinglegs or the range will not
be secured to the anti-tip device properly.
ForSlide-In Ranges:
To check if the bracket is installed and engaged properlg, remove
the storage drawer or kick panel and look underneath the range to
see that the leveling leg is engaged in the bracket.
For Drop-In Ranges:
To check if the bracket is installed and engaged properlg, lower
the oven door and gently apply medium force at the handle end
until movement of the range is detected. Continue pressing until
the anti-tip bracket is engaged and movement stops. A small
amount of movement is acceptable at the back of the range top,
but it should be stable and not tip once the anti-tip bracket is
engaged. If it does not, the bracket must be reinstalled.
If you did not receive on anti-tip bracket with your purchase,
call 1.800.626.8774to receive one at no cost (inCanada, call
1.800.561.3544).For installation instructions of the bracket,
visit GEApplionces.com(inCanada, GEApplionces.co).
WARNING I IMPORTANTSAFETYNOTICE
TheCaliforniaSafe Drinking Water and ToxicEnforcementAct requiresthe Governor of Californiato publish o list of
substancesknown to the state to causecancer,birth defectsor other reproductive harm, and requiresbusinessesto worn
customers of potential exposure to suchsubstances.
Thefiberglass insulation in self-clean ovensgivesoff a very small amount of carbon monoxide during the cleaning cucle.
Exposurecon be minimized bg venting with on open window or using o ventilation fan or hood.
2

GEAppliances.com
WARNING I GENERALSAFETYINSTRUCTIONS
, Usethis appliancefor its intendedpurposeas describedinthis
Owner'sManual.
, Besure your appliance isproperly installedandgrounded
by a qualified installerin accordancewith the provided
installationinstructions.
, Do notattempttorepairor replaceany partofyour range
unlessitisspecificallyrecommended inthismanual.All
otherservicingshouldbe transferredtoa qualified
technician.
, Beforeperforming any service,unplugthe rangeor
disconnectthe power supply at the householddistribution
panelby removingthe fuseor switchingoff the circuit
breaker.
, Do not leavechildrenalone-children should not be left
alone or unattendedin an areawhere an applianceis in use.
Theyshould neverbe allowedto climb,sit or stand on any
part of the appliance.
CAUTION:Do not store items of interestto children
above a range or on the backguard of a range-children
climbingon the rangeto reach items could be seriously
injured.
Useonly dry pot holders-moist or damp pot holderson
hot surfacesmay result in burnsfrom steam. Do not let pot
holderstouch hot surface units or heating elements.Do not
usea towel or other bulky cloth in placeof pot holders.
Neveruse your appliancefor warming or heating the room.
, Do not touch the surface units,the heating elementsor
the interiorsurface of the oven.Thesesurfaces may be
hot enoughto burneven though they aredark incolor.
Duringand after use,do not touch, or let clothing or other
flammable materialscontact the surface units,areas nearby
the surface unitsor any interior area of the oven;allow
sufficienttime for coolingfirst. Othersurfacesof the
appliancemay becomehot enoughto causeburns.
Potentiallyhot surfacesincludethe cooktop,areasfacing
the cooktop,ovenvent opening,surfacesnear the opening
and crevicesaround the oven door.
Do not heat unopenedfood containers.Pressurecould build
up and the container could burst,causingan injury.
Donot usealuminum foil to line the drip pans or anywhere
inthe oven,exceptas describedin this manual.Misusecould
resultin damage to the range and shock or fire hazard.
Avoidscratchingor impacting glass doors,cooktops or
control panels.Doingso may lead to glassbreakage.Do not
cook on a product with brokenglass.Shock,fire or cuts may
occur.
, Cookmeat and poultry thoroughly-meat to at least an
internaltemperature of 160°Fand poultry to at least an
internaltemperature of 180°F.Cookingto these
temperaturesusuallyprotectsagainst foodborne illness.
I-& WARNING I KEEP FLAMMABLE MATERIALSAWAY FROM
THE RANGE.
Do not store or useflammable materials in an ovenor near
the cooktop,includingpaper,plastic,pot holders,linens,wall
coverings,curtains, drapesand gasolineor other flammable
vaporsand liquids.
, Neverwear loose-fittingor hanging garments while using
the appliance.Thesegarments may ignite if they contact hot
surfaces,causingsevereburns.
Donot let cookinggreaseor other flammable materials
accumulate in or near the range.Greaseinthe ovenor on
the cooktop may ignite.
, Cleanventilatinghoods frequently.Greaseshould not be
allowed to accumulateon the hood or filter.
WARNING I IN THEEVENTOFA FIRE,TAKETHEFOLLOWING
STEPSTOPREVENTTHE FIREFROMSPREADING:
Do not usewater on greasefires.Neverpick up a flaming
pan.Turnthe controlsoff. Smothera flaming panon
a surface unit by covering the pan completelywith a
well-fitting lid,cookiesheet or flat tray. Usea multi-purpose
dry chemicalor foam-type fire extinguisher.
, If there is a fire inthe ovenduring baking,smother the fire by
closingthe oven doorand turning the oven off or by using a
multi-purposedry chemical or foam-type fire extinguisher.
, Ifthere isa fire in the ovenduring self-clean,turn the oven
off and wait for the fire to go out. Do not force the door
o_en. Introductionof freshair at self-cleantemperatures
may leadto a burst of flamefrom the oven.Failureto follow
thisinstructionmay result in severeburns.
3
IMPORTANT SAFETY INFORMATION.
READ ALL INSTRUCTIONS BEFORE USING.
I-&WARNING I COOKTOPSAFETYINSTRUCTIONS
Never leave the surface units unattended at
medium or high heat settings. Boilovers cause
smoking and greasy spillovers that may catch
on fire.
Never leave oil unattended while frying. If allowed
to heat beyond its smoking point, oil may ignite,
resulting in fire that may spread to surrounding
cabinets. Use a deep fat thermometer whenever
possible to monitor oil temperature.
To avoid oil spillover and fire, use a minimum
amount of oil when shallow pan-frying and avoid
cooking frozen foods with excessive amounts of ice.
Use proper pan size-select cookware having flat
bottoms large enough to cover the surface heating
element. The use of undersized cookware will
expose a portion of the surface unit to direct
contact and may result in ignition of clothing.
Proper relationship of cookware to surface unit
will also improve efficiency.
Only certain types of glass, glass/ceramic,
earthenware or other glazed containers are suitable
for cooktop service; others may break because of
the sudden change in temperature.
To minimize the possibility of burns, ignition of
flammable materials and spillage, the handle of a
container should be turned toward the center of the
range without extending over nearby surface units.
When preparing flaming foods under a hood, turn
the fan on.
WARNING I
(some models)
RADIANT COOKTOP SAFETY INSTRUCTIONS
Use care when touching the cooktop. The glass
surface of the cooktop will retain heat after the
controls have been turned off.
Do not cook on a broken cooktop. If glass cooktop
should break, cleaning solutions and spillovers may
penetrate the broken cooktop and create a risk of
electric shock. Contact o qualified technician
immediately.
Avoid scratching the glass cooktop. The cooktop
can be scratched with items such as knives, sharp
instruments, rings or other jewelry and rivets on
clothing.
Do not place or store items that can melt or catch
fire on the glass cooktop, even when it is not being
used. If the cooktop is inadvertently turned on, they
may ignite. Heat from the cooktop or oven vent
after it is turned off may cause them to ignite also.
Use CERAIVIABRYTE® ceramic Cooktop Cleaner and
CERAIVIABRYTE®Cleaning Pod to clean the cooktop.
Wait until the cooktop cools and the indicator light
goes out before cleaning. A wet sponge or cloth
on a hot surface con cause steam burns. Some
cleaners con produce noxious fumes if applied to
o hot surface. NOTE: Sugar spills ore on exception.
They should be scraped off while still hot using an
oven mitt and o scraper. See the Cleaning the gloss
cooktop section for detailed instructions.
Read and follow all instructions and warnings on
the cleaning cream label.
WARNING I
(some models)
COILCOOKTOPSAFETY'INSTRUCTIONS
Do not immerse or soak the removable surface
units. Do not put them in a dishwasher. Do not self-
clean the surface units in an oven. Doing so may
cause them to fail, presenting a burn or fire hazard.
To avoid the possibility of a burn or electric shock,
always be certain that the controls for oil surface
units are at the OFFposition and all coils are cool
before attempting to lift or remove a coil surface unit.
Be sure the drip pans are not covered and are in
place. Their absence during cooking could damage
range parts and wiring.
GEAppliances.com
WARNINGIOVENSAFETY INSTRUCTIONS
Stand awag from the range when opening the oven
door. Hot air or steam which escapes can cause
burns to hands, face and/or eyes.
Keep the oven vent unobstructed.
Keep the oven free from grease buildup. Grease
in the oven mag ignite.
Place oven racks in desired location while oven
is cool. If rack must be moved while oven is hot,
do not let pot holder contact hot heating element
in oven.
When using cooking or roasting bugs in the oven,
follow the manufacturer's directions.
Pull the oven rack to the stop-lock position when
loading and unloading food from the oven. This
helps prevent burns from touching hot surfaces
of the door and oven walls.
Do not leave items such as paper, cooking utensils
or food in the oven when not in use. Items stored in
an oven can ignite.
Do not use aluminum foil to line the oven bottom.
Foil mag trap or reflect heat, leading to a shock or
fire hazard.
WARNING I
(Some models)
SELF-CLEANING OVEN SAFETY INSTRUCTIONS
The self-cleaning feature operates the oven at temperatures high enough to burn away food soils in the
oven. Follow these instructions for safe operation.
i Beforeoperating the self-clean cgcle,remove pans,
shiny metal oven racks and other utensils from the
oven. Only gray porcelain-coated oven racks may
be left in the oven. Do not use self-cleanto clean
other parts, such as drip pans or bowls.
Before operating the self-clean cgcle, wipe grease
and food soils from the oven. Excessive amount of
grease mag ignite, leading to smoke damage to
gour home.
iiiiiiiiiiiii!
If the self-cleaning mode malfunctions, turn the
oven off and disconnect the power supplg. Have it
serviced bg a qualified technician.
Do not clean the door gasket. The door gasket is
essential for a good seal. Care should be taken not
to rub, damage or move the gasket.
Do not use oven cleaners. No commercial oven
cleaner or oven liner protective coating of ang kind
should be used in or around any part of the oven.
I.tl, WARNING I WARMING DRAWER/LOWER OVEN DRAWER
SAFETY INSTRUCTIONS Isomemode sl
The purpose of the warming drawer is to hold hot
cooked foods at serving temperature. Bacteria will
grow in food while it is below 140°F. Do not put cold
food in warming drawer. Do not heat food for more
than 2 hours. Failure to follow these instructions
mag result in foodborne illness.
Do not leave paper products, plastics, canned food
or combustible materials in the drawer. Theg mag
ignite.
Do not touch the heating element or the interior
surface of the drawer. These surfaces mag be hot
enough to cause burns.
iiiiiiiiiiiii!
iiiiiiiiiiiii!
Use care when opening the drawer. Open the
drawer a crack and let hot air or steam escape
before removing or replacing food. Hot air or
steam that escapes can cause burns to hands,
face and/or eges.
Do not use aluminum foil to line the warming
drawer. Foil is an excellent heat insulator and
will trap heat beneath it. This will upset the
performance of the drawer and potentiallg
cause a fire hazard.
5
Formodels with a glass coo/ op.
I,_ I FIRE HAZARD: Never leave the range unattended with the cooktop on medium
WARNING I highsettings./<eep flammable items away from the cooktop. Turn off all
controls when done cooking. Failure to follow these instructions can result in
fire, serious injury or death.
NOTE:Throughout this manual, features and appearance may vary from your model.
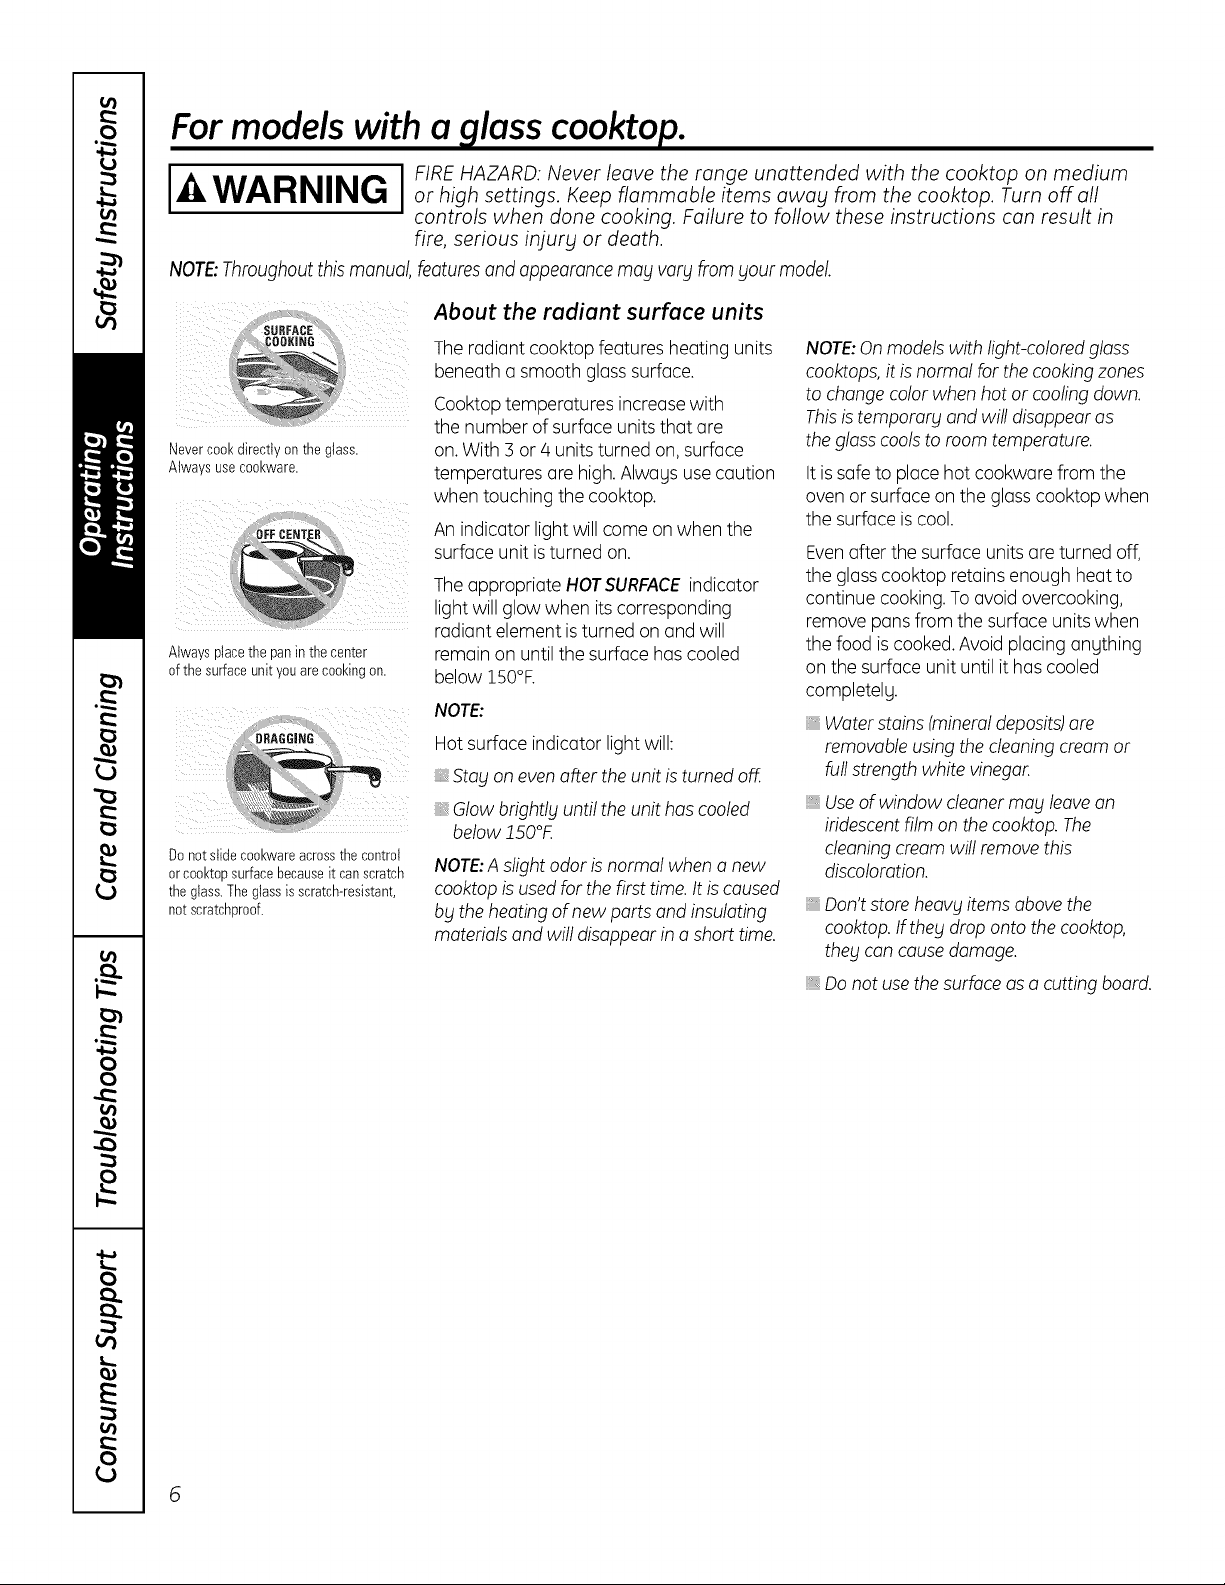
Nevercookdirectly on the glass.
Alwaysusecookware.
iii _,,,,,,,,,,,,,,,",,,,,,,,,,,,,,_::¸¸¸¸/¸¸5¸¸i
_i_i_i__i_q,giilii__i_ ii i_
Alwaysplacethe panin the center
of the surfaceunit youare cookingon.
Do notslide cookwareacrossthe control
orcooktopsurfacebecauseit canscratch
the glass.Theglassis scratch-resistant,
not scratchproof.
About the radiant surface units
The radiant cooktop features heating units
beneath a smooth glasssurface.
Cooktop temperatures increase with
the number of surface units that are
on. With 3 or/4 units turned on, surface
temperatures are high. Alwags use caution
when touching the cooktop.
An indicator light will come on when the
surface unit is turned on.
The appropriate HOTSURFACEindicator
light will glow when its corresponding
radiant element is turned on and will
remain on until the surface has cooled
below 150°F.
NOTE:
Hot surface indicator light will:
Stay on even after the unit is turned off.
_,Glow brightly until the unit has cooled
below 150°E
NOTE:A slight odor is normal when a new
cooktop is used for the first time. It is caused
b_lthe heating of new parts and insulating
materials and will disappear in a short time.
NOTE:On models with light-colored glass
cooktops, it is normal for the cookingzones
to change color when hot or cooling down.
Thisis temporary and will disappear as
the glasscools to room temperature.
It is safe to place hot cookware from the
oven or surface on the glass cooktop when
the surface is cool.
Evenafter the surface units are turned off,
the glasscooktop retains enough heat to
continue cooking. To avoid overcooking,
remove pans from the surface units when
the food is cooked. Avoid placing anything
on the surface unit until it has cooled
completelg.
Water stains (mineraldeposits)are
removable using the cleaning cream or
full strength white vinegar.
, Useof window cleaner ma_lleave on
iridescentfilm on the cooktop. The
cleaning cream will remove this
discoloration.
Don't store heav_litems above the
cooktop.If the_ldrop onto the cooktop,
they con cause damage.
_,Do not use the surface as a cutting board.
Selectingtypes of cookware
for glass coo/ op models.Ionnon nd t on
GEAppliances.com
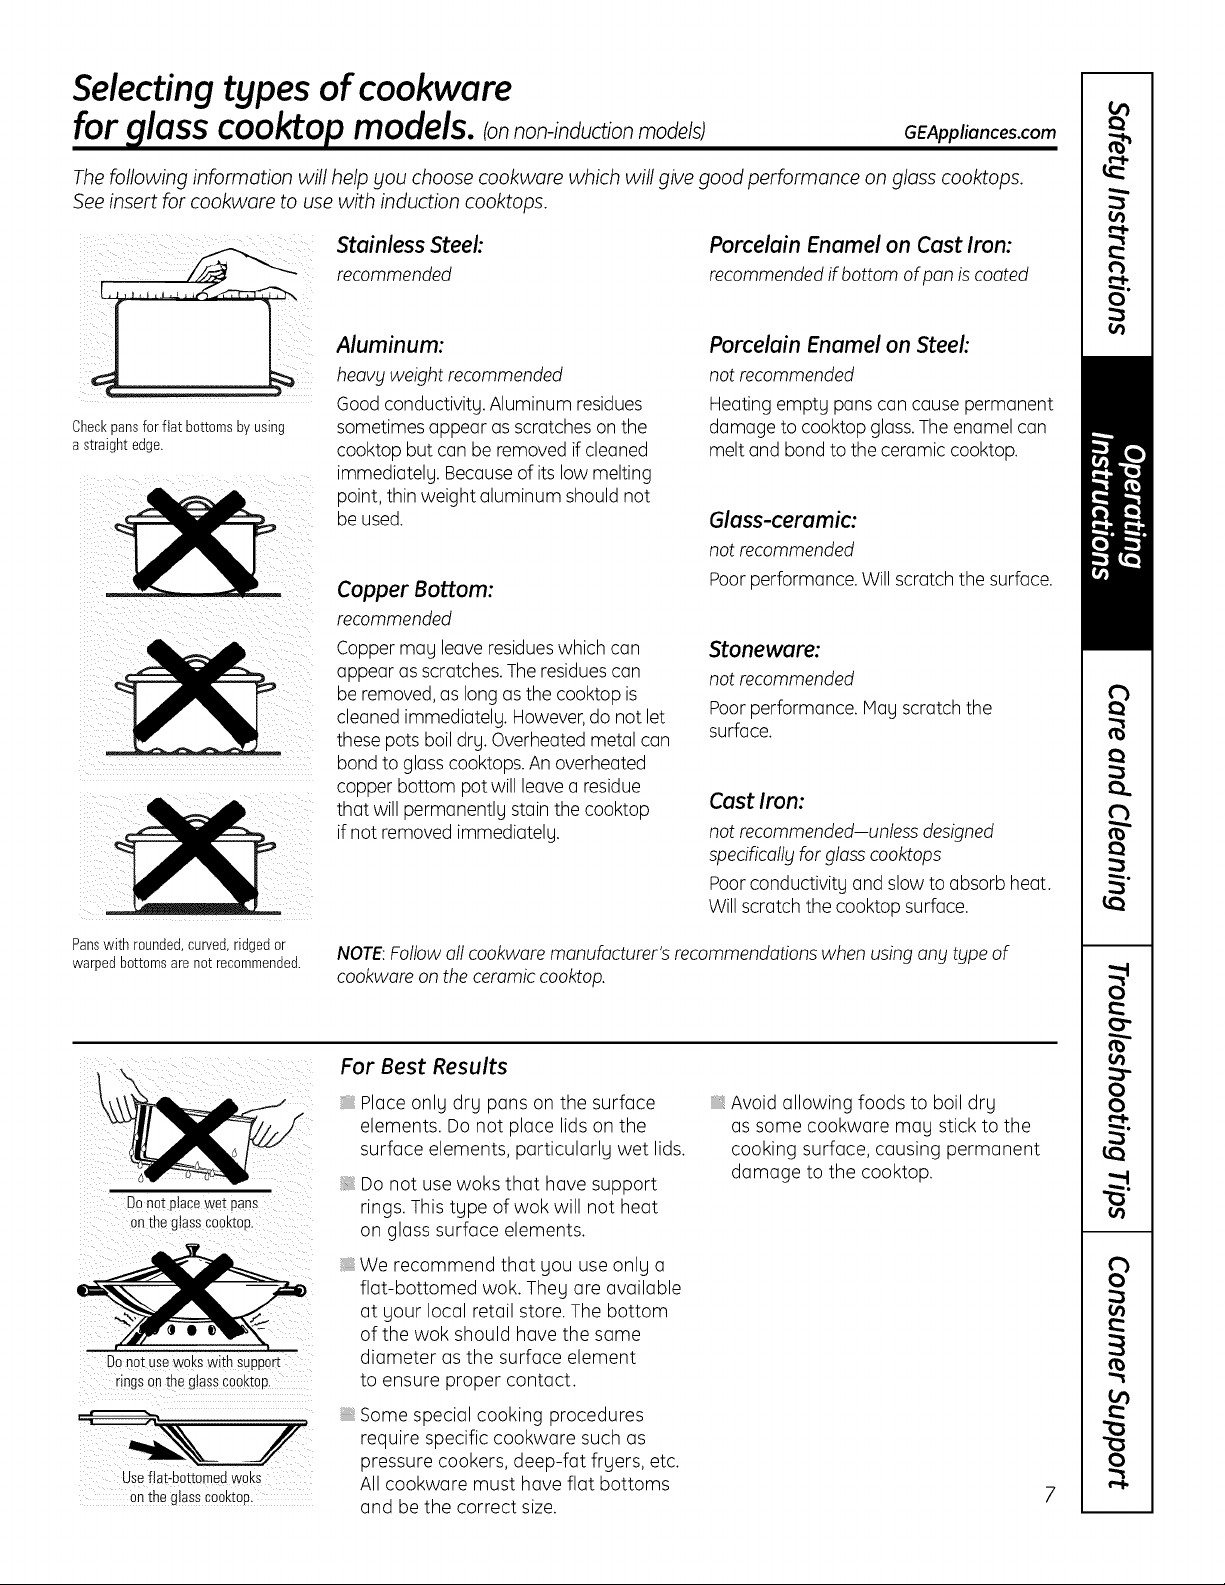
The following information will help you choose cookware which will give good performance on glass cooktops.
See insert for cookware to use with induction cooktops.
L(!! IIIIIII II I iiii
Checkpansfor fiat bottomsby using
a straight edge.
Panswith rounded,curved,ridgedor
warped bottoms are not recommended.
Stainless Steel:
recommended
Porcelain Enamel on Cast Iron:
recommended if bottom of pan is coated
Aluminum:
heavy weight recommended
Good conductivity. Aluminum residues
sometimes appear as scratches on the
cooktop but can be removed if cleaned
immediately. Because of its low melting
point, thin weight aluminum should not
be used.
Copper Bottom:
recommended
Copper may leave residueswhich can
appear as scratches. The residues can
be removed, as long as the cooktop is
cleaned immediately. However,do not let
these pots boil dry. Overheated metal can
bond to glass cooktops. An overheated
copper bottom pot will leave a residue
that will permanently stain the cooktop
if not removed immediately.
Porcelain Enamel on Steek
not recommended
Heating empty pans can cause permanent
damage to cooktop glass. The enamel can
melt and bond to the ceramic cooktop.
Glass-ceramic:
not recommended
Poor performance. Willscratch the surface.
Stoneware:
not recommended
Poor performance, lay scratch the
surface.
Cast Iron:
not recommended-unless designed
spedfically for glass cooktops
Poor conductivity and slow to absorb heat.
Willscratch the cooktop surface.
NOTE:Followall cookware manufacturer's recommendations when using any type of
cookware on the ceramic cooktop.
DOnat place wet pans
on the glasscooktop
I
Do BatUsewoks with Support
ringsan the glasscooktap
Useflat-bottomed woks
onthe glass€ooktop
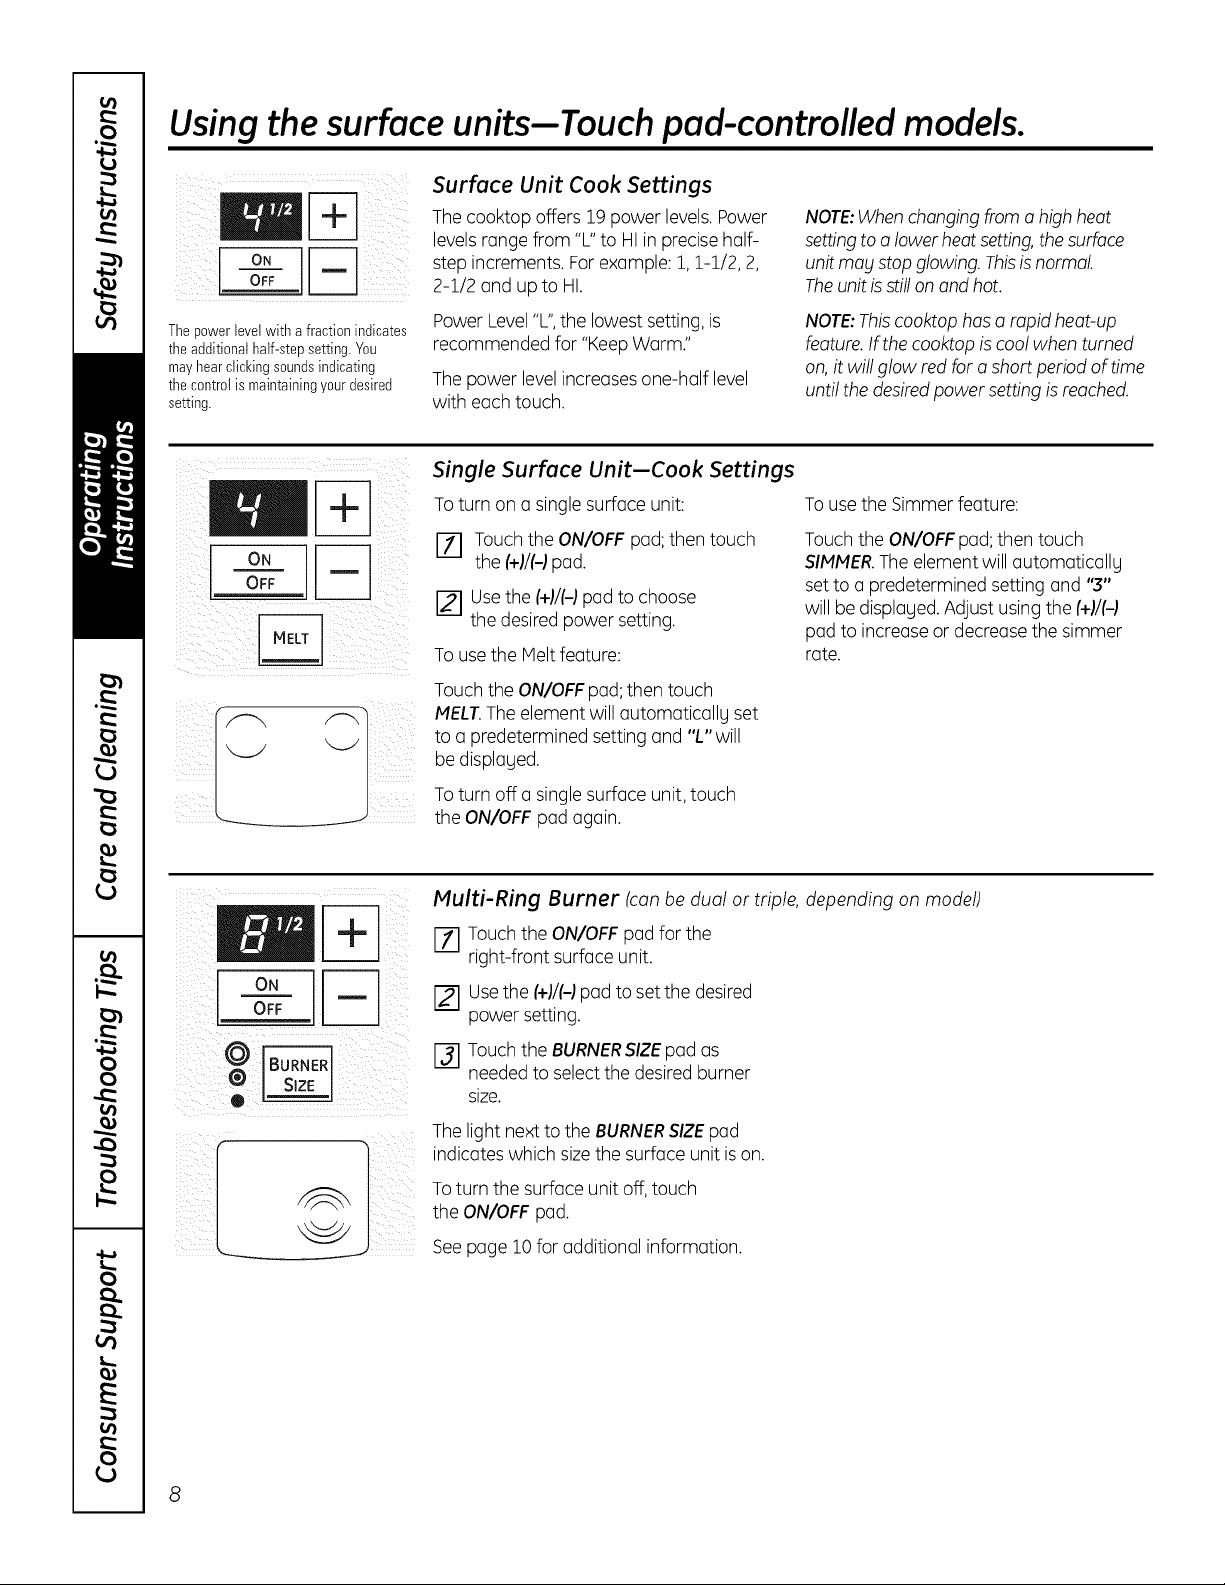
For Best Results
Place only dry pans on the surface
elements. Do not place lids on the
surface elements, particularly wet lids.
Do not use woks that have support
rings. This type of wok will not heat
on glass surface elements.
We recommend that you use only a
flat-bottomed wok. They are available
at your local retail store. The bottom
of the wok should have the same
diameter as the surface element
to ensure proper contact.
Some special cooking procedures
require specific cookware such as
pressure cookers, deep-fat fryers, etc.
All cookware must have flat bottoms
and be the correct size.
Avoid allowing foods to boil dry
as some cookware may stick to the
cooking surface, causing permanent
damage to the cooktop.
Using the surface units--Touch pad-controlled models.
The power levelwith a fraction indicates
the additional half-step setting.You
mayhearclickingsoundsindicating
the control is maintainingyourdesired
setting.
Surface Unit Cook Settings
The cooktop offers 19 power levels. Power
levelsrange from "L" to HI in precise half-
step increments. For example: 1, 1-1/2, 2,
2-1/2 and up to HI.
Power Level"L",the lowest setting, is
recommended for "Keep Warm."
The power levelincreases one-half level
with each touch.
NOTE:Whenchanging from a high heat
setting to a lower heat setting,the surface
unit may stop glowing. Thisis normal.
Theunit isstill on and hot.
NOTE:Thiscooktop has a rapid heat-up
feature. If the cooktop is cool when turned
on, it will glow red for a short period of time
until the desiredpower setting is reached.
Single Surface Unit-Cook Settings
To turn on a single surface unit:
FT] Touchthe ON/OFF pad; then touch
the (+)/(-) pad.
[] Usethe (+)/(-) pad to choose
the desired power setting.
To use the Helt feature:
Touch the ON/OFF pad; then touch
MELT.The element will automatically set
to a predetermined setting and "L" will
be displaued.
To turn off a single surface unit, touch
the ON/OFF pad again.
To use the Simmer feature:
Touchthe ON/OFFpad; then touch
SIMMER.The element will automatically
set to a predetermined setting and "3"
will be displayed. Adjust using the (+)/(-)
pad to increase or decrease the simmer
rate.
ON i
Multi-Ring Burner (can be dual or triple, depending on model)
E_] Touch the ON/OFF pad for the
right-front surface unit.
Usethe (+)/(-) pad to setthe desired
power setting.
F-_ Touch the BURNERSIZEpad as
needed to select the desired burner
size.
The light next to the BURNER.SIZEpad
indicates which sizethe surface unit is on.
Toturn the surface unit off, touch
the ON/OFF pad.
Seepage 10 for additional information.
GEAppliances.com
I WARNING
I OOD POISONHAZARD: Bacteria may grow in food at temperatures below 140°K
• Always start with hot food. Do not use warm settings to heat cold food.
• Do not warm food for more than 2 hours.
Failure to follow these instructions may result in foodbome illness.
0®0
©@
WARMING ZONE
II
SELECT
ON
OFF
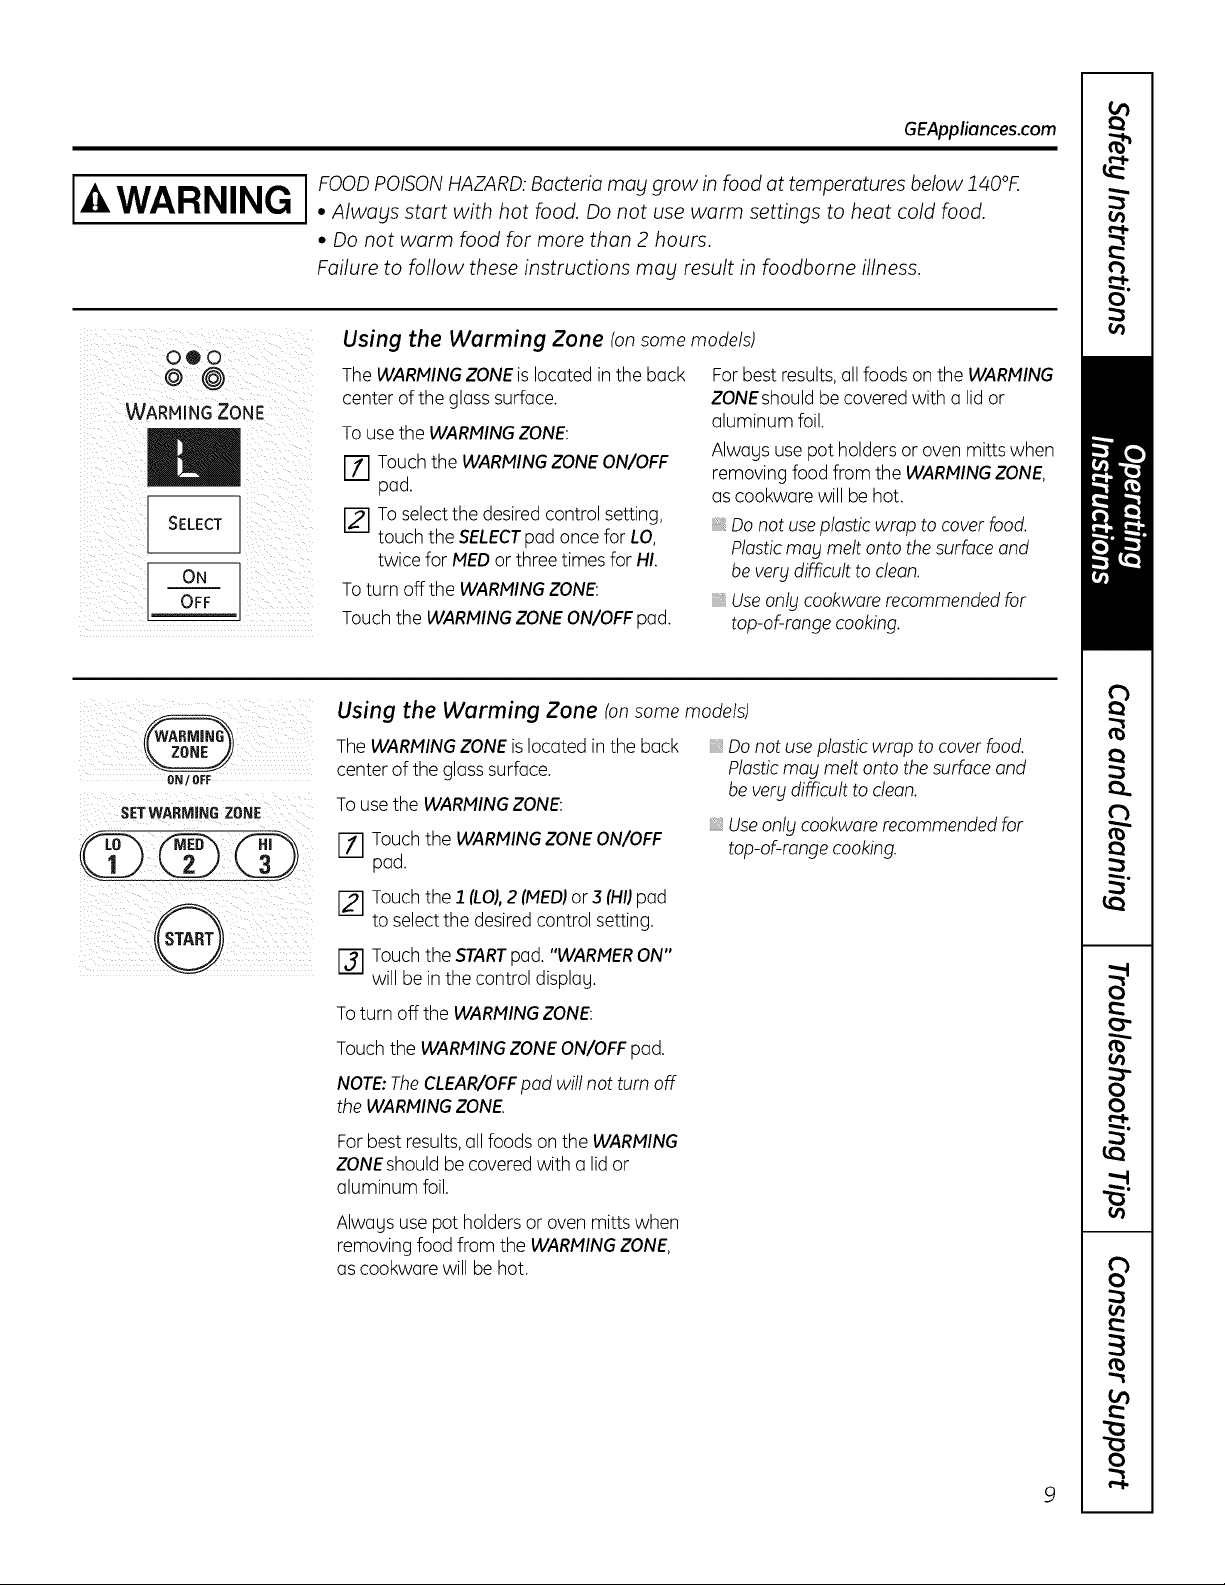
Using the Warming Zone (on some models)
The WARMINGZONEis located in the back
center of the gloss surface.
To use the WARMINGZONE:
Touch the WARMINGZONE ON/OFF
i, i
pad.
[] To select the desired control setting,
touch the SELECTpad once for LO,
twice for MEDor three times for HI.
To turn off the WARMINGZONE:
Touch the WARMINGZONE ON/OFF pad.
For best results, all foods on the WARMING
ZONEshould be covered with a lid or
aluminum foil.
Always use pot holders or oven mitts when
removing food from the WARMINGZONE,
as cookware will be hot.
Do not useplastic wrap to cover food.
Plasticmabl melt onto the surface and
be very difficult to clean.
Use only cookware recommended for
top-of-range cooking.
ON / OFF
SETWARMING ZONE
@
Using the Warming Zone (on some models)
The WARMINGZONEis located in the back
center of the glass surface.
To use the WARMINGZONE:
[] Touch the WARMINGZONE ON/OFF
pad.
[] Touch the 1 (LOI,2 (MED;or 3 (HI;pad
to select the desired control setting.
[] Touch the STARTpod. "WARMERON"
will be in the control displag.
Toturn off the WARMINGZONE:
Do not use plastic wrap to cover food.
Plastic mag melt onto the surface and
be verg difficult to clean.
Useonlg cookware recommended for
top-of-range cooking.
Touch the WARMING ZONE ON/OFF pad.
NOTE: The CLEAR/OFF pad will not turn off
the WARMING ZONE.
For best results,all foods on the WARMING
ZONEshould be covered with a lid or
aluminum foil.
Always use pot holders or oven mitts when
removing food from the WARMINGZONE,
as cookware will be hot.
9
Using the surface units-Knob-controlled models.
Throughout this manual, features and appearance may vary from your model.
At both01:1:andHI thecontrolclicks
intoposition.Youmayhearslightclicking
soundsduringcooking,indicatingthe
controlis maintainingyourdesiredsetting.
Besure youturnthe control knobto 01:1:
when youfinish cooking.
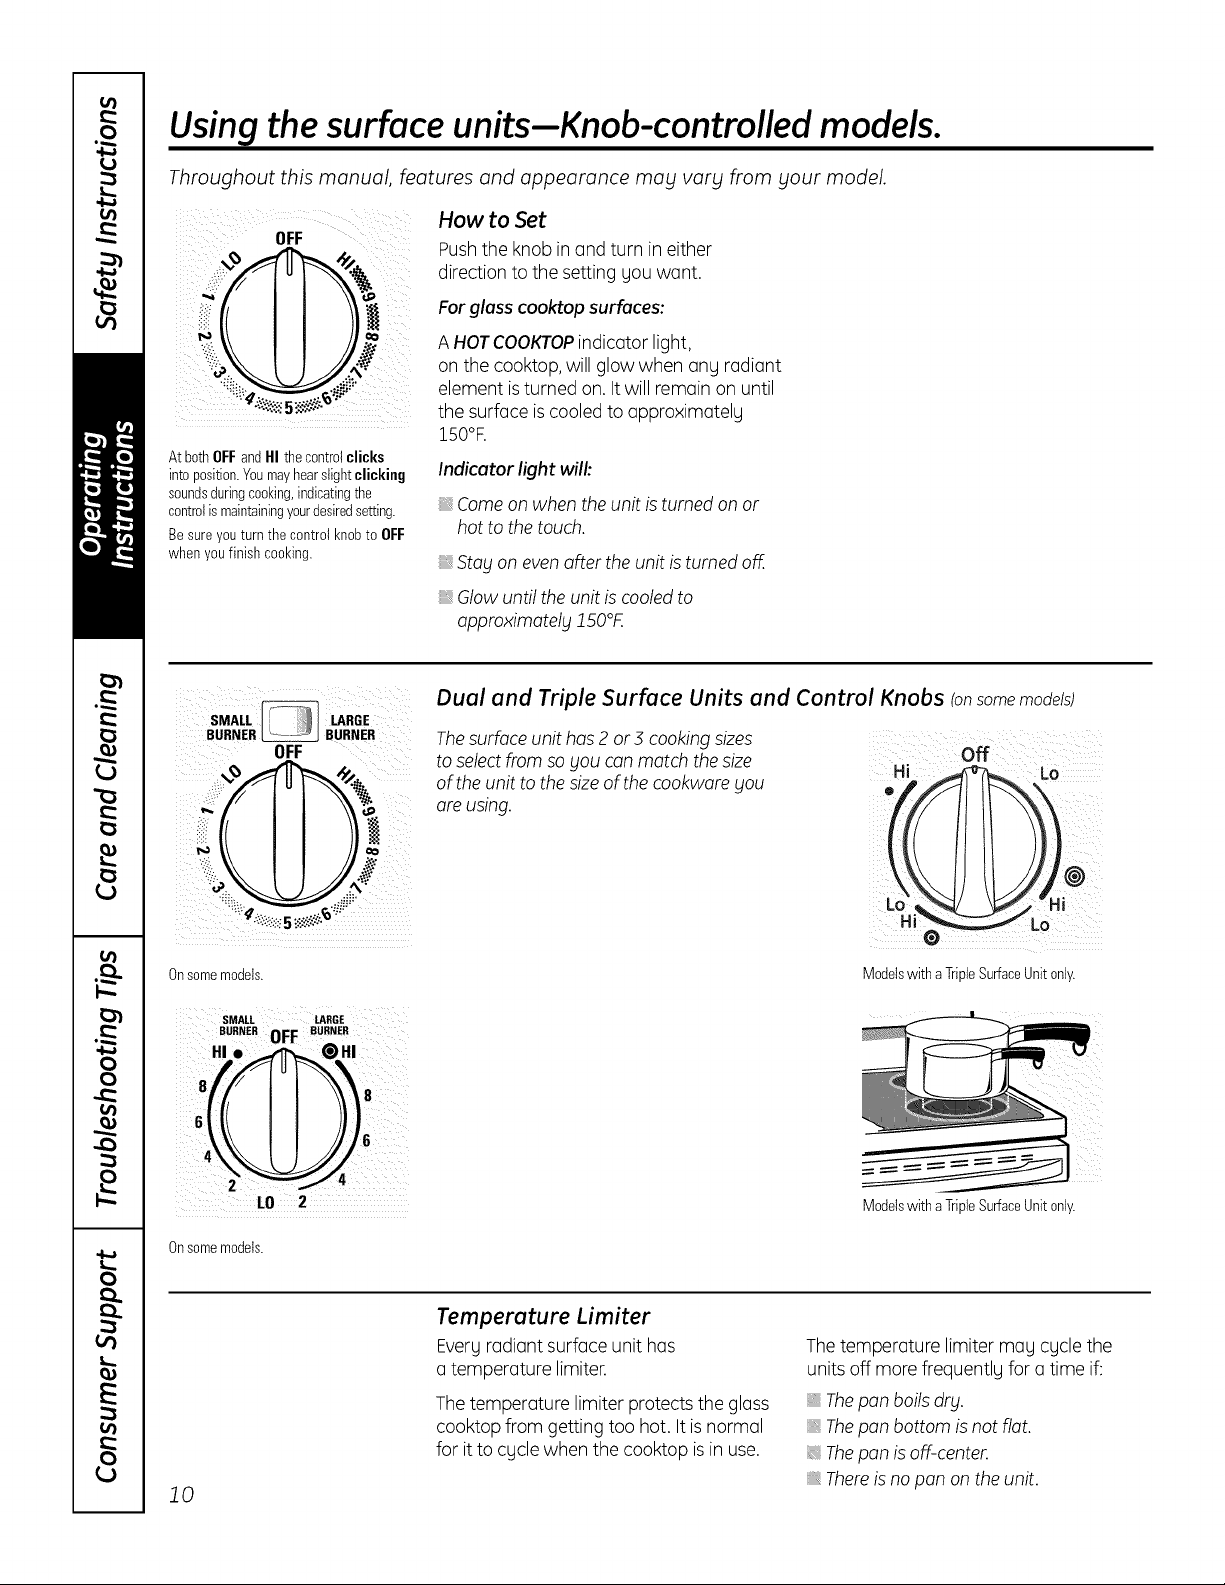
How to Set
Pushthe knob in and turn in either
direction to the setting you want.
For glass cooktop surfaces:
A HOT COOKTOPindicator light,
on the cooktop, will glow when ang radiant
element isturned on. It will remain on until
the surface is cooled to appro×imatelg
i50°R
Indicatorlight will:
Comeon when the unit is turned on or
hot to the touch.
Stag on even after the unit is turned off.
Glow until the unit is cooled to
approximately 150°F.
SMALL _ LARGE
BURNER BURNER
OFF
r -:.';''__'
Onsomemodels.
SMALL LARGE
BURNER OFF BURNER
HI. _ @HI
6
Onsomemodels.
Dual and Triple Surface Units and Control Knobs (onsome models)
Thesurface unit has 2 or 5 cooking sizes
to selectfrom so gou can match the size
of the unit to the sizeof the cookwore gou
are using.
Hi Lo
Modelswith a TripleSurfaceUnitonly.
Modelswith a TripleSurfaceUnit only.
10
Temperature Limiter
Everg radiant surface unit has
a temperature limiter.
The temperature limiter protects the glass
cooktop from getting too hot, It is normal
for it to cgcle when the cooktop is in use.
The temperature limiter mag cgcle the
units off more frequentlg for a time if:
Thepan boils drg.
: Thepan bottom is not flat.
:: Thepan is off-center.
Thereis no pan on the unit.
Throughout this manual, features and appearance may vary from your model.
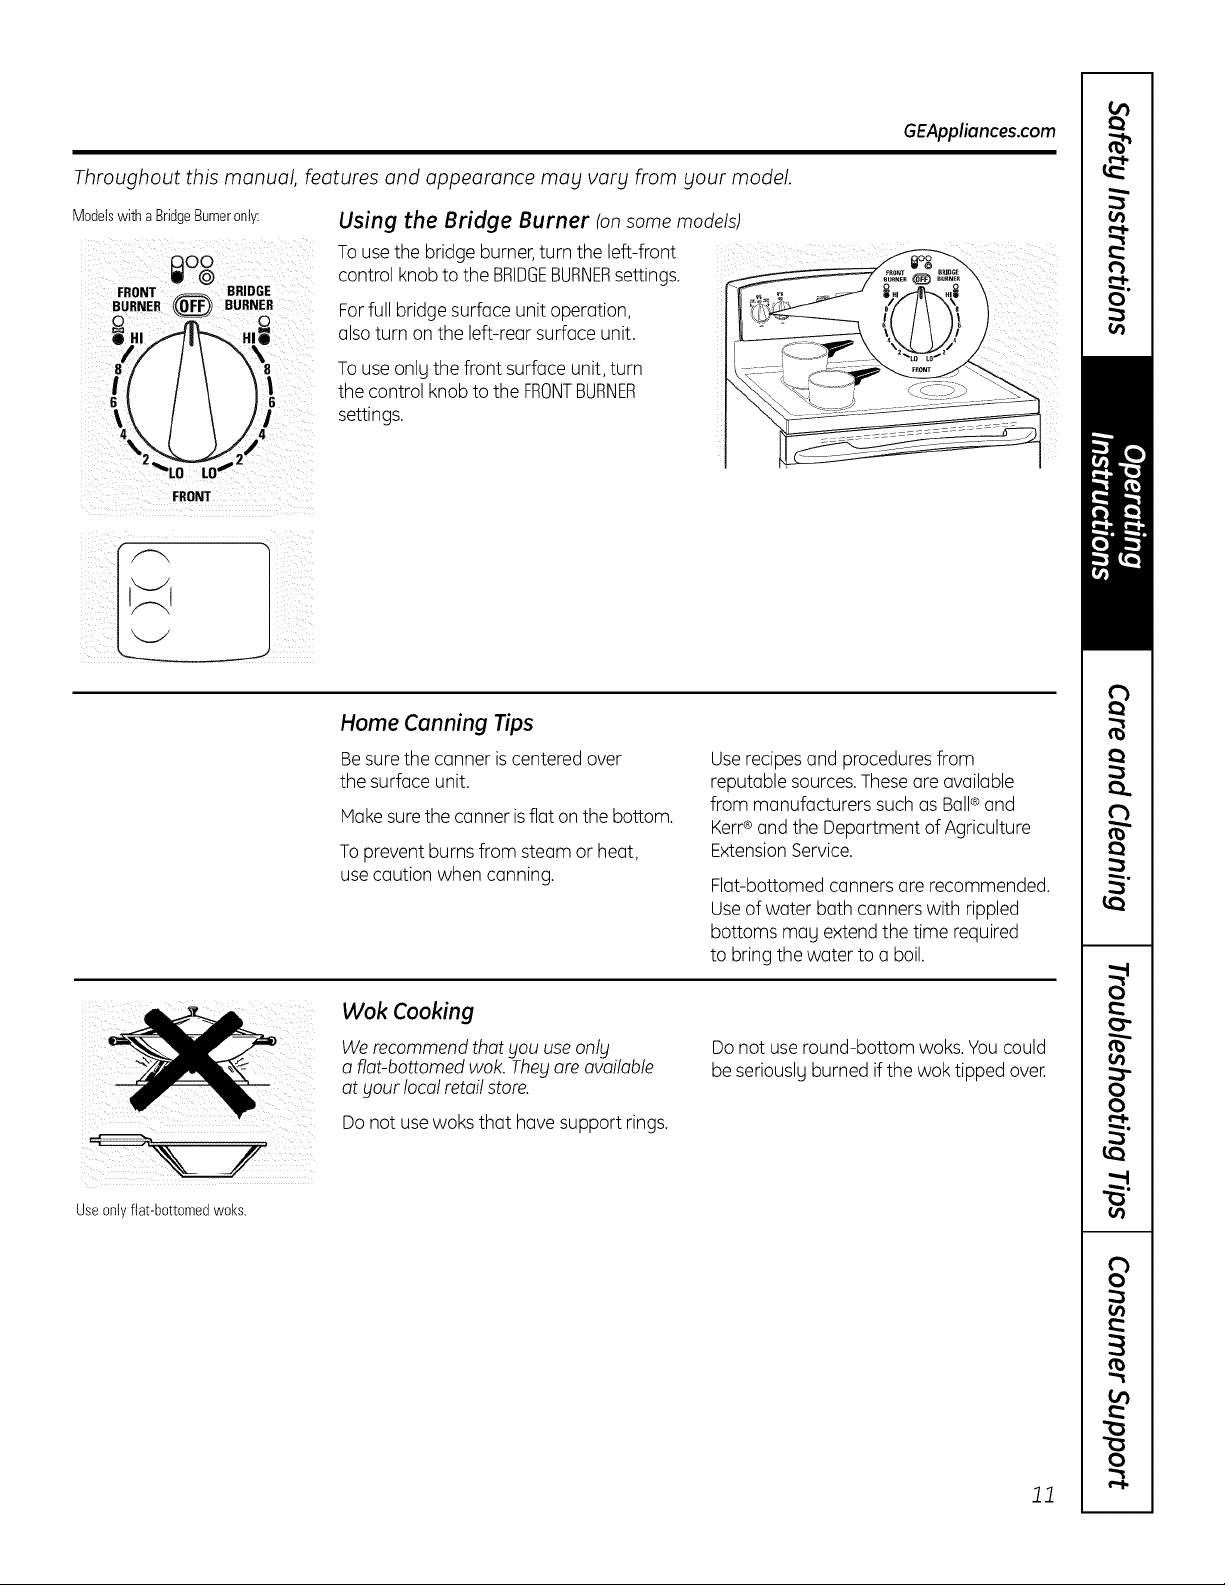
Modelswith a BridgeBurneronly:
HI
//
Using the Bridge Burner (onsome models)
To use the bridge burner,turn the left-front
control knob to the BRIDGEBURNERsettings.
For full bridge surface unit operation,
also turn on the left-rear surface unit.
To use only the front surface unit, turn
the control knob to the FRONTBURNER
settings.
GEAppliances.com
FRONT
I
J
Home Conning Tips
Besure the conner is centered over
the surface unit.
Makesure the conner isflat on the bottom.
To prevent burns from steam or heat,
use caution when conning.
Userecipesond proceduresfrom
reputoblesources.Theseoreovoiloble
frommonufocturerssuchos Boll®ond
Kerr®and the Deportment of Agriculture
ExtensionService.
Fiat-bottomed conners ore recommended.
Useof water both conners with rippled
bottoms mog extend the time required
to bring the water to o boil.
iii ilii i)iiii I
Useonly fiat-bottomedwoks.
Wok Cooking
We recommend that gou use onlg
o riot-bottomed wok. Thegore available
at gour local retail store.
Do not use woks that hove support rings.
Do not use round-bottom woks. You could
be seriouslg burned if the wok tipped over.
11
Usingthe griddle.
I,_ll I BURN HAZARD: Griddle surfaces may be hot enough to cause burns during and
CAUTION arteruse laceandremovethegriddlewhenitiscoolandallsurfaceunitsare
off. Use oven mitts if _lou will touch the griddle while hot. Failure to do so can
result in burns.
Before using this cookware for the first
time, wash it to make sure it is clean.Then
season it lightlg, rubbing cooking oil onto
the nonstick surface.
GRIDDLE CONTROL
OFF
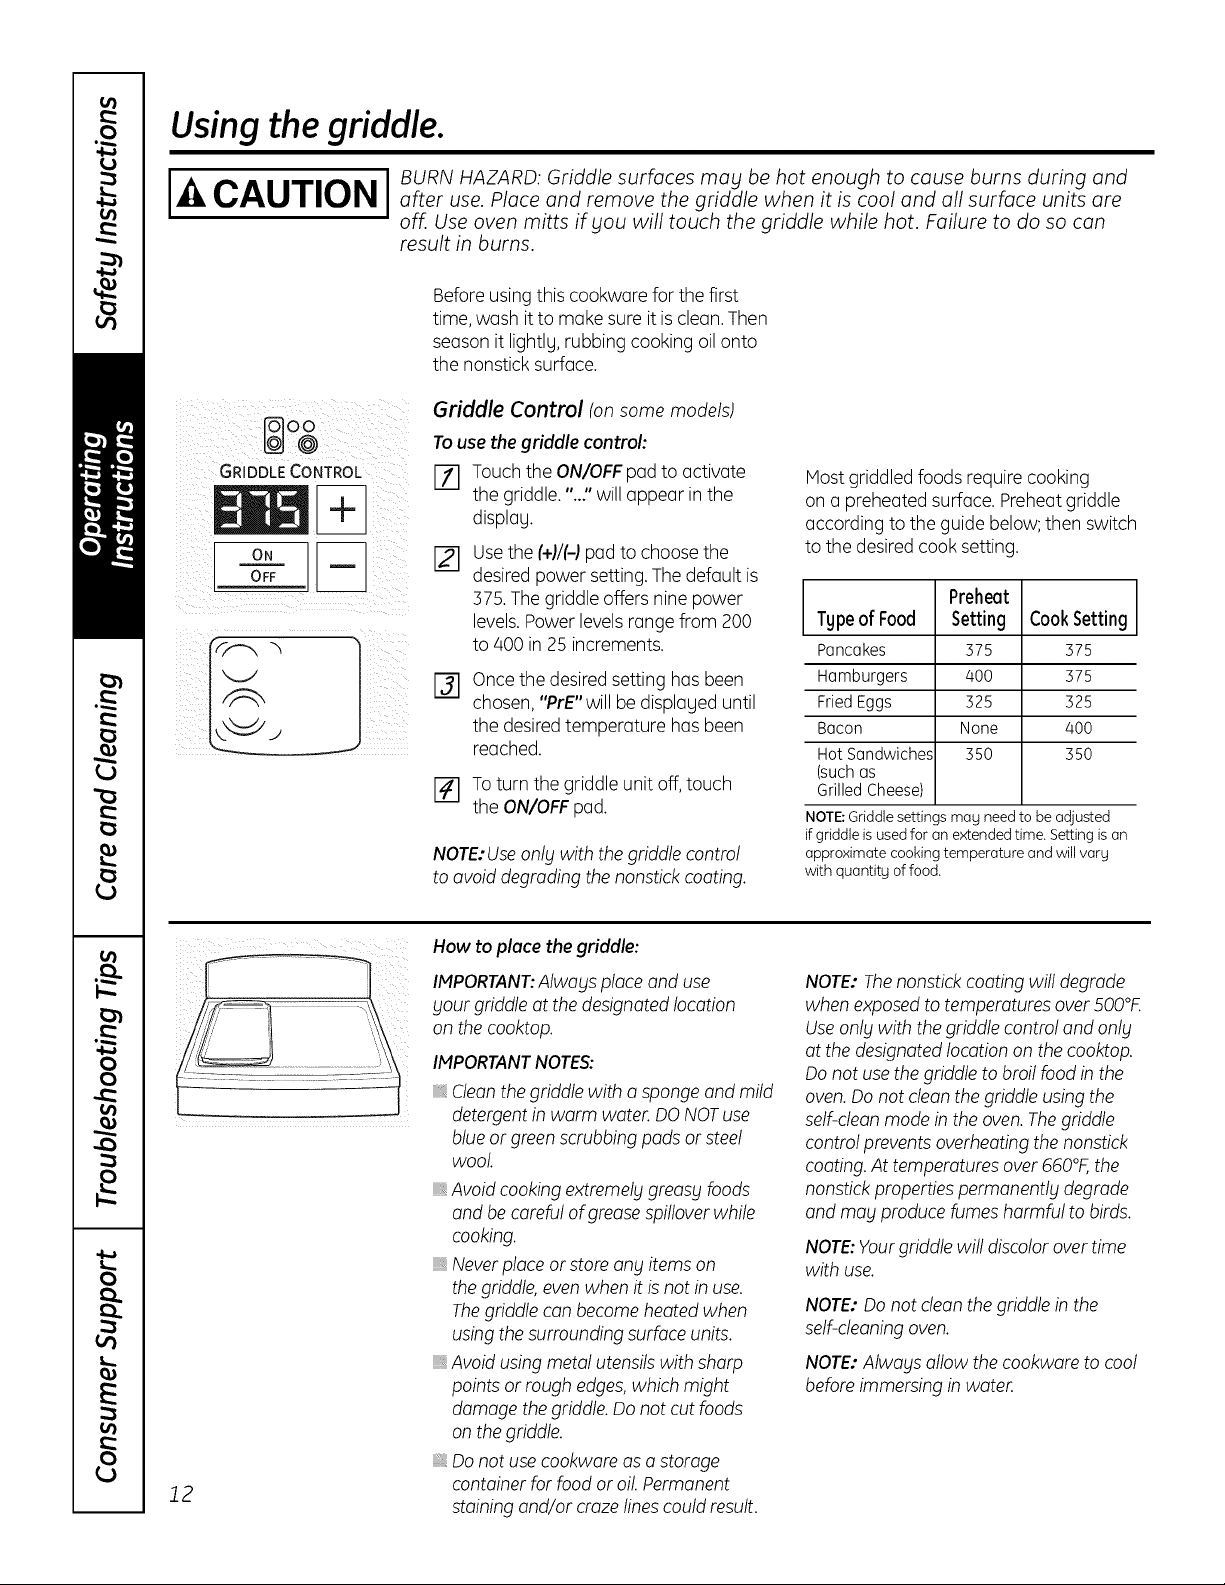
Griddle Control (onsome models)
To use the griddle control:
I-_ Touch the ON/OFFpad to activate
the griddle. "..:' will appear in the
displag,
[] Usethe (+)/(-)pad to choose the
desired power setting.The default is
375. The griddle offers nine power
levels.Power levels range from 200
to 400 in 25 increments.
[]
Once the desired setting has been
chosen, "PrE"will be displaged until
the desired temperature has been
reached.
_-] To turn the griddle unit off, touch
the ON/OFFpad.
NOTE:Use only with the griddle control
to avoid degrading the nonstick coating.
Host griddled foods require cooking
on a preheated surface. Preheatgriddle
according to the guide below; then switch
to the desired cook setting.
L Preheat ]
TgpeofFood Setting Cook Setting
Pancakes 375 375
Hamburgers 400 375
FriedEggs 325 325
Bacon None 400
HotSandwiches 350 350
(suchas
GrilledCheese)
NOTE:Griddle settings mag need to be adjusted
if griddle is usedfor an extended time. Setting is an
approximate cooking temperature and will varg
with quantitg of food.
12
How to place the griddle:
IMPORTANT:Always place and use
your griddle at the designated location
on the cooktop.
IMPORTANTNOTES:
, Cleanthe griddle with a sponge and mild
detergentin warm water. DO NOTuse
blueor greenscrubbing pads or steel
wool
Avoid cooking extremely greasy foods
and be careful of grease spillover while
cooking.
Neverplace or store any items on
the griddle, even when it is not in use.
Thegriddle con become heated when
using the surrounding surface units.
, Avoid using metal utensils with sharp
points or rough edges,which might
damage the griddle. Do not cut foods
on the griddle.
, Do not use cookware as a storage
container for food or oil Permanent
staining and/or crazelines could result.
NOTE: Thenonstickcoating will degrade
when exposed to temperatures over 500°F.
Useonly with the griddle control and only
at the designated location on the cooktop.
Do not usethe griddle to broil food in the
oven.Do not clean the griddle using the
self-dean mode in the oven. Thegriddle
control prevents overheating the nonstick
coating. At temperatures over 660°F,the
nonstick properties permanently degrade
and may produce fumes harmful to birds.
NOTE:Yourgriddle will discolor over time
with use.
NOTE: Do not dean the griddle in the
self-cleaning oven.
NOTE: Always allow the cookware to cool
before immersing in water.
GEAppliances.com
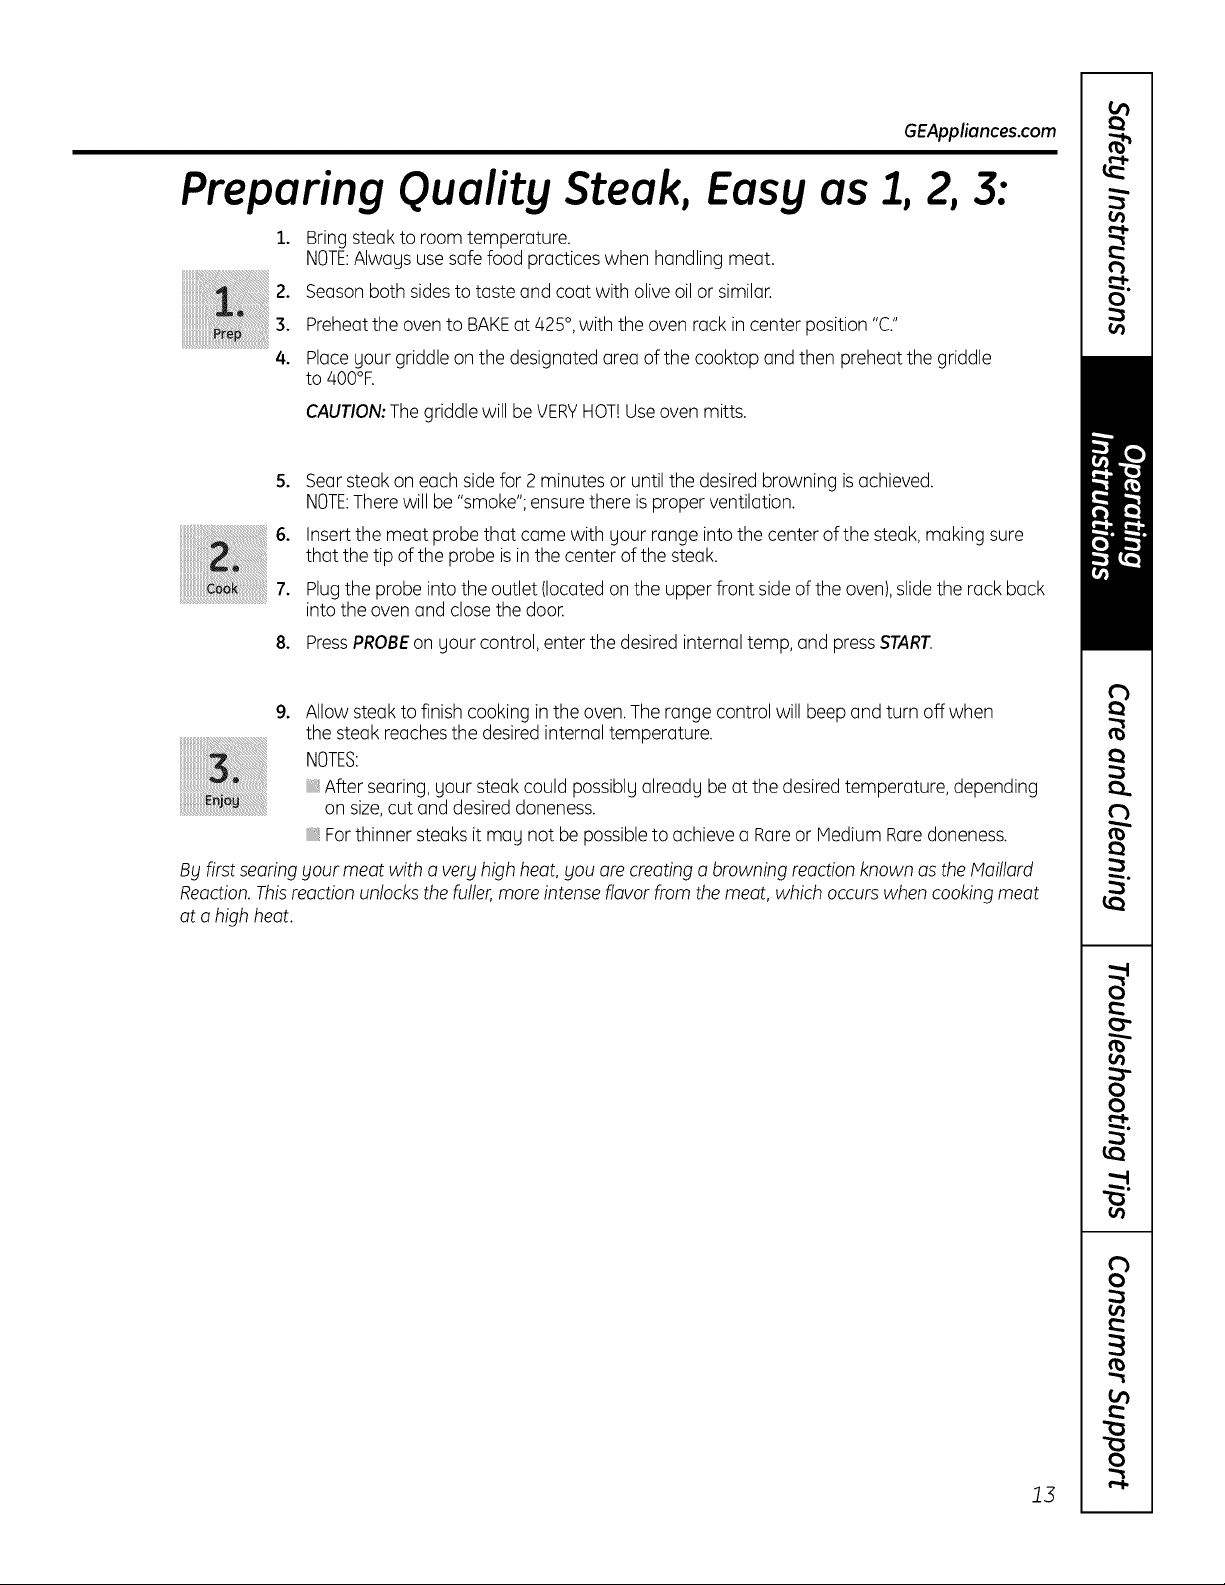
Preparing Quality Steak, Easy as 1, 2, 3:
1. Bring steak to room temperature.
NOTE:Always use safe food practices when handling meat.
2. Seasonboth sidesto taste and coat with olive oil or similar.
3. Preheat the oven to BAKEat 425°,with the oven rack in center position "C."
4. Place your griddle on the designated area of the cooktop and then preheat the griddle
to 400°R
CAUTION:The griddle will be VERYHOT!Useoven mitts.
Searsteak on each side for 2 minutes or until the desired browning is achieved.
NOTE:There will be "smoke"; ensure there is proper ventilation.
Insert the meat probe that came with your range into the center of the steak, making sure
that the tip of the probe is in the center of the steak.
Plugthe probe into the outlet (located on the upper front side of the oven),slide the rack back
into the oven and closethe door.
PressPROBEon your control, enter the desired internal temp, and press START.
°
Allow steak to finish cooking in the oven.The range control will beep and turn off when
the steak reachesthe desired internal temperature.
NOTES:
After searing, your steak could possibly already be at the desired temperature, depending
on size,cut and desired doneness.
For thinner steaks it may not be possible to achieve a Rareor Medium Raredoneness.
By first searing _lourmeat with a ver_lhigh heat, _lOUare creating a browning reaction known as the Maillard
Reaction.Thisreaction unlocks the fuller, more intense flavor from the meat, which occurs when cooking meat
at o high heat.
13
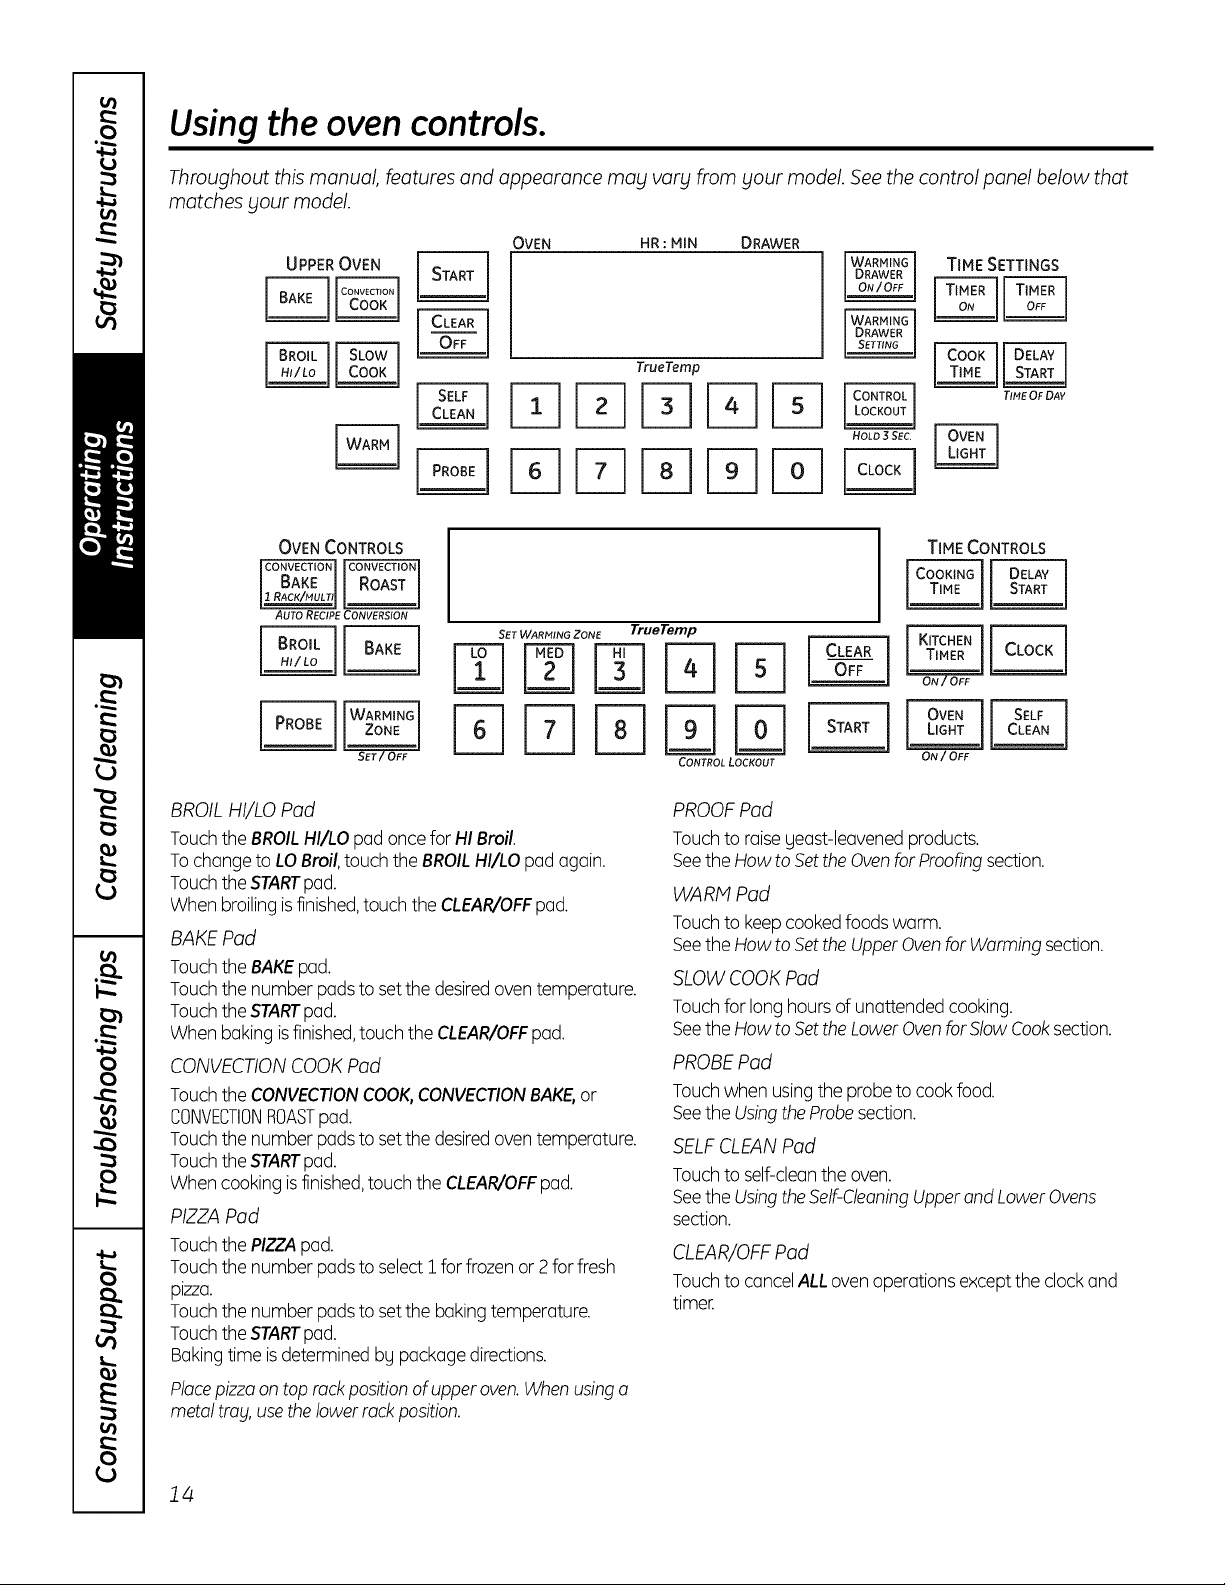
Using the oven controls.
Throughout this manual, features and appearance mag varg from gout model. See the control panel below that
matches blour model.
OVEN HR : MIN DRAWER
TrueTemp
FqPqPq
FqFq
TIME SETTINGS
OVEN CONTROLS
AUTO RECIPE CONVERSION
SET WARMING ZONE True Temp
NN%E]E]
CONTROL LOCKOUT
TIME CONTROLS
ON/OFF
BROIL HI/LO Pad
Touch the BROIL HI/LO pad once for HI Broil.
To change to LO Broil, touch the BROIL HI/LO pad again.
Touch the STARTpad.
When broiling is finished, touch the CLEAR/OFF pad.
BAKE Pod
Touchthe BAKEpad.
Touchthe number pads to setthe desiredoven temperature.
Touchthe STARTpad.
When baking is finished,touch the CLEAR/OFFpad.
CONVECTIONCOOK Pad
Touchthe CONVECTIONCOOK,CONVECTIONBAKE,or
CONVECTIONROASTpad.
Touchthe number pads to setthe desiredoven temperature.
Touchthe STARTpad.
When cooking isfinished,touch the CLEAR/OFFpad.
PIZZA Pod
Touchthe PIZZApad.
Touchthe number pads to select i for frozen or 2 for fresh
pizza.
Touchthe number pads to setthe baking temperature.
Touchthe STARTpad.
Bakingtime isdetermined by package directions.
Placepizzaon top rack position of upper oven.Whenusing a
metal trobl,usethe lower rock position.
PROOFPad
Touchto raiseyeast-leavenedproducts.
Seethe How to Set the Ovenfor Proofingsection.
WARM Pad
Touchto keepcookedfoodswarm.
Seethe How to Set the UpperOvenfor Warming section.
SLOW COOK Pad
Touchfor long hours of unattended cooking.
Seethe How to Set the LowerOvenfor Slow Cooksection.
PROBEPad
Touchwhen usingthe probeto cook food.
Seethe Usingthe Probesection.
SELFCLEANPad
Touchto self-cleanthe oven.
Seethe Usingthe Self-CleaningUpperand Lower Ovens
section.
CLEAR/OFFPad
Touchto cancelALLoven operationsexcept the clockand
timer.
14
GEAppliances.com
STARTPod
Must be touched to start any cooking or cleaningfunction.
OVEN LIGHT Pod
Touchto turn the oven lightson or off.
TIMERON/OFF Pod(s)/KITCHEN TIMERPod
Touchto set the kitchentimer.
Seethe Usingthe KitchenTimersection.
COOK TIME/COOKING TIME Pod
Touchthis pad and then touch the number padsto set the
amount of time you want your food to cook.Theoven will
shut offwhen the cooking time has run out.
DELAYSTARTPod
Usealongwith the COOKTIMEorSELFCLEANpads to set
the ovento start and stop automatically at a time you set.
CLOCKPod
NOTE:Whensetting times,you oresetting hours and minutes
only. Thelowest time you con set is one minute.
Touchthe CLOCKpad.
Touchthe number pads.
Touchthe STARTpad.
Theclockmust beset to the correcttime of day for the
automatic oventiming functionsto work properly. Thetime of
day cannotbe changedduring otimed baking or self-cleaning
cycle.
If your oven was set for a timed oven operation and a
power outage occurred, the clock and allprogrammed
functions must be reset. The time of day will flash in the
display when there has been a power outage.
CONTROLLOCKOUTPod
Yourcontrolwill allow you to lockout the touch pads and the
cooktopso they cannot beactivatedwhen touched.
To lockthecontrols and cooktop:
Touchand hold the CONTROLLOCKOUTpad for ] seconds.
Theoven displaywill show "on Locon."
To unlock the controls:
Touchand hold the CONTROLLOCKOUTpad for ] seconds.
TheCONTROLLOCKOUTmode affectsall touch pods.
No touch pads willwork when this feature isactivated.
WARMING DRAWER
The warming drawer willkeep hot, cooked foods at serving
temperature. Alwogs start with hot food.
Touch the WARMING DRAWER pad. "WARMERON"and "1"
are lit on the display and "Set"beginsto blink.Onthe number
pads,touch 1for Low,2 for Mediumor 3for High.The display
"1" changescorrespondingto the number pad selected.The
warming drawer starts automatically after you touch l, 2 or 3.
"WARIVlERON"and the number remain lit."Set"stops blinking.
Onsome models,pressSTART.
Onsomemodels - toggle between settingsbg touchingthe
WARMINGDRAWERpod.
Tocancel,touch the WARMINGDRAWERpad.
NOTE:Touchingthe CLEAR/OFFpad does not turn off the
warming drawer.
WARMING ZONE
Touchto keephot, cooked food warm. Seethe Usingthe
WormingZone section.
J5
Using the oven.
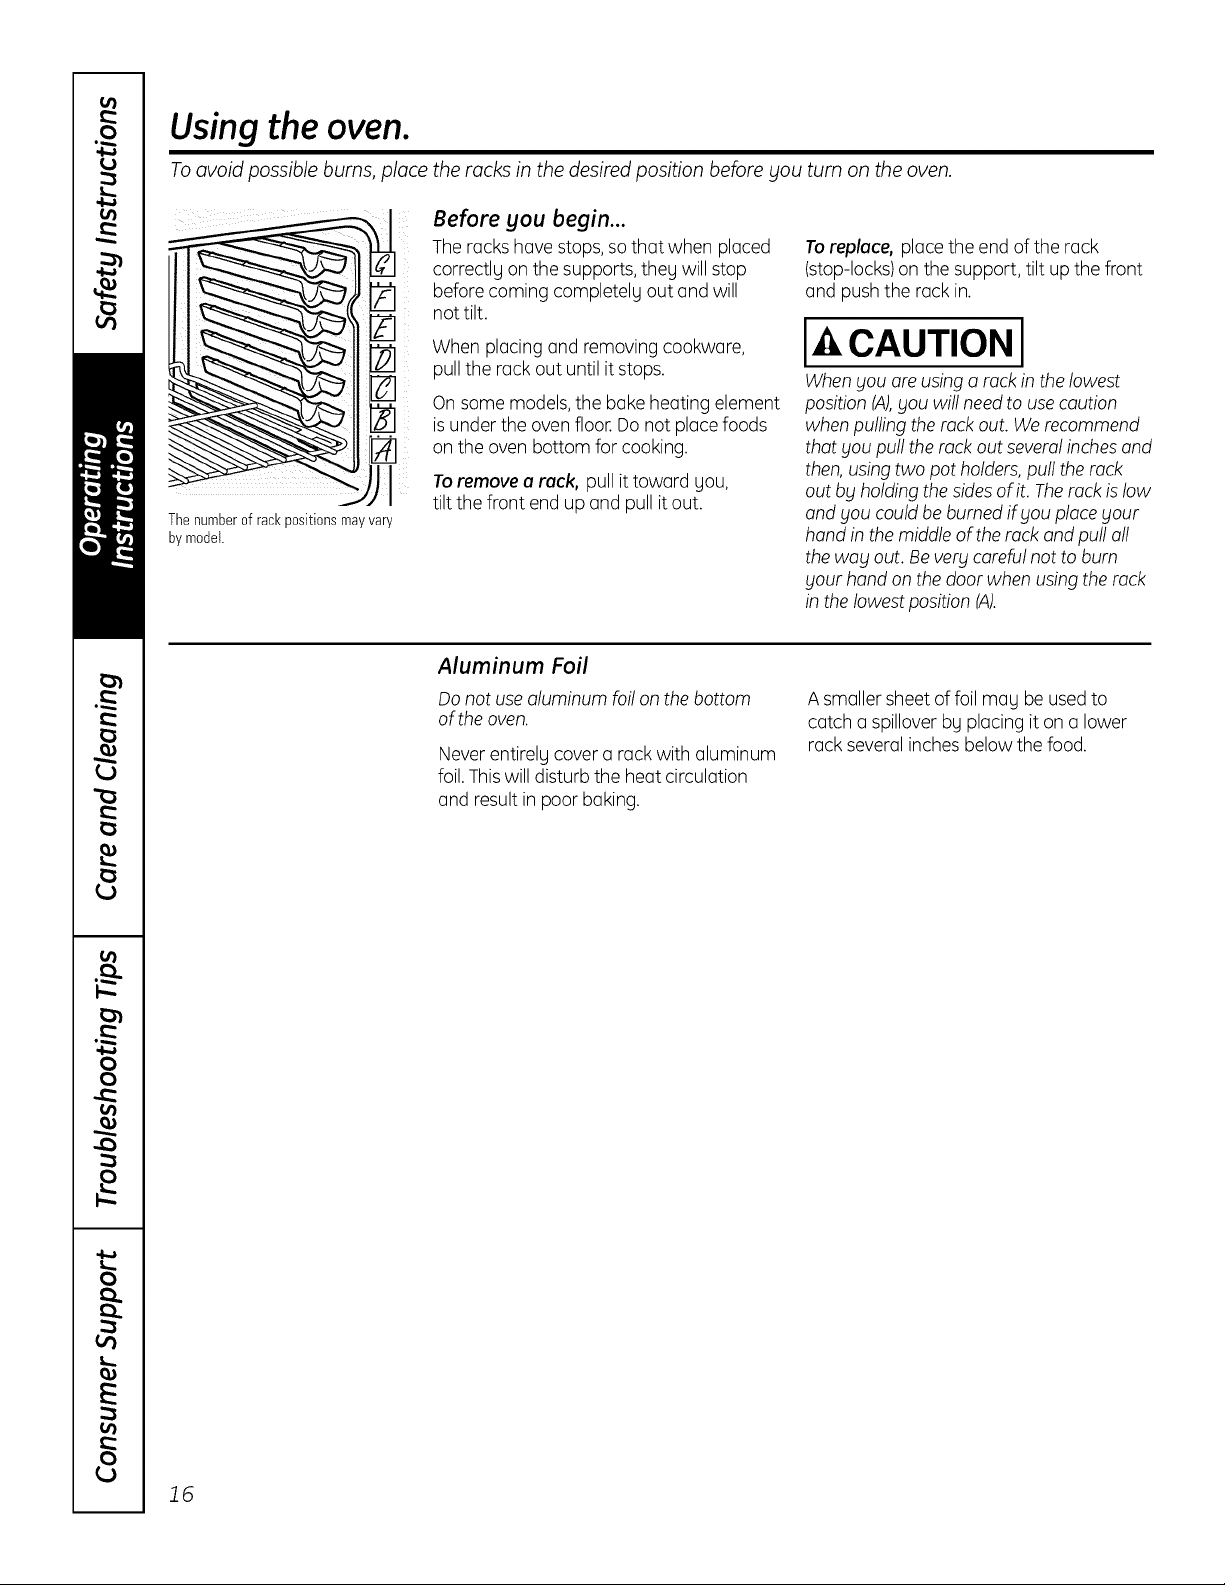
To ovoid possible burns, place the racks in the desired position before blOUturn on the oven.
The numberof rankpositionsmayvary
by model.
Before gou begin...
The racks have stops, so that when placed
correc% on the supports, theu will stop
before coming completelu out and will
not tilt.
When placing and removing cookware,
pull the rack out until it stops.
On some models, the bake heating element
is under the oven floor.Do not place foods
on the oven bottom for cooking.
To remove a reck, pull it toward Uou,
tilt the front end up and pull it out.
To replace, place the end of the rack
(stop-locks)on the support, tilt up the front
and push the rack in.
I-4,CAUTION I
When you ors using a rack in the lowest
position (A),you will need to use caution
when pulling the rock out. We recommend
that you pull the rock out severalinchesand
then, using two pot holders, pull the rock
out by holding the sides of it. Therock is low
and you could be burned if Fou place your
hand in the middle of the rock and pull oil
the way out. Bevery careful not to bum
your hand on the door when using the rock
in the lowest position IA).
Aluminum Foil
Do not use aluminum foil on the bottom
of the oven.
Never entirely cover a rack with aluminum
foil. This will disturb the heat circulation
and result in poor baking.
A smaller sheet of foil may be used to
catch a spillover by placing it on a lower
rack several inches below the food.
16
GEAppliances.com
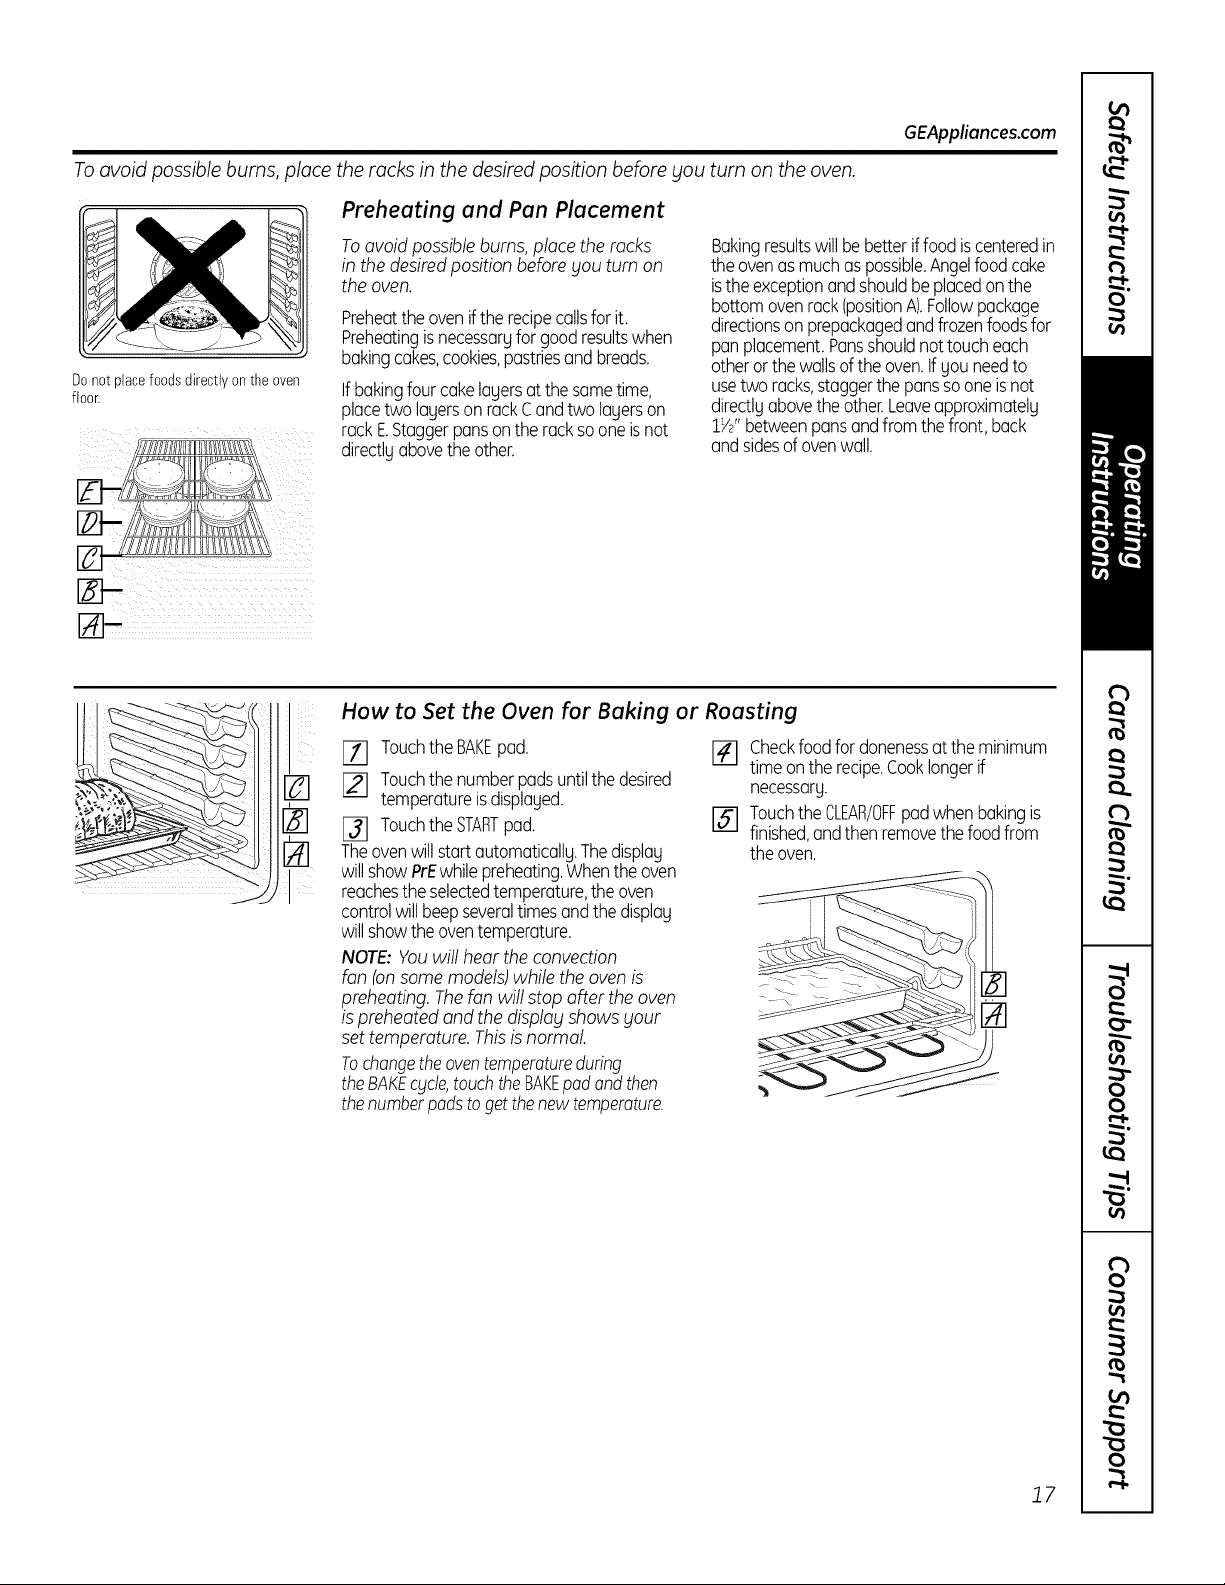
To avoid possible burns, place the racks in the desired position before you turn on the oven.
Do not placefoodsdirectlyon the oven
floor.
Preheating and Pan Placement
Toavoid possible burns, place the racks
in the desired position before blouturn on
the oven.
Preheatthe ovenifthe recipecallsfor it.
Preheatingis necessaryfor goodresultswhen
bakingcakes,cookies,pastriesandbreads.
Ifbakingfour cakelayersat the sametime,
placetwo layerson rackCand two layerson
rackE.Staggerpansonthe racksooneis not
directlyabovethe other.
Bakingresultswillbe betterif food iscenteredin
theovenas muchas possible.Angelfood cake
isthe exceptionandshouldbeplacedonthe
bottomovenrack(positionA).Followpackage
directionson prepackagedandfrozenfoods for
panplacement.Pansshouldnot toucheach
otherorthe wallsof the oven.If you needto
usetwo racks,staggerthe panssooneisnot
directlyabovethe other.Leaveapproximately
1W'betweenpansandfrom thefront, back
andsidesd ovenwall.
g]-
How to Set the Oven for Baking or Roasting
[II Touchthe BAKEpad.
[] Touchthe numberpadsuntilthe desired
temperatureisdisplayed.
[31 Touchthe STARTpad.
Theovenwillstart automatically.Thedisplay
will showPrEwhilepreheating.Whenthe oven
reachesthe selectedtemperature,the oven
controlwill beepseveraltimesand the display
will showthe oventemperature.
NOTE: Youwill hear the convection
fan (onsome models) while the oven is
preheating. Thefan will stop after the oven
is preheated and the display shows your
set temperature. Thisis normal.
Tochangetheoventemperatureduring
the BAKEcgcle,touch theBAKEpod and then
the numberpodsto getthe newtemperature.
F_I Checkfood for donenessat the minimum
ii i
timeonthe recipe.Cooklongerif
necessary.
[] Touchthe CLEAR/OFFpad whenbakingis
finished,andthen removethe foodfrom
the oven.
[]
17
Using the oven.
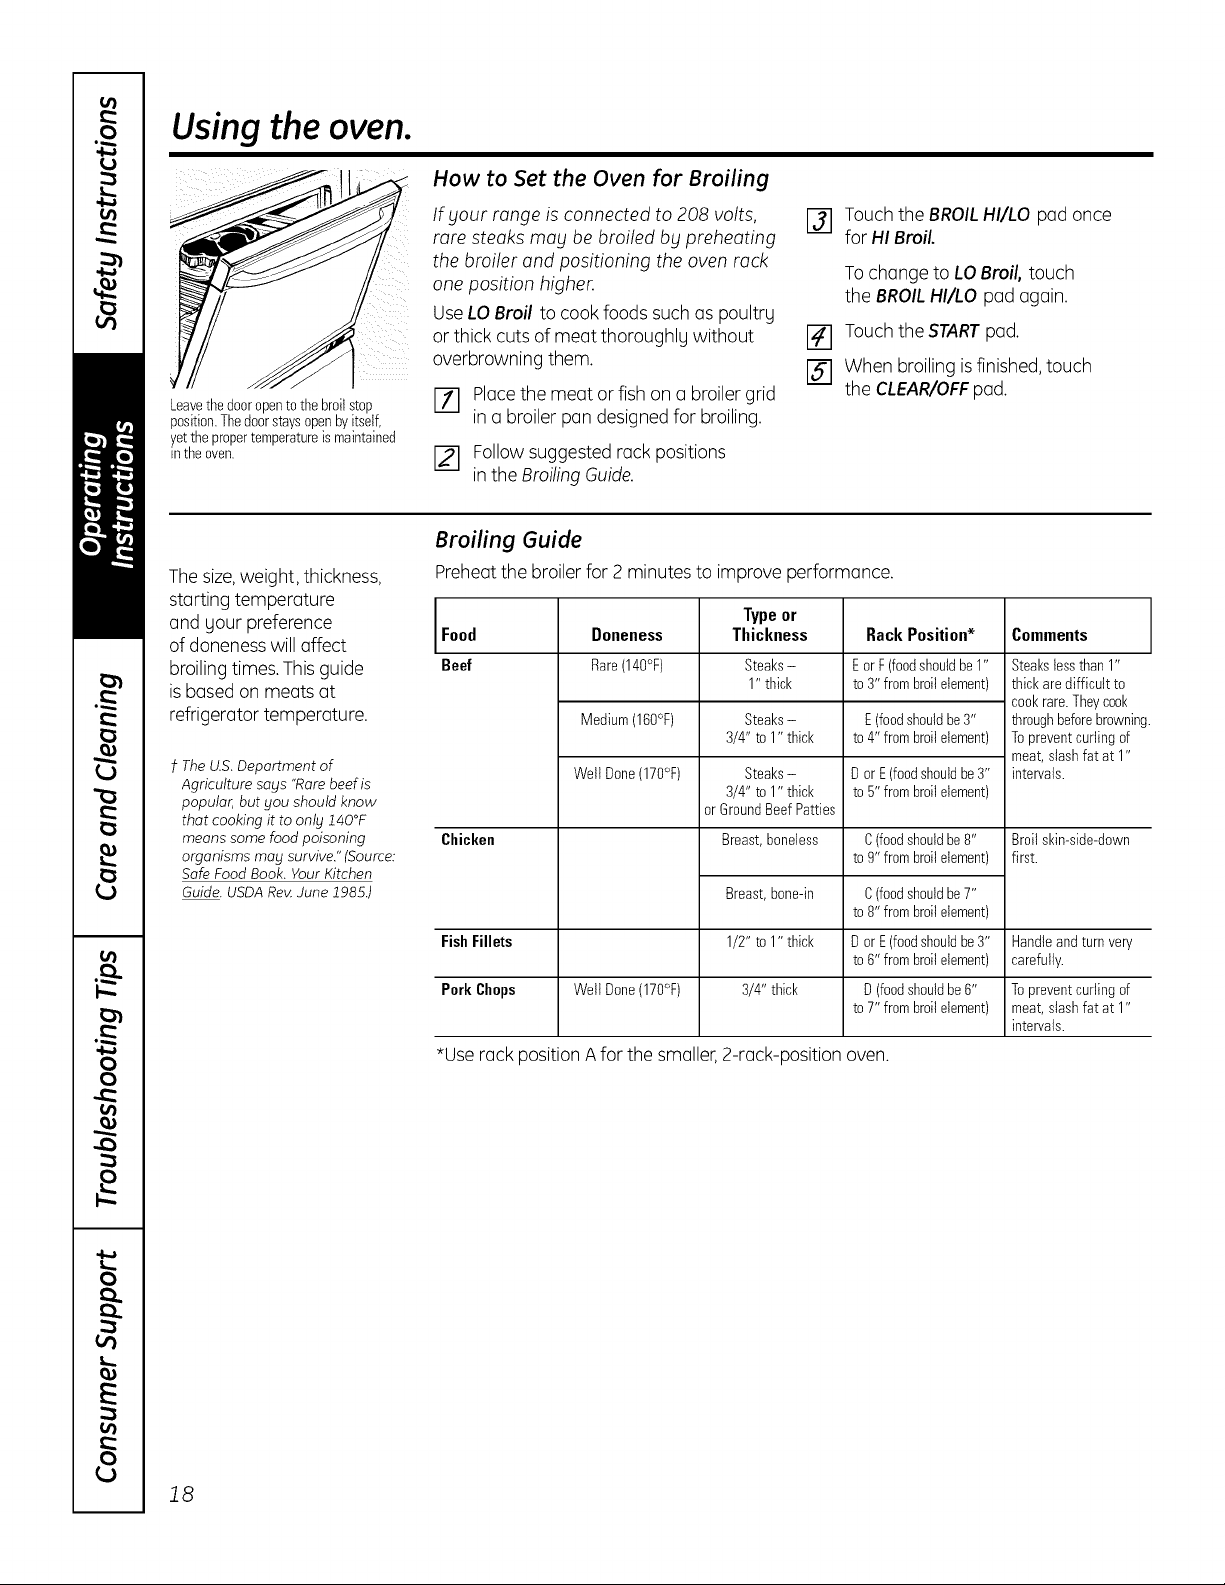
Leavethe dooropento thebroilstop
position.Thedoorstaysopenbyitself,
yetthe propertemperatureis maintained
inthe oven.
How to Set the Oven for Broiling
If gout range is connected to 208 volts,
rare steaks mog be broiled bg preheating
the broiler and positioning the oven rack
one position higher.
Use LO Broil to cook foods such as poultrg
or thick cuts of meat thoroughlg without
overbrowning them.
Placethe meat or fish on a broiler grid
E_ in a broiler pan designed for broiling.
[] Follow suggested rack positions
in the Broiling Guide.
F-_ Touch the BROILHI/LO pad once
for HI Broil.
To change to LO Broil, touch
the BROILHI/LO pad again.
[] Touchthe STARTpad.
FS] When broiling isfinished, touch
the CLEAR/OFF pad.
The size,weight, thickness,
starting temperature
and gour preference
of doneness will affect
broiling times. Thisguide
is based on meats at
refrigerator temperature.
t The U.S. Department of
Agriculture says "Rare beef is
popular, but you should know
that cooking it to only ff40°F
means some food poisoning
organisms may survive." (Source:
Safe Food Book. Your Kitchen
Guide. USDARe_ June 1985.)
Broiling Guide
Preheat the broiler for 2 minutes to improve performance.
Type or
Food Doneness Thickness Rack Position* Comments
Beef Rare(140°F) Steaks- Eor F(foodshouldbe 1" Steakslessthan1"
1" thick to 3" from broilelement) thick aredifficult to
cook rare.Theycook
Medium (160°F) Steaks- E(foodshouldbe3" throughbeforebrowninc
3/4" to 1" thick to 4" from broilelement) To preventcurling of
meat,slashfat at 1"
Welt Done(170°F) Steaks- D or E(foodshouldbe3" intervals.
3/4" to 1" thick to 5" from broilelement)
orGroundBeefPatties
Chicken Breast,boneless C(foodshouldbe8" Broil skin-side-down
to g" from broilelement) first.
Breast,bone-in
1/2" to 1" thick
3/4" thick
C(foodshouldbe7"
to 8" from broilelement)
Fish Fillets D or E(foodshouldbe3" Handleand turn very
to 6" from broilelement) carefully.
Pork Chops Welt Done(170°F) D (foodshouldbe6" Topreventcurling of
to 7" from broilelement) meat,slashfat at 1"
intervals.
*Use rack position A for the smaller, 2-rack-position oven.
18
Usingthe timedbakingandroastingfeatures,ionsomemode sIGEAppliances.com
NOTE: Foods that spoil easilbl-such as milk, eggs, fish, stuffings, poultry and porkishould not be allowed to sit
for more than 1 hour before or after cooking. Room temperature promotes the growth of harmful bacteria.
Be sure that the oven light is off because heat from the bulb will speed harmful bacteria growth.
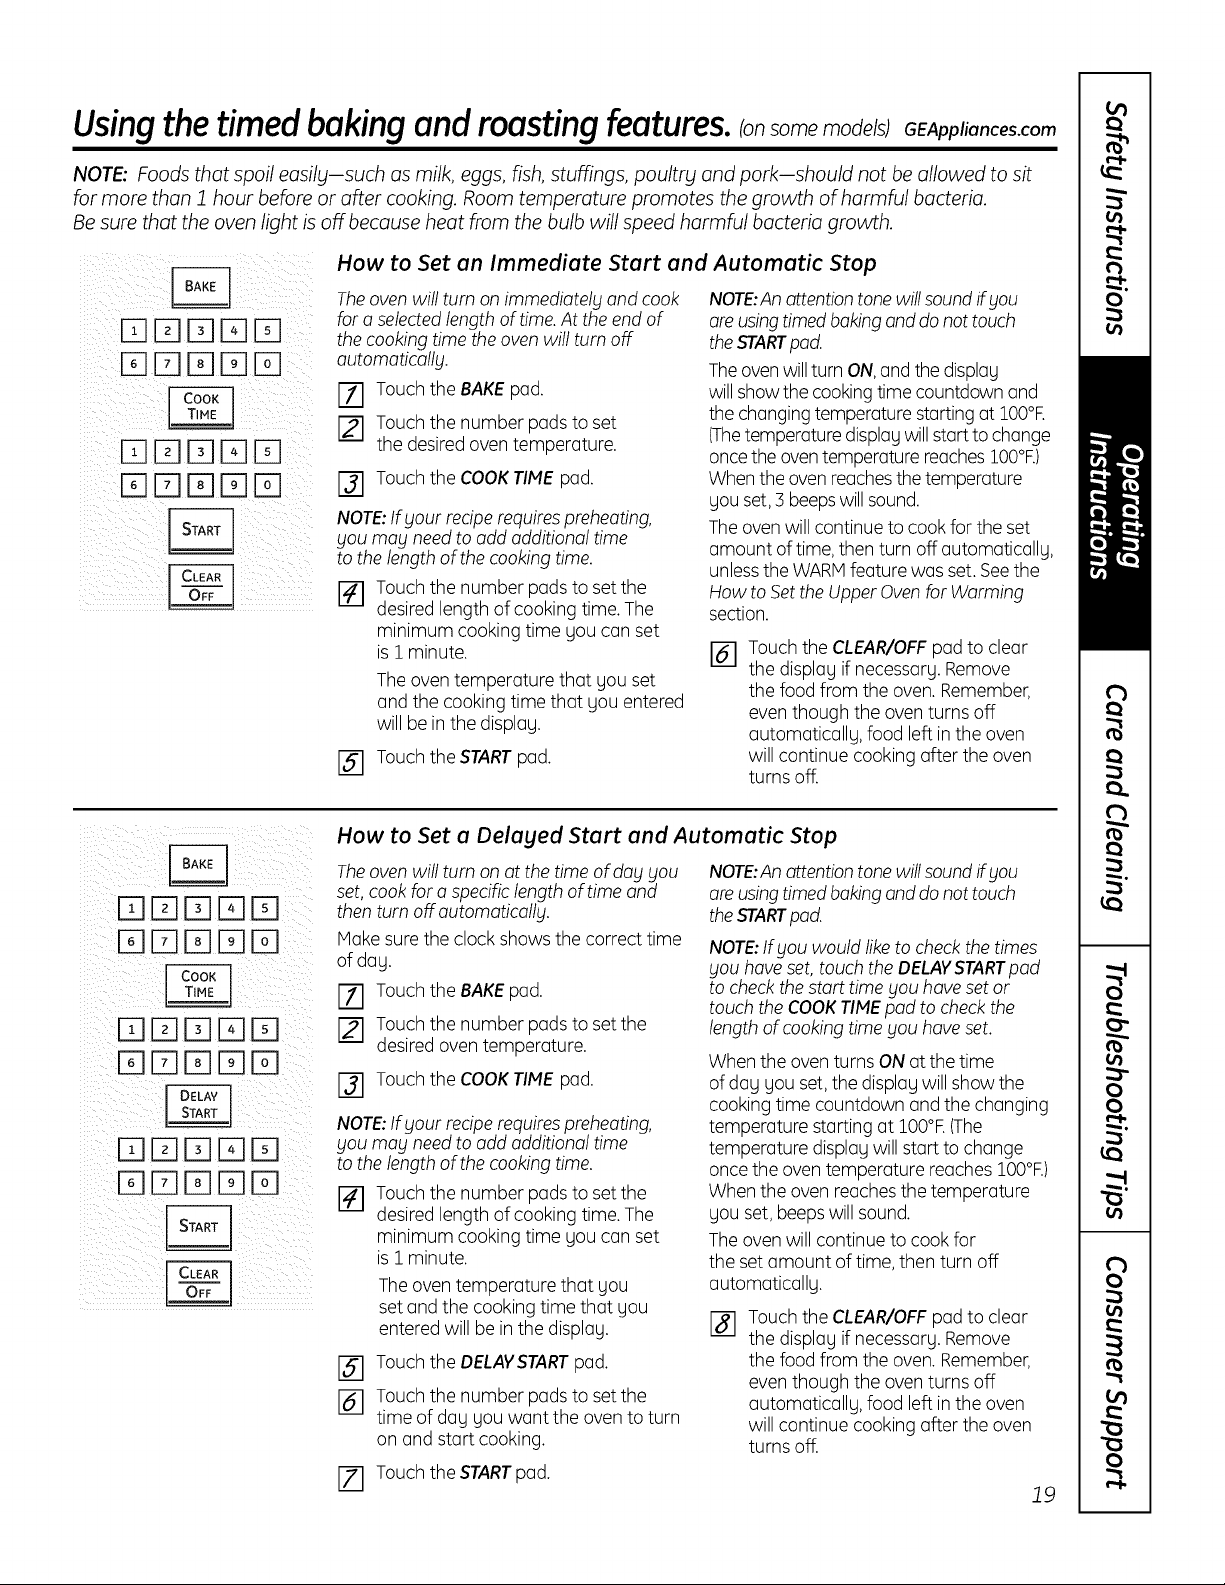
How to Set an Immediate Start and Automatic Stop
Theoven will turn on immediatelg and cook
for a selectedlength of time. At the end of
the cooking time the oven will turn off
outomoticollg.
171 Touch the BAKEpad.
r_ Touch the number pads to set
the desired oven temperature.
[] Touch the COOKTIME pad.
NOTE:If gout recipe requires preheating,
gou mag need to add additional time
to the length of the cooking time.
[] Touch the number pads to setthe
desired length of cooking time. The
minimum cooking time gou can set
is 1 minute.
The oven temperature that gou set
and the cooking time that gou entered
will be inthe displag.
I-_ Touchthe STARTpad.
NOTE:Anattention tone will soundif gou
areusing timedbaking and do not touch
the STARTpad.
Theoven will turn ON,and the displag
will show the cooking time countdown and
the changing temperature starting at 100°R
(Thetemperature displagwill start to change
once the oventemperature reaches100°R)
When the oven reachesthe temperature
gou set, 3 beepswill sound.
The oven will continue to cook for the set
amount of time, then turn off automaticallg,
unlessthe WARMfeature was set. Seethe
How to Set the Upper Ovenfor Warming
section.
[] Touch the CLEAR/OFFpad to clear
the displag if necessarg.Remove
the food from the oven. Remember,
even though the oven turns off
automaticallg, food left in the oven
will continue cooking after the oven
turns off.
DDD D
DDDDD
DDD[]D
DDDDD
DDD[]D
DDDDD
How to Set a Delayed Start and Automatic Stop
Theoven will turn on at the time of dog gou
set, cook for a specific length of time and
then turn off automaticallbl.
Make sure the clock shows the correct time
of dag.
17] Touch the BAKEpad.
[] Touch the number pads to setthe
desired oven temperature.
Touch the COOK TIME pad.
NOTE: If gout recipe requires preheating,
gou mag need to add additional time
to the length of the cooking time.
Touch the number pads to set the
desired length of cooking time. The
minimum cooking time you can set
is 2 minute.
@
@
The oven temperature that gou
set and the cooking time that gou
entered will be in the displag.
Touch the DELAVSTARTpad.
Touch the number pads to set the
time of dag you want the oven to turn
on and start cooking.
[Z] Touch the STARTpad.
NOTE:Anattention tone will soundif gou
areusing timedbaking and do not touch
the STARTpad.
NOTE:If gou would like to check the times
gou have set, touch the DELAVSTARTpod
to check the start time gou have set or
touch the COOKTIMEpad to check the
length of cooking time gou have set.
When the oven turns ON at the time
of dag gou set, the displag will show the
cooking time countdown and the changing
temperature starting at 100°R(The
temperature displag will start to change
once the oven temperature reaches 100°R)
When the oven reachesthe temperature
gou set, beeps will sound.
The oven will continue to cook for
the set amount of time, then turn off
automatically.
[] Touch the CLEAR/OFFpad to clear
the displag if necessarg.Remove
the food from the oven. Remember,
even though the oven turns off
automatically, food left in the oven
will continue cooking after the oven
turns off.
19

Usingthe probe,ionsomemode/sl
For mang foods, especiallg roasts and poultrg, internal food temperature is the best test for doneness. The
temperature probe takes the guesswork out of roasting b_lcooking foods to the exact doneness you want.
The temperatureprobehasa skewer-like
probeat oneend anda plugat the other
endthat goes intothe outlet in the oven.
-4,CAUTION I
Topreventburns,donotunplugtheprobe
fromtheovenoutletunti/theovenhascoded.
Useof probes other than the one provided k_ ". Readandremovelabel
with this product may result in damage to
the probe or oven control.
Usethe handles of the probe and plug
when inserting and removing them from
the food and outlet.
Toovoid damaging gout probe, do not
use tongs to pull on the cable when
removing it.
Toovoid breaking the probe, make sure
food is completelg defrosted before
inserting.
After preparing the meat and placing
it on a trivet or a broiler pan grid, follow
these directions for proper probe
placement.
Insert the probe completely into the
meet. It should not touch bone, fet
or gristle.
_,Neverleavegout probe inside the oven
during a self-cleaning or broil cgcle.
Do not store the probe in the oven.
For roosts with no bone, insert the probe
into the meatiest port of the roost. For
bone-in ham or lomb, insert the probe into
the center of the lowest large muscle.
Insert the probe into the center of dishes
such as meat loaf or casseroles.
Insert the probe into the meatiest port
of the inner thigh from below and parallel
to the leg of a whole turkey.
NOTE:Self-cleanand Broilsettings will not
work if the temperature probe is plugged in.
NOTE:Failureto fullg insert the probe
into the meat mag result in poor cooking
performance becausethe probe will sense
the oven air vs. the food temperature.
20
How to Set the Oven For Baking/Roasting When Using the Probe
(onsomemodels)
%
[]
Insert the probe fully into the food.
Plugthe probe into the outlet in the
oven. Make sure it's pushed all the
way in. Close the oven door. Make
sure the probe cable is not touching
the broil element.
F3] Touch the PROBEpad. Display will
show "Set Probe."
Touch the number pads to set
the desired internal food or meat
temperature. The maximum internal
temperature for the food that you can
set is 200°F.
Fb] Touch the BAKE pad.
[] Touch the number pads to set
the desired oven temperature.
[] Touch the STARTpad.
Thedisplay will flash if the probe is inserted
into the outlet and gou have not set a probe
temperature and touched the STARTpod.
After the internal temperature of the
food reaches 100°F,the changing internal
temperature will be shown in the display.
[-_ When the internal temperature of the
food reaches the number you have
set, the probe and the oven turn off
and the oven control signals.To stop
the signal,touch the CLEAR/OFFpad.
Usehot pads to remove the probe
from the food. Do not use tongs
to pull on it-they might damage it.
_,If the probe is removed from the oven
while probe cooking, the oven will not
automaticallg turn off.
To change the oven temperature during
the Bake/Roastcycle, touch the BAKEpod
and then the number pods to set the new
temperature.
_,Youcon use the Kitchen Timer even
though gou cannot use timed oven
operations while using the probe.
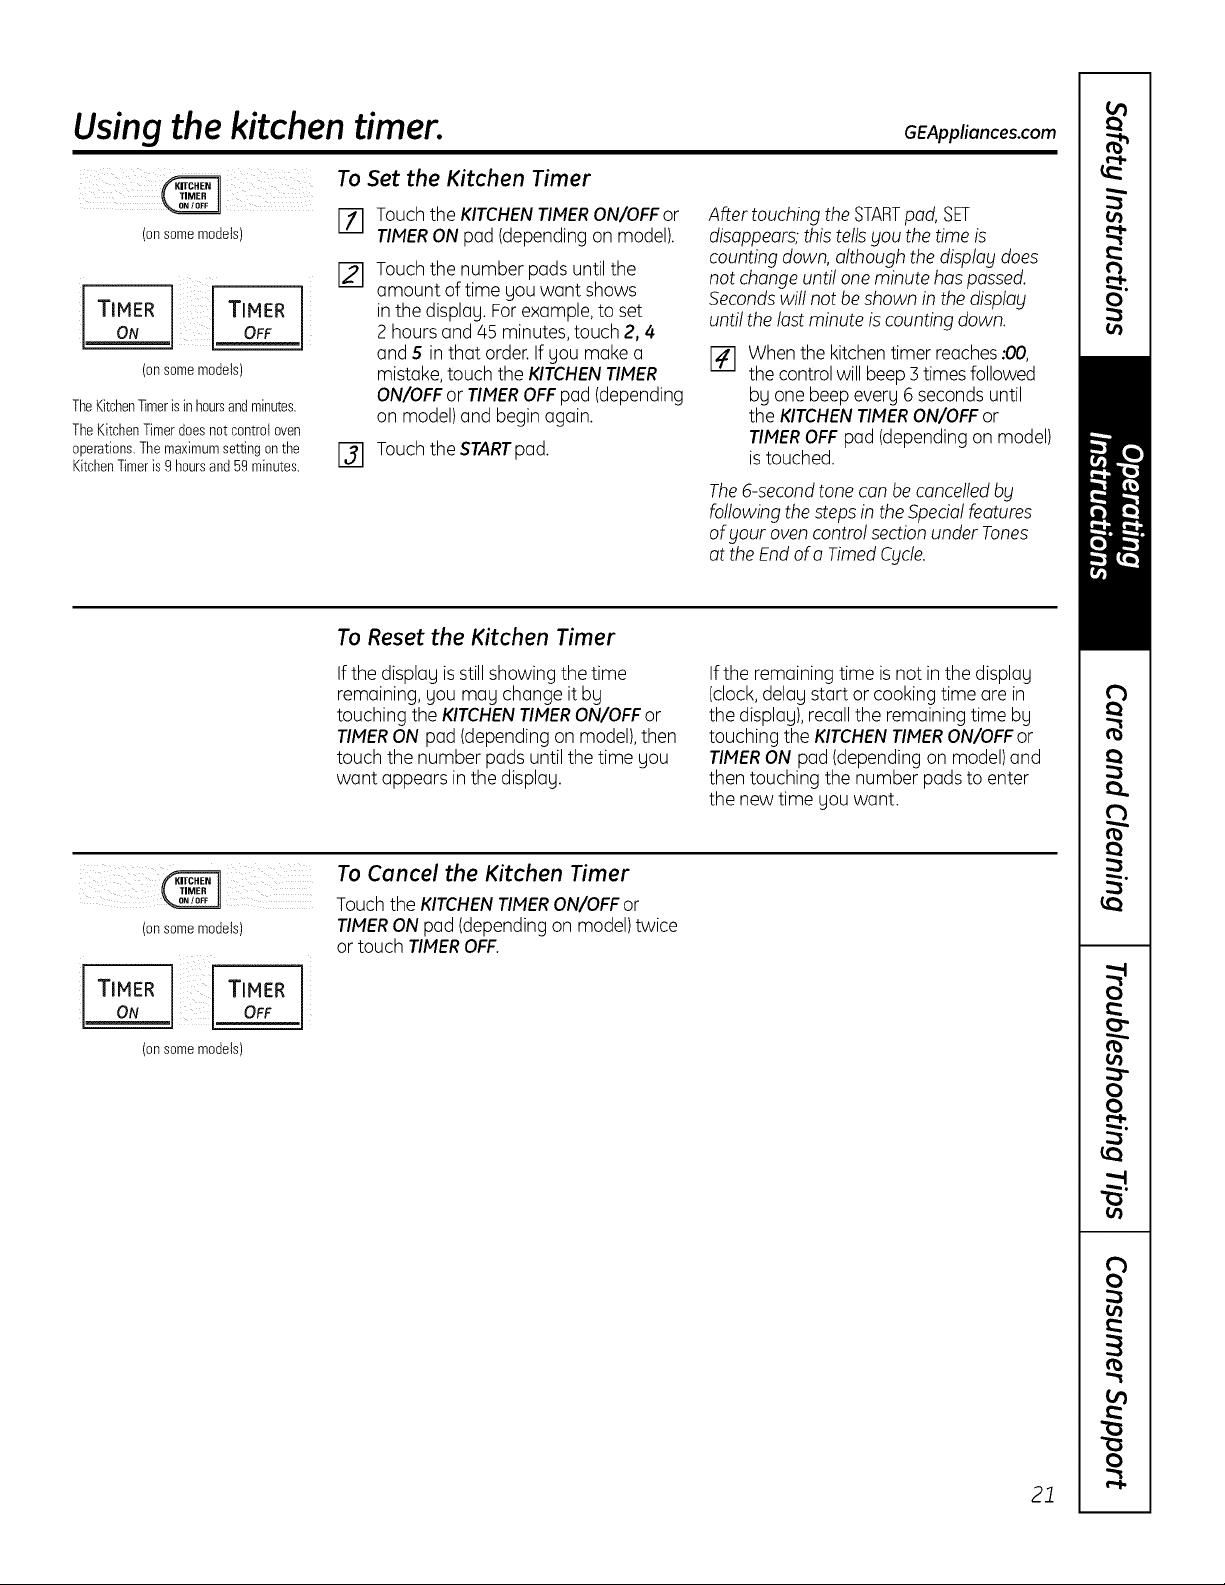
Usingthe kitchen timer. OEApp,ionces.com
(on some models)
I
TIMER TIMER
ON OFF
(on some models)
TheKitchen_mer is in hoursandminutes.
TheKitchenTimerdoesnot control oven
operations.The maximumsettingonthe
KitchenTimeris g hoursand 59 minutes.
To Set the Kitchen Timer
%
[]
Touch the KITCHENTIMERON/OFF or
TIMERON pod (depending on model).
Touch the number pads until the
amount of time gou want shows
in the display. Forexample, to set
2 hours and 45 minutes,touch 2, 4
and 5 in that order. If you make a
mistake, touch the KITCHENTIMER
ON/OFFor TIMEROFFpad (depending
on model) and begin again.
F3] Touch the STARTpad.
After touching the STARTpod, SET
disappears;this tells gou the time is
counting down, although the displo_ldoes
not change until one minute has passed.
Secondswill not beshown in the displo_l
until the last minute is counting down.
[] When the kitchen timer reaches :00,
the control will beep 3 times followed
bg one beep every 6 seconds until
the KITCHENTIMERON/OFFor
TIMEROFFpad (depending on model)
is touched.
The&second tone can be cancelledby
following the steps in the Spedal features
of gout oven control section under Tones
at the Endof o TimedCgcle.
To Reset the Kitchen Timer
If the display is still showing the time
remaining, Uoumau change it bu
touching the KITCHENTIMERON/OFFor
TIMERON pad (depending on model),then
touch the number pads until the time you
want appears in the displGy.
If the remaining time is not in the display
(clock,delay start or cooking time are in
the display), recall the remaining time by
touching the KITCHENTIMERON/OFFor
TIMERON pad (depending on model) and
then touching the number pads to enter
the new time you want.
(on some models)
I TIMER
ON
TIMER
OFF
(on some models)
To Cancel the Kitchen Timer
Touchthe KITCHENTIMERON/OFF or
TIMERON pod (depending on model) twice
or touch TIMEROFF.
21

Adjust the oven thermostat--Do it yourself!
You may find that your new oven cooks differentlbl than the one it replaced. Use your new oven for a few weeks
to become more familiar with it. If blOUstill think blour new oven is too hot or too cold, blOUcan adjust the
thermostat blourself.
Do not use thermometers, such as those found in grocery stores, to check the temperature setting of blour oven.
These thermometers mabl varb120-40 degrees.
NOTE: This adjustment will only affect baking and roasting temperatures; it will not affect broiling or self-cleaning
temperatures. The adjustment will be retained in memorbl after a power failure.
{i_(_i_!/_ii/!_}_i_i__ _i__i__i_i!i/_/ii
{} 16-1E] F1r-qF1 ;i{¸
(onsomemodels)
QQEE)EE)EE)
CE)GEE)EE)EE)
(on some models)
To Adjust the Thermostat
F_ Touch the BROILHI/LO and BAKE
pads at the same time until the
display shows SR
[] Touch the BAKEpad. A two-digit
number shows in the display.
Touch BAKEagain to alternate
between increasing and decreasing
the oven temperature.
To adjust the upper oven thermostat,
touch the upper oven BAKE pad. To
adjust the lower oven thermostat,
touch the lower oven BAKE pad.
The oven temperature can be
adjusted up to (+)35°F hotter or
(-)35°F cooler.Touch the number pads
the same way you read them.
For example, to change the oven
temperature 15°F,touch 1 and 5.
When you have made the adjustment,
touch the STARTpad to go backto
the time of day display. Use your
oven as you would normally.
The type of margarine will affect baking performance!
Most recipes for baking have been developed using high-@t products such as butter or margarine (80% fat).
If blOUdecrease the fat, the recipe mabl not give the same results as with a higher#at product.
Recipe failure can result if cakes, pies, pastries, cookies or candies are made with low-fat spreads.
The lower the fat content of a spread product, the more noticeable these differences become.
Federalstandards require products labeled "margarine" to contain at least 80% fat by weight. Low-fat spreads, on the
other hand, contain lessfat and more water. The high moisture content of these spreads affects the texture and flavor of
baked goods. For best results with your old favorite recipes,use margarine, butter or stick spreads containing at least 70%
vegetable oil.
22
Usingthe convectionoven. somemode s;
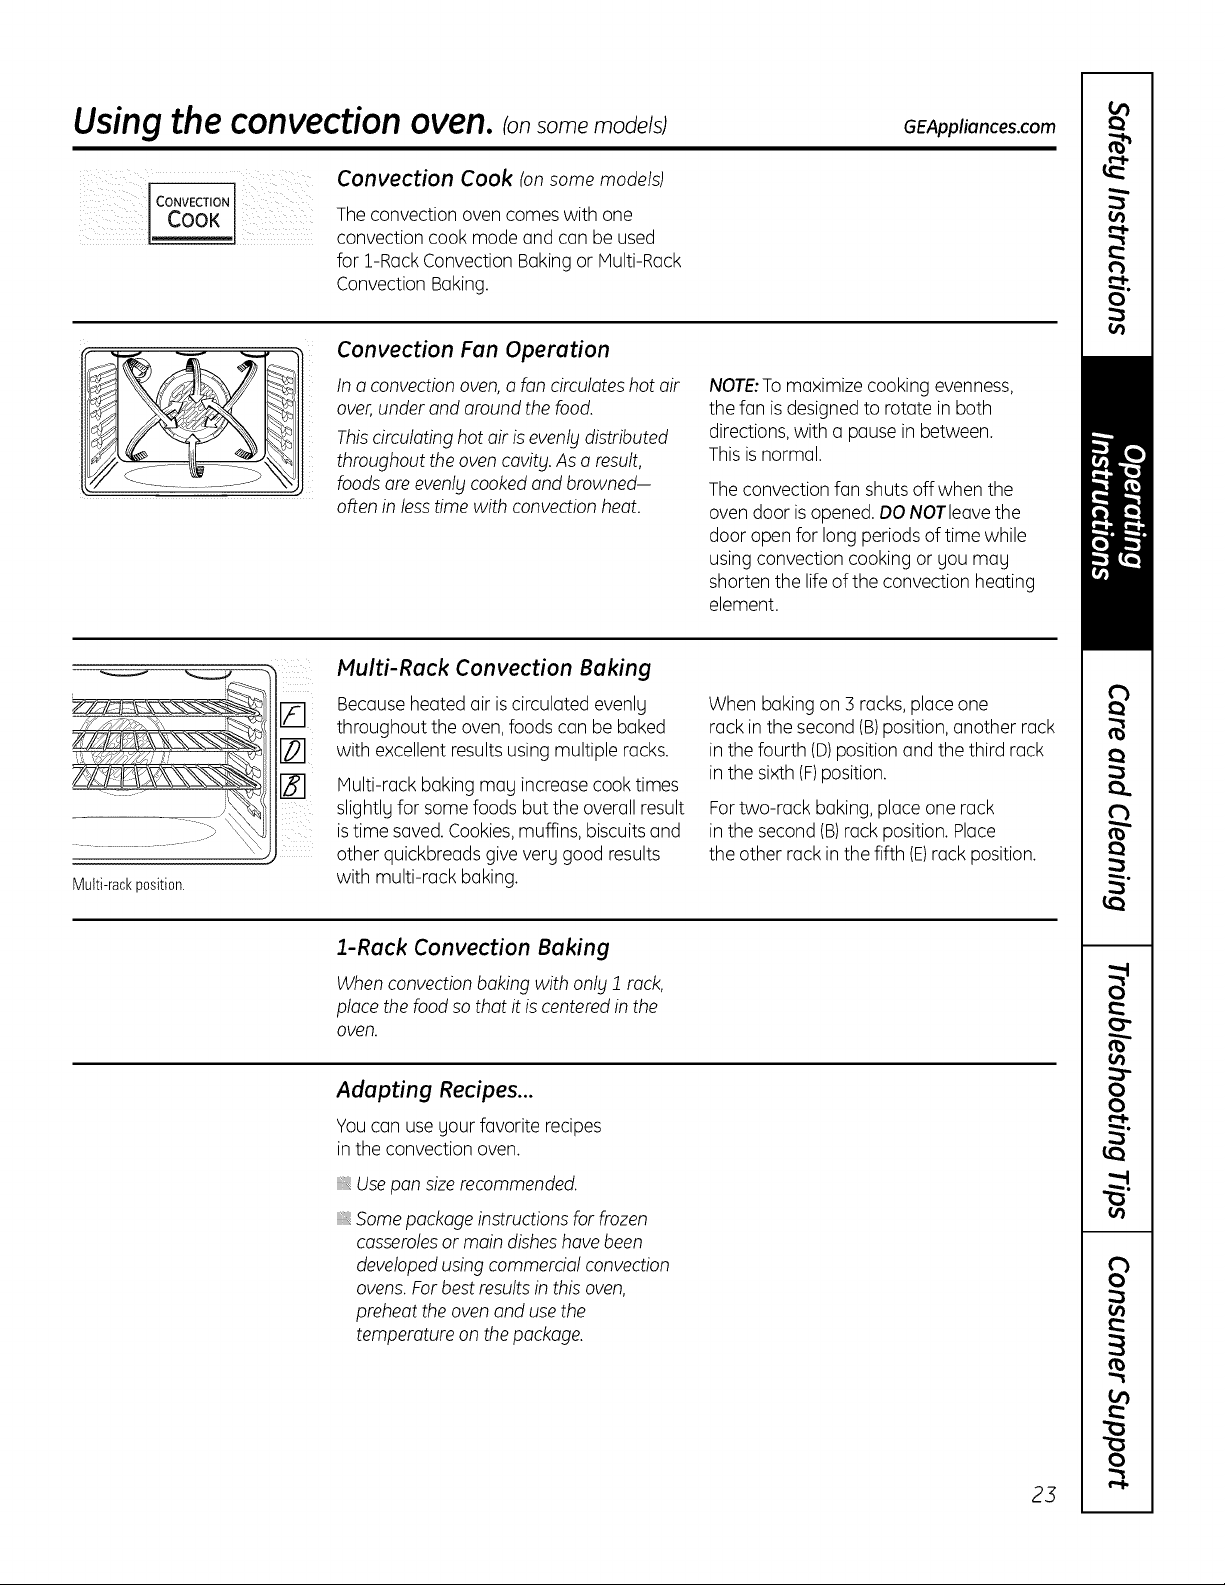
Convection Cook (on some models)
CONVECTION
The convection oven comes with one
convection cook mode and can be used
for Z-RackConvection Baking or Multi-Rack
Convection Baking.
GEApplionces.com
Convection Fan Operation
In a convection oven, a fan circulateshot air
over,under and around the food.
Thiscirculating hot air is evenlg distributed
throughout the oven cavitg. As a result,
foods ore evenl;j cooked and browned-
often in less time with convection heat.
NOTE:To maximize cooking evenness,
the fan is designed to rotate in both
directions,with a pause in between.
Thisis normal.
The convection fan shuts offwhen the
oven door is opened. O0 NOTleave the
door open for long periods of time while
using convection cooking or you mag
shorten the life of the convection heating
element.
Multi-rack position.
Multi-Rack Convection Baking
Because heated air is circulated evenly
[] throughout the oven, foods can be baked
[] with excellent results using multiple racks.
Z] Multi-rack baking may increase cook times
slightl9 for some foods but the overall result
is time saved. Cookies,muffins, biscuitsand
other quickbreads give ver9 good results
with multi-rack baking.
When baking on ] racks, place one
rack in the second (B)position, another rack
in the fourth (D)position and the third rack
in the sixth (F)position.
For two-rack baking, place one rack
in the second (B)rack position. Place
the other rack in the fifth (E)rack position.
1-Rack Convection Baking
When convection baking with only J rack,
place the food so that it is centered in the
oven.
Adapting Recipes...
Youcan use gour favorite recipes
in the convection oven.
Usepan sizerecommended.
Somepackage instructions for frozen
casserolesor main dishes have been
developedusing commercial convection
ovens.For best results in this oven,
preheat the oven and use the
temperature on the package.
23
Usingthe convectionoven. somemode s;
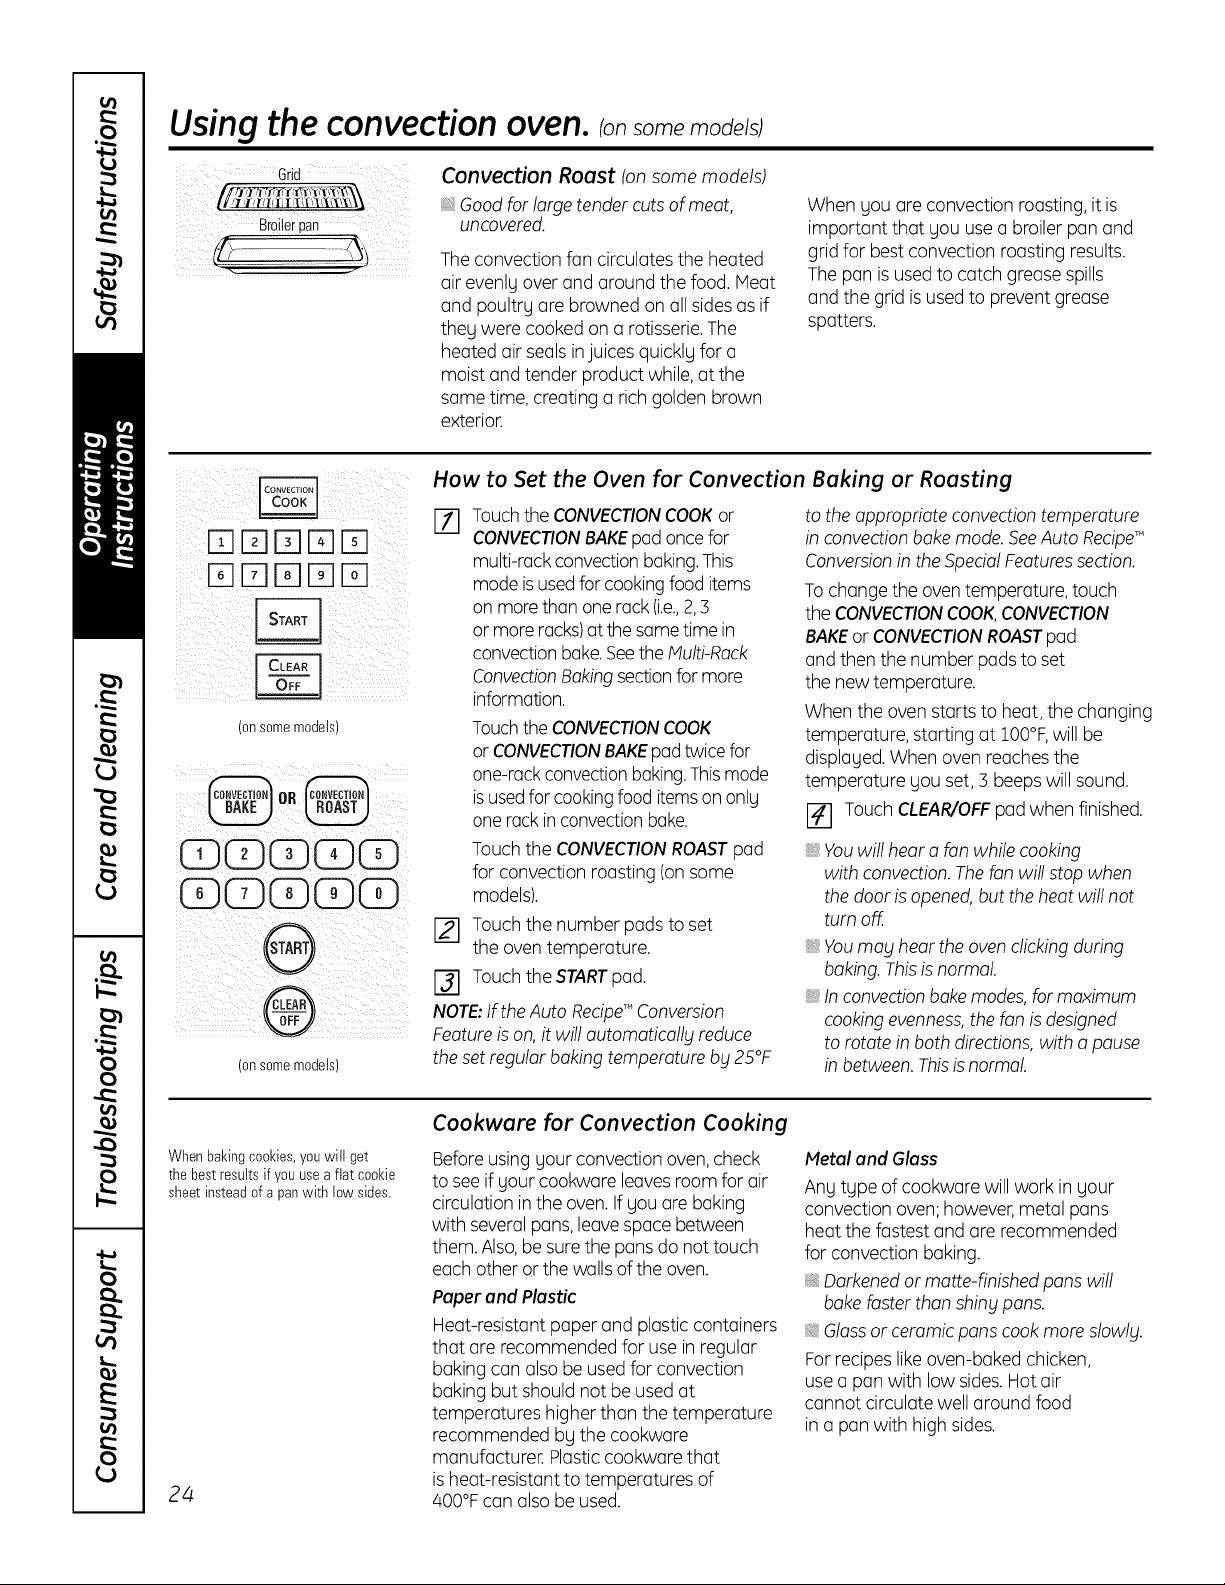
Convection Roast ton some models)
Good for large tender cuts of meat,
uncovered.
The convection fan circulates the heated
air evenly over and around the food. Meat
and poultry are browned on all sides as if
they were cooked on a rotisserie.The
heated air sealsinjuices quickly for a
moist and tender product while,at the
same time, creating a rich golden brown
exterior.
When you ore convection roosting, it is
important that you use a broiler pan and
grid for best convection roosting results.
The pan is used to catch grease spills
and the grid is used to prevent grease
spotters.
!_ _i_II_Iiiii_ i _i)_iiiii_il_iiii_
5rqrarqmES?::
iiii:E] E] E] E] E] 4/¸¸¸
_ i¸
_i___ii!__i_i_!_ii_i_iii!__i_!ili!:iiiiiiiii_
(onsomemodels}
(on some models}
How to Set the Oven for Convection Baking or Roasting
r-_ Touchthe CONVECTIONCOOKor to the appropriate convection temperature
CONVECTIONBAKEpad once for in convection bake mode. SeeAuto RecipeT"
multi-rack convection baking.This
mode is usedfor cookingfood items
on more than one rack (i.e.,2,3
or more rocks)atthe sametime in
convectionbake.Seethe Multi-Rock
ConvectionBakingsectionfor more
information.
Touchthe CONVECTIONCOOK
or CONVECTIONBAKEpad twice for
one-rackconvectionbaking.Thismode
is usedfor cookingfood itemson only
one rack in convection bake.
Conversionin the Spedal Featuressection.
To change the oven temperature, touch
the CONVECTIONCOOK,CONVECTION
BAKEor CONVECTIONROASTpad
and then the number pads to set
the new temperature.
When the oven starts to heat, the changing
temperature, starting at lO0°F,will be
displayed. When oven reaches the
temperature you set, 3 beeps will sound.
[] Touch CLEAR/OFFpad when finished.
Touch the CONVECTIONROASTpad
for convection roosting (onsome
models).
[] Touch the number pads to set
the oven temperature.
[] Touchthe STARTpad.
NOTE:If the Auto RecipeT"Conversion
Featureis on, it will automatically reduce
the set regular baking temperature bg 25°F
Youwill hear a fan while cooking
with convection.The fan will stop when
the door is opened, but the heat will not
turn off.
Youmay hear the oven clicking during
baking.Thisis normal.
, In convectionbake modes,for maximum
cookingevenness,the fan is designed
to rotate in both directions,with a pause
in between. Thisis normal.
Whenbakingcookies,youwill get
the best resultsif youusea flat cookie
sheet insteadof a pan with low sides.
24
Cookware for Convection Cooking
Before using your convection oven, check
to see if your cookware leavesroom for air
circulation inthe oven.If you ore baking
with severalpans,leave space between
them. Also,be sure the pans do not touch
each other or the walls of the oven.
Paper and Plastic
Heat-resistant paper and plastic containers
that are recommended for use in regular
baking can also be used for convection
baking but should not be used at
temperatures higher than the temperature
recommended by the cookware
manufacturer. Plasticcookware that
is heat-resistant to temperatures of
400°Fcan also be used.
Metal and Glass
Any type of cookware will work in your
convection oven;however, metal pans
heat the fastest and ore recommended
for convection baking.
Darkenedor matte-finished pans will
bake foster than shing pans.
Gloss or ceramic pans cook more slowlg.
For recipes like oven-baked chicken,
use a pan with low sides. Hot air
cannot circulate well around food
in a pan with high sides.

Usingthe timed features
for convectioncooking,ronsomemode/s; GEAppliances.com
You will hear a fan while cooking with these features. The fan will stop when the door is opened, but the heat
will not turn off.
NOTE: Foods that spoil easily--such as milk, eggs, fish, stuffings, poultrg and pork-should not be allowed to
sit for more than 1 hour before or offer cooking. Room temperature promotes the growth of harmful bacteria.
Be sure that the oven light is off becouse heat from the bulb will speed harmful bacteria growth.
i: ¸ : : :
CONVECTION
How to Set an Immediate Start and Automatic Stop
Pressdesiredconvectionfunction. Proceedto
step2 of Howto Seton ImmedioteStortond
AutomoticStop inUsingthe timed bokingond
roostingfeoturessection.
CONVECTION
cook
How to Set a Delayed Start and Automatic Stop
Pressdesiredconvectionfunction. Proceedto
step2 of Howto Seto Delo_jStort ond
AutomoticStop inUsingthe timed bokingond
roostingfeoturessection.
25

Usingthe convectionoven. somemode s;
Forbestresults when roasting large
turkeysand roasts,we recommend
using the probe includedin the
convectionoven.
DD[]DD
DD[]D[]
DD DD
DD DD
Tochangethe oven temperatureduring
the ConvectionRoastcycle, touch the
CONVECTIONCOOKpad andthen
touch the numberpadsto set the new
desiredtemperature.
How to Set the Oven for Convection Roosting when Using the Probe
CAUTIONI When the internal temperature of the
meat reaches the number gou have
set, the probe and the oven turn off
Toprevent burns, do not unplug the probe
from the oven outlet until the oven has
cooled.
%
[]
Placethe oven rack inthe position
that centers the food between the top
and bottom of the oven. Insert the
probe into the meat. Make sure it is
pushed all the wag in.
Plugthe probe into the outlet
in the oven. Make sure it is pushed
all the wag in. Closethe oven door.
[] Touch the PROBE pad.
[] Touch the number pads to setthe
desired internal meat temperature.
NOTE:The maximum internal temperature
for the food that gou can set is 200°F.
[] Touch the CONVECTIONCOOK pad.
[] Touch the number pads to setthe
desired oven temperature.
The displag will flash PROBEand the oven
control will signal if the probe is inserted
into the outlet,and gou have not set a probe
temperature and pressedthe STARTpad.
and the oven control signals.To stop
the signal,touch the CLEAR/OFFpad.
Use hot pads to remove the probe
from the food. Do not use tongs to pull
on it-theg might damage it.
NOTE:If the probe is removed from the
oven while probe cooking, the oven will not
outomoticollg turn off.
NOTES:
Youwill hear a fan while cooking with this
feature. Thefan will stop when the door is
opened,but the heat will not turn off.
, Youcon use the KitchenTimer even
though _lOUcannot use timed oven
operations.
, Neverleave your probe inside the oven
during a self-cleaningc_Icle.
Do not store the probe in the oven.
, Probeis not for use in Broil or Self-Cleon
functions.
, Fanonl_lrotates in one direction.
[Z] Touch the STARTpad.
When the oven starts to heat, the word
LO will be in the displag.
Afterthe internal temperature of the meat
reaches 100°F,the changing internal
temperature will be shown inthe displag.
Convection Roosting Guide
Beef
Pork
Lamb
Poultry
Meat Oven Temp.
RibRoast(4 to 8 Ibs.) Rare 325°F
Bone-InandBoneless Medium 325°F
BeefTenderloin(4to 6 Ibs.) Rare 425°F
BeefTenderloin(2to 3 Ibs.) Rare 425°F
Bone-In,Boneless(3to 5 Ibs.) 325°F
Bone-In(5to g Ibs.) Medium 325°F
Boneless(4to 7 Ibs.) Medium 375°F
Whole Chicken(5 to 7 Ibs.) 350°F
Turkey,Whole*
Unstuffed(10to 16 tbs.) 325°F
Unstuffed(18to 24 Ibs.) 325°F
TurkeyBreast(4to 6 Ibs.) 325°F
Internal Temp.
145°F
160°F
145°F
145°F
160°F
165°F
165°F
170°F
170°-180°F
170°-180°F
170°F
*Stuffed birds generally require 50-45 minutes additional roasting time. Shield legs and breast with foil to prevent
overbrowning and drying of skin.
26
Using the slow cook pizza, warming
and proofing features.
GEAppliances.com
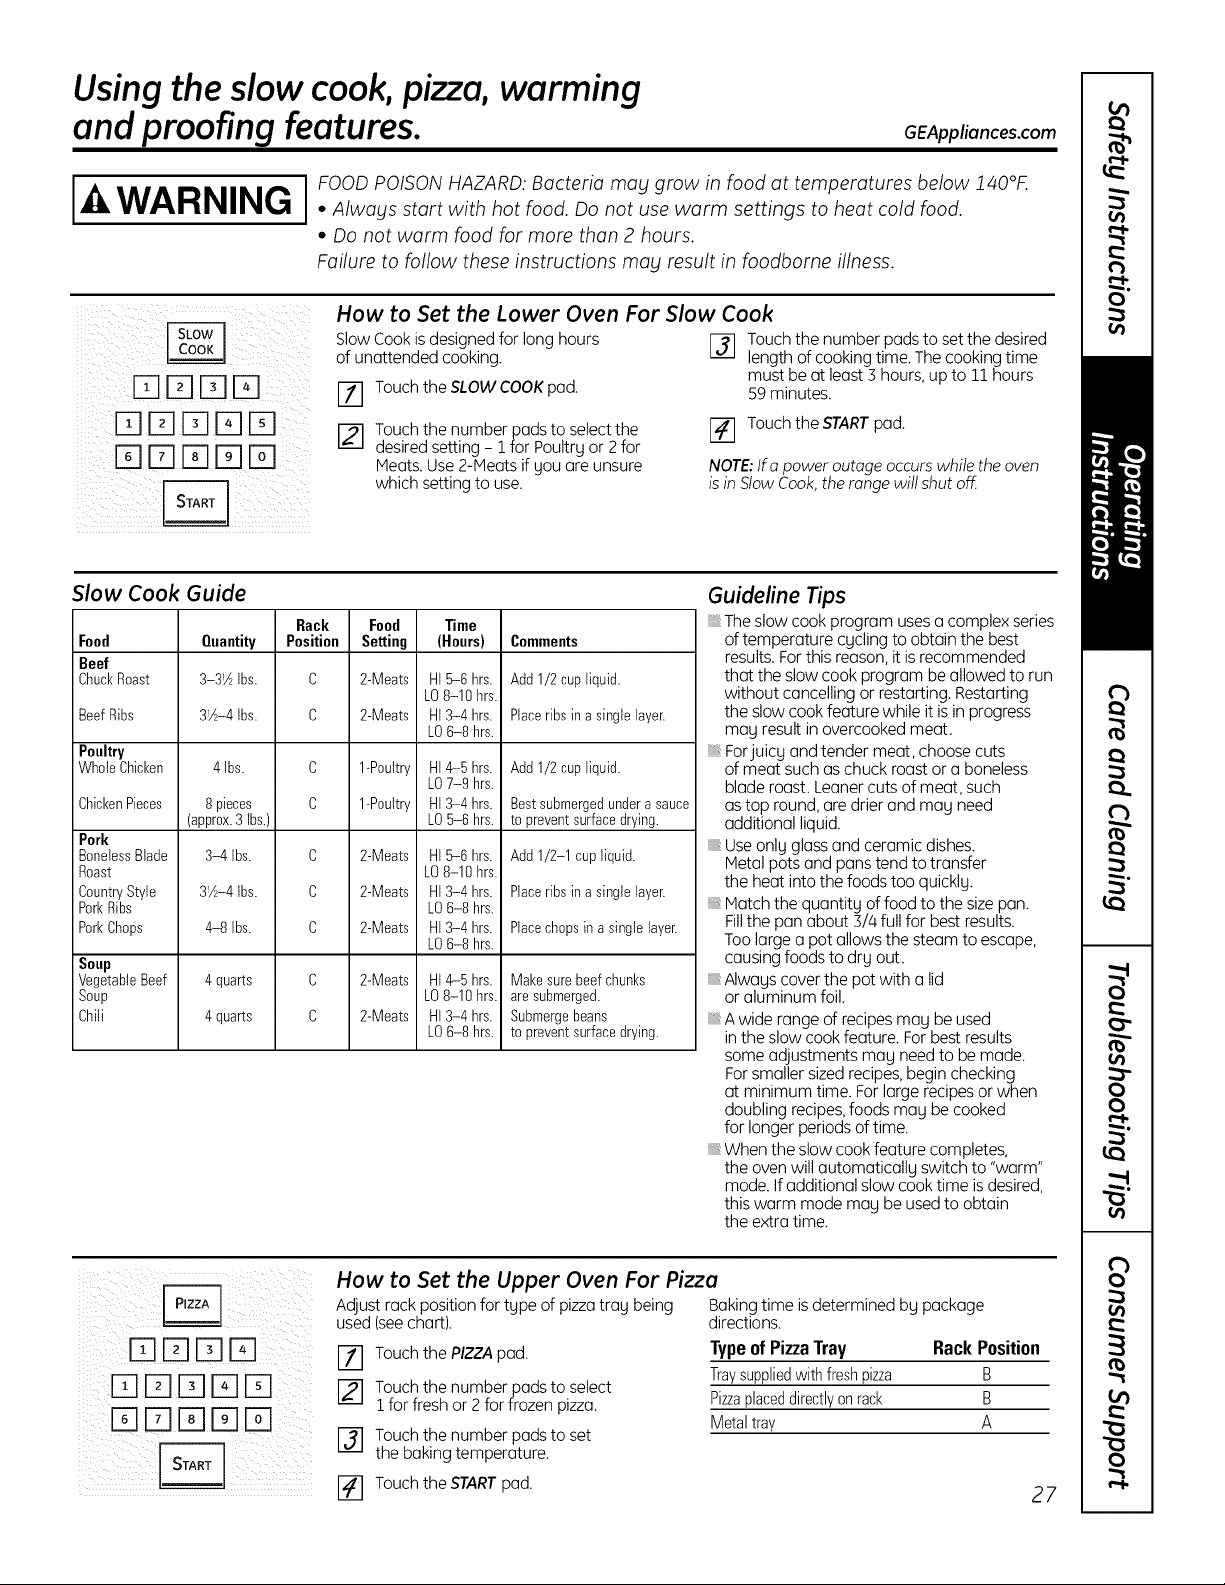
IA WARNING I OOD POISON HAZARD: Bacteria mag grow in food at temperatures below 140°£
• Always start with hot food. Do not use warm settings to heat cold food.
• Do not warm food for more than 2 hours.
Failure to follow these instructions may result in foodborne illness.
DE]DE3
E]E]IT1E3%
E3E3EEE]E}3
How to Set the Lower Oven For Slow Cook
SlowCook is designed for long hours
of unattended cooking.
I-i1 Touch the SLOWCOOK pad.
r2----]Touch the number pads to select the
desired setting - 1 for Poultrg or 2 for
Meats. Use 2-Meats if SOUare unsure
which setting to use.
F_l Touch the number pads to set the desired
length of cooking time. The cooking time
must be at least 3 hours, up to 11 hours
59 minutes.
[] Touch the STARTpad.
NOTE:Ira power outage occurs while the oven
is in Stow Cook,the range wilt shut off
Slow Cook Guide
Food
Beef
ChuckRoast
BeefRibs
Poultry
Whole Chicken
ChickenPieces
Pork
BonelessBlade
Roast
CountryStyle
PorkRibs
PorkChops
Soup
VegetableBeef
Soup
Chili
Rack Food Time
Quantity Position Setting (Hours)
3-31_ Ibs. C 2-Meats HI 5-6 hrs.
LO8-10 hrs.
31A-41bs. C 2-Meats HI 3-4 hrs.
LO6-8 hrs.
4 Ibs.
8 pieces
(approx.3 Ibs.)
3-4 Ibs.
31A-4Ibs.
4-8 Ibs.
4 quarts
4 quarts
C
C
C
C
C
C
C
1-Poultry HI 4-5 hrs.
LO7-9 hrs.
1-Poultry HI 3-4 hrs.
LO5-6 hrs.
2-Meats HI 5-6 hrs.
LO8-10 hrs.
2-Meats HI 3-4 hrs.
LO6-8 hrs.
2-Meats HI 3-4 hrs.
LO6-8 hrs.
2-Meats HI 4-5 hrs.
LO8-10 hrs.
2-Meats HI 3-4 hrs.
LO6-8 hrs.
Comments
Add 1/2 cupliquid.
Placeribs in a single layer.
Add 1/2 cupliquid.
Bestsubmergedundera sauce
to preventsurfacedrying.
Add 1/2-1 cup liquid.
Placeribs in a single layer.
Placechopsin a singlelayer.
Make sure beefchunks
are submerged.
Submergebeans
to preventsurfacedrying.
Guideline Tips
The slow cook program uses a complex series
of temperature cgcling to obtain the best
results. For this reason, it is recommended
that the slow cook program be allowed to run
without cancelling or restarting. Restarting
the slow cook feature while it is in progress
mag result in overcooked meat.
Forjuicg and tender meat, choose cuts
of meat such as chuck roast or a boneless
blade roast. Leaner cuts of meat, such
as top round, are drier and mag need
additional liquid.
Use onlg glass and ceramic dishes.
Metal pots and pans tend to transfer
the heat into the foods too quicklg.
Match the quantitg of food to the size pan.
Fillthe pan about 3/4 full for best results.
Too large a pot allows the steam to escape,
causing foods to drg out.
AIwags cover the pot with a lid
or aluminum foil.
A wide range of recipes mag be used
in the slow cook feature. For best results
some adjustments mag need to be made.
For smaller sized recipes, begin checking
at minimum time. For large recipes or when
doubling recipes, foods mag be cooked
for longer periods of time.
When the slow cook feature completes,
the oven willautomaticallg switch to "warm"
mode. Ifadditional slow cook time is desired,
this warm mode mag be used to obtain
the extra time.
iiiii ill iil !!ii
How to Set the Upper Oven For Pizza
Adjust rack position for tgpe of pizza trag being Baking time is determined bg package
used (seechart), directions.
[_ Touch the PIZZApad.
[] Touch the number pads to select
1for fresh or 2 for frozen pizza.
[_ Touch the number pads to set
the baking temperature.
Touch the STARTpad.
Type of Pizza Tray Rack Position
Traysuppliedwith freshpizza B
Pizzaplaceddirectlyon rack B
Metaltray A
27
Using the slow cook, pizza, warming and proofing features.
i L(I 111
ii i [ iiiii_i_
START
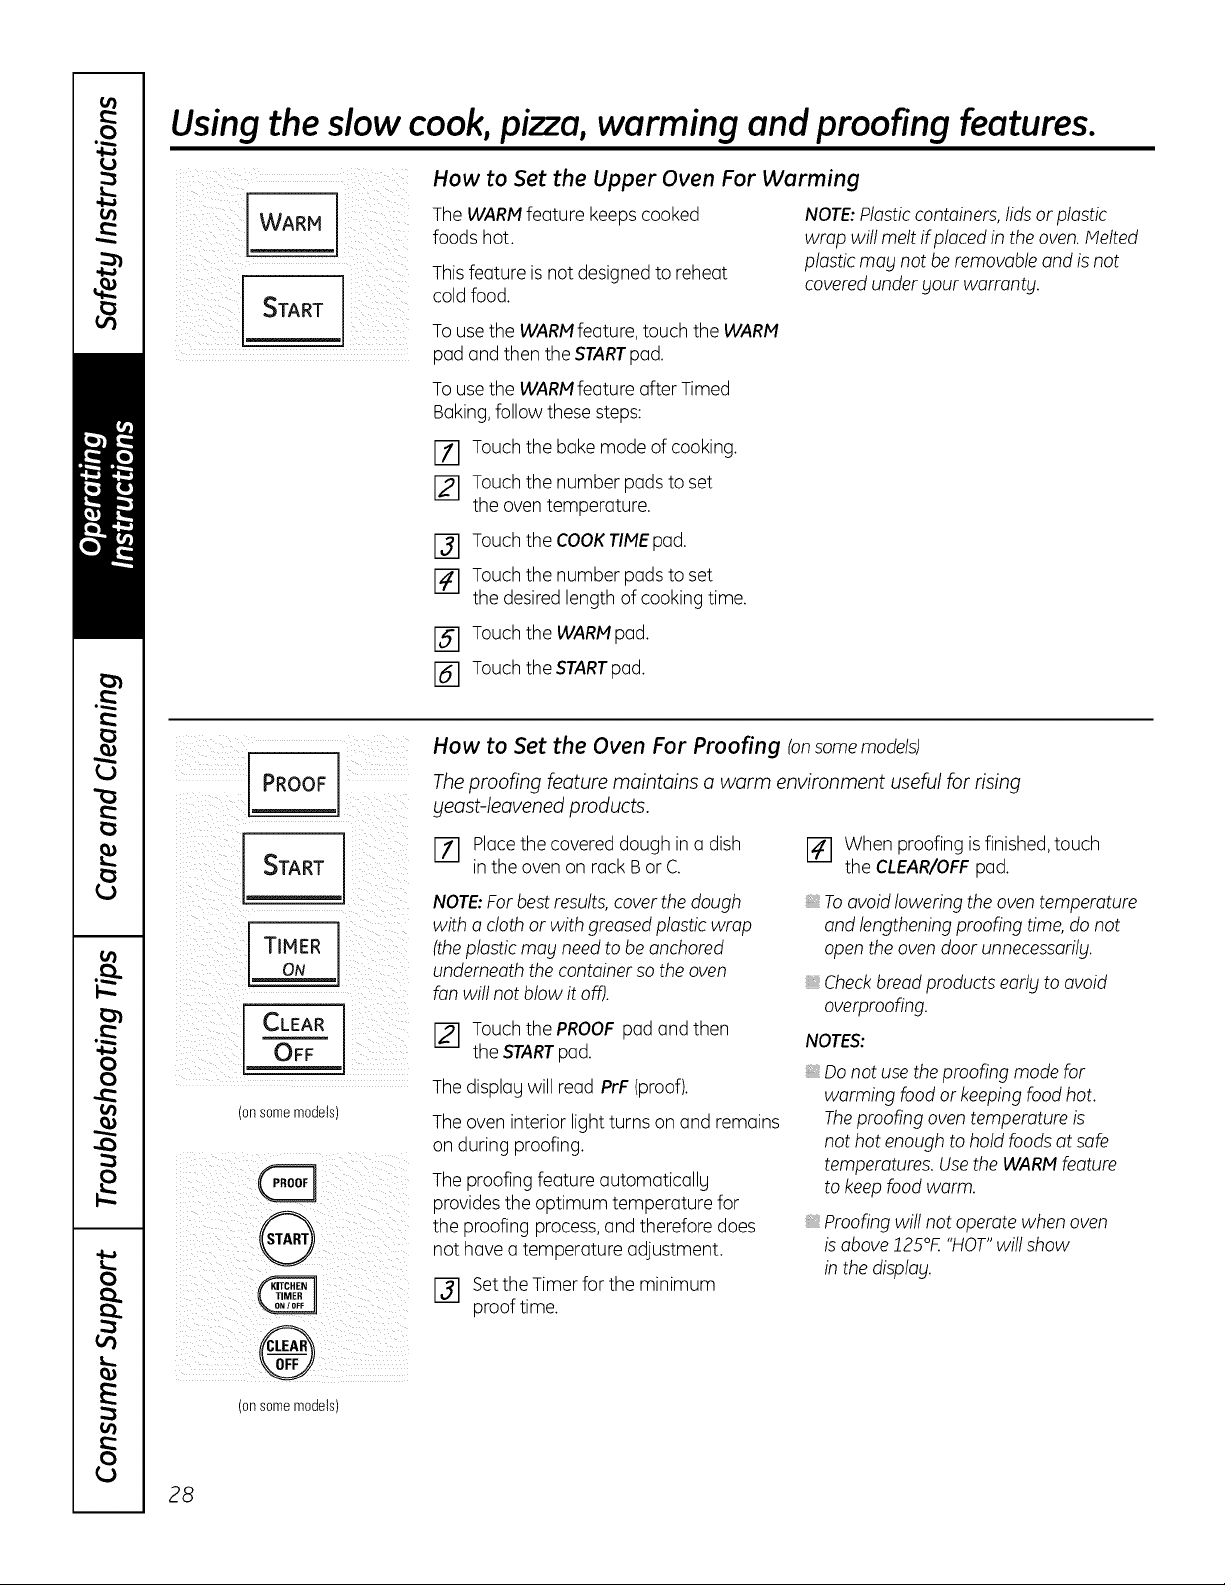
How to Set the Upper Oven For Warming
The WARM feature keeps cooked
foods hot.
Thisfeature is not designed to reheat
cold food.
To use the WARMfeature, touch the WARM
pad and then the STARTpad.
To use the WARM feature after Timed
Baking,follow these steps:
F-_ Touch the bake mode of cooking.
[] Touch the number pads to set
the oven temperature.
F31 Touch the COOKTIMEpad.
[] Touch the number pads to set
the desired length of cooking time.
[] Touch the WARMpad.
_-1 Touch the STARTpad.
NOTE:Plastic containers, lids or plastic
wrap will melt if placed in the oven. Melted
plastic mag not be removable and is not
coveredunder your warranty.
L
PROOF l
TIMER
ON
CLEAROFF
(onsomemodels}
ii ii
How to Set the Oven For Proofing Ion some models)
The proofing feature maintains o worm environment useful for rising
yeast-leavened products.
F-_ Placethe covered dough in a dish
in the oven on rack B or C.
When proofing is finished,touch
the CLEAR/OFFpad.
NOTE:For best results, cover the dough
with a cloth or with greased plastic wrap
(the plastic mag need to be anchored
underneath the container so the oven
fan will not blow it off).
Touch the PROOF pad and then
the STARTpad.
The displag will read PrF (proof).
The oven interior light turns on and remains
on during proofing.
The proofing feature automaticallg
provides the optimum temperature for
the proofing process,and therefore does
not have a temperature adjustment.
F31 Set the Timer for the minimum
proof time.
To avoid lowering the oven temperature
and lengthening proofing time, do not
open the oven door unnecessarilg.
_,Checkbreadproducts earlg to avoid
overproofing.
NOTES:
, Do not use the proofing mode for
warming food or keepingfood hot.
Theproofing oven temperature is
not hot enough to hold foods at safe
temperatures. Usethe WARMfeature
to keep food warm.
Proofing will not operate when oven
is above 225°F. "HOT" will show
in the display.
(onsomemodels}
28
Using the self-cleaning upper and lower ovens.
GEAppliances.com
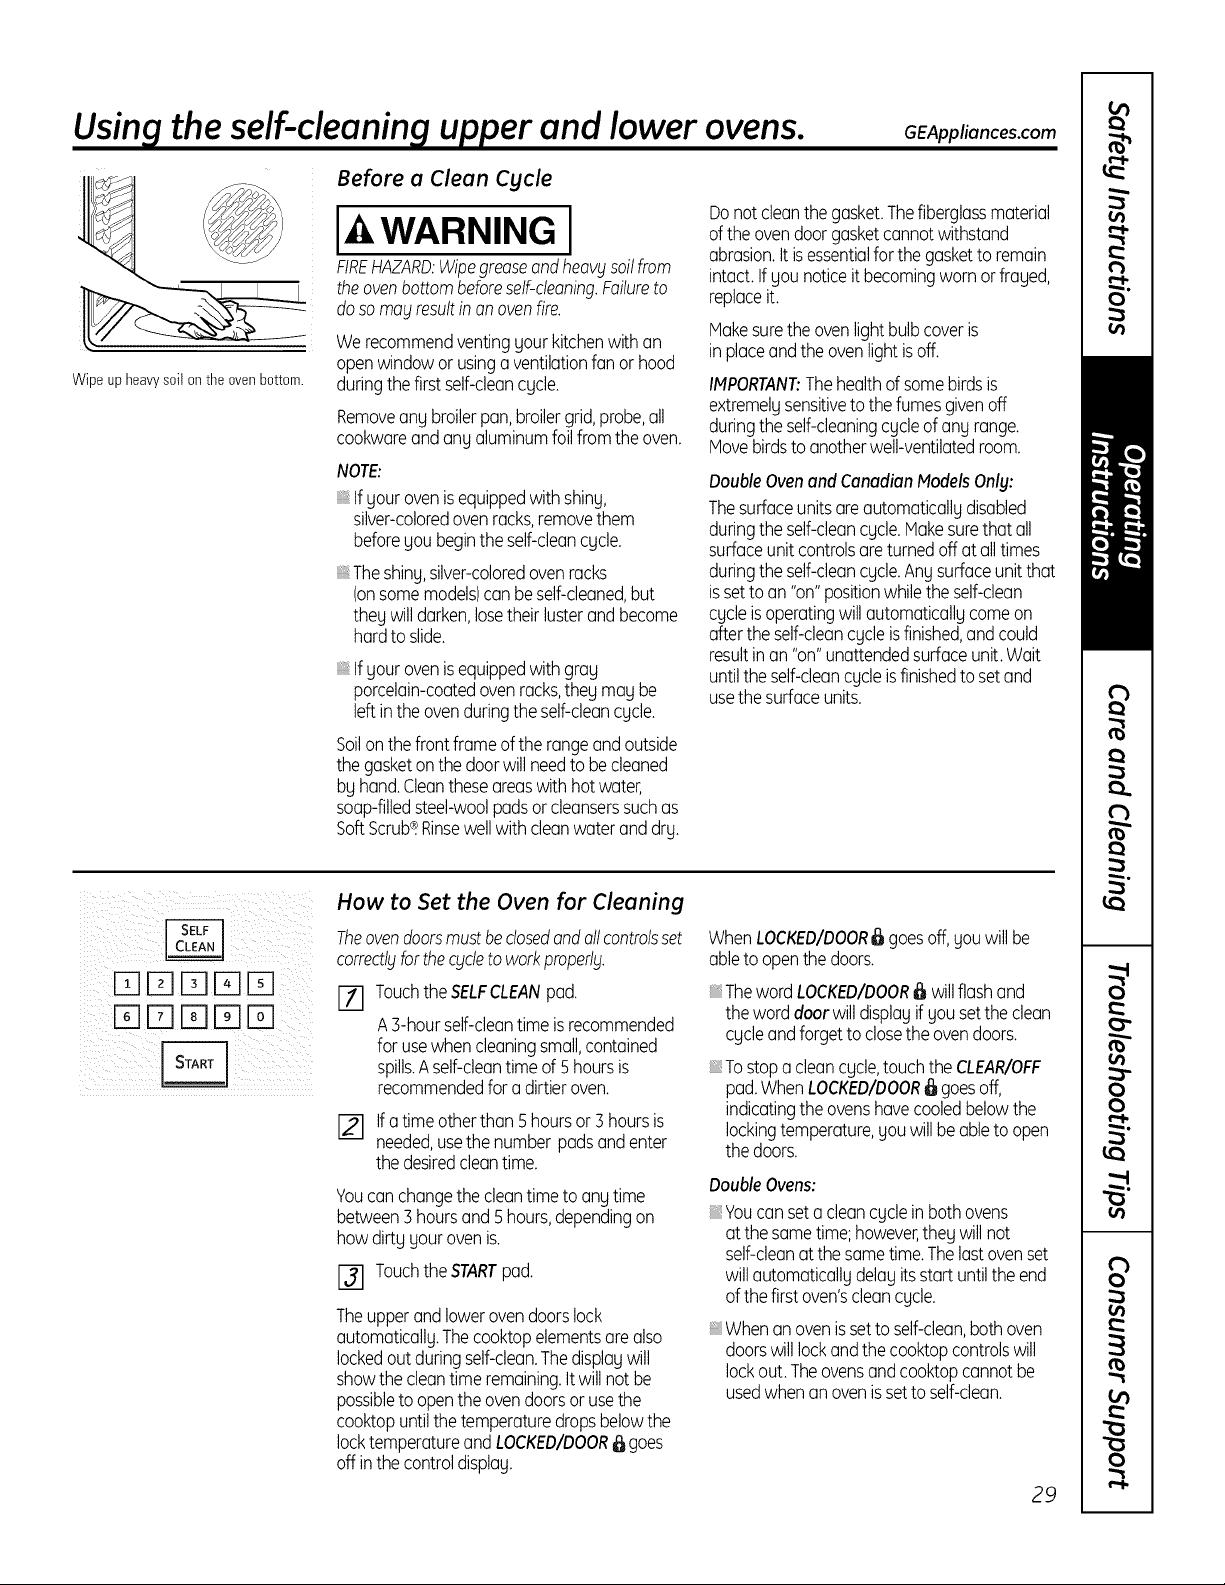
Wipe up heavysoil onthe oven bottom.
Before a Clean Cycle
I WARNING I
FIREHAZARD:Wipegreaseandheavblsoilfrom
theovenbottombeforeself-cleaning.Failureto
dosomoblresultin on ovenfire.
Werecommendventingyour kitchenwith an
openwindowor usinga ventilationfan or hood
duringthefirst self-cleancycle.
Removeany broilerpan,broilergrid,probe,all
cookwareandany aluminumfoil from the oven.
NOTE:
Ifyour ovenisequippedwith shiny,
silver-coloredovenracks,removethem
beforeyou beginthe self-cleancycle.
Theshiny,silver-coloredovenracks
(onsomemodels)can be self-cleaned,but
they willdarken,losetheirlusterandbecome
hardto slide.
Ifyour ovenisequippedwith gray
porcelain-coatedovenracks,they may be
left in theovenduringthe self-cleancycle.
Soilon the frontframeofthe rangeandoutside
thegasketonthe door will needto be cleaned
by hand.Cleanthese areaswithhot water,
soap-filledsteel-woolpadsor cleanserssuchas
SoftScrub®.Rinsewellwith cleanwateranddry.
Donot cleanthe gasket.Thefiberglassmaterial
of the ovendoorgasketcannotwithstand
abrasion.It isessentialfor the gasketto remain
intact.Ifyou noticeit becomingworn or frayed,
replaceit.
Makesurethe ovenlight bulbcoveris
inplaceandthe ovenlightis off.
IMPORTANT:Thehealthof somebirdsis
extremelysensitiveto the fumesgivenoff
duringthe self-cleaningcycleof any range.
Movebirdsto anotherwell-ventilatedroom.
DoubleOvenand CanadianModels Only:
Thesurfaceunitsare automaticallydisabled
duringthe self-cleancycle.Makesurethat all
surfaceunitcontrolsare turnedoff at all times
duringthe self-cleancycle.Any surfaceunitthat
issetto an "on"positionwhilethe self-clean
cycleisoperatingwillautomaticallycomeon
afterthe self-cleancycleisfinished,andcould
resultinan "on"unattendedsurfaceunit.Wait
untilthe self-cleancycleisfinishedto set and
usethe surfaceunits.
InqE] l-flrq Ffl
Drq Fflrql-q
How to Set the Oven for Cleaning
Theovendoorsmustbeclosedandallcontrolsset
correctlblforthechicleto workproperlbl.
[] Touchthe SELFCLEANpad.
AB-hourself-cleantimeis recommended
for usewhencleaningsmall,contained
spills.Aself-cleantimeof 5hoursis
recommendedfor a dirtieroven.
I--ffl Ifatime otherthan Shoursor Bhoursis
needed,usethe number padsand enter
the desiredcleantime.
Youcanchangethecleantime to any time
between3 hoursand 5hours,dependingon
how dirtyyour ovenis.
r-_ Touchthe STARTpad.
Theupperandlowerovendoorslock
automatically.Thecooktopelementsarealso
lockedout duringself-clean.Thedisplaywill
showthe cleantimeremaining.It willnot be
possibleto openthe ovendoorsor usethe
cooktopuntilthe temperaturedropsbelowthe
locktemperatureandLOCKEDIDOOR_ goes
off inthe controldisplay.
WhenLOCKED/DOOR_ goesoff,you willbe
ableto openthedoors.
Theword LOCKED/DOOR_ willflashand
the worddoor willdisplayif you setthe clean
cycleandforgetto closethe ovendoors.
To stop a clean cycle, touch the CLEAR/OFF
pad.When LOCKED/DOOR_ goes off,
indicating the ovens have cooled below the
locking temperature, you will be able to open
the doors.
DoubleOvens:
Youcanseta cleancyclein both ovens
at the sametime;however,they will not
self-cleanat the sametime.Thelastovenset
will automaticallydelay itsstart untilthe end
of the firstoven'scleancycle.
Whenanovenissetto self-clean,both oven
doorswilllockandthe cooktopcontrolswill
lockout. Theovensandcooktopcannot be
usedwhenanovenissetto self-clean.
29
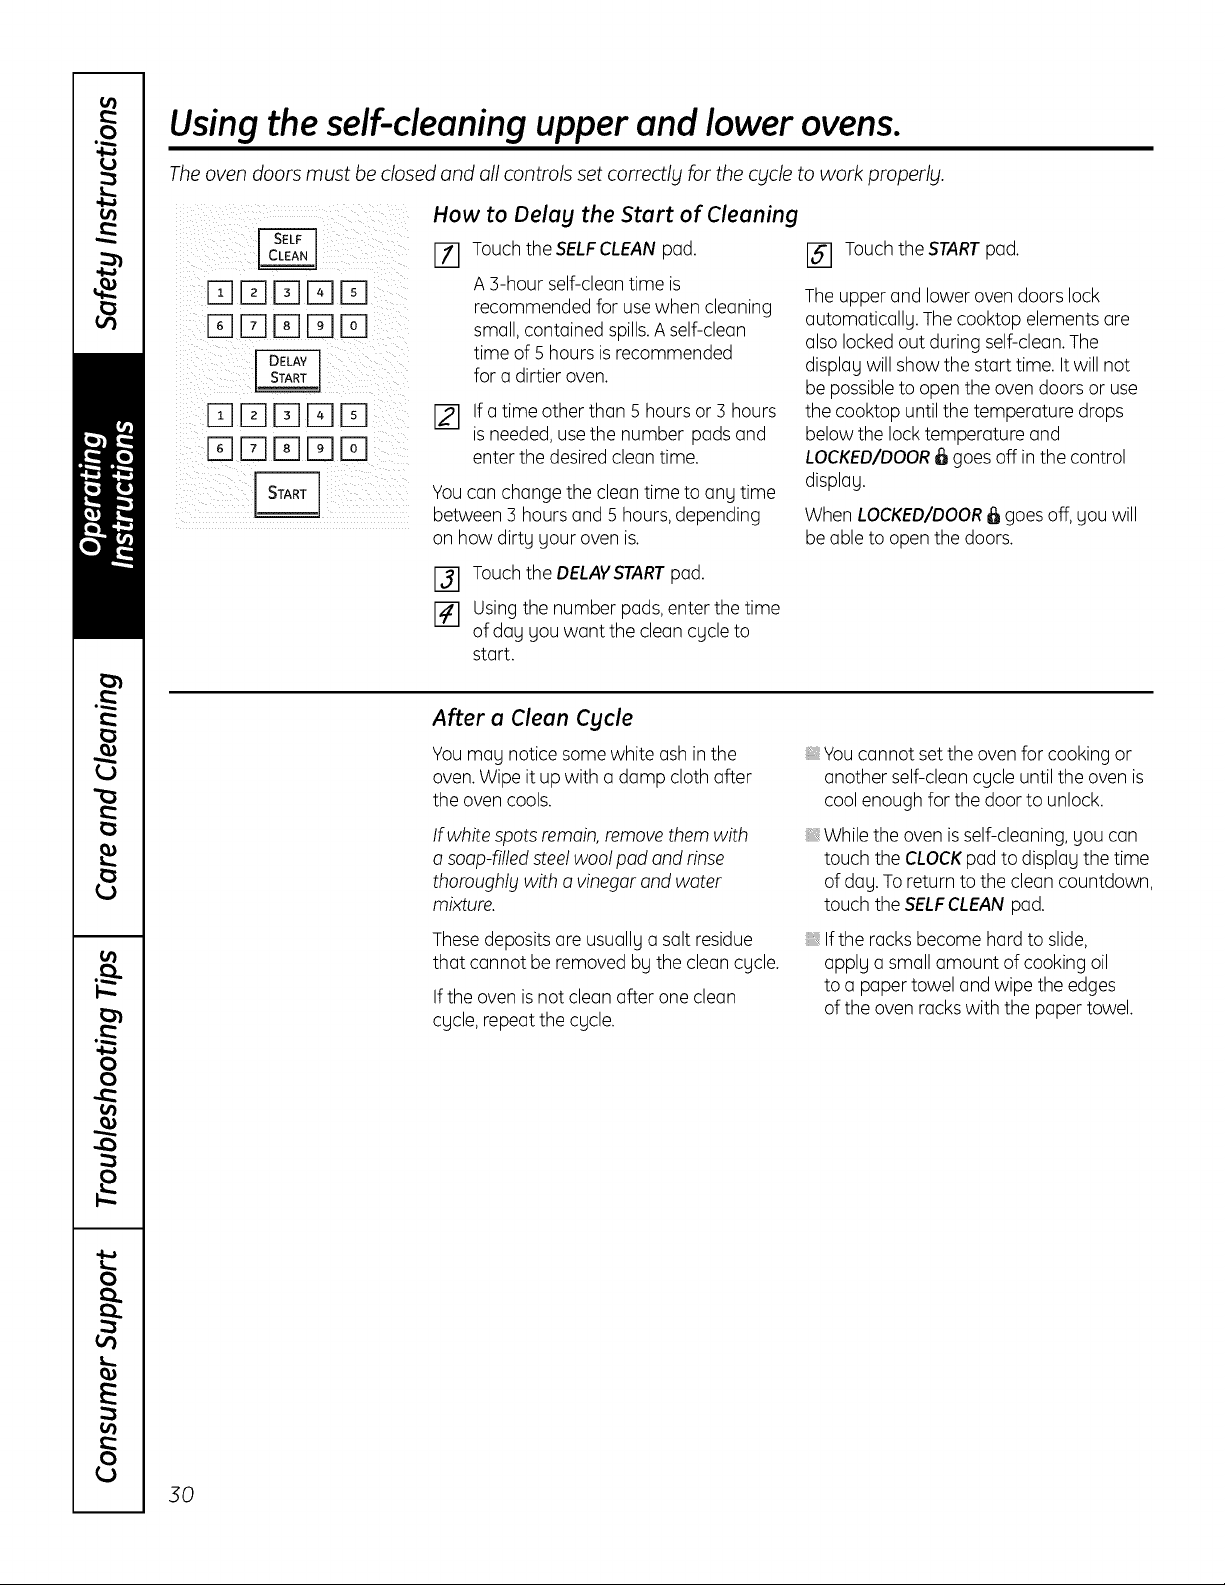
Usingthe self-cleaning upper and lower ovens.
The oven doors must be closed and all controls set correctly for the cycle to work properly.
[]DD[]D
DDDD
How to Delay the Start of Cleaning
F-_ Touch the SELFCLEAN pad.
A ]-hour self-clean time is
recommended for use when cleaning
small, contained spills.A self-clean
time of 5 hours is recommended
for a dirtier oven.
If a time other than 5 hours or 3 hours
is needed,use the number pads and
enter the desired clean time.
Youcan change the clean time to any time
between ] hours and 5 hours, depending
on how dirty your oven is.
F3] Touch the DELAVSTARTpad.
[] Using the number pads,enter the time
of day you want the clean cycle to
start.
[] Touch the START pad.
The upper and lower oven doors lock
automatically. The cooktop elements are
also locked out during self-clean. The
display will show the start time. It will not
be possible to open the oven doors or use
the cooktop until the temperature drops
below the lock temperature and
LOCKED/DOOR_ goes off in the control
display.
When LOCKED/DOOR _ goes off, you will
be able to open the doors.
After a Clean Cycle
Youmay notice some white ash in the
oven.Wipe it up with a damp cloth after
the oven cools.
If white spots remain, remove them with
a soap-filled steel wool pad and rinse
thoroughlg with a vinegar and water
mixture.
Thesedeposits are usually a salt residue
that cannot be removed by the clean cycle.
If the oven is not clean after one clean
cycle, repeat the cycle.
Youcannot set the oven for cooking or
another self-clean cycle until the oven is
cool enough for the door to unlock.
While the oven is self-cleaning, you can
touch the CLOCKpad to display the time
of day. To return to the clean countdown,
touch the SELFCLEAN pad.
Ifthe racks become hard to slide,
apply a small amount of cooking oil
to a paper towel and wipe the edges
of the oven racks with the paper towel.
30
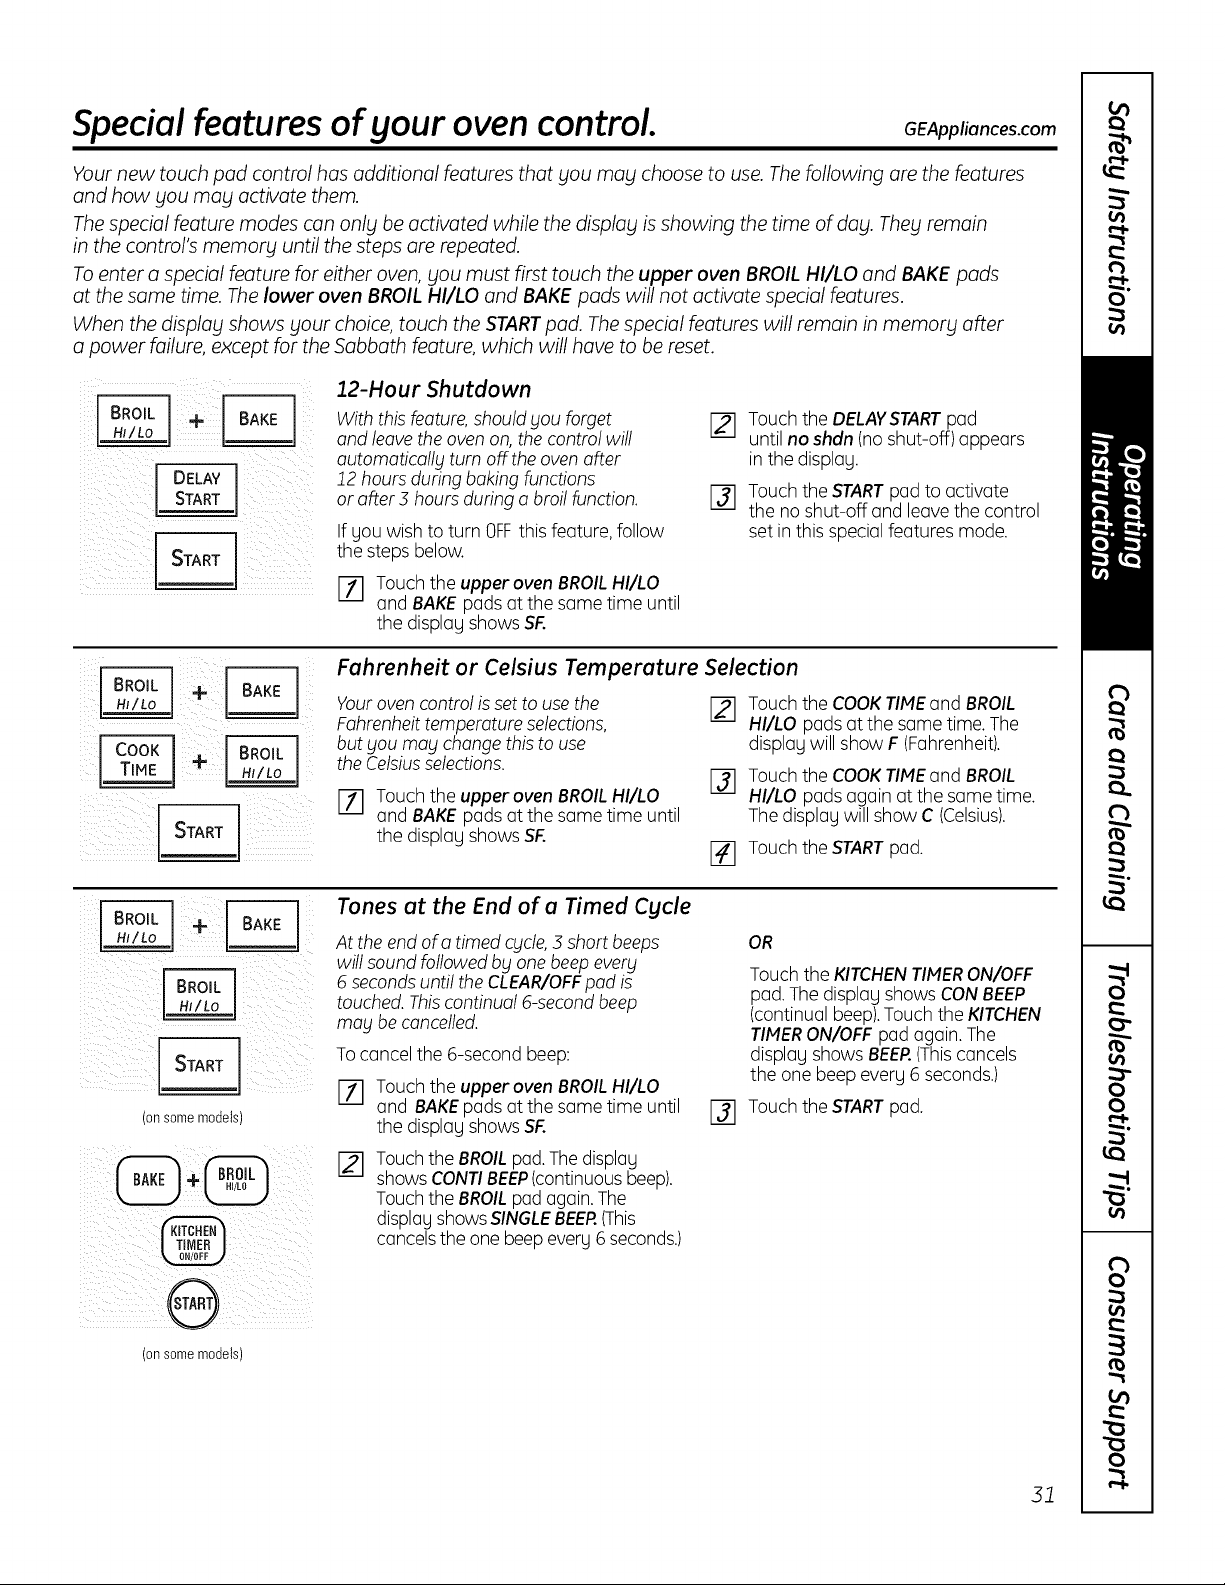
Special features of your oven control. GEApp,ionces.com
Your new touch pad control has additional features that you may choose to use. The following are the features
and how you may activate them.
The special feature modes can only be activated while the display is showing the time of day. They remain
in the control's memory until the steps are repeated.
To enter a special feature for either oven, you must first touch the upper oven BROIL HI/LO and BAKE pads
at the same time. The lower oven BROIL HI/LO and BAKE pads will not activate special features.
When the display shows your choice, touch the ,STARTpad. The special features will remain in memory after
a power failure, except for the Sabbath feature, which will have to be reset.
I DELAY I
12-Hour Shutdown
With this feature, should gou forget
and leave the oven on, the control will
automaticallg turn off the oven after
12 hours during baking functions
or after 3 hours during a broil function.
If gou wish to turn OFFthis feature, follow
the steps below.
F-_ Touch the upper oven BROIL HI/LO
and BAKEpods at the some time until
the displog shows SF.
[] Touch the DELAVSTARTpod
until no shdn (noshut-off) oppeors
in the displog.
F31 Touch the STARTpod to activate
the no shut-off and leave the control
set in this specialfeatures mode.
:!v i i
Fahrenheit or Celsius Temperature Selection
Your oven control isset to use the
Fahrenheit temperature selections,
but gou mug change this to use
the Celsius selections.
1-_ Touch the upper oven BROIL HI/LO
ond BAKEpods ot the some time until
the displog shows SF.
Touch the COOKTIMEond BROIL
HI/LO pods ot the some time. The
displog will show F (Fahrenheit).
F-_ Touch the COOK TIME and BROIL
HI/LO pods again at the same time.
The displag will show C (Celsius).
[] Touch the STARTpod.
_ ¸4"¸¸_
: i i___ii_i_!!_ i__iiii!i_!_(
i! ii__i__ _iI_I_I_!:_ii_i_.
(onsomemodels)
Tones at the End of a Timed Cycle
At the end of a timed cgcle, 3 short beeps
will sound followed bg one beep everg
6 seconds until the CLEAR/OFFpod is
touched. This continual 6-second beep
mog be cancelled.
To cancel the 6-second beep:
[] Touch the upper oven BROILHI/LO
and BAKEpads at the same time until
the displag shows SF.
Touch the BROILpod.The displog
shows CONTIBEEP(continuous beep).
Touch the BROILpod again.The
display shows SINGLEBEER(This
cancelsthe one beepevery 6 seconds.)
OR
Touch the KITCHENTIMERON/OFF
pod. The disploy shows CONBEEP
(continuol beep).Touch the KITCHEN
TIMERON/OFF pod oguin. The
displog shows BEER(Thiscancels
the one beep everg 6 seconds.)
[_] Touch the STARTpod.
(onsomemodels)
31

Special features of your oven control.
[ cook[
Tone Volume (on some models)
Thisfeature allows you to adjust the tone
volumes to o more acceptablevolume.
Thereore three possible volume levels.
F71 Touch the upper oven BROIL HI/LO
and BAKEpads at the same time until
the display shows SF.
[] Touch the COOKTIMEpad.
The display will show 2 BEEP.
This is the middle volume level.
Touch the COOKTIMEpad again.
The display will show 3 BEEP.This
is the loudest volume level.
Touch the COOKTIMEpad again.
The display will show 1 BEEP.This isthe
quietest volume level.
Foreach time the level is changed,
a tone will sound to provide an
indication of the volume level.
Choosethe desired sound level
(1BEER2BEER3 BEEP).
Touch the STARTpad to activate
the levelshown.
_i_ilili___ _i] ii/i_i_i_!I_
_i_ii_ _iII_I!
12-Hour, 24-Hour or Clock Blackout
Yourcontrol is set to use a 12-hour clock.
If you would prefer to have a 24-hour
military time clock or black out the clock
display, follow the steps below.
[] Touch the upper oven BROILHI/LO
and BAKEpads at the same time until
the display shows SF.
Touch the CLOCKpad once. The
display will show 12 hr. If this is the
choice you want, touch the START
pad.
Touchthe CLOCKpad again to change to
the 24-hour military time clock. The display
will show 24 hr. Ifthis is the choice you
want, touch the STARTpad.
Touchthe CLOCKpad again to black out
the clock display. The display will show
OFF. Ifthis is the choice you want, touch
the STARTpad.
NOTE:If the clock is in the black-out mode,
you will not be able to use the DelayStart
function.
iiiii__ilii__ii _i_ ___!_!__iiiiiii___ii_i!i__iii_i
iii_ / i ii _ :_ii!i
Auto Recipe TM Conversion (onsomemodels)
When using convectionbake,the
Auto RecipeT"Conversionfeature will
automatically convert entered regular
baking temperatures to convectionbaking
temperatures.
Thisfeature is activated so that the display
will show the actual converted (reduced)
temperature.For example,if you enter a
regular recipe temperature of 350°F and
touch the STARTpod, the display will show
CONand the converted temperature of
325°K
To deactivate the feature:
%
Touch the upper oven BAKEand
BROILHI/LO pads at the same time
until the display shows SF.
Touch the CONVECTIONCOOKpad.
The display will show CONON.Touch
the CONVECTIONCOOKpad again.
The display will show CONOFF.
[] Touch the STARTpad.
To reactivate the feature, repeat steps
1-3 above but touch the STARTpad when
CONON is inthe display.
_i i _i_ _i_!_
32
Cook and Hold (onsome models)
Yournew control has o cook-and-hold
feature that keeps cooked foods warm for
up to 3 hours after the cooking function is
finished.
To activate this feature, follow the steps
below.
[7] Touch the BAKE and BROILHI/LO
pads at the same time until the
display shows SF.
[] Touch the COOKINGTIME pad.
The display will show Hid OFF.
%
Touch the COOKINGTIME pad again
to activate the feature. The display will
show Hid ON.
Touch the STARTpad to activate
the cook-and-hold feature and
leave the control set in this
special features mode.
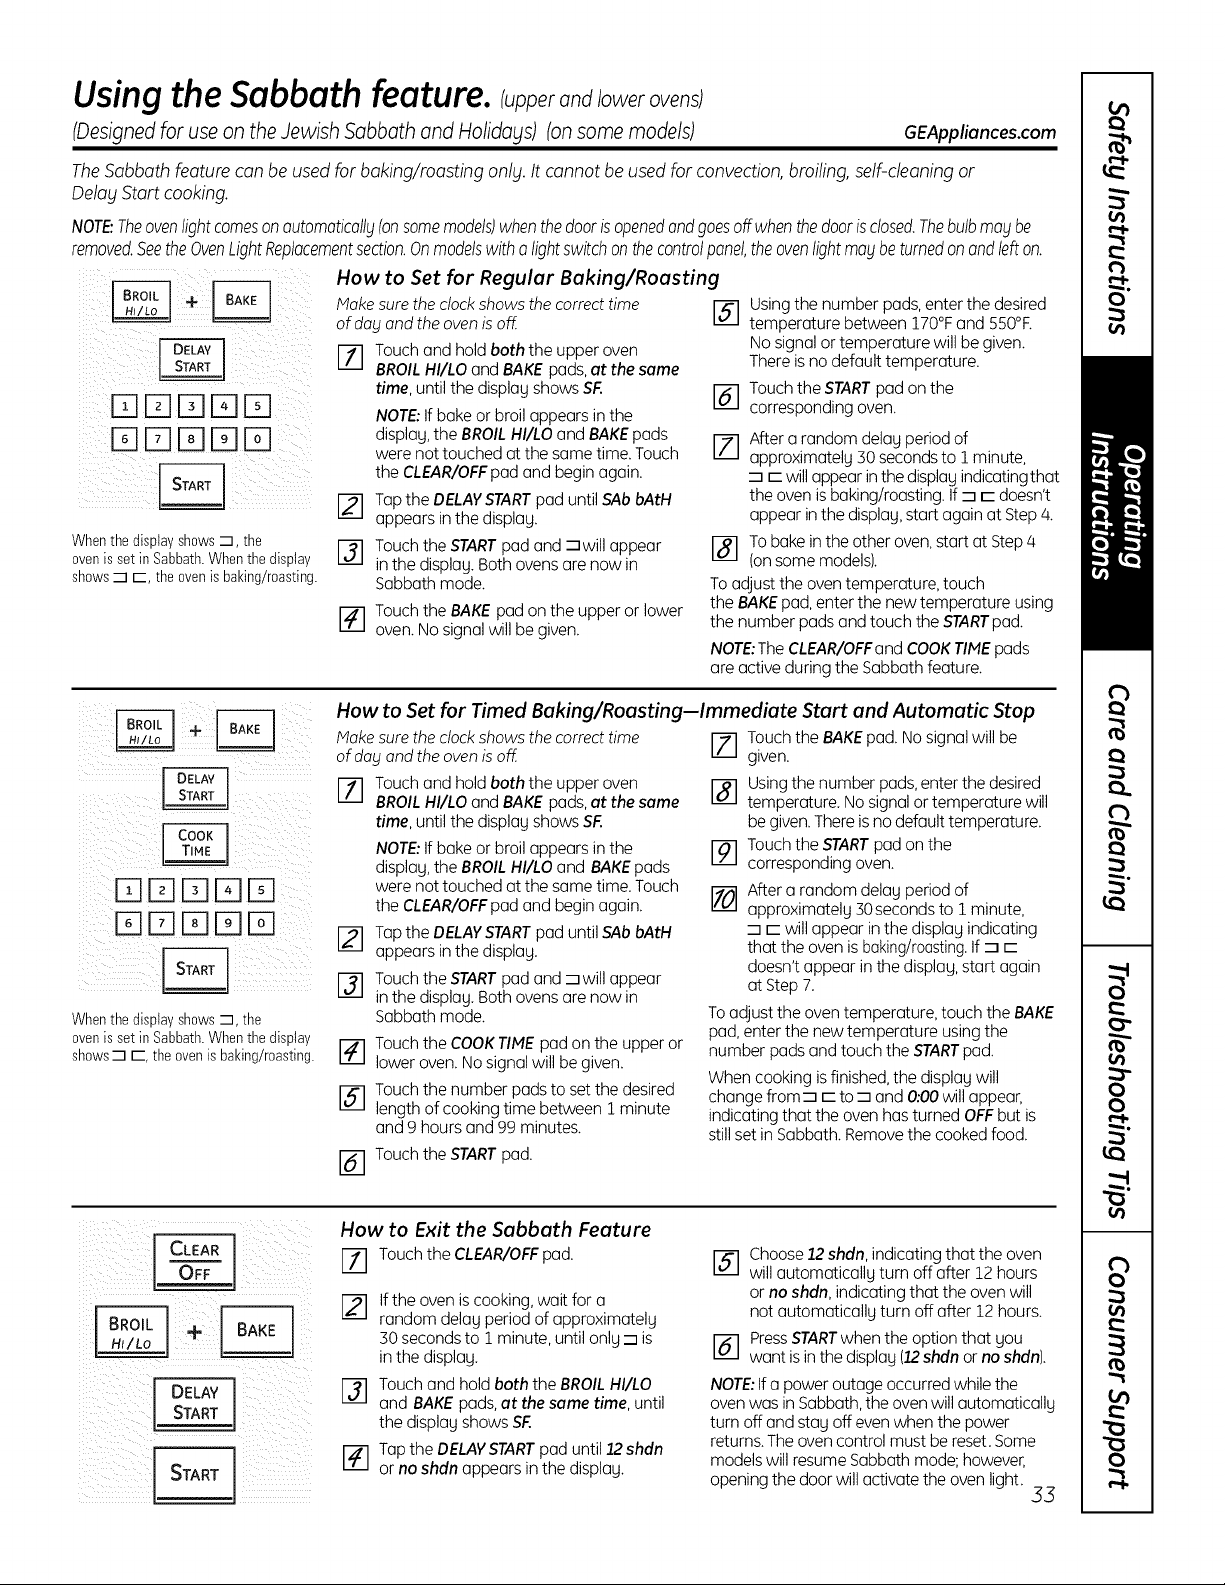
Usingthe Sabbath feature, cunnerand/owerovens
(Designedfor useon the Jewish Sabbathand Holidays) (onsome models) GEAppliances.com
TheSabbath feature can be used for baking/roosting onlg. It cannot beused for convection,broiling, self-cleaning or
DelayStart cooking.
NOTE:Theoven light comes on automatically (on some models) when the door is opened and goes off when the door is closed. The bulb may be
removed. See the Oven Light Replacement section. On models with a light switch on the control panel, the oven light may be turned on and left on.
How to Set for Regular Baking/Roasting
Hakesurethec ockshowsthecorrectt me@
of day and the oven is off
! i ii!i i i ii! ii iii
Whenthe display shows-m, the
ovenis set in Sabbath.Whenthe display
shows-m E, the ovenisbaking/r0asting.
Touch and hold both the upper oven
BROIL HI/LO and BAKE pads, at the some
time, until the display shows SF.
NOTE:If bake or broil appears in the
display, the BROILHI/LO and BAKEpads
were not touched at the same time. Touch
the CLEAR/OFFpad and begin again.
[] Tap the DELAVSTARTpad until SAb bAtH
appears in the displog.
Touch the STARTpod and mwill appear
in the displog. Both ovens ore now in
Sabbath mode.
[-4--] Touch the BAKE pod on the upper or lower
oven. No signal will be given.
Usingthe number pods, enter the desired
temperature between 170°Fand 550°F.
No signal or temperature will be given.
There is no default temperature.
Touch the STARTpod on the
corresponding oven.
After o random delog period of
opproximotelg 30 seconds to 1 minute,
-n r- will appear in the displog indicatingthat
the oven is baking/roosting. If -n E doesn't
appear in the displog, start again at Step/4.
[-_-] To bake in the other oven, start at Step/4
(on some models).
To adjust the oven temperature, touch
the BAKEpod, enter the new temperature using
the number pods and touch the STARTpod.
NOTE:TheCLEAR/OFFond COOKTIME pods
ore active during the Sabbath feature.
+
iilii iii!i iiiii!iiiIiii!il
[ [I-ql-qFq
Whenthe display shows-m, the
ovenis set in Sabbath.Whenthe display
shows-n E, the oven is baking/r0asting.
How to Set for Timed Baking/Roasting--Immediate Start and Automatic Stop
Hake sure the clock shows the correct time r_ Touch the BAKEpod. No signal will be
of day and the oven is off given.
rT]
%
[]
@
%
Touch and hold both the upper oven
BROIL HI/LO and BAKE pods, at the same
time, until the displog shows SF..
NOTE: Ifbake or broil appears in the
displog, the BROIL HI/LO and BAKE pods
were not touched at the some time. Touch
the CLEAR/OFF pod and begin again.
Top the DELAVSTARTpod until SAb bAtH
appears in the displog.
Touch the STARTpod and -n will appear
in the displog. Both ovens ore now in
Sabbath mode.
Touch the COOKTIME pod on the upper or
lower oven. Nosignal will be given.
Touch the number pods to set the desired
length of cooking time between :1minute
and 9 hours and 99 minutes.
Touch the STARTpod.
I--#-I Usingthe number pods, enter the desired
temperature. Nosignal or temperature will
be given.There is no default temperature.
r_ Touch the STARTpod on the
corresponding oven.
After o random delog period of
opproximotelg 30seconds to I minute,
-n r- will appear in the displog indicating
that the oven is baking/roasting.If -n r-
doesn't appear in the displog, start again
at Step 7.
To adjust the oven temperature, touch the BAKE
pod, enter the new temperature using the
number pods and touch the STARTpod.
When cooking isfinished, the displog will
change fromm r- to -n and 0:00 will appear,
indicating that the oven has turned OFFbut is
still set in Sabbath. Remove the cooked food.
How to Exit the Sabbath Feature
_7] Touchthe CLEAR/OFFpod.
Ifthe oven is cooking, wait for o
random delog period of opproximotelg
30 seconds to :1minute, until onlg -n is
in the displog.
[] Touch and hold both the BROILHI/LO
and BAKE pods, at the same time, until
the displog shows SF.
r-4--]Top the DELAVSTARTpod until/2 shdn
or no shdn appears in the displog.
[-_--] Choose 12 shdn, indicating that the oven
will outomoticollg turn off after 12 hours
or no shdn, indicating that the oven will
not outomoticollg turn off after 12 hours.
[_] PressSTARTwhen the option that gou
wont is in the displog (/2 shdn or no shdn).
NOTE:If o power outage occurred while the
oven was in Sabbath,the oven will outomoticollg
turn off and stag off even when the power
returns.The oven control must be reset. Some
models will resume Sabbath mode; however,
opening the door will activate the oven light.
33
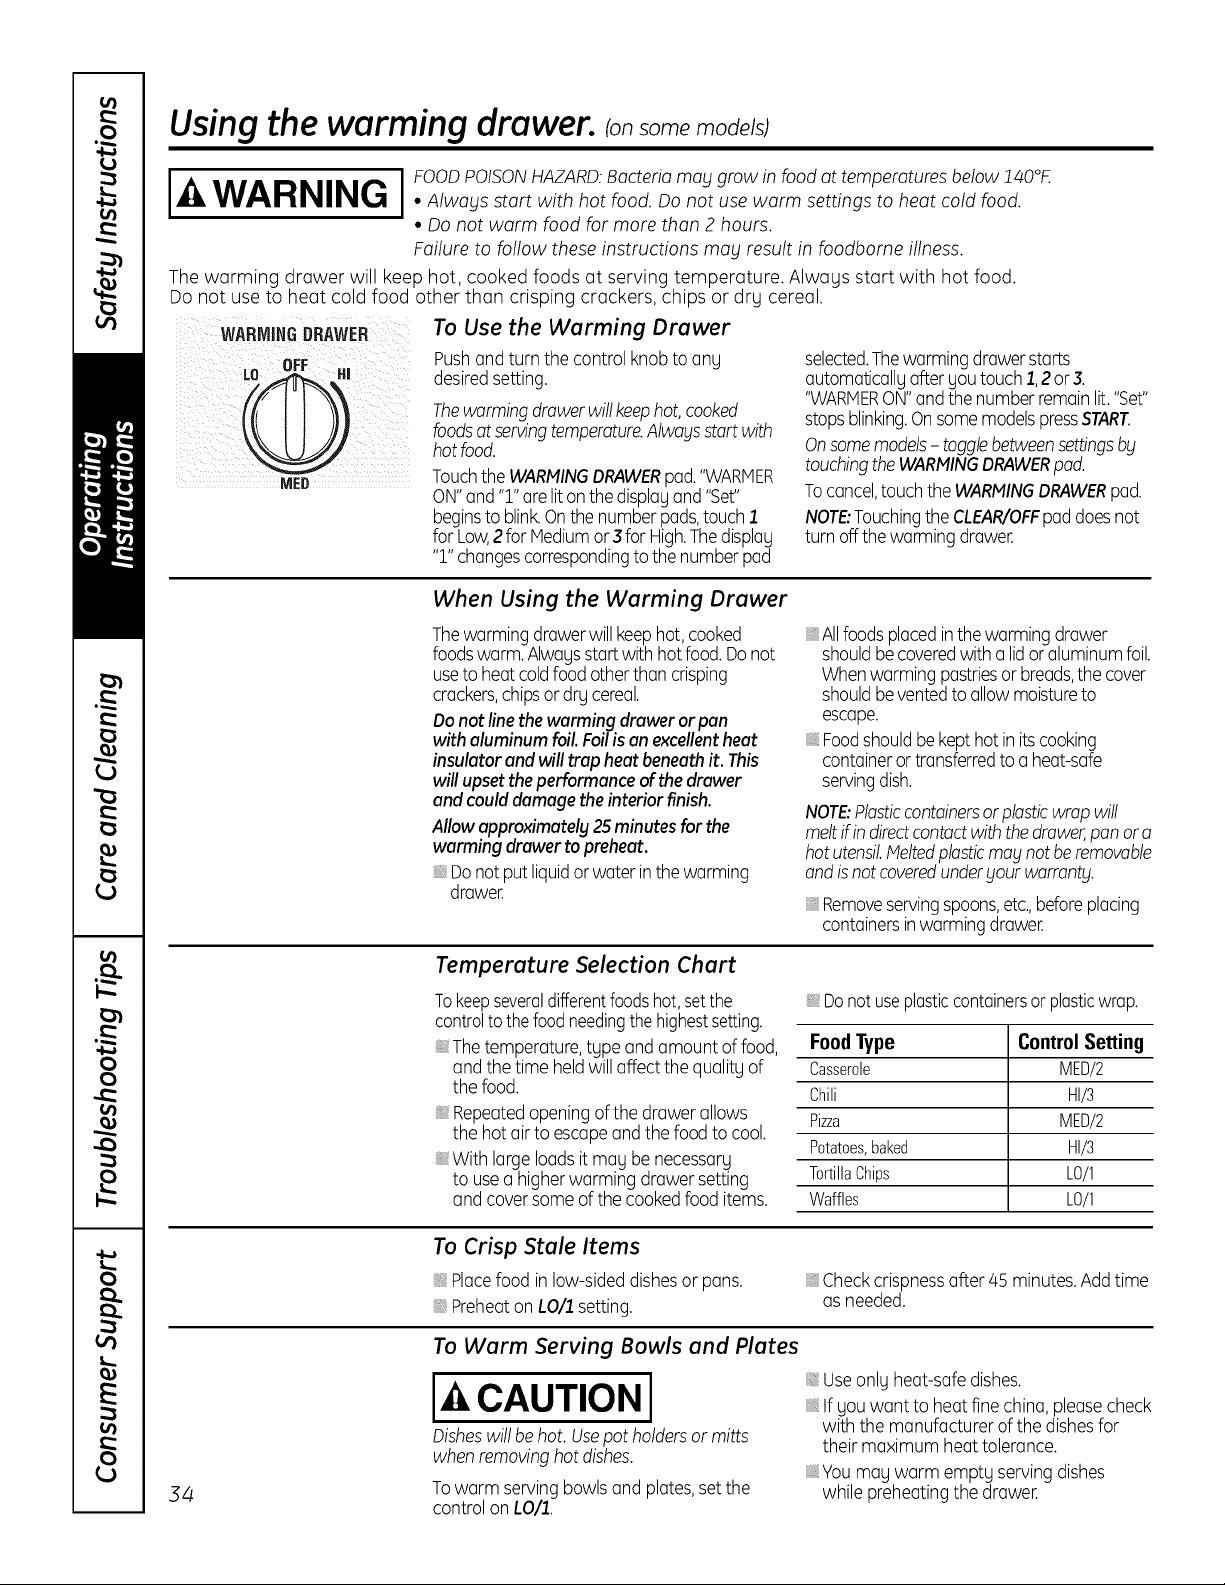
Using the warming drawer, somemode/s
I_ I FOOD POISON HAZARD:Bacteria may grow in food at temperatures below 140°F.
WARNING , •AIwausstartwithhotfoodDonotusewarmsettingstoheatcoldfood
• Do not warm food for more than 2 hours.
Failure to follow these instructions may result in foodbome illness.
The warming drawer will keep hot, cooked foods at serving temperature. Always start with hot food.
Do not use to heat cold food other than crisping crackers, chips or dry cereal.
WARMINGDRAWER
MED
To Use the Warming Drawer
Push and turn the control knob to any
desired setting.
Thewarmingdrawerwillkeephot,cooked
foodsat servingtemperature.Alwaysstart with
hot food.
Touchthe WARMINGDRAWERpad."WARMER
ON"and'T' arelit onthe displayand"Set"
beginsto blink.Onthe numberpads,touch I
for Low,2 for Mediumor 3for High.Thedisplay
":]_"changescorrespondingto the numberpad
selected.Thewarming drawerstarts
automaticallyafter youtouchI, 2 or &
"WARHERON"and the number remainlit."Set"
stopsblinking.On somemodelspressSTART.
Onsomemodels- togglebetweensettingsby
touchingthe WARMINGDRAWERpad.
Tocancel,touchthe WARMINGDRAWERpad.
NOTE:Touchingthe CLEAR/OFFpaddoesnot
turn offthe warmingdrawee
When Using the Warming Drawer
Thewarmingdrawerwill keephot,cooked
foodswarm.Alwaysstartwith hot food. Donot
useto heat coldfood otherthan crisping
crackers,chipsor dry cereal.
Do not linethe warming drawer orpan
withaluminum foil Foilisan excellentheat
insulator and willtrap heat beneath it. This
will upsettheperformance of the drawer
and could damage the interior finish.
Allow approximately 25 minutes for the
warming drawer to preheat.
, Donot put liquidor water inthe warming
drawer.
, Allfoodsplacedinthe warmingdrawer
shouldbecoveredwith a lid oraluminumfoil.
Whenwarming pastriesor breads,the cover
shouldbeventedto allowmoistureto
escape.
, Foodshouldbekepthot initscooking
containeror transferredto a heat-safe
servingdish.
NOTE:Plasticcontainersorplasticwrap will
meltif indirectcontactwith the drawer,pan or a
hot utensil.Meltedplasticmay not be removable
andisnot coveredunder_tourwarrant_t.
, Removeservingspoons,etc.,beforeplacing
containersinwarmingdrawer.
Temperature Selection Chart
Tokeepseveraldifferentfoodshot,setthe
controlto the foodneedingthe highestsetting.
Thetemperature,type and amountof food,
and the time heldwill affectthe quality of
the food.
, Repeatedopening of the drawerallows
the hot airto escapeandthe food to cool.
With large loadsit may be necessary
to usea higher warming drawersetting
and coversome of the cookedfood items.
Donot use plastic containers or plastic wrap.
FoodType ControlSetting
Casserole MEDi2
Chili HI/3
Pizza MEDi2
Potatoes,baked HI/3
TortillaChips LOi1
Waffles LOi1
34
To Crisp Stale Items
Placefood in low-sideddishesor pans.
, Preheaton LOll setting.
, Checkcrispnessafter45 minutes.Addtime
as needed.
To Warm Serving Bowls and Plates
I-4,CAUTIONI
Disheswill be hot. Usepot holdersor mitts
when removinghot dishes.
Towarm serving bowls and plates,setthe
control on LOll.
Useonly heat-safe dishes.
If you want to heat fine china, pleasecheck
with the manufacturer of the dishesfor
their maximum heat tolerance.
, Youmay warm empty serving dishes
while preheatingthe drawer.
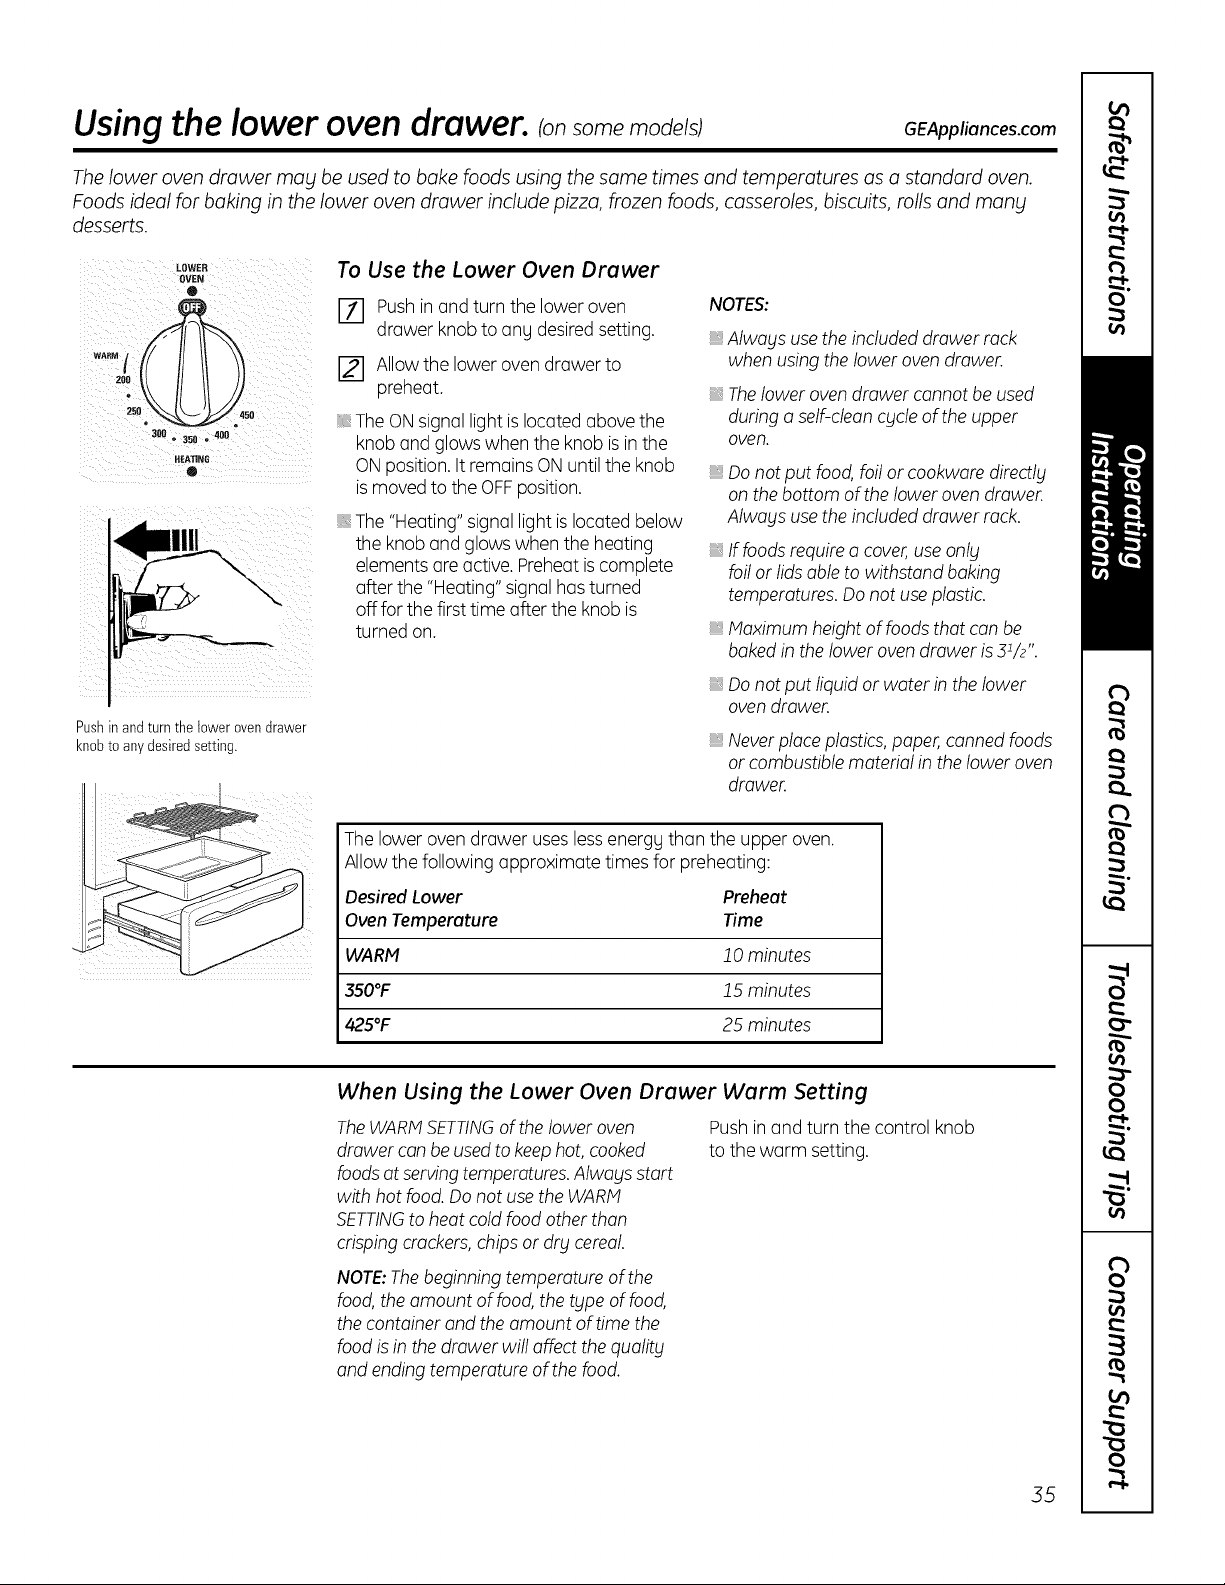
Using the lower oven drawer. Ionsome models) GEAppliances.com
The lower oven drawer may be used to bake foods using the same times and temperatures as a standard oven.
Foods ideal for baking in the lower oven drawer include pizza, frozen foods, casseroles, biscuits, rolls and many
desserts.
LOWER
OVEN
o
3011 _ 3511 • 480
HEATING
®
lli/ 1111 ..
Pushin andturn the lower ovendrawer
knobto anydesired setting.
To Use the Lower Oven Drawer
[] Push in and turn the lower oven
drawer knob to any desired setting.
[] Allow the lower oven drawer to
preheat.
The ON signal light is located above the
knob and glows when the knob is in the
ONposition. Itremains ON until the knob
is moved to the OFFposition.
The "Heating" signal light is located below
the knob and glows when the heating
elements are active. Preheatis complete
after the "Heating" signal has turned
off for the first time after the knob is
turned on.
NOTES:
Alwags usethe included drawer rack
when using the lower oven drawer.
_,Thelower oven drawer cannot be used
during o self-dean cucleof the upper
oven.
_,Do not put food, foil or cookwore directlg
on the bottom of the lower oven drawer.
Alwogs usethe included drawer rack.
_,If foods require o cover,use onlg
foil or lids ableto withstand baking
temperatures. Do not use plastic.
_,Maximum height of foods that can be
baked in the lower oven drawer is 31/2".
_, Do not put liquid or water in the lower
oven drawer.
Neverplace plastics,paper, canned foods
or combustible material in the lower oven
drawer.
The lower oven drawer useslessenergy than the upper oven.
Allow the following approximate times for preheating:
Desired Lower Preheat
Oven Temperature Time
WARM 10 minutes
350°F 15 minutes
425°F 25 minutes
When Using the Lower Oven Drawer Warm Setting
The WARM SETTINGof the lower oven
drawer con be used to keep hot, cooked
foods at serving temperatures. Alwogs start
with hot food. Do not use the WARM
SETTINGto heat cold food other than
crisping crackers, chips or dr_lcereal.
Push in and turn the control knob
to the warm setting.
NOTE:The beginning temperature of the
food, the amount of food, the type of food,
the container and the amount of time the
food is in the drawer will affect the quolitg
and ending temperature of the food.
35

Care and cleaning of the range.
Be sure all controls are off and all surfaces are cool before cleaning any part of the range.
I-4,WARNING
I f_lour range is removed for cleaning, servicing or any
reason,be sure the anti-tip device is reengoged properly
when the range is replaced. Failure to take this precaution
could result in tipping of the range and cause injur_l.
36
How to Remove Protective Shipping Film and Packaging Tape
Carefullygraspa cornerof the protective Toensurenodamageisdoneto the finish
shippingfilmwithyour fingersand slowlypeel of the product,the safestway to remove
itfrom the appliancesurface.Donot useany the adhesivefrompackagingtape on new
sharpitemsto removethe film.Removeall appliancesisan applicationof a household
of the film beforeusingtheappliance liquiddishwashingdetergent.Applywitha soft
for the firsttime. clothandallowto soak.
NOTE:Theadhesivemust beremovedfromall
ports.Itcannotberemovedif it isbakedon.
Control Knobs
Thecontrolknobsmayberemovedfor easier
cleaning.
Makesurethe knobsarein the OFFpositions
and pullthem straightoff the stemsfor
cleaning.
Theknobscanbecleanedin a dishwasheror
they may alsobewashedwith soapandwater.
Makesurethe insideofthe knobsaredry
beforereplacing.
Replacethe knobs,in the OFFpositionto
ensureproperplacement.
Control Panel
Ifdesired,thetouchpadsmablbe deactivated
beforecleaning.
Seethe ControlLockoutinformationinthe Using
theclock,kitchentimerand controllockout
sectioninthismanual.
Cleanupsplatterswith a dampcloth.
Youmayalsouseaglasscleaner.
Removeheaviersoilwithwarm,soapywater.
Donot useabrasivesof any kind.
Reactivatethetouch _adsafter cleaning.
Painted Surfaces
Paintedsurfacesincludethe sidesd the range
andthe door,top of controlpanelandthe
drawerfront.Cleanthesewithsoapandwater
or a vinegarandwatersolution.
Donot usecommercialovencleaners,cleaning
powders,steelwoolor harshabrasivesonany
paintedsurface.
Stainless Steel Surfaces Ion some models)
Do not use a steel wool pad; it will
scratch the surface.
To clean the stainlesssteel surface, use
warm, sudsy water or a stainlesssteel
cleaner or polish.Always wipe the surface
in the direction of the grain. Follow the
cleaner instructions for cleaning the
stainlesssteel surface.
To inquire about purchasing stainless steel
appliance cleaner or polish or to find the
location of a dealer nearest you, please
call our toll-free number:
National Parts Center 1.800.626.2002
GEAppliances.com
Porcelain Enamel Cooktop Ionsome modelsl
The porcelain enamel finish is sturdy
but breakable if misused.Thisfinish is
acid-resistant. However,any acidic foods
spilled (suchas fruit juices, tomato or
vinegar) should not be permitted to
remain on the finish.
If acids spill on the cooktop while it is hot,
use a dry paper towel or cloth to wipe it up
right away. When the surface has cooled,
wash with soap and water. Rinsewell.
Forother spillssuch as fat spatterings,
wash with soap and water or cleansing
powders after the surface has cooled.
Rinsewell. Polishwith a dry cloth.
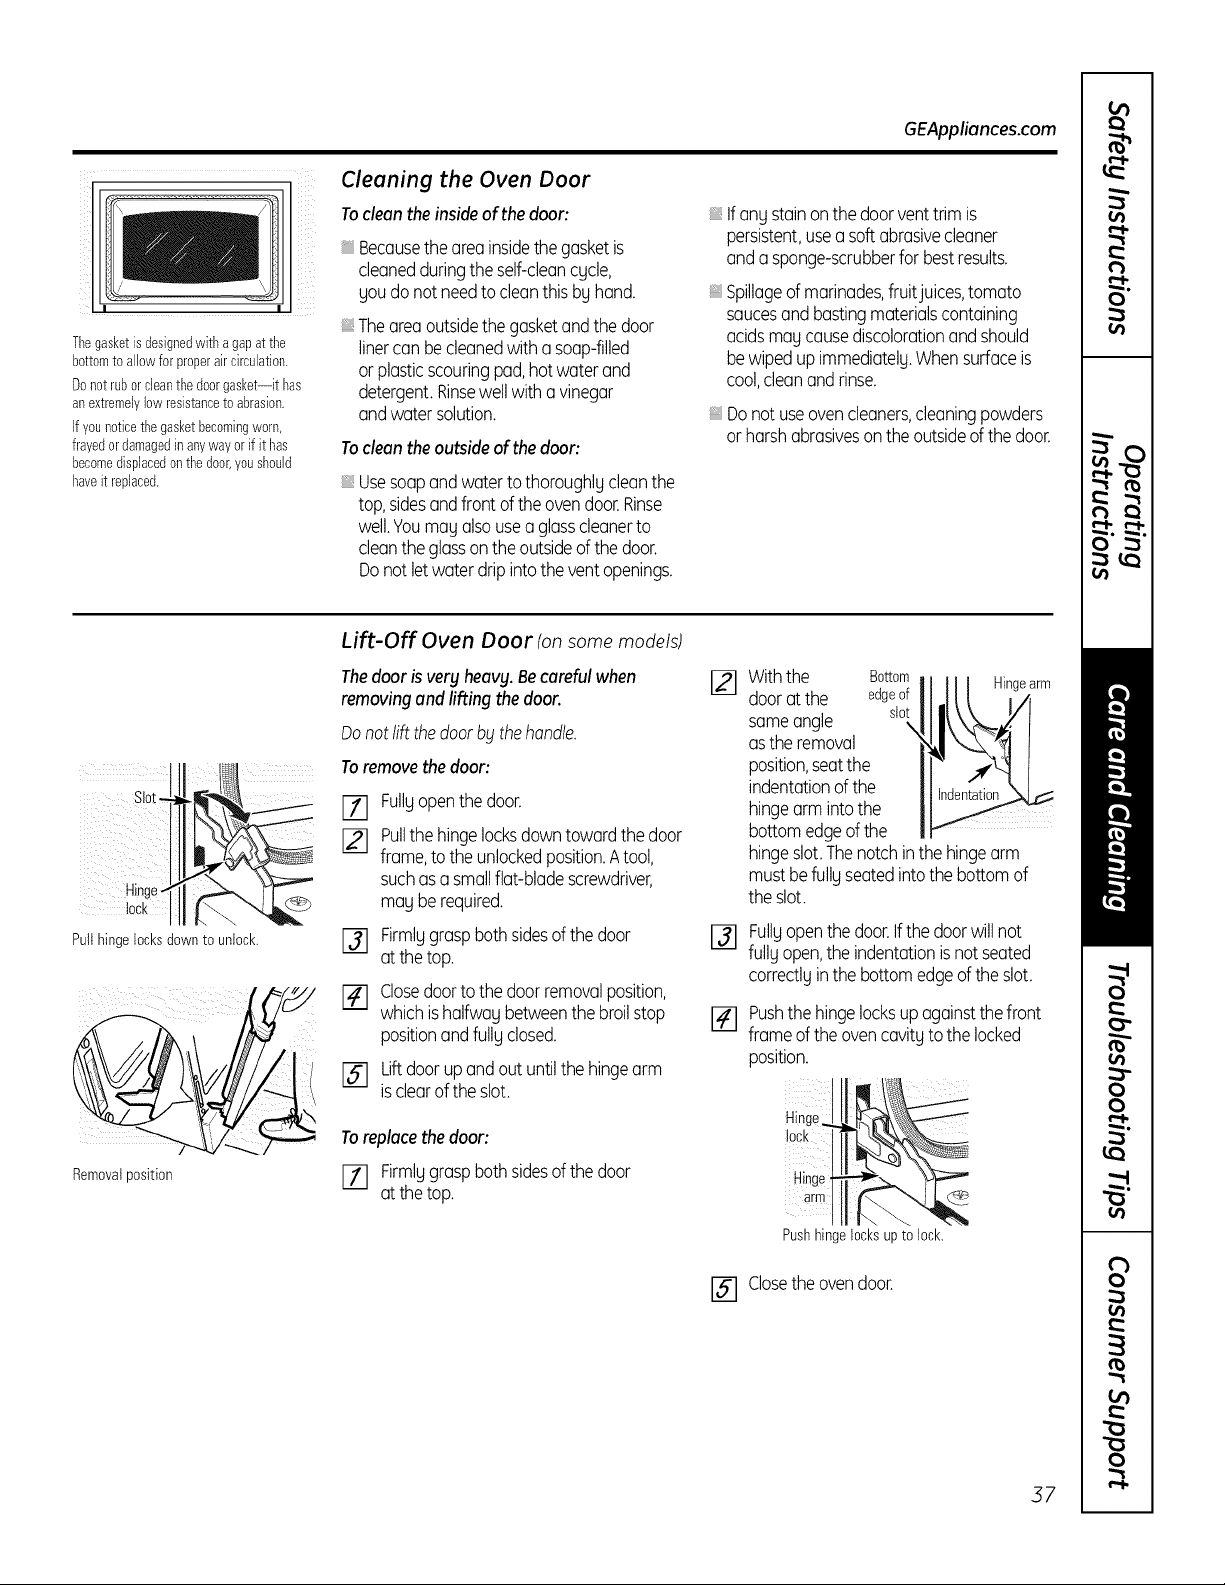
GEAppliances.com
Thegasketis designedwith a gapat the
bottomto allowfor properaircirculation.
Donotrubor cleanthedoorgasket--it has
anextremelylowresistanceto abrasion.
If younoticethegasketbecomingworn,
frayedordamagedinanywayorif it has
becomedisplacedonthe door,youshould
haveit replaced.
Cleaning the Oven Door
To clean the inside of the door:
ii_ii,i,i,l,ii_ii
Becausethe area insidethe gasketis
cleanedduringthe self-cleancycle,
you donot needto cleanthis by hand.
Theareaoutsidethe gasketandthe door
linercan becleanedwitha soap-filled
orplasticscouringpad,hot waterand
detergent.Rinsewellwith a vinegar
andwatersolution.
To cleon the outsideof the door:
Usesoapand waterto thoroughlycleanthe
top,sidesand front of the ovendoor.Rinse
well.Youmay alsousea glasscleanerto
cleanthe glassonthe outsideofthe door.
Donot let waterdripinto theventopenings.
Ifany stainonthe doorvent trim is
persistent,usea softabrasivecleaner
andasponge-scrubberfor bestresults.
Spillageof marinades,fruit juices,tomato
saucesandbastingmaterialscontaining
acidsmaycausediscolorationandshould
bewipedupimmediately.Whensurfaceis
cool,cleanand rinse.
Donot useovencleaners,cleaningpowders
orharshabrasivesonthe outsideof the door.
Pull hinge locks down to unlock.
Removalposition
Lift-Off Oven Door (on some models)
The door is very heavy. Be careful when
removing and lifting the door.
Do not lift the door bg the handle.
To remove the door:
EZ] Fullyopenthe door.
[_ Pullthe hingelocksdowntowardthe door
frame,to the unlockedposition.A tool,
suchasa smallflat-bladescrewdriver,
may be required.
_] Firmlygraspbothsidesof the door
at the top.
[] Closedoorto the doorremovalposition,
whichishalfwaybetweenthe broilstop
positionand fully closed.
Liftdoorup and out untilthe hingearm
[] isclearof the slot.
Toreplacethedoor:
FT] Firmlygraspbothsidesof the door
at the top.
@
Withthe Bottom
doorat the edgeof
sameangle sto_
asthe removal
position,seatthe
indentationof the
hingearm intothe
bottomedgeof the
Hilge arm
denta_otio
hingeslot.Thenotchinthe hingearm
mustbefullyseatedintothe bottomof
the slot.
Fullyopen thedoor.Ifthe door willnot
fully open,the indentationis notseated
correctlyinthe bottomedgeof the slot.
Pushthe hingelocksup againstthefront
frameof the ovencavityto the locked
position.
lock
Pushhinge locksup to lock.
[_] Closethe ovendoor.
37

Care and cleaning of the range.
Oven
frame
Door
Lift-Off Upper Oven Door Ionsomemodels)
To remove the door:
To replace the door:
r_ Fullyopen the door.
[] Lift up on the hinge lock toward the
oven frame until they stop.
[] Closethe door to 45 degrees (you will
feel the door stop).The hinge lock will
contact the oven frame.
[] On both sidesof the door, press down
on the release buttons on each hinge.
[] Liftdoor up until it is clear of the hinge.
161 Pullon hinge arms slightly to relieve
pressure on the locking tabs.
[Z] Pushthe hinge locks down onto
the hinge.
[] Pushthe hinges in toward the unit
so they are closed.
r-_ Pullthe hinges down away from the
oven frame to the fully open position.
Lift up on the hinge lockstoward
the oven frame until they stop.
The hinges will releaseto the
45-degree position.The hinge locks
will contact the oven frame.
Slidethe door back onto the hinges.
Makesure the buttons pop back out.
Fullyopen the door.
[] Pushthe hinge locks down onto
the hinge.
[Z] Close the oven door.
Oven Racks
Ftatrack
Handles
Usethe rack with the two front handles
in the upper oven.
Usethe rack without the two front
handlesin the lower oven.
All oven racks may be cleaned by hand
with an abrasive cleaner or steel wool. After
cleaning, rinse the racks with clean water
and dry with a clean cloth. Grog porcelain-
coated oven rocks may remain in the oven
during the self-cleaning cycle without being
damaged. The nickel-plated oven racks
may remain in the oven during the
self-cleaning cycle, but they will losetheir
luster and become hard to slide.It will be
necessary to grease all oven rack side
edges with a light coating of vegetable oil
after cleaning them bg hand or in the oven.
Thiswill help maintain the ease of sliding
the rocks in and out of the oven.
38
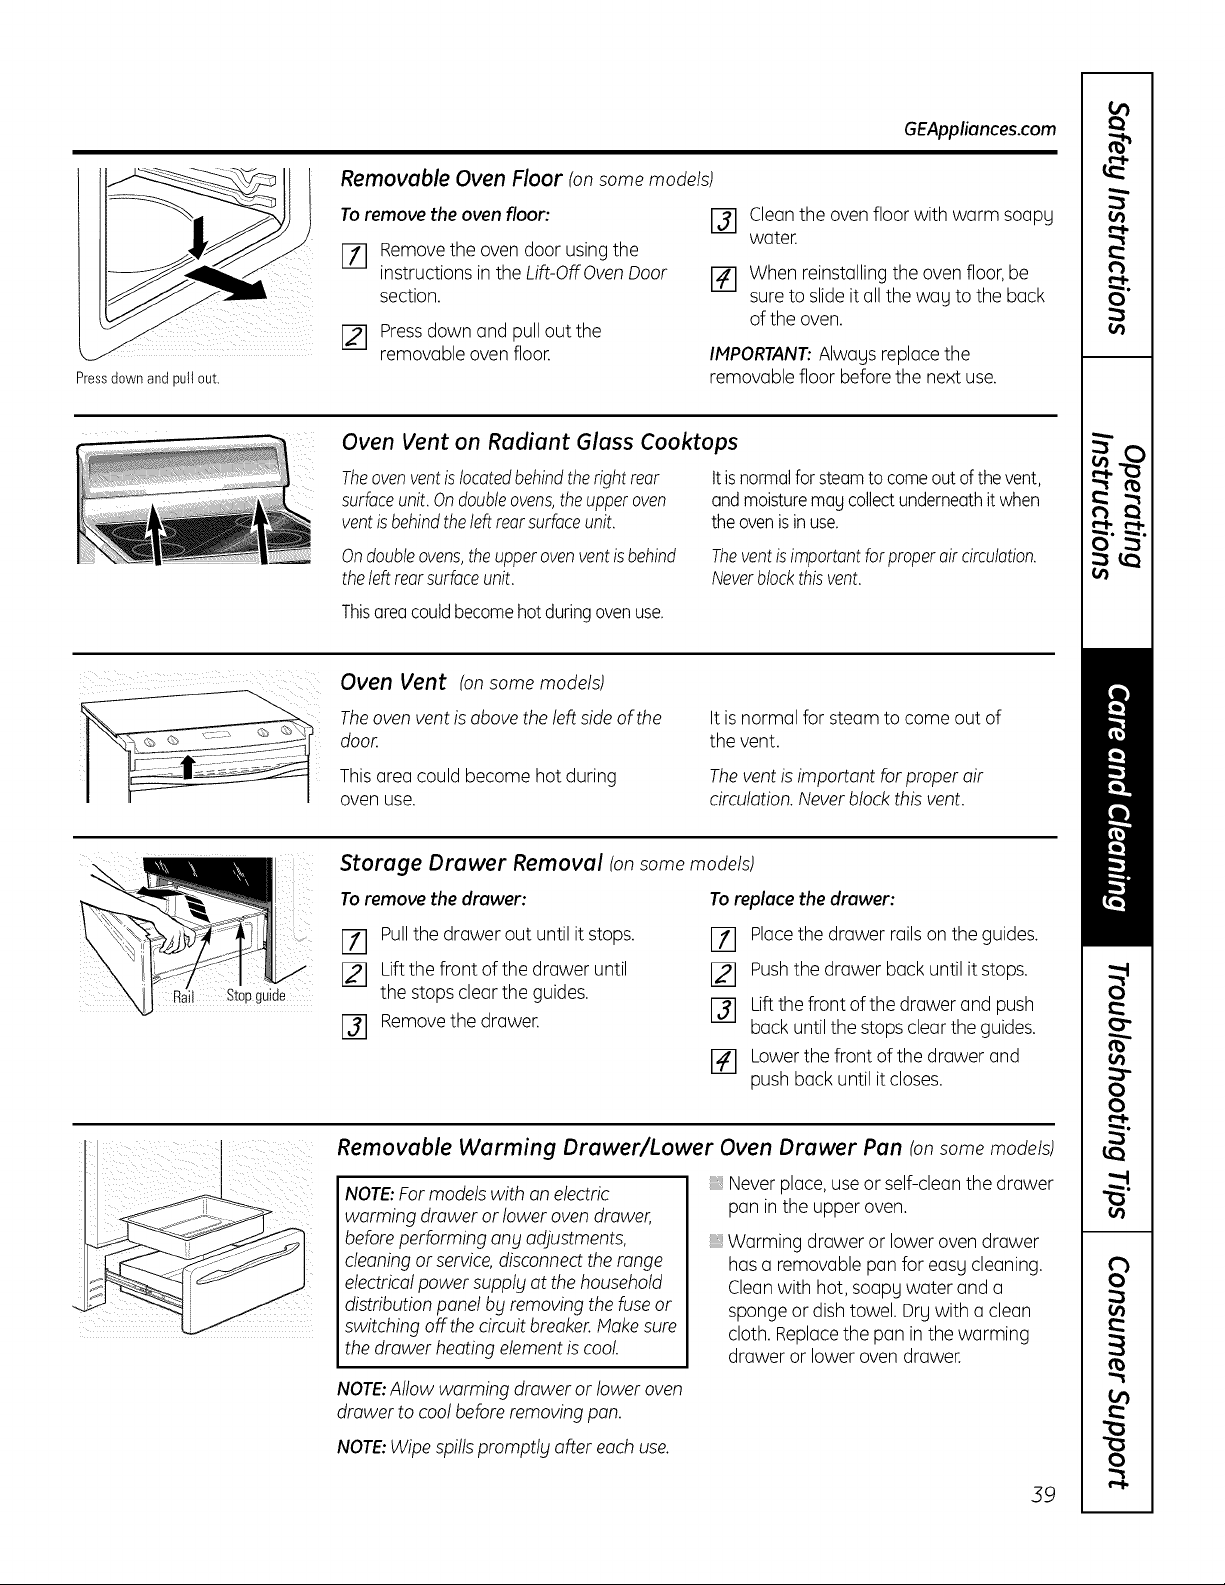
GEAppliances.com
Pressdown and pull out.
Removable Oven Floor (onsomemodels)
To remove the oven floor:
%
Removethe oven door using the
instructions in the Lift-Off Oven Door
section.
[] Pressdown and pull out the
removable oven floor.
[] Clean the oven floor with warm soapg
water.
[] When reinstalling the oven floor, be
sure to slide it all the wag to the back
of the oven.
IMPORTANT:Alwags replace the
removable floor before the next use.
Oven Vent on Radiant Glass Cooktops
Theovenventislocatedbehindtheright rear
surfaceunit.Ondoubleovens,the upperoven
ventisbehindtheleft rearsurfaceunit.
It is normal for steam to come out of the vent,
and moisture may collect underneath it when
the oven is in use.
Ondoubleovens,theupperovenventisbehind
theleftrearsurfaceunit.
Theventis importantforproperaircirculation.
Neverblockthisvent.
Thisarea couldbecomehot duringovenuse.
Oven Vent ton some models)
Theoven vent is above the left side of the
door
This area could become hot during
oven use.
It is normal for steam to come out of
the vent.
The vent is important for proper air
circulation. Never block this vent.
il Stopguide
Storage Drawer Removal (on some models)
To remove the drawer:
To replace the drawer:
I-_ Pullthe drawer out until it stops.
121 Lift the front of the drawer until
the stops clear the guides.
Removethe drawer.
I_1 Placethe drawer rails on the guides.
121 Pushthe drawer back until it stops.
[_] Liftthe front of the drawer and push
back until the stops clear the guides.
14] Lower the front of the drawer and
push back until it closes.
Removable Warming Drawer/Lower Oven Drawer Pan (onsomemodels)
NOTE:For models with on electric Never place, use or self-clean the drawer
warming drawer or lower oven drawer, pan in the upper oven.
before performing any adjustments, Warming drawer or lower oven drawer
cleaning or service, disconnect the range has a removable pan for easg cleaning.
electrical power supplg at the household Clean with hot, soapg water and a
distribution panel bg removing the fuse or sponge or dish towel. Drg with a clean
switching offthe circuit breaker Hake sure cloth. Replacethe pan in the warming
the drawer heating element is cool. drawer or lower oven drawer.
NOTE:Allow warming drawer or lower oven
drawer to cool before removing pan.
NOTE:Wipe spills promptly after each use.
39
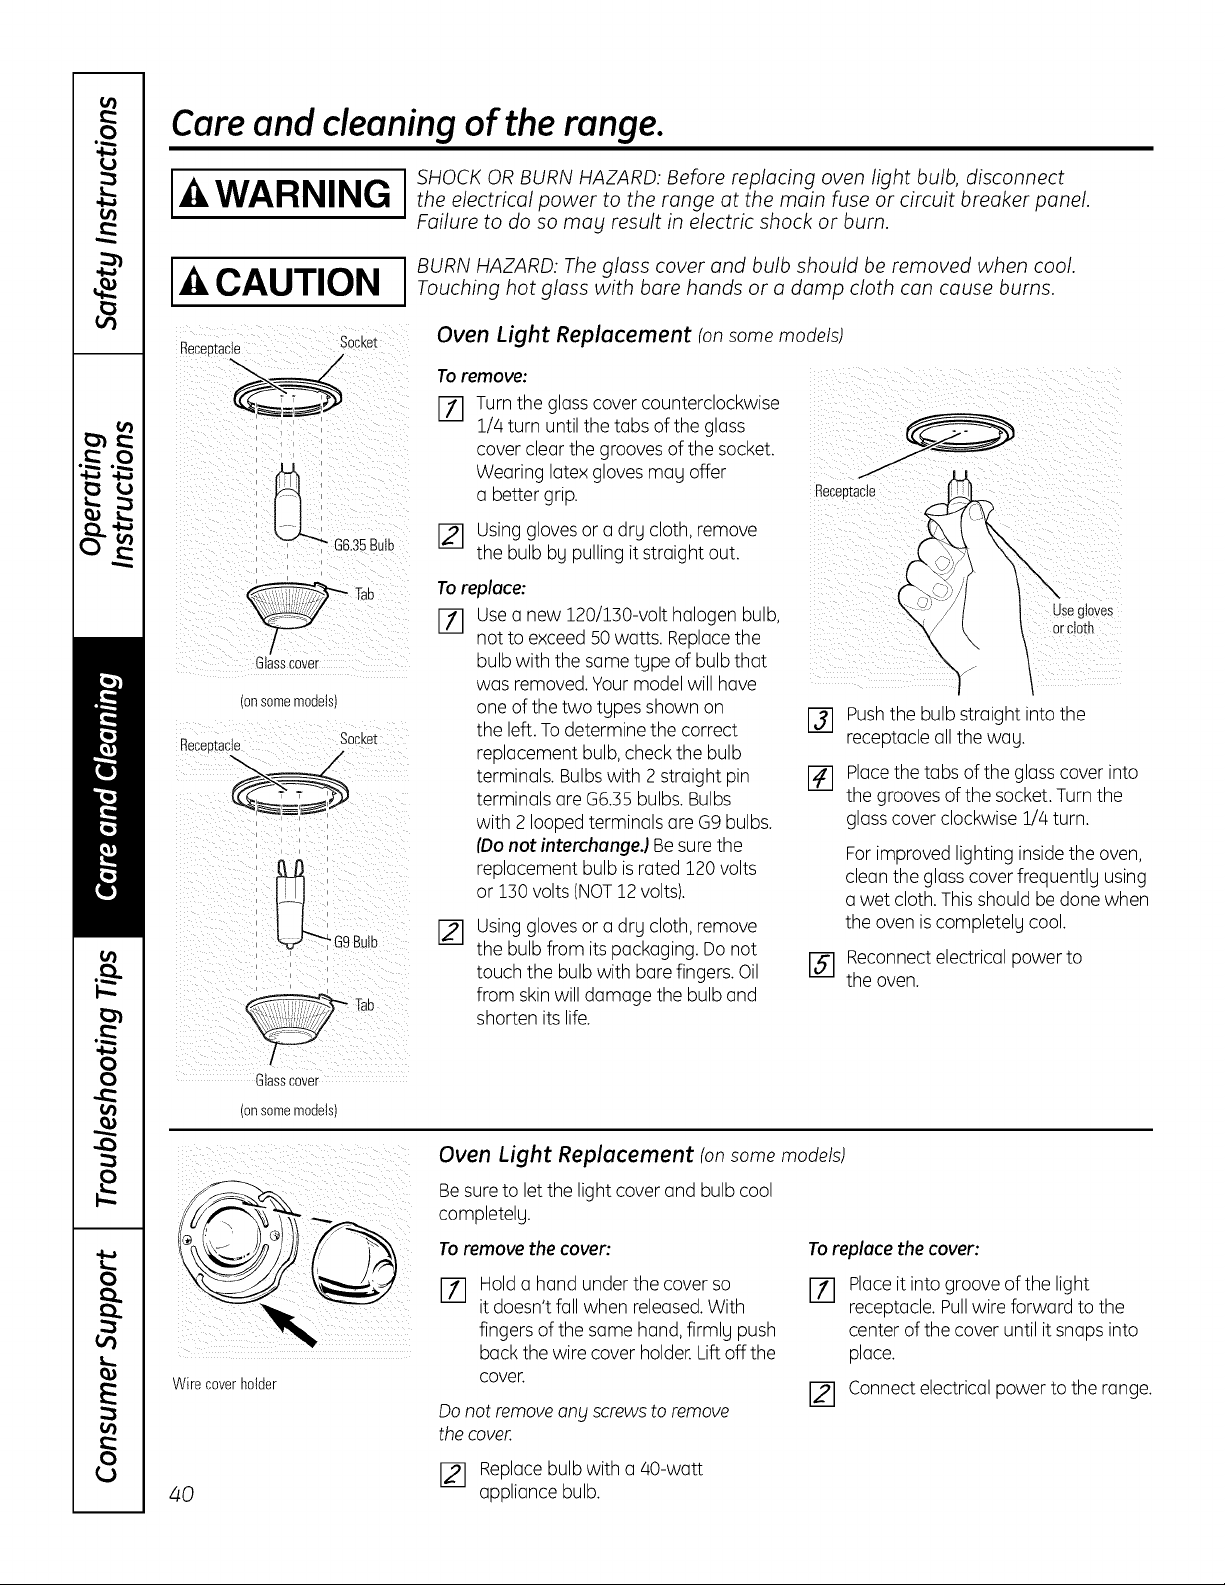
Care and cleaning of the range.
I I SHOCK OR BURN HAZARD: Before replacing oven light bulb, disconnect
_4,WARNING I theelectricalpowertotherangeatthemainfuseorcircuitbreakerpanel
Failure to do so may result in electric shock or burn.
CAUTION
Receutacle Socket
_G&35 Bulb
I
Glasscover
(on some models)
I BURN HAZARD: The glass cover and bulb should be removed when cool.Touching hot glass with bare hands or a damp cloth can cause burns.
Oven Light Replacement (onsome models)
Toremove-I-7] Turn the glass cover counterclockwise
1/4 turn until the tabs of the glass
cover clear the grooves of the socket.
Wearing latex gloves may offer
a better grip. Receptacle
[] Using glovesor a dry cloth, remove
the bulb by pulling it straight out.
To replace:
[] Usea new 120/130-volt halogen bulb, orcloth
not to exceed 50 watts. Replacethe Usegt0ves
bulb with the same type of bulb that y
was removed. Yourmodel will have
one of the two types shown on
the left. To determine the correct
replacement bulb, check the bulb
terminals. Bulbswith 2 straight pin
terminals are G6.35bulbs. Bulbs
with 2 looped terminals are G9 bulbs.
(Do not interchange.)Besure the
replacement bulb is rated 120 volts
or 130 volts (NOT12 volts).
@
[]
Using gloves or a dry cloth, remove
the bulb from its packaging. Do not
touch the bulb with barefingers. Oil
from skin will damage the bulb and
shorten its life.
Pushthe bulb straight into the
receptacle all the way.
Placethe tabs of the glass cover into
the grooves of the socket. Turn the
glasscover clockwise 1/4 turn.
For improved lighting inside the oven,
clean the glass cover frequently using
a wet cloth. Thisshould be done when
the oven is completely cool.
I-_ Reconnect electrical power to
the oven.
Glasscover
(onsomemodets)
_ii_ i]_ _ii_i_ii_
Wire cover holder
Oven Light Replacement (on some models)
Be sure to let the light cover and bulb cool
completely.
To remove the cover:
Toreplace the cover:
%
Hold a hand under the cover so
it doesn't fall when released.With
fingers of the same hand, firmly push
back the wire cover holder.Lift off the
cover.
Do not removeang screwsto remove
the cover,
%
Place it into groove of the light
receptacle. Pullwire forward to the
center of the cover until it snaps into
place.
I-_ Connect electrical power to the range.
40
I_] Replacebulb with a 40-watt
appliance bulb.

GEAppliances.com
I,_ I SHOCKORBURN HAZARD:Before replacing oven light bulb, disconnect the
WARNING I electrical power to the range at the main fuse or circuit breaker panel. Failure to
do so may result in electric shock or burn.
Oven Light Replacement (on some models)
Besure to let the light cover and bulb cool
completely.
To remove the coven
', i [] Twist lens counterclockwise about
a quarter turn to remove.
Do not removeang screws to remove
the cover.
[] Replacebulb with a 40-watt
appliance bulb or two-prong halogen
bulb, as appropriate.
To replace the cover:
Lineup tabs of lens in front of tabs
on housing and rotate clockwise
to engage.
_i!iii
i_iii
Oven Heating Elements (on some models)
Do not clean the bake element or the broil
element.Ang soil will bum off when the
elementsore heated.
To clean the oven floor,gentlg lift
the bake element. Clean with warm,
soapy water.
Wipe up heavysoil on the oven bottom.
Oven Heating Elements (onsome models)
Do not clean the broil element. Any soil will
burn off when the element is heated. Clean
the oven floor with warm, soapy water.
Onsome models, the bake element is
not exposedand is under the oven floor.
If spillovers, residueor ash accumulate on
the oven floor, wipe up before self-cleaning.
If the element is above the oven floor, gent!g
lift the bake elementand clean with warm,
soapg water.
41
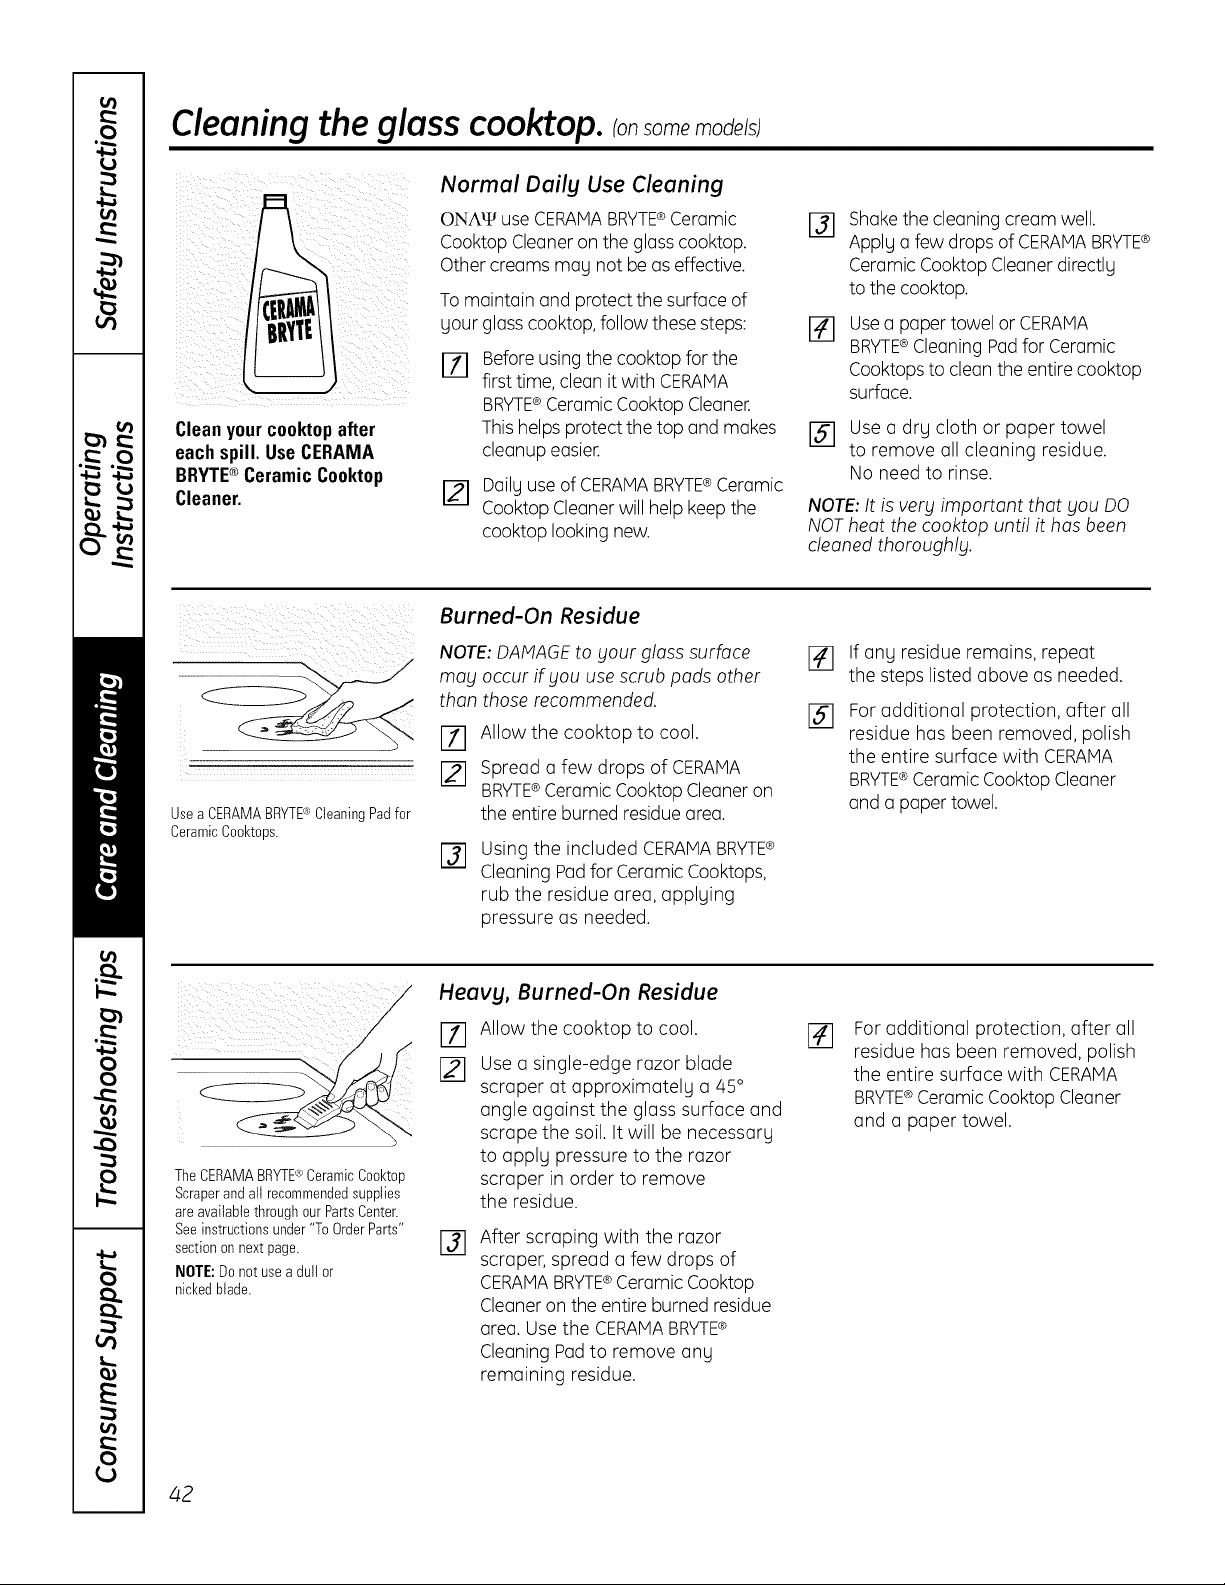
Cleaningthe glass cooktop. Consomemode/s;
Clean yourcooktopafter
each spill. Use CERAMA
BRYTE® CeramicCooktop
Cleaner.
Normal Daily Use Cleaning
ONAW use CERAMABRYTE®Ceramic
Cooktop Cleaneron the glass cooktop.
Other creams may not be as effective.
To maintain and protect the surface of
your glass cooktop, follow these steps:
Before using the cooktop for the
first time, clean it with CERANA
BRYTE® Ceramic Cooktop Cleaner.
This helps protect the top and makes
cleanup easier.
[] Daily use of CERANABRYTE®Ceramic
Cooktop Cleaner will help keep the
cooktop looking new.
[]
%
Shakethe cleaning cream well.
Apply a few drops of CERAMABRYTE®
Ceramic Cooktop Cleaner directly
to the cooktop.
Usea paper towel or CERAMA
BRYTE®Cleaning Padfor Ceramic
Cooktopsto clean the entire cooktop
surface.
r_ use a dry cloth or paper towel
to remove all cleaning residue.
No need to rinse.
NOTE:It is verF important that Fou DO
NOT heat the cooktop until it has been
cleaned thoroughlF.
Usea CEFIAMABFIYTE®CleaningPadfor
CeramicCo@tops.
Burned-On Residue
NOTE:DAMAGEto Four glass surface
roof occur if Fou use scrub pads other
than those recommended.
I-7-1 Allow the cooktop to cool.
[] Spread a few drops of CERAIA
BRYTE®Ceramic Cooktop Cleaner on
the entire burned residue area.
[]
Using the included CERANABRYTE®
Cleaning Padfor Ceramic Cooktops,
rub the residue area, applying
pressure as needed.
%
If any residue remains, repeat
the steps listed above as needed.
For additional protection, after all
residue has been removed, polish
the entire surface with CERAMA
BRYTE®Ceramic Cooktop Cleaner
and a paper towel.
The CEFIAMABRYTE® CeramicCo@top
Scraperand all recommendedsupplies
are availablethrough our PartsCenter.
Seeinstructionsunder"To OrderParts"
sectionon next page.
NOTE:Bo not usea dull or
nickedblade.
Heavy, Burned-On Residue
ryl
[]
Allow the cooktop to cool.
Use a single-edge razor blade
scraper at approximately a 45 °
angle against the glass surface and
scrape the soil. It will be necessary
to apply pressure to the razor
scraper in order to remove
the residue.
@
After scraping with the razor
scraper, spread a few drops of
CERAMABRYTE®Ceramic Cooktop
Cleaneron the entire burned residue
area. Use the CERAMABRYTE®
Cleaning Padto remove any
remaining residue.
[]
For additional protection, after all
residue has been removed, polish
the entire surface with CERAMA
BRYTE®Ceramic Cooktop Cleaner
and a paper towel.
z_2

GEAppliances.com
Metal Marks and Scratches
171 Be careful not to slide pots and
pans across your cooktop, It will
leave metal markings on the
cooktop surface.
These marks are removable using
the CERAMABRYTE®Ceramic
Cooktop Cleanerwith the CERAMA
BRYTE®Cleaning Pad for Ceramic
Cooktops.
[] If pots with a thin overlay of
aluminum or copper are allowed
to boil dry, the overlay may leave
black discoloration on the cooktop.
This should be removed
immediately before heating
again or the discoloration
may be permanent.
NOTE: Carefully check the bottom of
pans for roughness that would scratch
the cooktop.
Cooktop Seal
To clean the cooktop seal around the
edges of the glass, lay a wet cloth on it
for a few minutes, then wipe clean with
nonabrasive cleaners.
Glasssurface--potential for permanent damage.
Sugaryspillovers(suchas
jellies, fudge,candy,syrups)
or meltedplasticscancause
pittingofthe surfaceof your
cooktop(notcoveredbythe
warranty)unlessthe spill
is removedwhile still hot.
Specialcare shouldbe
takenwhenremovinghot
substances.
Besureto usea new, sharp
razorscraper.
Donotusea dullornicked
blade.
Damage from Sugary Spills and Melted Plastic
[] Turn off all surface units. Remove
hot pans.
I-_ Wearing an oven mitt:
a. Use a single-edge razor
blade scraper (CERAMABRYTE®
Ceramic Cooktop Scraper)
to move the spill to a cool
area on the cooktop.
b. Remove the spill with paper
towels.
[] Any remaining spillover should be
left until the surface of the cooktop
hascooled,
[] Don't use the surface units again
until all of the residue has been
completely removed.
NOTE:If pitting or indentation in the
glass surface has already occurred, the
cooktop glass will have to be replaced.
In this case, service will be necessary.
To Order Parts
To order CERAMABRYTE®Ceramic
Cooktop Cleaner and the cooktop
scraper, please call our toll-free number:
National Parts Center
800.626.2002
CERAMABRYTE®Ceramic
Cooktop Cleaner ......... #WX10X300
CERAMABRVTE® Ceramic
Cooktop Scraper .......... #WX! 0X0302
Kit ....................... #WB64XS027
(Kit includes cream and cooktop scraper)
CERAMA BRVTE ® Cleaning Pads for
Ceramic Cooktops ....... #WXl OX350
43
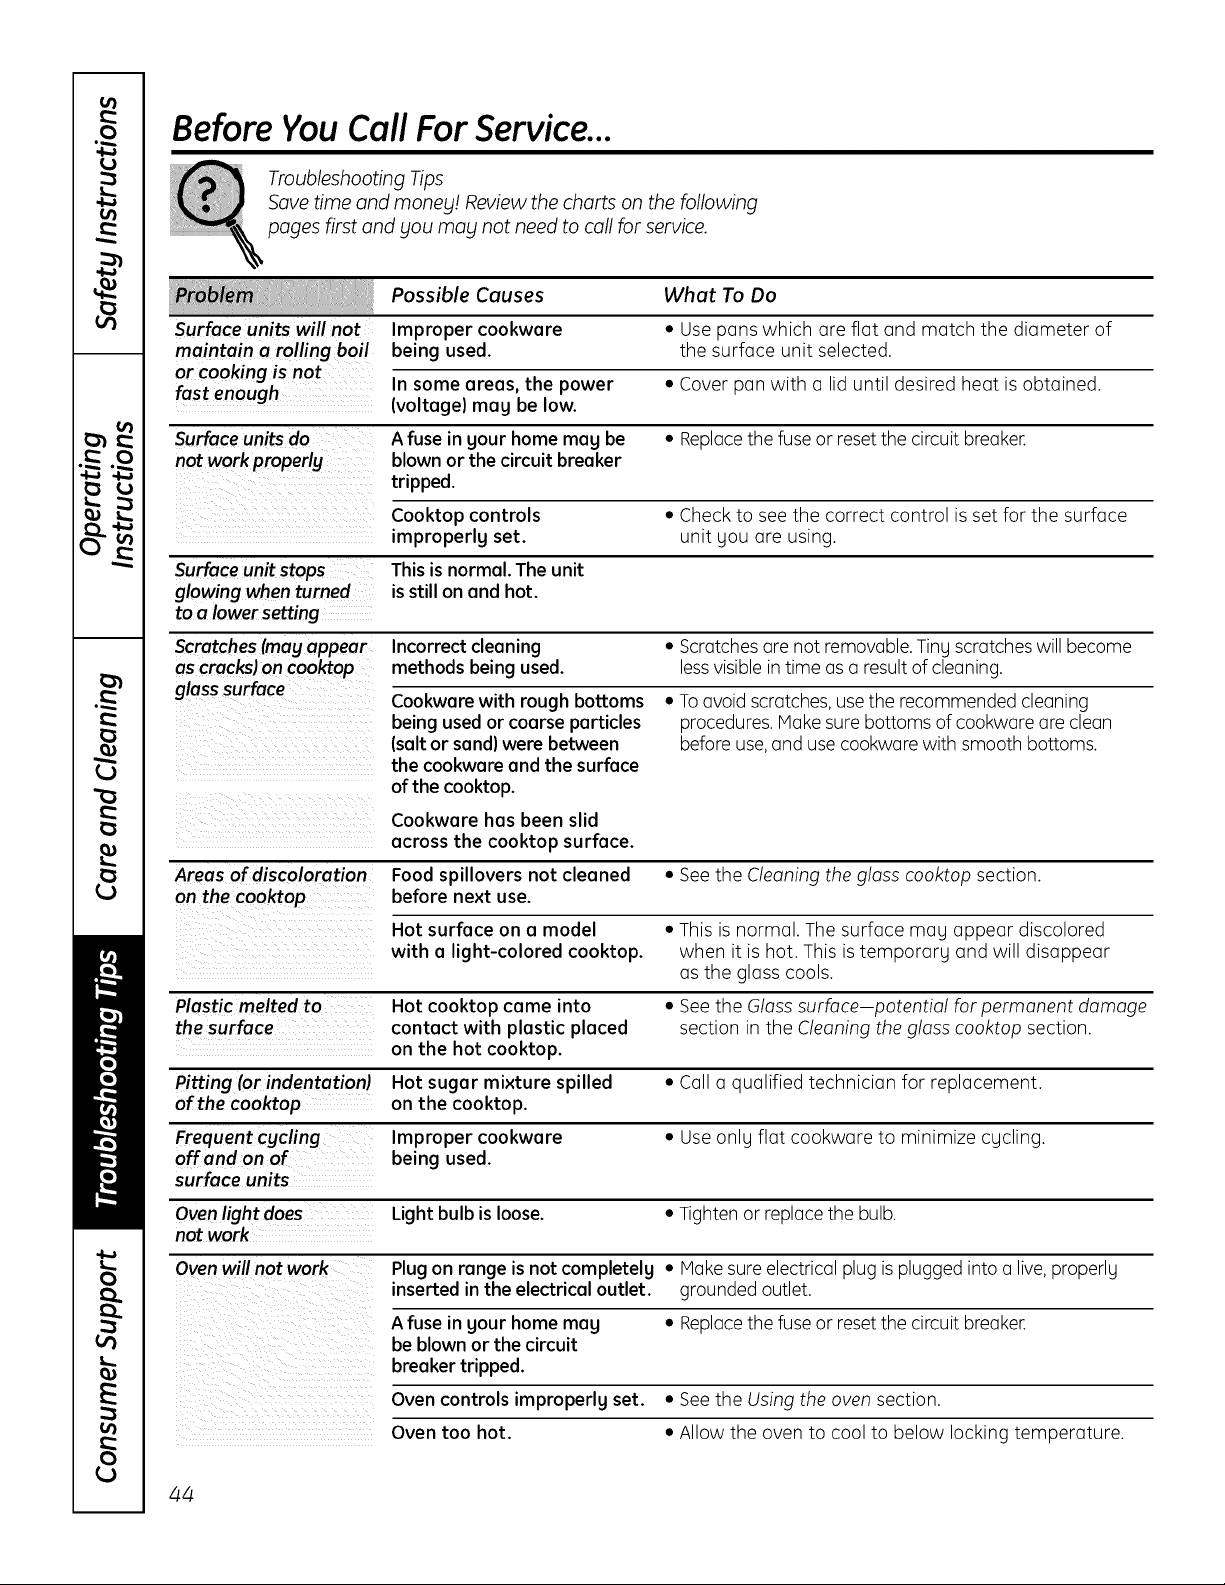
Before You Call For Service...
Troubleshooting Tips
Save time and moneg! Review the charts on the following
pages first and gou meg not need to call for service.
Surface units will not
maintain a rolling boil
or cooking is not
In some areas, the power • Cover pan with a lid until desired heat is obtained.
fast enough (voltage) meg be low.
Surfaceunits do A fuse in gour home meg be • Replacethe fuse or reset the circuit breaker.
not work properlg blown or the circuit breaker
tripped.
Cooktop controls • Check to see the correct control is set for the surface
improperly set. unit you are using.
Surface unit stops This is normal. The unit
glowing when turned isstill onand hot.
to a lower setting
Scratches (meg appear Incorrect cleaning • Scratches ore not removable.Tinu scratches will become
as cracks) on cooktop methods being used. lessvisible in time as a result of cleaning.
glass surface Cookware with rough bottoms • To ovoid scratches, usethe recommended cleaning
being used or coarse particles procedures. Make sure bottoms of cookware ore cleon
(salt or sand) were between before use, and use cookware with smooth bottoms.
the cookware and the surface
of the cooktop.
Possible Causes What To Do
Improper cookware
being used.
• Use pans which are flat and match the diameter of
the surface unit selected.
Cookwere has been slid
across the cooktop surface.
Areas of discoloration Food spillovers not cleaned • See the Cleaning the gloss cooktop section.
on the cooktop before next use.
Hot surface on a model • This is normal. The surface may appear discolored
with a light-colored cooktop, when it is hot. This is temporary and will disappear
as the gloss cools.
Plastic melted to Hot cooktop came into • See the Glass surface potential for permanent damage
the surface contact with plastic placed section in the Cleaning the gloss cooktop section.
on the hot cooktop.
Pitting (or indentation) Hot sugar mixture spilled • Call a qualified technician for replacement.
of the cooktop on the cooktop.
Frequent cgcling Improper cookware • Use onlu flat cookware to minimize cucling.
offend on of being used.
surface units
Ovenlight does Light bulb is loose. • Tighten or replace the bulb.
not work
Oven will not work Plugon range is not completelg • Makesure electrical plug is plugged into a live, properlu
inserted in the electrical outlet, grounded outlet.
A fuse in gour home meg • Replacethe fuse or reset the circuit breaker.
be blown or the circuit
breaker tripped.
Oven controls improperlg set. • See the Using the oven section.
Oven too hot. • Allow the oven to cool to below locking temperature.
44

GEAppliances.com
Possible Causes What To Do
Food does not bake Oven controls improperlg set. • Seethe Using the oven section.
or roast properly
Rack position is incorrect • Seethe Usingthe oven section.
or the rack is not level.
Incorrect cookware or • Seethe Usingthe oven section.
cookware of improper
size being used.
Oven thermostat needs • See the Adjust the oven thermostat Do it yourself!
adjustment, section.
Food does not Oven controls improperlg set. • Hake sure you touch the BROILHI/LO pad.
broil properly Improper rack position • Seethe BroilingGuide.
being used.
Cookware not suited • Forbest results,use a pan designed for broiling.
for broiling.
The probe is plugged • Unplug and remove the probe from the oven.
into the outlet in the oven.
(on some models)
In some areas the power • Preheatthe broil element for 10 minutes.
(voltage) may be low.
• Broil for the longest period of time recommended
in the Broiling Guide.
Oven temperature Oven thermostat • See the Adjust the oven thermostat Do it gourself!
too hot or too cold needs adjustment, section.
Storage drawer
is crooked
Storage drawer
won't close
Oven door is crooked
Rear drawer support is
on top of the guide rail.
• Reposition the drawer. See the Storage Drawer
Removal instructions in the Core and cleaning of the
range section.
• Check to moke sure drower is properlg seated
if removed.
Power cord meg be
obstructing drawer
in the lower back
of the range.
• Repositionthe drawer and power cord. Seethe
Storage Drawer Removal instructions in the Coreand
cleaning of the range section.
Rear drawer support is
on top of the guide rail.
• Reposition the drawer. See the Storage Drawer
Removal instructions in the Core and cleaning of the
range section.
The door is out of position. • Becausethe oven door is removable, it sometimes gets out
of position during installation.To straighten the door, push
down on the high corner.
45
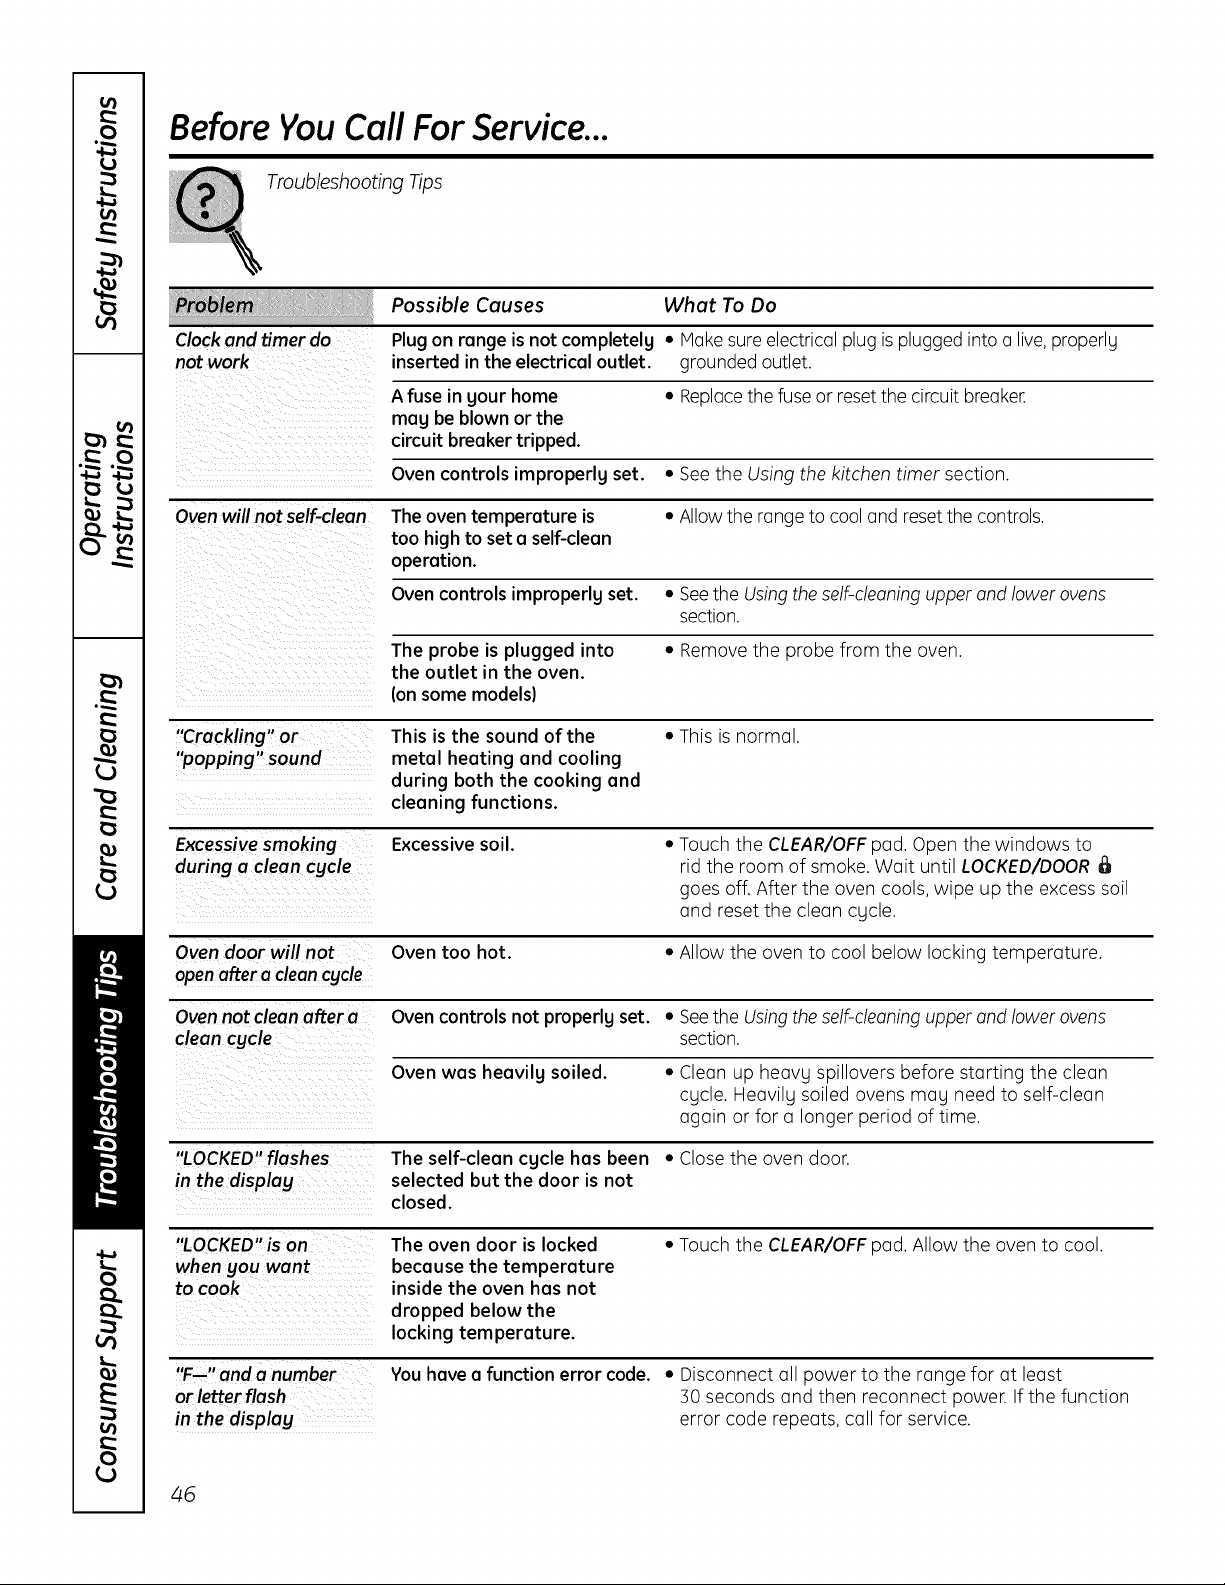
Before YouCall For Service...
Troubleshooting Tips
Possible Causes What
To Do
Clock and timer do Plugon range is not completely • Hake sure electrical plug is plugged into a live, properly
not work insertedinthe electrical outlet, grounded outlet.
A fuse in your home • Replacethe fuse or reset the circuit breaker.
may be blown or the
circuit breaker tripped.
Oven controls improperly set. • See the Using the kitchen timer section.
Ovenwill not self-clean The oven temperature is • Allow the range to cool and reset the controls.
too high to set a self-clean
operation.
Oven controlsimproperly set. • Seethe Using the self-cleaning upper and lower ovens
section.
The probe is plugged into • Remove the probe from the oven.
the outlet in the oven.
ion some modelsl
"Crackling" or This is the sound of the • This is normal.
"popping'sound metal heating and cooling
during both the cooking and
cleaning functions.
Excessivesmoking Excessivesoil. • Touch the CLEAR/OFFpad. Open the windows to
during a clean cycle rid the room of smoke. Wait until LOCKED/DOOR
goes off. After the oven cools, wipe up the excess soil
and reset the clean cycle.
Oven door willnot Oven too hot. • Allow the oven to cool below locking temperature.
openafter a cleancycle
Oven not clean after a Oven controls not properly set. * See the Usingthe self-cleaning upper and lower ovens
clean cycle section.
Oven was heavily soiled. * Clean up heavy spillovers before starting the clean
cycle. Heavily soiled ovens may need to self-clean
again or for a longer period of time.
"LOCKED" flashes The self-clean cycle has been • Close the oven door.
in the display selected but the door is not
closed.
"LOCKED" is on The oven door is locked • Touch the CLEAR/OFFpad. Allow the oven to cool.
when you wont because the temperature
to cook inside the oven has not
dropped below the
locking temperature.
"F-"andanumber You have a function error code. • Disconnect all power to the range for at least
or letter flash 30 seconds and then reconnect power. If the function
in the display error code repeats, coil for service.
46
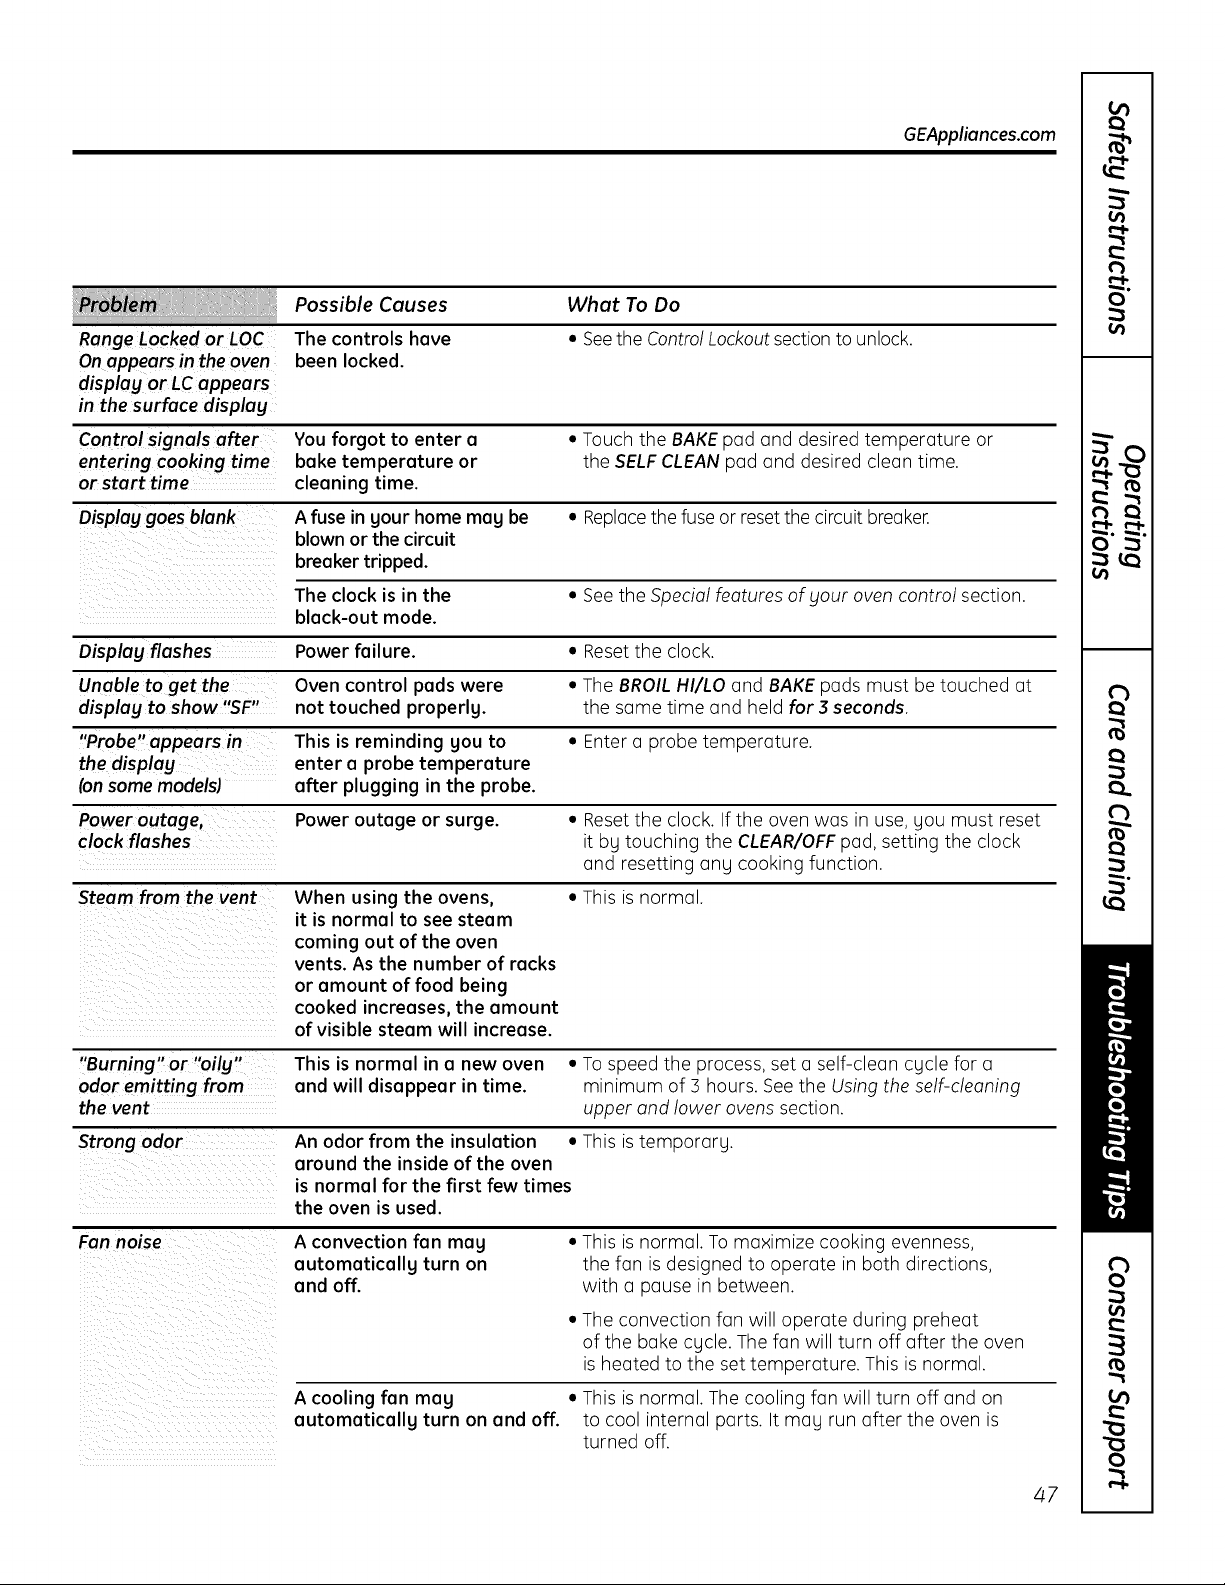
GEAppliances.com
Possible Causes What To Do
Range Locked or LOC The controls have • Seethe Control Lockoutsection to unlock.
On appears in the oven been locked.
displag or LC appears
in the surface displag
Control signals after You forgot to enter a • Touch the BAKE pad and desired temperature or
entering cooking time bake temperature or the SELFCLEAN pad and desired clean time.
or start time cleaning time.
Display goes blank A fuse in gour home mag be • Replacethe fuse or reset the circuit breaker.
blown or the circuit
breaker tripped.
The clock is in the • See the Special features of your oven control section.
black-out mode.
Display flashes Power failure. • Reset the clock.
Unable to get the Oven control pads were • The BROIL HI/LO and BAKE pads must be touched at
display to show "SF" not touched properlg, the same time and held for 3 seconds.
"Probe"appears in This is reminding gou to • Enter a probe temperature.
the display enter a probe temperature
(on some models) after plugging in the probe.
Power outage, Power outage or surge. • Reset the clock. If the oven was in use, you must reset
clock flashes it bg touching the CLEAR/OFF pad, setting the clock
and resetting any cooking function.
Steam from the vent When using the ovens, • This is normal.
it is normal to see steam
coming out of the oven
vents. As the number of racks
or amount of food being
cooked increases, the amount
of visible steam will increase.
"Burning, or "oily"
odor emitting from
the vent
Strong odor
This is normal in a new oven • To speed the process, set a self-clean cgcle for a
and will disappear in time. minimum of 3 hours. See the Using the self-cleaning
upper and lower ovens section.
An odor from the insulation • This is temporarg.
around the inside of the oven
is normal for the first few times
the oven is used.
Fan noise
A convection fan mag
automaticallg turn on
and off.
• This is normal. To maximize cooking evenness,
the fan is designed to operate in both directions,
with a pause in between.
• The convection fan will operate during preheat
of the bake cycle. The fan will turn off after the oven
is heated to the set temperature. This is normal.
A cooling fan meg • This is normal. The cooling fan will turn off and on
automaticallg turn on and off. to cool internal parts. It meg run after the oven is
turned off.
47
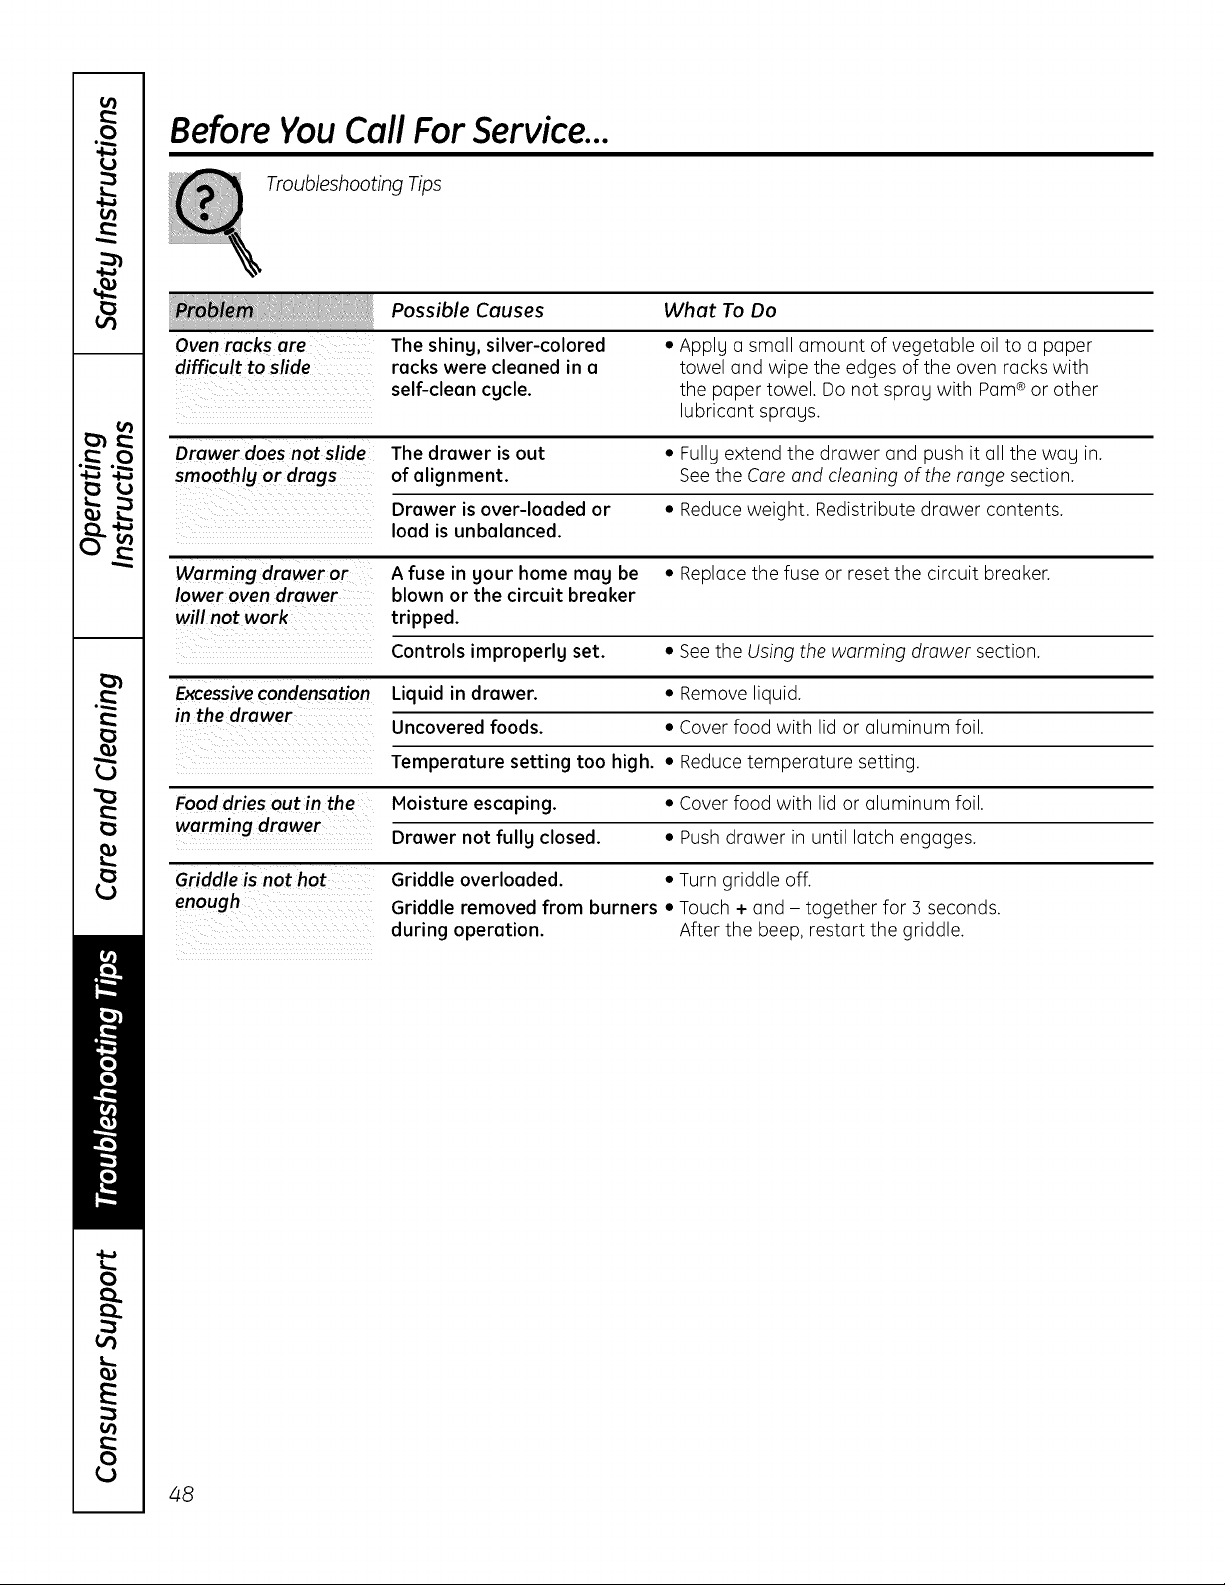
Before YouCall For Service...
Troubleshooting Tips
Oven racks are
difficult to slide
Possible Causes
The shiny, silver-colored
racks were cleaned in a
self-clean cycle.
What To Do
Applu a small amount of vegetable oil to a paper
towel and wipe the edges of the oven racks with
the paper towel. Do not spray with Pam® or other
lubricant sprays.
Drawer does not slide The drawer is out • Fully extend the drawer and push it all the way in.
smoothly or drags of alignment. See the Core ond cleoning of the tonga section.
Drawer is over-loaded or • Reduce weight. Redistribute drawer contents.
load is unbalanced.
Warming drawer or A fuse in gour home mag be • Replace the fuse or reset the circuit breaker.
lower oven drawer blown or the circuit breaker
will not work tripped.
Controls improperly set. • See the Using the worming drower section.
Excessivecondensation Liquid in drawer. • Remove liquid.
in the drawer
Uncovered foods. • Cover food with lid or aluminum foil.
Temperature setting too high. • Reduce temperature setting.
Food dries out in the Moisture escaping. • Cover food with lid or aluminum foil.
warming drawer
Drawer not fully closed. • Push drawer in until latch engages.
Griddle is not hot Griddle overloaded. • Turn griddle off.
enough Griddle removed from burners • Touch + and together for 3 seconds.
during operation. After the beep, restart the griddle.
48

Notes.
GEAppliances.com
o_
0
o_
Q
0"_"
_o
v
u_
0
0
_o
_n
u_
to
"1
o1
.._
.._
0
49

Accessories.
Looking For Something More?You can find these accessories and many more at 6EAppliances.com (U.S.)
or www.GEAppliances.ca (Canada), or call 800.626.2002 (U.S.) or 800.661.1616
(Canada) (during normal business hours). Have your model number ready.
Grates Surface Burner Heads and Caps Surface Elements and Drip Pans Knobs
OvenElements
Experience these other great products to keep your kitchen looking greaff
j c o_Top
i CLEA_G _IT
Ceramic Cooktop _ Ceramic Cooktop _ Stainless Steel _ Stainless Steel
Cleaning Kit: Cleaning Wipes Appliance Polish Appliance
Includes cleaner, Wipes Cleaner
scraper and pad
WXlOX117GCS WXlOX305 WXIOXIO001 PM10X311
Get the most out of your Broiler Pan! tNot for use with Broiler Drawer modelsJ
Useyour port ond grid cover to broil homburgers, seofood, steoks,vegetobles, bocon, chops ond so much
morel The pon below cotches the excess fats ond oils.
• GenuineGEPort
•Eosy To Cleon
• One-YeorWorronty ..
Limited Time Offe!! Free Shipping!
When you order your broiler pan within 30 days of purchasing your GEcooking product.
Small
U.S. Part # WB48XlO055
Dimensions 8-3/4" W x 1-1/4" H x 13-1/2"D
Large* XL**
WB48X10056 WB48X1005 7
12-3/4"Wxl-1/4"Hx15-1/4"D 15-1/2"Wxl-1/4"Hxlg"D
* The large (standard) broil pan does not fit in 20'Y24" ranges.
** The XL pan does not fit in 24" watt ovens, 27" drop-ins or 20"/24" ranges.
Toplace your order, call 800.626.2902(U.S.),800.661.1616(Canada)or mail this form to:
In the U.S.:GEParts,RO.Box 221027,Memphis, TN38122-1027.In Canada:GEParts, 1Factory Lane,Moncton, NB. E1C9M3
Quontity
Broiler Pun Order Form
Port Number
Model Number
First Name
Address
City
Phone
Check
Money Order
Serial Number Brand Date of Purchase
Last Name
State Zip Code
E-Mail
Call 800.626.2002 in the U.S. or 800.661.6161 in Canada for current pricing. All credit card orders must be called in.
50
GE Electric Range Warrantg. GEAppliances.com
All warranty service provided by our Factory Service Centers,
or an authorized Customer Care® technician. To schedule
service, visit us on-line at GEAppliances.com, or call
800.GE.CARES(800./432.2737). Please have serial number
and model number available when calling for service.
Staple Four receipt here.
Proof of the original purchase
date is needed to obtain service
under the warrant F.
GE Will Provide:
ii _i I
One_ Any part of the range which fails due to a defect in materials or workmanship.
Fromthe date of the During this limited one-year warranty, GEwill also provide, flee of charge, all labor
origina!Purchose and in-home service to replace the defective part.
Service trips to gour home to teach gou how to use
the product.
installation,deliverg or maintenance.
Failure of the product if it is abused, misused,
or used for other than the intended purpose
or used commerciallg.
Damage to the glass cooktop caused bg use of
cleaners other than the recommended cleaning
creams and pads.
Damage to the glass cooktop caused bg hardened
spills of sugarg materials or melted plastic that
are not cleaned according to the directions in
the Owner's Manual.
Replacement of house fuses or resetting of circuit
breakers.
Damage to the product caused bg accident, fire, floods
or acts of God.
Incidental or consequential damage caused bg possible
defects with this appliance.
Damage caused after deliverg.
Product not accessible to provide required service.
EXCLUSION OF IMPLIED WARRANTIES--Your sole and exclusive remedy is product repair as provided in this Limited
Warranty. Any implied warranties, including the implied warranties of merchantability or fitness for a particular
purpose, are limited to one gear or the shortest period allowed by law.
This warranty is extended to the original purchaser and any succeeding owner for products purchased for
home use within the USA. If the product is located in an area where service by a GE Authorized Servicer is not
available, you may be responsible for a trip charge or you may be required to bring the product to an Authorized
GEService location for service. In Alaska, the warranty excludes the cost of shipping or service calls to your home.
Some states do not allow the exclusion or limitation of incidental or consequential damages. This warranty
gives you specific legal rights, and you may also have other rights which vary from state to state. To know
what your legal rights are, consult your local or state consumer affairs office or your state's Attorney
General.
Warrantor: General Electric Compang. Louisville, KV 40225
51

Consumer Support.
GEAppliances Website GEAppliances.com
Have a question or need assistance with your appliance? Try the GEAppliances Website 24 hours a day,
any day of the year! For greater convenience and faster service,you can now download Owner's Manuals,
order parts or even schedule service on-line.
Schedule Service GEAppliances.com
Expert GErepair service is only one step away from your door. Get on-line and schedule your service at
your convenience any day of the year! Or call 800.GE.CARES(800.412.2717)during normal business hours.
Real Life Design Studio GEAppliances.com
GEsupports the Universal Designconcept-products, services and environments that can be used by
people of all ages, sizesand capabilities. We recognize the need to design for a wide range of physical and
mental abilities and impairments. For details of GE'sUniversal Design applications, including kitchen design ideas
for people with disabilities,check out our Website today. Forthe hearing impaired, please call 800.TDD.GEAC
(800.8]].4122).
Extended Warranties
GEAppliances.com
Purchasea GEextended warranty and learn about special discounts that are available while your warranty
is still in effect. You can purchase it on-line anytime, or call 800.626.2224 during normal business hours.
GEConsumer Home Serviceswill still be there after your warranty expires.
Parts and Accessories
GEAppliances.com
Individuals qualified to service their own appliances can have parts or accessoriessent directly to their homes
(VISA,MasterCord and Discovercards ore accepted). Orderon-line today, 24 hours every day or by phone at
800.626.2002during normal business hours.
Instructions contained in this manual coverprocedures to be performed by any user. Other servicing
generally should be referred to qualified service personnel. Caution must be exercised,since improper
servicing may cause unsafe operation.
Contact Us
GEAppliances.com
If you are not satisfied with the service you receivefrom GE,contact us on our Website with all the details
including your phone number,or write to: General Manager, Customer Relations
GEAppliances,Appliance Park
Louisville,KY40225
l Register Your Appliance GEAppliances.com
Register your new applience on-line--et your convenience! Timely product registration will allow for
enhanced communication and prompt service under the terms of your warranty, should the need arise.
Youmay also mail in the pre-printed registration card included inthe packing material.
52

GEAppliances.com
0
8
O)
€l)
O)
En Canadd:
www.GEAppliances.ca
lmpmso en los Estados Unidos
8
,0,!
0,!
Instrucciones de Seguridad ................... 2-5
Instrucciones de Operaci6n
Homo .............................................. 1/-4-35
Ajuste de1 termostato de1 homo ...................... 22
Asado, Guia de asado ................................. 18
Auto-limpieza ..................................... 29, 30
Coj6n calentador ...................................... 3/4
Caj6n de1 homo inferior ............................... 35
Caracter[sticas de cocci6n lenta, calentamiento
y leudado .......................................... 27, 28
Caracteristicas especiales ......................... 31, 32
Controles .......................................... 14, 15
Funci6n Sabbath ...................................... :33
Horneado o rostizado ................................ 17
Horneado y rostizado con temporizador ............. 19
Homo de convecci6n ............................. 23-26
Precalentamiento ..................................... 17
Sonda ................................................. 20
Temporizador de cocina ............................... 21
Unidades de superficie .............................. 6-13
Hodelos controlados por botones de toque ......... 8, 9
Hodelos controlados por perilla .................. 10, 11
Plancha ........................................... 12, 1:3
Recipientes de cocci6n ................................ 7
Cuidado g limpieza
Bandejas .............................................. 38
Caj6n calentador desmontable/Recipiente
del caj6n del homo inferior ............................. :39
Caj6n de almacenamiento ............................ 39
Elementos calentadores del homo .................... 41
Estufa de vidrio .................................... 42, 43
Luz ................................................. 40, 41
Panel de control ....................................... 36
Perillas de control ..................................... 36
Piso del homo .......................................... 39
Puerta del horno desmontable .................... 37, 38
Superficies ............................................. 36
Ventilaci6n ......................................... 37, 39
Consejqs para la identificaci6n
g somaon ae proo_emas .................... 44-48
Accesorios .......................................... 50
Apogo al cliente
Apogo al cliente ....................................... 52
Garant[a............................................... 51
Escriba los n(lmeros de modelo g de serie aquk
Modelo #
Serie #
Puede encontrarlos en una etiqueta ubicada
detr6s del caj6n o detr6s de la puerta del horno
inferior en el frente del marco de la cocina.
Control Quick Set V,
Quick Set Vl y
Next Step
Impreso en
papel reciclado
49-80602 08-09 JR
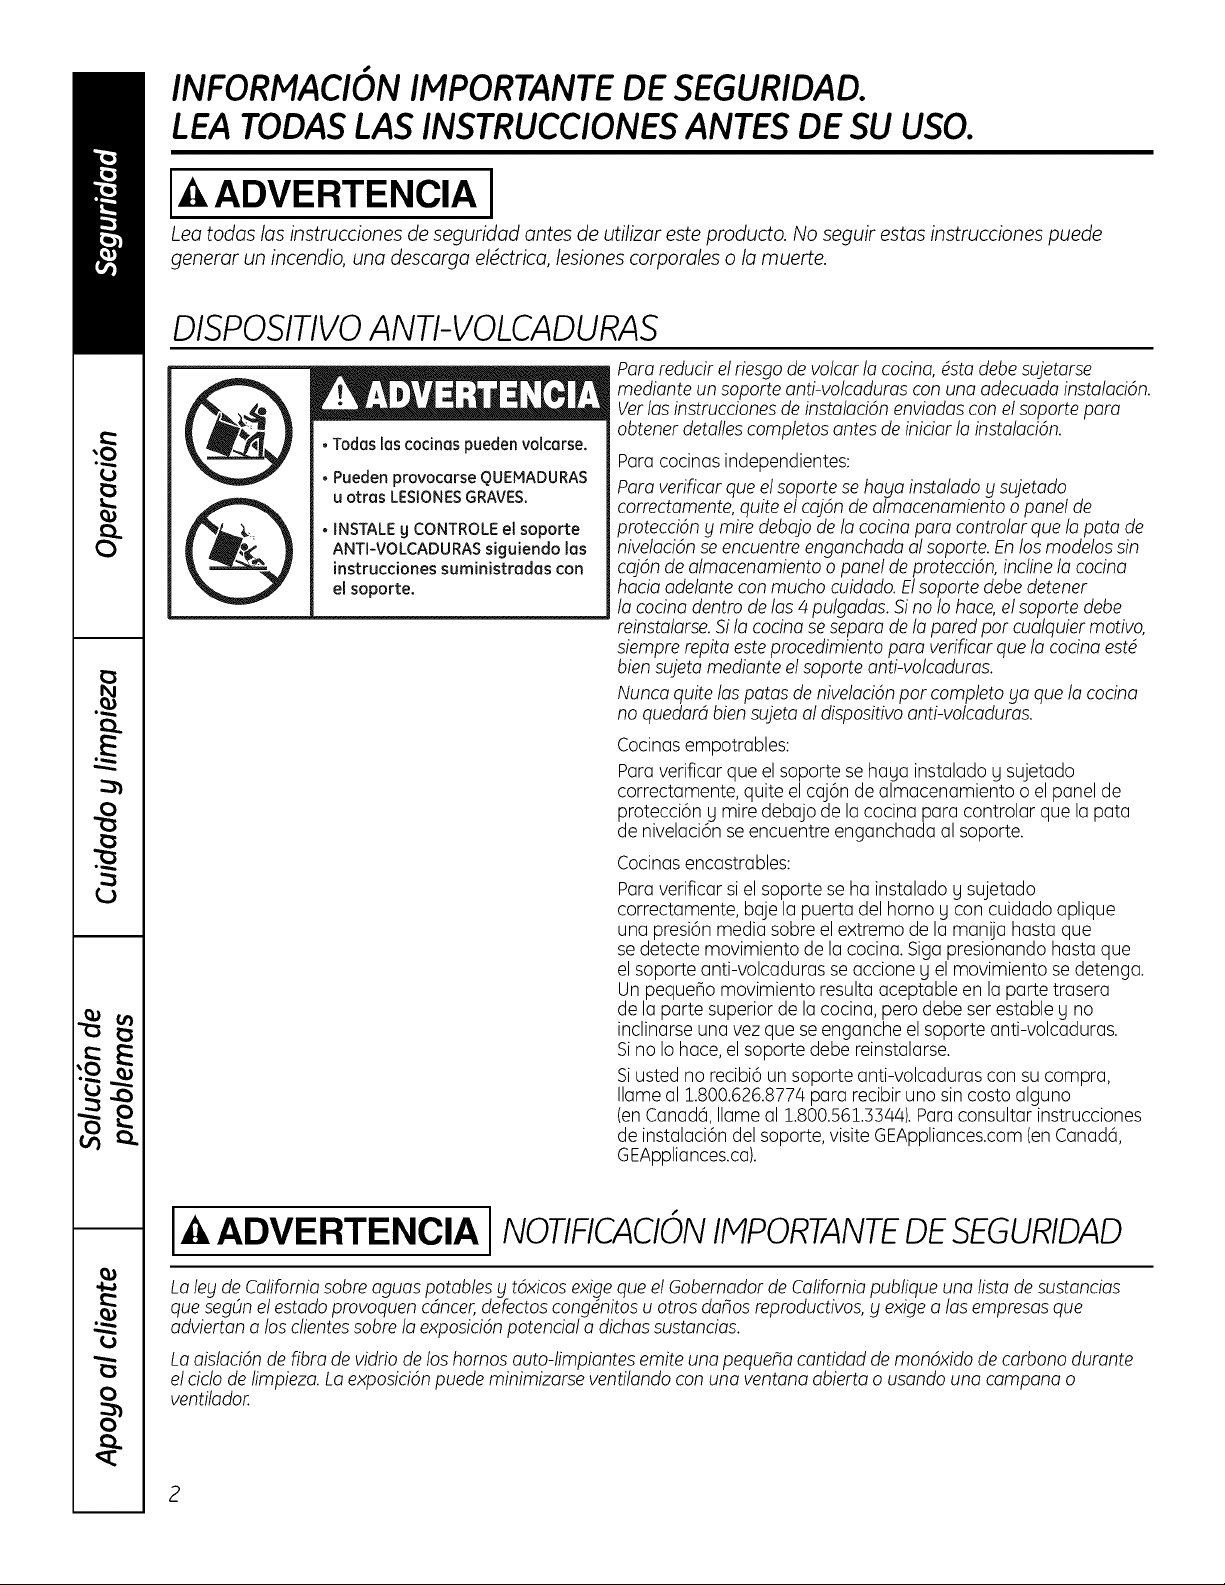
INFORMACION IMPORTANTEDE SEGURIDAD.
LEA TODASLAS INSTRUCCIONESANTES DE SU USO.
I-&ADVERTENCIA I
Lea todas los instrucciones de seguridod antes de utilizar este producto. No seguir estas instrucciones puede
generor un incendio, uno descorgo el_ctrico, lesiones corporoles o Io muerte.
DISPOSITIVO ANTI-VOLCADURAS
• Todas las cocinas pueden volcarse.
• Pueden provocarse QUEMADURAS
u otras LESIONESGRAVES.
, INSTALE£ICONTROLEel soporte
ANTI-VOLCADURASsiguiendo los
instrucciones suministradas con
el soporte.
Para reducir el riesgo de volcar la coma, 4sta debesujetarse
medionte un soporte anti-volcadums con uno adecuado instalodOn.
Vetlos instrucciones de instolodOn enviados con el soporte pore
obtener detallescompletos antes de inidor lo instolociOn.
Paracocinas independientes:
Paro verificar que el soporte se hoga instalado g sujetodo
correctamente,quite el cojOnde olmocenomiento o panel de
protecciOng mire debojo de la cocinopore contmlor que lo poto de
nivelociOnse encuentre engonchada alsoporte. Enlos modelos sin
cojOnde almacenomiento o panel de pmtecciOn,incline la cocino
hocia adelante con mucho cuidado.Elsoporte debe detener
lo cocinodentro de los 4 pulgodos. Si no Io hace, el soporte debe
reinstalarse.Sila coma se sepam de lo pared par cualquier motivo,
siempre repita este procedimiento pore verificor que lo coma estd
bien sujeto medionte el soporte onti-volcoduros.
Nunca quite los potas de nivelaciOnpar completo go que lo cocino
no quedor4 bien sujeto ol dispositivoonti-volcodums.
Cocinos empotrobles:
Poroveriflcor que el soporte se haya instolodo y sujetodo
correctamente, quite elcaj6n de almacenamiento o el panel de
protecci6n g mire debajo de la cocina para controlar que la pata
de nivelaci6n se encuentre enganchada al soporte.
Cocinos encostrobles:
Poraveriflcor si el soporte se ha instolodo g sujetodo
correctamente, boje la puerto del homo g con cuidado aplique
una presi6n media sabre el extremo de la manija hasta que
se detecte movimiento de la cocina. Siga presionando hasta que
el soporte anti-volcaduras se accione g el movimiento se detenga.
Un pequeflo movimiento resulta aceptable en la porte trasera
de la porte superior de la cocina, pero debe ser estable g no
inclinarse una vez que se enganche el soporte anti-volcaduras.
Sino Io hace, el soporte debe reinstalarse.
Siusted no recibi6 un soporte anti-volcaduras con su compra,
Ilame al 1.800.626.8774para recibir uno sin costa alguno
(enConod6, Ilame ol 1.800.561.3344).Poro consultor instrucciones
de instoloci6n del soporte, visite GEAppliances.com(enCanad(i,
GEAppliances.ca).
I-& ADVERTENCIA I NOTIFICACIONIMPORTANTEDESEGURIDAD
Loley de California sabre oguos potables g tOxicosexige que el Gobemodor de Californiapublique uno listo de sustoncios
que segOnel estadoprovoquen cdncer,defectos cong_nitos u otros da_os reproductivos,g exige a los empresos que
odvierton o los clientessabre lo exposiciOnpotential o dichossustoncios.
Looislocidn de fibro de vidrio de los boreas outo-limpiontes emite uno peque_o contidod de mondxido de corbono dumnte
el ciclo de limpiezo. Lo exposiciOnpuede minimizorse ventilondo con uno ventono obierto o usondo uno compono o
ventilodor.
2
GEAppliances.com
ADVERTENClA I INSTRUCCIONE5GENERALE5DESEGURIDAD
Useeste aparato s61ocon el objetivopara el quefue creado,
como sedescribe eneste Manualdel Propietario.
AsegOresede que unt_cnico calificado realiceuna correcta
instalaci6ng puesta a tierra del artefacto de acuerdocon
las instruccionesde instalaci6nprovistas.
No intenterepararo cambiar ninguna piezadesu cocina
a menosqueest@espedficamente recomendadoen este
manual.Cualquierotro serviciodeberealizarloun t_cnico
calificado.
Antesde realizarcualquier clasede reparaci6n,
desenchufela cocina o desconecteelsuministroel#ctrico
desdeel panel de distribuci6ndomasticoquitando elfusible
o desconectandoel interruptorde circuitos,
No dejea losninossolos;@stosno debenquedarsoloso sin
atenci6n en un 6rea donde un aparato est@en uso.Nunca
debe permitirseque se suban,sienteno paren en cualquier
parte deesteaparato.
P R ECAU C lO N: No almacene elementos
de inter@spara ninossobreuna cocina o en la protecci6n
trasera de una cocina:los ninosque setrepan a la cocina
paraalcanzarelementospuedenresultargravementeheridos.
, S61ouseagarraderassecas:lasagarraderas hOmedas
o mojadascolocadasen superficiescalientespueden
provocarquemadurasde vapor.No permita quelas
agarraderas entrenen contacto con unidadesde superficie
o loselementoscalentadorescalientes.No utilicetoallas
u otras telasgruesasen lugar de una agarradera.
Nuncausesu electrodom@sticopara calentarla habitaci6n.
, Notoque lasunidadesdesuperficie,loselementos
calentadoreso lasuperficieinterior del homo. Estas
superficiespuedenestar Iosuficientementecalientespara
quemar aOncuando tengan un color oscuro.Duranteg
despu@sdel uso, notoque o deje quesu vestimenta u otros
materialesinflamablesentren encontacto con unidades
desuperficie,6reascercanasalas unidadesdesuperficie
o cualquier6rea interiordel homo; deje pasar un tiempo
prudencialpara que se enfrfen.Otras superficiesdel aparato
puedencalentarseIosuficientecomo para provocar
quemaduras.Lassuperficiespotencialmentecalientes
inclugenla estufa, las6reasorientadashacia la estufa,
la abertura de ventilaci6n del homo,las superficiescercanas
a la abertura g las hendidurasubicadas alrededorde la
puerta del homo.
, No calienterecipientescerradosde alimentos.Podriahaber
una acumulaci6nde presi6nen el recipienteg _ste podria
explotar,provocandolesiones.
, No utilicepapelde aluminio para revestirlas bandejas
colectoraso ningunaparte delhomo,con excepci6nde
Iodescriptoen este manual.Un uso inadecuadopuede
provocardanos a la cocinag una descargael@ctrica
o un riesgode incendio.
, Tratede no ragar o golpear las puertas,estufaso paneles
de control de vidrio.Si Io hace podrfaromperseel vidrio.No
cocinesi un productotiene unvidrio roto. Puedeprovocarse
unadescarga,un incendioo heridas.
, Cocinecarnesde resg de ave por completo:Lascarnes
de res hasta alcanzar unatemperatura interna de por
Iomenos 160°F(7:]_°C)g las carnesde ave a una
temperatura interna depor Io menos :]_80°F182°C).
Lacocci6na estastemperaturasgeneralmenteprotege
de enfermedadestransmitidas por losalimentos.
ADVERTENCIA [ MANTENGALOSMATERIALES
INFLAMABLE5ALEJADOSDE LA COCINA.
, No almaceneo utilice materialesinflamablesdentro de
un homo o cercade la estufa,talescomo papel,pl6stico,
agarraderas,telas,recubrimientosde pared,cortinas
g gasolinau otrosvaporesg liquidosinflamables.
, Nuncause vestimentasholgadaso amplias mientrasutilice
el aparato. Estasvestimentas puedenprendersefuego si
entran en contacto con superficiescalientes,provocando
quemadurasgraves.
, No permitaque lagrasa de la cocci6n u otros materiales
inflamablesse acumulen dentro de lacocina o ensu
cercanfa.Lagrasa dentro delhomo o sobrela estufa
puedeencenderse.
, Limpielas campanas de ventilaci6ncon frecuencia.
Nodebe permitirsela acumulaci6n de grasaen la campana
o en elfiltro.
I-4,ADVERTENCIA I
EN CASO DE INCENDIO, SIGA LOS
SIGUIENTE5 PASOS PARA EVITAR
LA PROPAGACION DEL FUEGO:
, Noutiliceagua en incendiosdegrasa.Nunca levante una
sart@nen llamas.Apagueloscontroles.Apague una sart_n
en llamas sobreuna unidad de superficiecubriendo
la sart_n por completo con una tapa que ajustebien,
una plancha para galletaso una bandeja plana.Utilice
un qufmicoseco multiuso o un extintor de incendios
de espuma.
, Sihag un incendioenel homo duranteel horneado,
ap6guelocerrando la puerta del homo g apagando
el control o usandoun quimico seco multiuso o un extintor
de incendiosde espuma.
, Sihag un incendioen el homo durante la auto-limpieza,
apagueel homo g esperea que elincendiose consuma.
No abra la puerta del homo a la fuerza.Elingresode aire
frescoa temperaturas de auto-limpiezapuede provocar
una explosi6nde llamasdesdeel horno.No seguiresta
instrucci6npuedeprovocarquemadurasgraves.
3
INFORMACION IMPORTANTEDE SEGURIDAD.
LEA TODASLAS INSTRUCCIONESANTES DE SU USO.
ADVERTENCIA IINSTRUCCIONESDESEGURIDADDELAESTUFA
Nunca deje las unidades de superficie sin atenci6n
en configuraciones de calor media o alta. Los alimentos
que hierven g se derraman pueden provocar humo g
derrames grasosos que pueden prenderse fuego.
Nunca deje aceite sin atenci6n mientras fife. Si se deja
calentar m6s all6 del punto de humeo, el aceite puede
encenderse,provocando un incendio que podrfa
propagarse a los gabinetes cercanos. Utilice un
term6metro para grasa cuando sea posible para
controlar la temperatura del aceite.
Para evitar el derrame de aceite gun incendio,utilice una
cantidad mfnima de aceite cuando frfa en sartenes poco
profundas g evite la cocci6n de alimentos congelados
con una cantidad excesiva de hielo.
Utilice el tamano de recipiente adecuado: Elijarecipientes
con bases planas Io suficientemente grandes para cubrir
el elemento calentador de superficie. La utilizaci6n de
recipientes m6s peque_os dejar6 expuesta una porci6n
de la unidad de superficie al contacto directo, Io que
puede provocar el encendido de sus vestimentas.
Una relaci6n adecuada del recipiente con la unidad
de superficie tambi_n mejorar(i la eficiencia.
S61ociertos tipos de recipientes de vidrio,vidrio/cer6mico,
cer6mica, u otros recipientesvidriados pueden utilizarse
sobre la estufa; otros pueden romperse debido al cambio
repentino de temperatura.
Para minimizar la posibilidad de quemaduras,
el encendido de materiales inflamables g los derrames,
la manija de los recipientes deben girarse hacia el centro
de la cocina sin extenderse sobre ninguna unidad
de superficie cercana.
Siflambea alimentos bajo la campana, encienda
el ventilador.
I_ ADVERTENCIA I
INSTRUCCIONES DE SEGURIDAD DE LA
ESTUFA RADIANTE (algunos modelos)
Tenga cuidado al tocar la estufa. Lasuperficie de vidrio
de la estufa retendrci calor despu_sde que los controles
se hagan apagado.
No cocine sobre una estufa rota. Si la estufa se rompe,
las soluciones de limpieza U los derrames pueden
penetrar en la estufa rota Ucrear un riesgo de descarga
el@ctrica.Comuniquese con un t_cnico calificado de
inmediato.
Eviteragar la estufa de vidrio. La estufa puede ragarse
con elementos tales como cuchillos, instrumentos filosos,
anillos u otrasjogas, g remaches de la ropa.
No coloque o almacene elementos que pueden derretirse
o prenderse fuego sobre la estufa de vidrio, a0n cuando
no la est_ usando.Si la estufa se enciende en forma
accidental, pueden prenderse fuego. Elcalor proveniente
de la estufa o de la ventilaci6n del homo tambi@npuede
prenderlos fuego, a0n si el aparato est(i apagado.
Useel limpiador de estufas cer6micas CERAMABRYTE®
g laesponjilla de limpieza CERAMABRYTE®para limpiar
la estufa. Esperehasta que la estufa se enfrfe g la luz
indicadora se apague antes de limpiar. Una esponja
o un patio h0medos sobre una superficie caliente pueden
provocar quemaduras de vapor. Algunos limpiadores
pueden producir humos t6xicos si se los aplica a una
superficie caliente. NOTA:Los derrames de az0car son
la excepci6n. Estosdeben quitarse mientras est6n
calientes utilizando una agarradera gun raspador.Para
instrucciones detalladas, ver la secci6n C6mo limpior
la estufo de vidrio.
LeaU cumpla con todas las instrucciones Uadvertencias
de la etiqueta de la crema de limpieza.
I_ ADVERTENCIA I
INSTRUCCIONES DE SEGURIDAD DE LA
ESTUFA DE BOBINAS (algunos modelos)
No sumerja o remoje las unidades de superficie
desmontables. No las coloque en el lavavajillas.
No coloque las unidades de superficie dentro del homo
cuando realice la auto-limpieza. SiIo hace pueden Ilegar
a fallar,provocando un peligro de quemaduras o de
incendio.
Paraevitar la posibilidadde una quemadura o descarga
el@ctrica,siempre verifique que loscontroles de todas
las unidadesde superficie seencuentren en la posici6n
OFF(apagado)y que todas las bobinasest_n frfas antes
de levantaro quitar una unidad de superficiede bobinas.
Aseg0resede que las bandejas colectoras no est_n
cubiertas y se encuentren en su lugar.Su ausencia
durante la cocci6n podrfa da_ar las piezas Uel cableado
de la cocina.
GEAppliances.com
ADVERTENCIA I INSTRUCCIONE5DE5EGURIDADDEL HORNO
Mant@ngasealejadode lacocinacuandoabra
lapuertadelhomo. ElaJrey elvapor calJentesque salen
de lacocJnapueden provocarquemaduras en manos,
rostro y/o ojos.
Mantenga sin obstrucciones la ventilad6n del homo.
Mantenga el horno libre de acumulaciones de grasa.
La grasa dentro del homo puede prenderse fuego.
Siempre coloque las bandejas del homo en la posici6n
deseada mientras el homo est_ frio. Si la bandeja debe
quitarse cuando el homo todavia est6 caliente, no
permita que la agarradera toque el elemento calentador
del homo.
Cuando utilice bolsas de cocci6n o de asado en el homo,
siga las instrucciones del fabricante.
,Tire de la bandeja del homo hasta la posici6n de tope
de detenci6n cuando cargue o descargue alimentos
del horno. Esto aguda a evitar quemaduras por tocar
superficies calientes de la puerta g las paredes del homo.
No deje productos como papel, utensilios de cocina
o alimentos en el homo cuando no Io estOusando.
Loselementos guardados en el homo pueden prenderse
fuego.
No utilice papel de aluminio para revestir el piso
del homo. Elpapel de aluminio puede atrapar o reflejar
el calor, provocando una descarga elOctricao un peligro
de incendio.
ADVERTENCIA I INSTRUCCIONES DE SEGURIDAD DEL
HORNO AUTO-LIMPIANTE (olg. o modelos)
Lo caracterfstica de auto-limpieza funciona en el homo a temperaturas Io suficientemente elevadas como para
quemar los restos de alimentos que quedaron dentro del homo. 5iga estas instrucciones para una operaci6n segura.
Antes de iniciar el ciclo de auto-limpieza, quite las ollas,
bandejas del homo de metal brillante y otros utensilios
del homo. $61opueden dejarse en el homo las bandejas
revestidasde porcelana gris.No utilice la auto-limpieza
para limpiar otras piezas,como bandejas colectoras
o tazones.
Antes de utilizar el ciclo de auto-limpieza, limpie la grasa
y los derrames de alimentos del horno. Una cantidad
excesivade grasa puede encenderse,generando
daBos por el humo en su hogar.
Siel modo de auto-limpieza no funciona, apague
el homo g desconecte el suministro de energia. Llame
a un tOcnicocalificado para solicitar el arreglo.
No limpie la empacadura de la puerta. La empacadura
de la puerta es esencial para un buen sellado. Debe
tenerse cuidado de no refregar,daSar o mover la
empacadura.
No utilice limpiadores de homo. No debe utilizarse ningOn
limpiador comercial o revestimiento protector de ninguna
clase dentro o alrededor de ninguna pieza del homo.
ADVERTENCIA I CAJON CALENTADOR/CAJONDEL HORNO
INFERIOR INSTRUCCIONES DE SEGURIDAD
(algunos modelos)
Elobjetivo del caj6n calentador es mantener alimentos
cocidos calientes a la temperatura de servicio. Pordebajo
de los 140°F(60°C)puede producirse crecimiento de
bacterias en los alimentos. No coloque alimentos frbs
en el caj6n calentador. No caliente alimentos por m6s
de 2 horas. No seguir estas instrucciones puede provocar
enfermedades transmitidas por los alimentos.
No deje productos de papel, pl6sticos, comida enlatada
o materiales combustibles en el caj6n. Pueden prenderse
fuego.
No toque el elemento calentador o la superficie
interna del caj6n. Estassuperficies pueden estar
Io suficientemente calientes como para provocar
quemaduras.
Tenga cuidado al abrir el caj6n. Abra un poco el caj6n
y deje salir el aire caliente y el vapor antes de quitar o
volver a colocar los alimentos. Elaire y el vapor calientes
que salen pueden provocar quemaduras en manos,
rostro g/o ojos.
No utilice papel de aluminio para revestir el caj6n
calentador. Elpapel met01icoes un excelente aislante
de calory atrapar6 el calor debajo de @1.Estoalterar6
el desempe_o del caj6n y potencialmente podria
provocar un riesgo de incendio.
5
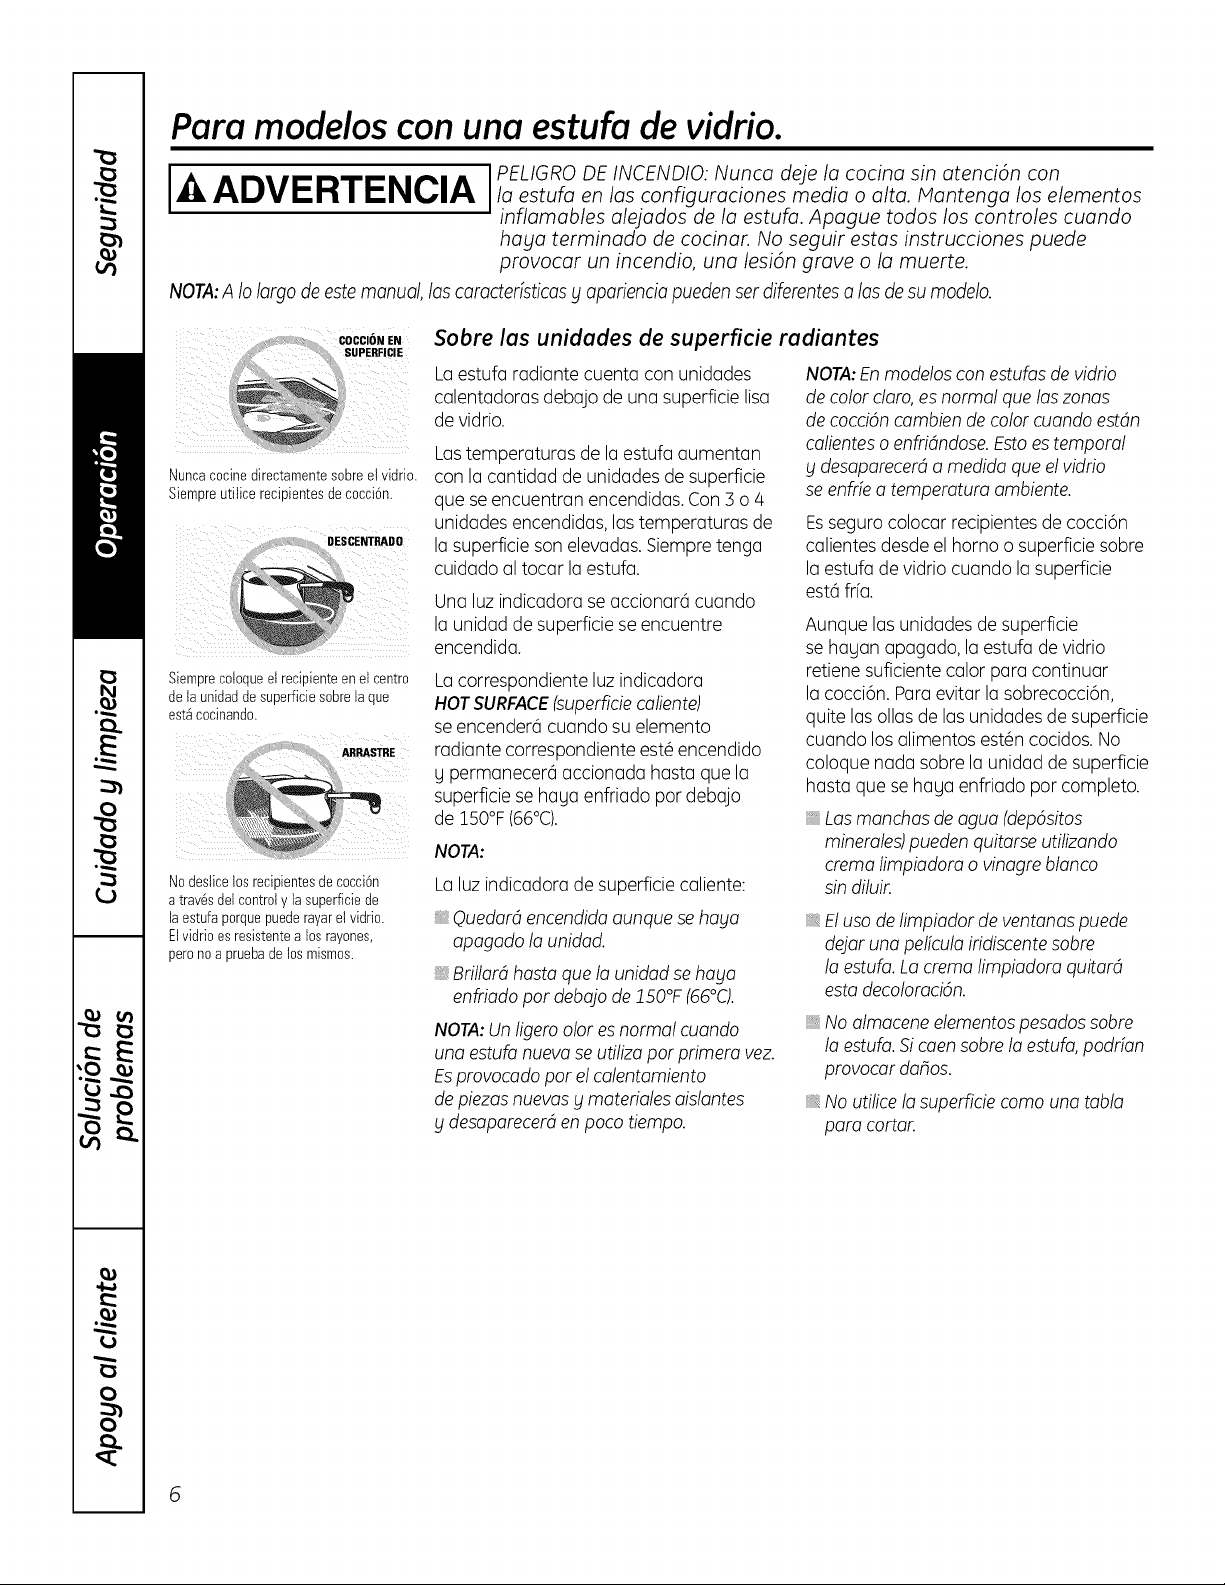
Para modelos con una estufa de vidrio.
I,_)i, I PELIGRO DE INCENDIO: Nunco deje Io cocino sin otenciOn con
ADVERTENCIA,/o est. oenloscon ig.rocionesme iooo/toMontengolose/ementos
inflomobles olejodos de Io estufo. Apogue todos los controles cuondo
hogo terminodo de cocinor. No seguir estos instrucciones puede
provocor un incendio, uno lesion grove o Io muerte.
NOTA:A Io Iorgo de este monuol, los corocterfsticosg oporienciopueden ser diferenteso los desu modelo.
COCCIONEN
SOPERFICIE
Nuncacocinedirectamentesobreel vidrio.
Siempreutiiice recipientesde cocci6n.
} DESCENTRADO
Siemprecoloqueet recipienteen el centro
de la unidadde superficiesobrela que
est_cocinando.
No deslicelos recipientesde cocci6n
a trav6sdet controly la superficiede
la estufa porquepuederayar elvidrio.
Elvidrioes resistentea los rayones,
perono a pruebade los mismos.
Sobre las unidades de superficie radiantes
Laestufa radiante cuenta con unidades
calentadoras debajo de una superficie lisa
de vidrio.
Lastemperaturas de la estufa aumentan
con Io cantidad de unidades de superficie
que se encuentran encendidas. Con 3 o 4
unidades encendidas, las temperaturas de
la superficie son elevadas. Siempretenga
cuidado al tocar la estufa.
Una luz indicadora se accionar(_cuando
la unidad de superficie se encuentre
encendida.
Lucorrespondiente luz indicudora
HOTSURFACE(superficiecaliente)
se encender(i cuando su elemento
radiante correspondiente est_ encendido
y permanecer(_accionada hasta que la
superficie se haya enfriado por debajo
de 150°F(66°C).
NOTA:
La luzindicadora de superficie caliente:
Quedor(_encendido ounque se ho_lo
opogodo Io unidod.
Brillord hosto que Io unidod se hoblo
enfriodo pot debqjo de 250°F (66°0.
NOTA:Un ligero olor es normol cuondo
uno estufo nuevo se utilizo pot primem vez.
Esprovocodo pot el colentomiento
depiezos nuevosblmoterioles oislontes
bldesoporecerden poco tiempo.
NOTA:En modelos con estufos de vidrio
de color cloro, es normol que los zonos
de cocdOn combien de color cuondo estdn
colientes o enfridndose.Esto es temporal
_Idesoporecerdo medido que el vidrio
se enfrfea temperature ombiente.
Esseguro colocar recipientes de cocci6n
calientes desde el homo o superficie sobre
la estufa de vidrio cuando la superficie
est(i frfa.
Aunque las unidades de superficie
se hayan apagado, la estufa de vidrio
retiene suficiente calor para continuar
la cocci6n. Para evitar la sobrecocci6n,
quite las ollas de las unidades de superficie
cuando los alimentos est_n cocidos. No
coloque nada sobre la unidad de superficie
hasta que se haya enfriado por completo.
Losmonchos de aguo (depOsitos
minemles)pueden quitorse utilizondo
crema limpiodom o vinogre blonco
sin diluir.
_,Eluso de limpiador de ventanas puede
dejar una pelfcula iridiscentesobre
Io estufa.Lo cremo limpiodoro quitor4
esta decoloraciOn.
, No olmoceneelementos pesodossobre
Io estufo.Sicoen sobre Io estufo,podrfon
provocor dodos.
, No utificeIo superficie como uno toblo
pore cortor.
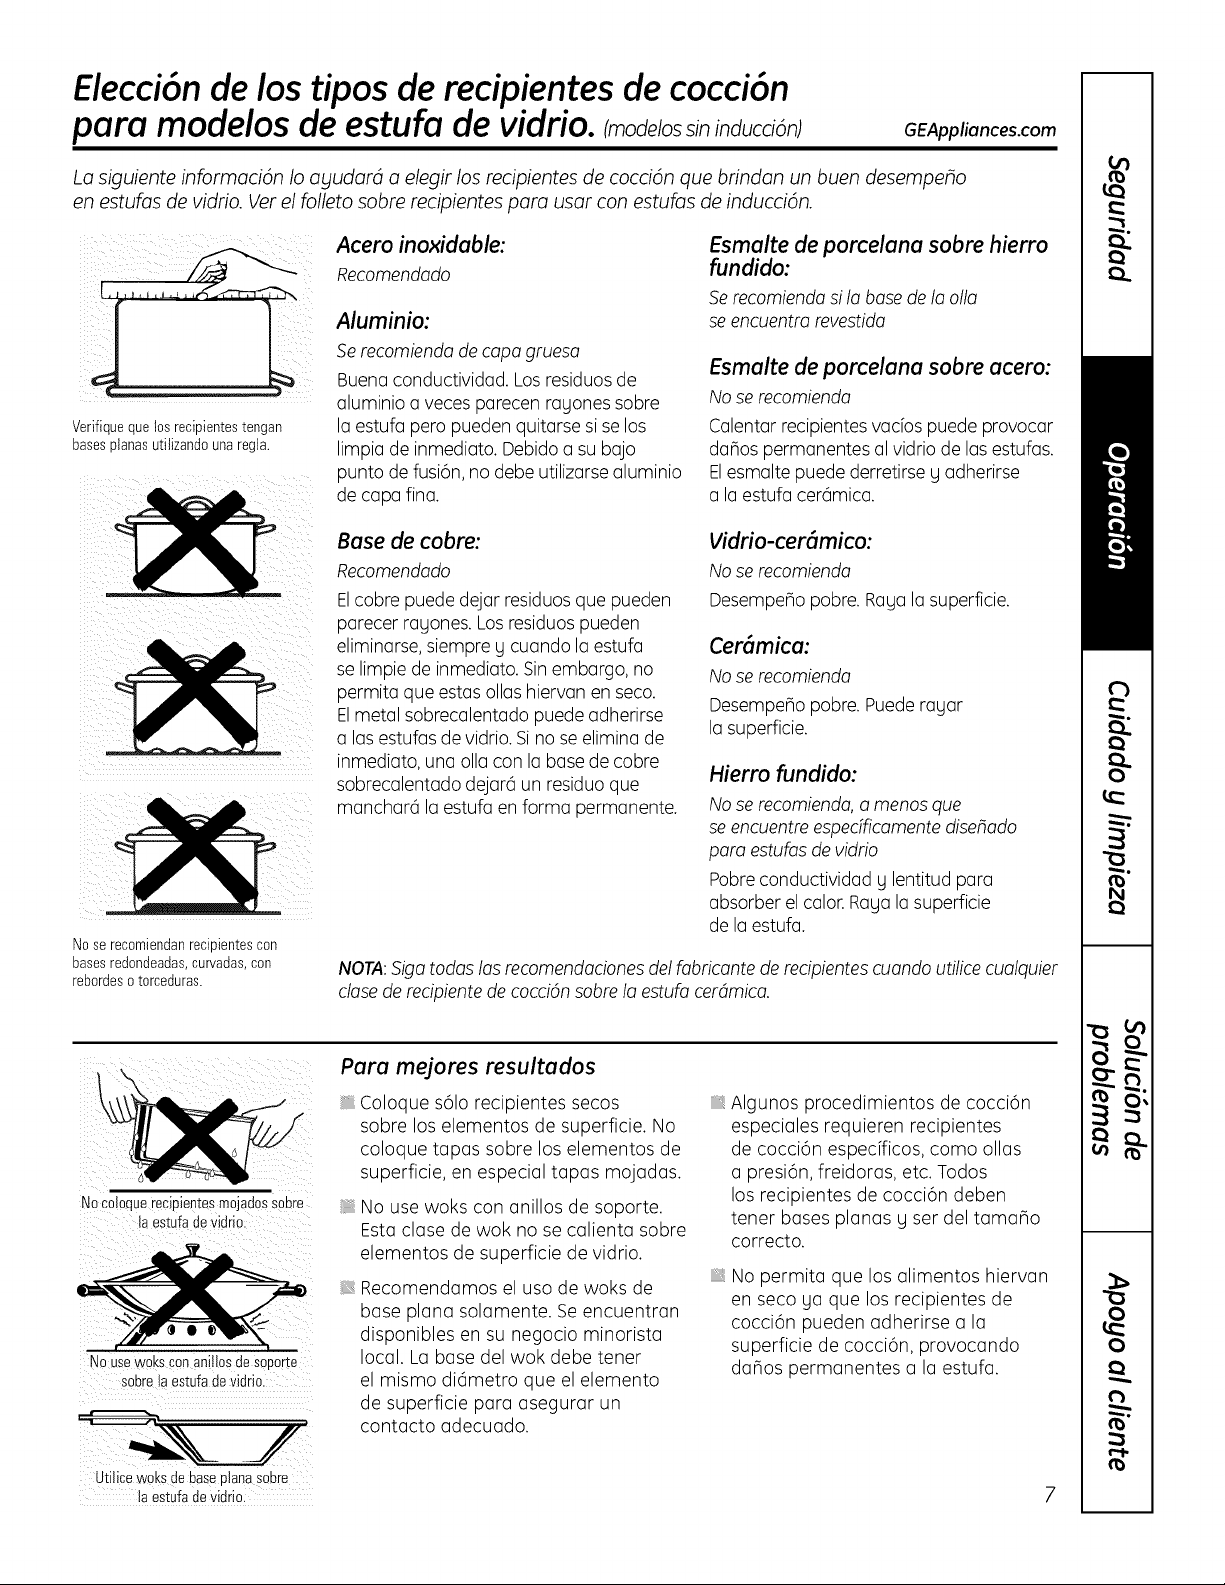
Elecci6n de los tipos de recipientes de cocci6n
para modelos de estufa de vidrio. Imoddossininducci6n)GEAppliances.com
La siguiente informaci6n Io ayudard a elegir los recipientes de cocci6n que brindan un buen desempefio
en estufas de vidrio. Ver el folleto sabre recipientes para usar con estufas de inducci6n.
Verifiqueque los recipientestengan
basesplanasutitizandounaregla.
No se recomiendanrecipientescon
basesredondeadas,curvadas,con
rebordeso torceduras.
Acero inoxidable:
Recomendado
Aluminio:
Se recomienda de copo gruesa
Buena conductividad. Los residuos de
aluminio a veces parecen ragones sabre
la estufa pero pueden quitarse si se los
limpia de inmediato. Debido a su bajo
punto de fusi6n, no debe utilizarse aluminio
de capa fina.
Esmalte de porcelana sobre hierro
fundido:
Se recomiendo silo base de lo alia
se encuentra revestida
Esmalte de porcelana sobre acero:
No se recomienda
Calentar recipientes vac[os puede provocar
danos permanentes al vidrio de las estufas.
Elesmalte puede derretirse g adherirse
a la estufa cer(imica.
Base de cobre:
Recomendado
Elcobre puede dejar residuos que pueden
parecer ragones. Los residuos pueden
eliminarse, siempre g cuando la estufa
se limpie de inmediato. Sin embargo, no
permita que estas ollas hiervan en seco.
Elmetal sobrecalentado puede adherirse
alas estufas de vidrio. Si no se elimina de
inmediato, una alia con la base de cobre
sobrecalentado dejar(i un residuo que
manchar(i la estufa en forma permanente.
Vidrio-cer6mico:
No se recomienda
Desempe_o pobre. Raga la superficie.
Cer6mica:
No se recomienda
Desempe_o pobre. Puede ragar
la superficie.
Hierro fundido:
No se recomienda, o menos que
se encuentre espedficamente dise_ado
paro estufos de vidrio
Pobre conductividad g lentitud para
absorber el calor. Raga la superficie
de la estufa.
NOTA:Sigo todos los recomendociones del fobriconte de recipientes cuondo utilice cuolquier
close de recipiente de cocci6n sabre la estufo cerdmica.
ii!_)!
No Co!oquerecipientesmojadossobre
la estufa de vidrio.
!
No Usew0ks conanitlos de soporte
sabrela estufa devidrio.
Utilice w0ks de base planaSabre
la estufa de Vidrio.
Para mejores resultados
Coloque s61orecipientes secos
sabre los elementos de superficie. No
coloque topos sabre los elementos de
superficie, en especial topos mojadas.
No use woks con anillos de soporte.
Esta clase de wok no se calienta sabre
elementos de superficie de vidrio.
Recomendamos el usa de woks de
base plana solamente. Se encuentran
disponibles en su negocio minorista
local. La base del wok debe tener
el mismo di6metro que el elemento
de superficie para asegurar un
contacto adecuado.
Algunos procedimientos de cocci6n
especiales requieren recipientes
de cocci6n especfficos, coma alias
a presi6n, freidoras, etc. Todos
los recipientes de cocci6n deben
tener bases planas g ser del tamaBo
correcto.
No permita que los alimentos hiervan
en seco ga que los recipientes de
cocci6n pueden adherirse a la
superficie de cocci6n, provocando
daBos permanentes a la estufa.
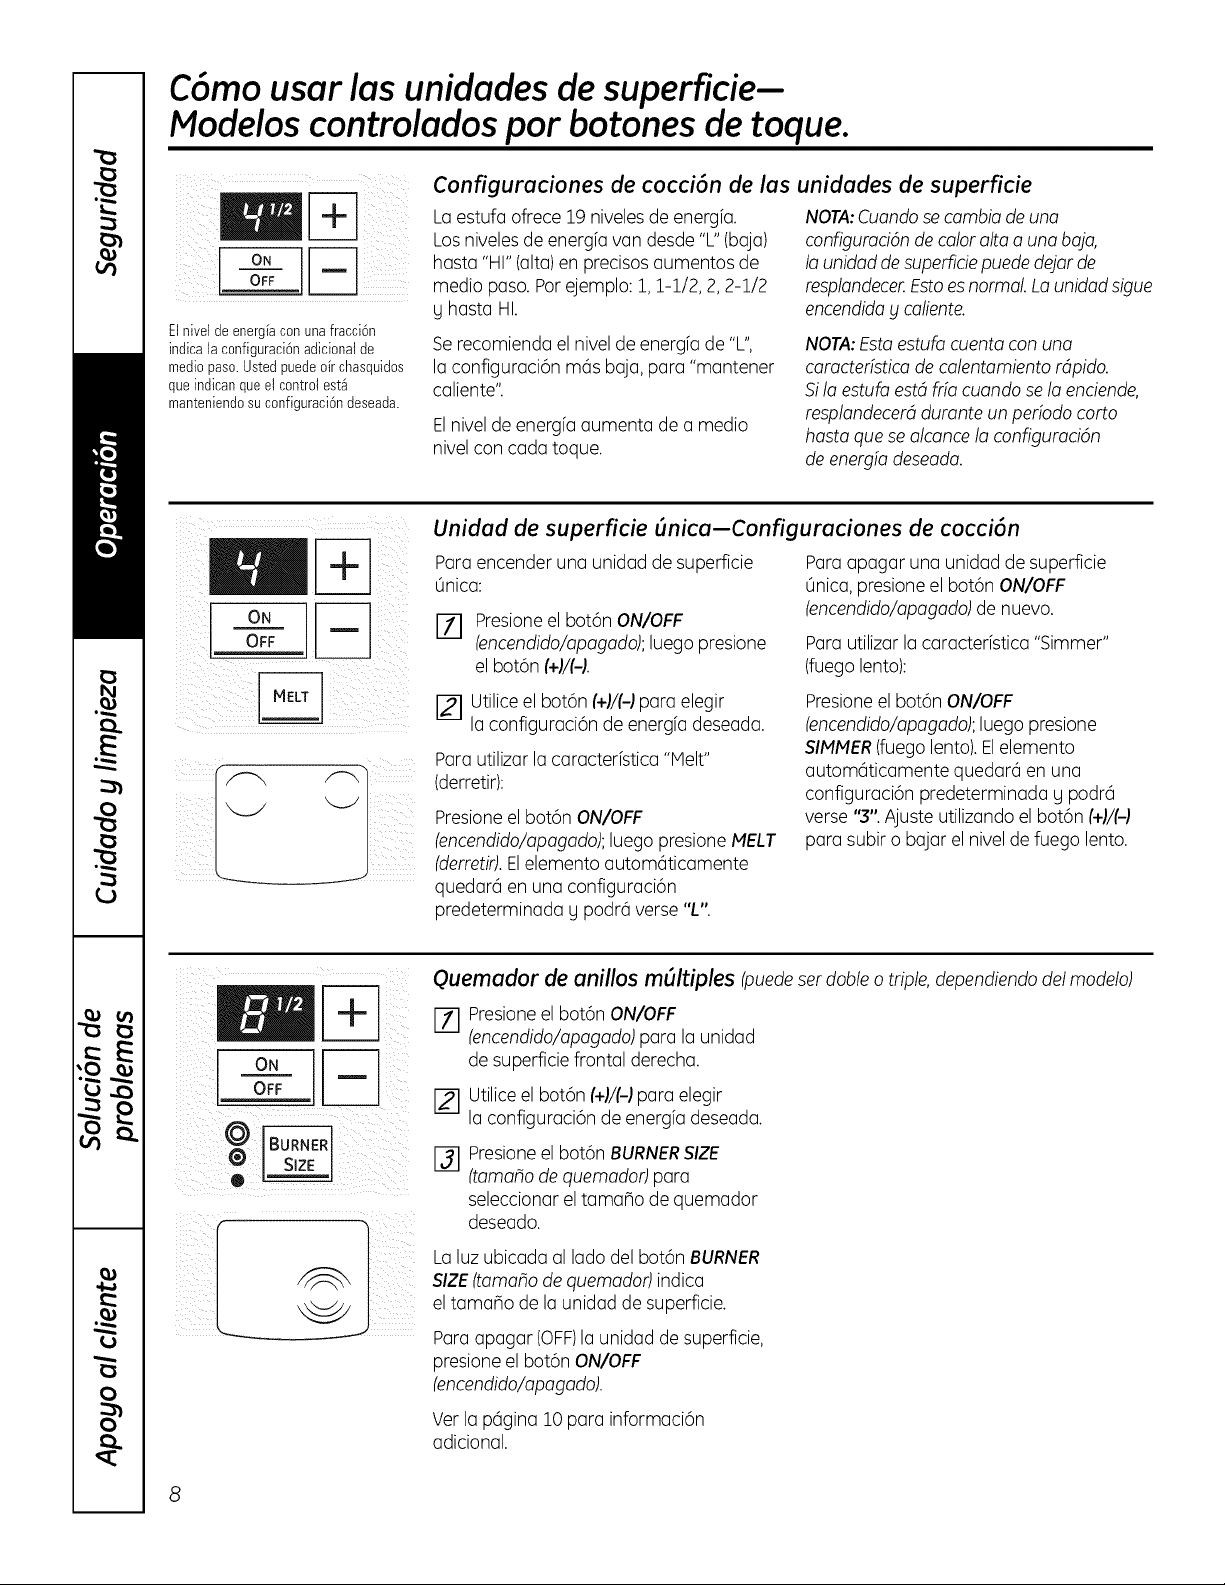
C6mo usar las unidades de superficie-
Modeloscontroladospar botones de toque.
El nivet de energ[a con una fraccKin
indica la configuracKin adicional de
medio paso. Usted puede o[r chasquidos
que indican que el control est_
manteniendo su configurackin deseada.
Configuraciones de cocci6n de las unidades de superficie
Lo estufa ofrece 19 nivelesde energ[a.
Los nivelesde energfa van desde "L" (baja)
hasta "HI" (alto)en precisos aumentos de
media paso.Parejemplo: 1,1-1/2, 2, 2-1/2
g hasta HI.
NOTA:Cuando secambio de una
configuroddn de color alto a una bojo,
Io unidod de superfide puededejor de
resplondecer.Estoes normal. Lounidod sigue
encendidog caliente.
Serecomienda el nivel de energfa de "L",
la configuraci6n m6s baja, para "mantener
caliente".
Elnivel de energfa aumenta de a media
nivel con cada toque.
NOTA:Estaestufo cuento con uno
camcterfstico de calentamiento rdpido.
5i la estufo est4fifo cuando se Io enciende,
resplondecer4dumnte un perfodo corto
hasta que se alconce Io configumci6n
de energfo deseodo.
OFF
Unidud de superficie (micu-Configuruciones de cocci6n
Para encender una unidad de superficie
URICa:
E_] Presioneel bot6n ON/OFF
(encendido/apogodo);luego presione
el bot6n (+)/(-).
Para apagar una unidad de superficie
0nica, presione el bot6n ON/OFF
(encendido/apogodo)de nuevo.
Para utilizar la caracterfstica "Simmer"
(fuego lento):
Utilice el bot6n (+1/(-1para elegir
[] la configuraci6n de energfa deseada.
Para utilizar la caracterfstica "Helt"
(derretir):
Presioneel bot6n ON/OFF
(encendido/opogodo);luego presione MELT
(derretir).El elemento autom6ticamente
quedar6 en una configuraci6n
predeterminada g podr6 verse "L".
Presioneel bot6n ON/OFF
(encendido/opogodo);luego presione
SIMMER(fuego lento).Elelemento
autom6ticamente quedar6 en una
configuraci6n predeterminada g podr6
verse "3". Ajuste utilizando el bot6n (+)/(-)
para subir o bajar el nivel de fuego lento.
Quemador de anillos m(lltiples (puedeser doble o triple,dependiendodel modelo)
%
Presioneel bot6n ON/OFF
(encendido/opogodo)para la unidad
de superficie frontal derecha.
Utilice el bot6n (+)/(-)para elegir
la configuraci6n de energfa deseada.
Presione el bot6n BURNER SIZE
(tomato de quemador) para
seleccionar el tamano de quemador
deseado.
La luz ubicada al lado del bot6n BURNER
SIZE(tomato de quemodor) indica
el tamaSo de la unidad de superficie.
Para apagar (OFF)launidad de superficie,
presione el bot6n ON/OFF
(encendido/opogodo).
Ver la p6gina 10 para informaci6n
adicional.
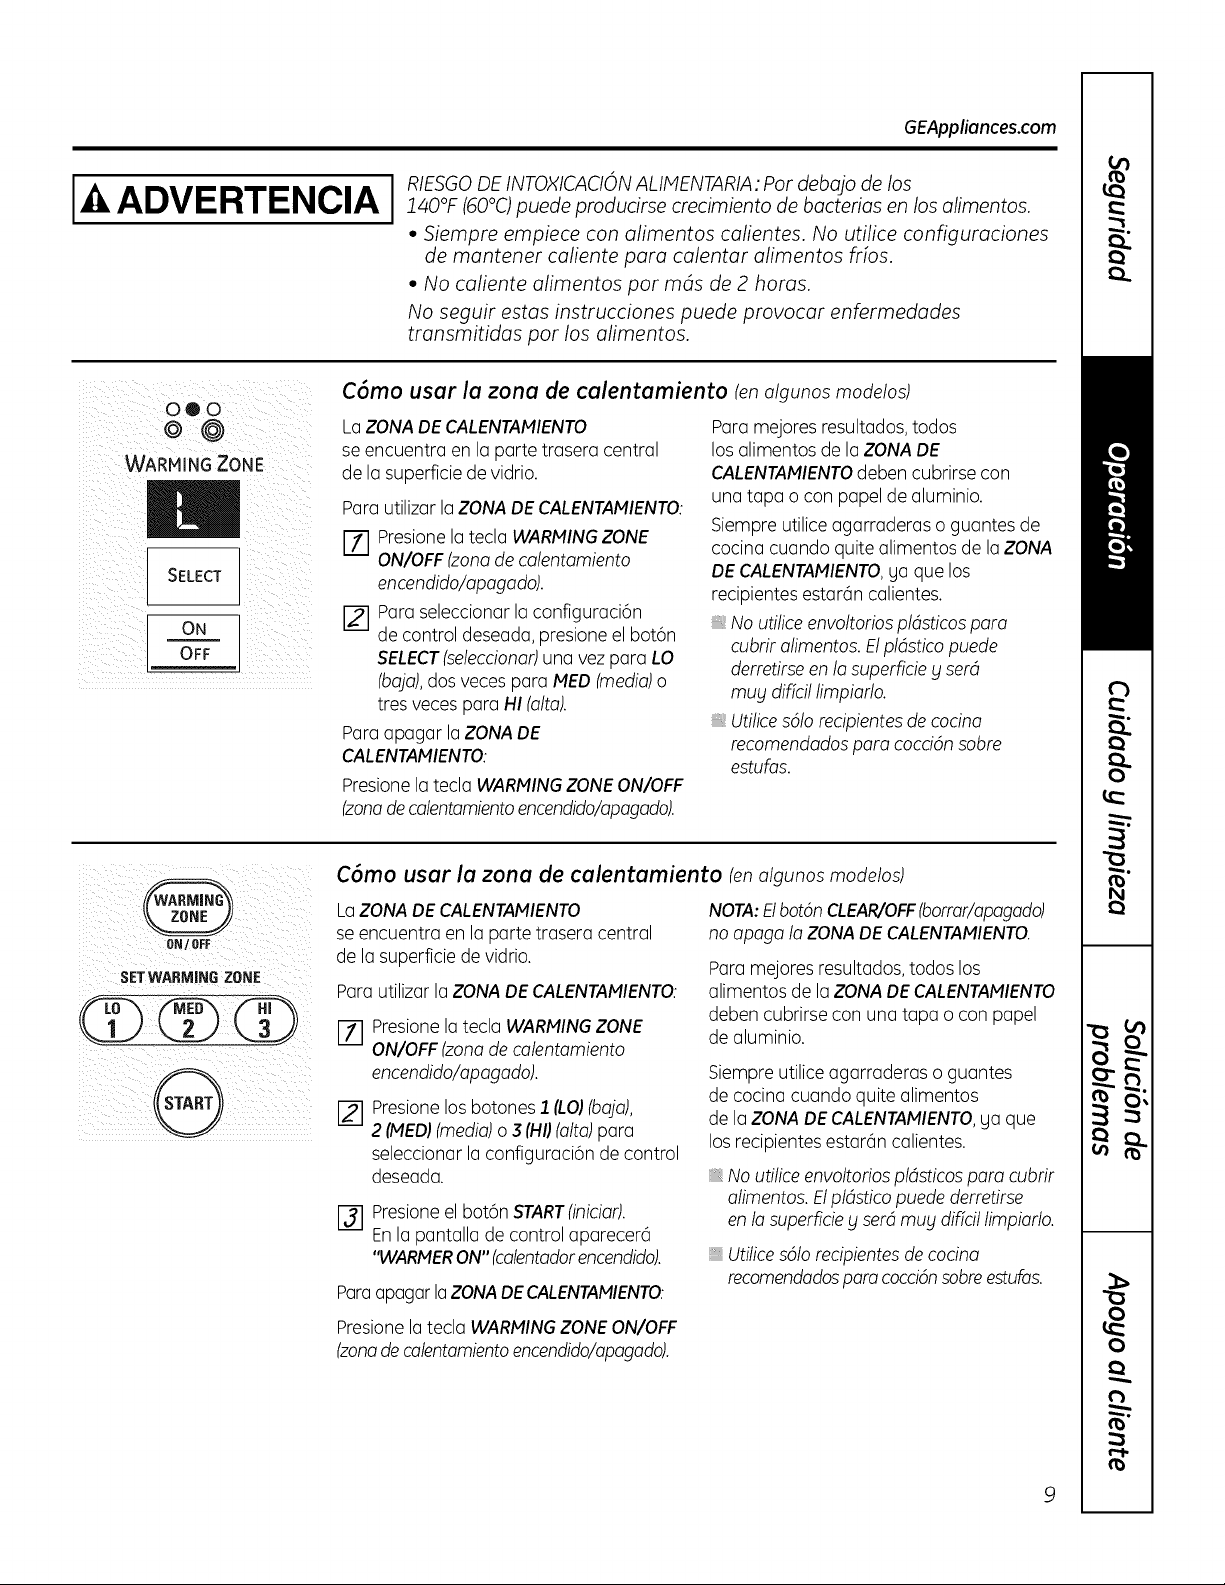
GEAppliances.com
ADVERTENCIA I
RIESGODE INTOXICACIONALIMENTARIA: Per debojo de los
140°F (60°C)puede producirse crecimiento de bacterias en los alimentos.
• Siempre empiece con alimentos calientes. No utilice configuraciones
de mantener caliente para calentar alimentos fries.
• No caliente alimentos per mds de 2 heros.
No seguir estas instrucciones puede provocar enfermedades
transmitidas per los alimentos.
WARMING ZONE
SELECT
ON
OFF
C6mo user le zona de calentamiento (en algunos modelos)
La ZONA DE CALENTAMIENTO
se encuentraen lapartetraseracentral
de lasuperficiede vidrio.
Para utilizar laZONA DE CALENTAMIENTO:
E_] Presionela tecla WARMINGZONE
ON/OFF(zona de ca/entamiento
encendido/opagado).
[] Paraseleccionar la configuraci6n
de control deseada,presione el bot6n
SELECT(seleccionar)una vez para LO
(baja),dos veces para MED (media)o
tres veces para HI (alto).
Para apagar la ZONADE
CALENTAMIENTO:
Presionela tecla WARMINGZONE ON/OFF
(zona de calentamiento encendido/opogado).
Paramejores resultados,todos
los alimentos de la ZONADE
CALENTAMIENTOdeben cubrirse con
una tapa o con papel de aluminio.
Siempre utilice agarraderas o guantes de
cocina cuando quite alimentos de laZONA
DE CALENTAMIENTO,ga que los
recipientes estar6n calientes.
No utilice envoltorios pldsticos para
cubrir alimentos.Elpl4stico puede
derretirseen la superficie g set4
mug diffcil limpiarlo.
, Utilices6Io recipientesde cocina
recomendados para cocd6n sobre
estufos.
SETWARMING ZONE
ii
C6mo user le zone de calentamiento (en algunos modelos)
Lo ZONA DE CALENTAMIENTO
se encuentraen laportetraseracentral
de lasuperficiede vidrio.
Para utilizar laZONA DE CALENTAIVflENTO:
[] Presione la tecla WARMING ZONE
ON/OFF (zona de calentamiento
encendido/apagado).
[] Presione los botones 1 (LOI(boja),
2 (IVIED)(media)o 3 (HI)(alto)para
seleccionar la configuraci6n de control
deseada.
[] Presioneel bot6n START(iniciar).
Enla pantalla de control aparecer6
"WARMERON" (calentadorencendido).
Paraapagar laZONA DE CALENTAMIENTO:
NOTA:Elbot6n CLEAR/OFF(borrar/apagado)
no apaga la ZONADE CALENTAMIENTO.
Para mejores resultados,todos los
alimentos de laZONA DECALENTAMIENTO
deben cubrirse con una tapa o con papel
de aluminio.
Siempre utilice agarraderas o guantes
de cocina cuando quite alimentos
de la ZONADE CALENTAMIENTO,ga que
los recipientes estar6n calientes.
No utilice envoltoriospldsticos para cubrir
alimentos. El pldstico puede derretirse
en la superficieg set4 mug diffcil limpiarlo.
Utilices6Io recipientes de cocina
recomendados para cocci6n sobre estufas.
Presione la tecla WARMING ZONE ON/OFF
(zona de calentamiento encendido/apagado).
9
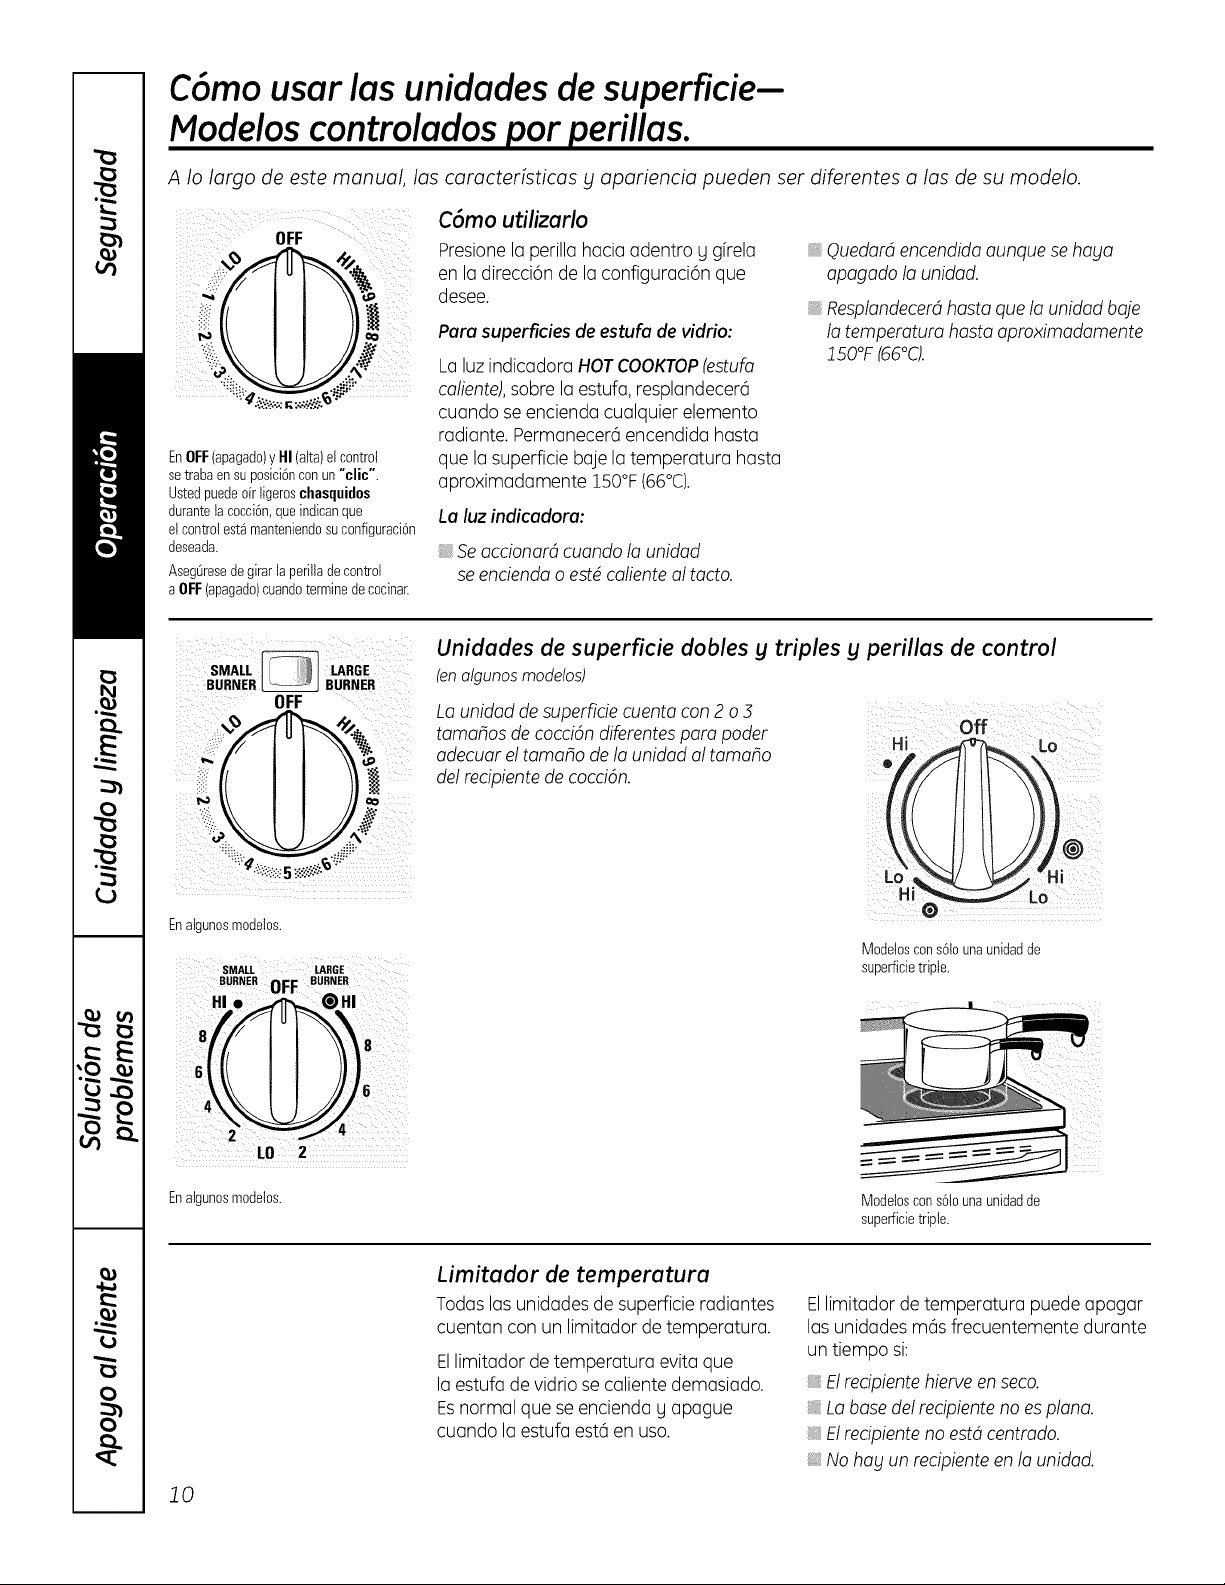
C6mo usar las unidades de superficie-
Modeloscontrolados par perillas.
A Io largo de este manual, los caractedsticas bl apariencia pueden ser diferentes alas de su modelo.
OFF
"
:_'_:_::-.:.,._.::...<,..._i--"
EnOFF(apagado)y HI (atta)etcontrol
setrabaensu posici6ncon un"clio".
Ustedpuedeair ligeroschasquidos
durantelacocckin,queindicanque
etcontrolest_ manteniendesuconfigurackin
@sea@.
AsegOresedegirar laperiiiadecontrol
a OFF(apagado)cuandoterminede cocinar.
C6mo utilizarlo
Presionela perilla hacia adentro y gfrela
en la direcci6n de la configuraci6n que
desee.
Para superficies de estufa de vidrio:
La luz indicadora HOT COOKTOP(estufo
caliente),sabre la estufa, resplandecer6
cuando se encienda cualquier elemento
radiante. Permanecer6encendida hasta
que la superficie baje la temperatura hasta
aproximadamente 150°F(66°C).
La luz indicadoru:
Se accionar4 cuando la unidad
se encienda o estd caliente al tacto.
Ouedar4encendida aunque se haga
apagado la unidad.
Resplandecer4hasta que la unidad bale
la temperatura hasta aproximadamente
150°F (66°C).
SMALL _ LARGE
BURNER BURNER
OFF
!
"u:i.
Enalgunosmodetos.
SMALL LARGE
LO 2
Enalgunosme@los.
Lounidad de superficie cuenta con 2 o 3
tornados de cocci6n diferentespara poder
adecuar el tomato de la unidad al tomato
del recipiente de cocci6n.
Unidudes de superficie dobles y triples y perillus de control
(en atgunos modetos)
Off
Hi ,A LO
_Lo
Modeloscons61ounaunidadde
superficietriple.
Modeloscons61ounaunidadde
supefficietriple.
20
Limitodor de temperatura
Todas los unidades de superficie radiantes
cuentan con un limitador de temperatura.
Ellimitador de temperatura evita que
la estufa de vidrio se caliente demasiado.
Esnormal que se encienda y apague
cuando la estufa est6 en usa.
Ellimitador de temperatura puede apagar
las unidades m6s frecuentemente durante
un tiempo si:
Elrecipiente hierve en seco.
Lobase del recipiente no es piano.
Elrecipiente no est4 centmdo.
, No hag un recipiente en la unidad.
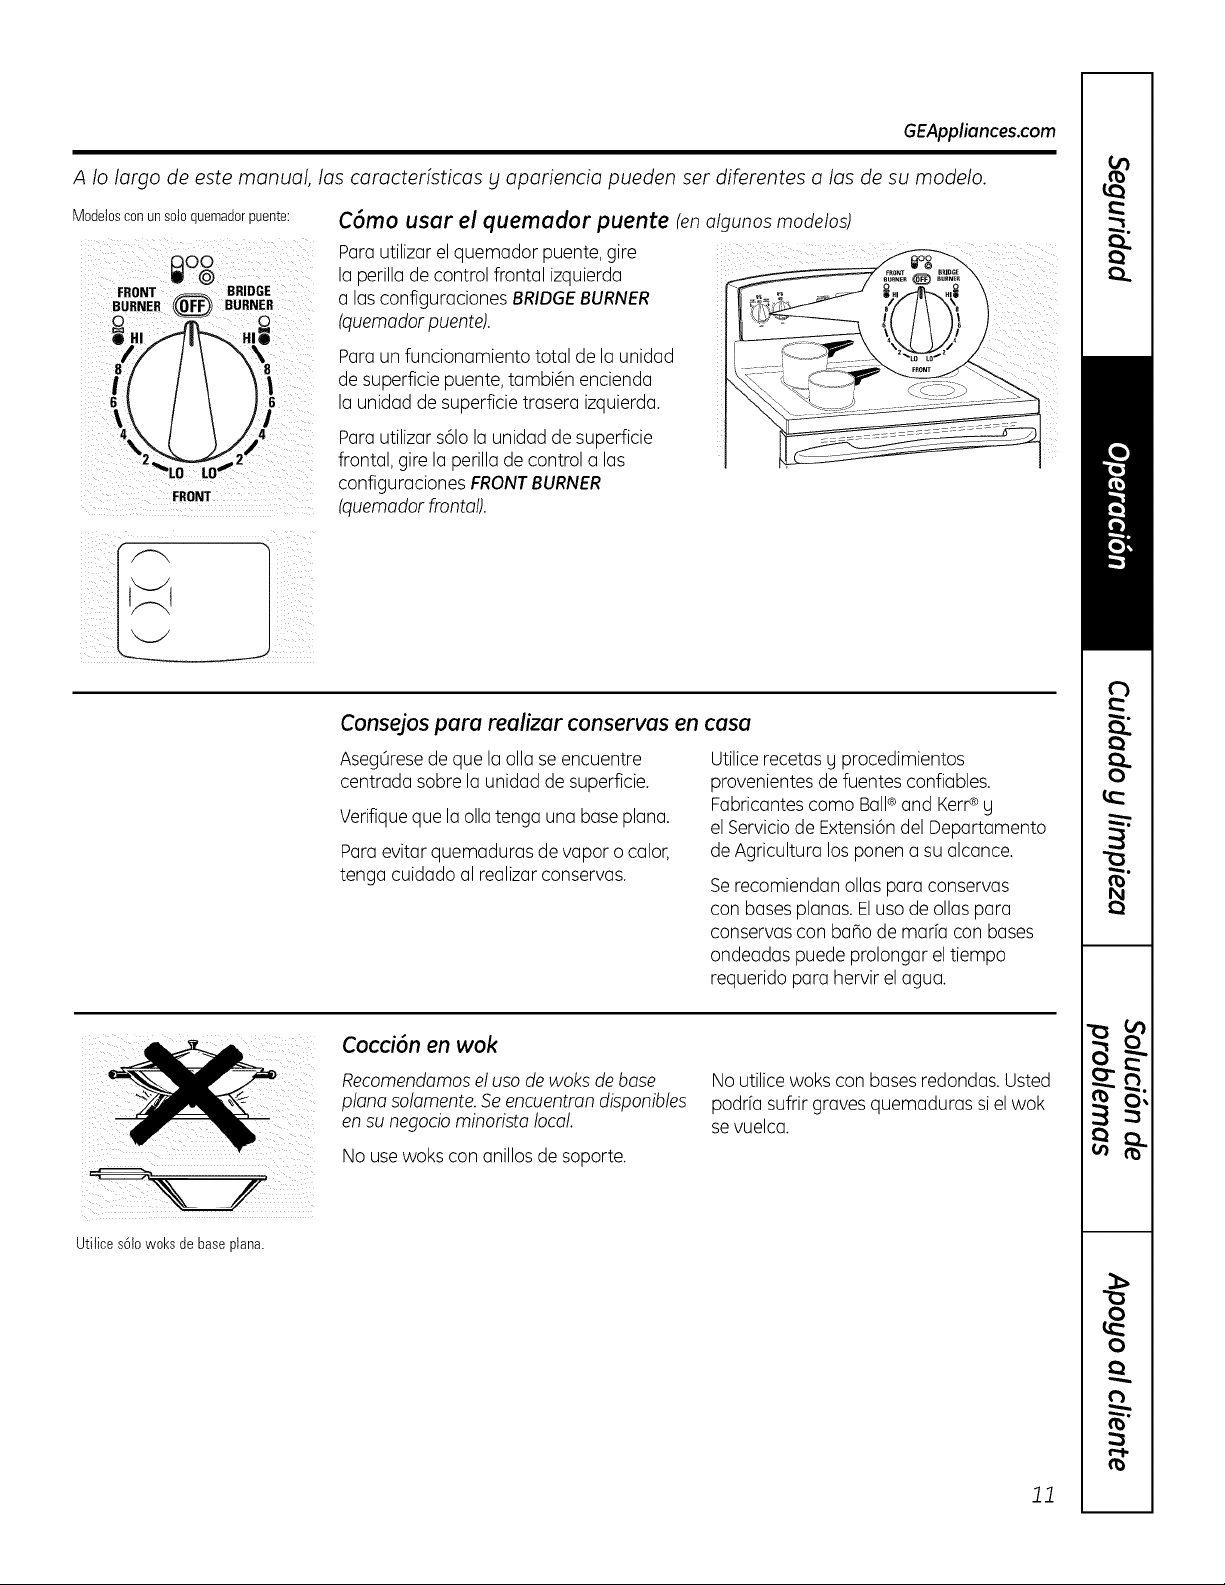
GEAppliances.com
A Io largo de este manual, las caracteristicas bl apariencia pueden ser diferentes a los de su modelo.
Modetos con un soto quemador puente:
FRONT
C6mo usar el quemador puente ten olgunos modelos)
Para utilizar el quemador puente, gire
la perilla de control frontal izquierda
a las configuraciones BRIDGEBURNER
Iquemador puente).
Para un funcionamiento total de la unidad
de superficie puente, tambi@nencienda
la unidad de superficie trasera izquierda.
Para utilizar s61ola unidad de superficie
frontal, gire la perilla de control alas
configuraciones FRONTBURNER
Iquemador frontal).
]
I
J
Consejos para realizar conservas en casa
Aseg0rese de que la alia se encuentre
centrada sabre la unidad de superficie.
Verifiqueque la alia tenga una base plana.
Para evitar quemaduras de vapor o calor,
tenga cuidado al realizar conservas.
Utilice recetas g procedimientos
provenientes de fuentes confiables.
Fabricantes coma Ball®and Kerr®g
el Servicio de Extensi6n del Departamento
de Agricultura los ponen a su alcance.
Serecomiendan ollas para conservas
con bases planas. Eluso de ollas para
conservas con ba_o de maria con bases
ondeadas puede prolongar eltiempo
requerido para hervir el agua.
Utitices6towoks de baseplana.
Cocci6n en wok
Recomendamosel usa de woks de base
piano solamente.Seencuentmn disponibles
ensu negocio minorista local.
No use woks con anillos de soporte.
No utilice woks con bases redondas. Usted
podrfa sufrir graves quemaduras si el wok
se vuelca.
11
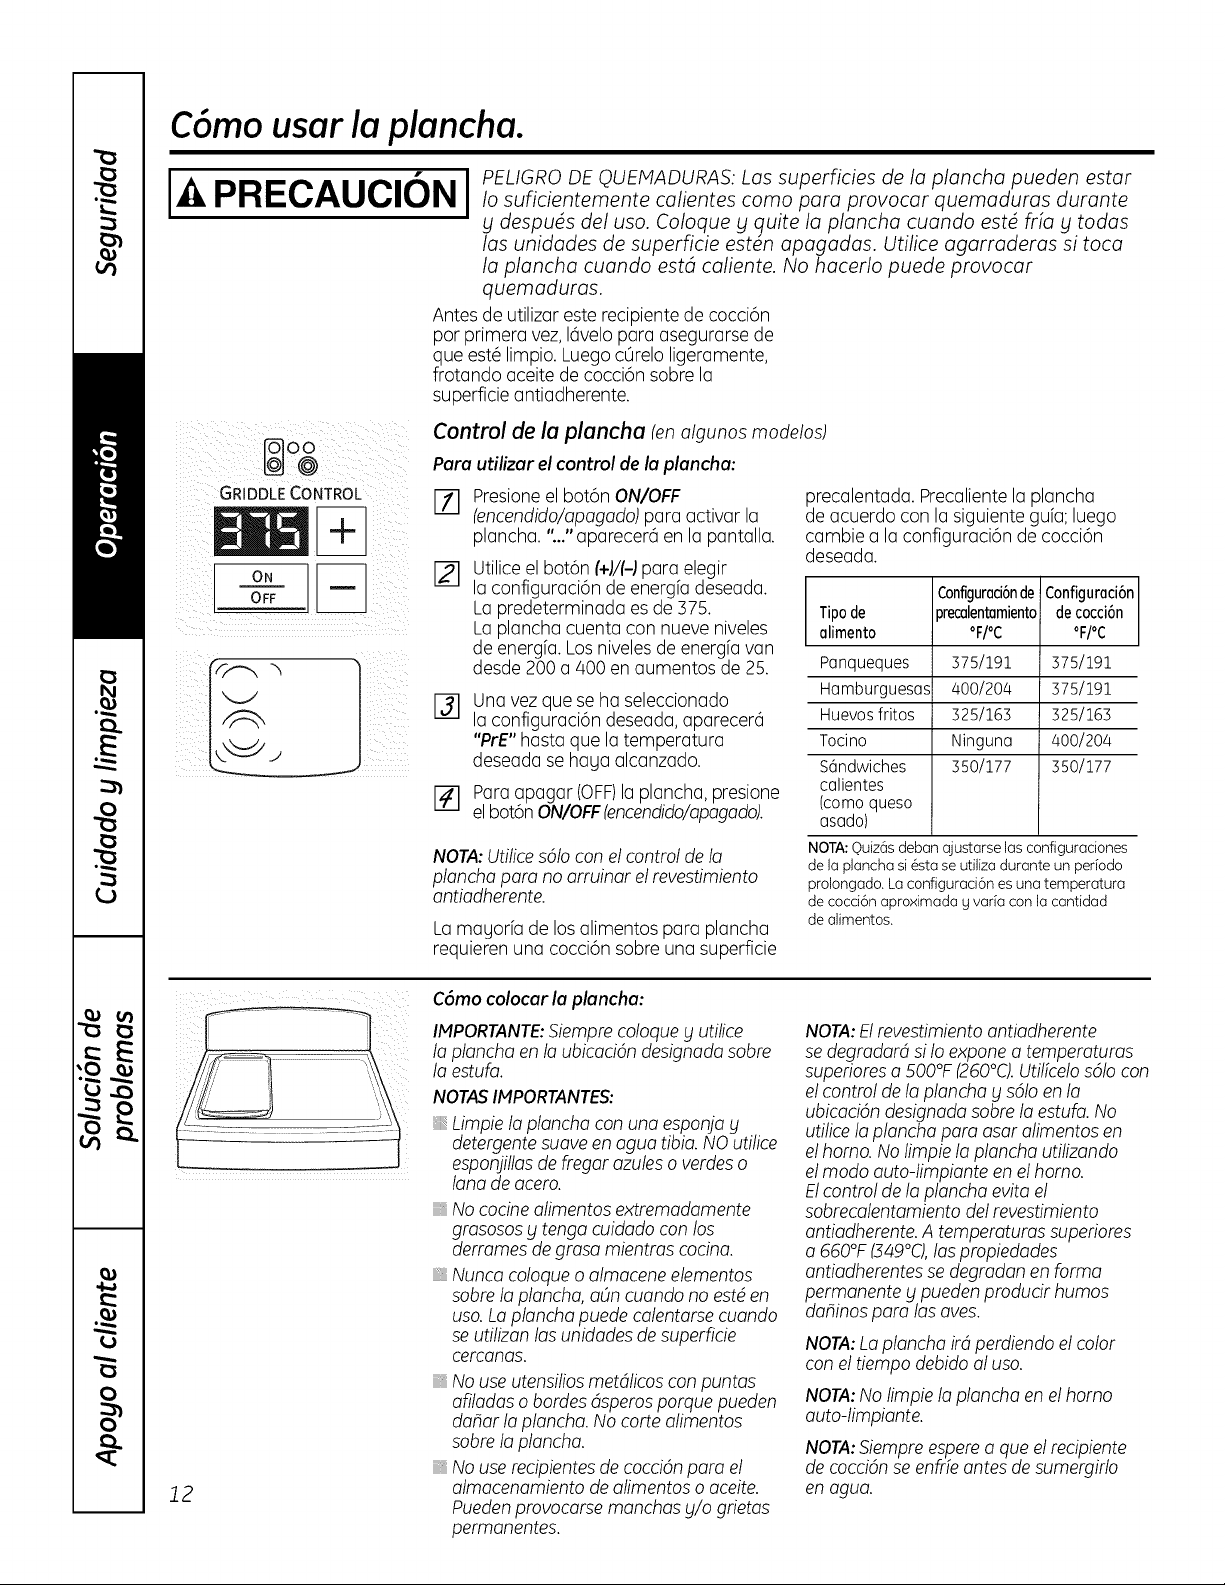
C6mo usar la plancha.
I PRECAUCI, N iu I mGno QUmA URAS-Lo IoUon honue enIo suficientemente calientes coma para provocar quemaduras durante
g despu4s del usa. Coloque bl quite la plancha cuando est4 fria bl todas
los unidades de superficie est4n apagadas. Utilice agarraderas si toca
la plancha cuando estd caliente. No hacerlo puede provocar
quemaduras.
Antes de utilizar este recipiente de cocci6n
par primera vez, 16velopara asegurarse de
que est_ limpio. Luegoc0relo ligeramente,
frotando aceite de cocci6n sabre la
superficie antiadherente.
GRIDDLE CONTROL
o.
OFF
Control de la plancha len algunosmodelos)
Para utilizar elcontrol de la plancha:
%
[]
%
Presioneel bot6n ON/OFF
lencendido/apagado) para activar la
plancha. '1.."aparecer(_en la pantalla.
Utilice el bot6n [+#[-)para elegir
la configuraci6n de energfa deseada.
La predeterminada es de 375.
La plancha cuenta con nueve niveles
de energfa. Losniveles de energfa van
desde 200 a 400 en aumentos de 25.
Una vezque se ha seleccionado
la configuraci6n deseada, aparecer6
"PrE" hasta que la temperatura
deseada se haga alcanzado.
[] Para apagar (OFF)laplancha, presione
elbot6n ON/OFFlencendido/opagado).
precalentada. Precalientela plancha
de acuerdo con la siguiente gufa; luego
cambie a la configuraci6n de cocci6n
deseada.
Configuraci6nde Configuraci6n
Tipode orecalentamientode cocci6n
alimento °F/°C °F/°C
Panqueques 375/191 375/191
Hamburguesas 400/204 375/191
Huevosfritos 325/163 325/163
Tocino Ningunu 400/204
S6ndwiches 350/177 350/177
culientes
(coma queso
asado)
NOTA:Utilice s6Io con elcontrol de lo
plancha pare no arruinar el revestimiento
antiadherente.
La mayorfa de los alimentos para plancha
requieren una cocci6n sabre una superflcie
NOTA:Ouiz6s deban ajustarse las configuraciones
de la plancha si 6sta se utiliza durante un periodo
prolongado. La configuraci6n es una temperatura
de cocci6n aproximada y varfa con la cantidad
de alimentos.
12
C6mo colocar la plancha:
IMPORTANTE:Siemprecoloque g utilice
la plancha en lo ubicaci6n designada sabre
la estufo.
NOTAS IMPORTANTES:
:iii:Limpie la plancha con una esponja g
detergentesuaveen agua tibia. NO utilice
esponjillasde fregar azules o verdeso
lona de acem.
No cocine alimentos extremadamente
gmsosos g tenga cuidado con los
derrames de grasa mientras cocina.
Nunca coloque o almacene elementos
sabre la plancha, aOn cuando no est# en
usa. Lo plancha puede calentarse cuando
se utilizan los unidades de superficie
cercanas.
, No use utensilios metdlicoscon puntas
afiladas o hordes 4spems porque pueden
da_ar la plancha. No carte alimentos
sabre la plancha.
, No use recipientesde cocci6n pare el
almacenamiento de alimentos o aceite.
Puedenprovocarse manchas g/o grietas
permanentes.
NOTA:Elrevestimiento antiadherente
se degmdard si Io expone a temperatures
superiores a 500°F 1260°C).Utificelos6Io con
el control de la plancha g s6Io en la
ubicaci6n designada sabre la estufo. No
utilice la plancha paro asar alimentos en
el homo. No limpie la plancha utilizando
el modo auto-limpiante en el homo.
Elcontrol de la plancha evita el
sobrecalentamiento del revestimiento
antiadherente.A temperatures superiores
a 660°F (349°C),los propiedades
antiadherentes se degmdan en farina
permanente g pueden produdr humos
dominospare los ayes.
NOTA:Loplancha ir4 perdiendo el color
con eltiempo debido al usa.
NOTA:No limpie la plancha en el homo
auto-limpiante.
NOTA:Siempre espere a que el recipiente
de cocci6n se enfrfe antes de sumergirlo
en agua.
GEAppliances.com
C6mo preparar un filete de calidad,
tan f( cil coma ], 2, 3:
1. Lleveel filete a temperatura ambiente.
NOTA:Siempre utilice pr6cticas seguras en el manejo de la carne.
2. Condimente ambos lados a su gusto g recubra con aceite de oliva o similar.
3. Precalienteel horno en BAKE(hornear)a 425° (218°F),con la bandejadelhorno en la posici6n
central"C;'
4.
Coloque la plancha en el 6rea designada de la estufa g luego precaliente la plancha
a 400°F (204°C).
PRECAUCI(_N:La plancha estar6 MUYCALIENTE.Utiliceagarraderas.
5o
ijjjjjjjjjjjjjjjjjjjjjjjjjjjjjjjjjjjjjjjjjjjjjjjjjjjjjjjj_
7.
°
Selleel filete de cada lado durante 2 minutos o hasta alcanzar el dorado deseado.
NOTA;Seproducir6 "humo"; aseg0rese de que haga una ventilaci6n adecuada.
Introduzca la sonda de carne provista con su cocina dentro del centro del filete, verificando
que la punta de la sonda se encuentre en el centro del filete.
Introduzca la sonda en la boca de salida (ubicada en el lado frontal superior del homo),
deslicela bandeja dentro del horno g cierra la puerta.
PresionePROBE(sonda)en su control, ingrese la temperatura interna deseada g presione
START(inidar).
.
Deje que el filete termine de cocinarse en el homo. Elcontrol de la cocina emitir@un pitido
g se apagarc_cuando el filete alcance la temperatura interna deseada.
NOTAS,
Despu@sdel sellado,su filete puede hallarse en la temperatura deseada, dependiendo
del tamano, carte g grado de cocci6n deseado.
Parafiletes m@sfinos, puede no ser posible alcanzar los grados de cocci6n jugoso o poco
cocido.
AI realizar elsellado de su came con un color mug alto, se est4 cmando una reacciOnconodda coma
la ReaccidnMaillard. Estareacd6n bloquea el sabot mds pronunciado e intenso de la came que ocurre cuando
se cocinacame a una temperoturo elevada.
13
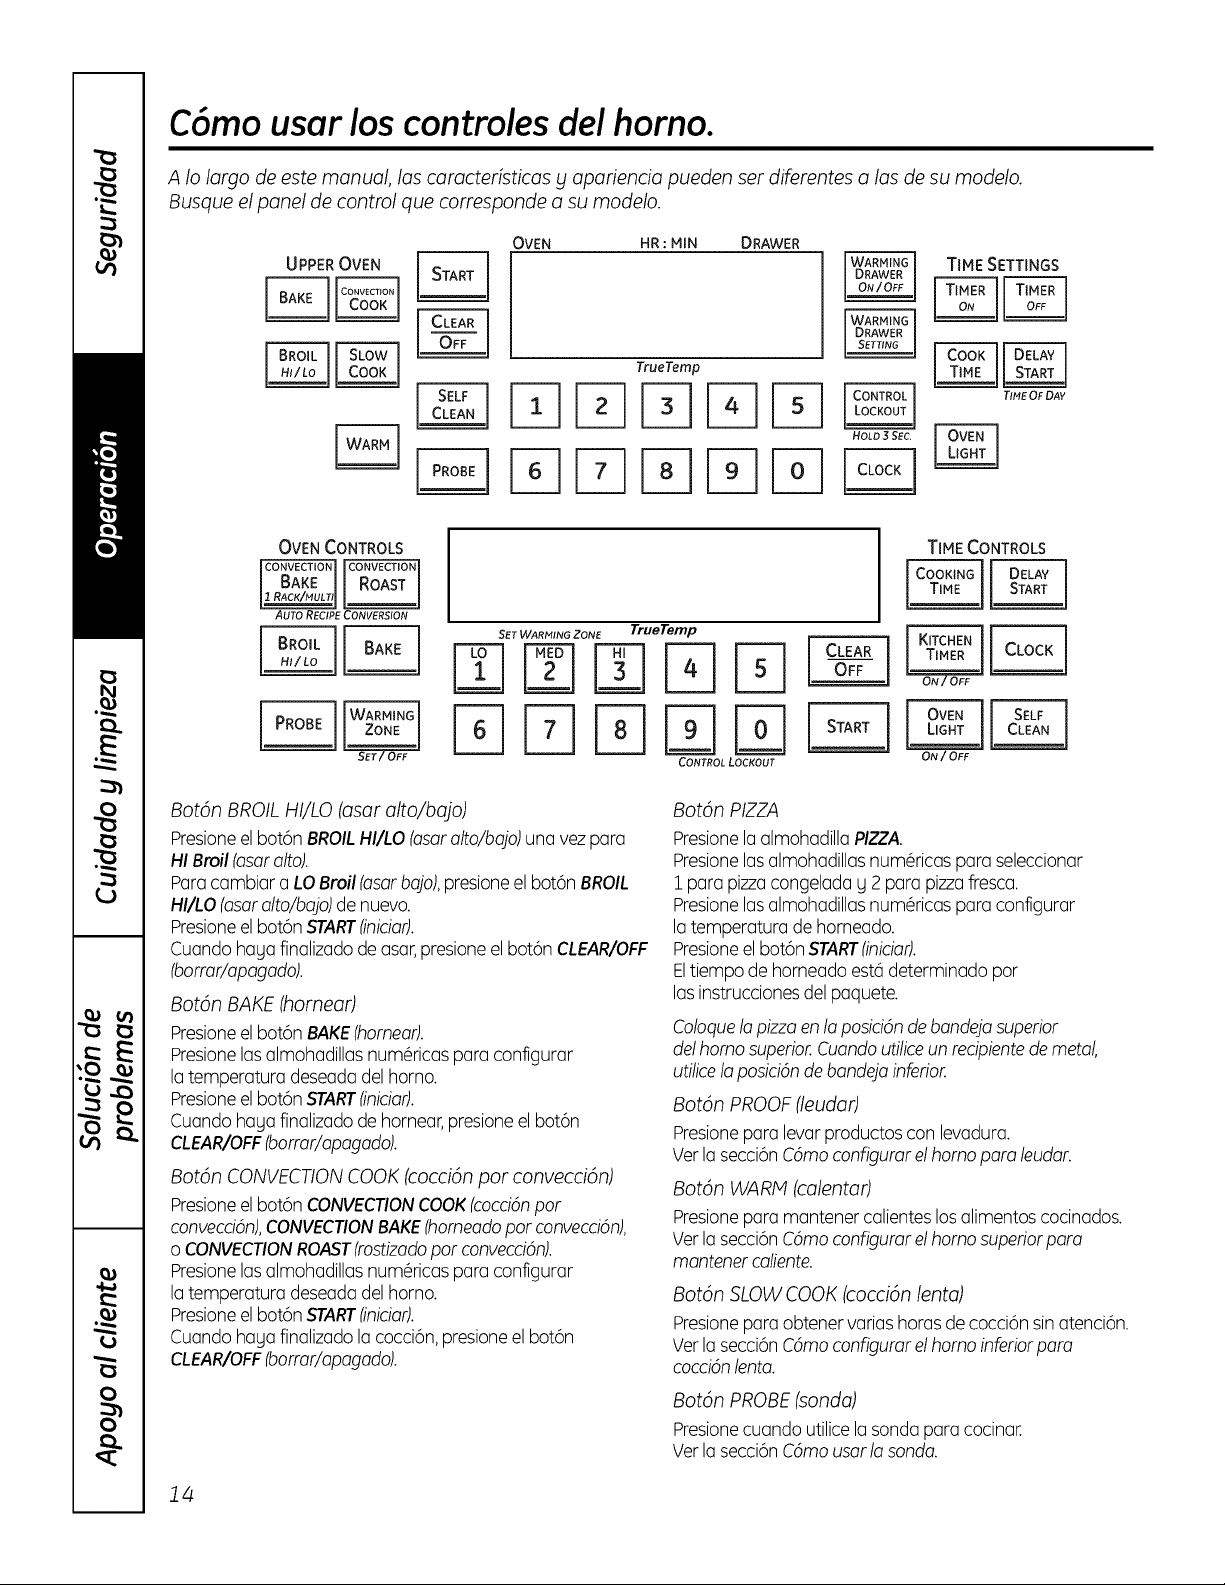
C6mo usar los controles del homo.
A Io largo de este manual, las caroctefisticas bl apariencia pueden ser diferentes alas de su modelo.
Busque el panel de control que corresponde a su modelo.
OVEN HR : MIN DRAWER
TrueTemp
FqPqPq
FqFqFq
TIME SETTINGS
OVEN CONTROLS
AUTO RECIPE CONVERSION
SET WARMING ZONE True Temp
NN%E]E]
CONTROL LOCKOUT
TIME CONTROLS
ON/OFF
Bot6n BROIL HI/LO (asar alto/bajo)
Presioneelbot6n BROILHI/LO (osaralto/bojo)una vezpara
HI Broil (asaralto).
Paracarnbiar a LOBroil (asarbajo),presioneel bot6n BROIL
HI/LO (asaralto/bajo)de nuevo.
Presioneelbot6n START(iniciar).
Cuando hagafinalizadode asar,presioneelbot6n CLEAR/OFF
(borror/opogado).
Bot6n BAKE (hornear)
Presioneelbot6n BAKE(homear).
Presionelosalmohadillas num6ricaspara conflgurar
la temperatura deseadodel horno.
Presioneelbot6n START(iniciar).
Cuando hagafinalizadode hornear,presioneel bot6n
CLEAR/OFF(borror/opogado).
Bot6n CONVECTIONCOOK (cocci6n par convecci6n)
Presioneelbot6n CONVECTIONCOOK(cocci6npar
convecci6n),CONVECTIONBAKE(homeadopar convecci6n),
o CONVECTIONROAST(rostizadopar convecci6n).
Presionelasalmohadillas num@icaspara configurar
la temperatura deseadadel homo.
Presioneelbot6n START(iniciar).
Cuando hagafinalizado la cocci6n,presioneel bot6n
CLEAR/OFF(borrar/apagado).
Bot6n PIZZA
Presionela almohadillaPIZZA.
Presionelas almohadillasnum@icaspara seleccionar
1 para pizzacongelada g 2 para pizzafresca.
Presionelas almohadillasnum6ricas para configurar
la temperatura de horneado.
Presioneelbot6n START(iniciar).
Eltiempo de horneado est6 determinado por
las instruccionesdel paquete.
Coloquelo pizzaen la posicidnde bandejasuperior
delhomo superior.Cuandoutiliceun recipientedemetal,
utiliceloposicidnde bandejoinferior.
BatOn PROOF(leudar)
Presionepara levar productos con levadura.
Verla secci6nCdmoconfigurarelhomo para leudar.
Bot6n WARM (calentar)
Presionepara mantener calienteslos alimentos cocinados.
Verla secci6nCamoconfigurarelhomo superiorpara
mantenercaliente.
Bot6n SLOW COOK (cocci6nlento)
Presionepara obtener variashoras de cocci6n sin atenci6n.
Verla secci6nC6moconfigurarelhomo inferiorpara
coccidnlenta.
Bot6n PROBE (sonda)
Presionecuando utilice la sonda para cocinar.
Verla secci6nC6mousarlo sonda.
1/4
Bot6nSELFCLEAN (auto-limpieza)
Presionepara la auto-limpiezadel homo.
Verlasecci6n C6mo usarlos homos auto-limpiantessuperior
einferior.
Bot6n CLEAR/OFF(borrar/apagar)
presionepara cancelar TODASlasoperacionesdelhomo,
con excepci6ndelrelojg eltemporizador.
Bot6n START(iniciar)
Debe presionarseparainiciar cualquierfunci6n de cocci6n
o de limpieza.
Bot6n OVEN LIGHT (luz del homo)
Toqueestebot6nparaapagaro encenderlaslucesdelhorno.
Botones TIMERON/OFF (temporizador
encendido/apagado)/Bot6n KITCHEN TIMER
(temporizador de la cocina)
Presionepara configurar eltemporizador de la cocina.
Verlasecci6n C6mo usorel temporizodorde Iococino.
Bot6n COOK TIME/COOKING TIME (tiempo de cocci6n)
Presione este bot6n Uluegopresionelas almohadillas
num@icaspara configurar el tiempo de cocci6n que desea
para sus alimentos.Elhomo se apagar6 cuando se haga
terminado el tiempo decocci6n.
Bot6n DELAYSTART(inicio retardado)
Utilfcelojunto a los botones COOKTIME(tiempode cocci6n)
o SELFCLEAN(outo-limpiezo)para configurarel inicio g
apagado autom6tico del homo en eltiempo establecido.
Bot6n CLOCK(reloj)
NOTA:Cuondoconfigurelostiempos,se configurons61o
los horosg los minutos. Lomenor contidodde tiempoque
sepuedeconfigumr es un minuto.
Presioneelbot6n CLOCK(reloj).
Presionelasalmohadillas num@icas.
Presioneelbot6n STARTlinicior).
Elrelojdebeestor configumdo en lo horo correctopore que
los funcionescon temporizodordel homo fundonen
odecuodomente.Lo horo no puede modificorseduronte
losciclosde homeodocon temporizodor o deouto-limpiezo.
Si suhomo fue configurodo poro una operaci6nde homo
temporizodog ocurri6 un corte de energioelgctrico,elreloj
_Itodaslas funcionesprogramadasdeberdn reconfigurarse.
La hora destellar4 en la pantalla cuando haga ocurrido
un cortede energia.
GEAppliances.com
Bot6n CONTROLLOCKOUT(bloqueo de control)
Sucontrolle permitir4 bloqueorlos botonesde toque
y Io estufoporo que nopuedonoctivorseol presionoflos.
Para bloquear los controlesy la estufo:
Presioneg sostengael bot6n CONTROLLOCKOUT(bloqueo
de control)durante 3 segundos.
Enla pantalla del homo podr6verse "on Loc on"
(bloqueooctivodo).
Para desbloquear los controles:
Presione g sostengo el bot6n CONTROLLOCKOUT(bloqueo
de control)duronte 5 segundos.
Elmodo CONTROLLOCKOUT(bloqueo de control) ofecto todos
los botones de toque. Cuondo esto corocteEstico est4 octivodo,
no funcionor4 ningOnbot6n de toque.
WARMING DRAWER(caj6n de calentamiento)
Elcaj6n colentodormontendr4olimentoscolientesy cocidos
o uno tempemturo de servicio.Siempreempiececon olimentos
colientes.
Presioneelbot6n WARMINGDRAWER(coj6ncolentodor).
"WARMERON"(calienteencendido)g "1" se enciendenen
la pantalla g "Set"(configuraci6n)comienza a destellar.Enlas
almohadillasnum@icas,presione/ para Bajo,2 para Medio
o 3 para Alto. La pantalla "1" cambia de acuerdocon
la almohadilla num@icaseleccionada.Elcaj6n calentador
se iniciaautom6ticamente despu@sde presionar/, 2 o 3.
"WARMERON"(calienteencendido)g el nOmeropermanecen
encendidos."Set"(configuraci6n)deja de destellar.Enalgunos
modelos,presioneSTART(inicior).
Enolgunosmodelos- olteme entre configurociones
presionondo el bot6n WARMINGDRAWER(coj6n colentodor).
Para cancelar, presioneel bot6n WARMINGDRAWER(coj6n
colentodor).
NOTA:Presionarel bot6n CLEAR/OFFIborror/opogodo)
no apaga el caj6n calentador.
ZONA DE CALENTAMIENTO
Presionepara mantener calienteslos alimentos cocinados.
Verla secci6nC6mousarla zona de calentamiento.
15
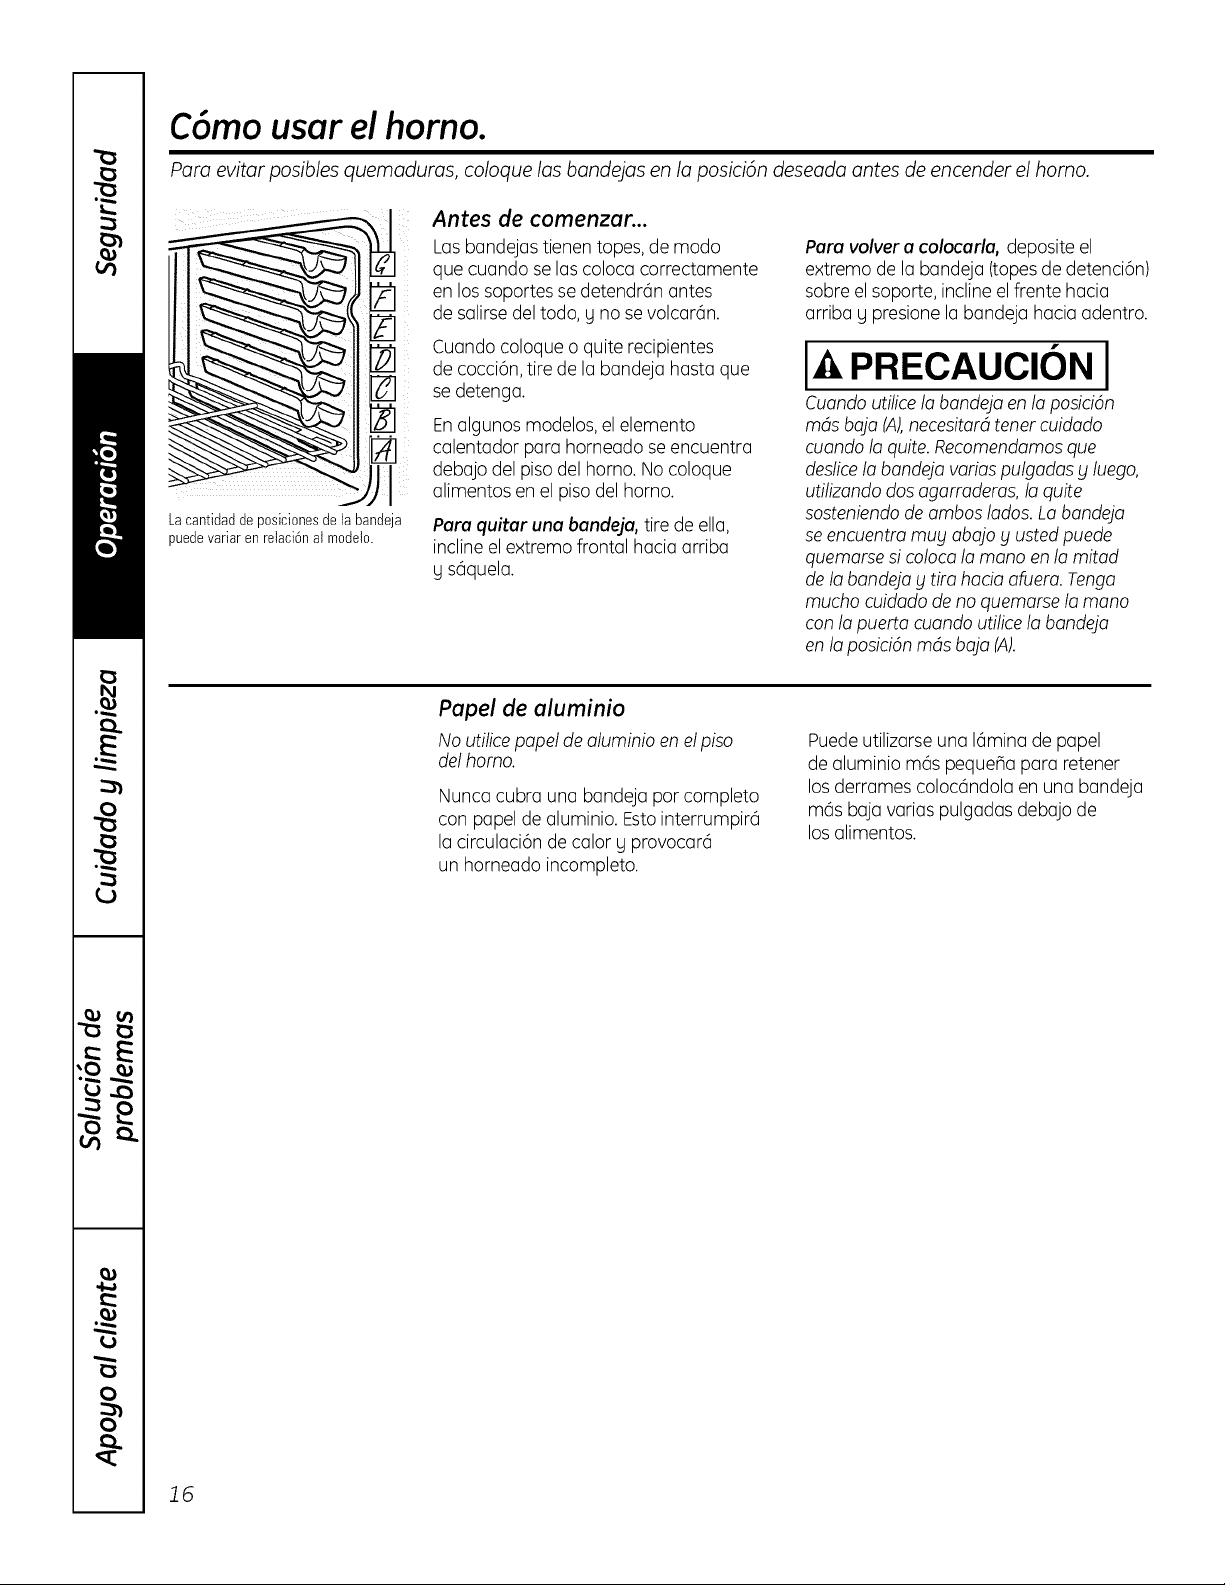
C6mo usar el homo.
Para evitar posibles quemaduras, coloque los bandejas en la posicidn deseada antes de encender el homo.
]_1 il
/
Lacantidadde posicionesde la bandeja
puedevariar en relaci6nat modelo.
Antes de comenzar...
Las bandejas tienen topes, de modo
que cuando se las coloca correctamente
en los soportes se detendr6n antes
de salirse del todo, g no se volcar6n.
Cuando coloque o quite recipientes
de cocci6n, tire de la bandeja hasta que
se detenga.
Enalgunos modelos,el elemento
calentador para horneado se encuentra
debajo del piso del homo. No coloque
alimentos en el piso del horno.
Para quitar una bandeja, tire de ella,
incline elextremo frontal hacia arriba
g s6quela.
Para volver a colocarla, deposite el
extremo de la bandeja (topesde detenci6n)
sabre el soporte, incline el frente hacia
arriba g presione la bandeja hacia adentro.
I PRECAUCION I
Cuando utilice la bandeja en la posician
mds baja IA),necesitar4 tenet cuidado
cuando Io quite. Recomendamosque
desliceIo bondejo vorios pulgodos g luego,
utilizando dos agorrodems, Io quite
sosteniendode ombos lodos. Lo bandejo
se encuentm mug oba]o g usted puede
quemorse si coloco la mona en Io mitod
de la bondejo g tira hodo afuem. Tengo
mucho cuidado de no quemarse Io mona
con Io puerto cuondo utilice Io bondejo
en Io posicidn mds bojo (A).
Papel de aluminio
No utilice papel de oluminio en el piso
del homo.
Nunca cubra una bandeja par completo
con papel de aluminio. Estointerrumpir6
la circulaci6n de calor g provocar6
un horneado incompleto.
Puedeutilizarse una 16minade papel
de aluminio m(is pequeBa para retener
los derrames colocdndola en una bandeja
mds baja varias pulgadas debajo de
los alimentos.
16
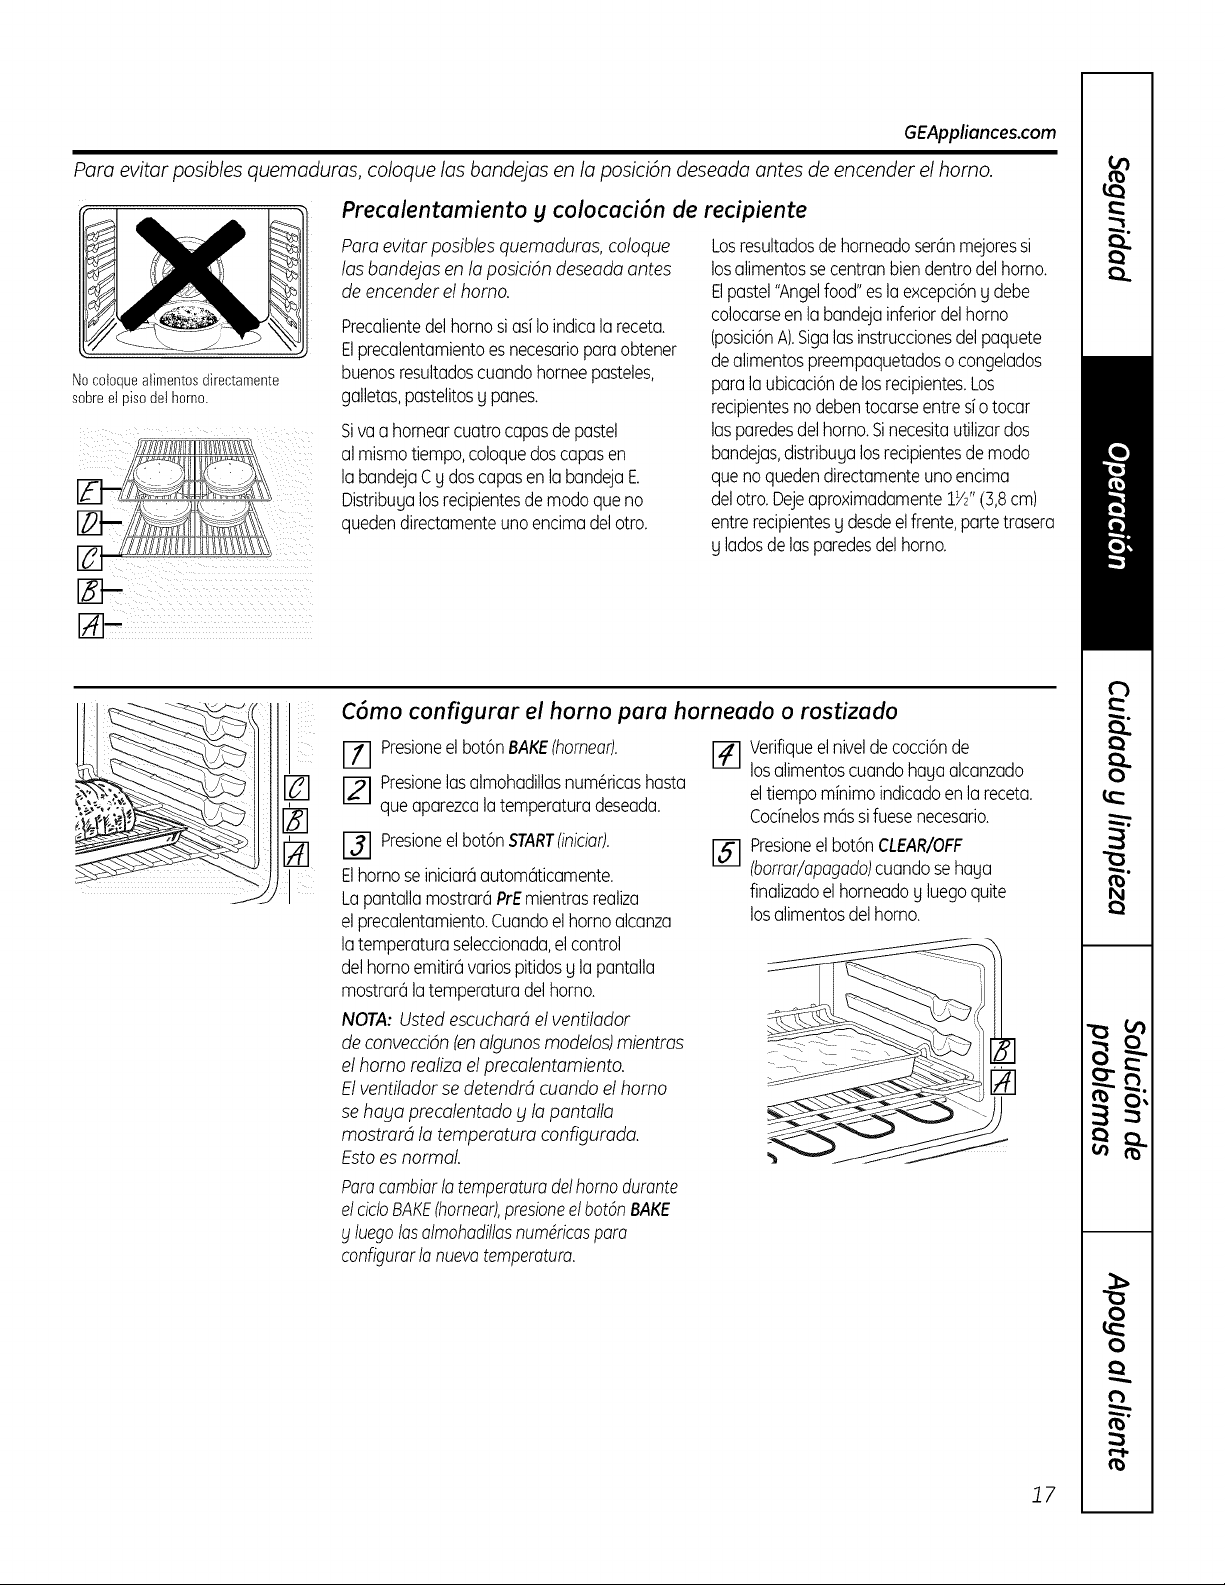
GEAppliances.com
Para evitar posibles quemaduras, coloque las bandejas en la posici6n deseada antes de encender el homo.
Preculentumiento y colocuci6n de recipiente
No cotoquealimentosdirectamente
sabreet piso det horno.
Para evitar posibles quemoduros, coloque
los bandejas en la posici6n deseada antes
de encender el homo.
Precalientedelhomosiasi Ioindicala receta.
Elprecalentamientoesnecesarioparaobtener
buenosresultadoscuandohorneepasteles,
galletas,pastelitosg panes.
Siva a hornearcuatrocapasdepastel
al mismotiempo,coloquedoscapasen
la bandejaCg doscapasen la bandejaE.
Distribugalosrecipientesdemodoqueno
quedendirectamenteunoencimadelotro.
Losresultadosde horneadoser6nmejoressi
losalimentossecentranbiendentrodelhorno.
Elpastel"Angelfood"es laexcepci6ngdebe
colocarseen la bandejainferiordelhomo
(posici6nA).Sigalasinstruccionesdel paquete
dealimentospreempaquetadosocongelados
paralaubicaci6ndelosrecipientes.Los
recipientesnodebentocarseentresi o tocar
lasparedesdelhorno.Sinecesitautilizardos
bandejas,distribugalosrecipientesdemodo
quenoquedendirectamenteunoencima
delotro.OejeaproximadamentelYJ' (3,8cm)
entrerecipientesgdesdeelfrente,partetrasera
g ladosdelasparedesdel horno.
g]-
C6mo configurur el homo pure horneudo o rostizudo
I11 Presioneel bot6nBAKE(homearL
r_ Presionelasalmohadillasnum6ricashasta
queaparezcala temperaturadeseada.
Presioneel bot6nSTART(inicior).
Elhomoseiniciar6autom6ticamente.
Lapantallamostrar6PrEmientrasrealiza
el precalentamiento.Cuandoelhomoalcanza
latemperaturaseleccionada,el control
delhomoemitir6variospitidosg la pantalla
mostrar6latemperaturadelhorno.
NOTA: Usted escuchor(_el ventilador
de convecci6n(enalgunos modelos)mientros
el homo reolizo el precolentomiento.
El ventilodor se detendrd cuondo el homo
se hogo precolentodo g lo pontollo
mostmrd lo temperature configumdo.
Estoes normal
Verifiqueelniveldecocci6nde
ii i
losalimentoscuandohagaalcanzado
eltiempominimaindicadoenlareceta.
Codnelosm6ssi fuesenecesario.
Presioneelbot6nCLEAR/OFF
(borror/opogodo)cuandose haga
finalizadoel horneadog luegoquite
losalimentosdel horno.
o
.... \
Paracambiarla temperaturadelhomodumnte
elcicloBAKE(hornea4presioneelbot6nBAKE
blluegolosolmohodillosnum_ricosporo
configurarla nuevatemperaturo.
17

C6mo usar el homo.
Dejela puertaabiertaen la posici6n
dedetencbndeasado.La puertaqueda
abierta,y aOnas[semantiene
latemperaturaadecuadaenet homo.
C6mo configurar el horno para asar
Si su cocina est4 conectada a 208 voltios,
pueden asarse filetes jugosos precalentando
el asador g colocando la bandeja del
homo en una posici6n mds elevada.
Utilice LO Broil (asarbajo) para cocinar par
completo alimentos coma aves o cortes
gruesos de came sin dorarlos de m6s.
%
Coloquelacame o pescadosabreuna
ii i
asadera dentro de una rejilladiseBada
para asar.
[] Siga las posiciones de las bandejos
sugeridas en la Guiode asado.
Presione el bot6n BROIL HI/LO (osar
alto/bajo) una vez para configurar
HI Broil (asar alto).
Para cambiar a LO Broil (asar bojo),
presione el bot6n BROILHI/LO
Iosar alto/bajo) de nuevo.
Presione el bot6n START (iniciar).
Cuando haga finalizado de asar,
presione el bot6n CLEAR/OFF
(borrar/apagado).
Eltamano, peso,grosor,
temperatura inicial g
el punto de cocci6n preferido
afectar6n lostiempos
de asado. Estagufa est6
basada en carnes a
temperatura de refrigerador.
t Et Ministefio de Agriculture de
tos EE.UU. afirma: "ta came de res
jugosa es popular, pero debe
saberse que at cocinada a s6to
140°F (60°C) atgunos organismos
que provocan intoxicaci6n
atimentafia pueden sobrevivir'i
(Fuente: Safe Food Book. Your
Kitchen Guide. USDA Re_
dunio 1985.)
Guia de asado
Precalientela asadera durante 2 minutos para mejorar el desempe_o.
Alimento
Carne de res
Polio
Filetes de
pescado
Chuletas
de cerdo
Nivel
de coccion
Jugosa
140°F(60°C)
A punto
160°F(71°0)
Bien cocida
170°F(77°C)
Bien cocida
170°F(77°C)
Tipo o grosor
Filetes-
Grosorde 1" (2,5cm)
Filetes-
3/4" a 1" (1,9cma
2,5cm)de grosor
Filetes-
3/4" a 1" (1,9cma
2,5 cm)de grosoro
8tties de came picada
Pechuga,sin hueso
Pechuga,conhueso
1/2" a 1" (1,3cma
2,5 cm)de grosor
3/4" (1,9cm)
de grosor
Posicion
de la bandeja*
Eo F(los atimentos
debenestar1"a 3"
[2,5cma 7,6cm]det
elementodeasado)
E(losatimentosdeben
estarde 3" a 4"
[7,6cma 10,2cm]det
etementodeasado)
D o E(losatimentos
debenestarde3" a 5"
[7,6cm a 12,7cm]det
elementode asado)
C(los atimentosdeben
estarde 8" a 9"
[20,3cm a 22,9cm]det
elementode asado)
C(los atimentos@ben
estarde 7" a 8"
[17,8cm a 20,3cm]det
etementodeasado)
D o E(losalimentos
@benestar3" a 6"
[7,6cm a 15,2cm]det
elementode asado)
D (losatimentos@ben
estarde 6" a 7"
[15,2cma 17,8cm]del
etementodeasado)
Comentarios
Esdificil cocinarfiletes
de menosdela 1" (2,5
cm)de grosory que
quedenjugosos.Se
cocinanparcompteto
antesdedorarse.
Paraevitar que la
carnase enrosque,
carte la grasaa
intervalosde 1" (2,5cm)
Asarsabreel lado
de la piel primero.
Manipuley girecon
muchocuidado.
Paraevitarquela carna
se enrosque,carte
la grasaa intervalos
de1" (2,5cm).
*Utilice Io posici6n de bandejo A para el homo m6s peque_o con posici6n de 2 bandejos.
18
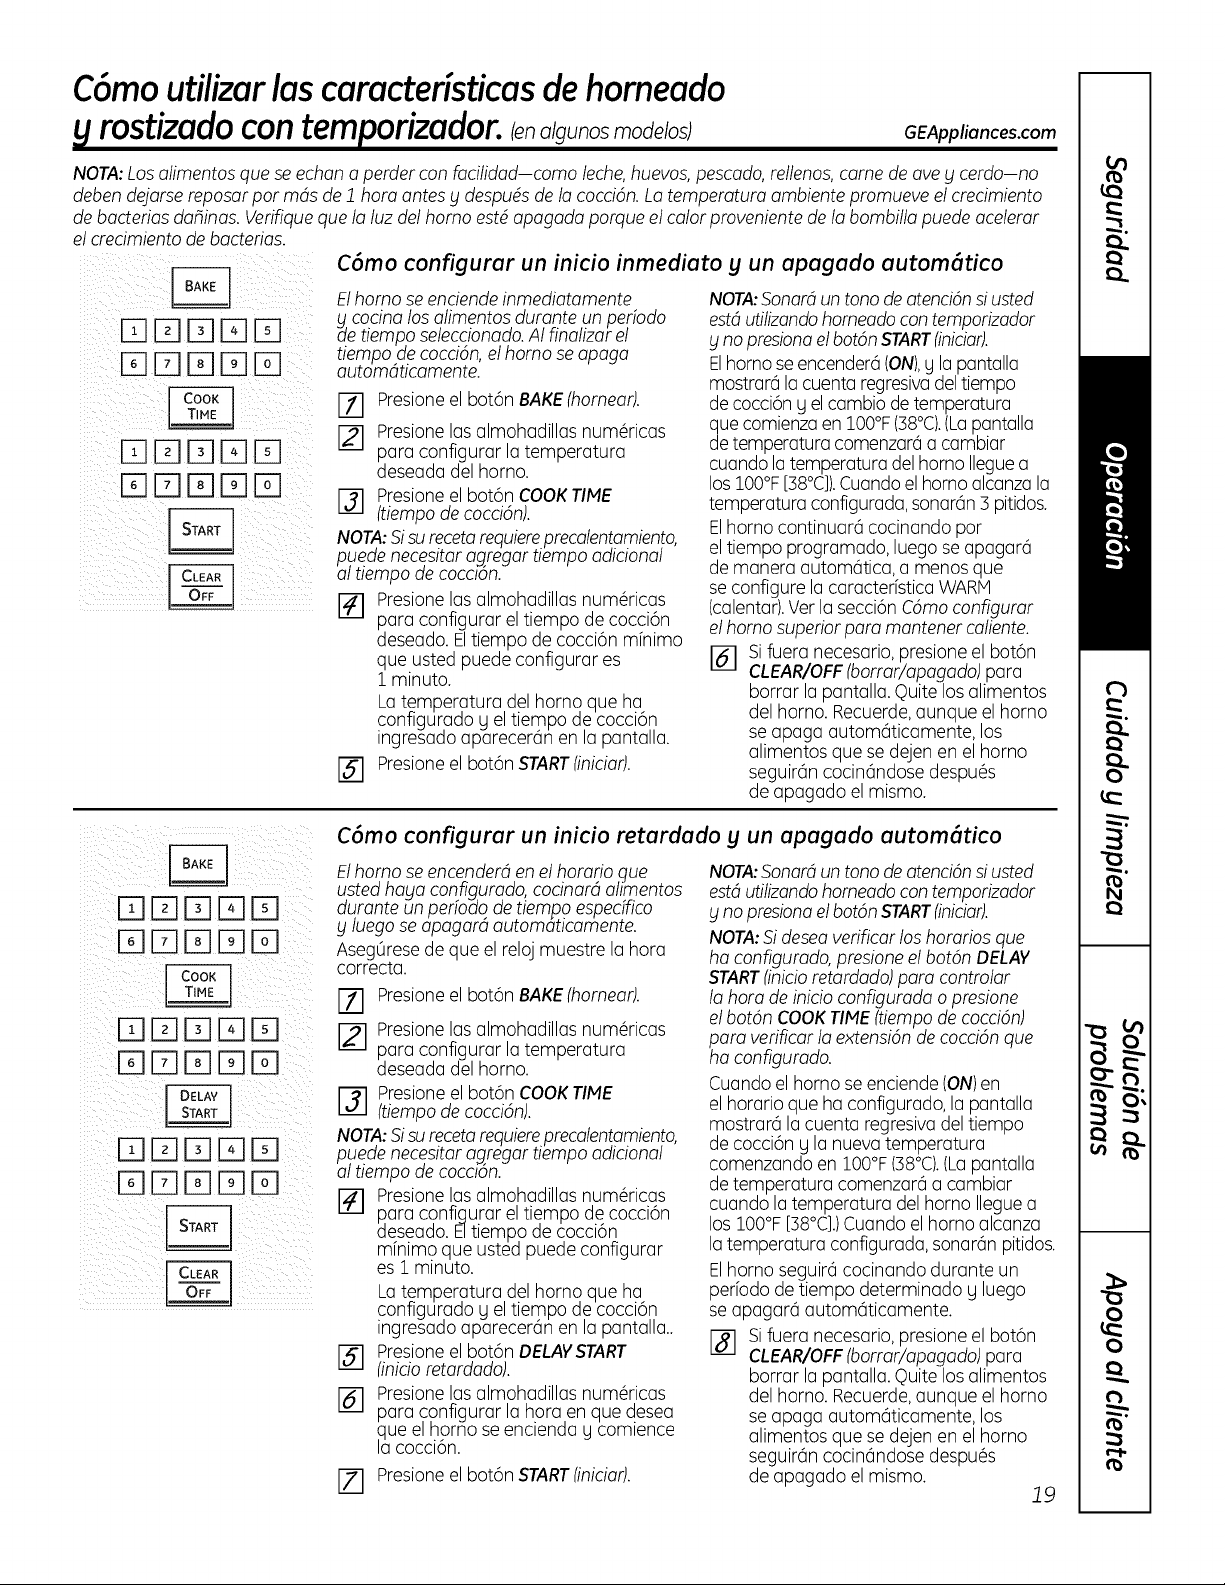
C6mo utilizarlas caracteristicas de homeado
rostizado con temporization oU nosmode os
GEAppliances.com
NOTA:Los alimentos que se echan a perder con facilidad-como leche, huevos, pescado, rellenos, came de ave g cerdo-no
deben dejarse reposar par m4s de 1 hora antes g despu_s de la cocci6n. Lo temperatura ambiente promueve el crecimiento
de bacterias dafiinas. Verifique que la luz del homo est_ apagada porque el color proveniente de la bombilla puede acelerar
el crecimiento de bacterias.
[-qFq FqEE
l-qr-qEEEE
D D D D
D D D D
C6mo configurar un inicio inmediato y un apagado autom6tico
Elhomo se enciende inmediatamente
Kcocina los alimentos durante un perbdo
de tiempo seleccionado.AI finalizar el
tiempo dRcocci6n,el homo se apaga
automdt_camente.
I-_ Presioneel bot6n BAKE(homear).
[] Presionelas almohadillas num@icas
para configurar la temperatura
deseada del homo.
[] Presioneel bot6n COOKTIME
(tiempo de cocci6n).
NOTA:Sisu recetarequiereprecalentamiento,
puede necesitar agregar tiempo adicional
of tlempo de cocc!Sn.
[] Presionelas almohadillas num@icas
para configurar el tiempo de cocci6n
deseado. Eltiempo de cocci6n mfnimo
que usted puede configurar es
1 minuto.
Latemperatura del horno que ha
configurado y el tiempo de cocci6n
ingresado aparecer6n en la pantalla.
[_] Presioneel bot6n STARTfiniciar).
NOTA:Sonar4 un tono de atenci6n si usted
est4 utilizando homeado con temporizador
g no presiona el bot6n START (iniciar).
Elhomo se encender6 (ON),g la pantalla
mostrar6 la cuenta regresiva del tiempo
de cocci6n g el cambio de temperatura
que comienza en IO0°F (58°C).(Lapantalla
de temperatura comenzar6 a cambiar
cuando la temperatura del homo Ilegue a
los IO0°F [38°C]).Cuando el homo alcanza la
temperatura configurada, sonar6n 5 pitidos.
Elhomo continuar6 cocinando par
el tiempo programado, luego se apagar6
de manera autom6tica, a menos que
se confgure la caracteristica WARN
(calentar).Verla secci6n C6mo configurar
el homo superiorpare mantener coliente.
[] Sifuera necesario, presione el bot6n
CLEAR/OFF(borrar/apagado) pa ra
borrar la pantalla. Quite los alimentos
del homo. Recuerde,aunque el homo
se apaga autom6ticamente, los
alimentos que se dejen en el homo
seguir6n cocin6ndose despu_s
de apagado el mismo.
DDD D
DDDDD
DDD[]D
DDDDD
DDD[]D
DDDDD
C6mo configurur un inicio returdudo y un upugudo uutom6tico
Elhomo se encender4 en el horatio gue
usted haya configurado, cocinar4 alimentos
durante un perfodo de tiempo espedfico
y fuego se apagar4 automatlcamente.
Aseg0resede que el reloj muestre la hora
correcta.
Presioneel bot6n BAKE(homear).
Presionelas almohadillas num@icas
para configurar la temperatura
deseada del homo.
I-_ Presioneel bot6n COOKTIME
(tiempo de cocci6n).
NOTt_:Sisu recetarequiereprecalentamiento,
puede necesitar agregar tiempo adicional
al tiempo de cocc/bn.
Presionelas almohadillas num@icas
Aara configurar el tiempo de cocci6n
deseado. Eltiempo de cocci6n
mhimo que usted puede configurar
es 1 minuto.
Latemperatura del horno que ha
configurado y el tiempo de cocci6n
ingresado aparecer@nen la pantalla..
Presioneel bot6n DELAYSTART
flnicioretardado).
Presionelas almohadillas num@icas
para configurar la hora en que desea
clueel horno se encienda g comience
lacocci6n.
Presioneel bot6n START(iniciar).
NOTA:Sonar4 un tono de atenci6n si usted
est4 utilizando homeado con temporizador
g no presionaelbot6n START(iniciar).
NOTA:Sidesea verificar los homrios que
ha configumdo, presioneel bot6n DELAY
START(inicioretardado) pare contmlar
la hora de inicio configumda o presione
el bot6n COOK TIME (tiempo de cocci6n)
paro verificar la extensi6n de cocd6n que
ha configurodo.
Cuando el homo se enciende (ON)en
elhorarioque ha configurado,lapantalla
mostrar(_lacuentaregresivadeltiempo
de cocci6ny lanuevatemperatura
comenzandoen IO0°F(38°C).(Lopantalla
de temperaturacomenzar(_a cambiar
cuandolatemperaturadelhornolleguea
losIO0°F[38°C].)Cuando elhornoalcanza
latemperaturaconfgurada,sonar(_npitidos.
Elhornoseguir(_cocinandoduranteun
periodode tiempodeterminadoy luego
seapagar(iautom(iticamente.
Sifuera necesario, presione el bot6n
CLEAR/OFF(borrar/apagado) pa ra
borrar la pantalla. Quite los alimentos
del homo. Recuerde,aunque el homo
se apaga autom6ticamente, los
alimentos que se dejen en el homo
seguir6n cocin6ndose despu_s
de apagado el mismo.
19
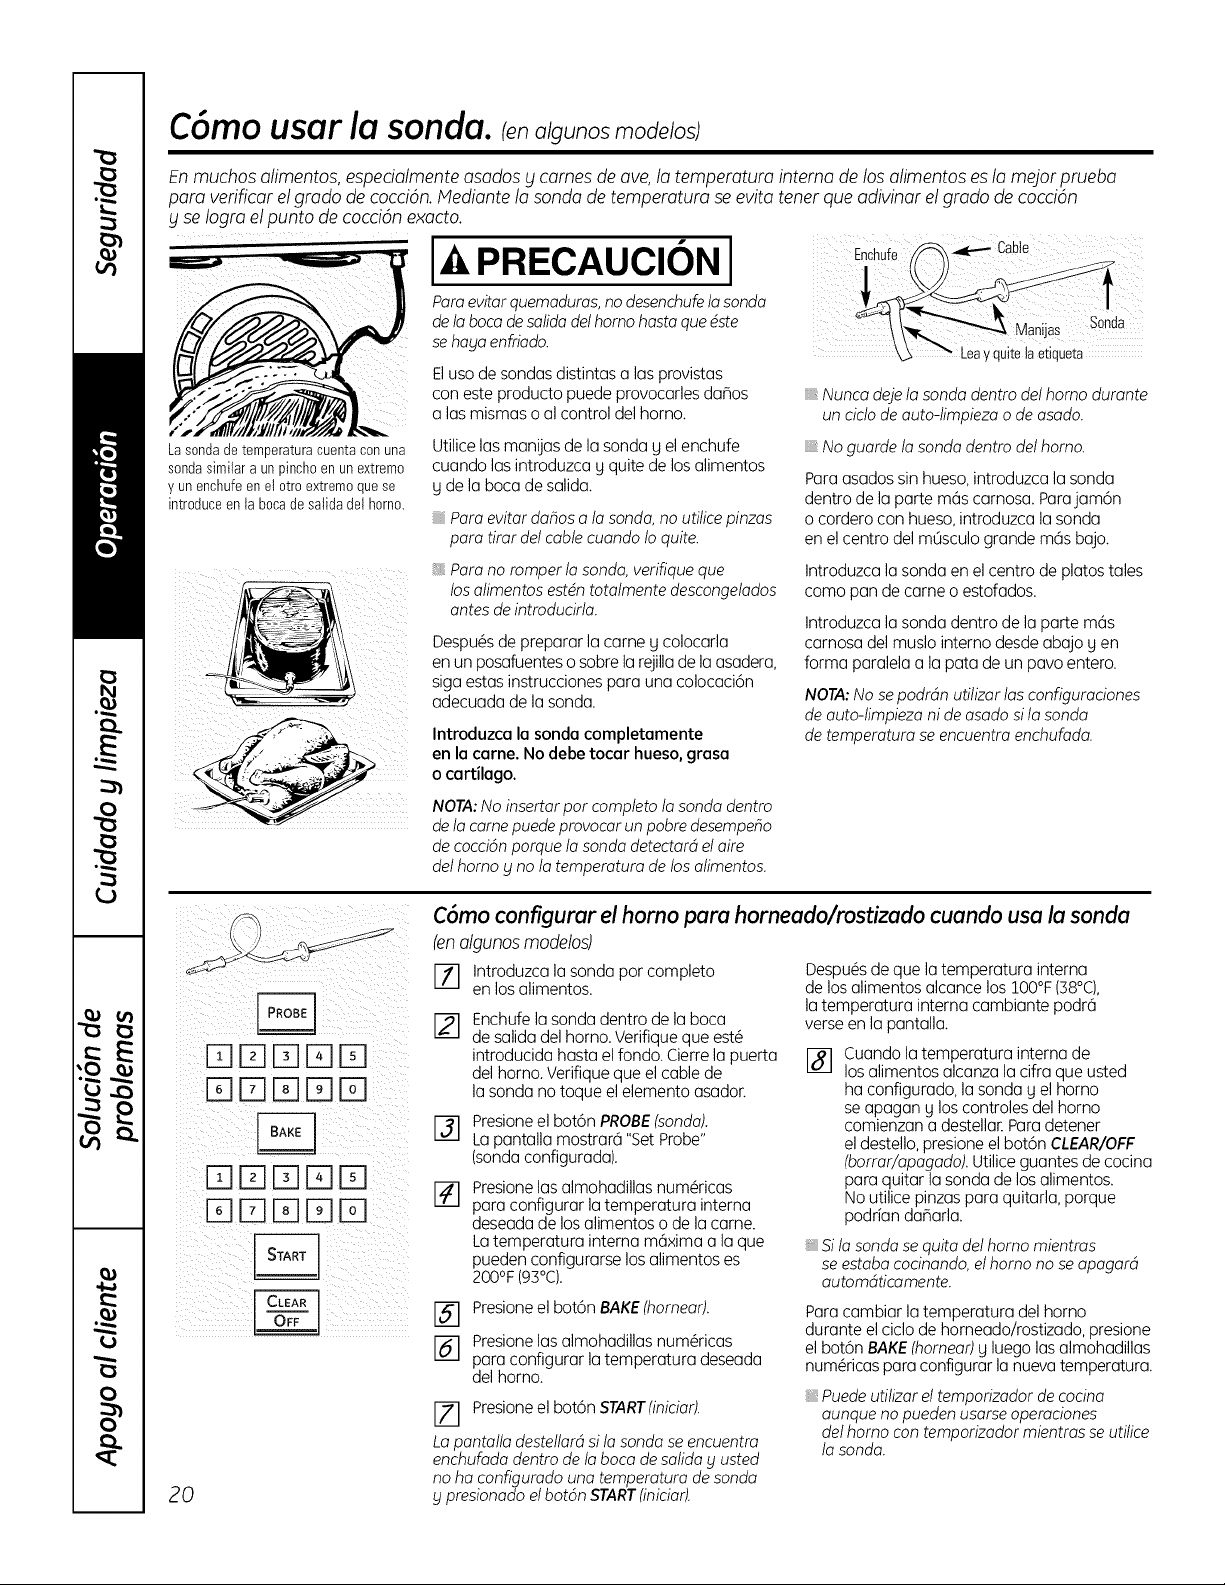
C6mo usor Io sondo. (en algunos modelos)
Enmuchos alimentos, especialmenteasados y carnes de ave,la temperatura interna de los alimentos esla mejor prueba
para verificar el grado de cocd6n. Nediante la sonda de temperatura se evita tener que adivinar el grado de cocci6n
g se Iogra el punto de cocci6n exacto.
PRECAUCION I
Para evitarquemaduras, no desenchufeta sonda
de ta boca de satidadet homo hasta quedste
sehaya enfriado.
Eluso de sondas distintas a las provistas
con este producto puede provocarles dahos
alas mismas o al control del horno.
E_chufe _ Cab!e
Nunca dejeta sonda dentro det homo durante
un cictode auto-timpieza o de asado.
Lasondade temperaturacuenta conuna
sondasimilara un pinch0en un extremo
y un enchufeen et 0tr0 extremoque se
introduceen ta bocade salidadet homo.
Utilice las manijas de la sonda g el enchufe
cuando las introduzca g quite de los alimentos
g de la boca de salida.
Para evitar dahos a ta sonda, no utitice pinzas
para tirar det cable cuando to quite.
No guarde to sonda dentro det homo.
Para asados sin hueso,introduzca la sonda
dentro de la parte m6s carnosa. Parajam6n
o cordero con hueso, introduzca la sonda
en elcentro del mOsculogrande m6s bajo.
Para no romper to sonda, verifique que
los atimentos est4n totatmente descongetados
antes de introducirta.
Despu_sde preparar la came g colocarla
en un posafuenteso sobre la rejillade la asadera,
siga estas instrucciones para una colocaci6n
adecuada de la sonda.
Introduzca la sonda completamente
en la came. No debe tocar hueso, grasa
o cartilago.
NOTA: No insertar pot completo to sonda dentro
de ta came puede provocar un pobre desempeho
de cocci6n porque to sonda detectard et aire
det homo y no ta temperatura de los atimentos.
Introduzca la sonda en elcentro de platos tales
como pan de came o estofados.
Introduzca la sonda dentro de la parte m6s
carnosa del muslo interno desde abajo g en
forma paralela a la pata de un pavo entero.
NOTA:No se podrdn utitizar los configuraciones
de auto-timpieza ni de asado si to sonda
de temperatura se encuentra enchufada.
len algunos moddog
EZ] Introduzca la sonda por completo
en los alimentos.
20
C6mo contigurar el homo para horneado/rostizado cuando usa la sonda
%
[]
Enchufe la sonda dentro de la boca
de salida del horno. Verifique que est@
introducida hasta el fondo. Cierre la puerta
del horno. Verifique que el cable de
la sonda no toque el elemento asador.
Presioneel bot6n PROBE(sonda).
La pantalla mostrar6 "Set Probe"
(sondaconfigurada).
Presionelas almohadillas num_ricas
para configurar latemperatura interna
deseada de losalimentos o de la carne.
La temperatura interna m6xima a la que
pueden configurarse los alimentos es
200OF(93°C).
Despu_s de que la temperatura interna
de los alimentos alcance los 100°F(38°C),
la temperatura interna cambiante podr6
verse en la pantalla.
#-1
Cuando la temperatura interna de
losalimentos alcanza la cifra que usted
ha configurado, la sonda g el homo
se apagan g los controles del homo
comienzan a destellar. Para detener
el destello, presione el bot6n CLEAR/OFF
Iborrar/apagado). Utilice guantes de cocina
para quitar la sonda de los alimentos.
No utilice pinzas para quitarla, porque
podrian daharla.
Si ta sonda se quita def homo mientras
se estaba cocinando, el homo no se apagard
automdticamente.
Presioneel bot6n BAKE(homear).
Presionelas almohadillas num_ricas
para configurar latemperatura deseada
del horno.
[] Presioneel bot6n START(iniciar).
La pantatta desteftard si to sonda se encuentro
enchufada dentro de ta boca de satida y usted
no ha configurodo una temperatura de sonda
y presionado el bot6n START(iniciar).
Para cambiar la temperatura del homo
durante el ciclo de horneado/rostizado, presione
el bot6n BAKE(homear)g luego las almohadillas
num@ricaspara configurar la nueva temperatura.
Puede utilizar et temporizador decocina
aunque nopueden usarse operociones
def homo con temporizador mientras se utitice
ta sonda.
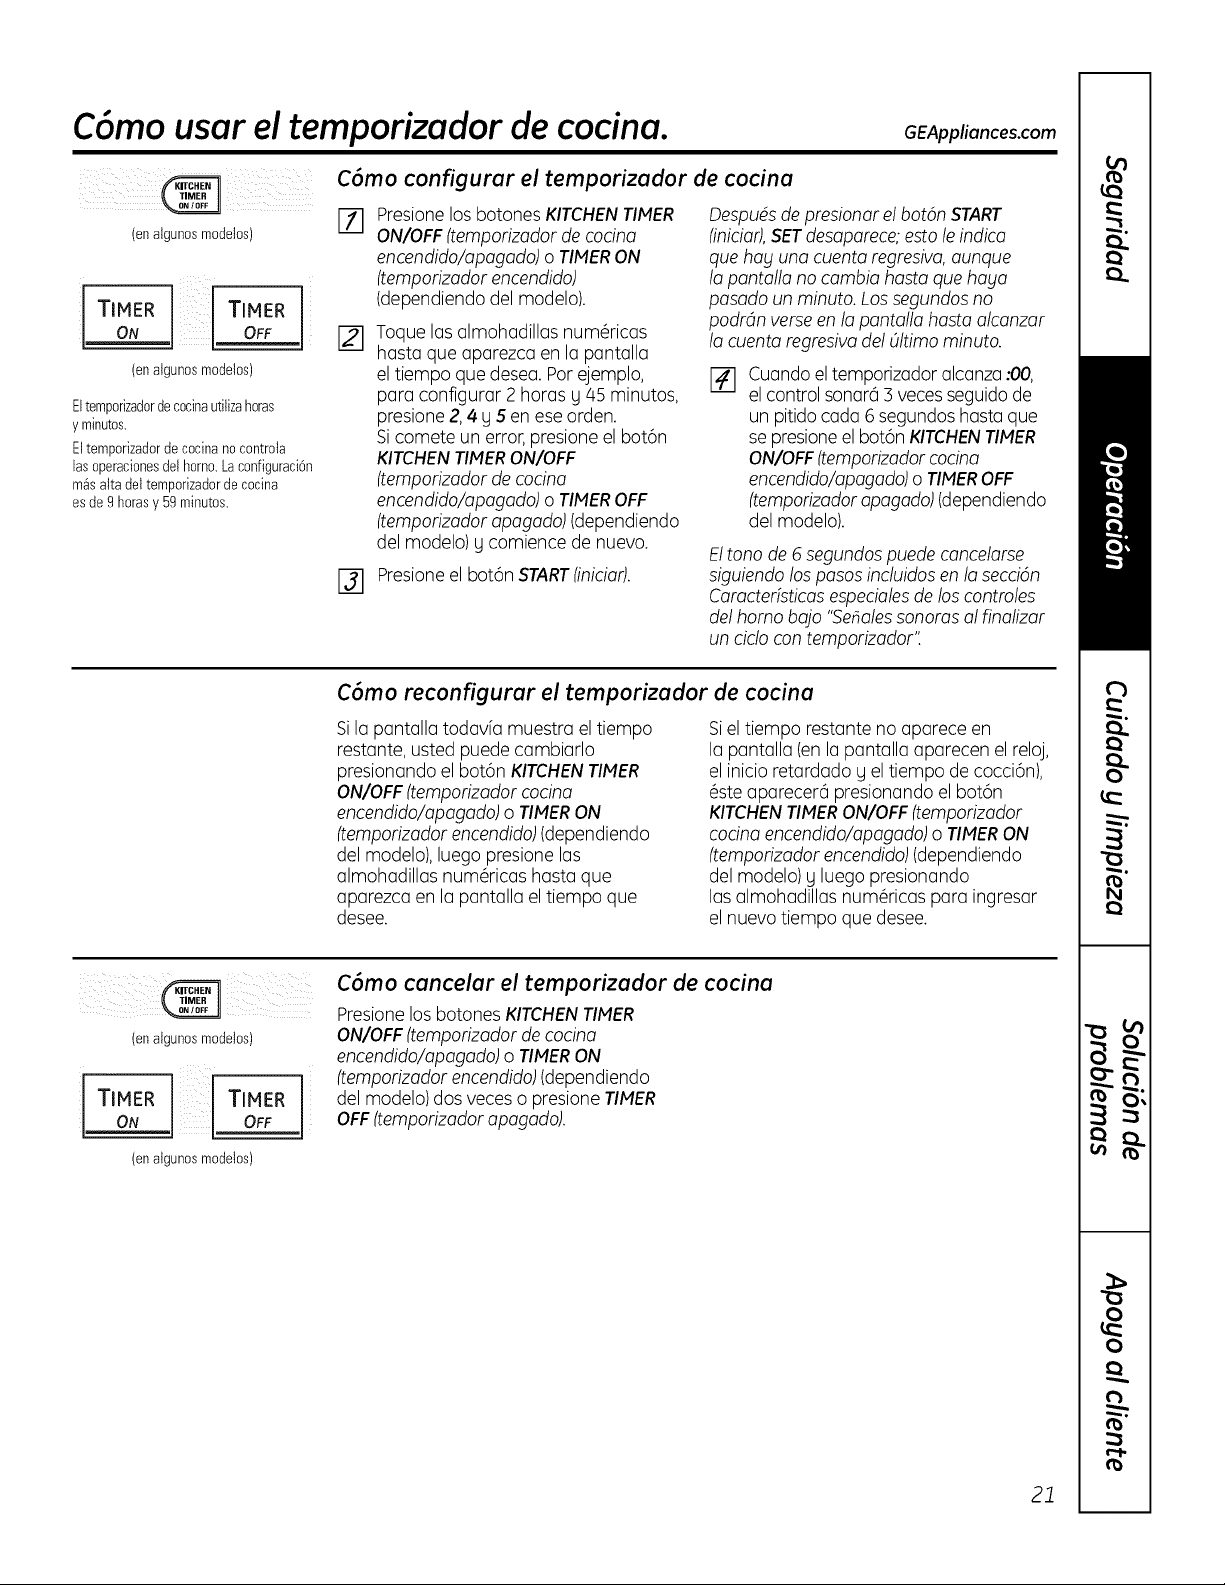
C6mo usar el temporizador de cocina. GEAppliances.com
(enatgunosmodetos)
I
TIMER TIMER
ON OFF
(enatgunosmodelos)
Eltemporizadordecocinautitizahoras
y minutos.
Eltemporizadordecocinanocontrota
las operacionesdethorno.Laconfiguraci6n
m_salta del temporizadorde cocina
esde 9 horasy 59 minutos.
C6mo configurar el temporizador de cocina
%
%
Presione los botones KITCHENTIMER
ON/OFF (temporizador de cocina
encendido/apagado) o TIMER ON
(temporizador encendido)
(dependiendo del modelo).
Toque las almohadillas num@icas
hasta que aparezca en la pantalla
el tiempo que desea. Por ejemplo,
para configurar 2 horas U45 minutos,
presione 2, 4,US en ese orden.
Sicomete un error, presione el bot6n
KITCHENTIMERON/OFF
(temporizador de cocina
encendido/opagado) o TIMER OFF
(temporizador apagado) (dependiendo
del modelo) g comience de nuevo.
Presioneel bot6n START(iniciar).
Despu4sde presionar el bot6n START
(iniciar),SETdesaparece;estole indica
que hag uno cuento regresivo,aunque
Io pontolla no combia hosto que hoblo
pasado un minuto. Lossegundos no
podrdn verseen Io pantallo hosta alconzor
Io cuento regresivo del Oltimominuto.
Cuando eltemporizador alcanza:00,
el control sonar6 3 veces seguidode
un pitido cada 6 segundos hasta que
se presioneel bot6n KITCHENTIMER
ON/OFF(temporizodorcocina
encendido/opogado)o TIMEROFF
(temporizadoropogodo)(dependiendo
del modelo).
Eltono de 6 segundos puede cancelarse
siguiendo los pasos incluidos en la secci6n
Carocterfsticasespecialesde los controles
del homo bajo "Seholessonoms ol finolizor
un cido con temporizodor't
C6mo reconfigurur el temporizudor de cocinu
Sila pantalla todada muestra el tiempo
restante, usted puede cambiarlo
presionando el bot6n KITCHENTIMER
ON/OFF(temporizodor cocino
encendido/opogado) o TIMERON
(temporizador encendido)(dependiendo
del modelo), luego presione las
almohadillas num@icas hasta que
aparezca en la pantalla eltiempo que
desee.
Siel tiempo restante no aparece en
la pantalla (en la pantalla aparecen el reloj,
el inicio retardado Uel tiempo de cocci6n),
Osteaparecer6 presionando el bot6n
KITCHENTIMERON/OFF (temporizador
codna encendido/apogado)o TIMERON
(temporizador encendido)(dependiendo
del modelo) g luego presionando
las almohadillas num@icas para ingresar
el nuevo tiempo que desee.
(enalgunosmodelos)
I
TIMER TIMER
ON OFF
(enatgunosmodelos)
C6mo canceler el temporizudor de cocinu
Presione los botones KITCHENTIMER
ON/OFF (temporizador de cocina
encendido/opagado) o TIMER ON
(temporizador encendido) (dependiendo
del modelo) dos veces o presione TIMER
OFF(temporizador apagado).
21
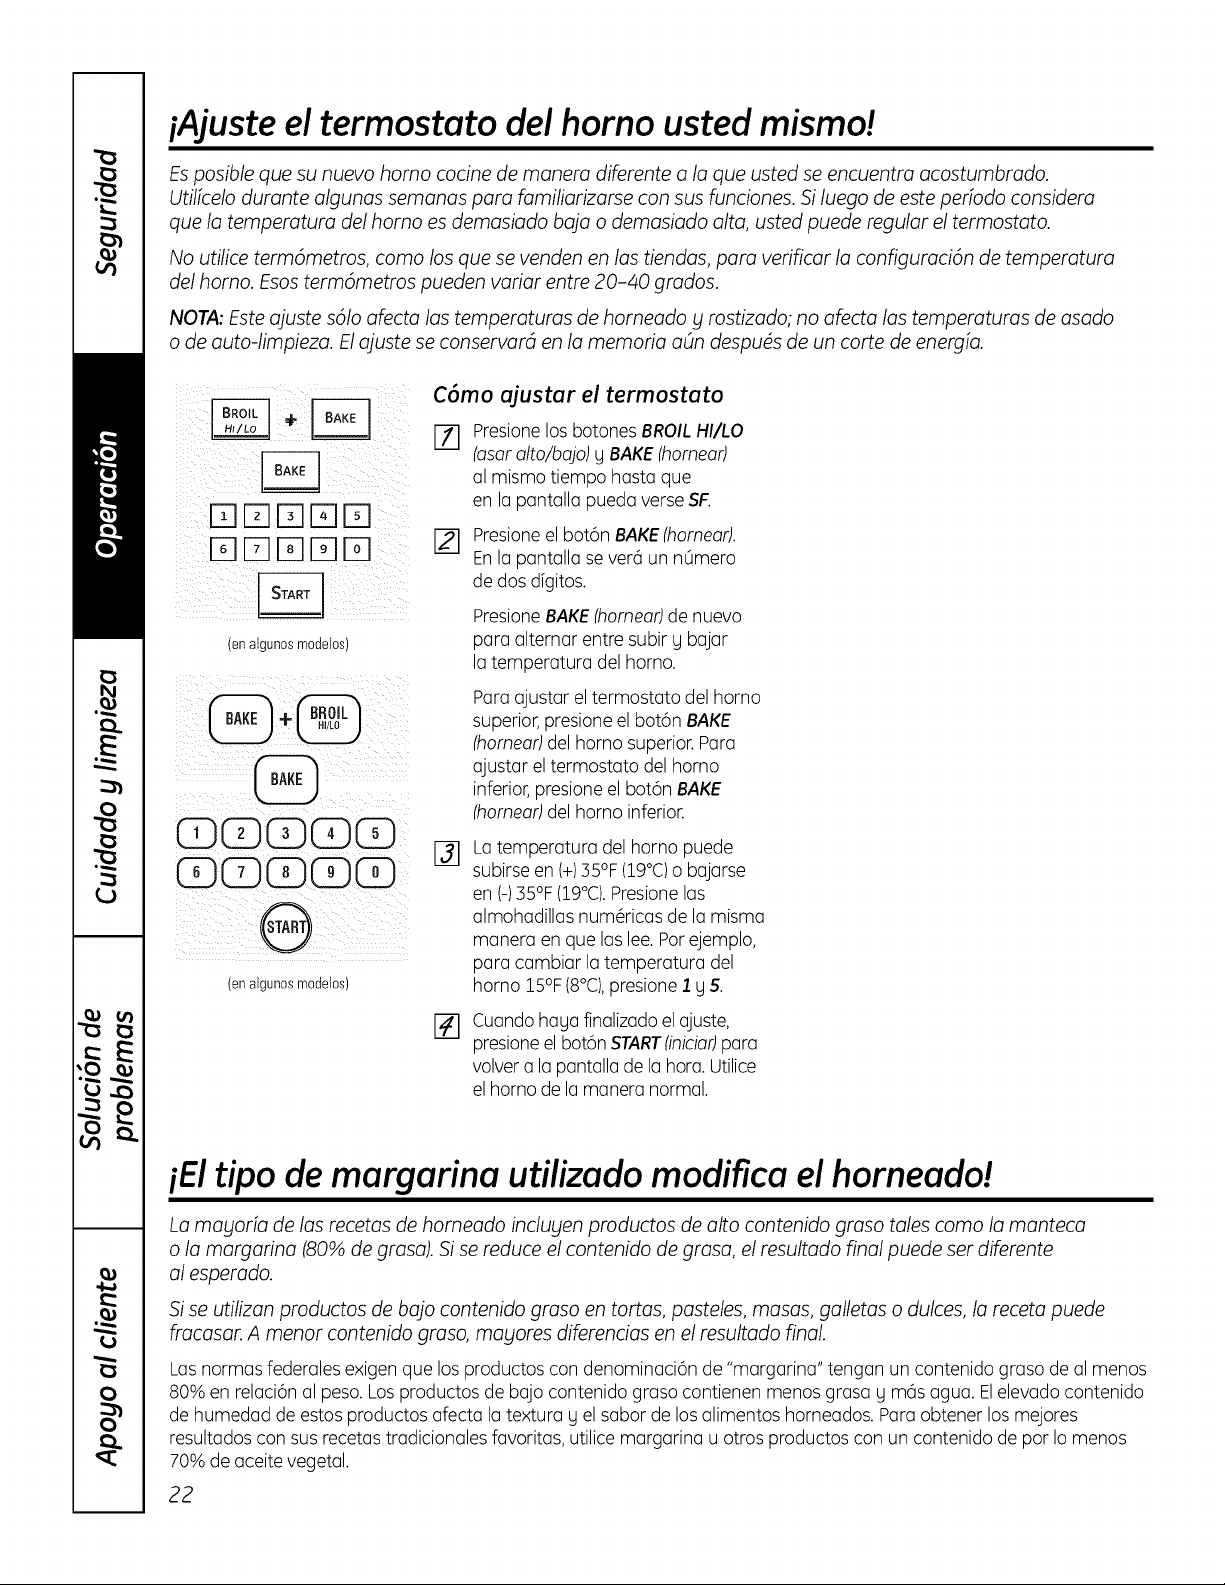
iAjuste el termostato del horno usted mismo!
Es posible que su nuevo homo cocine de manera diferente a la que usted se encuentra acostumbrado.
Utilicelo durante algunas semanas para familiarizarse con sus funciones. Si luego de este periodo considera
que la temperatura del homo es demasiado baja o demasiado alto, usted puede regular el termostato.
No utilice term6metros, coma los que se venden en los tiendas, para verificar la configuraci6n de temperatura
del homo. Esos term6metros pueden variar entre 20-40 grados.
NOTA: Este ajuste s61oafecta los temperaturas de homeado g rostizado; no afecta los temperaturas de asado
o de auto-limpieza. El ajuste se conservard en la memoria aOn despu4s de un carte de energia.
(enalgunosmodelos)
CDCDCDQQ:
i@iiiiii I ilill
(enatgunosmodelos)
C6mo ajustar el termostato
[] Presionelos botones BROILHI/LO
(osar alto/bajo) UBAKE (hornear)
al mismo tiempo hasta que
en la pantalla pueda verseSF.
[]
Presioneel bot6n BAKE(homear).
Enla pantalla se ver6 un n0mero
de dos dfgitos.
PresioneBAKE(hornear)de nuevo
para alternar entre subir y bajar
la temperatura del homo.
Para ajustar el termostato del horno
superior,presione el bot6n BAKE
Ihornear)del horno superior. Para
ajustar el termostato del horno
inferior,presione el bot6n BAKE
Ihomeor)del horno inferior.
%
[]
La temperatura del homo puede
subirse en (+)35°F (19°C)o bajarse
en (-) 35°F(19°C).Presionelas
almohadillas num@icas de la misma
manera en que las lee. Par ejemplo,
para cambiar la temperatura del
horno 15°F(8°C),presione 1 y 5.
Cuando haga flnalizado el ajuste,
presioneel bot6n STARTIiniciar)para
volvera la pantalla de la hora.Utilice
el horno de la manera normal.
iEI tipo de margarina utilizado modifica el horneado!
Lo magoria de los recetas de homeado inclugen productos de alto contenido graso tales coma la manteca
o la margarina (80% de grasa). Si se reduce el contenido de grasa, el resultado final puede ser diferente
al esperado.
Si se utilizan productos de bajo contenido graso en tortas, pasteles, masas, galletas o dulces, la receta puede
fracasar. A menor contenido graso, m%lores diferencias en el resultado final.
Las normas federales exigen que los productos con denominaci6n de "margarina" tengan un contenido graso de al menos
80% en relaci6n al peso. Losproductos de bajo contenido graso contienen menos grasa g m6s agua. Elelevado contenido
de humedad de estos productos afecta la textura g el sabor de los alimentos horneados. Para obtener los mejores
resultados con sus recetas tradicionales favoritas, utilice margarina u otros productos con un contenido de par Io menos
70% de aceite vegetal.
22
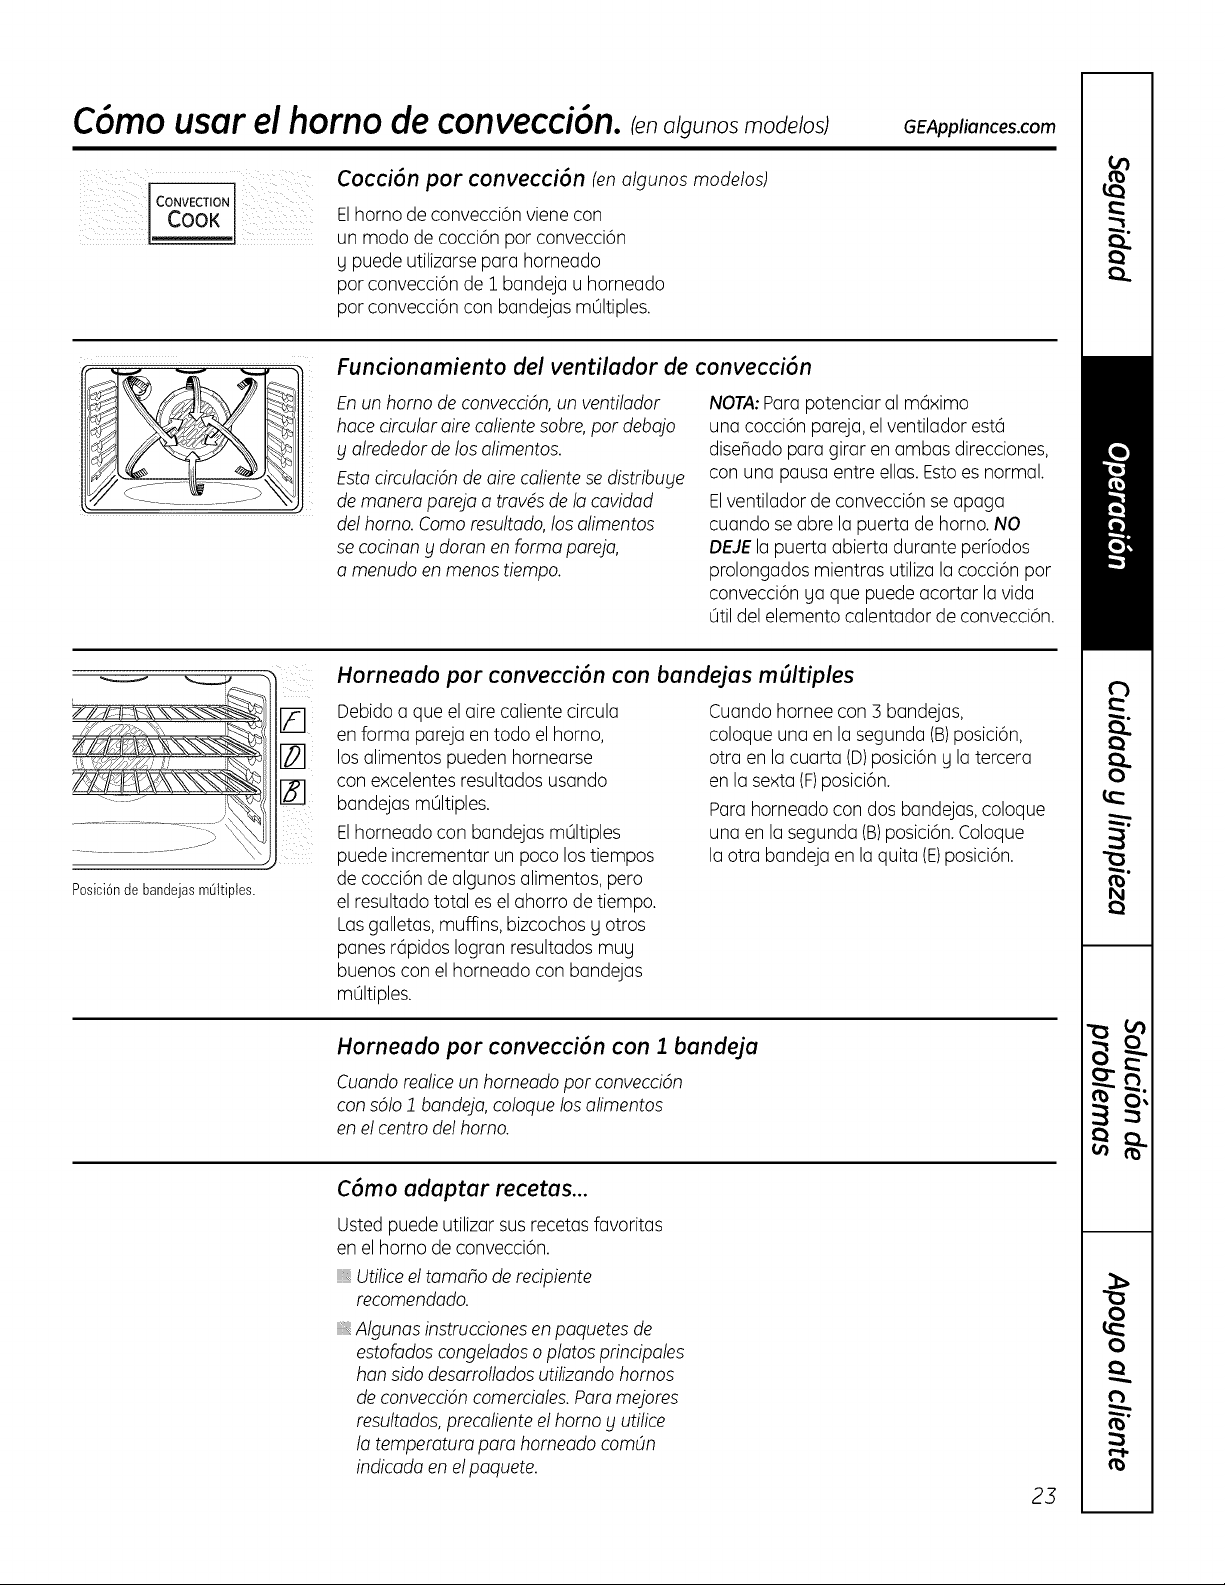
C6mo usar el homo de convecci6n. GEAppliances.com
CONVECTION
Cocci6n par convecci6n (enalgunos modelos)
Elhomo de convecci6n viene con
un modo de cocci6n par convecci6n
y puede utilizarse para horneado
par convecci6n de i bandeja u horneado
par convecci6n con bandejas mQItiples.
Funcionamiento del ventilador de convecci6n
Enun homo de convecci6n,un ventilador
hace circular aire calientesabre,par debajo
g alrededor de los alimentos.
Estacirculaci6n de aire calientese distribuge
de monero porejo o troves de lo covidod
del homo. Coma resultodo,los olimentos
se cocinon g damn en farina porejo,
o menudo en menos tiempo.
NOTA:Para potenciar al m6ximo
una cocci6n pareja, el ventilador est6
diseflado para girar en ambas direcciones,
con una pausa entre elias.Estoes normal.
Elventilador de convecci6n se apaga
cuando se abre la puerta de homo. NO
DEJEla puerta abierta durante perfodos
prolongados mientras utiliza la cocci6n par
convecci6n ga que puede acortar la vida
Otildel elemento calentador de convecci6n.
Posici6nde bandejasmOltiples.
Horneado por convecci6n con bandejas m(lltiples
Debido a que el aire caliente circula Cuando hornee con 3 bandejas,
en forma pareja en todo el homo, coloque una en la segunda (B)posici6n,
los alimentos pueden hornearse otra en la cuarta (D)posici6n g la tercera
con excelentes resultados usando en la sexta (F)posici6n.
@
bandejas mOItiples. Para horneado con dos bandejas, coloque
Elhorneado con bandejas mOItiples una en la segunda (B)posici6n. Coloque
puede incrementar un poco lostiempos la otra bandeja en la quita (E)posici6n.
de cocci6n de algunos alimentos, pero
el resultado total es el ahorro de tiempo.
Las galletas, muffins, bizcochos g otros
panes r6pidos Iogran resultados mug
buenos con el horneado con bandejas
mOItiples.
Horneado por convecci6n con 1 bandeja
Cuando realice un homeado por convecci6n
con s6Io 1 bandeja, coloque los alimentos
en el centro del homo.
C6mo adaptar recetas...
Usted puede utilizar sus recetas favoritas
en el homo de convecci6n.
Utilice eltomato de recipiente
recomendodo.
Algunos instruccionesen poquetes de
estofodoscongelados o platos principoles
hart sido desorrollodosutilizando homos
de convecd6n comerciales.Poro mejores
resultodos,precolienteel homo g utilice
Io temperature pore homeodo comOn
indicodo en el poquete.
23
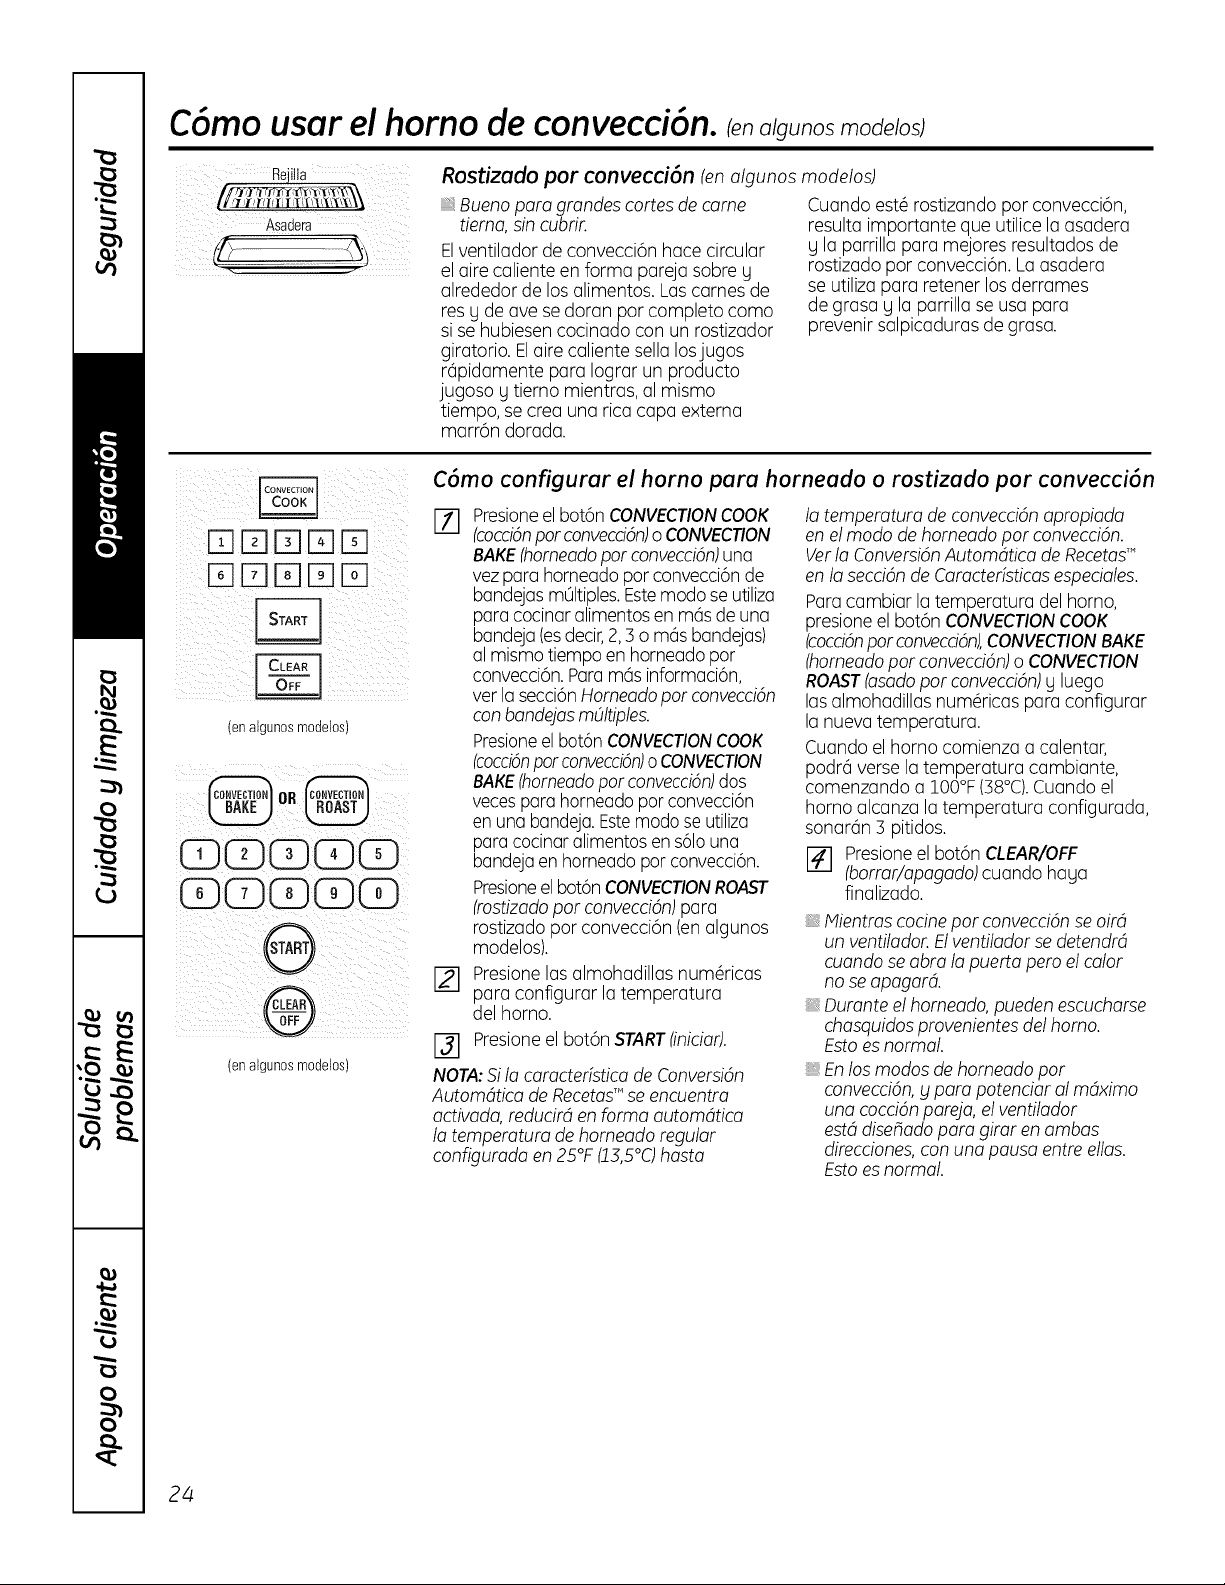
C6mo usar el homo de convecci6n, lenoUunosmade,as;
Rostizodo par convecci6n (enalgunos modelos)
Buena para grandes cortes de came
tiema, sin cubrir.
Elventilador de convecci6n hace circular
el aire caliente en forma pareja sabre g
alrededor de los alimentos. Lascarnes de
res 9 de ave se doran par completo coma
si se hubiesen cocinado con un rostizador
giratorio. Elaire caliente sella Iosjugos
r6pidamente para Iograr un producto
jugoso 9 tierno mientras, al mismo
tiempo, se crea una rica capa externa
marr6n dorada.
Cuondo est@rostizondo par convecci6n,
resulto importonte que utilice Io osodero
9 la porrillo poro mejores resultodos de
rostizado par convecci6n. Loosadero
se utilizo poro retener los derromes
de grasa U la parrilla se usa para
prevenir salpicaduras de grasa.
i
(enalgunosmodetos)
iGGGGG
iGGCDCDCD
ii x i
(enatgunosmodelos)
C6mo configurar el horno para horneado o rostizado par convecci6n
1-71 Presione el bot6n CONVECTIONCOOK la temperatura de convecci6n apropiada
(cocci6npar convecci6n)o CONVECTION en el modo de horneado par convecci6n.
[]
Verla ConversiOnAutom4tica de Recetas'"
en la secci6n de ComcteHsticasespedales.
Paracambiar la temperaturu del homo,
presione el bot6n CONVECTIONCOOK
(cocci6nparconvecci6n),CONVECTIONBAKE
(homeadopar convecd6n)o CONVECTION
ROAST(asadopar convecd6n)g luego
los almohudillas num@icaspara configurar
Io nueva temperatura.
Cuando el horno comienzo a calentar,
podr6 verse Io temperatura cambiante,
comenzondo a IO0°F(58°C).Cuundo el
horno alcunzo lutemperatura configurada,
sonar6n 5 pitidos.
[] Presioneel bot6n CLEAR/OFF
(borrar/apagado)cuando hogu
flnulizudo.
BAKE(homeadopar convecci6n)una
vezpara horneado par convecci6n de
bandejas mOItiples.Estemodo se utiliza
para cocinar alimentosen m6sde una
bandeja (esdecir,2,3 o m6s bandejas)
al mismo tiempo en horneadopar
convecci6n.Param6s informaci6n,
ver la secci6nHomeado par convecci6n
con bandejasmOltiples.
Presioneel bot6n CONVECTIONCOOK
(cocci6nparconvecci6n)o CONVECTION
BAKE(homeadopar convecci6n)dos
vecespara horneado par convecci6n
en una bandeja.Estemodo se utiliza
para cocinar alimentosen s61ouna
bandejaen horneado par convecci6n.
Presioneelbot6n CONVECTIONROAST
(rostizadopar convecci6n)para
rostizado par convecci6n (en algunos
modelos).
Presionelas almohadillas num@icas
para configurar la temperatura
del horno.
Presioneel bot6n STARTfiniciar).
NOTA:Sila caracterfstica de Conversi6n
Autom4tica de RecetasT"se encuentra
activada, reducir4 en forma automdtica
la temperatura de homeado regular
configurada en 25°F(23,5°C)hasta
, Mientms cocine par convecci6nse oir4
un ventilador. Elventilador se detendr4
cuando se abra la puerto peru el color
no se apagar4.
, Dumnte el homeado, pueden escucharse
chasquidospmvenientes del homo.
Estoesnormal.
Enlos modos de homeado par
convecci6n, y pare potenciar al mdximo
una cocci6n pareja, el ventilador
est4 dise#ado para girar en ambas
direcciones, con una pausa entre elias.
Estoesnormal.
24
GEApplionces.com
Cuandohorneegatletas,obtendr_
mejoresresultadossi usauna plancha
plana para gatletasen lugarde un
recipientede ladosbajos.
Recipientes para cocci6n por convecci6n
Antesde utilizar el horno de convecci6n,
verifique que suselementos de cocci6n
dejen espacio suficiente para la circulaci6n
de aire en el homo. $i va a hornear con
varios recipientes,deje un espacio entre
ellos.Adem6s,aseg0rese de que los
recipientes no se toquen entre sf o
toquen las paredes del horno.
Papelg pl6stico
Los recipientes de papel g pl6stico
resistentes al calor recomendados para
utilizar en horneado normal tambi6n
pueden utilizarse para horneado por
convecci6n, pero no deben utilizarse
a temperaturas m6s elevadas que
la temperatura recomendada por
elfabricante de los elementos de cocci6n.
Tambi6n pueden utilizarse elementos
de cocci6n pl6sticos resistentes
a temperaturas de 400°F (204,4°C).
Metal g vidrio
Cualquier tipo de recipiente de cocci6n
funciona en su horno de convecci6n;
sin embargo, los recipientes de metal
se calientan m6s r6pidamente g se
recomiendanpara horneadopor convecci6n.
Los bondejos oscums o con ocobodo
mote homeon olimentos mds rdpido
que los brillontes.
Los recipientesde vidrio o cerdmico
cocinon rods despocio.
Para recetas como polio horneado, utilice
un recipientecon ladosbajos.Elairecaliente
no puede circular bien alrededor de los
alimentos en un recipiente de lados altos.
C6mo usar las caracteristicascontemporizador
para cocci6n por convecci6n.
Mientms cocine con estos comcterfsticos se escuchor6un ventilodor.Elventilodor se detendrd cuondo se ohm Io puerto pero
el color no se opogord.
NOTA:Los olimentos que se echon o perder con focilidod-como leche, huevos,pescodo,rellenos, come de ove g cerdo-
no deben dejorse reposor pot rods de 2 horn ontes g despu_sde Io cocciOn.Lotemperature ombiente promueve
el crecimiento de bocterios dominos.Verifiqueque Io luz del homo est_opogodo porque el color proveniente
de Io bombillo puede ocelemr el credmiento de bocterios.
CONVECT,ON
, COOK
C6mo configurar un inicio inmedioto _1un opogodo outom6tico
Presionela funci6n de convecci6ndeseada.
Contin0econ el paso 2 de C6moconfiguror
un inicioinmedioto_tun opagodoautomdtico
de la secci6nC6moutilizorlos coractefisticas
dehomeado_trostizodocontemporizodor.
CONVECTION
COOK
C6mo configurar un inicio retardado y un apagado autom6tico
Presionela funci6n de convecci6ndeseada.
Contin0econ el paso 2 de C6moconfigurar
un inicioretardado_tun apagado automdtico
de la secci6nC6moutilizarlos caractefisticas
dehomeado_trostizadocontemporizador.
25
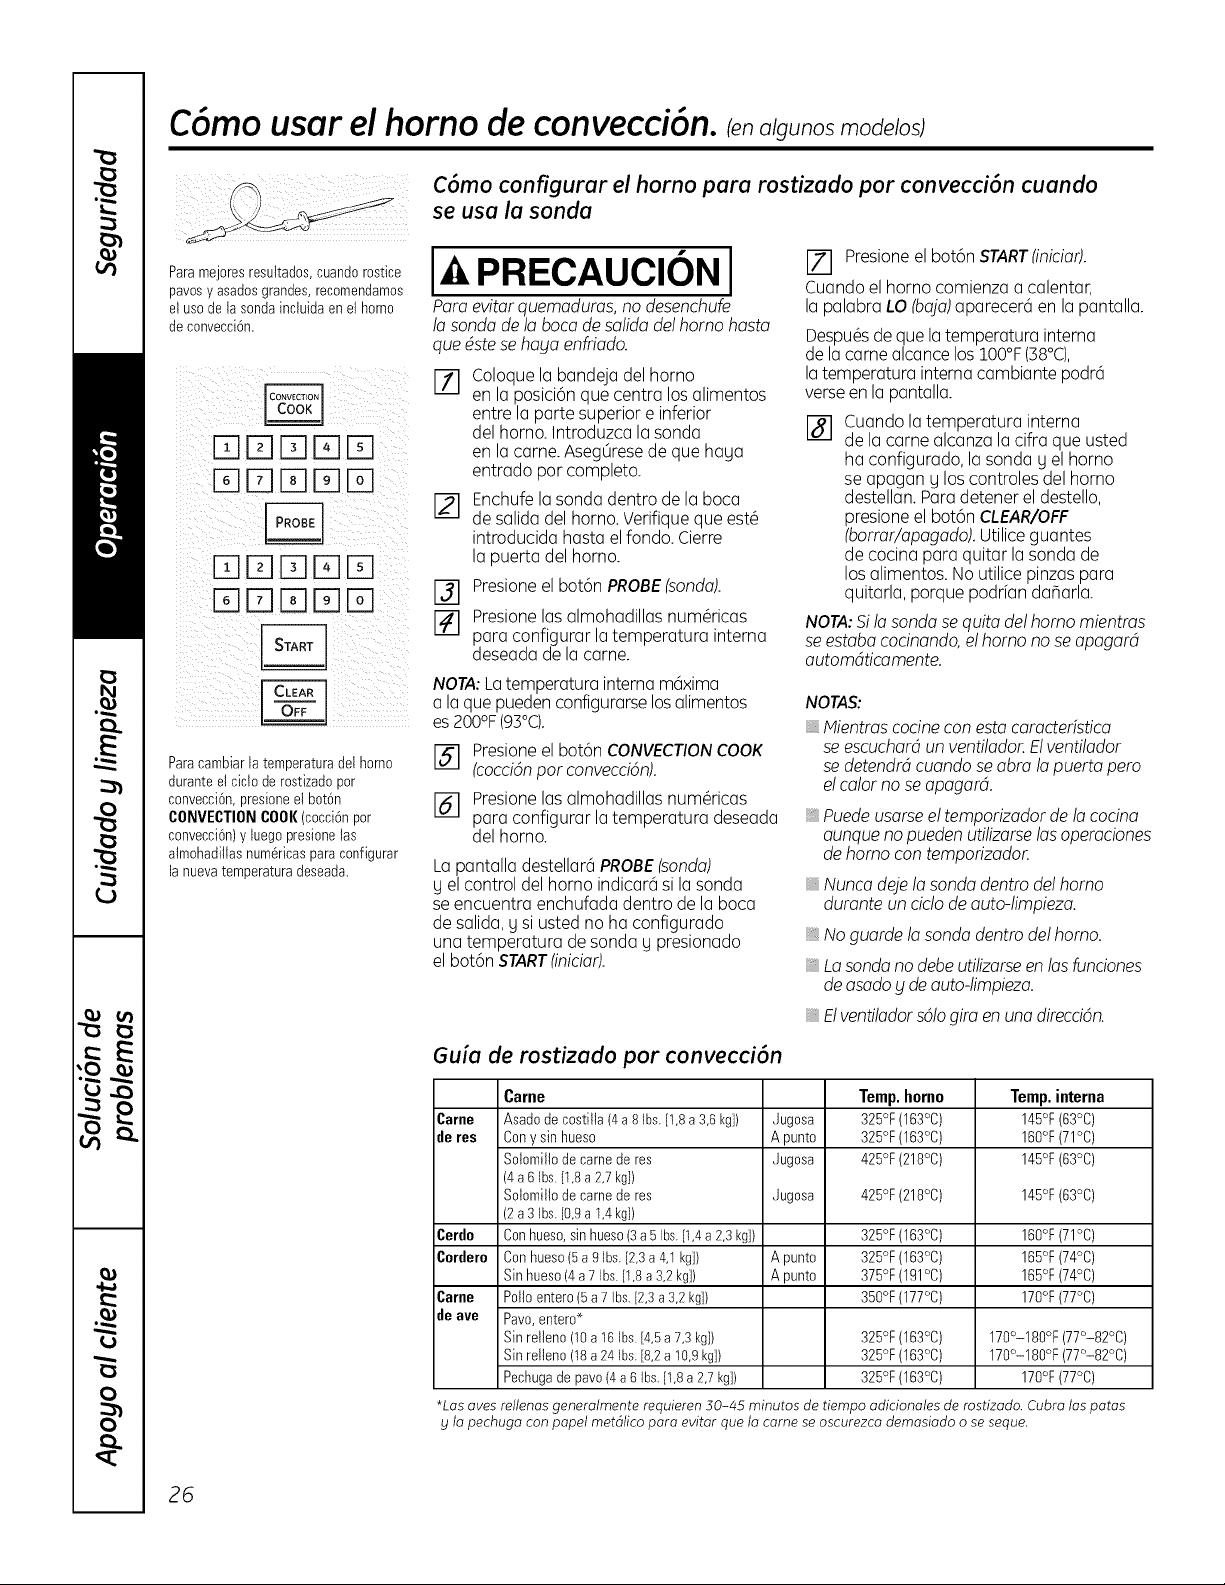
C6mo usar el homo de convecci6n, lenoUunosmode os;
Paramejoresresultados,cuandorostice
pavosy asadosgrandes,recomendamos
et uso de la sondaincluida en et homo
de convecci6n.
DD DD
DD DD
DD DD
DDDDD
Paracambiarla temperaturadet homo
duranteet ciclo de rostizadopor
convecci6n,presioneet bot6n
CONVECTIONCOOK(cocci_npor
convecci6n)y luego presionelas
almohadillasnum@icasparaconfigurar
la nuevatemperaturadeseada.
C6mo configurar el horno para rostizado por convecci6n cuando
se usa la sonda
PRECAUCIONI
Para evitar quemaduras, no desenchufe
la sonda de la boca de salida de! homo hasta
que dste se hab!aenffiado.
[] Coloquela bandejadelhorno
en la posici6nquecentra los alimentos
entre la parte superiore inferior
delhomo. Introduzcalasonda
en la came. Aseg0resede que haga
entrado por completo.
Enchufelasonda dentro de la boca
desalida delhorno.Verifiqueque est_
introducidahastaelfondo. Cierre
la puerta del horno.
%
g-1
Presione el bot6n PROBE (sonda).
Presionelas almohadillasnum@icas
para configurar la temperatura interna
deseadadela came.
NOTA:La temperatura interna m6xima
a la que pueden configurarse los alimentos
es 200°F (93°C).
r-_ Presione el bot6n CONVECTIONCOOK
(cocci6n por convecci6n).
Presionelas almohadillasnum@icas
para configurar la temperatura deseada
delhomo.
La pantalladestellar6 PROBE(sonda)
g el controldel homo indicar6si la sonda
se encuentraenchufadadentro de la boca
de salida,g si usted no ha configurado
una temperatura de sonda y presionado
el bot6n START(iniciar).
Z] Presioneel bot6n START(iniciar).
Cuandoel homo comienzaa calentar,
la palabra LO(baja)aparecer6en la pantalla.
Despu@sdeque la temperaturainterna
de la camealcancelos100°F(38°C),
latemperatura internacambiantepodr6
verseenla pantalla.
[] Cuandolatemperatura interna
de la came alcanza la cifraque usted
ha configurado,la sonda g el homo
se apagan g los controlesdelhomo
destellan.Paradetener el destello,
presioneel bot6n CLEAR/OFF
(borrar/apagado).Utiliceguantes
decocina paraquitar la sonda de
losalimentos.No utilicepinzaspara
quitarla,porquepodrfanda_arla.
NOTA:Si la sonda se quita de! homo mientras
se estaba cocinando, e! homo no se apagard
automdticamente.
NOTAS:
Mientras cocine con esta caracteristica
se escuchard un ventilador. E! ventilador
se detendrd cuando se abra la puerta pero
e! calor no se apagard.
, Puede usarse e! temporizador de la cocina
aunque no pueden utilizarse las operaciones
de homo con tempofizador.
, Nunca deje la sonda dentro de! homo
durante un cic!o de auto-limpieza.
, No guarde la sonda dentro de! homo.
, La sonda no debe utilizarse en las funciones
de asado b!de auto-limpieza.
, E! venfilador s6!o gira en una direcci6n.
Guia de rostizado por convecci6n
Came
Carne Asadode costilla(4 a 8 Ibs.[1,8a 3,6kg])
de res Cony sin hueso
Sotomillode came de res
(4a 6 Ibs [1,8a 2,7kg])
Sotomillode came de res
(2a 3 Ibs.[0,9a 1,4kg])
Cerdo Conhueso,sin hueso(3a 5 Ibs.[1,4a 2,3kg])
Cerdere Conhueso(5a 9 Ibs.[2,3a 4,1kg])
Sin hueso(4a 7 Ibs.[1,8a 3,2 kg])
Came Polioentero(5a 7 Ibs.[2,3a 3,2kg])
de ave Pavo,entero*
Temp. homo
Jugosa 325°F(163°C)
A punto 325°F(163°C)
Jugosa 425°F(218°C)
Jugosa 425°F(218°C)
325°F(163°C)
A punto 325°F(163°C)
A punto 375°F(191°C)
350°F(177°C)
Sin retleno(10a 16 Ibs [4,5a 7,3kg]) 325°F(163°C)
Sin relleno (18a 24 Ibs.[8,2a 10,9kg]) 325°F(163°C)
Pechugade pavo(4a 6 Ibs.[1,8a 2,7kg]) 325°F(163°C)
Temp. interna
145°F(63°C)
160°F(71°C)
145°F(63°C)
145°F(63°C)
160°F(71°C)
165°F(74°C)
165°F(74°C)
170°F(77°C)
o o o o
170-180 F(77-82 C)
o o o o
170-180 F(77-82 C)
170°F(77°C)
*Las ayes rellenas generalmente requieren 30-45 minutos de tiempo adicionales de rostizado. Cubra las paras
b! la pechuga con papel met61ico para evitar que la came se oscurezca demasiado o se seque.
26
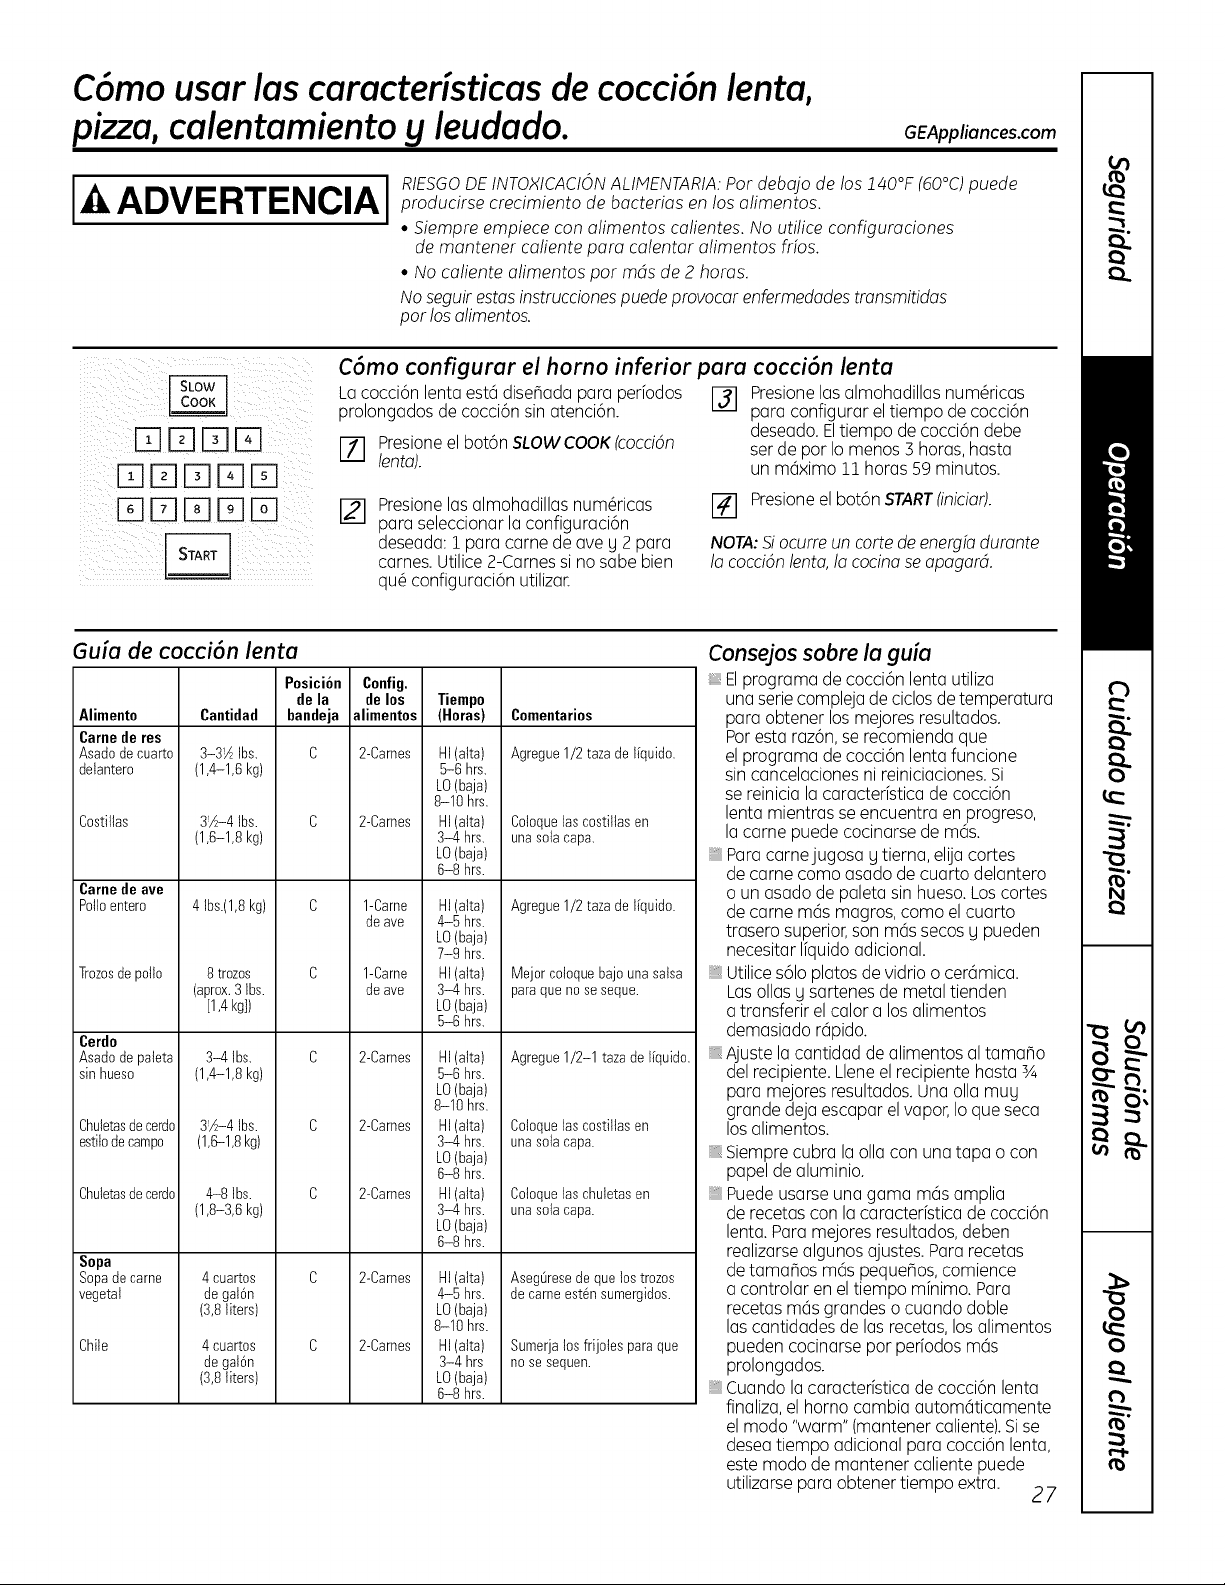
C6mo usar las caracteristicas de cocci6n lenta,
pizza,calentamientoy leudado.
GEAppliances.com
ADVERTENCIAI
RIESGODE INTOXICACION ALIMENTARIA: Por debvjo de los 140°F (60°C) puede
producirse crecimiento de bvcterivs en los vlimentos.
• Siempre empiece con vlimentos cvlientes. No utilice configumciones
de mantener caliente para calentvr vlimentos frios.
• No caliente alimentos por mds de 2 horas.
No seguir estvs instrucciones puede provocar enfermedvdes transmitidvs
por los alimentos.
DE]DEE
EEE]E]EEEE
EET]E]EEEE
C6mo configurur el homo inferior pure cocci6n lento
La cocci6n lenta est6 dise_ada para perfodos [_] Presione las almohadillas num_ricas
prolongados de cocci6n sin atenci6n, para configurar el tiempo de cocci6n
deseado. El tiempo de cocci6n debe
[Z] Presione el bot6n SLOWCOOK (cocci6n ser de por Io menos 3 horas, hasta
lento), un m6ximo 11 horas 59 minutos.
Presione las almohadillas num_ricas
para seleccionar la configuraci6n
deseada: 1 para came de ave g 2 para
carnes. Utilice 2-Carnes si no sabe bien
qu_ configuraci6n utilizar.
[-_ Presione el bot6n START(inicivr).
NOTA:Si ocurre un corte de energiv durvnte
!v cocci6n lentv, !v cocinv se vpvgvrd.
Guia de cocci6n lenta
Alimento
Came de res
Asadode cuarto
delantero
Costitlas
Came de ave
Polioentero
Trozosde potlo
Cerdo
Asado de pateta
sin hueso
Chuletasdecerdo
estitode campo
Chuletasdecerdo
Sopa
Sopade came
vegetal
Chile
Posicion Config.
de la de los Tiempo
Cantidad bandeja alimentos (Horas) Comentarios
3-31AIbs. C 2-Carnes
(1,4-1,6 kg)
3_A-4Ibs. C 2-Carnes
(1,6-1,8 kg)
HI (atta)
5-6 hrs.
LO(baja)
8-10 hrs.
HI (alta)
3-4 hrs.
LO(baja)
6-8 hrs.
Agregue1/2 taza de I[quido.
Coioquelos costiltasen
unasotacap&
4 Ibs.(1,8kg)
8 trozos
(aprox.3 Ibs.
[1,4kg])
1-Carne
de ave
1-Carne
de ave
HI (atta)
4-5 hrs.
LO(baja)
7-9 hrs.
HI (alto)
3-4 hrs.
LO(baja)
5-6 hrs.
Agregue1/2 taza de I[quido.
Mejor cotoquebajo una salsa
pare queno se seque.
3-4 Ibs.
(1,4-1,8 kg)
3!A-4 Ibs.
(1,6-1,8kg)
4-8 1bs.
(1,8-3,6 kg)
2-Carnes
2-Carnes
2-Carnes
HI (atta)
5-6 hrs.
LO(baja)
8-10 hrs.
HI (alto)
3-4 hrs.
LO(baja)
6-8 hrs.
HI (alto)
3-4 hrs.
LO(baja)
6-8 hrs.
Agregue1/2-1 taza de I[quido.
Coioque las costiltas en
una sota capa.
Coioquelos chuletasen
unasotacapa.
4 cuartos
de gal6n
(3,8liters)
4 cuartos
de gal6n
(3,8liters)
2-Carnes
2-Carnes
HI (atta)
4-5 hrs.
LO(baja)
8-10 hrs.
HI (alta)
3-4 hrs
LO(baja)
6-8 hrs.
AsegOrese de que los trozos
de came est_n sumergidos.
Sumerja los frijotes para que
no se sequen.
consejos sobre la guia
El programa de cocci6n lenta utiliza
una serie compleja de ciclos de temperatura
para obtener los mejores resultados.
Por esta raz6n, se recomienda que
el programa de cocci6n lenta funcione
sin cancelaciones ni reiniciaciones. Si
se reinicia la caractedstica de cocci6n
lenta mientras se encuentra en progreso,
la came puede cocinarse de m6s.
,Para carnejugosa g tierna, elija cortes
de came como asado de cuarto delantero
o un asado de paleta sin hueso. Los cortes
de came m6s magros, como el cuarto
trasero superior, son m6s secos g pueden
necesitar I[quido adicional.
, Utilice s61oplatos de vidrio o cerSmica.
Las ollas g sartenes de metal tienden
a transferir el calor a los alimentos
demasiado rQpido.
, Ajuste la cantidad de alimentos al tama_o
del recipiente. Llene el recipiente hasta sA
para mejores resultados. Una olla mug
grande deja escapar el vapor, Io que seca
los alimentos.
, Siempre cubra la olla con una tapa o con
papel de aluminio.
, Puede usarse una gama m6s amplia
de recetas con la caracter[stica de cocci6n
lenta. Para mejores resultados, deben
realizarse algunos ajustes. Para recetas
de tama_os m6s peque_os, comience
a controlar en el tiempo mfnimo. Para
recetas m6s grandes o cuando doble
las cantidades de las recetas, los alimentos
pueden cocinarse por pedodos m6s
prolongados.
, Cuando la caractedstica de cocci6n lenta
finaliza, el horno cambia autom6ticamente
el modo "warm" (mantener caliente). Sise
desea tiempo adicional para cocci6n lenta,
este modo de mantener caliente puede
utilizarse para obtener tiempo extra.
27
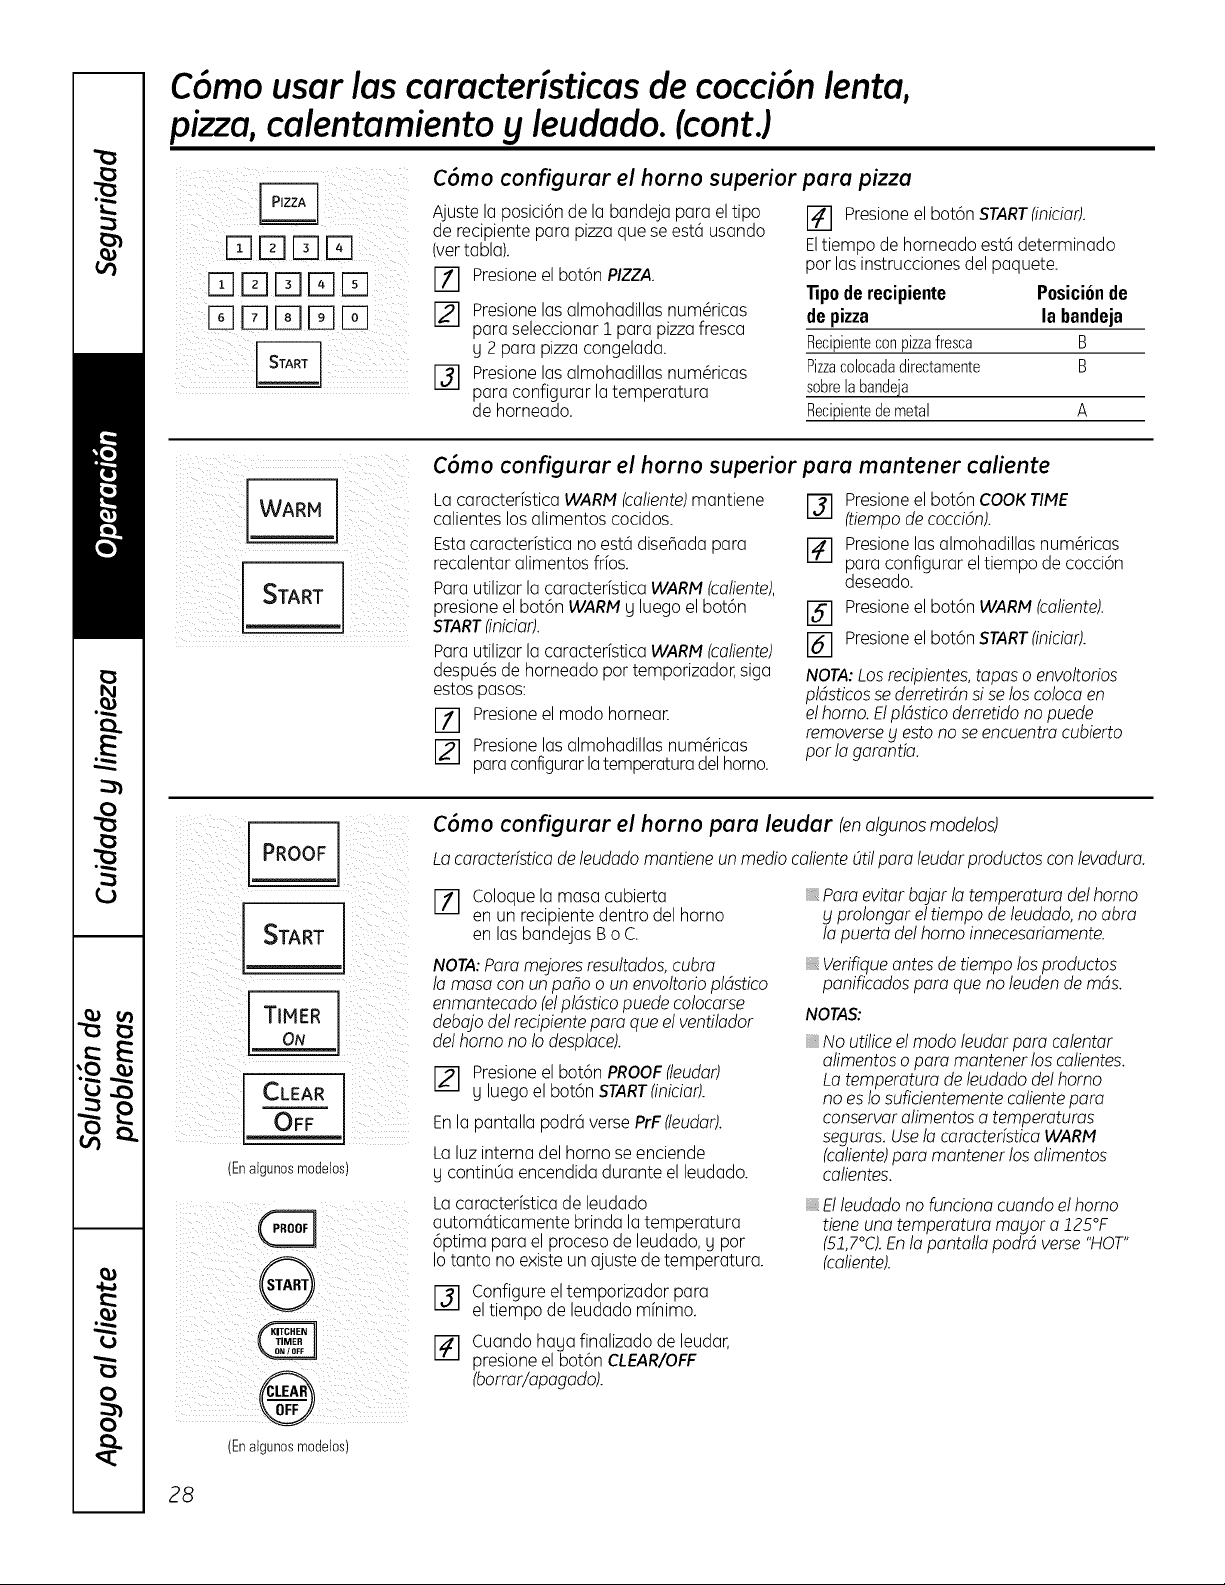
C6mo usar las caracteristicas de cocci6n lenta,
pizza,calentamiento y leudado.(cont.)
C6mo configurar el horno superior para pizza
ii EE E] E] EEE] ¸:
Ajuste la posici6n de la bandeja para el tipo
de recipiente para pizza que se est6 usando
(ver tabla).
F11 Presione el bot6n PIZZA.
Presione las almohadillas num@icas
para seleccionar 1 para pizza fresca
y 2 para pizza congelada.
Presione las almohadillas num@icas
para configurar la temperatura
de horneado.
[] Presione el bot6n START(iniciar).
Eltiempo de horneado est6 determinado
per las instrucciones del paquete.
"[ipode recipiente Posicion de
de pizza la bandeja
Redpiente_'onpizzafres('a B
Pizzacolocadadirectamente B
sabrelabandeja
Recipientede metal A
i ZZZZZZZZZZ ¸¸
i [
WARM
[
START
C6mo configurar el horno superior para mantener caliente
La caracter[stica WARM (caliente) mantiene
calientes los alimentos cocidos.
Esta caracterfstica no est6 disehada para
recalentar alimentos frbs.
Para utilizar la caracterfstica WARM (caliente),
presione el bot6n WARN U luego el bot6n
START(iniciar).
Para utilizar la caracterfstica WARM (caliente)
despu_s de horneado per temporizador, siga
estos pasos:
Presione el mode hornear.
Presione las almohadillas num@icas
para configurar latemperatura del horno.
[] Presione el bot6n COOK TIME
(tiempo de cocci6n).
[] Presione las almohadillas num@icas
para configurar el tiempo de cocci6n
deseado.
[-_ Presione el bot6n WARM (caliente).
re-1
Presione el bot6n STARTflniciar).
NOTA: Los recipientes, tapes o envoltofios
pldsticos se derretirdn si se los co!oca en
e! homo. E!pldstico derretido no puede
removerse y esto no se encuentra cubierto
per la garantia.
PROOF ]
CLEAR
OFF ,
(Enatgunosmodelos)
C6mo configurar el horno para leudar tenalgunosmoddos)
La caracteristica de leudado mantiene un media caliente Oti!pare louder productos con levadura.
F-_ coloque la masa cubierta
en un recipiente dentro del homo
en las bandejas B o C.
NOTA: Pare mejores resultados, cubm
la mesa con un paho o un envoltofio pldstico
enmantecado (e!pldstico puede co!ocarse
debajo de! recipiente pare qua e! ventilador
de! homo no !o desplace).
Presione el bot6n PROOF (louder)
_Le_dg luego el bot6n START (iniciar).
En la pantalla podr6 verse PrF (louder).
Lo luz interne del horno se enciende
y continOa encendida durante el leudado.
Lo caracterfstica de leudado
autom6ticamente brinda la temperature
6ptima pare el proceso de leudado, g per
Io tanto no existe un ajuste de temperature.
Configure eltemporizador pare
I-_ el tiempo de leudado minima.
Cuandohaya finalizadode leudar,
presioneel bot6n CLEAR/OFF
(borrar/apagado).
Pare evitar bajar la temperature de! homo
y pro!anger e! tiempo de leudado, no abra
la puerto de! homo innecesafiamente.
Verifique antes de tiempo los productos
panificados pare qua no leuden de mds.
NOTAS:
, No utilice e! mode louder pare calentar
alimentos o pare mantener !as calientes.
La temperature de leudado de! homo
no es !o suficientemente caliente pare
conserver alimentos a temperatures
segums. Use !a carocteristica WARM
(caliente) pare mantener los alimentos
calientes.
, E! leudado no funciona cuando e! homo
tiene una temperature mayor a 225°F
(51,7°C).En la pantalla podrd verse "HOT"
(caliente).
(Enatgunosmodelos)
28
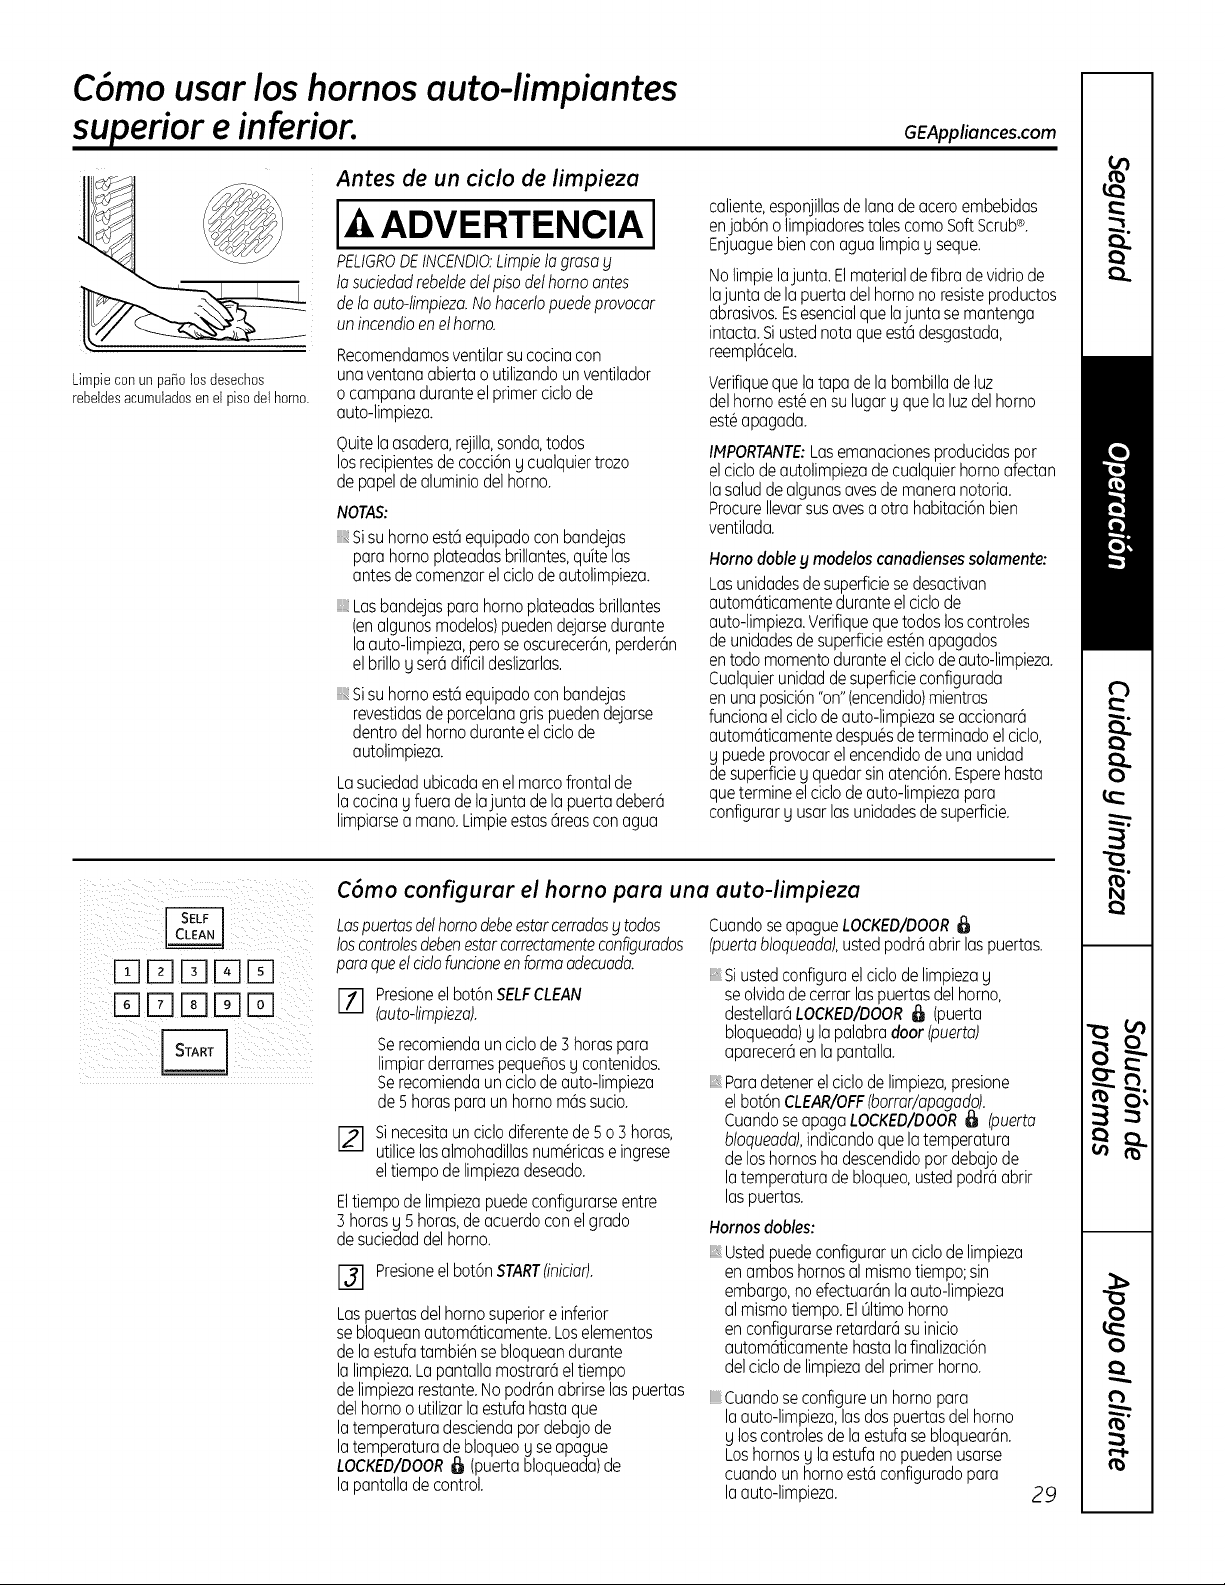
C6mo usar los hornos auto-limpiantes
superior e inferior.
GEAppliances.com
Antes de un ciclo de limpieza
I
DEINCENDIO:Limpiela grasa g
• ad rebel@del piso defhomo antes
la auto-limpieza.No hacerfopuedeprovocar
incendioen elhomo.
Recomendamosventilarsu cocinacon
Limpleconunpatiolosdesechos una ventana abierta o utilizando un ventilador
rebetdesacumuladosenetpisodelhomo. o campana durante el primer cido de
auto-limpieza.
Quitela asadera, rejilla,sonda,todos
losrecipientesde cocci6ng cualquier trozo
de papelde aluminio del horno.
NOTAS:
Sisu homo est6equipado con bandejas
para homo plateadas brillantes,quite las
antes de comenzar elciclo deautolimpieza.
iii,Las bandejaspara homo plateadas brillantes
(enalgunosmodelos)pueden dejarse durante
la auto-limpieza,pero se oscurecer6n,perder6n
el brillo g ser6 dificil deslizarlas.
iii,Sisu homo est6equipadocon bandejas
revestidasde porcelanagris pueden dejarse
dentro del hornodurante elciclode
autolimpieza.
La suciedad ubicada en el marcofrontal de
la cocina g fuera de lajunta de la puerta deber6
limpiarse a mona. Limpieestas6reascon agua
caliente,esponjillasdelanadeaceroembebidas
enjab6nolimpiadorestalescomaSoftScrub®.
Enjuaguebienconagualimpiag seque.
No limpie lajunta. Elmaterialde fibra de vidrio de
lajunta de la puerta del homo no resisteproductos
abrasivos.Esesencialque lajunta se mantenga
intacta. Siusted nota que est6 desgastada,
reempl6cela.
Verifiqueque latapa de la bombilla de luz
del homo est_en su lugar g que la luzdel homo
est6apagada.
IMPORTANTE:Lasemanacionesproducidas par
el ciclode autolimpieza de cualquier homo afectan
la saludde algunasayesde manera notoria.
Procure Ilevarsus ayesa otra habitaci6n bien
ventilada.
Horno doble y modelos canadiensessolamente:
Las unidadesde superficiese desactivan
autom@icamentedurante el cido de
auto-limpieza.Verifiquequetodos loscontroles
de unidadesde superficieest@napagados
en todo momenta duranteel ciclode auto-limpieza.
Cualquierunidadde superficieconfigurada
en unaposici6n"on" (encendido)mientras
funcionael cido de auto-limpieza se accionar6
autom@icamentedespu@sde terminado el ciclo,
g puedeprovocar el encendido de una unidad
de superficieg quedar sin atenci6n.Esperehasta
que termine el ciclode auto-limpieza para
configurar g usar lasunidadesde superficie.
D F-IITII-qI]-1
D IZ]ITIE] EE
C6mo configurar el horno para una auto-limpieza
Lospuertas del homo debe estar cerradas bltodos
los controfes deben estar correctamente configurados
para que el cicfofuncione en forma adecuada.
171 Presioneel bot6n SELFCLEAN
touto-fimpieza).
Serecomiendaunciclode] horaspara
limpiarderramespequehosg contenidos.
Serecomiendaunciclodeauto-limpieza
de5horasparaunhomom6ssucio.
[] Sinecesitaunciclodiferentede5o 3horas,
utilicelasalmohadillasnum@icase ingrese
eltiempodelimpiezadeseado.
Eltiempo de limpiezapuedeconfigurarseentre
3 horas g 5 horas, de acuerdo con el grado
de suciedad del horno.
[] Presioneel bot6n START(iniciafl.
Las puertas del homo superior e inferior
se bloquean autom@icamente.Loselementos
de laestufa tambi6n se bloquean durante
la limpieza.La pantalla mostrar6 eltiempo
de limpiezarestante.No podr6n abrirse laspuertas
del homo o utilizar la estufa hasta que
la temperatura desciendapar debajo de
la temperatura de bloqueog se apague
LOCKED/DOOR_ (puertabloqueada)de
la pantalla de control.
Cuandoseapague LOCKED/DOOR
(puertobfoqueada),usted podr6 abrir laspuertas.
iii,Siustedconfigura el ciclo de limpiezag
se olvida de cerrar laspuertas del homo,
destellar6LOCKED/DOOR_ (puerta
bloqueada)g la palabra door (puerto)
aparecer6en la pantalla.
iii,Para detener el ciclo de limpieza,presione
el bot6n CLEAR/OFF(borrar/apagado).
Cuandose apaga LOCKED/DOOR_ (puerto
bfoqueado),indicandoque la temperatura
de loshornos ha descendido par debajo de
la temperatura de bloqueo,usted podr6 abrir
laspuertas.
Homos dobles:
Usted puedeconfigurar un ciclo de limpieza
en ambos hornos al mismo tiempo;sin
embargo, no efectuar6n la auto-limpieza
al mismo tiempo. ElOltimohomo
en configurarse retardar6 su inicio
automdticamente hasta lafinalizaci6n
del ciclo de limpiezadel primer horno.
iii,Cuandose configure unhomo para
la auto-limpieza,las dos puertas del homo
g los controlesde la estufa se bloquear6n.
Los hornosg la estufa no pueden usarse
cuando un homo est6configurado para
la auto-limpieza. 29

C6mo usar los hornos auto-limpiantes superior e inferior.
Los puertas del homo debe estar cerradas bl todos los controles deben estar correctamente configurados para
que el ciclo funcione en forma adecuada.
C6mo configurar un inicio retardado de limpieza
[]DD[]D
[]DDDD
DDDD []
Presioneel bot6n SELFCLEAN
(outo-limpiezo).
Se recomienda un ciclo de 3 horas
para limpiar derrames pequeBos g
contenidos. Se recomienda un ciclo
de auto-limpieza de 5 horas para
un homo m6s sucio.
Sinecesita un ciclo diferente
de 5 o 3 horas, utilice las almohadillas
num@icas e ingrese el tiempo
de limpieza deseado.
Eltiempo de limpieza puede configurarse
entre 5 horas g 5 horas, de acuerdo con
el grado de suciedad del homo.
r-_ Presioneel bot6n DELAVSTART
flnicioretardodo).
[] Presioneel bot6n START(iniciar).
Las puertas del horno superior e inferior
se bloquean autom6ticamente.
Los elementos de la estufa tambi@n
se bloquean durante la auto-limpieza.
La pantalla mostrar6 la hora de inicio.
No podr6n abrirse las puertas del homo
o utilizarse la estufa hasta que
la temperatura descienda por debajo
de la temperatura de bloqueo g se apague
LOCKED/DOOR _ (puerto bloqueado)
de la pantalla de control.
Cuando se apague LOCKED/DOOR
(puerto bloqueado),usted podr(i abrir
las puertas.
[] Mediante las almohadillas num@icas,
ingrese la hora en que desea iniciar
el ciclo de limpieza.
Despu_s de un ciclo de limpieza
Puedenquedar cenizas blancas en
el homo. Lfmpielascon un paBo hOmedo
despu@sde que se enfrfeel homo.
Siquedan monchas blancos, quite los con
una esponjillode land de acem embebida
enjob6n g enjuogue biencon una mezcla
de vinagre bl agua.
Engeneral, estos dep6sitos son restos
de sal que no pueden eliminarse durante
el ciclo de limpieza.
Siel homo no queda limpiDdespu@s
de un cicIo de limpieza,repftalo.
No puede configurarse el horno
para cocinar o para otro cicIo de auto-
limpieza hasta que @stese encuentre
Io suficientemente fifo para que
se destrabe la puerta.
Mientras el homo se encuentra en
el proceso de auto-limpieza, usted puede
presionar el bot6n CLOCK(reloj)para que
seyea la hora. Para volver a la cuenta
regresivade limpieza,presione el bot6n
SELFCLEAN(outo-limpiezo).
Siresulta dificil deslizarlas bandejas,
coloque una pequeBacantidad de aceite
de cocina en una toalla de papel g frote
los extremos de las bandejas.
30

Caracteristicasespecialesdeloscontrolesdelhomo. GEAppliances.com
Los nuevos controles con botones de toque cuentan con camcterfsticas adicionales. Los siguientes
son los carocteristicas g la manero en que usted puede activarlas.
Los modos de caracteHsticas especiales s61opueden activarse mientms la pantalla muestra la ham. Se conservan
en la memoria de los controles hasta que se repitan los pasos.
Pare ingresar una caracteHstica especial en uno de los dos homos, usted debe primero presionar los botones
BROIL HI/LO (asar alto/bajo) g BAKE (homear) del homo superior al mismo tiempo. Los botones BROIL HI/LO
(asar alto/bajo) g BAKE (hornear) del homo inferior no activan camcteHsticas especiales.
Cuando la pantalla muestra su opci6n, presione el bot6n START (iniciar).Los caracteHsticas especiales
se conservardn en la memoria despu4s de un carte de energfo, con excepci6n del Sabbath, que debe reconfigurarse.
DELAY I
Apagado luego de .1.2horas
Con estaopciOn,en caso dedejarse []
el homo encendido accidentalmente,
el control Io apaga en forma automdtica
luego de 12 horas durante funciones
de homeado o despu_sde 3 horas []
durante la funci6n de asado.
Sidesea apagar (OFF)esta funci6n,
siga los pasos siguientes.
%
Presionelos botones BROIL HI/LO
(asar alto/bajo) g BAKE(homear)del
homo superior al mismo tiempo hasta
queen la pantalla pueda verse SF.
Presioneel bot6n DELAYSTART(inicio
retardado) hasta que aparezca no
shdn (noapagado)en la pantalla.
Presioneel bot6n START(iniciar)
para activar la caracter[stico de
no opogodo g dejor el control
configurodo en este modo
de corocterfsticos especioles.
Selecci6n de temperatura en Fahrenheit o Celsius
Sucontrol de homo est4 configumdo
pare utilizar los seleccionesde temperature
Fahrenheit,pero puede modificarse
pare usar selecdones en Celsius.
E_] Presionelos botones BROIL HI/LO
(asar alto/ba]o) g BAKE (homear)
del homo superior al mismo tiempo
hasta queen la pantalla pueda
verseSF.
[]
Presionelos botones COOKTIME
(tiempo de cocci6n) g BROILHI/LO
(osar alto/bo]o) al mismo tiempo.
Enla pantalla podr6 verse
F (Fahrenheit).
Presionelos botones COOKTIME
(tiempo de cocci6n) g BROILHI/LO
(asar alto/bajo) de nuevo al mismo
tiempo. Enla pantalla podr6 verse
C (Celsius).
Presioneel bot6n START(iniciar).
! i (/ START
(Enatgunosmodetos)
(Enatgunosmodelos)
SeSales sonoras al finalizar un ciclo con temporizador
AI finalizar un ciclo con temporizador
se escuchan3 pitidos cortos seguidos
par un pitido coda 6 segundoshasta
que se presione el botGn CLEAR/OFF
(borrar/apagado). Estepitido continua
de 6 segundos puede cancelarse.
Para cancelar el pitido continua
de 6 segundos:
%
Presionelos botones BROIL HI/LO
(asar alto/bajo) g BAKE(homear)del
homo superior al mismo tiempo
hasta queen la pantalla pueda
verseSF.
%
0
Presione el botGn KITCHENTIMER
ON/OFF (temporizador de la cocina
encendido/apagado). La pantalla
muestra CON BEEP(pitido continua).
Presione el botGn KITCHENTIMER
ON/OFF (temporizador de la cocina
encendido/apagado) de nuevo.
La pantalla muestra BEER(pitido).
(Estocancela el pitido coda 6
segundos.)
Presioneel bot6n START(iniciar).
Presioneel botGnBROIL(osar).
La pantalla muestra CONTIBEEP(pitido
continua).Presioneel botGnBROIL
(osar)de nuevo.Lapantalla muestra
SINGLEBEEP(pitidoOnico).(Esto
cancela el pitido coda 6 segundos.)
31
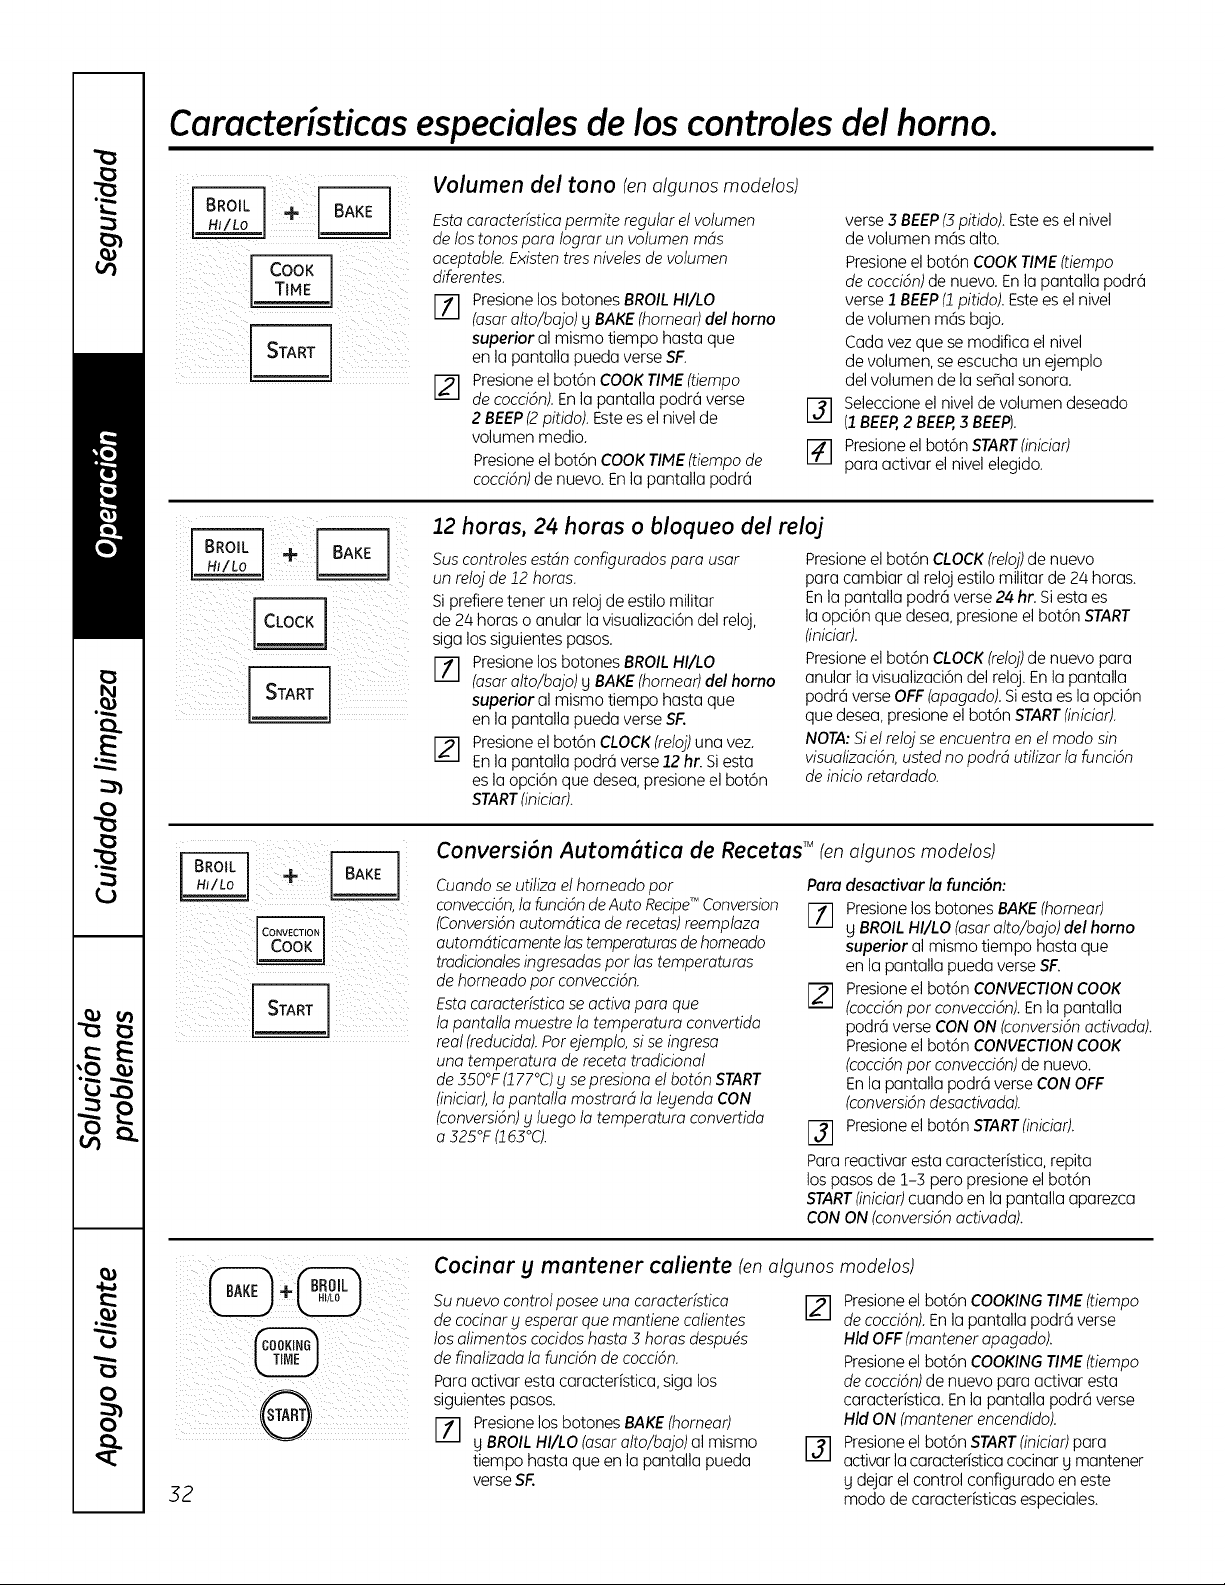
Caracteristicas especialesde los controles del homo.
[ cookI
Volumen del tono (enalgunos modelos)
Esta caractefistica permite regular et votumen
de los tonos para tograr un votumen rods
aceptabte.Existentres nivetesde votumen
diferentes.
[] Presionelos botones BROILHIILO
(asaratto/bajo) y BAKE(hornear)del homo
superior al mismo tiempo hasta que
en la pantalla pueda verse SF
[] Presioneel bot6n COOKTIME (tiempo
de cocci6n). Enla pantalla podr6 verse
2 BEEP(2pitidoL Estees el nivel de
volumen medio.
Presione el bot6n COOKTIME (tiempo de
coccidn)de nuevo. Enla pantalla podr6
%
[]
verse 3 BEEP(3pitido). Estees el nivel
de volumen m6s alto.
Presione el bot6n COOKTIME (tiempo
de coccidn)de nuevo. En la pantalla podr6
verse 1 BEEP(1pitido). Estees el nivel
de volumen m6s bajo.
Cada vez que se modifica el nivel
de volumen, se escucha un ejemplo
del volumen de la sehal sonora.
Seleccioneel nivel de volumen deseado
(1BEER2 BEER3 BEEP).
Presioneel bot6n START(iniciar)
para activar el nivel elegido.
ii i ill i iiiI
12 horas, 24 horas o bloqueo del reloj
Sus controtes estdn configurados para usar Presioneel bot6n CLOCK(retoj)de nuevo
un reto]de 12 horas, para cambiar al reloj estilo militar de 24 horas.
Siprefiere tener un relojde estilo militar
de 24 horas o anular la visualizaci6n del reloj,
siga los siguientes pasos.
71 Presionelos botones BROILHI/LO
(asaratto/bajo) y BAKE(hornear)del horno
superior al mismo tiempo hasta que
en la pantalla pueda verse SF.
Presioneel bot6n CLOCK(retoj)una vez.
iz,-i
En la pantalla podr6 verse 12 hr. Siesta
es la opci6n que desea, presione el bot6n
START(iniciar).
En la pantalla podr6 verse 24 hr. Siesta es
la opci6n que desea, presione el bot6n START
(inicior).
Presioneel bot6n CLOCK(retoj)de nuevo para
anular la visualizaci6n del reloj.En la pantalla
podr6 verse OFF(opogodo).Siesta es la opci6n
que desea, presione el bot6n START(iniciar).
NOTA:Siet retoj se encuentro en et modo sin
visuolizaci6n,usted no podrd utitizar ta funcidn
de inicio retardodo.
ilii iiiiiii ii ii
Conversi6n Autom6tica de Recetas TM (en algunos modelos)
Cuando se utitiza et homeado pot
convecd6n, ta funci6n de Auto Recipd _ Conversion
(Conversi6n automdtico de recetas) reemplaza
automdticamente tas temperoturos de homeodo
trodicionoles ingresodos pot los temperaturas
de homeodo por convecci6n.
Esta corocteffstica se octiva poro que
ta pontotta muestre ta temperatura convertida
reot (reducida). Por ejemplo, si se ingresa
uno temperotura de receta trodicionot
de 350°F (177°C) g se presiona et bot6n START
(inicior), ta pontolta mostrord ta tegenda CON
(conversi6n) g tuego ta temperatura convertida
a 325 °F (i63 °C).
Poredesactivar la funci6n:
Presionelos botones BAKE(homear)
I/I
y BROIL HI/LO (asaratto/bajo) del homo
superior al mismo tiempo hasta que
en la pantalla pueda verse SF.
Presioneel bot6n CONVECTIONCOOK
(cocci6npot convecci6n).Enla pantalla
podr6 verse CON ON (conversi6nactivada).
Presioneel bot6n CONVECTIONCOOK
(coccidnpot conveccidn)de nuevo.
Enla pantalla podr6 verse CON OFF
(conversi6ndesactivada).
Presioneel bot6n START(iniciar).
Para reactivar esta caracteristica, repita
los pasos de 1-3 pero presione el bot6n
STARTFniciar)cuando en la pantalla aparezca
CON ON (conversi6nactivada).
32
Cocinar y mantener caliente (enalgunos
Su nuevo control posee una caracterfstica
de cocinar g esperar que mantiene catientes
los otimentos cocidos hosta 3 horos despuds
de finatizoda ta funci6n de coccidn.
Para activar esta caracteristica, siga los
siguientes pasos.
Presione los botones BAKE(homear)
itl
y BROILHI/LO (asor otto/bojo) al mismo
tiempo hasta queen la pantalla pueda
verse SF.
modelos)
[] Presioneel bot6n COOKINGTIME(tiempo
de coccidn).En la pantalla podr6 verse
Hid OFF(mantener apogodo).
Presioneel bot6n COOKINGTIME(tiempo
de cocci6n)de nuevo para activar esta
caracter[stica. Enla pantalla podr6 verse
Hid ON (mantener encendido).
Presioneel bot6n START(inicior)para
activar la caracteristica cocinar y mantener
y dejar el control configurado en este
modo de caracter[sticas especiales.
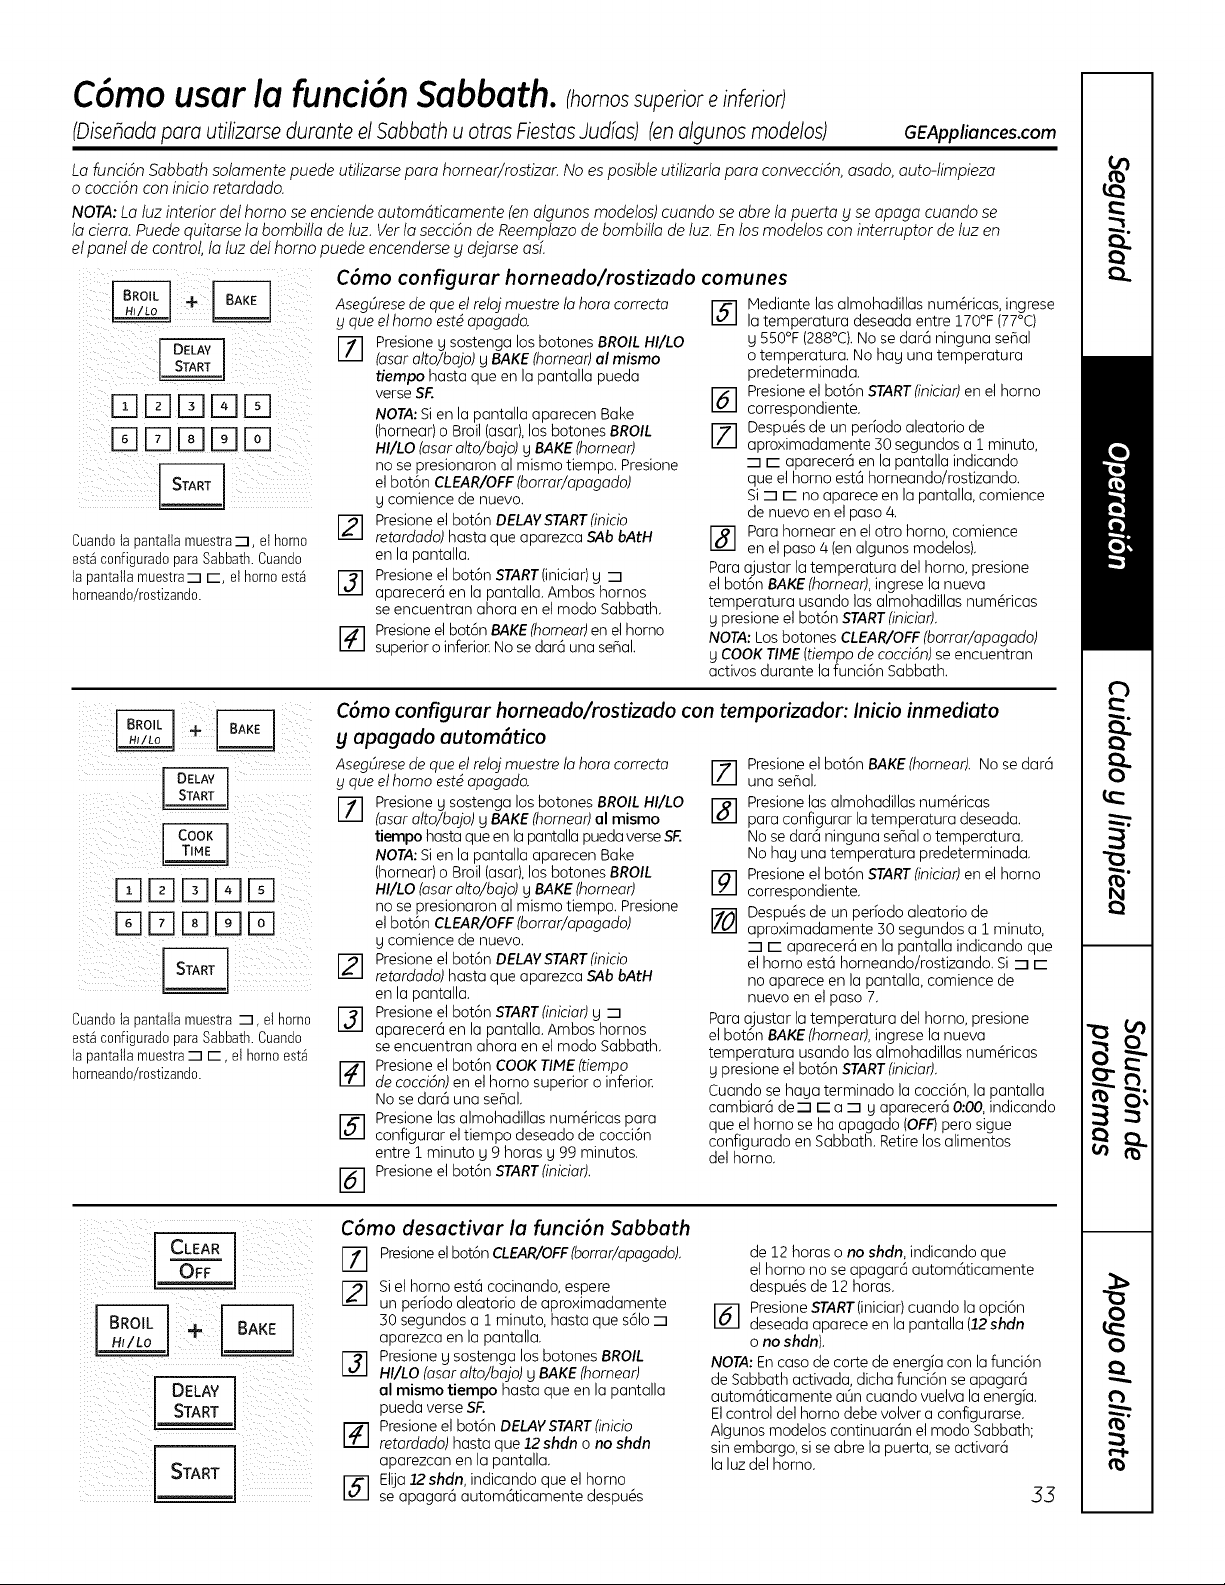
C6mo usar la funci6n Sabbath. Chomoss per/o e/n e /o )
(Disehadapara utilizarsedurante el Sabbathu arras FiestasJudas) (enalgunosmoddos) GEAppliances.com
La funci6n Sabbath sotamente puede utitizarse para homear/rostizar. No es posibte utitizarta para convecci6n, asado, auto-timpieza
o cocci6n con inicio retardodo.
NOTA: La tuz interior def homo se enciende automdticomente (en otgunos modetos) cuondo se abre ta puerta g se opoga cuondo se
ta cierro. Puede quitorse ta bombilta de tuz. Ver ta secci6n de Reemplazo de bombilta de tuz. En los modetos con interruptor de tuz en
et pond de control, to tuz det homo puede encenderse g dejarse asL
C6mo configurar horneado/rostizado comunes
g que el homo estd apagado. IV I
entre 170°F (77°C)
la temperatura deseada
iiii i :iiiIIIIiiiiIii
--71 Presione g sostenga los botones BROIL HI/LO
(asar alto/bajo) g BAKE (homear) al mismo
tiempo hasta queen la pantalla pueda
verse SIC:.
NOTA: Si en la pantalla aparecen Bake
(hornear) o Broil (asar), los botones BROIL
HI/LO (asar alto/bajo) g BAKE (homear)
no se presionaron al mismo tiempo. Presione
el bot6n CLEAR/OFF (borrar/apagado)
g eomienee de nuevo.
[] Presione el bot6n DELAVSTART(inicio
retardado) hasta que aparezca SAb bAtH
en la pantalla.
I-_ Presione el bot6n START(inieiar)g 7
apareeer6 en la pantalla. Ambos hornos
se eneuentran ahora en el modo Sabbath.
I-4--] Presione el bot6n BAKE (homear) en el homo
superior o inferior. No se dar6 una sepal.
Cuandola pantallamuestra7, et homo
est_configuradopara Sabbath.Cuando
la pantatlamuestram r-, el homoest_
horneando/rostizando.
g 550°F (288°C). No se dar6 ninguna sepal
o temperatura. No hag una temperatura
predeterminada.
I_-] Presione el bot6n STARTflniciar) en el homo
correspondiente.
FT-] Despu6s de un periodo aleatorio de
aproximadamente 30 segundos a i minuto,
-7 r- aparecer6 en la pantalla indicando
que el homo est6 horneando/rostizando.
Si -7 E no aparece en la pantalla, comience
de nuevo en el paso 4.
r-_ Para hornear en el otro homo, comience
en el paso/4 (en algunos modelos).
Para ajustar la temperatura del homo, presione
el bot6n BAKE (homear), ingrese la nueva
temperatura usando las almohadillas num6ricas
g presione el bot6n START(iniciar).
NOTA: Los botones CLEAR/OFF (borrar/apagado)
g COOK TIME (tiempo de cocci6n) se encuentran
activos durante la funci6n Sabbath.
i i
,ii III i iiiii iii
Cuandola pantallamuestra -m, et homo
est_configuradopara Sabbath.Cuando
la pantatlamuestra -mr-, el homoest_
horneando/rostizando.
C6mo configurar horneado/rostizado con temporizador: Inicio inmediato
g apagado autom6tico
AsegOrese de que el reloj muestre la hora correcta
g que el homo estd apagado.
[] resione g sostenga los botones BROIL HI/LO
(osor alto/bojo) g BAKE (homeor) al mismo
tiempo hasta queen la pantalla pueda verse SF:
NOTA: Si en la pantalla aparecen Bake
(hornear) o Broil (asar), los botones BROIL
HI/LO (asar alto/bajo) g BAKE (homear)
no se presionaron al mismo tiempo. Presione
el bot6n CLEAR/OFF (borrar/apagado)
g eomienee de nuevo.
Presione el bot6n DELAVSTART(inicio
retardado) hasta que aparezca SAb bAtH
en la pantalla.
I-_ Presione el bot6n START(iniciar) g -n
apareeer6 en la pantalla. Ambos hornos
se eneuentran ahora en el modo Sabbath.
F_ Presione el bot6n COOK TIME (tiempo
de cocci6n) en el homo superior o inferior.
No se dar6 una sepal.
[-_ Presione las almohadillas num6ricas para
eonfigurar el tiempo deseado de cocei6n
entre 1 minuto g 9 horasg 99 minutos.
I_-] Presione el bot6n START(inicior).
IZ] resione el bot6n BAKE (homear). No se dar6
una sepal.
[-_-] Presione las almohadillas num6rieas
para configurar la temperatura deseada.
No se dar6 ninguna sepal o temperatura.
No hag una temperatura predeterminada.
r_ Presione el bot6n START(iniciar) en el homo
correspondiente.
I_ espu6s de un periodo aleatorio de
aproximadamente 30 segundos a i minuto,
-7 E aparecer6 en la pantalla indicando que
el homo est6 horneando/rostizando. Si -7 E
no aparece en la pantalla, comience de
nuevo en el paso 7.
Para ajustar la temperatura del homo, presione
el bot6n BAKE (homear), ingrese la nueva
temperatura usando las almohadillas num6ricas
g presione el bot6n STARTflniciar).
Cuando se haga terminado la cocci6n, la pantalla
cambiar6 de7 r- a -7 g aparecer6 0:00, indicando
que el homo se ha apagado (OFF)pero sigue
configurado en Sabbath. Retire los alimentos
del horno.
:?::J CLEAR]i: : :
OFF
C6mo desactivar la funci6n Sabbath
%
Presioneel bot6n CLEAR/OFF(borrar/apagado).
Siel homo est6cocinando,espere
un periodo aleatorio de aproximadamente
30 segundosa i minuto, hasta que s61o-7
aparezca en lapantalla.
I-_ Presioneg sostenga losbotonesBROIL
HI/LO (asaralto/bajo) g BAKE(homear)
al mismo tiempo hasta que en la pantalla
puedaverseSF.
[] Presioneel bot6n DELAVSTART(inicio
retardado)hasta que12 shdn o no shdn
aparezcanen la pantalla.
[-_-] Elija12shdn, indicandoque el homo
se apagar6 autom6tieamente despu6s
de 12 horas o no shdn, indicando que
el homo no se apagar6 autom6ticamente
despu6s de 12 horas.
I_1 Presione START(inieiar) euando la opei6n
deseada aparece en la pantalla (12shdn
o no shdn).
NOTA: En caso de carte de energia con la funei6n
de Sabbath activada, dieha funei6n se apagar6
autom6tieamente aOn euando vuelva la energia.
Elcontrol del homo debe volver a configurarse.
Algunos modelos eontinuar6n el modo Sabbath;
sin embargo, si se abre la puerta, se aetivar6
la luz del horno.
33
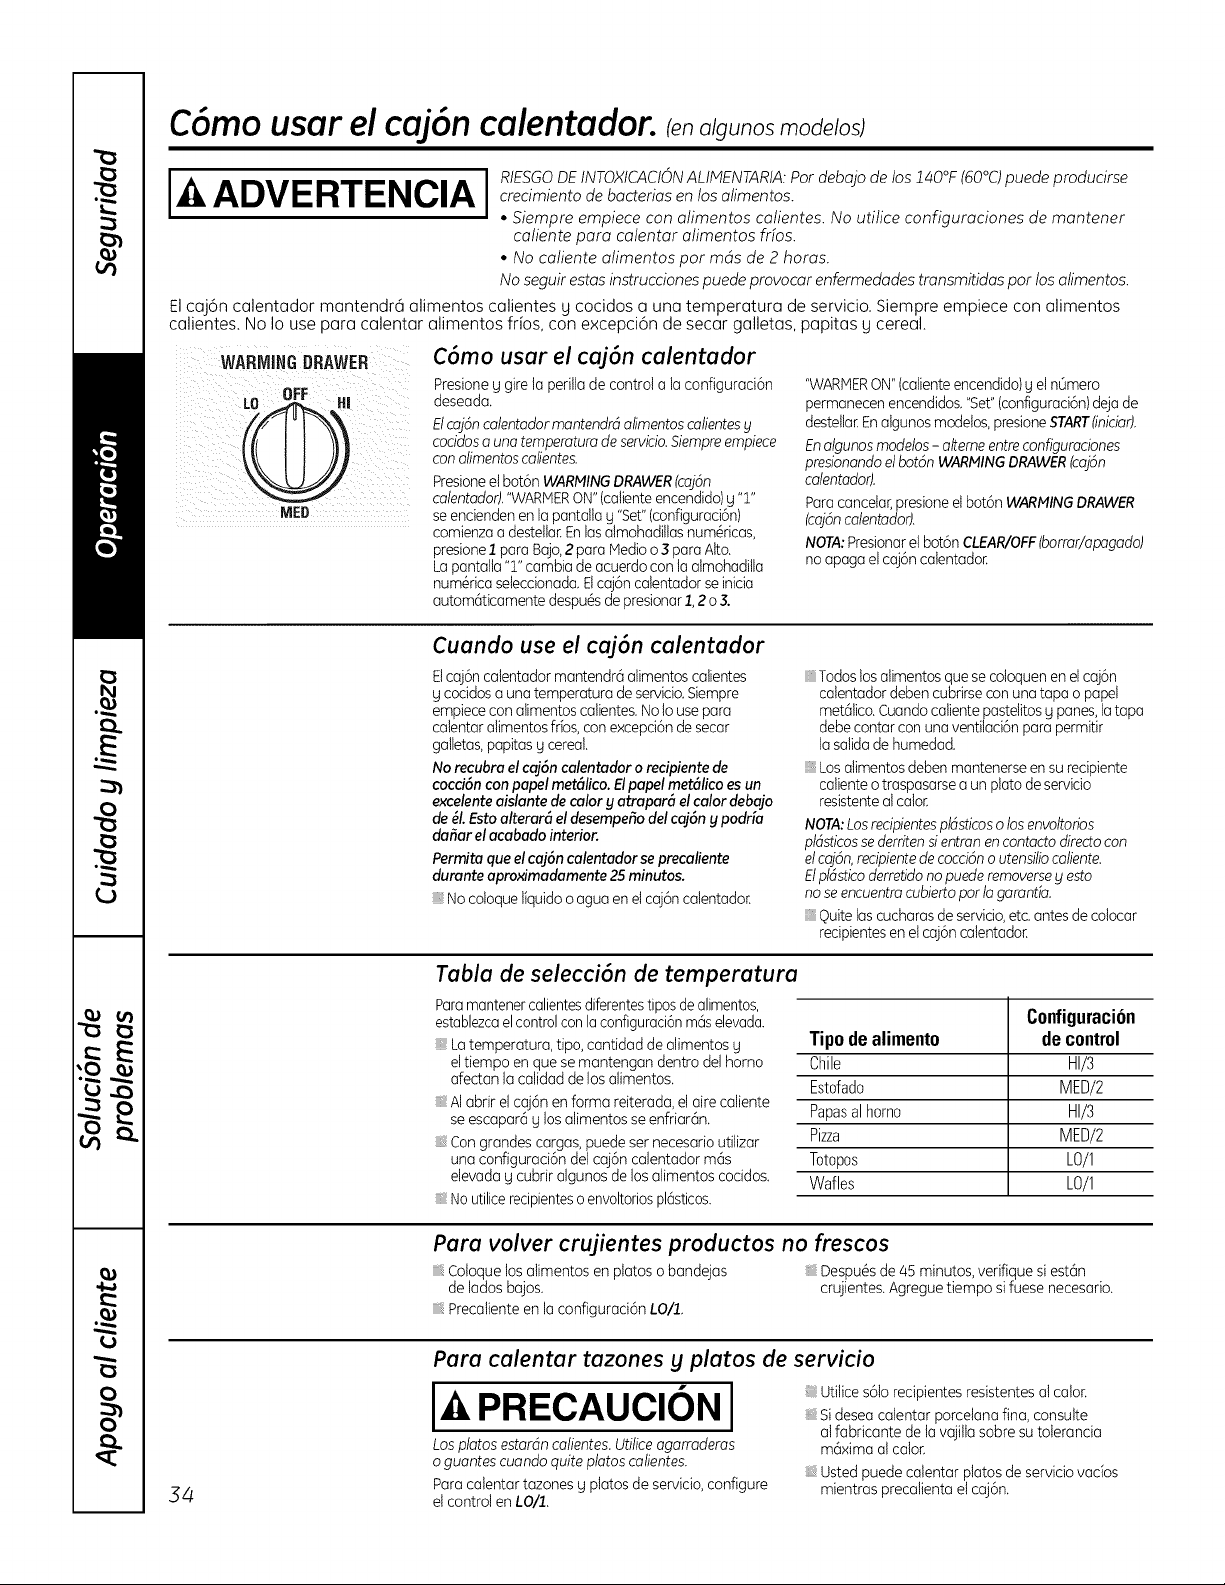
C6mo usar el caj6n calentador, oU no mod /o )
I'--ADVERTENCIA I'
• Siempre empiece con atimentos catientes. No utitice configuraciones de mantener
catiente pora cotentar atimentos frfos.
• No catiente atimentos por mds de 2 horas.
No seguir estas instrucciones puede provocar enfermedodes transmitidas por los otimenbs.
El caj6n calentador mantendr6 alimentos calientes g cocidos a una temperatura de servicio. Siempre empiece con alimentos
calientes. No Io use para calentar alimentos frios, con excepci6n de secar galletas, papitas g cereal.
WARMINGDRAWER
0
NE_
C6mo usar el caj6n calentador
Presione g gire la perilla de control a la configuraci6n
deseada,
EleajGn calentador mantendr6 alimentos ealientes y
eoeidos a una temperatura de servieio, Siempre empiece
con alimentos calientes.
Presioneel bot6n WARNING DRAWER(eaj6n
calentado4 "WARHERON" (calienteencendido)g "T'
se encienden en la pantatla g "Set"(configuraci6n)
comienza a destellar.En las almohaditlas num6ricas,
presione 1 para Bajo,2 para ledio o 3 para Alto.
La pantalla "T' cambia de acuerdo con la almohadilla
num6rica seleccionada. Etcaj6n catentador seinicia
autom6ticamente despu6s de presionar 1 2 o 3.
"WARHERON" (calienteencendido) g el n0mero
permanecen encendidos."Set"(configuraci6n) deja de
destetlar.Enalgunos modelos, presione START(inieia4
Enalgunos modelos - alteme entre eonfiguraeiones
presionando el bot6n WARNING DRAWER (eajGn
calentador).
Para cancetar, presione et bot6n WARNING DRAWER
(eajGncalentadorL
NOTA:Presionar el bot6n CLEAR/OFF(borrar/apagado)
no apaga et caj6n calentador.
Cuando use el caj6n calentador
Elcaj6n calentador mantendr6 alimentos calientes
g cocidos a una temperatura de servicio.Siempre
empiece con alimentos calientes. No Io usepara
catentar alimentos frios,con excepci6n de secar
galletas, papitas g cereal.
No recubra el cajGn calentador o recipiente de
cocciGn con pupel metGlico. El pupel metGlico es un
excelente aislante de calor g atrapur(_ el calor debajo
de _1.Esto alterar(_ el desempe_o del cajGn g podria
da_ar el acabado interior.
Permita que el cajGn calentador se precaliente
durante aproximadamente 25 minutos.
:_ No coloque liquido o agua en et caj6n calentador.
:_Todos losalimentos que se cotoquen en el caj6n
calentador deben cubrirse con una tapa o papel
met61ico.Cuando caliente pastelitos g panes, latapa
debe contar con una ventilaci6n para permitir
la salida de humedad.
:_ Los atimentos deben mantenerse en su recipiente
caliente o traspasarse a un plato de servicio
resistente at calor.
NOTA:Losrecipientespldsticoso los envoltofios
pldstieossederriten si entran encontaeto directo con
eleaj6n, reeipientede eoeci6no utensilioealiente.
Etpldstieo derretido no puede removerse blesto
no se encuentra cubierto por la garantb.
:_ Quite las cucharas de servicio,etc,antes de colocar
recipientes en el caj6n calentador.
Tabla de selecci6n de temperatura
Para mantener calientesdiferentestipos de alimentos,
establezcaelcontrol con la configuraci6nm6s elevada.
_, La temperatura, tipo, cantidad de alimentos g
eltiempo en que se mantengan dentro del homo
afectan la calidad de los alimentos.
_, AI abrir el caj6n en forma reiterada, el aire caliente
se escapar6 g los alimentos se enfriar6n.
_, Con grandes cargas, puede ser necesario utilizar
una configuraci6n del caj6n calentador m6s
elevada g cubrir algunos de los alimentos cocidos.
_, No utilice recipienteso envoltorios pl6sticos.
Configuracion
Tipodealimento de control
Chile HI/3
Estofado MEDi2
Papasalhomo HI/3
Pizza MEDi2
Totopos L0i1
Wafles L0i1
Para volver crujientes productos no frescos
:_ Cotoque los alimentos en platos o bandejas :_ Despu6s de 45 minutos, verifique si est6n
de lados bajos, crujientes. Agregue tiempo si fuese necesario.
;_ Precatiente en la configuraci6n LOll.
34
Para calentar tazones y platos de servicio
PRECAUClONI
Los platos estardn catientes. Utilice agarraderas
o guantes cuando quite platos calientes.
Para calentar tazones g platos de servicio, configure
el control en LOll.
Utilice s61orecipientes resistentes al calor.
:_ Si desea caientar porcelana fina, consulte
al fabricante de la vajilla sobre su tolerancia
m6xima al calor.
:_ Usted puede calentar platos de servicio ratios
mientras precatienta el caj6n.
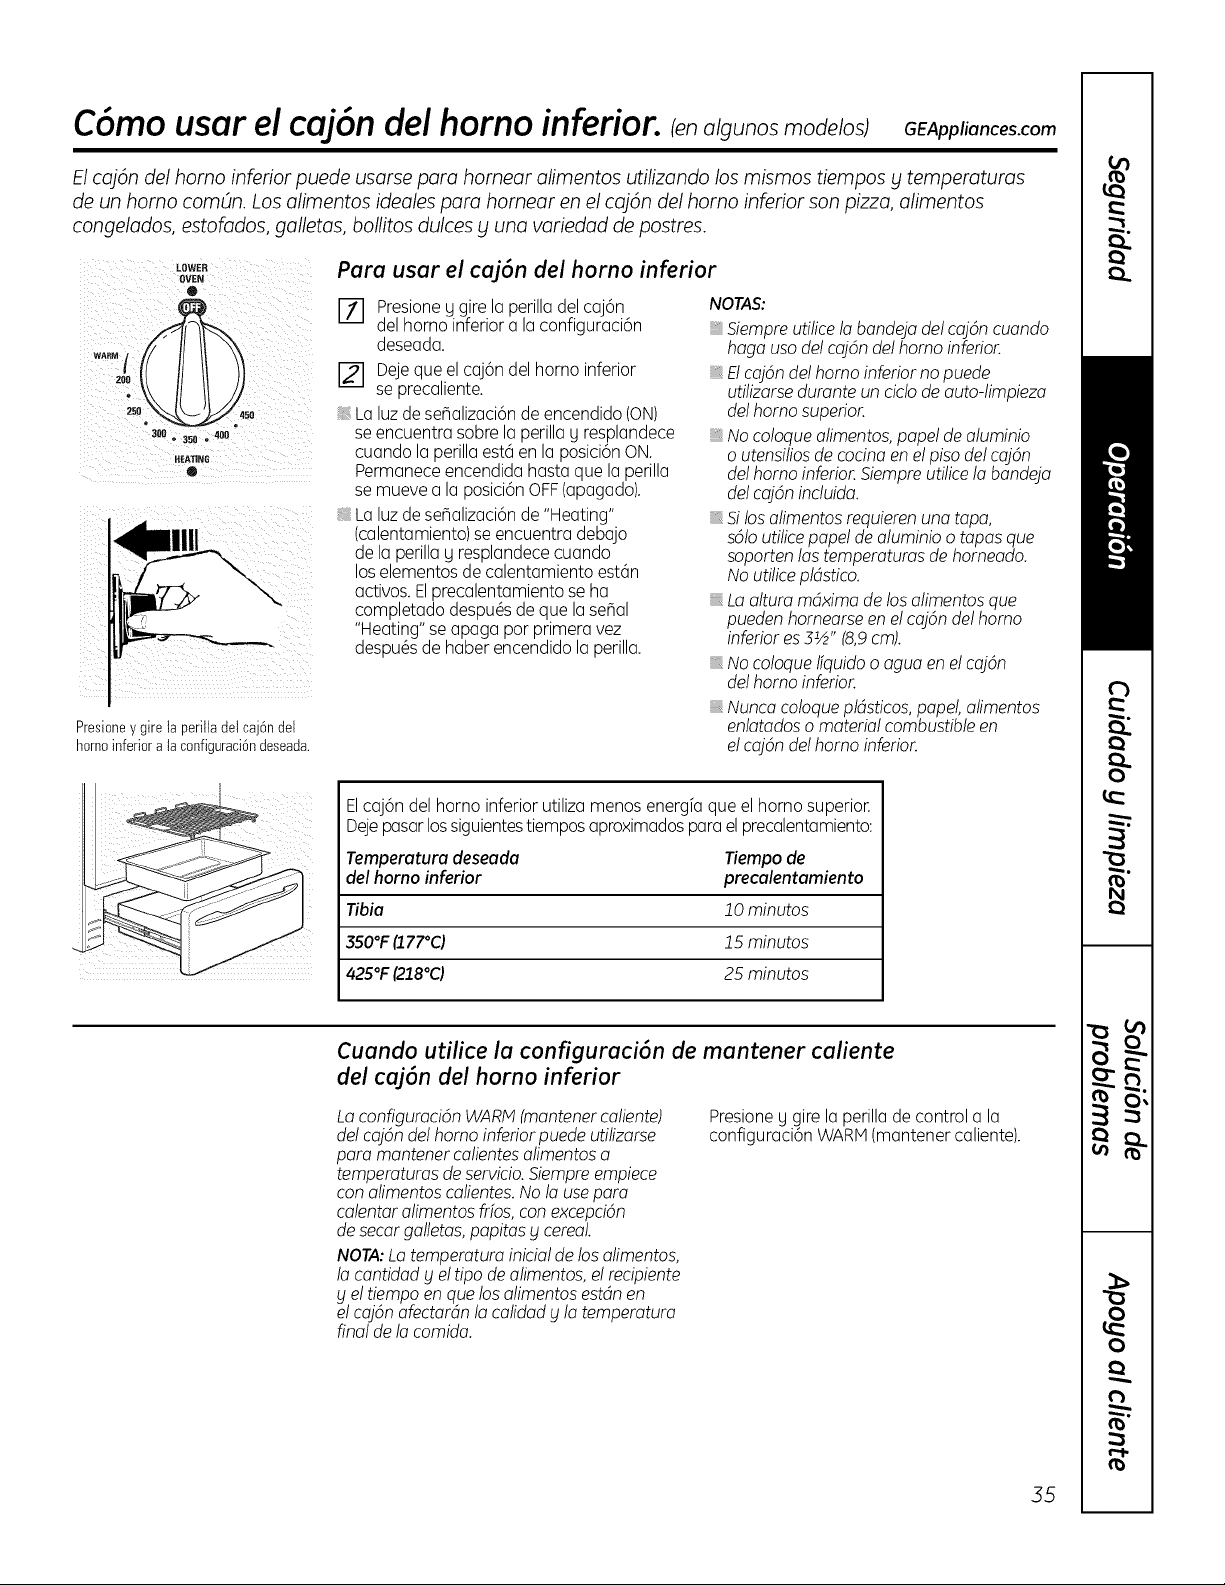
C6mousar el caj6n del horno inferior, o/guno GEAppliances.com
El caj6n del homo inferior puede usarse para homear alimentos utilizando los mismos tiempos bl temperaturas
de un homo comOn. Los alimentos ideales para homear en el caj6n del homo inferior son pizza, alimentos
congelados, estofados, galletas, bollitos dulces bl una variedad de postres.
LOWER
OVEN
o
3011 _ 3511 • 400
HEATIN_
®
1111
Presioney gire la perilla del caj6ndet
homoinferiora ta configuraci6ndeseada.
Para usar el caj6n del horno inferior
E_] Presione y gire la perilla del caj6n
del homo inferior a la configuraci6n
deseada.
[] Deje que el caj6n del homo inferior
se precaliente.
La luz de serializaci6n de encendido (ON)
se encuentra sabre la perilla y resplandece
cuando la perilla est6 en la posici6n ON.
Permanece encendida hasta que la perilla
se mueve a la posici6n OFF (apagado).
La luz de serializaci6n de "Heating"
(calentamiento) se encuentra debajo
de la perilla y resplandece cuando
los elementos de calentamiento est6n
activos. El precalentamiento se ha
completado despu@sde que la serial
"Heating" se apaga par primera vez
despu@sde haber encendido la perilla.
NOTAS:
Siempre uti!ice la bandeja de! caj6n cuando
haga usa de! caj6n de! homo inferior.
, E! caj6n de! homo inferior no puede
utilizarse durante un cic!o de auto-limpieza
de! homo superior.
, No co!oque alimentos, pape! de aluminio
o utensilios de cocina en e! piso de! caj6n
de! homo inferior. Siempre utilice la bandeja
de! caj6n incluida.
, Si los alimentos requieren una tapa,
s6!o utilice pape! de aluminio o tapas que
soporten las temperaturas de horneado.
No utilice pldstico.
, La altura mdxima de los alimentos que
pueden hornearse en e! caj6n de! homo
inferior es 3½" (8,9 cm).
, No co!oque !fquido o agua en e! caj6n
de! homo inferior.
, Nunca co!oque pldsticos, pape!, alimentos
enlatados o materia! combustible en
e! caj6n de! homo inferior.
Elcaj6n del homo inferior utiliza menos energia que el homo superior.
Deje pasar los siguientes tiempos aproximados para el precalentamiento:
Temperatura deseada
del horno inferior
Tiempode
precalentamiento
Tibia I 0 minutos
350°F (.1.77°C) 15 minutos
425°F (218°C) 25 minutos
Cuando utilice la configuraci6n de mantener caliente
del caj6n del horno inferior
La configuraci6n WARM (mantener caliente)
de! caj6n de! homo inferior puede utilizarse
para mantener calientes alimentos a
temperaturas de servicio. Siempre empiece
con alimentos calientes. No la use para
calentar alimentos frios, con excepci6n
de secar ga!letas, papitas g cerea!.
NOTA: La temperatura inicia! de los alimentos,
la cantidad g e! tipo de alimentos, e! recipiente
g e! tiempo en que los alimentos estdn en
e! caj6n afectardn la calidad g la temperatura
final de la comida.
Presione g gire la perilla de control a la
configuraci6n WARM (mantener caliente).
35
Cuidadog limpieza de la cocina.
AsegOresede quetodos loscontrolesestdnapagadosb!quelossuperficiesestdnfriasantesde limpiarcualquierporte de la cocina.
i_& ADVERTENCIA iS sequ talacoc naparodectuorunol mp eza,
reporacionesocualquierotto razdn,verifiqueque
eldispositivoanti-volcadurassecoloquedemanera
adecuodocuondovuelvoa instalorselo cocino.
Sinotomaestaprecoucidn,lo cocinapuedevolcarse
btprovocarlesiones.
C6mo quitor el envoltorio de protecci6n y la cinta de embaloje
Concuidado,tome una punta del envoltorio
de protecci6n con susdedos g lentamente quitelo
de la superficiedel aparato. Nouseelementos
filosos para quitar elenvoltorio.Quitetodo
elenvoltorio antes de usarel aparato par
primeravez.
Paraasegurarse de no dahar el acabado del
producto,la mejor forma de quitar el pegamento
de la cinta de empaque de losaparatos nuevos
consisteen aplicar detergentepara vajillasIfquido.
Aplique con un paho suave y deje remojar.
NOTA:Oeberetirarseel adhesivode todas
lospartes. Sise cafienta,serd imposbfe de quitar.
Perillas de control
Paraunafimpiezarodssenciffa,losperiffas
decontrolpuedenquitarse.
Verifiquequelasperillasest@nen la posici6n
OFF_apagado)y s6quelasdelosv6stagospara
lalimpieza.
Lasperillaspuedenlimpiarseenellavavajillas
otambi@npuedenlavarseconjab6ny agua.
AsegOresedequelaparteinternadelasperillas
est@secaantesdevolvera colocarse.
Vuelvaacolocarlasperillasen la posici6nOFF
(apagado)paraasegurarunacolocaci6ncorrecta.
Panel de control
Siasifo@sea,puededesactivarlosbotones
detoqueantesdela limpieza.
Verlainformaci6nsabreBfoqueodecontrofes
enlasecci6nC6mousarelrdoj,eltemporizador
blelbfoqueodecontrofesdeestemanual.
LimpielosderramesconunpahohOmedo.
Tambi@npuede utilizarun limpiador de vidrios.
Quitesuciedadesm6srebeldescon agua tibia
jabonosa. No utilice abrasivosde ninguna clase.
Vudvoa activarlos botonesde toque despuds
de lalimpieza.
Superficies pintadas
Lassuperficiespintadasincluyenlosladosde
lacocinay la puerta,lapartesuperiordelpanel
decontroly elfrentedelcaj6n.Limpielasconjab6n
y aguaoconunasoluci6nde aguayvinagre.
Noutilice limpiadoresde horno comerciales,
polvoslimpiadores,esponjillasde acero o
abrasivospotentes sabre cualquiersuperficie
pintada.
Superficies de acero inoxidable (enalgunos modelos)
Nouti/ice almohadillas de aceroporque
ragan la superffcie.
Paralimpiar lasuperficiede acero inoxidable,
utiliceaguatibiajabonosa o un limpiadoro
lustradorde acero inoxidable.Siemprelimpie
la superficieen direcci6nde la veta.Siga
las instruccionesdelproducto para limpiar
la superficiede acero inoxidable.
Paraconsultarsabre lacompra
de limpiadoreso lustradoresde aparatos
de acero inoxidable,o para encontrar
la ubicaci6n deldistribuidorm6scercano
asu domicilio,Ilamea nuestronOmerogratuito:
Centro nacional de repuestos
1.800.626.2002
GEAppliances.com
36
Estufa de esmalte de porcelana (en
Elacabado de esmaltede porcelanaes
resistenteperopuederompersesise utiliza
incorrectamente.Esteacabadoes resistente
al 6cido.Sin embargo,no debepermitirse
quealgunos alimentos6cidosque
se derraman (comojugos defruta, tomate
o vinagre)permanezcanenel acabado.
Sise derraman 6cidosen la estufa mientras
est6caliente,utiliceunatoalla de papelo
algunos modelos)
un pano secospara limpiarlo enel momenta.
Cuando lasuperficiese haya enfriado,
limpiecon aguajabonosa. Enjuaguebien.
Enel caso de otros derrames,coma
salpicadurasdegrasa,etc.,limpie con agua
jabonosa o polvoslimpiadorescuando
lasuperficiese haya enfriado.Enjuaguebien.
Pulacon un pano seco.

GEAppliances.com
Lajunta est_ disefiada con un espacio on
la parte inferior pare permitff una adecuada
circulaci6n do aire.
No frote o limpie la junta do la puerta porque
fieno una resistencia muy baja ala abrasi6n.
Si soadvierte que la junta est_ dosgastada,
ra[da o dafiada, o si so ha dosplazadode su
lugar, so la debe reemplazar.
C6mo limpiar la puerta del homo
Pare limpiar la parte interne de la puerta:
Debidoa queel 6reaqueseencuentra
dentrodelajuntaselimpiaduranteel ciclode
autolimpieza,noesnecesariolimpiarlaa mane.
iii, El6rea quese encuentra fuera de lajunta
y el burletede la puerto puedenlimpiarsecon
una esponjillapl6sticacenjab6n, ague caliente
y detergente.Enjuaguebiencon una soluci6n
de agua y vinagre.
Pare limpiarla parte externa de la puerta:
iii, Utilicejab6n y ague pare limpiar
cuidadosamente la porte superior,loslades
y elfrente de la puerta del homo. Enjuague
bien.Tambi6nes posibleutilizer un limpiadorde
vidriospara limpiar la parte exteriorde
lapuerta. Nopermita que caiga agua sobre
lasaberturas de ventilaci6n.
iii,Siqueda alguna mancha persistenteen
lasecci6nde ventilaci6n de la puerta, utilice
un limpiador abrasive suave y una esponja
para obtener losmejores resultados.
iii, Lassalpicadurasde salsas,jugos defrutas,
salsasde tomate yjugos de alimentosqua
contienen 6cidos pueden decolorar la
superficie,per Io que sedebe enjuagarlos
de inmediato.Cuandola supefficie est6fria,
limpie y enjuague.
iii_,Noutilice limpiadorespara hornos,pelves
limpiadoreso abrasivespotentes en la parte
externa de la puerta.
L ¸¸ iil_ ZL Z
Trabadela;
bisagra
Tirelastrabasde{a bisagrahaciaabajo
paredestrabar.
Posici6nde remoci6n
Puertu del horno desmontuble (an olgunos modelos)
Lapuertaesmuypesada.Tengacuidado
alquitar y levantarlapuerta.
No feventelepuertode le menije.
Parequitarla puerta:
%
[]
[]
Abra la puerta per cempleto.
Presionelas trabas de la bisagrahacia
abajo en direcci6ndel marco de la puerta
hasta destrabarlas.Puedenecesitarseuna
herramienta,come un destornilladorplane
pequeho.
Tomeconfirmezeambosladesdela puerta
delapartesuperior.
Cierrela puerta hasta la posici6n
de remeci6n de puerta, qua esa mitad
de cam|no entre la posici6ndeasado y
la puerta cerrada.
[_] Levantela puertahastaqueelbraze
delabisagrahayasalidodelaranura.
Para volver a colocar la puerta:
I--i1 Tome con firmeze ambos lades de la puerta
de la parte superior.
@
[]
Conla puerto Extreme
en el mismo inferiorde
6ngulode la laranura
posici6nde \
remoci6n,introduzca
la muescadel braze
de la bisagra dentro
del extreme inferior de
la ranura de la bisagra.
Brazedeta
t | | bisagra
ue
La ranura del braze de la bisagradebe
estar biencolocada en la parte inferior
de la ranura.
Abra la puerta per complete.Sila puerto
no se abre per cempleto,la muesce noest6
biencolocadaen el extreme inferior de
la ranura.
Presionelastrabasde labisagrahacia
arribacontraelmarcofrontalde lacavidad
delhomo,hastaalcanzarla posici6nde
bloqueo.
Trabade
la bisagra
la bisagra
Presionelas trabasde la bisagra
haciaarriba pare btoquear.
[_ Cierre la puerta del horno.
37
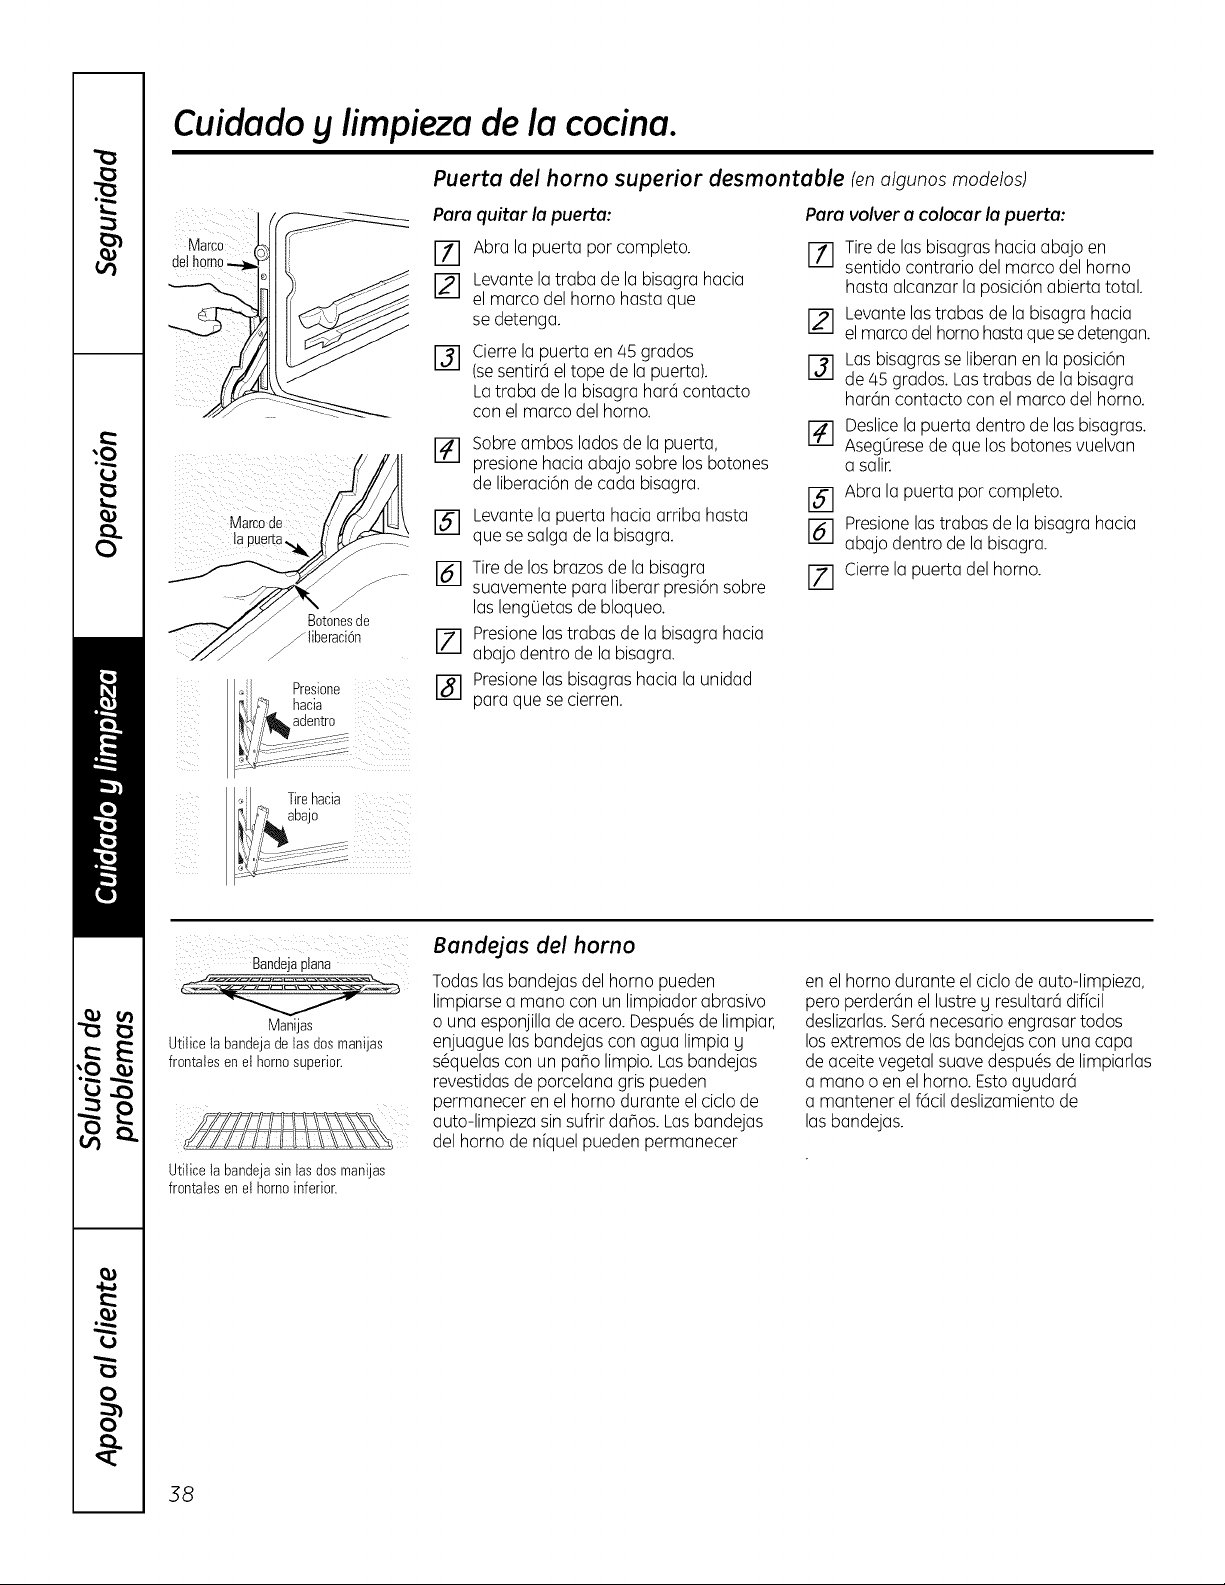
Cuidadog limpieza de la cocina.
Marco
@1homo
L
iilk
Puerta del horno superior desmontable tenalgunos modelos)
Para
%
I-21
%
quitar la puerta:
Abra la puerta por completo.
Levante la traba de la bisagra hacia
el marco del homo hasta que
se detenga.
Cierre la puerta en/45 grados
(se sentir6 el tope de la puerta).
La traba de la bisagra har6 contacto
con el marco del horno.
r-_ Sobre ambos lados de la puerta,
presione hacia abajo sobre los botones
de liberaci6n de cada bisagra.
[] Levante la puerta hacia arriba hasta
que se salga de la bisagra.
I_] Tire de los bra7os de la bisagra
suavemente para liberar presi6n sobre
las lengOetas de bloqueo.
[] Presione las trabas de la bisagra hacia
abajo dentro de la bisagra.
[] Presione las b!sagras hacia la unidad
para que se cierren.
Para volver a colocar la puert:a:
Tirede lasbisagras hacia abajoen
it i
sentidocontrario del marco del homo
hasta alcanzar la posici6nabierta total.
Levantelastrabas de la bisagra hacia
_Le_Jelmarcodel homohastaquesedetengan.
Las bisagrasse liberan en la posici6n
de45 grados.Lastrabasde la bisagra
har6n contacto con el marco del homo.
I-ZI Deslicela puerta dentro de las bisagras.
iii
Aseg0resede que los botonesvuelvan
a salir.
Abrala puerta porcompleto.
Presionelastrabas de labisagra hacia
abajodentro de la bisagra.
I-_ Cierrela puerta del horno.
I/ I
Bandejaplana
"V
Manijas
Utilice la bandejade las dosmanijas
frontales enet homosuperior.
Utilice la bandejasin lasdos manijas
frontatesen el homoinferior.
Bandejas del horno
Todaslas bandejasdel homo pueden
limpiarsea mano con un limpiadorabrasivo
o una esponjillade acero.Despu@sde limpiar,
enjuaguelas bandejascon agua limpia Y
s_quelascon un patio limpio. Lasbandejas
revestidasdeporcelanagris pueden
permanecerenel homo durante el ciclo de
auto-limpiezasinsufrir datos. Lasbandejas
del homo de nfquelpuedenpermanecer
en el homo durante el ciclo de auto-limpieza,
pero perder6n el lustre y resultar6 dificil
deslizarlas. Ser6 necesario engrasar todos
los extremos de las bandejas con una capa
de aceite vegetal suave despu_s de limpiarlas
a mano 0 en el horno. Esto ayudar6
a mantener el f6cil desli7amiento de
las bandejas.
38
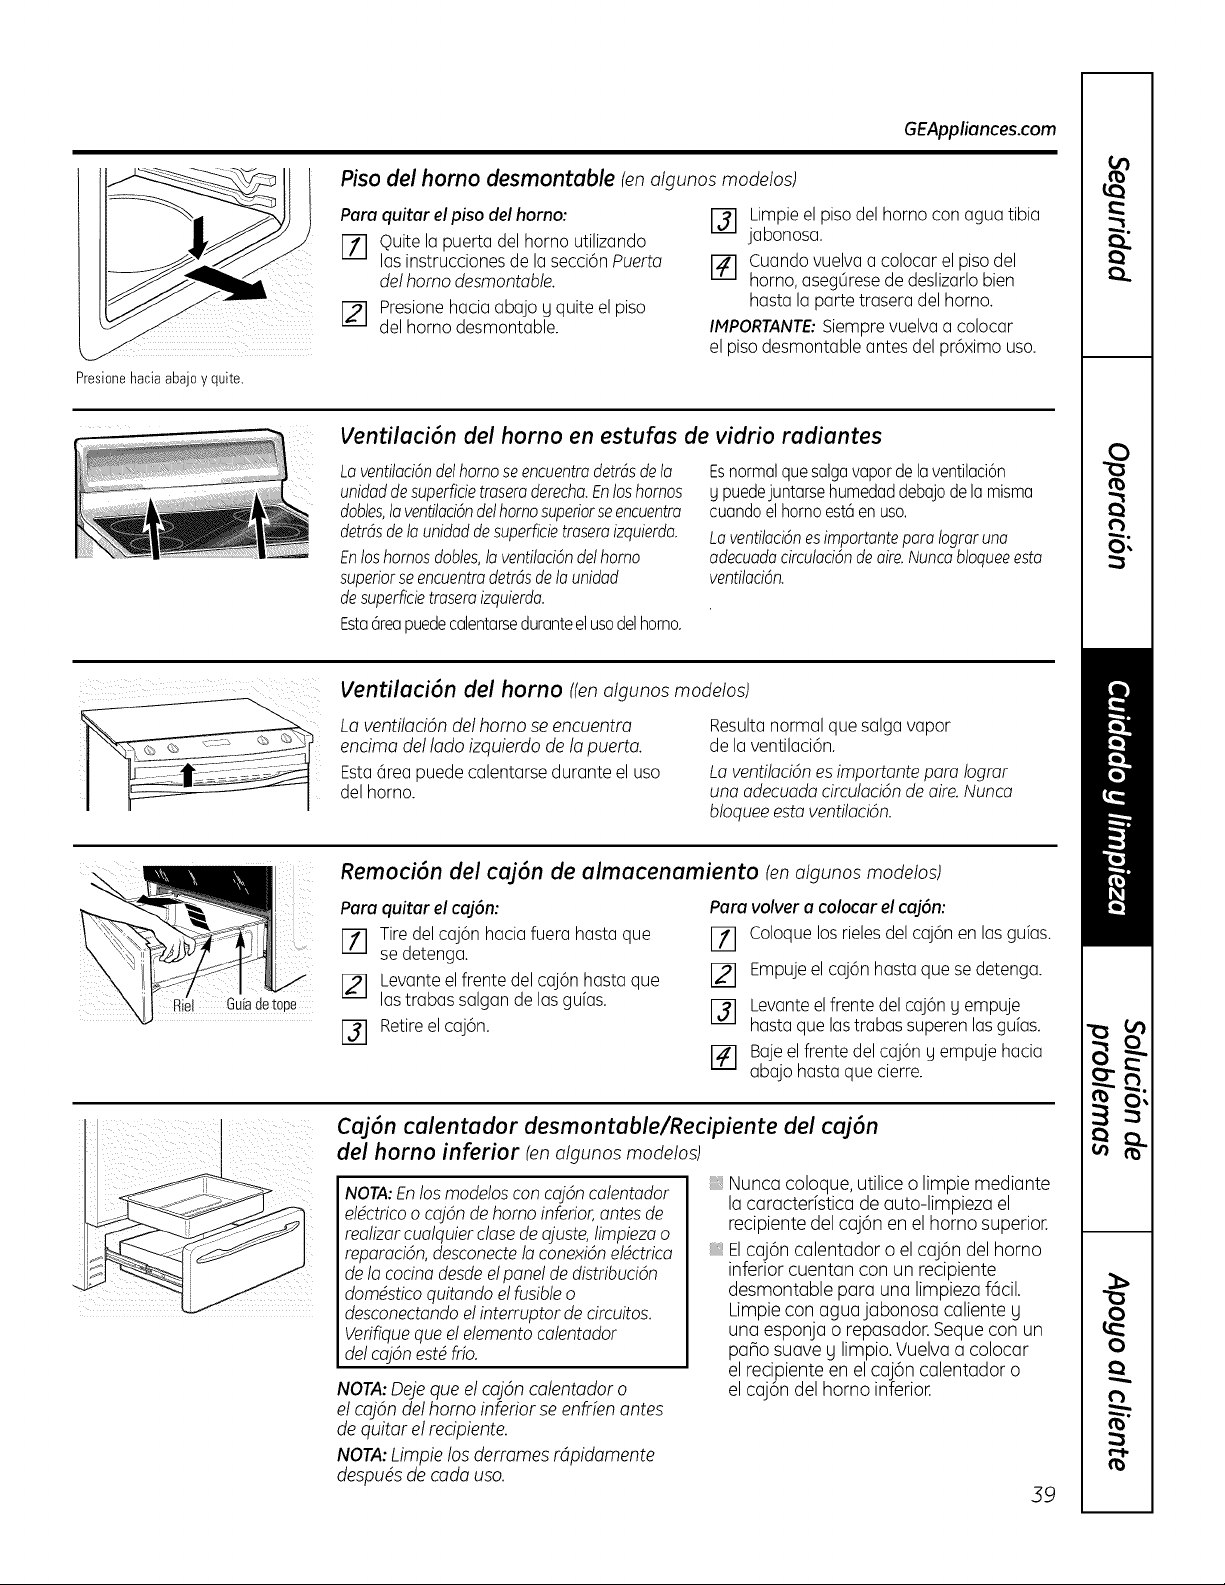
GEAppliances.com
Piso del homo desmontable ten algunos modelos)
Para quitar el piso del homo:
[7] Quite la puerta del horno utilizando
las instrucciones de la secci6n Puerto
de! homo desmontable.
[] Presione hacia abajo g quite el piso
del homo desmontable.
[_] Limpie el piso del horno con agua tibia
jabonosa.
[] Cuando vuelvaa colocarelpisodel
homo, asegOresede deslizarlobien
hastalapartetraseradelhomo.
IMPORTANTE" Siemprevuelvaa colocar
elpisodesmontableantesdelpr6ximouso.
Presionehaciaabajoy quite.
Ventilaci6n del homo en estufos de vidrio rudiantes
La ventifaci6n del homo se encuentra detrds de la
unidad de superficie trasem derecha. En los homos
dobfes, la ventifaci6ndel homo superiorse encuentra
detrds de la unidad de superficie trasero izquierda.
En los homos dobfes, la ventifaci6n del homo
superior se encuentra detrds de la unidad
de superficie trasero izquierda.
Esta@eapuedecalentarseduranteel usadel horno.
Esnormal que salgavapor de laventilaci6n
g puedejuntarse humedad debajo de la misma
cuando el homo est_ en usa.
La ventifaci6n es importante para lograr uno
adecuoda circufaci6nde aire. Nunca bfoquee esta
ventifaci6a
Ventiloci6n del homo ttenalgunos modelos)
Loventilaci6n delhomo se encuentra
encima del lado izquierdo de la puerto.
Esta6rea puede calentarsedurante el usa
delhorno.
Resultanormal quesalga vapor
de la ventilaci6n.
La ventilaci6n es importante para !ograr
una adecuada circulaci6n de aim. Nunca
b!oquee esta ventilaci6n.
_1 Guiadetope
Remoci6n del cuj6n de almacenamiento (enalgunos modelos)
Para quitar el caj6n:
[] Tire del caj6n hacia fuera hasta que
se detenga.
r2] Levanteelfrente delcaj6n hasta que
lastrabas salgan de las gufas.
r_ Retireel caj6n.
Para volver a colocar el cuj6n:
r_l Coloquelosrielesdel caj6nen las guias.
r21 Empujeel caj6n hasta que se detenga.
[] Levanteelfrente delcaj6n gempuje
hastaquelastrabas superenlasguias.
r4] Bajeelfrente delcaj6n g empuje hacia
abajo hasta que cierre.
Caj6n calentador desmontable/Recipiente del caj6n
del horno inferior lenalgunos modelos)
NOTA: En !os moddos con cuj6n calentador Nunca coloque, utilice o limpie mediante
la caracterfstica de auto-limpieza el
eldctrico o coj6n de homo inferior, antes de recipiente del caj6n en el horno superior.
realizar cualquier close de ajuste, limpieza o
reparaci6n, desconecte/a conexi6n e/dctrica El caj6n calentador o el caj6n del homo
de la cocina desde e! pane! de distribuci6n inferior cuentan con un recipiente
domdstico quitando e! fusible o desmontable para una limpieza f6cil.
desconectando e! interruptor de circuitos. Limpie con agua jabonosa caliente g
Verifique que e! elemento calentador
de! coj6n estd fib.
NOTA:Deje que el caj6n calentador o
el caj6n del homo inferior se enfrfen antes
de quitar el recipiente.
NOTA:Limpie los derromes rdpidamente
despu@s de coda usa.
una esponja o repasador.Seque con un
pano suave g limpio.Vuelva a colocar
el recipiente en el caj6n calentador o
elcaj6n del homo inferior.
39
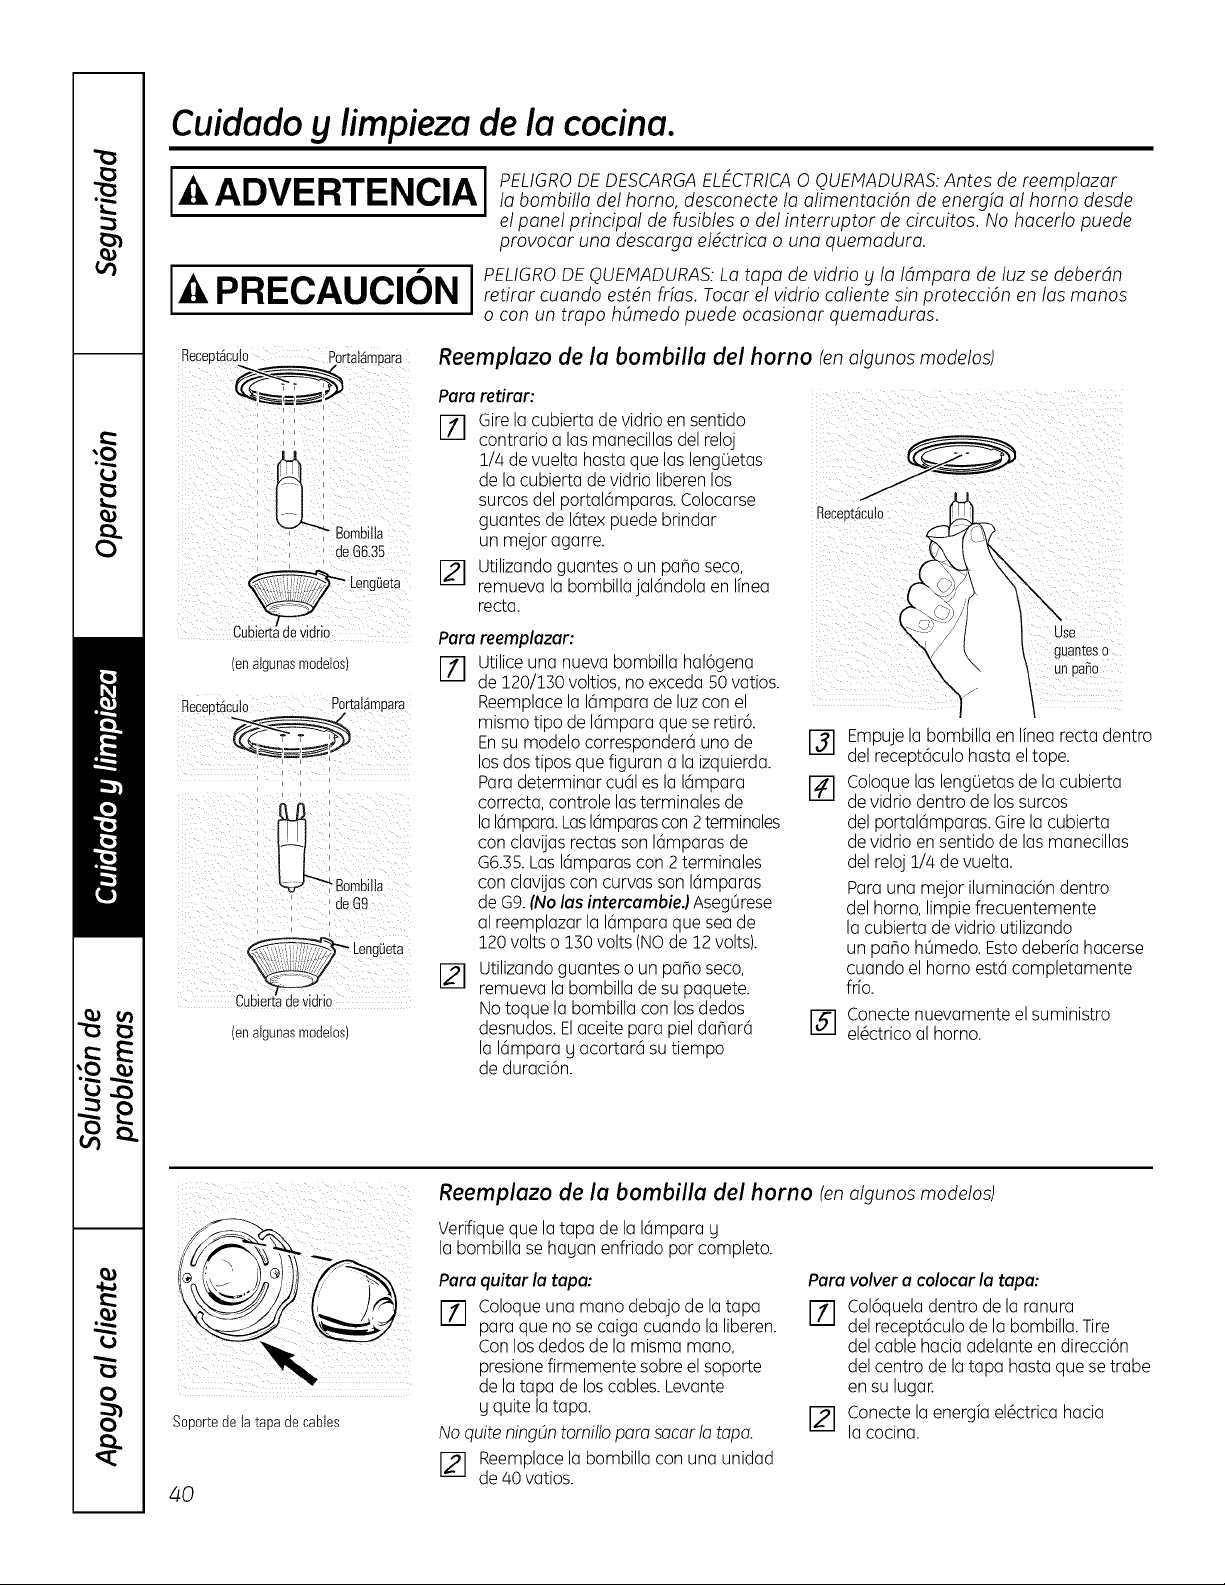
Cuidadog limpieza de la cocina.
ADVERTENCIA I
PELIGRODE DESCARGAELECTRICA0 QUEMADURAS:Antes de reemplazar
la bombilla del homo, desconecte la alimentaciOn de energfa al homo desde
el panel principal de fusibles o del interruptor de circuitos. No hacerlo puede
provocar una descarga el_ctrica o una quemadura.
PRECAUCION I pmGR°°EQUmAOURAS:Latapadev,dr,ou,a, mparadeUzsedeber n
retirar cuando est_n frfas. Tocar el vidrio caliente sin protecciOn en los manos
o con un trapo hOmedo puede ocasionar ('uemaduras.
Receutacu_o Pprtatamuara
_ Bombilla
de G&35
[en aigunasmodetos)
Receut_culo Por[al_muara
_ Bombilia
de G9
(en algunasmodetos)
Reemplazo de la bombilla del horno (enalgunos modelos)
Para retirar:
i-f-I Gire la cubierta de vidrio en sentido
i/i
contrario alas manecillas del reloj
1/4 de vuelta hasta que las lengOetas
de la cubierta de vidrio liberen los
surcos del portal6mparas. Colocarse
guantes de 16tex puede brindar
un mejor agarre.
[] Utilizando guantes o un patio seco,
remueva la bombilla jal6ndola en linea
recta.
Para reemplazar:
F-_ Utiliceuna nuevabombilla hal6gena
de 120/130voltios,no excedaSOvatios.
Reemplacela 16mparade luzcon el
mismotipo de 16mparaque se retir6.
Ensu modelo corresponder6unode
losdos tiposque figuran a la izquierda.
Paradeterminarcu61es la 16mpara
correcta,controlelasterminales de
la16mpara.Las16mparascon 2terminales
con clavijasrectasson 16mparasde
G6.35.Las 16mparascon 2terminales
con clavijascon curvasson 16mparas
deG9.(Nolas intercambie.] AsegOrese
alreemplazarla Idmparaquesea de
120volts o 130volts (NOde 12volts).
r_ utilizandoguantes o un patio seco,
remuevala bombillade su paquete.
Notoque la bombilla con los dedos
desnudos.Elaceitepara piel dafiar6
la 16mparag acortar6 su tiempo
de duraci6n.
guantes 0
°,1po o
%
Empuje la bombilla en linea recta dentro
del recept6culo hasta el tope.
Coloque las lengOetas de la cubierta
de vidrio dentro de los surcos
del portal6mparas. Gire la cubierta
de vidrio en sentido de las manecillas
del reloj 1/4 de vuelta.
Para una mejor iluminaci6n dentro
del homo, limpie frecuentemente
la cubierta de vidrio utilizando
un patio hOmedo. Esto deberfa hacerse
cuando el homo est6 completamente
fifo.
I-_ Conecte nuevamente el suministro
el@ctricoal horno.
Soportede la tapa de canes
40
Reemplazo de la bombilla del horno tenalgunos modelos)
Verifiqueque latapa de la 16mparaU
la bombillase hauan enfriado porcompleto.
Para quitar la tapa:
Coloqueuna mano debajode latapa
paraque no se caigacuando laliberen.
Con losdedos de lamisma mano,
presionefirmementesobreelsoporte
de latapa de loscables.Levante
y quitelatapa.
No quite ningOn tomi!lo para sacar la tapa.
r21 Reemplace la bombilla con una unidad
de 40 vatios.
Para volver a colocar la tapa:
Col6quela dentro de la ranura
del recept6culo de la bombilla. Tire
del cable hacia adelante en direcci6n
del centro de la tapa hasta que se trabe
en su lugar.
Conecte la energia el@ctricahacia
la cocina.
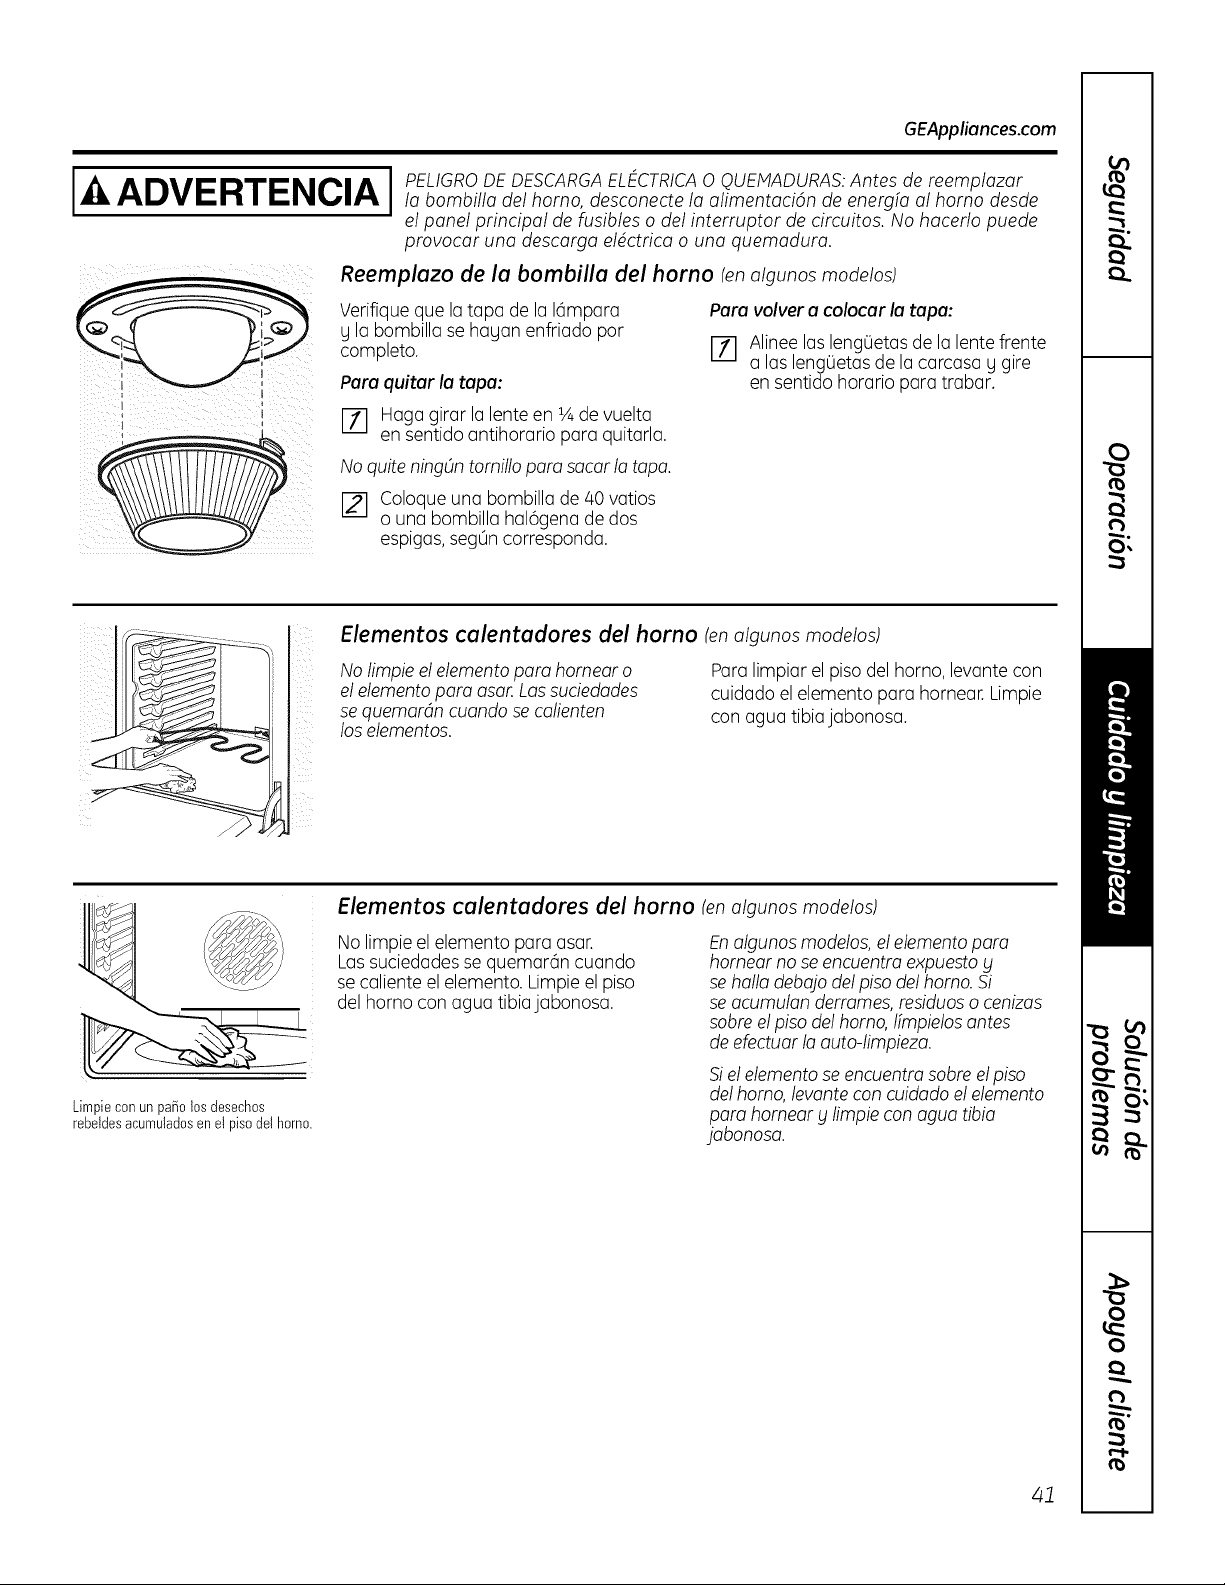
GEAppliances.com
ADVERTENCIA I
PELIGRODE DESCARGAELECTRICA0 QUEMADURAS:Antes de reemplazar
la bombilla del homo, desconecte la alimentaci6n de energfa al homo desde
el panel principal de fusibles o del interruptor de circuitos. No hacerlo puede
pmvocar una descarga el_ctrica o una quemadura.
Reemplazo de la bombilla del horno tenalgunos modelos)
I
I
Verifique que la tapa de la Idmpara
y la bombilla se hayan enfriado por
completo.
Para quitar la tapa:
1-71 Haga girar la lente en 1Ade vuelta
en sentido antihorario para quitarla.
No quite ningOntomillo para sacar la tapa.
[] Coloque una bombilla de/40 ratios
o una bombilla hal6gena de dos
espigas,segOncorresponda.
Para volver a colocar la tapa:
1-71Alinee las lengOetas de la lente frente
alas lengOetasde la carcasa y gire
en sentido horario para trabar.
_i!iii
i_iii
Elementos calentadores del horno (enalgunos modelos)
No limpie el elemento para homear o
el elemento para asar. Los suciedades
se quemar4n cuando se calienten
los elementos.
Para limpiar el piso del homo, levante con
cuidado el elemento para hornear. Limpie
con agua tibia jabonosa.
Limpieconun paho los desechos
rebeldesacumuladosen el pisodet homo.
Elementos calentadores del homo ten algunos modelos)
No limpie el elemento para asar.
Lassuciedades se quemardn cuando
se caliente el elemento. Limpie el piso
del homo con aguu tibia jabonosa.
En algunos modelos, el elemento pare
hornear no se encuentm expuesto g
se hallo debajo del piso del homo. Si
se acumulan derromes, residuoso cenizas
sabre el piso del homo, lfmpielos antes
de efectuar lo auto-limpieza.
Si el elemento se encuentm sabre el piso
del homo, levante con cuidado el elemento
para homear g limpie con agua tibia
jabonosa.
41

C6mo limpiar la estufa de vidrio, o/g no
J
Limpiela estufa despues
de cada derrame,Utilice
el limpiadorde estufas
ceramicasCERAMABRYTE®.
Limpieza normal de uso diario
SOLOutilice el limpiador de estufas
cer6micas CERAMABRYTE®en la estufa
de vidrio. Otras cremas pueden no ser tan
efectivas.
Paramantener g proteger Io superficie
de su estufa de vidrio, siga estos pasos:
%
r2]
Antes de usar la estufa por primera
vez,Ifmpiela con el limpiador de
estufas cer6micas CERAMABRYTE®.
Estoaguda a proteger la estufa
g hace la limpieza m(is sencilla.
Eluso diorio del limpiudor de estufas
cer6micas CERAMABRYTE®agudar6
a que la estufa quede como nueva.
[_] Agite bien la crema de limpieza.
Aplique unas gotas del limpiador de
estufas cer(_micasCERAMABRYTE®
directamente sobre la estufa.
[]
@
Utilice una toalla de papel o un pano
de limpieza CERAMABRYTE®para
estufas cerdmicas para limpiar toda
la superficie de la estufa.
Use un pano seco o una toalla
de papel para quitar los restos
del limpiador. No hace falta
enjuagar.
NOTA:Es mug importante que NO
CALIENTEla estufo hasta que la haya
limpiodo pot completo.
[]
Utitice un paBode limpiezaCERAMA
BRYTE® para estufascer_micas.
Residuos pegados
NOTA:Usted puede DANAR la superficie
de vidrio si udlizo esponjillos que no seon
los recomendodos.
%
Deje enfriar la estufa.
Coloque unas gotas del limpiador
de estufas cer6micas CERAMA
BRYTE®sobre toda el (irea de
residuospegados.
Utilizando el pano de limpieza
CERAMABRYTE® para estufas
cerdmicas incluido,frote el drea sucia
aplicando presi6n segOnsea
necesario.
%
@
Siquedan restos, repita los pasos
indicados con anterioridad.
Para protecci6n adicional, despu@s
de haber quitado todos los restos,
pula toda la superficie con
limpiador de estufas cer6micas
CERAMABRYTE®g una toalla
de papel.
Elraspadorde estufascer4micas
CEFIAMABFIYTE® y todos los insumos
recomendadosse encuentran
disponibtesen nuestroCentro
de Repuestos.Ver instruccionesbajo
la secci6n"Parasoticitarrepuestos"
en la p_ginasiguiente.
NOTA:No utitice hojasdesafiladas
o daBadas.
Residuos pegados rebeldes
%
[]
@
Deje enfriar la estufa.
Utilice el raspador de filo Onico
a un (ingulo aproximado de 45
degrees contra la superficie del
vidrio g raspe la suciedad. Puede
ser necesario aplicar presi6n al
raspador para quitar la suciedad.
Despu@sde utilizar el raspador,
coloque unas gotas de limpiador
de estufas cer6micas CERAMA
BRYTE®sobre toda el 6rea de
suciedad quemada. Utilice el pano
de limpieza CERAMABRYTE®para
quitar la suciedad restante.
Para protecci6n adicional, despu@s
de haber quitado todos los restos,
pula toda la superficie con
limpiador de estufas cer6micas
CERAMABRYTE® g una toalla
de papel.
z_2
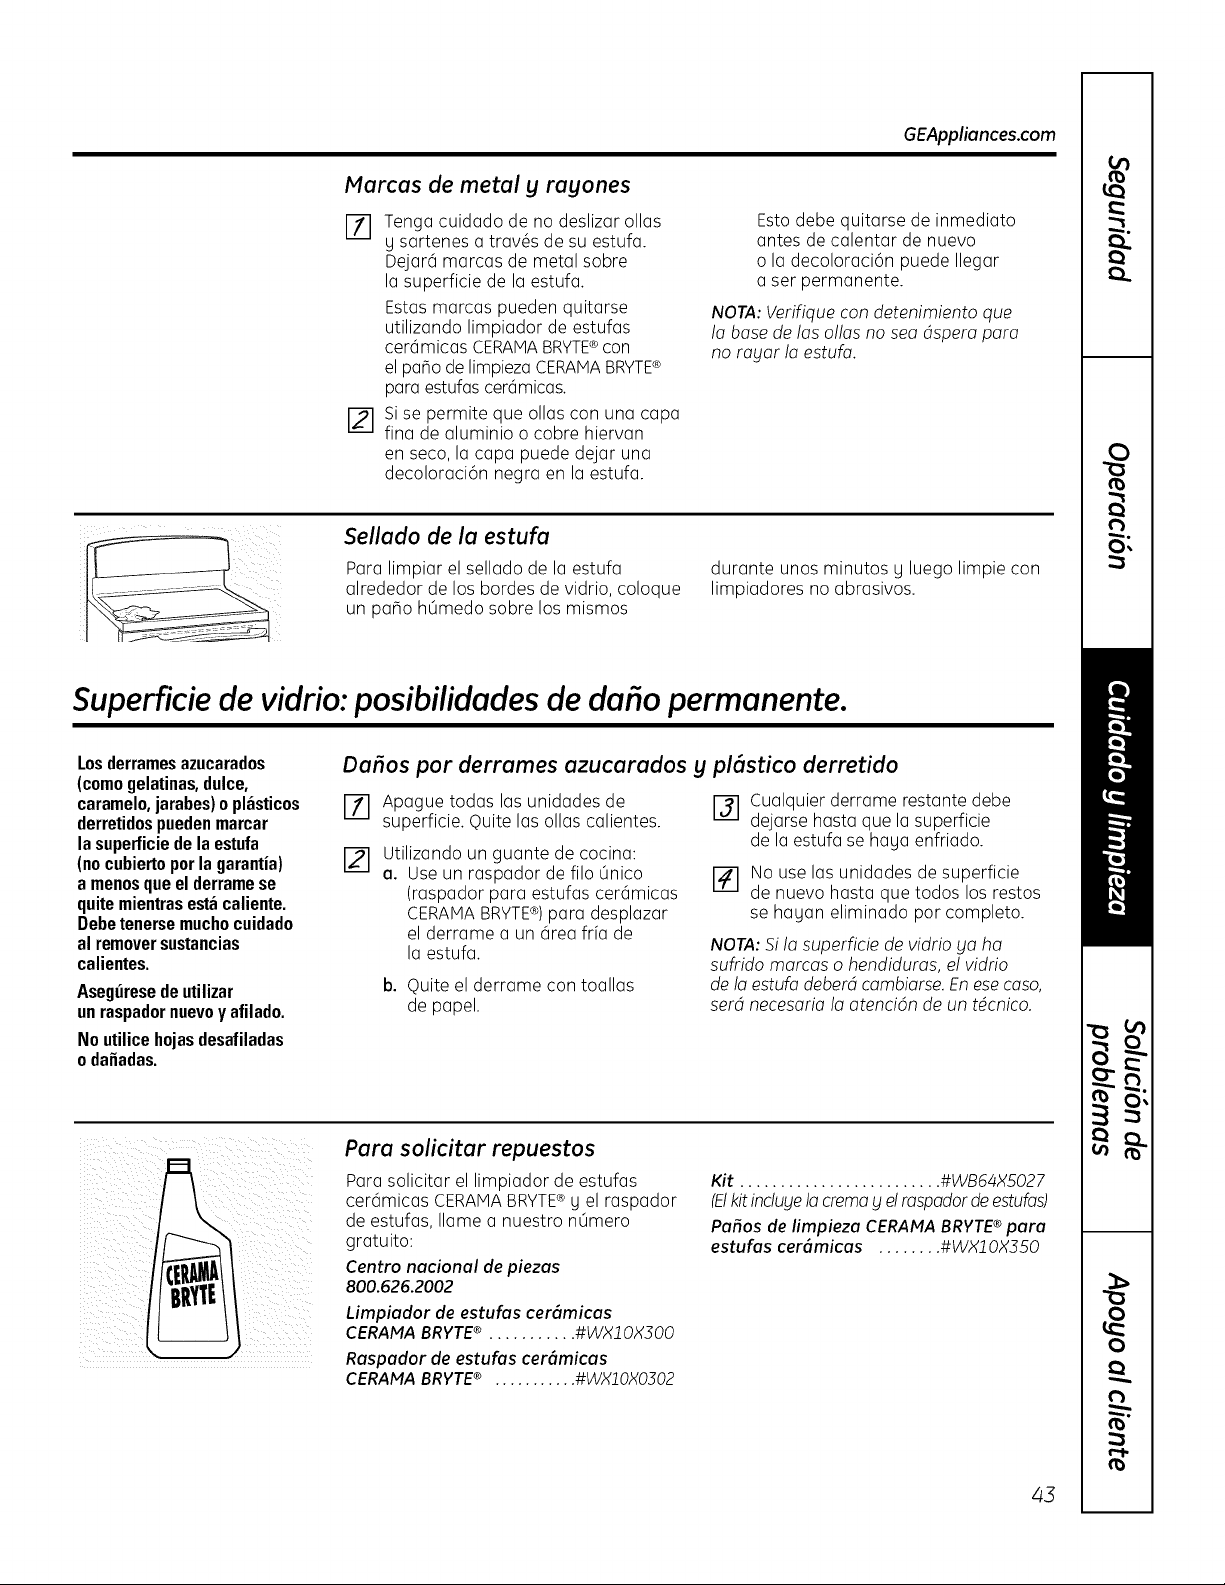
GEAppliances.com
lvlarcas de metal y rayones
[_] Tenga cuidado de no deslizar ollas
g sartenes a trav@s de su estufa.
Dejard marcas de metal sobre
la superficie de la estufa.
Estas marcas pueden quitarse
utilizando limpiador de estufas
cerdmicas CERAIVlABRYTE® con
el patio de limpieza CERAMABRYTE®
para estufas cerdmicas.
r_ si se permite que ollas con una capa
fina de aluminio o cobre hiervan
en seco, la capa puede dejar una
decoloraci6n negra en la estufa.
Esto debe quitarse de inmediato
antes de calentar de nuevo
ola decoloraci6n puede Ilegar
a ser permanente.
NOTA: Verifique con detenimiento que
la base de !os olios no sea dspero poro
no rogor !o estufo.
Sellado de la estufa
Para limpiar el sellado de la estufa
alrededor de los bordes de vidrio, coloque
un patio h0medo sobre los mismos
durante unos minutos y luego limpie con
limpiadores no abrasivos.
Superficie de vidrio: posibilidades de da o permanente.
Losderramesazucarados
(comegelatines,deice,
caramelo,jarabes)e plasticos
derretidospuedenmercer
lasuperficiedela estufa
(nocubiertoperla garantia)
a menosqueel derramese
quitemientrasestacaliente.
Debetenersemachocuidado
al removersustancias
calientes.
Asegt_resedeutilizer
unraspadornuevoy afilado.
Noutilicehojasdesafiladas
o danadas.
DaFms por derrames azucarados y
r_l Apague todas las unidades de
superficie. Quite las ollas calientes.
r_ Utilizando un guante de cocina:
a. Use un raspador de filo 0nico
(raspador para estufas cerdmicas
CERAMA BRYTE®) para desplazar
el derrame a un 6rea frfa de
la estufa.
b. Quite el derrame con toallas
de papel.
pl6stico derretido
I-_ Cualquier derrame restante debe
dejarse hasta que la superficie
de la estufa se haga enfriado.
r_ No use las unidades de superficie
de nuevo hasta que todos los restos
se hagan eliminado por completo.
NOTA: Si !a superficie de vidrio go ha
sufrido mamas o hendiduras, e! vidrio
de !a estufa deberd cambiarse. En ese caso,
serd necesaria !a atenci6n de un tdcnico.
Para solicitar repuestos
Para solicitar el limpiador de estufas
cerdmicas CERAMA BRYTE® g el raspador
de estufas, Ilame a nuestro nOmero
gratuito:
Centro necionel de piezes
800.626.2002
Limpiador de estufas cer_micas
CERAMA BRVTE® ........... #WX10X300
Raspador de estufas cerSmicas
CERAMA BRVTE ® ........... #WXIOX0702
Kit ......................... #WB64XS027
(E!kit inclub!ela crema y e! mspador de estufas)
Pe_os de limpieze CERAMA BRVTE®pare
estufas cerSmicas ........ #WXl OX350
43
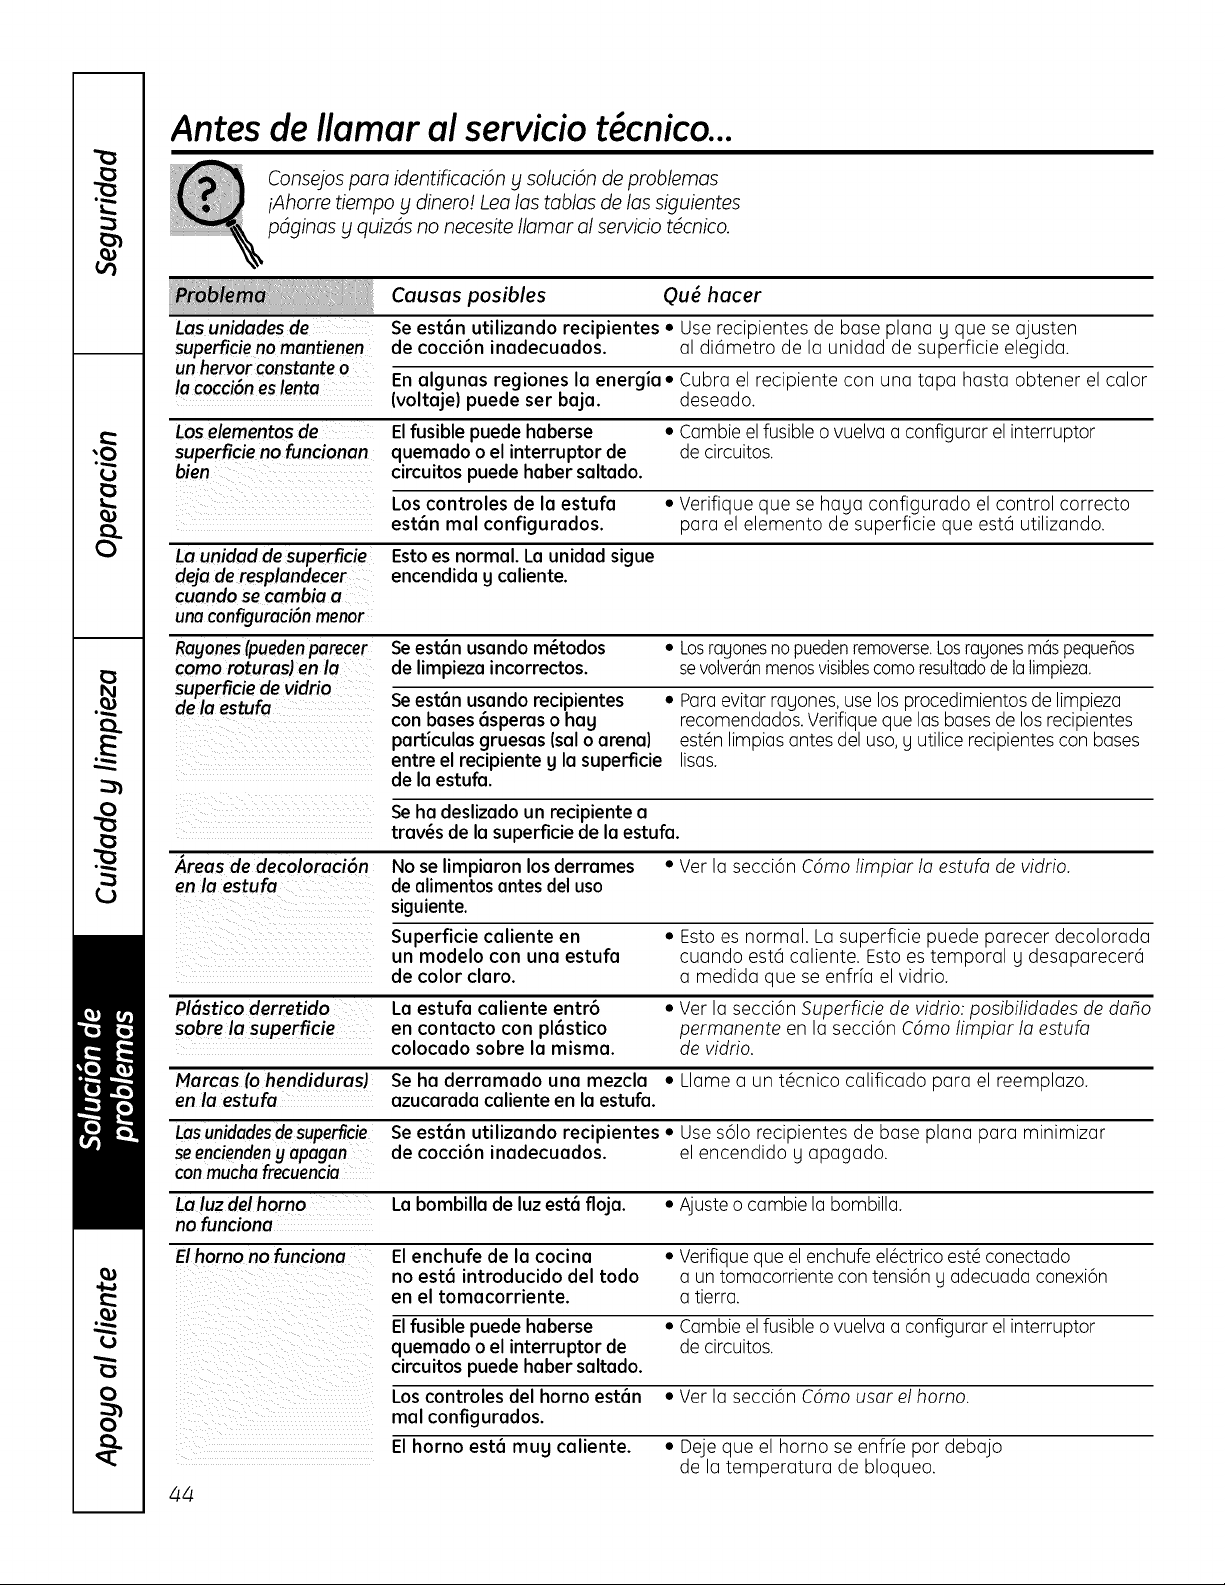
Antes de Ilamar al servicio t cnico...
consejos para identificaci6n g soluci6n de problemas
iAhorre tiempo g dinero! Lea los tobias de los siguientes
pdginas g quizds no necesite Ilamar al servicio t4cnico.
Los unidades de
superficie no mantienen
un hervor constante o
la cocci6n eslenta En algunas regiones la energia. Cubra el recipiente con una tapa hasta obtener el calor
(voltaje) puede ser baja. deseado.
Los elementos de Elfusible puede haberse • Cambie el fusible o vuelva a configurar el interruptor
superficie no funcionan quemado o el interruptor de de circuitos.
bien circuitos puede haber saltado.
Los controles de la estufa • Verifique que se haga configurado el control correcto
est6n real configurados, para el elemento de superficie que est6 utilizando.
La unidad desuperficie Esto es normal. La unidad sigue
deja de resplandecer encendida g caliente.
cuando se cambia a
unaconfiguraci6nmenor
Ragones(puedenparecer Seest6n usando m6todos • Losragonesnopuedenremoverse.Losragonesm6spequeSos
como roturasJ en la de limpieza incorrectos, sevolver6nmenusvisiblescomo resultadodela limpieza.
superficiede vidrio
de la estufa Seest6n usando recipientes • Paraevitar ragones, use los procedimientos de limpieza
con bases 6speras o hag recomendados.Verifique que las basesde los recipientes
particulas gruesas (salo arena) est_n limpias antes del uso, g utilice recipientes con bases
entre el recipiente g la superficie lisas.
de la estufa.
Causas posibles Ou_ hacer
Se est6n utilizando recipientes • Use recipientes de base plana g que se ajusten
de coccibn inadecuados, al di6metro de la unidad de superficie elegida.
Seha deslizado un recipiente a
troves de la superficie de la estufa.
Areas de decoloraci6n No se limpiaron los derrames • Ver la secci6n C6mo limpiar lo estufo de vidrio.
en la estufa de olimentos ontes del uso
siguiente.
Superficie caliente en * Esto es normal. La superficie puede parecer decolorada
un modelo con una estufa cuando est6 caliente. Esto es temporal g desaparecer6
de color claro, a medida que se enfrfa el vidrio.
PI6stico derretido La estufa caliente entr6 • Ver la secci6n Superficie de vidrio: posibilidades de da_o
sobre la superficie en contacto con pl6stico permanente en la secci6n C6mo limpiar la estufo
colocado sobre la misma, de vidrio.
Marcas Io hendiduras} Se ha derramado una mezcla • Llame a un t_cnico calificado para el reemplazo.
en la estufa azucamda caliente en laestufa.
Lasunidadesdesuperficie Se est6n utilizando recipientes * Use s61orecipientes de base plana para minimizar
seenciendeny apagan de cocci6n inadecuados, el encendido g apagado.
con muchafrecuencia
Laluz del homo La bombilla de luz est6 floja. • A]uste o cambie la bombilla.
no funciona
Elhomo no funciona Elenchufe de la cocina • Verifique que elenchufe el_ctrico est6 conectado
no est6 introducido del todo a un tomacorriente con tensi6n g adecuada conexi6n
en el tomacorriente, a tierra.
Elfusible puede haberse • Cambie el fusible o vuelva a configurar el interruptor
quemado o el interruptor de de circuitos.
circuitos puede haber saltado.
Los controles del homo est6n • Ver la secci6n C6mo usor el homo.
mal configurados.
El horno est6 mug caliente. • Deje que el homo se enfrfe por debajo
de la temperatura de bloqueo.
44
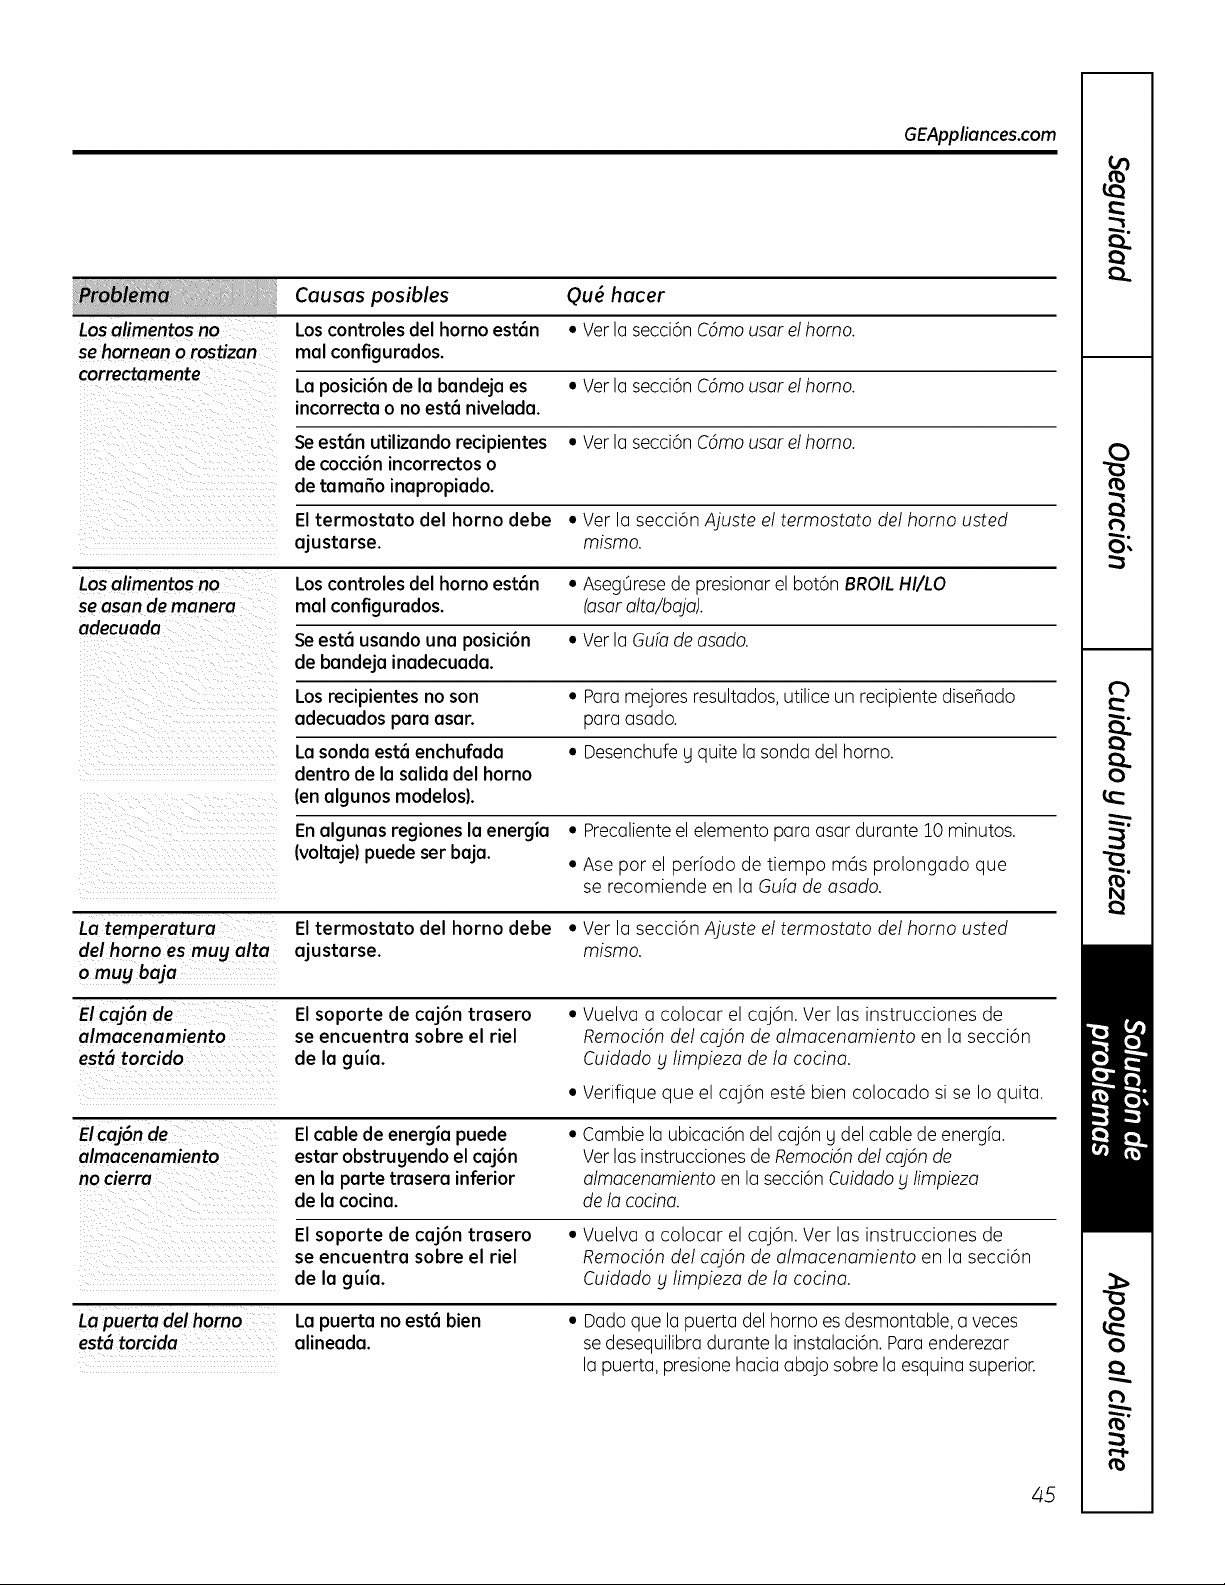
GEAppliances.com
Causas posibles Qu_ hacer
Los alimentos no Los controles del horno est6n • Verla secci6n Cdmo usar el homo.
se hornean o rostizan mal configurados.
correctomente
La posici6n de la bandeja es • Verla secci6n C6mo usar el homo.
incorrecta o no est6 nivelada.
Seest6n utilizando recipientes • Ver la secci6n C6mo usor el homo.
de cocci6n incorrectos o
de tama5o inapropiado.
El termostato del horno debe • Ver la secci6n Ajuste el termostoto del homo usted
ajustarse, mismo.
Los alimentos no Los controles del horno est6n • Aseg0resede presionar el bot6n BROILHI/LO
se osan de manera mal configurados. (asaralta/bajo).
adecuada
Seest6 usando una posici6n • Verla Guiade asado.
de bandeja inadecuada.
Los recipientes no son • Paramejores resultados,utilice un recipiente dise_ado
adecuados para asar. para asado.
La sonda est6 enchufada ° Desenchufe g quite la sonda del horno.
dentro de la salida del homo
(en algunos modelos).
Enalgunas regiones la energia ° Precalienteel elemento para asar durante 10 minutos.
(voltaje) puede ser baja. ° Ase por el perfodo de tiempo m6s prolongado que
se recomiende en la Gufa de asado.
La temperatura El termostato del horno debe °Ver la secci6n Ajuste el termostato del homo usted
del homo es muy alta ajustarse, mismo.
o muy baja
El caj6n de El soporte de caj6n trasero
almacenamiento se encuentra sobre el riel
est6 torcido de la guia.
° Vuelva a colocar el caj6n. Ver las instrucciones de
Remoci6n del caj6n de olmacenomiento en la secci6n
Cuidodo y limpieza de Io cocino.
• Verifique que el caj6n est_ bien colocado si se Io quita.
Elcaj6n de
almacenamiento
no cierra
Elcable de energia puede
estar obstrugendo el caj6n
en la parte trasera inferior
de la cocina.
* Cambie la ubicaci6n del caj6n Udel cable de energfa.
Verlas instrucciones de Remoci6ndel caj6n de
olmocenamiento en la secci6n Cuidodog limpiezo
de Io cocino.
El soporte de caj6n trasero
se encuentra sobre el riel
de la guia.
• Vuelva o colocar el caj6n. Ver las instrucciones de
Remoci6n del caj6n de olmacenomiento en la secci6n
Cuidodo y limpiezo de Io cocino.
La puerta del homo La puerta no est6 bien
est6 torcida alineada.
• Dado que la puerto del horno es desmontable, a veces
se desequilibra durante la instalaci6n. Paraenderezar
la puerto, presione hacia abajo sobre la esquina superior.
45
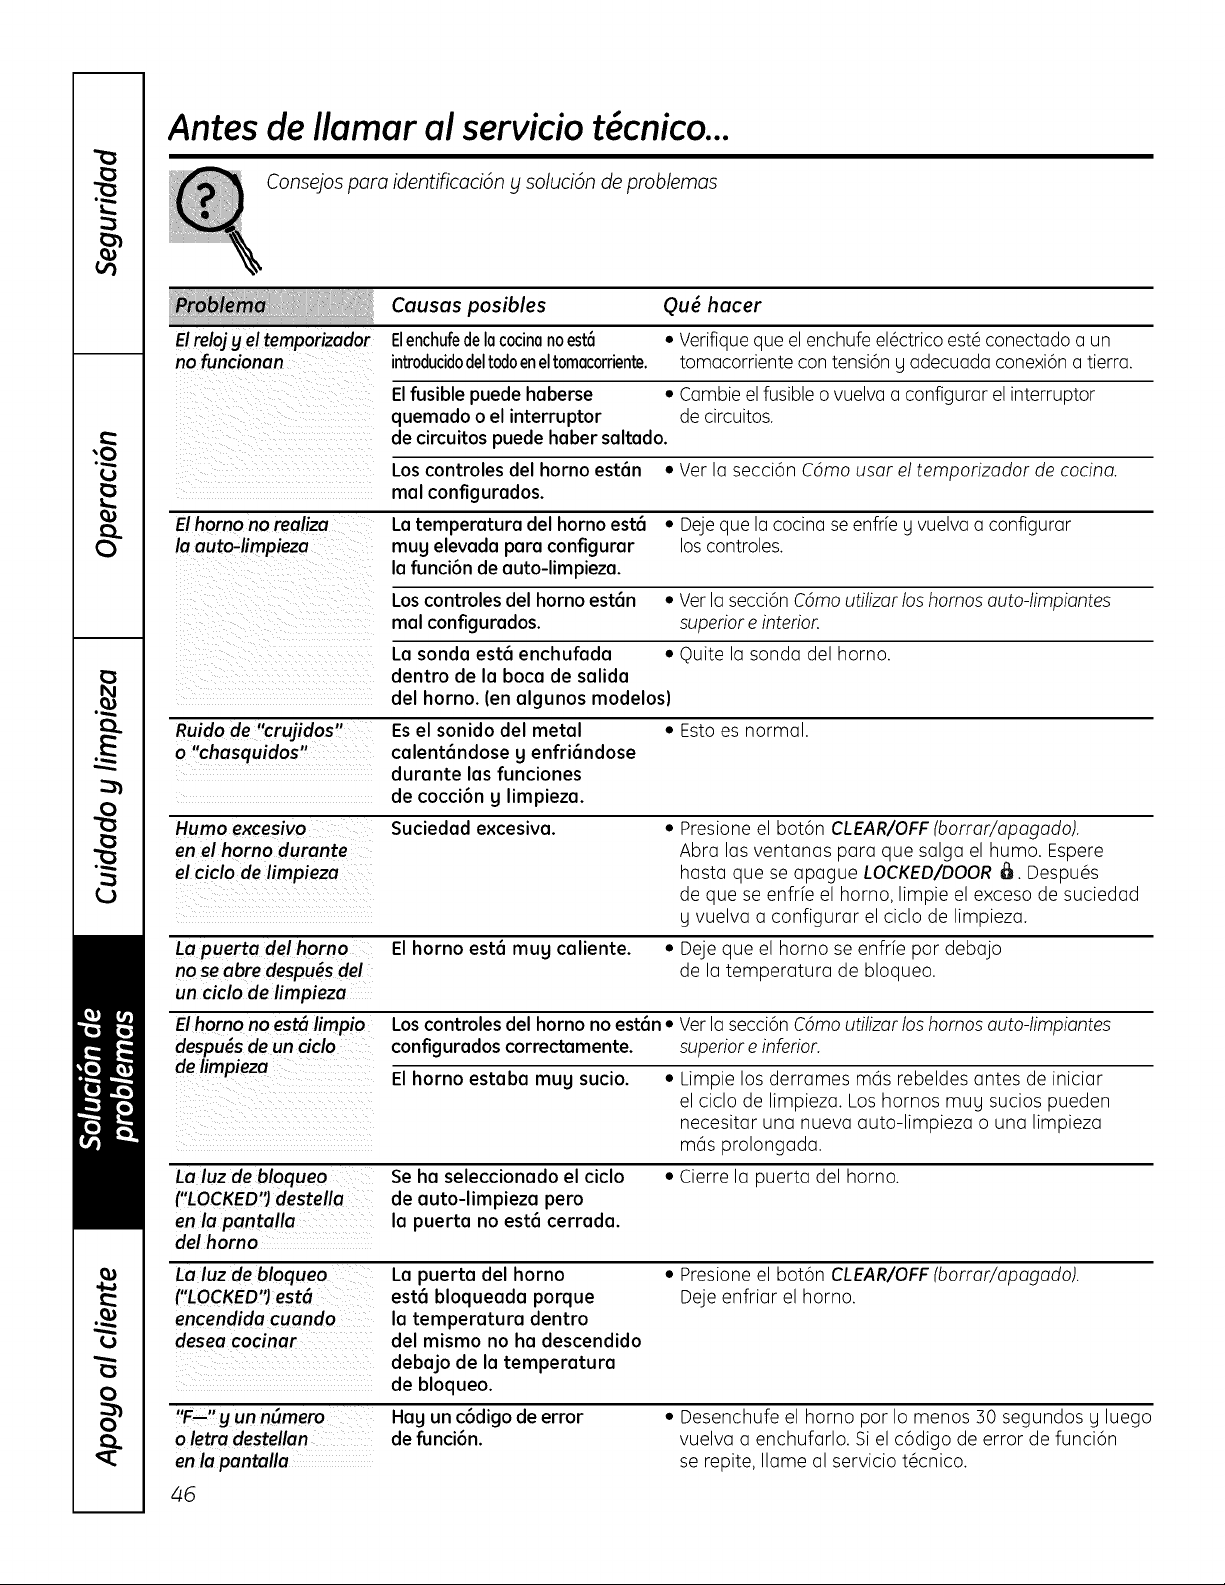
Antes de Ilamar al servicio t cnico...
Consejos pare identificaci6n y soluci6n de problemas
Elre/ojg el temporizador
no funcionan
Causas posibles Ou_ hacer
ElenchufedeIococinonoest_ • Verifique que el enchufe el#ctrico est# conectado a un
introducidodeltodoeneltomacorriente, tomacorriente con tensi6n g adecuada conexi6n a tierra.
Elfusible puede hoberse • Cambie el fusible o vuelva a configurar el interruptor
quemado o el interruptor de circuitos.
de circuitospuede haber saltado.
Los controles del horno est6n • Ver la secci6n C6mo user el temporizador de cocina.
mal configurados.
Elhomo no realize Latemperatura del horno est6 • Dejequa la cocina se enfrfe g vuelva a configurar
la auto-limpieza mug elevada para configurar los controles.
la funci6n de auto-limpieza.
Loscontroles del homo est6n • Ver I(]secci6n C6mo utilizor los homos outo-limpiontes
mal configurados, superior e interior.
La sonde est6 enchufada • Quite la sonde del horno.
dentro de la boca de salida
del horno. (an algunos modelos)
Ruido de "crujidos" Esel sonido del metal • Esto es normal.
o "chasquidos" calent6ndose g enfri6ndose
durante las funciones
de coccibn g limpieza.
Humo excesivo Suciedad excesiva. • Presione el bot6n CLEAR/OFF(borror/opogodo).
en el homo durante Abra las ventanas para que salga el humo. Espere
el title de limpieza hasta que se apague LOCKED/DOOR _. Despu_s
de que se enfrfe el homo, limpie el exceso de suciedad
g vuelvo o configuror el ciclo de limpiezo.
Lapuerta del homo El horno est6 mug coliente.
no se abre despu#s del
un ciclo de limpieza
• Deje que el homo se enfrfe par debajo
de la temperature de bloqueo.
Elhomo no est6 limpio
despu#s de un ciclo
de limpieza
Loscontroles del horno no est6n • Ver la secci6n COmautilizor los homos outo-limpiontes
configurados correctamente, superior e inferior.
El horno estobo mug sucio. Limpie los derr(]mes m6s rebeldes (]ntes de inici(]r
el ciclo de limpieza. Los hornos mug sucios pueden
necesitar una nuew auto-limpieza o una limpieza
m6s prolongada.
La luz de b/aquae
("LOCKED")destella
en la pantalla
del homo
Se ha seleccionodo el ciclo
de outo-limpiezo pero
la puerto no est6 cerrada.
• Cierre la puerta del horno.
La luz de bloqueo
('LOCKED'Jest6
encendida cuando
desea cocinar
"F--" g un nSmero
o letra destellan
en la pantalla
Lo puerto del horno
est6 bloqueodo porque
la temperature dentro
del mismo no ha descendido
debajo de la temperature
de bloqueo.
Hag un c6digo de error
de funci6n.
• Presione el botSn CLEAR/OFF(borror/opogodo).
Deje enfriar el horno.
• Desenchufe el horno par Io menos 30 segundos g luego
vuelva a enchufarlo. Si el c6digo de error de funci6n
se repite, llama al servicio t_cnico.
46
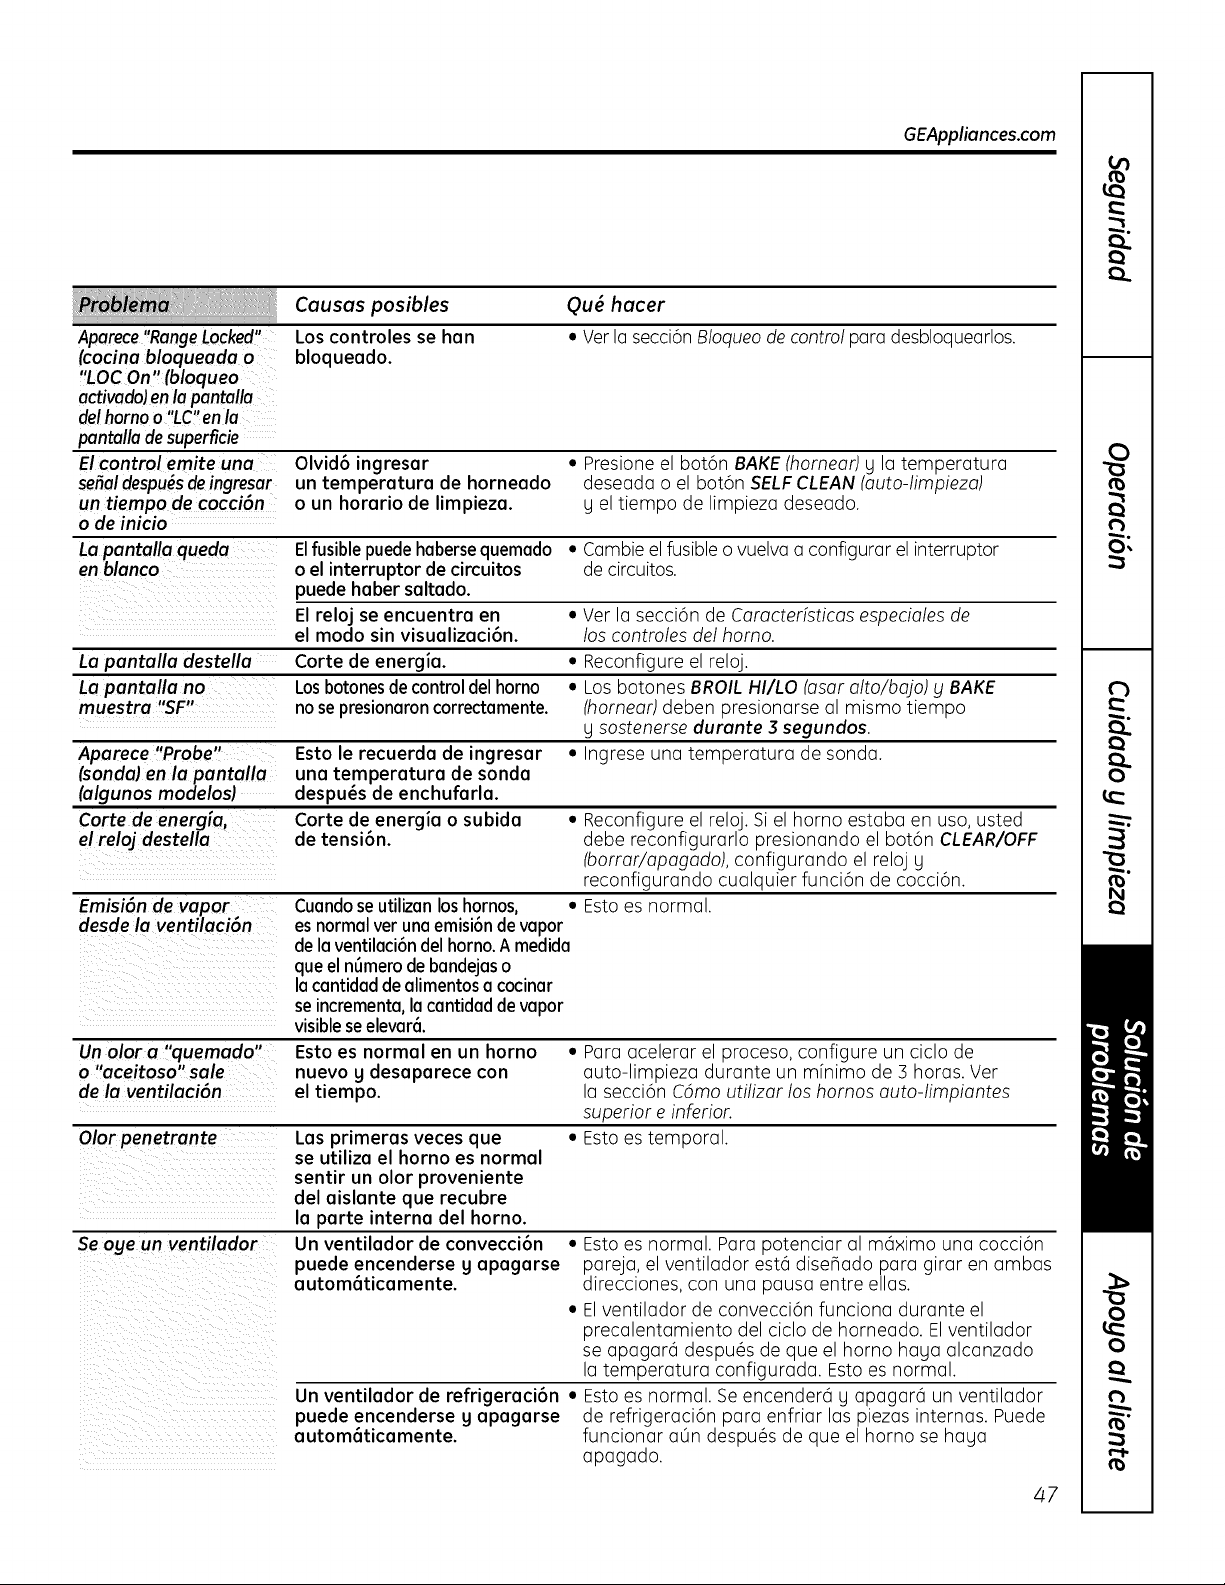
GEAppliances.com
Causas posibles Ou_ hacer
Aparece"RangeLocked"
(cacina blaqueada a
"LOC On" (bloquea
activado)enla pantalla
delhomo a "LC"enla
pantalladesuperficie
El control emite una Olvid6 ingresar • Presione el bot6n BAKE(horneor) g la temperatura
sepal despu_s de ingresar un temperature de horneado deseada o el bot6n SELF CLEAN (outo-limpieza)
un tiempa de cacci6n o un horario de limpieza, g el tiempo de limpieza deseado.
a de inicia
La pantalla queda Elfusible puede haberse quemado • Cambie el fusible o vuelva a configurar el interruptor
en blanca o el interruptor de circuitos de circuitos.
puede haber saltado.
El reloj se encuentra en • Ver la secci6n de Caracteristicas especiales de
el modo sin visualizaci6n, los controles del homo.
La pantalla destella Carte de energia. • Reconfigure el reloj.
La pantalla na Los botones de control del horno • Los botones BROIL HI/LO (asar a/to/bajo) g BAKE
muestra "SF" no se presionaron correctamente. (hornear) deben presionarse al mismo tiempo
g sostenerse durante 3 segundas.
Aparece "Probe" Esto le recuerda de ingresar • Ingrese una temperatura de sonda.
(sandal en la pantalla una temperatura de sonda
(algunas madelas) despu_s de enchufarla.
Carte de energia, Carte de energia o subida • Reconfigure el reloj. Si el horno estaba en usa, usted
el relaj destella de tensi6n, debe reconfigurarlo presionando el bot6n CLEAR/OFF
(borrar/opogodo), configurando el reloj g
reconfigurando cualquier funci6n de cocci6n.
Emisi6n de vapor Cuando se utilizanlos hornos, • Esto es normal.
desde la ventilaci6n es normal ver una emisi6n de vapor
Un alar a "quemada"
a "aceitasa" sale
de la ventilaci6n
Los controles se han
bloqueado.
• Ver la secci6n Bloqueo de control para desbloquearlos.
dela ventilaci6ndelhorno.A medida
queel nOmerode bandejaso
la cantidad de alimentosa cocinar
se incrementa,la cantidaddevapor
visibleseelevar&
Olar penetrante
Se age un ventiladar
Esto es normal en un horno
nuevo g desaparece con
el tiempo.
Los primeras veces que
se utiliza el horno es normal
sentir un olor proveniente
del aislante que recubre
la porte interna del homo.
Un ventilador de convecci6n
puede encenderse g apagarse
autom6ticamente.
Un ventilador de refrigeraci6n
puede encenderse g apagarse
autom6ticamente.
• Pare acelerar el proceso, configure un ciclo de
auto-limpieza durante un minima de 3 horas. Ver
la secci6n C6mo utilizer los hornos auto-limpiantes
superior e inferior.
• Esto es temporal.
• Esto es normal. Para potenciar al m(iximo una cocci6n
pareja, el ventilador est6 dise_ado pare girar en ambas
direcciones, con una pause entre elias.
• Elventilador de convecci6n funciona durante el
precalentamiento del ciclo de horneado. El ventilador
se apagar6 despu_s de que el horno haga alcanzado
la temperatura configurada. Estoes normal.
• Esto es normal. Se encenderO U apagarO un ventilador
de refrigeraci6n para enfriar las piezas internas. Puede
funcionar aLin despu@sde que el homo se haua
apagado.
47
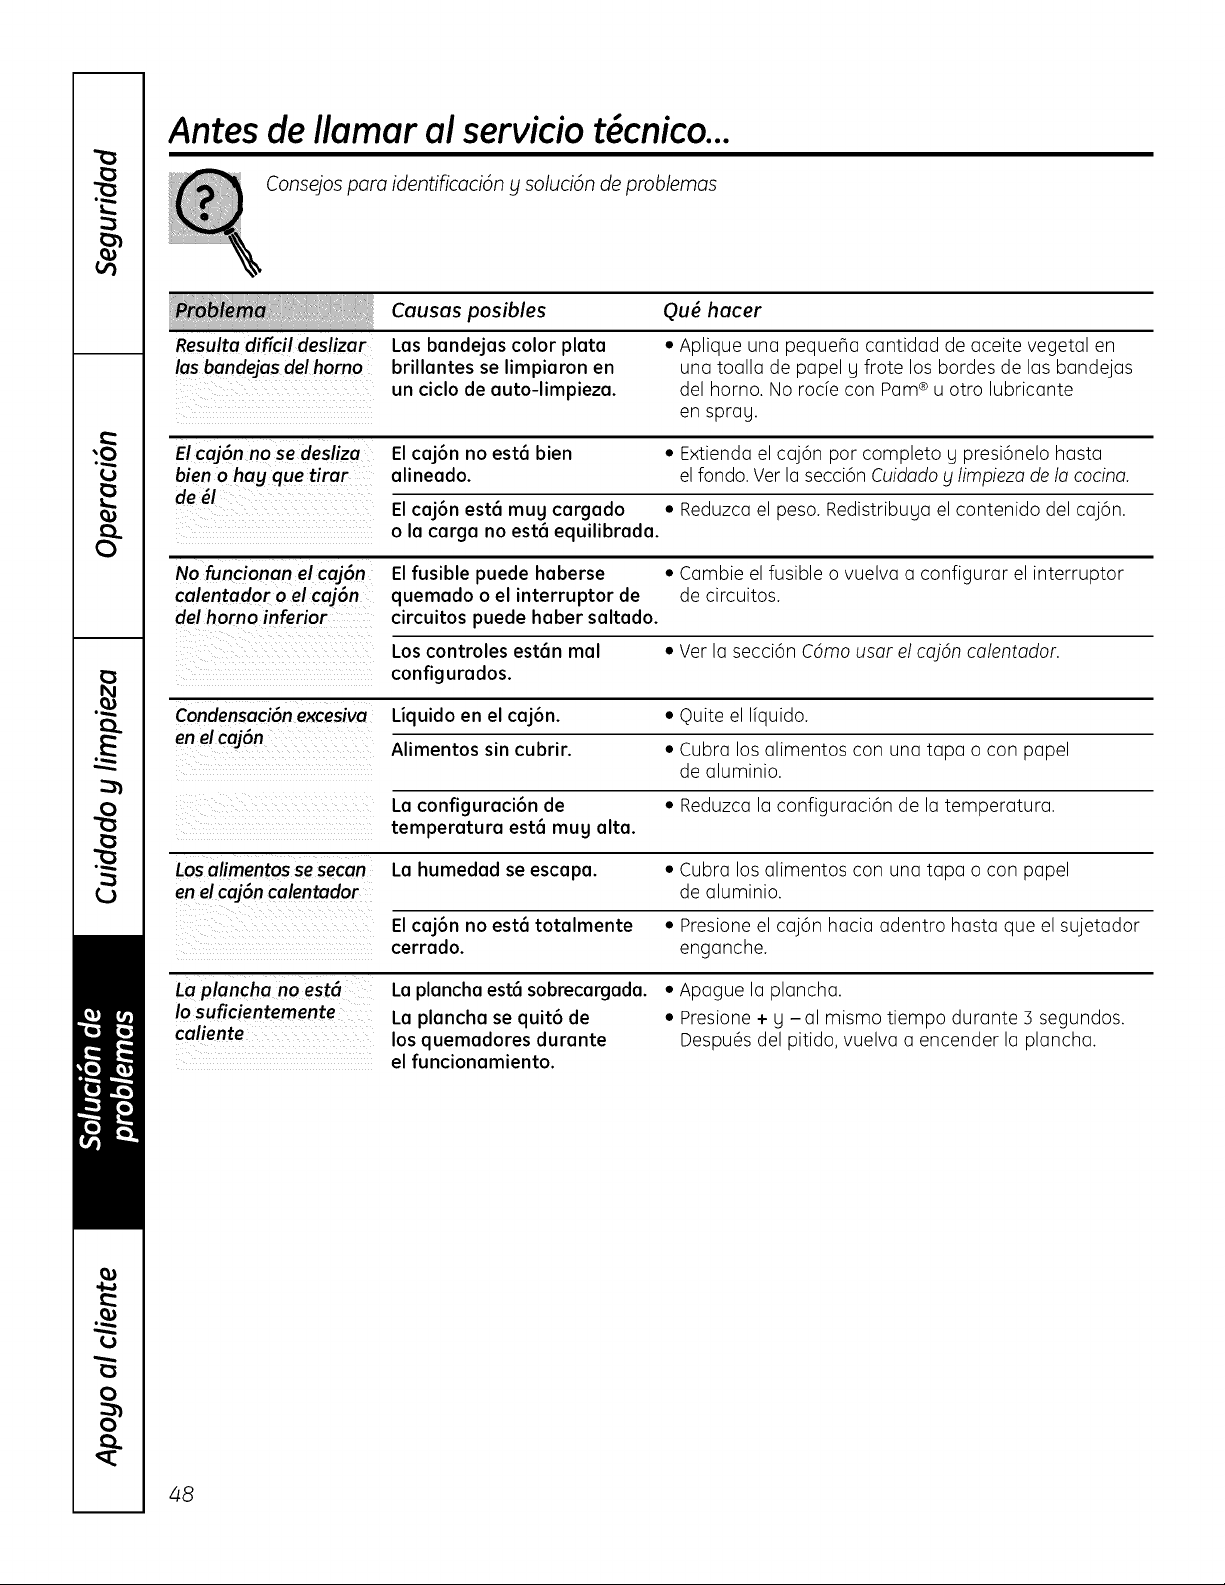
Antes de Ilamar al servicio t cnico...
Consejos para identificaci6n y soluci6n de problemas
Resulta dificil deslizar
las bandejas del homo
Causas posibles
Las bandejas color plata
brillantes se limpiaron en
un ciclo de auto-limpieza.
Ou_ hacer
* Aplique una pequeBa cantidad de aceite vegetal en
una toalla de papel y frote los bordes de las bandejas
del homo. No rode con Pam®u otro lubricante
en spray,
El caj6n no se desliza Elcaj6n no est6 bien • Extienda el caj6n por completo y presi6nelo hasta
bien o hag que tiror alineado, el fondo. Ver la secci6n Cuidado y limpieza de la cocina.
de _1
Elcaj6n est6 mug cargado • Reduzcael peso. Redistribuya el contenido del caj6n.
o la carga no est6 equilibrada.
No funcionan el coj6n Elfusible puede haberse * Cambie el fusible o vuelva a configurar el interruptor
calentador o el caj6n quemado o el interruptor de de circuitos.
del homo inferior circuitos puede haber saltado.
Los controles est6n mal • Ver la secci6n C6mo usor el coj6n calentador.
config urados.
Condensoci6nexcesivo Liquido en el caj6n. • Quite el Ifquido.
en elcaj6n Alimentos sin cubrir. •Cubra losalimentos con una tapa o con papel
de aluminio.
La configuraci6n de * Reduzca la configuraci6n de la temperatura.
temperatura est6 mug alta.
Losalimentos se secan La humedad se escapa. •Cubra los alimentos con una tapa o con papel
en el caj6n calentador de aluminio.
Elcaj6n no est6 totalmente • Presione el caj6n hacia adentro hasta que el sujetador
cerrado, enganche.
La plancha no est_
Io suficientemente
caliente
La plancha est6 sobrecargada.
La plancha se quit6 de
los quemadores durante
el funcionamiento.
• Apague la plancha.
• Presione + y -al mismo tiempo durante 5 segundos.
Despu_s del pitido, vuelva a encender la plancha.
z_8
Notas.
GEAppliances.com
iw,,_
P_
o..
0
to
_o
t_
N
u
u
n_
0
49

Accesorios.
zDesea algo m6s?Usted puede encontrar estos accesorios y muchos mds en GEAppliances.com, o Ilame
al 800.626.2002 (en horatio de trabajo normal). Tenga listo el nOmero de modelo.
Rejillas Cabezaleso tapas de Elementos de superficie y Peri/las
quemadores de superficie bandejas colectoras
i i i i i i
Bandejas del homo
Elementos del homo Bombillas de luz
Limpiador
de artefactos
de acero
inoxidable
Pruebe estos otros excelentes productos para que su cocina se yea estupenda!
....... Kit de limpieza Toallitas Toallitas para
............. de anafes de limpieza pulir artefactos de
__ vitrocerbmicos: de anafes acero
Incluye limpiador, vitrocerbmicos inoxidable
rasqueta y patio
WXIOX117GCS WXIOX305 WXIOXIO001
PMIOX311
iAproveche al m6ximo su bandeja para asar! (No para usar con modelos de caj6n asadorJ
iUtilice su bandeja y tapa de rejillapara asar hamburguesas, frutos de mar,filetes,vegetales, panceta,
costillas y mucho m6s! La bandeja inferior retiene el exceso de grasas y aceites.
• Pieza GE genuina
• F6cilde limpiar
• Garantfade un a_o
iOferta de tiempo limitado! iEnvio sin cargo!
Cuando solicite la bandeja para asar dentro de los 30 dias de haber adquirido su producto de cocina GE.
Pequefia Grande* Extra grande**
N ° de pieza WB 48X10055 WB48X10056 WB 48X1005 7
Dimensiones 8-3/4"Axl-1/4"Ax13-1/2"P 12-3/4"Axl-1/4"AxlS-1/4"P 15-1/2"Axl-1/4"Axlg"P
* La bandeja para asar grande (estdndar)no entra en cocinas de 20/24 putgadas.
** La bandeja extra grande no entra en homos de paredes de 24 putgadas, empotradas de 27 putgadas o cocinas de 20/24 putgadas.
Ltame at 800.626.2002 o utitice este formutario para enviar su soticitud par correo:
GEParts, RO.Box 221027, Memphis, TN38122-1027.
Cantidad
Formulario de solicitud de la bandeja para asar
NBmero de pieza
NBmero de modelo
Nombre
Direcci6n
Ciudad
Tel_fono
Check __ Giro postal __
N_mero de serie Marca
Apellido
Fecha de compra
Estado __ C6digo Postal
Correo electr6nico
Para consultar sobre los precios actuales Ilame a1800.626.2002. Todas lax 6rdenes con tarjeta de cr_dito se deber6n realizar
en forma telef6nica.
50
Garantia de cocina elgctrica de GE. 6EAppliances.com
Todos los servicios t_cnicos de garantia son otorgados par
nuestros Centros de ServicJo de Fdbrica, o un t_cnico autorizado
par Customer Care®.Para programar el servJcJot_cnJco,
visitenos on-line en GEAppliances.com, o flame a1800.GE.CARES
(800.432.2737). Tenga el nOmero de serie g de modelo a mano
cuando flame para solicJtar un servJcio t_cnico.
Abroche su recibo aquL
Se necesita una prueba
de la fecha de compra original
para obtener servicio tdcnico
cubierto par la garantfa.
i i i
Un a_o
Desdela fechade
compmoriginal
GE otorgar6:
Cualquierpieza de la cocina que falle debido a un defecto de los materiales o mano de obra.
Durante esta garantia limitada de un aria, GEtambi_n ofrece, en farina gratuita, la mano
de obra y trabajos en el hogar para reemplazar la pieza defectuosa.
Visitas a su hogar para ensetiarle a usar el producto.
Instalaci6n, entrega o mantenimiento inadecuados.
Fallas del producto debido a abuso, uso indebido, uso
diferente para el que fue disetiado, o uso comercial.
Datios a la estufa de vidrio provocados por el uso
de limpiadores distintos de las cremas g patios
recomendados.
Datios a la estufa de vidrio provocados por derrames
endurecidos de materiales azucarados o pl6stico
derretido que no se limpiaron de acuerdo con
las instrucciones del Manual del Propietario.
Reemplazo de fusibles dom_sticos o la reconfiguraci6n
de interruptores de circuito.
Datios al producto provocados por accidentes,
incendios, inundaciones o fuerza mayor.
Datios incidentales o resultantes provocados por
posibles defectos en este artefacto.
Datios provocados despu_s de la entrega.
Un producto no accesible para prestar el servicio
t_cnico solicitado.
EXCLUSI(_N DE GARANTiAS IMPLiCITAS--Su gnico g exclusivo recurso es la reparaci6n del producto como
se establece en la presente Garantia Limitada. Las garantias implicitas, inclugendo garantias de comerciabilidad
g aptitud para un objetivo particular, se encuentran limitadas a un afio o al periodo m6s corto permitido por la leg.
Esta garantia se extiende al comprador original g cualquier duefio posterior para productos adquiridos
para usa dom_stico dentro de los EE.UU. Si el producto se encuentra en una regi6n donde no hag Servicio
T_cnico autorizado de GE, usted serd responsable del costa del viaje ousted puede tenet que Ilevar el
producto a un Servicio T_cnico Autorizado de GE para efectuar la reparaci6n. En Alaska, la garantia
exclu_le el costa de envio o visitas para efectuar arreglos en su hogar.
Algunos estados no permiten la exclusidn o limitacidn de dafios incidentales o resultantes. Esta garanffa
le otorga derechos legales espedficos gusted puede cantor con otros derechos, que pueden variar de
estado a estado. Para conocer sus derechos legales, consulte a su oficina del consumidor local o estatal
o al Fiscal General de su estado.
Garante: General Electric Compang. Louisville, KV 40225
51

Apoyo al cliente.
Pdgina Web de GE Appliances GEAppliances.com
LTienealguna pregunta sabre su electrodom_stico? iPruebela p6gina Web de GEAppliances, 24 horas al dfa,
cualquier da del ari!! Para magor conveniencia g servicio m6s r6pido, ga puede descargar los Manuales
de los Propietarios,pedir piezas o incluso hacer una cita en Ifnea para que vengan a realizar una reparaci6n.
Solicite una reparaci6n GEAppliances.com
Elservicio de expertos GEestd a tan s61oun paso de su puerta, jEntre en Ifneag solicite su reparaci6n cuando
le venga cualquier dfa del a_o! O Ilame al 800.GE.CARES(800.452.2757)durante horas normales de oflcina.
RealLifeDesignStudio(Estudiodedisefioparalavidareal) GEAppliances.com
GEapoga el concepto de Dise_o Universal--productos, servicios g ambientes que pueden usar gente de todas
las edades,tama_os g capacidades. Reconocemosla necesidad de dise_ar para una gran gama de habilidades
g dificultades fisicas g mentales. Para rods detalles cobre las aplicaciones de GEDise_oUniversal,inclugendo
ideas de dise_o para la cocina para personas con discapacidades, mire nuestra pdgina Web hog mismo.
Para personas con dificultades auditivas,favor de Ilamar al 800.TDD.GEAC(800.833.4322).
GaranEas ampliadas GEAppliances.com
Compre una garantfa ampliada g obtenga detalles sobre descuentos especialesdisponibles mientras su garantfa
est6 a0n activa. Puedecomprarla en Ifneaen cualquier momento, o Ilamar al 800.626.2224 durante horas
normales de oficina. GE Consumer Home Servicesestar6 a0n ahf cuando su garantfa termine.
Piezos g occesorios GEAppliances.com
Aquellos individuos con la calificaci6n necesaria para reparar sus propios electrodom6sticos pueden
pedir que se les manden las piezas o accesorios directamente a sus hogares (aceptamos las tarjetas
VISA,MasterCardg Discover).Haga su pedido en Ifneahog, 24 horas cada dfa o Ilamar por tel6fono
al 800.626.2002 durante horas normales de oficina.
Las instrucciones descritas en este manual cubren los procedimientos a seguir por cualquier usuario.
Cualquier otra reparaci6n deberia, pot regla general, referirse a personal calificado autorizado. Debe
ejercerse precauci6n ga que /as reparaciones incorrectas pueden causar condiciones de funcionamiento
inseguras.
i P6ngase en contacto con nosotros GEAppliances.com
Si no est6 satisfecho con el servicio que recibe de GE,p6ngase en contacto con nosotros en nuestra p(igina
Web indicando todos los detalles asf como su n0mero de tel6fono o escrfbanos a:
General Manager, Customer Relations
GEAppliances,Appliance Park
Louisville,KY40225
Registre su electrodom6stico GEAppliances.com
iRegistre su nuevo electrodom6stico en linea--cuando usted prefiera! Elregistrar su producto a tiempo
le proporcionard, si surgiera la necesidad, una mejor comunicaci6n gun servicio mds rdpido bajo los t6rminos
de su garantia. Tambi6n puede enviar su tarjeta de registro pre-impresa que se incluge en el material de
embalaje.
52