

[ENGLISH]
Contents
>>
<<
1.
Part Names
2.
Introduction
3.
Direct Button Operation
4.
On
-Screen Display Menu
5.
Application
6.
Using a PC
7.
Using the touch function
8.
Appendix
9.
Specifications
10.
Trademarks
11.
Dimensional Drawings
Ver. 1.1
Important
DEAR SHARP CUSTOMER
Thank you for your purchase of the Sharp LCD TV. To ensure safety and many years
of trouble-free operation of your product, please read the Important Safety
Instructions carefully before using this product.
IMPORTANT SAFETY INSTRUCTIONS
Electricity is used to perform many useful functions, but it can also cause personal injuries and property damage if improperly handled. This
product has been engineered and manufactured with the highest priority on safety. However, improper use can result in electric shock and/or fire.
In order to prevent potential danger, please observe the following instructions when installing, operating and cleaning the product. To ensure your
safety and prolong the service life of your LCD TV, please read the following precautions carefully before using the product.
1) Read these instructions.
2) Keep these instructions.
3) Heed all warnings.
4) Follow all instructions.
5) Do not use this apparatus near water.
6) Clean only with dry cloth.
7) Do not block any ventilation openings. Install in accordance with the manufacturer's instructions.
8) Do not install near any heat sources such as radiators, heat registers, stoves, or other apparatus (including amplifiers) that produce heat.
9) Do not defeat the safety purpose of the polarized or grounding-type plug. A polarized plug has two blades with one wider than the other.
A grounding type plug has two blades and a third grounding prong. The wide blade or the third prong are provided for your safety. If the
provided plug does not fit into your outlet, consult an electrician for replacement of the obsolete outlet.
10) Protect the power cord from being walked on or pinched particularly at plugs, convenience receptacles, and the point where they exit from
the apparatus.
11) Only use attachments/accessories specified by the manufacturer.
12) Use only with the cart, stand, tripod, bracket, or table specified by the manufacturer, or sold with the apparatus. When a cart is used, use
caution when moving the cart/apparatus combination to avoid injury from tip-over.
13) Unplug this apparatus during lightning storms or when unused for long periods of time.
14) Refer all servicing to qualified service personnel. Servicing is required when the apparatus has been damaged in any way, such as
power-supply cord or plug is damaged, liquid has been spilled or objects have fallen into the apparatus, the apparatus has been exposed
to rain or moisture, does not operate normally, or has been dropped.
en-US 1

[ENGLISH]
Contents
>>
<<
1.
Part Names
2.
Introduction
3.
Direct Button Operation
4.
On
-Screen Display Menu
5.
Application
6.
Using a PC
7.
Using the touch function
8.
Appendix
9.
Specifications
10.
Trademarks
11.
Dimensional Drawings
Ver. 1.1
Important
IMPORTANT SAFETY INSTRUCTIONS
15) Power Sources—This product should be operated only from the type of power source indicated on the marking label. If you are not sure of the
type of power supply to your home, consult your product dealer or local power company. For products intended to operate from battery power,
or other sources, refer to the operating instructions.
16) Overloading—Do not overload wall outlets, extension cords, or integral convenience receptacles as this can result in a risk of fire or electric
shock.
17) Object and Liquid Entry—Never push objects of any kind into this product through openings as they may touch dangerous voltage points or
short-out parts that could result in a fire or electric shock. Never spill liquid of any kind on the product.
18) Damage Requiring Service—Unplug this product from the wall outlet and refer servicing to qualified service personnel under the following
conditions:
a) When the AC cord or plug is damaged.
b) If liquid has been spilled, or objects have fallen into the product.
c) If the product has been exposed to rain or water.
d) If the product does not operate normally by following the operating instructions.
Adjust only those controls that are covered by the operating instructions as an improper adjustment of other controls may result in
damage and will often require extensive work by a qualify ed technician to restore the product to its normal operation.
e) If the product has been dropped or damaged in any way, and
f) When the product exhibits a distinct change in performance - this indicates a need for service.
19) Replacement Parts—When replacement parts are required, be sure the service technician has used replacement parts specified by the
manufacturer or have the same characteristics as the original part. Unauthorized substitutions may result in fire, electric shock, or other
hazards.
20) Safety Check—Upon completion of any service or repairs to this product, ask the service technician to perform safety checks to determine
that the product is in proper operating condition.
21) Wall or ceiling mounting—When mounting the product on a wall or ceiling, be sure to install the product according to the method
recommended by the manufacturer.
Additional Safety Information
en-US 2
[ENGLISH]
Contents
>>
<<
1.
Part Names
2.
Introduction
3.
Direct Button Operation
4.
On
-Screen Display Menu
5.
Application
6.
Using a PC
7.
Using the touch function
8.
Appendix
9.
Specifications
10.
Trademarks
11.
Dimensional Drawings
Ver. 1.1
Important
IMPORTANT SAFETY INSTRUCTIONS
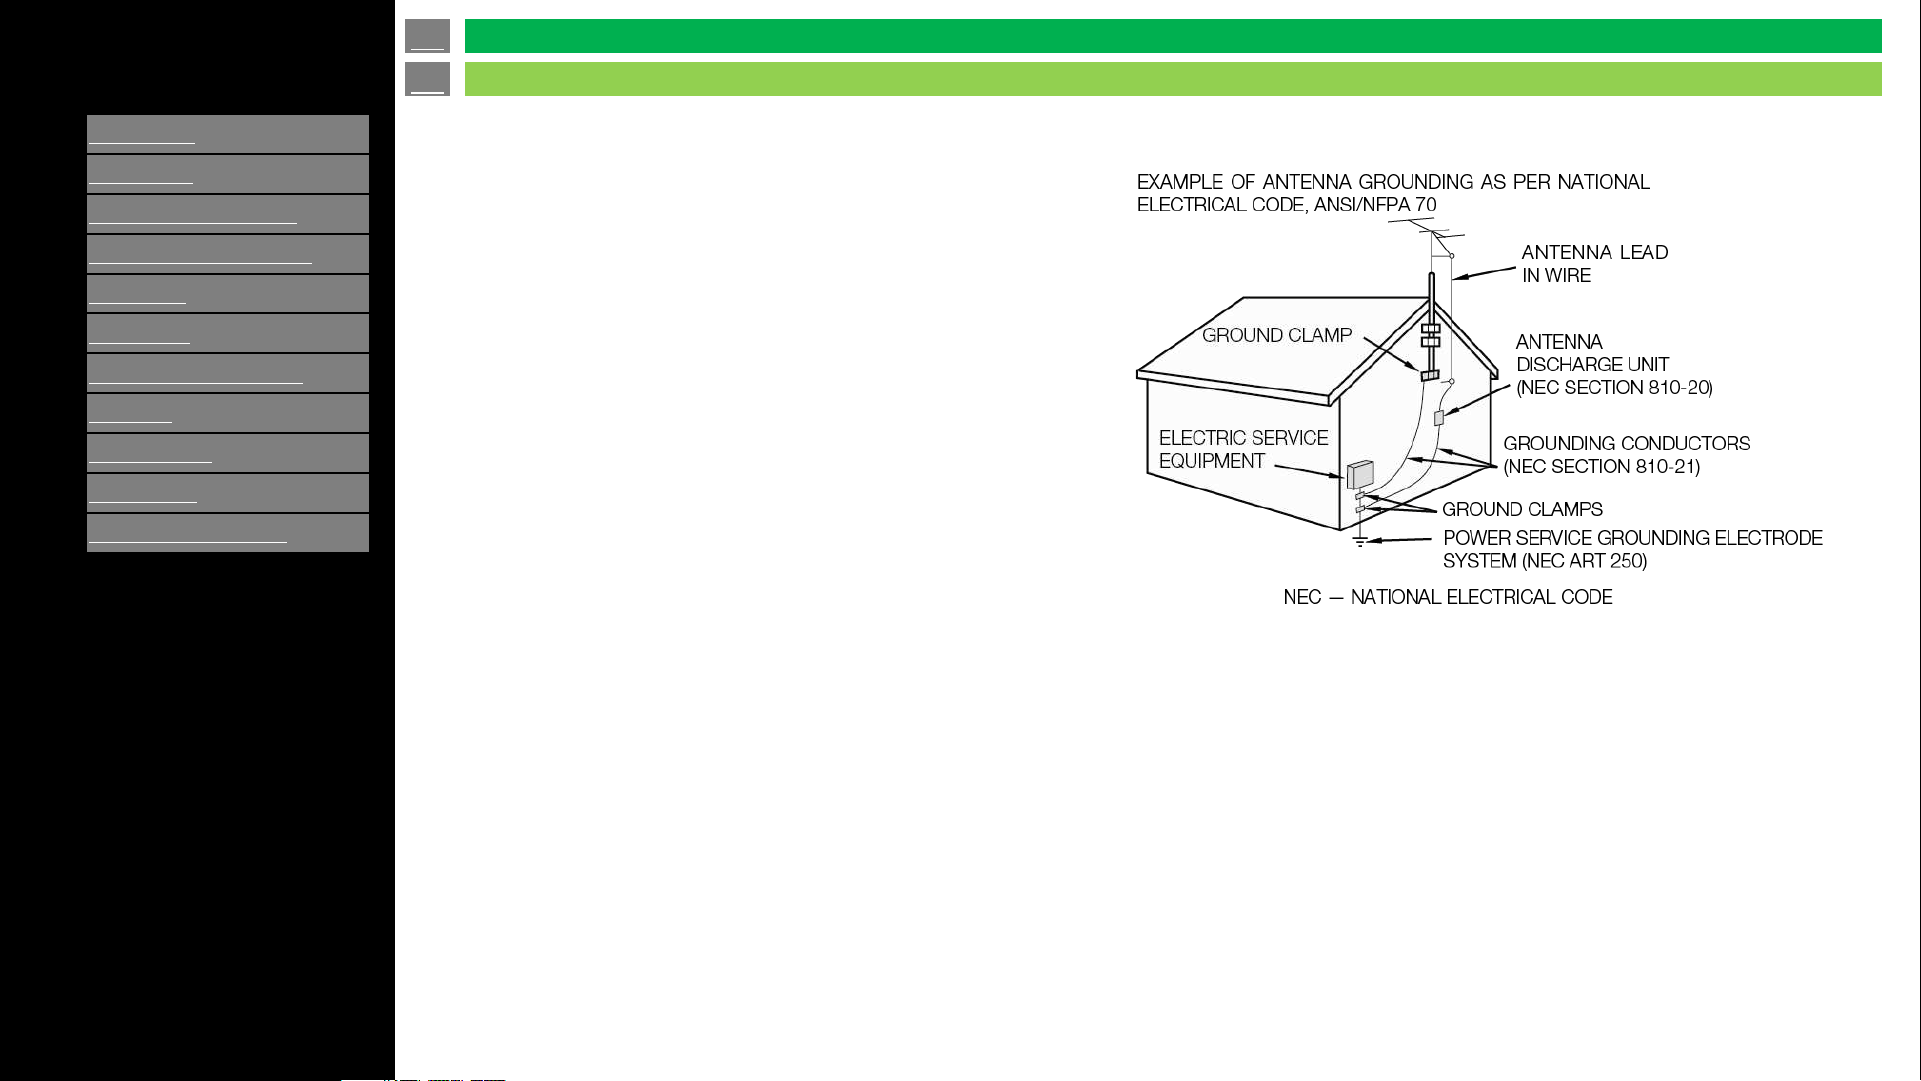
Outdoor Antenna Grounding — If an outside antenna is
connected to the television equipment, be sure the antenna
system is grounded so as to provide some protection against
voltage surges and built-up static charges. Article 810 of the
National Electrical Code, ANSI/ NFPA 70, provides
information regarding proper grounding of the mast and
supporting structure, grounding of the lead-in wire to an
antenna discharge unit, size of grounding conductors,
location of antenna-discharge unit, connection to grounding
electrodes, and requirements for the grounding electrode.
en-US 3

[ENGLISH]
Contents
>>
<<
1.
Part Names
2.
Introduction
3.
Direct Button Operation
4.
On
-Screen Display Menu
5.
Application
6.
Using a PC
7.
Using the touch function
8.
Appendix
9.
Specifications
10.
Trademarks
11.
Dimensional Drawings
Ver. 1.1
Important
IMPORTANT SAFETY INSTRUCTIONS
• Water and Moisture — Do not use this product near water - for example, near a bath tub, wash bowl, kitchen sink, or laundry tub; in a wet
basement; or near a swimming pool; and the like.
• Stand — Do not place the product on an unstable cart, stand, tripod or table. Placing the product on an unstable base can cause the product to
fall, resulting in serious personal injuries as well as damage to the product. Use only a cart, stand, tripod, bracket or table recommended by the
manufacturer or sold with the product. When mounting the product on a wall, be sure to follow the manufacturer's instructions. Use only the
mounting hardware recommended by the manufacturer.
• Selecting the location — Select a place with no direct sunlight and good ventilation.
• Ventilation — The vents and other openings in the cabinet are designed for ventilation. Do not cover or block these vents and openings since
insufficient ventilation can cause overheating and/or shorten the life of the product. Do not place the product on a bed, sofa, rug or other similar
surface, since they can block ventilation openings. This product is not designed for built-in installation; do not place the product in an enclosed
place such as a bookcase or rack, unless proper ventilation is provided or the manufacturer's instructions are followed.
• The front panel used in this product is made of glass. Therefore, it can break when the product is dropped or applied with impact. Be careful
not to be injured by broken glass pieces in case the panel breaks.
• Heat — The product should be situated away from heat sources such as radiators, heat registers, stoves, or other products (including
amplifiers) that produce heat.
• The Liquid Crystal panel is a very high technology product with 8,294,400 pixels, giving you fine picture details. Occasionally, a few non-active
pixels may appear on the screen as a fixed point of blue, green or red. Please note that this does not affect the performance of your product.
• Lightning — For added protection for this television equipment during a lightning storm, or when it is left unattended and unused for long
periods of time, unplug it from the wall outlet and disconnect the antenna. This will prevent damage to the equipment due to lightning and
power-line surges.
• Power Lines — An outside antenna system should not be located in the vicinity of overhead power lines or other electric light or power circuits,
or where it can fall into such power lines or circuits. When installing an outside antenna system, extreme care should be taken to keep from
touching such power lines or circuits as contact with them might be fatal.
• To prevent fire, never place any type of candle or flames on the top or near the TV set.
• To prevent fire or shock hazard, do not place the AC cord under the TV set or other heavy items.
en-US 4

[ENGLISH]
Contents
>>
<<
1.
Part Names
2.
Introduction
3.
Direct Button Operation
4.
On
-Screen Display Menu
5.
Application
6.
Using a PC
7.
Using the touch function
8.
Appendix
9.
Specifications
10.
Trademarks
11.
Dimensional Drawings
Ver. 1.1
Important
IMPORTANT SAFETY INSTRUCTIONS
A television set may fall causing serious personal injury or death. Many injuries, particularly to children, can be avoided by taking simple
precautions such as:
- ALWAYS use cabinets or stands or mounting method recommended by the manufacturer of the television set.
- ALWAYS use furniture that can safely support the television set.
- ALWAYS ensure the television set is not overhanging the edge of the supporting furniture.
- ALWAYS educate children about the dangers of climbing on furniture to reach the television set or its controls.
- ALWAYS route cords and cables connected to your television so they cannot be tripped over, pulled or grabbed.
- NEVER place a television set in an unstable location.
- NEVER place the television set on tall furniture (for example, cupboards or bookcases) without anchoring both the furniture and the
television set to a suitable support.
- NEVER place the television set on cloth or other materials that may be located between the television set and supporting furniture.
- NEVER place items that might tempt children to climb, such as toys and remote controls, on the top of the television or furniture on which
the television is placed.
If the existing television set is going to be retained and relocated, the same considerations as above should be applied.
WARNING – Stability Hazard
CAUTION
- Replacement of a battery with an incorrect type that can defeat a safeguard (for example, in the case of some lithium battery types).
- Disposal of a battery into fire or a hot oven, or mechanically crushing or cutting of a battery, that can result in an explosion.
- Leaving a battery in an extremely high temperature surrounding environment that can result in an explosion or the leakage of flammable
liquid or gas.
- A battery subjected to extremely low air pressure that may result in an explosion or the leakage of flammable liquid or gas.
- Risk of fire or explosion if the battery is replaced by an incorrect type.
en-US 5
[ENGLISH]
Contents
>>
<<
1.
Part Names
2.
Introduction
3.
Direct Button Operation
4.
On
-Screen Display Menu
5.
Application
6.
Using a PC
7.
Using the touch function
8.
Appendix
9.
Specifications
10.
Trademarks
11.
Dimensional Drawings
Ver. 1.1
Important
IMPORTANT SAFETY INSTRUCTIONS
• Do not display a still picture for a long time, as this could cause an afterimage to remain.
• To prevent fire or shock hazard, do not expose this product to dripping or splashing. No objects filled with
liquids, such as vases, should be placed on the product.
• Do not insert foreign objects into the product. Inserting objects in the air vents or other openings may
result in fire or electric shock. Exercise special caution when using the product around children.
Caring for the cabinet
• Use a soft cloth (cotton, flannel, etc.) and gently wipe the surface of the cabinet.
• Using a chemical cloth (wet/dry sheet type cloth, etc.) may deform the components of the main unit cabinet or cause cracking.
• Wiping with a hard cloth or using strong force may scratch the surface of the cabinet.
• If the cabinet is very dirty, wipe with a soft cloth (cotton, flannel, etc.) soaked in neutral detergent diluted with water and thoroughly wrung
out, and then wipe with a soft dry cloth.
• Avoid using benzene, thinner, and other solvents, as these may deform the cabinet and cause the paint to peel off.
• Do not apply insecticides or other volatile liquids.
• Also, do not allow the cabinet to remain in contact with rubber or vinyl products for a long period of time. Plasticizers inside the plastic may
cause the cabinet to deform and cause the paint to peel off
Precautions when transporting the TV (For SHARP dealer and service engineers)
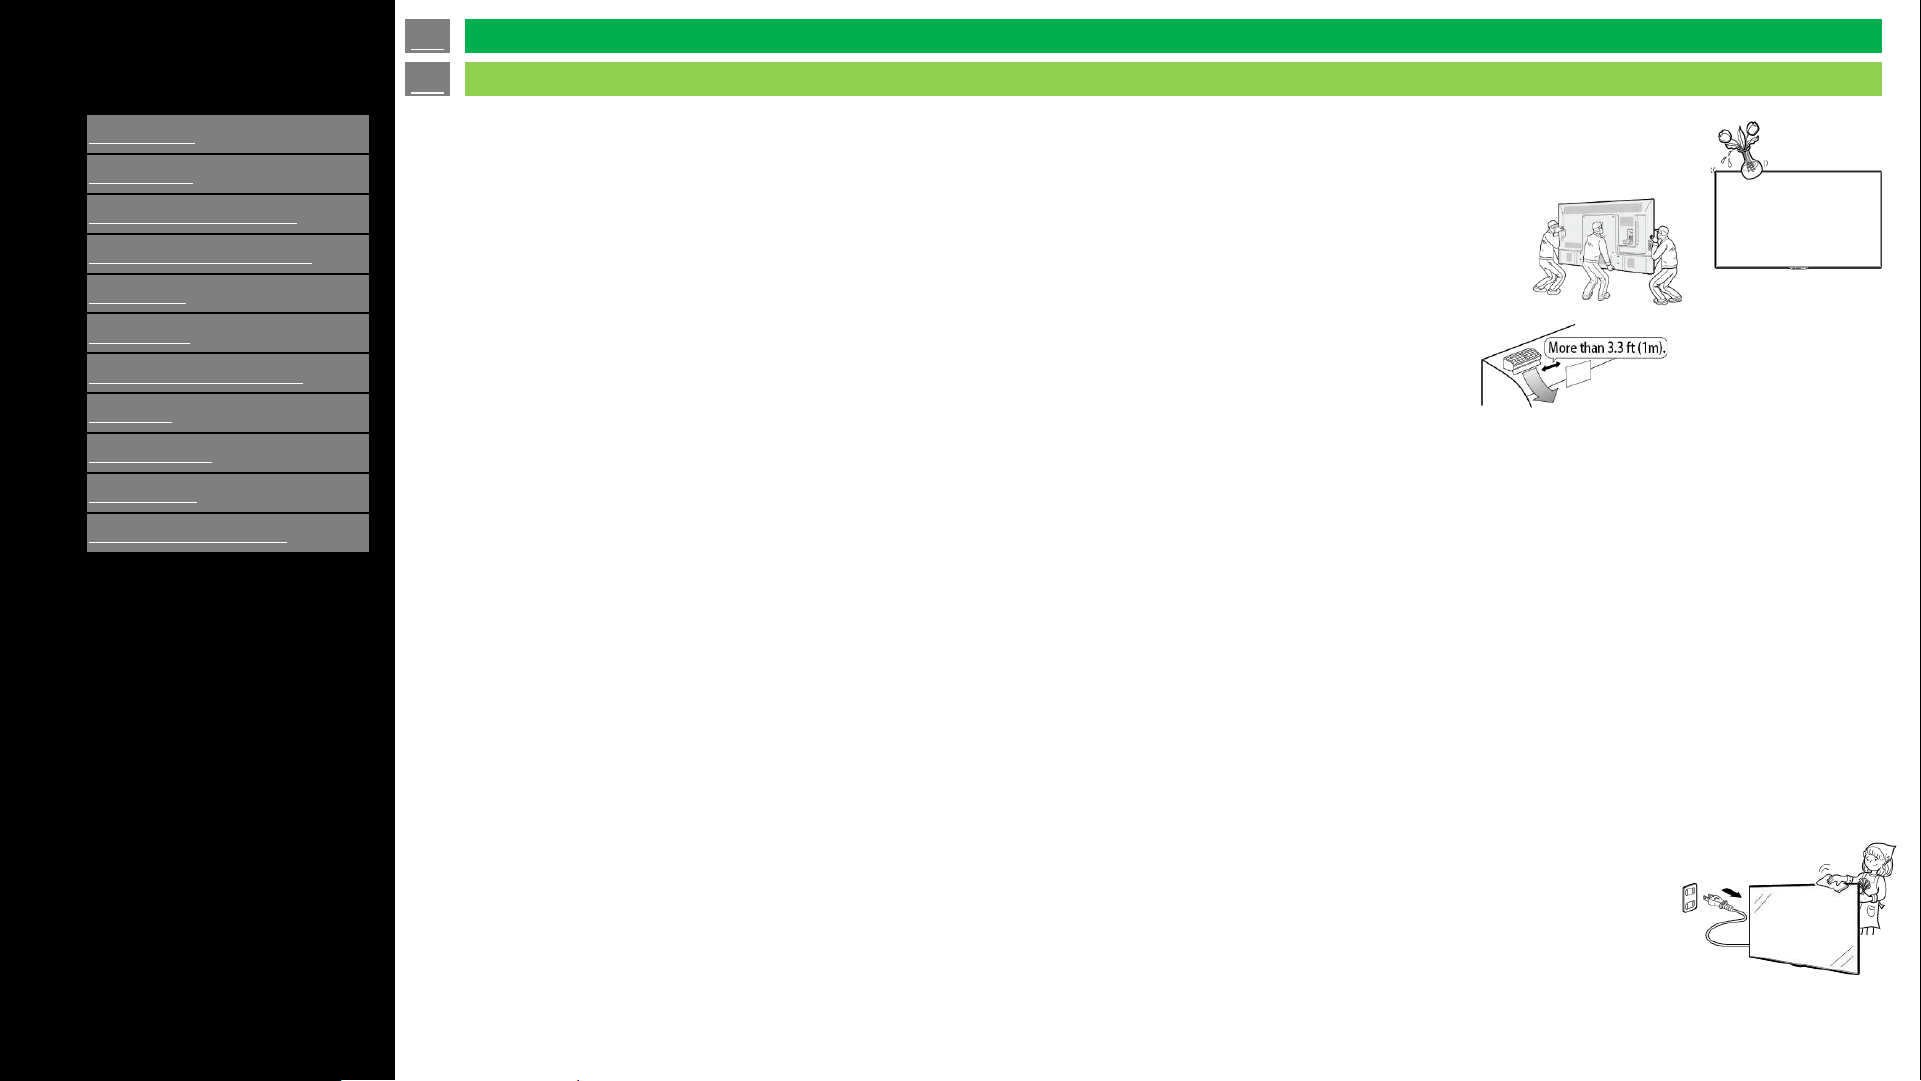
• When transporting the TV, never carry it by holding or otherwise putting pressure onto the display.
Be sure to always carry the TV by four people.
Do not install the TV in a location in which it will be subject to water drops such as underneath
an air conditioning unit or in the vicinity of a humidifier
• Water drops falling onto the TV and water entering inside it may result in fire, electric shock, or
malfunctions.
• We recommend that you install the TV at least 3.3 ft (1m) away from the outlet of an air conditioner.
Caring for the front panel
• Turn off the main power and unplug the AC cord from the wall outlet before handling.
• Gently wipe the surface of the front panel with a soft cloth (cotton, flannel, etc.). To protect the front panel, do not use a dirty cloth, liquid
cleaners, or a chemical cloth (wet/dry sheet type cloth, etc.). This may damage the surface of the front panel.
• Wiping with a hard cloth or using strong force may scratch the surface of the front panel.
• Use a soft damp cloth to gently wipe the front panel when it is really dirty.(It may scratch the surface of the front panel
when wiped strongly.)
• If the front panel is dusty, use an anti-static brush, which is commercially available, to clean it.
• To avoid scratching the frame or screen, please use a soft, lint free cloth for cleaning. Approved cleaning cloths are available directly
from Sharp in single (00Z-LCD-CLOTH) or triple (00Z-LCD-CLOTH-3) packs. Call 1-877-PRO-ADV1 (1-877-776-2381) for ordering,
or VISIT http://www.sharpusa.com.
en-US 6

[ENGLISH]
Contents
>>
<<
1.
Part Names
2.
Introduction
3.
Direct Button Operation
4.
On
-Screen Display Menu
5.
Application
6.
Using a PC
7.
Using the touch function
8.
Appendix
9.
Specifications
10.
Trademarks
11.
Dimensional Drawings
Ver. 1.1
Important
IMPORTANT SAFETY INSTRUCTIONS
Especially for child safety
- Don’t allow children to climb on or play with the TV.
- Don’t place the TV on furniture that can easily be used as steps, such as a chest of drawers.
- Remember that children can become excited while watching a program, especially on a “larger than life” TV. Care should be taken to place
or install the TV where it cannot be pushed, pulled over, or knocked down.
- Care should be taken to route all cords and cables connected to the TV so that they cannot be pulled or grabbed by curious children.
FCC
This device complies with part 15 of the FCC Rules. Operation is subject to the following two conditions:
(1) This device may not cause harmful interference, and (2) this device must accept any interference received, including interference that may
cause undesired operation. Changes or modifications not expressly approved by the party responsible for compliance could void the user’s
authority to operate the equipment. To comply with the FCC RF exposure compliance requirements, this device and its antenna must not be co-
located or operated in conjunction with any other antenna or transmitter.
en-US 7

[ENGLISH]
Contents
>>
<<
1.
Part Names
2.
Introduction
3.
Direct Button Operation
4.
On
-Screen Display Menu
5.
Application
6.
Using a PC
7.
Using the touch function
8.
Appendix
9.
Specifications
10.
Trademarks
11.
Dimensional Drawings
Ver. 1.1
IMPORTANT SAFETY INSTRUCTIONS
1. Part Names
1-1. TV (4P-B43EJ2U / 4P-B50EJ2U / 4P-B55EJ2U
/ 4P-B65EJ2U / 4P-B75EJ2U / 4P-B86EJ2U)
1-2. TV (4W-B55FT5U / 4W-B65FT5U / 4W-B75FT5U
/ 4W-B86FT5U)
1-3. Remote Control Unit
2. Introduction
2-1. Initial Installation
3. Direct Button Operation
3-1. Changing Input Source
3-2. Changing Channels
3-3. Changing Volume / MUTE
3-4. Displaying MANUAL
3-5. Displaying Current Input Mode
3-6. Sleep Timer
3-7. APPS
3-8. CEC MENU
4. On-Screen Display Menu
4-1. Introduction
4-2. Menu Operation Buttons
4-3. Video Settings
4-4. Audio Settings
4-5. Setup
4-6. Parental Control
4-7. About
5. Application
5-1. MMP - Video playback
5-2. OPEN BROWSER
5-3. ScreenCast
6. Using a PC
6-1. Control of the TV
6-2. PC Compatibility Chart/AV Compatibility Chart
7. Using the touch function
7-1. Computer connection
7-2. Touch actions
8. Appendix
8-1. Setting the TV on the Wall
8-2. Troubleshooting
9. Specifications
9-1. TV (4P-B43EJ2U / 4P-B50EJ2U / 4P-B55EJ2U
/ 4P-B65EJ2U / 4P-B75EJ2U / 4P-B86EJ2U)
9-2. TV (4W-B55FT5U / 4W-B65FT5U/ 4W-B75FT5U
/ 4W-B86FT5U)
9-3. Wireless LAN
10. Trademarks
11. Dimensional Drawings
en-US 8
Contents
[ENGLISH]
Contents
>>
<<
1.
Part Names
1.
TV
(4P-B43EJ2U / 4P-
B50EJ2U / 4P
-B55EJ2U /
4P
-B65EJ2U / 4P-
B75EJ2U
/ 4P-B86EJ2U)
2.
TV
(4W-B55FT5U / 4P-
B65
FT5U / 4P-B75FT5U
4P
-B65FT5U / 4P-
B
86FT5U
3.
Remote Controller
2.
Introduction
3.
Direct Button Operation
4.
On
-Screen Display Menu
5.
Application
6.
Using a PC
7.
Using the touch function
8.
Appendix
9.
Specifications
10.
Trademarks
11.
Dimensional Drawings
Ver. 1.1
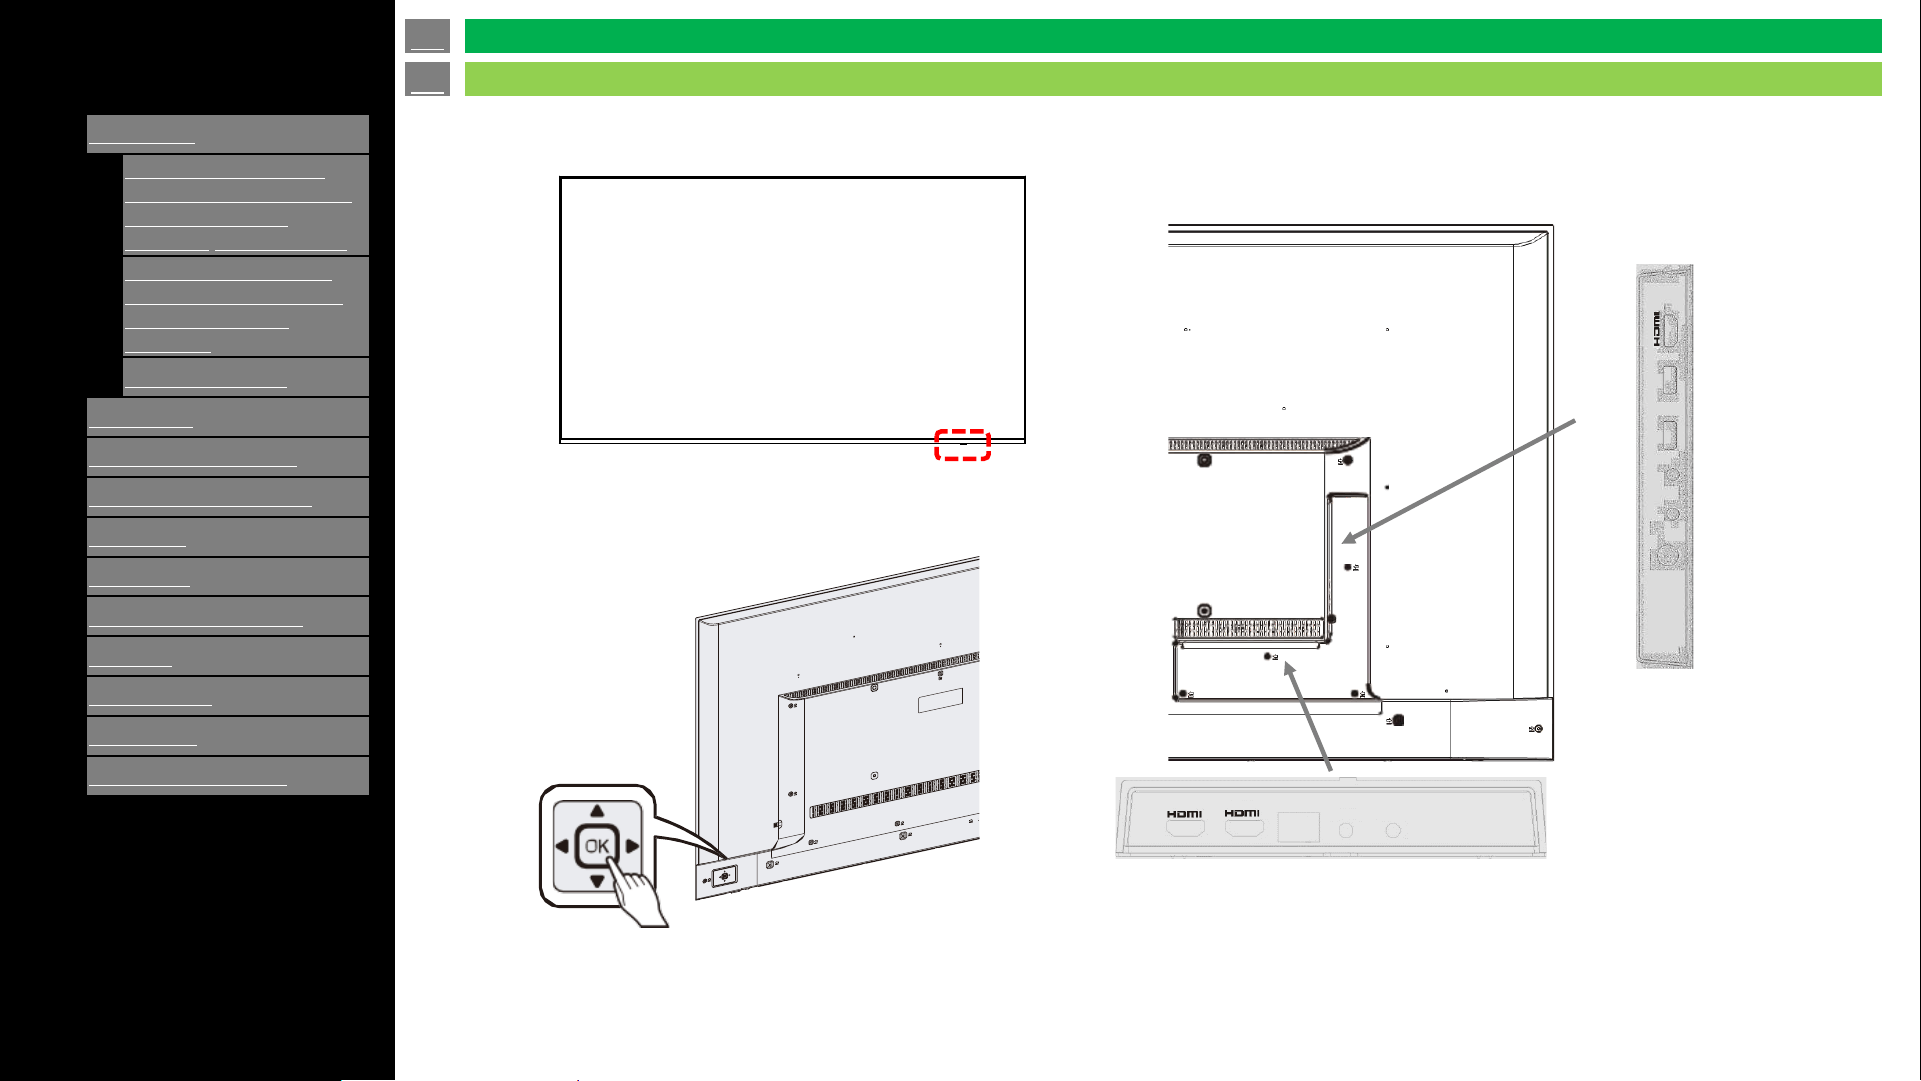
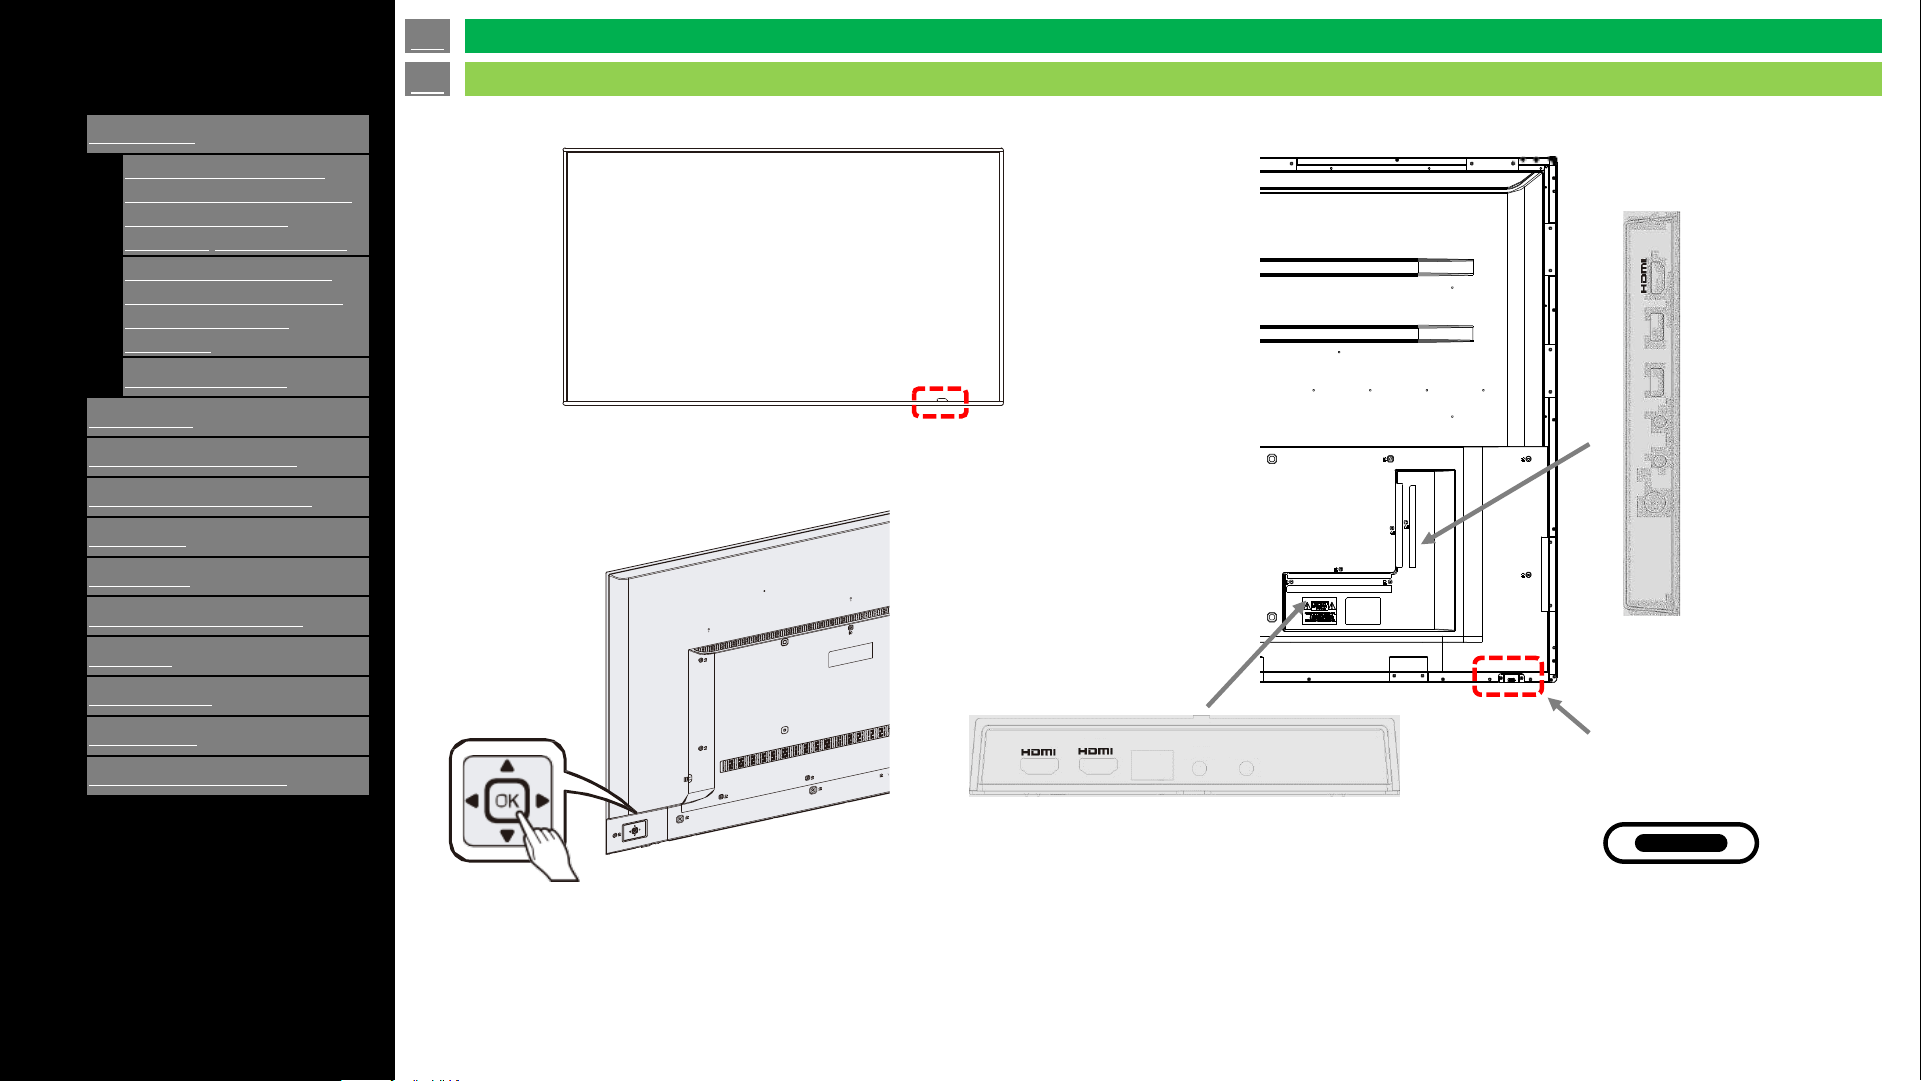
• The illustrations and on-screen displays in this operation manual
are for explanation purposes and may vary slightly from the actual
operations.
• The examples used throughout this manual are based on the
4P-B75EJ2U model.
(Rear)(Front)
(Rear)
Side I/O Panel
Bottom I/O Panel
RS-232 CEX-IR
LAN
(ARC)
-1
-2
en-US 9
Parts Names
TV (4P-B43EJ2U / 4P-B50EJ2U / 4P-B55EJ2U / 4P-B65EJ2U / 4P-B75EJ2U / 4P-B86EJ2U)
Power indicator
-3
USB-2
USB-1
EARPHONE
MINI AV-IN
TV
[ENGLISH]
Contents
>>
<<
1.
Part Names
1.
TV
(4P-B43EJ2U / 4P-
B50EJ2U / 4P
-B55EJ2U /
4P
-B65EJ2U / 4P-
B75EJ2U
/ 4P-B86EJ2U)
2.
TV
(4W-B55FT5U / 4P-
B65
FT5U / 4P-B75FT5U
4P
-B65FT5U / 4P-
B
86FT5U
3.
Remote Controller
2.
Introduction
3.
Direct Button Operation
4.
On
-Screen Display Menu
5.
Application
6.
Using a PC
7.
Using the touch function
8.
Appendix
9.
Specifications
10.
Trademarks
11.
Dimensional Drawings
Ver. 1.1
• The illustrations and on-screen displays in this
operation manual are for explanation purposes and
may vary slightly from the actual operations.
• The examples used throughout this manual are based
on the 4W-B75FT5U model.
(Rear)(Front)
(Rear)
Side I/O Panel
Bottom I/O Panel
RS-232 CEX-IR
LAN
(ARC)
-1
-2
-3
USB-2
USB-1
EARPHONE
MINI AV-IN
TV
en-US 10
Parts Names
TV (4W-B55FT5U / 4W-B65FT5U / 4W-B75FT5U / 4W-B86FT5U)
Power indicator
USB Type-C
(for Touch panel only)
USB
[ENGLISH]
Contents
>>
<<
1.
Part Names
1.
TV
(4P-B43EJ2U / 4P-
B50EJ2U / 4P
-B55EJ2U /
4P
-B65EJ2U / 4P-
B75EJ2U
/ 4P-B86EJ2U)
2.
TV
(4W-B55FT5U / 4P-
B65
FT5U / 4P-B75FT5U
4P
-B65FT5U / 4P-
B
86FT5U
3.
Remote Controller
2.
Introduction
3.
Direct Button Operation
4.
On
-Screen Display Menu
5.
Application
6.
Using a PC
7.
Using the touch function
8.
Appendix
9.
Specifications
10.
Trademarks
11.
Dimensional Drawings
Ver. 1.1
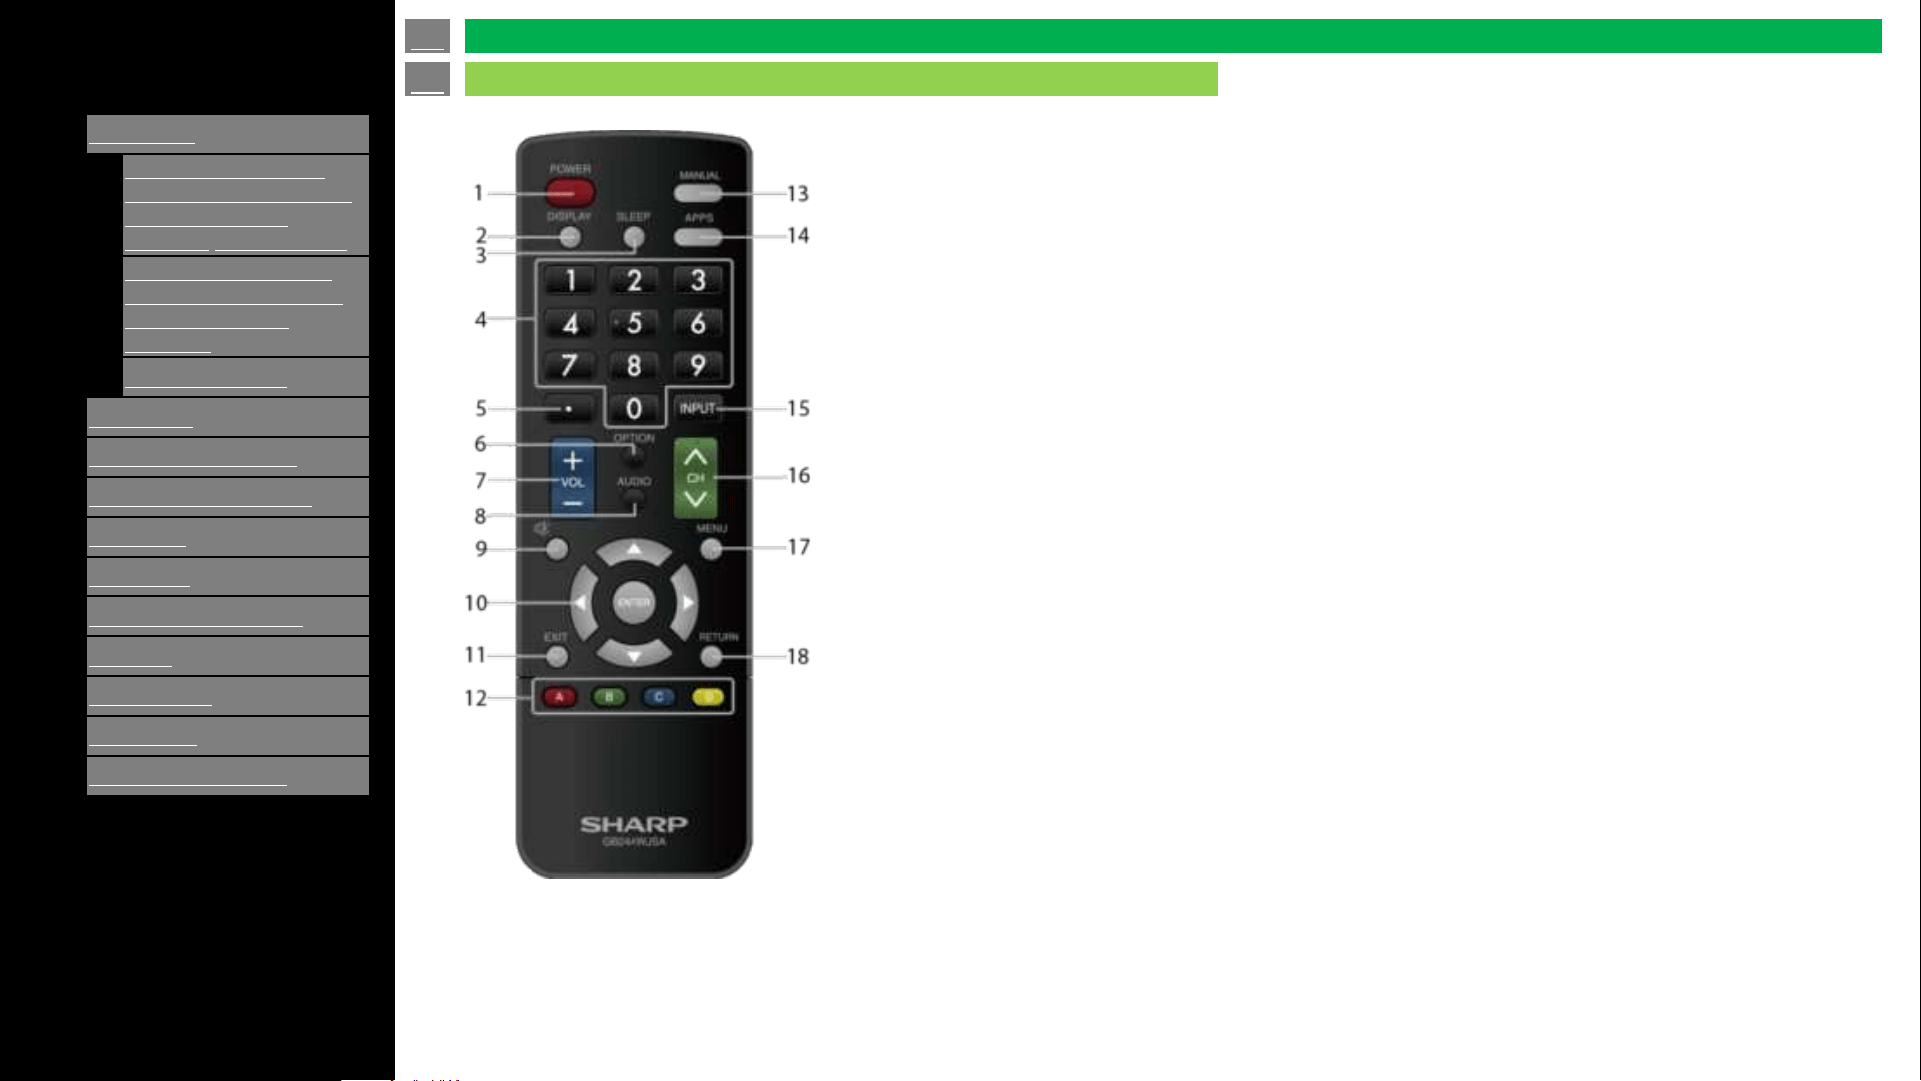
NOTE
• When using the remote control unit,
point it at the TV.
1 POWER: Switch the TV power on or enter standby.
2 DISPLAY: Display the channel information.
3 SLEEP: Set the sleep time (See “Direct Button Operation” > “Sleep Timer” )
4 0–9: Set the channel. (See “Direct Button Operation” > “Changing Channels” )
5 • (DOT): Set the channel. (See “Direct Button Operation” > “Changing Channels” )
6 OPTION: Display the HDMI CEC setting MENU screen. (See “Direct Button Operation” > “CEC Menu” )
7 VOL+/-: Set the volume. (See “Direct Button Operation” > “Changing Volume / MUTE” )
8 AUDIO: Function on TV Input. It depends of the audio type on the channel.
9 MUTE: Mute the sound. (See “Direct Button Operation” > “Changing Volume / MUTE” )
10 [left] / [right] / [up] / [down] (ENTER): Select a desired item on the screen.
11 EXIT: Exits Menu and APPS screen.
12 A/B/C/D: These buttons work as function keys and are different depending on the feature in use. Use
according to OSD.
13 MANUAL: Display the operation manual. (See “Direct Button Operation” > “Displaying Manual” )
14 APPS: Display the application window. (See “Direct Button Operation” > “APPS” )
15 INPUT: Select a TV input source. (See “Direct Button Operation” > “Changing Input Source” )
16 CH: Select the channel. (See “Direct Button Operation” > “Changing Channels” )
17 MENU: Display the menu screen. (See “On Screen Display Menu” > “Introduction” )
18 RETURN: Return to previous menu screen.
en-US 11
Parts Names
Remote Control Unit

[ENGLISH]
Contents
>>
<<
1.
Part Names
2.
Introduction
1.
Initial Installation
3.
Direct Button Operation
4.
On
-Screen Display Menu
5.
Application
6.
Using a PC
7.
Using the touch function
8.
Appendix
9.
Specifications
10.
Trademarks
11.
Dimensional Drawings
Ver. 1.1
Operation after first power-on
When the monitor is turned on for the first time after being shipped from the factory, the Initial Setup screen will be displayed.
NOTE
• You can change the TV configuration after finishing the Initial Setup by using "SETTINGS" on Menu.
• Regarding password of display, these are set as default as below;
System password: 1234
Public mode password : 027
You can also change these password from “MENU” after initial setup.
en-US 12
Introduction
Initial Installation
[ENGLISH]
Contents
>>
<<
1.
Part Names
2.
Introduction
3.
Direct Button Operation
1.
Changing Input Source
2.
Changing Channels
3.
Changing Volume / MUTE
4.
Displaying Manual
5.
Displaying Current Input
Mode
6.
Sleep Timer
7.
APPS
8.
CEC Menu
4.
On
-Screen Display Menu
5.
Application
6.
Using a PC
7.
Using the touch function
8.
Appendix
9.
Specifications
10.
Trademarks
11.
Dimensional Drawings
Ver. 1.1
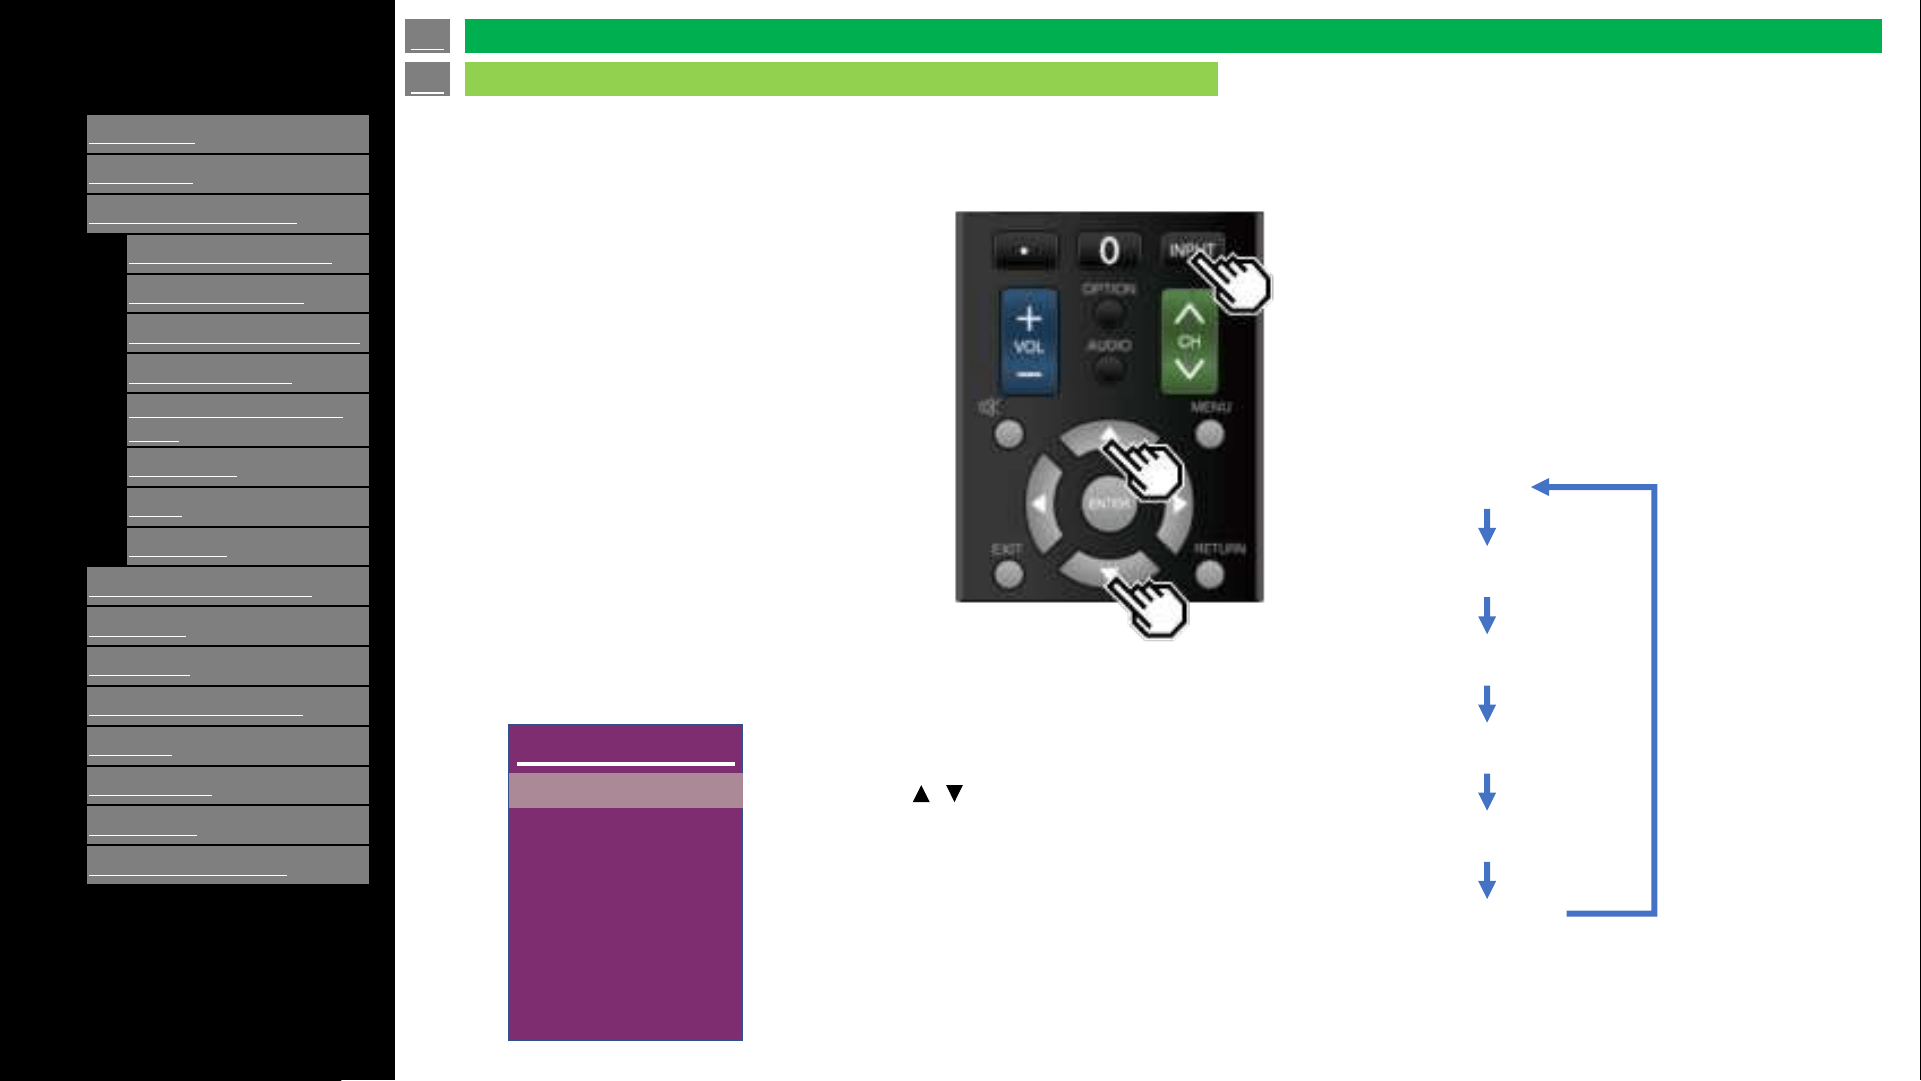
To view external source images, select the input source by pressing
INPUT on the remote control unit.
Example
• You can also select the input source by
pressing INPUT.
• Each time INPUT is pressed, the input
source toggles.
1 Press INPUT.
• The INPUT list screen displays.
2 Press / to select the input source.
• An image from the selected source
automatically displays.
Main
TV
Composite
HDMI 1
HDMI 2
HDMI 3
USB
✓
TV
Composite
HDMI 1
HDMI 2
HDMI 3
USB
en-US 13
Direct Button Operation
Changing Input Source

[ENGLISH]
Contents
>>
<<
1.
Part Names
2.
Introduction
3.
Direct Button Operation
1.
Changing Input Source
2.
Changing Channels
3.
Changing Volume / MUTE
4.
Displaying Manual
5.
Displaying Current Input
Mode
6.
Sleep Timer
7.
APPS
8.
CEC Menu
4.
On
-Screen Display Menu
5.
Application
6.
Using a PC
7.
Using the touch function
8.
Appendix
9.
Specifications
10.
Trademarks
11.
Dimensional Drawings
Ver. 1.1
1.
You can change channels in several ways.
Method 1
Using / on the remote control unit or on the TV.
Method 2
Using remote control buttons 0-9, • (DOT).
Examples:
To select a 1 or 2-digit channel number (e. g., Channel 5):
Press 5 ENTER
To select a 3-digit channel number (e. g., Channel 115):
Press 1 1 5 ENTER
To select a 4-digit channel number (e. g., Channel 22.1):
Press 2 2 • (DOT) 1 ENTER
NOTE
• When selecting a 1-digit channel number, it is
not necessary to press 0 before the number.
• When you enter 0-9 only, channel selection
will be made if there is no operation within a
few seconds.
• If you push "0" by itself, nothing will happen.
• Complete the above steps within a few
seconds.
• When you enter 0-9 and • (DOT), channel
selection will be made if there is no operation
within a few seconds.
en-US 14
Direct Button Operation
Changing Channels
[ENGLISH]
Contents
>>
<<
1.
Part Names
2.
Introduction
3.
Direct Button Operation
1.
Changing Input Source
2.
Changing Channels
3.
Changing Volume / MUTE
4.
Displaying Manual
5.
Displaying Current Input
Mode
6.
Sleep Timer
7.
APPS
8.
CEC Menu
4.
On
-Screen Display Menu
5.
Application
6.
Using a PC
7.
Using the touch function
8.
Appendix
9.
Specifications
10.
Trademarks
11.
Dimensional Drawings
Ver. 1.1
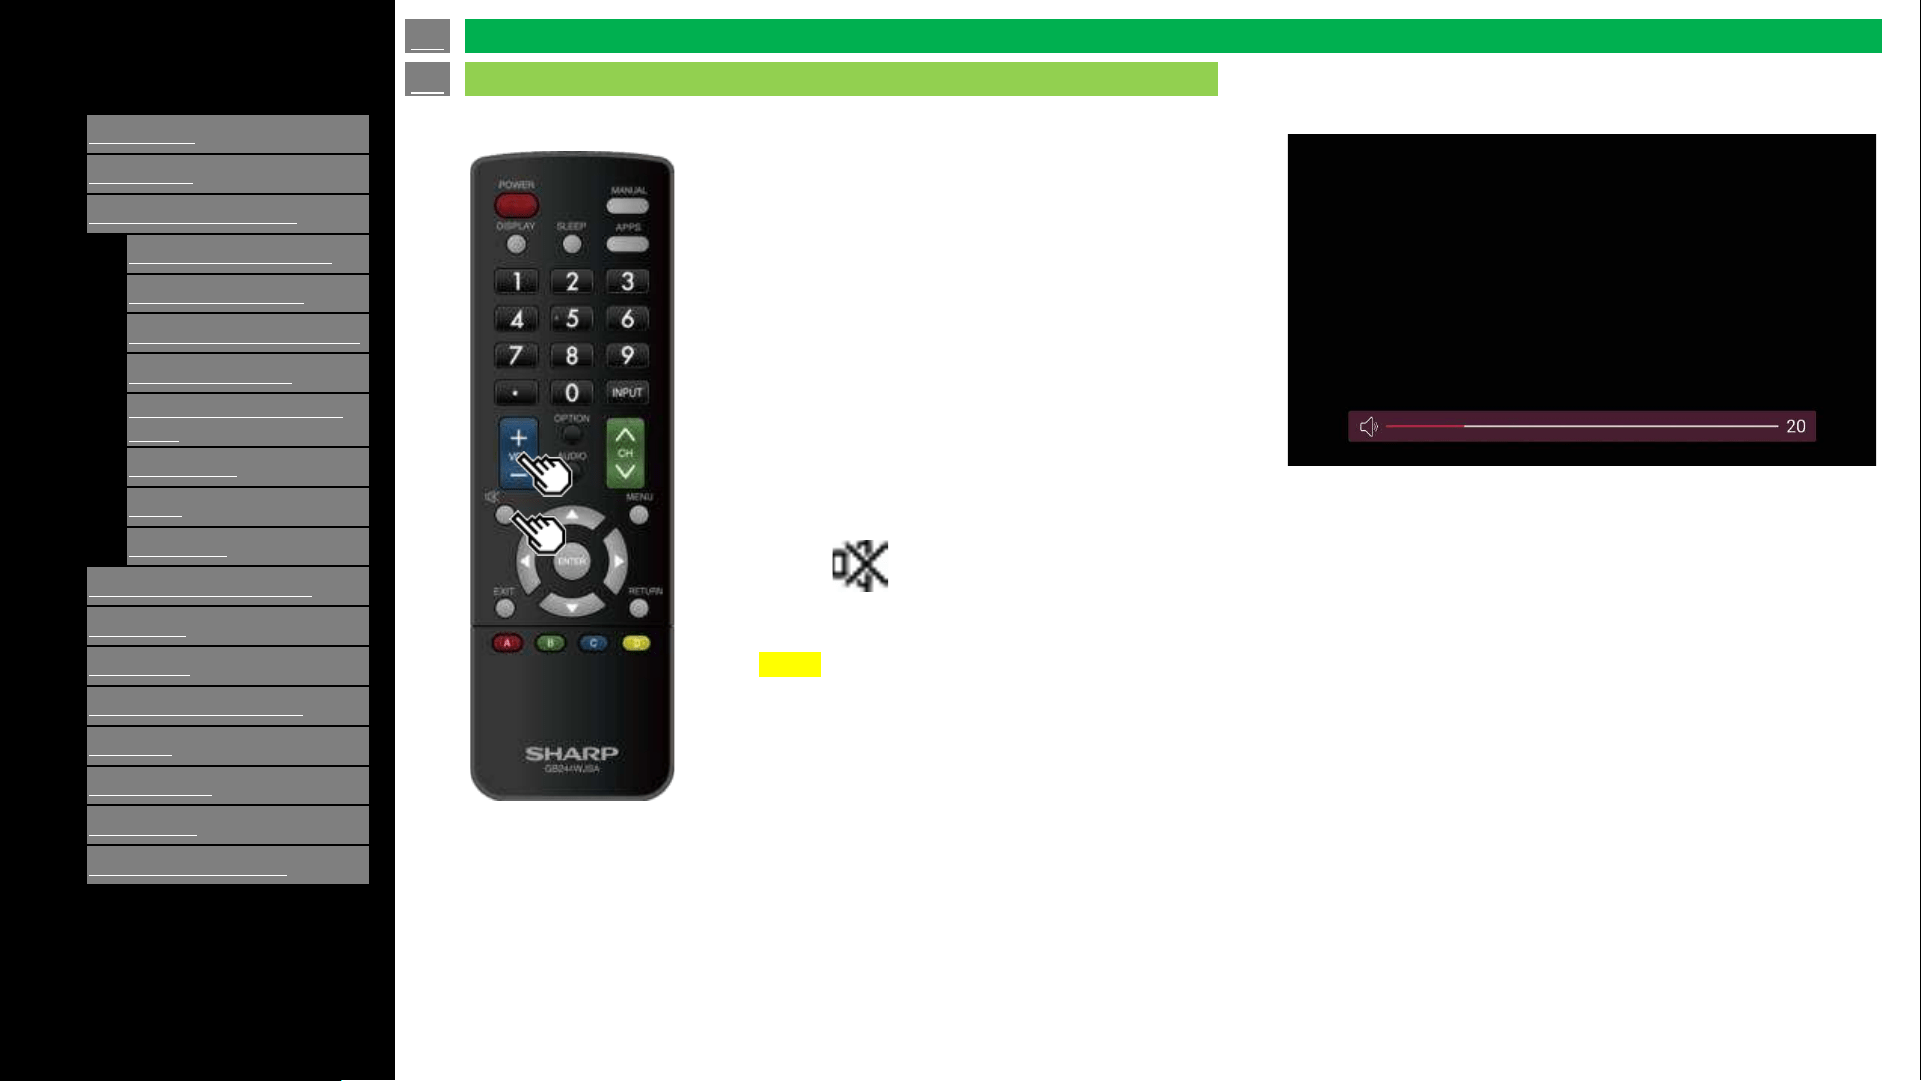
1.
You can change the volume by pressing VOL+/-
on the TV or on the remote control unit.
• To increase the volume, press VOL +.
• To decrease the volume, press VOL -.
Changing volume
MUTE
Press Mute button will mute audio. And screen will show mute icon at bottom of screen.
NOTE
• Mute can be cancelled by pressing VOL+/- or MUTE.
en-US 15
Direct Button Operation
Changing Volume / MUTE
[ENGLISH]
Contents
>>
<<
1.
Part Names
2.
Introduction
3.
Direct Button Operation
1.
Changing Input Source
2.
Changing Channels
3.
Changing Volume / MUTE
4.
Displaying Manual
5.
Displaying Current Input
Mode
6.
Sleep Timer
7.
APPS
8.
CEC Menu
4.
On
-Screen Display Menu
5.
Application
6.
Using a PC
7.
Using the touch function
8.
Appendix
9.
Specifications
10.
Trademarks
11.
Dimensional Drawings
Ver. 1.1
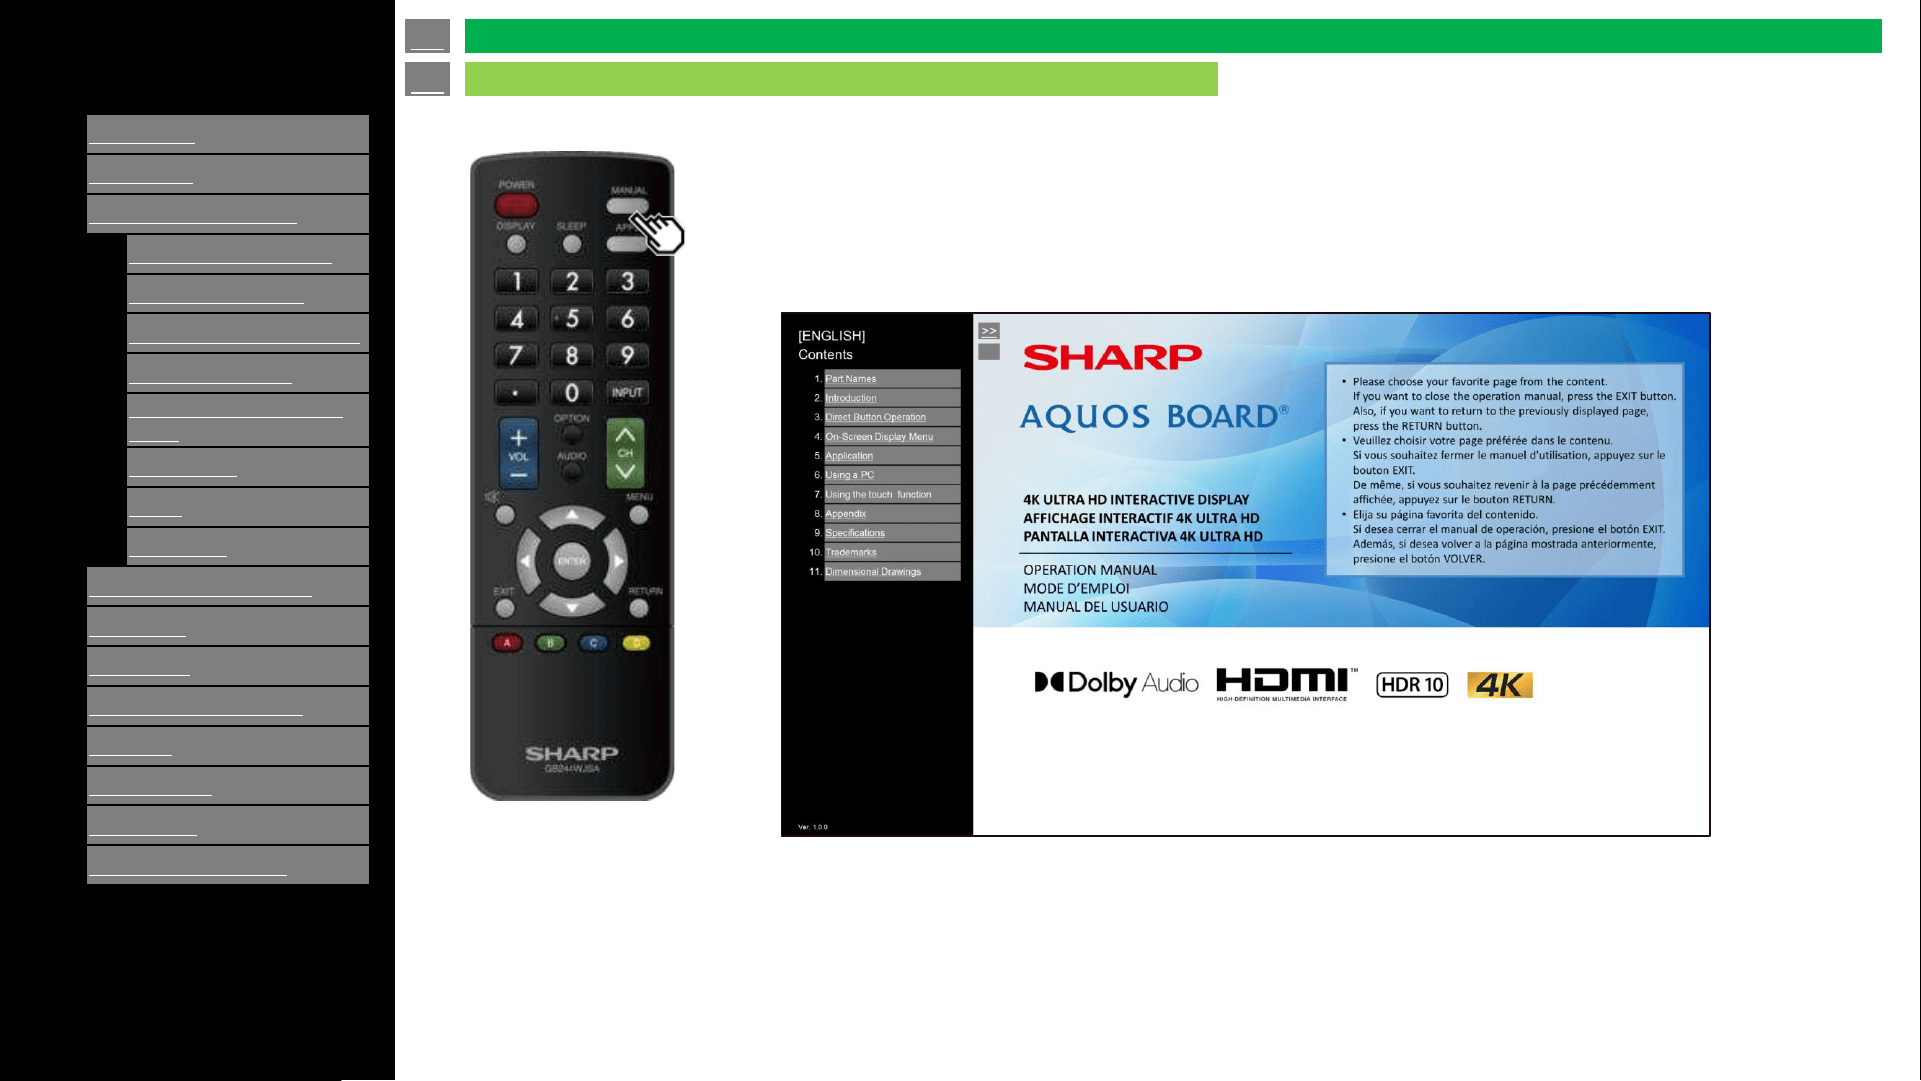
1.
To display this document, press "MANUAL" key on remote control.
en-US 16
Direct Button Operation
Changing Volume / MUTE

[ENGLISH]
Contents
>>
<<
1.
Part Names
2.
Introduction
3.
Direct Button Operation
1.
Changing Input Source
2.
Changing Channels
3.
Changing Volume / MUTE
4.
Displaying Manual
5.
Displaying Current Input
Mode
6.
Sleep Timer
7.
APPS
8.
CEC Menu
4.
On
-Screen Display Menu
5.
Application
6.
Using a PC
7.
Using the touch function
8.
Appendix
9.
Specifications
10.
Trademarks
11.
Dimensional Drawings
Ver. 1.1
1.
Display current source when you select some of AV input source TV,
Composite or HDMI 1 to 3
NOTE
• OSD message is not displayed if other functions are enabled (e.g. APPS, MENU, etc).
• If its necessary to return to AV input mode (TV, Composite, HDMI 1-3) use [EXIT] key.
HDMI 2
en-US 17
Direct Button Operation
Displaying Current Input Mode
[ENGLISH]
Contents
>>
<<
1.
Part Names
2.
Introduction
3.
Direct Button Operation
1.
Changing Input Source
2.
Changing Channels
3.
Changing Volume / MUTE
4.
Displaying Manual
5.
Displaying Current Input
Mode
6.
Sleep Timer
7.
APPS
8.
CEC Menu
4.
On
-Screen Display Menu
5.
Application
6.
Using a PC
7.
Using the touch function
8.
Appendix
9.
Specifications
10.
Trademarks
11.
Dimensional Drawings
Ver. 1.1
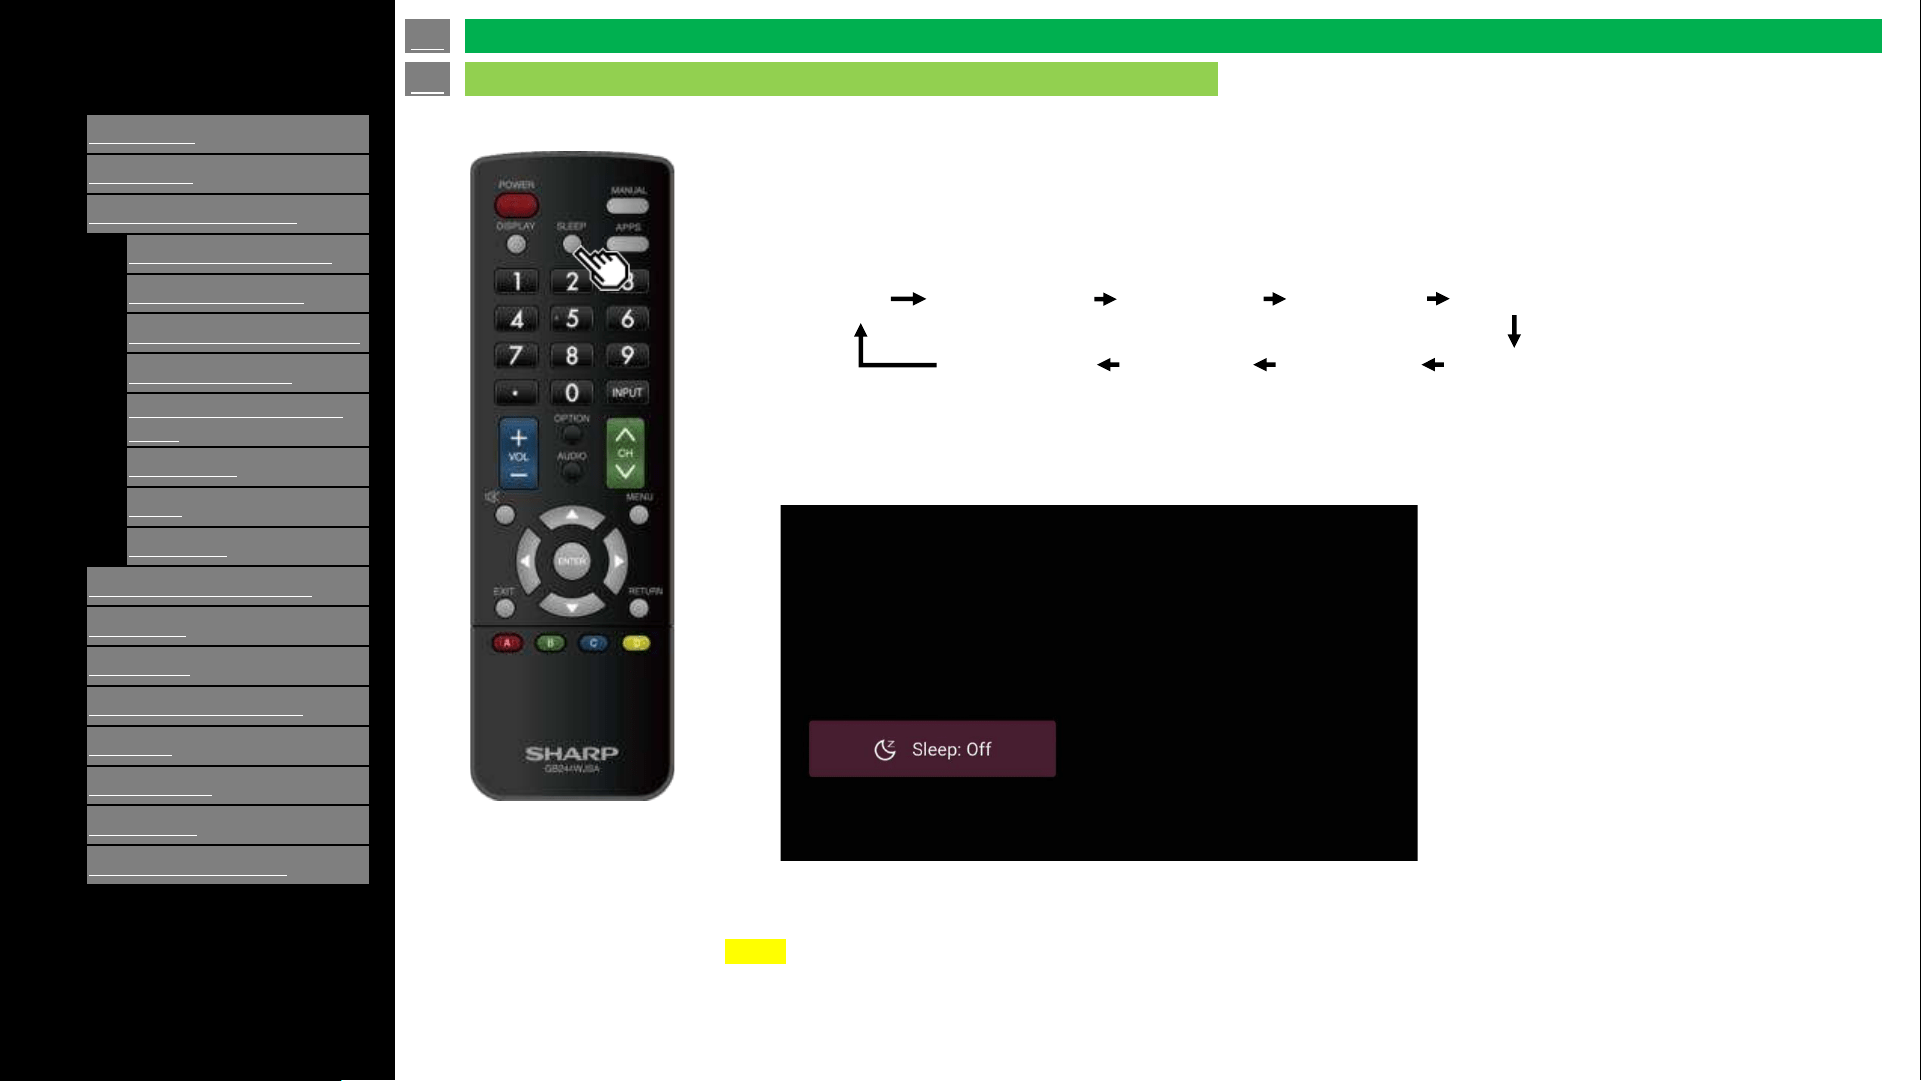
Sleep timer is used to turn off the TV automatically based on the settings without having to press the power
button on the remote control or the panel.
Press "Sleep" button to adjust the sleep timer to turn OFF the TV automatically.
After setting Sleep timer, the countdown will start. To show the countdown press "SLEEP" button once timer
is set. When 1 minute is remaining on timer, a prompt dialog box will pop up.
NOTE
• Select "Off" by pressing SLEEP to cancel the sleep timer.
• The TV will enter standby when the remaining time reaches 0.
Off 10 minutes 20 minutes 30 minutes 40 minutes
120 minutes 90 minutes 60 minutes 50 minutes
z
sleep: 10 minutes
en-US 18
Direct Button Operation
Sleep Timer
[ENGLISH]
Contents
>>
<<
1.
Part Names
2.
Introduction
3.
Direct Button Operation
1.
Changing Input Source
2.
Changing Channels
3.
Changing Volume / MUTE
4.
Displaying Manual
5.
Displaying Current Input
Mode
6.
Sleep Timer
7.
APPS
8.
CEC Menu
4.
On
-Screen Display Menu
5.
Application
6.
Using a PC
7.
Using the touch function
8.
Appendix
9.
Specifications
10.
Trademarks
11.
Dimensional Drawings
Ver. 1.1
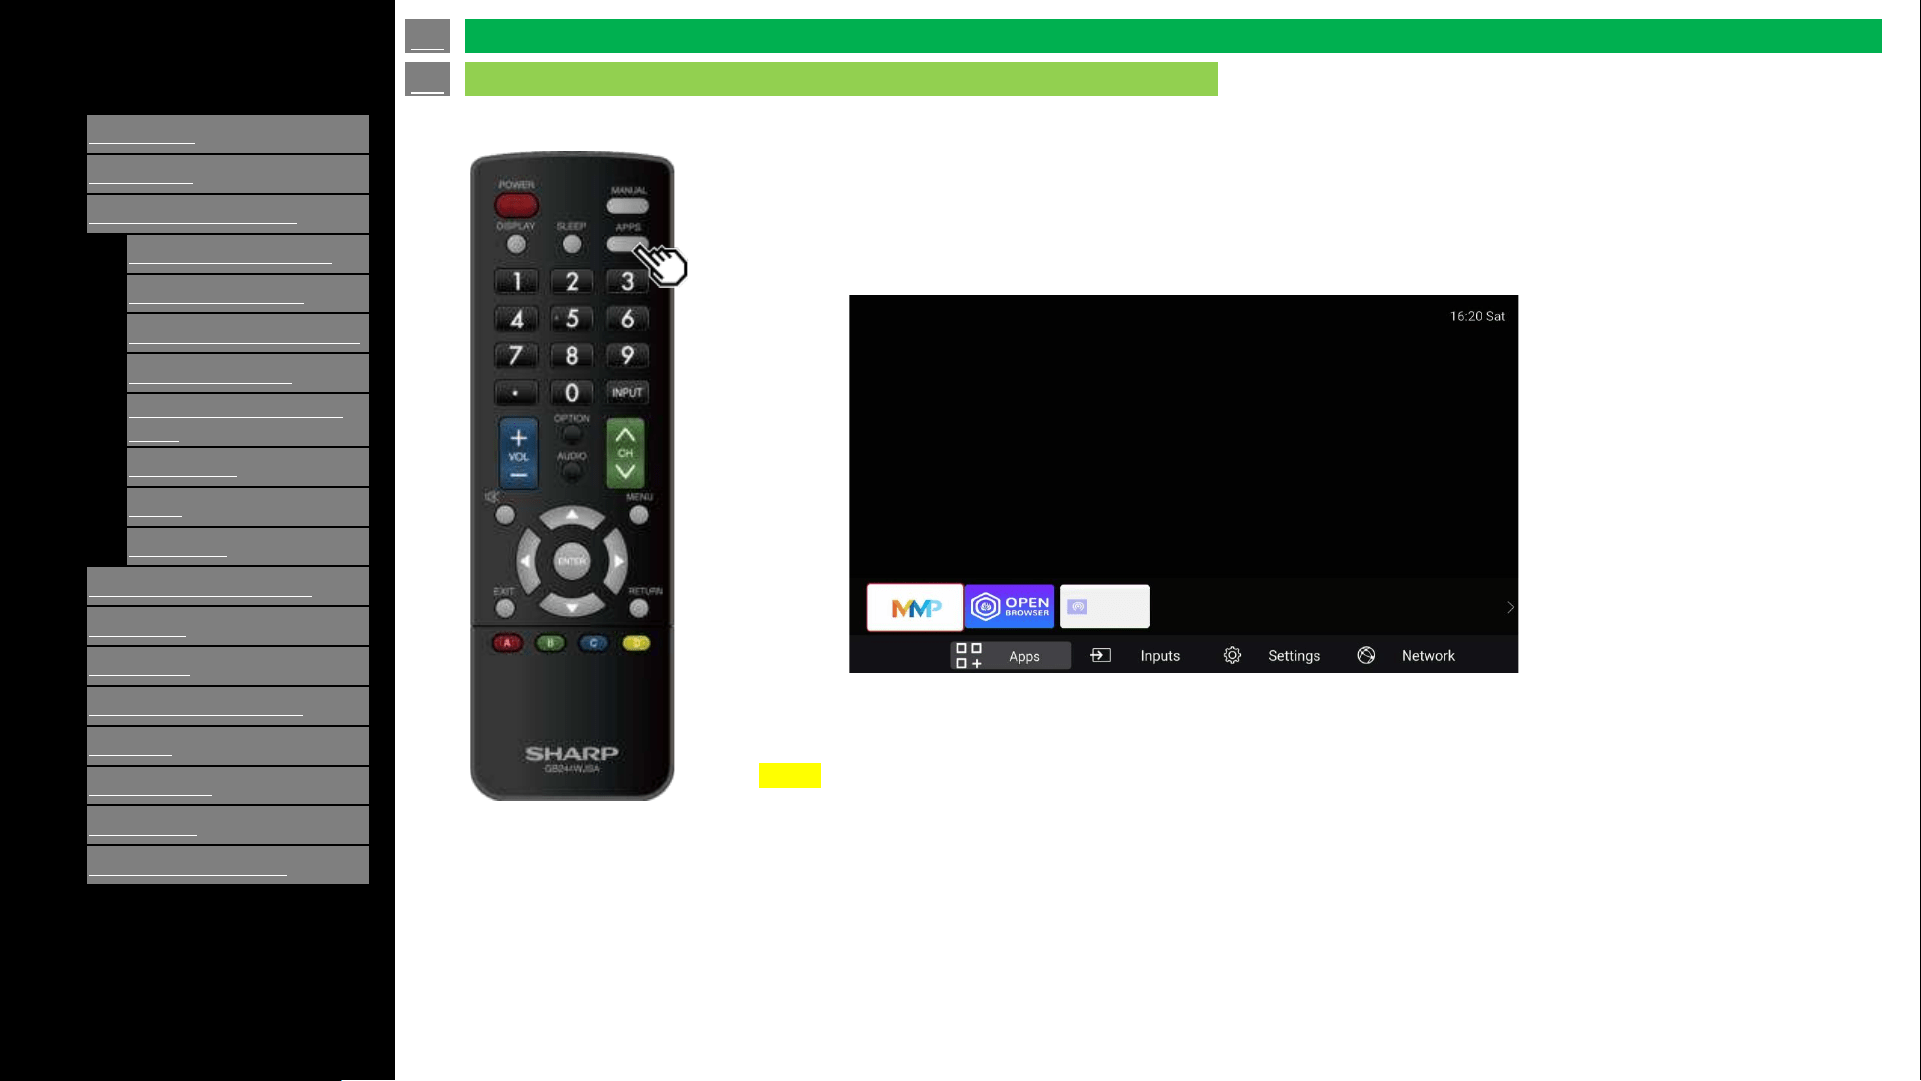
1.
Allows you to directly operate various types of applications
1. Press APPS to display the application window.
2. Select apps using [left] / [right] and [ENTER] to launch apps desired.
NOTE
• See “Application” for details of viewable applications.
• When this function is not available, "Cannot operate this function now" will display.
en-US 19
Direct Button Operation
APPS
Casting
[ENGLISH]
Contents
>>
<<
1.
Part Names
2.
Introduction
3.
Direct Button Operation
1.
Changing Input Source
2.
Changing Channels
3.
Changing Volume / MUTE
4.
Displaying Manual
5.
Displaying Current Input
Mode
6.
Sleep Timer
7.
APPS
8.
CEC Menu
4.
On
-Screen Display Menu
5.
Application
6.
Using a PC
7.
Using the touch function
8.
Appendix
9.
Specifications
10.
Trademarks
11.
Dimensional Drawings
Ver. 1.1
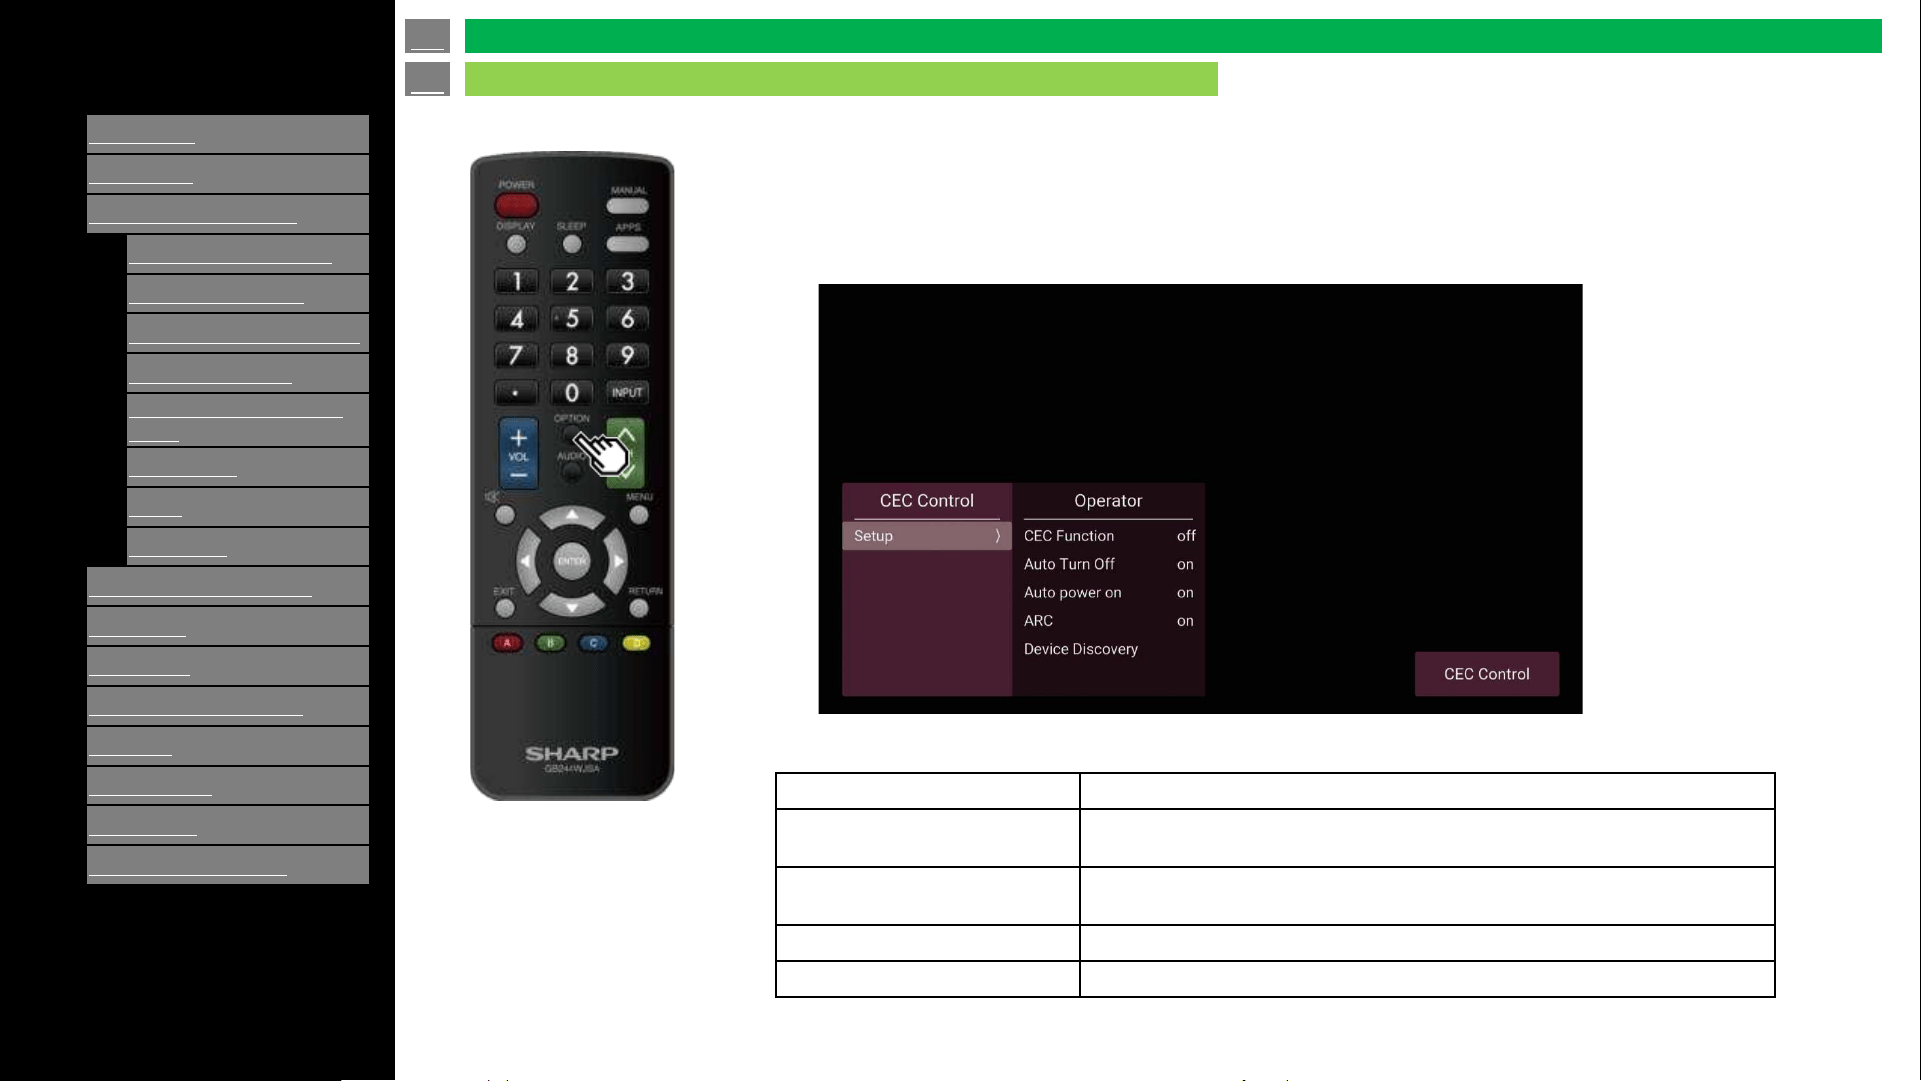
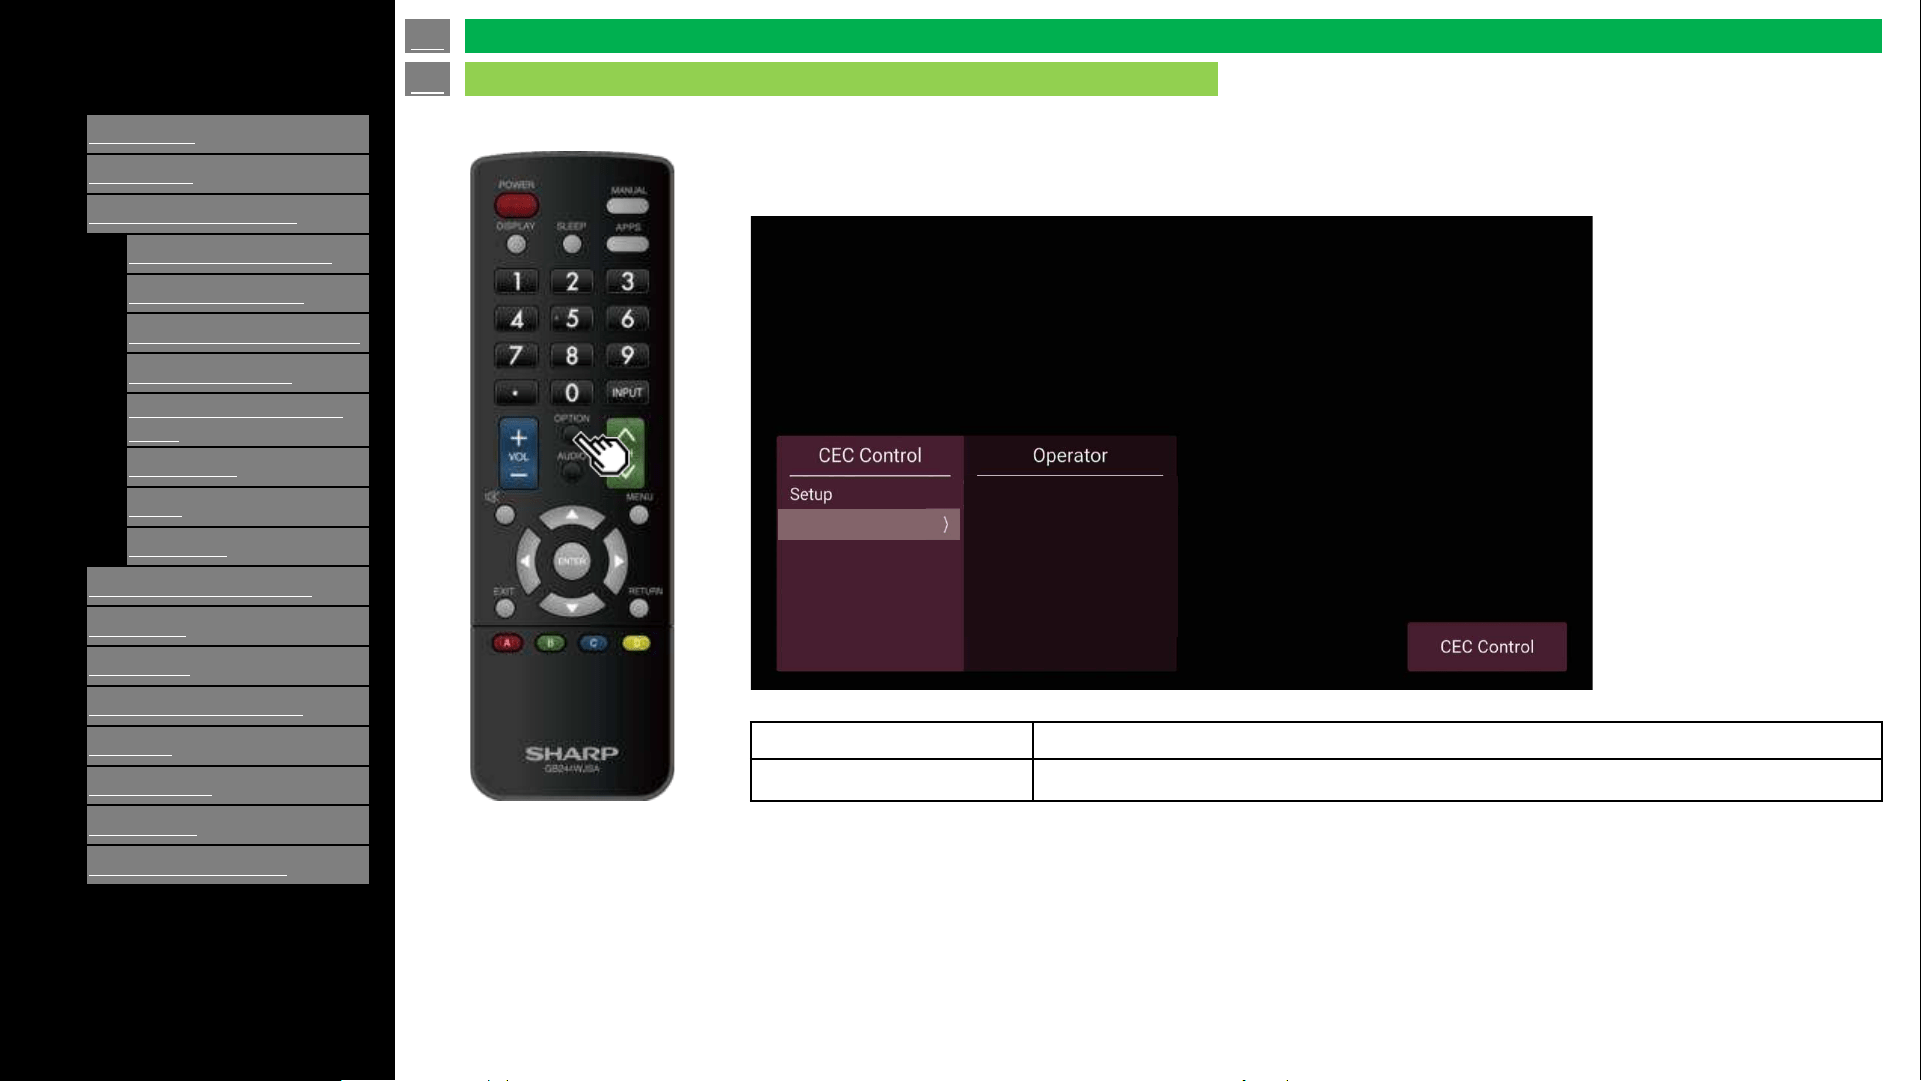
1.
Press “OPTION” to enter CEC menu
1. Connected CEC Device (Ex: AVR) to HDMI port.
2. Press “OPTION” key to enter CEC Menu, to enable CEC and ARC functions.
CEC Function
When CEC Function is On, CEC switch is enabled
Auto turn off
When Auto turn off is on, CEC device will auto turn off after the
TV goes into standby mode
Auto power on
When Auto power is enabled, if the CEC device is turned on, the
TV will turn on accordingly
ARC
Enable or Disable Audio System
Device Discovery
List of found devices connected by CEC.
en-US 20
Direct Button Operation
CEC Menu
[ENGLISH]
Contents
>>
<<
1.
Part Names
2.
Introduction
3.
Direct Button Operation
1.
Changing Input Source
2.
Changing Channels
3.
Changing Volume / MUTE
4.
Displaying Manual
5.
Displaying Current Input
Mode
6.
Sleep Timer
7.
APPS
8.
CEC Menu
4.
On
-Screen Display Menu
5.
Application
6.
Using a PC
7.
Using the touch function
8.
Appendix
9.
Specifications
10.
Trademarks
11.
Dimensional Drawings
Ver. 1.1
1.
3. Highlight Device on and select “Standby / Power On”.
Operator Standby When standby is enabled, CEC device will enter standby mode
Operator Power on When power on is enabled, CEC device will enter power on state
standby
power On
HT-SB20
en-US 21
Direct Button Operation
CEC Menu (Continue)
[ENGLISH]
Contents
>>
<<
1.
Part Names
2.
Introduction
3.
Direct Button Operation
4.
On
-Screen Display Menu
1.
Introduction
2.
Menu Operation Buttons
3.
Video / Audio Settings
4.
Setup
5.
Parental Control
5.
Application
6.
Using a PC
7.
Using the touch function
8.
Appendix
9.
Specifications
10.
Trademarks
11.
Dimensional Drawings
Ver. 1.1
1. Settings Menus are displayed in the purple left bar.
2. Default selected Item is highlighted in red.
3. Selected sub-item is highlighted in red.
This menu allows you to configure the TV settings.
en-US 22
On-Screen Display Menu
Introduction
[ENGLISH]
Contents
>>
<<
1.
Part Names
2.
Introduction
3.
Direct Button Operation
4.
On
-Screen Display Menu
1.
Introduction
2.
Menu Operation Buttons
3.
Video / Audio Settings
4.
Setup
5.
Parental Control
5.
Application
6.
Using a PC
7.
Using the touch function
8.
Appendix
9.
Specifications
10.
Trademarks
11.
Dimensional Drawings
Ver. 1.1
About Menu Items
• Some menu items may not be displayed depending on the selected input source.
NOTE
• The screens in the operation manual are for explanation purposes (some are enlarged, others
cropped) and may vary slightly from the actual screens.
• The order of explanations for each menu item in the following pages is not necessarily in accordance
with the alignment of the items on the screen.
en-US 23
Introduction (Continue)
On-Screen Display Menu
[ENGLISH]
Contents
>>
<<
1.
Part Names
2.
Introduction
3.
Direct Button Operation
4.
On
-Screen Display Menu
1.
Introduction
2.
Menu Operation Buttons
3.
Video / Audio Settings
4.
Setup
5.
Parental Control
5.
Application
6.
Using a PC
7.
Using the touch function
8.
Appendix
9.
Specifications
10.
Trademarks
11.
Dimensional Drawings
Ver. 1.1
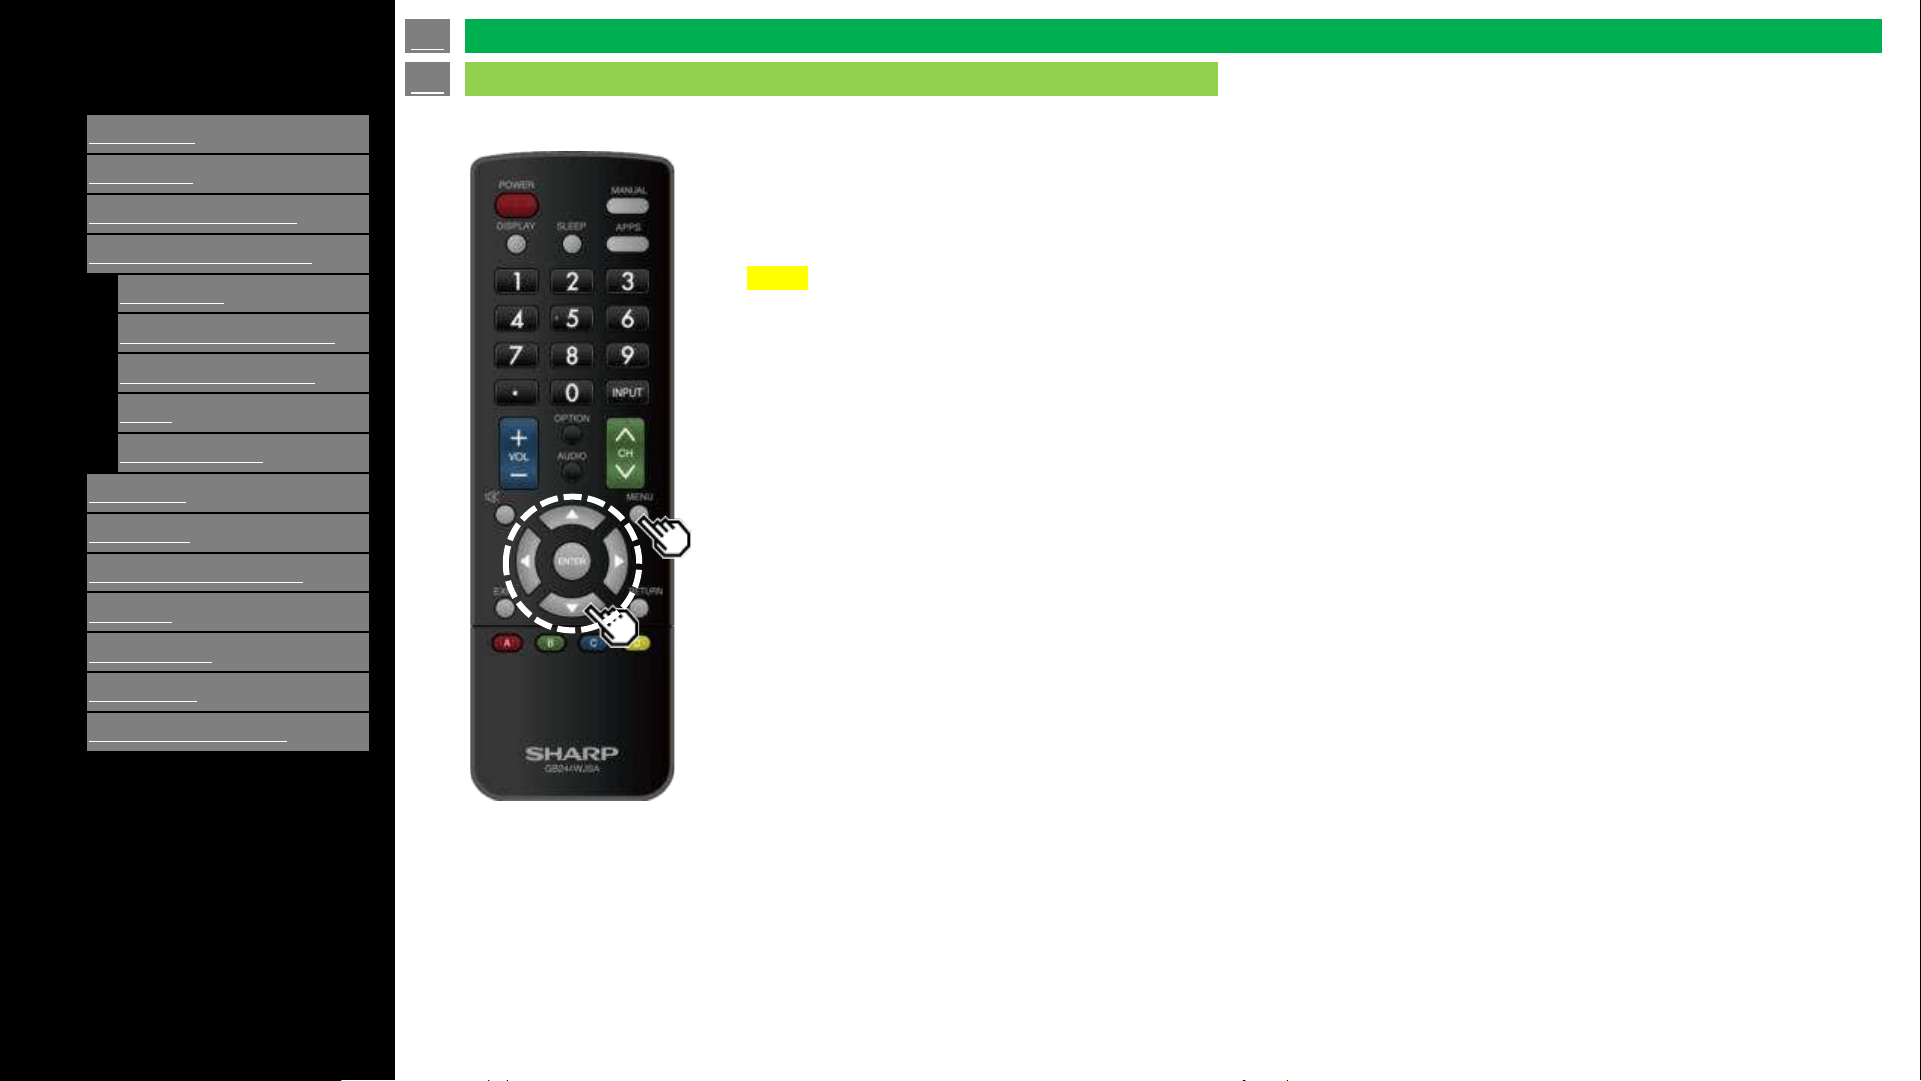
Using the remote control
Use the following buttons on the remote
control to operate the menu.
MENU: Press to open or close the menu
screen.
/ / Press to select a desired item
on the screen or adjust a selected item.
ENTER: Press to go to the next step or
complete the setting.
RETURN: Press to return to the previous step.
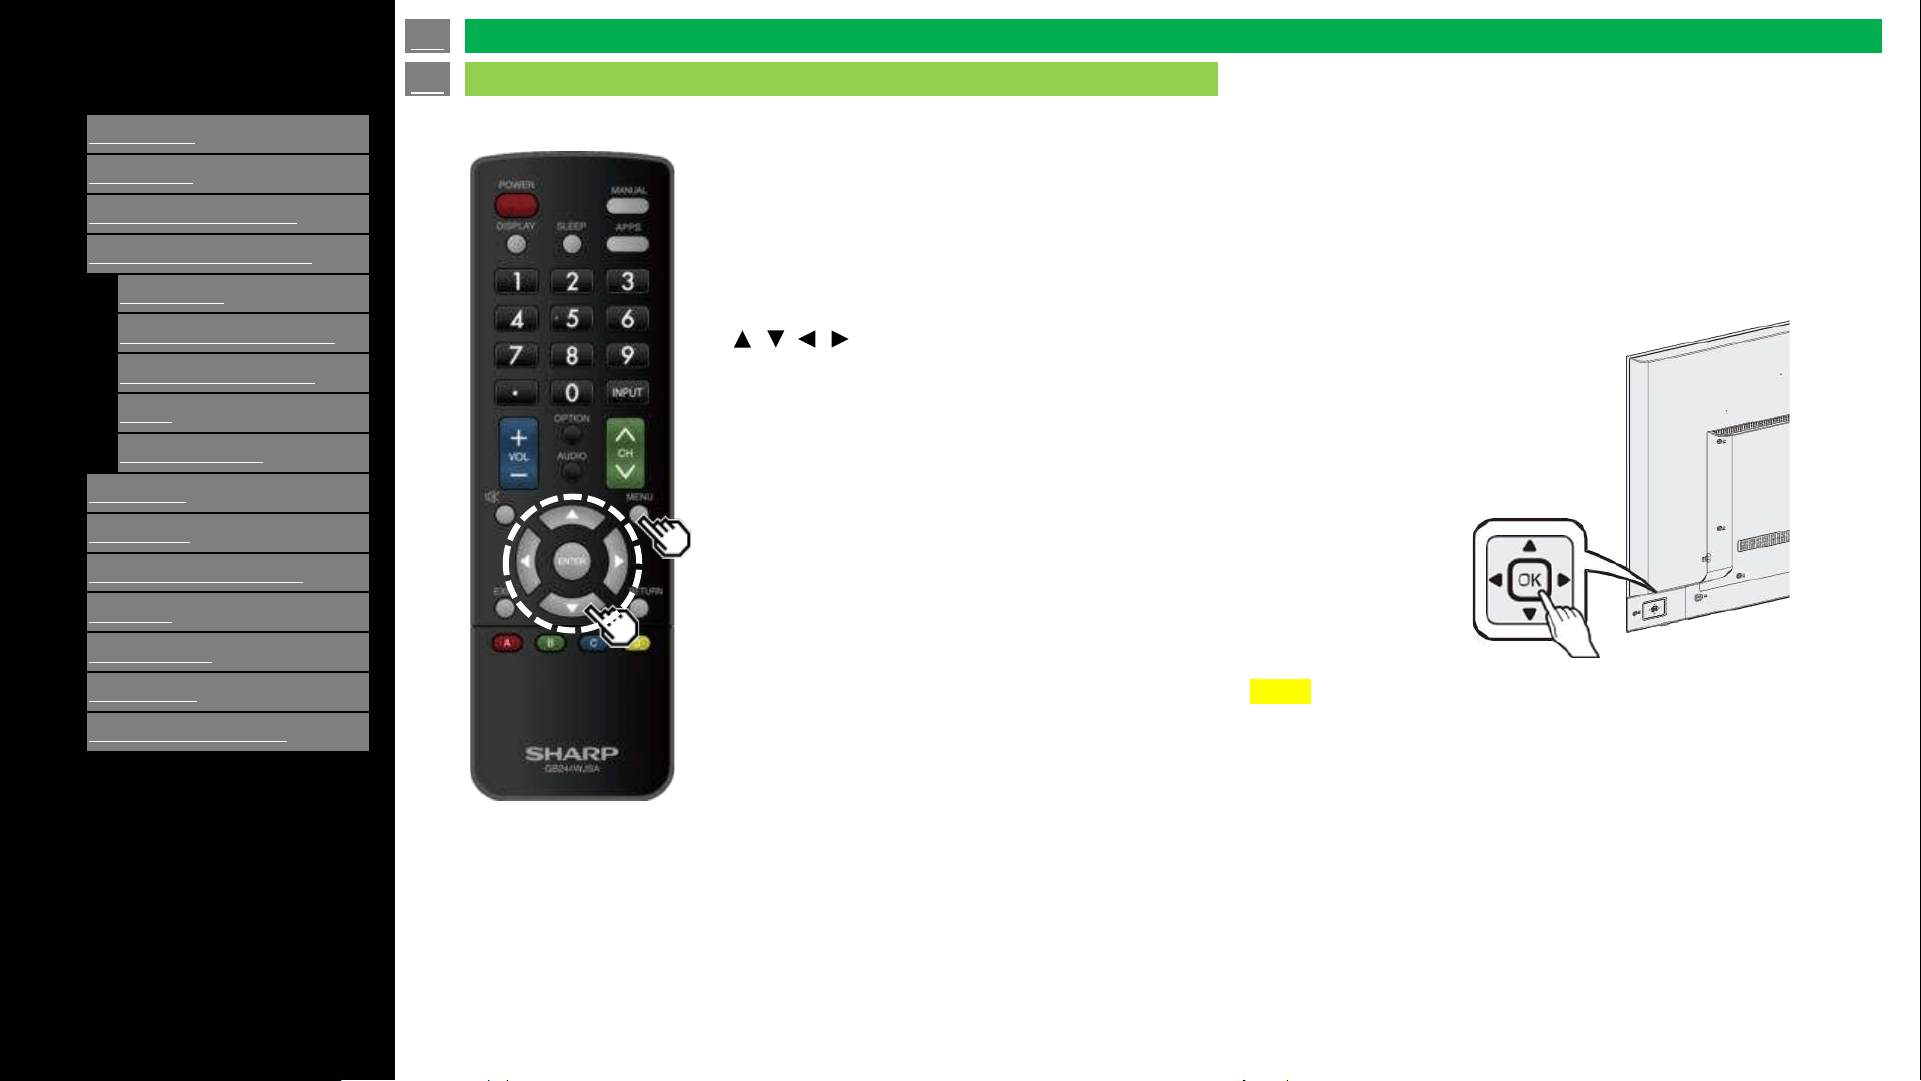
Using the control panel of the TV
PUSH : Power ON/OFF (Same as remote control)
Cursor Up / Down : CH Up / Down
Cursor Right / Left : VOL+/-
NOTE
• Control panel cannot support all functions.
• Use remote control for all TV functions.
en-US 24
Menu Operation Buttons
On-Screen Display Menu
[ENGLISH]
Contents
>>
<<
1.
Part Names
2.
Introduction
3.
Direct Button Operation
4.
On
-Screen Display Menu
1.
Introduction
2.
Menu Operation Buttons
3.
Video / Audio Settings
4.
Setup
5.
Parental Control
5.
Application
6.
Using a PC
7.
Using the touch function
8.
Appendix
9.
Specifications
10.
Trademarks
11.
Dimensional Drawings
Ver. 1.1
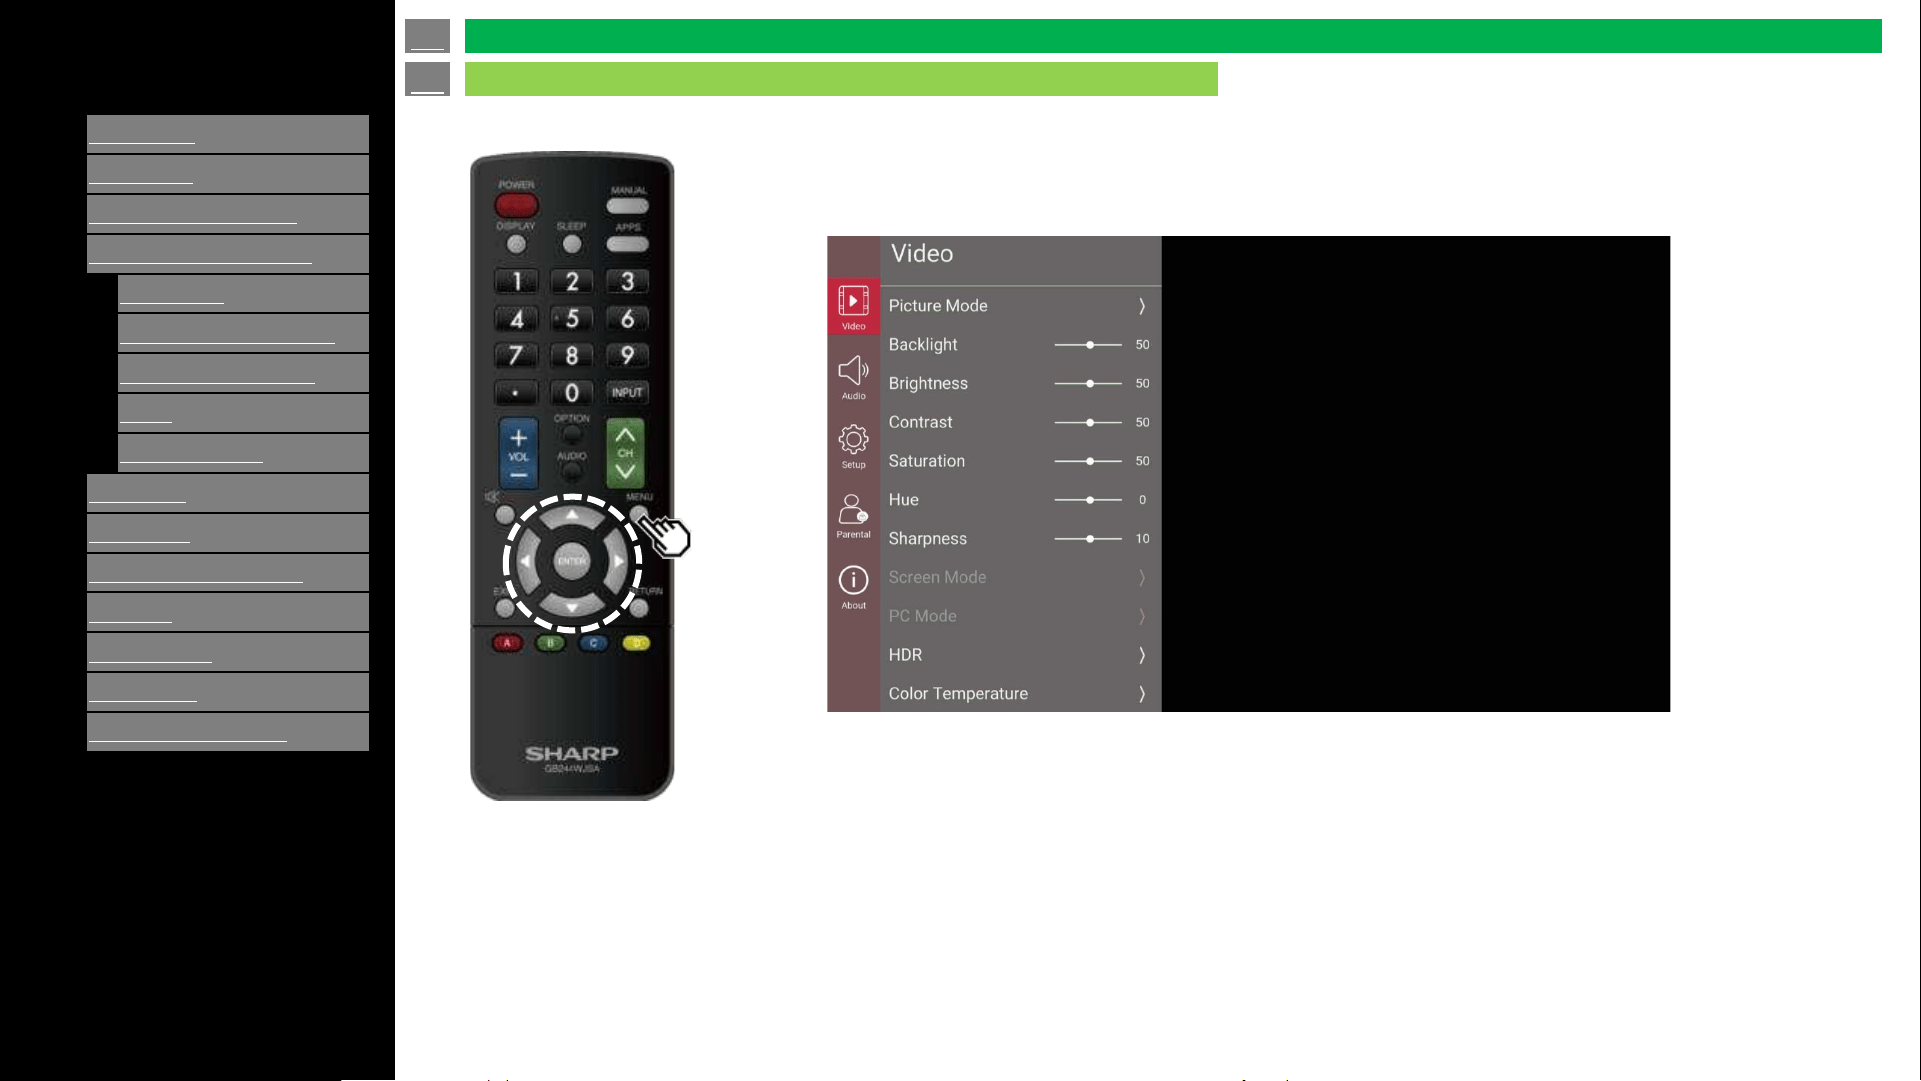
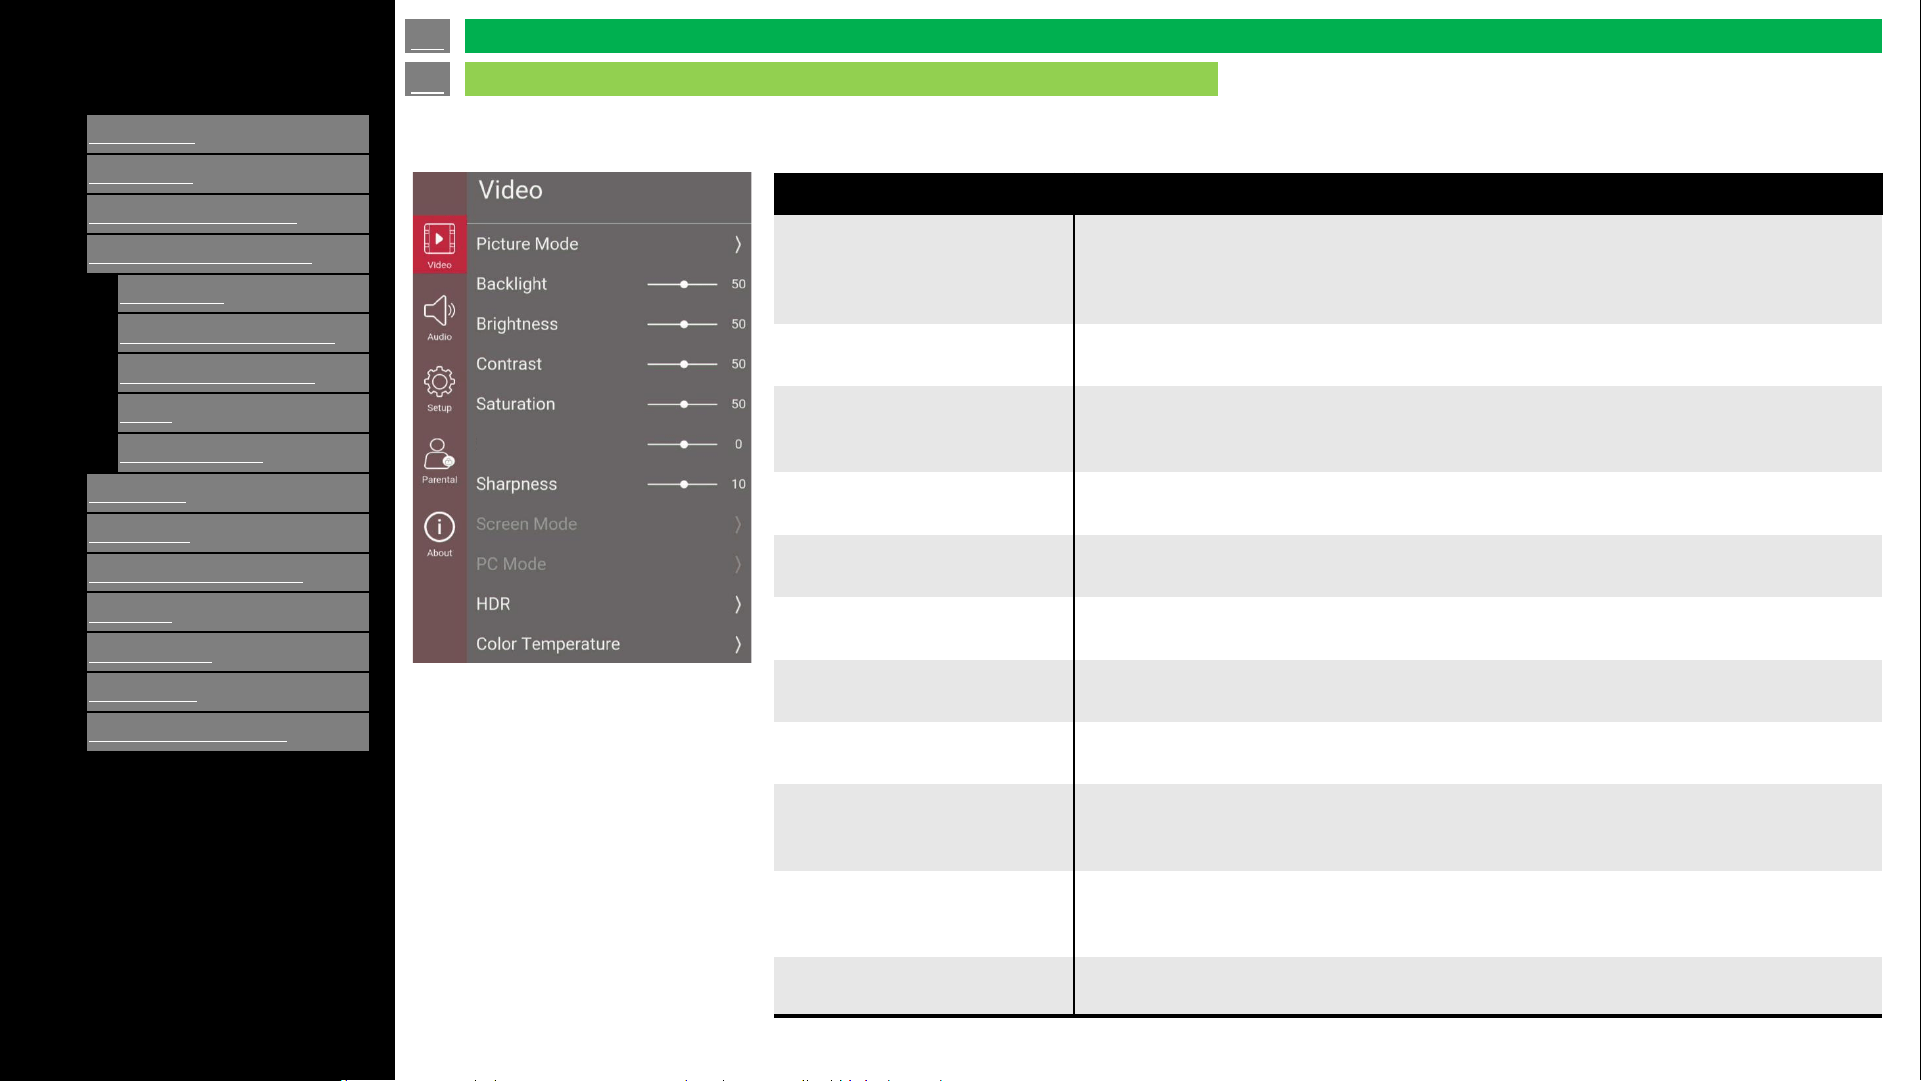
Adjusts the picture to your preference with the following picture settings.
Selected item
Picture mode
To adjust video settings by the default selections: Standard, Movie, Thru, PC, Dynamic,
Dynamic (Fixed) and User.
The different selections of Picture Mode will affect the option value of Backlight,
Brightness, Contrast, Saturation, Tint and Sharpness.
Picture Size
The Picture Size UI is only displayed when current source has signal.
To adjust screen size Auto / Normal / Zoom / Dot by Dot / 4:3 / 14:9 / 16:9
Backlight
When current progress option is available, Press ENTER key to pop up this progress
bar view.
To adjust the back light to brighten or darken: 0 ~ 100.
Brightness
Adjust brightness of screen.
Adjustment range: 0 (Darkest) - 100 (Brightest)
Contrast
Adjust contrast of screen.
Adjustment range: 0 (Lowest) – 100 (Highest)
Saturation
Adjust saturation of screen.
Adjustment range: 0 (Lowest) – 100 (Highest)
Tint
Adjust Tint of screen.
Adjustment range: -50 (Low) – 50 (High)
Sharpness
Adjust sharpness of screen.
Adjustment range: 0 (Weak) – 20 (Strong)
Color
Temperature
To adjust the color temperature: User, Cool, Standard and Warm.
The different selection of color temperature will affect the option value of R Gain, G Gain
and B Gain.
DNR
DNR is Digital Noise Reduction.
To adjust the level of reducing the appearance of digitizing error caused by the
compression: Medium, Strong, Auto, Off and Low.
Reset to Default Reset setting value to default
en-US 25
Video / Audio Settings
On-Screen Display Menu
Tint
[ENGLISH]
Contents
>>
<<
1.
Part Names
2.
Introduction
3.
Direct Button Operation
4.
On
-Screen Display Menu
1.
Introduction
2.
Menu Operation Buttons
3.
Video / Audio Settings
4.
Setup
5.
Parental Control
5.
Application
6.
Using a PC
7.
Using the touch function
8.
Appendix
9.
Specifications
10.
Trademarks
11.
Dimensional Drawings
Ver. 1.1
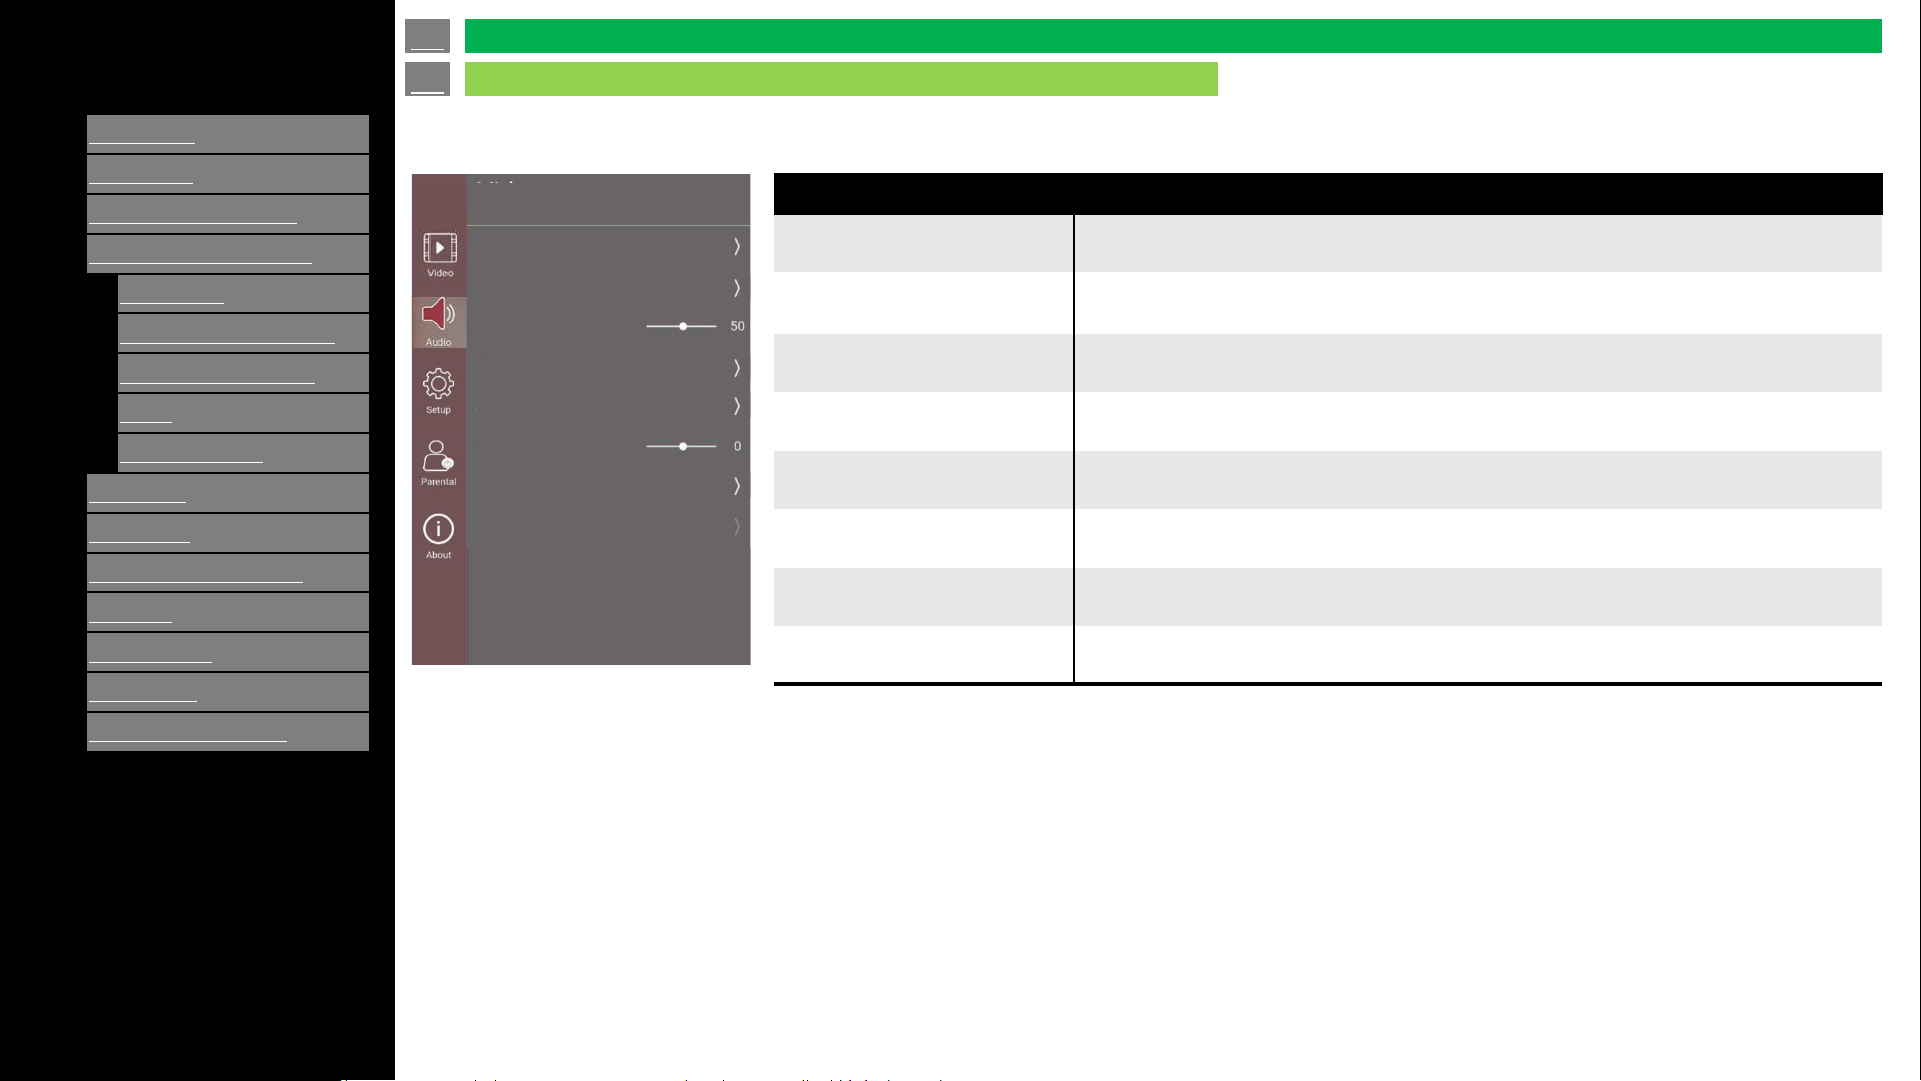
Adjusts the audio to your preference with the following audio settings.
Selected item (continue)
Sound Mode To adjust the Surround Style: User, Standard, Sport, Movie and Music.
Equalizer Detail
To adjust the EQUALIZER 50 ~ 50.
Submenu by Frequency band: 120, 500, 1500, 5000 and 10000Hz
Balance To adjust the left or right sound balance: 50 ~ 50.
Sound Surround To adjust the simulated surround sound: On and Off.
Digital Output To adjust the SPDIF output: Dolby Digital/PCM/Dolby Digital Plus/Auto
Digital Output Delay To adjust the SPDIF delay: 0 ~ 250
Dialogue Enhancer To adjust Dialog Enhancement: Off, Low, Medium and High
Reset to Default Reset setting value to default
en-US 26
Video / Audio Settings (Continue)
On-Screen Display Menu
Audio
Sound Mode
Equalizer Detail
Balance
Sound Surround
Digital Output
Digital Output Delay
Dialogue Enhancer
Reset to Default
[ENGLISH]
Contents
>>
<<
1.
Part Names
2.
Introduction
3.
Direct Button Operation
4.
On
-Screen Display Menu
1.
Introduction
2.
Menu Operation Buttons
3.
Video / Audio Settings
4.
Setup
5.
Parental Control
5.
Application
6.
Using a PC
7.
Using the touch function
8.
Appendix
9.
Specifications
10.
Trademarks
11.
Dimensional Drawings
Ver. 1.1
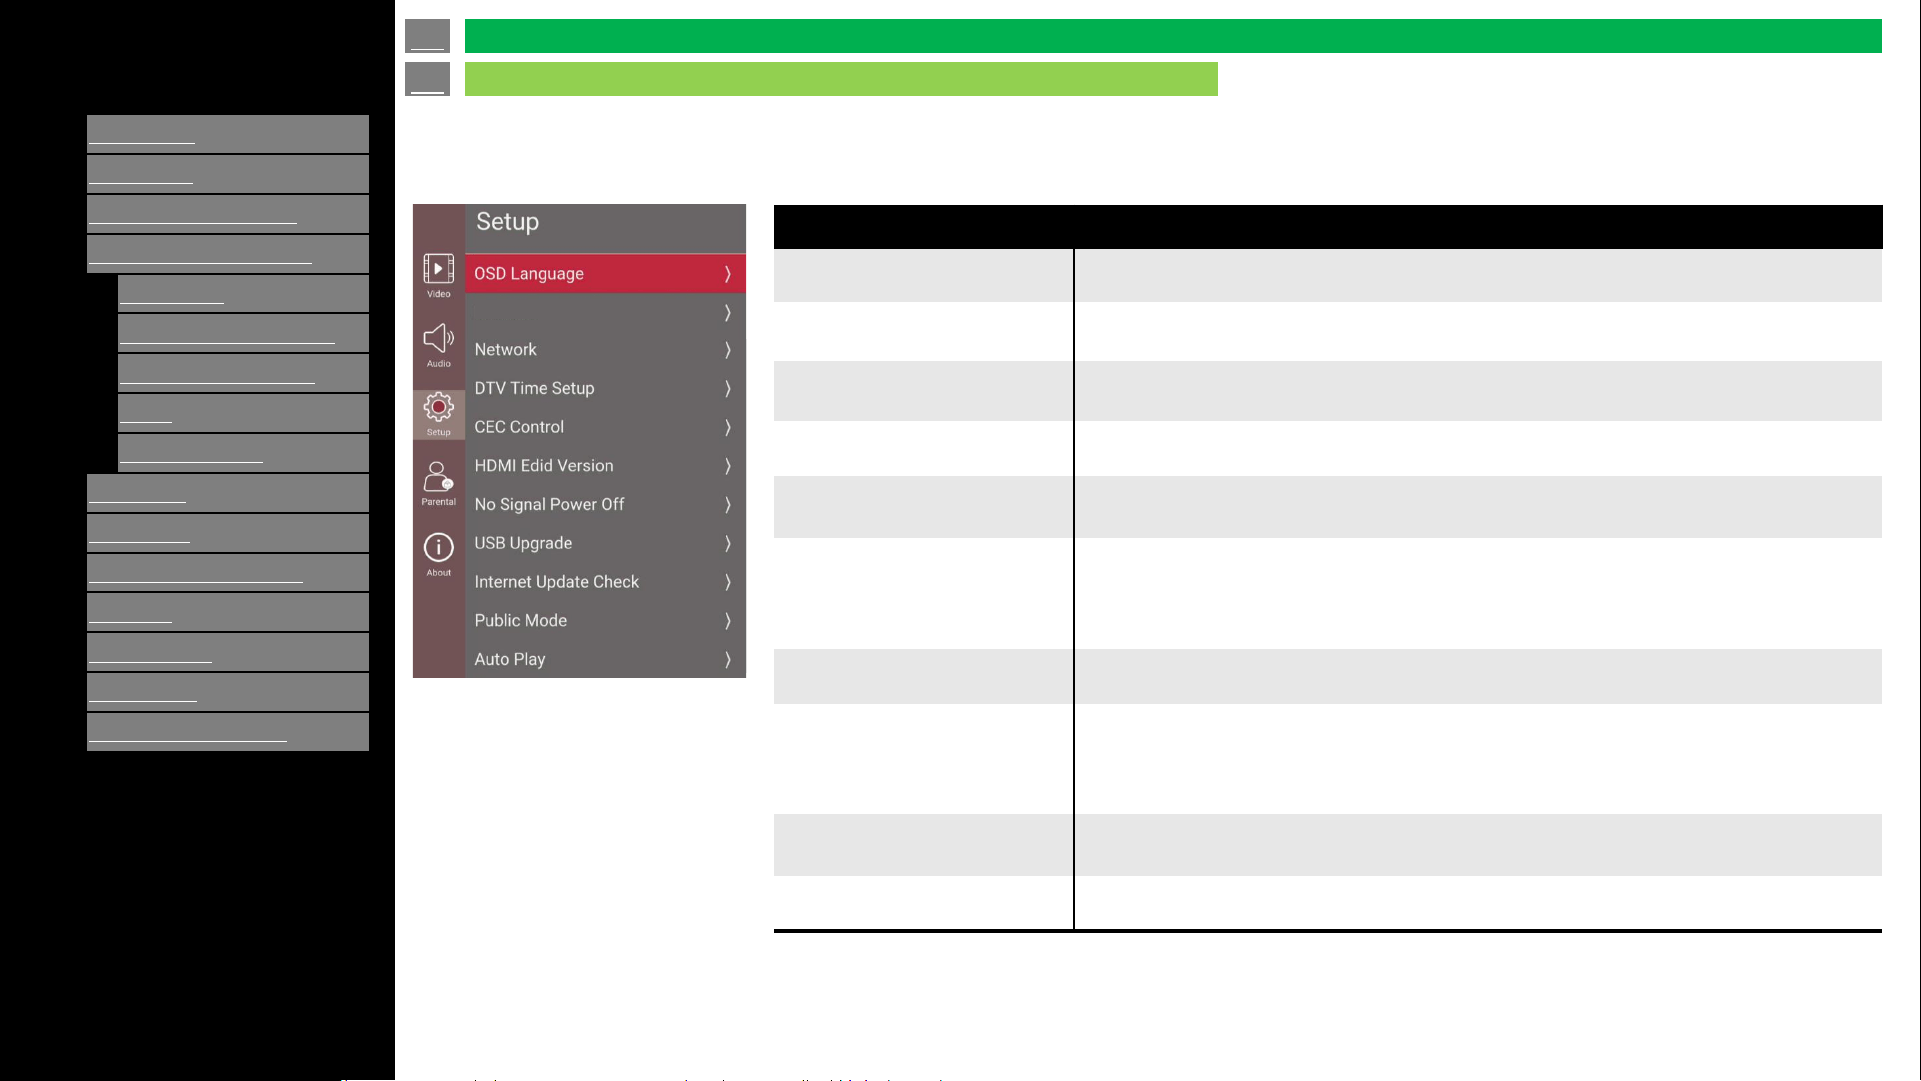
The menu Setup page provides OSD Language, Network, DTV Time Setup, CEC Control, HDMI EDID Version,
No Signal Power Off, USB Upgrade, Internet Update Check, Public Mode, Auto Play, E-Manual and Reset to
Default.
Selected item
OSD Language To adjust Language: English, Spanish and French.
Caption To adjust the caption configuration.
Network To adjust the network configuration.
DTV Time Setup To adjust Time related settings: Time zone, Time, Sleep timer and Auto Sleep.
CEC Control
1. Connected CEC Device (Ex: AVR) to HDMI port.
2. Press “OPTION” key to launch CEC Menu, enable CEC Function.
HDMI EDID Version
HDMI EDID Version include : HDMI EDID1.4 / HDMI EDID 2.0 / HDMI AUTO / HDMI
EDID 2.1.
When set to HDMI AUTO, it can automatic recognition for HDMI EDID 1.4 or HDMI
EDID 2.0.
No Signal Power Off To set “on”, Power off when no signal.
USB Upgrade
Plug the USB flash disk to TV with FW (MstarUpgrade.bin), select USB Auto Upgrade,
will do upgrade, if name isn’t “MstarUpgrade.bin” in USB disk, TV will display “Please
insert USB before execute USB Auto Upgrade”.
Please check SHARP’s web-site for downloading FW and detailed information.
Internet Update Check
“Internet Update Check” is the OTA upgrade function.
The TV needs to be connected to network before use.
Public Mode See “Setup” > “Public Mode”.
en-US 27
Setup
On-Screen Display Menu
Caption
[ENGLISH]
Contents
>>
<<
1.
Part Names
2.
Introduction
3.
Direct Button Operation
4.
On
-Screen Display Menu
1.
Introduction
2.
Menu Operation Buttons
3.
Video / Audio Settings
4.
Setup
5.
Parental Control
5.
Application
6.
Using a PC
7.
Using the touch function
8.
Appendix
9.
Specifications
10.
Trademarks
11.
Dimensional Drawings
Ver. 1.1
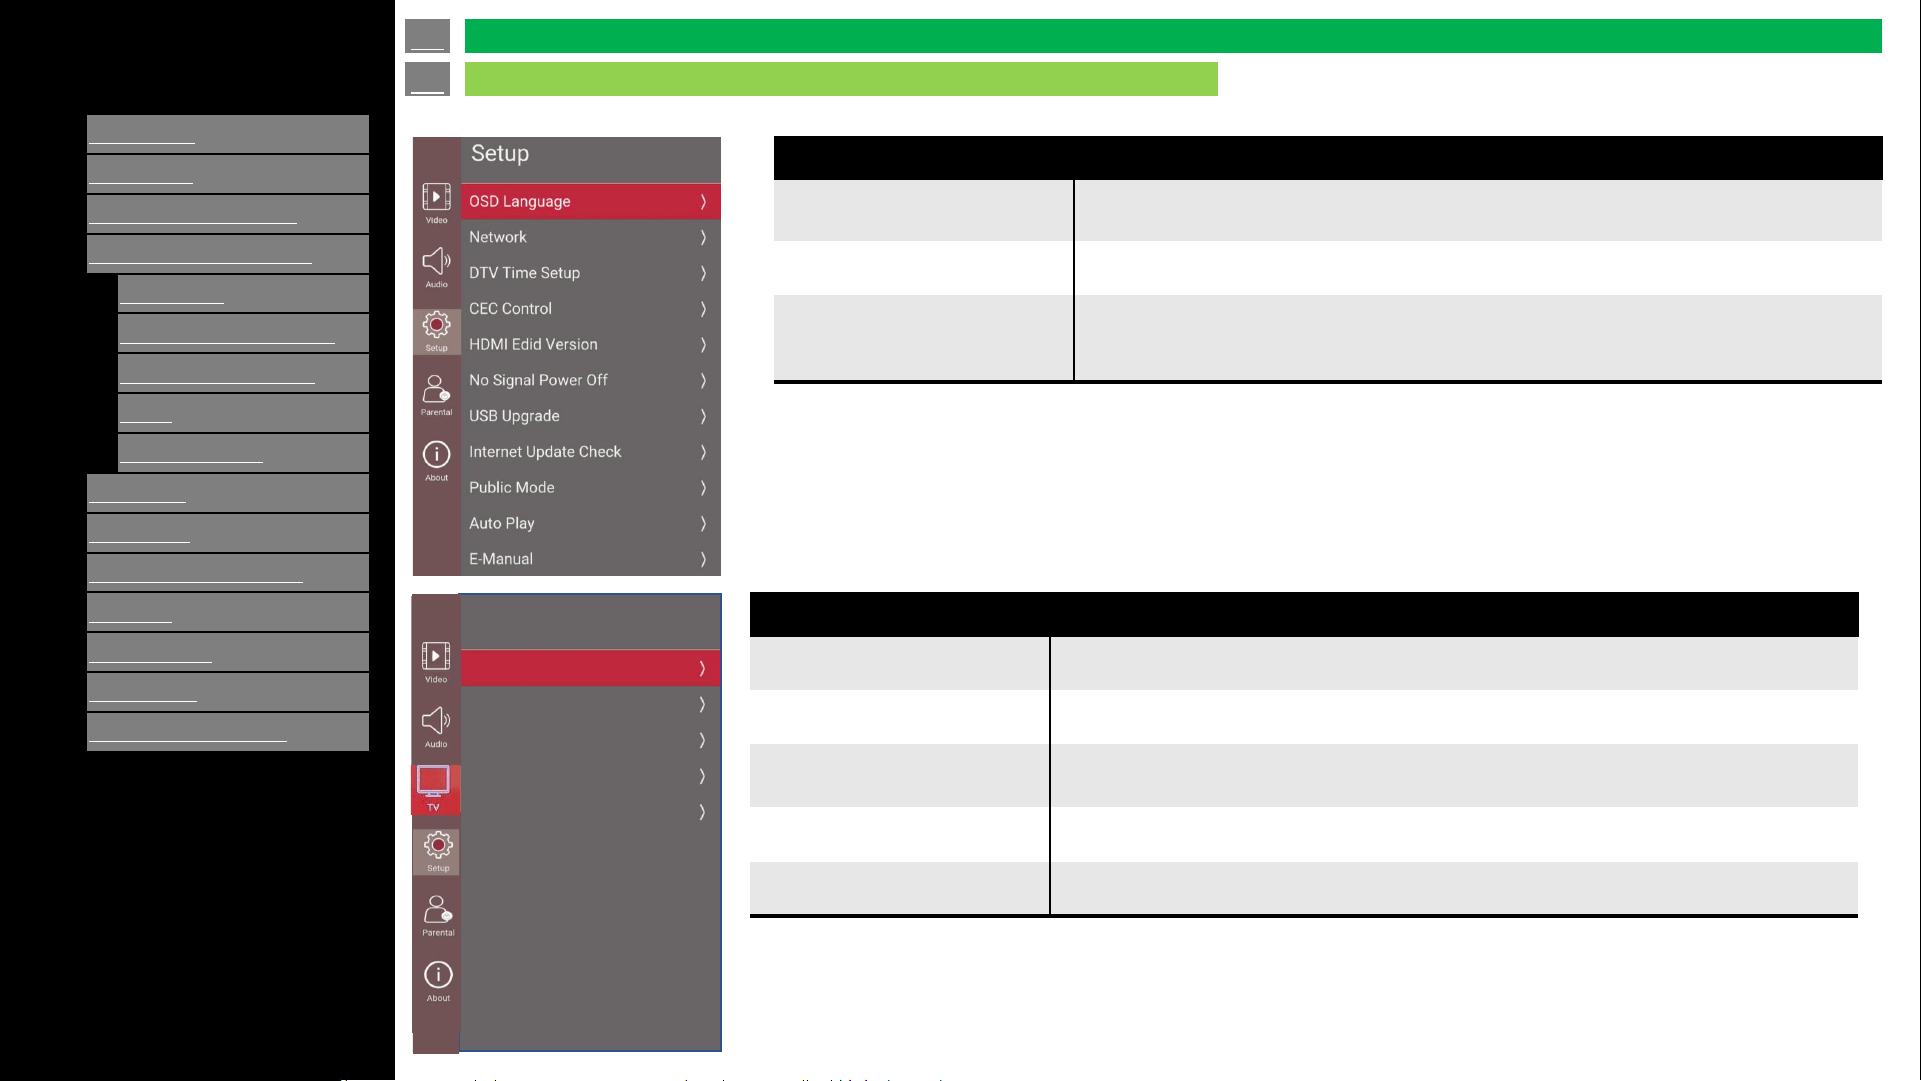
Selected item
Auto Play
You can automatically start USB media player or web browser
(See “Setup” > “Auto Play”).
E-Manual Display on screen manual.
Reset to Default
To reset menu settings to the default values. Press enter key, then insert password,
select OK to confirm, Setup Wizard Menu will be displayed automatically after executing
Reset to Default.
en-US 28
Setup (Continue)
On-Screen Display Menu
Selected item
Tuner Mode It can select Antenna or Cable.
Channel Scan Scan available channels both Digital and Analog.
Signal RF Scan
It is digital manual scan. This allow user to scan specific frequency by pressing left or
right key on the RF Channel item.
Channel Skip To select a channel to skip.
MTS To change audio track (Mono/Stereo/SAP).
TV
Tuner Mode
Channel Scan
Signal RF Scan
Channel Skip
MTS
[ENGLISH]
Contents
>>
<<
1.
Part Names
2.
Introduction
3.
Direct Button Operation
4.
On
-Screen Display Menu
1.
Introduction
2.
Menu Operation Buttons
3.
Video / Audio Settings
4.
Setup
5.
Parental Control
5.
Application
6.
Using a PC
7.
Using the touch function
8.
Appendix
9.
Specifications
10.
Trademarks
11.
Dimensional Drawings
Ver. 1.1
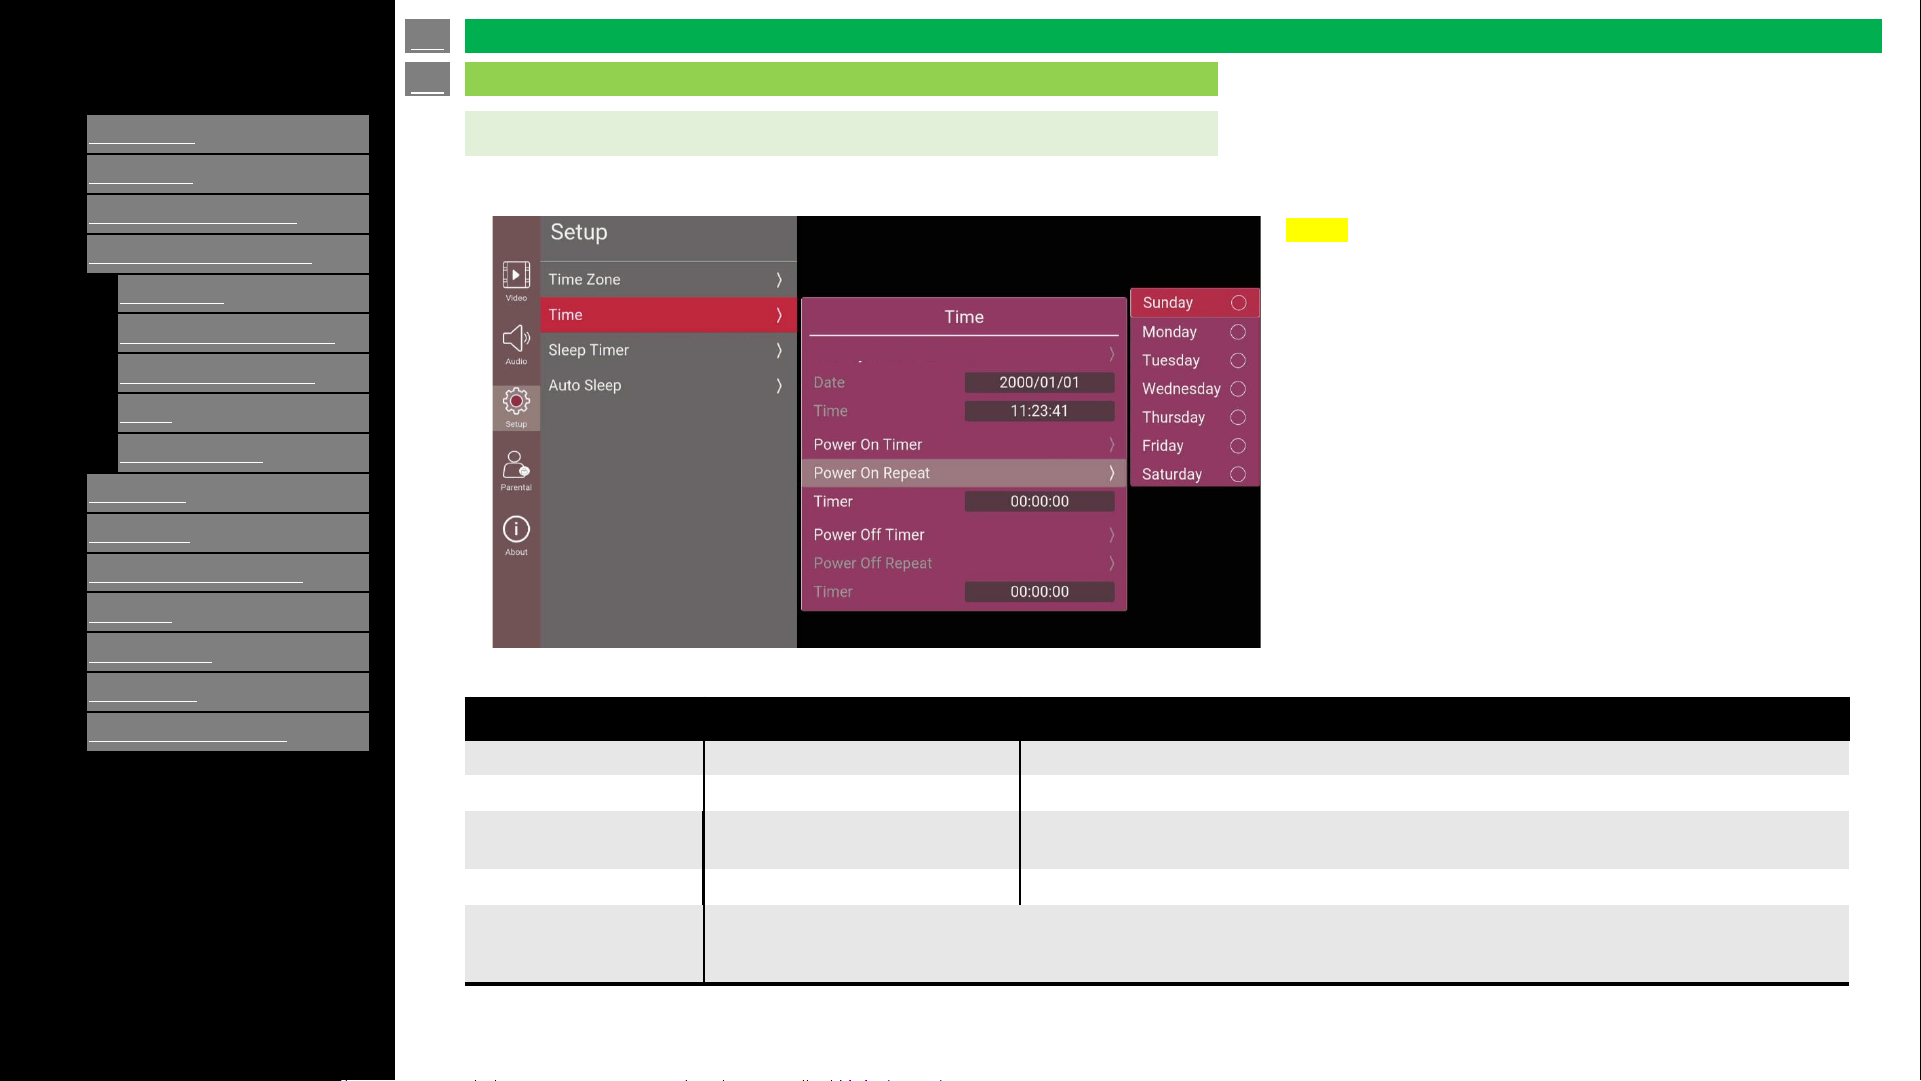
Time
You can set power on /off timing by using this menu.
Setting item
Selected item
Value Description
Date/Time Setting Off / On Enable Date/Time Setting when turned it on.
Power On Timer Off / On Set timer function on /off.
Power on repeat By day of week
To set the Power On Timer to On first, otherwise the Power On Repeat will be grayed out.
Option : Sunday / Monday / Tuesday / Wednesday / Thursday / Friday / Saturday.
Timer Hour / Minute / Second Set the Power On Timer (Available when Power On Timer is On).
Power Off timer
Power Off repeat
Timer (for Power Off)
Each functions are same as settings of “Power On”.
en-US 29
Setup (Continue)
On-Screen Display Menu
Date/Time Setting
NOTE
• Time setting will be cleared when AC cord is
unplugged. Please keep it plugged in if you use
time related settings.

[ENGLISH]
Contents
>>
<<
1.
Part Names
2.
Introduction
3.
Direct Button Operation
4.
On
-Screen Display Menu
1.
Introduction
2.
Menu Operation Buttons
3.
Video / Audio Settings
4.
Setup
5.
Parental Control
5.
Application
6.
Using a PC
7.
Using the touch function
8.
Appendix
9.
Specifications
10.
Trademarks
11.
Dimensional Drawings
Ver. 1.1
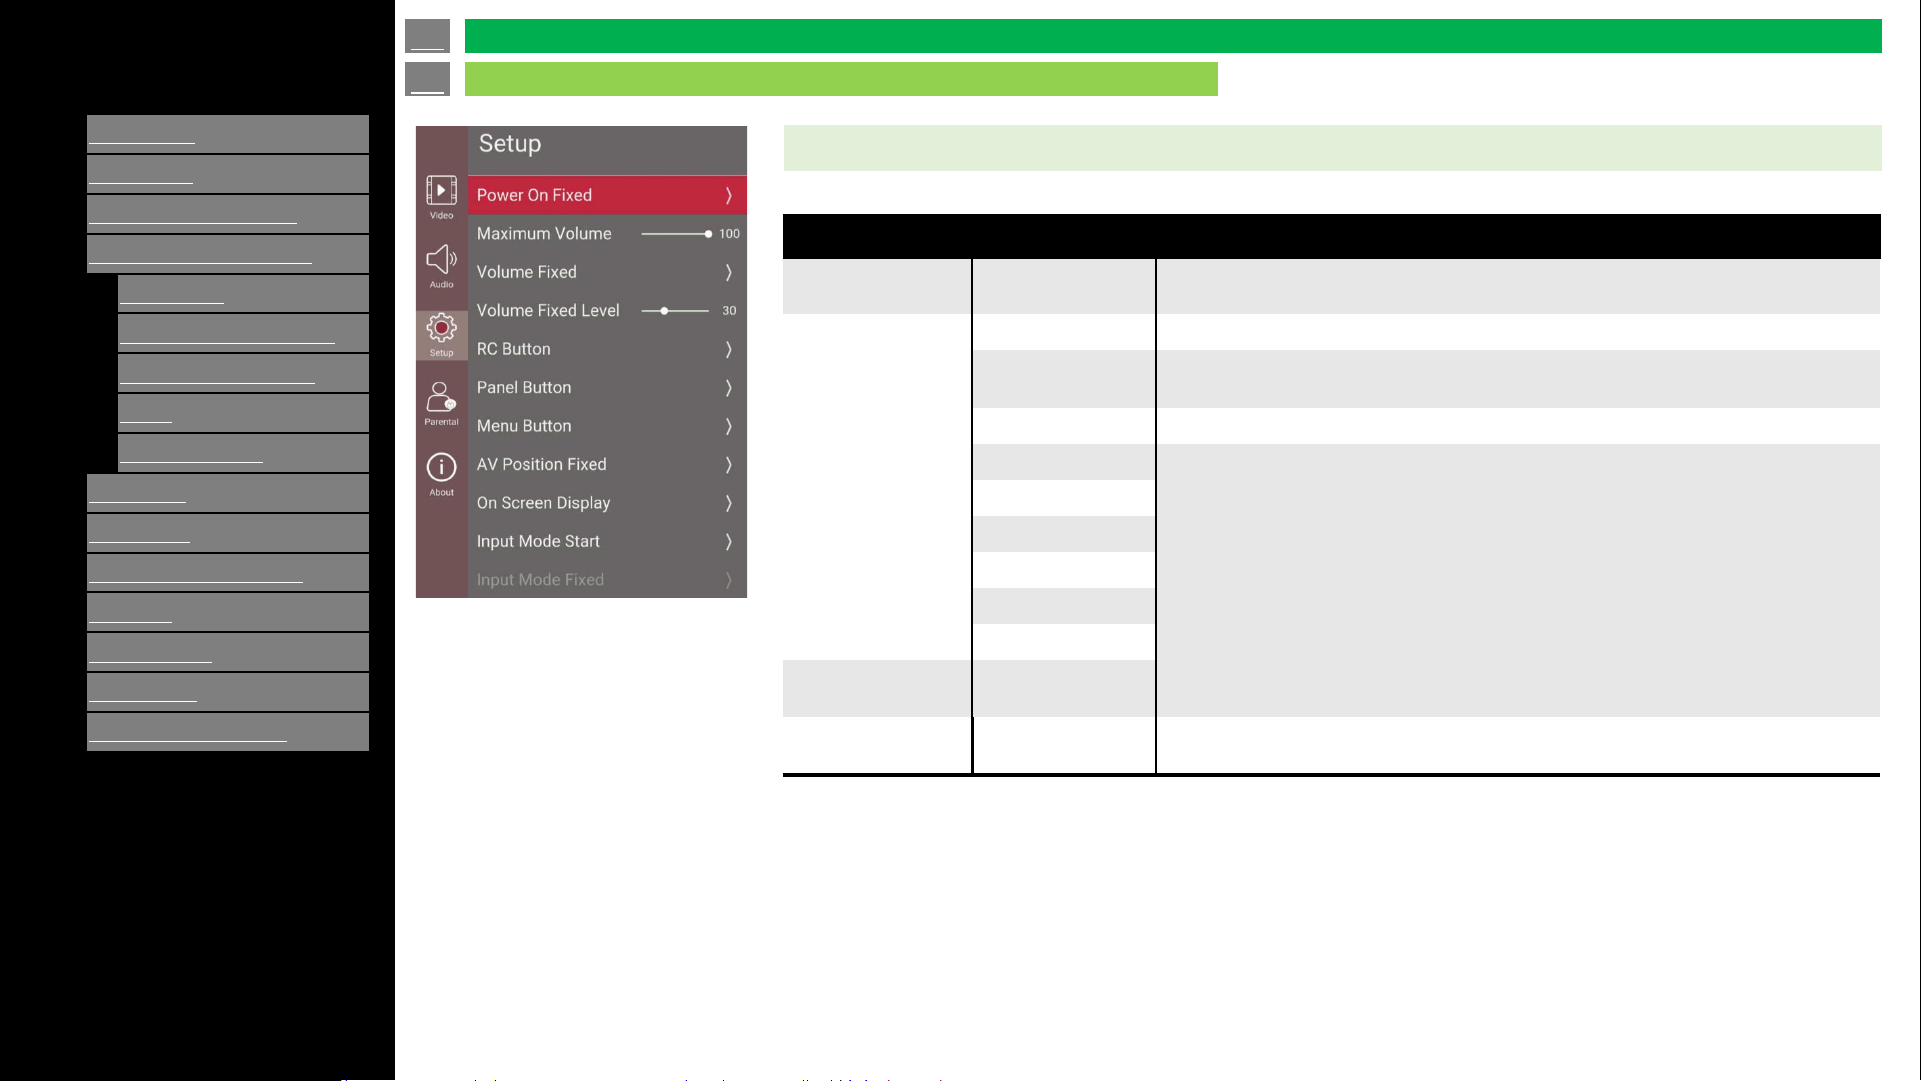
Public Mode
How to enable “Public Mode”.
1. [MENU] -> [Setup] -> [Public Mode]
2. Enter the password (set "027" as default).
3. Open the "Public Mode" menu, set "Public Mode" to "On", each item is enabled.
Limit control function to the display for control function to the display by using "Public Mode" menu.
Setting item
Selected item
Value Description
Power On Fixed Off / On
“Power key” on main body will be set invalid.
The message “No power off by power button.” is displayed when power button is
pushed.
RC Button
Respond (default) Remote control is enabled.
No respond RC is set as invalid during power on mode.
Limited RC is set as invalid except “Power”, “Ch. up/down” and “Vol. up/down”.
Panel Button
Respond (default) Panel button is enabled.
No respond
Panel buttons are set as invalid during power on mode.
* Secret command (some key bind) is valid even though during this mode.
Menu button
Respond (default) Menu button is enabled as usual.
No respond Menu button is set as invalid during power on mode.
Maximum Volume 0 - 100 Set maximum volume in public mode.
Volume Fixed
Off (default) No limitation for volume setting.
On Volume setting and MUTE are set invalid by panel button, RC and command control.
AC CTRL Start-up at the level specified for a fixed volume at AC CTRL.
BOOT CTRL Start-up at the level specified for a fixed volume at start.
NOTE
• If "Power on Fixed" in "Public Mode" is set as "ON", "No input OFF" will be set "OFF" automatically.
en-US 30
Setup (Continue)
On-Screen Display Menu
[ENGLISH]
Contents
>>
<<
1.
Part Names
2.
Introduction
3.
Direct Button Operation
4.
On
-Screen Display Menu
1.
Introduction
2.
Menu Operation Buttons
3.
Video / Audio Settings
4.
Setup
5.
Parental Control
5.
Application
6.
Using a PC
7.
Using the touch function
8.
Appendix
9.
Specifications
10.
Trademarks
11.
Dimensional Drawings
Ver. 1.1
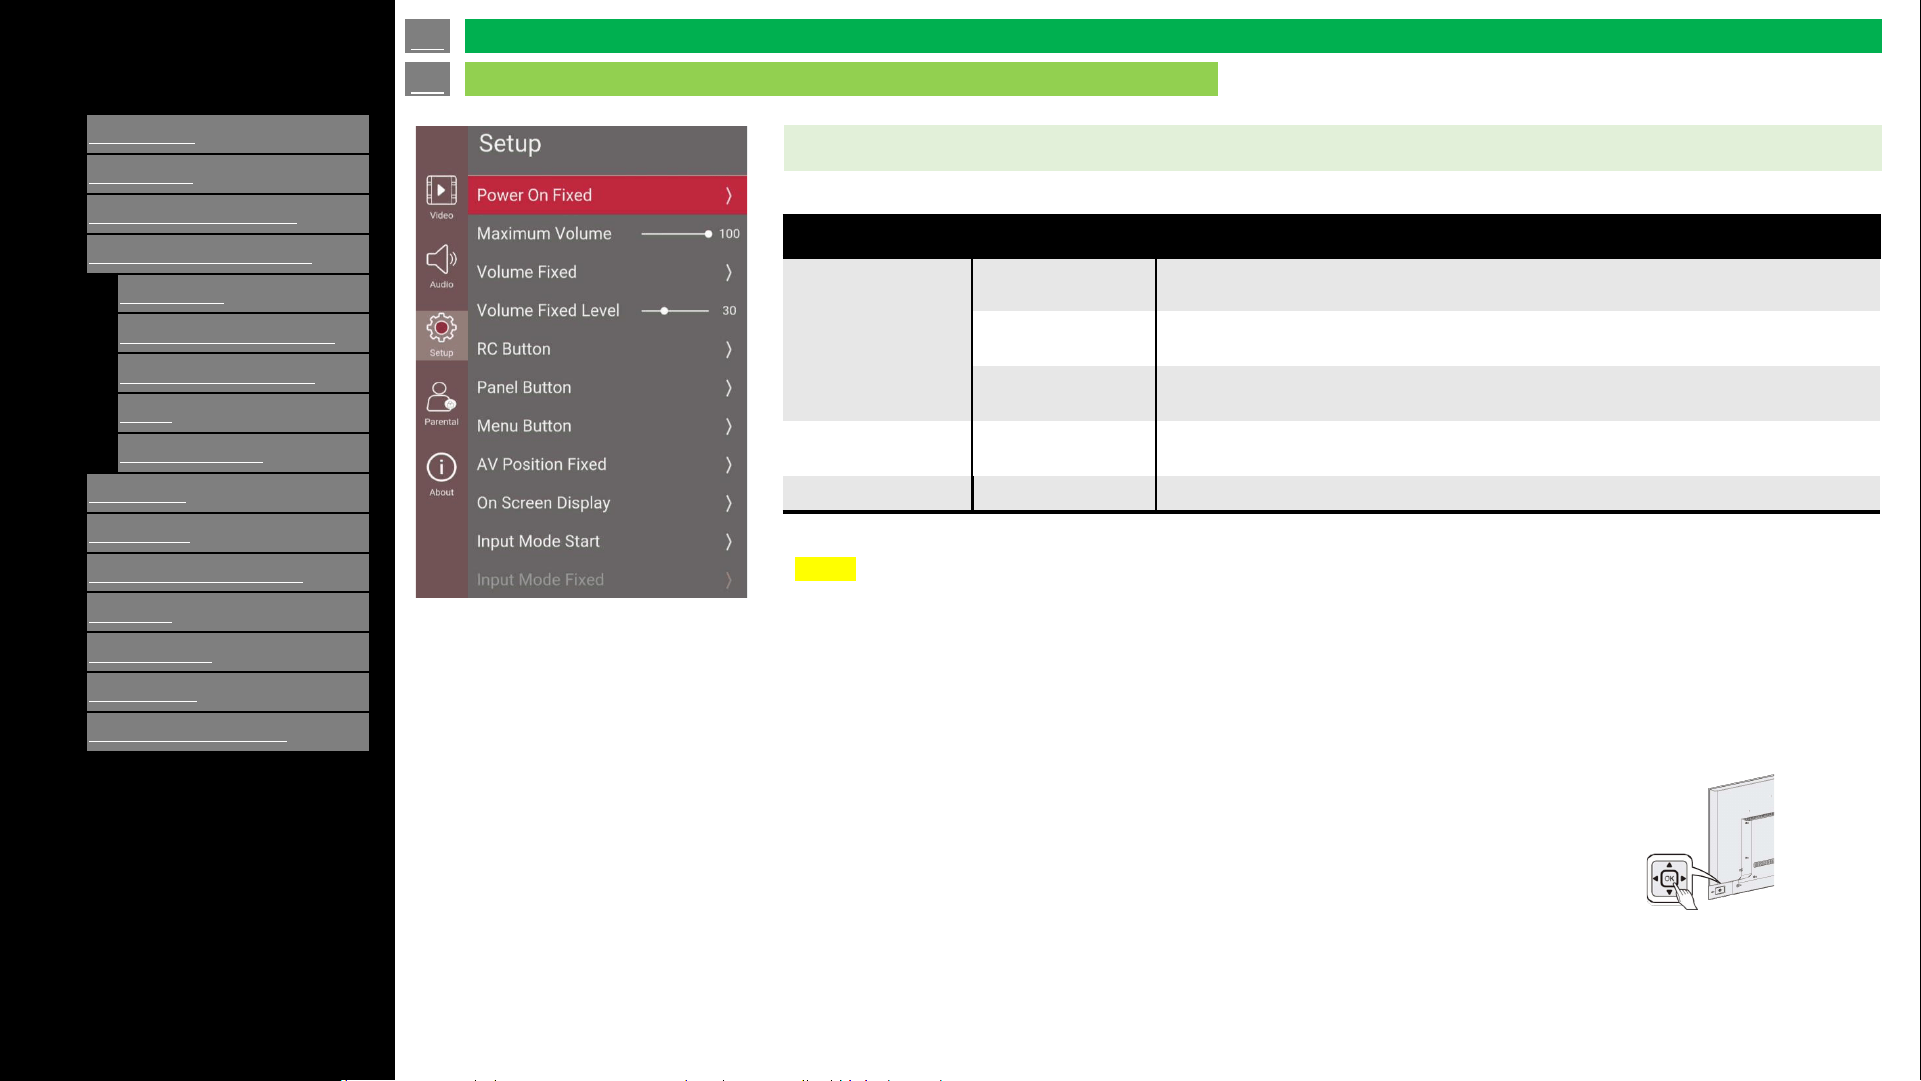
Public Mode
Setting item
Selected item
Value Description
Volume Fixed Level
0 – 100
(default : 30)
Set value of volume when “Volume fixed” is set “On”, “AC CTRL” and “BOOT CTRL”.
Input Mode Fixed
Variable (default) Panel buttons is enabled.
Fixed
Launch with input mode of which set by “Input Mode Start”.
* When “Input Mode Start” is set “Normal”, this function will be set invalid.
Input Mode Start
Normal (default) Menu button is enabled.
TV
Launch with input source selected.
Composite
HDMI 1
HDMI 2
HDMI 3
USB
AV Position Fixed On / Off
Launch with AV position selected. “Picture Mode” menu is only shown current setting
and changing is set invalid.
On Screen Display On / Off
When set “Off”, OSD is not shown.
* If "USB" or "OPENBROWSER" is selected, OSD is enabled.
en-US 31
Setup (Continue)
On-Screen Display Menu
[ENGLISH]
Contents
>>
<<
1.
Part Names
2.
Introduction
3.
Direct Button Operation
4.
On
-Screen Display Menu
1.
Introduction
2.
Menu Operation Buttons
3.
Video / Audio Settings
4.
Setup
5.
Parental Control
5.
Application
6.
Using a PC
7.
Using the touch function
8.
Appendix
9.
Specifications
10.
Trademarks
11.
Dimensional Drawings
Ver. 1.1
Public Mode
Setting item
Selected item
Value Description
RC Path through
Off Prohibit output IR signal by control “IR-path” port.
TV RCE Allow output IR signal to by control “IR-path” port.
TV RCD Allow output IR signal by control “IR-path” port and prohibit RC input.
Reset - Reset to default.
Execute - TV memorized current value set.
en-US 32
Setup (Continue)
On-Screen Display Menu
NOTE
How to exit from Public Mode:
Once it is set to the “Public Mode” with “On Screen Display" is set to "off“.
It is unable to exit Public Mode by using remote control.
Here are the steps to exit the Public Mode even if “On Screen Display" is set to "off“.
1. Turn off the display.
2. Unplug the display.
3. Plug-in the AC cord and press and hold "OK" button on control panel.
* Remain pressing and holding "OK" button until reboot is complete.
4. The display will be launched with Public Mode only mode.
5. You can change settings of Public Mode.
[ENGLISH]
Contents
>>
<<
1.
Part Names
2.
Introduction
3.
Direct Button Operation
4.
On
-Screen Display Menu
1.
Introduction
2.
Menu Operation Buttons
3.
Video / Audio Settings
4.
Setup
5.
Parental Control
5.
Application
6.
Using a PC
7.
Using the touch function
8.
Appendix
9.
Specifications
10.
Trademarks
11.
Dimensional Drawings
Ver. 1.1
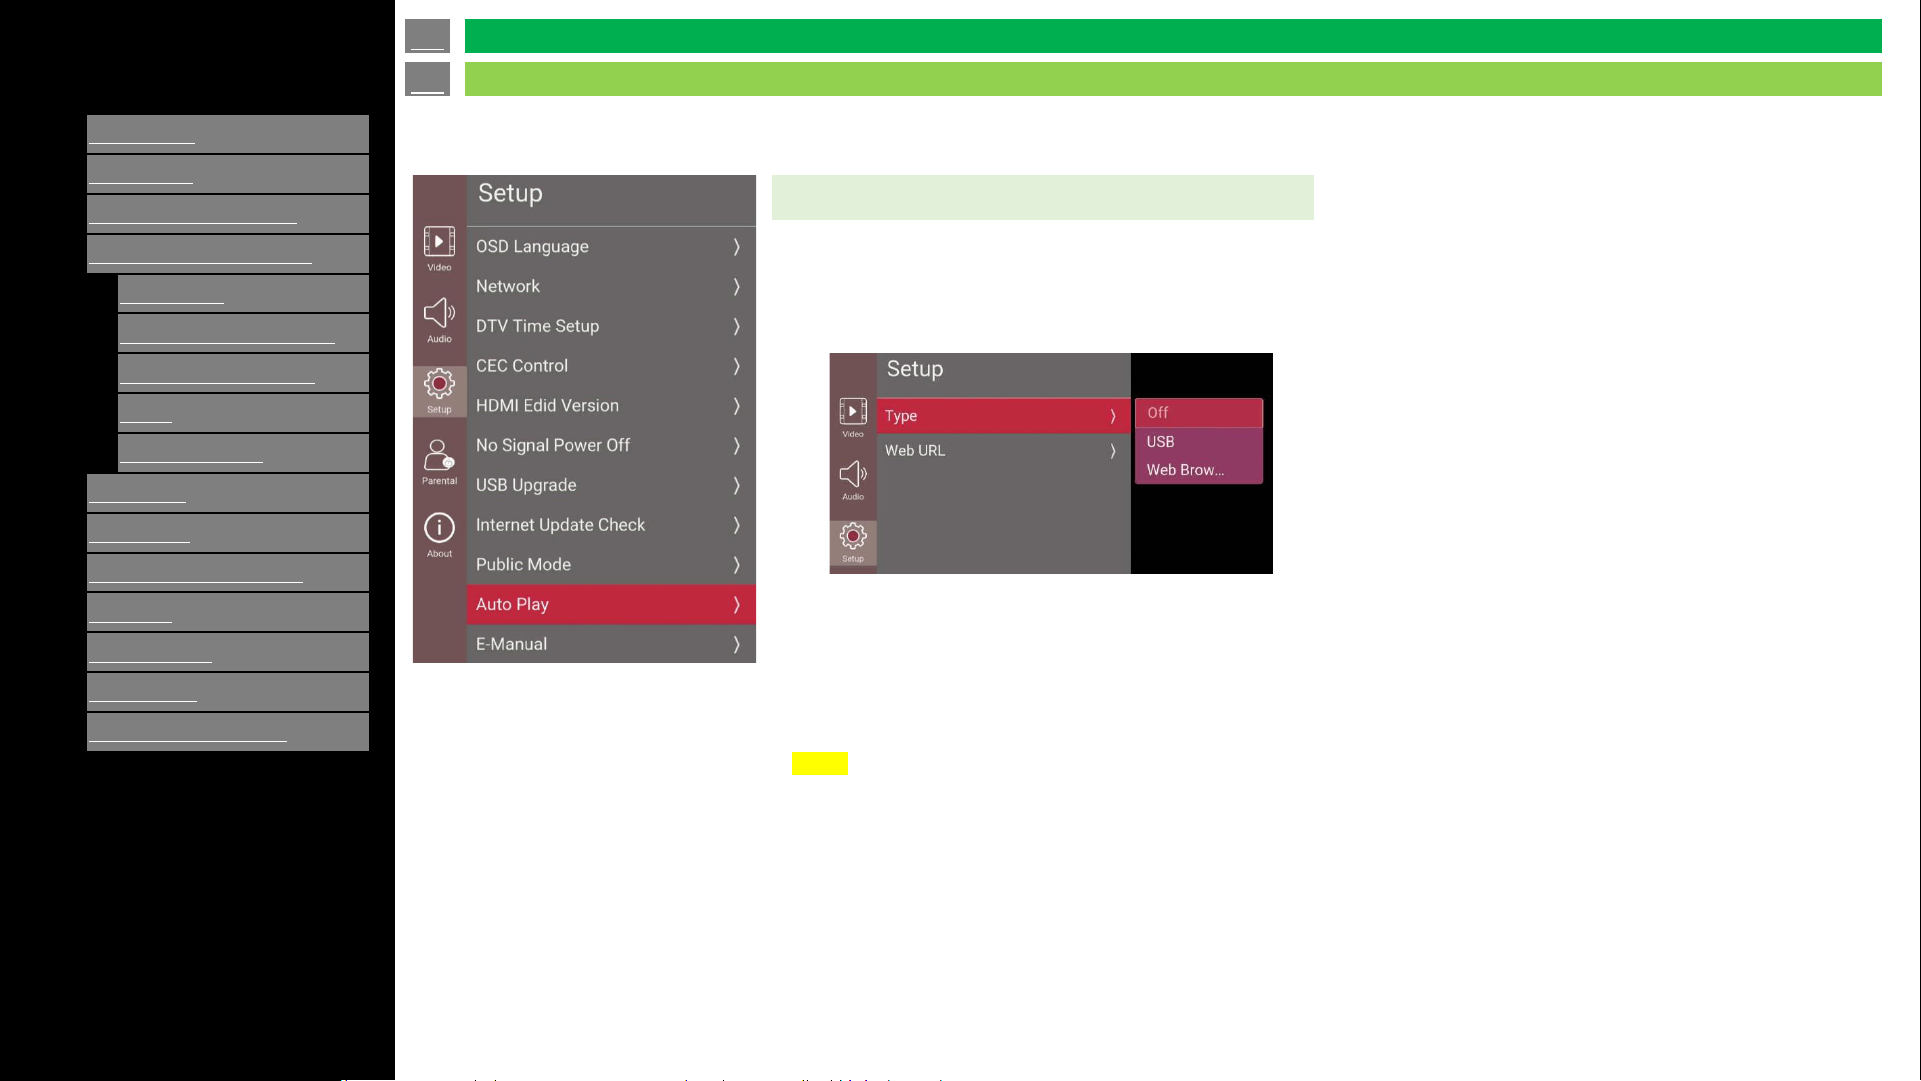
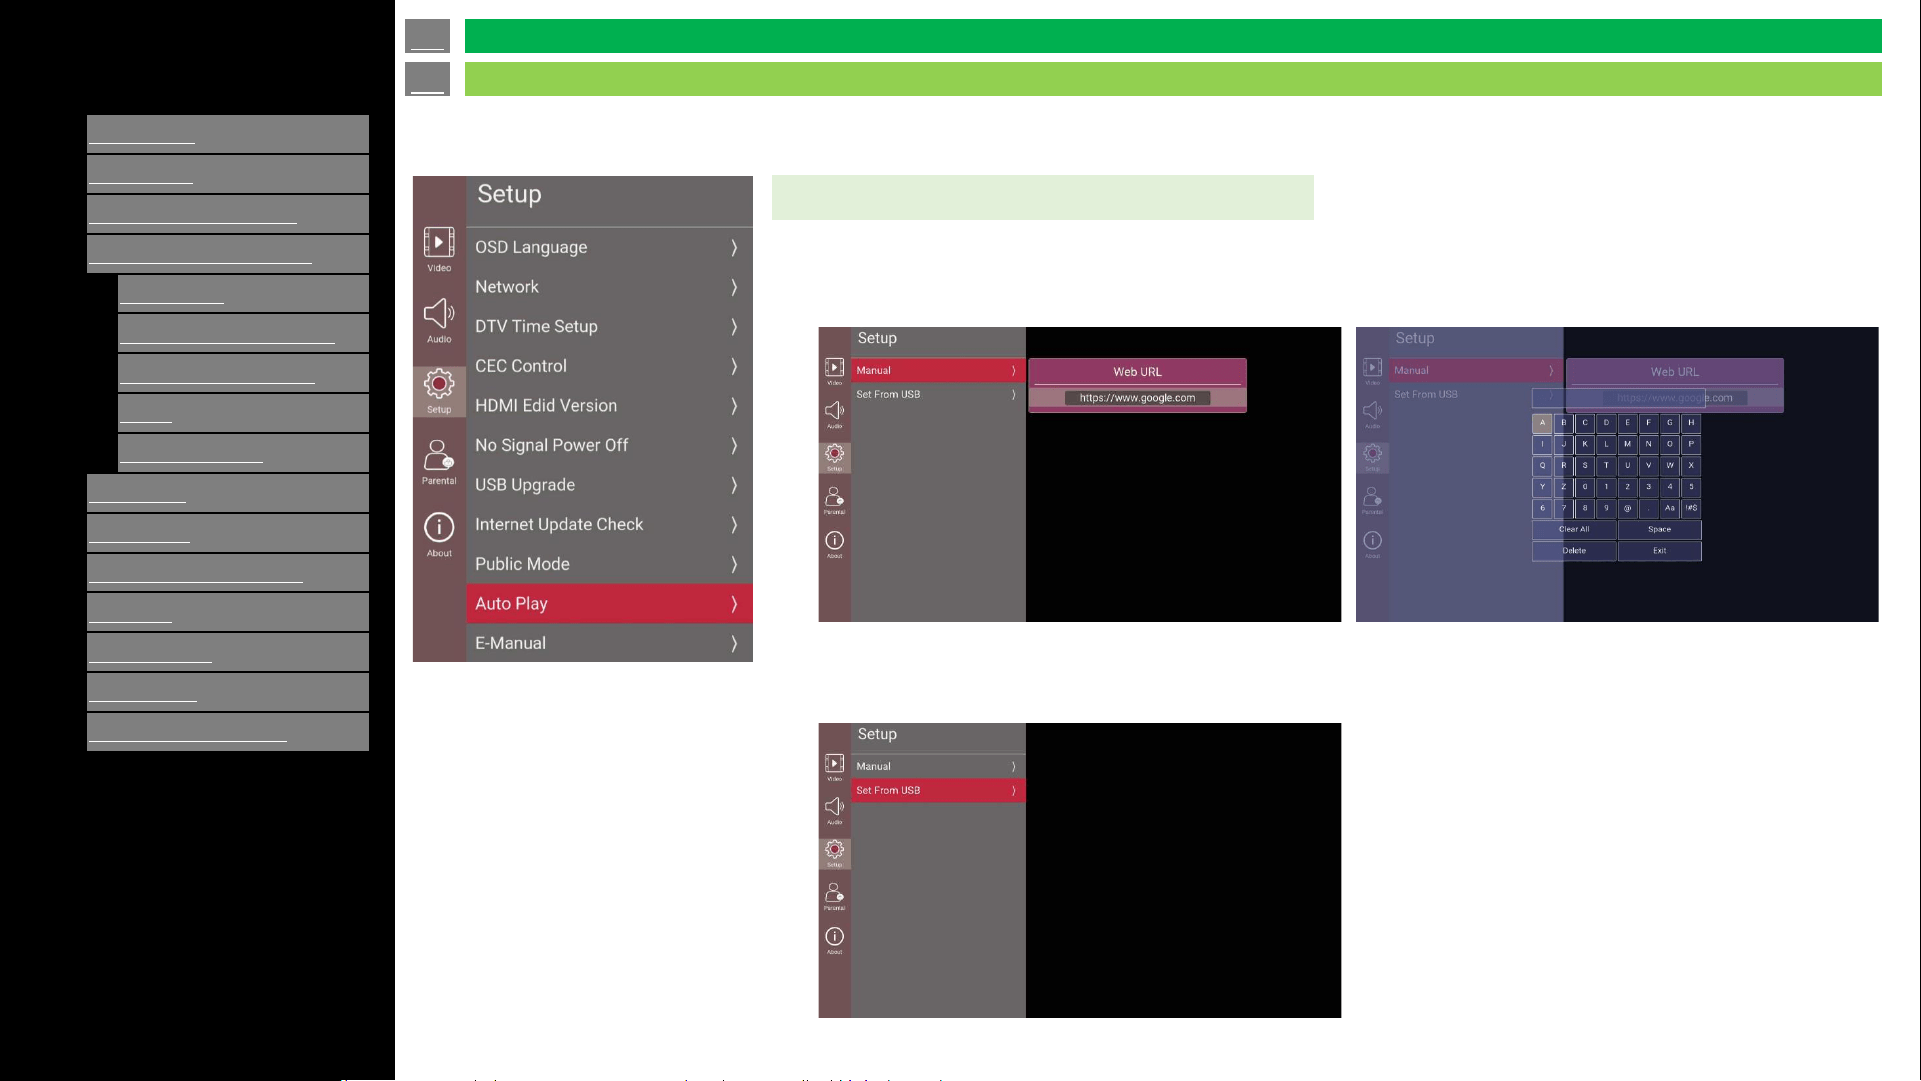
AutoPlay
You can automatically start USB media player or web browser.
Off: Disable AutoPlayUSB: After the power is turned on, the video is played back continuously or slide show of still images
automatically starts.
Web Browser: After the power is turned on, the Web Browser starts automatically and displays the Home Page.
NOTE
• When more than one video is played back continuously, the screen goes black while the data of the next video is being loaded.
To shorten this blackout time, adjust the data size of the content.
• Create a folder named "AutoPlay" in the root directory of the USB memory device (the first directory when the USB memory
device is opened), and store into the folder the video or still images you want to playback.
• When both video and still images are saved in "AutoPlay" folder, video has priority and still images will not be played.
• You must insert the USB memory device to the Monitor before turning off the TV.
• If there are images on the USB memory device but they do not appear on the screen, switch to USB mode and check whether the
image files on the USB memory device are shown correctly.
• It will be interrupted by any operation. After a few minutes, it will automatically start again.
en-US 33
Setup (Continue)
On-Screen Display Menu
[ENGLISH]
Contents
>>
<<
1.
Part Names
2.
Introduction
3.
Direct Button Operation
4.
On
-Screen Display Menu
1.
Introduction
2.
Menu Operation Buttons
3.
Video / Audio Settings
4.
Setup
5.
Parental Control
5.
Application
6.
Using a PC
7.
Using the touch function
8.
Appendix
9.
Specifications
10.
Trademarks
11.
Dimensional Drawings
Ver. 1.1
AutoPlay (Continue)
Start up page of Web Browser: It can be configured by two ways.
1. Manual: Enter Web URL by software keyboard
2. Set From USB: Set by using USB flash drive
How to create USB flash drive for start up
1. Create “AutoPlay” folder at root.
2. Create “autoplay.ini” in “AutoPlay” folder.
3. Description scheme of “autoplay.ini”
[WEB]
URL = https://foo.bar.com/
en-US 34
Setup (Continue)
On-Screen Display Menu
[ENGLISH]
Contents
>>
<<
1.
Part Names
2.
Introduction
3.
Direct Button Operation
4.
On
-Screen Display Menu
1.
Introduction
2.
Menu Operation Buttons
3.
Video / Audio Settings
4.
Setup
5.
Parental Control
5.
Application
6.
Using a PC
7.
Using the touch function
8.
Appendix
9.
Specifications
10.
Trademarks
11.
Dimensional Drawings
Ver. 1.1
Parental controls provides useful lock function for user to lock function or programs.
This feature can prevent watching some of sources, channels or programs.
Parental control
Enter Parental control
Enter Menu button -> Select Parental -> Input Password.
Channel Block
➢It will display channel list and channels can be blocked by select channel item.
➢Select Channel Block; the TV channel will be blocked. A password is needed to watch.
➢Change channel, power off/on, AC off/on the channel still locked.
Channel Block
en-US 35
Parental
On-Screen Display Menu
[ENGLISH]
Contents
>>
<<
1.
Part Names
2.
Introduction
3.
Direct Button Operation
4.
On
-Screen Display Menu
1.
Introduction
2.
Menu Operation Buttons
3.
Video / Audio Settings
4.
Setup
5.
Parental Control
5.
Application
6.
Using a PC
7.
Using the touch function
8.
Appendix
9.
Specifications
10.
Trademarks
11.
Dimensional Drawings
Ver. 1.1
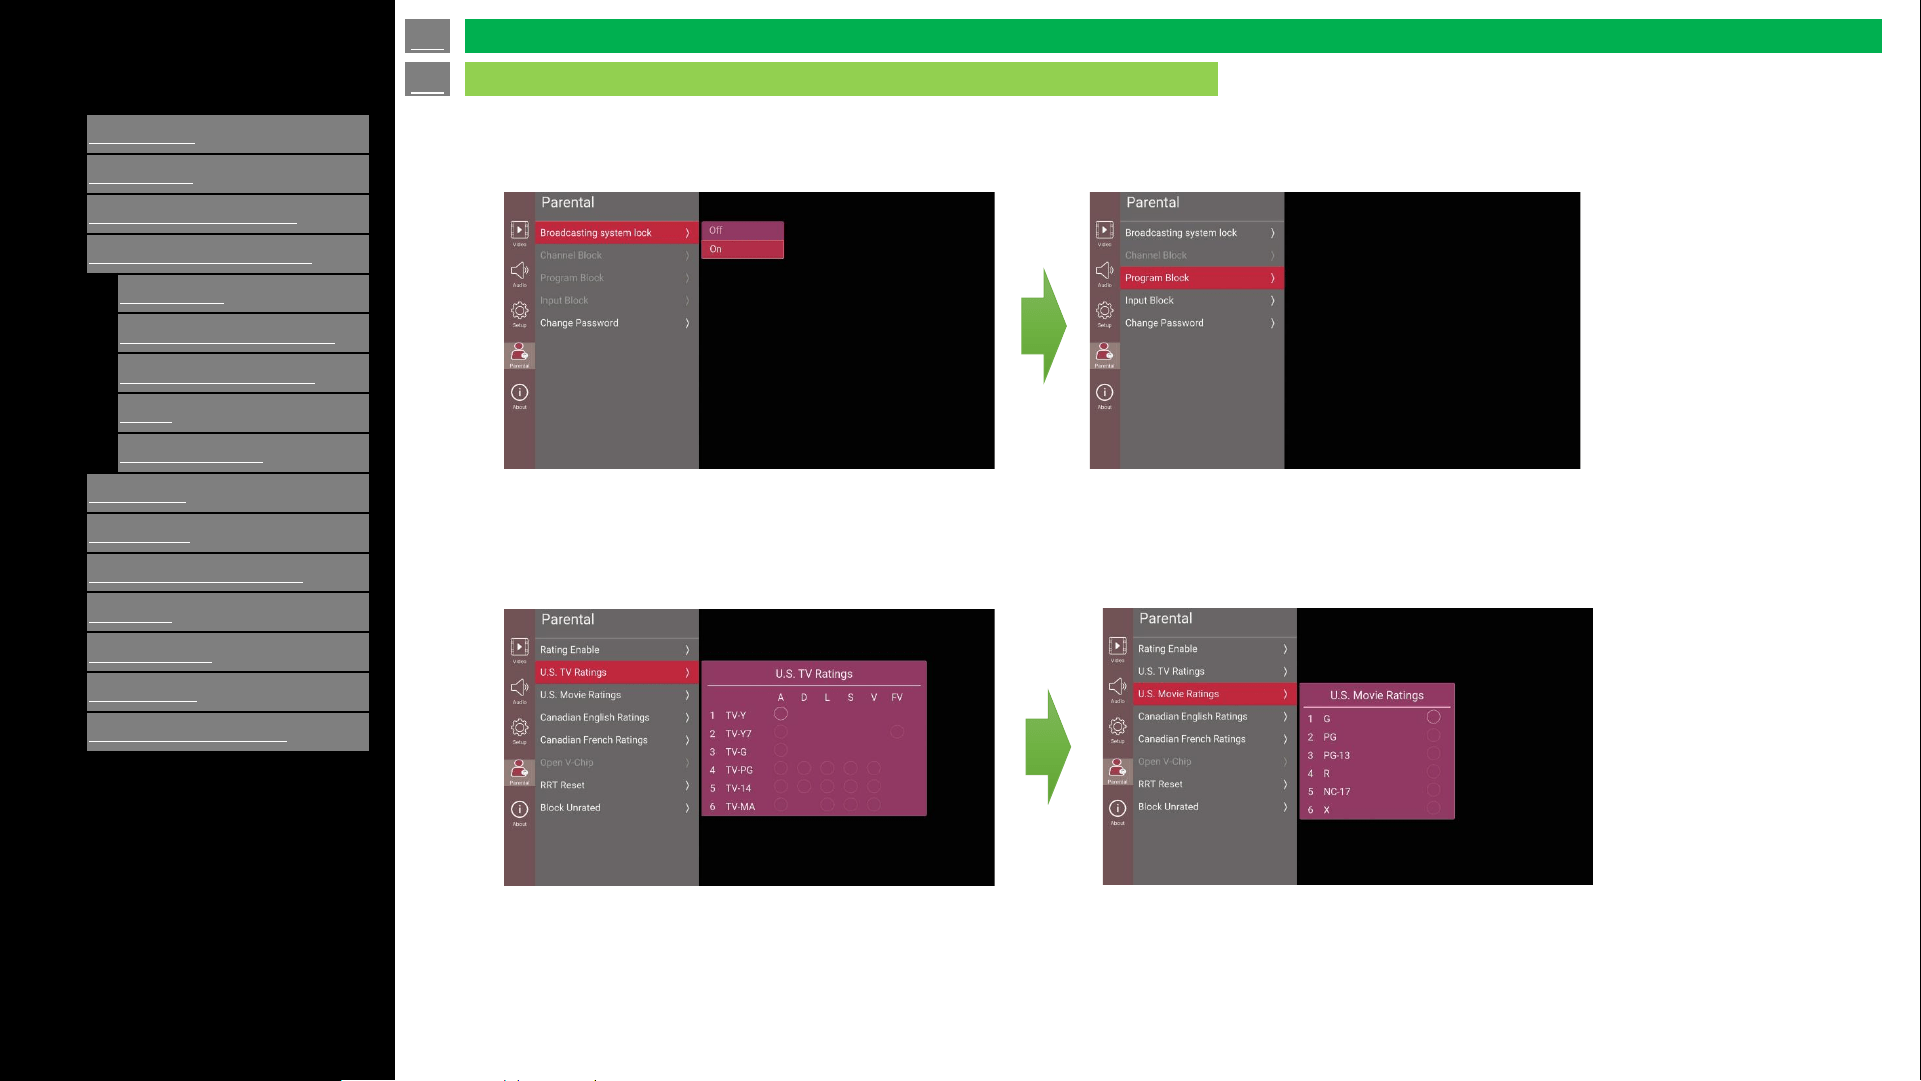
Select menu Program Restrictions
US Region
If Program Restrictions is off, user needs to change the settings to ON, otherwise the rest of the lock options are not
selectable.
Press “Down” key -> U.S TV Ratings
-> Press “Enter” key and select one items as below
Press “Down“ key -> U.S Moving Ratings
-> Press “Enter” key and select one items as below
en-US 36
Parental (Continue)
On-Screen Display Menu
[ENGLISH]
Contents
>>
<<
1.
Part Names
2.
Introduction
3.
Direct Button Operation
4.
On
-Screen Display Menu
1.
Introduction
2.
Menu Operation Buttons
3.
Video / Audio Settings
4.
Setup
5.
Parental Control
5.
Application
6.
Using a PC
7.
Using the touch function
8.
Appendix
9.
Specifications
10.
Trademarks
11.
Dimensional Drawings
Ver. 1.1
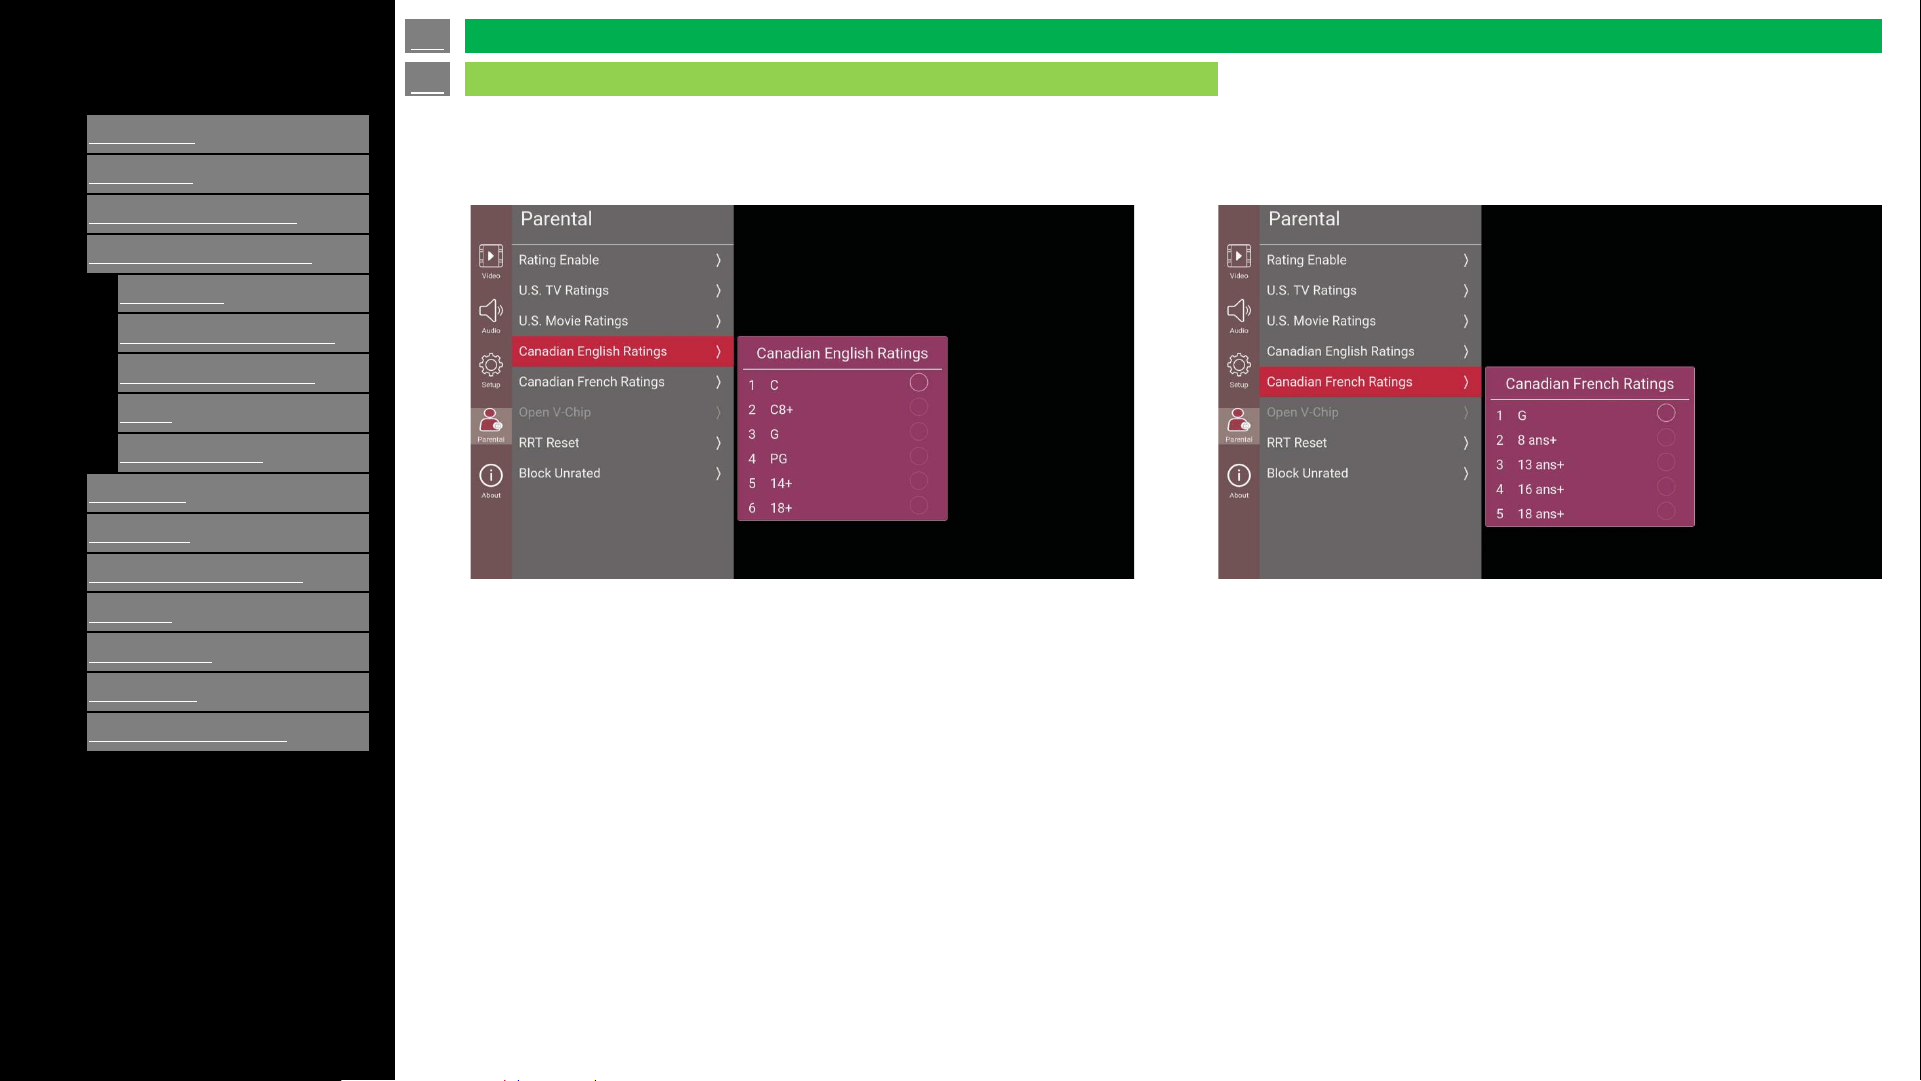
Press “Down” key -> Canadian English Ratings
-> Press “Enter” key and select one items as below
Press “Down” key -> Canadian French Ratings
-> Press “Enter” key and select one items as below
en-US 37
Parental (Continue)
On-Screen Display Menu

[ENGLISH]
Contents
>>
<<
1.
Part Names
2.
Introduction
3.
Direct Button Operation
4.
On
-Screen Display Menu
1.
Introduction
2.
Menu Operation Buttons
3.
Video / Audio Settings
4.
Setup
5.
Parental Control
5.
Application
6.
Using a PC
7.
Using the touch function
8.
Appendix
9.
Specifications
10.
Trademarks
11.
Dimensional Drawings
Ver. 1.1
Press “Down” key -> Open V Chip -> Press “Enter” key and select one item as show below
Channel Block
en-US 38
Parental (Continue)
On-Screen Display Menu

[ENGLISH]
Contents
>>
<<
1.
Part Names
2.
Introduction
3.
Direct Button Operation
4.
On
-Screen Display Menu
1.
Introduction
2.
Menu Operation Buttons
3.
Video / Audio Settings
4.
Setup
5.
Parental Control
5.
Application
6.
Using a PC
7.
Using the touch function
8.
Appendix
9.
Specifications
10.
Trademarks
11.
Dimensional Drawings
Ver. 1.1
Press “Down” key to Block Unrated.
This function will block all the programs which it has no parental rating info.
Press "ENTER" key to Turn OFF/ON Block Unrated option.
en-US 39
Parental (Continue)
On-Screen Display Menu
[ENGLISH]
Contents
>>
<<
1.
Part Names
2.
Introduction
3.
Direct Button Operation
4.
On
-Screen Display Menu
1.
Introduction
2.
Menu Operation Buttons
3.
Video / Audio Settings
4.
Setup
5.
Parental Control
5.
Application
6.
Using a PC
7.
Using the touch function
8.
Appendix
9.
Specifications
10.
Trademarks
11.
Dimensional Drawings
Ver. 1.1
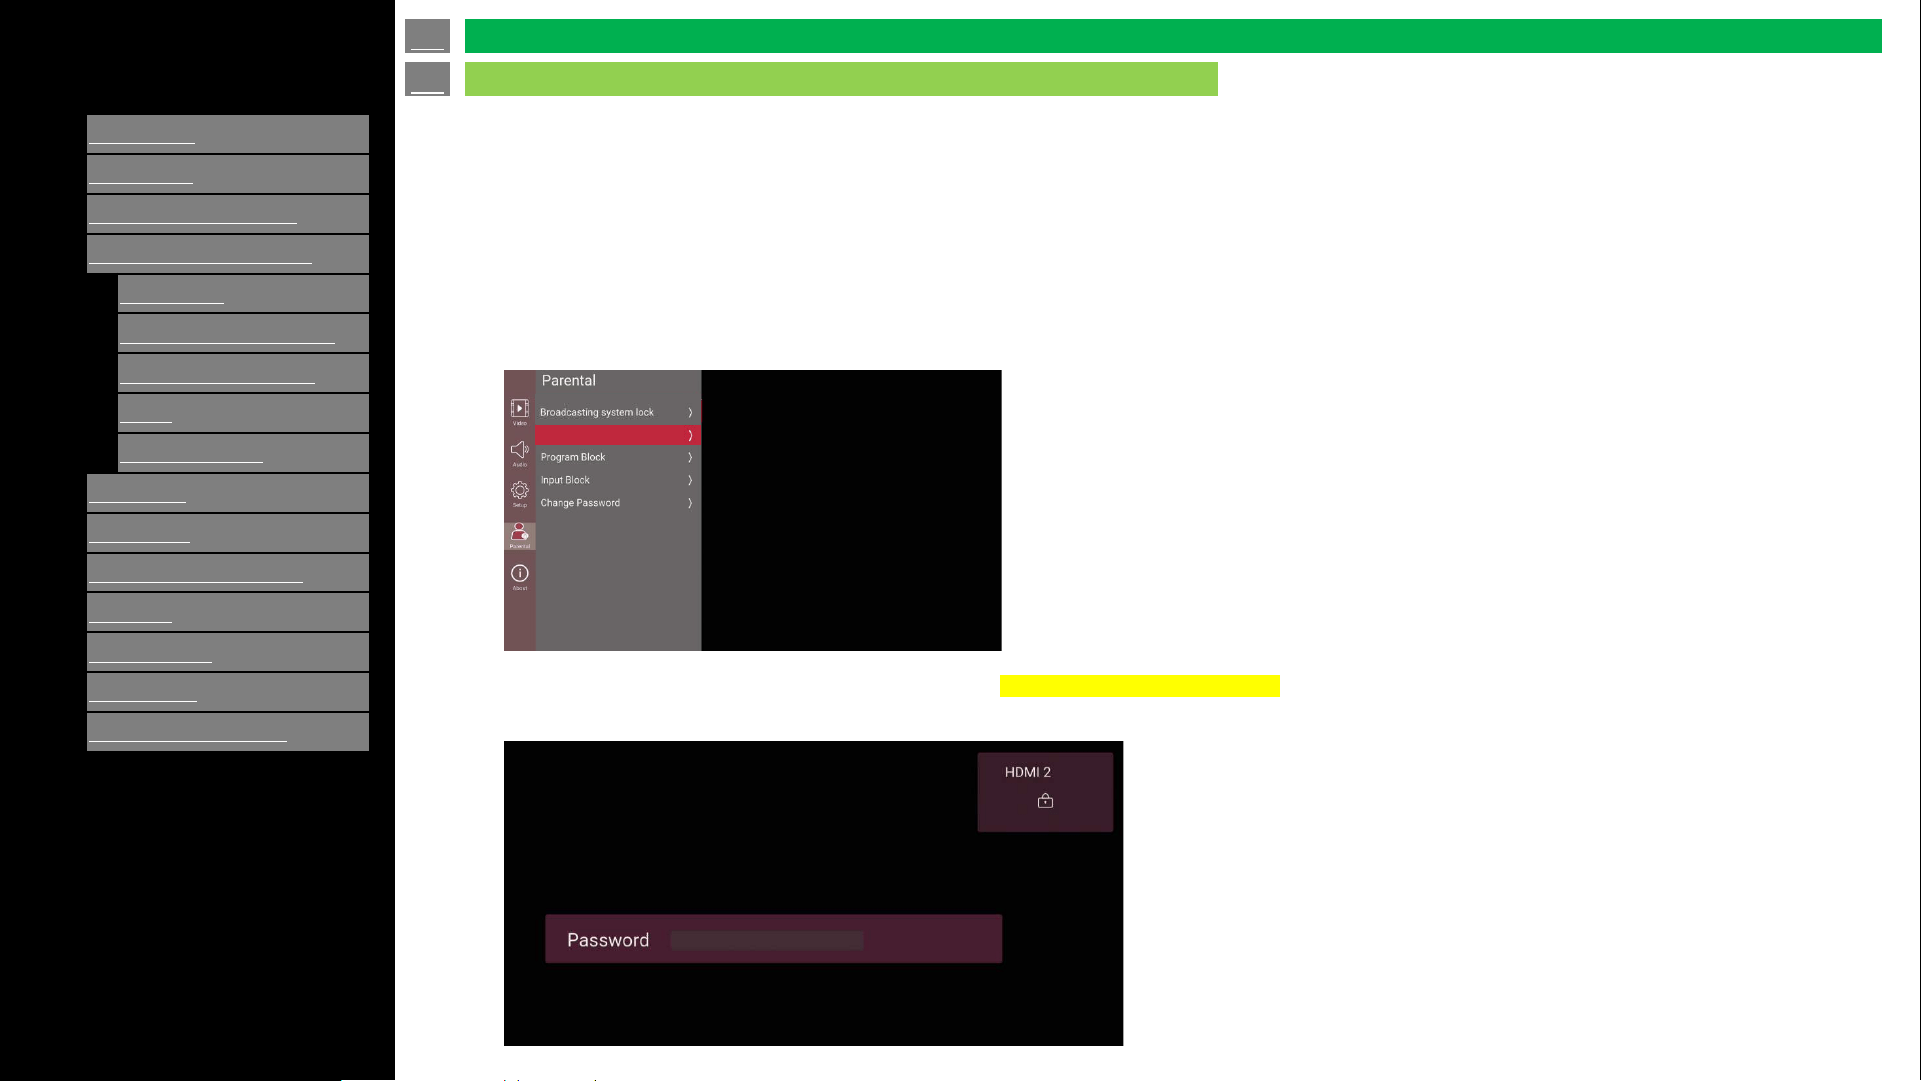
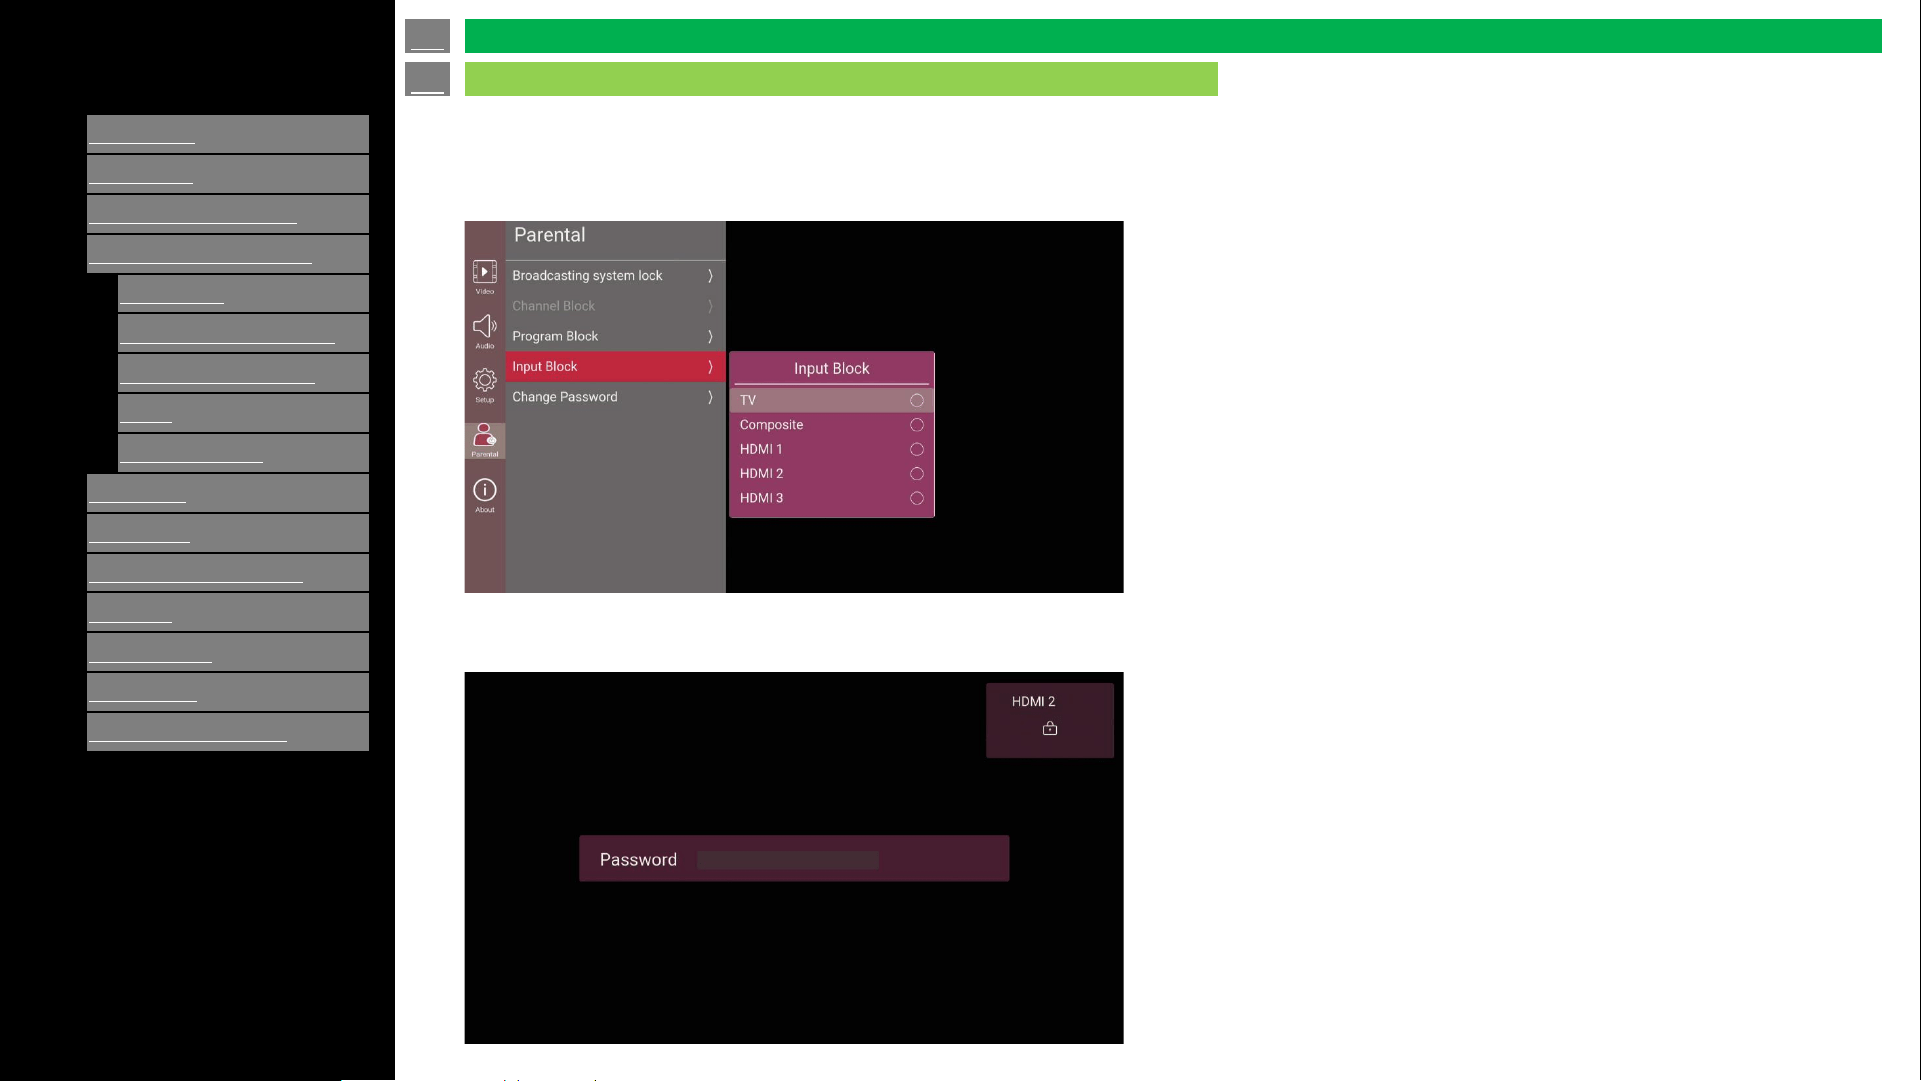
Input Block
Select menu Input Blocked.
Press key ‘up/down’ to select the source --> press key ‘OK’ to block/unblock.
If you select a locked Input, it will appear Blocked, you must enter a password to enable the input.
If you don't enter a password, after a while it will show Input locked.
en-US 40
Parental (Continue)
On-Screen Display Menu

[ENGLISH]
Contents
>>
<<
1.
Part Names
2.
Introduction
3.
Direct Button Operation
4.
On
-Screen Display Menu
1.
Introduction
2.
Menu Operation Buttons
3.
Video / Audio Settings
4.
Setup
5.
Parental Control
5.
Application
6.
Using a PC
7.
Using the touch function
8.
Appendix
9.
Specifications
10.
Trademarks
11.
Dimensional Drawings
Ver. 1.1
Password Dialog (Change Password)
If current program has been blocked (channel block/ratings block/input) password dialog will be displayed on screen.
* Password is set “1234” as default.
en-US 41
Parental (Continue)
On-Screen Display Menu
[ENGLISH]
Contents
>>
<<
1.
Part Names
2.
Introduction
3.
Direct Button Operation
4.
On
-Screen Display Menu
1.
Introduction
2.
Menu Operation Buttons
3.
Video / Audio Settings
4.
Setup
5.
Parental Control
5.
Application
6.
Using a PC
7.
Using the touch function
8.
Appendix
9.
Specifications
10.
Trademarks
11.
Dimensional Drawings
Ver. 1.1
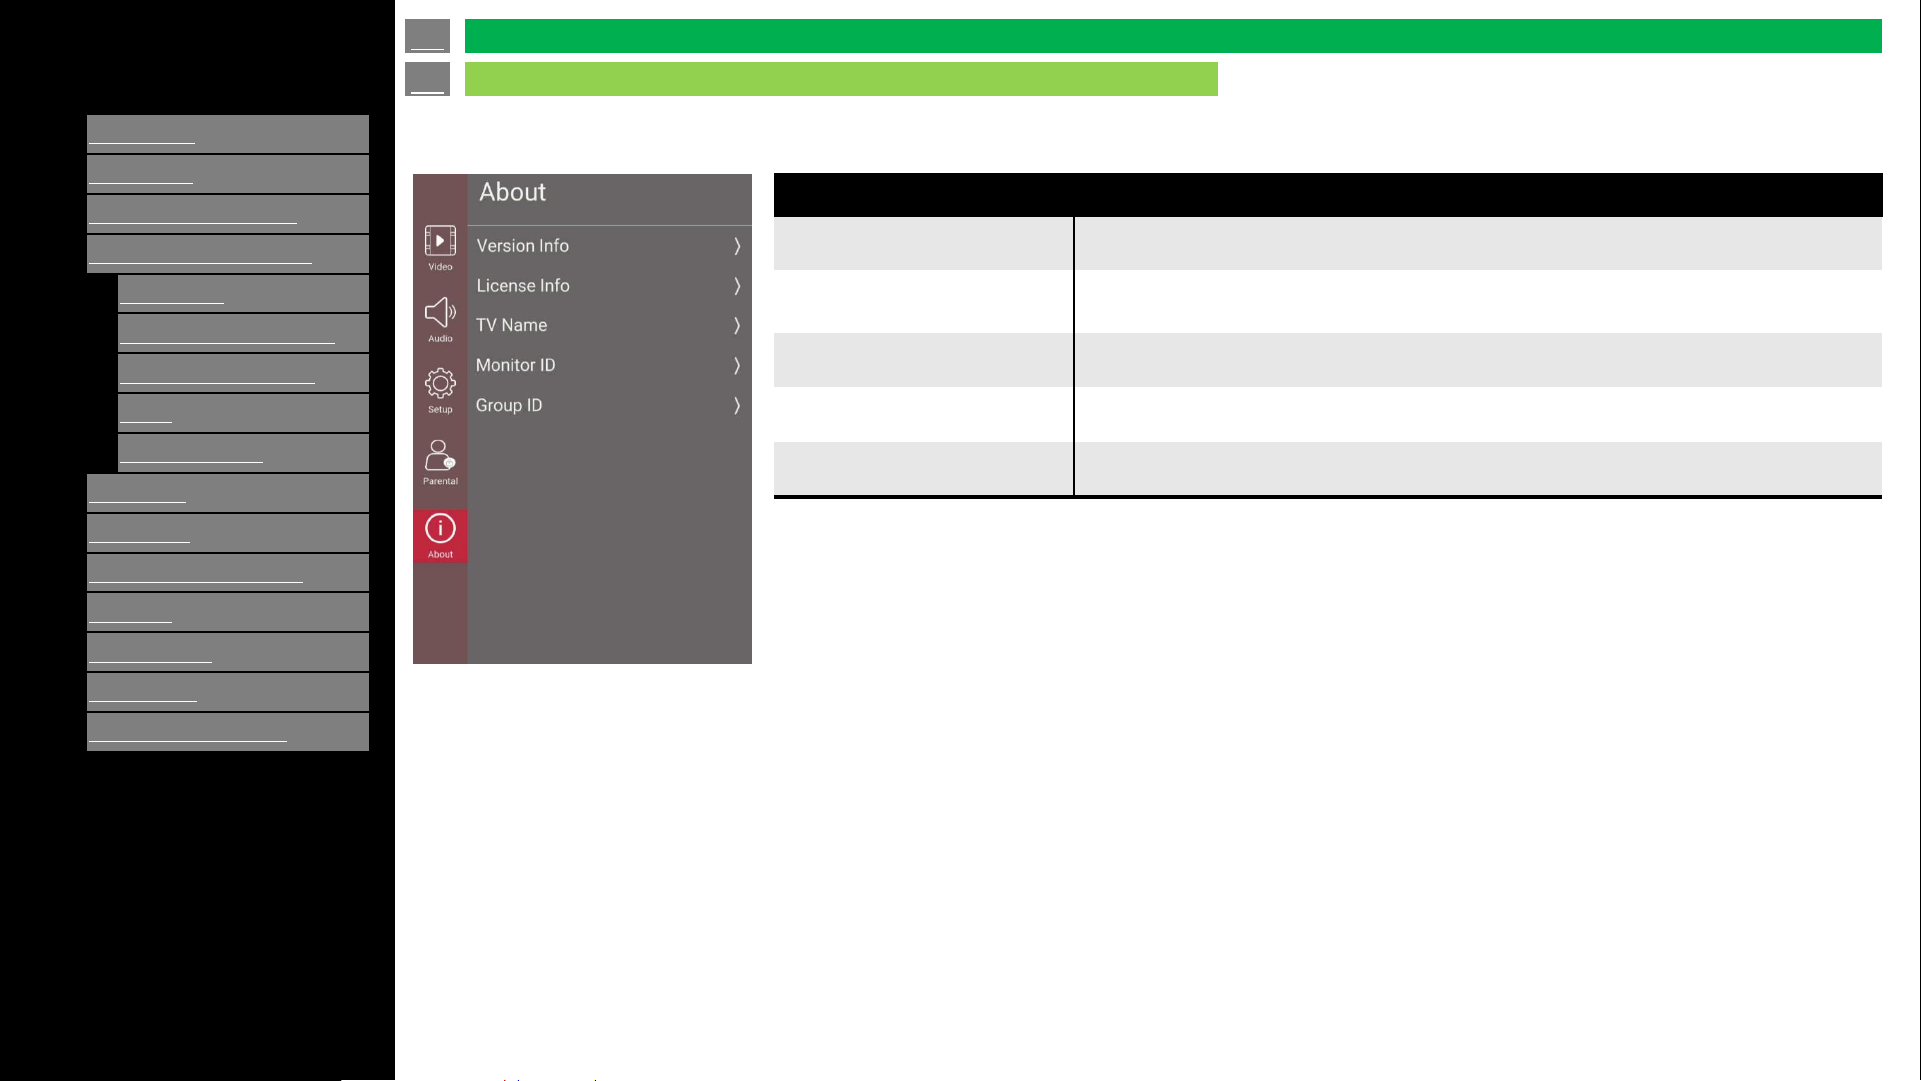
The about interface mainly displays information, including Version Info, License Info, System Information and
TV Name.
Selected item
Version Info Show Model Name, Version, Serial Number and Website.
License Info
Show the Information of “Data Collection and Firmware Updates Notice”.
Enter “View Additional Details” will display the Details.
TV name Displays the name of the TV. It can be edited.
Monitor ID Show the TV Name (a custom name for the display). It can be edited.
Group ID Show the Group ID that the display is subordinated. It can be edited.
en-US 42
On-Screen Display Menu
About
[ENGLISH]
Contents
1.
Part Names
2.
Introduction
3.
Direct Button Operation
4.
On
-Screen Display Menu
5.
Application
1.
MMP (Multi Media Player)
2.
Casting
3.
OPEN BROWSER
6.
Using a PC
7.
Using the touch function
8.
Appendix
9.
Specifications
10.
Trademarks
11.
Dimensional Drawings
>>
<<
Ver. 1.1
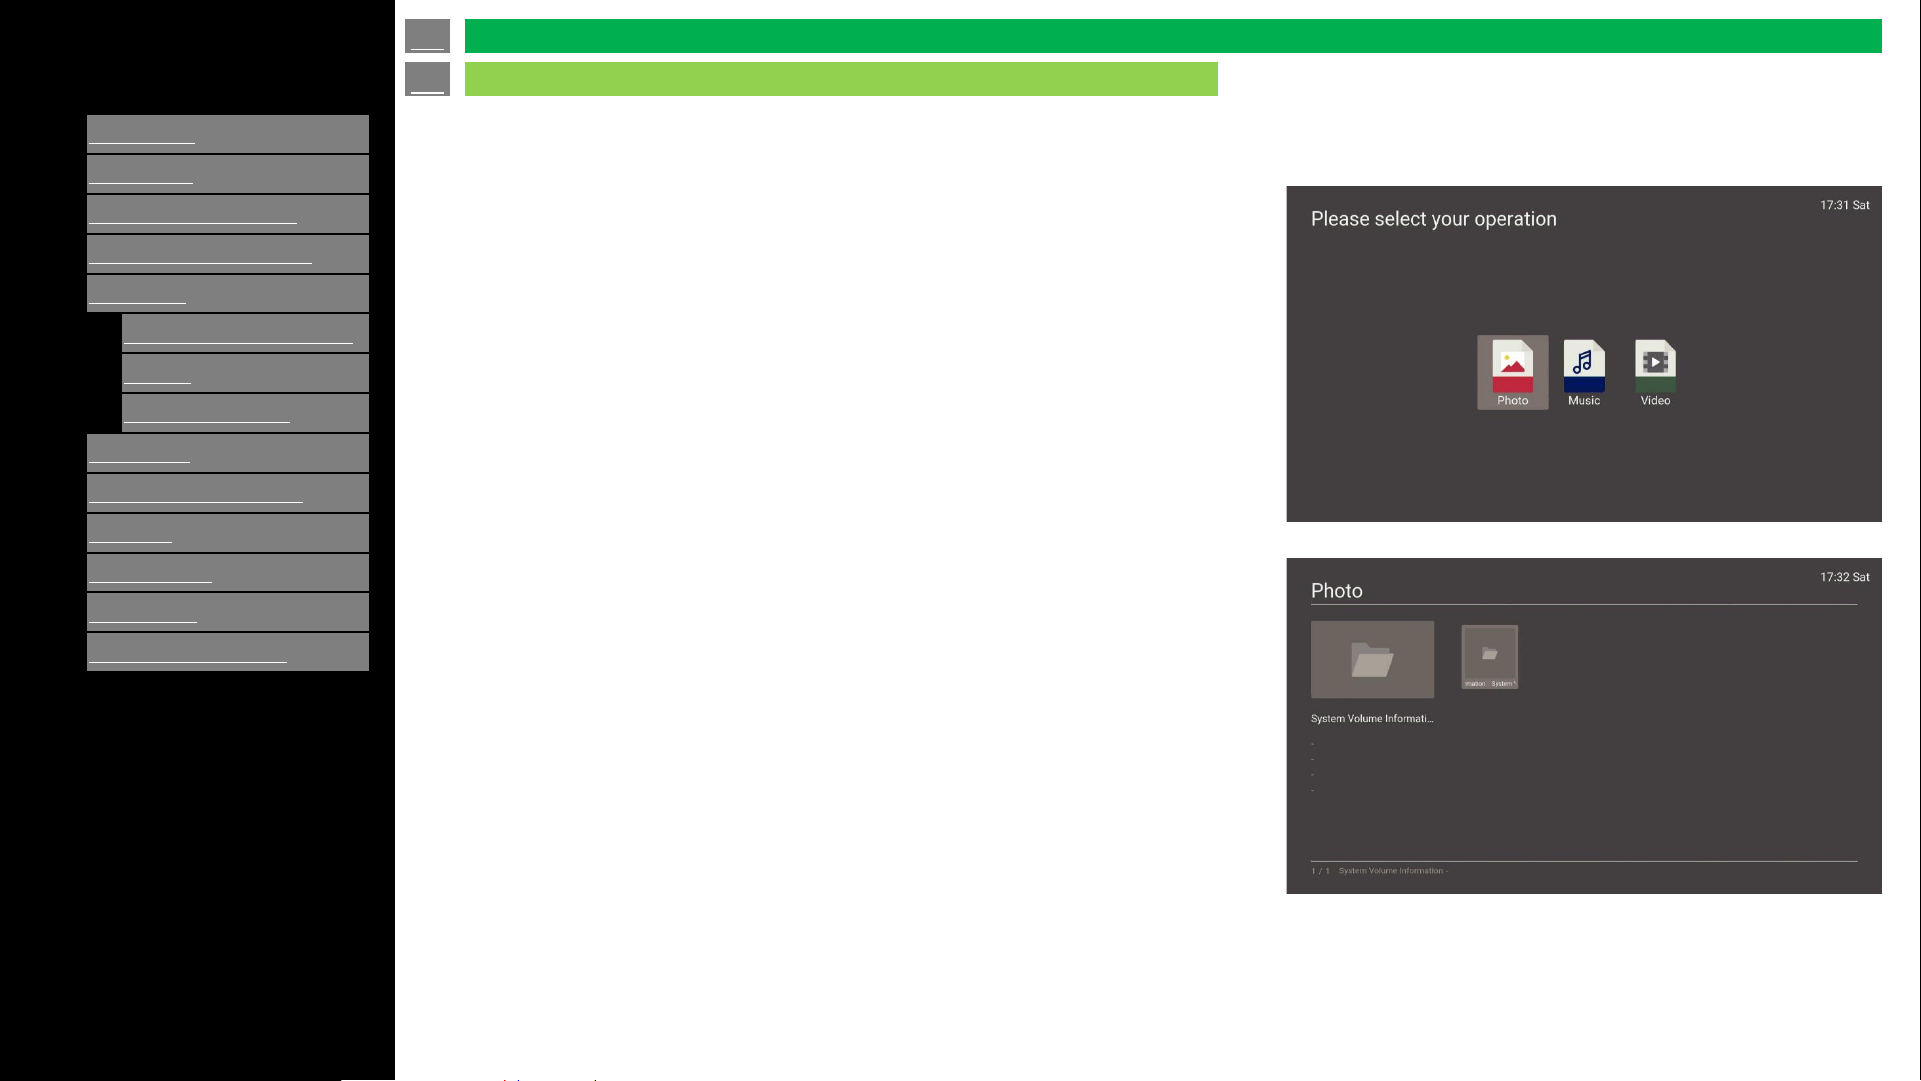
Multimedia Player is a Media player application. Users can use it to enjoy video, photo, audio on TV.
How to launch MMP:
a: Press [INPUT] or b: Press [APPS] -> Select “MMP”.
Enter MMP, MMP's main screen contains three multimedia type
icons: Video, Photo and Audio.
Select one of the icons (Photo, Music or Video) and it will enter the
corresponding file list screen.
en-US 43
MMP (Multi-Media Player)
Application
[ENGLISH]
Contents
1.
Part Names
2.
Introduction
3.
Direct Button Operation
4.
On
-Screen Display Menu
5.
Application
1.
MMP (Multi Media Player)
2.
Casting
3.
OPEN BROWSER
6.
Using a PC
7.
Using the touch function
8.
Appendix
9.
Specifications
10.
Trademarks
11.
Dimensional Drawings
>>
<<
Ver. 1.1
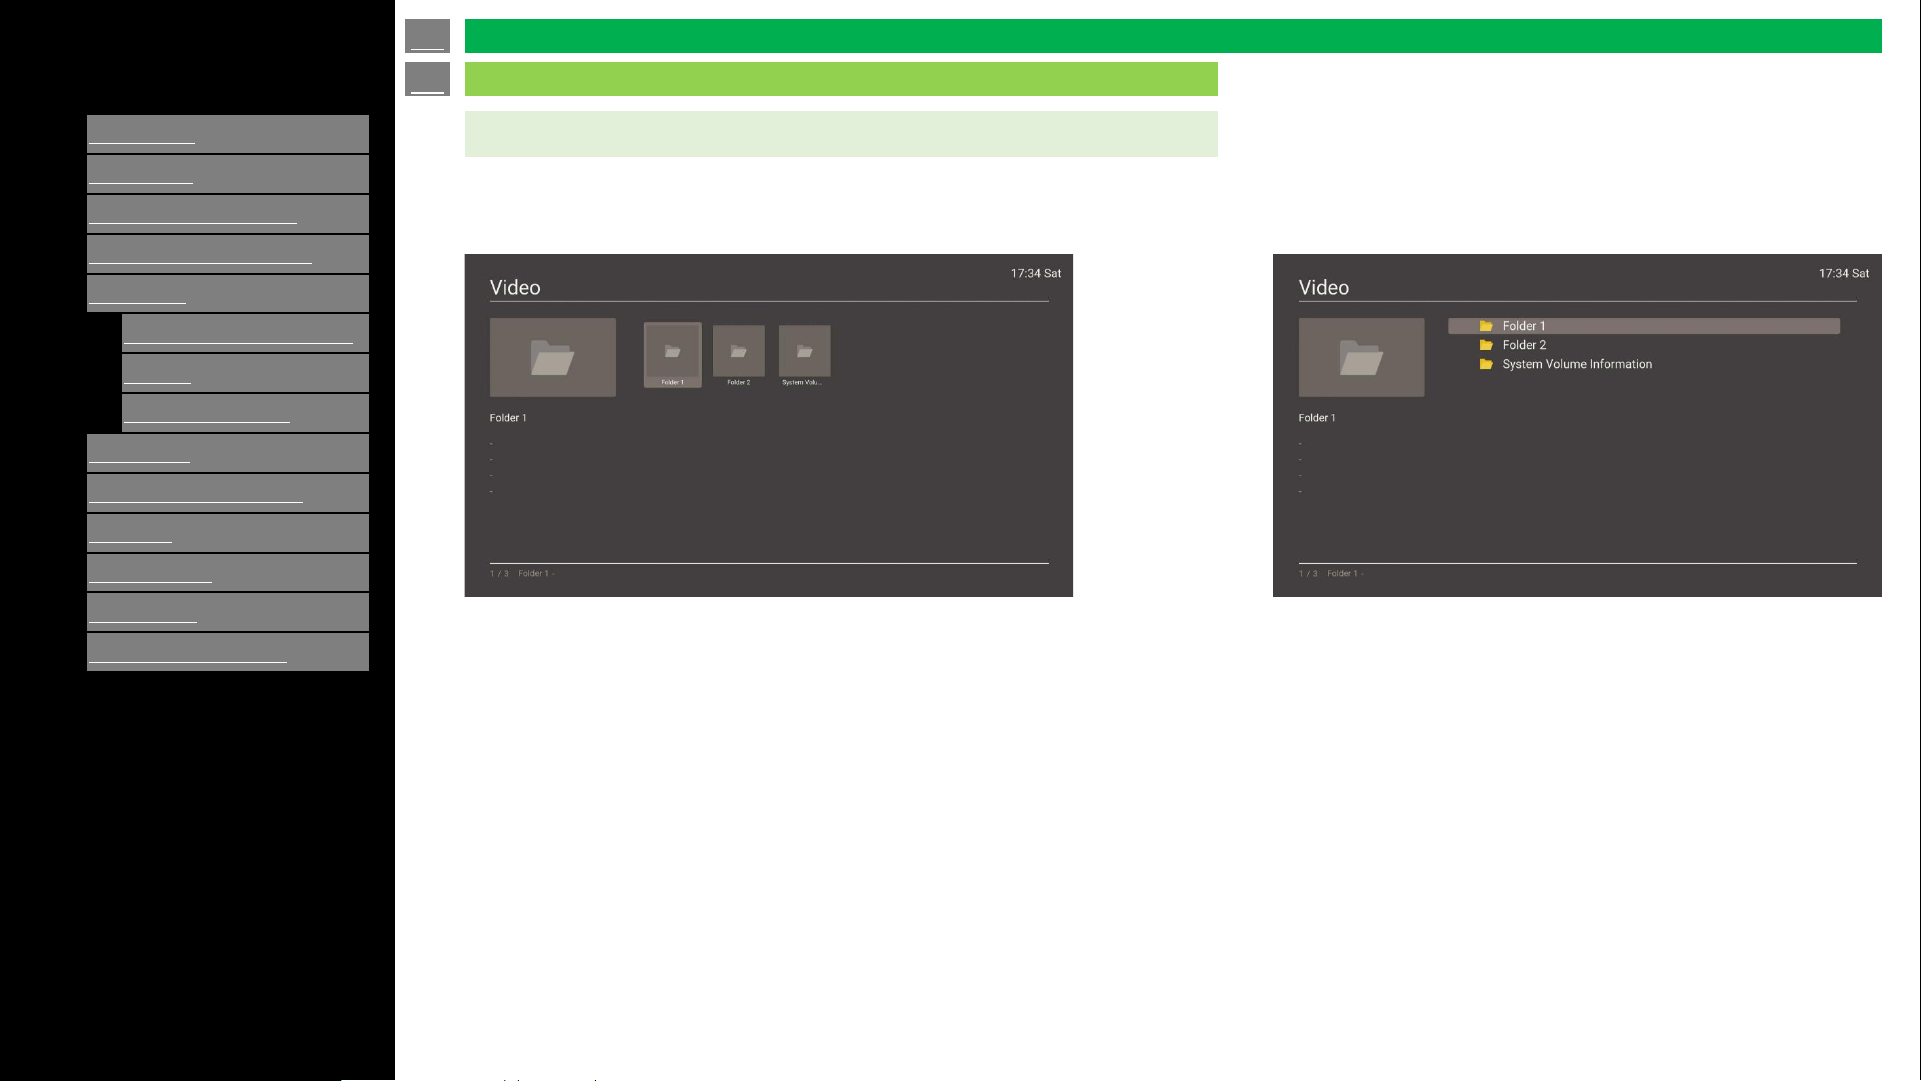
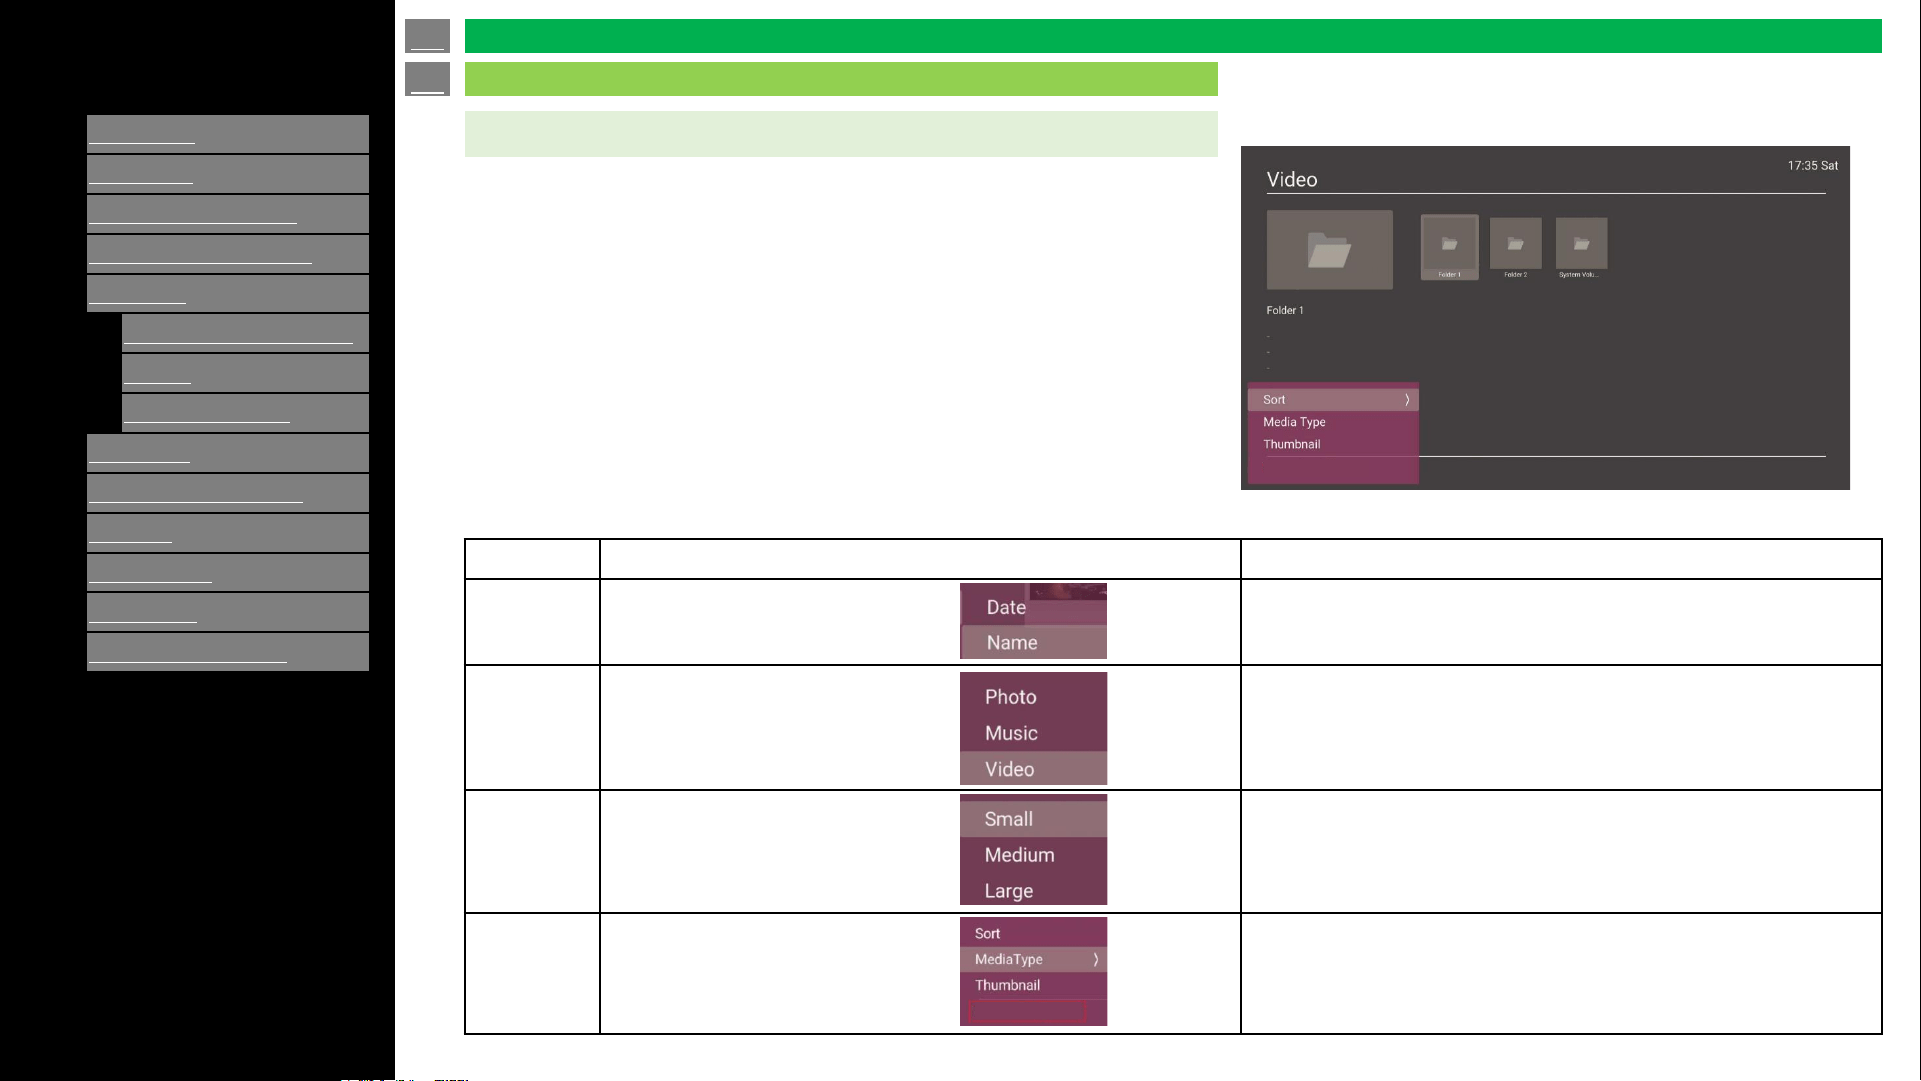
Grid mode:
Select Video icon, enter video file list screen.
List mode:
All folders and supported videos of the current directory will be
displayed.
The video file will display as a thumbnails.
- The video preview interface is displayed on the left side of the screen,
where detailed video information is displayed, and you do not perform
any operation on any video you select about 10s, the video will be
automatically played in the small window on the left.
- Press “Left/Right/Up/Down” key to choose target file or folder.
- Press “Enter” key to play video or enter folder.
- Default is grid mode. To switch to list mode, press the "Blue" key.
In list mode, video does not display as a thumbnail.
- Press “Up/Down” key to choose target file or folder.
- When moving to a video file, the video will be played in the
upper left corner.
- "Switch to grid mode by pressing the “Blue” key.
Video Playback
en-US 44
MMP (Multi-Media Player)
Application
[ENGLISH]
Contents
1.
Part Names
2.
Introduction
3.
Direct Button Operation
4.
On
-Screen Display Menu
5.
Application
1.
MMP (Multi Media Player)
2.
Casting
3.
OPEN BROWSER
6.
Using a PC
7.
Using the touch function
8.
Appendix
9.
Specifications
10.
Trademarks
11.
Dimensional Drawings
>>
<<
Ver. 1.1
Video Codec
Media Supported format:
VP9 HEVC/H.265 MPEG1/2 MPEG4
DivX 3.11/DivX 4.12
DivX 5.x/DivX 6/XviD
Sorenson H.263 H.263 H.264 AVS AVS+
AVS2 WMV3 VC1 Motion JPEG VP8
RV30/RV40 AV1
MPEG1/2 Layer1 MPEG1/2 Layer2
MPEG1/2/2.5 Layer3
AC3(DD) EAC3(DDP)
AAC-LC
HEAAC
WMA WMA 10 Pro M0 WMA 10 Pro M1 WMA 10 Pro M2
VORBIS DTS DTS LBR DTS XLL DTS Master Audio
LPCM
IMA-ADPCM
MS-ADPCM
G711 A/mu-law LBR (cook) FLAC
OPUS AC4
Fraunhofer MPEG
-
H
TV Audio System
AMR-NB AMR-WB
Audio Codec
Photo Codec
JPEG PNG BMP
Video Playback
* jpeg image : In case of progressive jpeg, it is available only up to Full HD (1,920x1,080) resolution.
* PNG image : It does not support interlaced format .
en-US 45
MMP (Multi-Media Player)
Application
[ENGLISH]
Contents
1.
Part Names
2.
Introduction
3.
Direct Button Operation
4.
On
-Screen Display Menu
5.
Application
1.
MMP (Multi Media Player)
2.
Casting
3.
OPEN BROWSER
6.
Using a PC
7.
Using the touch function
8.
Appendix
9.
Specifications
10.
Trademarks
11.
Dimensional Drawings
>>
<<
Ver. 1.1
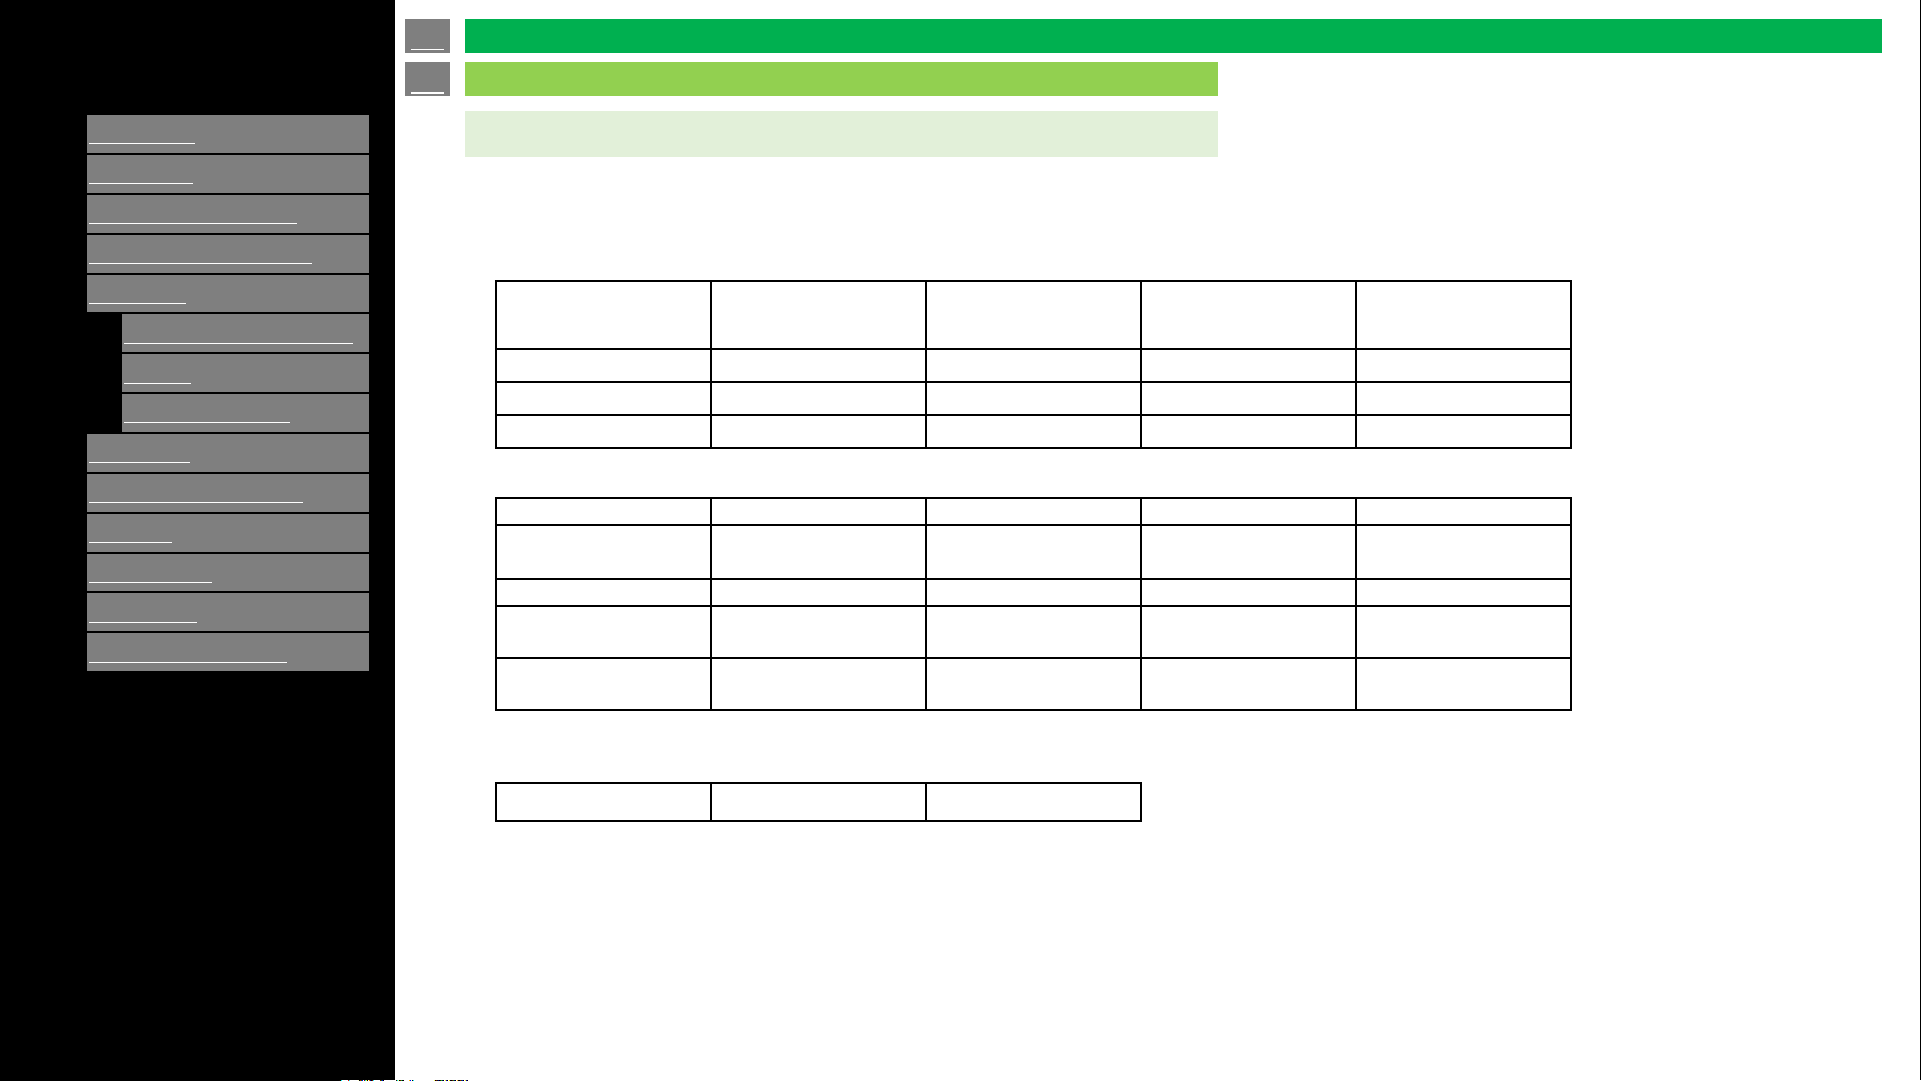
File list menu:
Note:
No “Thumbnail” item in list mode menu.
Press “Menu” key enter file list menu:
*File list menu of Photo/Music is as same as Video.
Item Sub Item Description
Sort Date/Name Files sorting methods, modification by name or modification date.
Media type Photo/Music/Video Enter the corresponding file list screen.
Thumbnail Small/Medium/Large Change the size of folder icon and video thumbnail.
View all
photo
View all photo
USB directory
a. “View all photo” will show all videos in the current device.
b. “USB directory” is the default mode, will show all folders and
supported videos in the current directory.
Video Playback
en-US 46
MMP (Multi-Media Player)
Application
View all photo
View all photo
[ENGLISH]
Contents
1.
Part Names
2.
Introduction
3.
Direct Button Operation
4.
On
-Screen Display Menu
5.
Application
1.
MMP (Multi Media Player)
2.
Casting
3.
OPEN BROWSER
6.
Using a PC
7.
Using the touch function
8.
Appendix
9.
Specifications
10.
Trademarks
11.
Dimensional Drawings
>>
<<
Ver. 1.1
• You can launch Casting by pressing “APPS” on remote control -> select “Casting” and press ENTER.
• You can cast the screen from your device to the TV.
1. Launch “Casting” from “APPS”.
* See client device for further instructions.
2. Find this display and start casting.
Casting
en-US 47
Casting
Application
Device Requirement
Android
Android 9 or later
Windows
Windows 10 or later
Wireless LAN is mandatory
Processor: 1GHz or faster
RAM: 2GB is mandatory, 8GB is recommend
Requirement of client devices
Specification
Wireless LAN: uses 2.4GHz bandwidth (5GHz does not support)
Max resolution on the display : Full HD(1,920 x 1,080)
Support OS : Android and Windows
Apple devices and Chrome OS are not supported
Video / Sound quality depends on network environment.
Not all devices are compatible with this casting app.
Casting
Disable Wireless display
◼ Connect from Android device
◼ Connect from Windows PC
1. Turn on “Cast” function on the Android device
2. Select device from the list of available devices to start casting
1. On the taskbar, select “action center” icon > “Connect” > pick the display
2. Make enable connection due to instruction on the screen
(in case of Windows 10)
(in case of Windows 11)
1. On right side of the taskbar, select the “Network” icon > “Cast”
> pick the display
2. Make enable connection due to instruction on the screen
[ENGLISH]
Contents
1.
Part Names
2.
Introduction
3.
Direct Button Operation
4.
On
-Screen Display Menu
5.
Application
1.
MMP (Multi Media Player)
2.
Casting
3.
OPEN BROWSER
6.
Using a PC
7.
Using the touch function
8.
Appendix
9.
Specifications
10.
Trademarks
11.
Dimensional Drawings
>>
<<
Ver. 1.1
NOTE
• This TV has a built-in wireless LAN function. Using a separate
wireless USB LAN adapter may result in radio communications that
do not comply with regulations on radio communications. Therefore,
do not use a separate wireless LAN.
• A wireless LAN connection and performance cannot be guaranteed
for all residential environments. In the following cases, the wireless
LAN signal may be poor or drop, or the connection speed may
become slower.
- When used in buildings made with concrete, reinforced steel, or
metal.
- When placed near objects that obstruct the signal.
- When used with other wireless devices that emit the same
frequency.
- When used in the vicinity of microwave ovens and other devices
that emit a magnetic field, electrostatic charge, or electromagnetic
interference.
Network Settings
To connect your TV to the Internet, you must have a broadband
Internet connection.
If you do not have a broadband Internet connection, consult the
store where you purchased your TV or ask your Internet service
provider or telephone company.
When an Internet connection is made, an Ethernet and wireless
connection cannot be used at the same time. Use only one of the
connection types.
By connecting your TV to a broadband system, you can access the
Internet from the TV.
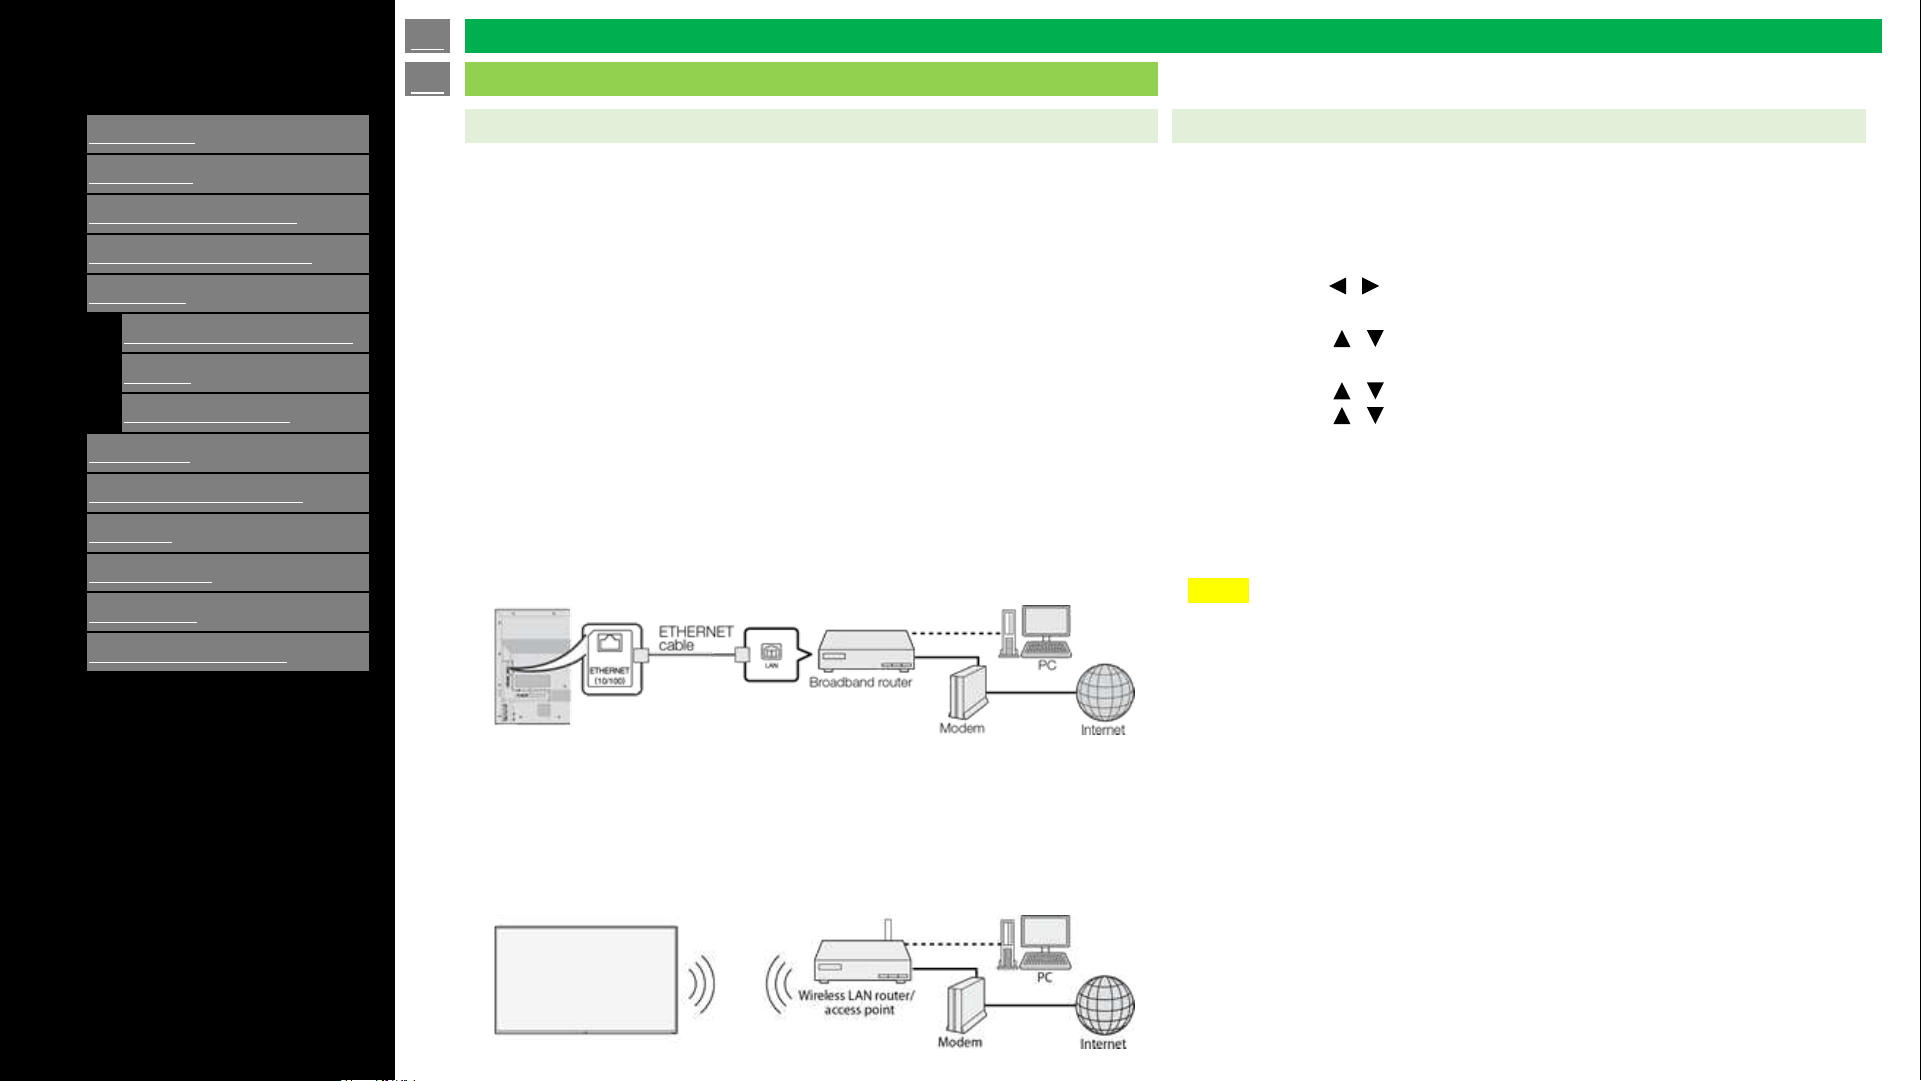
Using an ETHERNET cable
Use an ETHERNET cable (commercially available) to connect
the ETHERNET terminal on the TV to your broadband router
(commercially available).
Using the wireless LAN
This TV is equipped with a wireless LAN function.
For a wireless LAN connection, you must use "Wireless Setup"
to connect the access point and TV.
Perform the procedure below to make adjustments or to confirm the
settings for accessing the Internet.
1. Press MENU to display the MENU screen, and then press
ENTER.
2. Press / to select "Network Setting", and then press
ENTER.
3. Press / to select "Connection Type", and then press
ENTER.
Press / select "Wired" or "Wireless". and press ENTER.
4. Press / to select "Wired Setup", or "Wireless Setup", and
then press ENTER.
Select ”Wired Setup" when you make general adjustments to
connect to the Internet.
5. Press MENU to exit.
Connecting to the Internet
en-US 48
Application (Using the Internet)
OPEN BROWSER
[ENGLISH]
Contents
1.
Part Names
2.
Introduction
3.
Direct Button Operation
4.
On
-Screen Display Menu
5.
Application
1.
MMP (Multi Media Player)
2.
Casting
3.
OPEN BROWSER
6.
Using a PC
7.
Using the touch function
8.
Appendix
9.
Specifications
10.
Trademarks
11.
Dimensional Drawings
>>
<<
Ver. 1.1
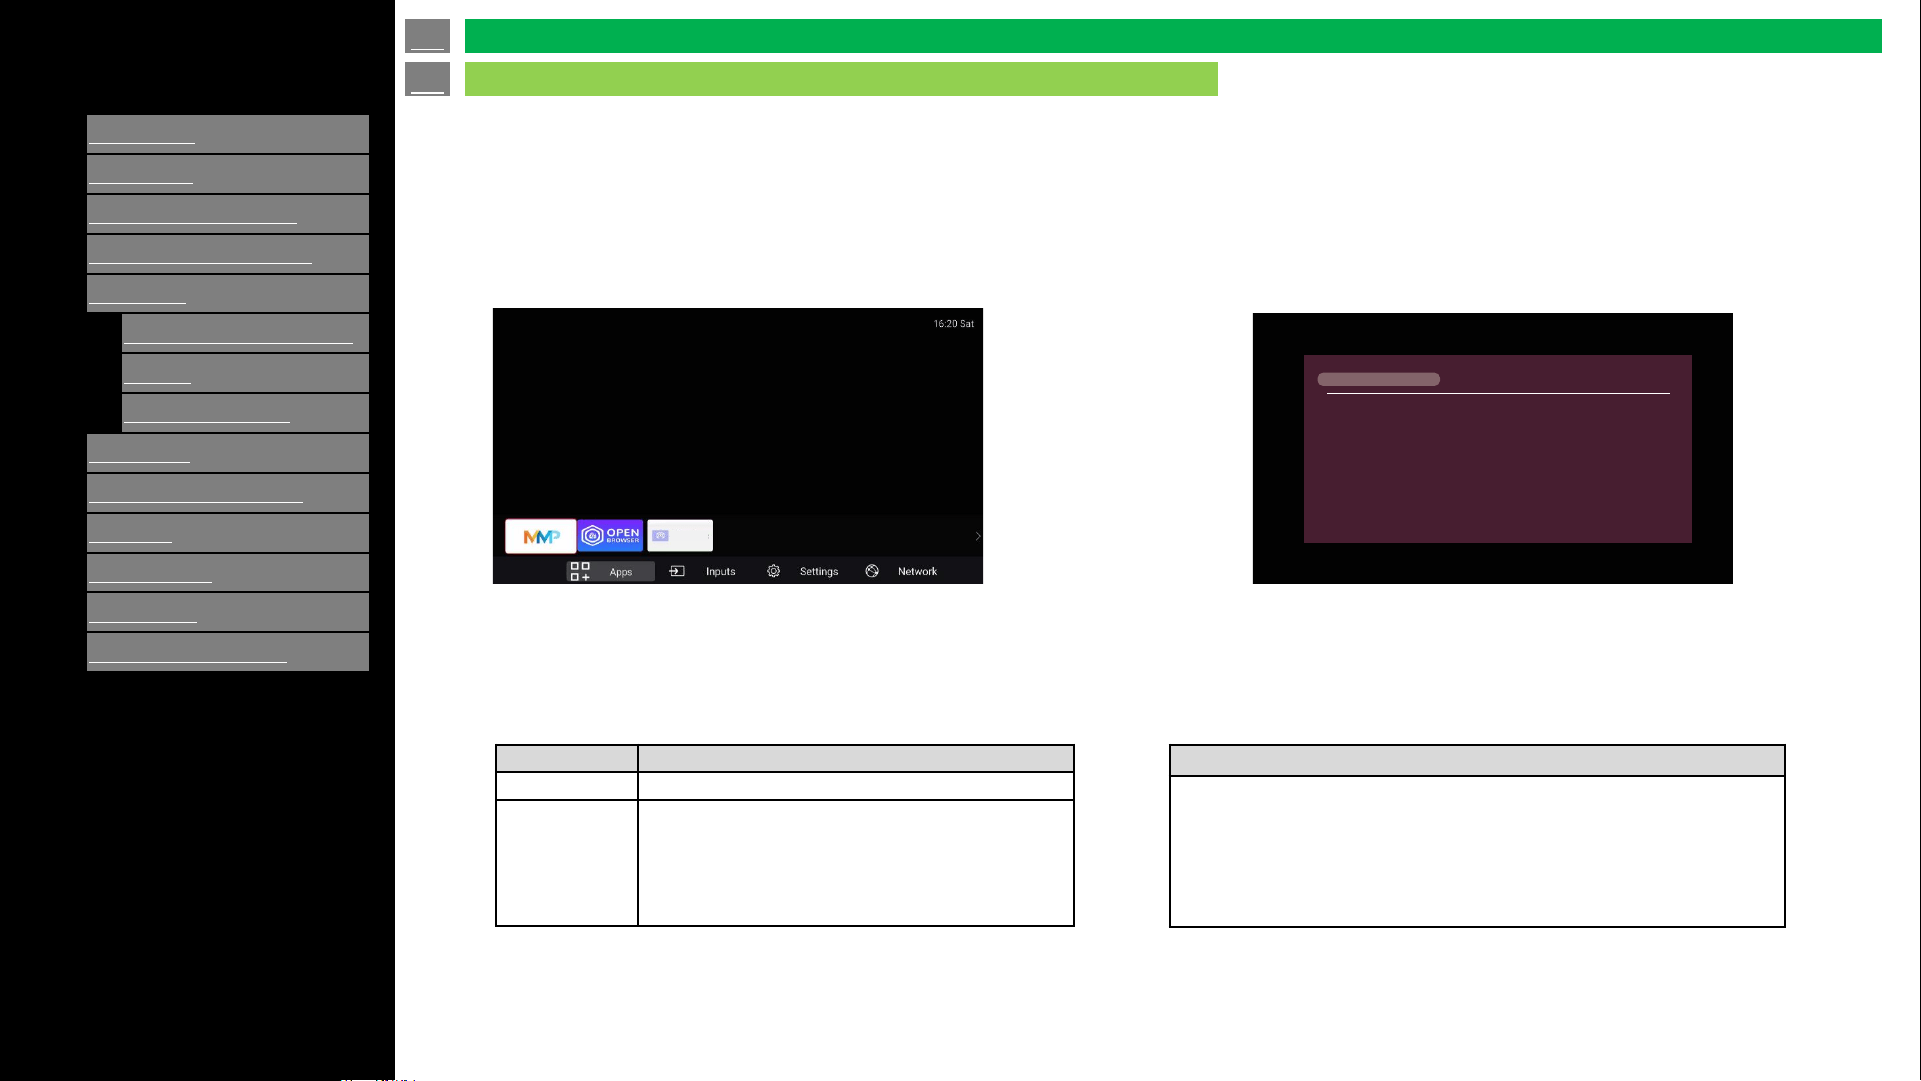
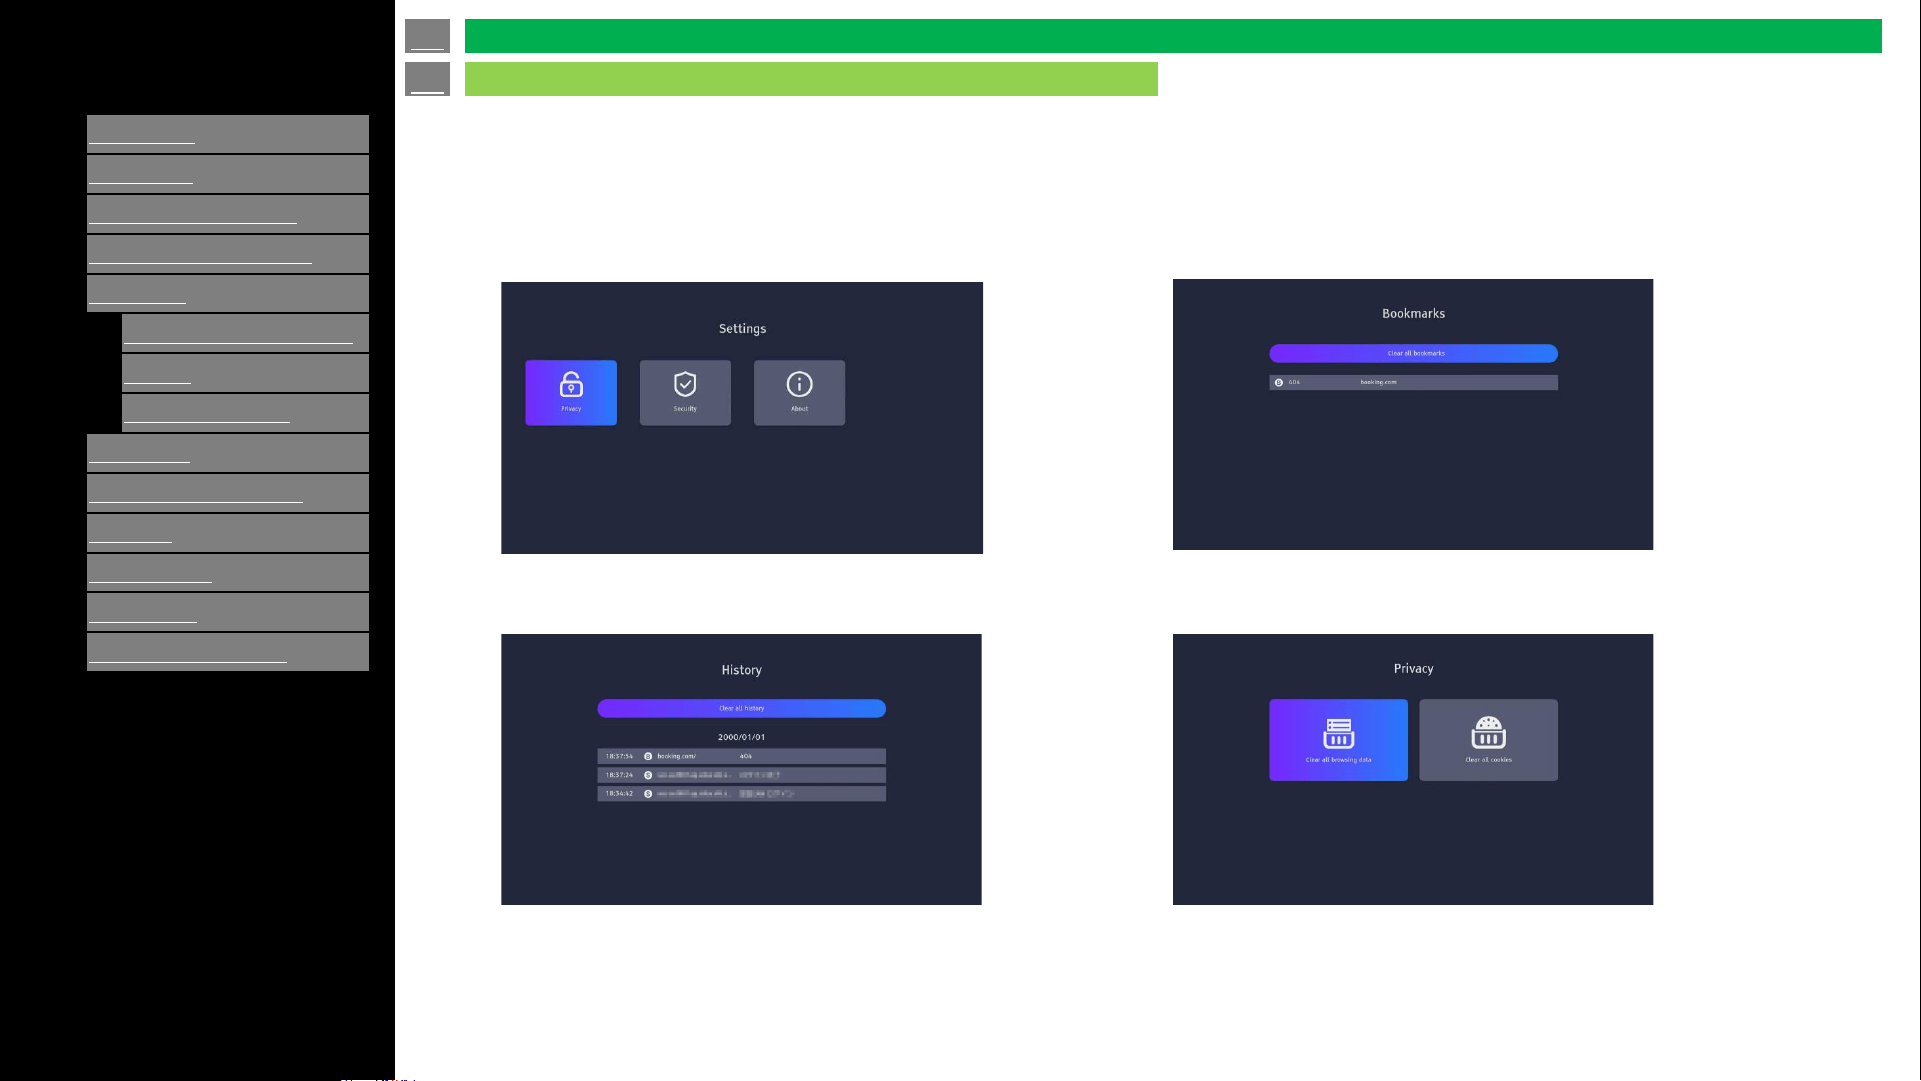
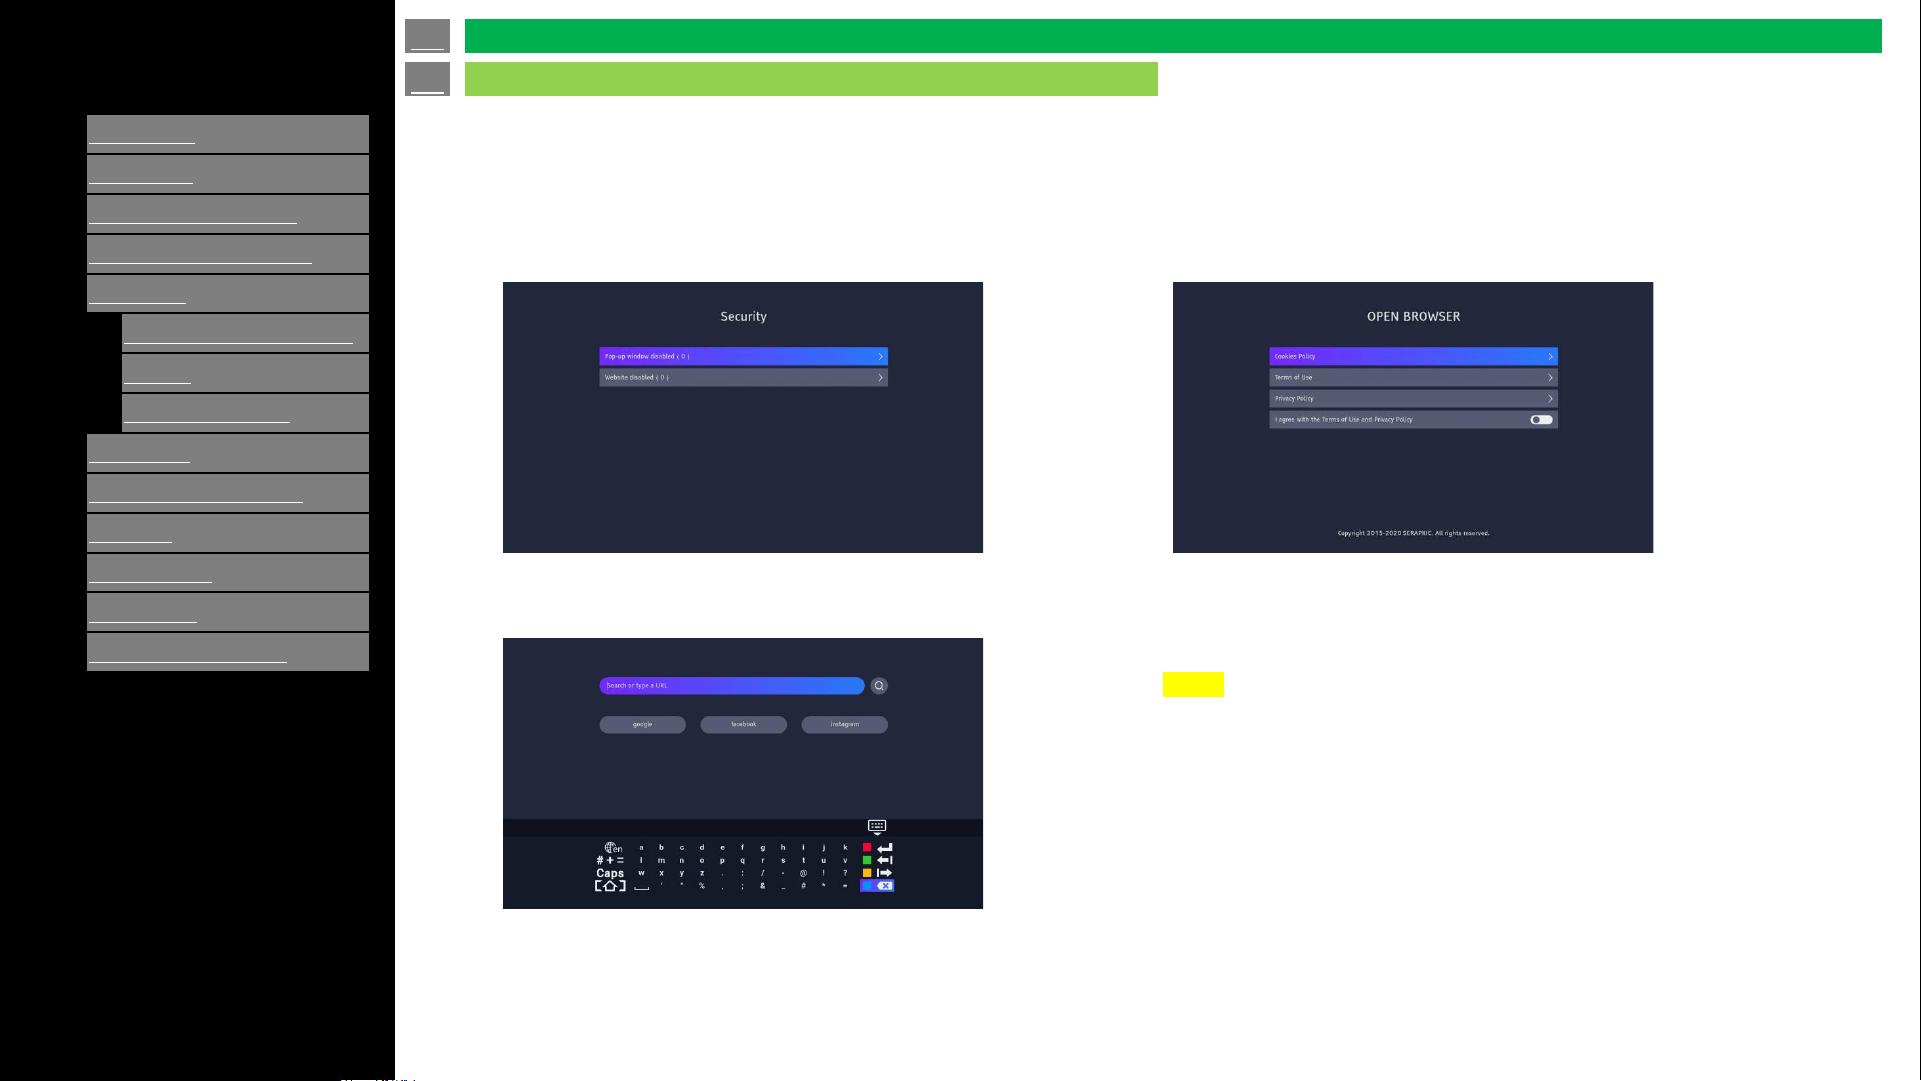
• To launch Web-browser press “APPS” on remote control -> select “OPEN BROWSER” and press ENTER.
• Go to the Browser homepage. You may see there are some apps to choose.
Press the Settings icon in the upper right corner of the screen to
enter the Settings page.
History: View previously visited pages.
Bookmarks: Saved favorite pages.
Privacy: Clear cached data.
en-US 49
Application (Using the Internet)
OPEN BROWSER
[ENGLISH]
Contents
1.
Part Names
2.
Introduction
3.
Direct Button Operation
4.
On
-Screen Display Menu
5.
Application
1.
MMP (Multi Media Player)
2.
Casting
3.
OPEN BROWSER
6.
Using a PC
7.
Using the touch function
8.
Appendix
9.
Specifications
10.
Trademarks
11.
Dimensional Drawings
>>
<<
Ver. 1.1
• To launch Web-browser press “APPS” on remote control -> select “OPEN BROWSER” and press ENTER.
• Go to the Browser homepage. You may see there are some apps to choose.
Security: Can be set to disabled ads and web pages.
About: You can see the Cookies Policy, Terms of Use and
Privacy Policy.
Click to enter to view detailed information.
The keyboard will display when you select the search bar.
Use the keyboard to search.
en-US 50
Application (Using the Internet)
OPEN BROWSER
NOTE
The web browser application may not reproduce onscreen content
accurately as seen with a computer web browser. Please confirm any
visual signage media on the browser.

[ENGLISH]
Contents
1.
Part Names
2.
Introduction
3.
Direct Button Operation
4.
On
-Screen Display Menu
5.
Application
6.
Using a PC
1.
Control of the TV
2.
PC Compatibility Chart/AV
Compatibility Chart
7.
Using the touch function
8.
Appendix
9.
Specifications
10.
Trademarks
11.
Dimensional Drawings
>>
<<
Ver. 1.1
IP Control
Set this function when operating the TV from equipment connected by
LAN. To perform the operation, refer to "Network Settings".
IP Control
When "IP Control" is selected, "Change" will be highlighted. Press
ENTER.
Detailed Settings
Make the detailed settings (Login ID, password, etc.).
Follow the on-screen instructions to configure these settings.
Device Name
Set the name of the TV displayed on other network devices.
• Use the software keyboard to set the name.
en-US 51
Control of the TV
Using a PC
The TV can be controlled from a PC, control panels and other devices
using RS-232C or IP. Use a cross-type RS-232C cable. (Needs the
conversion cable to minijack (Terminal : “RS-232C") for using RS-
232C.) ETHERNET cable (commercially available) or wireless LAN for
the connections
NOTE
• The Power on function is available only with the RS-232C
connection at 9600 baud.
• Use a Wake On LAN function when using IP connection.
• When the TV is powered off via RS232C, please wait
approx. 30 seconds before sending the power on command.
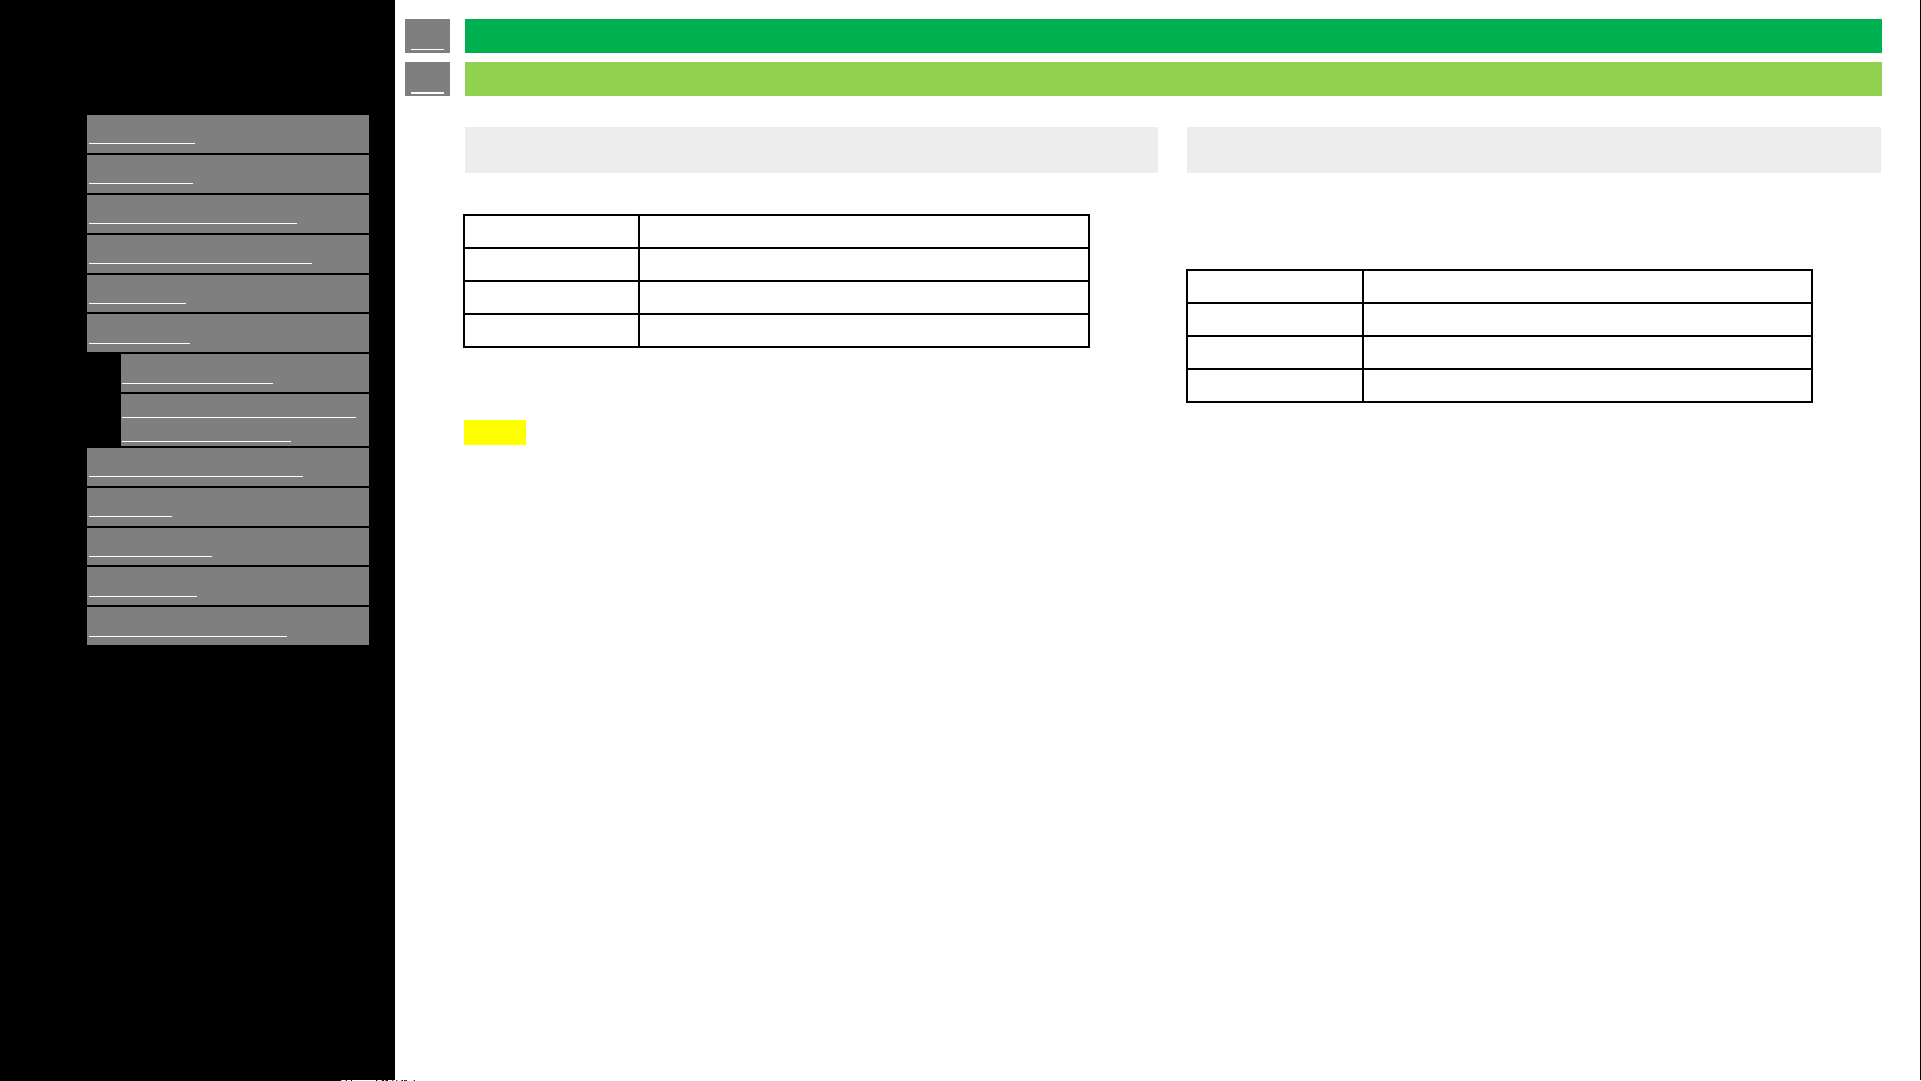
[ENGLISH]
Contents
1.
Part Names
2.
Introduction
3.
Direct Button Operation
4.
On
-Screen Display Menu
5.
Application
6.
Using a PC
1.
Control of the TV
2.
PC Compatibility Chart/AV
Compatibility Chart
7.
Using the touch function
8.
Appendix
9.
Specifications
10.
Trademarks
11.
Dimensional Drawings
>>
<<
Ver. 1.1
en-US 52
Control of the TV
Using a PC
NOTE
• To use this function, select settings of "IP Control".
• The connection will be cut off when there has been no
communication for 3 minutes.
Communication Conditions for IP
Connect to the TV with the following settings made for IP on the PC.
IP protocol:
TCP/IP
Host IP address:
Set the IP address on the TV menu
Service:
None (Do not select Telnet or SSH)
TCP port#:
Set a port number on the TV menu (Control port)
When you set your ID and password on the TV menu, you need to
enter them as soon as you connect to the TV.
Communication Conditions for RS-232C
Set the RS-232C communication settings on the PC to match the
Monitors communication conditions.
The Monitor's communication settings are as follows:
Baud rate:
9,600 /
115,200 baud
Data length:
8 bits
Parity bit:
None
Stop bit:
1 bit
Communication procedure.
Send the control commands from the PC via the RS-232C or IP.
The TV operates according to the received command and sends a
response message to the PC.
Do not send multiple commands at the same time.
Wait until the PC receives the OK response before sending the next
command.
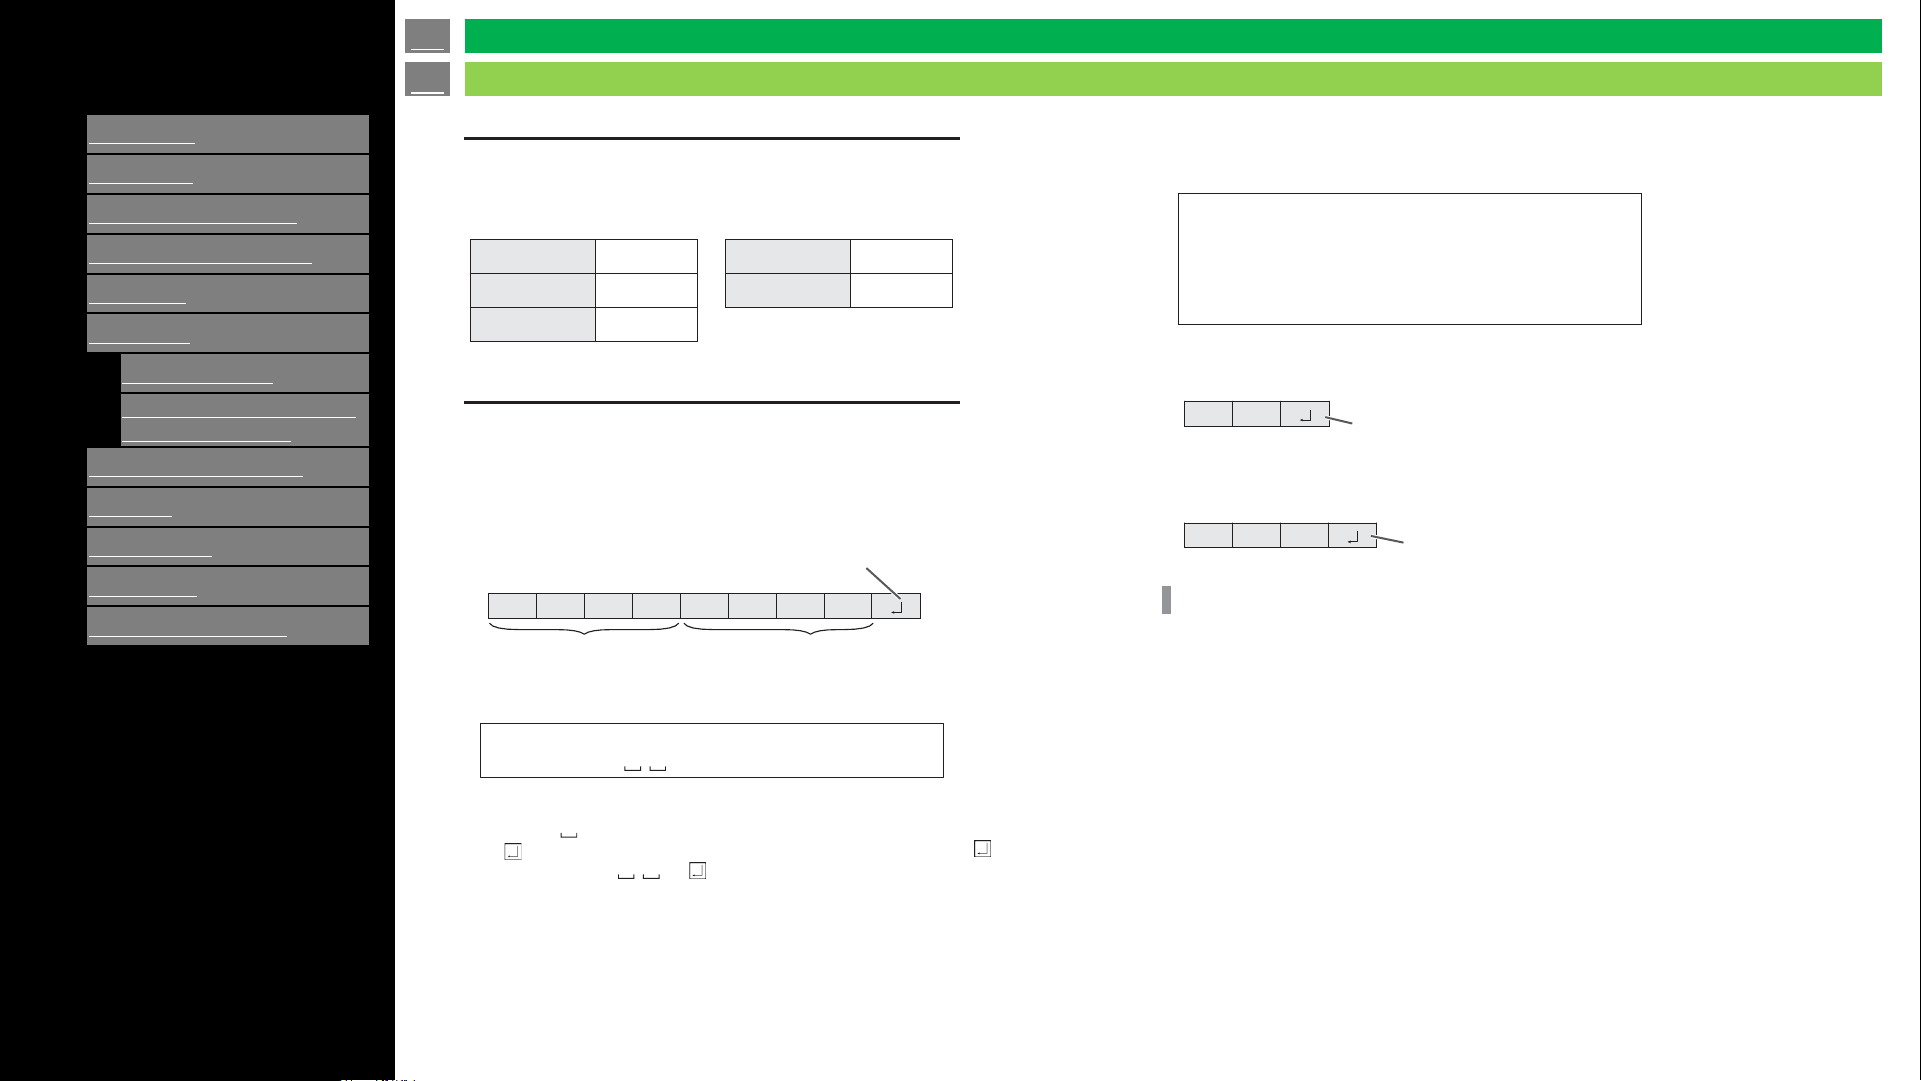
[ENGLISH]
Contents
1.
Part Names
2.
Introduction
3.
Direct Button Operation
4.
On
-Screen Display Menu
5.
Application
6.
Using a PC
1.
Control of the TV
2.
PC Compatibility Chart/AV
Compatibility Chart
7.
Using the touch function
8.
Appendix
9.
Specifications
10.
Trademarks
11.
Dimensional Drawings
>>
<<
Ver. 1.1
Communication conditions
Set the RS-232C communication settings on the computer to match the monitor’s
communication settings as follows:
Baud
rate
9600bps
Data
length
8
bits
Parity
bit
None
Stop
bit
1
bit
Flow
control
None
C1
C2
C3
C4
P1
P2
P3
P4
Communication procedure
⚫Command format
When a command is sent from the computer to the monitor, the monitor operates
according to the received command and sends a response message to the
computer.
Return code
Command field
(4 prescribed
alphanumerical characters)
Parameter field
(4 character string comprised of:
0-9, +, -, space, ?)
Example: VOLM0030
VOLM 30
* Be sure to input 4 characters for the parameter. Pad with
spaces (“ ”) if necessary.
(“ ” is a return code (0DH, 0AH or 0DH)) Wrong : VOLM30
Right : VOLM 30
The current value can be returned by using “?” as the parameter.
Example:
VOLM ?
←
30 ←
From computer to monitor (How
much is current volume setting?).
From monitor to computer
(Current volume setting: 30).
⚫Response code format
When a command has been executed correctly
O K
Return code
(0DH, 0AH)
A response is returned after a command is executed.
When a command has not been executed
E R R
Return code
(0DH, 0AH)
TIPS
• “ERR” is returned when there is no relevant command or when the command cannot
be used in the current state of the monitor.
• If communication has not been established for reasons such as a bad connection
between the computer and monitor, nothing is returned (not even ERR).
• “ERR” may be returned when a command cannot be received correctly due to
interference from the surrounding environment.
Please ensure that the system or software resends the
command if this occurs.
⚫Communication interval
• After OK or ERR is returned, you must send the following commands.
• To set a timeout for the command response, specify 10 seconds or longer.
• Provide an interval of 100 ms or more between the command response and the
transmission of the next command.
en-US 53
Control of the TV
Using a PC
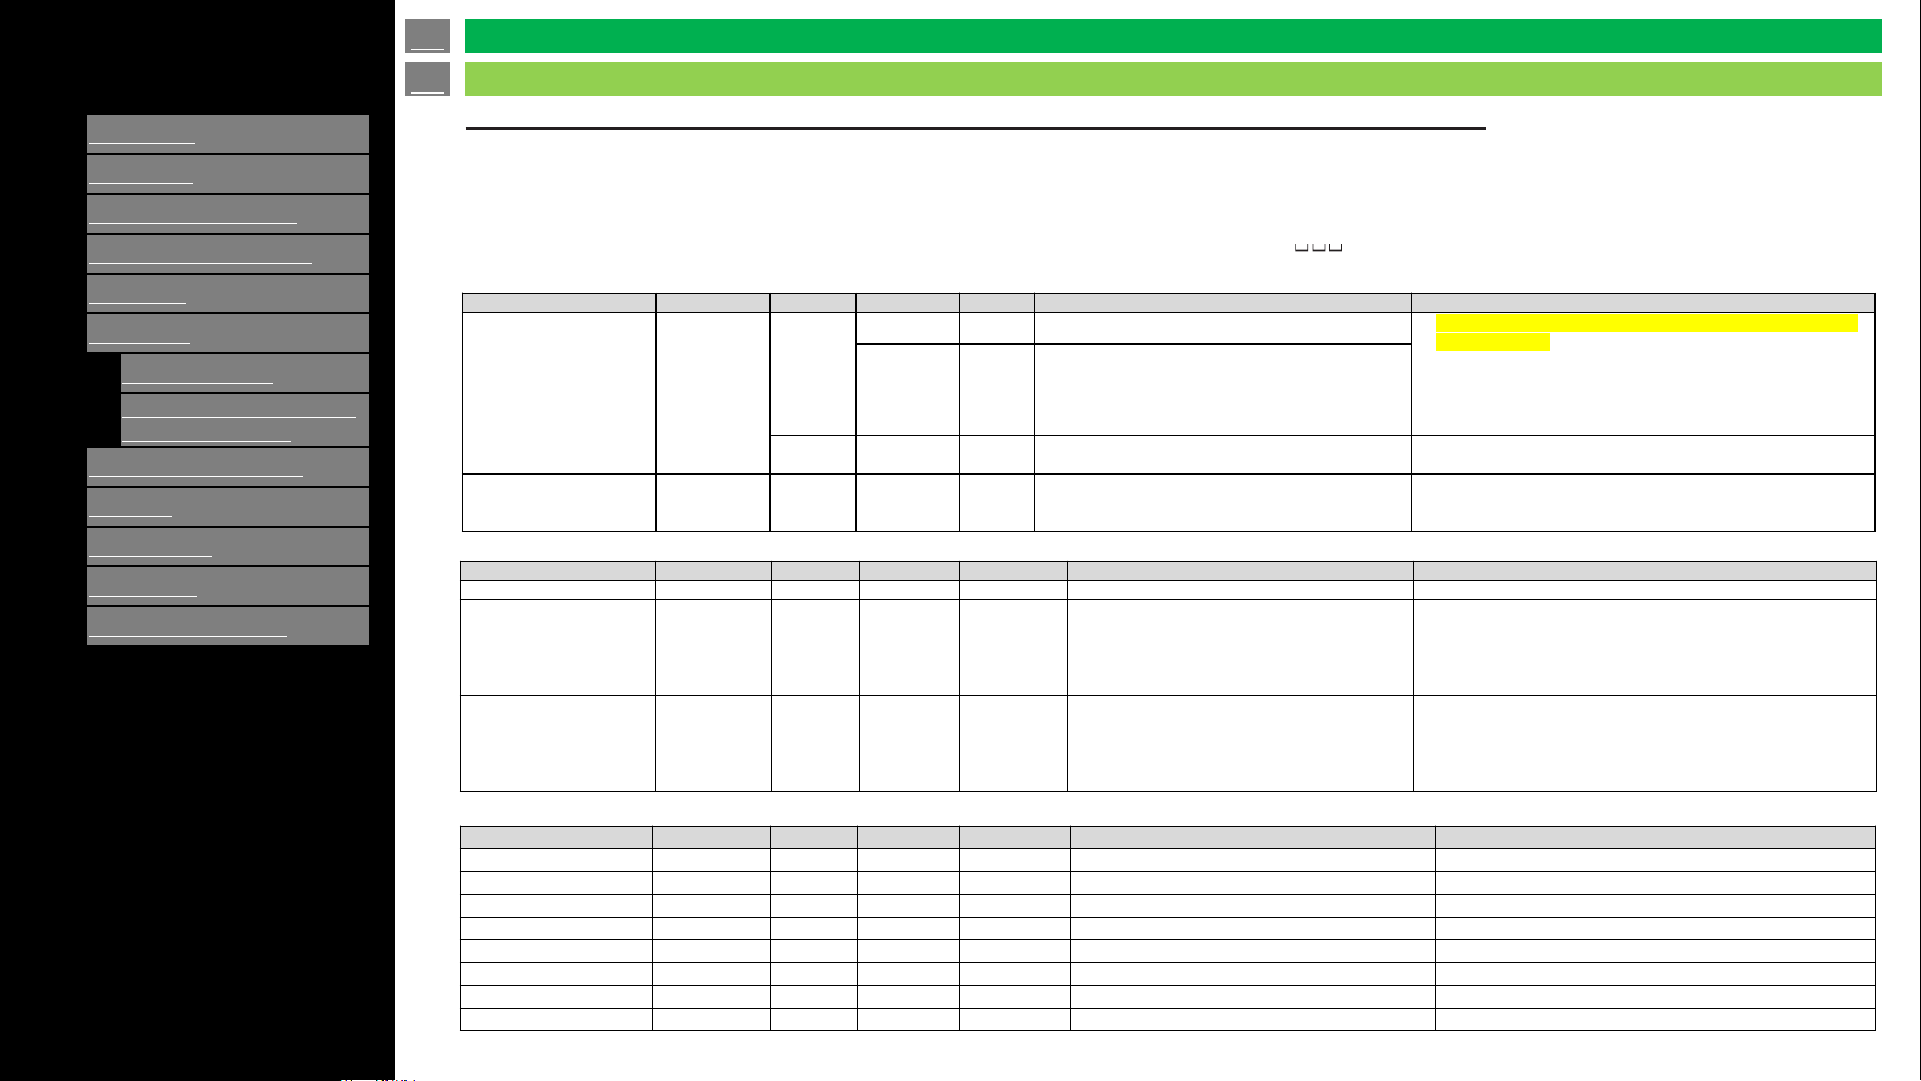
[ENGLISH]
Contents
1.
Part Names
2.
Introduction
3.
Direct Button Operation
4.
On
-Screen Display Menu
5.
Application
6.
Using a PC
1.
Control of the TV
2.
PC Compatibility Chart/AV
Compatibility Chart
7.
Using the touch function
8.
Appendix
9.
Specifications
10.
Trademarks
11.
Dimensional Drawings
>>
<<
Ver. 1.1
Command table
How to read the command table
Command:
Direction:
Command field
W When the “Parameter” is set in the parameter field, the command functions as described under “Control/Response Contents”.
?” in the
R The returned value indicated under “Reply” can be obtained by setting “????” or “ parameter field.
Power control/Input mode selection
Picture menu
Function Command Direction Parameter Reply Control Response content Remarks
POWER CONTROL POWR
W
0 Switch to standby mode
• Power on function is available only in RS-232C connection
with 9600 baud.
• Use WoL function when using IP connection.
• When the TV is powered off via RS232C, please wait
approx. 30 seconds before sending the power on
command.
1 Return from standby mode
R 1 Normal mode
"0" (standby mode) and "2" (input signal waiting mode) are
not available on the display.
INPUT MODE
SELECTION
INPS WR 0~6 0~6
TV = 0
AV = 1
HDMI1 = 2
HDMI2 = 3
HDMI3 = 4
USB = 5
HOME =6
Function Command Direction Parameter Reply Control Response content Remarks
BRIGHT VLMP WR 1~100 1~100
COLOR MODE BMOD WR 0~10 0~10
7 : Standard
9 : Movie
10 : Game
2 : PC
3 : Dynamic
4 : Dynamic(Fixed)
0 : User
SIZE WIDE WR 1~7 1~7
1 : Auto
2 : Normal
3 : Zoom
4 : Dot by Dot
5 : 4:3
6 : 14:9
7 : 16:9
8 : Letterbox
9 : Panorama
In each case, display mode will be changed to "normal" when
video source has changed and unable to adopt current
display mode.
Function Command Direction Parameter Reply Control Response content Remarks
VOLUME VOLM WR 1~100 1~100
MUTE AUDIO MUTE WR 0-1 0-1 0 MUTE_OFF 1 MUTE_ON
MODEL INF1 R
SERIAL NO SRNO R
Usage Time UTIM WR
MAIN firmware version FMVR R
MAC address RMAC R
RESET RSET W
Others menu
en-US 54
Control of the TV
Using a PC

[ENGLISH]
Contents
1.
Part Names
2.
Introduction
3.
Direct Button Operation
4.
On
-Screen Display Menu
5.
Application
6.
Using a PC
1.
Control of the TV
2.
PC Compatibility Chart/AV
Compatibility Chart
7.
Using the touch function
8.
Appendix
9.
Specifications
10.
Trademarks
11.
Dimensional Drawings
>>
<<
Ver. 1.1
If the DHCP CLIENT is set to OFF, specify an IP address.
Press the or button to select the items, and enter the
values with the numeric input buttons (0 to 9).
You can also change the values with the or button.
SUBNET MASK
If the DHCP CLIENT is set to OFF, specify the subnet mask.
Press the or button to select the items, and enter the
values with the numeric input buttons (0 to 9).
You can also change the values with the or button.
VIEW NETWORK SETTINGS
DHCP CLIENT
IP ADDRESS
Using a PC
Controlling a TV with a computer (LAN)
Caution
NOTE
• When you use a network, your communication data is exposed to the risks of being
stolen or illegally accessed. To avoid these risks, you need to use this monitor in a
secure network environment.
NOTE
• When POWER SAVE MODE is set to ON, the control is disabled in the standby
mode/input signal waiting state.
• To control the monitor via LAN, set RS-232C/LAN SELECT to LAN.
• You cannot use RS-232C and LAN control simultaneously.
⚫To set on the monitor
Set RS-232C/LAN SELECT of COMMUNICATION SETTING
on the SETUP menu to LAN, and then set the LAN SETUP options.
After setting each item, select SET and press the ENTER button.
Displays LAN setting information.
If your LAN has a DHCP server and you wish to obtain an
address automatically, change this setting to ON.
To set the address manually, set this to OFF.
Command-based control
You can control the monitor using RS-232C commands
via terminal software and other appropriate applications.
Read the manual for the terminal software for detailed
instructions.
(1) Connect the computer to the monitor.
1. Specify the IP address and data port number (10008)
and connect the computer to the monitor.
When connection has been established successfully,
[Login:] is returned as response.
2. Send the user name.
• Send [user name] + [ ].
• If the user name is not set, send [ ].
• When the transmission is successful, [ Password:]
is returned as response.
3. Send the password.
• Send [password] + [ ].
• If the password is not set, send [ ]. [ New password:]
is returned as response. Please set a password.
Send [password] + [ ]. [ Retype new password:]
is returned as response. Send [password] + [ ]
again.
• When the transmission is successful, [OK ] is
returned as response.
(2) Send commands to control the monitor.
• The commands used are the same as those for RS-
232C. Refer to the communication procedure for
operation.
• Usable commands are provided in the RS-232C
command table.
(2) Disconnect the connection with the monitor and
quit the function.
1. Send [BYE ].
When the transmission is successful, [goodbye] is
returned and the connection is disconnected.
en-US 55
Control of the TV
Using a PC
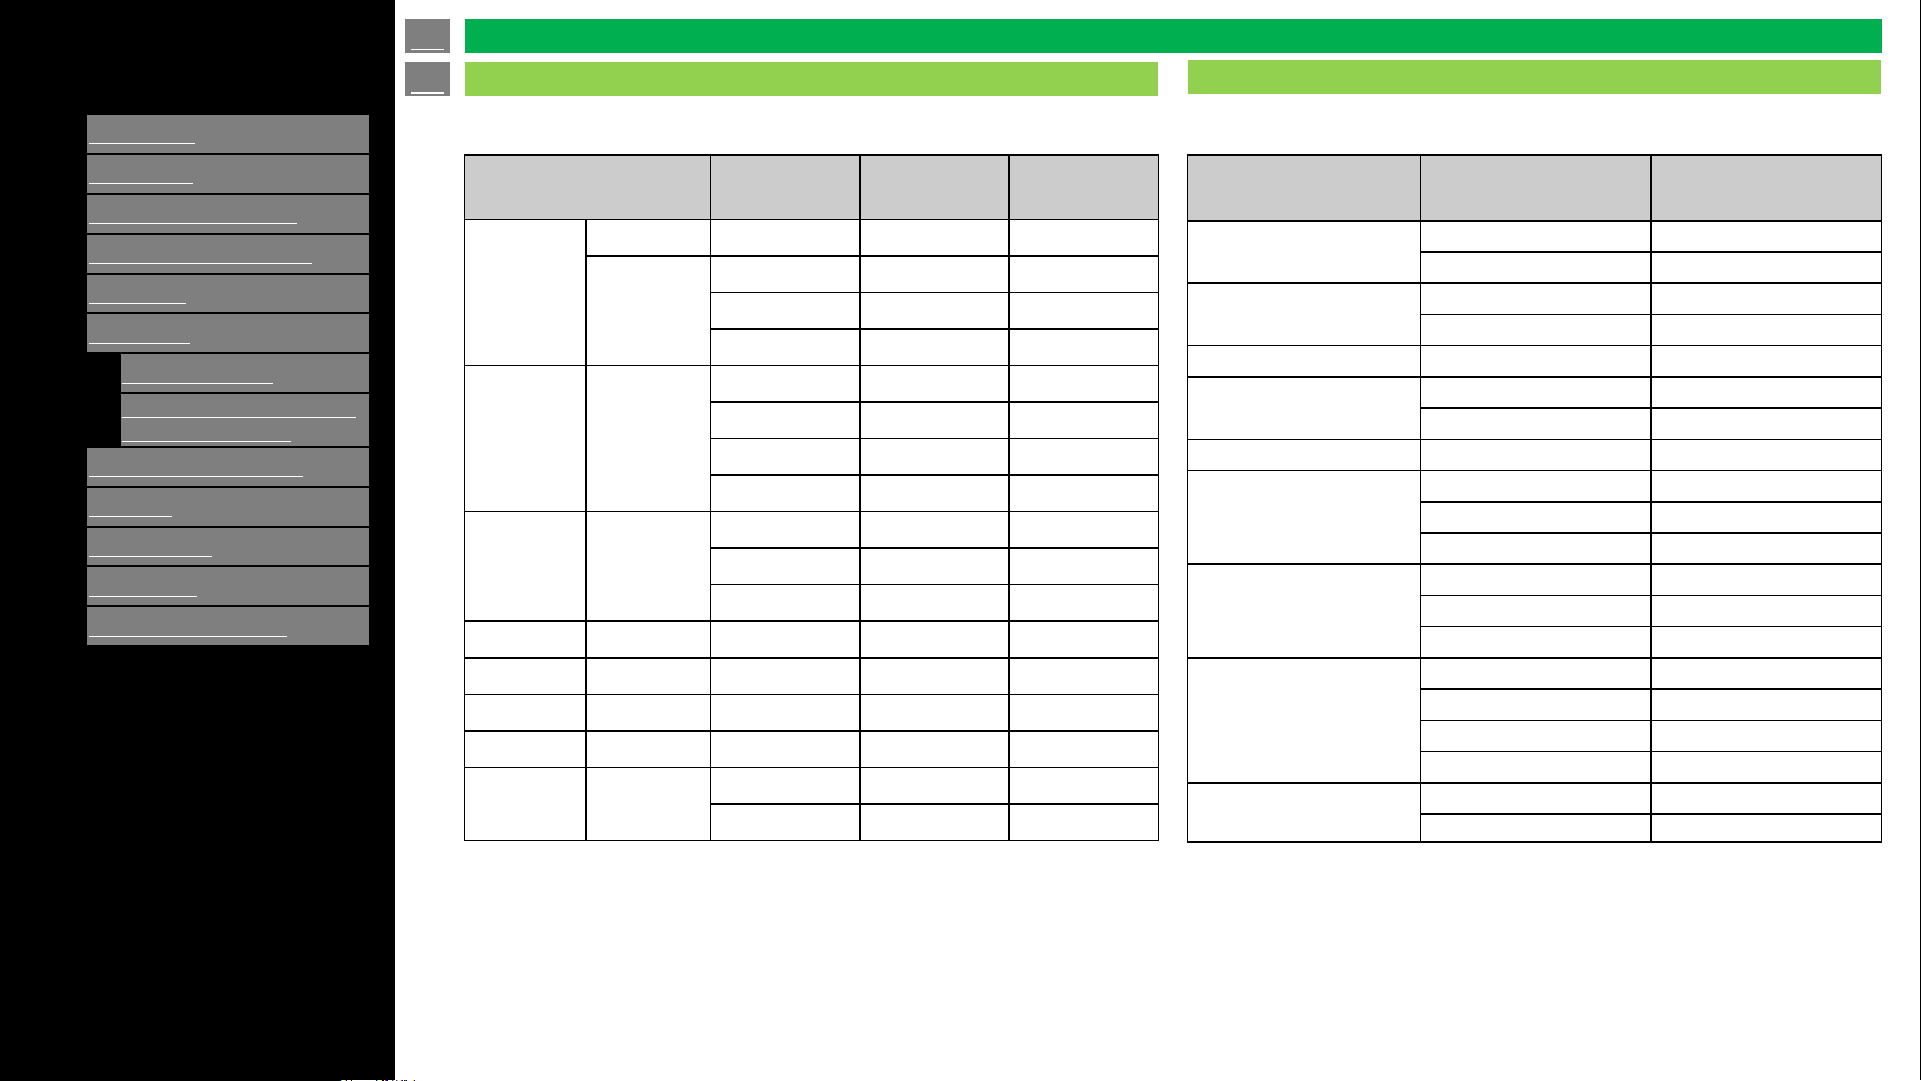
[ENGLISH]
Contents
1.
Part Names
2.
Introduction
3.
Direct Button Operation
4.
On
-Screen Display Menu
5.
Application
6.
Using a PC
1.
Control of the TV
2.
PC Compatibility Chart/AV
Compatibility Chart
7.
Using the touch function
8.
Appendix
9.
Specifications
10.
Trademarks
11.
Dimensional Drawings
>>
<<
Ver. 1.1
Resolution
Horizontal
Frequency
Vertical
Frequency
VESA
Standard
VGA
720 x 400 31.5 kHz 70 Hz -
640 x 480
31.5 kHz 60 Hz Yes
37.9 kHz 72 Hz Yes
37.5 kHz 75 Hz Yes
SVGA 800 x 600
35.1 kHz 56 Hz Yes
37.9 kHz 60 Hz Yes
48.1 kHz 72 Hz Yes
46.9 kHz 75 Hz Yes
XGA 1024 x 768
48.4 kHz 60 Hz Yes
56.5 kHz 70 Hz Yes
60.0 kHz 75 Hz Yes
WXGA 1360 x 768 47.7 kHz 60 Hz Yes
SXGA
1280 x 1024
64.0 kHz 60 Hz Yes
SXGA+
1400 x 1050
65.3 kHz 60 Hz Yes
1080p
1920 x 1080
67.5 kHz 60 Hz -
UHD
3840 x 2160
112.5 kHz 50 Hz -
135 kHz 60 Hz -
It is necessary to set the PC correctly to display XGA and WXGA signal.
VGA and XGA are registered trademarks of International Business Machines Corp.
Resolution
Vertical
Frequency
HDMI
640 x 480p
59.94 Hz Yes
60 Hz Yes
720 x 480p
59.94 Hz Yes
60 Hz Yes
720 x 576p 50 Hz Yes
720(1440) x 480i
59.94 Hz Yes
60 Hz Yes
720(1440) x 576i 50 Hz Yes
1280 x 720p
50 Hz Yes
59.94 Hz Yes
60 Hz Yes
1920 x 1080i
50 Hz Yes
59.94 Hz Yes
60 Hz Yes
1920 x 1080p
24 Hz Yes
50 Hz Yes
59.94 Hz Yes
60 Hz Yes
3840 x 2160p
30 Hz Yes
60 Hz Yes
en-US 56
PC Compatibility Chart
Using a PC
AV Compatibility Chart
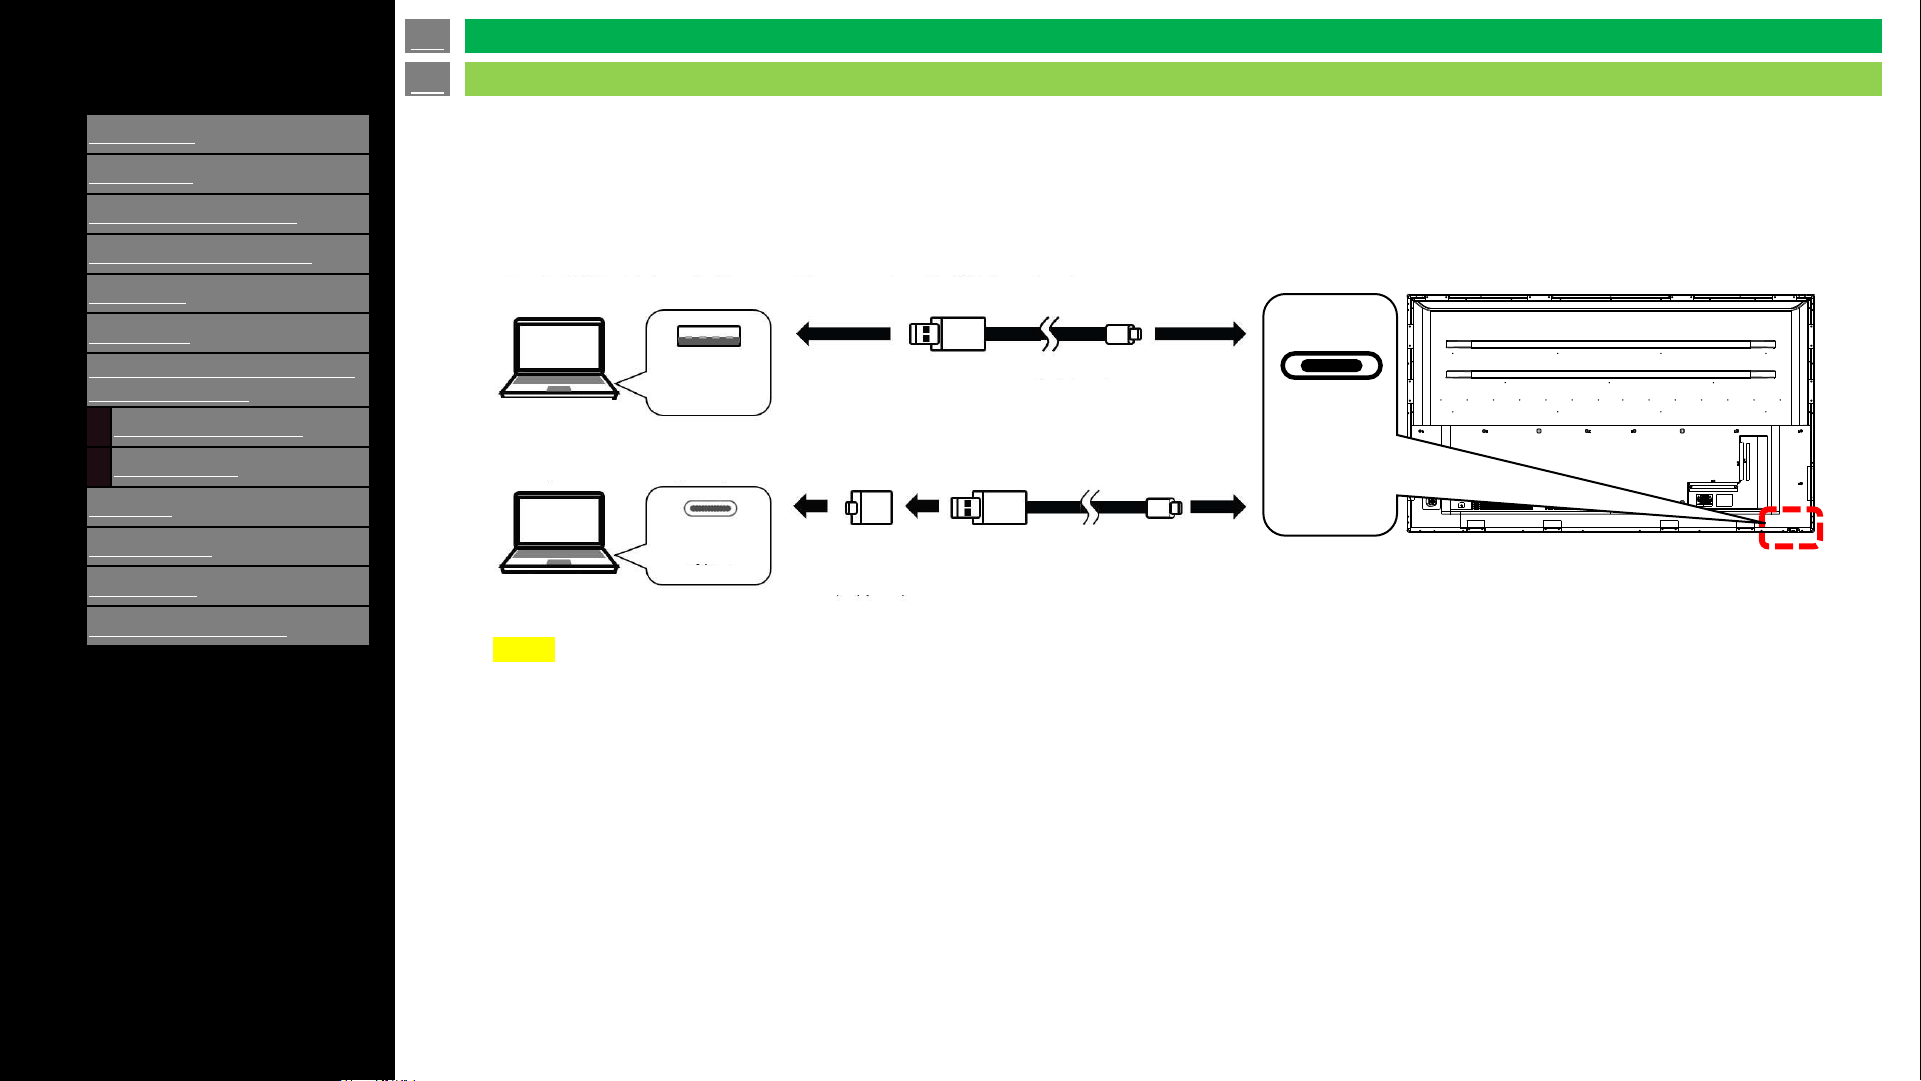
[ENGLISH]
Contents
1.
Part Names
2.
Introduction
3.
Direct Button Operation
4.
On
-Screen Display Menu
5.
Application
6.
Using a PC
7.
Using the touch function (Only
for touch models)
1.
Computer connection
2.
Touch actions
8.
Appendix
9.
Specifications
10.
Trademarks
11.
Dimensional Drawings
>>
<<
Ver. 1.1
en-US 57
Computer connection
Using the touch function (Only for touch models)
• HDMI input 1, 2 or 3
Use a commercially available HDMI cable
(conforming to the HDMI standard) that supports 4K.
• TOUCH PANEL terminal
Connect only with supplied USB cable and adapter depending
on type of USB on a computer.
The terminal on the monitor is a USB Type-C connector.
4W-B55FT5U / 4W-B65FT5U
/ 4W-B75FT5 / 4W-B86FT5U
NOTE
• Please only use supplied USB cable and USB adaptor to connect with computers. Using other commercially available USB type C cables
may not support touch functions and can damage the product.
• Use the USB cable (supplied) to connect to a computer with USB Type A port.
• Use the USB cable (supplied) and the USB A to C adapter (supplied) to connect
to a computer with USB Type C port.
USB cable (supplied)
USB cable (supplied)
Computer
Computer
USB
Type A
USB
Type A
USB A to C
adapter
(supplied)
TOUCH
Panel
terminal
(USB Type C)
USB
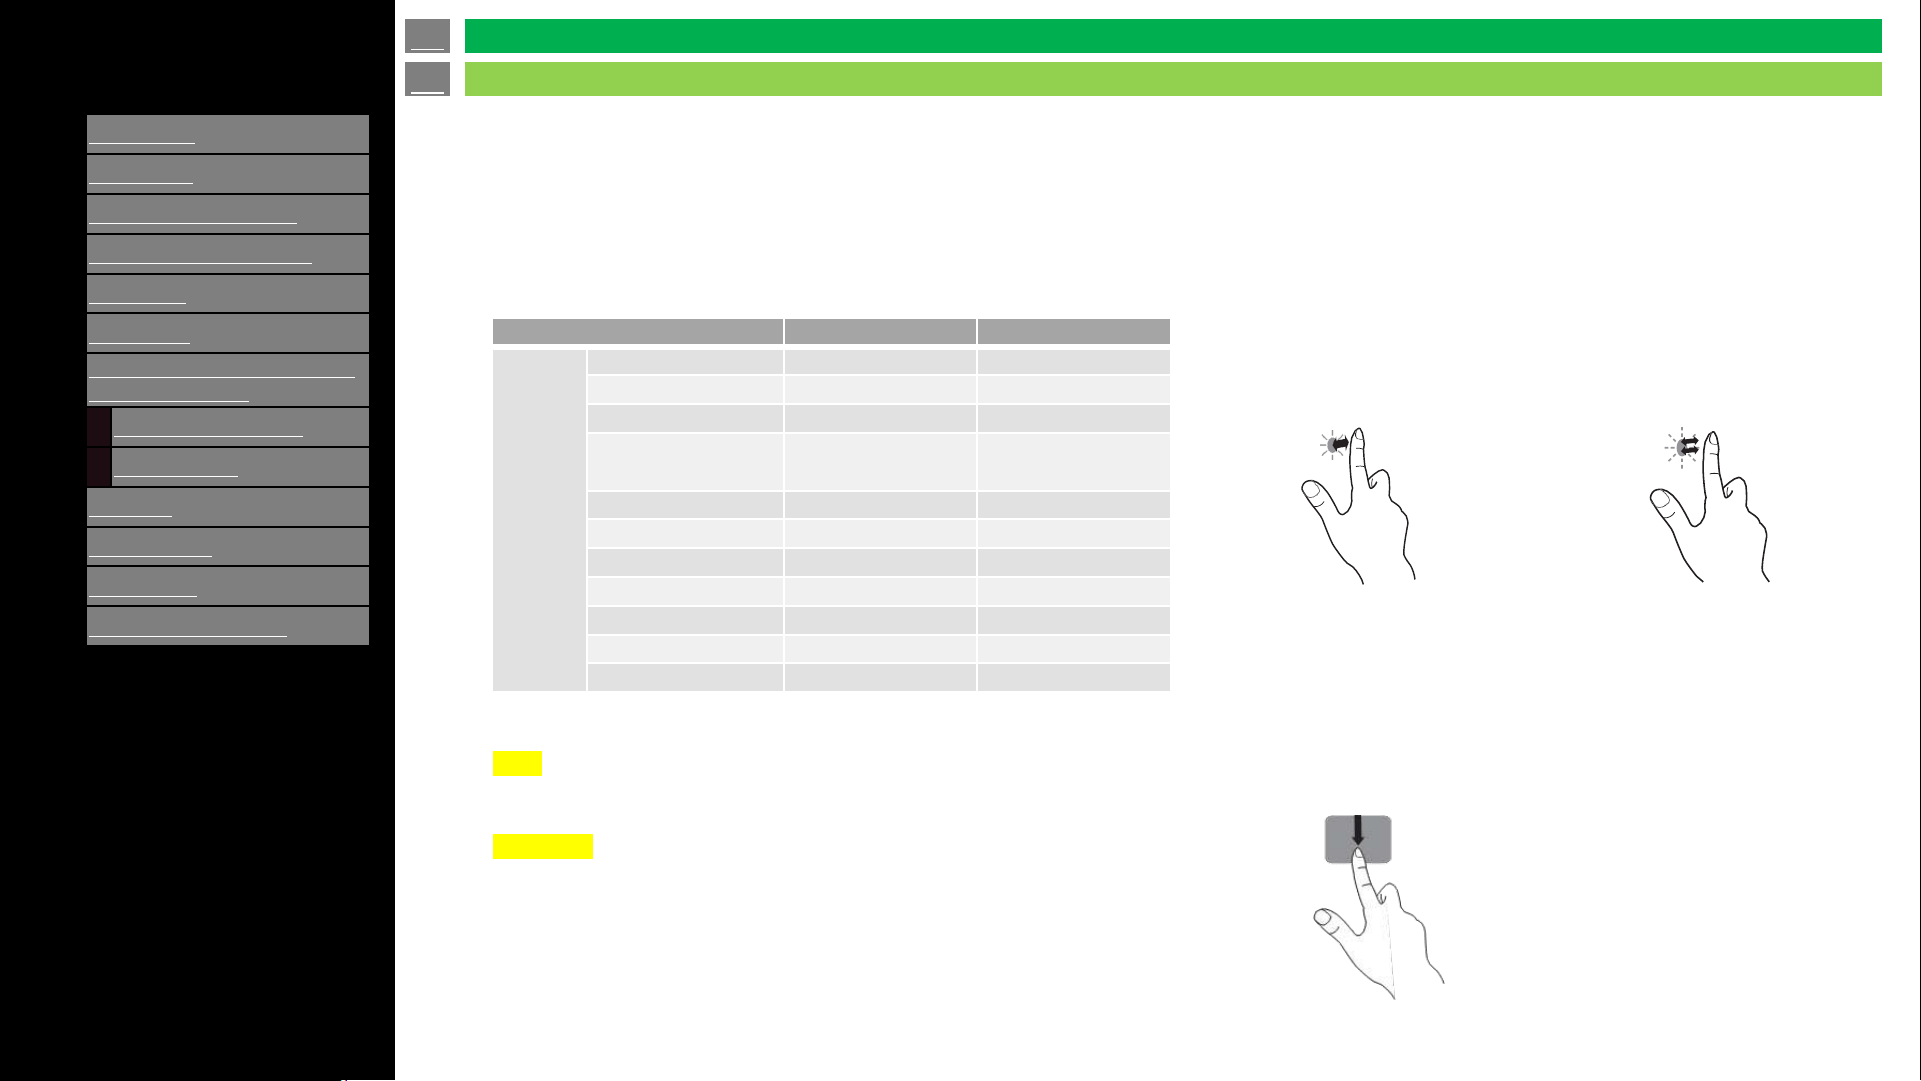
[ENGLISH]
Contents
1.
Part Names
2.
Introduction
3.
Direct Button Operation
4.
On
-Screen Display Menu
5.
Application
6.
Using a PC
7.
Using the touch function (Only
for touch models)
1.
Computer connection
2.
Touch actions
8.
Appendix
9.
Specifications
10.
Trademarks
11.
Dimensional Drawings
>>
<<
Ver. 1.1
en-US 58
Touch actions
• Touch action
Touch actions that can be used with this display differ
according to operating system and application. The functions
of touch actions are also different. For the details, check the
operating system’s help and the application’s support
documentation.
• Common finger and touch pen actions
Connect only with supplied USB cable and adapter depending
on type of USB on a computer.
The terminal on the monitor is a USB Type-C connector.
Operating system
Windows 10 / 11
Chrome OS
Touch
action
Single
-tap Yes Yes
Double
-tap Yes Yes
Swipe
Yes Yes
Swipe from edge
of screen
Yes Yes
Drag
-and-drop Yes Yes
Flicks
Yes Yes
Press
-and-hold Yes Yes
Slide to pan
Yes Yes
Zoom
Yes Yes
Press
-and-tap No Yes
Rotate
Yes Yes
TIPS
• On the mac, the actions are the equivalent mouse actions.
CAUTION
• Using touch function of 4W-B55 / 65 / 75 / 86FT5U for any on-screen
display menu settings is not supported.
Single-tap
Same action as left-
clicking a mouse. Touch
with your finger/touch pen.
Double-tap
Same action as double-
clicking a mouse.
Quickly touch twice with
your finger/touch pen.
When double-tapping with
your finger, be sure to lift
your finger sufficiently off the
screen after the first tap.
If there is insufficient
distance between the screen
and your finger, double-tap
will not take place.
Swipe
Touch the screen with your
finger/touch pen, move
without lifting, and then
stop.
Using the touch function (Only for touch models)
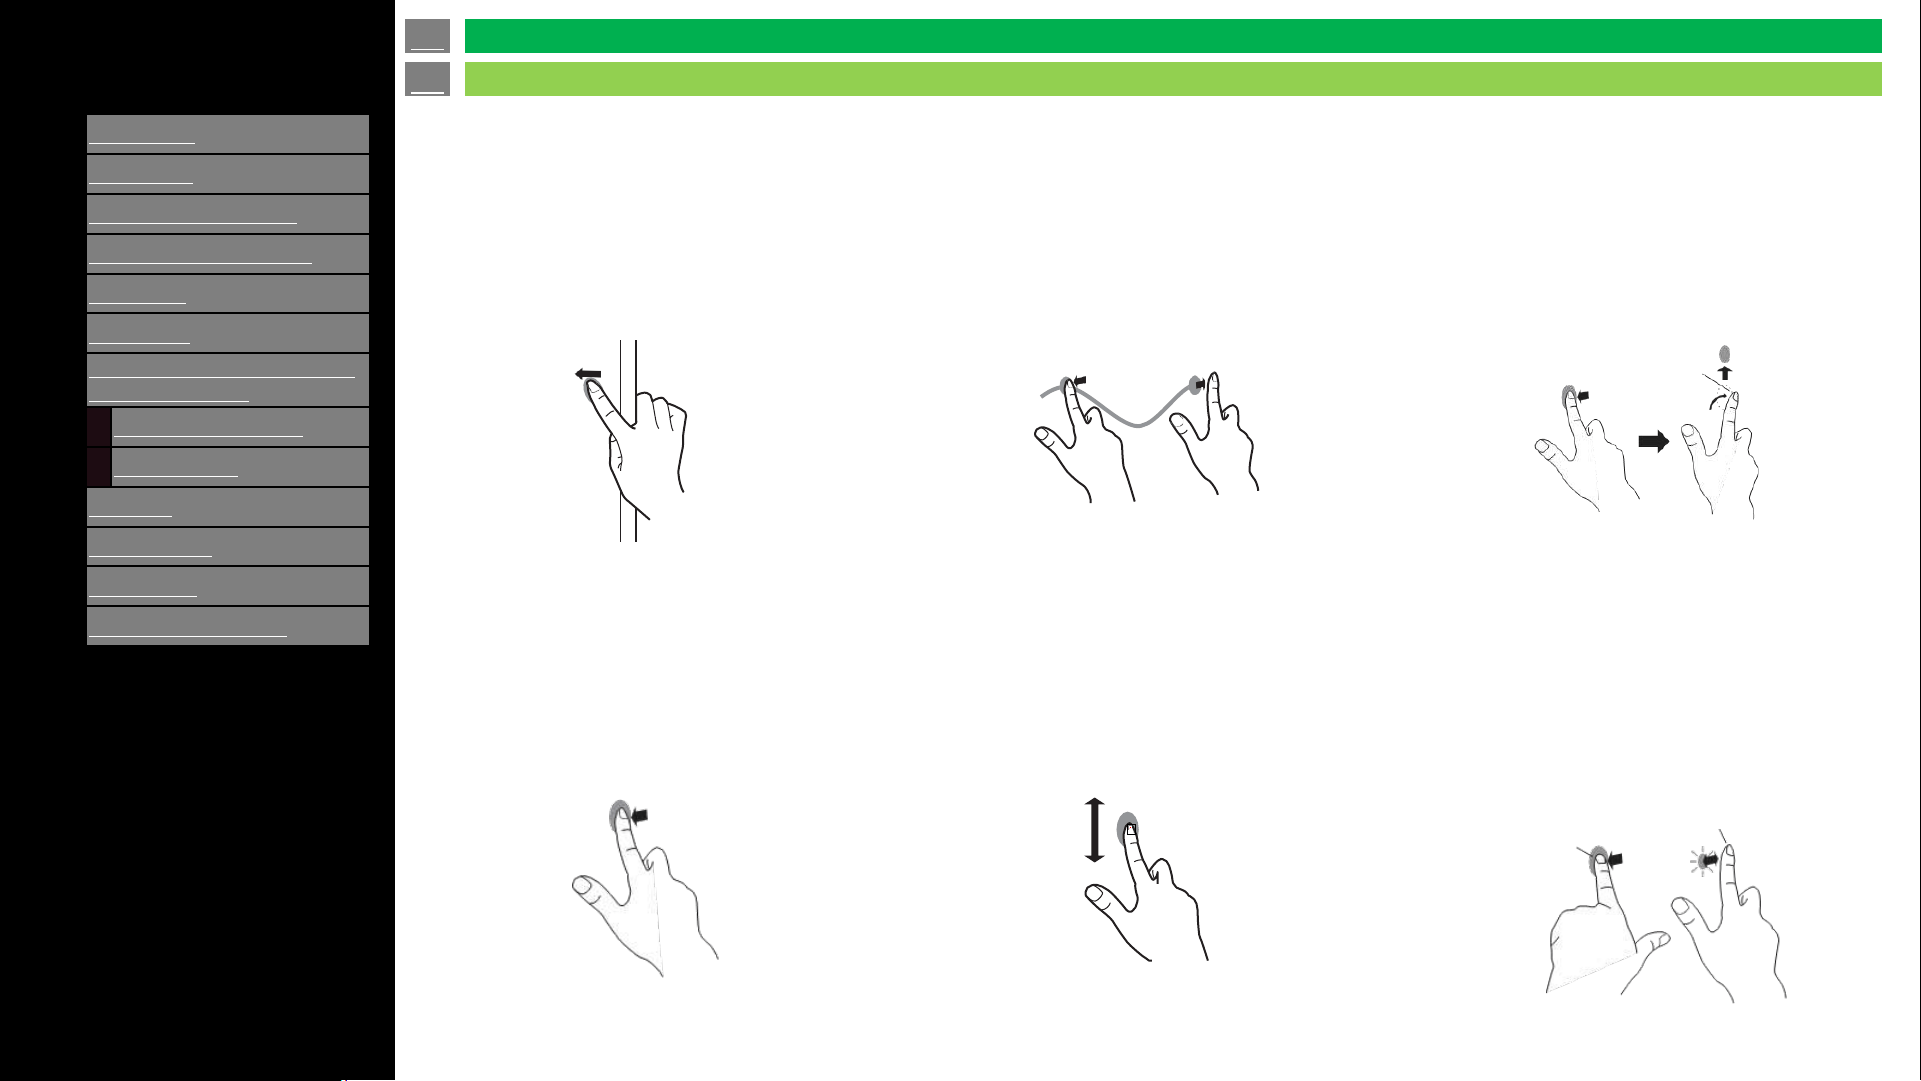
[ENGLISH]
Contents
1.
Part Names
2.
Introduction
3.
Direct Button Operation
4.
On
-Screen Display Menu
5.
Application
6.
Using a PC
7.
Using the touch function (Only
for touch models)
1.
Computer connection
2.
Touch actions
8.
Appendix
9.
Specifications
10.
Trademarks
11.
Dimensional Drawings
>>
<<
Ver. 1.1
en-US 59
Touch actions
Swipe from edge of screen
After touching the edge of the
monitor with your finger/touch pen,
move horizontally without
releasing your finger/touch pen
and then stop.
Drag-and-drop
Same action as drag-and-drop
with a mouse. Touch the screen
with your finger/touch pen and
move without lifting. When you
have finished the movement, lift
your finger/ touch pen.
Flicks
Flick your finger/touch pen in the
direction of the function you want
to use.
Press-and-hold
Same action as right-clicking a
mouse. Press briefly with your
finger/touch pen, and then lift
your finger/touch pen from the
screen.
Slide to pan
With your finger/touch pen
touching the screen, move it up
and down to scroll the screen.
Press-and-tap
Same action as right-clicking a
mouse. With one finger touching
the screen, tap once (single tap)
with another finger.
Tap once (single tap) with
another finger
With one finger
touching
Flick your finger
Using the touch function (Only for touch models)
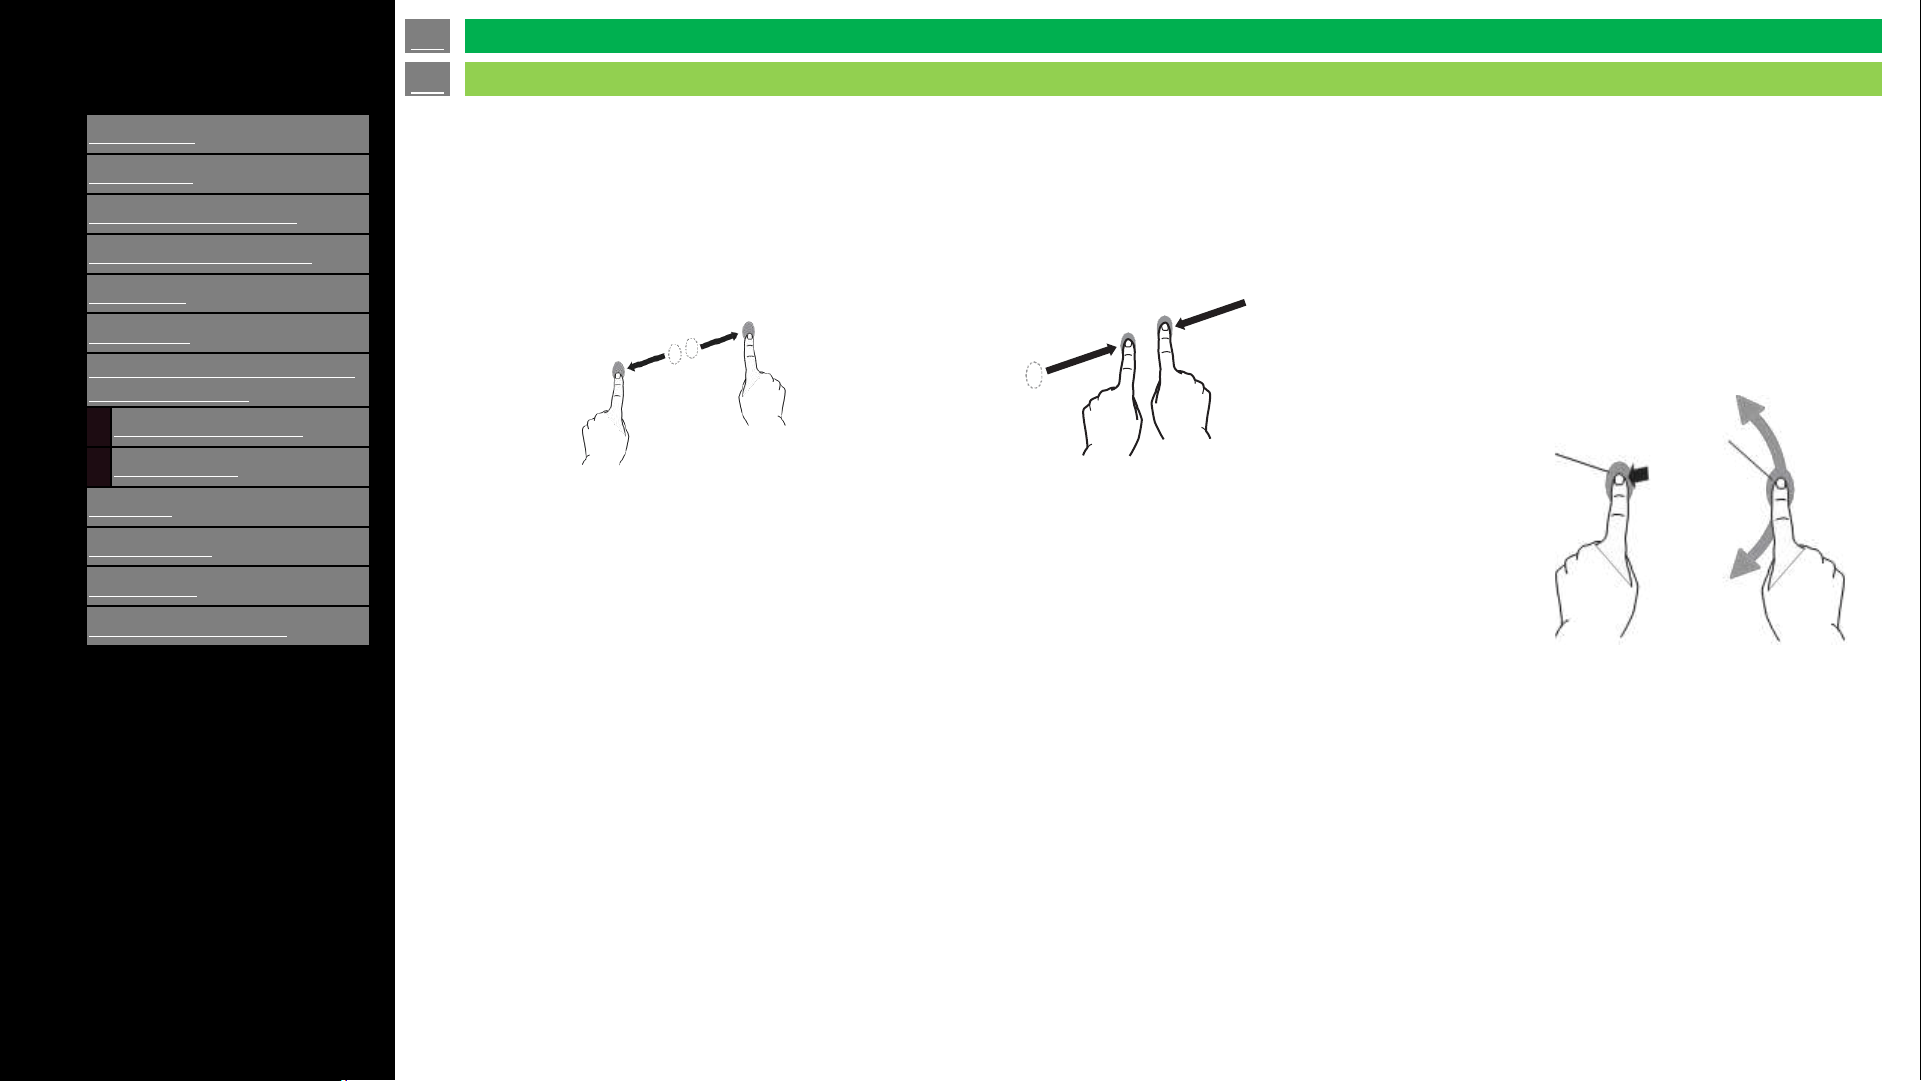
[ENGLISH]
Contents
1.
Part Names
2.
Introduction
3.
Direct Button Operation
4.
On
-Screen Display Menu
5.
Application
6.
Using a PC
7.
Using the touch function (Only
for touch models)
1.
Computer connection
2.
Touch actions
8.
Appendix
9.
Specifications
10.
Trademarks
11.
Dimensional Drawings
>>
<<
Ver. 1.1
en-US 60
Touch actions
Rotate
Use this action in a screen that is
capable of image rotation. Touch the
center point of the rotation with one
finger. While holding that finger still,
move another finger in the desired
direction of rotation.
Zoom
Use in a screen that is capable of enlargement/reduction. Touch the screen with
two fingers and move your fingers closer together to reduce the view, or apart to
enlarge the view.
Reduction Enlargement
Move another finger in the
desired direction of rotation
With one finger touching
Using the touch function (Only for touch models)
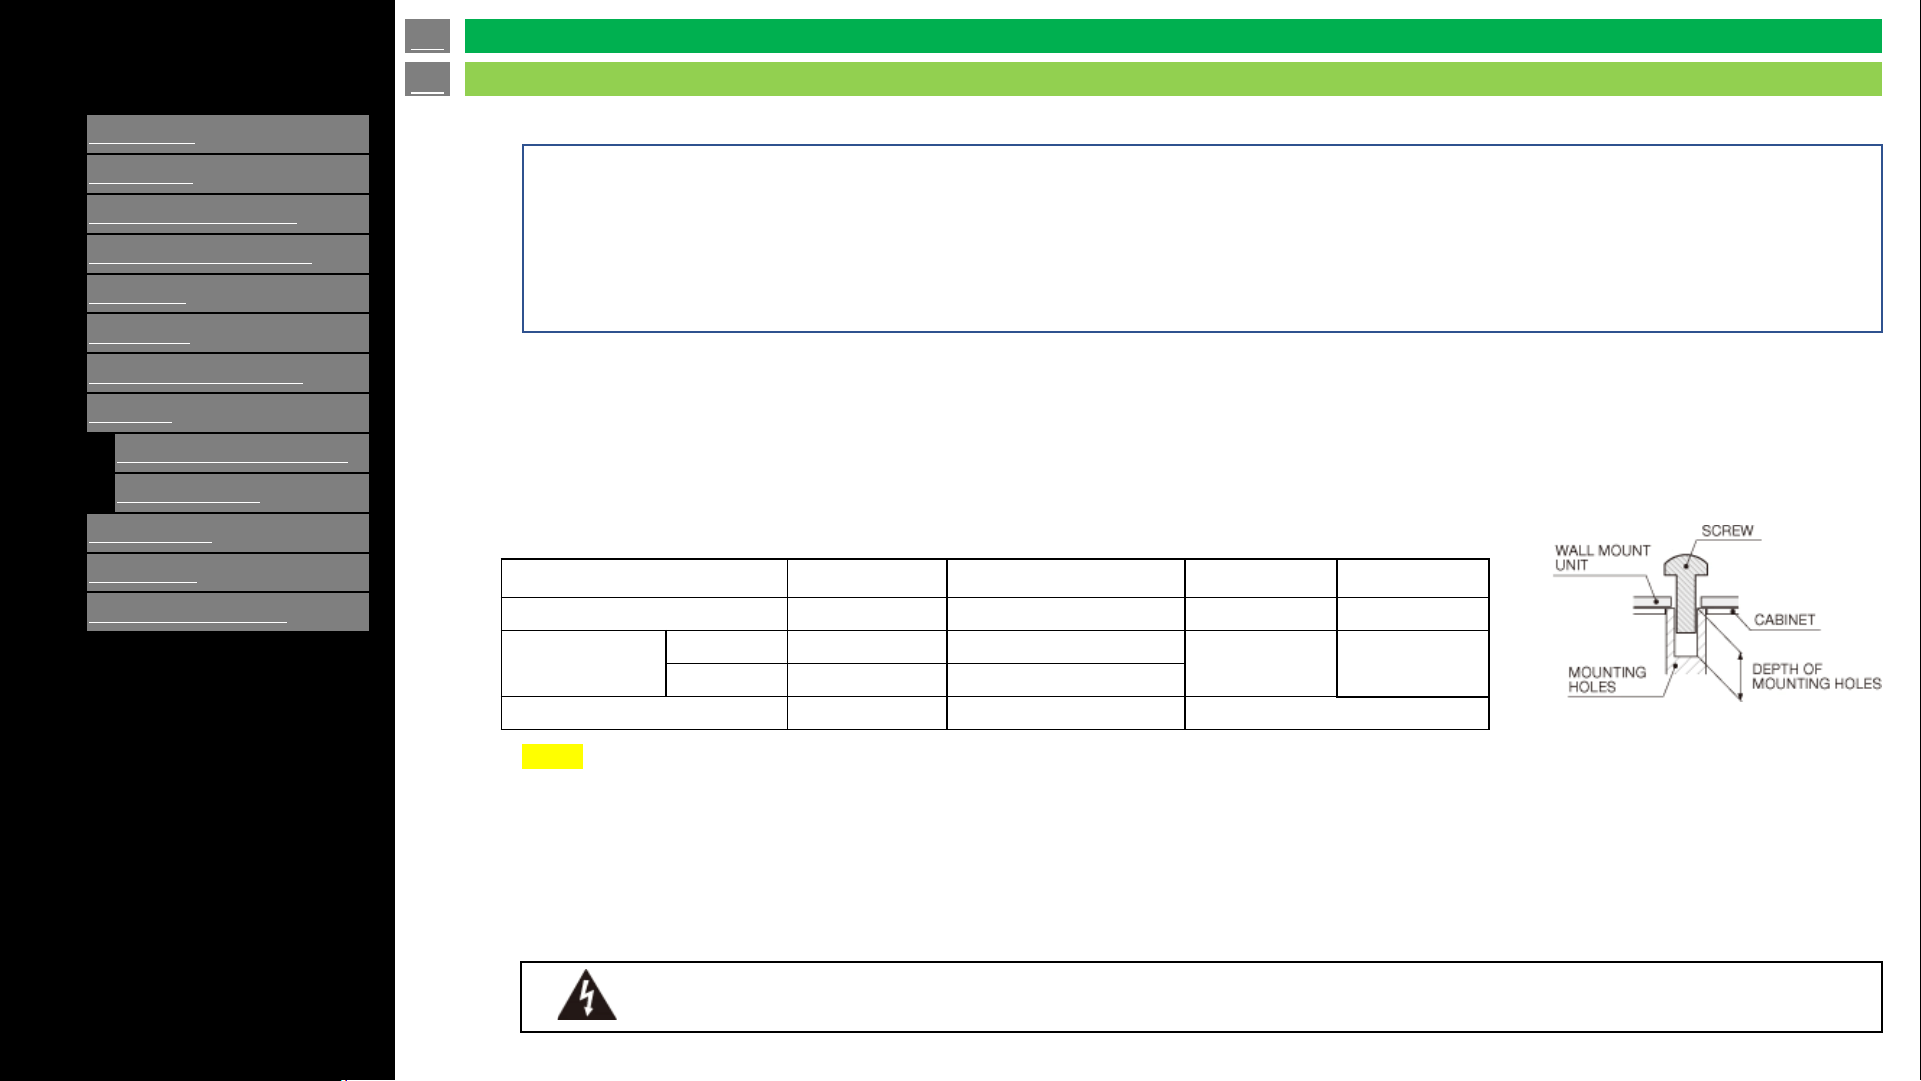
[ENGLISH]
Contents
1.
Part Names
2.
Introduction
3.
Direct Button Operation
4.
On
-Screen Display Menu
5.
Application
6.
Using a PC
7.
Using the touch function
8.
Appendix
1.
Setting the TV on the Wall
2.
Troubleshooting
9.
Specifications
10.
Trademarks
11.
Dimensional Drawings
>>
<<
Ver. 1.1
Unit mm
For the screws, refer to the table shown below.
NOTE
• To use this TV mounted on a wall, remove the cable tie as needed.
• Do not use screws that do not comply with the VESA standard screw specifications.
• Do not use screws that are longer than the standard length. Screws that are too long may cause damage to the inside of the TV.
• Do not fasten the screws too firmly or loosely. This may damage the product or cause the product to fall, leading to personal injury. SHARP is not
liable for these kinds of accidents.
• SHARP is not liable for product damage or personal injury when a non-VESA or non-specified wall mount is used, or the consumer fails to follow the
product installation instructions.
Do not install the wall mount kit while your TV is turned on. It may result in personal injury due to electric shock.
• Screws which suits for each models are set in the box.
• Especially, 50”, 55”, 65” models are different length screws required for either upper side and lower side.
• Screws for each upper and lower side are packed to separate bags (50”, 55”, 65” models).
• Please take care length of screws.
- Long length screws: for upper side
- Short length screws: for lower side
For 4P-B50EJ2U, 4P-B55EJ2U and 4P-B65EJ2U
For 4P-B75EJ2U
• Screw length are same for upper side and lower side.
• 4 pcs. of sleeves are set in the box. Please insert these to each VESA holes before fasten screws.
en-US 61
Setting the TV on the Wall
Appendix
For 4P-B43EJ2U
• There are 2 screw holes on the display. Screw length are same.
4P-B43EJ2U 4P-B50 / 55 / 65EJ2U 4P-B75EJ2U 4P-B86EJ2U
Standard screws
M6
(1.0 pitch
)
M6 (1.0 pitch)
M8 (1.25 pitch)
M8 (1.25 pitch)
Length(Depth of
mounting holes)
Upper side
30 mm 33 mm
24 mm 30 mm
Lower side
12 mm 10 mm
Quantity
4 pcs. 4 pcs. (set in the box) 4 pcs.
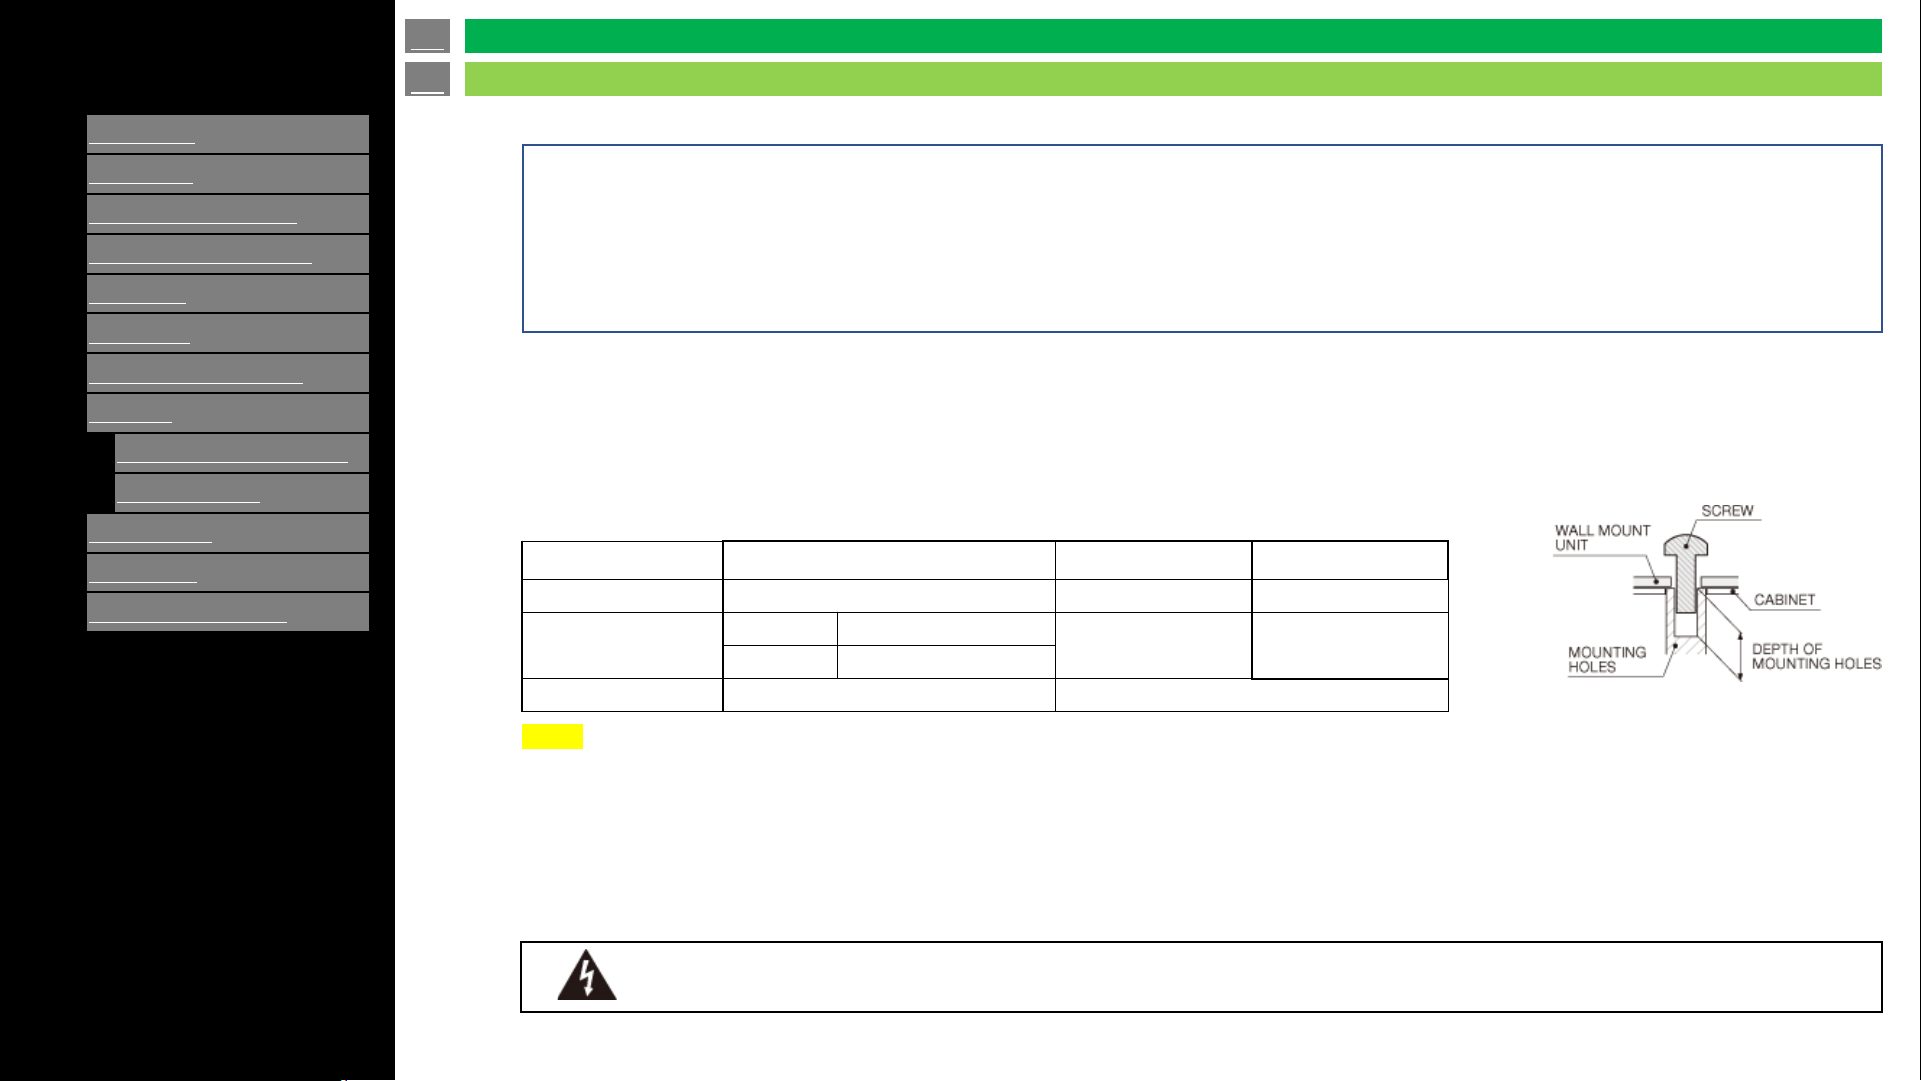
[ENGLISH]
Contents
1.
Part Names
2.
Introduction
3.
Direct Button Operation
4.
On
-Screen Display Menu
5.
Application
6.
Using a PC
7.
Using the touch function
8.
Appendix
1.
Setting the TV on the Wall
2.
Troubleshooting
9.
Specifications
10.
Trademarks
11.
Dimensional Drawings
>>
<<
Ver. 1.1
4W-B55FT5U and 4W-B65FT5U 4W-B75FT5U 4W-B86FT5U
Standard screws
M6 (1.0 pitch) M8 (1.25 pitch) M8 (1.25 pitch)
Length(Depth of
mounting holes)
Upper side
33 mm
24 mm 30 mm
Lower side
10 mm
Quantity
4 pcs. (set in the box) 4 pcs.
Unit mm
For the screws, refer to the table shown below.
NOTE
• To use this TV mounted on a wall, remove the cable tie as needed.
• Do not use screws that do not comply with the VESA standard screw specifications.
• Do not use screws that are longer than the standard length. Screws that are too long may cause damage to the inside of the TV.
• Do not fasten the screws too firmly or loosely. This may damage the product or cause the product to fall, leading to personal injury. SHARP is not
liable for these kinds of accidents.
• SHARP is not liable for product damage or personal injury when a non-VESA or non-specified wall mount is used, or the consumer fails to follow the
product installation instructions.
Do not install the wall mount kit while your TV is turned on. It may result in personal injury due to electric shock.
• Screws which suits for each models are set in the box.
• Especially, 55”, 65” models are different length screws required for either upper side and lower side.
• Screws for each upper and lower side are packed to separate bags (55”, 65” models).
• Please take care length of screws.
- Long length screws: for upper side
- Short length screws: for lower side
For 4W-B55FT5U and 4W-B65FT5U
For Rest of models
• Screw length is the same for upper side and lower side.
• 4 pcs. of sleeves are set in the box. Please insert these to each VESA holes before fasten screws.
en-US 62
Setting the TV on the Wall
Appendix
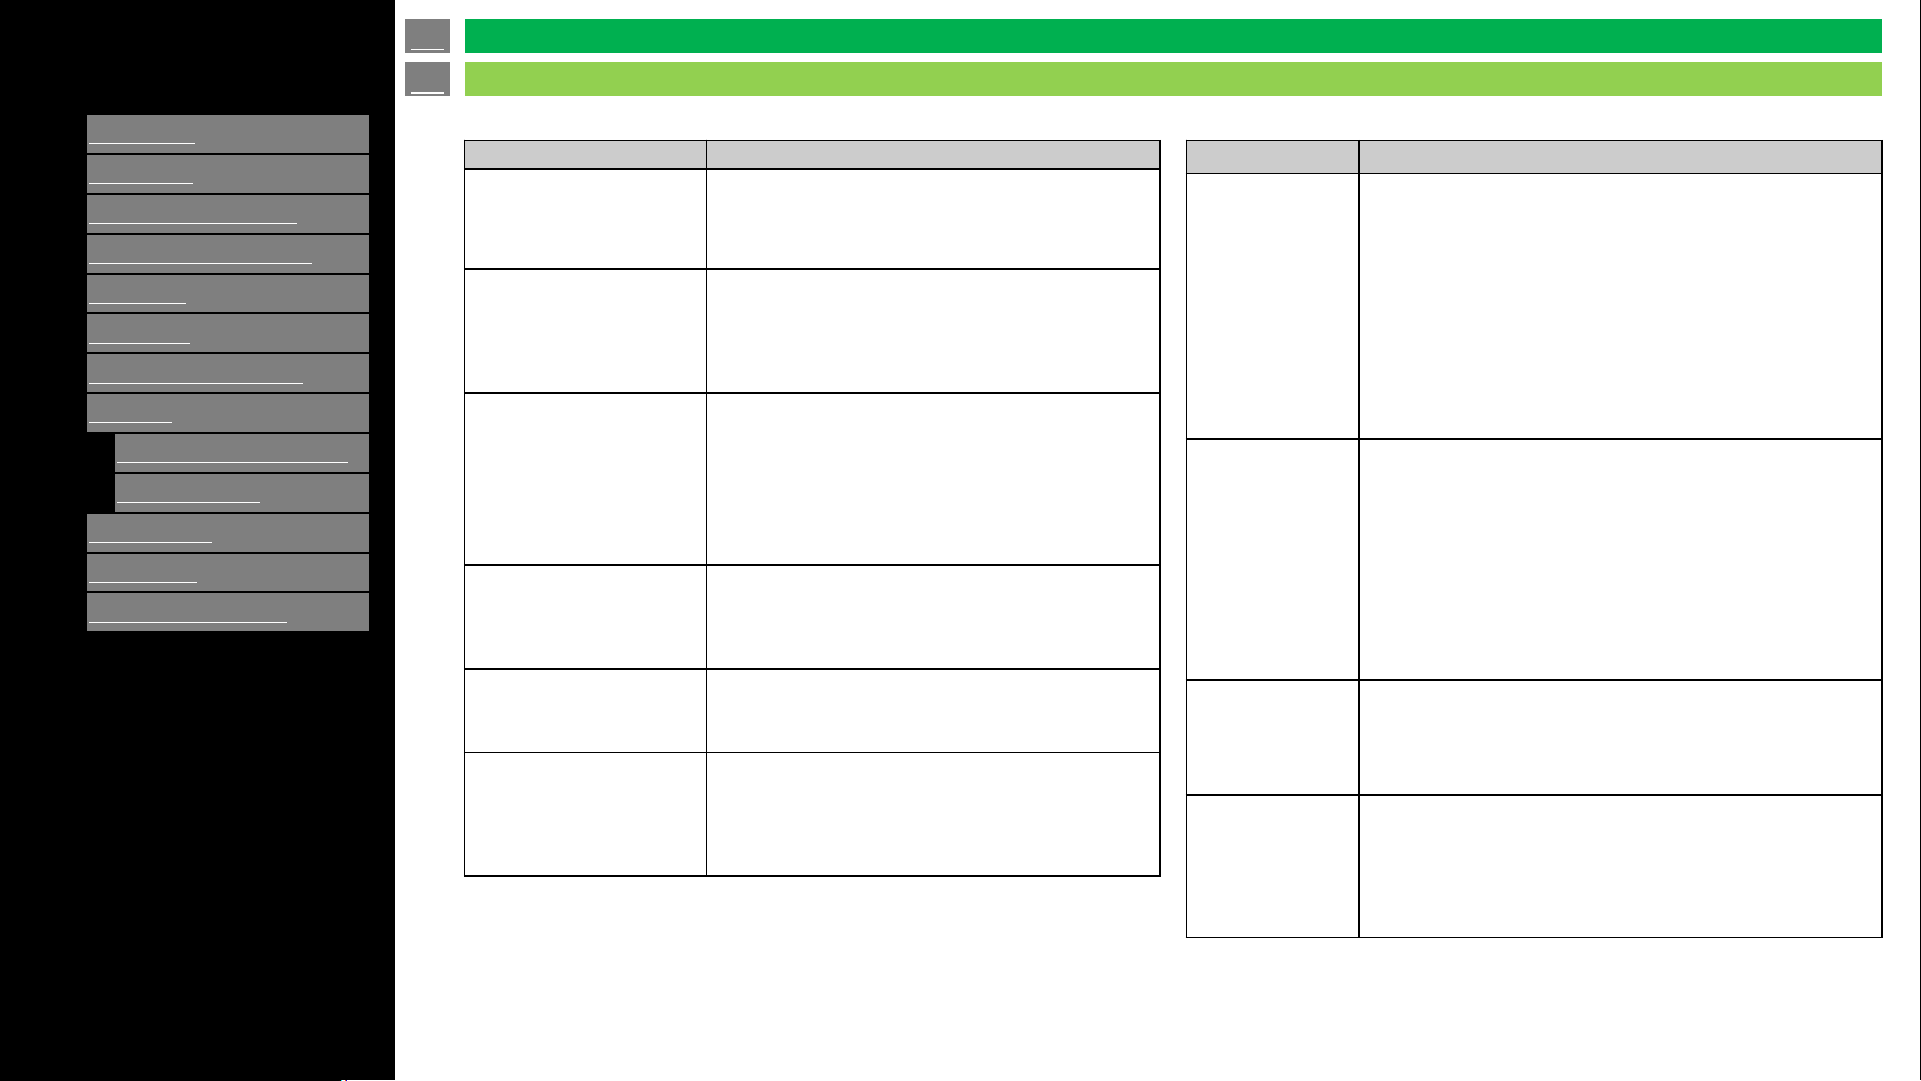
[ENGLISH]
Contents
1.
Part Names
2.
Introduction
3.
Direct Button Operation
4.
On
-Screen Display Menu
5.
Application
6.
Using a PC
7.
Using the touch function
8.
Appendix
1.
Setting the TV on the Wall
2.
Troubleshooting
9.
Specifications
10.
Trademarks
11.
Dimensional Drawings
>>
<<
Ver. 1.1
Problem Possible Solution
No power
.
•
Check if you pressed POWER on the remote
control unit.
•
Is the AC cord disconnected?
•
Has the power been turned on?
Unit cannot be operated.
•
External influences such as lightning, static
electricity, may cause improper operation. In this
case, operate the unit after first turning off the
power of the TV or unplugging the AC cord and
replunging it in after 1 or 2 minutes.
Remote control unit does
not operate.
•
Are batteries inserted with polarity (+, -
) aligned?
•
Are batteries worn out? (Replace with new
batteries).
•
Are you using it under strong or fluorescent
lighting?
• Is a fluorescent light illuminated near the remote
control sensor?
Picture is cut off/with
sidebar screen.
•
Is the image position correct?
Are screen mode adjustments such as picture
size made correctly?
Strange color, light color,
or color misalignment
•
Adjust the picture tone.
Is the room too bright? The picture may look
dark in a room that is too bright.
Power is suddenly turned
off.
•
Is the sleep timer set?
Check the power control settings.
The unit's internal temperature has increased.
Remove any objects blocking vent or clean.
Problem Possible Solution
No picture
.
•
Is connection to other components correct?
•
Is the correct input selected?
•
If the PC image is not displayed, check the following:
- When connecting a laptop PC to the TV, check that
display output mode of the PC is set to external TV.
- Check the resolution setting on the PC. Is a non-
compatible signal being input?
Picture quality of
HD videos is
poor.
•
To enjoy HD images from external equipment, you are
required to set up HDMI connection or component
connection.
•
If the Video source is not of HD quality, HD images
cannot be displayed. Check that the Video source you
are viewing provides HD images.
•
The HD cable/satellite set-top box may need to be
configured to output HD images via cable/satellite.
The TV
sometimes makes
a cracking sound.
•
This is not a malfunction. This happens when the
cabinet slightly expands and contracts according to
change in temperature. This does not affect the
Monitor's performance.
Some Internet
functions used on
a PC are not
available from the
TV.
• The TV has only limited functions compared with regular
PC browsers.
en-US 63
Troubleshooting
Appendix
[ENGLISH]
Contents
1.
Part Names
2.
Introduction
3.
Direct Button Operation
4.
On
-Screen Display Menu
5.
Application
6.
Using a PC
7.
Using the touch function
8.
Appendix
1.
Setting the TV on the Wall
2.
Troubleshooting
9.
Specifications
10.
Trademarks
11.
Dimensional Drawings
>>
<<
Ver. 1.1
Problem Possible Solution
No sound. • Is connection to other components correct?
• Is the volume too low?
• Have you pressed MUTE on the remote control unit?
• Check the audio output of the connected external equipment. Is the volume too low or muted?
• When external equipment is connected via an HDMI cable, you may need to configure the audio to be output through the
HDMI cable.
Cautions regarding use in high and low temperature environments.
• When the unit is used in a low temperature space (e.g. room, office), the picture may leave trails or appear slightly delayed. This is not a
malfunction, and the unit will recover when the temperature returns to normal.
• Do not leave the unit in a hot or cold location. Also, do not leave the unit in a location exposed to direct sunlight or near a heater, as this may
cause the cabinet to deform and the front panel to malfunction.
• Storage temperature: -4°F to +140°F (-20°C to +60°C).
en-US 64
Troubleshooting
Appendix
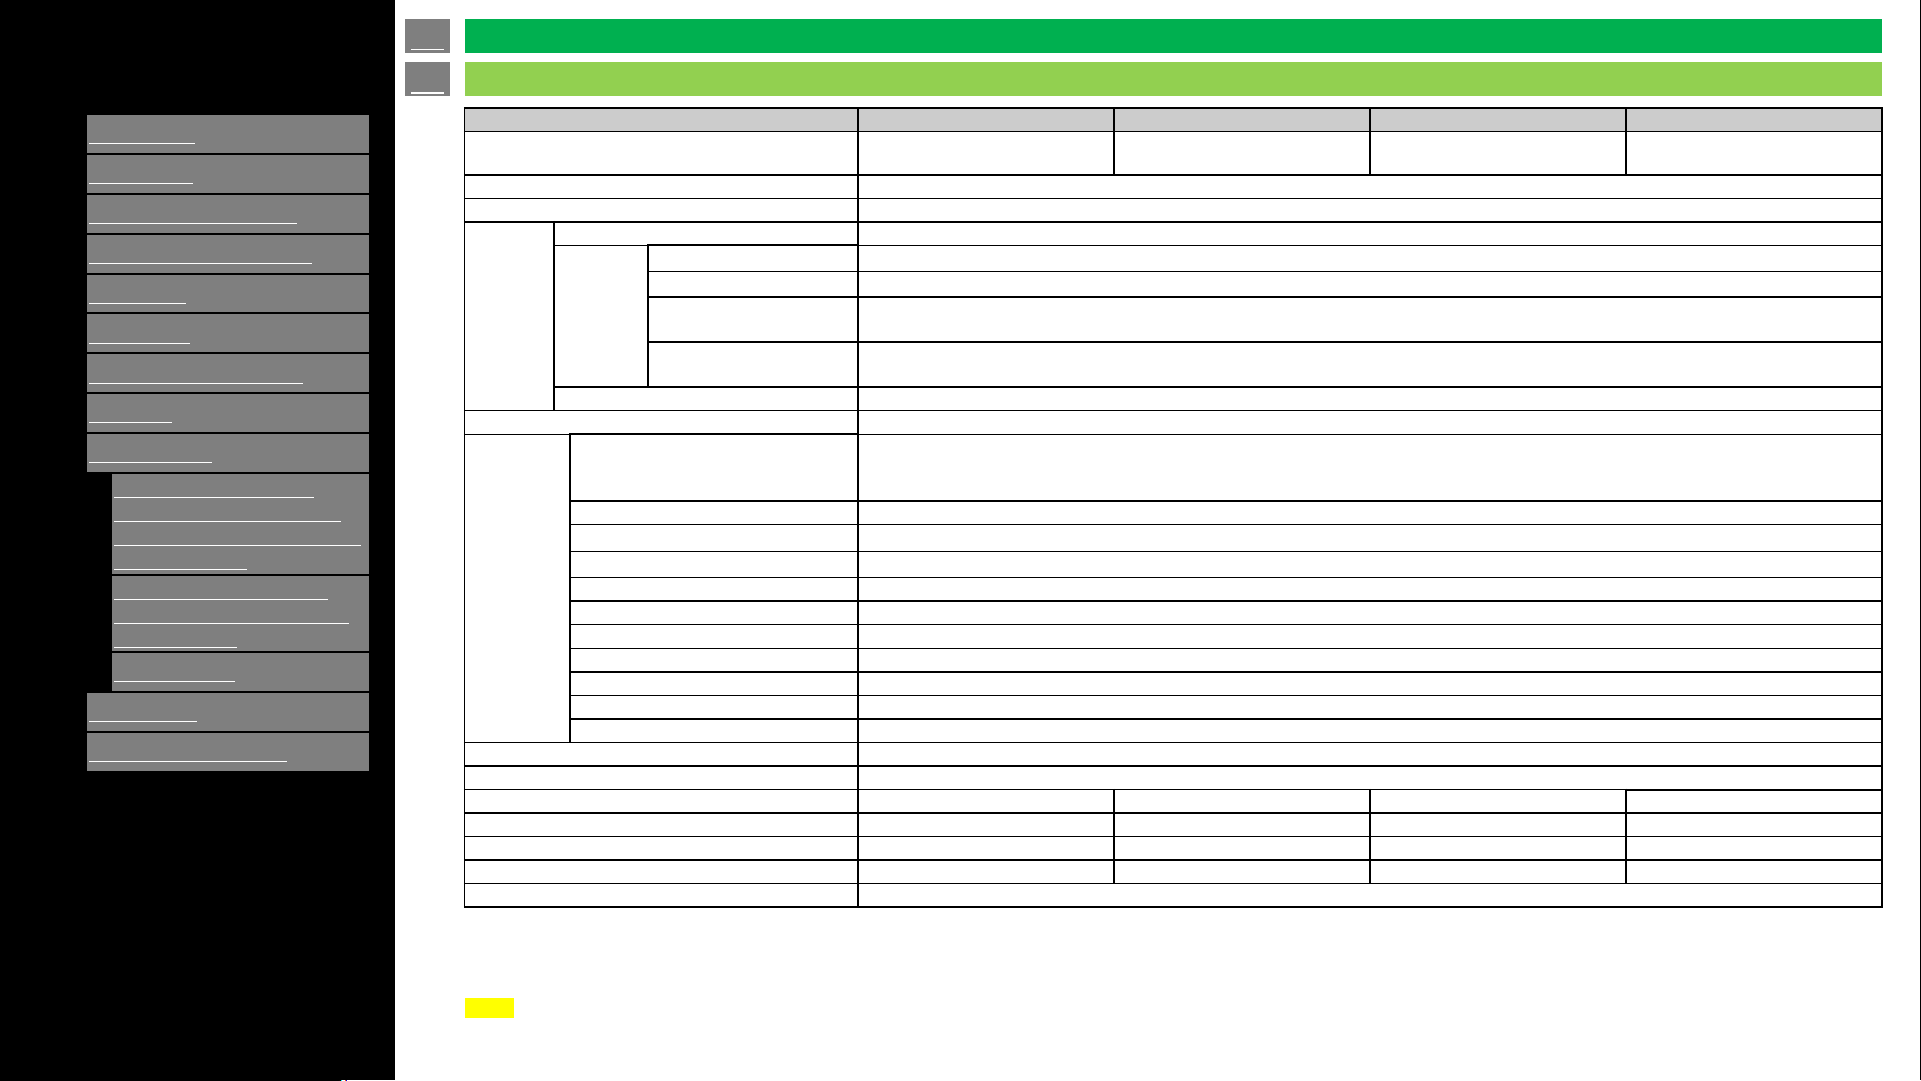
[ENGLISH]
Contents
1.
Part Names
2.
Introduction
3.
Direct Button Operation
4.
On
-Screen Display Menu
5.
Application
6.
Using a PC
7.
Using the touch function
8.
Appendix
9.
Specifications
1.
TV (4P
-B43EJ2U / 4P-
B50EJ2U / 4P
-B55EJ2U /
4P
-B65EJ2U / 4P-
B75EJ2U
/ 4P
-B86EJ2U)
2.
TV (4
W-B55FT5U / 4W-
B65
FT5U / 4W-B75FT5U /
4P
-B86FT5U)
3.
Wireless LAN
10.
Trademarks
11.
Dimensional Drawings
>>
<<
Ver. 1.1
Item 4P-B43EJ2U 4P-B50EJ2U 4P-B55EJ2U 4P-B65EJ2U
LCD Panel
43" Class
(42 33/64" Diagonal)
50" Class
(49 33/64" Diagonal)
55" Class
(54 33/64" Diagonal)
65" Class
(64 17/32" Diagonal)
Resolution
8,294,400 pixels (3840 x 2160)
Video color system
NTSC-M/PAL-N/PAL-M
TV
Function
TV
- Standard (CCIR)
American TV Standard ATSC/NTSC System
Receiving
Channel
VHF/UHF
VHF 2-13ch, UHF 14-69ch
CATV
1-135ch (non-scrambled channel only)
Digital Terrestrial
Broadcast (8VSB)
2-69ch
Digital cable*1 (64/256
QAM)
1-135ch (non-scrambled channel only)
STEREO/BILINGUAL
BTSC system
Audio amplifier
8 W x 2
Terminals
Antenna terminal
ANTENNA/CABLE IN (Antenna
input)
75Ω Unbalance, F Type x 1 for Analog (VHF/UHF/CATV) and Digital (AIR/CABLE)
SERVICE ONLY Ø3.5 mm jack
Ø3.5 mm jack
INPUT 1 (ARC) HDMI
HDMI (HDMI input), ARC
INPUT 2 HDMI
HDMI (HDMI input)
INPUT 3 HDMI
HDMI (HDMI input)
AV IN (INPUT 3)
AUDIO in, VIDEO in
AUDIO OUT
AUDIO out, Headphone (Ø3.5 mm stereo)
USB 1
Photo/Music/Video mode, Software update
USB 2
Photo/Music/Video mode, Software update
EX
-IR External IR receiver connector
ETHERNET (10/100 BASE
-T)
Network connector
OSD language
English/French/Spanish
Power Requirement
AC 120 V, 60 Hz
Power Consumption
98W 130W 130W 180W
Dimensions with stands
958 x 226 x 612 mm 1112 x 243 x 672 mm 1228 x 243 x 742 mm 1446 x 285 x 870 mm
Dimensions without stands
958 x 72 x 558 mm 1112 x 70 x 642 mm 1228 x 73 x 711 mm 1446 x 73 x 835 mm
Weight/Weight without stands
6.9 kg/6.6 kg 10.0 kg/9.8 kg 13.0 kg/12.8 kg 16.8 kg/16.4 kg
Operating temperature
0°C to +40°C
*1 Emergency alert messages via Cable are unreceivable.
• As a part of policy of continuous improvement, SHARP reserves the right to make design and specification changes for product improvement without prior notice. The performance specification
figures indicated are nominal values of production units. There may be some deviations from these values in individual units.
• Continuous operating time and warranty. This product is designed for a maximum daily use of 16 hours. Continual use in excess of 16 hours per day is not covered by the warranty.
NOTE
• Installing the Liquid Crystal Television requires special skill that should only be performed by qualified service personnel. Customers should not attempt to do the work themselves. SHARP
bears no responsibility for improper mounting or mounting that results in accident or injury.
• Carefully read the instructions that come with the bracket before beginning work.
en-US 65
TV (4P-B43EJ2U /4P-B50EJ2U / 4P-B55EJ2U / 4P-B65EJ2U)
Specifications

[ENGLISH]
Contents
1.
Part Names
2.
Introduction
3.
Direct Button Operation
4.
On
-Screen Display Menu
5.
Application
6.
Using a PC
7.
Using the touch function
8.
Appendix
9.
Specifications
1.
TV (4P
-B43EJ2U / 4P-
B50EJ2U / 4P
-B55EJ2U /
4P
-B65EJ2U / 4P-
B75EJ2U
/ 4P
-B86EJ2U)
2.
TV (4
W-B55FT5U / 4W-
B65
FT5U / 4W-B75FT5U /
4P
-B86FT5U)
3.
Wireless LAN
10.
Trademarks
11.
Dimensional Drawings
>>
<<
Ver. 1.1
Item 4P-B75EJ2U 4P-B86EJ2U
LCD Panel
75" Class
(75" Diagonal)
86” Class
(85 9/16" Diagonal)
Resolution
8,294,400 pixels (3840 x 2160)
Video color system
NTSC-M/PAL-N/PAL-M
TV
Function
TV
- Standard (CCIR)
American TV Standard ATSC/NTSC System
Receiving
Channel
VHF/UHF
VHF 2-13ch, UHF 14-69ch
CATV
1-135ch (non-scrambled channel only)
Digital Terrestrial
Broadcast (8VSB)
2-69ch
Digital cable*1 (64/256
QAM)
1-135ch (non-scrambled channel only)
STEREO/BILINGUAL
BTSC system
Audio amplifier
8 W x 2
Terminals
Antenna terminal
ANTENNA/CABLE IN (Antenna
input)
75Ω Unbalance, F Type x 1 for Analog (VHF/UHF/CATV) and Digital (AIR/CABLE)
SERVICE ONLY Ø3.5 mm jack
Ø3.5 mm jack
INPUT 1 (ARC) HDMI
HDMI (HDMI input), ARC
INPUT 2 HDMI
HDMI (HDMI input)
INPUT 3 HDMI
HDMI (HDMI input)
AV IN (INPUT 3)
AUDIO in, VIDEO in
AUDIO OUT
AUDIO out, Headphone (Ø3.5 mm stereo)
USB 1
Photo/Music/Video mode, Software update
USB 2
Photo/Music/Video mode, Software update
EX
-IR External IR receiver connector
ETHERNET (10/100 BASE
-T)
Network connector
OSD language
English/French/Spanish
Power Requirement
AC 120 V, 60 Hz
Power Consumption
300W 380W
Dimensions with stands
1674 x 331 x 1024 mm 1924 x 92.9 x 1102.2 mm
Dimensions without stands
1674 x 75 x 960 mm 1924 x 441 x 1182 mm
Weight/Weight without stands
28.9 kg/28.2 kg 56.1/43.4kg
Operating temperature
0°C to +40°C
*1 Emergency alert messages via Cable are unreceivable.
• As a part of policy of continuous improvement, SHARP reserves the right to make design and specification changes for product improvement without prior notice. The performance specification
figures indicated are nominal values of production units. There may be some deviations from these values in individual units.
• Continuous operating time and warranty. This product is designed for a maximum daily use of 16 hours. Continual use in excess of 16 hours per day is not covered by the warranty.
NOTE
• Installing the Liquid Crystal Television requires special skill that should only be performed by qualified service personnel. Customers should not attempt to do the work themselves. SHARP
bears no responsibility for improper mounting or mounting that results in accident or injury.
• Carefully read the instructions that come with the bracket before beginning work.
en-US 66
TV (4P-B75EJ2U / 4P-B86EJ2U)
Specifications

[ENGLISH]
Contents
1.
Part Names
2.
Introduction
3.
Direct Button Operation
4.
On
-Screen Display Menu
5.
Application
6.
Using a PC
7.
Using the touch function
8.
Appendix
9.
Specifications
1.
TV (4P
-B43EJ2U / 4P-
B50EJ2U / 4P
-B55EJ2U /
4P
-B65EJ2U / 4P-
B75EJ2U
/ 4P
-B86EJ2U)
2.
TV (4
W-B55FT5U / 4W-
B65
FT5U / 4W-B75FT5U /
4P
-B86FT5U)
3.
Wireless LAN
10.
Trademarks
11.
Dimensional Drawings
>>
<<
Ver. 1.1
Item 4W-B55FT5U 4W-B65FT5U 4W-B75FT5U 4W-B86FT5U
LCD Panel
55" Class
(54 33/64" Diagonal)
65" Class
(64 17/32" Diagonal)
75" Class
(75" Diagonal)
86” Class
(85 9/16" Diagonal)
Resolution
8,294,400 pixels (3840 x 2160)
Video color system
NTSC-M/PAL-N/PAL-M
TV
Function
TV
- Standard (CCIR)
American TV Standard ATSC/NTSC System
Receiving
Channel
VHF/UHF
VHF 2-13ch, UHF 14-69ch
CATV
1-135ch (non-scrambled channel only)
Digital Terrestrial Broadcast
(8VSB)
2-69ch
Digital cable*1 (64/256 QAM)
1-135ch (non-scrambled channel only)
STEREO/BILINGUAL
BTSC system
Audio amplifier
8 W x 2
Terminals
Antenna terminal ANTENNA/CABLE IN
(Antenna input)
75Ω Unbalance, F Type x 1 for Analog (VHF/UHF/CATV) and Digital (AIR/CABLE)
SERVICE ONLY Ø3.5 mm jack
Ø3.5 mm jack
INPUT 1 (ARC) HDMI
HDMI (HDMI input), ARC
INPUT 2 HDMI
HDMI (HDMI input)
INPUT 3 HDMI
HDMI (HDMI input)
AV IN (INPUT 3)
AUDIO in, VIDEO in
AUDIO OUT
AUDIO out, Headphone (Ø3.5 mm stereo)
USB 1
Photo/Music/Video mode, Software update
USB 2
Photo/Music/Video mode, Software update
EX
-IR External IR receiver connector
ETHERNET (10/100 BASE
-T)
Network connector
Interactivity
Touch Technology
IR (infrared blocking detection method)
PC Connection Port
USB Type Cx 1 (a USB cable and a C-to-A adapter included)
Multi Touch
20 points
Protection Glass
Thickness: Approx. 4.0mm Shock resistance: 130 cm
OSD language
English/French/Spanish
Power Requirement
AC 120 V, 60 Hz
Power Consumption
130W 180W 300W 380W
Dimensions
1,264.5 x 83.7 x 749.3 mm 1,483.6 x 83.6 x 872.8 mm 1,705.9 x 87.5 x 996.2 mm 1,955.1 x 105.5 x 1,143.2 mm
Weight
23.4 kg 31.3 kg 51 kg 68.2 kg
Operating temperature
0°C to +40°C
*1 Emergency alert messages via Cable are unreceivable.
• As a part of policy of continuous improvement, SHARP reserves the right to make design and specification changes for product improvement without prior notice. The performance specification
figures indicated are nominal values of production units. There may be some deviations from these values in individual units.
• Continuous operating time and warranty. This product is designed for a maximum daily use of 16 hours. Continual use in excess of 16 hours per day is not covered by the warranty.
NOTE
• Installing the Liquid Crystal Television requires special skill that should only be performed by qualified service personnel. Customers should not attempt to do the work themselves. SHARP
bears no responsibility for improper mounting or mounting that results in accident or injury.
• Carefully read the instructions that come with the bracket before beginning work.
en-US 67
TV (4W-B55FT5U / 4W-B65FT5U/ 4W-B75FT5U / 4W-B86FT5U)
Specifications
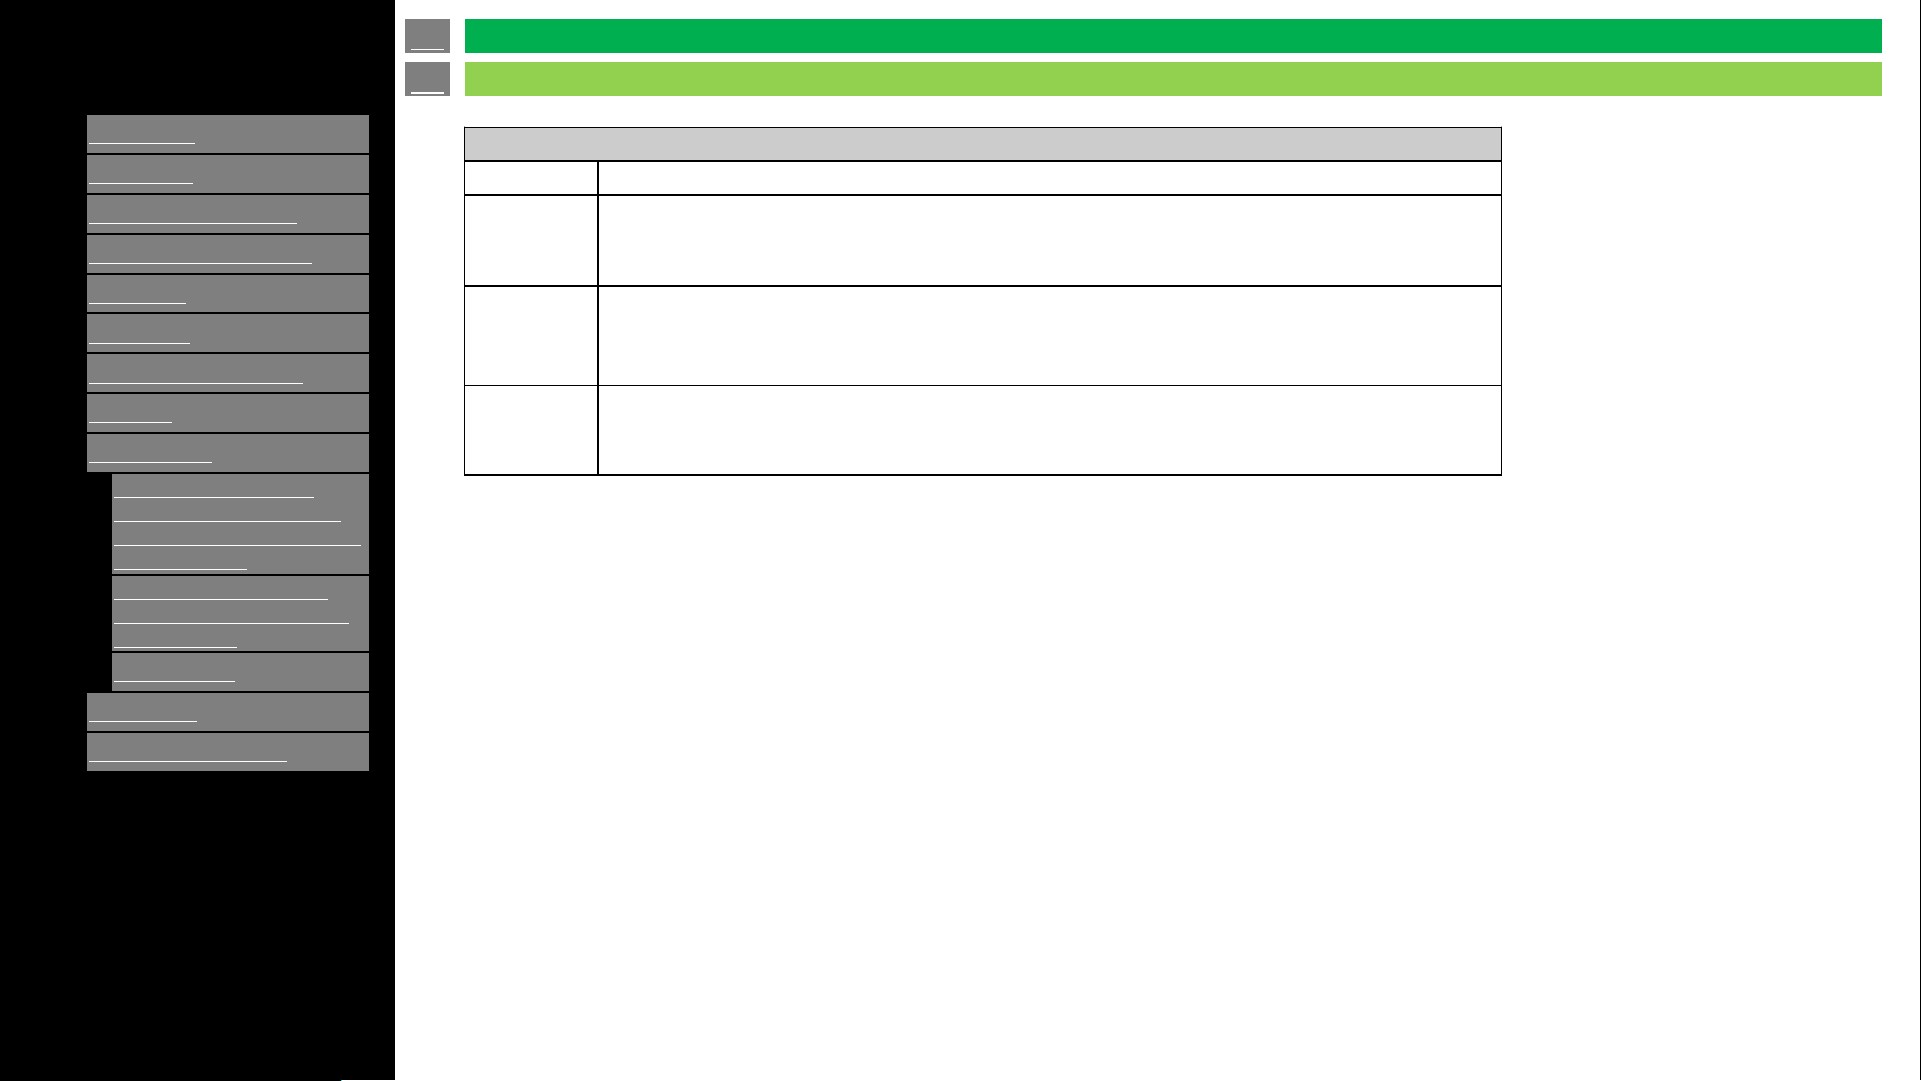
[ENGLISH]
Contents
1.
Part Names
2.
Introduction
3.
Direct Button Operation
4.
On
-Screen Display Menu
5.
Application
6.
Using a PC
7.
Using the touch function
8.
Appendix
9.
Specifications
1.
TV (4P
-B43EJ2U / 4P-
B50EJ2U / 4P
-B55EJ2U /
4P
-B65EJ2U / 4P-
B75EJ2U
/ 4P
-B86EJ2U)
2.
TV (4
W-B55FT5U / 4W-
B65
FT5U / 4W-B75FT5U /
4P
-B86FT5U)
3.
Wireless LAN
10.
Trademarks
11.
Dimensional Drawings
>>
<<
Ver. 1.1
Specification
Standard
IEEE 802.11b/g/n/ac
Security
Static WEP (64/128 bit key index 1 only)
WPA
-PSK (TKIP)
WPA2
-PSK (AES)
Modulation
IEEE802.11b: DBPSK, DQPSK, CCK / DSSS HRDSSS
IEEE802.11g: BPSK, QPSK, 16QAM, DBPSK, DQPSK, CCK, PBCC / OFDM
IEEE802.11n: BPSK, QPSK, 16QAM, 64QAM / OFDM
Throughput
IEEE802.11b: 1, 2.5, 5, 11Mbps
IEEE802.11g: 6, 9, 12, 18, 24, 36, 48, 54Mbps
IEEE802.11n:
~300Mbps
en-US 68
Wireless LAN
Specifications
[ENGLISH]
Contents
>>
<<
1.
Part Names
2.
Introduction
3.
Direct Button Operation
4.
On
-Screen Display Menu
5.
Application
6.
Using a PC
7.
Using the touch function
8.
Appendix
9.
Specifications
10.
Trademarks
11.
Dimensional Drawings
Ver. 1.1
Manufactured under license from Dolby Laboratories. Dolby, Dolby Audio and Doble-D symbol are trademarks of Dolby
Laboratories Licensing Corporation.
The terms HDMI, HDMI High-Definition Multimedia Interface, HDMI trade dress and the HDMI Logos are trademarks or
registered trademarks of HDMI Licensing Administrator, Inc.
en-US 69
Trademarks
Trademarks
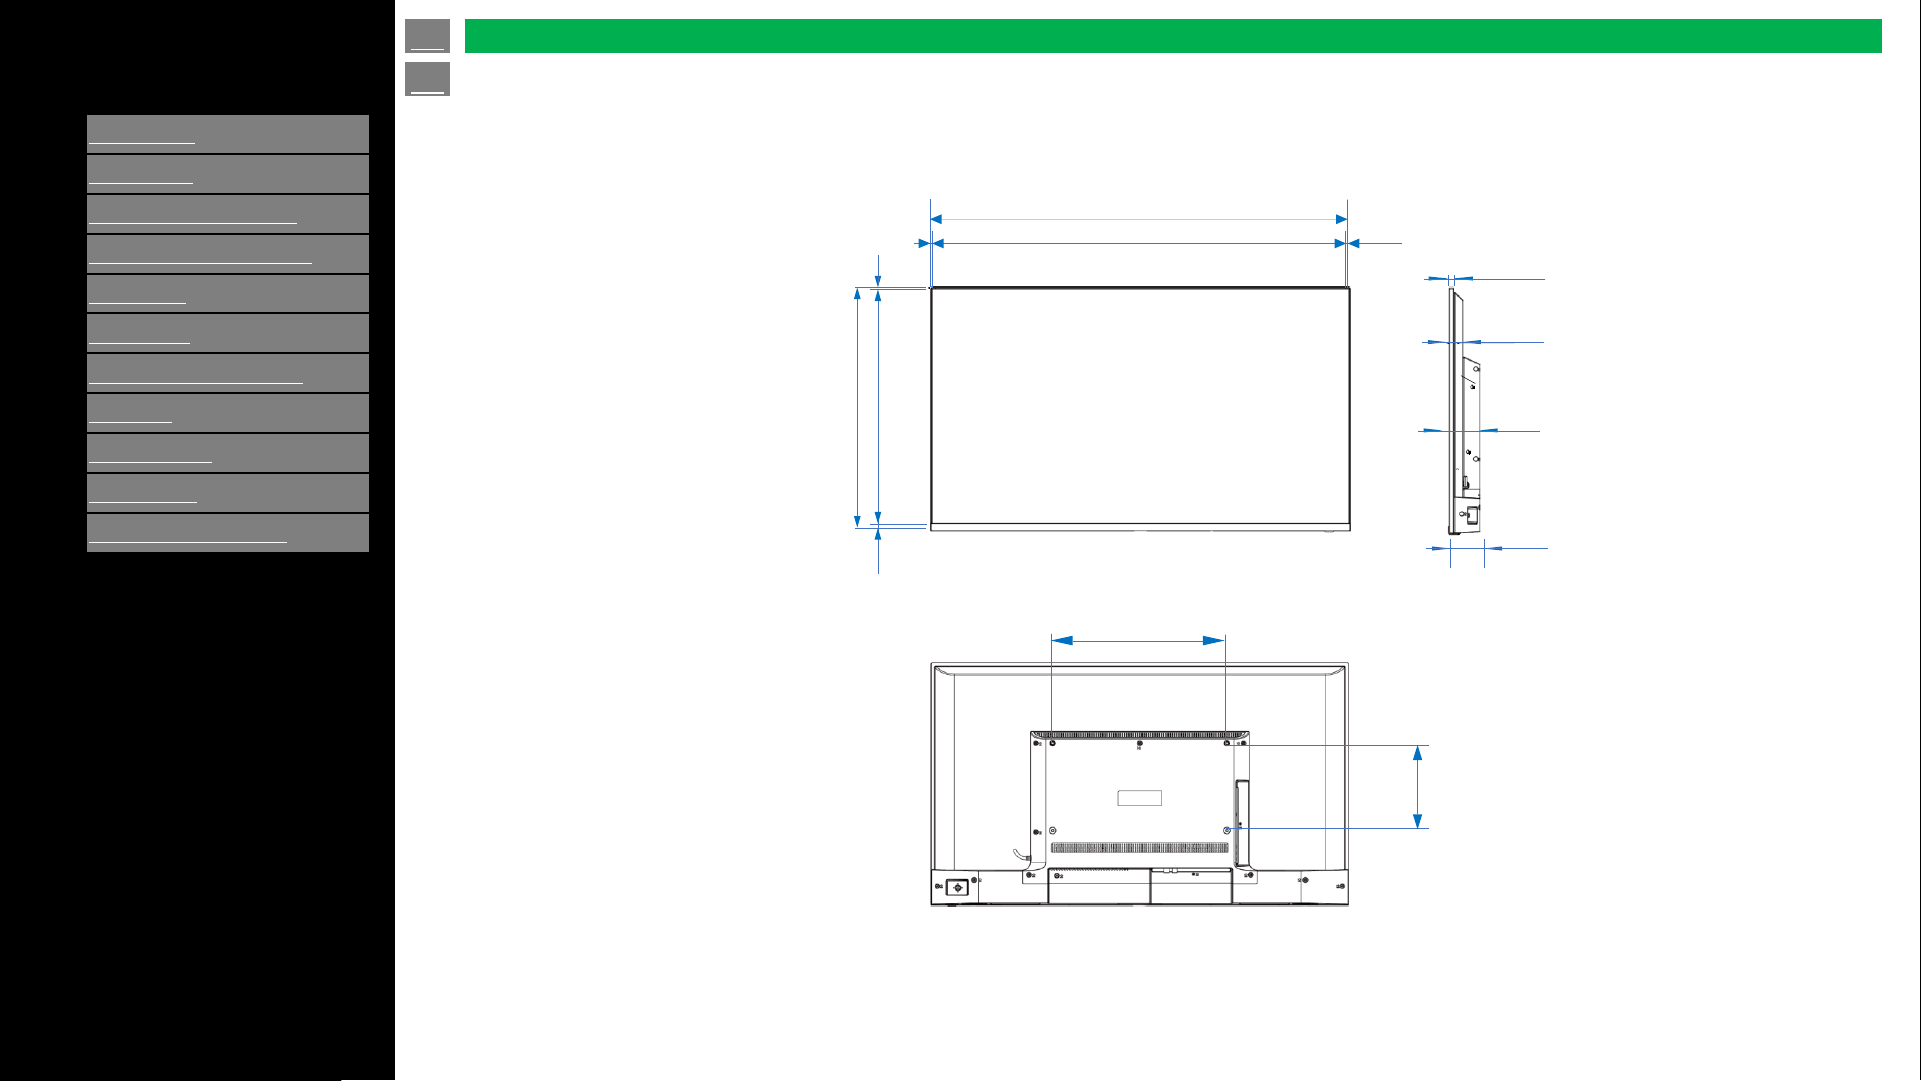
[ENGLISH]
Contents
>>
<<
1.
Part Names
2.
Introduction
3.
Direct Button Operation
4.
On
-Screen Display Menu
5.
Application
6.
Using a PC
7.
Using the touch function
8.
Appendix
9.
Specifications
10.
Trademarks
11.
Dimensional Drawings
Ver. 1.1
Unit inch (mm)
Dimensional Drawings
4P-B43EJ2U
37.8‘’ (958)
37.5‘’ (952)
0.12‘’ (3)
22'' (558)
21.3'' (540)
0.67‘’ (17)
0.12‘’ (3)
0.12’’ (3)
0.35'' (9)
1.2'' (31)
2.8'' (70)
2.8'' (72)
15.7'' (400)
7.9‘’
(200)
en-US 70

[ENGLISH]
Contents
>>
<<
1.
Part Names
2.
Introduction
3.
Direct Button Operation
4.
On
-Screen Display Menu
5.
Application
6.
Using a PC
7.
Using the touch function
8.
Appendix
9.
Specifications
10.
Trademarks
11.
Dimensional Drawings
Ver. 1.1
43.8‘’ (1,112)
43.5‘’ (1,106)
0.16'' (4)
25.3'' (642)
24.5'' (623)
0.63'' (16)
0.16'' (4)
0.16'' (4)
0.39'' (10)
1.2'' (31)
2.8'' (70)
2.8'' (72)
11.8'' (300)
7.9‘’
(200)
Unit inch (mm)
en-US 71
Dimensional Drawings
4P-B50EJ2U
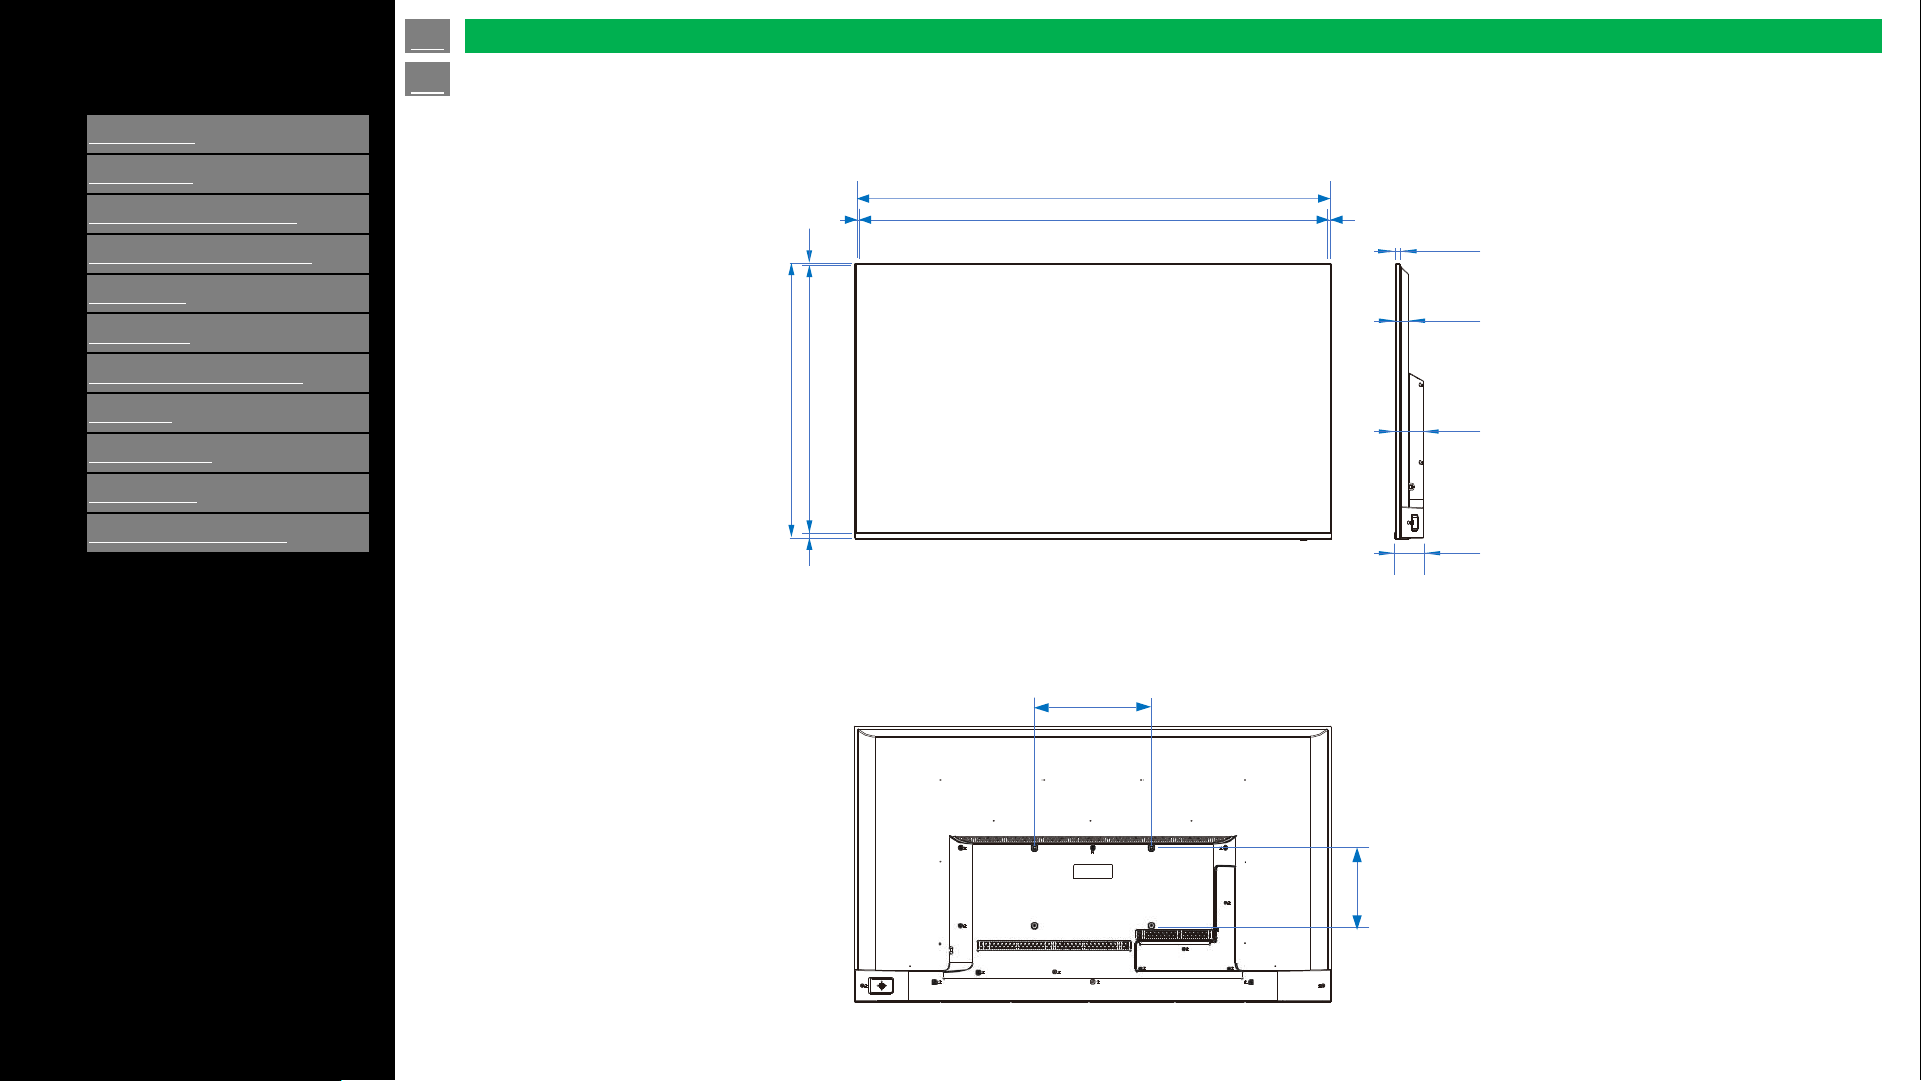
[ENGLISH]
Contents
>>
<<
1.
Part Names
2.
Introduction
3.
Direct Button Operation
4.
On
-Screen Display Menu
5.
Application
6.
Using a PC
7.
Using the touch function
8.
Appendix
9.
Specifications
10.
Trademarks
11.
Dimensional Drawings
Ver. 1.1
48.3‘’ (1,227)
48.1‘’ (1,222)
0.12'' (3)
28'' (710)
0.75'' (19)
0.12'' (3)
0.43'' (11)
1.3'' (32)
2.8'' (70)
2.9'' (73)
0.12'' (3)
11.8'' (300)
7.9‘’
(200)
27.1‘’ (689)
Unit inch (mm)
en-US 72
Dimensional Drawings
4P-B55EJ2U
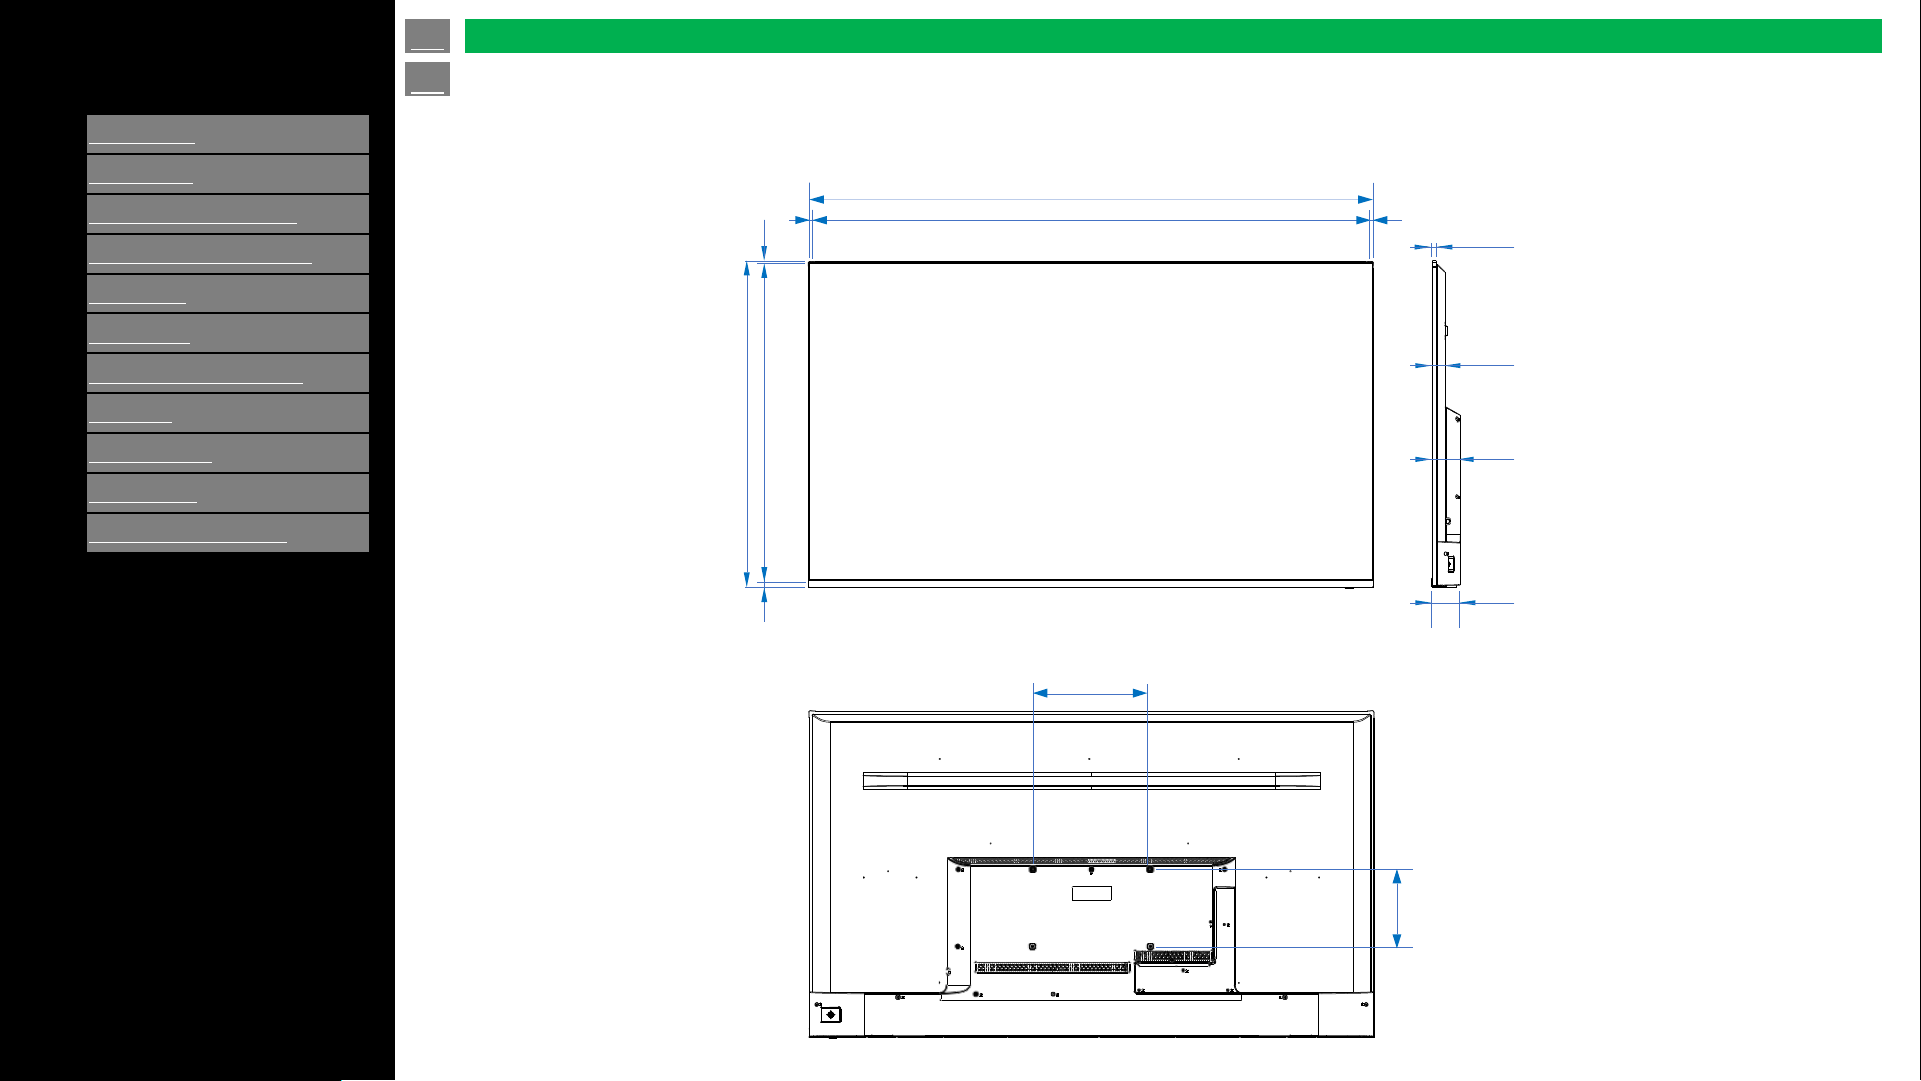
[ENGLISH]
Contents
>>
<<
1.
Part Names
2.
Introduction
3.
Direct Button Operation
4.
On
-Screen Display Menu
5.
Application
6.
Using a PC
7.
Using the touch function
8.
Appendix
9.
Specifications
10.
Trademarks
11.
Dimensional Drawings
Ver. 1.1
56.9‘’ (1,446)
56.7‘’ (1,440)
0.16'' (4)
0.16'' (4)
32.9'' (835)
31.9'' (811)
0.83'' (21)
0.12'' (3)
0.39'' (10)
1.3'' (32)
2.8'' (70)
2.9'' (73)
11.8'' (300)
7.9‘’
(200)
Unit inch (mm)
en-US 73
Dimensional Drawings
4P-B65EJ2U
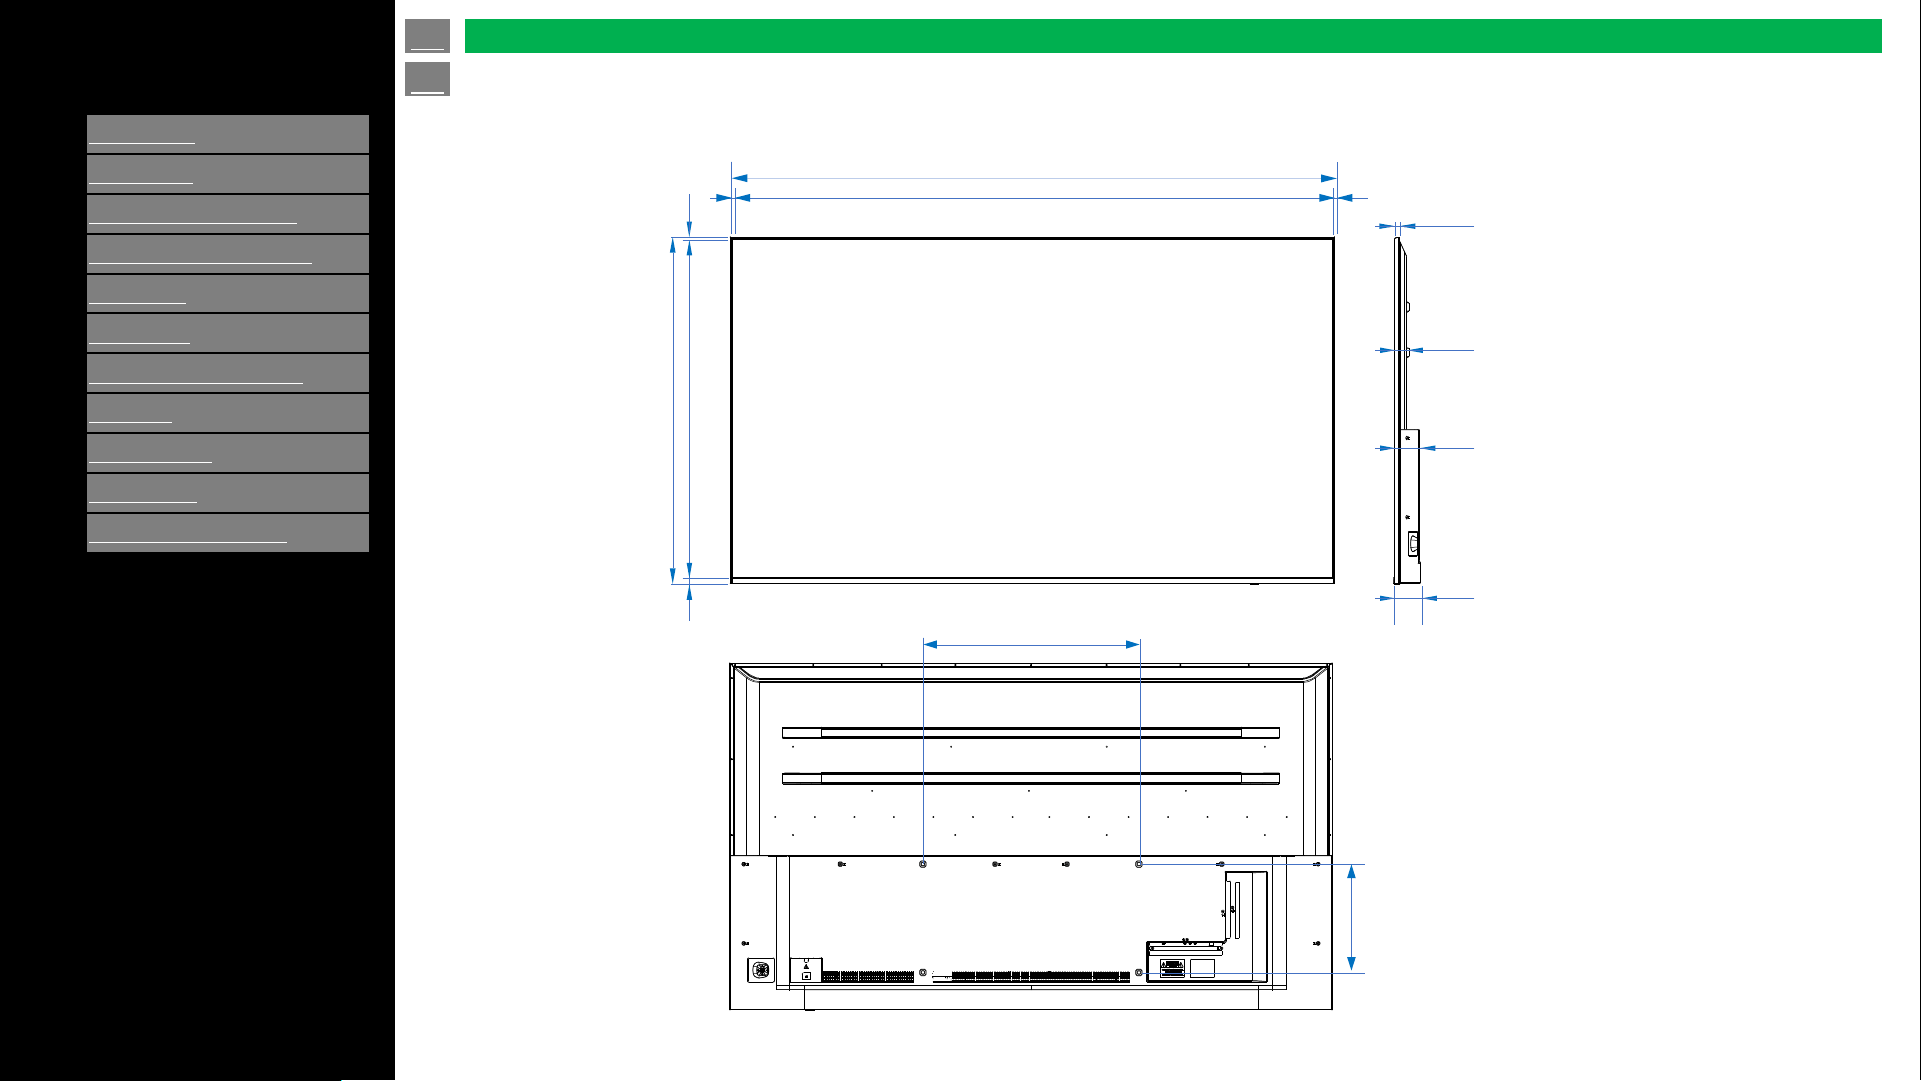
[ENGLISH]
Contents
>>
<<
1.
Part Names
2.
Introduction
3.
Direct Button Operation
4.
On
-Screen Display Menu
5.
Application
6.
Using a PC
7.
Using the touch function
8.
Appendix
9.
Specifications
10.
Trademarks
11.
Dimensional Drawings
Ver. 1.1
65.9‘’ (1,674)
65.4‘’ (1,662)
0.24'' (6)0.24'' (6)
37.8'' (960)
36.9'' (937)
0.67'' (17)
0.24'' (6)
0.51'' (13)
3'' (75)
23.6'' (600)
11.8‘’
(300)
Unit inch (mm)
en-US 74
Dimensional Drawings
4P-B75EJ2U
1.6’’ (41)
2.8’’ (70)
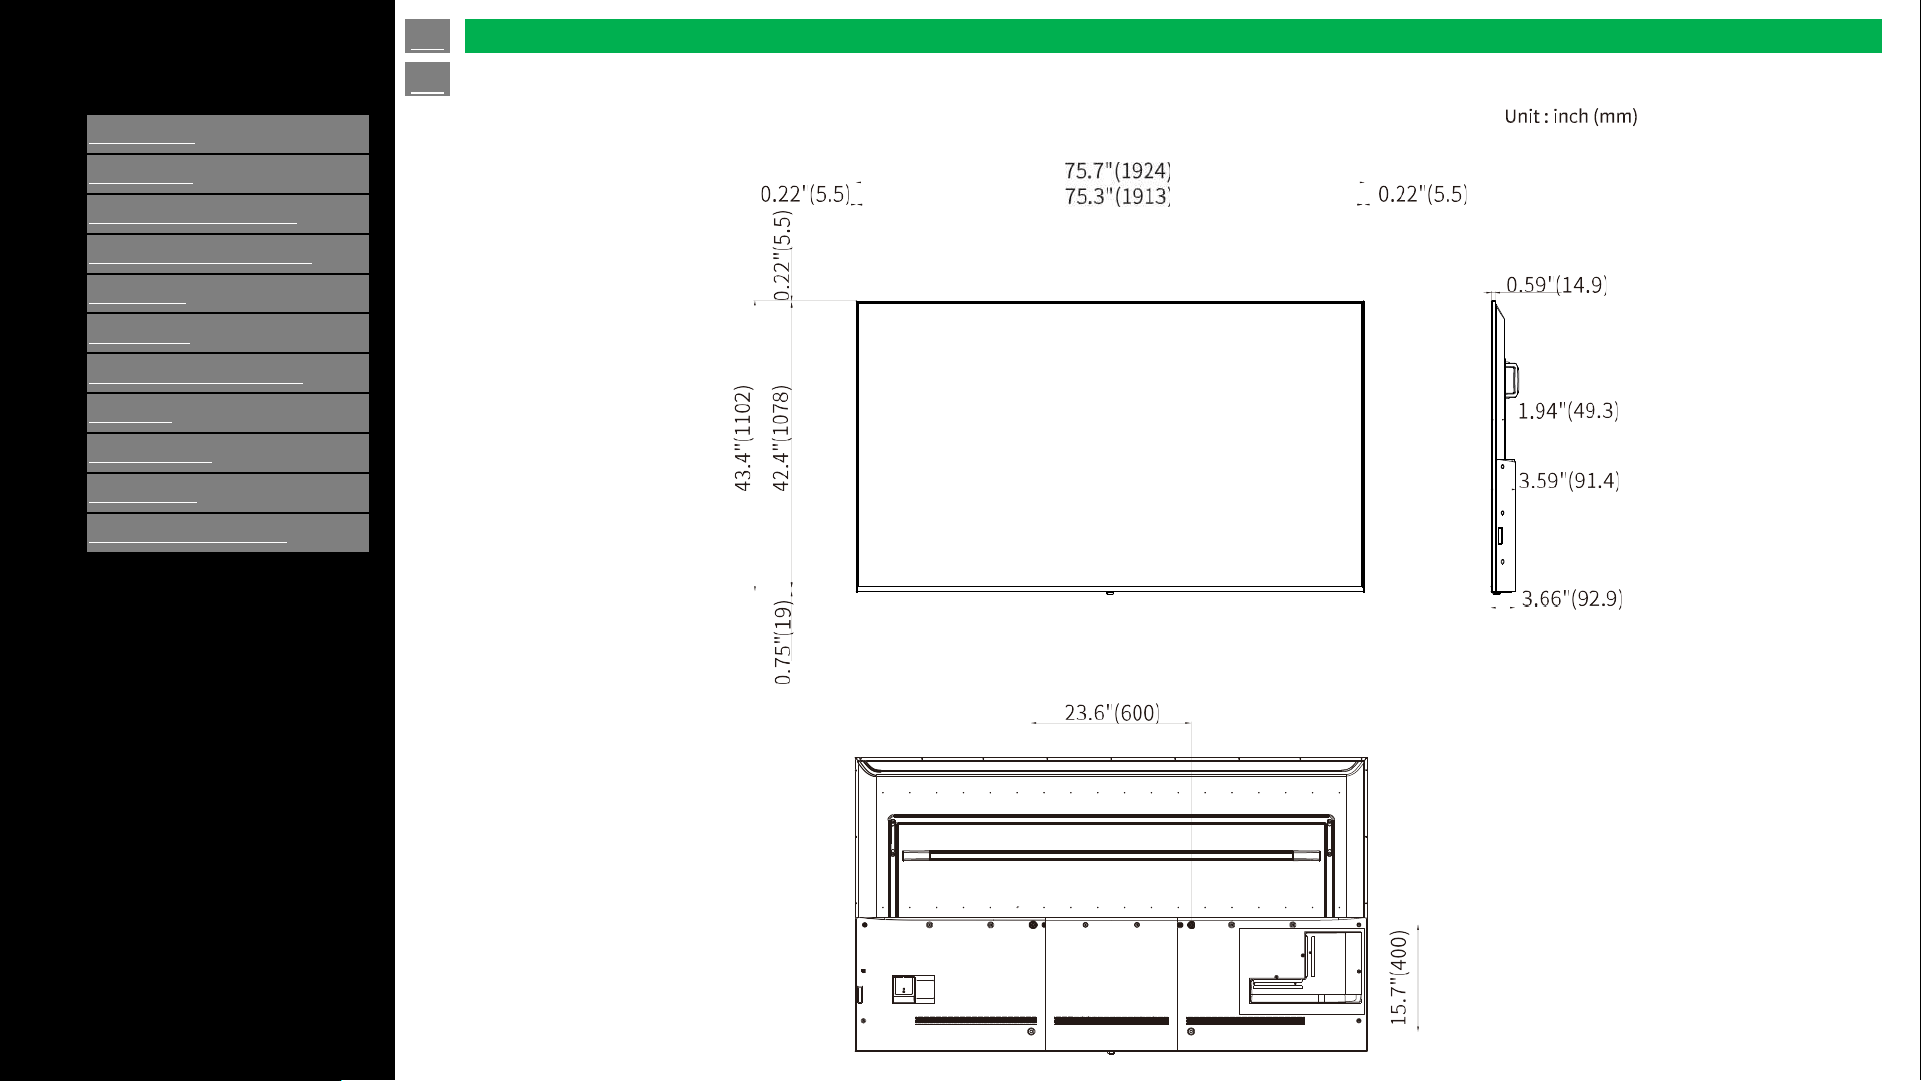

[ENGLISH]
Contents
>>
<<
1.
Part Names
2.
Introduction
3.
Direct Button Operation
4.
On
-Screen Display Menu
5.
Application
6.
Using a PC
7.
Using the touch function
8.
Appendix
9.
Specifications
10.
Trademarks
11.
Dimensional Drawings
Ver. 1.1
Unit inch (mm)
en-US 76
Dimensional Drawings
4W-B55FT5U
49.8"(1,265)
48.5"(1,232)
0.63"(16)
29.5"(749)
28.2"(716)
0.67"(17)
1.1"(28)
1.73"(44)
3.23"(82)
3.31"(84)
7.9"(200)
11.8"(300)
0.63"(16) 0.63"(16)

[ENGLISH]
Contents
>>
<<
1.
Part Names
2.
Introduction
3.
Direct Button Operation
4.
On
-Screen Display Menu
5.
Application
6.
Using a PC
7.
Using the touch function
8.
Appendix
9.
Specifications
10.
Trademarks
11.
Dimensional Drawings
Ver. 1.1
Unit inch (mm)
en-US 77
Dimensional Drawings
4W-B65FT5U
58.43"(1,484)
57.13"(1,451)
34.37"(873)
33.07"(840)
1.1"(28)
1.73"(44)
3.23"(82)
3.31"(84)
11.8"(300)
0.63"(16)
0.67"(17)
0.63"(16) 0.63"(16)
7.9"(200)
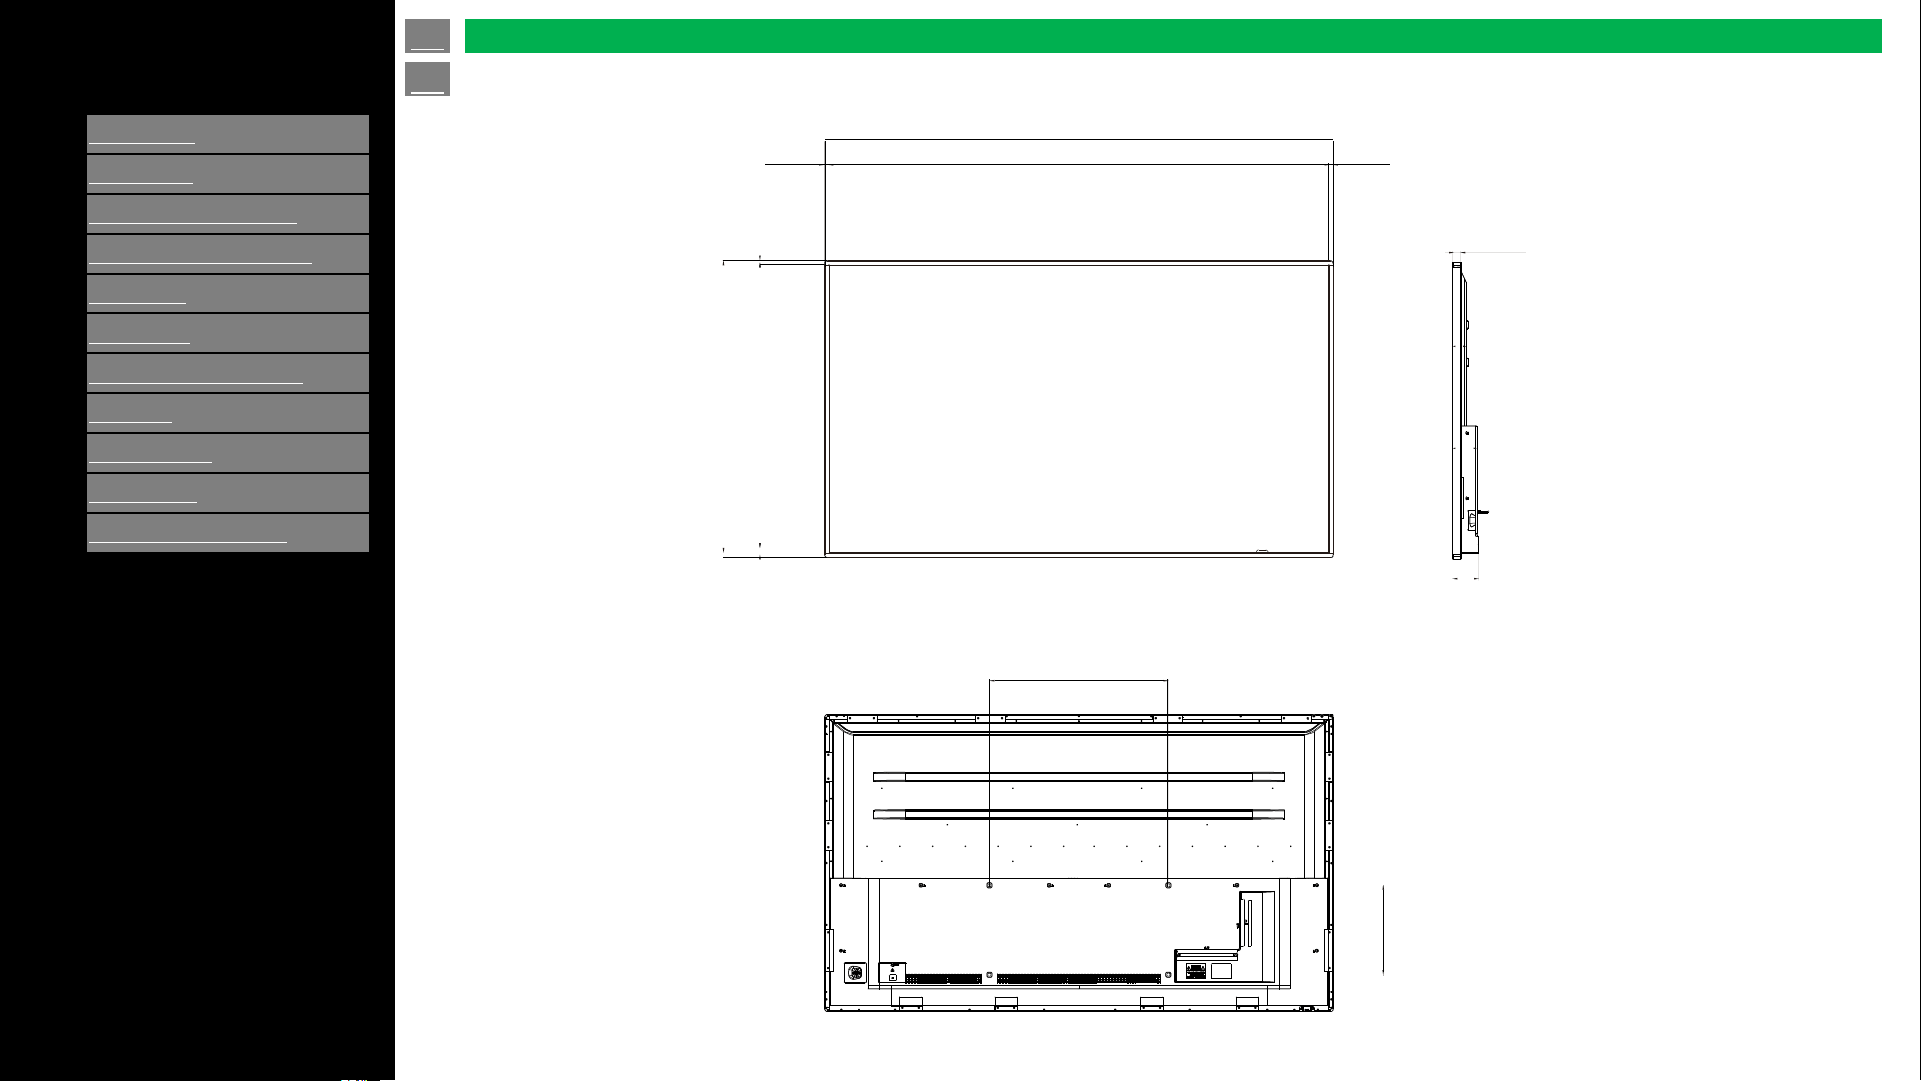
[ENGLISH]
Contents
>>
<<
1.
Part Names
2.
Introduction
3.
Direct Button Operation
4.
On
-Screen Display Menu
5.
Application
6.
Using a PC
7.
Using the touch function
8.
Appendix
9.
Specifications
10.
Trademarks
11.
Dimensional Drawings
Ver. 1.1
Unit inch (mm)
en-US 78
Dimensional Drawings
4W-B75FT5U
67.17"(1706)
65.91"(1674)
0.59"(15)
39.21"(996)
37.91"(963)
0.63"(16)
1.1"(28)
1.85"(47)
3.23"(82)
3.46"(88)
23.6"(600)
11.8"(300)
0.59"(15) 0.59"(15)