Loading ...
Loading ...
Loading ...
additional
safety
11. Note and Follow the Safety Rules that Appear on the
Panel on the Left Side of the Head:
l DANGER: FOR YOUR OWN SAFETY: READ AND
UNDERSTAND OWNERS MANUAL BEFORE
OPERATING THIS MACHINE. WEAR SAFETY
GOGGLES. DO NOT WEAR GLOVES. SECURELY
CLAMP WORK TO TABLE IF IT IS TOO SHORT TO
CONTACT THE COLUMN WHEN IN OPERATING
POSITION.
instructions for drill presses
12. Think Safety. Safety is a combination of operator
common senseand alertness at all times when the drill
pressis being used.
WARNING: DO NOT ALLOW FAMILIARITY
(GAINED FROM FREQUENT USE OF YOUR DRILL
PRESS) TO BECOME COMMONPLACE. ALWAYS
REMEMBER THAT A CARELESS FRACTION OF A
SECOND IS SUFFICIENT TO iNFLiCT SEVERE
INJURY.
unpacking and checking
CONTENTS
Page
General Safety Instructions for Power Tools ......... 2
Additional Safety Instructions for Drill Presses ....... 3
Unpacking and Checking Contents ................. 4
Table of Loose Parts ............................ 4
Motor Specifications and Electrical Requirements ..... 5
Assembly .................................... 6
Installing the Chuck .......................... 6
Installing Feed Handles ........................ 7
Installing the Depth Stop ...................... 8
Installing Motor Pulley ........................ 9
Mounting the Motor ......................... 10
Installing and Tensioning Belt .................. 12
Getting to Know Your Drill Press ................. 12
Belt Tension Rod ........................... 12
Drilling Speed .............................. 12
On-Off Switch ............................. 13
Removing the Chuck ........................ 14
Drilling to Depth ........................... 15
Basic Drill Press Operation ...................... 15
Installing Drills ............................. 16
Positioning Table and Workpiece ............... 16
Feeding ................................... 17
Adjustments ................................. 17
Depth Scale ............................... 17
Quill Return Spring ......................... 17
Table and Head Lock Handles ................. 17
Quill Bearing ............................... 17
Pinion Backlash ............................ 18
Automatic Feed Return ...................... 18
Maintenance ................................. 18
Lubrication .................................. 18
Recommended Accessories ...................... 19
Trouble Shooting ............................. 19
Repair Parts ................................. 20
UNPACKING AND CHECKING CONTENTS
Your Craftsman Drill Press is shipped complete in one
carton, lessmotor.
Separate all parts from packing materials and check each
one with the "Table of Loose Parts" to make certain all
items are accounted for, before discarding any packing
material.
If any parts are missing, do not attempt to assemble the
drill press, plug in the power cord or turn the switch on
until the missing parts are obtained and installed correctly.
Remove the protective oil that is applied to the table and
column. Use any ordinary household type grease and spot
remover.
CAUTION: Never use gasoline, naptha or similar highly
volatile solvents.
Apply a coat of automobile wax to the table.
Wipe all parts thoroughly with a clean dry cloth.
contents
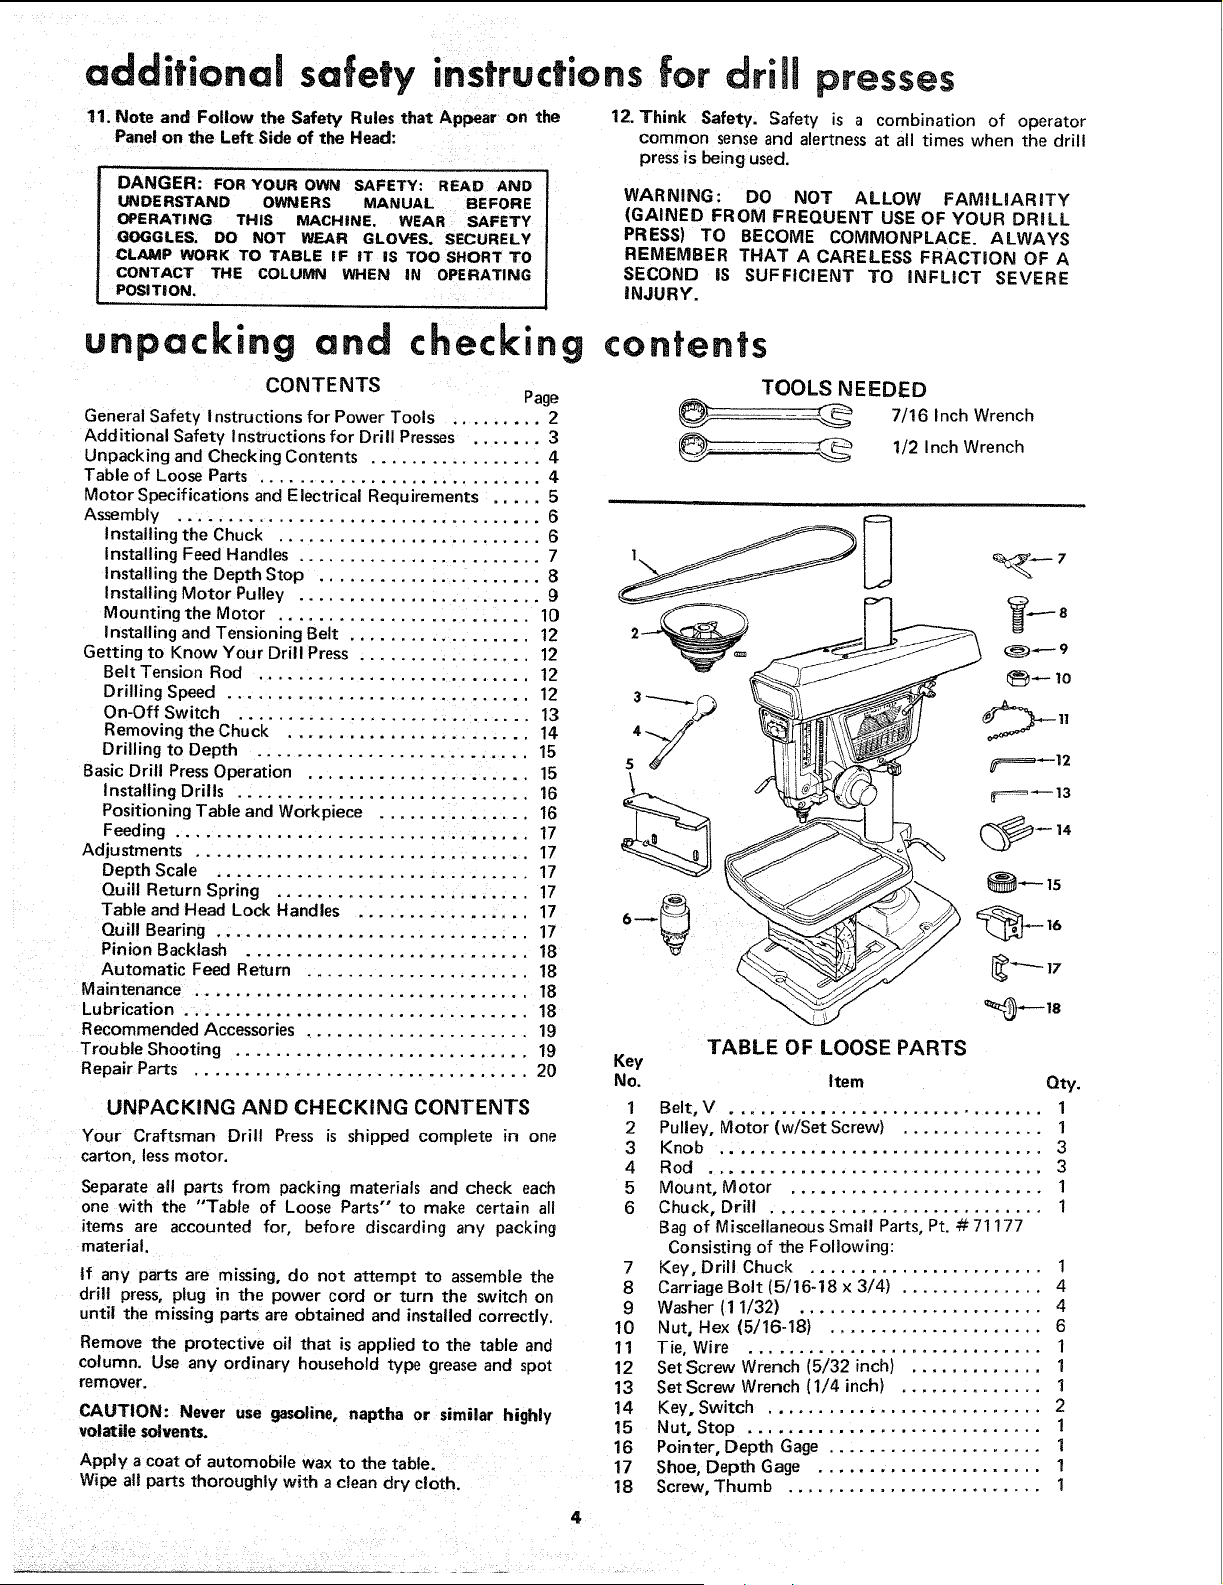
TOOLS NEEDED
_ 7/16 Inch Wrench
_; .... -_ 1/2 Inch Wrench
TABLE OF LOOSE PARTS
Key
No. Item Qty.
1 Belt, V ............................... 1
2 Pulley, Motor (w!Set Screw) .............. 1
3 Knob ................................ 3
4 Rod ................................. 3
5 Mount, Motor ......................... 1
6 Chuck, Drill ........................... 1
Bag of Miscellaneous Small Parts, Pt. # 71177
Consisting of the Following:
7 Key, Drill Chuck ....................... 1
8 Carriage Bolt (5/16-18 x 3/4) .............. 4
9 Washer (11/32) ........................ 4
10 Nut, Hex (5/16-18) ..................... 6
11 Tie, Wire ............................. 1
12 SetScrew Wrench (5/32 inch) ............. 1
13 SetScrew Wrench (1/4 inch) .............. 1
14 Key, Switch ........................... 2
15 Nut, Stop ............................. 1
16 Pointer, Depth Gage ..................... 1
17 Shoe, Depth Gage ...................... 1
18 Screw, Thumb ......................... 1
4
Loading ...
Loading ...
Loading ...