Use and Care Manual
Hood
HCB50651UC, HCB56651UC

2
Table of Contents
Use and care manual
Safety Definitions .......................................................... 2
IMPORTANT SAFETY INSTRUCTIONS ........................ 3
General notes ........................................................................ 3
Fire Safety .............................................................................. 3
Burn Prevention .................................................................... 4
Child Safety ........................................................................... 4
Cleaning Safety ..................................................................... 4
Safe use ................................................................................. 5
Proper Installation and Maintenance ................................ 5
State of California Proposition 65 Warnings ................... 5
Causes for damages ..................................................... 6
Protecting the environment .......................................... 6
Operating modes ........................................................... 6
Exhaust air mode ................................................................. 6
Circulating-air mode ............................................................. 6
Operating the appliance ................................................ 7
Lighting ................................................................................... 7
Saturation notification .......................................................... 7
Timer ....................................................................................... 7
Fan back flow ........................................................................ 7
Audible signal ....................................................................... 8
Overheating protection ....................................................... 8
Cleaning and maintenance ........................................... 8
Troubleshooting .......................................................... 10
Customer service ........................................................ 10
Accessories ................................................................. 10
STATEMENT OF LIMITED PRODUCT WARRANTY ... 11
What this Warranty Covers & Who it Applies to ......... 11
How Long the Warranty Lasts ........................................ 11
Repair/Replace as Your Exclusive Remedy ................ 11
Out of Warranty Product .................................................. 11
Warranty Exclusions ......................................................... 12
Produktinfo.
Additional information on products, accessories,
replacement parts and services can be found at
www.bosch-home.com and in the online shop.
Safety Definitions
9 WARNING
This indicates that death or serious injuries may
occur as a result of non-observance of this warning.
9 CAUTION
This indicates that minor or moderate injuries may
occur as a result of non-observance of this warning.
NOTICE: This indicates that damage to the appliance or
property may occur as a result of non-compliance with
this advisory.
Note: This alerts you to important information and/or
tips.
Obtaining Warranty Service ............................................ 12
Product information .......................................................... 12

3
9 IMPORTANT SAFETY INSTRUCTIONS
READ AND SAVE THESE INSTRUCTIONS
IMPORTANT SAFETY INS READ AND SAVE THESE INSTRUCTIONS
WARNING
When properly cared for, your new appliance has been
designed to be safe and reliable. Read all instructions
carefully before use. These precautions will reduce the
risk of burns, electric shock, fire, and injury to persons.
When using kitchen appliances, basic safety precautions
must be followed, including those in the following pages.
General notes
Examine the appliance after unpacking it. In the event of
transport damage, do not plug it in.
WARNING
TO REDUCE THE RISK OF FIRE, ELECTRIC SHOCK, OR
INJURY TO PERSONS, OBSERVE THE FOLLOWING:
▯ Use this unit only in the manner intended by the
manufacturer. If you have questions, contact the
manufacturer.
▯ Before servicing or cleaning unit, switch power off at
service panel and lock the service disconnecting
means to prevent power from being switched on
accidentally.
When the service disconnecting means cannot be
locked, securely fasten a prominent warning device,
such as a tag, to the service panel.
WARNING
WARNING – TO REDUCE THE RISK OF FIRE, ELECTRIC
SHOCK, OR INJURY TO PERSONS, OBSERVE THE
FOLLOWING
▯ Installation work and electrical wiring must be done by
qualified person(s) in accordance with all applicable
codes and standards, including fire-rated construction.
▯ Sufficient air is needed for proper combustion and
exhausting of gases through the flue (chimney) of fuel
burning equipment to prevent back drafting. Follow the
heating equipment manufacturer’s guideline and safety
standards such as those published by the National Fire
Protection Association (NFPA), and the American
Society for Heating, Refrigeration and Air Conditioning
Engineers (ASHRAE), and the local code authorities.
▯ When cutting or drilling into wall or ceiling, do not
damage electrical wiring and other hidden utilities.
▯ Ducted fans must always be vented to the outdoors.
This appliance is not intended for operation with an
external clock timer or a remote control.
Have an appropriate fire extinguisher available, nearby,
highly visible and easily accessible near the appliance.
Fire Safety
WARNING
To reduce risk of fire and to properly exhaust air, be sure
to duct air outside. Do not vent exhaust air into spaces
within walls, ceilings, attics, crawl spaces or garages.
WARNING
To reduce the risk of fire, use only metal ductwork.
Always have a working smoke detector near the kitchen.
WARNING
TO REDUCE THE RISK OF A RANGE TOP GREASE
FIRE:
a.
Never leave surface units unattended at high settings.
Boilovers cause smoking and greasy spillovers that
may ignite. Heat oils slowly on low or medium settings.
b.
Always turn hood ON when cooking at high heat.
c.
Clean ventilating fans frequently. Grease should not be
allowed to accumulate on fan or filter.
d.
Use proper pan size. Always use cookware
appropriate for the size of the surface element.
Do not flambé under the extractor hood or work with a
naked flame. When switched on, the extractor hood
draws flames into the filter. There is a risk of fire due to
deposits on the grease filter!
CAUTION
For general ventilating use only. Do not use to exhaust
hazardous or explosive materials and vapors.
In the event that personal clothing or hair catches fire,
drop and roll immediately to extinguish flames.
Smother flames from food fires other than grease fires
with baking soda. Never use water on cooking fires.
WARNING
TO REDUCE THE RISK OF INJURY TO PERSONS IN
THE EVENT OF A RANGE TOP GREASE FIRE,
OBSERVE THE FOLLOWING:
▯ SMOTHER FLAMES with a close-fitting lid, cookie
sheet, or metal tray, then turn off the burner. BE
CAREFUL TO PREVENT BURNS. If the flames do not
go out immediately, EVACUATE AND CALL THE FIRE
DEPARTMENT.
▯ NEVER PICK UP A FLAMING PAN – You may be
burned.
▯ DO NOT USE WATER, including wet dishcloths or
towels – a violent steam explosion will result.

9 IMPORTANT SAFETY INSTRUCTIONS
READ AND SAVE THESE INSTRUCTIONS
4
▯ Use an extinguisher ONLY if:
- You know you have a Class ABC extinguisher, and
you already know how to operate it.
- The fire is small and contained in the area where it
started.
- The fire department is being called
- You can fight the fire with your back to an exit.
Whenever possible, do not operate the ventilation system
during a cooktop fire. However, do not reach through fire
to turn it off.
WARNING
RISK OF FIRE
When gas burners are in operation without any cookware
placed on them, they can build up a lot of heat. A
ventilation appliance installed above the cooker may
become damaged or catch fire. Only operate the gas
burners with cookware on them.
WARNING
RISK OF FIRE
During simultaneous use of multiple gas cooktops, a
great deal of heat is created. A ventilation device located
above it can become damaged or catch fire. Never use
two gas cooktops together at maximum heat for longer
than 15 minutes. One large burner with over 17,000 Btu/
hr (5 kW) (wok) is equal to the wattage of two gas
burners.
WARNING
RISK OF FIRE
Hot oil and fat catch fire fast. Never leave hot oil and fat
unsupervised. Never extinguish a fire with water. Switch
off the cooking position. Suffocate flames carefully with a
lid, a fire blanket or similar.
WARNING
RISK OF FIRE
Grease deposits in the grease filter can ignite.
Clean the grease filter at least every two months.
Never operate the appliance without the grease filter.
WARNING
RISK OF FIRE
Grease deposits in the grease filter can catch fire. Never
work with a naked flame near the appliance (e.g.
flambéing). Install the unit near a heat-producing
appliance for solid fuels (e.g. wood or coal) only if there
is a closed, non-detachable cover. There must be no
flying sparks.
Burn Prevention
WARNING
RISK OF BURNS
The accessible parts get hot during operation. Never
touch hot parts. Keep children away.
Child Safety
When children become old enough to use the appliance,
it is the responsibility of the parents or legal guardians to
ensure that they are instructed in safe practices by
qualified persons.
Remove all tape and packaging before using the
appliance. Destroy the packaging after unpacking the
appliance. Never allow children to play with packaging
material.
Do not allow anyone to climb, stand, lean, sit, or hang on
any part of an appliance, especially a door, warming
drawer, or storage drawer. This can damage the
appliance, and the unit may tip over, potentially causing
severe injury.
Do not allow children to use this appliance unless closely
supervised by an adult. Children and pets should not be
left alone or unattended in the area where the appliance
is in use. They should never be allowed to play in its
vicinity, whether or not the appliance is in use.
CAUTION
Items of interest to children should not be stored in an
appliance, in cabinets above an appliance or on the
backsplash. Children climbing on an appliance to reach
items could be seriously injured.
Cleaning Safety
WARNING
Be sure the entire appliance (including the grease filters
and light bulbs, if applicable) has cooled and grease has
solified before attempting to clean any part of the
appliance.
Do not use steam cleaners to clean the appliance.

5
9 IMPORTANT SAFETY INSTRUCTIONS
READ AND SAVE THESE INSTRUCTIONS
Safe use
WARNING
Do not repair, replace or remove any part of the
appliance unless specifically recommended in the
manuals. Improper installation, service or maintenance
can cause injury or property damage. Refer to this
manual for guidance. All other servicing should be done
by a qualified technician.
WARNING
RISK OF INJURY
Items placed on the appliance may fall down. Do not
place any objects on the appliance.
Proper Installation and Maintenance
Have the installer show you the location of the circuit
breaker or fuse. Mark it for easy reference.
This appliance must be properly installed and grounded
by a qualified technician. Connect only to properly
grounded outlet. Refer to Installation Instructions for
details.
This appliance is intended for normal family household
use only. It is not approved for outdoor use. See the
Warranty. If you have any questions, contact the
manufacturer.
Do not store or use corrosive chemicals, vapors,
flammables or nonfood products in or near this
appliance. It is specifically designed for use when
heating or cooking food. The use of corrosive chemicals
in heating or cleaning will damage the appliance and
could result in injury.
Do not operate this appliance if it is not working properly,
or if it has been damaged. Contact an authorized
servicer.
Do not repair or replace any part of the appliance unless
specifically recommended in this manual. Refer all
servicing to a factory authorized service center.
CAUTION
Grease left on filters can remelt and move into the vent.
CAUTION
Turn power off at breaker before removing a damaged
bulb. Do not touch the bulbs immediately after use. The
bulbs will remain hot for several minutes.
WARNING
Make sure the appliance and lights are cool and power
to the appliance has been turned off before replacing the
light bulb(s). Failure to do so could result in electrical
shock or burns.The lenses (if equipped) must be in place
when using the appliance.The lenses (if equipped) serve
to protect the light bulb from breaking.The lenses (if
equipped) are made of glass. Handle carefully to avoid
breaking. Broken glass can cause an injury.
Hidden surfaces may have sharp edges. Use caution
when reaching behind or under appliance.
WARNING
When the hood is operated in exhaust-air mode
simultaneously with a different burner which also makes
use of the same chimney (such as gas, oil or coal-fired
heaters, continuous-flow heaters, hot-water boilers) care
must be taken to ensure that there is an adequate supply
of fresh air which will be needed by the burner for
combustion.
Safe operation is possible provided that the under
pressure in the room where the burner is installed does
not exceed 4 Pa (0.04 mbar).
This can be achieved if combustion air can flow through
non-lockable openings, e.g. in doors, windows and via
the air-intake/exhaust-air wall box or by other technical
measures, such as reciprocal interlocking, etc.
WARNING
Avoid carbon monoxide poisoning – Provide adequate
air intake so combustion gases are not drawn back into
the room.
An air-intake/exhaust-air wall box by itself is no
guarantee that the limiting value will not be exceeded.
Note: When assessing the overall requirement, the
combined ventilation system for the entire household
must be taken into consideration. This rule does not
apply to the use of cooking appliances, such as
cooktops and ovens.
Proposition 65 Warnings
This product may contain a chemical known to the
State of California, which can cause cancer or
reproductive harm. Therefore, the packaging of your
product may bear the following label as required by
California:
STATE OF CALIFORNIA PROPOSITION 65 WARNING:
WARNING
Cancer and reproductive harm - www.P65Warnings.ca.gov.
6
Causes for damages
9 CAUTION
Risk of damage due to corrosion. Always turn
appliance on when cooking to avoid condensation
buildup. Condensation can lead to corrosion
damages.
Always replace defective bulbs immediately to avoid an
overload of the remaining bulbs.
Risk of damage due to ingress of humidity into the
electronic circuitry. Never clean operator controls with a
wet cloth.
Surface damage due to incorrect cleaning. Clean
stainless steel surfaces in the grind direction only. Do not
use any stainless steel cleaners for operator controls.
Surface damage due to strong or abrasive cleaning
agents. Never use strong and abrasive cleaning agents.
Risk of damage from condensation back flow. Install
exhaust vent at a slight downward slope away from the
appliance (1° slope).
Protecting the environment
Unpack the appliance and dispose of the packaging in
line with environmental requirements.
Operating modes
You can use this appliance in the air extraction or the
recirculation mode.
Exhaust air mode
Note: Ventilation may not exit through an already
operational smoke or exhaust chimney, nor a duct used
for ventilating furnace installation areas.
▯ If the ventilation is intended to pass through a smoke
or exhaust that is not in operation, the responsible
area heating inspector must give approval.
▯ If the ventilation passes through an external wall, use a
telescope wall sleeve.
Circulating-air mode
Note: To bind odors in circulating-air mode, you must
install an activated carbon filter. The different options for
operating the appliance in circulating-air mode can be
found in the brochure. Alternatively, ask your dealer. The
required accessories are available from specialist
retailers, from customer service or from the Online Shop.
The accessory numbers can be found at the end of the
instructions for use.
The air that is drawn in is cleaned by
the grease filters and conveyed to the
exterior by a pipe system.
The air that is drawn in is cleaned by the
grease filters and an activated carbon filter
and conveyed back into the kitchen.
7
Operating the appliance
These instructions apply to several appliance models. It
is possible that individual features are described that do
not apply to your appliance.
Note: Turn the extractor hood on when you start cooking
and switch it off again a few minutes after you have
finished cooking. This is the most effective way to
eliminate cooking vapor.
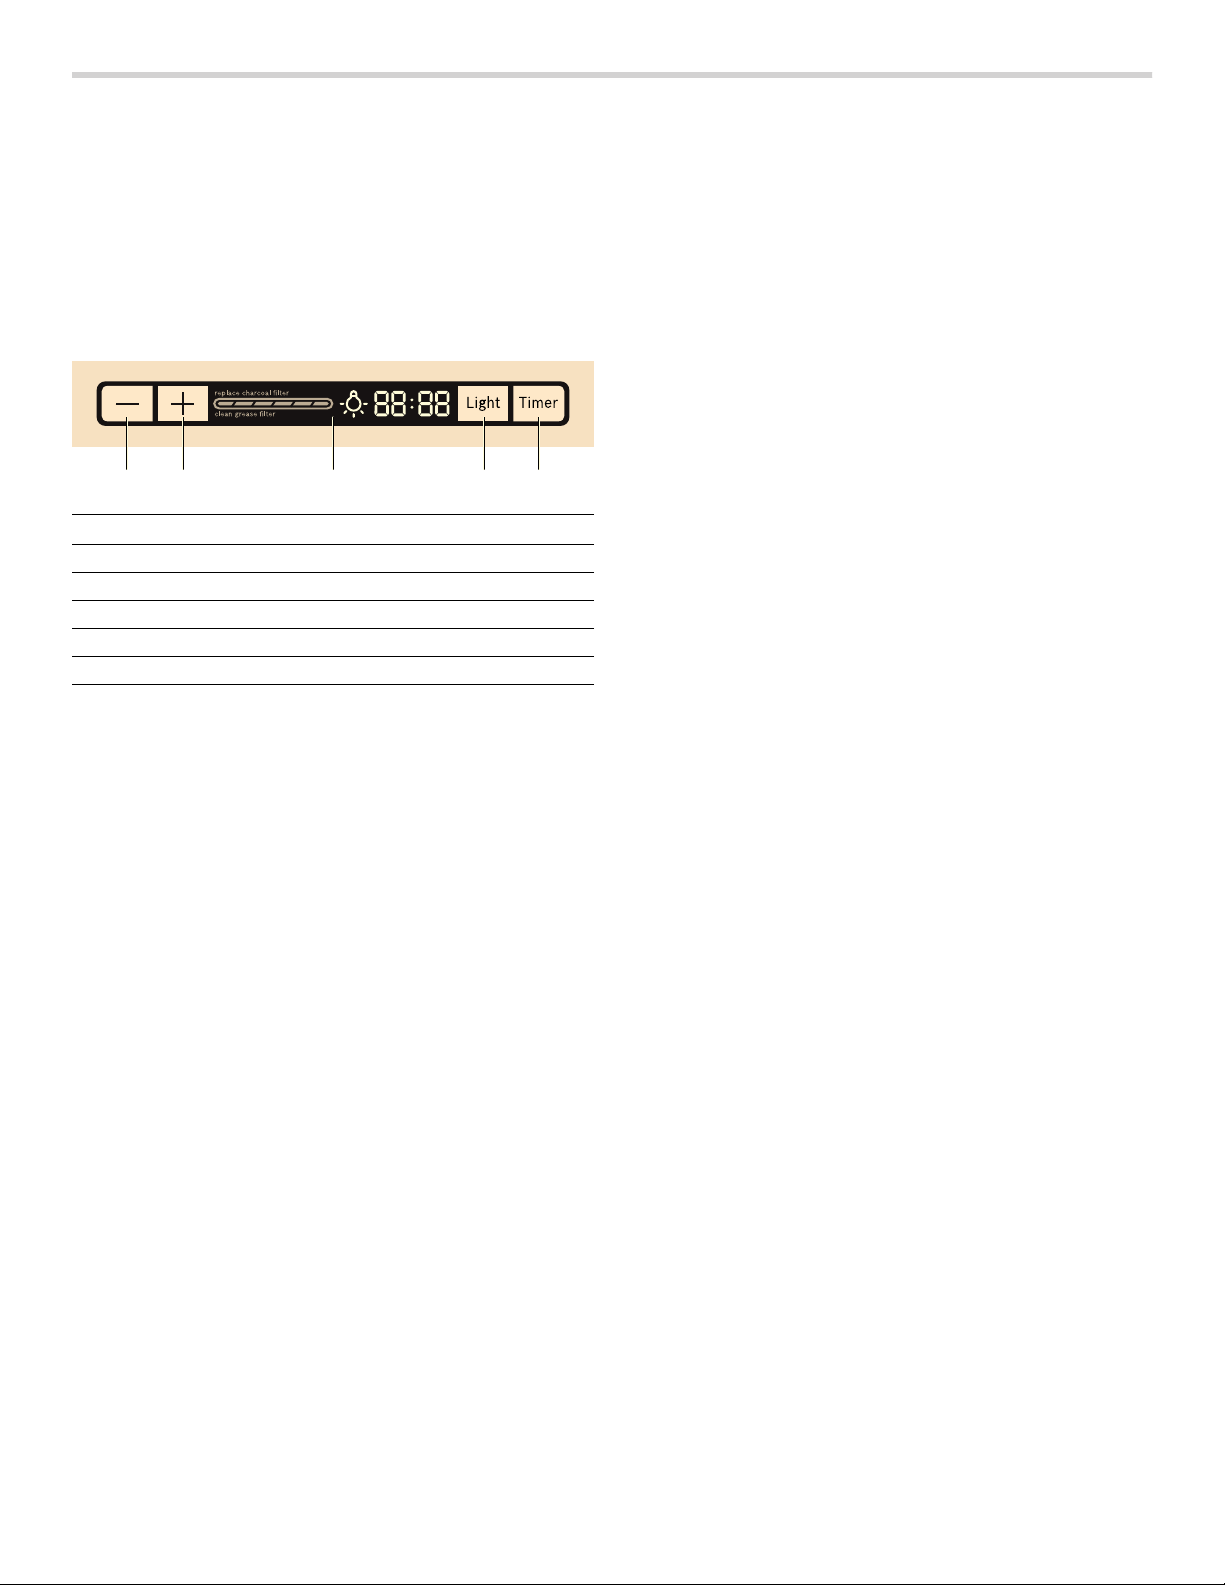
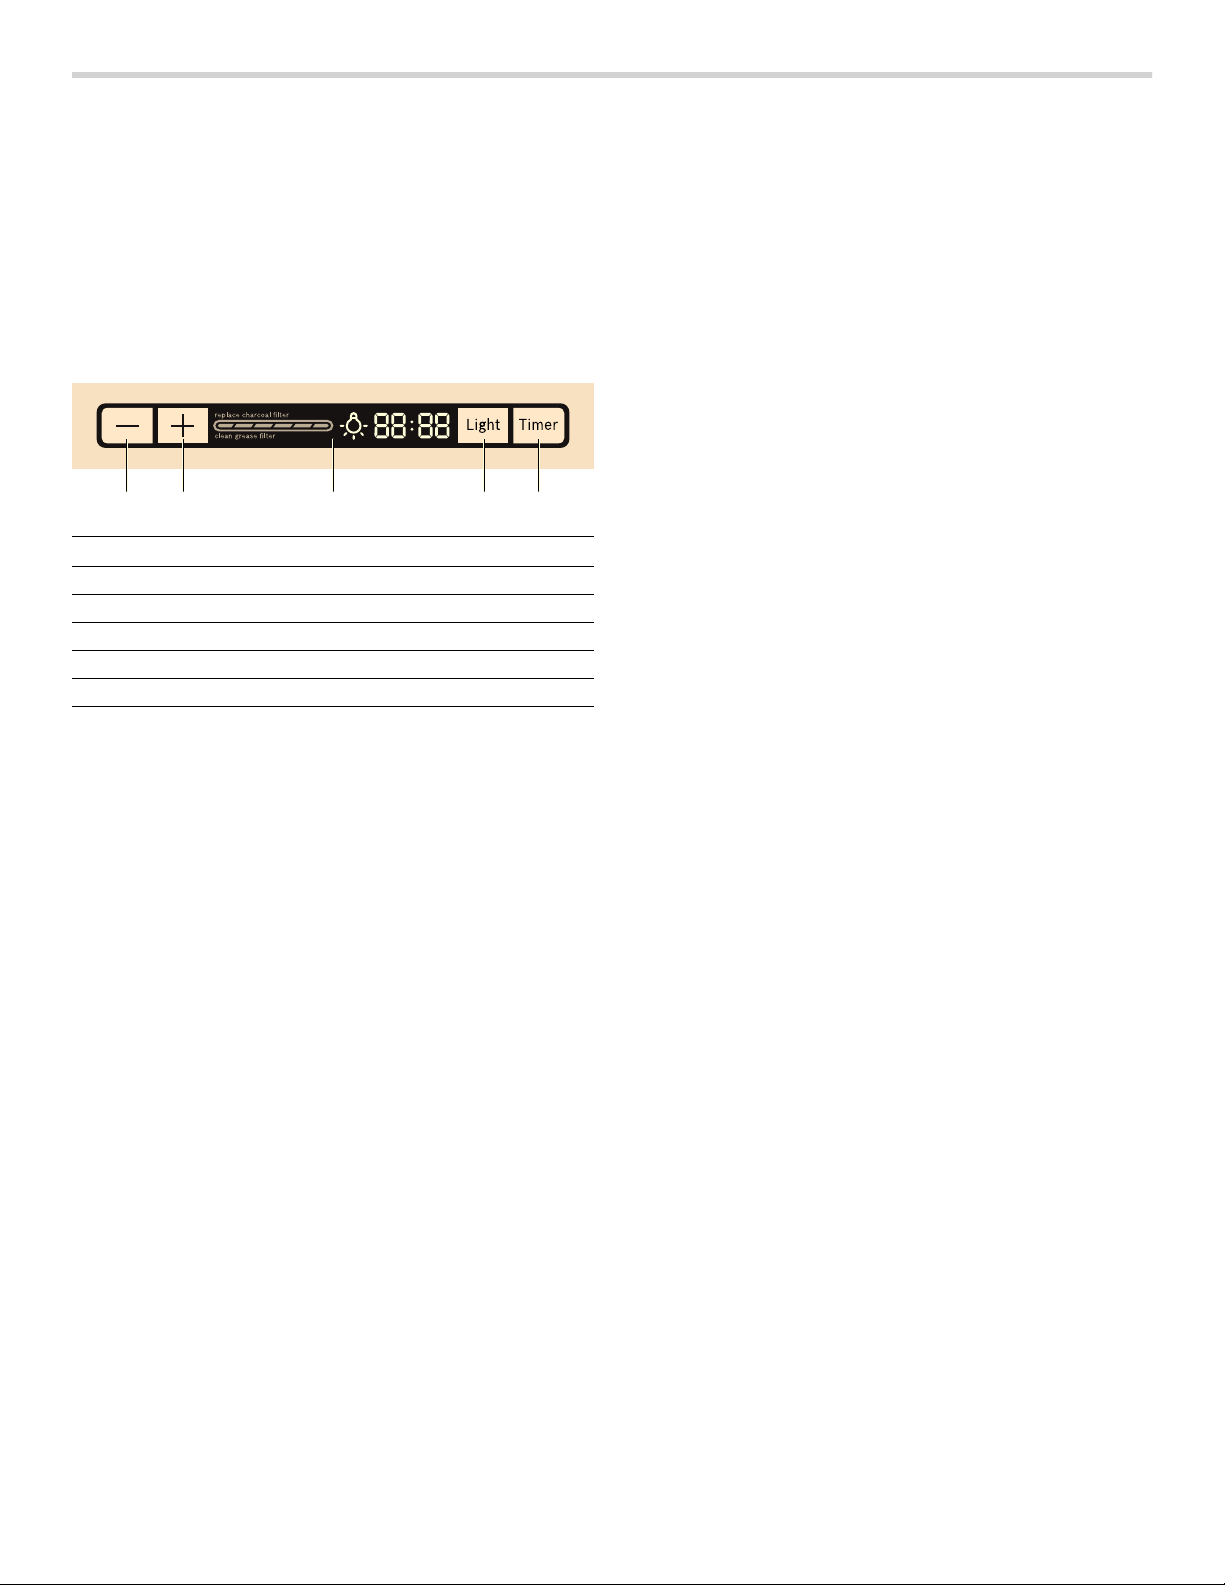
Control panel
Turn on the fan
Note: Always adjust the fan strength to meet current
conditions. If there is a large build-up of steam or fumes,
select a high fan setting.
Switching on
▯ Press "+" button.
The current ventilator settings are indicated by a bar
on the display panel.
▯ Press "+" or "-" keys to change the ventilator settings.
Switching off
Press the "-" button repeatedly until the ventilator
switches off.
Lighting
The lighting can be switched on and off independently of
the ventilation.
1.
Press the "Light" button.
The lighting switches on.
2.
Press the "Light" button again.
The brightness increases.
3.
Press the "Light" button a third time.
The lighting switches off.
Saturation notification
The saturation of the metal grease filter (after 30 hours of
ventilation operation) or of the activated carbon filter
(after 120 hours of ventilation operation) is indicated on
the display panel:
▯ Metal grease filter: “clean grease filter” appears on
the display panel.
▯ Activated carbon filter: “replace charcoal filter”
appears on the display panel.
If you have not yet done so, the metal mesh grease filters
should be cleaned or the activated carbon filter changed
now.
For instructions on how to clean the metal grease filters,
please refer to the Cleaning and maintenance section.
Resetting the saturation displays
▯ Metal grease filter: Press and hold the "+" button for 5
seconds.
▯ Activated carbon filter: Press and hold the "-" button
for 5 seconds.
Switching over the display for circulating-air mode
For circulating-air mode, the electronic control display
must be switched over accordingly:
▯ The extractor hood must be connected and switched
off.
▯ Press the "+" and "-" keys simultaneously until "Able"
lights up briefly on the display panel.
▯ Repeatedly press the button combination to switch the
electronic control display back to exhaust air mode.
"None" appears on the display panel.
Timer
The timer has no influence on the functions of the
exhaust hood. The duration of the timer can be set to
between 1 minute and 60 minutes. The default setting is
10 minutes.
1.
Press the “Timer” button.
10 flashes on the display panel.
2.
Set the required duration with the "+" and "-" buttons.
After 5 seconds, the time that has been set is adopted.
An audible signal sounds once the time has elapsed
and "End" appears on the display panel for 3 seconds.
Note: To switch off the timer earlier, press any button.
Fan back flow
The run-on time is ten minutes and cannot be changed.
1.
Select ventilator setting.
2.
Press "Timer" button for 3 seconds.
Once this time has elapsed, the ventilation and lighting
switch off automatically. The display shows the message
"End."
The ventilator run-on can be interrupted at any time by
pressing one of the buttons.
Explanation
1 Turn the fan down
2 Turn the fan up
3 Display panel
4 Switch on lighting
5 Timer

8
Audible signal
Switching on audible signal
▯ Press and hold the "Light" button for 5 seconds.
▯ An audible signal sounds and "Snd" appears on the
display panel for 3 seconds.
Switching off audible signal
▯ Press and hold the "Light" button for 5 seconds.
▯ "Snd" appears on the display panel for 3 seconds.
Overheating protection
The appliance is equipped with overheating protection. If
high temperatures are measured on the appliance, the
appliance switches automatically to the highest ventilator
setting until the temperature drops again.
▯ If the hood is switched on, the highest ventilator setting
is set. If the temperature drops again, the appliance
switches back to the previously-selected ventilator
setting.
▯ If the hood is switched off, the appliance switches
automatically to the highest ventilator setting. If the
temperature drops again, the appliance switches off
automatically.
▯ While the overheating protection is active, "Auto"
appears on the display panel. The ventilator setting
cannot be reduced in this time.
Cleaning and maintenance
9 WARNING
WARNING
To avoid risk of fire and explosion do not use
flammable liquids or solvents. Always unplug or
disconnect the appliance from the power supply
before servicing.
Do not use steam cleaners to clean the appliance.
Hidden surfaces may have sharp edges. Use caution
when reaching behind or under appliance.
9 WARNING
RISK OF BURNS
The appliance will become hot when in use,
especially in the area surrounding the bulbs. Let
cool before cleaning.
9 WARNING
RISK OF ELECTRIC SHOCK
Penetrating damp can cause electric shock. Only
clean appliance with a damp cloth. Prior to cleaning,
pull the plug or flip the breaker in the fusebox.
Cleaning agents
To prevent various surfaces from becoming damaged
due to incorrect cleaning agents, follow the specifications
given in the table. Do not use
▯ cleaning agents that are harsh or scouring,
▯ cleaning agents with high alcohol content,
▯ hard scouring pads or sponges,
▯ high-pressure cleaners or steam cleaners.
Thoroughly rinse all new sponges before use.
Observe all instructions and warnings accompanying
cleaning agents.
Area Cleaning agents
Stainless steel Warm soapy water:
Clean with a dish rag and dry with
a soft towel.
Only clean stainless steel with the
grain.
Specific products for stainless
steel care are available from cus-
tomer service or from specialized
retailers. Apply a thin layer of the
care product with a soft cloth.
Varnished sur-
faces
Warm soapy water:
Clean with a damp dish rag and
dry with a soft towel.
Do not use stainless steel
cleaner.
Aluminum and
plastic
Glass cleaner:
Clean with a soft cloth.
Glass Glass cleaner:
Clean with a soft cloth. Do not use
a glass scraper.
Controls Warm soapy water:
Clean with a damp dish rag and
dry with a soft towel.
Risk of damage to electronics
due to permeating damp. Never
clean controls with a wet cloth.
Do not use stainless steel
cleaner.
9
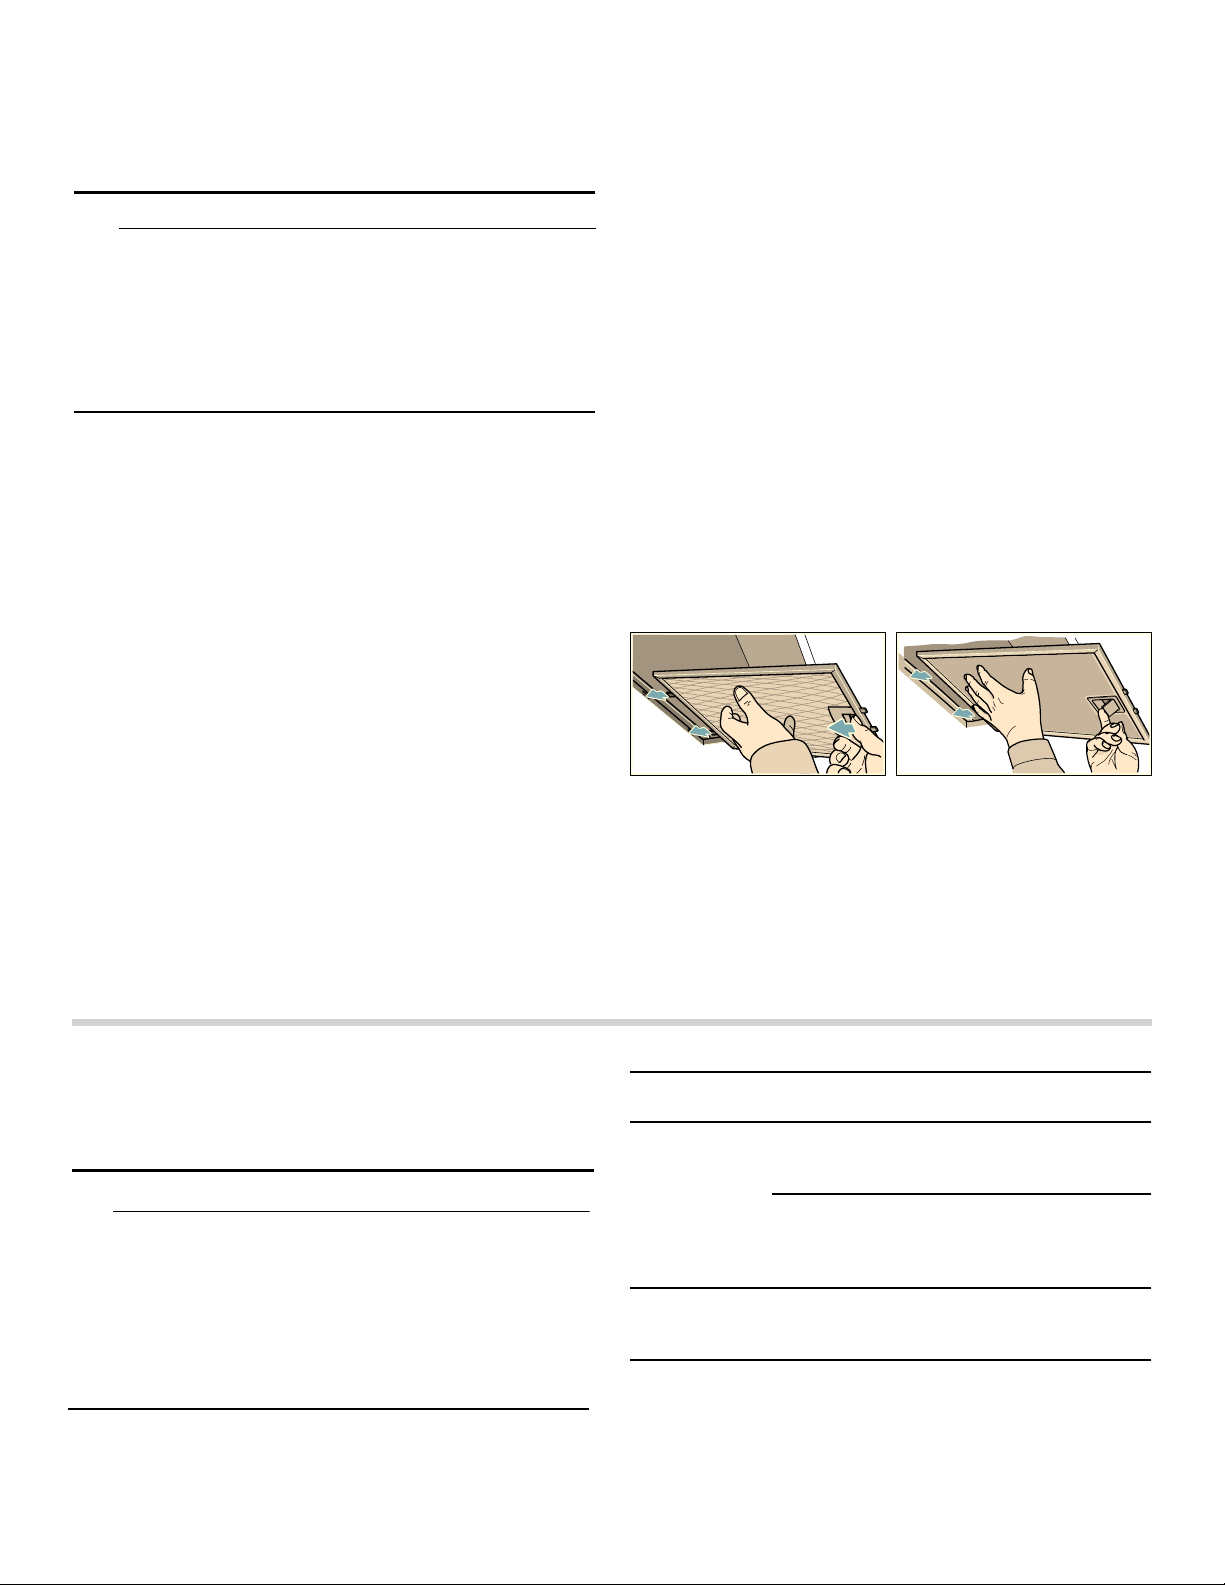
Cleaning the metal grease filter
These instructions apply to several appliance models. It
is possible that individual features are described that do
not apply to your appliance.
9 WARNING
RISK OF FIRE
Grease deposits in the grease filter can ignite.
Clean the grease filter at least every two months.
Never operate the appliance without the grease
filter.
Notes
▯ Do not use any aggressive, acidic or alkaline cleaning
agents.
▯ When cleaning the metal grease filters, also clean the
metal grease filter holder in the appliance with a moist
cloth.
▯ You can clean the metal grease filters in a dishwasher
or by hand.
By hand:
Note: You can use a special grease solvent if soiling is
stubborn. You can order it via the online shop.
▯ Soak the metal grease filters in hot soapy solution.
▯ Use a brush for cleaning and then rinse the filters well.
▯ Allow the metal grease filters to drip dry.
In the dishwasher:
Note: Slight discoloration is possible when cleaning the
grease filters in the dishwasher. This does not affect the
metal grease filter's functioning.
▯ Do not clean extremely dirty metal grease filters with
dishes.
▯ Loosely position the metal grease filter in the
dishwasher. The metal grease filters must not be
jammed in.
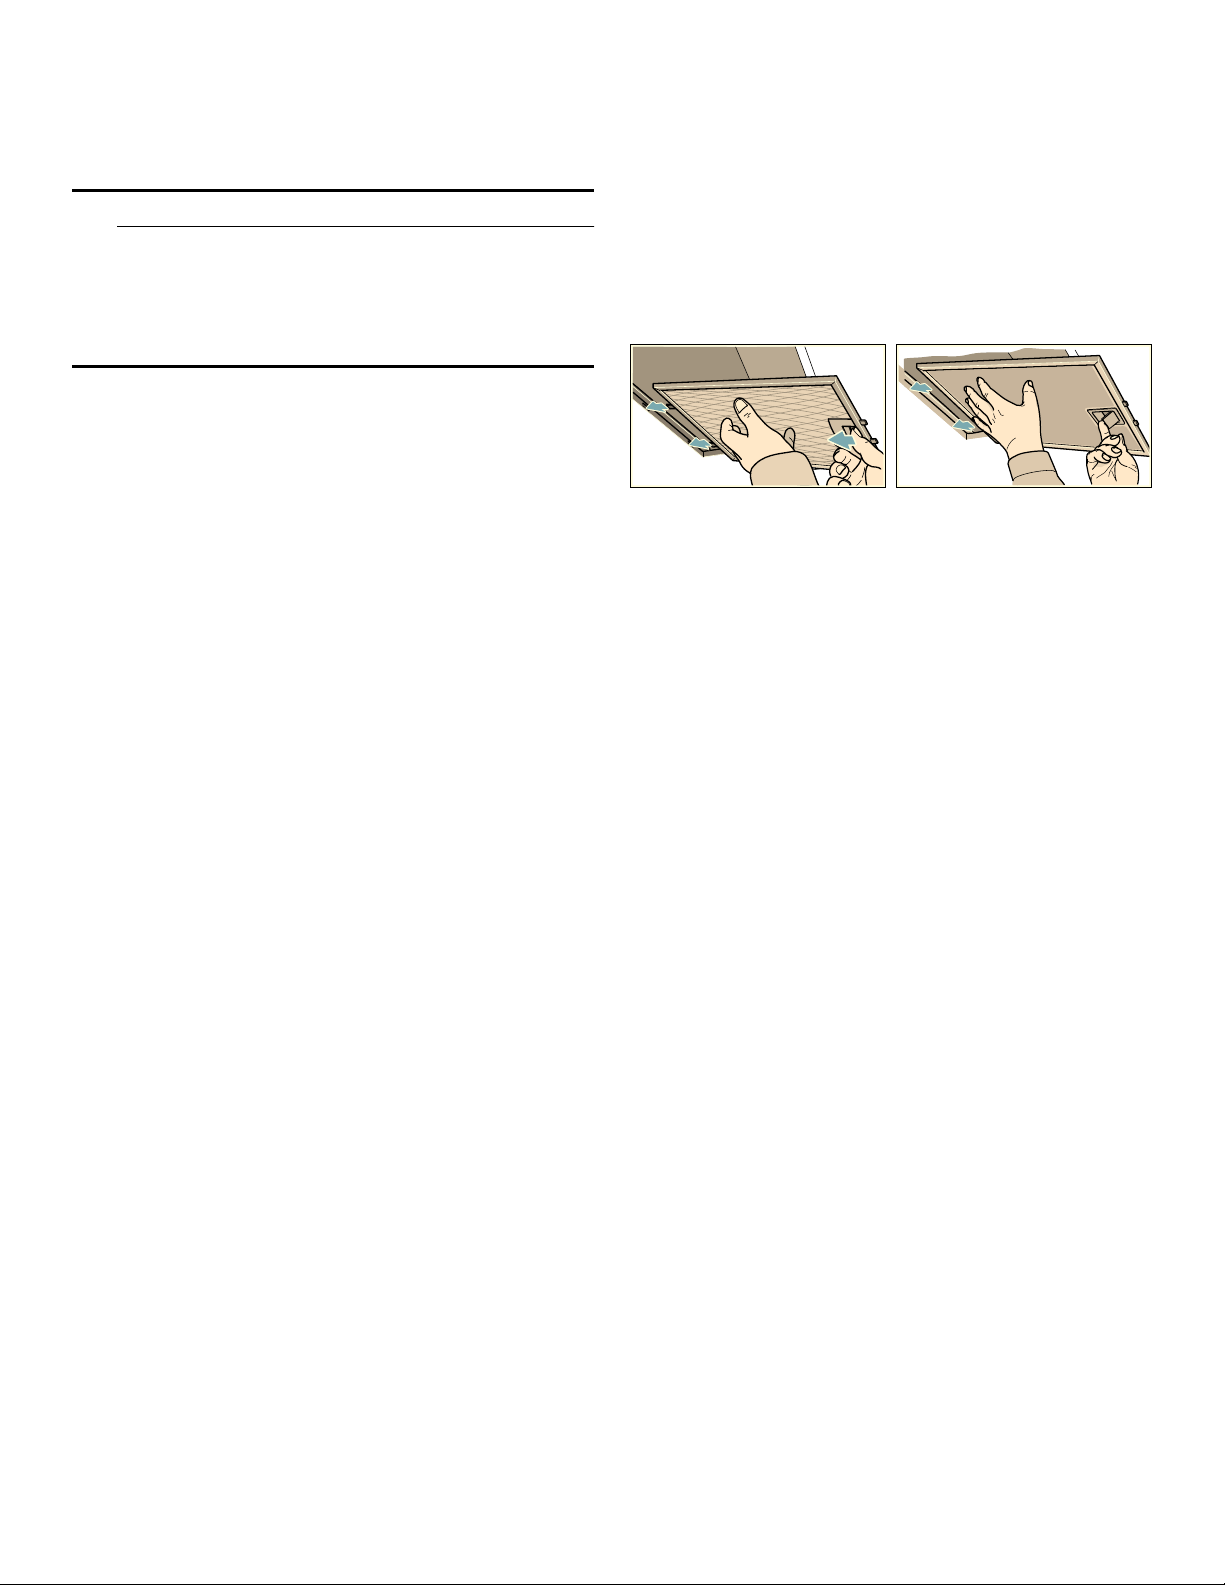
Uninstalling metal grease filter
1.
Open the latch and fold down the metal grease filter.
Simultaneously use your other hand to grasp under
the metal grease filter.
2.
Remove the metal grease filter from its mounting.
Notes
▯ Grease can gather in the bottom of the metal
grease filter.
▯ Hold metal grease filter horizontally to prevent
grease from dripping.
3.
Clean metal grease filter.
Installing metal grease filter
1.
Insert metal grease filter.
Simultaneously use your other hand to grasp under
the metal grease filter.
2.
Flip metal grease filter up and snap the latch into
place.
10
Troubleshooting
You can often easily eliminate problems that may occur
on your own. Before calling customer service, take into
account the following information.
9 WARNING
RISK OF ELECTRIC SHOCK
Improper repairs are dangerous. Only an after-sales
technician trained by us may perform repairs and
may replace damaged connecting leads. Remove
the mains plug or deactivate the fuse in the fuse box
if the appliance is defective. Call after-sales service.
--------
Changing bulbs
9 WARNING
RISK OF ELECTRIC SHOCK
When changing the bulbs, the bulb socket contacts
are live. Before replacing the bulb, unplug the
appliance or switch off the circuit breaker in the fuse
box.
Important! Use only bulbs of the same type and the
same power (see also lamp socket or rating plate).
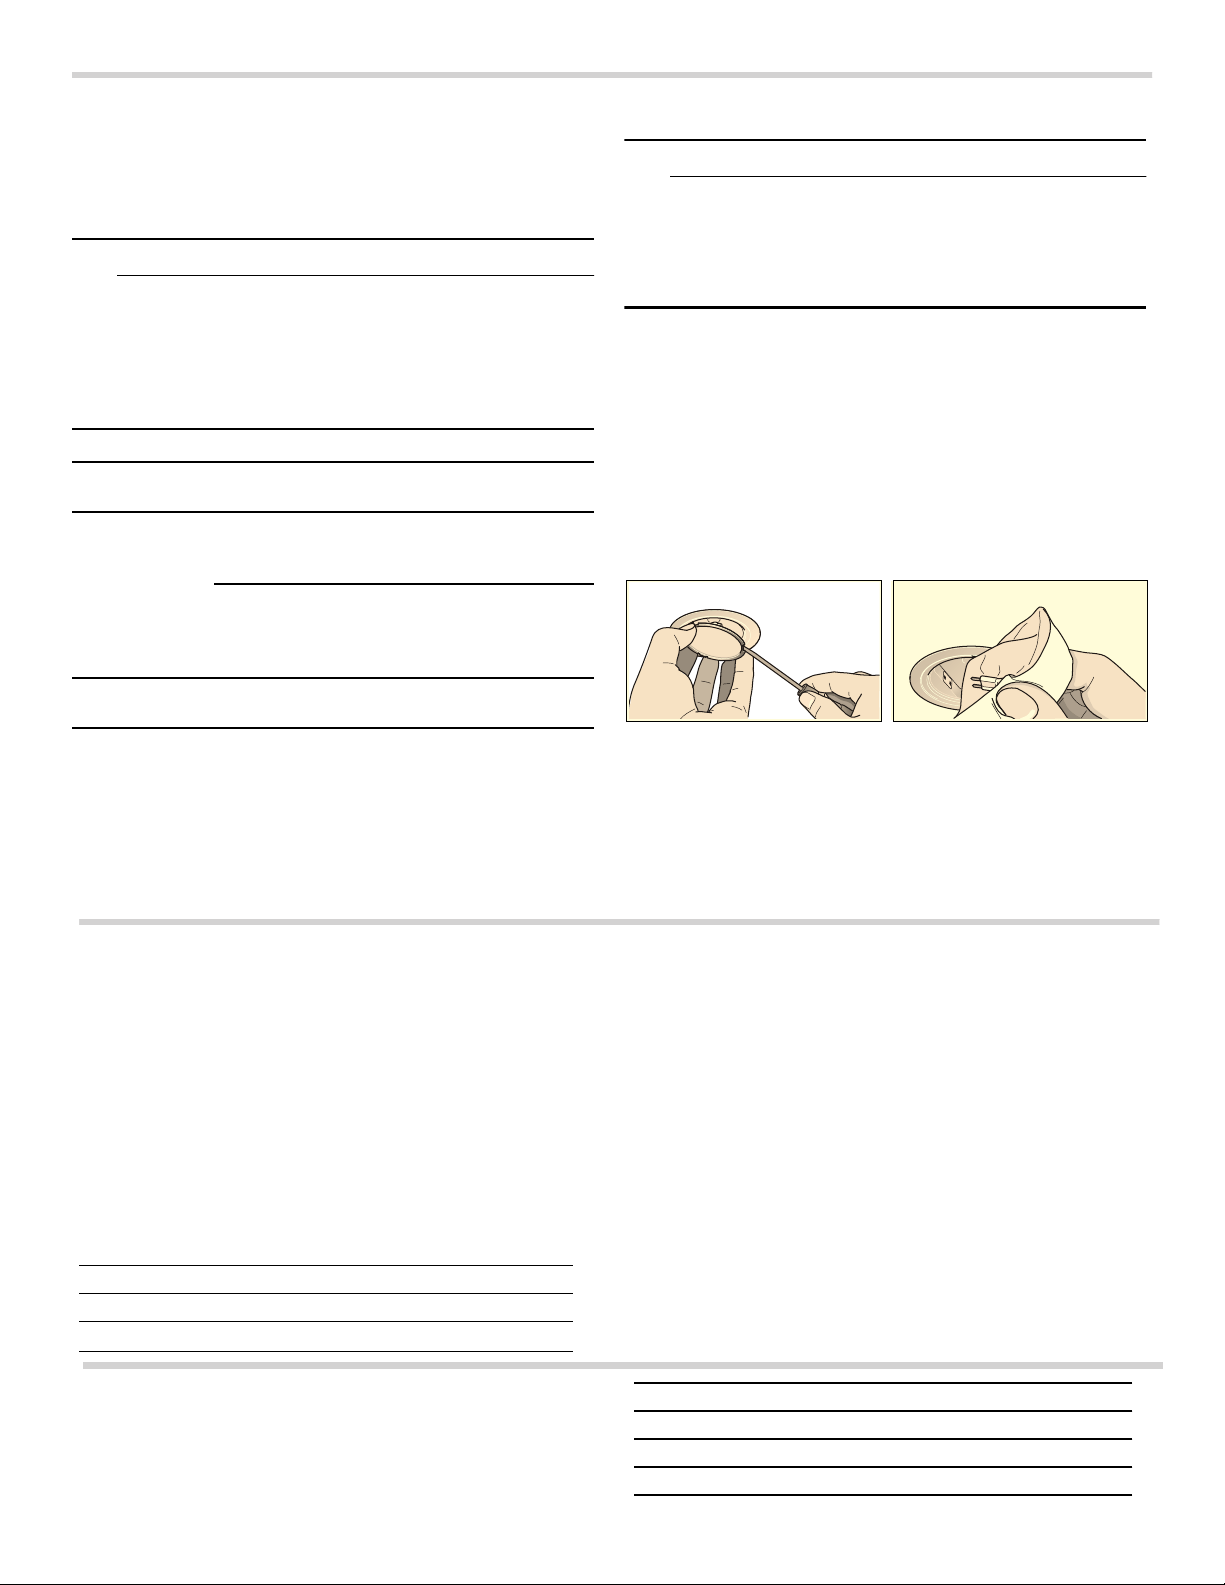
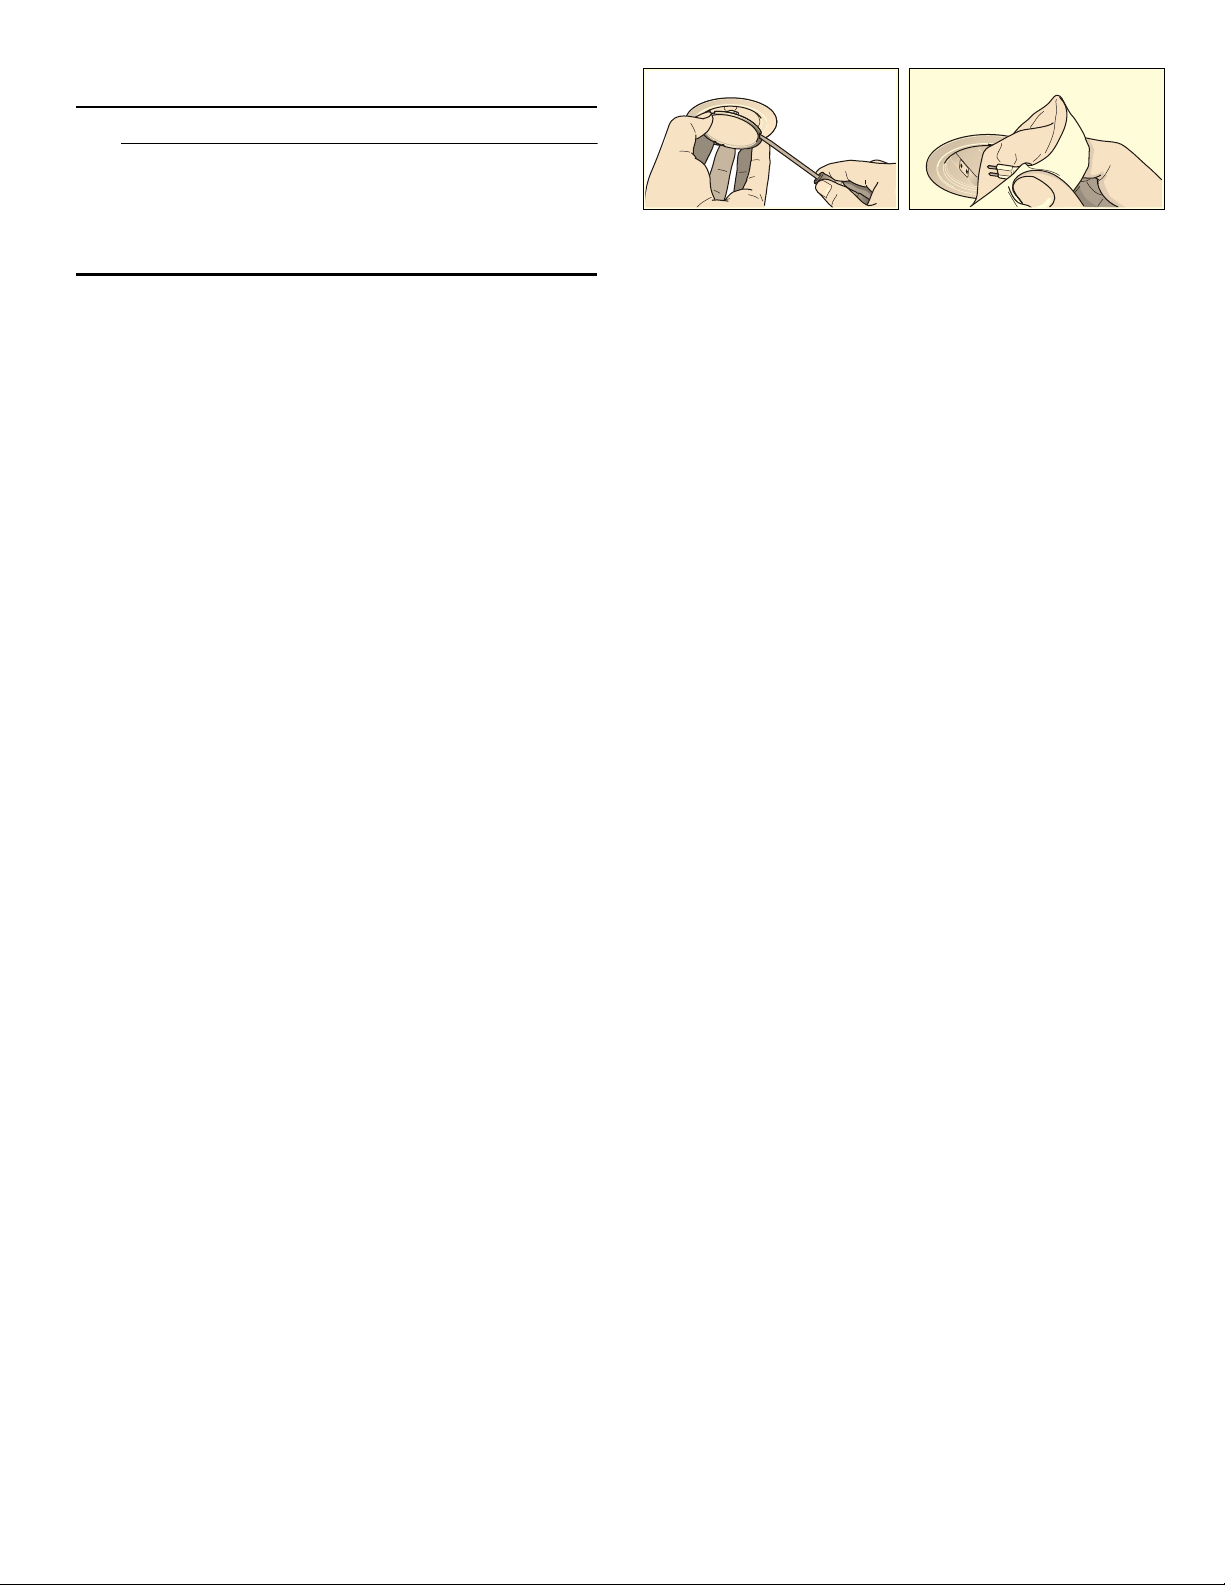
Replacing halogen bulbs
Note: When inserting halogen bulbs, do not touch the
glass bulb. Use a clean cloth to insert the halogen bulbs.
1.
Let the lamps cool down.
2.
Carefully remove bulb ring using a suitable tool.
3.
Pull out the bulb and replace with a bulb of the same
type.
4.
Insert lamp cover.
5.
Insert appliance plug or switch on fuse again.
Replace the bulb with one of the same type:
Voltage (V): 120 V
40 w max. power:
G9 socket:
Customer service
Our customer service department is there for you if your
appliance requires repair. We'll always find a suitable
solution, also to avoid unnecessary technician visits.
When calling, please give the Product Number (P-No.)
and the Serial Number (S-No.) so that we can offer you
the most competent service. The identification plate
listing the numbers can be found inside of the appliance
(remove metal grease filter to find it).
So that you don't have to search for them when you need
them, you can enter your appliance information and the
customer service number here.
Please note that a visit from a customer service
technician in the event of incorrect operation is not free
of charge, even during the warranty period.
Please find the contact data of all countries in the
enclosed customer service list.
To book an engineer visit and product advice
You can rely on the manufacturer’s expertise. Rest
assured that the repair will be handled by trained service
technicians who have the original replacement parts for
your appliance.
Disrup
tion Possible
cause
Solution
Appliance is
not working
Power outage Check whether other
kitchen appliances are
working
Fuse defec-
tive
Check in the fuse box
whether the fuse for the
appliance is in working
order
Lighting not
working.
Bulbs defec-
tive.
Replace bulbs, see
chapter "Replace Bulbs."
P-No. S-No.
Customer serviceO
US 800 944 2904
toll-free
Accessories
(not included in the delivery)
Accessories Material number
Recirculation module HCREC5UC
Charcoal filter HCIFILTUC
Flue duct HCBEXT5UC

11
STATEMENT OF LIMITED PRODUCT WARRANTY
What this Warranty Covers & Who it
Applies to
The limited warranty provided by BSH Home Appliances
(“Bosch”) in this Statement of Limited Product Warranty
applies only to the Bosch appliance sold to you
(“Product”), provided that the Product was purchased:
• For your normal, household (non-commercial) use,
and has in fact at all times only been used for normal
household purposes.
• New at retail from a BSH authorized dealer or directly
from BSH (not a display, "as is", or previously returned
model), and not for resale, or commercial use.
• Within the United States or Canada, and has at all
times remained within the country of original
purchase.
The warranties stated herein apply to the original
purchaser of the product warranted herein and to each
succeeding owner of the product purchased for ordinary
home use during the term of the warranty.
Please make sure to register your Product; while not
necessary to effectuate warranty coverage, it is the best
way for Bosch to notify you in the unlikely event of a safety
notice or product recall.
How Long the Warranty Lasts
Bosch warrants that the Product is free from defects in
materials and workmanship for a period of three hundred
and sixty-five (365) days from the date of the original
delivery. The foregoing timeline begins to run upon the
date of the original delivery, and shall not be stalled,
tolled, extended, or suspended, for any reason
whatsoever. This Product is also warranted to be free from
cosmetic defects in material and workmanship (such as
scratches of stainless steel, paint/porcelain blemishes,
chips, dents, or other damage to the finish) of the Product,
for a period of thirty (30) days from the date of delivery or
closing date for new construction. This cosmetic warranty
excludes slight color variations due to inherent differences
in painted and porcelain parts, as well as differences
caused by kitchen lighting, product location, or other
similar factors. This cosmetic warranty specifically excludes
any display, floor, “As Is”, or “B” stock appliances.
Repair/Replace as Your Exclusive
Remedy
During this warranty period, Bosch or one of its authorized
service providers will repair your Product without charge
to you (subject to certain limitations stated herein) if your
Product proves to have been manufactured with a defect
in materials or workmanship. If reasonable attempts to
repair the Product have been made without success, then
Bosch will replace your Product (upgraded models may be
available to you, in Bosch’s sole discretion, for an
additional charge). Nothing in this warranty requires
damaged or defective parts to be replaced with parts of a
different type or design than the original part. All removed
parts and components shall become the property of Bosch
at its sole option. All replaced and/or repaired parts shall
assume the identity of the original part for purposes of
this warranty and this warranty shall not be extended with
respect to such parts. Bosch’s sole liability and
responsibility hereunder is to repair manufacturer-
defective Product only, using a Bosch authorized service
provider during normal business hours. For safety and
property damage concerns, Bosch highly recommends
that you do not attempt to repair the Product yourself, or
use a non-authorized service provider; Bosch will have no
responsibility or liability for damage resulting from repairs
or work performed by a non-authorized service provider.
Authorized service providers are those persons or
companies that have been specially trained on Bosch
products, and who possess, in Bosch’s opinion, a superior
reputation for customer service and technical ability (note
that they are independent entities and are not agents,
partners, affiliates or representatives of Bosch).
Nevertheless, taking your product to be serviced by
a repair shop that is not affiliated with or an authorized
dealer of Bosch will not void this warranty. Also, using
third-party parts will not void this warranty.
Notwithstanding the foregoing, Bosch will not incur any
liability, or have responsibility, for the Product if it is
located in a remote area (more than 100 miles from an
authorized service provider) or is reasonably inaccessible,
hazardous, threatening, or treacherous locale,
surroundings, or environment; in any such event, if you
request, Bosch would still pay for labor and parts and ship
the parts to the nearest authorized service provider, but
you would still be fully liable and responsible for any travel
time or other special charges by the service company,
assuming they agree to make the service call. Further, to
the extent you have installed the Product in a difficult-to-
access location or have otherwise installed temporary or
permanent fixtures that create barriers to accessing or
removing the Product, Bosch will not incur any liability for,
or have responsibility, for work or costs associated with
moving the Product or otherwise creating access to the
Product in order to repair or replace it. All such costs shall
be your sole responsibility.
Out of Warranty Product
Bosch is under no obligation, at law or otherwise, to
provide you with any concessions, including repairs,
prorates, or Product replacement, once this warranty has
expired.

12
Warranty Exclusions
The warranty coverage described herein excludes all
defects or damage that is not the direct fault of Bosch,
including without limitation, one or more of the following:
• Use of the Product in anything other than its normal,
customary and intended manner (including without
limitation, any form of commercial use, use or storage
of an indoor product outdoors, use of the Product in
conjunction with air or water-going vessels).
• Any party's willful misconduct, negligence, misuse,
abuse, accidents, neglect, improper operation, failure
to maintain, improper or negligent installation,
tampering, failure to follow operating instructions,
mishandling, unauthorized service (including self
performed "fixing" or exploration of the appliance’s
internal workings).
• Adjustment, alteration or modification of any kind.
• A failure to comply with any applicable state, local,
city, or county electrical, plumbing and/or building
codes, regulations, or laws, including failure to install
the product in strict conformity with local fire and
building codes and regulations.
• Ordinary wear and tear, spills of food, liquid, grease
accumulations, or other substances that accumulate
on, in, or around the Product.
• Any external, elemental and/or environmental forces
and factors, including without limitation, rain, wind,
sand, floods, fires, mud slides, freezing temperatures,
excessive moisture or extended exposure to humidity,
lightning, power surges, structural failures surrounding
the appliance, and acts of God.
• Service calls to correct the installation of your Product,
to instruct you how to use your Product, to replace
house fuses or correct house wiring or plumbing.
• Removal and replacement of trim or decorative panels
that interfere with servicing the Product.
• Damage or defects caused by labor or parts installed
by any non-authorized service provider, unless
approved by Bosch before service is performed.
In no event shall Bosch have any liability or responsibility
whatsoever for damage to surrounding property, including
cabinetry, floors, ceilings, and other structures or objects
around the Product. Also excluded from this warranty are
Products, on which the serial numbers have been altered,
defaced, or removed; service visits to teach you how to
use the Product, or visits where there is nothing wrong
with the Product; correction of installation problems (you
are solely responsible for any structure and setting for the
Product, including all electrical, plumbing or other
connecting facilities, for proper foundation/flooring, and
for any alterations including without limitation cabinetry,
walls, floors, shelving, etc.); and resetting of breakers or
fuses.
TO THE EXTENT ALLOWED BY LAW, THIS WARRANTY
SETS OUT YOUR EXCLUSIVE REMEDIES WITH RESPECT
TO PRODUCT, WHETHER THE CLAIM ARISES IN
CONTRACT OR TORT (INCLUDING STRICT LIABILITY, OR
NEGLIGENCE) OR OTHERWISE. THIS WARRANTY IS IN
LIEU OF ALL OTHER WARRANTIES, WHETHER EXPRESS
OR IMPLIED. ANY WARRANTY IMPLIED BY LAW,
WHETHER FOR MERCHANTABILITY OR FITNESS FOR A
PARTICULAR PURPOSE, OR OTHERWISE, SHALL BE
EFFECTIVE ONLY FOR THE PERIOD THAT THIS EXPRESS
LIMITED WARRANTY IS EFFECTIVE. IN NO EVENT WILL
THE MANUFACTURER BE LIABLE FOR
CONSEQUENTIAL, SPECIAL, INCIDENTAL, INDIRECT,
"BUSINESS LOSS", AND/OR PUNITIVE DAMAGES,
LOSSES, OR EXPENSES, INCLUDING WITHOUT
LIMITATION TIME AWAY FROM WORK, HOTELS AND/
OR RESTAURANT MEALS, REMODELLING EXPENSES IN
EXCESS OF DIRECT DAMAGES WHICH ARE
DEFINITIVELY CAUSED EXCLUSIVELY BY BOSCH, OR
OTHERWISE. SOME STATES DO NOT ALLOW THE
EXCLUSION OR LIMITATION OF INCIDENTAL OR
CONSEQUENTIAL DAMAGES, AND SOME STATES DO
NOT ALLOW LIMITATIONS ON HOW LONG AN IMPLIED
WARRANTY LASTS, SO THE ABOVE EXCLUSIONS OR
LIMITATIONS MAY NOT APPLY TO YOU. THIS
WARRANTY GIVES YOU SPECIFIC LEGAL RIGHTS, AND
YOU MAY ALSO HAVE OTHER RIGHTS WHICH VARY
FROM STATE TO STATE.
No attempt to alter, modify or amend this warranty shall
be effective unless authorized in writing by an officer of
BSH.
Obtaining Warranty Service
To obtain warranty service for your product, you should
contact Bosch Customer Service at 1-800-944-2904 to
schedule a repair.
Product information
For handy reference, copy the information below from the
rating plate. Keep your invoice and/or delivery documents
for warranty validation.
Model number (E-Nr.)
Production number (FD)
Date of delivery

13
Table des Matières
Notice d’utilisation
Définitions de Sécurité ................................................ 13
CONSIGNES DE SÉCURITÉ IMPORTANTES ............. 14
Instructions générales ...................................................... 14
Sécurité-incendie ............................................................... 14
Prévention des brûlures ................................................... 15
Sécurité des enfants ......................................................... 16
Consignes en matière de nettoyage ............................. 16
Sécurité à l'utilisation ........................................................ 16
Installation et entretien corrects ..................................... 16
Avertissements de la Proposition 65 de l’État de la
Californie ............................................................................ 17
Causes des dommages ............................................... 18
Protection de l'environnement ................................... 18
Modes de fonctionnement .......................................... 18
Mode évacuation ............................................................... 18
Mode recirculation de l'air ............................................... 18
Utilisation de l'appareil ............................................... 19
Éclairage ............................................................................. 19
Indicateur de saturation ................................................... 19
Minuteur .............................................................................. 19
Poursuite du ventilateur ................................................... 19
Signal sonore ..................................................................... 20
Sécurité anti-surchauffe ................................................... 20
Nettoyage et entretien ................................................. 20
Anomalies – que faire ? .............................................. 22
Service après-vente .................................................... 23
Accessoire ................................................................... 23
ÉNONCÉ DE LA GARANTIE LIMITÉE ........................ 24
Couverture de la garantie : ............................................. 24
Durée de la garantie ......................................................... 24
Réparation ou remplacement comme solution
exclusive.............................................................................. 24
Produit hors garantie ...................................................... 25
Exclusions à la garantie
................................................... 25
Produktinfo.
Vous trouverez des informations supplementaires
concernant les produits, accessoires, pièces de
rechange et services sur Internet sous :
www.bosch-home.com
Définitions de Sécurité
9 AVERTISSEMENT
Le non-respect de cet avertissement peut entraîner
la mort ou des blessures graves.
9 ATTENTION
Le non-respect de cet avertissement peut entraîner
des blessures mineures ou modérées.
AVIS : Vous indique que des dommages à l'appareil ou
aux biens peuvent survenir si vous ne respectez pas cet
avertissement.
Remarque : Vous signale des informations importantes
ou des conseils.
Obtention du service de la garantie................................ 25

9 CONSIGNES DE SÉCURITÉ IMPORTANTES
LIRE ET CONSERVER CES INSTRUCTIONS
14
CONSIGNES DE SÉCURIT LIRE ET CONSERVER CES INSTRUCTIONS
AVERTISSEMENT
Votre nouvel appareil a été conçu pour un
fonctionnement sûr et fiable si vous en prenez bien soin.
Lire attentivement toutes les consignes avant l'emploi.
Ces précautions réduiront les risques de brûlures, de
choc électrique, d'incendie et de lésions corporelles.
Lors de l'utilisation d'un appareil électroménager,
quelques précautions de sécurité élémentaires doivent
être observées, y compris celles qui figurent aux pages
suivantes.
Instructions générales
Contrôler l'appareil après l'avoir déballé. Si l'appareil a
été endommagé durant le transport, ne pas le brancher.
AVERTISSEMENT
AFIN DE RÉDUIRE LES RISQUES D’INCENDIE, DE
CHOC ÉLECTRIQUE OU DE BLESSURES
CORPORELLES, VEUILLEZ SUIVRE LES INSTRUCTIONS
SUIVANTES :
▯ Utilisez cet appareil seulement de manière conforme à
l'usage prévu par le fabricant. Si vous avez des
questions, contactez le fabricant.
▯ Avant le nettoyage ou l'entretien de l'appareil, mettez-le
hors tension sur le tableau électrique et verrouillez les
dispositifs de sectionnement afin d'empêcher toute
remise sous tension accidentelle.
S'il est impossible de verrouiller les dispositifs de
sectionnement, fixez de manière sûre au tableau
électrique un dispositif d'alerte bien visible , par
exemple une étiquette.
AVERTISSEMENT
ATTENTION – AFIN DE RÉDUIRE LES RISQUES
D’INCENDIE, DE CHOC ÉLECTRIQUE OU DE
BLESSURES CORPORELLES, VEUILLEZ SUIVRE LES
INSTRUCTIONS SUIVANTES :
▯ Les travaux d’installation et de raccordement électrique
doivent être effectués par une personne qualifiée,
conformément aux codes et standards de construction,
y compris ceux concernant le feu.
▯ Assurez-vous que l'aération est suffisante pour
permettre la combustion et l'évacuation des gaz par le
conduit de cheminée d'un appareil à combustible afin
de prévenir le refoulement d'air. Respectez les
instructions du fabricant de l'appareil de chauffage et
les normes de sécurité, comme celles publiées par la
National Fire Protection Association (NFPA) et par la
American Society for Heating, Refrigeration and Air
Conditioning Engineers (ASHRAE), ainsi que par les
autorités locales.
▯ Lorsque vous faites une ouverture dans un mur ou un
plafond, veillez à ne pas endommager les fils
électriques ou les conduites qui y sont dissimulés.
▯ Les soufflantes canalisées doivent donner sur
l'extérieur.
Cet appareil n'est pas destiné à être utilisé avec un
programmateur externe ou une télécommande.
Veillez à avoir à portée de main un extincteur d'incendie
en bon état de marche, placé visiblement près de
l'appareil et facile d'accès.
Sécurité-incendie
AVERTISSEMENT
Pour réduire le risque de feu et pour évacuer
correctement l'air, évacuez l'air vers l'extérieur.
N'évacuez pas l'air dans les murs, les plafonds, les
greniers, les vides sanitaires ou les garages.
AVERTISSEMENT
Pour réduire les risques de feu, utiliser uniquement des
gaines en métal.
Toujours avoir un détecteur de fumée en état de marche
près de la cuisine.
AVERTISSEMENT
POUR RÉDUIRE LE RISQUE D'INCENDIE DE GRAISSE
DE CUISINIÈRE:
a.
Ne laissez jamais la surface de cuisson sans
surveillance à des températures élevées. Les
débordements causent de la fumée et les résidus
graisseux peuvent s'enflammer.. Faites chauffer les
huiles lentement à feu doux ou moyen.
b.
Faites toujours fonctionner la hotte lorsque vous
cuisinez à feu vif.
c.
Nettoyez les ventilateurs régulièrement. Ne laissez pas
la graisse s'accumuler sur le ventilateur ou sur le filtre.
d.
Utilisez des casseroles de taille appropriée. Utilisez
toujours des récipients adaptés à la taille de la surface
de cuisson.
Ne flambez jamais sous la hotte aspirante et ne travaillez
jamais avec une flamme nue. Une hotte aspirante en
marche aspire les flammes dans le filtre. Une hotte
aspirante en marche aspire les flammes dans le filtre. Ne
flambez jamais sous la hotte aspirante et ne travaillez
jamais avec une flamme nue. Une hotte aspirante en
marche aspire les flammes dans le filtre. Les dépôts de
graisse sur les filtre risquent alors de s'enflammer!
ATTENTION
Appareil conçu exclusivement pour la ventilation
générale. Ne pas utiliser pour évacuer des matières et
vapeurs dangereuses ou explosives.

15
9 CONSIGNES DE SÉCURITÉ IMPORTANTES
LIRE ET CONSERVER CES INSTRUCTIONS
Si des vêtements s’enflamment, rouler par terre
immédiatement pour éteindre les flammes.
Étouffez les flammes d'un feu d'aliments autre qu'un feu
de graisse à l'aide de bicarbonate de soude. Ne jamais
utiliser d'eau sur les feux de cuisson.
AVERTISSEMENT
POUR RÉDUIRE LE RISQUE DE LÉSIONS
CORPORELLES EN CAS D'UN FEU DE FRITURE SUR
UNE CUISINIÈRE, OBSERVER CE QUI SUIT :
▯ ÉTOUFFER LES FLAMMES à l'aide d'un couvercle bien
hermétique, d'une tôle à biscuits ou d'un plateau en
métal, puis éteindre le brûleur. FAIRE ATTENTION À NE
PAS SE BRÛLER. Si les flammes ne s'éteignent pas
immédiatement, ÉVACUER LES LIEUX ET FAIRE
APPEL AU SERVICE D'INCENDIE.
▯ NE JAMAIS SOULEVER UNE POÊLE EN FLAMMES –
Vous pourriez vous brûler.
▯ NE PAS UTILISER D'EAU, y compris les chiffons ou
serviettes mouillées - une violente explosion de vapeur
pourrait se produire.
▯ Utiliser UNIQUEMENT un extincteur si :
- Vous savez que vous avez un extincteur de classe
ABC et comment l'utiliser.
- Le feu est petit et circonscrit à la zone où il a débuté.
- Le service d'incendie est appelé.
- Si l'on peut combattre le feu en ayant le dos vers une
sortie.
Dans la mesure du possible, ne pas faire fonctionner le
système de ventilation lorsqu'un feu se déclenche sur
une table de cuisson. Toutefois, ne pas passer la main à
travers le feu pour mettre le système de ventilation hors
tension.
AVERTISSEMENT
RISQUE D’INCENDIE
Les brûleurs gaz dégagent une forte chaleur
lorsqu'aucun récipient n'est posé dessus. Ils peuvent
alors endommager les appareils de ventilation. Utiliser
les brûleurs gaz uniquement lorsqu'un récipient est placé
dessus.
AVERTISSEMENT
RISQUE D'INCENDIE
Lors du fonctionnement simultané de plusieurs foyers
gaz il y a une forte production de chaleur. Un appareil de
ventilation monté au-dessus peut être endommagé ou
prendre feu. Ne faites jamais fonctionner en même
temps deux foyers gaz à feu vif pendant plus de
15 minutes. Un brûleur grande puissance de plus de
17,000 Btu/hr (5 kW) (wok) chauffe autant que deux
brûleurs gaz.
AVERTISSEMENT
RISQUE D'INCENDIE
L'huile et la graisse très chaudes s'enflamment
rapidement. Ne jamais laisser de l'huile et de la graisse
chaudes sans surveillance. Ne jamais éteindre un
incendie avec de l'eau. Éteindre le foyer. Étouffer les
flammes avec précaution au moyen d'un couvercle,
d'une couverture antifeu ou équivalent.
AVERTISSEMENT
RISQUE D'INCENDIE
Les dépôts se trouvant dans le filtre à graisse peuvent
s'enflammer.
Nettoyer le filtre à graisse au moins tous les 2 mois.
Ne jamais faire fonctionner l'appareil sans son filtre à
graisse.
AVERTISSEMENT
RISQUE D'INCENDIE
Les dépôts se trouvant dans le filtre à graisse peuvent
s'enflammer. Ne jamais cuisiner à proximité de l'appareil
avec une flamme ouverte (par exemple pour faire
flamber). Installer l'appareil près d'un foyer pour
combustibles solides (bois ou charbon par exemple)
seulement s'il y a un couvercle fermé et non amovible. Il
ne faut pas qu'il se produise de projection d'étincelles.
Prévention des brûlures
AVERTISSEMENT
RISQUE DE BRÛLURE
Les parties accessibles chauffent lorsque la table est
allumée. Ne touchez jamais aux parties très chaudes.
Tenez les enfants à distance.

9 CONSIGNES DE SÉCURITÉ IMPORTANTES
LIRE ET CONSERVER CES INSTRUCTIONS
16
Sécurité des enfants
Lorsque les enfants sont assez âgés pour utiliser
l’appareil, c’est aux parents ou tuteurs légaux qu’il
incombe de veiller à ce qu’ils soient formés aux
pratiques sécuritaires par des personnes qualifiées.
Enlever le ruban adhésif et l’emballage avant d’utiliser
l’appareil. Détruire l’emballage après avoir déballé
l’appareil. Ne jamais laisser les enfants jouer avec les
matériaux de conditionnement.
Ne permettre à personne de grimper, rester debout,
s'appuyer, s'asseoir ou se pencher sur toute partie d'un
appareil, notamment une porte, un tiroir-réchaud ou un
tiroir de rangement. Ceci peut endommager l'appareil qui
risque de basculer et causer des blessures sérieuses.
Ne pas permettre aux enfants d'utiliser cet appareil sauf
sous la surveillance attentive d'un adulte. Ne pas laisser
les enfants et les animaux seuls ou sans surveillance
lorsque l'appareil est en service. Ne jamais les laisser
jouer aux alentours de l'appareil, que ce dernier soit en
service ou non.
ATTENTION
Les articles d’intérêt pour les enfants ne doivent pas être
rangés dans un appareil électroménager, dans les
armoires au–dessus de l’appareil ou sur le dosseret. Les
enfants peuvent grimper sur l’appareil pour atteindre ces
objets et se blesser sérieusement.
Consignes en matière de nettoyage
AVERTISSEMENT
S'assurer que l'appareil a complètement refroidi (y
compris les filtres à graisse et les ampoules, le cas
échéant) et que la graisse s'est solidifiée avant de tenter
de nettoyer une quelconque partie de l'appareil.
Ne pas utiliser de nettoyeur à vapeur pour nettoyer
l'appareil.
Sécurité à l'utilisation
AVERTISSEMENT
Ne pas réparer ni remplacer toute pièce de l’appareil à
moins que cela ne soit expressément recommandé dans
ce manuel. Ne jamais modifier ni altérer la configuration
de l’appareil. Toute installation, réparation ou
maintenance inadéquate peut entraîner des blessures ou
des dommages matériels. Se reporter à ce manuel pour
obtenir des conseils sur la façon de procéder. Toute
réparation doit être effectuée par un centre de réparation
autorisé par l’usine.
AVERTISSEMENT
RISQUE DE BLESSURE
Des objets posés sur l'appareil risquent de tomber. Ne
pas déposer d’objets sur l’appareil.
Installation et entretien corrects
Demandez à l'installateur de vous montrer où se trouve
le disjoncteur ou le fusible. Identifier sa position pour
pouvoir le retrouver facilement.
Cet appareil doit être adéquatement installé et mis à la
terre par un technicien agréé. Branchez l'appareil
uniquement dans une prise correctement reliée à la
terre. Pour plus de détails, reportez-vous à la notice
d'installation.
Cet appareil est destiné uniquement à une utilisation
domestique normale. Il n'est pas homologué pour un
usage en extérieur. Voyez la garantie. Si vous avez des
questions, communiquez avec le fabricant.
Ne pas entreposer ni utiliser de produits chimiques
corrosifs, vapeurs, substances inflammables ou produits
non alimentaires à l'intérieur ou à proximité de l'appareil.
Il a été spécialement conçu pour être utilisé pendant le
chauffage et la cuisson des aliments. L'emploi de
produits chimiques corrosifs pour chauffer ou nettoyer
l'appareil endommagera ce dernier et peut provoquer
des blessures.
Ne pas se servir de cet appareil s'il ne fonctionne pas
correctement ou s'il est endommagé. Communiquer
avec un réparateur autorisé.
Ne pas réparer ni remplacer toute pièce de l'appareil à
moins que cela ne soit spécifiquement recommandé par
ce manuel. Toute réparation doit être effectuée par un
centre de réparation autorisé par l'usine.
ATTENTION
La graisse restant sur les filtres peut se fondre à
nouveau et se déplacer à l'intérieur de l'évent.
ATTENTION
Couper le courant au niveau du disjoncteur avant
d'enlever une ampoule grillée. Ne pas toucher les
ampoules immédiatement après les avoir utilisées. Elles
restent chaudes pendant quelques minutes.
17
9 CONSIGNES DE SÉCURITÉ IMPORTANTES
LIRE ET CONSERVER CES INSTRUCTIONS
AVERTISSEMENT
S'assurer que l'appareil et les ampoules ont refroidi et
que le courant qui alimente l'appareil a été coupé avant
de changer une ou plusieurs ampoules. Le non respect
de cette instruction peut entraîner un choc électrique ou
des brûlures. Les lentilles (le cas échéant) doivent être
mises en place lors de l'utilisation de l'appareil. Les
lentilles (le cas échéant) permettent d'éviter que les
ampoules ne se brisent. Les lentilles (le cas échéant)
sont en verre. Manipuler avec précaution pour éviter les
cassures. Le verre brisé peut être une cause de
blessures.
Certaines surfaces peuvent avoir des bords tranchants.
Faire attention en étendant le bras derrière l’appareil ou
en dessous.
AVERTISSEMENT
Lorsque la hotte aspirante est utilisée en mode
d'évacuation d'air simultanément avec un brûleur
différent utilisant également la même cheminée, (tels des
appareils de chauffage au gaz, à l'huile ou au charbon,
des chauffe-eau instantanés ou des chaudières à eau
chaude), veillez à ce que l'apport d'air frais soit suffisant
pour assurer la combustion adéquate du brûleur.
Un fonctionnement sans risque est possible si la sous-
pression dans la pièce où le brûleur est installé ne
dépasse pas 4 Pa (0,04 mbar).
On peut y parvenir en acheminant l'air requis pour la
combustion à travers des ouvertures non verrouillables,
par exemple dans les portes et fenêtres, et en
association avec des boîtiers muraux d'admission/
d'évacuation d'air fixées au mur ou grâce à d'autres
mesures techniques telles qu'un verrouillage réciproque,
etc.
AVERTISSEMENT
Évitez l'intoxication au monoxyde de carbone. – Prévoyez
une admission d'air adéquate pour empêcher l'aspiration
des gaz de combustion dans la pièce.
Un boîtier mural air d'admission/air d'échappement ne
peut garantir que la valeur limite ne sera pas dépassée.
Remarque : Lorsque vous évaluez les exigences
globales, vous devez tenir compte du système combiné
d'aération de la maison au complet. Cette règle ne
s'applique pas aux appareils de cuisson, comme les
surfaces de cuisson et les fours.
Avertissements iddu de la
Proposition 65
Ce produit pourrait contenir un produit chimique
reconnu par l’État de la Californie comme
cancérigène ou ayant des effets nocifs sur la
reproduction. Par conséquent, l’emballage de votre
produit pourrait porter l’étiquette suivante, comme
requis par la Californie:
AVERTISSEMENT ISSUE DE LA PROPOSITION 65 DE
L’ÉTAT DE LA CALIFORNIE:
AVERTISSEMENT
Cancer et dommages à la reproduction –
www.P65Warnings.ca.gov.

18
Causes des dommages
9 ATTENTION
Risque de détérioration par la corrosion. Toujours
allumer l'appareil pendant la cuisson afin d'éviter la
formation de condensation. Cette dernière peut
provoquer de la corrosion.
Remplacer immédiatement les ampoules défectueuses,
afin d'empêcher une surcharge des ampoules restantes.
Risque de détérioration par pénétration d'humidité dans
l'électronique. Ne jamais nettoyer les commandes avec
un chiffon humide.
Détérioration de la surface par un nettoyage inapproprié.
Nettoyer les surfaces en inox seulement dans le sens du
métal. Ne pas utiliser de nettoyant à inox pour les
organes de commande.
Détérioration des surfaces par les produits de nettoyage
agressifs ou abrasifs. Ne jamais utiliser de produits de
nettoyage agressifs ou abrasifs.
Risque d'endommagement par le reflux de condensat.
Installer le canal d'évacuation d'air légèrement incliné
vers le bas à partir de l'appareil (1° de pente).
Protection de l'environnement
Déballez l'appareil et jetez l'emballage dans le respect
de l'environnement.
Modes de fonctionnement
Vous pouvez utiliser cet appareil en mode évacuation ou
en mode recyclage.
Mode évacuation
Remarque : Il ne faut pas rejeter l'air usé dans une
cheminée d'évacuation en service, ni dans un conduit
servant à la ventilation de pièces où sont installés des
foyers.
▯ Pour rejeter l'air dans un conduit de fumées qui n'est
pas en service, il faut demander l'accord du maître
ramoneur compétent.
▯ Si l'air est évacué à travers le mur extérieur de
l'habitation, il faut utiliser un caisson mural
télescopique.
Mode recirculation de l'air
Remarque : Pour filtrer les odeurs dans l’air recyclé,
vous devrez incorporer un filtre au charbon actif. Pour
connaître les différentes possibilités d’utiliser l’appareil
en mode recirculation de l'air, consultez les prospectus
ou votre revendeur spécialisé. Vous pourrez vous
procurer les accessoires dans un commerce spécialisé,
auprès du service après-vente ou dans la boutique en
ligne. Vous trouverez les numéros de référence des
accessoires à la fin de la notice d’utilisation.
L'air aspiré est débarrassé des
impuretés par les filtres à graisse,
transite par un conduit puis gagne
l’extérieur.
L’air aspiré se nettoie en traversant les filtres
à graisse et un filtre au charbon actif, puis il
revient dans la cuisine.
19
Utilisation de l'appareil
Ces instructions valent pour plusieurs variantes
d’appareil. Certains équipements ne concernant pas
votre appareil peuvent y être décrits.
Remarque : Allumer la hotte aspirante dès le début de
la cuisson ; une fois la cuisson achevée, laisser la hotte
aspirante fonctionner encore quelques minutes. Ceci
permet d’éliminer les vapeurs de cuisson plus
efficacement.
Bandeau de commande
Régler le ventilateur
Remarque : Toujours adapter la puissance du
ventilateur aux conditions du moment. En cas
d'émanations très denses de vapeur, veuillez
sélectionner une puissance d'aspiration élevée.
Mise en marche
▯ Appuyer sur la touche "+".
La puissance d'aspiration actuelle est représentée sur
le bandeau d'affichage sous forme de barres.
▯ Appuyer sur la touche "+" ou "-" pour modifier la
vitesse du ventilateur.
Arrêt
Appuyer répétitivement sur la touche "-" jusqu'à ce que le
ventilateur s'arrête.
Éclairage
Vous pouvez allumer et éteindre l’éclairage
indépendamment de la ventilation.
1.
Appuyer sur la touche "Light".
L'éclairage s'allume.
2.
Réappuyer sur la touche "Light".
La luminosité augmente.
3.
Appuyer une troisième fois sur la touche "Light".
L'éclairage s'éteint.
Indicateur de saturation
La saturation des filtres à graisse en métal (au bout de
30 heures de ventilation) ou du filtre au charbon actif (au
bout de 120 heures de ventilation) est affichée sur le
bandeau d'affichage :
▯ Filtres à graisse en métal : "clean grease filter"
s'affiche sur le bandeau d'affichage.
▯ Filtre au charbon actif : "replace charcoal filter" est
affichée sur le bandeau d'affichage.
Au plus tard à ce moment-là, il faudrait nettoyer les filtres
à graisse en métal ou changer le filtre à charbon actif.
Pour savoir comment nettoyer les filtres à graisse en
métal, consultez le chapitre Nettoyage et entretien.
Réinitialiser les affichages de saturation
▯ Filtres à graisse en métal : Maintenir la touche "+"
appuyée pendant 5 secondes.
▯ Filtre au charbon actif : Maintenir la touche "-"
appuyée pendant 5 secondes.
Commutation de l’affichage pour le mode recirculation
de l'air
Pour le mode recirculation de l'air, l’affichage de la
commande électronique doit être commuté en
conséquence :
▯ La hotte aspirante doit être raccordée au secteur, mais
éteinte.
▯ Appuyer simultanément sur les touches "+" et "-",
jusqu'à ce que "Able" s'allume dans le bandeau
d'affichage.
▯ En appuyant répétitivement sur la combinaison de
touches, l'affichage de la commande électronique est
recommuté au mode Évacuation d’air. "None" apparaît
dans le bandeau d'affichage.
Minuteur
Le minuteur n'a pas d'influence sur les fonctions de la
hotte aspirante. La durée du minuteur peut être réglée de
1 à 60 minutes. Le réglage par défaut est de 10 minutes.
1.
Appuyer sur la touche "Timer".
Le chiffre 10 clignote dans le bandeau d'affichage.
2.
Régler la durée désirée à l'aide des touches "+" et "-".
Le temps réglé est validé au bout de 5 secondes.
Un signal sonore retentit après écoulement du temps
et "End" s'affiche pendant 3 secondes dans le
bandeau d'affichage.
Remarque : Pour arrêter prématurément le minuteur,
appuyer sur une touche quelconque.
Poursuite du ventilateur
Le temps d'activation est de 10 minutes et ne peut pas
être modifié.
1.
Sélectionner la puissance de ventilation.
2.
Appuyez sur la touche "Timer" pendant 3 secondes.
Après écoulement de ce temps, la ventilation s'arrête
automatiquement et l'éclairage s'éteint. "End" apparaît
sur l'affichage.
L'activation du ventilateur peut être annulée à tout
moment en appuyant sur une touche quelconque.
Explication
1 Réduire la vitesse du ventilateur
2 Augmenter la vitesse du ventilateur
3 Bandeau d’affichage
4 Allumer l'éclairage
5 Minuteur
20
Signal sonore
Activer le signal sonore
▯ Maintenir la touche "Light" appuyée pendant 5
secondes.
▯ Un signal sonore retentit et "Snd" apparaît pendant 3
secondes dans le bandeau d'affichage.
Désactiver le signal sonore
▯ Maintenir la touche "Light" appuyée pendant 5
secondes.
▯ "Snd" apparaît pendant 3 secondes dans le bandeau
d'affichage.
Sécurité anti-surchauffe
L'appareil est équipé d'une sécurité anti-surchauffe. Si
des températures trop élevées sont mesurées sur
l'appareil, l'appareil commute automatiquement à la
puissance d'aspiration maximale, jusqu'à ce que la
température ait baissé.
▯ Si la hotte est en marche, la puissance d'aspiration
maximale est réglée automatiquement. Lorsque la
température rebaisse, l'appareil se remet à la
puissance d'aspiration sélectionnée au préalable.
▯ Si la hotte est éteinte, l'appareil se met en marche
automatiquement à la puissance d'aspiration
maximale. Lorsque la température rebaisse, l'appareil
s'éteint automatiquement.
▯ Lorsque la sécurité anti-surchauffe est active, la
mention "Auto" est affichée dans le bandeau
d'affichage. La puissance d'aspiration ne peut pas être
réduite pendant ce temps.
Nettoyage et entretien
9 AVERTISSEMENT
AVERTISSEMENT
To avoid risk of fire and explosion do not use
flammable liquids or solvents. Always unplug or
disconnect the appliance from the power supply
before servicing.
Ne pas utiliser de nettoyeur à vapeur pour nettoyer
l'appareil.
Certaines surfaces peuvent avoir des bords tranchants.
Faire attention en étendant le bras derrière l’appareil ou
en dessous.
9 AVERTISSEMENT
RISQUE DE BRÛLURES
L'appareil devient chaud pendant le fonctionnement,
en particulier au niveau des ampoules. Laisser
refroidir l'appareil avant de le nettoyer.
9 AVERTISSEMENT
RISQUE D’ÉLECTROCUTION
Une infiltration d'humidité risque de provoquer un
choc électrique. Nettoyer l'appareil uniquement
avec un chiffon humide. Avant le nettoyage,
débrancher la fiche secteur ou disjoncter le fusible
dans le tableau électrique.
Produits de nettoyage
Afin de ne pas endommager les différentes surfaces
avec des produits de nettoyage inadaptés, respecter les
indications du tableau. Ne pas utiliser
▯ de produits agressifs ou abrasifs,
▯ de produits de nettoyage fortement alcoolisés,
▯ de laine d'acier ni de tampons à récurer abrasifs,
▯ de nettoyeurs haute pression ni de nettoyeurs à
vapeur.
Avant d'utiliser des lavettes éponges neuves, les rincer
soigneusement.
Respecter les instructions et avertissements joints aux
produits de nettoyage.
Zone Produits de nettoyage
Inox Eau chaude additionnée de
liquide vaisselle :
Nettoyer avec une lingette et
sécher avec un chiffon doux.
Nettoyer les surfaces en inox seu-
lement dans le sens de polissage
du métal.
Des produits d'entretien spéciaux
pour inox sont en vente au ser-
vice après-vente ou dans les com-
merces spécialisés. Appliquer
avec un chiffon doux une pellicule
mince de produit d'entretien.
Surfaces laquées Eau chaude additionnée de
liquide vaisselle :
Nettoyer avec une lingette humide
et sécher avec un chiffon doux.
Ne pas utiliser de nettoyant pour
inox.
Aluminium et
plastique
Nettoyant à vitres :
Nettoyer avec un chiffon doux.
Verre Nettoyant à vitres :
Nettoyer avec un chiffon doux. Ne
pas utiliser de grattoir.
Éléments de
commande
Eau chaude additionnée de
liquide vaisselle :
Nettoyer avec une lingette humide
et sécher avec un chiffon doux.
Risque de détérioration de l'élec-
tronique par pénétration d'humi-
dité. Ne jamais nettoyer les
éléments de commande avec un
chiffon mouillé.
Ne pas utiliser de nettoyant pour
inox.
21
Nettoyage du filtre à graisse métallique
Ces instructions valent pour plusieurs variantes
d’appareil. Certains équipements ne concernant pas
votre appareil peuvent y être décrits.
9 AVERTISSEMENT
RISQUE D'INCENDIE
Les dépôts se trouvant dans le filtre à graisse
peuvent s'enflammer.
Nettoyer le filtre à graisse au moins tous les
2 mois.
Ne jamais faire fonctionner l'appareil sans son filtre
à graisse.
Remarques
▯ N'utilisez pas de produits nettoyants agressifs,
contenant de l'acide ou de la lessive.
▯ Au moment du nettoyage des filtres à graisse
métalliques, nettoyez aussi la fixation des filtres avec
un chiffon humide, à l'intérieur de l'appareil.
▯ Vous pouvez nettoyer les filtres à graisse métalliques
au lave-vaisselle ou à la main .
À la main :
Remarque : Pour les salissures tenaces, vous pouvez
utiliser un solvant à graisse spécial disponible en
particulier sur la boutique en ligne.
▯ Faites tremper les filtres métalliques dans de l'eau de
vaisselle chaude.
▯ Pour le nettoyage, utilisez une brosse, puis rincez bien
les filtres.
▯ Laissez les filtres s'égoutter.
A
u lave-vaisselle :
Remarque : Le nettoyage au lave-vaisselle peut
provoquer de légères décolorations. Celles-ci n'ont
aucune influence sur le fonctionnement des filtres à
graisse métalliques.
▯ Ne pas laver les filtres à graisse métalliques très
encrassés avec de la vaisselle.
▯ Positionner les filtres à graisse métalliques pour qu'ils
jouent librement dans le lave-vaisselle. Ne pas coincer
les filtres à graisse métalliques.
Retirer le filtre à graisse métallique
1.
Ouvrir le verrouillage puis abaisser le filtre à graisse
en métal.
Avec l’autre main sous le filtre à graisse en métal,
intercepter ce dernier.
2.
Sortir le filtre à graisse en métal de sa fixation.
Remarques
▯ La graisse peut s’accumuler dans le bas du filtre à
graisse en métal.
▯ Tenir le filtre à graisse en métal à l'horizontale pour
éviter tout égouttement de graisse.
3.
Nettoyer le filtre à graisse en métal.
Mettre en place le filtre à graisse
métallique
1.
Mettre en place le filtre à graisse en métal.
Avec l’autre main sous le filtre à graisse en métal,
intercepter ce dernier.
2.
Basculer le filtre à graisse en métal vers le haut puis
enclencher le verrouillage.
Anomalies – que faire ?
Dans de nombreux cas, vous pourrez remédier vous-
même facilement aux anomalies. Avant de contactez le
service après-vente, veuillez vérifier les points suivants :
9 AVERTISSEMENT
RISQUE DE CHOC ÉLECTRIQUE
Les réparations non conformes sont sources de
danger. Les réparations et le remplacement des
câbles endommagés doivent être confiés
exclusivement à des techniciens de S.A.V. formés
par nous. Si l'appareil est défectueux, débrancher la
fiche d'alimentation secteur ou désactiver le coupe-
circuit sur le tableau électrique. Appeler le S.A.V.
--------
Anomalie Cause pos-
sible
Solution
L'appareil ne
fonctionne
pas
Panne d'élec-
tricité
Vérifier si d'autres appa-
reils de cuisine fonc-
tionnent
Fusible défec-
tueux
Vérifier sur le tableau
électrique si le fusible
protégeant l'appareil est
en bon état.
L'éclairage ne
fonctionne
pas.
Les ampoules
sont défec-
tueuses.
Changer les ampoules,
voir le chapitre "Changer
les ampoules".
22
Changer les ampoules
9 AVERTISSEMENT
RISQUE D’ÉLECTROCUTION
Lors du changement des ampoules, les contacts de
la douille sont sous tension. Retirer la fiche secteur
ou désactiver le fusible dans le boîtier à fusibles
avant de procéder au remplacement.
Important ! Utiliser uniquement des lampes du même
type et de la même puissance (consulter aussi la douille
des lampes ou la plaque signalétique).
Changer les ampoules halogènes
Remarque : En insérant les ampoules halogènes, veiller
à ne pas toucher le ballon de verre. Pour insérer les
ampoules halogènes, utiliser un chiffon propre.
1.
Laisser refroidir les ampoules.
2.
Avec un outil approprié, retirer prudemment l’anneau
de l’ampoule.
3.
Extraire l’ampoule et la remplacer par une ampoule du
même type.
4.
Remettre le couvercle de l’ampoule en place.
5.
Brancher la fiche mâle dans la prise de courant ou
enclencher le fusible.
Remplacer l'ampoule par un modèle identique :
Tension : 120 V
Puissance : max. 40 W
Culot : G9

23
Service après-vente
Si votre appareil a besoin d'être réparé, notre service
après-vente se tient à votre disposition. Nous trouverons
toujours une solution adaptée, aussi afin d’éviter des
déplacements inutiles d'un technicien.
Lors de votre appel, veuillez indiquer le numéro de
produit (n° E) et le numéro de fabrication (n° FD), afin de
nous permettre de mieux vous aider. Vous trouverez la
plaque signalétique à l'intérieur de l'appareil (après avoir
retiré le filtre à graisse en métal).
Pour éviter d'avoir à les rechercher en cas de besoin,
vous pouvez inscrire ici les données de votre appareil et
le numéro de téléphone du service après-vente.
Veuillez noter que la visite d'un technicien du SAV n'est
pas gratuite en cas de manipulation incorrecte, même
pendant la période de garantie.
Veuillez consulter l'annuaire du service après-vente ci-
joint pour obtenir des informations sur les contacts dans
tous les pays.
Faites confiance aux compétences du fabricant. Vous
garantissez ainsi que la réparation sera effectuée par
des techniciens de SAV formés qui disposent des pièces
de rechange d’origine adaptées à votre appareil.
Accessoire
(non compris dans la livraison)
N° E N° FD
Service après-vente O
Accessoire Numéro article
Module de recircula-
tion
HCREC5UC
Filtre à charbon HCIFILTUC
Capot de cheminée HCBEXT5UC

24
ÉNONCÉ DE LA GARANTIE LIMITÉE
Couverture de la garantie limitée
La garantie limitée fournie par BSH Home Appliances («
Bosch ») dans cet énoncé de garantie limitée s’applique
seulement à l'appareil Bosch qui vous a été vendu
(« Produit »), pour autant que le produit ait été acheté :
• Pour une utilisation normale résidentielle (non-
commerciale), et qu’il a été utilisé en tout temps pour
un usage domestique normal.
• Neuf au détail auprès d'un revendeur agréé BSH ou
directement auprès de BSH (pas un présentoir, « tel
quel », ou un modèle précédemment retourné), et
non destiné à la revente ou à un usage commercial.
• Aux États-Unis ou au Canada et qu’il est demeuré en
tout temps dans son pays d’achat.
Les garanties aux présentes s’appliquent à l’acheteur
original du produit sous garantie et à tout propriétaire
successif du produit acheté pour une utilisation
résidentielle habituelle et la durée de la garantie.
Assurez-vous d'enregistrer votre produit ; bien qu'il ne
soit pas nécessaire pour appliquer la garantie, c'est le
meilleur moyen pour Bosch de vous informer dans le cas
peu probable d'un avis de sécurité ou d'un rappel de
produit.
Durée de la garantie
Bosch garantit que le produit est exempt de défauts de
matériaux et de fabrication pendant une période de trois
cent soixante-cinq (365) jours à compter de la date de
livraison initiale. La période susmentionnée commence à
partir de la date de livraison et ne doit pas être retenue,
retardée, prolongée, ou interrompue pour une raison
quelconque. Ce produit est également garanti exempt de
défauts cosmétiques de matériaux et de fabrication (tels
que des rayures sur l'acier inoxydable, des taches de
peinture/porcelaine, des éclats, des bosses ou d'autres
dommages à la finition) du produit, pendant une période
de trente (30) jours à compter de la date de livraison ou
de la date de clôture pour les nouvelles constructions. La
présente garantie cosmétique exclut les variations légères
de couleur causées par les différences inhérentes entre les
sections peintes et les sections en porcelaine, de même
que les différences causées par l'éclairage de la cuisine,
l'emplacement du produit et autres facteurs similaires. La
présente garantie cosmétique exclut spécifiquement tous
les appareils en montre, de plancher, « tel quel » et remis
à neuf.
Réparation ou remplacement : votre
recours exclusif
Pendant cette période de garantie, Bosch ou l’un de ses
centres de réparations autorisés réparera gratuitement
votre produit (sous réserve de certaines restrictions aux
présentes) si celui-ci présente des défauts de matériels ou
de fabrication. Si des tentatives raisonnables pour réparer
le produit sont vaines, alors Bosch remplacera le produit
(un modèle supérieur peut être offert, à la seule discrétion
de Bosch, moyennant des frais supplémentaires). Rien
dans cette garantie n’exige que les pièces endommagées
ou défectueuses soient remplacées par des pièces d’un
type ou d’une conception différent de la pièce d’origine.
Toutes les pièces ou les composants enlevés demeurent la
seule propriété de Bosch. Toute pièce remplacée ou
réparée doit être identique à la pièce d’origine aux fins de
la présente garantie et la garantie ne sera pas prolongée
en regard de telles pièces. La seule responsabilité de
Bosch est de faire réparer le produit défectueux
uniquement par un centre de réparation autorisé pendant
les heures de travail normales. Pour des raisons de
sécurité et de dommages matériels, Bosch vous
recommande fortement de ne pas essayer de réparer le
produit vous-même ou de faire appel à un prestataire de
services non agréé ; Bosch décline toute responsabilité en
cas de dommages résultant de réparations ou de travaux
effectués par un prestataire de services non agréé. Les
centres de réparation autorisés sont les personnes ou les
entreprises qui ont été spécialement formées sur les
produits Bosch et qui possèdent, selon l’opinion de Bosch,
une réputation supérieure pour le service après-vente et la
capacité technique (il est à noter qu’elles sont des entités
indépendantes et non des agents, partenaires, affiliés ou
représentants de Bosch). Néanmoins, le fait de confier
l'entretien de votre produit à un atelier de réparation non
affilié ou à un revendeur agréé Bosch n'annulera pas cette
garantie. De plus, l'utilisation de pièces tierces n'annulera
pas cette garantie. Nonobstant ce qui précède, Bosch ne
sera pas tenue responsable d’aucune façon si le produit
est situé dans une région éloignée (supérieure à 100 miles
d’un centre de réparation autorisé) ou n’est pas accessible
de façon raisonnable, dans un environnement ou un local
dangereux, menaçant ou périlleux; dans une telle
éventualité, à la demande du consommateur, Bosch
pourrait encore payer les frais de main-d’œuvre et de
pièces et expédier les pièces au centre de réparation
autorisé le plus près, mais le consommateur serait
entièrement responsable pour tous les frais de
déplacement et autres frais spéciaux encourus par le
centre de réparation, en autant qu’il accepte la demande
de réparation. En outre, dans la mesure où vous avez
installé le produit dans un endroit difficile d'accès ou si
vous avez installé des installations temporaires ou
permanentes qui créent des obstacles à l'accès ou au
retrait du produit, Bosch n'encourra aucune responsabilité
ou n'aura aucune responsabilité pour les travaux ou les
coûts associés au déplacement du Produit ou à la création
d'un accès au Produit afin de le réparer ou de le
remplacer. Tous ces frais seront à votre charge exclusive.
Produit hors garantie
Bosch n’a aucune obligation, aux termes de la loi ou
autrement, d’offrir toute concession, incluant réparation,
prorata ou remplacement de produit une fois la garantie
expirée.

25
Exclusions de garantie
La couverture de garantie décrite dans les présentes
exclut tous les défauts ou dommages pour lesquels Bosch
serait directement imputable, y compris, sans s'y limiter,
l'un ou plusieurs des cas suivants :
• Utilisation du produit autre qu’un usage normal,
habituel et de la façon destinée (incluant, sans s'y
limiter, toute forme d’utilisation commerciale,
d’utilisation ou de rangement d’un produit pour
l’intérieur à l’extérieur, d'utilisation du produit de
concert avec un transporteur aérien ou marin).
• Mauvaise conduite de toute partie, négligence,
mauvaise utilisation, abus, accidents, fonctionnement
inadéquat, mauvais entretien, installation inadéquate
ou négligente, altération, manquement d’observer les
instructions de fonctionnement, mauvaise
manipulation, service non autorisé (incluant réparation
par le consommateur ou exploration du
fonctionnement interne du produit).
• Réglage, modification ou altération de tout type.
• Non conformité aux normes fédérales, provinciales,
municipales ou électriques en vigueur au pays, aux
codes de plomberie ou du bâtiment, aux
réglementations ou aux lois, incluant le non respect
d’installer le produit en stricte conformité avec les
codes et les réglementations du bâtiment et
d’incendie locaux.
• Bris et usure normaux, déversements d’aliments ou de
liquides, accumulations de graisse ou d’autres
substances dans, sur ou autour du Produit.
• Toute force ou tout facteur externe, élémentaire et /
ou environnemental, incluant sans limitation, la pluie,
le vent, le sable, les inondations, les incendies, les
coulées de boue, le gel, l’humidité excessive ou
l’exposition prolongée à l’humidité, la foudre, les
surtensions, les problèmes de structure autour de
l’appareil et les désastres naturels.
• Demandes de service visant à corriger l'installation de
votre Produit, à obtenir des conseils à propos de son
utilisation, à remplacer les fusibles de votre maison ou
à réparer l'installation électrique ou la plomberie de
votre foyer.
• Retrait et remplacement de la garniture ou des
panneaux de décoration qui entravent l’entretien du
produit.
• Dommages ou défauts résultant de la main-d'œuvre
ou de pièces installées par un centre de réparation
non autorisé, à moins d'être approuvé par Bosch
avant de procéder à sa réparation.En aucun cas, Bosch
ne sera tenue responsable de dommages survenus à
la propriété environnantes, incluant les armoires, les
planchers, les plafonds et les autres objets ou
structures situés autour du produit. Également exclus
de la garantie sont les Produits dont les numéros de
série ont été modifiés, effacés ou enlevés;les
demandes de réparations pour enseigner le
fonctionnement du Produit ou les visites où il n’y a
aucun problème avec le produit; la correction de
problèmes d’installation (le consommateur est seul
responsable pour toute structure et tout réglage du
Produit, incluant l’électricité, la plomberie et les autres
raccordements nécessaires, pour une fondation /
plancher approprié[e], et pour toute modification
incluant, sans limitation, armoires, murs, planchers,
tablettes, etc.) et le réenclenchement de disjoncteurs
ou le remplacement de fusibles.
DANS LA MESURE AUTORISÉE PAR LOI, LA PRÉSENTE
GARANTIE PRÉCISE LES RECOURS EXCLUSIFS DONT
VOUS DISPOSEZ À L'ÉGARD DU PRODUIT, QUE LA
DEMANDE SOIT FONDÉE SUR UN CONTRAT OU DÉLIT
(Y COMPRIS RESPONSABILITÉ ABSOLUE OU
NÉGLIGENCE) OU AUTRE. LA PRÉSENTE GARANTIE
REMPLACE TOUTES LES AUTRES GARANTIES,
EXPRESSES OU IMPLICITES. TOUTES GARANTIES
IMPLICITES AUX TERMES DE LA LOI, QUE SE SOIT LES
GARANTIES DE QUALITÉ MARCHANDE OU D’APTITUDE
À UN USAGE PARTICULIER, OU AUTRES, SONT
LIMITÉES DANS LE TEMPS À LA DURÉE DE CETTE
GARANTIE LIMITÉE EXPRESSE. LE FABRICANT NE SERA
EN AUCUN CAS RESPONSABLE DE DOMMAGES
CONSÉCUTIFS, SPÉCIAUX, ACCESSOIRES, INDIRECTS
OU DE « PERTES COMMERCIALES » ET / OU DE
DOMMAGES PUNITIFS, DE PERTES OU DE DÉPENSES, Y
COMPRIS SANS S'Y LIMITER, ABSENCE DU TRAVAIL,
FRAIS D'HÔTEL ET / OU FRAIS DE RESTAURANT, FRAIS
DE REMANIEMENT EN EXCÉDENT DES DOMMAGES
DIRECTS QUI SONT DÉFINITIVEMENT CAUSÉS
EXCLUSIVEMENT PAR BOSCH, OU AUTREMENT.
CETAINS ÉTATS N'AUTORISENT PAS L'EXCLUSION OU
LA LIMITATION DE DOMMAGES ACCESSOIRES OU
CONSÉCUTIFS, ET CERTAINS ÉTATS N'AUTORISENT PAS
LA LIMITATION DE LA DURÉE DES GARANTIES
IMPLICITES. PAR CONSÉQUENT, LES EXCLUSIONS OU
LES LIMITES SUSMENTIONNÉES POURRAIENT NE PAS
VOUS CONCERNER. LA PRÉSENTE GARANTIE VOUS
DONNE DES DROITS PRÉCIS RECONNUS PAR LA LOI ET
VOUS POUVEZ ÉGALEMENT AVOIR D'AUTRES DROITS
QUI VARIENT D'UN ÉTAT À L'AUTRE.
Aucune tentative de modifier, changer ou amender la
présente garantie ne peut être valide sans le
consentement écrit autorisé par un dirigeant de BSH.
Obtention du service de garantie
Pour obtenir le service de garantie de votre produit, vous
devez contacter le service client Bosch au 1-800-944-2904
pour planifier une réparation.
Information sur le produit
Pour référence pratique, copiez l’information ci-après de
la plaque signalétique. Conservez votre facture et/ou vos
documents de livraison pour la validation de la garantie.
Numéro de modèle (E-Nr.)
Numéro de fabrication (FD)
Date de livraison

26
Contenido
Manual de instrucciones
Definiciones de Seguridad ......................................... 26
INSTRUCCIONES DE SEGURIDAD IMPORTANTES .. 27
Indicaciones generales .................................................... 27
Seguridad para evitar incendios .................................... 27
Prevención de quemaduras ............................................ 28
Seguridad de los niños .................................................... 28
Seguridad en la limpieza ................................................. 29
Seguridad durante su uso ............................................... 29
Instalación y mantenimiento adecuados ...................... 29
Advertencias en virtud de la Proposición 65 del estado
de California ....................................................................... 30
Causas de daños ......................................................... 31
Protección del medio ambiente ................................. 31
Modos de funcionamiento .......................................... 31
Funcionamiento con extracción de aire ........................ 31
Funcionamiento en modo de recirculación ................. 31
Operar el equipo .......................................................... 32
Iluminación ......................................................................... 32
Indicador de saturación ................................................... 32
Reloj de alarma ................................................................. 32
Desconexión automática ................................................. 33
Señal acústica ................................................................... 33
Protección contra sobrecalentamiento ......................... 33
Limpieza y mantenimiento ......................................... 33
¿Qué hacer en caso de fallas? .................................. 35
Servicio al Cliente ....................................................... 36
Accesorio ..................................................................... 36
DECLARACIÓN DE GARANTÍA LIMITADA DEL
PRODUCTO .................................................................. 37
Cobertura de esta garantía y a quiénes se aplica ..... 37
Duración de la garantía ................................................... 37
Reparación/reemplazo como único recurso ............. 37
Producto fuera de garantía ............................................ 38
Exclusiones de la garantía .............................................. 38
Produktinfo.
Encontrará más información sobre productos,
accesorios, piezas de repuesto y servicios en internet:
www.bosch-home.com y también en la tienda online.
Definiciones de Seguridad
9 ADVERTENCIA
Esto indica que se pueden producir lesiones graves
o la muerte si no se cumple con esta advertencia.
9 ATENCION
Esto indica que pueden producirse lesiones leves o
moderadas si no se cumple con esta advertencia.
AVISO: Esto indica que puede producirse un daño al
electrodoméstico o a la propiedad como resultado de la
falta de cumplimiento de este aviso.
Nota: Esto lo alerta sobre información y/o consejos
importantes.
Obtener el servicio técnico de la garantía ................... 38

27
9 INSTRUCCIONES DE SEGURIDAD IMPORTANTES
LEA Y CONSERVE ESTAS INSTRUCCIONES
INSTRUCCIONES DE SEG LEA Y CONSERVE ESTAS INSTRUCCIONES
ADVERTENCIA
Su nuevo electrodoméstico ha sido diseñado para ser
seguro y confiable si recibe el cuidado adecuado. Lea
atentamente todas las instrucciones antes de usarlo.
Estas precauciones reducirán el riesgo de quemaduras,
descarga eléctrica, incendio y lesiones a personas. Al
utilizar electrodomésticos de cocina, se deben tomar
precauciones de seguridad básicas, incluidas las que se
encuentran en las páginas siguientes.
Indicaciones generales
Una vez retirado el embalaje, revise el aparato. No lo
conecte si ha sufrido daños durante el transporte.
ADVERTENCIA
PARA REDUCIR EL RIESGO DE INCENDIO, CHOQUE
ELÉCTRICO O LESIONES A LAS PERSONAS, OBSERVE
LAS SIGUIENTES RECOMENDACIONES:
▯ Utilice esta unidad sólo de la manera indicada por el
fabricante. Si tiene preguntas, póngase en contacto
con el fabricante.
▯ Antes de reparar o limpiar la unidad, desconecte el
suministro eléctrico en el panel de servicio y bloquee
el servicio desconectando las conexiones para evitar
que se encienda accidentalmente.
Cuando no pueda bloquearse la desconexión del
servicio, coloque un aviso prominente de advertencia,
como un letrero, en el panel de servicio.
ADVERTENCIA
ADVERTENCIA – PARA REDUCIR EL RIESGO DE
INCENDIO, CHOQUE ELÉCTRICO O LESIONES A LAS
PERSONAS, OBSERVE LAS SIGUIENTES
RECOMENDACIONES
▯ El trabajo de instalación y el cableado eléctrico deben
realizarse por personal calificado conforme a todos los
códigos y estándares aplicables, incluyendo
construcción contra incendios.
▯ Se requiere suficiente aire para la combustión y
escape adecuado de gases por el conducto
(chimenea) del equipo que quema combustible para
evitar la contracorriente. Siga la directriz y las normas
de seguridad del fabricante de equipos de
calefacción, como las publicadas por La Asociación
Nacional para la Protección contra Incendios (NFPA,
por sus siglas en inglés) y la Sociedad Americana de
Ingenieros en Calefacción, Refrigeración y Aire
Acondicionado (ASHRAE, por sus siglas en inglés) y
las autoridades locales correspondientes.
▯ Al cortar o perforar la pared o el techo, no dañe el
cableado eléctrico u otras instalaciones ocultas.
▯ Los ventiladores entubados siempre deben ser
ventilados hacia el exterior.
Este electrodoméstico no fue diseñado para ser usado
con un temporizador externo ni con un control remoto.
Tenga un extinguidor de incendio disponible, cerca, en
un área fácilmente visible y accesible, cerca del
electrodoméstico.
Seguridad para evitar incendios
ADVERTENCIA
Para reducir el riesgo de incendio y para hacer que el
aire salga al exterior correctamente, asegúrese de que
haya un conducto que lo dirija hacia afuera. No dirija el
aire de salida hacia lugares cerrados, espacios dentro
de paredes, techos, áticos, huecos sanitarios o garajes.
ADVERTENCIA
A fin de reducir el riesgo de incendio, utilizar únicamente
conducciones de metal.
Siempre tenga un detector de humo en funcionamiento
cerca de la cocina.
ADVERTENCIA
PARA REDUCIR EL RIESGO DE INCENDIO
OCASIONADO POR LA GRASA EN LA ESTUFA:
a.
Nunca deje las unidades de la superficie sin vigilancia
en valores altos. Los derrames por hervor producen
humos y salpicaduras grasosas que pueden prenderse
fuego. Caliente los aceites despacio a temperaturas
bajas o medianas.
b.
Siempre encienda la campana al cocinar a una
temperatura alta.
c.
Limpie los ventiladores extractores con frecuencia. No
se debe permitir la acumulación de la grasa en el
ventilador ni en el filtro.
d.
Use el tamaño de cacerola adecuado. Siempre use
utensilios de cocina apropiados para el tamaño del
elemento de la superficie.
No flambee alimentos bajo la campana no decorativa ni
trabaje con la llama abierta. Cuando está encendida, la
campana extractora atrae las llamas hacia el filtro.
¡Siempre existe el riesgo de incendio debido a los
depósitos en el filtro de grasa!
ATENCION
Solo para la ventilación general. No utilizar para la
extracción de sustancias y vapores peligrosos o
explosivos.
En el caso de que su ropa se prenda fuego, arrójese al
piso y ruede de inmediato para extinguir las llamas.
Sofoque las llamas provocadas por alimentos que se
prenden fuego, que no sean incendios ocasionados por

9 INSTRUCCIONES DE SEGURIDAD IMPORTANTES
LEA Y CONSERVE ESTAS INSTRUCCIONES
28
grasa, con bicarbonato de sodio. Nunca use agua en
incendios ocasionados al cocinar.
ADVERTENCIA
PARA REDUCIR EL RIESGO DE LESIONES A
PERSONAS EN CASO DE INCENDIO OCASIONADO
POR GRASA EN LA ESTUFA, SIGA ESTAS
INDICACIONES:
▯ SOFOQUE LAS LLAMAS con una tapa que ajuste
correctamente, una placa para galletas u otra bandeja
de metal; luego, apague la hornilla. ASEGÚRESE DE
PREVENIR LAS QUEMADURAS. Si las llamas no se
apagan de inmediato, EVACUE EL ÁREA Y LLAME AL
DEPARTAMENTO DE BOMBEROS.
▯ NUNCA LEVANTE UNA OLLA EN LLAMAS ya que se
puede quemar.
▯ NO USE AGUA, ni toallas o repasadores húmedos, ya
que puede ocasionar una violenta explosión por vapor.
▯ Use un extinguidor SÓLO si:
- Sabe que tiene un extinguidor Clase ABC y ya sabe
cómo usarlo.
- El incendio es pequeño y se limita al área donde se
originó.
- Alguien llamó al departamento de bomberos.
- Puede combatir el incendio de espaldas a una
salida.
Si es posible, no ponga el sistema de ventilación en
funcionamiento si hay un incendio en la placa. Pero no
atraviese el fuego con la mano para apagarla.
ADVERTENCIA
RIESGO DE INCENDIO
Los quemadores de gas en los que no se haya colocado
ningún recipiente para cocinar encima, generan gran
cantidad de calor durante su funcionamiento. Eso
puede dañar o incendiar el aparato de ventilación
situado encima. Utilizar los quemadores de gas
únicamente colocando encima recipientes para cocinar.
ADVERTENCIA
PELIGRO DE INCENDIO
Cuando se usan simultáneamente varios fogones de gas
se genera mucho calor. Eso puede dañar o incendiar el
aparato de ventilación situado encima. No utilizar
simultáneamente durante más de 15 minutos dos zonas
de cocción de gas con una llama grande. Un quemador
grande con más de 17,000 Btu/hr (5 kW) (wok) equivale
a la potencia de dos quemadores de gas.
ADVERTENCIA
PELIGRO DE INCENDIO
El aceite y la grasa calientes son altamente inflamables.
Nunca deje aceite ni grasa calientes sin supervisión.
Nunca extinga un incendio con agua. Apague la zona de
cocina. Sofoque las llamas con cuidado con una tapa,
una manta ignífuga o un objeto similar.
ADVERTENCIA
PELIGRO DE INCENDIO
Los depósitos de grasa en el filtro de grasa se pueden
incendiar.
Limpie el filtro de grasa por lo menos cada dos meses.
Nunca haga funcionar el equipo sin filtro de grasa.
ADVERTENCIA
PELIGRO DE INCENDIO
Los depósitos de grasa en el filtro de grasa se pueden
incendiar. Nunca trabaje con flama abierta cerca del
equipo (por ejemplo con platillos flameados). Solamente
instale el equipo cerca de un fogón para sustancias
sólidas (p. ej. madera o carbón) si está disponible una
cubierta cerrada que no se pueda quitar. No deben volar
las chispas.
Prevención de quemaduras
ADVERTENCIA
RIESGO DE QUEMADURAS
Al estar en funcionamiento, las partes accesibles se
calientan mucho. Nunca toque las partes calientes.
Mantenga alejados a los niños.
Seguridad de los niños
Cuando los niños tienen la edad adecuada para operar
el aparato, es responsabilidad de los padres o tutores
legales asegurarse de que reciban instrucciones sobre
prácticas seguras de personas calificadas.
Retire toda la cinta y el embalaje antes de usar el
electrodoméstico. Destruya el embalaje después de
desembalar el electrodoméstico. Nunca deje que los
niños jueguen con el material de embalaje.
No deje que nadie se suba, pare, incline, siente o
cuelgue de cualquier parte de un electrodoméstico,
especialmente una puerta, cajón calentador o cajón para
almacenamiento. Esto puede dañar el electrodoméstico,
y la unidad puede caerse y, posiblemente, causar
lesiones graves.
No permita que niños utilicen este electrodoméstico, a
menos que sean supervisados de cerca por un adulto.
Los niños y las mascotas no deben quedar solos o sin

29
9 INSTRUCCIONES DE SEGURIDAD IMPORTANTES
LEA Y CONSERVE ESTAS INSTRUCCIONES
vigilancia en el área donde se utilice el electrodoméstico.
Nunca se les debe permitir jugar cerca del
electrodoméstico, independientemente de que esté en
funcionamiento o no.
ATENCION
Los objetos de interés para niños no deben almacenarse
en un electrodoméstico, en gabinetes sobre un
electrodoméstico ni en la placa antisalpicaduras. Si los
niños se suben a un electrodoméstico para alcanzar
estos objetos, podrían sufrir lesiones graves.
Seguridad en la limpieza
ADVERTENCIA
Asegúrese de que todo el electrodoméstico (incluidos
los filtros de grasa y los focos, si corresponde) se haya
enfriado y la grasa se haya solidificado antes de intentar
limpiar cualquier parte del electrodoméstico.
No use limpiadores a vapor para limpiar el aparato.
Seguridad durante su uso
ADVERTENCIA
No repare ni reemplace ninguna parte del
electrodoméstico, a menos que esté específicamente
recomendado en este manual. Nunca modifique ni altere
la construcción del electrodoméstico. La instalación,
servicio técnico o mantenimiento incorrectos pueden
causar lesiones o daños materiales. Consulte este
manual para su orientación. Remita todas las
reparaciones a un centro de servicio técnico autorizado
por la fábrica.
ADVERTENCIA
RIESGO DE LESIONES
Los objetos situados sobre el aparato pueden caerse.
No colocar objetos sobre el aparato.
Instalación y mantenimiento adecuados
Pídale al instalador que le muestre la ubicación del
disyuntor o el fusible. Márquela para recordarla más
fácilmente.
Este electrodoméstico debe ser correctamente instalado
y conectado a tierra por un técnico calificado. Conéctelo
sólo a una toma de corriente eléctrica correctamente
conectada a tierra. Para obtener más información,
consulte las Instrucciones de instalación.
Este electrodoméstico ha sido diseñado para uso
doméstico normal únicamente. No está aprobado para
uso en exteriores. Consulte la garantía. Si tiene alguna
pregunta, comuníquese con el fabricante.
No almacene ni utilice productos químicos corrosivos,
vapores, materiales inflamables ni productos no
alimenticios dentro de este electrodoméstico ni cerca de
él. Está específicamente diseñado para calentar o
cocinar alimentos. El uso de productos químicos
corrosivos al calentar o limpiar dañará el
electrodoméstico y podría causar lesiones.
No utilice este electrodoméstico si no funciona
correctamente o si ha sido dañado. Comuníquese con
un centro de servicio técnico autorizado.
No repare ni cambie ninguna parte del electrodoméstico,
a menos que se recomiende específicamente en este
manual. Remita todas las reparaciones a un centro de
servicio técnico autorizado por la fábrica.
ATENCION
La grasa acumulada en los filtros puede volver a
derretirse y entrar en la abertura de ventilación.
ATENCION
Apague la alimentación eléctrica en el disyuntor antes de
retirar un foco dañado. No toque los focos
inmediatamente después de que hayan estado en uso.
Los focos permanecen calientes durante varios minutos.
ADVERTENCIA
Asegúrese de que el electrodoméstico y las luces se
hayan enfriado, y de que la alimentación eléctrica del
electrodoméstico esté apagada antes de cambiar el (los)
foco(s). No hacerlo podría ocasionar una descarga
eléctrica o quemaduras. La lente (si viene incorporada)
debe estar en su lugar al usar el electrodoméstico. La
lente (si viene incorporada) sirve para proteger el foco
contra roturas. La lente (si viene incorporada) es de
vidrio. Manipúlela con cuidado para que no se rompa. El
vidrio roto podría causar una lesión.
Las superficies ocultas pueden tener bordes filosos.
Proceda con cuidado al intentar tomar el
electrodoméstico por la parte trasera o desde abajo.
ADVERTENCIA
Cuando se utiliza la campana en modo de aire de
escape simultáneamente con un quemador diferente
que también usa la misma chimenea (como
calentadores a gas, aceite o carbón, calentadores de
flujo continuo, calentadores de agua) se debe asegurar
que haya un suministro de aire fresco suficiente para las
necesidades de combustión del quemador.
9 INSTRUCCIONES DE SEGURIDAD IMPORTANTES
LEA Y CONSERVE ESTAS INSTRUCCIONES
30
La operación segura es posible siempre que la
subpresión de la habitación donde está instalado el
quemador no supere los 4 Pa (0.04 mbar).
Esto es posible si el aire de combustión puede circular a
través de aberturas que no puedan trabarse, como ser
en puertas y ventanas, y a través de cajas de entrada/
salida de aire en la pared, o mediante otras medidas
técnicas, como enclavamiento recíproco, etc.
ADVERTENCIA
Evite la intoxicación por monóxido de carbono:
proporcione una entrada de aire suficiente para que los
gases de la combustión no vuelvan a ingresar en la
habitación.
Una caja de entrada/salida de aire en la pared por sí
sola no garantiza que no se superará el valor límite.
Nota: Al evaluar el requisito total, se debe tener en
cuenta el sistema de ventilación combinado para todo
el hogar. Esta norma no se aplica al uso de aparatos de
cocina, como parrillas y hornos.
Advertencias en virtud de
la Proposición 65
Este producto puede contener un químico que el
Estado de California reconoce como potencialmente
cancerígeno o causante de daños reproductivos. Por
tanto, su producto debe llevar en su embalaje la
siguiente etiqueta de confor-midad con la legislación
de California:
ADVERTENCIA EN VIRTUD DE LA PROPOSICIÓN 65
DEL ESTADO DE CALIFORNIA:
ADVERTENCIA
Cáncer y daño reproductivo - www.P65Warnings.ca.gov.
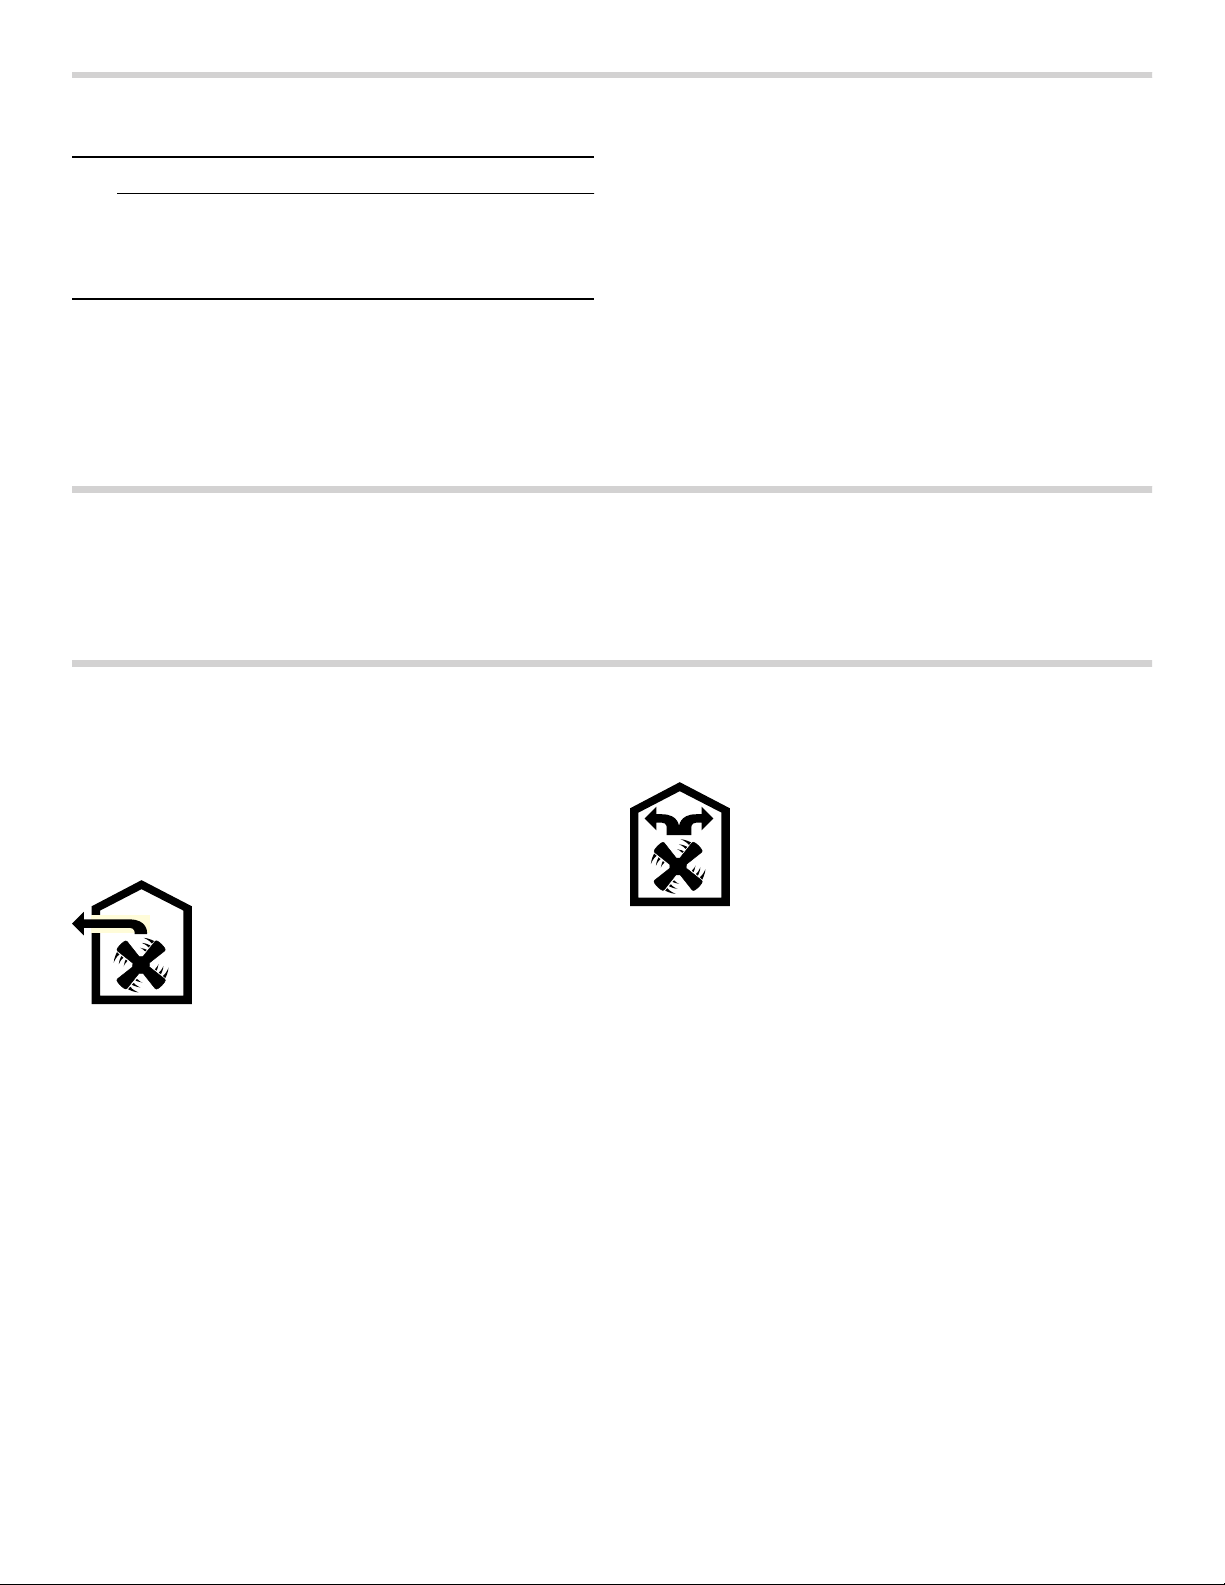
31
Causas de daños
9 ATENCION
Peligro de daños por corrosión. Encender siempre
el aparato cuando se vaya a cocinar con el fin de
evitar la formación de agua condensada. El agua
condensada puede conllevar daños por corrosión.
Cambiar de inmediato las lámparas defectuosas para
evitar una sobrecarga en las demás.
Peligro de daños por humedad que penetre en el
sistema eléctrico. Nunca limpie los elementos de
operación con trapos mojados.
Daño en la superficie por limpieza inadecuada. Limpie
las superficies de acero inoxidable solamente en
dirección del tallado original. No utilice limpiador para
acero inoxidable para elementos de servicio.
Daño en la superficie por productos de limpieza
agresivos o por frotación. Nunca use productos de
limpieza agresivos o por frotación.
Peligro de daños por recirculación del vapor
condensado. Instalar el canal de salida de aire del
aparato ligeramente inclinado hacia abajo (1° de
desnivel).
Protección del medio ambiente
Saque el equipo de su empaque y elimine éste de forma
ecológica.
Modos de funcionamiento
Este equipo se puede utilizar en funcionamiento con
extracción de aire o con funcionamiento de circulación
de aire.
Funcionamiento con extracción de aire
Nota: La emisión de los gases no se debe canalizar
hacia una chimenea de humo o de gases de escape que
esté en funcionamiento, ni hacia un tiro que sirva para
sacar el aire de las habitaciones donde haya equipos
con fuego.
▯ Si los gases de escape se van a canalizar hacia una
chimenea de humo o de gases de escape que no esté
en funcionamiento, se tiene que conseguir la
aprobación del especialista en chimeneas
correspondiente.
▯ Si las emisiones de gases se canalizan a través del
muro externo, se tiene que utilizar una caja
telescópica para muros.
Funcionamiento en modo de recirculación
Nota: Para neutralizar los olores durante el
funcionamiento en modo de recirculación, debe
instalarse un filtro de carbón activado. Para conocer
todas las posibilidades que ofrece el funcionamiento en
modo de recirculación del aparato, consulte la
documentación correspondiente o consúltelo en un
comercio especializado. Los accesorios necesarios para
tal fin pueden adquirirse en comercios especializados,
en el Servicio de Asistencia Técnica o en la tienda en
línea. Los códigos de los accesorios figuran al final de
las instrucciones de uso.
El aire aspirado se depura a través de
filtros antigrasa y se evacua al exterior
mediante un sistema de conductos.
El aire aspirado se depura a través de los
filtros antigrasa y de un filtro de carbón
activado y se vuelve a suministrar a la
cocina.

32
Operar el equipo
Este manual es válido para distintas versiones del
aparato. Es posible que se describan características de
equipamiento que sean aplicables a su aparato.
Nota: Encender la campana extractora al empezar a
cocinar y apagarla unos minutos después de haber
finalizado con las tareas de cocción. De esta manera se
neutralizarán con gran efectividad los vapores que se
desprenden al cocinar.
Tablero de control
Ajustar el ventilador
Nota: Ajustar siempre la potencia del ventilador a las
condiciones actuales. Si se forma mucho vapor,
seleccionar también una potencia de ventilación alta.
Conexión
▯ Oprimir la tecla "+".
El nivel de ventilación actual se representa en el panel
indicador mediante barras.
▯ Oprimir las teclas "+" o "-" para modificar el nivel de
ventilación.
Desconexión
Opimir repetidamente la tecla "-" hasta que el ventilador
se apague.
Iluminación
La iluminación se puede encender y apagar de forma
independiente de la ventilación.
1.
Oprimir la tecla "Light".
La iluminación se enciende.
2.
Oprimir de nuevo la tecla "Light".
El brillo aumenta.
3.
Oprimir por tecera vez la tecla "Light".
La iluminación se apaga.
Indicador de saturación
La saturación del filtro metálico antigrasa (después de
30 horas de funcionamiento del ventilador) o del filtro de
carbono activo (después de 120 horas de
funcionamiento del ventilador) se muestran en el campo
de lectura:
▯ Filtro metálico antigrasa: En el campo de lectura se
muestra "clean grease filter".
▯ Filtro de carbono activo: En el campo de lectura se
muestra "replace charcoal filter".
Ahora se deben limpiar los filtros metálicos antigrasa o
se debe sustituir el filtro de carbono activo sin demora.
La limpieza del filtro metálico antigrasa se explica en el
capítulo Limpieza y mantenimiento.
Restablecimiento de los indicadores de saturación
▯ Filtro metálico antigrasa: Mantener pulsada la tecla
"+" durante 5 segundos.
▯ Filtro de carbono activo: Mantener pulsada la tecla "-"
durante 5 segundos.
Cambiar el indicador para el funcionamiento en modo
de recirculación
Para el funcionamiento en modo de recirculación se ha
de cambiar el indicador del control electrónico de la
forma correspondiente:
▯ La campana extractora debe estar conectada a la red
eléctrica y apagada.
▯ Oprimir simultáneamente las teclas "+" y "-" hasta que
se ilumine "Able" en el panel indicador.
▯ Al pulsar repetidamente la combinación de teclas, el
indicador del control electrónico cambia de nuevo al
funcionamiento en salida de aire al exterior. En el
panel indicador aparece "None".
Reloj de alarma
El reloj de alarma no afecta a las funciones de la
campana extractora. La duración del reloj de alarma se
puede ajustar desde 1 hasta 60 minutos. El preajuste es
de 10 minutos.
1.
Oprimir la tecla "Timer".
En el panel indicador parpadea 10.
2.
Ajustar la duración deseada con las teclas "+" y "-".
El tiempo programado se aplica transcurridos 5
segundos.
Después de transcurrir el tiempo suena una señal
acústica y en el panel indicador se muestra "End" por
3 segundos.
Nota: Para finalizar el reloj de alarma antes de tiempo,
oprimir cualquier tecla .
Explicación
1 Reducir la velocidad del ventilador
2 Aumentar la velocidad del ventilador
3 Panel indicador
4 Conectar la iluminación
5 Reloj de alarma

33
Desconexión automática
El tiempo de desconexión automática es de 10 minutos
y no puede modificarse.
1.
Seleccionar el nivel del ventilador.
2.
Pulsar "Timer" durante 3 segundos.
La ventilación y la iluminación se apagarán
automáticamente una vez finalizado ese tiempo. En la
pantalla se muestra "End".
La desconexión automática del ventilador se puede
interrumpir en cualquier momento pulsando cualquier
tecla.
Señal acústica
Conectar la señal acústica
▯ Mantener pulsada la tecla "Light" durante 5 segundos.
▯ Suena una señal acústica y en el panel indicador se
muestra "Snd" durante 3 segundos.
Desconectar la señal acústica
▯ Mantener pulsada la tecla "Light" durante 5 segundos.
▯ En el panel indicador aparece "Snd" durante 3
segundos.
Protección contra sobrecalentamiento
El aparato está equipado con una protección contra
sobrecalentamiento. Si en el aparato se presentan
temperaturas demasiado elevadas, este se conecta
automáticamente a la velocidad más alta del ventilador
hasta que la temperatura haya disminuido nuevamente.
▯ Si la campana está encendida, se ajusta
automáticamente la velocidad más alta del ventilador.
Si la temperatura disminuye nuevamente, el aparato
se conecta a la velocidad del ventilador previamente
seleccionada.
▯ Si la campana está apagada, el aparato se conecta
automáticamente a la velocidad más alta del
ventilador. Si la temperatura disminuye nuevamente, el
aparato se apaga automáticamente.
▯ Mientras esté activa la protección contra
sobrecalentamiento se mostrará "Auto" en el panel
indicador. La intensidad de la ventilación no se podrá
reducir en este momento.
Limpieza y mantenimiento
9 ADVERTENCIA
ATENCIÓN
To avoid risk of fire and explosion do not use
flammable liquids or solvents. Always unplug or
disconnect the appliance from the power supply
before servicing.
No use limpiadores a vapor para limpiar el aparato.
Las superficies ocultas pueden tener bordes filosos.
Proceda con cuidado al intentar tomar el
electrodoméstico por la parte trasera o desde abajo.
9 ADVERTENCIA
PELIGRO DE QUEMADURAS
El aparato se calienta durante el funcionamiento,
sobre todo en la zona de las lámparas. Antes de
proceder a la limpieza del aparato, dejar que se
enfríe.
9 ADVERTENCIA
PELIGRO DE DESCARGA ELÉCTRICA
Si penetra humedad puede causar una descarga
eléctrica. Limpiar el aparato solo con un paño
húmedo. Antes de la limpieza hay que desconectar
el enchufe o los fusibles de la caja de fusibles.
Productos de limpieza
A fin de no dañar las distintas superficies con productos
de limpieza inapropiados, consultar las indicaciones de
la tabla. No usar en ningún caso:
▯ productos de limpieza abrasivos o corrosivos
▯ productos de limpieza con un alto contenido
alcohólico
▯ estropajos o esponjas de fibra dura
▯ limpiadores de alta presión o por chorro de vapor
Lavar a fondo las bayetas nuevas antes de usarlas.
Respetar todas las instrucciones y avisos que incluyen
los productos de limpieza.
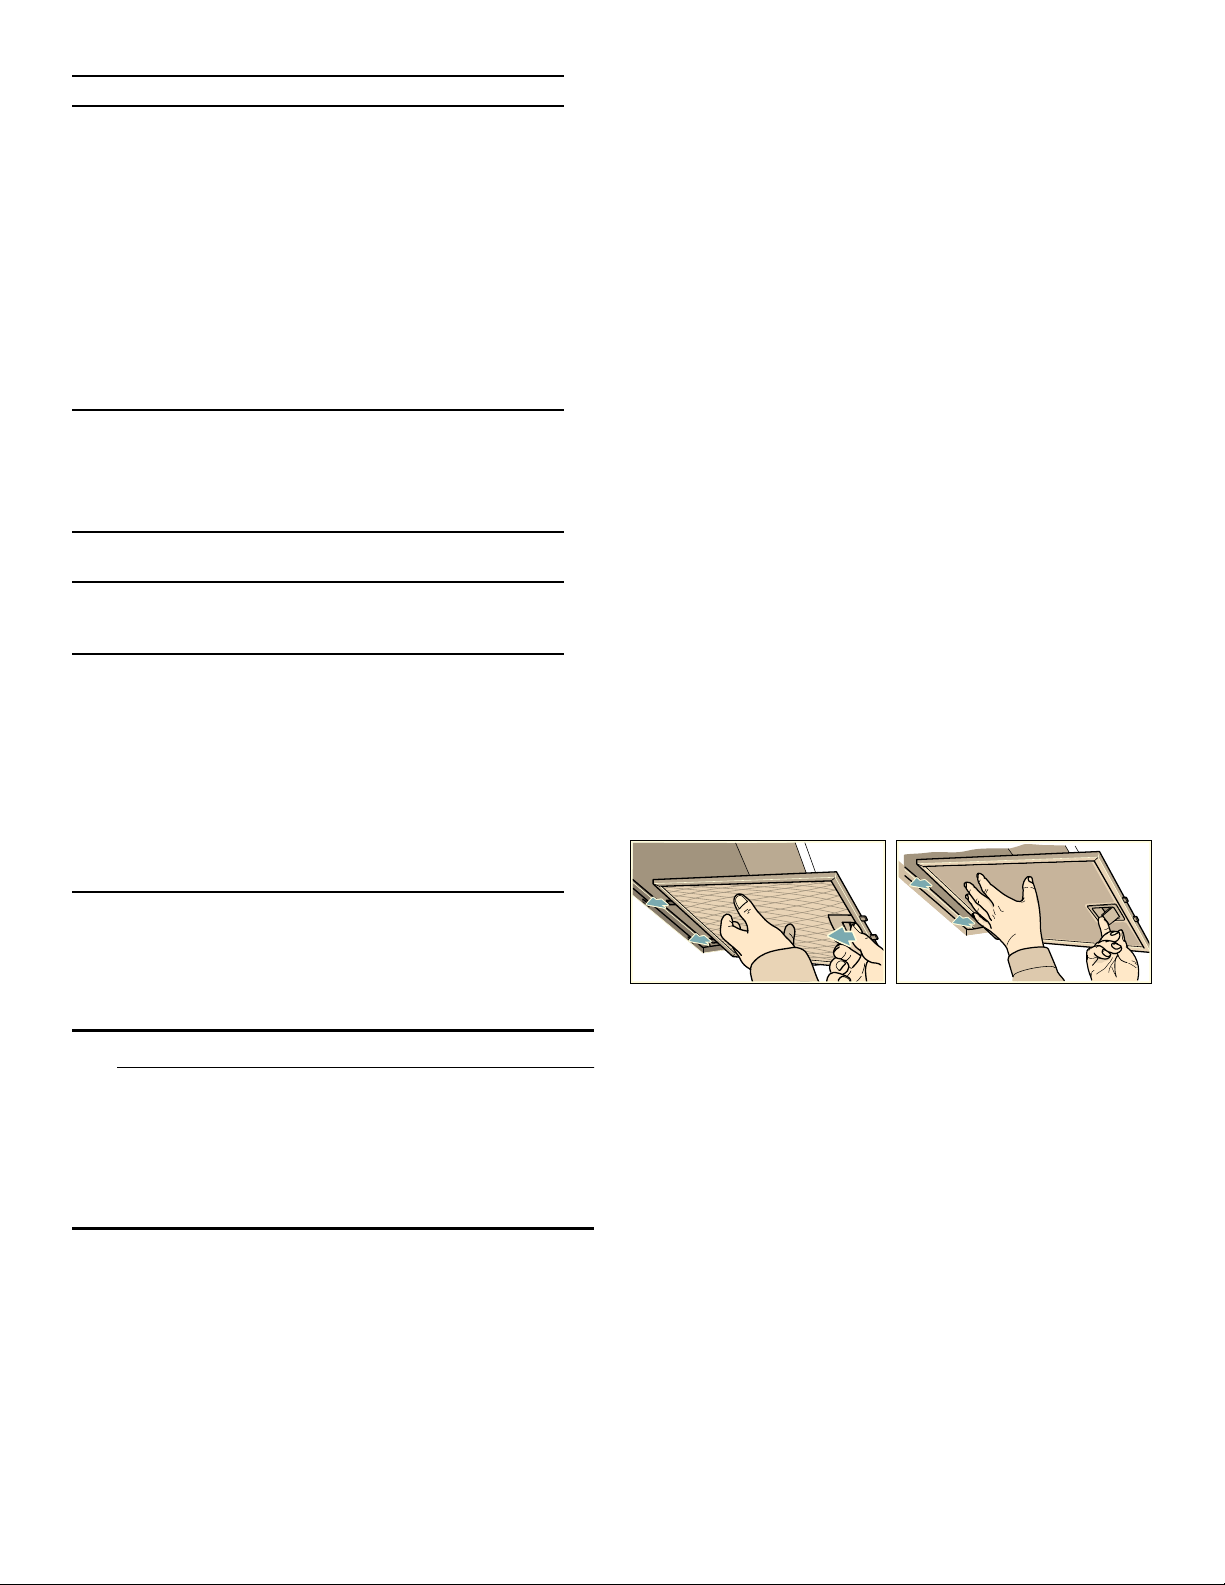
34
Limpiar los filtros metálicos para grasa
Este manual es válido para distintas versiones del
aparato. Es posible que se describan características de
equipamiento que sean aplicables a su aparato.
9 ADVERTENCIA
PELIGRO DE INCENDIO
Los depósitos de grasa en el filtro de grasa se
pueden incendiar.
Limpie el filtro de grasa por lo menos cada dos
meses.
Nunca haga funcionar el equipo sin filtro de grasa.
Notas
▯ No use productos de limpieza agresivos, o que
contengan ácidos o lejía.
▯ Al limpiar los filtros metálicos para grasa, limpie
también el soporte de los filtros en el equipo con un
trapo húmedo.
▯ Los filtros metálicos los puede lavar en la máquina
lavavajillas o a mano.
A mano:
Nota: En caso de suciedad rebelde, se puede usar un
solvente especial para la grasa. Este producto se puede
solicitar en la tienda en línea.
▯ Deje que los filtros metálicos para grasa se aflojen en
agua caliente con jabón para trastes .
▯ Utilice un cepillo para lavarlos, y después enjuague
bien los filtros.
▯ Permita que se escurran bien los filtros metálicos.
En el lavavajillas:
Nota: La limpieza en el lavavajillas podría conllevar
ligeras decoloraciones. Esto no afecta al funcionamiento
normal de los filtros de metal antigrasa.
▯ No lavar los filtros de metal antigrasa junto con el
resto de la vajilla si están muy sucios.
▯ Colocar debidamente los filtros de metal antigrasa en
el lavavajillas. Los filtros de metal antigrasa no deben
quedar aprisionados.
Desmontar el filtro de metal antigrasa
1.
Quitar el bloqueo y abatir el filtro de metal antigrasa.
Agarrar por debajo el filtro de metal antigrasa con la
otra mano.
2.
Extraer el filtro de metal antigrasa del soporte.
Notas
▯ La grasa puede acumularse en la parte inferior del
filtro de metal antigrasa.
▯ Sujetar el filtro de metal antigrasa en posición
horizontal para evitar que gotee grasa.
3.
Limpiar el filtro de metal antigrasa.
Montar el filtro de metal antigrasa
1.
Colocar el filtro de metal antigrasa.
Agarrar por debajo el filtro de metal antigrasa con la
otra mano.
2.
Plegar hacia arriba el filtro de metal antigrasa y fijar el
bloqueo.
Zona Productos de limpieza
Acero inoxidable Agua caliente con jabón:
Limpiar con una bayeta y secar
con un paño suave.
Limpiar las superficies de acero
inoxidable siempre en la direc-
ción del pulido.
Puede adquirir productos de lim-
pieza de acero especiales en el
Servicio de asistencia técnica o
en comercios especializados.
Aplicar una capa muy fina del
producto de limpieza con un
paño suave.
Superficies barni-
zadas
Agua caliente con jabón:
Limpiar con una bayeta húmeda y
secar con un paño suave.
No usar limpiadores para acero
inoxidable.
Aluminio y plás-
tico
Limpiacristales:
Limpiar con un paño suave.
Cristal Limpiacristales:
Limpiar con un paño suave. No
utilizar rascadores para vidrio.
Elementos de
mando
Agua caliente con jabón:
Limpiar con una bayeta húmeda y
secar con un paño suave.
Peligro de daños por humedad
en el interior del sistema electró-
nico. Elementos de mando: No
limpiarlos nunca con un paño
húmedo.
No usar limpiadores para acero
inoxidable.

35
¿Qué hacer en caso de fallas?
Muchas veces podrá solucionar fácilmente usted mismo
los fallos que aparezcan. Antes de llamar al servicio
técnico, tome en cuenta las siguientes indicaciones.
9 ADVERTENCIA
PELIGRO DE DESCARGA ELÉCTRICA
Las reparaciones no profesionales son peligrosas.
Solamente un técnico de servicio al cliente
entrenado por nosotros puede realizar las
reparaciones y cambiar las conexiones dañadas. Si
el equipo presenta defectos, saque el enchufe o
desconecte el fusible de la caja de fusibles.
Comuníquese con el servicio al cliente.
--------
Sustituir las lámparas
9 ADVERTENCIA
PELIGRO DE DESCARGA ELÉCTRICA
Al sustituir las lámparas, los contactos del
portalámparas están con carga de corriente. Antes
de sustituirla, desenchufar el aparato de la red o
desconectar el fusible de la caja de fusibles.
¡Importante! Utilizar exclusivamente lámparas de
iluminación del mismo tipo y potencia (véase el
portalámparas o la placa de características).
Sustituir las lámparas halógenas
Nota: Las lámparas halógenas no deben agarrase por
el foco para su colocación. Para colocar las lámparas
halógenas, utilizar un paño limpio.
1.
Dejar que las lámparas se enfríen.
2.
Retirar con cuidado el anillo de la lámpara con una
herramienta adecuada.
3.
Extraer la lámpara y sustituirla por otra del mismo tipo.
4.
Colocar la tapa de la lámpara.
5.
Conectar el enchufe a la red eléctrica o conectar de
nuevo el fusible.
Sustituir la lámpara por otra del mismo tipo:
Voltaje: 120 V
Potencia: máx. 40 W
Base: G9
Falla Posible
causa
Solución
El equipo no
funciona.
Corte de luz Verificar si están funcio-
nando los demás apara-
tos de la cocina
Fusible defec-
tuoso
Revisar en la caja de
fusibles si está bien el
fusible del equipo
La ilumina-
ción no fun-
ciona.
Las lámparas
están daña-
das.
Sustituir las lámparas,
ver el capítulo «Sustitu-
ción de lámparas».

36
Servicio al Cliente
Nuestro Servicio de Asistencia Técnica se encuentra a
su disposición siempre que necesite la reparación de su
aparato. Nosotros encontraremos la solución adecuada,
incluso para evitar desplazamientos innecesarios de los
técnicos.
Indicar el número de producto (E) y el de fabricación
(FD) para obtener un asesoramiento calificado. La placa
de características con la numeración se encuentra en el
interior del aparato (desmontar el filtro de metal
antigrasa).
A fin de evitarse molestias llegado el momento, le
recomendamos anotar los datos de su aparato así como
el número de teléfono del Servicio de Asistencia Técnica
en el siguiente apartado.
Recuerde que, en caso de manejo incorrecto, la
asistencia del personal del Servicio de Asistencia
Técnica no es gratuita, incluso aunque esté dentro del
período de garantía.
Consulte el directorio de Servicio al cliente adjunto para
obtener los datos de contacto para todos los países.
Confíe en la competencia de nuestros fabricantes. Esto
asegurará que las reparaciones sean realizadas por
técnicos de servicio capacitados equipados con piezas
de repuesto originales para su electrodoméstico.
Accesorio
(no incluido de serie)
N.º de producto (E) N.° de fabricación (FD)
Servicio de Asistencia
Técnica O
Accesorio Número de artículo
Módulo de recircula-
ción
HCREC5UC
Filtro de carbono HCIFILTUC
revestimientos de la
chimenea
HCBEXT5UC

37
DECLARACIÓN DE GARANTÍA LIMITADA DEL PRODUCTO
Qué cubre esta garantía y a quiénes se
aplica
La garantía limitada otorgada por BSH Home Appliances
(«Bosch») en esta Declaración de Garantía Limitada del
Producto se aplica únicamente al aparato Bosch vendido a
usted («Producto»), el primer comprador usuario,
condicionada estrictamente a que el Producto haya sido
comprado:
• Para uso doméstico normal (no comercial) y haya sido
utilizado en todo momento únicamente para fines
domésticos normales.
• Nuevo en una tienda minorista autorizada de BSH o
directamente de BSH (que no sea un producto de
exhibición ni un producto vendido «en las condiciones
en que se encuentre» ni un modelo devuelto
anteriormente) y que no esté destinado a reventa ni
uso comercial.
• Dentro de los Estados Unidos o Canadá, y que haya
permanecido en todo momento dentro del país de
compra original.
La garantía descrita aquí es válida para el comprador
original del producto cubierto por esta garantía y para
todo usuario posterior del producto, adquirido para un
uso doméstico, durante el término de la garantía.
Asegurarse de registrar su producto; si bien no es
necesario para hacer efectiva la cobertura de la garantía,
es la mejor manera de que Bosch pueda enviar una
notificación en el caso poco probable de que se emita un
aviso de seguridad o se retire del mercado un producto.
Plazo de vigencia de la garantía
Bosch garantiza que el producto no tiene defectos de
materiales ni de mano de obra durante un período de
trescientos sesenta y cinco (365) días a partir de la fecha
de entrega original. Dicho período comienza a contar a
partir de la fecha de entrega original y no se interrumpirá,
dejará sin efecto, extenderá ni suspenderá por ningún
motivo. También se garantiza que este Producto no
presenta defectos estéticos en el material ni en la mano
de obra (como rayas en el acero inoxidable,
imperfecciones en la pintura/porcelana, desportilladuras,
astillas, abolladuras ni ningún otro daño en el acabado)
del Producto durante un período de treinta (30) días
desde la fecha de entrega o fecha de cierre para una
nueva construcción. Se excluyen de esta garantía por
defectos estéticos las variaciones leves de color que se
deban a diferencias inherentes a las piezas pintadas y de
porcelana, así como diferencias provocadas por la
iluminación de la cocina, la ubicación del producto u otros
factores similares. Se excluye específicamente de esta
garantía por defectos estéticos cualquier
electrodoméstico en exposición, de piso, vendido “en el
estado en que se encuentra” o de segunda selección.
Reparación/Reemplazo como único recurso
Durante el período de esta garantía, Bosch o uno de sus
proveedores de servicio técnico autorizados reparará el
producto sin cargo (sujeto a determinadas limitaciones
especificadas en el presente) si se prueba que el producto
ha sido fabricado con un defecto en los materiales o en la
mano de obra. Si se ha intentado de manera razonable
reparar el Producto sin éxito, Bosch reemplazará el
Producto (es posible llegar a disponer de modelos
mejorados, a entera discreción de Bosch, por un cargo
adicional). Esta garantía no establece que las piezas
dañadas o defectuosas se reemplacen por piezas de
diferente tipo o diseño a las originales. Todas las partes y
los componentes retirados serán propiedad de Bosch, a su
entera discreción. Todas las partes reemplazadas y/o
reparadas se considerarán como la parte original a los
fines de esta garantía y esta garantía no se extenderá con
respecto a dichas partes. En virtud del presente
documento, la exclusiva responsabilidad y obligación de
Bosch es únicamente reparar el Producto defectuoso de
fábrica, a través de un proveedor de servicio técnico
autorizado por Bosch, durante el horario normal de
oficina. Por cuestiones de seguridad y daños materiales,
Bosch recomienda categóricamente no intentar reparar el
Producto por cuenta propia ni usar un proveedor de
servicio técnico no autorizado; Bosch no tendrá ninguna
responsabilidad ni obligación por daños ocasionados por
reparaciones o trabajos realizados por un proveedor de
servicio técnico no autorizado. Los proveedores de
servicio técnico autorizados son aquellas personas o
compañías que han sido especialmente capacitadas para
manejar los productos de Bosch y que tienen, según el
criterio de Bosch, una reputación superior de servicio de
atención al cliente y capacidad técnica (tenga en cuenta
que son entidades independientes y no son agentes,
socias, afiliadas ni representantes de Bosch). Sin embargo,
llevar su producto a un taller de reparación que no esté
afiliado o a un distribuidor autorizado de Bosch no anulará
esta garantía. Además, el uso de piezas de terceros no
anulará esta garantía. Independientemente de lo
antedicho, Bosch no tendrá responsabilidad ni obligación
alguna por el Producto que se encuentre en un área
remota (a más de 100 millas de un proveedor de servicio
técnico autorizado) o en un lugar, área circundante o
entorno que no sean accesibles por medios razonables o
que sean peligrosos, hostiles o arriesgados; en ese caso, a
su solicitud, Bosch de todas maneras pagará por la mano
de obra y las partes, y enviará las partes al proveedor de
servicio técnico autorizado más cercano, pero el cliente
seguirá siendo totalmente responsable por el tiempo de
viaje y demás cargos especiales de la compañía de
servicio técnico, siempre que esta acepte realizar la visita
de servicio técnico. Además, en la medida en que haya
instalado el producto en una ubicación de difícil acceso o
haya instalado accesorios temporales o permanentes que
creen barreras para acceder o retirar el producto, Bosch
no incurrirá en ninguna responsabilidad por el trabajo o
los costos asociados con el traslado del producto o la
creación de acceso al producto para repararlo o
reemplazarlo. Todos estos costos serán responsabilidad
exclusiva de usted.

38
Producto fuera de garantía
Bosch no tiene obligación alguna, en virtud de la ley ni por
otro motivo, de otorgarle ninguna concesión, incluidos
reparaciones, prorrateos o reemplazo del Producto, con
posterioridad al vencimiento de la garantía.
Exclusiones de la garantía
La cobertura de garantía descrita en el presente
documento excluye todos los defectos o daños que no
fueron provocados directamente por Bosch, incluidos,
entre otros, alguno de los siguientes:
• Uso del Producto de maneras distintas del uso normal,
habitual y previsto (incluidos, entre otros, cualquier
forma de uso comercial, uso o almacenamiento en
exteriores de un producto diseñado para interiores,
uso del Producto en aeronaves o embarcaciones).
• Conducta indebida, negligencia, uso indebido, abuso,
accidentes, descuido, operación inadecuada, omisión
de mantenimiento, instalación inadecuada o
negligente, adulteración, omisión de seguir las
instrucciones de operación, manipulación inadecuada,
servicio técnico no autorizado (incluidos «arreglos» o
exploración de los mecanismos internos del aparato
realizados por uno mismo) por parte de cualquier
persona.
• Ajuste, alteración o modificación de cualquier tipo.
• Incumplimiento de los códigos, reglamentaciones o
leyes de electricidad, plomería y/o construcción
estatales, locales, municipales o de condado, incluida
la omisión de instalar el producto cumpliendo
estrictamente con los códigos y reglamentaciones
locales de construcción y protección contra incendios.
• Desgaste habitual, derrames de alimentos, líquidos,
acumulaciones de grasa u otras sustancias que se
acumulen sobre el Producto, dentro o alrededor de
este.
• Cualquier fuerza y factor externo, elemental y/o
ambiental, incluidos, entre otros, lluvia, viento, arena,
inundaciones, incendios, aludes de lodo,
temperaturas bajas extremas, humedad excesiva o
exposición prolongada a la humedad, rayos,
sobrecargas eléctricas, fallos estructurales alrededor
del aparato y catástrofes naturales.
• Llamadas al servicio técnico para subsanar la
Producto, reemplazar los fusibles domésticos o
subsanar el cableado o las instalaciones de fontanería.
• Extracción y sustitución de recortes o paneles
decorativos que interfieran con el mantenimiento del
Producto.
• Daños o defectos provocados por la mano de obra o
piezas instaladas por cualquier proveedor de servicio
técnico no autorizado, a menos que este último haya
sido aprobado por Bosch antes de realizar el servicio.
En ningún caso Bosch tendrá responsabilidad ni
obligación alguna por los daños ocasionados a los bienes
circundantes, incluidos los gabinetes, pisos, techos y
demás estructuras u objetos que se encuentren alrededor
del Producto. También se excluyen de esta garantía los
Productos en los cuales los números de serie hayan sido
alterados, modificados o eliminados; las visitas del servicio
técnico para enseñarle a usar el Producto o las visitas en
las que se determine que no hay ningún problema con el
Producto; la corrección de los problemas de instalación
(usted es el único responsable de cualquier estructura y
soporte del Producto, incluidas todas las instalaciones de
electricidad y plomería o demás instalaciones de
conexión, de la correcta instalación en bases/pisos, y de
cualquier alteración, incluidos, a modo de ejemplo,
gabinetes, paredes, pisos, repisas, etc.); y el
restablecimiento de breakers o fusibles.
EN LA MEDIDA PERMITIDA POR LA LEY, ESTA
GARANTÍA ESTABLECE SUS RECURSOS EXCLUSIVOS
CON RESPECTO AL PRODUCTO,
INDEPENDIENTEMENTE DE QUE LA RECLAMACIÓN
SEA CONTRACTUAL O EXTRACONTRACTUAL
(INCLUIDA LA RESPONSABILIDAD OBJETIVA O LA
NEGLIGENCIA), O DE CUALQUIER OTRO TIPO. ESTA
GARANTÍA REEMPLAZA TODAS LAS DEMÁS
GARANTÍAS EXPRESAS O IMPLÍCITAS. LAS GARANTÍAS
IMPLÍCITAS POR LEY, YA SEA DE COMERCIABILIDAD O
DE APTITUD PARA UN FIN ESPECÍFICO, O DE
CUALQUIER OTRO TIPO, TENDRÁN VIGENCIA
ÚNICAMENTE POR EL PERÍODO DE VIGENCIA DE LA
PRESENTE GARANTÍA LIMITADA EXPRESA. EN NINGÚN
CASO SERÁ EL FABRICANTE RESPONSABLE POR LOS
DAÑOS CONSECUENTES, ESPECIALES, Y/O DAÑOS
PUNITIVOS, PÉRDIDAS O GASTOS, INCLUIDOS, ENTRE
OTROS, TIEMPO FUERA DEL TRABAJO, HOTELES O
COMIDAS EN RESTAURANTES, GASTOS DE
REMODELACIÓN QUE SUPEREN LOS DAÑOS
DIRECTOS, QUE DEFINITIVAMENTE HAYAN SIDO
PROVOCADOS DE MANERA EXCLUSIVA POR BOSCH O
DE OTRA MANERA. ALGUNOS ESTADOS NO PERMITEN
LA EXCLUSIÓN O LIMITACIÓN DE DAÑOS
INCIDENTALES O CONSECUENTES, Y ALGUNOS
ESTADOS NO PERMITEN LIMITACIONES CON
RESPECTO AL PLAZO DE VIGENCIA DE UNA GARANTÍA
IMPLÍCITA; POR LO TANTO, ES POSIBLE QUE LAS
EXCLUSIONES O LIMITACIONES PRECEDENTES NO SE
APLIQUEN. ESTA GARANTÍA OTORGA DERECHOS
LEGALES ESPECÍFICOS, Y TAMBIÉN PUEDEN
CORRESPONDERLE OTROS DERECHOS QUE PUEDEN
VARIAR SEGÚN EL ESTADO.
Ningún intento de alterar, modificar o enmendar la
presente garantía será válido, a menos que fuera
autorizado por escrito por un ejecutivo de BSH.
Obtener el servicio técnico de la garantía
Para obtener el servicio de garantía para su producto,
debe comunicarse con el Servicio de asistencia técnica de
Bosch al 1-800-944-2904 para programar una reparación.
Información del producto
Para una referencia rápida, copie la información que se
encuentra a continuación de la placa de características.
Conservar su factura y/o documentos de entrega para la
validación de la garantía.
Número de modelo (E-Nr.)
Número de fabricación (FD)
Fecha de entrega


1901 Main Street, Suite 600 • Irvine, CA 92614 • 800-944-2904
www.bosch-home.com • © 2023 BSH Home Appliances
*9001126907*
9001126907 01/23
LI32DB
030130