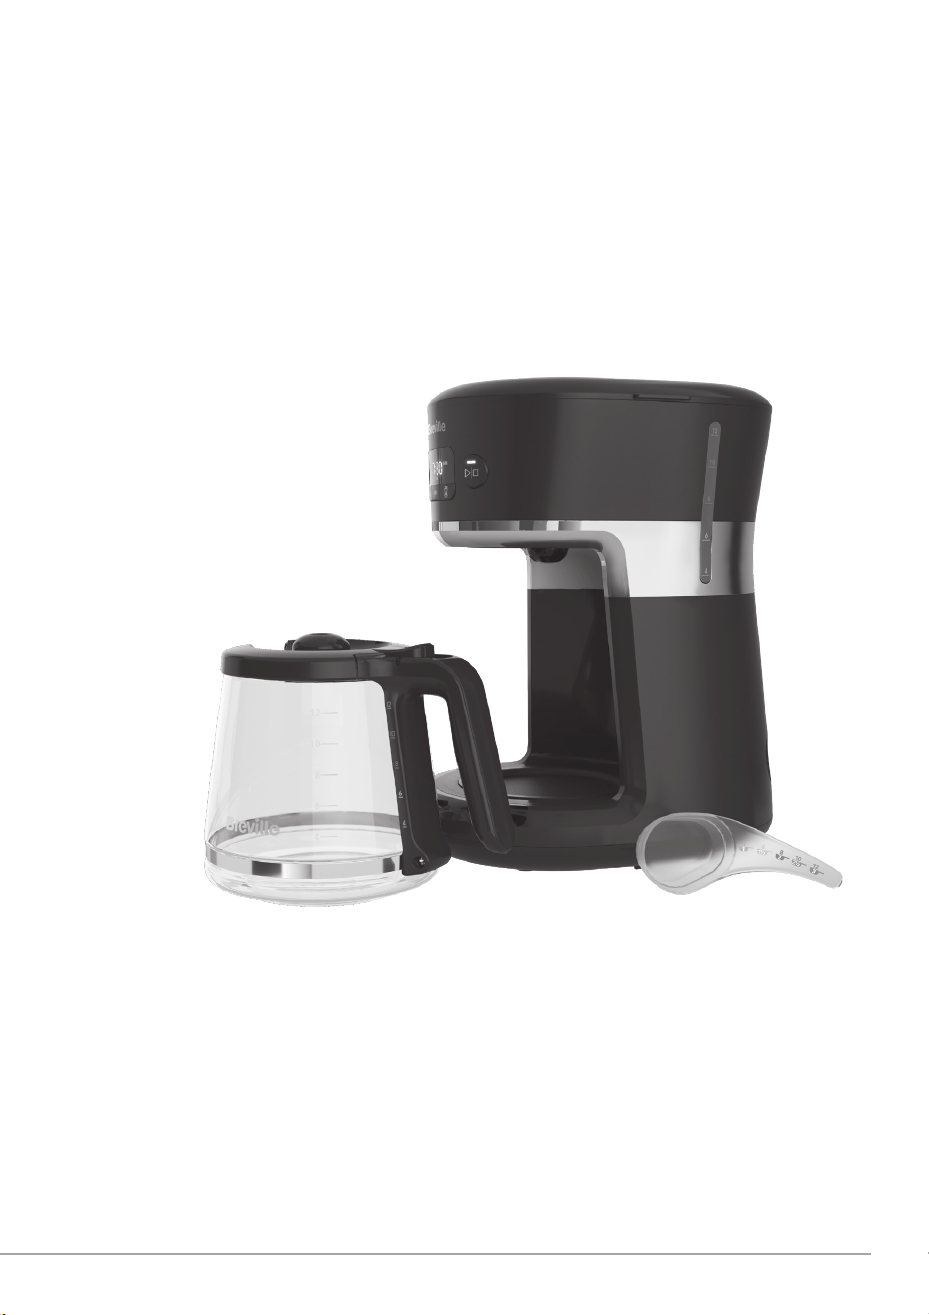
12 CUP PROGRAMMABLE
COFFEE MAKER
VCF114/VCF115/VCF116
VCF114_VCF115_VCF116_19EM2 (UK).indd 1 3/20/19 15:23

3
2
Do not use this appliance
outdoors.
Never immerse the main body
of the appliance or power
cord and plug in water or
any other liquid. Wash brew
basket, re-usable lters,
carafe and carafe lid in a
solution of hot water and mild
liquid soap. Dry thoroughly.
See Routine Cleaning Section.
! This appliance generates heat during
use. Adequate precaution must be taken
to prevent the risk of burns, scalds, res
or other damage to persons or property
caused by touching the exterior whilst in
use or during cooling.
! Always ensure that hands are dry before
handling the plug or switching on the
appliance.
! Always use the appliance on a stable,
secure, dry and level surface.
! This appliance must not be placed on or
near any potentially hot surfaces (such
as a gas or electric hob).
! Do not use the appliance if it has been
dropped, if there are any visible signs of
damage or if it is leaking.
! Ensure the appliance is switched off and
unplugged from the supply socket after
use and before cleaning.
! Always switch off, unplug and allow
to cool before removing/tting parts,
cleaning or storing.
! Never let the power cord hang over the
edge of a worktop, touch hot surfaces or
become knotted, trapped or pinched.
! The heating element surface is subject
to residual heat after use
! The coffee-maker shall not be placed in
a cabinet when in use.
! Cleaning and user maintenance
shall not be made by children without
supervision.
PRODUCT SAFETY
READ CAREFULLY AND KEEP
FOR FUTURE REFERENCE
This appliance can be used
by children aged from 8 years
and above and persons with
reduced physical, sensory
or mental capabilities or
lack of experience and
knowledge if they have
been given supervision or
instruction concerning use
of the appliance in a safe
way and understand the
hazards involved. Children
shall not play with the
appliance. Cleaning and
user maintenance shall
not be made by children
unless they are older than
8 and supervised. Keep the
appliance and its cord out of
reach of children aged less
than 8 years.
If the supply cord is damaged,
it must be replaced by the
manufacturer, its service agent
or similarly qualied persons
in order to avoid a hazard.
The carafe is made of glass.
Always inspect for chips,
cracks or any other damage.
Do not use the glass carafe
if it is damaged, as it may
shatter during use.
Never use this appliance
for anything other than its
intended use. This appliance
is for household use only.
Due to our policy of continuous improvement, the actual product may differ slightly from the one illustrated in these instructions.
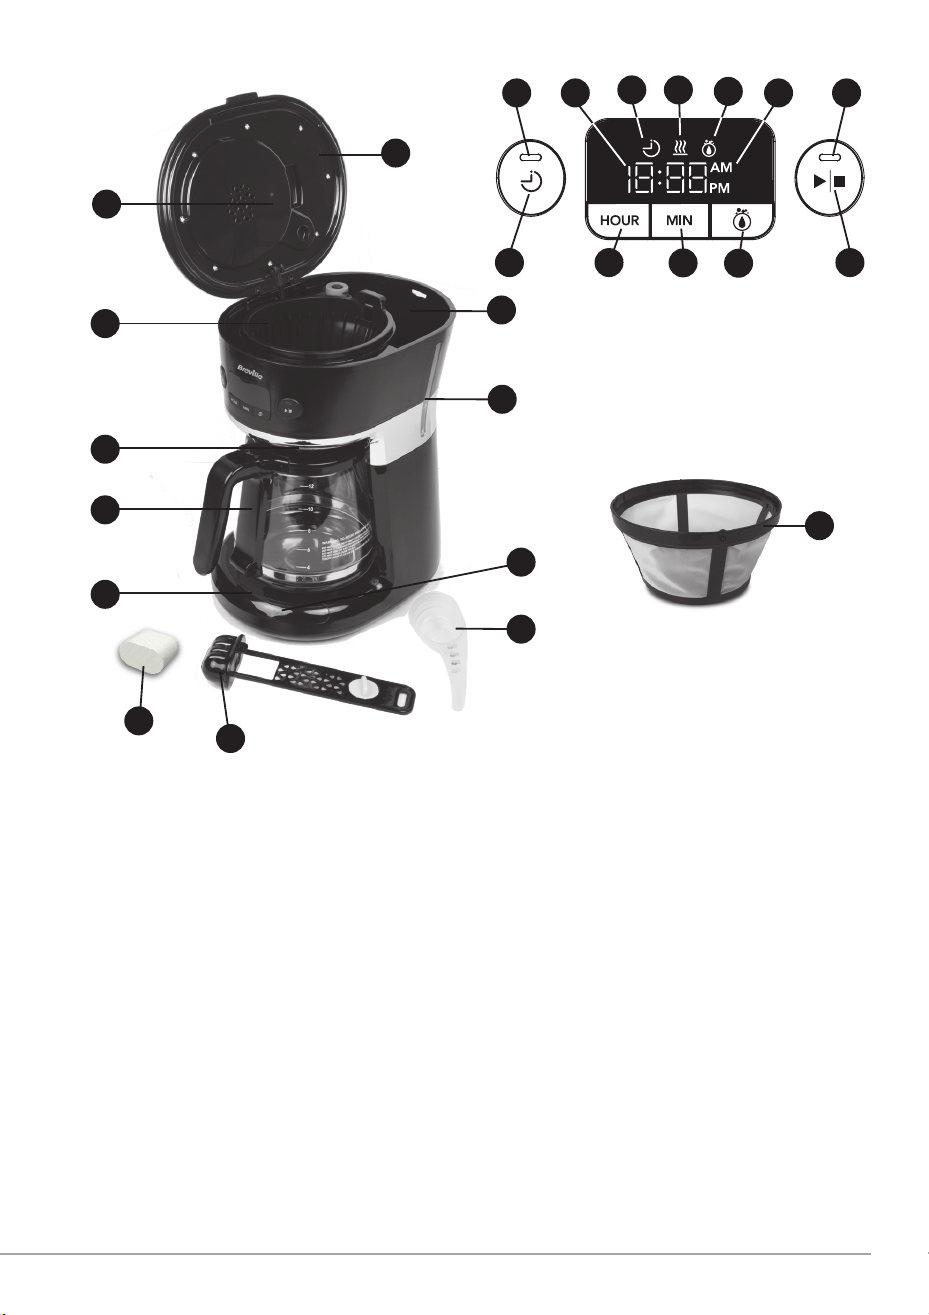
1. Brew Basket Lid
2. Water Reservoir
3. Spelling Water Window
4. Illuminated 30 Minutes Freshness Indicator
5. Colour Coded Measuring Scoop
6. Water Filtration Holder
7. Advanced Water Filtration Cartridge
8. Warming Plate
9. Colour Coded Carafe (dishwasher safe)
10. Grab-A-Cup Auto Pause
11. Removable Filter Basket (dishwasher safe)
12. Advanced Shower Head
A. Clock Display
B. Set Brew Later Indicator
C. AM/PM Indicator
D. Brew Now Indicator
E. Brew Now Button
F. Cleaning Coffee Maker Indicator
G. Clean Button
H. Minute Button
I. Hour Button
J. Warming Plate On Indicator
K. Brew Later Button
L. Brew Later Indicator
O. Reusable Filter
1
12
4
2
3
5
11
10
9
8
6
7
L
K
A
J
I
B
H
C
F
G
D
E
O
VCF114_VCF115_VCF116_19EM2 (UK).indd 2-3 3/20/19 15:23
3
2
Do not use this appliance
outdoors.
Never immerse the main body
of the appliance or power
cord and plug in water or
any other liquid. Wash brew
basket, re-usable lters,
carafe and carafe lid in a
solution of hot water and mild
liquid soap. Dry thoroughly.
See Routine Cleaning Section.
! This appliance generates heat during
use. Adequate precaution must be taken
to prevent the risk of burns, scalds, res
or other damage to persons or property
caused by touching the exterior whilst in
use or during cooling.
! Always ensure that hands are dry before
handling the plug or switching on the
appliance.
! Always use the appliance on a stable,
secure, dry and level surface.
! This appliance must not be placed on or
near any potentially hot surfaces (such
as a gas or electric hob).
! Do not use the appliance if it has been
dropped, if there are any visible signs of
damage or if it is leaking.
! Ensure the appliance is switched off and
unplugged from the supply socket after
use and before cleaning.
! Always switch off, unplug and allow
to cool before removing/tting parts,
cleaning or storing.
! Never let the power cord hang over the
edge of a worktop, touch hot surfaces or
become knotted, trapped or pinched.
! The heating element surface is subject
to residual heat after use
! The coffee-maker shall not be placed in
a cabinet when in use.
! Cleaning and user maintenance
shall not be made by children without
supervision.
PRODUCT SAFETY
READ CAREFULLY AND KEEP
FOR FUTURE REFERENCE
This appliance can be used
by children aged from 8 years
and above and persons with
reduced physical, sensory
or mental capabilities or
lack of experience and
knowledge if they have
been given supervision or
instruction concerning use
of the appliance in a safe
way and understand the
hazards involved. Children
shall not play with the
appliance. Cleaning and
user maintenance shall
not be made by children
unless they are older than
8 and supervised. Keep the
appliance and its cord out of
reach of children aged less
than 8 years.
If the supply cord is damaged,
it must be replaced by the
manufacturer, its service agent
or similarly qualied persons
in order to avoid a hazard.
The carafe is made of glass.
Always inspect for chips,
cracks or any other damage.
Do not use the glass carafe
if it is damaged, as it may
shatter during use.
Never use this appliance
for anything other than its
intended use. This appliance
is for household use only.
Due to our policy of continuous improvement, the actual product may differ slightly from the one illustrated in these instructions.
1. Brew Basket Lid
2. Water Reservoir
3. Spelling Water Window
4. Illuminated 30 Minutes Freshness Indicator
5. Colour Coded Measuring Scoop
6. Water Filtration Holder
7. Advanced Water Filtration Cartridge
8. Warming Plate
9. Colour Coded Carafe (dishwasher safe)
10. Grab-A-Cup Auto Pause
11. Removable Filter Basket (dishwasher safe)
12. Advanced Shower Head
A. Clock Display
B. Set Brew Later Indicator
C. AM/PM Indicator
D. Brew Now Indicator
E. Brew Now Button
F. Cleaning Coffee Maker Indicator
G. Clean Button
H. Minute Button
I. Hour Button
J. Warming Plate On Indicator
K. Brew Later Button
L. Brew Later Indicator
O. Reusable Filter
1
12
4
2
3
5
11
10
9
8
6
7
L
K
A
J
I
B
H
C
F
G
D
E
O
VCF114_VCF115_VCF116_19EM2 (UK).indd 2-3 3/20/19 15:23
5
4
INTRODUCTION
Congratulations! You have selected
the new and innovative Breville
®
Easy
Measure. Your new coffee maker will wake
up with you in the morning and provide
you tasty breaks during your hectic daily
activities. How you enjoy your Breville
®
Easy Measure Coffee Maker is up to you!
GETTING STARTED
Unpack your coffee maker
1. Unpack your coffee maker and remove
plastic bags, cartons and any tape on
the unit.
IMPORTANT: KEEP PLASTIC BAGS
AWAY FROM CHILDREN.
Clean Coffee Maker Before Use
Just follow these simple steps:
1. Wash the carafe lid and the reusable
lter basket in a mixture of mild
detergent and water. Rinse each
thoroughly.
2. Replace all the parts and close the lid.
Then, replace the carafe and run a
brew cycle by adding only water to the
coffee maker. After adding water, press
Brew Now.
3. When brewing is complete, turn your
coffee maker off. Turn your coffee
maker off by pressing the Brew Now
button again.
4. Discard the water in the carafe and
rinse the carafe, carafe lid, and
removable lter basket.
NOTE: Carafe, Removable Filter Basket
and Advanced Water Filtration Holder is
top rack dishwasher safe. Advanced Water
Filtration Cartridges are NOT!
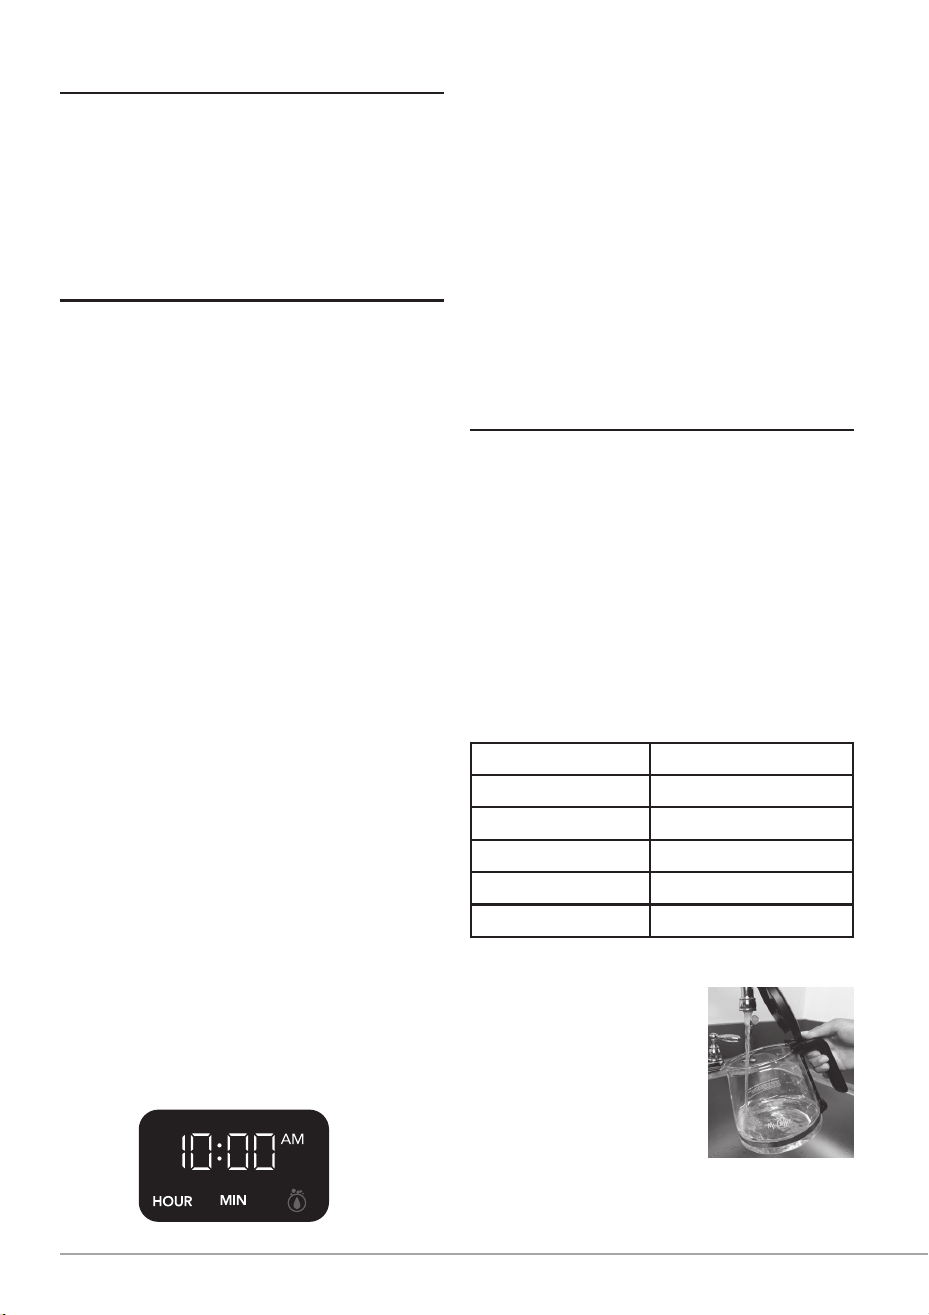
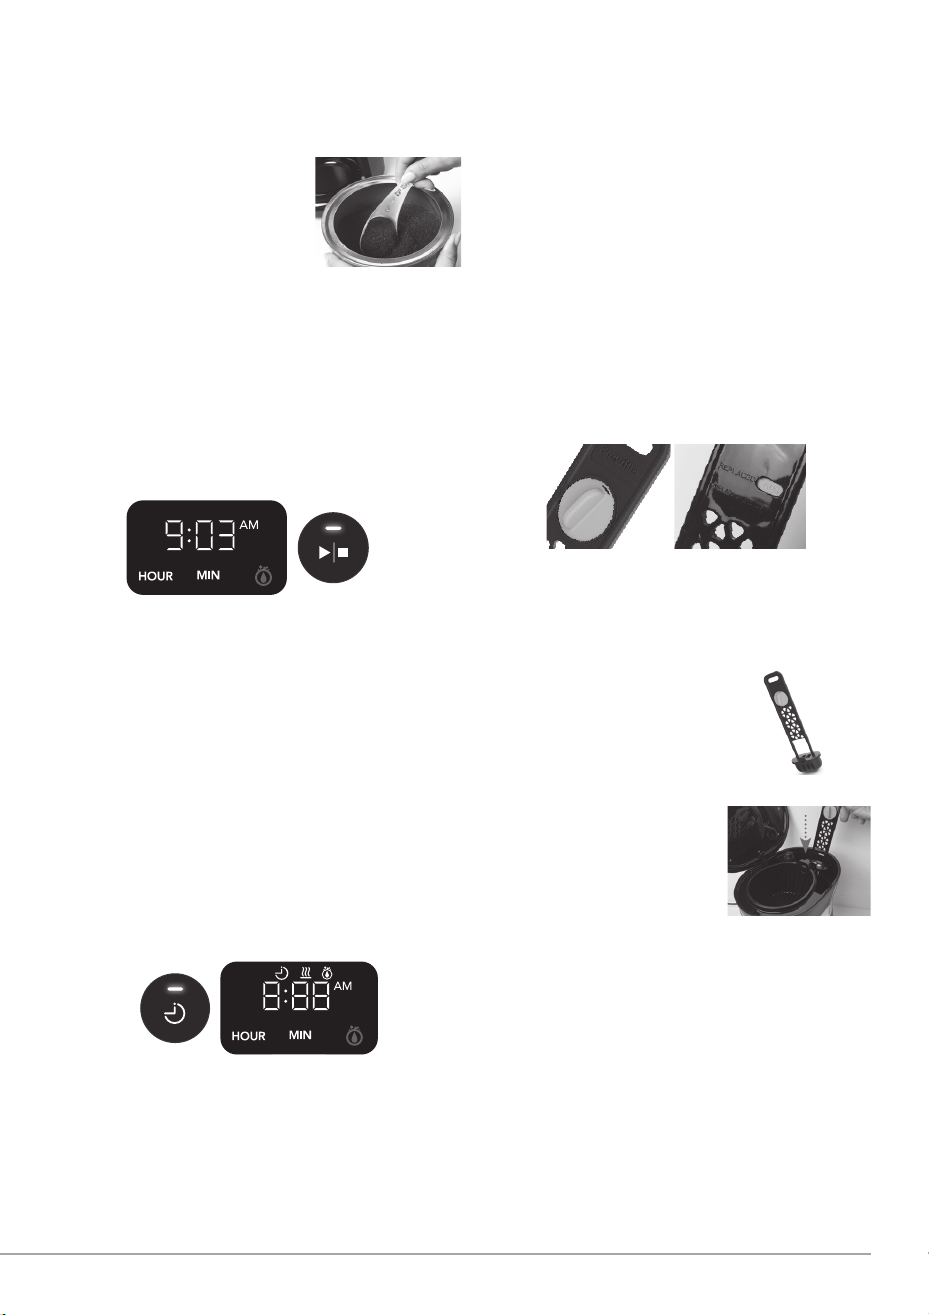
Setting the Clock
Plug in the coffee maker and set the
current time using the hour and minute
buttons. 5 Seconds of inactivity will set
clock at time selected.
Installing Advanced Water Filtration
1. Unpack the advanced water lter holder
and cartridge.
2. Place the cartridge in the holder, then
close it.
3. Install the advanced water lter by
placing it rmly into the slot at the
bottom of the water reservoir.
NOTE: Be sure to adjust the dial to the
current month as a reminder to replace
the lter according to your water area.
Reference page 5 to learn more about
installing and using lter.
HOW TO MAKE YOUR FIRST POT
OF COFFEE
Measuring the Right Amount of
Grounds and Water
Determine how much coffee you would
like to make and match the corresponding
Colour on the carafe, scoop and water
window. The Colour-coding quickly
indicates how much water and coffee
grounds should be added for consistent
taste.
Suggested Coffee Measurement Chart:
For best results, brew 4 or more cups of
coffee.
Water To Brew Ground Coffee
12 cups = 1.7L 3 scoops = 60g
10 cups = 1.4L 2.5 scoops = 50g
8 cups = 1.1L 2 scoops = 40g
6 cups = 0.8L 1.5 scoops = 30g
4 cups = 0.5L 1 scoop = 20g
Bonus: For a BOLDER CUP, use heaping
scoops
NOTE: The Colour coded
measuring scoop is four
tablespoons total.
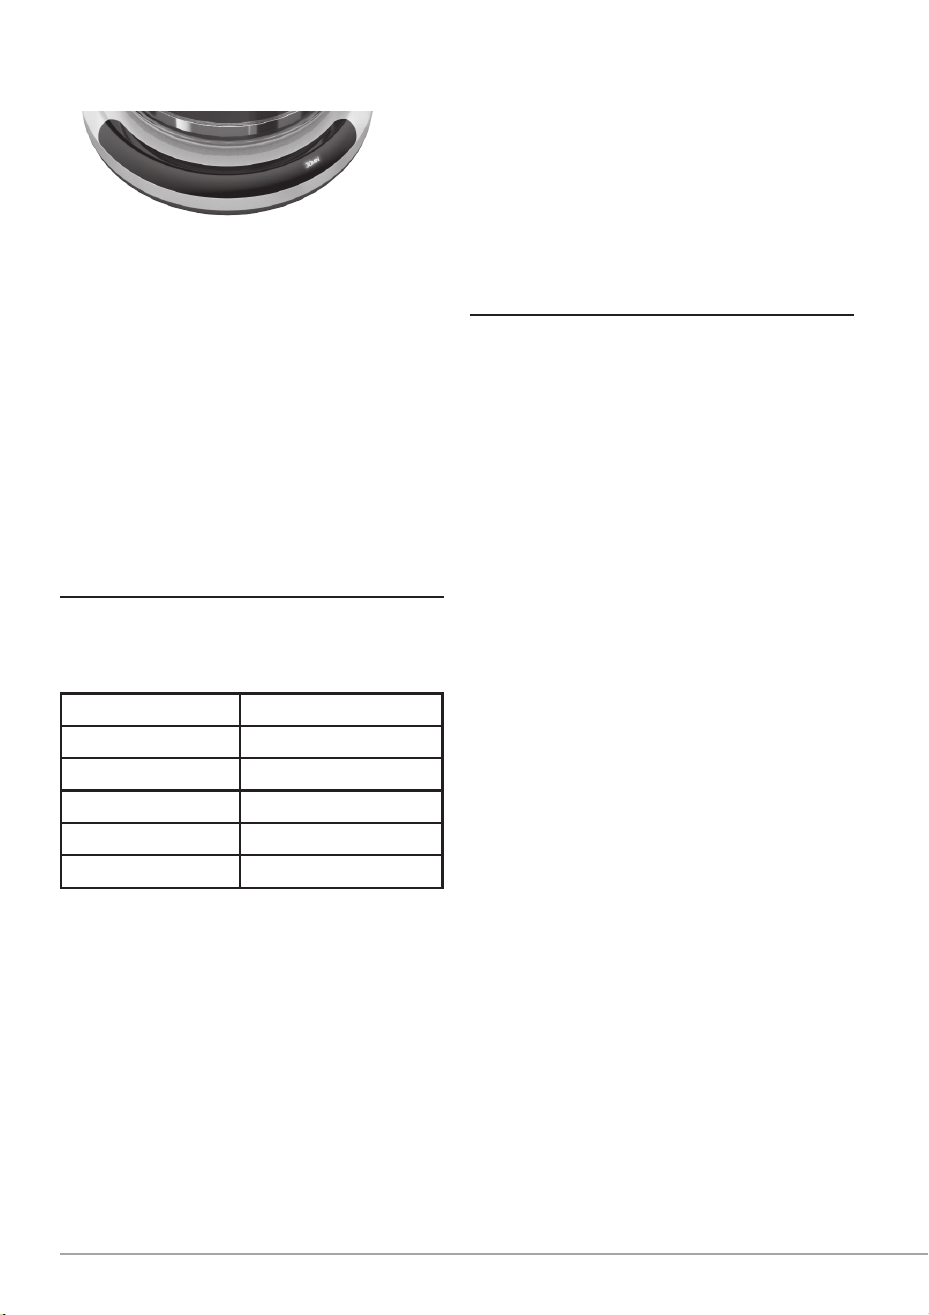
1. Fill the Colour coded
carafe with fresh
cold water to the
desired level. (Figure
1) 1 Breville “cup” is
equivalent to 150ml.
Pour into Water Reservoir.
NOTE: Some water will be absorbed
Figure 1
into the coffee grounds and water lter
during the brewing process.
2. Insert and line the Removable Filter
Basket with reusable lter.
3. Referencing the chart
above, scoop the
equivalent amount of
coffee grounds into
the lter using the
easy Colour-coded
scoop. (Figure 2)
4. You are ready to Brew Now!
5. After brewing, the coffee maker will
illuminate to indicate how long the
coffee has been sitting after brewed.
6. Enjoy consistently fresh coffee every
time!
BREW NOW
1. After lling the coffee maker with water
and grounds, press the Brew Now
button to brew instantly.
2. Brew Now light will illuminate to
indicate brewing.
3. “Warmer On” will illuminate on the
display to indicate warming plate is on.
The warming plate will stay on for up to
30 minutes. The coffee maker will beep
to signal the end of the brew cycle.
NOTE: Push Brew Now button prior to 30
minutes to turn the coffee maker off early.
BREW LATER
IMPORTANT: YOU MUST SET THE
CLOCK BEFORE USING THIS FEATURE.
1. Press Brew Later. The display flashes
“12:00 AM”. To set desired brew time,
press the Hour and Minute buttons. 2
Seconds of inactivity will set clock at
time selected.
2. The Brew Later indicator will light
up, showing that the coffee maker is
pre-set to brew at a later time. If you
change your mind and wish to turn off
the Brew Later feature, simply press
the Brew Later button again and it will
turn off. Once the Brew Later time is
set, the coffee maker will automatically
remember it until you change it or
unplug the machine.
NOTE: As a reminder, if you want to
continue to use the Brew Later feature,
you will have to press Brew Later
each time. Your coffee maker will not
automatically start again the next day.
ADVANCED WATER FILTRATION
Our improved 2-step advanced water
ltration system makes coffee taste better
by reducing specic impurities like chlorine
and calcium.
1. Set dial on water lter holder to current
month.
2. Open bottom hatch
where the cartridge
goes and insert a
new Advanced Water
Filtration cartridge.
(Figure 3)
3. Close the hatch
and place system
in designated slot
in water reservoir.
(Figure 4)
4. Replacement
cartridges available
from
www.breville.co.uk.
NOTE: When cleaning the coffee maker,
be sure to remove the Advanced Water
Filtration holder and cartridge.
Figure 2
Figure 3
Figure 4
VCF114_VCF115_VCF116_19EM2 (UK).indd 4-5 3/20/19 15:23
5
4
INTRODUCTION
Congratulations! You have selected
the new and innovative Breville
®
Easy
Measure. Your new coffee maker will wake
up with you in the morning and provide
you tasty breaks during your hectic daily
activities. How you enjoy your Breville
®
Easy Measure Coffee Maker is up to you!
GETTING STARTED
Unpack your coffee maker
1. Unpack your coffee maker and remove
plastic bags, cartons and any tape on
the unit.
IMPORTANT: KEEP PLASTIC BAGS
AWAY FROM CHILDREN.
Clean Coffee Maker Before Use
Just follow these simple steps:
1. Wash the carafe lid and the reusable
lter basket in a mixture of mild
detergent and water. Rinse each
thoroughly.
2. Replace all the parts and close the lid.
Then, replace the carafe and run a
brew cycle by adding only water to the
coffee maker. After adding water, press
Brew Now.
3. When brewing is complete, turn your
coffee maker off. Turn your coffee
maker off by pressing the Brew Now
button again.
4. Discard the water in the carafe and
rinse the carafe, carafe lid, and
removable lter basket.
NOTE: Carafe, Removable Filter Basket
and Advanced Water Filtration Holder is
top rack dishwasher safe. Advanced Water
Filtration Cartridges are NOT!
Setting the Clock
Plug in the coffee maker and set the
current time using the hour and minute
buttons. 5 Seconds of inactivity will set
clock at time selected.
Installing Advanced Water Filtration
1. Unpack the advanced water lter holder
and cartridge.
2. Place the cartridge in the holder, then
close it.
3. Install the advanced water lter by
placing it rmly into the slot at the
bottom of the water reservoir.
NOTE: Be sure to adjust the dial to the
current month as a reminder to replace
the lter according to your water area.
Reference page 5 to learn more about
installing and using lter.
HOW TO MAKE YOUR FIRST POT
OF COFFEE
Measuring the Right Amount of
Grounds and Water
Determine how much coffee you would
like to make and match the corresponding
Colour on the carafe, scoop and water
window. The Colour-coding quickly
indicates how much water and coffee
grounds should be added for consistent
taste.
Suggested Coffee Measurement Chart:
For best results, brew 4 or more cups of
coffee.
Water To Brew Ground Coffee
12 cups = 1.7L 3 scoops = 60g
10 cups = 1.4L 2.5 scoops = 50g
8 cups = 1.1L 2 scoops = 40g
6 cups = 0.8L 1.5 scoops = 30g
4 cups = 0.5L 1 scoop = 20g
Bonus: For a BOLDER CUP, use heaping
scoops
NOTE: The Colour coded
measuring scoop is four
tablespoons total.
1. Fill the Colour coded
carafe with fresh
cold water to the
desired level. (Figure
1) 1 Breville “cup” is
equivalent to 150ml.
Pour into Water Reservoir.
NOTE: Some water will be absorbed
Figure 1
into the coffee grounds and water lter
during the brewing process.
2. Insert and line the Removable Filter
Basket with reusable lter.
3. Referencing the chart
above, scoop the
equivalent amount of
coffee grounds into
the lter using the
easy Colour-coded
scoop. (Figure 2)
4. You are ready to Brew Now!
5. After brewing, the coffee maker will
illuminate to indicate how long the
coffee has been sitting after brewed.
6. Enjoy consistently fresh coffee every
time!
BREW NOW
1. After lling the coffee maker with water
and grounds, press the Brew Now
button to brew instantly.
2. Brew Now light will illuminate to
indicate brewing.
3. “Warmer On” will illuminate on the
display to indicate warming plate is on.
The warming plate will stay on for up to
30 minutes. The coffee maker will beep
to signal the end of the brew cycle.
NOTE: Push Brew Now button prior to 30
minutes to turn the coffee maker off early.
BREW LATER
IMPORTANT: YOU MUST SET THE
CLOCK BEFORE USING THIS FEATURE.
1. Press Brew Later. The display flashes
“12:00 AM”. To set desired brew time,
press the Hour and Minute buttons. 2
Seconds of inactivity will set clock at
time selected.
2. The Brew Later indicator will light
up, showing that the coffee maker is
pre-set to brew at a later time. If you
change your mind and wish to turn off
the Brew Later feature, simply press
the Brew Later button again and it will
turn off. Once the Brew Later time is
set, the coffee maker will automatically
remember it until you change it or
unplug the machine.
NOTE: As a reminder, if you want to
continue to use the Brew Later feature,
you will have to press Brew Later
each time. Your coffee maker will not
automatically start again the next day.
ADVANCED WATER FILTRATION
Our improved 2-step advanced water
ltration system makes coffee taste better
by reducing specic impurities like chlorine
and calcium.
1. Set dial on water lter holder to current
month.
2. Open bottom hatch
where the cartridge
goes and insert a
new Advanced Water
Filtration cartridge.
(Figure 3)
3. Close the hatch
and place system
in designated slot
in water reservoir.
(Figure 4)
4. Replacement
cartridges available
from
www.breville.co.uk.
NOTE: When cleaning the coffee maker,
be sure to remove the Advanced Water
Filtration holder and cartridge.
Figure 2
Figure 3
Figure 4
VCF114_VCF115_VCF116_19EM2 (UK).indd 4-5 3/20/19 15:23
7
6
ILLUMINATED 30 MINUTES
FRESHNESS INDICATOR
The Illuminated 30 minute Freshness
Indicator feature automatically lets you
know how long your coffee has been
waiting for you. At the end of the brew
cycle, the feature will automatically be
activated.
The indicator changes to show the time
since brewing began in 5 minute intervals,
up to 30 minutes.
After 30 minutes, the light will remain on
for 10 minutes, before the coffee maker
automatically turns off.
To continue after 30 minutes, press
Brew Now and the timer will reset after it
attempts to brew coffee.
HOW TO BREW THE PERFECT CUP
Suggested Coffee Measurement Chart:
For best results, brew 4 or more cups of
coffee.
Water To Brew Ground Coffee
12 cups = 1.7L 3 scoops = 60g
10 cups = 1.4L 2.5 scoops = 50g
8 cups = 1.1L 2 scoops = 40g
6 cups = 0.8L 1.5 scoops = 30g
4 cups = 0.5L 1 scoops = 20g
Bonus: For a BOLDER CUP, use heaping
scoops up to a maximum of 60g.
NOTE: The Colour coded measuring
scoop is four tablespoons total.
Water
While it may not seem like an important
ingredient, coffee is 98% water. The type
of water that you brew with greatly affects
the nal taste. Always use clean, fresh
water. Please refer to the “Advanced Water
Filtration” section to learn more about how
your coffee maker reduces impurities in
water.
ROUTINE CLEANING
Daily Cleaning
• Make sure your coffee maker is
unplugged and has cooled completely
before cleaning.
• Remove the brew baskets, reusable
lters, carafe, carafe lid, and wash
them in a solution of hot water and mild
liquid soap, and dry thoroughly. You
can also place in the dishwasher; top-
rack only.
Decalcifying your Breville
®
Easy
Measure Coffee Maker
Minerals (calcium/limestone) found in
water will leave deposits in your coffee
maker and affect its performance. It’s
recommended that you regularly remove
these deposits using vinegar.
1. IMPORTANT: Remove the advanced
water ltration system from the coffee
maker.
2. Prepare 4 cups or 20 fl. oz. / 592ml of
undiluted, white household vinegar.
Pour the vinegar into the water
reservoir.
3. Place the reusable lter into the lter
basket and close the coffee maker’s lid.
4. Place the empty carafe back in the unit,
centered on the warming plate.
5. Press the Clean button.
6. The coffee maker will run a slow clean
cycle and shut off.
7. Discard the cleaning solution and rinse
the carafe thoroughly with clean water.
8. Fill the water reservoir with 12 cups of
clean, fresh water.
9. Place the empty carafe back on the
coffee maker, centered on the warming
plate.
10. Remove the reusable lter and rinse
it thoroughly before replacing it in the
lter basket.
11. Press Brew Now and allow the full brew
cycle to complete, rinsing the coffee
maker with hot water.
12. Discard the water and rinse the carafe
thoroughly with clean water.
13. Repeat steps 8 through 12 one more
time, to ensure it is fully rinsed.
Your coffee maker is now clean and
ready to brew the next pot of delicious,
hot coffee!
NOTE: It is recommended that you
decalcify your coffee maker depending on
your type of water, as below.
Cleaning Frequency
Type of Water Cleaning Frequency
Soft Water Every 80 Brew Cycles
Hard Water Every 40 Brew Cycles
VCF114_VCF115_VCF116_19EM2 (UK).indd 6-7 3/20/19 15:23
9
8
REPLACEMENT PARTS
For additional or replacement parts, please
visit www.breville.co.uk or call us on
0161 621 6900.
TROUBLESHOOTING
For troubleshooting and FAQs visit:
www.breville.co.uk/faqs
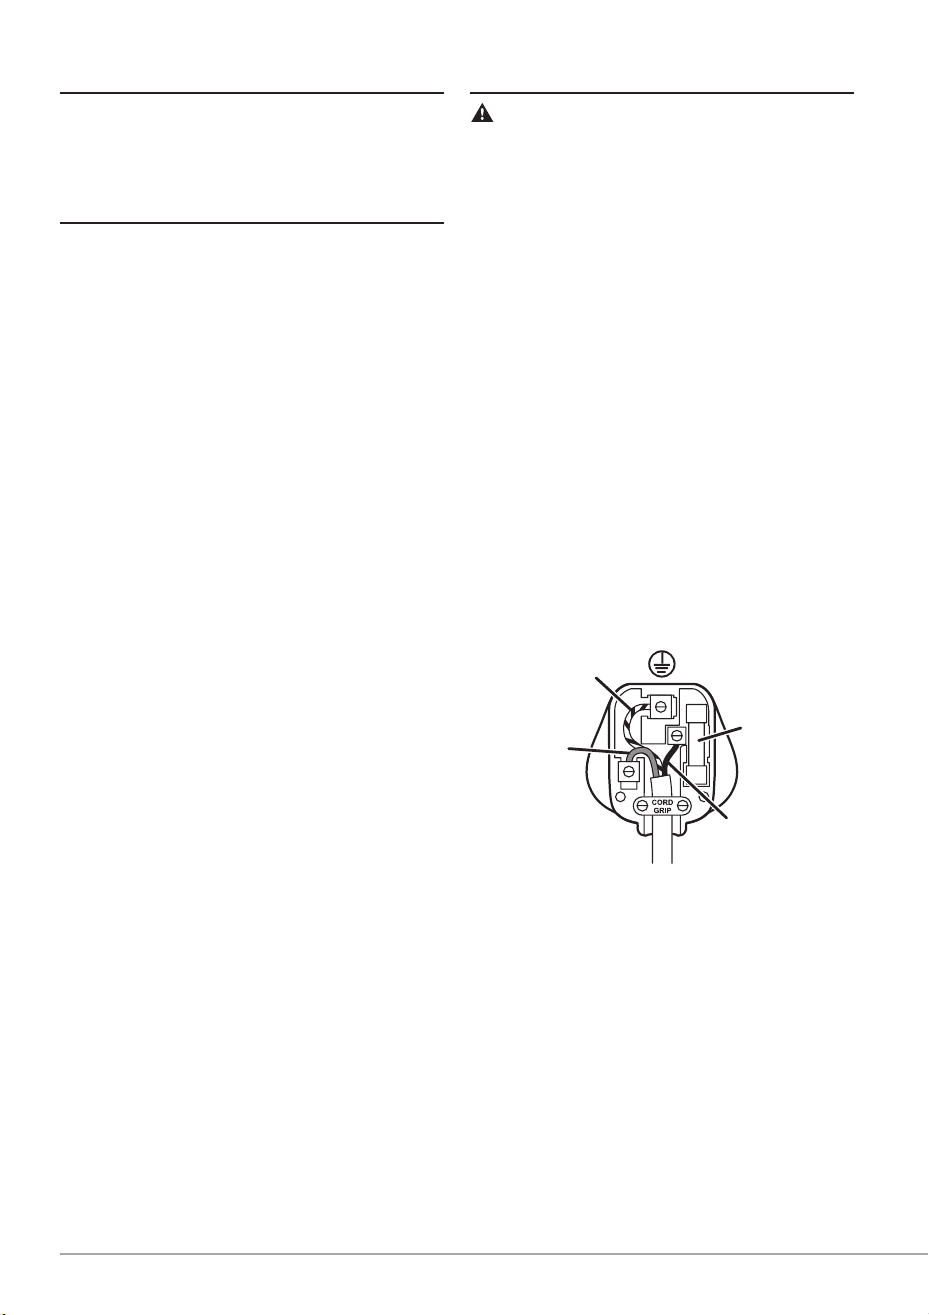
ELECTRICAL SAFETY
This appliance must be earthed.
If the plug is not suitable for the socket
outlets in your home, it can be removed
and replaced by a plug of the correct type.
If the fuse in a moulded plug needs to be
changed, the fuse cover must be retted.
The appliance must not be used without
the fuse cover tted.
If the plug is unsuitable, it should be
dismantled and removed from the supply
cord and an appropriate plug tted as
detailed. If you remove the plug it must not
be connected to a 13 amp socket and the
plug must be disposed of immediately.
If the terminals in the plug are not marked
or if you are unsure about the installation
of the plug please contact a qualied
electrician.
Blue
(Neutral)
Brown
(Live)
13A Fuse
Green/Yellow
(Earth)
Plug should be ASTA approved to BS1363
Fuse should be ASTA approved to BS1362
Ensure that the outer sheath of
the cable is firmly held by the cord grip
AFTER SALES SERVICE
These appliances are built to the very
highest of standards. There are no user
serviceable parts. Follow these steps if the
unit fails to operate:
• Check the instructions have been
followed correctly.
• Check that the fuse has not blown.
• Check that the mains supply is
functional.
If the appliance will still not operate, return
the appliance to the place it was purchased
for a replacement. To return the appliance
to the Customer Service Department,
follow the steps below:
1. Pack it carefully (preferably in the
original carton). Ensure the unit is
clean.
2. Enclose your name and address and
quote the model number (located on
the rating label) on all correspondence.
3. Give the reason why you are returning it.
4. If within the guarantee period, state
when and where it was purchased
and include proof of purchase (e.g. till
receipt).
5. Send it to our Customer Service
Department at the address below:
Customer Service Department
Jarden Consumer Solutions (Europe) Limited
Middleton Road, Royton, Oldham
OL2 5LN, UK
Telephone: 0161 621 6900 Fax: 0161 626 0391
e-mail: [email protected]
GUARANTEE
Please keep your receipt as this will
be required for any claims under this
guarantee.
This appliance is guaranteed for 1 year
after your purchase as described in this
document.
During this guaranteed period, if in the
unlikely event the appliance no longer
functions due to a design or manufacturing
fault, please take it back to the place of
purchase, with your till receipt and a copy
of this guarantee.
The rights and benets under this
guarantee are additional to your statutory
rights, which are not affected by this
guarantee. Only Jarden Consumer
Solutions (Europe) Limited (“JCS
(Europe)”) has the right to change these
terms.
JCS (Europe) undertakes within the
guarantee period to repair or replace the
appliance, or any part of appliance found
to be not working properly free of charge
provided that:
• you promptly notify the place of
purchase or JCS (Europe) of the
problem; and
• the appliance has not been altered
in any way or subjected to damage,
misuse, abuse, repair or alteration by a
person other than a person authorised
by JCS (Europe).
VCF114_VCF115_VCF116_19EM2 (UK).indd 8-9 3/20/19 15:23

9
8
REPLACEMENT PARTS
For additional or replacement parts, please
visit www.breville.co.uk or call us on
0161 621 6900.
TROUBLESHOOTING
For troubleshooting and FAQs visit:
www.breville.co.uk/faqs
ELECTRICAL SAFETY
This appliance must be earthed.
If the plug is not suitable for the socket
outlets in your home, it can be removed
and replaced by a plug of the correct type.
If the fuse in a moulded plug needs to be
changed, the fuse cover must be retted.
The appliance must not be used without
the fuse cover tted.
If the plug is unsuitable, it should be
dismantled and removed from the supply
cord and an appropriate plug tted as
detailed. If you remove the plug it must not
be connected to a 13 amp socket and the
plug must be disposed of immediately.
If the terminals in the plug are not marked
or if you are unsure about the installation
of the plug please contact a qualied
electrician.
Blue
(Neutral)
Brown
(Live)
13A Fuse
Green/Yellow
(Earth)
Plug should be ASTA approved to BS1363
Fuse should be ASTA approved to BS1362
Ensure that the outer sheath of
the cable is firmly held by the cord grip
AFTER SALES SERVICE
These appliances are built to the very
highest of standards. There are no user
serviceable parts. Follow these steps if the
unit fails to operate:
• Check the instructions have been
followed correctly.
• Check that the fuse has not blown.
• Check that the mains supply is
functional.
If the appliance will still not operate, return
the appliance to the place it was purchased
for a replacement. To return the appliance
to the Customer Service Department,
follow the steps below:
1. Pack it carefully (preferably in the
original carton). Ensure the unit is
clean.
2. Enclose your name and address and
quote the model number (located on
the rating label) on all correspondence.
3. Give the reason why you are returning it.
4. If within the guarantee period, state
when and where it was purchased
and include proof of purchase (e.g. till
receipt).
5. Send it to our Customer Service
Department at the address below:
Customer Service Department
Jarden Consumer Solutions (Europe) Limited
Middleton Road, Royton, Oldham
OL2 5LN, UK
Telephone: 0161 621 6900 Fax: 0161 626 0391
e-mail: [email protected]
GUARANTEE
Please keep your receipt as this will
be required for any claims under this
guarantee.
This appliance is guaranteed for 1 year
after your purchase as described in this
document.
During this guaranteed period, if in the
unlikely event the appliance no longer
functions due to a design or manufacturing
fault, please take it back to the place of
purchase, with your till receipt and a copy
of this guarantee.
The rights and benets under this
guarantee are additional to your statutory
rights, which are not affected by this
guarantee. Only Jarden Consumer
Solutions (Europe) Limited (“JCS
(Europe)”) has the right to change these
terms.
JCS (Europe) undertakes within the
guarantee period to repair or replace the
appliance, or any part of appliance found
to be not working properly free of charge
provided that:
• you promptly notify the place of
purchase or JCS (Europe) of the
problem; and
• the appliance has not been altered
in any way or subjected to damage,
misuse, abuse, repair or alteration by a
person other than a person authorised
by JCS (Europe).
VCF114_VCF115_VCF116_19EM2 (UK).indd 8-9 3/20/19 15:23
11
10
Faults that occur through, improper use,
damage, abuse, use with incorrect voltage,
acts of nature, events beyond the control
of JCS (Europe), repair or alteration by
a person other than a person authorised
by JCS (Europe) or failure to follow
instructions for use are not covered by this
guarantee. Additionally, normal wear and
tear, including, but not limited to, minor
disColouration and scratches are not
covered by this guarantee.
The rights under this guarantee shall only
apply to the original purchaser and shall
not extend to commercial or communal
use.
If your appliance includes a country-
specic guarantee or warranty insert
please refer to the terms and conditions of
such guarantee or warranty in place of this
guarantee or contact your local authorized
dealer for more information.
Waste electrical products should not be
disposed of with household waste. Please
recycle where facilities exist. E-mail us at
[email protected] for further
recycling and WEEE information.
Jarden Consumer Solutions (Europe) Limited
5400 Lakeside
Cheadle Royal Business Park
Cheadle
SK8 3GQ
UK
VCF114_VCF115_VCF116_19EM2 (UK).indd 10-11 3/20/19 15:23
VCF114_VCF115_VCF116_19EM2 (UK) 03/19 P.N. 197228 Rev. A
GCDS-BRE-JC
Jarden Consumer Solutions (Europe) Limited
Cheadle Royal Business Park, Cheadle, SK8 3GQ, United Kingdom
e-mail: [email protected]
Telephone: 0161 621 6900
For Customer Service details, please see the website.
www.breville.co.uk
© 2019 Jarden Consumer Solutions (Europe) Limited
All rights reserved. Imported and distributed by Jarden Consumer Solutions (Europe) Limited,
5400 Lakeside, Cheadle Royal Business Park, Cheadle, SK8 3GQ, United Kingdom.
Jarden Consumer Solutions (Europe) Limited is a subsidiary of Newell Brands Inc. (NYSE: NWL).
The product supplied may differ slightly from the one illustrated due to continuing product development.
Printed in China
VCF114_VCF115_VCF116_19EM2 (UK).indd 12 3/20/19 15:23