Dehumidifier
User Manual
Model: DryTank 3000

CONTENTS/CONTENIDO
PREFACE
SPECIFICATIONS
SAFETY INFORMATION
PARTS DESCRIPTION
OPERATION
CARE & MAINTENANCE
TROUBLESHOOTING
WARRANTY INFORMATION
CUSTOMER SUPPORT
PREFACIO
ESPECIFICACIONES
INFORMACIÓN DE SEGURIDAD
DESCRIPCIÓN DE LAS PIEZAS
OPERACIÓN
CUIDADO & MANTENIMIENTO
SOLUCIÓN DE PROBLEMAS
INFORMACIÓN DE GARANTÍA
ATENCIÓN AL CLIENTE
English
Español
01
01
02
04
05
09
10
11
12
13
13
14
16
17
21
22
23
24
FOR CUSTOMERS
PREFACE
BEFORE FIRST USE
Thank you for purchasing our DryTank 3000 Dehumidifier! Please be sure to read the entirety of this user
manual carefully before use of the product. If you have any questions regarding the use of this product,
please reach out to us at [email protected]. We hope you enjoy your new energy star dehumidifier!
Find Us Online
Search for @Vellgoo • #Vellgootech on social media for tips, special deals, giveaways, inspiration, and
more.
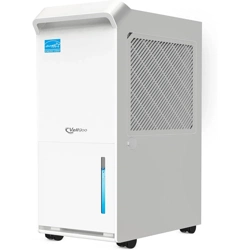
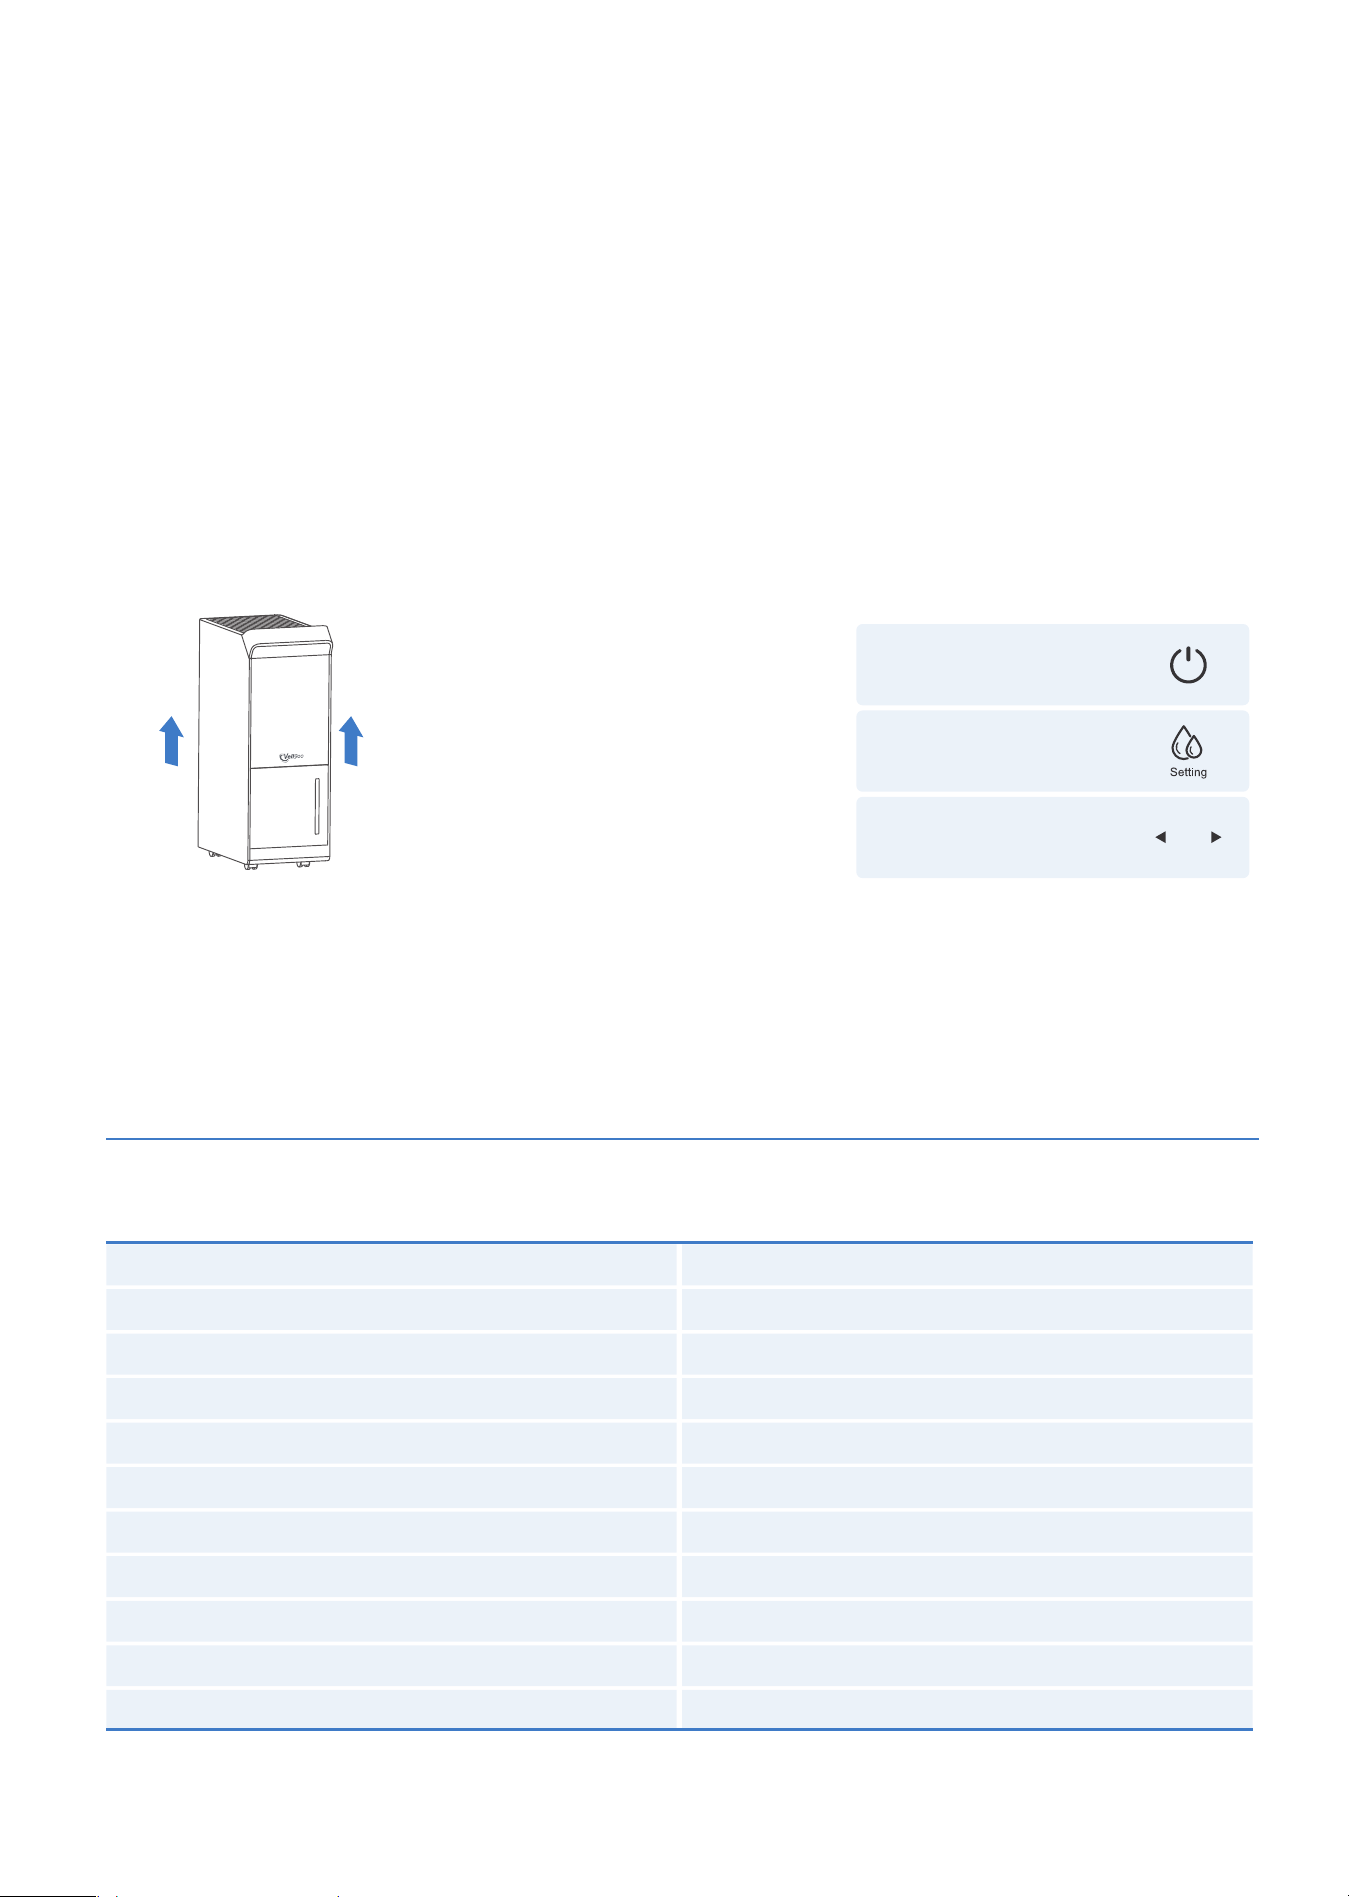
To prevent any internal damage, it is very important to keep refrigeration units (Figure 1.0) UPRIGHT
throughout their journey. Please leave it standing upright and outside the box for 24 HOURS - before
plugging it in.
In the event this product malfunctions or the customer believes it is defective, the customer should
contact Customer Service and retain the defective product pending further instructions.
Defective product should be clearly marked or stored where it cannot be used again by mistake.
Failure to retain the product may impede Vellgoo’s ability to correct any legitimate problem and may
limit the extent to which Vellgoo may provide recourse.
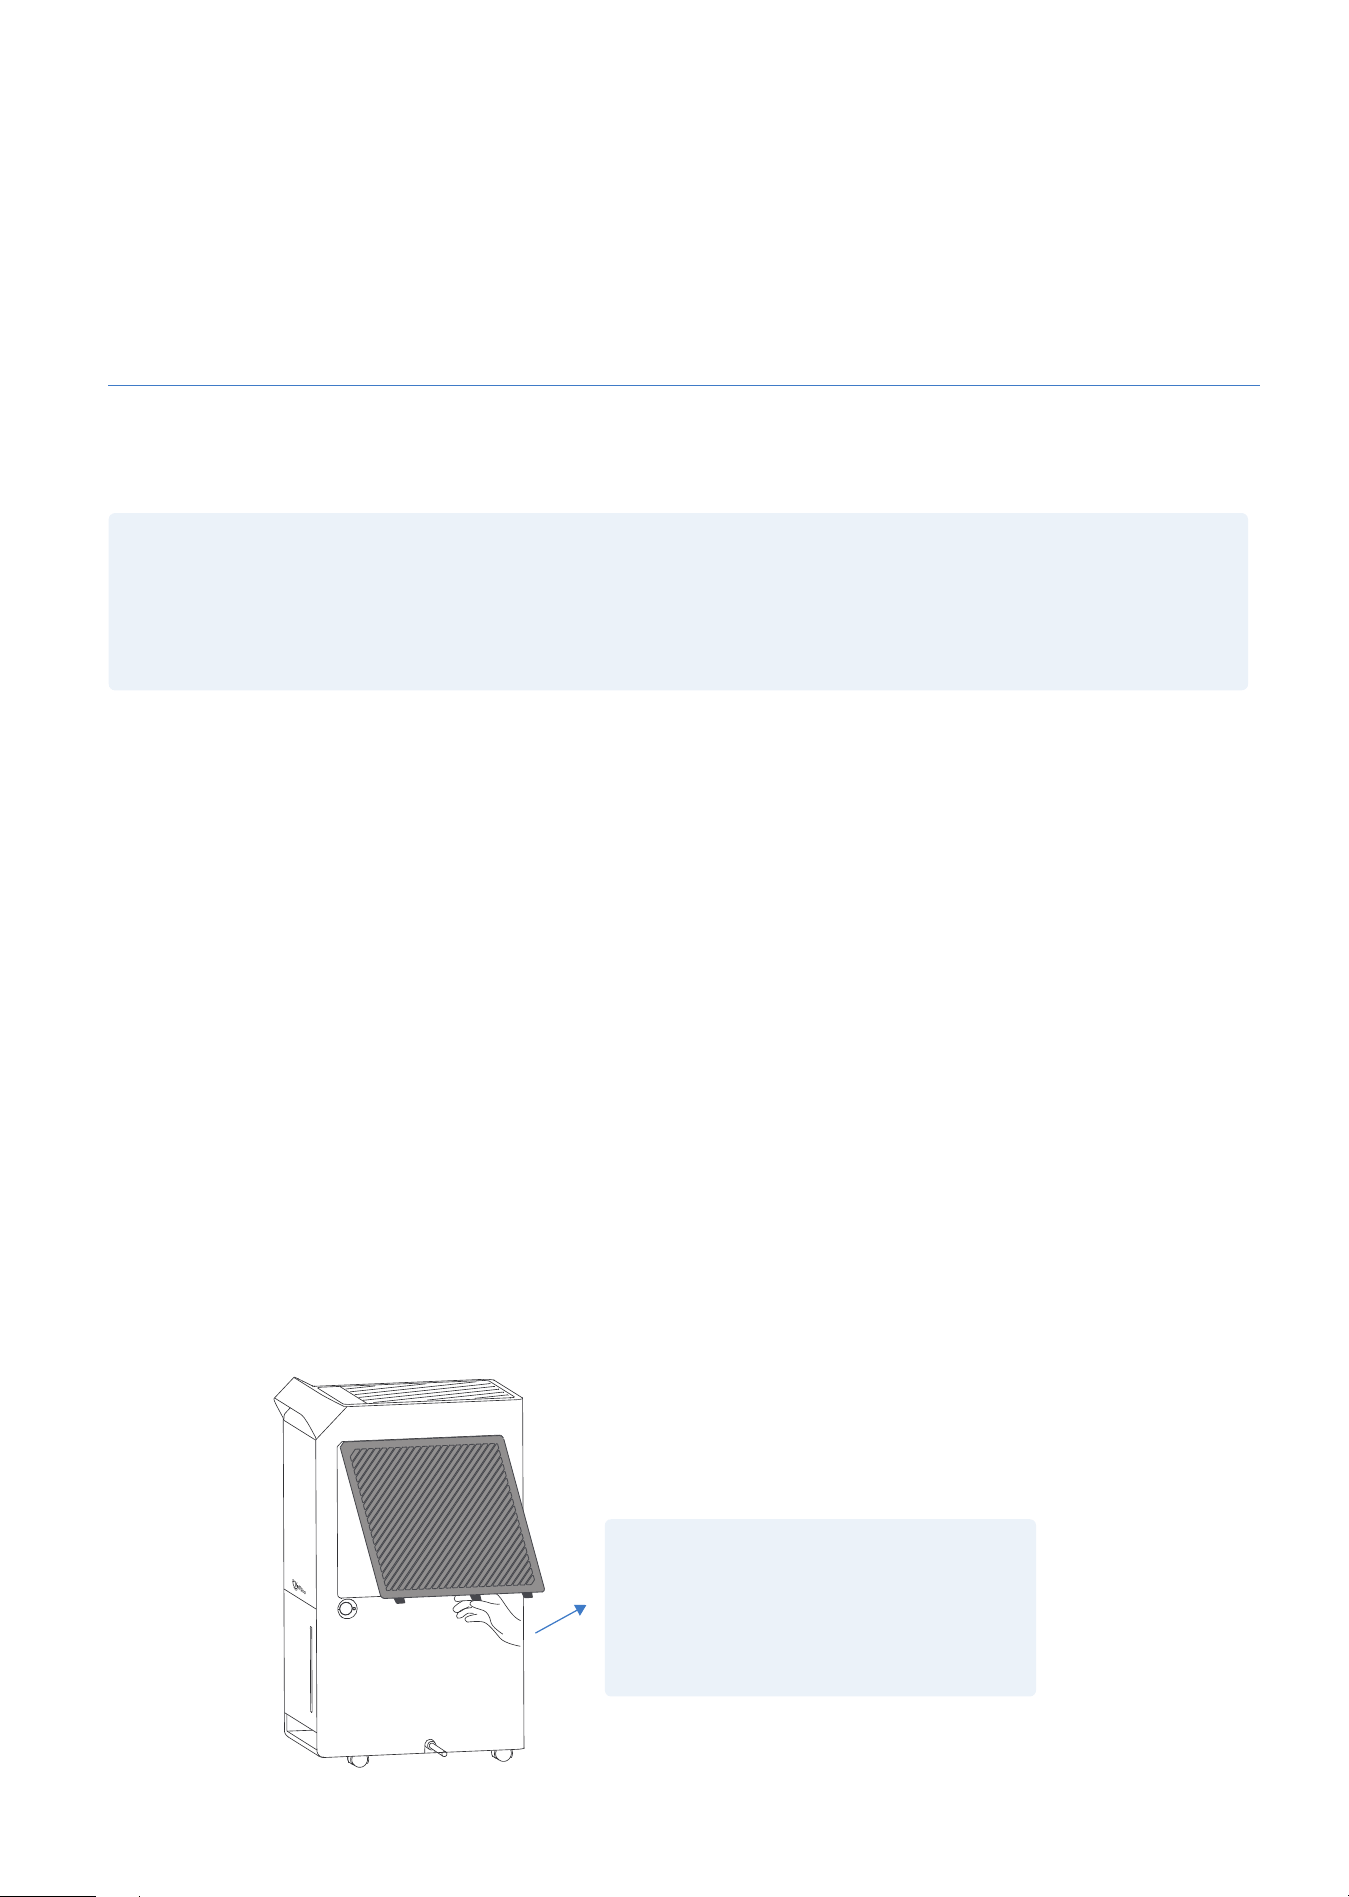
IMPORTANT NOTICE FOR FIRST USE
PLEASE NOTE:
This dehumidifier defaults to
CONTINUOUS MODE, disabling
Use of the LEFT/RIGHT buttons.
To regain use of the buttons, confirm
the CONTINUOUS MODE is turned off.
TURN OFF
DEHUMIDIFIER
TURN OFF
CONTINUOUS MODE
BEGIN USING
LEFT/RIGHT BUTTONS
■ 01 ■
SPECIFICATIONS
Figure 1.0
Model
Moisture removal (18.33°C, 60% RH)
Moisture removal (30°C, 80% RH)
Maximum allowable pressure
Max Suction Pressure
Size
Weight
Opreating Temperature
Water tank capacity
Power Supply
Rated Power
DryTank 3000
21.98 Pints/Day(10.4L/Day)
52 Pints/Day(25L/Day)
5.5 MPa (798 PSIG)
1.2 MPa (174 PSIG)
14.38*8.64*24.09 inches (36.6*22*61.3cm)
32.12 lb (14.6Kg)
5°C-35°C(41°F-95°F)
1.45 Gal/5.5L
120V~60Hz
400W

SAFETY INFORMATION
HOUSEHOLD USE ONLY
WARNING
This product can expose you to chemicals including Styrene and its compounds, which are known to the
State of California to cause cancer and birth defects, or other reproductive harm. For more information go
to: www.P65Warnings.ca.gov
PACKAGE CONTENTS
1 × DryTank 3000 Dehumidifier 1 × User Manual
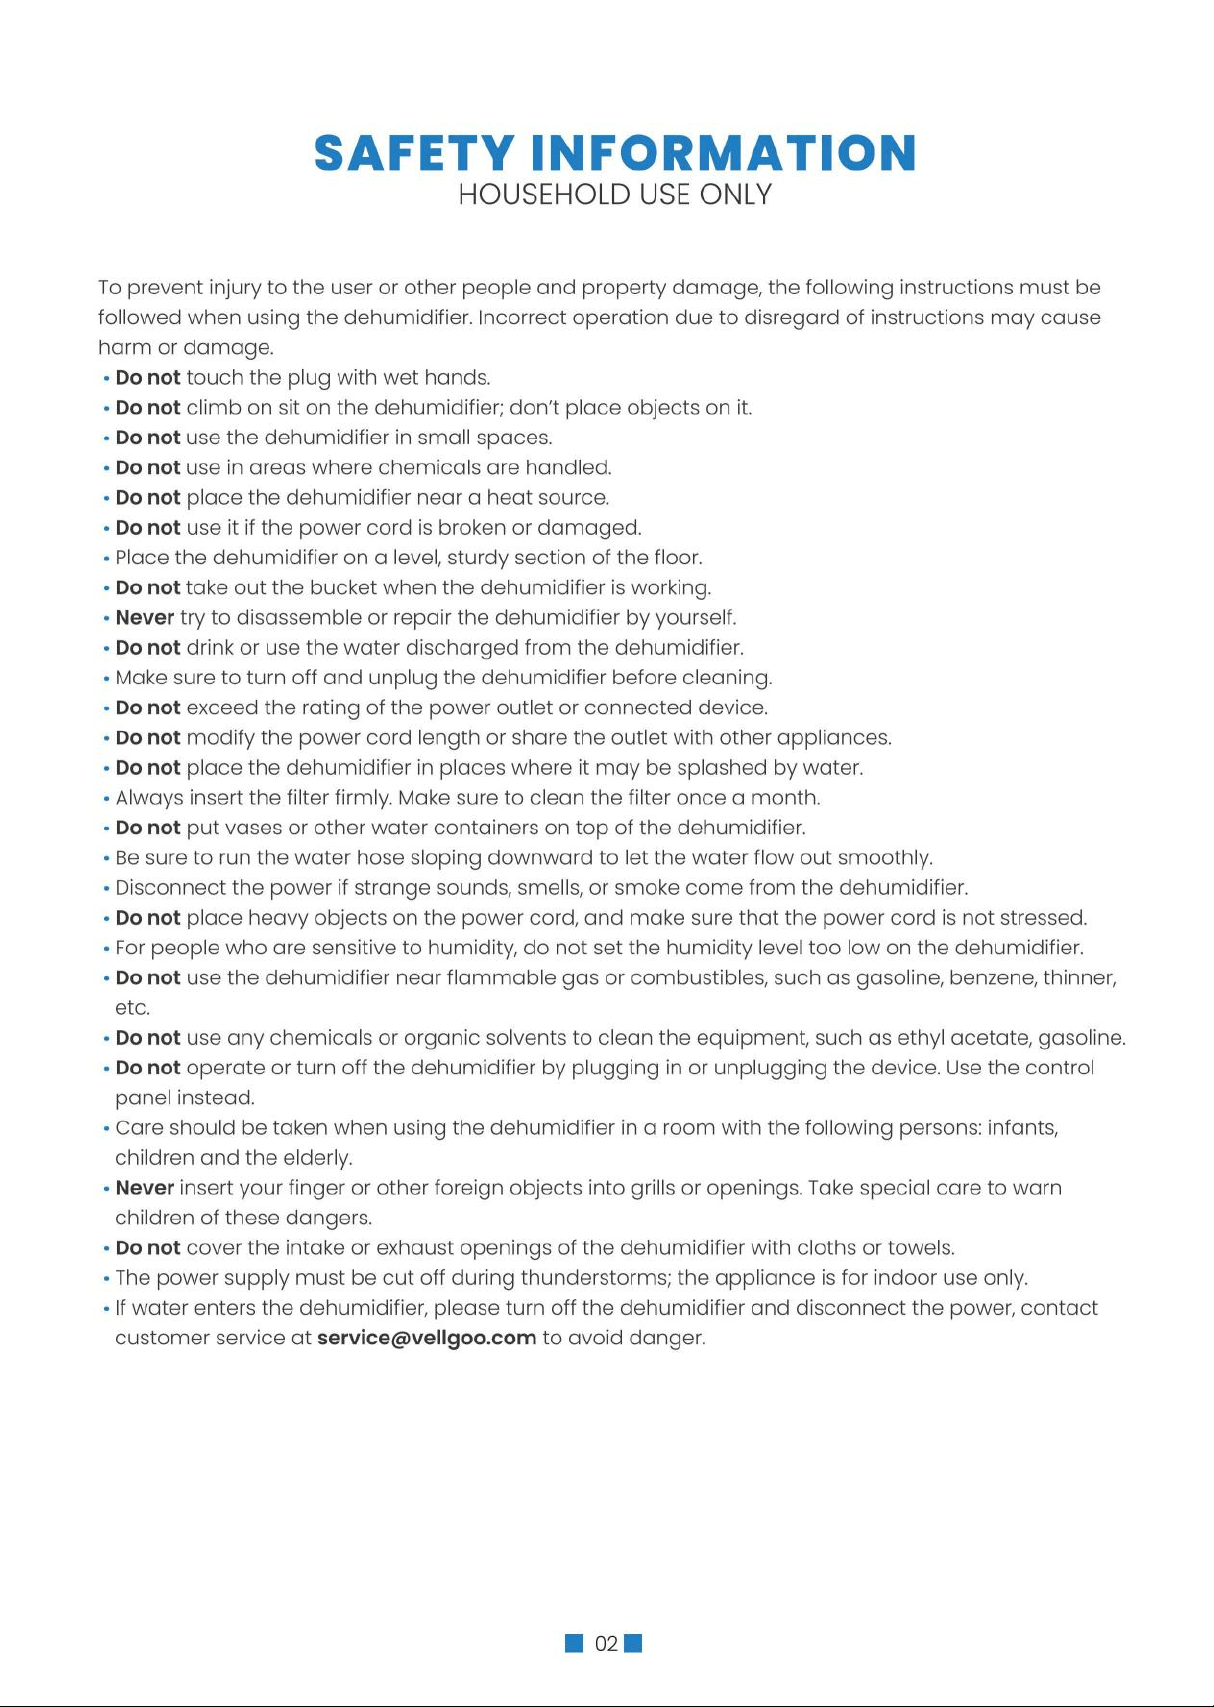
To prevent injury to the user or other people and property damage, the following instructions must be
followed when using the dehumidifier. Incorrect operation due to disregard of instructions may cause
harm or damage.
·
Do not touch the plug with wet hands.
·
Do not climb on sit on the dehumidifier; don’t place objects on it.
·
Do not use the dehumidifier in small spaces.
·
Do not use in areas where chemicals are handled.
·
Do not place the dehumidifier near a heat source.
·
Do not use it if the power cord is broken or damaged.
·
Place the dehumidifier on a level, sturdy section of the floor.
·
Do not take out the bucket when the dehumidifier is working.
·
Never try to disassemble or repair the dehumidifier by yourself.
·
Do not drink or use the water discharged from the dehumidifier.
·
Make sure to turn off and unplug the dehumidifier before cleaning.
·
Do not exceed the rating of the power outlet or connected device.
·
Do not modify the power cord length or share the outlet with other appliances.
·
Do not place the dehumidifier in places where it may be splashed by water.
·
Always insert the filter firmly. Make sure to clean the filter once a month.
·
Do not put vases or other water containers on top of the dehumidifier.
·
Be sure to run the water hose sloping downward to let the water flow out smoothly.
·
Disconnect the power if strange sounds, smells, or smoke come from the dehumidifier.
·
Do not place heavy objects on the power cord, and make sure that the power cord is not stressed.
·
For people who are sensitive to humidity, do not set the humidity level too low on the dehumidifier.
·
Do not use the dehumidifier near flammable gas or combustibles, such as gasoline, benzene, thinner,
etc.
·
Do not use any chemicals or organic solvents to clean the equipment, such as ethyl acetate, gasoline.
·
Do not operate or turn off the dehumidifier by plugging in or unplugging the device. Use the control
panel instead.
·
Care should be taken when using the dehumidifier in a room with the following persons: infants,
children and the elderly.
·
Never insert your finger or other foreign objects into grills or openings. Take special care to warn
children of these dangers.
·
Do not cover the intake or exhaust openings of the dehumidifier with cloths or towels.
·
The power supply must be cut off during thunderstorms; the appliance is for indoor use only.
·
If water enters the dehumidifier, please turn off the dehumidifier and disconnect the power, contact
customer service at [email protected] to avoid danger.
■ 02 ■
■ 03 ■
IMPORTANT SAFETY INSTRUCTIONS
·
Be sure the dehumidifier is properly grounded. To minimize shock and fire hazards, proper grounding
is important. This power cord is equipped with a three-prong grounding plug for protection against
shock hazards.
·
Your dehumidifier must be used in a properly grounded wall socket. If your wall socket is not ade
quately grounded or protected by a time-delay fuse or circuit breaker, have a qualified electrician
install the proper socket.
·
Avoid fire hazards or electric shock. Do not use an extension cord or an adapter plug. Do not remove
any prong from the power cord.
CAUTION
·
This dehumidifier can only be used by children 8 years or older and persons with reduced physical,
sensory or mental capabilities or lack of experience and knowledge with supervision or instruction
concerning the use of the dehumidifier. Cleaning and user maintenance shall not be done by children
without supervision.
·
If the supply cord is damaged, it must be replaced by qualified personnel. Please contact Customer
Service in order to avoid a hazard.
·
If the dehumidifier is knocked over during use, turn off the dehumidifier and unplug it from the main
power supply immediately. Visually inspect the dehumidifier to ensure there is no damage. If you
suspect the dehumidifier has been damaged, contact Vellgoo Customer Service at
·
To reduce the risk of fire or electric shock, do not use this dehumidifier with any solid-state speed
control device.
·
The dehumidifier shall be installed in accordance with national wiring regulations.
·
Details of type and rating of fuses: T, 250V AC,8A.
·
Please keep the machine on flat and firm ground. The gap between walls and machine should be over
19.65 inches (50cm) for better heat-release.
·
Recycling.
This marking indicates that this product should not be disposed with other
household wastes throughout the EU. To prevent possible harm to the
environment or human health from uncontrolled waste disposal, recycle it
responsibly to promote the sustainable reuse of material resources. To
return your used device, please use the return and collection systems or
contact the retailer where the product was purchased. They can take this
product for environmentally safe recycling.

PARTS DESCRIPTION
■ 04 ■
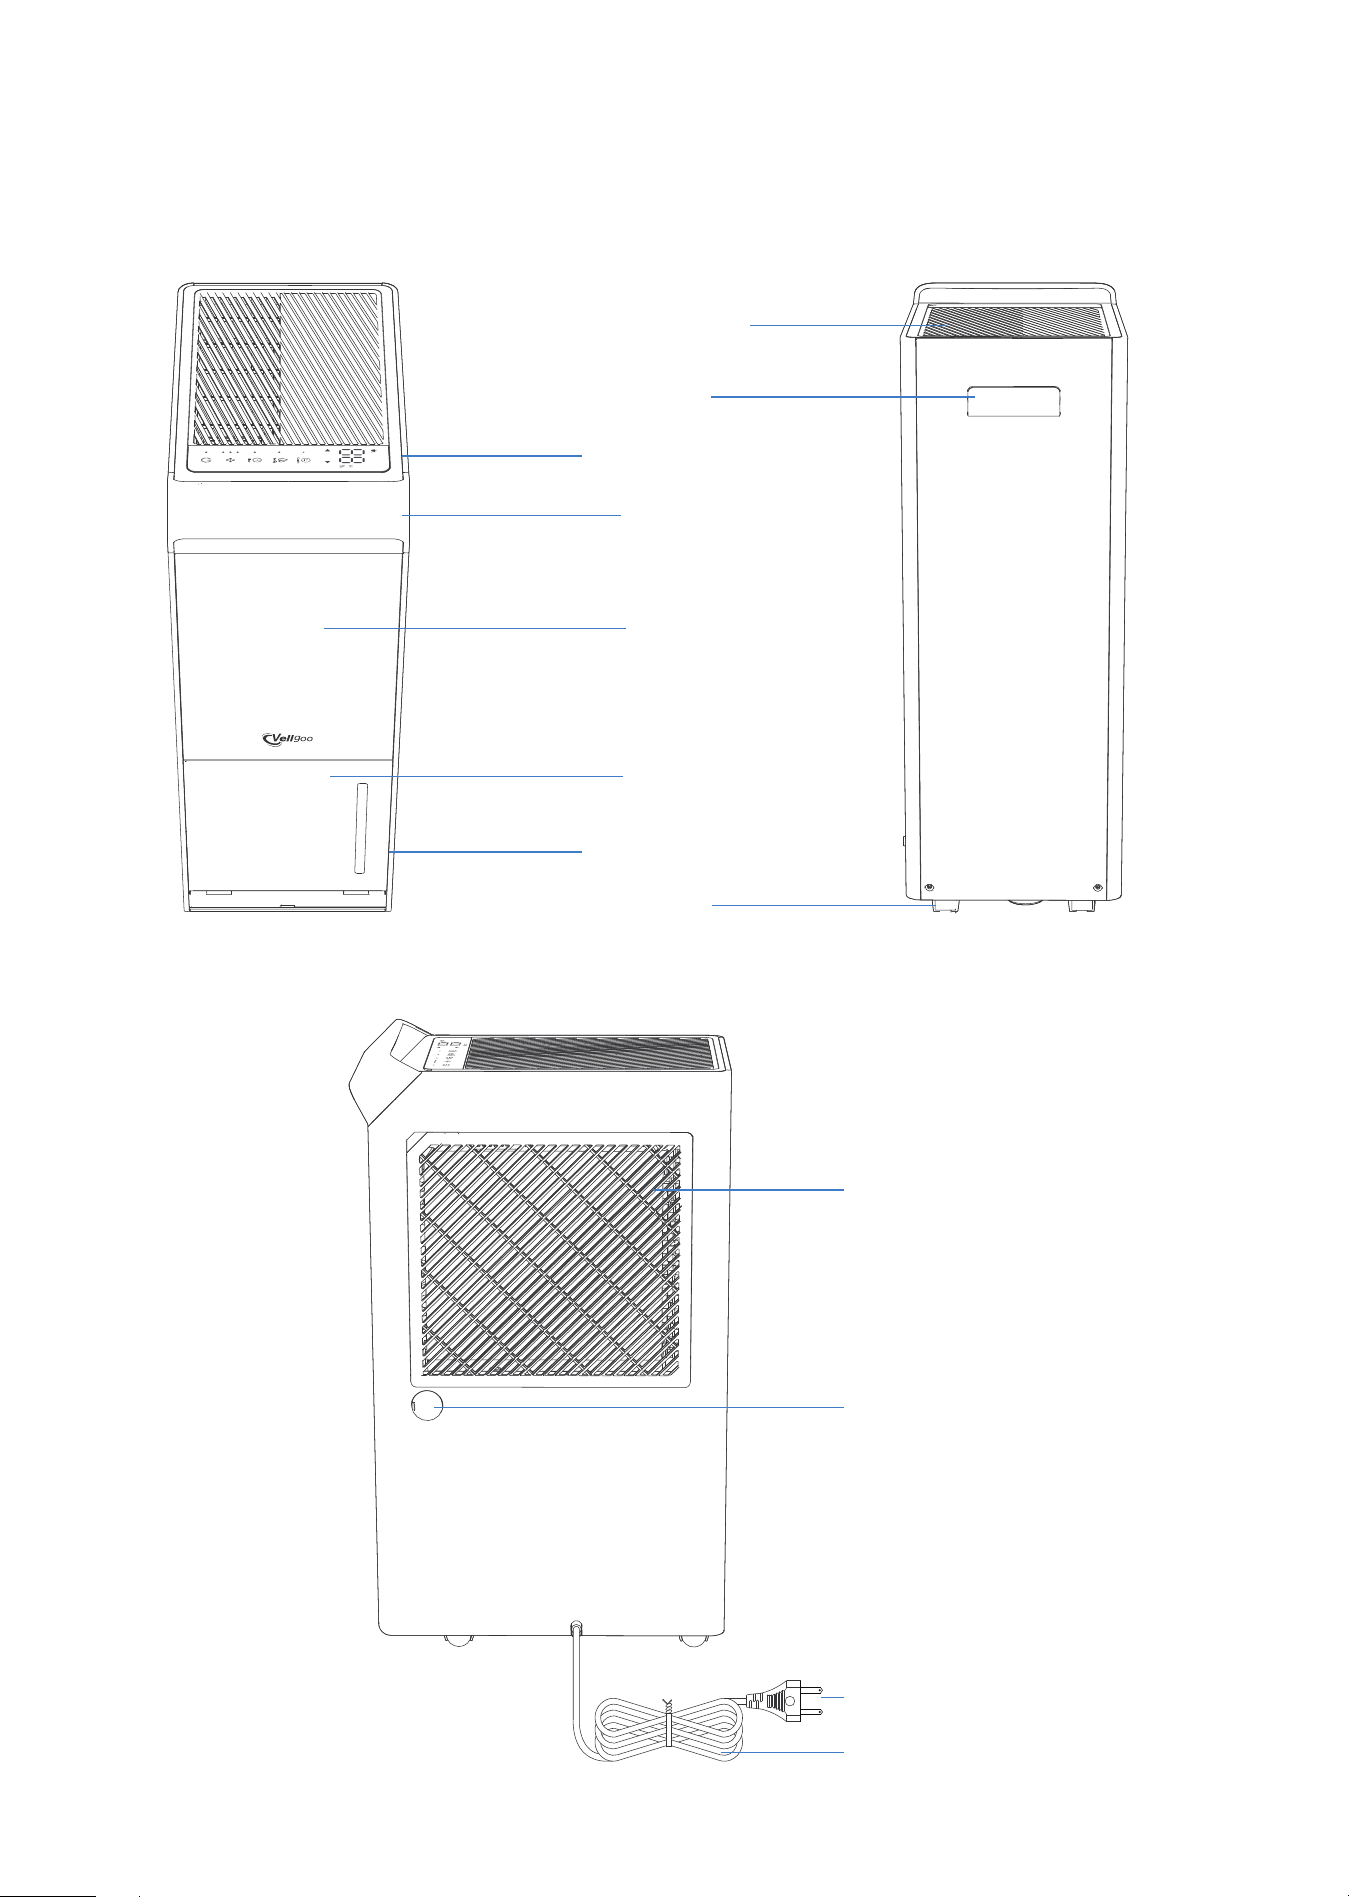
FRONT
SIDE FACE
REAR
Handle
Caster
Air Outlet
Control Panel
Panel
Bucket
VisualWindow
Handle
Air intake/ Air Filter
Continuous drain
hose Outlet
Power Cord
Power Plug
OPERATION
■ 05 ■
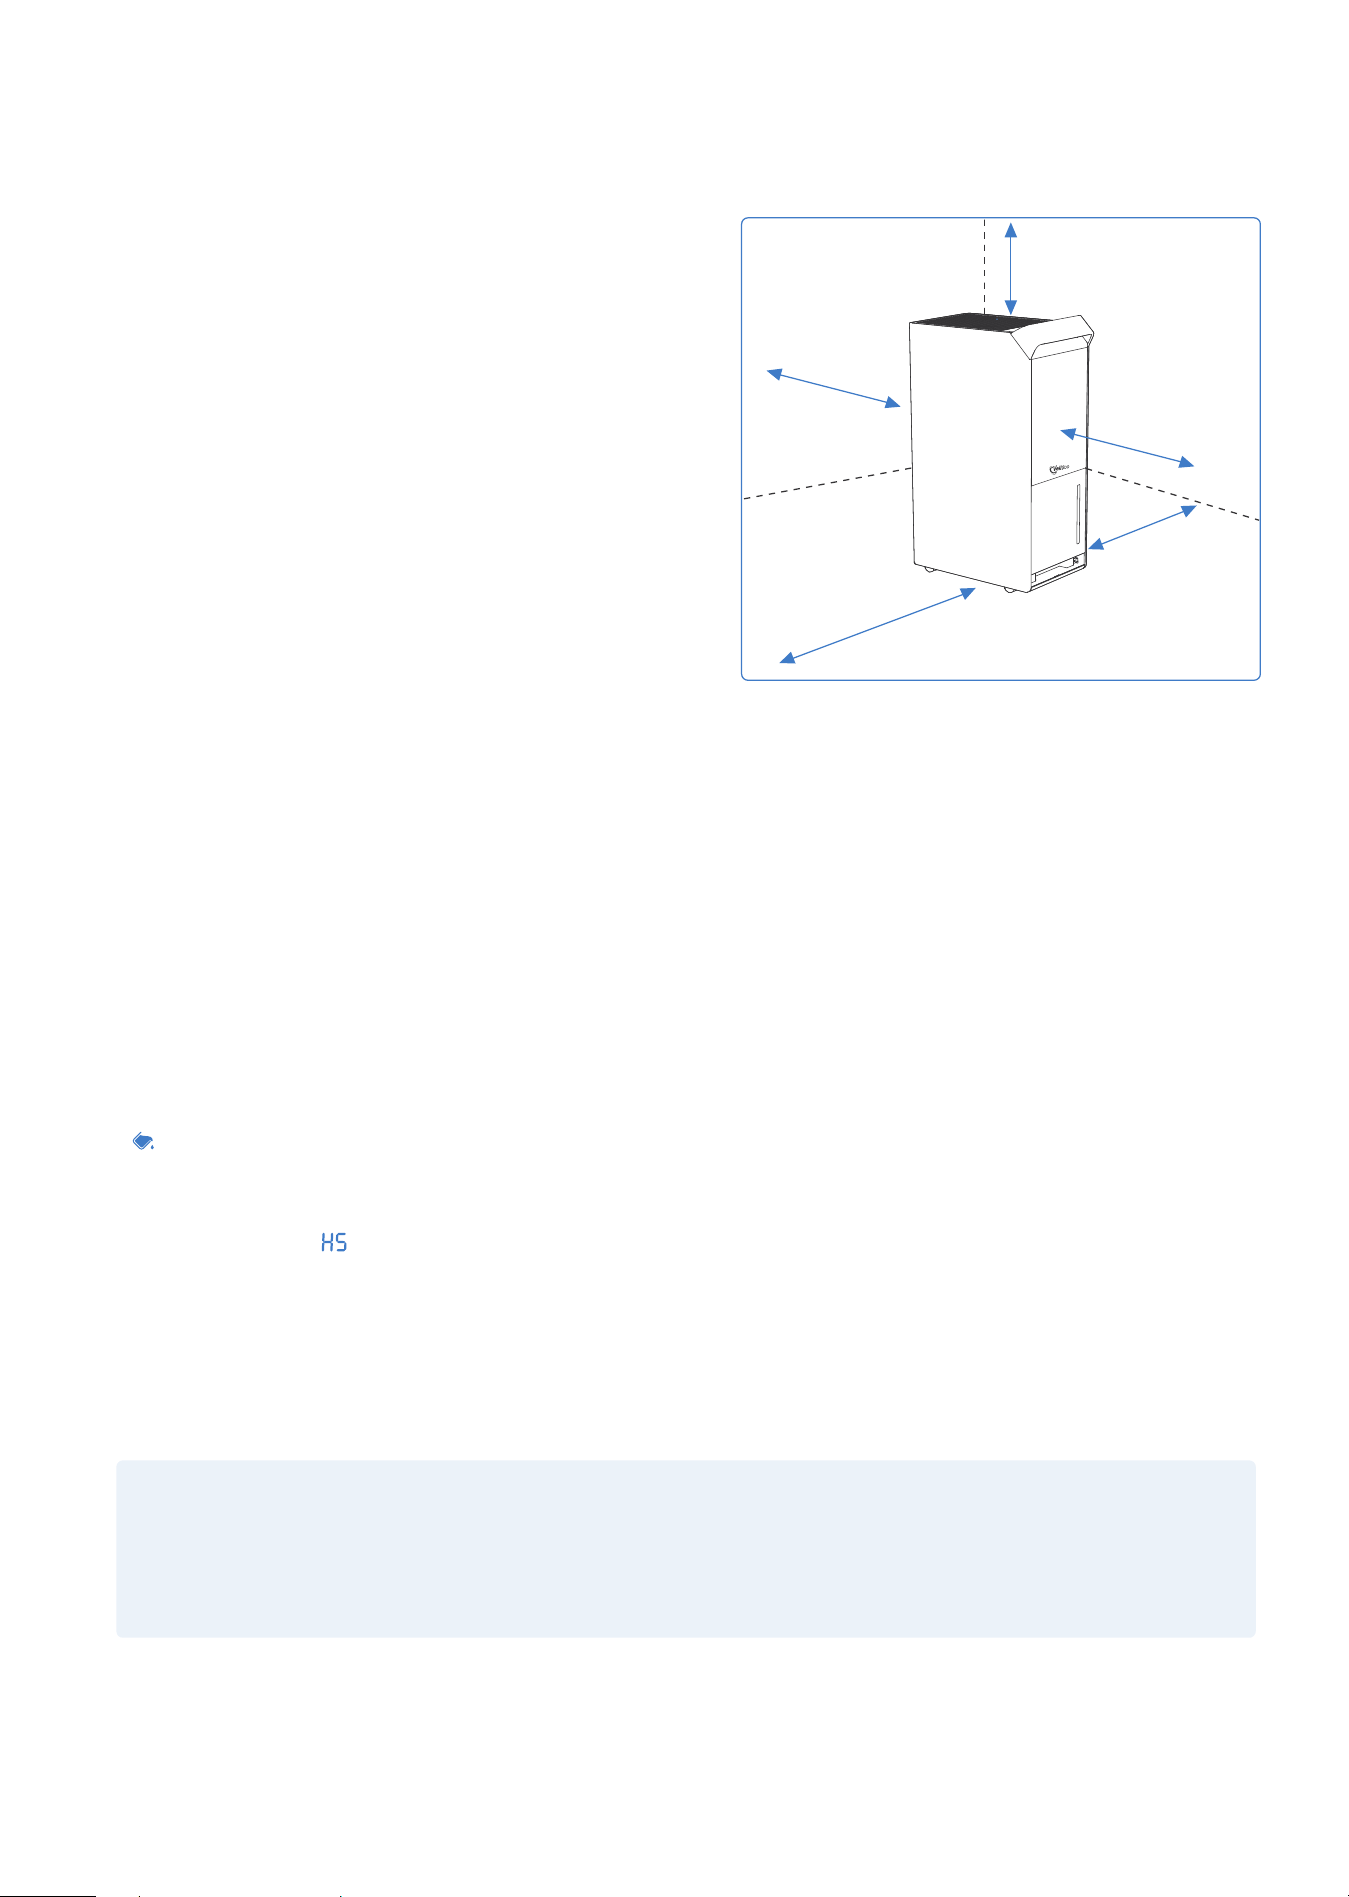
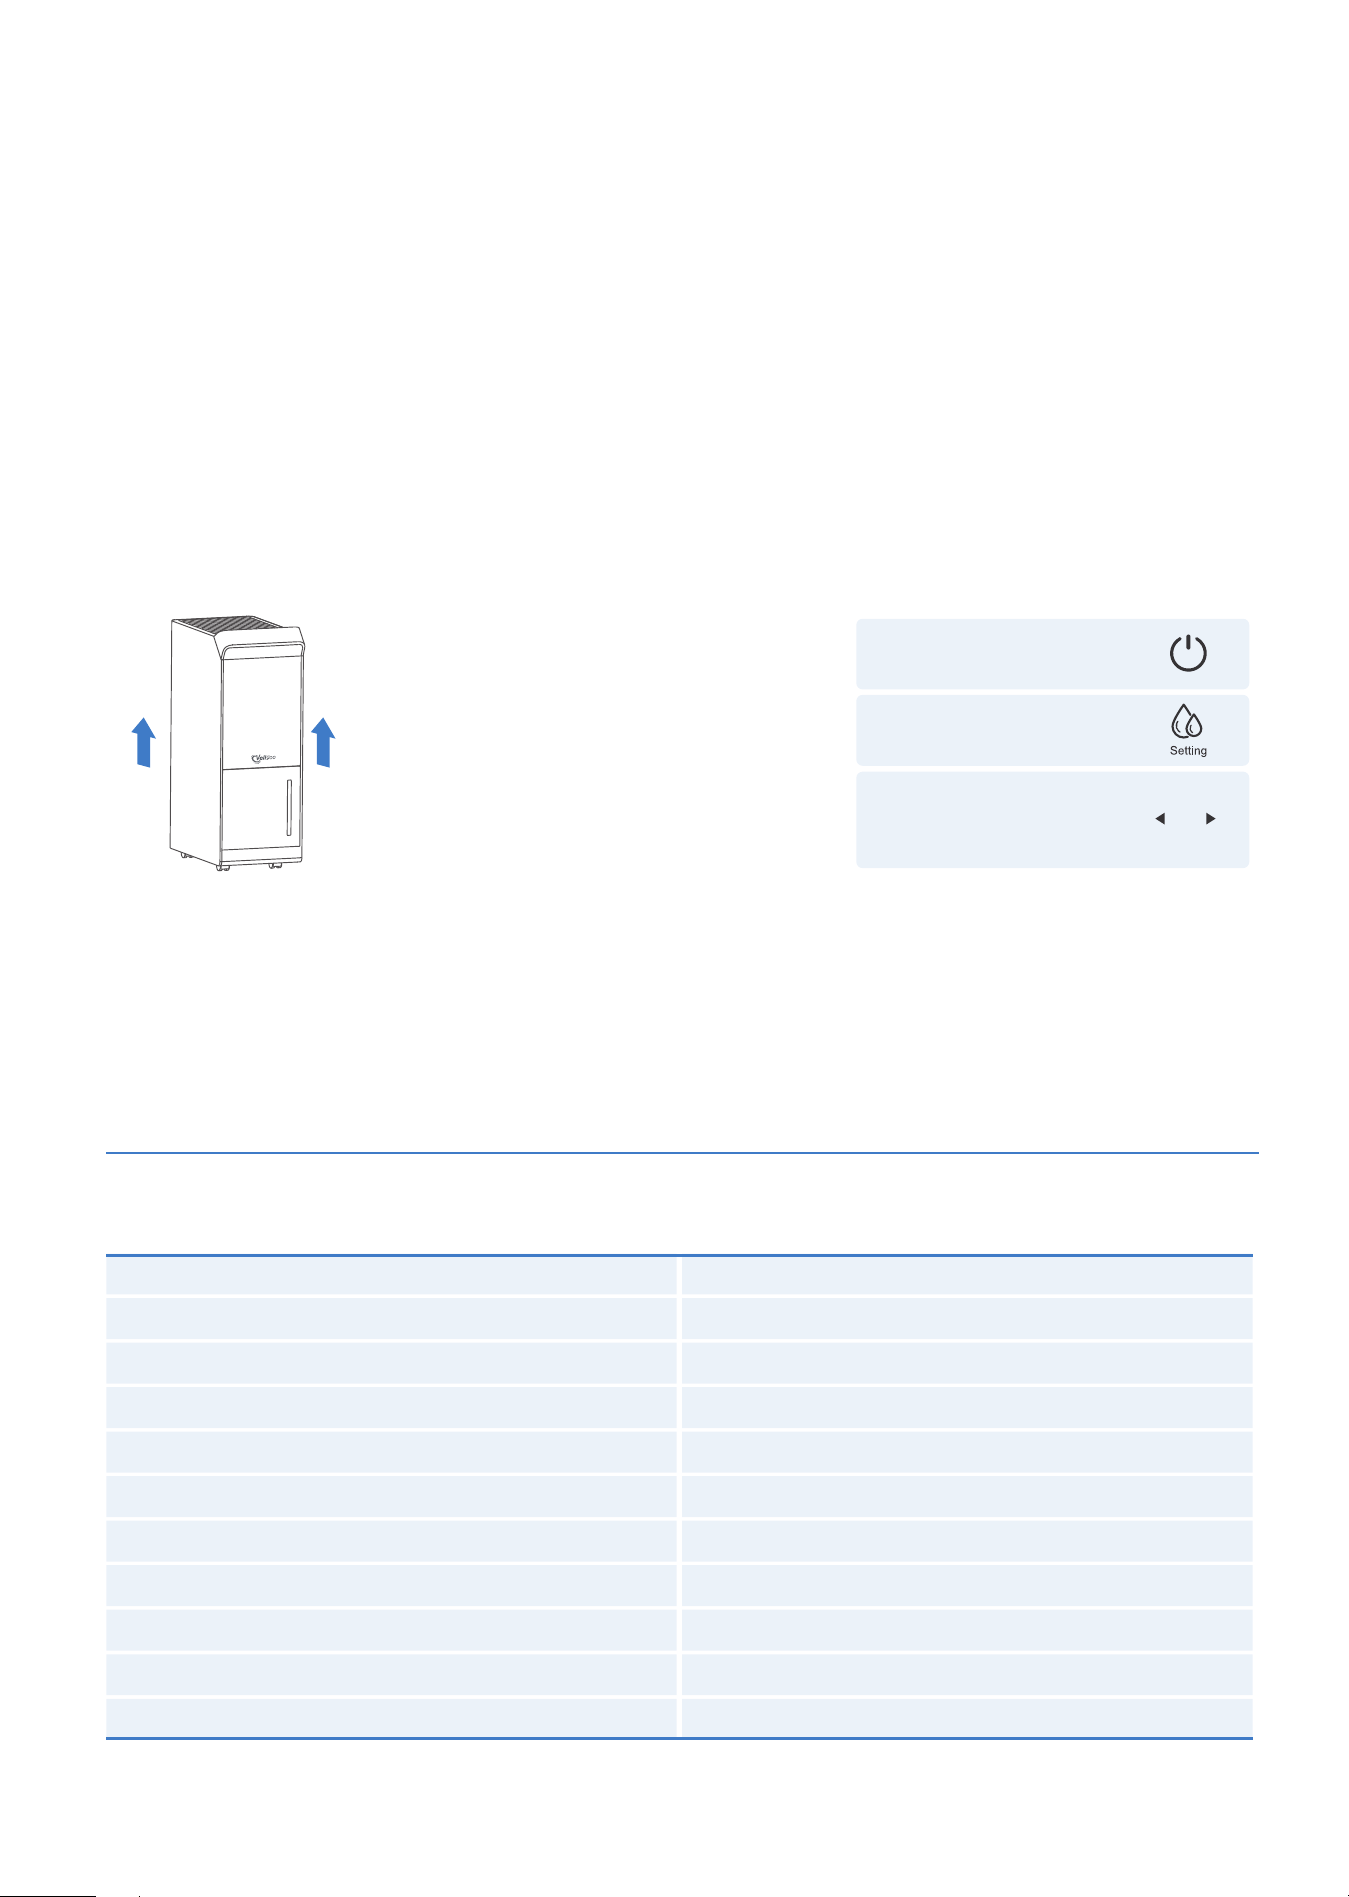
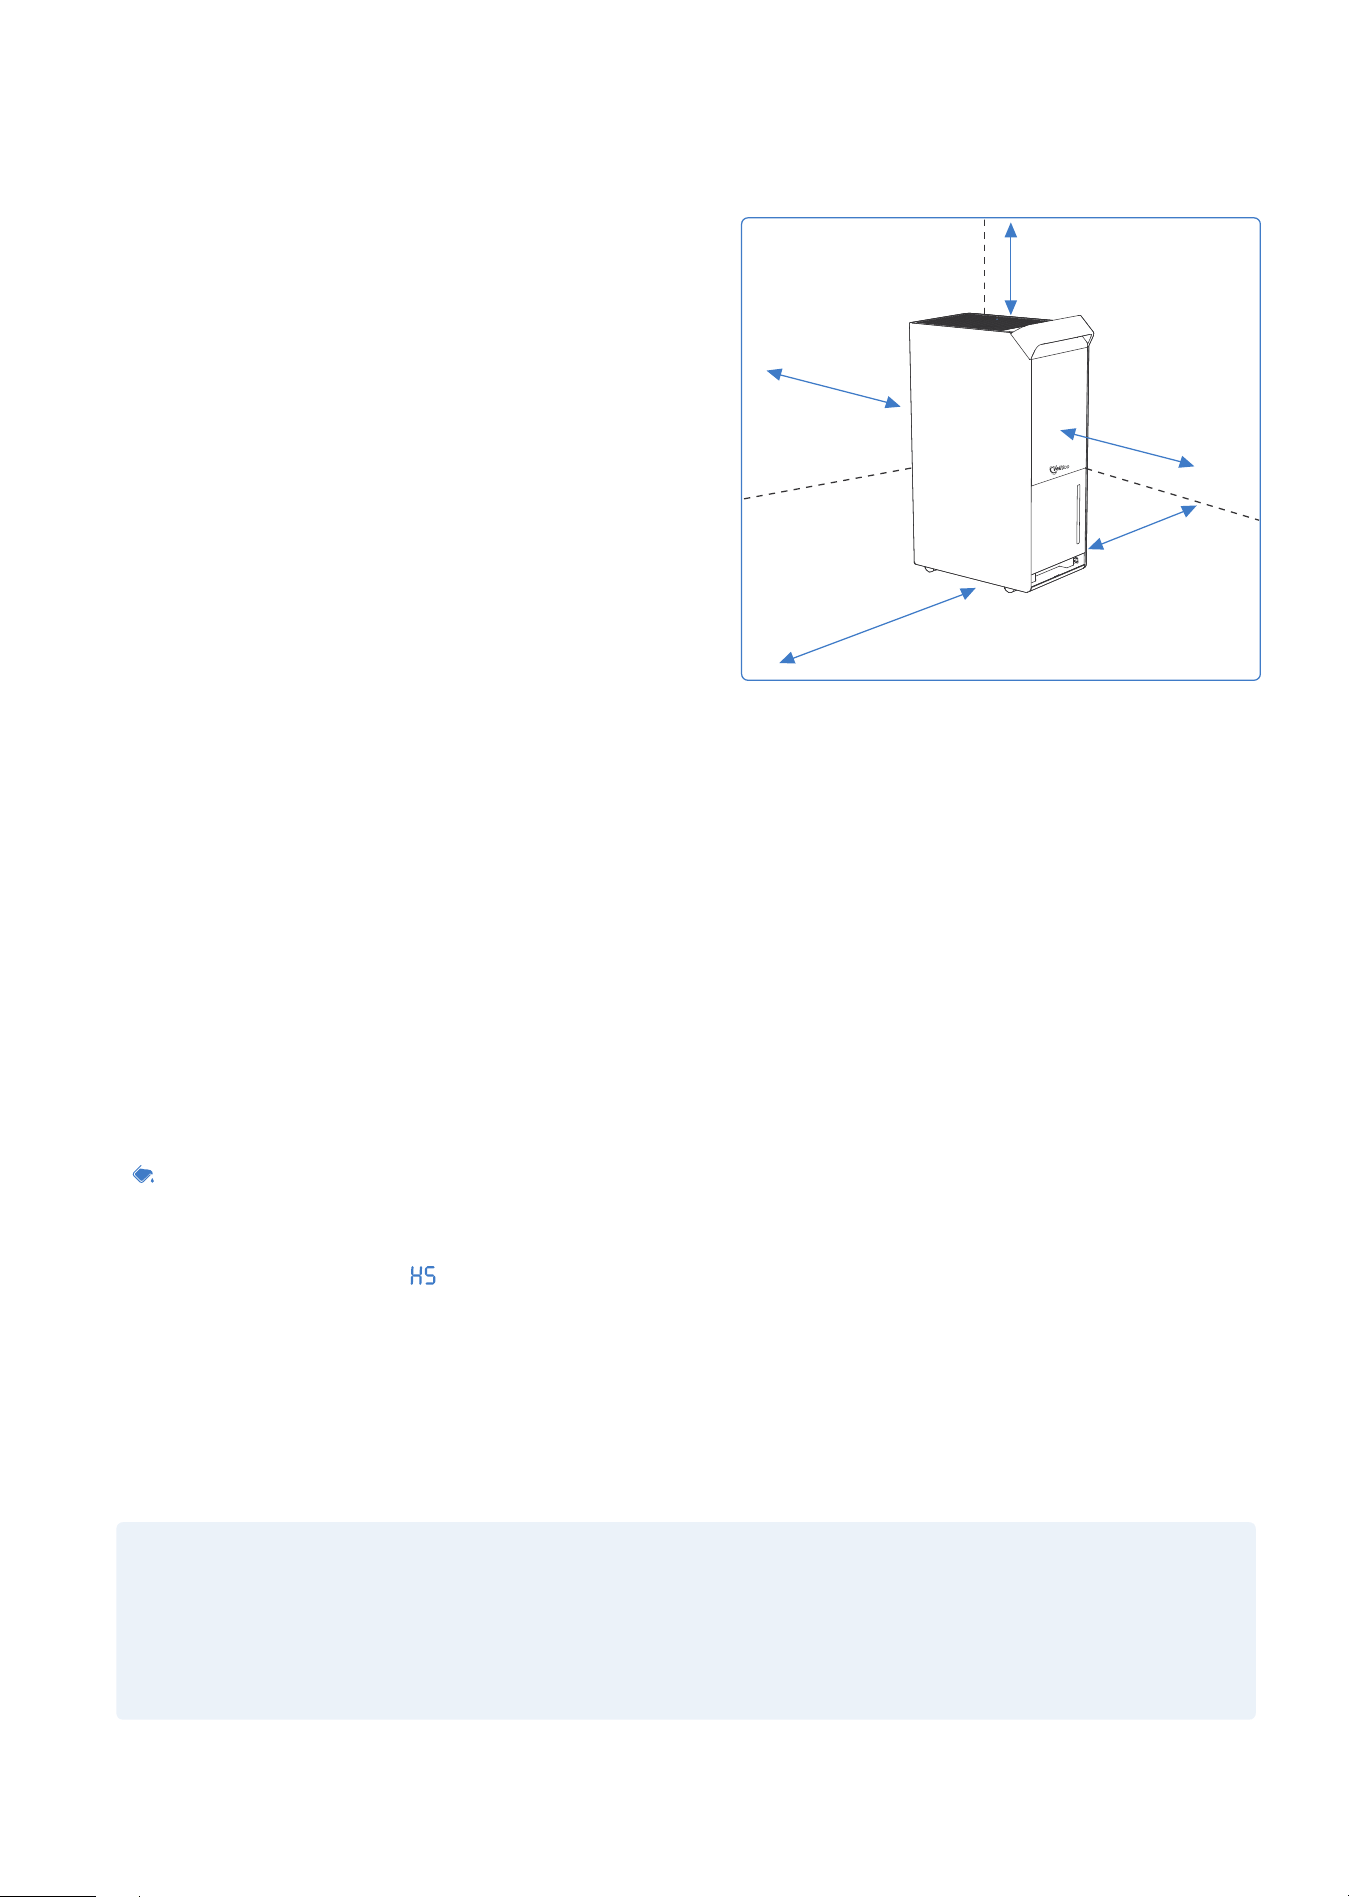
PLACE CORRECTLY
·
This unit may have been tilted or placed upside
down during shipping. To ensure this device works
properly, please ensure this unit is upright for at
least 24 hours before initial use.
·
This dehumidifier is designed to operate with a
working environment between 41°F (5°C) and 95°F
(35°C).
Do not force casters (Installed at four points on the
bottom of the dehumidifier) to move over the carpet,
or move the dehumidifier with water in the bucket.
(The dehumidifier may tip over and spill water.)
SMART FUNCTIONS
·
Auto Shut Off
When the bucket is full and/or the humidity setting is reached, the dehumidifier will automatically shut
off.
·
Power-on Delay
To avoid any damage to the dehumidifier, the dehumidifier will not start operation following a com
-plete cycle until after three (3) minutes. The operation will automatically start after three (3) minutes.
·
Bucket Full Indicator Light
The indicator glows when the bucket is ready to be emptied.
·
Auto Defrost
The LED displays " ", when the frost builds up on the evaporator coils, the compressor will cycle off
and the fan will continue to run until the frost disappears.
·
Auto-Restart
If the dehumidifier shuts off unexpectedly due to power being cut, the dehumidifier will restart with the
previous function setting automatically when the power resumes.
NOTE:
All the illustrations in the manual are for explanation purposes only. Your dehumidifier may be slightly
different. The actual shape shall prevail. The design and specifications are subject to change without
prior notice for product improvement. Consult Customer Service for details.
more than
19.65inches(50cm)
more than
19.65inches (50cm)
more than
19.65inches (50cm)
more than
19.65inches (50cm)
more than
19.65inches (50cm)
■ 06 ■
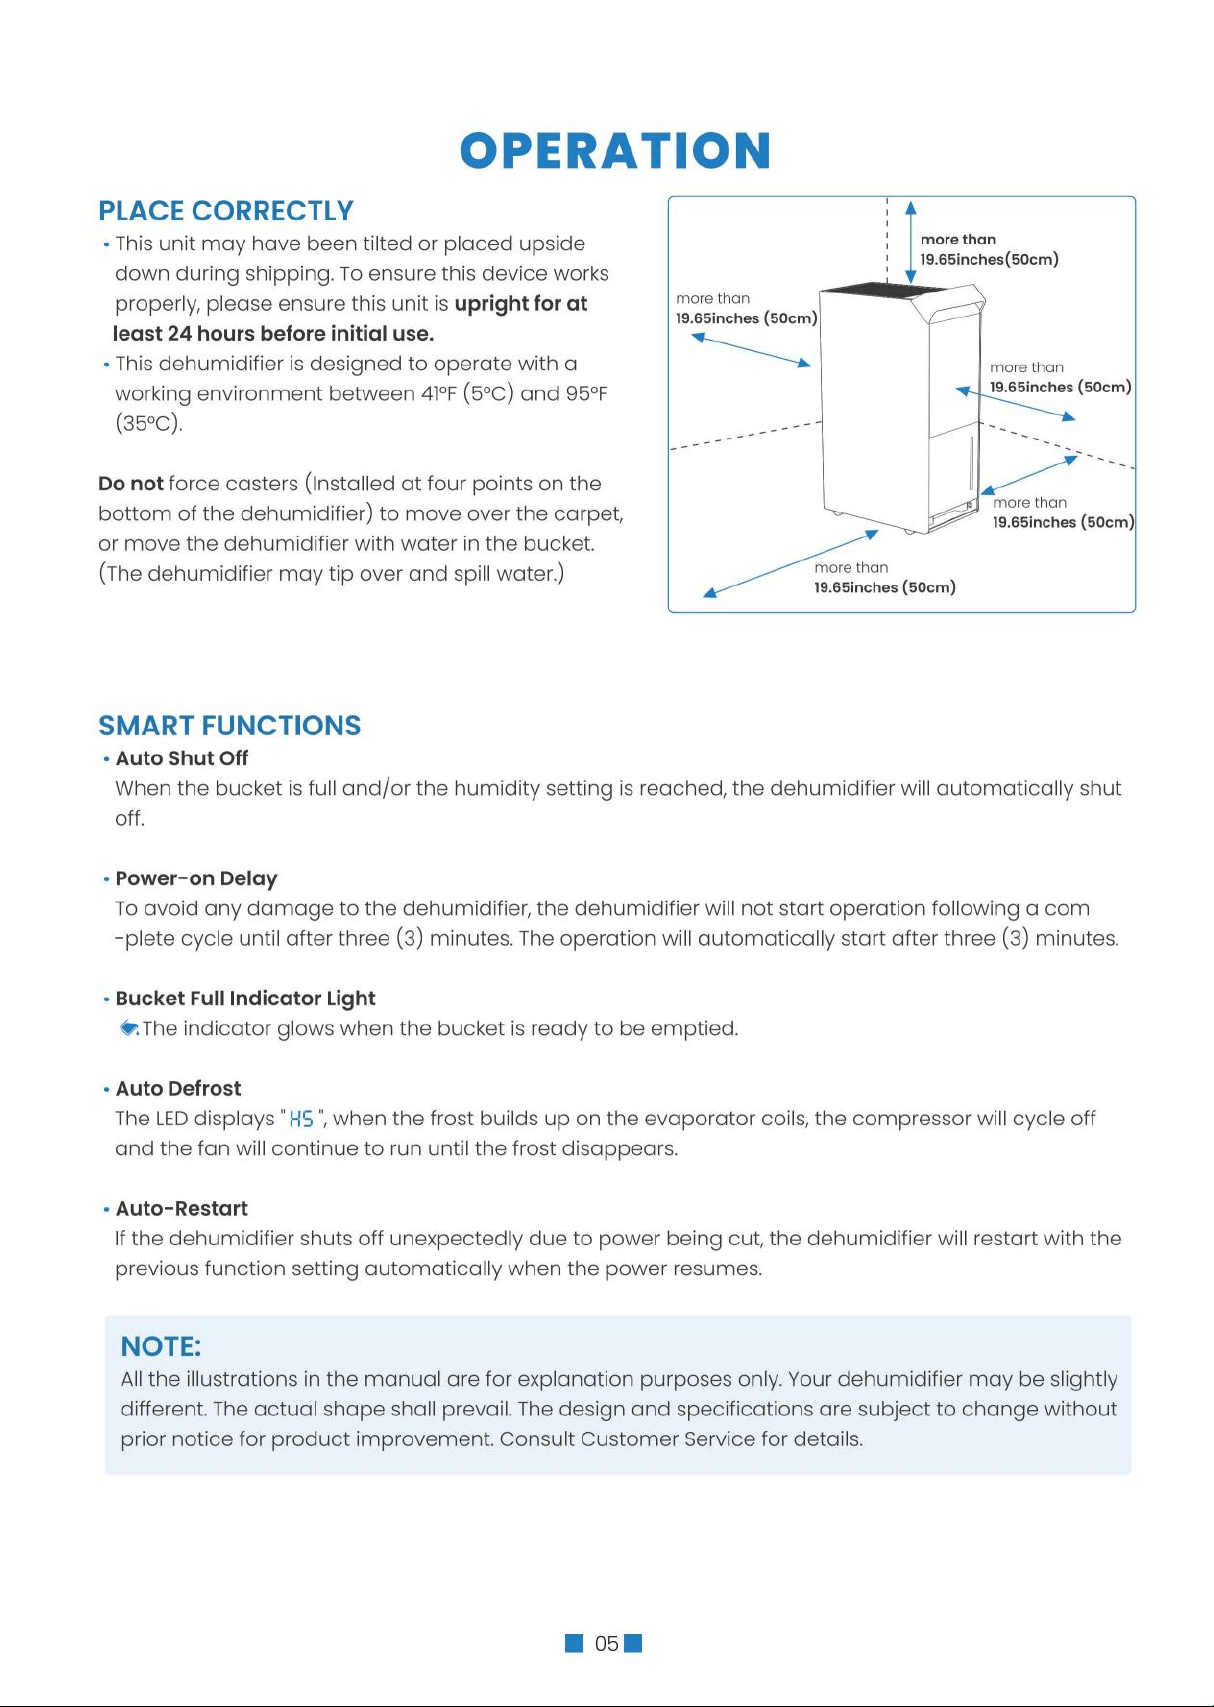
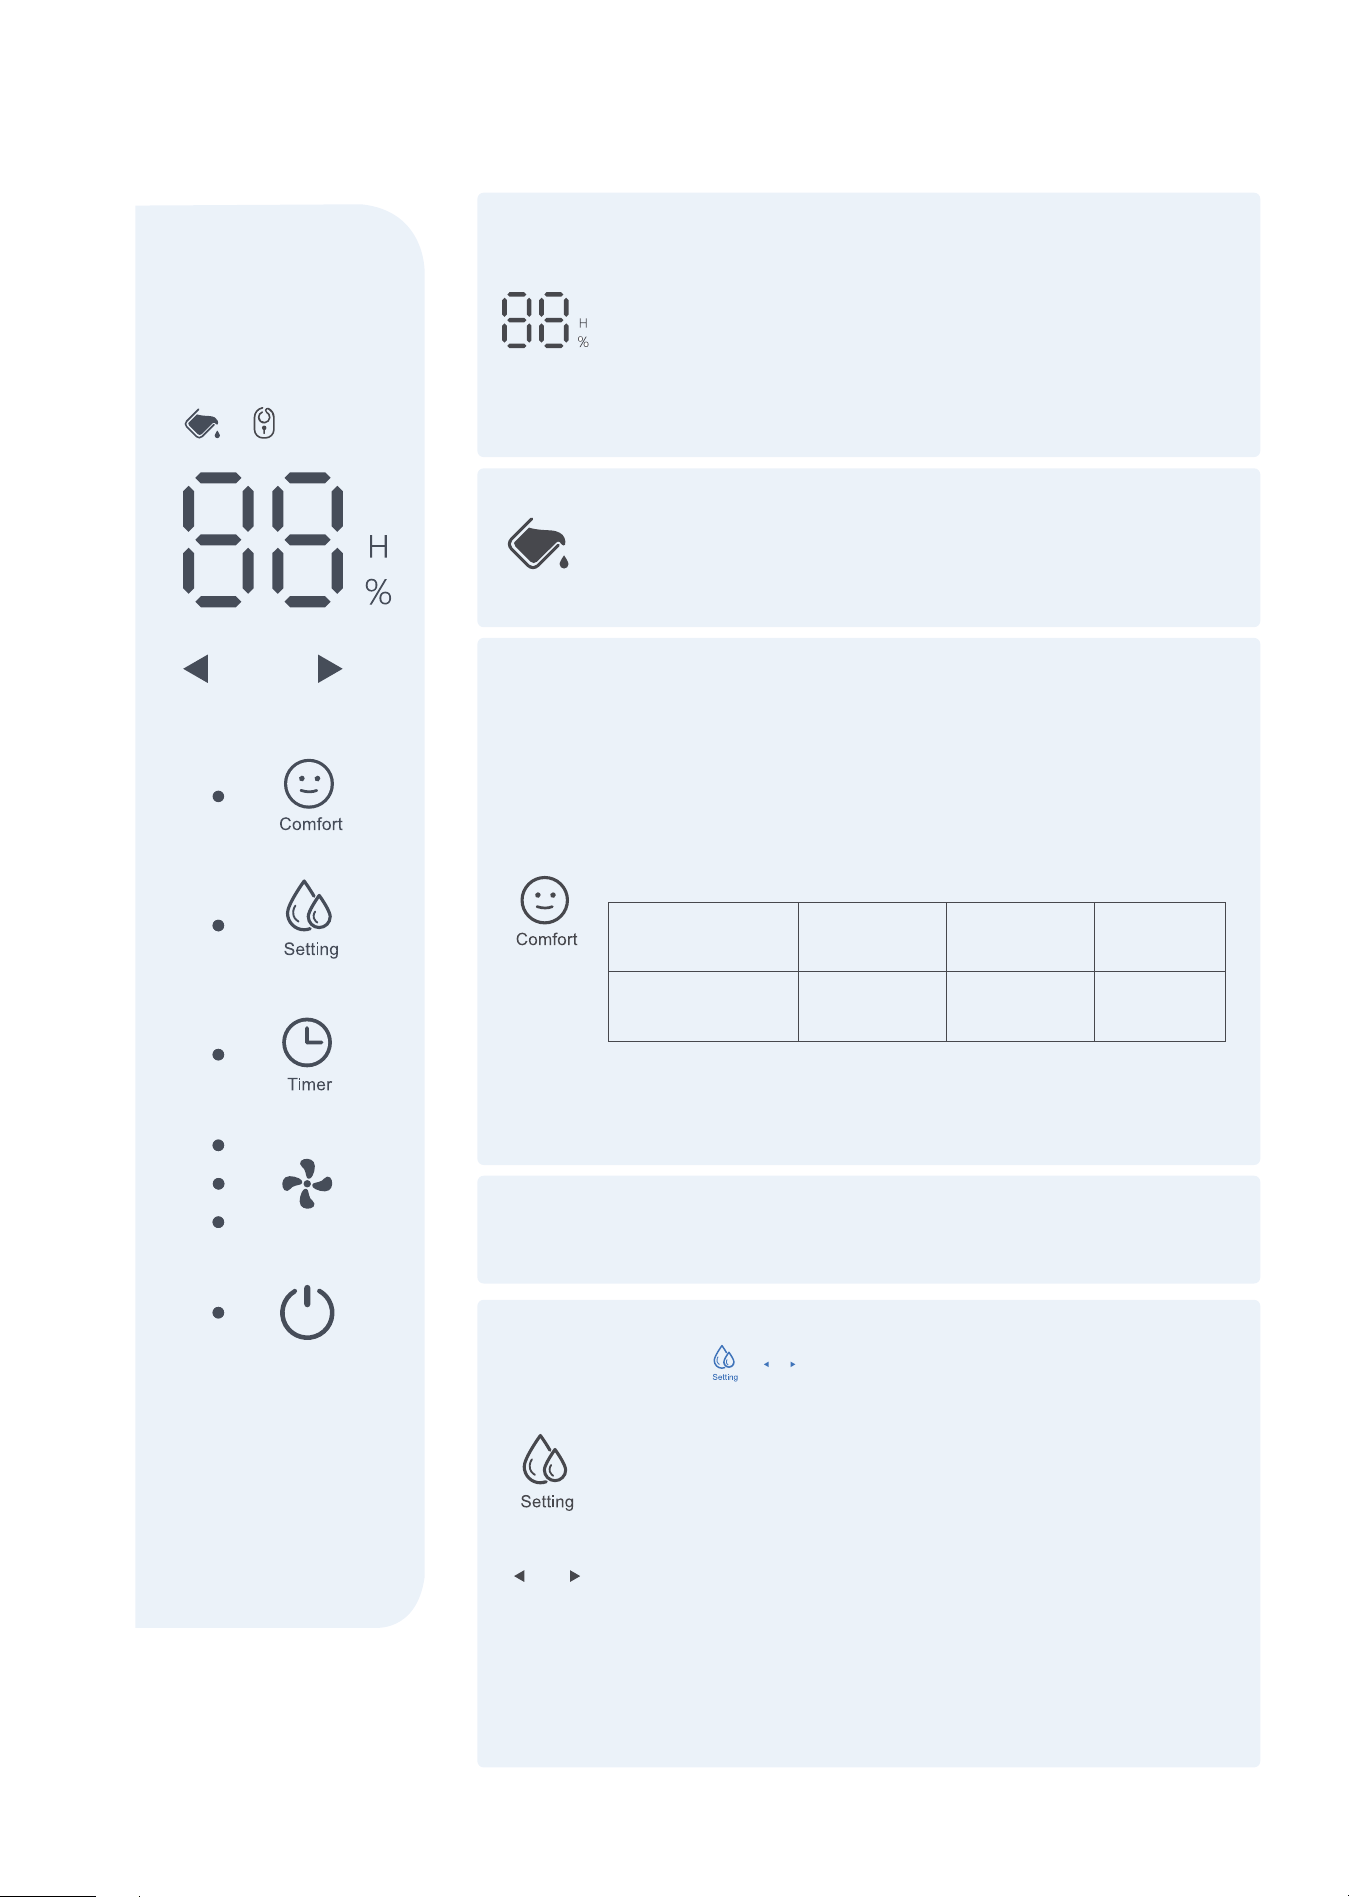
CONTROL PANEL
LED Display
Shows the set % humidity level from 40% to 80% or auto
start/stop time (0~24) while setting, then shows the actual
(±5% accuracy) room % humidity level in a range of 30%
RH (Relative Humidity) to 90%RH (Relative Humidity).
Bucket State Indicator
Whenthebucketisfullornotinthe rightposition,
thedehumidifierwillautomaticallyshutoff.
Comfort Mode
Press this button to turn the comfort function on/off.
Under this mode, the humidity cannot be adjusted
manually but will be preset to a recommended
comfortable level based on the ambient temperature.
The level will be controlled as per the below table:
Press this button again, the COMFORT mode will be
canceled and every time it is pressed, the buzzer will
sound once.
Ambient
Temperature
Relative
Humidity
<65˚F
55%
65-77˚F
50%
Continuous Mode
Turned on by default
Manually Mode
Press + adjust the target Humidity Range
(40%-80%), The humidity range is between 40% and 80%
with the initial state being 40%. The value increases or
decreases by 5% every time this button is pressed.
NOTE:
If there is no signal showing that the Left and Right
Adjustment buttons are pressed in more than 3 seconds,
the setting will be considered valid; meanwhile, the Left
and Right Adjustment keys will be closed synchronously
and resume the normal display state.
>77˚F
45%
+
■ 07 ■
CONTROL PANEL
Timer Button
Press to set an Auto on or an Auto off timer (0 - 24
hours) in conjunction with the and the buttons. The
value increases or decreases by 1H every time this button
is pressed.
NOTE:
·
When the timer indicator light is on, press the timer
button to cancel the timer, and the indicator light is off.
·
If you press the On/Off button to turn off the
dehumidifier before the timing is done, then the timing
setting will be canceled.
·
If the working mode is changed during the timing
process, the original setting will be maintained.
·
If you want to change the original setting, you can
press the Timer button with the and the again to
reset the timing.
Wind Speed Button
Low Speed Mode: Press this button once.
Medium Speed Mode: Press this button twice.
High speed: Press this button Three times.
NOTE:
·
Low Speed Mode (Sleep Mode): The brightness of all
LED lights will be reduced when there is no operation in
5S.
·
This button also serves as the child lock key. Press it
for 3 seconds to activate or shut down the child lock,
and the corresponding indicator light watt be on or off.
Power Button
Press to turn the dehumidifier on and off.
Left and Right Adjustment Buttons
NOTE:
·
When the dehumidifier is first turned on, it will go on
Continuous mode by default. This will disable the use of
the LEFT/RIGHT buttons. Make sure to turn off Continuous
mode to regain function in these buttons.
·
This button is only effective when either the Manual
Dehumidification key or the Timer button is valid.
■ 08 ■
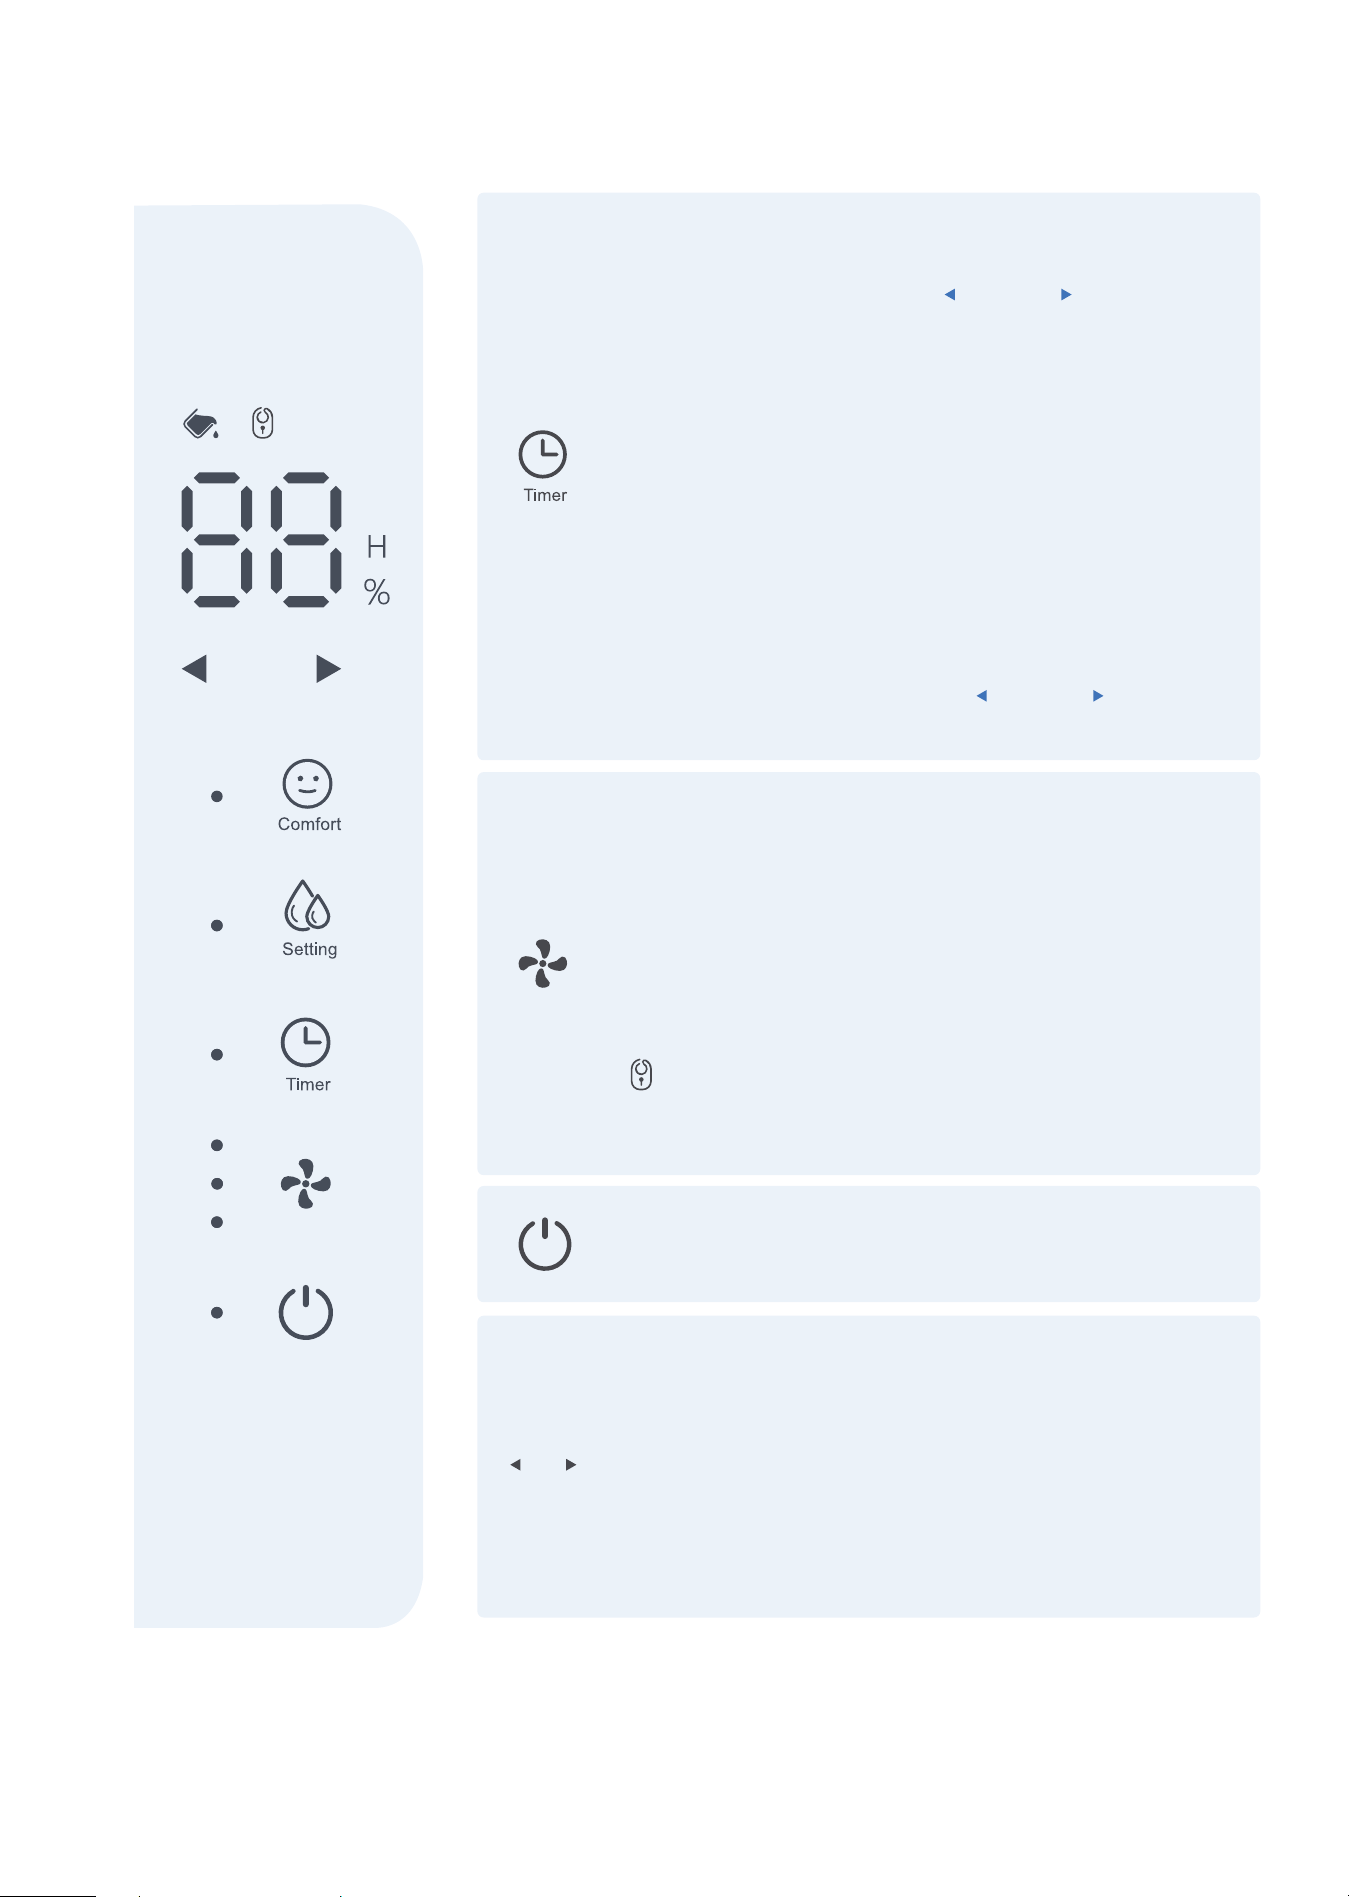
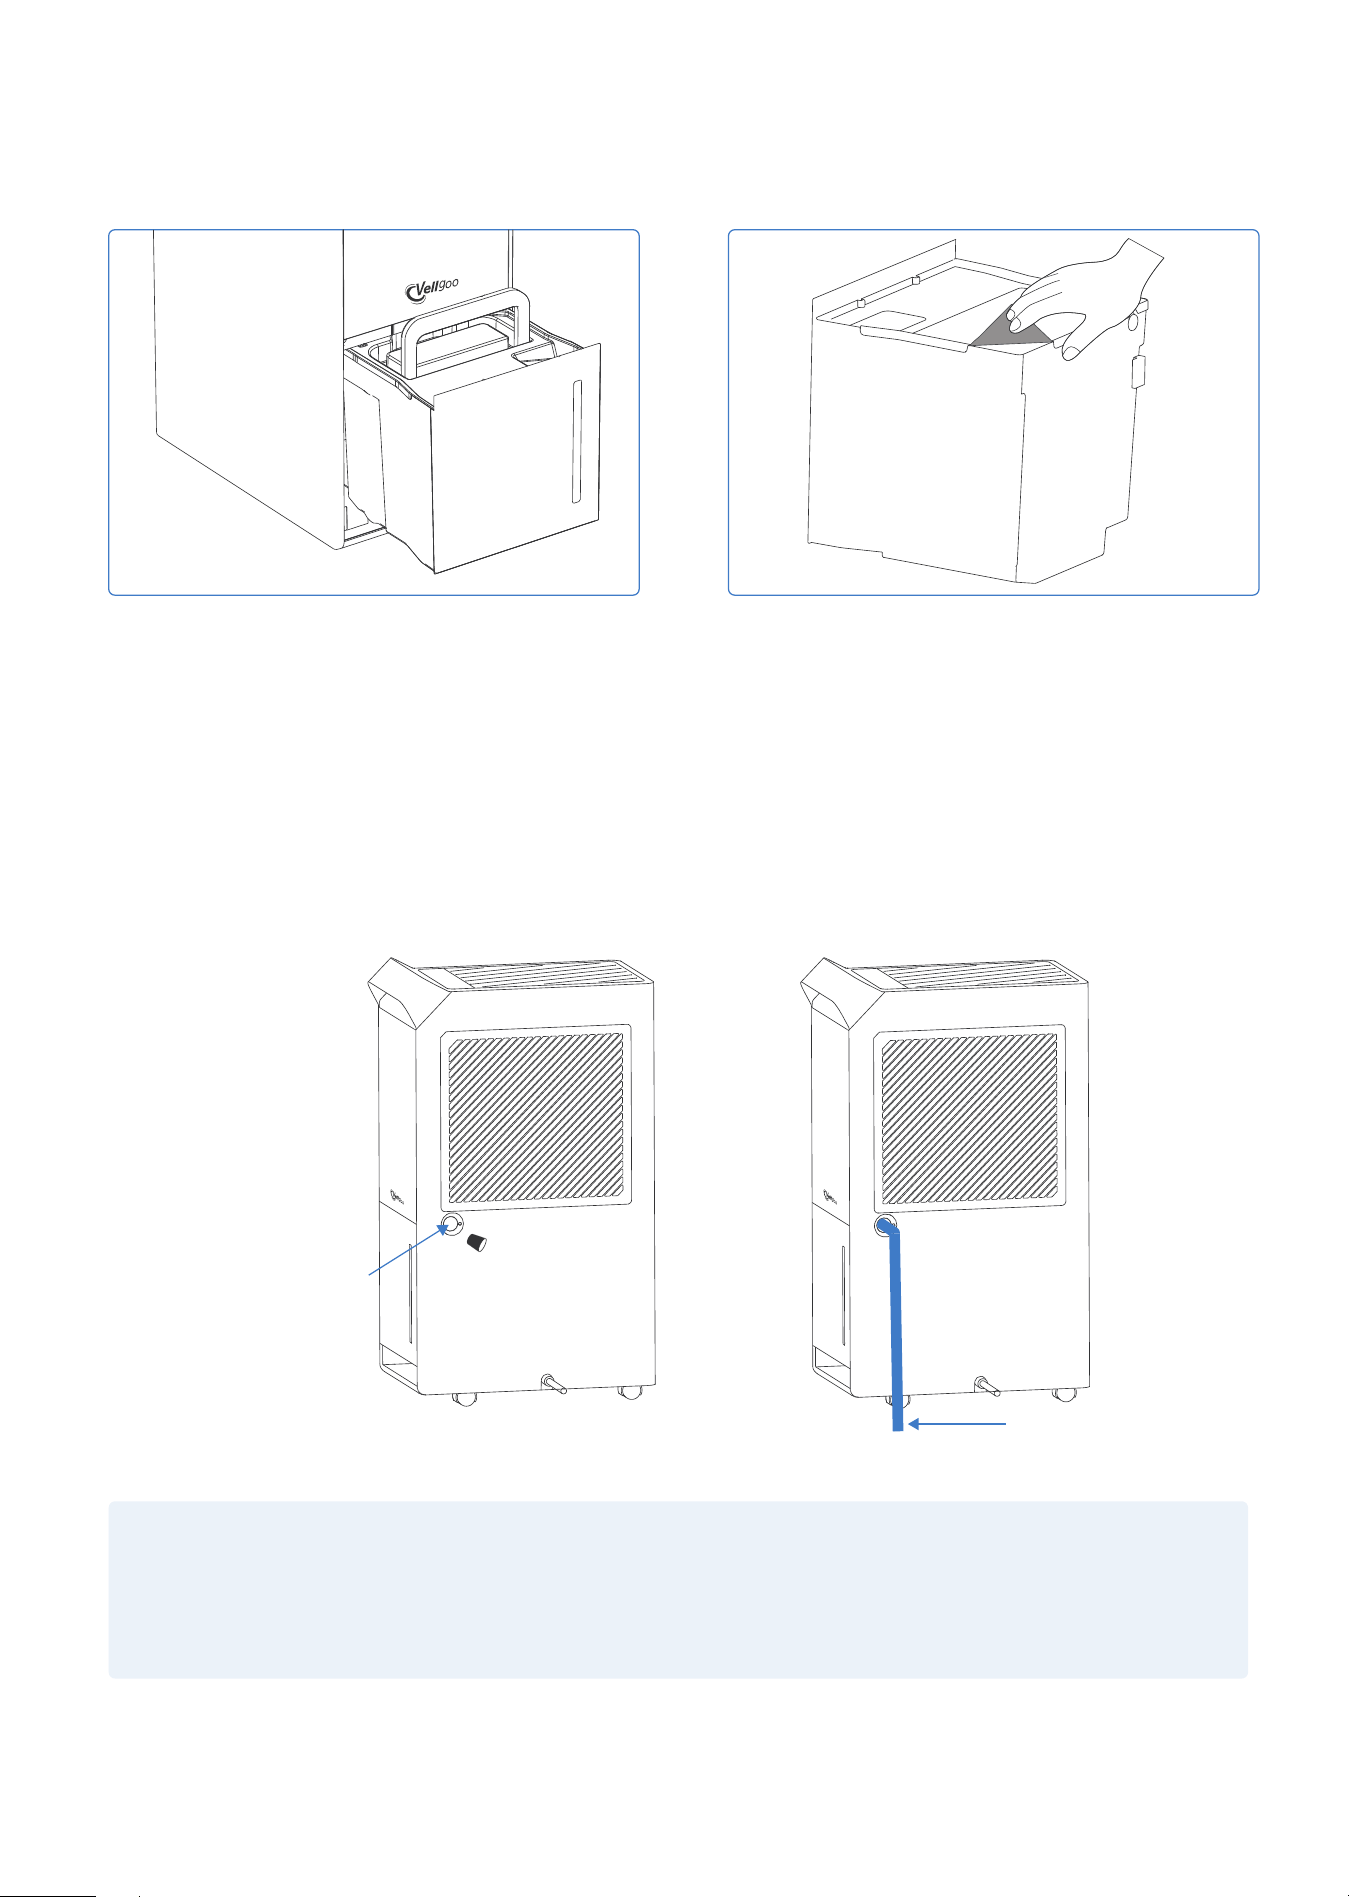
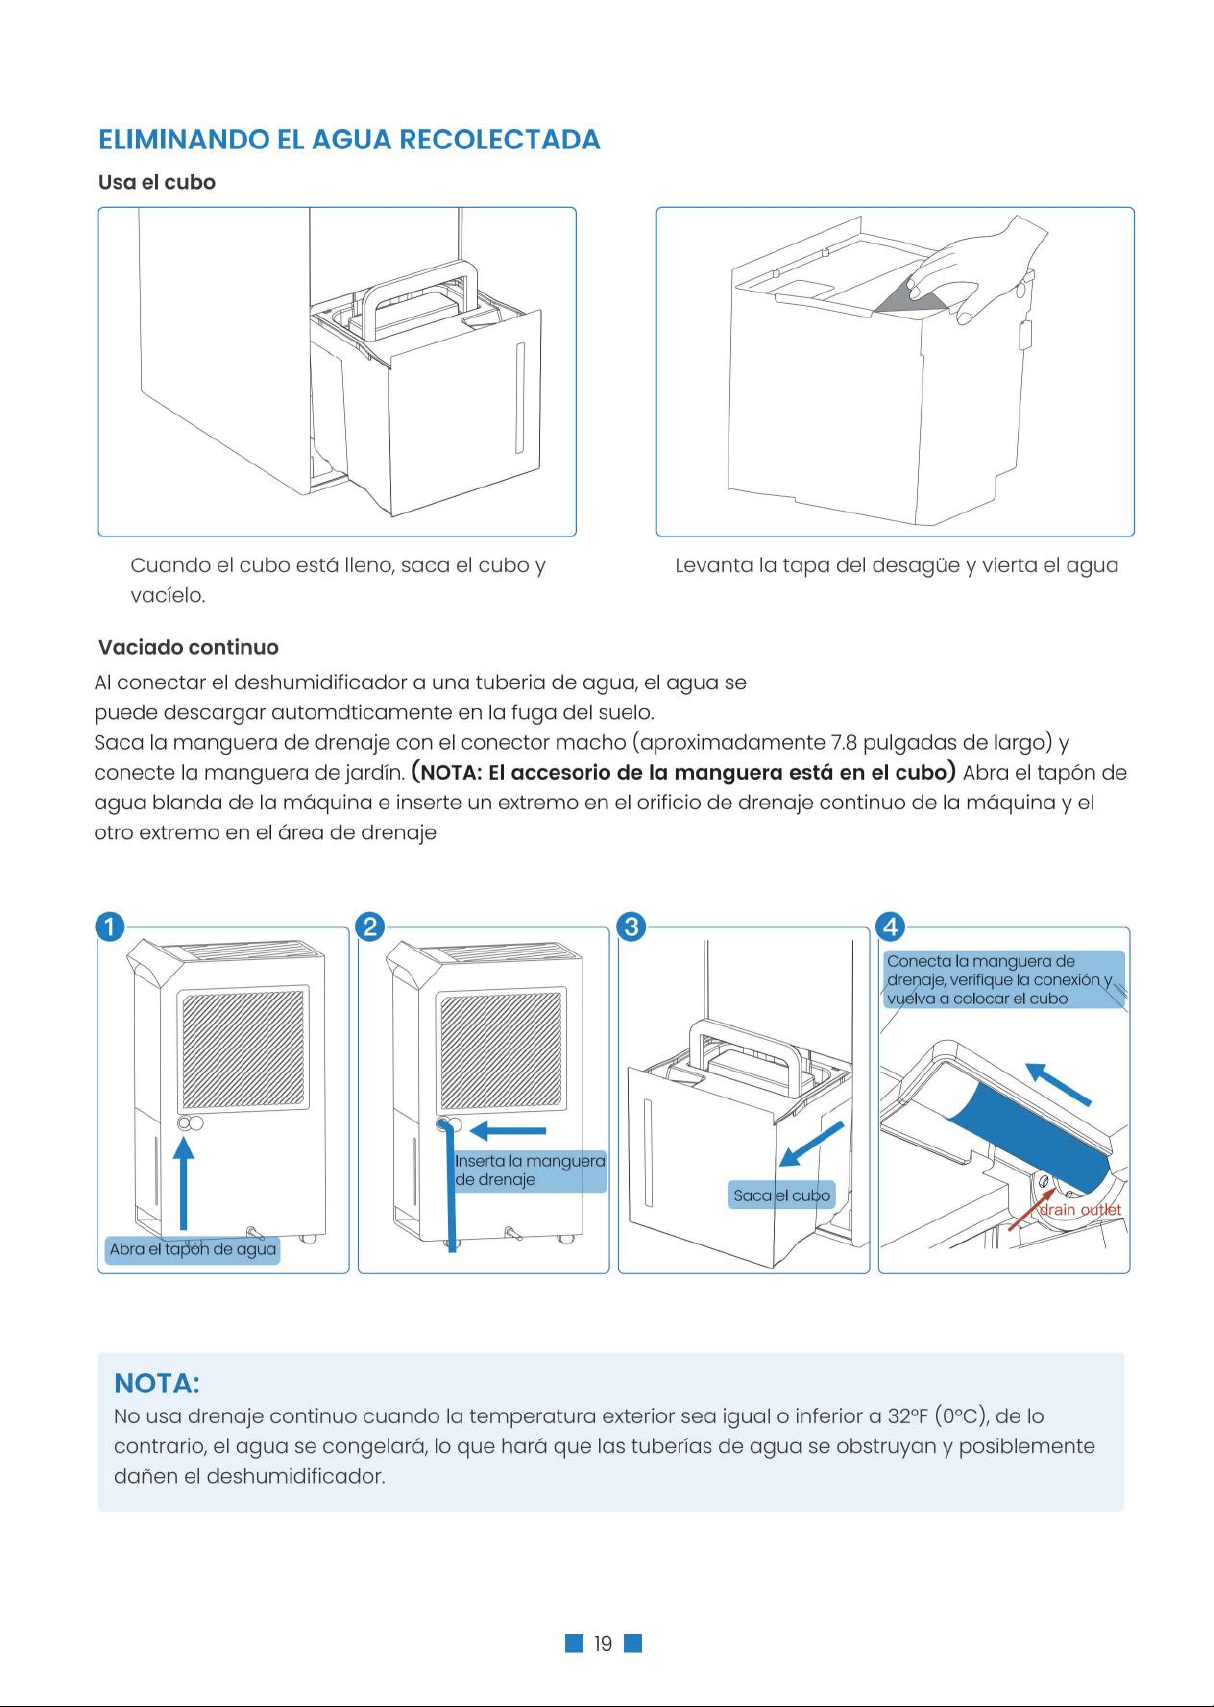
REMOVING THE COLLECTED WATER
NOTE:
Do not use continuous draining when the outdoor temperature is equal to or less than 32°F (0°C),
otherwise the water will freeze, causing the water hose to block up and the dehumidifier may be
damaged.
When the bucket is full, remove the bucket and
empty it.
Water can be automatically be emptied into a floor drain by attaching the dehumidifier to a water hose
with a female threaded end. (NOTE: On some models, the female threaded end is not included)
Take out the PVC water pipe (NOTE: the water pipe is in the bucket) and open the soft water plug at the
real shell and insert one end of it into the continuous drainage hole of the machine with the other end in
the drainage area.
Lift the drainage lid and Pour out water.
Use the bucket
Continuous draining
Open the water plug
Insert water pipe
■ 09 ■
CARE & MAINTENANCE
WARNING:
Turn the dehumidifier off and remove the plug from the wall outlet before cleaning.
Clean the dehumidifier with water and mild detergent.
Do not use bleach or abrasives.
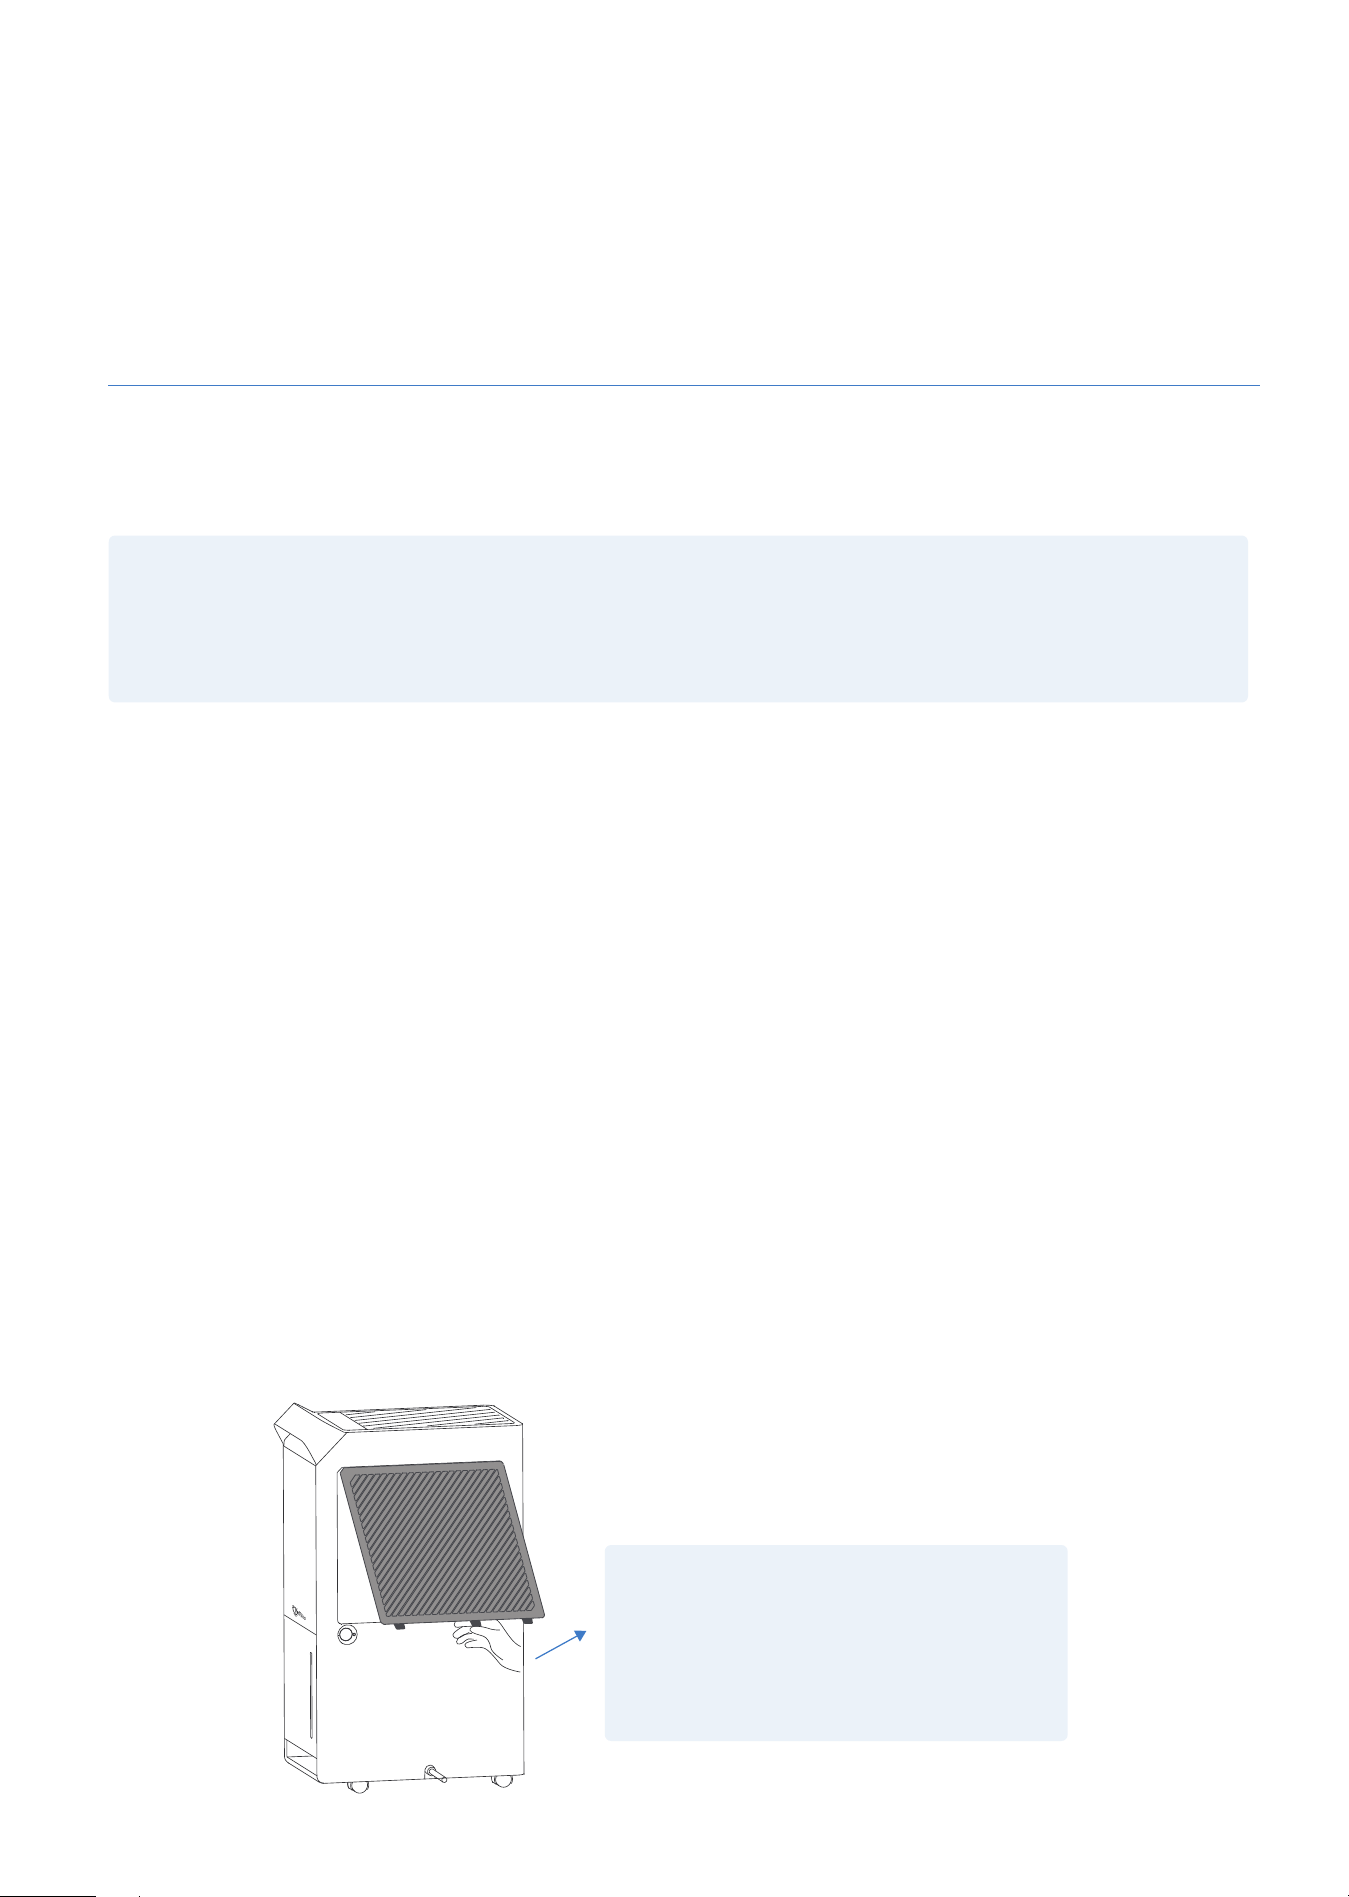
CAUTION:
DO NOT operate the dehumidifier
without a filter because dirt and lint
will clog it and reduce performance.
·
Lead the water hose to the floor drain or a suitable drainage facility, the drainage facility should be
lower than the drain outlet of the dehumidifier.
·
Be sure to run the water hose sloping downward to let the water flow out smoothly.
·
When the continuous drain feature is not being used, remove the drain hose from the outlet and
replace the plastic cover of the continuous drain hose outlet tightly.
Clean the Grille and Case
·
Do not splash water directly onto the main unit. Doing so may cause an electrical shock, cause the
insulation to deteriorate, or cause the unit to rust.
·
The air intake and outlet grilles get soiled easily. Use a vacuum attachment or brush to clean.
Clean the bucket
Clean the bucket with water and mild detergent every two (2) weeks.
Clean the air filter
Clean the filter with potable water at least once every 30days.
Storing the dehumidifier
Store the dehumidifier when it will not be used for a long time.
·
After turning off the dehumidifier, wait one day until all water in the internal of the dehumidifier flows
into the bucket, and then empty the bucket.
·
Clean the main dehumidifier, bucket and air filter.
·
Wrap the cord and bundle it with the band.
·
Cover the dehumidifier with a plastic bag.
·
Store the dehumidifier upright in a dry, well-ventilated place.
Make sure the connection is tight and there is no leaking.
■ 10 ■
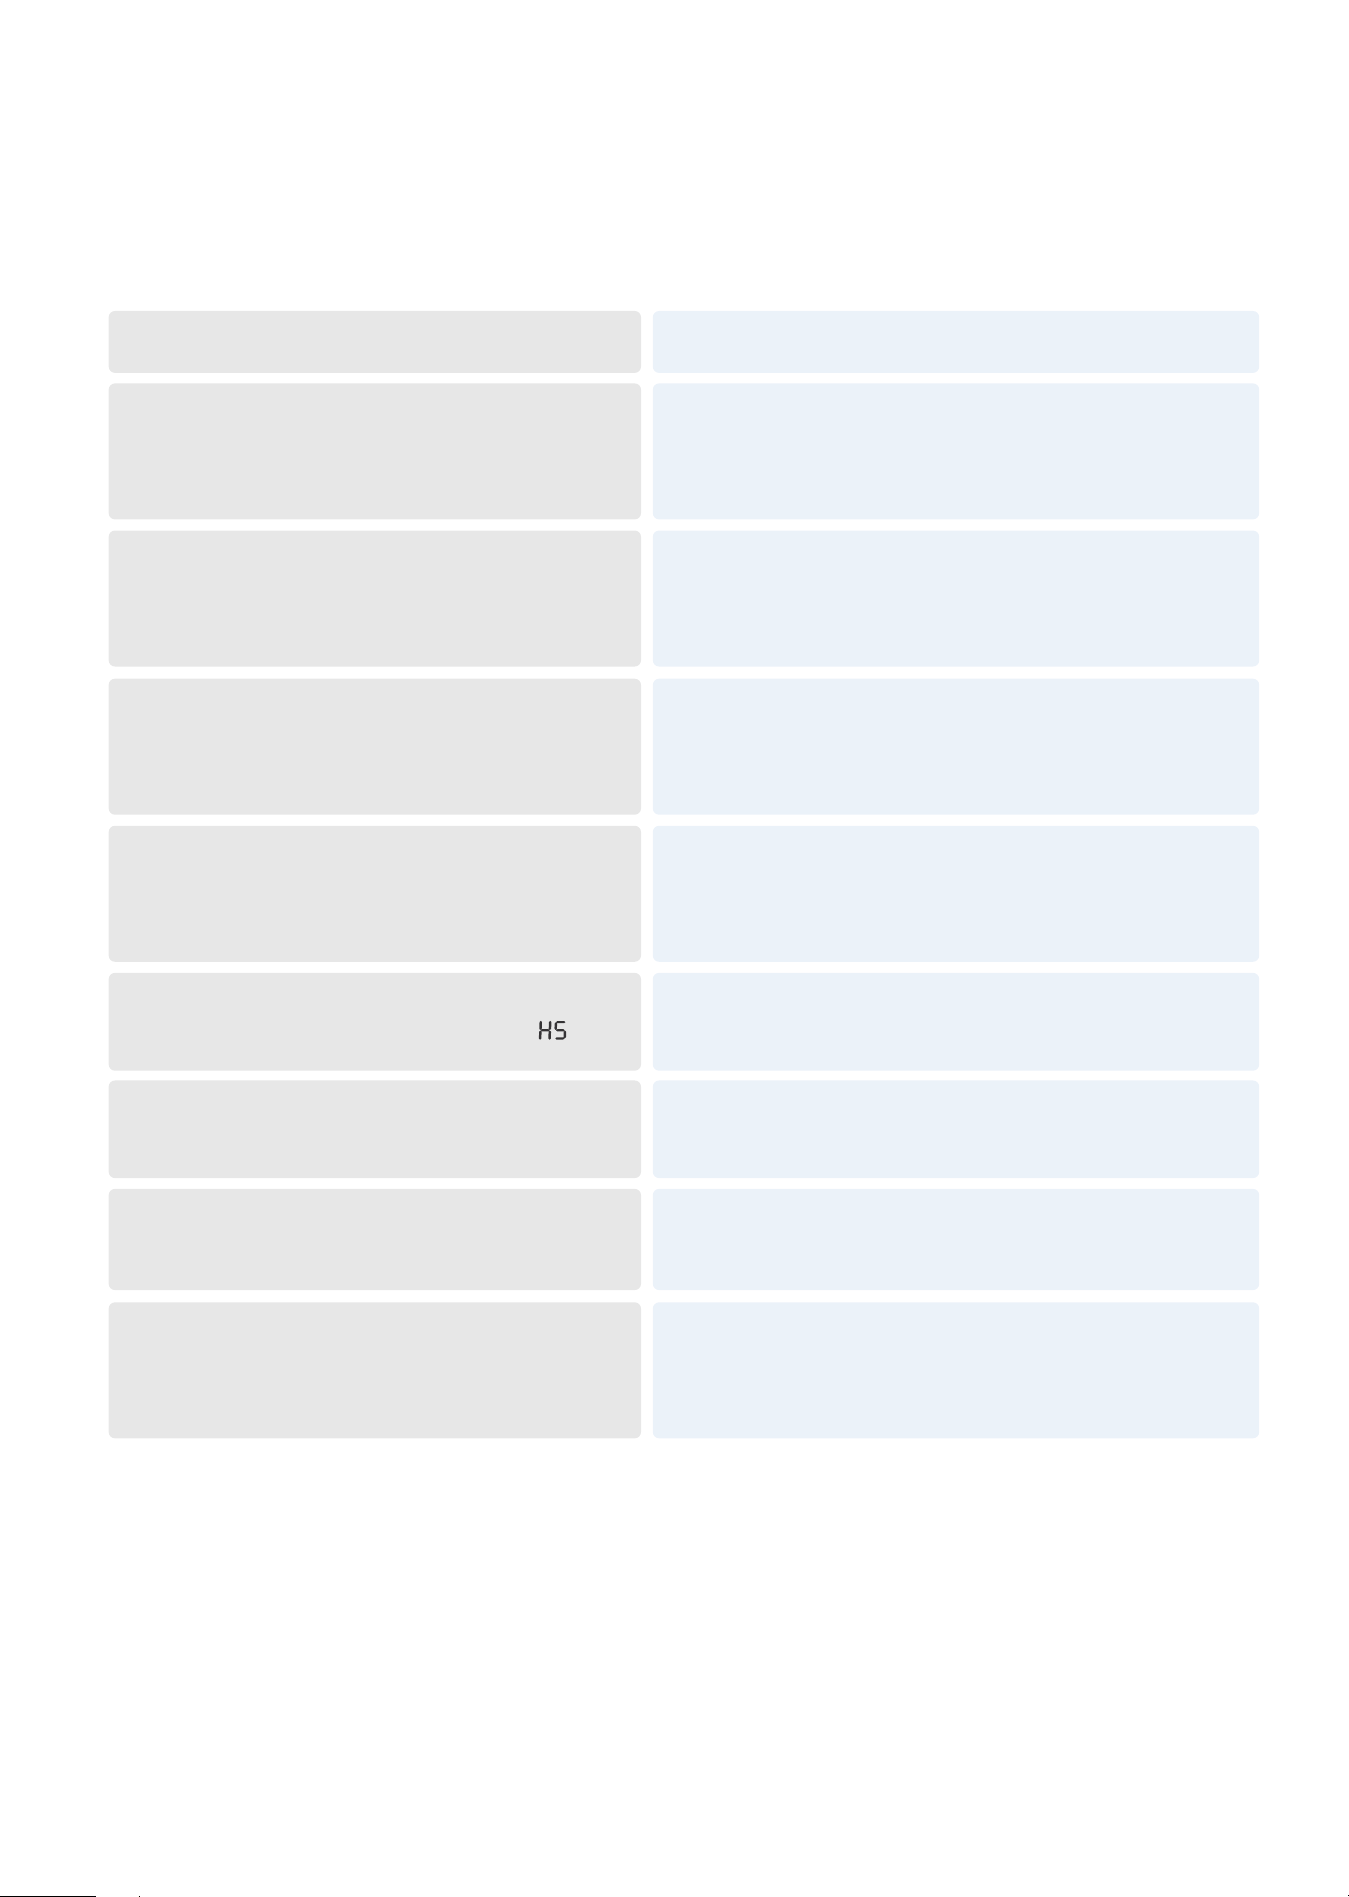
TROUBLESHOOTING
Before contacting customer service, reviewing this list can save time. This list includes the most common
occurrences that are not the result of defective workmanship or materials in this dehumidifier.
Contact Customer Service if the dehumidifier operates abnormally or does not operate, and the solu-
tions above are not useful.
Still work, the LED displays "E1" and flashes,
and the functions of the buttons are
normal.
Re-power on and the fault disappears
(Under this fault: the compressor runs for 30
minutes and defrosts for 10 minutes)
Stop working, the LED displays "E2" and
flashes. Pressing any button at this time
has no effect.
Please contact the customer service.
Stop working, the LED displays "L3" and
flashes. Pressing any Button at this time
has no effect.
Re-power on and the fault disappears.
Stop working, the LED displays "L4" and
flashes. Pressing any Button at this time
has no effect.
Re-power on and the fault disappears.
Stop working, the LED displays "E3" and
flashes. Pressing any Button at this time
has no effect
Please contact the customer service.
Automatic Defrost, the LED displays “ ”
The defrost is over and the fault disappears.
Ambient humidity ≤ 30%, the LED displays
“LO”.
The humidity returns to more than 30% and
returns to normal.
Ambient humidity ≥90%, the LED displays
“HI”.
The humidity returns to below 90% and returns to
normal.
FAULT DESCRIPTION
SOLUTION

■ 11 ■
WARRANTY INFORMATION
TERMS & POLICY
Vellgoo warrants all products to be of the highest quality in material, craftsmanship, and service,
effective from the date of purchase to the end of the warranty period.
Vellgoo will replace any product found to be defective due to manufacturer flaws based on eligibility.
Refunds are available within the first 30 days of purchase. Refunds are only available to the original
purchaser of the product. This warranty extends only to personal use and does not extend to any
product that has been used for commercial, rental, or any other use for which the product is not
intended. There are no warranties other than the warranties expressly set forth with each product.
This warranty is non-transferrable. Vellgoo is not responsible in any way for any damages, losses, or
inconveniences caused by equipment failure or by user negligence, abuse, or use noncompliant with
the user manual or any additional safety or use warnings included in the product packaging and
manual.
THIS WARRANTY DOES NOT APPLY TO THE FOLLOWING
·
Damage in return transit.
·
Improper or inadequate maintenance.
·
Unsupervised use by children under 18 years of age.
·
Damage resulted from natural disaster, fire, poison and moisture
·
Damage due to abuse, accident, alteration, misuse, tampering, or vandalism.
·
2nd hand purchase or purchase from non-authorized seller/distributor.
Vellgoo assume no liability for damage caused by the use of the product other than for its intended
use or as instructed in the user manual. Some states do not allow this exclusion or limitation of inciden-
tal or consequential losses so the foregoing disclaimer may not apply to you. This warranty gives you
specific legal rights and you may also have other rights which may vary from state to state.
EXTEND YOUR WARRANTY BY 1 YEAR
Register your product at www.Vellgoo.com warranty to extend your 1-year warranty by an additional
year.
Please fill out all required fields and include your order ID, place of purchase and SN code (On the
nameplate located at the side of the product).
■ 12 ■
DEFECTIVE PRODUCTS & RETURNS
If you discover your product is defective within the specified warranty period, please contact Customer
Support via [email protected] with a copy of your invoice and order ID. Do not dispose of your
product before contacting us. Once our Customer Support Team has approved your request, please
return the product with a copy of the invoice and order ID.
*Please do not return your product before contacting our Vellgoo customer service team.
If you have any questions or concerns about your new product, please contact our helpful Customer
Support Team.
All rights reserved, Vellgoo.
*Please have your order invoice, SN code and order ID ready before contacting Customer Support.
CUSTOMER SUPPORT
Product Name
Model
Default Warranty Period
Order ID
SN code
Dehumidifier
DryTank 3000
1 year
For your own reference, we strongly recommend that you record your order ID, SN code.
/vellgootech
/Vellgoo
/vellgoo
/Vellgoo
/vellgoo.com
PARA CLIENTES
PREFACIO
ANTES DEL PRIMER USO
¡Gracias por comprar nuestro deshumidificador DryTank 3000! Asegúrese de leer la totalidad de este
manual de usuario detenidamente antes de utilizar el producto. Si tiene alguna pregunta sobre el uso
de este producto, póngase en contacto con nosotros en [email protected]. ¡Esperamos que le guste
su nuevo deshumidificador Energy Star!
Encuéntrenos en línea
Buscar @Vellgoo • #Vellgootech en las redes sociales para
obtener consejos, ofertas especiales, obsequios, inspiración y más.
Para evitar cualquier daño interno, es importante mantener la unidad de refrigeración (Figura 1.0) en
posición VERTICAL durante todo el viaje. Colóquelo en posición vertical fuera de la caja durante 24
HORAS antes de insertarlo.
Si el producto falla o el cliente lo considera defectuoso, el cliente debe ponerse en contacto con el
Servicio de atención al cliente y mantener el producto defectuoso espere más instrucciones. Los
productos defectuosos deben estar claramente marcados o almacenados en lugares que no se
puedan reutilizar Error. La falta de retención del producto puede impedir la capacidad de Vellgoo para
corregir cualquier problema legítimo y puede limitar la medida en que Vellgoo puede proporcionar un
recurso.
AVISO IMPORTANTE PARA EL PRIMER USO
TENGA EN CUENTA:
Este deshumidificador tiene por defecto
MODO CONTINUO, desactivando
Uso de los botones IZQUIERDO / DERECHO.
Para reutilizar el botón, asegúrese de que
el MODO CONTINUO esté desactivado.
■ 13■
ESPECIFICACIONES
ENCENDER
DESHUMIDIFICADOR
APAGAR MODO
CONTINUO
COMIENCE A USAR
BOTONES IZQUIERDO
/ DERECHO
Figura 1.0
DryTank 3000
21.98 Pints/Day(10.4L/Day)
52 Pints/Day(25L/Day)
5.5 MPa (798 PSIG)
1.2 MPa (174 PSIG)
14.38*8.64*24.09 inches (36.6*22*61.3cm)
32.12 lb (14.6Kg)
5°C-35°C(41°F-95°F)
1.45 Gal/5.5L
120V~60Hz
400W
Modelo
Eliminación de humedad (18.33°C, 60% RH)
Eliminación de humedad (30°C, 80% RH)
Presión máxima permitida
Presión máxima de succión
Dimensión
Peso
Temperatura de funcionamiento
Capacidad de cubo
Fuente de alimentación
Potencia nominal

INFORMACIÓN DE SEGURIDAD
SOLO PARA USO DOMÉSTICO
ADVERTENCIA
Este producto lo expone a sustancias químicas como el estireno y sus compuestos, que California sabe
que causan cáncer y defectos de nacimiento, u otros daños reproductivos. Para obtener más infor-
mación, visita: www.P65Warnings.ca.gov
CONTENIDOS DEL PAQUETE
1 × DryTank 3000 Deshumidificador 1 × Manual de Usuario
Para evitar lesiones y daños a la propiedad de los usuarios u otros, se deben seguir las siguientes
instrucciones al usar deshumidificadores. El funcionamiento incorrecto debido a la indiferencia de las
instrucciones puede resultar en lesiones o daños.
·
No toca el tapón con las manos mojadas.
·
No sube ni se siente sobre el deshumidificador; no coloca objetos en él.
·
No utiliza el deshumidificador en espacios confinados reducidos
·
No usa en áreas donde se manipulan productos químicos.
·
No coloca el deshumidificador cerca de la fuente de calor.
·
No lo usa si el cable de alimentación está roto o dañado.
·
Coloca el deshumidificador en un piso nivelado y resistente.
·
No saca el cubo cuando el deshumidificador esté funcionando.
·
Nunca intenta desmontar o reparar el deshumidificador usted mismo.
·
No bebe ni usa el agua vertida por el deshumidificador.
·
Siempre apaga el deshumidificador y desconéctelo antes de limpiar.
·
No excede la clasificación de la toma de corriente o del dispositivo conectado
·
No modifica la longitud del cable de alimentación ni comparta la toma con otros aparatos
·
No coloca el deshumidificador en lugares donde el agua pueda derramarse.
·
Asegúrese de insertar el filtro firmemente. Asegúrese de limpiar el filtro una vez al mes.
·
No coloca jarrones u otros recipientes de agua sobre el deshumidificador.
·
Siempre incline la tubería de agua hacia abajo para que el agua fluya suavemente.
·
Si el deshumidificador produce sonidos, olores o humo extraños, desconecte la fuente de
alimentación.
·
No coloca objetos pesados en el cable de alimentación y asegúrese de que el cable de alimentación
no esté presurizado.
·
Para las personas que son sensibles a la humedad, no baje demasiado la humedad del deshumidifi
cador.
·
No utiliza el deshumidificador cerca de gas combustible o materiales combustibles, como gasolina,
benceno, disolvente, etc.
·
No utiliza productos químicos ni disolventes orgánicos para limpiarlo, como acetato de etilo, gasolina.
·
No opera ni apague el deshumidificador enchufando el dispositivo. En su lugar, utiliza el panel de
control.
·
Se debe tener cuidado al usar deshumidificadores en habitaciones con bebés, niños y ancianos.
·
Nunca inserta dedos u otros objetos extraños en parrillas o aberturas. Preste especial atención a
advertir a los niños de estos peligros.
·
No cubre las rejillas de ventilación de entrada y escapa del deshumidificador con un paño o toalla.
·
La fuente de alimentación debe cortarse durante las tormentas; el aparato es solo para uso en interi
ores.
·
Si el deshumidificador entra en el agua, apaga el deshumidificador y desconecta la fuente de
alimentación, póngase en contacto con el servicio de atención al cliente [email protected], para
no ser peligroso.
■ 14 ■
■ 15 ■
INSTRUCCIONES DE SEGURIDAD IMPORTANTES
Asegúrese de que el deshumidificador esté correctamente conectado a tierra. Para minimizar el riesgo
de descargas eléctricas e incendios, es importante una conexión a tierra adecuada.
Este cable de alimentación está equipado con un enchufe de tierra trifásico para evitar el riesgo de
descarga eléctrica.
·
Su deshumidificador debe usarse en un enchufe de pared correctamente conectado a tierra.
·
Si su enchufe de pared no está completamente conectado a tierra o protegido por un fusible de
retardo o un disyuntor, haga que un electricista calificado instale el enchufe correcto.
·
Evite incendios o descargas eléctricas. No utilice cables de extensión ni enchufes adaptadores. No
saca ningún alfiler de los cables de alimentación.
CAUCIÓN
·
Este deshumidificador solo puede ser utilizado por niños de 8 años de edad o mayores y por personas
con impedimentos físicos, sensoriales o mentales o falta de experiencia y conocimiento para super
-visar o guiar el uso de deshumidificadores. Los niños no deben limpiarse y mantenerse sin super
-visión.
·
Si el cable de alimentación está dañado, debe ser reemplazado por una persona calificada. Póngase
en contacto con el servicio de atención al cliente para evitar peligros.
·
Si el deshumidificador se derriba durante el uso, apague el deshumidificador inmediatamente y
desenchufe la red. Revise visualmente el deshumidificador para asegurarse de que no haya daños. Si
sospecha que el deshumidificador está dañado, póngase en contacto con el servicio de atención al
cliente de Vellgoo a través de [email protected].
·
Para reducir el riesgo de incendio o descarga eléctrica, no usa este deshumidificador con ningún
equipo de control de velocidad de estado sólido.
·
La instalación del deshumidificador debería cumplir con la normativa nacional de cableado.
·
Detalles del tipo de fusible y la clasificación: T, 250V AC, 8A
·
Coloca la máquina en un terreno plano y resistente. El espacio entre la pared y la máquina debe ser
de más de 19.65 inches (50 cm )para una mejor disipación del calor.
·
Recuperar
La marca indica que el producto no debe eliminarse con otros residuos
domésticos en toda la UE. Para evitar que la eliminación incontrolada de
residuos pueda causar daños al medio ambiente o a la salud humana,
recicle de manera responsable para promover la reutilización sostenible
de los recursos materiales. Para devolver un dispositivo que haya utilizado,
utilice el sistema de devolución y recogida o póngase en contacto con el
minorista que compró el producto. Pueden utilizar este producto para un
reciclaje seguro para el medio ambiente.
DESCRIPCIÓN DE LAS PIEZAS
■ 16 ■
DELANTERO
CARA LATERAL
TRASERO
Tirador
Castor
Salida de Aire
Panel de Control
Panel
Cubo
Ventana Visual
Tirador
Entrada de Aire / Filtro de Aire
Drenaje Continuo
Salida de Manguera
Cable de Alimentación
Enchufe de Alimentación
OPERACIÓN
■ 17 ■
COLOCA CORRECTAMENTE
·
La máquina puede inclinarse o invertirse durante el
transporte de uso. Para garantizar el correcto
funcionamiento de este dispositivo, asegúrese de
que la unidad se coloque en posición vertical
durante al menos 24 horas antes del primer uso.
·
El deshumidificador está diseñado para funcionar
en un entorno entre 41°F (5°C) y 95°F (35°C) cuando
se opera.
No fuerce las ruedas (instaladas en cuatro puntos en
la parte inferior del deshumidificador) a moverse
sobre la alfombra, ni mueva el deshumidificador con
agua en el cubo. (El deshumidificador puede volcarse
y salpicar agua).
FUNCIONES INTELIGENTES
·
Apagado Automático
Cuando el cubo está lleno y/o la humedad está configurada para llegar, el deshumidificador se
apaga automáticamente.
·
Retardo de Encendido
Para evitar cualquier daño al deshumidificador, el deshumidificador tarda tres (3) minutos en comen
zar a funcionar después de que se haya completado un ciclo completo. La operación se inicia
automáticamente después de tres (3) minutos.
·
Indicador de Agua Lleno
Cuando el cubo está listo para vaciarse, la luz se enciende.
·
Descongelación Automática
El indicador LED muestra " " y cuando la bobina del evaporador se congela, el compresor se apaga y
el ventilador continúa funcionando hasta que la escarcha desaparece.
·
Reinicio-Automático
Si el deshumidificador se apaga inesperadamente debido a un corte de energía, el deshumidificador
se reiniciará automáticamente con la configuración funcional anterior cuando se restablezca la
energía.
NOTA:
Todas las ilustraciones del manual son solo para fines ilustrativos. Su deshumidificador puede ser
ligeramente diferente. La forma real es la base. Los diseños y especificaciones están sujetos a
cambios sin previo aviso para mejorar el producto. Para obtener más información, póngase en
contacto con el servicio de atención al cliente.
más de 19.65inches (50cm)
más de
19.65inches (50cm)
más de
19.65inches (50cm)
más de
19.65inches (50cm)
más de
19.65inches (50cm)
■ 18 ■
PANEL DE CONTROL
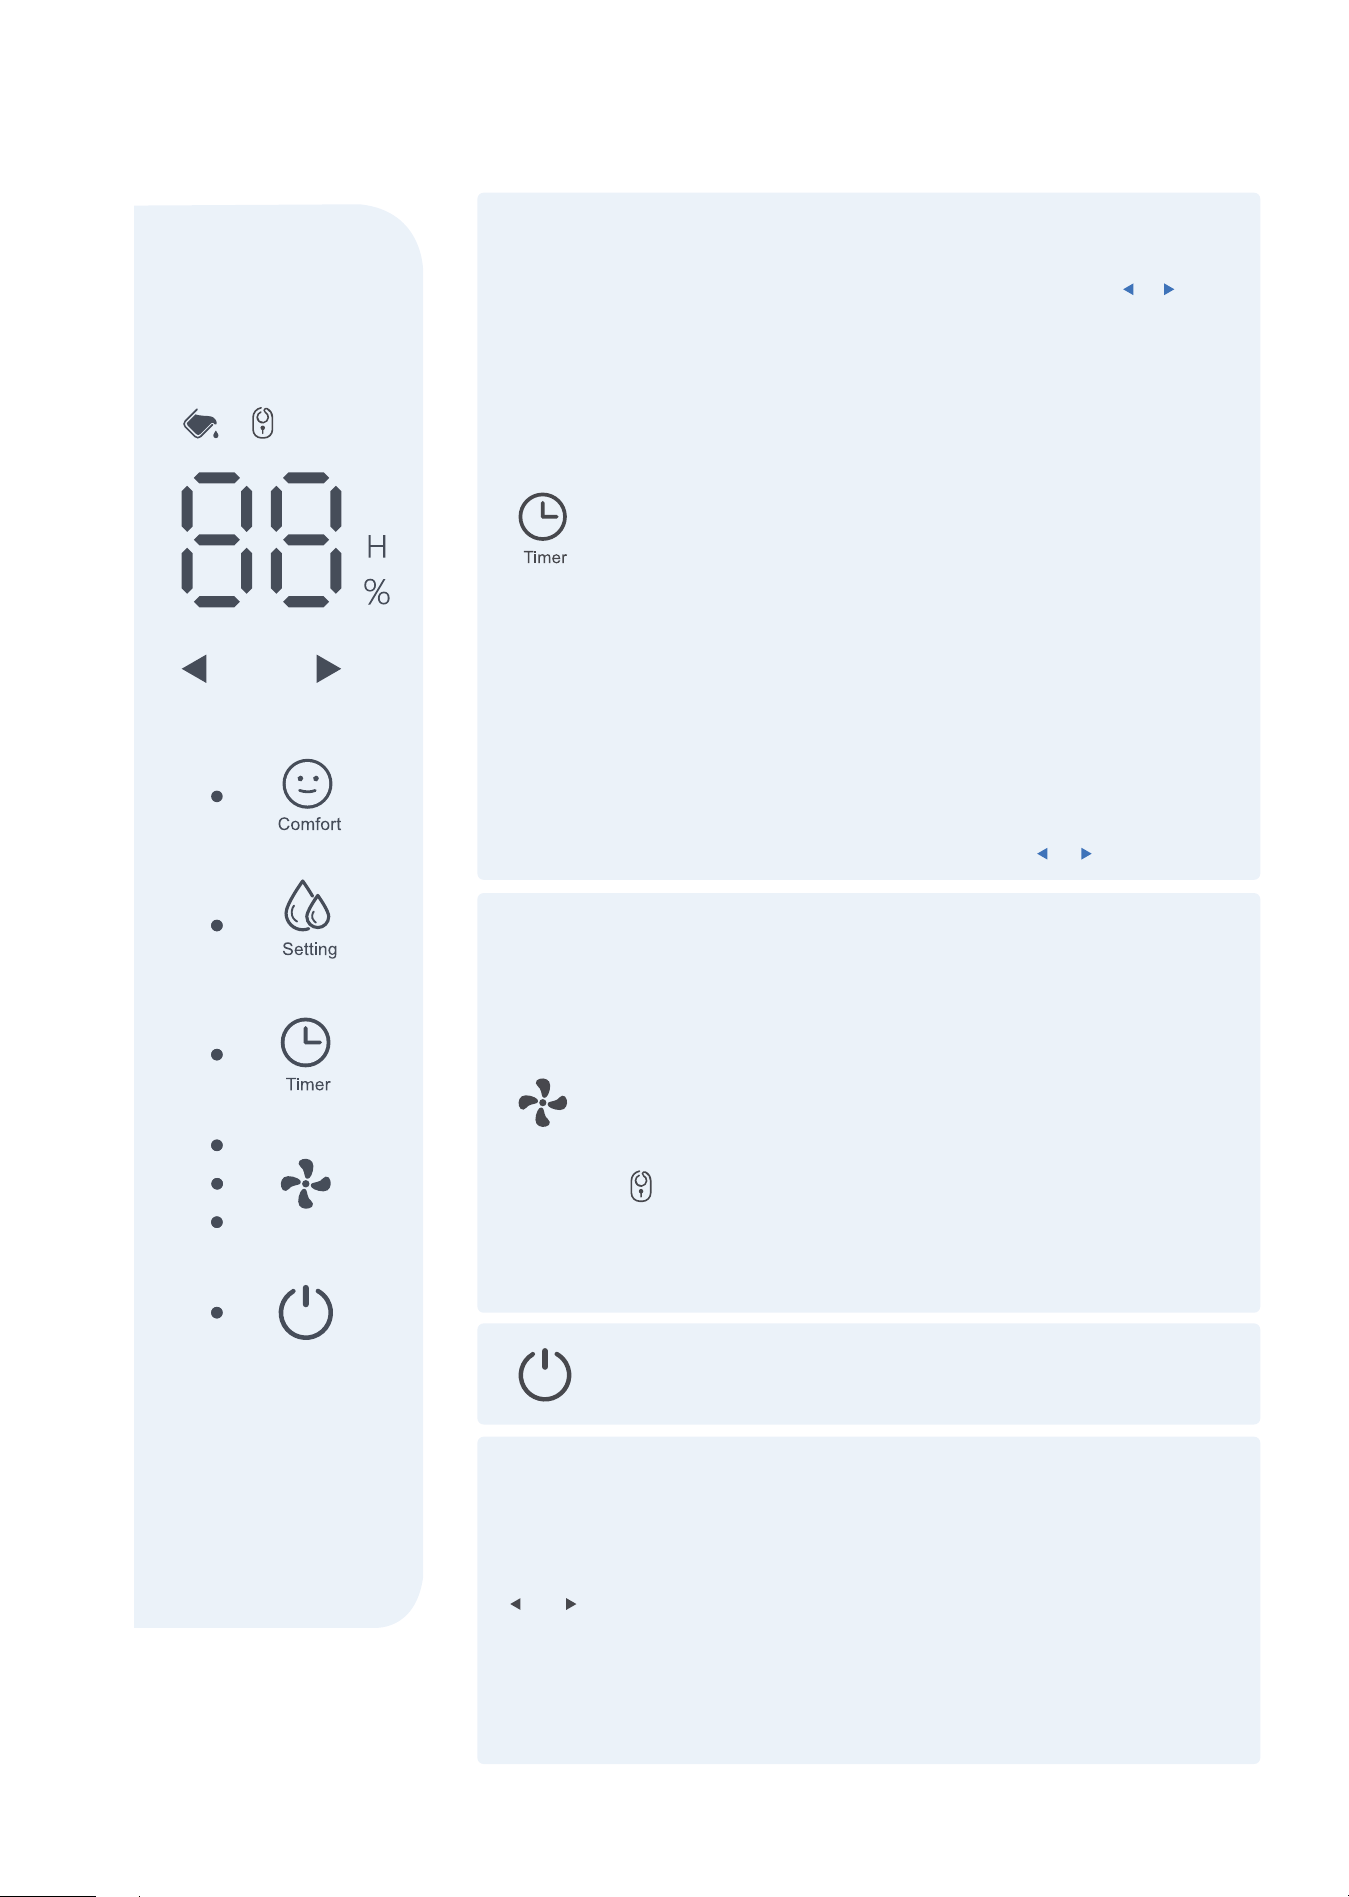
Pantalla LED
Muestra el nivel de humedad porcentual establecido del
40% al 80% o el tiempo de inicio/parada automático (0 a
24) en el momento establecido y, a continuación, mues-
tra el nivel de humedad porcentual de la habitación real
(±5%) en el rango de humedad relativa (HR) del 30% a
90% RH (humedad relativa).
Indicador de Estado del Cubo
Cuando el cubo está lleno o no está en la posición
correcta, el deshumidificador se apagará automática-
mente.
Modo de Comfort
Presiona este botón para activar la función de confort
encendido apagado. En este modo, la humedad no se
puede ajustar manualmente, pero la comodidad
recomendado está preestablecido en función de la
temperatura ambiente. El nivel se controlará de la
siguiente manera:
Presiona este botón nuevamente, el modo COMFORT
se cancelará y cada vez que se presiona, el zumbador
sonará una vez.
Ambiente
Temperatura
Relativo
Humedadwa
<65˚F
55%
65-77˚F
50%
Modo Continuo
Encendido de forma predeterminada.
Modo Manual
Presiona + ajustar el rango de humedad objetivo
(40% -80%), el rango de humedad está entre el 40% y el
80% con el estado inicial de 40%. El valor aumenta o
disminuye en un 5% cada vez que se presiona este
botón.
NOTA:
Si no hay ninguna señal que muestre que los botones de
Ajuste Izquierdo y Derecho se presionaron en más de 3
segundos, el ajuste se considerará válido; mientras
tanto, los botones de ajuste izquierdo y derecho se
cerrarán sincrónicamente y reanudarán el estado de
visualización normal.
>77˚F
45%
+
■ 19 ■
PANEL DE CONTROL
Botón de Timer
Presiona para configurar un temporizador de encendido
o apagado automático (0-24horas) junto con y
botones.
El valor aumenta o disminuye en 1 hora cada vez que se
presiona este botón.
NOTA:
·
Cuando la luz del temporizador esté encendida, presio
na el botón del temporizador para cancelar el tempori
zador y la luz se apaga.
·
Si presiona el botón de encendido / apagado para
apagar la máquina antes de que se complete la
sincronización, la configuración de sincronización se
cancela.
·
Si se cambia el modo de funcionamiento durante el
proceso de temporización, se mantiene la configura
ción original.
·
Si desea cambiar la configuración original, puede
restablecer la sincronización presionando el botón del
temporizador nuevamentejunto con y botones.
Botón de Velocidad del Viento
Modo de baja velocidad: presiona este botón una vez
Modo de velocidad media: presiona este botón dos veces
Alta velocidad: presiona este botón tres veces
NOTA:
·
Modo de baja velocidad (modo de suspensión): el brillo
de todas las luces LED se reducirá cuando no haya
operación en 5S.
·
Este botón también sirve como llave de bloqueo para
niños. Presiónelo durante 3 segundos para activar o
desactivar el bloqueo para niños, y la luz indicadora
correspondiente se encenderá o apagará.
Botón de Encendido
Presiona para encender y apagar el deshumidificador.
Botones de Ajuste Izquierdo y Derecho
NOTA:
·
La primera vez que enciende el deshumidificador, entra
en modo continuo de forma predeterminada.
·
Esto deshabilita el uso del botón izquierdo / derecho.
Asegúrese de desactivar el modo continuo para
recuperar la funcionalidad de estos botones.
·
Este botón solo es válido si la deshumidificación manual
o el botón de temporización son válidas.
■ 20 ■
ELIMINANDO EL AGUA RECOLECTADA
NOTA:
No usa drenaje continuo cuando la temperatura exterior sea igual o inferior a 32°F (0°C), de lo
contrario, el agua se congelará, lo que hará que las tuberías de agua se obstruyan y posiblemente
dañen el deshumidificador.
Cuando el cubo está lleno, saca el cubo y
vacíelo.
Al conectar el deshumidificador a una tubería de agua con un extremo roscado interior, el agua se
puede descargar automáticamente en la fuga del suelo. (NOTA: En algunos modelos, el extremo
roscado interior no está incluido)
Saca la tubería de PVC (NOTA: La tubería de PVC está en el cubo) abre el tapón de agua blanda en la
parte posterior, inserta el orificio de drenaje continuo de la máquina en un extremo e inserte el área de
drenaje en el otro extremo.
Levanta la tapa del desagüe y vierta el agua
Usa el cubo
Vaciado continuo
Abre el tapón de agua
Inserta tubería de agua
■ 21 ■
CUIDADO & MANTENIMIENTO
ADVERTENCIA:
Apaga el deshumidificador y retire el enchufe del tomacorriente de pared antes de limpiar.
Limpia el deshumidificador con agua y un detergente suave.
No usa lejía ni abrasivos.
CAUCIÓN:
No HACE funcionar el deshumidifica-
dor sin filtro, ya que el polvo y el
algodón pueden obstruirlo y degradar
el rendimiento.
·
Dirige la tubería de agua a la fuga de tierra o instalación de drenaje adecuada, las instalaciones de
drenaje deben ser más bajas que el deshumidificador de drenaje.
·
Asegúrese de inclinar la tubería de agua hacia abajo para que el agua fluya suavemente.
·
Cuando no se utiliza la función de drenaje continuo, sacar la manguera de drenaje de la salida y
cierre el tapón blando de la salida de la manguera de drenaje continuo.
Limpiar la rejilla y la carcasa
·
No salpica agua directamente sobre el anfitrión. Si no lo hace, puede provocar una descarga eléctri
ca, un deterioro del aislamiento o la oxidación del equipo.
·
Las tomas de aire y las rejillas de salida son fáciles de ensuciar. Limpia con un accesorio o cepillo de
vacío.
Limpiar el cubo
Limpia el cubo cada dos (2) semanas con agua y un detergente suave.
Limpiar el filtro de aire
Limpia el filtro con agua potable al menos una vez cada 30 días.
Almacenamiento del deshumidificador
Cuando no usa el deshumidificador durante mucho tiempo, manténgalo seguro.
·
Después de apagar el deshumidificador, espera un día hasta que toda el agua dentro del deshumidi
-ficador fluya hacia el cubo, luego vacíe el cubo.
·
Limpia el deshumidificador principal, el cubo y el filtro de aire.
·
Envuleve el cable de alimentación y póngalo.
·
Cubre el deshumidificador con una bolsa de plástico.
·
Guarda el deshumidificador en posición vertical en un lugar seco y bien ventilado.
Asegúrese de que la conexión sea segura y sin fugas.

■ 22 ■
SOLUCIÓN DE PROBLEMAS
Revisa esta lista ahorra tiempo antes de ponerse en contacto con el servicio de atención al cliente. Esta
lista incluye los eventos más comunes que no son causados por defectos de proceso o material en el
deshumidificador.
Póngase en contacto con el servicio de atención al cliente, si el deshumidificador funciona de forma
anormal o no y la solución anterior no es válida.
Aún funciona, el LED muestra "E1" y parpa-
dea, y las funciones de los botones son
normales
Vuelve a encender y la falla desaparece
(Bajo esta falla: el compresor funciona durante
30 minutos y se descongela durante 10 minutos)
Deje de funcionar, el LED muestra "E2" y
parpadea. Pulsar cualquier botón en este
momento no tiene ningún efecto.
Póngase en contacto con el servicio de atención
al cliente.
Deje de funcionar, el LED muestra "L3" y
parpadea. Presionar cualquier botón en
este momento no tiene ningún efecto
Vuelve a encender y la falla desaparece.
Deje de funcionar, el LED muestra "L4" y
parpadea. Presionar cualquier botón en
este momento no tiene ningún efecto.
Vuelve a encender y la falla desaparece.
Deje de funcionar, el LED muestra "E3" y
parpadea. Presionar cualquier botón en
este momento no tiene ningún efecto.
Póngase en contacto con el servicio de atención
al cliente.
Descongelación Automática, el LED muestra
“ ” .
La falla desaparece después de la
descongelación
Humedad ambiental ≤30%, el LED muestra
“LO” .
La humedad vuelve a más del 30% y vuelve a la
normalidad.
Humedad ambiental ≥90%, el LED muestra
“HI” .
La humedad vuelve por debajo del 90% a la
normalidad.
DESCRIPCIÓN DE LA FALLA
SOLUCIÓN

■ 23 ■
INFORMACIÓN DE GARANTÍA
TÉRMINOS Y POLÍTICA
Vellgoo garantiza que todos los productos son de la más alta calidad en materiales, mano de obra y
servicio, a partir de la fecha de compra hasta el final del período de garantía.
Vellgoo reemplazará cualquier producto que se encuentre defectuoso debido a fallas del fabricante
según la elegibilidad. Los reembolsos están disponibles dentro de los primeros 30 días de la compra.
Los reembolsos solo están disponibles para el comprador original del producto. Esta garantía se
extiende solo al uso personal y no se extiende a ningún producto que se haya utilizado para uso
comercial, alquiler o cualquier otro uso para el cual el producto no está destinado.
No existen garantías más que las garantías expresamente establecidas con cada producto.
Esta garantía no es transferible. Vellgoo no será responsable de ningún daño, pérdida o inconveniente
causado por la falla del equipo o la negligencia del usuario, el mal uso o el uso que no cumpla con las
advertencias adicionales de seguridad o uso contenidas en los manuales de usuario o en el embalaje
y los manuales del producto.
ESTA GARANTÍA NO SE APLICA A LO SIGUIENTE
·
Daños en tránsito de retorno.
·
Mantenimiento inadecuado.
·
Usa sin supervisión por niños menores de 18 años.
·
Daños causados por desastres naturales, incendios, venenos, humedad, etc.
·
Daños causados por abuso, accidente, alteración, mal uso, alteración o vandalismo.
·
Compra de segunda mano o compra a un vendedor / distribuidor no autorizado.
Vellgoo no asume ninguna responsabilidad por los daños causados por el uso del producto que no
sea para el uso previsto o como se indica en el manual del usuario. Algunos estados no permiten la
exclusión o limitación de pérdidas incidentales o indirectas, por lo que es posible que estas exenciones
de responsabilidad no se apliquen a usted. Esta garantía le otorga derechos legales específicos, y es
posible que tenga otros derechos que pueden variar de un estado a otro.
EXTIENDA SU GARANTÍA POR 1 AÑO
Registra su producto con una garantía www.Vellgoo.com y extienda su garantía de 1 año por otro año.
Completa todos los campos obligatorios e incluya su Número de orden y código SN (En la placa de
identificación ubicada al costado del producto).
■ 24 ■
PRODUCTOS DEFECTUOSOS & DEVOLUCIONES
Si descubre que su producto está defectuoso durante el período de garantía especificado,
comuníquese con el servicio de atención al cliente en [email protected] y proporcione una copia
de la factura y la identificación del pedido. No deseche su producto antes de contactarnos. Una vez
que nuestro equipo de atención al cliente haya aprobado su solicitud, devuelva el producto con una
copia de la factura y el número de identificación del pedido.
* No devuelva el producto antes de ponerse en contacto con nuestro equipo de atención al cliente
de Vellgoo.
Si tiene alguna pregunta o inquietud sobre su nuevo producto, comuníquese con nuestro útil Equipo de
atención al cliente.
Todos los derechos reservados, Vellgoo
* Antes de ponerse en contacto con el servicio de atención al cliente, tiene a mano la factura de su
pedido, el código SN y el Número de orden.
ATENCIÓN AL CLIENTE
Nombre del producto
Modelo
Período de garantía predeterminado
Número de orden
Código SN
Deshumidificador
DryTank 3000
1 año
Le recomendamos encarecidamente que registre su ID de pedido y el código SN para su referencia.
/vellgootech
/Vellgoo
/vellgoo
/Vellgoo
/vellgoo.com

Home Dehumidifier Expert