User Guide
Safety and Operation
Precautions must be read
before using this unit.
© 2015 ZOOM CORPORATION
Copying or reproduction of this User Guide in
part or in whole without permission is prohibited.
Q8

Contents
1
Contents
Contents .................................................. 1
Parts and their functions ........................ 2
Mic overview ........................................... 5
Connecting mics to Inputs 1 and 2 ........ 7
Display overview .................................... 8
Charging the battery ..............................11
Turning the power ON and OFF........... 12
Setting the date and time ..................... 13
Formatting SD cards ..............................14
Recording mode overview ................... 15
Selecting tracks to record ......................19
Adjusting recording levels ................... 21
Adjusting the angle of view ................. 22
Recording .............................................. 23
Audio monitoring settings ................... 24
Recording mode settings ..................... 25
Camera settings .................................... 27
Playing recordings ................................ 28
Deleting recordings .............................. 31
Mixer Screen settings ........................... 32
Headphones/line and HDMI output ..... 40
USB connections .................................. 41
LCD Rotation and FILE list .................... 43
System settings..................................... 44
Updating the firmware ......................... 45
Troubleshooting .................................... 46
Specifications ........................................ 47
Safety Precautions ................................ 48
Usage Precautions ................................ 49
Warnings and requests regarding safe
battery use ............................................. 50
Parts and their functions
2
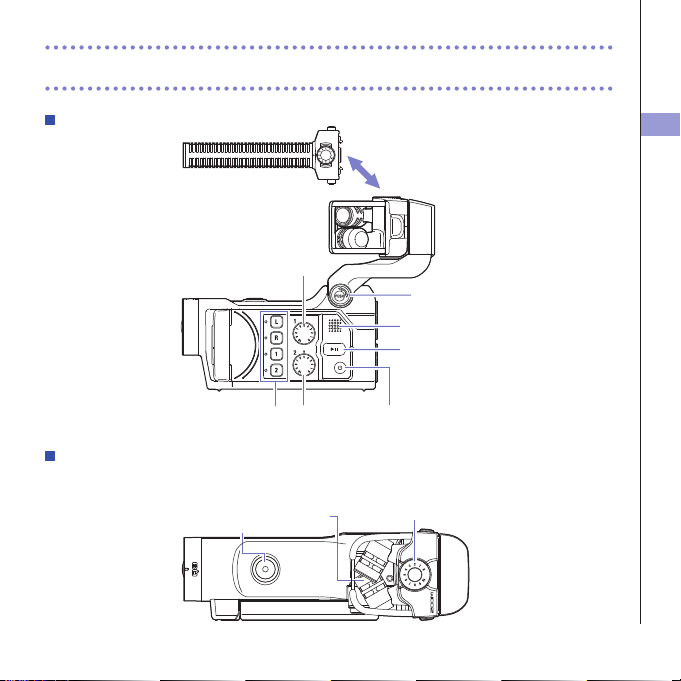
Parts and their functions
Left side
To p
XY mic
REC
button
MIC GAIN
adjustment knob
(Can be changed)
Mic attachment
(sold separately)
POWER
button
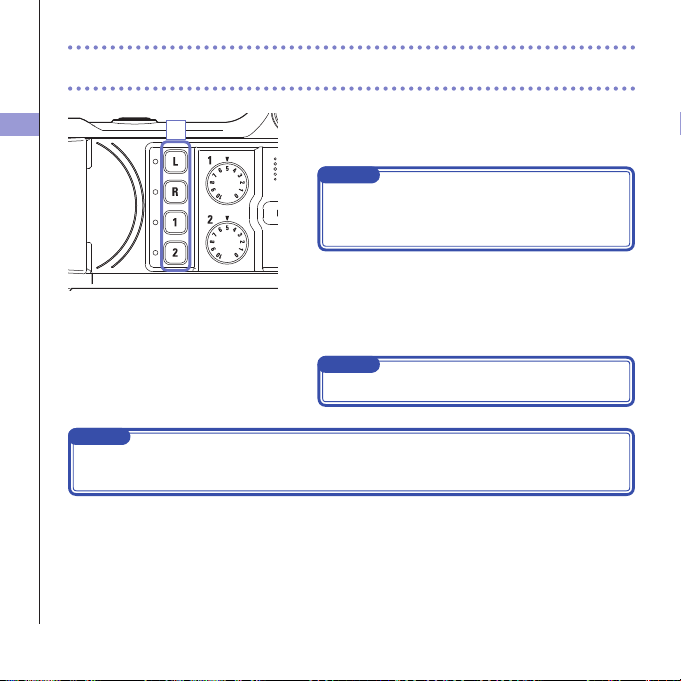
Track
buttons
Input
volume 2
Input
volume 1
PLAY/PAUSE
button
Speaker
UNLOCK
button
Parts and their functions
3
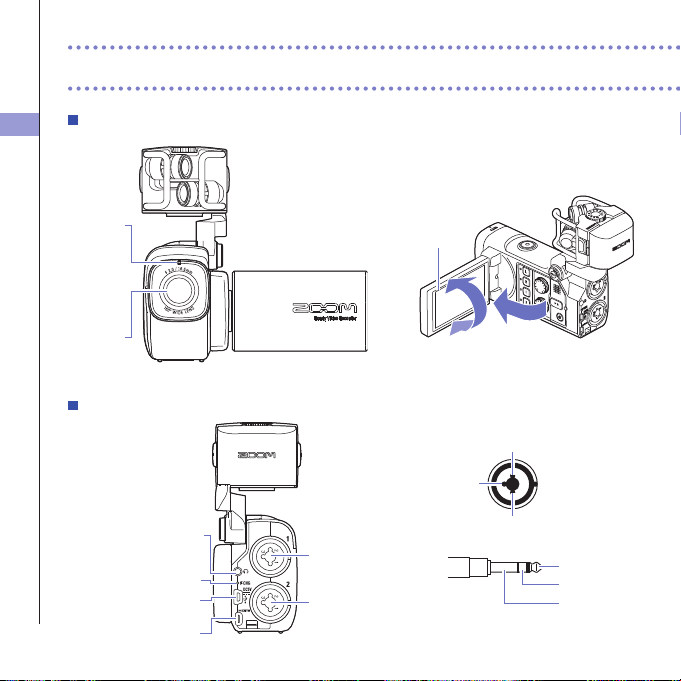
Front
Video
recording
LED
Lens
Display
Opening and closing the LCD screen
Parts and their functions (continued)
HDMI port
USB port
Headphones
jack
Input 2
jack
Input 1
jack
Charging LED
Back
1
2
3
XLR
TRS
1 : GND
2 : HOT
3 : COLD
TIP : HOT
RING : COLD
SLEEVE : GND
Parts and their functions
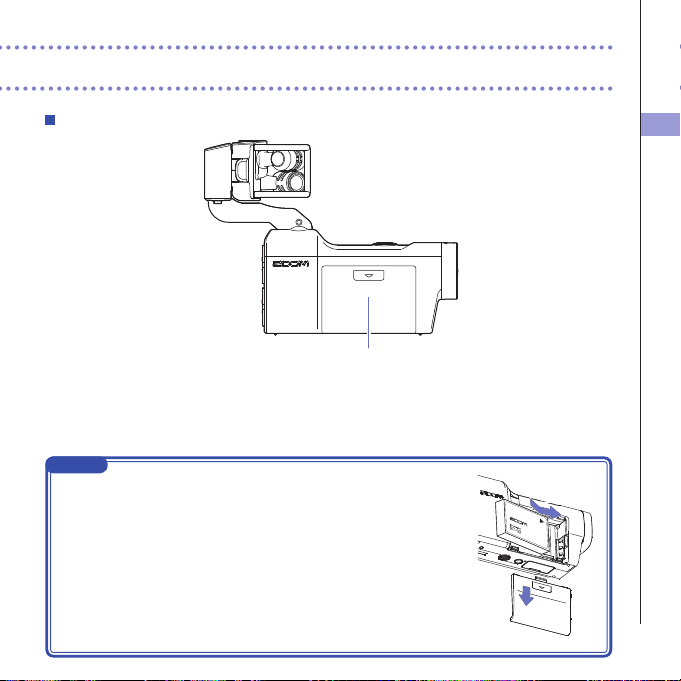
4
Battery cover
Right side
NOTE
Connecting the battery
1 Slide the battery cover down to remove it.
2 Install the battery as shown in the illustration and reattach the battery
cover.
11
22
Mic overview
5
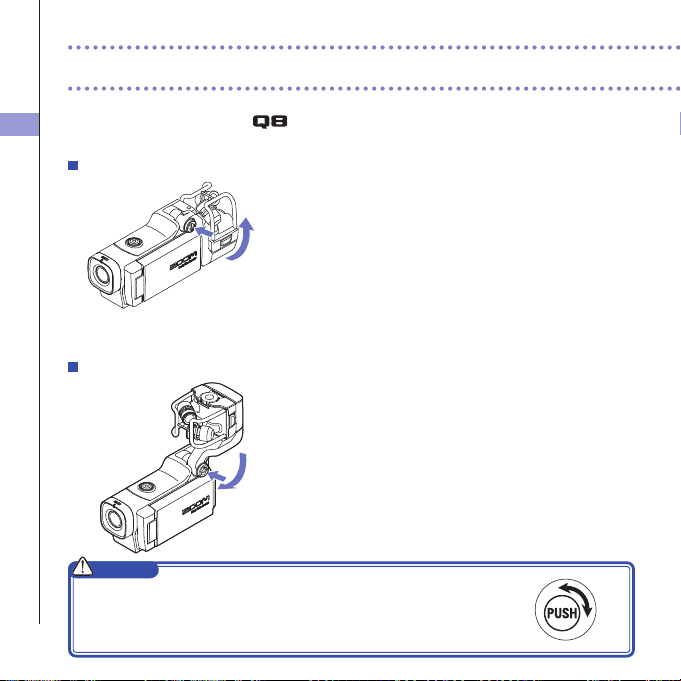
Raising the mic
1. While pressing the UNLOCK button, raise the mic
until it reaches the fixed position.
Lowering the mic
1. While pressing the UNLOCK button, lower the mic.
CAUTION
Do not force the mic arm without pushing the UNLOCK button. Doing so
could damage the main unit.
Mic overview
The XY mic included with the can be swapped with another mic attachment according
to your need.
Mic overview
6
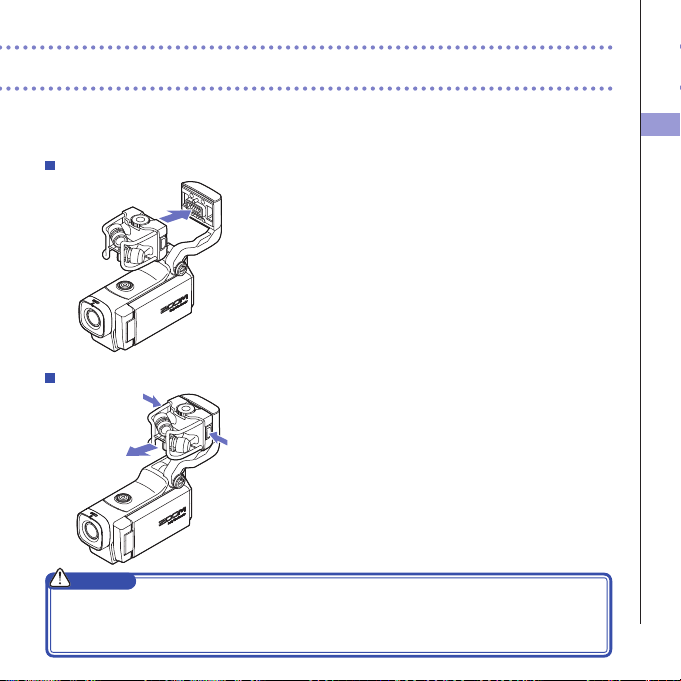
Attaching the mic
1. Attach the mic to the main unit and push it into
place until it locks.
Disconnecting the mic
1. While pressing the buttons on the left and right
sides of the mic, pull it out of the main unit.
CAUTION
•Whendisconnectingthemic,donotusetoomuchforce.Excessiveforcecoulddamagethemicor
the main unit.
•Videorecordingwillstopifamicisremovedduringrecording.
Connecting mics to Inputs 1 and 2
7
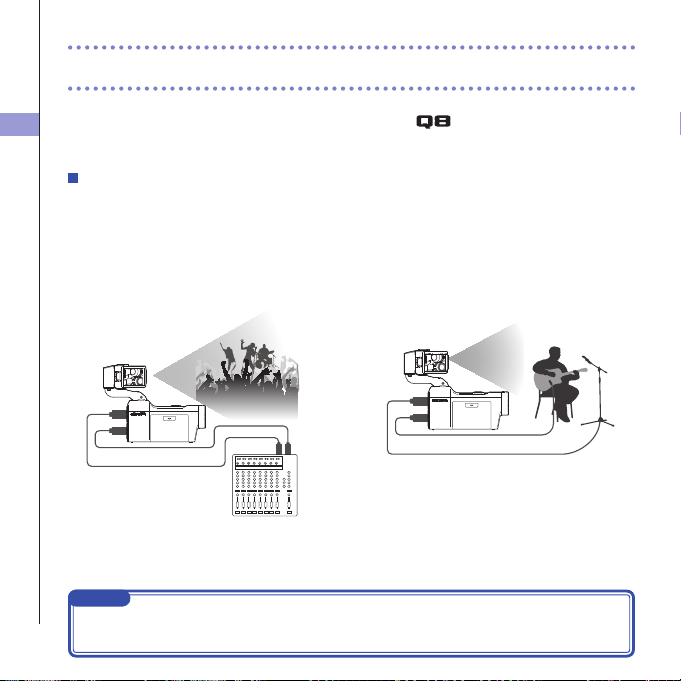
You can connect mics, mixers and other devices to the
Inputs 1 and 2. The L/R input
from the XY mic and Inputs 1/2 can be used together to record up to 4 tracks at the same
time.
Connection examples
Recording audio is possible in the following kinds of situations.
Concert video recording
•L/Rinputmic:Performanceonstage
•Inputs1/2:Lineoutputsfrommixer
PA mixer
Input 2
Input 1
L/R inputs
Guitar performance video recording
•L/Rinputmic:Off-micrecordingofvocaland
guitar
•Input1:Vocalmic
•Input2:Guitarmic(direct)
Vocal mic
Guitar mic
Input 2
Input 1
L/R inputs
Connecting mics to Inputs 1 and 2
NOTE
ConnectdynamicandcondensermicswithXLRplugstoInputs1and2.Phantompower
(+12V/+24V/+48V)canbesuppliedtocondensermics.(→P.36)

Display overview
8
Display overview
Main Screen
Level meters
PAD setting
Phantom power
setting
LO CUT setting DYNAMICS settings
Stereo link setting
Timecode
When recording: shows recording time
When paused: shows available recording time
Recording mode
Remaining battery
charge
Connected mic
Type of connected mic capsule
Camera SCENE setting
Open Menu Screen
Output volume
Adjust volume of headphones/
built-in speaker
Open Playback Screen
Open FILE list
Record/stop
Audio quality setting
Video resolution
setting
Open Mixer Screen
Zoom in/out
Upsidedown
Image inversion
LCDLock
Shows locked screen orientation
NOTE
Ifyoutouchanywhereotherthanabuttonorallowsometimetopasswithoutoperation,thebuttons
will disappear and only the level meters will be shown.
Display overview
9
Display overview (continued)
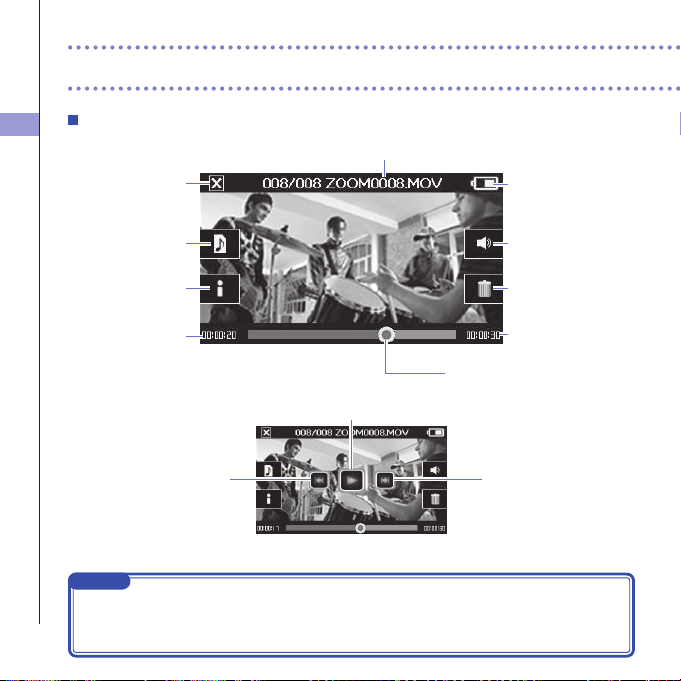
Playback screen
Playback position bar
Shows video playback positionTouch to change
the playback position
File name
Name of video file playing
Remaining battery
charge
Output volume
Adjust volume of headphones/
built-in speaker
When paused
Delete
Delete the video currently
playing
Video length
Audio switch
Select the audio played
(only appears for files recorded
using MOV+WAV or
MULTI AUDIO)
Main Screen
Return to Main Screen
Information
Show information about the
video currently playing
Timecode
Shows elapsed playback time
Play/Pause
Skiptobeginningor
previousvideo
Next video
NOTE
•Aftersometimepasseswithoutoperation,onlythevideoimagewillbeshown.Touchthescreen
to show the buttons again.
•Levelmeterscanbeshownontheplaybackscreen.(See"Systemsettings"onpage44.)
Display overview
10
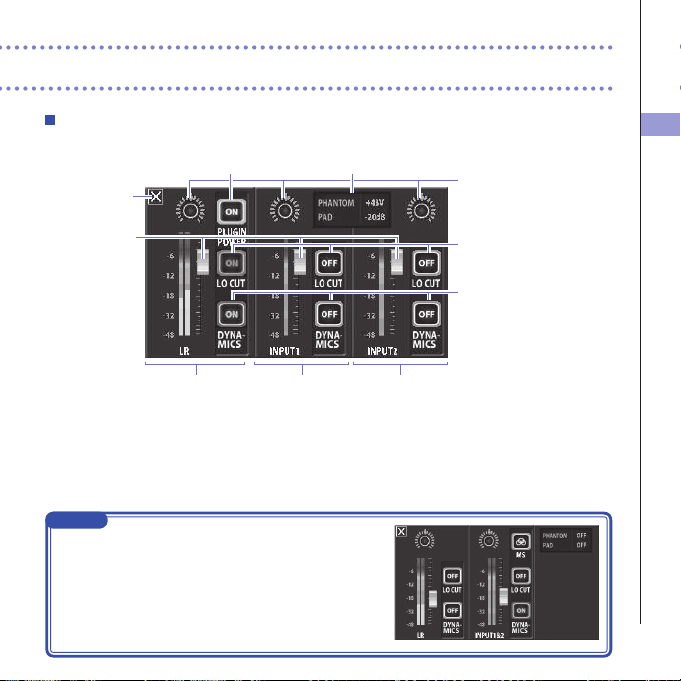
Mixer Screen
NOTE
WhenInputs1/2arestereo-linked,theyappear
differentlyontheMixerScreen.(See"Stereolink
setting"onpage35.)
Return to
Main Screen
L/R tracks
Input 1 Input 2
Input1/2 shared settings
Settings that affect both Inputs 1 and 2
(stereolink,phantompower,pad)
Mic option
Set according to the mic type
(shown only when using compatible mics)
Level faders
Adjust individual track
volumes
Pan knobs
Adjust audio left-right
balance
LO CUT
(See "LO CUT" on page 39.)
DYNAMICS
(See "DYNAMICS" on page
38.)
Charging the battery
11
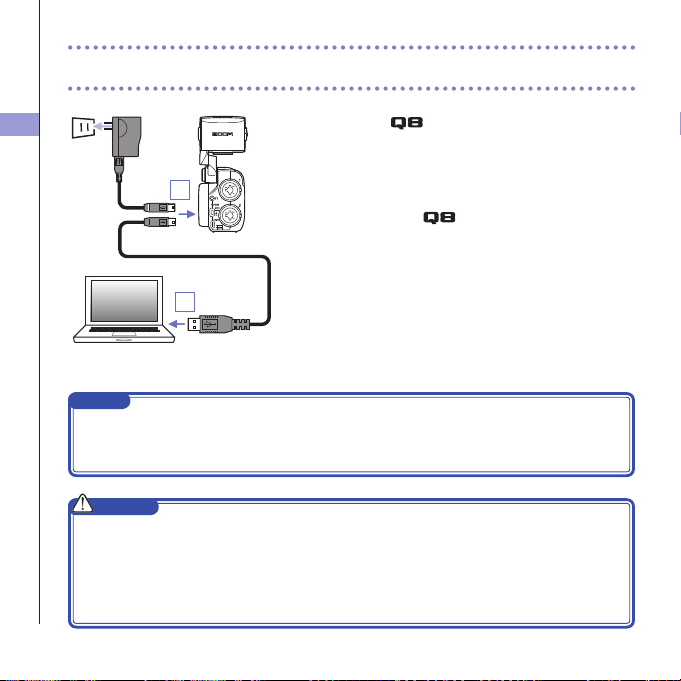
Charging the battery
1. Turn the off.
2. Connect a USB power source (running computer or
ZOOM AD-17 AC adapter (sold separately)).
Whilethebatteryisrecharging,theChargingLEDon
the back of the
will stay lit.
3. After charging completes, disconnect the cable from
the USB power source.
Afterrecharginghascompleted,theChargingLEDwill
become unlit.
NOTE
Rechargingthebatterycompletely(100%)takesabout4hours30minuteswhenconnectedtoa
computerandabout2hours45minuteswhenusinganACadapter.(Theamountoftimerequired
willvarydependingontheconditions.)
CAUTION
•Thebatterywillnotchargewhiletherecorderison.
•Thesurroundingtemperatureshouldbebetween5°Cand35°C(41°Fand95°F)whencharging.
Atothertemperatures,thebatterycouldbecomehot,damagedorweakened.
•Donotleavethecableconnectedforalongtimeafterchargingcompletes.
•Youmustalsofollowthehandlinginstructionsin"Warningsandrequestsregardingsafebattery
use"onpage50.
2
2
Turning the power ON and OFF
12
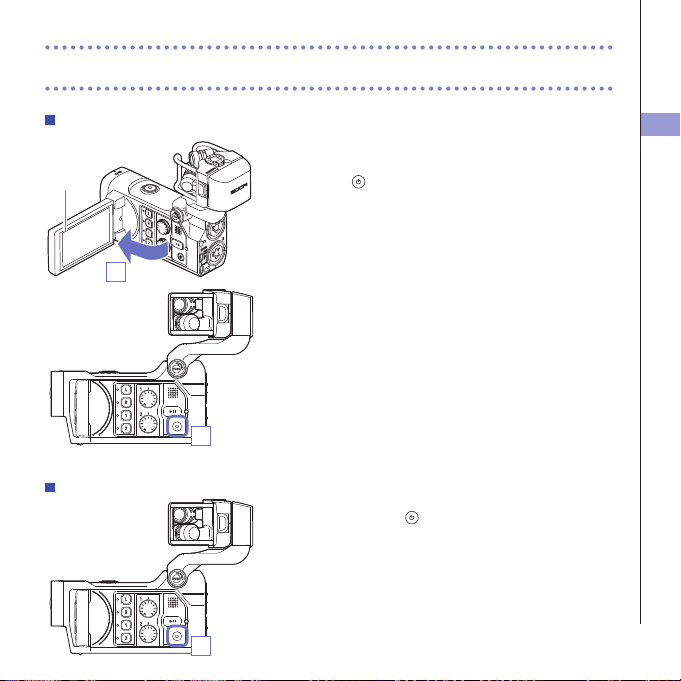
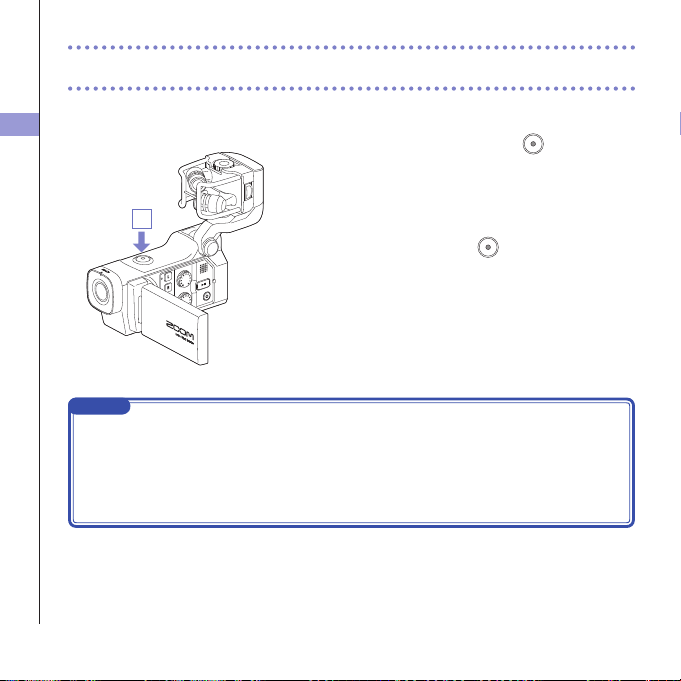
Turning the power ON and OFF
Turning the power ON
1. Open the LCD.
2. Press .
Turning the power OFF
1. Press and hold .
After"GoodbyeSeeYou!"appears,thepowerturnsoff.
2
1
Display
1
Setting the date and time
13
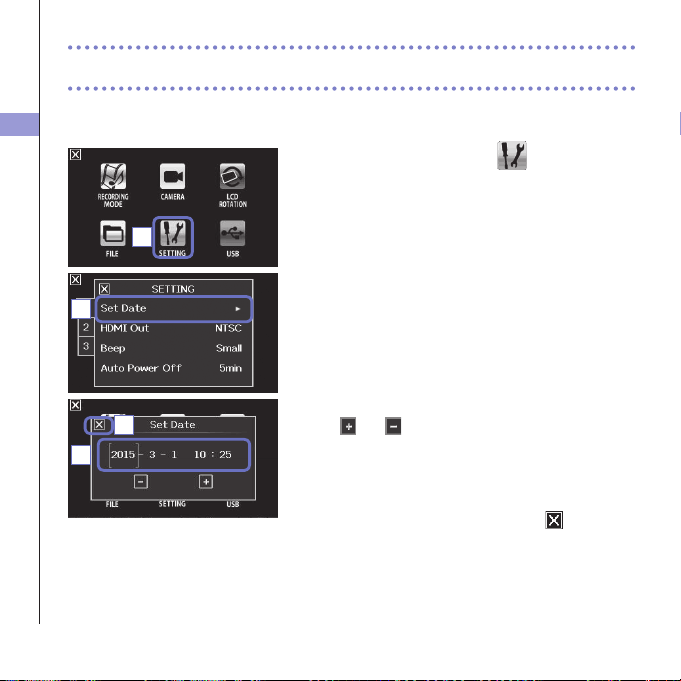
Setting the date and time
If the date and time are set, the recorder can add the recording date and time to files.
1. On the menu screen, touch
.
2. In the sub menu, touch "Set Date".
3. Touch an item to be changed to select it, and touch
and to set the current date and time.
4. After completing the setting, touch to close the
submenu.
1
2
3
4
Formatting SD cards
14
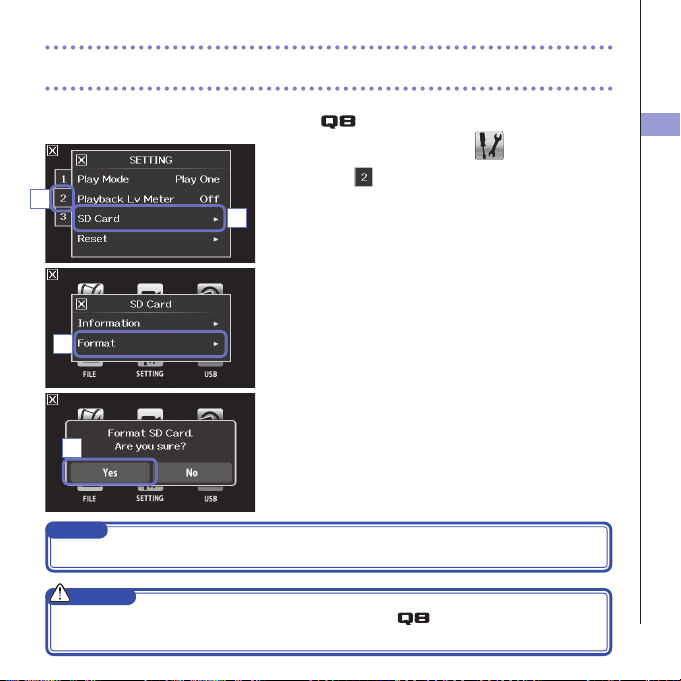
Formatting SD cards
You should format SD cards for use with the .
1. On the menu screen, touch
.
2. Touch .
3. In the sub menu, touch "SD Card".
4. In the sub menu, touch "Format".
5. On the confirmation screen, touch "Yes".
ThiswillstartSDcardformatting.Select"No"toreturn
totheSETTINGmenu.
Afterformattingcompletes,"Done"willappearandthe
SETTINGmenuwillreopen.
NOTE
IftheSDcard’swrite-protectionswitchisON,itcannotbeformatted.
CAUTION
•AfterpurchasinganewSDcard,alwaysformatitusingthetomaximizeperformance.
•AlldatapreviouslysavedontheSDcardwillbedeletedwhenitisformatted.
4
5
3
2
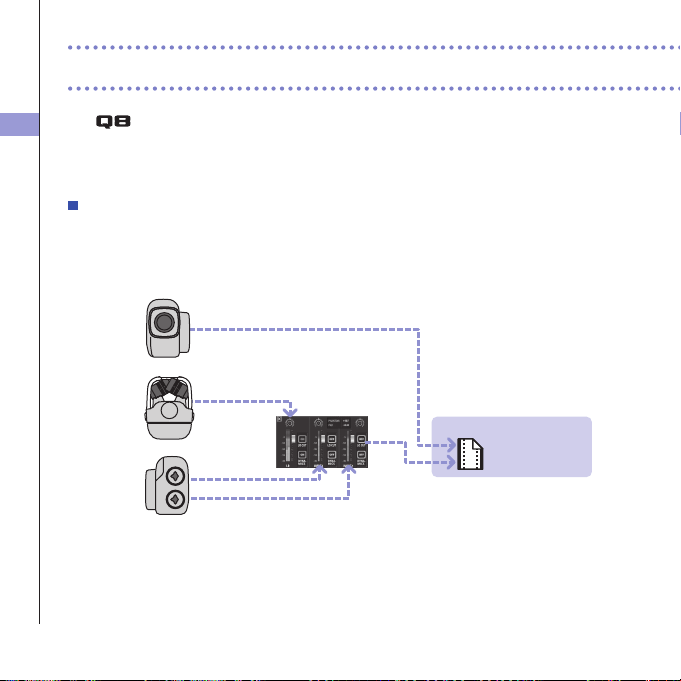
Recording mode overview
15
MOV mode
ThefourchannelsofaudiofromthemiccapsuleL/Rinputsandexternal1/2inputsaremixedto
stereoandsavedtogetherwiththevideoinasinglevideole(MOVformat).
The
can save individual unmixed audio files at the same time as video files. Use the
RECORDING MODE menu to change the recording mode. (See "Recording mode settings"
on page 25.)
Video file
ZOOM0001.MOV
Mixer
Video
Input 1
Mic capsule
Input 2
Recording mode overview
Recording mode overview
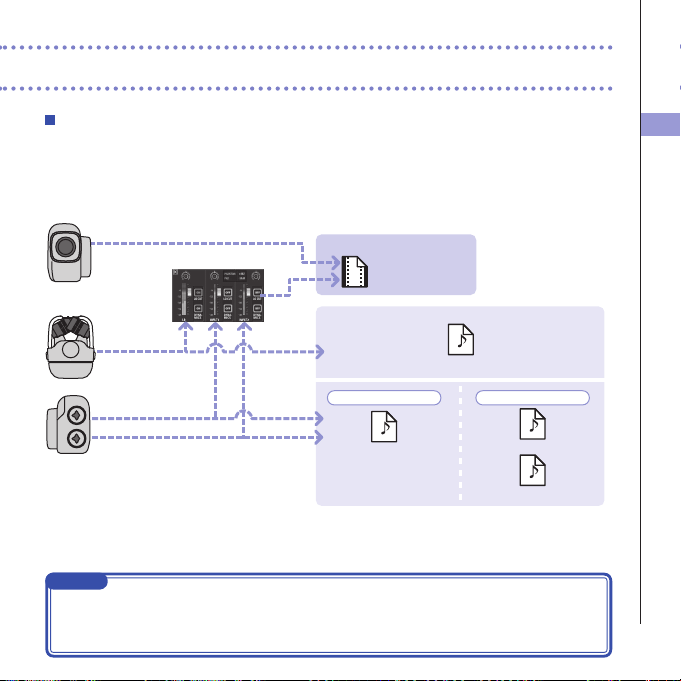
16
MOV+WAV mode
Audioles(WAVformat)aresavedforeachaudiotrackatthesametimeasvideoles.Theaudio
fromthemiccapsuleL/Rinputsandtheaudiofromtheexternal1/2inputsaresavedasseparate
files.
Audio file
ZOOM0001_LR.WAV
ZOOM0001_INPUT12.WAV
ZOOM0001_INPUT1.WAV
ZOOM0001_INPUT2.WAV
Video file
ZOOM0001.MOV
Mixer
Video
Input 1
Mic capsule
Input 2
Stereo link: ON
Stereo link: OFF
NOTE
•Only44.1/48kHzWAVformats(16/24-bit)canbeselectedwhenrecordinginMOV+WAVmode.
•InMOV+WAVmode,audiocannotbeoutputfromanHDMITV.
•Audiowillbesavedtoaudiolesbeforepassingthroughmixerlevelandpanadjustments.
Recording mode overview
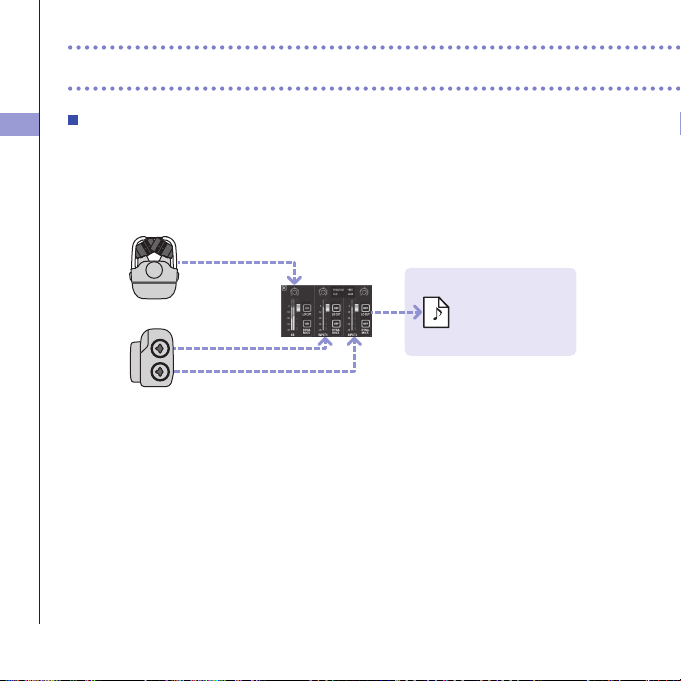
17
STEREO AUDIO mode
ThefourchannelsofaudiofromthemiccapsuleL/Rinputsandexternal1/2inputsaremixedto
stereoandsavedasasinglestereoaudiole.Videoisnotrecorded.
Audio file
ZOOM0001.WAV
Input 1
Mic capsule
Input 2
Mixer
Recording mode overview (continued)
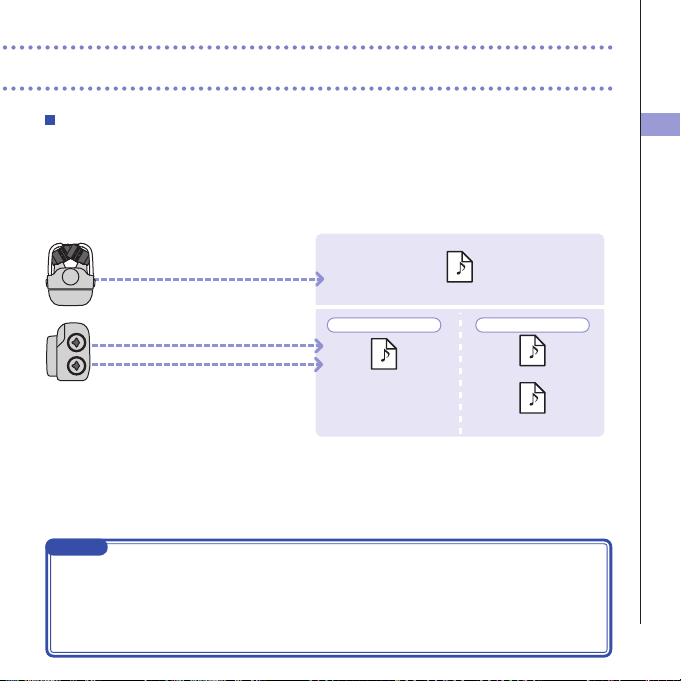
Recording mode overview
18
MULTI AUDIO mode
TheaudiofromthemiccapsuleL/Rinputsandtheaudiofromtheexternal1/2inputsaresavedas
separateaudioles(WAVformat).Videoisnotrecorded.
Audio file
ZOOM0001.WAV
ZOOM0001_INPUT12.WAV
ZOOM0001_INPUT1.WAV
ZOOM0001_INPUT2.WAV
Input 1
Mic capsule
Input 2
Stereo link: ON
Stereo link: OFF
NOTE
•Only44.1/48kHzWAVformats(16/24-bit)canbeselectedwhenrecordinginMULTIAUDIOmode.
•InMULTIAUDIOmode,thenamesofthelescreateddependontheON/OFFstatusofeachtrack.
(See"Selectingtrackstorecord"onpage19.)
•InMULTIAUDIOmode,audiocannotbeoutputfromanHDMITV.
•Audiowillbesavedtoaudiolesbeforepassingthroughmixerlevelandpanadjustments.
Selecting tracks to record
19
1. Press the buttons of the tracks that you want to
record.
NOTE
Theindicatorsoftheselectedtrackbuttonslightred,
and you will be able to monitor the signals input on
thesetracksthroughheadphones/lineoutput.
2. To record Inputs 1/2 as a stereo file (stereo link),
press both of their track buttons at the same time.
Toendthestereolink,pressthetrackbuttonsfor
Inputs1/2atthesametime.
NOTE
ThestereolinkoftheL/Rtrackscannotbedisabled.
NOTE
StereolinksettingscanalsobemadeusingtheInput1/2sharedsettingsontheMixerScreen.(See
page35.)
Selecting tracks to record
1
Selecting tracks to record
20
NOTE
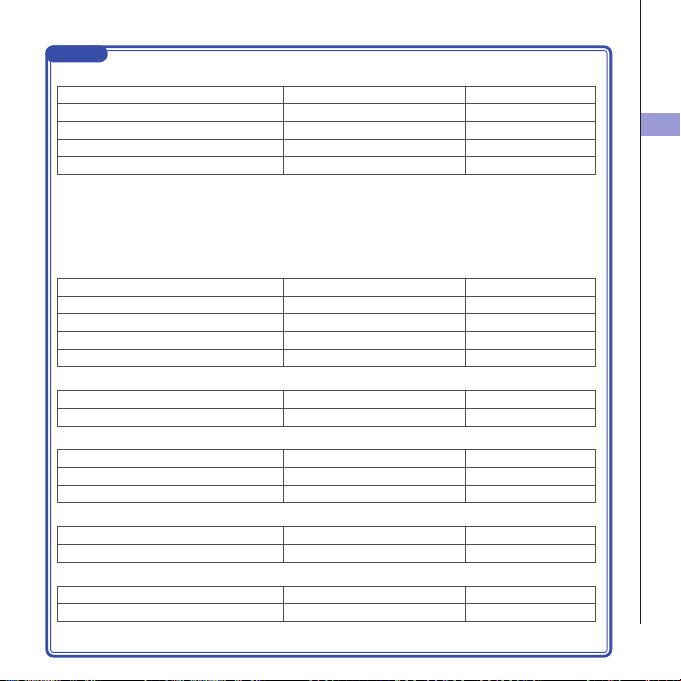
File names when recording in MOV+WAV mode
TrackrecordedFilenameDescription
L/RinputZOOMnnnn_LR.WAVStereo file
Input1ZOOMnnnn_INPUT1.WAVMono file
Input2ZOOMnnnn_INPUT2.WAVMono file
Inputs1/2(stereolinkactive)ZOOMnnnn_INPUT12.WAVStereo file
File names when recording in MULTI AUDIO mode
Thenameoftherstleis"ZOOMnnnn.WAV".Secondandlaterleswillhavetracknamesaddedto
their names.
• L/R inputs on
TrackrecordedFilenameDescription
L/RinputZOOMnnnn.WAVStereo file
Input1ZOOMnnnn_INPUT1.WAVMono file
Input2ZOOMnnnn_INPUT2.WAVMono file
Inputs1/2(stereolinkactive)ZOOMnnnn_INPUT12.WAVStereo file
• L/R inputs off, Inputs 1/2 on (stereo link active)
TrackrecordedFilenameDescription
Inputs1/2(stereolinkactive)ZOOMnnnn.WAVStereo file
• L/R inputs off, Inputs 1/2 on (no stereo link)
TrackrecordedFilenameDescription
Input1ZOOMnnnn.WAVMono file
Input2ZOOMnnnn_INPUT2.WAVMono file
• Input 1 only
TrackrecordedFilenameDescription
Input1ZOOMnnnn.WAVMono file
• Input 2 only
TrackrecordedFilenameDescription
Input2ZOOMnnnn.WAVMono file
Note:"nnnn"inthelenameisafour-digitnumber
Adjusting recording levels
21
Adjusting recording levels
You can adjust the recording level manually.
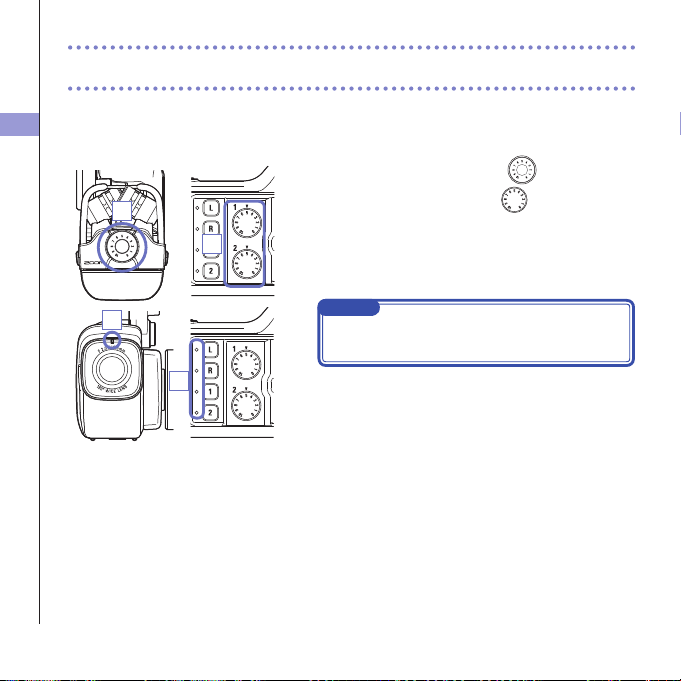
1. When using the XY mic, turn on the mic.
When using Inputs 1/2, turn
on the left side of
this recorder.
2. Adjust the level so that the recording and track key
LEDs do not blink even when loud sounds are input.
NOTE
Ifaninputclips,therecordingandtrackkeyLEDswill
blink.
Mic Input 1/2
1
1
2
2
Adjusting the angle of view
22
Adjusting the angle of view
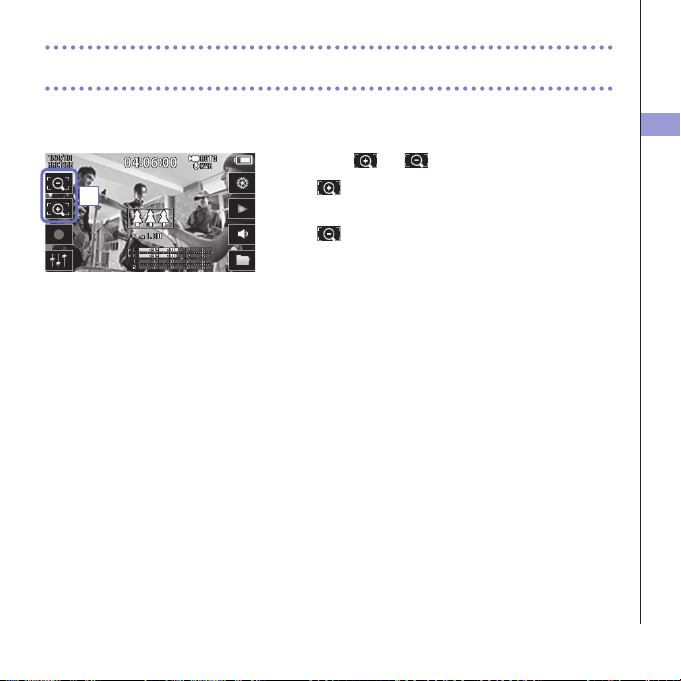
You can set the digital zoom to one of five levels.
1. Touch and on the Main Screen.
: Zoom in.
Close in on the central subject.
: Zoom out.
Record more of the scene.
1
Recording
23
Recording
From the Main Screen, you can start recording video by pressing a single button.
1. After preparing to record, press .
Thisstartsvideorecording.
Duringvideorecording,thevideorecordingLEDabove
the lens lights red.
2. To end recording, press
again.
NOTE
•Ifthetransferspeedtothecardisnotfastenoughduringvideorecording,"LowSpeedCard!"
appearsonthescreenandrecordingstops.Toavoidthis,werecommendusingcardsthatare
Class10orfaster.InformationaboutSDcardsthatcanbeusedwiththisunitisprovidedatwww.
zoom.co.jp.
•UsetheRECORDINGMODEmenutomakespecicvideorecordingsettings.(See"Recording
modesettings"onpage25.)
1
Audio monitoring settings
24
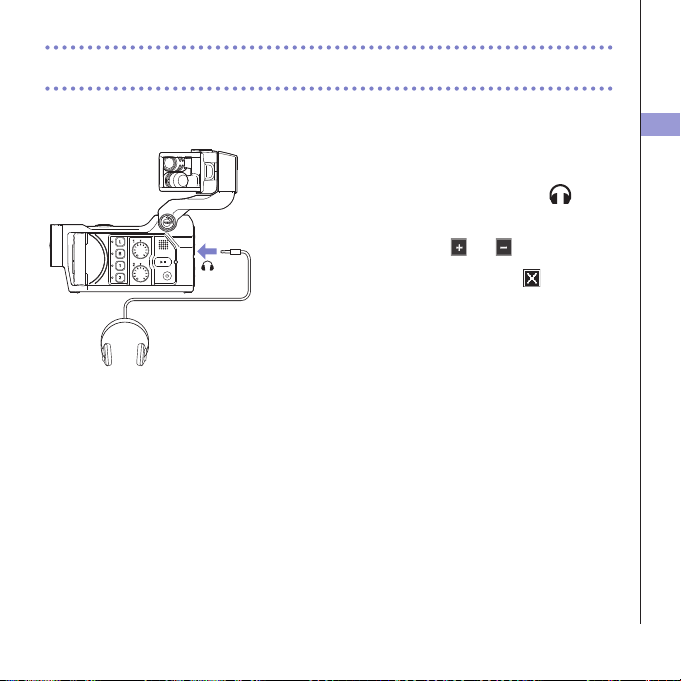
Audio monitoring settings
You can monitor audio being recorded with video through the headphones jack.
1. Connect headphones or other audio equipment to
the headphones jack on the back of the recorder.
2. To adjust the monitoring volume, touch on the
display.
3. In the sub menu, touch and .
4. After completing the setting, touch to close the
submenu.
Recording mode settings
25
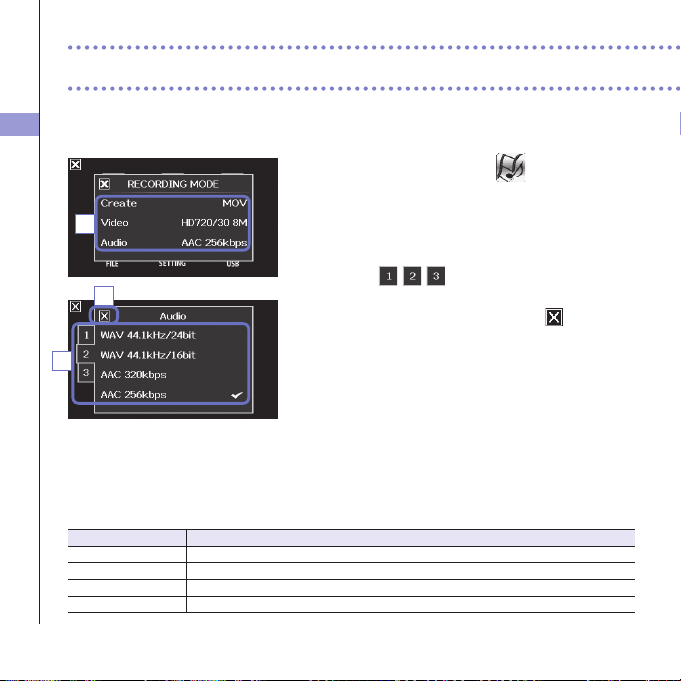
You can change the type of files created, video recording resolution and frame rate, and audio
quality, for example. Increasing the video resolution decreases the possible recording time.
1. On the menu screen, touch .
2. In the sub menu, touch the item that you want to
set.
3. In the sub menu, touch the setting value.
Touch
toshowhiddenVideoorAudio
items.
4. After completing the setting, touch to close the
submenu.
RECORDING MODE
Create:Typeoflescreated.(see"Recordingmodeoverview"onpage15.)
Setting Explanation
MOVRecordMOVlescontainingbothvideoandaudio.
MOV+WAVWAVlesaresavedseparatelyforeachtrackinadditiontoMOVles.
STEREOAUDIOOnlyaudioissavedasWAVles.
MULTIAUDIOFour-channelaudioissavedasmultipleWAVles.
2
Recording mode settings
4
3
Recording mode settings
26
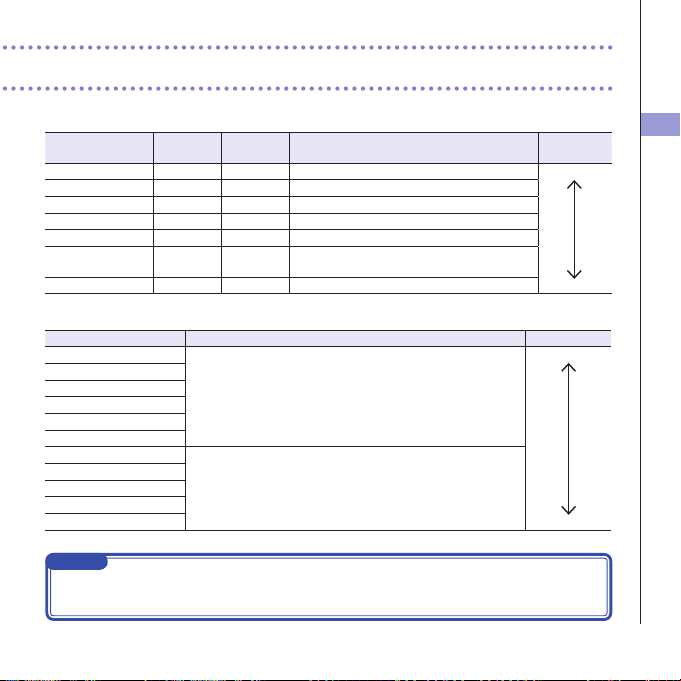
Video:videorecordingresolutionandframerate
Setting Resolution Frames/
second
Explanation
Filesize
3MHD/3024Mbps2304x129630RecordataresolutionhigherthanFullHD.Large
HD1080/3024Mbps1920x108030PlayonHDTVs.
HD1080/3016Mbps1920x108030SaveSDcardspaceandplayonHDTVs.
HD720/6015Mbps1280x72060Record scenes with fast movement.
HD720/308Mbps1280x72030PlaybackonHDTVsandcomputers.
WVGA/608Mbps800x48060Save SD card space and record scenes with fast
movement.
WVGA/305Mbps800x48030Save SD card space. Small
Audio:recordingaudioquality
Setting ExplanationFilesize
WAV96kHz/24bitRecordinanuncompressedWAVformatwhenaudioqualityis
important.
Thehigherthesamplingfrequency(kHz)andbitrate,thebetterthe
audioquality.
Large
WAV96kHz/16bit
WAV48kHz/24bit
WAV48kHz/16bit
WAV44.1kHz/24bit
WAV44.1kHz/16bit
AAC320kbpsRecordinacompressedAACformatwhenyouneedtosaveSD
card space.
AAC256kbpsThehigherthebitrate(bps),thebettertheaudio
quality.
AAC256kbps
AAC192kbps
AAC128kbps
AAC64kbpsSmall
NOTE
Only44.1/48kHz,16/24-bitWAVformatscanbeselectedwhentherecordingmodesettingisMOV+
-WAVorMULTIAUDIO.
Camera settings
27
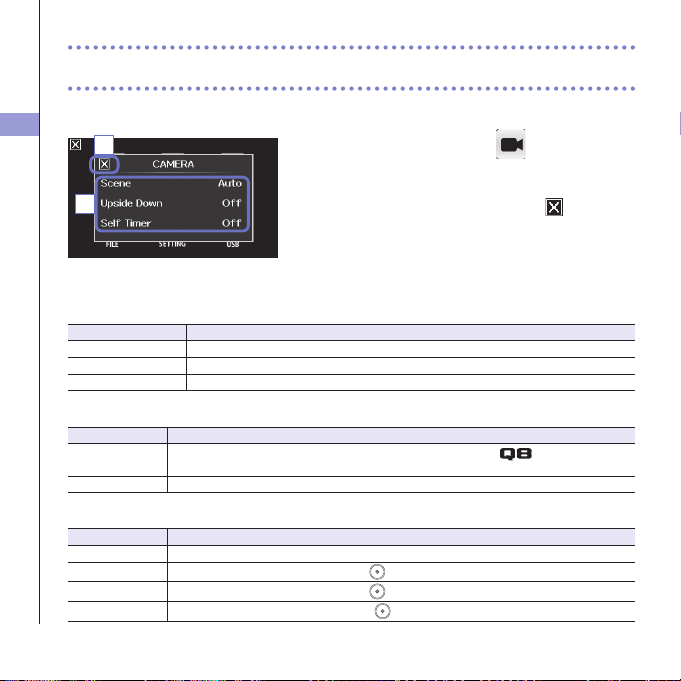
Camera settings
You can change the camera settings to suit the video recording conditions.
1. On the menu screen, touch .
2. In the sub menu, touch the setting value.
3. After completing the setting, touch to close the
submenu.
CAMERA
Scene:Setthecameraforthelightingconditionswhenvideorecording
Setting Explanation
AutoAdjusttolightingconditionsautomatically.
Concert Lighting Bestsettingforliveshows,concertsandothersituationswithbrightlights.
Night Best setting for night and other dark situations.
UpsideDown:Reverseverticalorientationwhenrecording
Setting Explanation
On
Videowillbesavedwiththeimagerotated180°.Usewhenthe
is recording upside
down,forexample.
Off Videoisnotrotated.
SelfTimer:Setsselftimer(canonlybeusedwhentheLCDisrotated)
Setting Explanation
Off Do not use the self timer.
3 sec
Start recording 3 seconds after pressing
.
5sec
Startrecording5secondsafterpressing
.
10sec
Startrecording10secondsafterpressing
.
3
2
Playing recordings
28
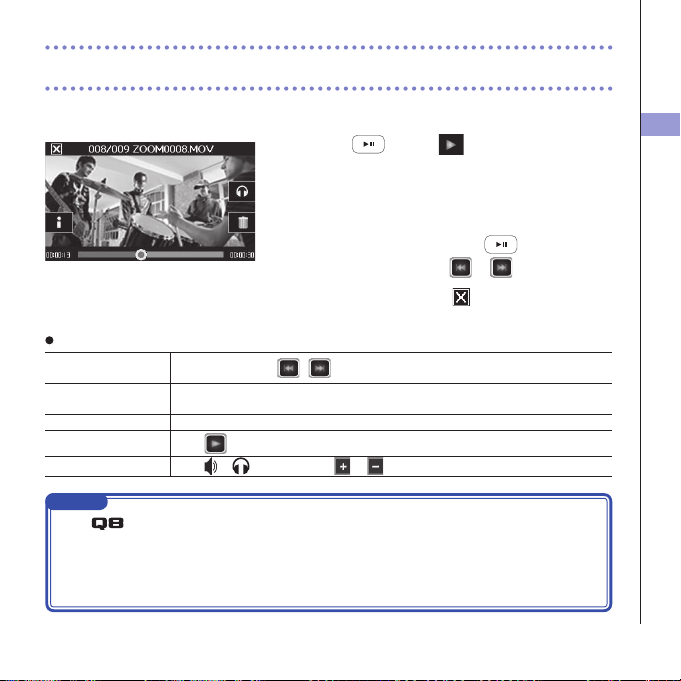
Playing recordings
This unit can play recorded videos.
1. Press or touch on the Main Screen.
Thisstartsplaybackofthelastrecordedvideo.
Aftertherearenooperationsforsometime,onlythe
videoimagewillbeshown.Touchthescreentoshow
the buttons again.
2. To play a different file, press or touch the
screen, and then touch
or .
3. To stop playback, touch .
TheMainScreenwillreappear.
Other operations
Playprevious/next
recording
Whenpaused,press
/ .
Jump Duringplayback,touchthebaronscreenanddragtothepositionyouwant.(see
page29.)
Pause Touchthescreenduringplayback.
EndpauseTouch
when paused.
Adjustthevolume
Touch
or
,andthentouch or in the submenu.
NOTE
•The
can only play videos that it recorded.
•ByconnectinganHDMIcable(soldseparately)totheHDMIOUT,videocanbeoutputtoan
externaldevice.(See"HDMIoutput"onpage40.)
•UseQuickTimetoplayrecordedvideosonacomputer.QuickTimecanbedownloadedfromthe
AppleInc.website.
Playing recordings
29
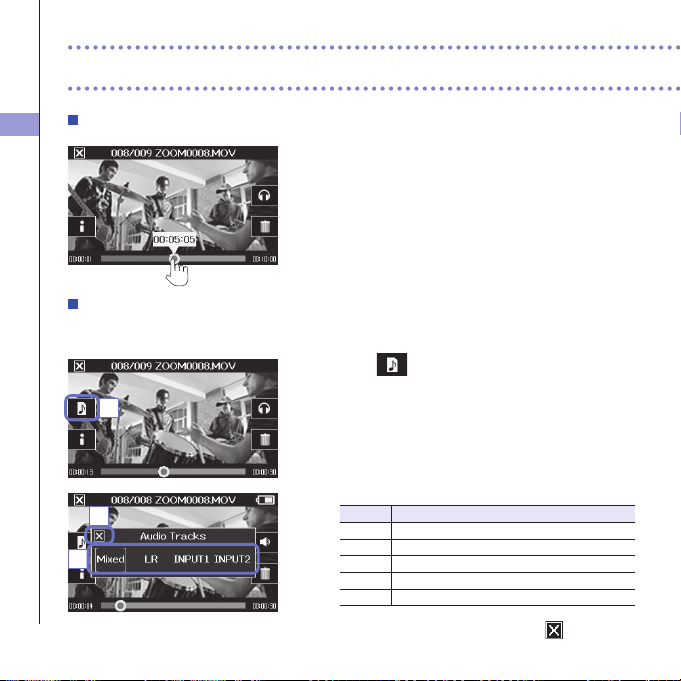
Changing the playback position
1. Touch the playback position bar and slide it to the
position you want.
Remove your finger from the screen to start playback
from that position.
Selecting the audio played
WithvideorecordedinMOV+WAVorMULTIAUDIOmode,youcanselecttheaudioforplayback.
1. Touch on the playback screen.
2. In the sub menu, touch the audio file to play.
Setting Main applications
MixedPlaythemixedaudio.
LR PlaytheL/Rinputaudio.
INPUT12Playtheaudiofromstereo-linkedInputs1/2.
INPUT1PlaytheInput1audio.
INPUT2PlaytheInput2audio.
3. After completing the setting, touch to close the
submenu.
Playing recordings (continued)
1
2
3
Playing recordings
30
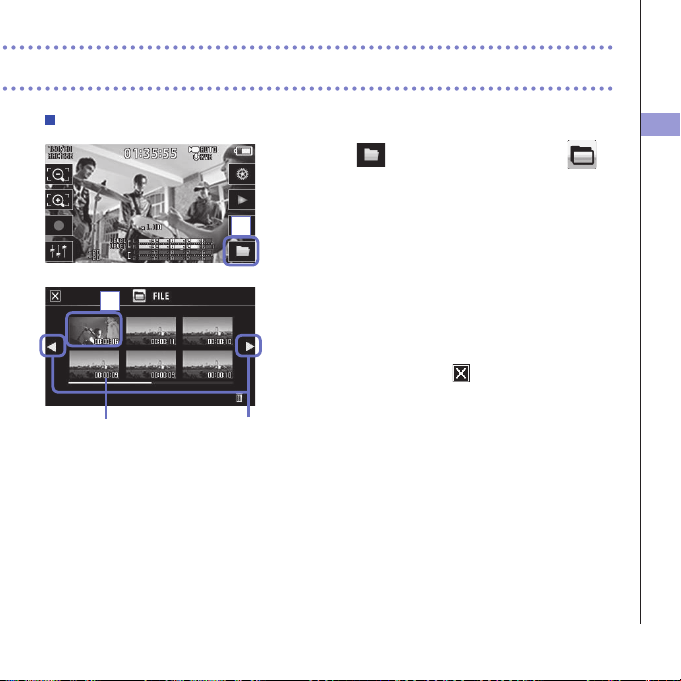
Playing files from the list
1. Touch on the Main Screen or touch in
the menu.
ThisopenstheFILElistscreen.
2. Touch the file to play back.
Thisopensasubmenu.
Touch"PlayBack"tostartplayback.
3. To stop playback, touch .
TheFILElistscreenwillreappear.
FilelengthChange page
1
2
Deleting recordings
31
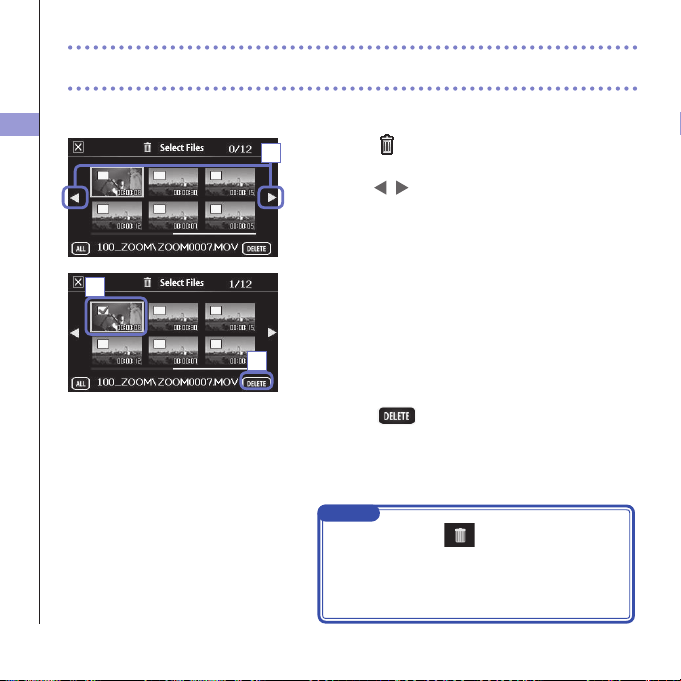
Deleting recordings
You can delete videos to increase the open space on the media.
1. Touch on the FILE list screen.
Alistofvideosappears.
Touch
to change the screen.
2. Touch a video to select it for deletion.
Acheckmarkappearsontheselectedvideo.
Youcanrepeatstep2toaddcheckmarkstomultiple
videos.
3. Touch .
4. On the confirmation screen, touch "Yes".
Theselectedvideoswillbedeleted.
1
2
3
NOTE
•Youcanalsotouch
on a video playback screen
to delete that video.
•WithvideorecordedinMOV+WAVorMULTIAUDIO
mode,relatedaudioleswillalsobedeletedatthe
same time.
Mixer Screen settings
32
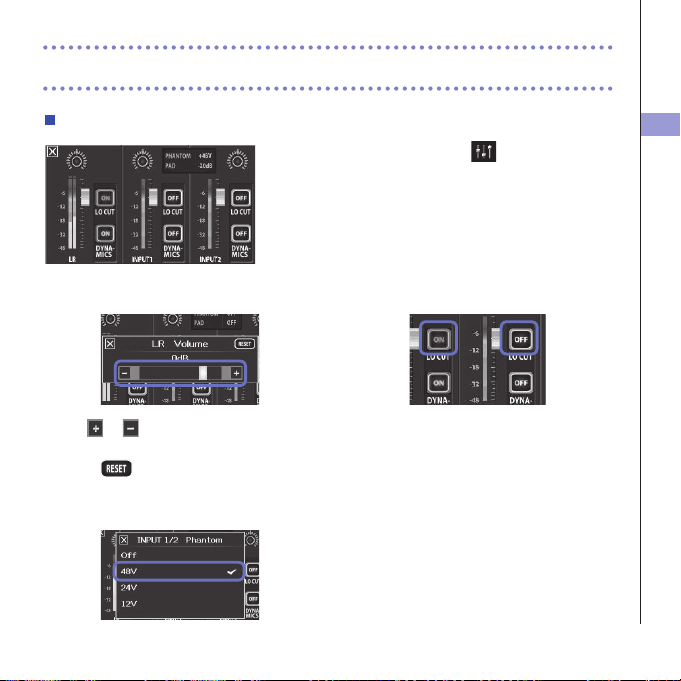
Mixer Screen settings
Using the Mixer Screen
1. On the Main Screen, touch .
ThisopenstheMixerScreen.
2. Touch the function you want to set.
Thiswillopenasettingscreenforthatfunction.
Changing values
Touch or ,ortouchandslidetheslider
toadjustavalue.
Touch
to restore the default value.
Selecting from lists
Touchaniteminashownlisttoselectit.
Changing settings
Touchabuttontoopenasubmenu
where you can change the setting.
Mixer Screen settings
33
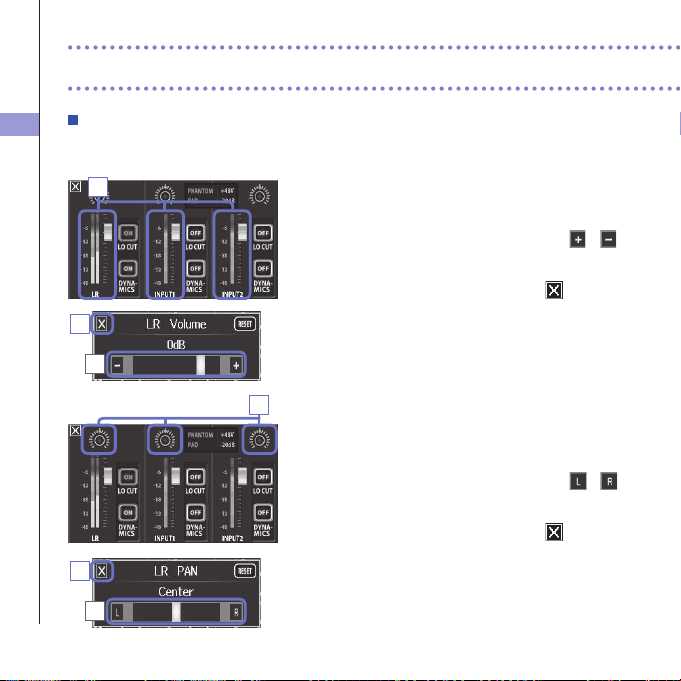
Adjusting levels and panning
Levels
1. On the Mixer Screen, touch the fader for the channel
that you want to adjust.
2. In the sub menu that appears, touch / or
move the slider to adjust it.
3. After completing the setting, touch to close the
submenu.
Panning
1. On the Mixer Screen, touch the pan pot for the
channel that you want to adjust.
2. In the sub menu that appears, touch / or
move the slider to adjust it.
3. After completing the setting, touch to close the
submenu.
Mixer Screen settings (continued)
1
1
2
2
3
3
Mixer Screen settings
34
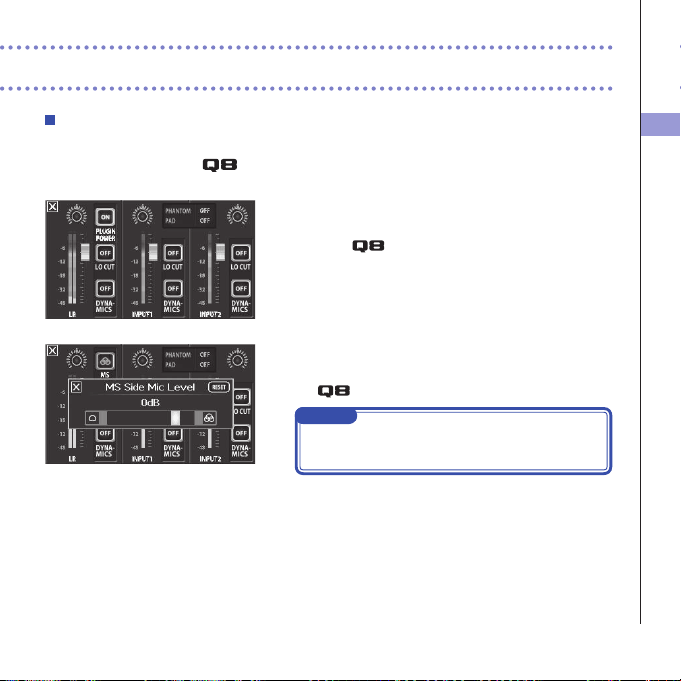
Making settings for different mic types
For the LR channel inputs, you can make specific settings according to the type of mic
capsule connected to the
.
Mic capsule that supports plug-in power
Whenamicthatsupportsplug-inpowerisconnected
to the
,youcansetwhetherornotplug-inpower
issuppliedtotheexternalinputjack.(See"PLUGIN
POWER"onpage38.)
MS mic capsule
IfanMSattachment,forexample,isconnectedtothe
,youcanadjustthesidemiclevel.
NOTE
AudiofromanMSmicisconvertedtostereoformat
during recording.
Mixer Screen settings
35
Mixer Screen settings (continued)
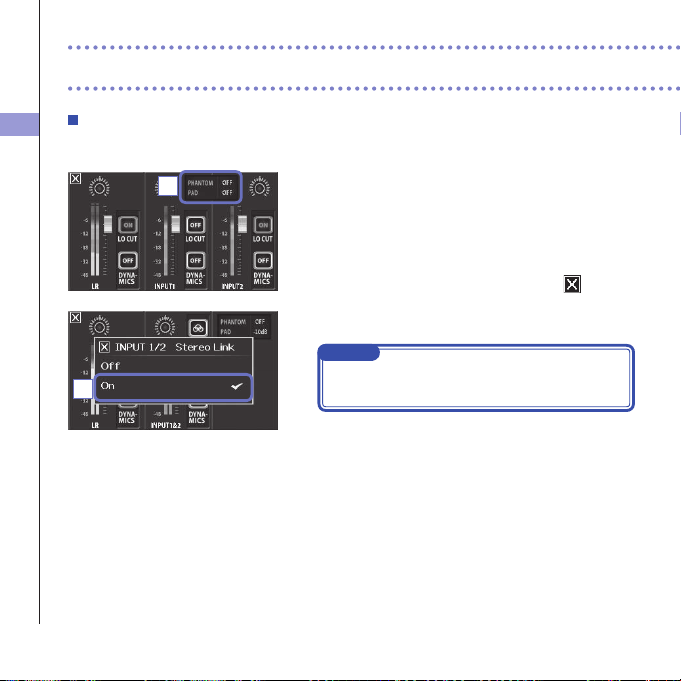
Stereo link setting
Byenablingthestereolink,Inputs1/2canbehandledasastereopair.
1. Touch the shared setting area for Inputs 1/2 on the
Mixer Screen.
2. Change the "INPUT 1/2 Stereo Link" setting in the
submenu.
3.
After completing the setting, touch
to close
the submenu.
NOTE
Youcanalsosetthestereolinkbypressingthetrack
buttonsforInputs1/2atthesametime.(Seepage19.)
2
1
Mixer Screen settings
36
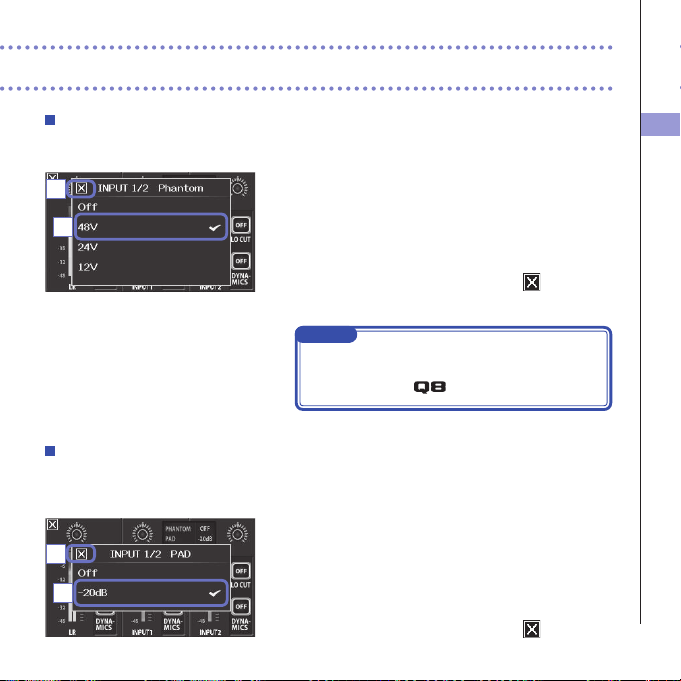
Phantom power
Inputs1/2supportphantompower.Theycansupplypowerat+12V,+24Vor+48V.
1. Touch the shared setting icons for Inputs 1/2 on the
Mixer Screen.
2. In the sub menu, change the "INPUT 1/2 Phantom"
setting to the voltage you want the unit to supply.
3. After completing the setting, touch to close the
submenu.
NOTE
Whenusingcondensermicsthatcanoperatewithless
than+48Vphantompower,youcanreducethepower
consumption of the
by selecting a lower voltage.
PAD (reduce input signal levels)
TurnthePADfunctionONtoreduceinputsignallevelsby20dBinordertoallowconnectionof
mixersandotherdeviceswitharatedoutputlevelof+4dB.
1. Touch the shared setting icons for Inputs 1/2 on the
Mixer Screen.
2. In the sub menu, change the "INPUT 1/2 PAD" setting
to "−20dB".
3. After completing the setting, touch to close the
submenu.
2
2
3
3
Mixer Screen settings
37
Mixer Screen settings (continued)
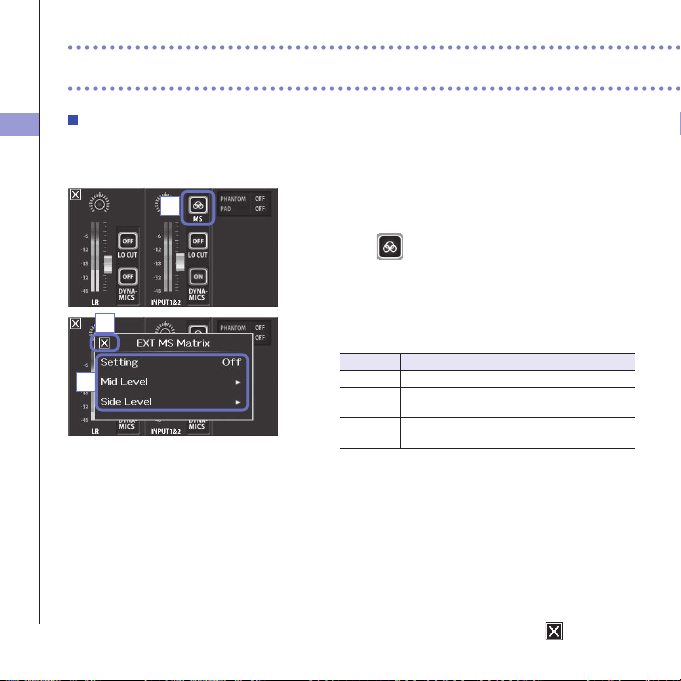
EXT MS MATRIX
SignalsfromanMSformatstereomicinputthroughInputs1/2canbeconvertedtoanordinary
stereo(L/R)signal.YoumustactivatethestereolinkforInputs1/2beforerecording.
1. Press the track buttons for Inputs 1/2 at the same
time to activate the stereo link.
2. Touch on the Mixer Screen.
3. Change the "EXT MS Matrix" setting in the submenu
that opens.
ThisopenstheMS-MATRIXsettingsscreen.
Setting:
Setting Explanation
Off DisabletheMS-MATRIX.
In1=Mid,
In2=Side
Input1willbeassignedtothemidmicand
Input2willbeassignedtothesidemic.
In1=Side,
In2=Mid
Input1willbeassignedtothesidemicand
Input2willbeassignedtothemidmic.
MidLevel:
Adjusttheleveloftheunidirectionalmicusedto
capturethecenterofthesound(Mid).
Thiscanbesettomuteorfrom−48.0to+12.0dB.
SideLevel:
Adjustthelevelofthebidirectionalmicusedtocapture
soundsfromleftandright(Side).
Thiscanbesettomuteorfrom−48.0to+12.0dB.
4. After completing the setting, touch to close the
submenu.
2
4
3
Mixer Screen settings
38
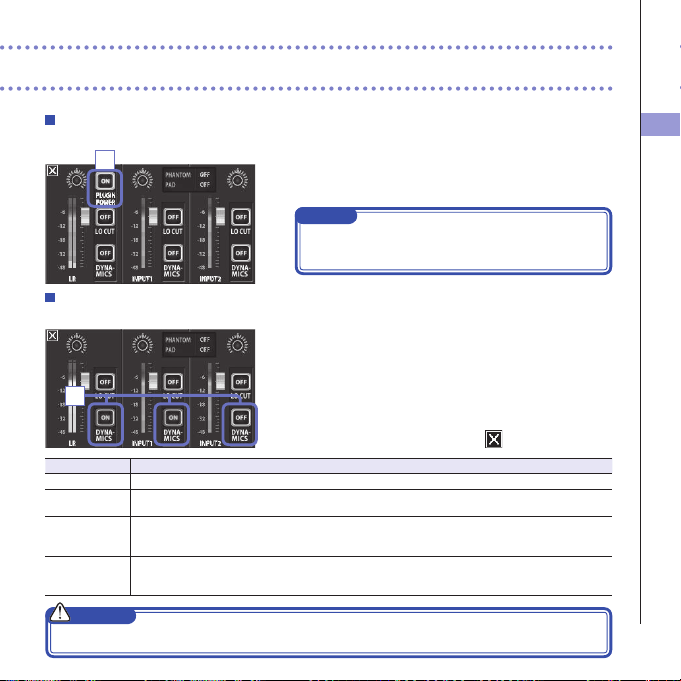
PLUGIN POWER
Thisunitcanprovideplug-inpowertomicsthatuseit.Makethefollowingsettingsbeforeconnectingmics.
1. Touch "PLUGIN POWER" on the Mixer Screen.
TouchingthistogglesitON/OFF
NOTE
Youcanusethiswhenamiccapsulethatsupports
plug-inpowerisconnected.
DYNAMICS
Thisdigitaleffectreducesaudiodynamics.Itcompensatestoreducevolumechanges.
1. On the Mixer Screen, touch the "DYNAMICS" button
for the channel that you want to adjust.
2. Change the "DYNAMICS" setting in the submenu
that opens.
3.
After completing the setting, touch to close the submenu.
Setting Explanation
Off DisableDYNAMICS.
Limiter
Iftheinputsignalexceedsacertainlevel,itwillbecompressedsothevolumestaysbelowthatlevel.
Thissuppressessuddenpeaks,makinglisteningtotherecordedaudioeasier.
Compressor Thiscompresseshigh-levelsoundsandraiseslow-levelsounds.
Whenrecordingbands,forexample,thiscanincreasethesoundpressure,whichincreasesthe
impact of the audio.
Leveler Iflow-levelsoundcontinues,theinputsignalisampliedandadjustedtomakethevolumeeven.
Thisiseffectivewhenvolumedifferencesaregreat,suchaswhenanemceespeaksbetween
concert performances.
CAUTION
TheAUTOGAINfunctioncannotbeusedwhentheaudioleformatissetto96kHzWAV.
1
1
Mixer Screen settings
39
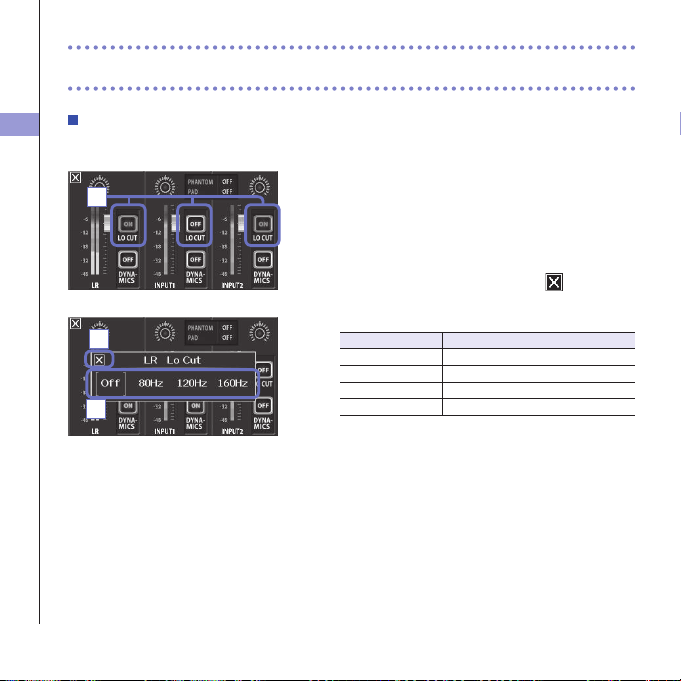
LO CUT (low-frequency cut)
Youcanturnthelow-cutlterontoreducethesoundofwind,vocalpopsandothernoise.
1. On the Mixer Screen, touch the "LO CUT" button for
the channel that you want to adjust.
2. Change the "lo cut" setting in the submenu that
opens.
3. After completing the setting, touch to close the
submenu.
Setting Explanation
Off Disablethelo-cutlter.
80HzCutaudiobelow80Hz.
120HzCutaudiobelow120Hz.
160HzCutaudiobelow160Hz.
1
Mixer Screen settings (continued)
3
2
Headphones/line and HDMI output
40
Headphones/line and HDMI output
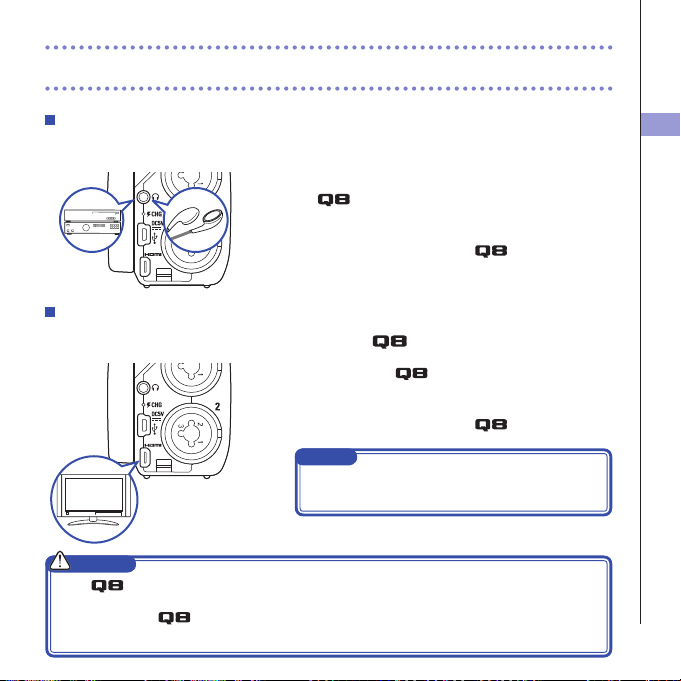
Headphones/line output
Youcanlistentotheaudiowithheadphonesoranexternalaudioamplier.
1. Connect headphones or audio equipment to the
headphones jack using a stereo mini plug
cable.
2. Start video playback on the .
HDMI output
UseanHDMIcabletoconnectwithanHDMITVtoshow video recordings in high definition.
1. Connect the HDMI jack with a TV using an
HDMI cable (commercially-available).
2. Start video playback on the .
NOTE
SomeTVsdonotsupportsomeaudioformats,so
correct playback might not always be possible.
CAUTION
•
ThehasanHDMITypeDMicroconnector.Whenusingacommercially-availableHDMIcable,be
suretouseaHighSpeedHDMI(category2)cablethathasanHDMITypeDMicroconnectorononeend
to connect to the
andaconnectorthatmatchestheTV’sHDMIinputontheotherend.
•
Whenrecordingvideo,connectingordisconnectinganHDMIcablewillcausevideoandaudiorecordingtostop.
USB connections
41
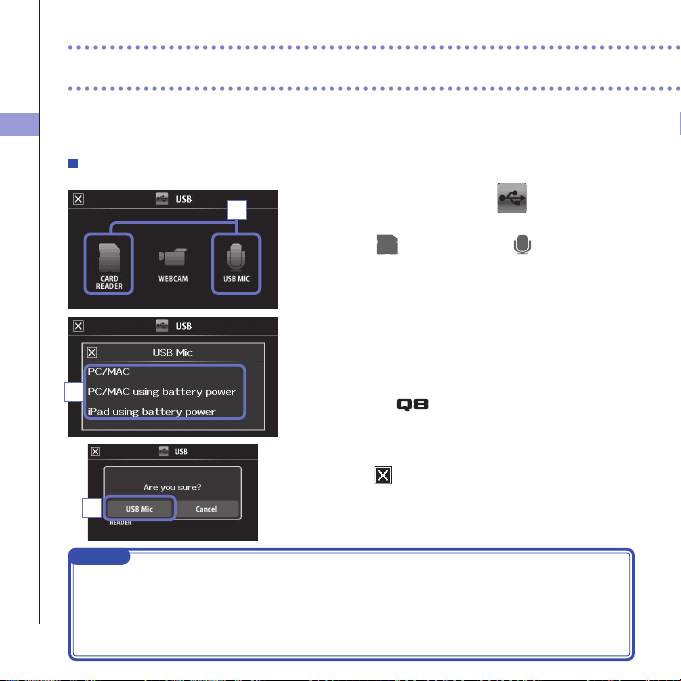
By connecting with a computer or iPad using a USB cable, you can use this recorder as a
card reader or USB mic, as well as to stream audio and video as a web camera.
Using as a card reader or USB mic (computer/iPad)
1. On the menu screen, touch
.
ThisopenstheUSBmenu.
2. Touch (CARD READER) or (USB MIC).
3.
In the sub menu, touch "PC/MAC", "PC/MAC using battery
power" (USB Mic only) or "iPad using battery power".
4. On the confirmation screen, touch "Card Reader" or
"USB Mic".
5. Use a USB cable to connect a computer or an iPad.
Whenthe
isrecognized,itwillbereadytouse.
6. To end use, conduct the necessary procedures from
the computer to end the USB connection. Then,
touch
and disconnect the USB cable.
WhenconnectedtoaniPadorwhenusingtherecorderasa
USBmic,noproceduresarenecessarybeforedisconnection.
NOTE
•Whenconnectedtoacomputer,powercanbesuppliedbyUSB.WhenconnectedtoaniPad,
power cannot be supplied by USB.
•AniPadCameraConnectionKit(soldseparately)isnecessarytoconnectaniPad.
•Ifyouwanttousephantompowerwhenconnectedtoacomputerthatcanonlysupplyalow
amountofUSBbuspower,select"PC/MACusingbatterypower".
USB connections
2
3
4
USB connections
42
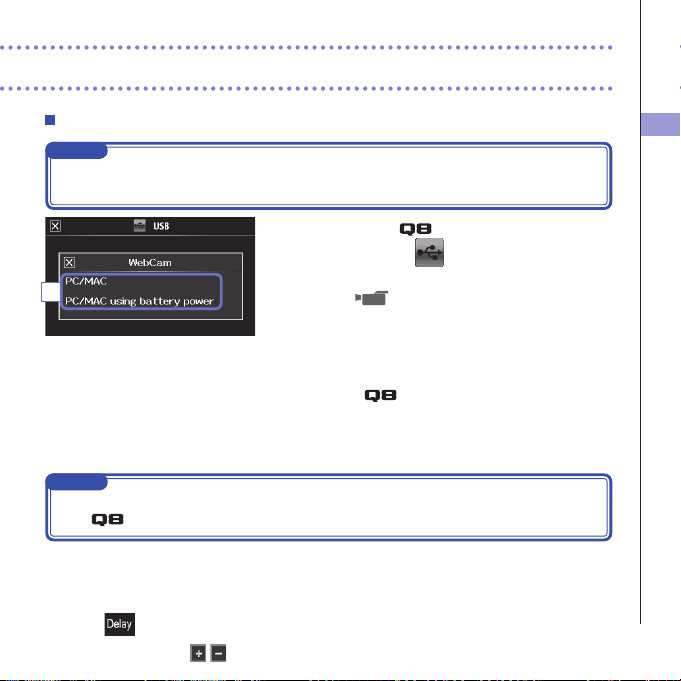
Using as a web camera (computer)
NOTE
Touseasawebcamera,anaudiodrivermustbedownloadedfromtheZOOMwebsite(www.zoom.
co.jp)andinstalled.
1. Connect the to a computer using a USB
cable, and touch
on the menu screen.
ThisopenstheUSBmenu.
2. Touch (WebCam).
3. In the sub menu, touch "PC/MAC" or "PC/MAC using
battery power".
4. On the confirmation screen, touch "WebCam".
5.
Use the
as a web camera for computer
streaming and other applications.
6. To end use, touch "EXIT" on the menu screen, and
disconnect the USB cable.
NOTE
•
TherecordercansimultaneouslytransmituptoHD720pvideoand48kHz/16-bitPCMaudiotoacomputer.
•The cannot output computer playback signals.
Delay setting
Whenusingtherecorderasawebcameraifthestreamingapplicationdoesnothavealip
synchronizationfunction,youcansetanaudiodelaytimesothatitmatchesthetimingofthevideo.
1. Touch on the screen.
2. In the sub menu, use
to adjust the audio delay time.
3
LCD Rotation and FILE list
43
LCD Rotation and FILE list
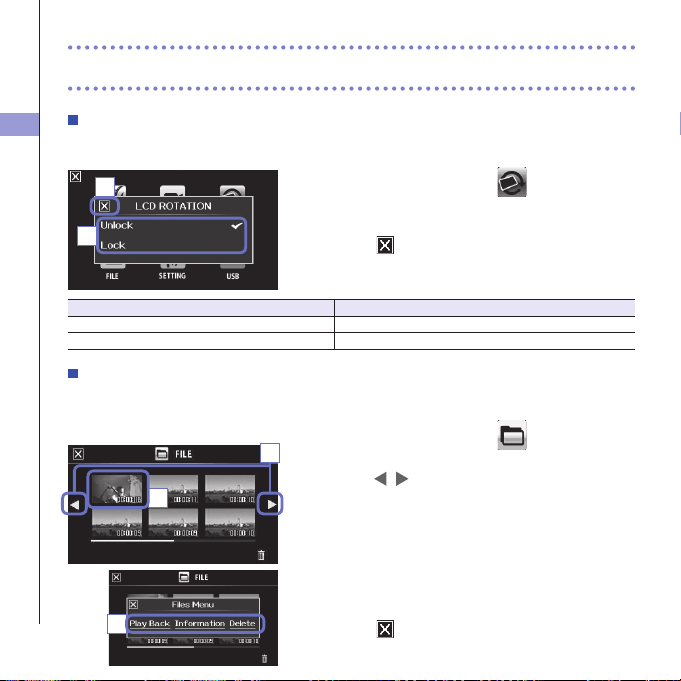
LCD ROTATION
YoucanlocktherotationoftheLCDscreen.
1. On the menu screen, touch .
2. In the sub menu, touch the setting value.
3. Touch to return to the menu screen.
Thiswillclosethesubmenu.
Setting Explanation
Unlock ThescreenrotatestomatchtheLCDorientation.
Lock Thescreenkeepsthecurrentstate.
FILE list
Onthisscreen,youcanviewvideolessavedontheSDcardasthumbnailsandplaythemback.
1. On the menu screen, touch
.
ThisopenstheFILElistscreen.
Touch
to change the screen.
2. Touch a thumbnail.
3. In the sub menu, touch the setting value.
Touch"PlayBack"tostartplayback.
Touch"Information"toviewleinformation.
Touch"Delete"todeletethele.
4. Touch to return to the menu screen.
3
1
2
2
3
System settings
44
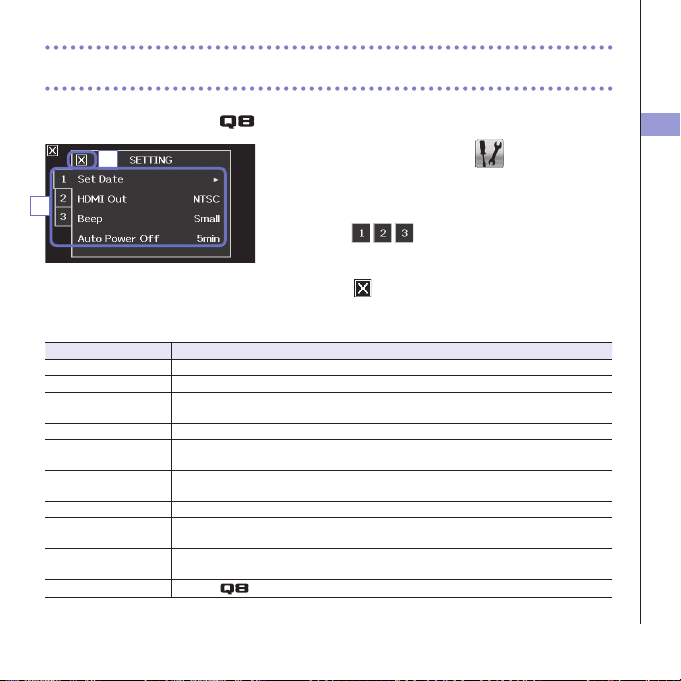
System settings
Make settings related to the system.
1. On the menu screen, touch .
2. In the sub menu, touch the item that you want to
set.
Touch
to show hidden items.
3. In the sub menu, touch the setting value.
4. Touch to return to the menu screen.
Thiswillclosethesubmenu.
Setting Explanation
Set Date Setthedateandtimeoftheinternalclock.(See"Settingthedateandtime"onpage13.)
HDMIOutSettheformatofthevideooutputfromtheHDMIporttoNTSCorPAL.
Beep Set whether a beep sound is made when the recorder it turned on and is operated.
SelectOff,SmallorLarge.
Direct Monitor Set whether the input sound is monitored directly when used as a USB mic.
AutoPowerOffSet whether the power turns off automatically when running on batteries if no recording
orotheroperationhasoccurredforsometime.SelectOffor2,5or10minutes.
Play Mode Setwhetherornotmultiplelesshouldbeplayedconsecutively.Select"PlayOne"or
"PlayAll".
Playback Lv Meter Set whether or not level meters are shown on the playback screen.
SD Card ChecktheopencapacityoftheSDcardorformatit.(See"FormattingSDcards"on
page14.)
Reset Restorevideoandaudioquality,thesceneandothersettingstothefactorydefault
values.
Information
Viewthe
system version.
4
2
Updating the firmware
45
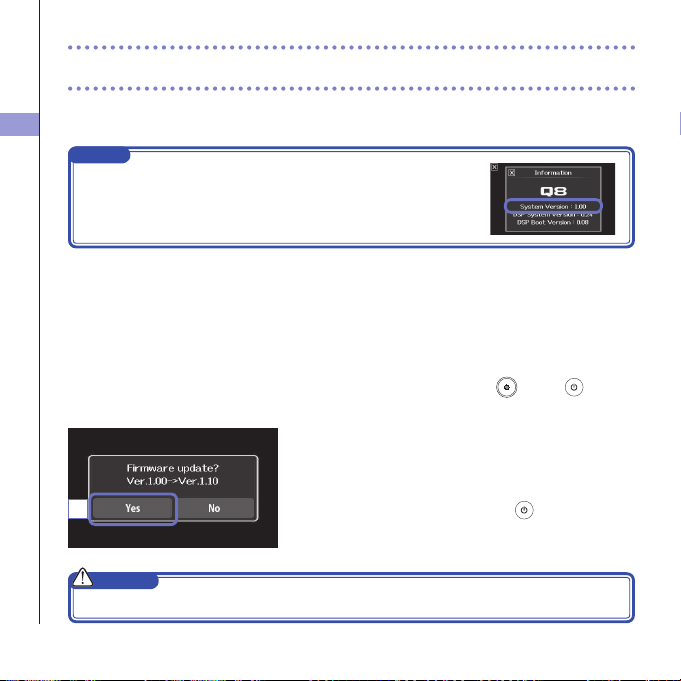
Updating the firmware
Update the firmware version when necessary.
NOTE
YoucancheckthefirmwareversionwiththeInformationiteminthe
SETTINGmenu.
1. Copy the file for updating the firmware to the root
directory on the SD card.
Thelatestversionofthermwarecanbedownloaded
fromwww.zoom.co.jp.
2. Insert the SD card into the unit’s card slot.
3.
While pressing and holding , press
until the
unit starts and the firmware update screen opens.
4. If the version update shown is as desired, touch
"Yes".
5. Wh e n up d a t ing t he v e r s i o n co m p lete s and
"Complete!" appears, press
for at least one
second to shut down.
CAUTION
Upgrading the firmware version is not possible if the remaining battery power is low.
4
Troubleshooting
46
If you think that the
is operating strangely, check the following items first.
Troubleshooting
Recording/playback trouble
There is no sound or output is very quiet
• Check the connections to your monitoring
system and its volume setting.
•
Confirm that the volume of the
is not
too low.
The recorded sound cannot be heard or
is very quiet
•IfyouareusingtheincludedXYmic,
confirm that it is oriented correctly.
•Checktheinputlevelsettings.(
→
P.21)
•CheckthelevelsettingsontheMixer
Screen.(
→
P.33)
• If a CD player or other device is connected
toaninputjack,raisetheoutputlevelofthat
device.
•ConrmthatthePADsettingontheMixer
Screenissetsuitably.(
→
P.36)
Recording video/audio is not possible
• Confirm that the SD card has open space.
(
→
P.44)
USB connection trouble
When the USB port is connected to a
computer, an error message related to
power supply appears
•Anerrormightappearifthepowerthatthe
computerUSBportcansupplyisexceeded.
Ifthisoccurs,dothefollowing.
BeforeconnectingthembyUSB,restartthe
computer and set the
USB menu to
"PC/MACusingbatterypower".
YoucouldalsouseanACadapter.
Specifications
47
Recording media SD/SDHC/SDXCcards(upto128GB)
Image sensor 1/3-inch3-megapixelCMOSsensor
Lens Fixedfocus(36cm–∞),F2.0,focaldistanceabout16.6mm(35mmequivalent)
VideoformatMPEG-4AVC/H.264(MOV)
Videoresolutions
3MHD(2304×1296)30fps,HD1080p30fps,HD720p60fps,HD720p30fps,WVGA60fps,WVGA30fps
AudioformatsWAV(16/24-bitquantization,44.1/48/96kHzsamplingfrequency)
AAC(64–320kbpsbitrate,48kHzsamplingfrequency)
AudiofunctionsLow-cutlter(80Hz,120Hz,160Hz),dynamicscontrol(Limiter,Compressor,Leveler)
Image functions 5-stepdigitalzoom,sceneselection(Auto/ConcertLighting/Night)
Selftimer(Off/3sec/5sec/10sec)
Display 2.7’’widefullcolorLCD,Touchscreen
L/RinputsXYmic:XYQ-8
120°XYstereoformat
Maximumsoundpressureinput:140dBspl
Inputgain:−∞to52dB
Equivalentinputnoise:−120dBuorless
INPUT1/2Inputconnectors:TRS/XLRcombojacks
Inputgain(PADOFF):−∞to55dB
Inputgain(PADON):−∞to35dB
Inputimpedance:1.8kΩormore
Maximumpermissibleinputlevel:+22dBu(PADON)
Phantompower:+12/+24/+48V
Equivalentinputnoise:−120dBuorless
Output connector Combinedline/headphonesstereominijack
HDMImicroTypeD
Built-inspeaker400mW8Ωmonospeaker
USB Mini B type
<Operationasmassstorage>Class:USB2.0HighSpeed
<Operation as audio interface>
Class:USB2.0FullSpeedSpecications:44.1kHzsamplingrate,16-bit
<Operationaswebcam>Specications:WVGA/720pvideosize,48kHz16-bitaudio
Note:AudiointerfaceandmassstorageoperationwithiPadissupported.
Note:USBbuspowersupported
Power supply Lithium-ionbattery:DC4.2Vmaximumvoltage,DC3.7Vnominalvoltage,1700mAhcapacity
ACadapter(ZOOMAD-17,soldseparately):DC5V/1A
Recharging times ByUSB:about4hoursand30minutes,UsingZOOMAD-17:about2hoursand45minutes
Battery operation
time
Rated:about3.5hours(whenrecording720p/30fpsvideowithLCDclosed)
Actuallyuse:
about2hours(whenrecording720p/30fpsvideowithLCDopenedandcondensermicconnectedtocombojack)
Externaldimensions
Mainunit(maximumdimensionswhenarmlowered)
157.57(length)×47.8(width)×68.65(height)mm
Mainunit(maximumdimensionswhenarmraised)
156.63(length)×47.8(width)×118.54(height)mm
300g(includingbattery)
Mic(maximumdimensions):50.17(length)×37(width)×52.3(height)mm40g
Specifications
Safety Precautions
48
Safety Precautions
InthisUserGuide,symbolsareusedtohighlightwarningsandcautionsthatyoumustreadtopreventaccidents.
Themeaningsofthesesymbolsareasfollows.
WARNING
Something that could cause serious injury or death
CAUTION
Something that could cause injury or damage to the equipment
Other symbols used
An action that is mandatory
An action that is prohibited
WARNING
Operation using an AC adapter
NeveruseanyACadapterotherthanaZOOM
AD-17(soldseparately).
Donotdoanythingthatcouldexceedtheratingsofoutlets
andotherelectricalwiringequipmentorsupplypower
otherthanAC100V.Beforeusingtheequipmentinaforeign
country or other region where the electrical voltage differs
fromAC100V,alwaysconsultwithashopthatcarriesZOOM
productsandusetheappropriateACadapter.
Alterations
Do not open the case or modify the product.
CAUTION
Product handling
Donotdrop,bumporapplyexcessiveforceto
the unit.
Becarefulnottoallowforeignobjectsorliquids
enter the unit.
Operating environment
Donotuseinextremelyhighorlowtemperatures.
Donotusenearheaters,stovesandotherheat
sources.
Do not use in very high humidity or where it
could be splashed by water.
Donotuseinplaceswithfrequentvibrations.
AC adapter handling
Whendisconnectingthepowerplug,alwayspull
on the power plug itself.
Whennotusingtheunitforalongtime,discon-
nect the power plug from the outlet.
You might need this User Guide in the future. Always keep it in a place where you can access it easily.
Usage Precautions
49
Usage Precautions
Interference with other electrical equipment
Inconsiderationofsafety,the
hasbeendesignedtominimizeitsemissionofelectromagneticwavesand
tosuppressinterferencefromexternalelectromagneticwaves.However,equipmentthatisverysusceptibleto
interference or that emits powerful electromagnetic waves could result in interference if placed nearby. If this oc-
curs,placethe
and the other device farther apart.
Withanytypeofelectronicdevicethatusesdigitalcontrol,includingthe
,electromagneticinterference
couldcausemalfunction,corruptordestroydataandresultinotherunexpectedtrouble.Alwaysusecaution.
Cleaning
Useasoftclothtocleantheexterioroftheunitifitbecomesdirty.Ifnecessary,useadampcloththathasbeen
wrung out well to wipe it.
Neveruseabrasivecleansers,waxorsolventssuchasalcohol,benzeneorpaintthinner.
Breakdown and malfunction
Iftheunitbecomesbrokenormalfunctions,immediatelydisconnecttheACadapter,turnthepoweroffanddis-
connect other cables. Contact the store where you bought the unit or ZOOM service with the following informa-
tion:productmodel,serialnumberandspecicsymptomsofbreakdownormalfunction,alongwithyourname,
address and telephone number.
Copyrights
WindowsisatrademarkofMicrosoftCorporation(USA).Apple,Macintosh,iPad,QuickTimeandtheQuickTime
logoareregisteredtrademarksortrademarksofAppleInc.intheUSAandothercountries.TheSD,SDHCand
SDXClogosaretrademarks.HDMI(High-DenitionMultimediaInterface)and
aretrademarksofHDMI
Licensing,LLC.Otherproductnames,registeredtrademarksandcompanynamesinthisdocumentaretheprop-
erty of their respective companies.
Recordingfromcopyrightedsources,includingCDs,records,tapes,liveperformances,videoworksandbroad-
casts,withoutpermissionofthecopyrightholderforanypurposeotherthanpersonaluseisprohibitedbylaw.
Zoom Corporation will not assume any responsibility related to infringements of copyrights.
Warnings and requests regarding safe battery use
50
Warnings and requests regarding safe battery use
Carefully read the following warnings in order to avoid serious injuries, burns, fires and
other problems caused by leaking, heat generation, combustion, rupture or accidental swal-
lowing.
DANGER
Donotchargethelithium-ionbattery(BT-03)inanywayotherthanusingtheandeitheranAD-17(sold
separately)oraUSBport.
Donotdisassemblethebattery,putitinre,orheatitinamicrowaveovenorconventionaloven.
Donotleavethebatterynearare,instrongsunlight,insideavehiclethathasbecomehotorinsimilarcon-
ditions. Do not recharge in conditions like these.
Donotcarryorstorethebatterywithcoins,hairpinsorothermetalobjects.
Donotallowthebatterytobewetbyanyliquid,includingwater,seawater,milk,softdrinksandsoapywater.
Do not charge or use a battery that is wet.
CAUTION
Donothitthebatterywithahammerorotherobject.Donotsteponitordropit.Donototherwiseimpactor
apply force to the battery.
Do not use the battery if it becomes deformed or damaged.
Do not remove or damage the outer seal. Never use a battery that has had all or part of its outer seal re-
moved or a battery that has been torn.
Pleaserecyclebatteriestohelpconserveresources.Whendiscardingusedbatteries,alwayscovertheirter-
minals and follow all laws and regulations that are applicable to the location.
Thecontentsofthisdocumentandthespecicationsoftheproductcouldbechangedwithoutnotice.

ZOOM CORPORATION
4-4-3Kanda-Surugadai,Chiyoda-ku,Tokyo101-0062Japan
http://www.zoom.co.jp
Z2I-2225-02
For EU Countries
Declaration of Conformity:
This product complies with the require-
ments of
EMC Directive 2004/108/EC and
RoHS Directive 2011 / 65 / EU
Disposal of Old Electrical & Electronic
Equipment (Applicable in European countries
with separate collection systems)
Products and batteries that have been marked
with the symbol of a crossed-outwheeled
waste bin must not be disposed of with
household waste.
Old electrical/electronic equipment and
batteries should be recycled at facilities thatare
able to process them and their byproducts.
Contact the local government for information
about nearby recycling facilities.Conducting
recycling and waste disposal properly helps
con serve resource s andpreve nts harmf ul
impacts on human health and the environment.
THIS PRODUCT IS LICENSED UNDER THE AVC PATENT PORTFOLIO LICENSE FOR THE PERSONAL AND NONCOMMERCIAL USE OF
A CONSUMER TO
(i) ENCODE VIDEO IN COMPLIANCE WITH THE AVC STANDARD (“AVC VIDEO”) AND/OR
(ii) DECODE AVC VIDEO THAT WAS ENCODED BY A CONSUMER ENGAGED IN A PERSONAL AND NONCOMMERCIAL ACTIVITY AND/OR WAS OBTAINED
FROM A VIDEO PROVIDER LICENSED TO PROVIDE AVC VIDEO.
NO LICENSE IS GRANTED OR SHALL BE IMPLIED FOR ANY OTHER USE. ADDITIONAL INFORMATION MAY BE OBTAINED FROM MPEG
LA, L.L.C. SEE HTTP://WWW.MPEGLA.COM
FCC regulation warning (for U.S.A.)
This equipment has been tested and found to comply with the
limits for a Class B digital device,pursuant to part 15 of the FCC
Rules. These limits are designed to provide reasonable protection
against harmful interference in a residential installation.This equip-
ment generates, uses and can radiate radio frequency energy and,
if not installed and used in accordance with the instructions, may
cause harmful interference to radio communications. However,
there is no guarantee that interference will not occur in a particular
installation. If this equipment does cause harmful interference to
radio or television reception, which can be determined by turning
the equipment off and on, the user is encouraged to try to correct
the interference by one or more of the following measures:
Reorient or relocate the receiving antenna.
Increase the separation between the equipment and
receiver.
Connect the equipment into an outlet on a circuit
different from that to which the receiver is connected.
Consult the dealer or an experienced radio/ TV tech-
nician for help.

· Lithium-ion battery
(BT-03)
BT-03
LITHIUM ION
· USB cable
· Foam windscreen
· Lens cover · Strap
・
Lens hood
· Accessory mount
adapter
· User Guide
Handy Video Recorder
· main unit
Included items
The package should contain the following items. Please conrm that they have all been included.
©2015 ZOOM CORPORATION Z2I-2284-01