
Loading ...
Loading ...
Loading ...
E-40
To measure two fi nishes
E
A E A A
Start Split
First runner fi nishes.
(
SPL
appears in the
lower display.)
Display time of fi rst
runner
Stop
Second runner
fi nishes.
Split release
Display time of
second runner
Reset
Note
• The Stopwatch Mode can indicate elapsed time up to 23 hours, 59 minutes, 59.99 seconds.
• Elapsed time returns to zero automatically and timing continues from there when the above elapsed
time limit is reached.
• An ongoing elapsed time measurement operation will continue internally even if you change to another
mode. However, if you exit the Stopwatch Mode while a split time is displayed, the split time will not be
displayed when you return to the Stopwatch Mode.
E-41
Using the Countdown Timer
The countdown timer can be confi gured to start at a preset time and sound an alarm when the end of the
countdown is reached.
To enter the Countdown Timer Mode
Use
D
to select the Countdown Timer Mode as shown on page E-8.
• The mode dial hand will move to
TMR
and the upper display will show
the current countdown time.
To specify the countdown start time
1. Enter the Countdown Timer Mode.
• If a countdown is in progress (indicated by the seconds counting
down), press
E
to stop it and then press
A
to reset to the current
countdown start time.
• If a countdown is paused, press
A
to reset to the current
countdown start time.
2. Hold down
A
until the minute setting of the current countdown start time starts to fl ash. This is the
setting screen.
3. Use
E
(+) and
B
(–) to change the minute.
• You can set a countdown start time from 1 to 60 minutes, in one minute increments.
4. Press
A
to exit the setting screen.
Countdown time
(Minutes, seconds)
E-42
To perform a countdown timer operation
E
E E E A
Start Stop (Resume) (Stop) Reset
• Before starting a countdown timer operation, check to make sure that a countdown operation is not
already in progress (indicated by the seconds counting down). If it is, press
E
to stop it and then
A
to reset to the countdown start time.
• An alarm sounds for 10 seconds when the end of the countdown is reached. This alarm will sound in all
modes. The countdown time is reset to its starting value automatically after the alarm sounds.
To stop the alarm
Press any button.
E-43
Using the Alarm
You can set fi ve independent daily alarms. When an alarm is turned on,
an alarm will sound for about 10 seconds each day when the time in the
Timekeeping Mode reaches the preset alarm time. This is true even if the
watch is not in the Timekeeping Mode. One of the daily alarms is a
snooze alarm. The snooze alarm will sound every fi ve minutes up to
seven times or until it is turned off.
You can also turn on an Hourly Time Signal, which will cause the watch
to beep twice every hour on the hour.
To enter the Alarm Mode
Use
D
to select the Alarm Mode as shown on page E-8.
• The mode dial hand will move to
ALM
, the lower display will show the
currently selected alarm number (
AL1
to
AL4
, or
SNZ
), or the hourly
time signal indicator (
SIG
).
• When you enter the Alarm Mode, the data you were viewing when you
last exited the mode appears fi rst.
Alarm number or SIG
Alarm time (Hour : Minutes)
E-44
To set an alarm time
1. In the Alarm Mode, use
E
to scroll through the alarm screens in the lower display until the one you
want to change is shown.
AL1 AL2 AL3
SIG SNZ AL4
2. Hold down
A
until the hour digits of the alarm setting start to fl ash in
the upper display.
• This is the setting screen.
3. Press
D
to move the fl ashing between the hour and minute settings.
4. While a setting is fl ashing, use
E
(+) and
B
(–) to change it.
• When setting the alarm time using the 12-hour format, take care to
set the time correctly as a.m. (no indicator) or p.m. (P indicator).
5. Press
A
to exit the setting screen.
To test the alarm
In the Alarm Mode, hold down
E
to sound the alarm.
l
l
l
l
l
l
l
l
l
l
Alarm ON/OFF indicator
E-45
To turn an alarm and the Hourly Time Signal on and off
1. In the Alarm Mode, use
E
to select an alarm or the Hourly Time Signal.
2. When the alarm or the Hourly Time Signal you want is selected, press
A
to turn it on (
on
) and off (
- -
).
• The alarm on indicator (when any alarm is on), snooze alarm
indicator (when the snooze alarm is on), and the Hourly Time
Signal on indicator (when the Hourly Time Signal is on) are shown
on the lower display in all modes.
To stop the alarm
Press any button.
Hourly time signal on indicator
Alarm on indicator
Snooze alarm indicator
E-46
Illumination
The display of the watch is illuminated for easy reading in the dark. The
auto light turns on illumination automatically when you angle the watch
towards your face.
• Auto light must be enabled (page E-48) for it to operate.
To illuminate the display manually
Press
B
in any mode (except when a fl ashing setting screen is
displayed) to illuminate the display.
• You can use the procedure below to select either 1.5 seconds or three
seconds as the illumination duration. When you press
B
, the display
will remain illuminated for about 1.5 seconds or three seconds,
depending on the current illumination duration setting.
• The above operation illuminates the display regardless of whether auto
light is enabled or disabled.
• Illumination is disabled while confi guring sensor measurement mode
settings, and during bearing sensor calibration.
To change the illumination duration
1. In the Timekeeping Mode, hold down
A
until
ADJ
appears in the lower display.
• When you release
A
(after ADJ appears), SET will be fl ashing in the upper display.
2. Use
D
to cycle through the settings on the lower display until the current illumination duration (
LT1
or
LT3
) is shown.
• See the sequence in step 2 of the procedure under “To change the current time and date settings”
(page E-15) for information about how to scroll through setting screens.
E-47
3. Press
E
to toggle the illumination duration between three seconds (
LT3
displayed) and 1.5 seconds
(
LT1
displayed).
4. After all of the settings are the way you want, press
A
to exit the setting screen.
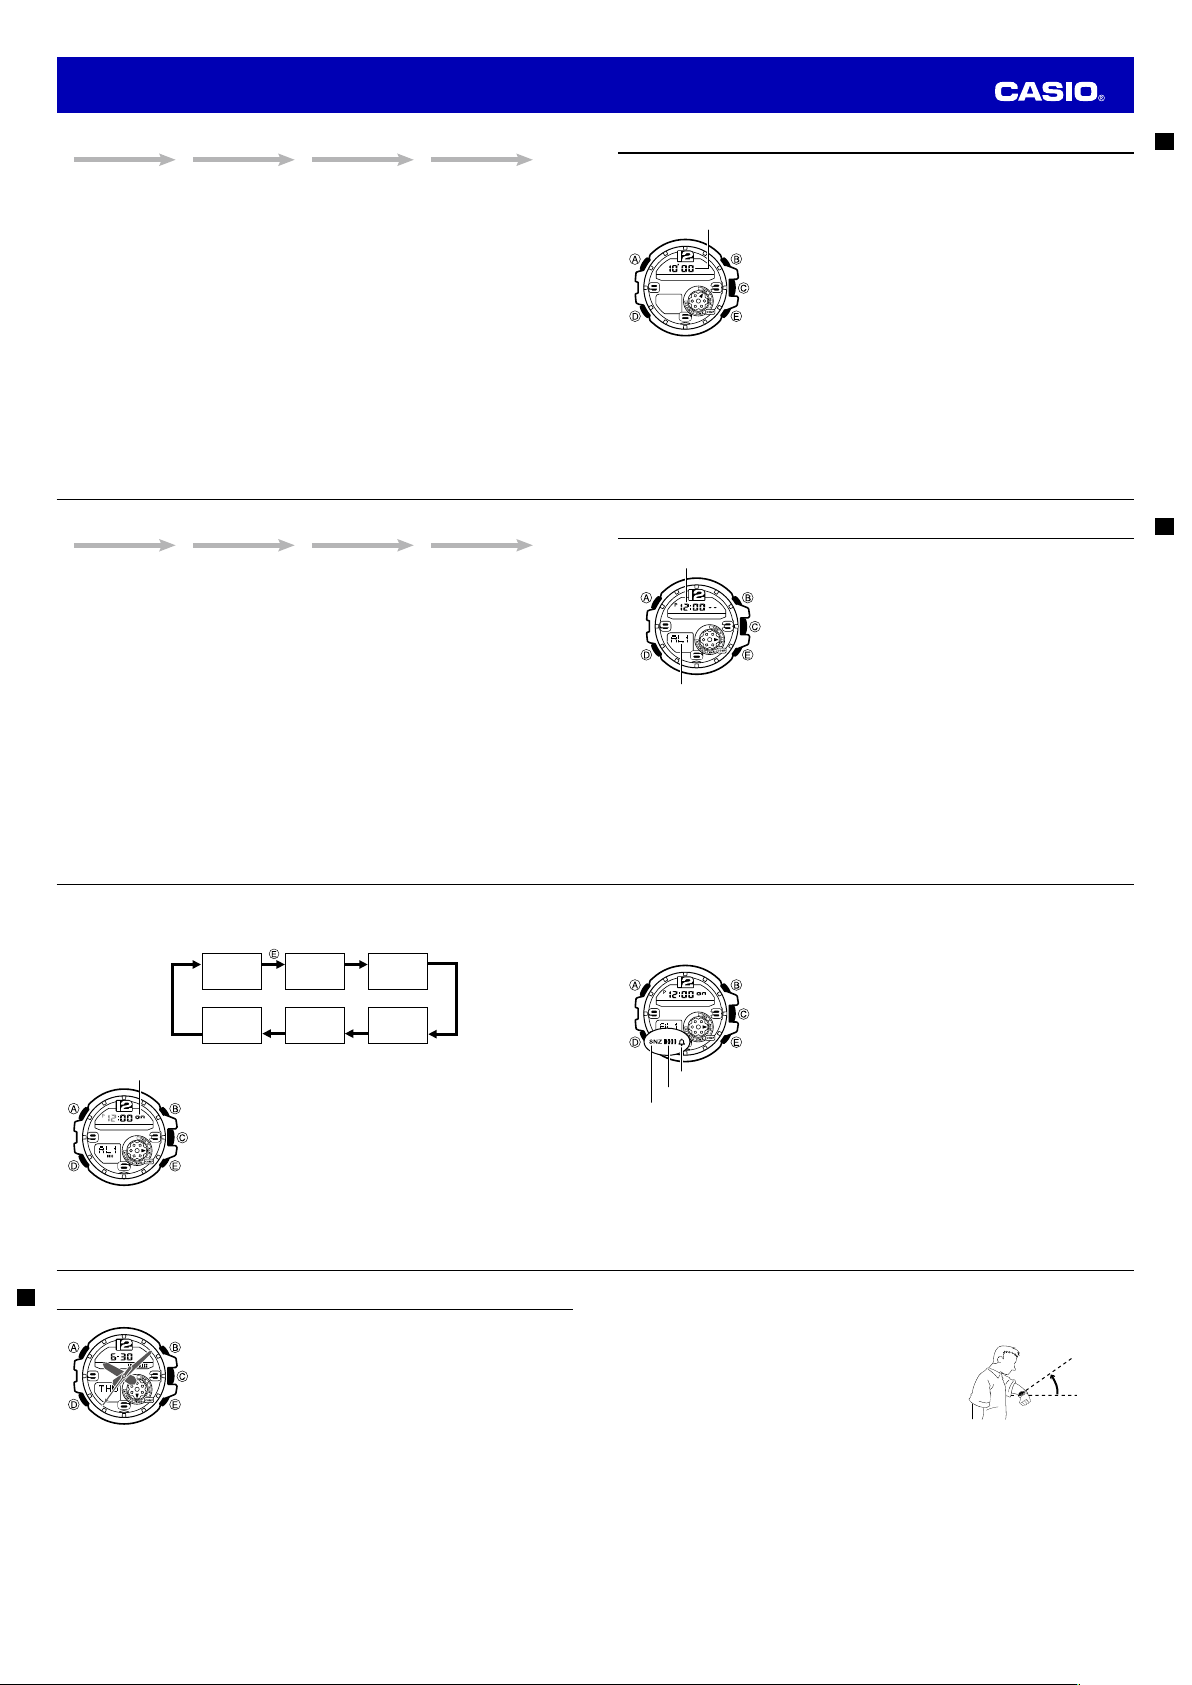
About auto light
While auto light is enabled, illumination will turn on whenever you
position your wrist as described below in any mode.
Moving the watch to a position that is parallel to the ground and
then tilting it towards you more than 40 degrees causes
illumination to turn on.
Warning!
•
Always make sure you are in a safe place whenever you are reading the display of the watch
using auto light. Be especially careful when running or engaged in any other activity that can
result in accident or injury. Also take care that sudden illumination by auto light does not startle
or distract others around you.
•
When you are wearing the watch, make sure that auto light is disabled before riding on a bicycle
or operating a motorcycle or any other motor vehicle. Sudden and unintended operation of auto
light can create a distraction, which can result in a traffi c accident and serious personal injury.
More than
40°
Wear the watch on the
outside of your wrist
Operation Guide 5476
Loading ...
Loading ...