Loading ...
Loading ...
Loading ...
16
SERVICE AND MAINTENANCE
13. If the recoil starter handle is difficult to pull:
a. Remove the three screws (a) that secure the lower panel.
Remove the lower panel by lifting up on the panel to free
the tabs at the bottom of the panel from the tab slots and
then pull back (Figure 25).
b. Remove the spark plug as instructed in your Engine
Operator’s Manual and pull the recoil starter handle
several times to ensure that any oil trapped in the head
is removed.
CAUTION
Oil may come out of the spark plug hole when it is
removed and the recoil starter handle is pulled.
c. Inspect the spark plug as instructed in your Engine
Operator’s Manual. If it is wet, clean off any oil before
re-installing.
d. Re-install the lower panel by placing the tabs in the tab
slots, lifting the panel into place and secure with the
three screws removed in Step a.
REPLACING THE AUGER PADDLES
The snow blower auger’s rubber paddles are subject to wear and
should be replaced if any signs of excessive wear are present.
CAUTION
DO NOT allow the auger’s rubber paddles to wear to the
point where portions of the metal auger itself can come
in contact with the pavement. Doing so can result in
serious damage to your snow blower.
1. Run the snow blower until the fuel tank is empty.
2. Pull the recoil starter handle until resistance is felt. Then tip
the snow blower back until it rests on the handles.
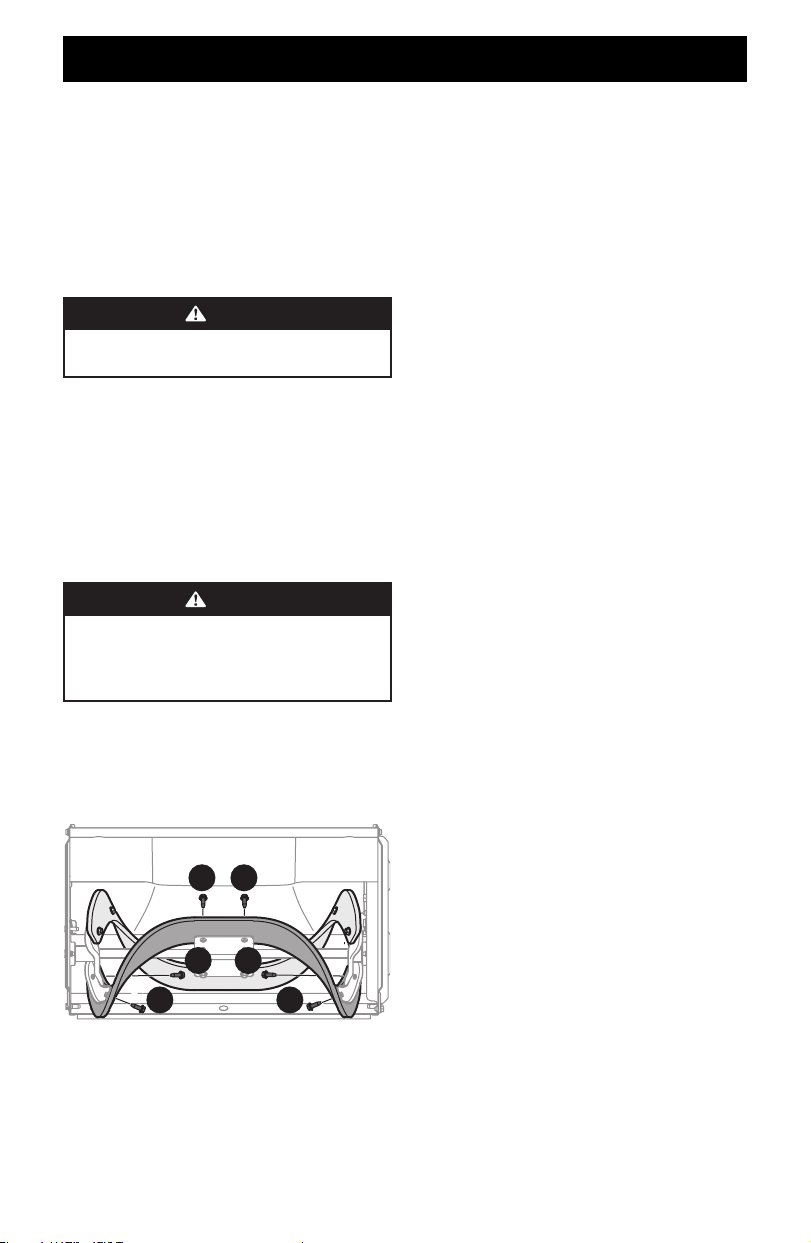
3. Remove the existing rubber paddles by un-threading the hex
washer screws (a) which secure them to the auger (Figure 31).
a a
a a
a a
Figure 31
NOTE: The auger paddles should be replaced one at a time so
that the paddle still attached can be used as an example for
positioning and re-installing the new paddle.
4. Secure the replacement rubber paddles to the auger using
the hex washer screws (a) removed in Step 3.
Replacing Shave Plate
1. The shave plate is attached to the bottom of the auger
housing and is subject to wear. It should be checked
periodically. There are two wearing edges and the shave plate
can be reversed.
2. Run the snow blower until the fuel tank is empty and remove
safety key or disconnect spark plug wire.
3. Pull the recoil starter handle until resistance is felt. Then tip
the snow blower back until it rests on the handles.
4. Remove the four carriage screws (b) and flange lock nuts (a)
which attach it to the snow blower housing (Figure 26).
5. Install the new shave plate, making sure the heads of the
carriage screws (b) are on the inside of the housing.
6. Adjust the shave plate as instructed in Shave Plate on page
14.
7. Tighten securely once adjusted.
Loading ...
Loading ...
Loading ...