
ge.com
PP950
PP980
Owner’s Manual
Cooktop
Electronic Touch Control
49-80423-1 12-06 JR
Safety Instructions . . . . . . . . 2–4
Operating Instructions
Cookware Tips . . . . . . . . . . .10, 11
Dual Surface Element . . . . . . . . 7
Features of Your Cooktop . . . . . .5
Kitchen Timer . . . . . . . . . . . . . . .9
Locking the Cooktop . . . . . . . . .9
Pan Detection Feature . . . . . . . . .9
Pan Sizing Feature . . . . . . . . . . . .9
Surface Elements . . . . . . . . . . 6–9
Warmer Surface Element . . . . . .7
Care and Cleaning
Control Lock Pad . . . . . . . . . . . 13
Glass Cooktop . . . . . . . . . . . 13, 14
Packaging Tape . . . . . . . . . . . . . 12
Troubleshooting Tips . . . . 15, 16
Consumer Support
Consumer Support . . . . . . . . . . 20
Product Registration . . . . . . 17, 18
Warranty . . . . . . . . . . . . . . . . . . 19
Write the model and serial
numbers here:
Model
# ______________
Serial # ______________
You can find them on a label
under the cooktop.

IMPORTANT SAFETY INFORMATION.
READ ALL INSTRUCTIONS BEFORE USING.
WARNING!
For your safety, the information in this manual must be followed to minimize the risk of fire or
explosion, electric shock, or to prevent property damage, personal injury, or loss of life.
When using electrical appliances, basic safety precautions should be followed, including
the following:
■ Use this appliance only for its intended use as
described in this manual.
■ Do not attempt to repair or replace any
part of your cooktop unless it is specifically
recommended in this manual. All other
servicing should be referred to a qualified
technician.
■ Before performing any service, disconnect
the cooktop power supply at the household
distribution panel by removing the fuse or
switching off the circuit breaker.
■ Be sure your appliance is properly installed
and grounded by a qualified technician in
accordance with the provided installation
instructions. This appliance must be supplied
with the proper voltage and frequency, and
connected to an individual, properly grounded
branch circuit, protected by a circuit breaker
or fuse acceptable for the indicated wattage
on the name plate.
■ Have the installer show you the location
of the circuit breaker or fuse. Mark it for easy
reference.
■ Do not leave children alone—children
should not be left alone or unattended in an
area where an appliance is in use. They should
never be allowed to sit or stand on any part of
the appliance.
■ Teach children not to play with the controls or
any other part of the cooktop.
■ Do not allow anyone to climb, stand or hang on
the cooktop.
■
CAUTION: Items of interest to children
should not be stored in cabinets above a
cooktop—children climbing on the cooktop
to reach items could be seriously injured.
■ Always keep combustible wall coverings,
curtains or drapes a safe distance from
your cooktop.
■ Always keep dish towels, dishcloths, pot holders
and other linens a safe distance away from your
cooktop.
■ Always keep wooden and plastic utensils and
canned food a safe distance away from your
cooktop. They may become hot and could
cause burns.
■ Never wear loose-fitting or hanging garments
while using the appliance. Flammable material
could be ignited if brought in contact with hot
surface elements and may cause severe burns.
■ Use only dry pot holders—moist or damp pot
holders on hot surfaces may result in burns
from steam. Do not let pot holders touch hot
surface elements. Do not use a towel or other
bulky cloth. Such cloths can catch fire on a
hot surface element.
■ Do not use water on grease fires. Never pick up
a flaming pan. Turn the controls off. Smother
a flaming pan on a surface element by covering
the pan completely with a well-fitting lid, cookie
sheet or flat tray. Use a multi-purpose dry
chemical or foam-type extinguisher.
■ Flaming grease outside a pan can be put out
by covering with baking soda or, if available,
using a multi-purpose dry chemical or
foam-type fire extinguisher.
■ When preparing flaming foods under the hood,
turn the fan on.
SAFETY PRECAUTIONS
COOK MEAT AND POULTRY THOROUGHLY…
Cook meat and poultry thoroughly—meat to at least an INTERNAL temperature of 160°F and poultry
to at least an INTERNAL temperature of 180°F. Cooking to these temperatures usually protects against
foodborne illness.
2
Safety Instructions
Operating Instructions
Care and CleaningTroubleshooting TipsConsumer Support
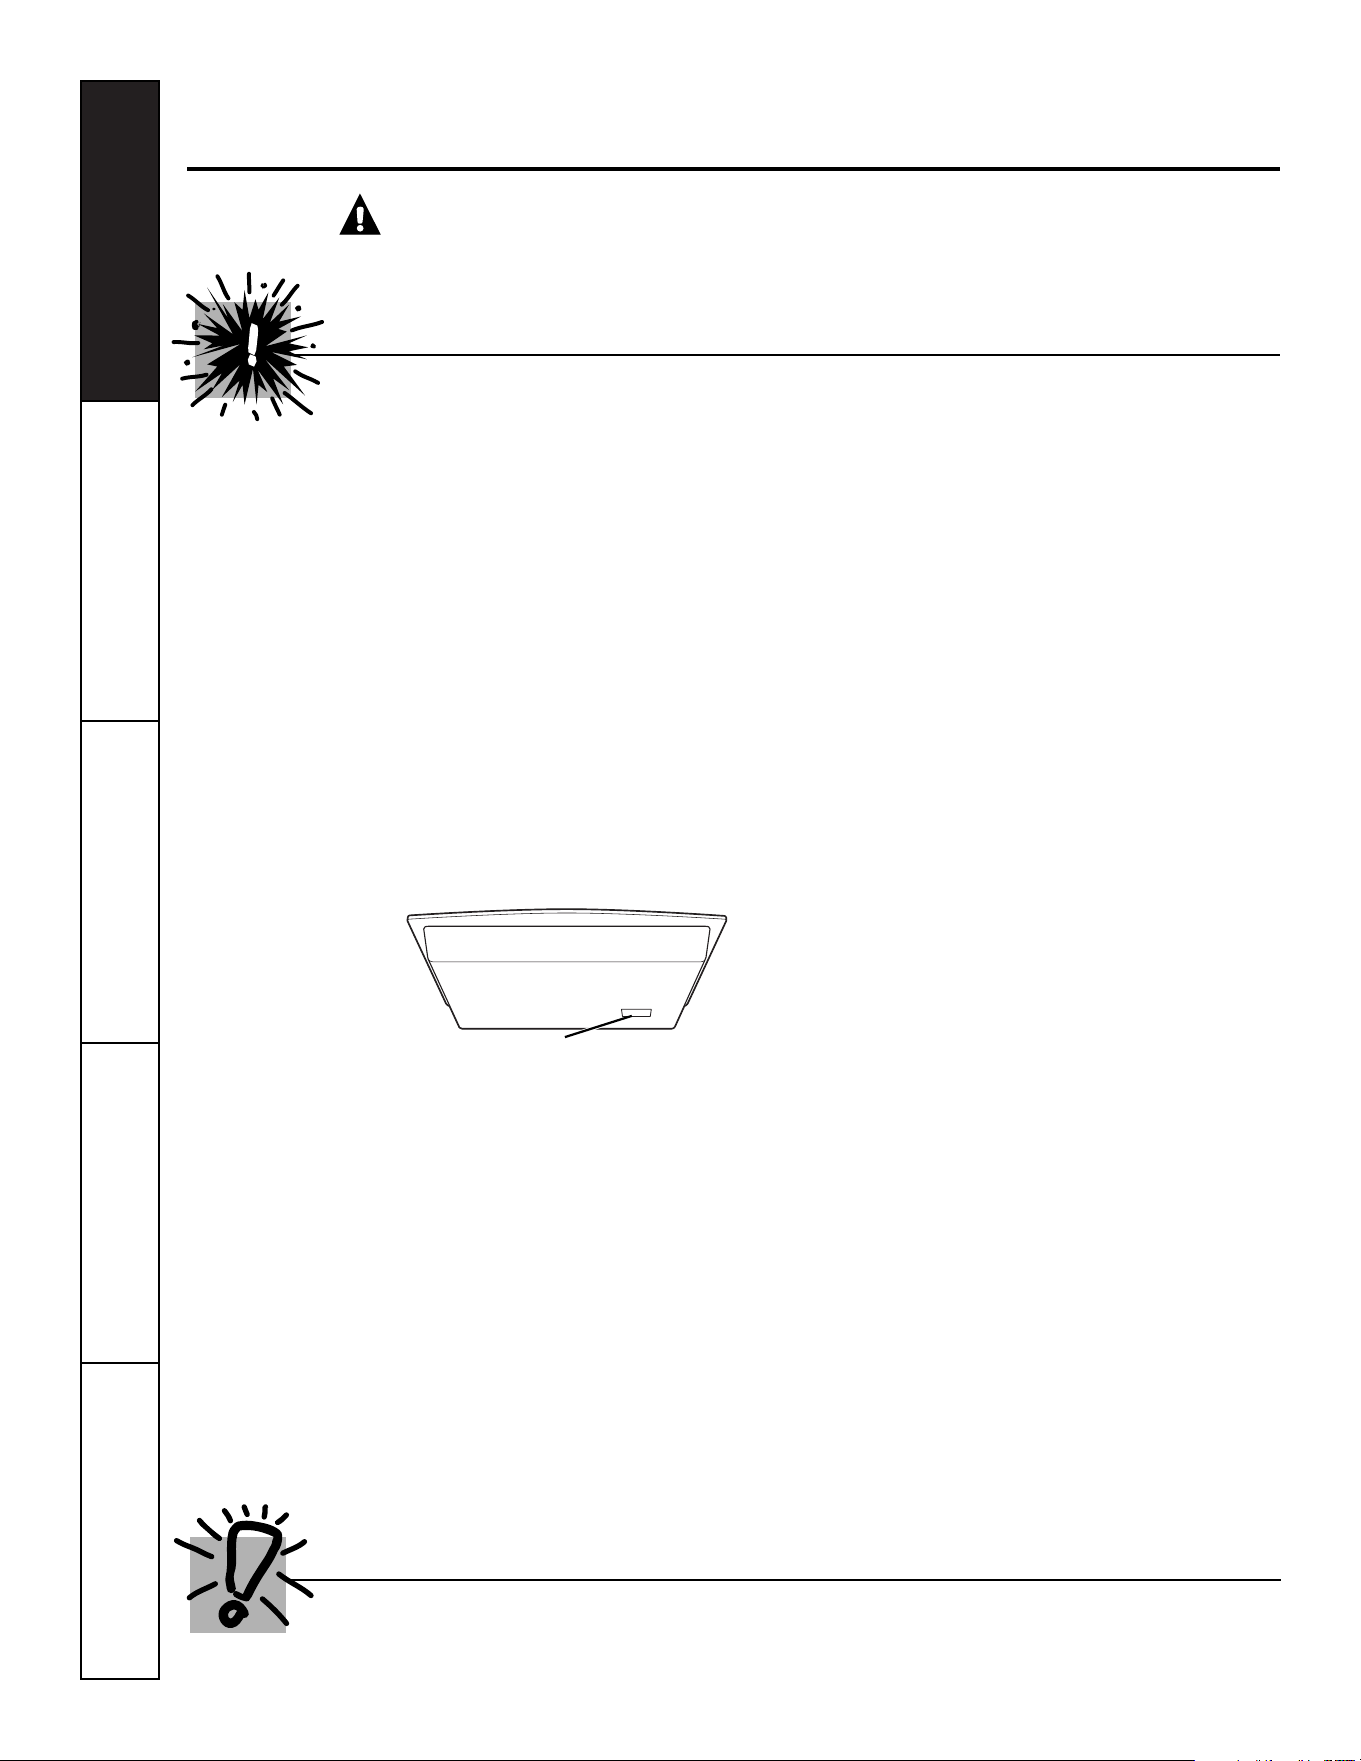
Name plate location
Safety Instructions Operating Instructions Care and Cleaning Troubleshooting Tips
Consumer Support
3
ge.com
■ Do not touch glass ceramic surface
elements while cooking. This surface may
be hot enough to burn even though it may
appear dark in color. During and after use,
do not touch, or let clothing or other
flammable materials contact the cooking
surface. Note the hot indicator lights and
allow sufficient time for cooling first.
■ Hot surfaces may include both the cooktop
and areas facing the cooktop.
■ To minimize the possibility of burns,
ignition of flammable materials and
spillage, the handle of a container should
be turned toward the center of the
cooktop without extending over any
nearby surface elements.
■ Always turn off the surface element control
before removing the cookware.
■ Use proper pan size—select cookware
having flat bottoms large enough to cover
the surface element heating element. The
use of undersized cookware will expose a
portion of the surface element to direct
contact and may result in ignition of
clothing. Proper relationship of cookware
to surface element will also improve
efficiency.
■ Never leave surface elements unattended
at high heat settings. Boilovers that cause
smoking and greasy spillovers may ignite.
■ Glass and ceramic cookware is not
recommended for use with your radiant
ceramic glass cooktop.
■ Keep an eye on foods being fried at high
or medium-high heat settings.
■ Foods for frying should be as dry as
possible. Frost on frozen foods or moisture
on fresh foods can cause hot fat to bubble
up and over the sides of the pan.
■ Avoid placing any objects on or near the
keypads in order to prevent accidental
activation of the cooktop controls.
■ Use little fat for effective shallow or
deep-fat frying. Filling the pan too full of
fat can cause spillovers when food is added.
■ If a combination of oils or fats will be used
in frying, stir together before heating, or as
fats melt slowly.
■ Always heat fat slowly, and watch as it heats.
■ Use a deep-fat thermometer whenever
possible to prevent overheating fat beyond
the smoking point.
■ Never try to move a pan of hot fat,
especially a deep-fat fryer. Wait until the fat
is cool.
■ Do not store flammable materials near
the cooktop.
■ Keep the hood and grease filters clean to
maintain good venting and to avoid grease
fires.
■ Do not store or use combustible materials,
gasoline or other flammable vapors and
liquids in the vicinity of this or any
appliance.
■ Clean only parts listed in this Owner’s
Manual.
■ Do not leave paper products, cooking
utensils or food on the cooktop when not
in use.
■ Keep cooktop clean and free of
accumulation of grease or spillovers
which may ignite.
■ Never heat unopened food containers.
Pressure buildup may make container
burst and cause injury.
■ Never leave jars or cans of fat drippings
on or near your cooktop.
■ Never use your appliance for warming or
heating the room.
WARNING!
SAFETY PRECAUTIONS
IMPORTANT SAFETY INFORMATION.
READ ALL INSTRUCTIONS BEFORE USING.
READ AND FOLLOW THIS SAFETY INFORMATION CAREFULLY.
SAVE THESE INSTRUCTIONS
Use care when touching the cooktop. The glass surface of the cooktop will retain heat after the
controls have been turned off.
RADIANT SURFACE ELEMENTS
■ Avoid scratching the glass cooktop.
The cooktop can be scratched with items
such as sharp instruments, rings or other
jewelry.
■ Never use the glass cooktop surface as a
cutting board.
■ Do not place or store items on top of the
glass cooktop surface when it is not in use.
■ Be careful when placing spoons or other
stirring utensils on glass cooktop surface
when it is in use. They may become hot
and could cause burns.
■ Avoid heating an empty pan. Doing so may
damage the cooktop and the pan.
■ Do not allow water, other liquids or grease
to remain on the cooktop.
■ Do not operate the glass surface elements
if the glass is broken. Spillovers or cleaning
solution may penetrate a broken cooktop
and create a risk of electrical shock.
Contact a qualified technician immediately
should your glass cooktop become broken.
■ Spilled or burnt-on foods may cause
accidental activation or deactivation of the
keypad. Clean the keypad thoroughly, and
controls will resume normal operation.
■ To prevent accidental activation of the
cooktop, do not place any objects on or
near the keypad.
■ Clean the cooktop with caution. Always
lock the control panel using the control
lock feature and wait until the entire glass
surface is cool before attempting to clean
the cooktop. See the Locking the Cooktop
section for details. If a wet sponge or cloth
is used to wipe spills on a hot surface
element, be careful to avoid steam burns.
Some cleansers can produce noxious
fumes if applied to a hot surface.
■ NOTE: We recommend that you avoid
wiping any surface element areas until they
have cooled and the indicator light has
gone off. Sugar spills are the exception to
this. Please see the Cleaning the glass
cooktop section.
■ To avoid possible damage to the cooking
surface, do not apply the cleaning cream
to the glass surface when it is hot.
■ After cleaning, use a dry cloth or paper
towel to remove all the cleaning cream
residue.
■ Read and follow all instructions and
warnings on the cleaning cream labels.
■ Large scratches or impacts to cooktops can
lead to broken or shattered glass.
■ Use care when touching the cooktop. The
glass surface of the cooktop will retain heat
after the controls have been turned OFF.
■ Do not stand on the glass cooktop.
4
Safety Instructions
Operating Instructions
Care and CleaningTroubleshooting TipsConsumer Support
WARNING!
5
Safety Instructions Operating Instructions Care and Cleaning Troubleshooting Tips
Consumer Support
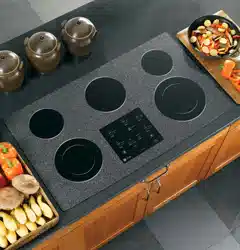
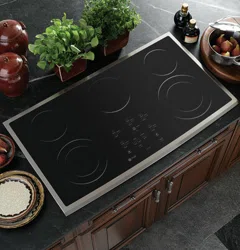
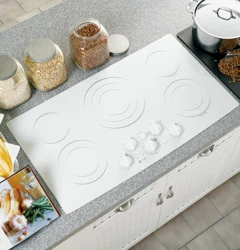
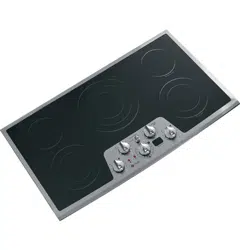
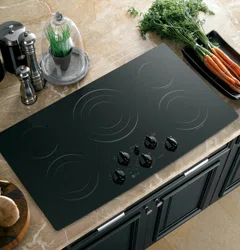
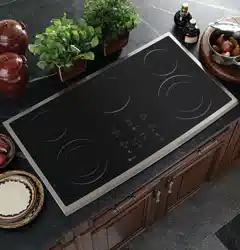
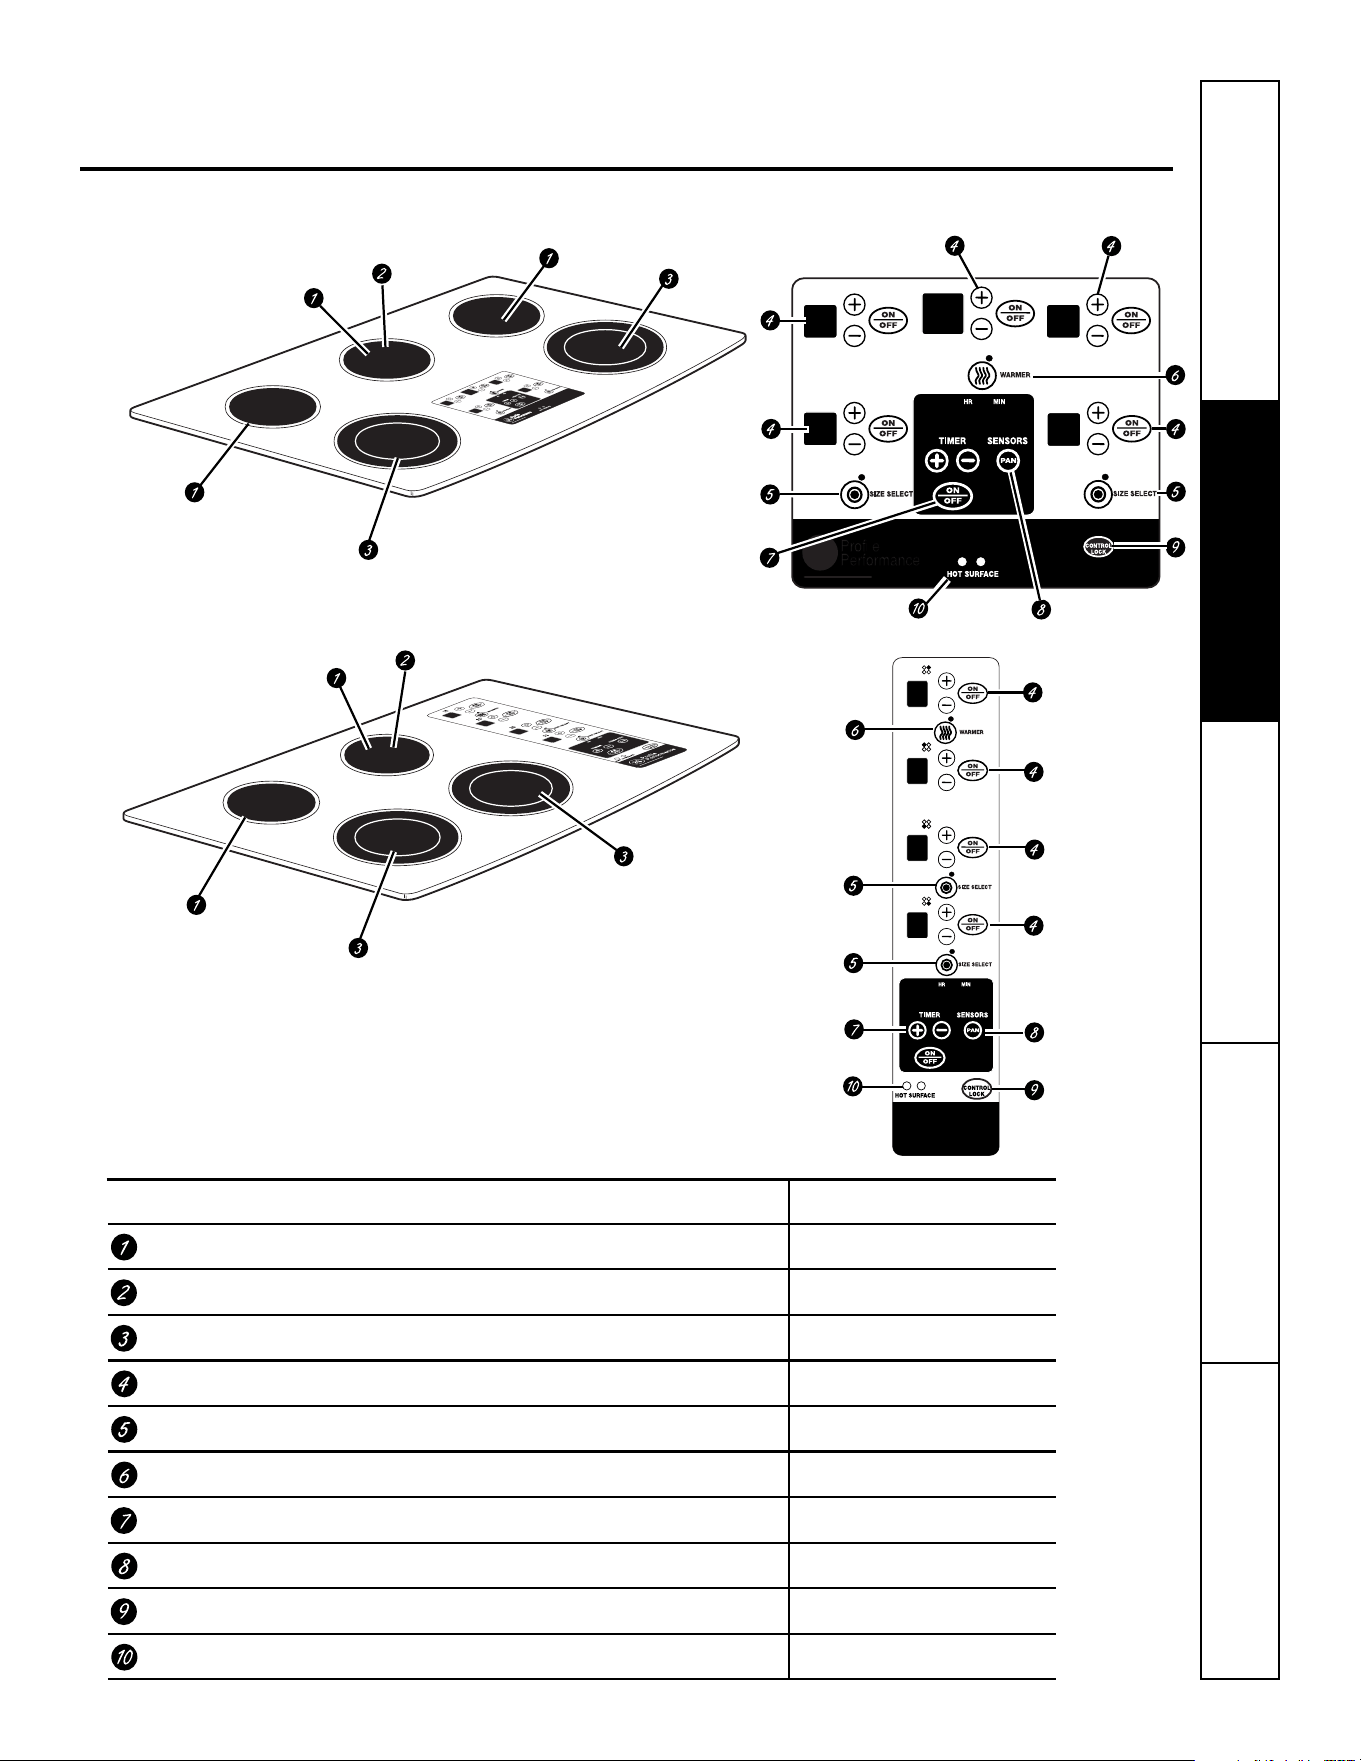
Features of your cooktop. ge.com
Throughout this manual, features and appearance may vary from your model.
Feature Index (Features and appearances may vary.) Explained on page
Single Surface Element 6
Warmer Surface Element 8
Dual Surface Element 7
Single Surface Element Control Pad 6
Dual Surface Element Control Pad 7
Warmer Surface Element Control Pad 8
Kitchen Timer Control Pad 9
Pan Sensor Control Pad 9
Control Lock Pad 9
Hot Surface Indicator Lights (one for each surface element) 9
PP980
PP950
Using the surface elements.
Your new Profile Cooktop makes an eloquent statement of style, convenience, and kitchen planning flexibility. Whether you
chose it for its purity of design, assiduous attention to detail, or for both of these reasons—you’ll find that your Profile
cooktop’s superior blend of form and function will delight you for years to come.
This cooktop contains several new features such as pan detection and pan sizing. The touch controls give you precise
control of the surface elements. You can quickly switch between a steady low heat and full power or any setting in
between. The information on the following pages will help you operate and maintain your cooktop properly.
NOTE: Throughout this manual, features and appearance may vary from your model.
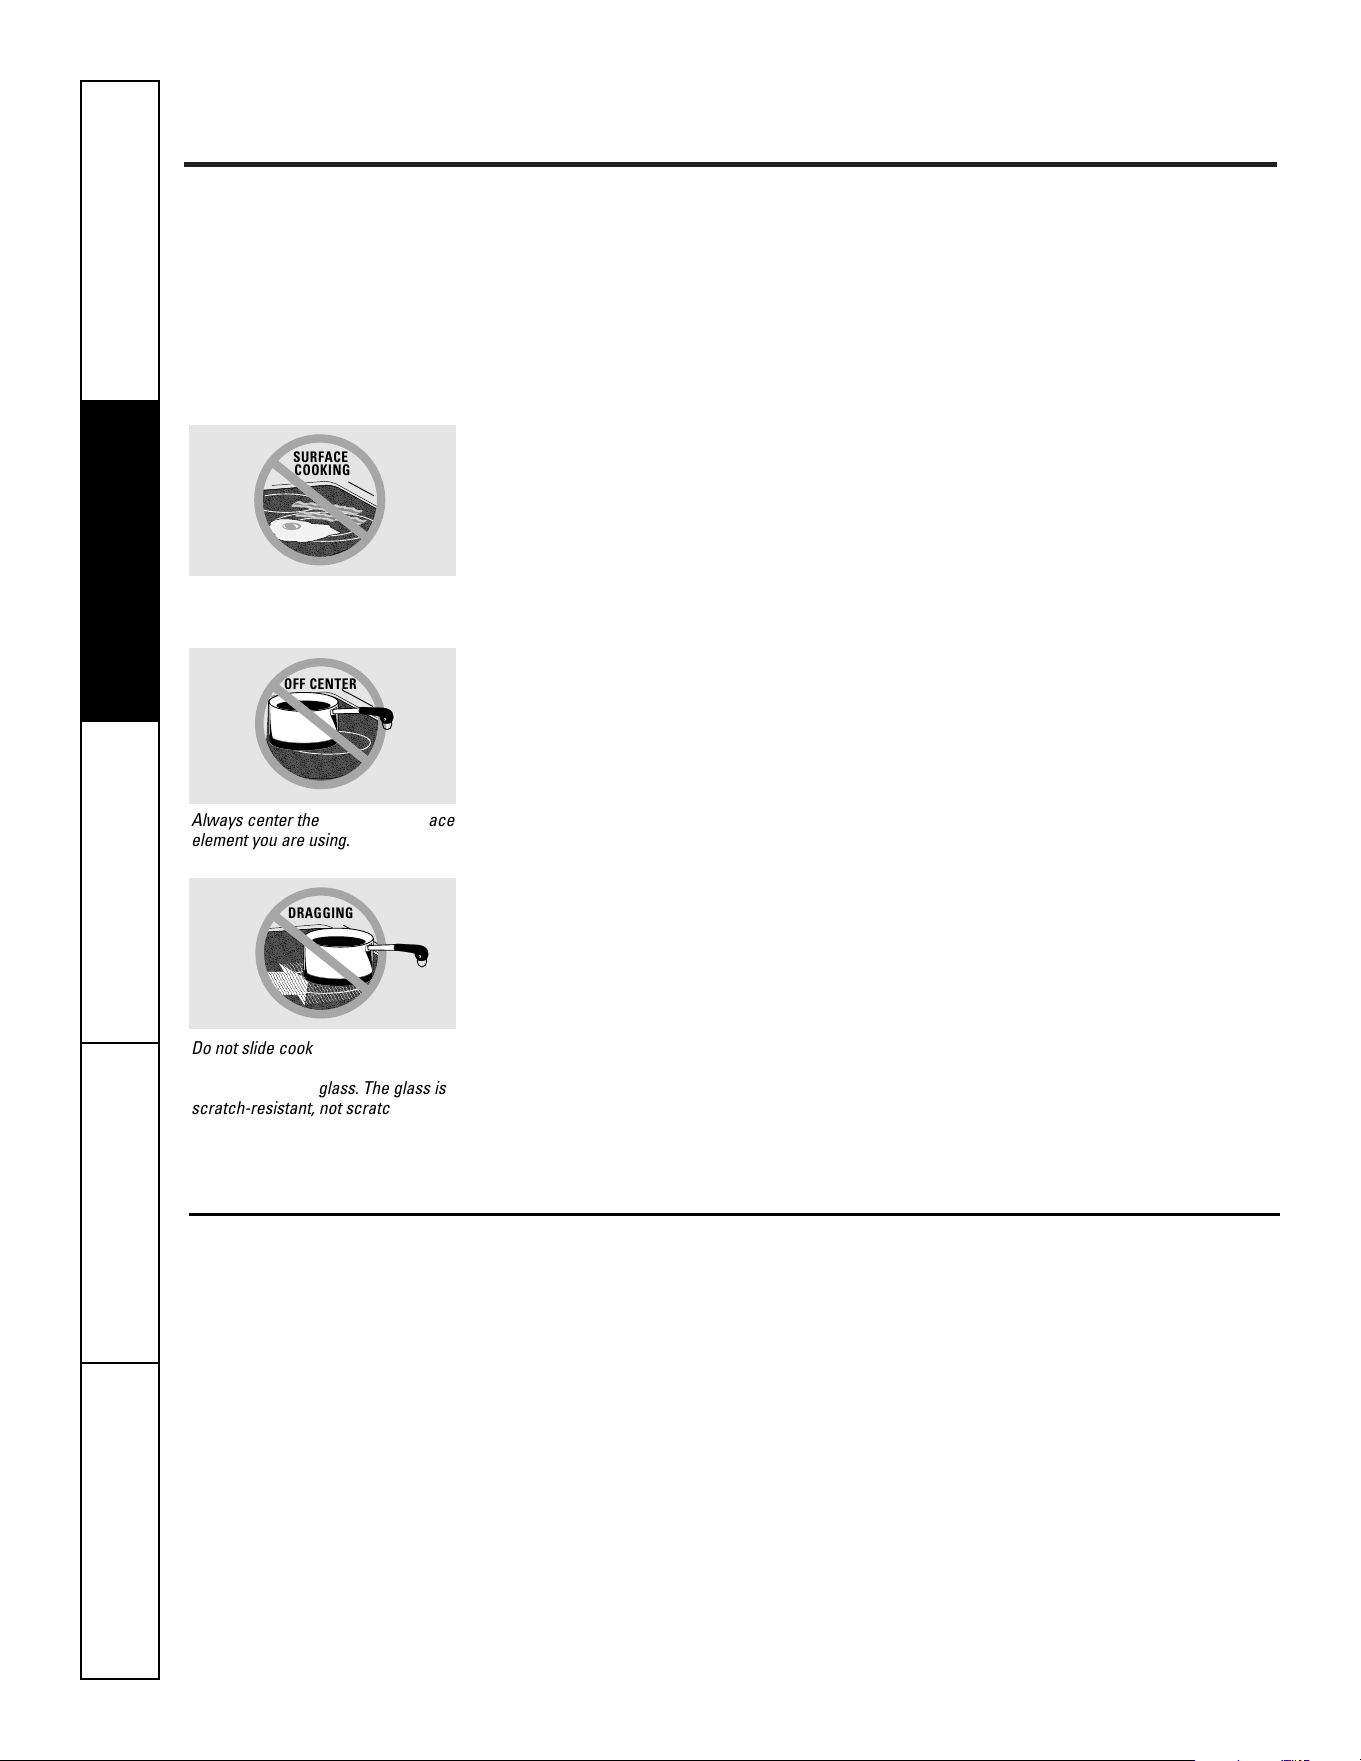
Never cook directly on the glass.
Always use cookware.
About the radiant surface elements…
The radiant cooktop features heating
elements beneath a smooth glass surface.
Cooktop temperatures increase with
the number of surface elements that
are on. With 3 or 4 elements turned on,
cooktop temperatures are high. Always
use caution when touching it.
The indicator lights will come on next
to the Warmer and Dual burners when
activated. Lights also activate for the Pan
Detect and Control Lock features when
they are turned on. The indicator lights
will go off when the surface element or
feature is turned off.
The appropriate HOT SURFACE indicator
light will glow when its corresponding
radiant element is turned on and will
remain on until the surface has cooled
to approximately 150°F.
NOTE:
Hot surface indicator light will:
■ Come on when the surface element is
turned on.
■ Stay on even after the element is turned off.
■ Glow brightly until the element has cooled
below 150°F.
NOTE: A slight odor is normal when a new
cooktop is used for the first time. It is caused by
the heating of new parts and insulating materials
and will disappear in a short time.
It is safe to place hot cookware (from
the oven or surface) on the glass cooktop
when the surface is cool. Never place
cookware on the control area.
Even after the surface elements are
turned off, the glass cooktop retains
enough heat to continue cooking. To
avoid overcooking, remove pans from
the surface elements when the food is
cooked. Avoid placing utensils that could
become hot or plastics that could melt
on the surface element until it has cooled
completely.
■ Water stains (mineral deposits) are removable
using the cleaning cream or full strength white
vinegar.
■ Use of window cleaner may leave an
iridescent film on the cooktop. The cleaning
cream will remove this discoloration.
■ Don’t store heavy items above the cooktop.
If they drop onto the cooktop, they can cause
damage.
■ Do not use the surface as a cutting board.
;;;;
;
;;;
;
;;
;
;;;;;;;;
;
;;
;;;
;
;;
;
;;
;
;;;;;
;
;
;
;;
SURFACE
COOKING
;;;;
;
;
;
;;
;
;
;
;;;
;;;;;;
;
;
;
;
;;
;
;;
;
;;;;
;
;
;;
;
;
;;
;
;
;
;
;
;
;
OFF CENTER
Always center the pan on the surface
element you are using.
;;
;;
;
;;
;;;;
;
;;
;
;
;;;;;
;;
;;
;
;
;;
;;;;
;
;
;;
;
;
;;
;
;
;
;
;;
;
DRAGGING
Do not slide cookware across the
control or cooktop surface because
it can scratch the glass. The glass is
scratch-resistant, not scratchproof.
Radiant Surface Elements
The controls for the radiant surface
elements allow for 11 different heat
settings: Low, 1–9 and High. The heating
element may not visibly glow at low heat
settings.
The surface heating element will cycle on
and off to maintain your selected control
setting.
Each radiant surface element has a
temperature limiter which protects the
glass cooktop from getting too hot.
NOTE: This cooktop has a rapid heat-up feature.
■ If the cooktop is cool when turned on, it will
glow red for a short period of time until the
desired power setting is reached.
■ If the cooktop is already warm, the rapid
heat-up feature may not activate.
6
Safety Instructions
Operating Instructions
Care and CleaningTroubleshooting TipsConsumer Support
To turn on the warmer surface element:
Touch the ON/OFF pad, then touch
the WARMER pad. The surface
element will turn on to warmer
power setting W1 (low).
Use the (+)/(-) pad to choose
additional settings of W2(medium)
and W3 (high).
To turn off the warmer power settings,
touch the ON/OFF pad. To change from
the warmer settings to regular cooking
settings, press the WARMER pad. The
surface element will be on power setting
L (low). The surface element may then
be set to the desired setting using the
(+)/(-) pads. To turn off the surface
element, touch the ON/OFF pad again.
Food Type Control Setting
Breads/Pastries W1 (LOW)
Sauces W2 (Medium)
Soups (cream) W2 (Medium)
Stews W2 (Medium)
Vegetables W2 (Medium)
Hot Beverages W3 (HIGH)
Soups (liquid) W3 (HIGH)
The chart above shows initial suggested settings
only. The temperature, type and amount of food,
and the time held will affect the quality of the
food.
CAUTION: Do not warm food on the WARMER
for more than two hours.
Do not use plastic wrap to cover food. Plastic
may melt onto the surface and be very difficult
to remove.
Use only cookware recommended for top-of-range
cooking.
The WARMER will keep hot, cooked food
at serving temperature. Always start with
hot food. Do not use to heat cold food.
Placing uncooked or cold food on surface
warmer could result in foodborne illness.
For best results, all food on the
WARMER should be covered with a lid or
aluminum foil. When warming pastries
or breads, the cover should be vented to
allow moisture to escape.
Always use potholders or oven mitts when
removing food from the WARMER as
cookware and plates will be hot.
A hot surface indicator light will glow
when the glass surface is hot and will
remain on until the surface has cooled
below 150°F.
ON
OFF
OR
To turn on a single surface element:
Touch the ON/OFF pad, then touch
the (+)/(-) pad.
Use the (+)/(-) pad to choose the
desired power setting. The control
will beep each time a pad is touched.
To turn off a single surface element,
touch the ON/OFF pad again.
Single Surface Element
ge.com
7
Safety Instructions Operating Instructions Care and Cleaning Troubleshooting Tips
Consumer Support
Dual Surface Element
The dual surface element has a pan
sizing sensor which will automatically set
the small or large surface element to
match the size of your pan (see the Using
Pan Sizing section). To override the
automatic pan sizing sensor and select
the small or large surface element:
Touch the dual surface element
ON/OFF pad.
Use the (+)/(-) pad to set the desired
power setting.
Touch the SIZE SELECT pad once to
turn on the large surface element.
Touch the pad again to turn on the
small surface element.
When the indicator light next to the
SIZE SELECT pad is on, the large surface
element is on. When it is off, the small
surface element is on.
To turn the dual surface element off,
touch the ON/OFF pad.
ON
OFF
OR
SIZE SELECT
Warmer Surface Element
ON
OFF
OR
WARMER

Using the surface elements.
8
Safety Instructions
Operating Instructions
Care and CleaningTroubleshooting TipsConsumer Support
If an error occurs in the control
operation, a fault code will flash “F”
with a number in the display and the
control will produce an audible sound.
To correct:
Touch the CONTROL LOCK pad to
reset the control.
Attempt to set the control to the
desired cooking setting.
If the fault code is not cleared, allow
the cooktop to cool completely.
After cooling, touch the CONTROL
LOCK pad again to reset the control.
Again attempt to set the control to
the desired cooking setting.
If the fault code is still not cleared,
turn off the cooktop power at the
circuit breaker or fuse box for one
minute.
If the fault code reappears, call for
service.
Fault Code (“F” and a number in the display)

This feature is only used on the dual
surface element when the pan detection
feature is enabled. When a small pan is
placed on the surface element, the small
surface element will activate. When a pan
larger than 6.0 inches is placed on the
surface element, the large surface
element will automatically activate. This
feature may be overridden for a single
cooking session while leaving the pan
detection feature active (see Dual Surface
Element section).
To turn off this feature and the pan detection
feature:
Touch the PAN pad.
The light next to the pad will go out,
indicating that pan features are turned off.
NOTE: The pan must be centered over the
surface element for this feature to work properly.
This feature automatically turns off a
surface element after 60 seconds if a pan
is absent from the surface element. The
power level display will flash until the
surface element automatically turns off
when the control detects the absence
of a pan.
To activate and deactivate pan detection for
all surface elements:
Touch the PAN pad. (At least one surface
element must be on.) The display will
flash “PAN ON” when the pan detection
feature is on.
A signal will sound and a light next to
the PAN pad will indicate whether the
feature is active. If the light is on, pan
detection is on, and if the light is off,
pan detection is off. When the pan
detection feature is disabled, the pan
sizing feature is also disabled.
NOTES:
■ For this feature to work properly, the
pan diameter must be greater than 4.0
inches and centered on the surface
element.
■ This feature may not operate properly
with rounded, curved or warped pan
bottoms (see the Types of Cookware
section).
■ This feature will not work with
glass-ceramic/stoneware cookware
(see the Types of Cookware section).
9
Safety Instructions Operating Instructions Care and Cleaning Troubleshooting Tips
Consumer Support
How to Lock the Cooktop
IMPORTANT: As a convenience, you
can lock the entire cooktop at any time
when it is not in use or before cleaning.
Locking the cooktop will prevent surface
elements from being turned on
accidentally.
To lock the cooktop:
Touch and hold the CONTROL LOCK pad
for 3 seconds.
A two-beep signal will sound, the word
“LOCK” will appear in the TIMER display,
and the Control Lock light will turn on,
indicating that the cooktop is locked.
If the cooktop is locked while the surface
elements or timer are in use, they will
automatically turn off.
To unlock:
Touch and hold the CONTROL LOCK pad
again for 3 seconds.
A two-beep signal will sound, and the
Control Lock light will go out, indicating
that the cooktop is unlocked.
CONTROL
LOCK
CONTROL
LOCK
How to Operate the Kitchen Timer
NOTE: The kitchen timer will NOT turn off the
surface elements when the time reaches 00:00.
To operate the kitchen timer, use the
pads below the TIMER display.
Touch the ON/OFF pad and then
touch the (+)/(-) pad to choose the
desired time setting. If the (+)/(-) pad is
held for several seconds, the timer will
increase or decrease at a faster rate.
After you have chosen your desired time,
the timer will automatically start to count
down from the hours/minutes that you
have selected. After the timer counts
down to the last minute, it will count
down in seconds until 00:00. After the
time has run out, the control will beep
twice every five seconds until the timer is
turned off. Touch the ON/OFF pad to turn
the timer off.
ON
OFF
OR
TIMER
Using the Pan Detection Feature
PAN
Using Pan Sizing
PAN
ge.com
10
Safety Instructions
Operating Instructions
Care and CleaningTroubleshooting TipsConsumer Support
Selecting types of cookware.
The following information will help you choose cookware which will give good performance on glass cooktops.
Stainless Steel:
recommended
Aluminum:
heavyweight recommended
Good conductivity. Aluminum residue
sometimes appears as scratches on the
cooktop but can be removed if cleaned
immediately. Because of its low melting
point, thin weight aluminum should not
be used.
Copper:
recommended
Copper Bottoms:
usable, but not recommended
Pans with copper bottoms may leave
residue appearing as scratches. Remove
any residue immediately after use. Do not
let a pot boil dry. Overheated metal can
bond to the glass cooktop and leave a
permanent stain if it is not removed
immediately.
Porcelain Enamel-Covered Cast Iron:
recommended
As long as the cookware is covered
completely with porcelain enamel, this
cookware is recommended. Caution is
recommended for cast-iron cookware
that is not completely covered with
smooth porcelain enamel, since it may
scratch the glass ceramic cooktop.
Glass-Ceramic/Stoneware:
not recommended
Poor performance. May scratch the
surface.
NOTE: Use pans that match the diameter
of the surface element. Cooking performance
will not be as good if the cookware is either
smaller or larger than the surface element.
Check pans for flat bottoms by
using a straight edge.
Pans with rounded, curved,
ridged or warped bottoms are not
recommended. Pan Detection/Sizing
may not work properly with these
types of pans.
For Best Results
■ Place only dry pans on the surface
elements. Do not place lids on the
surface elements, particularly wet lids.
■ Do not use woks that have support
rings. This type of wok will not heat on
glass surface elements.
■ Use only a flat-bottomed wok,
available from many popular cookware
manufacturers. The bottom of the wok
should have the same diameter as the
surface element to insure proper
contact.
■ Some special cooking procedures
require specific cookware such as
pressure cookers, deep-fat fryers, etc.
All cookware must have flat bottoms
that match the size of the surface
elements.
Do not place wet pans
on the glass cooktop.
Do not use woks with support
rings on the glass cooktop.
Use flat-bottomed woks
on the glass cooktop.
Pan Detection/Sizing will work properly with these types of cookware.
Pan Detection/Sizing will not work with these types of pans.
PAN
PAN
PAN
PAN
PAN
PAN
x
PAN
PAN
x

11
Note: Flat-bottomed canners are
required for glass cooktops.
When canning with water-bath or
pressure canner, larger-diameter pots
may be used. This is because boiling
water temperatures (even under
pressure) are not harmful to the
cooktop surfaces surrounding the
surface elements.
HOWEVER, DO NOT USE LARGE-
DIAMETER CANNERS OR OTHER
LARGE-DIAMETER POTS FOR
FRYING OR BOILING FOODS
OTHER THAN WATER. Most syrup
or sauce mixtures—and all types of
frying—cook at temperatures much
higher than boiling water. Such
temperatures could eventually harm
the glass cooktop surfaces.
Be sure the canner fits over the
center of the surface element.
If your cooktop or its location
does not allow the canner to be
centered on the surface element,
use smaller-diameter pots for
good canning results.
Flat-bottomed canners must be
used. Do not use canners with
flanged or rippled bottoms (often
found in enamelware) because
they don’t make enough contact
with the surface elements and
take a long time to boil water.
When canning, use recipes
and procedures from reputable
sources. Reliable recipes and
procedures are available from
the manufacturer of your canner;
manufacturers of glass jars for
canning, such as Ball and Kerr
brand; and the United States
Department of Agriculture
Extension Service.
Remember that canning is a
process that generates large
amounts of steam. To avoid burns
from steam or heat, be careful
when canning.
NOTE: If your house has low voltage,
canning may take longer than expected,
even though directions have been
carefully followed. The process
time will be shortened by:
(1) using a pressure canner, and
( 2) starting with HOT tap water for fastest
heating of large quantities of water.
CAUTION:
■ Safe canning requires that harmful
microorganisms are destroyed and
that the jars are sealed completely.
When canning foods in a water-bath
canner, a gentle but steady boil must be
maintained for the required time. When
canning foods in a pressure canner, the
pressure must be maintained for the
required time.
■ After you have adjusted the controls,
it is very important to make sure the
prescribed boil or pressure levels are
maintained for the required time.
■ Since you must make sure to
process the canning jars for the
prescribed time, with no interruption
in processing time, do not can on any
cooktop surface element if your canner
is not flat.
Safety Instructions Operating Instructions Care and Cleaning Troubleshooting Tips
Consumer Support
Observe the Following Points in Canning
Wrong!
Right!
ge.com
12
Safety Instructions
Operating Instructions
Care and CleaningTroubleshooting TipsConsumer Support
Care and cleaning of the cooktop.
Be sure electrical power is off and all surfaces are cool before cleaning any part of the cooktop.
How to Remove Protective Shipping Film and Packaging Tape
Carefully grasp a corner of the protective
shipping film with your fingers and slowly
peel it from the appliance surface. Do
not use any sharp items to remove the
film. Remove all of the film before using
the appliance for the first time.
To assure no damage is done to the
finish of the product, the safest way to
remove the adhesive from packaging tape
on new appliances is an application of a
household liquid dishwashing detergent.
Apply with a soft cloth and allow to soak.
NOTE: The adhesive must be removed from all
parts before using the cooktop. It cannot be
removed if it is baked on.
Allow the cooktop to cool.
Use a single-edge razor blade
scraper at approximately a 45°
angle against the glass surface
and scrape the soil. It will be
necessary to apply pressure to
the razor scraper in order to
remove the residue.
After scraping with the razor
scraper, spread a few drops of
ceramic cooktop cleaner on the
entire burned residue area. Use
the cleaning pad to remove
any remaining residue.
For additional protection,
after all residue has been
removed, polish the entire
surface with ceramic cooktop
cleaner and a paper towel.
Cleaning the glass cooktop. ge.com
Safety Instructions Operating Instructions Care and Cleaning Troubleshooting Tips
Consumer Support
13
Control Lock Pad
As a convenience, you can lock the
entire cooktop at any time when it is
not in use or before cleaning.
Locking the cooktop will prevent
surface elements from being turned
on accidently.
Begin by locking the cooktop; see
the Locking the Cooktop section. Use
the same cleaning methods as those
described for the glass-ceramic top.
CONTROL
LOCK
CONTROL
LOCK
Burned-On Residue
WARNING: DAMAGE to your glass surface
may occur if you use scrub pads other than the
pad included with your cooktop.
Allow the cooktop to cool.
Spread a few drops of ceramic
cooktop cleaner on the entire
burned residue area.
Using the included cleaning
pad for ceramic cooktops, rub the
residue area, applying pressure
as needed.
If any residue remains, repeat the
steps listed above as needed.
For additional protection, after all
residue has been removed, polish
the entire surface with ceramic
cooktop cleaner and a paper towel.
The ceramic cooktop scraper
and all recommended supplies are
available through our Parts Center.
See instructions under “To Order
Parts” section on next page.
NOTE: Do not use a dull or
nicked blade.
Heavy, Burned-On Residue
Use a cleaning pad for ceramic
cooktops.
Normal Daily Use Cleaning
ONLY use ceramic cooktop cleaner on
the glass cooktop. Other creams may not
be as effective.
To maintain and protect the surface of
your glass cooktop, follow these steps:
Before using the cooktop for
the first time, clean it with ceramic
cooktop cleaner. This helps protect
the top and makes cleanup easier.
Daily use of ceramic cooktop
cleaner will help keep the cooktop
looking new.
Shake the cleaning cream well.
Apply a few drops of ceramic
cooktop cleaner directly to the
cooktop.
Use a paper towel or cleaning pad
for ceramic cooktops to clean the
entire cooktop surface.
Use a dry cloth or paper towel
to remove all cleaning residue.
No need to rinse.
NOTE: It is very important that you DO NOT
heat the cooktop until it has been cleaned
thoroughly.
Clean your cooktop after
each spill. Use ceramic
cooktop cleaner.
14
Safety Instructions
Operating Instructions
Care and CleaningTroubleshooting TipsConsumer Support
To order ceramic cooktop cleaner
and the cooktop scraper, please call
our toll-free number:
National Parts Center 800.626.2002
Ceramic Cooktop Cleaner . . .# WX10X300
Ceramic Cooktop Scraper . . .# WX10X0302
Kit . . . . . . . . . . . . . . . . . . . . . . . .# WB64X5027
(Kit includes cream and cooktop scraper)
Cleaning Pads for
Ceramic Cooktops . . . . . . . . .# WX10X350
Turn off all surface elements.
Remove hot pans.
Wearing an oven mitt:
a. Use a single-edge razor blade
scraper (ceramic cooktop
scraper) to move the spill to
a cool area on the cooktop.
b. Remove the spill with
paper towels.
Any remaining spillover should be
left until the surface of the cooktop
has cooled.
Don’t use the surface elements
again until all of the residue has
been completely removed.
NOTE: If pitting or indentation in the glass
surface has already occurred, the cooktop glass
will have to be replaced. In this case, service will
be necessary.
Damage from Sugary Spills and Melted Plastic
Our testing shows that if
you are cooking high sugar
mixtures such as jelly or
fudge and have a spillover,
it can cause permanent
damage to the glass surface
unless the spillover is
immediately removed.
Be careful not to slide pots and
pans across your cooktop. It will
leave metal markings on the
cooktop surface.
These marks are removable using
the ceramic cooktop cleaner with
the cleaning pad for ceramic
cooktops.
If pots with a thin overlay of
aluminum or copper are allowed
to boil dry, the overlay may leave
black discoloration on the cooktop.
This should be removed
immediately before heating
again or the discoloration may
be permanent.
WARNING: Carefully check the bottom of pans
for roughness that would scratch the cooktop.
Metal Marks and Scratches
To Order Parts
Glass surface—potential for permanent damage.
Cleaning the glass cooktop.
15
Safety Instructions Operating Instructions Care and Cleaning Troubleshooting Tips
Consumer Support
Before you call for service…
ge.com
Troubleshooting Tips
Save time and money! Review the charts on the following
pages first and you may not need to call for service.
Problem Possible Causes What To Do
Surface elements will not Improper cookware • Use pans which are absolutely flat and match
maintain a rolling boil being used. the diameter of the surface element selected.
or cooking is slow
Surface elements do Cooktop controls • Check to see the correct control is set for the surface
not work properly improperly set. element you are using.
Scratches on cooktop Incorrect cleaning methods • Use recommended cleaning procedures. See the
glass surface being used. Cleaning the glass cooktop section.
Cookware with rough bottoms • To avoid scratches, use the recommended cleaning
being used or coarse particles procedures. Make sure bottoms of cookware are clean
(salt or sand) were between before use, and use cookware with smooth bottoms.
the cookware and the surface
of the cooktop.
Cookware has been slid
across the cooktop surface.
Areas of discoloration Food spillovers not cleaned • See the Cleaning the glass cooktop section.
on the cooktop before next use.
Hot surface on a model • This is normal. The surface may appear discolored
with a light-colored glass when it is hot. This is temporary and will disappear
cooktop. as the glass cools.
Plastic melted to Hot cooktop came into • See the Glass surface – potential for permanent damage
the surface contact with plastic placed section in the Cleaning the glass cooktop section.
on the hot cooktop.
Pitting (or indentation) Hot sugar mixture spilled • Call a qualified technician for replacement.
of the cooktop on the cooktop.
Frequent cycling Improper cookware • Use only flat cookware to minimize cycling.
off and on of being used. See the Radiant surface elements section.
surface elements
Unresponsive keypad Keypad is dirty. • Clean the keypad.
A fuse in your home may be • Replace the fuse or reset the circuit breaker.
blown or the circuit breaker
tripped.
Pan detection/sizing Improper cookware • Use a flat, metallic pan that is 4.0″ or larger.
not working properly being used.
Pan is improperly placed. • Make sure the pan is centered on the corresponding
surface element.
Cooktop control • Check to see that the control is set properly.
improperly set.
16
Safety Instructions
Operating Instructions
Care and CleaningTroubleshooting TipsConsumer Support
Before you call for service…
Troubleshooting Tips
Problem Possible Causes What To Do
TEMP appears Cooktop too hot and the • Allow the surface element(s) to cool for 1/2 to
in the display time-out feature activated. 1 hour before using again.
Surface element is The rapid heat-up feature • The cooktop has a rapid heat-up feature and is
glowing red when it activated. designed to do this. See the Radiant surface elements
should be on a low section.
power setting
“F” and a number You have a fault code. • Write down the “F” and the number and touch
appear in the display the CONTROL LOCK pad. See the Fault code section.
and the cooktop
produces an audible
sound

General Electric Company
Warranty Registration Department
P.O. Box 32150
Louisville, KY 40232-2150
GE Service Protection Plus
™
GE, a name recognized worldwide for quality and dependability, offers you
Service Protection Plus
™
—comprehensive protection on all your appliances—
No Matter What Brand!
Benefits Include:
• Backed by GE
• All brands covered
• Unlimited service calls
• All parts and labor costs included
• No out-of-pocket expenses
• No hidden deductibles
• One 800 number to call
You will be completely satisfied with our service protection or you may request your money back
on the remaining value of your contract. No questions asked. It’s that simple.
Protect your refrigerator, dishwasher, washer and dryer, range, TV, VCR and much more—any brand!
Plus there’s no extra charge for emergency service and low monthly financing is available. Even icemaker
coverage and food spoilage protection is offered. You can rest easy, knowing that all your valuable
household products are protected against expensive repairs.
Place your confidence in GE and call us in the U.S. toll-free at 800.626.2224
for more information.
*All brands covered, up to 20 years old, in the continental U.S.
We’ll Cover Any Appliance.
Anywhere. Anytime.*
Please place in envelope and mail to:
✁
Cut here
17
18
Consumer Product Ownership Registration
Important
Mail
Today!
GE Consumer & Industrial
Appliances
General Electric Company
Louisville, KY 40225
ge.com
First
Name
Mr. ■■ Ms. ■■ Mrs. ■■ Miss ■■
Street
Address
City
State
Date Placed
In Use
Month
Day
Year
Zip
Code
Apt. #
Last
Name
Phone
Number
_
_
Consumer Product Ownership Registration
Dear Customer:
Thank you for purchasing our product and thank you for placing your confidence in us.
We are proud to have you as a customer!
Follow these three steps to protect your new appliance investment:
Important: If you did not get a registration card with your
product, detach and return the form below to
ensure that your product is registered, or register
online at ge.com.
1
23
Model Number Serial Number
✁
Cut here
Complete and mail
your Consumer
Product Ownership
Registration today.
Have the peace of
mind of knowing we
can contact you in
the unlikely event of
a
safety modification.
After mailing the
registration below,
store this document
in a safe place. It
contains information
you will need should
you require service.
Our service number is
800.GE.CARES
(800.432.2737).
Read your Owner’s
Manual carefully.
It will help you
operate your new
appliance properly.
Model Number Serial Number
E-mail Address*
* Please provide your e-mail address to receive, via e-mail, discounts, special offers and other important
communications from GE Appliances (GEA).
■■ Check here if you do not want to receive communications from GEA’s carefully selected partners.
FAILURE TO COMPLETE AND RETURN THIS CARD DOES NOT DIMINISH YOUR
WARRANTY RIGHTS.
For more information about GEA’s privacy and data usage policy, go to ge.com and click on
“Privacy Policy” or call 800.626.2224.
Safety Instructions Operating Instructions Care and Cleaning Troubleshooting Tips
Consumer Support
GE Electric Cooktop Warranty.
This warranty is extended to the original purchaser and any succeeding owner for products purchased for
home use within the USA. If the product is located in an area where service by a GE Authorized Servicer is not
available, you may be responsible for a trip charge or you may be required to bring the product to an Authorized GE
Service location for service. In Alaska, the warranty excludes the cost of shipping or service calls to your home.
Some states do not allow the exclusion or limitation of incidental or consequential damages. This warranty
gives you specific legal rights, and you may also have other rights which vary from state to state. To know
what your legal rights are, consult your local or state consumer affairs office or your state’s Attorney General.
Warrantor: General Electric Company. Louisville, KY 40225
All warranty service provided by our Factory Service Centers,
or an authorized Customer Care
®
technician. To schedule
service, on-line, 24 hours a day, visit us at ge.com, or call
800.GE.CARES (800.432.2737). Please have serial number and
model number available when calling for service.
■ Service trips to your home to teach you how to use
the product.
■ Improper installation, delivery or maintenance.
■ Failure of the product if it is abused, misused,
or used for other than the intended purpose or
used commercially.
■ Damage to the glass cooktop caused by use of cleaners
other than the recommended cleaning creams and
pads.
■ Damage to the glass cooktop caused by hardened
spills of sugary materials or melted plastic that
are not cleaned according to the directions in
the Owner’s Manual.
■ Replacement of house fuses or resetting of circuit
breakers.
■ Damage to the product caused by accident, fire, floods
or acts of God.
■ Incidental or consequential damage caused by possible
defects with this appliance.
■ Damage caused after delivery.
■ Product not accessible to provide required service.
What GE Will Not Cover:
Staple your receipt here.
Proof of the original purchase
date is needed to obtain service
under the warranty.
EXCLUSION OF IMPLIED WARRANTIES—Your sole and exclusive remedy is product repair as provided in this Limited
Warranty. Any implied warranties, including the implied warranties of merchantability or fitness for a particular purpose,
are limited to one year or the shortest period allowed by law.
For The Period Of: GE Will Provide:
One Year Any part of the cooktop which fails due to a defect in materials or workmanship. During this
From the date of the limited one-year warranty, GE will also provide, free of charge, all labor and in-home service
original purchase to replace the defective part.
Five Years A replacement glass cooktop if it should crack due to thermal shock, discolor, or
From the date of the if the pattern wears off.
original purchase
A replacement radiant surface element if it should burn out.
During this limited additional four-year warranty, you will be responsible for any labor or
in-home service.
19

Register Your Appliance ge.com
Register your new appliance on-line—at your convenience! Timely product registration will allow for
enhanced communication and prompt service under the terms of your warranty, should the need arise.
You may also mail in the preprinted registration card included in the packing material.
Printed in the United States
Consumer Support.
GE Appliances Website
ge.com
Have a question or need assistance with your appliance? Try the GE Appliances Website 24 hours a day,
any day of the year! For greater convenience and faster service, you can now download Owner’s Manuals,
order parts or even schedule service on-line.
Schedule Service ge.com
Expert GE repair service is only one step away from your door. Get on-line and schedule your service at
your convenience 24 hours any day of the year! Or call 800.GE.CARES (800.432.2737) during normal
business hours.
Real Life Design Studio ge.com
GE supports the Universal Design concept—products, services and environments that can be used by
people of all ages, sizes and capabilities. We recognize the need to design for a wide range of physical and
mental abilities and impairments. For details of GE’s Universal Design applications, including kitchen
design ideas for people with disabilities, check out our Website today. For the hearing impaired, please
call 800.TDD.GEAC (800.833.4322).
Extended Warranties ge.com
Purchase a GE extended warranty and learn about special discounts that are available while your warranty
is still in effect. You can purchase it on-line anytime, or call 800.626.2224 during normal business hours.
GE Consumer Home Services will still be there after your warranty expires.
Parts and Accessories ge.com
Individuals qualified to service their own appliances can have parts or accessories sent directly to their
homes (VISA, MasterCard and Discover cards are accepted). Order on-line today, 24 hours every day or by
phone at 800.626.2002 during normal business hours.
Instructions contained in this manual cover procedures to be performed by any user. Other servicing generally
should be referred to qualified service personnel. Caution must be exercised, since improper servicing may cause
unsafe operation.
Contact Us ge.com
If you are not satisfied with the service you receive from GE, contact us on our Website with all the details
including your phone number, or write to: General Manager, Customer Relations
GE Appliances, Appliance Park
Louisville, KY 40225
20

ge.com
PP950
PP980
Manual del
propietario
Estufa
Control electrónico de contacto
49-80423-1 12-06 JR
Instrucciones
de seguridad . . . . . . . . . . . . . 2–4
Instrucciones de operación
Bloqueo de la estufa . . . . . . . . . .9
Características de su estufa . . . . .5
Consejos sobre los utensilios
de cocina . . . . . . . . . . . . . . .10, 11
Elemento de superficie
calentador . . . . . . . . . . . . . . . . . .7
Elemento de superficie doble . . 7
Elementos de superficie . . . . . 6–9
Función de detección
de cacerola . . . . . . . . . . . . . . . . .9
Función de tamaño
de cacerola . . . . . . . . . . . . . . . . .9
Temporizador de cocina . . . . . . .9
Cuidado y limpieza
Cinta adhesiva de empaque . . . 12
Superficie de vidrio . . . . . . 13, 14
Tecla de bloqueo de control . . 13
Consejos para la solución
de problemas . . . . . . . . . . . 15, 16
Soporte al consumidor
Garantía . . . . . . . . . . . . . . . . . . 19
Soporte al consumidor . . . . . . . 20
Escriba los números de
modelo y de serie aquí:
No. de model
o __________
No. de serie ____________
Los puede encontrar en la
etiqueta que está debajo de
la superficie de la estufa.
Seguridad
Operación
Cuidado y limpiezaSolucionar problemas
Soporte al consumidor
INFORMACIÓN DE SEGURIDAD IMPORTANTE.
LEA TODAS LAS INSTRUCCIONES ANTES DE SU USO.
¡ADVERTENCIA!
Por su seguridad, se debe seguir la información de este manual para reducir el riesgo de incendio o
explosión, descarga eléctrica o para evitar daños a la propiedad, lesiones personales o la pérdida de la vida.
Cuando use electrodomésticos, se deben seguir precauciones básicas de seguridad, incluyendo las siguientes:
■ Use este electrodoméstico sólo para el uso
descrito en este manual.
■ No intente reparar o reemplazar alguna parte
de su estufa a menos que se recomiende
específicamente en este manual. Cualquier otro
servicio se debe remitir a un técnico calificado.
■ Antes de realizar cualquier servicio, desconecte
la fuente de energía de la estufa en el tablero
general de distribución retirando el fusible o
apagando el interruptor de circuitos.
■ Asegúrese de que un electricista calificado instale y
conecte a tierra correctamente el electrodoméstico
de acuerdo con las instrucciones de instalación
suministradas. Este electrodoméstico debe contar
con el voltaje y frecuencia adecuados, así como
conectarse con un circuito derivado individual y
descargado a tierra adecuadamente, protegido por
un cortacircuitos o fusible aceptable para el vataje
indicado en el rótulo.
■ Pida al instalador que le muestre la ubicación
del interruptor de circuitos o fusible. Márquelo
para una fácil referencia.
■ No deje a los niños solos o sin supervisión en una
zona donde un electrodoméstico está en uso.
Nunca se debe permitir que alguien se siente o
se pare en alguna parte del electrodoméstico.
■ Enseñe a los niños a no jugar con los controles
ni con ninguna otra parte de la estufa.
■ No permita que nadie salte, se pare o se
cuelgue de la estufa.
■
PRECAUCIÓN: No se deben guardar
en los gabinetes encima de la estufa artículos de
interés para los niños ya que si se suben en la
estufa para alcanzar dichos artículos pueden
sufrir serias lesiones.
■ Siempre mantenga el papel de colgadura o las
cortinas de material combustible a una distancia
prudente de la estufa.
■ Siempre mantenga las toallas y paños
para platos, guantes para ollas y otros artículos
de tela a una distancia prudente de la estufa.
■ Siempre mantenga los utensilios plásticos
y de madera y los alimentos enlatados a una
distancia prudente de la estufa. Podrían
calentarse y provocar quemaduras.
■ Nunca use ropa suelta o prendas
que cuelguen mientras utiliza el
electrodoméstico. El material inflamable
se podría prender si entra en contacto con
elementos calientes de la superficie y puede
causar quemaduras severas.
■ Use únicamente guantes para ollas que estén
secos; los guantes húmedos en superficies
calientes pueden causar quemadas por el vapor.
No deje que los guantes para ollas toquen los
elementos calientes de la superficie. No use
toallas u otros paños gruesos que puedan arder
si entran en contacto con el elemento caliente
de la superficie.
■ No use agua para extinguir incendios de grasa.
Nunca levante una olla en llamas. Apague los
controles. Sofoque la olla en llamas en un
elemento de la superficie cubriendo la olla
completamente con una tapa que encaje bien,
con una bandeja de galletas o plana. Use un
extintor químico seco multiusos o de tipo
espumoso.
■ Se debe sofocar la grasa encendida por fuera
de la olla cubriéndola con soda cáustica o
si está disponible, usando un extintor químico
seco multiusos o de tipo espumoso.
■ Si quema alimentos bajo la campana,
encienda el ventilador.
PRECAUCIONES DE SEGURIDAD
2
Ubicación del rótulo
COCINE LA CARNE Y LAS AVES COMPLETAMENTE...
Cocine la carne y las aves completamente. La carne se debe cocinar a una temperatura mínima INTERNA de
160° F y las aves a una temperatura mínima INTERNA de 180° F. Normalmente, cocinar a estas temperaturas
protege contra enfermedades causadas por los alimentos.
Seguridad
Operación Cuidado y limpieza
Solucionar problemas
Soporte al consumidor
3
ge.com
■ No toque los elementos de la superficie de
vidrio/cerámica durante el cocción. Esta
superficie puede estar tan caliente como para
quemar aunque esté de color oscuro. Durante
y después de su uso, no las toque, ni permita
que algún paño u otro material inflamable
entre en contacto con la superficie de cocción.
Nota las luces indicadoras de caliente y deje
suficiente tiempo para que se enfríen primero.
■ Las zonas potencialmente calientes son la
superficie de la estufa y las áreas al frente.
■ Para reducir la posibilidad de quemaduras,
el encendido de materiales inflamables y los
derrames, el mango de cualquier recipiente
se debe girar hacia el centro de la estufa sin
extenderse hacia ningun elemento cercano
de la superficie.
■ Apague siempre el control del elemento de
la superficie antes de retirar el recipiente.
■
Use sartenes de tamaño apropiado. Seleccione
aquellas que tengan fondos planos suficiente
para cubrir el elemento de calentamiento
del elemento de la superficie. El uso de ollas
o sartenes de menor tamaño expondrá una
porción del elemento de la superficie al
contacto directo y puede causar que la ropa
se encienda. La relación correcta de la olla
o sartén con respecto al elemento también
mejorará la eficiencia.
■ Nunca deje los elementos de la superficie sin
atención en niveles de alta temperatura. Hervir
en exceso causa humaredas y derramamientos
de grasa que se pueden encender.
■ No se recomienda usar utensilios de vidrio
ni de cerámica con su estufa de vidrio/cerámica
radiante.
■ Vigile los alimentos mientras se fríen a niveles
de temperatura altos o medios.
■ Los alimentos a freír deben estar lo más
secos posible. La escarcha de los alimentos
congelados o la humedad en los alimentos
frescos puede hacer que la grasa caliente
salpique por fuera de los lados de la olla.
■ No coloque objetos encima o cerca del teclado
para evitar activar accidentalmente los controles de
la estufa.
■ Use poca grasa para freír incluso al sumergir los
alimentos en la grasa. Llenar la olla con demasiada
grasa puede resultar en derramamientos cuando se
agregan los alimentos.
■ Si se usa una combinación de aceites o grasas
para freír, revuelva antes de calentar, o a
medida que las grasas se mezclan lentamente.
■ Siempre caliente la grasa lentamente y vigile
mientras se calienta.
■ Cuando sea posible, use un termómetro para
grasa para evitar sobrecalentar la grasa.
■ Nunca trate de mover una sartén con grasa
caliente, especialmente una sartén profunda
para freír. Espere hasta que la grasa esté fría.
■ No almacene materiales inflamables cerca de
la estufa.
■ Mantenga los filtros de la campana y de la grasa
limpios para mantener una buena ventilación y
evitar que la grasa se encienda.
■ No almacene o use materiales combustibles,
gasolina u otros vapores y líquidos inflamables en
la cercanía de éste o cualquier electrodoméstico.
■ Limpie sólo las partes señaladas en este manual
del propietario.
■ No deje productos de papel, utensilios de cocina
o alimentos en la estufa cuando no esté en uso.
■ Mantenga la estufa limpia y libre de acumulación de
grasa o derramamientos que se puedan encender.
■ Nunca caliente recipientes de alimentos sin
abrir, el aumento de presión podría causar que
la lata explotara u otras lesiones.
■ Nunca deje frascos o latas con restos
de grasa sobre o cerca de la superficie
de la estufa.
■ Nunca use este electrodoméstico para calentar
el cuarto de la cocina.
PRECAUCIONES DE SEGURIDAD
¡ADVERTENCIA!
LEA Y SIGA ESTAS INSTRUCCIONES
DE SEGURIDAD CUIDADOSAMENTE.
CONSERVE ESTAS INSTRUCCIONES
Tenga cuidado al tocar la estufa. La superficie de vidrio de la estufa retendrá el calor después de que
se hayan apagado los controles.
ELEMENTOS RADIANTES DE LA SUPERFICIE
■ Evite raspar la cubierta de vidrio de la estufa.
La estufa puede rayarse con objetos tales como
instrumentos puntiagudos, anillos u otros tipos
de joyería y remaches en la ropa.
■ Nunca use la superficie de vidrio de la estufa
como una tabla para picar.
■ No coloque o almacene objetos sobre la
superficie de la cubierta de vidrio de la estufa
cuando no esté en uso.
■ Tenga cuidado al momento de colocar cucharas
u otros utensilios para agitar sobre la cubierta
de vidrio de la estufa mientras esté en uso.
Podrían calentarse y provocar quemaduras.
■ Evite calentar una cacerola vacía. Hacerlo
podría dañar tanto a la estufa como la cacerola.
■ No deje que agua, otros líquidos o grasa
permanezcan sobre la estufa.
■ No opere los elementos de superficie de vidrio
si el vidrio está roto. Los derrames o la solución
limpiadora pueden penetrar en una estufa rota
y crear el riesgo de un shock eléctrico. Si la
cubierta de vidrio de su estufa llegara a
romperse, póngase en contacto con un técnico
calificado de inmediato.
■ Los alimentos derramados o quemados pueden
activar o desactivar accidentalmente el teclado.
Limpie el teclado completamente y los
controles volverán a funcionar normalmente.
■ Para evitar activar accidentalmente la estufa, no
coloque objetos encima o cerca del teclado.
■ Limpie la estufa con cuidado. Siempre bloquee
el panel de control con la función de bloqueo
de control y espere hasta que la superficie
de vidrio se enfríe antes de limpiar la estufa.
Consulte la sección Cómo bloquear la estufa
para más información. Si usa una esponja o
paño para limpiar los derrames en algún
elemento de superficie caliente, tenga cuidado
y evite las quemaduras por vapor. Algunos
limpiadores pueden producir emisiones tóxicas
si se les aplica sobre una superficie caliente.
■
NOTA: Recomendamos que evite limpiar las
áreas de los elementos de la superficie hasta
que se hayan enfriado y la luz indicadora
se haya apagado. Los derrames de azúcar son
la excepción a esta recomendación. Consulte
la sección Limpieza de la cubierta de vidrio de
la estufa.
■ Para evitar la posibilidad de dañar la superficie
de la estufa, no aplique la crema limpiadora
a la superficie de vidrio cuando esté caliente.
■ Después de limpiar, use un paño seco o bien
una toalla de papel para remover los residuos
de crema limpiadora.
■ Lea y siga todas las instrucciones y advertencias
de las etiquetas de la crema limpiadora.
■ Los rayones o impactos severos sobre las estufas
con cubierta de vidrio podrían romper o astillar
el vidrio.
■ Tenga cuidado al tocar la estufa. La superficie
de vidrio de la estufa retendrá el calor después
de que los controles se hayan colocado en la
posición OFF.
■ No se pare sobre la estufa con cubierta
de vidrio.
4
Seguridad
Operación
Cuidado y limpiezaSolucionar problemas
Soporte al consumidor
INFORMACIÓN DE SEGURIDAD IMPORTANTE.
LEA TODAS LAS INSTRUCCIONES ANTES DE SU USO.
¡ADVERTENCIA!

5
Características de su estufa.
ge.com
A lo largo de este manual, las características y apariencia pueden variar con los de su modelo.
Índice de características (Las características y la apariencia puede variar.) Se explica en la página
Elemento de superficie simple
6
Elemento de superficie calentador
8
Elemento de superficie doble
7
Tecla de control del elemento de superficie simple
6
Tecla de control del elemento de superficie doble
7
Tecla de control del elemento de superficie calentador
8
Tecla de control del temporizador de cocina
9
Tecla de control del sensor de cacerola
9
Tecla de bloque de control 9
Luces indicadoras de superficie caliente (una por cada elemento de superficie)
9
PP980
PP950
Seguridad
Operación Cuidado y limpieza
Solucionar problemas
Soporte al consumidor
Cómo usar los elementos de superficie.
Su nueva estufa Profile representa lo último en estilo, comodidad y flexibilidad al momento de planificar el espacio de su cocina.
Ya sea que la haya elegido por la perfección de su diseño, el cuidado de los detalles o por ambas razones, usted descubrirá que
la combinación superior de forma y funcionamiento de la estufa Profile lo deleitará durante los próximos años.
Esta estufa contiene varias funciones nuevas como detección de cacerola y tamaño de cacerola. Los controles de
contacto permiten un control exacto de los elementos de superficie. Puede alternar rápidamente entre calor bajo
constante, máximo o alguna opción intermedia. La información que figura en las siguientes páginas lo ayudará a operar
y a mantener su estufa de manera adecuada.
NOTA: A lo largo de este manual, las características y apariencia pueden variar con los de su modelo.
6
Seguridad
Operación
Cuidado y limpiezaSolucionar problemas
Soporte al consumidor
Nunca cocine directamente sobre
el vidrio. Siempre use piezas de
cocina.
Acerca de los elementos de superficie radiantes…
La estufa radiante tiene elementos
calentadores por debajo de una
superficie suave de vidrio.
La temperatura de la estufa aumenta
según la cantidad de elementos de
superficie que estén encendidos. Si 3
ó 4 elementos están encendidos, la
temperatura de la estufa será más alta.
Tenga cuidado al tocar la cocina.
Las luces indicadoras se encenderán después
de que se activen los quemadores calentador
y dobles. Las luces también se activan
cuando la función de detección de cacerola
y Control Lock (bloqueo de control) está
encendida. Las luces indicadoras se
apagarán cuando el elemento de superficie
o la función se apaguen.
La luz indicadora de SUPERFICIE
CALIENTE correspondiente se encenderá
cuando el elemento radiante se encienda
y permanecerá encendida hasta que la
superficie se haya enfriado hasta llegar a
los 150° F aproximadamente.
NOTA:
La luz indicadora de superficie caliente:
■ Se encenderá cuando el elemento de
superficie esté encendido.
■ Permanecerá encendida incluso después de
que el elemento se apaga.
■ Brillará intensamente hasta que el elemento
se enfríe a aproximadamente 150° F.
NOTA: Un olor ligero es normal cuando una
estufa nueva es usada por primera vez. Esto es
causado por el calentamiento de las partes
nuevas y los materiales de aislamiento y
desaparecerá en corto tiempo.
Es seguro colocar una pieza de cocina
caliente del horno o de la superficie
sobre la superficie de vidrio cuando la
superficie está fría. Nunca coloque un
utensilio de cocina sobre el área de control.
Aún después de que los elementos de
superficie son apagados, la estufa de
vidrio retiene suficiente calor para
continuar cocinando. Para evitar cocinar
excesivamente, remueva las cacerolas de
los elementos de superficie cuando la
comida se haya cocinado. Evite colocar
utensilios que podrían sobrecalentarse o
plásticos que podrían derretirse sobre el
elemento de superficie hasta que se haya
enfriado por completo.
■ Las manchas de agua (depósitos de minerales)
se remueven usando una crema de limpieza
o vinagre blanco puro.
■ El uso de limpiador de ventanas podría dejar
una película iridiscente sobre la estufa. La
crema de limpieza removerá esta decoloración.
■ No almacene artículos pesados sobre la estufa.
Si se caen sobre la estufa, podrían dañarla.
■ No use la superficie como tabla de corte.
;
;
;
;
;
;;
;
;;
;
;
;
;
;;
;
;;
;
;;;
;;
;
;;
;
;;;
;
;;;;;
;
;
;;;
SURFACE
COOKING
;
;;;
;
;
;;
;
;;
;
;
;
;;
;
;;;;
;
;;
;
;
;
;;;;
;
;;
;
;;;;;
;;
;
;
;
;;
;;
;
OFF CENTER
Siempre coloque la cacerola en el
centro del elemento de superficie
en la que está cocinando.
;
;
;;;;;
;
;;;;
;
;;
;
;
;
;
;;;;
;
;
;
;
;
;
;
;;
;
;;;;;
;;
;
;
;
;;
;
;;;
DRAGGING
No deslice cacerolas encima de la
superficie de la estufa porque esto
podría rasguñar el vidrio. El vidrio
es resistente, pero no es a prueba
de rasguños.
Elementos de superficie radiantes
Los controles para los elementos de
superficie radiantes permiten 11 niveles
de temperatura diferentes: bajo, 1–9 y
alto. Es posible que el elemento de calor
no se perciba visualmente en niveles
bajos de temperatura.
El elemento de superficie de calor tendrá
ciclos de encendido y apagado para
mantener el ajuste de control que usted
seleccionó.
Cada elemento de superficie radiante
tiene un límite de temperatura que evita
que la cubierta de vidrio de la estufa se
caliente demasiado.
NOTA: Esta estufa tiene una función
de calentamiento rápido.
■ Si la estufa está fría al encenderla, aparecerá
una luz roja durante un corto tiempo hasta que
alcance la configuración de potencia deseada.
■ Si la estufa ya está caliente, es posible que la
función de calentamiento rápido no se active.
ON
OFF
OR
Para encender un elemento de
superficie simple:
Presione la tecla ON/OFF, y luego
presione la tecla (+)/(-).
Utilice la tecla (+)/(-) para establecer
el ajuste de potencia deseado. El
control emitirá un sonido cada vez
que usted presione una tecla.
Para apagar un elemento de
superficie simple, presione la tecla
ON/OFF nuevamente.
Elemento de superficie simple
ge.com
7
Elemento de superficie doble
El elemento de superficie doble tiene un
sensor de tamaño de cacerola que ajustará
de manera automática el elemento de
superficie pequeño o grande según el
tamaño de su cacerola (consulte la sección
Cómo usar la función Tamaño de cacerola).
Para anular el sensor automático de
tamaño de cacerola y seleccionar el
elemento de superficie pequeño o grande:
Presione la tecla ON/OFF del
elemento de superficie doble.
Utilice la tecla (+)/(-) para establecer
el ajuste de potencia deseado.
Presione la tecla SIZE SELECT
(seleccionar tamaño) para encender
el elemento de superficie grande.
Presione la tecla nuevamente para
encender el elemento de superficie
pequeño.
Cuando la luz indicadora junto a la tecla
SIZE SELECT (seleccionar tamaño) está
encendida, el elemento de superficie
grande está encendido. Cuando está
apagada, el elemento de superficie
pequeño está encendido.
Para apagar el elemento de superficie
doble, presione la tecla ON/OFF.
ON
OFF
OR
SIZE SELECT
Seguridad
Operación Cuidado y limpieza
Solucionar problemas
Soporte al consumidor

Cómo usar los elementos de superficie.
8
Si se produce un error en el
funcionamiento del control, en la
pantalla destellará un código de falla
con una letra “F” y un número;
además, el control producirá un
sonido audible.
Para corregir:
Presione la tecla CONTROL LOCK
(bloqueo de control) para reiniciar
el control.
Intente ajustar el control a la
configuración de cocción deseada.
Si el código de falla no desaparece,
deje enfriar la estufa por completo.
Luego de que la estufa se haya
enfriado, presione la tecla CONTROL
LOCK para reiniciar el control.
Intente ajustar nuevamente el
control a la configuración de
cocción deseada.
Si el código de falla aún no
desaparece, apague la estufa desde
el interruptor de circuito o la caja
de fusibles durante un minuto.
Si el código de falla vuelve a
aparecer, llame al servicio técnico.
Código de falla (“F” y un número en la pantalla)
Para encender el elemento de superficie
calentador:
Presione la tecla ON/OFF y luego
la tecla WARMER (calentador). El
elemento de superficie se encenderá
con la configuración de potencia
del calentador W1 (baja).
Use la tecla (+)/(-) para elegir
las configuraciones adicionales
de W2 (media) y W3 (alta).
Para apagar las configuraciones de
potencia del calentador, presione la
tecla ON/OFF. Para cambiar de las
configuraciones del calentador a las
configuraciones de cocción normales,
presione la tecla WARMER. El elemento
de superficie estará configurado en
potencia L (baja). El elemento de
superficie luego puede ajustarse a la
configuración deseada usando las teclas
(+)/(-). Para apagar el elemento de
superficie, vuelva a presionar la tecla
ON/OFF.
Tipo de alimento Ajuste de control
Pan/Pastelería L (LOW/BAJO)
Salsa L (LOW/BAJO)
Sopa (crema) L (LOW/BAJO)
Guiso L (LOW/BAJO)
Vegetales L (LOW/BAJO)
Bebidas calientes H (HIGH/ALTO)
Sopa (líquida) H (HIGH/ALTO)
El cuadro anterior muestra los ajustes iniciales
recomendados únicamente. La temperatura, el
tipo y la cantidad de alimentos y el tiempo de
cocción afectarán la calidad del alimento.
PRECAUCIÓN: no caliente alimentos en
el CALENTADOR por más de dos horas.
No utilice envoltorio plástico para cubrir los
alimentos. El plástico podría derretirse sobre la
superficie de la estufa y es muy difícil removerlo.
Utilice únicamente utensilios de cocina
recomendados para cocción a calor intenso.
El CALENTADOR mantendrá los alimentos
cocinados a una temperatura ideal para
ser servidos. Siempre comience con los
alimentos calientes. No utilice la estufa
para calentar alimento fríos. Colocar
alimentos crudos o fríos en el elemento
de superficie calentador puede provocar
intoxicación alimentaría.
Para obtener mejores resultados, cubra
todos los alimentos que vaya a colocar
en el CALENTADOR con una tapa o papel
de aluminio. Cuando caliente pastelería
o panes, deje una salida de aire para
permitir la salida de la humedad.
Siempre utilice agarraderas o manoplas
cuando retire los alimentos del
CALENTADOR ya que los utensilios de
cocina y los platos estarán calientes.
La luz indicadora de superficie caliente
se encenderá cuando la superficie de
vidrio se caliente y permanecerá
encendida hasta que la superficie se
enfríe hasta llegar a los 150° F.
Elemento de superficie calentador
ON
OFF
OR
WARMER
Seguridad
Operación
Cuidado y limpiezaSolucionar problemas
Soporte al consumidor
Esta función sólo se usa en el elemento
de superficie doble cuando la función de
detección de cacerola está activada. Cuando
se coloque una cacerola pequeña en el
elemento de superficie, el elemento de
superficie pequeño se activará. Cuando se
coloque una cacerola de un tamaño mayor
que 6.0 pulgadas en el elemento de
superficie, el elemento de superficie grande
se activará automáticamente. Esta función
puede anularse para una sola sesión de
cocción con la función de detección de
cacerola activada (consulte la sección
Elemento de superficie doble).
Para apagar esta función y la función
de detección de cacerola:
Presione la tecla PAN (cacerola).
La luz junto a la tecla se apagará; esto indica
que las funciones de la cacerola están apagadas.
NOTA: La cacerola debe estar colocada en
el centro del elemento de superficie para que
esta función funcione correctamente.
Esta función apaga automáticamente un
elemento de superficie después de 60
segundos si no hay una cacerola sobre el
elemento de superficie. La pantalla de nivel
de potencia destellará hasta que el elemento
de superficie se apague automáticamente
cuando el control detecte que no hay una
cacerola sobre el elemento de superficie.
Para activar y desactivar la función de
detección de cacerola para todos los
elementos de superficie:
Presione la tecla PAN (cacerola). (Al
menos un elemento de superficie debe
estar encendido). La pantalla mostrará
las palabras “PAN ON” (cacerola
encendida) cuando la función de
detección de cacerola esté encendida.
Se oirá una señal y aparecerá una luz junto
a la tecla PAN que indicará si la función está
activada. Si la luz está encendida, la función
de detección de cacerola está encendida
y, si la luz está apagada, la función de
detección de cacerola está apagada. Cuando
la función de detección de cacerola está
desactivada, la función de tamaño de
cacerola también está desactivada.
NOTAS:
■ Para que esta función funcione
correctamente, el diámetro de la cacerola
debe ser mayor que 4.0 pulgadas, y la
cacerola debe estar colocada en el centro
del elemento de superficie.
■ Es posible que esta función no funcione
con cacerolas con fondos redondeados,
curveados o combados (consulte la
sección Tipos de utensilios).
■ Esta función no es adecuada para
utensilios de vidrio-cerámica/cerámica
de gres (consulte la sección Tipos
de utensilios).
9
Cómo bloquear la estufa
IMPORTANTE: Para su comodidad, puede
bloquear la estufa en cualquier momento
cuando no está en uso o antes de limpiarla.
Bloquear la estufa es una forma de prevenir
que se enciendan accidentalmente los
elementos de superficie.
Para bloquear la estufa:
Mantenga presionada la tecla CONTROL LOCK
(bloqueo de control) durante 3 segundos.
Se emitirá el mismo sonido dos veces, la
palabra “LOCK” aparecerá en la pantalla
del TIMER (temporizador) y la luz
Control Lock se encenderá para indicar
que la estufa ha sido bloqueada. Si la
estufa se bloquea mientras los elementos
de superficie o el temporizador están en
uso, se apagarán automáticamente.
Para desbloquear la estufa:
Mantenga presionada la tecla CONTROL LOCK
(bloqueo de control) durante 3 segundos.
Se emitirá el mismo sonido dos veces y
la luz Control Lock se encenderá para
indicar que la estufa ha sido desbloqueada.
CONTROL
LOCK
CONTROL
LOCK
Cómo usar el temporizador de cocina
NOTA: El temporizador de cocina NO apagará los
elementos de superficie cuando el tiempo llegue a 00:00.
Para usar el temporizador de cocina, use
las teclas que se encuentran debajo de la
pantalla del TIMER (temporizador).
Presione la tecla ON/OFF y luego la tecla
(+)/(-) para elegir la configuración de
tiempo deseada. Si se mantiene oprimida
la tecla (+)/(-) durante varios segundos,
el temporizador aumentará o disminuirá
a un ritmo más rápido.
Después de elegir el tiempo que desea,
el temporizador comenzará a contar
automáticamente y en forma regresiva las
horas/los minutos que haya seleccionado.
Después de que el temporizador llegue al
último minuto, contará en forma regresiva
en segundos hasta 00:00. Una vez agotado
el tiempo, el control emitirá dos tonos de
aviso cada cinco segundos, hasta que se
apague el temporizador. Presione la tecla
ON/OFF para apagar el temporizador.
ON
OFF
OR
TIMER
Cómo usar la función Detección de cacerola
PAN
Cómo usar la función Tamaño de cacerola
PAN
ge.com
Seguridad
Operación Cuidado y limpieza
Solucionar problemas
Soporte al consumidor
10
Cómo seleccionar los tipos de utensilios.
La información siguiente le ayudará a escoger piezas de cocina que le darán un mejor rendimiento sobre su
estufa de vidrio.
Acero inoxidable:
recomendable
Aluminio:
Se recomienda el uso de aluminio pesado
Buena conductividad. Los residuos
de aluminio a veces tienen la apariencia
de raspones sobre la estufa, pero pueden
eliminarse si se limpian de inmediato.
Debido a su punto de fusión bajo, no
debe usarse aluminio ligero.
Cobre:
recomendable
Fondos de cobre:
Puede usarse, pero no se recomienda
Las cacerolas con fondos de cobre
pueden dejar residuos con la apariencia
de raspones. Elimine cualquier residuo
inmediatamente después del uso. No deje
que el líquido hirviendo en una cacerola
se evapore. El metal sobrecalentado
puede adherirse a la cubierta de vidrio de
la estufa y dejar una mancha permanente
si no se retira de inmediato.
Hierro fundido con porcelana
esmaltada:
recomendable
El uso de este tipo de utensilios es
recomendable siempre que estén
cubiertos por completo con porcelana
esmaltada. Se recomienda tener cuidado
con utensilios de hierro fundido que no
estén cubiertos por completo con
esmalte de porcelana, ya que podrían
rayar la cubierta de vidrio de la estufa.
Vidrio-cerámica/cerámica
de gres:
No se recomienda
Bajo rendimiento. Podría raspar
la superficie.
NOTA: Use cacerolas que correspondan
con el diámetro del elemento de superficie.
El desempeño de cocción no será bueno
si los utensilios son más pequeños o más
grandes que el elemento de superficie.
Verifique que los fondos de las
cacerolas estén planos usando
una tablilla derecha.
No se recomienda el uso de
cacerolas con fondos redondeados,
curveados, con protuberancias o
pandeados. La detección de
cacerolas/identificación del tamaño
puede no funcionar adecuadamente
con este tipo de cacerolas.
Las funciones Detección/Tamaño de cacerola podrán funcionar con estos tipos de utensilios.
Las funciones Detección/Tamaño de cacerola no funcionan para estos tipos de cacerolas.
PAN
PAN
PAN
PAN
PAN
PAN
x
PAN
PAN
x
Seguridad
Operación
Cuidado y limpiezaSolucionar problemas
Soporte al consumidor
Para obtener mejores resultados
■ Coloque únicamente cacerolas secas
sobre los elementos de superficie.
No coloque tapas sobre los elementos
de superficie, en especial tapas
mojadas.
■ No use woks con anillos de soporte.
Este tipo de wok no se calentará sobre
elementos de superficie de vidrio.
■ Use únicamente woks con fondo
plano, que puede conseguir en
distintos fabricantes de utensilios de
cocina muy conocidos. El fondo del
wok debe ser del mismo diámetro
que el elemento de superficie para
garantizar un contacto adecuado.
■ Algunos procedimientos especiales
de cocción requieren utensilios
específicos tales como estufas de
presión, freidoras de aceite, etc.
Todos los utensilios deben contar
con fondos planos que tengan
el mismo tamaño que los elementos
de superficie.
No coloque cacerolas mojadas sobre
la cubierta de vidrio de la estufa.
No use woks con anillos de soporte
sobre la cubierta de vidrio de la estufa.
Use woks con fondo plano sobre
la cubierta de vidrio de la estufa.
11
ge.com
Seguridad
Operación Cuidado y limpieza
Solucionar problemas
Soporte al consumidor
Nota: Las enlatadoras con fondo plano
son necesarias para las estufas con
cubierta de vidrio.
Cuando enlate por medio de baño
María o un elemento de presión,
pueden usarse cacerolas de mayor
diámetro. Esto es debido a que las
temperaturas del agua hirviendo
(incluso bajo presión) no dañan
las superficies de la estufa alrededor
de los elementos de superficie.
NO OBSTANTE, NO USE
ENLATADORAS DE GRANDES
DIÁMETROS U OTRAS CACEROLAS
GRANDES PARA FREÍR O HERVIR
ALIMENTOS QUE NO SEAN AGUA.
La mayoría de las mezclas de jarabe o
salsa (y todos los tipos de fritura) se
cuecen a temperaturas más elevadas
que la del agua hirviendo. Tales
temperaturas podrían eventualmente
dañar la superficie de la cubierta
de vidrio de la estufa.
Asegúrese de que la enlatadora
se ajuste al centro del elemento
de superficie. Si su estufa o su
ubicación no permiten centrar la
enlatadora sobre el elemento de
superficie, use cacerolas de menor
diámetro para obtener mejores
resultados de enlatado.
Deben emplearse enlatadoras
de fondo plano. No use enlatadoras
con fondos rebordeados u
ondulados (con frecuencia en
utensilios esmaltados), debido a
que no tienen el contacto suficiente
con los elementos de superficie y
requiere más tiempo hervir el agua.
Cuando enlate, use recetas y
procedimientos que provengan
de fuentes confiables. Las recetas
y procedimientos de fuentes
confiables están disponibles a través
del fabricante de su enlatadora;
fabricantes de frascos de vidrio para
enlatar, tales como la marca Ball
and Kerr, y el Servicio de Extensión
del Departamento de Agricultura
de EE.UU.
Recuerde que el enlatado es un
proceso que genera gran cantidad
de vapor. Para evitar quemaduras
debidas al vapor o calor, tenga
cuidado al enlatar.
NOTA: Si su casa cuenta con un voltaje
bajo, el enlatado puede tomar más tiempo
del esperado, incluso si se han seguido las
instrucciones cuidadosamente. El tiempo
del proceso disminuirá si:
(1) usa una enlatadora a presión, y
( 2) si comienza con agua del grifo
CALIENTE para un calentado más rápido
de cantidades mayores de agua.
PRECAUCIÓN:
■ El enlatado seguro requiere la
destrucción de microorganismos dañinos
y que los frascos estén completamente
sellados. Cuando enlate alimentos con
una enlatadora de baño María, debe
mantenerse un hervor ligero pero
constante durante el tiempo requerido.
Cuando enlate alimentos con una
enlatadora a presión, debe mantenerse
la presión durante el tiempo requerido.
■ Una vez que haya ajustado los controles,
es muy importante que se asegure que
los niveles de hervor o presión prescritos
se mantengan durante el tiempo
requerido.
■ Debido a que debe asegurarse de
enlatar durante el tiempo prescrito, sin
interrupción alguna durante el período
del proceso, no enlate sobre ningún
elemento de superficie de la estufa
si su enlatadora no es plana.
Siga los siguientes puntos para la preparación de enlatados
¡Incorrecto!
¡Correcto!
12
Cuidado y limpieza de la estufa.
Asegúrese que la corriente eléctrica esté apagada y de que las superficies estén frías antes de limpiar
cualquier parte de la estufa.
Cómo retirar la película protectora y la cinta adhesiva de empaque
Tome cuidadosamente una esquina
de la película protectora y despéguela
lentamente de la superficie del aparato.
No use ningún objeto puntiagudo para
retirar la película. Retire toda la película
antes de usar el aparato por primera vez.
Para asegurarse de no dañar el acabado
del producto, la manera más segura de
retirar el adhesivo de la cinta de
empaque sobre aparatos nuevos es la
aplicación de un detergente doméstico
líquido para lavar platos. Aplique con
un paño suave y moje.
NOTA: Antes de usar la estufa, debe retirar el
adhesivo de todas las partes. No puede retirarse
si se quema.
Seguridad
Operación
Cuidado y limpiezaSolucionar problemas
Soporte al consumidor
CONTROL
LOCK
CONTROL
LOCK
Deje enfriar la estufa.
Use un raspador con una
sola cuchilla a un ángulo de
aproximadamente 45° contra
la superficie de vidrio y raspe
la mancha. Será necesario que
aplique presión al raspador
para remover los residuos.
Después de raspar, esparza unas
gotas de limpiador para estufas
de cerámica sobre toda el área
con residuos quemados. Use la
almohadilla de limpieza para
remover los residuos restantes.
Para protección adicional, una
vez que haya removido todos los
residuos, pula toda la superficie
con limpiador para estufas
de cerámica y una toalla
de papel.
Cómo limpiar la cubierta de vidrio de la estufa.
ge.com
13
Tecla de control lock (bloqueo de control)
Para su comodidad, puede bloquear la
estufa en cualquier momento cuando
no está en uso o antes de limpiarla.
Bloquear la estufa es una forma de
prevenir que se enciendan accidentalmente
los elementos de superficie.
Comience por bloquear la cocina;
consulte la sección Cómo bloquear la
estufa. Utilice los mismos métodos
de limpieza descritos para la cubierta
de vidrio y cerámica de la estufa.
Residuos quemados
ADVERTENCIA: Puede DAÑAR la superficie
de vidrio si usa un estropajo que no sea el
incluido con la estufa.
Deje enfriar la estufa.
Esparza unas cuantas gotas
de limpiador para estufas de
cerámica sobre toda el área
con residuos quemados.
Frote el área con residuos
quemados con la almohadilla
de limpieza incluida, aplicando
la presión necesaria.
Si queda algún residuo, repita los
pasos arriba mencionados tantas
veces como sea necesario.
Para protección adicional, una
vez que haya removido todos los
residuos, pula toda la superficie
con limpiador para estufas de
cerámica y una toalla de papel.
El raspador para estufas de
cerámica y todos los artículos
recomendados están disponibles
a través de nuestro Centro de
piezas. Consulte las instrucciones
en la sección “Para ordenar
piezas” en la siguiente página.
NOTA: No use una cuchilla roma
o mellada.
Residuos quemados difíciles de quitar
Use una almohadilla limpiadora
para estufas de cerámica.
Limpieza durante el uso diario normal
ÚNICAMENTE use limpiador de estufas
de cerámica sobre la cubierta de vidrio.
Otras cremas podrían no ser tan efectivas.
Para mantener y proteger la superficie
de la cubierta de vidrio de la estufa, siga
los siguientes pasos:
Antes de usar la estufa por primera
vez, límpiela con limpiador de
estufas de cerámica. Esto ayuda a
proteger la parte superior y facilita
la limpieza.
El uso diario del limpiador de
estufas ayudará a mantener el
aparato como nuevo.
Agite bien la crema limpiadora.
Aplique unas cuantas gotas de
limpiador de estufas de cerámica
directamente en la estufa.
Use una toalla de papel o
almohadilla limpiadora para estufas
de cerámica para limpiar toda
la superficie de la estufa.
Use un paño seco o una toalla de
papel para remover los residuos del
limpiador. No es necesario enjuagar.
NOTA: Es muy importante que NO caliente
la estufa sino hasta que esté completamente
limpia.
Limpie su estufa después
de cada derrame. Use
limpiador para estufas
de cerámica.
Seguridad
Operación Cuidado y limpieza
Solucionar problemas
Soporte al consumidor
14
Cómo limpiar la cubierta de vidrio de la estufa.
Seguridad
Operación
Cuidado y limpiezaSolucionar problemas
Soporte al consumidor
Para ordenar limpiador para estufas de
cerámica y el raspador para estufas, llame
a nuestro número sin costo:
Centro de piezas nacional 800.626.2002
Limpiador para estufas
de cerámica . . . . . . . . . . . . . . .# WX10X300
Raspador para estufas
de cerámica . . . . . . . . . . . . . . .# WX10X0302
Equipo . . . . . . . . . . . . . . . . . . . .# WB64X5027
(El equipo incluye la crema y el raspador para
estufas)
Almohadillas limpiadoras
para estufas de cerámica . . .# WX10X350
Apague todos los elementos de
superficie. Retire las cacerolas
calientes.
Con un guante para horno:
a. Use un raspador de una sola
cuchilla (raspador para estufas de
cerámica) para mover el derrame
a un área fría sobre la estufa.
b. Retire el derrame con toallas
de papel.
Cualquier derrame restante debe
dejarse ahí hasta que la superficie
de la estufa se haya enfriado.
No use los elementos de superficie
otra vez sino hasta que haya
limpiado todos los residuos.
NOTA: Si la superficie ya presenta hendiduras
o agujeros, deberá reemplazar el vidrio de la
estufa. En este caso, será necesario un servicio
de reparación.
Daños causados por derrames con azúcar y plástico fundido
Nuestras pruebas demuestran
que si está cocinando mezclas
con un alto contenido de azúcar
tales como gelatina o caramelo
fundido y éstas se derraman
sobre la estufa, podrían causar
daños permanentes a la
superficie de vidrio a menos
que el derrame se limpie de
inmediato.
Tenga cuidado de no deslizar
cacerolas y sartenes sobre su estufa.
Dejará marcas de metal sobre la
superficie de la misma.
Estas marcas son removibles con
limpiador para estufas de cerámica y
una almohadilla para limpiar estufas
de cerámica.
Si deja secar el líquido hirviendo en
cacerolas con una capa delgada de
aluminio o cobre, dicha capa podría
dejar una decoloración negra sobre
la estufa.
Debe eliminar dicha coloración
de inmediato antes de calentar otra
vez; de lo contrario la decoloración
podría ser permanente.
ADVERTENCIA: Verifique cuidadosamente el
fondo de las cacerolas para comprobar si podrían
rayar la estufa.
Marcas metálicas y raspones
Para ordenar piezas
Superficie de vidrio—potencial para daño permanente.
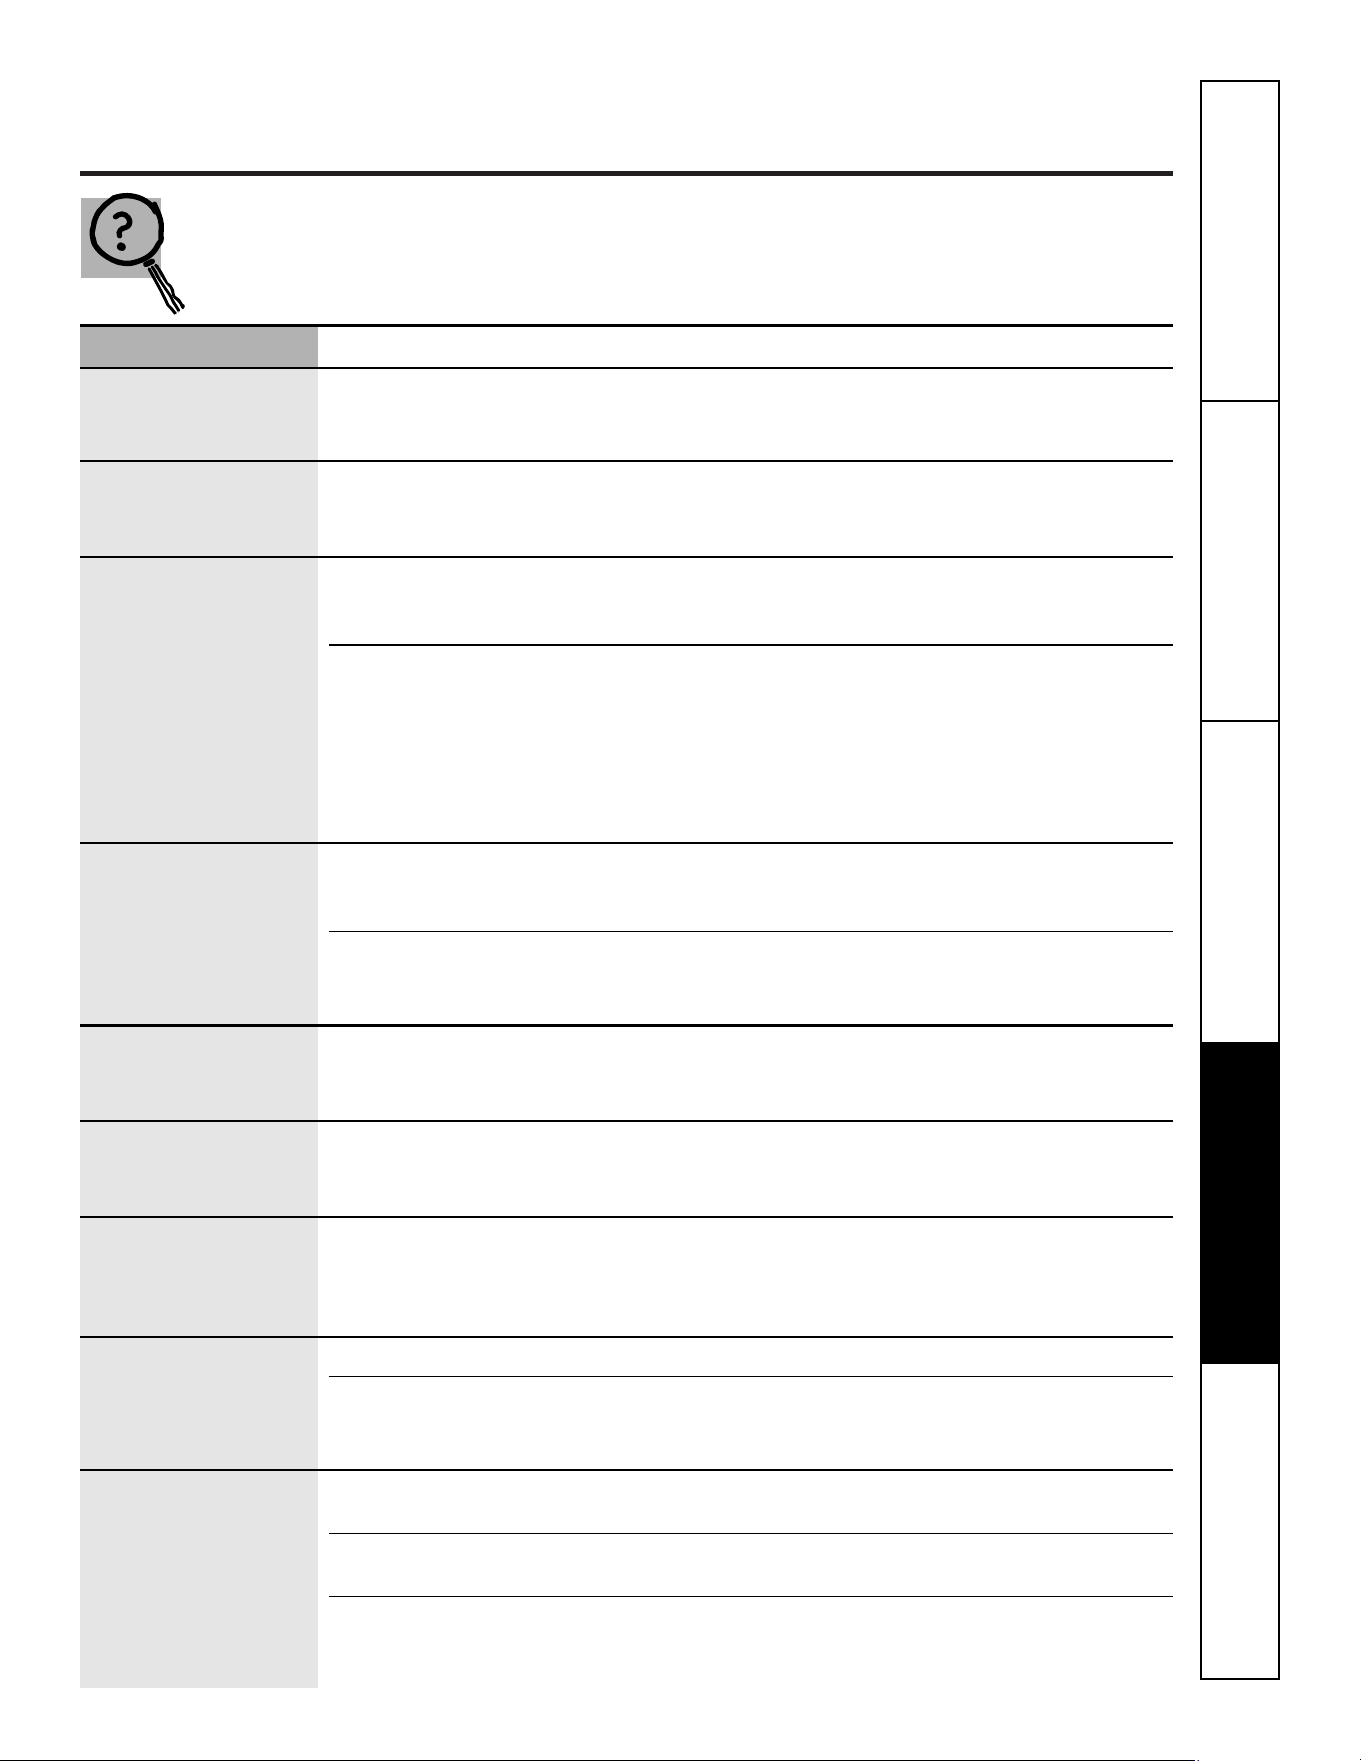
Antes de llamar para solicitar servicio… ge.com
Ideas sobre la identificación y solución de problemas
¡Ahorre tiempo y dinero! Revise esta tabla primero y es posible
que no necesite llamarnos en busca de servicio.
Problema Causas posibles Qué hacer
Los elementos de superficie
Está empleando • Use cacerolas que sean absolutamente planas y que
no se mantienen hirviendo
los utensilios inadecuados. correspondan al diámetro del elemento de superficie
o la cocción es lenta
seleccionado.
Los elementos de Los controles de la • Inspeccione que el control correcto haya sido
superficie no funcionan estufa están colocados seleccionado para el elemento de superficie que
apropiadamente inapropiadamente. usted seleccionó.
Rasguños sobre la Métodos de limpieza • Use los procedimientos de limpieza recomendados.
superficie de vidrio incorrectos siendo usados. Consulte la sección Cómo limpiar la cubierta de vidrio
de la estufa de la estufa.
Utensilios con fondos rugosos • Para evitar los rasguños, use los procedimientos de
están siendo usados o hubo limpieza recomendados. Asegúrese de que los fondos
partículas gruesas (sal o arena) de los utensilios estén limpios antes de usarlos. Use
entre los utensilios y la utensilios con fondos lisos.
superficie de la estufa.
Se han deslizado utensilios
sobre la superficie de la estufa.
Áreas de decoloración No se limpiaron los derrames • Consulte la sección Cómo limpiar la cubierta de vidrio
en la estufa de alimentos antes del de la estufa.
siguiente uso.
Superficie caliente en un • Esto es normal. La superficie podría parecer
modelo con cubierta de vidrio decolorada cuando está caliente. Esto es temporal
de color claro. y desaparecerán conforme el vidrio se enfría.
Plástico fundido sobre La estufa caliente entró • Consulte la sección Superficie de vidrio—potencial
la superficie en contacto con plástico de daño permanente en la sección Cómo limpiar
colocado sobre ésta. la cubierta de vidrio de la estufa.
Agujeros (o hendiduras) Derrame de una mezcla • Llame a un técnico calificado para que realice
en la superficie de azucarada caliente sobre un reemplazo.
la estufa la estufa.
Ciclos frecuentes de Está empleando los utensilios • Para minimizar los ciclos, use únicamente utensilios
encendido y apagado inadecuados. planos. Consulte la seccíon Elementos de superficie
de los elementos de radiantes.
superficie
El teclado no funciona El teclado está sucio. • Limpie el teclado.
Un fusible en su casa podría • Reemplace el fusible o reajuste el interruptor
haberse volado o el interruptor de circuitos.
de circuito se aterrizó.
Las funciones Detección/ Está empleando los utensilios • Use una cacerola plana, metálica de tamaño
Tamaño de cacerola no inadecuados. igual o mayor que 4.0″.
funcionan correctamente
La cacerola se ha colocado • Asegúrese de que la cacerola esté colocada en
en forma incorrecta. el centro del elemento de superficie correspondiente.
El control de la estufa ha sido • Verifique que el control esté configurado
configurado de manera correctamente.
inadecuada.
Seguridad
Operación Cuidado y limpieza
Solucionar problemas
Soporte al consumidor
15
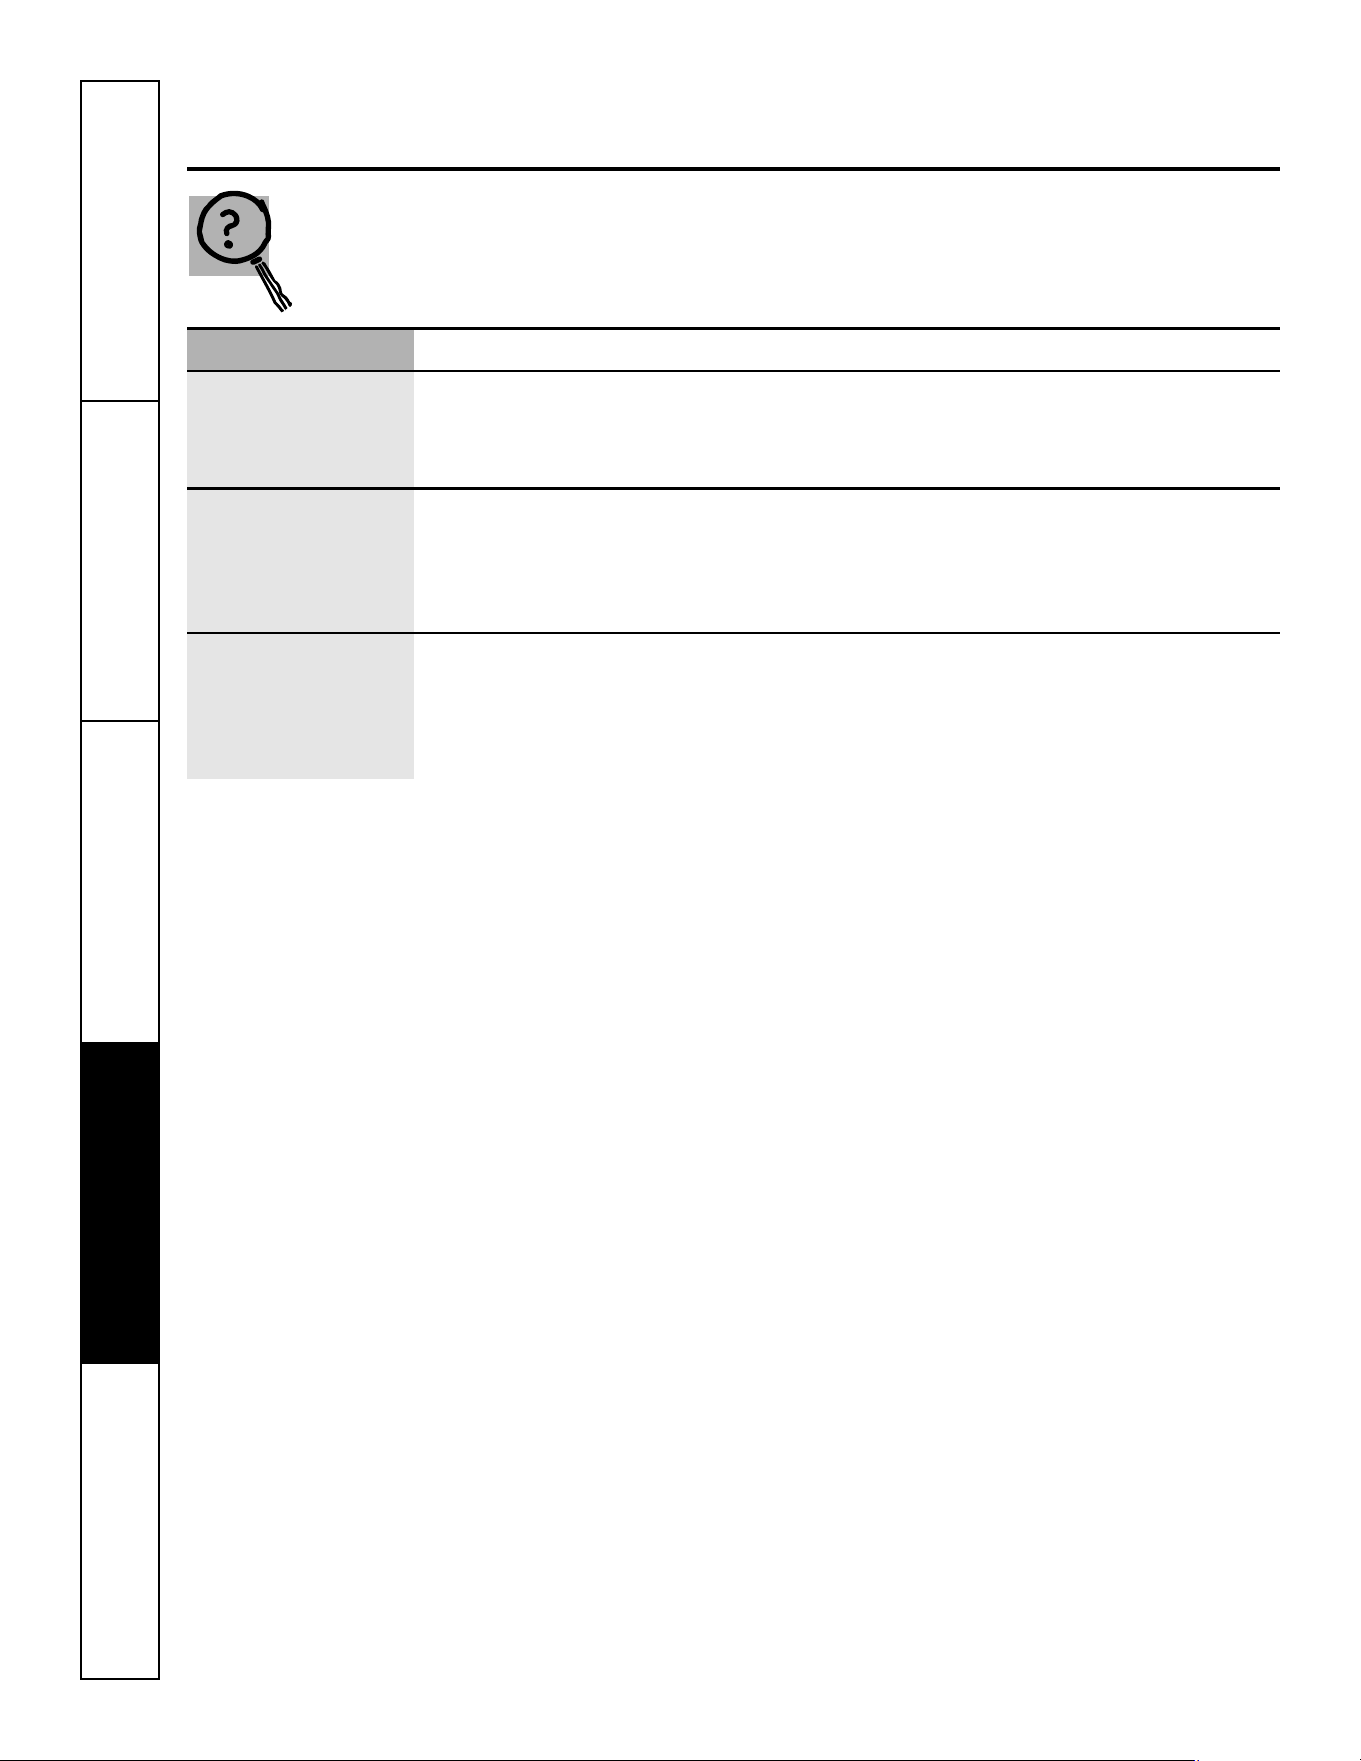
16
Seguridad
Operación
Cuidado y limpiezaSolucionar problemas
Soporte al consumidor
Antes de llamar para solicitar servicio…
Ideas sobre la identificación y solución de problemas
Problema Causas posibles Qué hacer
La palabra TEMP La temperatura de la estufa • Deje enfriar el (los) elemento(s) de superficie entre
aparece en la pantalla es demasiado alta, y se ha 30 minutos y 1 hora antes de usarlo(s) nuevamente.
activado la función de tiempo
espera agotado (time-out).
El elemento de La función de calentamiento • La estufa tiene una función de calentamiento rápido
superficie está al rojo rápido está activada. y está diseñada para hacer esto. Consulte la sección
vivo cuando debe estar Elementos de superficie radiante.
en una configuración
de potencia baja
La letra “F” y un Tiene un código de falla. • Anote la letra “F” y el número y presione la tecla
número aparecen CONTROL LOCK (bloqueo de control). Consulte
en la pantalla, y la la sección Código de falla.
estufa produce un
sonido audible

17
Seguridad
Operación Cuidado y limpieza
Solucionar problemas
Soporte al consumidor
Notas.
18
Seguridad
Operación
Cuidado y limpiezaSolucionar problemas
Soporte al consumidor
Notas.
Seguridad
Operación Cuidado y limpieza
Solucionar problemas
Soporte al consumidor
Por el período de: GE reemplazará:
Un año Cualquier parte de la estufa que falle debido a un defecto en los materiales o mano de obra.
A partir de la fecha Durante esta garantía limitada de un año, GE también ofrecerá, sin costo alguno, toda la mano
de compra original de obra y servicio interno para reemplazar las partes defectuosas.
Cinco años Una cubierta de vidrio de la estufa de reemplazo si es que: la ruptura se debe a un golpe
A partir de la fecha térmico, la decoloración, o si el molde se desgasta.
de compra original
Un elemento de superficie radiante si se quema.
Durante esta garantía limitada adicional de cuatro años, usted será responsable de cualquier
mano de obra y servicio interno.
■ Viajes de servicio a su hogar para enseñarle cómo usar
el producto.
■ Instalación, entrega o mantenimiento incorrectos.
■ Fallas del producto si hay abuso, mal uso, o uso para
otros propósitos que los propuestos, o uso para fines
comerciales.
■ Daño a la estufa de vidrio causado por el uso de
limpiadores diferentes a las cremas y almohadillas
recomendadas.
■ Daño a la estufa de vidrio causado por derrames
endurecidos de materiales azucarados o por plástico
derretido que no sean limpiados conforme a las
direcciones en el Manual del propietario.
■ Reemplazo de fusibles de su hogar o reajuste de
interruptores de circuito.
■ Daño al producto causado por accidente, fuego,
inundaciones o actos de Dios.
■ Daño incidental o consecuencial causado por posibles
defectos con el aparato.
■ Daños causados después de la entrega.
■ Producto no accesible para facilitar el servicio
requerido.
Lo que no está cubierto por GE:
Todos los servicios de garantía los proporcionan nuestros Centros
de Reparación de Fábrica o nuestros técnicos Customer Care
®
autorizados. Para concertar una cita de reparación, en línea,
24 horas al día, visítenos en ge.com, o llame al 800.GE.CARES
(800.432.2737). Cuando llame para solicitar servicio, por favor
tenga a mano el número de serie y el número de modelo.
Pegue aquí su recibo.
Se requiere facilitar prueba
de la fecha de compra original
para obtener un servicio
bajo la garantía.
Garantía de GE para su estufa eléctrica.
Esta garantía se extiende al comprador original y cualquier comprador posterior de productos comprados para uso
residencial dentro des Estados Unidos. Si el producto está situado en un área que no dispone de servicio por parte
de un proveedor de servicio autorizado de GE, podría tener que hacerse cargo de los costes de envío o bien podría
solicitársele que lleve el producto a una centro de servicio de GE autorizado para realizar la reparación. En Alaska,
la garantía excluye el costo de envío o las visitas de servicio a su casa.
Algunos estados no permiten la exclusión o las limitaciones de daños incidentales o consecuenciales. Esta garantía
da derechos legales específicos, y usted podría tener otros derechos que variarán de estado a estado. Para saber
cuáles son sus derechos legales, consulte a la oficina de asuntos del consumidor local o la oficina del Prucurador
(Attorney General) en su localidad.
Garante: General Electric Company. Louisville, KY 40225
EXCLUSIÓN DE GARANTÍAS IMPLÍCITAS—Su único y exclusivo derecho es la reparación del producto, tal y como se
indica en esta Garantía limitada. Cualquier garantía implícita, incluyendo las garantías implícitas de comerciabilidad o
adecuación para un fin determinado, están limitadas a un año o el período de tiempo más breve permitido por la ley.
19
Soporte al consumidor.
Página Web de GE Appliances
ge.com
¿Tiene alguna pregunta sobre su electrodoméstico? ¡Pruebe la página Web de GE Appliances 24 horas al
día, cualquier día del año! Para mayor conveniencia y servicio más rápido, ya puede descargar los Manuales
de los Propietarios, pedir piezas o incluso hacer una cita en línea para que vengan a realizar una reparación.
Solicite una reparación ge.com
El servicio de expertos GE está a tan sólo un paso de su puerta. ¡Entre en línea y solicite su reparación
cuando le venga bien 24 horas al día cualquier día del año! O llame al 800.GE.CARES (800.432.2737)
durante horas normales de oficina.
Real Life Design Studio (Estudio de diseño para la vida real)
ge.com
GE apoya el concepto de Diseño Universal—productos, servicios y ambientes que pueden usar gente de
todas las edades, tamaños y capacidades. Reconocemos la necesidad de diseñar para una gran gama de
habilidades y dificultades físicas y mentales. Para más detalles cobre las aplicaciones de GE Diseño Universal,
incluyendo ideas de diseño para la cocina para personas con discapacidades, mire nuestra página Web hoy
mismo. Para personas con dificultades auditivas, favor de llamar al 800.TDD.GEAC (800.833.4322).
Garantías ampliadas ge.com
Compre una garantía ampliada y obtenga detalles sobre descuentos especiales disponibles mientras su garantía
está aún activa. Puede comprarla en línea en cualquier momento, o llamar al (800.626.2224) durante horas
normales de oficina. GE Consumer Home Services estará aún ahí cuando su garantía termine.
Piezas y accesorios ge.com
Aquellos individuos con la calificación necesaria para reparar sus propios electrodomésticos pueden
pedir que se les manden las piezas o accesorios directamente a sus hogares (aceptamos las tarjetas
VISA, MasterCard y Discover). Haga su pedido en línea hoy, 24 horas cada día o llamar por teléfono
al 800.626.2002 durante horas normales de oficina.
Las instrucciones descritas en este manual cubren los procedimientos a seguir por cualquier usuario. Cualquier
otra reparación debería, por regla general, referirse a personal calificado autorizado. Debe ejercerse precaución
ya que las reparaciones incorrectas pueden causar condiciones de funcionamiento inseguras.
Póngase en contacto con nosotros ge.com
Si no está satisfecho con el servicio que recibe de GE, póngase en contacto con nosotros en nuestra
página Web indicando todos los detalles así como su número de teléfono o escríbanos a:
General Manager, Customer Relations
GE Appliances, Appliance Park
Louisville, KY 40225
Registre su electrodoméstico ge.com
¡Registre su nuevo electrodoméstico en línea—cuando usted prefiera! El registrar su producto a tiempo le
proporcionará, si surgiera la necesidad, una mejor comunicación y un servicio más rápido bajo los términos de
su garantía. También puede enviar su tarjeta de registro pre-impresa que se incluye en el material de embalaje.
Impreso en los E-U
20