Loading ...
12
TIMER RESET
To completely erase all settings in the timer and return to the original factory settings, press and hold
the button for 7 seconds. The screen will display RESET.
You will need to press and hold the
button a second time to change the clock format.
Note: All programming will be lost when the timer is RESET. After RESET You may need to change
the time setting between 12-hour (AM/PM) and 24-hour (military time). See Step 4 for further
instructions.
Warning: Intended for outdoor use only. Severe electrical shock could result if water is sprayed into outlets or sources of electrical current. Do not use water more than 115°F (46°C). Do not use when the
ambient air temperature is less 40°F (4.5°C). When not in use, remove batteries, drain and store indoors away from freezing temperatures.
9
RAIN DELAY: “Prevent watering when rain is in the forecast.”
■ If there is rain in the forecast, you can temporarily suspend your watering program on both
zones for up to 7 days using the RAIN DELAY feature. After the selected delay has ended, your
watering program will automatically resume.
■ To set the Rain Delay, check to make sure the arrow on the screen is pointing to AUTO.
■ Hold the button until the word DELAY appears. Now press the button to set the duration
of the delay. You can reduce or deactivate the delay period with the button.
■ Once the delay time is selected, press the button
and wait for the number to stop flashing.
■ All other functions, including MANUAL WATERING
and OFF are on hold during RAIN DELAY. To cancel
RAIN DELAY, press the button until DELAY is
set to “0”.
■ Note: In the RAIN DELAY mode, the screen will
alternate between the current time and the
remaining delay time.
10
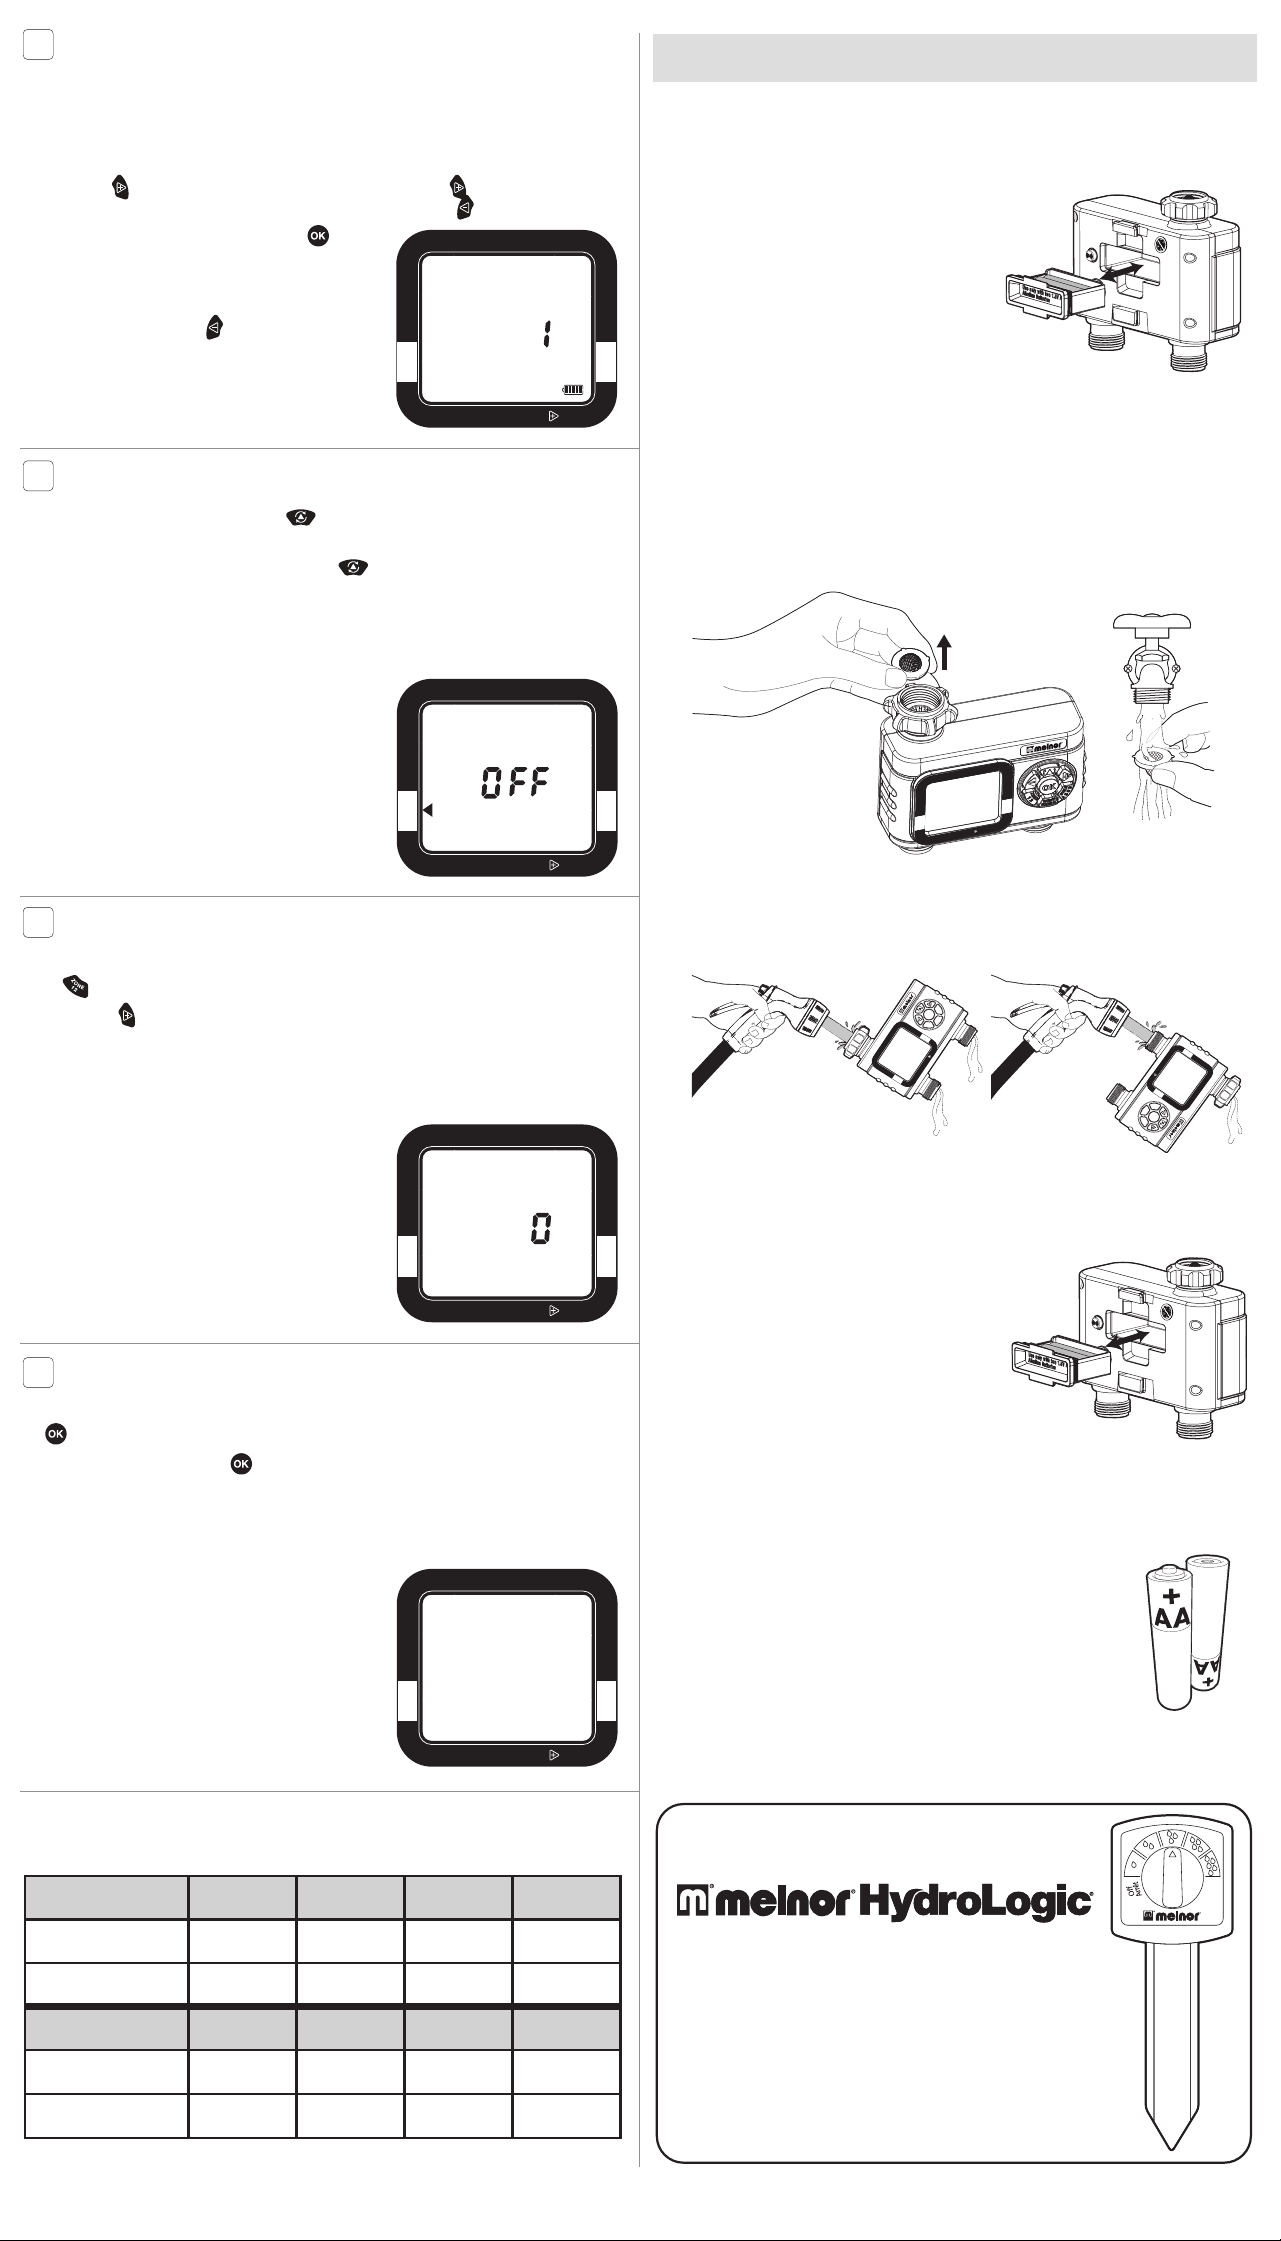
OFF MODE: “Stop watering for an extended period.”
■ To stop watering indefinitely, press the button until the arrow on the screen points to OFF.
The timer will not water while in this mode. The screen will display the word OFF.
■ To start watering automatically again, press the button until the arrow on the screen points
to the AUTO. The program will begin watering at the next previously scheduled START WATER
Time.
■ Note: Watering will be stopped for both zones when this feature is activated.
Works with
Soil Moisture Sensor (not included)
Prevent overwatering while conserving water by connecting
your timer to the HydroLogic® Soil Moisture Sensor. The easy
to set sensor monitors moisture in the soil, and will suspend
a watering cycle when it is raining or when the ground is
already wet. Adjust the dial to maintain just the right amount
of moisture for healthy lawns and gardens.
Learn more at www.melnor.com
CYCLE
HRS
DAY
MIN
RESET
MANUAL
AM
PM
TODAY
DELAY
TIME
WATER EVERY
1
2
3
4
SU
FR
SATH
WE
TUMO
A
B
C D
DAY
NEXT START
ZONE
START WATER
OFF
HOW LONG AUTO
RAIN DELAY, HOLD
WATER DAY
SET CLOCK
CYCLE
HRS
DAY
MIN
RESET
MANUAL
AM
PM
TODAY
DELAY
TIME
WATER EVERY
1
2
3
4
SU
FR
SATH
WE
TUMO
A
B
C D
DAY
NEXT START
ZONE
START WATER
OFF
HOW LONG AUTO
RAIN DELAY, HOLD
WATER DAY
SET CLOCK
CYCLE
HRS
DAY
MIN
RESET
MANUAL
AM
PM
TODAY
DELAY
TIME
WATER EVERY
1
2
3
4
SU
FR
SATH
WE
TUMO
A
B
C D
DAY
NEXT START
ZONE
START WATER
OFF
HOW LONG AUTO
RAIN DELAY, HOLD
WATER DAY
SET CLOCK
CYCLE
HRS
DAY
MIN
RESET
MANUAL
AM
PM
TODAY
DELAY
TIME
WATER EVERY
1
2
3
4
SU
FR
SATH
WE
TUMO
A
B
C D
DAY
NEXT START
ZONE
START WATER
OFF
HOW LONG AUTO
RAIN DELAY, HOLD
WATER DAY
SET CLOCK
PLANNING TABLE
ZONE 1 CYCLE A CYCLE B CYCLE C CYCLE D
Start Water (Time)
How Long (Minutes)
ZONE 2 CYCLE A CYCLE B CYCLE C CYCLE D
Start Water (Time)
How Long (Minutes)
11
MANUAL WATERING: “Fill a bucket, clean the car or wash the dog.”
■ To use a hose or other watering tool, simply press the (manual) button. Then using the
button select which zone you want to use.
■ Using the button, select the length of time you wish to water. After a few seconds, the
valve will open, and then automatically close when the selected time is reached.
Open Valve During Installation
Shaking during transportation can cause valves to be open. if this occurs, water may run continuously
through the valves during installation.
■ Turn the water off.
■ Remove the batteries. Wait for the screen to go blank.
Reinsert the batteries.
■ Note: Removing the batteries will not erase any
existing watering schedules.
■ Turn the water back on.
■ If the problem persists, turn off the water. Use the
Manual feature to open and close the valves 3
times.
Seasonal Storage
Freezing temperatures can cause water in the timer to
freeze and expand, damaging the timer.
■ At the end of the season or when there is frost in
the forecast, turn off the water and remove your
timer from the faucet.
■ Remove the batteries.
■ Be sure to store the timer indoors, away from
freezing temperatures.
Tips for Battery Life
■ Make sure to use fresh alkaline batteries.
■ Do not use rechargeable batteries.
■ Remove the batteries at the end of the season before storing.
■ Batteries should last about one season. A schedule with more frequent
watering times can cause the batteries to drain faster.
Cleaning Your Timer
You should clean your timer periodically. Debris or sediments commonly found in water can build up
in your timer.
■ Turn off the water. Remove the timer from the faucet and check that the filter washer is clear. If
you notice any debris, remove the filter washer and clean it out with water.
■ Activate the MANUAL mode by pressing the MANUAL button. Open the valves and spray
water through the valves and the faucet connection to flush out any built-up sediments or
debris.
((
((
RAIN DELAY, HOLD
WATER DAY START WATER
OFF
AUTO
HOW LONG
SET CLOCK
OK
O
N
/
O
F
F
Z
O
N
E
C
Y
C
L
E
M
A
N
U
A
L
A
B
C
D
1
2
WATER DAY START WATER
OFF
HOW LONG AUTO
SET CLOCK
RAIN DELAY, HOLD
OK
O
N
/
O
F
F
Z
O
N
E
C
Y
C
L
E
M
A
N
U
A
L
A
B
C
D
1
2
WATER DAY START WATER
OFF
HOW LONG AUTO
SET CLOCK
RAIN DELAY, HOLD
((
((
USEFUL TIPS