11-15/1
12” OSCILLATING FAN
12” VENTILADOR OSCILANTE
30.5 cm VENTILATEUR OSCILLANT
Model: ALE-FAN122
OPERATING INSTRUCTIONS
Please read and save these instructions
GUIDE D’UTILSATION
Prière de lire et de conserver ces instructions
INSTRUCCIONES DE OPERACIÓN
Lea y conserve este instructivo.
1
CAUTION
Read Rules and Instructions for Safe Operation
WARNINGS
1. Toreducetheriskofreorelectricshock,donotusethisfanwithanysolid-statespeedcontroldevice.
2. Thisappliancehasapolarizedplug(onebladeiswiderthantheother).Toreducetheriskofelectricshock,thisplug
isintendedtotinapolarizedoutletonlyoneway.Iftheplugdoesnottfullyintheoutlet,reversetheplug.Ifitstill
doesnott,contactaqualiedelectrician.Donotattempttodefeatthissafetyfeature.
3. This appliance is not intended for use by children.
4. Do not leave the fan running unattended.
SAFETY WARNINGS
1. Fan should be used under rated voltage.
2. Connectpoweronlyafterthefanisfullyassembled.
3. Neverinsertngersoranyotherobjectthroughthegrillwhenfanisrunning.
4. Unplugfromoutletwhennotinuse,whenmovingfanfromonelocationtoanother,beforeputtingonortakingoff
parts before cleaning.
5. Do not leave the fan running unattended.
6. Keepchildrenawayfromtheappliance.
7. ThisproductisintendedforhouseholduseONLYandnotforcommercial,industrialoroutdooruse.
8. Toprotectagainstelectricalshock,donotplacefaninwindows,immerseunitorcordinwaterorspraywithliquids.
9. Donotoperatethefaninthepresenceofexplosiveorammablefumes.
10. Donotplacethefanoranypartsnearanopename,cookingorotherheatingappliance.
11. Todisconnect,griptheplugandpullitfromthewalloutlet.Neveryankthecord.
12. Donothangormountfanonwallorceiling.
13. Donotoperateifthefanhousingisremovedordamaged.
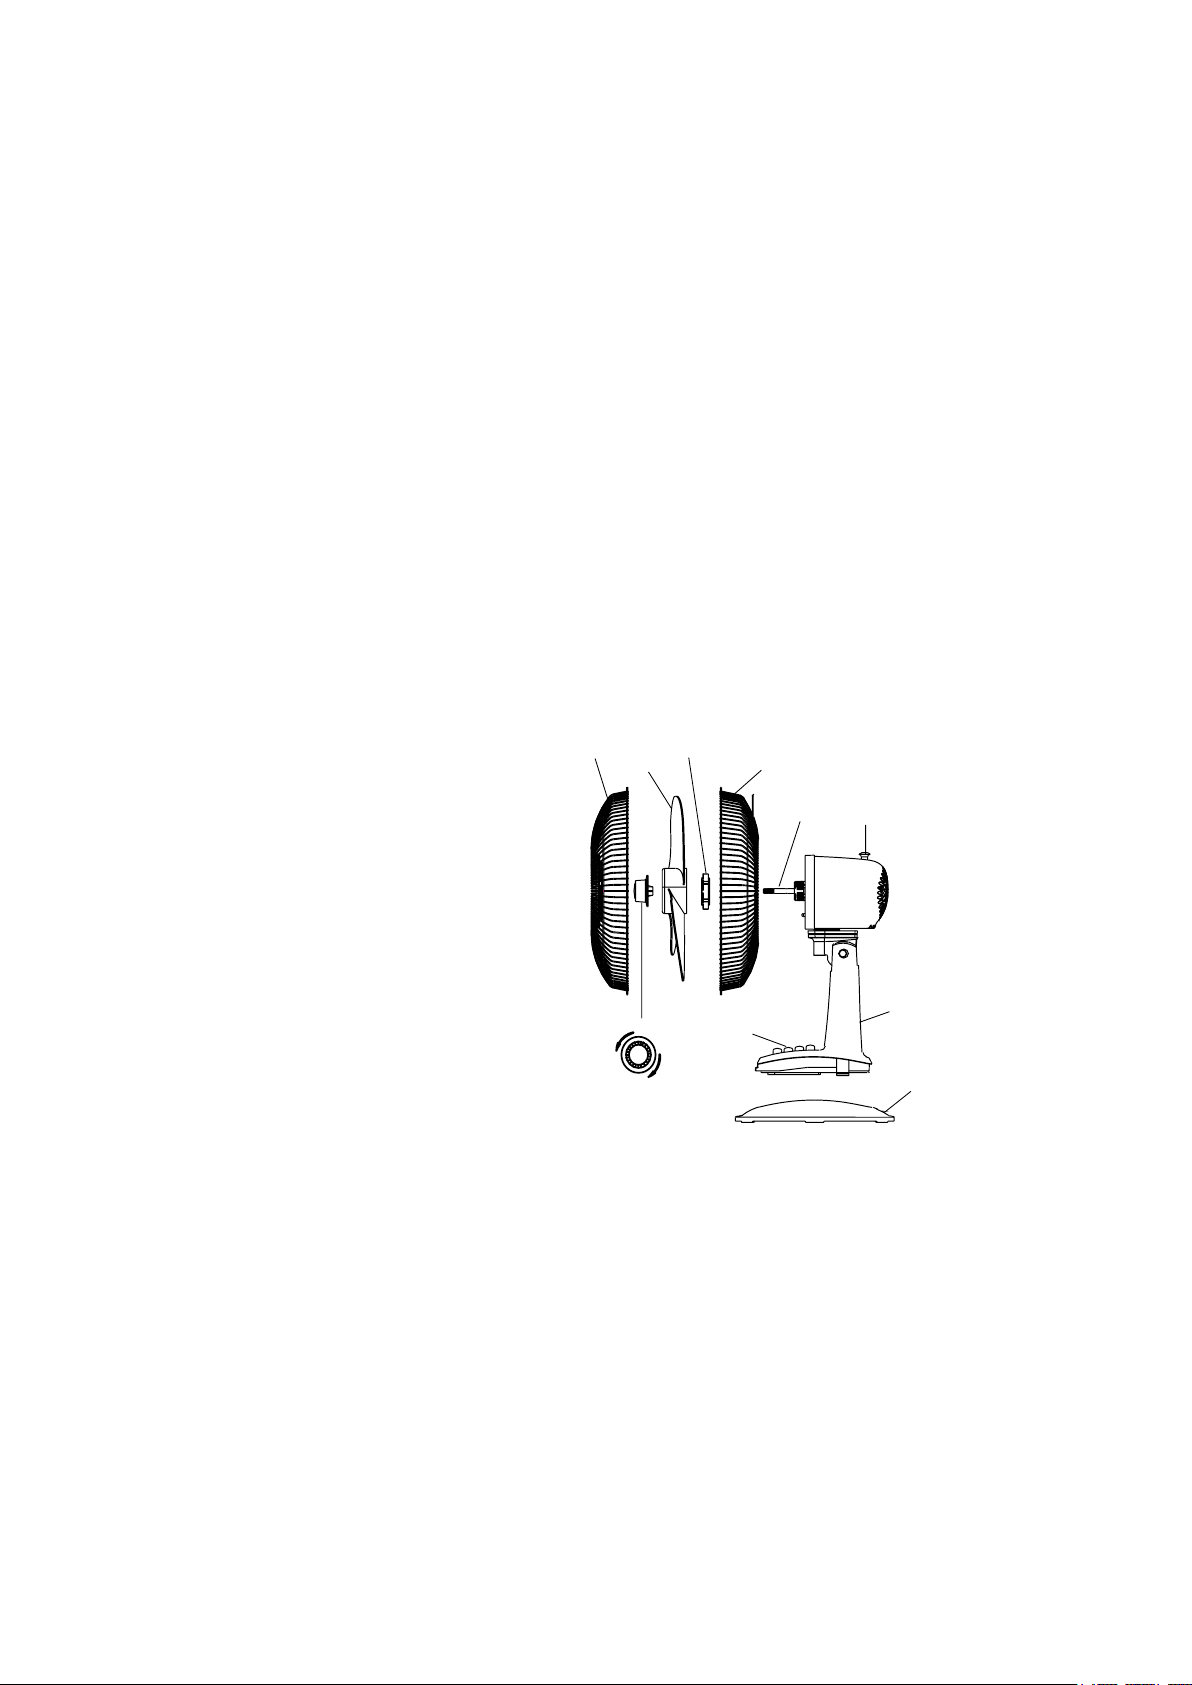
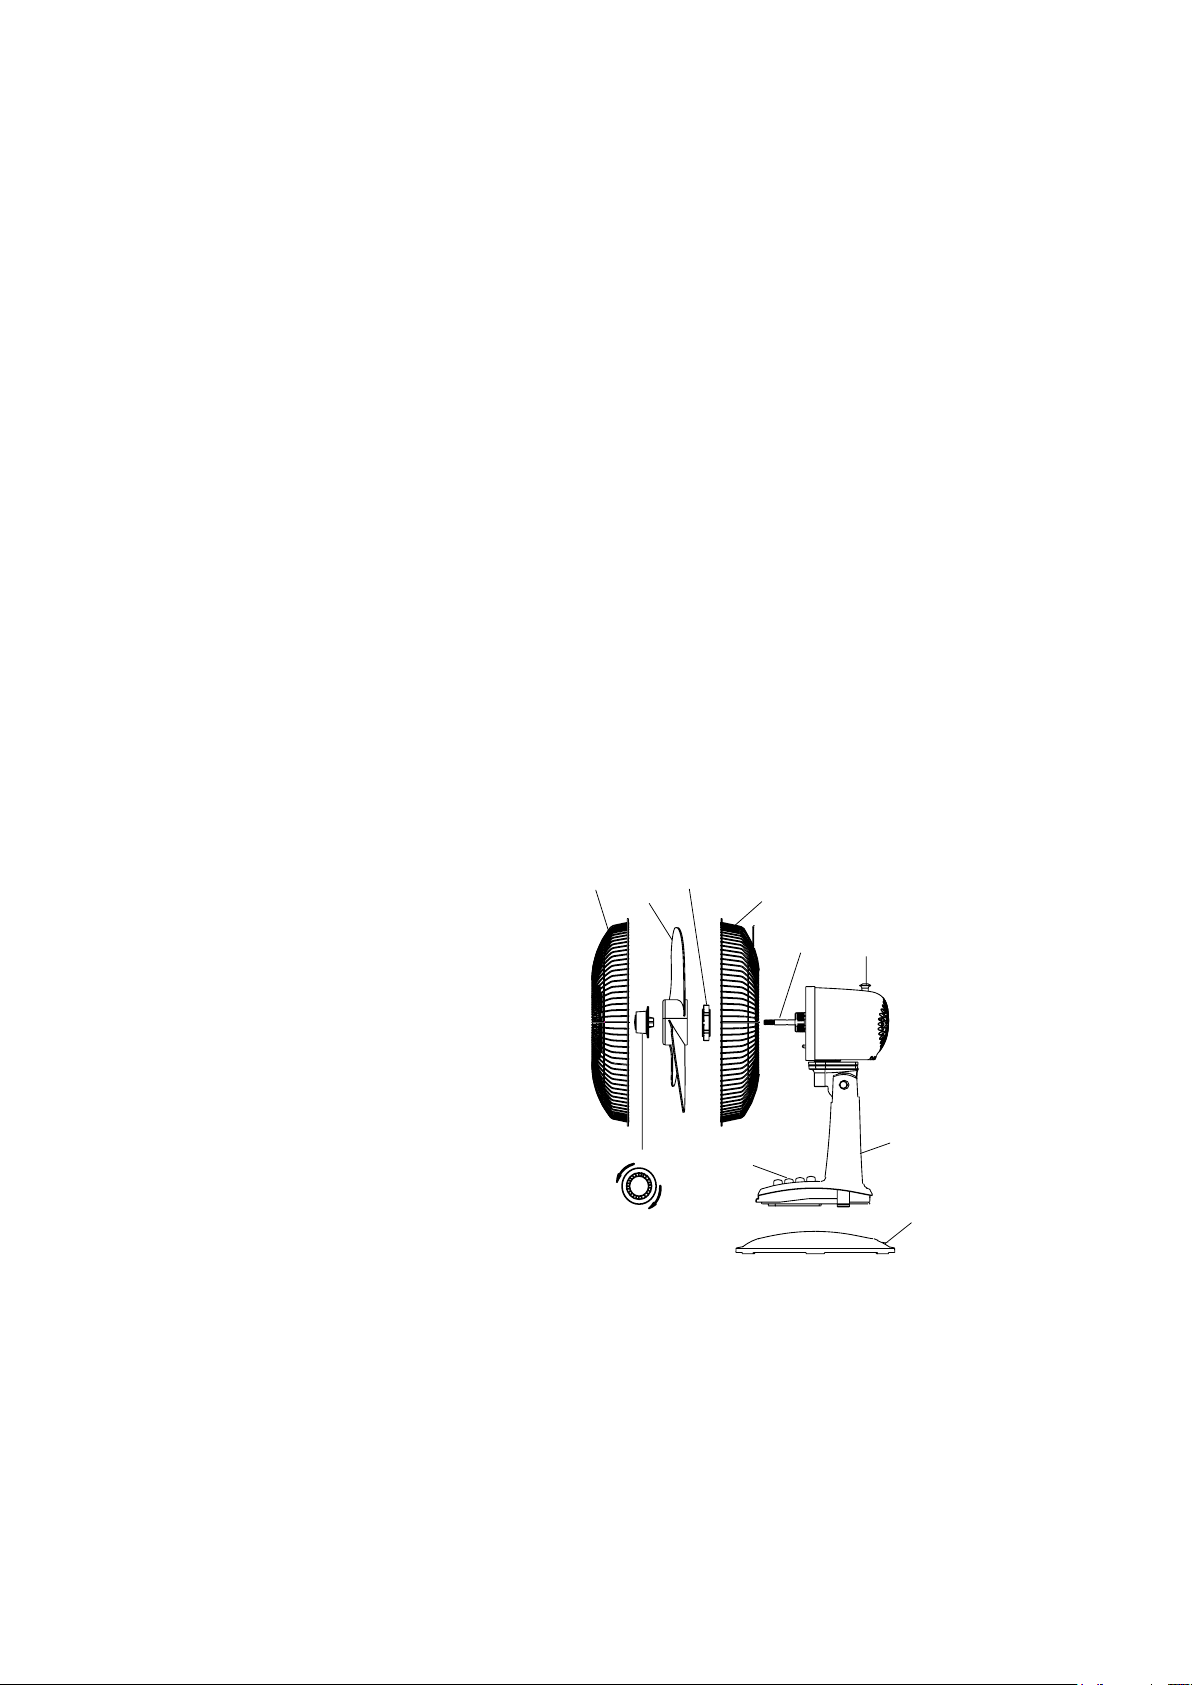
1. Front grille
2. Blade
3. Plastic nut
4. Rear grille
5. Motor shaft
6. OscillatingSwitch
7. Fan Body
8. Spinner
9. Base
10. Speed control keys
11. Tight
12. Loose
PARTS NAME
BASE ASSEMBLY
1. Detachscrewfrombaseofthefan.
2. Match locking tab to base and click into position.
3. Tightenthescrewinthebasetosecurethefantothebase.
ASSEMBLY OF BLADE AND GRILLS
1. TaketheSpinneroutfromthebagandremovetheplasticnutbyturningitcounterclockwise.
2. Setthereargrillintheproperpositionwiththehandleup.
3. Screwonplasticnuttightlytoattachgrill.
4. Installthebladeontotheshaftuntiltheretainingpintsintothenotchontheblade.
5. Screwspinnerontomotorshaftcounterclockwise.
6. Mountthefrontgrillandjoinbothgrillstogetherusingtheclips.
7. Removeanddiscardplasticsleeveonshaft.
9
1
2
3
4
5
6
7
10
8
12
11
2
OPERATING INSTRUCTIONS:
1. Useonlywithstandardpolarized120voltACwalloutlet
2. Adjustspeedusingthedialcontrolinbackofthefan:
0-Stop 1-Low 2-Medium 3-High
3. Tilt the angle by pushing the grill
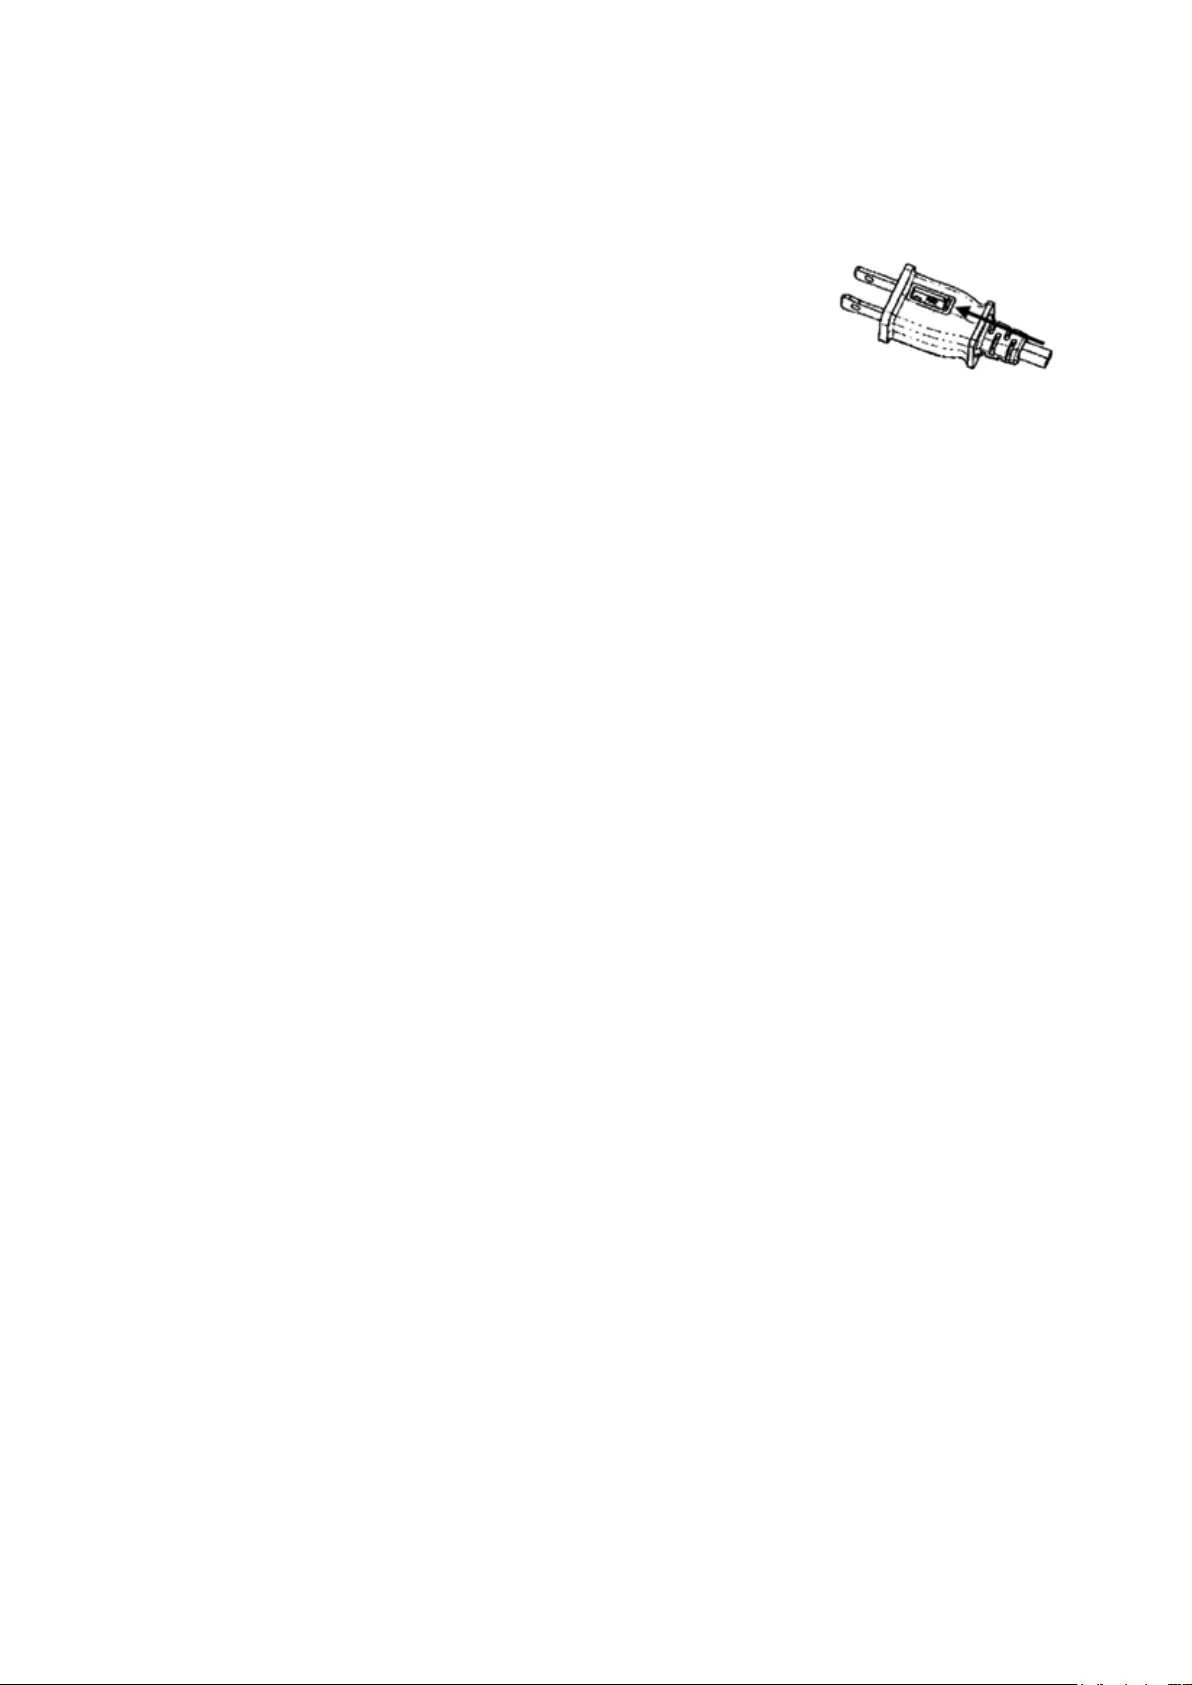
USER SERVICING INSTRUCTIONS
a) Grasptheplugandremovefromelectricalsocket.Donotunplugbypullingon
the cord.
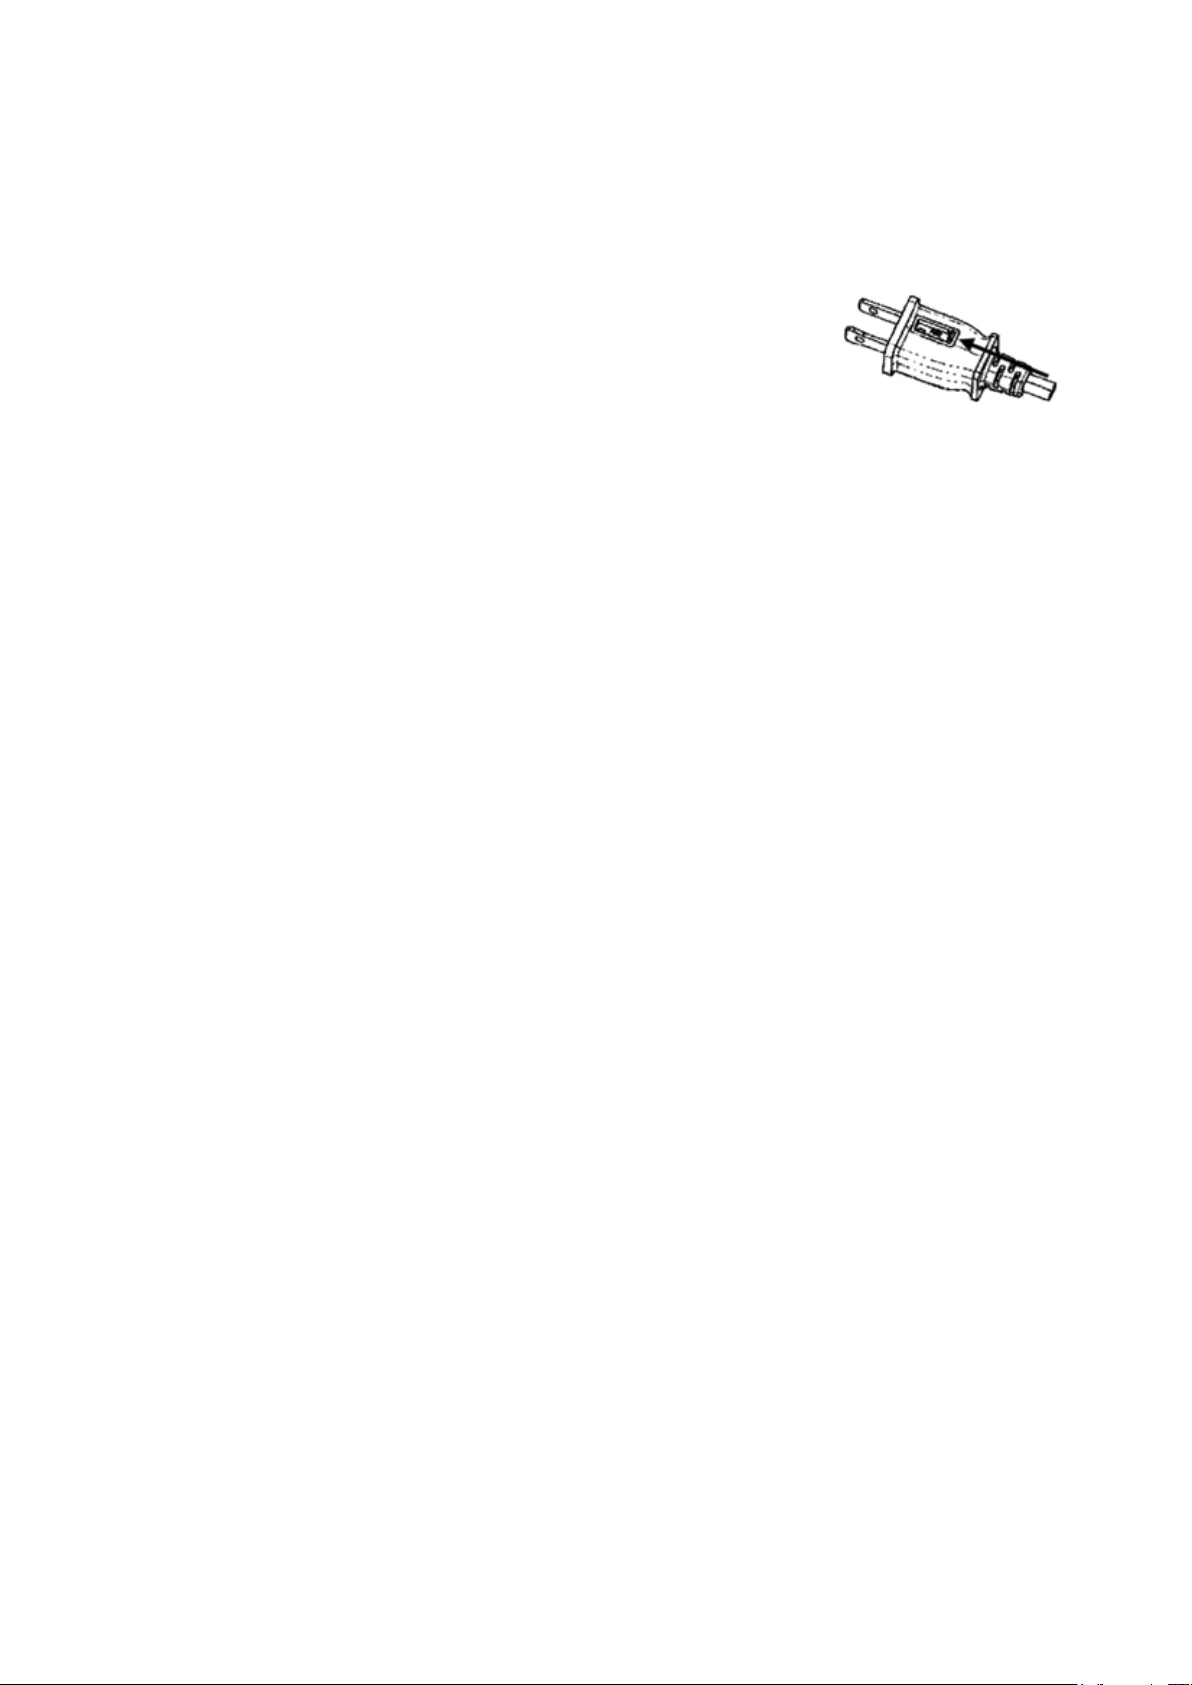
b) Toopenthefusecover,slidetheaccesscoverontopoftheplugtowardstheblades.
c) Removetheoldfusecarefully.Pushthefusefromtheothersideorturnfuseholder
overtoremovefuse.
d) Topreventriskofre,replaceonlywith2.5Amp,125Voltfuse.
e) Toclosethefusecover,slidetheaccesscoverbackontopoftheplug.
Notice:
1. Donotuseexcessiveforcewheninstallingthefuse.Thismaycausedamages.
2. Iftheunitdoesnotoperate,verifycorrectratingofthefuseandinstallationintheproperposition.
CLEANING/ MAINTENANCE INSTRUCTIONS:
WARNING: To avoid electrical shock and personal injury, always unplug from electrical outlet before cleaning/ maintenance.
1. Donotallowwatertodriponorenterthefan/motorhousing.
2. Onlyuseasoftclothwithmildsoapsolutionforcleaning.
3. Donotuseanyofthefollowingcleanser:gasoline,thinner,oranyotherammablechemicals.
TO CLEAN FAN BLADE OR GRILL:
WARNING: To avoid electrical shock and personal injury, always unplug from electrical outlet before cleaning.
1. Open the clips.
2. Liftgrill(1).
3. Removethenut(8).
4. Cleanthefan-bladebyusingasoftclothwithamildsoapsolution.Pleaseusecautionaroundthemotorhousingarea.
5. Donotallowthemotororotherelectricalcomponentstobeexposedtowater.Reassembleaftercleaningby
reversing above procedure.
6. Donottoletwaterorotherliquidentertheinsideofthemotor.
ELECTRICAL RATINGS
120VoltsAC,98Amps,60Hz
SERVICE & SUPPORT
Ifyouexperienceaproblemorhavequestionsregardingthisproduct,pleasecontactcustomerserviceat1-800-733-4000
3
ATTENTION
Lisezlesréglesetlesinstructionspourunfonctionnementsécuritaire.
AVERTISSEMENTS
1. Anderéduirelerisqued’incendieoud’electrocution,n’utilisezpasceventilateuravecaucundisposiliftransistorisé
de côntrllle de vilesse.
2. Cetappareilpossédeunechepolarisée(unelameestpluslargequel’autre).Anderéduirelerisqued’électrocution,cette
cheestconçuepours’insérerseulementd’unefaçondansuneprisepolarisée.SiIachenes’insèrepascomplètement
dansIaprise,inversezIache.Siellenes’insèretoujourspas,veuillezappelerunélectricianqualié.N’essayezpasde
neutralisercettecaractéristiquedesécurité.
3. Catappareiln’estpasconçupourêtreutilisépardesenfants.
4. Ne laissez pas fonctionner le ventilateur sans surveillance.
FONCTIONNEMENT SÉCURITAIRE:
1. Leventilateurdoitêtreutiliséselonsonvoltagenominal.
2. Branchezseulementdanslaprisequ’aprèsavoircomplètementassembléleventilateur.
3. N’insérezjamaislessdoigts,outoutautreàtraverslegrillagelorsqueleventilateur.
4. Débranchezleventilateurdelapriselorsqu’iln’estpasutilisé,qu’ilestdéplacéd’unendroitàunautre,avantd’installer
ou d’enlever des pièces et avant le nettoyage.
5. Ne laissez pas ventilateur fonctionner sans surveillance.
6. Tenez les enfants éloignés de l’appareil.
7. Ceproduitestdestinéàunusagedomestiqueuniquementetnonàdesnscommerciales,industriellesouune
utilisation en extérieur.
8. Pouréviterchocélectrique,neplacezpasdeventilateurenfenetre,nel’immergerpasdeventilateuroudecordon
dansdel’eauouvaporiserdesliquides.
9. Nepasfairefonctionnerleventilateurenprésencedevapeursinammablesouexplosives.
10. Neplacezpasleventilateuroutoutpièceàproximitéd’uneammenue,appareildecaissonouautreappareildechauffage.
11. Pourdéconnecter,tenezlachedecordonetretirez-ladelaprisemurale.Nejamaistirezsurlecordon.
12. Nepasmontezaumurouauplafond.
13. Nepasfairefonctionnersilecarterduventilateurestretiréoud’endommage.
9
1
2
3
4
5
6
7
10
8
12
11
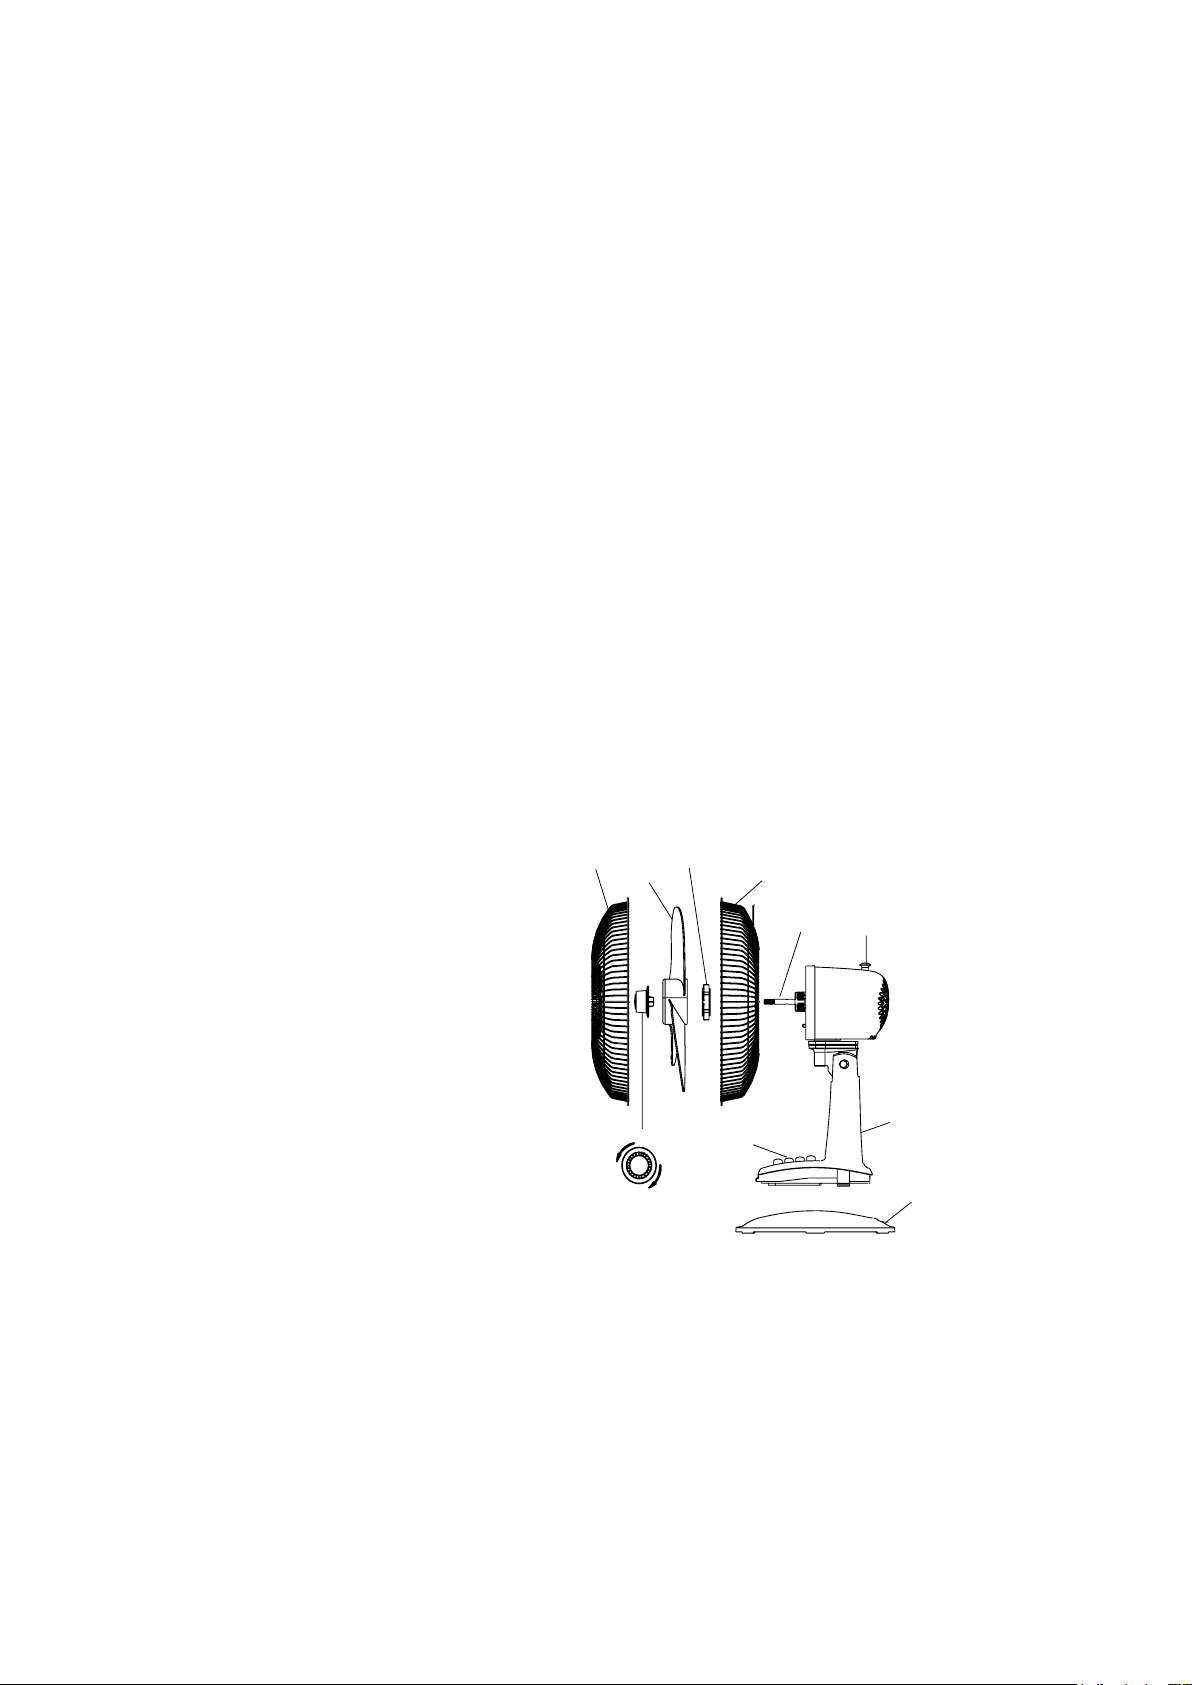
1. Grille avant
2. Hélice
3. Écroudeplastique
4. Grille arrière
5. Arbredumoteur
6. Bouton d’oscillation
7. Boîtier du ventilateur
8. Cône
9. Socle
10. Boutons de vitesse
11. Serrer
12. Desserer
NOMENCLATURE DES PIÈCES
ASSEMBLAGE DU PIED
1. Desserrer la vis du socle du ventilateur.
2. Alignerl’ongletdeverrouillagesurlepiedetcliquerenplace.
3. Serrerlavisdusoclepourxerleventilateurausocle.
ASSEMBLAGE DE L’HÉLICE ET DES GRILLES
1. Prendrelaleusehorsdesonemballageetretirezl’écrouenplastiqueenletournantdanslesensantihoraire.
2. Placerlagrillearrièresurlatêteduventilateur,lapoignéeverslehaut.
3. Visserl’écroudeplastiqueàfondandexerlagrillesurlatêteduventilateur.
4. Glisserl’héliceduventilateursurl’arbremoteurjusqu’àcequelatigederetenues’insèredansl’encochedel’hélice.
5. Visserlecônedanslesensanti-horairesurl’arbredumoteur.
6. Installerlagrilleavantetjoindrelesdeuxgrillesàl’aidedesagrafes.
7. Déposeretmettreaurebutlemanchonenplastiquesurl’arbre.
4
INSTRUCTIONS DE FONCTIONNEMENT
1. N’utilisezseulementqu’avecuneprisemuralepolariseestandardde120volts.
2. Réglezlavitesseaumoyenducardanderéglagesituéàl’arriéreduventilateur:
0-Arrêt 1-Faible 2-Moyen 3-Élevé
3. Inclinez L’angle en poussant sur le grillage.
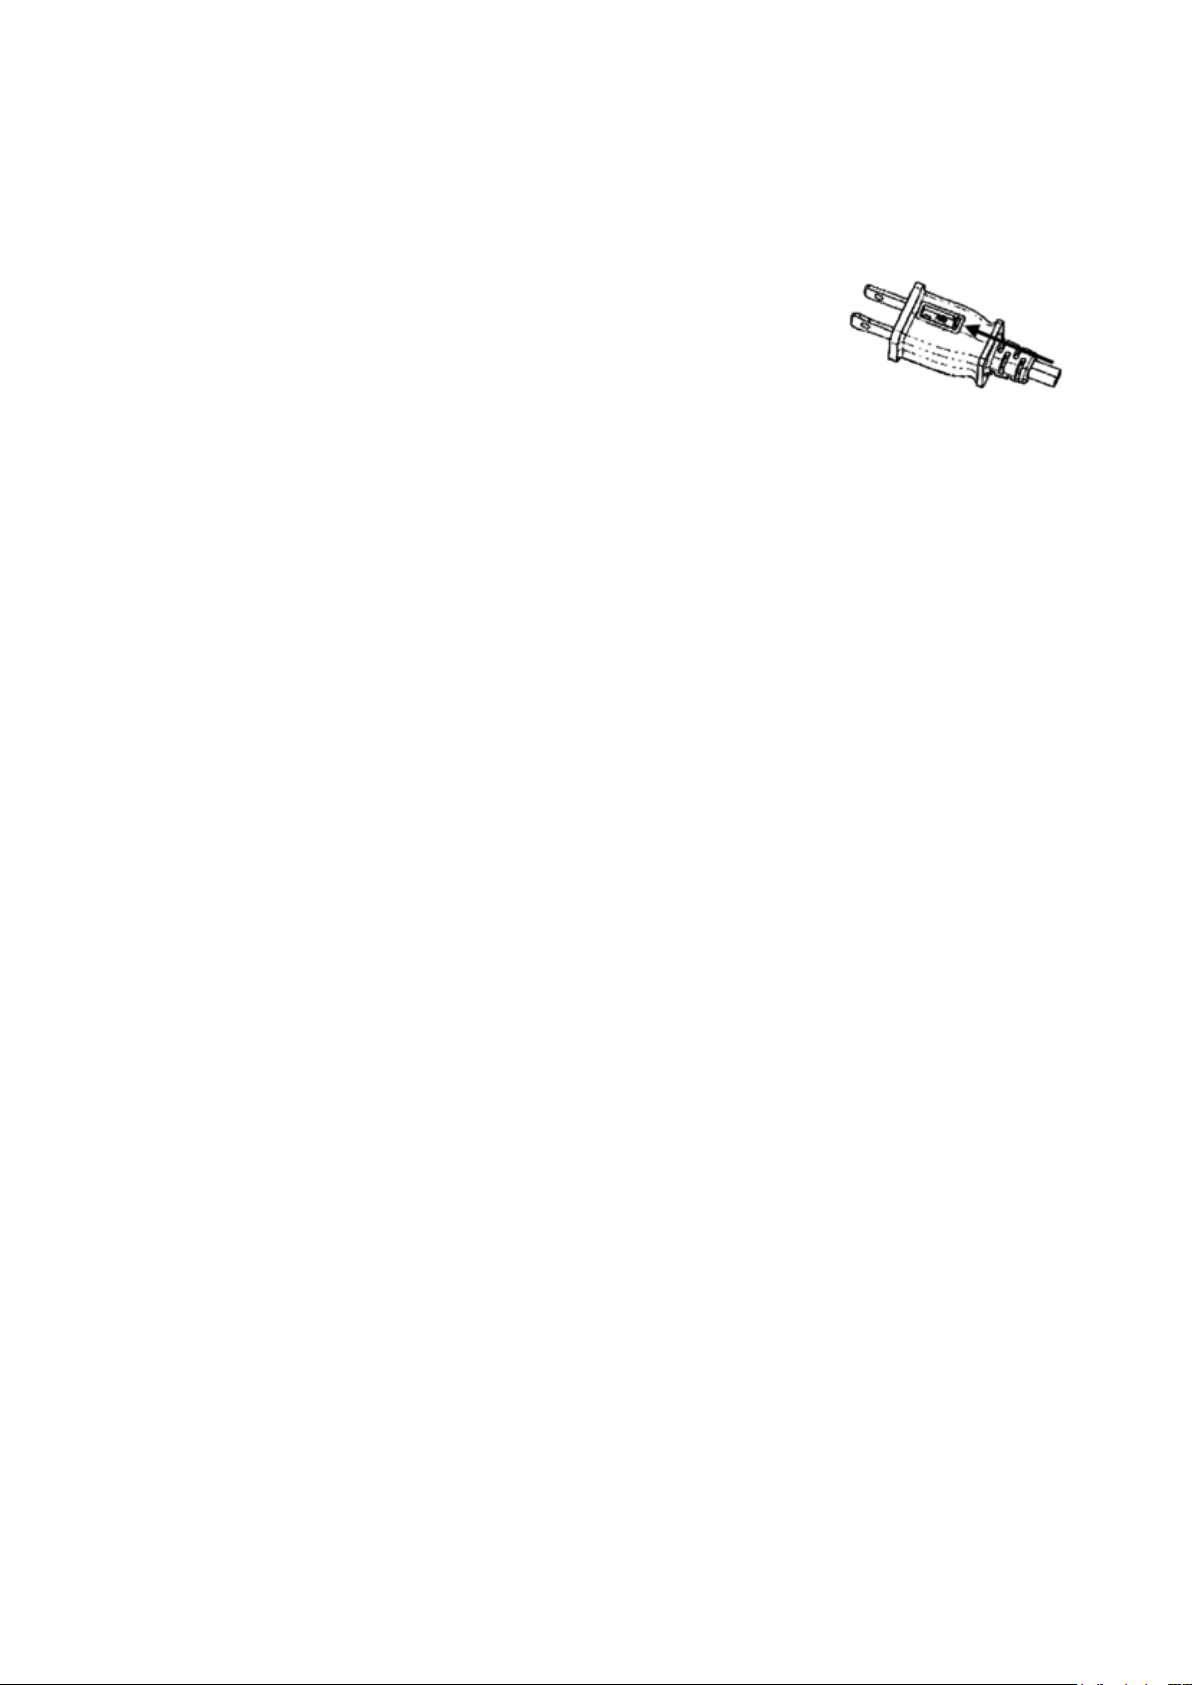
INSTRUCTIONS D’ENTRETIEN DESTINÉES À L’UTILISATEUR
a) BienprendreIacheetIaretirerdeIaprise.Nejamaisdébrancherentirantsurle
cordon.
b) Ouvrirlecouvercledufusible.Faireglisserpourl’ouvrirlecouvercledonnantaccès
aufusible,situésurledessusdeIachedebranchementendirectiondespales.
c) Retirerlefusibleenusantdeprécaution.Pousserlefusibledel’autrecôtéou
tourner le porte-fusible pour retirer le fusible.
d) Risqued’incendie.Neremplacerlefusiblequeparunfusiblede2,5ampères,125volts.
e) Fermerlecouvercledufusible.Faireglisserpourlefermerlecouvercled’accèsaufusiblesurledessusdeIache
debranchement.
Remarque:
1. Nepasutiliseruneforceexcessivelorsdel’installationdufusible.Celapeutcauserdesdommages.
2. Sil’uniténefonctionnepas,vérierlecorrectcalibredufusibleetl’installationdanslacorrecteposition.
INSTRUCTIONS DE NETTOYAGE/ENTRETIEN
MISE EN GARDE: An d’éviter l’électrocution et les blessures personnelles, débranchez toujours l’appareil de la prise
de courant avant d’effectuer le nettoyage/ entretien.
1. Assurez-vousdenepaslaisserdel’eaus’égoutteroupénétreràl’intérieurduboîtierdumoteur.
2. Assurez-vousd’utiliserunlingedouximbibéd’unesolutionfaibledesavon.
3. N’utilisezaucundesproduitssuivantscommenettoyant:essence,diluantoutousautresproduitschimiquesinammables.
POUT NETTOYER LES PALES OU LE GRILLAGE DU VENTILATEUR
MISE EN GARDE: An d’éviter l’électrocution et les blessures personnelles, débranchez toujours l’appareil de la prise
de courant avant d’effectuer le nettoyage.
1. Ouvrez l’attache.
2. Retirezlegrillage(1).
3. Enlevezl’écrou(8).
4. Nettoyezlespalesduventilateuràl’aidelingedouxhumide,avecousansunesolutionfaibledesavon.Priére
d’êtreprudentprêsduboîtierdumoteur.
5. Nepermettezpasquelemoteurouquetousautrescomposantsélectriquessoientexposésàl’eau.Ré-assemblez
aprés le nettoyage en inversant less procédures précédentes.
6. Assurez-vousdenepaslaisserdel’eauoud’autresliquidespênétreràl’intérieurdumoteur.
CARACTÉRISTIQUES ÉLECTRIQUES
120VoltsAC,98Amps,60Hz
ENTRETIEN ET SUPPORT
Sivousrencontrezunproblèmeouavezdesquestionsconcernantceproduit,veuillezcontacterleserviceclientèleau
1-800-733-4000
5
PRECAUCIÓN
Lealasinstruccionesyreglasparaunaoperaciόnsegura.
ADVERTENCIAS
1. Parareducirelriesgodeincendioochequeeléctrico,noutiliceesteventiladorconotrosaparatosdecontrol
estático de velocidad.
2. Esteelectrodomésticotieneunenchufepolarizado(unaterminalesmásanchaqueIaotra).Parareducirelriesgo
dechequeeléctrico,sόlohayunaformadeconectarloauntomacorrientepolarizado.Sielenchufenoseajusta
perfectamentealtomacorriente,inviertaelenchufe.Siaúnasínoseajusta,acudaconunelectricistacalicado.
Nointentealterarestacaracterísticadeseguridad.
3. Este aparato no está diseñado para su uso por niños.
4. Nodejeelventiladorenfuncionamientosinatenciόn.
REGLAS PARA UNA OPERACIÓN SEGURA
1. Elventiladordeberáutilizarseconformeallvoltajenominal.
2. Conectealsuministroeléctricoúnlcamentedespuésdehaberensambladoporcompletoelventilador.
3. Jamásinsertelosdedosocualquierotroobjetoatravésdelarejillamientraselventiladorestéenfuncionamiento.
4. Desconéctelocuandonoestéenuso,almoverlodeunlugaraotro,antesdecolocartoretirarcualquieradesus
partes,yantesdesulimpieza.
5. Nodejeelventiladorenfuncionamientosinatenciόn.
6. Mantengaalosniñosalejadosdelaparato.
7. Esteproductoestádiseñadoparausodomésticosolamenteynoparacomercial,industrialoalairelibre.
8. Paraprotegersecontraunchoqueeléctrico,nocoloqueelventiladorenventanas,sumerlalaunidadnicableen
aguaorociarlaconlíquidos.
9. Noaccionaelventiladorenpresenciadevaporesexplosivosoinammables.
10. Nocoloqueelventiladorocualquierpartecercadeunallamaabierta,cocinauotroaparatodecalefacción.
11. Paradesconectar,sujeteelenchufeytiredelapared.Nuncatiredelcable.
12. Nocuelguedelventiladorentechoomontajeloenpared.
13. Noutilicesilacarcasadelventiladorestáremovidaodañada.
1. Guarda frontal
2. Aspa
3. Tuerca plástica
4. Guarda trasera
5. Ejedelmotor
6. Oscilador
7. Cuerpo del ventilador
8. Buje
9. Chasis
10. Teclas de control de la velocidad
11. Apretar
12. Aojar
PARTES
9
1
2
3
4
5
6
7
10
8
12
11
ENSAMBLADO DE LA BASE
1. Retire el tornillo de la base del ventilador.
2. Coloquelalengüetadesujecióncorrespondientealabase,enposición(debehacerclic)
3. Aprieteeltornilloenlabaseparajarelventiladoralamisma.
ENSAMBLADO DE LAS ASPAS Y LA REJILLAS
1. Sacalahélicedelabolsayretiralatuercaplásticagirándolacontrarioalasmanecillasdelreloj.
2. Coloquelarejillatraseraenposición,conelasahaciaarriba.
3. Atornillelatuercaplásticarmementeparajarlarejilla.
4. Instalelasaspasalejehastaqueelpinderetenciónencajeenlamuesca.
5. Atornilleelbujealejedelmotorensentidocontrarioaldelasagujasdelreloj.
6. Montelarejillafrontalyunaambasrejillasusandolosclips.
7. Quitarydesecharelmanguitodeplásticoeneleje.
6
INSTRUCCIONES DE OPERACIÒN
1. Utilícesesóloconunenchufedeparedpolarizadoestándarde120voltios.
2. Adjustelavelocidadconelcontroldeesferaenlaparteposteriordelventilador:
0-Alto 1-Baja 2.-Media 3.-Alta
3. Ajusteelángulodeinclinaciónpresionandolarejilla.
INSTRUCCIONES DE SERVICIO DEL USUARIO
a) Agarreelenchucheyretírelodeltomacorrienteuotrodispositivodetomacorriente.
No lo desenchufe tirando el cable.
b) Abralatapadefusibles.Deslicelacubiertadelaccesoalosfusiblesencimadela
partesuperiordelaclavijahacialashojas.
c) Retireelfusibleconcuidado.Presioneelfusibledelotroladoodévueltaal
portafusiblesparaquitarelfusible.
d) Riesgodeincendio.Reemplaceelfusiblesóloporunfusiblede2,5amperios,125voltios(proporcionadoconel
producto).
e) Cierrelatapadefusibles.Deslicelacubiertadeaccesodefusibleshastacerrarencimadelapartesuperiordelaclavija.
Nota:
1. No use fuerza excesiva al instalar el fusible. Esto puede causar daños.
2. Silaunidadnofunciona,vericarlacorrectavaloracióndelacajadefusiblesylainstalaciónenlaposiciónadecuada.
INSTRUCCIONES DE LIMPIEZA O MANTENIMIENTO
ADVERTENCIA: Para evitar un choque eléctrico o lesiones personales, siempre desconecte el aparato del suministro
eléctrico antes de su limpieza o mantenimiento.
1. Nopermitaquecaigaoentreaguaalinteriordelventilador.
2. Asegúresedeutilizaruntraposuaveyhumedecidoconunasoluciόnconjabόnsuave.
3. Noutilicelosiguienteslíquidosparalalimpiezadelaparato:gasolina,diluyenteocualquierotroquimicoinamable.
PARA LIMPIAR EL ASPA o LA REJILLA
ADVERTENCIA: Para evitar un choque eléctrico o lesiones personales, siempre desconecte el aparato del suministro
eléctrico antes de su limpieza.
1. Abra el seguro.
2. Levantelarejilla(1).
3. Retirelatuerca(8).
4. Limpieelaspautilizandountraposuavebyhúmedoconosinunasolucióndejabónsuave.
Tengaprecauciónallimpiareláreaalrededordelconnamientodelmotor.
5. Nopermitaqueelmotoruotroscomponenteselêctricosquedenexpuestosalagua.Vuelvaaensamblardespués
delalimpiezainvirtiendoelordendelprocedimientoanterior.
6. Asegúresedeevitarqueelaguaocualquierotroliquidoentrenalmotor.
CLASIFICACIONES ELÉCTRICAS
120voltiosAC,98amperios,60Hz
SERVICIO Y SOPORTE
Enelcasodeunagarantíadereclamación,póngaseencontactoconservicioalclientea1-800-733-4000.