Dual .Fuel Rarlge
@
Welcome .................................. 2
Important Safety Instructions .. 3-6
Features at a Glance ............. 7
Before Setting
Surface Controls .................... 8
Setting Surface Controls ....... 9
Before Setting
Oven Controls ................. 10-11
Setting Warm & Serve Drawer Controls
(Some mode(s) .................................................. 11-12
Setting Oven Controns ......... 12
Cooking Jnformations ..... 13-14
Care & CWeaning .............. 15-20
Adjusting Your
Oven Temperature ................ 20
Before You Call
SoBations to
Commor,ProbI_m,....................... 21-22
Visit the Frigidaire Web Site at:
http://www.frigidaire.com
Warranty ................ Back Cover
READ AND SAVE THESE INSTRUCTIONS
318203851 (0502) Rev° A
Welcome & Congratulations
Questions?
1°800°944°9044
(United States_
1°866°294°991 t
(Canada)
Phase attach sales receipt
here for future reference.
Congratulations on your purchase of a new appliance! At ElectroJux Home
Products, we are very proud of our product and are completely committed to
providing you with the best service possible, Your satisfaction is our number one
priority
We know you'll enjoy your new appliance and ThankYou for choosing our product,
We hope you consider us for future purchases,
PLEASE CAREFULLY READ AND SAVE THESE iNSTRUCTiONS
This Use & Care Manual contains general operating instructions for your appliance
and feature information for several models, Your product may not have all the
described features, The graphics shown are representative,The graphics on your
appliance may not look exactly like those shown, These instructions are not
meant to cover every possible condition and situation that may occur, Common
sense and caution must be practiced when installing, operating and maintaining
any appliance,
Ptease record your modeJ and seriaJ numbers beJow for future reference.
Model Number:
Serial Number:
Purchase Date:
Product Registration
Register Your Product
The PRODUCT REGISTRATION CARD should
be filled in completely, signed and returned to
Electrelux Home Products,
Versi6n en espaSom
Si desea ebtener una copia en espa_hol
de este Manual del Usuario, sirvase
escribir a la direcci6n que se incluye a
continuaci6n, Solicite la P/N
318203851 E,
Spanish Use & Care Manual
Electrolux Home Products
P, O, Box 212378
Augusta, GA 30917
Seda P ate Location
Serial Plate
@ 2005 Ebctrolux Canada Corp.
All rights reserved
Printed in United States
Important safety lnstruct ons
Read aH instructions before using this appliance.
Save these instructions for future reference.
This manuaUcontains important safety symbob and instructions, PUease pay attention to these symbob and follow all
This symbol Will he!p alert YOUt° situations that may cause serious bodily harm, deat h or property damage.
This symb ol w iHhe!p ab rt you to situati0ns that may cause b0di!y !njury or pr0perty damagel
if the information in this manuaJ is not
followed e×actly, a fire or expJosion may result causing
property damage, personaJ injury or death.
FOR YOUR SAFETY:
-- Do not store or use gasoline or other flammabb
vapors and tiquids in the vicinity of this or any other
appliance.
-- WHAT TO DO IF YOU SMELL GAS:
, Do not try to Jight any appJiance.
, Do not touch any electrical switch; do not use any
phone in your building.
o lmmediatelycaH your gas supplier from a neighbor's
phone. Follow the gas suppJier's instructions.
o If you cannot reach your gas supplier, call the fire
department.
-- Installation and service must be performed by a
qualified installer, servicer or the gas supplier.
* AH rangescan tip.
, injury to persons couJd resuJt.
, Install anti-tip device packed with range.
, SeelnstaHationinstructions.
tipping, the range must be secured
by properJy installed anti-tip
bracket(s) provided with the range.
To check if the bracket(e) is installed
properly, remove the tower paneJ or
storage drawer and verify that the
anti-tip bracket(s) is engaged. Refer
to the Installation Instructions for
proper anti-tip bracket(s)
installation.
Remove aH tape and packaging before using the
range. Destroy the carton and plastic bags after
unpacking the range, Never allow children to play with
packaging material,
Proper Installation-Be sure your appliance is property
installed and grounded by a qualified technician in
accordance with the National Fuet Gas Code ANSI
Z223.1 Jatest edition, and National EJectricaJ Code
ANSl/NFPA No. 70 tatest edition, and tocaJ code
requirements. Install only per installation instructions
provided in the literature package for this range,
Ask your dealer to recommend a qualified technician and an
authorized repair service, Know how to disconnect the elec-
trical power to the appliance at the circuit breaker or fuse
box in case of an emergency,
User servicing--Do not repair or repJace any part of
the appJiance untess specifically recommended in
the manuaJs. All other servicing should be done only by
a qualified technician, This may reduce the risk of
personal injury and damage to the range,
o Never modify or alter the construction of a range by
removing teveHng Jegs, paneJs, wire covers, anti-tip
brackets/screws, or any other part of the product.
Stepping, teaning or sitting on the door
or drawer of this range can result in serious injuries
and aJso cause damage to the range. Do not allow
children to climb or play around the range, The weight of a
child on an open door may cause the range to tip, resulting
in serious burns or other injury,
Do not use the oven or warm & serve
drawer (if equipped) for storage.
Do not store items of interest to children
in the cabinets above a range. Children climbing on the
range to reach items could be seriously injured.
Never use your appliance for warming up
or heating up the room.
lmpartant safety Instrut tions
o Storage in or on Appliance--Flammable materials
should not be stored in an oven, near surface burners
or in the drawer (if equipped). This includes paper,
pUastb and cbth items, such as cookbooks, pUastbware
and towels, as well as flammabb liquids, Do not store
explosives, such as aerosol cans, on or near the appliance,
Flammable materials may explode and result in fire or
property damage,
Do not leave children aJone--Children should not be
teft aJone or unattended in the area where appliance
is in use. They should never be allowed to sit or stand
on any part of the appliance,
DO NOTTOUCH SURFACE BURNERS, AREAS NEAR
THESE BURNERS, OVEN BURNERS OR INTERIOR
SURFACES OF THE OVEN. Both surface burners and
oven burners may be hot even though flames are not
visible, Areas near surface burners may become hot
enough to cause burns, During and after use, do not
touch, or let clothing or other flammable materials touch
these areas until they have had sufficient time to cool,
Among these areas are the cooktop, surfaces facing the
cooktop, the oven vent openings and surfaces near
these openings, oven door and window,
Wear proper apparel--Loose-fitting or hanging
garments should never be worn white using the
appJiance. Do not let clothing or other flammable
materials contact hot surfaces,
o Do not use water or flour on grease fires--Smother
the fire with a pan tid, or use baking soda, a dry
chemicaJ or foam-type extinguisher.
o When heating fat or grease, watch it cJoseJy. Fat or
grease may catch fire if allowed to become too hot,
in case of fire or gas teak, be sure to
turn off the main gas shutoff valve.
Use onJy dry potholders--Moist or damp pothoiders
on hot surfaces may result in burns from steam. Do
not let potholders touch hot heating burners, Do not
use a towel or other bulky cloth instead of a potholder,
o Do not heat unopened food containers--Buildup of
pressure may cause container to burst and result in
injury.
o Remove the oven door from any unused range if it
is to be stored or discarded.
IMPORTANT--Do not attempt to operate the oven
during a power faiJure, if the power falls, aJways turn
off the oven, If the oven is not turned off and the power
resumes, the oven may begin to operate again, Once the
power resumes, reset the clock and oven function,
Electronic controllers can be damaged
by cotd temperatures. When you use your appliance
for the first time, or if it has not been used for a long
period of time, make sure that it has been exposed to a
temperature above 0°0/32°F for at teast 3 hours before
connecting it to the power supply.
mMPORTANT mNSTRUCTmONS FOR USmNG
YOUR COOKTOP
Use proper flame size--Adjust flame size
so it does not extend beyond the edge of the utensil, The
use of undersized utensils will expose a portion of the
burner flame to direct contact and may result in ignition of
clothing, Proper relationship of utensil to flame will also
improve efficiency,
Do not use stove top grills on the burner
grates of sealed gas burners, if you use a stove top grill
on a sealed gas burner, it will cause incomplete
combustion and can result in exposure to carbon
monoxide levels above allowable current standards. This
can be hazardous to your health.
o Know which knob controJs each surface burner.
Place a pan of food on the burner before turning it on,
and turn the burner off before removing the pan,
o AJways turn the knob to the full LITE position when
igniting top burners. Visually check that burner has lit,
Then adjust the flame so it does not extend beyond the
Use proper pan size. This appliance is equipped with
one or more surface burners of different sizes, Select
utensils having fiat bottoms large enough to cover the
surface burner, The use of undersized utensils will
expose a portion of the surface burner to direct contact
and may result in ignition of clothing, Proper relationship
of utensil to the surface burner will also improve
efficiency,
Utensil handles should be turned inward and not
extend over adjacent surface burners, To reduce the
risk of burns, ignition of flammable materials, and
spillage due to unintentional contact with the utensil, the
handle of the utensil should be positioned so that it is
turned inward, and does not extend to adjacent surface
burners.
NeverJeavesurfaceburnersunattendedathighheat
settings--Believerscausesmokingandgreasy
spHUoversthatmayignite,orapanthathasboileddry
maymeUt.
Protectiveliners--DonotuseaUuminumfoiltoHne
surfaceburnerpans,orovenbottom,exceptas
suggestedinthismanualUmproperinstallationofthese
HnersmayresuUtin riskof eUectricshock,orfire.
Glazedcookingutensils--OnUycertaintypesofgUass,
gUass/ceramic,ceramic,earthenware,orothergUazed
utensilsaresuitableforrangetopservicewithout
breakingduetothesuddenchangeintemperature.
Checkthemanufacturer'srecommendationsforcooktop
use,
o Do not use Searing Grilt on the cooktop. The searing
grill is not designed for use on the cooktop. Doing so
may result in a fire,
Do not use decorative surface burner covers, If a
burner is accidentally turned on, the decorative cover
will become hot and possibly melt. Burns will occur if
the hot covers are touched. Damage may also be done
to the cooktop or burners because the covers may
cause overheating. Air will be blocked from the burner
and cause combustion problems.
FOR GLASS COOKTOPS ONLY
o Do not clean or operate a broken cooktop--lf cooktop
should break, cleaning solutions and spillovers may
penetrate the broken cooktop and create a risk of
electric shock, Contact a qualified technician
immediately,
o Clean cooktop glass with caution--If a wet sponge or
cloth is used to wipe spills on a hot cooking area, be
careful to avoid a steam burn. Some cleaners can
produce harmful fumes if applied to a hot surface.
o Avoid scratching the cooktop glass with sharp
objects.
mMPORTANT mNSTRUCTmONS FOR USING
YOUR OVEN
o Use care when opening oven door or warm & serve
drawer (if equipped}--Stand to the side of the range
when opening the door of a hot oven. Let hot air or
steam escape before you remove or replace food in the
oven/warm & serve drawer.
Keep oven vent ducts unobstructed. The oven vent is
located at the center rear of the cooktop. Touching the
surfaces in this area when the oven is operating may
cause severe burns. Also, do not place plastic or heat-
sensitive items on or near the oven vent. These items
could melt or ignite.
PJacement of oven/warm & serve drawer (if
equipped) racks. Always place oven racks in desired
location while oven/warm & serve drawer (if equipped) is
cool. if rack must be moved while oven is hot use
extreme caution. Use potholders and grasp the rack
with both hands to reposition. Do not let potholders
contact the hot heating elements in the oven/warm &
serve drawer (if equipped). Remove all utensils from the
rack before moving.
o Do not use the broiler pan without its insert. The
broiler pan and its insert allow dripping fat to drain and
be kept away from the high heat of the broiler.
o Do not cover the broiler insert with aJuminum foit.
Exposed fat and grease coutd ignite.
Do not touch a hot tight butb with a damp ctoth.
Doing so could cause the bulb to break. Disconnect the
appliance or turn off the power to the appliance before
removing and replacing light bulb.
mMPORTANT mNSTRUCTmONS FOR CLEANmNG
YOUR RANGE
o CJean the range reguJarly to keep aH parts free of
grease that coutd catch fire. Exhaust fan ventilation
hoods and grease filters should be kept clean. Do not
allow grease to accumulate on hood or filter. Greasy
deposits in the fan could catch fire. When you are
flaming food under the hood, turn the fan on. Refer to the
hood manufacturer's instructions for cleaning.
Kitchen cleaners and aerosols--Always follow the
manufacturer's recommended directions for use, Be
aware that excess residue from cleaners and aerosols
may ignite causing damage and injury,
SELF-CLEANmNG OVENS
o mnthe serf-Cleaning cycte onty ctean the parts listed
in this Use and Care Guide. Before self-cleaning the
oven, remove the broiler pan and any utensils or foods
from the oven.
o Do not use oven cleaners--No commercial oven
cleaner or oven liner protective coating of any kind
should be used in or around any part of the oven.

o Donotcleandoorgasket--Thedoorgasketis
essentiaUfora goodseal CareshouUdbetakennotto
rub,damageormovethegasket,
o Removeovenracks.OvenrackscobrwHUchangeif bft
intheovenduringa seff-cbaningcycb,
Thehealthofsomebirds is extremely
sensitiveto thefumesgivenoff duringthesetf-
cJeaningcycteof therange.Movethebirdstoanother
wettventilatedroom.
mmportant Safety Notice
The California Safe Drinking Water and Toxic Enforcement
Act requires the Governor of California to publish a Hstof
substances known to the state to cause cancer, birth
defects or other reproductive harm, and requires
businesses to warn customers of potential exposure to
such substances,
SAVE THESE INSTRUCTmONS
Conversion to Liquefied Petroleum Gas (or L.R Gas)
This natural gas range is designed to allow for conversion to
Liquefied Petroleum (L,P,) Gas,
If L,P, conversion is needed, contact the service center for
assistance, The L,P, Conversion Kit is provided with this range
and is located on the right panel (right side) of the range, Before
installing the kit be sure to follow the L,P, Installation Instructions
carefully,
Personal injury or death from electrical shock
may occur if the range is not installed by a qualified installer
or electrician,
Any additions, changes or conversions
required in order for this appliance to satisfactorily meet the
application needs must be made by an authorized Service
Center,
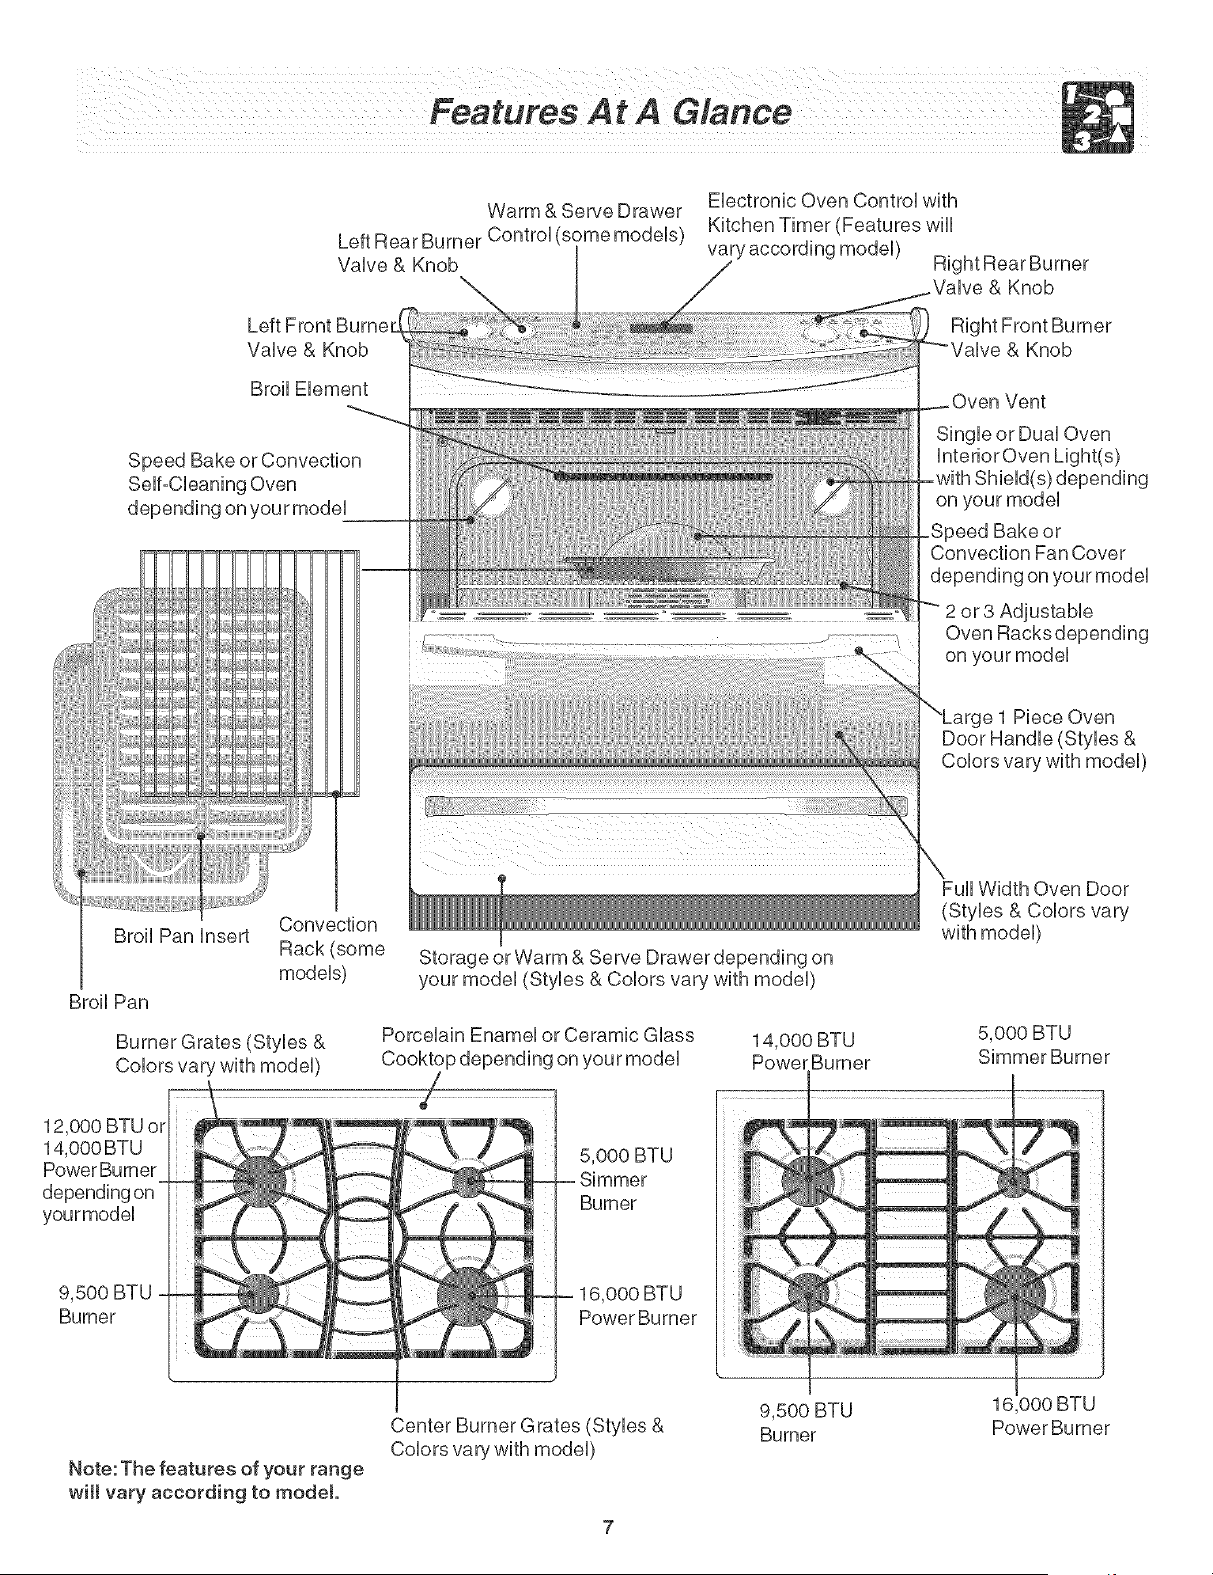
Warm&ServeDrawer
LeftRearBurnerContrei(somemodeis)
Vaive& Knob
EHectronbOvenControiwith
KitchenTimer(FeatureswHI
varyaccordingmodei)
LeftFrontBurneE
Valve& Knob
BroilElement
SpeedBakeorConvection
BroilPaninsert
BroilPan
Convection
Rack(some
models)
StorageorWarm&ServeDrawerdependingon
yourmodel(SUes&Colorsvarywithmodel)
BurnerGrates(SUes&
Colorsvarywithmodel)
PorcelainEnamelorCeramicGlass
Cooktopdependingonyourmodel
14,000BTU
PowerBurner
&Knob
& Knob
Vent
SingleorDualOven
-withShield(s)depending
_SpeedBakeor
ConvectionFanCover
2or3 Adjustable
OvenRacksdepending
e1PieceOven
DoorHandle(SUes&
Colorsvarywithmodel)
WidthOvenDoor
(SUes&Colorsvary
withmodel)
5,00OBTU
SimmerBurner
12,000BTUor
14,000BTU
PowerBumer
yourmodel
9,5OOBTU
Burner
5,OOOBTU
-- Simmer
Burner
-- 16,000BTU
PowerBurner
Note:Thefeaturesofyourrange
wiltvaryaccordingto model.
CenterBurnerGrates(SUes&
Colorsvarywithmodel)
9,500 BTU
Burner
16,000 BTU
Power Burner
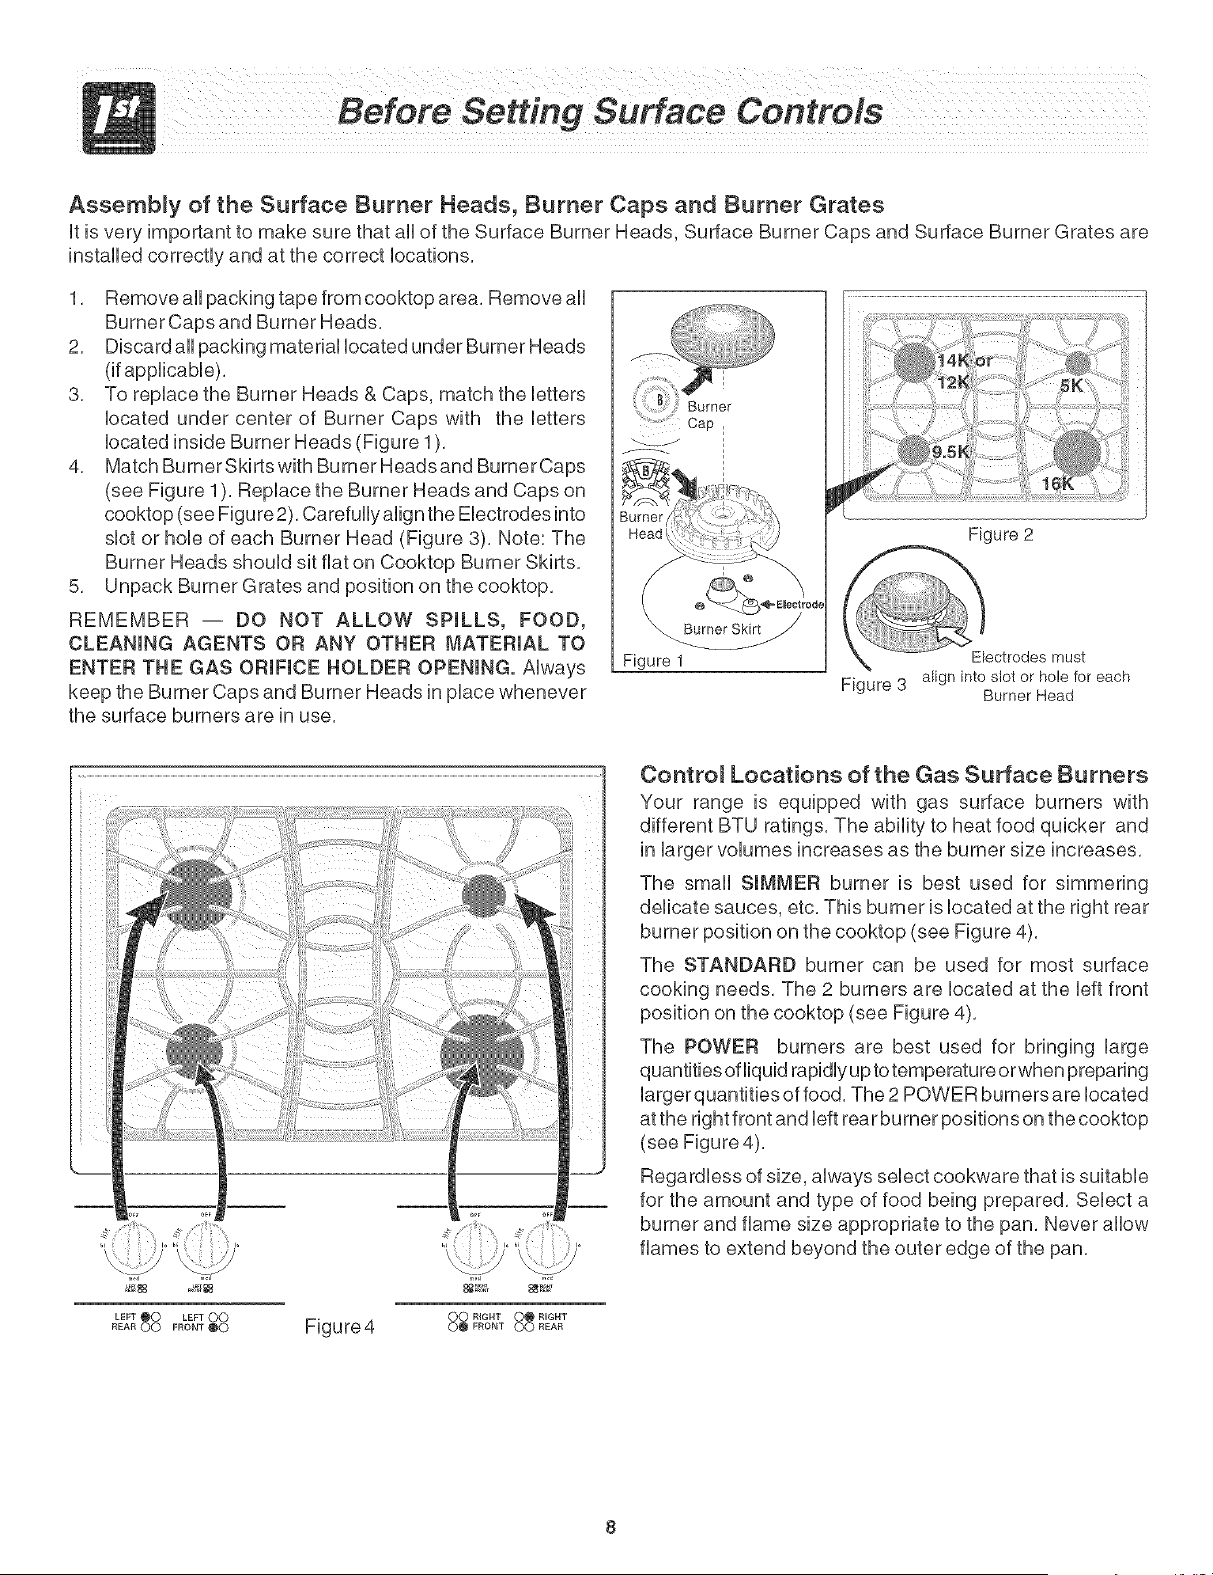
Assembly of the Surface Burner Heads, Burner Caps and Burner Grates
utis very important to make sure that aUUof the Surface Burner Heads, Surface Burner Caps and Surface Burner Grates are
instaUUedcorrectUy and at the correct locations,
1. Remove all packing tape from cooktop area. Remove all
Burner Caps and Burner Heads.
2. Discard all packing material located under Burner Heads
3. To replace the Burner Heads & Caps. match the letters
located under center of Burner Caps with the letters
located inside Burner Heads (Figure 1).
4. Match BumerSkirtswith Burner Headsand BurnerCaps
(see Figure 1). Replace the Burner Heads and Caps on
cooktop (see Figure 2). Carefully afign the Electrodes into
slot or hole of each Burner Head (Figure 3). Note: The
Burner Heads should sit flat on Cooktop Burner Skirts.
5. Unpack Burner Grates and position on the cooktop.
REMEMBER -- DO NOT ALLOW SPILLS. FOOD.
CLEANING AGENTS OR ANY OTHER MATERIAL TO
ENTER THE GAS ORIFICE HOLDER OPENING. Always
keep the Burner Caps and Burner Heads in place whenever
the surface burners are in use.
Burner
Cap
Figure 1
Figure 2
_ectrodes must
Figure 3 align into slot or hole for each
Burner Head
LEFT @O LEFT OO OO RIGHT OO RIGHT
REA,O0 F,O,TeO Figure 4 oo F,O,TO0"E*"
Contro_ Locations of the Gas Surface Burners
Your range is equipped with gas surface burners with
different BTU ratings. The ability to heat food quicker and
in larger volumes increases as the burner size increases.
The small SIMMER burner is best used for simmering
delicate sauces, etc. This burner is located at the right rear
burner position on the cooktop (see Figure 4).
The STANDARD burner can be used for most surface
cooking needs. The 2 burners are located at the left front
position on the cooktop (see Figure 4).
The POWER burners are best used for bringing large
quantities of liquid rapidly up to temperature orwhen preparing
larger quantities of food. The 2 POWER burners are located
at the right front and left rear burner positions on the cooktop
(see Figure 4).
Regardless of size. always select cookware that is suitable
for the amount and type of food being prepared. Select a
burner and flame size appropriate to the pan. Never allow
flames to extend beyond the outer edge of the pan.
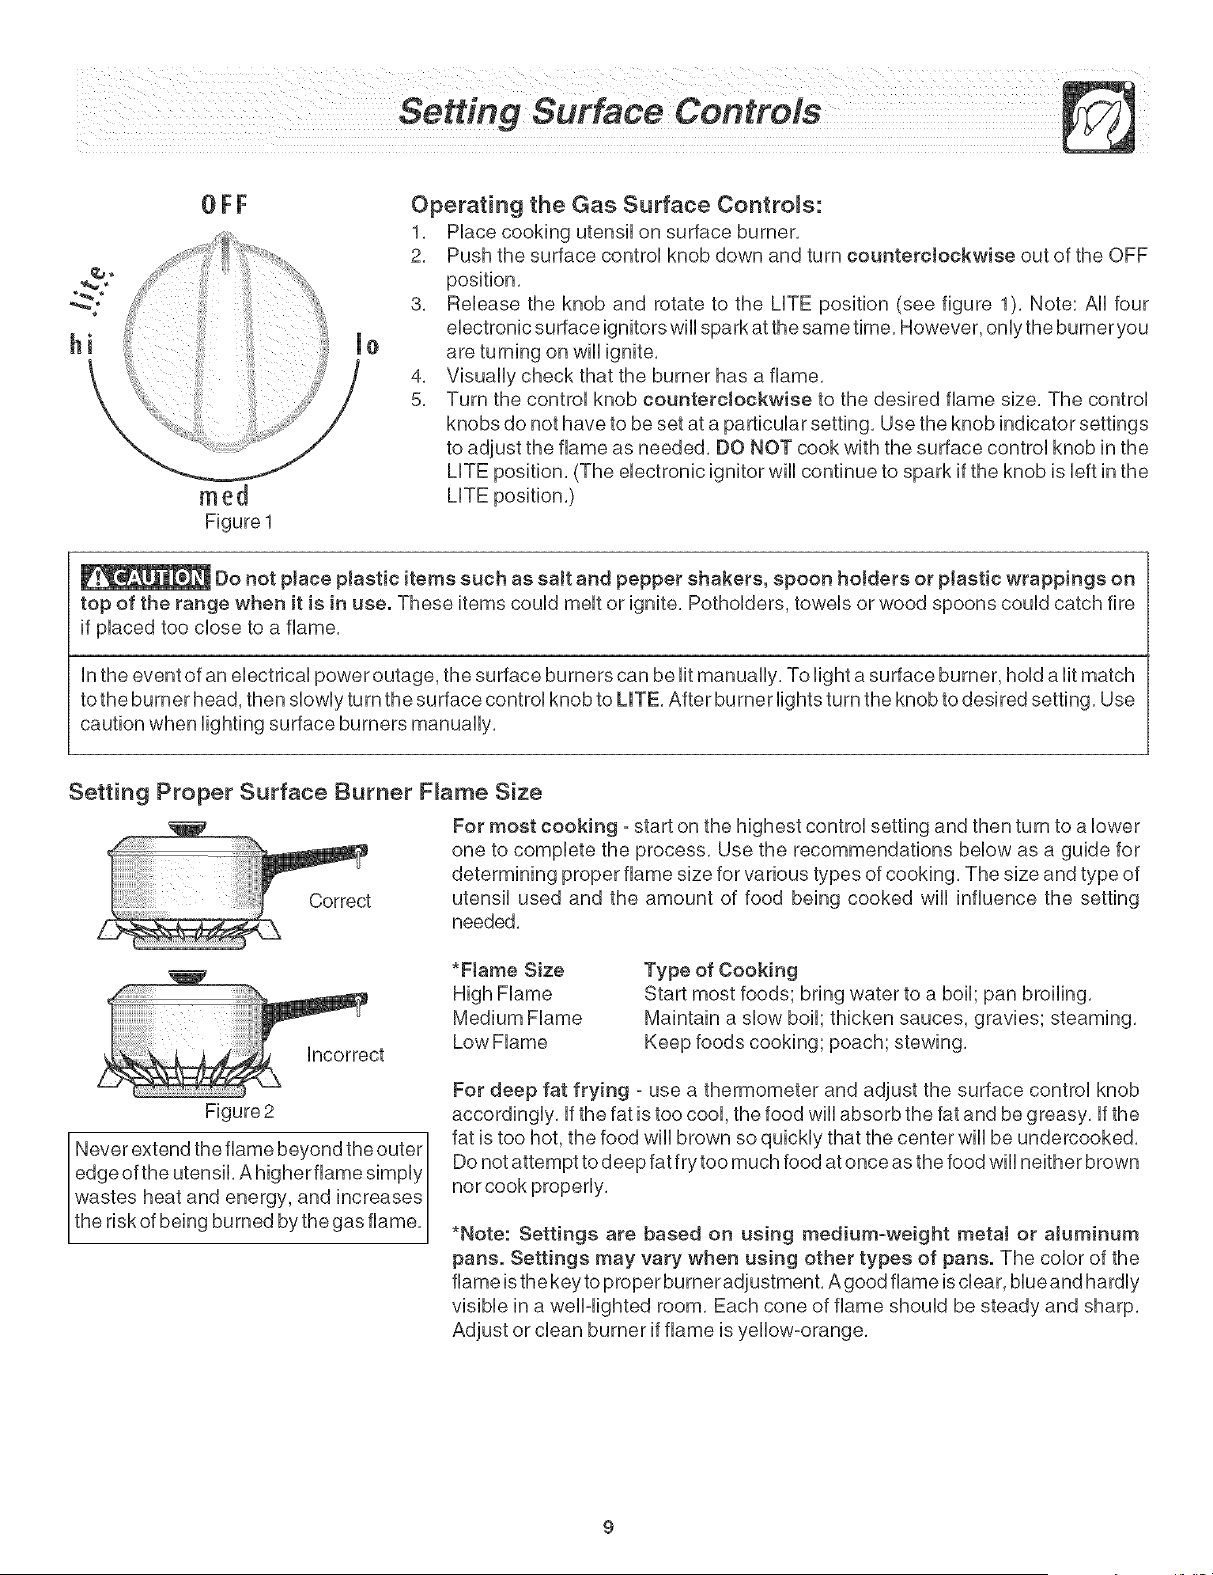
OFF
hi Ue
reed
Figure 1
Operating the Gas Surface Controls:
1, Place cooking utensil on surface burner,
2, Push the surface control knob down and turn counterclockwise out of the OFF
position,
3, Release the knob and rotate to the LITE position (see figure 1), Note: All four
electronic surface ignitors will spark at the same time, However, only the burner you
are turning on will ignite,
4, Visually check that the burner has a flame,
5, Turn the control knob countercJockwise to the desired flame size, The control
knobs do not have to be set at a particular setting, Use the knob indicator settings
to adjust the flame as needed, DO NOT cook with the surface control knob in the
LITE position, (The electronic ignitor wiii continue to spark if the knob is left in the
LITE position,)
Do not ptace plastic items such as saJt and pepper shakers, spoon holders or pJastic wrappings on
top of the range when it is in use. These items could melt or ignite, Potholders, towels or wood spoons could catch fire
if placed too close to a flame,
in the event of an electrical power outage, the surface burners can be lit manually, To light a surface burner, hold a lit match
to the burner head, then slowly turn the surface control knob to LITE, After burner lights turn the knob to desired setting, Use
caution when lighting surface burners manually,
Setting Proper Surface Burner F_ame Size
For most cooking - start on the highest control setting and then turn to a lower
one to complete the process, Use the recommendations below as a guide for
determining proper flame size for various types of cooking, The size and type of
Correct utensil used and the amount of food being cooked will influence the setting
needed,
incorrect
Figure2
Never extend the flame beyond the outer]
edge of the utensil, A higher flame simply /
wastes heat and energy, and increases /
the risk of being burned by the gas flame,]
*Ftame Size
High Flame
Medium Flame
Low Flame
Type of Cooking
Start most foods; bring water to a boil; pan broiling,
Maintain a slow boil; thicken sauces, gravies; steaming,
Keep foods cooking; poach; stewing,
For deep fat frying =use a thermometer and adjust the surface control knob
accordingly, if the fat is too cool, the food will absorb the fat and be greasy, if the
fat is too hot, the food will brown so quickly that the center will be undercooked,
Do not attempt to deep fat fry too much food at once as the food will neither brown
*Note: Settings are based on using medium-weight metaJ or aJuminum
pans. Settings may vary when using other types of pans. The color of the
flame is the key to proper burner adjustment, A good flame is clear, blue and hardly
visible in a well-lighted room, Each cone of flame should be steady and sharp,
Adjust or clean burner if flame is yellow-orange,
i _Thie range has a fan that wilt turn "ON" and "OFF" by itself to keep the electronics cool. it may
|
continue to run after the range has been turned "OFF" but may aJso stop immediately to turn "ON" after a while.
1
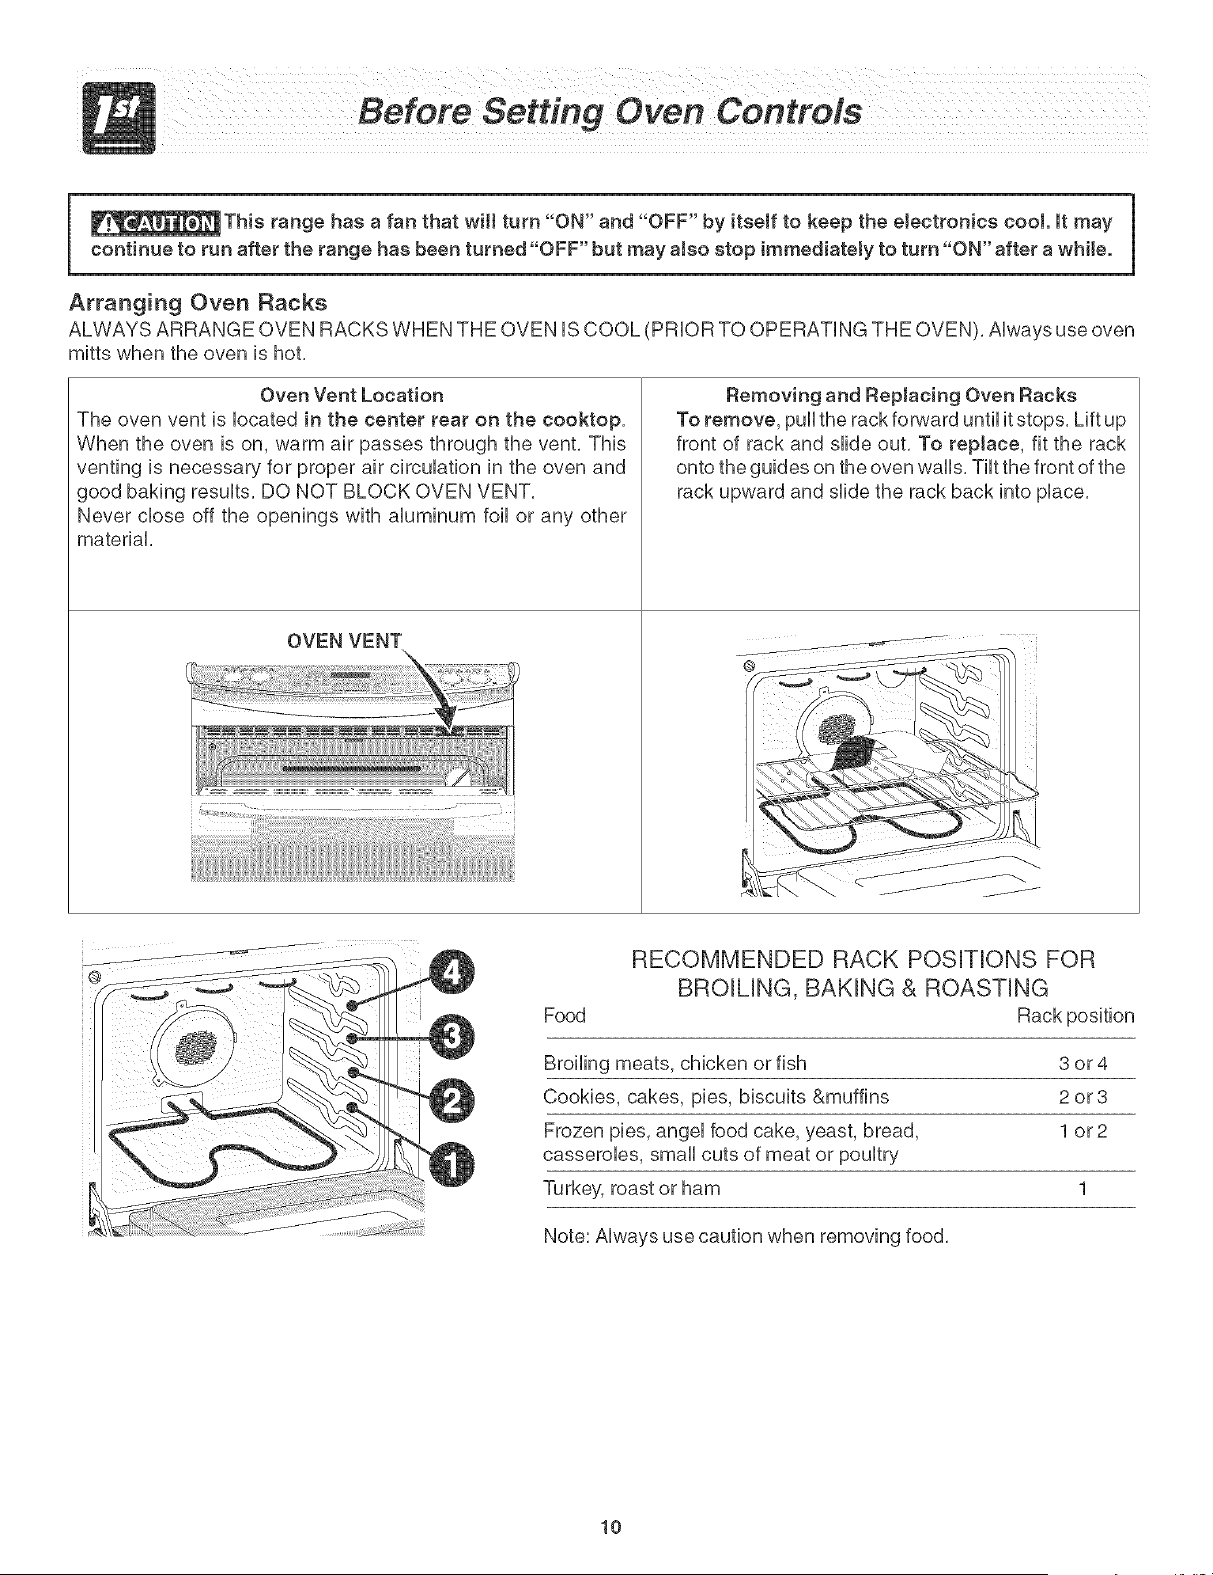
Arranging Oven Racks
ALWAYS ARRANGE OVEN RACKS WHEN THE OVEN iS COOL (PRIOR TO OPERATING THE OVEN), Always use oven
mitts when the oven is hot,
Oven Vent Location
The oven vent is located in the center rear on the cooktop,
When the oven is on, warm air passes through the vent, This
venting is necessary for proper air circulation in the oven and
good baking results, DO NOT BLOCK OVEN VENT,
Never close off the openings with aluminum foil or any other
material,
OVEN VENT
Removing and Replacing Oven Racks
To remove, pull the rack forward until it stops, Lift up
front of rack and slide out, To reptace, fit the rack
onto the guides on the oven walls, Tilt the front of the
rack upward and slide the rack back into place,
@
RECOMMENDED RACK POSITIONS FOR
BROILING, BAKING & ROASTING
Food
Broiling meats, chicken or fish 3 or 4
Cookies, cakes, pies, biscuits &muffins 2 or3
Frozen pies, angel food cake, yeast, bread, 1 or2
casseroles, small cuts of meat or poultry
Turkey, roast or ham 1
Note: Always use caution when removing food,
10
Air Circulation in the Oven
Forbestaircirculationandbakingresultsallow2-4"(5-10cm)aroundthe
cookwareforproperaircirculationandbesurepansandcookwaredonot
toucheachother,theovendoor,sidesorbackoftheovencavity,Thehot
airmustcirculatearoundthepansandcookwareintheovenforevenheat
toreacharoundthefood,
1OvenRack
MultipleOvenRacks
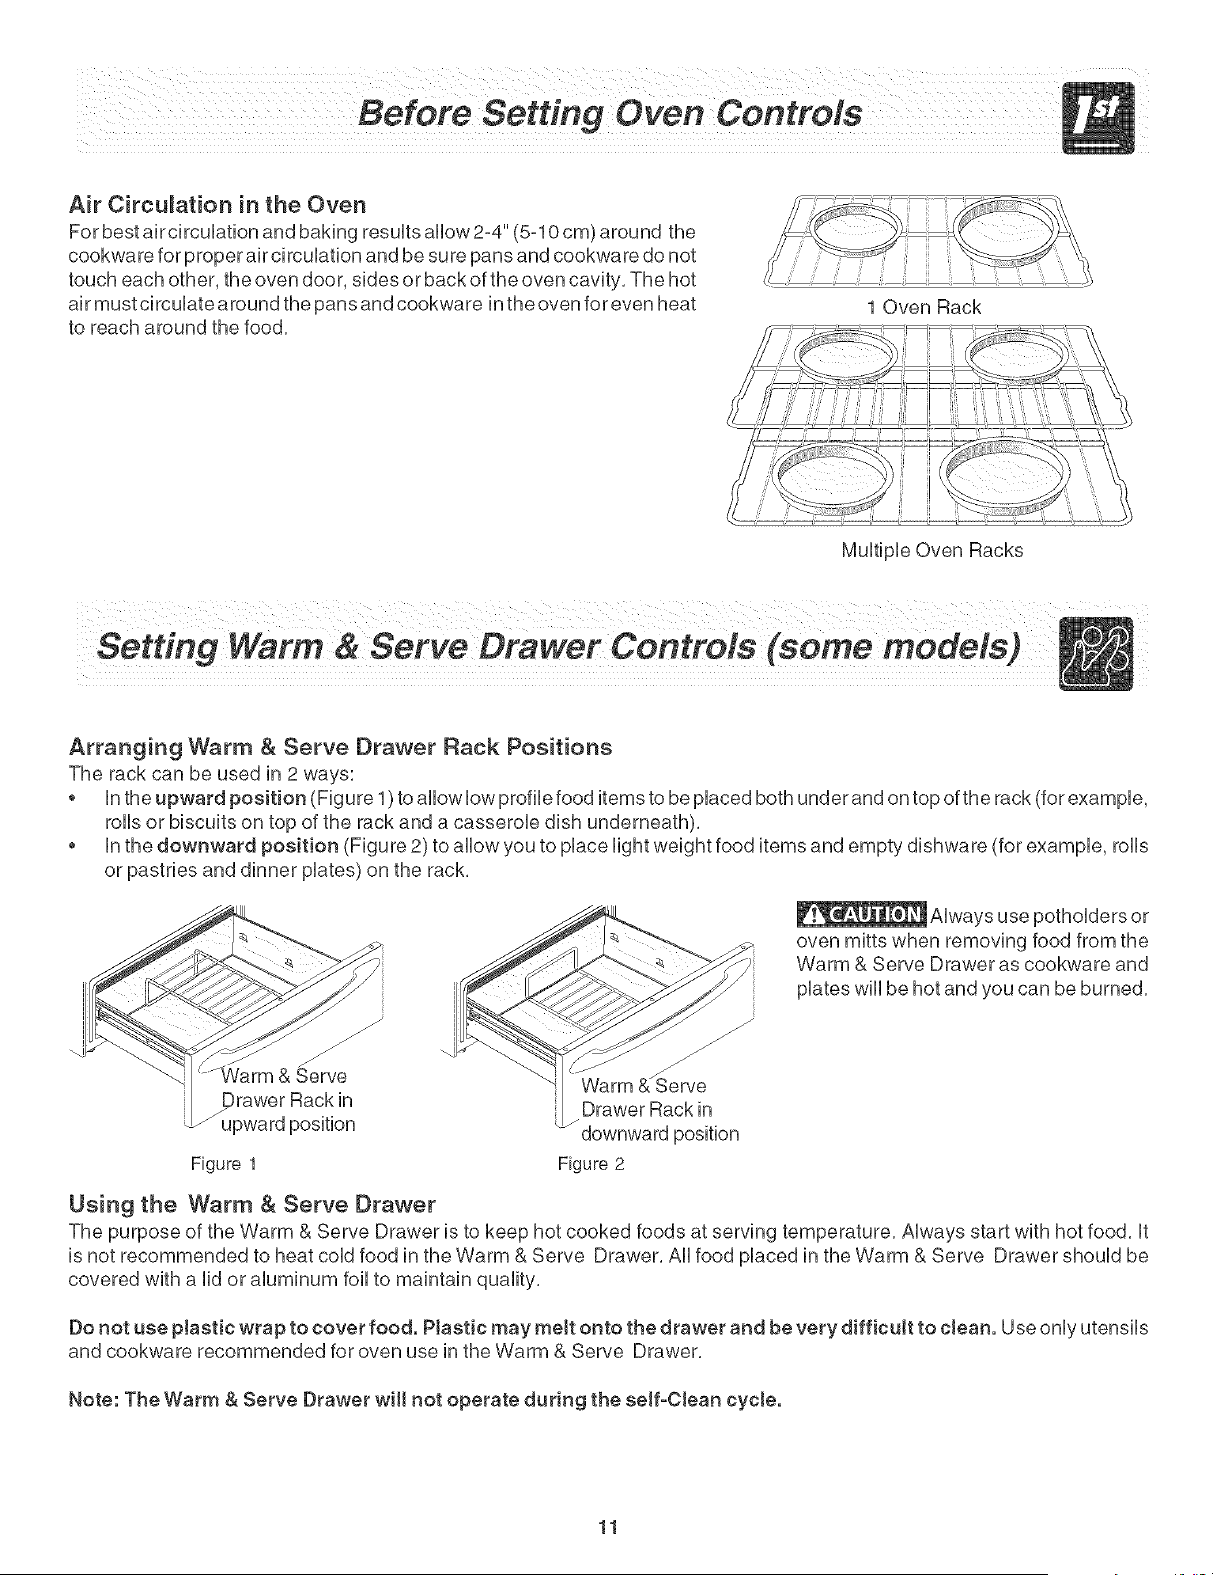
Arranging Warm & Serve Drawer Rack Positions
The rack can be used in 2 ways:
in the upward position (Figure 1 )to allow low profile food items to be placed both under and on top of the rack (for example,
rolls or biscuits on top of the rack and a casserole dish underneath),
in the downward position (Figure 2) to allow you to place light weight food items and empty dishware (for example, rolls
or pastries and dinner plates) on the rack,
oven mitts when removing food from the
Warm & Serve Drawer as cookware and
plates will be hot and you can be burned,
Serve Warm &ZServe
_, rawer Rack in Drawer Rack in
upward position downward position
Figure 1 Figure 2
Using the Warm & Serve Drawer
The purpose of the Warm & Serve Drawer is to keep hot cooked foods at serving temperature, Always start with hot food, it
is not recommended to heat cold food in the Warm & Serve Drawer, All food placed in the Warm & Serve Drawer should be
covered with a lid or aluminum foil to maintain quality,
Do not use plastic wrap to cover food. Plastic may melt onto the drawer and be very difficult to clean. Use only utensils
and cookware recommended for oven use in the Warm & Serve Drawer,
Note: The Warm & Serve Drawer wi[[ not operate during the self-Clean cycle.
11
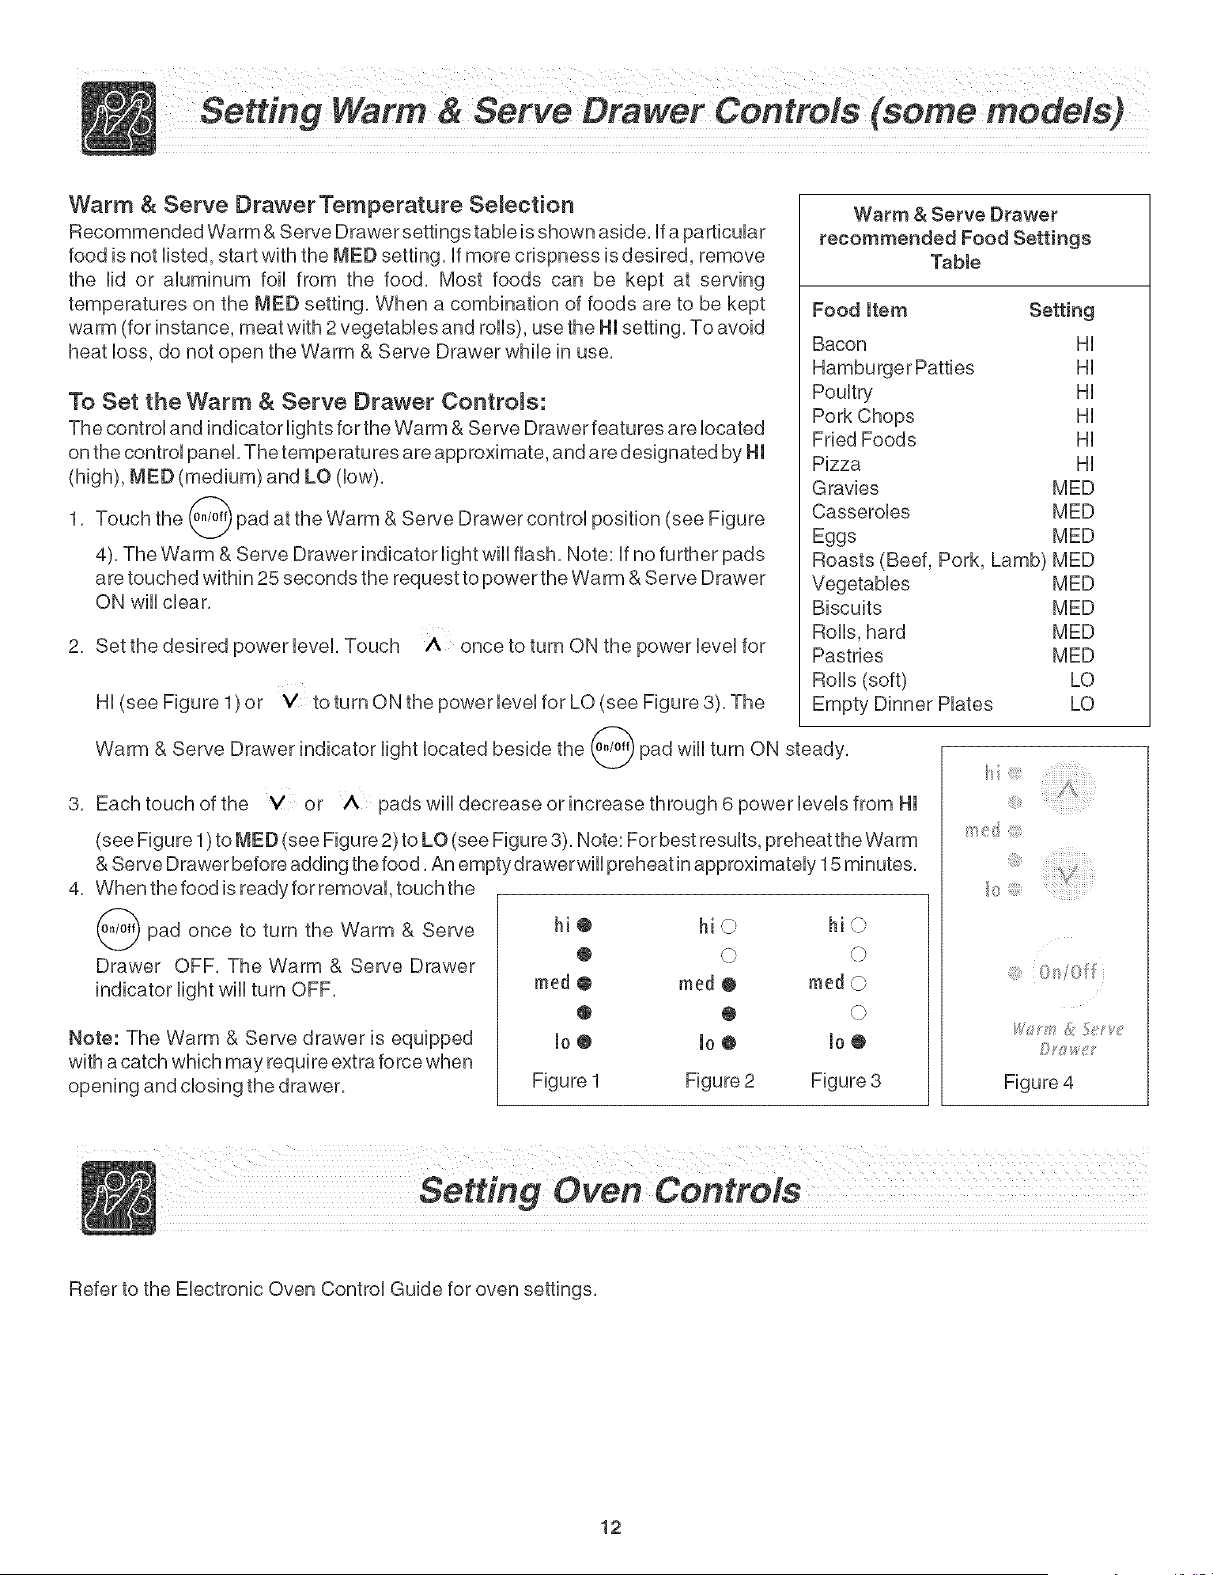
Warm & Serve DrawerTemperature Selection
Recommended Warm & Serve Drawer settings table is shown aside, if a particular
food is not listed, start with the MED setting, if more crispness is desired, remove
the lid or aluminum foil from the food, Most foods can be kept at serving
temperatures on the MED setting, When a combination of foods are to be kept
warm (for instance, meat with 2 vegetables and rolls), use the Hmsetting, To avoid
heat loss, do not open the Warm & Serve Drawer while in use,
To Set the Warm & Serve Drawer Controls:
The control and indicator lights for the Warm & Serve Drawer features are located
on the control panel, The temperatures are approximate, and are designated by HI
(high), MED (medium) and LO (low),
1, Touch the _/w_ pad at the Warm & Serve Drawer control position (see Figure
4), The Warm & Serve Drawer indicator light will flash, Note: if no further pads
are touched within 25 seconds the request to power the Warm & Serve Drawer
ON will clear,
2, Set the desired power level. Touch ,A once to turn ON the power level for
Hi (see Figure 1) or V to turn ON the power level for LO (see Figure 3), The
Warm & Serve Drawer indicator light located beside the @ pad will turn ON steady,
3,
Warm & Serve Drawer
recommended Food Settings
Tabte
Food Item Setting
Bacon Hi
Hi
Poultry Hi
Pork Chops Hi
Fried Foods Hi
Pizza Hi
Gravies MED
Casseroles MED
Eggs MED
Roasts (Beef, Pork, Lamb) MED
Vegetables MED
Biscuits MED
Rolls, hard MED
Pastries MED
Roils (soft) LO
LO
Each touch of the Y or A pads wiii decrease or increase through 6 power levels from HI
(see Figure 1)to MED (see Figure 2) to LO (see Figure 3), Note: For best results, preheat the Warm
& Serve Drawer before adding the food, An empty drawerwill preheat in approximately 15 minutes,
hi@ M© M©
med e reed O reed ©
@ @ O
Io@ lo@ Io@
Figure 1 Figure 2 Figure 3
4, When the food is ready for removal, touch the
pad once to turn the Warm & Serve
Drawer OFF, The Warm & Serve Drawer
indicator light will turn OFF,
Note: The Warm & Serve drawer is equipped
with a catch which may require extra force when
opening and cbsing the drawer,
@ On/Off
Figure 4
Refer to the Electronic Oven Control Guide for oven settings,
12
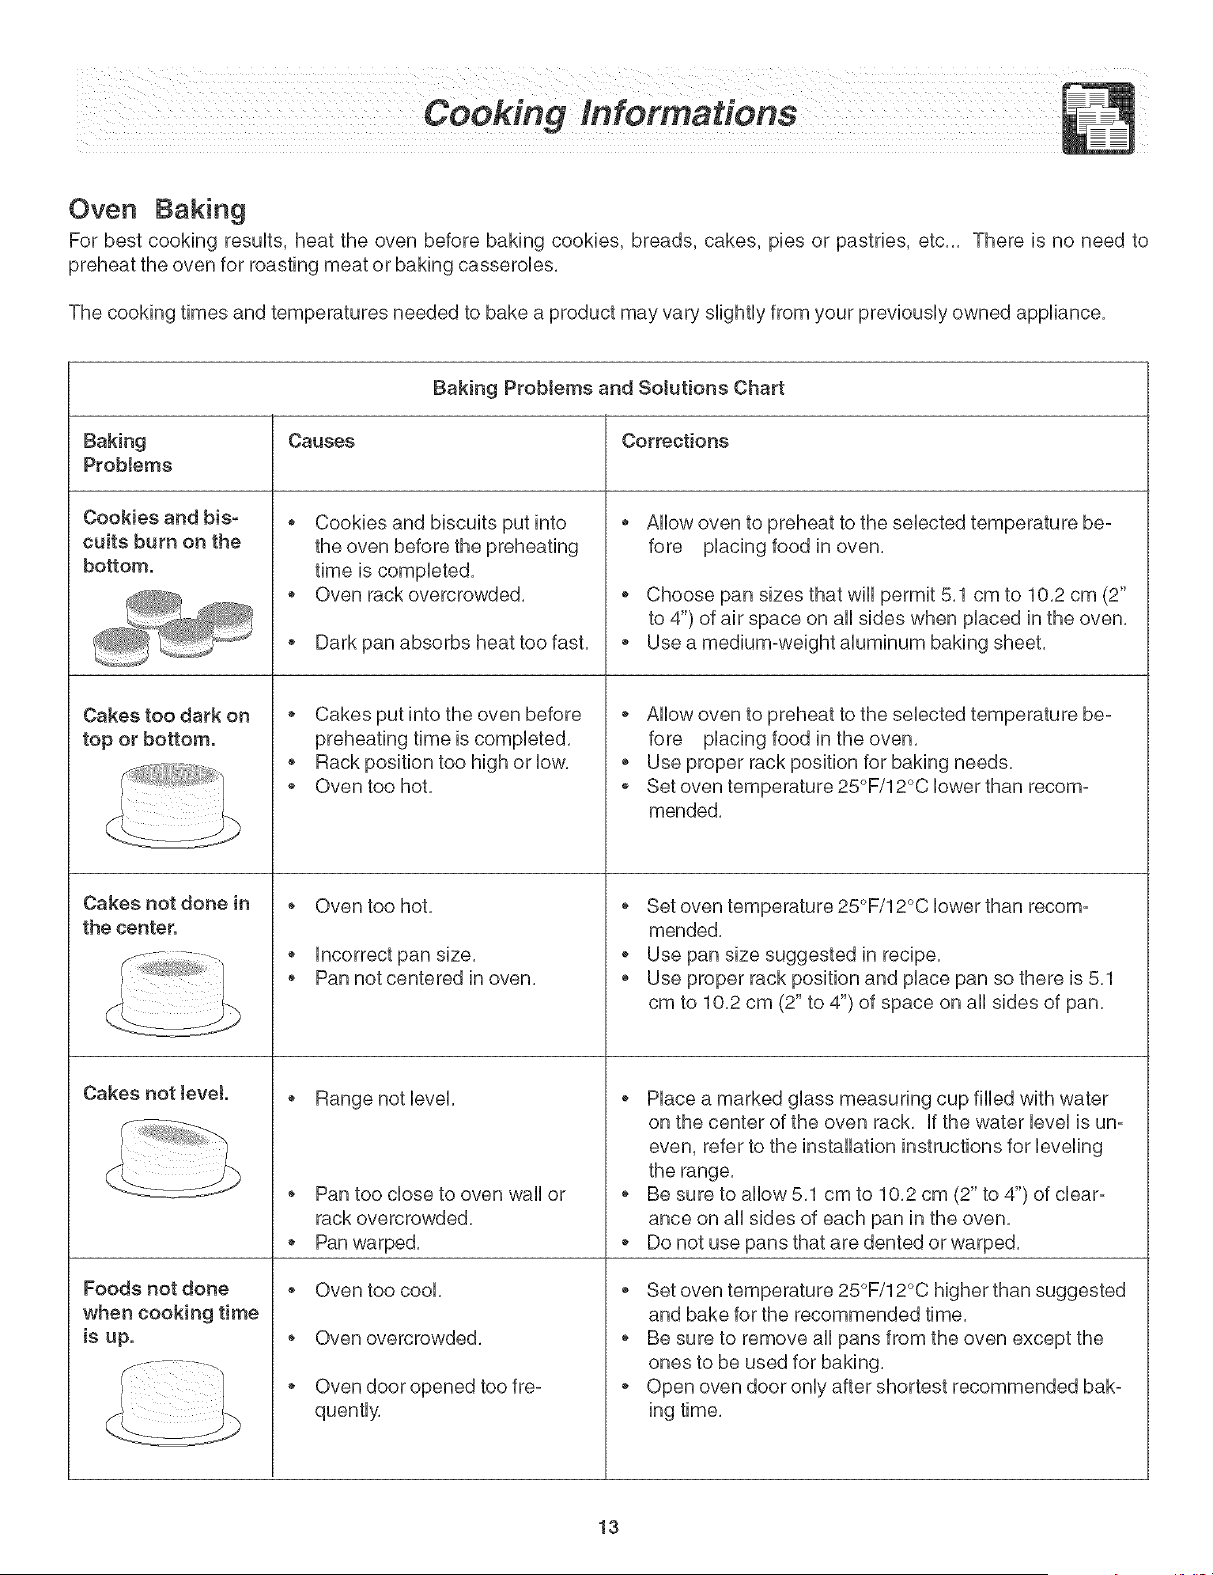
Oven Baking
For best cooking resuUts, heat the oven before baking cookies, breads, cakes, pies or pastries, etc... There is no need to
preheat the oven for roasting meat or baking casseroUes.
The cooking times and temperatures needed to bake a product may vary sHghtUyfrom your previousUy owned appliance.
Baking Problems and Solutions Chart
Baking Causes Corrections
ProMems
Cookies and his=
cuits burn on the
bottom.
Cakes too dark on
top or bottom.
Cakes not done in
the center.
Cakes not level
Foods not done
when cooking time
is up.
Cookies and biscuits put into
the oven before the preheating
time is completed.
Oven rack overcrowded.
Dark pan absorbs heat too fast.
o Cakes put into the oven before
preheating time is compUeted.
Rack position too high or low.
Oven too hot.
o Oven too hot.
o Incorrect pan size.
Pan not centered in oven.
o Range not level,
o Pan too close to oven wall or
rack overcrowded,
o Pan warped,
Oven too cool,
o Oven overcrowded,
o Oven door opened too fre-
quently.
Allow oven to preheat to the selected temperature be-
fore placing food in oven.
o Choose pan sizes that will permit 5,1 cm to 10,2 cm (2"
to 4") of air space on all sides when placed in the oven,
Use a medium-weight aluminum baking sheet,
o Allow oven to preheat to the selected temperature be-
fore placing food in the oven.
• Use proper rack position for baking needs.
Set oven temperature 25°F/12°C lower than recom-
mended.
o Set oven temperature 25°F/12°C lower than recom-
mended,
o Use pan size suggested in recipe,
Use proper rack position and place pan so there is 5,1
cm to 10,2 cm (2" to 4") of space on all sides of pan,
o Place a marked glass measuring cup filled with water
on the center of the oven rack. If the water level is un-
even, refer to the installation instructions for leveling
the range,
o Be sure to allow 5,1 cm to 10,2 cm (2" to 4") of clear-
ance on all sides of each pan in the oven,
o Do not use pans that are dented or warped,
Set oven temperature 25°F/12°C higher than suggested
and bake for the recommended time,
o Be sure to remove all pans from the oven except the
ones to be used for baking,
o Open oven door only after shortest recommended bak-
13

Broiling
Broiling is a method of cooking tender cuts of meat by direct heat under the broil eUement
of the oven,
Preheating
Preheating is suggested when searing rare steaks, (Remove the broiler pan before ................
preheating. Foods will stick if placed on hot metal.) To preheat, set the control(s) to BROIL
as instructed in the Owner's Guide. Wait for the element to become red-hot, usually about
2 minutes. Preheating is not necessary when broiling meats well-done.
To Broil
Broil on side until the food is browned; turn and cook on the second side. Season and
serve. Always pull rack out to the "stop" position before turning or removing food.
Determine Broiling Times
Broiling times vary, so watch the food closely, Time not only depends on the distance from element, but on the thickness and
aging of meat, fat content and doneness preferred, The first side usually requires a few minutes longer than second, Frozen
meats also require additional time,
Broiling Tips
The broiler pan and its grid allow dripping grease to drain and be kept away from the
high heat of the broiler.
DO NOT use the pan without its grid. DO NOT cover the grid with foil. The
exposed grease could ignite.
Should an oven fire occur, close the oven door and turn off the
oven. if the fire continues, throw baking soda on the fire or use fire extinguisher. DO
NOT put water or flour on the fire. Flour may be explosive.
Broiler Pan
Broi_er C_ean-Up Tips:
To make cleaning easier, line the bottom of the broiler pan with aluminum foil. DO
NOT cover the broiler grid with foil.
To prevent grease from baking on, remove the broiler pan from the oven as soon as cooking is completed. Use hot pads
because the broiler pan is extremely hot. Pour off grease. Soak the pan in HOT, soapy water.
Clean the broiler pan as soon as possible after each use. If necessary, use soap=filled steel wool pads. Heavy scouring may
scratch the grid.
14
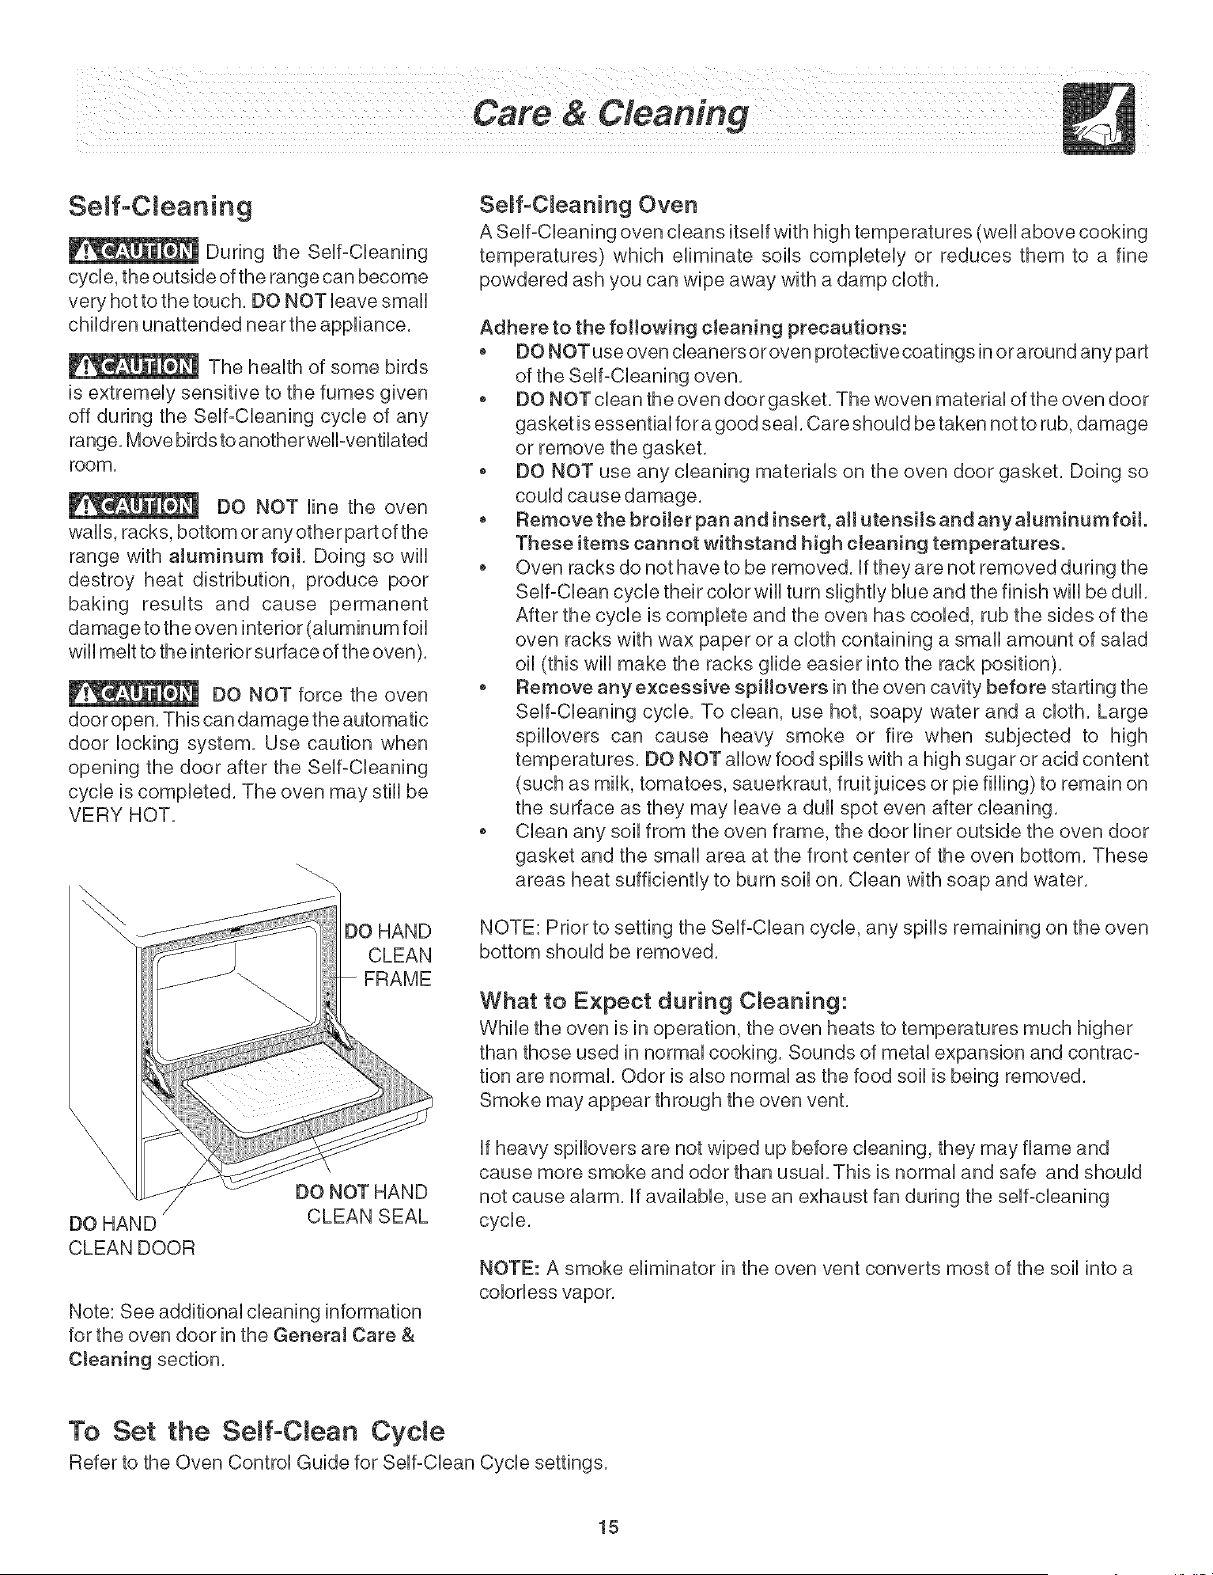
Seff-CWeaning
During the Self=Cleaning
cycle, the outside of the range can become
very hot to the touch, DO NOT leave small
children unattended near the appliance,
The health of some birds
is extremely sensitive to the fumes given
off during the Self-Cleaning cycle of any
range, Move birds to another well-ventilated
room,
DO NOT line the oven
walls, racks, bottom or anyother part of the
range with aJuminum foit, Doing so will
destroy heat distribution, produce poor
baking results and cause permanent
damage to the oven interior (aluminum foil
will melt to the interior surface of the oven),
DO NOT force the oven
door open, This can damage the automatic
door locking system, Use caution when
opening the door after the Self-Cleaning
cycle is completed, The oven may still be
VERY HOT,
DO HAND
CLEAN DOOR
CLEAN SEAL
Note: See additional cleaning information
for the oven door in the General Care &
CJeaning section,
Seff-C_eaning Oven
A Self-Cleaning oven cleans itself with high temperatures (well above cooking
temperatures) which eliminate soils completely or reduces them to a fine
powdered ash you can wipe away with a damp cloth,
Adhere to the following cJeaning precautions:
o DO NOTuse oven cleanersoroven protectivecoatings inoraround any part
o DO NOT clean the oven door gasket, The woven material of the oven door
gasket is essential for a good seal, Care should be taken not to rub, damage
or remove the gasket,
o DO NOT use any cleaning materials on the oven door gasket, Doing so
could cause damage,
o Remove the broiler pan and insert, aH utensils and anyatuminum foit.
These items cannot withstand high cteaning temperatures.
o Oven racks do not have to be removed, if they are not removed during the
Self-Clean cycle their color will turn slightly blue and the finish will be dull,
After the cycle is complete and the oven has cooled, rub the sides of the
oven racks with wax paper or a cloth containing a small amount of salad
oil (this will make the racks glide easier into the rack position),
o Remove any excessive spillovers in the oven cavity before starting the
Self-Cleaning cycle, To clean, use hot, soapy water and a cloth, Large
spillovers can cause heavy smoke or fire when subjected to high
temperatures, DO NOT allow food spills with a high sugar or acid content
(such as milk, tomatoes, sauerkraut, fruit juices or pie filling) to remain on
the surface as they may leave a dull spot even after cleaning,
o Clean any soil from the oven frame, the door liner outside the oven door
gasket and the small area at the front center of the oven bottom, These
areas heat sufficiently to burn soil on, Clean with soap and water,
NOTE: Prior to setting the Self-Clean cycle, any spills remaining on the oven
bottom should be removed,
What to Expect during C_eaning:
While the oven is in operation, the oven heats to temperatures much higher
than those used in normal cooking, Sounds of metal expansion and contrac-
tion are normal, Odor is also normal as the food soil is being removed,
Smoke may appear through the oven vent,
if heavy spillovers are not wiped up before cleaning, they may flame and
cause more smoke and odor than usual, This is normal and safe and should
not cause alarm, if available, use an exhaust fan during the self-cleaning
cycle,
NOTE: A smoke eliminator in the oven vent converts most of the soil into a
colorless vapor,
To Set the Self-CWean Cycle
Refer to the Oven Contro] Guide for SeUf=CUeanCycle settings,
15
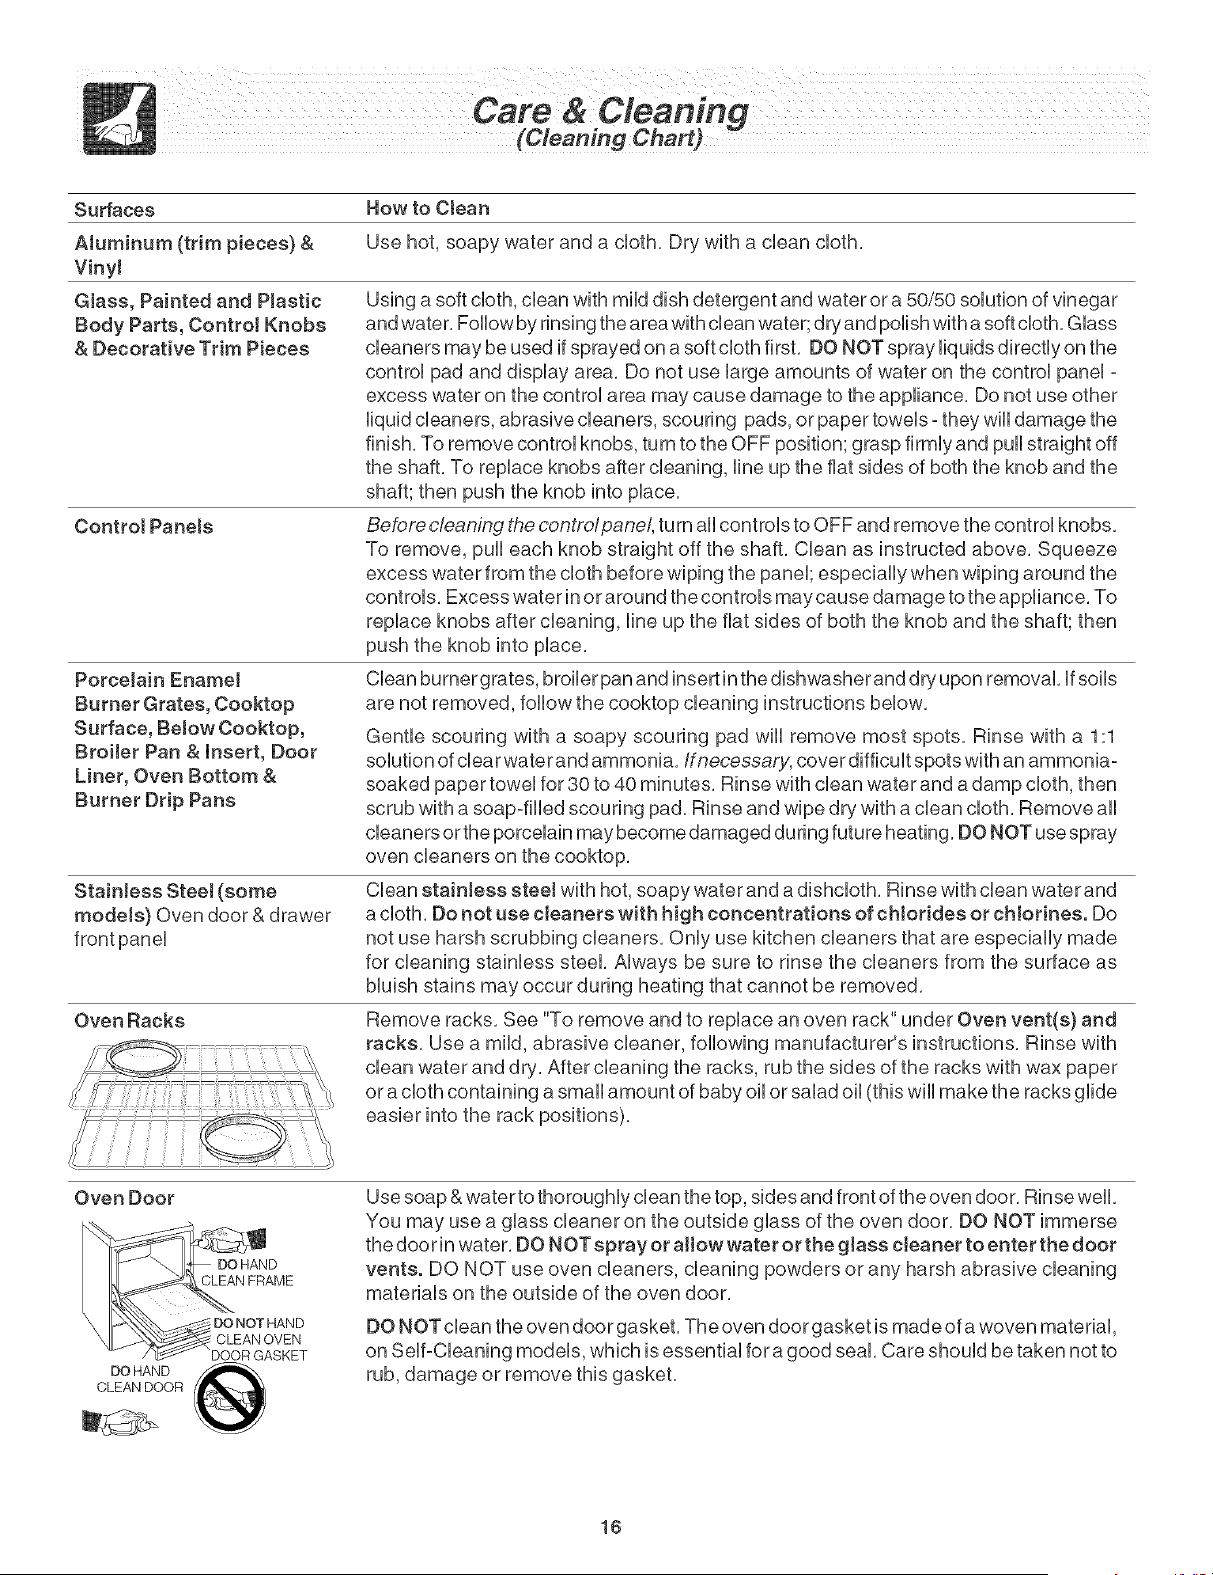
Surfaces Howto CJean
AJuminum(trimpieces}& Usehot,soapywateranda cloth,Drywitha cleancloth,
Vinyl
Glass,PaintedandPJastic
BodyParts,ControlKnobs
&DecorativeTrimPieces
ControlPanets
PorcelainEnamel
BurnerGrates,Cooktop
Surface,BelowCooktop,
BroilerPan&insert, Door
Liner, Oven Bottom &
Burner Drip Pans
Stainless Steet (some
modeJs) Oven door & drawer
front panel
Oven Racks
Using a soft cloth, clean with mild dish detergent and water or a 50/50 solution of vinegar
and water, Follow by rinsing the area with clean water; dry and polish with a soft cloth, Glass
cleaners may be used if sprayed on a soft cloth first, DO NOT spray liquids directly on the
control pad and display area, Do not use large amounts of water on the control panel -
excess water on the control area may cause damage to the appliance, Do not use other
liquid cleaners, abrasive cleaners, scouring pads, or paper towels- they will damage the
finish, To remove control knobs, turn to the OFF position; grasp firmly and pull straight off
the shaft, To replace knobs after cleaning, line up the fiat sides of both the knob and the
shaft; then push the knob into place,
Before cleaning the controlpanel, turn all controls to OFF and remove the control knobs,
To remove, pull each knob straight off the shaft, Clean as instructed above, Squeeze
excess water from the cloth before wiping the panel; especially when wiping around the
controls, Excess water in or around the controls may cause damage to the appliance, To
replace knobs after cleaning, line up the fiat sides of both the knob and the shaft; then
push the knob into place,
Clean burner grates, broiler pan and insert in the dishwasher and dry upon removal, if soils
are not removed, follow the cooktop cleaning instructions below,
Gentle scouring with a soapy scouring pad will remove most spots, Rinse with a 1:1
solution of clear water and ammonia, Ifnecessary, cover difficult spots with an ammonia-
soaked paper towel for 30 to 40 minutes, Rinse with clean water and a damp cloth, then
scrub with a soap-filled scouring pad, Rinse and wipe dry with a clean cloth, Remove all
cleaners orthe porcelain may become damaged during future heating, DO NOT use spray
oven cleaners on the cooktop,
Clean stainJess steeJ with hot, soapy water and a dishcloth, Rinse with clean water and
a cloth, Do not use cleaners with high concentrations of cHoddes or cHorines, Do
not use harsh scrubbing cleaners, Only use kitchen cleaners that are especially made
for cleaning stainless steel, Always be sure to rinse the cleaners from the surface as
bluish stains may occur during heating that cannot be removed,
Remove racks, See "To remove and to replace an oven rack" under Oven vent(s) and
racks, Use a mild, abrasive cleaner, following manufacturer's instructions, Rinse with
clean water and dry, After cleaning the racks, rub the sides of the racks with wax paper
or a cloth containing a small amount of baby oil or salad oil (this will make the racks glide
easier into the rack positions),
Oven Door
DOHAND
CLEAN DOOR
Use soap & water to thoroughly clean the top, sides and front of the oven door, Rinse well,
You may use a glass cleaner on the outside glass of the oven door, DO NOT immerse
the doorin water, DO NOTsprayor aHowwater or the gJass cJeaner to enter the door
vents, DO NOT use oven cleaners, cleaning powders or any harsh abrasive cleaning
materials on the outside of the oven door,
DO NOT clean the oven door gasket, The oven door gasket is made of a woven material,
on Self-Cleaning models, which is essential fora good seal, Care should be taken not to
rub, damage or remove this gasket,
16
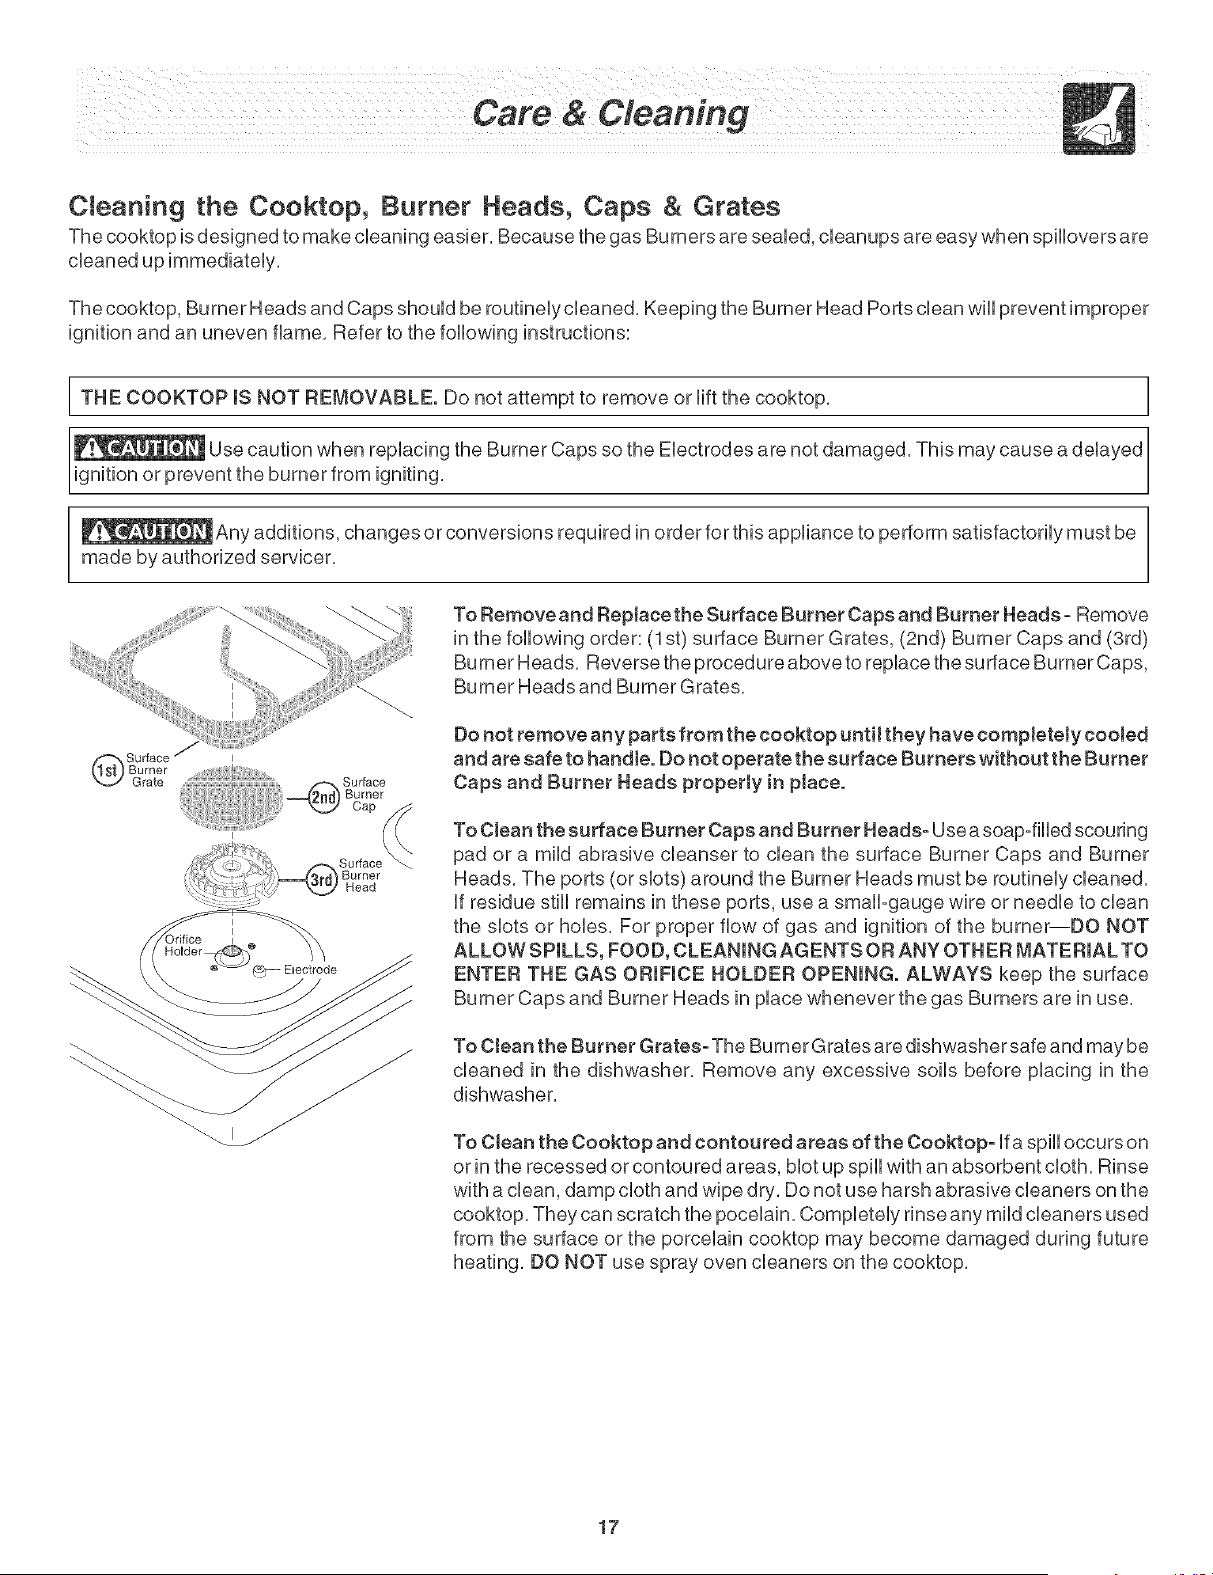
C[eanin 9 the Cooktop, Burner Heads, Caps & Grates
The cooktop is designed to make cleaning easier, Because the gas Burners are sealed, cleanups are easy when spillovers are
cleaned up immediately,
The cooktop, Burner Heads and Caps should be routinely cleaned, Keeping the Burner Head Ports dean wii[ prevent improper
ignition and an uneven flame, Refer to the following instructions:
THE COOKTOP IS NOT REMOVABLE. Do not attempt to remove or lift the cooktop,
ignition or preventUSetheCaUti°nburnerWhenfromrepiacingigniting,the Burner Caps so the Electrodes are not damaged, This may cause a delayed
_Any additions, changes or conversions required in order for this appliance to perform satisfactorily must be
made by authorized servicer,
Surface
Burner
Cap
To Remove and Replace the Surface Burner Caps and Burner Heads - Remove
in the following order: (1 st) surface Burner Grates, (2nd) Burner Caps and (3rd)
Burner Heads, Reverse the procedure above to replace the surface Burner Caps,
Burner Heads and Burner Grates,
Do not remove any parts from the cooktop until they have completely cooled
and are safe to handle. Do not operate the surface Burners without the Burner
Caps and Burner Heads properly in place.
To Clean the surface Burner Caps and Burner Heads- Usea soap°filled scou ring
pad or a mild abrasive cleanser to clean the surface Burner Caps and Burner
Heads, The ports (or slots) around the Burner Heads must be routinely cleaned,
if residue still remains in these ports, use a small-gauge wire or needle to clean
the slots or hobs, For proper flow of gas and ignition of the burner--DO NOT
ALLOW SPILLS, FOOD, CLEANING AGENTS OR ANY OTHER MATERIAL TO
ENTER THE GAS ORIFICE HOLDER OPENING. ALWAYS keep the surface
Burner Caps and Burner Heads in place whenever the gas Burners are in use,
To Clean the Burner Grates-The Burner Grates are dishwasher safe and may be
cleaned in the dishwasher, Remove any excessive soils before placing in the
dishwasher,
To Clean the Cooktop and contoured areas of the Cooktop- if a spill occurs on
or in the recessed or contoured areas, Mot up spill with an absorbent cloth, Rinse
with a dean, damp cloth and wipe dry, Do not use harsh abrasive cleaners on the
cooktop, They can scratch the pocelain, Completely rinse any mild cleaners used
from the surface or the porcelain cooktop may become damaged during future
heating, DO NOT use spray oven cleaners on the cooktop,
17
Care and Cleaning of Stainless Steel (StainlessSteel models only)
Some models are equipped with stainless steel exterior parts, Special care and cleaning are required for maintaining the
appearance of stainless parts, Please refer to the table provided at the beginning of the GeneraJ Care & Cleaning section in
this Use & Care Guide,
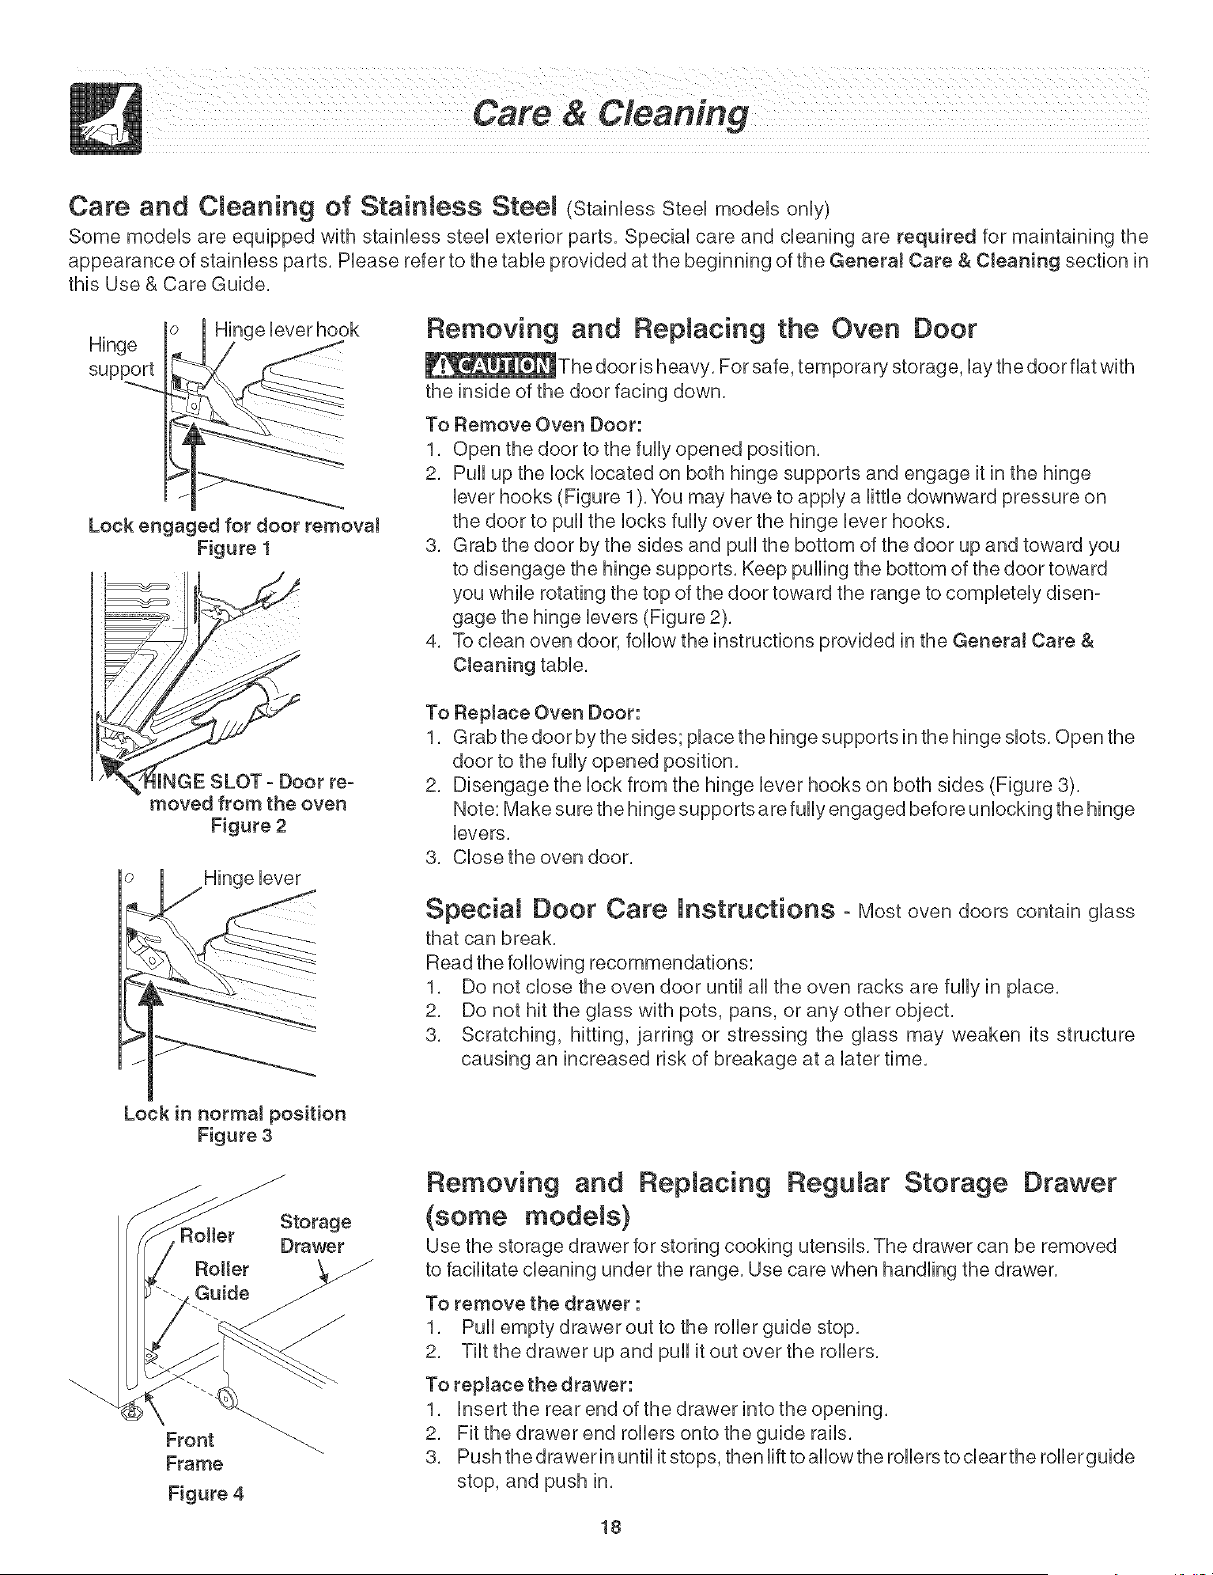
Hinge
support
Hinge lever hook
Lock engaged for door removaJ
Figure 1
Removing and Replacing the Oven Door
_The door is heavy, For safe, temporary storage, lay the door fiat with
the inside of the door facing down,
To Remove Oven Door:
1, Open the door to the fully opened position,
2, Pull up the lock located on both hinge supports and engage it in the hinge
lever hooks (Figure 1), You may have to apply a little downward pressure on
the door to pull the locks fully over the hinge lever hooks,
3, Grab the door by the sides and pull the bottom of the door up and toward you
to disengage the hinge supports, Keep pulling the bottom of the door toward
you while rotating the top of the door toward the range to completely disen-
gage the hinge levers (Figure 2),
4, To clean oven door, follow the instructions provided in the GeneraJ Care &
Cteaning table,
NGE SLOT - Door re-
moved from the oven
Figure 2
Hinge lever
To Replace Oven Door:
1, Grab the door by the sides; place the hinge supports in the hinge slots, Open the
door to the fully opened position,
2, Disengage the lock from the hinge lever hooks on both sides (Figure 3),
Note: Make sure the hinge supports are fully engaged before unlocking the hinge
levers,
3, Close the oven door,
Special Door Care Instructions - Most oven doors contain glass
that can break,
Read the following recommendations:
1, Do not close the oven door until all the oven racks are fully in place,
2, Do not hit the glass with pots, pans, or any other object,
3, Scratching, hitting, jarring or stressing the glass may weaken its structure
causing an increased risk of breakage at a later time,
Lock in normal position
Figure 3
Roller Storage
Drawer
Front _.
Frame
Figure 4
Removing and Replacing Regular Storage Drawer
(some models}
Use the storage drawer for storing cooking utensils, The drawer can be removed
to facilitate cleaning under the range, Use care when handling the drawer,
To remove the drawer :
1, Pull empty drawer out to the roller guide stop,
2, Tilt the drawer up and pull it out over the rollers,
To replace the drawer:
1, insert the rear end of the drawer into the opening,
2, Fit the drawer end rollers onto the guide rails,
3, Push the drawer in until it stops, then lift to allow the rollers to clear the rollerguide
stop, and push in,
18
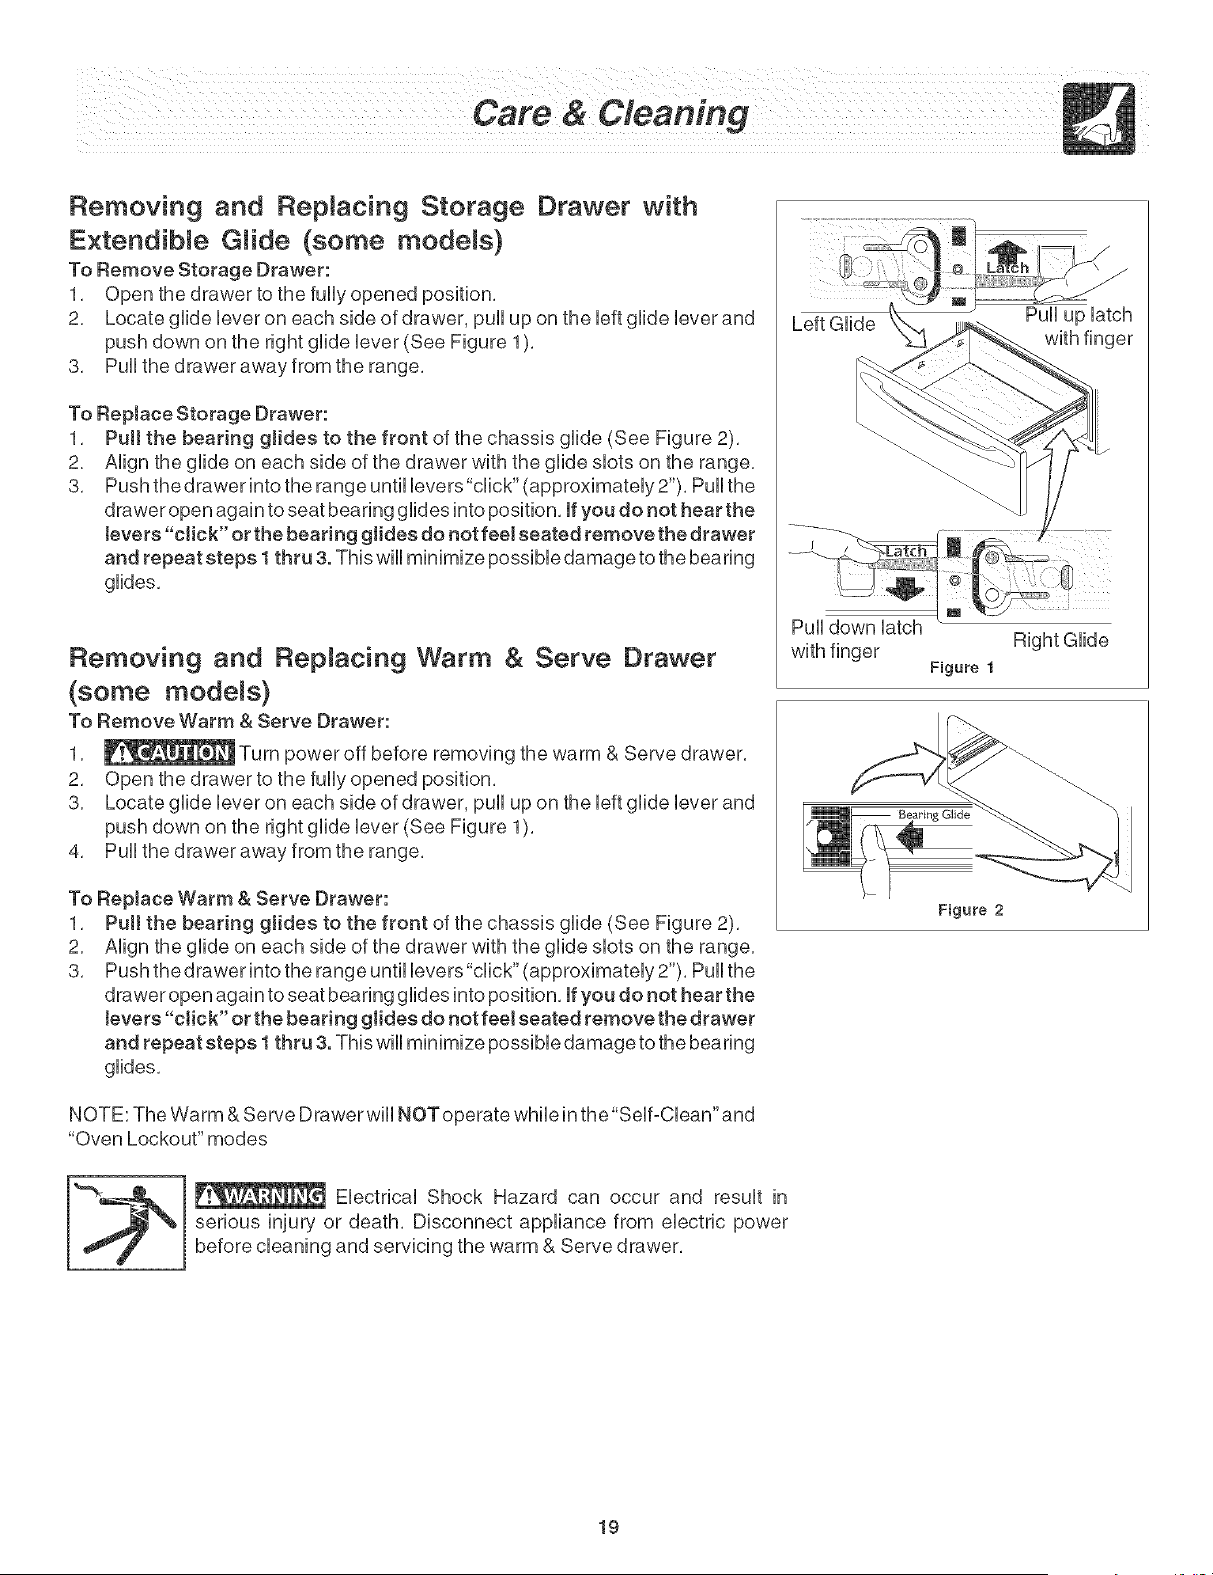
Removing and Replacing Storage Drawer with
Extendible GJide (some models)
To Remove Storage Drawer:
1, Open the drawer to the fully opened position,
2, Locate glide lever on each side of drawer, pull up on the left glide lever and
push down on the right glide lever (See Figure 1),
3, Pull the drawer away from the range,
To Replace Storage Drawer:
1, Pui[ the bearing gJides to the front of the chassis glide (See Figure 2),
2, Align the glide on each side of the drawer with the glide slots on the range,
3, Push the drawer into the range until levers"click" (approximately 2"), Pull the
drawer open again to seat bearing glides into position, If you do not hear the
[evers "click" or the bearing glides do not feeJ seated remove the drawer
and repeat steps 1 thru 3. This will minimize possible damage to the bearing
glides,
Removing and Replacing Warm & Serve Drawer
(some models}
To Remove Warm & Serve Drawer:
1, _ Turn power off before removing the warm & Serve drawer,
2, Open the drawer to the fully opened position,
3, Locate guide bver on each side of drawer, pull up on the bft guide bver and
push down on the right guide bver (See Figure 1),
4, Pull the drawer away from the range,
To Replace Warm & Serve Drawer:
1, Pull the bearing glides to the front of the chassis glide (See Figure 2),
2, Align the glide on each side of the drawer with the glide slots on the range,
3, Push the drawer into the range until bvers"dick" (approximately 2"), Pull the
drawer open again to seat bearing glides into position, If you do not hear the
levers "cIick" or the bearing glides do not fee[ seated remove the drawer
and repeat steps 1 thru 3. This will minimize possible damage to the bearing
glides,
NOTE: The Warm & Serve D rawer will NOT operate while in the"Self-Cban" and
"Oven Lockout" modes
_'_1 _ Electrical Shock Hazard can occur and result in
serious injury or death, Disconnect appliance from electric power
before cleaning and servicing the warm & Serve drawer,
Left Glide
with finger
Pull down latch
with finger Right Glide
Figure 1
Figure 2
19
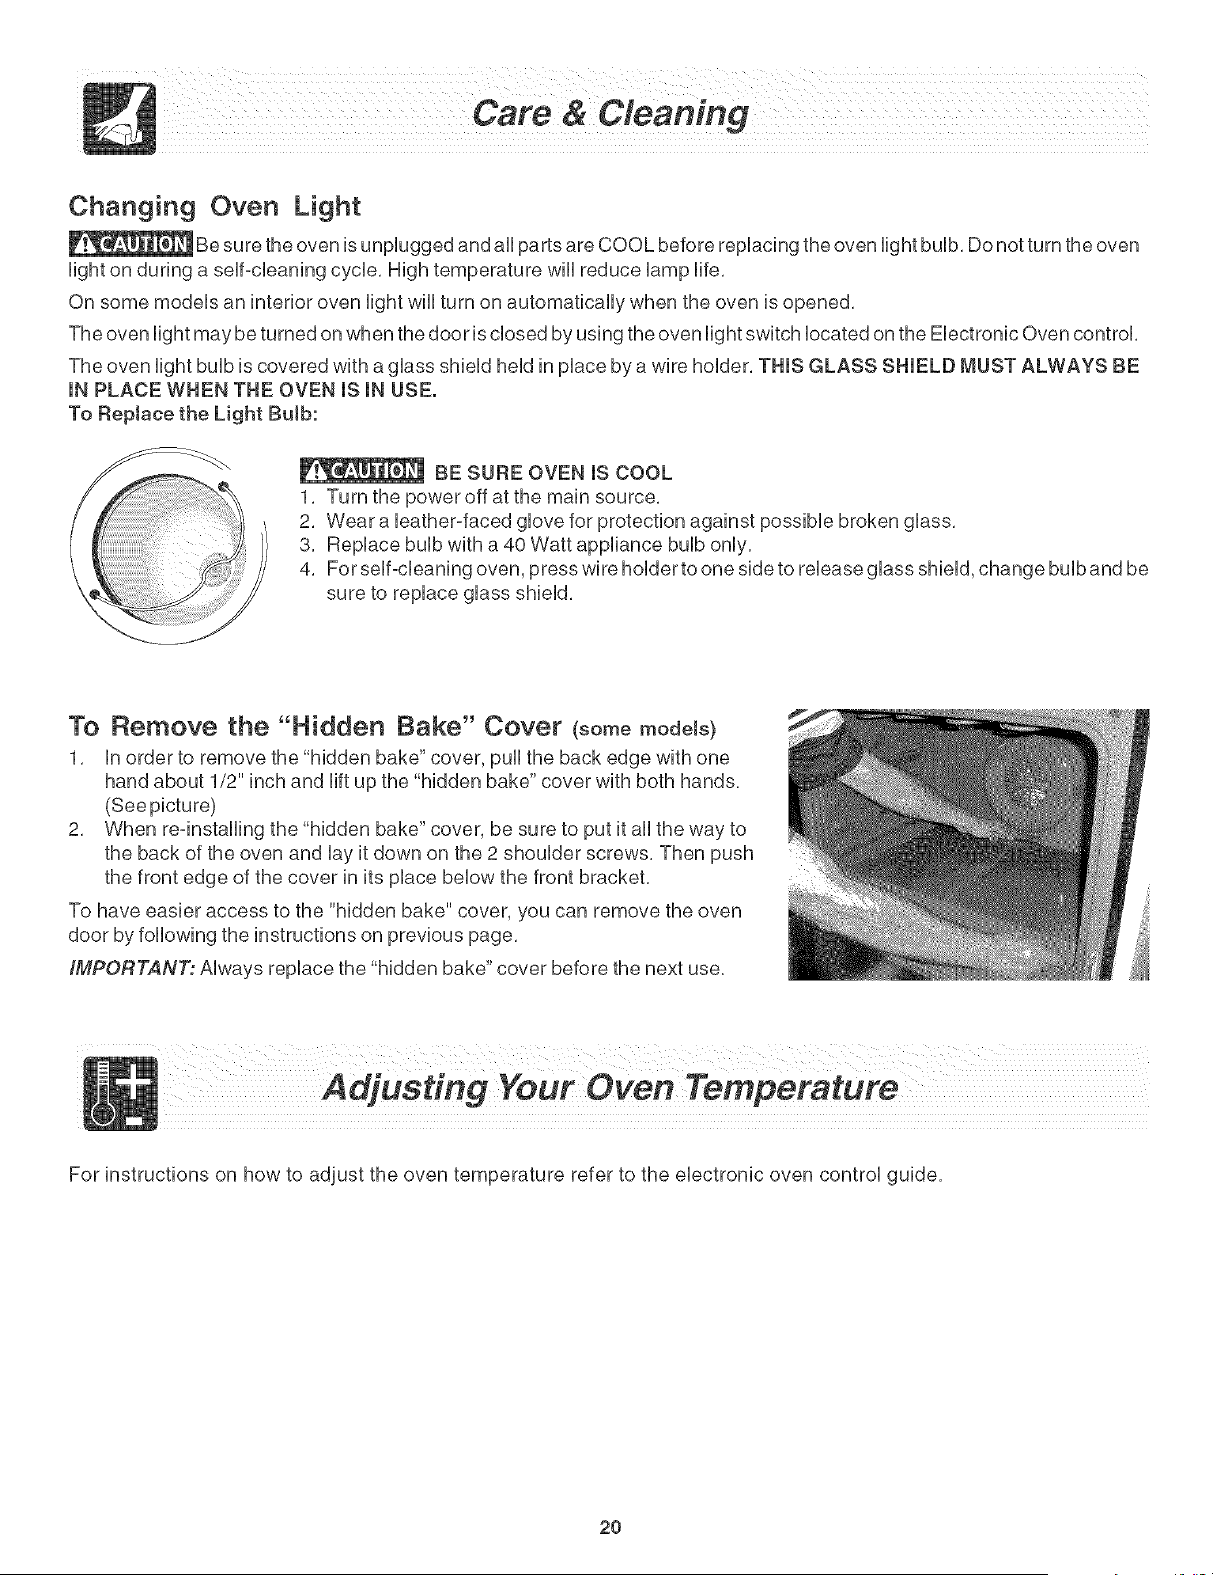
Changing Oven Light
Be sure the oven is unplugged and all parts are COOL before replacing the oven light bulb, Do not turn the oven
light on during a self-cleaning cycle, High temperature will reduce lamp life,
On some models an interior oven light will turn on automatically when the oven is opened,
The oven light may be turned on when the door is closed by using the oven light switch located on the Electronic Oven control,
The oven light bulb is covered with a glass shield held in place by a wire holder, THIS GLASS SHIELD MUST ALWAYS BE
mNPLACE WHEN THE OVEN mSmNUSE.
To Reptace the Light Bulb:
BE SURE OVEN IS COOL
1. Turn the power off at the main source.
2. Wear a bather-faced glove for protection against possible broken glass.
3. Replace bulb with a 40 Watt appliance bulb only.
4. For self-cleaning oven, press wire holder to one side to release glass shield, change bulb and be
sure to replace glass shield.
To Remove the "Hidden Bake" Cover (somemodets)
1. in order to remove the "hidden bake" cover, pull the back edge with one
hand about 1/2" inch and lift up the "hidden bake" cover with both hands.
(See picture)
2. When re°installing the "hidden bake" cover, be sure to put it all the way to
the back of the oven and lay it down on the 2 shoulder screws. Then push
the front edge of the cover in its place below the front bracket.
To have easier access to the "hidden bake" cover, you can remove the oven
door by following the instructions on previous page.
IMPORTANT: Always replace the "hidden bake" cover before the next use.
For instructions on how to adjust the oven temperature refer to the electronic oven control guide,
2O
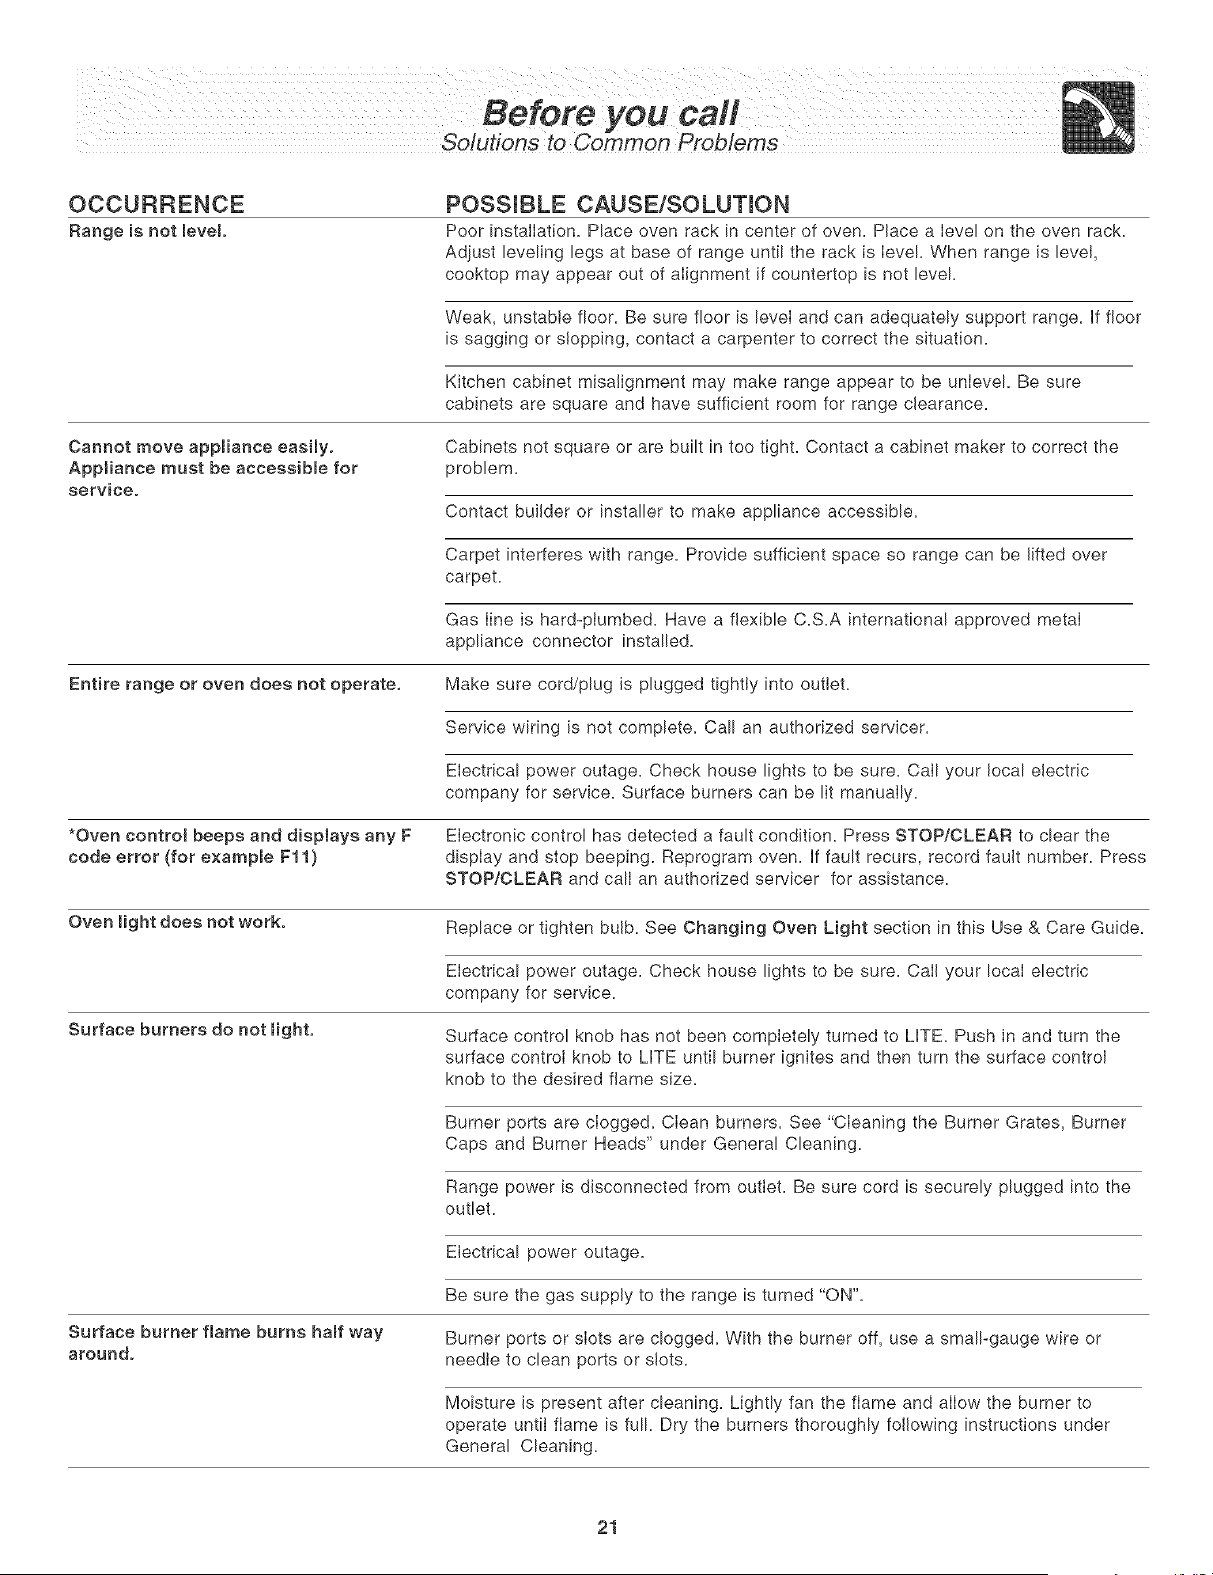
Solutions to Common Problems
OCCURRENCE
Range is not level
POSSIBLE CAUSE/SOLUTmON
Poor installation. Place oven rack in center of oven. Place a level on the oven rack.
Adjust leveling legs at base of range until the rack is Ievel. When range is level,
cooktop may appear out of alignment if countertop is not bvek
Weak, unstable floor. Be sure floor is level and can adequately support range. If floor
is sagging or slopping, contact a carpenter to correct the situation.
Kitchen cabinet misalignment may make range appear to be unleveL Be sure
cabinets are square and have sufficient room for range clearance.
Cannot move appmiance easily,
Appliance must be acceseibme for
service.
Cabinets not square or are built in too tight. Contact a cabinet maker to correct the
problem.
Contact builder or installer to make appliance accessible.
Carpet interferes with range. Provide sufficient space so range can be lifted over
carpet.
Gas Iine is hard@lumbed. Have a flexible C.S.A international approved metal
appliance connector installed.
Entire range or oven does not operate. Make sure cord/plug is plugged tightly into outlet.
Service wiring is not complete. Call an authorized servicer.
Electrical power outage. Check house lights to be sure. CalI your local electric
company for service. Surface burners can be lit manually.
*Oven control beeps and displays any F Electronic control has detected a fault condition. Press STOP/CLEAR to clear the
code error (for exampme Fll) display and stop beeping. Reprogram oven. If fault recurs, record fault number. Press
STOP/CLEAR and call an authorized servicer for assistance.
Oven light does not work,
Replace or tighten bulb. See Changing Oven Light section in this Use & Care Guide.
Electrical power outage. Check house lights to be sure. CalI your local electric
company for service.
Surface burners do not might,
Surface control knob has not been compietely turned to LITE. Push in and turn the
surface control knob to LITE until burner ignites and then turn the surface control
knob to the desired flame size.
Burner ports are clogged. Clean burners. See "Cleaning the Burner Grates, Burner
Caps and Burner Heads" under General Cleaning.
Range power is disconnected from outlet. Be sure cord is securely plugged into the
outlet.
Electrical power outage.
Surface burner flame burns haft way
around,
Be sure the gas supply to the range is turned "ON".
Burner ports or slots are clogged. With the burner off, use a smalPgauge wire or
needle to clean ports or slots.
Moisture is present after cleaning. Lightly fan the flame and allow the burner to
operate until flame is full. Dry the burners thoroughly following instructions under
General Cleaning.
21
Solutions to Common Problems
Surface burner flame is orange. Dust particles in main line. Allow the burner to operate a few minutes until flame
turns blue.
Salt air in coastal areas. A slightly orange flame is unavoidable.
Poor baking results. Many factors affect baking results. Make sure the proper rack position is used.
Center food in the oven and space pans to aIIow air to circulate. Allow the oven to
preheat to the set temperature before placing food in the oven. Try adjusting the
recipes' recommended temperature or baking time. if you feel the oven is too hot or
cool, see "Adjusting the Oven Temperature" section in the Electronic Oven Control
Guide.
Fan noise during cooking operation. A cooling fan may automatically turn on and off to coot internal parts. It is normal,
and the fan may continue to run even after oven is turned off.
Flames inside oven or smoking from Excessive spiilovers in oven. Set self-clean cycle for a longer cleaning time.
vent.
Excessive spiIIovers in oven. This is normal, especially for pie spillovers or large
amounts of grease on the oven bottom. Wipe up excessive spiIIovers before starting
the self-cIean cycle. If flames or excessive smoke are present, stop the seIf-cIean
cycle and follow the steps under "Stopping or Interrupting the Seff-Cmeaning
Cycle" in the Electronic Oven Control Guide.
Oven smokes excessively during
broiling.
Meat is too close to the element. Reposition the rack to provide proper clearance
between the meat and the oven boil element.
Meat is not properly prepared. Remove excess fat from meat. Remove remaining
fatty edges to prevent the meat from curling, but do not cut into the lean of the meat.
Broiler pan used without the Broiler Pan Insert or insert is covered with foil. DO NOT
use the Broiler Pan without the Broiler Pan Insert or cover the insert with foil.
Broiler Pan or Broiler Pan Insert needs to be cIeaned. Excessive smoking is caused
by buiIdup of grease or food spatters. Clean the Broiler Pan and Insert on a regular
basis.
Oven door is closed. Oven door should be open at the broiI stop position when
broiling.
Seff-c_eaning cycme does not work. Control(s) not set properIy. FoIIow instructions under "Oven Cmeaning" in the
Electronic Oven Control Guide.
Self-cleaning cycle was interrupted. Stop time must be 2 to 4 hours past the start
time. Follow steps under "Stopping or _nterrupting the Seff-Omeaning Cycle" in the
Electronic Oven Control Guide.
Soil not completely removed after serf-
cleaning cycle.
Set Self-Clean cycle for a longer cleaning time.
Failure to clean bottom front, top of oven or door areas outside oven seal. These
areas are not in the Self-Cleaning area, but get hot enough to burn on food residue.
Clean these areas before starting the Self-CIean cycie. Burned-on residue may be
cleaned with a stiff nylon brush and water or nylon scrubber. Be careful not to
damage the oven gasket.
Excessive smoking from oven vent, Excessive spillovers in oven, especially for pie spillovers or large amounts of grease
on the oven bottom. Wipe up excessive spilIovers before starting the Self-Clean
cycle, if flames or excessive smoke are present, stop the Self-Clean cycle and follow
the steps under "Stopping or interrupting the Seff_Cmeaning Cycle" in the
Electronic Oven Control Guide.
22

23
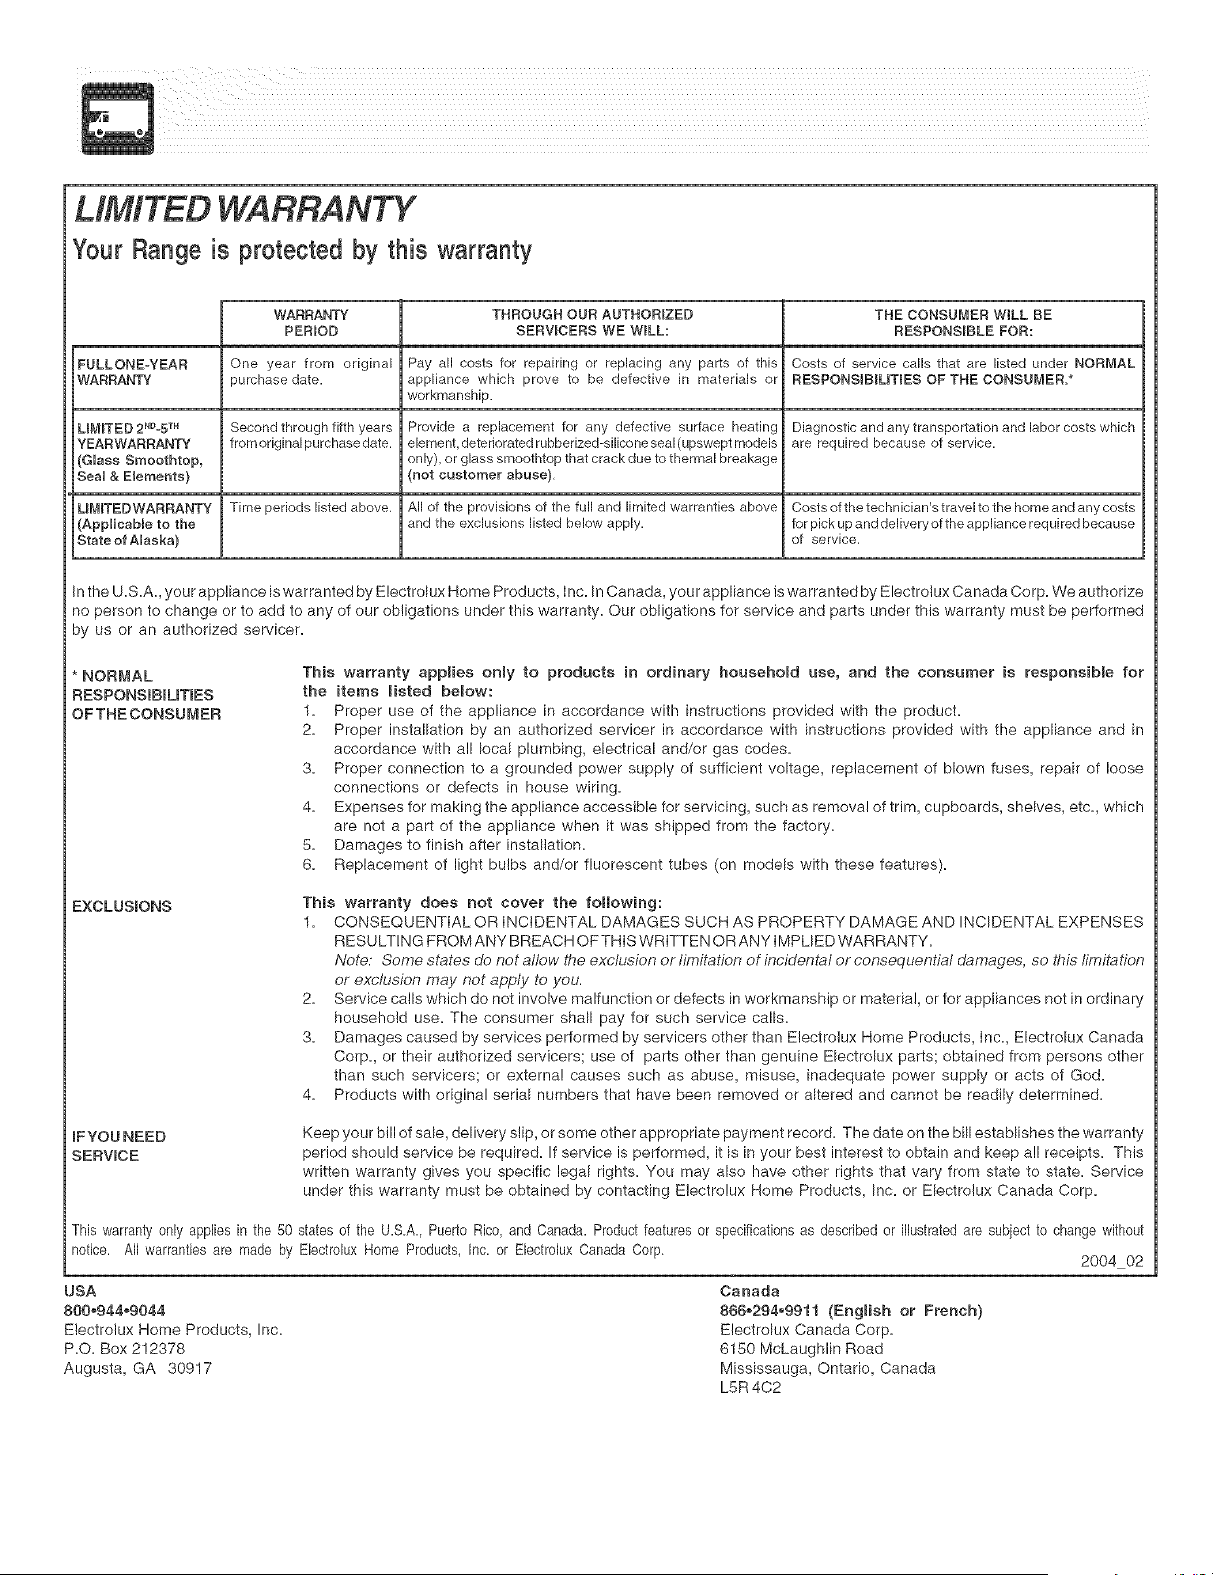
MMtTED WARRANTY
Your Range is protected by this warranty
WARRANTY THROUGH OUR AUTHORIZED THE CONSUMER WiLL BE
PERIOD SERWCERS WE WILL: RESPONSIBLE FOR:
FULLONE-YEAR One year from original Pay all costs for repairing or replacing any parts of this Costs of service calls that are listed under NORMAL
WARRANTY purchase date. appliance which prove to be defective in materials or RESPONSJBlUTIES OF THE CONSUMER.*
workmanship.
LIM_TED2ND"5TM Second through fifth years Provide a replacement for any defective surface heating Diagnosticand anytransportation and labor costs which
YEARWARRANTY fromoriginalpurchasedate, element,deterioratedrubberized-siliconeseal(upsweptmodels are required because of service,
(GUassSmoothtop, only), or glass smoothtop that crack due to thermal breakage
SeaU& Elements) (not customer abuse),
UMITEDWARRANTY Time periods listed above, All of the provisions of the full and limited warranties above Costsofthetechnician'straveltothe homeandanycosts
(Applicable to the and the exclusions listed below apply, for pickup and delivery of the appliance required because
State of AUaeka) of service,
in the U=S=A. your appliance is warranted by Electrolux Home Products, Inc=In Canada, your appliance is warranted by Electrotux Canada Corp= We authorize
no person to change or to add to any of our obligations under this warranty. Our obligations for service and parts under this warranty must be performed
by us or an authorized servicer.
*NORMAL
RESPONSIBILITIES
OFTHECONSUMEB
This warranty applies only to products in ordinary household use, and the consumer is responsible for
the items misted below:
1. Proper use of the appliance in accordance with instructions provided with the product.
2. Proper installation by an authorized servicer in accordance with instructions provided with the appliance and in
accordance with all local plumbing, electrical and/or gas codes.
3. Proper connection to a grounded power supply of sufficient voltage, replacement of blown fuses, repair of loose
connections or defects in house wiring.
4. Expenses for making the appliance accessible for servicing, such as removal of trim, cupboards, shelves, etc. which
are not a part of the appliance when it was shipped from the factory.
5= Damages to finish after installation=
6. Replacement of light bulbs and/or fluorescent tubes (on models with these features).
EXCLUSIONS This warranty does not cover the following:
1= CONSEQUENTIAL OR INCIDENTAL DAMAGES SUCH AS PROPERTY DAMAGE AND INCIDENTAL EXPENSES
RESULTING FROM ANY BREACHOFTHIS WRITTEN OR ANY IMPLIEDWARRANTY.
Note: Some states do not aflow the exclusion or limitation of incidental or consequential damages, so this limitation
or exclusion may not apply to you.
2. Service calls which do not involve malfunction or defects in workmanship or material, or for appliances not in ordinary
household use. The consumer shall pay for such service calls.
3. Damages caused by services performed by servicers other than Electrolux Home Products, Inc. Electrolux Canada
Corp. or their authorized servicers; use of parts other than genuine Electrolux parts; obtained from persons other
than such servicers; or external causes such as abuse, misuse, inadequate power supply or acts of God.
4. Products with original serial numbers that have been removed or altered and cannot be readily determined.
IFYOU NEED
SERVmCE
Keep your bill of sale, delivery slip, or some other appropriate payment record. The date on the bill establishes the warranty
period should service be required. If service is performed, it is in your best interest to obtain and keep all receipts. This
written warranty gives you specific legal rights. You may also have other rights that vary from state to state. Service
under this warranty must be obtained by contacting Electrolux Home Products, Inc= or Electrolux Canada Corp=
This warranty only applies in the 50 states of the U.S.A. Puerto Rico, and Canada. Productfeatures or specifications as describedor illustrated are subjectto change without
notice. All warranties are made by Electrolux Home Products, Inc. or Electrolux Canada Corp.
USA
800.944.9044
Electrolux Home Products, lnc.
P.O. Box 212378
Augusta, GA 30917
Canada
866_294_9911 {English or French}
Electrolux Canada Corp=
6150 McLaughlin Road
Mississauga, Ontario, Canada
LSR 4C2
2004 02