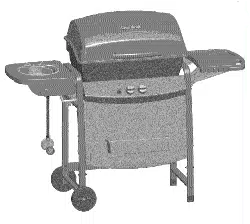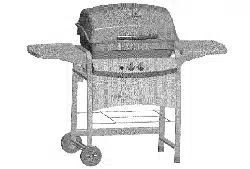
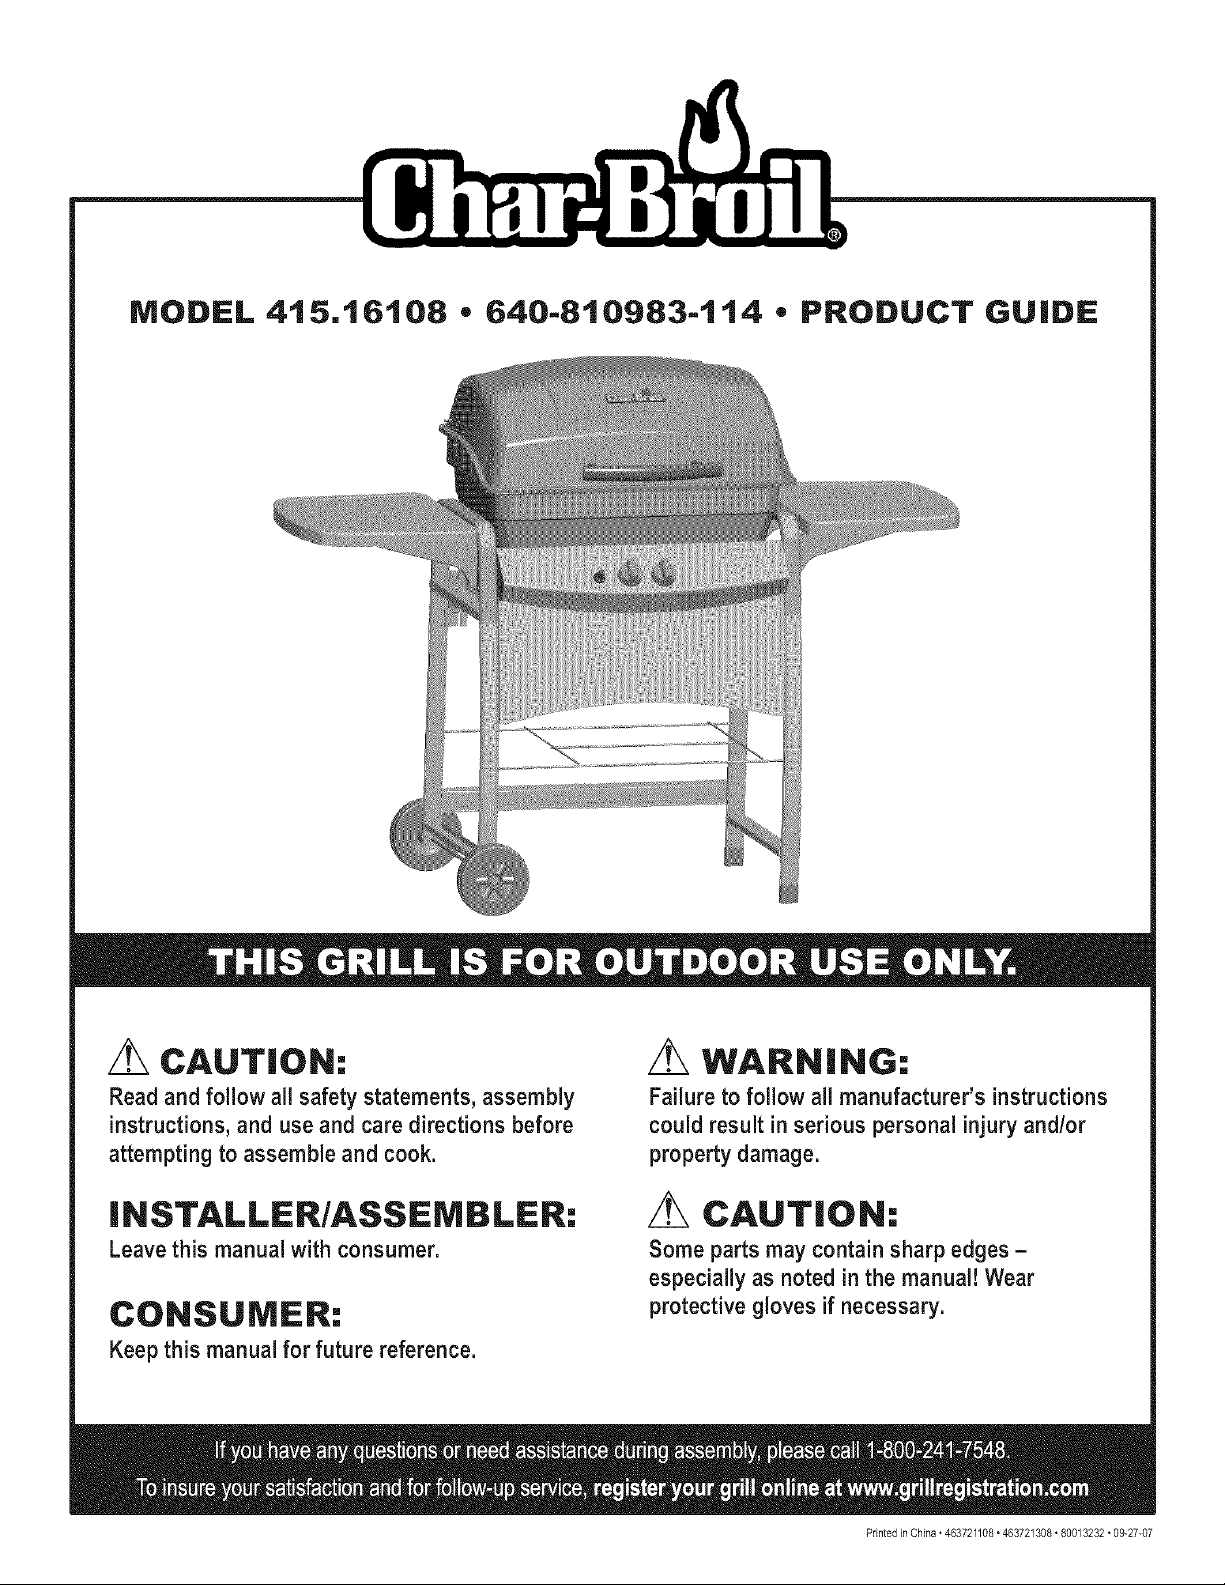
MODEL 415.16108 • 640-810983-114 • PRODUCT GUIDE
/_ CAUTION:
Read and follow all safety statements, assembly
instructions, and use and care directions before
attempting to assemble and cook.
INSTALLER/ASSEMBLER:
Leave this manual with consumer.
CONSUMER:
Keep this manual for future reference.
/_ WARNING:
Failure to follow all manufacturer's instructions
could result in serious personal injury and/or
property damage.
/_ CAUTION:
Some parts may contain sharp edges -
especially as noted in the manual! Wear
protective gloves if necessary.
Printedin China • 463721108• 463721308 • 80013232 • 09-27-07

if you smell gas:
1. Shut off gas to the appliance.
2. Extinguish any open flame.
3. Open lid.
4. if odor continues, keep away from the
appliance and immediately call your gas
supplier or your fire department.
1. Do not store or use gasoline or other
flammable liquids or vapors in the vicinity of
this or any other appliance.
2. An LP cylinder not connected for use shall not
be stored in the vicinity of this or any other
appliance.
Call Grill Service Center for Help and Parts
. If you need assistance with your product or warranty parts call
1-800-241-7548. Hours of Service Center Operation are
8:00 A.M. To 6:00 P.M. EST Monday- Friday.
, To order non-warranty replacement parts or accessories
please visit us on the web at www.charbroil, com or call
1-800-241-7548 and one of our friendly and knowledgeable
agents will be glad to assist you.
IMPORTANT: Fill out the product record information below.
Model Number
Serial Number
See ratinglabelongrillfor serialnumber.
Date Purchased
CAUTION
For residential use only. Do not use for commercial
cooking.
2 " 463721108"463721308
Installation Safety Precautions
• Use grill only with LP (propane) gas and the regulator/valve
assembly supplied.
• Grill installation must conform with local codes, or in their
absence with National Fuel Gas Code, NFPA 54 / ANSI
Z223.1 and Natural Gas and Propane Installation Code,
CSA B149.1. Handling and storage of LP cylinders must
conform to LP Gas Code NFPNANSI 58. Grill is not for use in
or on recreational vehicles and/or boats.
, All electrical accessories (such as rotisserie) must be
electrically grounded in accordance with local codes, or
National Electrical Code, ANSI / NFPA 70 or Canadian
Electrical Code, CSA C22.1. Keep any electrical cords
and/or fuel supply hoses away from any hot surfaces.
. This grill is safety certified for use in the United States and/or
Canada only. Do not modify for use in any other location.
Modification will result in a safety hazard.
CALIFORNIA PROPOSITION 65
1. Combustion by-products produced when using
this product contain chemicals known to the
State of California to cause cancer, birth defects,
and other reproductive harm.
2. This product contains chemicals, including lead
and lead compounds, known to the State of
California to cause cancer, birth defects or other
reproductive harm.
Wash your hands after handfinq this product.
Safety Symbols
Thesymbolsand boxesshownbelowexplainwhateachheading
means.Readandfollowallof themessagesfoundthroughout
themanual.
DANGER: Indicates an imminently hazardous situation
which, if not avoided,will result in death or serious injury.
WARNING: Indicatesan potentially hazardous situation
which, if not avoided, could result in death or serious
injury.
__ m
D T,o.
CAUTION: Indicates a potentially hazardous situation or
unsafe practicewhich, if not avoided, may result in minor
or moderate injury.
For Your Safety ...................................... 2
Grill Service Center................................... 2
Product Record Information ............................ 2
Installation Safety Precautions .......................... 2
Safety Symbols ...................................... 2
Use and Care .................................... 4-10
Parts List .......................................... 11
Parts Diagram ...................................... 12
Assembly ....................................... 13-23
Troubleshooting .................................. 24-25
Limited Warranty .................................... 26
Registration Card ................................... 27
Do not attempt to repair or alter the
hose/valve/regulatorfor any "assumed" defect. Any
modification to this assembly will void your warranty
and create the risk of a gas leak and fire. Use only
authorized replacement parts supplied by
manufacturer.
CertifiedGrill PartsAnd Accessories@,Char-Broil and Design@,Char-Broil (Gas Grill Briquettes)@,Char-Diamonds@,CookingZone and Design@,Diamond Flame@,Executive Chef@,Faststarf@,Flare
Fighter@,FlavorMaster@,Gas Grill Silouetteand Design@,H20 Smoke@, Lava Flame@,MasterFlame@,MasterFlamePrecision CookingSystem@,PowerSpark@,Quantum@,VIP@,PrecisionFlameand
Design@,Sierra@,and TruFlame@are registeredTrademarksof the W,C. Bradley Company. TheeT_os@is a registeredtrademarkof the Thermos Companyand its affiliates.
Artisan Collectionby Char-Broil T'_',C3 and DesignTM ,Char-Broil and Design_'_', FlameDesign_'_', FlavorTentsf'_', Grill 2GoT'_', Grillin'Stick_'_',Keeperof the FJame_'_',Keepers of theFlame_'_',NaturalGrip_'_',
OutdoorCooking Collectionand DesignTM, PatioBistroTM, PrecisionFlameTM, Pro-Checkf'_',QuickSetGrills and DesignTM, SmokerTentsT'_',The Big EasyT'_',TheMinute GdllT'',The EdgeTM, The Tuscan
Collection_'_',and The Urban GdllT'' are Trademarksof the W.C.Bradley Company. Universal GrillParts and DesignTM is a trademark of theTheeTIosCompanyand its affiliates.
Protectedunder one or moreof the following U.S. Patents: 4,598,692; 4,624,240;4,747,391;4,747,391; 4,817,583; 4,924,846;4,989,579;5,003,960; 5,076,256; 5,076,257;5,090,398;5,109,834; 5,224,676;
5,277,106;5,421,319;5,441,226;5,452,707; 5,458,309;5,566,606;5,566,606; 5,579,755; 5,582,094;5,613,486;5,649,475; 5,706,797; 5,711,663;5,765,543;5,931,149;5,996,573;6,095,I32; 6,135,104;
6,173,644B1;6,279,566;6,397,73I; 6,418,923; 6,439,222;6,523,461;6,935,327; D282,619;D339,714;D341,292;D343,337;D358,059;D361,466;D364,535;D372,637;D373,701; D377,735;D383,035;
D397,910;D405,643;D405,643;D406,005;D406,009;D413,043;D413,229;D413,229;D414,982;D415,388; D416,I64; D416,44I; D416,441;D417,587;D422,516;D423,274;D423,876;D428,303;D435,396;
D436,004;D438,059;D438,060;D438,427;D439,II0; D442,505;D443,I79; D443,354;D447,384;D447,385;D447,909;D448,610;D448,614;D448,615;D448,616; D448,975;D449,492; D451,759;D456,202S;
D460,313,D461,359and D504,048, Canada:87743;87744; 92607; 92608 and 1,316,424, Other PatentsPending.Assembly instructions@2006,
463721108°463721308 • 3

LP Tank
• The LP tank used with your grill must meet the following
requirements:
• Use LP tanks only with these required measurements: 12"
(30.5cm) (diameter) x 18" (45.7 cm) (tall) with 20 lb. (9 kg.)
capacity maximum.
. LP tanks must be constructed and marked in accordance with
specifications for LP tank of the U.S. Department of
Transportation (DOT) or for Canada, CAN/CSA-B339,
cylinders, spheres and tubes for transportation of dangerous
goods, Transport Canada (TC). See LP tank collar for marking.
LP tank valve must have:
, Type 1 outlet compatible with
regulator or grill.
, Safety relief valve.
, UL listed Overfill Protection OPDHand Wheel
Device (OPD). This OPD safety
feature is identified by a unique triangular hand wheel. Use
only LP tanks equipped with this type of valve.
, LP tank must be arranged for vapor withdrawal and include
collar to protect LP tank valve.
LP Tank Removal, Transport And Storage
, Turn OFF all control knobs and LP tank valve. Turn coupling
nut counterclockwise by hand only - do not use tools to
disconnect. Lift LP tank wire upward off of LP tank collar, then
lift LP tank up and off of support bracket, install safety cap onto
LP tank valve. Always use cap and strap supplied with valve.
Failure to use safety cap as directed may result in serious
personal injury and/or property damage.
LP TankValve
Safety Cap
RetainerStrap
, A disconnected LP tank in storage or being transported must
have a safety cap installed (as shown). Do not store an LP tank
in enclosed spaces such as a carport, garage, porch, covered
patio or other building. Never leave an LP tank inside a vehicle
which may become overheated by the sun.
, Do not store an LP tank in an area where children play.
4 " 463721108"463721308
LP cylinder in upright position for vapor withdrawal
LP (Liquefied Petroleum Gas)
• LP gas is nontoxic, odorless and colorless when produced. For
Your Safety, LP gas has been given an odor (similar to rotten
cabbage) so that it can be smelled.
• LP gas is highly flammable and may ignite unexpectedly when
mixed with air.
LP Tank Filling
• Use only licensed and experienced dealers.
• LP dealer must purge tank before filling.
• Dealer should NEVER fill LP tank more than 80% of LP tank
volume. Volume of propane in tank will vary by temperature.
• A frosty regulator indicates gas overfill. Immediately close LP
tank valve and call local LP gas dealer for assistance.
, Do not release liquid propane (LP) gas into the atmosphere.
This is a hazardous practice.
, To remove gas from LP tank, contact an LP dealer or call a
local fire department for assistance. Check the telephone
directory under "Gas Companies" for nearest certified LP
dealers.
LP Tank Exchange
o Many retailers that sell grills offer you the option of replacing
your empty LPtank through an exchange service. Use only
those reputable exchange companies that inspect, precision fill,
test and certify their cylinders. Exchange your tank only for
an OPB safety feature-equipped tank as described in the
"LP Tank" section of this manual.
Always keep new and exchanged LP tanks in upright position
during use, transit or storage.
, Leak test new and exchanged LP tanks BEFORE
connecting to grill,
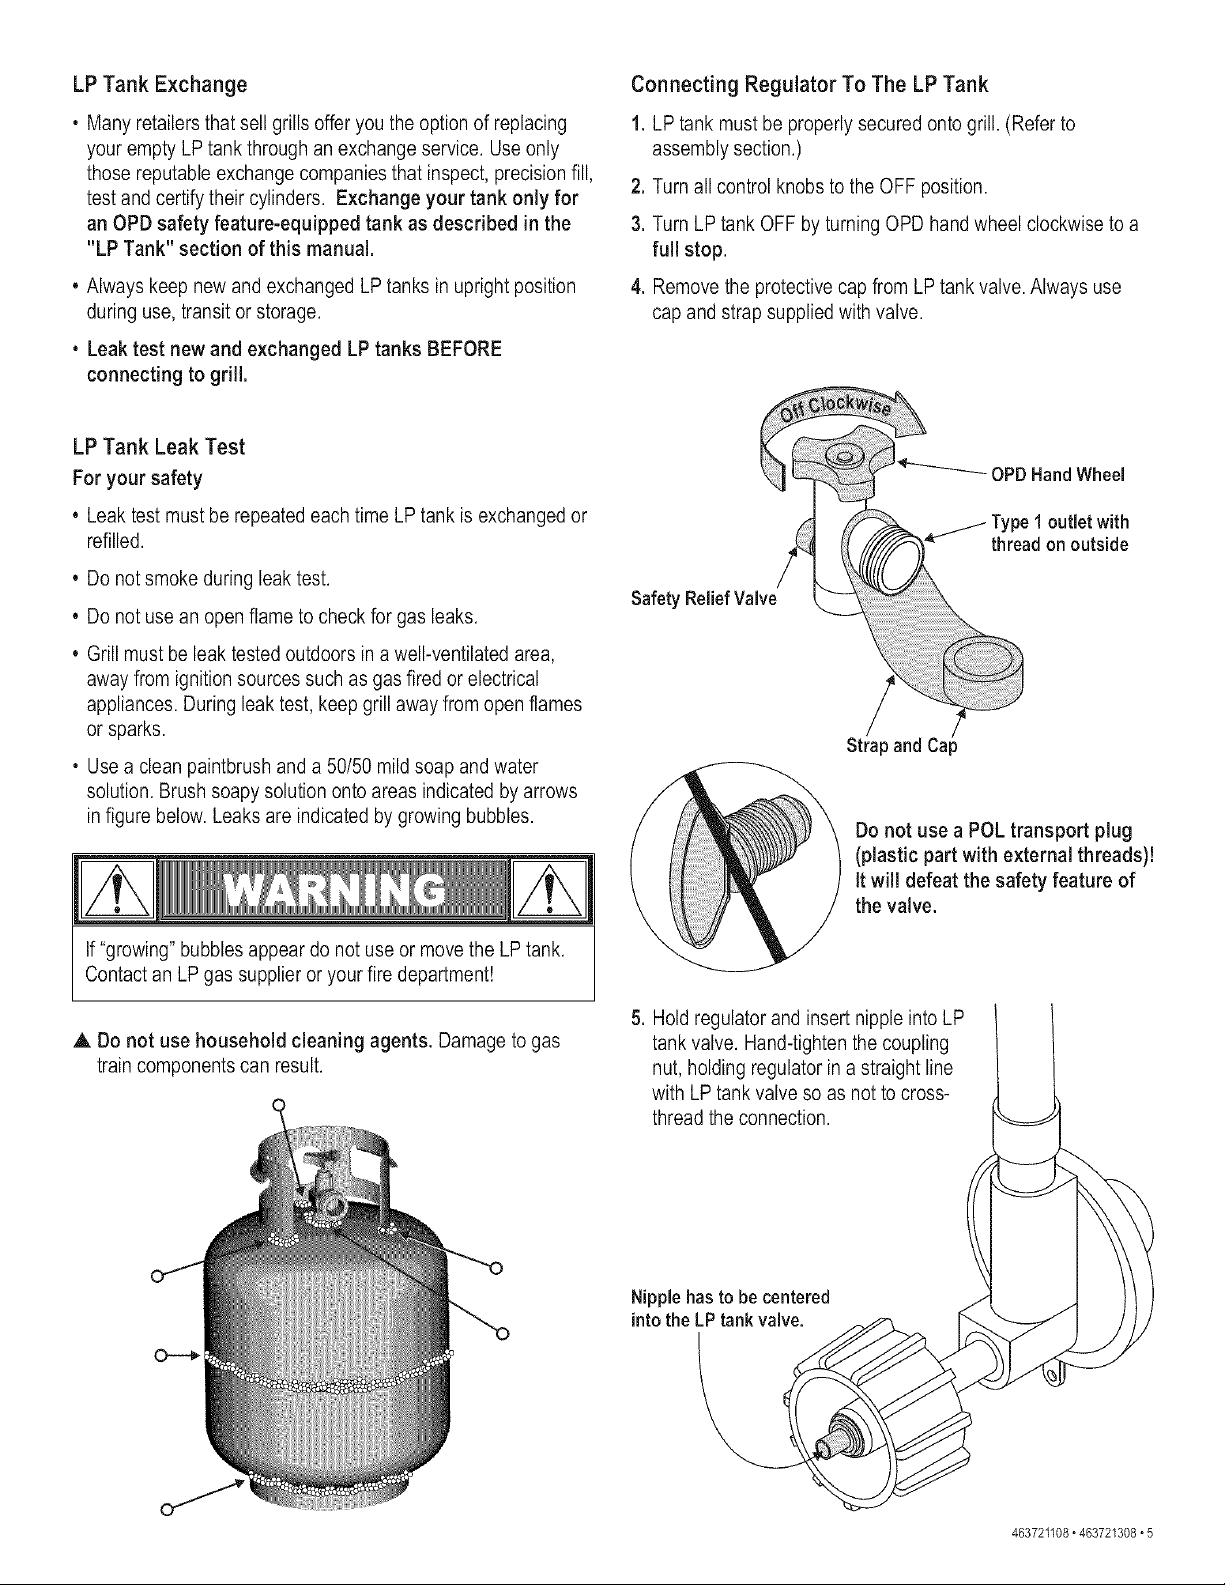
Connecting Regulator To The LP Tank
1. LP tank must be properly secured onto grill. (Refer to
assembly section.)
2. Turn all control knobs to the OFF position.
3. Turn LP tank OFF by turning OPD hand wheel clockwise to a
full stop.
4. Remove the protective cap from LP tank valve. Always use
cap and strap supplied with valve.
LP Tank Leak Test
For your safety
• Leak test must be repeated each time LP tank is exchanged or
refilled.
Do not smoke during leak test.
• Do not use an open flame to check for gas leaks.
Grill must be leak tested outdoors in a well-ventilated area,
away from ignition sources such as gas fired or electrical
appliances. During leak test, keep grill away from open flames
or sparks.
, Usea clean paintbrush and a 50/50 mild soap and water
solution. Brush soapy solution onto areas indicated by arrows
in figure below. Leaks are indicated by growing bubbles.
If "growing" bubbles appear do not use or move the LP tank.
Contact an LP gas supplier or your fire department!
A Do not use household cleaning agents. Damage to gas
train components can result.
Do not use a POL transport plug
(plastic part with external threads)!
it will defeat the safety feature of
the valve.
5. Hold regulator and insert nipple into LP
tank valve. Hand-tighten the coupling
nut, holding regulator in a straight line
with LPtank valve so as not to cross-
thread the connection.
O---*
Nipple has to be centered
intothe LP tankvalve.
463721108• 463721308• 5
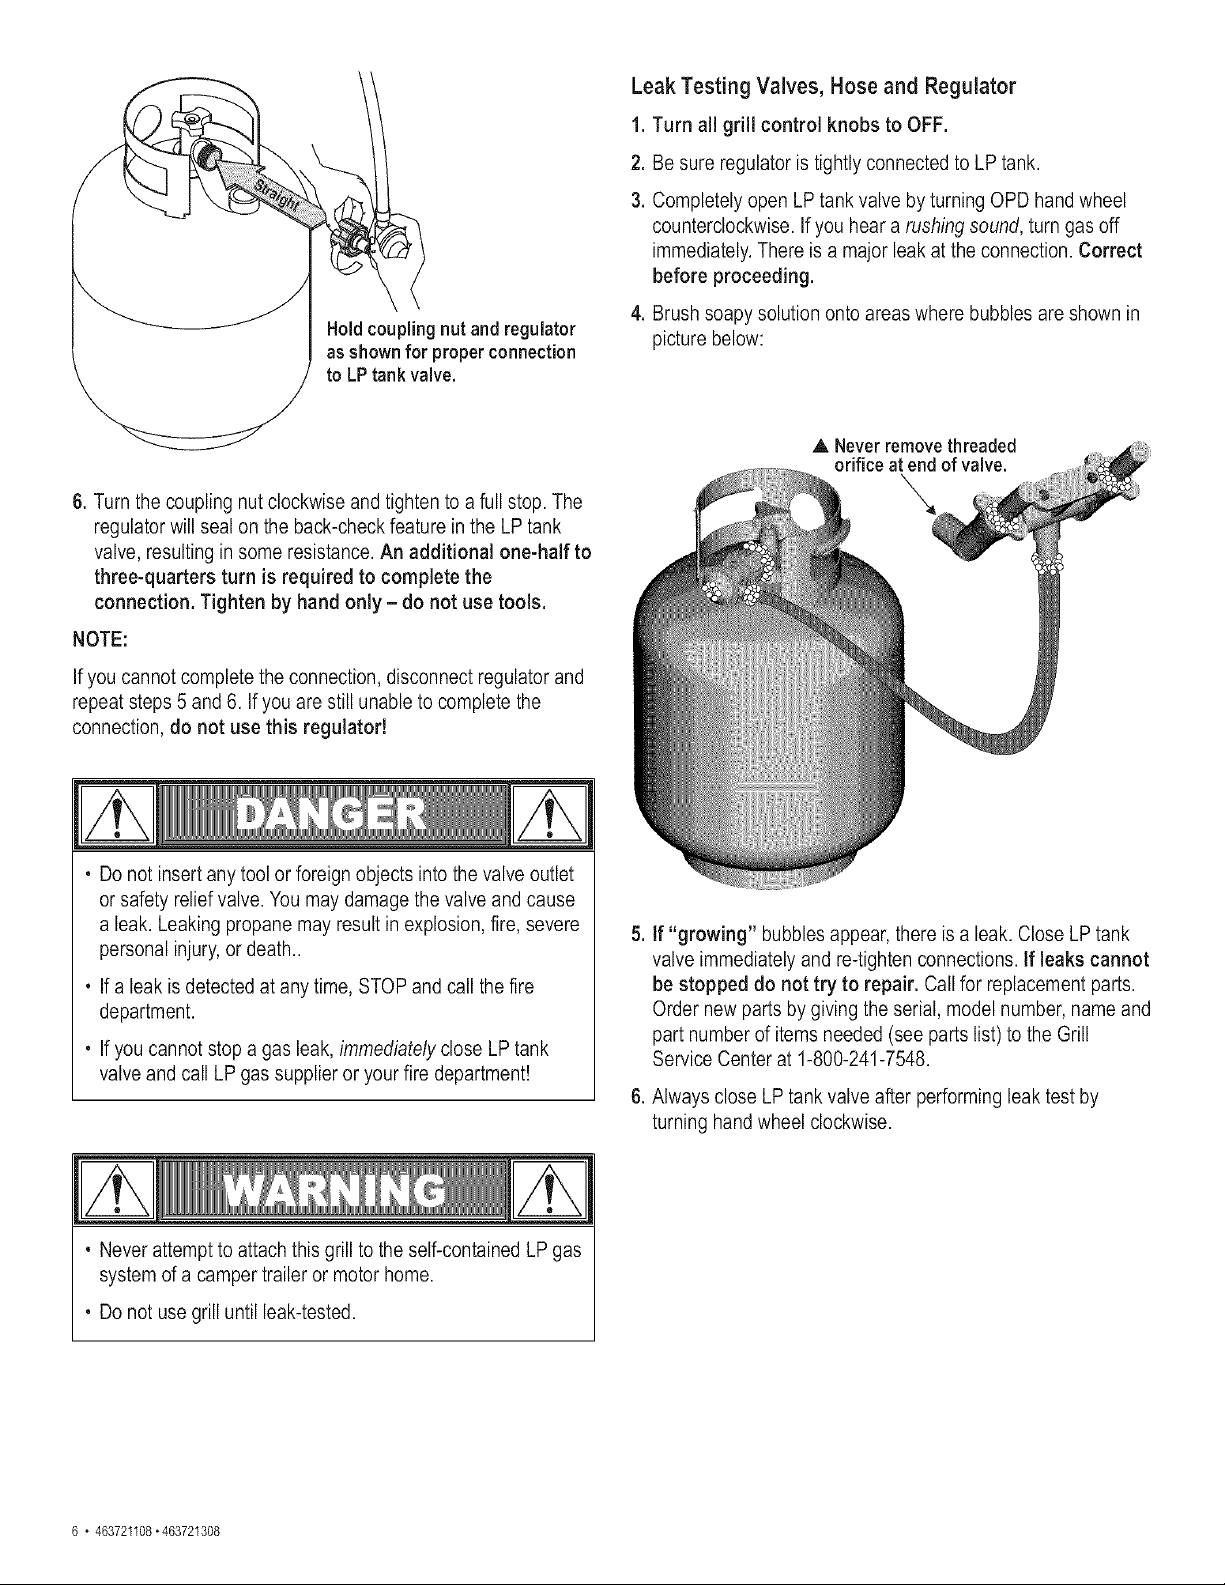
Hold coupling nut and regulator
as shown for properconnection
to LP tank valve.
Leak Testing Valves, Hose and Regulator
1. Turn all grill controlknobs to OFF.
2. Be sure regulator is tightly connected to LP tank.
3. Completely open LP tank valve by turning OPD hand wheel
counterclockwise. If you hear a rushing sound, turn gas off
immediately. There is a major leak at the connection. Correct
before proceeding.
4. Brush soapy solution onto areas where bubbles are shown in
picture below:
6. Turn the coupling nut clockwise and tighten to a full stop. The
regulator will seal on the back-check feature in the LP tank
valve, resulting in some resistance. An additional one-half to
three-quarters turn is required to complete the
connection. Tighten by hand only - do not use tools.
NOTE:
If you cannot complete the connection, disconnect regulator and
repeat steps 5 and 6. If you are still unable to complete the
connection, do not use this regulator!
, Do not insert any tool or foreign objects into the valve outlet
or safety relief valve. You may damage the valve and cause
a leak. Leaking propane may result in explosion, fire, severe
personal injury,or death..
, If a leak is detected at any time, STOP and call the fire
department.
, If you cannot stop a gas leak, immediately close LP tank
valve and call LP gas supplier or your fire department!
A Neverremovethreaded
orifice at end of valve.
.
if "growing" bubbles appear, there is a leak. Close LP tank
valve immediately and re-tighten connections. If leaks cannot
be stopped do not try to repair, Call for replacement parts.
Order new parts by giving the serial, model number, name and
part number of items needed (see parts list) to the Grill
Service Center at 1-800-241-7548.
Always close LP tank valve after performing leak test by
turning hand wheel clockwise.
, Never attempt to attach this grill to the self-contained LP gas
system of a camper trailer or motor home.
, Do not use grill until leak-tested.
6 " 463721108"463721308
For Safe Use Of Your Grill And To Avoid Serious
injury:
• Do not let children operate or play near grill.
• Keep grill area clear and free from materials that burn.
• Do not block holes in bottom or back of grill.
• Check burner flames regularly.
• Use grill only in well-ventilated space. NEVER use in
enclosed space such as carport, garage, porch, covered
patio, or under an overhead structure of any kind.
• Do not use charcoal or ceramic briquets in a gas grill.
(Unless briquets are supplied with your grill.)
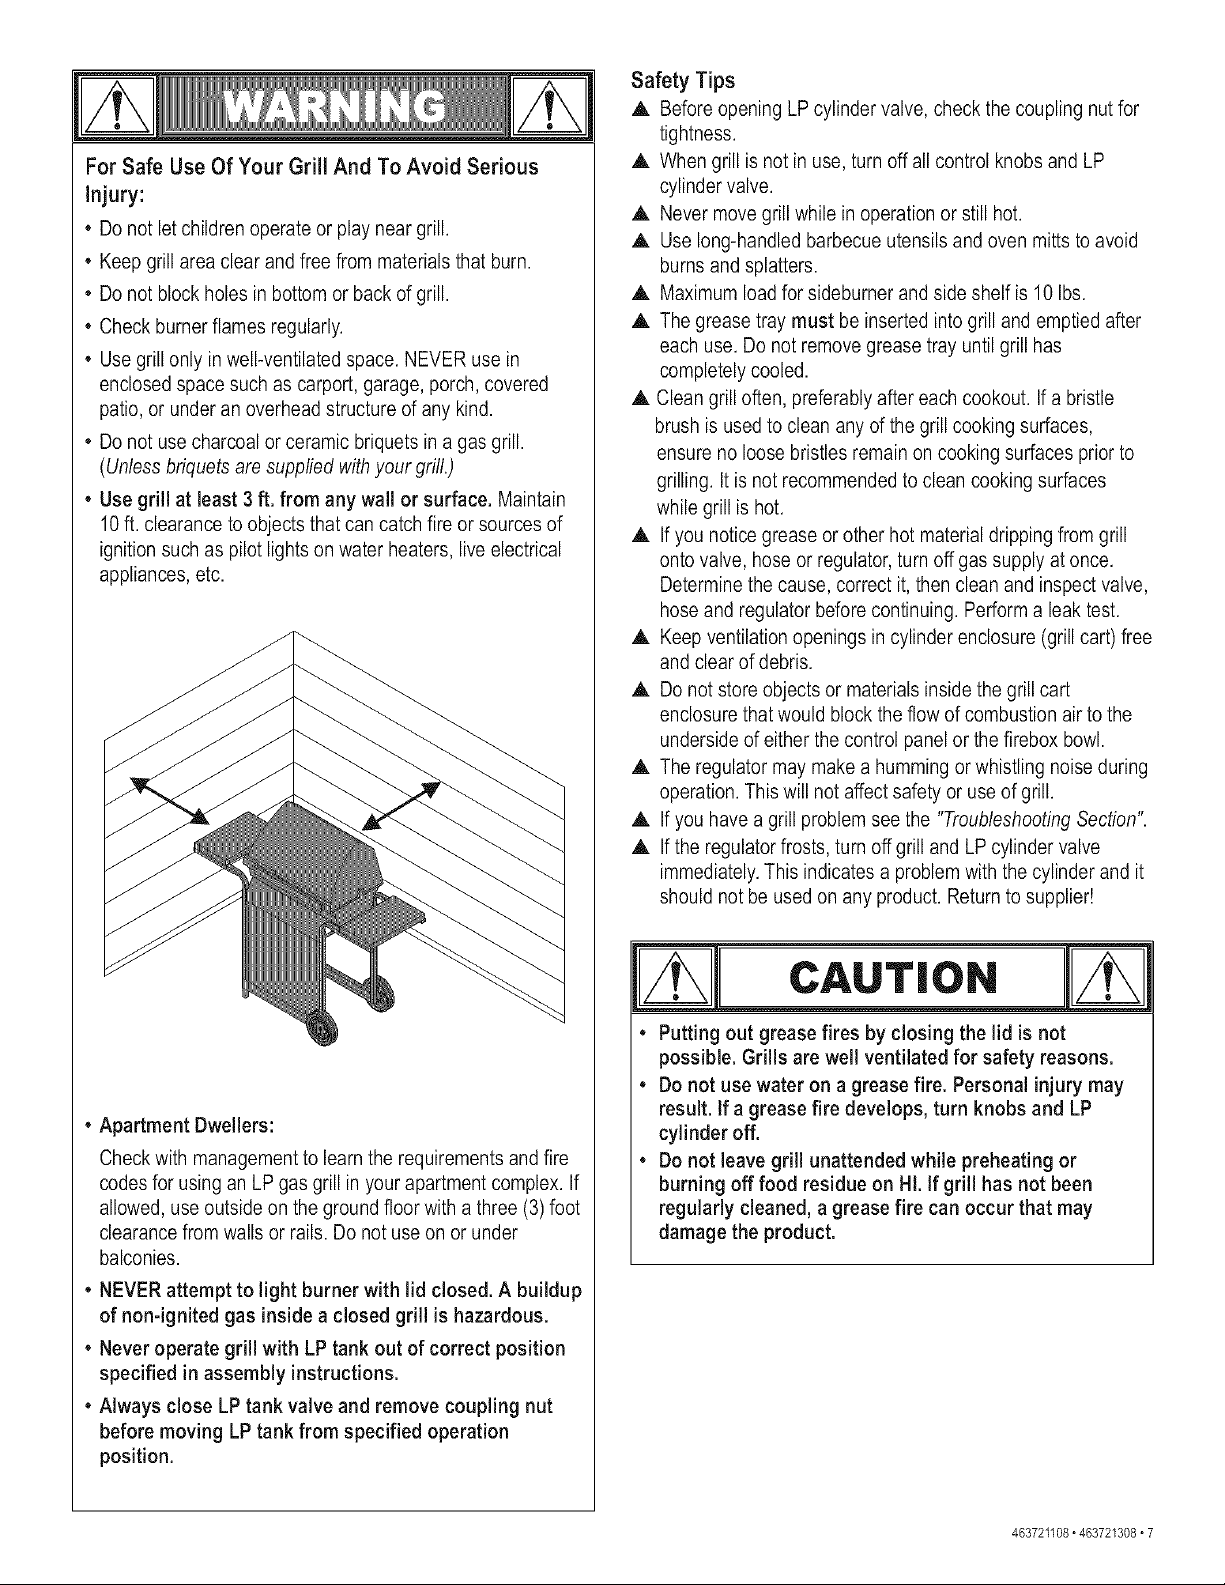
• Use grill at least 3 ft. from any wall or surface. Maintain
10ft. clearance to objects that can catch fire or sources of
ignition such as pilot lights on water heaters, live electrical
appliances, etc.
Apartment Dwellers:
Check with management to learn the requirements and fire
codes for using an LP gas grill in your apartment complex. If
allowed, use outside on the ground floor with a three (3) foot
clearance from walls or rails. Do not use on or under
balconies.
• NEVER attempt to light burner with lid closed. A buildup
of non-ignited gas inside a closed grill is hazardous.
• Never operate grill with LP tank out of correct position
specified in assembly instructions,
• Always close LP tank valve and remove coupling nut
before moving LP tank from specified operation
position.
Safety Tips
,A. Before opening LP cylinder valve, check the coupling nut for
tightness.
A When grill is not in use, turn offall control knobs and LP
cylinder valve.
A Never move grill while in operation or still hot.
A Use long-handled barbecue utensils and oven mitts to avoid
burns and splatters.
A Maximum load for sideburner and side shelf is 10 Ibs.
A The grease tray must be inserted into grill and emptied after
each use. Do not remove grease tray until grill has
completely cooled.
,A. Clean grill often, preferably after each cookout. If a bristle
brush is used to clean any of the grill cooking surfaces,
ensure no loose bristles remain on cooking surfaces prior to
grilling. It is not recommended to clean cooking surfaces
while grill is hot.
,A. If you notice grease or other hot material dripping from grill
onto valve, hose or regulator, turn off gas supply at once.
Determine the cause, correct it, then clean and inspect valve,
hose and regulator before continuing. Perform a leak test.
A Keep ventilation openings in cylinder enclosure (grill cart) free
and clear of debris.
,A. Do not store objects or materials inside the grill cart
enclosure that would block the flow of combustion air to the
underside of either the control panel or the firebox bowl.
,A. The regulator may make a humming or whistling noise during
operation. This will not affect safety or use of grill.
A If you have a grill problem see the "Troubleshooting Section".
,A. If the regulator frosts, turn off grill and LP cylinder valve
immediately.This indicates a problem with the cylinder and it
should not be used on any product. Return to supplier!
CAUTION
• Putting out grease fires by closing the lid is not
possible, Grills are well ventilated for safety reasons,
• Do not use water on a grease fire. Personal injury may
result, if a grease fire develops, turn knobs and LP
cylinder off,
• Do not leave grill unattended while preheating or
burning off food residue on Hi. if grill has not been
regularly cleaned, a grease fire can occur that may
damage the product,
463721108"463721308 • 7
ignitor Lighting
A Do not lean over grill while lighting.
1. Turn OFF all burner control valves.
2. Turn ON gas source or tank.
3. Open lid during lighting.
4. To ignite, turn LEFT knob to,_ High.
5. Push IGNITOR button rapidly.
6. If ignition does NOT occur in 5 seconds, turn the burner
controls OFF, wait 5 minutes and repeat the lighting
procedure.
7. To ignite right burner, turn knob to _.
If ignitor does not work, follow match lighting instructions.
After Lighting: Turn knobs to HI position for warm-up.
CAUTIO./t
• Putting out grease fires by closing the lid is not
possible. Grills are well ventilated for safety reasons.
• Do not use water on a grease fire. Personal injury may
result. If a grease fire develops, turn knobs and LP tank
off.
• Do not leave grill unattended while preheating or
burning off food residue on high. if grill has not been
regularly cleaned, a grease fire can occur that may
damage the product. Follow instructions on General
Grill Cleaning and Cleaning The Burner Assembly to
prevent grease fires.
CAUTION
If burner does not light, turn knobs to OFF, wait 5
minutes, and try again. Always close valve during the 5
minute waiting period. If the burner does not ignite with
the valve open, gas will continue to flow out of the burner
and could accidentally ignite with risk of injury.
Match-Lighting
A Do not lean over grill while lighting.
1. Open lid during lighting.
2. Place match into match holder (hanging from side of cart).
3. Push in and turn left knob to _ HIGH position. Be sure
burner lights and stays lit.
4. Light right burner by pushing knob in and turning to _ HIGH
position.
Before Your First Cookout
, Light burners, check to make sure they are lit, close the lid and
warm up grill on HIGH for 15 minutes. This curing of paint and
parts will produce an odor only on first lighting.
Burner Flame Check
, Light burner, rotate knobs from HIGH to LOW. You should see
a smaller flame in LOW position than seen on HIGH.Always
check flame prior to each use. If only low flame is seen refer to
"Sudden drop or low flame" in the Troubleshooting Section.
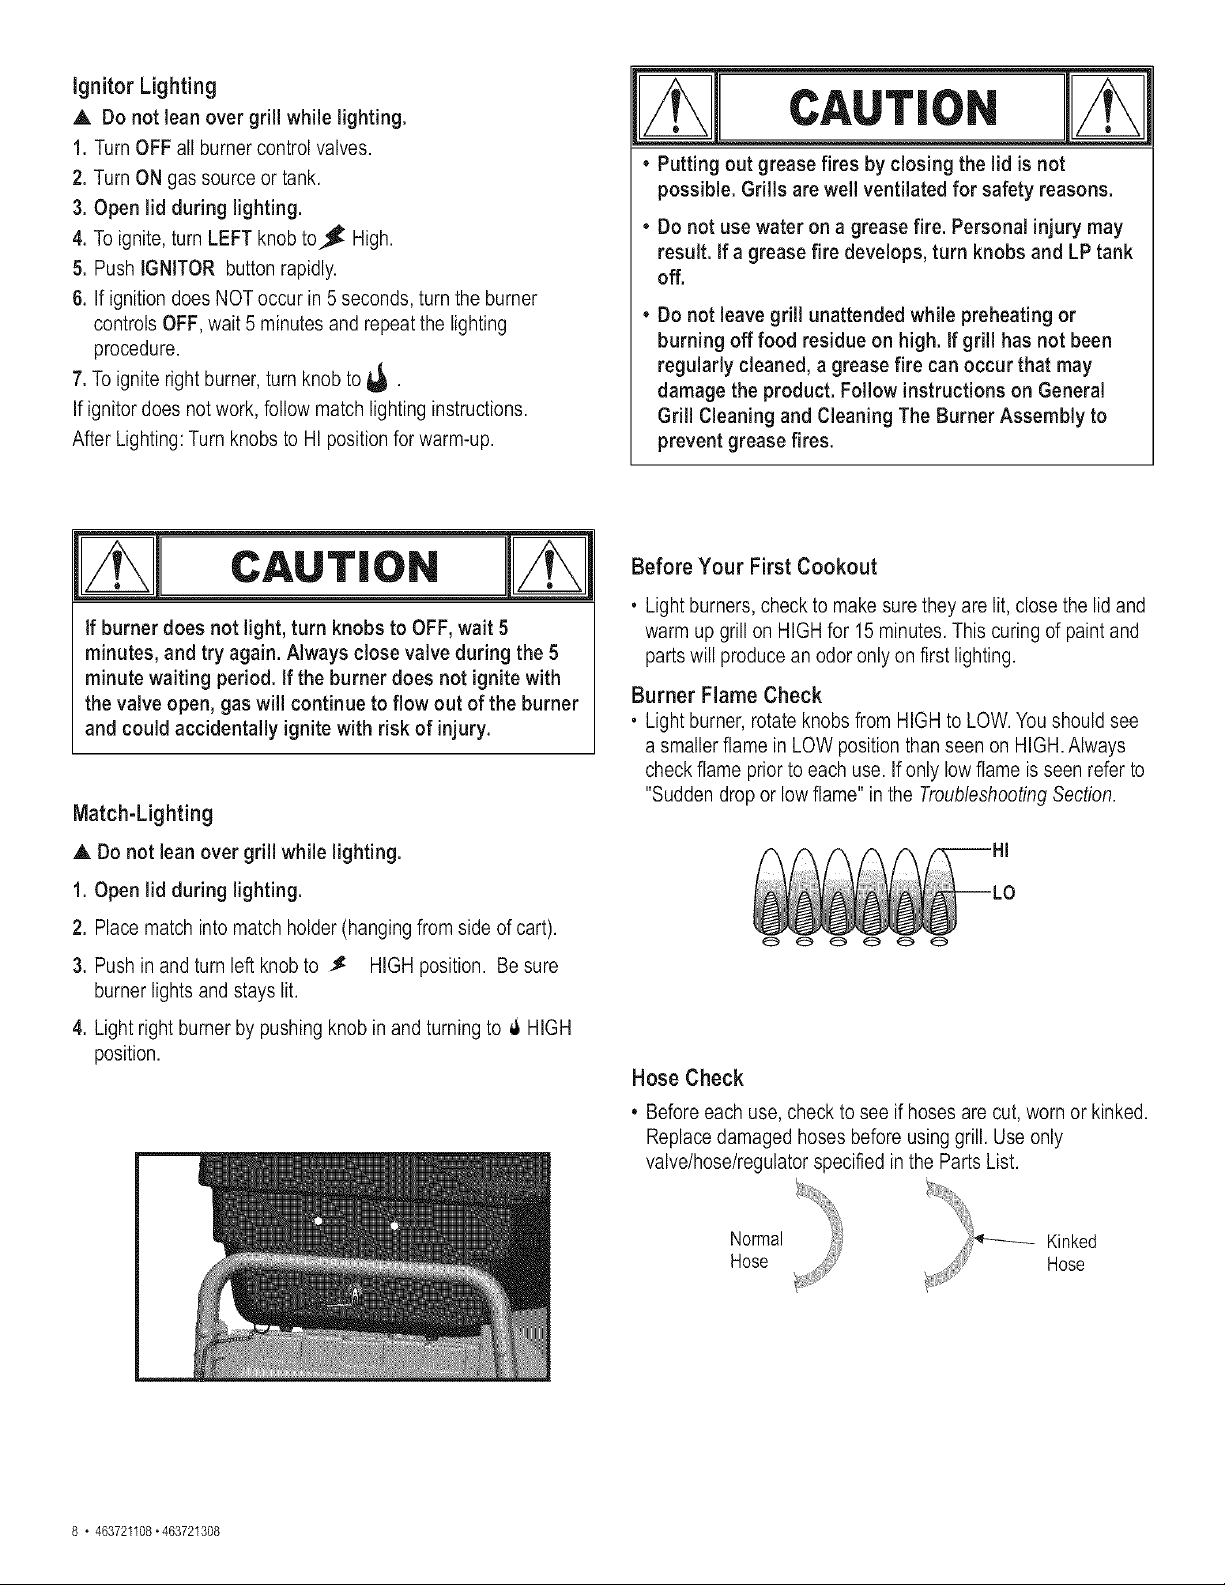
Hose Check
• Before each use, check to see if hoses are cut, worn or kinked.
Replace damaged hoses before using grill. Use only
valve/hose/regulator specified in the Parts List.
Normal Kinked
Hose Hose
8 " 463721108"463721308

Turning Grill Off
, Turn all knobs to OFF position. Turn LP tank off by turning
OPD hand wheel clockwise to a full stop.
ignitor Check
• Turn gas off at LP tank. Press and hold ignitor button. "Click"
should be heard and spark seen each time between collector
box or burner and electrodes. See "Troubleshooting" if no click
or spark.
Valve Check
• Important: Make sure gas is off at LP tank before checking
valves. Knobs lock in OFF position. To check valves, first
push in knobs and release, knobs should spring back. If knobs
do not spring back, replace valve assembly before using grill.
Turn knobs to LO position then turn back to OFF position.
Valves should turn smoothly.
General Grill Cleaning
, Keep the outside of your grill looking new by cleaning it once a
month with warm soap and water or a non-abrasive cleaner. If
you don't have a grill cover, wipe off dust and grime before
starting your grill.
, Coating the cooking grids with spray-on cooking oil will keep the
food from sticking and make clean up easier.After cooking,
scrape the grates with a long handled, brass wire bristle brush.
, Check inside the grill bottom for grease build up and clean
often, especially after cooking fatty meat.
, Do not mistake brown or black accumulation of grease and
smoke for paint. Apply a strong solution of detergent and water
or use a grill cleaner with scrub brush on insides of grill lid and
bottom. Rinse and allow to completely air dry. Do not apply a
caustic grill/oven cleaner to painted surfaces.
• Plated wire grates: Wash grates with concentrated grill
cleaner or use soap and water solution. Dry thoroughly and
store indoors between cookouts.
, Plastic parts: Wash with warm soapy water and wipe dry.
A Do not use citrisol, abrasive cleaners, degreasers or a
concentrated grill cleaner on plastic parts. Damage to and
failure of parts can result.
* Porcelain grates: Because of glass-like composition, most
residue can bewiped away with baking soda/water solution or
specially formulated cleaner. Use non-abrasive scouring
powder for stubborn stains.
• Cooking surfaces: If a bristle brush is used to clean any of
the grill cooking surfaces, ensure no loose bristles remain on
cooking surfaces prior to grilling. It is not recommended to
clean cooking surfaces while grill is hot.
CAUTION
SPIDER ALERT!
GASCOLLECTOR
VALVE AIR VENTURI
SHUTTER
If you notice that your grill is getting hard to light or that the
flame isn't as strong as it should be, take the time to check and
clean the venturi's.
LIFT OUT
BURNERASSEMBLY
?
i
6/ CLEAN OUT SPIDERWEBS
VENTURI INSIDEVENTURI
i
REMOVE
BURNER
CLIPS
Insome areasof thecountry,spidersor small insectshavebeen
knownto create"flashback"problems.Thespidersspinwebs,build
nestsand layeggsin thegrill'sventuritube(s)obstructingthe flowof
gas to the burner.The backed-upgas can ignitein the venturibehind
the controlpanel.Thisis knownas a flashbackandit can damage
your grill andeven causeinjury.
Topreventflashbacksand ensuregoodperformancethe burnerand
venturiassemblyshouldberemovedfromthegrill andcleaned
beforeusewheneverthe grill has beenidle for an extendedperiod.
\ J
463721108• 463721308• 9
Cleaning the Burner Assembly
Follow these instructions to clean and/or replace parts of burner
assembly or if you have trouble igniting grill.
1. Turn gas off at control knobs and LP cylinder,
2. Remove cooking grate and heat tent.
3. Under grill remove grease cup, disconnect ignitor wire from
burner.
4. Insidegrill remove burner assembly (A), clean ceramic
portion of electrode with rubbing alcohol and a swab.
5. Clean outside of burner with soap and water. Lay burner
upside down on flat surface, insert garden hose to force
water through tubes. Make sure water comes out of all
burner holes. Open clogged holes with a thin wire. Shake
out excess water and examine holes. Due to normal wear
and corrosion some holes may become enlarged. If any
large cracks or holes are found replace burner.
6. Ifgrill is to be stored, coat burner lightly with cooking oil.
Wrap in protective cover to keep insects out.
7. If not storing grill after cleaning, replace burner into grill
bottom.
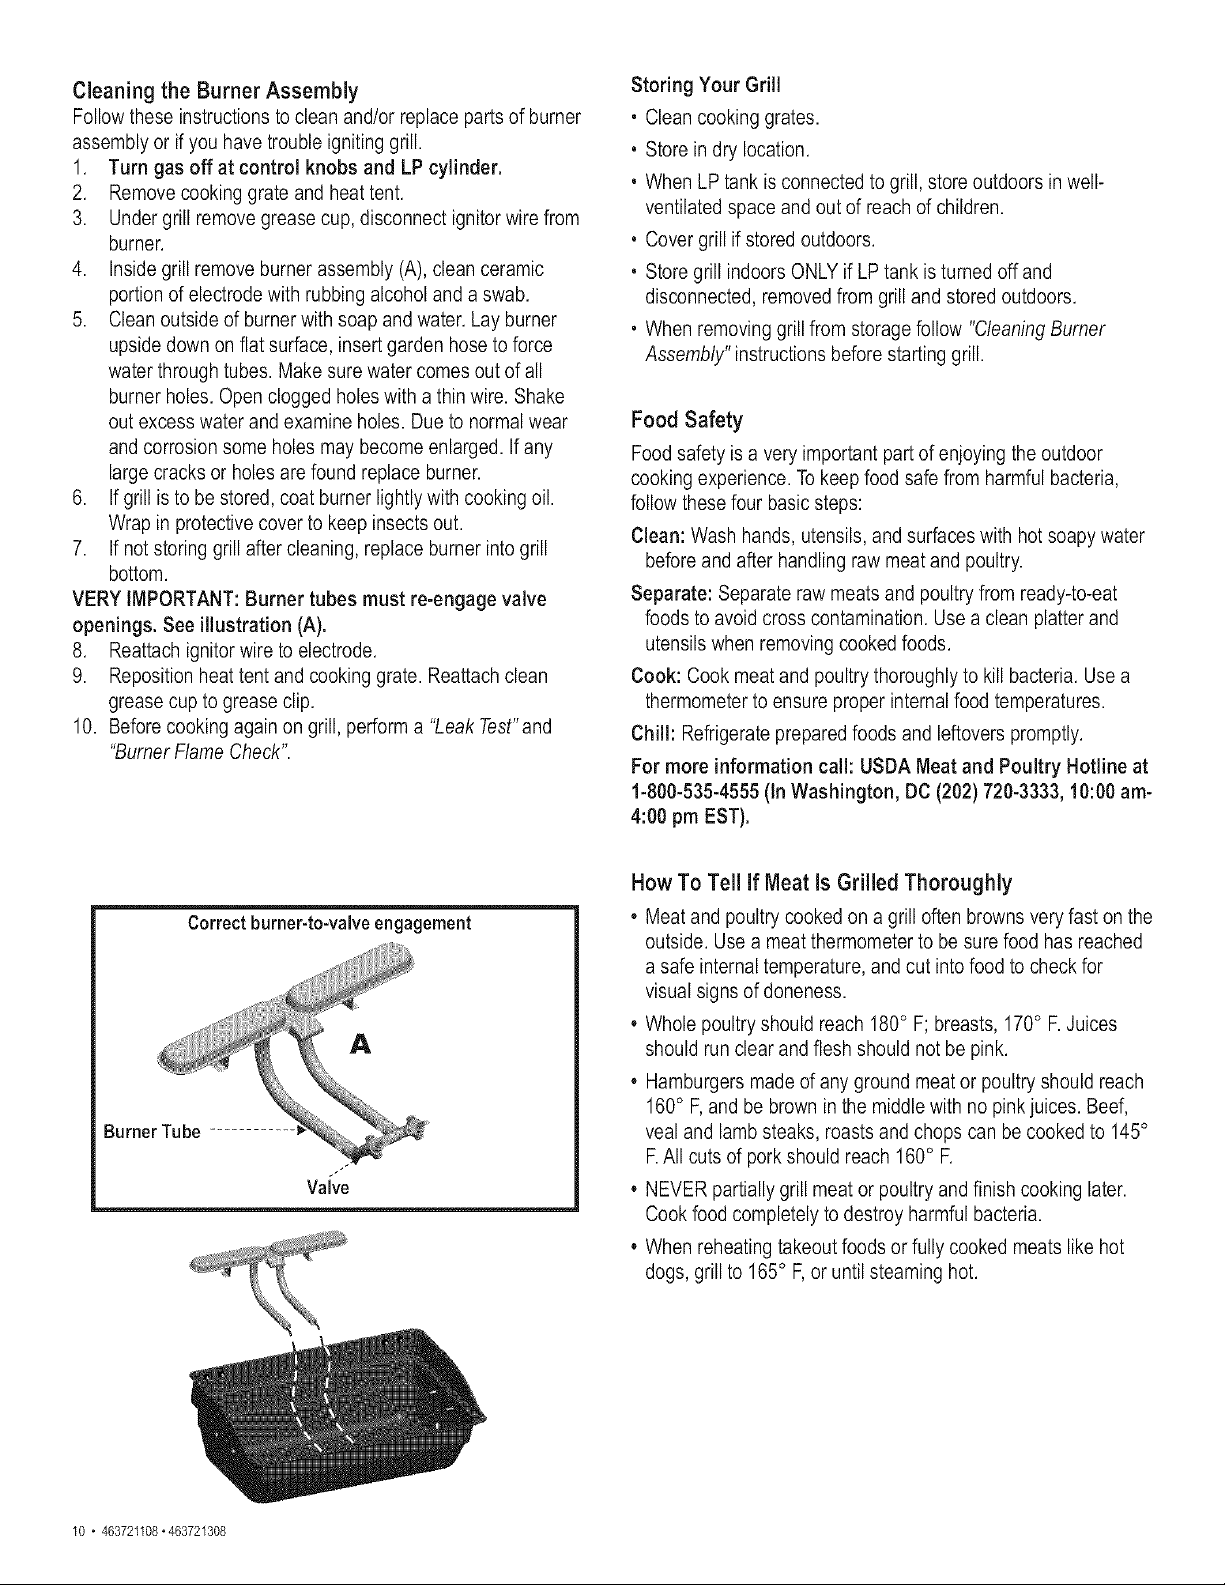
VERY IMPORTANT: Burner tubes must re-engage valve
openings. See illustration (A).
8. Reattach ignitor wire to electrode.
9. Reposition heat tent and cooking grate. Reattach clean
grease cup to grease clip.
10. Before cooking again on grill, perform a "Leak Test'and
"Burner Flame Check".
Correct burner-to-valve engagement
A
BurnerTube
Valve
10 • 463721108"463721308
Storing Your Grill
o Clean cooking grates.
o Store in dry location.
o When LP tank is connected to grill, store outdoors in well-
ventilated space and out of reach of children.
o Cover grill if stored outdoors.
o Store grill indoors ONLY if LP tank is turned offand
disconnected, removedfrom grill and stored outdoors.
, When removing grill from storage follow "Cleaning Burner
Assembly" instructions before starting grill.
Food Safety
Food safety is a very important part of enjoying the outdoor
cooking experience. To keep food safe from harmful bacteria,
follow these four basic steps:
Clean: Wash hands, utensils, and surfaces with hot soapy water
before and after handling raw meat and poultry.
Separate: Separate raw meats and poultry from ready-to-eat
foods to avoid cross contamination. Use a clean platter and
utensils when removing cooked foods.
Cook: Cook meat and poultry thoroughly to kill bacteria. Usea
thermometer to ensure proper internal food temperatures.
Chill: Refrigerate prepared foods and leftovers promptly.
For more information call: USDA Meat and Poultry Hotline at
1-800-535-4555 (In Washington, DC (202) 720-3333, 10:00 am-
4:00 pm EST).
How To Tell If Meat is Grilled Thoroughly
• Meat and poultry cooked on a grill often browns very fast on the
outside. Use a meat thermometer to be sure food has reached
a safe internal temperature, and cut into food to check for
visual signs of doneness.
• Whole poultry should reach 180° F; breasts, 170° F. Juices
should run clear and flesh should not be pink.
• Hamburgers made of any ground meat or poultry should reach
160° F,and be brown in the middle with no pink juices. Beef,
veal and lamb steaks, roasts and chops can be cooked to 145°
R All cuts of pork should reach 160° R
• NEVER partially grill meat or poultry and finish cooking later.
Cook food completely to destroy harmful bacteria.
• When reheating takeout foods or fully cooked meats like hot
dogs, grill to 165° F, or until steaming hot.
K_X_y
A 1
B 1
C 1
D 1
1
F 2
G 2
H 2
I 2
J 1
K 1
L 1
M 1
N 1
O 2
P 2
Q 1
R 1
S 1
T 1
U 1
V 1
W 1
X 2
Y 1
Z 1
AA 1
BB 1
CC 2
Description ................... Part#
Firebox..................... 80012226
Heat Shield Firebox ........... 80010068
BurnerAssembly ............. 80010069
Lid ........................ 80010070
Logo Plate .................. 80005765
Shelves .................... 80010072
Mounting Brackets, RFt LB ..... 80010073
Mounting Brackets, LFt RB ..... 80010074
Upper Leg .................. 80010075
Side Brace, F/Tank Retainer.... 80010076
Leg, Right Front.............. 80010077
Leg, Right Back .............. 80010078
Leg, Left Back ............... 80010079
Leg, Left Front ............... 80010080
Back Braces................. 80010081
Support Bracket.............. 80010082
Firebox Support,Left .......... 80010083
Firebox Support, Right......... 80010084
Tank Exclusion Wire .......... 80010193
Valve/Hose/Regulator ......... 80013769
Control Panel................ 80013770
Front Panel ................. 80010087
Axle Rod ................... 80012692
Leg Extenders............... 80009820
Grease Cup ................. 80000270
Grease Cup Clip ............. 80000271
Tank Retainer................ 80009014
Ignitor...................... 80008322
Wheels..................... 80010191
DD
EE
FF
GG
HH
II
JJ
KK
2
2
2
1
1
1
1
1
1
1
1
5
1
26
38
2
12
12
22
4
4
4
4
1
Description ................... Part#
Control Knobs ............... 80000035
Hinges, Lower ............... 80010090
Hinges, Upper ............... 80010091
Handle ..................... 80010092
Heat Tent ................... 80009840
Cooking Grate ............... 80013224
Match Holder ................ 80004320
Heat Shield ................. 80010089
Assembly Instruction (English) .. 80013232
Assembly Instruction (Spanish).. 80013233
Hardware Pack .............. 80015900
1 Wheel Bushing ........... 80009743
4 Hinge Pins............... 80003610
Hitch Pins ............... 80003661
Wing Screw, #10-24x3t8" ... 80008304
Screws, #10-24xlt2"
Flange Nuts, #10-24
Wing Nuts, 1t4"-20
Screws, #10-24x1-1t4"
Screws, #10-24x2"
Fiber Washers, 5mm
Fiber Washers, 7mm
Screws, 1/4"-20x1/2"
Flange Nuts, 1/4"-20
Screws, 1t4"-20x1-1t4"
Spacer
463721108°463721308 "11

B
FF_
E
"GG
H
jJJ
CC
Y,_
W
/N
CC
12 • 463721108"463721308

Left Leg
Placeupperleg as shown. NOTE:Leftfrontand left back legsdonot havelegextenders. Infront,attachupperleg,side brace
andleftfrontleg (curve)with #10-24x!-1/4" screw and #10-24flange nut. In back,attachedupperleg,side braceand left back
leg (straight)with #10-24x1-1/4"screw and #10-24flange nut. Do not tighten.
Attachsupportbracketinsecondholefrombottomof legwitha hingepinsandhitch pins(A).
HingePin
Qty:2
HitchPin
Qty:2 _ 8race
LeftFrontLeg
(Curve) _
(::_1 Left BackLeg
o/./ (Straight) _
S UpperLeg
............_ #10-24x1-1/4"
Screw
Qty:2
SupPortBraCket #10-24FlangeNut
Qty:2
Right Leg
Placeupperleg as shown.Attachupperleg and rightfront leg(curve)with #10-24x1-1/4"screws and#10-24flange nuts. Then
attachupperleg and rightbackleg (straight)with #10-24x1-1/4"screws and#10-24flange nuts. Do not tighten.
Attachsupportbracketwith #10-24x1-1/4"screws and#10-24flange nuts.
#10-24FlangeNut
Qty:4
#10-24x1-1/4"
Screw
Qty:4
Leg Extender
RightFront Leg
RightBack Leg\
(Curve) (Straight) _
S_ort Bracket
463721108" 463721308 " 13
TankExclusion Wire
Hooktankexclusionwire into legswithopeningfor LP cylinderonside braceside.
\
SideBrace
Largeropeningside
TankExclusionWire
D FrontPanel
Lay front legs down on the floor,
Slidefrontpanelbetweenlegs.Attachwith #I0-24x2" screwsand#10-24flange nuts.
#10-24x2"Screw
Qty:4
#10-24Nut
Qty:4
FrontPanel
\
14 " 463721108" 463721308
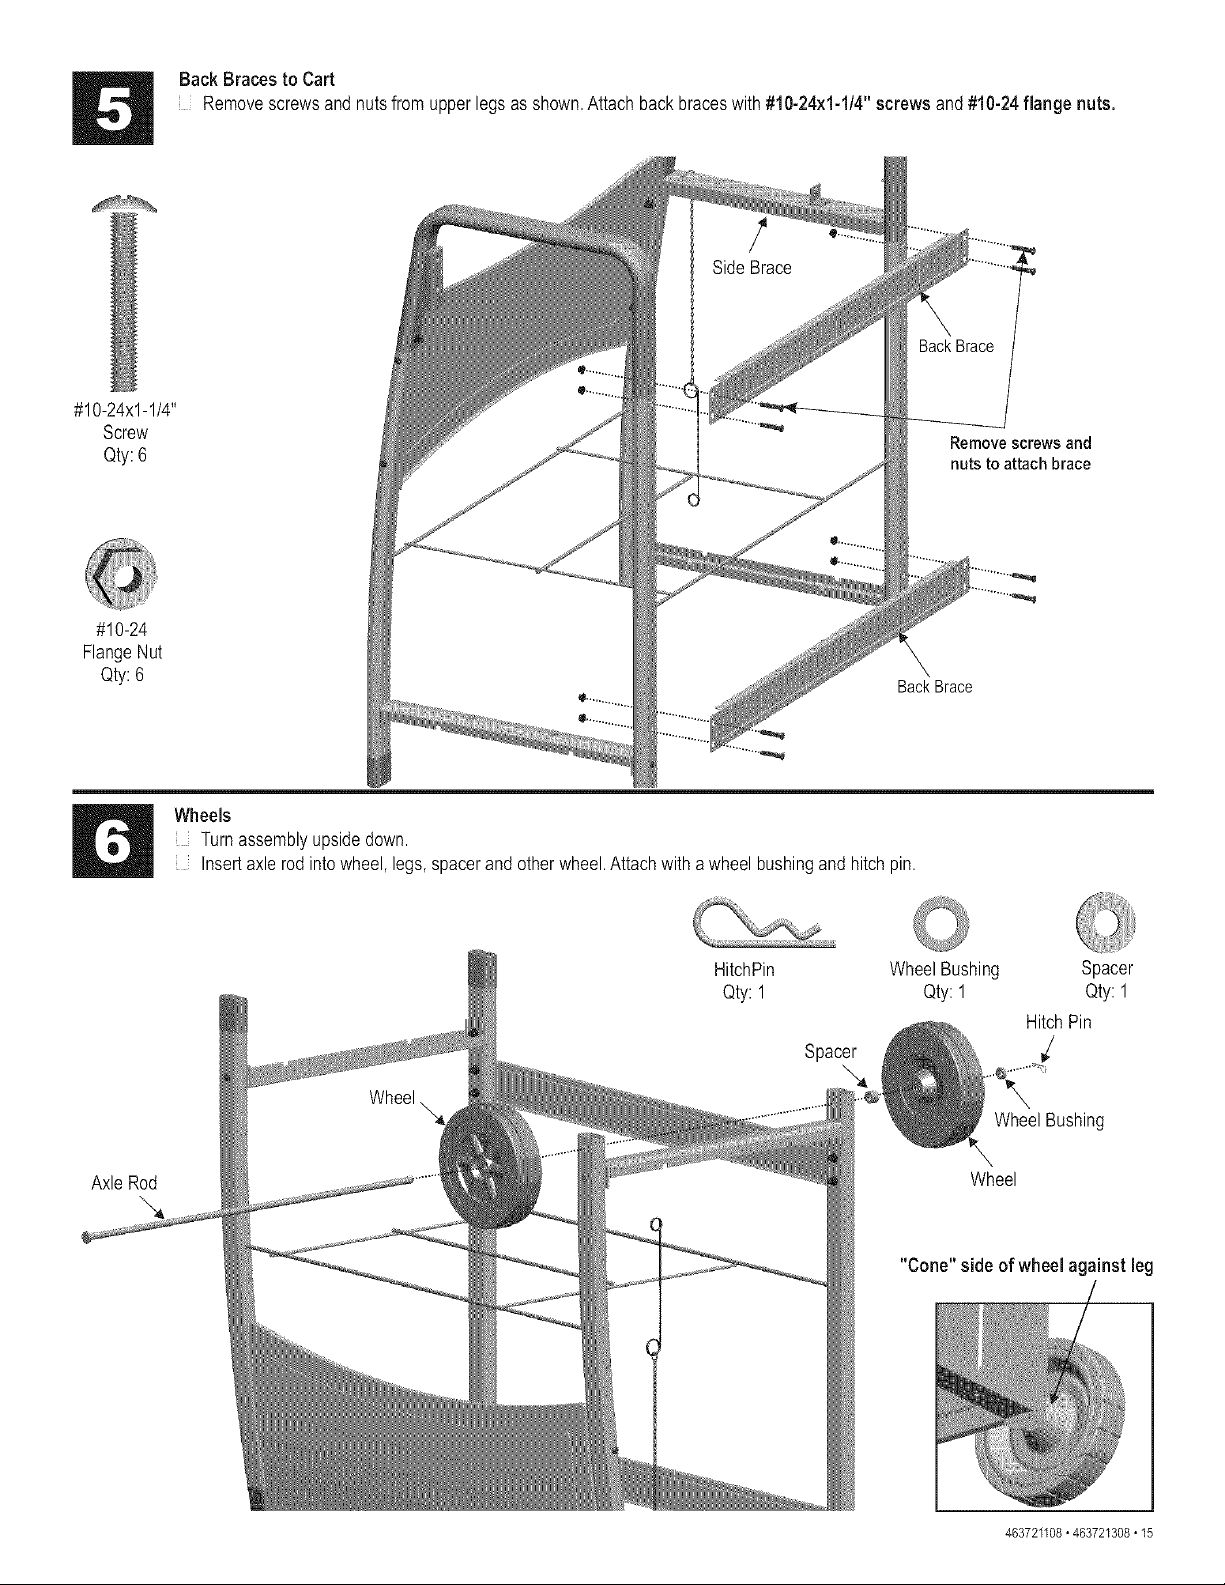
Back Braces to Cart
Removescrewsand nutsfrom upperlegs as shown.Attachback braceswith#10-24x1-1/4"screws and#10-24flange nuts.
#10-24x1-1/4"
Screw
Qty: 6
Remove screws and
nuts to attach brace
#10-24
FlangeNut
Qty:6
Back Brace
Wheels
Turnassemblyupsidedown.
Insertaxlerodintowheel,legs,spacerandotherwheel.Attachwithawheel bushingand hitchpin.
Axle Rod
HitchPin WheelBushing Spacer
Qty:l Qty:l Qty:l
HitchPin
Spacer ¢
WheelBushing
Wheel
"Cone" side of wheel against leg
463721108• 463721308 o15
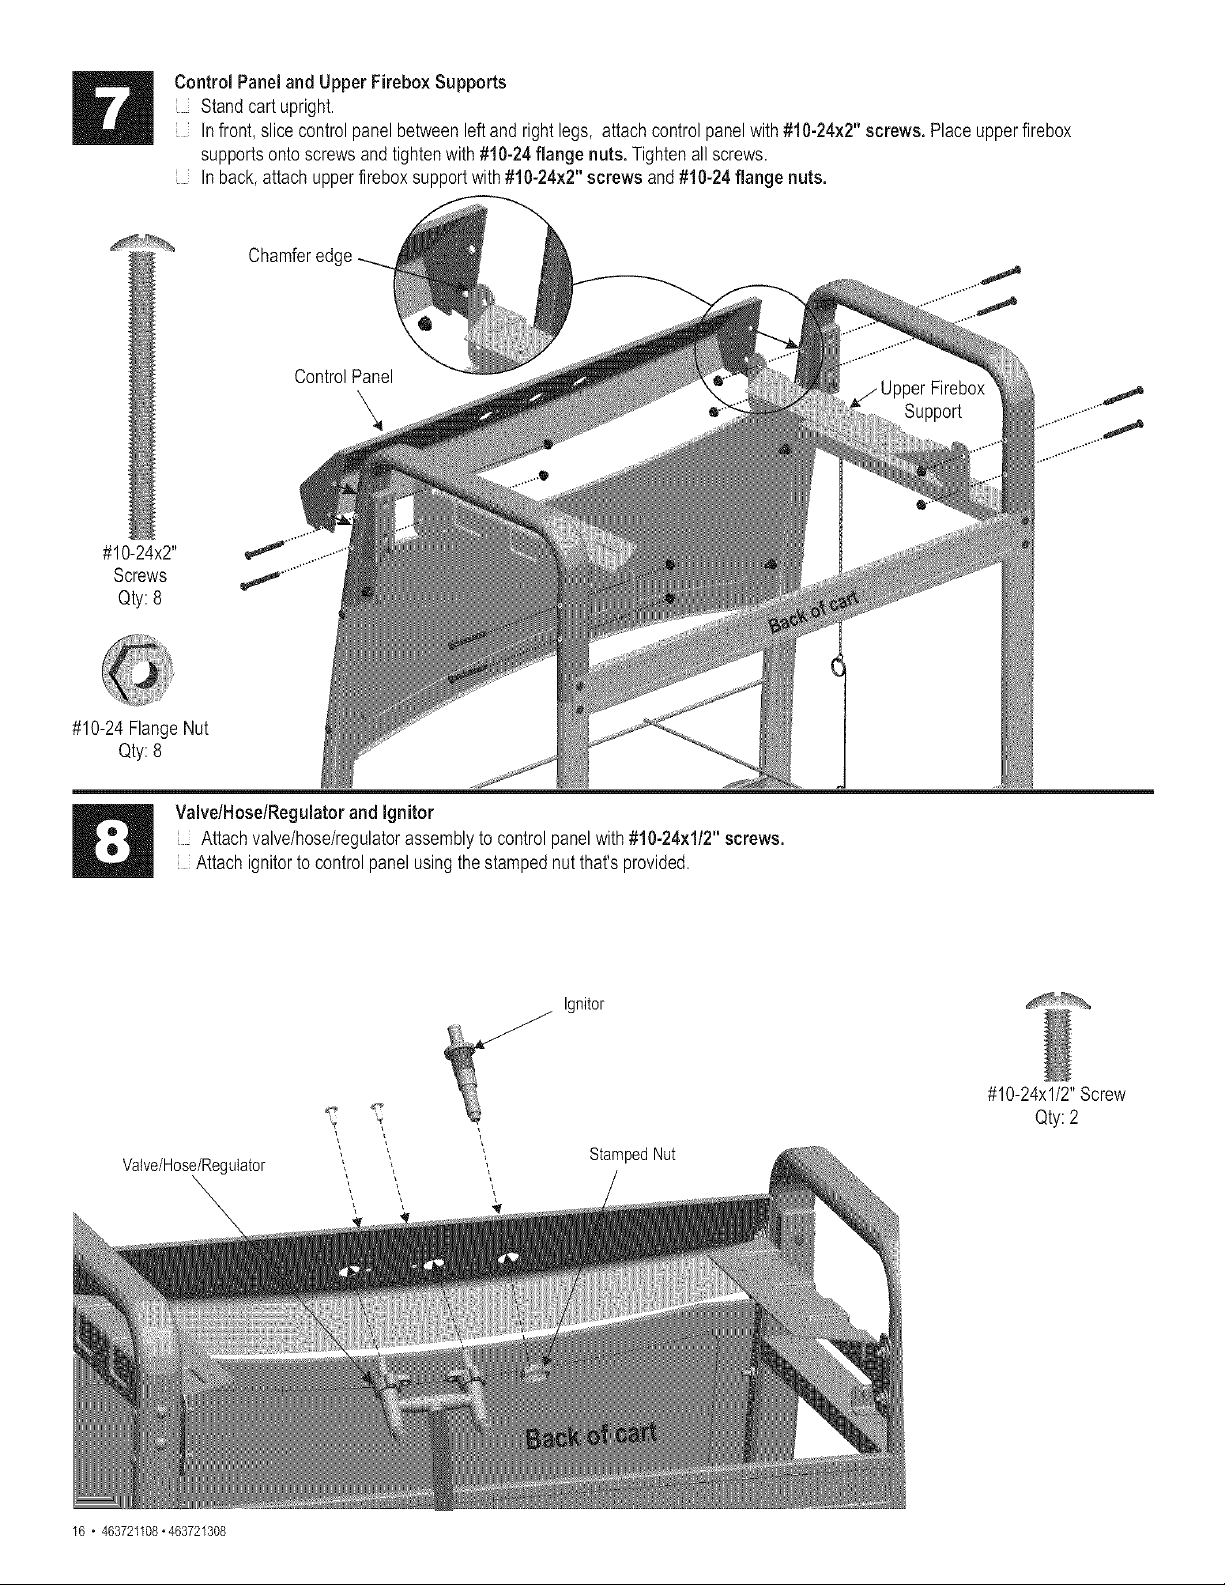
Control Paneland Upper FireboxSupports
Standcart upright.
Infront,slicecontrolpanelbetweenleftand rightlegs, attachcontrolpanelwith#10-24x2"screws. Placeupperfirebox
supportsontoscrewsandtightenwith#!0-24 flange nuts. Tightenall screws.
Inback,attachupperfireboxsupportwith#10-24x2"screws and #10-24flange nuts.
Chamferedc
ControlPanel
#10-24x2"
Screws
Qty:8
#10-24FlangeNut
Qty:8
Valve/Hose/Regulatorand Ignitor
Attachvalve/hose/regulatorassemblyto controlpanelwith #10-24x1/2"screws.
Attach ignitorto controlpanelusingthe stampednutthat'sprovided.
Ignitor
#10-24xl/2"Screw
Qty:2
16 " 463721108"463721308
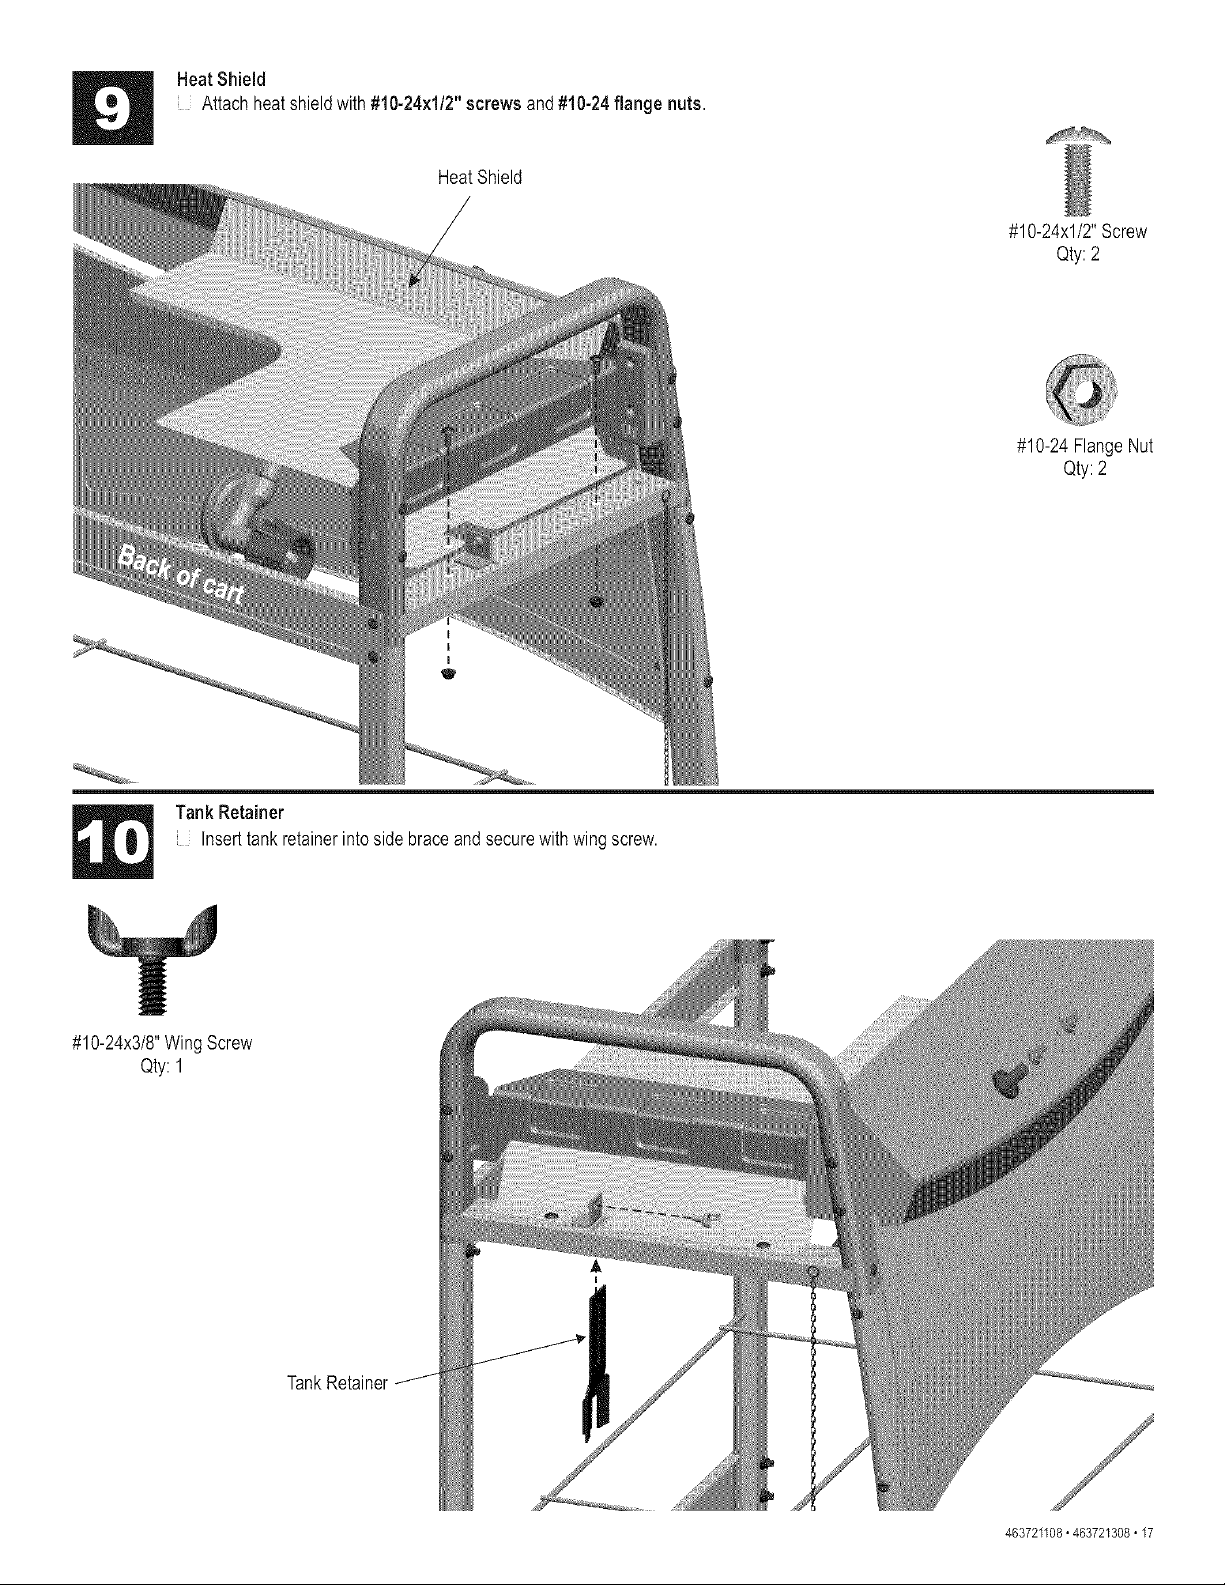
HeatShield
Attach heatshieldwith#10-24x1/2"screws and#10-24flange nuts.
HeatShield
#10-24xl/2' Screw
Qty: 2
#10-24FlangeNut
Qty:2
Tank Retainer
Inserttank retainerintoside braceandsecurewith wingscrew.
#10-24x3/8"WingScrew
Qty:l
TankRetainer
463721108" 463721308 " 17
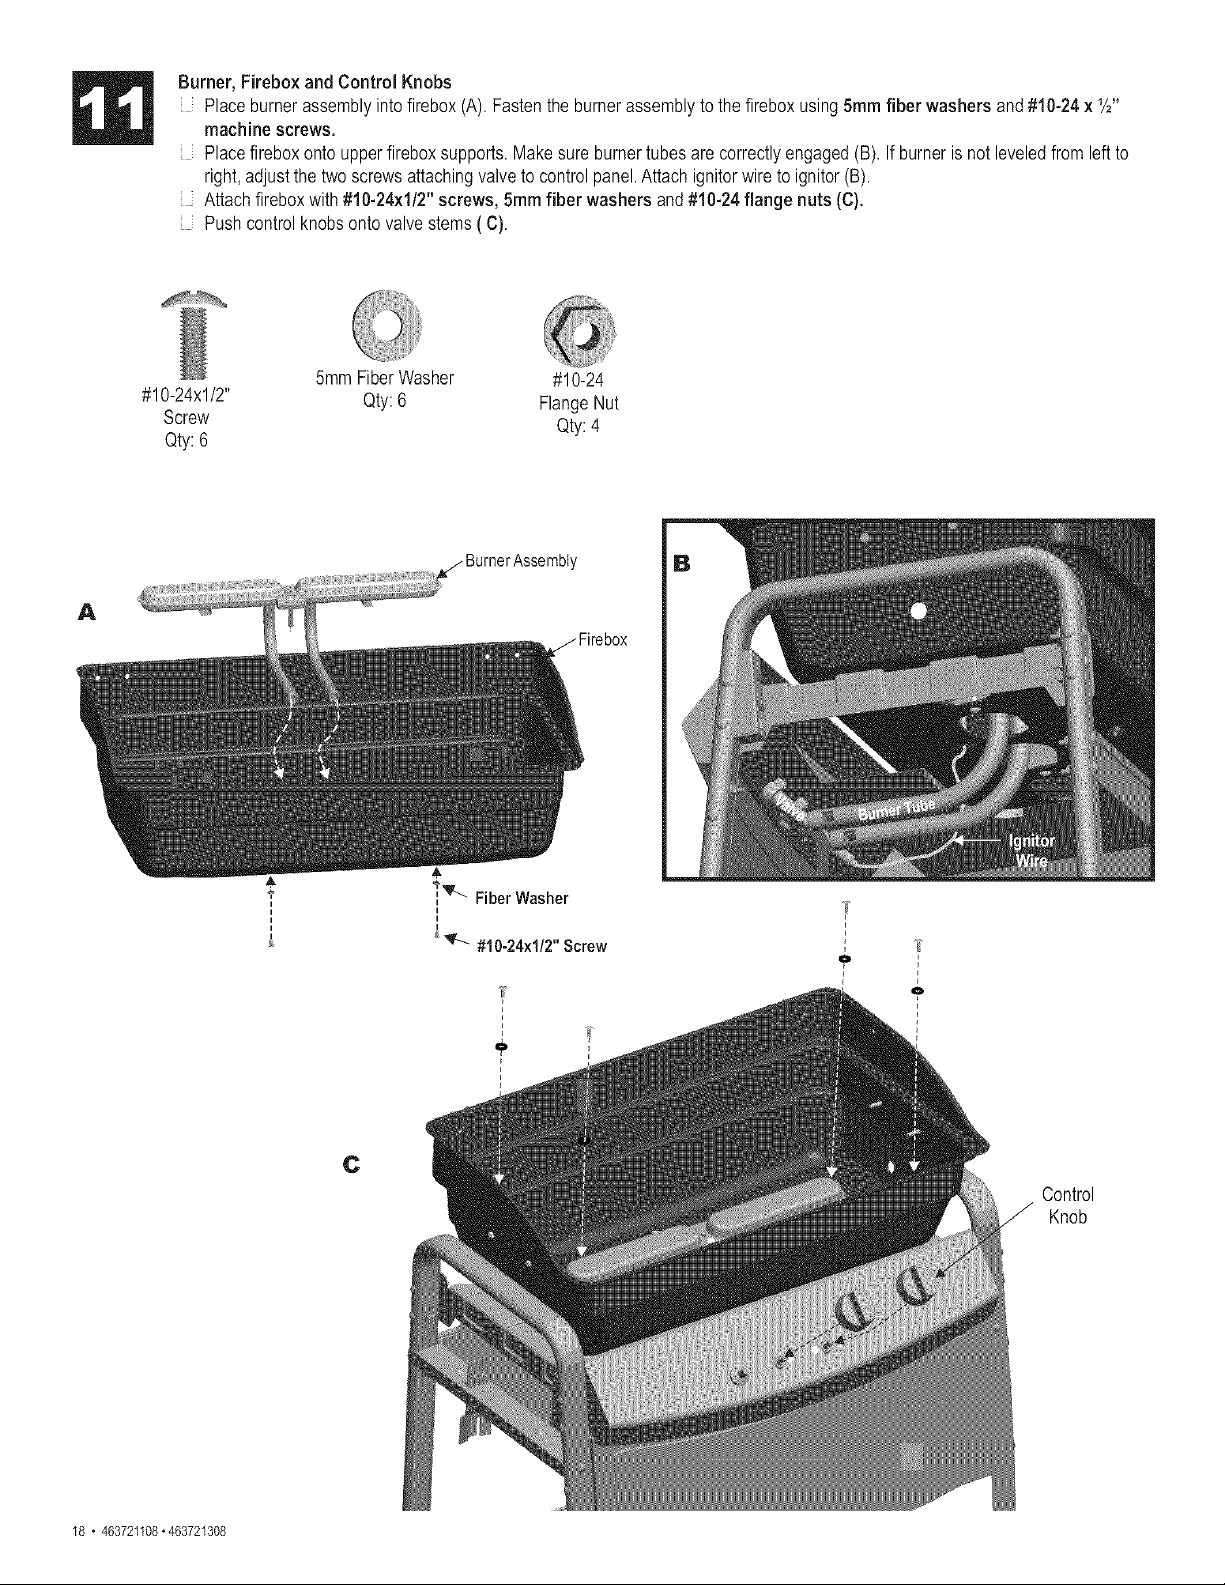
Burner, Fireboxand Control Knobs
Placeburnerassemblyintofirebox(A). Fastenthe burnerassemblyto the fireboxusing5ramfiber washersand #10-24x 1/2"
machinescrews.
Placefirebox ontoupperfireboxsupports.Makesure burnertubesarecorrectlyengaged(B).If burneris not leveledfromleftto
right,adjustthe two screwsattachingvalveto controlpanel.Attachignitorwire to ignitor(B).
Attachfireboxwith #10-24x1/2"screws, 5ramfiber washers and#10-24flange nuts (C).
Pushcontrolknobsontovalvestems(C).
5mmFiberWasher #10-24
#10-24xl/2" Qty:6 FlangeNut
Screw Qty:4
Qty:6
i
i
i
i
C
Control
Knob
18 " 463721108"463721308
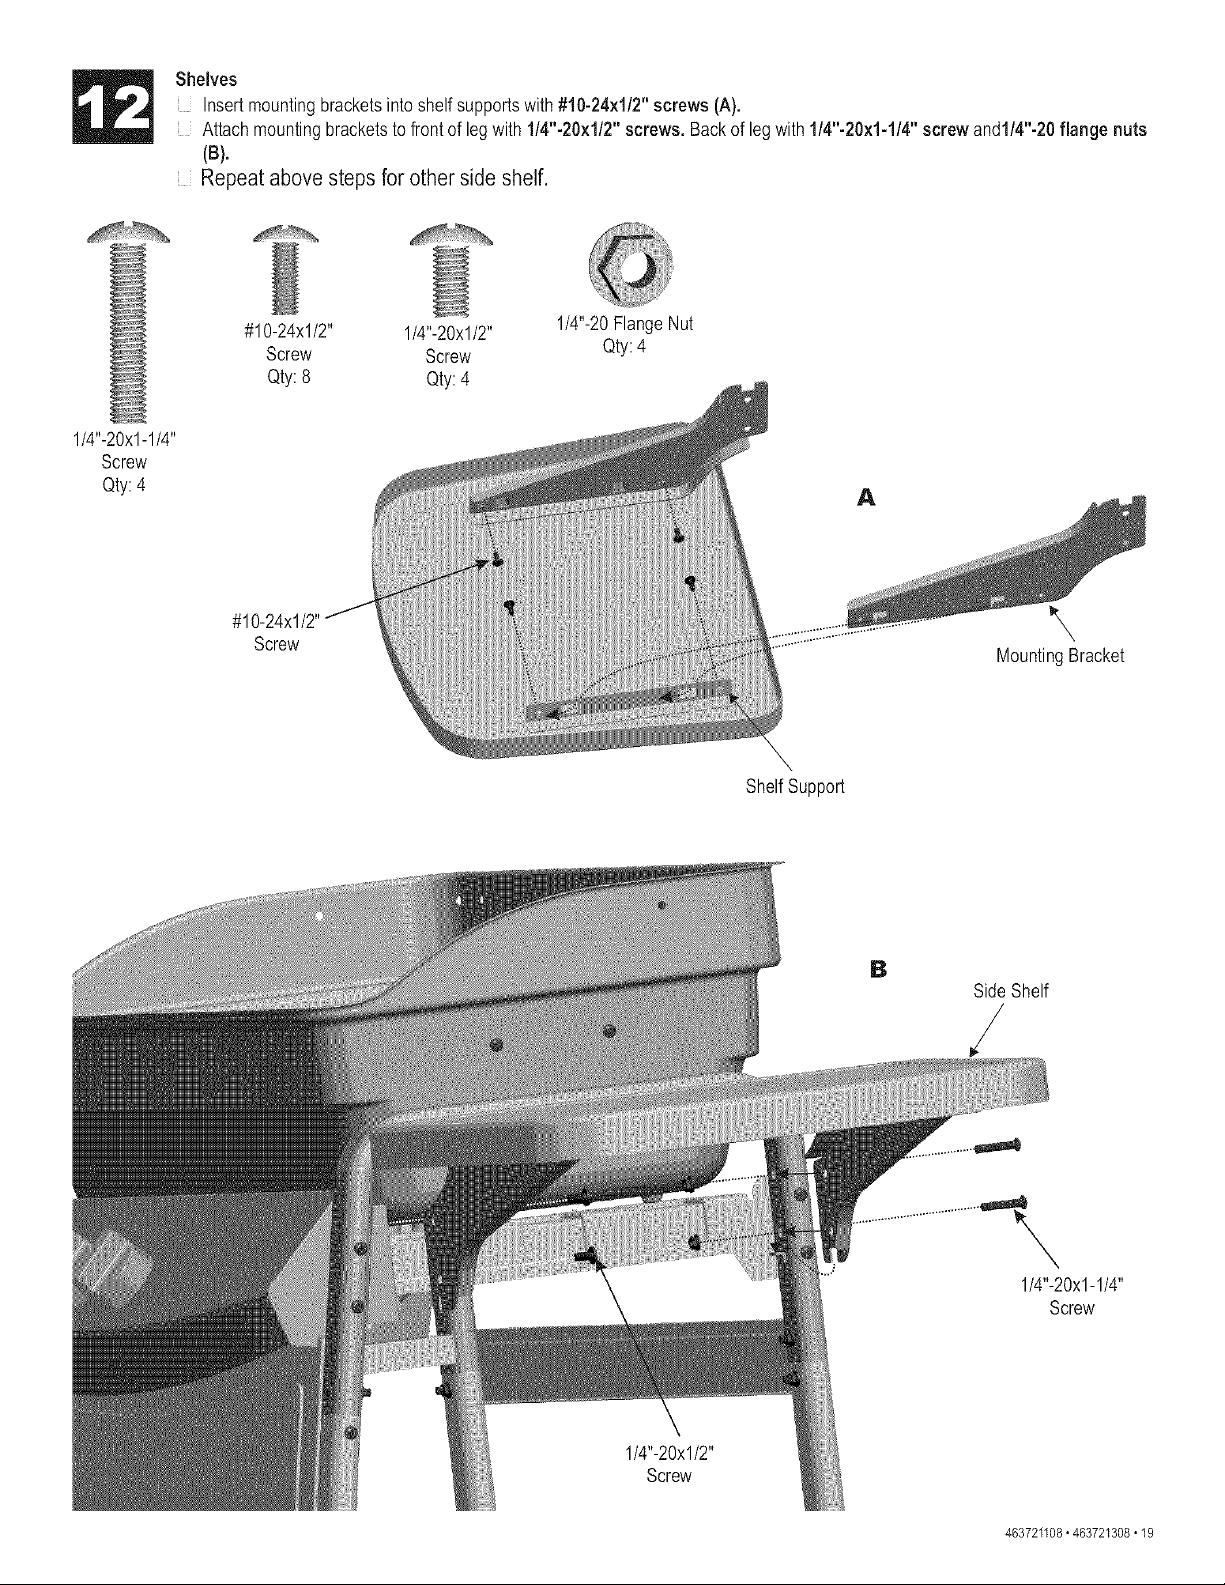
Shelves
Insertmountingbracketsintoshelf supportswith #!0-24x1/2" screws (A).
Attachmountingbracketsto frontof legwith 1/4"-20x1/2"screws, Backof leg with1/4"-20x1-1/4"screw and1/4"-20flange nuts
(B).
Repeat above steps for other side shelf.
#10-24x1/2" 1/4"-20xl/2" 1/4"-20FlangeNut
Screw Screw Qty:4
Qty:8 Qty:4
1/4"-20xl-1/4"
Screw
Qty:4
A
Screw
\
MountingBracket
ShelfSupport
B
SideShelf
/
1/4"-20x1-1/4"
Screw
1/4"-20xl/2"
Screw
463721108" 463721308 " 19
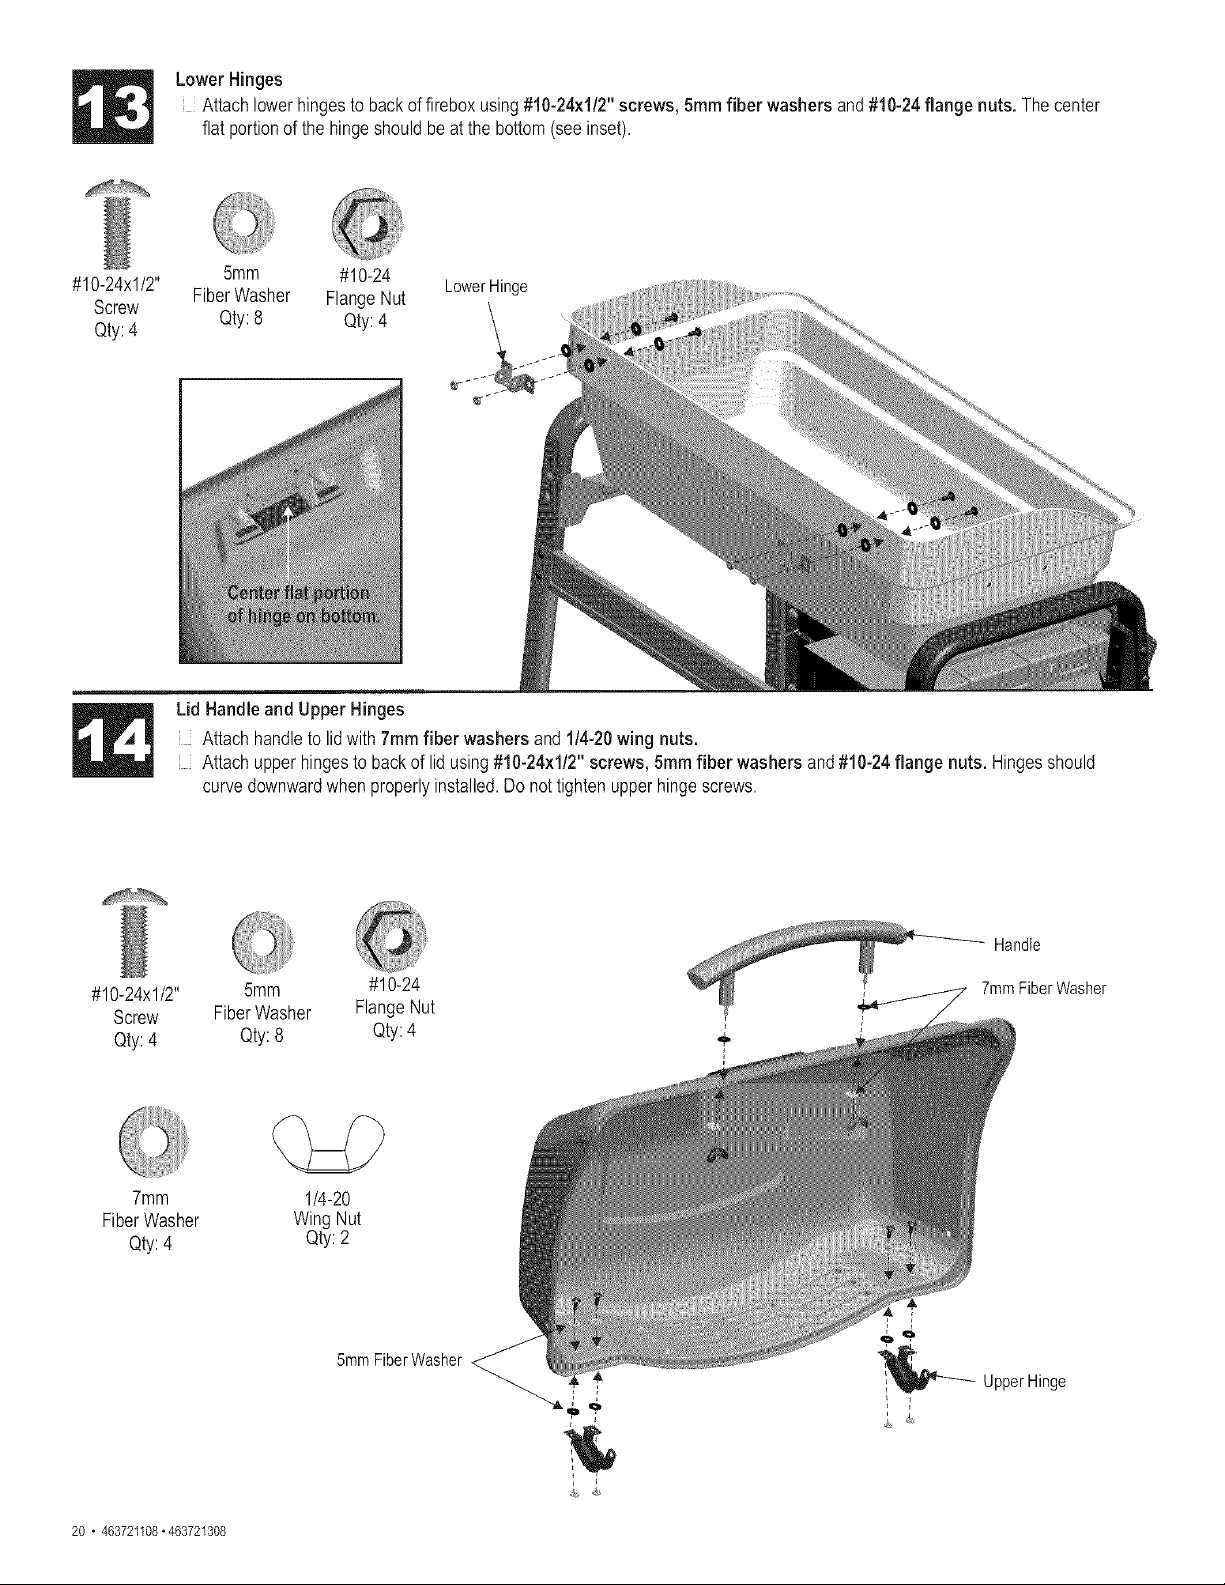
LowerHinges
Attachlowerhingesto backof fireboxusing#10-24x1/2"screws, 5mmfiber washers and #10-24flange nuts, Thecenter
flatportionof the hingeshouldbe at the bottom(seeinset).
5mm #10-24
#10-24xl/2"
FiberWasher FlangeNut
Screw
Qty:4 Qty: 8 Qty:4
LowerHinge
Lid Handleand Upper Hinges
Attachhandleto lidwith 7ramfiber washersand 1/4-20wing nuts.
Attachupperhingesto backof lid using#10-24x1/2"screws, 5ramfiber washers and#10-24flange nuts, Hingesshould
curvedownwardwhenproperlyinstalled.Do not tightenupperhingescrews.
#10-24
#10-24x1/2" 5mm
Screw FiberWasher FlangeNut
i
Qty:4 Qty:8 Qty:4 ,_
Handle
7mm FiberWasher
7mm
FiberWasher
Qty:4
1/4-20
Wing Nut
Qty: 2
5ramFiberWasher
_ UpperHinge
t
J
20 • 463721108"463721308
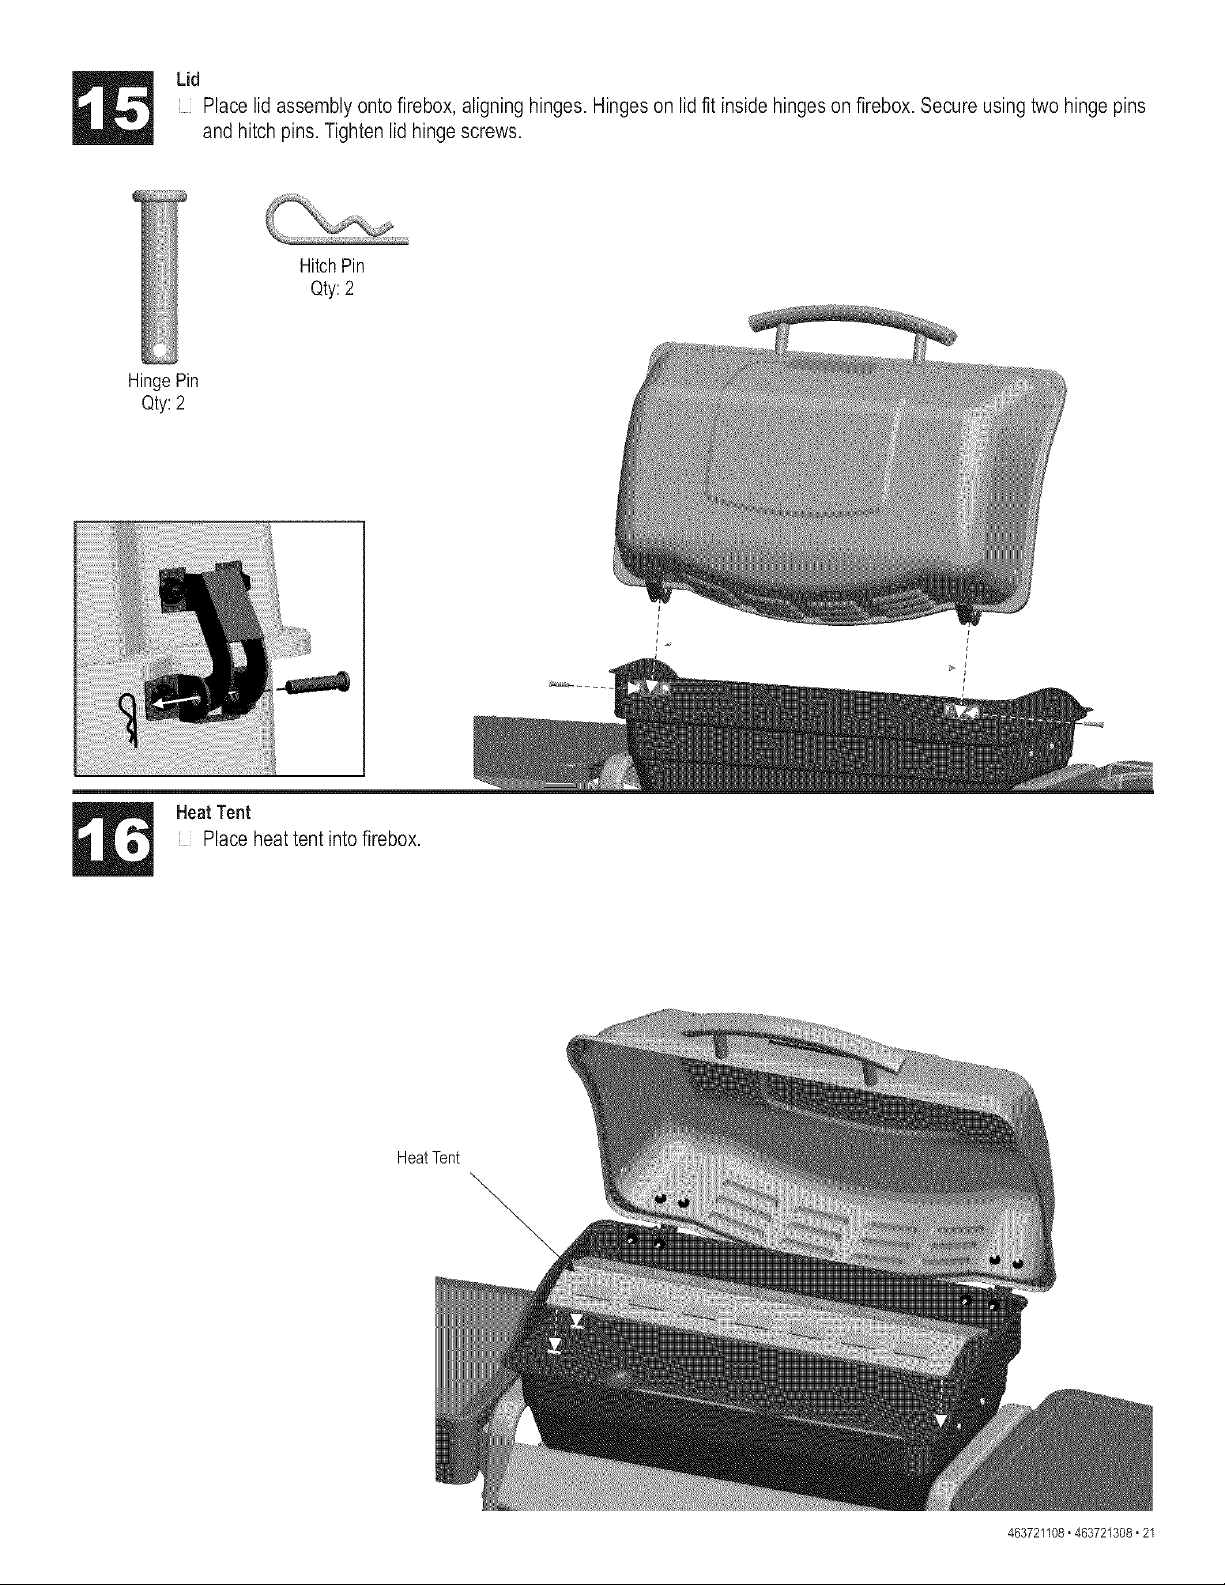
Lid
Place lid assembly onto firebox, aligning hinges. Hinges on lid fit inside hinges on firebox. Secure using two hinge pins
and hitch pins. Tighten lid hinge screws.
HingePin
Qty: 2
HitchPin
Qty:2
HeatTent
Place heat tent into firebox.
HeatTent
463721108" 463721308" 21
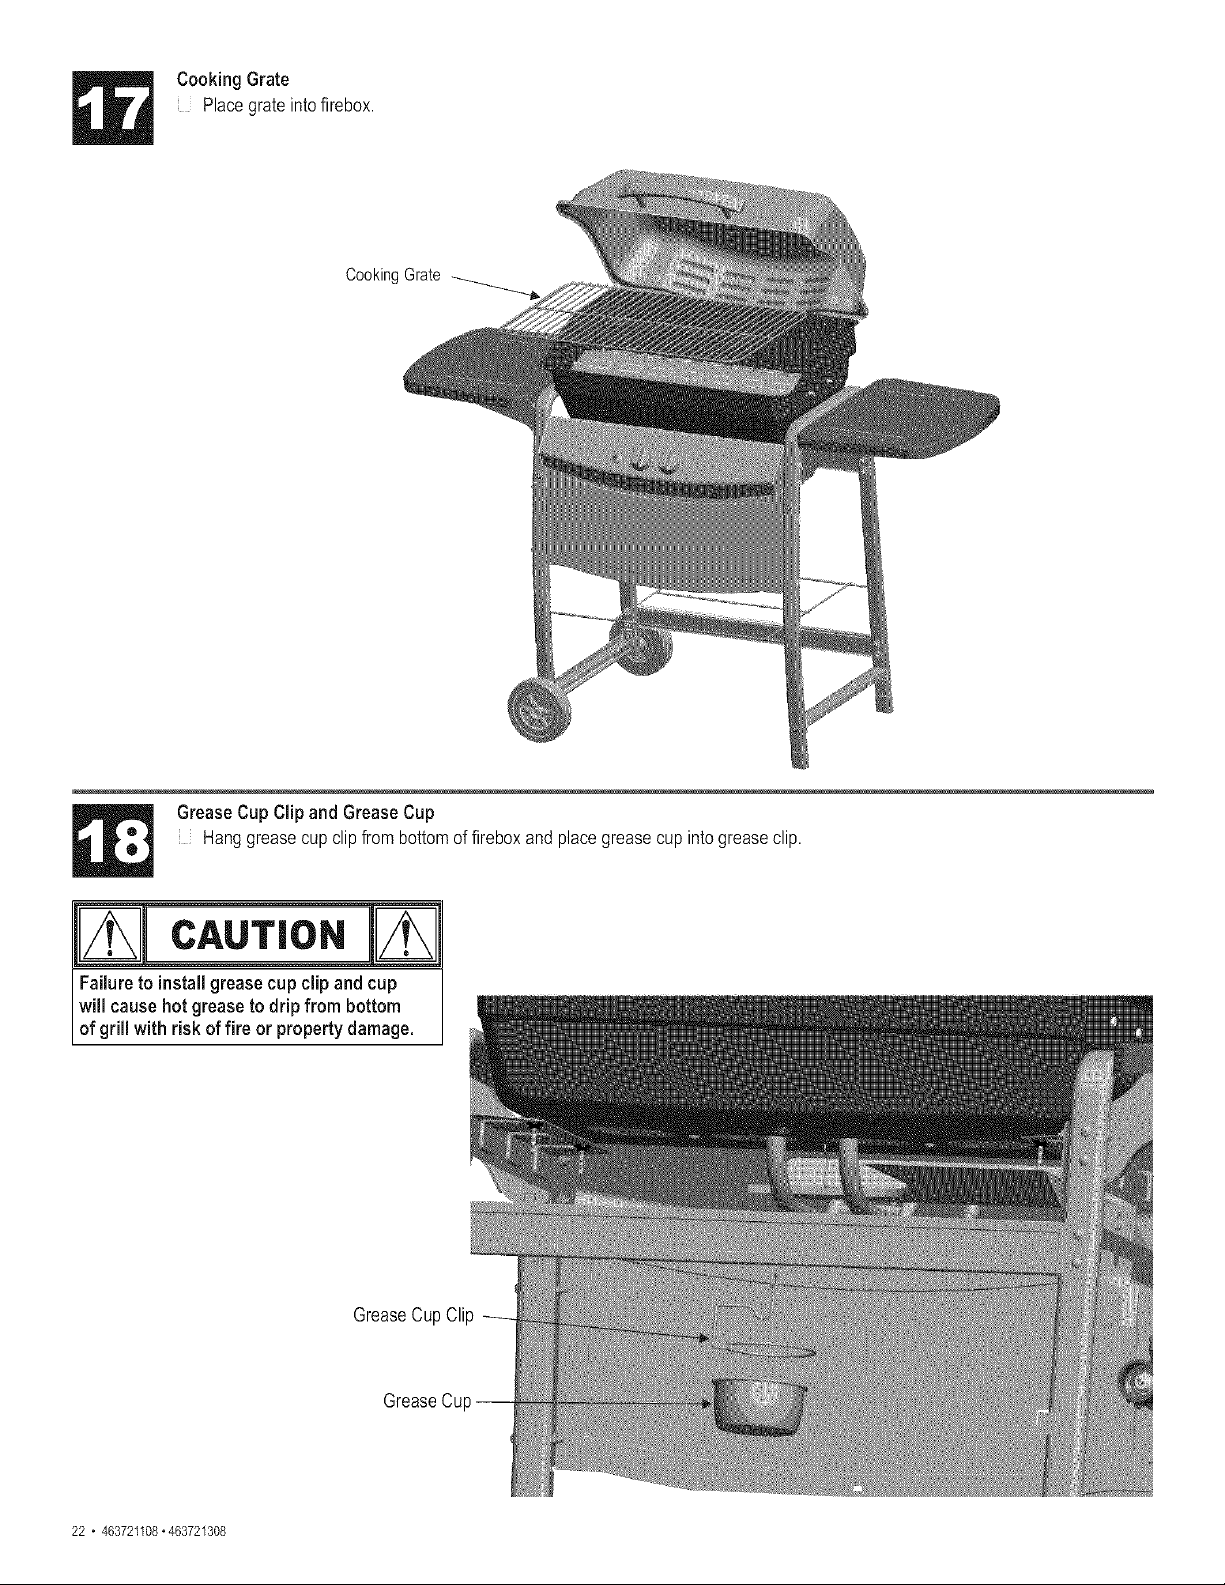
Cooking Grate
Placegrateintofirebox.
CookingGrate
GreaseCup Clip and GreaseCup
Hanggreasecup clipfrom bottomof fireboxand placegreasecupintogreaseclip.
CAUT|ON
FaUureto installgreasecup clip andcup
will causehotgrease to drip from bottom
of grill with risk of fire or property damage,
GreaseCupClip
GreaseCup--
22 • 463721108"463721308

LPTank
LPtankis soldseparately.Useonlywithan OPD(over-fillprotectiondevice)equippedLPtank. Fillandleakcheck before
attachingto grilland regulator.See Use and Care section to correctly Leak Test and perform the Burner Flame Check.
Tankcollaropeningmustfaceto frontof grill.Loosenwing nutfrom tank retainerbracket.Set bottomof tankontonotchesin the
tankbracket.Placetank retainerbracketontotankcollarandtightenthewing nut.
CAUTION
Cylinder valve must face to front of cart once
tank is attached. Failure to install cylinder
correctly may allow gas hose to be damaged
in operation, resulting in the risk of fire.
Tank
Regulator
Always keep LP cylinders in
upright position during use,
transport, and storage.
LPTank
Correctly Installed
LP cylinder.
463721108• 463721308 • 23
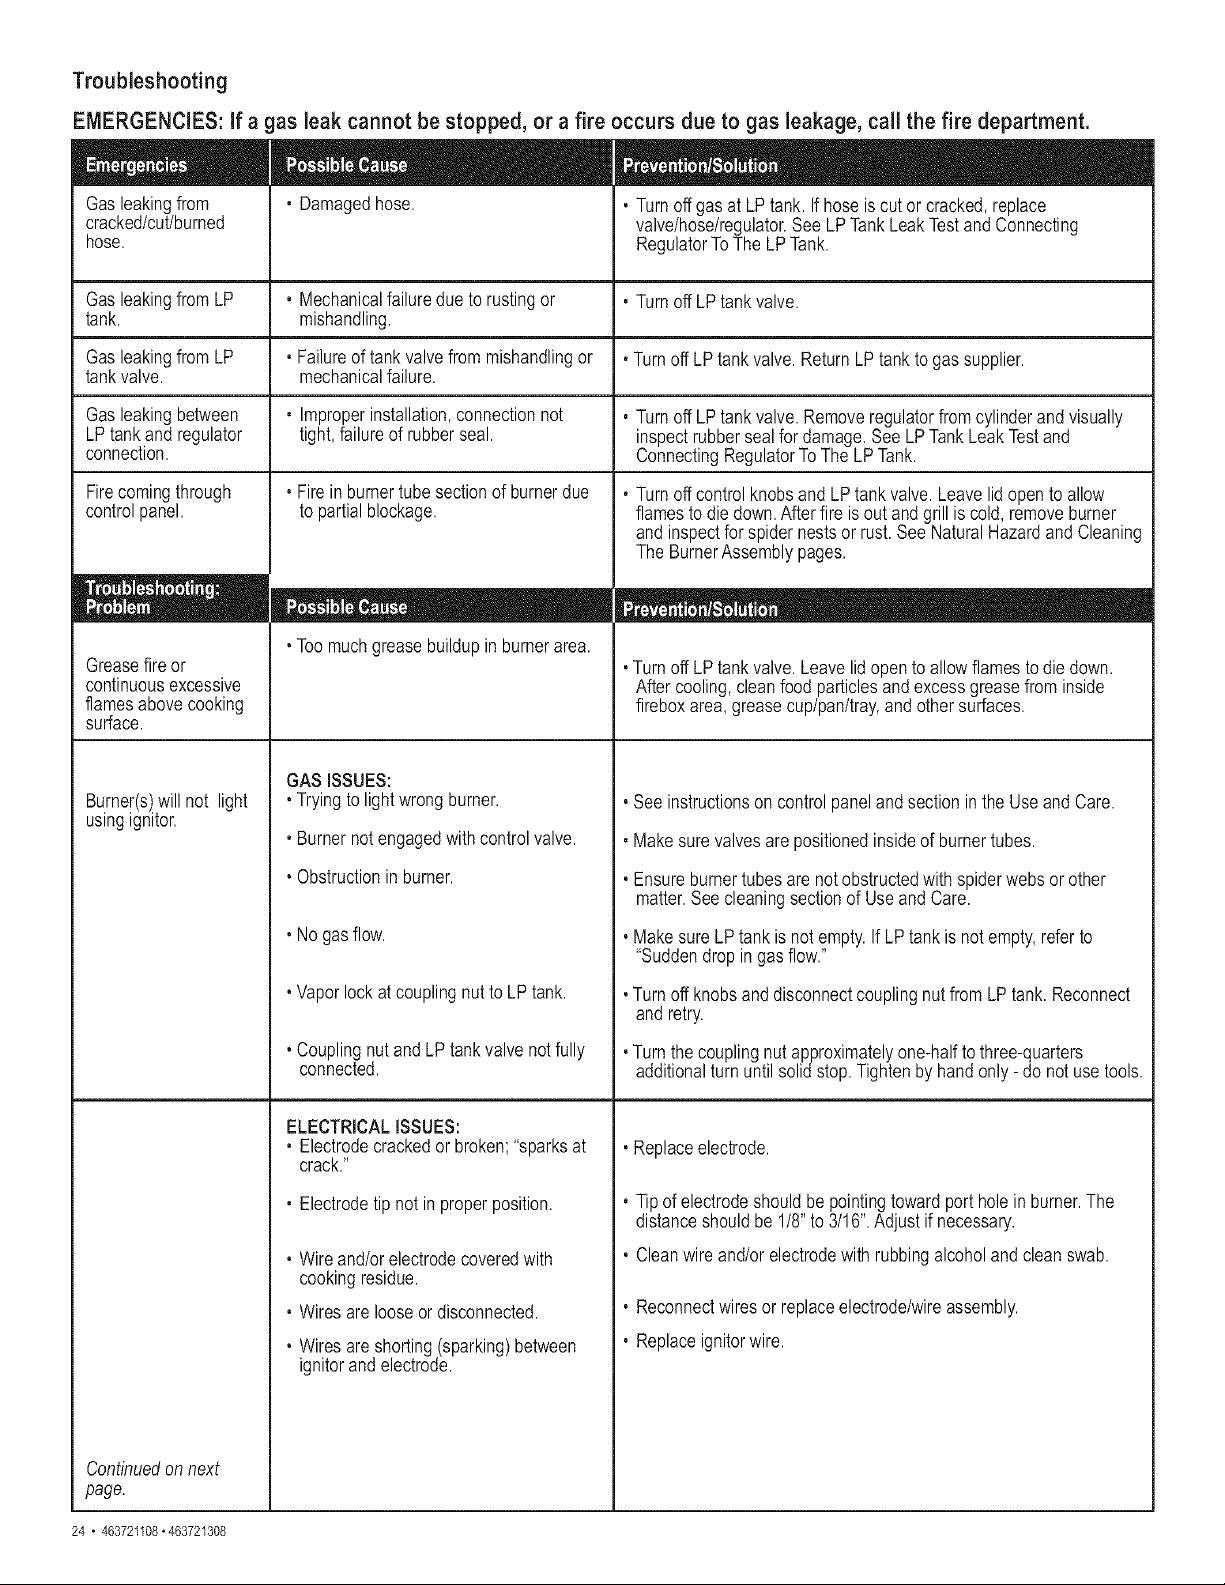
Troubleshooting
EMERGENCIES: if a gas leak cannot be stopped, or a fire occurs due to gas leakage, call the fire department.
, Damagedhose. , Turnoff gas at LPtank. Ifhoseis cut orcracked,replaceGasleakingfrom
cracked/cut/burned valve/hose/regulator.SeeLPTankLeakTestand Connecting
hose. RegulatorToThe LPTank.
GasleakingfromLP , Mechanicalfailuredueto rustingor , Turnoff LPtankvalve.
tank. mishandling.
GasleakingfromLP , Failureof tank valvefrom mishandlingor , TurnoffLPtankvalve.ReturnLPtanktogas supplier.
tankvalve, mechanicalfailure.
Gasleakingbetween , Improperinstallation,connectionnot , Turnoff LP tankvalve.Removeregulatorfrom cylinderandvisually
LPtankandregulator tight,failureof rubberseal. inspectrubbersealfor damage.See LPTankLeakTestand
connection. ConnectingRegulatorToTheLP Tank.
Firecomingthrough
controlpanel.
, Fire in burnertubesectionof burnerdue
to partialblockage.
, Toomuchgreasebuildupin burnerarea.
GASISSUES:
, Tryingto lightwrongburner.
Greasefire or
continuousexcessive
flamesabovecooking
surface.
Burner(s)will not light
usingignitor.
Continuedonnext
page.
, Burnernotengagedwithcontrolvalve.
, Obstructionin burner.
, No gasflow.
, Vaporlockat couplingnut to LP tank.
, CouplingnutandLPtank valve notfully
connected.
ELECTRICALISSUES:
, Electrodecrackedor broken;"sparksat
crack."
, Electrodetip not in properposition.
, Wireand/orelectrodecoveredwith
cookingresidue.
, Wiresarelooseordisconnected.
, Wiresareshorting(sparking)between
ignitorand electrode.
, Turnoff controlknobsand LPtankvalve.Leavelidopento allow
flamesto diedown.Afterfire is out and grillis cold, removeburner
and inspectfor spidernestsor rust.SeeNaturalHazardandCleaning
The BurnerAssemblypages.
, Turnoff LP tankvalve.Leavelidopento allowflamesto diedown.
Aftercooling,cleanfood particlesand excessgreasefrom inside
fireboxarea,greasecup/pan/tray,andothersurfaces.
, Seeinstructionson controlpanelandsectionin the Use and Care.
, Makesure valvesarepositionedinsideof burnertubes.
, Ensureburnertubesarenotobstructedwith spiderwebsor other
matter.See cleaningsectionof Useand Care.
, Makesure LP tank is notempty.If LP tank is notempty,referto
"Suddendropin gasflow."
, Turnoff knobsand disconnectcouplingnutfrom LPtank.Reconnect
and retry.
, Turnthecouplingnut approximatelyone-halfto three-quarters
additionalturnuntil solidstop.Tightenby hand only- do notusetools.
. Replaceelectrode.
, Tip of electrodeshouldbe pointingtowardport holein burner.The
distanceshouldbe 1/8"to 3/16".Adjustif necessary.
, Cleanwireand/orelectrodewithrubbingalcoholand cleanswab.
, Reconnectwiresor replaceelectrode/wireassembly.
, Replaceignitorwire.
24 • 463721108"463721308
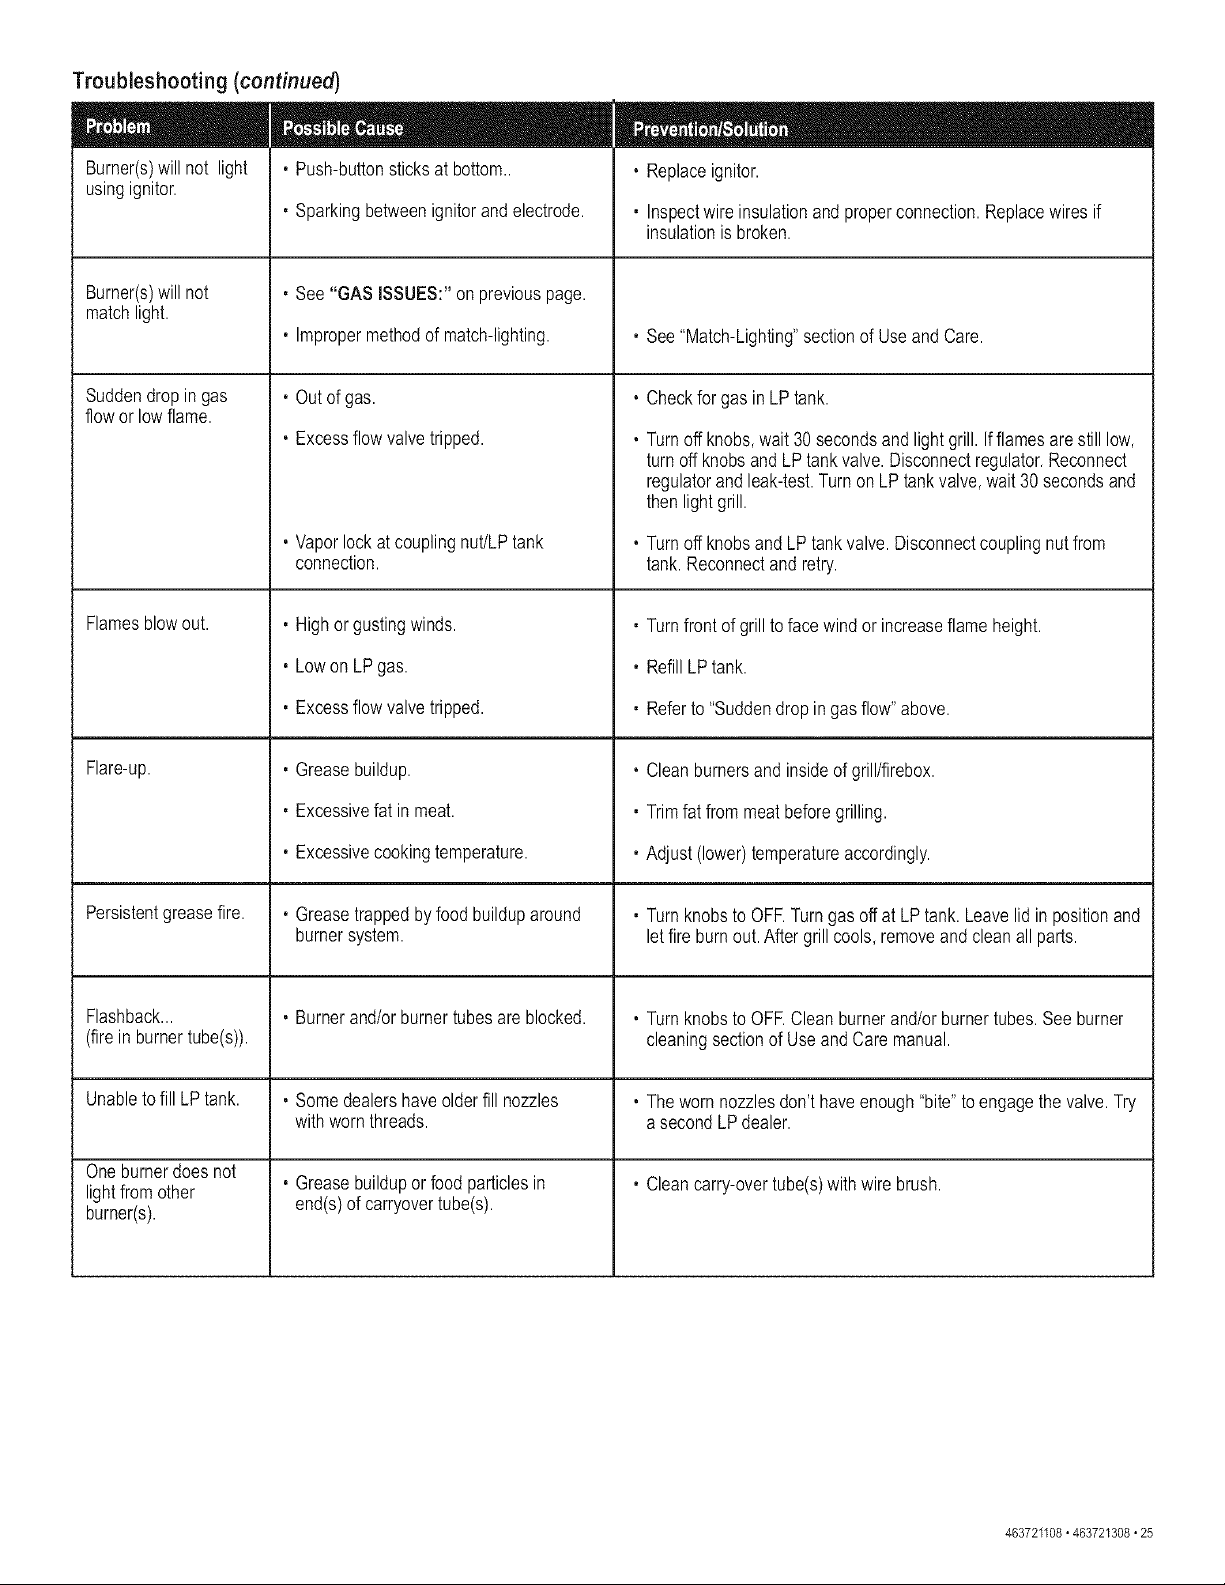
Burner(s)will not light
usingignitor.
Troubleshooting (continued)
, Push-buttonsticksat bottom..
Burner(s)will not
matchlight.
Suddendropingas
flowor lowflame.
Flamesblowout.
Flare-up.
Persistentgreasefire.
Flashback...
(firein burnertube(s)).
Unabletofill LPtank.
Oneburnerdoesnot
lightfrom other
burner(s).
, Sparkingbetweenignitorand electrode.
, See "GAS ISSUES:"onpreviouspage.
, Impropermethodof match-lighting.
, Outof gas.
, Excessflowvalvetripped.
, Vaporlockat couplingnut/LPtank
connection.
, Highorgustingwinds.
, LowonLPgas.
, Excessflowvalvetripped.
, Greasebuildup.
, Excessivefat in meat.
, Excessivecookingtemperature.
, Greasetrappedbyfood builduparound
burnersystem.
, Burnerand/orburnertubesare blocked.
, Somedealershaveolder fill nozzles
withwornthreads.
, Greasebuildupor foodparticlesin
end(s)of carryovertube(s).
, Replaceignitor.
, Inspectwireinsulationandproperconnection.Replacewiresif
insulationis broken.
, See"Match-Lighting"sectionof UseandCare.
, Checkfor gas in LPtank.
, Turnoff knobs,wait30 secondsandlight grill.If flamesare still low,
turnoff knobsand LPtank valve.Disconnectregulator.Reconnect
regulatorandleak-test.Turnon LPtankvalve,wait 30 secondsand
thenlightgrill.
, Turnoff knobsand LP tankvalve.Disconnectcouplingnutfrom
tank.Reconnectand retry.
, Turnfrontof grillto facewindor increaseflameheight.
, RefillLP tank.
, Referto "Suddendropin gasflow"above.
, Cleanburnersand insideof grill/firebox.
, Trimfat from meatbeforegrilling.
, Adjust(lower)temperatureaccordingly.
, Turnknobsto OFF.Turngas offat LPtank. Leavelid in positionand
letfire burnout.After grill cools,removeandcleanall parts.
, Turnknobsto OFF.Cleanburnerand/orburnertubes.See burner
cleaningsectionof UseandCare manual.
, Thewornnozzlesdon'thaveenough"bite"to engagethe valve.Try
asecondLPdealer.
, Cleancarry-overtube(s)withwire brush.
463721108• 463721308 • 25

Manufacturerwarrantsto theoriginalconsumer-purchaseronly thatthisproductshall befreefrom defectsinworkmanshipandmaterialsafter
correctassemblyandundernormalandreasonablehomeusefor the periodsindicatedbelowbeginningon thedate of purchase.
The manufacturerreservesthe rightto requirethatdefectiveparts be returned,postageandorfreight pre-paid,bythe consumer,for reviewand
examination.
1YearLIMITEDwarranty
Uponconsumersupplyingproofof purchaseas providedherein,Manufacturerwill repairor replacethe partslistedbelowwhichare proven
defectiveduringthe applicablewarrantyperiod.Parts requiredto completesuchrepairor replacementshall befreeof chargeto youexceptfor
shippingcosts.Theoriginal consumer-purchaser will be responsiblefor all shipping chargesof parts replaced under the terms of this
limited warranty,
This limitedwarrantyis applicablein the UnitedStatesandCanadaonly,is only availableto theoriginalownerof theproductandis not
transferable.Manufacturerrequiresreasonableproofof your dateof purchase.Therefore,you shouldretainyoursalesslip or invoiceand register
yournew productimmediately.Defectiveor missingpartssubjectto this limitedwarrantywill notbe replacedwithoutregistrationandproofof
purchase.Registeronlineat http://www.charbroil.comorcompleteand returnvia mailthe ProductRegistrationCardlocatedon the last pageof the
Use& Caremanualincludedwith thisproductand retainyoursalesreceiptfor proofof purchase.
This limitedwarrantyappliesto the functionalityof the productONLYanddoesnot covercosmeticissuessuchasscratches,dents,corrosions
or discoloringby heat,abrasiveandchemicalcleanersorany toolsusedinthe assemblyor installationof the appliance,surfacerust,or the
discolorationof stainlesssteelsurfaces.
This limitedwarrantywill not reimburseyoufor the costof anyinconvenience,food, personalinjuryor propertydamage.
Ifan originalreplacementpart is notavailable,a comparablereplacementpartwill besent.Youwill be responsiblefor all shippingchargesof
partsreplacedunderthetermsof thislimitedwarranty.
iTEMSMANUFACTURERWILL NOTPAY FOR:
1. Servicecallsto yourhome.
2. Repairswhenyourproductis usedfor otherthannormal,single-familyhouseholdor residentialuse.
3. Damageresultingfrom accident,alteration,misuse,abuse,fire,flood,actsof God,improperinstallation,installationnot in accordancewith
electricalor plumbingcodes,or useof productsnotapprovedby the manufacturer.
4. Any foodloss due to productfailures.
5. Replacementparts or repairlaborcostsfor units operatedoutsidethe UnitedStatesor Canada.
6. Pickupanddeliveryd yourproduct.
7. Repairsto parts or systemsresultingfrom unauthorizedmodificationsmadeto the product.
8. Theremovaland/orreinstallationof your product.
9. Shippingcost,standardor expedited,for warrantyandreplacementparts.
DISCLAIMEROF IMPLIEDWARRANTIES;LIMITATIONOF REMEDIES
Repairor replacementof defectpartsis yourexclusiveremedyunderthe termsof thislimitedwarranty.Manufacturerwill not be responsiblefor
any consequentialor incidentaldamagesarisingfrom the breachof eitherthis limitedwarrantyor any applicablewarranty,or for failureor damage
resultingfrom actsof God,impropercareand maintenance,greasefire, accident,alteration,
replacementof partsby anyoneotherthan Manufacturer,misuse,transportation,commercialuse,abuse,hostileenvironments(inclementweather,
actsof nature,animaltampering),improperinstallationor installationnot in accordancewith localcodesor printedmanufacturerinstructions.
THISLIMITEDWARRANTYISTHE SOLEEXPRESSWARRANTYGIVENBYTHEMANUFACTURER.NO PRODUCTPERFORMANCE
SPECIFICATIONOR DESCRIPTIONWHEREVERAPPEARINGIS WARRANTEDBYMANUFACTUREREXCEPTTOTHE EXTENTSET FORTH
INTHISLIMITEDWARRANTY.ANY IMPLIEDWARRANTYPROTECTIONARISINGUNDERTHELAWSOFANYSTATE,INCLUDINGIMPLIED
WARRANTYOF MERCHANTABILITYOR FITNESSFORA PARTICULARPURPOSEOR USE,IS HEREBYLIMITEDIN DURATIONTOTHE
DURATIONOFTHISLIMITEDWARRANTY.
Neitherdealers nor the retail establishment selling this product has any authority to make_ additional warranties or to promise
remedies in addition to or inconsistent with those stated above,
Manufacturer'smaximumliability,in anyevent,shallnot exceedthe documentedpurchasepriceof the productpaidby theoriginalconsumer.
This warranty only applies to units purchased from an authorized retailer and or re-seller,
NOTE:Somestatesdo notallowan exclusionor limitationof incidentalor consequentialdamages,so someof theabovelimitationsor
exclusionsmay notapplyto you. This limitedwarrantygivesyouspecificlegalrightsas set for herein.Youmay alsohaveotherrightswhichvary
fromstateto state. Inthe stateof Californiaonly,if refinishingor replacementof the productis notcommerciallypracticable,the retailersellingthis
productorthe Manufacturerwill refundthe purchasepricepaidfor the product,lessthe amountdirectlyattributableto use by theoriginalconsumer-
purchaserpriorto discoveryof thenonconformity.In addition,in the stateof Californiaonly,youmay takethe productto the retailestablishment
sellingthis productin orderto obtainperformanceunderthislimitedwarranty.
If you wish to obtain performanceof any obligation under this limited warranty, you should write to:
Char-Broil Consumer Relations
P,O. Box 1240
Columbus,GA 31902-!240
Consumerreturnswill not be acceptedunlessa validReturnAuthorizationis first acquiredbycalling1-800-241-7548andthen clearlymarked
onthe outsideof the packageandthe packageis shippedfreight/postagepre-paidto the addressabove.
26 • 463721108"463721308
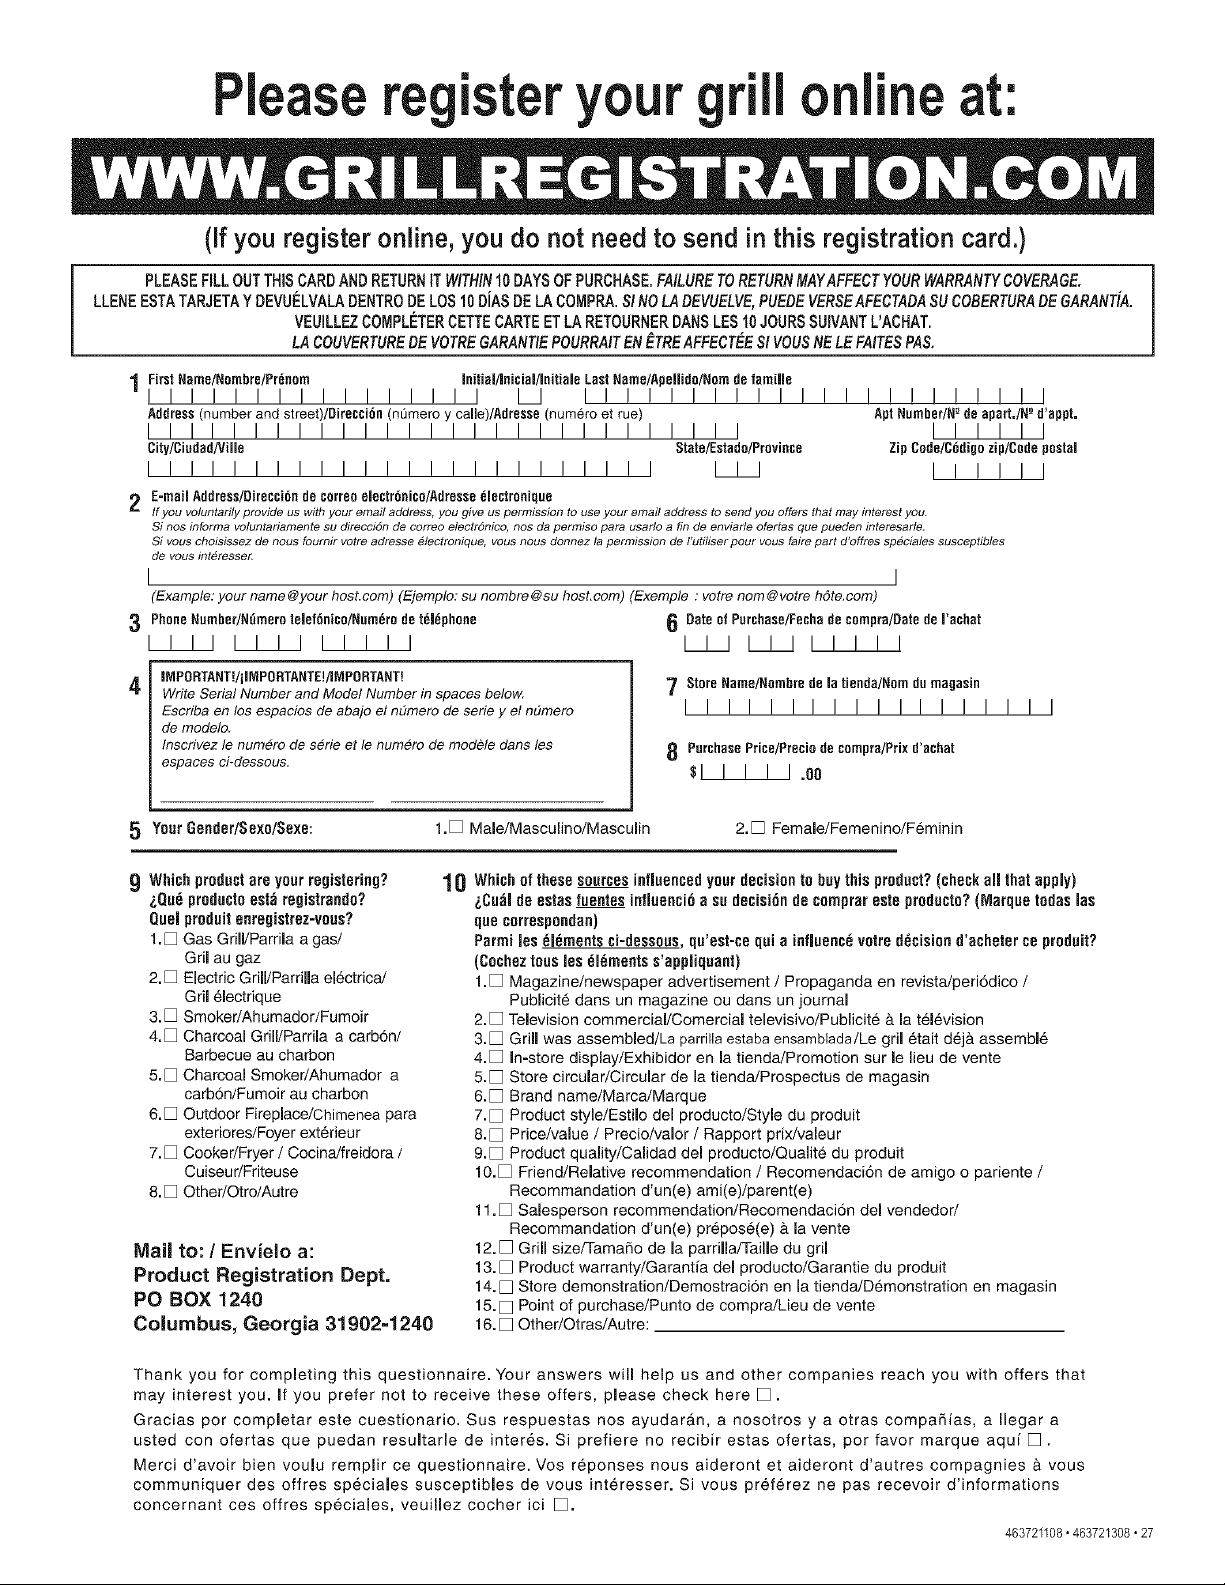
Pleaseregisteryour
rillonlineat:
(if you register online, you do not need to send in this registration card.)
PLEASEPiLL OUTTHiS CARDAND RETURNiT WITHIN10 DAYSOF PURCHASE=FAILURETORETURN MAYAFFECTYOURWARRANTYCOVERAGE, |
LLENE ESTATARJETAY DEVU_:LVALADENTRODE LOS 10 DiAS DE LA COMPRA.SI NO LA DEVUELVE,PUEDEVERSEAFECTADASU COBERTURADE GARANT/A.
1
VEUILLEZCOMPLC:TERCETTE CARTEET LA RETOURNERDANSLES10 JOURS SUIVANTL'ACHAT.
LA COUVERTUREDE VOTREGARANTIEPOURRAITEN ETREAFFECTEESI VOUSNE LE FAiTES PAS,
FirstHarne/Nombre/Pr_norn Initioi/inicioi/initioieLastNamo/Apeiiida/Homdotamiiie
11111111111111111 I I I! ! ! ! ! ! ! ! ! ! ! ! I ! ! ! ! ! ! ! I
Address(number and street)/Direcoi6n(namero y calJe)/Adrosso(numero et rue) AptNumber/H-_de aport,/N-°d'appt,
I ! I! ! ! ! ! ! ! ! ! ! ! ! ! ! ! ! ! ! ! ! ! ! ! ! I I ! I I I I
City/Ciadad/Ville Stoto/Estado/Province ZipCade/C6digazip/Codepostal
I ! !! ! ! ! ! ! I ! ! ! ! ! ! ! ! ! ! ! ! ! I I I I I ! ! ! ! I
2 E-rnoilAddress/Birecci6ndocorrooeiectr6oico/Adrosse_lectroniquo
If you voluntarily provide us with your email address, you give us permission to use your email address to send you offers that may interest you.
Si nos intorma voluntariamente su direcci4n de correo electr4nico, nos da permiso pare usarlo a fin de enviarle ofertas que pueden interesarle.
Si vous cholsissez de nous fournir votre adresse 4tectronique, vous nous donnez la permission de Futihser pour vous faire part d'offres sp_ciales susceptibles
de VOUS int_ressel_
I I
(Example: your name@your host.com) (Ejemplo: su nombre@su host,corn) (Exemple : votre nom@votre hSte.com)
3 PhoneNsrnber/N_merotelef6nico/Num6rode t_l_phone
I II I I I I I ! ! ! I
iMPORTAHTUiiMPORTANTE!/IMPORTANT!
4 Write Serial Number and Model Number in spaces below.
Escriba en los espacios de abajo et n_mero de serie y el n_mero
de modulo,
Inscrivez le numero de serie et le numero de modele dens los
espaces ci-deseous.
6 Dateat Purchaso/Fechode compro/BotedoI'achot
I I II I II ! ! ! !
7 StoreName/Nornbredela tienda/Norndumagasin
I ! !! ! !! ! ! ! !! ! ! ! ! ! I
8 PurchasePrice/Prociode compra/Prixd'achat
$! ! ! ! I .oo
5 YourGender/Sexo/Sexe:
1.[] Male/Masculino/Masculin 2.[] Female/Femenino/F6minin
9 Which product are your registering?
i,Qu_ predactoest_ registrando?
Quel produit enregistrez-vous?
1. [] Gas Grill/Parrila a gas/
Gril au gaz
2. [] Electric Grill/Parrilla electrica/
Gril _lectrique
3. [] Smoker/Ahumador/Fumoir
4. [] Charcoal Grill/Parrila a carbon/
Barbecue au charbon
5.[] Charcoal Smoker/Ahumador a
carbon/Fumoir au charbon
6.[] Outdoor Fireplace/Chimenea para
exteriores/Foyer ext_rieur
7. [] Cooker/Fryer / Cocina/freidora /
CuiseuriFriteuse
8. [] Other/Otro/Autre
Mail to: / Envielo a:
Product Registration Dept,
PO BOX 1240
Columbus, Georgia 31902=1240
1 _ Which of these sources influenced your decision to buy this product?(check all lhat apply)
i,Cu_l de estas fuentes infiuenci6 a su decisi6n de comprar este producto?(Marque todas las
que correspondan)
Parmi los _l_ments ci=dessuus,qu'est-ce qui a influenc6 votre d_cision d'echeter ce prodeit?
(Cuchez tous les _l_rnents s'oppliquant)
1.[] Magazine/newspaper advertisement / Propaganda en revista/peri6dico /
Publicit_ dans un magazine ou dans un journal
2. [] Television commercial/Oomercial televisivo/Publicite b. la t_16vision
3.[] Grill was assembled/La parrilla estaba ensamblada/Le gril 6tait d_jb. assembl6
4.[] In-store display/Exhibidor en la tienda/Promotion sur le lieu de vente
5.[] Store circular/Circular de la tienda!Prospectus de magasin
6.[] Brand name/Mama/Marque
7.[] Product style/Estilo del producto/Style du produit
8.[] Price/value / Precio/valor / Rapport prix/valeur
9.[] Product quality/Calidad del producto/Qualite du produit
10.[] Friend!Relative recommendation / Recomendaci6n de amigo o pariente /
Recommandation d'un(e) ami(e)/parent(e)
11. [] Salesperson recommendation/Recomendaci6n del vendedori
Recommandation d'un(e) prOpose(e) b. la vente
12. [] Grill size/TamaSo de la parrilla/Taille du gril
13. [] Product warranty/Garanfia del producto/Garantie du produit
14. [] Store demonstration/Demostracion en la tienda/Demonstration en magasin
15. [] Point of purchase/Punto de compra/Lieu de vente
16. [] OtheriOtras/Autre:
Thank you for completing this questionnaire. Your answers will help us and other companies reach you with offers that
may interest you. If you prefer not to receive these offers, please check here [].
Gracias por completar este cuestionario. Sus respuestas nos ayudaran, a nosotros y a otras compa5ias, a Ilegar a
usted con ofertas que puedan resultarle de inter6s. Si prefiere no recibir estas ofertas, por favor marque aqui [].
Merci d'avoir bien voulu remplir ce questionnaire. Vos reponses nous aideront et aideront d'autres compagnies & vous
communiquer des offres speciales susceptibles de vous interesser. Si vous preferez ne pas recevoir d'informations
concernant ces offres speciales, veuillez cocher ici [].
463721108•463721308• 27
Should you encounter a problem with our product
CALL US FIRST
Do not return this product to the store.
WE CAN HELP
GRILL SERVICE CENTER
1=800-241-7548
HOURS 8AM-6PM EST Mon-Fri
Please ensure your warranty registration is complete.
Grilling Safety Checklist
[] Read and understand owners manual.
[] Never overfill LP cylinder.Overfilled cylinders may cause freeze-up of
regulator.
[] Check tubes for spider webs, Ensurevalves are correctly installed in
burner tubes.
[] Always ensure control knobs are in OFF position and regulator is
attached to tank BEFORE opening tank valve to avoid low flames,
[] Perform leak test regularly.
Thank You for Your Purchase!
Char-Broil,LLC. Columbus,GA31902. Printedin China