Use and Care Manual
Induction Ranges
HIIP055U, HIIP055C

() = cm

3
Table of Contents
Use and care manual
Safety Definitions .......................................................... 4
IMPORTANT SAFETY INSTRUCTIONS ........................ 5
Proper Installation and Maintenance ................................ 5
Fire Safety .............................................................................. 6
Burn Prevention .................................................................... 6
Electromagnetic Interference ............................................. 7
Child Safety ........................................................................... 7
Cleaning Safety ..................................................................... 7
Cookware Safety .................................................................. 8
State of California Proposition 65 Warnings ................... 8
Food Safety ........................................................................... 8
Causes of Damage ........................................................ 9
Protecting the Environment ........................................ 10
Saving Energy .................................................................... 10
Getting Started ............................................................. 11
Parts ..................................................................................... 11
Accessories ........................................................................ 12
Getting familiar with the appliance ............................ 14
Control panel ...................................................................... 14
The elements ...................................................................... 15
Residual heat indicator .................................................... 15
Operation ...................................................................... 15
Main power switch ............................................................ 15
Setting the cooktop ........................................................... 15
FlexInduction
®
cooking zone .......................................... 17
PowerMove function ......................................................... 18
Time-setting options .......................................................... 19
SpeedBoost
®
function ...................................................... 20
ShortBoost function .......................................................... 20
Keep Warm function ......................................................... 21
Panel Lock .......................................................................... 21
Wipe protection .................................................................. 21
Automatic time limitation .................................................. 21
Basic settings ..................................................................... 21
Energy consumption indicator ........................................ 23
Cooking with Induction ............................................... 23
Advantages of induction cooking ................................... 23
Cookware ............................................................................ 23
Cleaning and Maintenance ......................................... 25
Daily Cleaning .................................................................... 25
Cleaning guidelines .......................................................... 26
Cleaning charts .................................................................. 26
Maintenance ....................................................................... 27
Operation-Oven ........................................................... 28
Oven Control Panel ........................................................... 28
About the Oven .................................................................. 29
Basic Features ................................................................... 29
Special Features ................................................................ 32
Settings Menu Options ..................................................... 35
Getting the Most Out of Your Appliance ................... 36
General Tips ....................................................................... 36
Bake
% ............................................................................... 37
Auto Convection Conversion .......................................... 37
Convection Bake
2 ......................................................... 38
Convection Multi-Rack
: ................................................. 38
Pizza
2 ............................................................................... 38
Roast % .............................................................................. 39
Convection Roast
2 ........................................................ 39
Broil
( ................................................................................ 39
Convection Broil 4 .......................................................... 40
Proof
$ .............................................................................. 40
Warm
% ............................................................................. 40
Cleaning and Maintenance-Oven ............................... 41
Cleaning the Oven ............................................................ 41
Maintenance ....................................................................... 43
Operation-Warming Drawer ........................................ 45
About the Warming Drawer ............................................. 45
Warming Drawer Specifications ..................................... 45
Operation ............................................................................ 45
Getting the Most Out of Your Warming Drawer ........ 46
About the Appliance ......................................................... 46
General Tips ....................................................................... 46
Use of Your Appliance ..................................................... 46
Preheating .......................................................................... 46
Warming Empty Serving Bowls and Plates .................. 46
Crisping Stale Items ......................................................... 46
Temperature Recommendations .................................... 46
Cleaning and Maintenance-Warming Drawer ........... 47
Cleaning the Warming Drawer ....................................... 47
Removing Drawer from Housing .................................... 47
Installing Drawer to Housing ........................................... 48
Service ......................................................................... 50
Frequently-asked questions and answers (FAQ) ........ 50
Fixing Malfunctions ........................................................... 51
Oven Troubleshooting ...................................................... 53
How to Obtain Service or Parts ...................................... 54
STATEMENT OF LIMITED PRODUCT WARRANTY ... 54
What this Warranty Covers & Who it Applies to ......... 54
How Long the Warranty Lasts ........................................ 54
Repair/Replace as Your Exclusive Remedy ................ 55
Out of Warranty Product .................................................. 55
Warranty Exclusions ......................................................... 55
Cooking Charts ........................................................... 56
Baked Goods/Entrees ..................................................... 56
Meats ................................................................................... 57

4
Safety Definitions
9 WARNING
This indicates that death or serious injuries may
occur as a result of non-observance of this warning.
9 CAUTION
This indicates that minor or moderate injuries may
occur as a result of non-observance of this warning.
NOTICE: This indicates that damage to the appliance or
property may occur as a result of non-compliance with
this advisory.
Note: This alerts you to important information and/or
tips.
4XHVWLRQV"
ZZZERVFKKRPHFRPXV
:HORRNIRUZDUGWRKHDULQJIURP\RX
7KLV%RVFK$SSOLDQFHLVPDGHE\
%6++RPH$SSOLDQFHV&RUSRUDWLRQ
0DLQ6WUHHW6XLWH
,UYLQH&$

5
9 IMPORTANT SAFETY INSTRUCTIONS
READ AND SAVE THESE INSTRUCTIONS
IMPORTANT SAFETY INS READ AND SAVE THESE INSTRUCTIONS
WARNING
When properly cared for, your new appliance has been
designed to be safe and reliable. Read all instructions
carefully before use. These precautions will reduce the
risk of burns, electric shock, fire, and injury to persons.
When using kitchen appliances, basic safety precautions
must be followed, including those in the following pages.
This appliance is intended for use at an elevation of no
more than 2000 meters above sea level.
Proper Installation and Maintenance
WARNING
TIP OVER HAZARD
Have the installer show you the location of the circuit
breaker or fuse. Mark it for easy reference.
This appliance must be properly installed and grounded
by a qualified technician. Connect only to properly
grounded outlet. Refer to Installation Instructions for
details.
This appliance is intended for normal family household
use only. It is not approved for outdoor use. See the
Statement of Limited Product Warranty. If you have any
questions, contact the manufacturer.
Do not store or use corrosive chemicals, vapors,
flammables or nonfood products in or near this
appliance. It is specifically designed for use when
heating or cooking food. The use of corrosive chemicals
in heating or cleaning will damage the appliance and
could result in injury.
Do not operate this appliance if it is not working properly,
or if it has been damaged. Contact an authorized
servicer.
Do not obstruct oven vents.
Do not repair or replace any part of the appliance unless
specifically recommended in this manual. Refer all
servicing to an authorized servicer.
In the event of an error the display flashes and beeps
continuously. Disconnect appliance from the power
supply and call an authorized servicer.
WARNING
When removing the door make sure oven is cool and
power to the oven has been turned off before removing
the door. Failure to do so could result in burns.
The oven door is heavy and fragile. Use both hands to
remove the oven door. The door front is glass. Handle
carefully to avoid breaking.
Grasp only the sides of the oven door. Do not grasp the
handle as it may swing in your hand and cause injury or
damage.
Failure to grasp the oven door firmly and properly could
result in personal injury or product damage.
Lay the door on a flat smooth surface so that the door
cannot fall over. Failure to do so may result in personal
injury or damage to the appliance.
WARNING
To avoid injury from hinge bracket snapping closed, be
sure that both levers are securely in place before
removing door. Also, do not force door open or closed -
the hinge could be damaged and injury could result.
WARNING
Make sure the appliance and lights are cool and power
to the appliance has been turned off before replacing the
light bulb(s). Failure to do so could result in electrical
shock or burns. The lenses (if equipped) must be in
place when using the appliance. The lenses (if equipped)
serve to protect the light bulb from breaking. The lenses
(if equipped) are made of glass. Handle carefully to
avoid breaking. Broken glass can cause an injury.
WARNING
Light socket is live when door is open if main power
supply is not turned off.
A child or adult can tip the
range over and be killed.
Verify that the anti-tip
bracket is engaged when-
ever the range is moved
to a new location.
Do not operate the range without the anti-tip bracket
in place. Failure to follow the instructions in this man-
ual can result in death or serious burns to children
and adults.
Check for proper installation and use of the anti-tip
bracket. Carefully tip the range forward pulling from
the back to ensure that the anti-tip bracket engages
the range leg and prevents tip-over. The range
should not move more than 1” (2.5cm).

9 IMPORTANT SAFETY INSTRUCTIONS
READ AND SAVE THESE INSTRUCTIONS
6
Fire Safety
WARNING
NEVER cover any slots, holes or passages in the oven
bottom or cover an entire rack with materials such as
aluminum foil. Doing so blocks air flow through the oven.
Aluminum foil linings may also trap heat, causing a fire
hazard.
If materials inside an oven or warming drawer should
ignite, keep door closed. Turn off the appliance and
disconnect the circuit at the circuit breaker box.
WARNING
Use this appliance only for its intended use as described
in this manual. NEVER use this appliance as a space
heater to heat or warm the room. Doing so may result in
overheating the appliance. Never use the appliance for
storage.
Always have a working smoke detector near the kitchen.
In the event that personal clothing or hair catches fire,
drop and roll immediately to extinguish flames.
Have an appropriate fire extinguisher available, nearby,
highly visible and easily accessible near the appliance.
Smother flames from food fires other than grease fires
with baking soda. Never use water on cooking fires.
WARNING
TO REDUCE THE RISK OF INJURY TO PERSONS IN
THE EVENT OF A GREASE FIRE, OBSERVE THE
FOLLOWING:
a.
SMOTHER FLAMES with a close-fitting lid, cookie
sheet, or metal tray, then turn off the burner. BE
CAREFUL TO PREVENT BURNS. If the flames do not
go out immediately, EVACUATE AND CALL THE FIRE
DEPARTMENT.
b.
NEVER PICK UP A FLAMING PAN – You may be
burned.
c.
DO NOT USE WATER, including wet dishcloths or
towels – a violent steam explosion will result.
d.
Use an extinguisher ONLY if:
- You know you have a Class ABC extinguisher, and
you already know how to operate it.
- The fire is small and contained in the area where it
started.
- The fire department is being called.
- You can fight the fire with your back to an exit.
Burn Prevention
DO NOT TOUCH HEATING ELEMENTS OR INTERIOR
SURFACES OF OVEN - Heating elements may be hot
even though they are dark in color. Interior surfaces of an
oven become hot enough to cause burns. During and
after use, do not touch, or let clothing, potholders, or
other flammable materials contact heating elements or
interior surfaces of oven until they have had sufficient
time to cool. Other surfaces of the appliance may
become hot enough to cause burns. Among these
surfaces are oven vent openings, surfaces near these
openings and oven doors.
Do not touch interior surface of the drawer while it is in
use. The interior drawer could become hot enough to
cause burns. Allow drawer and rack (if equipped) to cool
before handling.
Exercise caution when opening the appliance. Standing
to the side, open the door (or drawer) slowly and slightly
to let hot air and/or steam escape. Keep your face clear
of the opening and make sure there are no children or
pets near the unit. After the release of hot air and/or
steam, proceed with your cooking. Keep doors shut
unless necessary for cooking or cleaning purposes. Do
not leave open doors unattended.
Do not heat or warm unopened food containers. Build-up
of pressure may cause the container to burst and cause
injury.
Use high heat settings on the cooktop only when
necessary. To avoid bubbling and splattering, heat oil
slowly on no more than a low-medium setting. Hot oil is
capable of causing extreme burns and injury.
Use caution when cooking foods with high alcohol
content (e.g. rum, brandy, bourbon) in the oven. Alcohol
evaporates at high temperatures. There is a risk of
burning as the alcohol vapors may catch fire in the oven.
Use only small quantities of alcohol in foods, and open
the oven door carefully.
Always place oven racks in desired location while oven is
cool. Always use oven mitts, when the oven is warm. If a
rack must be moved while oven is hot, do not let
potholder contact the heating elements.
Never move a pan of hot oil, especially a deep fat fryer.
Wait until it is cool.
CAUTION
To avoid possible injury or damage to the appliance,
ensure rack is installed exactly per installation
instructions and not backwards or upside down.
Always use dry potholders. Moist or damp potholders on
hot surfaces may result in burns from steam. Do not let
potholder touch hot heating elements. Do not use a towel
or other bulky cloth.
Secure all loose garments, etc. before beginning. Tie
long hair so that it does not hang loose, and do not wear
loose fitting clothing or hanging garments, such as ties,
scarves, jewelry, or dangling sleeves.
Avoid reaching or leaning over the appliance. Be aware
that certain clothing and hair sprays may contain
flammable chemicals that could be ignited if brought in
to contact with hot surface units or heating elements and
may cause severe burns.

7
9 IMPORTANT SAFETY INSTRUCTIONS
READ AND SAVE THESE INSTRUCTIONS
Electromagnetic Interference
WARNING
This induction cooktop generates and uses ISM
frequency energy that heats cookware by using an
electromagnetic field. It has been tested and complies
with Part 18 of the FCC Rules for ISM equipment. This
induction cooktop meets the FCC requirements to
minimize interference with other devices in residential
installation. Induction cooktops may cause interference
with television or radio reception. If interference occurs,
the user should try to correct the interference by:
▯ Relocating the receiving antenna of the radio or
television.
▯ Increasing the distance between the cooktop and the
receiver.
▯ Connecting the receiver into an outlet different than the
receiver.
It is the user’s responsibility to correct any interference.
CAUTION
Persons with a pacemaker or similar medical device
should exercise caution when standing near an induction
cooktop while it is in use. Consult your doctor or the
manufacturer of the pacemaker or similar medical device
for additional information about its effects with
electromagnetic fields from an induction cooktop.
WARNING
HAZARD DUE TO MAGNETISM
The probe is magnetic. The magnetic elements can
damage electronic implants such as pacemakers or
insulin pumps. People with electronic implants should
therefore not put the temperature sensor in the pockets
of their clothes and should maintain a minimum distance
of 4 inches (10 cm) with respect to their pacemaker or
similar medical device.
Child Safety
When children become old enough to use the appliance,
it is the responsibility of the parents or legal guardians to
ensure that they are instructed in safe practices by
qualified persons.
Do not allow anyone to climb, stand, lean, sit, or hang on
any part of an appliance, especially a door, warming
drawer, or storage drawer. This can damage the
appliance, and the unit may tip over, potentially causing
severe injury.
Do not allow children to use this appliance unless closely
supervised by an adult. Children and pets should not be
left alone or unattended in the area where the appliance
is in use. They should never be allowed to play in its
vicinity, whether or not the appliance is in use.
CAUTION
Items of interest to children should not be stored in an
appliance, in cabinets above an appliance or on the
backsplash. Children climbing on an appliance to reach
items could be seriously injured.
Cleaning Safety
WARNING
RISK OF BURNS
; The appliance will become very hot on the outside
during the cleaning function. Never touch the appliance
door. Allow the appliance to cool down. Keep children
away from the appliance.
Notes
▯ Do not clean the appliance while it is still hot. Some
cleaners produce noxious fumes when applied to a
hot surface. Wet cloths or sponges can cause burns
from steam.
▯ When self-cleaning, confirm that the door locks and
will not open. If the door does not lock, do not run Self
Clean. Contact service.
▯ Birds have very sensitive respiratory systems. Keep
pet birds out of the kitchen or other rooms where
kitchen fumes could reach them. During Self Clean,
fumes are released that may be harmful to birds.
Other kitchen fumes such as overheating margarines
and cooking oils may also be harmful.
▯ Keep oven free from grease build up.

9 IMPORTANT SAFETY INSTRUCTIONS
READ AND SAVE THESE INSTRUCTIONS
8
Cookware Safety
Notes
▯ Do not place food directly on oven bottom.
▯ Follow the manufacturer’s directions when using
cooking or roasting bags.
▯ Hold the handle of the pan when stirring or turning
food. This helps prevent spills and movement of the
pan.
▯ Use proper pan size.
The use of undersized cookware will expose a portion
of the heating element or burner to direct contact and
may result in ignition of clothing. Select cookware
having flat bottoms large enough to cover the surface
heating unit. This appliance is equipped with one or
more surface units of different size. Proper relationship
of cookware to heating element or burner will also
improve efficiency.
▯ Cookware not approved for use with ceramic
cooktops may break with sudden temperature
changes. Use only pans that are appropriate for
ceramic cooktops. See Cookware Selection Guide.
▯ Always position handles of utensils inward so they do
not extend over adjacent work areas, burners or the
edge of the cooktop. This reduces the risk of fires,
spills and burns.
CAUTION
Plastic containers or plastic wrap can melt if in direct
contact with the drawer or hot utensil. If it melts on to the
drawer, it may not be removable.
WARNING
RISK OF INJURY
When cooking with a bain-marie, the cooktop and
cooking vessel may crack due to overheating. The
cooking vessel in the bain-marie must not come in direct
contact with the bottom of the pot filled with water. Use
only heat-resistant cookware.
WARNING
DANGER OF INJURY
Cookware may spring or bounce upward due to fluid
trapped between the cookware bottom and cooking
zone. Always keep cooking zone and cookware bottom
dry.
State of California Proposition 65
Warnings
WARNING
This product contains chemicals known to the State of
California to cause cancer, birth defects or other
reproductive harm.
Note: IMPORTANT SAFETY NOTICE: The California Safe
Drinking and Toxic Enforcement Act requires the
Governor of California to publish a list of substance
known to the state to cause cancer, birth defect or other
reproductive harm, and requires businesses to warn
customers of potential exposure to such substances. The
burning of gas cooking fuel and the elimination of soil
during self-cleaning can generate small amounts of
carbon monoxide. The fiberglass insulation in Self Clean
ovens gives off very small amounts of formaldehyde
during the first several cleaning cycles. California lists
formaldehyde as a potential cause of cancer. Carbon
monoxide is a potential cause of reproductive toxicity.
Exposure to these substances can be minimized by:
1.
Providing good ventilation when cooking with gas.
2.
Providing good ventilation during and immediately
after self-cleaning the oven.
3.
Operating the unit according to the instructions in this
manual.
Food Safety
CAUTION
To maintain food safety, follow these guidelines:
a. DO NOT use a warming drawer to heat cold food. It is
safe to use the drawer to crisp crackers, chips or dry
cereal and to warm plates.
b.
Be sure to maintain proper food temperature. The
USDA recommends holding hot food at 140°F or
warmer.
c.
DO NOT warm food for longer than one hour.

9
Causes of Damage
9 WARNING
RISK OF INJURY
NOTICES
▯ DO NOT place accessories or items such as foil,
greaseproof paper, oven liners or bakeware on the
oven cavity floor. This will cause heat to accumulate.
The baking and roasting times will no longer be
correct and the enamel will be damaged.
▯ Aluminum foil in the cooking compartment must not
come into contact with the door glass. This could
cause permanent discoloration of the door glass.
▯ Aluminum foil and plastic will melt in hot cooking
areas. Stove protective film is not suitable for your
cooktop.
▯ Do not cook on a broken cooktop. Cleaning solutions
and spillovers may create risk of electric shock.
▯ Cookware with rough bottoms will scratch the glass
ceramic surface.
▯ Salt, sugar and grains of sand will scratch the glass
ceramic surface. Never use the cooktop as a working
surface or for setting things down.
▯ Avoid heating pots or pans that are empty.
▯ Hard or sharp objects falling off the cooktop may
damage it.
▯ Sugar and products containing sugar may damage the
cooktop. Immediately eliminate spills of these
products with a glass scraper once the cooktop has
had sufficient time to cool.
▯ Never set down hot pans and pots on the control
panel or frame. This may cause damage.
▯ Always turn hood ON when cooking at high heat or
when flambéing food (i.e. Crepe Suzette, Cherries
Jubilee, Peppercorn Beef Flambé).
▯ When baking particularly juicy fruit pies, do not pack
the baking tray too generously. Fruit juice dripping
from the baking tray leaves stains that cannot be
removed. If possible, use the deeper universal pan.
▯ If the seal is very dirty, the appliance door will no
longer close properly during operation. The fronts of
adjacent units could be damaged. Always keep the
seal clean.
▯ Shimmering metallic discolorations on the glass
ceramic surface result from the use of inappropriate
cleaning agents and abrasion from cookware.
▯ Do not use the appliance door as a seat, shelf or
worktop. Do not place any cookware or accessories
on the appliance door.
▯ Depending on the appliance type, accessories can
scratch the door glass when closing the door. Always
slide accessories into the cooking compartment as far
as they will go.
▯ Do not carry or hold the appliance by the door handle.
The door handle cannot support the weight of the
appliance and could break.
Exercise caution when opening the appliance.
Standing to the side, open the door (or drawer)
slowly and slightly to let hot air and/or steam
escape. Keep your face clear of the opening and
make sure there are no children or pets near the
unit. After the release of hot air and/or steam, pro-
ceed with your cooking. Keep doors shut unless
necessary for cooking or cleaning purposes. Do not
leave open doors unattended.

10
Protecting the Environment
Your new appliance is energy-efficient. Here you can find
tips on how to save even more energy when using the
appliance, and how to dispose of your appliance
properly.
Unpack the appliance and dispose of the packaging in
an environmentally friendly manner.
Saving Energy
▯ Only preheat the appliance if this is specified in the
recipe or in the tables in the operating instructions.
▯ Use baking tins that are dark-colored, painted black or
have an enamel coating. They absorb the heat
particularly well.
▯ Open the appliance door as infrequently as possible
when the appliance is in use.
▯ It is best to bake several cakes one after the other.
The cooking compartment is still warm. This reduces
the baking time for the second cake. You can place
two cake tins next to each other in the cooking
compartment.
▯ For longer cooking times, you can switch the
appliance off 10 minutes before the end of the
cooking time and use the residual heat to finish
cooking.
▯ Always place a fitting lid on cookware. Cooking with
an uncovered pan will result in a four-fold increase in
energy use. Use a glass lid to provide visibility and
avoid having to lift the lid.
▯ Use cookware equipped with a solid, flat bottom.
Curved pan bases increase energy consumption.
▯ The diameter of the pan base must match the size of
the element. If not, energy may be wasted.
Note: The manufacturer normally indicates the pan’s
upper diameter. This is normally greater than the
diameter of the pan’s base.
▯ Choose cookware of a size suited to the amount of
food you are going to cook. A large pan that is only
half full will use more energy.
▯ Use a small amount of water when cooking. This
saves energy and vegetables retain a larger
percentage of their vitamins and minerals.
▯ Select a lower power level.
▯ When cooking, ensure that there is sufficient supply air
so that the extractor hood works efficiently and quietly.
▯ Fan level adjust to the intensity of the cooking fumes.
Only use the high mode if necessary. A lower fan level
means lower energy consumption.
▯ With intensive cooking fumes, select a higher fan level
early on. Cooking fumes that are already distributed in
the kitchen mean that the extractor hood will have to
be operated longer.
▯ Switch off the extractor hood when it is no longer
required.
▯ Switch off the lighting when it is no longer required.
▯ Clean and change the filter at the specified intervals in
order to increase the effectiveness of the ventilation
and prevent a risk of fire.
11
Getting Started
Parts
Your appliance may vary slightly.
Range Features
Retained Heat
The glass cooking surface retains heat and stays hot
after the element(s) have been turned off. The retained
heat may be used to hold foods at serving temperatures
for a short time. If a hot surface light is on, use caution
when working or cleaning around the cooktop as the
cooktop is still hot.
Hot Surface Indicator
The cooktop displays a hot indicator light to show when
the cooking surface is too hot to touch. If a hot surface
light is on, use caution when working or cleaning around
the cooktop as the cooktop is still hot.
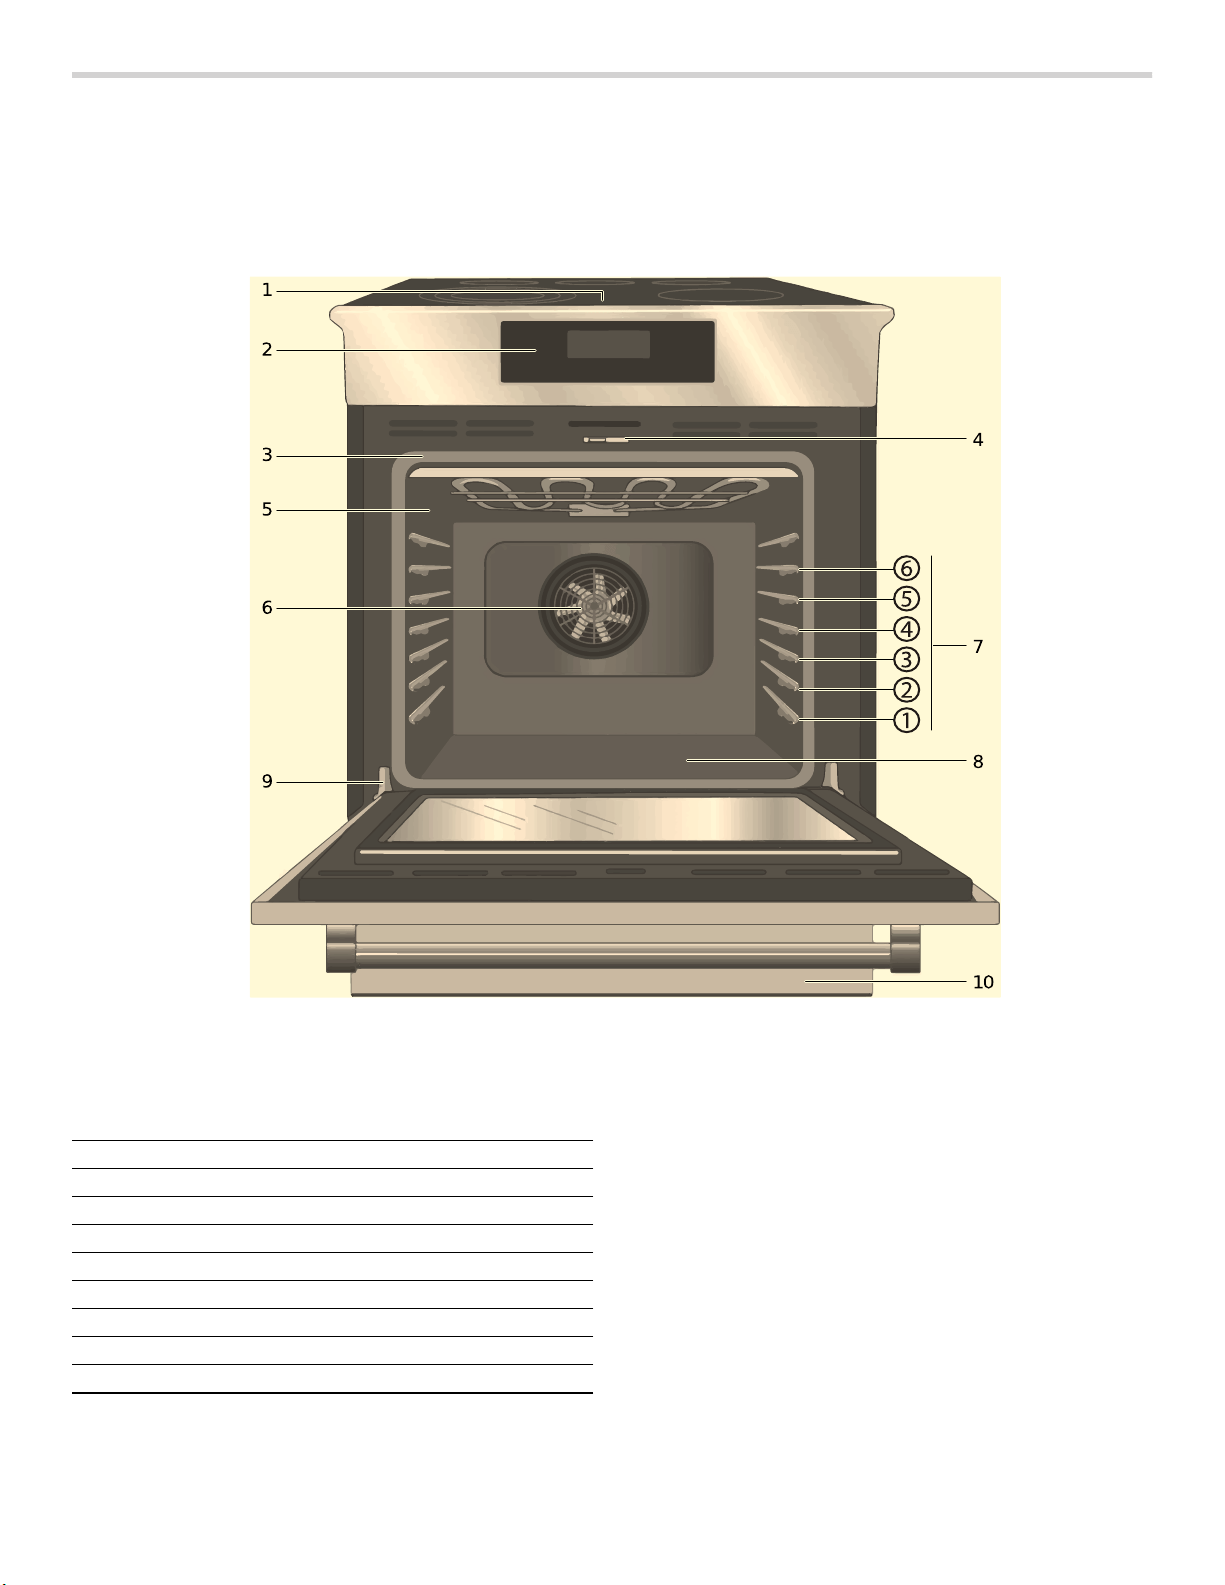
1 Cooktop Control Panel
2 Oven Control Panel
3 Door Gasket
4 Door Latch
5 Probe Jack
6 Convection Fan
7 Rack Position Guides with 6 rack positions
8 Oven Bottom
9 Door Hinge
10 Warming Drawer
12
Oven Features
Cooling Fan
The cooling fan runs during all cooking modes. The fan
can be heard when it is running, and warm air may be
felt as it is released from the oven vent. The fan may also
run after the oven is off.
Convection Fan
The convection fan operates during all convection
modes. When the oven is operating in a convection
mode, the fan turns off automatically when the door is
opened. The convection fan may also run during Fast
Preheat and Self-Clean.
Oven Bottom
The oven bottom conceals the lower heating element. As
a result the element is protected from damage and spills.
Tip: Do not place food directly on the oven bottom.
9 WARNING
Do not use aluminum foil or protective liners to line
any part of the appliance, especially the oven
bottom. Installation of these liners may result in a
risk of electric shock or fire.
Oven Vent
The oven vent is located at the bottom of the unit. Warm
air may be released from the vent before, during and
after cooking. It is normal to see steam escaping from
the vent, and condensation may collect in this area. This
area may be warm when the oven is in use. Do not block
the vent, since it is important for air circulation.
Automatic Shutoff
The oven will automatically shut off after 24 hours.
Self-cleaning
The oven features a self-cleaning function that eliminates
the manual labor involved with cleaning your oven.
Indicators and Other Features
Default Settings-The cooking modes automatically
select the default temperature. These can be changed
when a different one is needed.
E Number Codes-These codes display when there is a
problem with the range.
Standby Mode-Standby mode means that the oven has
power but no cooking mode or timer is running.
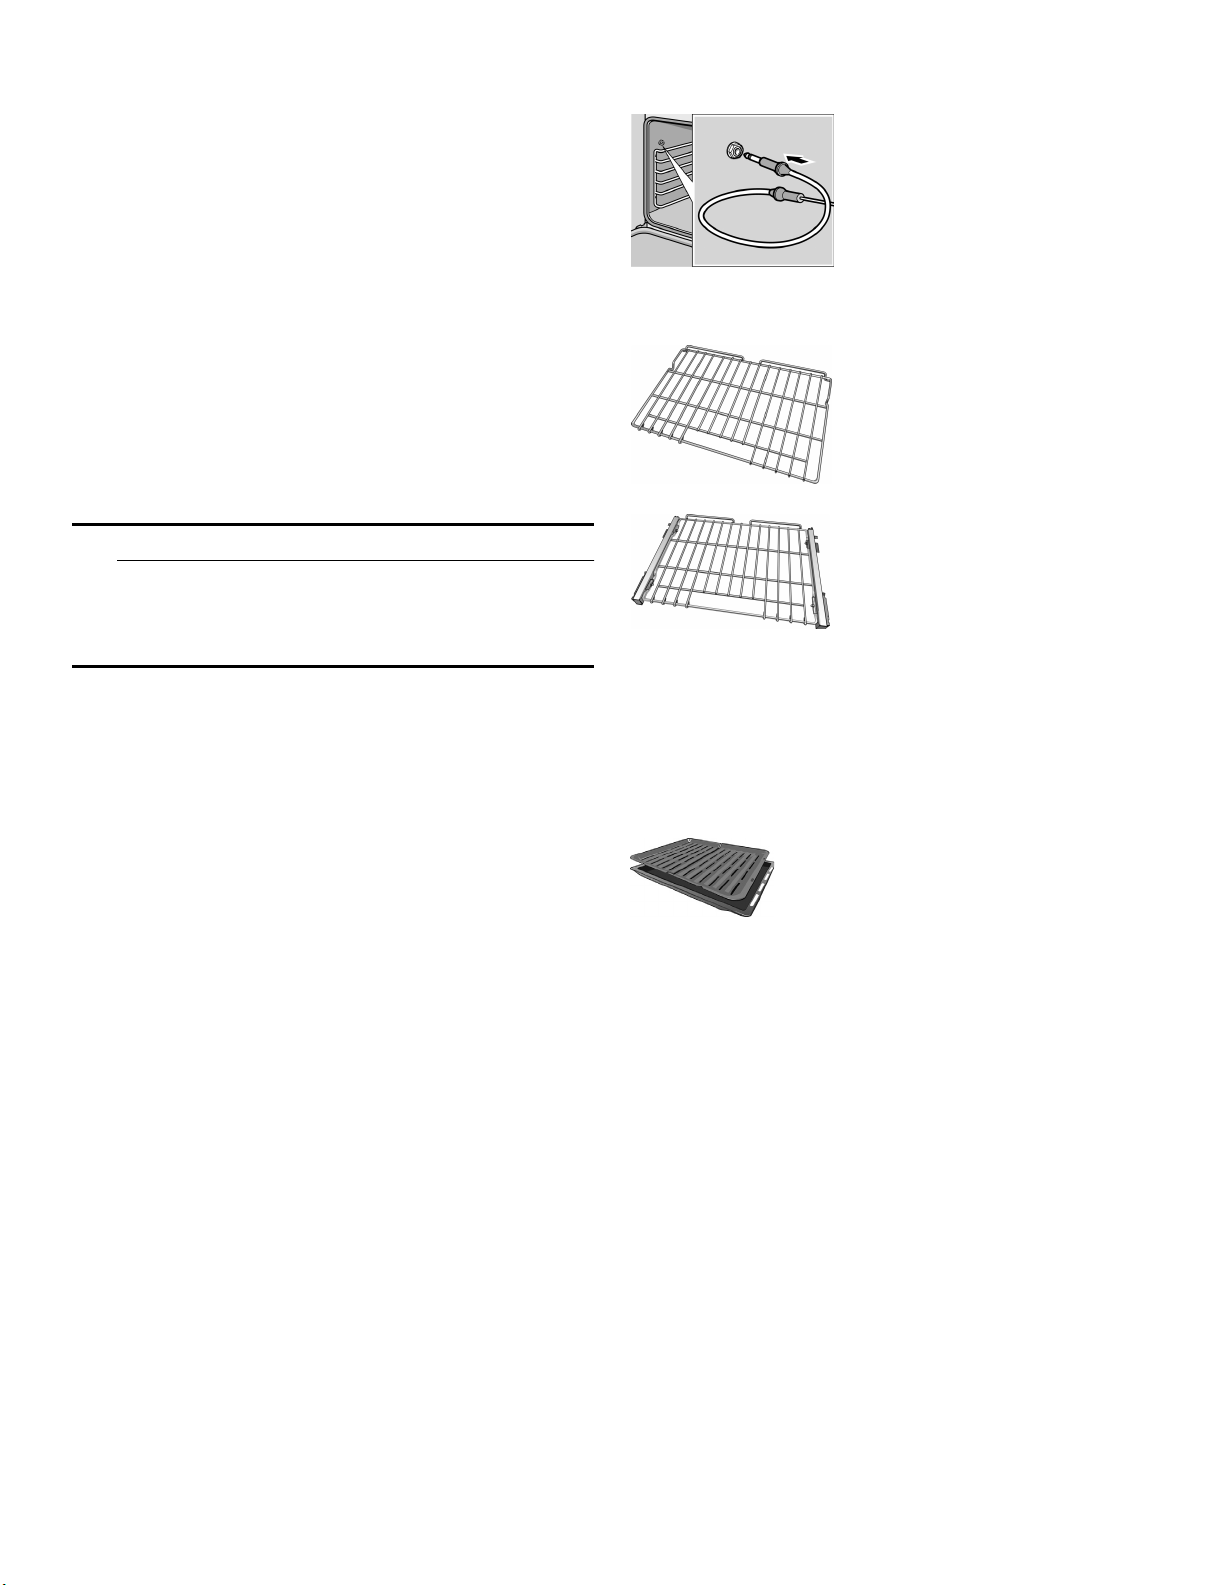
Accessories
Probe
The probe can be used to
determine the internal doneness
or the end temperature of many
foods, especially meats and
poultry.
Do not clean in the Self Clean
oven or dishwasher.
Flat Rack
Use for most cooking. Can use
multiple racks in some modes.
Do not clean in the self-clean
oven.
Telescopic Rack (some models)
Additional 30-inch racks
available from e-Shop:
#HEZTR301
Use with heavier dishes to make
easier to place dishes into the
oven. Check on food while
cooking and remove dishes from
oven when done.
Do not clean in the self-clean
oven.
Broiling Pan
(available from e-Shop)
Pan: #00449757
Grill top: #00449756
Use for broiling and roasting.
Do not clean in the self-clean
oven.
13
Inserting Racks
9 CAUTION
▯ To avoid burns, place oven racks in desired
positions before turning oven on. Always use
oven mitts when the oven is warm. If a rack must
be moved while the oven is hot, do not let oven
mitts contact hot heating elements.
▯ Use caution when removing oven racks from the
lowest rack position to avoid contact with the hot
oven door.
▯ To avoid possible injury or damage to the
appliance, ensure racks are installed exactly per
installation instructions and not backwards or
upside down.
Flat Rack
The rack is designed with a stop so it will stop before
coming completely out of the oven and not tilt.
To insert Flat Rack into Oven:
1.
Grasp rack firmly on both sides.
2.
Insert rack (see picture).
3.
Tilt rack up to allow stop into rack guide.
4.
Bring rack to a horizontal position and push the rest of
the way in.
Rack should be straight and flat, not crooked.
To remove Flat Rack from Oven:
1.
Grasp rack firmly on both sides and pull rack toward
you.
2.
When the stop is reached, tilt rack up and pull the rest
of the way out.
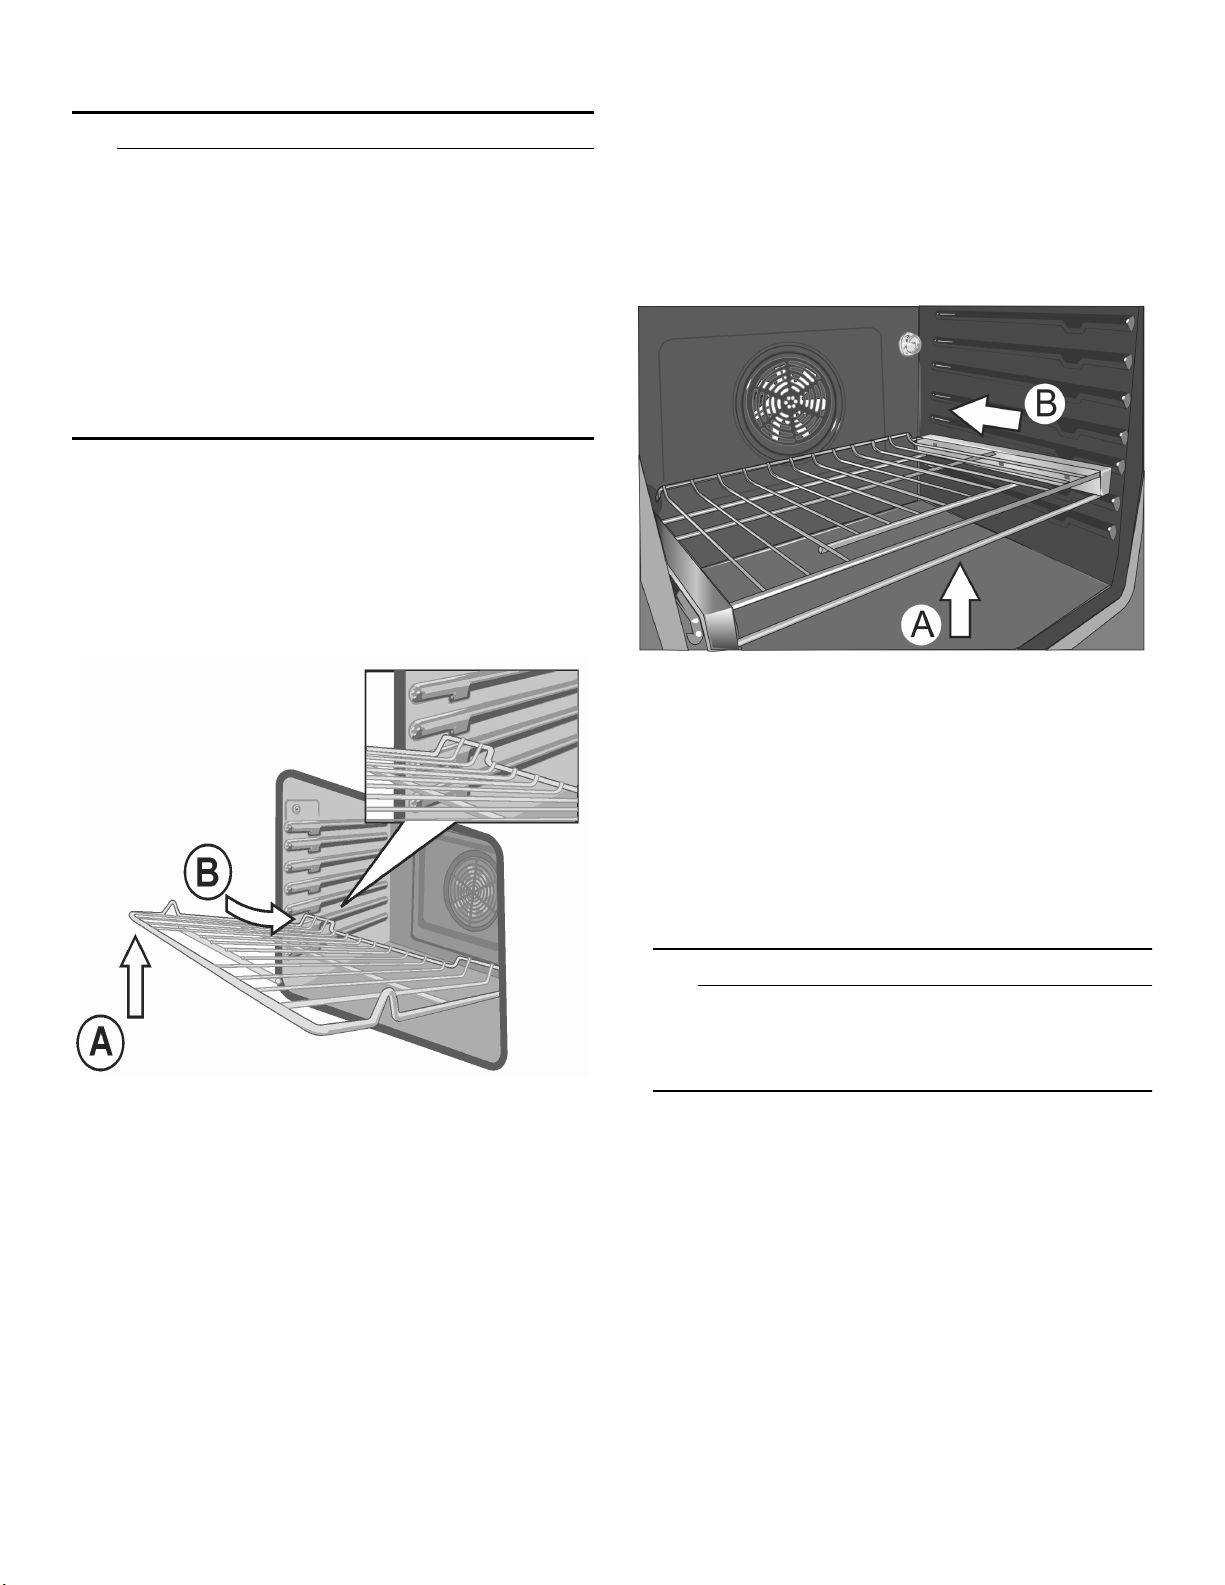
Telescopic Rack
To insert Telescopic Rack into Oven:
1.
Slide the rack in evenly until the rear of the rack is
about two (2) inches from the back of the oven.
2.
Tilt the front of the rack up about 3/4” (A) and finish
pushing the rack all the way back (B).
Note: Avoid striking the oven light cover glass when
pushing the rack into position.
3.
The back of the telescopic rack drops in to place.
4.
Pull the rack forward to engage the bottom of the rack
onto the rear of the rack position guide.
5.
Lower the front of the rack to finish seating it on the
rack guide. The rack should feel stable when properly
seated.
6.
Slide the movable part of the telescopic rack in and
out a few times to make sure it is able to move freely
and that the non-moving part of the telescopic rack is
securely anchored.
9 CAUTION
To avoid possible injury or damage to the
appliance, ensure the telescopic rack is installed
exactly per installation instructions and not
backwards or upside down.
To Remove Telescopic Rack from the Oven:
1.
Lift the front of the telescopic rack assembly about 1/
2” and push the rack to the rear about 3/4”. This
allows the rack to disengage from the rack position
guide.
2.
Lift the rear of the telescopic rack assembly so it
clears the rack position guide and gently pull the rack
from the oven.
Note: Take care to avoid pulling the rack unevenly
which will cause it to bind during removal, catching on
the oven walls.
14
Before Using the Appliance for the First Time
▯ Remove all packaging materials and labels from the
range.
▯ Range must be properly installed by a qualified
technician before use.
▯ Remove packing materials from inside the oven and
inside the drawer.
▯ While cool, wipe with clean, damp sponge and dry.
▯ Apply the glass ceramic cooktop cleaner to the glass
ceramic cooktop. Buff with a clean cloth. See Care
and Cleaning Section.
▯ There may be a slight odor during first uses. This is
normal and will disappear.
▯ Optimum cooking results depend on proper cookware
and bakeware being used.
▯ The cooking surface will hold the heat and remain hot
after the elements have been turned off.
▯ Read and understand all safety precautions and Use
and Care Manual information prior to operating.
Getting familiar with the appliance
In this section we describe the control panel, elements
and displays.
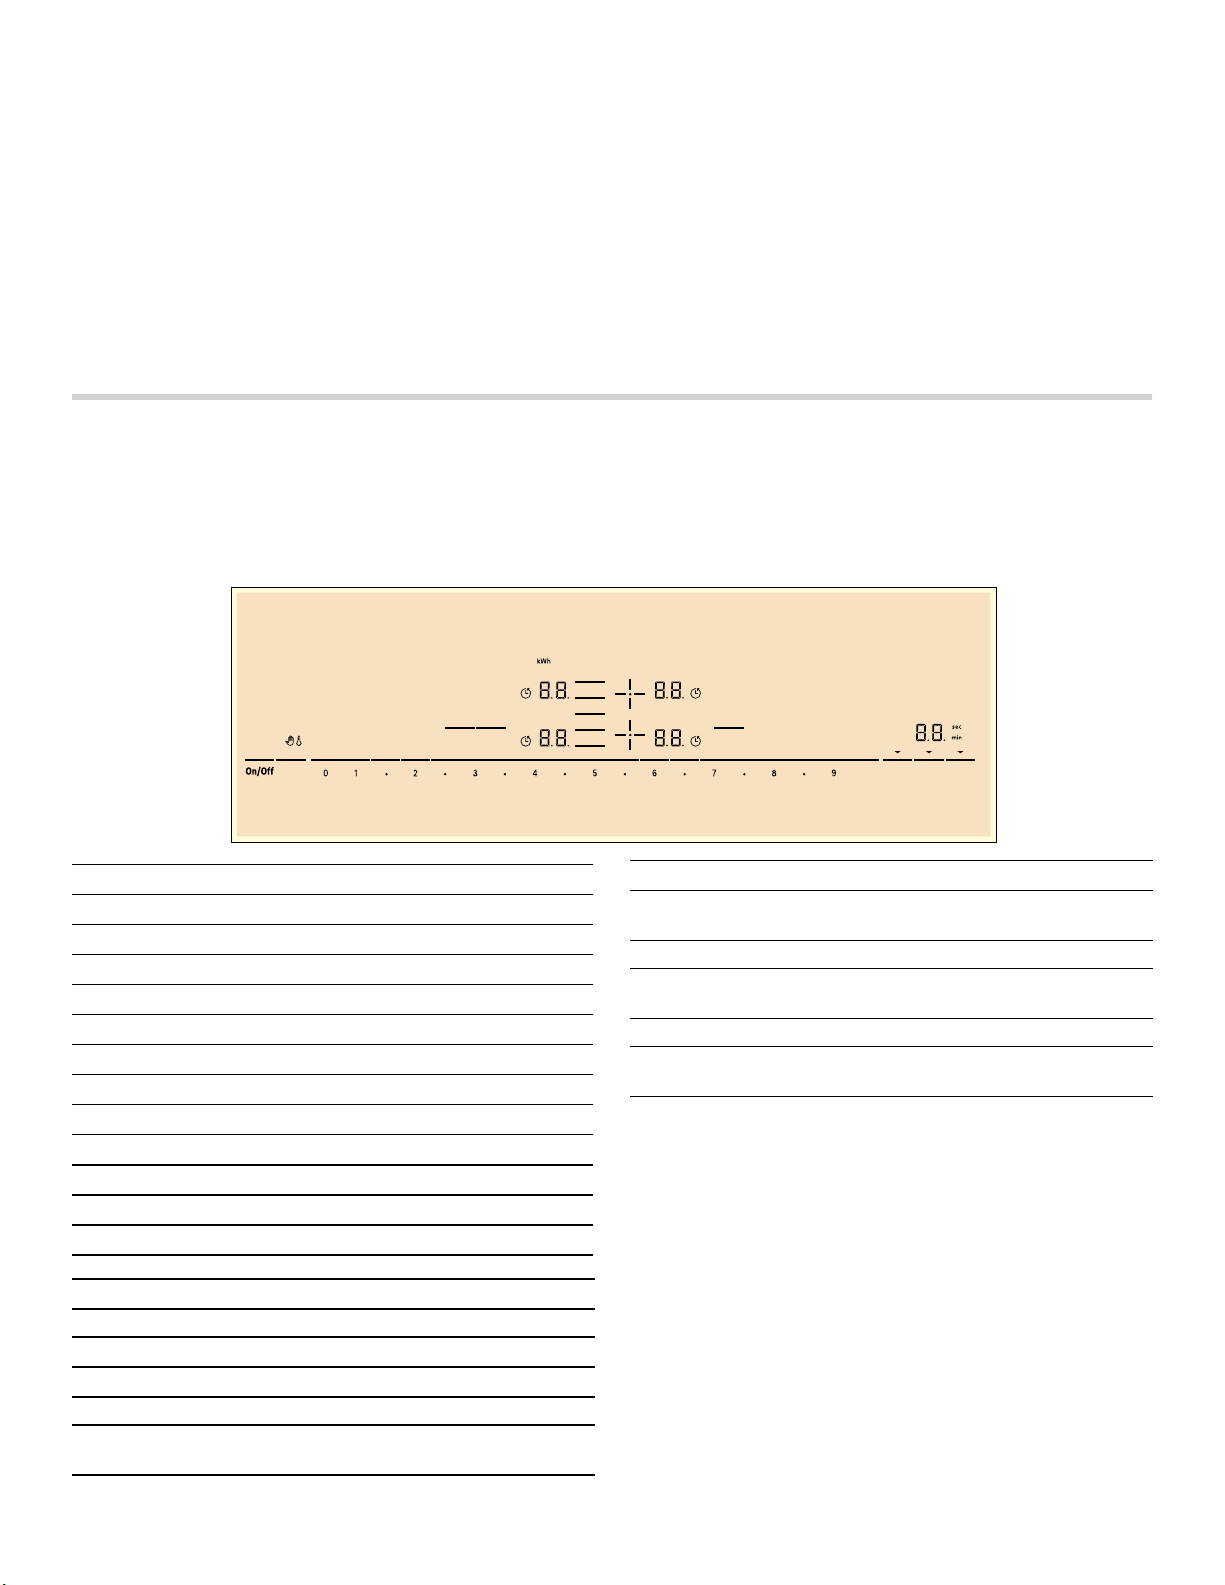
Control panel
Touch controls
When the cooktop heats up, the keys for the touch
controls available at this time light up.
Touching a key activates the respective function.
Notes
▯ The corresponding keys for the controls light up
depending on whether they are available.
The displays for the elements or the selected functions
get brighter.
▯ Always keep the control panel clean and dry. Moisture
can prevent it from working properly.
3DQHO
/RFN
3RZHU
0RYH
)OH[
-RLQ6SOLW
.HHS
:DUP
6SHHG
%RRVW
.LWFKHQ
7LPHU
&RRN
7LPHU
&RXQW8S
7LPHU
Display icons
‹.‹
Cooktop ready
‚-Š
Power levels
•/œ
Residual heat
‹‹
Time programming functions
>
Wipe protection
Š
Child lock
y
Cook timer
ö / ô
Timer indicator
›.
SpeedBoost
®
function
˜›.
ShortBoost function
÷
Energy consumption
–©
Keep Warm function
Touch keys
On/Off Main switch
ø/ã
Select a cooking zone
0 1û2û...û8û9
Settings range
Speed Boost
SpeedBoost
®
and ShortBoost function
Panel Lock Panel lock for child safety/wipe protec-
tion
Keep Warm Keep warm function
Flex Join/
Split
Flexible cooking zone
Power Move PowerMove function
Kitchen
Timer
Kitchen Timer function
Cook Timer Setting the cooking time
Count Up
Timer
Stopwatch function
Touch keys
15
The elements
Residual heat indicator
The cooktop has a residual heat indicator for each
element. This indicates that an element is still hot. Do not
touch an element while the residual heat indicator is lit
up.
The following are shown depending on the amount of
residual heat:
▯ Display •: High temperature
▯ Display œ: Low temperature
If you remove the cookware from the element during
cooking, the residual heat indicator and the selected
heat setting will flash alternately.
When the element is switched off, the residual heat
indicator will light up. Even after the cooktop has been
switched off, the residual heat indicator will stay lit for as
long as the element is still warm.
Operation
9 WARNING
BOILOVER HAZARD
Never leave surface units unattended at high heat
settings. Boilover causes smoking and greasy
spillovers that may ignite.
Main power switch
Use the main switch to turn on the electronic circuitry for
the control panel. The cooktop is now ready to use.
Turning the cooktop on
Touch the On/Off touch key. An acoustic signal will
sound. The __ indicator located on top of the On/Off
touch key and the symbols for the cooking zones light
up. ‹:‹ lights up next to the cooking zones. The cooktop
is ready to use.
Turning the cooktop off
Touch the On/Off touch key. The __ indicator goes out.
The cooktop is switched off. The residual heat indicators
will remain on until the elements have cooled off
sufficiently.
Note: The cooktop switches off automatically when all
the elements have been switched off for more than 20
seconds.
The residual heat indicator remains lit until the elements
have cooled down sufficiently. •/œ is displayed next to
the corresponding element symbol.
Setting the cooktop
This section will show you how to set the elements. The
table contains details on the heat settings for a variety of
dishes.
Setting the element
Select the desired heat level using the number keys
1 to 9.
Heat level 1 = minimum power
Heat level 9 = maximum power
Each heat setting has an intermediate level. This level is
indicated by .5 in the element display and is set by
touching the Ú symbols between the number keys.
Selecting the heat level
The cooktop must be turned on.
1.
Select the desired element with by touching the ã or
ø symbol of the desired element. In the cooking zone
display ‹.‹ lights up brighter.
2.
Then select the desired power level using the number
keys.
3.
The power level is set.
Element
$ / Û
Single element Use cookware of suitable size.
á
Flexible cooking zone
See section on ~ "FlexInduction
®
cooking zone"
Only use suitable cookware for induction cooking; see section on Cooking with Induction

16
Changing the power level
Select the cooking zone and then set the required power
level in the control panel.
Turning off the cooking zone
Select the cooking zone and set the power level to 0. The
cooking zone is turned off and the residual heat indicator
is displayed.
Notes
▯ If there is no cookware on the induction cooking zone,
the heat setting display blinks. After a while, the
cooking zone will switch itself off.
▯ If cookware has been placed on the cooking zone
before you turn on the cooktop, it will be detected
within 20 seconds after you have touched the main
switch and the cooking zone will be selected
automatically. Once detected, set the power level
within the next 20 seconds, otherwise the cooking
zone will turn off.
Even if there are several pots and pans on the cooktop
when it is switched on, only one piece of cookware is
detected.
Recommendations for cooking
▯ Set heat setting 8 to 9 for preheating ; for delicate
dishes like milk, pudding, rice pudding or cereals heat
up with setting 8 - 8.5.
▯ When cooking with the lid on, turn the heat setting
down as soon as steam escapes between the lid and
the cookware. Steam does not need to escape for a
good cooking result.
▯ After cooking, keep the lid on the cookware until you
serve the food.
▯ To cook with the pressure cooker, observe the
manufacturer's instructions.
▯ Do not cook food for too long, otherwise more
nutrients than necessary will be lost. The kitchen timer
can be used to set the optimum cooking time.
▯ For a more healthy cooking result, smoking oil should
be avoided.
▯ To brown food, fry small portions in succession.
▯ Cookware may reach high temperatures while the food
is cooking. We recommend that you use oven mits.
Settings table
The following table provides some examples. Cooking
times may vary depending on the type of food, its weight
and quality. Deviations are therefore possible.
9 CAUTION
During cooking, stews or liquid meals such as
soups, sauces or drinks can heat up too quickly
unnoticed and overflow or spatter. For this reason
we recommend that you stir continuously, gradually
heating the food at a suitable power level.
Power levels
Melting
chocolate 1.5
butter 1.0 - 2.0
Heating
frozen vegetables, e.g. spinach 2.5 - 3.5
broth 7.0 - 8.0
thick soup 1.5 - 2.5
milk** 1.0 - 2.0
Simmering
delicate sauce e.g. Béchamel sauce 4.0 - 5.0
spaghetti sauce 2.0 - 3.0
pot roast 4.0 - 5.0
fish** 4.0 - 5.0
Cooking
rice (with double amount of water) 2.0 - 3.0
potatoes boiled in their skins (with 1-2 cups of water) 4.0 - 5.0
boiled potatoes (with 1-2 cups of water) 4.0 - 5.0
fresh vegetables (with 1-2 cups of water) 2.0 - 3.5
frozen vegetables (with 1-2 cups of water) 3.5 - 4.5
pasta (with 2-4 qt. water)* 6.0 - 7.0
17
FlexInduction
®
cooking zone
You can combine the elements into a large cooking zone
as needed or use two elements that are independent of
one another.
The FlexInduction
®
cooking zone consists of 4 inductors,
which are controlled independently of one another. When
FlexInduction
®
is in use, only the area is activated that is
covered by cookware.
Cookware use recommendations
Place the cookware in the middle. This guarantees
optimal pot detection and heat distribution.
As two independent elements
The flexible cooking zone is used like two independent
elements.
Turning on
See section on ~ "Setting the cooktop"
As a single element
Using the entire cooking zone by connecting both
elements.
Linking the two elements
The cooktop must be turned on.
1.
Set down the cookware. Select one of the two
elements assigned to the flexible cooking zone and
set the power level.
2.
Touch the Flex Join/Split key. The display lights up.
The heat setting appears in the display for the lower
element.
The flexible cooking zone is activated.
Changing the power level
Select one of the element in the flexible cooking zone
and change the power level with the number keys.
Add another piece of cookware
Set the new item of cookware down on the cooktop,
select one of the two elements in the flexible cooking
zone and then touch the Flex Join/Split key twice. The
new item of cookware will be detected and the power
level that was previously selected will be retained.
Note: If the cookware is moved to the element being
used or lifted up, the element begins an automatic
search and the heat setting selected previously is
retained.
pudding** 1.0 - 2.0
cereals 2.0 - 3.0
Frying
pork chop 5.5 - 6.5
chicken breast 5.0 - 6.0
bacon 6.0 - 7.0
eggs 5.0 - 6.0
fish 5.0 - 6.0
pancakes 6.0 - 7.0
Deep fat frying** (in 1-2 qt. oil)
deep frozen foods, e.g. chicken nuggets (0.5 lb per serving) 8.0 - 9.0
other, e.g. doughnuts (0.5 lb per serving) 4.5 - 5.5
Keep warm
tomato sauce 1.5
* ongoing cooking without lid
** without lid
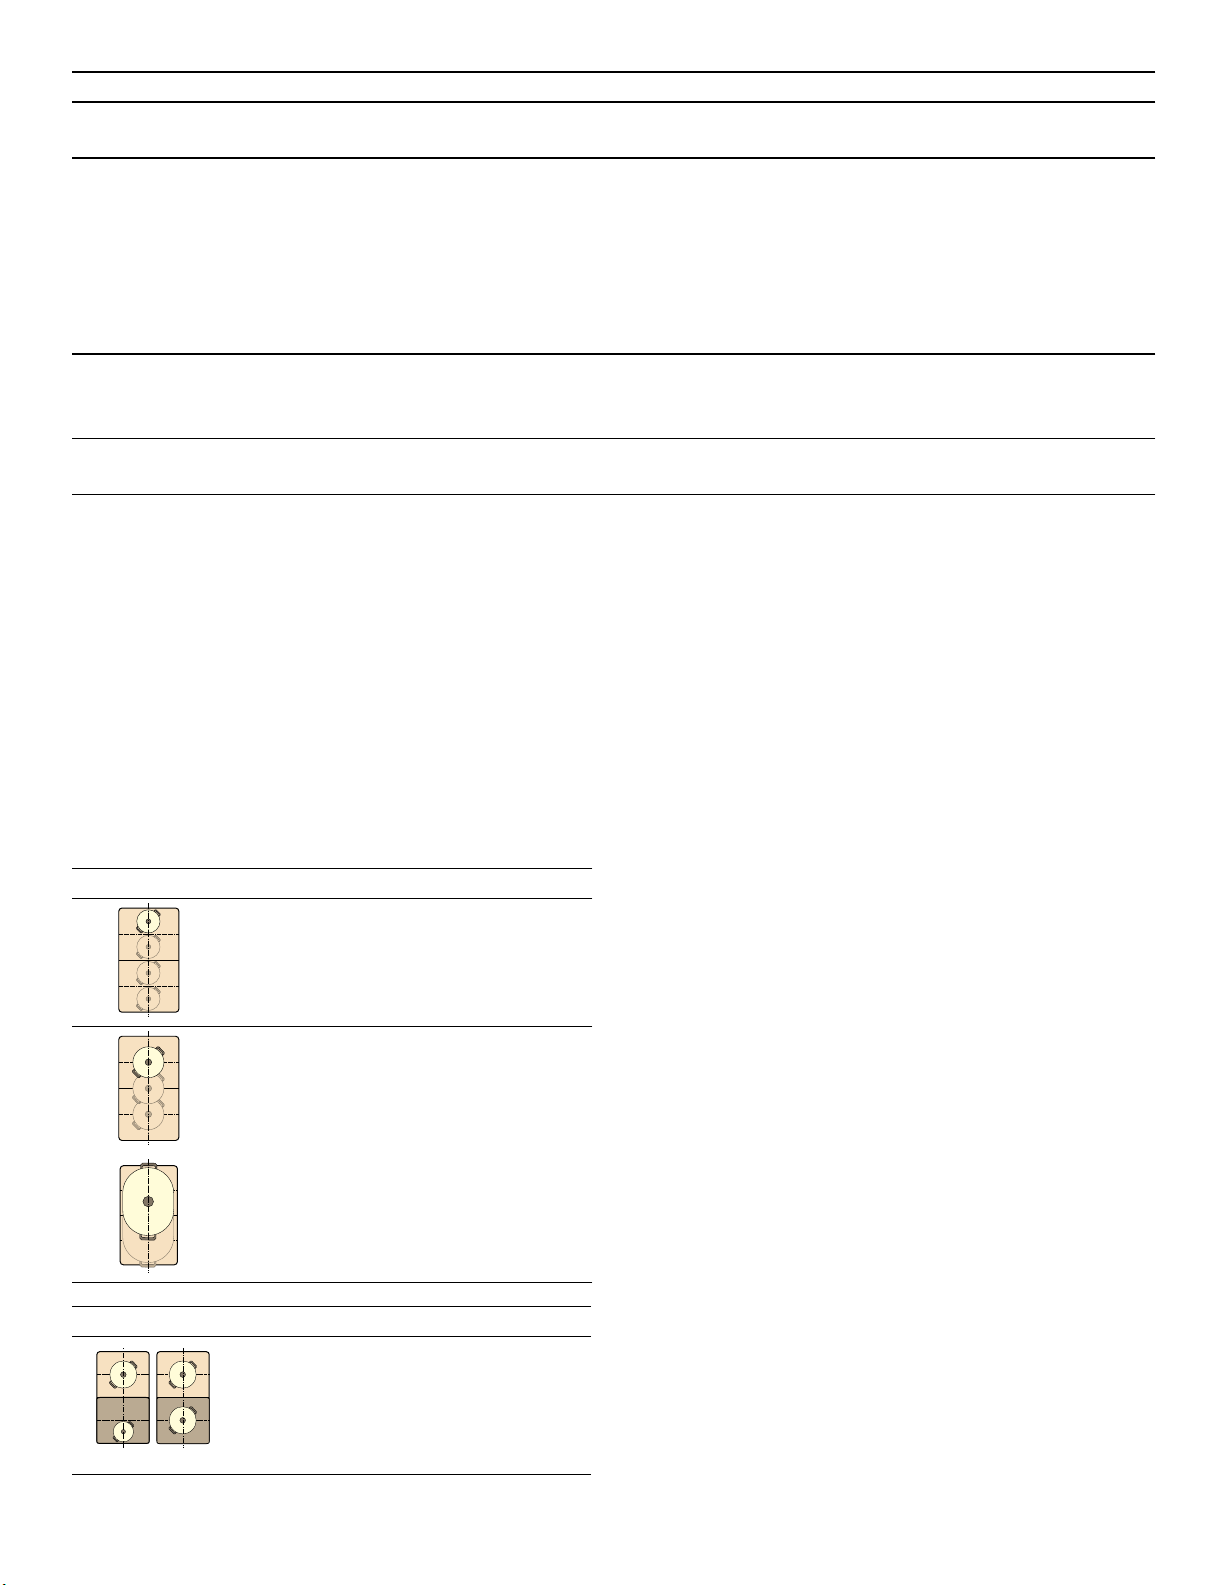
Power levels
Flexible cooking zone - as an individual element
Diameter of the cookware max. 5X"
(13 cm)
Place the cookware on one of the
4 positions visible in the figure.
Diameter larger than 5X" (13 cm)
Place the cookware on one of the
3 positions visible in the figure.
If the cookware takes up more than
one element, place it on the upper or
lower edge of the flexible cooking
zone.
Flexible cooking zone - two independent elements
The front and rear elements with two
inductors apiece can be used inde-
pendently. The heat setting is set indi-
vidually for each element. Use only
one piece of cookware on each ele-
ment.
18
Separating the two elements
Select one of the two elements in the flexible cooking
zone and touch the Flex Join/Split key.
This deactivates the flexible cooking zone. The two
elements will now function independently.
Notes
▯ If the element is switched off, and then switched back
on again later, the flexible cooking zone is reset to
function as two independent elements.
▯ To change the configuration settings for the flexible
cooking zone, refer to the section on ~ "Basic
settings"
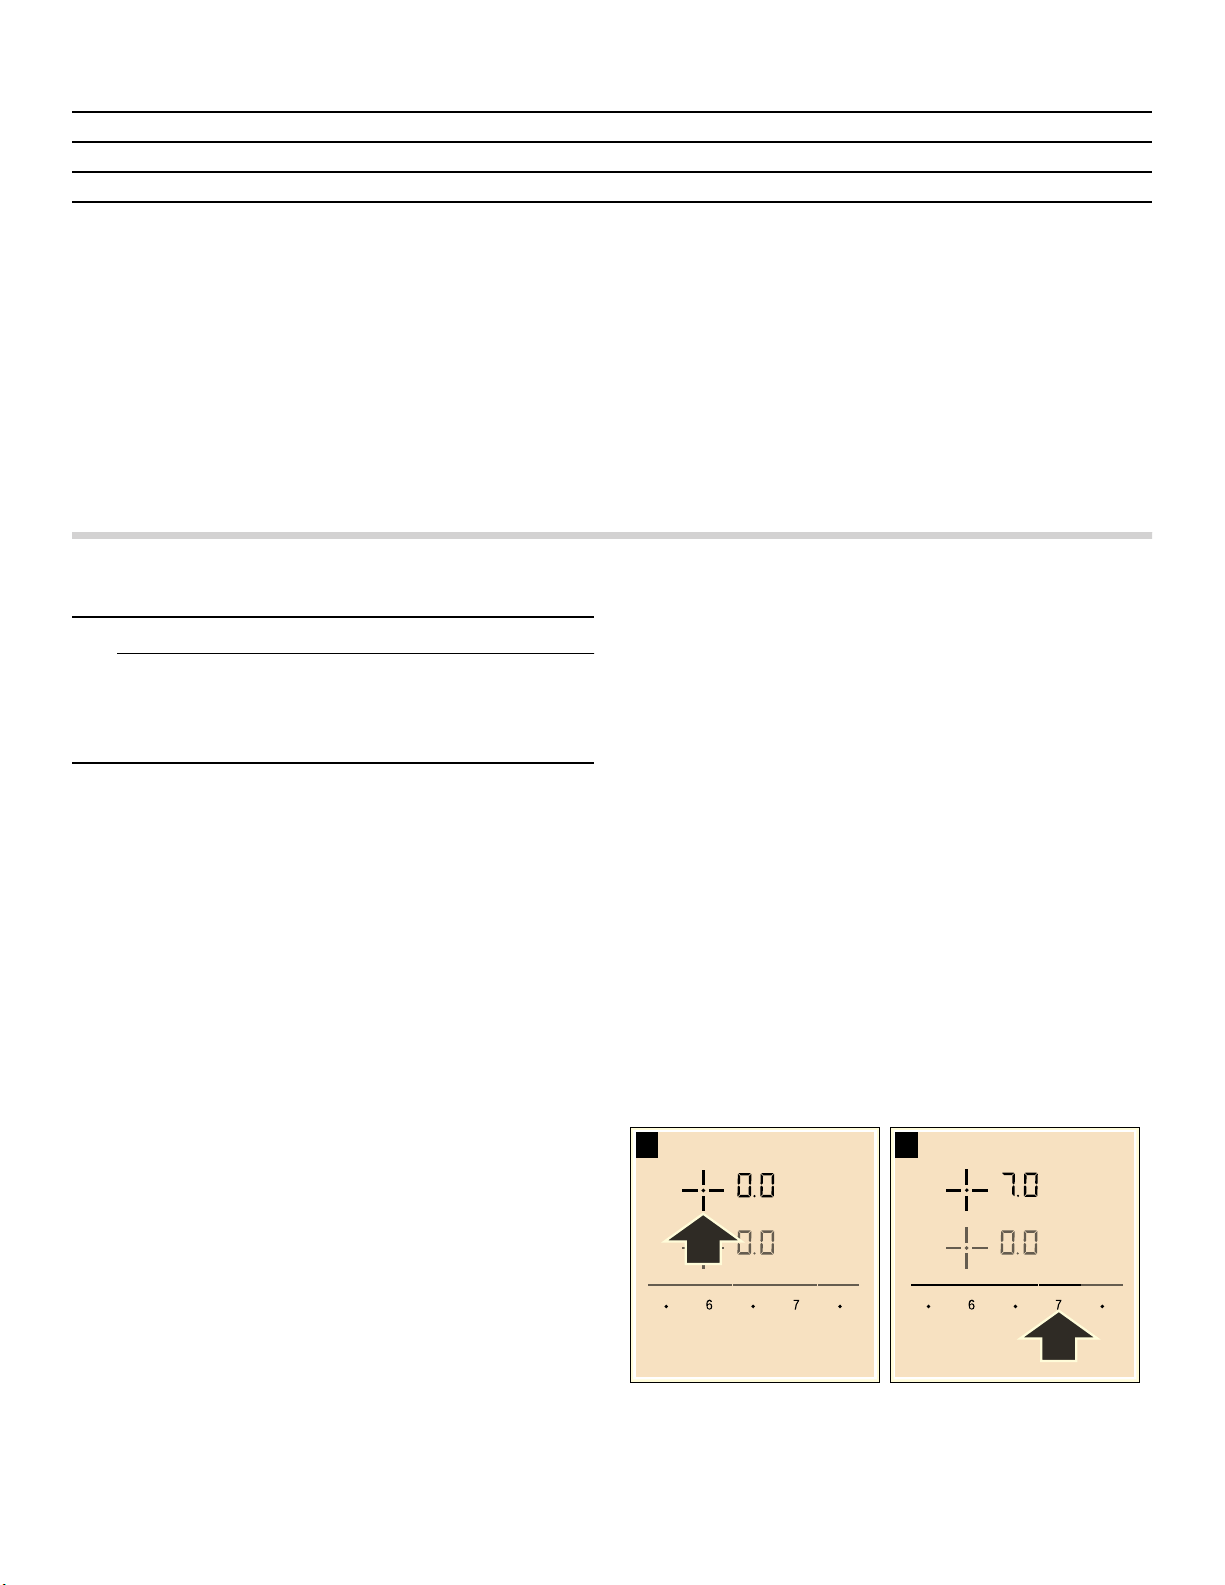
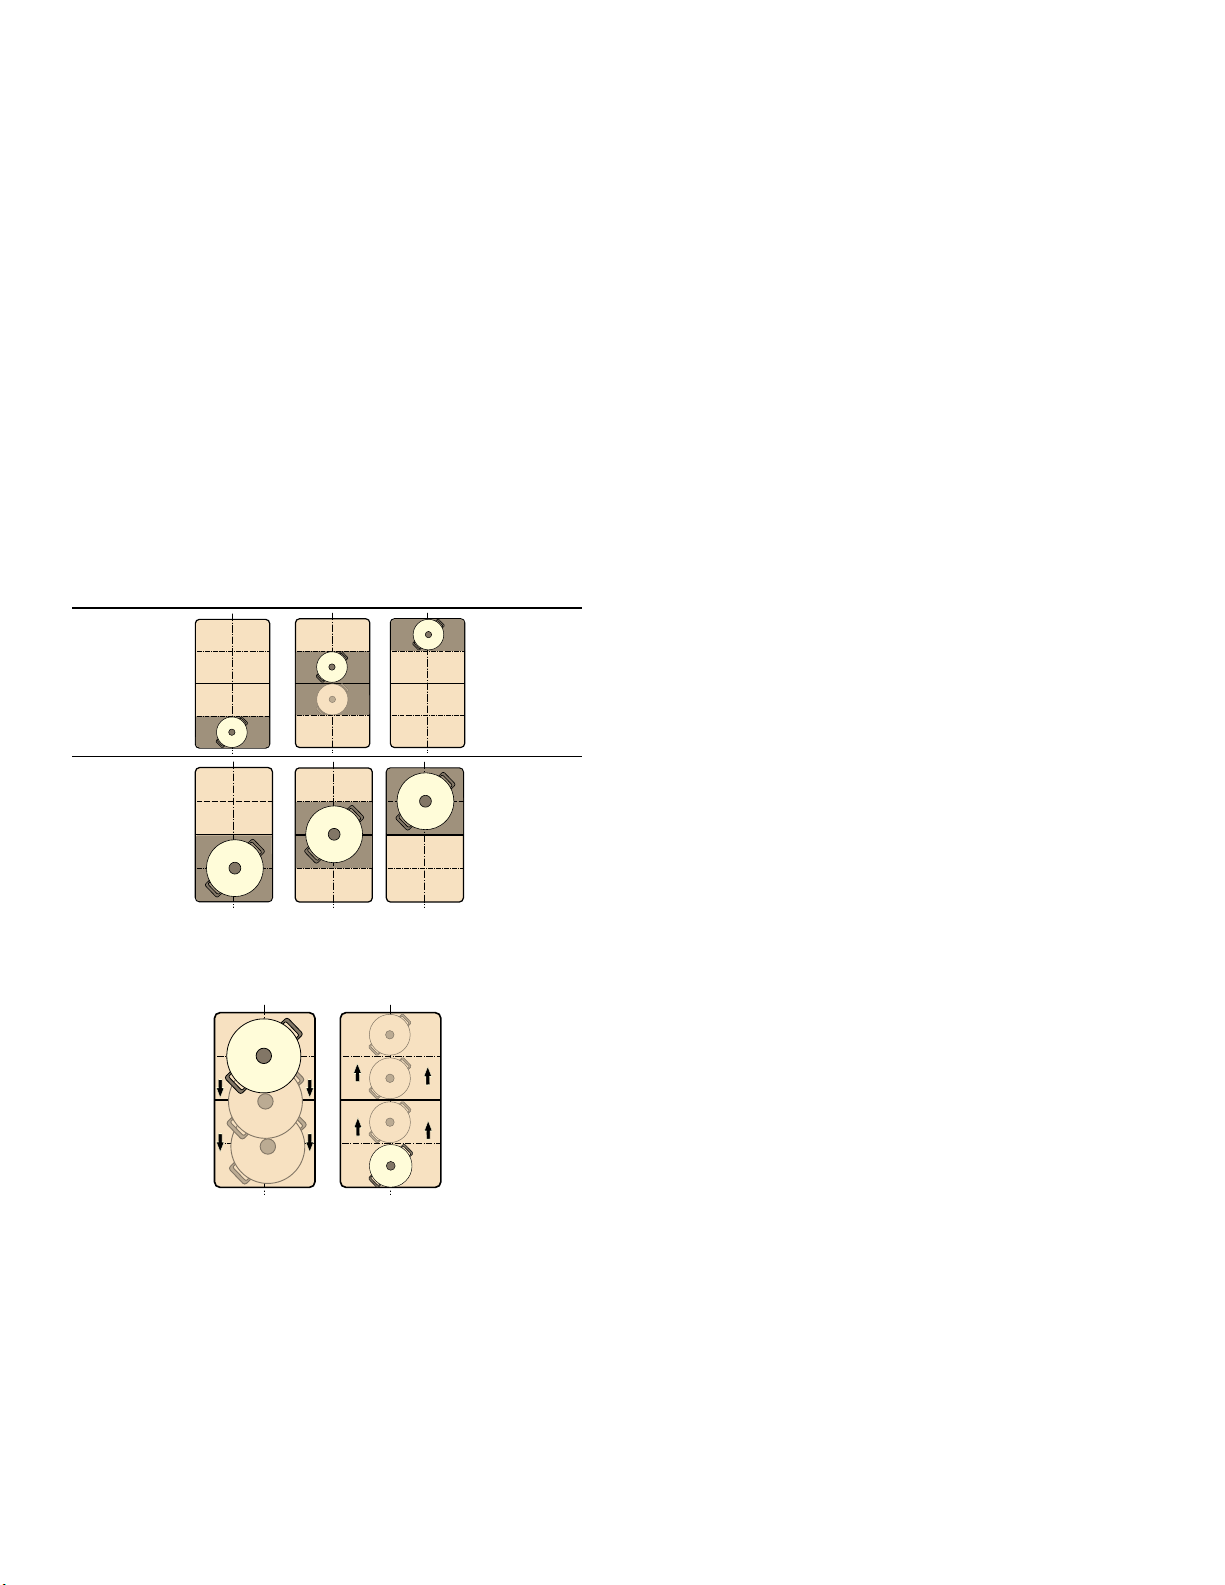
PowerMove function
This function activates the entire flexible cooking zone,
which is divided into three cooking areas and which has
preset power levels.
Only use one item of cookware. The size of the cooking
area depends on the cookware used and whether it is
positioned correctly.
This means that an item of cookware can be moved
during the cooking process to another cooking area with
another power level:
Preset power levels:
Front area = power level
Š
Middle area = power level †
Rear area = power level‚.†
The preset power levels can be changed independently
of one another. You can find out how to change these in
the section on ~ "Basic settings"
Notes
▯ If more than one item of cookware is detected on the
flexible cooking zone, the function is deactivated.
▯ If the cookware is moved within the flexible cooking
zone or lifted up, the cooktop automatically starts
searching and the power level of the area in which the
cookware was detected is set.
▯ You can find information on the size and positioning of
the cookware in the section on the function
~ "FlexInduction
®
cooking zone"
Activation
1.
Select one of the two elements in the flexible cooking
zone.
2.
Touch the Power Move key. The indicator beside the
Power Move key lights up. The flexible cooking zone is
activated as a single cooking zone.
The power level in the area in which the cookware is
located lights up in the cooking zone display.
The function has now been activated.
Changing the power level
The power levels for the individual cooking areas can be
changed during the cooking process. Set the cookware
down on the cooking area and change the power level
using the number keys.
Notes
▯ Only the power level in the area in which the cookware
is located is changed.
▯ If the function is deactivated, the power levels for the
three cooking areas are reset to the preset values.
Deactivating
Touch the Power Move key. The indicator beside the
Power Move key goes out.
The function was deactivated.
Note: If one of the cooking areas is set to ‹, the function
deactivates after a few seconds.
Cooking areas
19
Time-setting options
Your cooktop has three timer functions:
▯ Programming the cooking time
▯ Kitchen timer
▯ Stopwatch function
Programming the cooking time
The element automatically switches off after the set time
has elapsed.
Setting procedure:
1.
Select the element and the required power level.
2.
Touch the Cook Timer key. The ‹‹ symbol and theV
indicator light up in the Cook Timer display.
y lights up in the display for the element.
3.
Within the next 10 seconds, set the required cooking
time using the number keys.
4.
Touch the Cook Timer key to confirm the selected
setting.
The cooking time begins to elapse.
Notes
▯ The same cooking time can be set automatically for all
elements. The set time for each of the elements counts
down independently.
You can find information on automatically
programming the cooking time in section on “Cook
timer”.
▯ If the flexible cooking zone is selected as the only
element, the set time for the entire cooking zone is the
same.
▯ If the Move function is selected for the combined
cooking zone, the set time for the three elements is the
same.
Changing or deleting the time
Select the element and then touch the Cook Timer key.
Change the cooking time using the number keys or set
‹‹ to delete the programmed cooking time.
Touch the Cook Timer key to confirm the selected
setting.
When the time has elapsed
The element switches off, the
y display flashes and the
element switches to power level ‹‹. An acoustic signal
sounds.
‹‹ and the V indicator flash in the timer display.
When the
y symbol is touched, the indicators go out
and the acoustic signal ceases.
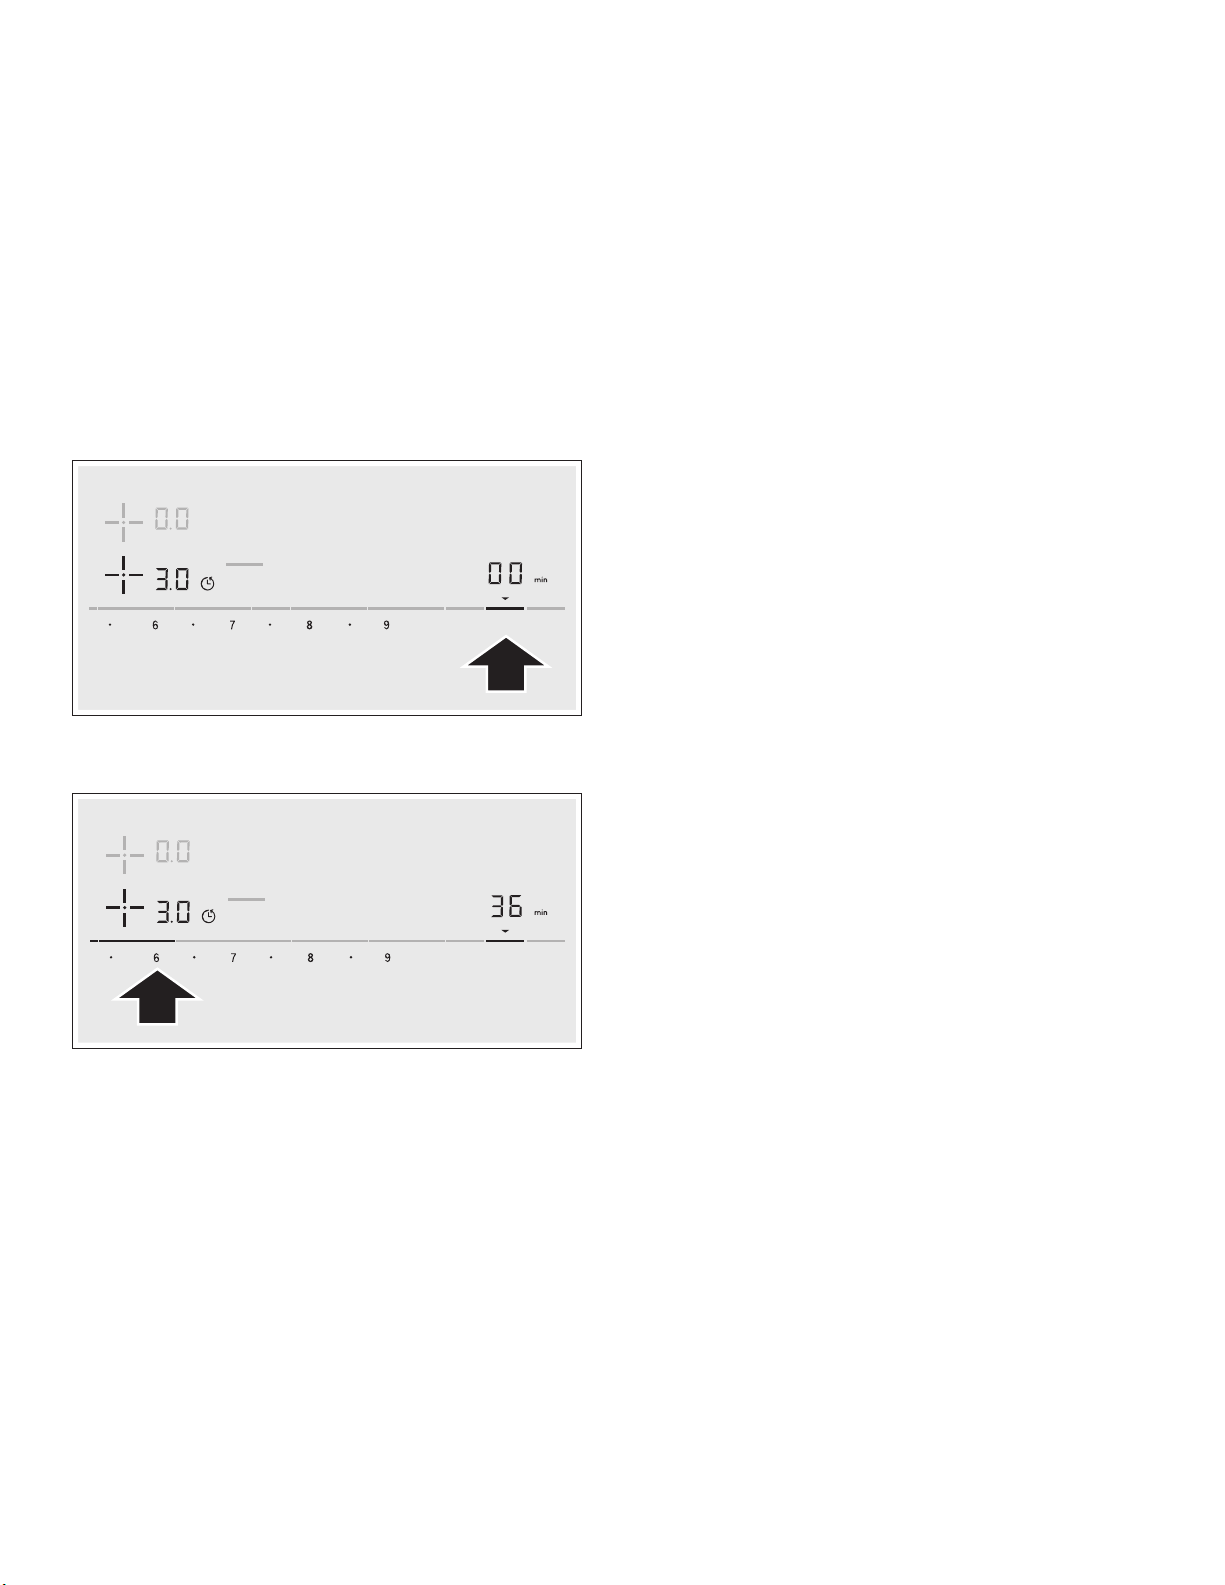
Notes
▯ To set a cooking time of under 10 minutes, always
touch 0 before you select the required value.
▯ If a cooking time was set for several elements, the time
information for the selected element is shown in the
timer display.
▯ Select the relevant element to call up the remaining
cooking time.
▯ You can set a cooking time of up to ŠŠ minutes.
Kitchen timer
The timer can be set for periods of up to 99 minutes. It is
independent of the other settings. You can also use the
kitchen timer when the cooktop is turned off or locked.
This function does not automatically switch off an
element.
Setting procedure
1.
Touch the Kitchen Timer key. The ‹‹ symbol and the
V indicator light up in the timer display.
2.
Select the required time on the control panel and
touch the Kitchen Timer key to confirm.
After a few seconds, the time begins to elapse.
Changing or deleting the time
Touch the Kitchen Timer key.
Change the cooking time using the number keys or set
‹‹ to delete the programmed cooking time.
Touch the Kitchen Timer key to confirm the selected
setting.
When the time has elapsed
An audible signal sounds once the time has elapsed. ‹‹
and the V symbol flash in the timer display.
The indicators go out after touching the Kitchen Timer
key.
Count-up timer function
The count-up timer function displays the time that has
elapsed since activation.
This functions independently from the elements and from
other settings. This function does not automatically
switch off an element.
6SHHG
%RRVW
.LWFKHQ
7LPHU
&RRN
7LPHU
&RXQW8S
7LPHU
.HHS
:DUP
6SHHG
%RRVW
.LWFKHQ
7LPHU
&RRN
7LPHU
&RXQW8S
7LPHU
.HHS
:DUP
20
Activating
Touch the Count Up Timer key. The ‹‹ symbol and the
V indicator light up in the timer display.
The time begins to count up.
Deactivating
Touching the Count Up Timer key the stopwatch
function. The timer displays remain lit.
If you touch the Count Up Timer key again, the displays
go out.
The function is deactivated.
SpeedBoost
®
function
The SpeedBoost
®
function enables you to heat up large
quantities of water faster than when using heat setting
Š.
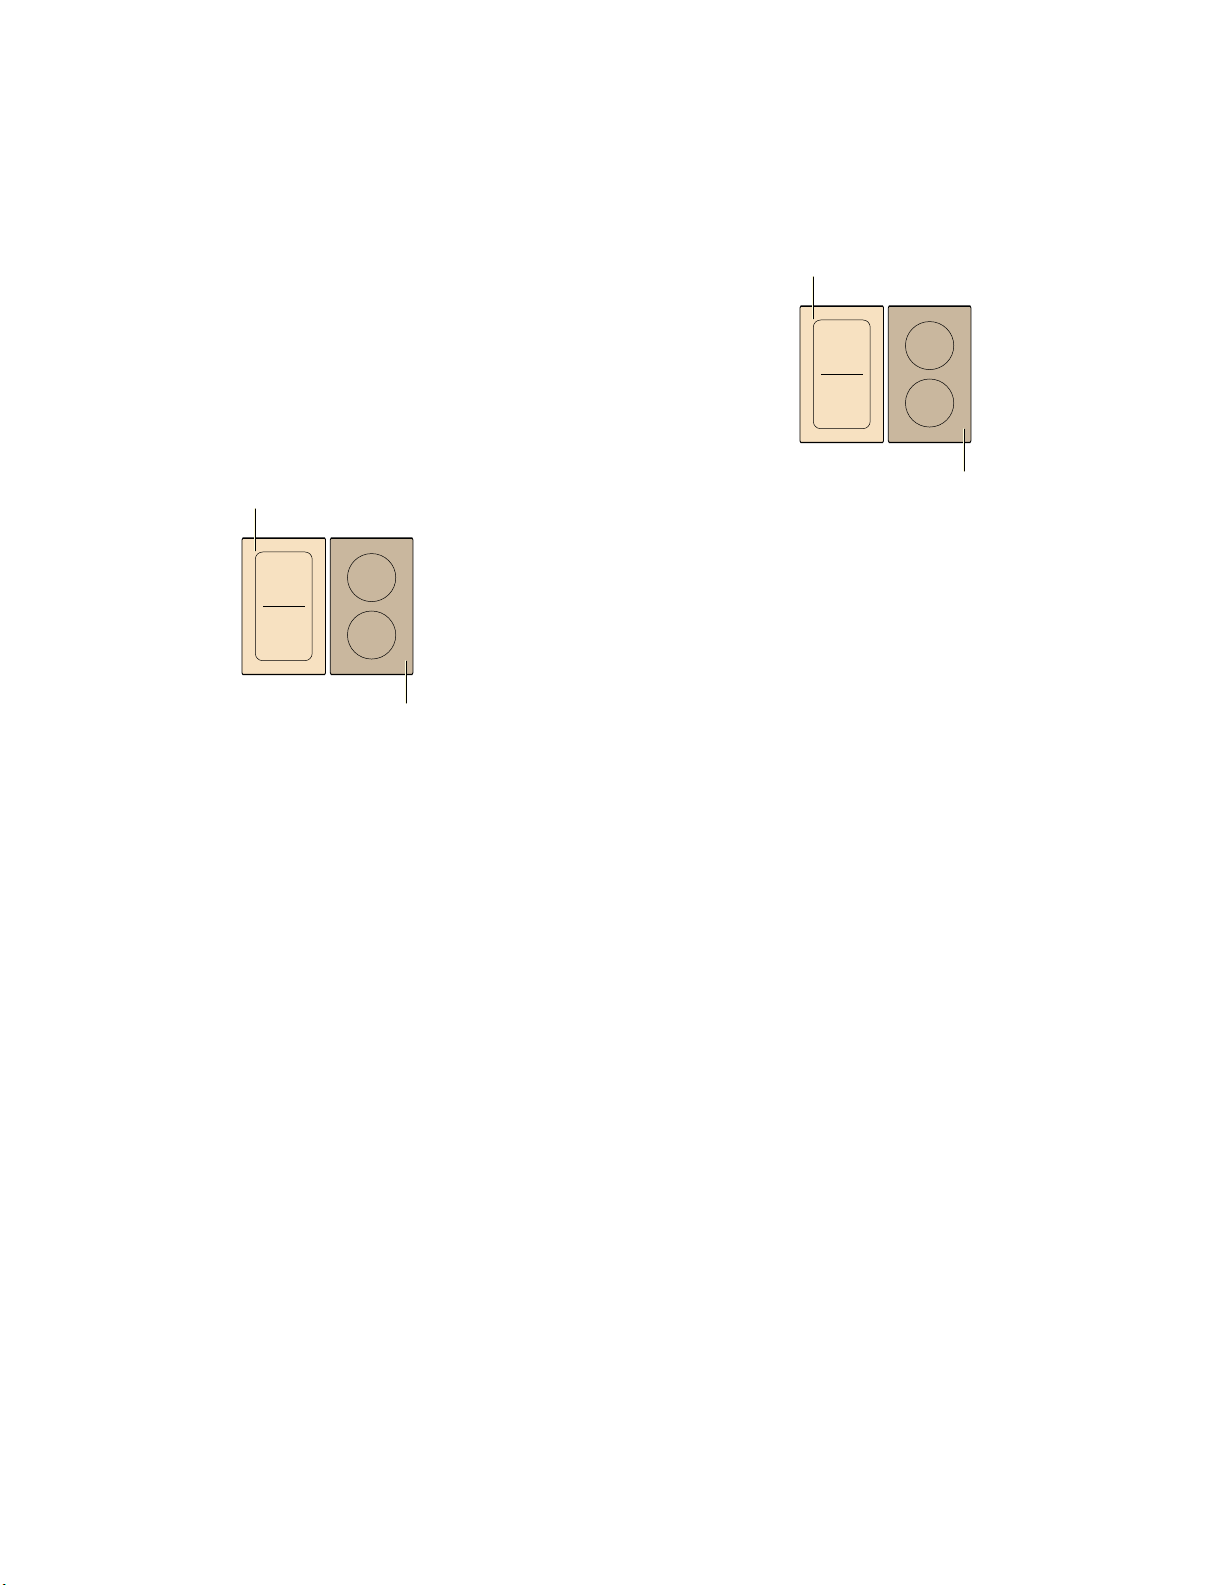
This function can always be activated for an element,
provided the other element in the same group is not in
use (see illustration).
Note: The SpeedBoost
®
function can also be activated
in the FlexInduction
®
area if it is being used as a single
cooking zone.
Activating
1.
Select a element.
2.
Touch the Speed Boost key.
The › indicator lights up.
The function is activated.
Deactivating
1.
Select a element.
2.
Touch the Speed Boost key.
The › display goes out and the element switches back
to heat setting Š.
The function is deactivated.
Note: In certain circumstances, the SpeedBoost
®
function can switch itself off automatically in order to
protect the electronic elements inside the cooktop.
ShortBoost function
The ShortBoost function enables you to heat cookware
faster than when using heat setting
Š.
After deactivating the function, select the appropriate
heat setting for your food.
This function can always be activated for an element,
provided the other element in the same group is not in
use (see illustration).
Note: The ShortBoost function can also be activated in
the FlexInduction
®
area if it is being used as a single
cooking zone.
Recommendations for use
▯ Always use cookware that has not been pre-heated.
▯ Use pots and pans with a flat base. Do not use
containers with a thin base.
▯ Never leave empty cookware, oil, butter or lard to heat
up unattended.
▯ Do not place a lid on the cookware.
▯ Place the cookware on the center of the element.
Ensure that the diameter of the base of the cookware
corresponds to the size of the element.
▯ You can find information on the type, size and
positioning of the cookware in section Cooking with
Induction.
Activating
1.
Select an element.
2.
Touch the Speed Boost key twice.
The ˜›Ú indicator lights up.
The function is activated.
Deactivating
1.
Select an element.
2.
Touch the Speed Boost key.
The ˜›Ú display goes out and the element switches
back to heat setting Š.
The function is deactivated.
Note: In certain circumstances, the ShortBoost function
can switch itself off automatically to protect the electronic
elements inside the cooktop.

21
Keep Warm function
This function is suitable for melting chocolate or butter
and for keeping food warm.
Activating
1.
Select the required power level.
2.
Within the next 10 seconds, touch the Keep Warm
key.
The
–© indicator lights up.
The function is activated.
Deactivating
1.
Select an element.
2.
Touch the Keep Warm key.
The –© display goes out. The element switches itself
off and the residual heat indicator appears.
The function is deactivated.
Panel Lock
You can use the panel lock to prevent children from
accidentally turning the appliance on.
Activating and deactivating the panel lock
The cooktop must be turned off.
To activate:
1.
Switch on the cooktop using the main switch.
2.
Touch the Panel Lock key for approx. 4 seconds.
The D indicator lights up for 10 seconds.
The cooktop is locked.
To deactivate:
1.
Switch on the cooktop using the main switch.
2.
Touch the Panel Lock key for approx. 4 seconds.
The lock is released.
Automatic panel lock
With this function, the panel lock is automatically
activated whenever you turn off the cooktop.
Turning on and off
See "Basic settings" section.
Wipe protection
Cleaning the control panel while the cooktop is on may
change the settings. In order to avoid this the cooktop
has a wipe protection function.
To activate: Touch the Panel Lock key. An acoustic
signal sounds. The control panel is locked for
35 seconds. You can now wipe over the surface of the
control panel without altering any settings.
To deactivate: The control panel will be unlocked once
35 seconds have elapsed. To release the function early,
touch the Panel Lock key.
Notes
▯ An audible signal sounds 30 seconds after activation.
This indicates that the function is about to finish.
▯ The wipe protection function does not lock the main
switch. The cooktop can be switched off at any time.
Automatic time limitation
If the element is used for prolonged periods of time
without changes in the settings being made, the
automatic time limitation function is triggered.
The element stops heating. ”‰ and the residual heat
indicator •/œ flash alternately in the display.
The indicator goes out when any symbol is pressed. The
element can now be reset.
When the automatic time limitation is activated depends
on the selected heat level (from 1 to 10 hours).
Basic settings
The appliance has various basic settings. You can adjust
these settings to the way you usually cook.
Display Function
™‚
Automatic child lock/panel lock
‹ Manual*.
‚ Automatic.
ƒ Function deactivated.
™ƒ
Signal tones
‹ Confirmation and error signals are switched off.
‚ Only the error signal is switched on.
ƒ Only the confirmation signal is switched on.
„ All signal tones are switched on.*
™„
Display energy consumption
‹ Switched off.*
‚ Switched on
* Factory settings
22
Changing the basic settings
The cooktop must be turned off.
1.
Turn on the cooktop with the main switch.
2.
Within10 seconds, touch the Kitchen Timer key for
about 4 seconds.
The first four displays provide product information.
Touch the settings area to view the individual displays.
3.
Touching the Kitchen Timer key again takes you to
the basic settings.
™ ‚ lights up in the timer display and ‹ light up in the
displays.
4.
Touch the Kitchen Timer key repeatedly until the
indicator for the required function is displayed.
™†
Automatically setting the cooking time
‹‹ Switched off.*
‹‚-ŠŠ Time until automatic switch-off.
™‡
Audible signal duration for the timer function
‚ 10 seconds.*
ƒ 30 seconds.
„ 1 minute.
™ˆ
Power management function. Limiting the total power of the cooktop
‹ Switched off.*
‚ 1000 W minimum power.
‚. 1500 W
ƒ 2000 W
...
Š Maximum power of the cooktop.
™‚‚
Changing the preset heat settings for the PowerMove function
׊ Preset heat setting for the front cooking zone.
Ù† Preset heat setting for the central cooking zone.
Ø‚ Preset heat setting for the rear cooking zone.
™‚ƒ
Checking cookware, result of the cooking process
‹ Not suitable
‚ Not perfect
ƒ Suitable
™‚„
Configure the flexible cooking zone activation.
‹ As two independent elements.*
‚ As a single element.
™‹
Restoring the factory settings
‹ Individual settings.*
‚ Restore factory settings.
Display Function
* Factory settings
Product information Display
Directory for the technical after-sales
service (TK)
‹‚
FD number
”š
FD number 1
Š†.
FD number 2
‹.†
.HHS
:DUP
6SHHG
%RRVW
.LWFKHQ
7LPHU
&RRN
7LPHU
&RXQW8S
7LPHU
23
5.
Set the required value with the number keys.
6.
Touch the Kitchen Timer key again for at least
4 seconds. The settings have been stored.
Quit basic settings
Turn the cooktop off with the main switch.
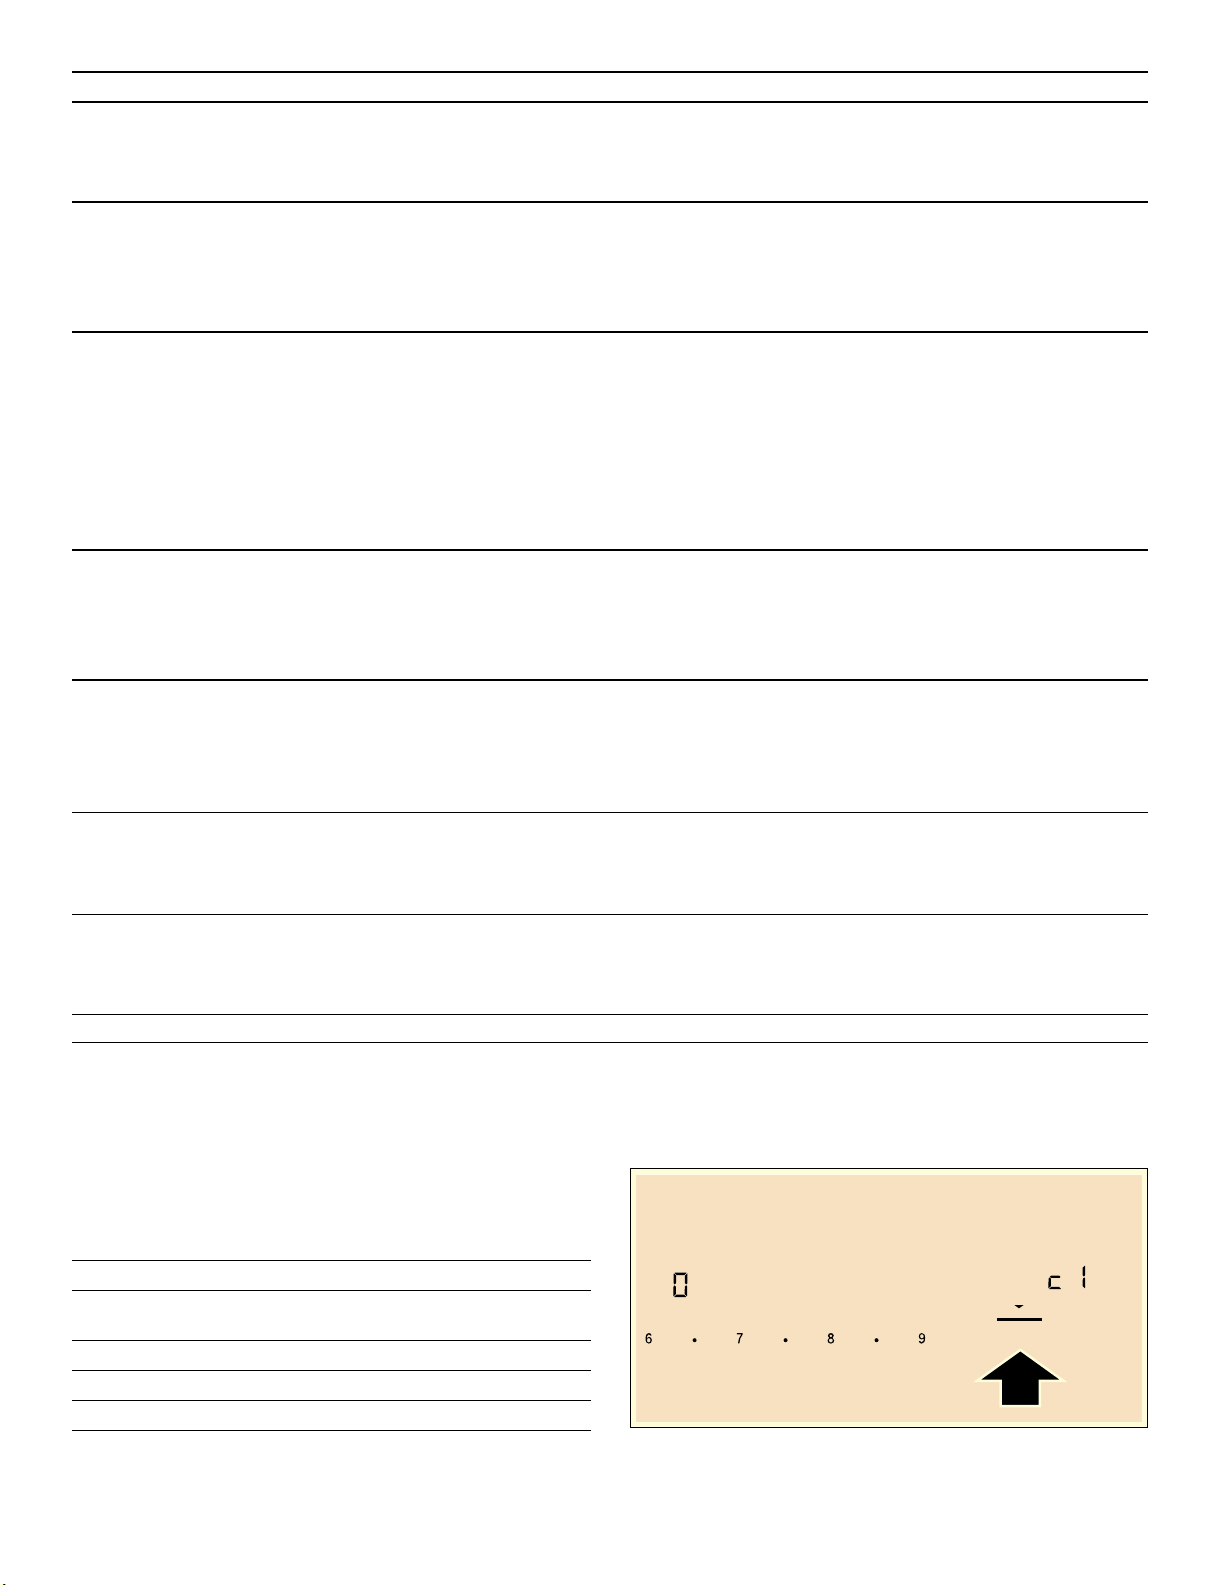
Energy consumption indicator
This function indicates the total amount of energy
consumed by this cooktop the last time it was used for
cooking.
Once switched off, the energy consumption in kWh is
displayed for 10 seconds.
The picture shows an example with an energy
consumption of
‚.‹‰ kWh.
You can find out how to turn this function on in the
section on ~ "Basic settings"
Cooking with Induction
Advantages of induction cooking
Induction cooking is very different from traditional
cooking methods, as heat builds up directly in the item of
cookware. This offers numerous advantages:
▯ Saves time when boiling and frying.
▯ Saves energy.
▯ Easier to care for and clean. Spilled food does not
burn on as quickly.
▯ Heat control and safety – the cooktop increases or
decreases the heat supply as soon as the user
changes the setting. The induction element stops the
heat supply as soon as the cookware is removed from
the element, without having to switch it off first.
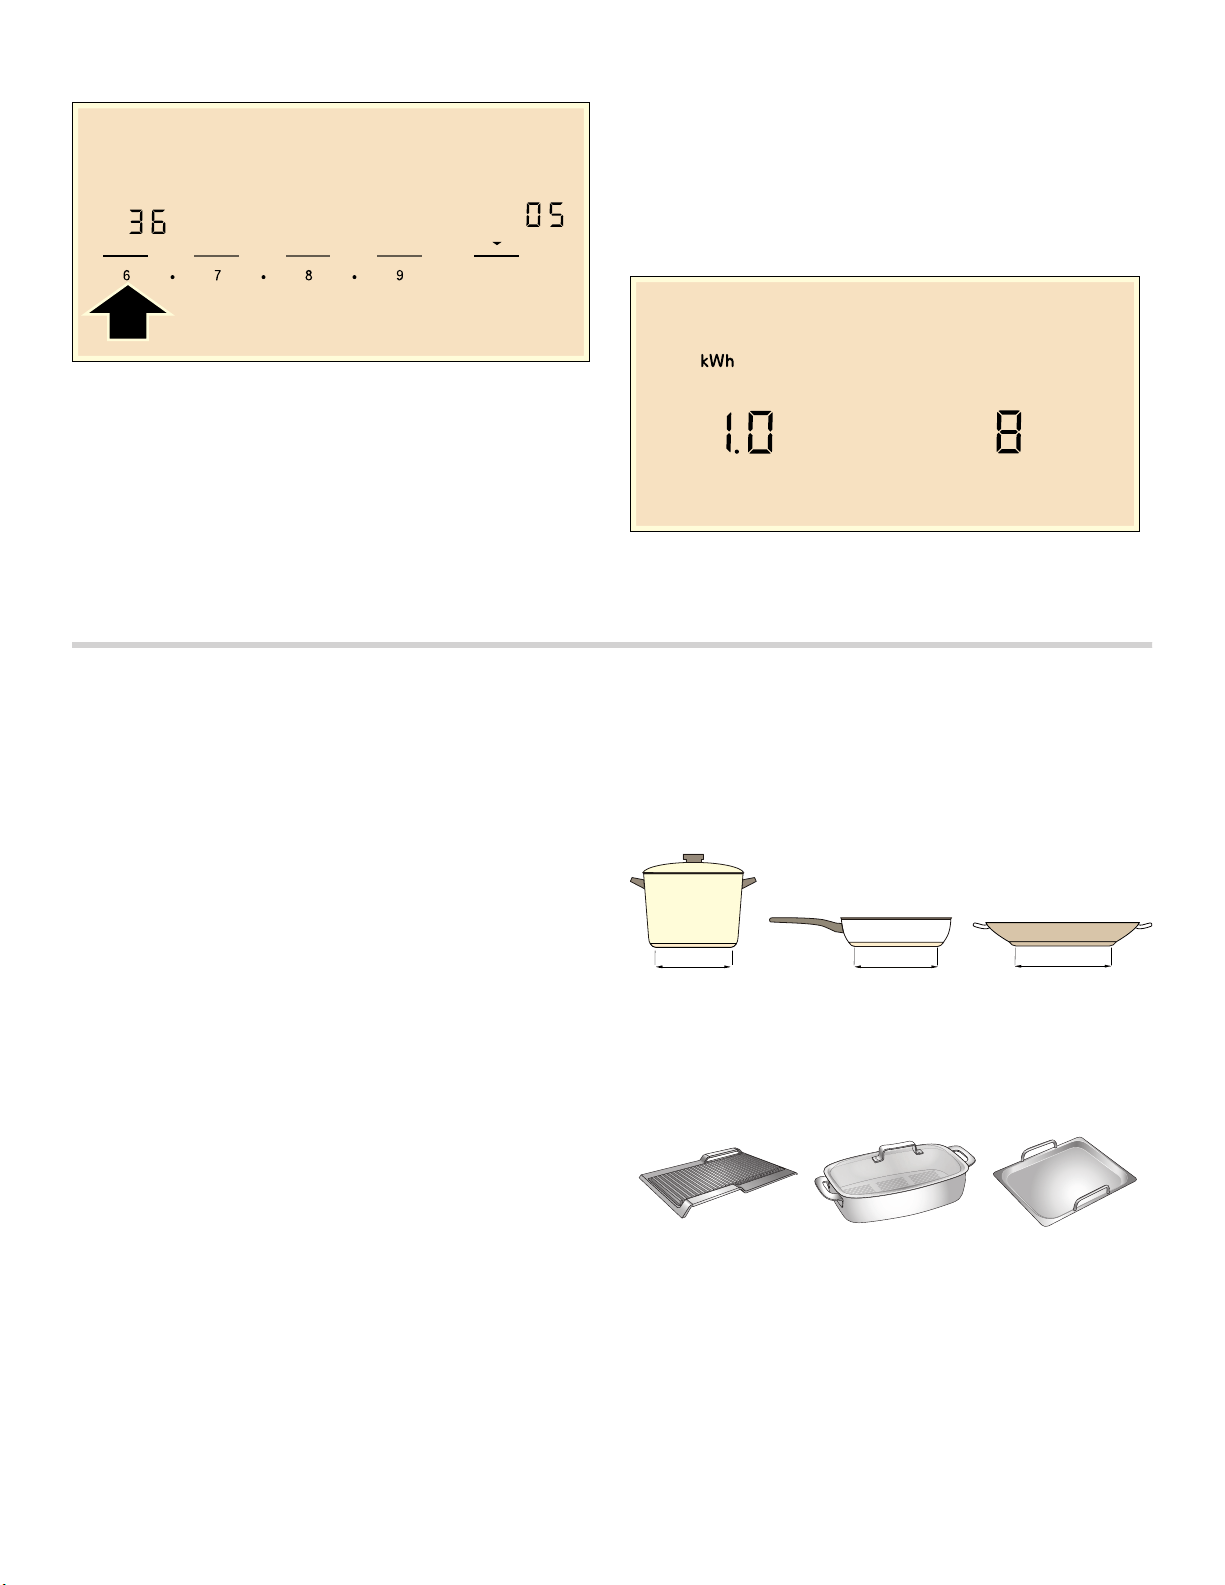
Cookware
Only use ferromagnetic cookware for induction cooking,
such as:
▯ Cookware made from enameled steel
▯ Cookware made from cast iron
▯ Special induction-compatible cookware made from
stainless steel.
To check whether your cookware is suitable for induction
cooking, refer to the section on ~ "Suitability test of
cookware".
To achieve a good cooking result, the ferromagnetic area
on the base of the pan should match the size of the
element. If a element does not detect an item of
cookware, try placing it on another element with a
smaller diameter.
If the only element being used is the flexible cooking
zone, larger cookware that is particularly suited to this
zone can be used. You can read more information on the
positioning of the cookware in the Flex Induction
Cooking Zone section.
.HHS
:DUP
6SHHG
%RRVW
.LWFKHQ
7LPHU
&RRN
7LPHU
FP
FP
FP
LQ LQ LQ
24
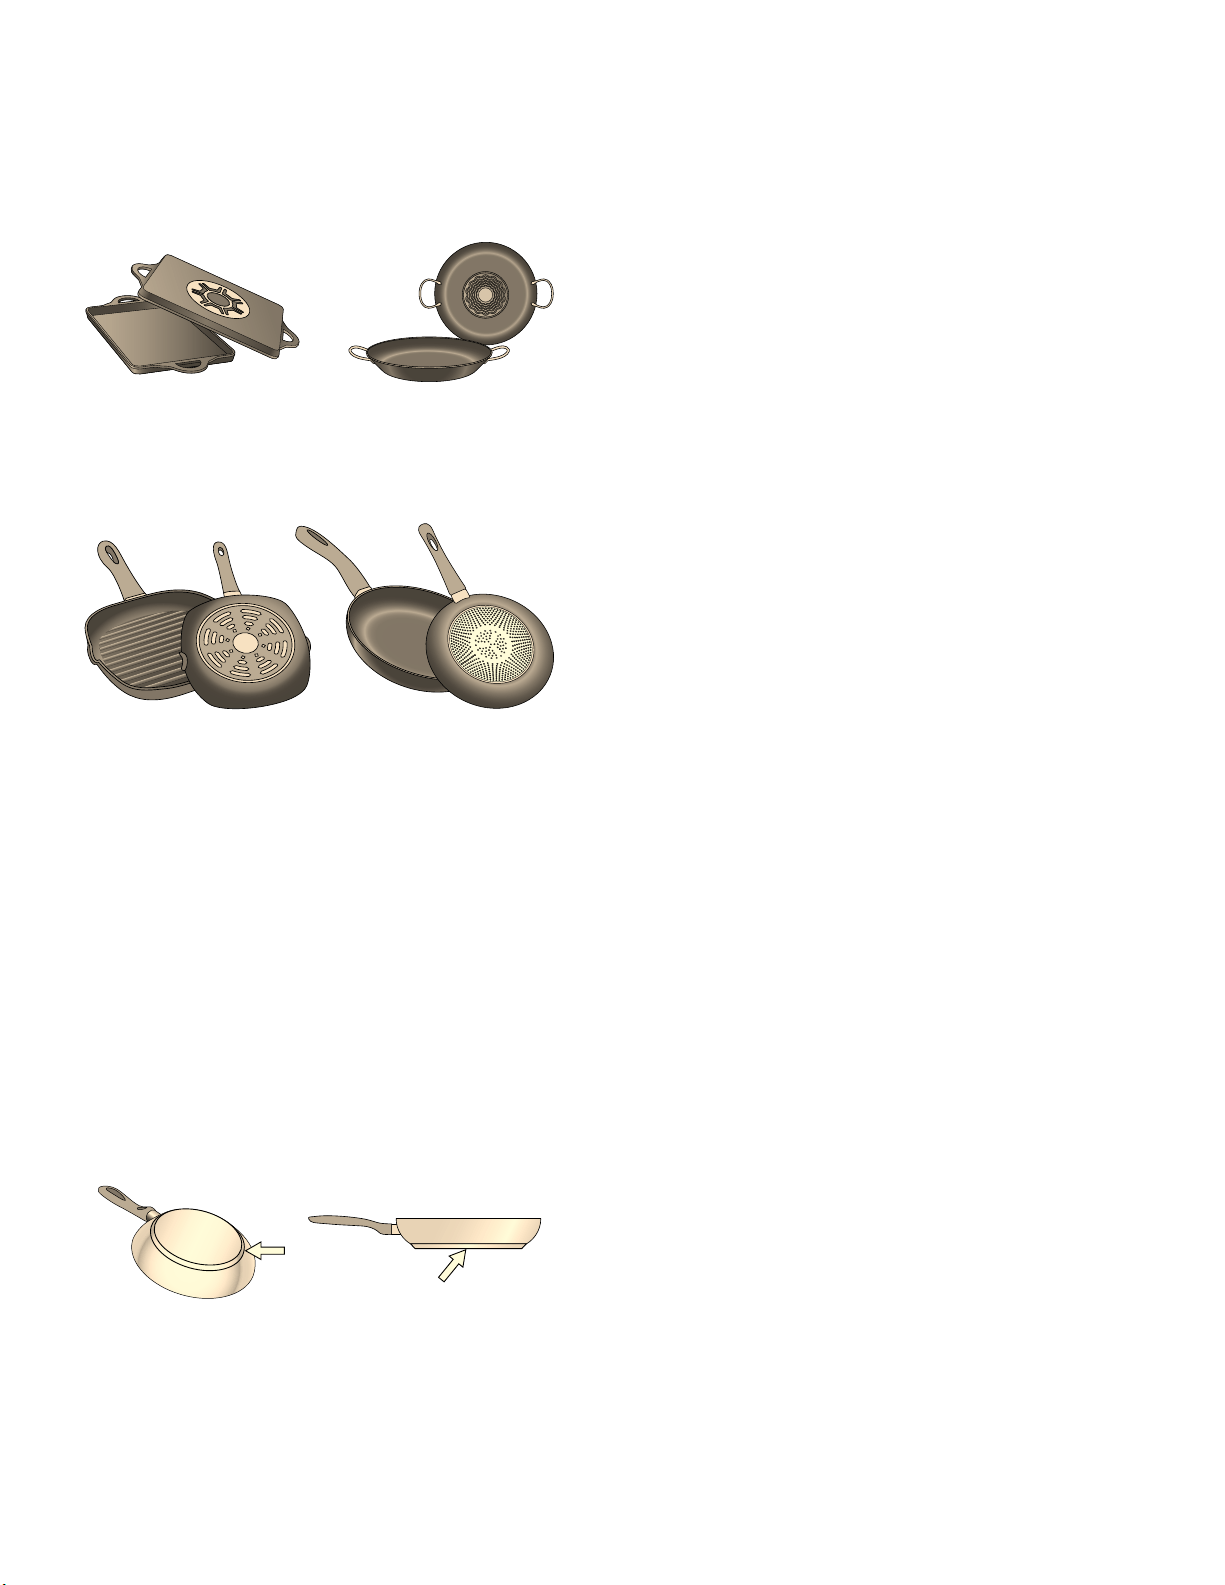
Some induction cookware does not have a fully
ferromagnetic base:
▯ If the base of the cookware is only partially
ferromagnetic, only the area that is ferromagnetic will
heat up. This may mean that heat will not be
distributed evenly. The non-ferromagnetic area may
not heat up to a sufficient temperature for cooking.
▯ The ferromagnetic area will also be reduced if the
material of which the base of the cookware is made
contains aluminum, for example. This may mean that
the cookware will not become sufficiently hot or even
that it will not be detected.
Unsuitable cookware
Never use adapter plates for induction or cookware
made of:
▯ Traditional stainless steel
▯ Glass
▯ Clay
▯ Copper
▯ Aluminum
Properties of the base of the cookware
The material(s) of which the base of the cookware is
made can affect the cooking result. Using pots and pans
made from materials that distribute heat evenly through
them, such as stainless-steel pans with a three-layer
base, saves time and energy.
Use cookware with a flat base; if the base of the
cookware is uneven, this may impair the heat supply.
No pan or improper size
If no pan is placed on the selected element, or if it is
made of unsuitable material or is not the correct size, the
power level displayed on the element indicator will flash.
Place a suitable pan on the element to stop the flashing.
If you take longer than 90 seconds to place a suitable
pan on the element, it will automatically turn off.
Empty pans or pans with a thin base
Do not heat up empty pans, or use pans with a thin base.
The cooktop is equipped with an internal safety system.
However, an empty pan may heat up so quickly that the
"automatic switch off" function may not have time to react
and the pan may reach very high temperatures. The pan
base could melt and damage the cooktop glass. In this
case, do not touch the pan and switch the cooktop off. If
the cooktop fails to work after it has cooled down, please
contact technical service.
Pan detection
Each element has a lower limit for pan detection. This
depends on the diameter of the ferromagnetic area of the
cookware and the material of which its base is made. For
this reason, you should always use the element that best
matches the diameter of the base of the pan.

25
Cleaning and Maintenance
Daily Cleaning
Notes
▯ Clean only parts listed in manual.
▯ Bosch cleaners have been tested and approved for
use on Bosch appliances. Other recommended
cleaners do not constitute an endorsement of a
specific brand.
Cleaning the Cooktop
9 WARNING
DO NOT TOUCH SURFACE UNITS OR AREAS
NEAR UNITS
Surface units may be hot even though they are dark
in color. Areas near surface units may become hot
enough to cause burns. During and after use, do not
touch, or let clothing or other flammable materials
contact surface units or areas near units until they
have had sufficient time to cool. Among those areas
are the cooktop and surfaces facing the cooktop.
9 CAUTION
Do not use any kind of cleaner on the glass while
the surface is hot. The resulting fumes can be
hazardous to your health. Heating the cleaner can
chemically attack and damage the surface.
Precautions for Long Life and Good Appearance of the
Surface
▯ Regular, daily care using the glass ceramic cooktop
cleaner will protect the surface and make it easier to
remove food soil and water spots.
▯ The glass ceramic cooking surface is a durable
material resistant to impact but not unbreakable if a
pan or other object is dropped on it.
▯ Never cook food directly on the glass.
▯ Avoid placing a wok support ring, trivet or other metal
stand on glass surface.
▯ Do not use the glass surface as a cutting board.
▯ Do not slide cookware across the cooking surface as
it may scratch the surface.
▯ Do not place wet pans on the glass surface.
Care Before Use
Care is easy when preventative steps are taken. For
example, apply a small amount of glass ceramic cooktop
cleaner (packaged with range) on a daily basis. This
provides a protective film that makes it easy to remove
water spots or food spatters. The temperature of the
cooking surface reduces the protective qualities of this
cleaner. It must be reapplied before each use. Use a
clean cloth and apply glass ceramic cooktop cleaner
before each use to remove dust or metal marks that can
occur on the counter level surface between uses.
Daily Cleaning Techniques
9 WARNING
RISK OF BURNS
Be extremely careful as the cooking surface is hot. If
using damp sponge or cloth, wait until the cooktop
has cooled sufficiently to prevent steam burns. Also,
some cleaners give off noxious fumes when applied
to hot surfaces.
1.
Clean the surface when it is completely cool with glass
ceramic cooktop cleaner.
Exception: Remove dry sugar, sugar syrup, tomato
products and milk with the razor blade scraper once
the cooktop has sufficiently cooled. See Cooktop Care
Chart on the next page.
2.
Wipe off spatters with a clean, damp sponge or a
paper towel. Rinse and dry. Use white vinegar if
smudge remains; rinse.
3.
Apply a small amount of the glass ceramic cooktop
cleaner. When dry, buff surface with a clean paper
towel or cloth.
Using the Razor Blade Scraper
Use the scraper to remove dried or baked on foods. Wait
until the cooktop has cooled sufficiently. Hold the scraper
at a 30° angle. Move it over the soil to lift it off of the
cooktop. Finish with a clean, damp sponge or paper
towel. Apply white vinegar if smudge remains and rinse.
9 WARNING
RISK OF INJURY
The blade is extremely sharp. Risk of cuts. Protect
the blade when not in use. Replace the blade
immediately when any imperfections are found.
Follow manufacturer’s instructions.

26
Cleaning the Control Knobs
1.
Pull out and off to remove knobs. Wipe with hot, soapy
cloth. Rinse and dry. Do not soak.
2.
To replace, push knob straight onto shaft.
Cleaning guidelines
When using a cleaner, use only a small amount; apply to
a clean paper towel or cloth. Wipe on the surface and
buff with a clean dry towel.
For best results, use a glass cooktop cleaner such as the
Bosch Glass Cooktop Cleaner (part number 12010030),
which can be ordered online at www.bosch-home.com/
us/store (for U.S. customers only). Other cleaners
include Bon Ami®, Soft Scrub® (without bleach), and
white vinegar.
Avoid these cleaners
▯ Glass cleaners which contain ammonia or chlorine
bleach. These ingredients may damage or
permanently stain the cooktop.
▯ Caustic cleaners such as Easy Off® may stain the
cooktop surface.
▯ Abrasive cleaners.
▯ Metal scouring pads and scrub sponges such as
Scotch Brite® can scratch and/or leave metal marks.
▯ Soap-filled scouring pads such as SOS® can scratch
the surface.
▯ Powdery cleaners containing chlorine bleach can
permanently stain the cooktop.
▯ Flammable cleaners such as lighter fluid or WD-40.
Cleaning charts
Type of Soil Possible Solution
Dry sugar, sugar syrup, milk or tomato spills. Melted
plastic film or foil. All these items require removal after
the cooktop has sufficiently cooled. Be extremely care-
ful as the cooking surface is hot. Failure to remove these
can permanently damage the surface.
Remove these types of spills after the surface has suffi-
ciently cooled using the razor blade scraper. Use a new,
sharp razor in the scraper. Remove pan and turn off the
element. Wearing an oven mitt, hold scraper at 30°
angle, using care not to gouge or scratch the glass. Push
soil off the heated area. After the surface has cooled,
remove the residue and apply the glass ceramic cooktop
cleaner.
9 WARNING
RISK OF INJURY
The blade is extremely sharp. Risk of cuts. Protect
the blade when not in use. Replace the blade imme-
diately when any imperfections are found. Follow
manufacturer’s instructions.
Burned-on food soil, dark streaks, and specks Soften by laying a damp paper towel or sponge on top of
soil for 30 minutes. Use a plastic scrubber and glass
ceramic cooktop cleaner or use the razor blade scraper.
Rinse and dry.
Greasy spatters Use a soapy sponge or cloth to remove grease; rinse
thoroughly and dry. Apply glass ceramic cooktop
cleaner.
Metal marks: Iridescent stain Pans with aluminum, copper or stainless steel bases may
leave marks. Treat immediately after surface has cooled
with glass ceramic cooktop cleaner. If this does not
remove the marks, try a mild abrasive (Bon Ami®, Soft
Scrub® without bleach) with a damp paper towel. Rinse
and reapply glass ceramic cooktop cleaner. Failure to
remove metal marks before the next heating makes
removal very difficult.

27
Maintenance
This appliance requires no maintenance other than daily
cleaning. For best results, apply cooktop cleaning cream
daily.
Hard water spots:
Hot cooking liquids dripped on surface
Minerals in some water can be transferred onto the sur-
face and cause stains. Use undiluted white vinegar, rinse
and dry. Recondition with glass ceramic cooktop cleaner.
Remove boilovers and stains before using the cooktop
again.
Surface scratches:
Small scratches are common and do not affect cooking.
They become smoother and less noticeable with daily use
of the glass ceramic cooktop cleaner.
Apply glass ceramic cooktop cleaner before using to
remove sand-like grains and grit such as salt and sea-
soning. Scratches can be reduced by using pans with
bases that are smooth, clean, and dry before use. Use
recommended glass ceramic cooktop cleaner daily.
NOTE: Diamond rings may scratch the surface.
Type of Soil Possible Solution
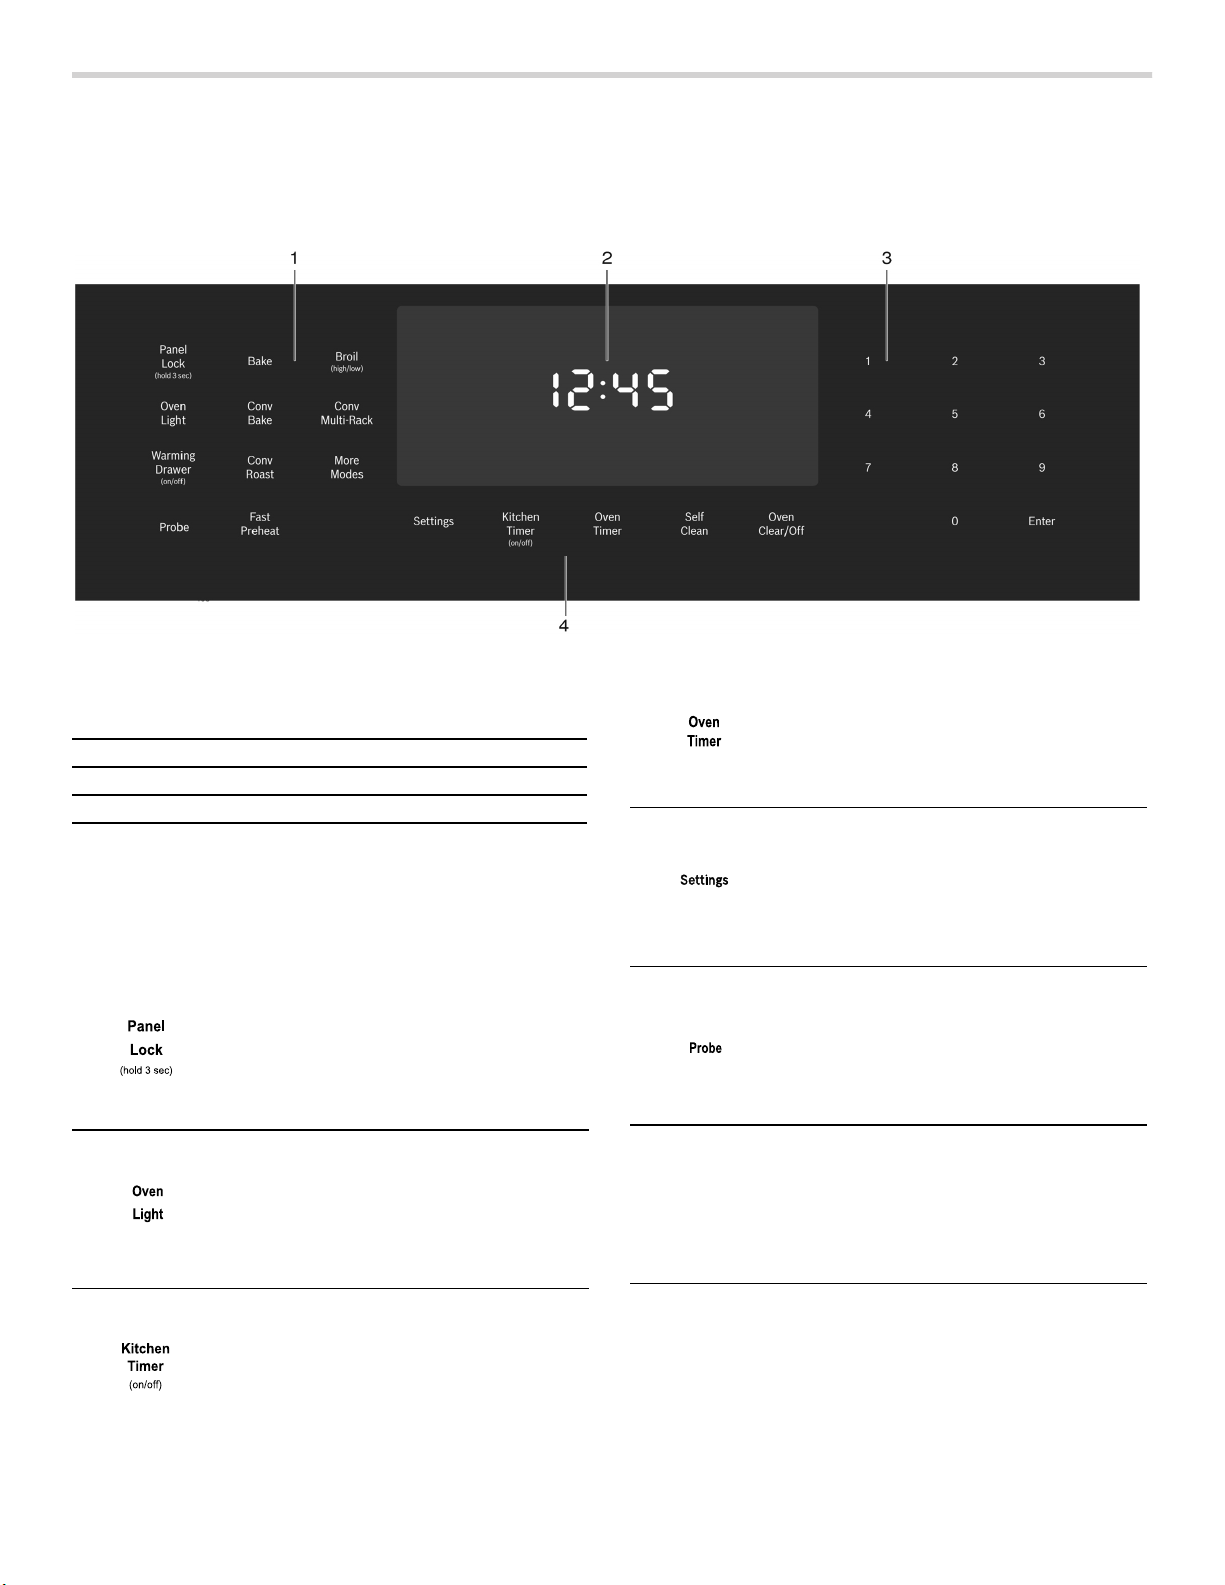
28
Operation-Oven
Oven Control Panel
800 Series Oven Control Panel
Note: You only need to press lightly on the buttons to
operate them.
Button Descriptions
1 Mode Selection Buttons
2 Display
3 Numeric Keypad Buttons
4 Special Function Buttons
Turns Panel Lock mode on and off.
Turns the oven lights on or off.
Starts and stops the kitchen timer(s).
Press to edit a timer.
Press to edit the oven timer for the
selected oven. Turns off the oven at
the end of the specified time.
Provides access to user settings to
allow customization of basic display,
language and other features. Use also
to set clock.
Sets probe target temperature. Probe
allows monitoring of internal meat tem-
perature during cooking.
Enables Fast Preheat option.
Activates Self Clean mode.
'BTU
1SFIFBU
6HOI
&OHDQ
29
More Modes
Additional modes are available by pressing the More
Modes button. These modes include Convection Broil,
Warm, Pizza, Proof and Roast. These are discussed in
the Getting the Most Out of Your Appliance section later
in this manual.
Display Symbols
About the Oven
Your new oven combines premium cooking results and
simple operation.
The oven design has been optimized to improve heat
distribution in the oven cavity. The result is even
browning, shorter cooking times and lower energy
consumption.
Thanks to the Self Clean mode, hours of scrubbing into
the darkest corners of the oven is a thing of the past. The
oven burns off soil simply and easily. All that is left to do
is to remove a few ashes from the oven when Self Clean
is done.
Clear labeling of the touch pads makes operating the
oven very easy. This manual includes all instructions for
operating the oven.
Please call us if you ever have any questions. Our
telephone number is located at the beginning of this
manual. We welcome your comments and suggestions.
Basic Features
Setting the Clock
The oven includes time functions that require the current
time to be set. It is therefore important to set the clock
before beginning to use the oven. The oven cannot be in
a cooking mode to access the clock set mode.
To set the clock:
1.
The oven must be in Standby mode (oven is powered
on, but no cooking mode or timer in operation).
2.
To access the clock set mode:
Press the Settings button. The display shows “SET
CLOCK”. Press Enter to edit the clock.
3.
Use the numeric keypad to enter the desired time.
Each number pressed is entered at the right and
moving previously entered digits to the left. To set
“12:45 pm”, press 1,2,4,5.
4.
When the desired time is entered, set the time by
pressing Enter.
The clock is now set and running.
Turns the warming drawer on or off.
Allows access to cooking/heating
modes that do not have a direct
access button.
Door Lock- Is displayed when the oven
door is locked.
Fast Preheat Symbol- Is displayed when
Fast Preheat is active.
Probe Symbol- Appears when a probe is
detected.
Panel Lock- Is displayed when the con-
trol panel is locked.
Self Clean- Is displayed when Self Clean
is active.
8BSNJOH
%SBXFS
POPGG
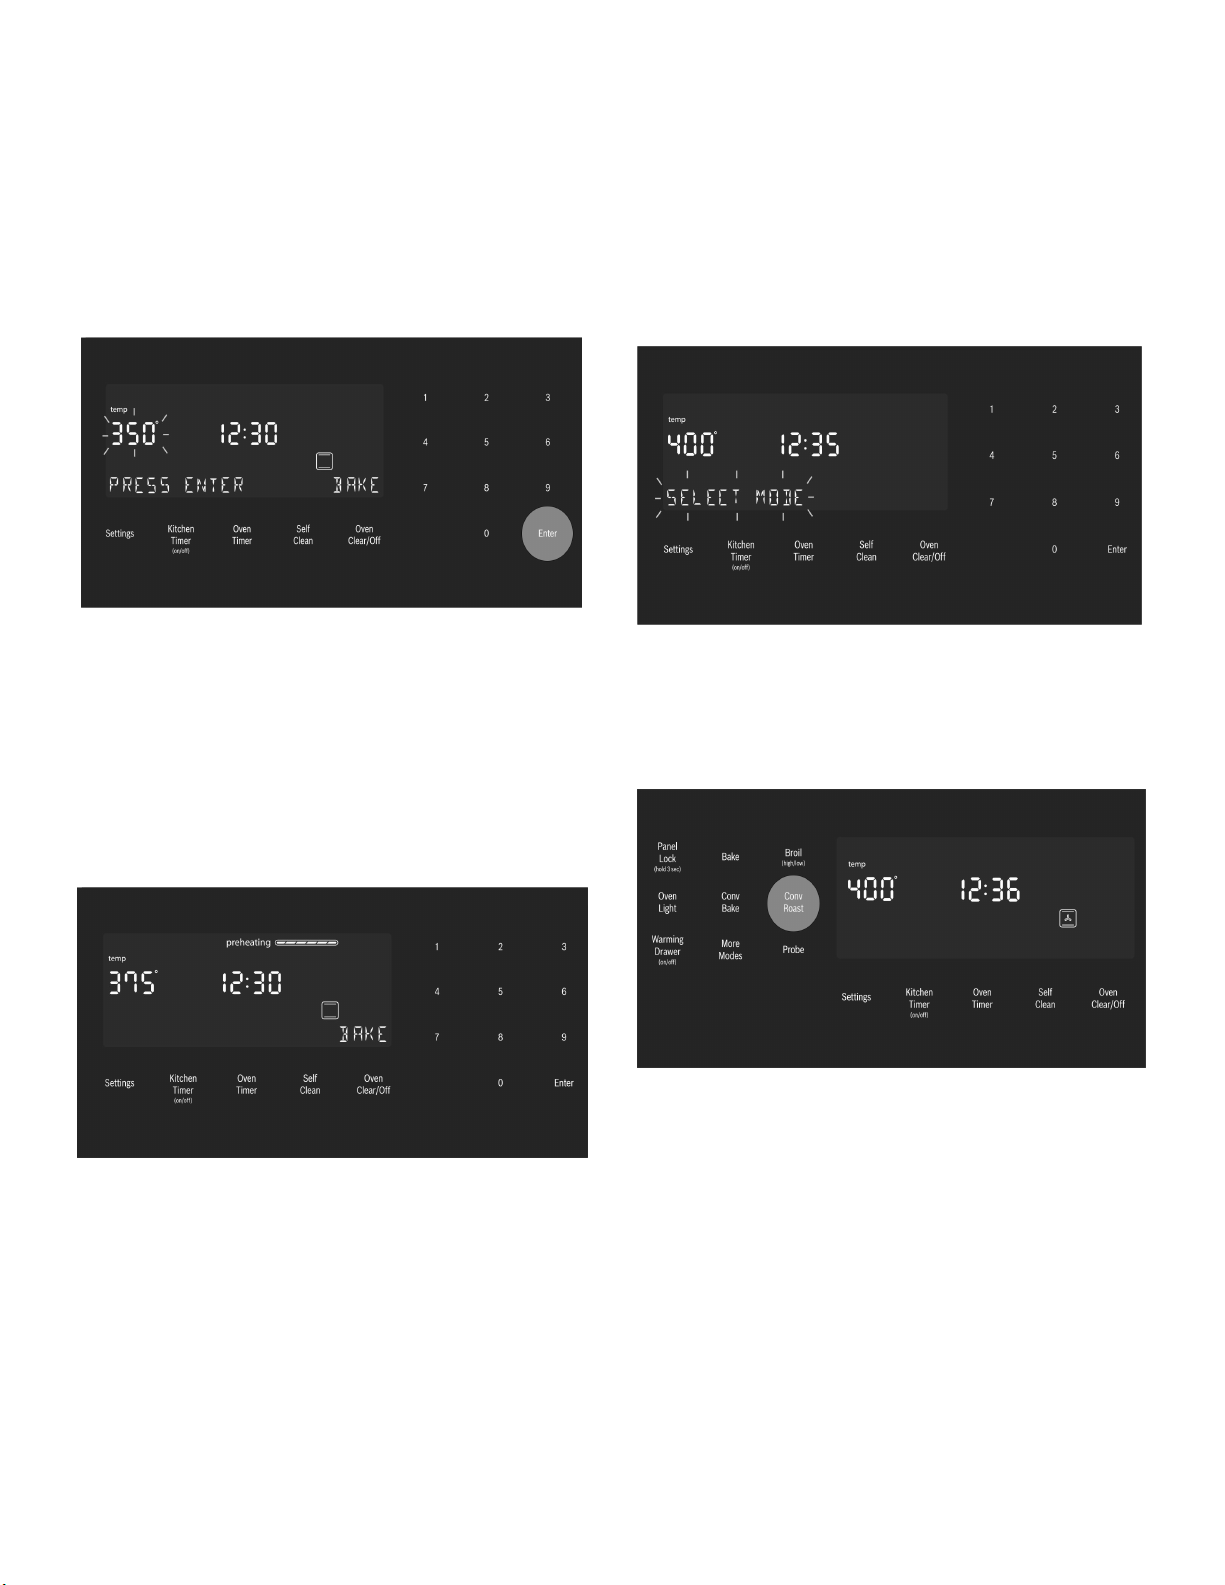
30
Setting the Cooking Mode and Temperature
There are two alternate methods to set cooking mode
and temperature.
To set the Cooking Mode first, then the temperature:
1.
Press the desired Cooking Mode button. The cooking
mode and default temperature are displayed. The
temperature flashes to show it can be edited.
2.
Press Enter to start the mode using the default
temperature.
3.
To change the temperature, enter the new temperature
using the numeric buttons. For example, changing
temperature to 375°. Press Enter to set the updated
temperature.
Note: The new temperature is automatically set after
10 seconds if Enter is not pressed.
4.
Preheating starts.
Note: If a temperature is entered that is not within the
allowed range for the mode, an error tone will sound
and the lower part of the screen will display “TEMP
NOT ALLOWED”.
To set the Temperature first and then the Cooking
Mode (not for Broil or Convection Broil):
1.
Press the numeric keys to enter the desired
temperature setting. The temperature entered is
displayed beside the current time.
2.
Select a cooking mode that is compatible with the
temperature entered. If no cooking mode is selected
within 5 seconds of setting the temperature, an error
tone sounds and a “SELECT MODE” message is
displayed and blinks.
3.
Press a Mode Selection button to select a cooking
mode.
The new mode and temperature set automatically after
10 seconds if Enter is not pressed.
Note: If a temperature is entered that is not within the
allowed range for the mode selected, an error tone will
sound and the lower part of the screen will display
“TEMP NOT ALLOWED”.
To change the Oven Temperature:
1.
Press the Cooking Mode button.
2.
The current temperature flashes. Use the numeric
buttons to enter a new temperature. Press Enter.
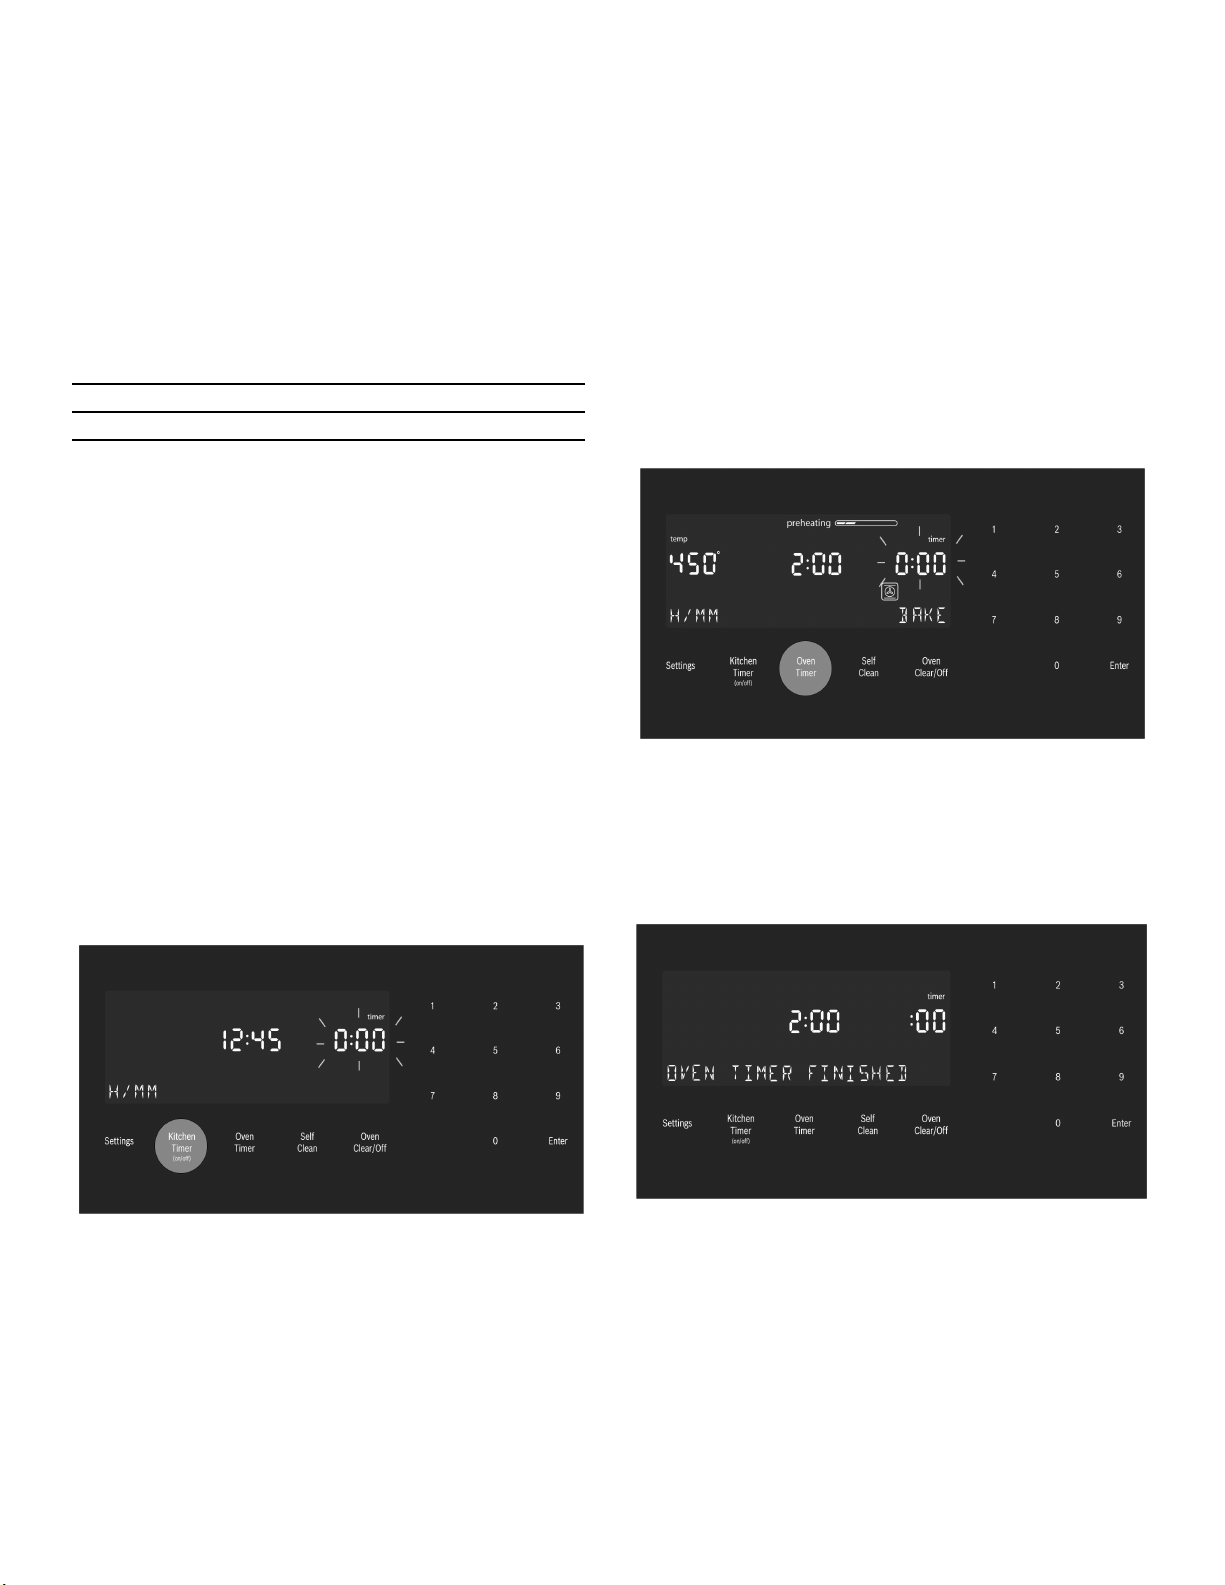
31
Heating Time Limitation
The maximum heating time is limited. If you forget to turn
off the oven, it turns off automatically after a set period of
time.
The maximum time for Sabbath Mode is 74 hours. For all
other cooking modes the maximum allowed time is 24
hours.
Timer
Your new oven is equipped with two types of timers.
Kitchen Timer- is a countdown timer that has no affect
on oven heating. The kitchen timer is used for general
kitchen timing needs.
Oven Timer- is a countdown timer which upon reaching
00:00 turns the oven off, stopping the current mode. The
oven timer is used to set how long a mode will run. Not
available for Broil, Convection Broil or Proof.
To set a kitchen timer (for general kitchen timer needs):
1.
Press the Kitchen Timer On/Off button.
0:00 is displayed and blinks in the display. Enter the
desired timer value in H/MM format using the numeric
keypad.
2.
Press Enter.
The kitchen timer starts.
3.
When the kitchen timer has counted down to zero an
alarm tone sounds every 10 seconds for 2 minutes
and the message “TIMER END” is displayed.
Cancel the kitchen timer- press the Kitchen Timer On/
Off button.
Note: The timer does not change when other settings
are changed.
To edit a kitchen timer (for setting a timer to turn the
oven off):
1.
Press the Kitchen Timer On/Off button.
2.
The current time value blinks and can be edited.
To set an oven timer:
Note: An oven timer cannot be run during Self Clean.
1.
Press Oven Timer button.
2.
Select mode, press Enter.
0:00 is displayed and blinks in the display. Enter the
desired timer value in H/MM format using the numeric
keypad.
Press the Enter button. The oven timer counts down to
0:00.
3.
When the timer reaches :00 the cooking mode ends
and the message “OVEN TIMER FINISHED” is
displayed. The oven alarm tone sounds every 10
seconds for 2 minutes.
Temperature
in °F
Temperature
in °C
Max. Time Allowed
without Activity
100-200 30-120 24 hours
201-550 121-300 12 hours
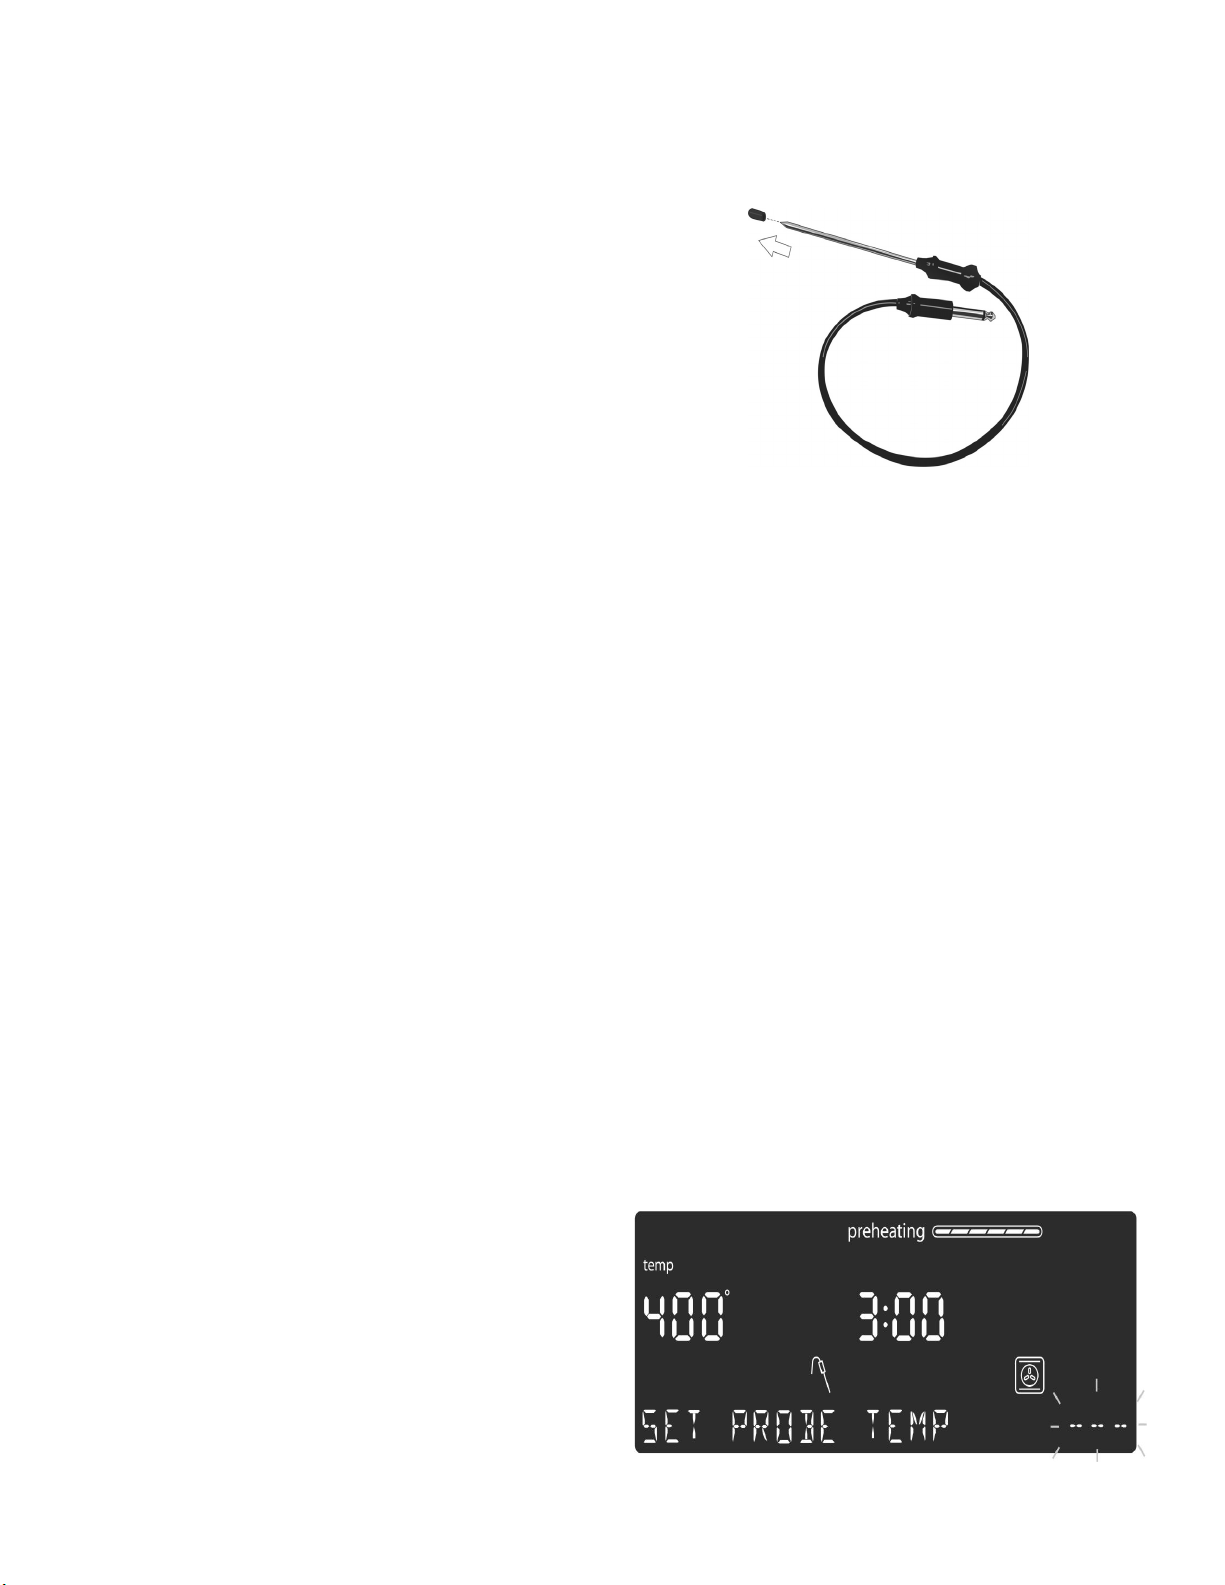
32
Editing the oven timer:
1.
If the oven timer is running and the time remaining
needs to be changed, enter the oven timer mode by
pressing the Oven Timer button
2.
The temperature blinks, indicating it can be edited.
Input a new temperature or press Enter for no change.
3.
The timer value blinks, indicating it can be edited.
Input the new time and restart the timer by pressing
the Enter button.
The oven timer may be cleared by entering 0:00.
Fast Preheat
Fast Preheat heats the oven quicker than standard
preheat. It is available for Bake, Convection Multi Rack,
Convection Bake, Convection Roast, Roast and Pizza.
Roast is found in the “More Modes” menu. If Fast
Preheat is not allowed for the selected cooking mode an
error tone sounds. Fast Preheat is not available for Broil,
Convection Broil, Proof or Warm.
To set Fast Preheat:
1.
Press Fast Preheat.
The fast preheat icon appears in the display just above
the mode name.
2.
Press Start.
Fast Preheat can be turned off by pressing Fast Preheat
again.
Special Features
The special features provide you with additional
conveniences when cooking.
Learn more about these special features in the following
sections:
▯ Probe (some models)
▯ Sabbath Mode
▯ Panel Lock
Probe
The probe measures the internal temperature of the food.
The probe is available for Bake, Roast and all convection
cooking modes except Convection Broil.
Some models include a temperature probe used to
sense internal temperature of meats during cooking.
The probe ships with a black plastic safety cap over the
pointed metal end of the probe. The cap must be
removed prior to use.
Inserting the probe:
Insert the tip of the probe in the middle and thickest part
of the meat or the breast for poultry. Make sure the probe
is not touching fat, bone or parts of the oven or the pan.
Note: Food must be completely thawed before inserting
the probe into the meat.
To use the probe:
1.
Insert the probe into the meat as described above. The
probe symbol is displayed.
2.
Connect the probe to the oven. If the probe is not
connected to the oven prior to starting Probe mode, an
error tone sounds and the message “INSERT PROBE”
is displayed.
3.
Set the cooking mode and temperature.
4.
The Set Probe Temp screen is displayed. A three digit
input prompt “- - -” blinks in the lower right corner. Use
the numeric keypad to enter the desire probe
temperature and press Enter.
Note: The minimum probe temperature that can be
set is 100°F (40°C) and the maximum is 200°F
(100°C). If the probe temperature entered is outside
this range, an error is displayed.
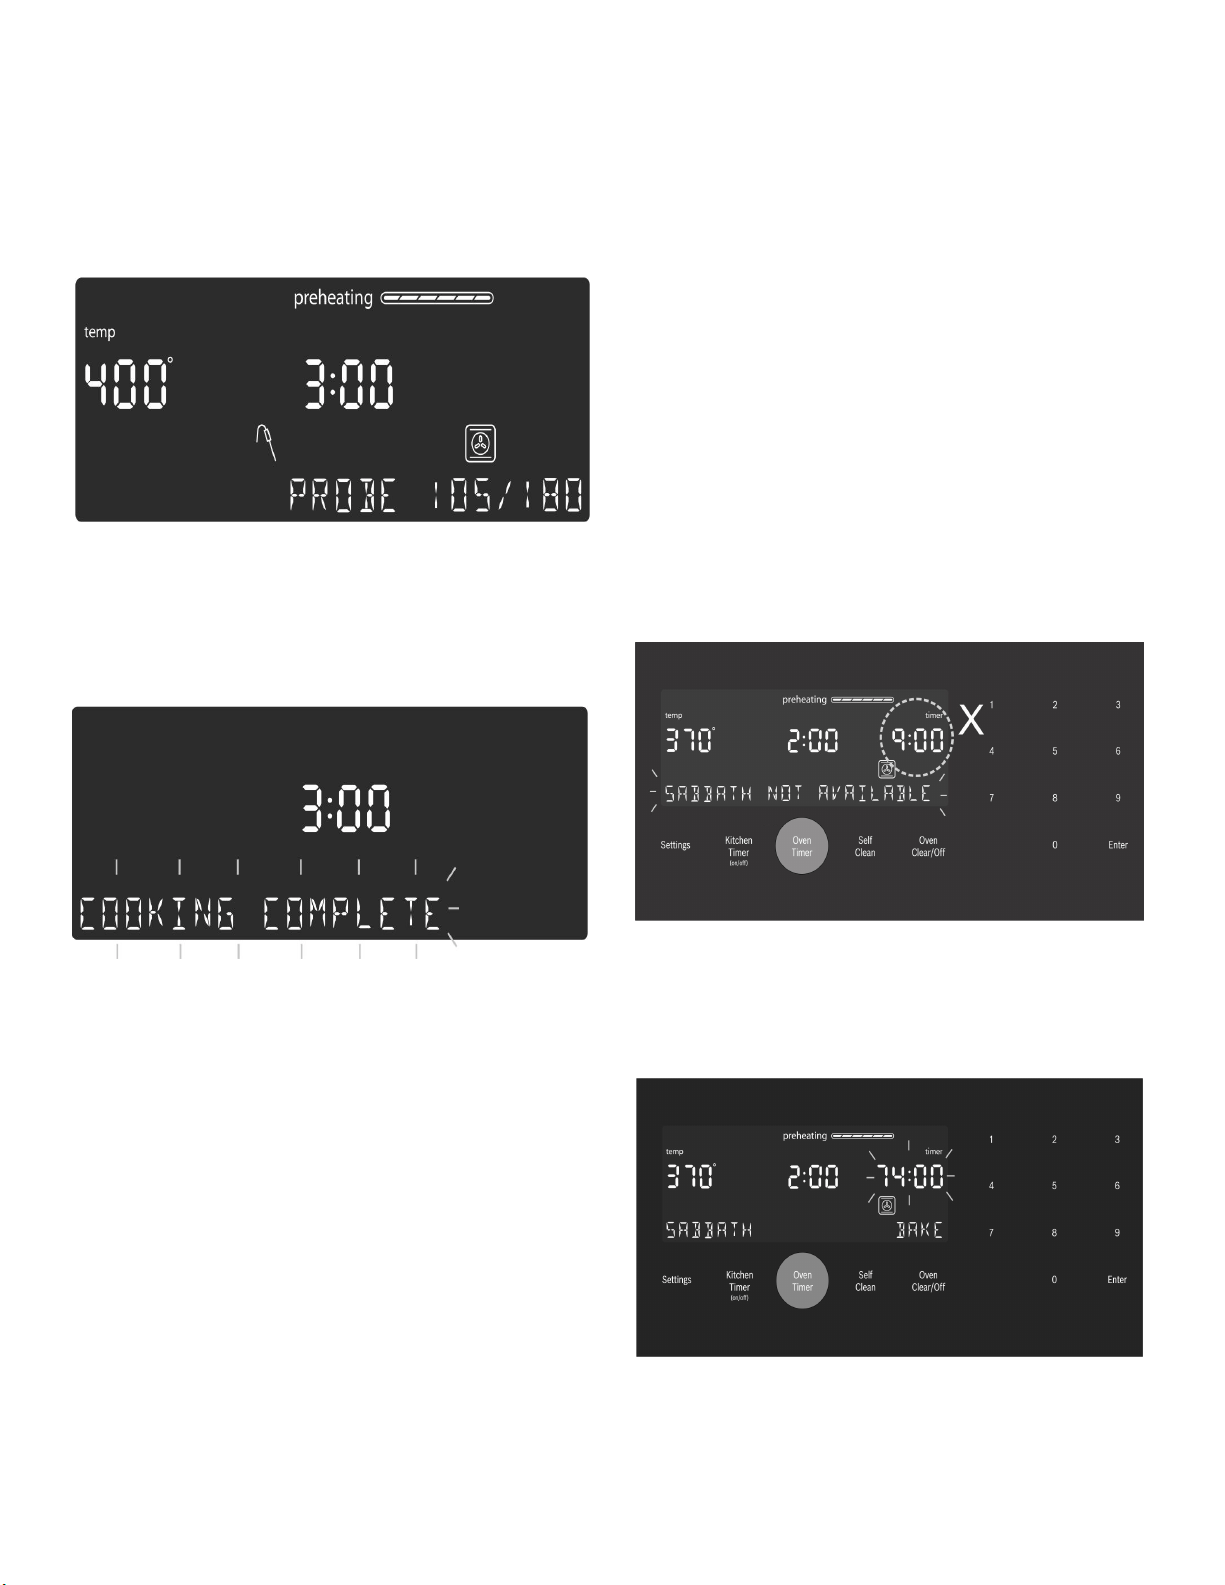
33
5.
The probe current temperature and target temperature
are both displayed in the format “105/180” at the
lower right corner of the display. The actual
temperature will display <80 until the food temperature
reaches 80°F.
The displayed probe temperature is updated in
increments of 5° during the cooking process.
6.
When the probe temperature reaches the set
temperature, the cooking mode turns off. The current
time is displayed and the message “COOKING
COMPLETE” blinks at the bottom left of the display. An
alarm tone sounds every 10 seconds for 2 minutes.
This screen remains in the display until it is cleared by
pressing the Oven Clear/Off button or until the probe
is removed. The display then goes back to Standby
mode.
Notes
▯ Probe is not available when an Oven Timer has
been set.
▯ To change the probe temperature, press the Probe
button. The display enters probe temperature
editing mode and displays the message “SET
PROBE TEMP”. Enter the new probe temperature
and press Enter to accept the new value.
▯ Do not store the probe in the oven.
▯ Always use the handle of the probe for inserting and
removing.
▯ Always use a potholder to remove the probe since it
becomes hot.
▯ Since meat continues to cook after being removed
from the oven, set the internal (probe) temperature
5°-10° below the desired final internal temperature
except with poultry.
Sabbath Mode
The Sabbath Mode enables those of particular faiths to
use their ovens on the Sabbath.
The Sabbath Mode can be entered in a Bake mode only.
The bake temperature must be within the Sabbath Mode
temperature range of 100° to 450°F.
If the oven light is on at the start of Sabbath Mode, it
remains on throughout the Sabbath Mode operation. If
the oven light is off at the start of Sabbath Mode, it
remains off throughout the Sabbath Mode operation.
To set the Sabbath Mode:
No kitchen timers or oven timers may be running when
Sabbath Mode is entered.
1.
Begin a Bake operation. While Bake is running, press
and hold the Oven Timer button for 5 seconds.
The message:”SABBATH NOT AVAILABLE” is
displayed if a timer is running or the set temperature is
outside the allowable range.
If no timers are running, the Sabbath Mode settings
appear in the display. The Sabbath Mode timer blinks
showing the value can be edited. The default value is
74:00 (the maximum number of hours for which
Sabbath Mode can be set).
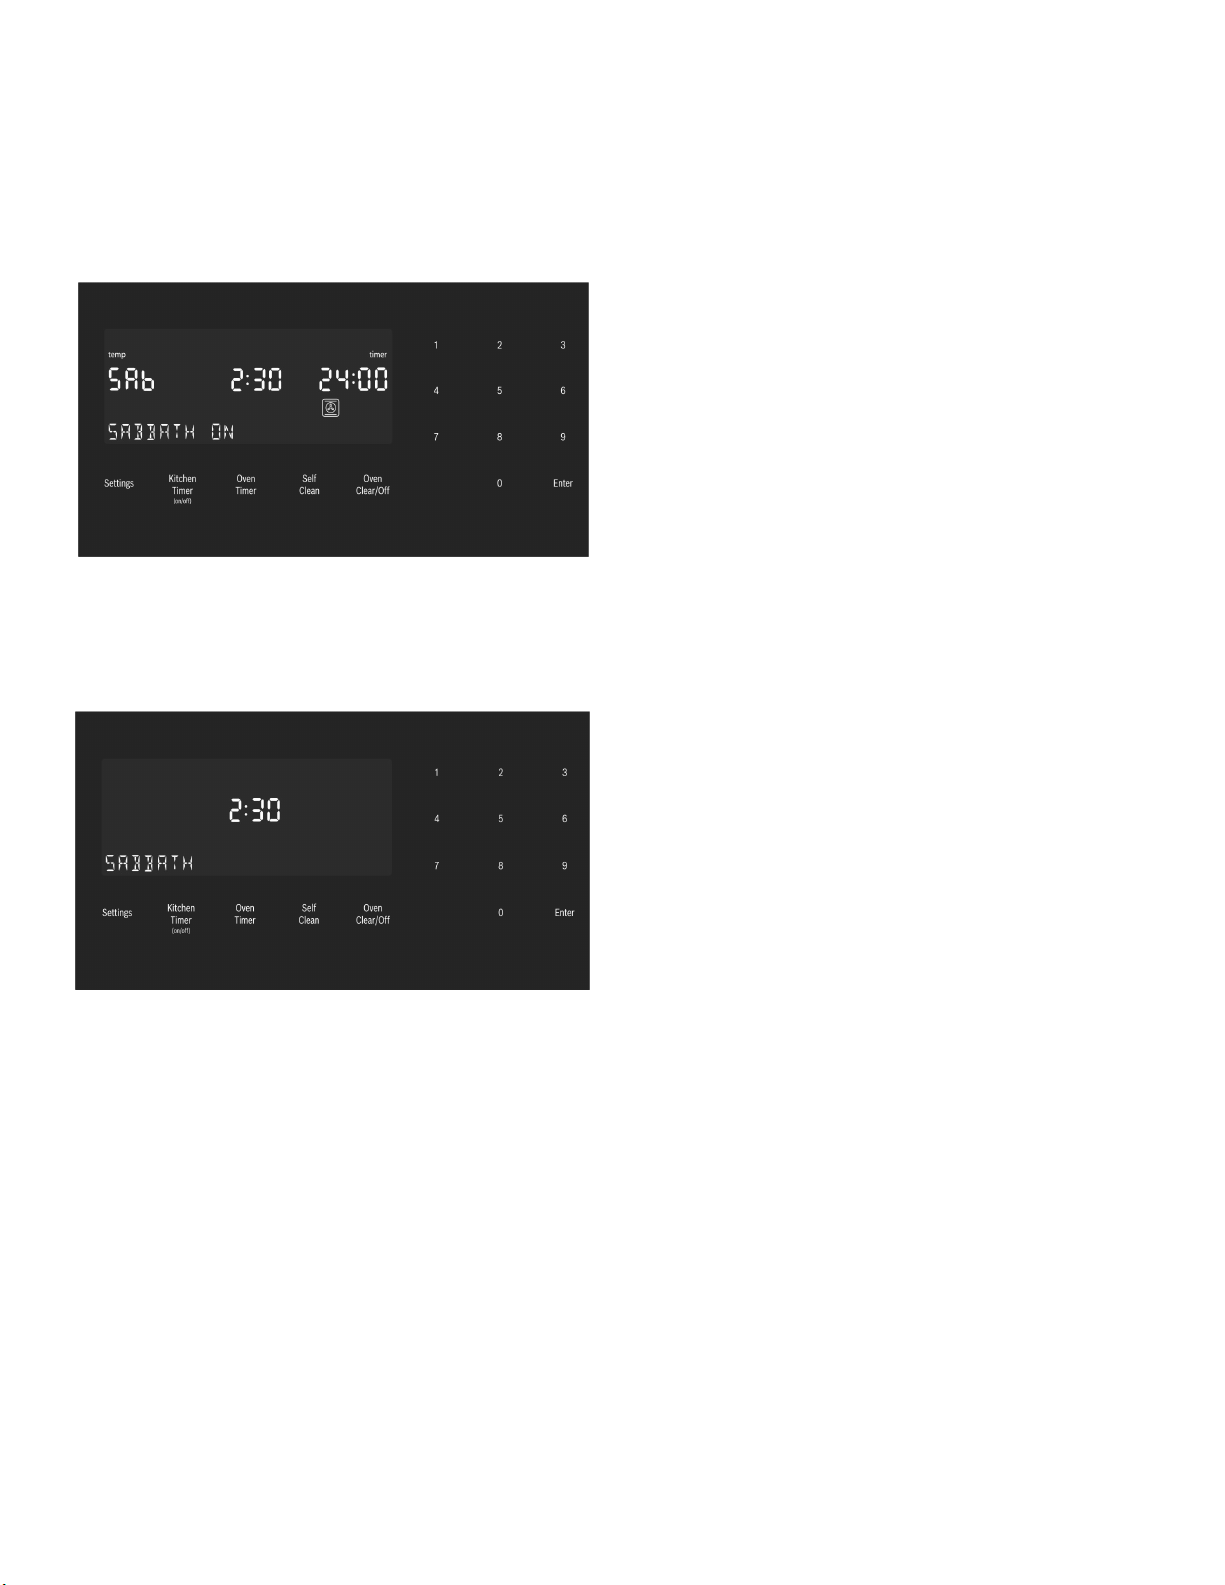
34
2.
Press Enter to accept the default 74:00 hours and
start Sabbath Mode or use the numeric keypad to
enter the desired Sabbath Mode timer value. Timer
values between 0:01 and 74:00 can be entered.
Note: If no changes are made within 10 seconds,
Sabbath Mode auto starts.
3.
Once Sabbath Mode has begun, the display changes
to show the message “SABBATH ON”.
4.
After the Sabbath Mode countdown reaches zero, the
oven displays the current time and the message
“SABBATH”. No changes can be made at this point.
To end the Sabbath Mode and return to normal
function, press the Oven Clear/Off button.
Notes
▯ The temperature range in Sabbath Mode is 100°F
to 450°F.
▯ The Sabbath Mode timer can be set between 0:01
and 74:00 hours.
To edit the Sabbath Temperature:
While editing the temperature in Sabbath Mode there is
no feedback from the control. If an invalid temperature is
set, the oven will default back to the previous running
temperature.
1.
Press the Bake button.
2.
Enter the new desired set temperature.
3.
Press Enter.
The oven will adjust its set temperature after randomized
delay.
Panel Lock
Allows the user to disable all buttons on the control
panel. Panel Lock can only be enabled in Standby mode.
1.
To enable Panel Lock, press and hold the Panel Lock
button for 3 seconds (in Standby mode).
2.
To disable Panel Lock, press and hold the Panel Lock
button for 3 seconds. The display returns to Standby
mode.
Settings
The oven setup menu is used to customize certain oven
settings.
The oven must be in Standby mode (no cooking mode or
timer running) in order to access the setup menu.
To make changes to Settings menu items:
1.
Press the Settings button.
2.
The fist setup item is displayed. The display shoes
“SET CLOCK”. Press Settings again to access the
settings menu.
3.
To display a different setup item, press the number
corresponding to that setting (see table following or
press the Settings button to cycle through available
options).
4.
To change the value for the displayed setting, press
the Enter button to enter the edit mode. Use the
numeric keypad to change the setting value. The
corresponding setting value is shown in the table
following.
For the temperature offset, with the item in edit mode,
press “-” or “+” first, then the numeric offset value.
The new value is automatically accepted as the display
reverts from edit mode back to display mode.
To exit the Settings menu:
Press the Oven Clear/Off button.

35
Oven Temperature Offset
The oven is calibrated to provide accurate results. This
feature is useful if you prefer your foods lighter or darker.
When an offset temperature is selected, the actual oven
temperature is raised or lowered by this value.
Do not use residential oven thermometers to evaluate
oven temperatures as they will fluctuate throughout
cooking.
The oven must be turned off in order to set an offset
value. Refer to Temperature Offset in Settings Menu
Options for setting.
Note: This process can be repeated until a satisfactory
result is achieved. Each time these steps are repeated,
the oven temperature sets to zero. In other words, if the
offset was changed by 5° the first time, the second time
it will need to be offset by 10°. The oven will not add to
the original offset.
Settings Menu Options
Menu Item Description Default
1 Temperature
Mode
Fahrenheit (°F) or
Celsius (°C)
°F
2 Brightness High, Medium, Low High
3 Volume High, Medium, Low High
4 Clock Mode 12-hour or 24-hour display
mode. 12HR, 24HR
12HR
5 Auto
Convection
Conversion
Decreases oven tempera-
ture by 25°F for Convec-
tion Bake and Convection
Multi-Rack cooking modes.
On, Off
OFF
6 Button Beep Tone when button is
pressed. ON, OFF
ON
7 Standby
Clock
Display
Clock displays when no
cooking mode or timer is
in use. ON, OFF
ON
8 Language Language setting: English
(EN), French (FR)
EN
9 Temperature
Offset
Sets the temperature offset
value for Bake, Convec-
tion Bake, Roast, Convec-
tion Roast and Convection
Multi-Rack.
Note: Temperature offsets
must always be entered as
2 digits.
Example: 5°is entered as
05.
When an offset value is
entered, the actual oven
temperature is increased
or decreased by this value.
This feature is useful if
food is either too brown or
too light.
The range for changing the
offset is between +/- 35°F
(+/- 19°C) in 1° incre-
ments.
The default value is 0.
0

36
Getting the Most Out of Your Appliance
General Tips
Pan Placement
Baking results are better if pans are placed in the center
of the oven. If baking more than one pan on a rack, allow
at least 1’’ to 1 1/2’’ of air space around the pan. When
baking four cake layers at the same time, stagger pans
on two racks so that one pan is not directly above the
other.
Rack Position
The rail at the top of the oven is used as the guide for the
top rack (position 6). Use rack postions 1 through 6 only.
DO NOT attempt to use the top guide to support an oven
rack.
Aluminum Foil
9 WARNING
Do not use aluminum foil or protective liners to line
any part of the appliance, especially the oven
bottom. Installing these liners may result in risk of
electric shock or fire.
Preheating the Oven
▯ Place oven racks in desired position before heating
the oven.
▯ Preheat the oven when using the Bake, Convection
Bake, Convection Multi Rack, Pizza, Broil, Convection
Broil and Warm modes.
▯ Preheat is not used for Roast, Convection Roast and
Proof modes.
▯ Allow oven to preheat while preparing recipe
ingredients or food items.
▯ Setting a higher temperature does not shorten preheat
time.
▯ Once oven is preheated, place food in the oven as
quickly as possible to minimize the loss of heat and
reduction of oven temperature.
▯ Use Fast Preheat to speed up preheating.
Preheat Reminders
Your oven has one of the fastest preheat times in the
market using a concealed bake element. The lower
element is hidden under the oven bottom. It is normal
that the preheat time is different than your previous oven
that had an exposed element on the bottom.
▯ The hidden lower element is protected from food soils
and spills. Wiping up excess spills is easy.
▯ Preheating is not necessary for meats, poultry,
casseroles and some frozen foods.
▯ Preheat time will be longer when the electrical supply
to your house is less than 240 volts.
▯ Increasing the oven temperature will require a longer
preheat time. For example, the preheat time for 425° F
is longer than the preheat time for 350° F.
When broiling, preheat the oven 3-4 minutes. Do not
preheat for more than 5 minutes.
For Best Results
▯ Use the cooking recommendation charts as a guide.
See charts at the end of the book.
▯ Open the door as briefly as possible to avoid
temperature reduction.
▯ Use the interior oven light to view the food through the
oven window rather than opening the door frequently.
▯ Use the Timer to keep track of cooking times.
Rack positions
are numbered
from 1 to 6,
from bottom to
top.
Consult the food
cooking charts
at the back of
this manual for
recommended
rack positions.
Rack Position Best For
6 (highest usable position) hamburgers, steaks
5 toasting bread, broiling
most meats, melting
cheese
4 thicker meats
3 broiling poultry, most
baked goods on a cookie
sheet or baking pan using
a single rack, includes fro-
zen convenience foods,
cakes, casseroles, frozen
pizza
2 small roasts or poultry,
bundt cakes, pies, breads
1(lowest usable position) large roasts, turkey, angel
food cake

37
Baking Pans and Dishes
▯ Glass baking dishes absorb heat. Some cookware
manufacturers recommend reducing the temperature
25°F when using this type of dish. Follow
manufacturers’ recommendations.
▯ Preheat the oven before adding glass baking dishes.
▯ Use pans that provide the desired browning. For
tender, light, golden brown crusts, use light, anodized
or shiny metal bakeware.
▯ Dark, rough or dull pans (nonstick or anodized) will
absorb heat and result in a browner, crisper crust.
Some manufacturers recommend reducing the
temperature 25°F when using this type of pan. Follow
manufacturers’ recommendations.
▯ Insulated cookie sheets or bakeware may increase the
length of cooking time.
▯ Do not set broil pans or any other heavy object on the
open oven door.
▯ Do not keep empty pans or pizza stones in the oven
during cooking as this changes cooking performance.
Store pans outside the oven.
Opening the Oven Door
Open and close the appliance door only by holding the
door handle. To avoid risk of burns, do not touch any
other parts of the door.
High Altitude Baking
When cooking at high altitudes, recipes and cooking
times will vary.
For accurate information, write the Extension Service,
Colorado State University, Fort Collins, Colorado 80521.
There may be a cost for the guides. Specify which high
altitude food preparation guide you prefer: general
information, cakes, cookies, breads, etc.
Condensation
It is normal for certain amount of moisture to evaporate
from the food during any cooking process. The amount
depends on the moisture content of the food. The
moisture may condense on any surface cooler than the
inside of the oven, such as the control panel.
Temperature Range by Cooking Mode
Temperatures shown are in Fahrenheit.
Bake %
Bake is cooking with dry, heated air. Both the upper and
lower elements cycle to maintain the oven temperature.
The Bake mode can be used to prepare a variety of food
items, from pastries to casseroles. Refer to recipe or
package directions for oven temperature and baking
time.
Tips
▯ Preheat the oven if the recipe recommends it.
▯ Baking time will vary with the size, shape and finish of
the bakeware. Dark metal pans or nonstick coatings
will cook faster with darker results. Insulated bakeware
will lengthen the cook time for most foods.
▯ For best results, bake food on a single rack with at
least 1-1^” space between pans or dishes and oven
walls.
▯ Eliminate heat loss from the oven by using the window
to periodically check food for doneness instead of
opening the door.
Auto Convection Conversion
Convection Bake and Convection Multi-Rack modes
require a 25°F reduction in temperature. Auto
Convection Conversion reduces the temperature you
enter automatically. Simply enter the package or recipe
temperature when setting the mode. The control
calculates the correct temperature and it is shown in the
display.
The Auto Convection Conversion feature can be turned
on to allow for automatic temperature adjustments. See
“Auto Convection Conversion” in the Settings section for
details.
Mode Lowest Highest
Bake 100 550
Roast 100 550
Broil (Low, High) 450 550
Warm 150 225
Proof 85 125
Convection Bake 100 550
Convection Multi-Rack 100 550
ConvectionRoast 100 550
Pizza 100 550
Convection Broil (Low, High) 450 550
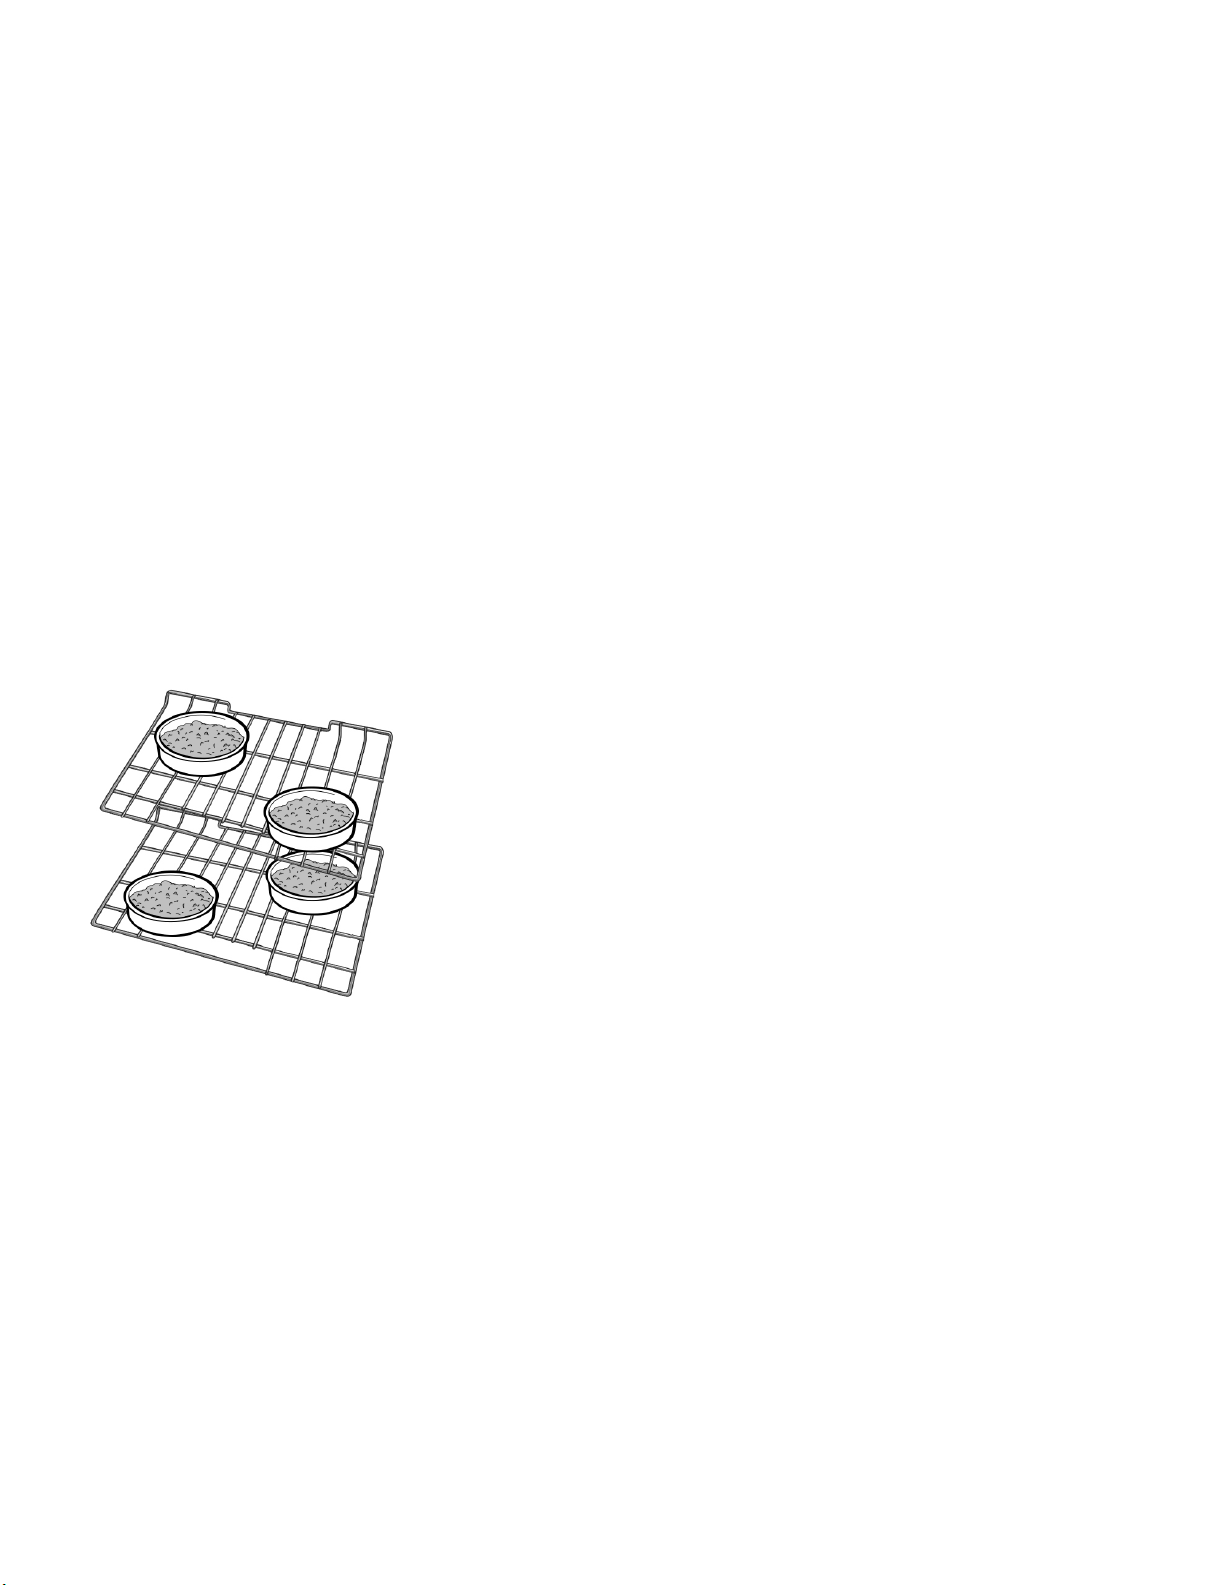
38
Convection Bake 2
Convection Bake is similar to Bake. Heat comes from the
upper and lower heating elements. The main difference
in convection baking is that the heat is circulated
throughout the appliance by the convection fan.
The Convection Bake mode is well suited for cakes, bar
cookies and breads to take advantage of the bottom
heat, yielding a better crust on baked items.
The benefits of Convection Bake include:
▯ Slight decrease in cook time.
▯ Higher volume (yeast items rise higher).
Tips
▯ Reduce recipe temperature by 25°F. Refer to the
cooking chart at end of this manual.
▯ Place food in shallow, uncovered pans, such as
cookie sheets without sides.
▯ If baking more than one pan on a rack, allow at least
1-1^“ of air space around the pan.
▯ For cakes use rack positions 2 and 5. Stagger pans
so that one is not directly above the other (see
following graphic).
Convection Multi-Rack:
Convection Multi-Rack cooks with heat from a third
element behind the back wall of the oven. The heat is
circulated throughout the oven by the convection fan.
The Convection Multi-Rack is well suited for cooking
individual serving-sized foods such as cookies and
biscuits. It is also good for cooking on multiple racks (2
or 3) at the same time. Baking cookies is possible on 6
racks simultaneously. In this case, the baking time
increases slightly.
The benefits of Convection Multi-Rack include:
▯ Even browning.
▯ Time savings as a result of using multiple racks at one
time.
Tips
▯ Reduce recipe temperature by 25°F if Auto
Convection Conversion is not activated.
▯ Place food in low-sided, uncovered pans such as
cookie sheets without sides.
▯ If baking more than one pan on a rack, allow at least
1“ to 1^“ of air space around the pan. Stagger pans
so that one is not directly above the other.
Pizza 2
In the Pizza mode, heat from the upper and lower
elements is circulated throughout the oven by the
convection fan.
Use the Pizza mode for fresh or frozen pizza.
Tips
▯ There might be a slight decrease in baking time.
Check before minimum package time.
▯ When baking a frozen pizza:
For a crispy crust, place directly on the rack.
For a softer crust, use a pizza pan.
▯ When proofing pizza dough, coat dough with olive oil
and cover it in a bowl tightly with plastic wrap to
prevent crust formation.
▯ Sprinkle cornmeal on the pizza pan to prevent sticking.
▯ If using a pizza paddle, sprinkle the paddle liberally
with cornmeal for ease in transferring the dough to the
pan.
▯ If par baking handmade pizza dough, prick the dough
with a fork before baking.
▯ If using a pizza pan, choose a dark, perforated pan for
a more crisp crust and a non-perforated pan for a
softer crust.
▯ Preheat baking stones following manufacturer’s
recommendations while the oven is preheating.
▯ Bake homemade pizzas on rack position 2 in the
center of the rack.
▯ Follow manufacturer’s directions for frozen pizza.
▯ The convection fan cycles on and off when using pizza
mode.

39
Roast %
Roast uses both the upper and lower elements to
maintain the oven temperature. Roasting uses more
intense heat from the upper element than the lower
element. This results in more browning of the exterior
while the inside remains especially moist.
Roast is best suited for large cuts of meat and poultry.
Tips
▯ Preheating the oven is not necessary.
▯ Use a high-sided broil pan or roasting pan. Cover dish
with a lid or foil for less tender cuts of meat.
▯ For less tender cuts of meat, add liquids, such as
water, juice, wine, bouillon or stock for flavor and
moisture.
▯ Roasting bags and using a liquid are suitable for use
in this mode.
▯ When roasting whole chicken or turkey, tuck wings
behind back and loosely tie legs with kitchen string.
Convection Roast 2
Convection Roast uses heat from the top and bottom
elements as well as heat circulated by the convection
fan.
The Convection Roast mode is well suited for preparing
tender cuts of meat and poultry. It is also suitable for
roasting vegetables.
The benefits of Convection Roast mode include:
▯ As much as 25% faster cooking than non-convection
modes.
▯ Rich, golden browning.
Tips
▯ Preheating the oven is not necessary.
▯ Use the same temperature as indicated in the recipe.
▯ Check doneness early, since roasting time may
decrease.
▯ Do not cover meat or use cooking bags.
▯ Use a broil pan with a rack and grid or a shallow,
uncovered pan with a rack for roasting.
▯ Use a meat thermometer to determine the internal
temperature of the meat.
▯ If the meat is browned to your liking, but is not yet
done, foil can be placed over the meat to prevent over-
browning.
▯ Let meat stand covered with foil 10-15 minutes after
removing it from the oven.
▯ See charts for recommended rack positions.
Broil (
Broil uses intense heat radiated from the upper element.
The Broil mode is best suited for cooking thin, tender
cuts of meat (1“ or less), poultry and fish. It can also be
used to brown breads and casseroles. Always broil with
the door closed.
The benefits of broiling include:
▯ Fast and efficient cooking.
▯ Cooking without the addition of fats or liquids.
Tips
▯ Preheat oven 3-4 minutes. Do not preheat for more
than 5 minutes.
▯ Steaks and chops should be at least 3/4” thick.
▯ Brush fish and poultry with butter or oil to prevent
sticking.
▯ Use the broil pan and grid or a deep pan with a metal
rack, for broiling.
▯ Do not cover the broil grid with foil. It is designed to
drain fats and oils away from the cooking surface to
prevent smoking and spattering.
▯ Turn meats (other than fish) once during the
recommended cook time. Fish does not need to be
turned.
▯ When top browning casseroles, use only metal or
glass ceramic dishes such as Corningware®.
▯ Never use heat-proof glass (Pyrex®); it cannot tolerate
the high temperature.
▯ For broil times, refer to the Meat/Poultry Cooking
Chart.

40
Convection Broil 4
Convection Broil is similar to Broil. It combines intense
heat from the upper element with heat circulated by a
convection fan.
Convection Broil mode is well suited for cooking thick,
tender cuts of meat, poultry and fish. Convection Broil is
not recommended for browning breads, casseroles and
other foods. Always use Convection Broil with the door
closed.
In addition to the benefits of standard broiling,
convection broiling is faster.
Temperature must be set within 450°-550°F to enable
Broil and Convection Broil.
Tips
▯ Preheat oven 3-4 minutes. Do not preheat for more
than 5 minutes.
▯ Steaks and chops should be at least 1^“ thick.
▯ Use the broil pan and grid or a deep pan with a metal
rack, for broiling.
▯ Do not cover the broil grid with foil. It is designed to
drain fats and oils away from the cooking surface to
prevent smoking and spattering.
▯ Turn meats (other than fish) once during the
recommended cook time. Fish does not need to be
turned.
▯ Never use heat-proof glass (Pyrex®); it cannot tolerate
the high temperature.
▯ For Convection Broil times, refer to the Meat/Poultry
Cooking Chart.
Proof $
In Proof, the appliance uses the upper and lower
elements to maintain a low temperature to proof bread or
other yeast doughs.
▯ No preheat is necessary.
▯ Proofing is the rising of yeast dough.
▯ The Proof mode temperature is 85°F to 125°F.
▯ The default temperature in Proof mode is 100°F.
▯ Loosely cover the bowl or pan and use any rack that
accommodates the size of the container.
▯ Keep the door closed and use the oven light to check
the rising of the dough.
Warm %
In Warm, the upper and lower elements maintain a low
temperature in the oven cavity in order to keep food at
serving temperature.
▯ Use the Warm mode to keep cooked foods hot for up
to one hour until ready to serve.
▯ Warm mode temperatures are 150°F to 225°F.
▯ The default temperature in the Warm mode is 170°F.
▯ Foods that must be kept moist should be covered with
a lid or aluminum foil.
9 CAUTION
WHEN USING WARM MODE, FOLLOW THESE
GUIDELINES:
▯ Do not use the Warm mode to heat cold food.
▯ Be sure to maintain proper food temperature. The
USDA recommends holding hot food at 140°F
(60°C) or warmer.
▯ DO NOT warm food longer than one hour.
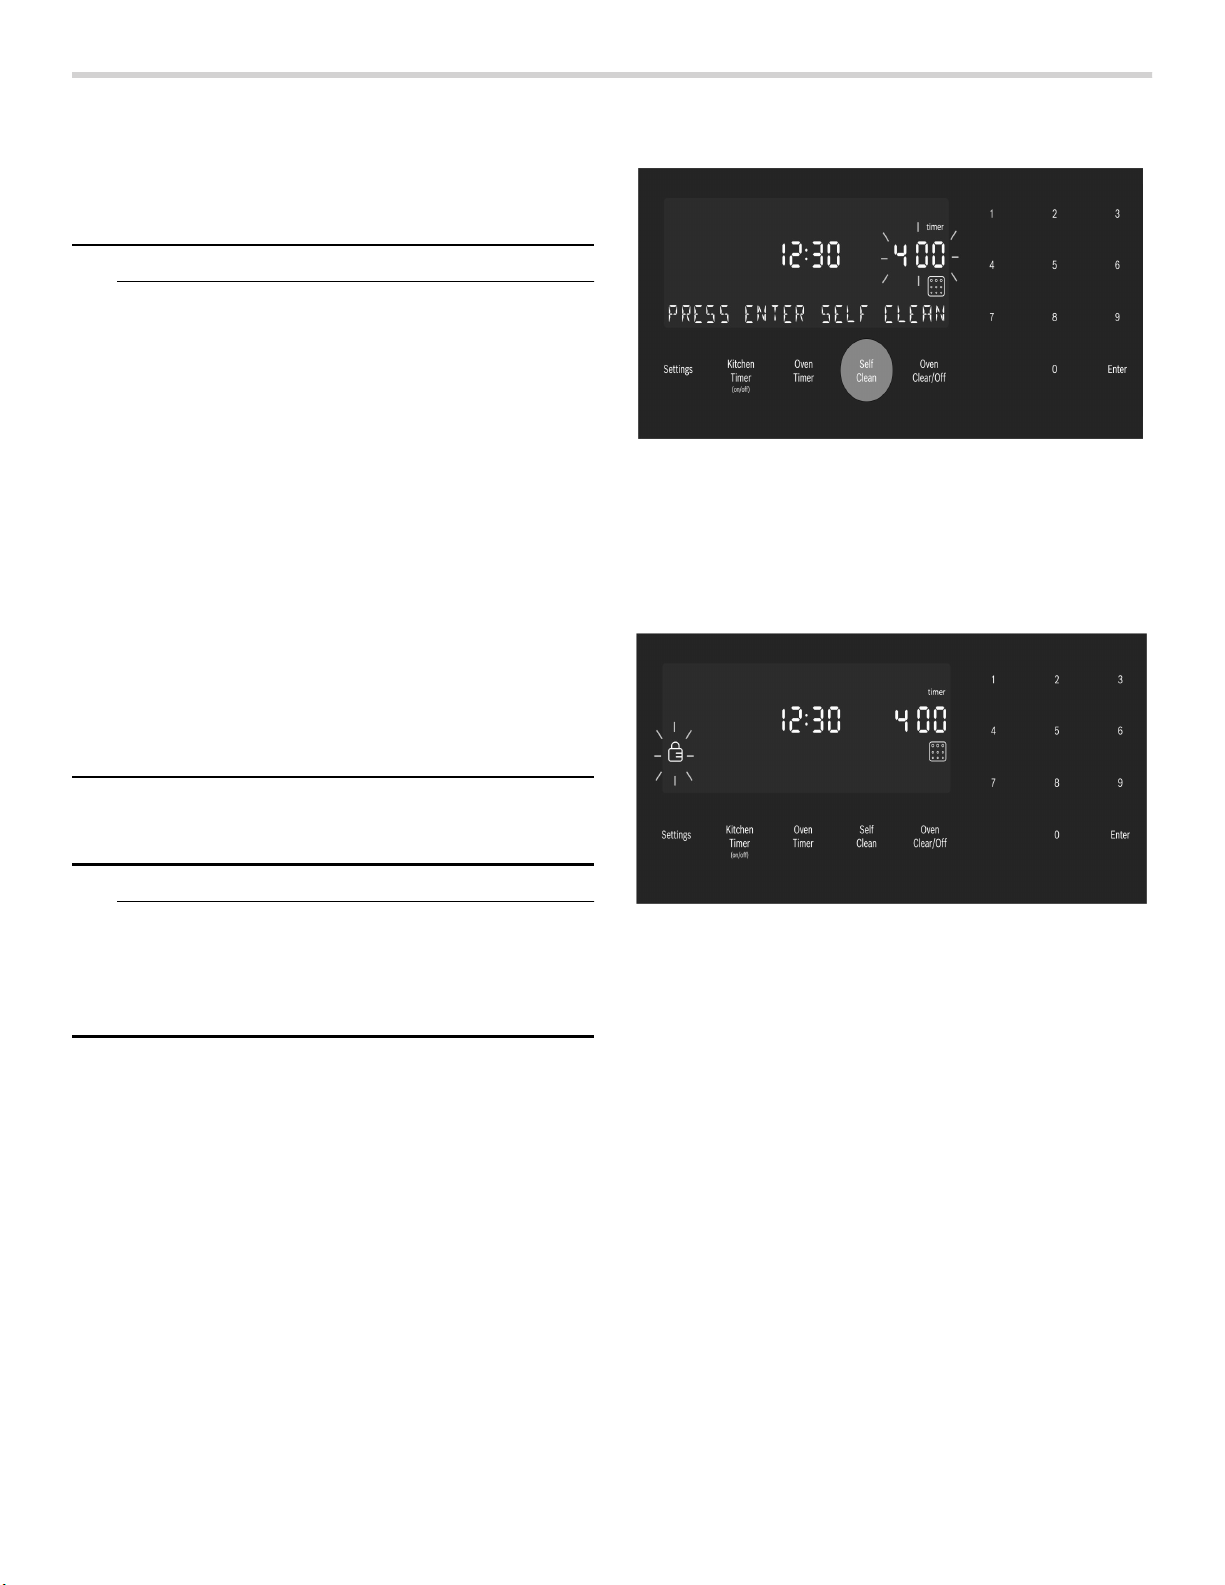
41
Cleaning and Maintenance-Oven
Cleaning the Oven
Self-Clean
9 WARNING
WHEN USING THE SELF-CLEAN SETTING
▯ During the elimination of soil during self-cleaning,
small amounts of Carbon Monoxide can be
created and the fiberglass insulation could give
off very small amounts of formaldehyde during
the first several cleaning cycles. To minimize
exposure to these substances, provide good
ventilation with an open window, or use a
ventilation fan or hood.
▯ Children should not be left alone or unattended in
an area where appliances are in use. During the
Self Clean cycle, parts of the appliance may
become potentially harmful to persons who lack
adult knowledge of appliances and adult
reactions to potentially harmful conditions.
▯ Do not block the oven vent(s) during the self-
cleaning cycle. Always operate the unit according
to the instructions in this manual.
▯ When self-cleaning, confirm that the door locks
and will not open. If the door does not lock, do
not run Self-Clean. Contact service.
During Self-Clean, the oven is heated to a very high
temperature. Soil is burned off at this temperature.
9 CAUTION
AVOID RISK OF DAMAGE
▯ Wipe out excessive spillage before self-cleaning
the oven.
▯ Do not clean parts or accessories in the self-
clean oven.
Self Clean
1.
Remove all accessories and racks from the oven.
2.
If there is a cooking mode on, press Oven Clear/Off to
end the running mode.
3.
Press the Self Clean button below the display.
The Self Clean icon q appears in the display. The Self
Clean timer default (4:00 hours) blinks to indicate it
can be accepted or changed.
To accept the 4:00 hour default Self Clean time, press
Enter on the numeric keypad.
To enter a different number of hours, use the numeric
keypad. The value entered must be within the range of
2:00 to 4:00 hours. Entering a value less than 2:00 or
greater than 4:00 results in an error tone and
message.
Use a longer setting for a heavily soiled oven.
4.
When the desired Self Clean time is displayed, press
Enter on the numeric keypad.
The oven door locks prior to starting Self Clean.
The door lock symbol L is displayed and blinks while
the door is being locked. Once locked, the door lock
symbol is continuously illuminated but not blinking.
The door lock symbol remains illuminated as long as
the Self Clean mode is running.
Note: The door remains locked until the oven has
cooled down after self-cleaning. The door can be
opened again only after “Self Clean” disappears from
the display.
5.
Self Clean starts and the oven Self Clean timer begins
its countdown.
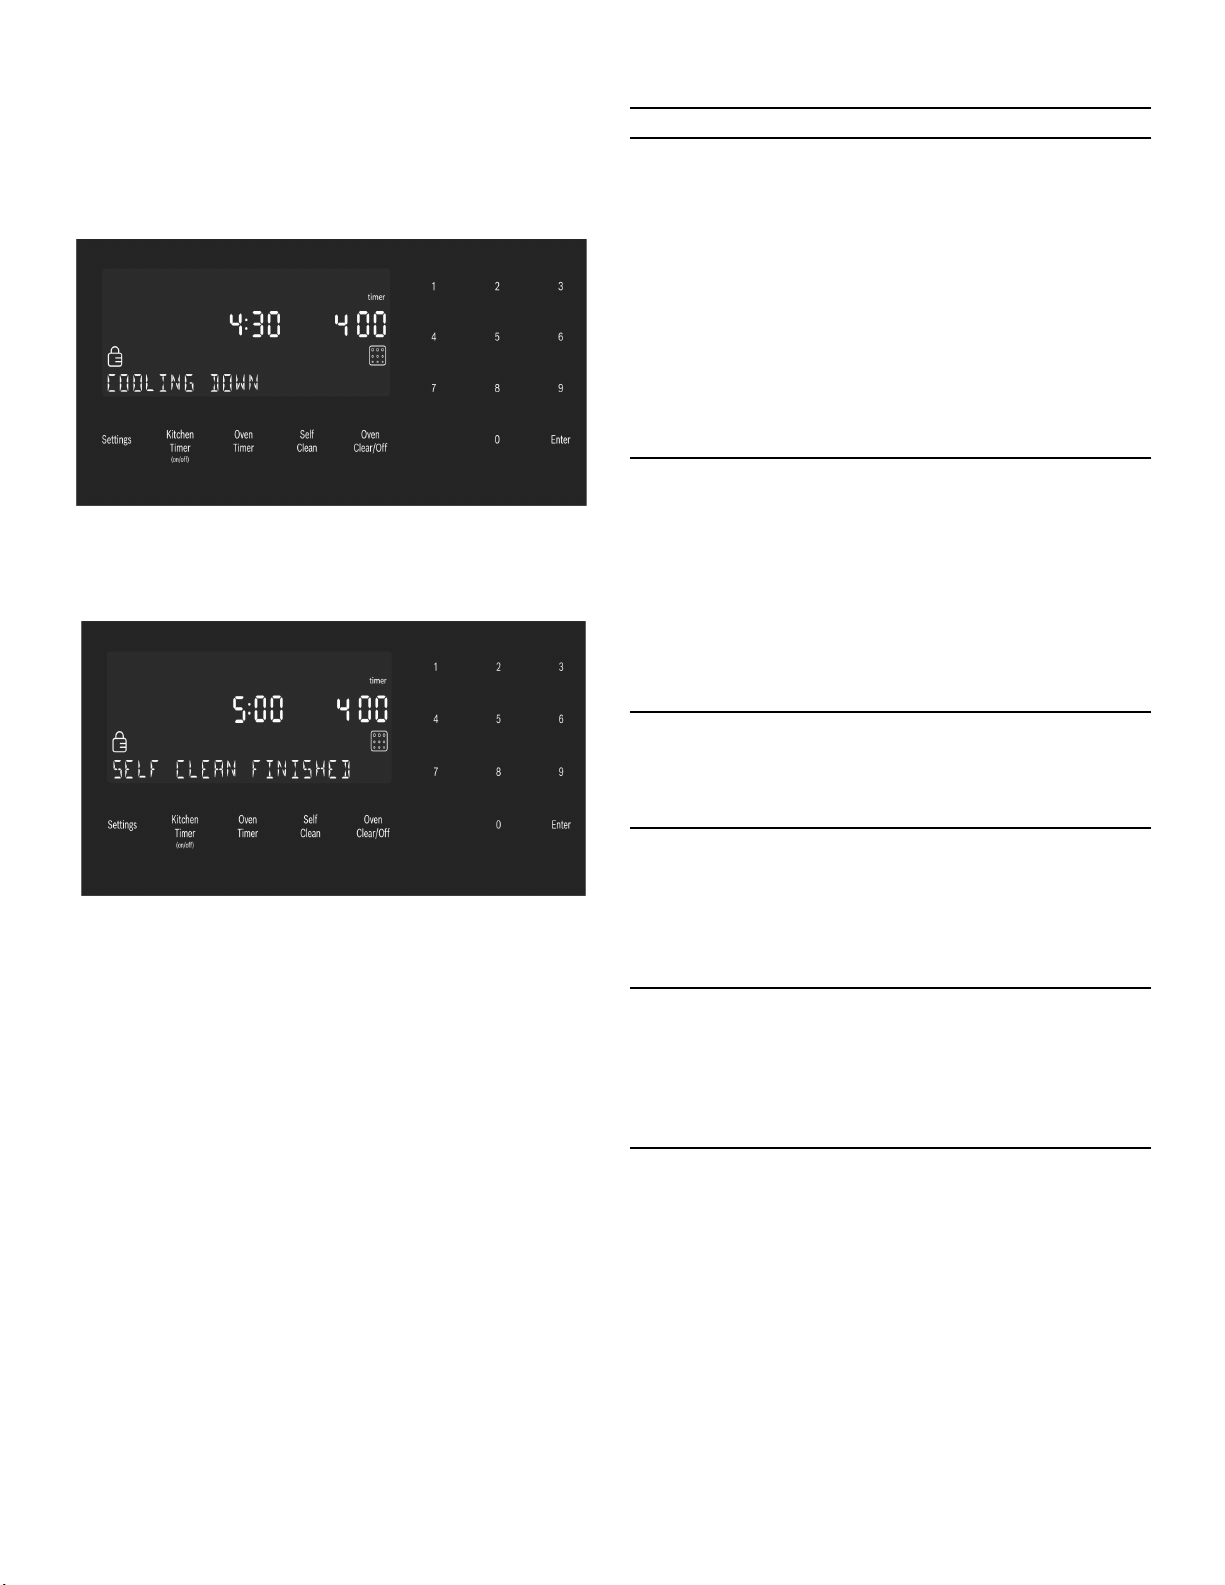
42
To Cancel Self Clean
Press the Oven Clear/Off button to cancel Self Clean.
For Safety, when the Self Clean timer ends, the unit
must cool down before the door can unlock. During
this period the message “COOLING DOWN” is
displayed.
6.
When the cool down is complete, the message “SELF
CLEAN FINISHED” is displayed. Continue to use
caution when opening the oven door.
7.
Press Oven Clear/Off to clear the display when Self
Clean is finished.
8.
After the oven has cooled down and the door is
unlocked, wipe remaining ash from the oven using a
moist cloth.
Notes
▯ The oven light cannot be turned on during self-
cleaning.
▯ The special heat-resistant enamel and the polished
components in the oven can become discolored over
time. This is normal and does not affect operation. Do
not use scouring pads or abrasive cleaners to treat
discolorations.
Avoid These Cleaners
Do not use commercial oven cleaners such as Easy
Off®. They may damage the oven finish or parts.
Chlorine or chlorine compounds in some cleansers are
corrosive to stainless steel. Check ingredients on label.
Never use scouring pads or abrasive cleaners.
Oven Cleaning Guide
Part Recommendations
Flat Rack Wash with soapy water. Rinse
thoroughly and dry, or gently rub
with cleansing powder or soap-
filled pads as directed. DO NOT
clean the rack in the self-cleaning
oven.
If the flat racks are cleaned in the
oven during the self-clean mode,
they will loose their shiny finish
and may not glide smoothly. If
this happens, wipe the rack
edges with a small amount of
vegetable oil. Then wipe off
excess.
Telescopic Rack Wash with soapy water. Rinse
thoroughly and dry, or gently rub
with cleansing powder or soap-
filled pads as directed. Avoid get-
ting cleansing powder in the tele-
scopic slides. Re-lubrication may
become necessary. Use only
high-temperature food-grade
lubricants to re-lubricate slides.
DO NOT clean the rack in the
self-cleaning oven.
Fiberglass Gasket Do Not Clean Door Gasket-The
door gasket is essential for a
good seal. Care should be taken
not to rub, damage or move the
gasket.
Glass Wash with soap and water or
glass cleaner. Use Fantastik® or
Formula 409® to a clean sponge
or paper towel and wipe clean.
Avoid using powder cleaning
agents, steel wool pads and
oven cleaners.
Painted Surfaces Clean with hot soapy water or
apply Fantastik® or Formula
409® to a clean sponge or
paper towel and wipe clean.
Avoid using powder cleaning
agents, steel wool pads and
oven cleaners.
Porcelain Surfaces Immediately wipe up acid spills
like fruit juice, milk and tomatoes
with a dry cloth. Do not use a
moistened sponge/cloth on hot
porcelain. When cool, clean with
hot soapy water or apply Bon-
Ami® or Soft Scrub® to a damp
sponge. Rinse and dry. For stub-
born stains, use soap-filled pads.
It is normal for porcelain to show
fine lines with age due to expo-
sure to heat and food soil.
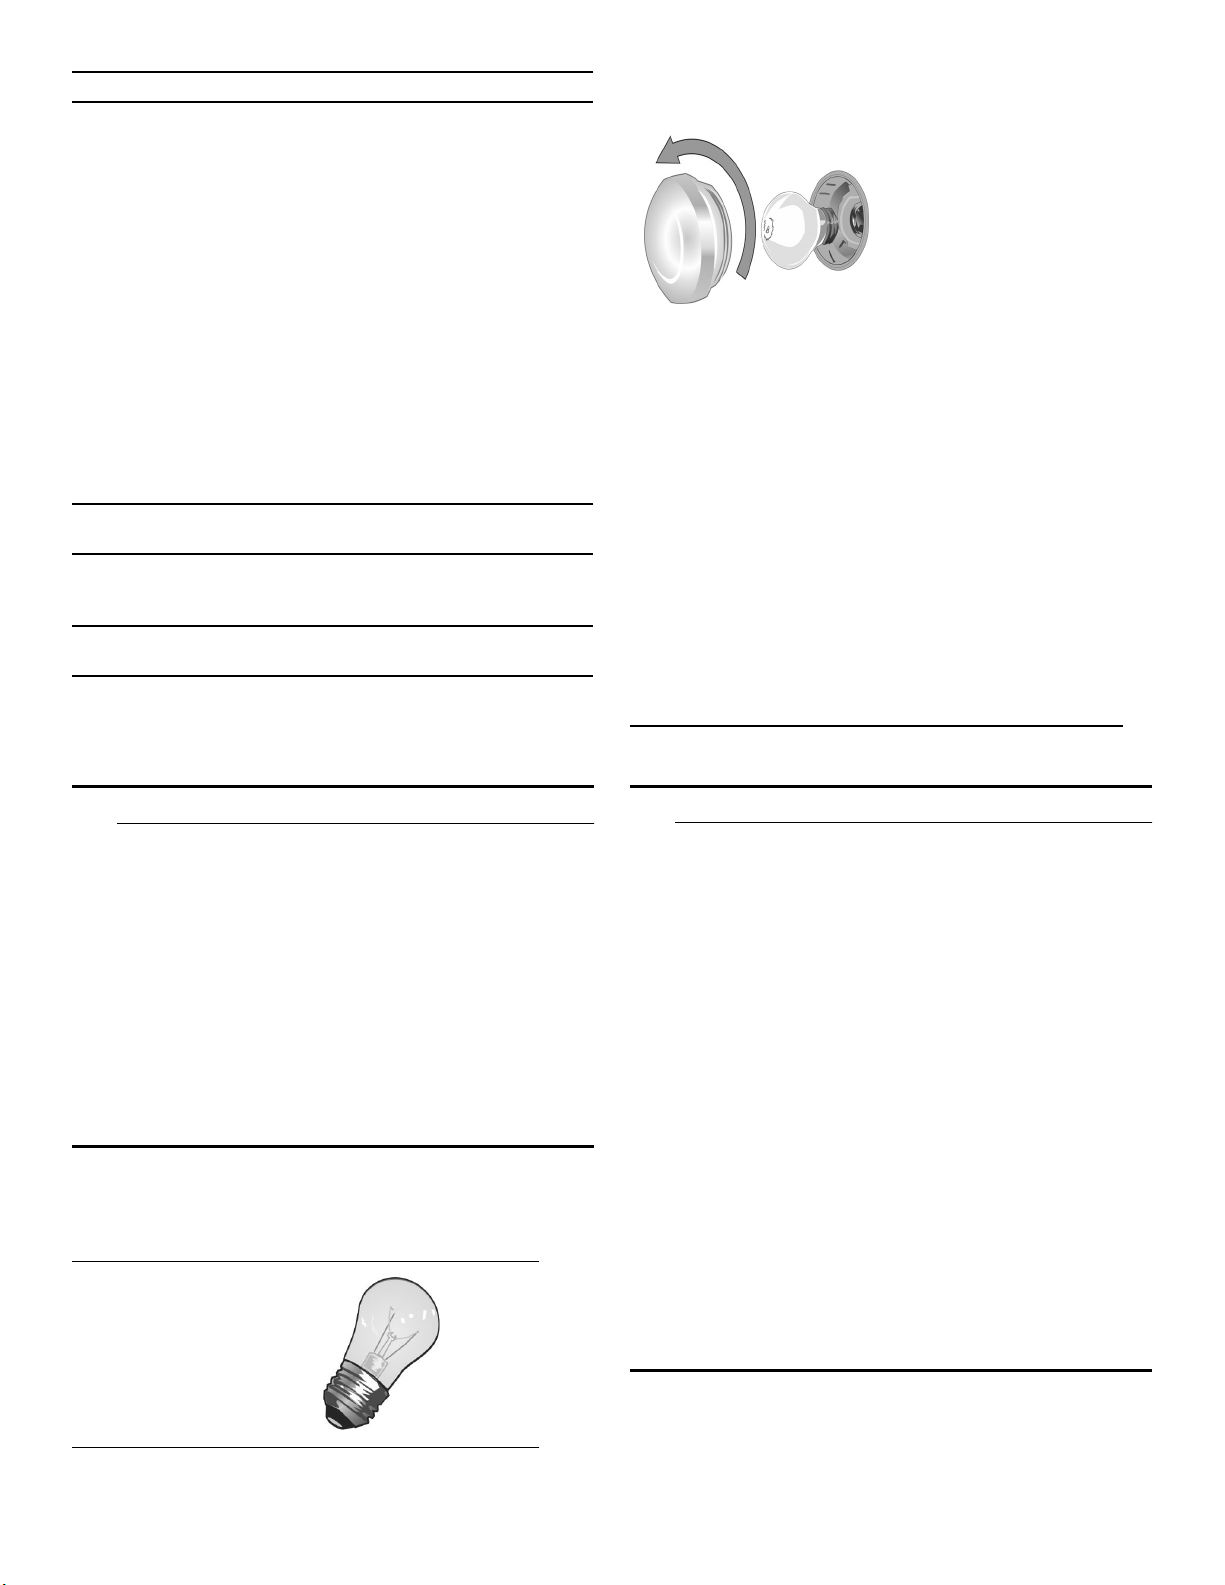
43
Maintenance
Replacing an Oven Light
9 CAUTION
WHEN REPLACING AN OVEN LIGHT:
▯ Make sure the appliance and lights are cool and
power to the appliance has been turned off
before replacing the light bulb(s). Failure to do so
could result in electrical shock or burns.
▯ The lenses must be in place when using the
appliance.
▯ The lenses serve to protect the light bulb from
breaking.
▯ The lenses are made of glass. Handle carefully to
avoid breaking. Broken glass could cause an
injury.
▯ Light socket is live when door is open.
Bulb Specifications:
To Change the Bulb:
How to Remove the Oven Door
9 WARNING
▯ Make sure oven is cool and power to the oven
has been turned off before removing the door.
Failure to do so could result in electrical shock or
burns.
▯ The oven door is heavy and parts of it are fragile.
Use both hands to remove the oven door. The
door front is glass. Handle carefully to avoid
breakage.
▯ Grasp only the side of the oven door. Do not
grasp the handle as it may swing in your hand
and cause damage or injury.
▯ Failure to grasp the oven door firmly and properly
could result in personal injury or product damage.
▯ To avoid injury from hinge bracket snapping
closed, be sure both levers are securely in place
before removing the door. Also, do not force door
open or closed-the hinge could be damaged and
injury could result.
▯ Do not lay removed door on sharp or pointed
objects as this could break the glass. Lay on a
flat, smooth surface, positioned so that the door
cannot fall over.
To help avoid injury or damage, be sure to read the
above WARNING before attempting to remove the oven
door.
Stainless Steel Sur-
faces
Never allow food stains or salt to
remain on stainless steel for any
length of time. Always wipe or
rub in the direction of the grain.
Clean with a soapy sponge, then
rinse and dry, or wipe with Fan-
tastik® or Formula 409®
sprayed on a paper towel. Pro-
tect and polish with Stainless
Steel Magic® and a soft cloth.
Remove water spots with a cloth
dampened with white vinegar.
Use Bar Keeper´s Friend® to
remove heat discoloration. Chlo-
rine or chlorine compounds in
some cleansers are corrosive to
stainless steel. Check ingredients
on label.
Plastic & Controls When cool, clean with soapy
water, rinse and dry.
Probe Wipe with soapy water. Do not
submerge. Do not wash in the
dishwasher.
Printed Areas
(Words & Numbers)
Do not use abrasive cleaners or
petroleum based solvents.
Bulb Description Bulb Image
40 watt, appliance
bulb, standard Edison
base.
Part Recommendations
▯ Turn off the power to
the oven at the main
power supply (fuse or
breaker box).
▯ Remove the glass
cover by unscrewing
it. Turn the glass coun-
terclockwise to
remove it.
▯ Remove the bulb. The
bulb unscrews coun-
terclockwise.
▯ Grasp the new bulb
with a clean, dry cloth
to prevent depositing
skin oils on the glass
which could lead to
premature bulb failure.
Replace the bulb by
screwing it in turning
the bulb clockwise.
▯ Screw the glass cover
back on.
▯ Turn power back on at
the main power supply
(fuse or breaker box).

44
1.
Open the oven door to its fully open position.
2.
Flip levers on hinges toward you.
Note: It may be necessary to use a tool, such as a
screwdriver, to gently pry the upper part of the lever
away from the housing. Take care to avoid scratching
the housing.
3.
Bring both door hinge levers to their fullest down
position as shown in the illustration. The left and right
door hinges differ slightly but operate in the same
manner.
4.
Close the oven door until it catches on the hinge stop
levers, locking the hinges at the proper angle for door
removal. The door will be open about 7 inches at the
top. This takes the spring tension off the hinges so the
door can be easily lifted out.
5.
The door is heavy. Use both hands to firmly grip it by
the sides. Do not grip the door by the handle.
Maintaining the door angle, lift the door straight up
approximately 3/4” to unhook the hinges from the
slots and then pull it out towards you until the hinges
are clear of the oven housing.
6.
Place the door in a convenient and stable location for
cleaning.
How to Replace the Oven Door
1.
Holding the door firmly in both hands, grip it on either
side, not by the handle.
2.
Tilt the door back slightly towards you until it opens
about 7 inches at the top.
3.
Slide the hinges into the slots as far as they will go and
then lower the door straight down. The angle of the
door may need to be adjusted slightly to allow the
hinges to engage properly and the door to lower into
place. The door should lower about 3/4” and stop. If
not, the hinges have not engaged properly and the
door could fall if it is released.
4.
Once both hinges are fully engaged as described in
Step 3, gently open the door until it is fully open.
5.
Push the levers on both the hinges up and forward
until they are locked into the slot and flush with the
front of the oven body.
6.
Close and open the door slowly to be sure it is
correctly and securely in place.
"
#

45
Operation-Warming Drawer
This section explains how to operate the warming
drawer. See “Getting the Most Out of Your Warming
Drawer” for guidelines to improve warming drawer
results.
About the Warming Drawer
The warming drawer will keep hot, cooked foods at
serving temperature. Warming drawer settings are Low,
Medium and High.
Warming Drawer Specifications
Drawer Interior: 25”W x 17”D x 3”H
Dish Sizes:
▯ 2- 9” x 13” Pyrex 3-quart dishes, side by side
▯ 2- 9 1/2” x 15” Pyrex 4 quart dishes, side by side
▯ 4- 10 1/2” plates, single or stacked
▯ 3- 11” plates, single or stacked
Operation
9 CAUTION
To maintain food safety, follow these guidelines:
▯ DO NOT use the warming drawer to heat cold
food (exception: it is safe to use the drawer to
crisp crackers, chips or dry cereal and to warm
plates).
▯ Be sure to maintain proper food temperature. The
USDA recommends holding hot food at 140°F or
warmer.
▯ DO NOT warm food for longer than one hour.
▯ Plastic containers, plastic wrap or aluminum foil
can melt if in direct contact with the drawer or a
hot cooking container. If it melts onto the drawer,
it may not be removable.
Preheating
For best results, preheat the warming drawer when
warming food.
Preheat Times:
▯ Low: 10 minutes
▯ Medium: 15 minutes
▯ High: 20 minutes
Turning the Warming Drawer On and Off
1.
Press the Warming Drawer button.
2.
WARMING DRAWER will be displayed with the default
setting “MED”. The warming drawer amber icon is
displayed below the clock.
3.
To accept the “MED” setting, press the Enter button.
The setting is accepted and the warming drawer icon
remains illuminated. If enter is not pressed, the
warming drawer setting is not accepted and the
warming drawer turns off.
4.
To change the setting, when “MED” is displayed, press
the Warming Drawer button again. The setting
changes to “HIGH”. Press the Warming Drawer button
again to change the setting to “LOW”.
To accept a setting press Enter.
The displayed setting will be accepted and the
warming drawer icon is illuminated below the clock,
indicating that the warming drawer is active.
5.
To turn the warming drawer off, press the Warming
Drawer button and the warming drawer will turn off.
The warming drawer icon will no longer appear under
the clock.
Sabbath Mode
The warming drawer may also operate in Sabbath Mode
but ONLY while the oven is in Sabbath Mode. It is not
possible to run Sabbath Mode in the warming drawer
only. Simply start the desired warming drawer operation
and then start Sabbath Mode in the oven cavity. The
warming drawer and oven will operate in Sabbath Mode
until the timer reaches zero. It is not possible to change
the warming drawer temperature while in Sabbath Mode.
Warming Empty Serving Bowls and Plates
▯ Use only heat-safe dishes.
▯ Warm on low setting for cooking containers.
▯ Check dish temperature during warming period.
▯ Place empty plates or dishes in a cold warming
drawer. Do not preheat drawer prior to placing dishes.
46
Getting the Most Out of Your Warming Drawer
About the Appliance
The warming drawer will keep hot, cooked foods at
serving temperature. Always start with hot food. DO NOT
use to heat cold food. It is safe to use the drawer to crisp
crackers, chips or dry cereal and to warm plates.
The warming drawer has a push-to-open feature. Push in
the front of the drawer to activate opening.
General Tips
Refer to the Warming Drawer Chart for recommended
settings.
▯ To keep several different foods hot, set the
temperature for the food needing the highest setting.
▯ Place items needing the highest setting toward the
side of the drawer and items needing less heat in the
center of the drawer.
▯ Food should be at serving temperature (above 140°F)
before being placed in the warming drawer. DO NOT
use to heat cold food other than crisping crackers,
chips and dry cereal or warming dishes or plates.
▯ Preheat empty serving dish while preheating drawer if
desired.
▯ Place cooked, hot food in warming drawer in its
original cooking container or in a heat-safe serving
dish.
▯ Aluminum foil may be used to cover food. DO NOT
line the warming drawer with aluminum foil.
▯ Do not use the warming drawer for storage.
Use of Your Appliance
9 CAUTION
To maintain food safety, do not leave food in the
drawer for more than one hour before or after
cooking.
IMPORTANT:
Plastic containers or plastic wrap can melt if in direct
contact with the drawer or a hot utensil. If it melts onto
the drawer, it may not be removable.
Note: Use only heat-safe dishes.
Preheating
For best results, preheat the warming drawer when
warming food.
Preheat Times:
▯ Low: 10 minutes
▯ Medium: 15 minutes
▯ High: 20 minutes
Warming Empty Serving Bowls and Plates
▯ Use only heat-safe dishes.
▯ Warm on low setting for cooking containers.
▯ Check dish temperature during warming period.
▯ Place empty plates or dishes in a cold warming
drawer. Do not preheat drawer prior to placing dishes.
Crisping Stale Items
Place food in low-sided dishes or pans.
1.
Press LOW.
2.
Preheat for 10 minutes, then place dish in drawer.
3.
Set the warming timer.
4.
Check crispness after 45 minutes. Add time as
needed.
Temperature Recommendations
Food/Cookware Setting Cover Dish
Bacon HIGH No
Beef, medium and well done MED No
Beef, medium rare LOW No
Bread, hard rolls MED No
Bread, soft rolls, coffee cakes MED Yes
Biscuits MED Yes
Casseroles MED Yes
Eggs MED Yes
Fish, seafood MED Yes
Fried foods HIGH No
Gravy, cream sauces MED Yes
Ham MED Yes
Pancakes HIGH Yes
Pies, one crust MED Yes
Pies, two crusts MED No
Pizza HIGH No
Pork MED Yes
Potatoes, baked HIGH Yes
Potatoes, mashed MED Yes
Poultry, roasted MED Yes
Vegetables MED Yes
Plates LOW No
Plate of food MED Yes
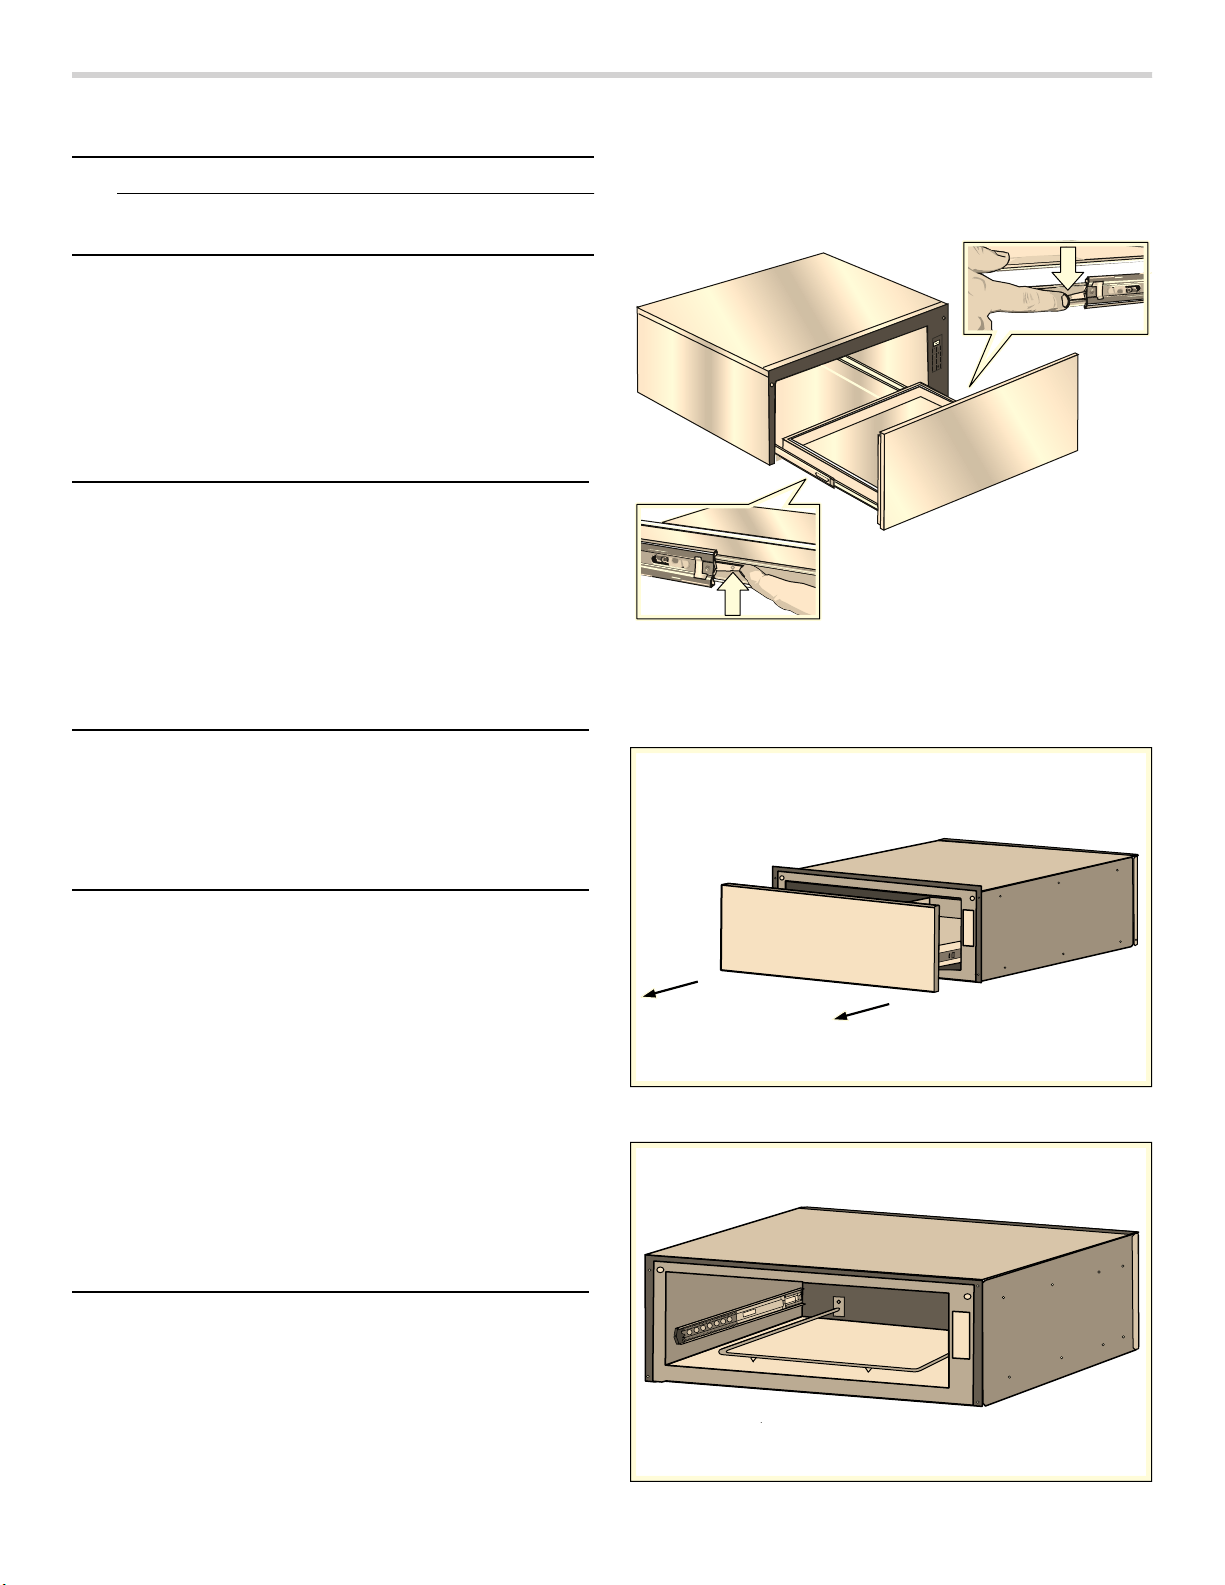
47
Cleaning and Maintenance-Warming Drawer
9 CAUTION
To prevent burns, do not remove drawer while hot.
Be sure drawer is empty before removing.
Note: The warming drawer is opened with a Push-To-
Open mechanism. It is referred to in this chapter as a
PTO mechanism.
Cleaning the Warming Drawer
Removing Drawer from Housing
NOTICE: The following is the manufacturer’s
recommendations for removing and installing the drawer
to minimize the risk of damage to the PTO mechanism.
1.
Remove the drawer from the drawer housing.
▯ Pull drawer to fully open position.
▯ Press down right drawer release lever.
▯ Lift up left drawer release lever.
▯ Firmly pull the drawer straight out.
▯ Retract cabinet rails while drawer is removed.
2.
Grasp both sides of the drawer and pulling straight
and level, carefully remove the drawer housing. This
step may require light to moderate force to completely
remove drawer.
3.
Install or service (clean) housing with drawer removed.
Part Recommendations
Drawer Interior (polished
stainless steel)
Use dish detergent. Wash,
rinse well and dry. For hard
water spots or scale, use
white vinegar. Apply with a
sponge or cloth, rinse and
dry. Chlorine or chlorine
compounds in some
cleansers are corrosive to
stainless steel and can
cause injury. Check ingredi-
ents on label.
Painted Surfaces Use hot, soapy water or
mild cleaners such as Fan-
tastik® or Formula 409®.
Wash, rinse well and dry.
Avoid using abrasive clean-
ing agents, steel wool pads
and oven cleaners.
Drawer Exterior Frame
(brushed stainless steel)
Always wipe or rub in the
direction of the grain. Clean
with a soapy sponge, then
rinse and dry or wipe with
Fantastik® or Formula
409® sprayed on a paper
towel. Protect and polish
with Stainless Steel Magic®
and a soft cloth. Remove
water spots with a cloth
dampened with white vine-
gar. Use Bar Keeper’s
Friend® to remove heat
discoloration. Chlorine or
chlorine compounds in
some cleansers are corro-
sive to stainless steel.
Check ingredients on label.
-
0
8
)*
(
)
@
.
&%
1
3
0
0
'
0
/
0
''
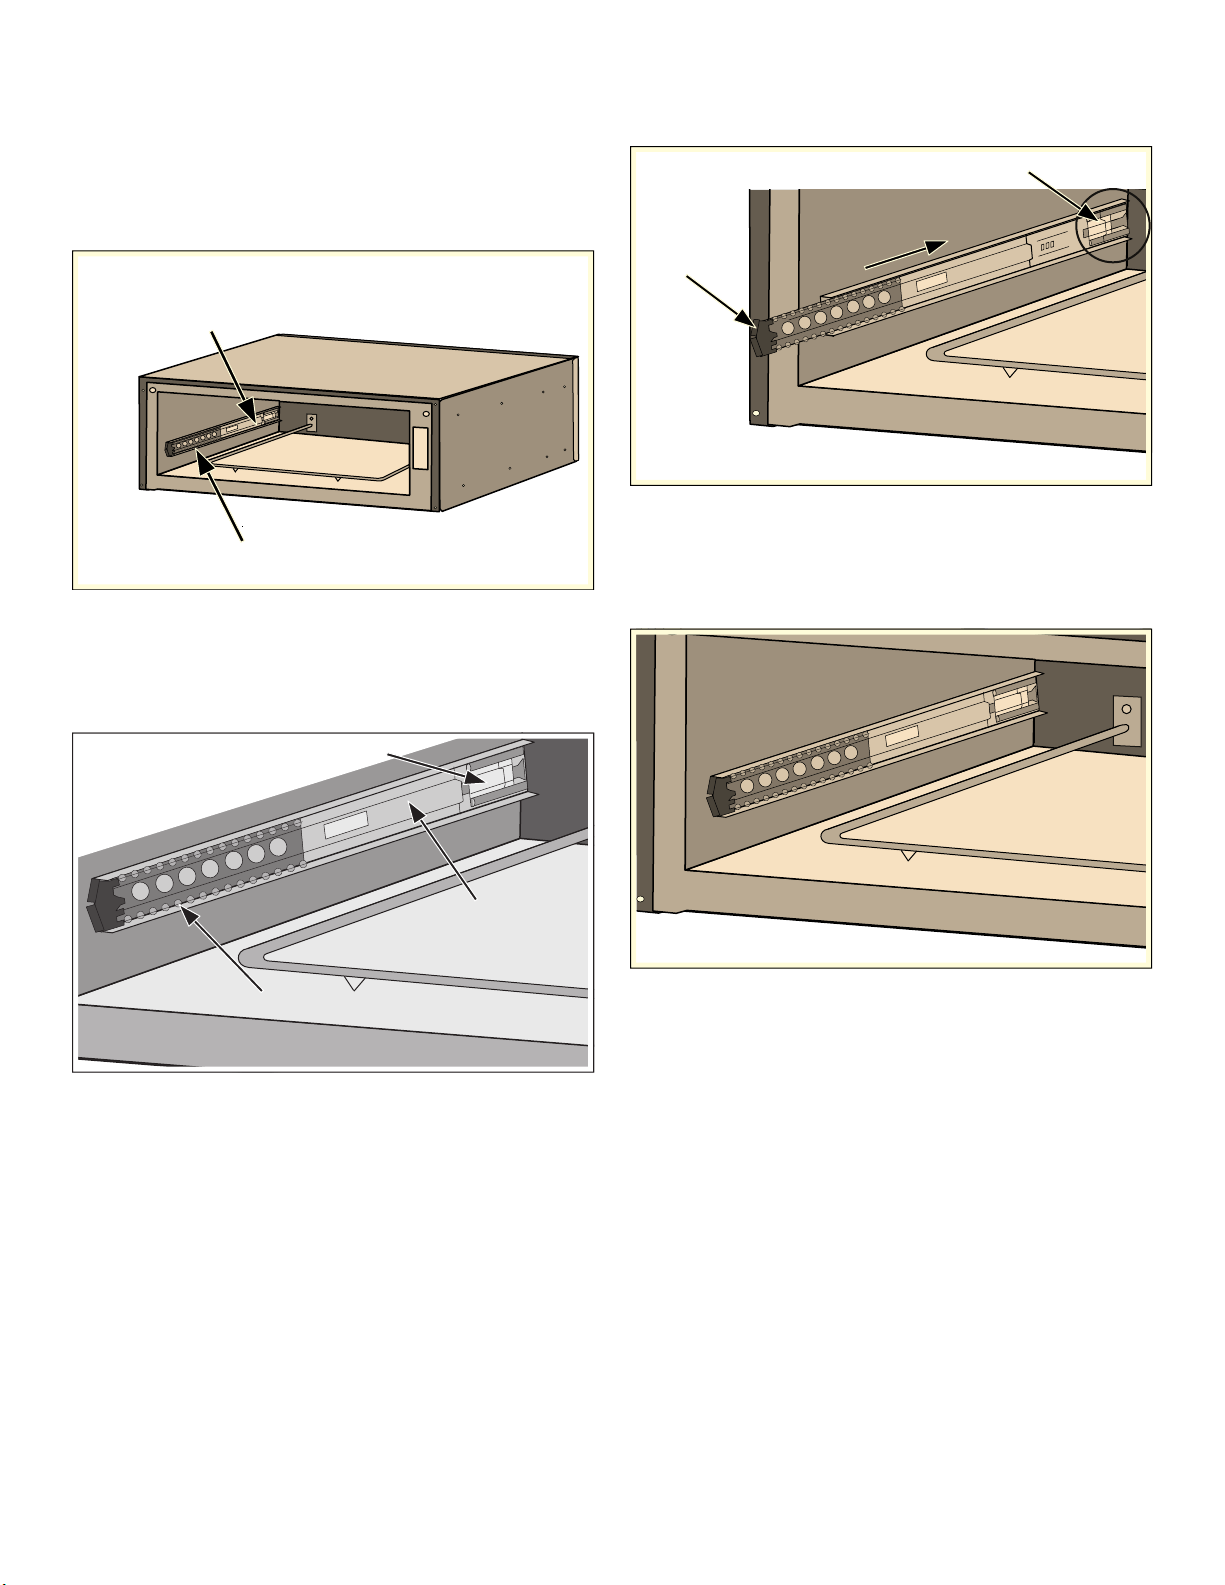
48
Installing Drawer to Housing
The slides mounted to each side of the housing wall
have two moving components, an inner rail and a ball
bearing carrier which need to be in the proper orientation
for accurate installation and alignment.
There is also a visible locking mechanism located at the
rear of each slide.
Note: The housing of your warming drawer should
match the image below identically before starting your
installation. The ball bearing carrier should be locked in
to the inner rail’s black plastic rail tip at the front of the
inner rail.
1.
With the drawer removed, set the slide inner rail to the
drawer locked position by pushing the slide inner rail
toward the rear of the housing until it locks in place.
Note: A moderate force pushing on the black plastic
ball carrier locking mechanism is required to set the
slide to the drawer locked position. The drawer is
locked when it remains in place and does not spring
back to the open position.
6OLGH,QQHU5DLO
%DOO%HDULQJ&DUULHU
/RFNLQJ0HFKDQLVP
%DOO%HDULQJ&DUULHU
6OLGH,QQHU5DLO
4MJEF*OOFS3BJM
-PDLJOH.FDIBOJTN
4MJEF*OOFS3BJMJTJOMPDLFEQPTJUJPO
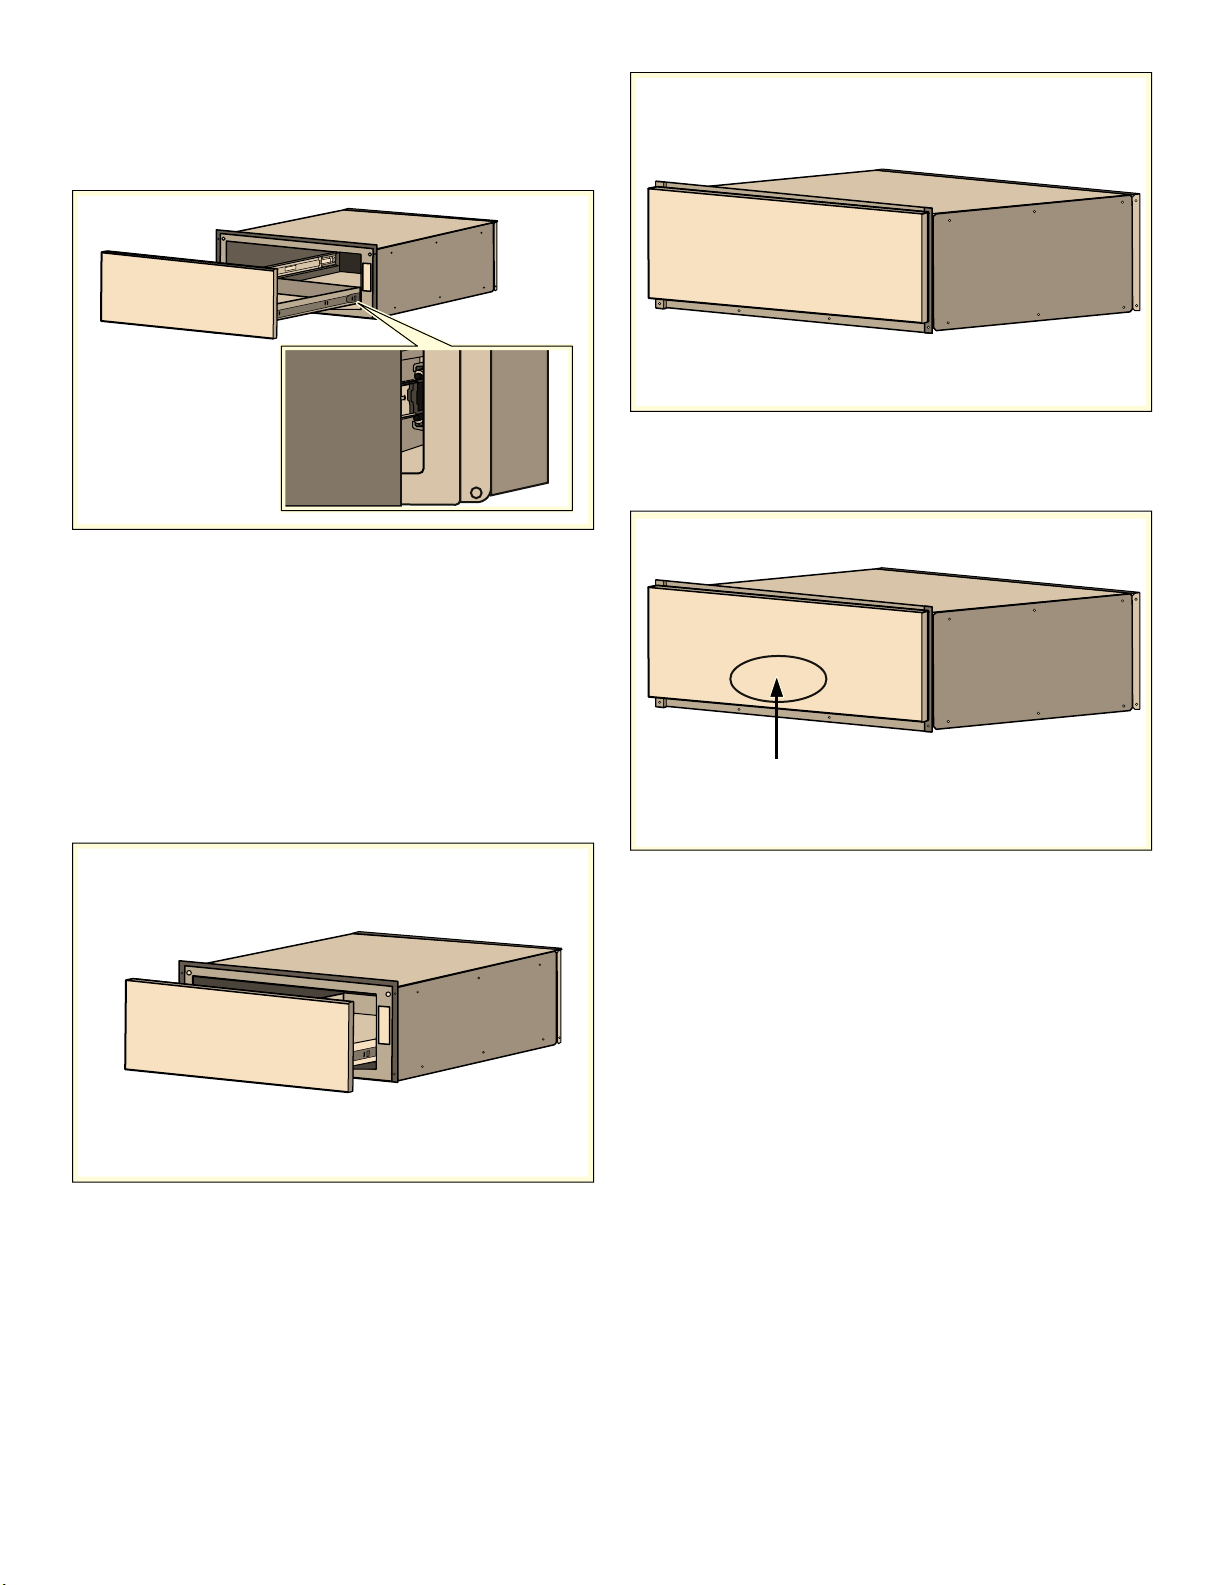
49
2.
Position the drawer assembly in front of the housing
assembly and align the rail (plastic rail tip) to the slide
ball carrier assembly. Keeping the drawer assembly
level and square to the housing, gently insert the
drawer to the housing assembly.
Notes
▯ A slight side-to-side wiggle motion may be required
to properly get the ball bearings to accurately align.
▯ Remember: You are attempting to align two sets of
ball bearings at this point. If more than a moderate
force is required to insert the drawer at this time,
remove the drawer and repeat the installation
procedure to this point.
3.
Continue to insert the drawer keeping the drawer level
and square to the housing until a slight increase in
resistance is felt at the approximate position shown
below.
NOTICES
▯ At this position, a slight increase in closure force is
required with several small increments of force
applied to the drawer to accurately align and set the
drawer for proper operation.
▯ An audible “click” should be heard when the drawer
is properly closed causing the drawer to lock in the
closed position.
4.
Test the operation of the PTO drawer by pushing on
the center lower portion of the drawer front (optimum
location for function).
Note: It should be noted the recommended and
optimum location for opening the drawer is the lower
center front. The drawer will operate with an opening
force applied to any location on the drawer front,
however a slight increase in opening force may be
required.
2SWLPXPORFDWLRQIRU372IXQFWLRQ

50
Service
Frequently-asked questions and answers
(FAQ)
Using the appliance
Why can't I switch on the cooktop and why is the child lock symbol lit?
The child lock is activated.
You can find information about this function in section
Why are the displays flashing and why can I hear an acoustic signal?
Remove any liquid or food remains from the control panel. Remove any objects from the control panel.
You can find instructions on how to deactivate the audible signal in the section on ~ "Basic settings"
Noises
Why I can hear noises while I'm cooking?
Noises may be generated while using the cooktop depending on the base material of the cookware. These
noises are a normal part of induction technology. They do not indicate a defect.
Possible noises:
A low humming noise like the one a transformer makes:
Occurs when cooking at a high heat setting. The noise disappears or becomes quieter when the heat set-
ting is reduced.
Low whistling noise:
Occurs when the cookware is empty. This noise disappears when water or food is added to the cookware.
Crackling:
Occurs when using cookware made from different layers of material or when using cookware of different
sizes and different materials at the same time. The volume of the noise can vary depending on the quantity
of food being cooked or the cooking method.
High-pitched whistling noises:
Can occur when two elements are used on the highest heat setting at the same time. The whistling noises
disappear or become quieter when the heat setting is reduced.
Fan noise:
The cooktop is equipped with a fan that switches on automatically at high temperatures. The fan may con-
tinue to run even after you have switched off the cooktop if the temperature detected is still too high.
Cookware
Which types of cookware can be used with an induction cooktop?
You can find information on which types of cookware can be used with an induction cooktop in the section
on
Why is the element not heating up and why is the heat setting flashing?
The element on which the cookware is standing is not turned on.
Check that you have turned on the correct element.
The cookware is too small for the element that is turned on or it is not suitable for induction cooking.
Check that the cookware is suitable for induction cooking and that it is placed on the element that best cor-
responds to its size. You can find information on the type, size and positioning of cookware in the sections
on , ~ "FlexInduction
®
cooking zone" and ~ "PowerMove function"

51
Fixing Malfunctions
Malfunctions are usually due to small details. Before
calling the Technical Assistance Service, you should
consider the following advice and warnings.
9 CAUTION
Repairs should only be done by an authorized
servicer.
Improper repair of your appliance may result in risk
of severe physical injury or death.
Why is it taking so long for the cookware to heat up or why is it not heating up sufficiently despite being on a high
heat setting?
The cookware is too small for the element that is turned on or it is not suitable for induction cooking.
Check that the cookware is suitable for induction cooking and that it is placed on the element that best cor-
responds to its size. You can find information on the type, size and positioning of cookware in the sections
on , ~ "FlexInduction
®
cooking zone" and ~ "PowerMove function"
Cookware
Cleaning
How do I clean the cooktop?
Using a special glass-ceramic cleaning agent produces the best results. We advise against using harsh or
abrasive cleaning agents, dishwater detergent (concentrated) or scouring pads.
You can find more information about cleaning and caring for your cooktop in the section on
Display Possible cause Solution
None The power supply has been discon-
nected.
Use other electrical devices to check whether a
short-circuit has occurred in the power supply.
The device has not been connected in
accordance with the connection dia-
gram.
Ensure that the device has been connected in
accordance with the connection diagram.
Electronics error. If the error cannot be eliminated, inform the techni-
cal after-sales service.
The displays flash The control panel is damp or an
object is covering it.
Dry the control panel or remove the object.
The Ù indicator flashes
in the element displays
An error has occurred in the electron-
ics.
To confirm the error, cover the control panel with
your hand.
”ƒ
The electronics have overheated and
have switched off the corresponding
element.
Wait until the electronics have cooled down suffi-
ciently. Then touch any symbol on the cooktop.
”…
The electronics have overheated and
have switched off all elements.
Ӡ + heat setting and
acoustic signal
There is a hot pan in the area of the
control panel. There is a risk that the
electronics will overheat.
Remove the pan. The error display goes out shortly
afterwards. You can continue to cook.
Ӡ and acoustic signal
There is a hot pan in the area of the
control panel. To protect the electron-
ics, the element has been switched
off.
Remove the pan. Wait for a few seconds. Touch
any control. If the error display goes out, you can
continue to cook.
”‚/”‡
The element has overheated and
switched itself off to protect the work
surface.
Wait until the electronics have cooled down suffi-
ciently and switch the element on again.
”‰
The element was operating for an
extended period without interruption.
The automatic safety switch-off function has been
activated. See section “Automatic time limitation”
“Š‹‹‹
“Š‹‚‹
The supply voltage is incorrect; out-
side of the normal operating range.
Contact your electrical utility provider.
Do not place hot pans on the control panel.
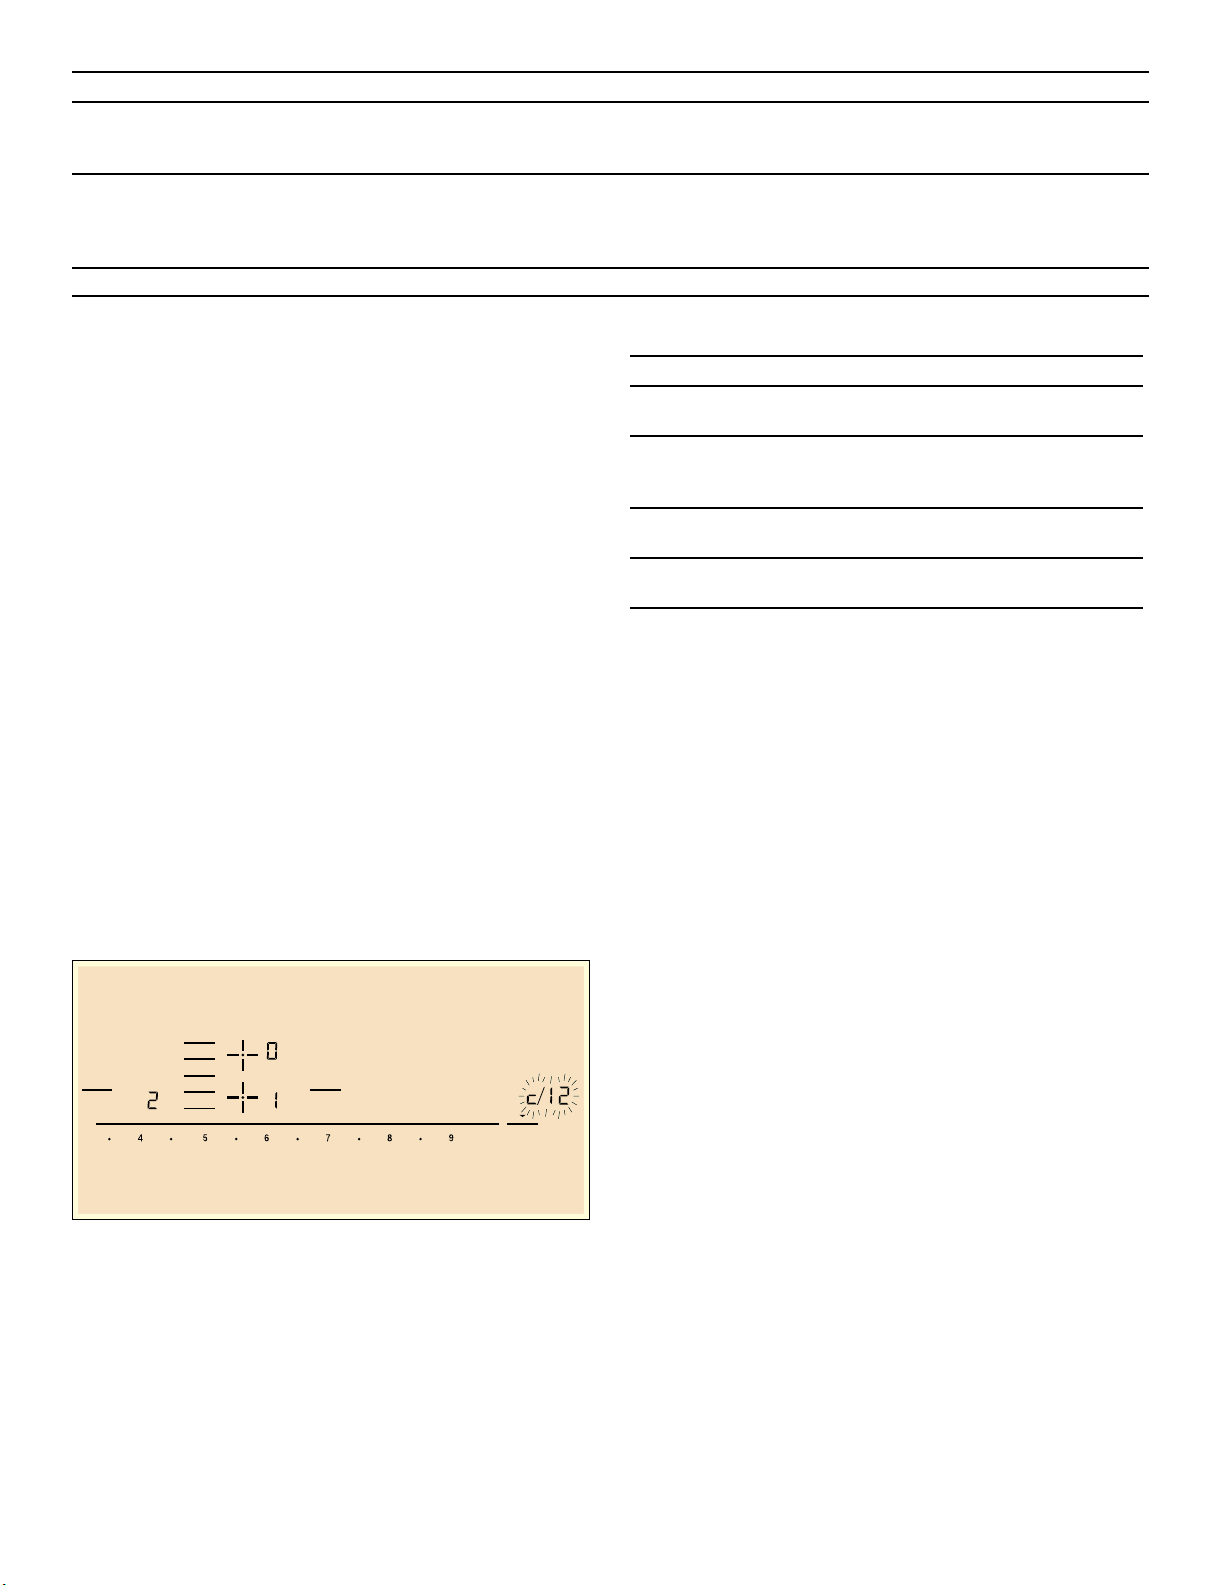
52
Notes
▯ If “ appears on the display, the sensor for the element
in question must be held down in order to be able to
read off the fault code.
▯ If the fault code is not listed in the table, disconnect
the cooktop from the power supply, wait 30 seconds,
and then reconnect it again. If the display appears
again, contact Technical Assistance Service and tell
them the precise fault code.
Suitability test of cookware
This function can be used to check the speed and quality
of the cooking process depending on the cookware.
The result is a reference value and depends on the
properties of the cookware and the element being used.
1.
With the cookware still cold, fill it with approx. 8 oz.
(200 ml) of water and place it on the center of the
cooking zone with the diameter that most closely
matches that of the base of the cookware.
2.
Go to the basic settings and select the ™‚ƒ setting.
3.
Touch the settings range. A will flash on the cooking
zone display.
The function has now been activated.
After 10 seconds, the result for the quality and speed of
the cooking process will appear on the cooking zone
display.
Check the result using the table below:
To reactivate this function, touch the settings range.
Notes
▯ The flexible cooking zone only counts as a single
element; place no more than one item of cookware on
it.
▯ If the diameter of the used cooking zone is much
smaller than the diameter of the cookware, only the
middle of the cookware can be expected to heat up.
This may result in the cooking results not being as
good as expected or being less than satisfactory.
▯ You can find information on this function in the section
~ "Basic settings"
▯ You can find information on the type, size and
positioning of the cookware in the section and
~ "FlexInduction
®
cooking zone"
“Š‹‚‚
The cooktop is not connected prop-
erly.
Disconnect the cooktop from the power supply.
Ensure that it has been connected in accordance
with the connection diagram.
š“
The demo mode is activated Disconnect the cooktop from the power supply.
Wait 30 seconds and reconnect it. Touch any
touch control in the next three minutes. The demo
mode is deactivated.
Display Possible cause Solution
Do not place hot pans on the control panel.
)OH[
-RLQ6SOLW
.HHS
:DUP
6SHHG
%RRVW
.LWFKHQ
7LPHU
&RRN
7LPHU
Result
‹
The cookware is not suitable for the element and
will therefore not heat up.*
‚
The cookware is taking longer to heat up than
expected and the cooking process is not going as
well as it ought to.*
ƒ
The cookware is heating up correctly and cooking
is progressing well.
* If there is a smaller element available, try the cook-
ware again on the smaller element.
53
Oven Troubleshooting
Use these suggestions before calling for service to avoid
service charges.
Oven Problem Possible Causes and Suggest Solutions
The oven mode or temperature selected or
the numbers selected do not appear in the
display
Review manual instructions when setting clock, timer, or Self Clean.
Oven door is locked and will not release,
even after cooling
Turn the oven off at the circuit breaker and wait 5 minutes. Turn breaker
back on. The oven should reset itself and will be operable.
Oven is not heating Check circuit breaker or fuse box to your house. Make sure there is
proper electrical power to the oven. Be sure oven temperature has been
selected.
Oven is not cooking evenly Adjust oven calibration if necessary (see “Change the Oven Tempera-
ture Offset” in this manual). Refer to cooking charts for recommended
rack position.
Baking results are not as expected Refer to cooking charts for recommended rack position. Check “Getting
the Most out of Your Oven” for tips and suggestions. Adjust oven cali-
bration if necessary (see “Change the Oven Temperature Offset” in this
manual).
Food takes longer to cook than expected The oven is carefully calibrated to provide accurate results. However,
the temperature can be offset if food is consistently too brown or too
light. See “Change the Oven Temperature” Offset”.
Food is overcooked The oven is carefully calibrated to provide accurate results. However,
the temperature can be offset if food is consistently too brown or too
light. See “Change the Oven Temperature” Offset”.
Convection Bake or Convection Multi-Rack
Results are not as Expected
If the Automatic Convection Conversion Feature is turned off, the tem-
perature must be manually reduced by 25°F. If the feature is active, the
temperature is automatically adjusted. See “Turn Automatic Convection
Conversion ON or OFF” for more information. Refer to cooking charts
and tips for rack positions, cooking times and pan selection. Adjust
oven calibration if necessary. See “Change the Oven Temperature” Off-
set”.
Oven temperature is too hot or too cold The oven thermostat needs adjustment. See Oven Temperature Offset.
See “Change the Oven Temperature” Offset”.
Oven light is not working properly Replace or reinsert the light bulb if loose or defective. Touching the bulb
with fingers may cause the bulb to burn out.
Oven light will not turn off Check for obstruction in oven door. Check to see if hinge is bent. When
the Sabbath feature is activated, the oven light will stay on or off (as
selected during set-up) during the entire Sabbath Mode.
Cannot remove lens cover on light There may be soil build-up around the lens cover. Wipe lens cover area
with a clean dry towel prior to attempting to remove the lens cover.
Oven will not Self Clean properly Allow the oven to cool before running Self Clean. Always wipe out loose
soils or heavy spillovers before running Self Clean. If oven is badly
soiled, set oven for a four-hour Self Clean. See Preparing the Oven to
Self Clean.
Clock and timer are not working properly Make sure there is electrical power to oven. See Clock and Timer sec-
tions.
Porcelain chips When oven racks are removed and replaced, always tilt racks upward
and do not force them to avoid chipping the porcelain.
“F” and a number appears in display and
control beeps
This is a fault code. Press Off to clear the display and stop beeping.
Reset oven if necessary. If fault code remains and beep continues,
record fault code, cancel oven and call authorized service technician.
With a new range there is a strong odor
when oven is turned on
This is normal with a new range and will disappear after a few uses.
Operating the Self Clean cycle will also “burn-off” the smell more
quickly.
Control does not react when the pad is
touched
Be sure that pad is clean. Touch the center of the button. Use the flat
part of your finger.
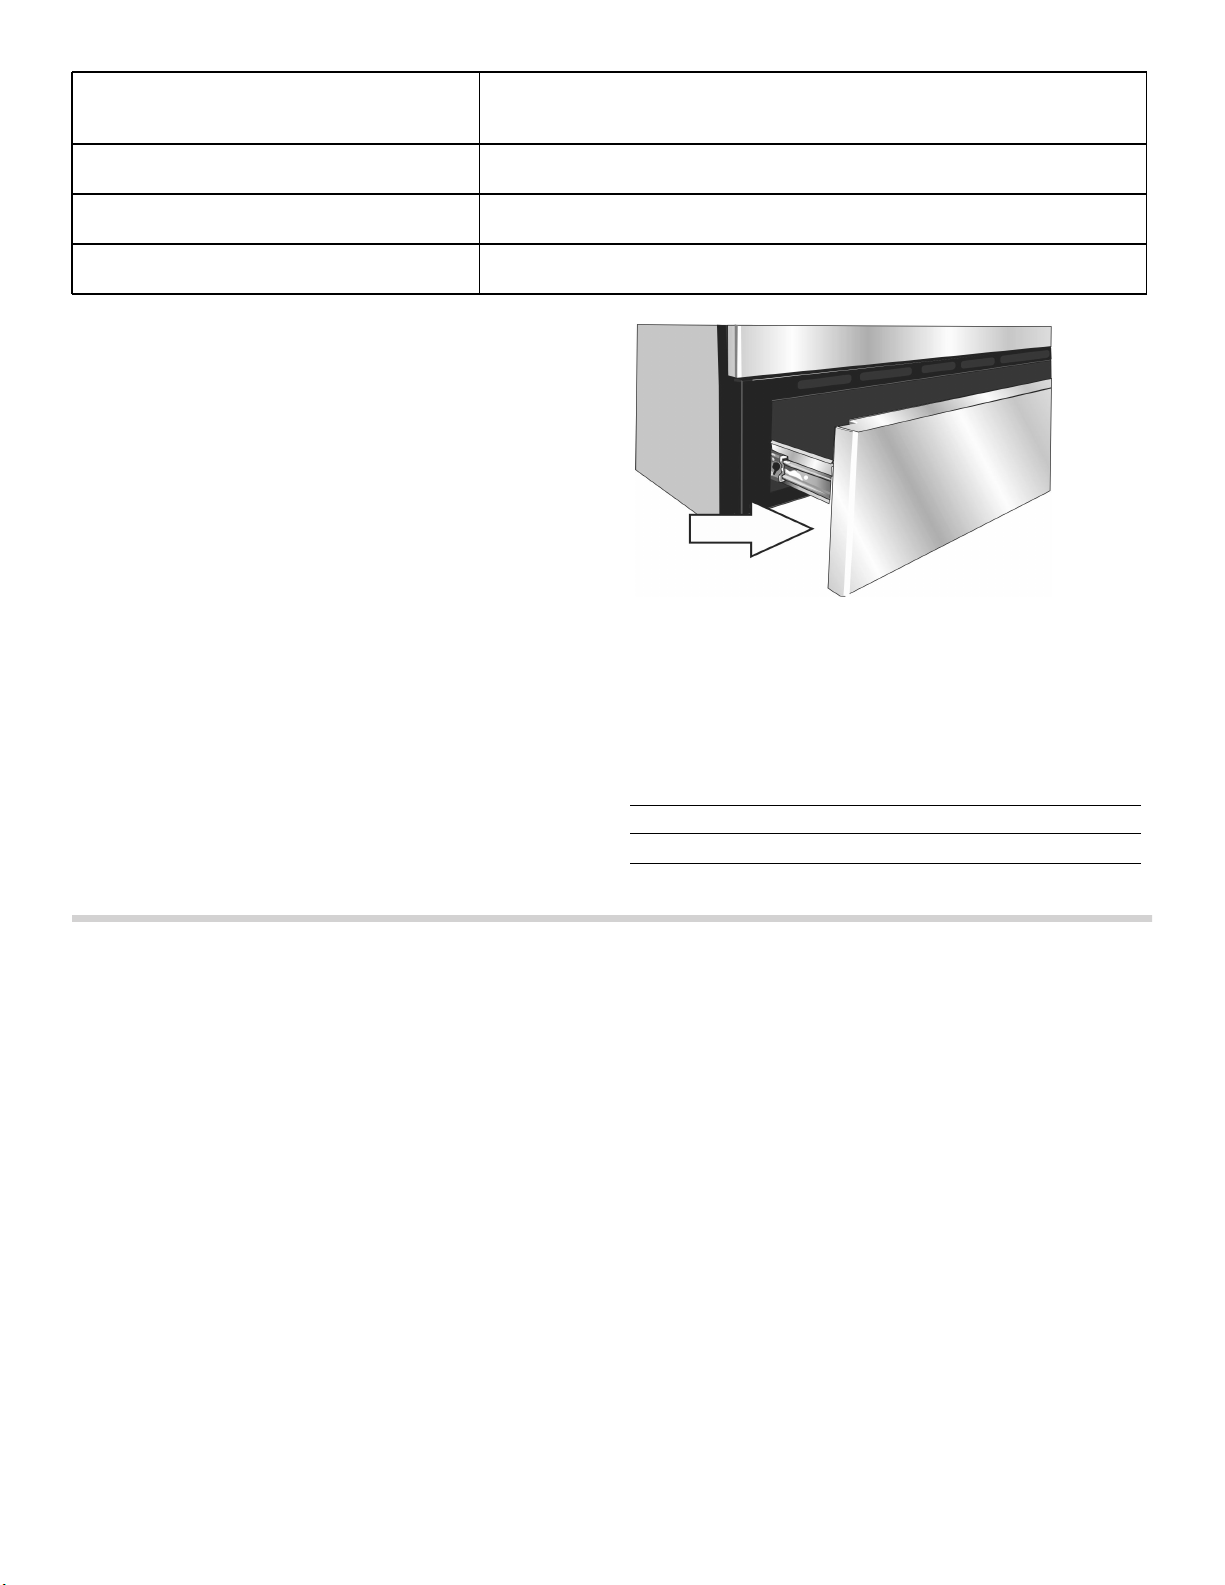
54
How to Obtain Service or Parts
To reach a service representative, see the contact
information at the front of the manual. Please be
prepared with the information printed on your data plate
when calling.
Data Plate
The data plate shows the model and FD number. Refer
to the rating label on the appliance when requesting
service. The rating label is located on the back side of
the drawer front. Open the drawer to view it.
STATEMENT OF LIMITED PRODUCT WARRANTY
What this Warranty Covers & Who it
Applies to
The limited warranty provided by BSH Home Appliances
Corporation (“BSH“) in this Statement of Limited Product
Warranty applies only to the Bosch appliance (“Product“)
sold to you, the first using purchaser, provided that the
Product was purchased:
▯ For your normal, household (non-commercial) use,
and has in fact at all times only been used for normal
household purposes.
▯ New at retail (not a display, "as is", or previously
returned model), and not for resale, or commercial
use.
▯ Within the United States or Canada, and has at all
times remained within the country of original purchase.
The warranties stated herein apply only to the first
purchaser of the Product and are not transferable.
Please make sure to return your registration card; while
not necessary to effectuate warranty coverage, it is the
best way for BSH to notify you in the unlikely event of a
safety notice or product recall.
How Long the Warranty Lasts
BSH warrants that the Product is free from defects in
materials and workmanship for a period of three hundred
sixty-five (365) days from the date of purchase. The
foregoing timeline begins to run upon the date of
purchase, and shall not be stalled, tolled, extended, or
suspended, for any reason whatsoever.
This Product is also warranted to be free from cosmetic
defects in material and workmanship (such as scratches
of stainless steel, paint/porcelain blemishes, chip, dents,
or other damage to the finish of the Product), for a period
of thirty (30) days from the date of purchase or closing
date for new construction. This cosmetic warranty
excludes slight color variations due to inherent
differences in painted and porcelain parts, as well as
differences caused by kitchen lighting, product location,
or other similar factors. This cosmetic warranty
specifically excludes any display, floor, “As Is”, or “B”
stock appliances.
Fan is running during modes that don’t use
convection
On some models, the convection fan will run while the oven is preheat-
ing for the bake mode. This is normal.Slide-in models also have a cool-
ing fan that runs during every cooking mode.
Warm air or steam escapes from oven vent It is normal to see or feel steam or warm air escaping from the oven
vent. Do not block the vent.
Cooling fan runs after oven is turned off
(Slide-in ranges only)
This is normal. When the oven has cooled to a pre-determined tempera-
ture, the cooling fan turns off
The cooktop does not operate during Self
Clean
This is normal for some models. Operation will return once Self Clean is
complete.
Model number
and FD number
The model number and the FD
number of your appliance are found
on the data plate. Make a note of
these numbers in the space below to
save time in the event your appliance
requires service.
Model # FD #
Bosch Customer Support O
800-944-2904

55
Repair/Replace as Your Exclusive Remedy
During this warranty period, BSH or one of its authorized
service providers will repair your Product without charge
to you (subject to certain limitations stated herein) if your
Product proves to have been manufactured with a defect
in materials or workmanship. If reasonable attempts to
repair the Product have been made without success,
then BSH will replace your Product (upgraded models
may be available to you, in BSH’s sole discretion, for an
additional charge). All removed parts and components
shall become the property of BSH at its sole option. All
replaced and/or repaired parts shall assume the identity
of the original part for purposes of this warranty and this
warranty shall not be extended with respect to such
parts. BSH's sole liability and responsibility hereunder is
to repair manufacturer-defective Product only, using a
BSH-authorized service provider during normal business
hours. For safety and property damage concerns, BSH
highly recommends that you do not attempt to repair the
Product yourself, or use an un-authorized servicer; BSH
will have no responsibility or liability for repairs or work
performed by a non-authorized servicer. If you choose to
have someone other than an authorized service provider
work on your Product, THIS WARRANTY WILL
AUTOMATICALLY BECOME NULL AND VOID. Authorized
service providers are those persons or companies that
have been specially trained on BSH products, and who
possess, in BSH's opinion, a superior reputation for
customer service and technical ability (note that they are
independent entities and are not agents, partners,
affiliates or representatives of BSH). Notwithstanding the
foregoing, BSH will not incur any liability, or have
responsibility, for the Product if it is located in a remote
area (more than 100 miles from an authorized service
provider) or is reasonably inaccessible, hazardous,
threatening, or treacherous locale, surroundings, or
environment; in any such event, if you request, BSH
would still pay for labor and parts and ship the parts to
the nearest authorized service provider, but you would
still be fully liable and responsible for any travel time or
other special charges by the service company, assuming
they agree to make the service call.
Out of Warranty Product
BSH is under no obligation, at law or otherwise, to
provide you with any concessions, including repairs, pro-
rates, or Product replacement, once this warranty has
expired.
Warranty Exclusions
The warranty coverage described herein excludes all
defects or damage that are not the direct fault of BSH,
including without limitation, one or more of the following:
▯ Use of the Product in anything other than its normal,
customary and intended manner (including without
limitation, any form of commercial use, use or storage
of an indoor product outdoors, use of the Product in
conjunction with air or water-going vessels).
▯ Any party's willful misconduct, negligence, misuse,
abuse, accidents, neglect, improper operation, failure
to maintain, improper or negligent installation,
tampering, failure to follow operating instructions,
mishandling, unauthorized service (including self-
performed "fixing" or exploration of the appliance's
internal workings).
▯ Adjustment, alteration or modification of any kind.
▯ A failure to comply with any applicable state, local,
city, or county electrical, plumbing and/or building
codes, regulations, or laws, including failure to install
the product in strict conformity with local fire and
building codes and regulations.
▯ Ordinary wear and tear, spills of food, liquid, grease
accumulations, or other substances that accumulate
on, in, or around the Product.
▯ Any external, elemental and/or environmental forces
and factors, including without limitation, rain, wind,
sand, floods, fires, mud slides, freezing temperatures,
excessive moisture or extended exposure to humidity,
lightning, power surges, structural failures surrounding
the appliance, and acts of God.
In no event shall BSH have any liability or responsibility
whatsoever for damage to surrounding property,
including cabinetry, floors, ceilings, and other structures
or objects around the Product. Also excluded from this
warranty are Products on which the serial numbers have
been altered, defaced, or removed; service visits to teach
you how to use the Product, or visits where there is
nothing wrong with the Product; correction of installation
problems (you are solely responsible for any structure
and setting for the Product, including all electrical,
plumbing or other connecting facilities, for proper
foundation/flooring, and for any alterations including
without limitation cabinetry, walls, floors, shelving, etc.);
and resetting of breakers or fuses.
TO THE EXTENT ALLOWED BY LAW, THIS WARRANTY
SETS OUT YOUR EXCLUSIVE REMEDIES WITH
RESPECT TO PRODUCT, WHETHER THE CLAIM ARISES
IN CONTRACT OR TORT (INCLUDING STRICT LIABILITY,
OR NEGLIGENCE) OR OTHERWISE. THIS WARRANTY
IS IN LIEU OF ALL OTHER WARRANTIES, WHETHER
EXPRESS OR IMPLIED. ANY WARRANTY IMPLIED BY
LAW, WHETHER FOR MERCHANTABILITY OR FITNESS
FOR A PARTICULAR PURPOSE, OR OTHERWISE,
SHALL BE EFFECTIVE ONLY FOR THE PERIOD THAT
THIS EXPRESS LIMITED WARRANTY IS EFFECTIVE. IN
NO EVENT WILL THE MANUFACTURER BE LIABLE FOR
CONSEQUENTIAL, SPECIAL, INCIDENTAL, INDIRECT,
"BUSINESS LOSS", AND/OR PUNITIVE DAMAGES,
LOSSES, OR EXPENSES, INCLUDING WITHOUT
LIMITATION TIME AWAY FROM WORK, HOTELS AND/
OR RESTAURANT MEALS, REMODELLING EXPENSES
IN EXCESS OF DIRECT DAMAGES WHICH ARE
DEFINITIVELY CAUSED EXCLUSIVELY BY BSH, OR
OTHERWISE. SOME STATES DO NOT ALLOW THE
EXCLUSION OR LIMITATION OF INCIDENTAL OR
CONSEQUENTIAL DAMAGES, AND SOME STATES DO
NOT ALLOW LIMITATIONS ON HOW LONG AN IMPLIED
WARRANTY LASTS, SO THE ABOVE LIMITATIONS MAY
NOT APPLY TO YOU. THIS WARRANTY GIVES YOU
SPECIFIC LEGAL RIGHTS, AND YOU MAY ALSO HAVE
OTHER RIGHTS WHICH VARY FROM STATE TO STATE.
No attempt to alter, modify or amend this warranty shall
be effective unless authorized in writing by an officer of
BSH.

56
Cooking Charts
The charts can be used as a guide. Follow package or recipe directions.
Baked Goods/Entrees
Food Recommended
Cooking Mode
Oven Tem-
perature
Pre-
heat
Oven
Number
of Racks
Rack
Position
Time
(min.)
Pan Size & Type
Cakes
Angel Food Convect. Bake 325° F Yes Single 1 35-50 10" tube
Bundt Convect. Bake 325° F Yes Single 2 45-65 12-cup bundt
Cupcakes Conv. Multi-Rack 325° F Yes Single 4 17-27 12-cup muffin pan
Conv. Multi-Rack 325° F Yes Multiple 2 & 5 17-27 12-cup muffin pan
Conv. Multi-Rack 325° F Yes Multiple 1, 3, & 5 17-27 12-cup muffin pan
Round Layers Convect. Bake 325° F Yes Single 3 28-40 8" or 9" round
Convect. Bake 325° F Yes Multiple 2 & 5 28-40 8" or 9" round
Sheet Cake Convect. Bake 325° F Yes Single 3 45-60 13"X9X2"
Cookies
Brownies Convect. Bake 325° F Yes Single 3 33-40 8" or 9" square
Chocolate Chips Conv. Multi-Rack 325° F Yes Single 3 8-17 cookie sheet
Conv. Multi-Rack 325° F Yes Multiple 2 & 5 8-17 cookie sheet
Conv. Multi-Rack 325° F Yes Multiple 1,3, & 5 8-17 cookie sheet
Cookie Bars Convect. Bake 325° F Yes Single 3 23-33 8" or 9" square
Sugar Conv. Multi-Rack 325° F Yes Single 3 8-10 cookie sheet
Conv. Multi-Rack 325° F Yes Multiple 2 & 5 8-10 cookie sheet
Conv. Multi-Rack 325° F Yes Multiple 1,3, & 5 8-10 cookie sheet
Entrees/Vegetables
Casseroles Bake recipe temp. Yes Single 3 recipe
time
casserole dish
Quiche Bake 375° F Yes Single 2 30-40 quiche dish
Soufflé Bake 325° F Yes Single 3 45-55 soufflé dish
Vegetables Conv. Roast recipe No Single 3 recipe cookie sheet
The charts can be used as a guide. Follow package or recipe directions.
The convection temperatures have been reduced by 25°F from the recipe or package directions.
Pastries
Cream Puffs Conv. Multi-Rack 400° F Yes Single 3 23-33 cookie sheet
Conv. Multi-Rack 400° F Yes Multiple 2 & 5 23-33 cookie sheet
Conv. Multi-Rack 400° F Yes Multiple 1,3, & 5 23-33 cookie sheet
Puff Pastry Conv. Multi-Rack 375° F Yes Single 3 10-12 cookie sheet
Pies
1 Crust Shell Convect. Bake 475° F Yes Single 2 8-12 9" pie pan
2 Crust, Fruit Convect. Bake 375° F Yes Single 2 45-60 9" pie pan
Frozen Convect. Bake 375° F Yes Single 3 70-85 9" pie pan
Meringue Bake 350° F Yes Single 2 10-15 9" pie pan
Pecan Bake 350° F Yes Single 2 45-60 9" pie pan

57
Meats
The charts can be used as a guide. Follow package or recipe directions.
Pumpkin Bake 425° F/
350° F
Yes Single 2 15
35-45
9" pie pan
Pizza
Baking Stone Pizza 425° F Yes Single 2 recipe
time
baking stone
Fresh Pizza 425° F Yes Single 2 recipe
time
pizza pan
Thick Crust, Frozen Pizza on package Yes Single on pack-
age
pkg time package directions
Thin Crust, Frozen Pizza on package Yes Single on pack-
age
pkg time package directions
Quick Breads
Biscuits Conv. Multi-Rack 325° F Yes Single 3 10-20 cookie sheet
Conv. Multi-Rack 325° F Yes Multiple 2 & 5 10-20 cookie sheet
Loaf Convect. Bake 350° F Yes Single 2 48-60 8" x 4" loaf pan
Muffins Conv. Multi-Rack 400° F Yes Single 3 14-25 12-cup muffin pan
Conv. Multi-Rack 400° F Yes Multiple 2 & 5 14-25 12-cup muffin pan
Yeast Breads
Dinner Rolls Conv. Multi-Rack 375° F Yes Single 3 10-20 cookie sheet
Conv. Multi-Rack 375° F Yes Multiple 2 & 5 10-20 cookie sheet
Conv. Multi-Rack 375° F Yes Multiple 1, 3, & 5 10-20 cookie sheet
Loaf Convect. Bake 400° F Yes Single 2 22-35 9" x 5" loaf pan
Sweet Rolls Conv. Multi-Rack 325° F Yes Single 3 20-25 cookie sheet
The charts can be used as a guide. Follow package or recipe directions.
The convection temperatures have been reduced 25°F from the recipe or package directions.
Food Recommended
Cooking Mode
Oven Tem-
perature
Pre-
heat
Oven
Number
of Racks
Rack
Position
Time
(min.)
Pan Size & Type
Food Recommended
Cooking Mode
Oven Tem-
perature
Rack
Position
Internal
Tempera-
ture Done-
ness
Cooking Time Food
Covered
Stand Time
Beef
Chuck Roast, 2-3
lbs
Roast 350° F 2 Well, 170° F
1 1/2-2 hours
Yes none
Hamburgers, 3/4-
1inch thick
Broil High 6 Medium,
160° F
Side 1: 5-8
Side 2: 4-6
No none
Rib Eye, Boneless,
3-3.5 lbs.
Convection
Roast
325° F 2 Medium-rare,
145° F
27-31 min./lb. No 10-15 min.
Rib Eye, Boneless,
3-3.5 lbs.
Convection
Roast
325° F 2 Medium,
160° F
30-38 min./lb. No 10-15 min.
The charts can be used as a guide. Follow package or recipe directions.
Roasting times are approximate and may vary depending on the shape of the meat.
Stuffed turkey requires additional roasting time. The minimum safe temperature for stuffing in poultry is 165°F.
Note: Internal food temperatures are USDA recommended as measured by a digital cooking thermometer.

58
Rump, Eye, Sirloin,
Boneless, 3-5.5
lbs.
Convection
Roast
325° F 2 Medium-rare,
145° F
18-33 min./lb. No 10-15 min.
Rump, Eye, Sirloin,
Boneless, 3-5.5
lbs.
Convection
Roast
325° F 2 Medium,
160° F
30-35 min/lb. No 10-15 min.
Steaks, 1-inch
thick
Broil High 6 Medium-rare,
145° F
Side 1: 5-8
Side 2: 4-6
No none
Steaks, 1-inch
thick
Broil High 6 Medium,
160° F
Side 1: 8-9
Side 2: 5-7
No none
Steaks 1 1/2-inch
thick
Convection
Broil
High 3 Medium-rare,
145° F
Side 1: 11-13
Side 2: 9-11
No none
Steaks 1 1/2-inch
thick
Convection
Broil
High 3 Medium,
160° F
Side 1: 13-15
Side 2: 11-13
No none
Tenderloin, 2-3
lbs.
Convection
Roast
425° F 2 Medium-rare,
145° F
15-24 min./lb. No 5 min.
Lamb
Leg, Boneless, 2-3
lbs.
Convection
Roast
325° F 2 Medium,
160° F
25-30 min./lb. No 10-15 min.
Leg, Boneless, 4-6
lbs.
Convection
Roast
325° F 2 Medium,
160° F
30-35 min./lb. No 10-15 min.
Chops, 1-inch
thick
Broil High 4 Medium-rare,
145° F
Side 1: 4-6
Side 2: 4-5
No none
Chops, 1-inch
thick
Broil High 4 Medium,
160° F
Side 1: 5-7
Side 2: 5-6
No none
Pork
Ham Slice 1/2-
inch thick
Broil High 5 160° F Side 1: 4-5
Side 2: 3-4
No none
Loin Roast, 1 1/2-
3 lbs.
Convection
Roast
350° F 2 Medium,
160° F
19-36 min./lb. No 10-15 min.
Loin Roast, 3-6
lbs.
Convection
Roast
350° F 2 Medium,
160° F
14-23 min./lb. No 10-15 min.
Chops, 1-inch
thick
Broil Medium 4 Medium,
160° F
Side 1: 8-10
Side 2: 8-9
No none
Chops, 1 1/2-inch
thick
Convection
Broil
High 4 Medium,
160° F
Side 1: 9-11
Side 2: 8-10
No none
Sausage, Fresh Broil High 4 170° F Side 1: 3-5
Side 2: 2-4
No none
Tenderloin, 2-3
lbs.
Convection
Roast
425° F 3 Medium,
160° F
18-28 min./lb. No 5-10 min.
Poultry
Chicken
Bone-in Breasts Convection
Broil
450°F 3 170°F Side 1: 18-22
Side 2: 17-20
No none
Bone-in Thighs Broil Low 3 180°F in
thigh
Side 1: 14-15
Side 2: 12-13
No none
Food Recommended
Cooking Mode
Oven Tem-
perature
Rack
Position
Internal
Tempera-
ture Done-
ness
Cooking Time Food
Covered
Stand Time
The charts can be used as a guide. Follow package or recipe directions.
Roasting times are approximate and may vary depending on the shape of the meat.
Stuffed turkey requires additional roasting time. The minimum safe temperature for stuffing in poultry is 165°F.
Note: Internal food temperatures are USDA recommended as measured by a digital cooking thermometer.

59
Whole. 3.5-8 lbs. Convection
Roast
375°F 2 180°F in
thigh
13-20 min./lb. No none
Cornish Game
Hens, 1-1 1/2 lbs.
Convection
Roast
350°F 2 180°F in
thigh
45-75 min. total
time
No none
Turkey
Breast, 4-8 lbs. Convection
Roast
325°F 2 170°F 19-23 min. /lb. No 15-20 min.
for easy
carving
Unstuffed, 12-19
lbs.
Convection
Roast
325°F 1 180°F in
thigh
9-14 min./lb. Foil to
prevent
over-
brown-
ing
15-20 min.
for easy
carving
Unstuffed, 20-25
lbs.
Convection
Roast
325°F 1 180°F in
thigh
6-12 min./lb. Foil to
prevent
over-
brown-
ing
15-20 min.
for easy
carving
Seafood
Fish Filets, 3/4-1-
inch thick
Broil Low 3 145°F 11-15 min. No none
Food Recommended
Cooking Mode
Oven Tem-
perature
Rack
Position
Internal
Tempera-
ture Done-
ness
Cooking Time Food
Covered
Stand Time
The charts can be used as a guide. Follow package or recipe directions.
Roasting times are approximate and may vary depending on the shape of the meat.
Stuffed turkey requires additional roasting time. The minimum safe temperature for stuffing in poultry is 165°F.
Note: Internal food temperatures are USDA recommended as measured by a digital cooking thermometer.

60
Table des Matières
Notice d’utilisation
Définitions de sécurité ................................................ 61
IMPORTANTES CONSIGNES DE SÉCURITÉ ............. 62
Installation et entretien corrects ..................................... 62
Sécurité-incendie ............................................................... 63
Prévention des brûlures ................................................... 63
Interférence électromagnétique ...................................... 64
Sécurité des enfants ......................................................... 65
Consignes en matière de nettoyage ............................. 65
Sécurité pour la batterie de cuisine ............................... 65
Avertissements de la Proposition 65
de l’État de la Californie ................................................. 66
Sécurité alimentaire .......................................................... 66
Causes de pannes ....................................................... 67
Protection de l'environnement ................................... 68
Économie d'énergie .......................................................... 68
Mise en route ............................................................... 69
Pièces .................................................................................. 69
Accessoires ........................................................................ 70
Faire connaissance avec l’appareil ............................ 72
Panneau de commande ................................................... 72
Les éléments ...................................................................... 73
Indicateur de chaleur résiduelle ..................................... 73
Fonctionnement ........................................................... 73
Interrupteur d'alimentation principal ............................. 73
Allumage de la table de cuisson .................................... 74
Zone de cuisson FlexInduction
MD
................................... 76
Fonction PowerMove (Déplacement de puissance) ... 77
Options de réglage du temps ......................................... 77
Fonction SpeedBoost
MD
(Haute vitesse) ....................... 79
Fonction ShortBoost (Puissance rapide) ...................... 79
Fonction Keep Warm (Garder au chaud) ..................... 80
Verrouillage du panneau de commande ...................... 80
Protection contre l'essuyage ........................................... 80
Durée limitée automatique ............................................. 80
Réglages de base ............................................................. 81
Indicateur de consommation énergétique .................... 82
Cuisson à induction .................................................... 83
Avantages lors de la cuisson par induction ................. 83
Ustensiles de cuisson ...................................................... 83
Nettoyage et entretien ................................................. 84
Nettoyage quotidien .......................................................... 84
Instructions pour le nettoyage ........................................ 85
Tableau de nettoyage ....................................................... 86
Entretien .............................................................................. 87
Fonctionnement –Four ............................................... 87
Bandeau de commande du four .................................... 87
À propos du four ............................................................... 88
Caractéristiques générales ............................................. 88
Fonctions spéciales .......................................................... 91
Options de menu des réglages ..................................... 94
Tirer le meilleur parti de votre appareil ..................... 95
Conseils généraux ............................................................ 95
Cuisson % ......................................................................... 97
Auto Convection Conversion .......................................... 97
Cuisson par convection 2 ............................................. 97
Convection MultiRack: .................................................. 98
Pizza
2 ............................................................................... 98
Rôtissage
% ...................................................................... 99
Rôtissage Convection 2 ................................................ 99
Gril ( .................................................................................. 99
Gril Convection 4 .......................................................... 100
Apprêt $ .......................................................................... 100
Maintien au chaud % ..................................................... 100
Nettoyage et entretien – Four ................................... 101
Nettoyage du four ........................................................... 101
Entretien ............................................................................ 103
Fonctionnement - Tiroir chauffant ........................... 106
À propos du tiroir chauffant .......................................... 106
Spécifications du tiroir chauffant : ............................... 106
Fonctionnement ............................................................... 106
Tirer le meilleur parti de votre tiroir chauffant ....... 107
À propos de l'appareil .................................................... 107
Conseils généraux .......................................................... 107
Utilisation de l'appareil ................................................... 107
Préchauffage .................................................................... 107
Maintenir au chaud des bols et des assiettes vides 107
Faire croustiller des aliments rassis ............................ 107
Températures recommandées ..................................... 107
Nettoyage et entretien – Tiroir chauffant ................ 108
Nettoyer le tiroir chauffant ............................................. 108
Retirer le tiroir de son compartiment .......................... 109
Installation du tiroir dans le compartiment ................. 109
Dépannage ................................................................. 111
Foire aux questions (FAQ) ............................................ 111
Corrections des défaillances ........................................ 113
Dépannage pour le four ................................................ 114
Comment obtenir des services de dépannage
ou des pièces .................................................................. 116

61
ÉNONCÉ DE LA GARANTIE LIMITÉE ...................... 116
Couverture de la garantie : ............................................ 116
Durée de la garantie ....................................................... 116
Réparation ou remplacement comme solution
exclusive ........................................................................... 116
Produit hors garantie ..................................................... 117
Exclusions à la garantie ................................................. 117
Tableaux de cuisson ................................................. 118
Plats de boulangerie/Plats principaux ........................ 118
Viandes ............................................................................. 121
Définitions de sécurité
9 AVERTISSEMENT
Ceci indique que le non-respect de cet
avertissement peut entraîner des blessures graves,
voire la mort.
9 ATTENTION
Ceci indique que le non-respect de cet
avertissement peut entraîner des blessures légères
ou de gravité moyenne.
AVIS : Ceci indique que la non-conformité à cet avis de
sécurité peut entraîner des dégâts matériels ou
endommager l'appareil.
Remarque : Ceci vous signale des informations et/ou
indications importantes.
9RXVDYH]GHVTXHVWLRQV"
ZZZERVFKKRPHFRPXV
ââ
1RXVQRXVIHURQVXQSODLVLUGHYRXVVHUYLU
&HWDSSDUHLOpOHFWURPpQDJHU%RVFKHVWIDEULTXpSDU
%6++RPH$SSOLDQFHV&RUSRUDWLRQ
0DLQ6WUHHW6XLWH
,UYLQH&$
9 IMPORTANTES CONSIGNES DE SÉCURITÉ
LIRE ET CONSERVER CES INSTRUCTIONS
62
IMPORTANTES CONSIGNE LIRE ET CONSERVER CES INSTRUCTIONS
AVERTISSEMENT
Votre nouvel appareil a été conçu pour un
fonctionnement sûr et fiable si vous en prenez bien soin.
Lire attentivement toutes les consignes avant l'emploi.
Ces précautions réduiront les risques de brûlures, de
choc électrique, d'incendie et de lésions corporelles.
Lors de l'utilisation d'un appareil électroménager,
quelques précautions de sécurité élémentaires doivent
être observées, y compris celles qui figurent aux pages
suivantes.
Cet appareil est conçu pour une utilisation jusqu'à une
altitude maximale de 2 000 m.
Installation et entretien corrects
AVERTISSEMENT
RISQUE DE BASCULEMENT
Demandez à l'installateur de vous montrer où se trouve
le disjoncteur ou le fusible. Identifier sa position pour
pouvoir le retrouver facilement.
Cet appareil doit être adéquatement installé et mis à la
terre par un technicien agréé. Branchez l'appareil
uniquement dans une prise correctement reliée à la
terre. Pour plus de détails, reportez-vous à la notice
d'installation.
Cet appareil est destiné uniquement à une utilisation
domestique normale. Il n'est pas homologué pour un
usage en extérieur. Voyez la Ènoncé de la Garantie
Limitée. Si vous avez des questions, communiquez avec
le fabricant.
Ne pas entreposer ni utiliser de produits chimiques
corrosifs, vapeurs, substances inflammables ou produits
non alimentaires à l'intérieur ou à proximité de l'appareil.
Il a été spécialement conçu pour être utilisé pendant le
chauffage et la cuisson des aliments. L'emploi de
produits chimiques corrosifs pour chauffer ou nettoyer
l'appareil endommagera ce dernier et peut provoquer
des blessures.
Ne pas se servir de cet appareil s'il ne fonctionne pas
correctement ou s'il est endommagé. Communiquer
avec un réparateur autorisé.
Ne pas obstruer les évents du four.
Ne pas réparer ni remplacer toute pièce de l'appareil à
moins que cela ne soit spécifiquement recommandé par
ce manuel. Toute réparation doit être effectuée par un
réparateur autorisé.
En cas d'erreur, l'affichage clignote et émet un signal
sonore continu. Débrancher l'appareil de l'alimentation et
appeler un réparateur autorisé.
AVERTISSEMENT
Avant de démonter la porte, s'assurer que le courant qui
alimente le four est coupé. Le non respect de cette
instruction peut entraîner des brûlures.
La porte du four est lourde et fragile. Utilisez les deux
mains pour retirer la porte du four. La face avant de la
porte est en verre. Manipuler avec précaution pour éviter
les cassures.
Saisir la porte uniquement par les côtés. Ne pas tenir la
porte par la poignée car elle risque de tourner et
provoquer des blessures ou des dommages.
Si la porte n'est pas maintenue fermement et
correctement, des lésions corporelles ou des dommages
matériels pourraient survenir.
Placer la porte sur une surface plane et stable afin
qu'elle ne puisse pas tomber. Le non respect de cette
consigne peut entraîner des lésions corporelles ou des
dommages à l'appareil.
AVERTISSEMENT
Pour éviter les blessures dues à l'enclenchement des
charnières, s'assurer que les deux leviers sont bien en
place avant de retirer la porte. D'autre part, ne pas forcer
la porte pour la fermer ou l'ouvrir - cela pourrait
endommager une charnière et provoque des blessures.
Il est possible pour un
enfant ou un adulte de
faire basculer la cuisinière
et d'être tué. Vérifier que
le support antibascule-
ment est réengagé
lorsque la cuisinière est
déplacée.
Ne pas faire fonctionner la cuisinière si le support
antibasculement n'est pas en place. Ne pas respec-
ter les instructions de ce manuel peut causer la mort
ou de sérieuses brûlures chez les enfants et les
adultes.
Vérifier que le support antibasculement est installé
et utilisé correctement. Incliner doucement la cuisi-
nière vers l'avant pour vérifier si le dispositif antibas-
culement est engagé au niveau des pieds de la
cuisinière et empêche celle-ci de basculer. La cuisi-
nière ne doit pas se déplacer de plus de 1 po
(2,5 cm).

63
9 IMPORTANTES CONSIGNES DE SÉCURITÉ
LIRE ET CONSERVER CES INSTRUCTIONS
AVERTISSEMENT
S'assurer que l'appareil et les ampoules ont refroidi et
que le courant qui alimente l'appareil a été coupé avant
de changer une ou plusieurs ampoules. Le non respect
de cette instruction peut entraîner un choc électrique ou
des brûlures. Les lentilles (le cas échéant) doivent être
mises en place lors de l'utilisation de l'appareil. Les
lentilles (le cas échéant) permettent d'éviter que les
ampoules ne se brisent. Les lentilles (le cas échéant)
sont en verre. Manipuler avec précaution pour éviter les
cassures. Le verre brisé peut être une cause de
blessures.
AVERTISSEMENT
Si l'alimentation principale n'est pas coupée, la douille
reste sous tension lorsque la porte est ouverte.
Sécurité-incendie
AVERTISSEMENT
Ne JAMAIS couvrir les encoches, orifices ou passages
pratiqués au fond du four et ne jamais recouvrir
complètement la grille avec des matériaux tels que le
papier d'aluminium. Vous risquez autrement de bloquer
la circulation de l'air à l'intérieur du four. Les feuilles
d'aluminium peuvent également emprisonner la chaleur
et présenter ainsi un risque d'incendie.
Si des matériaux à l'intérieur d'un four ou d'un tiroir-
réchaud venaient à prendre feu, conserver la porte
fermée. Éteindre l'appareil et déconnecter le circuit
depuis le boîtier de disjoncteurs.
AVERTISSEMENT
Utiliser cet appareil uniquement dans le cadre de
l'utilisation prévue tel que décrit dans ce manuel. NE
JAMAIS utiliser pour chauffer ou réchauffer une pièce.
Ceci pourrait faire surchauffer l'appareil. L'appareil ne
doit jamais servir à entreposer quoi que ce soit.
Toujours avoir un détecteur de fumée en état de marche
près de la cuisine.
Si des vêtements s’enflamment, rouler par terre
immédiatement pour éteindre les flammes.
Veillez à avoir à portée de main un extincteur d'incendie
en bon état de marche, placé visiblement près de
l'appareil et facile d'accès.
Étouffez les flammes d'un feu d'aliments autre qu'un feu
de graisse à l'aide de bicarbonate de soude. Ne jamais
utiliser d'eau sur les feux de cuisson.
AVERTISSEMENT
POUR RÉDUIRE LE RISQUE DE LÉSIONS
CORPORELLES DANS L'ÉVENTUALITÉ D'UN FEU DE
GRAISSE, OBSERVER LES CONSIGNES SUIVANTES :
a.
ÉTOUFFER LES FLAMMES à l'aide d'un couvercle bien
hermétique, d'une tôle à biscuits ou d'un plateau en
métal, puis éteindre l'appareil. FAIRE ATTENTION À NE
PAS SE BRÛLER. Si les flammes ne s'éteignent pas
immédiatement, ÉVACUER LES LIEUX ET FAIRE
APPEL AU SERVICE D'INCENDIE.
b.
NE JAMAIS SAISIR UN RÉCIPIENT QUI BRÛLE. Vous
pourriez vous brûler.
c.
NE PAS UTILISER D'EAU, y compris les chiffons ou
serviettes mouillées. Une violente explosion de vapeur
risque de se produire.
d.
Utiliser un extincteur uniquement si :
- Vous savez que vous possédez un extincteur de
CLASSE ABC, et vous en connaissez déjà le
maniement.
- L'incendie est de petite ampleuret contenu dans la
zone où il s'est déclaré.
- Le service d'incendie est appelé.
- On peut combattre l'incendie le dos tourné vers la
sortie.
Prévention des brûlures
NE PAS TOUCHER LES ÉLÉMENTS CHAUFFANTS OU
LES SURFACES INTÉRIEURES DU FOUR - Les éléments
chauffants peuvent être chauds même s'ils ne sont pas
rouges. Les parois intérieures d'un four peuvent devenir
suffisamment chaudes pour provoquer des brûlures.
Avant et après l'utilisation, ne pas toucher les éléments
chauffants ou les surfaces intérieures du four et ne pas
mettre des vêtements, des maniques ou d'autres
matériaux inflammables en contact avec ces éléments et
ces surfaces tant qu'ils n'auront pas suffisamment
refroidi. Les autres surfaces de l'appareil peuvent devenir
suffisamment chaudes pour provoquer des brûlures.
Parmi ces surfaces, citons les ouvertures d'évent, les
surfaces situées près de ces ouvertures et les portes du
four.
Ne pas toucher la surface intérieure du tiroir pendant son
utilisation. Le tiroir intérieur pourrait devenir suffisamment
chaud pour causer des brûlures. Laisser le tiroir et la
grille (s'il y en a une) refroidir avant de les manipuler.
Faire attention en ouvrant le tiroir-réchaud. En se plaçant
sur le côté, ouvrir la porte (ou le tiroir) lentement et
légèrement pour laisser l'air chaud et/ou la vapeur
s'échapper du four. Éloigner le visage de l'ouverture et
s'assurer qu'aucun enfant ou animal ne se trouve près
de l'appareil. Une fois l'air chaud et/ou la vapeur sortis,
continuez la cuisson. Ne pas laisser les portes ouvertes
à moins que vous ne soyez en train de cuisiner ou de
nettoyer. Ne pas laisser les portes ouvertes sans
surveillance.

9 IMPORTANTES CONSIGNES DE SÉCURITÉ
LIRE ET CONSERVER CES INSTRUCTIONS
64
Ne pas chauffer ou réchauffer des contenants d'aliments
non ouverts. L'accumulation de pression peut faire
exploser le contenant et provoquer desblessures.
Utiliser les réglages de température élevée sur la table
de cuisson, seulement si nécessaire. Pour éviter les
bouillons et les éclaboussures, chauffer l'huile lentement
à une température qui ne dépasse pas le réglage faible-
moyen. L'huile chaude peut causer des brûlures et des
blessures extrêmes.
Prendre des précautions lors de la cuisson d'aliments au
contenu élevé en alcool (e.g. le rhum, le brandy, le
bourbon) dans le four. L'alcool s'évapore à des
températures élevées. Il existe un risque d'incendie car
les vapeurs d'alcool peuvent prendre feu à l'intérieur du
four. Utiliser de petites quantité d'alcool dans les
aliments et ouvrir la porte du four avec précautions.
Placez toujours les grilles du four à la position souhaitée
alors que le four est froid. Toujours utiliser des maniques
quand le four est chaud. Si une grille doit être déplacée
alors que le four est chaud, ne pas laisser les poignées
isolantes entrer en contact avec les éléments chauffants.
Ne jamais déplacer un récipient rempli d'huile chaude,
surtout une friteuse. Attendre qu'elle refroidisse.
ATTENTION
Afin d'éviter toute blessure ou dommage potentiels,
s'assurer d'installer la grille en suivant exactement les
instructions d'installation, et ne pas la mettre à l'envers ni
dans le mauvais sens.
Toujours utiliser des poignées isolantes sèches. Des
poignées mouillées ou humides entrant en contact avec
les surfaceschaudes peuvent provoquer des blessures
par dégagement de vapeur. Ne laissez pas les poignées
toucher les éléments chauffants chauds. Ne pas utiliser
de serviette ni de chiffon volumineux.
Attacher les vêtements lâches, etc. avant de commencer.
Attacher les cheveux longs de façon à ce qu'ils ne
pendent pas et ne pas porter de vêtements lâches ou
d'habits ou objets qui pendillent, tels que cravates,
foulards, bijoux ou manches.
Éviter de se pencher au-dessus de l'appareil. Se rappeler
que certains vêtements et produits capillaires
contiennent des produits chimiques inflammables qui
peuvent s'enflammer au contact des éléments de surface
ou des brûleurs chauds et causer des blessures graves.
Interférence électromagnétique
AVERTISSEMENT
Cette table de cuisson à induction génère et utilise de
l'énergie à fréquence ISM qui chauffe les casseroles en
utilisant un champ électromagnétique. Elle a été testée et
est conforme avec la partie 18 des règlements FCC
régissant les appareils ISM. Cette table de cuisson est
conforme aux exigences FCC visant à réduire la
perturbation des autres dispositifs dans des installations
résidentielles. Les tables de cuisson à induction peuvent
perturber la réception radio et télévision. En cas de
perturbation de la réception, l'utilisateur devrait essayer
d'y remédier en :
▯ Relocalisant l'antenne de réception de la radio ou du
téléviseur.
▯ Augmentant la distance entre la table de cuisson et le
récepteur.
▯ Branchant le récepteur dans une prise de courant autre
que celle du récepteur.
C'est à l'utilisateur qu'il incombe de corriger toute
perturbation.
ATTENTION
Les personnes avec un stimulateur cardiaque ou autre
dispositif médical similaire devraient redoubler de
vigilance lorsqu'elles sont à proximité d'une table de
cuisson à induction en marche. Consultez votre médecin
ou le fabricant du stimulateur cardiaque pour de plus
amples renseignements sur les effets que peuvent
causer les champs électromagnétiques provenant d'une
table de cuisson à induction.
AVERTISSEMENT
RISQUE DÛ AU MAGNÉTISME
La sonde est magnétique. Les éléments magnétiques
peuvent endommager les implants électroniques, tels
que les stimulateurs cardiaques et les pompes à
insuline.Par conséquent, les personnes portant un
implant électronique ne devraient pas mettre la sonde de
température dans la poche de leurs vêtements et
devraient se tenir à 4 pouces de distance (10 cm) du
four, pour ne pas affecter leur stimulateur cardiaque ou
un dispositif médical similaire.

65
9 IMPORTANTES CONSIGNES DE SÉCURITÉ
LIRE ET CONSERVER CES INSTRUCTIONS
Sécurité des enfants
Lorsque les enfants sont assez âgés pour utiliser
l'appareil, il incombe aux parents ou tuteurs légaux de
veiller à ce qu'ils soient formés aux pratiques sécuritaires
par des personnes qualifiées.
Ne permettre à personne de grimper, rester debout,
s'appuyer, s'asseoir ou se pencher sur toute partie d'un
appareil, notamment une porte, un tiroir-réchaud ou un
tiroir de rangement. Ceci peut endommager l'appareil qui
risque de basculer et causer des blessures sérieuses.
Ne pas permettre aux enfants d'utiliser cet appareil sauf
sous la surveillance attentive d'un adulte. Ne pas laisser
les enfants et les animaux seuls ou sans surveillance
lorsque l'appareil est en service. Ne jamais les laisser
jouer aux alentours de l'appareil, que ce dernier soit en
service ou non.
ATTENTION
Les articles d’intérêt pour les enfants ne doivent pas être
rangés dans un appareil électroménager, dans les
armoires au–dessus de l’appareil ou sur le dosseret. Les
enfants peuvent grimper sur l’appareil pour atteindre ces
objets et se blesser sérieusement.
Consignes en matière de nettoyage
AVERTISSEMENT
RISQUE DE BRÛLURE
; L'extérieur de l'appareil devient très chaud lors de la
fonction de nettoyage. Ne jamais toucher la porte de
l'appareil. Laisser l'appareil refroidir. Tenir hors de portée
des enfants.
Remarques
▯ Ne pas nettoyer l’appareil pendant qu’il est encore
chaud. Certains nettoyants produisent des émanations
toxiques lorsqu’ils sont appliqués sur une surface
chaude. Des chiffons ou des éponges humides
peuvent provoquer des brûlures provoquées par la
vapeur.
▯ Lors de l'autonettoyage, vérifier que la porte est
verrouillée et ne s'ouvre pas. Si la porte de ne se
verrouille pas, ne pas lancer le Nettoyage Auto.
Contacter le service après-vente.
▯ Les oiseaux ont un système respiratoire très sensible.
Éloigner les oiseaux de compagnie de la cuisine ou
des pièces où la fumée peut les atteindre. Pendant
l'autonettoyage, les émanations de fumée peuvent être
nocives pour les oiseaux. D'autres émanations telles la
margarine surchauffée et les huiles de cuisson sont
également nocives.
▯ Ne pas laisser la graisse s'accumuler dans le four.
Sécurité pour la batterie de cuisine
Remarques
▯ Ne pas déposer de nourriture directement sur la sole
du four.
▯ Suivre les instructions du fabricant lors de l’utilisation
de sacs de cuisson ou de rôtissage.
▯ Tenir la poignée de la casserole en mélangeant ou en
retournant l'aliment. Cela aide à prévenir les
éclaboussures et les mouvements de la casserole.
▯ Utiliser des casseroles de taille appropriée.
L'emploi d'une casserole trop petite expose une partie
de l'élément chauffant ou du brûleur au contact direct
et peut ainsi provoquer l'inflammation des vêtements.
Sélectionner des ustensiles de cuisine à fond plat
suffisamment grands pour couvrir la surface de l'unité
chauffante. Cet appareil est équipé d'un ou plusieurs
éléments de surface de tailles différentes. Des plats
de cuisson adaptés à l'élément de cuisson ou au
brûleur en améliorent l'efficacité.
▯ Les ustensiles de cuisson qui ne sont pas approuvés
pour une utilisation sur des tables de cuisson en
vitrocéramique risquent de se fendre sous l'effet de
brusques changements de température. N'utiliser que
des casseroles adaptées aux surfaces de céramique.
Voir Guide de sélection des ustensiles de cuisson.
▯ Toujours diriger les poignées des ustensiles vers
l'intérieur de manière à ce qu'elle ne soient pas
orientées vers les zones de travail situées à proximité,
les brûleurs ou le bord de la table de cuisson. Cela
réduit le risque de feux, d'éclaboussures et de
brûlures.
ATTENTION
Les contenants de plastique ou les pellicules de
plastique peuvent fondre en cas de contact direct avec
le tiroir ou un ustensile chaud. Si le plastique fond sur le
tiroir, il peut ne pas être possible de l'enlever.
AVERTISSEMENT
RISQUE DE BLESSURE
Lors de la cuisson au bain-marie, la table de cuisson et
le plat de cuisson peuvent se fendre sous l'effet d'une
surchauffe. Le plat de cuisson du bain-marie ne peut
entrer en contact direct avec le fond de la casserole
remplie d'eau chaude. N'utiliser que des ustensiles de
cuisson résistants à la chaleur.

9 IMPORTANTES CONSIGNES DE SÉCURITÉ
LIRE ET CONSERVER CES INSTRUCTIONS
66
AVERTISSEMENT
DANGER DE BLESSURE
Un plat de cuisson peut « sauter » ou « rebondir » à
cause du liquide emprisonné entre le dessous du plat et
la zone de cuisson. Toujours garder la zone de cuisson
et le dessous des plats de cuisson secs.
Avertissements de la Proposition 65 de
l’État de la Californie
AVERTISSEMENT
Ce produit contient des produits chimiques connus de
l’État de la Californie pour causer le cancer, des
anomalies congénitales ou d’autres problèmes de
reproduction.
Remarque : AVIS DE SÉCURITÉ IMPORTANT : En
application de la loi californienne concernant la salubrité
de l’eau et la protection contre les substances chimiques
(« California Safe Drinking Water and Toxic Enforcement
Act »), le gouverneur de Californie est tenu de publier
une liste des substances reconnues par l’État de
Californie comme étant cancérigènes ou pouvant causer
des malformations ou présenter un danger pour la
reproduction, et les entreprises sont tenues d’avertir les
consommateurs des risques potentiels d’exposition à de
telles substances. La combustion de gaz combustible
pour la cuisson et l'élimination de résidus pendant
l'autonettoyage peuvent générer de faibles quantités de
monoxyde de carbone. Dans les fours équipés du
Nettoyage Auto, de faibles quantités de formaldéhyde
peuvent se dégager lors de l'élimination des salissures
pendant les quelques premiers cycles autonettoyants. La
Californie classe le formaldéhyde parmi les produits
potentiellement cancérigènes. Le monoxyde de carbone
est une cause possible de reprotoxicité. Il est possible
de réduire l'exposition à ces substances en :
1.
assurant une bonne ventilation lors de la cuisson au
gaz;
2.
assurant une bonne ventilation pendant et
immédiatement après le cycle d'autonettoyage du
four;
3.
utilisant l'unité selon les instructions de ce manuel.
Sécurité alimentaire
ATTENTION
Pour préserver la sécurité des aliments, suivre ces
recommandations :
a. NE PAS utiliser tiroir chauffant pour faire chauffer des
aliments froids. Il est sécuritaire d'utiliser le tiroir pour y
faire croustiller des craquelins, des chips ou des
céréales sèches et garder des assiettes au chaud.
b.
Veiller à garder la nourriture à la bonne température.
L'USDA recommande de maintenir les aliments chauds
à 140 °F (60 °C) ou plus.
c.
NE PAS maintenir des aliments au chaud pendant
plus d'une heure.

67
Causes de pannes
9 AVERTISSEMENT
RISQUE DE BLESSURES
AVIS
▯ NE PAS déposer d'accessoires ou d'objets, tels que
du papier d'aluminium, du papier sulfurisé, des
doublures de protection ou des plats de cuisson sur la
sole du four. Cela entraîne une accumulation de
chaleur. Les temps de cuisson et de rôtissage ne
seront alors plus exacts et cela risque d'endommager
l'émail.
▯ Le papier d'aluminium, dans le compartiment de
cuisson, ne doit pas entrer en contact avec la porte
vitrée du four. Cela pourrait tacher le verre de manière
permanente.
▯ Le papier d'aluminium et le plastique fondent dans les
zones de cuisson chaudes. Un film protecteur pour
cuisinière ne convient pas à cette table de cuisson.
▯ Ne pas cuire d'aliments sur une table de cuisson
cassée. Les solutions nettoyantes et les
éclaboussures peuvent entraîner un risque de choc
électrique.
▯ Les plats de cuisson dont le dessous est rugueux
peuvent rayer la surface en vitrocéramique.
▯ Le sel, le sucre et les grains de sable rayent la surface
en vitrocéramique. Ne jamais utiliser la table de
cuisson comme surface de travail ou pour y déposer
des objets.
▯ Éviter de chauffer des casseroles ou des plats vides.
▯ Des objets durs ou tranchants qui tombent sur la table
de cuisson risquent de l'endommage.
▯ Le sucre et les produits contenant du sucre peuvent
endommager la table de cuisson. Éliminer
immédiatement les éclaboussures provoquées par
ces produits avec un grattoir à vitre, une fois que la
table à cuisson a eu le temps de refroidir.
▯ Ne jamais déposer des casseroles ou des plats sur le
bandeau de commande ou le cadre du four. Cela peut
causer des dommages.
▯ Toujours ALLUMER la hotte lors de la cuisson à
température élevée ou pour flamber certains plats (c.-
à-d., crêpes Suzette, cerises Jubilé, steak au poivre
flambé).
▯ Lors de la cuisson de tartes aux fruits particulièrement
juteuses, ne pas trop remplir le moule à tarte. Le jus
de fruit qui s'égoutte d'un moule laisse des taches qui
ne peuvent pas s'enlever. Si possible, utiliser la poêle
universelle profonde.
▯ Si le joint est très sale, la porte de l'appareil ne se
fermera plus correctement quand le four est en
opération. La façade des unités adjacentes pourrait
être endommagée. Toujours garder le joint propre.
▯ Les décolorations métalliques irisées de la surface en
vitrocéramique proviennent de la mauvaise utilisation
d'agents nettoyants et d'abrasions dues aux plats de
cuisson.
▯ Ne pas utiliser la porte de l'appareil comme siège,
étagère ou surface de travail. Ne pas placer de plats
de cuisson ou des accessoires sur la porte de
l'appareil.
▯ En fonction du type d'appareil, les accessoires
peuvent rayer la porte vitrée lors de la fermeture.
Toujours glisser les accessoires dans le compartiment
de cuisson, aussi loin que possible.
▯ Ne pas porter ou tenir l'appareil par la porte. La
poignée du four ne peut pas supporter le poids de
l'appareil et pourrait casser.
Faire attention en ouvrant l'appareil. En se plaçant
sur le côté, ouvrir la porte lentement et légèrement
pour laisser l'air chaud et/ou la vapeur s'échapper
du four. Éloigner le visage de l'ouverture et s'assurer
qu'aucun enfant ou animal ne se trouve près de
l'appareil. Une fois l'air chaud et/ou la vapeur sortis,
continuer la cuisson. Ne pas laisser les portes
ouvertes à moins que l'on soit en train de cuisiner ou
de nettoyer. Ne pas laisser les portes ouvertes sans
surveillance.

68
Protection de l'environnement
Votre nouvel appareil est écoénergétique. Vous pouvez
trouver ici des conseils pour économiser encore plus
d'énergie lors de l'utilisation de l'appareil et apprendre
comment en disposer convenablement.
Déballez l'appareil et jetez l'emballage dans le respect
de l'environnement.
Économie d'énergie
▯ Ne préchauffer l'appareil que si la recette ou les
tableaux des instructions d'utilisation le précisent.
▯ Utiliser des moules à gâteaux foncés, peints en noir ou
émaillés.Ils absorbent particulièrement bien la chaleur.
▯ Ouvrir la porte de l'appareil aussi peu que possible
lorsque le four fonctionne.
▯ Il vaut mieux cuire plusieurs gâteaux les uns après les
autres. Le compartiment de cuisson est encore chaud.
Cela réduit le temps de cuisson du deuxième gâteau.Il
est possible de placer deux moules à gâteaux l'un à
côté de l'autre dans le compartiment de cuisson.
▯ Pour des temps de cuisson plus longs, vous pouvez
éteindre l'élément 10 minutes avant la fin du temps de
cuisson et utiliser la chaleur résiduelle pour finir la
cuisson.
▯ Toujours placer un couvercle adéquat sur les
ustensiles de cuisson. La cuisson avec des ustensiles
non recouverts augmente considérablement la
consommation d'énergie. Utiliser un couvercle en
verre pour voir, sans devoir soulever le couvercle.
▯ Utiliser des ustensiles de cuisson à base solide et
plate. Les bases bombées augmentent la
consommation d'énergie.
▯ Le diamètre de la base de la casserole doit
correspondre à la taille de l'élément. Sinon, de
l'énergie sera gaspillée.
Remarque : le fabricant indique habituellement le
diamètre supérieur de l'ustensile de cuisson. Il est
normalement plus élevé que le diamètre de la base de
l'ustensile.
▯ Choisissez des ustensiles de cuisson d'un format
approprié pour la quantité de nourriture à cuire. Une
casserole à moitié pleine utilisera beaucoup d'énergie.
▯ Utiliser une petite quantité d'eau pour cuisiner. Cela
représente une économie dl'énergie, tout en
permettant aux légumes de conserver une plus grande
part de leurs vitamines et minéraux.
▯ Sélectionner un niveau de puissance plus faible.
▯ En cuisinant, veiller à ce que l'aération soit suffisante
pour que la hotte puisse fonctionner efficacement et
silencieusement.
▯ Le ventilateur s'adapte à l'intensité des vapeurs de
cuisson dégagées. N'utiliser que le mode élevé, si
nécessaire. Un ventilateur à un niveau plus bas
économise de l'énergie.
▯ En cas de vapeurs de cuisson importantes,
sélectionner assez tôt un niveau de ventilation plus
élevé. Si des vapeurs de cuisson déjà répandues dans
la cuisine, la hotte devra fonctionner plus longtemps.
▯ Éteindre la hotte lorsqu'elle n'est plus nécessaire.
▯ Éteindre la lumière lorsqu'elle n'est plus nécessaire.
▯ Nettoyer et changer le filtre à intervalles donnés pour
améliorer l'efficacité de la ventilation et éviter un risque
d'incendie.

69
Mise en route
Pièces
Votre appareil peut être légèrement différent.
Caractéristiques de la cuisinière
Rétention de la chaleur
La surface de cuisson retient la chaleur et demeure
chaude après que les éléments ont été éteints. La
chaleur ainsi retenue peut être utilisée pour maintenir les
plat à la température de service pendant un moment.Si
un voyant lumineux de surface chaude est allumé, faire
attention en travaillant ou en nettoyant autour de la table
de cuisson, puisque celle-ci est encore chaude.
1 Bandeau de commande de la table de cuisson
2 Bandeau de commande du four
3 Joint d’étanchéité de porte
4 Loquet de porte
5 Prise de sonde
6 Ventilateur de convection
7 Guides de positionnement de grilles avec 6
positions
8 Sole du four
9 Charnière de porte
10 Tiroir chauffant
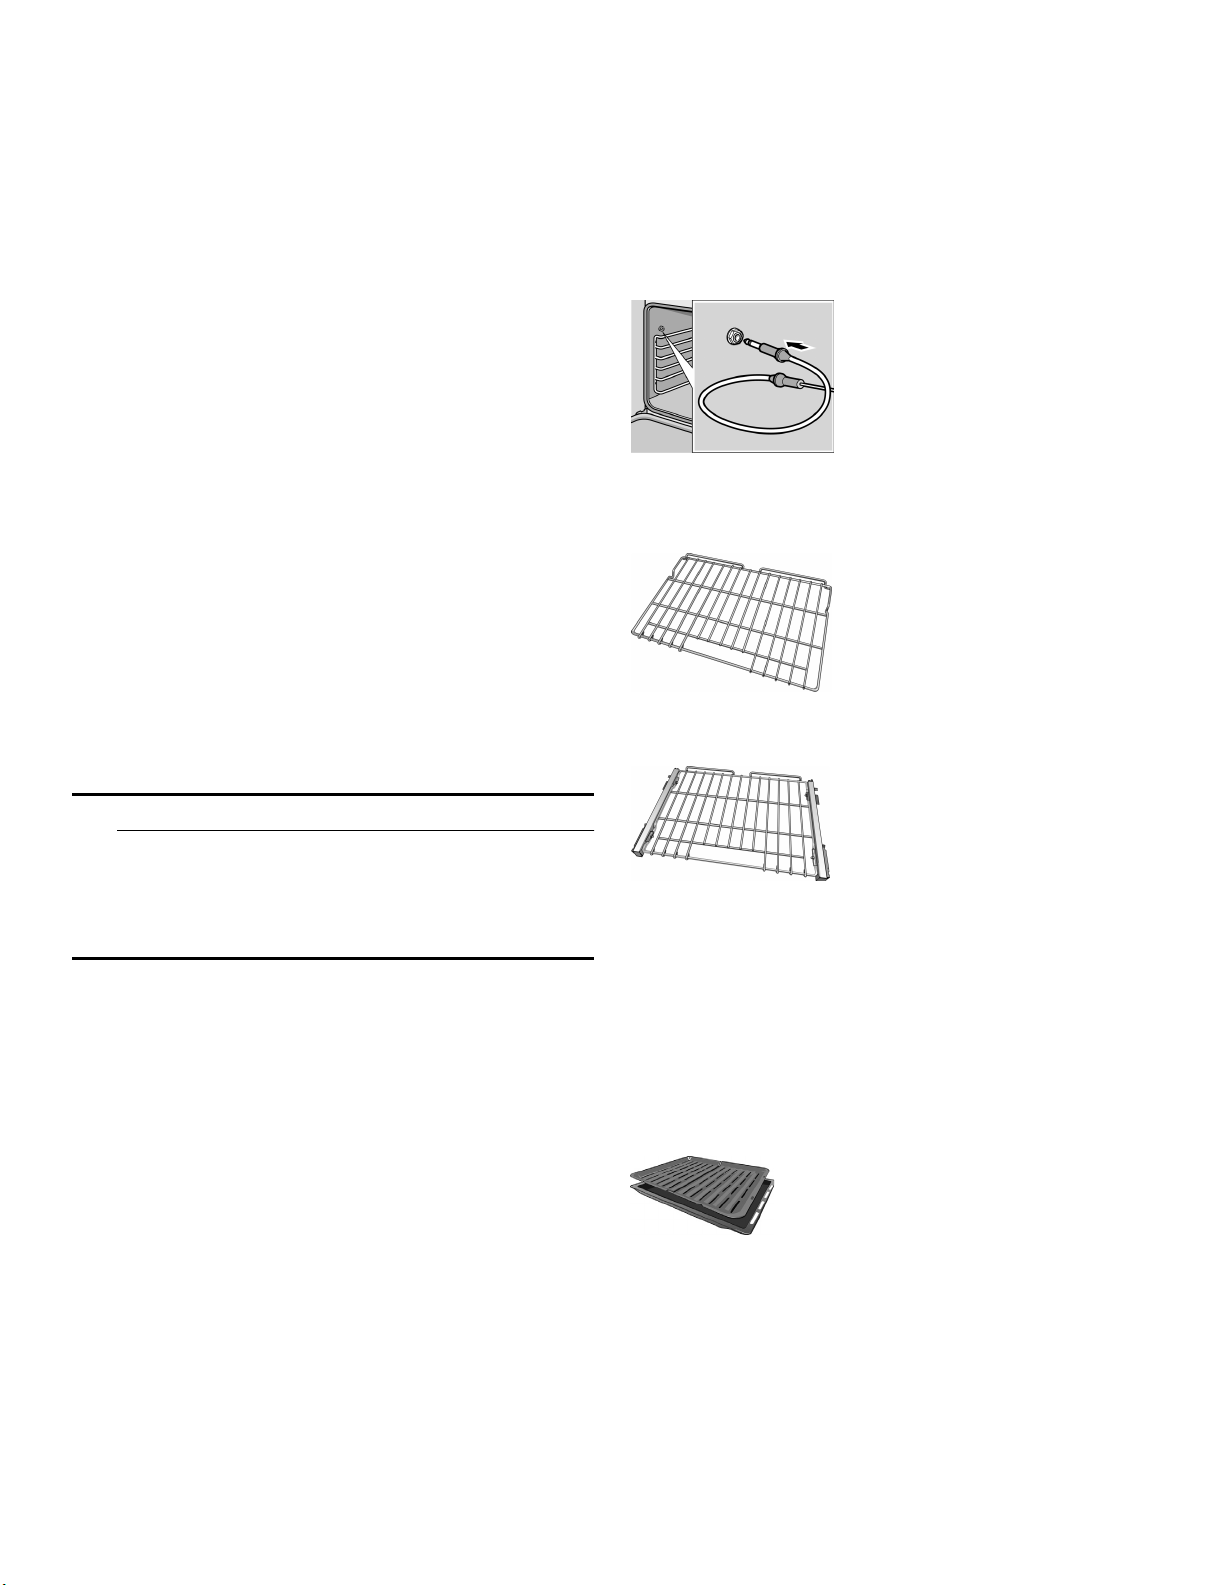
70
Indicateur de surface chaude
La table de cuisson affiche un voyant lumineux indicateur
de chaleur pour signaler que la table de cuisson est trop
chaude pour être touchée. Si un voyant lumineux de
surface chaude est allumé, Si un voyant de surface
chaude est allumé, faire attention en travaillant ou en
nettoyant autour de la table de cuisson, puisque celle-ci
est encore chaude.
Caractéristiques du four
Ventilateur de refroidissement
Le ventilateur de refroidissement tourne pendant tous les
modes de cuisson. On peut l'entendre fonctionner et
sentir parfois de l'air chaud s'échapper de l'évent du four.
Le ventilateur peut également fonctionner une fois le four
éteint.
Ventilateur à convection
Le ventilateur à convection fonctionne pendant tous les
modes de cuisson à convection. Lorsque le four est en
mode de cuisson par convection, le ventilateur s'arrête
automatiquement lorsque la porte est ouverte. Il
fonctionne également pendant l'autonettoyage.
Sole du four
La sole du four abrite l'élément chauffant inférieur. Ceci
permet de protéger l'élément des dommages et des
déversements.
Conseil : ne pas placer les aliments directement sur la
sole du four.
9 AVERTISSEMENT
Ne pas utiliser de papier aluminium ou de doublure
de protection pour revêtir toute partie de l’appareil,
et en particulier le fond du four. L’utilisation de ces
doublures peut entraîner un risque de choc
électrique ou d’incendie.
Évent du four
L'évent du four se trouve au bas de l'unité. De l'air chaud
peut s'échapper de l'évent avant, pendant et après la
cuisson. Il est normal de voir de la vapeur s'échapper de
l'évent et de la condensation peut se former à cet
endroit. Cette zone peut devenir très chaude pendant
l'utilisation du four. Ne pas obstruer l'évent car il est
indispensable à la bonne circulation de l'air.
Extinction automatique
Le four s'éteindra automatiquement après 24 heures.
Autonettoyage
Le four est doté d'une fonction d'autonettoyage qui
élimine le travail qu'exige le nettoyage du four à la main.
Indicateurs et autres caractéristiques
Réglages par défaut – Les modes de cuisson
sélectionnent automatiquement la température par
défaut. Celle-ci peut être modifiée lorsqu'une autre
température est indiquée.
Codes chiffrés E – Ces codes s'affichent lorsque la
cuisinière rencontre un problème.
Mode Veille – Le mode Veille signale que le four est
alimenté en électricité mais qu'aucun mode de cuisson
ou qu'aucune minuterie ne sont en service.
Accessoires
Sonde
La sonde peut servir à déterminer
le niveau de cuisson interne ou la
température finale de nombreux
aliments, et en particulier les
viandes et la volaille.
Ne pas nettoyer dans le four
autonettoyant ni mettre au lave-
vaisselle.
Grille plate
Utiliser pour la plupart des plats. Il
est possible d'utiliser plusieurs
grilles avec certains modes de
cuisson.
Ne pas nettoyer dans le four
autonettoyant.
Grille téléscopique (certains
modèles)
Des grilles de 30 po (76 cm)
supplémentaires sont
disponibles sur e-Shop :
#HEZTR301
Utiliser cette grille pour la cuisson
de plats plus lourds afin de
faciliter l'insertion des plats dans
le four. Vérifier la cuisson des
aliments et retirer les plats du four
lorsque la cuisson est terminée.
Ne pas nettoyer dans le four
autonettoyant.
Plat à rôtir
(disponible sur e-Shop)
Plat : #00449757
Grille : #00449756
À utiliser pour griller et rôtir.
Ne pas nettoyer dans le four
autonettoyant.
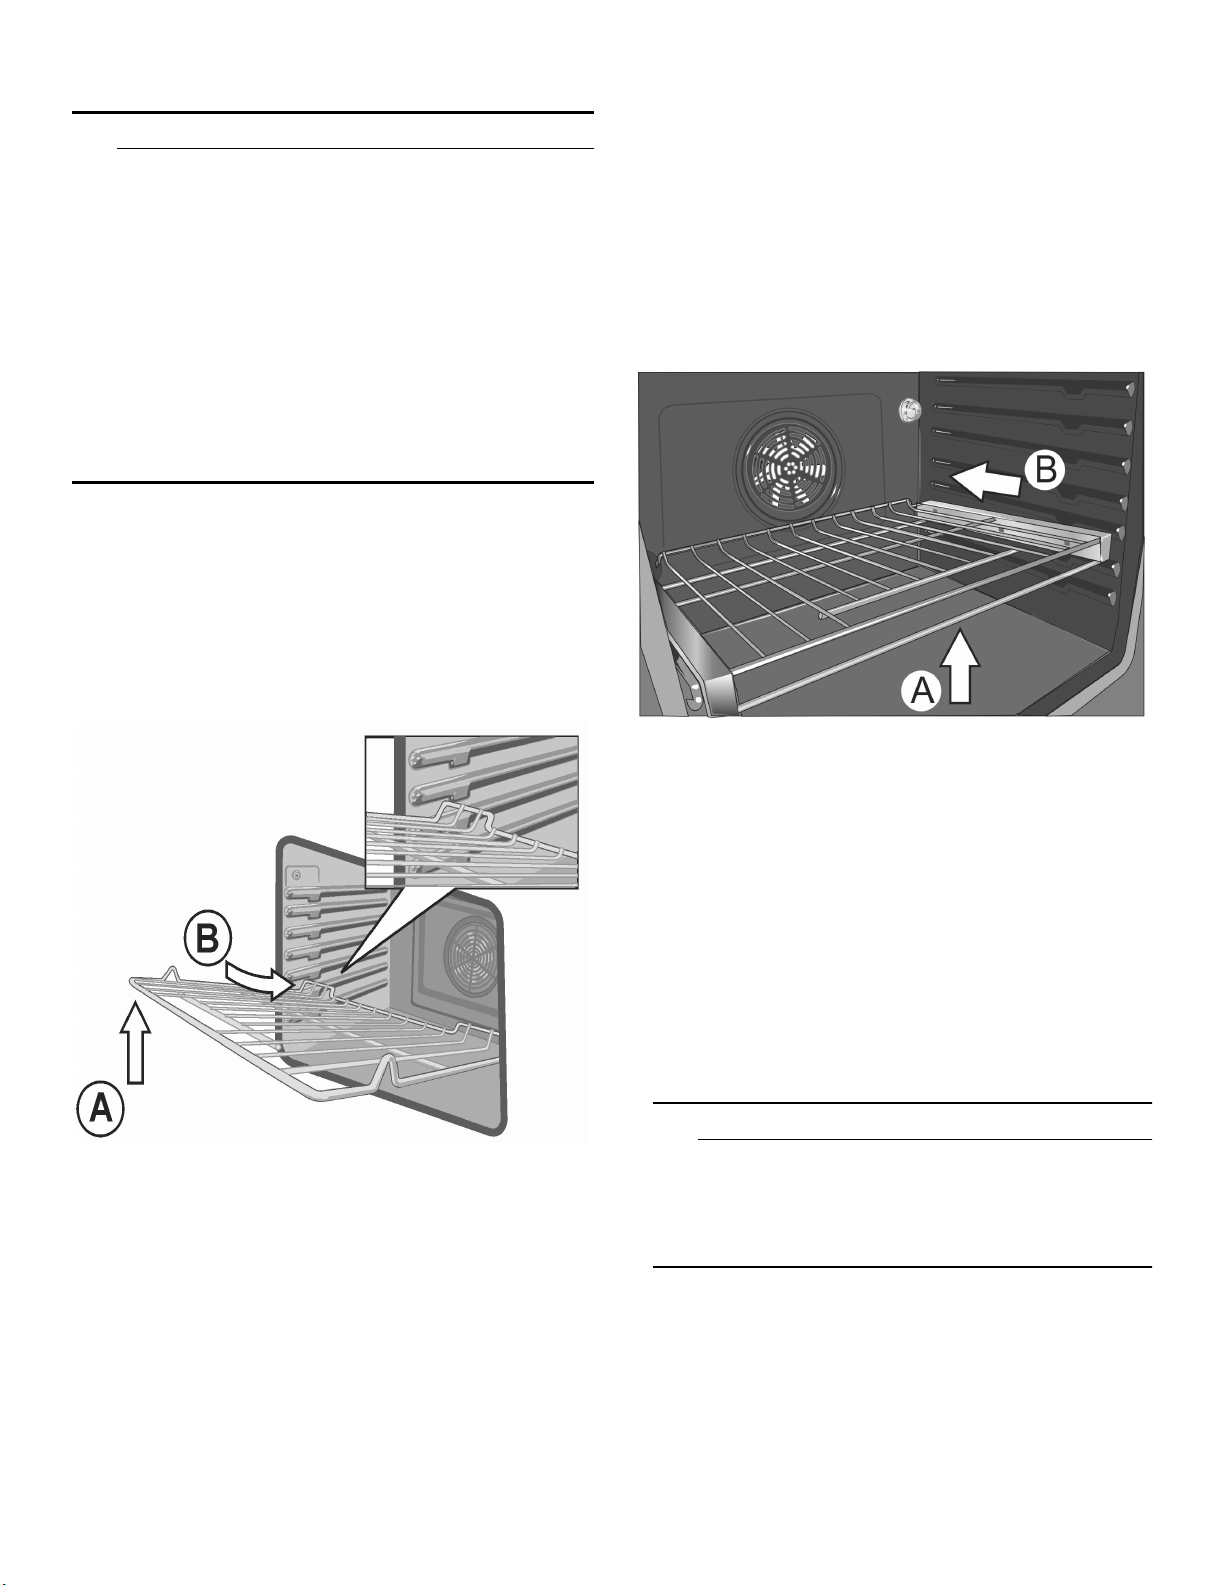
71
Mise en place de la grille
9 ATTENTION
▯ Pour éviter les brûlures, placer les grilles dans la
position désirée avant de mettre le four en
marche. Toujours utiliser des gants isolants
lorsque le four est chaud. Si vous devez déplacer
les grilles lorsque le four est chaud, ne pas
laisser les gants isolants entrer en contact avec
les élément chauffants.
▯ Agir avec prudence en retirant les grilles de la
position la plus basse pour éviter d'entrer en
contact avec la porte du four chaude.
▯ Pour éviter toute blessure ou endommagement
de l'appareil, s'assurer que les grilles sont
installées conformément à la notice d'installation
et non à l'envers ou sens dessus dessous.
Grille plate
La grille est conçue avec une butée, de manière à ce
qu'elle s'arrête avant de sortir complètement du four et
qu'elle ne bascule pas.
Pour insérer une grille plate dans le four :
1.
Saisir fermement la grille des deux côtés.
2.
Installer la grille (voir illustration).
3.
Incliner la grille vers le haut pour engager la butée
dans la glissière.
4.
Ramener la grille à l'horizontale et la pousser
complètement.
La grille doit être droite, pas de travers.
Pour retirer la grille plate du four :
1.
Saisir fermement la grille des deux côtés et tirer vers
soi.
2.
Lorsque la butée est atteinte, incliner la grille vers le
haut façon et la tirer complètement hors du four.
Grille télescopique
Insérer la grille télescopique dans le four :
1.
Faire glisser la grille de manière régulière jusqu'à ce
que l'arrière de la grille soit à environ 2 po (5 cm) de
la paroi arrière du four.
2.
Incliner la partie avant de la grille d'environ ¾ po
(2 cm) (A) et continuer de l'enfoncer toute entière
jusqu'au fond du four (B).
Remarque : Éviter de percuter la lentille de protection
de l'éclairage du four en enfonçant la grille dans la
cavité pour la mettre en place.
3.
L'arrière de la grille télescopique se met en place en
se calant.
4.
Tirer la grille vers l'avant pour engager sa partie
inférieure sur la partie arrière du guide de
positionnement de grille.
5.
Abaisser la partie avant de la grille pour terminer sa
mise en place sur le guide de grille. Lorsque
correctement positionnée, la grille doit être stable au
toucher.
6.
Faire glisser la partie amovible de la grille
télescopique plusieurs fois d'avant en arrière pour
vérifier qu'elle peut se déplacer librement et que la
partie non amovible de la grille télescopique est bien
fixée.
9 ATTENTION
Pour éviter toute possibilité de blessure ou
d'endommagement de l'appareil, s'assurer que la
grille télescopique est installée exactement
suivant les instructions de montage et non à
l'envers ou sens dessus dessous.
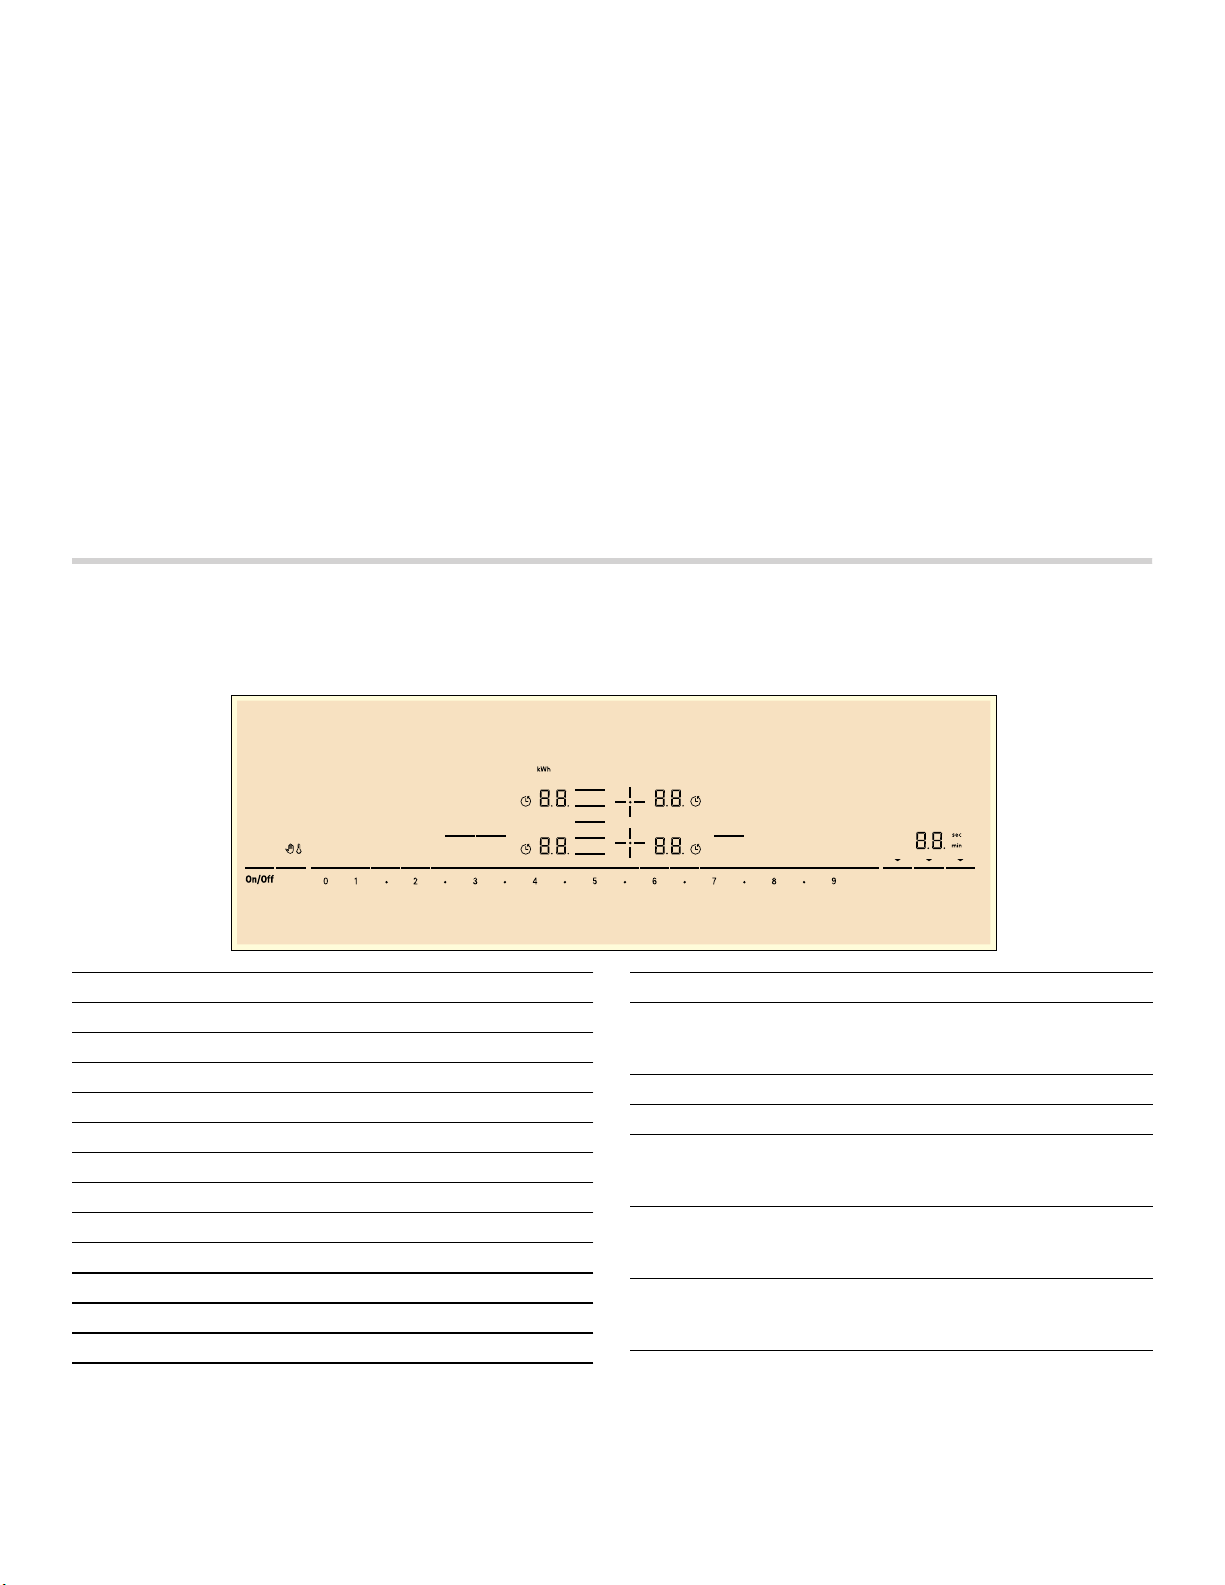
72
Retirer la grille télescopique du four :
1.
Soulever la partie avant de la grille télescopique
d'environ ½ po (1,3 cm) et pousser la grille d'environ
¾ po (2 cm) vers le fond. Cela permet de dégager la
grille du guide de positionnement de grille.
2.
Soulever la partie arrière de la grille télescopique de
manière qu'elle se dégage du guide de
positionnement de grille et tirer doucement la grille
hors du four.
Remarque : Prendre soin d'éviter de tirer la grille de
manière irrégulière car elle aura tendance à se coincer
et à buter contre les parois du four.
Avant la première utilisation de l'appareil
▯ Retirer tout matériau d'emballage et toute étiquette de
l'appareil.
▯ Avant l'utilisation, le four doit être correctement installé
par un technicien qualifié.
▯ Retirez tout matériau d’emballage à l’intérieur du four
et du tiroir.
▯ Essuyer le four froid à l'aide d'un chiffon propre et
humide et sécher.
▯ Appliquer du produit nettoyant pour table de cuisson
en vitrocéramique sur la table de cuisson en
vitrocéramique. Polir avec un chiffon propre. Consulter
la section Nettoyage et entretien.
▯ Il peut y avoir une légère odeur aux premières
utilisations. Ceci est normal et disparaîtra.
▯ Pour obtenir des résultats de cuisson optimaux, utiliser
des plats de cuisson au four adéquats.
▯ La surface de cuisson retient la chaleur et demeure
chaude après que les éléments ont été éteints.
▯ Lire et comprendre toutes les précautions de sécurité
et le manuel d'utilisation et d'entretien avant toute
utilisation.
Faire connaissance avec l’appareil
Cette section déctrit le panneau des touches, les
éléments chauffants et les affichages.
Panneau de commande
3DQHO
/RFN
3RZHU
0RYH
)OH[
-RLQ6SOLW
.HHS
:DUP
6SHHG
%RRVW
.LWFKHQ
7LPHU
&RRN
7LPHU
&RXQW8S
7LPHU
Symboles affichés
‹.‹
Table de cuisson prête
‚-Š
Niveaux de puissance
•/œ
Chaleur résiduelle
‹‹
Fonctions de programmation du temps
>
Protection contre l'essuyage
Š
Verrou pour enfant
y
Minuterie de cuisson
ö / ô
Indicateur de minuterie
›.
Fonction SpeedBoost
MD
(Haute vitesse)
˜›.
Fonction ShortBoost (Puissance rapide)
÷
Consommation énergétique
–©
Fonction Keep Warm (Garder au chaud)
Commandes
On/Off
(Marche/
arrêt)
Interrupteur principal
ø/ã
Sélectionnez la zone de cuisson
0 1û2û...û8û9
Plage des réglages
Speed Boost
(Haute
vitesse)
Fonction SpeedBoost
MD
(Haute vitesse)
et ShortBoost (Puissance rapide)
Panel Lock
(Verrouillage
du panneau)
Verrouillage du panneau pour la sécurité
des enfants/Protection contre l'essuyage
Keep Warm
(Garder
chaud)
Fonction Keep Warm (Garder au chaud)
Flex Join/
Split (Flex
Joindre/
Séparer)
Zone de cuisson flexible

73
Surfaces de commande
Quand le foyer commence à chauffer, les symboles des
champs de commande disponibles à ce moment
s'allument.
Lorsque vous touchez un symbole, la fonction respective
sera activée.
Remarques
▯ Les symboles correspondants des champs de
commande s'allument en fonction de leur disponibilité.
Les affichages des foyers ou des fonctions
sélectionnées brillent plus intensément.
▯ Maintenez toujours le bandeau de commande propre
et sec. L'humidité peut affecter le fonctionnement.
Les éléments
Indicateur de chaleur résiduelle
La table de cuisson possède pour chaque foyer un
indicateur de chaleur résiduelle. Il indique qu'un foyer est
encore chaud. Ne touchez pas le foyer tant que
l'indicateur de chaleur résiduelle est allumé.
Selon le degré de la chaleur résiduelle, l'affichage est le
suivant :
▯ Affichage • : température élevée
▯ Affichage œ : faible température
Si vous retirez le récipient du foyer pendant la cuisson,
l'indicateur de chaleur résiduelle et la puissance de
cuisson sélectionnée clignotent en alternance.
Lorsque le foyer est éteint, l'indicateur de chaleur
résiduelle s'allume. Même si la table de cuisson est déjà
éteinte, l'indicateur de chaleur résiduelle est allumé tant
que le foyer est encore chaud.
Fonctionnement
9 AVERTISSEMENT
RISQUE DE DÉBORDEMENT
À température élevée, ne jamais laisser des
éléments de surface sans surveillance. Un
débordement cause de la fumée et les résidus
graisseux peuvent s'enflammer.
Interrupteur d'alimentation principal
Utilisez l'interrupteur principal pour activer les circuits
électroniques du panneau de commande. La table de
cuisson est maintenant prête à être utilisée.
Mise en marche de la table de cuisson
Touchez la touche On/Off (Marche/Arrêt). Un signal
sonore retentit. L'indicateur __ situé sur le dessus du
bouton On/Off (Marche/Arrêt) et les symboles des zones
de cuisson s'allument. ‹:‹ s'allume ensuite à côté des
zones de cuisson. La table de cuisson est prête à être
utilisée.
Mise à l'arrêt de la table de cuisson
Touchez la touche On/Off (Marche/Arrêt). L'indicateur __
s'éteint. La table de cuisson est éteinte. Les indicateurs
de chaleur résiduelle demeureront allumés jusqu'à ce
que les éléments soient suffisamment refroidis.
Remarque : La table de cuisson s'éteindra
automatiquement lorsque tous les éléments sont
désactivés pendant plus de 20 secondes.
L'indicateur de chaleur résiduelle demeurera allumé
jusqu'à ce que les éléments soient suffisamment
refroidis. •/œ sera affiché à côté du symbole d'élément
correspondant.
Power Move
(Déplace-
ment de puis-
sance)
Fonction PowerMove (Déplacement de
puissance)
Kitchen
Timer (Minu-
terie de cui-
sine)
Fonction de minuterie de cuisine
Cook Timer
(Minuterie de
cuisson)
Réglage du temps de cuisson
Count Up
Timer (Minu-
terie crois-
sante)
Fonction de chronomètre
Commandes
Élément
$ / Û
Élément simple Utiliser des articles de cuisson de la taille appropriée.
á
Zone de cuisson flexible
Consulter la section ~ "Zone de cuisson FlexInduction
MD
"
N'utiliser que des articles convenant à la cuisson à induction; voir la section sur la Cuisson à induction

74
Allumage de la table de cuisson
Ce chapitre explique comment procéder au réglage des
éléments chauffants. Le tableau ci-après répertorie les
réglages de chaleur pour différents aliments.
Réglage de l'élément
Sélectionnez le niveau de chauffage souhaité avec les
touches numérotées 1 à 9.
Niveau de chaleur 1 = puissance minimum
Niveau de chaleur 9 = puissance maximum
Chaque réglage de chaleur a un niveau intermédiaire.Ce
niveau est indiqué par .5 dans l'écran de l'élément et est
réglé en touchant les symboles
Ú entre les touches
numérotées.
Sélection du niveau de chaleur
La table de cuisson doit être allumée.
1.
Sélectionnez l'élément souhaité en touchant le
symbole ã ou ø de l'élément souhaité. Dans l'écran
de la zone de cuisson,
‹.‹ s'allume plus intensément.
2.
Entrez ensuite le niveau de puissance souhaité avec
les touches numérotées.
3.
Le niveau de puissance est réglé.
Modification du niveau de puissance
Sélectionnez la zone de cuisson et réglez ensuite le
niveau de puissance souhaité sur le panneau de
commande.
Mise à l'arrêt de la table de cuisson
Choisissez la zone de cuisson et réglez le niveau de
chaleur à 0. L'élément sera désactivé et l'indicateur de
chaleur résiduelle s'allumera.
Remarques
▯ Lorsqu'aucun récipient n'est placé sur une zone de
cuisson par induction, l'indicateur du niveau de
puissance clignote. La zone de cuisson s'éteint après
quelque temps.
▯ Si un récipient est placé sur la zone de cuisson avant
l'allumage de la table de cuisson, ce récipient est
reconnu au plus tard 20 secondes après l'allumage de
l'interrupteur principal et la zone de cuisson est
automatiquement sélectionnée. Réglez le niveau de
puissance dans les 20 secondes qui suivent. Sinon, la
zone de cuisson s'éteindra de nouveau.
Si plusieurs casseroles sont placées sur la table de
cuisson lors de son allumage, une seule sera reconnu.
Recommandations pour la cuisson
▯ Régler le niveau de chaleur entre 8 et 9 pour le
préchauffage; pour les plats délicats, comme le lait, le
pudding, le pudding au riz ou les céréales, choisir
plutôt un réglage entre 8 et 8,5.
▯ Lors d'une cuisson sous couvercle, baisser le niveau
de chaleur aussitôt que de la vapeur s'échappe entre
le couvercle et la casserole. La vapeur n'a pas besoin
de s'échapper pour obtenir de bons résultats de
cuisson.
▯ Après la cuisson, garder le couvercle sur l'ustensile de
cuisson jusqu'au moment de servir.
▯ Pour une cuisson à l'autocuiseur, suivre les
instructions du fabricant.
▯ Ne pas cuire la nourriture trop longtemps, car les
aliments risquent de perdre plus de nutriments que
nécessaire. La minuterie de cuisine peut être utilisée
pour régler un temps de cuisson optimal.
▯ Pour des résultats de cuisson plus sains, éviter de
faire fumer de l'huile.
▯ Pour brunir la nourriture, frire successivement de
petites portions.
▯ Les ustensiles de cuisson peuvent devenir très chauds
pendant la cuisson de la nourriture. Nous
recommandons d'utilisation de gants de cuisine.

75
Tableau des réglages
Le tableau qui suit indique certains exemples. La durée
de cuisson varie en fonction du type d'aliment, de son
poids et de sa qualité. Des variations sont donc
possibles.
9 ATTENTION
Au cours de la cuisson, les ragoûts ou repas
liquides, comme les soupes, sauces ou boissons,
peuvent chauffer très rapidement et déborder ou
causer des dégâts. Pour cette raison, nous vous
recommandons de brasser continuellement la
nourriture afin de la chauffer graduellement à un
niveau de puissance approprié.
Niveaux de puissance
Fondre
chocolat 1,5
beurre 1,0 - 2,0
Chauffer
légumes congelés, p. ex., épinards 2,5 - 3,5
bouillon 7,0 - 8,0
soupe épaisse 1,5 - 2,5
lait** 1,0 - 2,0
Mijoter
sauce délicate, p. ex., sauce béchamel 4,0 - 5,0
sauce à spaghetti 2,0 - 3,0
bœuf braisé 4,0 - 5,0
poisson** 4,0 - 5,0
Cuisson
riz (avec le double de la quantité d'eau) 2,0 - 3,0
pommes de terre bouillies avec leur peau (avec 1 à 2 tasses d'eau) 4,0 - 5,0
pommes de terre bouillies (avec 1 à 2 tasses d'eau) 4,0 - 5,0
légumes frais (avec 1 à 2 tasses d'eau) 2,0 - 3,5
légumes congelés (avec 1 à 2 tasses d'eau) 3,5 - 4,5
pâtes (avec 2 à 4 pintes d'eau)* 6,0 - 7,0
pouding** 1,0 - 2,0
céréales 2,0 - 3,0
Frire
côtelette de porc 5,5 - 6,5
poitrine de poulet 5,0 - 6,0
bacon 6,0 - 7,0
œufs 5,0 - 6,0
poisson 5,0 - 6,0
crêpes 6,0 - 7,0
Grande friture** (dans 1 à 2 pintes d'huile)
produits alimentaires surgelés, p. ex., croquettes de poulet (0,5 lb par portion) 8,0 - 9,0
autres, p. ex., beignes (0,5 lb par portion) 4,5 - 5,5
Garder au chaud
sauce tomate 1,5
* cuisson continue sans couvercle
** sans couvercle
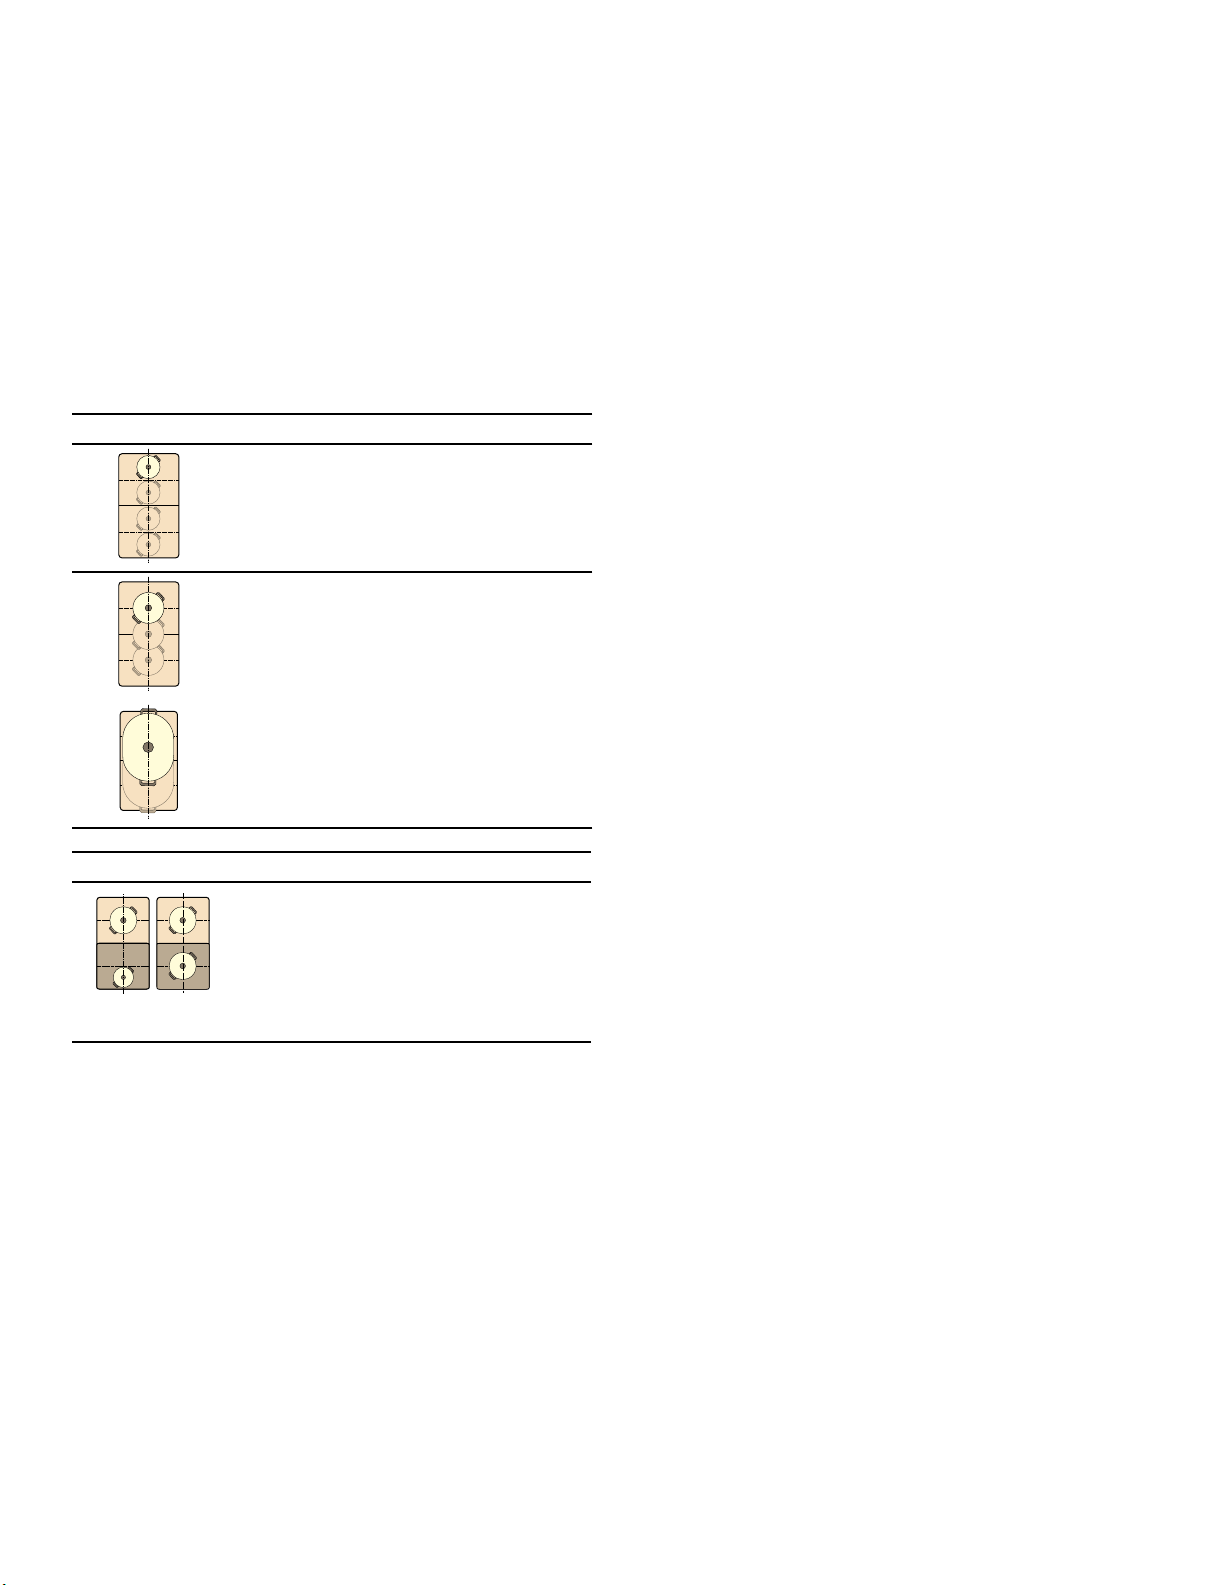
76
Zone de cuisson FlexInduction
MD
Selon vos besoins, vous pouvez combiner les éléments
en une grande zone de cuisson ou l'utiliser comme deux
éléments indépendants.
La zone de cuisson FlexInduction
MD
comprend 4
inducteurs commandés indépendamment. Lorsque la
fonction FlexInduction
MD
est activée, seule la zone
couverte par un ustensile de cuisine est activée.
Recommandations d'utilisation de l'ustensile de
cuisson
Placez l'ustensile de cuisson au milieu du foyer. La
reconnaissance de la casserole et la répartition de
chaleur sont ainsi garanties.
En tant que deux foyers indépendants
La zone de cuisson flexible peut être utilisée comme
deux foyers indépendants.
Activation
Consultez la section ~ "Allumage de la table de
cuisson"
En tant que foyer unique
Utilisation de l'ensemble de la zone de cuisson en
associant les deux foyers.
Joindre les deux éléments
La table de cuisson doit être allumée.
1.
Déposez l'ustensile de cuisine. Sélectionnez un des
deux éléments assignés à la zone de cuisson flexible
et réglez ensuite le niveau de puissance souhaité.
2.
Touchez la touche Flex Join/Split (Flex Joindre/
Séparer). L'écran s'allume.
Le réglage de chaleur apparaît à l'écran de l'élément
inférieur.
La zone de cuisson flexible est activée.
Modification du niveau de puissance
Sélectionnez un des éléments de la zone de cuisson
flexible et modifiez ensuite le niveau de puissance
souhaité avec les touches numérotées.
Ajouter un autre ustensile de cuisson
Déposer le nouvel ustensile de cuisson sur la table de
cuisson, sélectionner un des deux éléments de la zone
de cuisson polyvalente et toucher ensuite deux fois la
touche Flex Join/Split (Flex Joindre/Séparer). L'élément
détectera le nouvel ustensile de cuisson et le niveau de
puissance, réglé antérieurement, sera maintenu.
Remarque : Si l'ustensile de cuisson est déplacé sur
l'élément ou enlevé de l'élément utilisé, l'élément lance
une recherche automatique et le degré de chaleur réglé
antérieurement sera maintenu.
Séparer les deux éléments
Sélectionnez un des deux éléments de la zone de
cuisson flexible et touchez ensuite la touche Flex Join/
Split (Flex Joindre/Séparer).
La zone de cuisson flexible est désactivée. Les deux
éléments fonctionnent maintenant de façon autonome.
Remarques
▯ Si l'élément est éteint puis rallumé ultérieurement, la
zone de cuisson flexible est réinitialisée et fonctionne
à nouveau comme deux éléments indépendants.
▯ Pour modifier les réglages de configuration de la zone
de cuisson flexible, consultez la section ~ "Réglages
de base"
Zone de cuisson flexible - comme foyer individuel
Diamètre de l'ustensile inférieur ou
égal à 5X po (13 cm)
Placez l'ustensile de cuisson sur l'une
des 4 positions indiquées sur
l'illustration.
Diamètre de l'ustensile supérieur à
5X po (13 cm)
Placez l'ustensile de cuisson sur l'une
des 3 positions indiquées sur
l'illustration.
Lorsque l'ustensile de cuisson néces-
site plus d'un foyer, placez-le sur le
bord supérieur ou inférieur de la zone
de cuisson flexible.
Zone de cuisson flexible - deux foyers indépendants
Les foyers avant et arrière peuvent être
utilisés indépendamment avec cha-
cun deux inducteurs. Le niveau de
puissance est réglé individuellement
pour chaque foyer. Utilisez seulement
un ustensile de cuisson sur chaque
foyer.
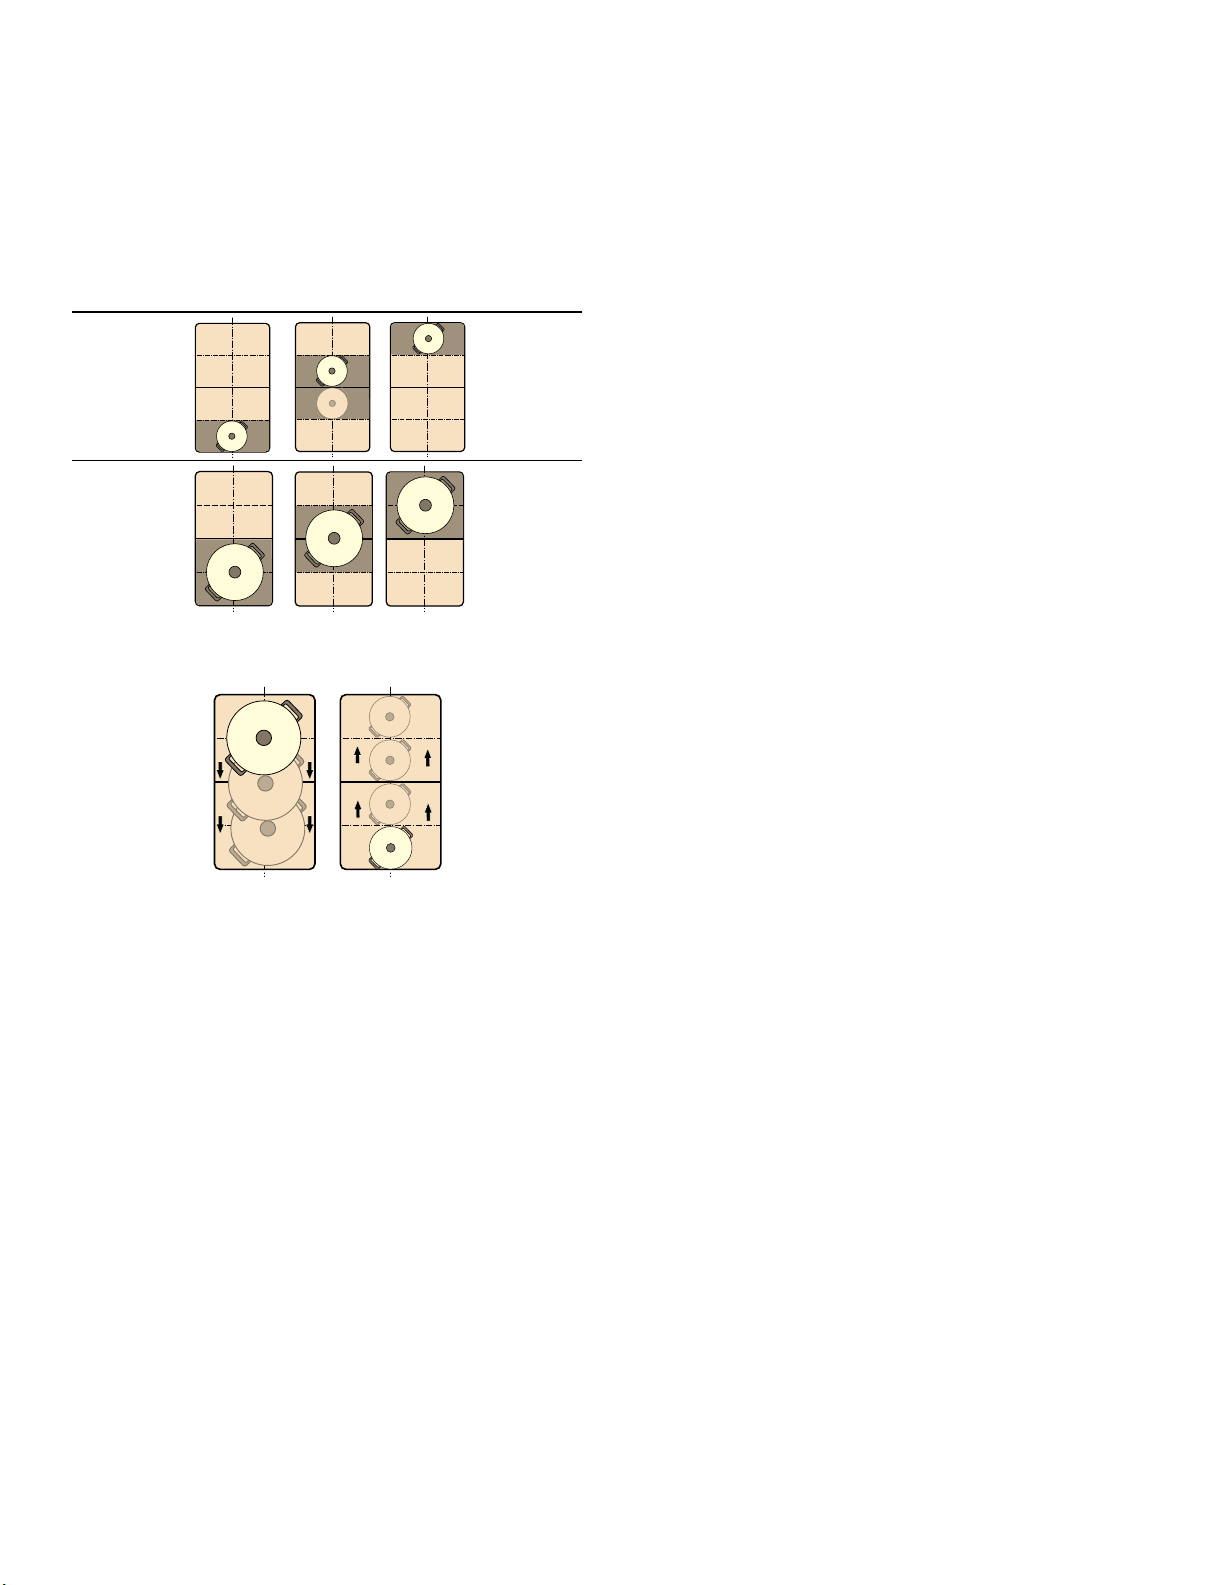
77
Fonction PowerMove (Déplacement de
puissance)
Cette fonction active toute la zone de cuisson flexible, qui
est divisée en trois zones de cuisson possédant des
niveaux de puissance préétablis.
Utilisez seulement un ustensile de cuisine. La taille de la
zone de cuisson dépend de l'ustensile de cuisine utilisé
et de son positionnement approprié.
Cette fonction permet de placer un récipient sur une
autre zone de cuisson pendant le processus de cuisson :
Niveaux de puissance préétablis :
Zone avant = niveau de puissance Š
Zone du milieu = niveau de puissance †
Zone arrière = niveau de puissance ‚.†
Les niveaux de puissance préétablis peuvent être
changés indépendamment les uns des autres. Vous
pouvez trouver comment modifier ces niveaux dans la
section ~ "Réglages de base"
Remarques
▯ Si plus d'un ustensile de cuisine est détecté sur la
zone de cuisson flexible, la fonction est désactivée.
▯ Si l'ustensile de cuisine est déplacé dans la zone de
cuisson flexible ou soulevé, la table de cuisson
essaiera de le détecter automatiquement et le niveau
de puissance de la zone où se trouvait l'ustensile de
cuisson sera automatiquement appliqué au nouvel
emplacement de l'ustensile de cuisine.
▯ Vous pouvez trouver davantage de renseignements
sur le format et le positionnement des ustensiles de
cuisine dans la section sur la fonction ~ "Zone de
cuisson FlexInduction
MD
"
Activer
1.
Sélectionnez un des deux éléments de la zone de
cuisson flexible.
2.
Touchez la touche Power Move (Déplacement de
puissance). L'indicateur à côté de la touche Power
Move s'allume. La zone de cuisson flexible est activée
comme une seule zone de cuisson.
Le niveau de puissance de la zone où se trouve
l'ustensile de cuisine s'affiche à l'écran de la zone de
cuisson.
La fonction est maintenant activée.
Modification du niveau de puissance
Les niveaux de puissance pour les zones de cuisson
individuelles peuvent être modifiés au cours de la
cuisson. Déposez l'ustensile de cuisine sur la zone de
cuisson et réglez le niveau de puissance avec les
touches numérotées.
Remarques
▯ Seul le niveau de puissance de la zone où se trouve
l'ustensile de cuisine sera modifié.
▯ Si la fonction est désactivée, les niveaux de puissance
des trois zones de cuissons reviendront à leurs
valeurs préréglées.
Désactiver
Touchez la touche Power Move (Déplacement de
puissance). L'indicateur à côté de la touche Power Move
s'éteint.
La fonction est désactivée.
Remarque : Si une des zones de cuisson est réglée à ‹,
la fonction est désactivée après quelques secondes.
Options de réglage du temps
Votre table de cuisson dispose de trois fonctions de
minuterie :
▯ Programmation du temps de cuisson
▯ Minuterie
▯ Fonction Chronomètre
Programmation du temps de cuisson
Le foyer s'éteint automatiquement après écoulement du
temps réglé.
Secteurs de cuisson
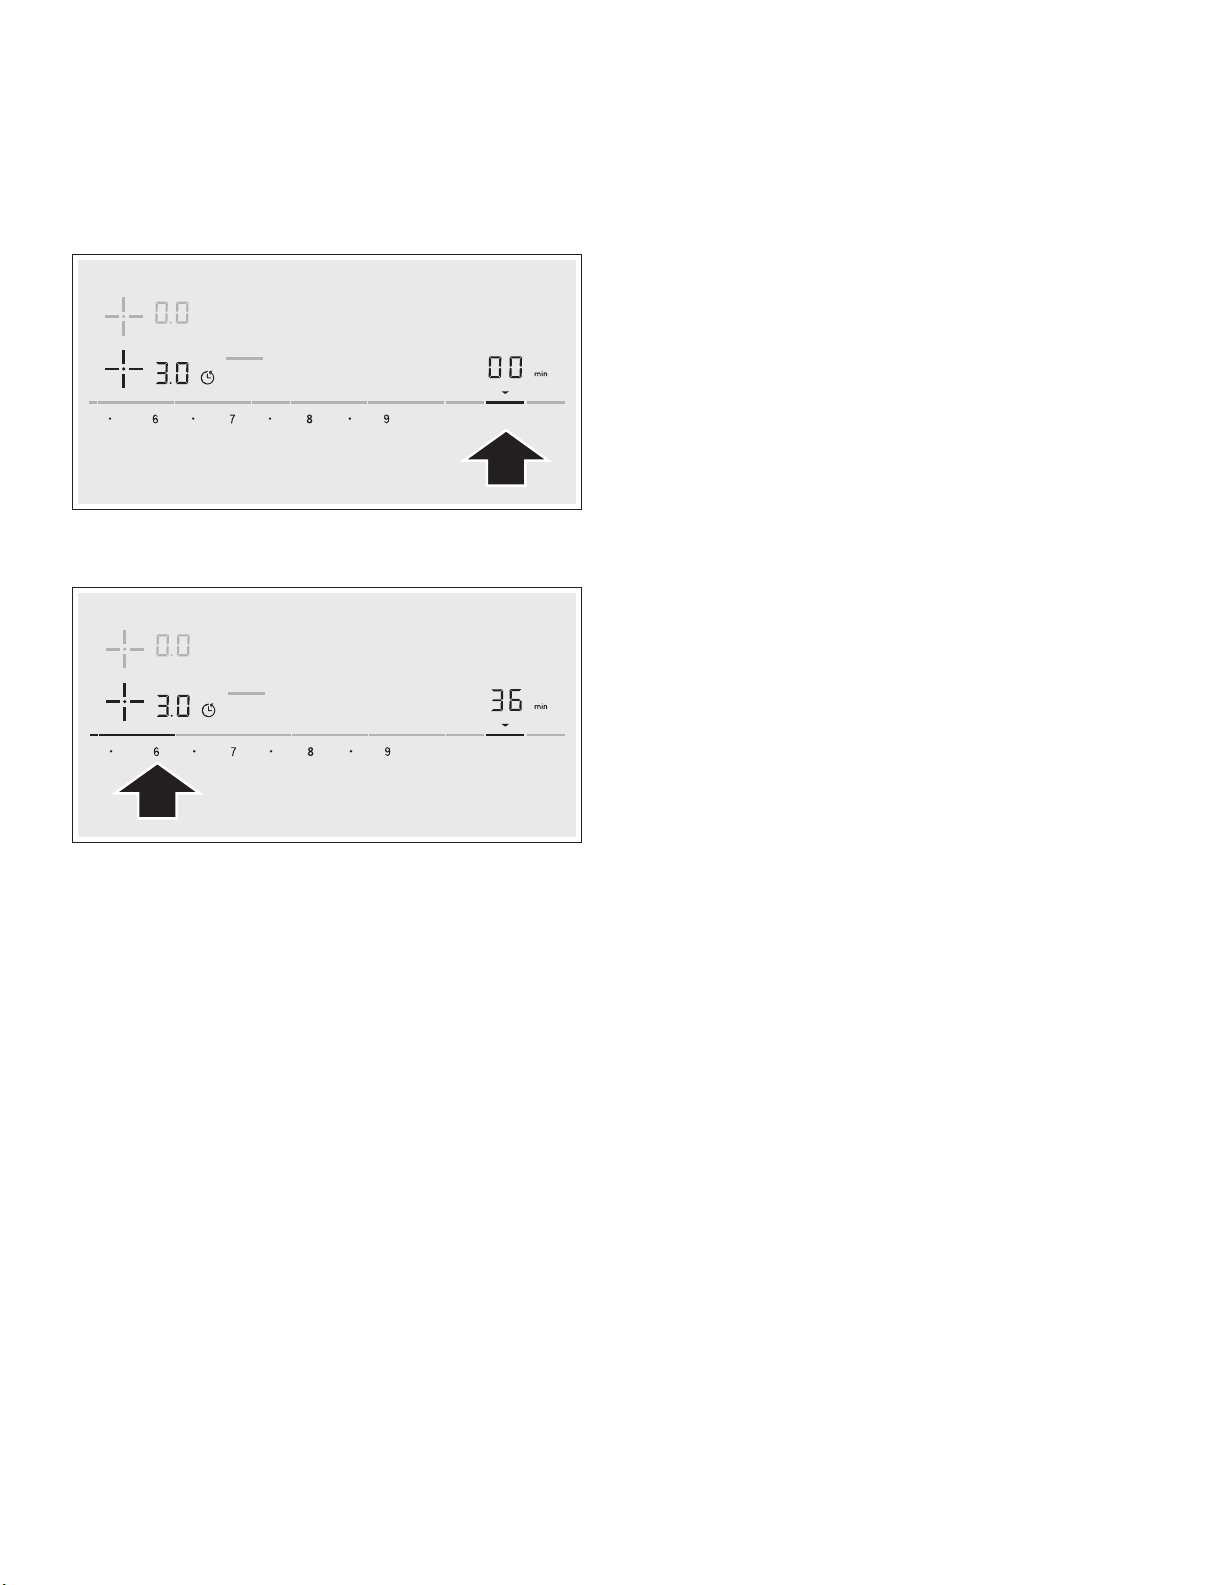
78
Procédure de réglage :
1.
Sélectionnez l'élément et le niveau de puissance
souhaité.
2.
Touchez la touche Cook Timer (Minuterie de cuisson).
Le symbole ‹‹ et l'indicateur V s'allument dans
l'écran de la Minuterie de cuisson.
y s'allume sur l'écran de l'élément.
3.
Dans les 10 secondes qui suivent, réglez le temps de
cuisson souhaité avec les touches numérotées.
4.
Touchez la touche Cook Timer (Minuterie de cuisson)
pour confirmer le réglage choisi.
Le temps de cuisson commence à s'écouler.
Remarques
▯ Le même temps de cuisson peut être
automatiquement réglé pour tous les éléments. Le
temps réglé pour chaque élément s'écoule
séparément.
Vous pouvez trouver des informations
supplémentaires sur la programmation automatique
du temps de cuisson dans la section portant sur la
minuterie de cuisson.
▯ Si la zone de cuisson flexible est sélectionnée comme
seul élément, le temps réglé pour toute la zone de
cuisson est le même.
▯ Si la fonction de déplacement est sélectionnée pour la
zone de cuisson combinée, le temps réglé pour toute
la zone de cuisson est le même.
Modification ou annulation du temps
Sélectionnez l'élément et touchez la touche Cook Timer
(Minuterie de cuisson).
Réglez le temps de cuisson souhaité avec les touches
numérotées, ou choisissez ‹‹ pour effacer le temps
programmé.
Touchez la touche Cook Timer (Minuterie de cuisson)
pour confirmer le réglage choisi.
Une fois que le temps s'est écoulé,
L'élément s'éteint, l'affichage y clignote et l'élément
passe au niveau de puissance ‹‹. Un signal sonore
retentit.
‹‹ et l'indicateur Vclignotent dans l'affichage de la
minuterie.
Lorsque le yest touché, les indicateurs s'éteignent et le
signal sonore cesse.
Remarques
▯ Pour régler un temps de cuisson inférieur à 10
minutes, effleurez toujours 0 avant de sélectionner la
valeur souhaitée.
▯ Si vous avez réglé un temps de cuisson pour plusieurs
foyers, l'indication de temps du foyer sélectionné
apparaît toujours dans l'affichage de la minuterie.
▯ Pour connaître le temps de cuisson restant,
sélectionnez le foyer correspondant.
▯ Vous pouvez régler un temps de cuisson de jusqu'à
ŠŠ minutes.
Minuterie de cuisine
La minuterie peut être programmée pour des périodes
allant jusqu'à 99 minutes. Elle est également
indépendante de tous les autres réglages. Vous pouvez
aussi utiliser la minuterie de cuisine lorsque la table de
cuisson est désactivée ou verrouillée.
Cette fonction n'éteint pas automatiquement un élément.
Procédure de réglage
1.
Touchez la touche Kitchen Timer (Minuterie de
cuisine). Le symbole ‹‹ et l'indicateur V s'allument
dans l'affichage de la minuterie.
2.
Sélectionnez le temps requis sur le panneau de
commande et touchez la touche Kitchen Timer
(Minuterie de cuisine) pour confirmer.
Après quelques secondes, le temps de cuisson
commence à s'écouler.
Modification ou annulation du temps
Touchez la touche Kitchen Timer (Minuterie de cuisine).
Réglez le temps de cuisson souhaité avec les touches
numérotées, ou choisissez ‹‹ pour effacer le temps
programmé.
Touchez la touche Kitchen Timer (Minuterie de cuisine)
pour confirmer le réglage choisi.
Une fois que le temps s'est écoulé,
un signal sonore retentit pour indiquer la fin du temps
réglé. ‹‹ et le symbole V clignotent dans l'affichage
de la minuterie.
Les indicateurs s'éteignent lorsque vous touchez la
touche Kitchen Timer (Minuterie de cuisine).
6SHHG
%RRVW
.LWFKHQ
7LPHU
&RRN
7LPHU
&RXQW8S
7LPHU
.HHS
:DUP
6SHHG
%RRVW
.LWFKHQ
7LPHU
&RRN
7LPHU
&RXQW8S
7LPHU
.HHS
:DUP
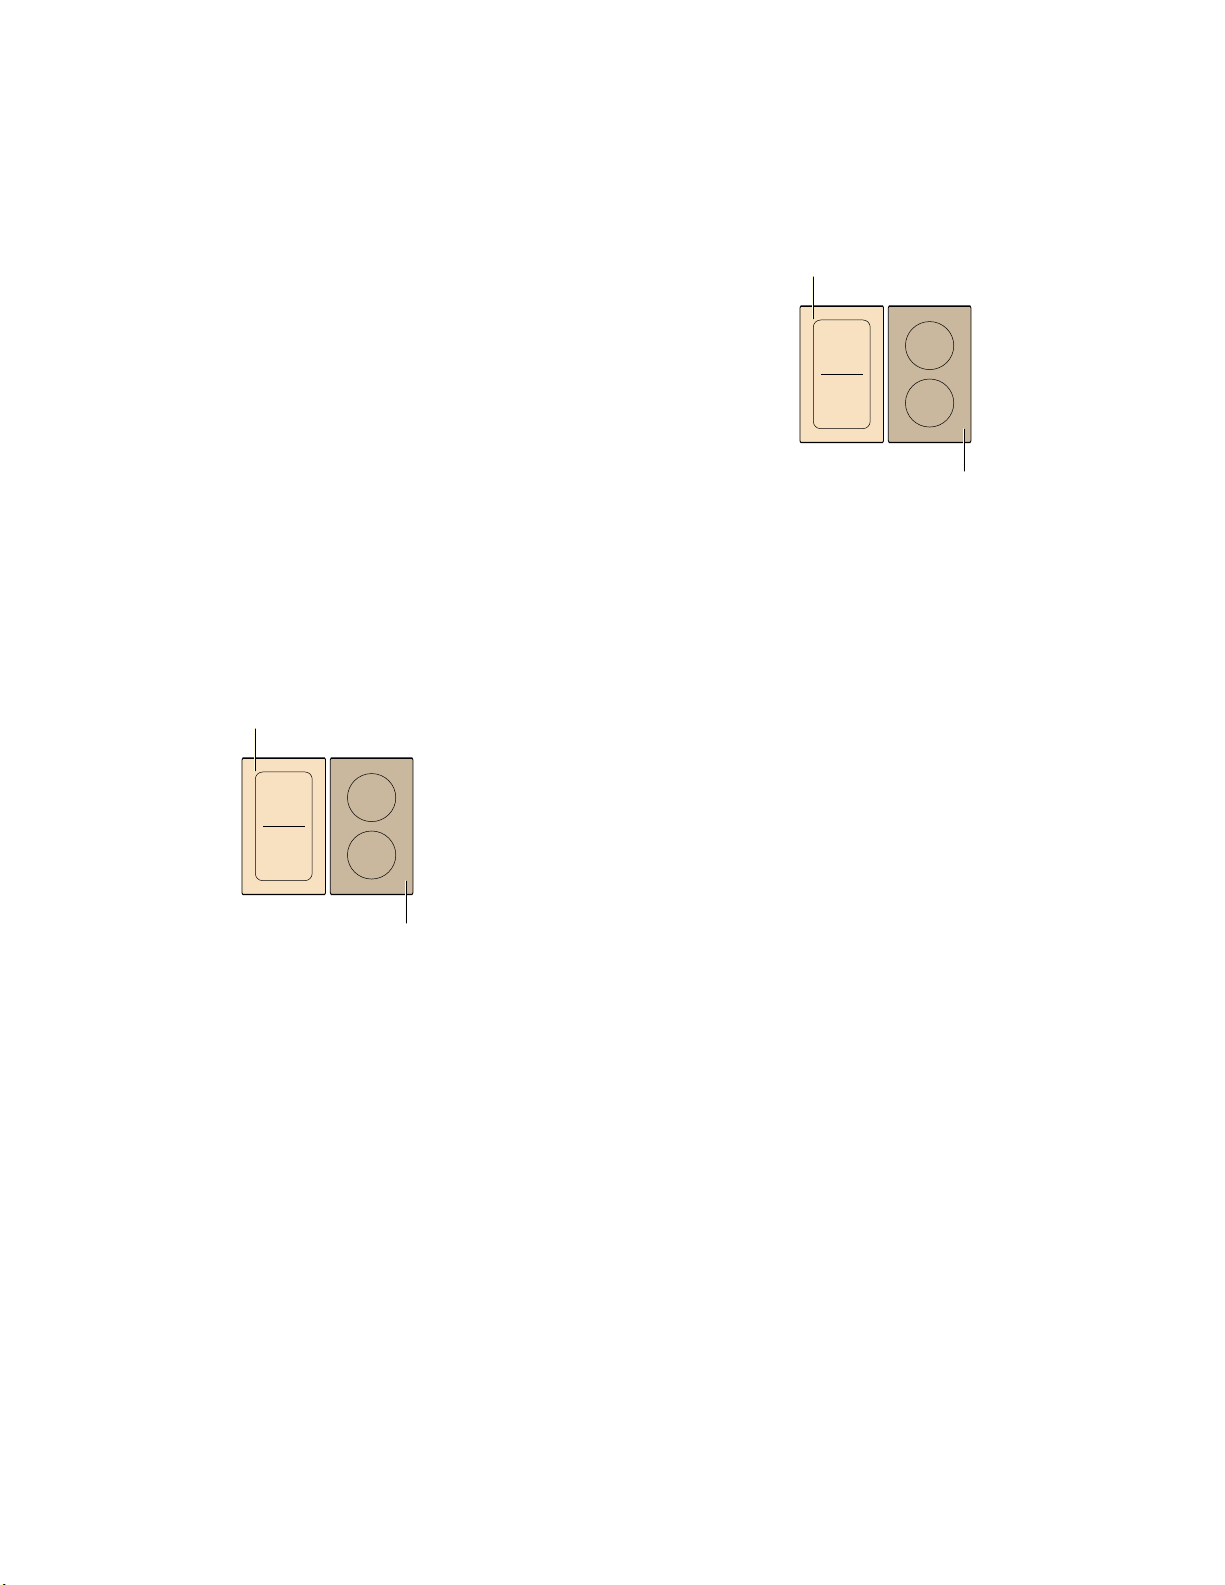
79
Fonction Chronomètre
La fonction Chronomètre indique le temps écoulé depuis
l'activation.
Elle fonctionne indépendamment des foyers et des
autres réglages. Cette fonction ne désactive pas
automatiquement un foyer.
Activation
Touchez la touche Count Up Timer (Minuterie
croissante). Le symbole
‹‹ et l'indicateur V s'allument
dans l'affichage de la minuterie.
Le temps commence à s'écouler.
Désactivation
Touchez la touche Count Up Timer (Minuterie
croissante) pour arrêter la fonction chronomètre.
L'affichage de la minuterie demeure allumé.
Si vous touchez la touche Count Up Timer (Minuterie
croissante) de nouveau, l'affichage s'éteindra.
La fonction est désactivée.
Fonction SpeedBoost
MD
(Haute vitesse)
La fonction SpeedBoost
MD
vous permet de chauffer de
grandes quantités d'eau plus rapidement qu'en utilisant
le réglage de chaleur Š.
Cette fonction peut toujours être activée pour un foyer, si
l'autre foyer du même groupe n'est pas allumé (voir
l'illustration).
Remarque : La fonction SpeedBoost
MD
peut également
être activée dans la zone FlexInduction
MD
si elle est
utilisée comme une seule zone de cuisson.
Activation
1.
Sélectionnez un élément.
2.
Touchez la touche Speed Boost (Haute vitesse).
L'indicateur › s'allume.
La fonction est activée.
Désactivation
1.
Sélectionner un élément.
2.
Toucher la touche Speed Boost (Haute vitesse).
L'écran › s'éteint et l'élément revient au niveau de
chaleur Š.
La fonction est désactivée.
Remarque : Dans certaines circonstances, la fonction
SpeedBoost
MD
peut se désactiver automatiquement afin
de protéger les composants électroniques à l'intérieur de
la table de cuisson.
Fonction ShortBoost (Puissance rapide)
La fonction ShortBoost permet de chauffer la casserole
plus rapidement qu'avec la puissance de cuisson
Š.
Après désactivation de la fonction, sélectionnez la
position de mijotage appropriée pour votre mets.
Cette fonction peut toujours être activée pour un foyer, si
l'autre foyer du même groupe n'est pas allumé (voir
l'illustration).
Remarque : La fonction ShortBoost peut également être
activée dans la zone FlexInduction
MD
si elle est utilisée
comme une seule zone de cuisson.
Recommandations d'utilisation
▯ Toujours utiliser des ustensiles de cuisson qui n'ont
pas été préchauffés.
▯ Utiliser des casseroles et des poêles à fond plat. Ne
pas utiliser de récipients à base mince.
▯ Ne jamais laisser d'ustensiles de cuisson vides, de
l'huile, du beurre ou du lard cuire sans surveillance.
▯ Ne pas couvrir pas l'ustensile de cuisson.
▯ Placer l'ustensile au centre de l'élément. Vérifier que le
diamètre du fond de l'ustensile correspond à la taille
de l'élément.
▯ La section Cuisson à induction offre plus d'information
sur le type, la taille et le positionnement des ustensiles
de cuisson.
Activation
1.
Sélectionnez un élément.
2.
Touchez deux fois la touche Speed Boost (Haute
vitesse).
L'indicateur ˜›Ú s'allume.
La fonction est activée.
Désactivation
1.
Sélectionnez un élément.
2.
Touchez la touche Speed Boost (Haute vitesse).
L'écran ˜›Ú s'éteint et l'élément revient au niveau de
chaleur Š.
La fonction est désactivée.
Remarque : Dans certaines circonstances, cette
fonction peut se désactiver automatiquement pour
protéger les composants électroniques à l'intérieur de la
table de cuisson.

80
Fonction Keep Warm (Garder au chaud)
Cette fonction convient pour faire fondre du chocolat ou
du beurre, et pour maintenir au chaud des mets et de la
vaisselle.
Activation
1.
Sélectionnez le niveau de puissance souhaité.
2.
Dans les 10 secondes qui suivent, touchez Keep
Warm (Garder au chaud).
L'indicateur –© s'allume.
La fonction est activée.
Désactivation
1.
Sélectionnez un élément.
2.
Touchez la touche Keep Warm (Garder au chaud).
L'affichage
–© s'éteint. L'élément est désactivé et
l'indicateur de chaleur résiduelle apparaît.
La fonction est désactivée.
Verrouillage du panneau de commande
Vous pouvez utiliser le verrouillage du panneau pour
empêcher les enfants d'activer accidentellement
l'appareil.
Activation et désactivation du verrouillage du panneau
La table de cuisson doit être éteinte.
Pour activer :
1.
Allumez la table de cuisson avec l'interrupteur
principal.
2.
Touchez Panel Lock (Verrouillage du panneau)
pendant environ 4 secondes.
L'indicateur D s'allume pendant 10 secondes.
La table de cuisson est verrouillée.
Pour désactiver :
1.
Allumez la table de cuisson avec l'interrupteur
principal.
2.
Touchez Panel Lock (Verrouillage du panneau)
pendant environ 4 secondes.
Le verrouillage est désactivé.
Verrouillage automatique du panneau
Avec cette fonction, le verrouillage du panneau est
automatiquement activé chaque fois que vous éteignez
la table de cuisson.
Activation et désactivation
Consultez la section sur les « Réglages de base ».
Protection contre l'essuyage
Le nettoyage du panneau de commande pendant que la
table de cuisson est allumée peut modifier les réglages.
Pour éviter cette situation, la table de cuisson est dotée
d'une fonction de protection contre l'essuyage.
Pour activer: touchez la touche Panel Lock (Verrouillage
du panneau). Un signal sonore retentit. Le panneau de
commande est verrouillé pendant 35 secondes. Vous
pouvez maintenant nettoyer la surface du panneau de
commande sans risquer de modifier les réglages.
Pour désactiver : le panneau de commande sera
déverrouillé après 35 secondes. Pour mettre fin plus
rapidement à la fonction, touchez la touche Panel Lock
(Verrouillage du panneau).
Remarques
▯ Un signal retentit au bout de 30 secondes après
l'activation. Cela indique la fin imminente de la
fonction.
▯ Le verrouillage pour le nettoyage n'a pas d'effet sur
l'interrupteur principal. La table de cuisson peut être
éteinte à tout moment.
Durée limitée automatique
Si un élément est utilisé pour une période prolongée
sans qu'aucun changement de réglage ne soit effectué,
la fonction de durée limitée automatique sera activée.
L'élément cessera de chauffer. ”‰ et l'indicateur de
chaleur résiduelle •œ clignoteront en alternance à
l'écran.
L'indicateur s'éteindra lorsque n'importe quel symbole
est touché. L'élément peut ensuite être réinitialisé.
Le moment d'activation de la durée limitée automatique
dépend du niveau de chaleur choisi (de 1 à 10 heures).

81
Réglages de base
Votre appareil comprend divers réglages de base. Vous
pouvez ajuster ces réglages en fonction de votre façon
de cuisiner.
Affi-
chage
Fonction
™‚
Verrouillage automatique du panneau/à l'épreuve des enfants
‹ Manuel*.
‚ Automatique.
ƒ Fonction désactivée.
™ƒ
Signaux sonores
‹ Signal de confirmation et signal d'erreur désactivés.
‚ Seulement le signal d'erreur est activé.
ƒ Seulement le signal de confirmation est activé.
„ Tous les signaux sonores sont activés.*
™„
Affichage de la consommation énergétique
‹ Désactivé.*
‚ Activée.
™†
Réglage automatique du temps de cuisson
‹‹ Désactivé.*
‹‚-ŠŠ Temps avant la désactivation automatique.
™‡
Signal sonore pour la durée de la fonction minuterie
‚ 10 secondes.*
ƒ 30 secondes.
„ 1 minute.
™ˆ
Fonction de gestion de la puissance Limite la puissance totale de la table de cuisson
‹ Désactivée.*
‚ puissance minimale de 1000 W.
‚. 1500 W
ƒ 2000 W
...
Š Puissance maximale de la table de cuisson.
™‚‚
Modification des réglages de chaleur préétablis de la fonction PowerMove
׊ Réglage de chaleur préétabli pour la zone de cuisson avant.
Ù† Réglage de chaleur préétabli pour la zone de cuisson centrale.
Ø‚ Réglage de chaleur préétabli pour la zone de cuisson arrière.
™‚ƒ
Vérifier les ustensiles de cuisine et les résultats du processus de cuisson
‹Ne convient pas
‚N'est pas parfait
ƒConvient
™‚„
Configurer l'activation de la zone de cuisson flexible.
‹ Comme deux éléments indépendants.*
‚ Comme un seul élément.
* Réglages d'usine
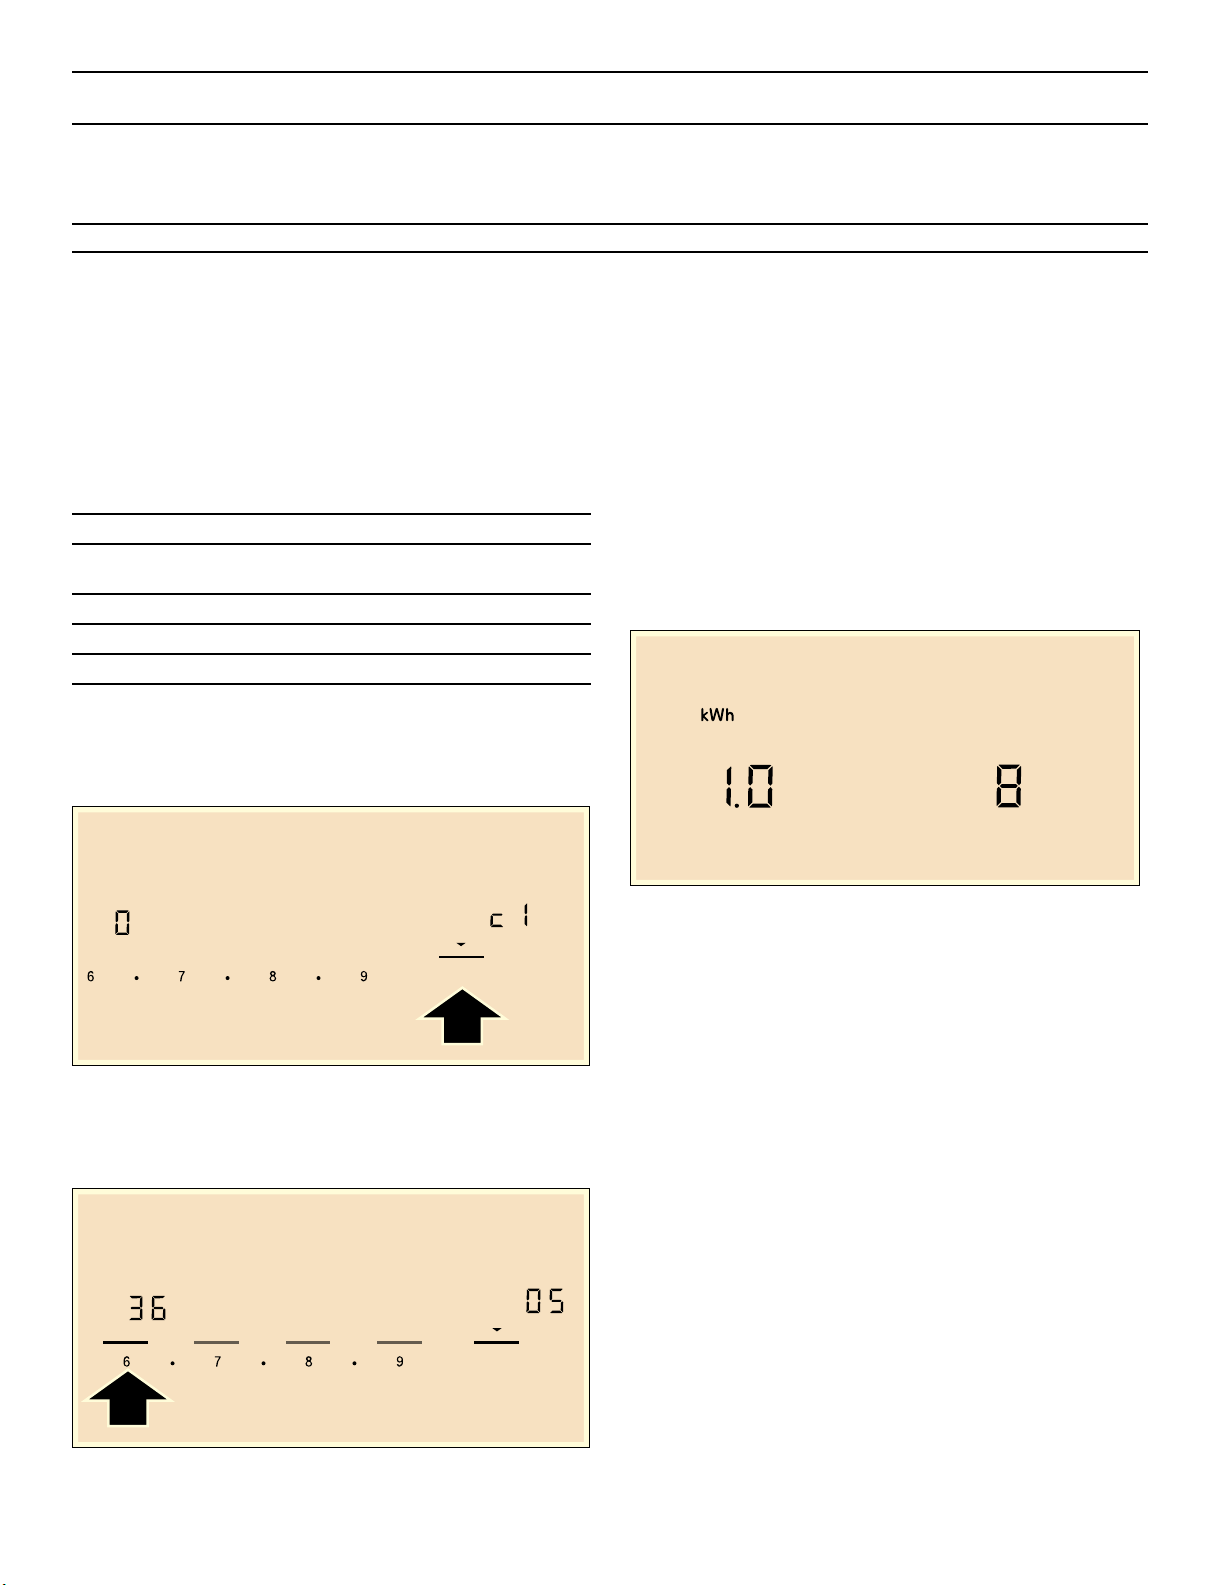
82
Modification des réglages de base
La table de cuisson doit être éteinte.
1.
Allumez la table de cuisson avec l'interrupteur
principal.
2.
Dans les 10 secondes qui suivent, touchez Kitchen
Timer (Minuterie de cuisine) pendant 4 secondes.
Les quatre premiers écrans offrent des informations
sur le produit. Touchez la zone des réglages pour voir
les écrans individuels.
3.
Touchez la touche Kitchen Timer (Minuterie de
cuisine) à nouveau pour revenir aux réglages de base.
™ ‚ s'allume dans l'écran de la minuterie et ‹
s'allume dans les écrans.
4.
Touchez la touche Kitchen Timer (Minuterie de
cuisine) à plusieurs reprises jusqu'à ce que l'indicateur
pour la fonction requise s'affiche.
5.
Réglez la valeur requise avec les touches numérotées.
6.
Touchez de nouveau la touche Kitchen Timer
(Minuterie de cuisine) pendant au moins 4 secondes.
Les réglages sont sauvegardés.
Sortie des réglages de base
Éteignez la table de cuisson avec l'interrupteur principal.
Indicateur de consommation énergétique
Cette fonction affiche la consommation énergétique
totale du dernier processus de cuisson de cette table de
cuisson.
Après la mise hors tension, la consommation est affichée
pendant 10 secondes en kWh.
L'illustration montre un exemple avec une consommation
de ‚.‹‰ kWh.
Vous pouvez trouver comment activer cette fonction
dans la section ~ "Réglages de base"
™‹
Revenir aux réglages par défaut
‹ Réglages individuels.*
‚ Revenir aux réglages par défaut de l'appareil.
Affi-
chage
Fonction
* Réglages d'usine
Informations sur le produit Affichage
Répertoire pour le service après-vente
technique (TK)
‹‚
Numéro FD
”š
Numéro FD 1
Š†.
Numéro FD 2
‹.†
.HHS
:DUP
6SHHG
%RRVW
.LWFKHQ
7LPHU
&RRN
7LPHU
&RXQW8S
7LPHU
.HHS
:DUP
6SHHG
%RRVW
.LWFKHQ
7LPHU
&RRN
7LPHU
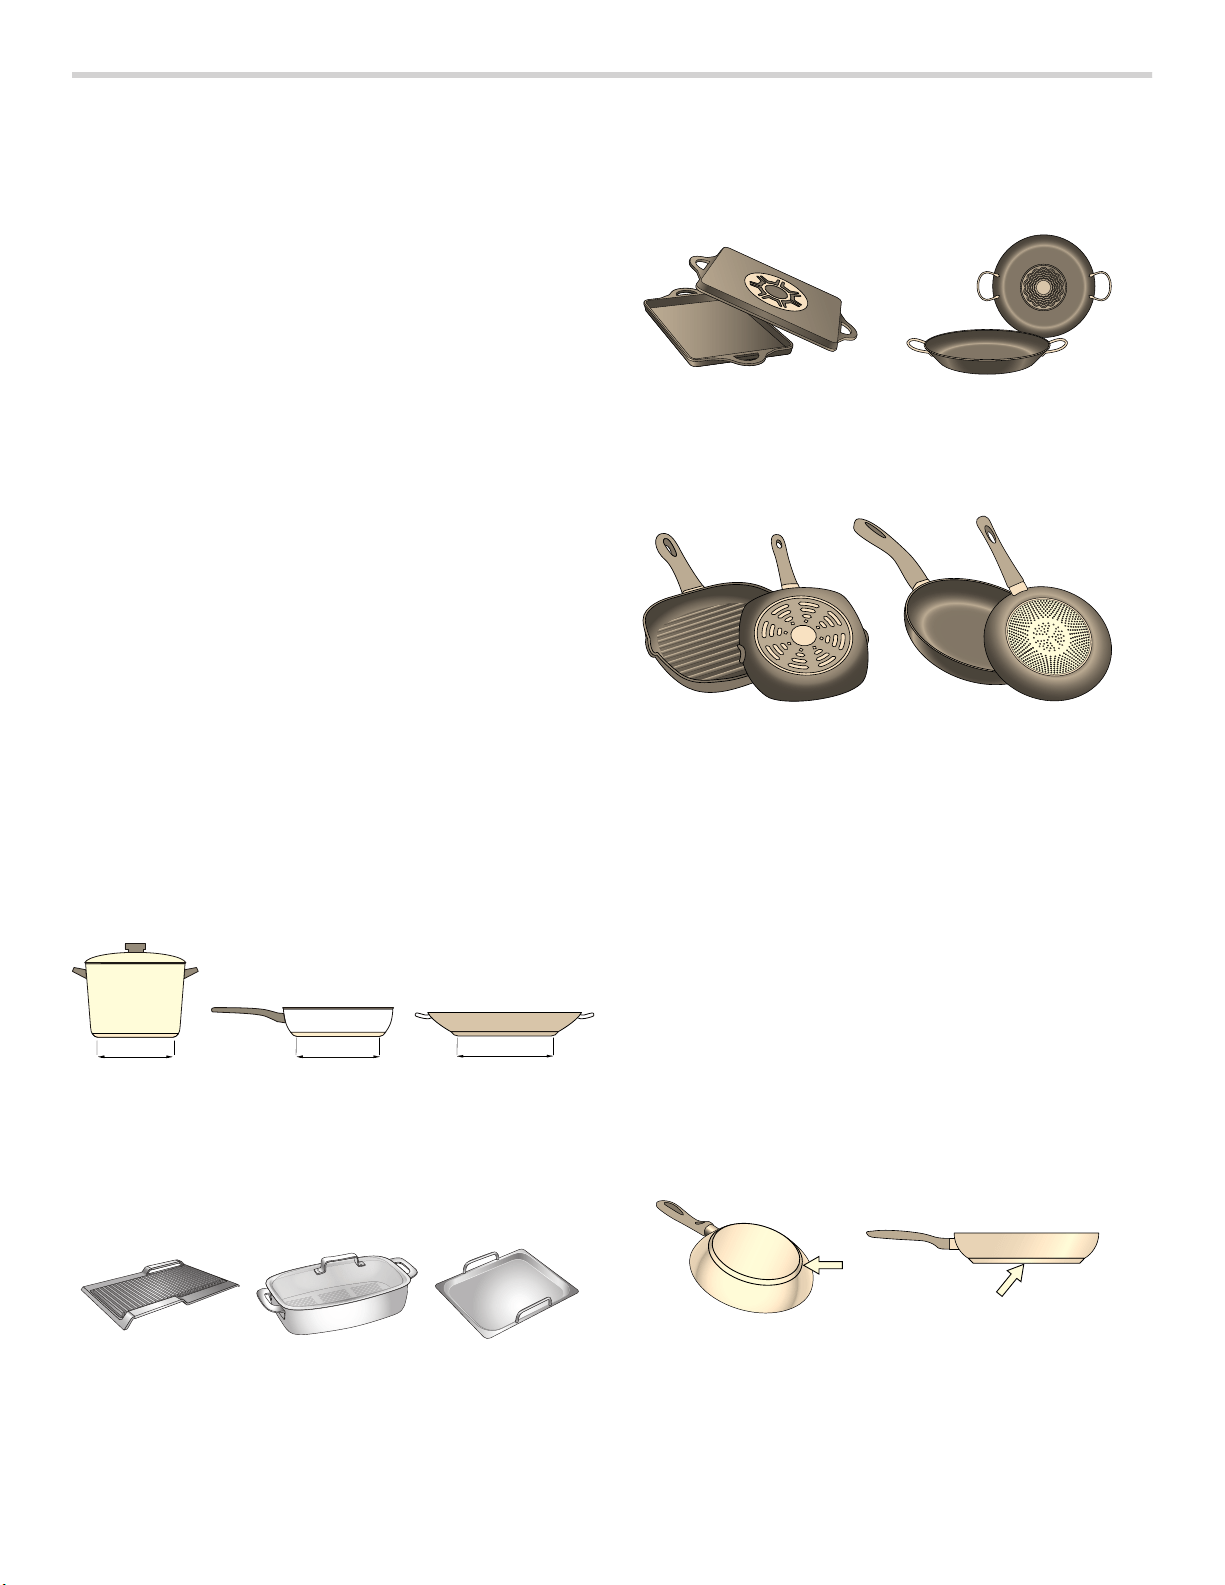
83
Cuisson à induction
Avantages lors de la cuisson par induction
La cuisson par induction est totalement différente de la
cuisson traditionnelle, la chaleur étant directement
générée dans le récipient. Ce qui offre toute une série
d'avantages :
▯ Gain de temps lors de la cuisson et du rôtissage.
▯ Économie d'énergie.
▯ Entretien et nettoyage plus faciles. Les aliments qui
ont débordé ne brûlent pas aussi rapidement.
▯ Puissance thermique contrôlée et sécurité accrue. Le
foyer génère ou coupe la puissance thermique
immédiatement après chaque commande. Le foyer
coupe immédiatement la puissance thermique dès
que le récipient est retiré du foyer, même s'il est
encore allumé.
Ustensiles de cuisson
N'utilisez que des récipients ferromagnétiques pour la
cuisson par induction, par exemple :
▯ des récipients en acier émaillé
▯ des récipients en fonte
▯ des récipients spéciaux pour la cuisson par induction
en acier inox.
Pour vérifier si la casserole est compatible pour la
cuisson par induction, veuillez consulter le chapitre
~ "Test de la vaisselle".
Pour obtenir un bon résultat de cuisson, la zone
ferromagnétique du fond du récipient devrait
correspondre à la taille du foyer. Si le récipient n'est pas
détecté sur un foyer, essayez de nouveau sur un foyer
d'un diamètre plus petit.
Si le seul élément utilisé est la zone de cuisson
polyvalente, de grands ustensiles de cuisson, qui
conviennent particulièrement bien à cette zone, peuvent
être utilisés. La section Zone de cuisson à induction
polyvalente offre plus d'information sur le positionnement
des ustensiles de cuisson.
Il existe aussi des récipients spéciaux pour la cuisson
par induction dont le fond n'est pas entièrement
ferromagnétique :
▯ Si le fond du récipient n'est que partiellement
ferromagnétique, seule la zone ferromagnétique se
réchauffe. Il se peut donc que la chaleur ne soit pas
uniformément répartie. La zone non ferromagnétique
pourrait présenter une température trop basse pour la
cuisson.
▯ Si le fond du récipient contient entre autres de
l'aluminium, cela réduit aussi la surface
ferromagnétique. Il se peut que ce récipient ne chauffe
pas correctement ou, éventuellement, qu'il ne soit
même pas détecté.
Ustensiles de cuisson inappropriés
Ne jamais utiliser d'adaptateurs pour plaque à induction
ou d'articles de cuisson en :
▯ Acier inoxydable traditionnel
▯ Verre
▯ Terre cuite
▯ Cuivre
▯ Aluminium
Caractéristiques du fond du récipient
La composition du fond du récipient peut influencer le
résultat de cuisson. Utilisez des casseroles et des poêles
fabriquées dans des matériaux diffusant uniformément la
chaleur, comme les récipients "sandwich" en acier
inoxydable, ce qui permet d'économiser du temps et de
l'énergie.
Utilisez des récipients avec un fond plat, les fonds de
récipient inégaux nuisent à la puissance thermique.
FP
FP
FP
SR SR SR

84
Casserole manquante ou de taille inappropriée
Si vous ne placez pas de casserole sur l'élément choisi,
ou si la casserole est fabriquée d'un matériau inadéquat
ou n'est pas de la taille appropriée, le niveau de
puissance affiché sur l'indicateur de l'élément clignotera.
Placez une casserole adéquate sur l'élément pour faire
cesser le clignotement. Si vous prenez plus de 90
secondes pour placer une casserole adéquate sur
l'élément, ce dernier se désactivera automatiquement.
Casseroles vides ou casseroles à base mince
Ne pas chauffer de casseroles vides ou à base mince.
La table de cuisson est équipée d'un système de
sécurité interne. Toutefois, une casserole vide peut
chauffer si rapidement que la fonction d'« arrêt
automatique » n'a pas le temps de s'engager et la
casserole peut atteindre des températures très élevées.
La base de la casserole pourrait fondre et endommager
la vitre de la table de cuisson.Dans un tel cas, ne pas
toucher la casserole et éteindre la cuisinière. Si la table
de cuisson ne fonctionne pas après s'être refroidie,
contacter le service technique.
Détection du récipient
Chaque foyer possède une limite inférieure pour la
détection du récipient et celle-ci dépend du diamètre
ferromagnétique et du matériau du fond du récipient.
Vous devriez toujours utiliser le foyer qui correspond le
mieux au diamètre du fond du récipient.
Nettoyage et entretien
Nettoyage quotidien
Remarques
▯ Ne nettoyer que les parties indiquées dans le manuel.
▯ Les produits de nettoyage Bosch ont été testés et
approuvés pour être utilisés sur les appareils Bosch.
La recommandation d'autres produits de nettoyage ne
signifie pas que nous cautionnons une marque en
particulier.
Nettoyage de la table de cuisson
9 AVERTISSEMENT
NE PAS TOUCHER LES ÉLÉMENTS DE SURFACE
OU LES ZONES À PROXIMITÉ DES ÉLÉMENTS
Les éléments de surface peuvent être chauds,
même s'ils sont foncés. Les zones à proximité des
éléments peuvent devenir suffisamment chaudes
pour causer des brûlures. Pendant et après
l'utilisation, éviter de toucher ou de laisser des
vêtements ou d'autres tissus inflammables entrer en
contact avec les éléments de surface ou à proximité
des éléments de surface jusqu'à ce ce que ceux-ci
aient le temps de refroidir. Ces zones comprennent
la table de cuisson et les surfaces situées face à la
table de cuisson.
9 ATTENTION
N'utiliser aucun produit nettoyant sur la vitre quand
la surface est chaude. Les émanations qui s'en
dégagent peuvent être dangereuses pour la santé.
Chauffer le produit nettoyant peut chimiquement
attaquer et endommager la surface.
Précautions pour une surface durable et de belle
apparence
▯ Un entretien régulier et quotidien, à l'aide du produit
nettoyant pour table de cuisson en vitrocéramique,
vous permettra de protéger la surface de votre table
de cuisson et facilitera le nettoyage des salissures
alimentaires et des taches d'eau.
▯ La surface de cuisson en vitrocéramique est
fabriquée à partir d'un matériau durable résistant aux
chocs mais qui n'est pas incassable si une casserole
ou tout autre objet tombe dessus.
▯ Ne jamais cuire d'aliments directement sur la vitre.
▯ Éviter de placer un anneau de support pour wok, un
trépied ou une autre plaque de support en métal sur la
surface en verre.
▯ Ne pas utiliser la surface vitrée comme planche à
découper.
▯ Ne pas faire glisser d'articles de cuisson sur la surface
de cuisson, car ils peuvent l'égratigner.
▯ Ne pas déposer de casseroles mouillées sur la
surface vitrée.
Entretien avant utilisation
L'entretien est facile si des mesures préventives sont
prises. Par exemple, appliquer tous les jours une petite
quantité de produit nettoyant pour table de cuisson en
vitrocéramique (livré avec la cuisinière). Le produit
nettoyant dépose un film protecteur qui facile le
nettoyage des taches d'eau ou des projections
d'aliments. La température de la table de cuisson réduit
les qualités protectrices de ce produit. Il convient de
passer à nouveau le nettoyant avant chaque utilisation.
Utiliser un chiffon propre et appliquer le produit nettoyant
pour table de cuisson en vitrocéramique avant chaque
utilisation pour enlever la poussière ou les traces de
métal pouvant se trouver sur la surface parallèle au plan
de travail entre deux utilisations.

85
Techniques de nettoyage quotidien
9 AVERTISSEMENT
RISQUE DE BRÛLURES
Faire extrêmement attention, car la surface est
chaude. Attendre que la table de cuisson ait
suffisamment refroidi avant d'utiliser un éponge ou
un chiffon, de manière à éviter les brûlures dues à
la vapeur. Aussi, certains produits nettoyant
dégagent des émanations nocives lorsqu'ils sont
appliquées sur des surfaces chaudes.
1.
Nettoyer la surface lorsqu'elle a complètement refroidi
à l'aide du produit nettoyant pour table de cuisson en
vitrocéramique.
Exceptions : Enlever les déversements de sucre sec,
de sirop de sucre, de produits à base de tomates et
de lait à l'aide du grattoir muni d'une lame de rasoir
une fois que la table de cuisson a suffisamment
refroidi. Voir le Tableau d'entretien de la table de
cuisson, page suivante.
2.
Essuyer les projections à l'aide d'une éponge humide
propre ou d'un papier absorbant. Rincer et sécher.
Éliminer les traces pouvant persister avec du vinaigre
blanc; rincer.
3.
Appliquer une petite quantité de produit nettoyant pour
table de cuisson en vitrocéramique. Une fois sec, polir
la surface avec du papier essuie-tout ou un chiffon
propre.
Utilisation du grattoir muni d'une lame de rasoir
Utiliser le grattoir pour éliminer les aliments séchés ou
collés. Attendre que la table de cuisson ait suffisamment
refroidi. Tenir le grattoir à un angle de 30°. Déplacer le
grattoir sur la tâche de manière à la détacher de la table
de cuisson. Pour terminer, essuyer la surface avec du
papier absorbant ou une éponge humide et propre.
Éliminer les traces pouvant persister en appliquant du
vinaigre blanc et rincer.
9 AVERTISSEMENT
RISQUE DE BLESSURES
La lame du grattoir est extrêmement tranchante.
Risque de coupures.Protéger la lame quand elle ne
sert pas. Remplacer la lame immédiatement si elle
montre des imperfections. Respecter les
instructions du fabricant.
Nettoyage des boutons de commande
1.
Tirer et enlever les boutons. Essuyer les boutons de
commande avec un chiffon imbibé d'eau savonneuse
chaude. Rincer et sécher. Ne pas faire tremper les
boutons de commande.
2.
Pour les remettre en place, il suffit de les enfoncer
directement sur l'axe.
Instructions pour le nettoyage
Lorsque vous utilisez un nettoyant, utilisez uniquement
une petite quantité appliquée sur un linge ou une
serviette en papier propre. Frottez les surfaces et
polissez-les avec une serviette propre et sèche.
Pour des résultats optimaux, utilisez le nettoyant pour
surface de cuisson en vitre de Bosch (numéro de pièce
12010030), que vous pouvez commander en ligne à
l'adresse www.bosch-home.com/us/store (pour les
clients américains seulement). Les autres nettoyants
comprennent Bon Ami®, Soft Scrub® (sans détergent)
et le vinaigre blanc.
Éviter ces produits de nettoyage
▯ Les produits de nettoyage pour les vitres qui
contiennent de l'ammoniaque ou un agent de
blanchiment au chlore. Ces ingrédients peuvent
endommager ou tacher la table de cuisson de
manière permanente.
▯ Les produits de nettoyage caustiques, tel Easy Off®,
peuvent tacher la surface de la table de cuisson.
▯ Produits de nettoyage abrasifs.
▯ Les tampons métalliques, les tampons à récurer, tel
Scotch Brite®, peuvent rayer ou laisser des traces
métalliques.
▯ La tampons à récurer savonneux, tel SOS®, peuvent
rayer la surface.
▯ Les produits de nettoyage en poudre contenant un
agent de blanchiment au chlore tachent la table de
cuisson de manière permanente.
▯ Les produits de nettoyage inflammables, tels que de
l'essence à briquet ou WD 40.

86
Tableau de nettoyage
Type de tache Solution possible
Déversement de sucre sec, de sirop de sucre ou écla-
boussures de lait ou de tomate. Feuille ou pellicule de
plastique fondu. Tous ces éléments doivent être élimi-
nés une fois que la table de cuisson a suffisamment
refroidi. Faire extrêmement attention, car la surface est
chaude. La surface peut être endommagée de manière
permanente si ces taches ne sont pas éliminées.
Retirer ces types de taches, après que la surface a suffi-
samment refroidi, à l'aide d'un grattoir muni d'une lame.
Utiliser une nouvelle lame aiguisée dans le grattoir. Reti-
rez l'ustensile de cuisson et éteindre l'élément. En portant
un gant isolant, tenir le grattoir à un angle de 30° en fai-
sant attention à ne pas abîmer ou rayer le verre. Retirer
la tache de la zone chauffée. Après que la surface a
refroidi, retirer le résidus et appliquer le produit de net-
toyage pour table de cuisson en vitrocéramique.
9 AVERTISSEMENT
RISQUE DE BLESSURE
La lame du grattoir est extrêmement tranchante.
Risque de coupures.Protéger la lame quand elle ne
sert pas. Remplacer la lame immédiatement si elle
montre des imperfections. Suivre les instructions du
fabricant.
Débris alimentaires brûlés, traces sombres et mouche-
tures
Amollir en plaçant du papier absorbant ou une éponge
humides sur la tache pendant 30 minutes. Utiliser une
racle en plastique et le produit de nettoyage pour table
de cuisson en vitrocéramique ou le grattoir muni d'une
lame de rasoir. Rincer et sécher.
Éclaboussures graisseuses Utiliser une éponge ou un chiffon savonneux pour délo-
ger la graisse, rincer à fond et sécher. Appliquer le pro-
duit de nettoyage pour table de cuisson en
vitrocéramique.
Traces métalliques : tache iridescente Les casseroles dont la base est en aluminium, en cuivre
ou en acier inoxydable peuvent laisser des traces. Traiter
immédiatement, après que la surface a refroidi, avec le
produit de nettoyage pour table de cuisson en vitrocéra-
mique. Si cela n'enlève pas les traces, essayer un abrasif
doux (Bon Ami®, Soft Scrub® sans agent de blanchi-
ment) avec du papier absorbant humecté. Rincer et
réappliquer le produit de nettoyage pour table de cuis-
son en vitrocéramique. Il devient très difficile d'enlever
les traces métalliques si celles-ci ne sont pas éliminées
avant la prochaine cuisson.
Taches d'eau calcaire
Les liquides de cuisson chauds ont coulé sur la surface
Les minéraux de certaines eaux peuvent être transférés
sur la surface de la table de cuisson et provoquer des
taches. Utiliser du vinaigre blanc; rincer et sécher.
Reconditionner avec le produit de nettoyage pour table
de cuisson en vitrocéramique.Éliminer les débordements
et les taches avant de réutiliser la table de cuisson.
Rayures sur la surface :
Les petites rayures sont courantes et n'affectent pas la
cuisson. Elles deviennent plus lisses et moins visibles
avec l'usage quotidien du produit de nettoyage pour table
de cuisson en vitrocéramique.
Appliquer le produit de nettoyage pour table de cuisson
en vitrocéramique avant l'utilisation du four pour éliminer
les saletés de la taille d'un grain de sable et les parti-
cules telles que le sel et l'assaisonnement. Il est possible
de réduire les rayures en utilisant des casseroles dont la
base est lisse, propre et sèche avant de les utiliser. Utili-
ser tous les jours le produit de nettoyage pour table de
cuisson en vitrocéramique.
REMARQUE : Les bagues de diamant peuvent rayer la
surface.
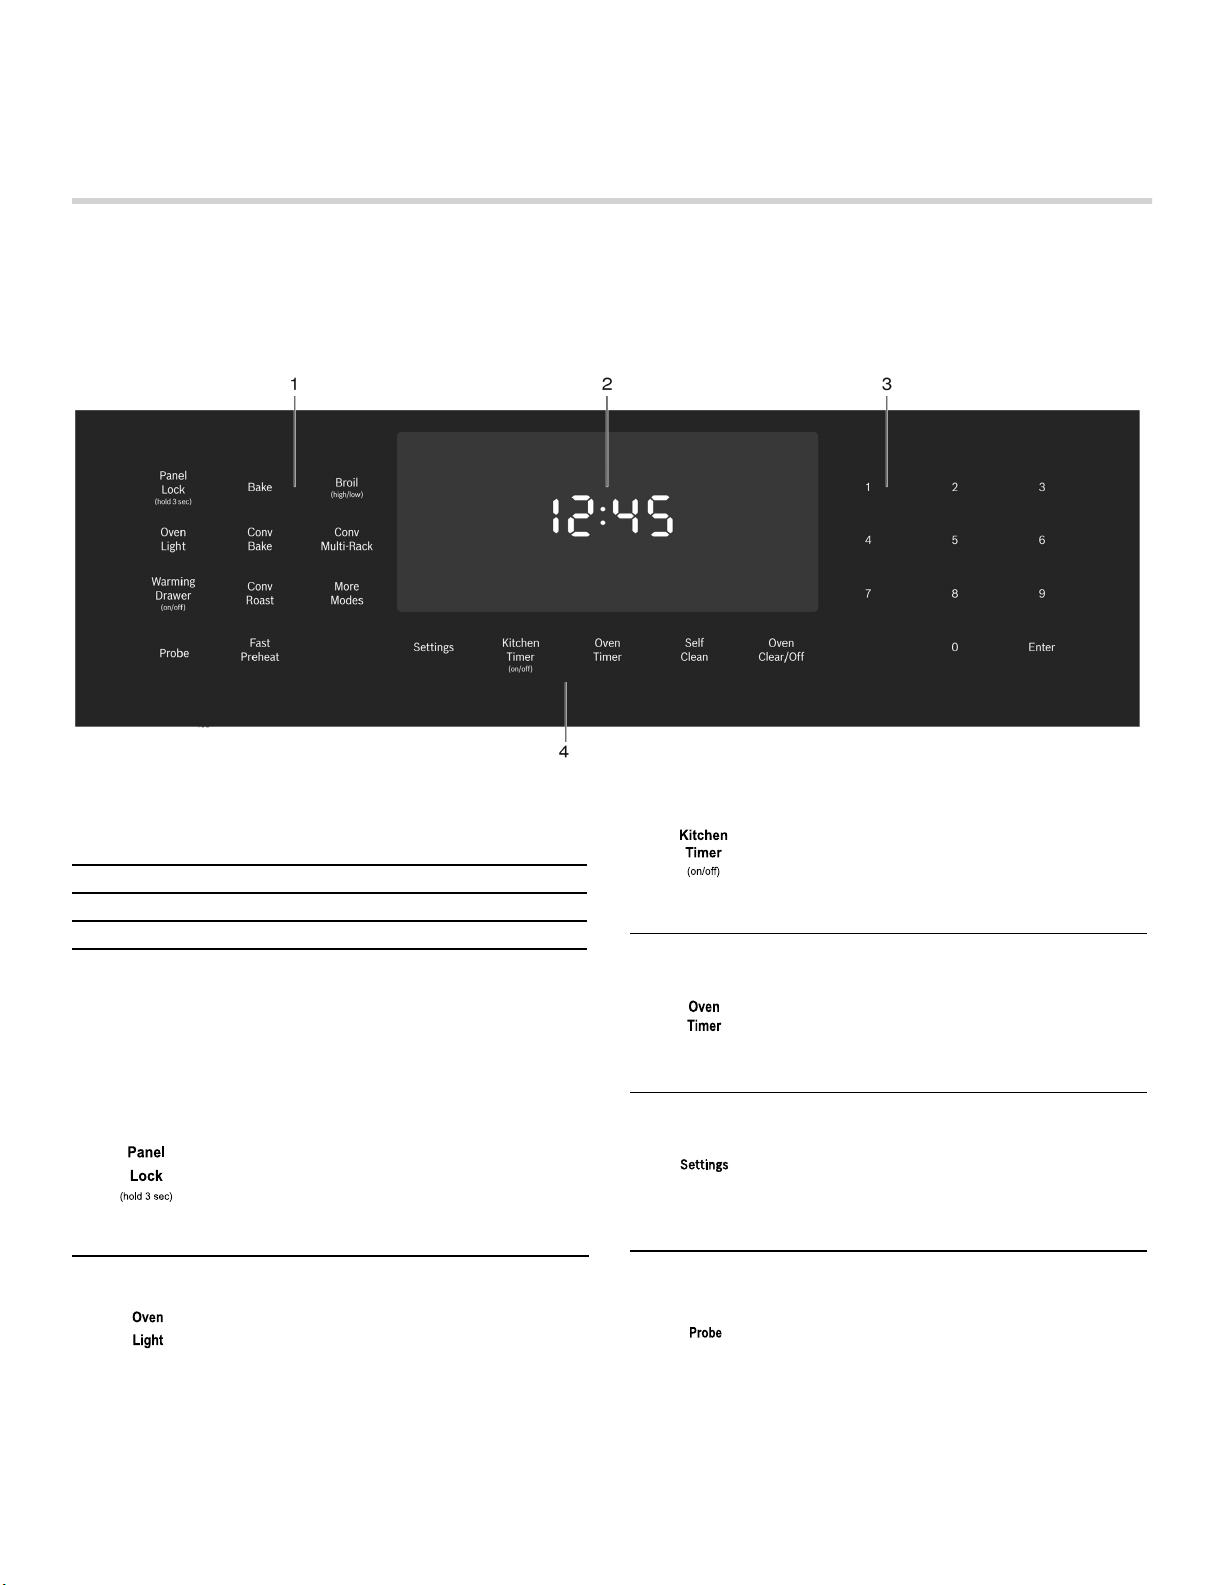
87
Entretien
Cet appareil ne requiert pas d'autre entretien qu'un
nettoyage quotidien. Pour obtenir les meilleurs résultats,
appliquer chaque jour une crème de nettoyage pour
tables de cuisson.
Fonctionnement –Four
Bandeau de commande du four
Série 800 – Bandeau de commande du four
Remarque : Une légère pression sur les touches suffit
pour les activer.
Description des touches
1 Touches de sélection des modes
2 Affichage
3 Touches du clavier numérique
4 Touches de fonction spéciales
Active ou désactive le mode Verrouil-
lage du bandeau de commande.
Allume ou éteint l'éclairage du four.
Démarre et arrête la ou les minuteries
de cuisine. Appuyer pour modifier une
minuterie.
Appuyer pour modifier la minuterie du
four sélectionné. Éteint le four à la fin
du temps dévolu.
Permet d'accéder aux paramètres de
l'utilisateur pour personnaliser l'affi-
chage de base, la langue d'utilisation
et d'autres fonctions. Utiliser égale-
ment pour régler l'horloge.
Régler la température à atteindre de la
sonde. La sonde permet de surveiller
la température interne de la viande
durant la cuisson.
88
Mores Modes (Autres modes)
D'autres modes sont accessibles en appuyant sur la
touche More Modes (Autres modes). Ces modes
comprennent Gril à convection, Maintien au chaud, Pizza,
Apprêt et Rôtisserie. Le détail de ces modes est
présenté à la section Tirer le meilleur parti de votre
appareil, plus loin dans ce manuel.
Symboles affichés
À propos du four
Votre nouveau four réunit des résultats de cuisson
supérieurs et un fonctionnement tout simple.
La conception du four a été optimisée pour améliorer la
distribution de la chaleur dans la cavité du four. Il en
résulte un brunissage uniforme, une réduction des temps
de cuisson et une diminution des coûts énergétiques.
Grâce au mode Nettoyage Auto, les heures passées à
récurer les coins les plus inaccessibles du four sont
aujourd'hui révolus. Le four carbonise les salissures
simplement et en toute facilité. Lorsque l'autonettoyage
est terminé, il vous suffit d'essuyer les cendres
résiduelles.
Le lettrage clair et lisible des touches à effleurement
facilitent grandement l'utilisation du four. Ce manuel
contient toutes les instructions relatives au
fonctionnement du four.
Veuillez nous appeler pour toute question. Notre numéro
de téléphone se trouve au début de ce manuel. Vos
commentaires et suggestions sont les bienvenus!
Caractéristiques générales
Réglage de l’horloge
Le four inclut des fonctions temporelles qui nécessitent
que l'heure actuelle soit réglée. Par conséquent, il est
important de régler l'horloge avant de commencer à
utiliser le four. Le four ne peut pas être en mode de
cuisson lors du réglage de l'horloge.
Pour régler l'horloge :
1.
Le four doit être en mode Veille (le four est sous
tension, mais aucun mode de cuisson ni minuterie
n'est en fonctionnement).
2.
Pour accéder au mode de réglage de l'horloge :
Appuyer sur la touche Settings (Réglages).L'écran
affiche « SET CLOCK » (Réglage de l'horloge).
Appuyer sur Enter (Entrée) pour modifier l'heure.
Active l'option Préchauffage rapide.
Active le mode Nettoyage Auto.
Allume ou éteint le tiroir chauffant.
Permet d'accéder aux modes de cuis-
son et de chauffage pour lesquels il
n'existe pas de touche d'accès direct.
Door Lock (Verrouillé) s'affiche lorsque
la porte du four est verrouillée.
Le symbole Fast Preheat (Préchauffage
rapide) s'affiche lorsque le préchauffage
rapide est activé.
Le symbole Probe (Sonde) s'affiche
lorsqu'une sonde est détectée.
'BTU
1SFIFBU
6HOI
&OHDQ
8BSNJOH
%SBXFS
POPGG
Panel Lock (Verrouillage du bandeau)
s'affiche lorsque le bandeau de com-
mande est verrouillé.
Self Clean (Nettoyage Auto) s'affiche
lorsque l'autonettoyage est activé.
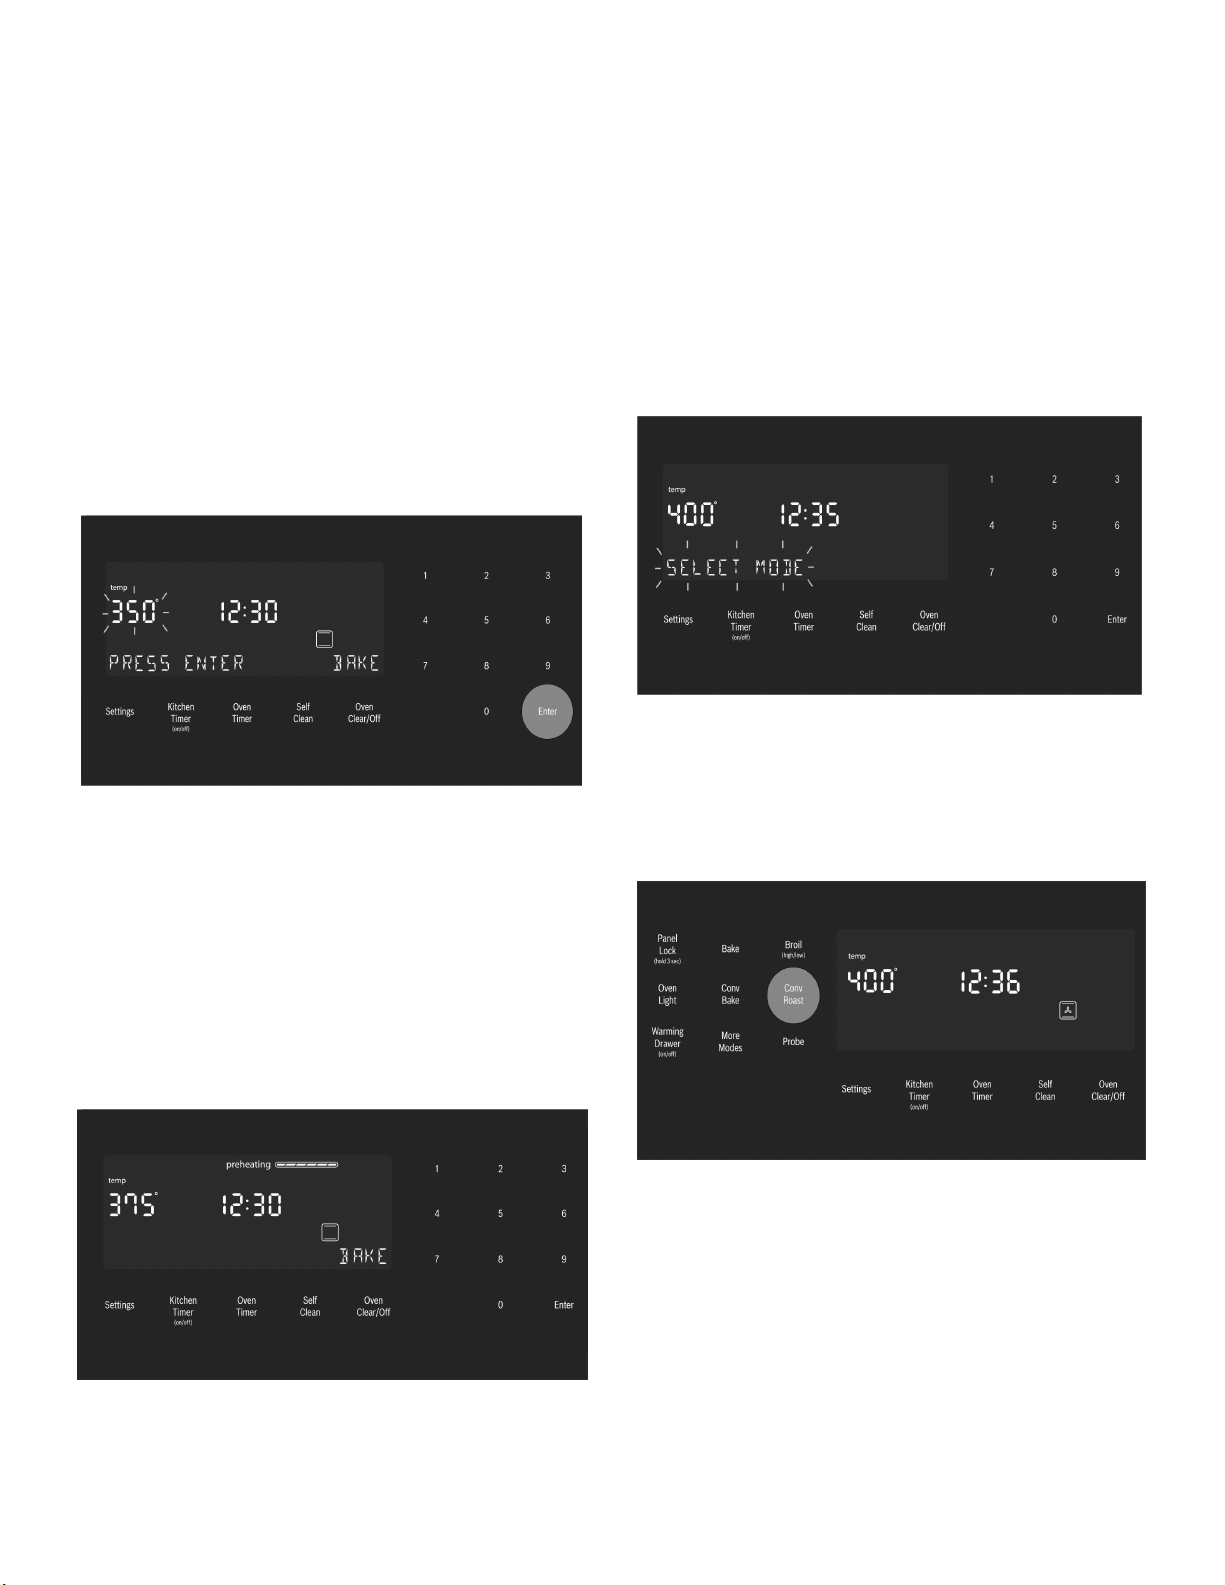
89
3.
Saisir l'heure souhaitée à l'aide du clavier numérique.
Chaque chiffre saisi s'affiche à droite et déplace les
chiffres précédemment saisis vers la gauche. Pour
régler l'heure à « 12:45 p.m. », appuyer sur 1,2, 4 , 5.
4.
Quand l'heure souhaitée est saisie, confirmer l'heure
en appuyant sur Enter (Entrée).
L'horloge est désormais réglée et fonctionne.
Réglage du mode de cuisson et de la température
Il existe deux méthodes de réglage du mode de cuisson
et de la température.
Pour régler le mode de cuisson d'abord, puis la
température :
1.
Appuyer sur le mode de cuisson désiré. Le mode de
cuisson et la température par défaut s'affichent. La
température clignote, signalant qu'elle peut être
modifiée.
2.
Appuyer sur Enter (Entrée) pour lancer le mode avec
la température par défaut.
3.
Pour modifier la température, entrer la nouvelle
température à l'aide des touches numériques. Par
exemple, modifier la température à 375 °F (190 °C).
Appuyer sur Enter (Entrée) régler la température
modifiée.
Remarque : La nouvelle température s'enregistre
automatiquement après 10 secondes si la touche
Enter (Entrée) n'est pas appuyée.
4.
Le préchauffage démarre.
Remarque : Si la température saisie est en dehors de
la plage autorisée pour le mode, une tonalité d'erreur
retentit et la partie inférieure de l'écran affiche «TEMP
NOT ALLOWED » (Température non autorisée).
Pour régler la température d'abord, puis le mode de
cuisson (sauf pour les modes Gril ou Gril à
convection) :
1.
Entrez la température souhaitée à l’aide des touches
numériques. La température saisie s'affiche à côté du
temps.
2.
Sélectionner un mode de cuisson compatible avec la
température saisie. Si aucun mode de cuisson n'est
sélectionné dans les 5 secondes suivant le réglage de
la température, une tonalité retentit et le message
« SELECT MODE » (Sélectionner mode) s'affiche et
clignote.
3.
Appuyer sur une touche de sélection de mode pour
sélectionner un mode de cuisson.
Le nouveau mode s'enregistre automatiquement après
10 secondes si la touche Enter (Entrée) n'est pas
appuyée.
Remarque : Si la température saisie est en dehors de
la plage autorisée pour le mode sélectionné, une
tonalité d'erreur retentit et la partie inférieure de l'écran
affiche «TEMP NOT ALLOWED » (Température non
autorisée).
Pour changer la température du four :
1.
Appuyer sur le mode de cuisson désiré.
2.
La température affichée clignote. Entrer une nouvelle
température à l'aide des touches numériques. Appuyer
sur Enter (Entrée).
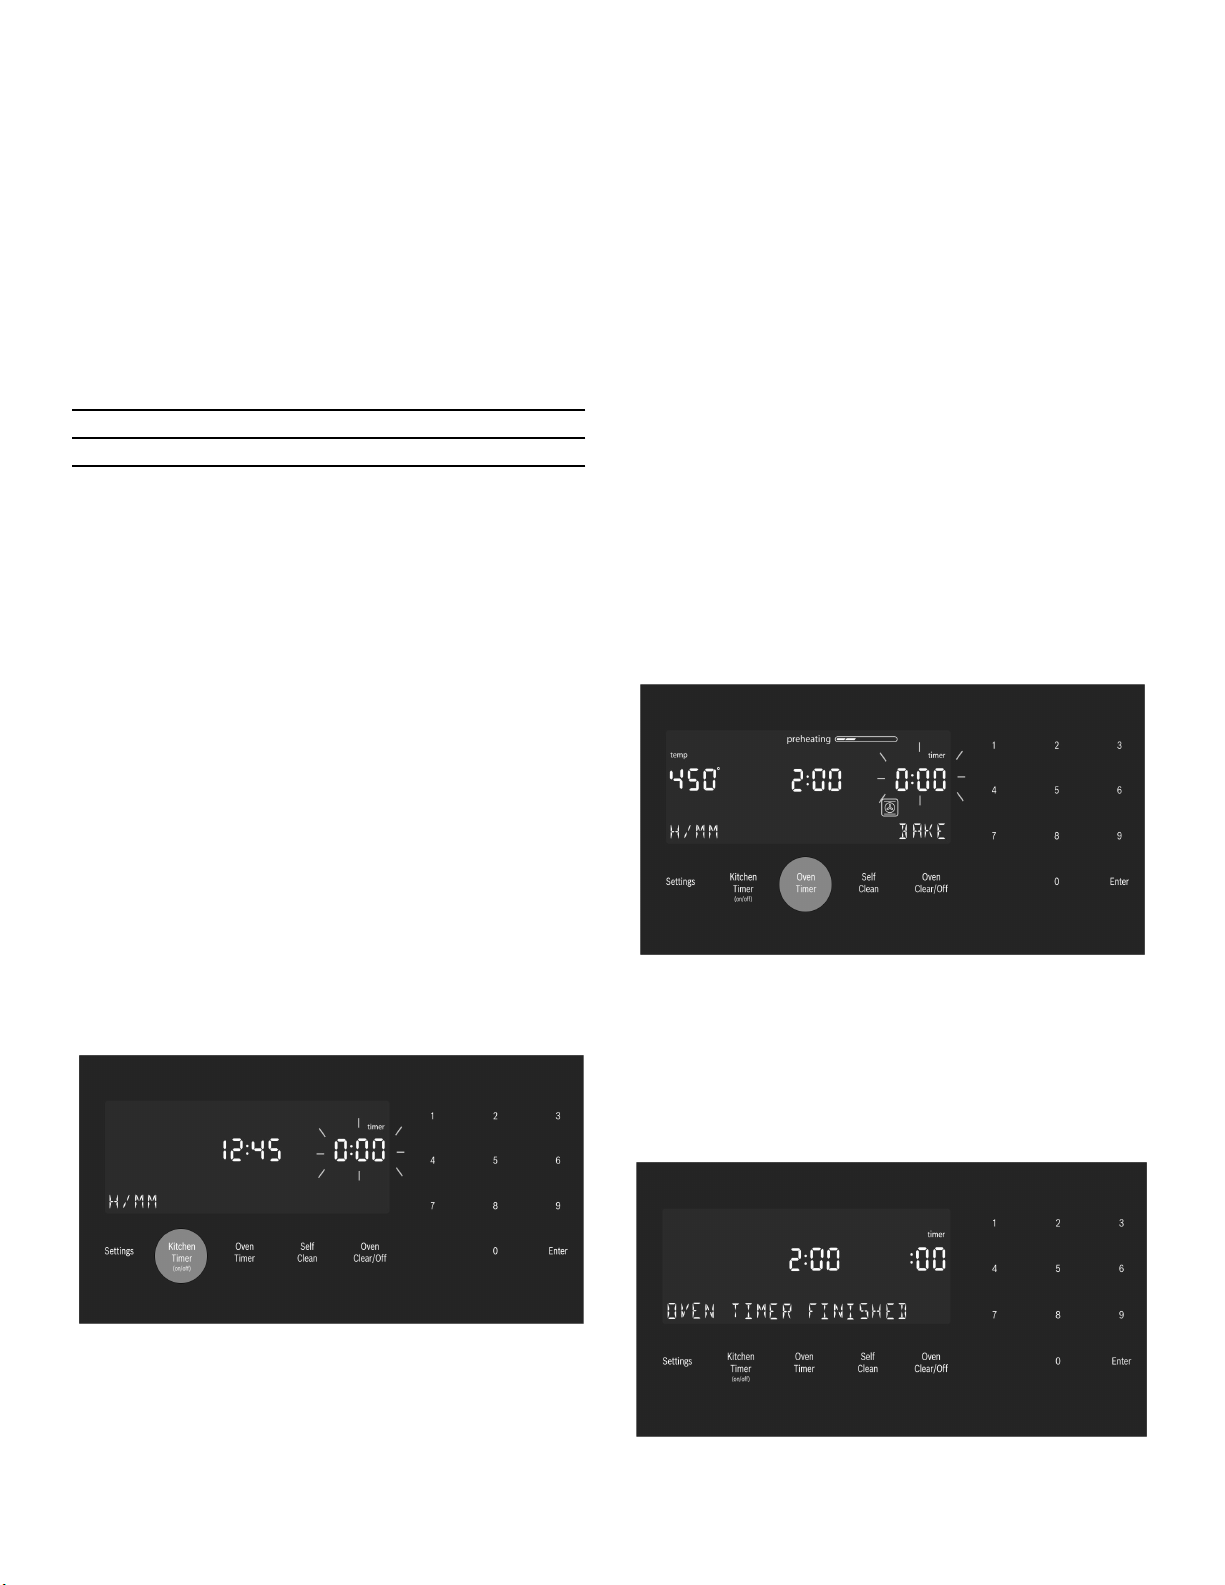
90
Limite de la durée de chauffage
La durée de chauffage maximale est limitée. Si vous
oubliez d'éteindre le four, il s'éteint automatiquement
après un certain temps.
Le temps maximal en mode Shabbat est de 74 heures.
Pour tous les autres modes de cuisson, le temps
maximal autorisé est de 24 heures.
Minuterie
Votre nouveau four est équipé de deux types de
minuterie.
Minuterie de cuisine – Minuterie à compte à rebours qui
n'a aucune incidence sur le chauffage du four. La
minuterie de cuisine est utilisée pour les besoins de
chronométrage des tâches ménagères d'ordre général.
Minuterie du four - Minuterie à compte à rebours qui,
lorsqu'elle atteint 00:00, éteint le four et, par conséquent,
le mode en cours. La minuterie du four est utilisée pour
régler la durée d'activation d'un mode. N'est pas offerte
pour les modes Gril, Gril à convection ou Apprêt.
Pour régler la minuterie de cuisine (pour des besoins
d'ordre général) :
1.
Appuyez sur le bouton Kitchen Timer On/Off
(Minuterie de cuisine Activée/Désactivée).
La valeur « 00:00 » s'affiche et clignote.Saisir la valeur
de minuterie souhaitée dans le format H/MM, à l'aide
du clavier numérique.
2.
Appuyer sur Enter (Entrée).
La minuterie de cuisine démarre.
3.
Lorsque le compte à rebours de la minuterie de
cuisine atteint zéro, une tonalité d'alarme retentit
toutes les 10 secondes, et ce, pendant 2 minutes et le
message « TIMER END » (Minuterie Fin) s'affiche.
Annuler la minuterie de cuisine en appuyant sur le
bouton Kitchen Timer On/Off (Minuterie de cuisine
Activée/Désactivée).
Remarque : La minuterie ne change pas lorsque
d'autres paramètres sont modifiés.
Modification d'une minuterie de cuisine (réglage d'une
minuterie pour éteindre le four :
1.
Appuyez sur le bouton Kitchen Timer On/Off
(Minuterie de cuisine Activée/Désactivée).
2.
La valeur actuelle clignote et peut être modifiée.
Pour régler la minuterie du four :
Remarque : La minuterie d'un four ne peut pas
fonctionner pendant le cycle d'autonettoyage (Nettoyage
Auto).
1.
Sélectionner la touche Oven Timer (Minuterie du four).
2.
Sélectionner le mode, appuyer sur Enter (Entrée).
La valeur « 00:00 » s'affiche et clignote.Saisir la valeur
de minuterie souhaitée dans le format H/MM, à l'aide
du clavier numérique.
Appuyer sur Enter (Entrée).La minuterie du four
compte à rebours jusqu'à 0:00.
3.
Lorsque la minuterie atteint :00, le mode de cuisson
prend fin et le message « OVEN TIMER FINISHED »
(Minuterie du four – Fin) s'affiche. L'alarme du four
retentit toutes les 10 secondes, et ce, pendant
2minutes.
Température
en °F
Température
en °C
Durée d'inactivité
maximum autorisée
100-200 30-120 24 heures
201-550 121-300 12 heures
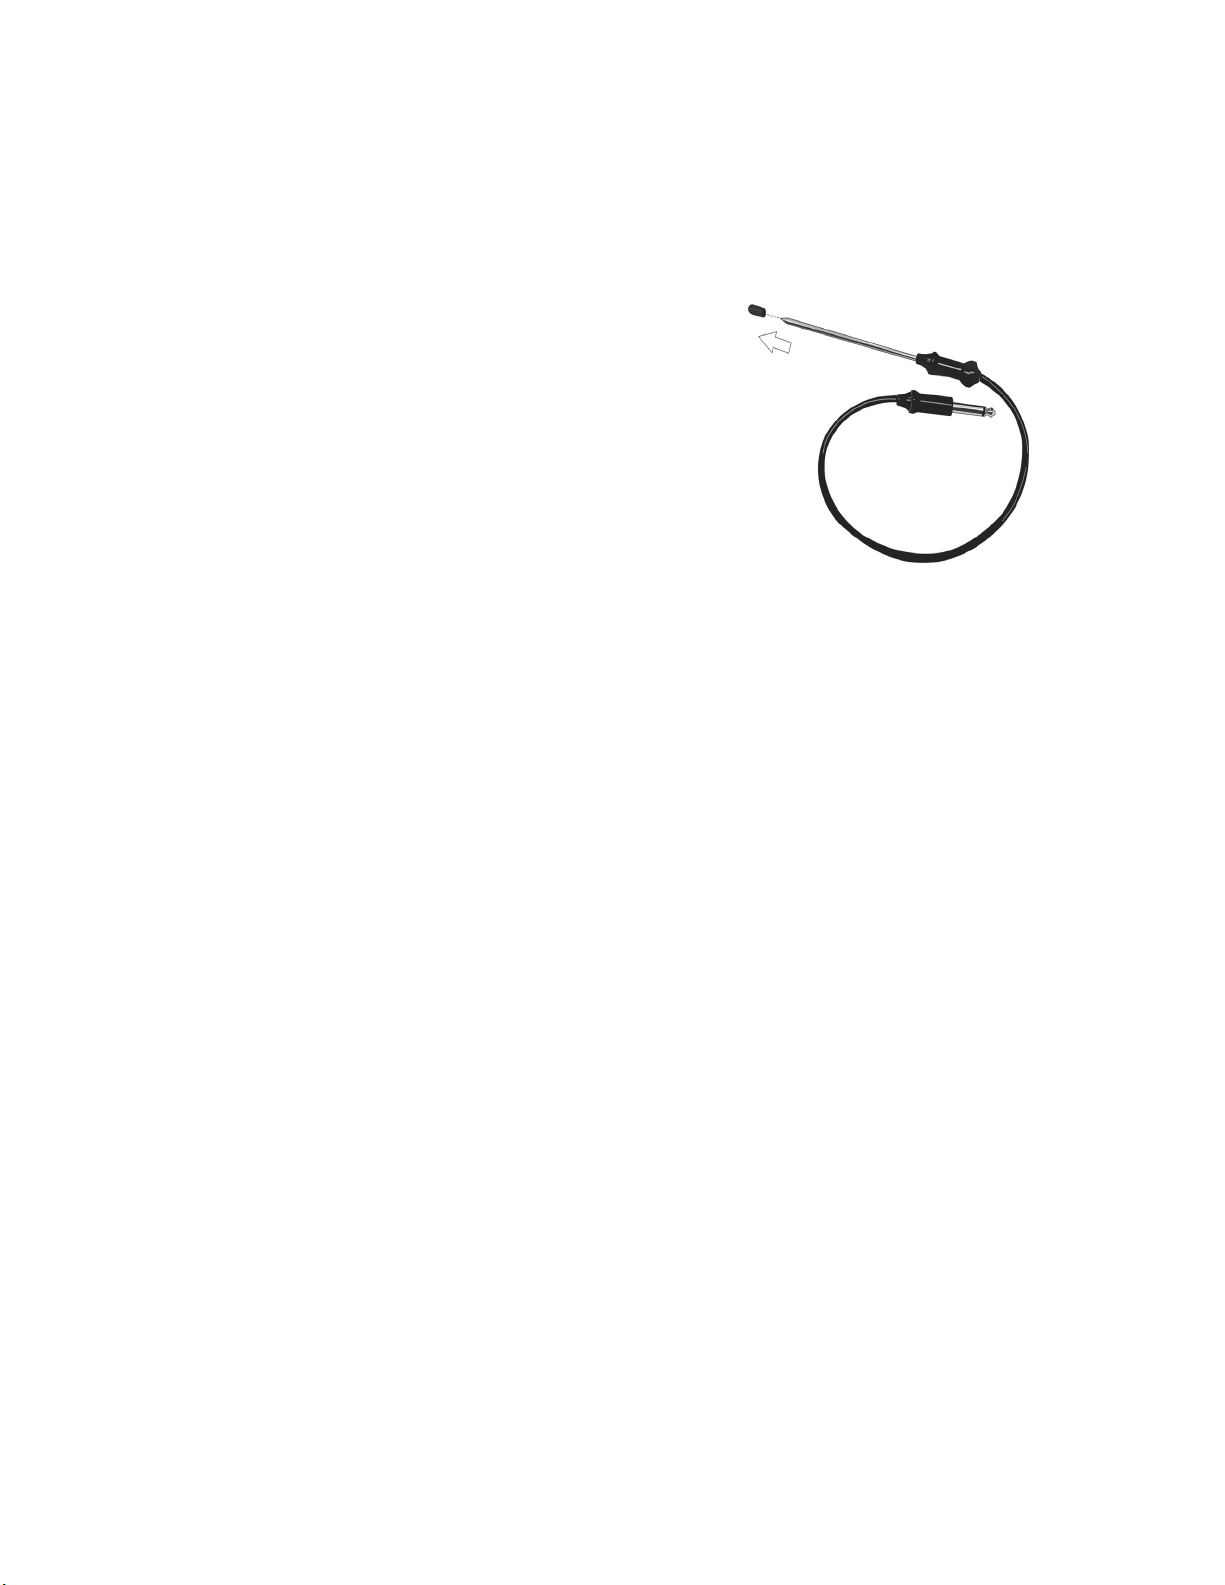
91
Modification de la minuterie du four :
1.
Si la minuterie du four est en service et que le temps
restant doit être modifié, entrer le mode de minuterie
du four en appuyant sur Oven Timer (Minuterie du
four).
2.
La température clignote, signalant qu'elle peut être
modifiée. Saisir une nouvelle température ou appuyer
sur Enter (Entrée) pour ne pas apporter de
modification.
3.
La valeur de minuterie clignote, signalant qu'elle peut
être modifiée. Saisir la nouvelle durée et redémarrer la
minuterie en appuyant sur Enter.
La minuterie du four peut être réinitialisée en
entrant 0:00.
Préchauffage rapide
La fonction de préchauffage rapide permet de faire
chauffer le four plus rapidement que le préchauffage
standard.Elle est disponible pour les modes Cuisson,
Convection Multi-Rack, Cuisson par Convection,
Rôtissage Convection, Rôtissage et Pizza. Le mode
Rôtissage apparaît dans le menu « Autres modes ». Si le
Préchauffage Rapide n'est pas autorisé pour le mode de
cuisson sélectionné, une tonalité d'erreur retentit. Le
préchauffage rapide n'est pas disponible pour les modes
Gril, Gril Convection, Apprêt ou Maintien au Chaud.
Pour régler le Préchauffage rapide :
1.
Appuyer sur Fast Preheat (Préchauffage rapide).
L'icône de préchauffage rapide s'affiche juste au-
dessus du nom du mode de cuisson.
2.
Appuyer sur Start (Démarrer).
Le Préchauffage rapide peut être éteint en appuyant de
nouveau sur Fast Preheat (Préchauffage rapide).
Fonctions spéciales
L'appareil comporte des fonctions spéciales qui vous
offrent des avantages supplémentaires en cuisinant.
Pour en savoir davantage sur ces fonctions spéciales,
consulter les sections suivantes :
▯ Sonde (certains modèles)
▯ Mode Shabbat
▯ Verrouillage du bandeau de commande
Sonde
La sonde mesure la température interne de l'aliment. La
sonde peut être utilisée pour les modes Cuisson,
Rôtissage et tous les modes de Cuisson par Convection
sauf Gril Convection.
Certains modèles sont dotés d'une sonde de
température servant à mesurer la température interne
des viandes pendant la cuisson.
La sonde est livrée avec un capuchon de plastique noir
sur son extrémité. Le capuchon doit être retiré avant
l'emploi.
Insertion de la sonde :
Introduire la pointe de la sonde dans la viande au milieu,
dans la partie la plus épaisse de la viande ou de la
poitrine, dans le cas d'une volaille. S'assurer que la
sonde ne touche pas au gras, à l'os ou à des parties du
four ou du plat.
Remarque : L'aliment doit être complètement dégelé
avant d'introduire la sonde dans la viande.
Utilisation de la sonde :
1.
Insérer la sonde dans la viande comme décrit cid-
essus. Le symbole de la sonde s'affiche.
2.
Brancher la sonde au four. Si la sonde n'est pas
connectée au four avant le démarrage du mode
Sonde, une tonalité d'erreur retentit et le message
« INSERT PROBE » (Introduire la sonde) s'affiche.
3.
Régler la mode de cuisson et la température.
4.
L'écran de réglage de la température de la sonde
s,affiche. Une invite à trois chiffres « - - - » clignote
dans le coin inférieur droit. Entrer la température de la
sonde souhaitée à l’aide des touches numériques et
appuyer sur Enter (Enter).
Remarque : La température de sonde minimum
pouvant être définie est de 100 °F (40 °C) et la
température maximum est de (200 °F (100 °C). Si la
température de sonde saisie est en dehors de cette
plage, une erreur s'affiche.

92
5.
La température réelle de la sonde et la température
ciblée s'affichent toutes deux au format : « 105/180 »
(40/80), dans le coin inférieur droit de l'écran. La
température réelle affichera <80 jusqu'à ce que la
température atteigne 80 °F (27 °C).
La température de sonde affichée est mise à jour par
incréments de 5 °F (1 °C) au cours du processus de
cuisson.
6.
Lorsque la température de la sonde atteint la
température définie, le mode de cuisson est désactivé.
L'heure en cours s'affiche et le message « COOKING
COMPLETE » (Cuisson terminée) s'affiche au coin
inférieur gauche de l'écran. Une tonalité d'alarme
retentit toutes les 10 secondes, et ce, pendant
2 minutes.
Cet écran reste dans l'affichage jusqu'à ce qu'on
l'efface en appuyant sur la touche Oven Clear/Off
(Four Effacer/Désactiver) ou jusqu'à ce que la sonde
soit retirée. L'écran repasse en mode veille.
Remarques
▯ La sonde n’est pas disponible lorsque la minuterie
de four a été programmée.
▯ Pour changer la température du four, appuyer sur la
touche Probe (Sonde). L'écran affiche le mode
d'édition de la température de sonde et affiche le
message « SET PROBE TEMP » (Régler
température sonde). Saisir la nouvelle température
de la sonde et appuyer sur Enter (Enter) pour
accepter la nouvelle valeur.
▯ Ne pas ranger la sonde dans le four.
▯ Toujours utiliser la sonde par la poignée pour
l'insérer et la retirer.
▯ Toujours utiliser une manique pour retirer la sonde
car elle est chaude.
▯ Étant donné que la viande continue à cuire une fois
retirée du four, régler la température interne (de la
sonde) de 5 F à 10 F (1 °C à 2 C) en deçà de la
température finale souhaitée, sauf pour la volaille.
Mode Shabbat
Le mode Shabbat permet aux personnes de religions
spécifiques d'utiliser leur four le jour du Shabbat.
Le mode Shabbat ne peut être saisi que dans le cadre
d'un cycle de cuisson. La température de cuisson doit
être dans la plage de température du mode Shabbat,
soit comprise entre 100 °F (38 °C) et 450 °F (232 °C).
Si l'éclairage du four est allumé pendant la configuration,
il le restera tout au long du fonctionnement du mode
Shabbat.Si l'éclairage du four est éteint pendant la
configuration, il le restera tout au long du fonctionnement
du mode Shabbat.
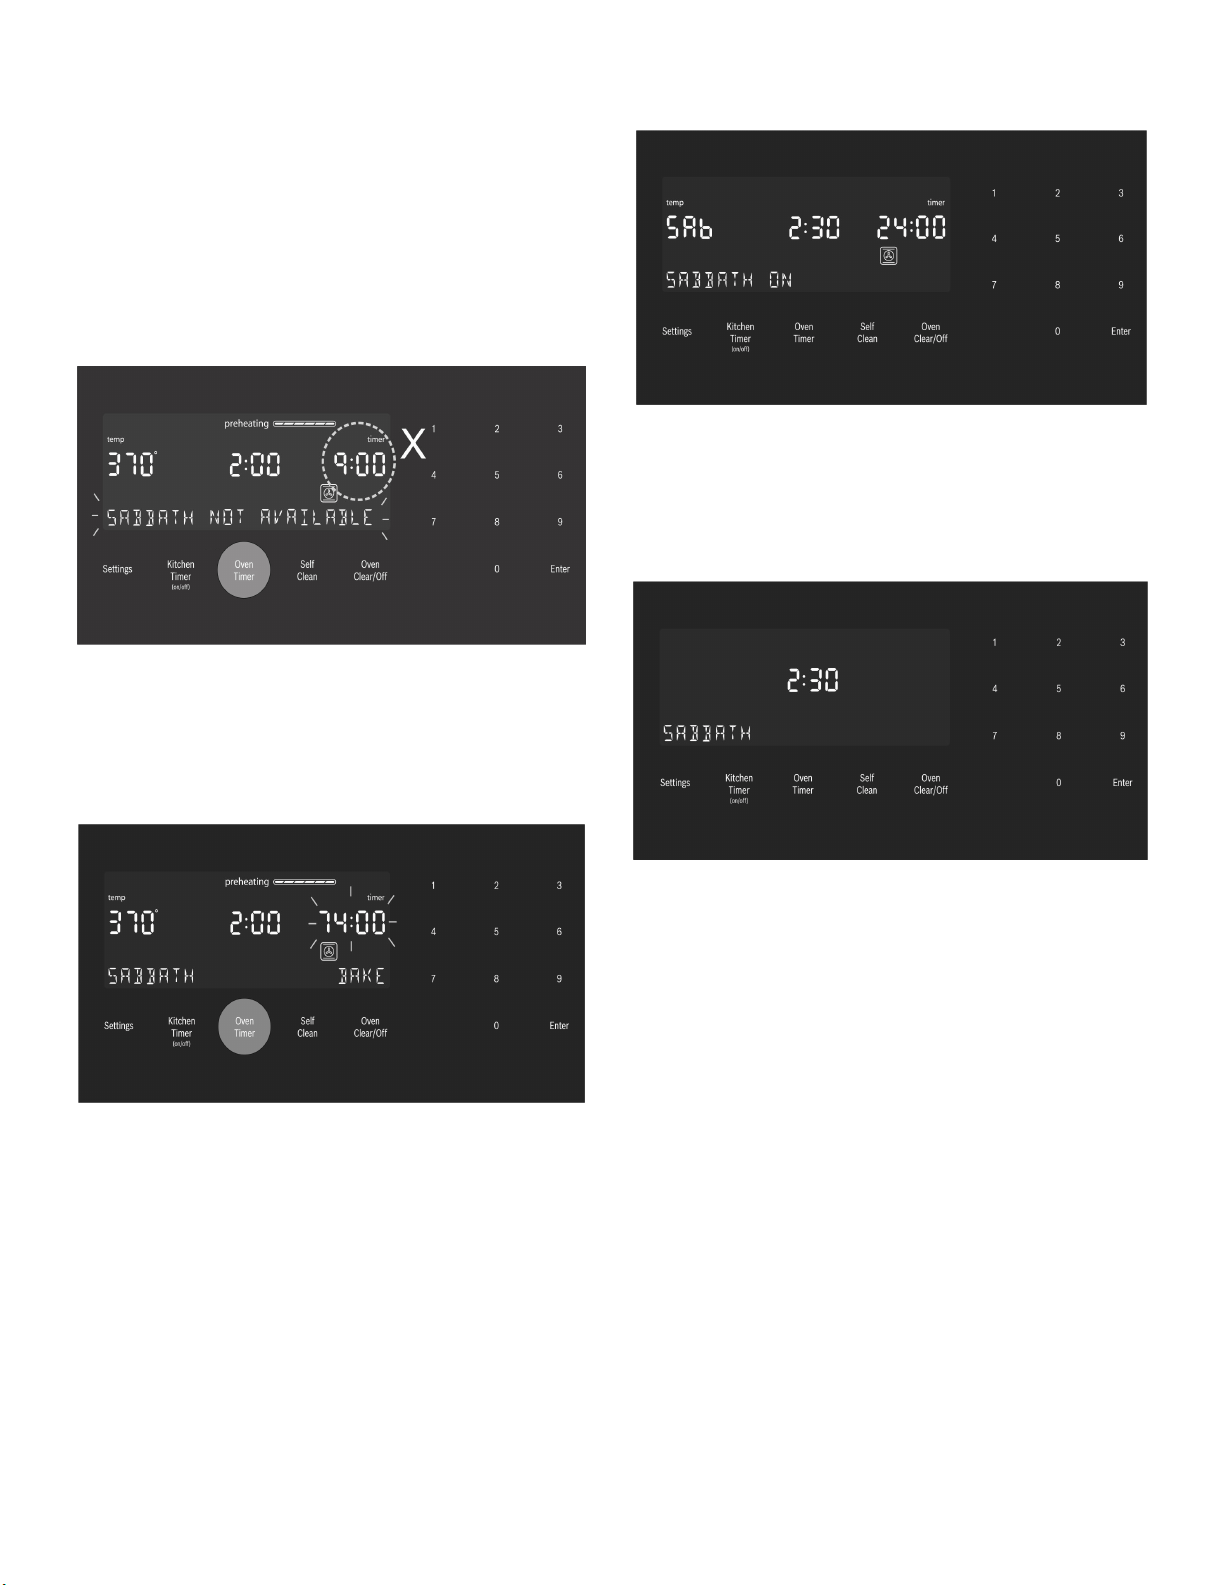
93
Pour régler le mode Shabbat :
Aucune minuterie de cuisine ou de four ne doit
fonctionner pendant la saisie du mode Shabbat.
1.
Commencer une cuisson. Pendant que le mode de
cuisson est en cours, appuyer et maintenir enfoncée
la touche Oven Timer (Minuterie du four) pendant
5 secondes.
Le message « SABBATH NOT AVAILABLE » (Shabbat
non disponible) s'affiche si une minuterie est en
marche ou si la température saisie est en dehors de la
plage autorisée.
Si aucune minuterie n'est en marche, les réglages du
mode Shabbat s'affichent à l'écran. La minuterie du
mode Shabbat clignote, signalant qu'elle peut être
modifiée. La valeur par défaut est 74:00 (le nombre
d'heures maximal auquel le mode Shabbat peut être
réglé).
2.
Appuyer sur Enter (Entrée) pour confirmer les
74:00 heures par défaut et lancer le mode Shabbat ou
utiliser le clavier numérique pour saisir la valeur de
minuterie du mode Shabbat. Des valeurs de minuterie
peuvent être saisies entre 0:01 et 74:00.
Remarque : Si aucune modification n'est apportée en
10 secondes, le mode Shabbat démarre
automatiquement.
3.
Le mode Shabbat lancé, l'écran change pour afficher
« SABBATH ON » (Shabbat activé).
4.
Une fois que le compte à rebours atteint zéro, le four
affiche l'heure courante et le message «SABBATH »
(Shabbat). À ce stade, aucune modification ne peut
être apportée. Pour mettre fin au mode Shabbat et
revenir au fonctionnement habituel, appuyer sur la
touche Oven Clear/Off (Four Effacer/Désactivé).
Remarques
▯ La température pour le mode Shabbat est comprise
entre 100 °F (38 °C) et 450 °F (232 °C).
▯ La minuterie du mode Shabbat peut être réglée
entre 00:01 et 74 heures.
Pour modifier la température en mode Shabbat :
Rien ne s'affiche pendant que la température en mode
Shabbat est modifiée. Si une température invalide est
saisie, le four reviendra, par défaut, à la température
précédente.
1.
Appuyer sur la touche Bake (Cuisson).
2.
Saisir la nouvelle température souhaitée.
3.
Appuyez sur Enter (Entrée).
Le four ajustera sa température réglée après un délai
aléatoire.

94
Verrouillage du bandeau de commande
Permet à l'utilisateur de désactiver toutes les touches du
bandeau de commande.Le verrouillage du bandeau de
commande ne peut être activé qu'en mode de veille.
1.
Pour le verrouillage du bandeau, appuyer et tenir
enfoncée la touche Panel Lock (Verrouillage du
bandeau) pendant 3 secondes.
2.
Pour désactiver le verrouillage du bandeau, appuyer et
tenir enfoncée la touche Panel Lock (Verrouillage du
bandeau) pendant 3 secondes. L'écran repasse en
mode veille.
Réglages
Le menu de configuration du four est utilisé pour
personnaliser certains réglages du four.
Le four doit être en mode Veille (aucun mode de cuisson
ou minuterie de four ne doit s'exécuter) afin de pouvoir
accéder au menu de configuration.
Pour apporter des modifications aux éléments du
menu des réglages :
1.
Appuyer sur la touche Settings (Réglages).
2.
Le premier élément de réglage s'affiche. L'écran
affiche « SET CLOCK » (Réglage de l'horloge).
Appuyer de nouveau sur Réglages pour accéder au
menu des réglages.
3.
Pour afficher un élément de réglage différent, appuyer
sur le chiffre correspondant à ce réglage (voir le
tableau ci-dessous ou appuyer sur Réglages pour
faire défiler les options).
4.
Pour modifier la valeur du réglage affiché, appuyer sur
Enter pour accéder au mode d'édition.Modifier la
valeur du réglage souhaité à l'aide du clavier
numérique. La valeur de réglage correspondante
apparaît dans le tableau ci-dessous.
Pour la température compensée, lorsque l'élément est
en mode d'édition, appuyer d'abord sur « - » ou sur « +
», puis sur la valeur numérique compensée.
La nouvelle valeur est automatiquement confirmée
alors que l'écran repasse du mode d'édition au mode
d'affichage.
Pour quitter le menu des réglages :
Appuyer sur la touche Oven Clear/Off (Four Effacer/
Désactiver).
Température compensée du four
Le four est calibré de manière à offrir des résultats
précis. La fonction est utile si vous préférez des aliments
plus ou moins dorés. Lorsqu'une valeur compensée est
saisie, la température réelle du four est augmentée ou
diminuée de cette valeur.
Ne pas utiliser les thermomètres de cuisson résidentiels
pour mesurer les températures du four, car elles
fluctueront au gré de la cuisson.
Le four doit être éteint pour régler une valeur
compensée. Pour le réglage, se reporter à Temperature
Offset (Température compensée) dans les Settings
Menu Options (Options de menu des réglages).
Remarque : Ces étapes peuvent être répétées jusqu'à
l'obtention d'un résultat satisfaisant. Chaque fois qu'une
de ces étapes est répétée, la température du four
retombe à zéro. En d'autres mots, si la température
compensée a été modifiée de 5 °F (1 °C) la première
fois, la deuxième, elle devra être compensée de 10 °F
(2 °C). Le four ne modifiera pas la température
compensée originale.
Options de menu des réglages
Élément de
menu
Description Réglag
e par
défaut
1 Unités de
température
Fahrenheit ( °F) ou
Celsius ( °C)
°F
2 Luminosité Élevé, Moyen, Faible Élevé
3 Volume Élevé, Moyen, Faible Élevée
4 Mode Hor-
loge
Mode d'affichage
12 heures ou 24 heures.
12HR, 24HR
12HR
5 Auto
Convection
Conversion
Diminue la température du
four de 25 °F (3,9 °C)
pour les modes de Cuis-
son par Convection et de
Convection Multi-
Rack.Activé, Désactivé
DÉSAC-
TIVÉ
6 Tonalité des
touches
Tonalité lorsqu'on appuie
sur la touche.ACTIVÉ,
DÉSACTIVÉ
ACTIVÉ
7 Veille
Horloge
Affichage
L'horloge s'affiche quand
aucun mode de cuisson ou
minuterie ne s'exécute.
ACTIVÉ, DÉSACTIVÉ
ACTIVÉ
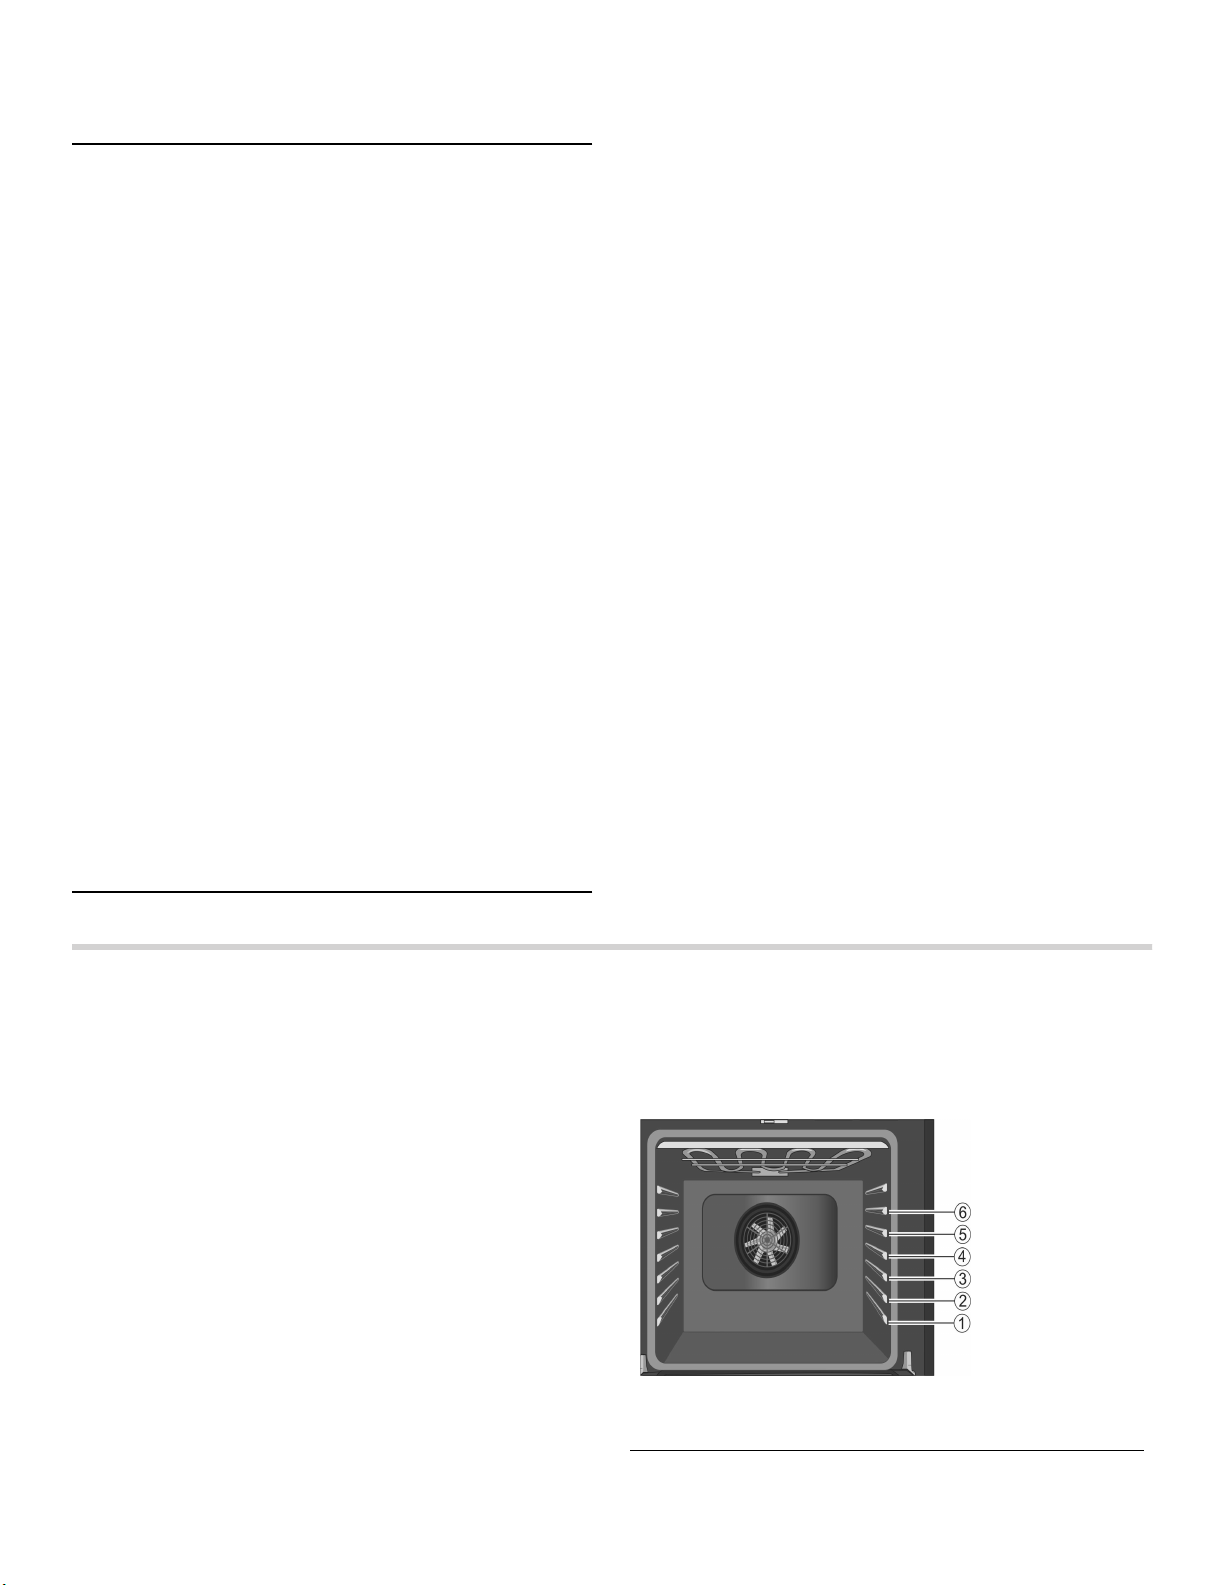
95
Tirer le meilleur parti de votre appareil
Conseils généraux
Positionnement du plat de cuisson
Les résultats de cuissons sont meilleurs si les plats sont
placés au centre du four. Si plus d'un plat cuit sur une
grille, laisser environ 1 po-1,5 po (2 cm-2,5 cm)
d'espace entre les plats. Lors de la cuisson de quatre
pâtes à gâteau en même temps, étager les moules sur
deux grilles de manière à ce qu'un moule ne soit pas
placé directement au-dessus de l'autre.
Position des grilles
8 Langue Paramètre de langue :
Anglais, (EN), Français,
(FR)
EN
9 Température
Température
compensée
Règle la valeur de la tem-
pérature compensée pour
Cuisson, Cuisson par
Convection, Rôtissage,
Rôtissage Convection et
Convection Multi-Rack.
Remarque : Les tempéra-
tures compensées doivent
toujours être saisies à
deux chiffres.
Exemple : 5 est saisi
comme 05.
Lorsqu'une valeur compen-
sée est saisie, la tempéra-
ture réelle du four est
augmentée ou diminuée
de cette valeur. Cette fonc-
tion est utile si les aliments
sont systématiquement
trop ou pas assez dorés.
La plage de modification
de la compensation est
comprise entre +/- 35 °F
(+/- 19 °C) par incréments
de 1 °F (0,20 °C).
La valeur par défaut est 0.
0
Les positions
des grilles sont
numérotée de
1 à 6, du bas
vers le haut.
Consulter les
tableaux de
cuisson à la fin
de ce manuel
pour connaître
les positions de
grille recom-
mandées.

96
La glissière située sur la voûte du four permet de guider
la grille supérieure (position 6). Utiliser uniquement les
positions de grille de 1 à 6. NE PAS tenter d'utiliser le
dispositif de guidage supérieur pour soutenir une grille
de four.
Papier d'aluminium
9 AVERTISSEMENT
Ne pas utiliser de papier aluminium ou de doublure
de protection pour revêtir toute partie de l'appareil,
et en particulier la sole du four. L'utilisation de ces
doublures peut entraîner un risque de choc
électrique ou d'incendie.
Préchauffer le four
▯ Placer les grilles dans la position désirée avant de
faire chauffer le four.
▯ Préchauffer le four lors de l'utilisation des modes
Cuisson, Cuisson par convection, Convection
MultiRack, Pizza, Gril Convection et Maintien au
chaud.
▯ Le préchauffage n'est pas utilisé pour les modes
Rôtisserie, Rôtisserie à convection et Levée.
▯ Faire préchauffer le four tout en préparant les
ingrédients de la recette ou les aliments.
▯ Le réglage d'une température plus élevée n'écourte
pas le temps de préchauffage.
▯ Une fois le four préchauffé, mettre les aliments au four
le plus vite possible pour minimiser la perte de chaleur
et éviter la baisse de température du four.
▯ Pour aller plus vite, utiliser la fonction de Préchauffage
rapide.
Rappels concernant le préchauffage
Ce four possède l'un des temps de préchauffage les plus
brefs du marché grâce à un élément de cuisson
dissimulé. Il est normal que le temps de préchauffage
soit différent de votre four précédent dont l'élément était
exposé sur la sole du four. Il est normal que le temps de
préchauffage diffère de celui de votre four précédent,
dont l'élément chauffant était exposé dans le bas du four.
▯ L'élément inférieur dissimulé est protégé des
salissures et des éclaboussures. Les éclaboussures
sont faciles à essuyer.
▯ Les viandes, la volailles, les plats en casserole et
certains aliments congelés n'ont pas besoin d'être
préchauffés.
▯ Le temps de préchauffage sera plus long si
l'alimentation électrique du domicile est inférieure
à 240 volts.
▯ Toute augmentation de la température entraînera un
temps de préchauffage supplémentaire. Par exemple,
le temps de préchauffage pour un four à 425 °F
(220 °C) est plus long que celui d'un four à 350 °F
(180 °C).
Pour la cuisson au gril, préchauffer le four pendant
3 à 4 minutes.Ne pas préchauffer le four au-delà de
5 minutes.
Pour de meilleurs résultats
▯ Se servir des tableaux de recommandations de
cuisson comme guide. Voir les tableaux à la fin du
manuel.
▯ Ouvrir la porte aussi brièvement que possible pour
éviter les chutes de température.
▯ Utiliser l'éclairage intérieur du four pour vérifier la
cuisson des aliments par le hublot plutôt que d'ouvrir
souvent la porte du four.
▯ Se servir de la minuterie pour comptabiliser les temps
de cuisson.
Casseroles et plats allant au four
▯ Les plats de cuisson en verre absorbent la chaleur.
Certains fabricants d'ustensiles de cuisine
recommandent de réduire la température de 25 °F
(3,9 °C) lors de l'utilisation de ce type de plat. Suivre
les recommandations du fabricant.
▯ Préchauffer le four avant d'y placer des plats de
cuisson en verre.
▯ Utiliser des plats adaptés au degré de brunissage
désiré. Pour obtenir une croûte tendre, légère et brun
doré, utiliser des plats allant au four en métal anodisé
ou brillant.
▯ Les plats foncés, rugueux ou mats (antiadhésifs ou
anodisés) absorbent la chaleur et donnent une croûte
plus dorée et plus croustillante. Certains fabricants
recommandent de réduire la température de 25 °F
(3,9 °C) lors de l'utilisation de ce type de plat. Suivre
les recommandations du fabricant.
▯ Les plaques à biscuits ou les plats allant au four isolés
feront augmenter la durée de cuisson.
Position des grilles Idéal pour
6 (position utilisable la
plus élevée)
les hamburgers, les
steaks
5 le pain grillé, la plupart
des viandes grillées et le
fromage fondu
4 les viandes plus épaisses
3 volailles rôties, la plupart
des produits boulangers
préparés sur une plaque à
biscuits ou dans un moule
utilisant une seule grille;
ceci comprend les ali-
ments surgelés prêts-à-
servir, les gâteaux, les
plats en casserole et la
pizza surgelée
2 les petits rôtis ou volailles,
les savarins, les tartes, le
pain
1 (position la plus basse) les gros rôtis, la dinde, le
gâteau des anges

97
▯ Ne pas déposer de plat à rôtir ou tout autre objet lourd
sur la porte ouverte du four.
▯ Ne pas laisser des plats de cuisson ou des pierres à
pizza vides dans le four pendant la cuisson, car cela
risque de modifier la performance de cuisson. Ranger
les plats de cuisson à l'extérieur du four.
Ouvrir la porte du four
Ouvrir et fermer la porte de l'appareil par la poignée de
la porte seulement. Pour éviter tout risque de brûlure, ne
pas toucher d'autres parties de la porte.
Cuisson à haute altitude
À haute altitude, les recettes et les temps de cuisson
peuvent varier.
Pour des renseignements plus précis, écrire au Service
de vulgarisation de la Colorado State University, à Fort
Collins, Colorado 80521. Des frais peuvent être exigés
pour l,achat de ces guides de cuisson. Préciser le nom
du guide de préparation culinaire à haute altitude que
vous désirez : renseignements généraux, gâteaux,
biscuits, pains, etc.
Condensation
Il est normal de voir une certaine quantité de vapeur
d'eau s'échapper des aliments lors de la cuisson. La
quantité dépend de la teneur en humidité de l'aliment.
L'humidité peut se condenser sur n'importe quelle
surface plus froide que la cavité du four, comme par
exemple sur le bandeau de commande.
Plages de température par type de cuisson
Les températures s'affichent en Fahrenheit.
Cuisson %
Le mode Cuisson revient à faire cuire avec de l'air chaud
et sec. Les éléments supérieur et inférieur chauffent à
intervalles réguliers pour maintenir la température du
four.
Le mode Cuisson peut être utilisé pour préparer toute
sorte d'aliments, depuis les pâtisseries jusqu'aux plats en
casserole. Consulter les conseils de préparation de la
recette ou de l'emballage pour connaître les
températures et les temps de cuisson.
Conseils
▯ Préchauffer le four si la recette le recommande.
▯ Le temps de cuisson varie selon la taille, la forme et le
revêtement de l'ustensile utilisé. Les récipients en
métal foncés ou les revêtements antiadhésifs
permettent d'obtenir une cuisson plus rapide et un
brunissage plus intense.Les ustensiles de cuisson
isolants, augmentent la durée de cuisson pour la
plupart des aliments.
▯ Pour de meilleurs résultats, faire cuire les aliments sur
une seule grille en laissant 1,5 po (3,8 cm) d'espace
minimum entre les ustensiles ou les plats et les parois
du four.
▯ Éviter les pertes de chaleur en vérifiant
périodiquement la cuisson des aliments par le hublot
du four au lieu d'ouvrir la porte.
Auto Convection Conversion
Les modes de Cuisson par Convection et Convection
MultiRack nécessitent une réduction de température de
25 °F (3,9 °C). La fonction Conversion Convection Auto
réduit la température saisie automatiquement. Entrer
simplement la température de la recette ou indiquée sur
l'emballage lors du réglage du mode. La commande
calcule la bonne température et l'affiche à l'écran.
La fonction Conversion Convection Auto peut être
activée pour permettre le réglage automatique de la
température. Voir « Conversion Convection Auto » à la
section « Réglages » pour plus de détails.
Cuisson par convection 2
Le mode Cuisson par Convection est similaire au mode
Cuisson. La chaleur provient des éléments chauffants
supérieur et inférieur. La principale différence est que la
chaleur circule à l'intérieur de la cavité du four grâce au
ventilateur à convection.
Le mode de Cuisson par Convection est idéal pour la
cuisson des gâteaux, des biscuits en barres et des pains
pour tirer profit de la chaleur de l'élément inférieur qui
donne aux aliments cuits au four une croûte plus
savoureuse.
Les avantages du mode Cuisson par Convection
comprennent :
▯ Une légère diminution de la durée de cuisson.
▯ Un volume plus élevé (les aliments à base de levure
lèvent mieux).
Conseils
▯ Réduire la température du four indiquée dans la
recette de 25° F (3,9 °C). Consulter le tableau de
cuisson à la fin de ce manuel.
▯ Placer les aliments dans des moules peu profonds,
non couverts, telles des plaques à biscuit sans
rebords.
Mode Plus
faible
Plus élevé
Cuisson 100 550
Rôtissage 100 550
Gril (bas, élevé) 450 550
Tiède 150 225
Apprêt 85 125
Cuisson à convection 100 550
Convection MultiRack 100 550
Rôtissage à convection 100 550
Pizza 100 550
Gris à convection (bas, élevé) 450 550
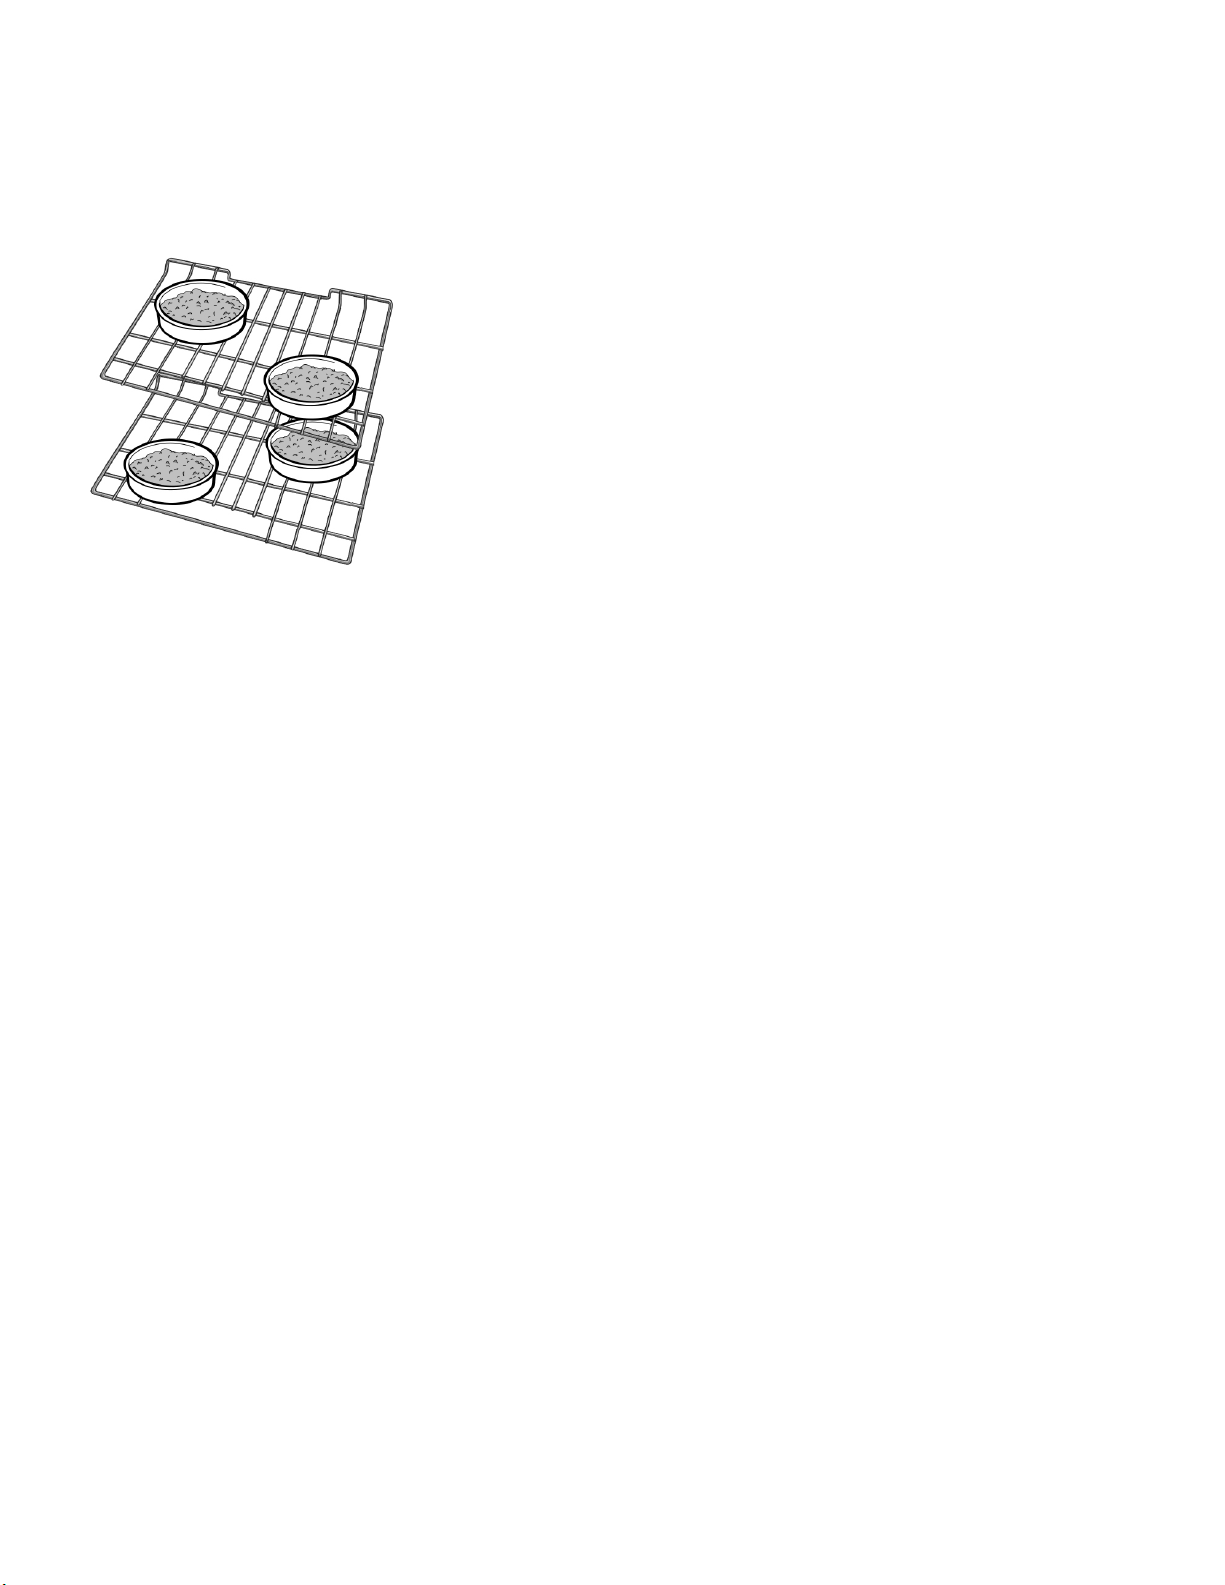
98
▯ Si l'on dispose plusieurs moules sur une même grille,
laisser au moins 1 po à 1,5 po (2,5 cm à 3,8 cm)
d'espace entre les moules.
▯ Pour les gâteaux, utiliser les positions 2 et 5. Étager
les moules de manière à ce que l'un ne soit pas placé
directement au-dessus de l'autre (voir l'illustration
suivante).
Convection MultiRack:
Le mode Convection Multi-Rack utilise la chaleur diffusée
par un troisième élément situé derrière la paroi arrière du
four. La chaleur circule à l'intérieur de la cavité du four
grâce au ventilateur à convection.
Le mode Convection Multi-Rack convient tout
particulièrement aux aliments en portions individuelles,
tels les biscuits et les biscottines.Il est également
efficace pour la cuisson sur plusieurs grilles (2 ou 3) en
même temps. La cuisson des biscuits peut se faire sur
6 grilles différentes simultanément. Dans ce cas, le
temps de cuisson augmente légèrement.
Les avantages du mode Multi-Rack comprennent :
▯ Un brunissage uniforme.
▯ Des économies de temps provenant de l'utilisation de
plusieurs grilles en même temps.
Conseils
▯ Réduire la température du four indiquée dans la
recette de 25 °F (3,9 °C) si le mode Conversion
Convection Auto n'est pas activé.
▯ Placer les aliments dans des plats peu profonds, non
couverts, telles des plaques à biscuit sans rebords.
▯ Si l'on dispose plusieurs plats sur une même grille,
laisser au moins 1 po à 1,5 po (2,5 cm à 3,8 cm)^
d'espace entre les plats.Étager les plats de manière à
ce que l'un ne soit pas placé directement au-dessus
de l'autre.
Pizza 2
En mode Pizza, la chaleur diffusée par les éléments
supérieur et inférieur circule dans la cavité du four grâce
au ventilateur à convection.
Le mode Pizza convient pour les pizzas fraîches ou
congelées.
Conseils
▯ Il se peut qu'il ait une légère diminution du temps de
cuisson. Vérifier la durée minimale inscrite sur
l'emballage.
▯ Lorsque vous faites cuire une pizza congelée :
Pour obtenir une croûte croustillante, placer la pizza
directement sur la grille.
Pour obtenir une croûte plus molle, utiliser une plaque
à pizza.
▯ Pour apprêter la pâte à pizza, badigeonner celle-ci
d'huile d'olive et la mettre dans un saladier couvert
hermétiquement d'un film étirable pour éviter qu'une
croûte ne se forme à la surface.
▯ Saupoudrer de la semoule de maïs sur la plaque à
pizza pour éviter que la pâte n'attache.
▯ Si vous utilisez une palette à pizza, saupoudrer
généreusement celle-ci de semoule de maïs pour
transférer la pâte sur la plaque.
▯ Si vous faites cuire à blanc une pâte à pizza faites à la
main, piquer le fond avec une fourchette avant de la
mettre au four.
▯ Si vous utilisez un moule à pizza, choisir un moule
foncé muni de trous pour obtenir une croûte plus
croustillante et un moule non troué pour obtenir une
croûte plus molle.
▯ Préchauffer les pierres à pizza en suivant les
recommandations du fabricant pendant le
préchauffage du four.
▯ Faire cuire les pizzas maison au centre de la grille et
placer celle-ci en position 2.
▯ Pour les pizzas congelées, observer les
recommandations du fabricant.
▯ Lors de l'utilisation du mode Pizza, le ventilateur à
convection s'allume et s'éteint par intermittence.

99
Rôtissage %
Le mode Rôtissage utilise à la fois les éléments
supérieur et inférieur pour maintenir la température du
four. Ce mode exige que l'élément supérieur produise
une chaleur plus intense que celle diffusée par l'élément
inférieur. Ceci permet d'obtenir des mets bien dorés à
l'extérieur et particulièrement moelleux à l'intérieur.
Le mode Rôtissage convient parfaitement à la viande et
à la volaille et aux coupes de viande moins tendres.
Conseils
▯ Il n'est pas nécessaire de préchauffer le four.
▯ Utiliser un plat à rôtir ou une rôtissoire. Couvrir le plat
avec un couvercle ou une feuille d'aluminium pour
faire cuire les coupes de viande moins tendres.
▯ Pour les coupes de viande moins tendres, ajouter des
liquides, tels de l'eau, du jus, du vin, du bouillon ou un
fond pour parfumer et mouiller la viande.
▯ Les sacs à rôtir se prêtent bien à ce mode de cuisson
de même que les couvercles.
▯ Pour faire rôtir un poulet entier ou une dinde entiers,
replier les ailes en dessous et attacher les cuisses de
manière lâche avec de la ficelle de cuisine.
Rôtissage Convection 2
Le mode Rôtissage Convection utilise la chaleur diffusée
par les éléments supérieur et inférieur ainsi que la
chaleur qui circule dans la cavité grâce au ventilateur à
convection.
Le mode Rôtissage Convection est bien adapté à la
préparation des coupes de viande tendres et de la
volaille. Il convient également au rôtissage des légumes.
Les avantages du mode Rôtissage Convection
comprennent :
▯ Une cuisson jusqu'à 25 % plus rapide que les modes
n'utilisant pas la Cuisson par Convection.
▯ Un brunissage riche, doré.
Conseils
▯ Il n'est pas nécessaire de préchauffer le four.
▯ Utiliser la température exacte indiquée sur la recette.
▯ Vérifier la cuisson au début car la durée de rôtissage
peut être écourtée.
▯ Pour des exemples, consulter le tableau de cuisson
de la viande/volaille.
▯ Utiliser un plat à rôtir avec une grille et une lèchefrite
ou un plat peu profond, à découvert, doté d'une grille
pour le rôtissage.
▯ Utiliser un thermomètre à viande pour déterminer la
température interne de celle-ci.
▯ Si la viande est dorée à souhait, mais qu'elle n'a pas
fini de cuire, vous pouvez la couvrir de papier
d'aluminium pour qu'elle ne dore pas trop.
▯ Une fois la viande sortie du four, la couvrir avec du
papier d'aluminium et laisser reposer de
10 à 15 minutes.
▯ Consulter les tableaux pour connaître les positions de
grille recommandées.
Gril (
Le mode Gril utilise la chaleur intense diffusée par
l'élément supérieur.
Le mode Gril est parfaitement adapté à la cuisson des
pièces de viande minces et tendres de 1 po (2,5 cm)
d’épaisseur ou moins, de la volaille et du poisson. On
peut l'utiliser également pour faire griller le pain et
gratiner les plats en casserole. Toujours griller les
aliments avec la porte fermée.
Les avantages du mode Gril comprennent :
▯ Une cuisson rapide et efficace.
▯ Une cuisson ne nécessitant pas l'ajout de matières
grasses ou de liquides.
Conseils
▯ Préchauffer le four pendant 3 à 4 minutes. Ne pas
préchauffer le four au-delà de 5 minutes.
▯ Le steak et les côtelettes doivent avoir au moins ¾ po
(2 cm) d'épaisseur.
▯ Badigeonner le poisson et la volaille de beurre ou
d'huile pour éviter qu'ils n'attachent pendant la
cuisson.
▯ Pour le rôtissage, utiliser un plat à rôtir et une
lèchefrite ou un plat profond doté d'une plaque-gril en
métal.
▯ Ne pas recouvrir le gril-lèchefrite de papier
d'aluminium. Il a été conçu pour faciliter l'écoulement
des matières grasses sans contact avec la surface et
éviter le dégagement de fumée et les éclaboussures.
▯ Tourner les viandes (autres que le poisson) une fois
pendant la durée de cuisson. Le poisson n'a pas
besoin d'être tourné.
▯ Pour faire gratiner les plats en casserole, utiliser
uniquement des plats en métal ou en céramique de
verre tels que Corningware®.
▯ Ne jamais utiliser de plats en verre résistant à la
chaleur (Pyrex®); ils ne tolèrent pas les températures
élevées.
▯ Pour les durées de cuisson au gril, consulter le
tableau de cuisson de la viande/volaille.

100
Gril Convection 4
Le mode Gril Convection est similaire au mode Gril. Ce
mode allie la chaleur intense diffusée par l'élément
supérieur à l'air chaud qui circule sous l'action d'un
ventilateur à convection.
Le mode Gril Convection est bien adapté à la cuisson
des coupes de viande épaisses et tendres, de la volaille
et du poisson. Le mode Gril Convection n'est pas
recommandé pour le brunissage des pains, des plats en
casserole et autres aliments. Utiliser toujours le mode
Gril Convection avec la porte fermée.
Outre les avantages de la cuisson au gril normale, le
mode Gril Convection est plus rapide.
La température doit être réglée entre 450 °F et 550 °F
(230 °C et 285 °C) pour activer les modes Gril et Gril
Convection.
Conseils
▯ Préchauffer le four pendant 3 à 4 minutes. Ne pas
préchauffer le four au-delà de 5 minutes.
▯ Le steak et les côtelettes doivent avoir au moins
1^ po (2,5 cm) d'épaisseur.
▯ Pour le rôtissage, utiliser un plat à rôtir et une
lèchefrite ou un plat profond doté d'une plaque-gril en
métal.
▯ Ne pas recouvrir le gril-lèchefrite de papier
d'aluminium. Il a été conçu pour faciliter l'écoulement
des matières grasses sans contact avec la surface et
éviter le dégagement de fumée et les éclaboussures.
▯ Tourner les viandes (autres que le poisson) une fois
pendant la durée de cuisson. Le poisson n'a pas
besoin d'être tourné.
▯ Ne jamais utiliser de plats en verre résistant à la
chaleur (Pyrex®); ils ne tolèrent pas les températures
élevées.
▯ Pour les durées de cuisson au au mode Gril
Convection, consulter le tableau de cuisson de la
viande/volaille.
Apprêt $
Le mode Apprêt utilise les éléments supérieur et inférieur
du four pour faire lever la pâte à pain ou d'autres types
de pâtes à base de levure en les maintenant à basse
température.
▯ Aucun préchauffage n'est nécessaire.
▯ L'apprêt consiste à faire lever la pâte à levure.
▯ La plage de température du mode Apprêt est
comprise entre 85 °F et 110 °F (29 °C et 43 °C).
▯ La température par défaut du mode Apprêt est de
100 °F (38 °C).
▯ Couvrir sans serrer le bol ou l'ustensile de cuisson et
utiliser une grille adaptée à la taille du contenant.
▯ Laisser la porte du fermée et utiliser l'éclairage du four
pour vérifier la levée de la pâte.
Maintien au chaud %
En mode Maintien au Chaud, les éléments supérieur et
inférieur maintiennent la température à un faible niveau
dans la cavité du four pour conserver les aliments à la
température adéquate jusqu'au service.
▯ Utiliser le mode de Maintien au Chaud pour conserver
les aliments cuits au chaud jusqu'au moment de servir.
▯ Les températures du mode Maintien au Chaud vont de
140 °F à 220 °F (60 °C à 104 °C).
▯ La température par défaut du mode Maintien au
Chaud est de 170 °F (77 °C).
▯ Protéger les aliments devant rester humides avec un
couvercle ou du papier d'aluminium.
9 ATTENTION
LORS DE L'UTILISATION DU MODE MAINTIEN AU
CHAUD, SUIVRE LES RECOMMANDATIONS
SUIVANTES :
▯ Ne pas utiliser le mode Maintien au Chaud pour
faire chauffer des aliments froids.
▯ Veiller à garder la nourriture à la bonne
température. L'USDA recommande de maintenir
les aliments chauds à 140 °F (60 C) ou plus.
▯ NE PAS maintenir des aliments au chaud
pendant plus d'une heure.
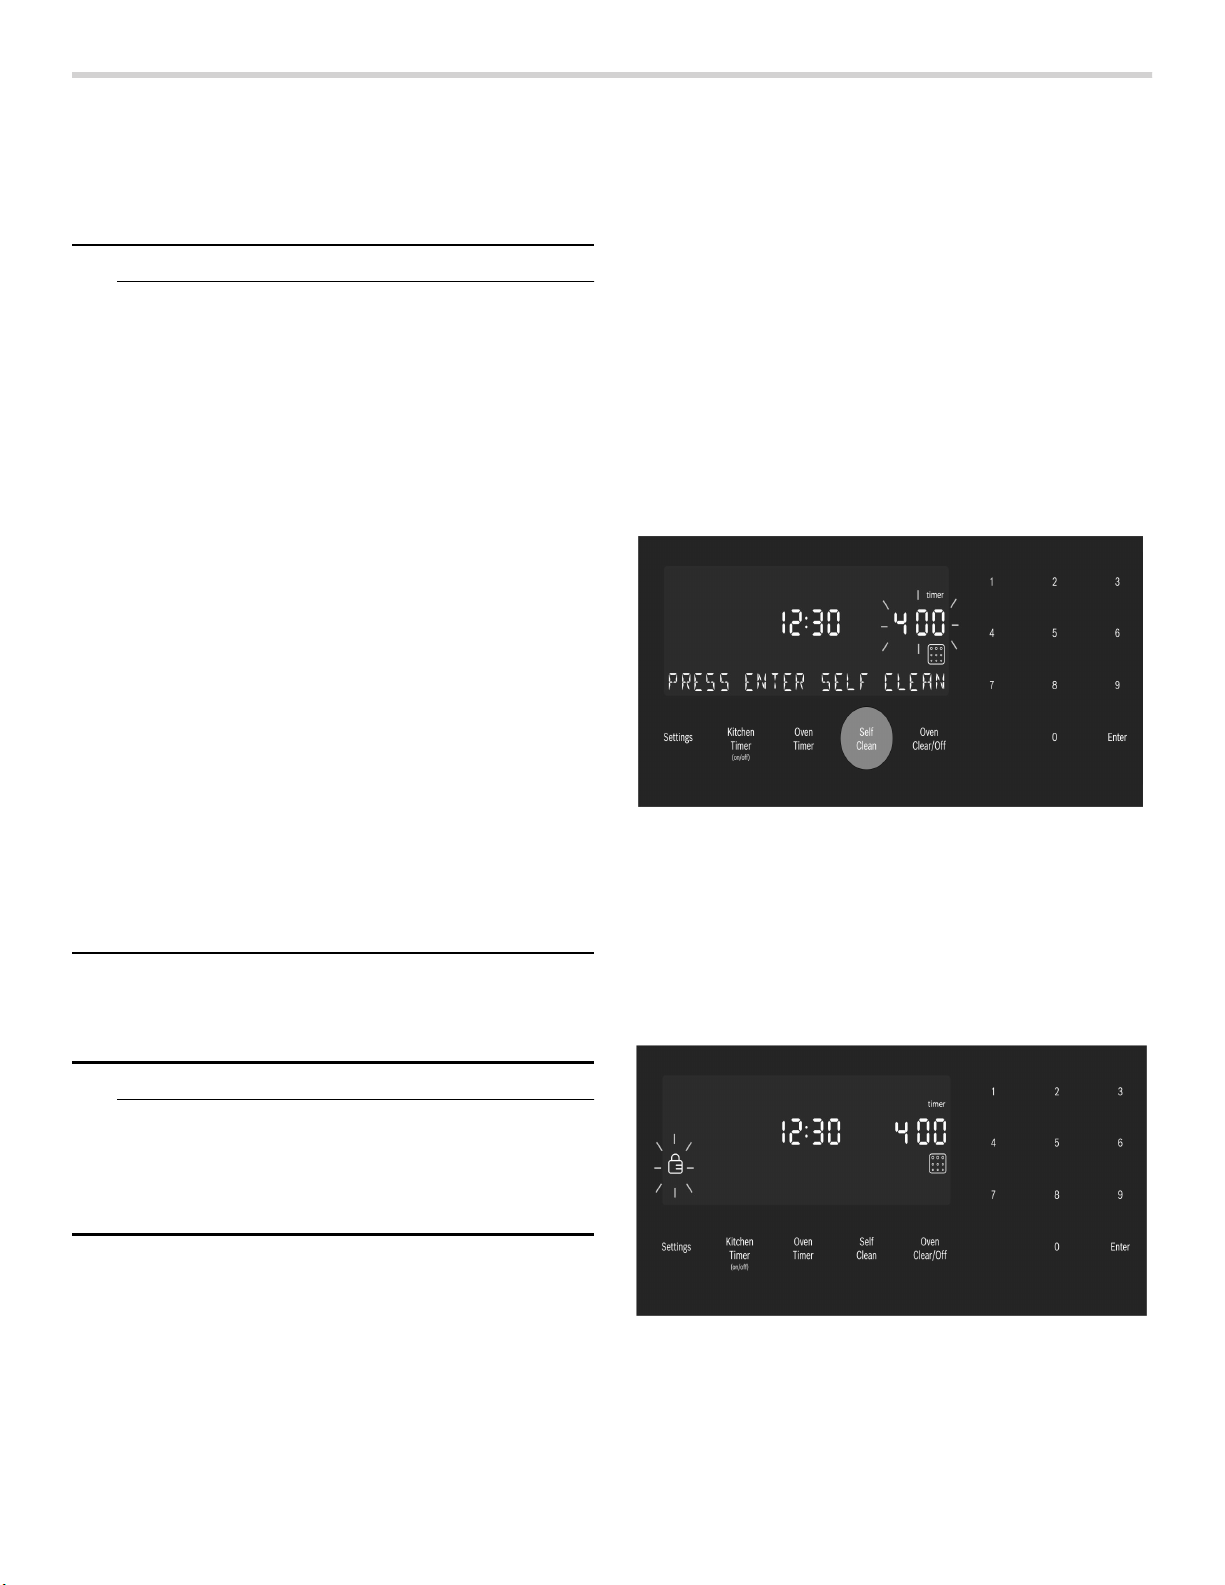
101
Nettoyage et entretien – Four
Nettoyage du four
Nettoyage Auto
9 AVERTISSEMENT
LORS DE L'UTILISATION DU RÉGLAGE
NETTOYAGE AUTO
▯ De faibles quantités de monoxyde de carbone
peuvent se dégager lors de l'élimination des
salissures pendant le cycle d'autonettoyage et
l'isolant en fibre de verre peut émettre de faibles
quantités de formaldéhyde pendant les quelques
premiers cycles autonettoyants. Pour minimiser
l'exposition à ces substances, assurer une bonne
ventilation en laissant une fenêtre ouverte, ou
utiliser un ventilateur ou une hotte d'aération.
▯ Les enfants ne doivent pas être laissés seuls ou
sans surveillance à un endroit où des appareils
électroménagers sont utilisés. Durant le cycle de
nettoyage automatique, certaines parties de
l'appareil peuvent poser un danger aux
personnes qui n'ont pas les compétences des
adultes concernant l'usage des appareils
électroménagers et ne peuvent pas réagir
comme le ferait un adulte devant des conditions
potentiellement dangereuses.
▯ Ne pas bloquer les évents du fours pendant le
cycle d'autonettoyage. Toujours faire fonctionner
l'appareil en suivant les instructions de ce
manuel.
▯ Lors de l'autonettoyage, vérifier que la porte est
verrouillée et ne s'ouvre pas. Si la porte de ne se
verrouille pas,ne pas lancer le Nettoyage Auto.
Contacter le service après-vente.
Lors de l'autonettoyage, le four est chauffé à une
température très élevée. Les salissures sont brûlées
sous l'action de cette température.
9 ATTENTION
ÉVITER LES RISQUES D'ENDOMMAGEMENT
▯ Essuyer les déversements importants avant de
procéder à l'autonettoyage du four.
▯ Ne pas nettoyer les pièces ou accessoires dans
le four autonettoyant.
Nettoyage Auto
1.
Retirer tous les accessoires et toutes les grilles du
four.
2.
Si un mode de cuisson est activé pour le four
sélectionné, appuyer sur Oven Clear/Off (Four
Effacer/Désactiver) pour mettre fin au mode en
fonctionnement.
3.
Appuyer sur la touche Self Clean (Nettoyage Auto)
sous l'écran d'affichage.
L'icône du Nettoyage Auto
q s'affiche à l'écran. La
minuterie de la fonction Nettoyage Auto affiche
4 heures (4:00) par défaut et clignote pour indiquer
que cette valeur peut être acceptée ou modifiée.
Pour confirmer la durée d'autonettoyage par défaut de
4 heures (4:00), appuyer sur Entrée sur le clavier
numérique.
Pour saisir un nombre d'heures différent, utiliser le
clavier numérique.La valeur saisie doit se situer entre
2:00 et 4:00 heures.Si une une valeur saisie est
inférieure à 2:00 ou supérieure à 4:00, une tonalité
d'erreur retentit et un message s'affiche.
Utiliser un réglage plus long pour un four très sale.
4.
Lorsque la durée d'autonettoyage voulue est affichée,
appuyer sur Entrée sur le clavier numérique.
La porte du four se verrouille avant le début du cycle
d'autonettoyage.
Le symbole de verrou de porte L est affiché et
clignote pendant le verrouillage de la porte. Une fois la
porte verrouillée, le symbole de verrou de porte reste
allumé, mais il ne clignote plus.
Le symbole de verrou de porte reste allumé tant que le
mode Nettoyage Auto n'est pas terminé.
Remarque : La porte reste fermée jusqu'à ce que le
four ait refroidi, une fois l'autonettoyage terminé. La
porte peut être ouverte de nouveau uniquement
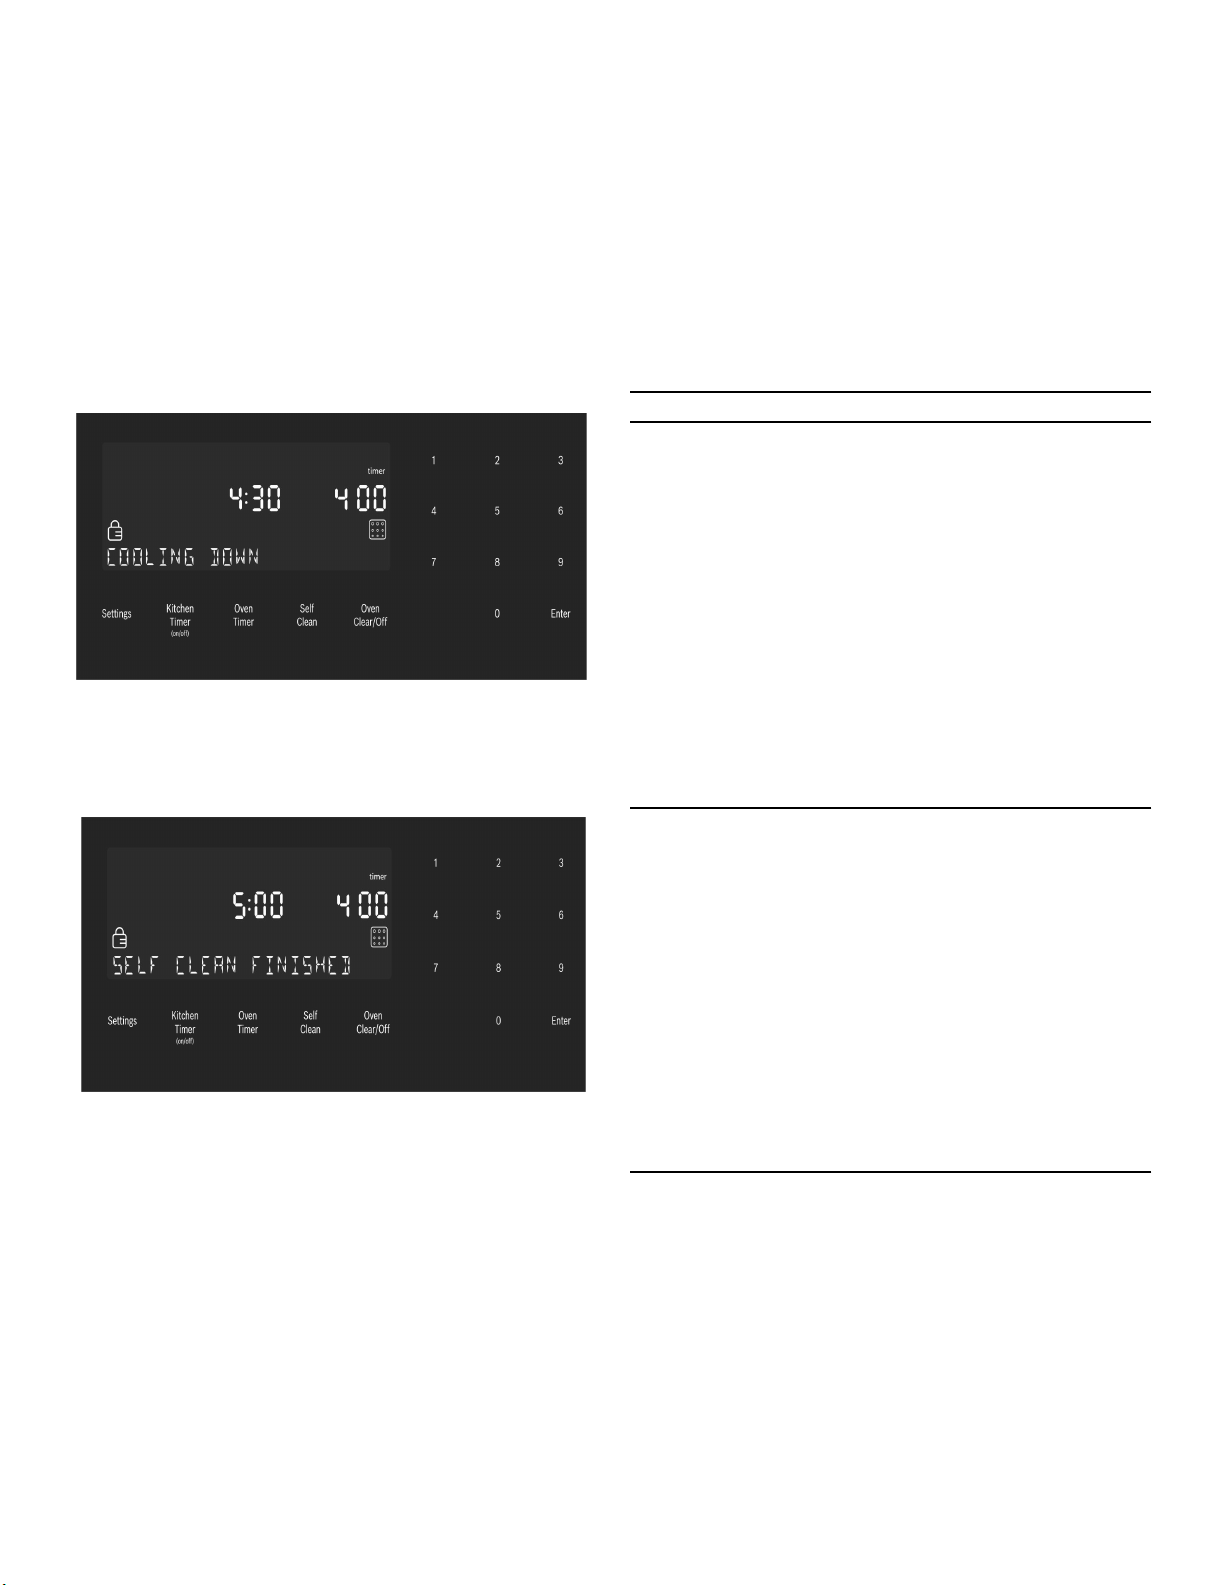
102
lorsque le message Self Clean (Nettoyage Auto)
s'efface de l'écran.
5.
Le processus d'autonettoyage démarre et la minuterie
d'autonettoyage du four débute son compte à rebours.
Annuler le mode Nettoyage Auto
Appuyer sur la touche Oven Clear/Off (Four Effacer/
Désactiver) pour annuler le mode Nettoyage Auto.
Lorsque la minuterie de la fonction Nettoyage Auto
s'arrête, par sécurité, l'unité doit refroidir avant que la
porte puisse être déverrouillée. Pendant ce délai, le
message « COOLING DOWN » (Refroidissement en
cours) s'affiche.
6.
Lorsque la période de refroidissement est terminée, le
message « SELF CLEAN FINISHED » (Nettoyage Auto
terminé) s'affiche.Continuer à faire attention en ouvrant
la porte du four.
7.
Appuyer sur Oven Clear/Off (Four Effacer/Désactiver)
pour effacer les données affichées à l'écran une fois
l'autonettoyage terminé.
8.
Une fois le four refroidi et la porte déverrouillée,
essuyer les cendres à l'intérieur du four à l'aide d'un
chiffon humide.
Remarques
▯ L'éclairage du four ne peut pas être allumé pendant le
cycle d'autonettoyage.
▯ L'émail résistant à la chaleur spécial et les éléments
polis du four peuvent présenter une décoloration au fil
du temps. Cela est normal et ne nuit en rien au
fonctionnement du four. Ne pas utiliser des tampons à
récurer ou des produits de nettoyage abrasifs pour
tenter d'éliminer les décolorations.
Éviter ces produits de nettoyage
Ne pas utiliser les produits de nettoyage commerciaux
tels que Easy Off®. Ils risquent d'abîmer le fini ou les
pièces du four.
Le chlore ou des composés chlorés contenus dans
certains produits de nettoyage peuvent oxyder l'acier
inoxydable. Vérifier les ingrédients sur l'étiquette.
Ne jamais utiliser des tampons à récurer ou des produits
de nettoyage abrasifs.
Guide de nettoyage du four
Pièce Recommandations
Grille plate Laver avec de l'eau
savonneuse.Rincer à fond et
sécher ou frotter doucement
avec de la poudre à récurer ou
des tampons savonneux en sui-
vant les instructions. NE PAS net-
toyer la grille dans le four
autonettoyant.
Si les grilles plates sont net-
toyées dans le four en mode
autonettoyant, elles perdront de
leur finition brillante et peuvent
ne plus glisser uniformément. Si
cela se produit, frotter les bords
de la grille d'une petite quantité
d'huile végétale. Puis, enlever
l'excédent.
Grille téléscopique Laver avec de l'eau
savonneuse.Rincer à fond et
sécher ou frotter doucement
avec de la poudre à récurer ou
des tampons savonneux en sui-
vant les instructions. Éviter de
mettre de la poudre à récurer
dans les glissières télesco-
piques. Il peut s'avérer néces-
saire de lubrifier à nouveau les
glissières. Utiliser uniquement
des lubrifiants pour haute tempé-
rature de qualité alimentaire pour
lubrifier les glissières.
NE PAS nettoyer la grille dans le
four autonettoyant.
Joint en fibre de
verre
Ne pas nettoyer le joint en fibre
de verre. Le joint de la porte est
essentiel pour maintenir une
bonne étanchéité. Prendre soin
de ne pas frotter, endommager
ou déplacer le joint.

103
Entretien
Remplacement de l'ampoule du four
9 ATTENTION
AU MOMENT DE REMPLACER UNE AMPOULE DU
FOUR :
▯ S'assurer que l'appareil et l'éclairage sont froids
et veiller à couper l'alimentation électrique de
l'appareil avant de remplacer la ou les ampoules.
Le non-respect de cette précaution pourrait
entraîner un choc électrique ou des brûlures.
▯ Les lentilles doivent être en place lors de
l'utilisation de l'appareil.
▯ Elles permettent d'éviter que les ampoules ne se
cassent.
▯ Les lentilles sont en verre. Manipuler avec
précaution pour éviter les cassures. Les éclats de
verre peuvent blesser quelqu'un.
▯ La douille d'éclairage est sous tension lorsque la
porte est ouverte.
Spécifications des ampoules :
Verre Laver avec de l'eau ou du savon
ou avec un nettoyant pour vitres.
Utiliser Fantastik® ou
Formula 409® avec une éponge
propre ou du papier absorbant et
essuyer. Éviter les agents net-
toyants à base de poudre, les
tampons métalliques et les pro-
duits à nettoyer les fours.
Surfaces peintes Nettoyer avec de l’eau chaude
savonneuse ou appliquer les pro-
duits Fantastik® ou
Formula 409® sur une éponge
propre ou du papier absorbant et
essuyer. Éviter les agents net-
toyants à base de poudre, les
tampons métalliques et les pro-
duits à nettoyer les fours.
Surfaces en porce-
laine
Essuyer immédiatement les
déversements acides tels que jus
de fruits, lait et tomates avec un
chiffon sec.Ne pas utiliser
d'éponge ou de chiffon humide
sur la porcelaine chaude. Dès
que la surface est froide, nettoyer
avec de l'eau chaude
savonneuse ou appliquer du
Bon-Ami® ou du Soft Scrub®
sur une éponge humide. Rincer
et sécher. Pour les taches
tenaces, utiliser des tampons
savonneux.Il est normal, qu'au fil
du temps, de fines lignes appa-
raissent sur la porcelaine à
cause de la chaleur et des salis-
sures.
Surfaces en acier
inoxydable
Ne jamais laisser des taches ali-
mentaires ou du sel sur de l'acier
inoxydable. Toujours essuyer ou
frotter dans le sens du poli. Net-
toyer avec une éponge
savonneuse, puis rincer et
sécher ou essuyer avec du Fan-
tastik® ou du Formula 409®
vaporisé sur du papier absor-
bant. Protéger et polir en utilisant
du Stainless Steel Magic® et un
chiffon doux. Éliminer les traces
d'eau avec un chiffon humide
imprégné de vinaigre blanc. Utili-
ser Bar Keeper's Friend® pour
éliminer les traces d'échauffe-
ment. Le chlore ou des compo-
sés chlorés contenus dans
certains produits de nettoyage
peuvent oxyder l'acier inoxy-
dable. Vérifier les ingrédients sur
l'étiquette.
Plastique et com-
mandes
Lorsque refroidis, nettoyer avec
de l'eau savonneuse, rincer et
sécher.
Pièce Recommandations
Sonde Essuyer avec de l'eau
savonneuse.Ne pas plonger
dans l'eau. Ne pas laver au lave-
vaisselle.
Zones de texte
imprimé (mots et
chiffres)
N’utilisez pas de nettoyants abra-
sifs ou de solvants à base de
pétrole.
Description de
l'ampoule
Illustration de l'ampoule
40 watts, ampoule
pour appareil électro-
ménager, base Edi-
son standard.
Pièce Recommandations
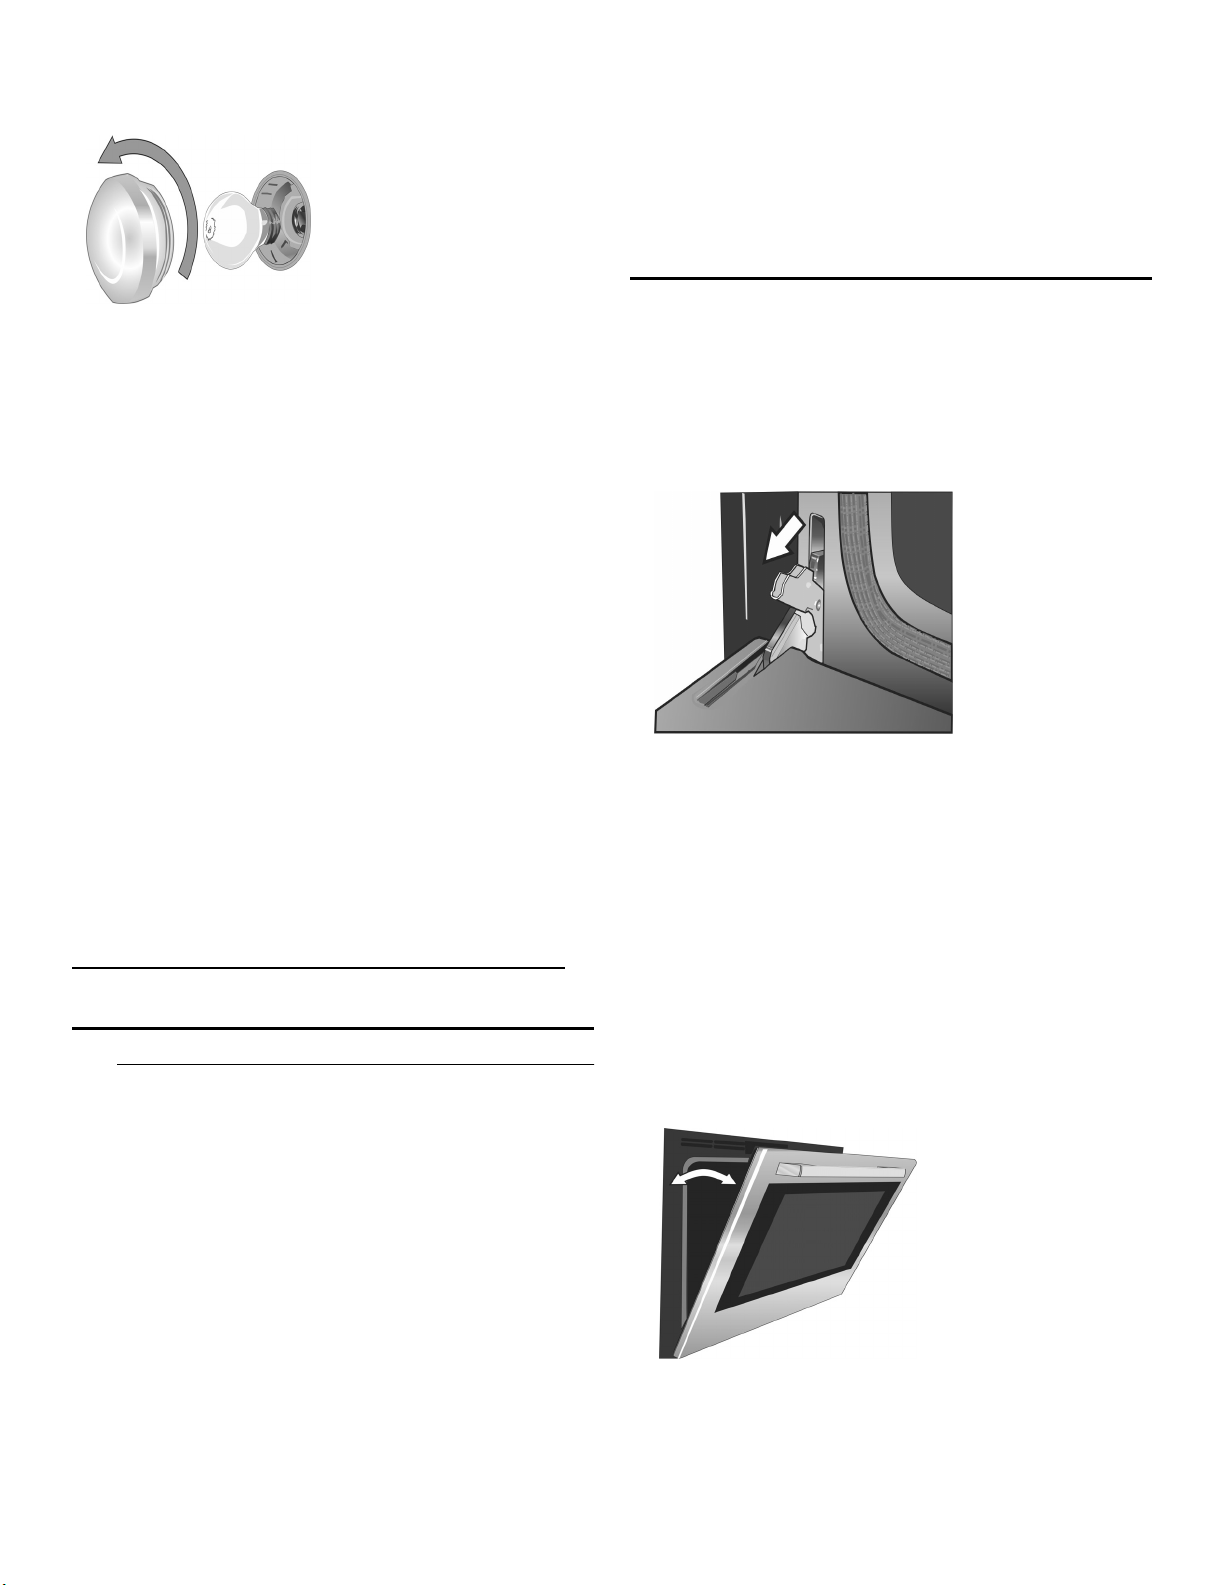
104
Pour remplacer l'ampoule :
Démontage de la porte du four
9 AVERTISSEMENT
▯ Avant de démonter la porte, s'assurer que le four
est froid et que le courant qui l'alimente a été
coupé. Le non-respect de cette précaution
pourrait entraîner un choc électrique ou des
brûlures.
▯ La porte du four est lourde et certaines parties
sont fragiles. L'enlever à deux mains. Le devant
de la porte est en verre. À manipuler avec
précaution pour éviter les cassures.
▯ Saisir uniquement les côtés de la porte. Ne pas
saisir la poignée, car elle peut pivoter dans la
main et causer des dommages ou des blessures.
▯ Si la porte du four n'est pas saisie fermement et
correctement, il y a un risque de lésion corporelle
ou de dommage à l'appareil.
▯ Pour éviter toute blessure causée par
l'enclenchement soudain du support de
charnière, s'assurer que les deux leviers sont
bien enclenchés avant d'enlever la porte.En outre,
ne pas forcer la porte pour l'ouvrir ou la fermer
car la charnière risque de s'abîmer et de causer
des blessures.
▯ Ne pas déposer la porte sur des objets acérés ou
pointus car ils risquent de briser la vitre. Poser la
porte sur une surface plane et lisse afin qu'elle ne
risque pas de tomber.
Pour prévenir les blessures ou les dommages, veiller à
lire l'AVERTISSEMENT ci-dessus avant de tenter de
démonter la porte du four.
1.
Ouvrir complètement la porte du four.
2.
Basculer les leviers de fermeture des charnières vers
soi.
Remarque : Il est parfois nécessaire d'utiliser un outil,
tel un tournevis, pour forcer délicatement la partie
supérieure du levier pour dégager celui-ci du bâti.
Faire attention à ne pas rayer le bâti.
3.
Mettre les deux leviers de charnière en position
abaissée comme le montre l'illustration.Les charnières
gauche et droite de la porte diffèrent légèrement mais
fonctionnent de la même manière.
4.
Fermer la porte du four jusqu'à ce qu'elle s'accroche
sur les leviers d'arrêt des charnières, verrouillant ainsi
les charnières au bon angle pour le démontage de la
porte. La porte sera ouverte d'environ 7 po (17,8 cm)
sur la partie supérieure. Cela a pour effet d'éliminer la
tension des ressorts exercée sur les charnières ce qui
permet de soulever aisément la porte.
▯ Couper l'alimentation
du four au tableau de
distribution principal
(boîte à fusibles ou
boîtier de disjonc-
teurs).
▯ Retirer le couvercle de
verre en le dévissant.
Tourner le verre dans
le sens contraire des
aiguilles d'une montre
pour l'enlever.
▯ Retirer l'ampoule.
L'ampoule se dévisse
dans le sens contraire
des aiguilles d'une
montre.
▯ Saisir la nouvelle
ampoule avec un chif-
fon propre et sec pour
éviter le dépôt d'huiles
cutanées sur le verre
qui pourrait entraîner
une défaillance pré-
maturée de l'ampoule.
Replacer l'ampoule en
la vissant dans le sens
des aiguilles d'une
montre.
▯ Revisser le couvercle
de verre.
▯ Allumer l'alimentation
du four au tableau de
distribution principal
(boîte à fusibles ou
boîtier de disjonc-
teurs).

105
5.
La porte est lourde.Saisir la porte fermement à deux
mains en la prenant par les côtés. Ne pas saisir la
porte par la poignée. Tout en maintenant l'angle de la
porte, soulever la porte à la verticale d'environ ¾ po
(2 cm) pour dégager les charnières de leur logement,
puis la tirer vers soi jusqu'à ce que les charnières
soient dégagées du bâti du four.
6.
Placer la porte dans un endroit pratique et stable pour
le nettoyage.
Remontage de la porte du four
1.
En tenant fermement la porte des deux mains, la saisir
de chaque côté et non pas par la poignée.
2.
Incliner légèrement la porte vers soi, jusqu'à ce que.
sa partie supérieure s'ouvre d'environ 7 po (18 cm).
3.
Glisser les charnières dans leurs logements jusqu'en
butée, puis baisser la porte. L'angle de la porte peut
nécessiter un léger ajustement pour permettre
d'engager les charnières convenablement et
d'abaisser la porte en place.La porte devrait s'abaisser
d'environ 2 cm (¾ po) et s'arrêter. Si ce n'est pas le
cas, les charnières ne sont pas convenablement
engagées et la porte pourrait tomber si elle est
relâchée.
4.
Une fois les deux charnières complètement engagées,
tel que décrit à l'tape 3, doucement ouvrir la porte
jusqu'à ce qu'elle soit complètement ouverte.
5.
Poussez les loquets à levier sur les deux charnières
vers le haut et l'avant, jusqu'à ce qu'ils s'enclenchent
dans logements, affleurant à l'avant du four.
6.
Fermer et ouvrir la porte lentement pour s'assurer
qu'elle est correctement et solidement installée.
"
#

106
Fonctionnement - Tiroir chauffant
Cette section explique comment utiliser le tiroir chauffant.
Consulter « Tirer le meilleur parti de votre tiroir
chauffant », pour améliorer le rendement du tiroir
chauffant.
À propos du tiroir chauffant
Le tiroir chauffant conserve les aliments cuits au chaud à
la température de service. Les réglages du tiroir
chauffant sont faible, moyen, élevé.
Spécifications du tiroir chauffant :
Intérieur du tiroir : L25 po x P17 po x H3 po
(L63,5 cm x P43 cm x H7,6 cm)
Taille des plats :
▯ 2 plats en Pyrex de 3 litres 9 po x 13 po
(23 cm x 33 cm), côte à côte
▯ 2 plats en Pyrex de 4 litres 9,5 po x 15 po
(24 cm x 38 cm), côte à côte
▯ 4 assiettes de 10,5 po (27 cm) individuelles ou
empilées
▯ 3 assiettes de 11 po (28 cm) individuelles ou
empilées
Fonctionnement
9 ATTENTION
Pour préserver la sécurité des aliments, suivre ces
recommandations :
▯ NE PAS utiliser le tiroir chauffant pour y chauffer
des aliments froids (exception : il est sécuritaire
d'utiliser le tiroir pour y faire croustiller des
craquelins, des chips ou des céréales sèches et
garder des assiettes au chaud).
▯ Veiller à garder la nourriture à la bonne
température. L'USDA recommande de maintenir
les aliments chauds à 140 °F (60 °C) ou plus.
▯ NE PAS maintenir des aliments au chaud
pendant plus d'une heure.
▯ Les contenants de plastique, les pellicules de
plastique ou le papier d'aluminium peuvent
fondre en cas de contact direct avec le tiroir ou
un ustensile de cuisson chaud. Si le plastique
fond sur le tiroir, il peut ne pas être possible de
l'enlever.
Préchauffage
Pour de meilleurs résultats, préchauffer le tiroir chauffant
en maintenant de la nourriture au chaud.
Durée de préchauffage
▯ Faible : 10 minutes
▯ Moyen 15 minutes
▯ Élevé : 20 minutes
Allumer ou éteindre le tiroir chauffant
1.
Appuyer sur la touche Warming Drawer (Tiroir
chauffant).
2.
WARMING DRAWER (Tiroir chauffant) s'affiche avec le
réglage par défaut à « MED » (Moyen). L'icône ambrée
du tiroir chauffant s'affiche sous l'horloge.
3.
Pour confirmer le réglage moyen, appuyer sur Enter
(Entrée). Le réglage est confirmé et l'icône du tiroir
chauffant reste allumée. Si la touche Enter (Entrée)
n'est pas appuyée, le réglage du tiroir chauffant n'est
pas accepté et le tiroir chauffant s'éteint.
4.
Pour modifier le réglage lorsque « MED » est affiché,
appuyer de nouveau sur la touche du tiroir chauffant.
Le réglage passe à « HIGH » (Élevé). Pour modifier le
réglage à « LOW » (Faible), appuyer de nouveau sur la
touche du tiroir chauffant.
Pour confirmer un réglage, appuyer sur Enter (Entrée).
Le réglage affiché sera confirmé et l'icône du tiroir est
allumé sous l'horloge, indiquant que le tiroir chauffant
est activé.
5.
Pour éteindre le tiroir chauffant, appuyer sur la touche
du tiroir chauffant et le tiroir chauffant s'éteindra.
L'icône du tiroir chauffant ne s,affichera plus sous
l'horloge.
Mode Shabbat
Le tiroir chauffant peut aussi fonctionner en mode
Shabbat, mais SEULEMENT si le four est en mode
Shabbat. Il n'est pas possible de faire fonctionner le tiroir
chauffant seul en mode Shabbat. Simplement démarrer
la fonction désirée du tiroir chauffant et activer le mode
Shabbat dans la cavité du four.Le tiroir chauffant et le
four fonctionneront en mode Shabbat jusqu'à ce que la
minuterie atteigne zéro. Il n'est pas possible de changer
la température du tiroir chauffant en mode Shabbat.
Maintenir au chaud des bols et des assiettes vides
▯ N'utiliser que de la vaisselle résistante à la chaleur.
▯ Chauffer les plats de cuisson à réglage faible.
▯ Vérifier la température du plat pendant la période de
maintien au chaud.
▯ Disposer les assiettes et les plats froids dans un tiroir
chauffant froid. Ne pas préchauffer le tiroir avant d'y
disposer les plats.

107
Tirer le meilleur parti de votre tiroir chauffant
À propos de l'appareil
Le tiroir chauffant conserve les aliments cuits au chaud à
la température de service. Toujours commencer par des
aliments chauds. NE PAS utiliser pour chauffer des
aliments froids. Il est sécuritaire d'utiliser le tiroir pour y
faire croustiller des craquelins, des chips ou des
céréales sèches et garder des assiettes au chaud.
Le tiroir est doté d'un poussoir. Pousser sur le devant du
tiroir pour déclencher son ouverture.
Conseils généraux
Se reporter au tableau du tiroir chauffant pour obtenir les
réglages recommandés.
▯ Pour maintenir plusieurs aliments au chaud, régler la
température sur celle de l'aliment qui nécessite le
réglage le plus élevé.
▯ Placer les plats qui ont besoin d'un réglage plus élevé
sur les côtés du tiroir et ceux qui ont moins besoin de
moins de chaleur, au centre du tiroir.
▯ Les mets devraient être à la température de service
(supérieure à 140 °F [60 °C]) avant d'être placés
dans le tiroir chauffant. NE PAS utiliser le tiroir
chauffant pour y chauffer des aliments froids, si ce
n'est pour y faire croustiller des craquelins, des chips
ou des céréales sèches et garder des assiettes ou
des plats au chaud.
▯ Préchauffer un plat de service vide en préchauffant le
tiroir, si désiré.
▯ Placer le mets cuit, chaud, dans son plat de cuisson le
tiroir chauffant ou dans un plat résistant à la chaleur.
▯ Il est possible de couvrir le plat de papier d'aluminium.
NE PAS doubler le tiroir chauffant de papier
d'aluminium.
▯ Ne pas utiliser le tiroir chauffant comme tiroir de
rangement.
Utilisation de l'appareil
9 ATTENTION
Pour préserver la sécurité alimentaire, ne pas
laisser les mets dans le tiroir plus d'une heure avant
ou après leur cuisson.
IMPORTANT :
Les contenants de plastique ou les pellicules de
plastique peuvent fondre en cas de contact direct avec le
tiroir ou un ustensile chaud. Si le plastique fond sur le
tiroir, il peut ne pas être possible de l'enlever.
Remarque : N'utiliser que de la vaisselle résistante à la
chaleur.
Préchauffage
Pour de meilleurs résultats, préchauffer le tiroir chauffant
en maintenant de la nourriture au chaud.
Durée de préchauffage
▯ Faible : 10 minutes
▯ Moyen 15 minutes
▯ Élevé : 20 minutes
Maintenir au chaud des bols et des
assiettes vides
▯ N'utiliser que de la vaisselle résistante à la chaleur.
▯ Chauffer les plats de cuisson à réglage faible.
▯ Vérifier la température du plat pendant la période de
maintien au chaud.
▯ Disposer les assiettes et les plats froids dans un tiroir
chauffant froid. Ne pas préchauffer le tiroir avant d'y
disposer les plats.
Faire croustiller des aliments rassis
Placer l'aliment dans un plat peu profond.
1.
Appuyer sur LOW (Faible).
2.
Préchauffer pendant 10 minutes, puis placer le plat
dans le tiroir.
3.
Régler la minuterie du tiroir.
4.
Vérifier le croustillant après 45 minutes. Ajouter du
temps, si nécessaire.
Températures recommandées
Aliment/Ustensile de cuisson Réglage Plat couvert
Bacon ÉLEVÉ Non
Bœuf, à point et bien cuit MOYEN Non
Bœuf, rosé FAIBLE Non
Pain, petits pains croustillants MOYEN Non
Pain, petits pains moelleux,
petits gâteaux
MOYEN Oui
Biscuits MOYEN Oui
Plats en casserole MOYEN Oui
Œufs MOYEN Oui
Poissons, fruits de mer MOYEN Oui
Aliments frits ÉLEVÉ Non
Sauce, sauces à la crème MOYEN Oui
Jambon MOYEN Oui

108
Nettoyage et entretien – Tiroir chauffant
9 ATTENTION
Pour éviter les brûlures, ne pas retirer le tiroir quand
il est chaud. Vérifier que le tiroir est vide avant de le
retirer.
Remarque : Le tiroir chauffant s'ouvre avec un
mécanisme de poussoir (Push-To-Open).Dans ce
chapitre, il est désigné sous l'acronyme PTO.
Nettoyer le tiroir chauffant
Crêpes ÉLEVÉ Oui
Tartes, croûte simple MOYEN Oui
Tartes, double croûte MOYEN Non
Pizza ÉLEVÉ Non
Porc MOYEN Oui
Pommes de terre, au four ÉLEVÉ Oui
Pommes de terre, purée MOYEN Oui
Volaille, rôtie MOYEN Oui
Légumes MOYEN Oui
Assiettes FAIBLE Non
Plat de nourriture MOYEN Oui
Pièce Recommandations
Tiroir intérieur (acier inoxy-
dable poli)
Utiliser un détergent à vais-
selle.Laver, bien rincer et
sécher. Pour les taches de
calcaire ou de calamine,
utiliser du vinaigre blanc.
Appliquer avec une éponge
ou un chiffon, rincer et
sécher. Le chlore ou des
composés chlorés conte-
nus dans certains produits
de nettoyage peuvent oxy-
der l'acier inoxydable et
causer des blessures. Véri-
fier les ingrédients sur l'éti-
quette.
Surfaces peintes Utiliser de l'eau chaude
savonneuse ou des pro-
duits de nettoyage doux,
tels que Fantastik® ou
Formula 409®. Laver, bien
rincer et sécher. Éviter les
produits de nettoyage abra-
sifs, les tampons métal-
liques et les produits pour
nettoyer les fours.
Cadre extérieur du tiroir
(acier inoxydable brossé)
Essuyez ou frottez toujours
dans la direction du poli.
Nettoyer avec une éponge
savonneuse, puis rincer et
sécher ou essuyer avec du
Fantastik® ou du
Formula 409® vaporisé sur
du papier absorbant.Proté-
ger et polir en utilisant du
Stainless Steel Magic® et
un chiffon doux.Retirez les
traces d’eau avec un chif-
fon humecté de vinaigre
blanc. Utiliser Bar Keeper's
Friend® pour éliminer les
traces d'échauffement. Le
chlore ou des composés
chlorés contenus dans cer-
tains produits de nettoyage
peuvent oxyder l'acier
inoxydable. Vérifier les
ingrédients sur l'étiquette.
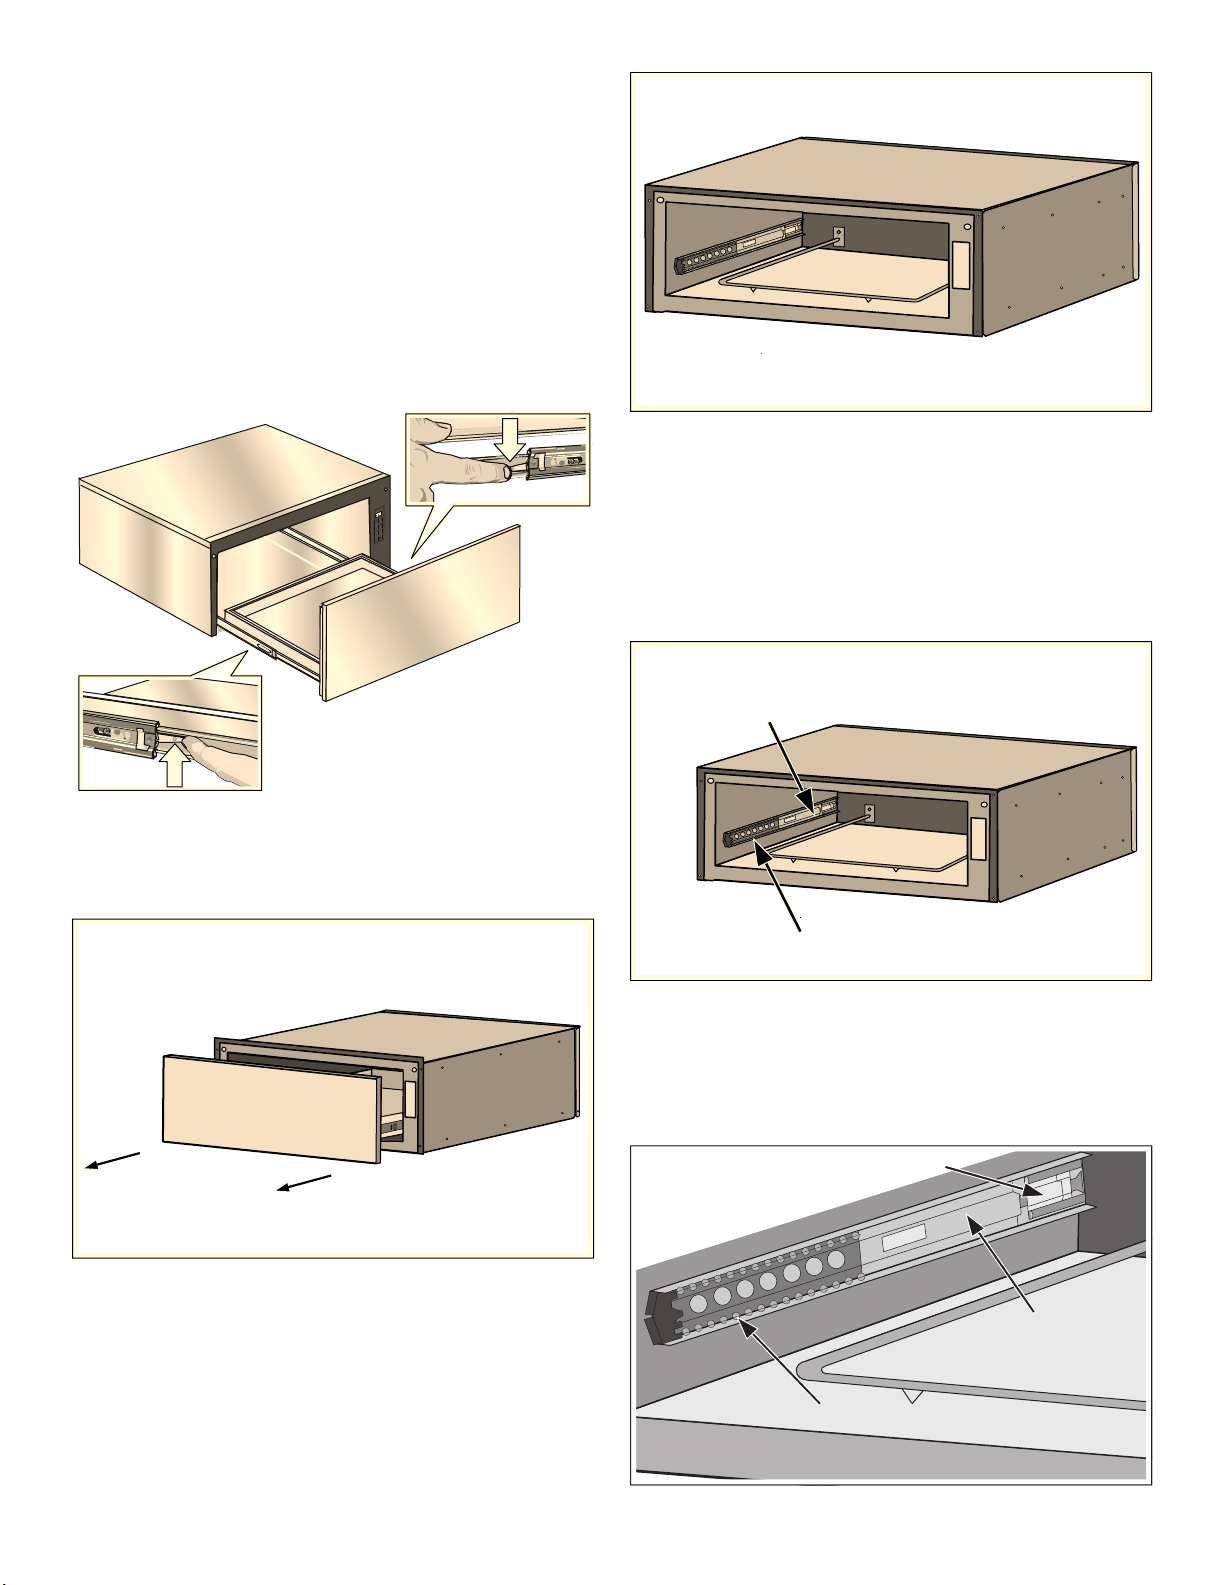
109
Retirer le tiroir de son compartiment
AVIS : Les instructions qui suivent sont celles
recommandées par le fabricant pour retirer et installer le
tiroir de façon à réduire le risque d'endommager le
mécanisme PPO.
1.
Retirez le tiroir de son compartiment.
▯ Tirez sur le tiroir jusqu'à son ouverture complète.
▯ Appuyez sur le levier de dégagement du tiroir à
droite.
▯ Relevez le levier de dégagement du tiroir à gauche.
▯ Tirez fermement le tiroir du compartiment.
▯ Rentrez les glissières de l'armoire une fois le tiroir
retiré.
2.
En prenant les deux côtés du tiroir et en tirant droit et
vers vous, retirez soigneusement le compartiment du
tiroir. Cette étape pourrait nécessiter une force légère
à modérée pour retirer complètement le tiroir.
3.
Installation ou entretien (nettoyage) du compartiment
sans le tiroir.
Installation du tiroir dans le compartiment
Les glissières fixées sur chaque côté du compartiment
possèdent deux pièces mobiles : un rail intérieur et un
porteur à roulement à billes qui doivent être placés de
façon appropriée pour une installation et un alignement
adéquats.
Un mécanisme de verrouillage se trouve également à
l'arrière de chaque glissière.
Remarque : Le compartiment du tiroir-réchaud devrait
se trouver dans une position identique à celle de l'image
ci-dessous avant de commencer l'installation. Le porteur
à roulement à billes devrait être verrouillé en place dans
le bout en plastique noir du rail intérieur situé sur la
partie avant du rail intérieur.
-
0
8'"*#
-
&
)
*
(
)²-&7²
@
.
&
%.0:
1
3
0
0
'"113³5
0
/
0
''."3$)&"33³5
5DLOLQWHUQHGHODJOLVVLqUH
3RUWHXUjURXOHPHQWjELOOHV
3RUWHXUjURXOHPHQWjELOOHV
5DLOLQWHUQHGH
ODJOLVVLqUH
0pFDQLVPHGHYHUURXLOODJH

110
1.
Sans que le tiroir ne soit en place, faites glisser le rail
intérieur de la glissière jusqu'à la position de
verrouillage du tiroir en poussant le rail intérieur de la
glissière vers l'arrièrejusqu'à ce qu'elle se verrouille
en place.
Remarque : Une force modérée exercée sur le
mécanisme de verrouillage du porteur à roulement à
billes noir en plastique est requise pour placer la
glissière dans la position de verrouillage du tiroir. Le
tiroir est verrouillé lorsqu'il demeure en place et ne
revient pas automatiquement en position ouverte.
2.
Placez l'assemblage du tiroir devant l'assemblage du
compartiment et alignez le rail (bout en plastique du
rail) avec l'assemblage du porteur à roulement à billes.
Tout en gardant l'assemblage du tiroir droit et au
niveau par rapport au compartiment, insérez
doucement le tiroir dans l'assemblage du
compartiment.
Remarques
▯ Une légère secousse de gauche à droite du tiroir
pourrait être nécessaire pour assurer un alignement
adéquat des roulements à billes.
▯ N'oubliez pas : Vous tentez seulement d'aligner
deux ensembles de roulements à billes à cette
étape de l'installation. Si une force excessive doit
être utilisée pour insérer le tiroir, retirez le tiroir et
répétez la procédure d'installation.
3.
Continuez d'insérer le tiroir, tout en gardant le tiroir
droit et au niveau par rapport au compartiment,
jusqu'à ce que sentiez une légère augmentation de la
résistance à l'endroit approximatif indiqué ci-dessous.
3BJMJOUFSOF
EFMBHMJTTJÒSF
.ÏDBOJTNFEFWFSSPVJMMBHF
3BJMJOUFSOFEFMBHMJTTJÒSFFOQPTJUJPOWFSSPVJMMÏF
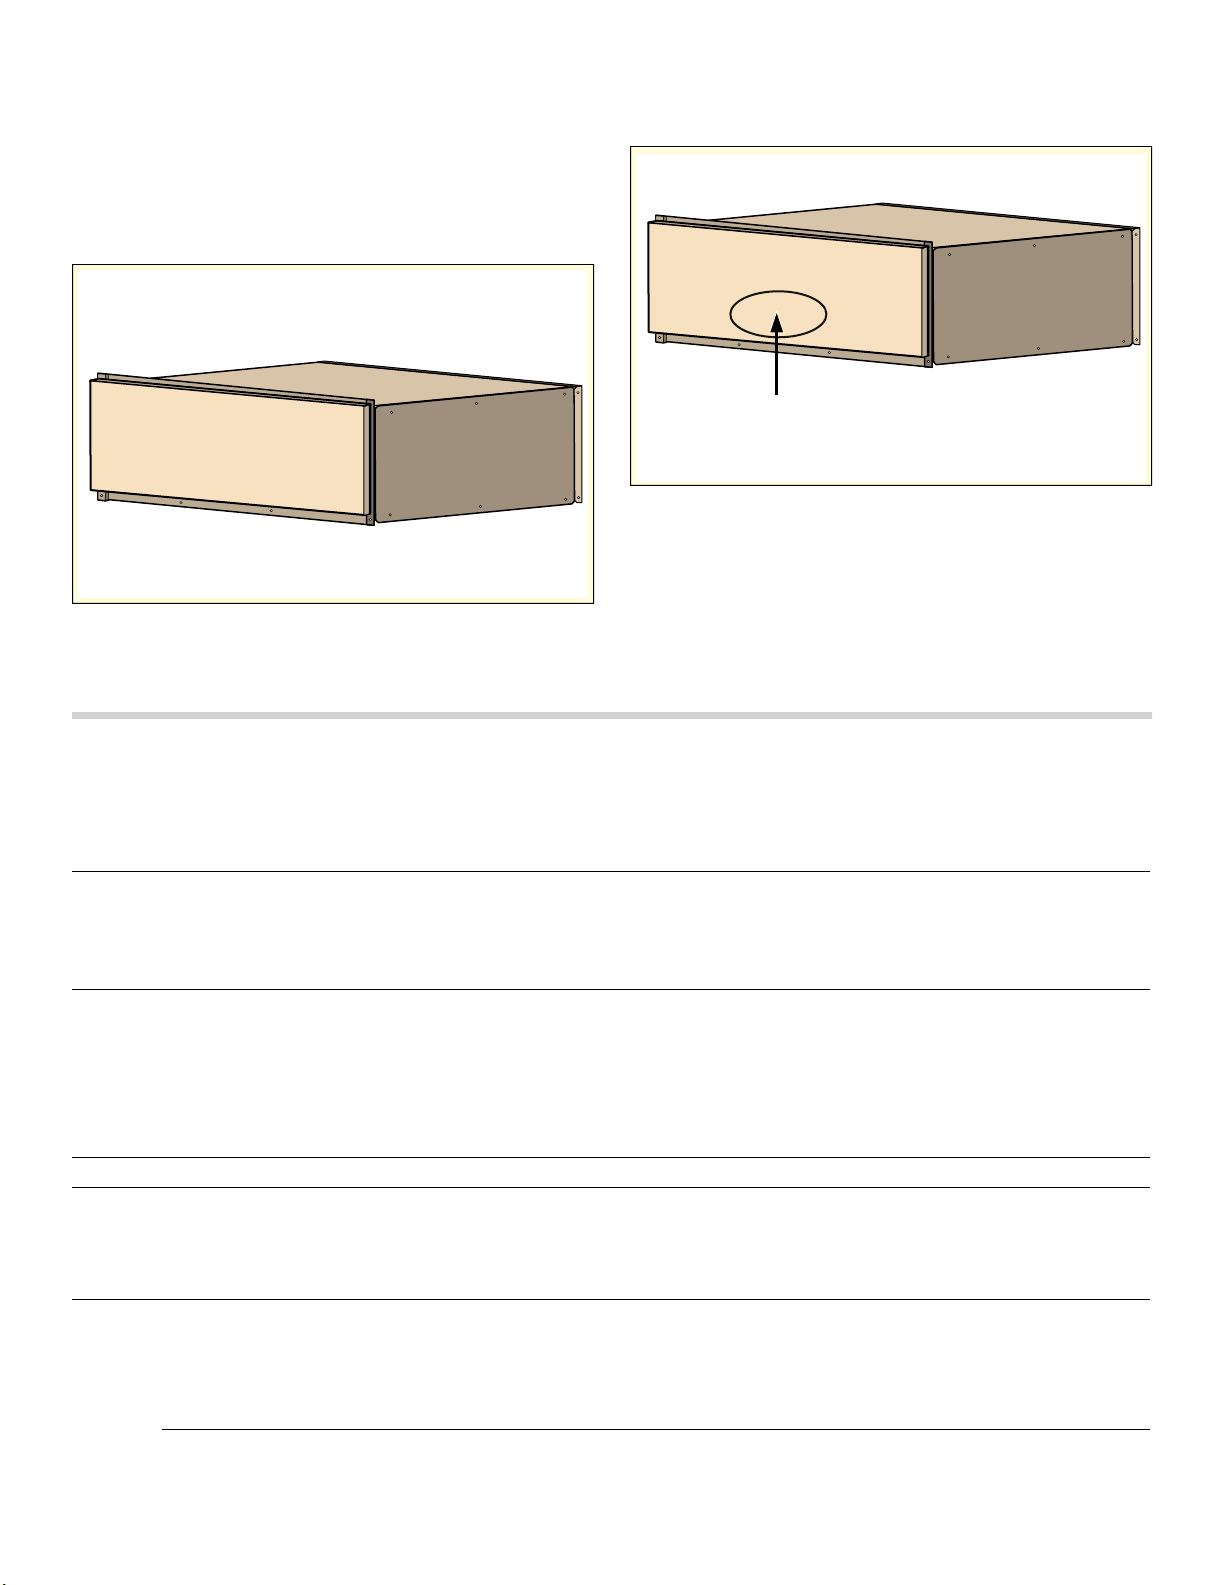
111
AVIS
▯ Dans cette position, une légère augmentation par
petits coups de la force de fermeture à appliquer au
tiroir est nécessaire pour assurer un alignement
optimal et un fonctionnement approprié du tiroir.
▯ Vous devriez entendre un déclic lorsque le tiroir est
fermé de façon appropriée, ce qui signifiera que le
tiroir est également verrouillé en position fermée.
4.
Vérifiez le fonctionnement du tiroir PPO en poussant
sur le centre de la portion inférieure de l'avant du tiroir
(l'endroit optimal pour la fonction).
Remarque : Il est à noter que l'endroit optimal
recommandé pour l'ouverture du tiroir est la portion
inférieure de l'avant du tiroir. Le tiroir fonctionne
lorsqu'une pression est appliquée à n'importe quel
endroit sur l'avant du tiroir, mais une pression accrue
pourrait être nécessaire pour activer le mécanisme
d'ouverture à certains endroits.
Dépannage
Foire aux questions (FAQ)
(PSODFHPHQWLGpDOSRXUODIRQFWLRQ332
Utilisation de l'appareil
Pourquoi ne puis-je pas allumer la table de cuisson et pourquoi le symbole de verrou pour les enfants est-il
allumé?
Le verrou pour enfant est activé.
Vous pouvez trouver davantage de renseignements sur cette fonction dans la section
Pourquoi les écrans clignotent-ils et pourquoi un signal sonore retentit-il?
Retirez tout reste de liquide ou de nourriture sur le panneau de commande. Retirez tout objet se trouvant sur
le panneau de commande.
Vous pouvez trouver des instructions sur la façon de désactiver le signal sonore dans la section
~ "Réglages de base"
Bruits
Pourquoi entend-on des bruits pendant la cuisson?
En fonction de la composition du fond du récipient, des bruits peuvent se produire pendant l'utilisation de
la table de cuisson. Ces bruits sont normaux et font partie de la technologie de chauffage par induction, et
n'indiquent aucun défaut.
Bruits possibles :
Bourdonnement profond comme dans un transformateur :
Bruit généré lors d'une cuisson à puissance élevée. Le bruit disparaît ou s'atténue après réduction de la
puissance de cuisson.
Sifflement grave :

112
Généré quand le récipient est vide. Ce bruit disparaît lorsque de l'eau ou des aliments sont mis dans le
récipient.
crépitement :
Généré avec des récipients composés de différents matériaux superposés ou en cas d'utilisation simulta-
née de récipients de différentes tailles et en matériaux différents. L'intensité du bruit peut varier en fonction
de la quantité et du mode de préparation des aliments.
sifflements aigus :
Peuvent se produire lorsque deux foyers sont utilisés simultanément à la puissance de cuisson maximale.
Les sifflements disparaissent ou s'atténuent dès que la puissance de cuisson est réduite.
Bruit du ventilateur :
La table de cuisson est dotée d'un ventilateur qui se met en marche en cas de températures élevées. Le
ventilateur peut également continuer de tourner par inertie, une fois la table de cuisson éteinte, si la tempé-
rature détectée est encore trop élevée.
Bruits
Ustensile de cuisine
Quels types d'ustensiles de cuisine peuvent être utilisés avec une table de cuisson à induction?
Vous pouvez trouver davantage de renseignements sur types d'ustensiles de cuisine pouvant être utilisés
avec une table de cuisson à induction dans la section
Pourquoi l'élément ne chauffe-t-il pas et pourquoi le réglage de chaleur clignote-t-il?
L'élément où se trouve l'ustensile de cuisine n'est pas activé.
Vérifiez que vous avez activé l'élément approprié.
L'ustensile de cuisine est trop petit pour l'élément activé ou ne convient pas à la cuisson par induction.
Vérifiez que l'ustensile de cuisine convient à la cuisson par induction et qu'il est placé sur l'élément qui cor-
respond le mieux à sa taille. Vous pouvez trouver davantage de renseignements sur le type, le format et le
positionnement des ustensiles de cuisine dans les sections , ~ "Zone de cuisson FlexInduction
MD
" et
~ "Fonction PowerMove (Déplacement de puissance)"
Pourquoi l'ustensile de cuisine prend-il autant de temps à se réchauffer ou pourquoi n'est-il pas suffisamment
chaud malgré un réglage de chaleur élevé?
L'ustensile de cuisine est trop petit pour l'élément activé ou ne convient pas à la cuisson par induction.
Vérifiez que l'ustensile de cuisine convient à la cuisson par induction et qu'il est placé sur l'élément qui cor-
respond le mieux à sa taille. Vous pouvez trouver davantage de renseignements sur le type, le format et le
positionnement des ustensiles de cuisine dans les sections , ~ "Zone de cuisson FlexInduction
MD
" et
~ "Fonction PowerMove (Déplacement de puissance)"
Nettoyage
Comment puis-je nettoyer la table de cuisson?
Utilisez un agent de nettoyage spécial conçu pour la vitrocéramique afin d'obtenir des résultats optimaux.
Nous vous déconseillons d'utiliser des agents de nettoyage abrasifs ou agressifs, du détergent pour lave-
vaisselle (concentré) ou des tampons à récurer.
Vous pouvez trouver davantage de renseignements sur le nettoyage et l'entretien de votre table de cuisson
dans la section

113
Corrections des défaillances
Les défaillances sont généralement attribuables à de
petits détails. Avant d'appeler le service d'assistance
technique, vous devriez envisager les conseils et
avertissements suivants.
9 ATTENTION
Les réparations devraient être effectuées
uniquement par un réparateur autorizé.
Des réparations inappropriées sur votre appareil
peuvent mener à des risques de blessures graves
ou de décès.
Remarques
▯ Lorsque le symbole “ apparaît dans l'affichage, vous
devez maintenir enfoncé le capteur du foyer
correspondant afin de pouvoir lire le code d'erreur.
▯ Si le code d'erreur n'apparaît pas dans le tableau,
débranchez la table de cuisson du réseau, patientez
30 secondes, puis raccordez-la de nouveau. Si
l'afficheur apparaît encore, contactez le service après-
vente technique et transmettez le code d'erreur exact.
Affichage Cause possible Solution
Rien La source d'alimentation électrique a
été coupée.
Utilisez d'autres appareils électriques pour voir si
un court-circuit s'est produit dans l'alimentation.
L'appareil n'a pas été connecté cor-
rectement selon le schéma de raccor-
dement.
Vérifiez que l'appareil a été raccordé correctement
selon le schéma de raccordement.
Défaillance du système électronique. Si les mesures ci-dessus ne peuvent corriger la
défaillance, contactez le service d'assistance tech-
nique.
L'écran clignote. Le panneau de commande est
humide ou un objet le couvre.
Séchez la zone du panneau de commande ou
enlevez l'objet qui le couvre.
L'indicateur Ù clignote
dans les écrans des élé-
ments
Une défaillance est survenue dans le
système électronique.
Pour confirmer la défaillance, couvrez le panneau
de commande avec la main.
”ƒ
Le système électronique a surchauffé
et l'élément correspondant a été
éteint.
Attendez que le système électronique se soit com-
plètement refroidi. Ensuite, touchez n'importe quel
symbole sur la table de cuisson.
”…
Le système électronique a surchauffé
et tous les éléments ont été éteints.
”† + réglage de chaleur
et signal sonore
Il y a un plat de cuisson chaud dans
la zone du panneau de commande. Il
y a un risque que le système électro-
nique surchauffe.
Retirez le plat de cuisson. L'affichage de défail-
lance disparaît rapidement par la suite. Vous pou-
vez continuer de cuisiner.
Ӡ et signal sonore
Il y a un plat de cuisson chaud dans
la zone du panneau de commande.
Pour protéger le système électro-
nique, l'élément a été éteint.
Retirez le plat de cuisson. Attendez quelques
secondes. Touchez n'importe quelle commande. Si
l'affichage de défaillance disparaît, vous pouvez
continuer de cuisiner.
”‚/”‡
L'élément a surchauffé et s'est éteint
automatiquement pour protéger la
surface de travail.
Attendez que le système électronique se soit com-
plètement refroidi et activez de nouveau l'élément.
”‰
L’élément chauffant a été en fonction-
nement continu pendant trop long-
temps.
La fonction de désactivation automatique de sécu-
rité a été activée. Consultez la section “Durée limi-
tée automatique”.
“Š‹‹‹
“Š‹‚‹
La tension d'alimentation est incor-
recte et à l'extérieur des limites de
fonctionnement normales.
Contactez votre distributeur d'électricité.
“Š‹‚‚
La table de cuisson n'est pas bran-
chée de façon adéquate.
Débranchez la table de cuisson de la source d'ali-
mentation. Vérifiez que l'appareil a été raccordé
correctement selon le schéma de raccordement.
š“
Le mode démo est activé Débranchez la table de cuisson de la source d'ali-
mentation. Attendez 30 secondes avant de la
rebrancher. Touchez n'importe quelle commande
dans les trois minutes qui suivent. Le mode démo
est désactivé.
Ne posez aucun plat de cuisson chaud sur le panneau de commande.
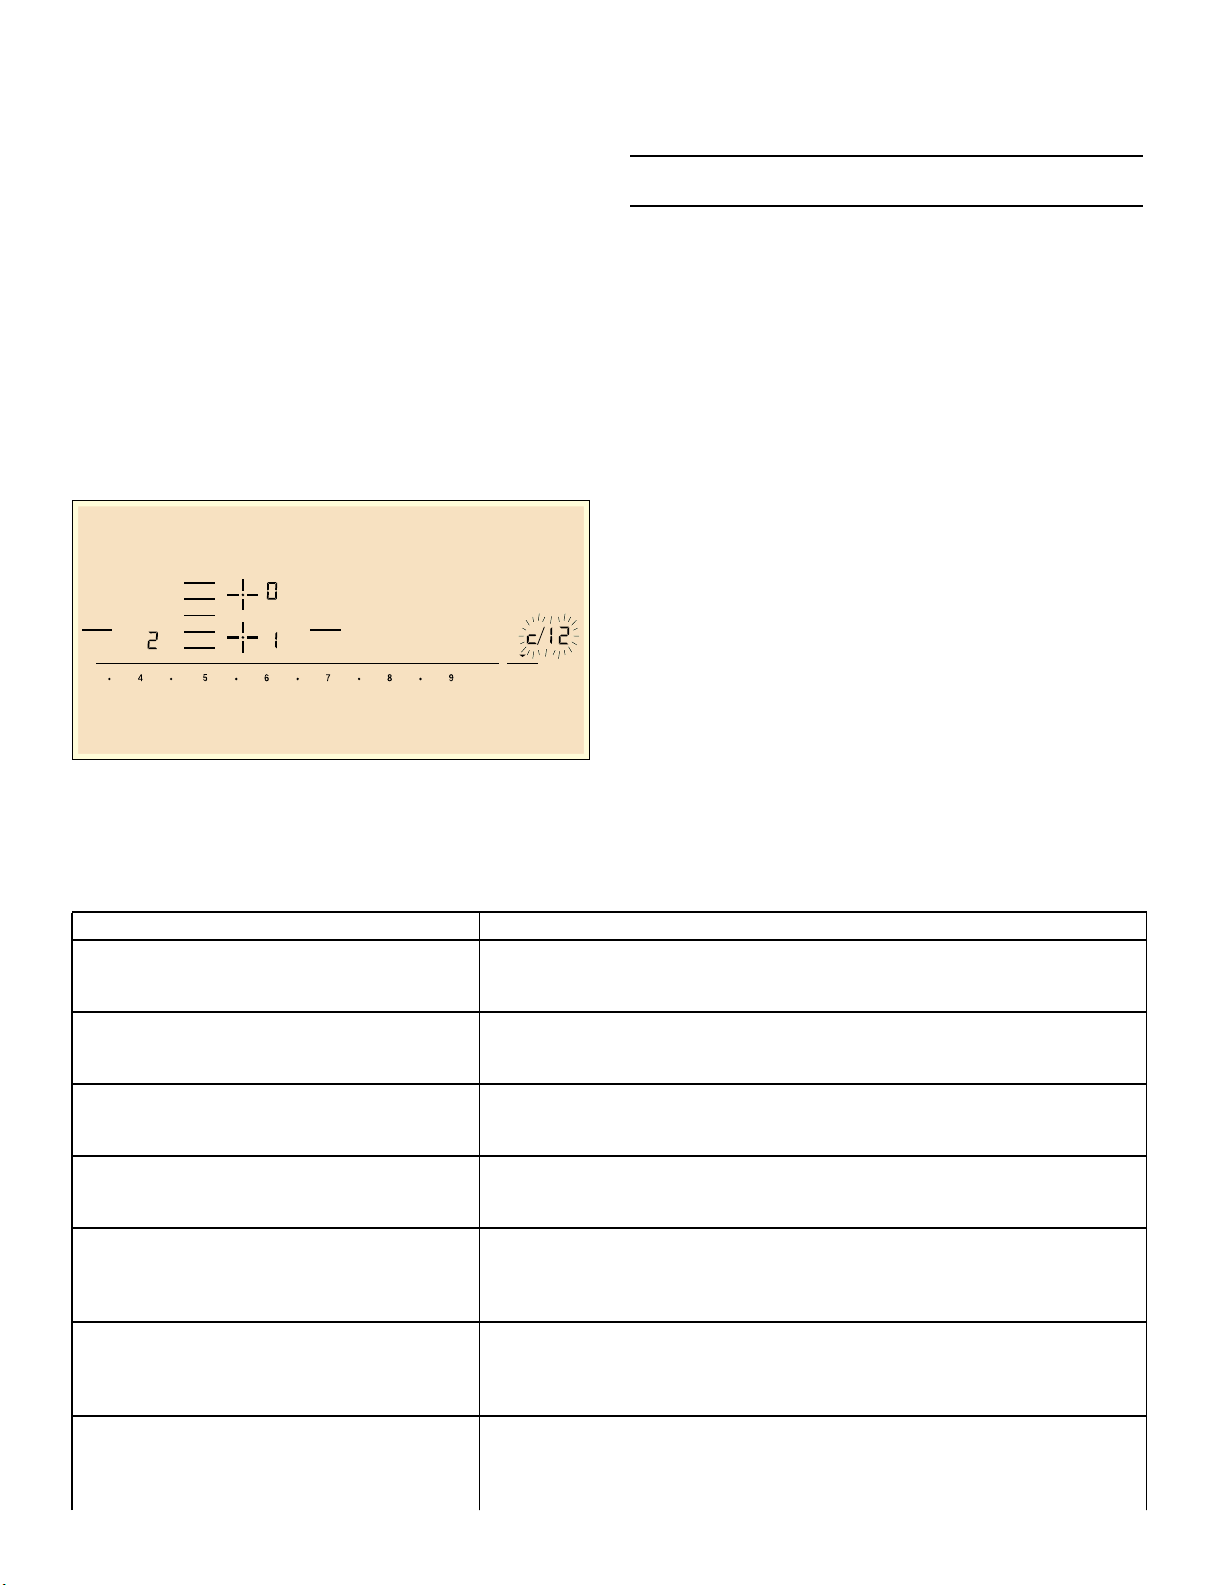
114
Test de la vaisselle
Cette fonction permet de contrôler la rapidité et la qualité
du processus de cuisson en fonction du récipient.
Le résultat est une valeur de référence et dépend des
caractéristiques du récipient et du foyer utilisé.
1.
Remplissez l'ustensile de cuisine encore froid avec
200 ml (8 oz) d'eau et placez-le au centre de la zone
de cuisson au diamètre se rapprochant le plus de
celui de la base de l'ustensile de cuisson.
2.
Accédez aux réglages de base et sélectionnez le
réglage
™‚ƒ.
3.
Touchez la zone des réglages. A clignotera à l'écran
de la zone de cuisson.
La fonction est maintenant activée.
Après 10 secondes, le résultat de la qualité et de la
vitesse du processus de cuisson apparaîtra sur l'écran
de la zone de cuisson.
Contrôlez le résultat à l'aide du tableau suivant :
Pour réactiver cette fonction, effleurez la zone de
réglage.
Remarques
▯ La zone de cuisson flexible compte comme un seul
élément, ne l'utilisez pas avec plus d'un ustensile de
cuisson.
▯ Si le diamètre de la zone de cuisson utilisée est
beaucoup plus petit que le diamètre de l'ustensile de
cuisson, seule la portion centrale de l'ustensile de
cuisson sera chauffée. Cela pourrait avoir un impact
sur les résultats de cuisson, qui pourraient être
imprévisibles ou ne pas être satisfaisants.
▯ Vous pouvez trouver davantage de renseignements
sur cette fonction dans la section ~ "Réglages de
base"
▯ Vous pouvez trouver davantage de renseignements
sur le type, le format et le positionnement des
ustensiles de cuisine dans la section et ~ "Zone de
cuisson FlexInduction
MD
"
Dépannage pour le four
Utiliser ces suggestions avant d'appeler le service après-
vente, de manière à éviter des frais de service.
)OH[
-RLQ6SOLW
.HHS
:DUP
6SHHG
%RRVW
.LWFKHQ
7LPHU
&RRN
7LPHU
Résultat
‹
Le récipient n'est pas compatible pour le foyer, ce
qui explique pourquoi il ne chauffe pas.*
‚
Le récipient chauffe plus lentement que prévu et
le processus de cuisson n'est pas optimal.*
ƒ
Le récipient chauffe correctement et le processus
de cuisson est correct.
* En présence d'un foyer plus petit, testez de nouveau
le récipient sur le foyer plus petit.
Problème de four Causes possibles et solutions suggérées
Le mode de cuisson ou la température du
four ou les chiffres sélectionnés ne
s'affichent pas à l'écran
Revoir les instructions du manuel pour le réglage de l'horloge, de la
minuterie ou du Nettoyage Auto.
La porte du four est verrouillée et refuse de
s'ouvrir, même après le refroidissement
Mettre le four hors circuit au disjoncteur et attendre 5 minutes. Remettre
le disjoncteur en circuit. Le four devrait se réinitialiser et être fonction-
nel.
Le four ne chauffe pas Vérifier le disjoncteur ou le coffret à fusibles de la résidence. S'assurer
que l'alimentation électrique du four est adéquate. S'assurer que la tem-
pérature du four a été sélectionnée.
Le four ne cuit pas uniformément Ajuster le calibrage, si nécessaire (voir « Changer la température du
four » dans ce manuel).Consulter les tableaux de cuisson pour
connaître les positions de grille recommandées.
Les résultats de cuisson ne sont pas satis-
faisants
Consulter les tableaux de cuisson pour connaître les positions de grille
recommandées. Consulter « Tirer le meilleur parti de votre appareil »
pour des conseils et des suggestions. Ajuster le calibrage, si néces-
saire (voir « Changer la température compensée » dans ce manuel).
La durée de cuisson des aliments est plus
longue que prévue
Le four est soigneusement calibré de manière à offrir des résultats pré-
cis. Toutefois, si les aliments sont systématiquement trop ou pas assez
dorés, la température peut être ajustée pour compenser. Voir « Pour
changer la température compensée du four ».
Les aliments sont trop cuits Le four est soigneusement calibré de manière à offrir des résultats pré-
cis. Toutefois, si les aliments sont systématiquement trop ou pas assez
dorés, la température peut être ajustée pour compenser. Voir « Pour
changer la température compensée du four ».
115
Le mode de cuisson ou la température du
four ou les chiffres sélectionnés ne
s'affichent pas à l'écran
Si la fonction Conversion Convection Auto est éteinte, la température
doit être manuellement réduite de 25 °F (3,9 °C). Si la fonction est acti-
vée, la température s'ajuste automatiquement. Voir « Allumer ou
éteindre la Conversion Convection Auto » pour de l'information. Se
reporter aux tableaux de cuisson et aux conseils pour le positionnement
des grilles, les temps de cuisson et la sélection des ustensiles de cuis-
son. Ajuster le calibrage, si nécessaire.Voir « Changer la température
compensée du four ».
La température du four est trop chaude ou
trop froide
Le thermostat du four doit être ajusté. Voir « Température compensée
du four ». Voir « Changer la température compensée du four ».
L'éclairage du four fonctionne mal Remplacer l'ampoule ou la remettre en place si elle a du jeu ou si elle
est défectueuse. Toucher l'ampoule avec les doigts peut la faire griller.
L'éclairage refuse de s'éteindre Vérifier s'il y a obstruction de la porte du four. Vérifier si la charnière est
tordue. Lorsque la fonction Shabbat est activée, l'éclairage du four res-
tera allumé ou éteint (suivant la sélection lors de la configuration) pen-
dant toute la durée du mode Shabbat.
Impossible de retirer la lentille de la lampe Il peut y avoir une accumulation de saleté autour de la lentille. Essuyer
la surface du couvercle de la lentille avec un chiffon propre et sec avant
d'essayer de l'enlever.
Le cycle d'autonettoyage du four fonc-
tionne mal
Laisser refroidir le four avant d'exécuter le cycle d'autonettoyage. Tou-
jours essuyer les saletés et les déversements importants avant d'exécu-
ter le cycle d'autonettoyage. Si le four est très sale, programmer le four
pour une durée d'autonettoyage maximum. Voir « Préparer le four pour
le Nettoyage Auto ».
L'horloge et la minuterie fonctionnent mal S'assurer que l'alimentation électrique alimente le four. Voir les sec-
tions à propos de l'horloge et de la minuterie.
Éclats de porcelaine En enlevant et en replaçant les grilles, toujours les soulever vers l'avant
et ne pas les forcer pour éviter d'ébrécher la porcelaine.
« F »et un numéro s'affichent à l'écran et la
commande émet un signal sonore
Il s'agit d'un code d'erreur.Appuyer sur Off (Désactiver) pour effacer
l'affichage et arrêter le signal sonore. Réinitialiser le four, si néces-
saire.Si un code d'erreur reste affiché, le prendre en note, annuler le
four, et appeler un technicien en entretien et en réparation agréé.
Une forte odeur se dégage du four neuf
lorsqu'il est mis sous tension
Cela est normal pour un four neuf et disparaîtra après quelques utilisa-
tions. Actionner le cycle d'autonettoyage éliminera l'odeur plus rapide-
ment.
Le bandeau de commande ne répond pas
lorsqu'une touche est activée
S'assurer que la surface est propre. Toucher le centre de la touche. Uti-
liser le plat du doigt.
Le ventilateur fonctionne pendant des
modes qui n'utilisent pas la convection
Sur certains modèles, le ventilateur à convection fonctionne pendant
que le four préchauffe en mode de cuisson. Cela est normal. Les
modèles insérés sont également dotés d'un ventilateur de refroidisse-
ment qui fonctionne pendant tous les modes de cuisson.
De l'air chaud ou de la vapeur s'échappent
de l'évent du four
Il est normal de voir ou de sentir de la vapeur ou de l'air chaud s'échap-
per de l'évent du four. Ne pas obstruer l'évent.
Le ventilateur de refroidissement fonc-
tionne même si le four est éteint (cuisi-
nières insérées seulement)
Cela est normal. Le ventilateur de refroidissement s'éteint, lorsque le
four a refroidi à une certaine température, prédéterminée
La table de cuisson ne fonctionne pas pen-
dant le Nettoyage Auto
Cela est normal pour certains modèles. Elle fonctionnera de nouveau à
la fin du cycle d'autonettoyage.
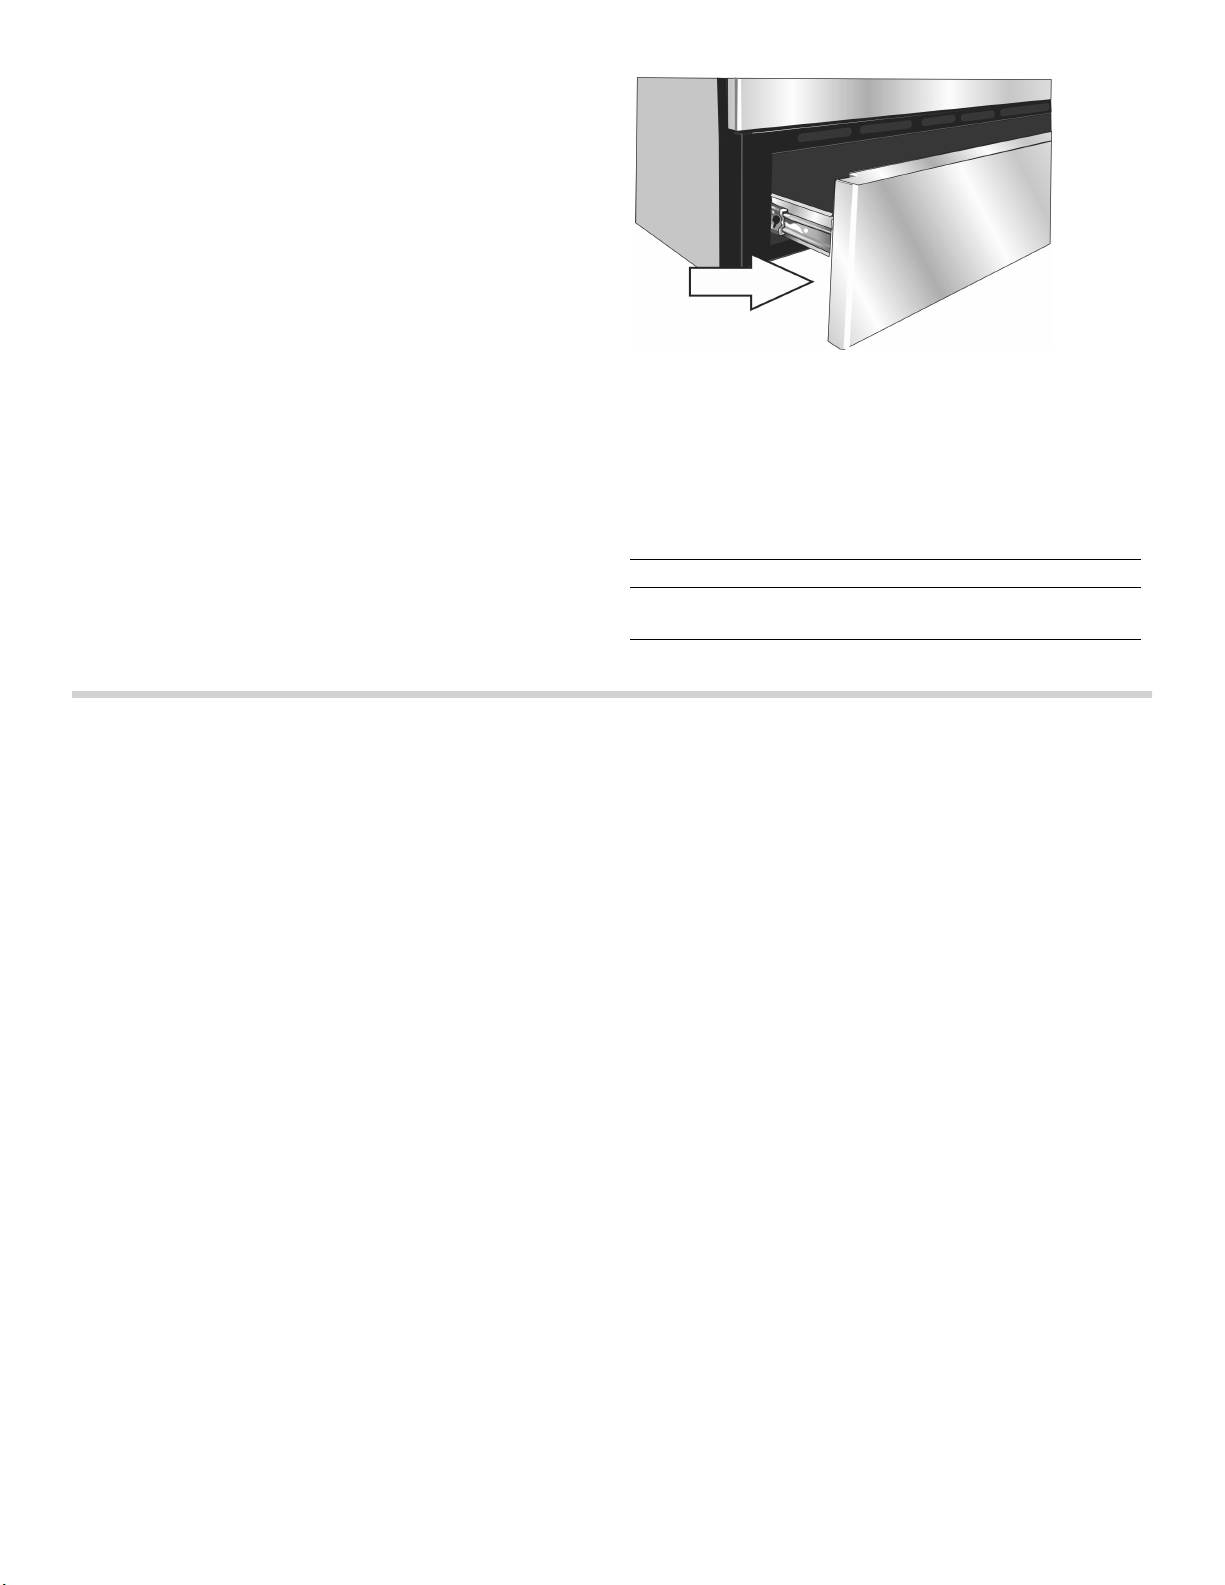
116
Comment obtenir des services de
dépannage ou des pièces
Pour contacter un technicien de dépannage, consulter
les coordonnées au début du manuel. Lors de l'appel,
être prêt à fournir les informations imprimées sur la
plaque signalétique du produit.
Plaque signalétique
La plaque signalétique comporte le numéro de modèle
et le numéro de série (FD).Consulter la plaque
signalétique de l’appareil lors d'une demande de
réparation.La plaque signalétique se trouve au dos de la
façade du tiroir.Ouvrir le tiroir pour la repérer.
ÉNONCÉ DE LA GARANTIE LIMITÉE
Couverture de la garantie :
La garantie limitée fournie par BSH Home Appliances
Ltd. (« BSH ») dans le présent énoncé de garantie limitée
s’applique seulement aux Bosch appareil (« Produit »)
vendu au premier acheteur, en autant que le produit ait
été acheté :
▯ pour une utilisation normale résidentielle (non
commerciale), et qu’en fait en tout temps a été utilisé
pour un usage domestique normal ;
▯ nouveau au détail (non en montre, tel quel ou un
retour), qu’il n’est pas destiné à la revente ni à un
usage commercial et ;
▯ aux États-Unis ou au Canada et qu’il est demeuré en
tout temps dans le pays où l’appareil a été acheté.
Les garanties données ici s’appliquent seulement au
premier acheteur du produit et ne sont pas transférables.
S’assurer de retourner la carte d’enregistrement,
quoiqu’elle n’est pas nécessaire pour la garantie, c’est la
façon dont BSH peut vous aviser dans le cas d’un avis
de rappel ou de sécurité du produit.
Durée de la garantie
BSH garantit que le produit ne présente aucun défaut de
matériaux ou de fabrication pour une période trois cent
soixante cinq (365) jours à compter de la date d’achat.
La durée commence à la date d’achat et ne sera pas
allongée, prolongée, interrompue pour quelle que raison
que ce soit.
Ce Produit est également garanti contre tout défaut de
matériau et de fabrication apparent (tels les éraflures sur
l'acier inoxydable, les défauts d'aspect de la peinture ou
de la porcelaine, les ébréchures, les bosselures, ou
autres dégâts au fini du Produit), pendant une période de
trente (30) jours à compter de la date d'achat ou de la
date de clôture pour une nouvelle construction. Cette
garantie relative à l'apparence exclut les légères
variations de couleur découlant des différences
inhérentes aux pièces peintes et en porcelaine, ainsi que
découlant des différences causées par l'éclairage de
cuisine, l'emplacement du produit ou d'autres facteurs
similaires. Cette garantie relative à l'apparence exclut
plus particulièrement tout appareil électroménager en
exposition, de plancher, « En l'état » ou de stock « B ».
Réparation ou remplacement comme
solution exclusive
Pendant la période de garantie, BSH ou un de ses
centres de service autorisés réparera le produit sans
frais (sujet à certaines limitations indiquées dans le
présent document), si le produit présente un défaut de
fabrication ou de matériaux. Si des tentatives
raisonnables pour réparer le produit sont vaines, alors
BSH remplacera le produit (un modèle supérieur peut
être disponible, à la seule discrétion de BSH, moyennant
des frais additionnels). Toutes les pièces ou les
composants enlevés demeurent la seule propriété de
BSH. Toute pièce et tout composant réparés doit être
identique à la pièce d’origine à des fins de cette garantie
et la garantie ne sera pas prolongée en regard de telles
pièces. La seule responsabilité de BSH est de faire
réparer le produit défectueux par un centre de service
autorisé pendant les heures d’affaires normales. Pour la
Numéro de
modèle et
numéro FD:
Le numéro de modèle et le numéro
FD de l'appareil figurent sur la plaque
signalétique.Prendre ces numéros en
note dans l'espace ci-dessous pour
sauver du temps, au cas où l'appareil
aurait besoin d'être réparé.
Modèle # FD #
Service après-vente de
Bosch O
800 944-2904

117
sécurité et éviter des dommages à la propriété, BSH
recommande fortement de ne pas réparer le produit soi-
même, par une personne non qualifié ; BSH ne sera pas
tenu responsable des réparations ou du travail effectué
par une personne non autorisée. Si le consommateur
désire faire réparer par une personne autre qu’une
personne autorisée, CETTE GARANTIE EST
AUTOMATIQUEMENT NULLE ET NON AVENUE. Les
centres de service autorisés sont les personnes ou les
compagnies qui ont été spécialement formées sur les
produits BSH et qui possèdent, selon l’opinion de BSH,
une réputation supérieure pour le service à la clientèle
et la capacité technique (il est à noter qu’elles sont des
entités indépendantes et non des agents, partenaires,
affiliations ou représentants de BSH). Nonobstant ce qui
suit, BSH ne sera pas tenu responsable d’aucune façon
si le produit est situé dans une région éloignée
(supérieure à 100 miles d’un centre de service autorisé)
ou n’est pas accessible de façon raisonnable, dans un
environnement hasardeux, dangereux ; dans une telle
éventualité, à la demande du consommateur, BSH
pourrait payer les frais de main-d’oeuvre et de pièces et
expédier les pièces à un centre de service autorisé le
plus près, mais le consommateur serait entièrement
responsable pour toute durée de déplacement et autres
frais spéciaux encourus par le centre de service, en
autant qu’il accepte l’appel de service.
Produit hors garantie
BSH n’a aucun obligation, par loi ou autre, d’offrir toute
concession, incluant réparation, prorata ou
remplacement de produit une fois la garantie expirée.
Exclusions à la garantie
La couverture de garantie décrite aux présentes exclut
tout défaut ou dommage qui n'est pas une faute directe
de BSH, y compris sans limitation, un ou plusieurs des
cas suivants :
▯ utilisation du produit autre qu’un usage normal,
habituel et de la façon destinée (incluant sans
limitation toute forme d’utilisation commerciale,
d’utilisation ou de rangement d’un produit pour
l’intérieur à l’extérieur, utilisation du produit de concert
avec un transporteur aérien ou marin) ;
▯ mauvaise conduite, négligence, mauvaise utilisation,
abus, accidents, fonctionnement inadéquat, mauvais
entretien, installation inadéquate ou négligente,
altération, manquement d’observer les instructions de
fonctionnement, mauvaise manipulation, service non
autorisé (incluant réparation par le consommateur ou
exploration du fonctionnement interne du produit) ;
▯ ajustement, modification ou altération de toute sorte ;
▯ manquement à la conformité des normes applicables
fédérales, provinciales, municipales ou électrique du
pays, codes de plomberie et/ou de construction,
réglementation ou lois, incluant le manquement
d’installer le produit en stricte conformité avec les
codes et réglementations de construction et
d’incendie locaux ;
▯ usure ordinaire, déversements d’aliments, liquide,
accumulation de graisse ou autres substances
accumulées dans, sur ou autour du produit ;
▯ toute force ou tout facteur externe, élémentaire et/ou
environnemental, incluant sans limitation, pluie, vent,
sable, inondation, incendie, coulée de boue, gel,
humidité excessive et exposition prolongée à
l’humidité, foudre, surtension, problème de structure
autour de l’appareil et actes de Dieu.
En aucun cas, BSH ne sera tenu responsable des
dommages survenus à la propriété, incluant les
armoires, planchers, plafonds et autres objets ou
structures autour du produit. Également exclus de la
garantie sont des produit sur lequel le numéro de série a
été modifié, altéré, effacé, enlevé ; appel de service pour
enseigner le fonctionnement du produit ou les visites où
il n’y a aucun problème avec le produit ; correction de
problèmes d’installation (le consommateur est seul
responsable pour toute structure et tout réglage du
produit, incluant l’électricité, la plomberie et autres
connexions nécessaires, pour un plancher/fondation
appropriée, et pour toute modification incluant, sans
limitation, armoire, mur, plancher, tablette, etc.) et la
remise de coupe-circuit ou remplacement de fusible.
SELON LA PORTÉE PERMISE PAR LA LOI, CETTE
GARANTIE DONNE DES SOLUTIONS EXCLUSIVE
RELATIVEMENT AU PRODUIT, QUE LA RÉCLAMATION
SURVIENNE PAR CONTRAT OU TORT (INCLUANT
RESPONSABILITÉ STRICTE OU NÉGLIGENCE) OU
AUTRE. CETTE GARANTIE EST EN LIEU DE TOUTE
AUTRE GARANTIE, EXPRESSE OU IMPLICITE, TOUTE
GARANTIE PAR LOI, À DES FINS DE
COMMERCIALISATION OU À DES FINS
PARTICULIÈRES, OU AUTRE, SERA EN VIGUEUR
SEULEMENT POUR LA PÉRIODE EFFECTIVE DE LA
GARANTIE LIMITÉE EXPRESSE. EN AUCUN CAS, LE
FABRICANT NE PEUT ÊTRE TENU RESPONSABLE DES
DOMMAGES ACCESSOIRES, SPÉCIAUX, INDIRECTS,
PERTES D’AFFAIRES, ET/OU DOMMAGES PUNITIFS,
PERTES, FRAIS INCLUANT SANS LIMITATION LE
MANQUEMENT AU TRAVAIL, REPAS À L’HÔTEL ET/OU
AU RESTAURANT, FRAIS DE REMODELAGE
SURVENUS À CAUSE DE DOMMAGES DIRECTS
DÉFINITIVEMENT CAUSÉS EXCLUSIVEMENT PAR BSH
OU AUTRE. CERTAINS ÉTATS NE PERMETTENT PAS
L’EXCLUSION OU LA LIMITATION DES DOMMAGES
ACCESSOIRES OU INDIRECTS ET NE PERMETTENT
PAS LA LIMITATION SUR LA DURÉE D’UNE GARANTIE
IMPLICITE, PAR CONSÉQUENT LES LIMITATIONS
SUSMENTIONNÉES PEUVENT NE PAS S’APPLIQUER.
CETTE GARANTIE DONNE DES DROITS SPÉCIFIQUES
ET IL PEUT Y EN AVOIR D’AUTRES QUI VARIENT D’UN
ÉTAT À L’AUTRE.
Aucune tentative de modifier, changer ou amender cette
garantie ne peut être effective sansle consentement écrit
autorisé par un officier de BSH.

118
Tableaux de cuisson
Les tableaux de cuisson peuvent servir de guide. Suivez les instructions de l'emballage ou de la recette.
Plats de boulangerie/Plats principaux
Aliment Mode de cuis-
son recom-
mandé
Tempéra-
ture du four
Pré-
chauf-
fer le
four
Nombre
de grilles
Position
des
grilles
Temps
(min.)
Type et taille de
casserole
Gâteaux
Gâteau des anges Convect.
Cuisson
325 °F
(160 °C)
Oui Simple 1 35-50 Tube de 10 po
(25 cm)
Savarin Convect.
Cuisson
325 °F
(160 °C)
Oui Simple 2 45-65 Moule à savarin de
12 tasses
Cupcakes Conv. Multi-Rack 325 °F
(160 °C)
Oui Simple 4 17-27 Moule à muffins de
12 alvéoles
Conv. Multi-Rack 325 °F
(160 °C)
Oui Multiple 2 et 5 17-27 Moule à muffins de
12 alvéoles
Conv. Multi-Rack 325 °F
(160 °C)
Oui Multiple 1, 3, et 5 17-27 Moule à muffins de
12 alvéoles
Ronds de gâteaux Convect.
Cuisson
325 °F
(160 °C)
Oui Simple 3 28-40 rond de gâteau de
8 po ou 9 po
(20 cm ou 23 cm)
Convect.
Cuisson
325 °F
(160 °C)
Oui Multiple 2 et 5 28-40 rond de gâteau de
8 po ou 9 po
(20 cm ou 23 cm)
Galette Convect.
Cuisson
325 °F
(160 °C)
Oui Simple 3 45-60 13 po x 9 x 2 po
(33 cm x 23 cm x
5 cm)
Biscuits
Brownies Convect.
Cuisson
325 °F
(160 °C)
Oui Simple 3 33-40 Moule carré de
8 po ou 9 po
(20 cm ou 23 cm)
Biscuits aux
brisures de choco-
lat
Conv. Multi-Rack 325 °F
(160 °C)
Oui Simple 3 8-17 plaque à biscuits
Conv. Multi-Rack 325 °F
(160 °C)
Oui Multiple 2 et 5 8-17 plaque à biscuits
Conv. Multi-Rack 325 °F
(160 °C)
Oui Multiple 1, 3 et 5 8-17 plaque à biscuits
Barres de biscuits Convect.
Cuisson
325 °F
(160 °C)
Oui Simple 3 23-33 Moule carré de
8 po ou 9 po
(20 cm ou 23 cm)
Sucre Conv. Multi-Rack 325 °F
(160 °C)
Oui Simple 3 8-10 plaque à biscuits
Conv. Multi-Rack 325 °F
(160 °C)
Oui Multiple 2 et 5 8-10 plaque à biscuits
Conv. Multi-Rack 325 °F
(160 °C)
Oui Multiple 1, 3 et 5 8-10 plaque à biscuits

119
Plats principaux/Légumes
Plats en casserole Cuisson temp. recette Oui Simple 3 temps
de pré-
para-
tion de
la
recette
plat
Quiche Cuisson 375 °F
(190 °C)
Oui Simple 2 30-40 moule à quiche
Soufflé Cuisson 325 °F
(160 °C)
Oui Simple 3 45-55 moule à soufflé
Légumes Conv. Rôtissage recette Non Simple 3 recette plaque à biscuits
Les tableaux peuvent servir de guide. Suivre les instructions de l'emballage ou de la recettes.
Les températures de convection ont été réduites de 25 °F (3,9 °C) par rapport à celles figurant sur la recette ou
l'emballage.
Pâtisseries
Choux à la crème Conv. Multi-Rack 400 °F
(200 °C)
Oui Simple 3 23-33 plaque à biscuits
Conv. Multi-Rack 400 °F
(200 °C)
Oui Multiple 2 et 5 23-33 plaque à biscuits
Conv. Multi-Rack 400 °F
(200 °C)
Oui Multiple 1, 3 et 5 23-33 plaque à biscuits
Pâte feuilletée Conv. Multi-Rack 375 °F
(190 °C)
Oui Simple 3 10-12 plaque à biscuits
Tartes
Une croûte de tarte Convect.
Cuisson
475 °F
(245 °C)
Oui Simple 2 8-12 moule à tarte de
9 po (22 cm)
2 croûtes, fruit Convect.
Cuisson
375 °F
(190 °C)
Oui Simple 2 45-60 moule à tarte de
9 po (22 cm)
Congelé Convect.
Cuisson
375 °F
(190 °C)
Oui Simple 3 70-85 moule à tarte de
9 po (22 cm)
Meringue Cuisson 350 °F
(175 °C)
Oui Simple 2 10-15 moule à tarte de
9 po (22 cm)
Noix de pécan Cuisson 350 °F
(175 °C)
Oui Simple 2 45-60 moule à tarte de
9 po (22 cm)
Citrouille Cuisson 425 °F
(220 °C)
350 °F
(175 °C)
Oui Simple 2 15
35-45
moule à tarte de
9 po (22 cm)
Pizza
Pierre à cuisson Pizza 425° F
(220 °C)
Oui Simple 2 temps
de pré-
para-
tion de
la
recette
pierre à cuisson
Aliment Mode de cuis-
son recom-
mandé
Tempéra-
ture du four
Pré-
chauf-
fer le
four
Nombre
de grilles
Position
des
grilles
Temps
(min.)
Type et taille de
casserole

120
Pizza fraîche 425° F
(220 °C)
Oui Simple 2 temps
de pré-
para-
tion de
la
recette
plaque à pizza
Croûte épaisse,
congelée
Pizza sur l'embal-
lage
Oui Simple sur
l'embal-
lage
temps
de cuis-
son indi-
qué sur
l'embal-
lage
mode de prépara-
tion sur l'embal-
lage
Croûte mince,
congelée
Pizza sur l'embal-
lage
Oui Simple sur
l'embal-
lage
temps
de cuis-
son indi-
qué sur
l'embal-
lage
mode de prépara-
tion sur l'embal-
lage
Pains éclair
Biscuits Conv. Multi-Rack 325 °F
(160 °C)
Oui Simple 3 10-20 plaque à biscuits
Conv. Multi-Rack 325 °F
(160 °C)
Oui Multiple 2 et 5 10-20 plaque à biscuits
Pain Convect.
Cuisson
350 °F
(175 °C)
Oui Simple 2 48-60 Moule à pain
8 po x 4 po
(20 cm x 10 cm)
Muffins Conv. Multi-Rack 400 °F
(200 °C)
Oui Simple 3 14-25 Moule à muffins de
12 alvéoles
Conv. Multi-Rack 400 °F
(200 °C)
Oui Multiple 2 et 5 14-25 Moule à muffins de
12 alvéoles
Pains à la levure
Petits pains Conv. Multi-Rack 375 °F
(190 °C)
Oui Simple 3 10-20 plaque à biscuits
Conv. Multi-Rack 375 °F
(190 °C)
Oui Multiple 2 et 5 10-20 plaque à biscuits
Conv. Multi-Rack 375 °F
(190 °C)
Oui Multiple 1, 3, et 5 10-20 plaque à biscuits
Pain Convect.
Cuisson
400 °F
(200 °C)
Oui Simple 2 22-35 Moule à pain
9 po x 5 po
(23 cm x 13 cm)
Viennoiseries Conv. Multi-Rack 325 °F
(160 °C)
Oui Simple 3 20-25 plaque à biscuits
Les tableaux peuvent servir de guide. Suivre les instructions de l'emballage ou de la recettes.
Les températures de convection ont été réduites de 25 °F (3,9 °C) par rapport à celles figurant sur la recette ou
l'emballage.
Aliment Mode de cuis-
son recom-
mandé
Tempéra-
ture du four
Pré-
chauf-
fer le
four
Nombre
de grilles
Position
des
grilles
Temps
(min.)
Type et taille de
casserole

121
Viandes
Les chartes peuvent servir de guide. Suivre les instructions de l'emballage ou de la recettes.
Aliment Mode de cuis-
son recom-
mandé
Tempéra-
ture du four
Position
des
grilles
Tempéra-
ture interne
Temps de cuis-
son
Nourri-
ture
cou-
verte
Temps de
repos
Bœuf
Rôti d'épaule de
bœuf, 2 lb-3 lb
(1 kg-2 kg)
Rôtissage 350 °F
(175 °C)
2 Bien cuit,
170 °F
(80 °C)
1,
5-2 heures
Oui aucun
Hamburgers,
3/4 po (2 cm)
d'épaisseur
Gril Élevée 6 Moyenne,
160 °F
(70 °C)
Côté 1 : 5-8
Côté 2 : 4-6
Non aucun
Faux-filet,
désossé,
3 lb-3,5 lb (1,3 kg-
1,6 kg)
Rôtisserie à
convection
325 °F
(160 °C)
2 Rosé,
145 °F
(60 °C)
27-31 min./lb Non 10-15 min.
Faux-filet,
désossé,
3 lb-3,5 lb (1,3 kg-
1,6 kg)
Rôtisserie à
convection
325 °F
(160 °C)
2 Moyenne,
160 °F
(70 °C)
30-38 min./lb Non 10-15 min.
Rumsteck, noix,
surlonge, désossé,
3-3,5 lb
(1,3-1,6 kg)
Rôtisserie à
convection
325 °F
(160 °C)
2 Rosé,
145 °F
(60 °C)
18-33 min./lb Non 10-15 min.
Rumsteck, noix,
surlonge, désossé,
3-3,5 lb
(1,3-1,6 kg)
Rôtisserie à
convection
325 °F
(160 °C)
2 Moyenne,
160 °F
(70 °C)
30-35 min./lb Non 10-15 min.
Steaks, 1 po
(2,5 cm) d'épais-
seur
Gril Élevée 6 Rosé,
145 °F
(60 °C)
Côté 1 : 5-8
Côté 2 : 4-6
Non aucun
Steaks, 1 po
(2,5 cm) d'épais-
seur
Gril Élevée 6 Moyenne,
160 °F
(70 °C)
Côté 1 : 8-9
Côté 2 : 5-7
Non aucun
Steaks 1,5 po
(4 cm) d'épaisseur
Gril à
convection
Élevée 3 Rosé,
145 °F
(60 °C)
Côté 1 : 11-13
Côté 2 : 9-11
Non aucun
Steaks 1,5 po
(4 cm) d'épaisseur
Gril à
convection
Élevée 3 Moyenne,
160 °F
(70 °C)
Côté 1 : 13-15
Côté 2 : 11-13
Non aucun
Filet, 2 lb-3 lb
(900 g-2 kg)
Rôtisserie à
convection
425° F
(220 °C)
2 Rosé,
145 °F
(60 °C)
15-24 min./lb Non 5 min.
Agneau
Gigot, désossé,
2 lb-3 lb
(1 kg-1,5 kg)
Rôtisserie à
convection
325 °F
(160 °C)
2 Moyenne,
160 °F
(70 °C)
25-30 min./lb Non 10-15 min.
Les tableaux peuvent servir de guide. Suivre les instructions de l'emballage ou de la recettes.
Les temps de cuisson sont approximatifs et peuvent varier en fonction de la forme de la viande.
Une dinde farcie exige un temps de cuisson plus long. La température sécuritaire minimum pour une farce de volaille
est de 165 °F (75 °C).
Remarque : la température interne des aliments, mesurée à l'aide d'un thermomètre à viande numérique, est recom-
mandée par la USDA.

122
Gigot, désossé,
4 lb-6 lb (2 kg-
2,75 kg)
Rôtisserie à
convection
325 °F
(160 °C)
2 Moyenne,
160 °F
(70 °C)
30-35 min./lb Non 10-15 min.
Côtelettes, 1 po
(2,5 cm) d'épais-
seur
Gril Élevée 4 Rosé,
145 °F
(60 °C)
Côté 1 : 4-6
Côt 2 : 4-5
Non aucun
Côtelettes, 1 po
(2,5 cm) d'épais-
seur
Gril Élevée 4 Moyenne,
160 °F
(70 °C)
Côté 1 : 5-7
Côt 2 : 5-6
Non aucun
Porc
Tranche de jam-
bon de 0,5 po
(1,3 cm) d'épais-
seur
Gril Élevée 5 160 °F
(70 °C)
Côté 1 : 4-5
Côt 2 : 3-4
Non aucun
Longe de porc,
1,5 lb-3 lb (700 g-
1,5 kg)
Rôtisserie à
convection
350 °F
(175 °C)
2 Moyenne,
160 °F
(70 °C)
19-36 min./lb Non 10-15 min.
Longe de porc,
3 lb-6 lb (1,5 kg-
2,75 kg)
Rôtisserie à
convection
350 °F
(175 °C)
2 Moyenne,
160 °F
(70 °C)
14-23 min./lb Non 10-15 min.
Côtelettes, 1 po
(2,5 cm) d'épais-
seur
Gril Moyenne 4 Moyenne,
160 °F
(70 °C)
Côté 1 : 8-10
Côté 2 : 8-9
Non aucun
Côtelettes, 1,5 po
(4 cm) d'épaisseur
Gril à
convection
Élevée 4 Moyenne,
160 °F
(70 °C)
Côté 1 : 9-11
Côté 2 : 8-10
Non aucun
Saucisse, fraîche Gril Élevée 4 170 °F
(80 °C)
Côté 1 : 3-5
Côté 2 : 2-4
Non aucun
Filet, 2 lb-3 lb
(1 kg-2 kg)
Rôtisserie à
convection
425° F
(220 °C)
3 Moyenne,
160 °F
(70 °C)
18-28 min./lb Non 5-10 min.
Volaille
Poulet
Poitrines avec os Gril à
convection
450 F
(230 °C)
3 170 °F
(80 °C)
Côté 1 : 18-22
Côté 2 : 17-20
Non aucun
Cuisses avec os Gril Faible 3 180 °F
(85 °C) dans
la cuisse
Côté 1 : 14-15
Côté 2 : 12-13
Non aucun
Entier. 3,5 lb-8 lb
(1,5 kg-3,5 kg)
Rôtisserie à
convection
375 °F
(190 °C)
2 180 °F
(85 °C) dans
la cuisse
13-20 min./lb Non aucun
Poulets de
Cornouaille,
1 lb-1,5 lb (450 g-
700 g)
Rôtisserie à
convection
175 °C
(350 °F)
2 180 °F
(85 °C) dans
la cuisse
45-75 min.
temps de cuis-
son total
Non aucun
Dinde
Aliment Mode de cuis-
son recom-
mandé
Tempéra-
ture du four
Position
des
grilles
Tempéra-
ture interne
Temps de cuis-
son
Nourri-
ture
cou-
verte
Temps de
repos
Les tableaux peuvent servir de guide. Suivre les instructions de l'emballage ou de la recettes.
Les temps de cuisson sont approximatifs et peuvent varier en fonction de la forme de la viande.
Une dinde farcie exige un temps de cuisson plus long. La température sécuritaire minimum pour une farce de volaille
est de 165 °F (75 °C).
Remarque : la température interne des aliments, mesurée à l'aide d'un thermomètre à viande numérique, est recom-
mandée par la USDA.

123
Poitrine, 4 lb-8 lb
(1,8 kg-3,6 kg)
Rôtisserie à
convection
325 °F
(160 °C)
2 170 °F
(80 °C)
19-23 min./lb Non 15-20 min.
pour une
découpe
facile
Non farcie,
12 lb-19 lb
(5,5 kg-8,5 kg)
Rôtisserie à
convection
325 °F
(160 °C)
1 180 °F
(85 °C) dans
la cuisse
9-14 min./lb Couvrir
de
papier
d'alumi-
nium
pour
empê-
cher de
trop
brunir
15-20 min.
pour une
découpe
facile
Non farcie,
20 lb-25 lb (9 kg-
11,5 kg)
Rôtisserie à
convection
325 °F
(160 °C)
1 180 °F
(85 °C) dans
la cuisse
6-12 min./lb Couvrir
de
papier
d'alumi-
nium
pour
empê-
cher de
trop
brunir
15-20 min.
pour une
découpe
facile
Fruits de mer
Filets de poisson,
¾ po-1 po (2 cm-
2,5 cm)
Gril Faible 3 145 °F
(63 °C)
11-15 min. Non aucun
Aliment Mode de cuis-
son recom-
mandé
Tempéra-
ture du four
Position
des
grilles
Tempéra-
ture interne
Temps de cuis-
son
Nourri-
ture
cou-
verte
Temps de
repos
Les tableaux peuvent servir de guide. Suivre les instructions de l'emballage ou de la recettes.
Les temps de cuisson sont approximatifs et peuvent varier en fonction de la forme de la viande.
Une dinde farcie exige un temps de cuisson plus long. La température sécuritaire minimum pour une farce de volaille
est de 165 °F (75 °C).
Remarque : la température interne des aliments, mesurée à l'aide d'un thermomètre à viande numérique, est recom-
mandée par la USDA.

1901 Main Street, Suite 600 • Irvine, CA 92614 • 800-944-2904
www.bosch-home.com • © 2016 BSH Home Appliances
960912
*9001246204*
9001246204