Loading ...
Loading ...
Loading ...

10
Installation
B320-4X1-MHB-K
& B320-4X1-MHE-K
extender kit
Up to 15 ft. (4.5 m) HDMI 2.0 cable at 4K/60Hz
Up to 15 ft. (4.5 m) DisplayPort cable at 4K/60Hz
Up to 15 ft. (4.5 m) VGA cable at 1080p/60Hz
Up to 6 ft. (1.83 m) USB Type-C cable at 4K/60Hz
Up to 50 ft. (15 m) Cat6 cable at 4K/60Hz
Up to 125 ft. (38 m) Cat6 cable at 4K/60Hz
RS-232 cable
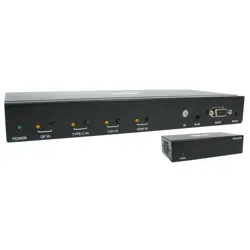
SWITCH RECEIVER
1. Make sure all equipment in the installation is powered off.
2. Connect the HDMI source to HDMI IN with a user-supplied HDMI cable.
3. Connect the DisplayPort source to DP IN with a user-supplied
DisplayPort cable.
4. Connect the USB-C source to TYPE-C IN with a user-supplied USB-C cable.
5. (Optional) Connect your USB-C source’s power adapter to CHARGE IN,
supporting up to 100W (20V 5A) and supplying up to 90W of power to
your USB-C source.
6. Connect the VGA source to VGA IN with a user-supplied VGA cable.
Then connect the VGA source’s Audio Out port to VGA AUDIO with a
user-supplied 3.5 mm audio cable. Note: 15-pin VGA cables must be
used. 14-pin VGA cables will not work.
20-05-025-933CA4.indb 1020-05-025-933CA4.indb 10 10/21/2020 9:26:38 AM10/21/2020 9:26:38 AM
Loading ...
Loading ...
Loading ...